
Akoya E62004 (MD 34384) - Desktop computer MEDION - Free user manual and instructions
Find the device manual for free Akoya E62004 (MD 34384) MEDION in PDF.


User questions about Akoya E62004 (MD 34384) MEDION
0 question about this device. Answer the ones you know or ask your own.
Ask a new question about this device
Download the instructions for your Desktop computer in PDF format for free! Find your manual Akoya E62004 (MD 34384) - MEDION and take your electronic device back in hand. On this page are published all the documents necessary for the use of your device. Akoya E62004 (MD 34384) by MEDION.
USER MANUAL Akoya E62004 (MD 34384) MEDION
Operating instructions
Multimedia PC High Performance PC Mini PC
MEDION®
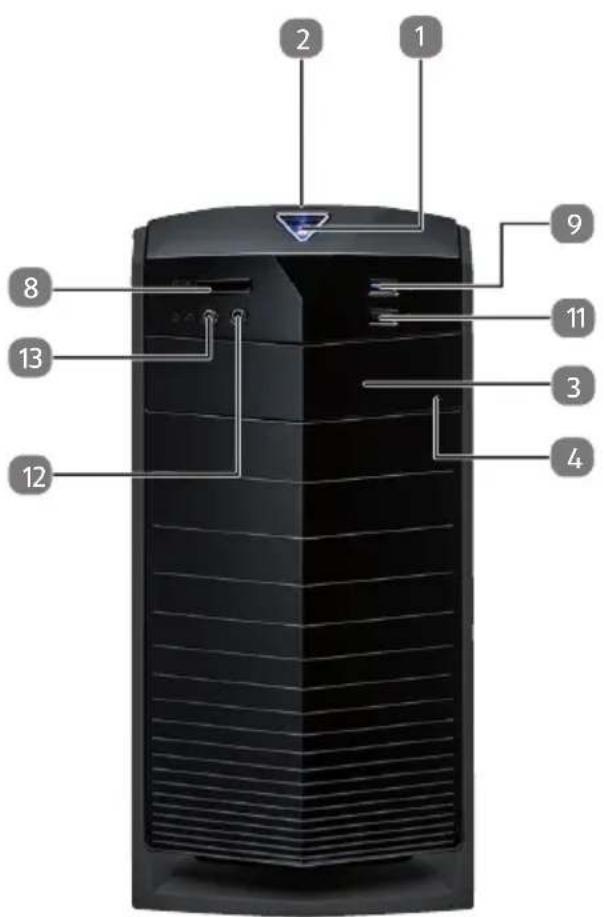
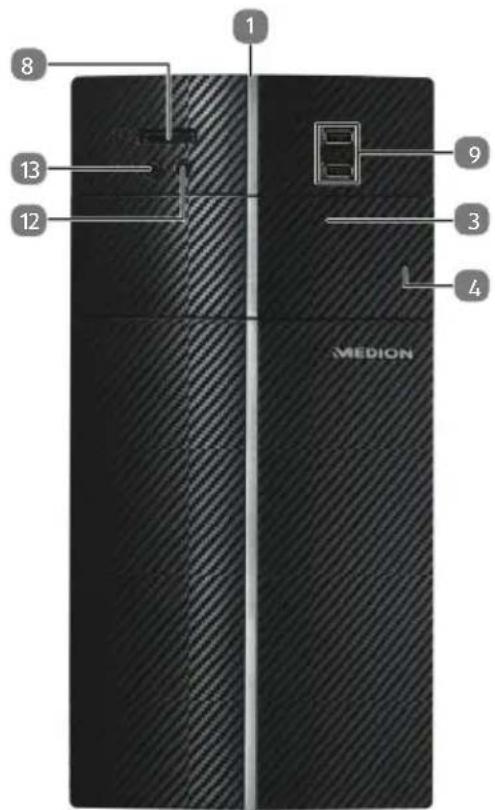
Important information about the illustrations

PLEASE NOTE!
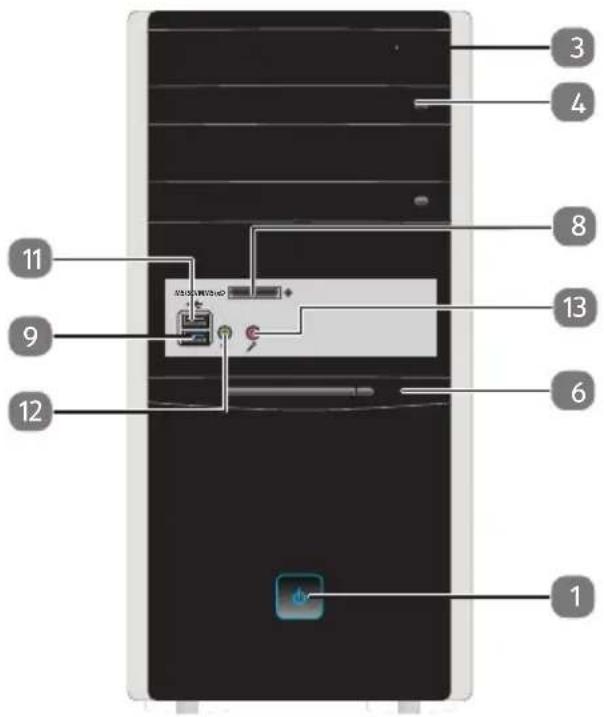
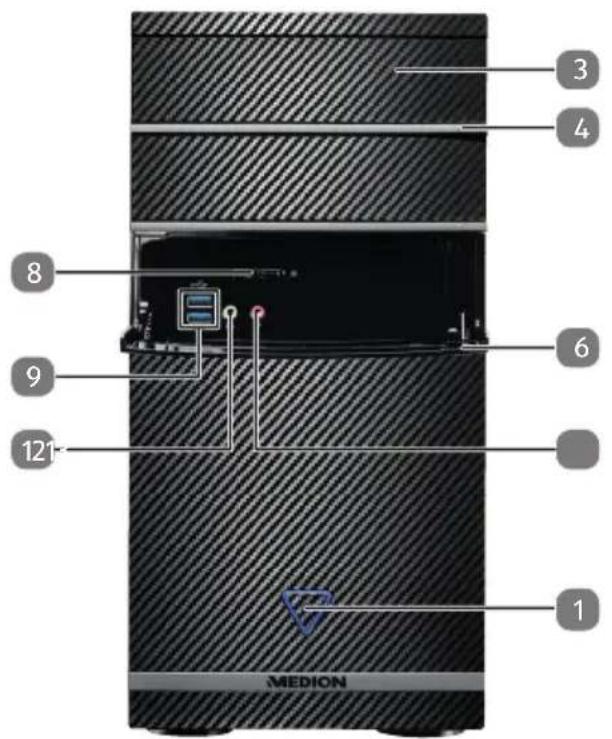
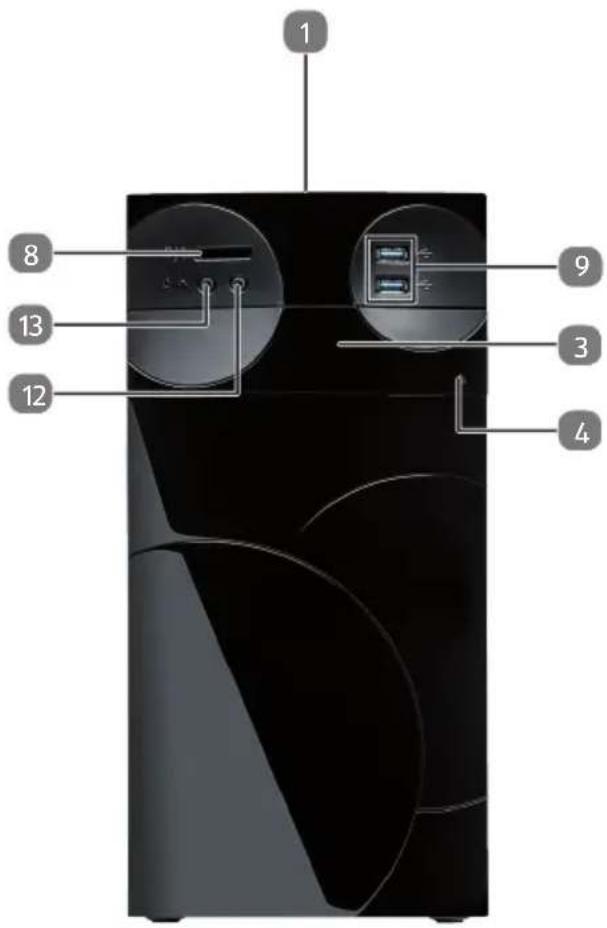
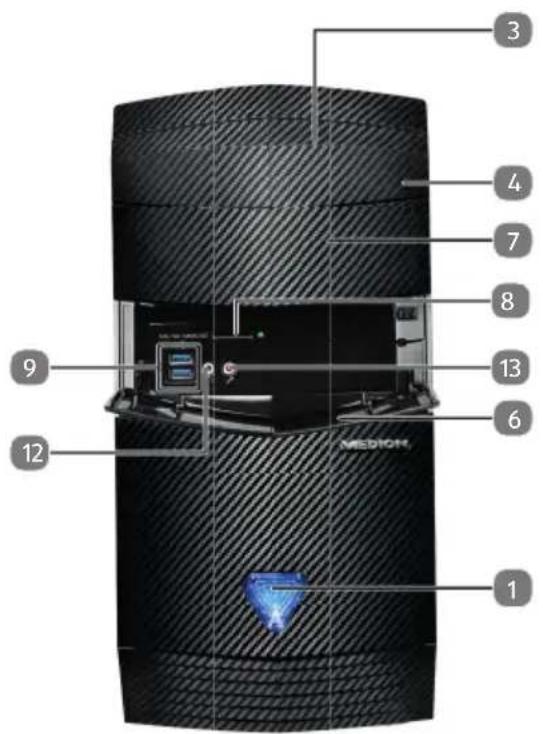
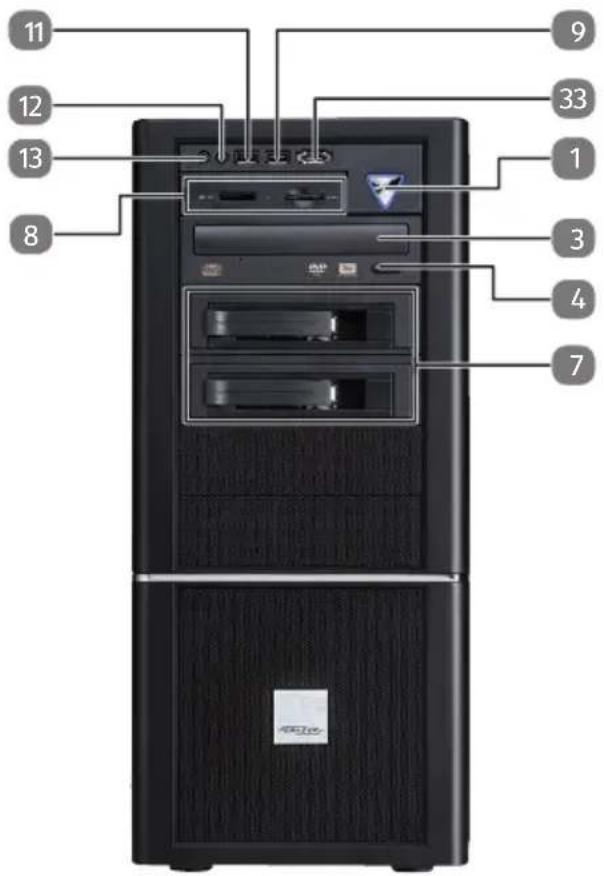
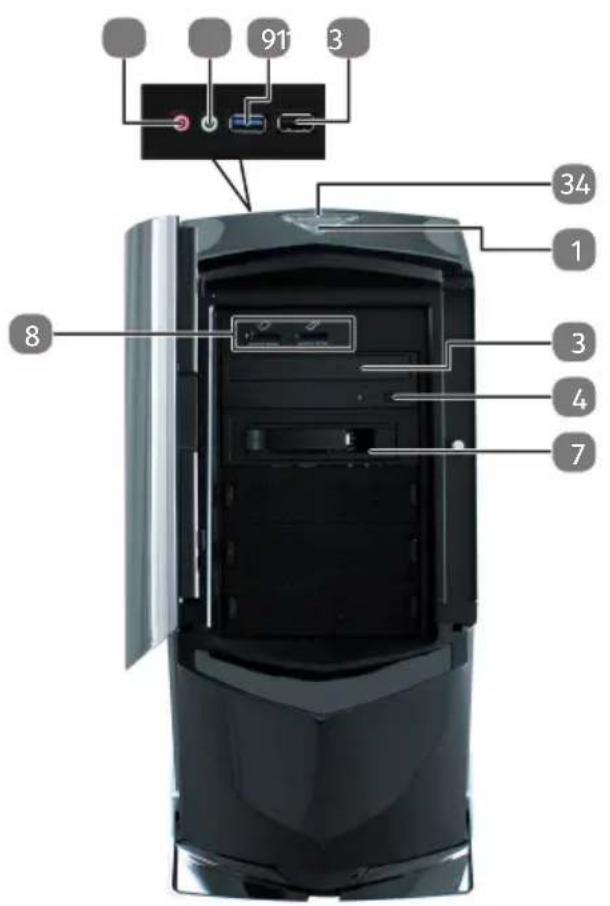
The overview includes all connections; your device may differ from this depending on configuration.
Some video connectors are fitted with a protective cover. These connections are not available in the respective configuration.
Multimedia PC
P3 Revision 22
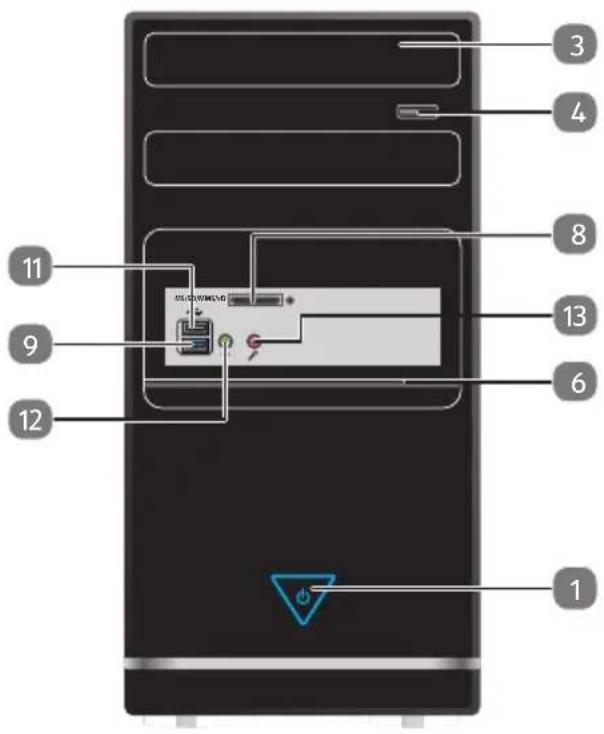
text_image
1 2 3 4 5 6 7 8 9 10 11 12 MOSO/WMOSO/WMOSO 13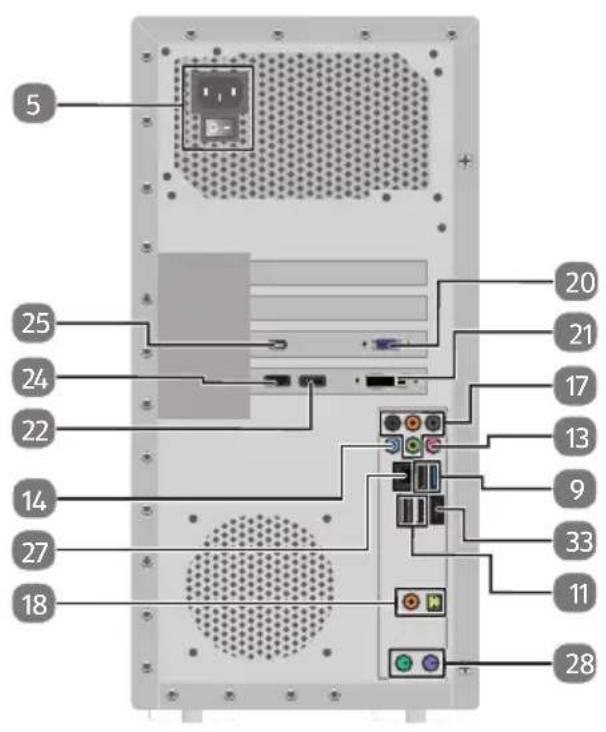
text_image
5 25 24 22 14 27 18 20 21 17 13 9 33 11 28Multimedia PC
F2 Revision 22
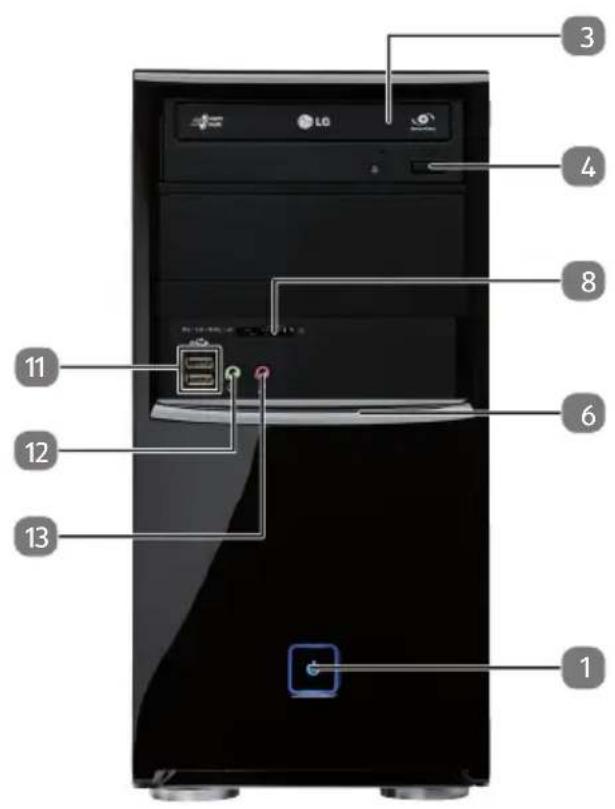
text_image
Labeled diagram of a desktop computer tower showing numbered components including I/O ports, drive slots, and a switch.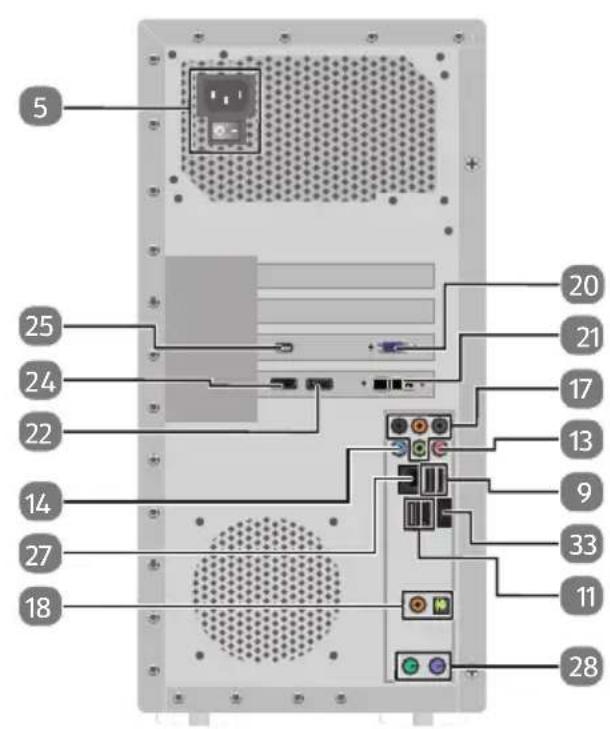
text_image
5 25 24 22 14 27 18 20 21 17 13 9 33 11 28Multimedia PC
R9 Revision 22
text_image
1 2 3 4 5 6 7 8 9 10 11 12 13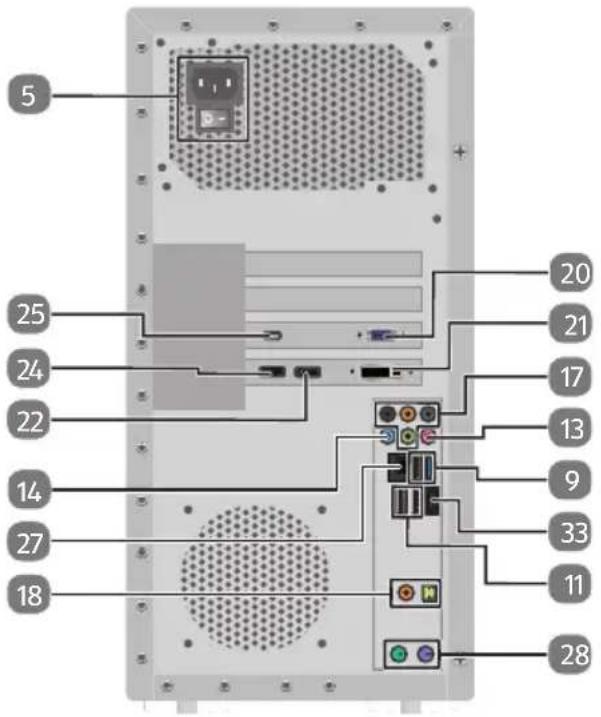
text_image
5 25 24 22 14 27 18 20 21 17 13 9 33 11 28Multimedia PC
M11 Revision 22
text_image
3 4 8 9 121 6 1 MEDION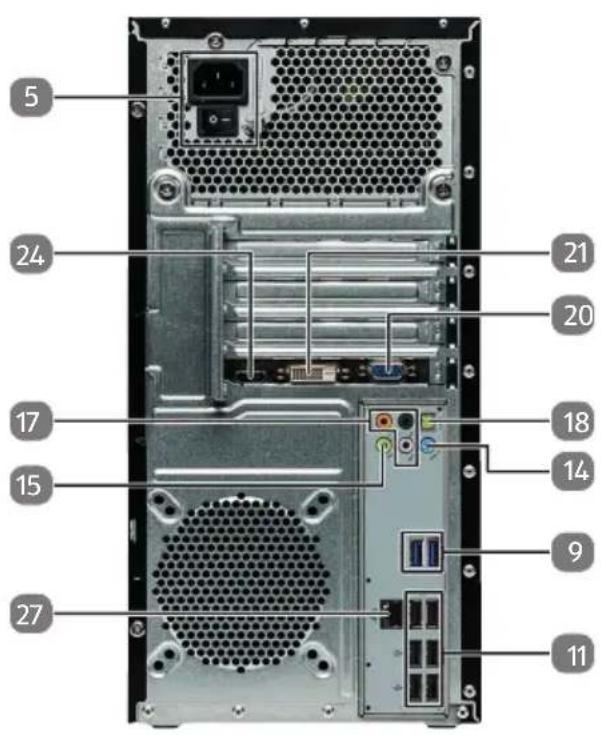
text_image
5 24 21 20 17 18 15 14 9 27 11Multimedia PC
M50 Revision 34A
text_image
1 2 1 9 8 11 3 4 13 12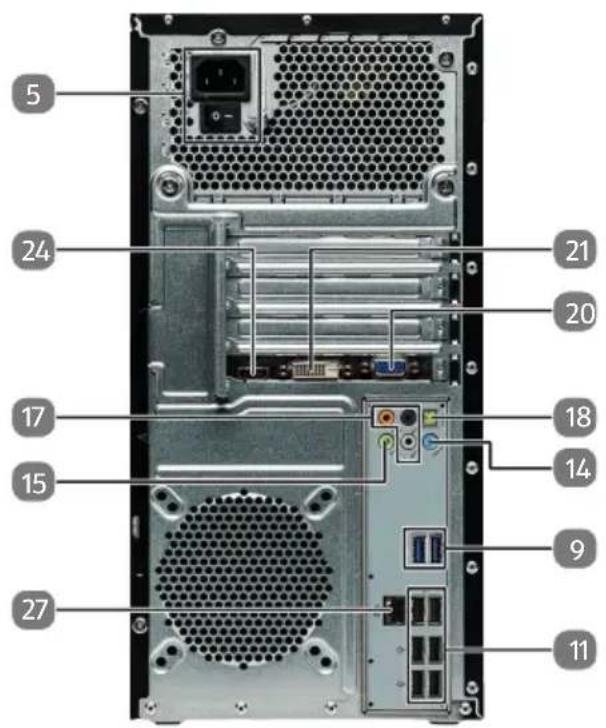
text_image
5 24 17 15 27 21 20 18 14 9 11Multimedia PC
M55 Revision 34
text_image
1 8 13 12 9 3 4 MEDION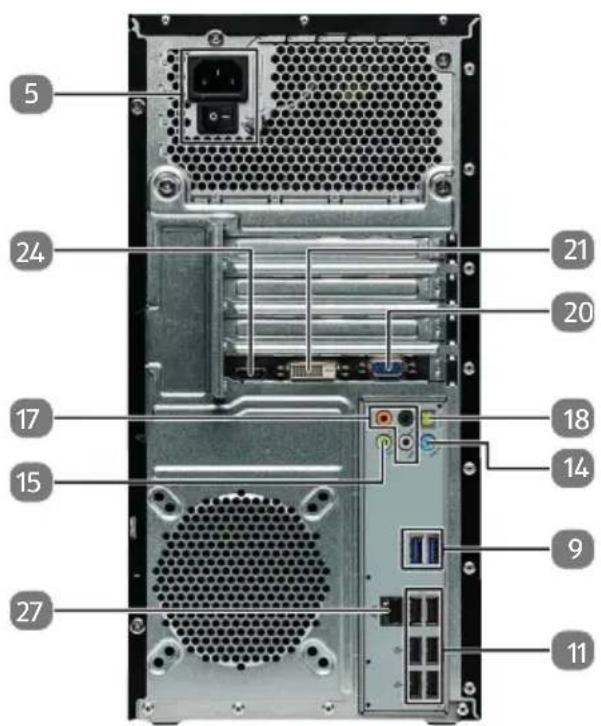
text_image
5 24 21 20 17 18 15 14 9 27 11Multimedia PC
M65 Revision 34
text_image
1 8 13 12 9 3 4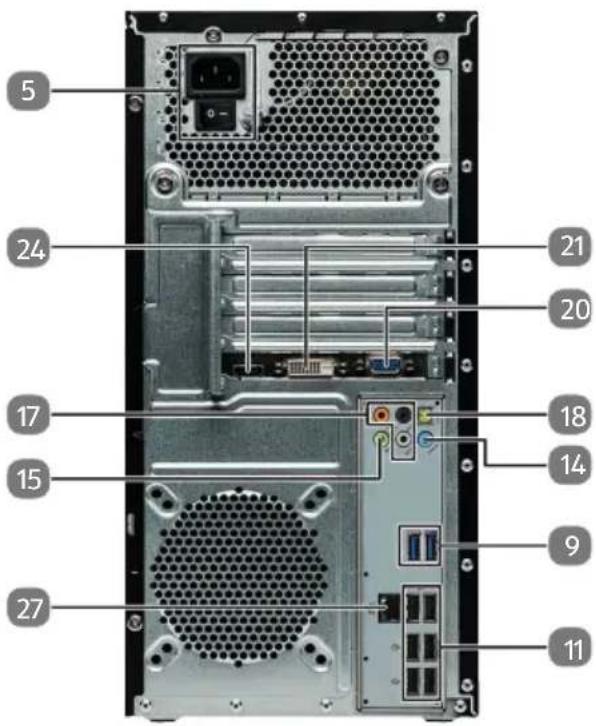
text_image
5 24 17 15 27 21 20 18 14 9 11High-Performance PC
S91 Revision 22
text_image
3 4 7 8 13 6 9 12 MEDROM. 1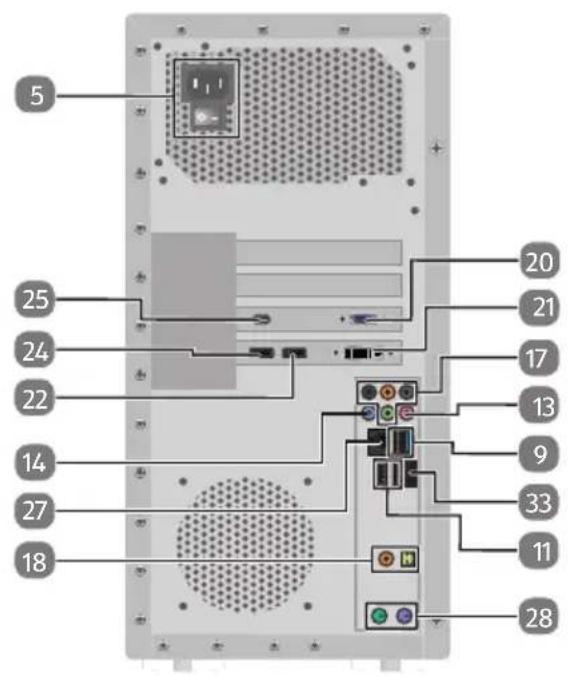
text_image
5 25 24 22 14 27 18 20 21 17 13 9 33 11 28High-Performance PC
X30 Revision 29A
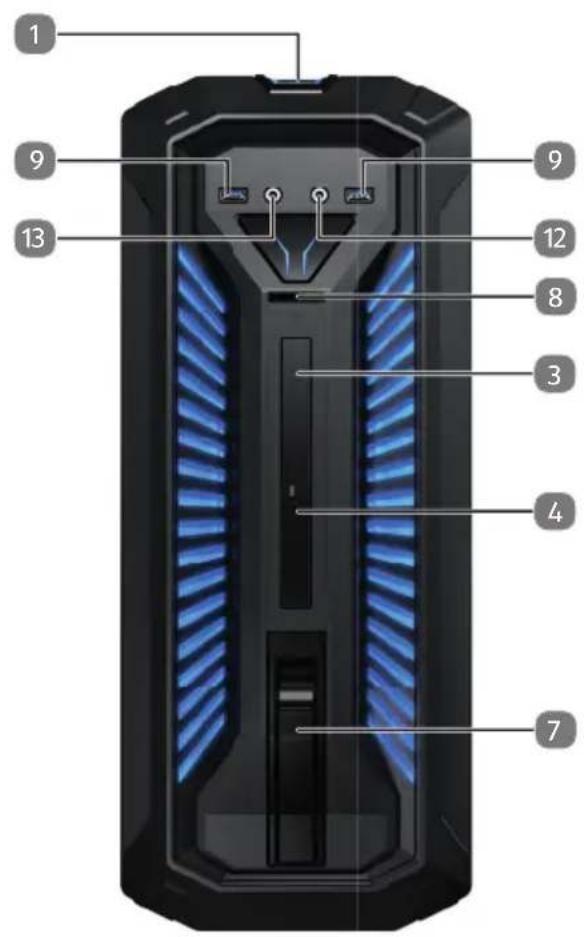
text_image
1 9 13 9 12 8 3 4 7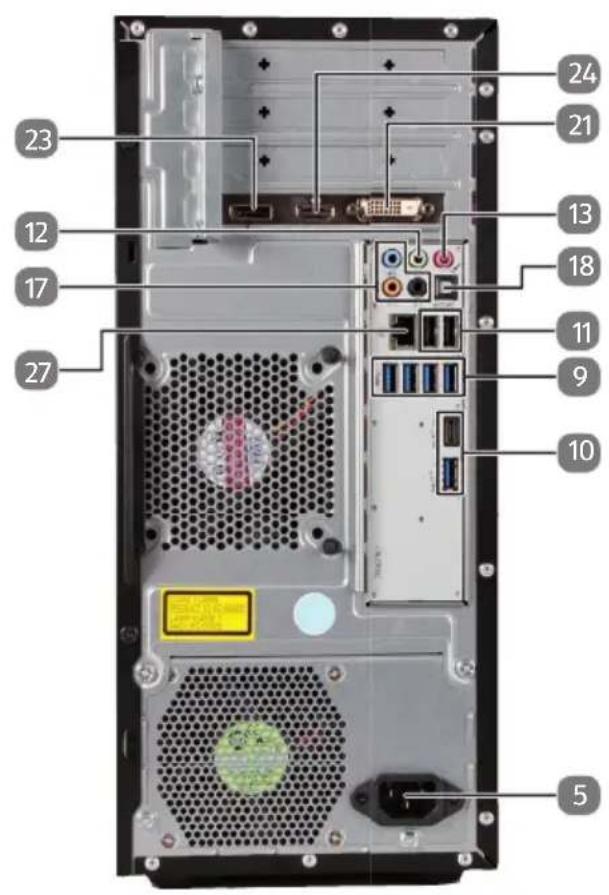
text_image
Internal view diagram of a computer tower drive with numbered labels pointing to ports and componentsHigh-Performance PC
X57 Revision 37
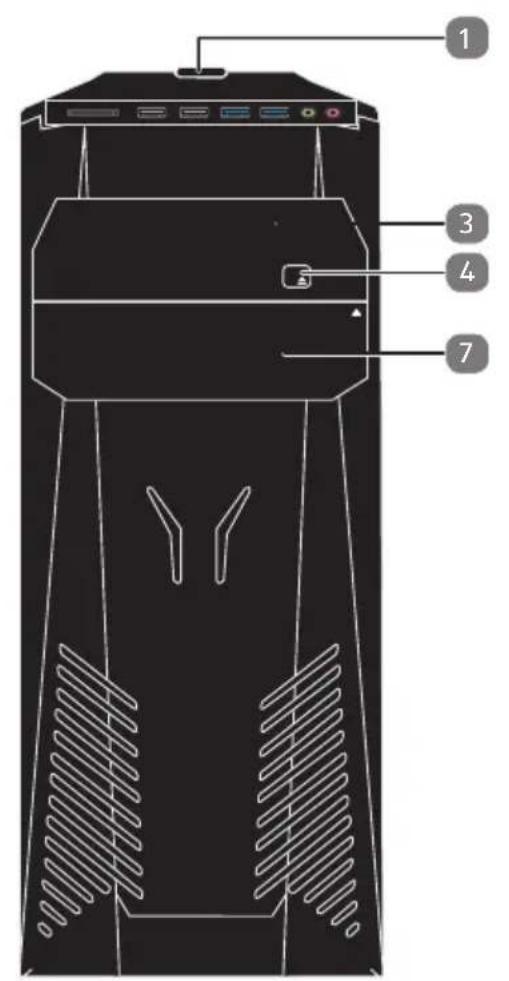
text_image
1 3 4 7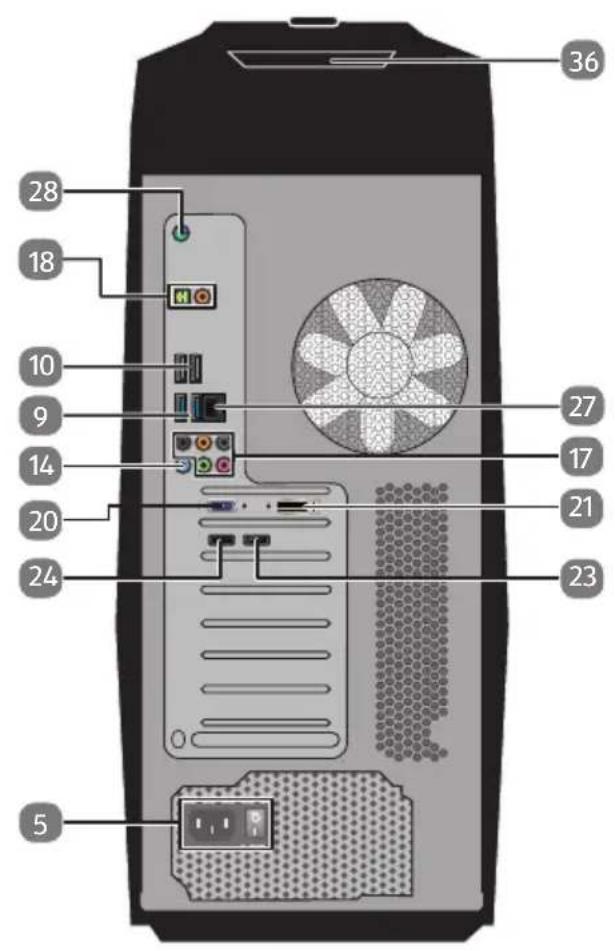
text_image
36 28 18 10 9 14 20 24 27 17 21 23 5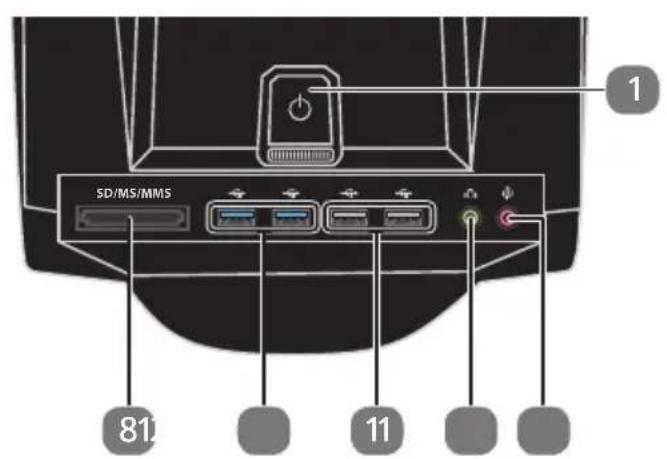
text_image
SD/MS/MMS 1 81 11High-Performance PC
X71 Revision 30
text_image
11 12 13 8 9 33 1 3 4 7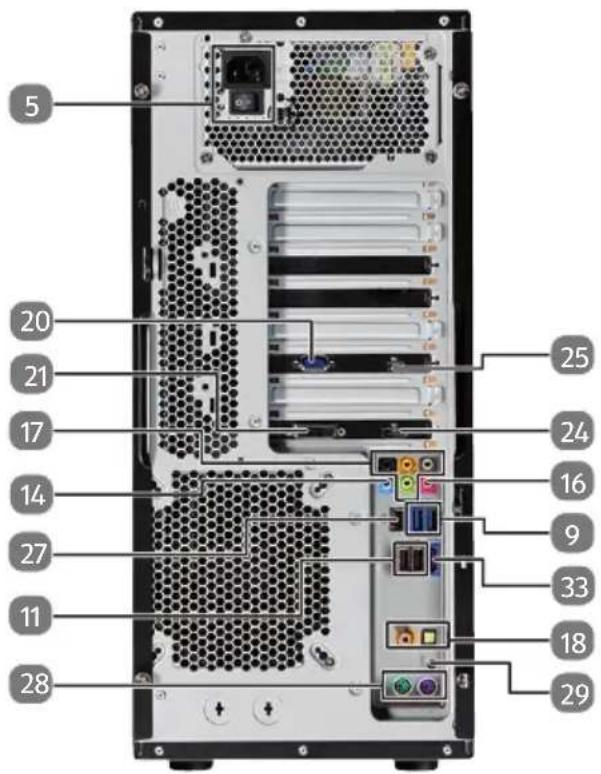
text_image
5 20 21 17 14 27 11 28 25 24 16 9 33 18 29High-Performance PC
X75 Revision 32A
text_image
91 3 34 1 3 4 7 8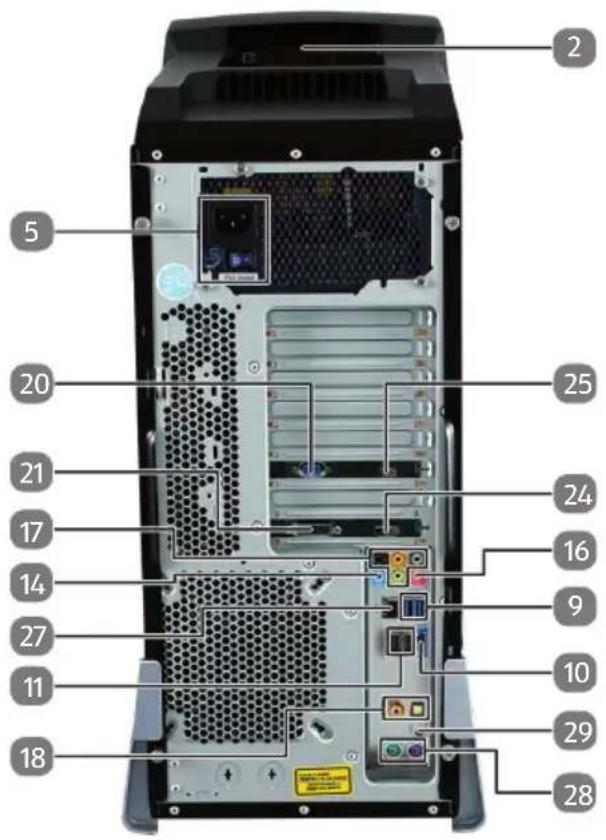
text_image
Labeled diagram of a desktop computer tower showing internal hardware and storage areas with numbered annotationsHigh-Performance PC
X77 Revision 35
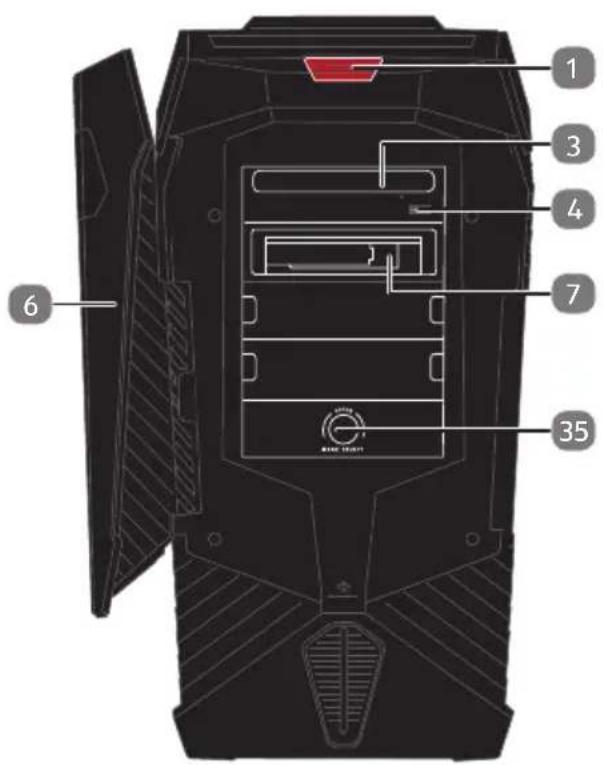
text_image
1 3 4 7 6 35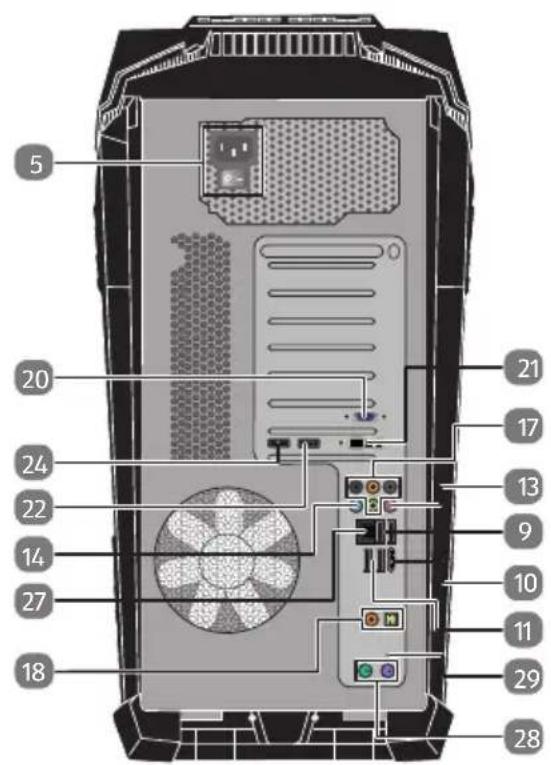
text_image
5 20 24 22 14 27 18 21 17 13 9 10 11 29 28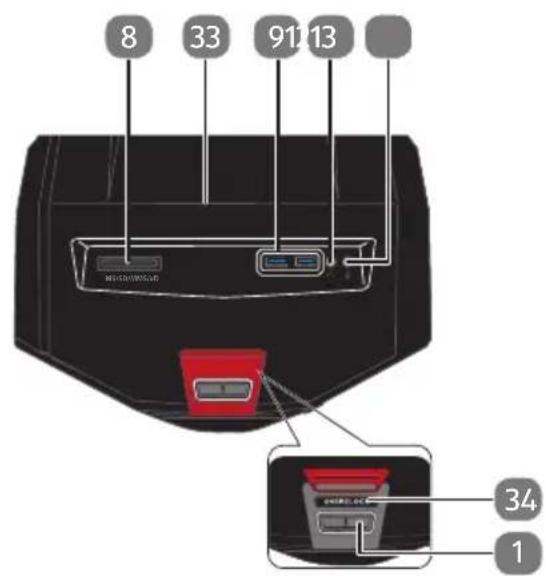
text_image
8 33 91/13 M250000000 34 1Mini PC
NUC S13
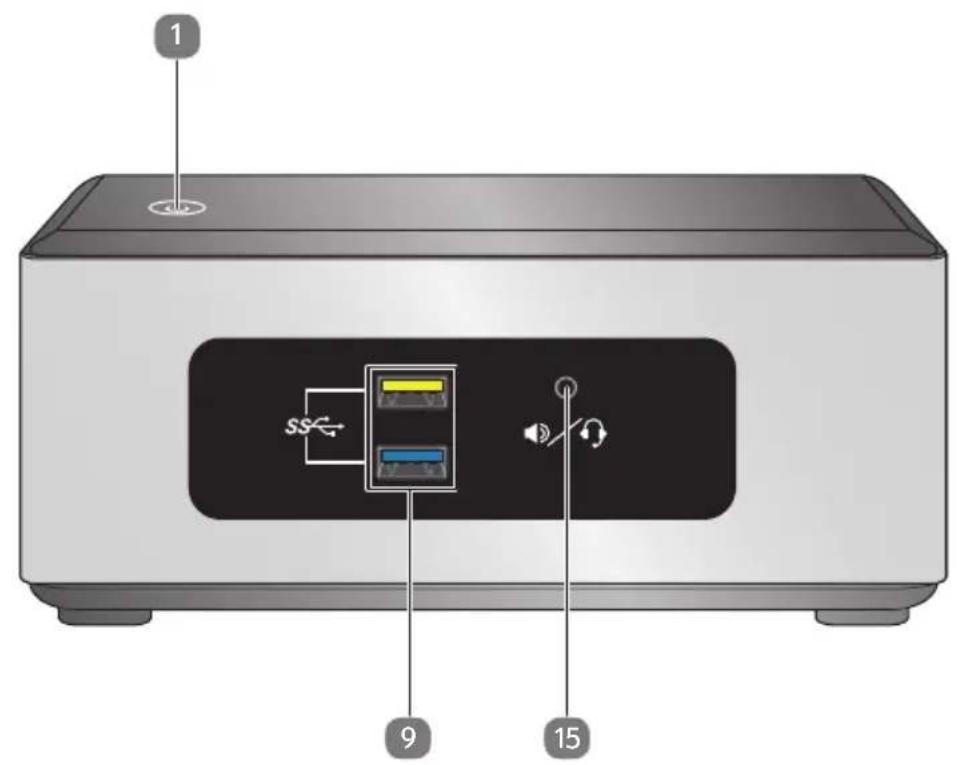
text_image
1 SS 9 15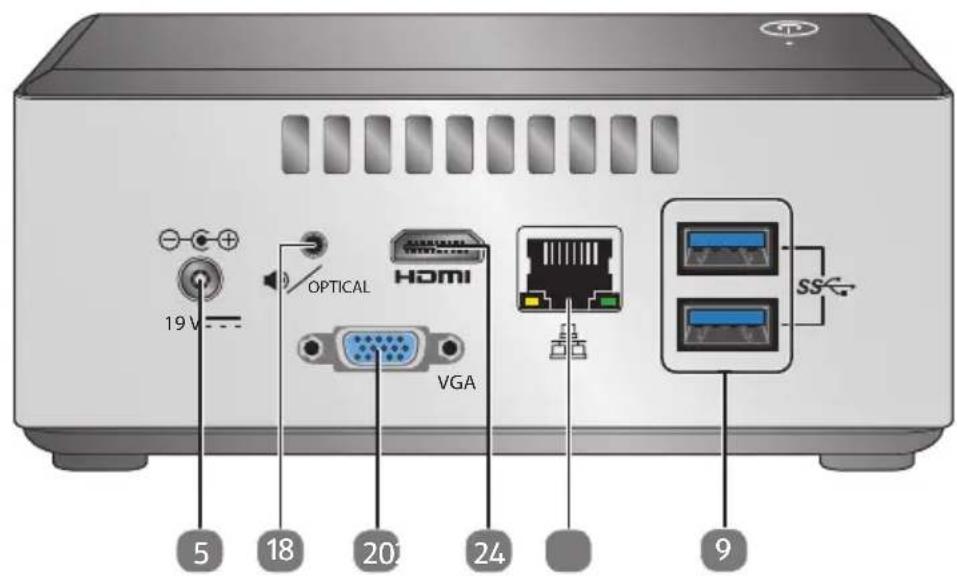
text_image
19 V OPTICAL HDMI VGA SS 5 18 20 24 9Mini PC
NUC S14

text_image
1 SS 9 15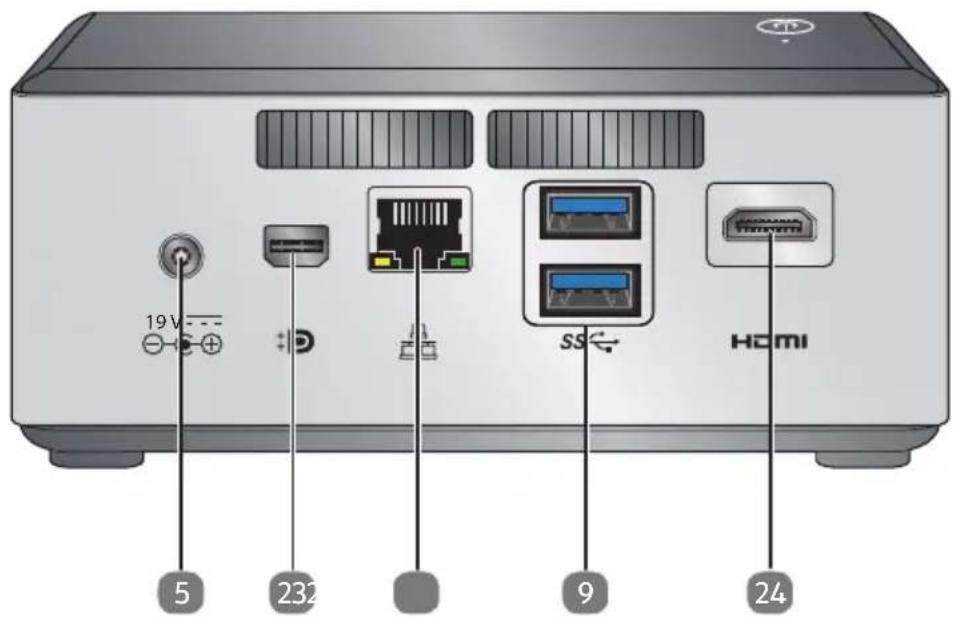
text_image
19 V 5 232 SS 9 24 HDMIMini PC
LivaX S15
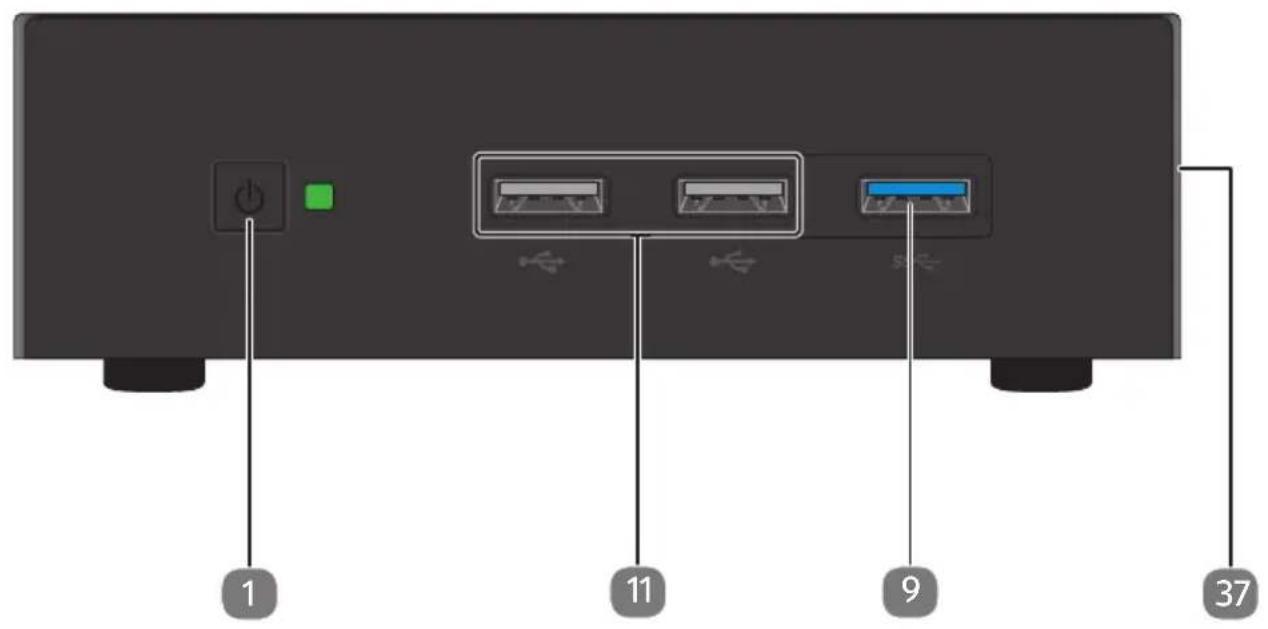
text_image
1 11 9 37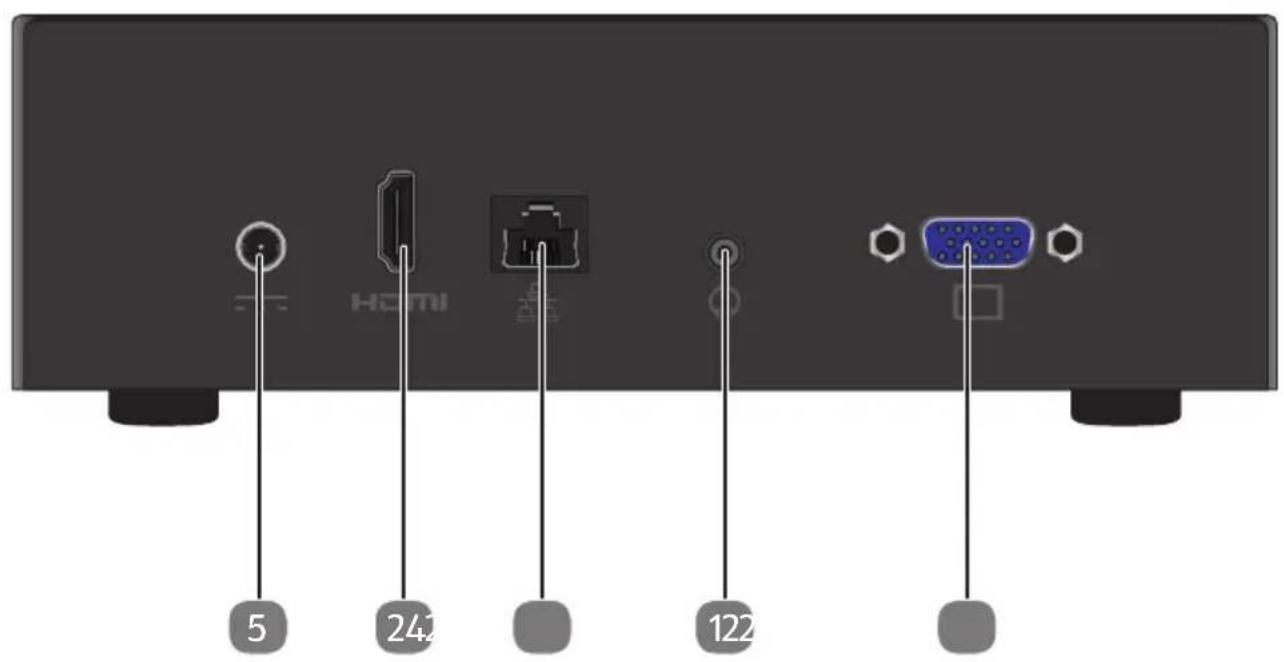
text_image
5 241 122Connections
| 1 On/off switch/operating mode | |
| 2 Slot for Medion HDDrive2Go super-speed external hard drive | |
| 3 Optical drive | |
| 4 Optical drive eject button | |
| 5 Power supply (mains cable socket & mains switch) | |
| 6 Front panel | |
| 7 Hot-swap mobile rack | |
| 8 Card reader | |
| 9 USB 3.0 ports | |
| 10 USB 3.1 ports | |
| 11 USB 2.0 ports | |
| 12 Headphones socket | |
| 13 Microphone socket | |
| 14 Audio input / Speaker RS (rear out)* | |
| 15 Headphones socket / Speaker FS (front out)* | |
| 16 Microphone socket / Speaker CC/SS (center/subwoofer out)* | |
| 17 Surround (FS, RS, CC, SS) | |
| 18 Optical/coaxial digital S/PDIF audio output* | |
| 19 | |
| 20 VGA monitor connection | |
| 21 DVI-D monitor connection | |
| 22 DVI-I monitor connection | |
| 23 Display Port | |
| 24 HDMI connection | |
| 25 mini DisplayPort | |
| 26 | |
| 27 LAN | network (RJ45) |
| 28 PS/2 | connection |
| 29 Clear | CMOS |
| 30 | |
| 31 | |
| 32 | |
| 33 eSATA | connection |
| 34 Overclocking button | |
| 35 Illumination control | |
| 36 EJECT | button |
Table of Content
1. About these operating instructions .... 3
1.1. Warning symbols and key words used in these operating instructions....3
1.2. Proper use....4
1.3. Declaration of conformity 4
1.4. Information on trademarks .... 5
2. Safety information
2.1. Dangers for children and people with reduced ability to operate machinery....6
2.2. Operating safety....6
2.3. Never carry out repairs yourself ....8
2.4. Data backup....8
3. Package contents
4. Setting up the PC 9
4.1. Installation location....9
4.2. Environmental requirements
4.3. Ergonomics....9
5. Connecting.... 11
5.1. Connecting the cables....11
5.2. Opening and closing the front cover (optional) .....12
5.3. Connecting the monitor (optional)....12
5.4. Connecting an HDMI device (optional)....12
5.5. Touchscreen (optional) 1
5.6. Brightness control (optional) 14
5.7. Source Select / Display off (optional)....14
5.8. Connecting PS/2 devices (optional)....15
5.9. Connecting the audio output / headphones / speaker boxes......16
5.10. Connect microphone (optional)....17
5.11. Connecting audio input / recording source....17
5.12. Connecting the network (LAN)....17
5.13. Connecting S-ATA devices (optional)....17
5.14. Illumination (optional) 17
5.15. EJECT button....18
5.16. Connecting power supply 19
6. Starting up for the first time....20
6.1. Starting up your PC 20
6.2. Overclocking button (optional) 22
7. Mouse 24
7.1. Left button....24
7.2. Right button....24
7.3. Scroll wheel....24
8. Keyboard 24
8.1. The Alt, Alt Gr and Ctrl keys ......24
9. Hard drive
9.1. Important directories 25
9.2. Hot-swap mobile rack (optional) 26
9.3. Connecting an external hard drive (optional) 29
10. Optical drive (optional) 30
10.1. Loading a disc....30
10.2. Playing/reading discs 31
10.3. Blank CDs and DVDs ....31
11. Card reader (optional) 32
11.1. Inserting a memory card ....33
11.2. Removing memory card ....33
12. Graphics system 33
13. Sound system 34
14. USB connection (optional) 34
15. Network operation 35
15.1. Wireless LAN (Wi-Fi)....35
15.2. Bluetooth 36
16. Settings 37
16.1. Reset PC to factory settings 37
16.2. UEFI setting 38
17. FAQ - Frequently Asked Questions.... 39
18. Customer service 39
18.1. What to do in case of hardware problems ....39
18.2. Find the cause ....39
18.3. Faults and possible causes ....40
18.4. Do you need more help? 40
18.5. Driver support 41
19. Transport 41
20. Cleaning and care 41
21. Upgrading/modifying and repair.... 41
21.1. Notes for service technicians ....42
22. Recycling and disposal...... 43
23. Information about the scope of delivery 44
23.1. Keyboard and mouse 44
23.2. WiFi USB....44
24. Legal Notice 45
25. Index 46
1. About these operating instructions

Read the safety instructions carefully before using the device for the first time. Note the warnings on the device and in the operating instructions.
Always keep the operating instructions close to hand. If you sell the device or give it away, please ensure that you also pass on these instructions.
1.1. Explanation of symbols

DANGER!
Warning of immediate mortal danger!

WARNING!
Warning of possible risk of fatal injury and/or serious irreversible injuries!
WARNING!
Warning: danger due to excessive volume!

CAUTION!
Danger of possible minor or moderate injuries!

NOTICE!
Please follow the guidelines to avoid property damage! Additional information on using the device!

NOTICE!
Please follow the guidelines in the operating instructions!

Declaration of conformity
Products that feature this symbol meet the requirements of the EC directives (see section 'Declaration of conformity')
1.2. Proper use
This device is designed for the use, management and editing of electronic documents and multimedia content, as well as for digital communication and it is only intended for private and not commercial/industrial use.
Please note that we shall not be liable in cases of improper use:
- Do not modify the device without our consent and do not use any auxiliary equipment which we have not approved or supplied.
- Use only spare parts and accessories that we have supplied or approved.
- Heed all the information in these operating instructions, especially the safety information. Any other use is deemed improper and can cause personal injury or damage to the device.
- Do not use the device in extreme environmental conditions.
1.3. Declaration of conformity
This PC is supplied with the following wireless features:
- Wireless LAN (optional)
- Bluetooth (optional)
- Keyboard (optional)
- Mouse (optional)
Medion AG hereby declares that this product conforms with the essential requirements and the remaining relevant regulations:
• RE Directive 2014/53/EU
• Ecodesign Directive 2009/125/EC
• RoHS Directive 2011/65/EU.
If your device operates with a network connection in the 5 GHz frequency range of the integrated wireless LAN solution, the device may only be used inside buildings in EU countries (see table).*
Full declarations of conformity are available at www.medion.com/conformity.
CE
| AT BE BG CZ DK | ||
| EE FR DE IS IE | ||
| IT EL ES CY LV | ||
| LI LT LU HU MT | ||
| NL NO PL PT RO | ||
| SI SK TR FI SE | ||
| CH UK HR |
AT = Austria, BE = Belgium, CZ = Czech Republic, DK = Denmark, EE = Estonia,
FR = France, DE = Germany, IS = Iceland, IE = Ireland, IT = Italy, EL = Greece,
ES = Spain, CY = Cyprus, LV = Latvia, LT = Lithuania,
LU = Luxembourg, HU = Hungary, MT = Malta, NL = Netherlands, NO = Norway,
PL = Poland, PT = Portugal, RO = Romania, SI = Slovenia, SK = Slovakia, TR = Turkey,
FI = Finland, SE = Sweden, CH = Switzerland, UK = United Kingdom, HR = Croatia
1.4. Information on trademarks
Windows ^ is a registered trademark of Microsoft ^ . Intel ^ , the Intel ^ logo, Intel Inside ^ , Intel Core ^ , Ultrabook ^TM and Core Inside ^ are trademarks of the Intel ^
Corporation in the USA and other countries.
The HDMI logo and High-Definition Multimedia Interface are registered trademarks of HDMI Licensing LLC.
The Bluetooth ^® word mark and logos are registered trademarks of Bluetooth SIG, Inc. and are used by Lenovo/Medion under licence.
Other trademarks are the property of their respective owners.
2. Safety information
2.1. Dangers for children and people with reduced ability to operate machinery
This device is not intended for use by people (including children) with reduced physical, sensory or mental abilities or for those without experience and/or knowledge, unless they are supervised by a person responsible for their safety or they have been instructed in its use.
- Children should be supervised to ensure that they do not play with the product.
- Children should not be allowed to use this device without supervision.
- Keep the device and accessories out of reach of children.

DANGER!
Risk of suffocation!
Packaging film can be swallowed or used improperly. Therefore, there is a risk of suffocation!
- Keep packaging material such as plastic film or plastic bags away from children.
2.2. Operating safety
Read this section carefully and follow all instructions given. The instructions will help you to operate your PC reliably and help increase its service life.
Liquids penetrating the device may impair the electrical safety of the product.
- Avoid exposing the device to water droplets or spray and do not place anything containing water, e.g. vases, on the device.
The slots and openings on the PC are for ventilation purposes.
▶ Do not cover these openings as this could cause the device to overheat.
When setting up the PC make sure that it has a minimum clearance of 20cm on all sides.
▶ Do not insert anything into the PC through the slots and openings.
This could result in an electrical short circuit, an electric shock or even ignite a fire which will damage your PC.
There is a risk of electric shock or fire when the PC casing is open.
▶ Never open the casing of the PC!
▶ Never use the PC when the casing is open.
There is a risk of electric shock or fire when the mains adapter is open.
▶ Never open the mains adapter!
▶ Never manipulate the mains adapter or live components!
The optical drives (CDRW, DVD, DVD-RW) constitute class 1 laser equipment.
▶ Do not remove the drive cover as invisible laser radiation can escape.
Switch the PC off immediately/do not switch the PC on and contact customer services if ...
- the power cable or the attached plugs are burnt or damaged.
▶ Have faulty mains adapters/mains cables replaced only with original parts.
These parts should not be repaired under any circumstances!
- the PC casing is damaged or liquid has penetrated into the device.
▶ Have the PC inspected by customer services first. Otherwise, it may not be possible to operate the PC safely and there is a risk of fatal electric shock!
2.3. Never carry out repairs yourself

CAUTION! Risk of electric shock!
There is a risk of electric shock if repairs are not carried out by qualified personnel!
▶ Never try to open or repair the product yourself!
In the event of a fault, please contact the Service Centre or an approved repair specialist.
2.4. Data backup

PLEASE NOTE!
Back up your data on external storage media before each update. We do not accept any liability for compensation claims arising from the loss of data or any consequential damages incurred.
3. Package contents
Please check your purchase to ensure that all items are included. If anything is missing, please contact us within 14 days of purchase. If you do contact us, please give your serial number.
The following components are supplied with the PC you have purchased:
• PC and connection cable
- Keyboard and mouse (optional)
- Documentation

DANGER! Risk of suffocation!
Packaging film can be swallowed or used improperly. Therefore, there is a risk of suffocation!
- Keep packaging material such as plastic film or plastic bags away from children.
4. Setting up the PC
Setting up your PC in the right way helps to ensure that your PC is comfortable to operate.
4.1. Installation location
- Set up all components on a stable, level and vibration-free surface and only operate them on a surface of this kind to prevent the PC from malfunctioning.
- Keep your PC and all connected devices away from moisture and avoid dust, heat and direct sunlight. This will avoid faults or damage to your PC.
- Your PC is not suitable for use at VDU workstations within the meaning of §2 of the German VDU workstation regulation.
4.2. Environmental requirements
- The PC can be operated at an ambient temperature of +10^ to +35^ and at a relative humidity of 30% - 70% (non-condensing).
- When switched off, the PC can be stored at temperatures from -20^ to 50^ .
- During a thunderstorm, disconnect the mains plug and, in particular, remove the network cable and, if applicable, the antenna cable. For extra safety, we recommend using an overvoltage protection device to prevent your PC from sustaining damage from the mains supply as a result of power surges or lightning strikes.
- After transporting the PC, wait until it has reached ambient temperature before switching it on. Major changes in temperature or fluctuations in humidity can cause moisture to build up within the PC due to condensation – this can cause an electrical short circuit.
4.3. Ergonomics

PLEASE NOTE!
Avoid dazzle, reflections and strong bright-dark contrast in order to protect your eyes.
The monitor should never be placed next to a window because this is the brightest part of the room in daylight. This brightness can make it more difficult for the eyes to adjust to the darker monitor.
The monitor should always be positioned so that the direction of vision is parallel to the window frontage.
The parallel line of vision should also be maintained in relation to artificial lighting equipment. In other words, the same criteria and principles apply where the workspace is illuminated with artificial light.
If it is not possible to position the screen as described, the following can be helpful:
- Rotate, lower or tilt the monitor;
- Slatted or vertical blinds on the windows;
- Partitions or changes to artificial lighting.

PLEASE NOTE!
Take regular breaks when working at your monitor to prevent tenseness and fatigue.
Sitting for a long time without changing position can be uncomfortable. Correct posture is very important for minimising the risks of physical problems or damage.
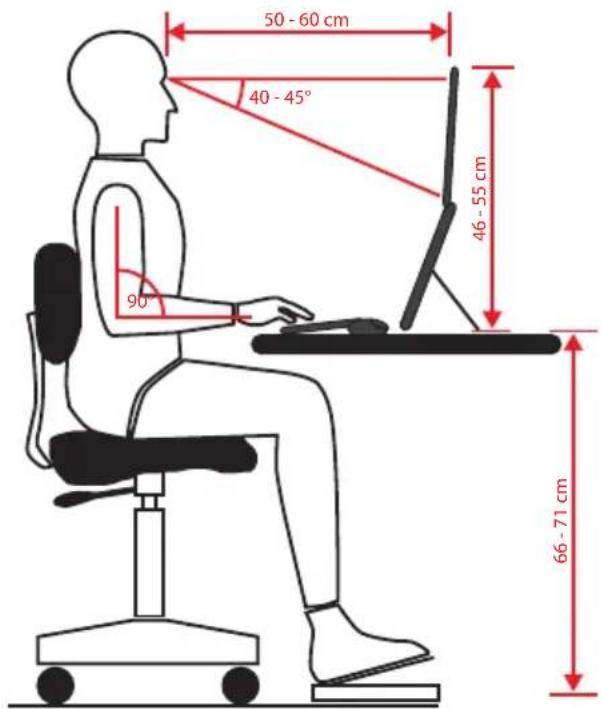
text_image
50 - 60 cm 40 - 45° 90° 46 - 55 cm 66 - 71 cm- In general – change your position frequently (around every 20-30 minutes) and take regular breaks to avoid tiredness.
- Back – when sitting at your workstation, your back must be supported by your chair's backrest, which must be upright or angled slightly back.
- Arms – your arms and elbows should be relaxed and loose. Your elbows should be close to your body. Hold your forearms and hands roughly parallel to the floor.
- Wrists – when working with the keyboard, mouse or trackball, your wrists should be stretched out and not bent at an angle of more than 10^ , where possible. Make sure that your wrists are not resting on the table edge itself.
- Legs – your thighs should be horizontal or angled slightly down. Your lower legs should form an angle with your thighs of approximately 90^ . Your feet should be resting flat on the floor. Use a foot rest if you need one, but first make sure that your seat height has been adjusted correctly.
- Head – your head should be upright or bent very slightly forward. Do not work with your head or upper body twisted.
As you work, the top edge of the monitor should be at eye level or very slightly lower.
The distance between the monitor and the person viewing it depends on individual requirements. Distances between 50 and 70cm are commonly used.
5. Connecting

PLEASE NOTE!
The devices listed are not necessarily supplied. You only need to connect up those components that you want to operate on your PC. If you do not have the described device, you can simply skip the relevant point and carry out these steps at a later point in time if required.
5.1. Connecting the cables
Follow the instructions below to connect your PC correctly and safely:
- Maintain a distance of at least one metre from sources of high-frequency and magnetic interference (TV sets, loudspeakers, mobile phones, DECT telephones, etc.) in order to avoid malfunctions and data loss.
- Please note that only shielded cables that are shorter than 3 metres may be connected to the external interfaces of this PC. Please only use double-shielded cables for printer cable connections.
- Position the cable so that it cannot be stepped on or tripped over.
- To avoid damaging the cables, do not place any objects on them.
- In order to prevent cable breaks, do not crush or bend cables, because this could cause a short circuit.
- Do not apply force when connecting cables and plugs and make sure that connectors are the right way round.
- Do not connect any devices to the PC which do not meet the requirements set out in the EN60950 standard "Information Technology Equipment – Safety" or the EN60065 standard "Audio, video and similar electronic apparatus - Safety requirements".
- Only connect peripheral devices – such as keyboard, mouse and monitor, etc. – when the PC is switched off to avoid damage to the PC or the devices. Some devices may also be connected while the computer is running. This is generally the case for devices with a USB connection. In all cases, observe the relevant operating instructions.
- In addition, when connecting your peripherals only use the connecting cables supplied with those devices.
- Do not expose plug connections to impacts/pressure, e.g. from lateral forces. This could cause internal and external damage to the product.
- When you disconnect a cable from your device, pull it out by holding the plug and not the cable.
- Do not exchange the supplied cable for another one. Use only the supplied cable as this cable has been extensively tested in our laboratory.
- Ensure that all connection cables are connected to their corresponding peripheral device to avoid any interference radiation. Disconnect any cables that are not required.
5.2. Opening and closing the front cover (optional)
Some connections are behind the front cover. This is very useful because you can quickly and conveniently make frequently used connections without turning around the PC. The closable cover also protects the connections.
5.3. Connecting the monitor (optional)
Your PC has a VGA, DVI connection and/or a DisplayPort.

PLEASE NOTE!
If your monitor has several inputs, only ever connect one data cable to avoid problems with signal allocation.
▶ Ensure that the plug and the socket fit together precisely in order to avoid any damage to the contacts. Due to its asymmetrical shape, the plug will only fit into the socket in one position.
Connect the screen data cable with the graphics system socket. Remove the white protective ring (if present) on the monitor plug.
When connecting a VGA or DVI device to the monitor cable, screw the screws in hand-tight.
5.4. Connecting an HDMI device (optional)
HDMI stands for "High Definition Multimedia Interface", which is an interface for fully digital transfer of audio and video data.
▶ You can connect a television set, monitor or projector to this socket if these output devices have the corresponding connection.
5.5. Connecting USB devices (optional)

PLEASE NOTE!
Only connect your USB devices after initial set-up of your new PC. This will prevent unnecessary confusion during installation. These devices can normally be connected during operation. Please refer to the operating manual for your peripheral device.
- Normally, a choice of several connection sockets is available.

PLEASE NOTE! Risk of damage!
Ensure that the plug and the socket fit together precisely in order to avoid any damage to the contacts. Due to the arrangement of the contacts, the plug will only fit into the socket in one position.
Connect devices (printer, scanner, camera, etc.) to the corresponding socket.

PLEASE NOTE!
Where possible, always connect your devices to the port that they were originally installed on. Otherwise you will be assigned a new ID and the drivers will need to be reinstalled.
5.6. Connecting PS/2 devices (optional)
If you want to connect a USB mouse or a USB keyboard, you do not need to connect a PS/2 mouse or keyboard.
Connect the mouse cable to the green PS/2 connection socket.
Connect the keyboard cable to the blue PS/2 connection socket.
5.7. Connecting the audio output / headphones / speakerboxes
Connect active speaker boxes for playback or an audio connection cable for recording. Read the operating instructions for your stereo to find out which input you need to use (usually Line In or Aux).
Connect the cable to the green socket on the back of your PC with the 3.5mm stereo jack.
5.7.1. Connecting the headphones
Connect the headphones/earphones here.
Connect the cable to the green socket on the front of your PC with the 3.5mm stereo jack.

WARNING!
Damage to hearing!
Excessive volumes when using headphones or earphones, as well as changes to the default settings on the equaliser, driver, software or operating system, can generate excessive acoustic pressure that can cause hearing loss.
Before pressing play, set the volume to the lowest setting.
▶ Start playback and increase the volume to a comfortable level.
5.7.2. PCs with surround sound system (Surround) (optional)
Connect the surround sound system as follows:
Connect the cable of the front speaker into the green socket marked FS.
Connect the boxes for emitting sound to the back of the room to the RS socket.
Connect a central speaker or subwoofer to the CS socket.
Connect other speakers for emitting sound to the rear of the room to the SS socket.
A digital audio output (SPDIF) (optional) can be connected with an optical or coaxial cable.
- Connect an optical cable to the optical socket or a coaxial cable to the coaxial socket.
Connect the other end of the cable to an audio device that has a corresponding digital input.
5.8. Connect microphone (optional)
Connect a microphone with a 3.5 mm mono jack plug to the pink socket on the front of your PC.
▶ Position the microphone so that it is not pointing directly at the speaker. This will prevent acoustic feedback that creates a loud whistling sound.
5.9. Connecting audio input / recording source
This connection is used for connecting external analogue audio sources (e.g. stereo system, synthesizer).
Connect the cable to the pale blue socket with the 3.5mm stereo jack.
5.10. Connecting the network ( LAN)
You can prepare your PC for network operation using the network connection. A network cable normally has two RJ45 plugs so it does not matter which side is connected to which socket.
▶ Plug one end of the network cable into the PC socket.
Connect the other end to the other PC or hub/switch.
You can find more information on this in the section "Network operation".
5.11. Connecting e-SATA devices (optional)
e-SATA stands for “external Serial ATA” and is a connection for external hard drives. In comparison to current USB standards, transfer speed with an e-SATA connection is higher than with external USB hard drives.

PLEASE NOTE!
Risk of damage!
Ensure that the plug and the socket fit together precisely in order to avoid any damage to the contacts. Due to its asymmetrical shape, the plug will only fit into the socket in one position.
Plug the cable into the e-SATA socket on the front of your PC.
5.11.1. Removing e-SATA devices
Before removing an e-SATA hard drive from your PC, click on the "Safely remove hardware" icon in the taskbar at the bottom and then on the hard drive that you want to remove.
5.12. Illumination (optional)
Your PC has illumination that can show different colours and light up in two operating modes.
5.12.1. Select illumination style
▶ Press the illumination control once in order to switch on the lighting permanently.
▶ Press the control again to change the operating mode to pulsing light.
▶ Press the control again to switch off the lighting.
5.12.2. Colour selection
▶ Turn the illumination control to the right or left to select the required colour.
5.13. EJECT button
You can use the EJECT button to open the side panel of your PC without the inconvenience of unscrewing it.
▶ Press the EJECT button to open the side panel.
To close the side panel, ease it back into the housing until it clicks audibly into place.
5.14. Connectingpowersupply
Finally, connect your PC and monitor to the power supply.
Plug the mains cable into the socket and then connect it to the mains cable socket on your PC.
Please observe the following safety information:

DANGER!
Risk of electric shock!
Even when the mains switch is off, some components of the device are live.
▶ Pull the mains plug out of the socket to disconnect your PC from the power supply and isolate the device entirely from voltage sources.
The mains plug socket must be near the PC and easy to reach.
▶ Only operate the PC on earthed, domestic power supply sockets.
▶ Use only the mains cable supplied.
For extra safety, we recommend using an overvoltage protection device to prevent your PC from sustaining damage from the mains supply as a result of power surges or lightning strikes.
The standard PC mains adapter has an on and an off switch. These can be used to switch the PC on and off. When the switch is at the OFF (0) setting, no power is being supplied.
Do not start up your PC yet!
▶ Please read the next section first to find out what you need to look out for during start-up.
6. Starting up for the first time
The operating system and all hardware drivers are pre-installed.
For some programs (e.g. telephone CDs or encyclopaedias), it may be necessary to insert the relevant disc to call up the data stored on it. The software will prompt you to do this if necessary.
Once you have made all of the connections and screwed on all of the required connections, you can start up your PC:
6.1. Starting up your PC
▶ Switching on the monitor.
▶ Switch on the mains switch by moving it to the setting I. (Set this switch to 0 to disconnect the power supply.)
▶ Press the On/Off switch once to switch on your PC. Your PC will now start and run through various steps.

PLEASE NOTE!
There should be no bootable disk in the optical drive as this will prevent the operating system from being loaded from the hard drive.
The operating system will be loaded from the hard disk drive. The loading process takes a little longer during the initial setup. Once all the necessary data has been entered, the operating system will be set up. The operating system is fully loaded once the Windows ^® start-up screen appears.

PLEASE NOTE!
Data loss!
The initial installation may take a few minutes. Do not disconnect the PC from the power supply during initial installation and do not switch it off. This may adversely affect the installation. Only switch off the PC when installation has been successfully completed and the start screen appears.
▶ Follow the instructions on the screen. Step-by-step instructions will guide you through the process to be followed.
The welcome procedure takes you through several screens and dialogues.
▶ Choose your required language and then the country you require.
Licence agreement
Please read through the licence agreement carefully. It provides important legal information about the use of your software product. To view the text in full, you must move the scroll bar downwards using the mouse until you reach the end of the document. You accept the licence agreement by checking the “I accept the agreement” button. Only this entitles you to use the product in accordance with the terms and conditions.
After entering a computer name you can connect your PC to the Internet immediately on the "Wireless" page if you already have a WLAN system or access point installed.
If you choose to skip this step, you can connect to the Internet later via the Windows® interface.
If you have already set up an Internet connection, you can now log in to your PC using a Microsoft account.
The Microsoft Store allows you e.g. to purchase new apps or update previously installed apps.
If you log in on a local account, you can set up a Microsoft account later at any time.
The following animated windows are purely for information about using the new Windows ^® operating system.
No entries of any kind may be made during the animation. The Windows® interface appears after the login process.

PLEASE NOTE!
Data loss!
In the first few days following the initial installation, Windows might update and configure data (e.g. with new updates), which can result in delays in the PC shutting down and starting up. For this reason, do not switch the PC off prematurely. This may adversely affect the installation.
6.2. Overclocking button (optional)
Your computer is delivered with an application that enables you to overclock the processor. This is useful if you want higher performance for certain applications, such as video editing or games.
Depending on computer model, you enable overclocking...
- using the button in the Intel® Extreme Tuning Utility or
• using the OC switch on the front cover.
Regardless of how you enable or disable overclocking, you will always need to restart your computer. When you launch the Intel® Extreme Tuning Utility, a corresponding notification will appear.

PLEASE NOTE!
Data loss!
Back up your data on external storage media before each update or change. We do not accept any liability for compensation claims arising from the loss of data or any consequential damages incurred.
6.2.1. Processor overclocking using the button in the Intel® Extreme Tuning Utility
- Launch the Intel® Extreme Tuning Utility by double-clicking the desktop shortcut.
User Account Control now informs you about changes being made to your computer. Confirm the query with Yes. You will see the program's main page with some information regarding your computer.
▶ Open the OC Genie tab.
Click the OC Genie button to enable overclocking. A message prompts you to restart your computer.

PLEASE NOTE!
Your computer may be fitted with an OC switch on the front cover or on the back. If so, then this button has a purely informational purpose. Disable indicates that overclocking is disabled; if the button shows Enable, overclocking is enabled.
▶ To disable overclocking, click the Enable button and restart your computer.
6.2.2. Processor overclocking using the OC switch on the front cover
If your computer has an OC switch on its front cover, you simply need to press the switch in order to overclock the processor (the switch should click into position).
▶ Restart your computer for the change to take effect. If you have launched the Intel® Extreme Tuning Utility, a corresponding notification will appear on the screen.
▶ To disable overclocking, press the switch again and restart your computer.
6.2.3. Making settings in the Intel® Extreme Tuning Utility
After activating processor overclocking, you can make a number of settings using the Intel® Extreme Tuning Utility.
For example, you can regulate the overclocking using the settings under CPU Ratio/Tuning All Contacts. After making a change, you will need to restart your computer.

PLEASE NOTE!
A warning will appear if you make settings that are not supported by your computer.
The Intel® Extreme Tuning Utility is also a monitoring tool that shows you information about the motherboard, memory and processor. The data provided is purely for information purposes and cannot be changed.
7.Mouse
In addition to the two standard buttons, the mouse also features a third button in the scroll wheel.
7.1. Left button
The left mouse button is used to make a selection (click once) and to confirm this selection (double click).
7.2. Right button
The right mouse button is used to call up commands (context menus) in certain places.
7.3. Scroll wheel
The scroll wheel in the middle has two functions:
- you can use the wheel to scroll through long documents e.g. websites or text files.
- depending on the configuration of the mouse, the wheel can also be used as a third button.
The scroll wheel can be configured via the mouse settings in the control panel.

PLEASE NOTE!
If the mouse pointer moves jerkily on the screen, please try operating it on a different surface (mouse pad). Glass and metallic surfaces might cause problems.
8. Keyboard
In addition to the standard numbers and characters, the keyboard can also be used to enter a number of special characters, as well as to perform certain commands depending on the program. These special functions are controlled using the keys Alt; Alt Gr and Ctrl.
8.1. The Alt, Alt Gr and Ctrl keys
The Alt key is used in combination with other keys to perform particular functions. These functions are determined by the program being used. To enter a keyboard shortcut with the Alt key, you press and hold down the Alt key as you press the other key. The Alt Gr key works in a similar way to the Alt key, but is used to obtain certain special characters. The Ctrl key (Control) performs program functions in the same fashion as the Alt key.
9. Hard drive
The hard drive is your main memory medium and combines high storage capacity with rapid data access.
Your PC is supplied with an OEM version* of the Microsoft Windows® operating system which fully supports all of the PC's performance features. We have configured your PC's hard drive so that you will be able to work with it optimally without having to install any additional drivers yourself.
The Windows® operating system requires part of the capacity to manage the hard drive and, therefore, the hard drive's full capacity is not available. This explains any differences between the BIOS display and the operating system display. The PC's operating system, other applications and security data are located on the hard drive meaning that the full capacity is already reduced.

PLEASE NOTE!
Data loss!
Never try to switch off the PC while it is accessing the hard drive as this could lead to a loss of data.
9.1. Important directories

PLEASE NOTE!
Data loss!
Do not delete or modify these directories or their content otherwise data may be lost or system functionality may be impaired.
The root partition (C:) contains the operating system, the applications and the "Documents" folder for the configured user.
We have listed the most important directories below and described their contents.
C:\User
This directory contains a folder for each user configured on the computer. In this folder, there are a number of important files and folders required for starting and operating Windows ^® that are hidden by default for security reasons.
C:\Programs
This directory contains the files belonging to the installed applications.
C:\Windows
The main directory for the Windows installation. This directory contains the files for the operating system.
The second partition (D:) is used for data backup and also contains drivers (D:\Drivers) and utilities (D:\Tools) for your PC.

PLEASE NOTE!
Depending on the configuration of the computer, there may be other partitions with different drive designations. Therefore, it should be noted that the drive designation "D:\" given here is an example and may be different on your computer.
D:\Drivers
This directory contains copies of the drivers required for your PC. These files may be required after a system restore.
D:\Tools
You will find additional programs and other documentation about your PC here.
D:\Recover
You will find the system recovery files here with which you can restore the computer to the factory settings.

PLEASE NOTE!
Data loss!
In addition, you will find the start-up files for the system restore tool, as well as the installation files for Windows ^® , on other non-rewritable partitions. These partitions are not visible and cannot be deleted.
9.2. Hot-swap mobile rack (optional)
An additional external hard drive can be connected behind the front cover via a hot-swap SATA mobile rack for 2.5" or 3.5" hard drives.

NOTICE!
Please bear in mind that only the mobile rack supplied can be used.
9.2.1. Installing a 3.5" hard drive in a 3.5" mobile rack
The mobile rack is made of plastic and enables the hard drive to be installed without the need for tools.
The 3.5" mobile rack has four premounted hard drive decouplers, which consist of a rubber bushing with a thin metal holding pin.

NOTICE!
Only 3.5" hard drives can be installed in this mobile rack. It is not possible to install a 2.5" SSD drive.
Proceed as follows:
▶ Pull the mobile rack out of the slot.
Place the mobile rack onto a firm surface with the open side facing upwards. If necessary, use a soft surface to minimise any knocks or collisions. The handle must be facing in your direction.
▶ Turn the hard drive so that you can see its lower surface and the contacts are located in the top left.
Now insert the hard drive at an angle into one side of the mobile rack and ensure that the metal pins on the hard drive decouplers fit into the screw holes on the side of the hard drive.
Now carefully fold open the other side of the mobile rack so that the hard drive can slide under the side strips.
▶ Ensure that the metal pins on the hard drive decouplers also slide into the screw holes on the other side of the hard drive. The hard drive is now locked in place and it is not possible for it to slip out of position when inserting the mobile rack.
▶ Turn over the mobile rack so that the top surface of the hard drive is facing upwards and carefully slide the mobile rack into the slot until it clicks into place. The hard drive will be recognised and can now be used.

NOTICE!
If the hard drive has been correctly installed, there will be a gap of approx. 3 mm in front of the handle on the mobile rack. If this is not the case, check once again whether the hard drive is correctly locked in place via the metal pins on the decouplers. If necessary, correct the position of the hard drive and the decouplers.
9.2.2. Installing a 3.5" hard drive in a 2.5"/3.5" mobile rack
The mobile rack is made of metal and enables the hard drive to be installed without the need for tools.
The 2.5"/3.5" mobile rack has a premounted hard drive decoupler, which consists of a rubber bushing with two thin metal holding pins.
Proceed as follows:
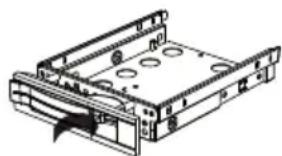
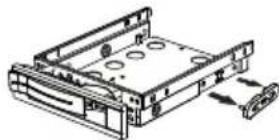
▶ Unlock the mobile rack by pressing the release lever.
▶ Pull the mobile rack out of the slot.
natural_image
Technical line drawing of a mechanical device with mounting holes and a central slot (no text or symbols)Place the mobile rack onto a firm surface with the open side facing upwards. If necessary, use a soft surface to minimise any knocks or collisions. The handle must be facing in your direction.
▶ Pull the hard drive decoupler out of the mobile rack.
natural_image
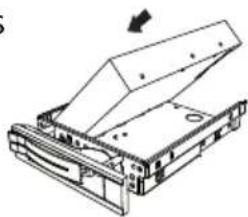
Technical line drawing of a computer drive chassis with mounting holes and a connector (no text or symbols)The upper surface of the hard drive should be facing upwards with the contacts located in the bottom right.
Now insert the hard drive at an angle into one side of the mobile rack.
Ensure that both small hooks on the mobile rack slide into the screw holes on the hard drive. Then carefully allow the hard drive to slide completely into the mobile rack.
natural_image
Technical line drawing of a mechanical device with an open lid and internal components (no text or symbols)▶ Press the hard drive decoupler back into the mobile rack. Ensure that both metal pins slide into the screw holes on the hard drive.
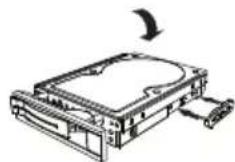
Carefully slide the mobile rack into the slot until it clicks into place.
- Lock the mobile rack in place by pressing on the handle until it audibly clicks into place. The hard drive will be recognised and can now be used.
9.2.3. Installing a 2.5" SSD drive in a 2.5"/3.5" mobile rack
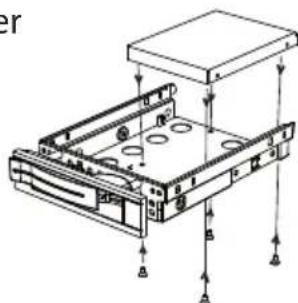
When installing an SSD drive, follow the first four steps in the previous instructions and then proceed as follows:
The upper surface of the hard drive should be facing upwards with the contacts located in the bottom right.
Now insert the right side of the hard drive into the mobile rack.
▶ Tightly hold the hard drive and the mobile rack, turn it over and use four M3 x 4mm countersunk screws (not supplied) to screw the hard drive in place using the corresponding screw holes.
natural_image
Technical line drawing of a mechanical assembly with mounting holes and structural supports (no text or symbols)
NOTICE!
The hard drive decoupler does not need to be replaced because the hard drive has been sufficiently secured in place by the screws.
Carefully slide the mobile rack into the slot until it clicks into place.
- Lock the mobile rack in place by pressing on the handle until it audibly clicks into place. The hard drive will be recognised and can now be used.
9.3. Connecting an external hard drive (optional)
Your PC has a hard drive bay that can be used for easily and conveniently connecting a MEDION HDDrive 2Go super speed* external hard drive via the USB 3.0 connection.
The connection is made, just like with a USB memory stick, while the operating system is running. The hard drive will be automatically recognised as a removable data medium and will be allocated a drive letter.

PLEASE NOTE!
This hard drive bay is only compatible with MEDION HDDrive 2Go super speed hard drives. All other HDDrive 2Go hard drives from previous generations cannot be used!

PLEASE NOTE!
Risk of damage!
In order to protect the connections on the data port, the plugs are fitted with dust caps that need to be removed before use. These caps should be replaced if these connections are not being used.
MEDION HDDrive 2Go super speed hard drives are available in the following sizes:
- MEDION hard drive HDDrive 2Go super speed 6.35 cm/2.5" USB 3.0 and
- MEDION hard drive HDDrive 2Go super speed 8.89 cm/3.5" USB 3.0.
10.Opticaldrive(optional)
10.1. Loading a disc

PLEASE NOTE!
Risk of damage!
The high speeds in the drive can cause defective media to break and damage your device. Damage caused by faulty media is not covered under warranty and repairs will be chargeable.
▶ Do not use scratched, broken, dirty or poor quality discs.
▶ Do not stick protective film or other stickers onto the discs because the adhesive could damage the surface of the disc and destroy your data.
Inspect discs carefully before inserting them. If damage or dirt is visible, do not use these discs.
▶ Press the eject button on the optical drive to open the drawer.
Insert the disc into the drawer with the label facing upwards so that it is lying flat.
Carefully push the drawer until you feel some resistance and the drawer automatically moves back into the optical drive.
In the factory settings, your optical drive is allocated the drive letter "E:\". You can conveniently access the data on your discs using Windows Explorer (Computer). Run Windows Explorer using the shortcut on the taskbar or by simultaneously pressing the Windows key and the "E" key. When accessing DVD videos (or audio and video files on conventional data CDs), the pre-installed media player is used automatically.
10.2. Removing the disc

PLEASE NOTE!
Data loss!
Do not try to remove the disc from the drive while the PC is accessing the optical drive.
In order to remove the disc, press the eject button again.
Remove the disc and store it in a CD case.
▶ Close the drive again.
10.3. Playing/reading discs

PLEASE NOTE!
Some discs start automatically when they are inserted. This depends on the operating system and the corresponding settings.
The optical drive on your PC is capable of playing audio CDs, DVD films or data discs. Once a disc has been loaded, a dialogue box opens containing various playback options. Normally, there will be a number of different options available. Playback of DVD film titles includes decoding MPEG2 video, digital AC3 audio data and decoding CSS-protected content.
CSS (sometimes also referred to as Copy Guard) is the name of a data protection program used by the film industry to protect against illegal copying. Among the many controls for CSS licensees, the most important of the playback restrictions involve country-specific content. To make it easier to create geographically separate film releases, DVD titles are coded for specific regions. Copyright laws require that each DVD film be limited to a specific region (usually the region where it is sold). DVD film versions can be published in multiple regions but CSS rules require that each CSS decoder system may only be used for one region.

PLEASE NOTE!
The region setting can be changed up to five times via the viewing software before the last setting becomes permanent. If you then wish to change the region setting again, this must be carried out by the manufacturer. Any shipping and configuration costs must be borne by the user.
10.4. Blank CDs and DVDs
Normal CDs are pressed from a glass master and then sealed. With blank discs, digital information is burned on using the drive's laser. They are therefore more sensitive then conventional discs.
Because of this, it is essential to avoid, particularly in the case of unused blanks:
- exposure to direct sunlight (UVA/UVB radiation)
• scratches and damage
• extreme temperatures
10.4.1. Important information on high-resolution video formats (optional)
Depending on the model, your system is supplied with a Blu-ray drive.
The technology used in the Blu-ray drive supports high-resolution video formats.
You can use your drive to play the following media:
- Audio CDs
- CD-R
- CD-RW
- DVD+R/DVD-R
• DVD+RW/DVD-RW
To be able to play back the new video format and new media (Blu-ray discs), the following prerequisites must also be met:

PLEASE NOTE!
Windows Media Player does not support any high-resolution video formats.
- The playback software must be updated via the Internet at regular intervals to ensure it can always play back the latest titles. The update intervals will be specified by the software providing there is an Internet connection.
- When connecting to a digital output source (e.g. TFT monitor or LCD TV), the connections (DVI or HDMI) must support the HDCP standard. You can find this information in the operating instructions for your output device.
11. Card reader (optional)
If your PC is equipped with a card reader, you can use the following types of memory card.
When inserting the memory cards, ensure that the contacts are facing in the right direction, as specified in the list below. Inserting a card incorrectly may damage the card reader and/or the card.
| Card type Connection contacts | |
| SD; SDHC (Secure Digital) facing downwards | |
| MMC (MultiMediaCard) facing downwards | |
| Memory Stick facing downwards | |
| Memory Stick Pro facing downwards |
11.1. Inserting a memory card

PLEASE NOTE! Risk of damage!
The memory cards can only be inserted in one direction. Please observe the instructions in the section above.
▶ Slide the card in as far as it will go.
When a card is inserted into a slot, it is allocated a free drive letter on the workstation (but only if it is a removable data medium).
11.2. Removing memory card
▶ Pull the card out of the slot and store it properly.
12. Graphics system
This program gives you the option of customising your desktop. This includes the background image, the screensaver and other settings for your screen and your graphics card. The program can be started as follows:
▶ Right-click on the Windows desktop.
▶ Then left-click on Show settings
or
▶ Select the menu option Settings from the Start menu.
▶ Select the System option.
▶ Then click on Screen.
▶ Select the option Adjust display in the dialogue box that is now open.
13. Sound system
The external audio connections can be configured so that you can connect a surround sound system.
If you wish to change the default volume, click the loudspeaker icon in the taskbar.

WARNING!
Damage to hearing!
Excessive volumes when using headphones or earphones, as well as changes to the default settings on the equaliser, driver, software or operating system, can generate excessive acoustic pressure that can cause hearing loss.
Before pressing play, set the volume to the lowest setting.
▶ Start playback and increase the volume to a comfortable level.
14. USB connection (optional)

PLEASE NOTE!
Devices connected directly to the USB bus may not draw more than 500 mA. The power output is protected by a fuse (limited power source as per EN 60950). If you want to connect devices that require more power, you need to connect them to two USB ports using a Y cable.
The USB 3.0 ports are fully backwards compatible with USB 2.0 and 1.1.
▶ Where possible, always connect your USB devices to the same port that they were originally installed on. Otherwise you will be assigned a new ID and the drivers will need to be reinstalled.
15. Network operation
15.1.WirelessLAN(Wi-Fi)
Your PC is equipped with WLAN. The components (module, antenna) have already been integrated into your PC and activated. You can disable this function using the Windows ^® device manager if required.
Wireless LAN enables you to establish a network connection to a corresponding remote station.

PLEASE NOTE!
Do not operate your PC's wireless LAN function in areas where there are radio-sensitive devices (e.g. in hospitals etc.). If you are unsure whether the use of these devices will result in damage or interference, disable this option.
15.1.1. Requirements
A so-called LAN access point can be used as a remote station. An access point is a radio-transmitting device that communicates with your PC and controls access to the connected network. LAN access points are frequently found in large offices, airports, train stations, universities or Internet cafés. They provide access to particular services and networks or to the Internet. Access permissions are generally necessary and often result in usage charges. Access points often have built-in DSL modems. These so-called routers establish the connection to the existing DSL Internet connection and the wireless LAN. A connection can also be established to another end device using wireless LAN functionality without an access point. Without a router, however, the network is restricted to those devices directly connected to it.
The wireless network connection works in accordance with the IEEE 802.11ac* standard and is compatible with the IEEE 802.11b/g/n standard.
If encryption is used for the transfer, the same procedure must be used for all devices. Encryption is a procedure to protect the network from unauthorised access.
The transfer speed can vary depending on the distance and the number of users accessing the remote station.
15.2. Bluetooth®
Bluetooth technology is used to wirelessly bridge short distances. Bluetooth devices transfer data via radio so that computers, mobile phones, printers, keyboards, mice and other devices can communicate with one another wirelessly. Bluetooth wireless technology has numerous possible applications. A few of them are listed below:
- Creating a wireless Internet connection using a mobile phone.
- Transferring files between computers or between a computer and another device.
- Printing using a Bluetooth printer.
• Using a Bluetooth keyboard and mouse. - Connecting to a PAN (Personal Area Network).
The Bluetooth wireless technology data transfer speed can vary depending on the device or environmental factors. Data can be transferred through walls, jacket pockets and briefcases using a Bluetooth device. The transfer between Bluetooth devices occurs at the high frequency of 2.4 Gigahertz (GHz).

PLEASE NOTE!
Do not operate the Bluetooth function in locations (e.g.: hospitals, aeroplanes, etc.) where there is sensitive equipment. Do not switch the device unless you are sure it will cause no interference.
16. Settings
16.1. Reset PC to factory settings
In the event of problems with installation or other software problems which make it necessary to reinstall the software, Windows ^® offers three options for reinstalling Windows ^® on your PC.
First ensure that you have backed up all important data and programs.
16.1.1.Startsystemrestore
▶ Restart the PC and press the F11 button during the boot process to start PowerRecover.
or
▶ Click on the PowerRecover app in the Start menu to start the program. You will be offered the following options:
• Create driver and tool rescue media
The drivers and tools will be saved to a storage medium.
-Create driver and tool rescue media
Create a support disc
-Create driver and tool rescue USB disk
Create a support USB storage medium
- Update your PC, without damaging your data
Updates the PC with the help of the Windows recovery options.
-Keep my files
All apps and settings will be deleted, while personal data will be retained.
-Remove everything
All data, apps and settings will be deleted.
- Restore
The PC will be restarted and reset to the factory settings.
- Reset to HDD - user data not saved
All data on the PC will be permanently deleted.
The factory settings will be restored.
- Reset to HDD - user data saved
The factory settings will be restored and all user data under C:\USERS will be backed up.
▶ Click on Next and follow the on-screen instructions to restore the factory settings.

PLEASE NOTE!
Data loss!
The recovery process takes a long time when you select the option to back up user data. Only the data located in the folder C:\USERS will be backed up. All other data will be deleted. It is therefore important to perform regular data backups to external data media. We do not accept any liability for claims for compensation arising from a loss of data or for any consequential damages.
16.2. System restore with Windows Recovery Options
If you experience problems with your device, you can refresh or reset it. Windows is reinstalled when you refresh your device. Your personal files and settings are retained.
Windows is also reinstalled when you reset your device. However, your files, settings and apps – except for the apps pre-installed on the device – are deleted.

PLEASE NOTE!
If your notebook does not start properly three times in a row, the Windows recovery menu automatically appears.
16.2.1. How to refresh your device
▶ Open the start menu.
▶ Select the Settings app from the list.
Tap or click on Update & Security.
Tap or click on the menu option Recovery.
Tap or click on Get started.
▶ A dialogue box will now open, select the recovery option Keep my files to refresh your notebook.
16.2.2. How to reset your device
▶ Open the start menu.
▶ Select the Settings app from the list.
Tap or click on Update & Security.
Tap or click on the menu option Recovery.
▶ Tap or click on Get started.
▶ A dialogue box will now open, select the recovery option Remove everything to completely reinstall Windows.

PLEASE NOTE!
Always perform any type of recovery using AC power.

PLEASE NOTE!
If you have forgotten the Windows password for your device, you can also restore the notebook from the login screen after rebooting the device.
To do this, hold down the Shift key while on the login screen and then select Power ⏻ > Restart in the bottom right. After rebooting the device, select Troubleshoot > Reset this PC.
16.3. UEFI setting
The UEFI setting (the basic hardware configuration of your system) offers you numerous configuration options for operating your PC.
For example, you can modify the operating mode for interfaces, security features or power supply management.

ATTENTION!
Data loss!
The PC has already been configured by the manufacturer to ensure optimum operation. Please only change settings where strictly necessary and if you are familiar with the configuration options.
16.3.1. Executing the UEFI setting
You can only run the configuration program upon system start-up. If you have already started up your PC, exit Windows® and restart your PC.
Before restarting your PC, press the button Entf and hold it down until the message Entering Setup appears.
16.3.2. Clear CMOS (optional)

PLEASE NOTE!
If you have changed settings that unexpectedly result in the PC becoming unstable, you can delete the CMOS memory using the Clear CMOS button and restore the UEFI to its factory settings.
17. FAQ - Frequently Asked Questions
Where can I find the necessary drivers for my PC?
- The drivers can be found in the second hard drive partition in the Drivers and Tools folders.
What is Windows activation?
- You will find a relevant section in these operating instructions containing detailed information on this topic.
How do I activate Windows?
- Windows is activated automatically as soon as an Internet connection is established.
How do I activate Windows without an Internet connection?
- Windows can also be activated over the telephone. Follow the instructions in the section Windows activation to activate Windows by telephone.
When is restoring factory settings recommended?
- This method should only be selected as a last resort. Read about the alternatives in the System restore section.
How do I perform a data backup?
- Perform a backup or backup synchronisation of selected data onto external media to familiarise yourself with the technology. A backup is of no use if you are unable to recover the data or if the medium is faulty or is no longer available.
Why do I need to reinstall my USB device even though I have already done it?
- If the device is not operated on the same USB port as the one it was installed in, it automatically receives a new identifier. The operating system then treats it like a new device and tries to reinstall it.
- Use the installed driver or connect the device to the port on which it was originally installed.
18. Customer service
18.1. What to do in case of hardware problems
Malfunctions can sometimes have different causes, so we have included a guide that might help to solve any problems.
If these tips don't do the trick, then we'll be more than pleased to help you out. Just give us a call!
18.2. Find the cause
Start by carefully checking all the cable connections. If the indicator lights are not working, ensure that the PC and all peripheral devices are correctly connected to the power supply.
- Check the mains socket, mains cable and all of the switches in the main socket's circuit.
▶ Turn off the PC and check all cable connections.
Do not swap around the cables for the various devices, even if they look exactly the same. The polarity of the various cables may be different.
▶ Once you have ensured that the power supply to the device is working correctly and all connections are intact, then switch the PC back on.
18.3. Faults and possible causes
The screen is black.
▶ Make sure that your PC is not in hibernate mode.
Wrong time and date displayed.
▶ Click the clock display in the taskbar. Select the option Change date and time settings... and then set the correct values.
The cards in the card drive will be allocated a different drive letter after the reboot.
This can happen if the card reader updates its slot during system start-up. New IDs are issued, if required, which can lead to some cards having new drive letters.
No data can be read by the optical drive.
▶ Check whether the disc has been inserted correctly.
The mouse or keyboard does not work.
▶ Check the cable connection.
▶ If you have a wireless mouse or wireless keyboard, check the batteries and the receiver.
Not enough space is available on the hard disk drive.
▶ Save data you do not need to CD-Rs, DVDs or other external media.
The PC will not start.
If the cable connections are correct, try resetting the PC's mains adapter. Move the mains switch on the back of the PC to the position 0 (OFF). Then press and hold the mains switch on the front for 10 seconds. Wait another 5 seconds and start up your PC again.
Apps (e.g. the weather app) cannot be displayed as live tiles.
▶ Check the date, time zone and time.
18.4. Do you need more help?
You've checked through the suggestions in the previous section and you're still having problems? Then call the hotline for the country where you bought the PC. We will try to help you over the phone. Before contacting us, however, please have the following information ready:
- Have you made any upgrades or modifications to the initial configuration?
• What peripheral devices do you use?
• What messages, if any, appear on the screen?
• What software were you using when the problem occurred?
• What steps have you already taken to try and rectify the problem?
18.5. Driver support
The system has been thoroughly and successfully tested with the installed drivers in our test laboratory. It is normal in the computer sector, however, for the drivers to need updating from time to time.
This is because there may be compatibility problems with other components (programs, devices) which have not yet been tested.
19. Transport
Please note the following advice on transporting your PC:
- Pack your PC using the original packaging to avoid transport damage.
20. Cleaning and care
You can extend the life expectancy of your PC by following the advice below:

PLEASE NOTE!
None of the parts inside the PC housing require cleaning or maintenance.
- Always unplug the device and disconnect all cables before cleaning. Clean the PC with a damp, lint-free cloth.
- Do not use solvents, corrosive agents or aerosol-based detergents.
- Do not use CD-ROM cleaning discs or similar products that clean the lens of the laser to clean your optical drive (CD/DVD). The laser does not need to be cleaned.
- Dust can block the ventilation openings, which can lead to overheating and malfunctions. Check at regular intervals that the ventilation openings guarantee adequate air circulation (approx. every 3 months). Use a vacuum cleaner to remove dust from the ventilation openings. If your device regularly attracts a lot of dust, we recommend that you also have the inside of your PC housing cleaned by a specialist.
21. Upgrading/modifying and repair
Upgrades and modifications to your PC should only be carried out by qualified specialists. If you do not have the necessary qualifications, have the work carried out by a qualified service technician. Please contact your customer service department if you are having technical problems with your PC.
if a repair must be carried out, please contact only our authorised service partner.
21.1. Notes for service technicians
Before opening the housing, disconnect all power and connecting cables. If the PC is not disconnected from the power supply before being opened, there is a risk of fatal electric shock. There is also a risk that the components could be damaged.
▶ Internal components of the PC may be damaged by electrostatic discharge (ESD). Carry out repairs, as well as system enhancements or modifications, at an ESD workplace. If such a workplace is not available, wear an antistatic cuff or touch an earthed, metallic object. We will charge for any repairs to damage caused by incorrect handling.
▶ Use only original replacement parts.

CAUTION!
Risk of explosion!
There is a lithium battery on the motherboard.
Batteries are special waste and must be disposed of properly.
▶ Never try to recharge the battery.
▶ Do not expose the battery to high temperatures or fire.
▶ Please note the polarity when changing the battery.
▶ Keep batteries away from children.
▶ Replace the battery only with the same type (CR 2032).
21.1.1. Information on laser radiation
- Laser equipment classified as laser class 1 to laser class 3b can be used in the PC. The equipment meets the requirements for laser class 1.
- By opening the housing of the optical drive, you will have access to laser equipment classified up to laser class 3b.
The following should be observed when removing and/or opening this laser equipment:
- The integrated optical drive contains no parts that require repair or maintenance.
- Repairs to the optical drive should only be carried out by the manufacturer.
- Do not look directly into the laser beam, even when using optical instruments.
- Do not allow yourself to be exposed to the laser beam. Avoid exposing your eyes or skin to the laser beam – either directly or through scattered laser radiation.
22. Recycling and disposal
If you have any questions about disposal, please contact your sales agent or our service centre.

PACKAGING
Your device has been packaged to protect it against transportation damage. Packaging is raw material and can be re-used or added to the recycling system.

APPLIANCE
At the end of its service life, the device should not be disposed of with the household rubbish. Enquire about the options for environmentally friendly and appropriate disposal.

BATTERIES/RECHARGEABLE BATTERIES
Do not dispose of used or defective batteries in the household rubbish! They should be taken to a collection point for used batteries.
23. Information about the scope of delivery
23.1. Keyboard and mouse
| Model Manufacturer | ||
| Keyboard | K28K31 | Sysgration |
| KB313UKB313W | WELL PARK | |
| Mouse | AGM-946S6 | Sysgration |
| MA105UMA105WMG100U | WELL PARK | |
| Receiver RG10-P WELL PARK | ||
23.2. WiFi USB
| Model Manufacturer | ||
| WiFi USB | EW-7811GLN | Acelink/Edimax |
| EW-7811UTC | ||
| EW-7611ULB | ||
| EW-7611UCB | ||
24. Legal Notice
Copyright © 2016
All rights reserved.
This operating manual is protected by copyright.
Mechanical, electronic and any other form of reproduction is prohibited without the written permission of the manufacturer.
Copyright is owned by the company:

text_image
QR code image containing encoded data, no visible human-readable textMedion AG
Am Zehnthof 77
45307 Essen
Germany
Subject to technical and optical changes as well as printing errors.
The operating manual can be reordered via the service hotline and is available for download via the service portal at www.medion.com/gb/service/start/.
You can also scan the QR code above and download the operating manual onto your mobile device via the service portal.
25. Index
B
Bluetooth....33
C
Cable connections 11
Card reader 30
Memory Stick.... 30
Memory Stick Pro 30
MMC 30
Removing memory cards 30
SD 30
SDHC 30
Cleaning and care 39
Cleaning agents.... 39
Clear CMOS 36
Connection....11
Audio input 14
Audio output 13
External hard drive 26
HDMI....12
Headphones 13
LAN....15
Microphone 14
Monitor....12
Power supply 16
PS/2 devices 13
Recording source 14
SATA 15
Speaker....13
Surround 14
USB devices 12
Customer service 37
D
Data backup 8
Declaration of conformity ....4
Disposal....41
Driver support 39
E
EJECT button 16
Environmental requirements ......9
Ergonomics....9
Arms....10
Back....10
General 10
Head 10
Legs....10
Wrists....10
External hard drive 26
F
Factory settings 34
System restore 34
FAQ 37
Front slot cover 12
G
Graphics card 30
Graphics system 30
H
Hard drive 22
Hardware problems 37
HDMI 12
Hot-swap 23
|
Illumination 15
Colour selection 15
Select illumination mode 15
Important directories 22
Installation location 9
K
Keyboard 21
L
Laser radiation 40
M
Monitor 12
Mouse....21
N
Network 15,32
LAN....15
LAN access point 32
Wireless LAN 32
0
Operating safety 6
Operation
Keyboard......21
Mouse.... 21
Optical drive 27
CD-ROM....27
DVD....27
Overclocking....19
P
Power supply 16
Proper use ....4
PS/2 devices 13
R
Recycling 41
Repairs....39
S
Security
Cable connections 11
Connection....11
Service technician 40
Setting up the PC 9
Sound system 31
Start-up 17
System restore 34
Burn drivers and tools to an optical disc 34
PowerRecovery 34
Reset to HDD - user data not saved 34
Reset to HDD - user data saved...... 34
Restoring the factory settings ...... 34
Update your PC, without damaging your data 34
T
Transport 39
Troubleshooting 37
U
UEFI firmware setting.... 36
Upgrades/modifications......39
USB 12,31
W
Wireless LAN 32