E2-F8 - Camera Z CAM - Free user manual and instructions
Find the device manual for free E2-F8 Z CAM in PDF.


User questions about E2-F8 Z CAM
0 question about this device. Answer the ones you know or ask your own.
Ask a new question about this device
Download the instructions for your Camera in PDF format for free! Find your manual E2-F8 - Z CAM and take your electronic device back in hand. On this page are published all the documents necessary for the use of your device. E2-F8 by Z CAM.
USER MANUAL E2-F8 Z CAM
Z CAM E2 Flagship Series
(Z CAM E2-S6 / E2-F6 / E2-F8)
User Manual v0.2
Draft
(Firmware 0.93)
1. Introduction
1.1. Camera Introduction
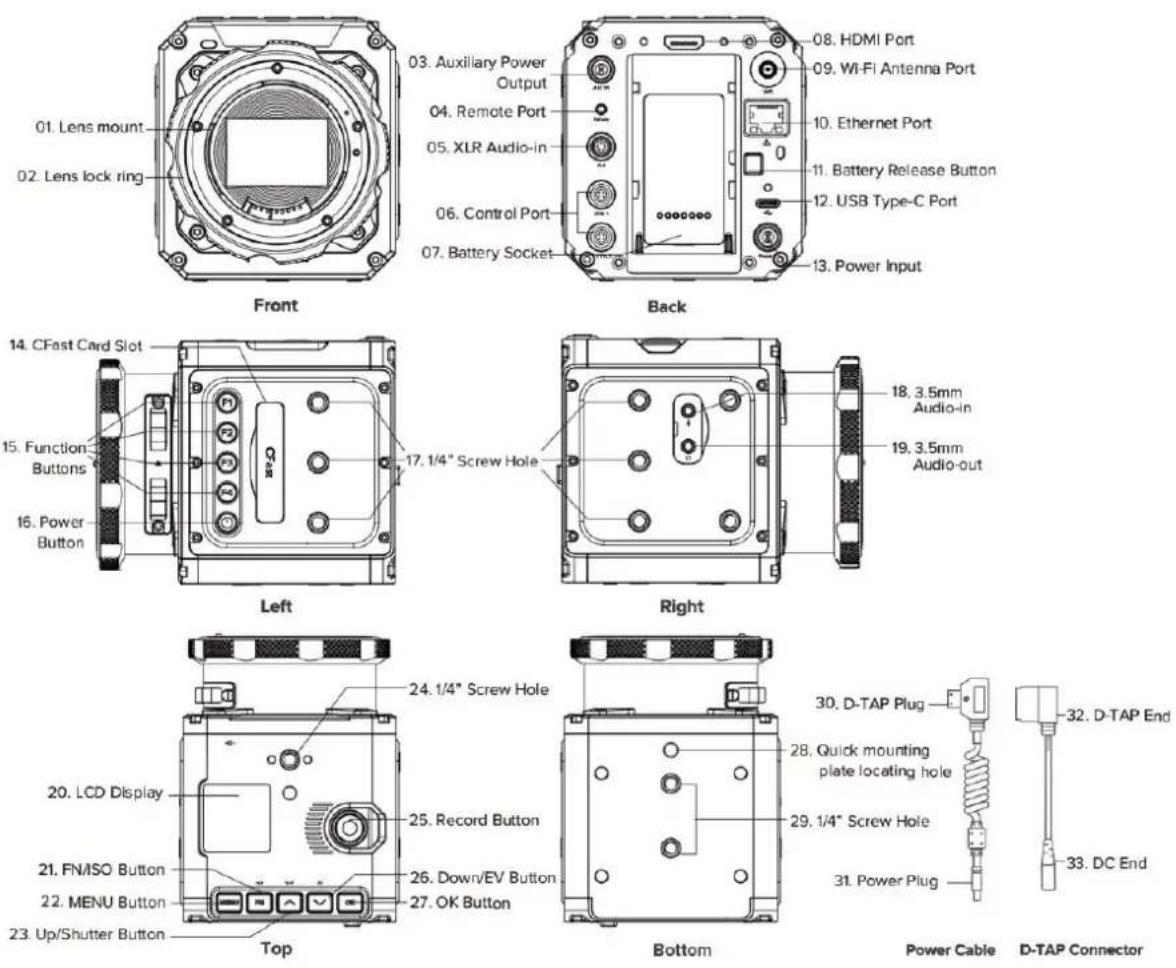
text_image
01. Lens mount 02. Lens lock ring Front 03. Auxiliary Power Output 04. Remote Port 05. XLR Audio-in 06. Control Port 07. Battery Socket 08. HDMI Port 09. Wi-Fi Antenna Port 10. Ethernet Port 11. Battery Release Button 12. USB Type-C Port 13. Power Input Back 14. CFast Card Slot 15. Function Buttons 16. Power Button 17. 1/4" Screw Hole Left 24. 1/4" Screw Hole Right 25. Record Button 26. Down/EV Button 27. OK Button 28. Quick mounting plate locating hole 29. 1/4" Screw Hole 30. D-TAP Plug 31. Power Plug 32. D-TAP End 33. DC End 34. Up/Shutter Button Top Bottom Power Cable D-TAP Connector1.2. Lens Mount
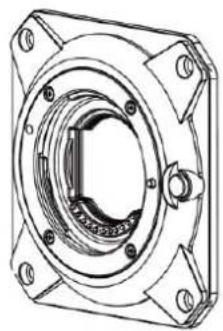
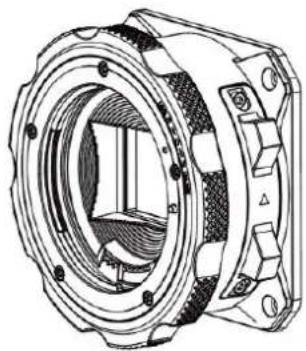
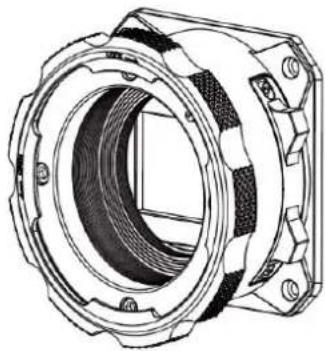
There are EF or PL lens mount options for Z CAM E2 flagship series, and MFT lens mount for Z CAM E2-S6 only. It's interchangeable and you can purchase additional lens mount module to change it with professional tools (only for EF and PL lens mount) *.
| Model | Lens Mount |
| Z CAM E2-S6 | EF / PL / MFT |
| Z CAM E2-F6 | EF / PL |
| Z CAM E2-F8 | EF / PL |
* Replacement of lens mount is recommended to be operated by the manufacturer's designated agent/dealer or under professional guidance. The failure of the camera may be appearing due to changing the lens mount by the user.
natural_image
Technical line drawing of a mechanical housing component with mounting flanges and central bore (no text or symbols)MFT lens mount
natural_image
Technical line drawing of a mechanical component with concentric rings and mounting holes (no text or symbols)EF lens mount
natural_image
Technical line drawing of a mechanical component with concentric rings and mounting holes (no text or symbols)PL lens mount
1.3. LCD Screen
The content displayed on the LCD Screen will be different when the camera is in different mode.
- Standby & Recording
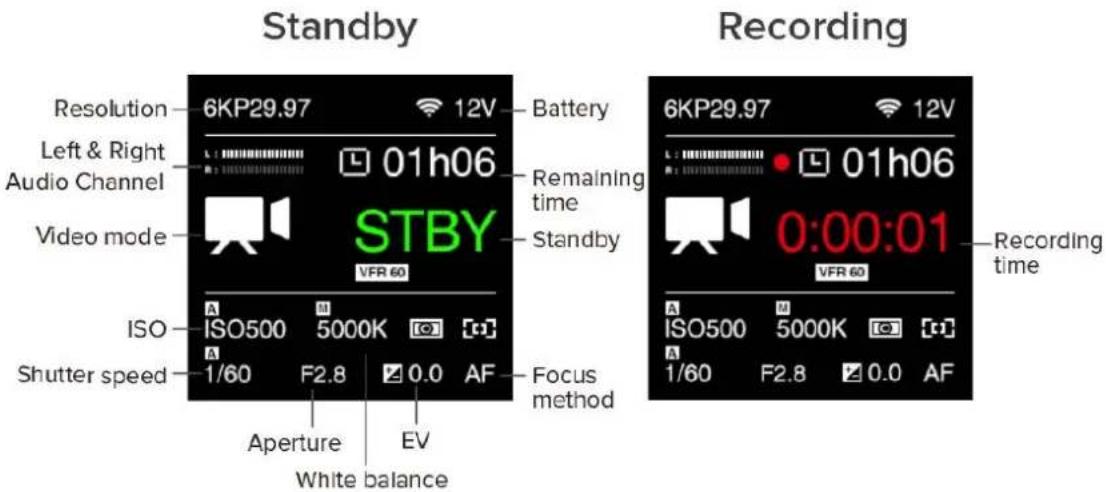
text_image
Standby Resolution 6KP29.97 12V Battery Left & Right Audio Channel Video mode STBY VFR 60 ISO ISO500 5000K Shutter speed 1/60 F2.8 0.0 AF Focus method Aperture EV White balance Recording 6KP29.97 12V 01h06 0:00:01 VFR 60 ISO500 5000K 1/60 F2.8 0.0 AF Remaining time Standby Recording time- Preview
Press FN + OK button when the camera is in Standby mode, it will switch to Preview mode. Press FN + OK again to come back to Standby mode.
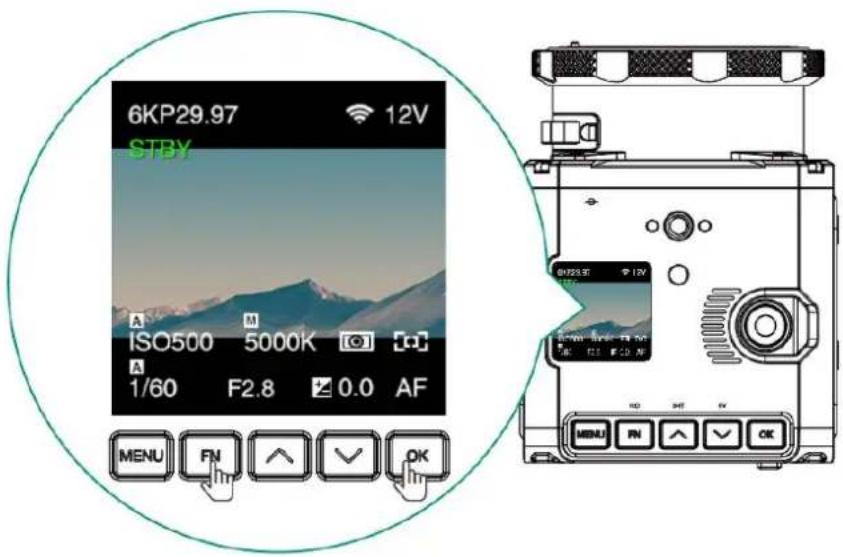
text_image
6KP29.97 STBY ISO500 5000K 1/60 F2.8 0.0 AF MENU FN ↑ ✓ OK 6P29.97 12V F2.8 0.0 AF MENU FN ↑ ✓ OK- Playback
Short press Power button when the camera is in Standby / Preview mode, it will switch to Playback mode. Short press Power button again to come back to Standby / Preview mode.
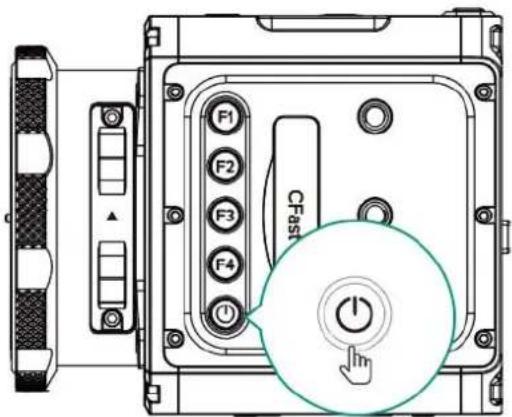
text_image
F1 F2 F3 F4 CFast Power
text_image
Folder A001 A002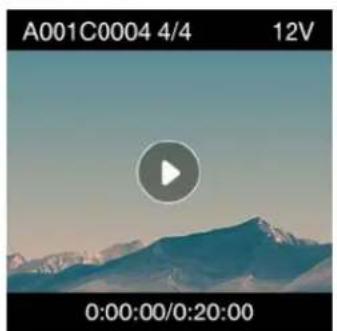
natural_image
Video player interface showing a play button over a mountain range under a clear sky (no text or symbols on the image itself)
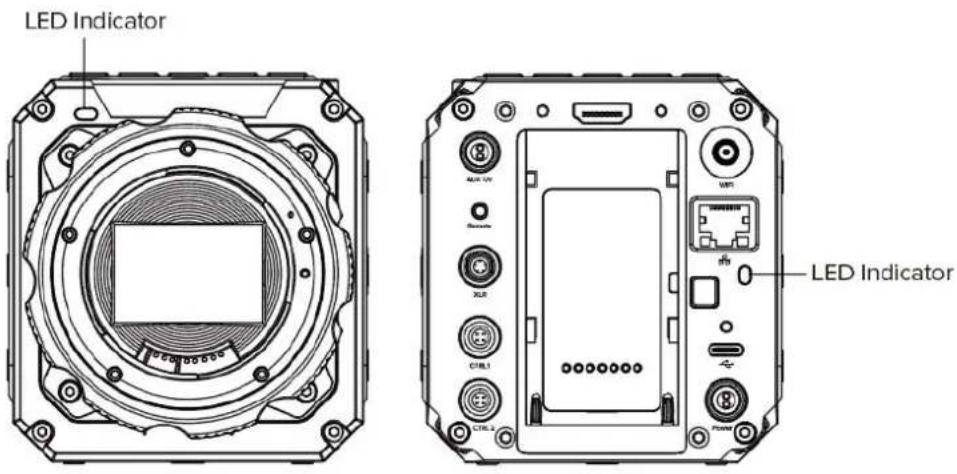
1.4. LED Indicator Status
text_image
LED Indicator LED Indicator- Green
: Standby
- Red
: Recording.
- Flashing Red (every 1s)
: No memory card.
- Flashing Red (every 0.5s)
: Memory card is full.
- Flashing Red (every 0.2s)
: Camera overheat.
- Flashing Red (very fast)
: Critical error.
- Flashing Red (fast & slow alternant)
: Low battery
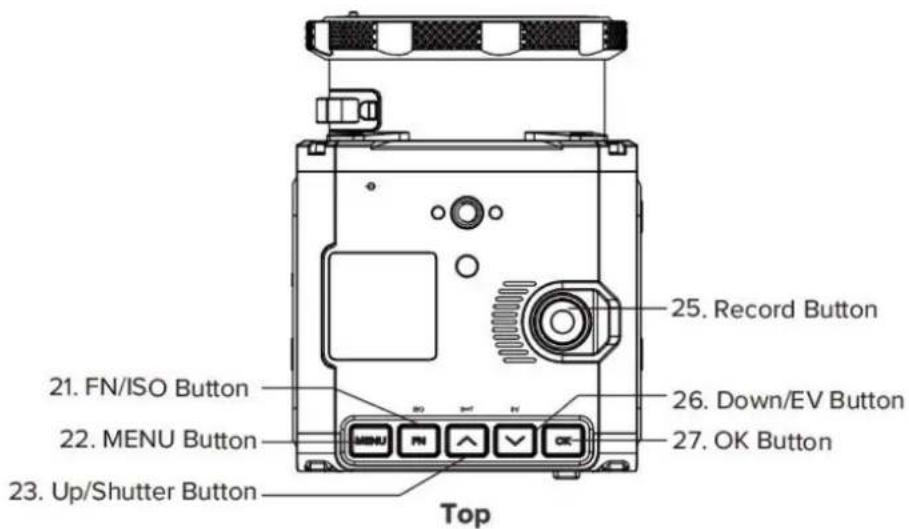
1.5. Buttons
text_image
21. FN/ISO Button 22. MENU Button 23. Up/Shutter Button Top 25. Record Button 26. Down/EV Button 27. OK Button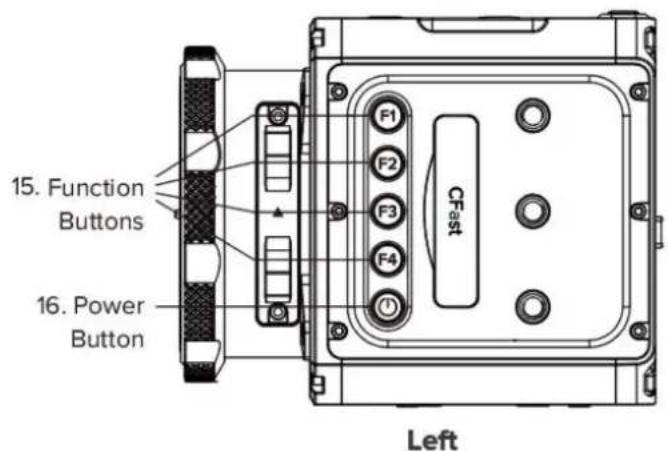
text_image
15. Function Buttons 16. Power Button CFast Left- MENU button: Enter / exit the camera settings, or return to the previous menu in camera settings.
• FN / ISO button: FN function in camera settings, or ISO quick setting in standby / preview / recording mode by default. - Up / SHT button: Up selection (or add value) in camera settings, or Shutter Speed / Shutter Angle quick setting in standby / preview / recording mode by default.
- Down / EV button: Down selection (or reduce value) in camera settings, or EV quick setting in standby / preview / recording mode by default.
- OK button: Confirmation in camera settings, or to trigger the Auto Focus function in standby / preview / recording mode by default (with lens supports auto focus and the Auto Focus function on the camera is enabled).
• F1 button: AEL (Auto Exposure Lock) by default.
• F2 button: Load profile by default.
• F3: Aperture quick setting by default.
• F4: No function by default.
• Power button: Long press for 3 seconds to power on / off the camera, short press to switch to / back from Playback mode.
Note: Quick setting function of FN / Up / Down / OK / F1 / F2 / F3 / F4 buttons can be changed in system menu (2.10 System - User button).
1.6. Interfaces
text_image
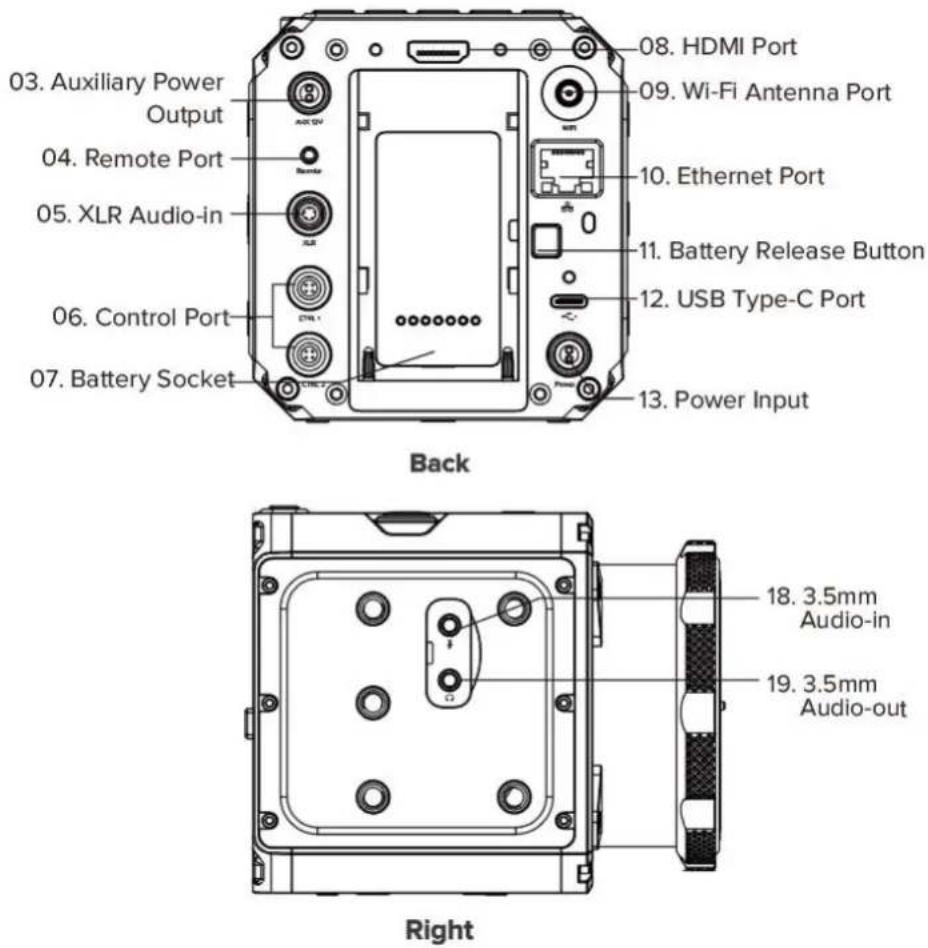
03. Auxiliary Power Output 04. Remote Port 05. XLR Audio-in 06. Control Port 07. Battery Socket Back 08. HDMI Port 09. Wi-Fi Antenna Port 10. Ethernet Port 11. Battery Release Button 12. USB Type-C Port 13. Power Input 18. 3.5mm Audio-in 19. 3.5mm Audio-out Right- Auxiliary Power Output: DC 12V (2-pin LEMO socket), can supply power to other devices.
- Remote: 2.5mm jack socket, compatible with Sony LANC protocol.
- XLR audio-in: 5-pin LEMO port for dual-channel XLR microphone, require additional XLR audio connector (compatible with ARRI Mini XLR connector).
• Control Port: 2 x serial port (4 pin aviation connector), support RS232 protocol.
• HDMI port: HDMI 2.0 Type A standard port
• Wi-Fi antenna port: Connect Wi-Fi antenna to use, 2.4GHz / 5GHz Wi-Fi antenna port, support 802.11 b/g/n standard. - Ethernet port: Gigabit Ethernet port for camera control, setting & live preview.
• USB Type C port: USB 3.0 standard. Can be connected to mobile devices for camera control, setting and live preview, and be connected to computers for data transmission.
• 3.5mm Audio-in: 3.5mm (TRS) jack socket for stereo audio input (Mic Level & Line Level supported), can connect to microphone or audio output device.
• 3.5mm Audio-out: 3.5mm (TRS) jack socket for support stereo output, can be connected to headset or earphone.
1.7. Power Options
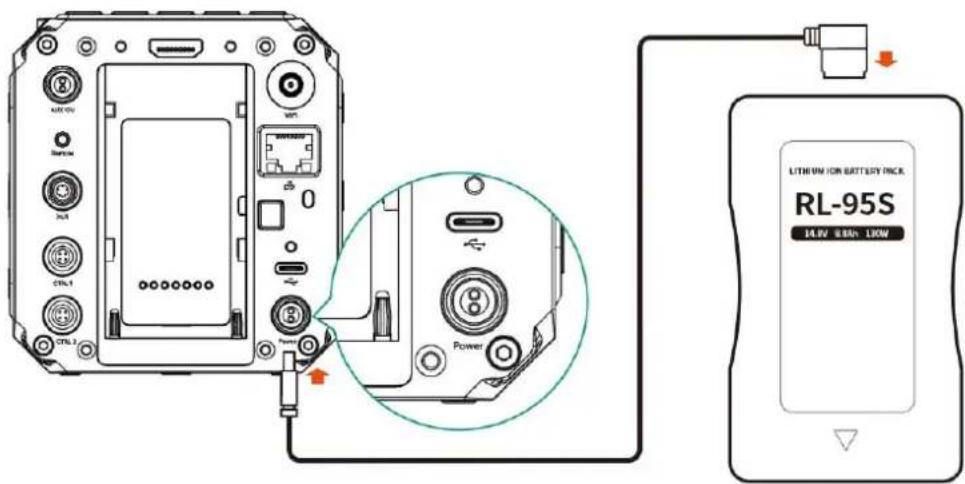
- External Power Source: The camera comes with a power cable (D-TAP plug end), D-TAP/DC connector, and can be connected to an AC/DC power adapter with 12V / 3\~5A output, and 2.1 x 5.5mm DC plug. (Power adapter not included in the package)

text_image
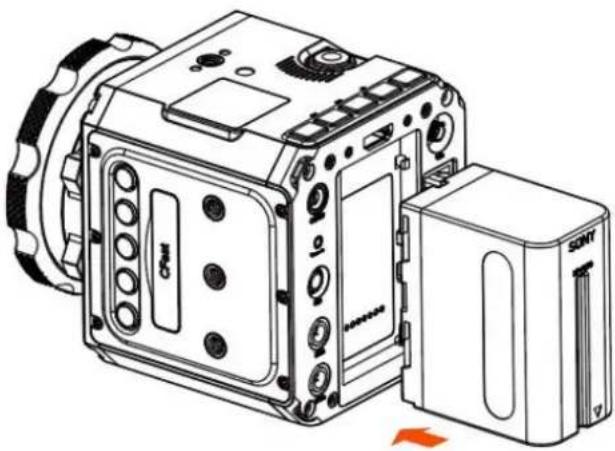
Diagram showing connections between a device rear panel, power connector, and connected to a power adapter via cable• Camera Battery: The battery socket is compatible with SONY NP-F series batteries,
including NP-F970/770/550 etc. (Battery not included in the package)
natural_image
Technical line drawing of a mechanical device with labeled components (no readable text or symbols)- V Mount Battery: Connect the camera to a V mount battery (with D-TAP port) with the power cable (D-TAP plug).
text_image
LITHIUM ION BATTERY PACK RL-95S 14.0V 9.8mA 1.0W1.8. Storage
The camera uses CFast 2.0 card or SSD as storage.
- CFast card: The camera has 1 x internal CFast card slot, which supports CFast 2.0 standard. Insert the CFast card with correct direction, push it to the end until it's locked. To take out the CFast card, push in the card and it will be unlocked, then take it out from the slot.

natural_image
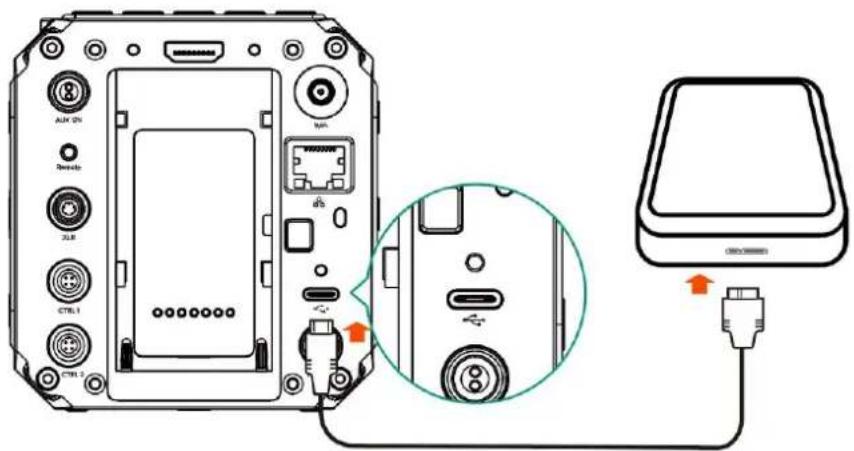
Technical line drawing of a mechanical device with mounting holes and internal components (no text or symbols)- SSD: Connect the SSD through USB-C port on back of camera as storage. (Note: USB-C port must be in "Host" mode, see 2.9 Connect - USB)
text_image
Diagram showing device rear panel connected to a CD-ROM drive, with labeled ports and connectors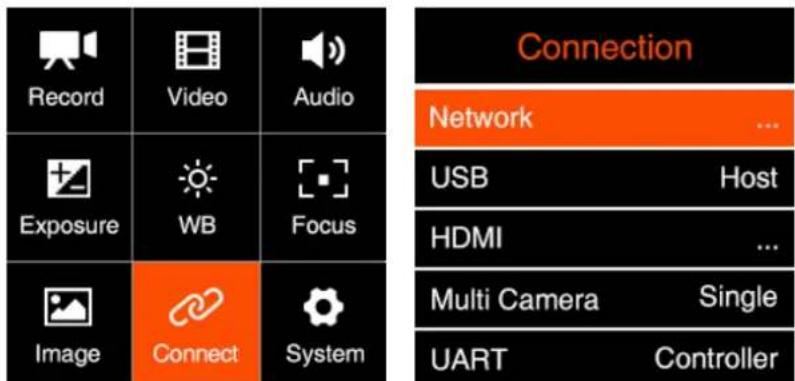
text_image
Record Video Audio Exposure WB Focus Image Connect System Connection Network ... USB Host HDMI ... Multi Camera Single UART ControllerPlease not that the SSD will NOT be recognized if there is CFast card in the camera.
Attention: When using a CFast or SSD on Z CAM E2 for the first time, please format it before recording (2.10 System – Format Card).
2. Camera Settings
2.1. Quick Setting
When the camera is in Standby or Recording mode, some key settings can be quickly accessed by pressing the buttons on the camera.
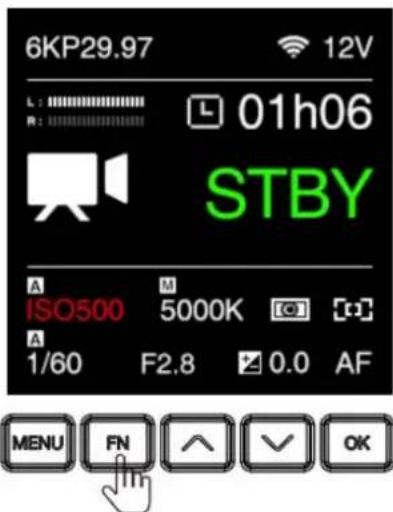
- ISO: Press FN to set ISO, then press Up / Down to adjust the value, and OK to confirm.
text_image
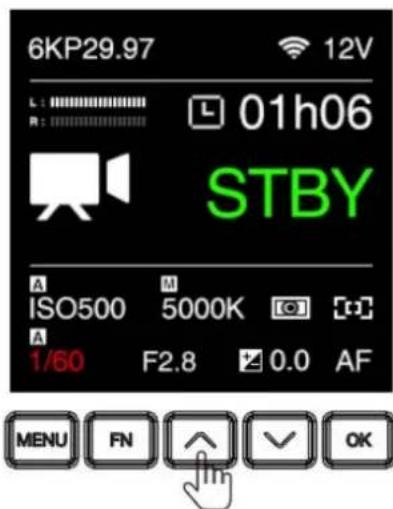
6KP29.97 12V L: 01h06 R: STBY ISO500 5000K A 1/60 F2.8 0.0 AF MENU FN ✓ OK- Shutter: Press UP to set shutter speed / angle (refer to 2.5 Exposure – Shutter Operation about shutter speed / shutter angle), then press Up / Down to adjust the value, and OK to confirm.
text_image
6KP29.97 12V L: 01h06 R: STBY A ISO500 M 5000K [C] A 1/60 F2.8 0.0 AF MENU FN ✓ OK- Aperture : Press F3 to set the aperture, then press Up / Down to adjust the value, and OK to confirm.
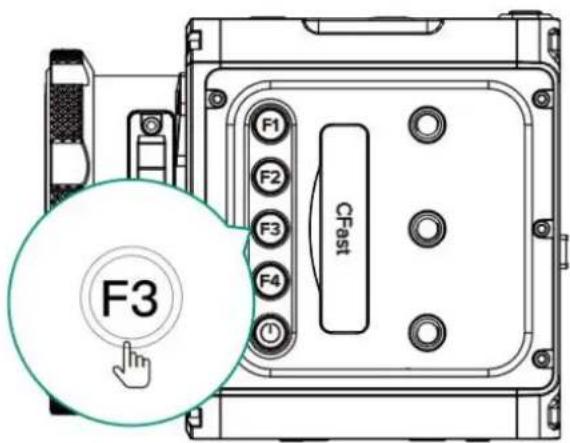
text_image
F1 F2 F3 F4 CFast F3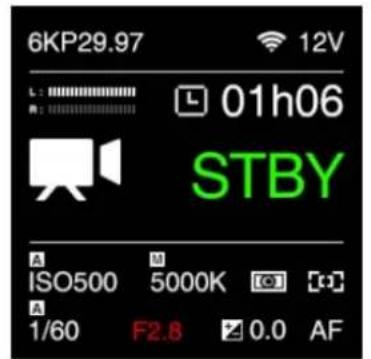
text_image
6KP29.97 12V L: 01h06 STBY A ISO500 M 5000K C A 1/60 F2.8 0.0 AF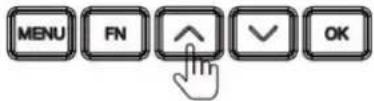
- EV: Press DOWN to set EV, then press Up / Down to adjust the value, and OK to confirm.
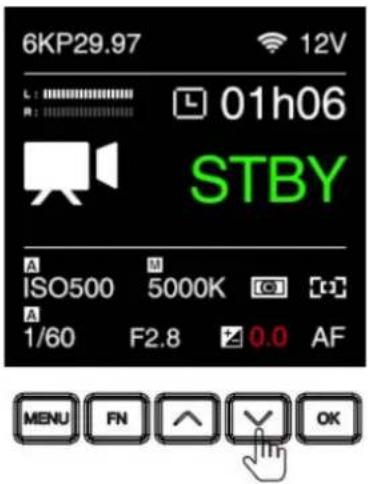
text_image
6KP29.97 12V L: 01h06 R: STBY A ISO500 M 5000K A 1/60 F2.8 0.0 AF MENU FN ↑ Y OK• AF: When the lens supports auto focus and the Focus on the camera is set to AF, press OK to trigger the auto focus function.
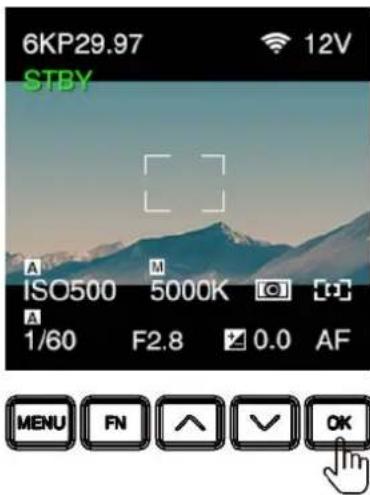
text_image
6KP29.97 STBY A M ISO500 5000K A 1/60 F2.8 0.0 AF MENU FN ↑ √ OK• AEL (F1): Press F1 to lock the exposure, then press again to unlock
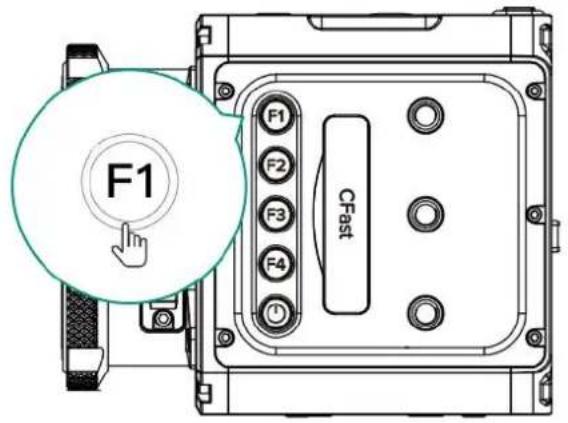
text_image
F1 F1 F2 F3 F4 CFast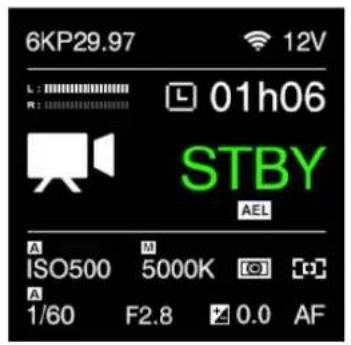
text_image
6KP29.97 L : R : 01h06 STBY AEL ISO500 M 5000K A 1/60 F2.8 0.0 AF- Load profile (F2): Load the configuration saved in the camera. (2.10 System User Profile).
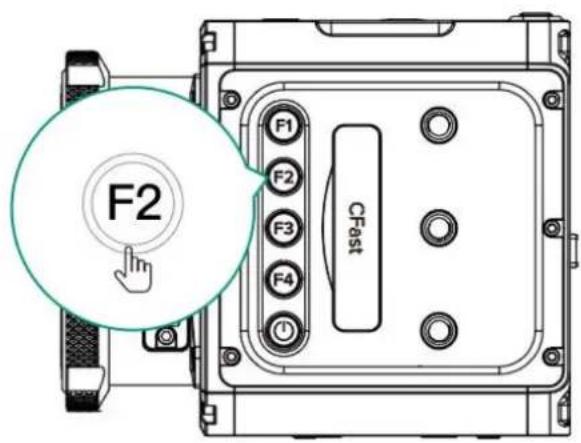
text_image
F2 F1 F2 F3 F4 CFest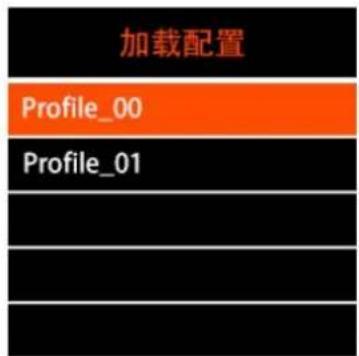
text_image
加载配置 Profile_00 Profile_01Note: Quick setting function on the buttons can be changed in system setting (2.10 System - User Button).
2.2. Record
text_image
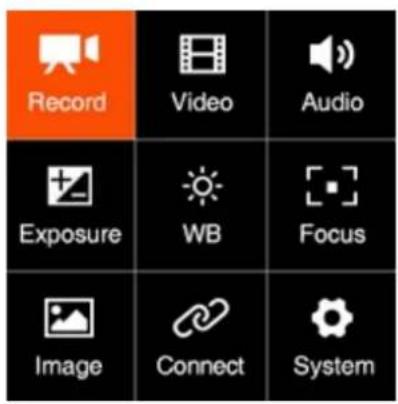
Record Video Audio Exposure WB Focus Image Connect System| Record | |
| Resolution | 4K |
| Project FPS | 29.97 |
| File Format | MOV |
| Split Duration | 5min |
| Time Code | ... |
- Resolution
- Z CAM E2-S6
| Resolution | Details |
| 6244 x 4168 | Open Gate |
| 6K UHD | 5760 x 3240 |
| 6K DCI | 6144 x 3240 |
| 6K 2.4:1 | 6144 x 2592 (2.4:1 aspect ratio) |
| 5K 4:3 | 5552 x 4164 (4:3 aspect ratio),can be used with anamorphic lens. |
| 5K 6:5 | 4992 x 4160 (6:5 aspect ratio),can be used with anamorphic lens. |
| 4K DCI (Low Noise) | 4096 x 2160, Low Noise Mode* |
| 4K DCI | 4096 x 2160 |
| 4K 2.4:1 | 4096 x 1728 (2.4:1 aspect ratio) |
| 4K UHD (Low Noise) | 3840 x 2160, Low Noise Mode* |
| 4K UHD | 3840 x 2160 |
| Super16 (16:9) | 3392 x 1908 (16:9), S16 mode, suitable for S16 cinema camera lens. |
| FHD | 1920 x 1080 |
- Z CAM E2-F6
| Resolution | Details |
| 6064 x 4040 | Open Gate |
| 6K UHD | 5760 x 3240 |
| 6K DCI | 6064 x 3196 |
| 6K 2.4:1 | 6064 x 2560 (2.4:1 aspect ratio) |
| 5K 4:3 | 5376 x 4032 (4:3 aspect ratio), can be used with anamorphic lens. |
| 5K 6:5 | 4848 x 4040 (6:5 aspect ratio), can be used with anamorphic lens. |
| 4K DCI | 4096 x 2160 |
| 4K UHD | 3840 x 2160 |
| 4K 2.4:1 | 4096 x 1728 (2.4:1 aspect ratio) |
| Super16 (16:9) | 2112 x 1188 (16:9), S16 mode, suitable for S16 cinema camera lens. |
| FHD | 1920 x 1080 |
- Z CAM E2-F8
| Resolution | Details |
| 8K 2.4:1 | 8192 x 3456 |
| 8K UHD | 7680 x 4320 |
| 6K DCI | 6144 x 3240 |
| 6K UHD | 5760 x 3240 |
| 4K UHD | 3840 x 2160 |
| Super16 (16:9) | 3392 x 1908 (16:9), S16 mode, suitable for S16 cinema camera lens. |
* With lower noise in shadow area in this mode, but the jelly effect will be more obvious. So it is suitable for static scenes shooting or less moving scene.
- Project FPS: Frame rate of the video project. It will be different for each camera when the resolution is set to different values.
Z CAM E2-S6
| Resolution | Frame Rate (fps) |
| 6244x4168 / 6K DCI / 6K UHD / 5K 4:3 / 5K 6:5 / 4K DCI (Low Noise)/ 4K UHD (Low Noise) | 23.98 / 24 / 25 / 29.97 |
| 6K 2.4:1 / 4K DCI / 4K 2.4:1 / 4K UHD / Super16 (16:9) / FHD | 23.98 / 24 / 25 / 29.97 / 50 / 59.94 |
Z CAM E2-F6
| Resolution | Frame Rate (fps) |
| 6064 x 4040 / 6K DCI / 6K UHD / 5K 4:3 / 5K 6:5 / | 23.98 / 24 / 25 / 29.97 |
| 6K 2.4:1/ 4K DCI / 4K UHD / 4K 2.4:1 / Super16 (16:9) / FHD | 23.98 / 24 / 25 / 29.97 / 50 / 59.94 |
Z CAM E2-F8
| Resolution | Frame Rate (fps) |
| 8K 2.4:1 / 8K UHD / 6K DCI / 6K UHD | 23.98 / 24 / 25 / 29.97 |
| 4K UHD / Super16 (16:9) | 23.98 / 24 / 25 / 29.97 / 50 / 59.94 |
• File format: MOV / MP4
- Split duration: 1 / 5 / 10 / 15 / 20 / 30 / 60 min. The camera will split the video with the length set here automatically.
Note: After the first section via camera automatically splitting, the out of sync problem between audio and video will happen. You need to use "Z CAM™ Video Concatenator" to merge the video section before the post editing and processing.
The download link as below:
http://www.z-cam.com/cn/software-update/
• Time Code: Set the time code, there are sub-items as below:
■ Time Code Source: Internal / External
■ Time Code Value: Reset / Manual / Current
- Reset: Reset the time code value to 0.
- Manual Input: Set the time code value manually 00:00:00:00 (hour:minute:second:frame).
- Current Time: Set time according to the camera system setting time.
■ Count Up: Rec Run / Free Run.
- Rec Run: Counts the time code only when recording video.
- Free Run: Counts the time code even when not recording video (including when the camera is power off)
■ Time Code Mode: DF / NDF.
- DF: The camera modifies the difference between recorded time and time code. Seconds and frames are separated by “.” (Example: 00:00:00.00)
- NDF: Records the time code without drop frame. Seconds and frames are separated by “:”. (Example: 00:00:00:00)
■ HDMI Display: On / Off. To enable / disable the display of time code through HDMI output.
- Playback FR: Default / VFR. When it's set to Default, the frame rate of playback will be the same as set in Project FPS, when it's set VFR, the frame rate of playback will be the same as set in Variable Frame Rate (2.3 Video – Variable Frame Rate)
For example: Set "Record"-Project FPS" to 29.97, and "Video"-Variable Frame Rate" to 120. If the "playback FR" is set to "Default", the playback frame rate of the video is 29.97fps (4-fold slow motion). If the "playback frame rate" is set to "Variable Frame Rate", the playback frame rate of the video is 120fps (normal speed).
- Meta Setup: Set the camera metadata, include "Camera ID" and "Reel Name".
■ Camera ID: A \~ Z
■ Reel Name: 001 \~ 999
- Pre Roll: On / Off. Set "Pre Roll" to "ON", there would appear one red flashing circle on the left of remaining recording time (See the below picture). To press Record button to start recording, the camera will automatically save the first 5 seconds before pressing record button.
2.3. Video
text_image
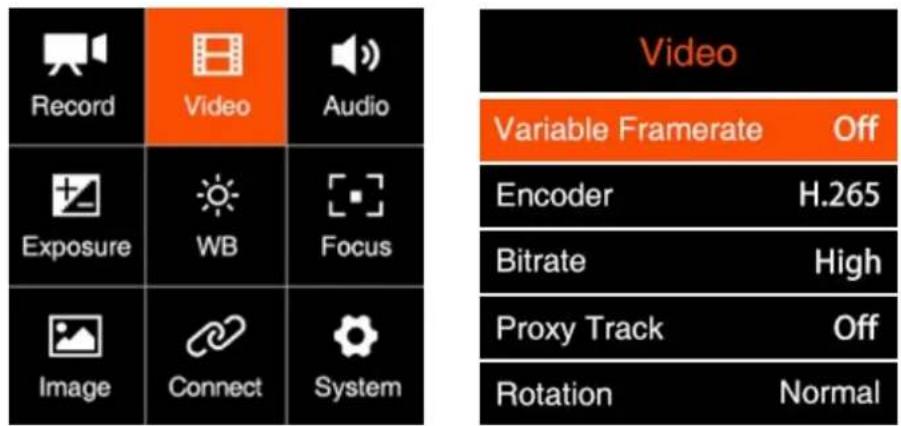
Record Video Audio Exposure WB Focus Image Connect System Video Variable Framerate Off Encoder H.265 Bitrate High Proxy Track Off Rotation Normal- Variable Frame Rate (VFR): With VFR you can set a different frame rate for capturing based on the Project FPS for recording, in this way you can get a slow-motion or fast-motion footage.
VFR options are related to the Resolution and Project FPS in Record setting. And the maximum VFR is related to the exact camera model and resolution, see below:
Z CAM E2-S6
| Resolution | Max Variable Frame Rate (fps) |
| 6244 x 4148 | 30 |
| 6K DCI | 48 |
| 6K UHD | 48 |
| 6K 2.4:1 | 60 |
| 5K 4:3 | 30 |
| 5K 6:5 | 30 |
| 4K DCI | 75 |
| 4K DCI (Low Noise) | 30 |
| 4K UHD | 75 |
| 4K UHD (Low Noise) | 30 |
| 4K 2.4:1 | 100 |
| Super16 (16:9) | 75 |
| FHD | 120 |
Z CAM E2-F6
| Resolution | Max Variable Frame Rate (fps) |
| 6064 x 4040 | 30 |
| 6K DCI | 48 |
| 6K UHD | 48 |
| 6K 2.4:1 | 60 |
| 5K 4:3 | 30 |
| 5K 6:5 | 30 |
| 4K DCI | 72 |
| 4K UHD | 72 |
| 4K 2.4:1 | 120 |
| Super16 (16:9) | 170 |
| FHD | 120 |
Z CAM E2-F8
| Resolution | Max Variable Frame Rate (fps) |
| 8K 2.4:1 | 30 |
| 8K UHD | 30 |
| 6K DCI | 30 |
| 6K UHD | 30 |
| 4K UHD | 60 |
| Super16 (16:9) | 60 |
*Each resolution to the highest variable frame rate subject to H.265 encoder standard.
• Encoder: H.264 / H.265 / ZRAW
The corresponding color bit depth and sampling of each encoding format are as follows:
| Encoder | H.264 | H.265 | ZRAW |
| Color Bit Depth | 8bit | 10bit | 12bit |
| Color Sampling | 4:2:0 | 4:2:0 | N/A |
Max frame rate @30fps for ZRAW encoder.
- Bitrate: High / Middle / Low. Value of the bitrate varies in different resolution and frame rate.
| Resolution | Frame Rate Range (fps) * | Bitrate (Mbps) | ||
| H | M | L | ||
| 8K (8K 2.4:1, 8K UHD) | FR <= 30 | 500 | 400 | 200 |
| 6K (Open Gate, 6K DCI, 6K UHD, 6K 2.4:1) | 30 < FR <= 60 | 300 | 190 | 130 |
| FR <= 30 | 250 | 160 | 100 | |
| 5K (5K 4:3, 5K 6:5) | FR <= 30 | 250 | 160 | 100 |
| 4K (4K DCI, 4K UHD, 4K 2.4:1) / Super16 (16:9) | FR >60 | 300 | 200 | 160 |
| 30 < FR <= 60 | 230 | 150 | 100 | |
| FR <= 30 | 200 | 130 | 60 | |
| FHD | FR >60 | 200 | 130 | 60 |
| 30 < FR <= 60 | 60 | 30 | 15 | |
| FR <= 30 | 30 | 20 | 10 |
* If VFR is activated, the frame rate here refers to the frame rate in VFR, otherwise it refers to the frame rate in Movie Format.
For ZRAW, the bitrate is 1.2Gbps.
- Proxy Track: On / Off. To enable or disable proxy track recording during video recording, it will automatically "On" when using ZRAW as recording encoder, which will record a second video track (H.265) into the video file.
• Rotation: Normal / Upside Down. Rotate the image by 180 degrees.
text_image
Timelapse 4 0.0 s OK Cancel• VFR Control : Coarse / Fine
- Coarse: Adjust based on the camera's preset value within the range of VFR
- Fine: VFR fine control within the range of VFR, 1 frame per step.
2.4. Audio
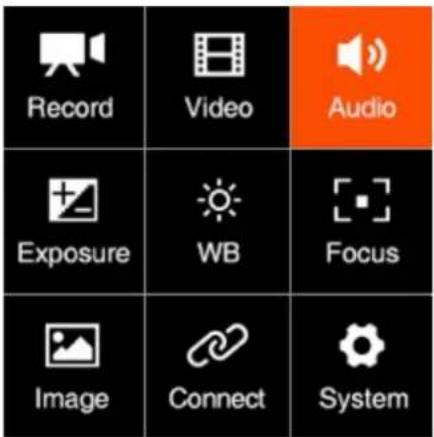
text_image
Record Video Audio Exposure WB Focus Image Connect System| Audio | |
| Encoder | AAC |
| Input | XLR |
| Input Level | Mic Level |
| Input Gain | 0dB |
| Output Gain | 0dB |
• Encoder: None / AAC / PCM
• Input: Off / Microphone / XLR / Mic Left + XLR Right / Mic Right + XLR Left
■ Off: Turn off all audio input.
■ Microphone: The camera will use built-in microphone as audio input if there is no external microphone plugged into the 3.5mm audio-in port, and will use the external microphone if there is one plugged into the 3.5mm audio-in port.
■ XLR: Take XLR port as audio-in
■ Mic Left + XLR Right: Take 3.5mm audio-in(microphone) left channel, and XLR port right channel to merge for audio-in
■ Mic Right + XLR Left: Take 3.5mm audio-in(microphone) right channel, and XLR port left channel to merge for audio-in
• Input Level: Mic Level / Line Level
• Input Gain: -18 \~ 6 dB, can be set manually.
• Output Gain: -6 \~ 6 dB, can be set manually.
- Phantom Power: Enable / Disable. Available when "Input" is set to "XLR", "Mic Left + XLR Right" and "Mic Right + XLR Left" to enable or disable the phantom power of the XLR port.
• Audio Level Display: Disable / Enable, enabling this setting displays the audio level on the standby screen.
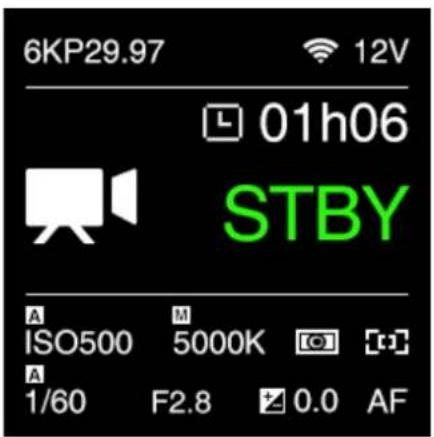
text_image
6KP29.97 12V 01h06 STBY A ISO500 M 5000K C A 1/60 F2.8 0.0 AF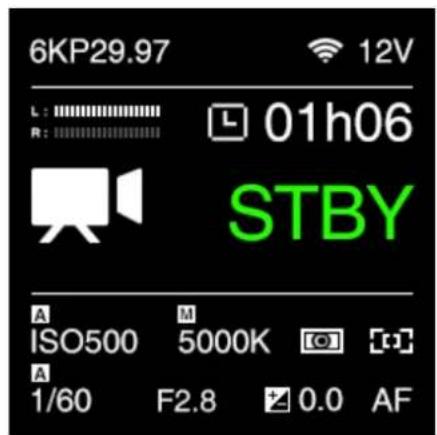
text_image
6KP29.97 L : R : 01h06 STBY A ISO500 M 5000K A 1/60 F2.8 0.0 AF2.5. Exposure
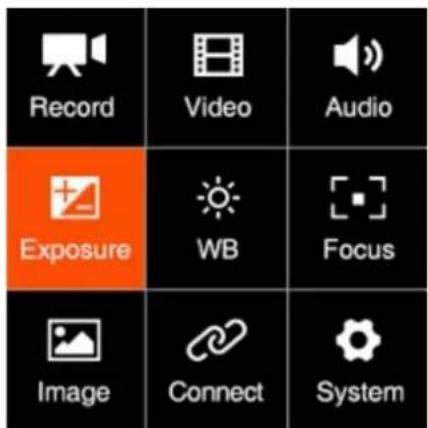
text_image
Record Video Audio Exposure WB Focus Image Connect System| Exposure | |
| Flicker Reduction | 50Hz |
| EV | 0 |
| Shutter Angle | Auto |
| Aperture | F2.8 |
| ISO | 500 |
- Flicker Reduction: 60Hz / 50Hz. It's set to eliminate light flicking caused by the frequency of the electricity, which is 60Hz in North America and some parts of Asia. (South Korea, Philippines, Taiwan of China), And 50Hz for China mainland, other countries and regions.
• EV: -3.0 \~ 3.0 - Shutter Speed / Shutter Angle: This setting depends on whether "Shutter Speed" or "Shutter Angle" is selected in 2.5 Exposure - Shutter Operation
Shutter Speed: Auto / Manual (1\~1/8000") *
Shutter Angle: Auto / Manual (1° \~ 360° )
* The minimum shutter speed "1" is available only when "variable frame rate "is set to "1".
- Aperture: It shows the range of aperture of the lens, and can be adjusted manually if it's an electrical lens. Only for lenses with electronic contacts. If the lens used is a purely mechanical without electronic contacts, the aperture value is not shown here.
- ISO: ISO optional values depend on the setting in ISO control. The native ISO value varies from different models.
| ISO Control | ISO |
| Fine | 400 ~ 125000 |
| Dual Native ISO | Z CAM E2-F6: 400 / 2500Z CAM E2-S6 & E2-F8: 400 / 1250 |
• eND: (to be added later).
• Minimum ISO: This setting will only be enabled when ISO is set to "Auto".
• Max ISO: This setting will only be enabled when ISO is set to "Auto".
- Max Shutter Speed / Max Shutter Angle: This setting will be activated if Shutter Speed / Shutter Angle is in Auto mode.
Max Shutter Speed: Auto / Manual (1" \~ 1/1600") *
Max Shutter Angle: Auto / Manual (1° \~ 360° )
* Minimum shutter speed "1" is optional only when variable frame rate is set to "1".
- Metering Mode: Center / Average / Spot, it sets the metering mode of exposure.
• Shutter Operation: Speed / Angle
• ISO Control: Fine / Native ISO
Fine: ISO can be set in detail value within ISO range (according to standard ISO definition)
Native ISO: only native ISO can be selected.
• AE Speed: Slow / Normal / Fast
- Lock In Record: Off / On. Enable this function, it will automatically lock the exposure during recording.
2.6. White Balance
text_image
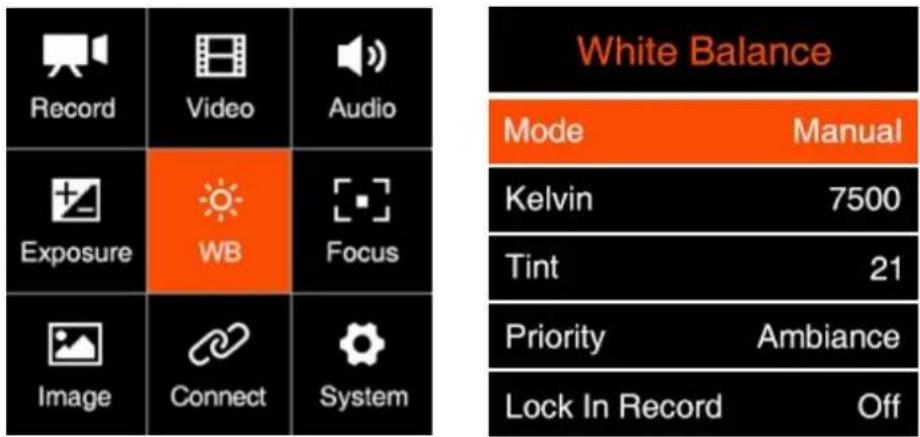
Record Video Audio Exposure WB Focus Image Connect System White Balance Mode Manual Kelvin 7500 Tint 21 Priority Ambiance Lock In Record Off• Mode: Auto / Incandescent / Cloudy / D10000 / Fluorescent / Daylight / Shade / Manual
- Kelvin: When White Balance is set to "Auto" or "Preset Value", it shows the current color temperature, when White Balance is set to "Manual", it can be adjusted manually (2300 K \~ 7500 K)
• Tint: -100 \~ 100, default is 0.
• Priority: Ambiance / White
- Ambiance: To increase the intensity of the image's warm color cast when shooting a tungsten-light scene.
- White: To reduce the intensity of the image's warm color cast when shooting a tungsten-light scene.
- Lock In Record: Off / On. Enable this function, it will automatically lock the white balance during recording.
2.7. Focus
text_image
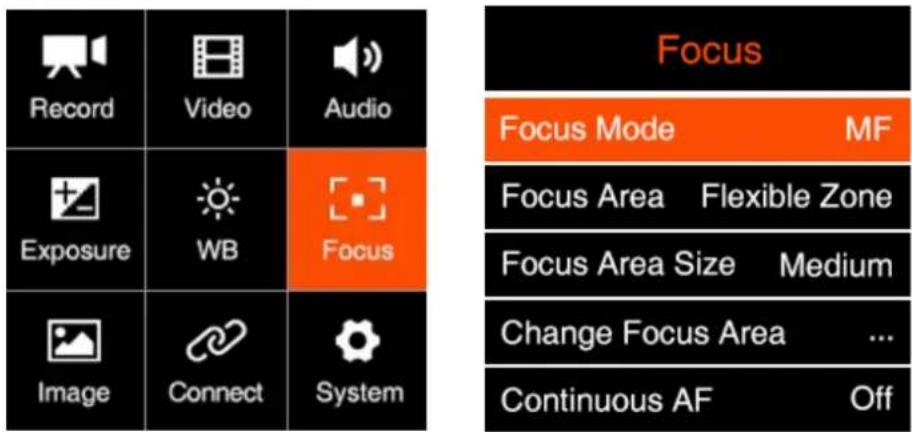
Record Video Audio Exposure WB Focus Image Connect System Focus Focus Mode MF Focus Area Flexible Zone Focus Area Size Medium Change Focus Area ... Continuous AF Off• Focus Mode: MF (Manual Focus) / AF (Auto Focus)
- Focus Area: Flexible Zone / Human Track. This will only be enabled when Focus Mode is set to "Auto Focus".
- Flexible Zone: Can move focus area via Up / Down button
- Human Track: The camera can detect whether there is a human body in the picture. If yes, the focus area will keep tracking the human body automatically.
- Focus Area size: Small / Medium / Large. This will only be enabled when Focus Mode is set to "AF" and Focus Area is set to "Flexible Zone".
- Change Focus Area: Move the focus area via Up / Down button. This will only be enabled when Focus Mode is set to "AF" and Focus Area is set to "Flexible Zone".
- Continuous AF (CAF): On / Off. This will only be enabled when Focus Mode is set to "Auto Focus". When CAF is activated, the camera will continuously adjust the focus as to follow the target object when it is moving.
Live CAF: On / Off. This will only be enabled when CAF is set to "On". Active continuous focus in real time according to the scene.
• CAF Sensitivity: High / Medium / Low. This will only be enabled when CAF is activated.
- MF Assist
■ Preview: On / Off
■ Recording: On / Off
This will only be enabled when Focus Mode is set to MF. When it is set to On, the image in the focus mode will enlarged to 2 x size on the screen(both LCD display and HDMI output) when the focus is being adjusted manually. And it be set for Preview and Recording separately.
2.8. Image
text_image
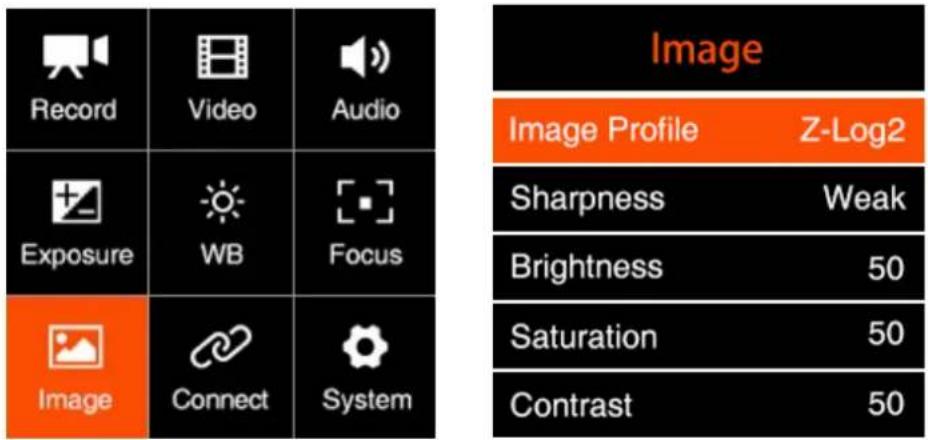
Record Video Audio Image Image Profile Z-Log2 Sharpness Weak Brightness 50 Saturation 50 Contrast 50• Image Profile: Rec.709 / Z-Log2 / Flat / HLG
- Rec.709: It is Rec.709 like color space, which is usually used for directly output
- Z-Log2: It is the log developed by Z CAM, with 13 stops of dynamic range and reserve more detain in highlight area, good enough for post processing.
- FLAT: It is 709 like curve with color information, and lower the contrast for easy post processing.
- HLG (Hybrid Log-Gamma): Encode the high-light and low-light parts of the HDR signal in two different ways in which the low-light part use the standard gamma curve and the high-light part use the logarithmic curve.
• Sharpness: Strong / Medium / Week, default Medium.
- Brightness: 0\~100, default is 50.
• Saturation: 0\~100, default is 50.
• Contrast: 0\~100, default 50.
- Luminance Level: Full / Limited. The range of luminance level is 0\~255 when it's set to Full, and 16\~235 when it's set to Limited.
2.9. Connect
text_image
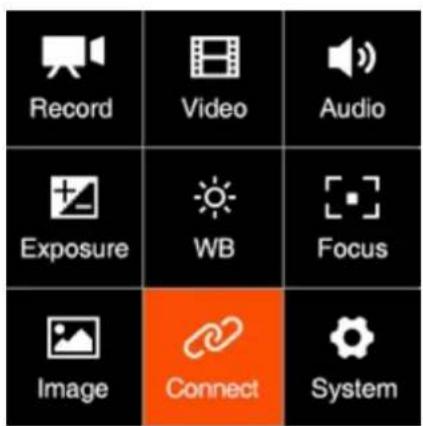
Record Video Audio Exposure WB Focus Image Connect System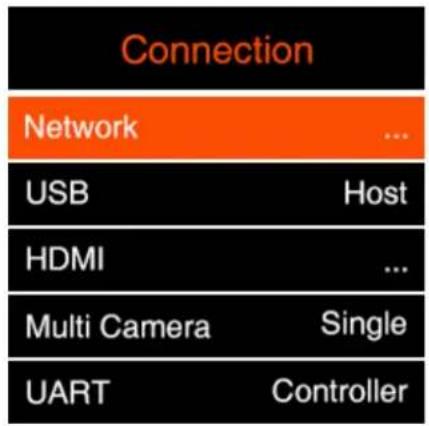
text_image
Connection Network ... USB Host HDMI ... Multi Camera Single UART Controller• Network: there are sub-items as below:
■ Wi-Fi: Off / On. When the Wi-Fi is activated, here will show the Wi-Fi ID, which is ZCAM-E2-XX-XXXX (last four digits which match to the camera ID), and the default password is: 12345678, which can only be changed with iOS app (6. Using Z Camera App)
■ Wi-Fi IP: Here will show IP address of the Wi-Fi when it's is activated.
■ ETH. Mode (Ethernet Mode): Direct / Router / Static
- Router: Camera is connected to the computer through a router, IP address will be assigned by the router.
- Direct: Camera is connected to the computer directly through Ethernet cable, camera will generate the IP address. The default is: 10.98.32.1
- Static: to set the IP address with configuration file. (Please contact Z CAM's technical support if you want to set this)
■ ETH. IP: IP address of the Ethernet when it's connected.
• USB: Host / Mass Storage / Network / Serial
■ Host: The camera will act as a host device which can transfer data to external storage (SSD e.g.) or communicate with external device like smart phone or tablet etc. with Z Camera app (6. Using Z Camera App).
■ Mass Storage: The camera will be recognized as a storage when it is connected to a computer (PC / Mac), and the file on the CFast card inside the camera can be accessed.
■ Network: The camera will act as a RNDIS device. The camera will be recognized as a RNDIS device when it is connected to a
computer (PC / Mac) or external device. Computer or external device can access or control the camera using the HTTP API. (for HTTP API information, contact Z CAM technical support)
Serial: The camera will be controlled by UART command from a computer through USB port.
• HDMI: Display Info. / OSD Layout / Resolution / Use EDID
■ Display Info: On / Off. Turn on / off camera status on HDMI monitor.
■ OSD Layout: Type 1 / Type 2
Type 1: Assist tool as waveform etc. display on the video directly.
Type 2: Add the black frame area to display assist tool.
■ Resolution: Auto / Manual (options supported by the HDMI display).
Auto: The camera will select the most suitable format (resolution & frame rate) from the HDMI monitor.
Manual: Here will list the formats supported by the HDMI monitor for the user to select manually.
■ Use EDID: Disable / Enable. This setting determines whether the camera automatically reads the EDID information of the HDMI connected monitor.
• UART Role: Controller / Pelco D / Multiplexer / Linear TC.
- UART Role2: Controller / Pelco D / Multiplexer / Linear TC, can set separately:
- Controller: The camera will be controlled by UART command from a computer through COM port.
- Pelco D: The camera will control the external device like a gimbal through COM port with Pelco D protocol.
- Multiplexer: Need 3 ^rd -party device to support.
- Linear TC: to be supported with extra accessories later.
2.10. System
text_image
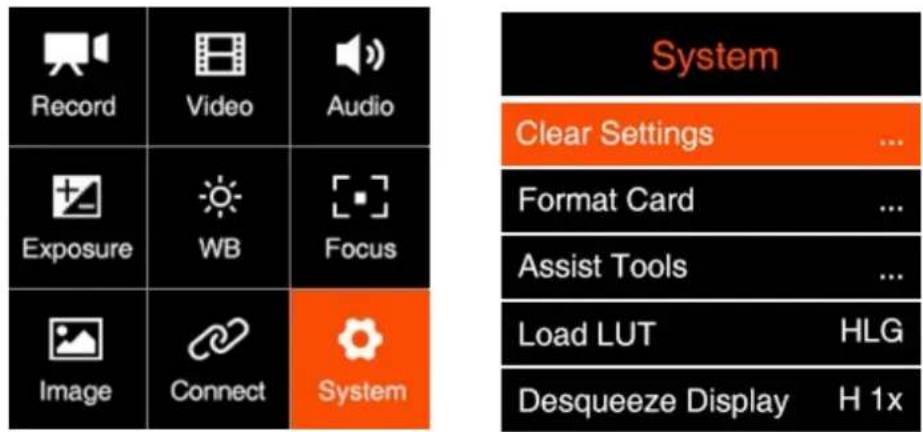
Record Video Audio Exposure WB Focus Image Connect System System Clear Settings ... Format Card ... Assist Tools ... Load LUT HLG Desqueeze Display H 1x• Clear Settings: Clear all the Settings in the camera and set them to default values.
- Format Card: Format the CFast card or the external SSD connected through USB Type C port (if there is no CFast card in the camera). Please note that formatting will erase ALL DATA in the storage!
- Assist Tools: There is three sub-items in this setting: Display / Scope / Peak / Exposure / Frame Line / Center Mark / Grid Line / Safe Area
■ Display: On / Off. To enable or disable the assist tool on the display. Please note that when the assist tool is enabled, the effect will be output through HDMI together with the video stream. So you would need to turn it off if you are using external recorder though HDMI connection.
■ Scope: Tool / Opacity / Measure
-Tool: Disable / Waveform / Parade / Vectorscope / Histogram, HDMI output monitor view
-Opacity: 10\~100, adjust the tool's transparency on the display
-Measure: Without LUT / With LUT, if it's set to "With LUT", then the scope tool will measure on the video with LUT, otherwise it will measure the video without LUT.
■ Peak: Enable / Color / Monochrome / Threshold
- Enable: Off / On, to enable / disable the Peak tool and set the color of peaking focus.
-
Color: Red, Green, Blue, Orange and White, choose the color of peaking focus display.
-
Monochrome: Off / On, enable “Monochrome”, the screen becomes black and white, the peak color setting to remain.
- Threshold: 10\~100, the high threshold means the extraneous edges on the back wall are not quite in focus.
■ Exposure: Tool / Zebra1 Setting / Zebra2 Setting
- Tool: Disable / False Color / Zebra / Monochrome
Select the appropriate exposure assist tool or turn it off. The False Color/Waveform / Vectorscope are only displayed on the HDMI output screen.
- Zebra1 setting: 55\~100, it can only be set when the tool is selected as "zebra".
- Zebra2 setting: 0\~50, it can only be set when the tool is selected as "zebra".
■ Frame line: Ratio / Color
- Ratio: None / 2.4:1 / 2.35:1 / 1.9:1 / 1.85:1 / 4:3 Frame line can be displayed on the HDMI output screen according to the selected ratio.
- Color: Red, Green, Blue, Orange and White, can choose the color of frame line.
■ Center Mark: Enable / Color
- Enable: On / Off, when setting "Enable", there display cross mark on the center of HDMI output screen.
- Color: Red, Green, Blue, Orange and White, can choose the color of center mark.
■ Grid Line: On / Off, to turn on / off the grid line on HDMI output.
■ Safe Area: On / Off, to turn on / off the safe area frame line on HDMI output.
- Load LUT: None / Rec709 / V709 / LC709A / zRGB_AR / zRGB_AX2 / sRGB / sCINE_709 / Rec2020 / HLG / P3D60 / P3D65 / P3DCI / F709 / Import
Note:
- To import external LUT, the LUT file must be saved to MISC/looks/preview/ of the storage (CFast card or external SSD).
- The LUT file must be x33 cube format.
- File name of the LUT can not exceed 16 letters and with no space.
-
LUT is available in playback mode
-
Desqueeze Display: H 1x / H 1.33x / H 1.5x / H 1.8x / H 2x / V 1x / V 1.33x / V 1.5x / V 1.8x / V 2x.. When the camera is using an anamorphic lens, it's to set the desqueeze ratio as to horizontally or vertically resize the image correctly.
• User Profile: Save Profile / Load Profile / Save To Card / Load From Card
■ Save Profile: Export current camera settings to a file and save it in the memory of the camera.
- Load Profile: Select the saved configuration in the camera, import and apply it to the camera settings.
■ Save To Card: Export the current camera settings as a configuration file and save in storage of the camera (save in /MISC/profile/ directory, with file name suffix.prf)
- Load From Card: Import the configuration file from the storage, and apply it to the camera settings.
Note: Configuration files saved on a memory card can be renamed, but only in English letters.
- User Button: Users can set the function for the keys (including FN /F1 / F2 / F3 / F4 / POWER / UP / DOWN / OK) on the camera except MENU. It can be defined as shortcut setting functions., which includes as below:
Playback (for power button only) / AE Lock / AF Lock / White Balance Lock / Aperture / ISO / Peak / Exposure Tool / Scope Tool / White Balance / HDMI OSD / Shutter / Exposure Value / AF / Magnifier / Focus Area / None
Note: the custom function of the power button is short press trigger, long press the power button is still on/off function.
• Record Indicator: On / Off. Set both front LED light and back LED light on / off
- Restore Lens Pos.: Disable / Enable.
When it's set to "Enable", the camera will remember the latest focusing position of the lens when the camera is shut down and restore it when it's powered on again (with the same lens only).
• LCD Brightness: 10 \~ 100, default 50.
• Power: Auto Power Off / Auto Standby / Low Alarm / Power Output
■ Auto Power OFF: Off / 30s / 1min / 2mins / 4mins / 8mins / 15mins
■ Auto Standby: Off / 1min / 5mins / 15mins
■ Low Alarm: NP-F series battery / V Mount battery, Low alarm voltage value for
camera can be set for the different batteries.
- NP-F series battery: 6.6V \~ 7.0V, Default as 6.8V
- V Mount Battery: 13.1V \~ 13.5V, Default as 13.5V
■ Power Output: auxiliary power output, DC 12V (2-pin LEMO socket), can supply power to other devices.
- Language: 简体中文 / English
• Date / Time: Set the date and time of the camera.
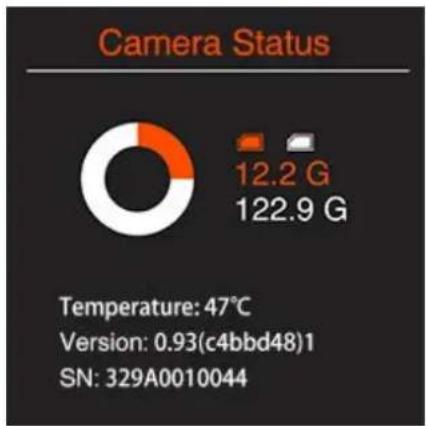
• Time Zone: Set the time zone of the camera. - Camera Status: Displays the current status of the camera, including storage capacity (used and remaining space), temperature (inside the camera), firmware version and camera ID etc.
pie
Camera Status | Category | Value | |---|---| | Camera Status | 12.2 G | | Camera Status | 122.9 G | | Temperature: 47°C Version: 0.93(c4bbd48)1 SN: 329A0010044- Version: Firmware version of the camera. If there is other version of firmware (newer or older) on root of storage (CFast card or external SSD), press OK when Version is selected and there will pop up a message to update the firmware.
3. Video Recording
3.1. Start / Stop Recording
While camera is in Standby mode with CFast card inserted or SSD connected (and the storage is not full), press Record button to start recording, and press Record button again to stop recording.
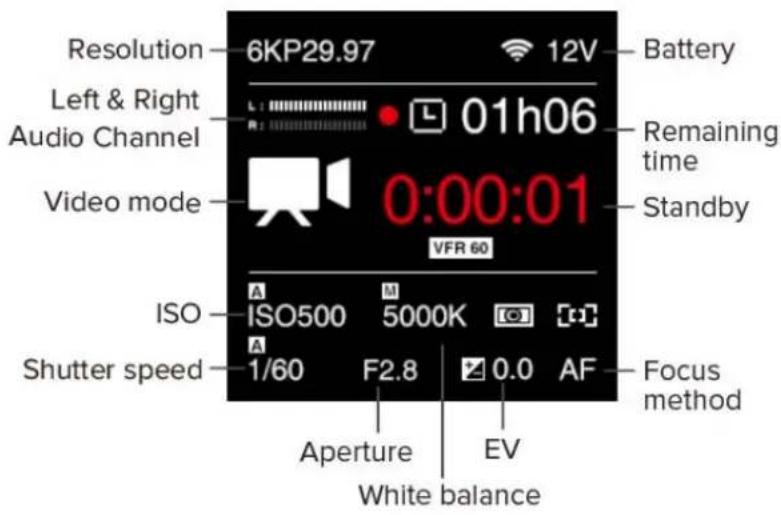
The recording time and remaining time for recording (depends on the capacity of the storage) would appear on the LCD display.
text_image
Resolution 6KP29.97 12V Battery Left & Right Audio Channel 01h06 Remaining time Video mode 0:00:01 Standby VFR 60 ISO ISO500 M 5000K Shutter speed 1/60 F2.8 AF Focus method Aperture EV White balance3.2. Variable Frame Rate (VFR) Video Recording
VFR will enable you to record a footage with higher / lower frame rate in capturing than in playback, which is usually called slow motion / fast motion effect.
Fox example, to use Z CAM E2-F6 record a 4K 2.4:1 @120fps footage with playback frame rate in 4K 2.4:1 @29.97fps for example, you would need to follow the steps as below:
1) In Record setting, set Resolution to "4K 2.4:1", Project FPS to "29.97" and make sure Playback FR is set to "Default".
2) In Video setting, set Variable Frame Rate (VFR) to "120".
3) Go back to the standby status, an "VFR 120" icon would show up on LCD display, which means the camera is working with VFR in 120fps.
Note: Different resolution and frame rate settings correspond to different variable frame rate range. Refer to 2.2 Record and 2.3 Video.
3.3. Timelapse Video Recording
With Timelapse function, the camera can record time-lapse video with steps are as follows:
1) Set Video - Variable Framerate to "off", otherwise it is not able to enable Timelapse setting.
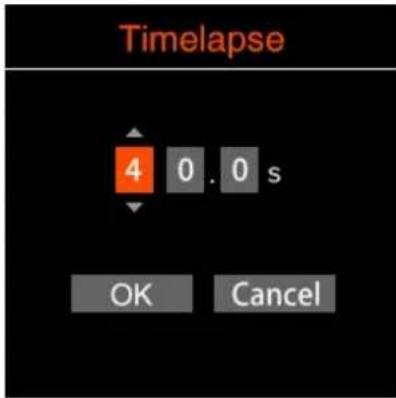
2) In Video - Timelapse setting, set the Timelapse interval value (the interval is the time between each frame shot) through the FN key (skip to the next setting item), and UP/DOWN button, then select "OK" to confirm it.
The minimum unit of interval time is milliseconds (0.1s), and the range can be set as
0.2s \~ 60s.
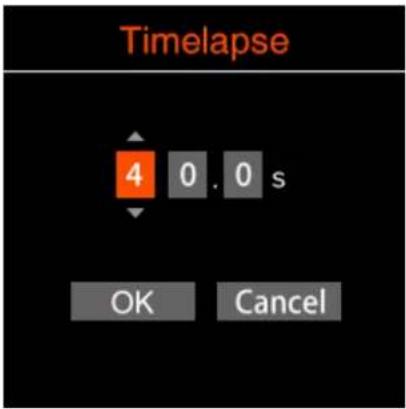
text_image
Timelapse 4 0.0 s OK Cancel3) After the timelapse interval is confirmed, the value will show in the item Timelapse, and the camera icon will change to timelpase recording mode on the standby screen.
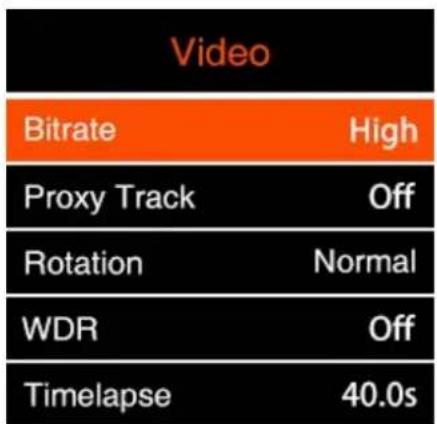
text_image
Video Bitrate High Proxy Track Off Rotation Normal WDR Off Timelapse 40.0s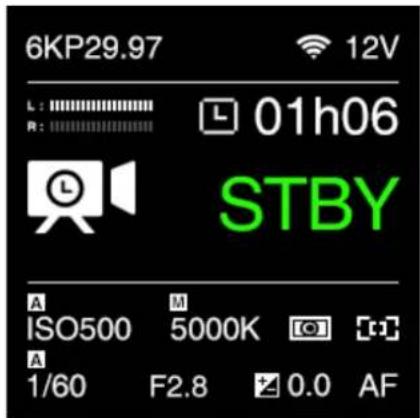
text_image
6KP29.97 12V L : 01h06 R : STBY A M ISO500 5000K A 1/60 F2.8 0.0 AF4) Set other required video parameters, except the Variable Framerate can not be opened, the rest is the same as normal recording video.
5) Press Record button and the camera will start recording. Note that he recording time shown on the screen is the time-length of the video file that is being recorded, but not the time used for recording.
The formula to calculable the time required for recording and the time-length of the video file is:
Recording time = Timelapse interval time x frame rate x time-length of video file
For example, if the timelapse interval is set to 0.5s and the recording frame rate is 25fps, then as to record 1 minute of timelapse video, the time required for recording will be 0.5 × 25 × 1 = 12.5 minutes.
4. Video Playback & File Management
4.1. Video Playback
While camera is in Standby mode, short press Power button to enter into Playback mode, on the LCD display there would list the file folders on the storage( CFast card or external SSD).
Come into the folder then will show the thumbnail, video serial No. and the total number of the latest video in the folder. Press Up / Down button to browse the footages inside the folder.
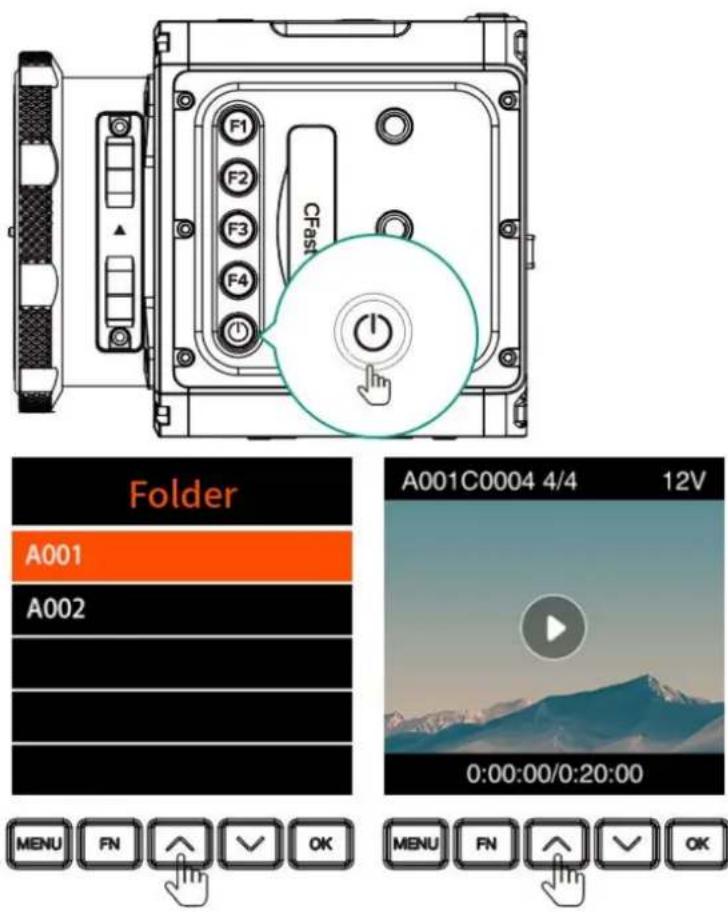
text_image
CFast Folder A001 A002 A001C0004 4/4 12V 0:00:00/0:20:00 MENU FN ↑ OK MENU FN ↑ OKPress OK button to play the selected footage. When the footage is being played, press the Up / Down button to speed up / slow down (2x faster / slower).
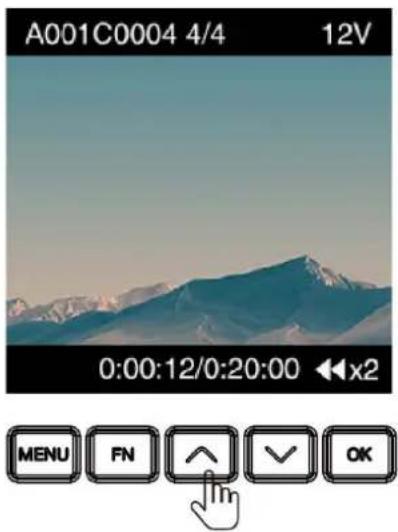
text_image
A001C0004 4/4 12V 0:00:12/0:20:00 x2 MENU FN ↑ OK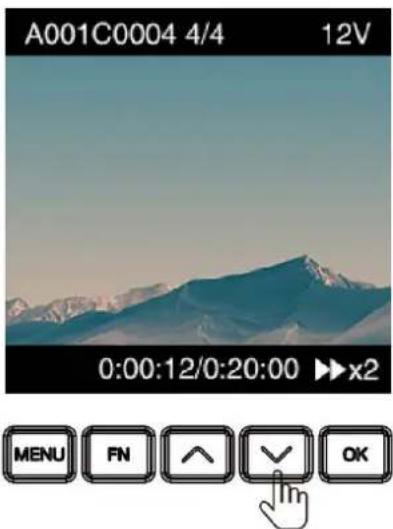
text_image
A001C0004 4/4 12V 0:00:12/0:20:00 ▶x2 MENU FN ↑ OKPress OK button to pause, and press MENU button to stop it.
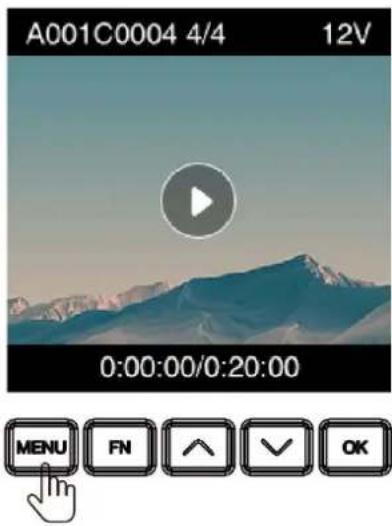
text_image
A001C0004 4/4 12V 0:00:00/0:20:00 MENU FN ↑ ✓ OK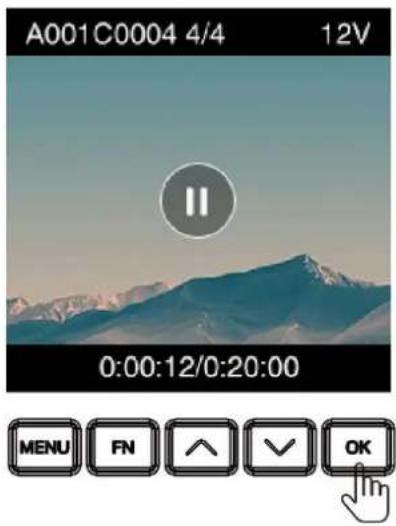
text_image
A001 C0004 4/4 12V II 0:00:12/0:20:00 MENU FN ↑ ✓ OKPlease note if there is no storage in the camera, or there is storage in the camera but no video footage in the storage (or other files not supported), there will be alert message on the screen.
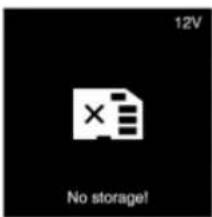
text_image
12V No storage!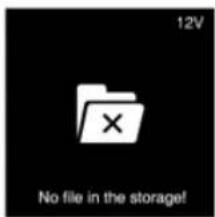
text_image
12V No file in the storage!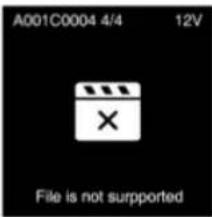
text_image
A001C0004 4/4 12V File is not supportedNote: LUT is supported in playback
4.2. Delete Video
Under Playback mode, long press FN button when the video is not playing, there will be a pop-up confirmation message "Delete the file?", select "Confirm" and then press OK to delete the file.
Note: The deleted file is not restorable, please double check before this action.
4.3. Download Video
Besides taking out the CFast card to get the footages recorded, you can also get the footages from the camera (with CFast card inside) to a computer through a USB Type C cable:
- Power on the camera.
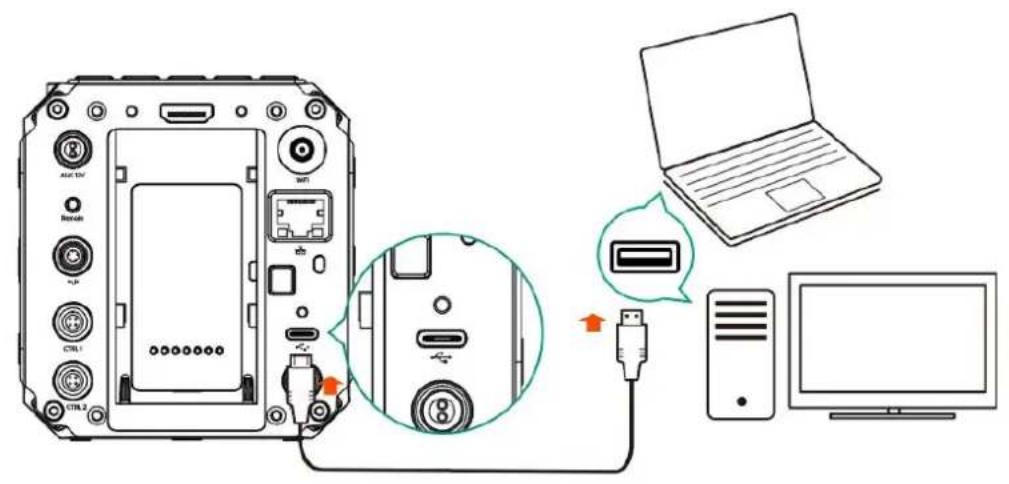
text_image
Diagram showing device connection to laptop via USB port, with labeled ports and cable connections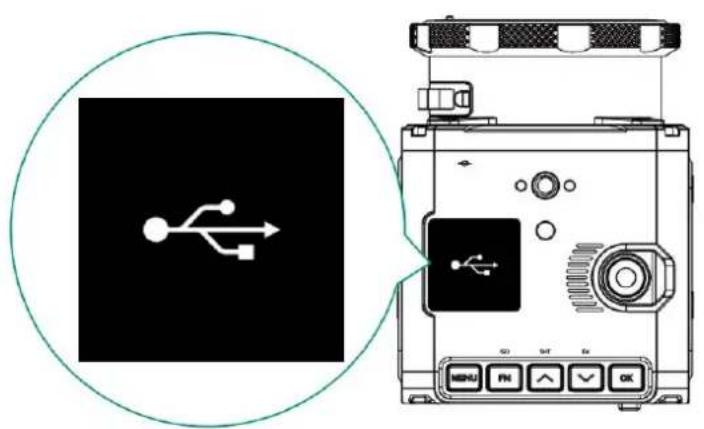
text_image
Diagram showing a USB switch icon and a camera module with control buttons labeled G, H, S, D, OK.- PC will detect the camera and shows it as external storage device. You can access & manage the files in the CFast card inside the camera.
5. Connect to the Camera
5.1. Wi-Fi Connection
You can connect the camera to an external device (smart phone / tablet) or a computer (PC / Mac) through Wi-Fi with following steps:
- Install a Wi-Fi antenna to the Wi-Fi Antenna Port of the camera.
- In Connect – Network setting menu, set the Wi-Fi to "On", go back to Network setting, there will show the Wi-Fi ID: ZCAM-E2-XX-XXXX (last 4 digits match to camera ID) on the Wi-Fi item.
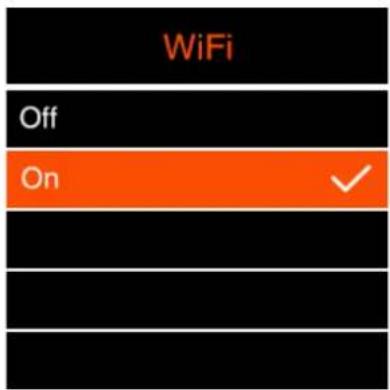
text_image
WiFi Off On ✓| Network | |
| Wi-Fi ZCAM-E2-F6-0044 | |
| Wi-Fi IP | 10.98.33.1 |
| ETH.Mode | Direct |
| ETH.IP | 192.168.1.101 |
- Press MENU to go back to Standby screen, there will be a Wi-Fi icon on top of the screen.
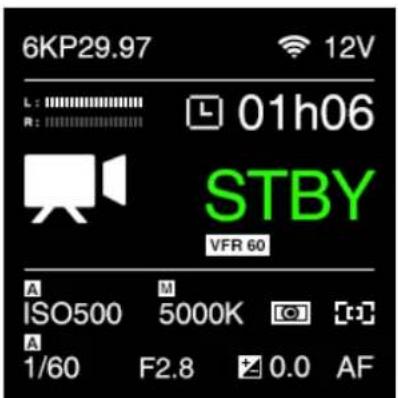
text_image
6KP29.97 L: 01h06 R: STBY VFR 60 A M ISO500 5000K A 1/60 F2.8 0.0 AF- Connect to the camera from the iOS device or a computer with that Wi-Fi ID, and the default password of the Wi-Fi is 12345678. (not changeable for now)
5.2. Ethernet Connection
There are 2 options to connect the camera to a computer through Ethernet: Direct Connection or Connection through a Router:
Direct connection
Follow the steps below to set up direct Ethernet connection between the camera and the computer:
- Set the Network-ETH. Mode to "Direct" in Connect-Network setting (default).
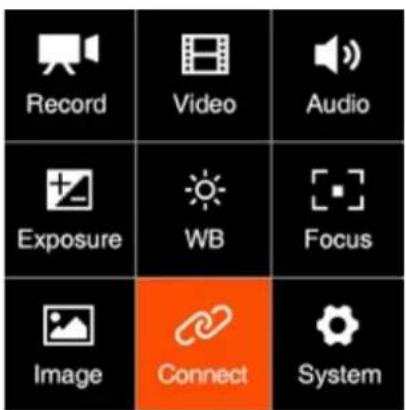
text_image
Record Video Audio Exposure WB Focus Image Connect System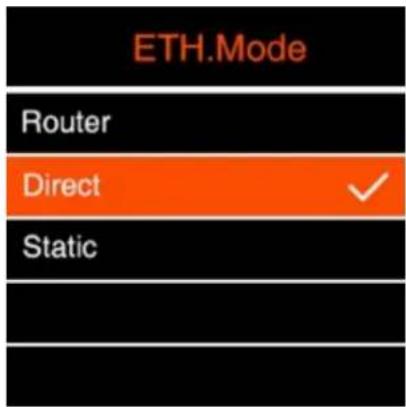
text_image
ETH.Mode Router Direct ✓ Static- Connect the camera to a computer with an Ethernet cable.
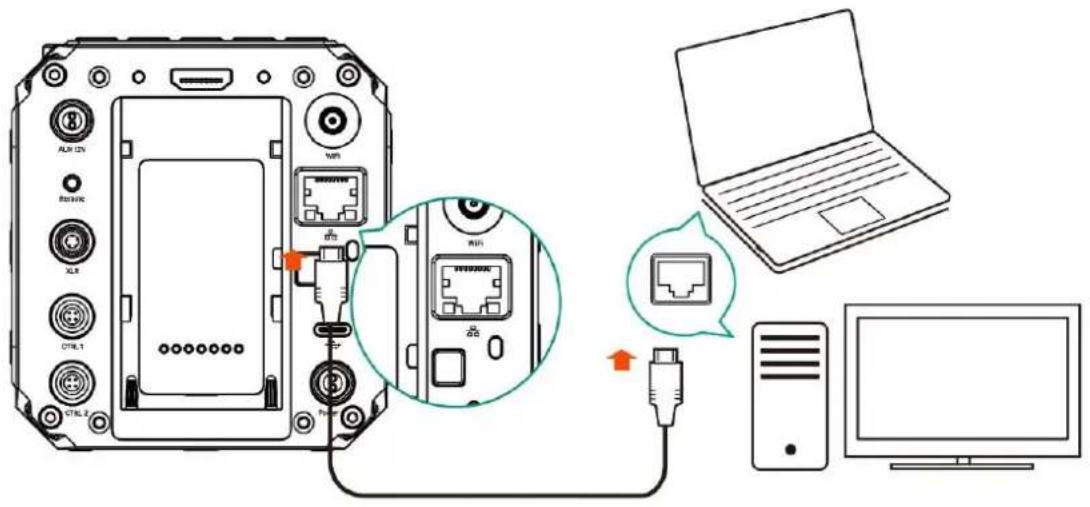
text_image
Diagram showing network connection between a device, router, laptop, and monitor with labeled ports and connections- Open a browser on the PC / Mac, type in the address:
http://10.98.32.1/www/index.html. You will see the page below if it's connected successfully.
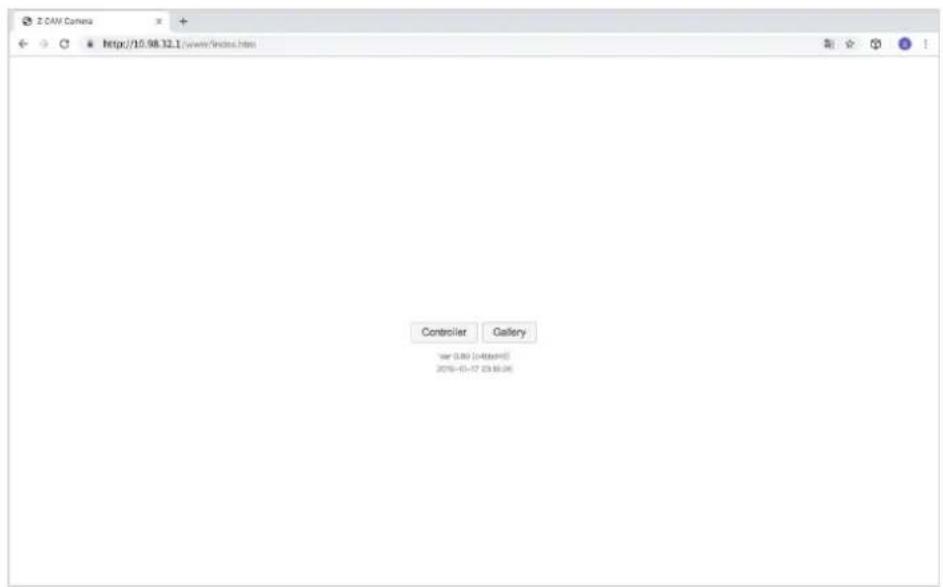
text_image
Z CAN Camera http://15.98.32.1/www/index.html Controller Gallery user 0.89 (0-4) (0-6) 2016-01-17 23:16:26Connection through a Router
You can set up an Ethernet connection between the camera and a computer through a router with following steps:
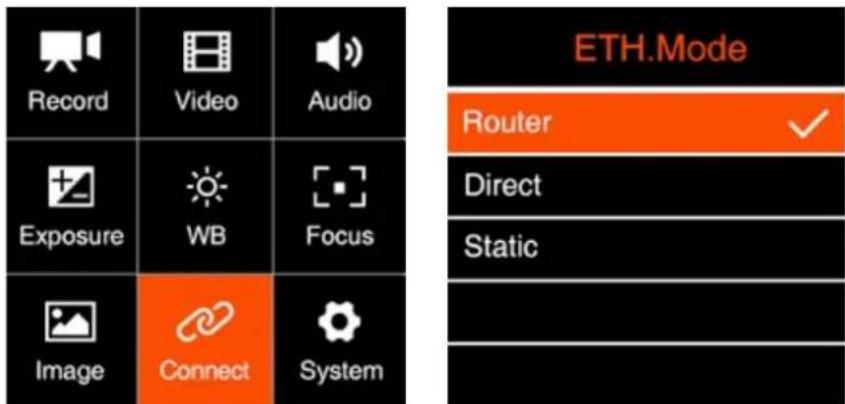
- Set the Network-ETH. Mode to "Router" in Connect-Network setting (2.10 Connect – Network-ETH. mode)
text_image
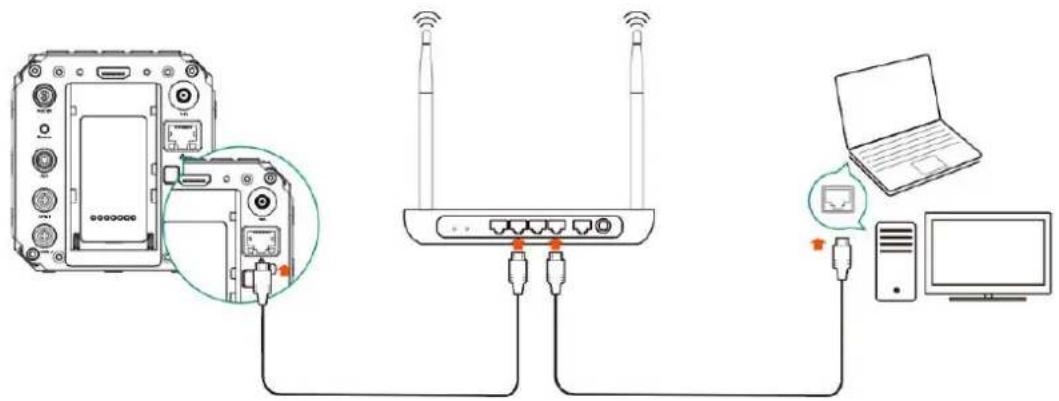
Record Video Audio Exposure WB Focus Image Connect System ETH.Mode Router Direct Static- Connect the camera to a router with an Ethernet cable, then connect the router to the computer with Ethernet cable or Wi-Fi. (Note: Camera and PC should connect to the LAN port of router, not WAN port)
text_image
Diagram showing wireless network connection between a device, a router, and a laptop connected to a monitor.- Check the Connect – Network setting, and there will show the IP address of the camera on ETH.IP item (e.g. 192.168.1.101) if the connection is OK.

text_image
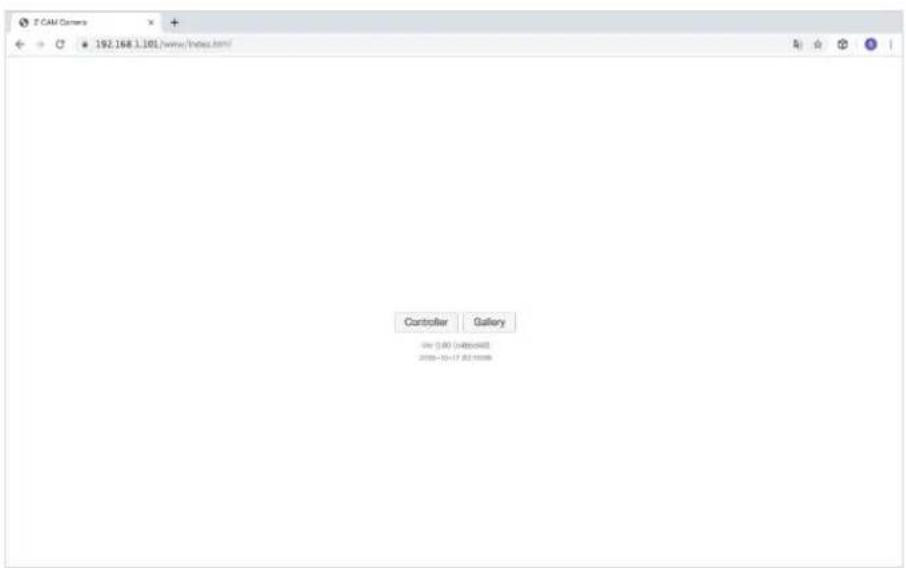
Network Wi-Fi ZCAM-E2-F6-0044 Wi-Fi IP 10.98.33.1 ETH.Mode Router ETH.IP 192.168.1.101- Open a browser on the PC / Mac, type in the address:
http://192.168.1.101/www/index.html (192.168.1.101 is the IP address example on step 3 above, please use the actual IP address of the camera. You will see the page below if it's connected successfully.
text_image
T CAM Censors 192.168.1.101/www/index.htm/ Controller Gallery Date: 13:00 [48/05/08] Time: 00:17:00 [10:00:00]6. Using Z Camera App
Download and install the Z Camera App from App Store to your device (smart phone or tablet), then you can use this device to live view and control the camera including start / stop recording and most of the settings, with following steps
• Install App: Search "Z Camera" in App Store to download and install it.
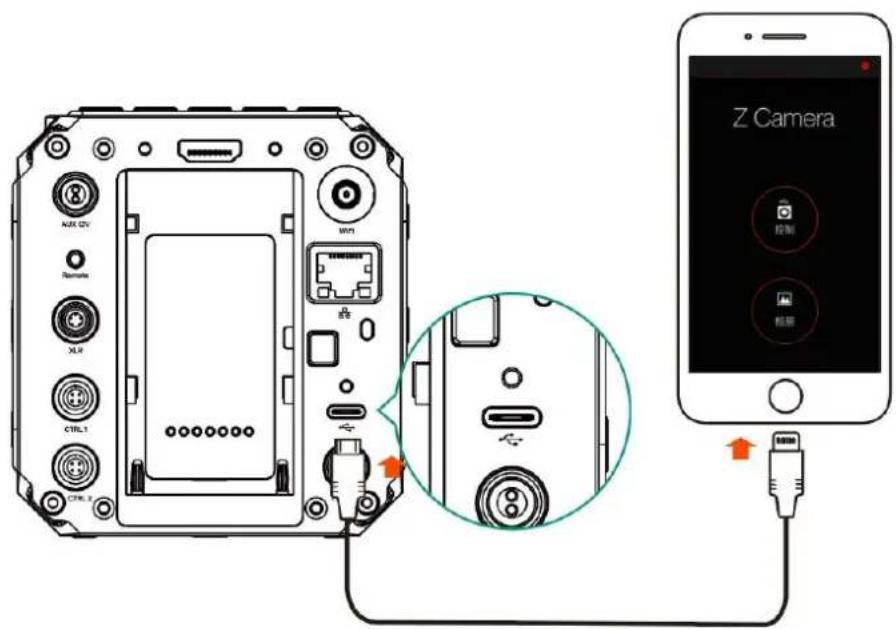
- Connect to camera: Connect the device to the camera with an USB Type C to Lighting cable as below, or through Wi-Fi.
• Wi-Fi connection refer to the section 5.1. The steps of USB connection are as follows:
- Connect the device to the camera via USB cable
text_image
AUX 12V Remarise XLR CTRL 1 CTRL 2 WIN Z Camera 控制 USB-
If it's the 1 ^st time to connect the device to the camera, there will be a pop-up message on your device "Trust this device?", click "Yes" and it will ask you to input password, which is the password to unlock your iOS device.
-
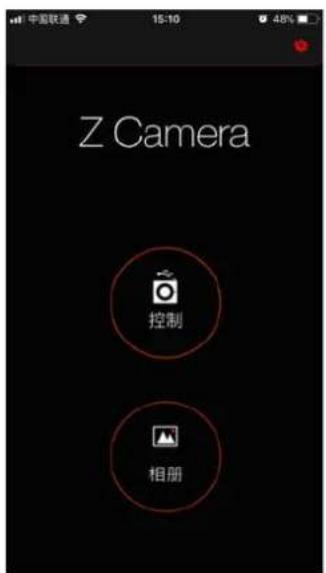
Open Z Camera App, if the camera is connected successfully, the "Control" icon will be activated (it's gray color if there is no connection) and there will be a small USB or Wi-Fi icon on (depends the connection method you use). Click the "Control" icon and you will come into the live-view and control panel.
Details about the Z Camera app will be added in the future update of the document.
In the App, you can monitor and play back the video of the camera in real time, and set camera parameters through the menu.
7. Firmware Upgrade
Follow the steps below to upgrade the firmware of the camera:
- Download the latest version of firmware (E2_FX_FW_0.93.zip) for Z CAM E2 from Z CAM's website: http://www.z-cam.com/e2/updates/
- Put the firmware file to the root directory of the CFast card (DO NOT unzip it!).
- Insert the CFast card to the camera and power it on.
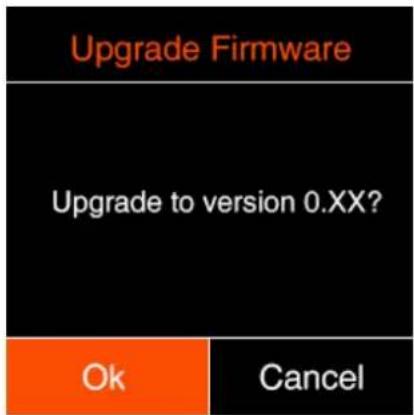
If the firmware version of file in the card is higher than the camera's one, there will be a pop-up message for firmware upgrade. Select "OK" and press OK button, the camera will upgrade the firmware* and restart the camera after it's finished.
text_image
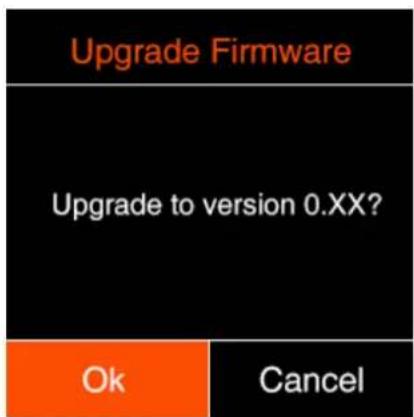
Upgrade Firmware Upgrade to version 0.XX? Ok Cancel- If the version of the firmware file in CFast card is the same as or lower than the camera's one (to refresh or downgrade the firmware), there will be no pop-up message when the camera is powered on. Go to Version in System setting, press OK button and you will see the pop-up message for firmware update. Select "OK" and press OK button to update the firmware*.
text_image
Upgrade Firmware Upgrade to version 0.XX? Ok Cancel* Please make sure the camera will not power off during the firmware upgrade / update process.
8. Camera Maintenance
- As the camera is a precise instrument, please do not drop it or let it suffer physical strike.
-
As the camera is not waterproof, please do not use it in water or under a humid environment.
-
If the camera is infiltrated by water accidentally, please shut it down, cut off the power or take off the battery (if any), take out the memory card, and drying the camera within 24 hours.
- The working temperature of the camera is 0-40°C. Please do not place or use the camera in an environment where the temperature is lower than 0°C or higher than 40°C.
- Please do not let the camera and the installed lens to face the sun for long time.
- Please do not touch the image sensor while removing the lens.
- Please do not use any detergent containing organic solvent to clean the camera body and the lens.
- Please use soft lens cloth to clean the camera body regularly.
- Please do not disassemble the camera by yourself.
- Please do not place the camera in a darkroom or a lab or other places where corrosive chemicals are stored.
Disclaimer: All product features and technical specifications stated above are subjected to Z CAM's sole interpretation and explanation.