
ES8473dnct - Printer OKI - Free user manual and instructions
Find the device manual for free ES8473dnct OKI in PDF.


User questions about ES8473dnct OKI
0 question about this device. Answer the ones you know or ask your own.
Ask a new question about this device
Download the instructions for your Printer in PDF format for free! Find your manual ES8473dnct - OKI and take your electronic device back in hand. On this page are published all the documents necessary for the use of your device. ES8473dnct by OKI.
USER MANUAL ES8473dnct OKI
Installation & Operation Manual
Contents
1 Preface....3
1.1 About This Document....3
2 Installing the Driver Software....4
2.1 Installing/Uninstalling by the dpkg Command....5
2.1.1 Installing the Package .... 5
2.1.2 Uninstalling the Package....6
2.2 Installing the Package Using the rpm Command....7
2.2.1 Installing the Package 7
2.2.2 Uninstalling the Package....7
2.3 Installing With the Ubuntu Software Center......8
2.3.1 Installing the Package 8
2.3.2 Uninstalling the Package....10
3 Installation of Software Required for Operation 12
4 Scanning Methods....13
4.1 Registering Network Connected Devices ....14
4.1.1 Registering Network Scanners 15
4.1.2 Registering Network Scanners Without Performing a Search 21
4.1.3 Removing Network Scanners.... 23
4.2 Scan Command 25
4.3 Scan Utility 26
4.3.1 Performing Scanning by the Scan Tool 28
4.3.2 Performing a PushScan.... 34
4.3.3 Customizing Application Setting.... 39
1 Preface
1.1 About This Document
This document is the Installation Manual of the Linux scanner driver intended for MFP (Multi Function Printer) devices.
2 Installing the Driver Software
Download the installation files of the Linux scanner driver from the Internet to the desired folder on your computer.
There are two installation files, 64bit version and 32bit version. Use the installation file suited to the system where you will be installing the Linux scanner driver.
- Debian package
- 32bit version okimfpsdrv_X.X.X_i386.deb
- 64bit version okimfpsdrv_X.X.X_amd64.deb
- rpm package
- 32bit version okimfpsdrv-X.X.X.i386.rpm
- 64bit version okimfpsdrv-X.X.X.x86_64.rpm
* X.X.X represents the software version.
| Package name okimfpsdrvVersion 1.1.0Section GraphicsDependent packages libc6(>=2.3.4), libgcc1(>=1:4.1.1), libstdc++6(>=4.1.1),libusb-1.0-0(>=2:1.0.3), python |
2.1 Installing/Uninstalling by the dpkg Command
This section describes how to install/uninstall the Debian software package using the dpkg command on the Debian Linux OS.
This procedure must be performed by a user having administrator privileges.
Be sure to restart the system after the installation/uninstallation is complete.
Memo
When installing/uninstalling the package on Ubuntu, use the sudu command to enable administrator privileges and then execute the dpkg command.
When installing/uninstalling the package on Debian and other Linux OS's, use the su command to switch to a user having administrator privileges, and then execute the dpkg command.
2.1.1 Installing the Package
Use the dpkg command, and specify the "-i" option and package file name.
dpkg -i package file name
The following shows how execution looks using root privileges. On Ubuntu, use the sudo command and then execute installation.
<h1 id="dpkg-i-okimfpsdrv_110_i386deb">dpkg -i okimfpsdrv_1.1.0_i386.deb</h1>
Selecting previously deselected package okimfpsdrv.
(Reading database ... 121429 files and directories currently installed.)
Unpacking okimfpsdrv (from okimfpsdrv_1.1.0_i386.deb) ...
Setting up okimfpsdrv (1.1.0) ...
Adding system startup for /etc/init.d/okiscand ...
/etc/rc0.d/K20okiscand -> ../init.d/okiscand
/etc/rc1.d/K20okiscand -> ../init.d/okiscand
/etc/rc6.d/K20okiscand -> ../init.d/okiscand
/etc/rc2.d/S20okiscand -> ../init.d/okiscand
/etc/rc3.d/S20okiscand -> ../init.d/okiscand
/etc/rc4.d/S20okiscand -> ../init.d/okiscand
/etc/rc5.d/S20okiscand -> ../init.d/okiscand
postinst: configure /etc/sane.d/dll.conf for oki
Processing triggers for ureadahead ...
#
2.1.2 Uninstalling the Package
Use the dpkg command, and specify the "-r" or "-P" option and package name. To leave behind the configuration file, specify the "-r" option, and to remove the configuration file as well (i.e. to completely remove it), specify the "-P" option.
dpkg -r/-P package name
The following shows how execution looks using root privileges. On Ubuntu, use the sudo command and then execute installation.
<h1 id="dpkg-r-okimfpsdrv">dpkg -r okimfpsdrv</h1>
(Reading database ... 121552 files and directories currently installed.)
Removing okimfpsdrv ...
prerm: deconfigure /etc/sane.d/dll.conf for oki
Removing any system startup links for /etc/init.d/okiscand ...
/etc/rc0.d/K20okiscand
/etc/rc1.d/K20okiscand
/etc/rc2.d/S20okiscand
/etc/rc3.d/S20okiscand
/etc/rc4.d/S20okiscand
/etc/rc5.d/S20okiscand
/etc/rc6.d/K20okiscand
Processing triggers for ureadahead ...
#
<h1 id="dpkg-p-okimfpsdrv">dpkg -P okimfpsdrv</h1>
(Reading database ... 121552 files and directories currently installed.)
Removing okimfpsdrv ...
prerm: deconfigure /etc/sane.d/dll.conf for oki
Removing any system startup links for /etc/init.d/okiscand ...
/etc/rc0.d/K20okiscand
/etc/rc1.d/K20okiscand
/etc/rc2.d/S20okiscand
/etc/rc3.d/S20okiscand
/etc/rc4.d/S20okiscand
/etc/rc5.d/S20okiscand
/etc/rc6.d/K20okiscand
Purging configuration files for okimfpsdrv ...
Removing any system startup links for /etc/init.d/okiscand ...
Processing triggers for ureadahead ...
#
Memo
Do not install/uninstall the package using the dpkg command with the Ubuntu Software Center started up. The installation status display of the Ubuntu Software Center will no longer match. To install/uninstall the package using the dpkg command on Ubuntu, either perform the procedure with the Ubuntu Software Center stopped or restart the Ubuntu software center after finishing operations using the dpkg command.
2.2 Installing the Package Using the rpm Command
This section describes how to install/uninstall the software package using the rpm command on the Redhat Linux OS.
This procedure must be performed by a user having administrator privileges. Be sure to restart the system after the installation/uninstallation is complete.
2.2.1 Installing the Package
Use the rpm command, and specify the "-i" option and package file name.
rpm -i package file name
<h1 id="rpm-ihv-okimfpsdrv-110-1x86_64rpm">rpm -ihv okimfpsdrv-1.1.0-1.x86_64.rpm</h1>
Preparing...    ##########
1:okimfpsdrv    ########
postinst: configure /etc/sane.d/dll.conf for oki
#
2.2.2 Uninstalling the Package
Use the rpm command, and specify the "-e" option and package file name.
rpm -e package name
<h1 id="rpm-e-okimfpsdrv">rpm -e okimfpsdrv</h1>
prerm: deconfigure /etc/sane.d/dll.conf for oki
#
2.3 Installing With the Ubuntu Software Center
2.3.1 Installing the Package
1 Display the installation file in the file manager. Next, right-click the installation file and select [Open With Ubuntu Software Center].
The Ubuntu Software Center starts up, and the installation file opens.
![OKI ES8473dnct - Display the installation file in the file manager. Next, right-click the installation file and select [Open With Ubuntu Software Center]. - 1](/content/2026/05/816909/images/8c354e9c401c9375681e0cecbab91e2faff94f5e8e069d2de5726045049bc793.jpg)
text_image
Downloads Computer Home Desktop Documents Downloads Music Pictures Videos File System Trash Network Browse Net... okimfpsdrv_1.1.0_1386.dwg Open With Ubuntu Software Center Open With Archive Manager Open With Other Application... Cut Copy Make Link Rename... Copy to Move to Move to Trash Send To... Extract Here Properties "okimfpsdrv_1.1.0_1386.deb" selected (462.7 kB)2 Click the [Install] button displayed on the right side of the window. Installation is started.
When installation is started, the message "To install this package, you need to authenticate." is displayed.
![OKI ES8473dnct - Click the [Install] button displayed on the right side of the window. Installation is started. - 1](/content/2026/05/816909/images/9daca3ed1fdc6386ee0214e3e5a69faa24defb05ad2400bbb9c409de5b8367c0.jpg)
text_image
Ubuntu Software Center All Software Installed History okimfpsdrv Oki MFP Scanner Driver Only install this file if you trust the origin. Copyright (c) 2012 Oki Data Corporation. All rights reserved. Developer Web Site Install No screenshot available Version.okimfpsdrv 1.1.0 Total size 1.8 MB when installed License Unknown3 Enter the password, and click [Authenticate]. Installation is started when authentication ends successfully. When installation progress is displayed and installation is completed, the message "Installed" is displayed.
![OKI ES8473dnct - Click the [Install] button displayed on the right side of the window. Installation is started. - 2](/content/2026/05/816909/images/a86726e3906cb34cac540febc438d18e9fa853798518aa2659f2b09c4371b694.jpg)
text_image
To install this package, you need to authenticate. An application is attempting to perform an action that requires privileges. Authentication is required to perform this action. Password: Details Cancel Authenticate![OKI ES8473dnct - Click the [Install] button displayed on the right side of the window. Installation is started. - 3](/content/2026/05/816909/images/9d8cd99f164067d37115657529f7885bab8e22e8dd6357930445153363a99720.jpg)
text_image
Ubuntu Software Center All Software Installed History okimfpsdrv Okil MFP Scanner Driver Installed Reinstall These programs are run from a terminal: okimfpatray, okipushass, okipushconfig, okiscan, okiscanadm, okiscantool Copyright (c) 2012 Oki Data Corporation. All rights reserved. Developer Web Site No screenshot available Version_okimfpsdrv 1.1.04 Restart the system.
2.3.2 Uninstalling the Package
Uninstall the Linux scanner driver using the Ubuntu Software Center.
1 Click the Ubuntu Software Center icon.
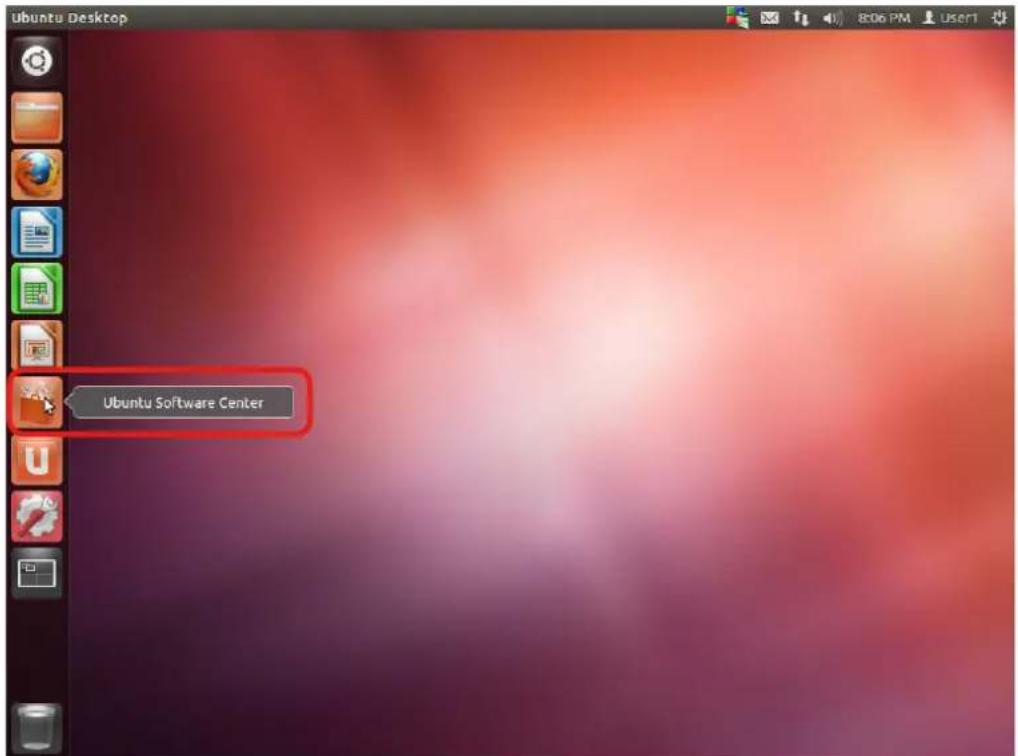
text_image
Ubuntu Desktop Ubuntu Software Center2 Select [Unknown] from [Installed].
![OKI ES8473dnct - Select [Unknown] from [Installed]. - 1](/content/2026/05/816909/images/23b01fcdf94334c329151e78a74edfb935e5edf21db0ded563cdad5bea8bb64b.jpg)
text_image
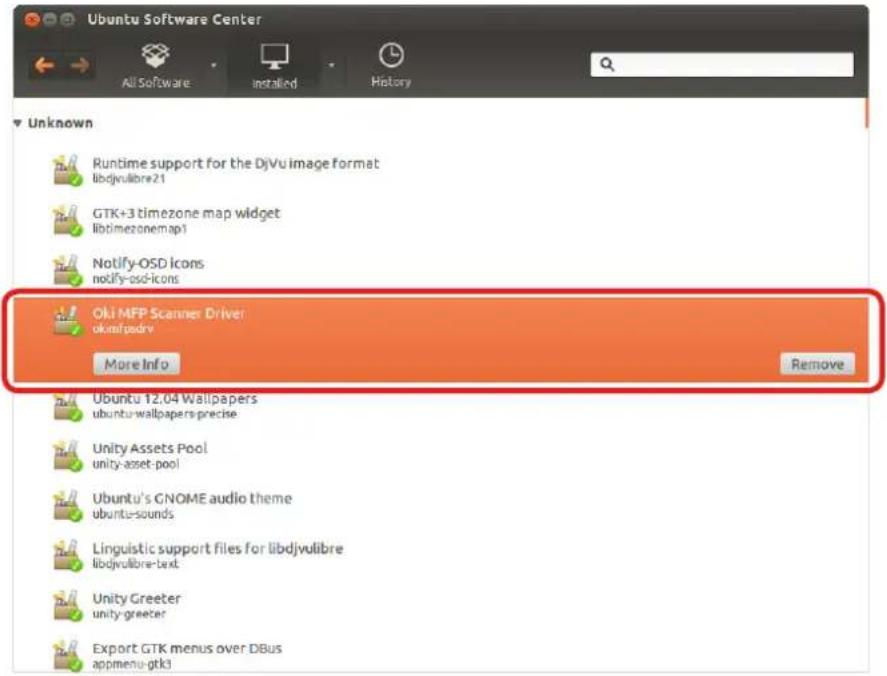
Ubuntu Software Center All Software Installed History Provided by Ubuntu Canonical Partners For Purchase Unknown apps Come and explore our favourites Accessories Books & Magazines Developer Tools Education Fonts Games Graphics Internet Office Science & Engineering Sound & Video System Themes & Tweaks Universal Access What's New More Top Rated More Recommended For You3 The list of installed software is displayed. Select "Oki MFP Scanner Driver".
text_image
Ubuntu Software Center All Software Installed History Unknown Runtime support for the DjVu image format libdjvulibre21 GTK+3 timezone map widget libtimezonemap1 Notify-OSD Icons notify-osd-icons Oki MFP Scanner Driver okimipadrv More Info Remove Ubuntu 12.04 Wallpapers ubuntu-wallpapers-precise Unity Assets Pool unity-asset-pool Ubuntu's GNOME audio theme ubuntu-sounds Linguistic support files for libdjvulibre libdjvulibre-text Unity Greeter unity-greeter Export GTK menus over DBus appmenu-gk34 When an item to be removed is selected, the [Remove] button is displayed. Click the [Remove] button. (Items can also be removed from content displayed by clicking the [More Info] button.)
When this button is clicked, you will be prompted to authenticate in the same way as at installation. Enter the password to authenticate.
5 Restart the system.
3 Installation of Software Required for Operation
Though the following packages need not necessarily be installed for operation, they are required for saving scanned images in file formats other than PNM format using the Scan Utility.
- netpbm
- ghostscript
We recommend installing these packages if they are not installed yet.
Installation status can be confirmed by the Package Manager provided with the respective distribution. It can also be confirmed by commands. Open the terminal application, and execute the following commands:
Debian OS
dpkg -l package name
Redhat OS
rpm -q package name
Memo
When installing on Ubuntu, search for "netpbm" from the Ubuntu Software Center and install the package. When installing on RHEL, insert the installation disk (DVD) in the disk drive, and search for "netpbm" from "Add/remove software". Two packages (netpbm-progs and netpbm) can be confirmed. Select and "Apply" both packages. Generally, Ghostscript is already installed when the Ubuntu and RHEL OS are installed. (This may differ according to the distribution and version.)
4 Scanning Methods
With this driver, scanning can be performed on two types of connections, on MFP devices connected over a network (LAN) and on MFP devices connected via the USB interface.
MFP devices connected by the USB interface can be used right away if they support this driver. For MFP devices connected over a network (LAN), however, the MFP must be registered.
For details on preparing/setting up the MFP device for scanning, refer to the manual for that MFP device.
! Note
The MC860 cannot be used in a network connection. Use it by a USB connection.
The Secure Scan Mode is not supported.
! Note
In Linux OS's such as RHEL where firewall functions are enabled, PushScan on the network sometimes cannot be performed. If this happens, check the firewall settings, and set so that external communications is enabled on the TCP 9968 port.
4.1 Registering Network Connected Devices
Turn the network connected device (MFP) to be connected ON to enable connection with the PC via the network (LAN).
Next, execute the Network Scanner Utility by the okiscanadm command using administrator privileges, and register/remove the network scanner by following the on-screen instructions.
Memo
On Ubuntu, use the sudo command to enable administrator privileges, and execute the okiscanadm command.
On Linux OS's such as Debian, log in as a root user or general user, use the su command on the terminal application to switch to a user having administrator privileges or execute the okiscanadm command using a terminal having administrator privileges in the "system terminal super user mode."
4.1.1 Registering Network Scanners
To register/remove an MFP device, administrator privileges are required. Perform this procedure as a root user.
On Ubuntu, use the sudo command to enable administrator privileges and start up the Network Scanner Utility. You will be prompted to enter the password. Enter the password, and click "Enter". The Network Scanner Utility starts up when authentication ends successfully.
[1] Selecting operation
Options are displayed when the Network Scanner Utility is started.
Enter "1" at "Add Network Scanner", and click "Enter".
* To cancel, click "q" followed by "Enter".
# okiscanadm
Network Scanner Utility
1) Add Network Scanner
2) Delete Network Scanner
Please select option:
[2] Searching network scanners
Select whether or not to search for scanner devices on the network. To perform a search, enter "y", and click "Enter".
* If "Enter" is clicked without any entry made, the system assumes that "y" was entered.
* To cancel, click "q" followed by "Enter".
2) Delete Network Scanner
Please select option: 1
Searching for network scanner . . .: ([y]/n)
! Note
When performing a search, make sure that the target MFP device is turned ON, and that the PC to be used with the MFP device is connected and can communicate on the network.
Also note that searches are not possible if the PC to be used with the scanner device is connected via a router or a gateway. In addition to this, searches are sometimes not possible depending on the PC settings (routing settings, firewall settings, etc.). If this happens, enter "n", and click "Enter". Then, enter the required information following the on-screen messages.
For details, see "4.1.2 Registering Network Scanners Without Performing a Search".
[3] Broadcast address
Specify the broadcast address used for searches. Clicking "Enter" sets the default address "255.255.255.255". To specify a specific search range, for example, enter the desired broadcast address.
* To cancel, click "q" followed by "Enter".
2) Delete Network Scanner
Please select option: 1
Searching for network scanner . . .: ([y]/n)
Broadcast address used in search[255.255.255.255]:
! Note
- Broadcast packets sometimes cannot be sent using 255.255.255.255 depending on the OS settings, etc. If the IP address of the device (MFP) to register is already known, register that address without performing a search.
- If the IP address (MFP) is not known, search by a broadcast address that targets only inside the subnet of the network where the PC is connected. The broadcast address to specify in this instance can be obtained by the following method. When the device has multiple NICs, specify the broadcast address of the interface to which the target device (MFP) is connected.
\$ /sbin/ifconfig
eth0 Link encap:Ethernet HWaddr 08:00:27:cf:d0:aa
inet addr:192.168.1.211 Bcast:192.168.1.255 Mask:255.255.255.0
inet6 addr: fe80::a00:27ff:fecf:d0aa/64 Scope:Link
UP BROADCAST RUNNING MULTICAST MTU:1500 Metric:1
RX packets:5765362 errors:0 dropped:0 overruns:0 frame:0
TX packets:5562386 errors:0 dropped:0 overruns:0 carrier:0
collisions:0 txqueuelen:1000
RX bytes:1166366174 (1.0 GiB) TX bytes:2498995368 (2.3 GiB)
lo Link encap:Local Loopback
! Note
With OSs such as RHEL that have a firewall, reply packets from the device (MFP) in response to the broadcast packet sometimes cannot be received. If the IP address of the device (MFP) to register is already known, register that address without performing a search.
If it is absolutely necessary to search for a device, perform the following measures, for example:
- Disable firewall functions.
- Set the interface (NIC) to be used to a reliable interface.
For details, refer to the manual for the OS.
[4] Scanner selection
If, as a result of the network scanner search, target devices for installing this driver are found, a list of IP addresses and model names of the found devices will be displayed. Enter the No. of the desired scanner to register, and click "Enter".
* To cancel, click "q" and "Enter".
Searching for network scanner . . .: ([y]/n)
Broadcast address used in search[255.255.255.255]:
Searching...

IP Address Model name MAC Address
1) 192.168.1.10 MB491 00:01:02:03:04:05

Please select scanner:
[5] Entry of scanner name
Enter the name of the scanner. Enter the desired name, and click "Enter". Double quotation marks """ cannot be used in scanner names.
* Operation cannot be canceled during entry of the name.
* Up to 31 characters can be entered for scanner names.
Searching for network scanner . . .: ([y]/n)
Broadcast address used in search[255.255.255.255]:
Searching...

IP Address Model name MAC Address
1) 192.168.1.10 MB491 00:01:02:03:04:05

Please select scanner: 1
Please enter scanner name:
[6] Entry of scanner port No.
Enter the port No. of the scanner. Normally, the default value can be left as it is. Do not change the port No. and click "Enter" to proceed to the next step.
* To cancel, click "q" and "Enter".
Please select scanner: 1
Please enter scanner name: My Scanner
Please enter scanner port #[9967]:
[7] Entry of PC domain name
Enter the domain name of the PC. The default value is the PC host name. Normally, the default value can be left as it is. Do not change the PC host name and click "Enter".
Please select scanner: 1
Please enter scanner name: My Scanner
Please enter scanner port #[9967]:
Please enter PC Domain Name[my-pc]:
[8] Entry of PC IP address
Enter the IP address of the PC. The IP address obtained from the PC host name is set as the default value. The IP address must be one that can communicate with the connected device (MFP). If the default value is OK as it is, click "Enter". If there is a problem with the IP address, enter the correct IP address, and click "Enter".
Please select scanner: 1
Please enter scanner name: My Scanner
Please enter scanner port #[9967]:
Please enter PC Domain Name[my-pc]:
Please enter PC IP Address[192.168.1.211]:
! Note
- The default value is not displayed if the Configuration Tool cannot acquire the IP address of the PC. If this happens, enter the IP address of the PC.
Please enter PC IP Address[192.168.1.211]:←The default value is not displayed
! Note
- The domain name and IP address of the PC entered above are used for authentication when executing a PushScan. The IP address of the PC must be the IP address used in communications when executing a scan.
Memo
- On the Redhat Linux OS, if the self address is set to 127.0.1.1 in the /etc/hosts settings, then this value is used for the above IP address of the PC. Note, however, that if the IP address is left as it is and "Enter" is clicked to register that IP address, this will result in an authentication error when a PushScan is executed.
[9] Entry of PC port No.
Enter the port No. of the PC. Normally, the default value can be left as it is. Do not change the port No. and click "Enter" to proceed to the next step.
Please select scanner: 1
Please enter scanner name: My Scanner
Please enter scanner port #[9967]:
Please enter PC Domain Name[my-pc]:
Please enter PC IP Address[192.168.1.211]:
Please enter PC port #[9968]:
[10] Confirmation of registered details
When all entries are completed, entered details are displayed. If the details are OK, enter "y", and click "Enter".
* To cancel, click "q" and "Enter".
Please select scanner: 1
Please enter scanner name: My Scanner
Please enter scanner port #[9967]:
Please enter PC Domain Name[my-pc]:
Please enter PC IP Address[192.168.1.211]:
Please enter PC port #[9968];

Scanner added . . .

IP Address : 192.168.1.10
MAC Address : 00:01:02:03:04:05
Model name : MB491
Scanner name : My Scanner
Scanner port # : 9967
PC Domain Name : my-pc
PC IP Address : 192.168.1.211
PC port # : 9968

Proceed? (y/[n])
The network scanner is registered to the PC, and the PC is registered to the MFP. If each of these processes are performed successfully, the following message is displayed and the Network Scanner Utility ends.
Scanner added . . .
IP Address : 192.168.1.10
MAC Address : 00:01:02:03:04:05
Model name : MB491
Scanner name : My Scanner
Scanner port # : 9967
PC Domain Name : my-pc
PC IP Address : 192.168.1.211
PC port # : 9968
Proceed? (y/[n]) y
* Added a network scanner on this PC.
* Added this PC on a MFP.
#
If registration of the PC to the MFP fails, the following message is displayed. Enter "y" to perform registration to the MFP again. If you enter "n", the tool ends. The PC is registered even if "n" is entered.
Proceed? (y/[n]) y
* Added a network scanner on this PC. Could not add your PC to the MFP. (code=250) Try again? ([y]/n)
Error Codes Displayed at Registration to the MFP
| Code Explanation |
| 249 The same PC domain name is already registered. |
| 250 MFP registration information currently being edited. |
| 251 The maximum number is registered. |
| 252 Communications error |
| 253 Registration failed. |
| 254 Error occurred. |
If an error re-occurs after retrying an operation, register the PC in question on the MFP Web interface or operation panel of the MFP main unit.
Operations on PC information registered to the MFP can be performed on the MFP Web interface or operation panel of the MFP main unit. When operating via the Web interface, first log in using administrator privileges. You can then check and edit registration information by [List][NetworkScan] . Checks and editing can be performed on the operation panel of the MFP main unit by [SETTING][Network Scan Destination] . For details, refer to the manual provided with the device.
4.1.2 Registering Network Scanners Without Performing a Search
[1] Entry of Scanner IP address
When a search for a network scanner is not performed, manually enter the IP address of the scanner and the model of device to be registered.
Enter the IP address of the scanner device at the connection destination, and click "Enter".
* To cancel, click "q" and "Enter".
Network Scanner Utility
1) Add Network Scanner
2) Delete Network Scanner
Please select option: 1
Searching for network scanner . . .: ([y]/n) n
Please enter scanner IP Address: 192.168.1.10
Communications is performed on the IP address of the specified scanner to acquire the information of the device (MFP). When it has been confirmed that the information has been acquired successfully and that the device is the target device for installing this driver, follow the procedure from "4.1.1 [5] Entry of scanner name" onwards.
[2] Entry of scanner MAC address
If communications with the IP address of the specified scanner is not possible, you will be prompted to enter the information of the scanner device (MFP).
Enter the MAC address of the scanner device (MFP), and click "Enter". (* For details on how to check the MAC address of the device (MFP), refer to the manual for the device.)
2) Delete Network Scanner
Please select option: 1
Searching for network scanner . . .: ([y]/n) n
Please enter scanner IP Address: 192.168.1.10
Please enter scanner MAC Address: 00:01:02:03:04:05
[3] Model selection
The list of models that support this driver is displayed. Enter the model No. of the scanner device (MFP) from this list, and click "Enter".
* To cancel, click "q" and "Enter".
Please select option: 1
Searching for network scanner . . . : ([y]/n) n
Please enter scanner IP Address: 192.168.1.10
Please enter scanner MAC Address: 00:01:02:03:04:05
Model name
1) CX2633 MFP
2) CX2731 MFP
3) ES3451 MFP
4) ES3452 MFP
5) ES3461 MFP
6) ES4160
7) ES4161 MFP
8) ES4180
:
Please select the model of the scanner:
After selecting the model, follow the procedure from entry of the scanner name (4.1.1 [5] Entry of scanner name) onwards.
Please select the model of the scanner: 22
Please enter scanner name: My Scanner
Please enter scanner port #[9967]:
Please enter PC Domain Name[my-pc]:
Please enter PC IP Address[192.168.1.211]:
Please enter PC port #[9968]:
Scanner added . . .
IP Address : 192.168.1.10
MAC Address : 00:01:02:03:04:05
Model name : MB491
Scanner name : My Scanner
Scanner port # : 9967
PC Domain Name : my-pc
PC IP Address : 192.168.1.211
PC port # : 9968
Proceed? (y/[n])
4.1.3 Removing Network Scanners
[1] Selecting operation
To remove a registered network scanner, enter "2" at "Delete Network Scanner" in the Network Scanner Utility operation selection, and click "Enter".
* To cancel, click "q" followed by "Enter".
Network Scanner Utility
1) Add Network Scanner
2) Delete Network Scanner
Please select option: 2
[2] Selecting the scanner to remove
When removal of a network scanner registration is selected, a list of registered network scanners is displayed. Enter the No. of the desired scanner to remove, and click "Enter".
* To cancel, click "q" and "Enter".
Please select option: 2
IP Address Model name Scanner name 1) 192.168.1.10 MB491 My Scanner
Please select scanner:
[3] Confirming removal
The information of the selected scanner is displayed.
IP Address Model name Scanner name
1) 192.168.1.10 MB491 My Scanner
Please select scanner: 1
Scanner deleted . .
IP Address : 192.168.1.10
MAC Address : 00:01:02:03:04:05
Model name : MB491
Scanner name : My Scanner
Scanner port # : 9967
PC Domain Name : my-pc
PC IP Address : 192.168.1.211
PC port # : 9968
Proceed? (y/[n])
Confirm the details. If they are OK, enter "y", and click "Enter".
To cancel, click "q" and "Enter".
The network scanner registered to the PC and the PC registered to the MFP are removed. If each of these processes are performed successfully, the following message is displayed and the Network Scanner Utility ends.
Scanner deleted . . .
IP Address : 192.168.1.10
MAC Address : 00:01:02:03:04:05
Model name : MB491
Scanner name : My Scanner
Scanner port # : 9967
PC Domain Name : my-pc
PC IP Address : 192.168.1.211
PC port # : 9968
Proceed? (y/[n]) y
* Deleted the designated network scanner from this PC.
* Deleted this PC information from the MFP.
#
If removal of the PC registered to the MFP fails, the following message is displayed. Enter "y" to perform removal of registration from the MFP again. If you enter "n", the tool ends. The PC registered is removed even if "n" is entered.
Proceed? (y/[n]) y
* Deleted the designated network scanner from this PC. Could not delete your PC from the MFP. (code=250) Try again? ([y]/n)
Error Codes Displayed at Removal from the MFP
| Code Explanation |
| 250 MFP registration information currently being edited. |
| 252 Communications error |
| 253 Removal failed. |
| 254 Error occurred. |
If an error re-occurs after retrying an operation, remove registration of the PC in question on the MFP Web interface or operation panel of the MFP main unit.
Operations on PC information registered to the MFP can be performed on the MFP Web interface or operation panel of the MFP main unit. When operating via the Web interface, first log in using administrator privileges. You can then check and edit registration information by [List][NetworkScan] . Checks and editing can be performed on the operation panel of the MFP main unit by [SETTING][Network Scan Destination] . For details, refer to the manual provided with the device.
4.2 Scan Command
This command is provided for performing scans more easily. Normally, use the Scan Utility.
When this command is used, scanning is performed on the specified device, and the scanned image is output in standard PNM format or output to the specified file.
okiscan -dev <scanner-name>
[-source Auto|Flatbed|ADF]
[-mode Color|Gray|BW]
[-resolution <50..1200{dpi}-(75)>]
[-duplex-scanning None|RightLeftBind|TopBind]
[-sharpness None|Sharpen|SharpenMore]
[-bg-eliminat-level <0..6(0)>]
[-edge-erase <0,5..50{mm}(0)>]
[-font-smoothing yes|no]
[-moire-elimination yes|no]
[-left <0..max-paper-width{mm}(0)>]
[-top <0..max-paper-height{mm}(0)>]
[-width <0..max-paper-width{mm}(max-paper-width)>]
[-height <0..max-paper-height{mm}(max-paper-height)>]
[-paper-width <0..max-paper-width{mm}(0)>]
[-paper-height <0..max-paper-height{mm}(0)>]
[-output-dir <output-directory>]
[-file-name <filename>]
Execution example
\$ okiscan -dev MB471 | pnmtojpeg > test.jpeg
4.3 Scan Utility
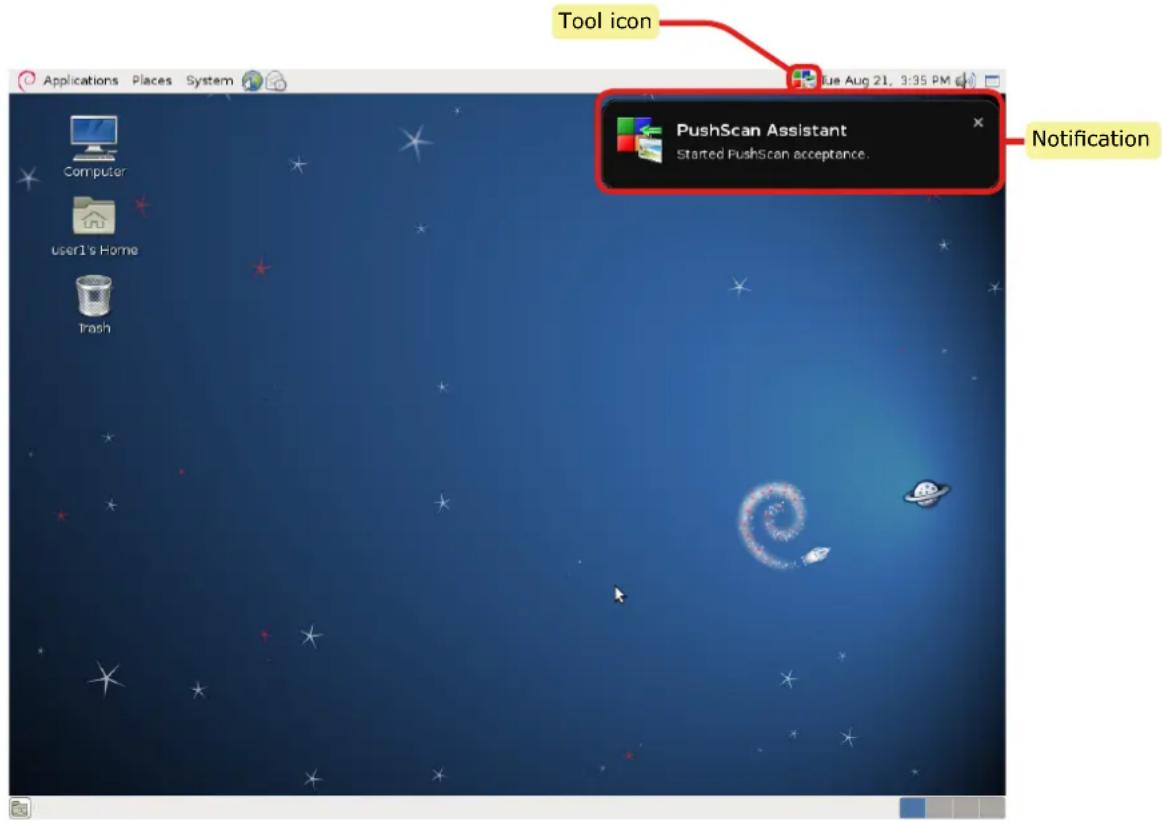
When this driver is installed, a utility for performing Pull/Push scanning also is installed. When you log in to the desktop after installation, the "MFP Scanner applet" is automatically started up and the icon is displayed on the panel.
text_image
Applications Places System Computer user1's Home Trash Tool icon PushScan Assistant Started PushScan acceptance. NotificationWhen the "MFP Scanner applet" starts up, the "PushScan Assistant" for performing a PushScan starts up. When "PushScan Assistant" starts up, the system stands by for input of a PushScan (acceptance is started) and the above notification message is displayed. For details on PushScan, see "4.3.2 Performing a PushScan".
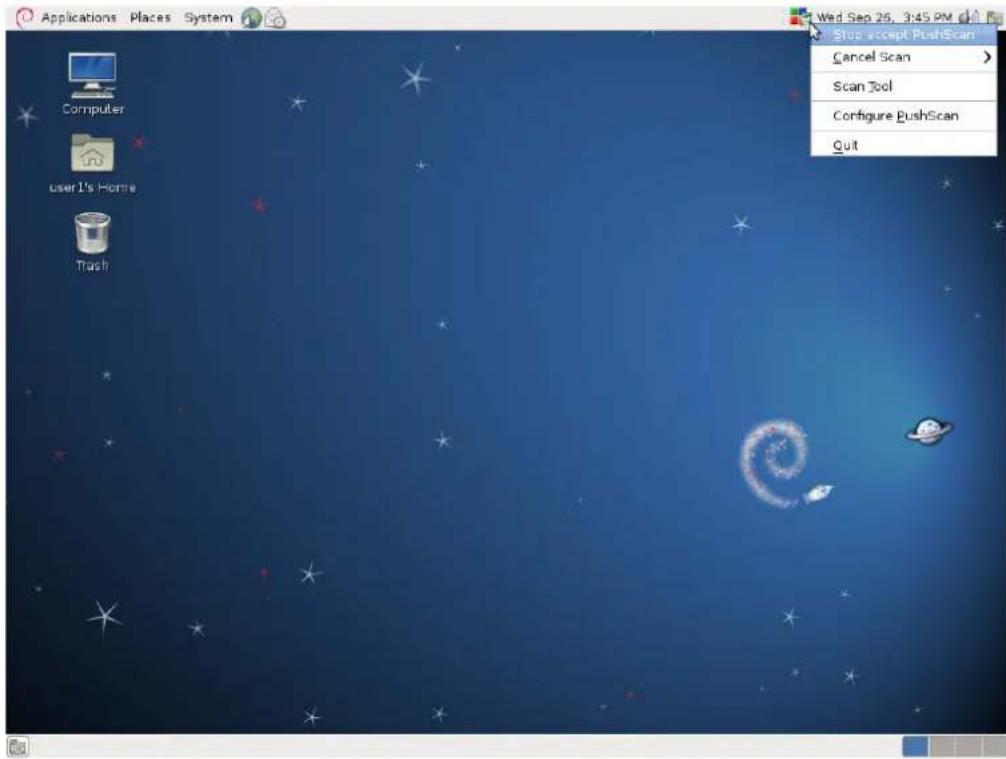
Right-click on the tool icon to display the applet menu. The following operations can be performed from the applet menu.
Applet Menu
| Menu Item Explanation | |
| Start/stop accept PushScan Start | ts/stops acceptance of PushScan. |
| Cancel Scan Currently scanning | devices (MFPs) are listed in the sub menu.Scanning can be canceled by selecting a device. |
| Scan Tool Displays "Scan Tool". | |
| Configure PushScan Displays the | "PushScan Configure" window. |
| Quit Quits this applet. |
text_image
Applications Places System Computer user1's Home Trash Stop accept PushScan Cancel Scan > Scan Tool Configure PushScan QuitThe automatic startup setting of the "MFP Scanner applet" can be changed in the automatic startup setting of the OS.
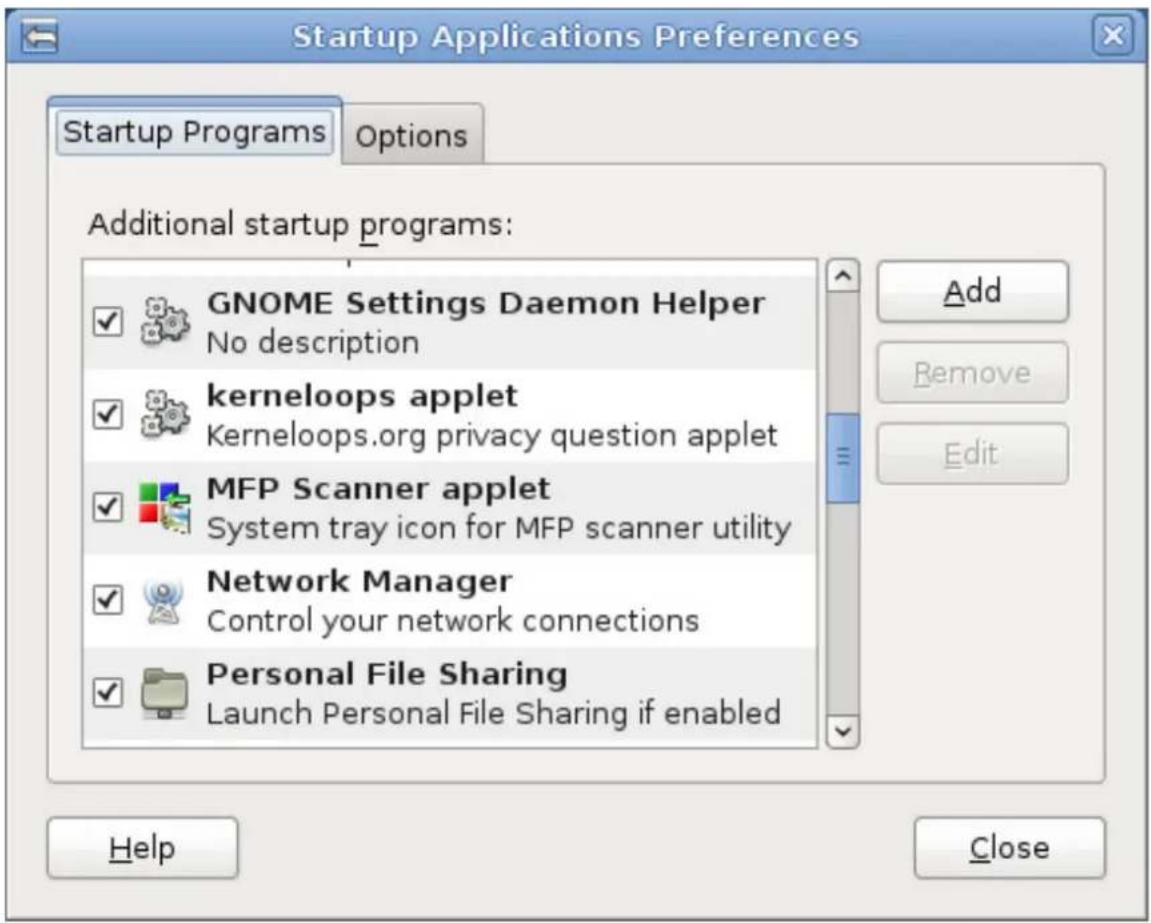
text_image
Startup Applications Preferences Startup Programs Options Additional startup programs: GNOME Settings Daemon Helper No description kerneloops applet Kernelloops.org privacy question applet MFP Scanner applet System tray icon for MFP scanner utility Network Manager Control your network connections Personal File Sharing Launch Personal File Sharing if enabled Add Remove Edit Help Close4.3.1 Performing Scanning by the Scan Tool
"Scan Tool" can be started up from the "MFP Scanner applet" applet menu. Up to eight scan settings (quick settings) can be registered, and scanning can be performed on any device (MFP) using a registered scan configuration.
Registered scan configurations can also be used as settings when performing a PushScan.
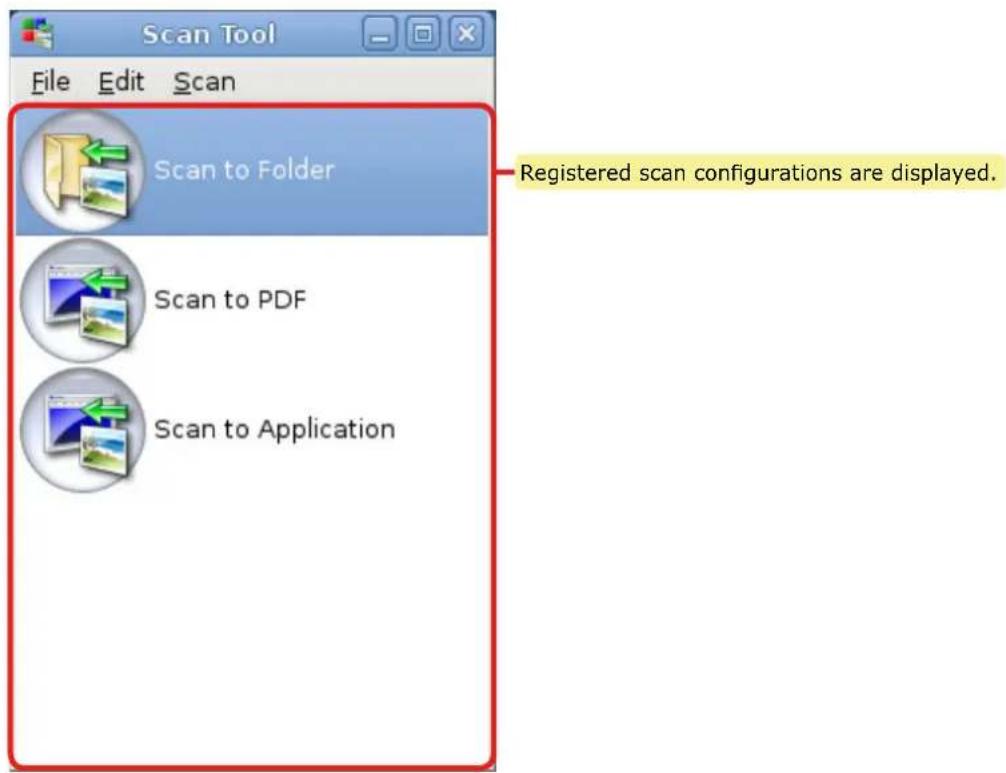
text_image
Scan Tool File Edit Scan Scan to Folder Scan to PDF Scan to Application Registered scan configurations are displayed.Scan Tool Menu
| Menu Menu | Item Explanation | |
| File Exit Exits | s the Scan Tool. | |
| Edit Add Adds | ds new scan configurations. | |
| Modify Modifies the | currently selected scan configuration. | |
| Delete Removes the | currently selected scan configuration. | |
| Scan Start S | can Displays the "Scan" dialog box for executing scanning. Multiple "Scan" dialog boxes also can be displayed for a single scan configuration.When a scan configuration is double-clicked, operation is the same as selection of this menu item. | |
Menu items in the "Edit" and "Scan" menus are included in the displayed menu by right-clicking on the scan configuration list.
4.3.1.1 Performing Scanning
[1] Preparations on the MFP device side
When performing scanning using the Scan Tool, set in advance so that the MFP device side can be scanned from a remote PC.
On the device operation panel, select [SCAN] → [Remote PC] → [TWAIN].
For a detailed method, refer to "Scan to Remote PC" in the manual for the device.
[2] Selecting the scan configuration
Select the scan configuration from the "Scan Tool" window.
[3] Displaying the Scan dialog box
Select [Start Scan] from the [Scan] menu.
The "Scan" dialog box is displayed with no available devices selected.
![OKI ES8473dnct - [3] Displaying the Scan dialog box - 1](/content/2026/05/816909/images/5ee8f4005ef11bdeee34eee5994e36f00e14a34fa7520eaace18456d24d2e6b5.jpg)
text_image
Scan - Save to Folder Choose a device to use, and please click 'Start Scan' button. Device None Start scan Cancel scan Close[4] Selecting the device to use
Select the device to use from the [Device] dropdown list in the center of the "Scan" dialog box. When a device is selected, the [Start Scan] button is enabled and can be clicked.
![OKI ES8473dnct - [4] Selecting the device to use - 1](/content/2026/05/816909/images/3db70c91fdd1b6fa7451d6e111c1faa7e93d94d48f1f826dec7b8819b46c5bf7.jpg)
text_image
Scan - Save to Folder Choose a device to use, and please click 'Start Scan' button. Device MB471 Start scan Cancel scan Close[5] Starting scanning
Start scanning by clicking the [Start Scan] button.
During scanning, progress is displayed in the "Scan" dialog box.
![OKI ES8473dnct - [5] Starting scanning - 1](/content/2026/05/816909/images/3c64e680f9459425f5646e5bb4283741c56c871aaa716bbff0d3aec6c625806b.jpg)
text_image
Scan - Save to Folder Choose a device to use, and please click 'Start Scan' button. Device MB471 Page 1 (Scanning... 61.8%) Start scan Cancel scan CloseAfter scanning is completed, scanning can be repeatedly executed on the same device or on another device.
![OKI ES8473dnct - [5] Starting scanning - 2](/content/2026/05/816909/images/a7133242f96e57d6bdc1663fca1f360ebef769518e1019ff7e9439aa3b2eb8de.jpg)
text_image
Scan - Save to Folder Choose a device to use, and please click 'Start Scan' button. Device MB471 Success. (Scanned page 1) Start scan Cancel scan Close4.3.1.2 Adding Scan Configurations
Select [Add] from the [Edit] menu of the Scan Tool menu. The "Scan Configuration" window is displayed with each of the values at their defaults.
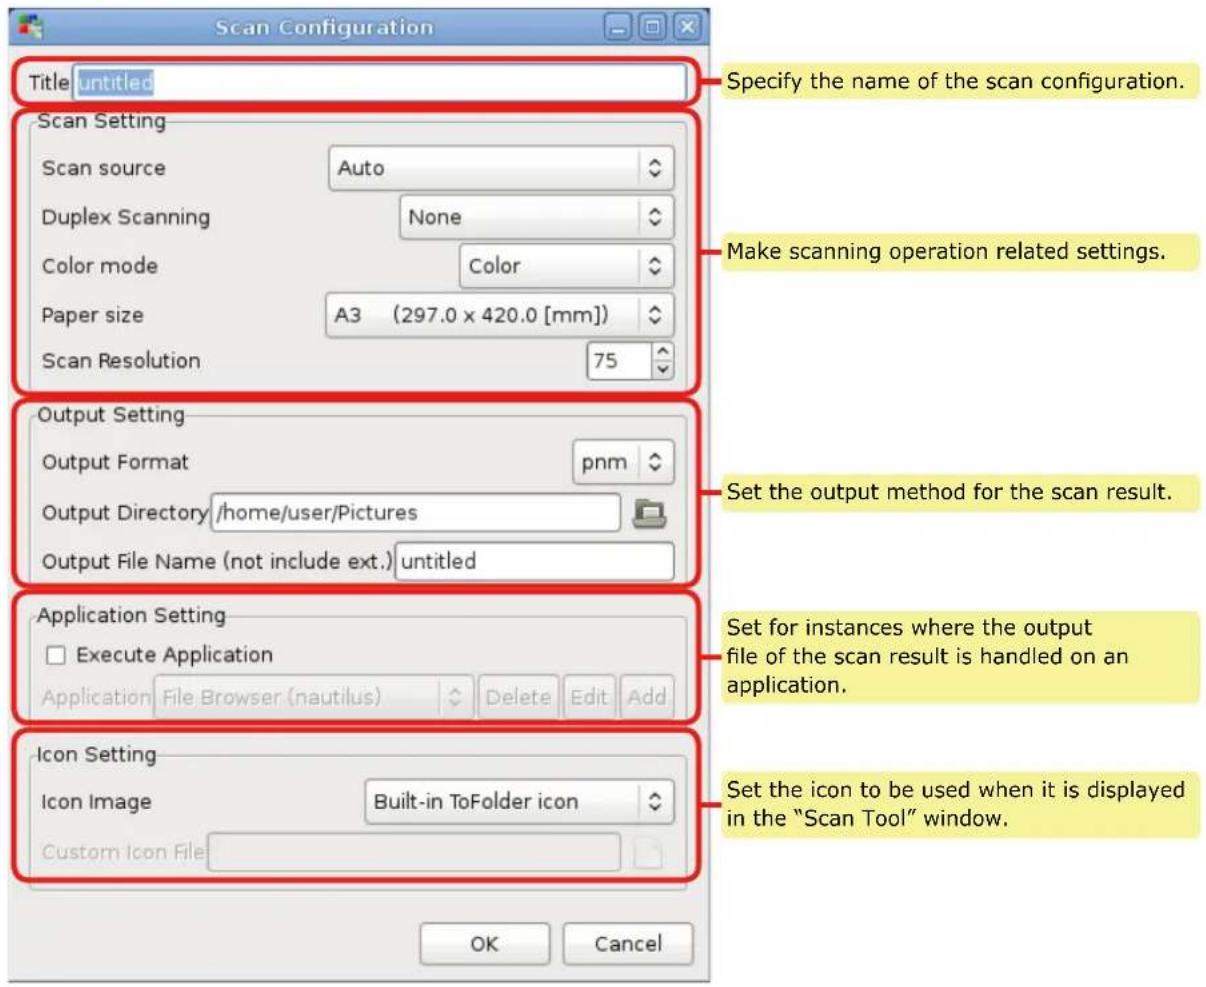
text_image
Scan Configuration Title untitled Scan Setting Scan source Auto Duplex Scanning None Color mode Color Paper size A3 (297.0 x 420.0 [mm]) Scan Resolution 75 Output Setting Output Format pnm Output Directory /home/user/Pictures Output File Name (not include ext.) untitled Application Setting Execute Application Application File Browser (nautilus) Delete Edit Add Icon Setting Icon Image Built-in ToFolder icon Custom Icon File OK Cancel Specify the name of the scan configuration. Make scanning operation related settings. Set the output method for the scan result. Set for instances where the output file of the scan result is handled on an application. Set the icon to be used when it is displayed in the "Scan Tool" window.[1] Assign a name
Enter a unique name for the scan configuration at "Title".
[2] Make the scan settings
Set each of "Scan source", "Duplex scanning", "Color mode", "Paper size" and "Scan Resolution".
- Scan source Specify how the original is input. When an MDF without an ADF mounted is used, do not set up scanning with use of an ADF specified. Scanning cannot be executed.
- Duplex scanning This item can be specified when "Scan source" is set to [Auto] or [Automatic Document Feeder].
- Color mode Specify one of [Color], [Gray] or [Black and white].
- Paper size Specify the size of the original to be scanned. If an original larger than the largest supported size of the model used for scanning is scanned, the part of the original protruding beyond the largest supported size cannot be scanned. When PDF is specified as the output format, the file is output enlarged/reduced to match the paper size specified here.
- Scan Resolution Specify the scan resolution (dpi).
[3] Specifying the output method
Specify the output method of the scanned data. Specify "Output Format", "Output Directory" and "Output File Name".
- Output Format Specify the file format. netpbm is required separately for formats other than "PNM", and ghostscript is required additionally for "PDF" format. Copy these from the OS installation disk or download them from the Internet, and install them.
- Output Directory Specify the directory of the output destination.
- Output File Name
Specify the file name without an extension. The output file will become the name specified here appended with “'-year/month/day/hour/minutes/seconds.
[4] Using an application
To view or further process output files on an application, specify the application to start up. To use an application, select the [Execute Application] checkbox and select the application from the [Application] list.
[5] Customizing icons
Set the icon to display in "Scan Tool". Any other image can be used in addition to the two available built-in icons. When using other images, make sure that their maximum size is 64 x 64 pixels.
4.3.1.3 Modifying Scan Configurations
Select [Modify] from the [Edit] menu of the Scan Tool menu. The "Scan Configuration" window is displayed using the settings of the selected scan configuration.
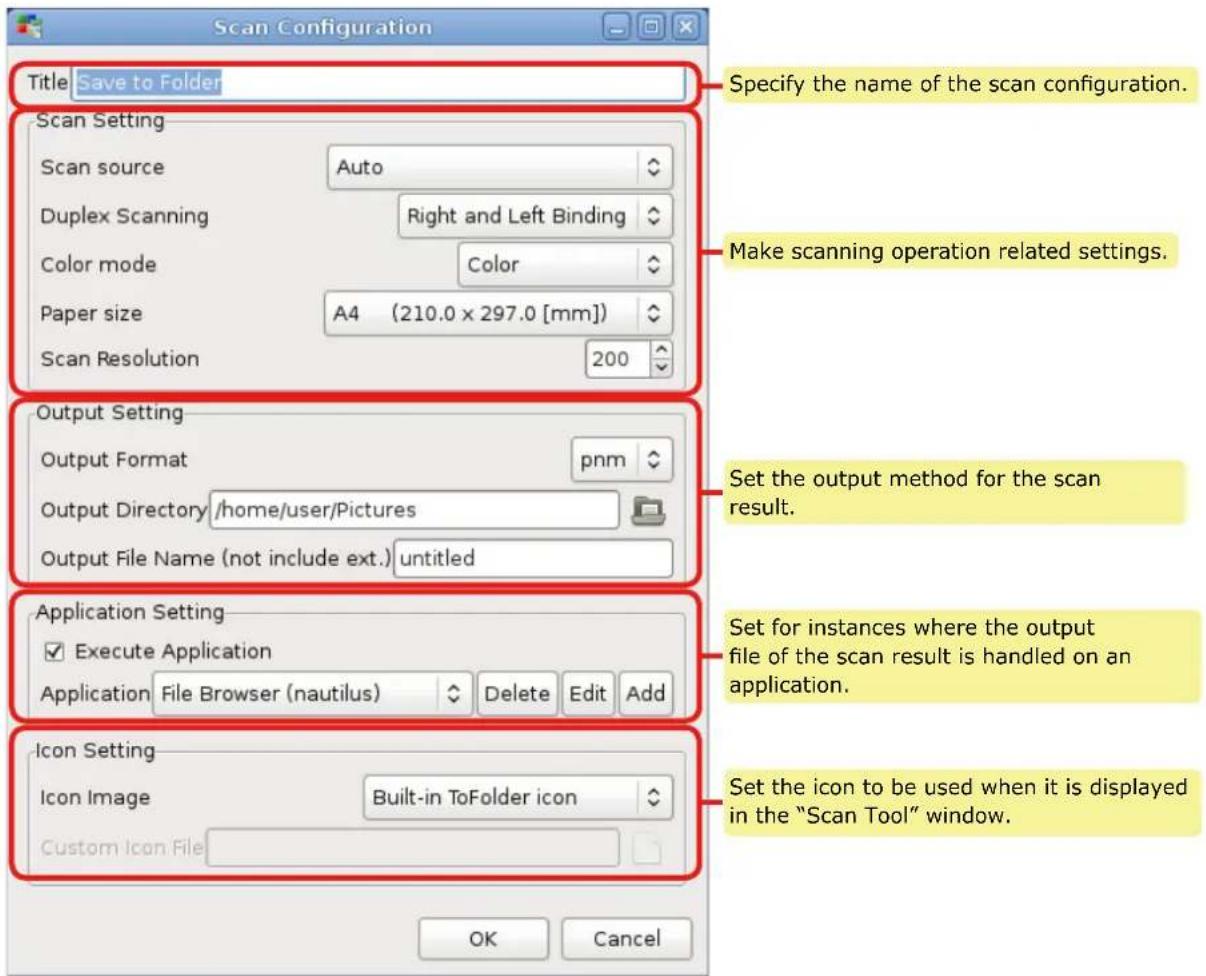
text_image
Scan Configuration Title Save to Folder Scan Setting Scan source Auto Duplex Scanning Right and Left Binding Color mode Color Paper size A4 (210.0 x 297.0 [mm]) Scan Resolution 200 Output Setting Output Format pnm Output Directory /home/user/Pictures Output File Name (not include ext.) untitled Application Setting ✓ Execute Application Application File Browser (nautilus) Delete Edit Add Icon Setting Icon Image Built-in ToFolder icon Custom Icon File OK Cancel Specify the name of the scan configuration. Make scanning operation related settings. Set the output method for the scan result. Set for instances where the output file of the scan result is handled on an application. Set the icon to be used when it is displayed in the "Scan Tool" window.4.3.1.4 Removing Scan Configurations
Select [Delete] from the [Edit] menu of the Scan Tool menu.
4.3.2 Performing a PushScan
Operate the MFP device to execute a PushScan, and save the scanned data to the PC.
4.3.2.1 Enabling PushScan
To use PushScan, the PushScan Assistant of the Scan Utility must be standing by for input of a PushScan (acceptance is started). Normally, the PushScan Assistant starts up at the same time that the "MFP Scanner applet" starts up, and is standing by for input of a PushScan (acceptance is started).
When PushScan has been accepted, the "MFP Scanner applet" menu changes to "Start accept PushScan". Also, when PushScan has not been accepted, the menu changes to "Start accept PushScan".
If the menu is "Stop accept PushScan" even though PushScan has not been accepted, select "Start accept PushScan" from the applet menu to start PushScan acceptance.
! Note
Only one PushScan acceptance can be started on the OS. "Start accept PushScan" results in an error when other users have started acceptance of PushScan.
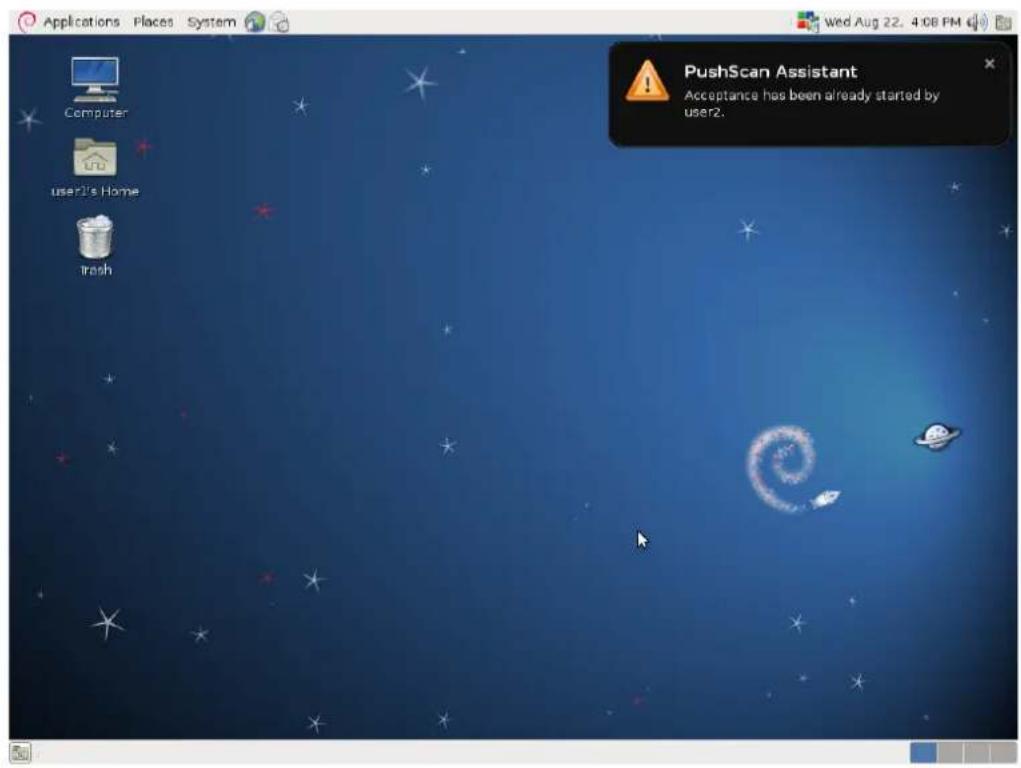
text_image
Applications Places System Wed Aug 22. 4:08 PM Computer user's Home Trash PushScan Assistant Acceptance has been already started by user2.4.3.2.2 Performing Scanning
[1] Operations on the MFP device side
PushScan is executed by operating the MFP device side.
On the MFP device side, select [SCAN]→[Local PC]→[Select A Connecting PC], select either [From Network] or [From USB Interface], and specify the PC to output the scan result to. With [From Network], select the PC from the names specified at "4.1.1 [7] Entry of PC domain name".
Next, specify either [Application] or [Folder] from [Select An Application]. (Other items are not functional.)
Finally, click the [Start] button to start scanning.
For a detailed method, refer to "Scan to Local PC" in the manual for the device.
[2] Accepting PushScan
When PushScan is accepted, a message is displayed on the PC desktop. Another message displaying scanning status also is displayed.
![OKI ES8473dnct - [2] Accepting PushScan - 1](/content/2026/05/816909/images/f03eed91df9c064129341c46a9c8a18fb81a07396097de976dd64b44e0f09ef5.jpg)
text_image
Applications Places System Computer user1's Home Trash MB471 Page 1 (wait for scan to begin...) PushScan Assistant PushScan(Scan To Application) accepted. (MB471) Fri Sep 28, 4:18 PM[3] Executing scanning
During scanning, a progress message is displayed.
![OKI ES8473dnct - [3] Executing scanning - 1](/content/2026/05/816909/images/35ebbb6e650069bf3e6d8cdd48f6479314d3d6d56849ff1649318fecae2ddf50.jpg)
text_image
Applications Places System Computer user's Home Trash MB471 Page 1 (Scanning... 50.4%)4.3.2.3 Canceling scanning
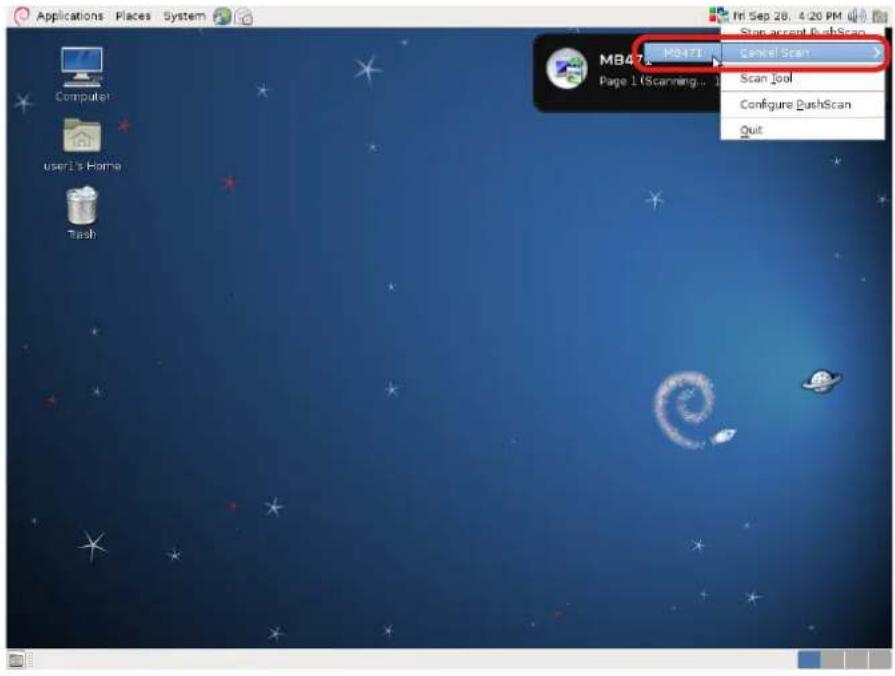
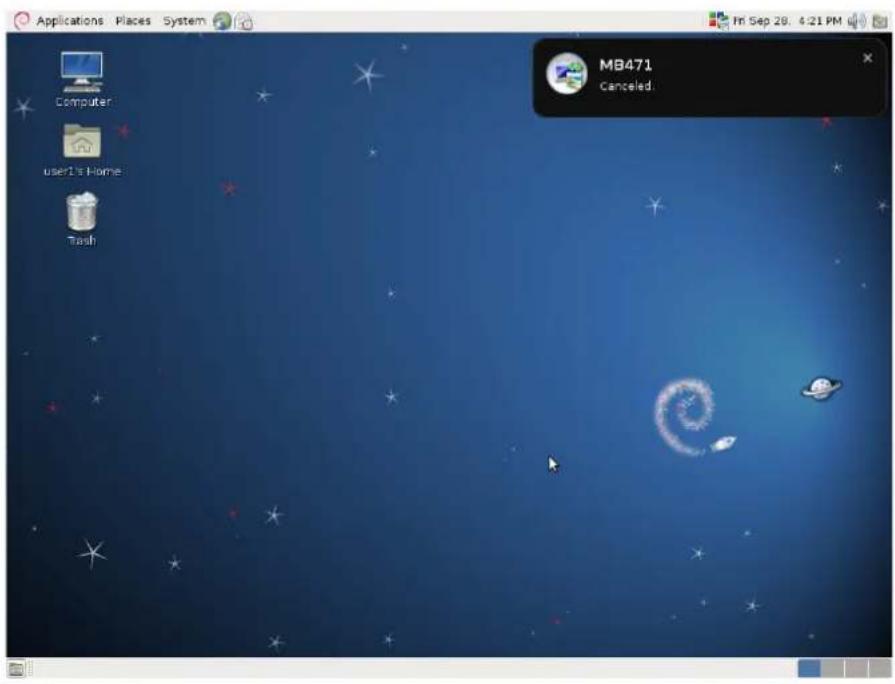
To cancel a PushScan, select [Cancel Scan] from the "MFP Scanner applet" menu, and select the corresponding device from the sub menu.
text_image
Applications Places System MB471 MB471 Scan Scan Scan Tool Configure PushScan Quit"Canceled." is displayed.
text_image
Applications Places System MB471 Canceled Computer user's Home Trash4.3.2.4 Modifying PushScan Configurations
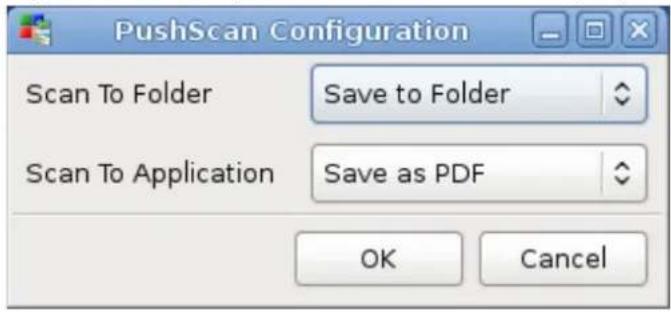
Select the scan configuration when performing Scan To Application and Scan To Folder from the dropdown list. The scan configurations set up on the Scan Tool are displayed in the dropdown list.
text_image
PushScan Configuration Scan To Folder Save to Folder Scan To Application Save as PDF OK Cancel4.3.3 Customizing Application Setting
The "Application Setting" of "Scan Configurations" can be added, modified or removed as individual settings for each individual user.
4.3.3.1 Modifying Application Configurations
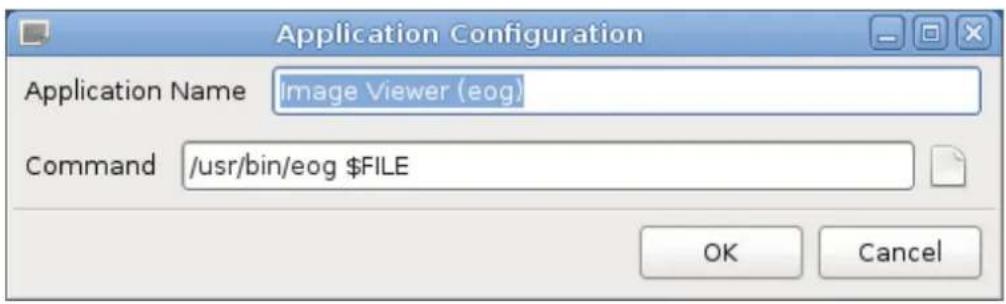
Select the [Execute Application] checkbox under "Application Setting" of "Scan Configurations". This enables operation of the application selection dropdown list and buttons. Next, click the [Edit] button.
! Note
Application configurations cannot be set independently by individual scan configuration. Content specified in application configurations is common to scan configurations within the same user.
! Note
When the application name in an application configuration used in other scan configurations has been modified, the application configuration in other scan configurations will be invalid.
text_image
Application Configuration Application Name Image Viewer (eog) Command /usr/bin/eog $FILE OK CancelEnter a unique name for the application configuration at "Application Name". At "Command", specify the command/parameter to be executed. Right-click and the file selection dialog box is displayed.
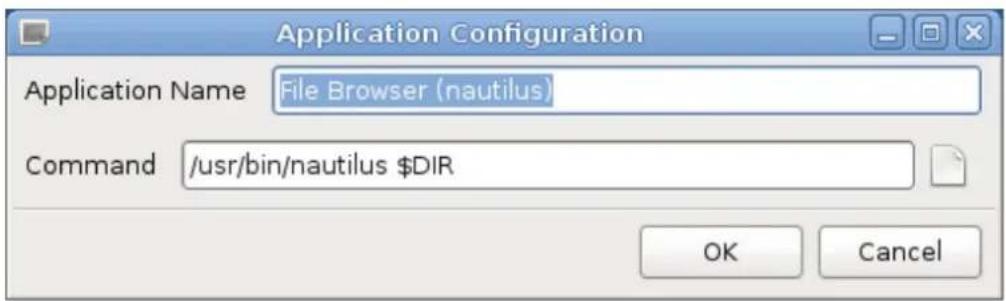
“\FILE” in the “Command” setting swaps to the output file (in the case of multiple file output, files are enumerated delimited with blanks) of the scanned data before executing the application. Otherwise, “\DIR” that indicates the output destination directory also can be specified.
text_image
Application Configuration Application Name File Browser (nautilus) Command /usr/bin/nautilus $DIR OK Cancel4.3.3.2 Adding Application Configurations
To add a new application configuration, click the [Add] button.
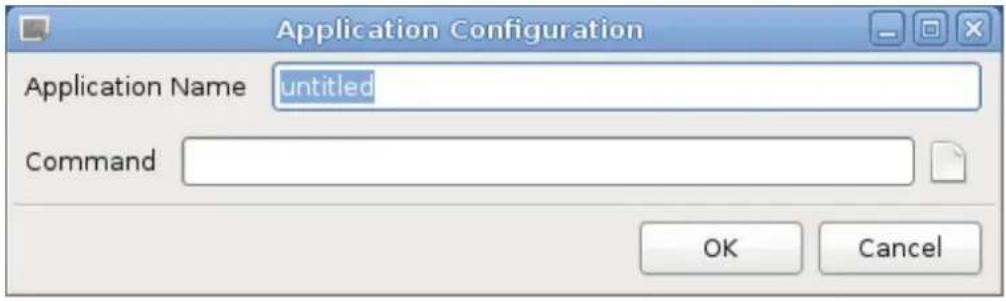
The [Application Configuration] window opens with the default "Untitled" in the "Application Name" field and the "Command" field left blank. Enter a unique application name and the command text string to start up, and click [OK].
In the command text string, include "\FILE" that indicates the output file (list) or "\DIR" that indicates the output destination directory.
text_image
Application Configuration Application Name untitled Command OK Cancel4.3.3.3 Removing Application Configurations
To remove an existing application configuration, select the application to remove and click the [Delete] button.