
C8800DTN - Printer OKI - Free user manual and instructions
Find the device manual for free C8800DTN OKI in PDF.


| Product Type | Color LED Printer |
| Model | OKI C8800DTN |
| Dimensions (WxDxH) | 485 x 556 x 345 mm (without duplex unit) |
| Weight | 36 kg (approx., without duplex unit) |
| Print Speed (Color) | Up to 26 pages per minute |
| Print Speed (Monochrome) | Up to 32 pages per minute |
| Print Resolution | 600 x 600 dpi, 1200 x 600 dpi, ProQ2400 (600 x 600 dpi x 2 bit) |
| Paper Input Capacity | Standard tray: 300 sheets; Multipurpose tray: 100 sheets; Optional 2nd tray: 530 sheets |
| Paper Output Capacity | Face-down stacker: 250 sheets; Face-up stacker: 100 sheets |
| Supported Paper Sizes | A3, A4, A5, A6 (tray 1 only), B4, B5, Legal, Letter, Executive, custom (up to 1200mm length via MP tray) |
| Duplex (Double-Sided) Printing | Standard on DN models (automatic) |
| Memory (RAM) | 256 MB standard, upgradeable to 768 MB |
| Hard Disk Drive | Optional, 40 GB |
| Connectivity | USB 2.0, Ethernet 10/100Base-TX, IEEE 1284 Parallel |
| Print Languages | PostScript 3, PCL 5c, PCL 6, HP-GL, Epson FX, IBM ProPrinter |
| Power Supply | 220-240 VAC, 50/60 Hz |
| Power Consumption | Operating: 1300W peak, 550W average; Standby: 200W; Power Save: <17W |
| Noise Level | Operating: <54 dBa; Standby: <37 dBa |
| Operating Temperature / Humidity | 10°C to 32°C / 20% to 80% RH (optimal 25°C, 50% RH) |
| Toner Life (Starter) | CMYK each: 2,000 pages at 5% coverage |
| Toner Life (Replacement) | CMYK each: 6,000 pages at 5% coverage |
| Image Drum Life | 20,000 A4 pages (average) |
| Transfer Belt Life | 80,000 A4 pages (3 pages per job average) |
| Fuser Life | 100,000 A4 pages (3 pages per job average) |
| Monthly Duty Cycle | 50,000 pages maximum; 10,000 pages average |
Frequently Asked Questions - C8800DTN OKI
User questions about C8800DTN OKI
0 question about this device. Answer the ones you know or ask your own.
Ask a new question about this device
Download the instructions for your Printer in PDF format for free! Find your manual C8800DTN - OKI and take your electronic device back in hand. On this page are published all the documents necessary for the use of your device. C8800DTN by OKI.
USER MANUAL C8800DTN OKI
natural_image
White paper printer with control panel and display screen (no visible text or symbols)PREFACE
Every effort has been made to ensure that the information in this document is complete, accurate, and up-to-date. The manufacturer assumes no responsibility for the results of errors beyond its control. The manufacturer also cannot guarantee that changes in software and equipment made by other manufacturers and referred to in this guide will not affect the applicability of the information in it. Mention of software products manufactured by other companies does not necessarily constitute endorsement by the manufacturer.
While all reasonable efforts have been made to make this document as accurate and helpful as possible, we make no warranty of any kind, expressed or implied, as to the accuracy or completeness of the information contained herein.
The most up-to-date drivers and manuals are available from the Oki Europe website:
http://www.okiprintingsolutions.com
Copyright © 2007. All rights reserved.
Oki and Microline are registered trademarks of Oki Electric Industry Company, Ltd.
Energy Star is a trademark of the United States Environmental Protection Agency.
Hewlett-Packard, HP, and LaserJet are registered trademarks of Hewlett-Packard Company.
Microsoft, MS-DOS and Windows are registered trademarks of Microsoft Corporation.
Apple, Macintosh, Mac and Mac OS are registered trademarks of Apple Computer.
Other product names and brand names are registered trademarks or trademarks of their proprietors.

As an Energy Star Program Participant, the manufacturer has determined that this product meets the Energy Star guidelines for energy efficiency.

This product complies with the requirements of the Council Directives 89/336/EEC (EMC), 2006/95/EC (LVD) and 1999/5/EC (R&TTE), as amended where applicable, on the approximation of the laws of the member states relating to Electromagnetic Compatibility, Low Voltage and Radio & Telecommunications Terminal Equipment.
EMERGENCY FIRST AID

Take care with toner powder:
If swallowed, induce vomiting and seek medical attention. Never attempt to induce vomiting if person is unconscious.
If inhaled, move the person to an open area for fresh air. Seek medical attention.
If it gets into the eyes, flush with large amounts of water for at least 15 minutes keeping eyelids open. Seek medical attention.
Spillages should be treated with cold water and soap to help reduce risk of staining skin or clothing.
IMPORTER TO THE EU
Oki Europe Limited (trading as OKI Printing Solutions)
Central House
Balfour Road
Hounslow
TW3 1HY
United Kingdom
For all sales, support and general enquiries contact your local distributor.
ENVIRONMENTAL INFORMATION
text_image
WWW.okiprintingsolutions.com OKICONTENTS
Preface 2
Emergency First Aid 3
Importer to the EU 3
Environmental Information.... 3
Contents 4
Notes, Cautions and Warnings 9
Introduction 10
Printer overview 12
Front view 12
Rear view 13
Changing the display language. 14
Paper recommendations....15
Cassette trays 16
Multi purpose tray 16
Face down stacker 17
Face up stacker 17
Duplex unit 17
Loading paper 18
Cassette trays 18
Multi purpose tray 21
A guide to printing 23
How to access the driver screens 23
Windows drivers. 23
PCL or PostScript 24
Printing preferences in Windows applications ..... 24
PostScript emulation. 25
PCL emulation 26
Changing the driver defaults 27
Windows XP/2000/Server 2003 ..... 27
Windows Vista 27
Changing the application's driver settings ..... 27
Windows 27
Macintosh 27
PCL saved driver settings 27
Saving a set of driver settings 28
Recalling saved driver settings. 28
Setting the driver device options 29
Windows 29
Mac OS X 29
Blacks and greys 30
Black overprint 30
Black printing (black generation) 31
Composite black. 31
Fine lines enhancement 36
Greyscale printing. 37
Windows 37
Mac OS X 38
Colour printing (Basics) 39
Factors that affect the appearance of prints ..... 39
Tips for printing in colour. 41
Printing photographic images. 41
Printing from office applications 41
Printing specific colours (e.g. a company logo) . . . 41
Adjusting the brightness or intensity of a print. . . . 41
Accessing the colour matching options 42
Setting the colour matching options 42
Using the colour swatch feature 44
Using the Colour Correct Utility 45
Colour matching (advanced).... 46
Basics 46
Printer colour management 47
Introduction 47
About RGB and CMYK colour 48
About the printer drivers 49
Office colour 49
Office colour - RGB options 50
Windows 51
Mac OS X 52
Customising RGB office colour with the colour correct utility (Windows) ..... 53
Graphic pro 54
Matching printer colour to an RGB input device . . . 54
Printer simulation. 54
CMYK ink simulation 54
More accurate printer colour 55
Types of ICC profile supported . . . . . . . . . . . . . . . . 55
Graphic pro workflow - overview 56
Step 1 - Gather or create the ICC profiles . . . . . . . 56
Step 2 - Down loading ICC profiles to the printer hard disk. 56
Step 3 - Select ICC profiles in the printer driver. . . 58
Matching the colour of a monitor, scanner or camera 58
Windows 59
Mac OS X 60
Simulating another printer - RGB source data ..... 63
Windows 64
Mac OS X 65
CMYK ink simulations - CMYK source data ..... 68
Windows 69
Mac OS X 70
Rendering intents 72
Perceptual 72
Saturation 72
Relative colorimetric 73
Absolute colorimetric 73
Pure black text / graphics 73
Colour match precision 73
Printer driver settings for ICC profile creation or no colour matching 74
Windows PCL 74
Mac OS X 75
Finishing options 76
Booklet printing (imposition) 77
Windows PostScript 78
Windows PCL 79
Collating 80
Windows 81
Mac OS X 81
Colour separation 83
Windows PostScript 83
Mac OS X 84
Separating queued print jobs 85
Windows separator page 85
Mac OS X cover page 86
Cover print 87
Windows PCL 87
Mac OS X 88
Custom page size 89
Windows PostScript 89
Windows PCL 91
Mac OS X 92
Duplex (double-sided) printing 93
Windows PostScript 93
Windows PCL 94
Mac OS X 95
Printing multiple pages on one sheet (N-up) ..... 96
Windows PostScript 96
Windows PCL 97
Mac OS X 98
Poster printing 99
Windows PCL 99
Scale to page .....100
Watermarks....101
Windows....101
Security 103
Secure printing.....103
Sending the document .....103
Printing the document .....105
Deleting a secure print document.....105
Store to hard disk....106
Sending the document .....107
Printing the document .....107
Deleting a stored document.....107
Encrypted secure printing .....108
Sending the document .....108
Printing the document .....110
Menu functions ..... 111
Operator Panel:....111
How to change the settings - User .....112
How to change the settings - Administrator .....113
Menus....114
Print jobs menu .....114
Information menu 114
Shutdown menu....115
Print menu 115
Media menu....119
Colour menu .....121
System configuration menu .....123
PCL emulation .....124
PPR emulation ....125
FX emulation .....127
Parallel Menu 128
USB menu 129
Network menu .....129
Maintenance menu 131
Usage menu 132
Job log menu....132
Replacing consumable items.... 133
Consumable order details 134
Toner cartridge replacement .....135
Image drum replacement .....140
Transfer belt replacement .....144
Fuser replacement .....147
Cleaning the LED head .....149
Installing upgrades.... 150
Duplex unit .....150
Memory upgrade .....152
Hard disk drive....157
Additional paper tray. 160
Adjusting Windows printer drivers .....161
Clearing paper jams 162
Major printer components and paper path .....162
Paper sensor error codes....163
Specifications 172
Index.... 175
Oki contact details 178
NOTES, CAUTIONS AND WARNINGS
NOTE:
A note appears in this manual like this. A note provides additional information to supplement the main text which may help you to use and understand the product.
CAUTION!
A caution appears in this manual like this. A caution provides additional information which, if ignored, may result in equipment malfunction or damage.
WARNING!
A warning appears in this manual like this. A warning provides additional information which, if ignored, may result in a risk of personal injury.
INTRODUCTION
Congratulations on buying this Oki Printing Solutions colour printer. Your new printer is designed with advanced features to give you clear, vibrant colour prints and crisp black and white pages at high speed on a range of print media for the office.
Your printer includes these features:
Compact A3 desktop footprint;
ProQ2400 multi-level technology produces subtler tones and smoother graduations of colour to lend photographic quality to your documents;
Up to 26 pages per minute in full colour for fast printing of high impact colour presentations and other documents;
Up to 32 pages per minute in black and white for fast and efficient printing of all general purpose documents not requiring colour;
600 x 600, 1200 x 600 dpi (dots per inch) and ProQ2400 print resolution for high quality image production showing the finest detail;
Single Pass colour Digital LED technology for high speed processing of your printed pages;
Profile Assistant utility allows you to download ICC profiles to the hard disc (Hard Disc Drive required);
PostScript 3, PCL 5C, PCL 6 and Epson FX emulations for industry standard operation and wide compatibility with most computer software;
Secure encrypted printing - allows you to print confidential documents on printers that are shared with other users in a network environment;
10Base-T and 100Base-TX network connection lets you share this valuable resource among users on your office network;
Photo Enhance mode allows printing of sharp, photo-like images on ordinary office quality paper;"Ask Oki" – a user-friendly function for Windows that gives a direct link from your printer driver screen to a dedicated web site specific to the exact model you are using. This is where you'll find all the advice, assistance and support you could need to help you get the best possible results from your Oki printer;
"WebPrint Internet Explorer 6.0 plugin" - a new function for Windows that enables you to print web pages properly;
Template Manager 2006 utility for Windows enables the design and print of Business cards, banners, labels with ease;
Support for Windows Vista operating system.
Additionally, the following optional features are also available:
Automatic two-sided (duplex) printing for economical use of paper and compact printing of larger documents (standard on dn models);
Additional paper tray for loading a further 530 sheets to minimise operator intervention, or different paper stocks for letterhead stationery, alternative paper sizes or other print media;
Additional memory allows printing of more complex pages. For example, high resolution banner printing;
Internal hard disk drive for Secure printing, storage of overlays, macros and downloadable fonts, and automatic collation of multiple copies of multipage documents and the download of ICC Profiles;
Storage Cabinet.
PRINTER OVERVIEW
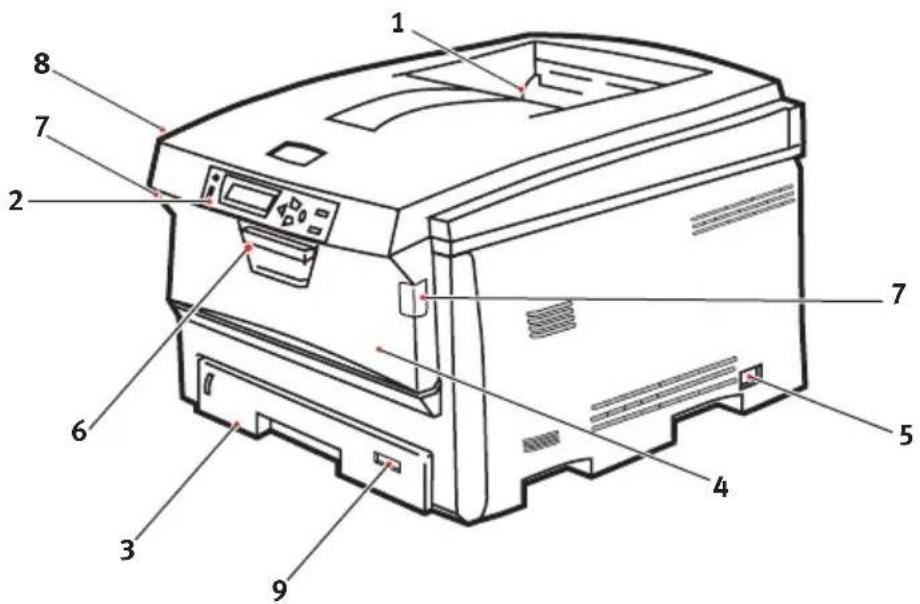
FRONT VIEW
text_image
Labeled diagram of a printer with numbered parts for identification1. Output stacker, face down.
Standard printed copy delivery point. Holds up to 250 sheets at 80g/m ^4 .
2. Operator panel.
Menu driven operator controls and LCD display panel.
3. Paper tray.
Standard blank paper tray. Holds up to 300 sheets of 80g/m² paper.
4. Multi purpose tray.
Used for feeding heavier paper stocks, envelopes and other special media. Also for manual feeding of single sheets when required.
5. ON/OFF switch.
- Front cover release lever.
- Multi-purpose tray release lever
- Top cover release button.
- Paper size
The LCD display language can be changed to show different languages. (See "Changing the display language" on page 14.)
REAR VIEW
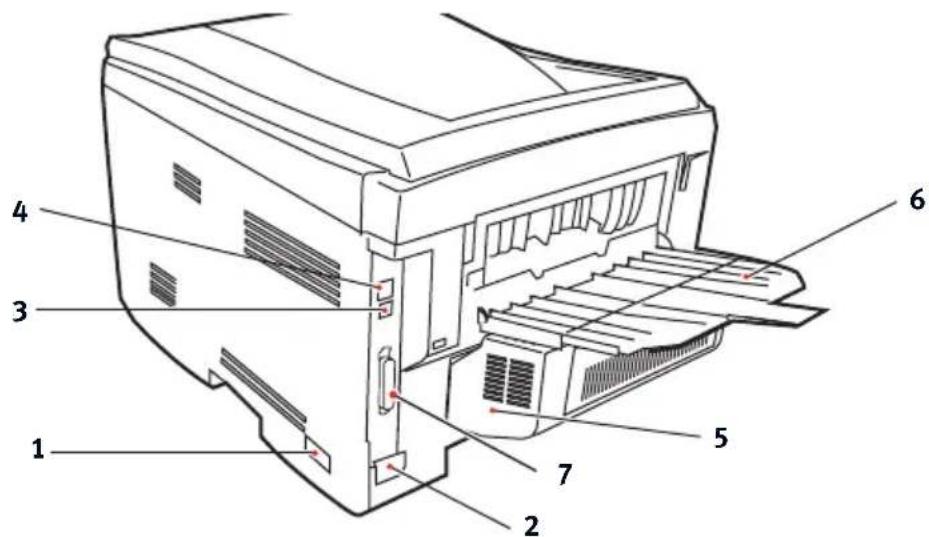
This view shows the connection panel, the rear output stacker and the location of the optional duplex (two-sided printing) unit.
text_image
Technical diagram of a printer internal structure with numbered parts labeled 1 through 7-
ON/OFF switch.
-
AC power socket.
-
USB interface.
-
Network interface.*
-
Duplex unit (when fitted).
-
Rear, face up, 100 sheet stacker.
-
Parallel port
* The Network Interface has a protective "plug" which must be removed before connection can be made.
When the rear paper stacker is folded down paper exits the printer through the rear of the printer and is stacked here face up. This is mainly used for heavy print media. When used in conjunction with the multi purpose feed tray, the paper path through the printer is essentially straight. This avoids bending the paper around curves in the paper path and enables feeding of up to 200g / m^2 media.
CHANGING THE DISPLAY LANGUAGE
The default language used by your printer for display messages and for report printing is English. If required, this can be changed to:
German Danish
French Dutch
Italian Turkish
Spanish Portuguese
Swedish Polish
Russian Greek
Finnish Czech
Hungarian Norwegian
NOTE:
-
The list above is neither conclusive nor exhaustive.
-
See the information enclosed with the product (Operator Panel Language Set-up utility) on the procedure for changing the language setting.
PAPER RECOMMENDATIONS
Your printer will handle a variety of print media, including a range of paper weights and sizes, transparencies and envelopes. This section provides general advice on choice of media, and explains how to use each type.
The best performance will be obtained when using standard 75\~90g/m² paper designed for use in copiers and laser printers. Suitable types are:
Arjo Wiggins Conqueror Colour Solutions 90g/m²;
Colour Copy by Neusiedler.
Use of heavily embossed or very rough textured paper is not recommended.
Pre-printed stationery can be used, but the ink must not offset when exposed to the high fuser temperatures used in the printing process.
Envelopes should be free from twist, curl or other deformations.
They should also be of the rectangular flap type, with glue that remains intact when subjected to hot roll pressure fusing used in this type of printer. Window envelopes are not suitable. Envelopes should be handled by the Multi Purpose tray.
Transparencies should be of the type designed for use in copiers and laser printers. We strongly recommend Oki Printing Solutions transparencies (Order No. 01074101). In particular, avoid office transparencies designed for use by hand with marker pens. These will melt in the fuser and cause damage. Transparencies should be handled by the Multi Purpose tray.
Labels should also be of the type recommended for use in copiers and laser printers, in which the base carrier page is entirely covered by labels. Other types of label stock may damage the printer due to the labels peeling off during the printing process.
CASSETTE TRAYS
| SIZE DIMENSIONS WEIGHT (G/M2) | ||
| A6 (Tray 1 only) | 105 x 148mm | Light 64-82g/m2Medium 83-105g/m2Heavy 106-128g/m2Ultra heavy 129-200g/m2(>176g/m2 - MP Tray only) |
| A5 148 x 210mm | ||
| B5 182 x 257mm | ||
| Executive 184.2 x 266.7mm | ||
| A4 210 x 297mm | ||
| B4 250 x 353mm | ||
| A3 420 x 297mm | ||
| Letter 215.9 x 279.4mm | ||
| Legal 13in. 216 x 330mm | ||
| Legal 13.5in. 216 x 343mm | ||
| Legal 14in. 216 x 356mm | ||
If you have identical paper stock loaded in another tray (2nd tray if you have one, or multi purpose tray) you can have the printer automatically switch to the other tray when the current tray runs out of paper. When printing from Windows applications, this function is enabled in the driver settings. (See "Printer Settings in Windows" later in this guide.) When printing from other systems, this function is enabled in the Print Menu. (See "Menu Functions" later in this guide.)
If fitted, tray 2 may be removed and replenished while the machine is being fed from tray 1. Tray 1 cannot be removed while the machine is being fed from tray 2, because parts of tray 1 are used to guide paper fed from tray 2.
MULTI PURPOSE TRAY
The multi purpose tray can handle the same sizes as the cassette trays but in weights up to 200g/m^2 (Ultra heavy). For very heavy paper stock use the face up (rear) paper stacker. This ensures that the paper path through the printer is almost straight.
The multi purpose tray can feed paper widths as small as 100mm and lengths up to 1200mm (banner printing).
For paper lengths exceeding 431.8mm use paper stock up to 128g/m^2 and the face up (rear) paper stacker.
Use the multi purpose tray for printing on envelopes and transparencies. Up to 50 sheets of transparencies or 10 envelopes can be loaded at one time, subject to a maximum stacking depth of 10mm.
Paper or transparencies should be loaded print side up and top edge into the printer. Do not use the duplex (two-sided printing) function.
FACE DOWN STACKER
The face down stacker on the top of the printer can hold up to 250 sheets of 80g/m^2 standard paper, and can handle paper stocks up to 176g/m^2 . Pages printed in reading order (page 1 first) will be sorted in reading order (last page on top, facing down).
FACE UP STACKER
The face up stacker at the rear of the printer should be opened and the tray extension pulled out when required for use. In this condition paper will exit via this path, regardless of driver settings.
The face up stacker can hold up to 100 sheets of 80g/m^2 standard paper, and can handle stocks up to 200g/m^2 .
Always use this stacker and the multi purpose feeder for paper stocks heavier than 176g/m^2 .
DUPLEX UNIT
This option provides automatic two-sided printing on the same range of paper sizes as tray 2 (i.e. all cassette sizes except A6), using paper stocks from 64-105g/m ^2 .
NOTE:
The duplex unit comes as standard with dn models.
LOADING PAPER
CASSETTE TRAYS
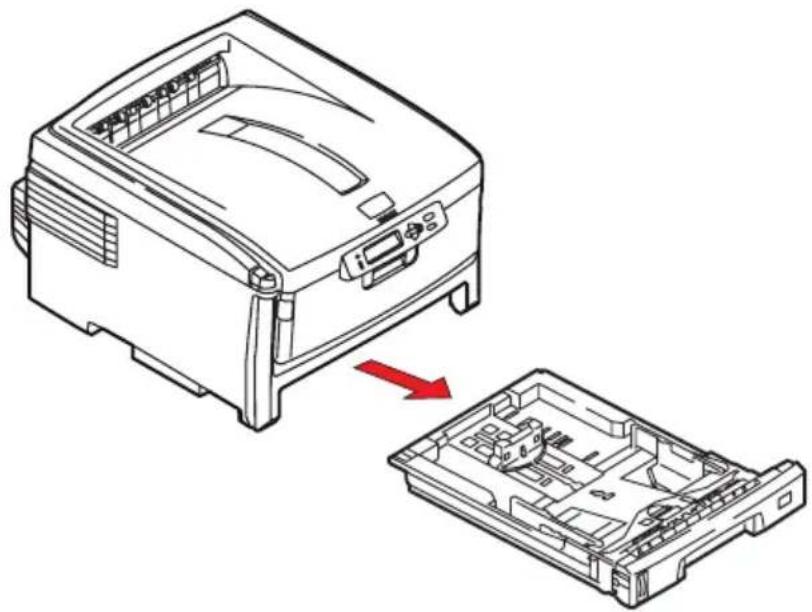
- Remove the paper tray from the printer.
natural_image
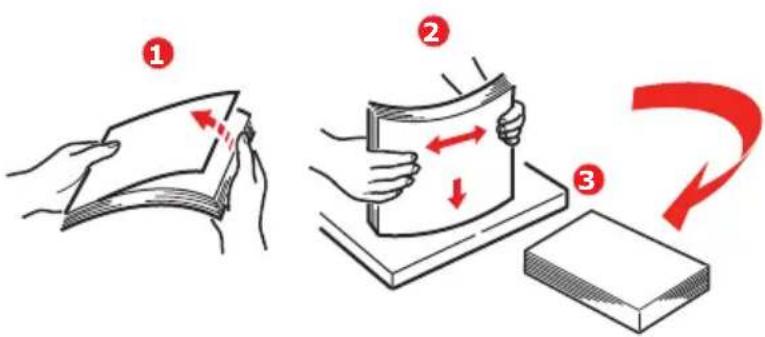
Line drawing of a printer with an open lid and internal compartments, showing a red arrow indicating the process (no text or symbols present)- Fan the paper to be loaded at the edges (1) and in the middle (2) to ensure that all sheets are properly separated, then tap the edges of the stack on a flat surface to make it flush again (3).
text_image
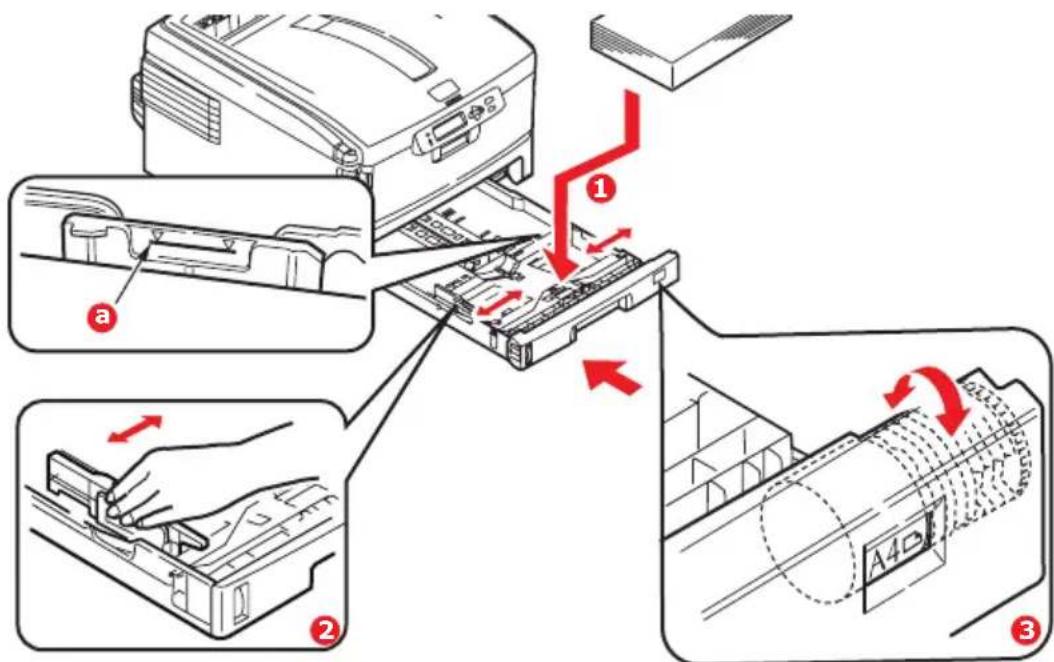
Illustration showing three-step folding process: folding paper, holding a card, and cutting a block with red curved arrow indicating rotation.- Load paper long edge feed (LEF) (letter headed paper - face down and top edge towards the right of the printer) (1) up to mark (a).
text_image
Diagram illustrating the process of printer internal structure with labeled steps and directional arrows indicating movement.- Adjust the rear stopper and paper guides (2) to the size of paper being used. For A6 paper, remove and re-install in the A6 position.
To prevent paper jams:
Do not leave space between the paper and the guides and rear stopper.
Do not overfill the paper tray. Capacity depends on the type of paper stock.
Do not load damaged paper.
Do not load paper of different sizes or types at the same time.
Do not pull the paper tray out during printing (except as described below for the 2nd tray).
Close the paper tray gently.
CAUTION!
IMPORTANT: Set paper size dial (3) to the size of paper being used (A4 in the above example).
-
If you have two trays and you are printing from the 1st (upper) tray, you can pull out the 2nd (lower) tray during printing to reload it. However, if printing from the 2nd (lower) tray, do not pull out the 1st (upper) tray. This will cause a paper jam.
-
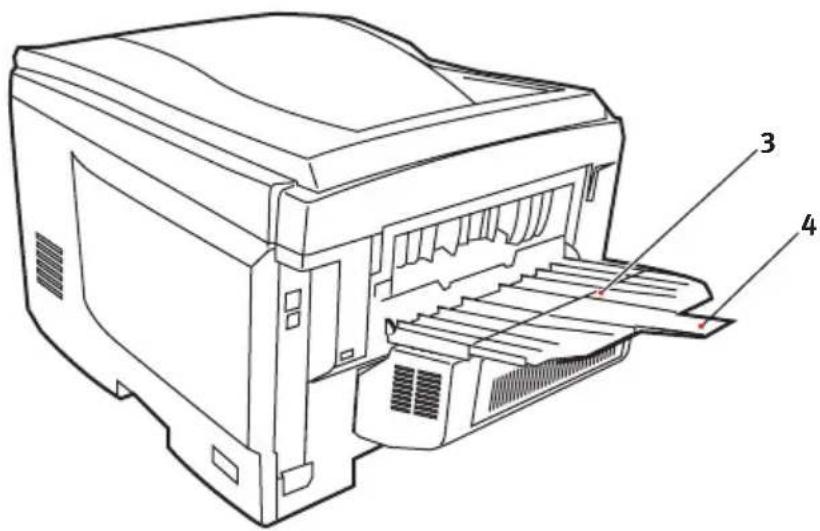
For face down printing, make sure the face up (rear) stacker (3) is closed (the paper exits from the top of the printer). Stacking capacity is approximately 250 sheets, depending on paper weight.
-
For face up printing, make sure the face up (rear) stacker (3) is open and the paper support (4) is extended. Paper is stacked in reverse order and tray capacity is approximately 100 sheets, depending on paper weight.
-
Always use the face up (rear) stacker for heavy paper (card stock etc.).
text_image
Technical line drawing of a printer with labeled parts 3 and 4CAUTION!
Do not open or close the rear paper exit while printing as it may result in a paper jam.
MULTI PURPOSE TRAY
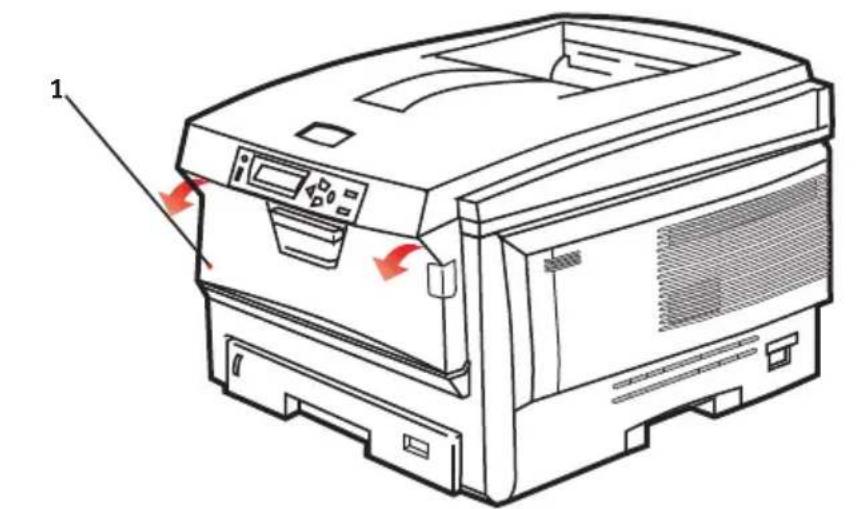
- Open the multi purpose tray (1).
- Fold out the paper supports (2).
natural_image
Line drawing of a printer with control panel and ventilation slots, showing internal components without any text or symbols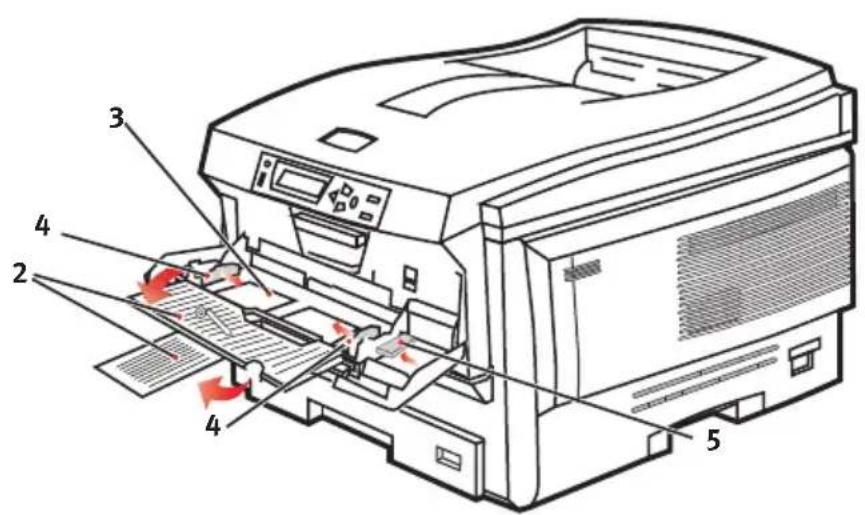
text_image
Technical diagram of a printer with numbered parts and red arrows indicating motion or assembly steps- Press gently down on the paper platform (3) to ensure it is latched down.
- Load the paper and adjust the paper guides (4) to the size of paper being used.
For single-sided printing on headed paper load the paper into the multi purpose tray with pre-printed side up and top edge into the printer.
For two-sided (duplex) printing on headed paper load the paper with pre-printed side down and top edge away from the printer. (Optional duplex unit must be installed for this function.)
Envelopes should be loaded face up with top edge to the left and short edge into the printer. Do not select duplex printing on envelopes.
Do not exceed the paper capacity of about 100 sheets or 10 envelopes. Maximum stacking depth is 10mm.
- Press the tray latch button (5) inwards to release the paper platform, so that the paper is lifted and gripped in place.
Set the correct paper size for the multi purpose tray in the Media Menu (see "Menu Functions").
A GUIDE TO PRINTING
This Chapter provides a convenient on-screen reference to the many features of the driver software supplied with your printer.
How to access the driver screens
Most of the features described are accessed via the printer driver screens. How you access them depends on your computer and its operating system.
WINDOWS DRIVERS
The driver windows are tabbed dialogue boxes, offering a wide range choices about how you want to print your documents.
There are two ways to access the driver features from within Windows:
- Directly from the Windows "Printers" folder ("Printers and Faxes" folder in Windows XP).
If you choose this method any changes you make will become the driver defaults. This means they will remain active for all your applications unless you specifically change them from within the application's Print dialogue.
- From your application's Print dialogue.
If you choose this method any changes you make will usually only last for as long as the particular application is running, or until you change them again. In most cases, once you quit the application the driver defaults will return.
NOTE:
Settings made from the printer's own control panel are the printer defaults. They determine how your printer will behave unless you specify otherwise from your computer.
The driver defaults override the printer defaults.
Application Print settings override both the printer defaults and the driver defaults.
PCL OR POSTSCRIPT
Three printer drivers are supplied with your printer: one for PCL5c emulation, one for PCL6 emulation, and the other for PostScript 3 emulation. If you print mainly from general "Office" applications choose one of the PCL drivers. For faster printing of PDF documents, choose PostScript. If you print mainly from professional DTP and graphics applications, choose PostScript.
PRINTING PREFERENCES IN WINDOWS APPLICATIONS
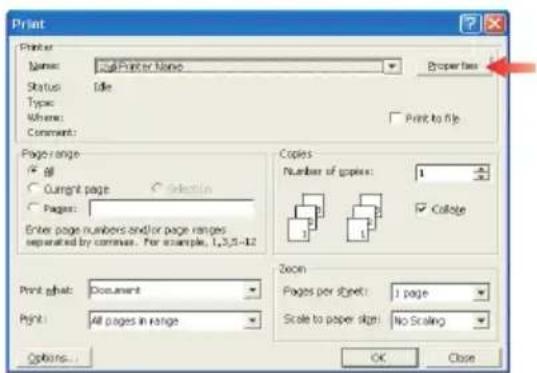
When you choose to print your document from a Windows application program a print dialogue box appears. This dialogue usually specifies the name of the printer on which you will print your document. Next to the printer name is a Properties button.
text_image
Print Printer: Name: Real Printer Name Status: Idle Type: Where: Comment: Print to file Page range: All Current page Selection Pages: Enter page numbers and/or page ranges separated by common. For example, 1,3,5-12 Print page: Document Print: All pages in range Copies Number of copies: 1 College Zoom Pages per sheet: 1 page Scale to paper size: No Scaling Options... OK CloseWhen you click Properties a new window opens which contains a short list of the printer settings available in the driver, which you can choose for this document.
The window which opens when you click Properties depends on which printer driver has been installed. The PostScript driver offers different choices to the PCL driver.
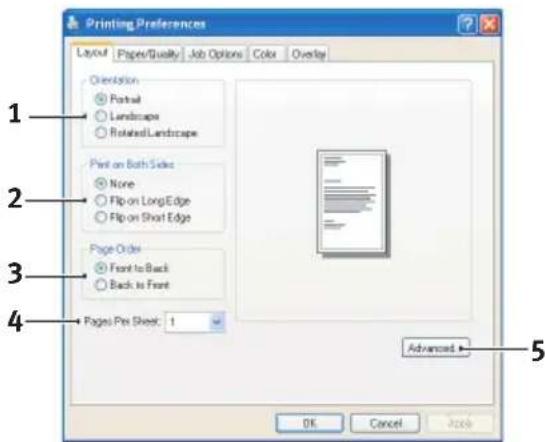
POSTSCRIPT EMULATION
-
Page orientation sets portrait (tall) or landscape (wide) page orientation. The "rotated" rotates the paper through 90 degrees anti-clockwise.
-
When printing double sided pages (duplex unit required). You can flip the paper either on its long edge or short edge.
text_image
Printing Preferences Layout Paper/Quality Job Options Color Overlay Orientation ● Portrait ○ Landscape ○ Rotated/Landscape Print on Both Side ● None ○ Flip on LongEdge ○ Flip on Short Edge Page Order ● Front to Back ○ Back to Front Pages Per Sheet: 1 Advanced OK Cancel Tools-
Pages can be printed in forward or reverse order. If using the face down (top) paper stacker, forward order is usually appropriate to ensure that pages are stacked in numerical order. If using the face up (rear) paper stacker, reverse order would normally stack your pages in numerical order.
-
You can specify how many pages to print on a sheet. Pages will be scaled to fit the number you choose. If you choose booklet printing (requires duplex unit) two pages will automatically be set, and pages will be printed with the correct pages opposite one another so that folding the stacked printout produces a booklet.
-
Advanced options are also available, such as how to download TrueType fonts, and whether advanced options such as booklet printing are available.
The printer driver contains extensive on-line help for these items to help you make the most appropriate choices.
PCL EMULATION
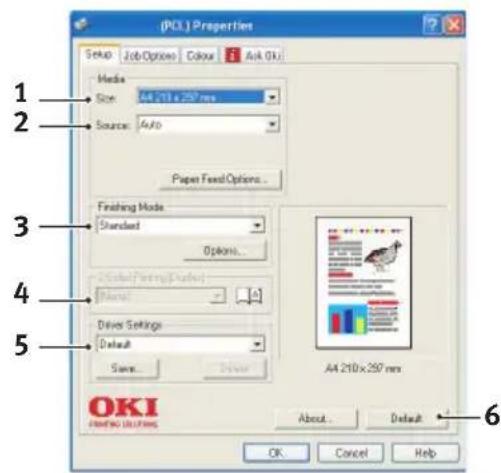
When you click the Properties button from your application's Print dialogue, the driver window opens to allow you to specify your printing preferences for this document.
-
Paper size should be the same as the page size of your document (unless you wish to scale the printout to fit another size), and should also be the same as the size of paper you will feed into the printer.
-
You can choose the source of the paper to feed, which may be Tray 1 (the
text_image
(KCI.) Properties Setup Job Options Colour Ask OKI Media Size: A4 210 x 250 mm Source: Auto Paper Feed Options... Finishing Mode: Standard Options... (A4 210 x 250 mm) Driver Settings Default Save... Driver OKI FINDING SOLUTIONS About. Default OK Cancel Helpstandard paper tray), Tray 2 (if you have the optional 2nd paper tray installed) or the multi purpose feeder. You can also click on the appropriate part of the screen graphic to select your preferred tray.
- A variety of document finishing options can be selected, such as normal one page per sheet, or N-up (where N can be any number up to 16) for printing scaled down pages at more than one page per sheet. Booklet printing prints two pages per sheet on each side of the paper so that when folded they make up a booklet. Booklet printing requires the duplex unit to be installed in your printer.
Poster printing will print large pages as tiles spread over multiple sheets.
-
For two-sided printing, you can choose to flip the page by the long edge or the short edge. Of course, this requires that a duplex unit be installed in your printer.
-
If you have changed some printing preferences before and saved them as a set, you can recall them to avoid having to set them individually each time you need them.
-
A single on-screen button restores the default settings.
CHANGING THE DRIVER DEFAULTS
WINDOWS XP/2000/SERVER 2003
- Click [Start] → [Printers and Faxes] to open the Printers and Faxes window.
- In the Printers and Faxes window, right-click on the appropriate printer driver icon, and choose [Printing Preferences] from the context menu.
WINDOWS VISTA
- Click [Start] → [Control Panel] → [Printers] to open the Printers window.
- In the Printers window, right-click on the appropriate printer driver icon, and choose [Printing Preferences] from the context menu.
CHANGING THE APPLICATION'S DRIVER SETTINGS
WINDOWS
- In your application, open the file you want to print.
- On the [File] menu, choose [Print...].
- In the application's Print dialogue, make sure the printer shown is the appropriate one, and click [Properties].
MACINTOSH
The Mac user interface is very different to that in Windows. In particular, OS X differs considerably from previous versions. Full instructions are therefore included with each procedure.
PCL SAVED DRIVER SETTINGS
This feature, unique to the Windows PCL drivers, allows you to save the printer driver settings and reuse them later. This could be useful if you frequently print many different types of document that require different printer driver settings.
Recalling saved settings in the PCL drivers is a simple task that must be done first, before any job-specific changes are made. Rather than repeat the procedure throughout this manual, it is described here.
SAVING A SET OF DRIVER SETTINGS
-
Make any changes to the driver settings you want, as described in the relevant section of this manual.
-
In the driver's [Setup] tab, click [Save...].
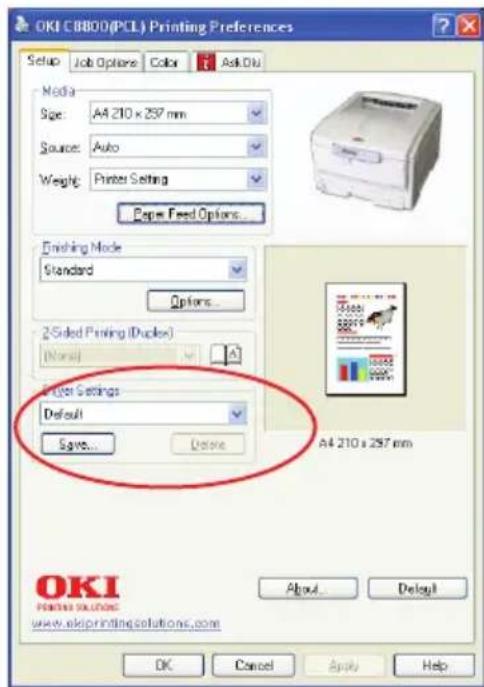
text_image
OKI C8800(PCL) Printing Preferences Setup Job Options Color Ask Dia Media Size: A4 210 x 257 mm Source: Auto Weight: Printer Setting Paper Feed Options... Finishing Mode Standard Options... 2-Sided Printing (Dukes) Normal Printer Settings Default Save... Delete A4 210 x 257 mm OKI Printing Solutions www.okiprinting.solutions.com About Cancel Apply Help- Enter a meaningful name for the settings you are saving, and click [OK].
RECALLING SAVED DRIVER SETTINGS
-
In the driver's [Setup] tab, choose any previously saved [driver settings] you need.
-
Proceed to make any other adjustments for this job, as described in the relevant section in this manual.
SETTING THE DRIVER DEVICE OPTIONS
This section explains how to ensure that your printer driver can utilize all of the hardware features installed in your printer.
Accessories such as hard disk, duplex unit (two sided printing), additional paper trays, etc., will only be usable if the printer driver on your computer knows they are there.
In some cases the hardware configuration of your printer is automatically detected when the driver is installed. However, it is advisable to at least check whether all of the available hardware features are listed in the driver.
This procedure is essential if you subsequently add extra hardware features to your printer after the drivers have been installed and set up.
WINDOWS
- Access the driver's [Properties] window. ("Changing the application's driver settings" on page 24)
- Select the [Device Options] tab.
- In the Windows XP PostScript driver the tab may be called "Device Settings".
- Set the options for any devices you have installed, including the correct number of paper trays, high capacity feeder, duplex unit, etc.
- Click [OK] to close the window and save your changes.
MAC OS X
- Open the Printer Setup Utility (OS X 10.3) or Printer Center (OS X earlier versions), and ensure that your printer model is selected.
- Choose [Printers] → [Show Info] → [Installable Options].
- Select all hardware options appropriate to your printer, and click [Apply Changes].
BLACKS AND GREYS
BLACK OVERPRINT
Black overprint eliminates the white edge between the printed fonts and the coloured background.
Black overprint can only be used when printing 100 percent black text over a background colour.
Black Overprint may not be available with some software applications.
NOTE:
-
The Black Overprint feature is not included in the Windows PCL 6 driver.
-
When the background colour is very dark, the toner may not fuse correctly. Change the background colour to a lighter colour.
Windows
- On the [Job Options] tab, click [Advanced].
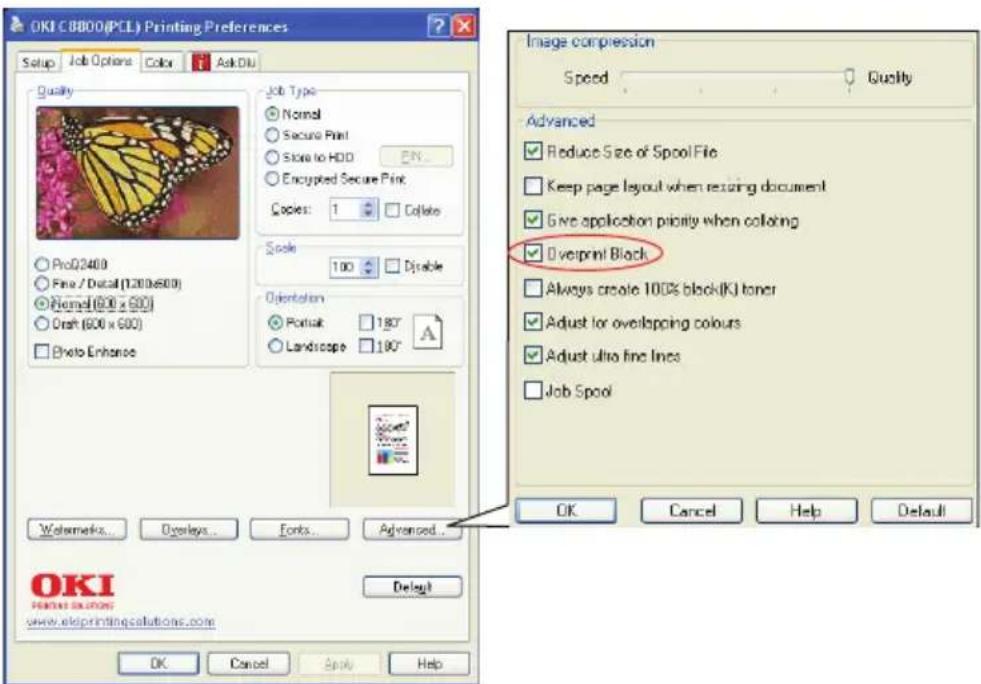
text_image
OKI C8800(PCL) Printing Preferences Setup Job Options Color Ask Diu Quality Normal Secure Print Store to HDD PN... Encrypted Secure Print Copies: 1 Collate Spool 100 Disable Orientation Portrait 180° Landscape 190° Watermarks... Displays... Fonts... Advanced... OK Cancel Help Default OK Cancel Help Default Image compression Speed Quality Advanced Reduce Size of Spool File Keep page layout when resizing document Give application priority when collating Overprint Block Always create 100% black(K) toner Adjust for overlapping colours Adjust ultra fine lines Job Spool OK Cancel Help Default OK Cancel Help Default OK Cancel Help- Check [Black Overprint].
Mac OS X
- Choose [File] → [Print].
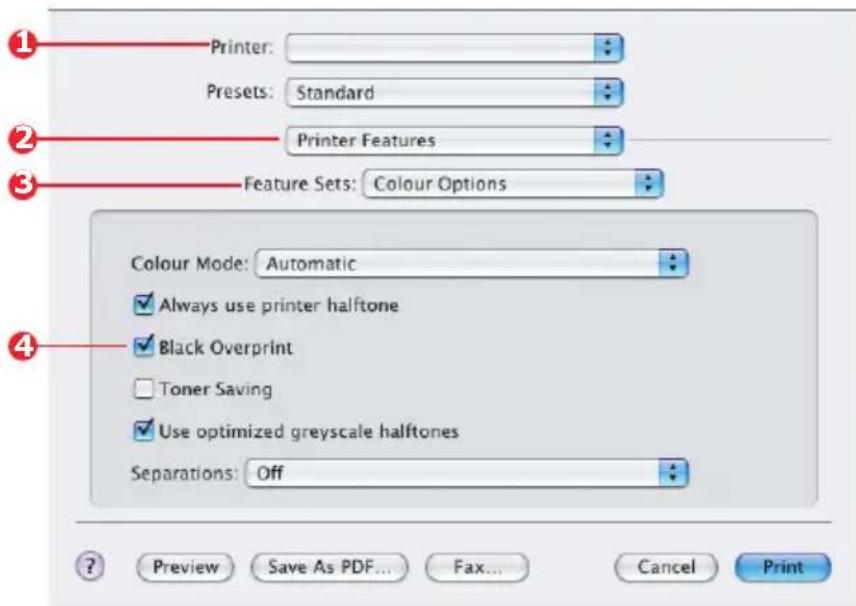
text_image
Printer: Presets: Standard Printer Features Feature Sets: Colour Options Colour Mode: Automatic Always use printer halftone Black Overprint Toner Saving Use optimized greyscale halftones Separations: Off Preview Save As PDF... Fax... Cancel Print-
From the [Printer] menu (1), select your printer model.
-
Select [Printer Features] (2).
-
From the [Feature Sets] menu (3), select [Colour Options].
-
Select the [Black Overprint] checkbox (4).
BLACK PRINTING (BLACK GENERATION)
To use Black Generation, Office Colour or Graphic Pro must be the selected Print Mode.
Your printer prints the colour black in one of two ways: Composite Black or True Black.
COMPOSITE BLACK
The cyan, magenta, yellow, and black toners are combined to create composite black.
This will sometimes give a glossier finish, due to the increased amount of toner. It can also sometimes appear as a slightly brownish black.
Use composite black when printing photographs.
TRUE (PURE) BLACK
Only black toner is used to print true black.
Use True Black when printing a combination of text and graphics. If you use True Black to print photographs, dark sections of the photos may appear black.
Windows (Office Colour)
- On the driver's [Colour] tab, select [Office Colour] (1) and click the [Options] button.
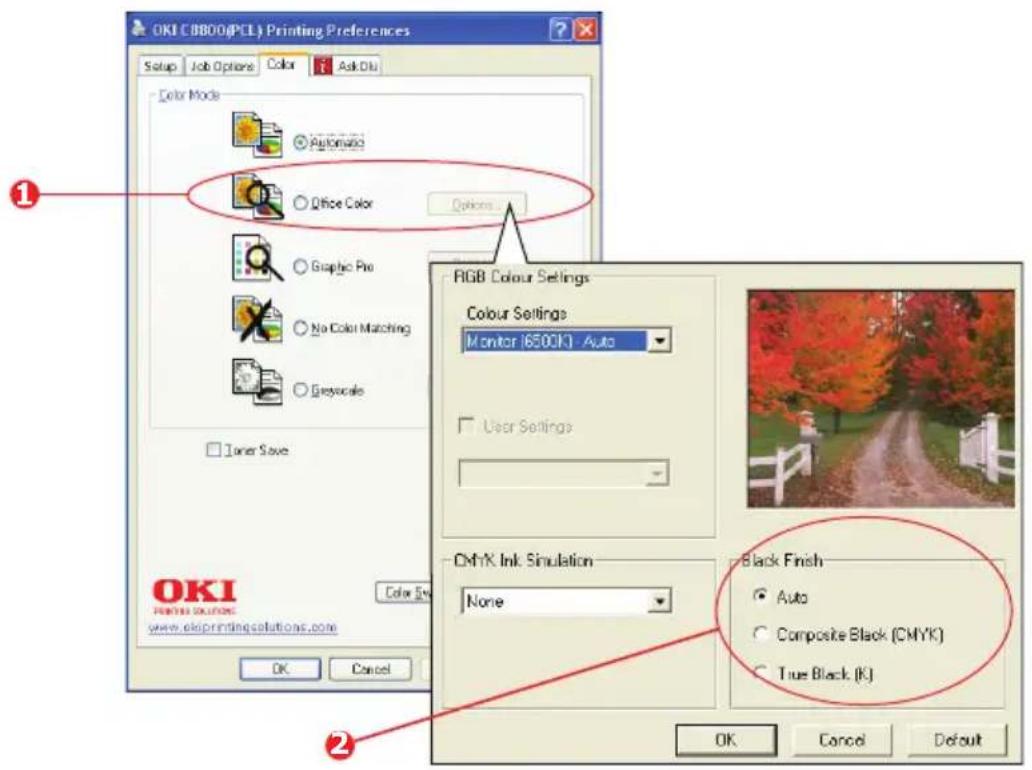
text_image
OKI CBB00(PCL) Printing Preferences Setup Job Options Color Ask Dlu Color Mode Automatic Office Color Options Graphic Pro No Color Matching Greyscale Timer Save RGB Colour Settings Colour Settings Monitor (6500K) - Auto User Settings CMYK Ink Simulation None Black Finish Auto Composite Black (CMYK) True Black (K) OK Cancel Default OK Cancel Default OK Print Solutions www.ekisprinting.solutions.com- On [Black Finish] (2), make your selection: [Auto] (allow printer to choose the best method depending on page content), [True Black] or [Composite Black].
Windows (Graphic Pro)
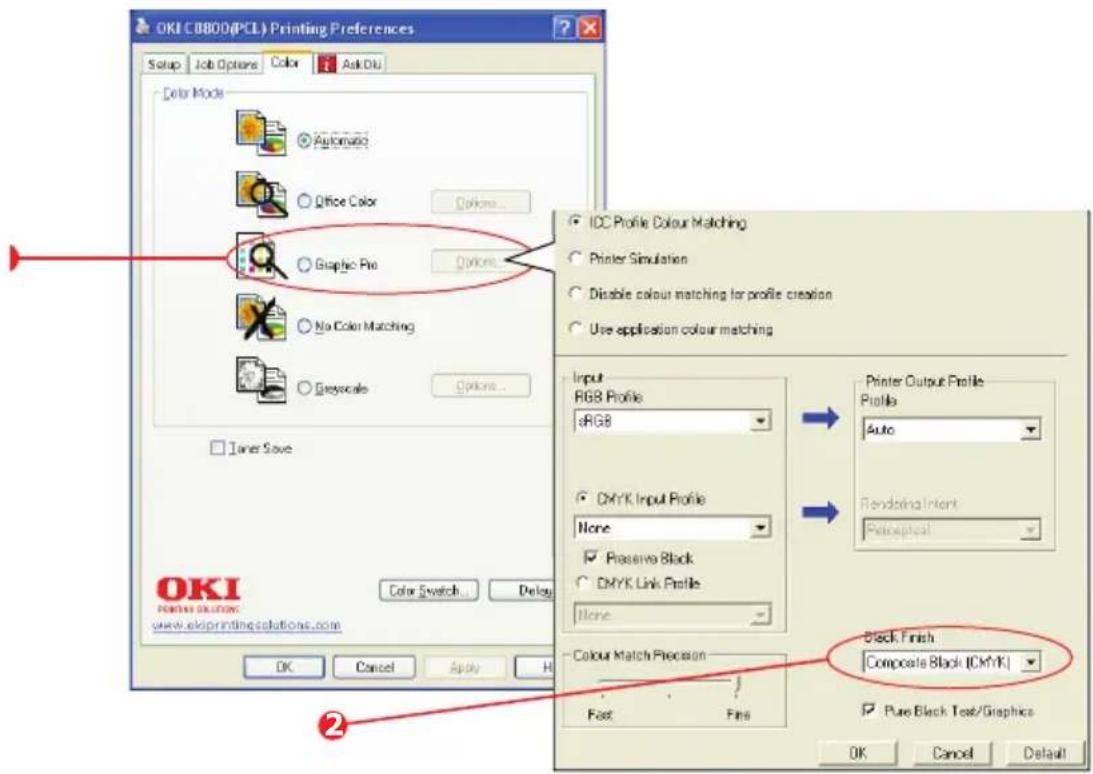
- On the driver's [Colour] tab, select [Graphic Pro] (1) and click the [Options] button.
text_image
OKI C0800(PCL) Printing Preferences Setup Job Options Color Ask Diu Color Mode Automatic Office Color Options... Graphic Pro Options... No Color Matching Greyscale Options... Timer Save OKI PAINING SOLUTIONS www.ekiprintingsolutions.com Color Switch Cancel Delay OK Cancel Apply H IDC Profile Colour Matching Printer Simulation Disable colour matching for profile creation Use application colour matching Input RGB Profile eRGB CMYK Input Profile None Passive Black CMYK Link Profile None Colour Match Precision Fast Fins Printer Output Profile Profile Auto Rendering Intent Pelicephial Black Finish Composite Black (CMYK) Pure Black Text/ Graphics OK Cancel Default- From the [Black Finish] menu (2), choose your preferred setting.
Mac OS X (Office Colour)
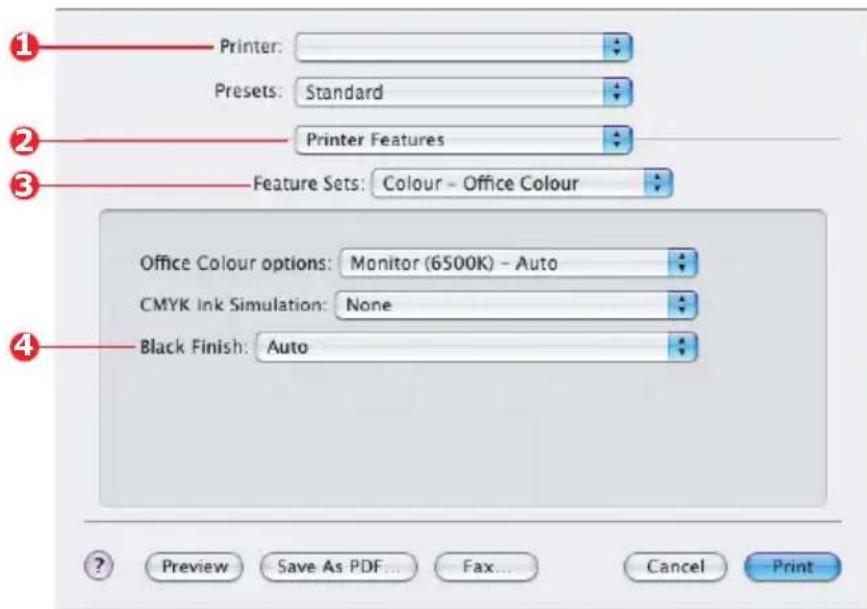
- From the [File] menu, select [Print].
text_image
Printer: Presets: Standard Printer Features Feature Sets: Colour - Office Colour Office Colour options: Monitor (6500K) - Auto CMYK Ink Simulation: None Black Finish: Auto Preview Save As PDF... Fax... Cancel Print- From the [Printer] menu (1), select your printer.
- In the next menu (2), select [Printer Features].
- From the [Feature Sets] menu (3), select [Colour - Office Colour].
- For [Black Finish] menu (4), choose your preferred setting.
Mac OS X (Graphic Pro)
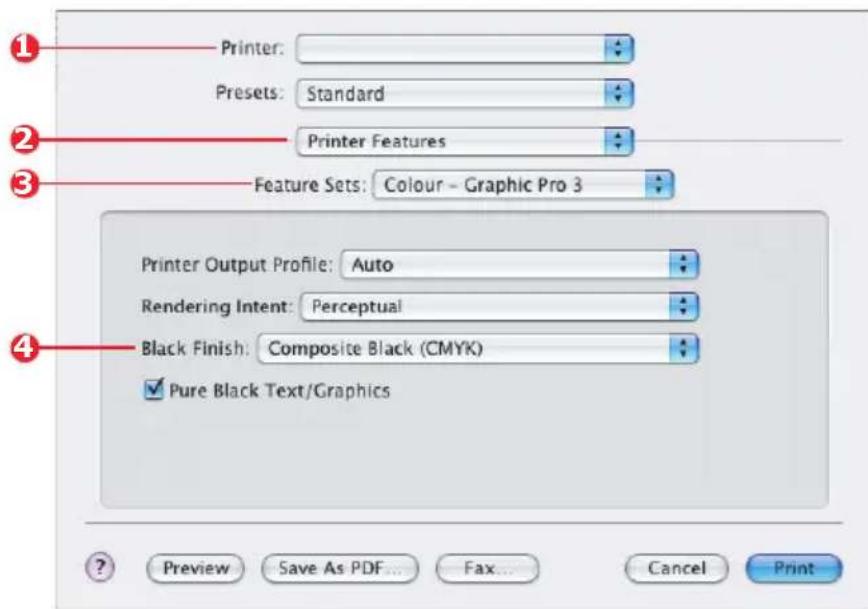
- From the [File] menu, select [Print].
text_image
Printer: Presets: Standard Printer Features Feature Sets: Colour - Graphic Pro 3 Printer Output Profile: Auto Rendering Intent: Perceptual Black Finish: Composite Black (CMYK) Pure Black Text/Graphics Preview Save As PDF Fax Cancel Print- From the [Printer] menu (1), select your printer.
- In the next menu (2), select [Printer Features].
- From the [Feature Sets] menu (3), select [Colour - Graphic Pro 3].
- For [Black Finish] menu (4), choose your preferred setting.
FINE LINES ENHANCEMENT
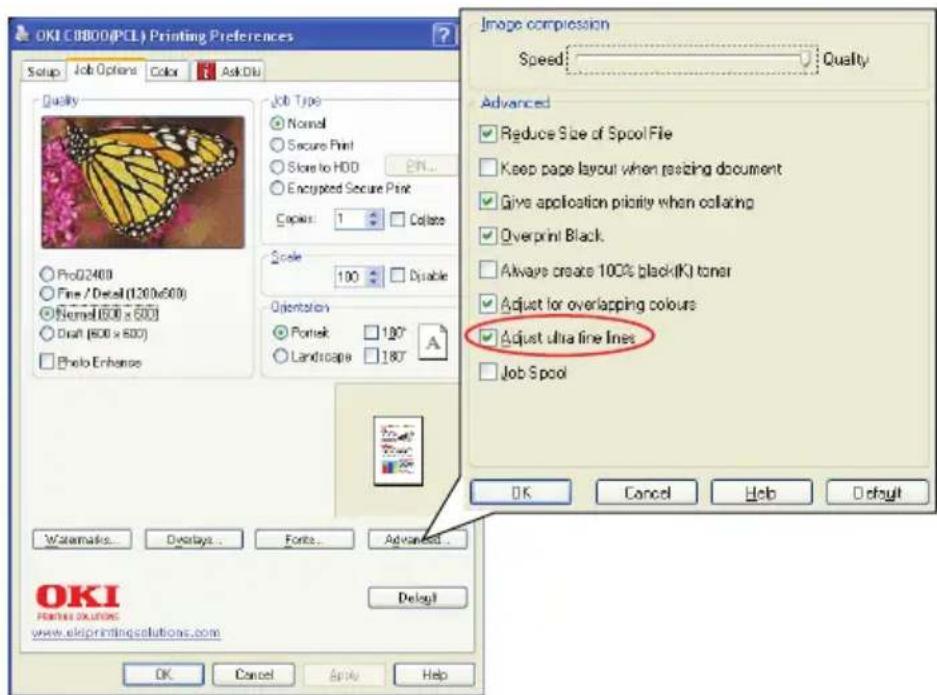
This feature can be used to emphasize the pen width of very fine lines (minimum line width).
With some software applications, if this feature is turned ON, the spaces in bar codes may become too narrow. If this happens, turn [Adjust Ultra Fine Lines] OFF.
- In the driver's [Job Options] tab, click [Advanced].
text_image
OKI C8000(PCL) Printing Preferences Setup Job Options Color Ask Diu Quality ○ Pro02400 ○ Fine / Detail (1200x600) ○ Normal(500 x 500) ○ Dash (500 x 500) ○ Photo Enhance Job Type ● Normal ○ Secure Print ○ Store to HDD ○ Encrypted Secure Print Copies: 1 Colors Scale 100 Disable Orientation ● Portisk 190° ○ Landscape 180° Image compression Speed Quality Advanced ✓ Reduce Size of Spool File □ Keep page layout when resizing document ✓ Give application priority when collating ✓ Overprint Black. □ Always create 100% black(K) toner ✓ Adjust for overlapping colours ✓ Adjust ultra fine lines □ Job Spool OK Cancel Help Default Watermarks... Displays... Fonte... Advanced... OK Print Solutions www.ekiprintingsolutions.com OK Cancel Apply Help- Click the checkbox to turn on [Adjust Ultra Fine Lines]. If the option is turned on, a check mark appears in the box.
GREYSCALE PRINTING
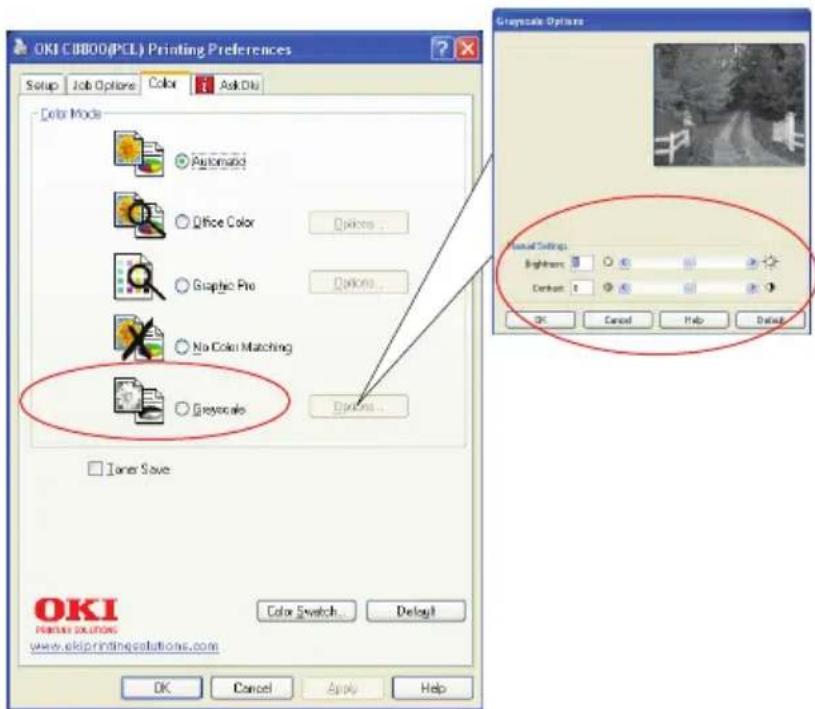
If you select Greyscale, the printer converts all colours into shades of grey, and prints using only black toner.
Use Greyscale to speed up printing of proof copies or when you do not need to print a colour document in colour.
WINDOWS
-
If using the PCL driver, in the driver's [Setup] tab, choose any previously saved [driver settings] you need. See "Recalling saved driver settings" on page 25
-
On the driver's [Colour] tab, click [Greyscale], then click [Options].
text_image
OKI CIBOO(PCL) Printing Preferences Setup Job Options Color Ask Diu Color Mode Automatic Office Color Options... Graphic Pro Options... No Color Matching Options... Greyscale Options... Timer Save OKI Plants Solutions www.ekiprintingpsolutions.com OK Cancel Apply Help Grayscale Options Initial Settings Brightness 0 Contrast 2 OK Cancel Help ResetSome applications will attempt to set the halftone screen information for the printer. If the option to [use printer halftones] is left at ON, the printer will set its own halftone screen value, giving a smoother result. It is recommended to leave this option on.
[Optimised greyscale halftones] may take slightly longer to print but will give best quality.
- If using the PS driver, on the [Colour] tab, click [Greyscale], and then click [Advanced] if you want to adjust brightness and contrast.
MAC OS X
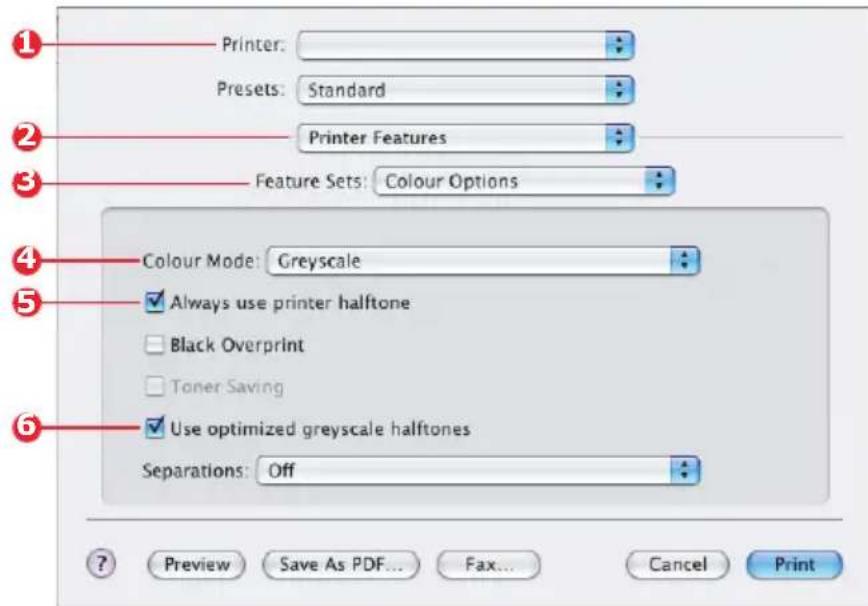
- In your application program, choose [File] → [Print].
text_image
Printer: Presets: Standard Printer Features Feature Sets: Colour Options Colour Mode: Greyscale Always use printer halftone Black Overprint Toner Saving Use optimized greyscale halftones Separations: Off Preview Save As PDF... Fax... Cancel Print- From the [Printer] menu (1), select your printer.
- From the next menu (2), select [Printer Features].
- From the [Feature Sets] menu (3), select [Colour Options].
- From the [Colour Mode] menu (4), select [Greyscale].
- Select [Always Use Printer Halftone] checkbox (5). This ensures best quality when using greyscale.
- Select the [Use optimized greyscale halftones] checkbox (6).
This may slow down printing slightly, but will produce superior results.
COLOUR PRINTING (BASICS)
The printer drivers supplied with your printer provide several controls for changing the colour output. For general use the automatic settings will suffice, providing reasonable default settings that will produce good results for most documents.
Many applications have their own colour settings, and these may override the settings in the printer driver. Please refer to the documentation for your software application for details on how that particular program's colour management functions.
FACTORS THAT AFFECT THE APPEARANCE OF PRINTS
If you wish to manually adjust the colour settings in your printer driver, please be aware that colour reproduction is a complex topic, and there are many factors to take into consideration. Some of the most important factors are listed below.
Differences between the range of colours a monitor or printer can reproduce
Neither a printer nor a monitor is capable of reproducing the full range of colours visible to the human eye. Each device is restricted to a certain range of colours. In addition to this, a printer cannot reproduce all of the colours displayed on a monitor, and vice versa.
Both devices use very different technologies to represent colour. A monitor uses Red, Green and Blue (RGB) phosphors (or LCDs), a printer uses Cyan, Magenta, Yellow and Black (CMYK) toner or ink.
A monitor can display very vivid colours such as intense reds and blues and these cannot be easily produced on any printer using toner or ink. Similarly, there are certain colours, (some yellows for example), that can be printed, but cannot be displayed accurately on a monitor. This disparity between monitors and printers is often the main reason that printed colours do not match the colours displayed on screen.
Viewing conditions
A print can look very different under different lighting conditions. For example, the colours in a print may look different when viewed standing next to a sunlit window, compared to how they look under standard office fluorescent lighting.
Printer driver colour settings
The driver settings for manual colour can change the appearance of a print. There are several options available to help match the printed colours with those displayed on screen.
Monitor settings
The brightness and contrast controls on your monitor can change how your document looks on-screen. Additionally, your monitor's colour temperature influences how "warm" or "cool" the colours look.
There are several settings found on a typical monitor:
5000k Warmest; yellowish lighting, typically used in graphic art environments.
6500k Cooler; approximates daylight conditions.
9300k Cool; the default setting for many monitors and television sets.
(k = degrees Kelvin, a measurement of temperature.)
How your software application displays colour
Some graphics applications such as Corel Draw or Adobe Photoshop may display colour differently from "Office" applications such as Microsoft Word. Please see your application's on-line help or user manual for more information.
Paper type
The type of paper used can also significantly affect the printed colour. For example, a printout on recycled paper can look duller than one on specially formulated glossy paper.
TIPS FOR PRINTING IN COLOUR
The following guidelines may help you to achieve good colour output from your printer.
PRINTING PHOTOGRAPHIC IMAGES
Use the Monitor (6500k) Perceptual setting.
If the colours look too dull, try the Monitor (6500k) Vivid or Digital Camera settings.
PRINTING FROM OFFICE APPLICATIONS
Use the Monitor (9300k) setting. This may help if you are having problems with specific colours from applications such as Microsoft Excel or Microsoft PowerPoint.
PRINTING SPECIFIC COLOURS (E.G. A COMPANY LOGO)
There are 2 utilities on your printer driver CD-ROM that can help match specific colours:
Colour Correct Utility
Colour Swatch Utility
ADJUSTING THE BRIGHTNESS OR INTENSITY OF A PRINT
If the print is too light/dark, you can use the Brightness control to adjust it.
If the colours are too intense/not intense enough, use the Saturation control.
ACCESSING THE COLOUR MATCHING OPTIONS
The colour matching options in the printer driver can be used to help match your printed colours to the ones displayed on your monitor or from some other source, such as a digital camera.
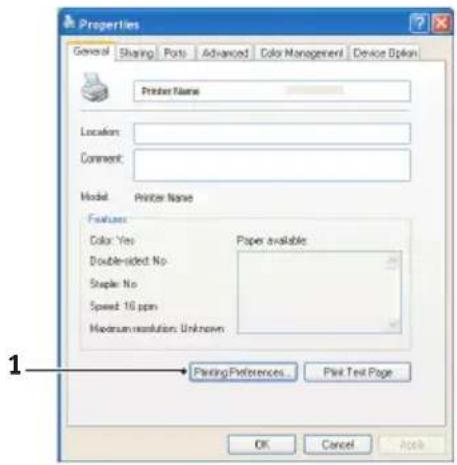
To open colour matching options from the Windows Control Panel:
- Open the Printers window (called "Printers and Faxes" in Windows XP).
- Right-click the printer name and choose Properties.
- Click the Printing Preferences button (1).
To open colour matching options from within a Windows application:
text_image
Properties General Sharing Ports Advanced Color Management Device Option Printer Name Location: Comment: Model Printer Name Features Color: Yes Papers available Double-sided No Stapler: No Speed: 10 ppm Maximum resolution: Unknown 1 Paring Preferences... Pink Text Page OK Cancel Apply- Choose File>Print... from the application's menu bar.
- Click the Properties button next to the printer name.
SETTING THE COLOUR MATCHING OPTIONS
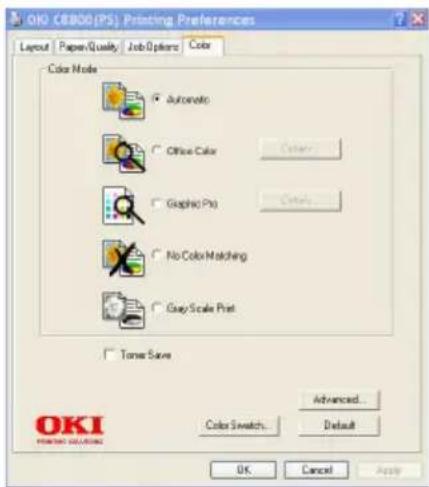
- On the Colour tab select Office Color for colour matching.
text_image
OKI C8800 (PS) Printing Preferences Layout Paper Quality Job Options Color Color Mode Automatic Office Color Graphic Print No Color Matching Gray Scale Print Tense Save Advanced... Color Switch... Default OK Cancel Apply OK2. Choose Details and select from the following options:
text_image
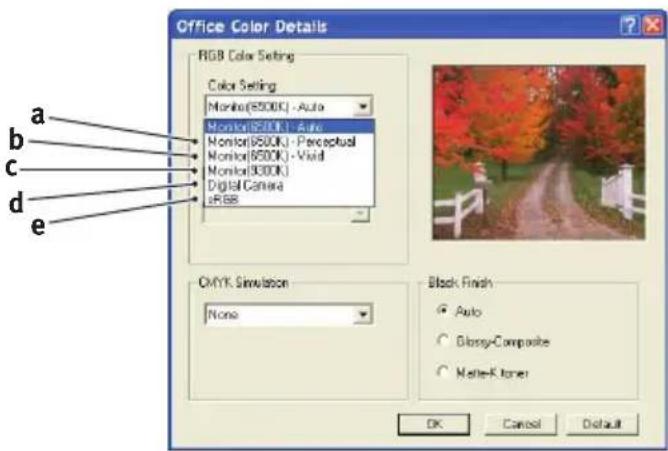
Office Color Details RGB Color Setting Color Setting Monitor(8500K) - Auto Monitor(8500K) - Auto Monitor(8500K) - Perceptual Monitor(8500K) - VID Monitor(8500K) Digital Camera eRGB CMYK Simulation None Black Finish Auto Glossy-Composite Melle-K tone OK Cancel Default(a) Monitor (6500k) Perceptual
Optimised for printing photographs. Colours are printed with emphasis on saturation.
(b) Monitor (6500k) Vivid
Optimised for printing photographs, but with even more saturated colours than the Monitor (6500k) Perceptual setting.
(c) Monitor (9300k)
Optimised for printing graphics from applications such as Microsoft Office. Colours are printed with emphasis on Lightness.
(d) Digital Camera
Optimised for printing photographs taken with a digital camera.
Your results will vary depending on the subject and the conditions under which the photograph was taken.
(e) sRGB
The printer will try to reproduce the sRGB colour space. This may be useful if colour matching from an sRGB input device such as a scanner or digital camera.
USING THE COLOUR SWATCH FEATURE
To use the Colour Swatch feature, you must install the Colour Swatch Utility. This is supplied on the CD-ROM that was supplied with your printer.
The Colour Swatch function prints charts which contain a range of sample colours. Note that this is not the full range of colours that the printer can produce. Listed on each sample colour are the corresponding RGB (Red, Green, Blue) values. This can be used to pick specific colours in applications that allow you to choose your own RGB values. Simply click the Colour Swatch button (1) and choose from the options available.
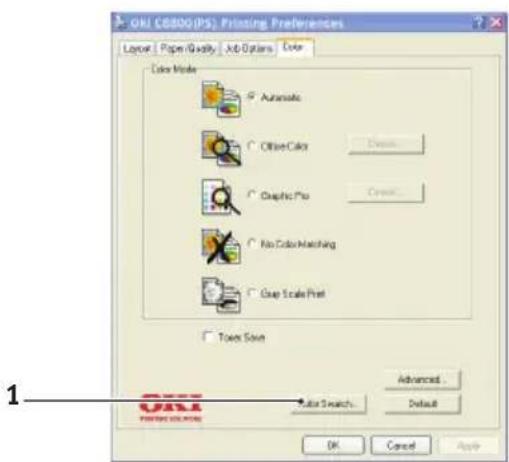
text_image
OKI (GB20G PS) Printing Preferences Layout | Paper Quality | Job Options | Color Color Mode Automatic Office Colors Graphic Pro No Color Matching Gray Scale Print Town Skin Advanced... Default OK Cancel ApplyAn example of using the colour swatch function:
You wish to print a logo in a particular shade of red. The steps you would follow are:
- Print a colour swatch, then select the shade of red that best suits your needs.
- Take a note of the RGB value for the particular shade that you liked.
- Using your program's colour picker, enter these same RGB values, and change the logo to that colour.
The RGB colour displayed on your monitor may not necessarily match what was printed on the colour swatch. If this is the case, it is probably due to the difference between how your monitor and printer reproduce colour. Here, it is unimportant since your primary objective is to print the required colour.
USING THE COLOUR CORRECT UTILITY
The Oki Colour Correct Utility is provided on your printer driver CD-ROM. You must install it separately since it is not installed along with the printer driver.
The Colour Correct utility has the following features:
Microsoft Office palette colours can be individually adjusted. This is useful if you want to change how a specific colour is printed.
Colours can be adjusted by changing Hue, Saturation and Gamma. This is useful if you wish to change the overall colour output.
Once these colour adjustments have been made, the new settings can be selected from the printer driver Colour tab.
To select adjustments made with the Colour Correct Utility:
- From your application program, click File and point to Print.
- Click Properties. This displays the printer driver options.
- Click the Colour tab.
- Click Advanced Colour.
- Click User Defined.
Select the colour adjustment you made with the Colour Correct Utility.
COLOUR MATCHING (ADVANCED)
This Chapter only discusses the printer colour management system.
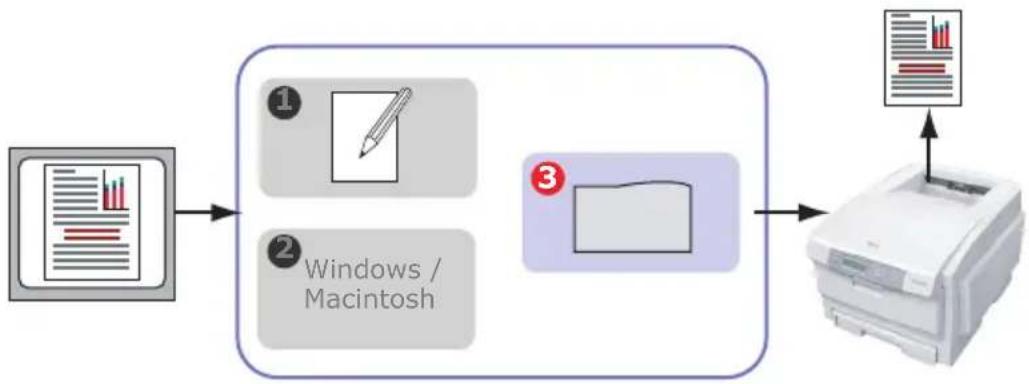
flowchart
graph LR
    A["Document"] --> B["Windows / Macintosh"]
    B --> C["Printer"]
    C --> D["Print File"]
If you wish to learn more about your application program or operating system colour management, please see the documentation that was supplied with your application software or computer.
BASICS
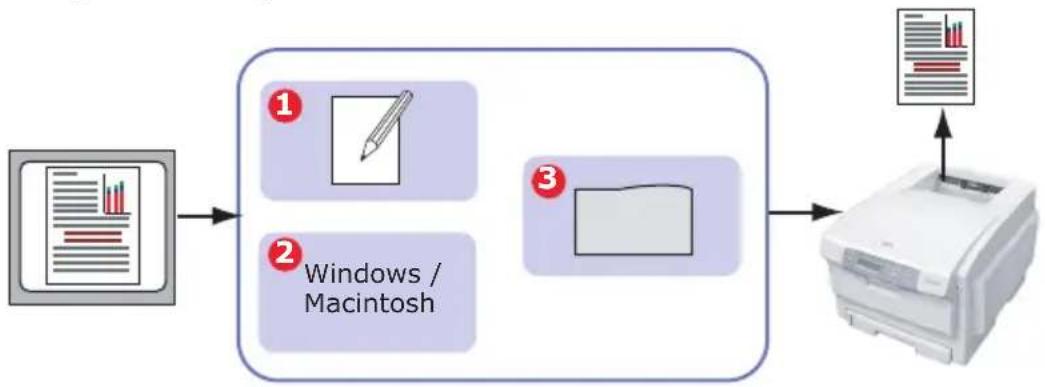
There are three methods by which your document's colour can be managed and adjusted:
flowchart
graph LR
    A["Document"] --> B["Windows / Macintosh"]
    B --> C["Printer"]
    C --> D["Output Box with Paper Icon"]
- Application Colour Management (1).
Some graphics and desktop publishing programs such as Adobe Photoshop, Adobe Illustrator, and Quark Xpress have their own built-in colour management systems. See "Printer driver settings for ICC profile creation or no colour matching" on page 74.
Most applications do not have these colour management features and rely instead on the printer or operating system.
- Operating System Colour Management (2).
Windows 2000 and XP have Windows ICM Colour Management.
Mac OS X have Apple ColorSync.
- Printer Colour Management (3).
When you print your document and modify settings in the printer driver, the printer performs colour adjustments.
NOTE:
Only use one colour management system if you want the best results from your printer.
If you wish to use your printer's colour management system, ensure that your application or operating system colour management is switched off.
Applying colour management in multiple places will give unpredictable results.
PRINTER COLOUR MANAGEMENT
INTRODUCTION
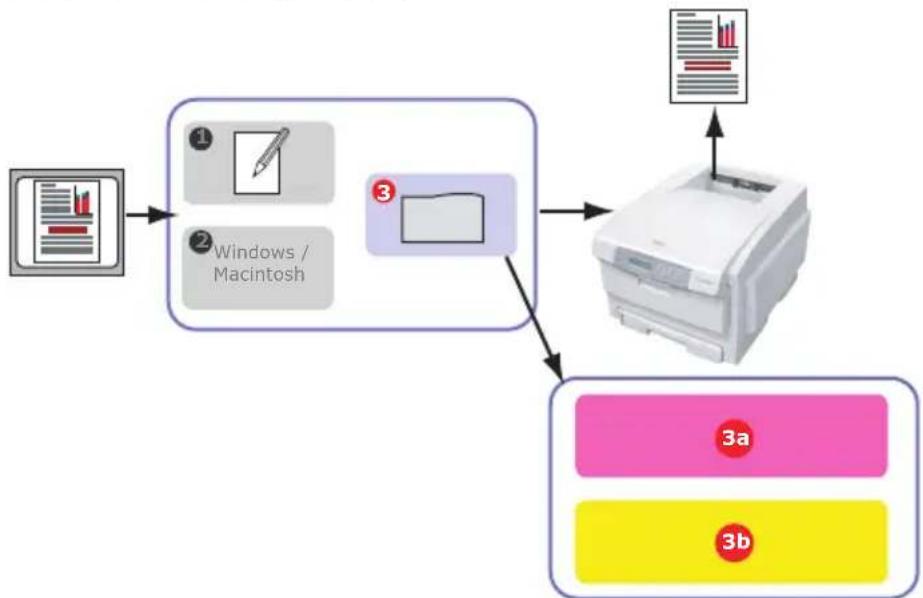
Your printer has two separate colour management systems – Office Colour and Graphic Pro.
flowchart
graph TD
    A["File Submission"] --> B["Document Processing"]
    B --> C["Printer"]
    C --> D["Output"]
    subgraph Input
        E["1: Paper Icon"]
        F["2: Windows / Macintosh Icon"]
        G["3: Tablet Icon"]
    end
    subgraph Output
        H["Output Box Icon"]
    end
Office Colour (3a) - "Office colour" on page 49
This is a simpler colour management system designed for ease of use. Office Colour is recommended for users who are not experts in colour but want good results when printing from programs such as Microsoft Office.
Graphic Pro (3b) - "Graphic pro" on page 54
This is a powerful colour management system based on ICC colour profiles.
Profiles can be down loaded to the printer hard disk using a special utility, and then colour matching can be applied to all incoming print jobs.
The Graphic Pro colour management system is recommended for users who are already familiar with ICC profile-based colour matching and require more control over colour.
ABOUT RGB AND CMYK COLOUR
Some application programs give you the choice to create and edit documents using either RGB colour or CMYK colour. Typically, only professional graphics and desktop publishing software support CMYK colour. Most application programs only support RGB colour, for example Microsoft Office programs or web browsers.
If your application program does not give you the choice of RGB or CMYK colour, you should assume that it only supports RGB.
The RGB colour model is based on the three primary colours of light; Red, Green and Blue. This model is used by scanners, digital cameras and computer monitors.
The CMYK colour model is based on Cyan, Magenta, Yellow and Black printer inks or toners.
ABOUT THE PRINTER DRIVERS
Depending on your operating system, you may have the choice of different drivers to use with your printer. You may wish to select a printer driver based on whether it supports CMYK data.
| SUPPORT FOR RGB DATA | SUPPORT FOR CMYK DATA | |
| PCL 5c driver (Windows) √✗ | ||
| PCL 6 driver (Windows) √✗ | ||
| PostScript driver (Windows) √ | √ | |
| PostScript driver (Mac) √ | √ |
OFFICE COLOUR
This section describes the features in the printer driver for "Office Colour" printer colour management.
There are two different sets of options in Office Colour:
| RGB OPTIONS CMYK OPTIONS (POSTSCRIPT ONLY) | |
| Monitor (6500K) – Auto SWOP | |
| Monitor (6500K) – Perceptual Euroscale | |
| Monitor (6500K) – Vivid Japan Color | |
| Monitor (9300K) | |
| Digital Camera | |
| sRGB | |
NOTE:
The options for CMYK data are not present in the Windows PCL 5c or PCL 6 printer drivers. These printer drivers only support RGB colour data.
Although the Office Colour options contain controls for CMYK data, it is strongly recommended that you use the Graphic Pro options instead. If you are printing CMYK data, the Graphic Pro options provide more power and flexibility.
OFFICE COLOUR - RGB OPTIONS
Office Colour provides a collection of several different colour matching presets for RGB data.
These presets each change the colour of your print in a slightly different way.
These RGB colour matching options are available in all printer drivers.
| PRESET EXPLANATION | |
| Monitor (6500K) - Auto | The best colour match preset will be selected based on the type of document.6500K - Perceptual will be selected if printing photographs. 6500K - Vivid will be selected if printing graphics and text. |
| Monitor (6500K) - Perceptual | Optimized for printing photographs. Colours are printed with emphasis on saturation. |
| Monitor (6500K) - Vivid | Optimized for printing photographs and for office graphics. The printer uses even more saturation than the Monitor (6500k) Perceptual setting. |
| Monitor (9300K) Colours | are printed with emphasis on Lightness.Use this setting if you are having problems achieving the correct colour when printing from Microsoft Office applications. |
| Digital Camera Optimized | for printing photos taken with a digital camera. Your results will vary depending on the subject and the conditions under which the photograph was taken. |
| sRGB The printer will try to reproduce the sRGB colour space. This may be useful if colour matching from an sRGB input device such as a scanner or digital camera. | |
WINDOWS
This information applies to the Windows PCL 5c, PCL 6 and PostScript drivers.
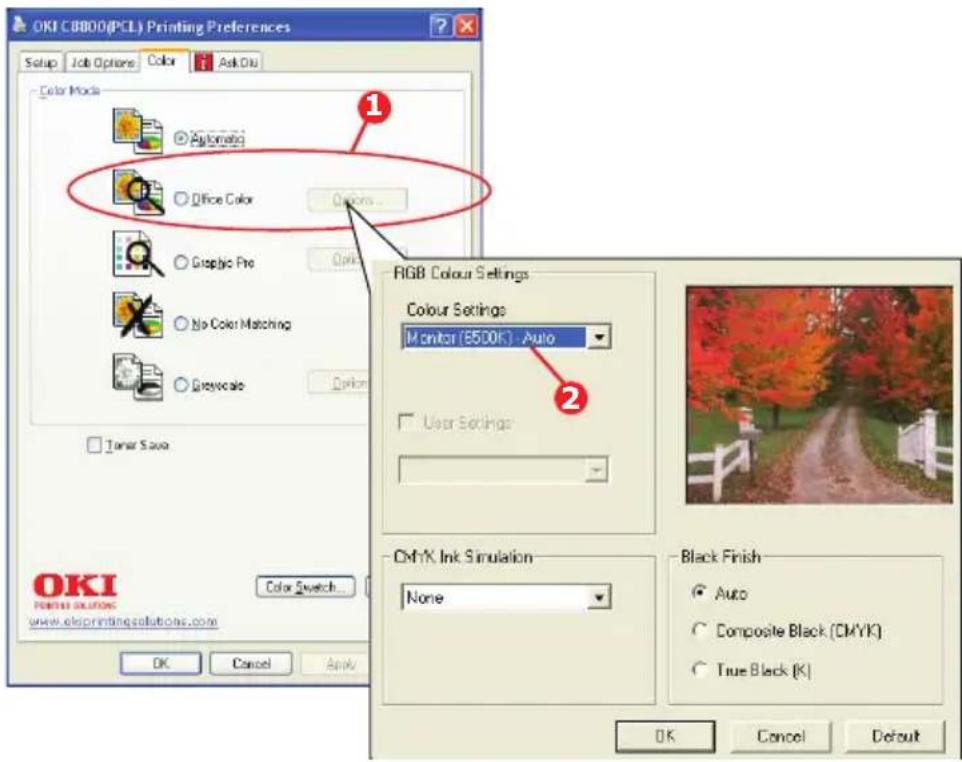
- On the printer driver [Colour] tab, select [Office Colour] (1) and click the [Options] button.
text_image
OKI C0800(PCL) Printing Preferences Setup Job Options Color Ask Dia Color Mode Automatic Office Color Options... Graphic Pro Optic No Color Matching Greyscale Option Timer Save RGB Colour Settings Colour Settings Monitor (6500K) - Auto User Settings OMYK Ink Simulation None Black Finish Auto Composite Black (CMYK) True Black (K) OK Cancel Default OK Cancel Default OK- Select a preset from [Colour matching options] (2).
NOTE:
When printing from some applications on Mac OS X, these RGB colour match options may not affect the colour of your print. If you discover that the colour of your print has not changed after applying one of the Office Colour Match presets, then the application is incompatible with this type of printer colour matching.
As an alternative, Mac OS X 10.3.x users may be able to adjust the colour of their document using ColorSync Quartz filters.
- In your application program, choose [File] → [Print].
text_image
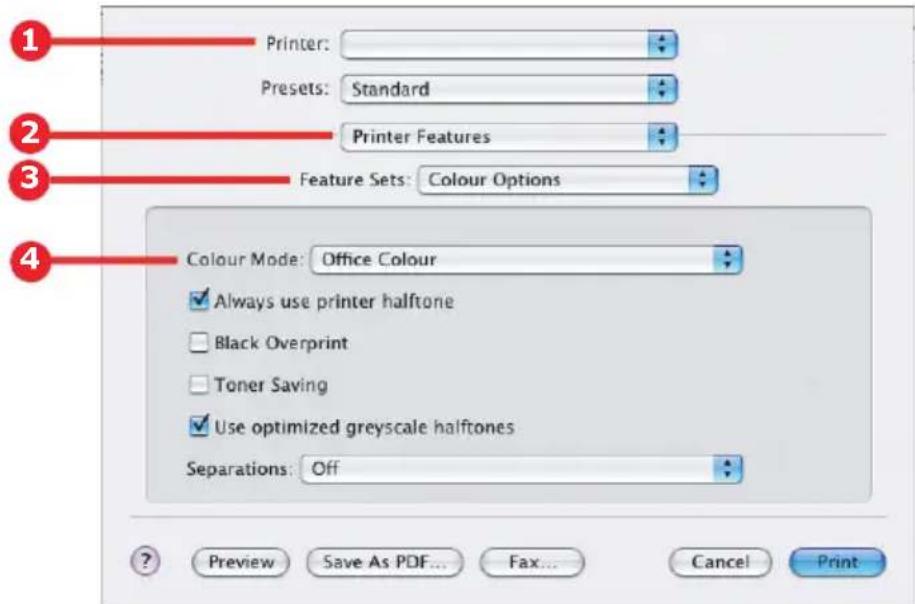
Printer: Presets: Standard Printer Features Feature Sets: Colour Options Colour Mode: Office Colour ✓ Always use printer halftone □ Black Overprint □ Toner Saving ✓ Use optimized greyscale halftones Separations: Off Preview Save As PDF... Fax... Cancel Print- From the [Printer] menu (1), select your printer model.
- Select [Printer Features] (2).
- From the [Feature Sets] menu (3), select [Colour Options].
-
From the [Colour Mode] menu (4), select [Office Colour].
-
From the [Feature Sets] menu (5), select [Colour - Office Colour].

text_image
Printer: Presets: Standard Printer Features Feature Sets: Colour - Office Colour Office Colour options: Monitor (6500K) - Auto CMYK Ink Simulation: None Black Finish: Auto- Select the [Office Colour] Preset (6) you wish to use.
CUSTOMISING RGB OFFICE COLOUR WITH THE COLOUR CORRECT UTILITY (WINDOWS)
If the Office Colour presets are not sufficient for your needs, the Colour Correct utility provides a means of further adjustment. The Colour Correct utility provides two methods for adjusting the Office Colour settings:
- You can adjust the overall appearance of the print by modifying Hue, Saturation and Gamma.
- You can adjust the specific palette colours used in Microsoft Office applications. These adjustments only affect one specific palette colour at a time.
GRAPHIC PRO
This section describes the colour matching options available for Graphic Pro.
The Graphic Pro colour matching system is based around ICC profiles. These profiles are down loaded to the printer using the Profile Assistant utility and then selected in the printer driver. When a job is sent to the printer, the ICC profiles are applied to the print job on the printer.
NOTE:
Some features of Graphic Pro colour matching can only be used if your printer is fitted with a hard disk. The printer hard disk is required if you wish to download and use your own ICC profiles to the printer.
The printer's internal hard disk is an optional accessory for some models.
If your printer does not have a hard disk fitted, you will only be able to select the factory default profiles that are built-in to the printer.
WHAT CAN YOU DO WITH GRAPHIC PRO COLOUR MATCHING?
The Graphic Pro colour matching system is both powerful and flexible. Here are some examples of how the Graphic Pro colour matching system can be used:
MATCHING PRINTER COLOUR TO AN RGB INPUT DEVICE
By using the ICC profiles of a scanner, digital camera or monitor, the printer's colour can be matched to the input device.
PRINTER SIMULATION
Your printer can be used to simulate the colour output of another printer, even when printing RGB documents. For best results, use CMYK documents when simulating the colour output of other printers.
CMYK INK SIMULATION
Your printer can be used to simulate the colour output of a commercial printing press (SWOP, Euroscale or Japan Color inks).
MORE ACCURATE PRINTER COLOUR
If you have created your own profiles with third-party ICC profile creation software, these can be download to the printer and used when printing.
TYPES OF ICC PROFILE SUPPORTED
There are four classes of ICC profile supported by the Graphic Pro colour matching system:
| PROFILE TYPE | DESCRIPTION |
| RGB Source (RGB Input) | These profiles describe the device that was used to capture RGB data (e.g. scanner or digital camera).The RGB Input Profile may also be your monitor profile if you are trying to match to your screen. |
| CMYK Simulation (CMYK input) | These profiles describe the CMYK device whose colours you are trying to simulate. Typically this would be another manufacturer's printer or an offset printing press.Profiles are already built-in to the printer for commercial printing press inks such as SWOP or Euroscale. |
| Printer (CMYK Output) | This profile describes the colour characteristics of your own printer.The printer already has factory default profiles built-in, but you can replace these profiles with your own if required. |
| Link Profile This is | a special type of ICC profile that converts directly from CMYK to CMYK.For example, a link profile could convert directly from the CMYK space of another printer to the CMYK space of your printer. |
There are three steps to using the Graphic Pro colour matching system:
- Gather or create ICC profiles (see below)
- Download ICC profiles to the printer hard disk (page 56)
- Select the ICC profiles in the printer driver when printing (page 58)
STEP 1 - GATHER OR CREATE THE ICC PROFILES
Where can I get the profiles I need?
| PROFILE TYPE | WHERE TO GET PROFILES |
| RGB Source (RGB Input) | Obtain your RGB source profiles from your scanner, camera or monitor manufacturer. |
| CMYK Simulation (CMYK input) | Obtain the simulation profile from the manufacturer of the printer you wish to simulate. |
| Printer (CMYK Output) | The factory default profiles for your printer are built-in. If you need greater accuracy, you should create your own printer profile using third-party ICC profile creation software. |
| Link Profile You can create Link profiles using third-party ICC profile creation software.Note that not all ICC profile creation software can create Link profiles. | |
STEP 2 - DOWN LOADING ICC PROFILES TO THE PRINTER HARD DISK
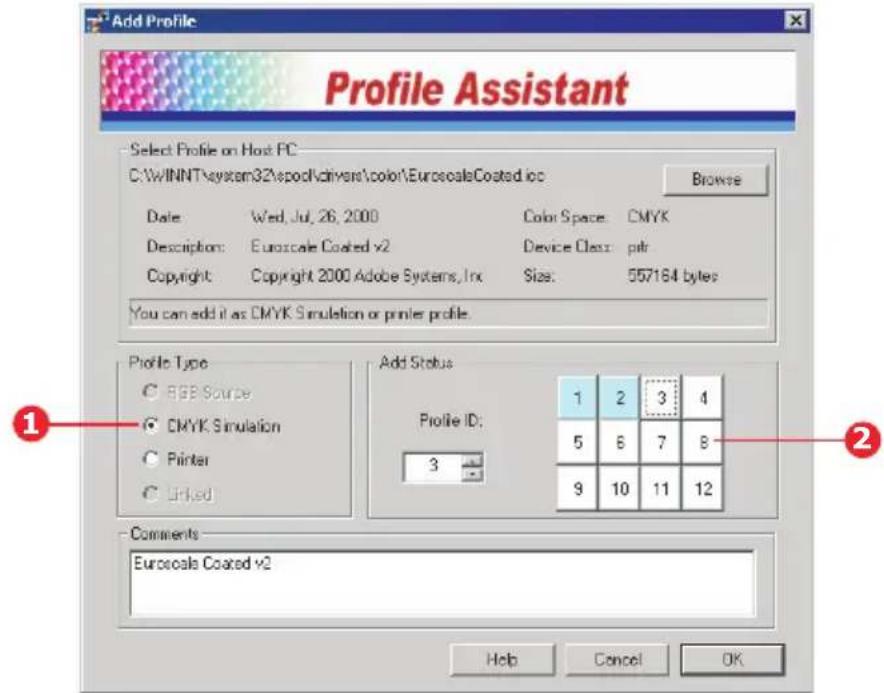
You can download profiles to the printer hard disk using the Profile Assistant utility.
Using Profile Assistant
- Launch Profile Assistant
- Select a printer
If this is the first time you have used Profile Assistant, you should allow the utility to search for compatible printers.
Select the connection types that you wish to search – USB or Network (TCP/IP), and click [Start].
If you know the Printer's IP address, you can enter it manually.
- The main screen of Profile Assistant displays the profiles resident on the selected printer's hard disk. To download a new profile to the printer:
(a) Click [Add].
(b) Select an ICC profile from your computer's hard disk.
(c) Once you have selected a profile, you can add it to the printer as one of the 4 profile types - RGB Source, CMYK Simulation, Printer or Linked.
(d) The options available will depend on which ICC profile you have selected. For example, if you have selected a CMYK profile, you may only be able to add this to the printer as a CMYK Simulation or Printer output profile.
(e) Select a number from 1 to 12. This number is used to identify the profile in the printer driver.
text_image
Add Profile Profile Assistant Select Profile on Host PC CDWINNT\system32\spool\chivers\color\EuroscaleCoated.ico Browse Date Wed, Jul, 26, 2000 Color Space CMYK Description: Euroscale Coated v2 Device Class pkr Copyright Copyright 2000 Adobe Systems, Inc Size: 557164 bytes You can add it as CMYK Simulation or printer profile. Profile Type BBB Source CMYK Simulation Printer Linked Add Status Profile ID: 1 2 3 4 5 6 7 8 9 10 11 12 Comments Euroscale Coated v2 Help Cancel OK(f) Click [OK] to download the ICC profile to the printer.
STEP 3 - SELECT ICC PROFILES IN THE PRINTER DRIVER
What you select in the printer driver depends on the colour matching task that you wish to perform.
Examples of selecting ICC profiles for different colour matching tasks are shown in the next sections of this guide.
MATCHING THE COLOUR OF A MONITOR, SCANNER OR CAMERA
The Graphic Pro colour matching system can be used to match the printer colour to an RGB input device such as a monitor, scanner or digital camera.
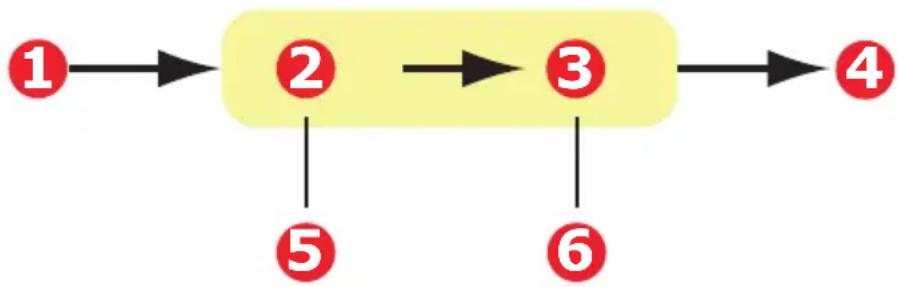
flowchart
graph TD
    1["1"] --> 2["2"]
    2 --> 3["3"]
    3 --> 4["4"]
    5["5"] --> 2
    6["6"] --> 3
- RGB data 4. Printed document
- RGB source profile 5. Scanner, monitor, camera, etc.
- Printer output profile 6. Leave on Auto or select your custom profile.
To match an RGB input device, first download the RGB source profile and printer profile (optional) to the printer hard disk using Profile Assistant. See "Using Profile Assistant" on page 56.
Once the profile(s) have been down loaded, make the appropriate selections in the printer driver. These are described in the next section (Windows page 59, Mac OS X page 60).
WINDOWS
This information applies to the Windows PCL 5c, PCL 6 and PostScript drivers.
To match the colour of an input RGB device such as a monitor, scanner or digital camera, make the following selections in the printer driver:
- On the printer driver [Colour] tab, select [Graphic Pro] (1) and click [Options].
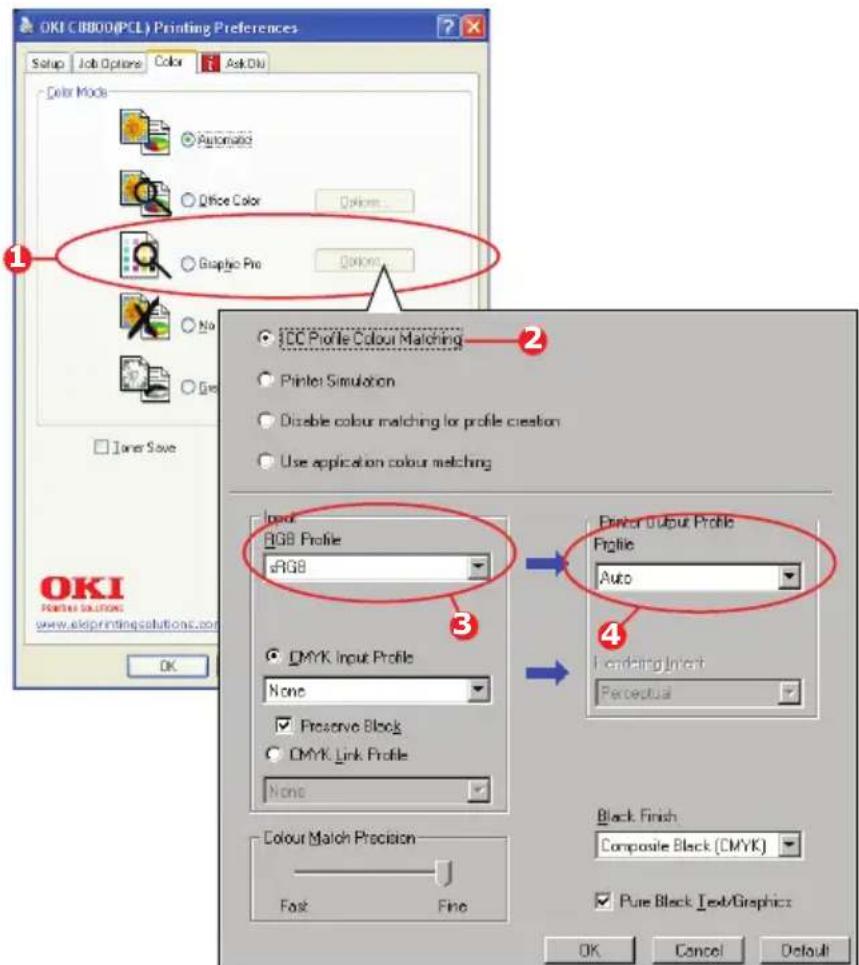
text_image
OKI C8000(PCL) Printing Preferences Setup Job Options Color Ask Olu Color Mode Automobile Office Color Options... Graphic Pro Options ICC Profile Colour Matching Printer Simulation Disable colour matching for profile creation Use application colour matching Input RGB Profile sRGB Output Output Profile Profile Auto CMYK Input Profile None Preserve Block CMYK Link Profile None Black Finish Composite Black (CMYK) Pure Black Text/Graphicx Colour Match Precision Fast Fine OK Cancel Default OKI Points solutions www.ekiprintingsalutions.com OKI- Select [ICC Profile Colour Matching] (2).
- Select the ICC profile that corresponds to the device you are trying to match such as your monitor, scanner or digital camera (3).
Remember that the names "RGB Source 1", "RGB Source 2" and so on relate to the number assigned to the profile using Profile Assistant. See "Using Profile Assistant" on page 56.
- Select a Printer Output Profile (4).
If [Auto] is selected, the factory default profiles that are embedded in the printer will be used. If you have created a printer profile yourself using profile creation software, select it here.
NOTE:
If you have selected your own printer output profile (4), you will also be able to adjust the rendering intent. See "Rendering intents" on page 72.
MAC OS X
- Choose [File] → [Print].
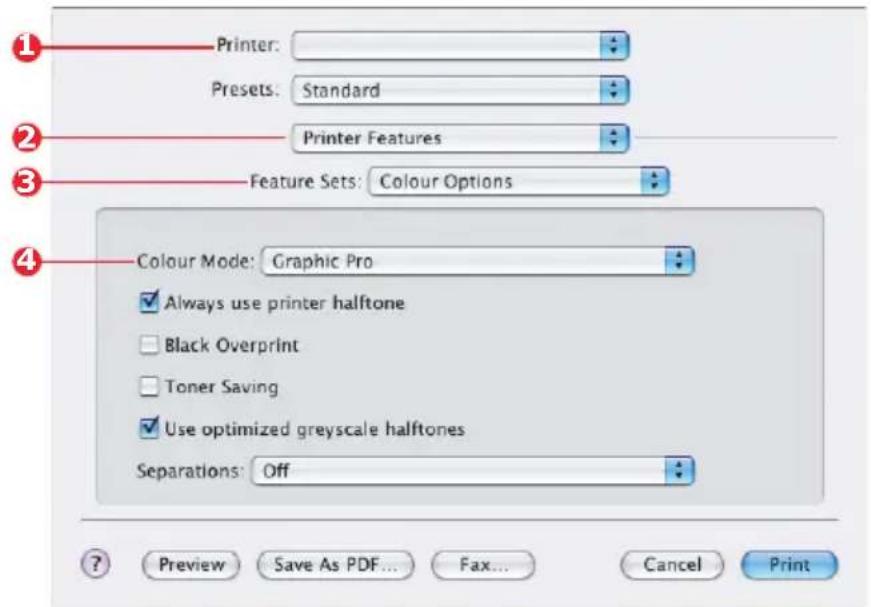
text_image
Printer: Presets: Standard Printer Features Feature Sets: Colour Options Colour Mode: Graphic Pro ✓ Always use printer halftone □ Black Overprint □ Toner Saving ✓ Use optimized greyscale halftones Separations: Off Preview Save As PDF... Fax... Cancel Print- From the [Printer] menu (1), select your printer model.
- Select [Printer Features] (2).
- From the [Feature Sets] menu (3), select [Colour Options].
-
From the [Colour Mode] menu (4), select [Graphic Pro].
-
From the [Feature Sets] menu (5), select [Colour - Graphic Pro 1].
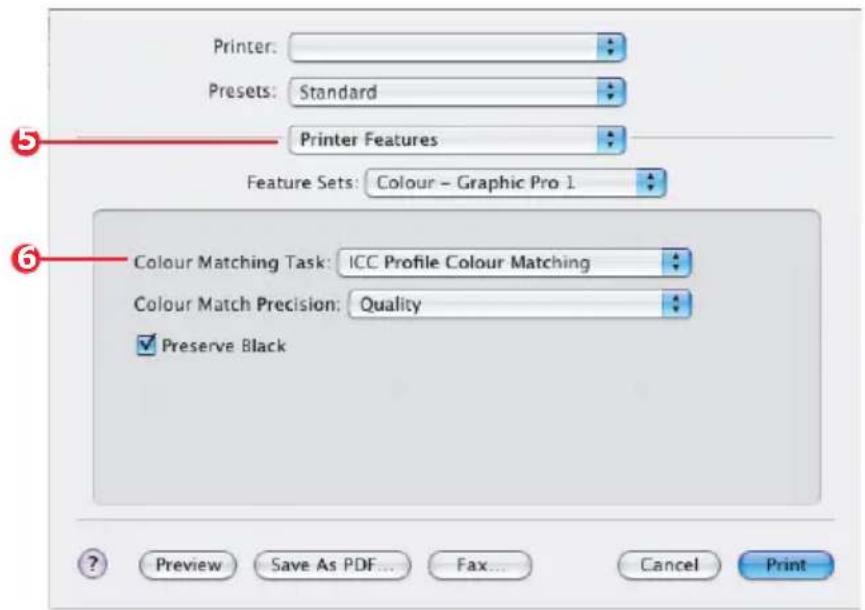
text_image
Printer: Presets: Standard Printer Features Feature Sets: Colour - Graphic Pro 1 Colour Matching Task: ICC Profile Colour Matching Colour Match Precision: Quality ✓ Preserve Black Preview Save As PDF... Fax... Cancel Print- From the [Colour Matching Task] menu (6), select [ICC Profile Colour Matching].
- From the [Feature Sets] menu (7), select [Colour - Graphic Pro 2].
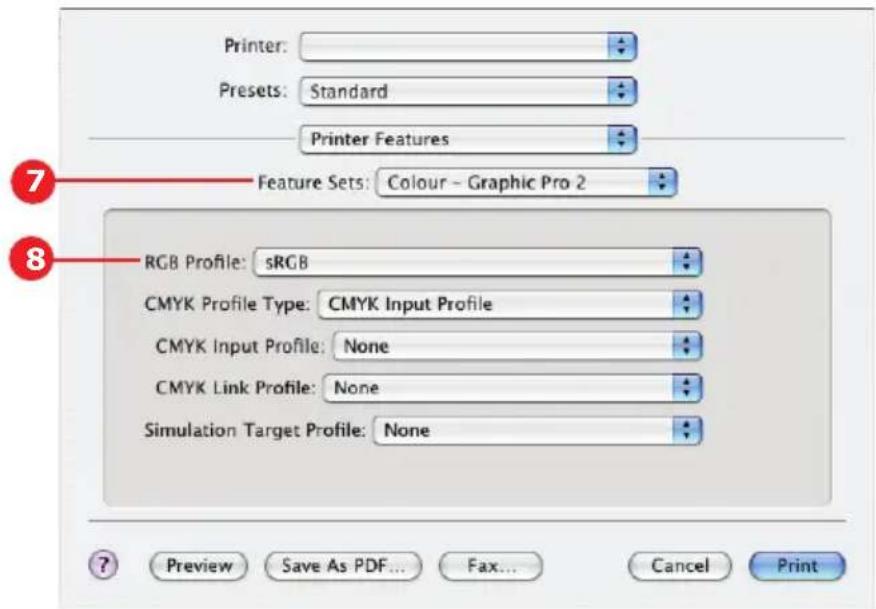
text_image
Printer: Presets: Standard Printer Features Feature Sets: Colour - Graphic Pro 2 RGB Profile: sRGB CMYK Profile Type: CMYK Input Profile CMYK Input Profile: None CMYK Link Profile: None Simulation Target Profile: None- From the [RGB Profile source] (8), select the ICC profile that corresponds to the device you are trying to match such as your monitor, scanner or digital camera.
Remember that the names "RGB Source 1", "RGB Source 2" and so on relate to the number assigned to the
profile using Profile Assistant. See "Using Profile Assistant" on page 56.
- From the [Feature Sets] menu, select [Colour - Graphic Pro 3] (9).
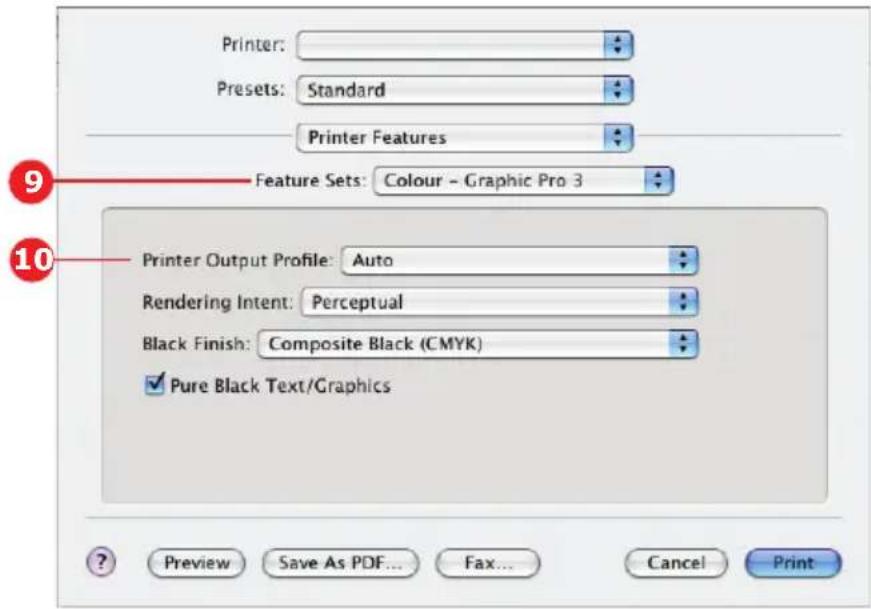
text_image
Printer: Presets: Standard Printer Features Feature Sets: Colour - Graphic Pro 3 Printer Output Profile: Auto Rendering Intent: Perceptual Black Finish: Composite Black (CMYK) Pure Black Text/Graphics Preview Save As PDF... Fax... Cancel Print- From the [Printer Output Profile] menu, select your printer profile (10).
- If Auto is selected, the factory default profiles that are embedded in the printer will be used. If you have created a printer profile yourself using profile creation software, select it here and choose a rendering intent (see "Rendering intents" on page 72).
SIMULATING ANOTHER PRINTER - RGB SOURCE DATA
The Graphic Pro colour matching system can be used to simulate the colour output of another printer.
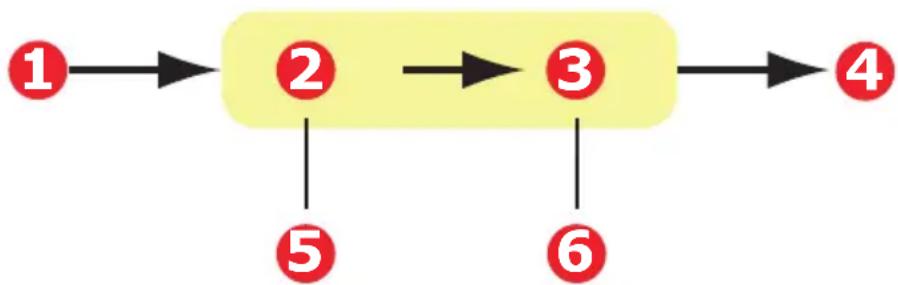
flowchart
graph TD
    1["1"] --> 2["2"]
    2 --> 3["3"]
    3 --> 4["4"]
    5["5"] --> 2
    6["6"] --> 3
- RGB data 4. Printed document
- RGB source profile 5. Scanner, monitor, camera, etc.
- Printer output profile 6. Leave on Auto or select your custom profile.
NOTE:
Be aware that if the device you are trying to simulate has different colour capabilities from your own printer, exact colour simulation will not be possible. For example, it may be difficult to reproduce the exact colours of an ink jet printer on a toner-based printer.
Additionally, differences in the range of printable colours between different devices can make simulation using RGB source data inaccurate. To achieve best results when simulating the colour output of other printers, you are strongly advised to use CMYK data as a source. See "CMYK ink simulations - CMYK source data" on page 68.
To simulate the output of another printer, you need to download at least 2 profiles to your printer using Profile Assistant:
RGB Source Profile
Simulation Target Profile
Printer Output Profile (optional)
Once the profile(s) have been down loaded, make the appropriate selections in the printer driver. These are described in the next section (Windows page 64, Mac OS X page 60).
WINDOWS
If you are using a source RGB document, simulate the output of another printer by making the following selections in the printer driver:
- On the printer driver [Colour] tab, select [Graphic Pro] (1) and click [Options].
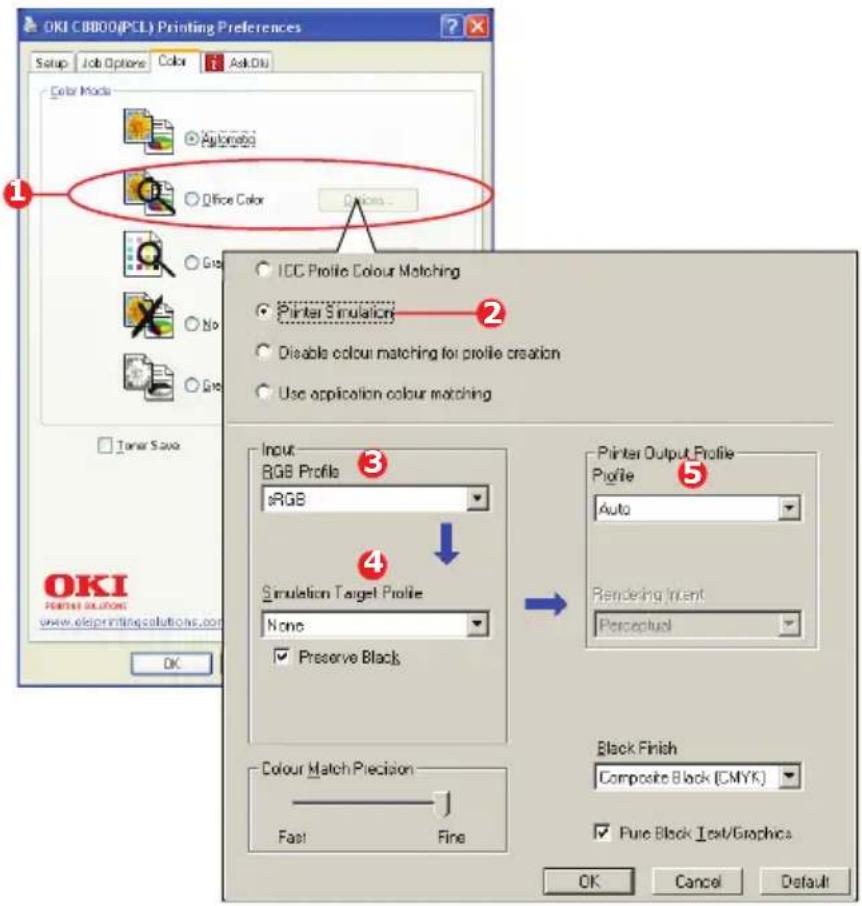
text_image
OKI C8000(PCL) Printing Preferences Setup Job Options Color AskDiu Color Mode Automobile Office Color Devices ICC Profile Colour Matching Printer Simulation Disable colour matching for profile creation Use application colour matching Timer Save OKI PENKING SOLUTIONS www.eleprintingcolutions.com OK Input RGB Profile sRGB Simulation Target Profile None Preserve Black Colour Match Precision Fast Fine Printer Output Profile Profile Auto Rendering Incent Perceual Black Finish Composite Block (CMYK) Pure Black Text/Graphics OK Cancel Default- Select [Printer Simulation] (2).
- Select the ICC profile that corresponds to the device used to capture or display your source document - this could be a monitor, scanner or digital camera (3).
- Remember that the names "RGB Source 1", "RGB Source 2" and so on relate to the number assigned to the profile using Profile Assistant. See "Using Profile Assistant" on page 56.
-
Select a Simulation Target Profile (4).
-
This profile corresponds to the printer you want to simulate.
- If you wish to produce black and grey colours that are printed using only black toner, enable the [Preserve Black] option. Although this produces a better quality print, the black and grey colours will not be simulated accurately.
- Select your printer output profile (5).
- If [Auto] is selected, the factory default profiles that are embedded in the printer will be used. If you have created a printer profile yourself using profile creation software, select it here and choose a rendering intent. See "Rendering intents" on page 72.
MAC OS X
- Choose [File] → [Print].
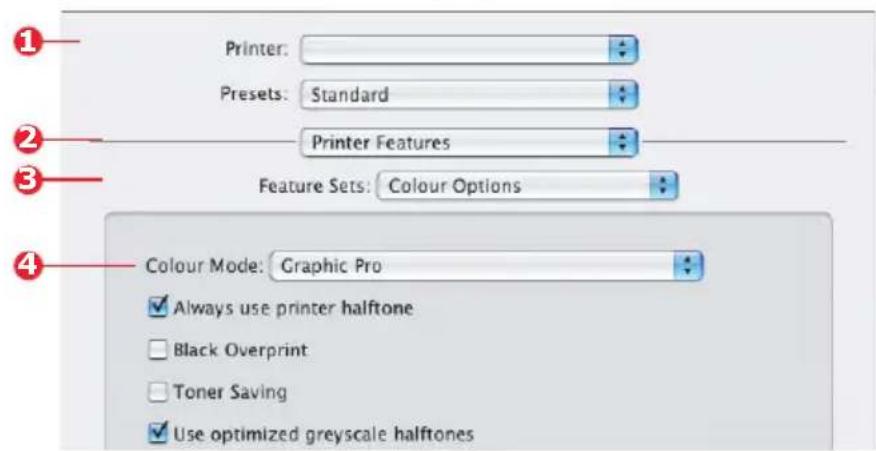
- From the [Printer] menu (1), select your printer model.
text_image
Printer: Presets: Standard Printer Features Feature Sets: Colour Options Colour Mode: Graphic Pro Always use printer halftone Black Overprint Toner Saving Use optimized greyscale halftones- Select [Printer Features] (2).
- From the [Feature Sets] menu (3), [Colour Options].
-
From the [Colour Mode] menu (4), select [Graphic Pro].
-
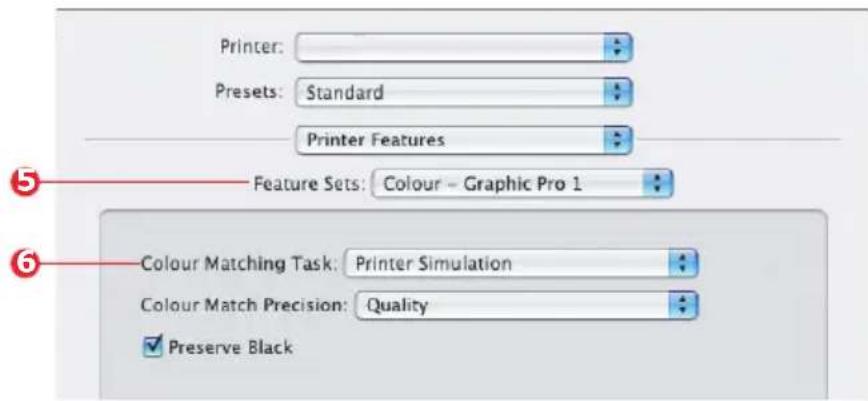
From the [Feature Sets] menu (5), select [Colour - Graphic Pro 1].
text_image
Printer: Presets: Standard Printer Features Feature Sets: Colour - Graphic Pro 1 Colour Matching Task: Printer Simulation Colour Match Precision: Quality ✓ Preserve Black- From the [Colour Matching Task] menu (6), select [Printer Simulation].
If you wish to produce black and grey colours that are printed using only black toner, enable the [Preserve Black] option. Although this produces a better quality print, the black and grey colours will not be simulated accurately.
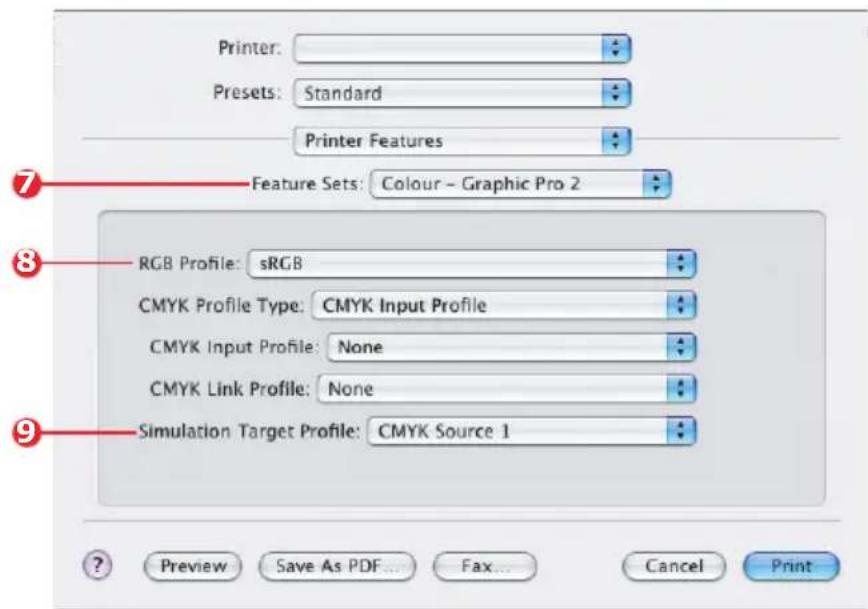
- From the [Feature Sets] menu (7), select [Colour - Graphic Pro 2].
text_image
Printer: Presets: Standard Printer Features Feature Sets: Colour - Graphic Pro 2 RGB Profile: sRGB CMYK Profile Type: CMYK Input Profile CMYK Input Profile: None CMYK Link Profile: None Simulation Target Profile: CMYK Source 1 Preview Save As PDF... Fax... Cancel Print- From the [RGB Profile source] (8), select the ICC profile that corresponds to the device you are trying to match such as your monitor, scanner or digital camera.
Remember that the names "RGB Source 1", "RGB Source 2" and so on relate to the number assigned to the
profile using Profile Assistant. See "Using Profile Assistant" on page 56.
- From the [Simulation Target Profile] menu (9), select the profile of the device you wish to simulate.
Remember that the names "CMYK Source 1", "CMYK Source 2" and so on relate to the number assigned to the profile using Profile Assistant. See "Using Profile Assistant" on page 56.
- From the [Feature Sets] menu (10), select [Colour - Graphic Pro 3].
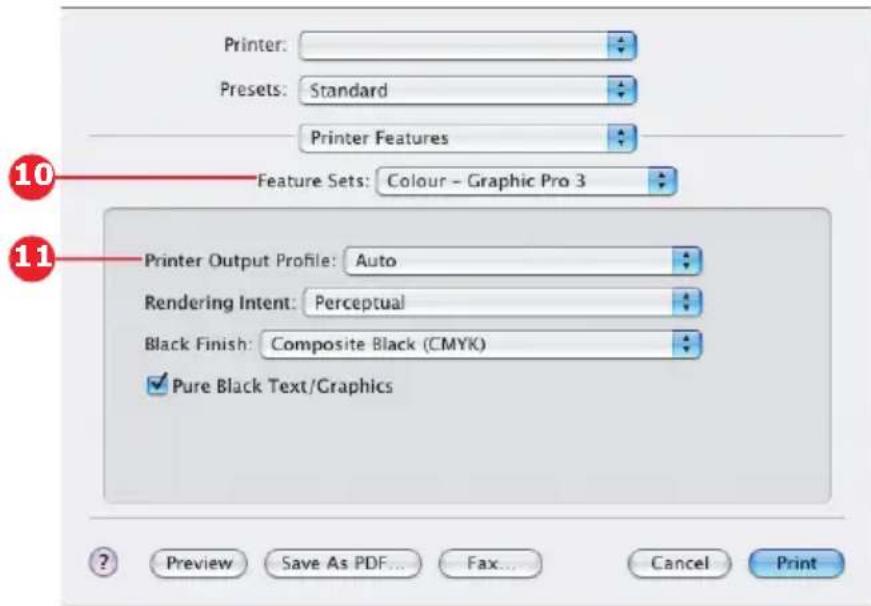
text_image
Printer: Presets: Standard Printer Features Feature Sets: Colour - Graphic Pro 3 Printer Output Profile: Auto Rendering Intent: Perceptual Black Finish: Composite Black (CMYK) Pure Black Text/Graphics Preview Save As PDF... Fax... Cancel Print- From the [Printer Output Profile] menu (11), select your printer profile.
If [Auto] is selected, the factory default profiles that are embedded in the printer will be used. If you have created a printer profile yourself using profile creation software, select it here and choose a rendering intent (see "Rendering intents" on page 72).
CMYK INK SIMULATIONS - CMYK SOURCE DATA
The ICC-based colour matching system can be used to simulate the output on commercial printing presses.
You can select from the ink types most commonly used in different regions of the world:
Euroscale – Europe
Swop - North America
Toyo - Japan
To print CMYK Ink Simulations, you must use PostScript printer driver supplied.
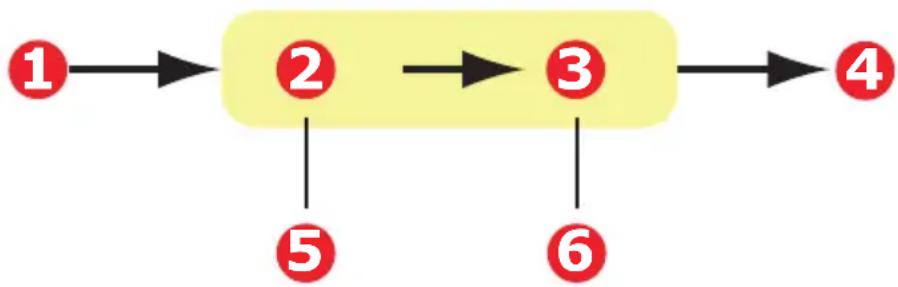
flowchart
graph TD
    1["1"] --> 2["2"]
    2 --> 3["3"]
    3 --> 4["4"]
    5["5"] --> 2
    6["6"] --> 3
- CMYK data 4. Printed document
- CMYK input profile 5. CMYK device you wish to simulate (e.g. SWOP press)
- Printer output profile 6. Leave on Auto or select your custom profile
Although it is possible to perform CMYK ink simulations using the Office Colour options in the printer driver, we recommend that you use the Graphic Pro colour matching system to perform CMYK ink simulations, as this provides additional controls, such as using the "Preserve Black" feature, or specifying an alternative printer output profile.
Instructions on how to apply Ink Simulations appear in the next section (Windows page 69, Mac OS X page 70).
NOTE:
This information applies to the Windows PostScript driver only.
If you are using a source CMYK document, use the following printer driver settings to perform a CMYK Ink Simulation:
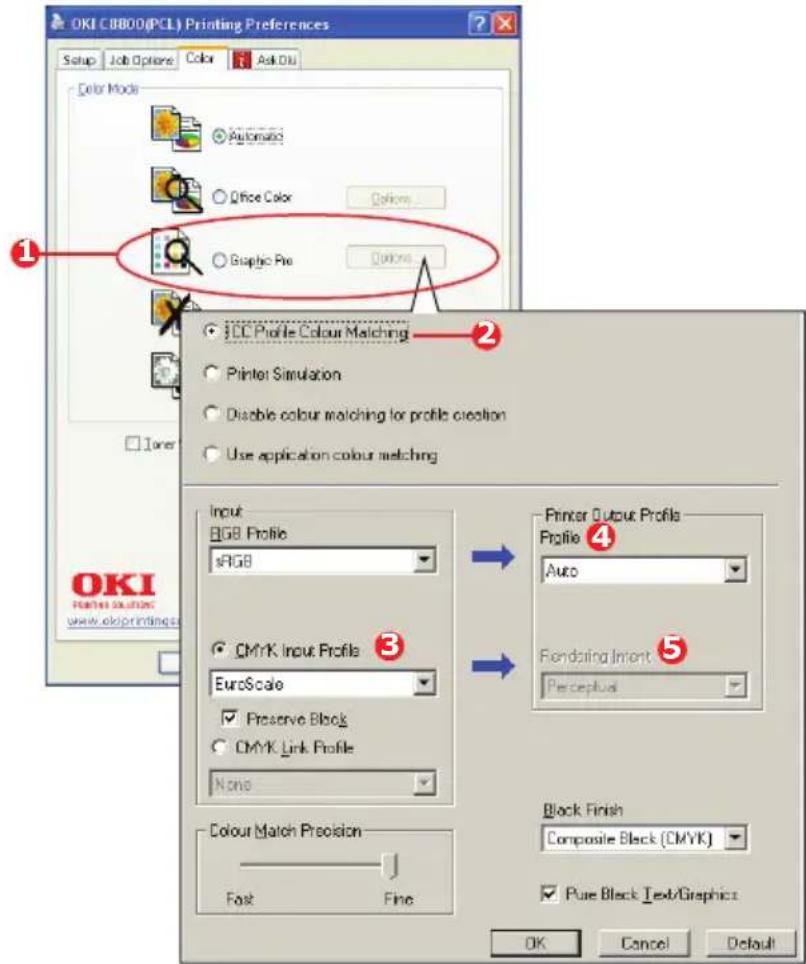
text_image
OKI C8000(PCL) Printing Preferences Setup Job Options Color Ask Olu Color Mode Automatic Office Color Options... Graphic Pro Options... ICC Profile Colour Matching Printer Simulation Disable colour matching for profile creation Use application colour matching Input RGB Profile sRGB CMYK Input Profile EuroScale Preserve Block CMYK Link Profile None Colour Match Precision Fast Fine Printer Output Profile Profile Auto Fondoring Invert Perceptual Black Finish Composite Block (CMYK) Pure Black Text/Graphic: OK Cancel Default OKI FORTH SOLUTIONS www.ekprinting.s- On the printer driver [Colour] tab, select [Graphic Pro] (1) and click [Options].
- Select [ICC Profile Colour Matching] (2).
- Select the [CMYK Input profile] (3) that corresponds to the device you are trying to match such as a SWOP or Euroscale Press. If you have another CMYK Ink profile that you wish to use, select it here as the appropriate "CMYK Source x" profile.
Remember that the names "CMYK Source 1", "CMYK Source 2" and so on relate to the number assigned to the profile using Profile Assistant. See "Using Profile Assistant" on page 56.
Use the [Preserve Black] option to keep the original grey component (K channel) information. If [Preserve Black] is disabled, the grey components may be printed using a mixture of CMYK toner, instead of just K (black) toner.
- Select a Printer Output Profile (4).
If [Auto] is selected, the factory default profiles that are embedded in the printer will be used. If you have created a printer profile yourself using profile creation software, select it here.
If you have selected a profile other than [Auto], select the [Rendering Intent] (5). (See "Rendering intents" on page 72.)
MAC OS X
If you are using a source CMYK document, use the following printer driver settings to perform a CMYK Ink Simulation:
- Choose [File] → [Print].
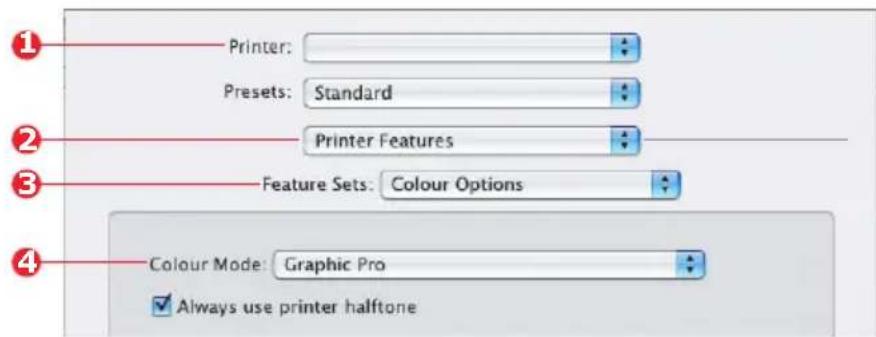
text_image
Printer: Presets: Standard Printer Features Feature Sets: Colour Options Colour Mode: Graphic Pro Always use printer halftone- From the [Printer] menu (1), select your printer model.
- Select [Printer Features] (2).
- From the [Feature Sets] menu (3), select [Colour Options].
-
From the [Colour Mode] menu (4), select [Graphic Pro].
-
From the [Feature Sets] menu (5), select [Colour - Graphic Pro 1].
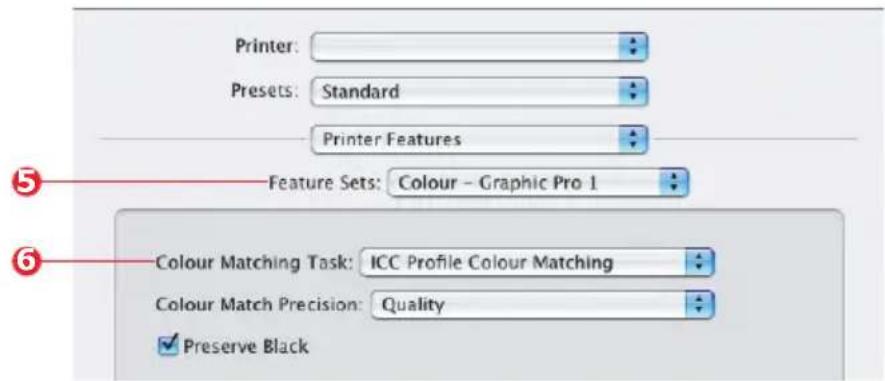
text_image
Printer: Presets: Standard Printer Features Feature Sets: Colour - Graphic Pro 1 Colour Matching Task: ICC Profile Colour Matching Colour Match Precision: Quality ✓ Preserve Black- From the [Colour Matching Task] menu (6), select [ICC Profile Colour Matching].
Use the [Preserve Black] option to keep the original grey component (K channel) information. If [Preserve Black] is disabled, the grey components may be printed using a mixture of CMYK toner, instead of just K (black) toner.
- From the [Feature Sets] menu (7), select [Colour - Graphic Pro 2].
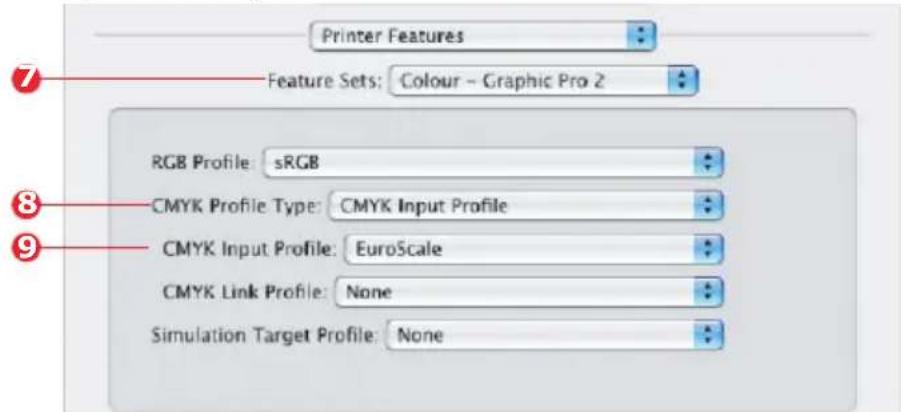
text_image
Printer Features Feature Sets: Colour - Graphic Pro 2 RGB Profile: sRGB CMYK Profile Type: CMYK Input Profile CMYK Input Profile: EuroScale CMYK Link Profile: None Simulation Target Profile: None-
From the [CMYK Profile Type] menu (8), select [CMYK Input Profile].
-
From the [CMYK Input Profile source] (9), select the CMYK Input profile that corresponds to the device you are trying to match such as a SWOP or Euroscale Press. If you have another CMYK Ink profile that you wish to use, select it here as the appropriate "CMYK Source x" profile.
Remember that the names "CMYK Source 1", etc., relate to the number assigned to the profile using Profile Assistant. See "Using Profile Assistant" on page 56.
- From the [Feature Sets] menu, select [Colour - Graphic Pro 3] (10).
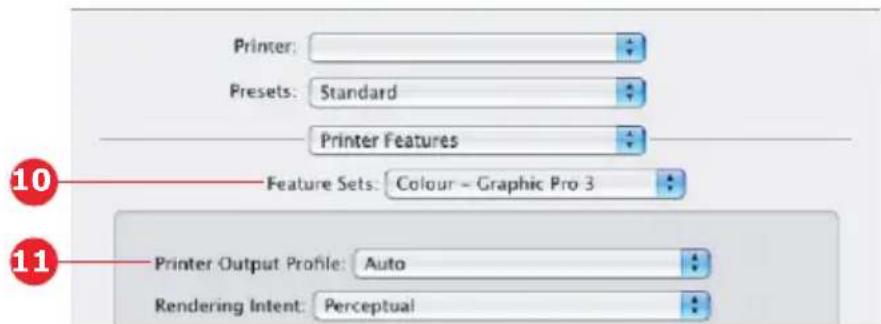
text_image
Printer: Presets: Standard Printer Features Feature Sets: Colour - Graphic Pro 3 Printer Output Profile: Auto Rendering Intent: Perceptual- From the [Printer Output Profile] menu (11), select your printer profile.
If [Auto] is selected, the factory default profiles that are embedded in the printer will be used. If you have created a printer profile yourself using profile creation software, select it here and choose a rendering intent (see "Rendering intents" on page 72).
RENDERING INTENTS
When selecting the Printer Output Profile, if you select any other profile apart from [Auto], you can select the Rendering Intent. The rendering intents are essentially a set of rules that determine how colours that fall outside of the printable colours are treated.
Select the rendering intent that best suits the document you are printing.
PERCEPTUAL
This option is recommended for printing photographs.
Typically, perceptual rendering desaturates all the colours when printing. This brings unprintable colours into the printer's range, whilst keeping the relationships between the colours the same.
SATURATION
This option is recommended for printing business graphics if you want vivid colours. This will not necessarily produce accurate colour, as the emphasis is on maintaining saturation.
RELATIVE COLORIMETRIC
This option is best for printing solid colours and tints. Use Relative Colorimetric when printing from a drawing program such as Adobe Illustrator, or Macromedia Freehand.
ABSOLUTE COLORIMETRIC
This option is recommended if you are proofing images on your printer that are intended for final output on a printing press. This may result in a visible colour cast on your print as it will also try to simulate the paper white of the target device.
When your document is printed, often the pure black colours will not be printed using 100% black toner. Instead, these pure black colours are sometimes converted and printed using a mixture of CMYK toner.
Using the Pure Black Text / Graphics feature ensures that 100% black text or graphics in your document is printed using pure black toner.
This means that the following colours in your documents will be printed using only 100% black toner:
$$ R G B \text { Red } = 0, \text { Green } = 0, \text { Blue } = 0 $$
$$ \text {CMYK Cyan} = 0 \%, \text {Yellow} = 0 \%, \text {Magenta} = 0 \%, $$
$$ \text { Black } = 100 \% $$
COLOUR MATCH PRECISION
When the printer performs colour matching, it must do many calculations to convert between different colour formats (RGB, CMYK, etc.). These calculations can take time to process.
The [Colour Match Precision] option allows you to choose between higher quality colour matching (more time consuming) or faster but less accurate colour matching.
PRINTER DRIVER SETTINGS FOR ICC PROFILE CREATION OR NO COLOUR MATCHING
If you are creating ICC profiles using third-party software, select [Disable Colour Matching for ICC Profile Creation]. This option switches off all printer colour management and also prevents the printer from restricting toner layer thickness.
If you are using your application colour matching, select [Use Application Colour Matching]. This option switches off all printer colour management. (Mac OS X page 75.)
WINDOWS PCL
- On the printer driver [Colour] tab, select [Graphic Pro] (1) and click [Options].
- Select [Disable Colour Matching for Profile Creation] (2) if you are creating an ICC profile using third-party profile creation software. Select [Use Application Colour Matching] (3) if you wish to switch off all printer colour management and use your application's colour matching.
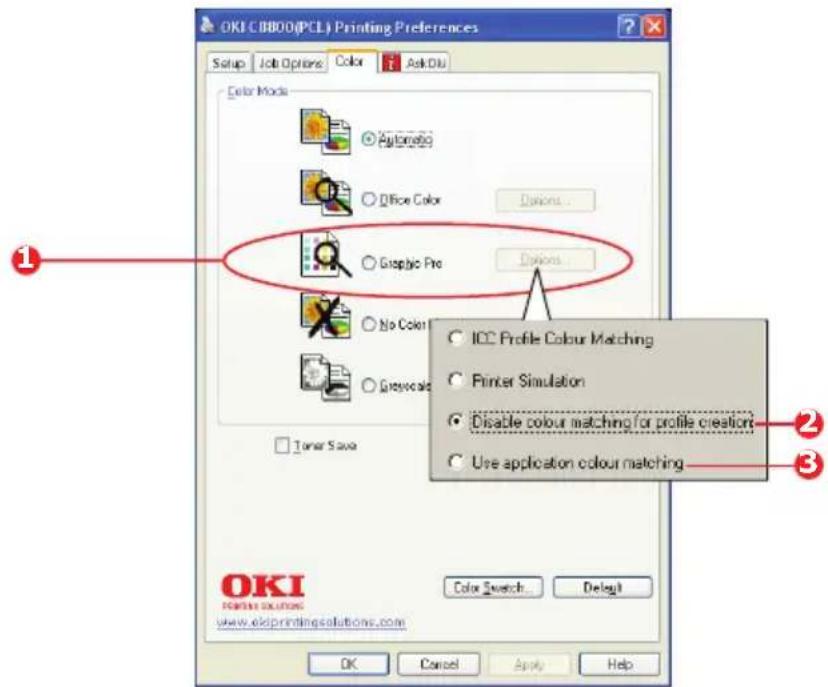
text_image
OKI CBB00(PCL) Printing Preferences Setup Job Options Color Ask Diu Color Mode Automatic Office Color Disons... Graphic Pro Disons... No Color Greycale Timer Save ICC Profile Colour Matching Printer Simulation Disable colour matching for profile creation Use application colour matching OKI Profile Solutions www.okiprintingsolutions.com Color Search... Delete! OK Cancel Apply HelpMAC OS X
- Choose [File] → [Print].
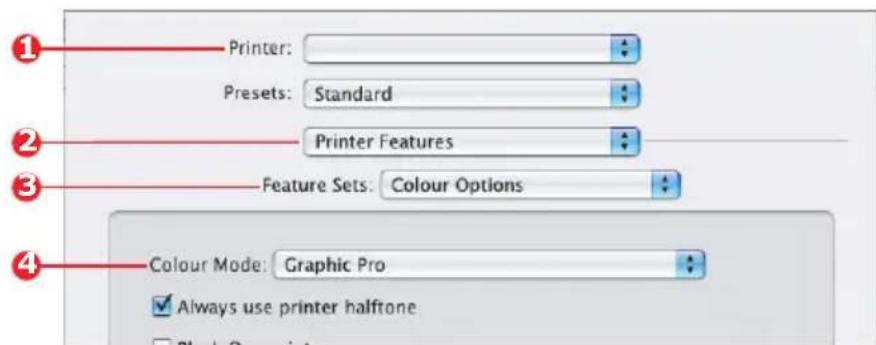
text_image
Printer: Presets: Standard Printer Features Feature Sets: Colour Options Colour Mode: Graphic Pro Always use printer halftone- From the [Printer] menu (1), select your printer model.
- Select [Printer Features] (2).
- From the [Feature Sets] menu (3), select [Colour Options].
- From the [Colour Mode] menu (4), select [Graphic Pro].
- From the [Feature Sets] menu (5), select [Colour - Graphic Pro 1].
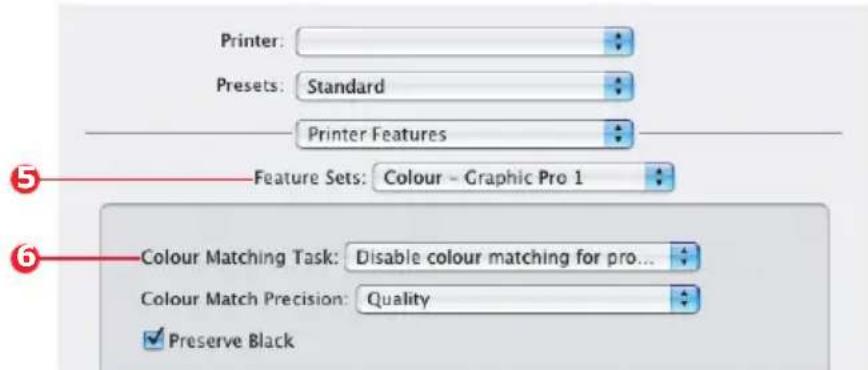
text_image
Printer: Presets: Standard Printer Features Feature Sets: Colour - Graphic Pro 1 Colour Matching Task: Disable colour matching for pro... Colour Match Precision: Quality ✓ Preserve Black- From the [Colour Matching Task] menu (6), select [Disable Colour Matching for Profile Creation] if you are creating an ICC profile using third-party profile creation software. Select [Use Application Colour Matching] if you wish to switch off all printer colour management and use your application's colour matching.
FINISHING OPTIONS
Your printer offers a wide selection of document finishing options that help you to control the final form of your printed document.
Depending on the hardware fitted, either as optional upgrades or included as standard and on which model you have, your system can offer a number of choices.
For detailed information on these options see:
"Booklet printing (imposition)" on page 77
"Collating" on page 80
"Colour separation" on page 83
"Separating queued print jobs" on page 85
"Cover print" on page 87
"Custom page size" on page 89
"Duplex (double-sided) printing" on page 93
"Printing multiple pages on one sheet (N-up)" on page 96
"Poster printing" on page 99
"Scale to page" on page 100
"Watermarks" on page 101
BOOKLET PRINTING (IMPOSITION)
Booklet printing in the Windows drivers printing allows printing of multi-page documents with their pages ordered and arranged so that final printed output can be folded into a booklet. Typically, A4 pages would be reduced to A5 and printed side by side on both sides of A4 paper, so that the paper can be folded into a booklet.
Since this feature prints on both sides of the page, it requires a duplex unit to be installed in the printer, and 256MB of additional memory (512MB in total).
NOTES:
- To find out how much memory currently installed, print out a Configuration page from the printer control panel.
- A few applications do not support booklet printing, but most do.
- This feature is not available in the Macintosh drivers.
When using the PostScript driver, if you plan to print a long document, more than about 16 pages, consider printing it in sections of 8 or 16 at a time. This is called the "signature," and will avoid having too thick a stack of paper to fold to make your booklet. Your document will then be printed in a series of booklets which can be stacked one above the other. This is usually a neater arrangement.
The above considerations do not matter when using the PCL driver as the signature can be set within the driver, and a long document can be printed directly as a series of booklets.
Note that the number of pages in a booklet is always a multiple of four, since two pages are printed on each side of each sheet of paper. If your document is not a multiple of four pages long, the last one, two or three pages in your folded booklet will be blank.
WINDOWS POSTSCRIPT
- In the driver's [Layout] tab, choose [Booklet] from the [Pages Per Sheet] drop-down list.
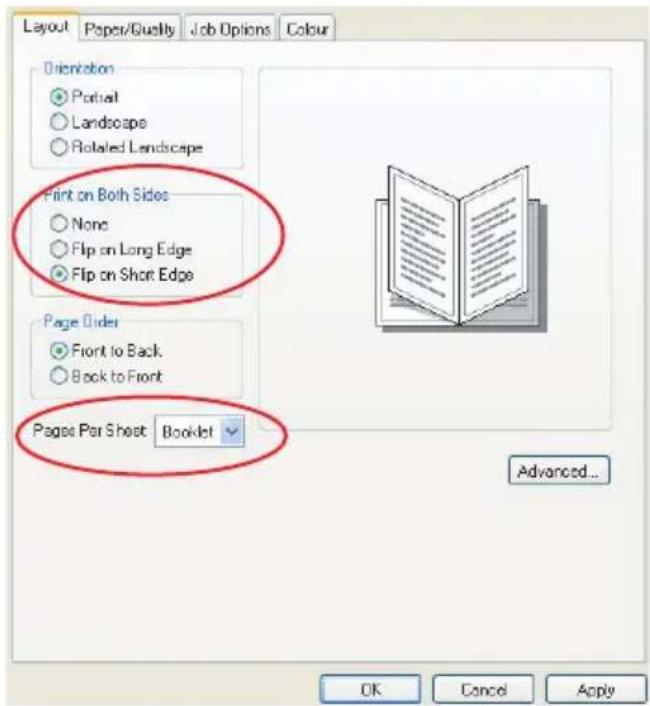
text_image
Layout Paper/Quality Job Options Colour Orientation • Portrait ○ Landscape ○ Rotated Landscape Print on Both Sides ○ None ○ Flip on Long Edge ● Flip on Short Edge Page Order • Front to Back. ○ Book to Front Pages Per Sheet Booklet Advanced... OK Cancel Apply- Check that the duplex option is set to [Flip on Short Edge].
NOTE:
If the Booklet choice is not shown, check that the Duplex option is enabled in the driver. ("Setting the driver device options" on page 29)
WINDOWS PCL
- In the driver's [Setup] tab, recall any saved [driver settings] you may wish to use.
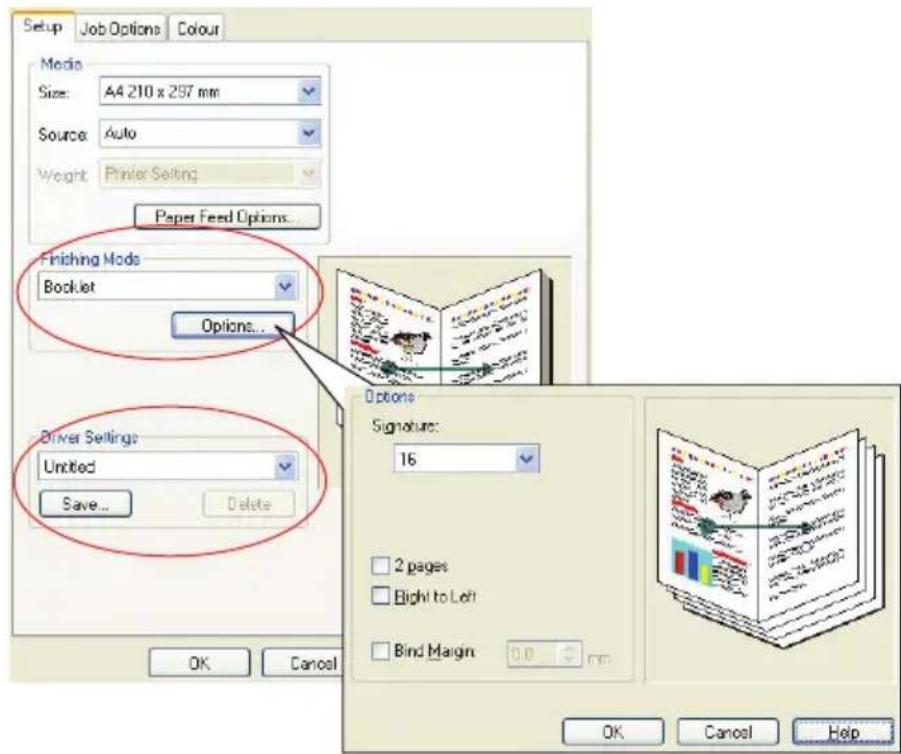
text_image
Setup Job Options Colour Media Size: A4 210 x 257 mm Source: Auto Weight: Printer Setting Paper Feed Options... Finishing Mode Booklet Options... Driver Settings: Untitled Save... Delete Options Signature: 16 2 pages Right to Left Bind Margin OK Cancel OK Cancel Help- Choose [Booklet] from the [Finishing Mode] drop-down list, then click [Options].
- In the Options window you can set the [signature] size, the number of [pages] per side of paper and the [binding margin] if your document is going to be thick. The graphic in this window shows the effect of each choice you make.
NOTE:
If the Booklet choice is not shown, check that the Duplex option is enabled in the driver. (See "Setting the driver device options" on page 29.)
COLLATING
This feature allows multiple copies of a multi-page document to be printed with the pages of each copy in sequence.
Uncollated pages print like this
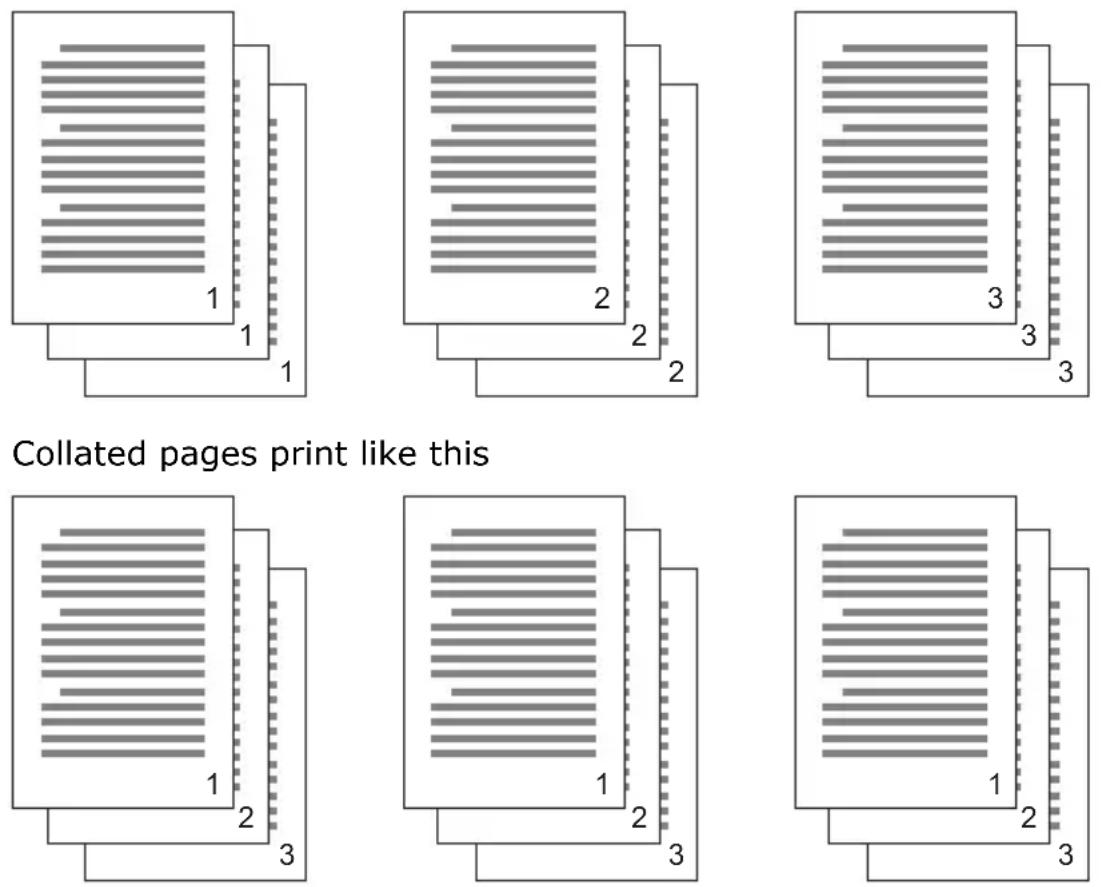
Collated pages print like this
Application collate—Some application programs have a collate feature in their print options. In this case the application performs the document collation and may send the job multiple times to the printer. Generally, this method is slower but can be more reliable.
Printer collate—This section describes the collate function built into the printer driver. In this case the job is stored temporarily in printer memory or on the printer's hard disk (if installed), and the printer performs collation. This method is normally faster, but may not work from all applications.
If you experience problems using printer collate, use the collate option in your application's print options instead.
WINDOWS
-
If using the PCL driver, on the [Setup] tab first choose any saved [driver settings] that you wish to use. See "Recalling saved driver settings" on page 28.
-
In the [Job Options] tab, choose how many [copies] you want to print from the scrolling list.
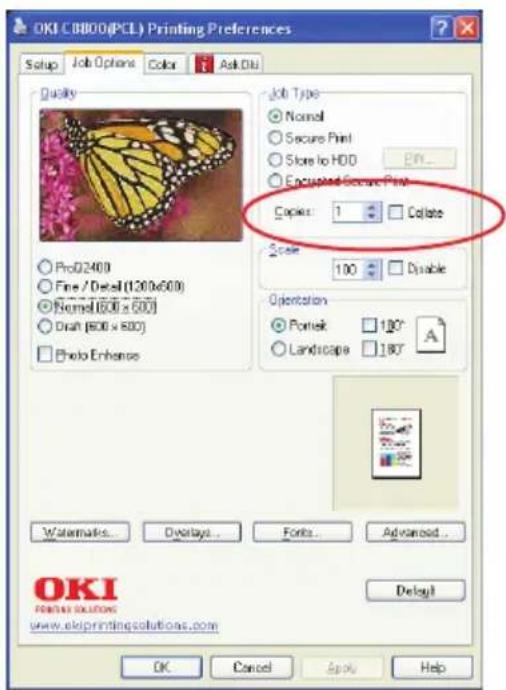
text_image
OKI C8000(PCL) Printing Preferences Setup Job Options Color Ask OKI Quality ProD2400 Fine / Detail (130x600) Normal (500 x 500) Draft (500 x 500) Photo Enhance Job Type Normal Secure Print Store to HDD Encrypted Secure Print Copies: 1 Collate Scale: 100 Double Orientation Portek 120° A Landscape 180° Watermarks... Overtays... Fonts... Advanced... OK Cancel Apply Help OK Cancel Apply Help OK Print Solutions www.okiprintingsolutions.com Delay! OK Cancel Apply Help- Click the [Collate] checkbox.
MAC OS X
- Choose [File] → [Print].
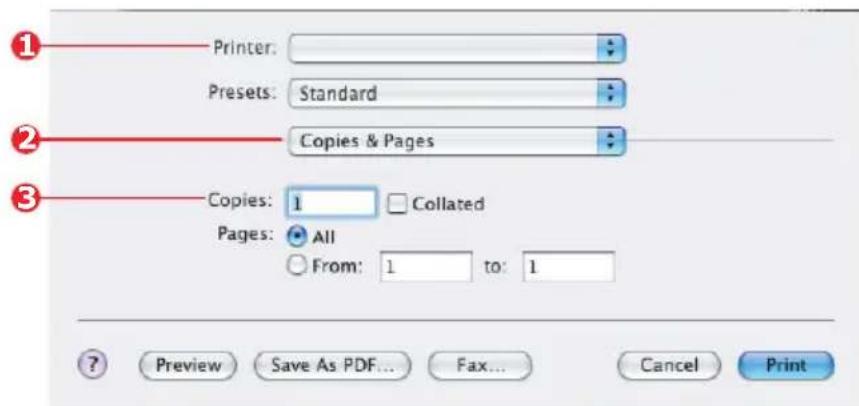
text_image
Printer: Presets: Standard Copies & Pages Copies: 1 Collated Pages: All From: 1 to: 1 Preview Save As PDF... Fax... Cancel Print- From the printer menu (1), select your printer model.
3. Select [Copies & Pages] (2).
The [Collate] option in the [Copies & Pages] dialogue is for application collate. See "Collating" on page 80.
![OKI C8800DTN - Select [Copies & Pages] (2). - 1](/content/2026/05/816835/images/f43f809f687ca9917ecc2289dc54f0c8f532bbe7802cfa90dc2ae878dd2ec1d8.jpg)
text_image
Printer: Presets: Standard Printer Features Feature Sets: Job Options Quality: Photo (Multilevel) Image Smoothing Collate Page Rotate Adjust ultra fine lines- Enter the number of [copies] (3) you wish to print.
- Select [Printer Features] (4).
- From the [Feature Sets] menu (5), select [Job Options].
- Select the [Collate] checkbox (6) to enable printer collate.
COLOUR SEPARATION
The colour separation feature prints each of four primary colours as separate greyscale images. This is a proofing facility that indicates the relative densities of each of the four toner colours in your print document. The darker an area appears, the more of the corresponding toner colour will be used when printing in full colour.
WINDOWS POSTSCRIPT
- In the driver's [Colour] tab, click [Advanced].
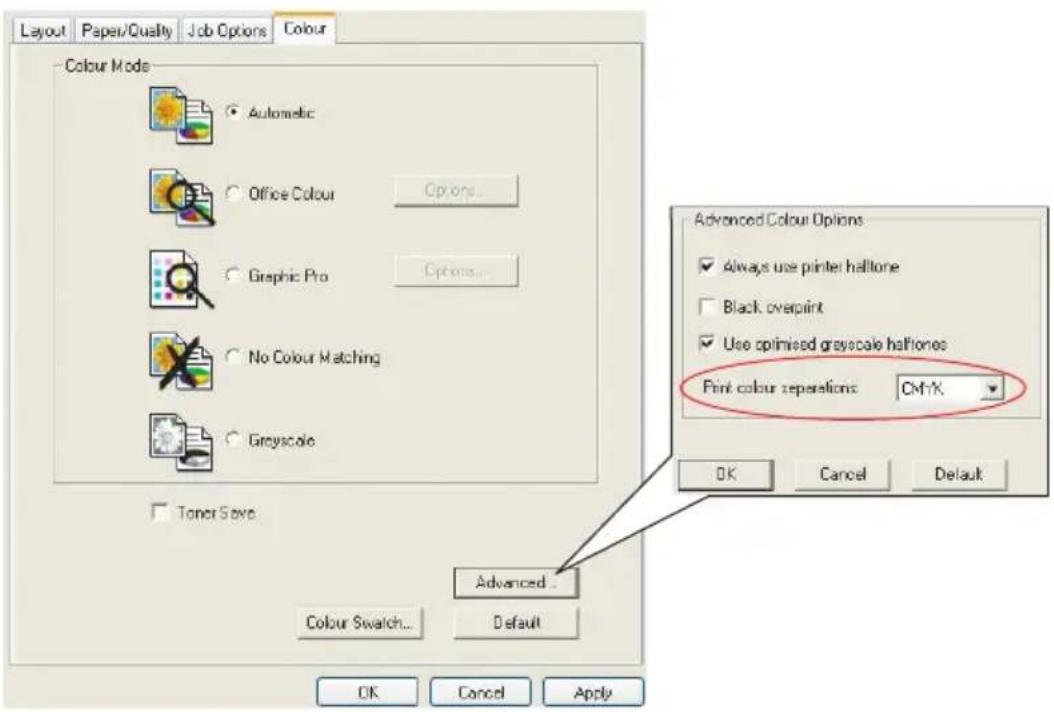
text_image
Layout Paper/Quality Job Options Colour Colour Mode Automatic Office Colour Options... Graphic Pro Options... No Colour Matching Grayscale Toner Save Advanced Colour Swatch... Default Advanced Colour Options Always use printer halftone Black overprint Use optimised grayscale halftones Print colour repetitions CMYK OK Cancel Default OK Cancel Apply- Select which [separations] you want to print from the drop-down list.
MAC OS X
- Choose [File] → [Print].
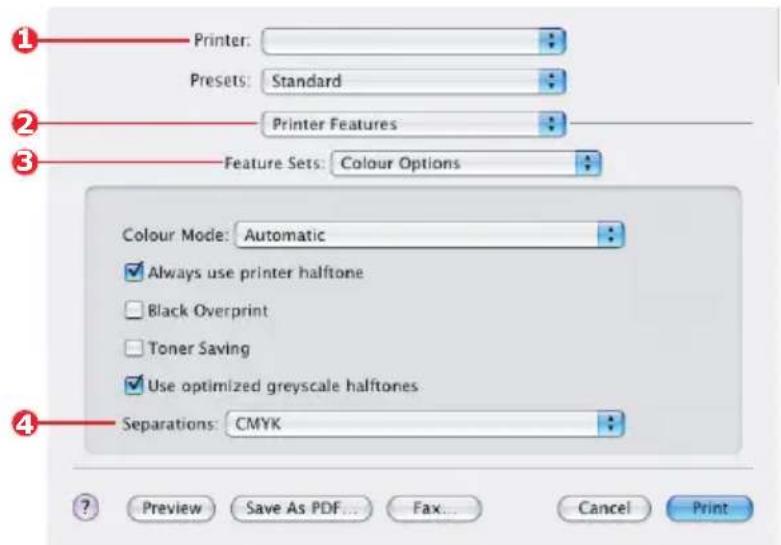
text_image
Printer: Presets: Standard Printer Features Feature Sets: Colour Options Colour Mode: Automatic Always use printer halftone Black Overprint Toner Saving Use optimized greyscale halftones Separations: CMYK Preview Save As PDF... Fax... Cancel Print- From the printer menu (1), select your printer model.
- Select [Printer Features] (2).
- From the [Feature Sets] menu (3), select [Colour Options]
- From the [Separations] menu (4), select the separations you wish to print.
SEPARATING QUEUED PRINT JOBS
When you share a printer with other users it can be useful to print a special page between print jobs to help locate each user's job in a paper stack at the printer. In Windows this page is called a "separator page". On the Mac it is called a "cover page".
NOTE:
Do not confuse Cover Page with "Cover Print". Cover Print is when the first page (cover) of a print job is fed from one paper tray, and the remaining pages of the print job are fed from a different tray. See "Cover print" on page 87
WINDOWS SEPARATOR PAGE
The separator page is set from the printer driver's default properties window. Access to this is directly from Windows, not from within your application program. See "Changing the driver defaults" on page 27
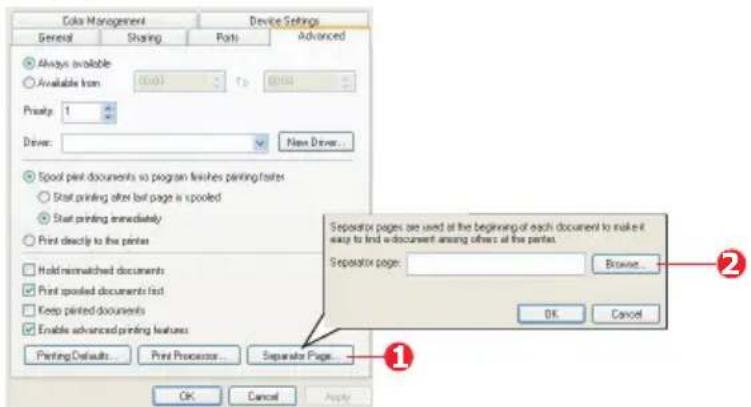
text_image
Coke Management Device Settings General Sharing Parts Advanced Always available Available Icon (0.0) Top 0004 Print: 1 Driver: New Driver... Spot print documents so program finishes printing fairs: Start printing after last page is spoiled Start printing immediately Print directly to this printer Hold mismatched documents Print spoolled documents first Keep printed documents Enable advanced printing features: Separator pages are used at the beginning of each document to make it easy to find a document among others at the printer. Separator page: Browse... OK Cancel Printing Defaults... Print Processor... Separate Page... OK Cancel Apply- In the driver's Advanced tab click the [Separator Page...] button (1).
- Click [Browse] (2) and navigate to a file containing an image of the separator page you wish to use, then click [OK].
MAC OS X COVER PAGE
The cover page is accessed from your application's print dialogue.
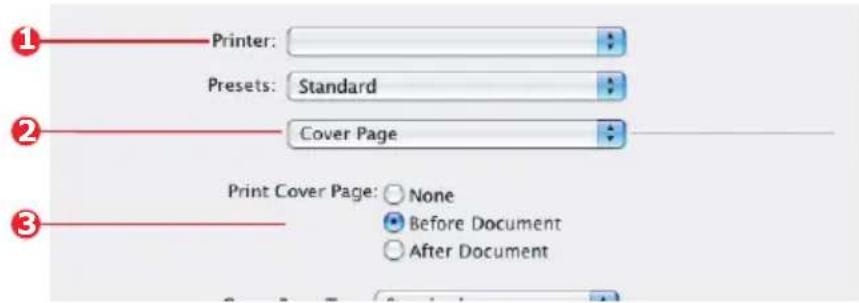
text_image
Printer: Presets: Standard Cover Page Print Cover Page: None Before Document After Document- Choose [File] → [Print].
- From the [Printer] menu (1), select your printer model.
- Select [Cover Page] (2).
- Select the required options for the cover page (3).
COVER PRINT
Cover print is when the first page (cover) of a print job is fed from one paper tray, and the remaining pages of the print job are fed from another paper tray.
This feature is not available in the Windows PostScript Drivers.
Do not confuse Cover Print with "Cover Page". A Cover Page is an identification sheet inserted between the print jobs of a network printer. See "Separating queued print jobs" on page 85.
WINDOWS PCL
- In the Setup tab, choose any saved driver settings you wish to use. See "Recalling saved driver settings" on page 28
- Click [Paper Feed Options].
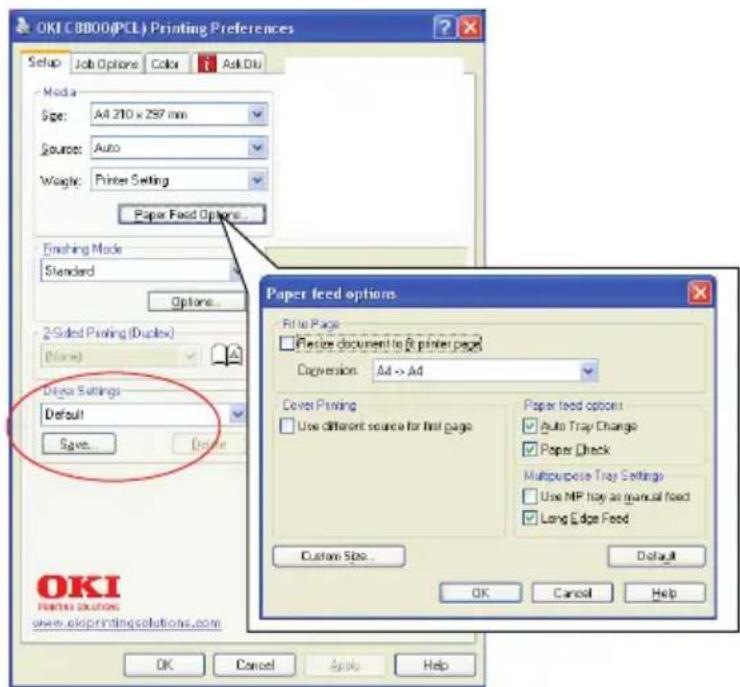
text_image
OKI CBB00(PCL) Printing Preferences Setup Job Options Color Ask Diu Moda Size: A4 210 x 257 mm Source: Auto Weight: Printer Setting Paper Feed Options... Finishing Mode Standard Options... 2-Sided Printing (Duplex) (Done) Dryser Settings Default Save... Delete Paper feed options Fit to Page Flector document to & printer page Conversion: A4 -> A4 Cover Printing Use different source for first page Paper feed options Auto Tray Change Paper Check Multipurpose Tray Settings Use MP tray as manual feed Long Edge Feed Custom Site... OK Cancel Help OK Cancel Apply Help- Check the [Use different source for first page] checkbox.
- Choose the tray you want to feed the cover page from and the paper type in the [Source] and [Weight] drop-down lists.
MAC OS X
- Choose [File] → [Print].
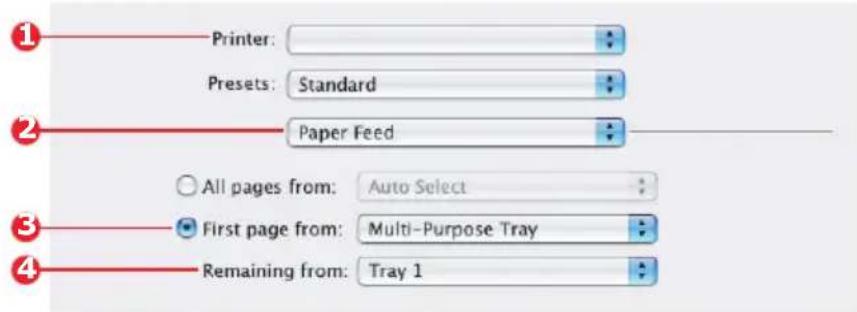
text_image
Printer: Presets: Standard Paper Feed All pages from: Auto Select First page from: Multi-Purpose Tray Remaining from: Tray 1- From the [Printer] menu (1), select your printer model.
- Select [Paper Feed] (2).
- Select the trays or paper types you wish to use for the first page and remaining pages (3).
CUSTOM PAGE SIZE
This feature enables printing on non-standard sized print media. The multipurpose tray is used for feeding non-standard media sizes. Print media width can be from approximately 76mm to 328mm, and its length can be from 90mm to 1200mm. Actual limits vary slightly depending on which printer driver you use and your computer's operating system.
Some applications software may not produce the desired results with non-standard print media sizes, and some experimentation may be required to obtain the results you want.
WINDOWS POSTSCRIPT
- In the driver's [Layout] tab, click [Advanced].
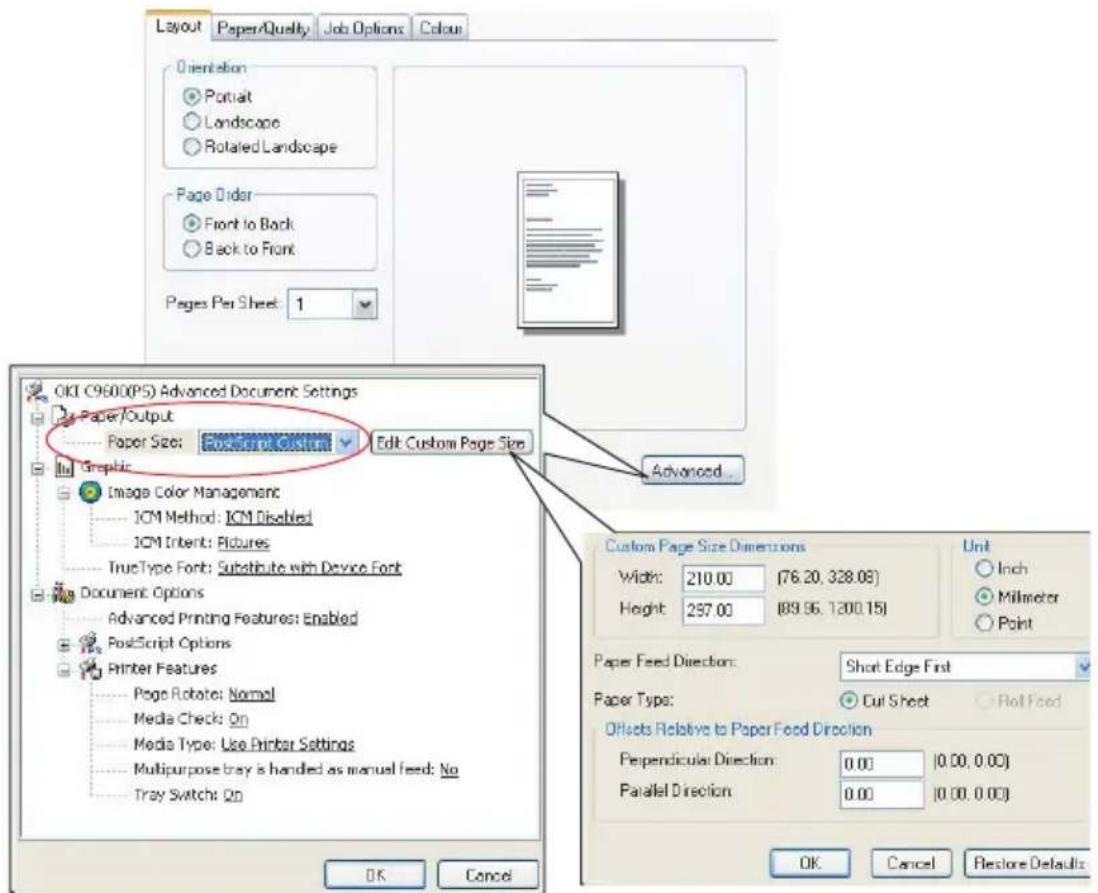
text_image
Layout Paper/Quality Job Options Colour Orientation Portrait Landscape Rotated Landscape Page Order Front to Back Back to Front Pages Per Sheet: 1 OK! C9600(P5) Advanced Document Settings Paper/Output Paper Size: Edit Custom Page Size Graphic Image Color Management ICM Method: ICM Disabled ICM Intent: Pictures TrueType Font: Substitute with Device Font Document Options Advanced Printing Features: Enabled PostScript Options Printer Features Page Rotate: Normal Media Check: On Media Type: Use Printer Settings Multipurpose tray is handled as manual feed: No Tray Switch: On Custom Page Size Dimensions Width: 210.00 (76.20, 328.08) Height: 297.00 (89.96, 1300.15) Unit Inch Millimeter Point Paper Feed Direction: Short Edge First Paper Type: Cut Sheet Roll Feed Effects Relative to Paper Feed Direction Perpendicular Direction: 0.00 (0.00, 0.00) Parallel Direction: 0.00 (0.00, 0.00) OK Cancel Restore Defaults-
In the Advanced Options window, under [Paper/Output], choose [PostScript Custom Page Size] from the [Paper Size] drop-down list.
-
In the PostScript Custom Page Size Definition window, Choose your [paper feed direction] from the drop-down list.
The available choices are:
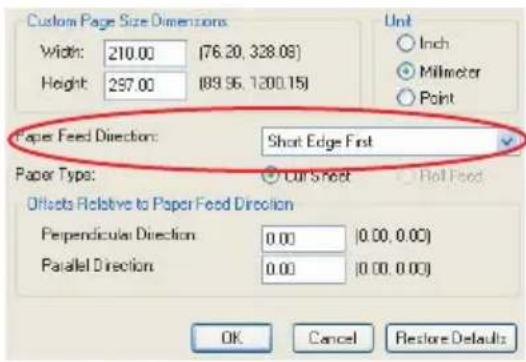
text_image
Custom Page Size Dimensions Width: 210.00 (76.20, 328.08) Height: 297.00 (89.95, 1200.15) Unit ○ Inch ● Millimeter ○ Point Paper Feed Direction: Short Edge First Paper Type: Cut Sheet Roll Feed Offsets Relative to Paper Feed Direction Perpendicular Direction 0.00 (0.00, 0.00) Parallel Direction 0.00 (0.00, 0.00) OK Cancel Restore DefaultsShort edge first The page is portrait (tall) format and you will feed the top of the page into the printer.
Long edge first The page is landscape (wide) format and you will feed the top of the page into the printer.
Short edge first flipped The page is portrait (tall) format and you will feed the bottom of the page into the printer.
Long edge first flipped The page is landscape (wide) format and you will feed the bottom of the page into the printer.
Notice that the size ranges available swap places when you change the paper feed direction between a portrait and a landscape choice.
Remember that the width of the multipurpose tray is limited to the long edge of an A4 sheet (297mm), so, if your paper is longer than this, you will have to feed it short edge first.
- You can also position the page image on the paper to avoid printing too close to the edge by choosing an [Offset].
Offset relative to [perpendicular] direction adds to your left margin.
Offset relative to [parallel] direction adds to your top margin (normal feed) or bottom margin (flipped feed).
-
Click [OK] to close the PostScript Custom Page Size Definition window.
-
Click [OK] to close the Advanced Options window.
-
In the driver's window, choose the [Multipurpose Tray] as the [Paper Source].
WINDOWS PCL
- In the driver's [Setup] tab, select any previously saved settings you wish to use.
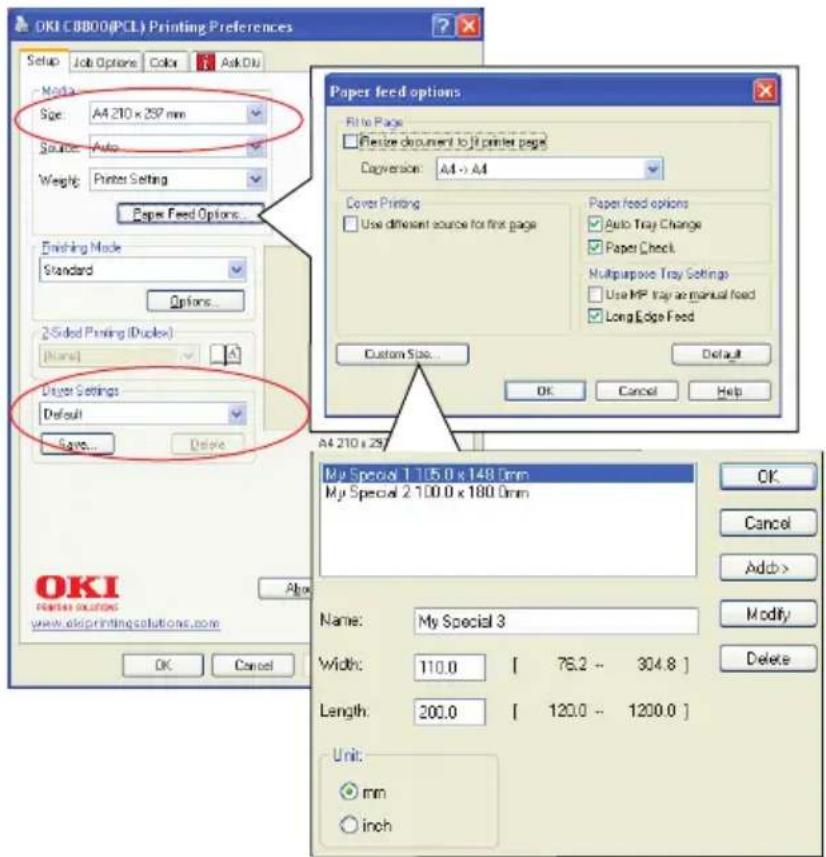
text_image
OKI C8000(PCL) Printing Preferences Setup Job Options Color Ask Diu Media Size: A4 210 x 257 mm Source: Auto Weight Printer Setting Paper Feed Options... Finishing Mode Standard Options... 2-Sided Printing (Ducke) [Name] Layer Settings Default Save... Delete Paper feed options Fit to Page Fimize document to it printer page Compression: A4 -> A4 Cover Printing Use different source for first page Paper feed options Auto Tray Change Paper Check Multipurpose Tray Settings Use MP Tray as manual feed Long Edge Feed Custom Size... Default OK Cancel Help A4 210 x 257 My Special 1.105.0 x 148.0mm My Special 2.100.0 x 180.0mm Name: My Special 3 Width: 110.0 [ 76.2 - 304.8 ] Length: 200.0 [ 120.0 - 1200.0 ] Unit: mm inch-
Click the [Paper Feed Options] button.
-
In the Paper Feed Options window, click [Custom Size].
-
If you have previously saved any special custom sizes they will be listed in the Custom Size window.
-
To use a previously saved custom size, click its name in the list.
To create a new custom size:
(a) Enter its dimensions in the [Width] and [Length] boxes.
(b) Enter a name for the new size in the [Name] box, and click [Add] to save it in the list.
-
Click [OK] to accept your chosen size and close the Custom Size window.
-
If this is the size of your document but you want to scale it to fit a standard size of paper, click [Resize document to fit printer page] in the Paper Feed Options window, and choose the printer's actual paper size from the [Conversion] drop-down list.
MAC OS X
- In your application program, choose [File] → [Page Setup].
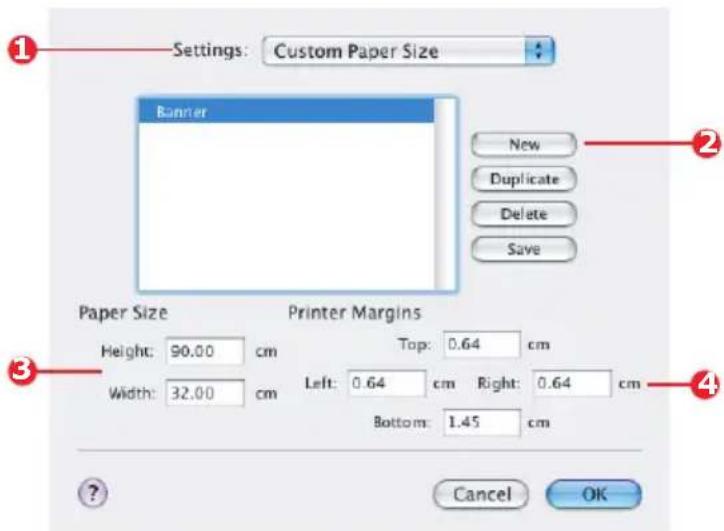
text_image
Settings: Custom Paper Size Banner New Duplicate Delete Save Paper Size Printer Margins Height: 90.00 cm Width: 32.00 cm Top: 0.64 cm Left: 0.64 cm Right: 0.64 cm Bottom: 1.45 cm Cancel OK- Select [Custom Page Size] (1).
- Click the [New] button (2) to define a new paper size and enter a name for the paper size.
- Enter the [Width] and [Height] (3) of your paper.
- Specify paper [margins] (4) as required.
- Click [OK] to save the new paper size.
DUPLEX (DOUBLE-SIDED) PRINTING
If your printer has a duplex unit installed you can print on both sides of the paper, to save paper, weight, bulk and cost.
Only paper can be used for duplex printing, not transparencies or other media.
Use paper stock of 64–105 g/m². If you experience excessive curling with 75–90 g/m² paper, use 105 g/m².
Use standard sized paper stock only, e.g. A4, A3, Letter, etc.
Load the paper print side up. Ream wrappers are usually marked with an arrow, indicating which is the print side.
Paper can be fed from standard paper trays, including the high capacity feeder if you have one, but not from the multipurpose tray.
Do not set the paper weight to Ultra Heavy.
Do not enable the White Page Skip function.
WINDOWS POSTSCRIPT
- In the driver's Layout tab, under [2-Sided Printing], select the binding edge you want.
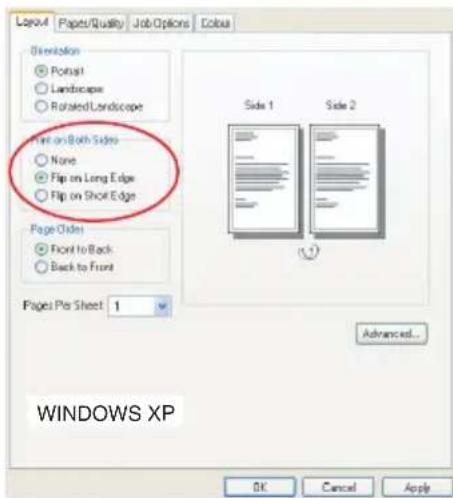
text_image
Layout Papers/Quality Job Options Colour Orientation ● Portrait ○ Landscape ○ Rotated/Landscape Flip on Both Side ○ None ● Flip on Long Edge ○ Flip on Short Edge Page Order ● Front to Back ○ Back to Front Page Per Sheet 1 Side 1 Side 2 Advanced... WINDOWS XP OK Cancel ApplyFor portrait (tall) page layout the usual choice is [Long Edge]. For landscape (wide) page layout the usual choice is [Short Edge]. Choosing [Off] turns off duplex printing and your document will be printed single-sided.
WINDOWS PCL
- In the driver's Setup tab, under [2-Sided Printing], select the binding edge you want.
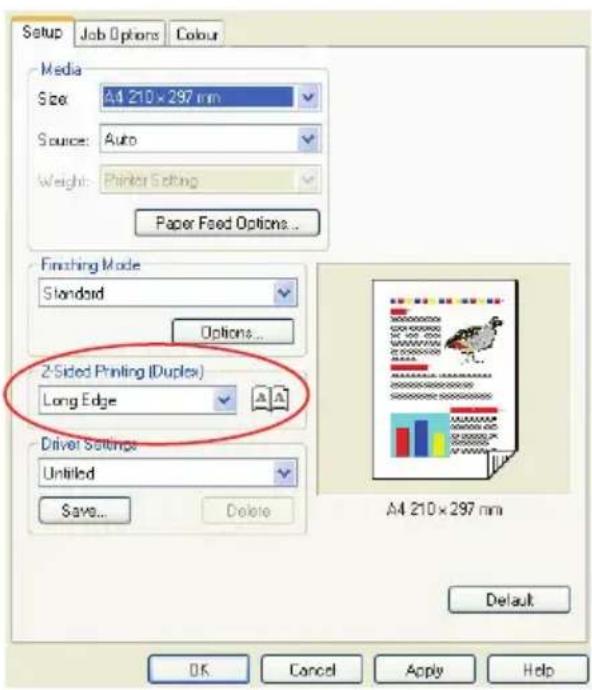
text_image
Setup Job Options Colour Media Size: A4 210 x 297 mm Source: Auto Weight: Printer Setting Paper Feed Options... Finishing Mode Standard Options... 2-Sided Printing (Duplex) Long Edge Driver Settings Untitled Save... Delete A4 210 x 297 mm Default OK Cancel Apply HelpFor portrait (tall) page layout the usual choice is [Long Edge]. For landscape (wide) page layout the usual choice is [Short Edge].
Choosing [Off] turns off duplex printing and your document will be printed single-sided.
MAC OS X
- In your application program, choose [File] → [Print].
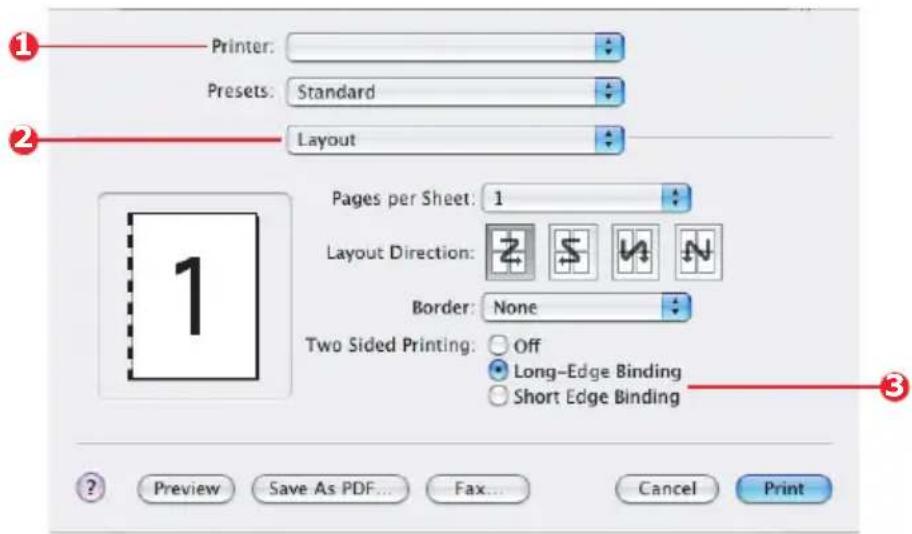
text_image
Printer: Presets: Standard Layout Pages per Sheet: 1 Layout Direction: Border: None Two Sided Printing: Off Long-Edge Binding Short Edge Binding Preview Save As PDF... Fax... Cancel Print- From the [Printer] menu (1), select your printer model.
- Select [Layout] (2).
- From the [Two Sided Printing] options (3), select either [Long Edge Binding] or [Short Edge Binding].
Which choice you make will usually depend on whether your page format is portrait (tall) or landscape (wide), and how you plan to turn the paper over to read the second side.
PRINTING MULTIPLE PAGES ON ONE SHEET (N-UP)
This feature scales the page size of your document for printing and reproduces several pages per sheet.
This is useful when you simply want to proof your page layout, or distribute your document in a more compact format. It saves paper, bulk, weight and cost.
If you have a duplex unit installed, you can even combine this feature with duplex printing to save even more.
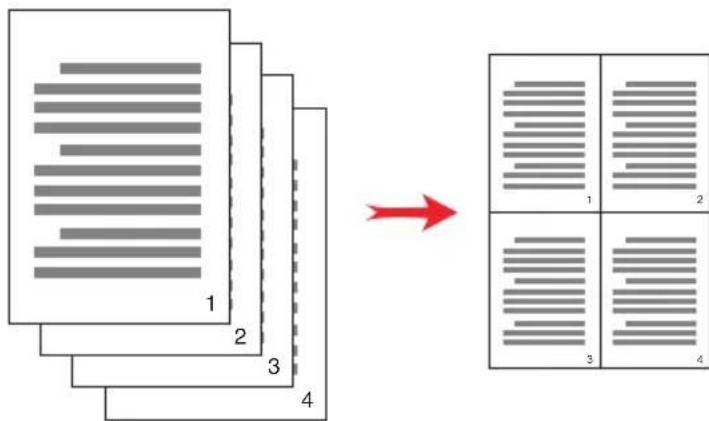
text_image
Diagram illustrating document structure transformation, showing a stack of documents with horizontal lines and a separate grid of four labeled sections.WINDOWS POSTSCRIPT
- In the driver's Layout tab, choose the number of pages ("N-up") you want to print on each sheet. 1-up is normal, 16-up is maximum.
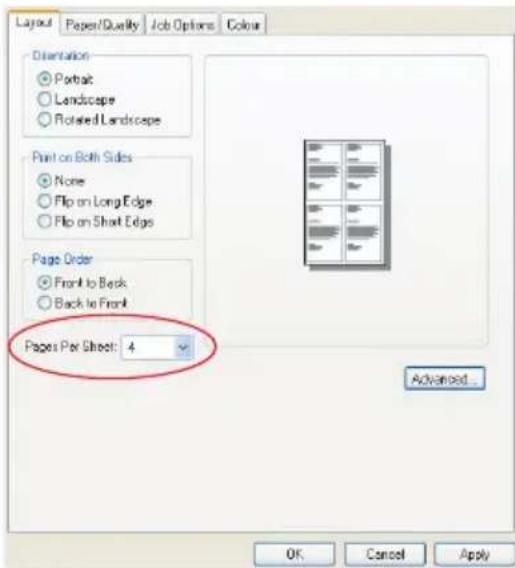
text_image
Layout Paper/Quality Job Options Colour Orientation ● Portrait ○ Landscape ○ Rotated Landscape Print on Both Sides ● None ○ Flip on Long Edge ○ Flip on Short Edges Page Order ● Front to Back ○ Back to Front Pages Per Sheet: 4 Advanced... OK Cancel ApplyWINDOWS PCL
- In the driver's Setup tab (Windows XP), choose the number of pages ("N-up") you want to print on each sheet. 1-up is normal, 16-up is maximum.
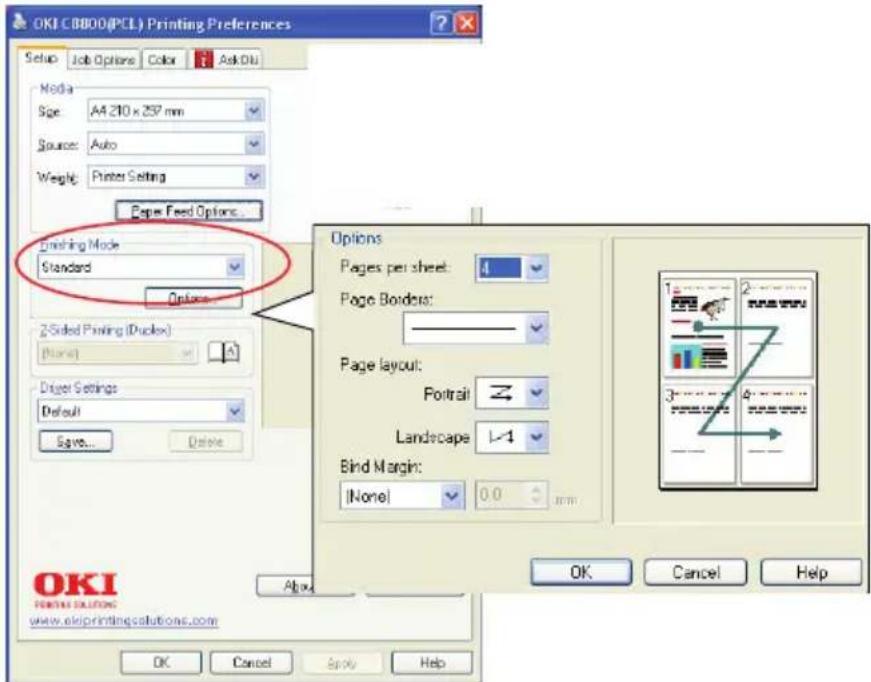
text_image
OKI C8800(PCL) Printing Preferences Setup Job Options Color Ask Diu Media Size: A4 210 x 257 mm Source: Auto Weight: Printer Setting Paper Feed Options... Drinking Mode Standard Options 2-Sided Printing (Duckex) None Draper Settings Default Save... Delete Options Pages per sheet: 4 Page Borders: Page layout: Portrait Z Landscape 1/4 Bind Margin: (None) 0.0 mm OK Cancel Help OK Cancel Apply Help OK Printers Solutions www.okiprintingsolutions.com- Click [Options] to choose from the available options for this feature.
From here you can choose the page printing order, the page layout, whether you want printed page borders, and a binding margin if you need it.
MAC OS X
- In your application program, choose [File] → [Print].
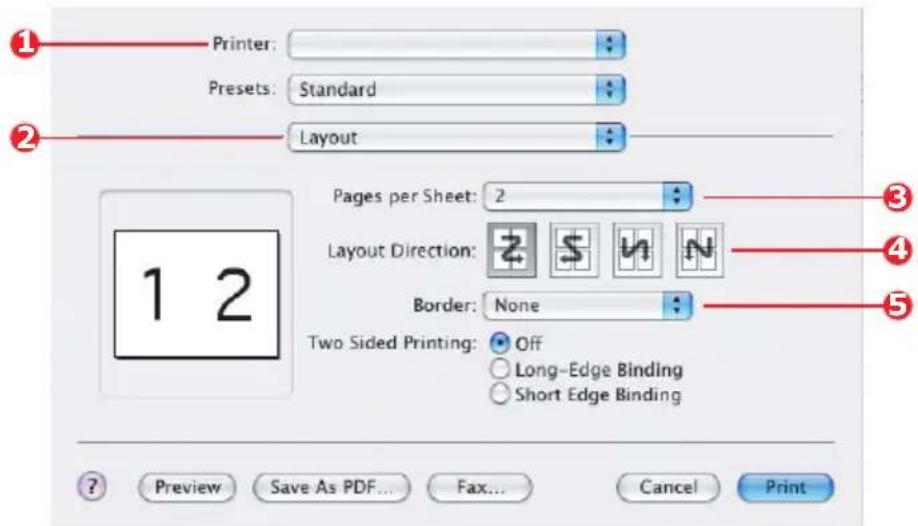
text_image
Printer: Presets: Standard Layout Pages per Sheet: 2 Layout Direction: Border: None Two Sided Printing: Off Long-Edge Binding Short Edge Binding Preview Save As PDF... Fax... Cancel Print- From the [Printer] menu (1), select your printer model.
- Select [Layout] (2).
- From the [Pages per Sheet] menu (3), select the number of pages you want to fit onto a single sheet of paper.
- If required, change the direction (4) the document pages are laid out on each sheet of paper.
- If required, you can surround each page with a border (5).
POSTER PRINTING
This option allows you to print posters by dividing a single document page into multiple pieces (sometimes called "tiles"). Each piece prints, enlarged, on a separate sheet. Then, you combine the separate sheets to create a poster.
Poster Print is only available with the Windows PCL printer drivers.
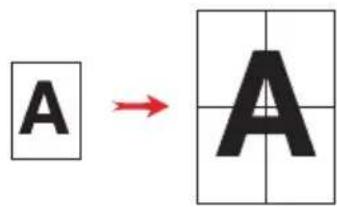
text_image
A → AWINDOWS PCL
- In the driver's Setup tab, under [Finishing Mode], choose [Poster Print].
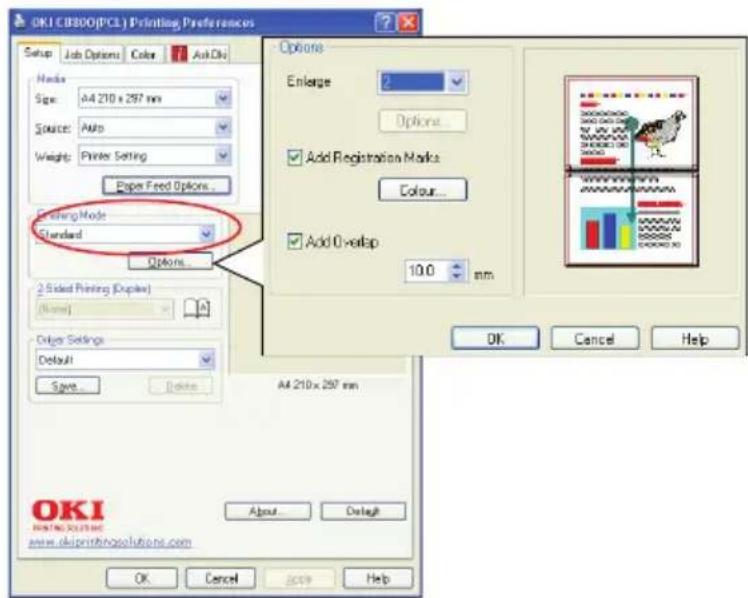
text_image
OKI CIBDO(PCL) Printing Preferences Setup Job Options Color Ask Dia Hardware Size: A4 210 x 297 mm Sources: Auto Weight: Printer Setting Paper Feed Options... Printing Mode Standard Options... 2 Sided Printing (Duplex) [Name] Delete Settings Default Save... Delete... Options Enlarge 2 Options... Add Registration Marks Colour... Add Overlap 10.0 mm OK Cancel Help A4 210 x 297 mm OKI PRINTING SOLUTIONS www.okiprintingsolutions.com About... Delete! OK Cancel 2009 Help- Click [Options] to open the Options window.
(a) Choose the [enlargement] required for your document to fill the poster.
(b) [Registration marks] can be printed if required so that your printed pages (tiles) can be trimmed exactly to the edge of the image.
(c) An [overlap] may help you to match adjacent tiles when making up your final poster.
SCALE TO PAGE
Scale to Page allows you to print data formatted for one size page onto a different size page, without modifying the print data.
This feature is only available with the Windows PCL drivers.
- In the driver's Setup tab, click the [Options] button.
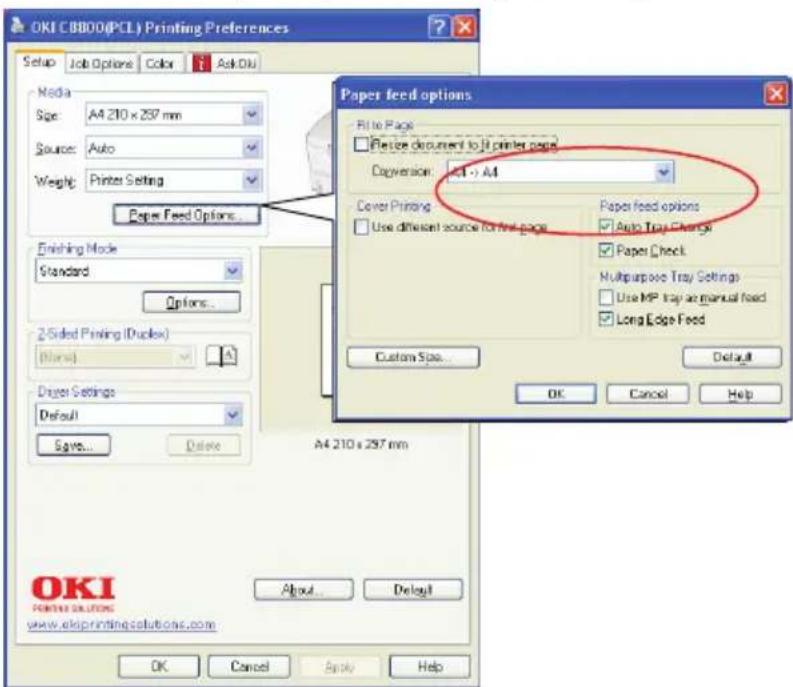
text_image
OKI CBB00(PCL) Printing Preferences Setup Job Options Color Ask Odu Media Size: A4 210 x 297 mm Source: Auto Weight: Printer Setting Paper Feed Options... Paper feed options Rit to Page Place document to it printer page Conversion: (A4) → A4 Cover Printing Use different source for first page Paper feed options Auto Tray Settings Paper Check Multipurpose Tray Settings Use MP tray manual feed Long Edge Feed Custom Size... Default... OK Cancel Help Enishing Mode Standard Options... 2-Sided Printing (Duckex) Blown Driver Settings Default Save... Delete A4 210 x 297 mm OKI Pencil Solutions www.ekisprinting.solutions.com About... Delay! OK Cancel Apply Help- Check the [Fit to Page] checkbox.
- Choose the scaling factor you need from the [Conversions] drop-down list.
WATERMARKS
A watermark is typically faint text that is superimposed on a printed document. This can be used to indicate that the document is "Draft", or perhaps "Confidential".
This feature is not available on Mac OS X. The illustration below shows the Windows PostScript driver. The PCL driver is very similar.
WINDOWS
The Watermarks Feature is found in the driver's [Job Options] tab. Click the [Watermarks] button.
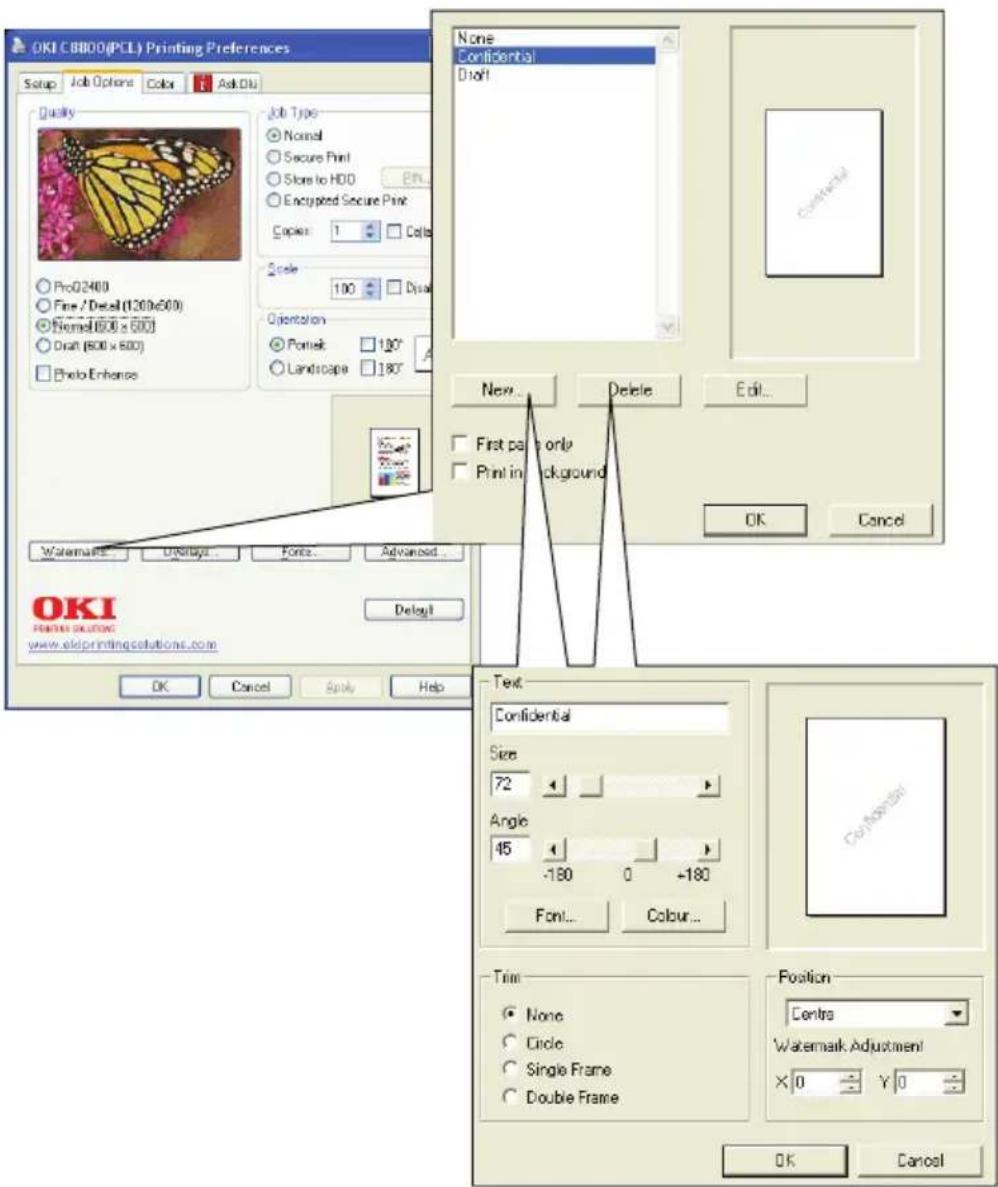
text_image
OKI C8800(PCL) Printing Preferences Setup Job Options Color Ask DI Quality Pro02400 Fine / Deel (1200x600) Flamed (500 x 500) Draft (500 x 500) Photo Enhance Job Type Normal Secure Print Store to HDD EN... Encrypted Secure Print Copies: 1 Calls Scale 100 Dash Orientation Portek 180° Landrocape 180° Watermark Delete First page only Print in background OK Cancel OK Cancel OK Cancel OK Cancel OK Cancel OK Cancel OK Cancel OK Cancel OK Cancel OK Cancel OK Cancel OK Cancel OK Cancel OK Cancel OK Cancel OK Cancel OK Cancel OK Cancel OK Cancel OK Cancel OK Cancel OK Cancel OK Cancel OK Cancel OK Cancel OK Cancel OK Cancel OK Cancel OK Cancel OK Cancel OK Cancel OK Cancel OK Cancel OK CancelTo create a new watermark
- In the Watermarks window, click [New...].
- Enter the text you want for your watermark.
- Adjust your watermark's font, size, colour, angle, position and border (trim) as required.
- Click [OK] to accept your changes.
To choose a previously created watermark
- In the Watermarks window, click the watermark in the list.
To edit an existing watermark
- In the Watermarks window, click the watermark's name in the list.
- Click [Edit...].
- Make any adjustments you wish, and click [OK] to accept your changes.
To print using a watermark
- In the Watermarks window, click the watermark's name in the list.
- Click [OK] to close the Watermarks window.
- Click [OK] to close the Printer Properties window.
- Print your document.
SECURITY
SECURE PRINTING
Secure printing allows you to print confidential documents on machines that are shared with other users in a network environment.
The document does not print until a PIN (Personal Identification Number) is entered through the Printer Control Panel. You must go to the machine and enter the PIN.
This feature requires the hard disk drive option to be fitted to your machine and enabled in the printer driver. (See "Setting the driver device options" on page 29)
The secure printing feature is not available for Mac OS X.
If there is not enough hard disk space for the spooled data, a "Disk Full" message displays, and only one copy prints.
The secure printing feature may not be available from within some PC applications.
If your application software has a collate print option, turn it off. Otherwise secure printing will not work.
Secure printing is not supported in the Mac environment.
There are three parts in secure printing:
Sending the document to the machine (page 103);
Printing the document (page 105);
Deleting the document when it is not required (page 105).
SENDING THE DOCUMENT
-
If using the PCL driver, in the [Setup] tab choose any saved driver settings you wish to use. "Recalling saved driver settings" on page 28
-
In the driver's [Job Options] tab, click [Secure Print].
-
The Job PIN (Personal Identification Number) window opens.
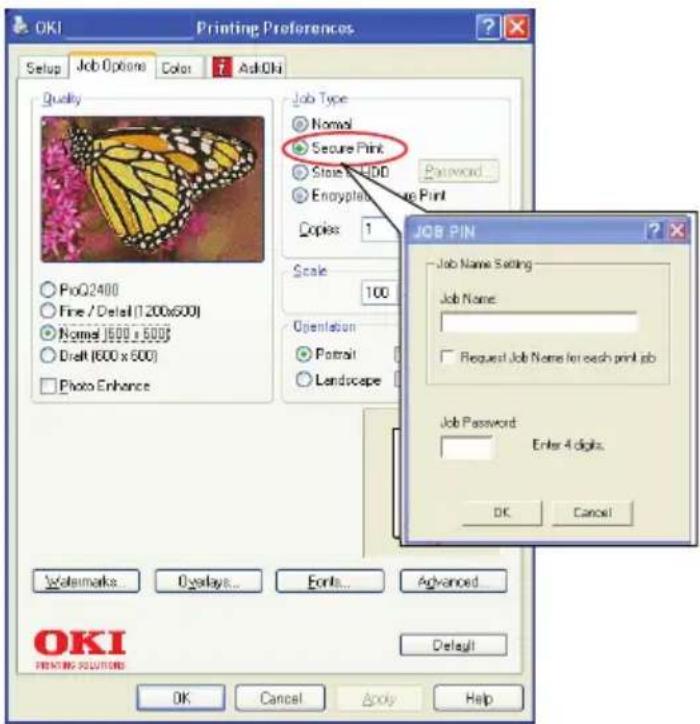
text_image
OKI Printing Preferences Setup Job Options Color i AshOki Quality PoQ2400 Fine / Detail (1200x600) Normal 1600 x 5000 Draft (600 x 500) Photo Enhance Job Type Normal Secure Print Store A-IDD Password... Encrypted Write Print Copies 1 Scale 100 Orientation Portrait Landscape JOB PIN Job Name Setting Job Name: Request Job Name for each print job Job Password: Enter 4 digits. OK Cancel Volumarks Oyslays Fonts Advanced OK Cancel Apply Help OK Cancel Apply Help-
If the PIN window does not open, click the [PIN] button.
-
In the Job PIN window, enter a [name] for this print job.
-
The name may be up to 16 alpha-numeric characters.
-
If you would like a prompt at the machine for the job name, click the [Request...] checkbox below the name entry.
-
Enter a number from 0000 to 9999 in the [PIN] box.
-
Your PIN must be unique on this machine. Each user should be allocated a PIN by the system administrator.
-
Click [OK] to accept your changes.
-
Click [OK] to close the Printer Properties window.
-
Print your document.
-
The print job will be sent to the machine, but will not print at this time.
PRINTING THE DOCUMENT
Your secure print job is printed using the Printer Control Panel on the front of the machine.
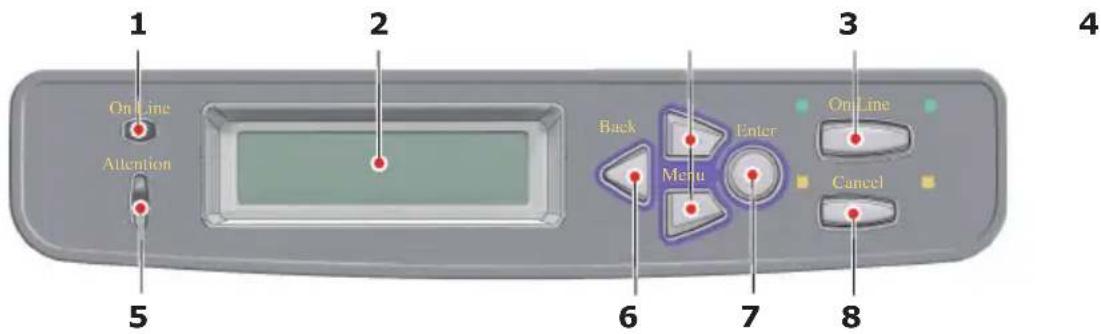
text_image
1 2 3 4 On Line Attention Back Enter On Line Menu Cancel 5 6 7 8- When the machine is idle ("ONLINE" indicated in the display), use the +/- buttons to select the PRINT JOB menu, then press [ENTER].
- Select "ENCRYPTED/STORED JOB".
- Use the +/- buttons to enter the first digit of your PIN, then press [ENTER].
- Repeat step 3 to enter the remaining three digits.
- Press [ENTER] to confirm you wish to print the document.
- Use the +/- buttons to select the number of collated copies you require.
- Press [ENTER] to print your document.
When all required copies have been printed your document is automatically deleted from the machines hard disk.
It is also possible to print and delete secure documents remotely from your PC using the Storage Device Manager utility.
DELETING A SECURE PRINT DOCUMENT
If you change your mind about printing a secure document, you can delete it from the machine's hard disk without printing it first.
- Follow steps 1 to 4 in the above procedure for printing the document.
-
Use the +/- buttons to highlight the DELETE option and press [ENTER].
-
If necessary, use the +/- buttons to highlight the YES choice, and press [ENTER] to confirm the deletion.
-
Your document is deleted from the machine's hard disk without printing.
STORE TO HARD DISK
This feature allows print jobs to be created on the PC and stored on the machine's hard disk for printing on demand. This is good for forms, generic memos, letterhead, stationery, etc.
If you use this feature for standard forms, for example, you can walk up to the machine at any time and print off your forms without having to re-send them from the PC.
This feature works in exactly the same way as the secure printing feature described earlier in this Chapter, and is available only in the Windows PostScript and PCL drivers. The difference with job spooling is that the document is not automatically deleted from the machine's hard disk after printing. It remains there for future use until you delete it from the Printer Control Panel or from your PC with the Storage Device Manager utility.
NOTE:
If this choice does not appear in the driver screens, or if it is greyed out, check to ensure that the hard disk is enabled in the printer driver. (See "Setting the driver device options" on page 29)
Like the secure printing feature, there are three parts in job spooling:
- Sending the document
- Printing the document
- Deleting a stored document
SENDING THE DOCUMENT
Follow the same procedures as described in the section "Sending the document" on page 103 for sending a secure document, except that on the [Job Options] tab in step 2, click [Store to HDD].
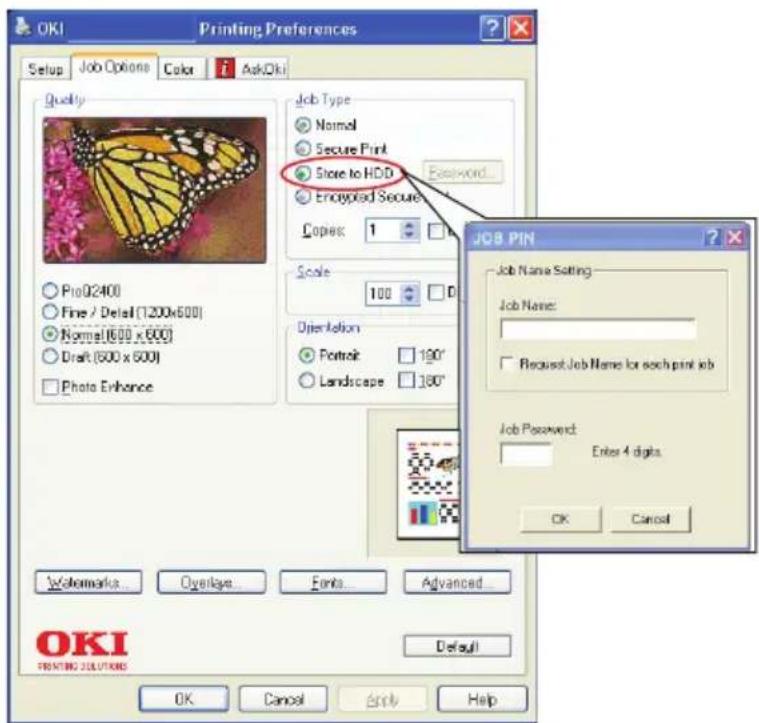
text_image
OKI Printing Preferences Setup Job Options Color i AskOki Quality Prob02400 Fine / Detail (1200x600) Normal(600 x 600) Draft (600 x 600) Photo Enhance Job Type Normal Secure Print Store to HDD Password... Encrypted Secure Copies: 1 Scale 100 D Operation Portrait 190° Landscape 180° JOB PIN Job Name Setting Job Name: Request Job Name for each print job Job Password: Enter 4 digits OK Cancel OK Cancel Help OK OK Cancel HelpPRINTING THE DOCUMENT
Follow the same procedures as described in "Printing the document" on page 107 for printing a secure document. In this case the document will not be deleted from the hard disk after it has been printed.
DELETING A STORED DOCUMENT
Follow the procedure as described in "Deleting a secure print document" on page 105 for deleting a secure print document.
Like secure print documents, any other documents stored on the machine's hard disk can also be deleted remotely from the PC using the Storage Device Manager utility.
ENCRYPTED SECURE PRINTING
Security over the network is an increasing concern for some organisations. Encrypted secure printing allows you to send, store and print confidential documents on machines that are shared with other users in a network environment.
Encrypting your documents before sending them to your machine will prevent unauthorised personnel accessing confidential or sensitive information.
Print jobs are encrypted immediately before transmission to the machine, where they are stored in an encrypted format on the hard disk drive. The documents will remain stored and unprinted until an authorised user authenticates the print job; decryption only happens when the job is actually printing.
This feature requires the hard disk drive in your machine, this device must be enabled in the printer driver. (See "Adjusting Windows printer drivers" on page 161.)
The encrypted secure printing feature may not be available from within some PC applications.
If your application software has a collate print option, turn it off. Otherwise secure printing may not work.
There are two parts in encrypted secure printing:
Sending the document
Printing the document
SENDING THE DOCUMENT
- If using the PCL driver, in the [Setup] tab choose any saved driver settings you wish to use. See "Recalling saved driver settings" on page 28.
-
In the driver's [Job Options] tab, click [Encrypted Secure Print].
-
The Encrypted Secure Print window opens.
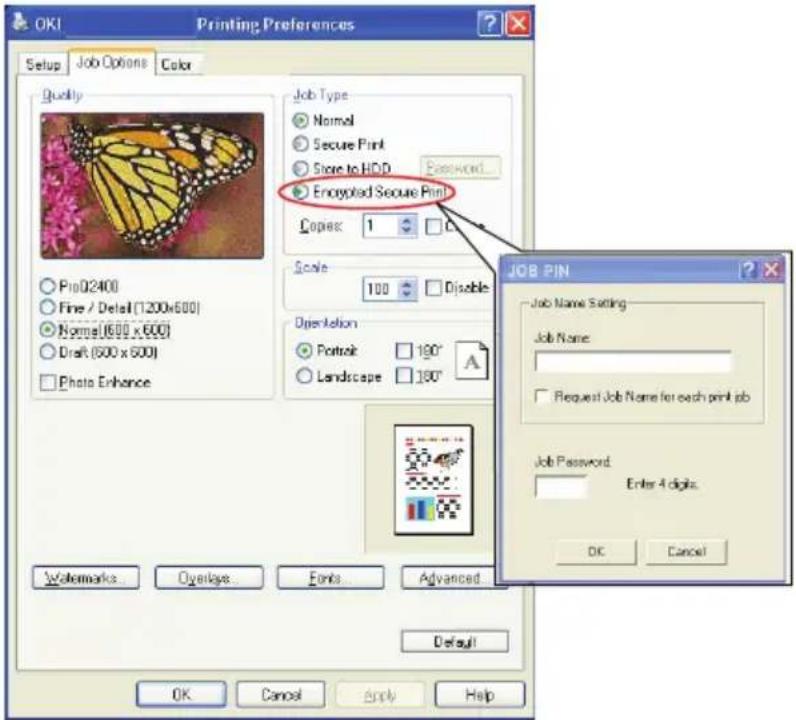
text_image
OK! Printing Preferences Setup Job Options Color Quality Job Type Normal Secure Print Store to HDD Password... Encrypted Secure Print Copies: 1 Scale 100 Disable Orientation Portrait 190° Landscape 190° Job PIN Job Name Setting Job Name: Request Job Name for each print job Job Password: Enter 4 digits. OK Cancel Watermarks... Overlay... Fonts... Advanced... Default OK Cancel Apply Help- In the Encrypted Secure Print window, enter a [Password] for this print job:
The password must be between 4 and 12 alpha-numeric characters. Numbers 1 to 9 and letters a to z are all valid.
If you would like a prompt at the machine for the job password, click the [Always ask for password] checkbox below the password entry.
- Select the required erase option for your print job:
No overwrite: simply erases a print job without over writing the job with data. This erase method poses a risk of the print job being reconstructed.
Zero out once: erases a print job after over writing it with data once. This erase method is safer than the "No overwrite" option however it still poses a risk of the print job being reconstructed.
Multiple Random Overwrites: erases a print job after over writing it with data three times. This is the safest method of erasing a print job however it takes longer to complete the job.
- Select the Auto Erase Time-out period.
Specify a period of time (hours:minutes) during which the print job is stored in the machine's HDD. When this period expires, the print job is automatically erased from the HDD.
- Click [OK] to accept your changes.
- Click [OK] to close the Printer Properties window.
- Print your document.
PRINTING THE DOCUMENT
Follow the same procedures as described in the section "Printing the document" on page 107 for printing a secure document. In this case you will enter your password, and the document will be erased from the hard disk depending on the options you specified when sending the document to print.
MENU FUNCTIONS
This section lists the menus accessed via the controls on the printer's operator panel and displayed in the LCD window.
OPERATOR PANEL:
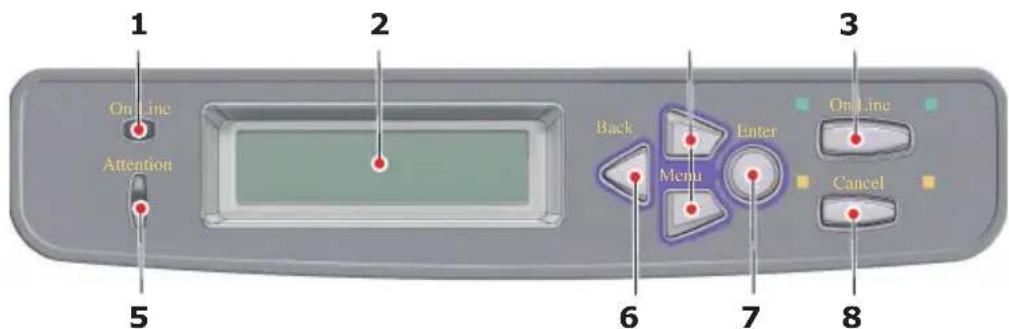
text_image
1 2 3 On Line Attention Back Menu Enter On Line Cancel 5 6 7 84
| 1. ONLINE LED ON:Ready to receive data.Blinking:Processing data.OFF: Offline. | 2. DISPLAY Displays the printer status and any error messages. | ||
| 3. MENU Button | Enters the Menu mode. In Menu mode, forwards or reverses the menu item displayed. Press for 2 secs. or longer to fast forward or reverse. | 4. ONLINE Button | Switches between ONLINE and OFFLINE.Exits the menu and goes ONLINE when pressed in the Menu mode.Forces printing on the paper currently loaded when pressed with “WRONG PAPER” or “WRONG PAPER SIZE” displayed. |
| 5. ATTENTION LED | On: A warning occurs.Printing is possible.Blinking: An error occurs.Printing not possible.Off: Normal condition. | 6. BACK Button | Returns to the previous higher level menu item. |
| 7. ENTER Button | In the ONLINE or OFFLINE mode: enters the Menu mode.In the Menu mode:determines the setting selected. | 8. CANCEL Button | Deletes the data being printed or received when pressed for two seconds or longer.Deletes the data when pressed for two seconds or longer with WRONG PAPER SIZE, RUN OUT OF PAPER, TRAY 1 IS OPEN, or TRAY 1 IS NOT FOUND is displayed. |
HOW TO CHANGE THE SETTINGS - USER
It should be noted that many of these settings can be, and often are, overridden by settings in the Windows printer drivers. However, several of the driver settings can be left at "Printer Setting", which will then default to the settings entered in these printer menus.
Where applicable, factory default settings are shown in bold type in the following tables.
In the normal operating condition, known as "standby," the printer's LCD window will show "ONLINE." In this condition, to enter the menu system, press the +/- buttons on the operator panel to move up and down through the list of menus until the menu you wish to view is displayed. Then proceed as follows:
- Press ENTER to enter the menu.
- Use the +/- buttons to move up and down through the items in the menu. When the item you want to change is displayed, press ENTER to edit that item. An asterisk (*) appears next to the setting currently in effect.
- Use the +/- buttons to move up and down through the available settings for this item, and press ENTER when the setting you want is displayed. An asterisk (*) will appear next to the setting, indicating that this setting is now in effect.
- Press BACK to move back to the list of menu items.
- Do one of the following:
Press BACK again to move up to the list of menus; or...
Press ON LINE to exit from the menu system and return to standby.
NOTE: When you have changed any settings in the USB MENU, turn the printer OFF, then ON again.
HOW TO CHANGE THE SETTINGS - ADMINISTRATOR
You can set whether to ENABLE or DISABLE each category in the user menu.
Disabled categories are not displayed in the User's menu.
Only a system administrator can change these settings.
- Tum OFF the printer.
- Turn ON the printer while pressing the "ENTER" button.
When [ADMIN MENU] appears, take your finger off the button. - Press the "ENTER" button.
- When [ENTER PASSWORD] appears, press the "MENU+" or "MENU-" button several times to display the 1st line of the password and then press the "ENTER" button.
- Enter your 4- to 9-digit password.
The default password is "aaaaaa". - Press the "MENU+" button until the "category" you want to change is displayed.
- Press the "ENTER" button.
- Press the "MENU+" or "MENU-" until the "item" you want to change is displayed.
- Press the "ENTER" button.
- To execute it, press the "MENU+" button or "MENU-" button to display "YES" and then press the "ENTER" button. The printer automatically reboots.
- When [PLEASE POW OFF/SHUTDOWN COMP] is displayed, turn the printer OFF/ON
- Press the "MENU+" button or "MENU-" until the "setting" you want is displayed.
- Press the "ENTER" button to enter [*] on the right side of the setting selected.
- Press the "ONLINE" button to switch to [ONLINE].
MENUS
PRINT JOBS MENU
This menu only appears when the hard disk drive is installed. It is used for printing of documents stored on the internal hard disk. These will be stored using either the secure printing feature or the proof and print feature. Please refer to these features elsewhere in this manual for instructions on how to use.
You will be prompted for your password or personal identification number (PIN). The +/- keys are used to enter each digit and the ENTER key to advance from one digit to the next.
INFORMATION MENU
This menu provides a quick method of listing various items stored within the printer.
| ITEM ACTION | EXPLANATION | |
| PRINT MENU MAP | EXECUTE | Prints complete menu listing with current settings shown. |
| NETWORK EXECUTE | TE | Prints Network configuration information. |
| PRINT FILE LIST | EXECUTE | Prints a list of overlays, macros, fonts and other files stored on the printer's hard disk drive (if installed). |
| PRINT PCL FONT | EXECUTE | Prints complete list of all internal PCL fonts plus those stored in ROM (slot 0), flash memory and in hard disk (if installed). |
| PRINT PSE FONT | EXECUTE | Prints complete list of all internal PostScript emulation fonts. |
| PRINT PPR FONT | EXECUTE | Prints complete list of all internal IBM ProPrinter III XL emulation fonts, including any downloaded to flash memory or hard disk. |
| PRINT FX FONT | EXECUTE | Prints complete list of all internal Epson FX emulation fonts, including any downloaded to flash memory or hard disk. |
| DEMO1 EXECUTE | Prints demonstration page containing graphics and text in colour and monochrome. | |
| PRINT ERROR LOG | EXECUTE | Prints a list of all errors and warnings experienced. |
| ITEM ACTION | EXPLANATION |
| COLOR PROF LIST | EXECUTE Prints a list of stored colour profiles. |
SHUTDOWN MENU
This menu only appears if the hard disk drive is installed. This item should always be selected before switching the printer off, to ensure that no hard disk data is lost.
| ITEM SETTINGS EXPLANATION | ||
| SHUTDOWN START | EXECUTE Performs controlled shutdown of the printer, ensuring that all files on the internal hard disk are closed before power is turned off. Only power the printer off when the display indicates that shutdown is complete. | |
PRINT MENU
This menu provides adjustment of various print job related functions.
| ITEM SETTINGS EXPLANATION | ||
| COPIES 1-999 Enter the number of copies of a document to be printed from 1 to 999. | ||
| DUPLEX ON | OFF | Switches the Duplex (2 sided) function ON/OFF. |
| BINDING LONG EDGE SHORT EDGE | Sets the default binding to SEF or LEF | |
| PAPER FEED TRAY1 | TRAY2MP TRAY | Selects the default tray for paper feed, Tray 1 (upper), Tray 2 (lower, if installed) or MP Tray (multi purpose tray). |
| AUTO TRAY SWITCH | ON OFF | If two trays contain identical paper, the printer can switch to an alternative source when the current tray runs out in the middle of a print job. |
| TRAY SEQUENCE DOWNUP PAPER FEED TRAY | Determines tray sequence order when automatically switching. | |
| MP TRAY USAGE DO NOT USEWHENMISMATCH | If a document to be printed demands a paper size not installed in the selected tray, the printer can automatically feed from the multi purpose tray instead. If this function is not enabled, the printer will stop and request the correct size of paper to be loaded. | |
| MEDIA CHECK ENABLE DISABLE | Determines whether the printer check the size of paper loaded matches that required for the document sent to print. | |
| RESOLUTION 600DPI600 x1200DPI600DPI M-LEVEL | Sets the default resolution for printing (dots per inch). 600x1200DPI uses more memory and requires more time to process, but prints at a higher quality. | |
| TONER SAVE MODE | ONOFF | Reduces the amount of toner used for imaging. Toner saving gives lighter prints but is more economical. |
| ITEM SETTINGS EXPLANATION | ||
| MONO-PRINT SPEED | AUTO SPEED | If the first page of a print job is black and white, the printer runs at 32ppm (pages per minute). When a colour page is detected the printer slows down to 26ppm for the rest of that job. |
| MONO 32PPM | This setting operates in the same way as AUTO SPEED, except that the printer runs at 32ppm until a colour page is detected. To achieve this speed the printer requires an additional 10 - 20 seconds to warm up and 30 -60 seconds to cool down when switching to 26ppm for colour pages. This setting is therefore most appropriate when the majority of print jobs are entirely black and white. | |
| COLOR SPEED | The printer runs at 26ppm for all print jobs. This setting is most appropriate when the majority of print jobs are in colour. | |
| MIXED SPEED | The printer automatically switches between 26ppm for each colour page and 20ppm for each black and white page. When black and white pages are printed, the 3 colour drums are automatically lifted to maximize their working life. This operation imposes delay each time the printer switches between colour and black and white printing. However, the 30 -60 second cool down delay described for MONO 32ppm is avoided by limiting mono speed to 20ppm. This setting may be preferred for mostly black and white printing with some colour pages, or where most print jobs are entirely colour or entirely black and white. | |
| ORIENTATION PORTRAIT LANDSCAPE | Selects default page orientation between portrait (tall) and landscape (wide). | |
| LINES PER PAGE | 5~64~128 | Sets the number of lines of text per page when raw text is received from systems other than Windows. The default for A4 portrait is 65, and for Letter is 60. |
| ITEM SETTINGS EXPLANATION | ||
| EDIT SIZE CASSETTESIZEA3 / A4 SEF/A4 LEF/A5 SEF/ A6 /B4 /B5 SEF /B5 LEFLEGAL14LEGAL13.5LEGAL13LETTER SEFLETTER LEFEXECUTIVECUSTOMCOM-10ENVELOPEDL ENVELOPEC5 ENVELOPEC4 ENVELOPE | Sets the size of the printable page area to match the size of paper in use. This is not the same as the physical paper size, which is always slightly larger. For dimensions of physical page sizes, see "Paper Recommendations" section in this guide. | |
| X SIZE (mm) 64~210~297 | ||
| Y SIZE (mm) 105~297~1200 | ||
MEDIA MENU
This menu provides adjustment to suit a wide range of print media.
| ITEM SETTINGS EXPLANATION | ||
| TRAY1PAPERSIZE | CASSETTE SIZECUSTOM | Selects the size of paper loaded in Tray 1 (upper tray if both trays installed). For CUSTOM setting see X-DIMENSION and Y-DIMENSION later in this table. |
| TRAY1MEDIATYPE | PLAINLETTERHEADBONDRECYCLEDROUGHGLOSSY | Selects the type of media loaded in this tray. This will help the printer to adjust its internal operating parameters, such as engine speed and fusing temperature, to better accommodate the media to be fed. For example, letterhead may benefit from a slightly lower fusing temperature to ensure that its ink does not offset. |
| TRAY1MEDIAWEIGHT | LIGHT(64~74g/m2)MEDIUM(75~90g/m2)HEAVY(91~105g/m2) | Adjusts the printer for the weight of paper stock loaded in this tray. |
| TRAY1 LEGALSIZE | LEGAL 14LEGAL 13.5LEGAL 13 | Specifies the legal paper size for TRAY1. |
| TRAY2PAPERSIZE | CASSETTE SIZECUSTOM | Selects the size of paper loaded in Tray 2 (lower) if installed. For CUSTOM setting see X-DIMENSION and Y-DIMENSION later in this table. |
| TRAY2MEDIATYPE | PLAINLETTERHEADTRANSPARENCYBONDRECYCLEDROUGHSPECIALUSER TYPE 1USER TYPE 2USER TYPE 3USER TYPE 4USER TYPE 5 | Selects the type of media loaded in this tray (if installed). (see notes above for tray 1). |
| TRAY2 MEDIAWEIGHT | LIGHT(64~74g/m2)MEDIUM(75~90g/m2)HEAVY(91~120g/m2) | Adjusts the printer for the weight of paper stock loaded in this tray (if installed). |
| TRAY2 LEGAL SIZE | LEGAL 14LEGAL 13.5LEGAL 13 | Specifies the legal paper size for TRAY2.(Displayed if an optional second tray unit is installed). |
| MPT PAPERSIZE A3 | A4 SEFA4 LEFA5 SEFA6B4B5 SEFB5 LEFLEGAL 14LEGAL 13.5LEGAL 13LETTER SEFLETTER LEFEXECUTIVECUSTOMCOM-10ENVELOPEDL ENVELOPEC5 ENVELOPEC4 ENVELOPE | Selects the size of paper to be fed from the multi purpose tray. For CUSTOM setting see X-DIMENSION and Y-DIMENSION later in this table. |
| MPT MEDIATYPE | PLAINLETTERHEADTRANSPARENCYLABELSBONDRECYCLEDCARD STOCKROUGHGLOSSYSPECIAL | Selects the type of media to be fed from the multi purpose tray so that the printer can adjust its internal parameters to better accommodate the selected type of media. |
| MPT MEDIAWEIGHT | LIGHT(64~74g/m2)MEDIUM(75-90g/m2)HEAVY(91-120g/m2)ULTRA HEAVY(121-200g/m2) | Selects the media weight to be fed from the multi purpose tray. |
| UNIT OF MEASURE | MILLIMETREINCH | Selects the unit of measure. |
COLOUR MENU
The printer automatically adjusts colour balance and density at appropriate intervals, optimising the printed output for bright white paper viewed in natural daylight conditions. The items on this menu provide a means of changing the default settings for special or particularly difficult print jobs.
| ITEM SETTINGS EXPLANATION | ||
| DENSITYCONTROL | AUTOMANUAL | If set to AUTO, image density will be automatically adjusted at power on, when a new image drum or toner cartridge is installed, and at intervals of 100, 300 and 500 drum counts. If a 500 drum count interval occurs during a print job it will occur at the end of that job, and will take up to 55 seconds. If set to manual, this adjustment will only be performed when initiated by the next menu item. |
| ADJUST DENSITY | EXECUTE Selecting | this will activate adjustment of the colour density. |
| COLOUR TUNING | PRINT PATTERN Selecting | this item prints the colour tuning pattern to help you adjust the colour balance. |
| C HIGHLIGHTC MID-TONEC DARKM HIGHLIGHTM MID-TONEM DARKY HIGHLIGHTY MID-TONEY DARKK HIGHLIGHTK MID-TONEK DARK | -3~0~+3-3~0~+3-3~0~+3-3~0~+3-3~0~+3-3~0~+3-3~0~+3-3~0~+3-3~0~+3-3~0~+3-3~0~+3-3~0~+3 | Adjusts image density for each colour component (cyan, magenta, yellow and black). Normal setting is 0. |
| C DARKNESSM DARKNESSY DARKNESSK DARKNESS | -3~0~+3-3~0~+3-3~0~+3-3~0~+3 | Adjusts darkness of each colour component (cyan, magenta, yellow and black). Normal setting is 0. |
| AJST REGISTRATION | EXECUTE Performs | automatic colour registration adjustment. Normally this is done on power on and when the top cover is opened and then closed. This process accurately aligns the cyan, magenta and yellow images to the black image. |
| C REG FINE AJSTM REG FINE AJSTY REG FINE AJST | -3~0~+3-3~0~+3-3~0~+3 | Performs fine adjustment of image timing in relation to the black image component. |
| INK SIMULATION | OFF SWOPEUROSCALEJAPAN | Selects from a range of industry standard colour swatches. |
| UCR LOW | MEDIUM HIGH | |
| CMY 100% DENSITY | DISABLE ENABLE | When enabled, black areas are produced using 100% C, M, and Y instead of black. This results in a glossier finish. |
This menu adjusts general printer settings to suit the way you prefer to work.
| ITEMS SETTINGS EXPLANATION | ||
| POWER SAVE DELAY TIME | 5153060240 | Adjusts the idling time before the printer automatically switches into power saving mode. In this mode power consumption is reduced to a low level required to just keep the printer operating and ready to receive data. When a job is sent the printer will require a warm-up time of up to 1 minute before printing can begin. |
| PERSONALITY AUTO PCL IBM PPR III XL EPSON FX PS3 EMULATION | This item selects which industry standard emulation your printer should use. When set to AUTO, incoming data is examined and the correct emulation is automatically selected each time a print job is received. | |
| PARA PS-PROTOCOL | RAW ASCII | Selects PostScript data format for parallel port. |
| USB PS PROTOCOL | RAW ASCII | Selects PostScript data format for USB port. |
| NET PS PROTOCOL | RAW ASCII | Selects PostScript data format for network port. |
| CLRABLE WARNING | ONLINE JOB | When ONLINE, non-critical warnings, such as requests for a different paper size, can be cleared by pressing the ON LINE button. When set to JOB, they are cleared when the print job resumes. |
| AUTO CONTINUE | ON OFF | Determines whether or not the printer will automatically recover from a memory overflow condition. |
| MANUAL TIMEOUT | OFF3060 | Specifies how many seconds the printer will wait for paper to be fed before cancelling the job. |
| WAIT TIMEOUT 5~40~300, OFF | Specifies how many seconds the printer will wait when received data pauses before forcing a page eject. In PostScript Emulation mode the job will be cancelled if timeout occurs. | |
| LOW TONER CONTINUE STOP | Specifies whether the printer should continue printing even after a low toner condition is detected. | |
| JAM RECOVERY ON | OFF | Specifies whether the printer should perform jam recovery after a paper jam has occurred. If ON, the printer will attempt to print again any pages lost due to a paper jam once the jam has been cleared. |
| ERROR REPORT ON | OFF | If ON, the printer will print error details when a PostScript Emulation error occurs. |
PCL EMULATION
This menu controls settings effective when the printer is operating in PCL emulation mode.
| ITEMS SETTINGS EXPLANATION | ||
| FONT SOURCE RESIDENT / DIMM0 / DIMM1 / DOWNLOADED | Specifies the location of the PCL default font. Normally this will be INTERNAL unless additional fonts are installed in the expansion ROM slot or additional fonts have been downloaded to RAM as permanent fonts. | |
| FONT No. IO/ C001 / S001 | Sets the current default font number from the currently selected source, which could be internal (I), ROM slot (C) or downloaded (S). | |
| FONT PITCH 10.00 CPI +/- Sets the pitch in Characters per Inch in increments of .01CPI | ||
| SYMBOL SET PC-8 | PCL symbol set. If the font source and number are changed to one which does not support the selected symbol set, this must be changed to an available symbol set for that font. | |
| A4 PRINT WIDTH | 78 COLUMN 80 COLUMN | Sets the number of columns subject to Auto LF with A4 paper in PCL. This is the value when Auto CR/LF Mode is set to OFF with the 10CPI character. |
| WHITE PAGE SKIP | OFF / ON Selects | whether blank pages are printed or not. |
| CR FUNCTION | CR / CR+LF | Selects whether a received carriage return character (0Dh) also causes a line feed. |
| ITEMS | SETTINGS EXPLANATION | |
| LF FUNCTION | LF / LF+CR | Selects whether a received line feed character (0Ah) also causes a carriage return. |
| PRINT MARGIN NORMAL1/5 INCH1/6 INCH | Sets the non-printable page area.NORMAL is PCL compatible. | |
| TRUE BLACK OFF | / ON Selects whether | black image data is printed using black toner (ON) or 100% CMY (OFF). (Valid in PCL emulation mode only.) |
| PEN WIDTH ADJUST | ON/OFF | |
| TRAY ID# MP TRAY | 1~4~59 | |
PPR EMULATION
This menu controls settings effective when the printer is operating in PPR emulation mode.
| ITEM SETTINGS EXPLANATION | ||
| CHARACTER PITCH | 10 CPI; 12 CPI; 17 CPI; 20 CPI; PROPORTIONAL | Specifies character pitch in IBM PPR emulation. |
| FONT CONDENSE | 12CPI - 20CPI; 12CPI - 12CPI | Specifies 12CPI pitch for Condense Mode. |
| CHARACTER SET | Set 1; Set 2 Specifies a character set. | |
| SYMBOL SET IBM | 437 Specifies a symbol set. | |
| LETTER 0 STYLE | Disable; Enable | Specifies the style that replaces 9BH with letter o and 9DH with a zero |
| ZERO CHARACTER | Normal; Slashed | Sets the zero to be slashed or unslashed. |
| LINE PITCH | 6 LPI; 8 LPI | Specifies the line spacing. |
| WHITE PAGE SKIP | OFF / ON Selects | whether blank pages are printed or not. |
| CR FUNCTION | CR / CR+LF | Selects whether a received carriage return character (0Dh) also causes a line feed. |
| LF FUNCTION | LF / LF+CR | Selects whether a received line feed character (0Ah) also causes a carriage return. |
| LINE LENGTH 80 COLUMN;136 COLUMN | Specifies the number of characters per line. | |
| FORM LENGTH 11 Inch;11.7 Inch12 Inch | Specifies the length of paper. | |
| TOF POSITION 0.0 INCH -1.0 Inch | Specifies the distance of print from the top edge of the paper. | |
| LEFT MARGIN 0.0 Inch -1.0 Inch | Specifies the distance of print from the left hand edge of the paper. | |
| FIT TO LETTER Disable;Enable | Sets the printing mode that can fit print data, equivalent to 11 inches (66 lines), in the LETTER-size printable area. | |
| TEXT HEIGHT Same; Diff Sets the height of a character.SAME: Regardless of CPI, same heightDIFF: As CPI, character heights vary. | ||
FX EMULATION
This menu controls settings effective when the printer is operating in FX emulation mode.
| ITEM SETTINGS EXPLANATION | ||
| CHARACTER PITCH | 10 CPI; 12 CPI; 17 CPI; 20 CPI; PROPORTIONAL | Specifies character pitch in this emulation. |
| CHARACTER SET | Set 1; Set 2 Specifies a character set. | |
| SYMBOL SET IBM | 437 Specifies a symbol set. | |
| LETTER 0 STYLE Disable; Enable | Specifies the style that replaces 9BH with letter o and 9DH with a zero | |
| ZERO CHARACTER | Normal; Slashed | Sets the zero to be slashed or unslashed. |
| LINE PITCH | 6 LPI; 8 LPI | Specifies the line spacing. |
| WHITE PAGE SKIP | OFF / ON Selects | whether blank pages are printed or not. |
| CR FUNCTION | CR / CR+LF | Selects whether a received carriage return character (0Dh) also causes a line feed. |
| LINE LENGTH 80 COLUMN; 136 COLUMN | Specifies the number of characters per line. | |
| FORM LENGTH 11 inch; 11.7 inch; 12 inch | Specifies the length of paper. | |
| TOF POSITION 0.0 inch - 1.0 inch | Specifies the distance of print from the top edge of the paper. | |
| LEFT MARGIN | 0.0 inch - 1.0 inch | Specifies the distance of print from the left hand edge of the paper. |
| FIT TO LETTER | Disable; Enable | Sets the printing mode that can fit print data, equivalent to 11 inches (66 lines), in the LETTER-size printable area. |
| TEXT HEIGHT | Same; Diff | Sets the height of a character.SAME: Regardless of CPI, same height.DIFF: As CPI, character heights vary. |
PARALLEL MENU
This menu controls the operation of the printer's Parallel data interface.
| ITEM SETTINGS EXPLANATION | ||
| PARALLEL ENABLE | / DISABLE | Enables or disables the parallel port. |
| BI-DIRECTIONAL | ENABLE / DISABLE | ENABLE/DISABLE the bi-directional capability of the parallel interface. |
| ECP ENABLE / | DISABLE | |
| ACK WIDTH NARROW /WIDE /MEDIUM | ||
| ACK / BUSY TIMING | ACK IN BUSY/ ACK WHILEBUSY | |
| I-PRIME DISABLE/ | 3μsec/50μsec | |
| OFFLINE RECEIVE | ENABLE / DISABLE | |
USB MENU
This menu controls the operation of the printer's USB data interface.
| ITEM SETTINGS EXPLANATION | ||
| SOFT RESET ENABLE / DISABLE | Enables or disables the SOFT RESET command. | |
| SPEED 12 / 480 Mps Selects the interface speed. | ||
| OFFLINE RECEIVE | ENABLE / DISABLE | OFFLINE RECEIVE. |
| SERIAL NUMBER ENABLE / DISABLE | Specifies whether to ENABLE or DISABLE a USB serial number.The USB serial number is used to identify the USB device connected to your PC. | |
| USB ENABLE / DISABLE | ENABLES / DISABLES the USB port. | |
NOTE:
When you have changed any settings in the USB MENU, turn the printer OFF, then ON again.
NETWORK MENU
This menu controls the operation of the printer's 10Base-T/100Base-TX network interface.
| ITEM SETTINGS EXPLANATION | ||
| TCP/IP ENABLE / | DISABLE | Enables or disables this network protocol. |
| IP VERSION IP V4 / IPV 4 & V6 | ||
| NETBEUI ENABLE / DISABLE | Enables or disables this network protocol. | |
| NETWARE ENABLE / DISABLE | Enables or disables this network protocol. | |
| ETHERTALK ENABLE / DISABLE | Enables or disables this network protocol. | |
| ITEM SETTINGS EXPLANATION | ||
| FRAME TYPE AUTO / 802.2 /802.3 /ETHERNET II /SNAP | Selects the Ethernet MAC layer frametype. | |
| IP ADDRESSSET | AUTO /MANUAL | Specifies whether IP address allocationis automatic (DHCP) or manuallyassigned. |
| IP ADDRESS xxx.xxx.xxx.xxx Current | assigned IP address. Tochange, press ENTER and use +/-keys to increment 1st octet, then pressENTER again to move on to next octet.When 4th octet has been set, pressENTER again to register new address. | |
| SUBNET MASK xxx.xxx.xxx.xxx Current | assigned subnet mask. Tochange, proceed as above. | |
| GATEWAYADDRESS | xxx.xxx.xxx.xxx Current assigned gateway address. Tochange, proceed as above. | |
| FACTORYDEFAULTS | EXECUTE Reloads the settings present when theunit was setup by the manufacturer. | |
| WEB ENABLE / | DISABLE | Enables or disables Web config. facility. |
| TELNET ENABLE / | DISABLE | Enables or disables Telnet config.facility. |
| FTP ENABLE / | DISABLE | Enables or disables communication viaFTP. |
MAINTENANCE MENU
This menu provides access to various printer maintenance functions.
| ITEM SETTINGS EXPLANATION | ||
| MENU RESET EXECUTE Resets menus to default settings. | ||
| SAVE MENU EXECUTE Saves the current menu settings. The last menu executed is saved and the menu previously saved is overwritten and erased.When you press the ENTER button, the following confirmation message is displayed."DO YOU WANT TO EXECUTE THIS FUNCTION?" YES/NOIf you select NO, the display returns to the previous menu.If you select YES, the current menu settings are stored and the menu is exited. | ||
| POWER SAVE ENABLE / DISABLE | Enables or disables automatic power save mode.Delay before entering this mode is set in the SYSTEM CONFIGURATION menu. | |
| PAPER BLACK SETTING | -2~0~+2 Used for small adjustment when you experience faded print or light specks / streaking in monochrome printing on white paper. Select a higher value to reduce fading, or a lower value to reduce specks or streaking in high density print areas. | |
| PAPER COLOR SETTING | -2~0~+2 As above, but for colour printing. | |
| TRANSPR BLACK SETTING | -2~0~+2 As above but for mono printing on transparencies. | |
| TRANSPR COLOR SETTING | -2~0~+2 As above but for colour printing on transparencies. | |
USAGE MENU
This menu is for information only, and provides an indication of total usage of the printer and the expected life left in its consumable items. This is particularly useful if you do not have a full set of replacement consumables to hand and you need to know how soon you will need them.
| ITEM EXPLANATION | |
| TRAY1 PAGE COUNT The | total number of pages fed from tray 1. |
| TRAY2 PAGE COUNT The | total number of pages fed from tray 2 (if fitted). |
| MPT PAGE COUNT The | total number of pages fed from the multi purpose tray. |
| COLOR PAGE COUNT The | total number of pages printed in colour. |
| MONO PAGE COUNT The | total number of pages printed in monochrome. |
| K DRUM LIFE REMAINING C DRUM LIFE REMAINING M DRUM LIFE REMAINING Y DRUM LIFE REMAINING | Percentage of life remaining in these consumable items. |
| BELT LIFE REMAINING | Percentage of belt life remaining. |
| FUSER LIFE REMAINING | Percentage of fuser life remaining. |
| K TONER C TONER M TONER Y TONER | Cartridge size and current toner level. |
JOB LOG MENU
| ITEM SETTING | EXPLANATION | |
| JOB LOG ENABLE/ | DISABLE | Prints a list of jobs carried out on this printer. (Note: You will be prompted for the Administrator password to enter/change this menu item). |
REPLACING CONSUMABLE ITEMS
This section explains how to replace consumable items when due.
NOTE:
When the LCD display indicates TONER LOW, or if print appears faded, first open the top cover and try tapping the cartridge a few times to evenly distribute the toner powder. This will enable you to obtain the best "yield" from your toner cartridge.
As a guide, the life expectancy of these items is:
> Toner:
Starter Cartridge:
The printer is shipped with sufficient Cyan, Magenta, Yellow & Black toner for 2,000 A4 pages in the print cartridges, of which 750 A4 pages are used to charge the image drum (1,250 A4 pages remaining at 5% coverage).
Replacement Cartridge:
| A4 PAGE COVERAGE (OF THIS COLOUR) | 2.5% 5.0% 10% | ||
| Black 12,000 | 6,000 3,000 | ||
| Cyan 12,000 | 6,000 3,000 | ||
| Magenta 12,000 | 6,000 3,000 | ||
| Yellow 12,000 | 6,000 3,000 | ||
Image drum: Approximately 20,000 A4 pages (calculated on typical office usage where 20% of printing is 1 page only, 30% is 3 page documents and 50% is print runs of 15 pages or more).
Transfer belt: Approximately 80,000 A4 pages.
Fuser: Approximately 100,000 A4 pages.
CONSUMABLE ORDER DETAILS
| ITEM LIFE ORDER | NO. | |
| Toner, black 6,000 A4 @ 5%* 43487712 | ||
| Toner, cyan 6,000 A4 @ 5%* 43487711 | ||
| Toner, magenta 6,000 A4 @ 5%* 43487710 | ||
| Toner, yellow 6,000 A4 @ 5%* 43487709 | ||
| Toner Rainbow pack (1 ea. C,M,Y,K) N/A 43698501 | ||
| Image drum, black 20,000 A4 pages* 43449016 | ||
| Image drum, cyan | 20,000 A4 pages* 43449015 | |
| Image drum, magenta | 20,000 A4 pages* 43449014 | |
| Image drum, yellow | 20,000 A4 pages* 43449013 | |
| Fuser | 100,000 A4 pages* | 43529405 |
| Transport belt | 80,000 A4 @ 3/job | 43449705 |
* Average life: 20% pages at continuous print, 50% pages at 3 pages per job and 30% pages at 1 page per job.
Only use genuine Oki Original consumables to ensure the best quality and performance from your hardware. Non Oki Original products may adversely affect your printer's performance and invalidate your warranty.
TONER CARTRIDGE REPLACEMENT
CAUTION!
To avoid toner wastage and possible toner sensor errors, do not change the toner cartridge(s) until "TONER EMPTY" is displayed.
The toner used in this printer is a very fine dry powder. It is contained in four cartridges: one each for cyan, magenta, yellow and black.
Have a sheet of paper handy so that you have somewhere to place the used cartridge while you install the new one.
Dispose of the old cartridge responsibly, inside the pack that the new one came in. Follow any regulations, recommendations, etc., which may be in force concerning waste recycling.
If you do spill any toner powder, lightly brush it off. If this is not enough, use a cool, damp cloth to remove any residue.
Do not use hot water, and never use solvents of any kind. They will make stains permanent.
WARNING!
If you inhale any toner or get it in your eyes, drink a little water or bathe your eyes liberally in cold water. Seek medical attention immediately.
- Press the cover release and open the printer's top cover fully.
WARNING!
If the printer has been powered on, the fuser may be hot. This area is clearly labelled. Do not touch.
- Note the positions of the four cartridges.
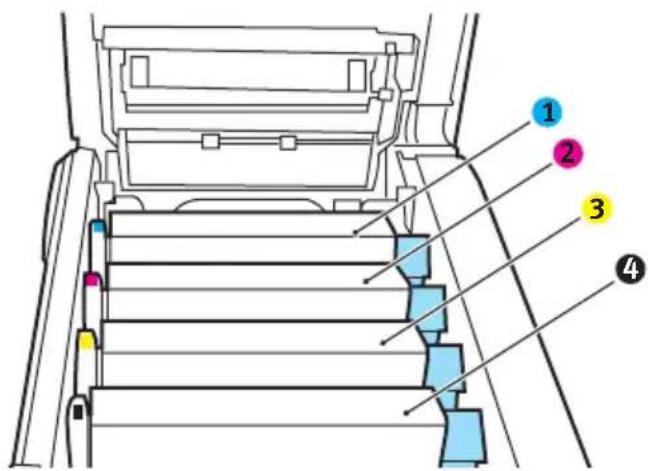
text_image
Technical diagram of a vehicle rearview system with numbered components labeled 1, 2, 3, and 4.- Cyan cartridge 2. Magenta cartridge
- Yellow cartridge 4. Black cartridge
(a) Pull the coloured toner release lever (1) on the cartridge to be replaced fully towards the front of the printer.
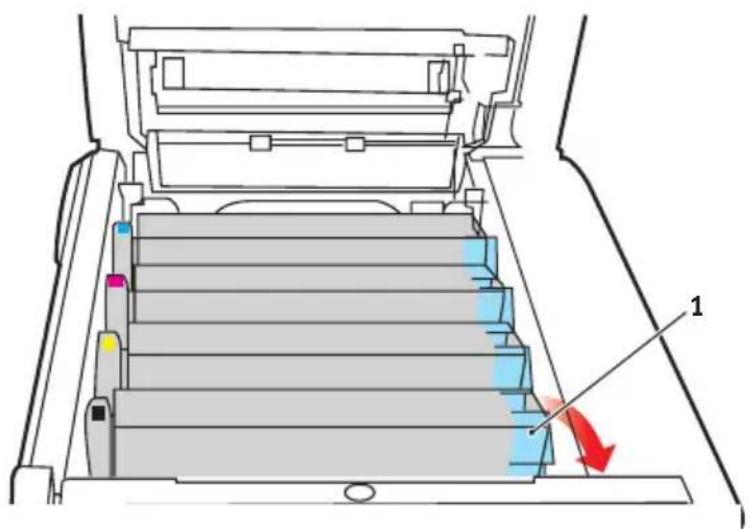
text_image
Technical diagram of a printer drawer with labeled component '1' and color-coded parts- Lift the right-hand end of the cartridge and then draw the cartridge to the right to release the left-hand end as shown, and withdraw the toner cartridge.
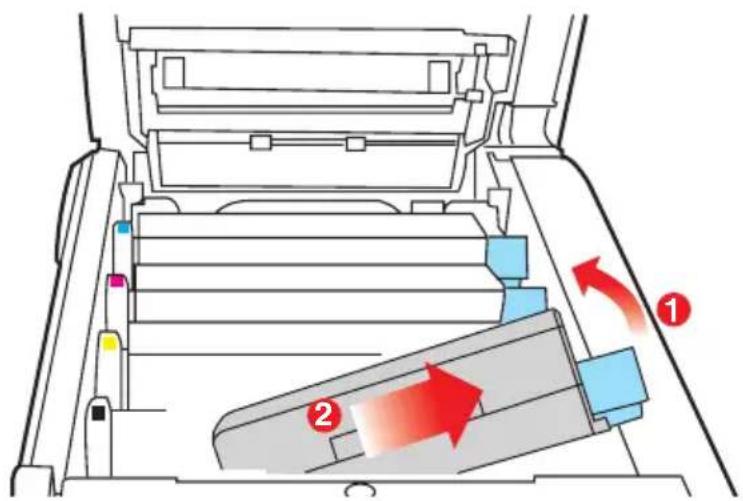
text_image
Diagram of a printer drawer with labeled parts and directional arrows indicating movement or flow-
Put the assembly down gently onto a piece of paper to prevent toner from marking your furniture.
-
Remove the new cartridge from its box but leave its wrapping material in place for the moment.
-
Gently shake the new cartridge from end to end several times to loosen and distribute the toner evenly inside the cartridge.
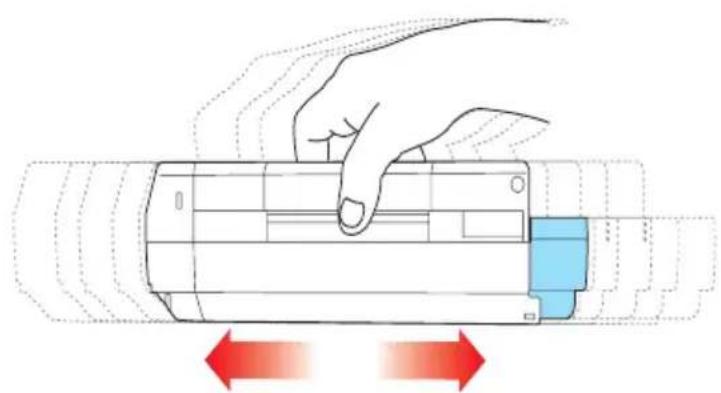
natural_image
Illustration of a hand pressing down on a cylindrical device with red directional arrows indicating movement (no text or symbols)- Remove the wrapping material and peel off the adhesive tape from the underside of the cartridge.
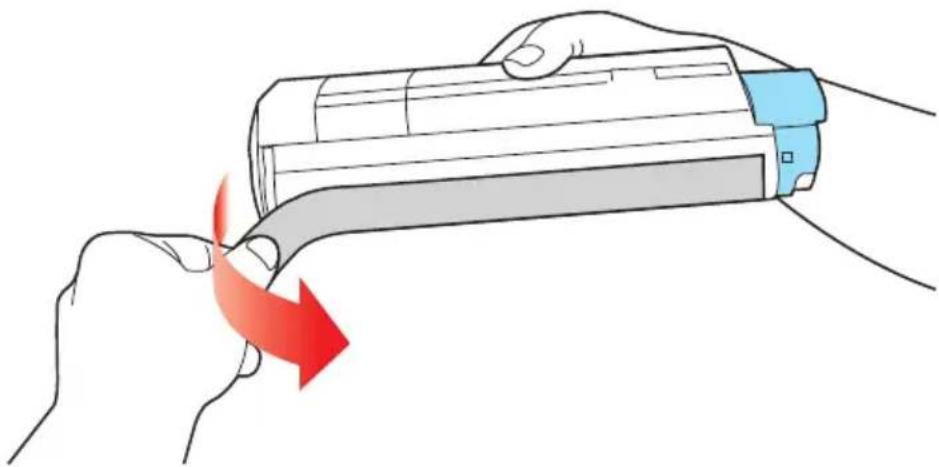
natural_image
Illustration of hands holding a cylindrical device with a red arrow indicating compression or disassembly (no text or symbols)-
Holding the cartridge by its top centre with the coloured lever to the right, lower it into the printer over the image drum unit from which the old cartridge was removed.
-
Insert the left end of the cartridge into the top of the image drum unit first, pushing it against the spring on the drum unit, then lower the right end of the cartridge down onto the image drum unit.
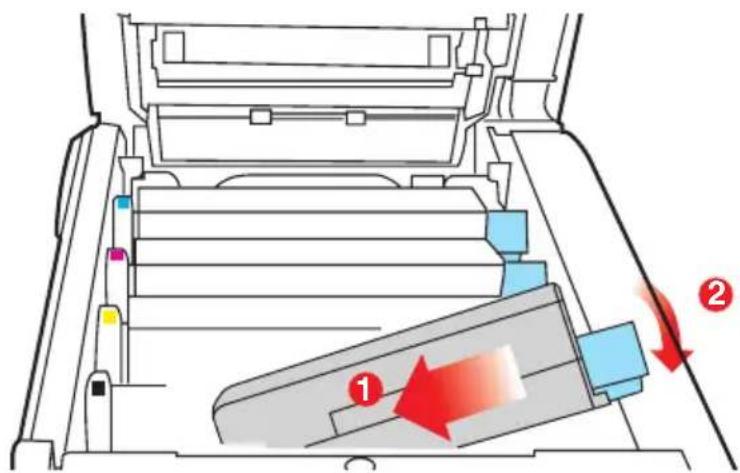
text_image
Diagram of a printer drawer with labeled parts and directional arrows indicating movement or flow- Pressing gently down on the cartridge to ensure that it is firmly seated, push the coloured lever (1) towards the rear of the printer. This will lock the cartridge into place and release toner into the image drum unit.
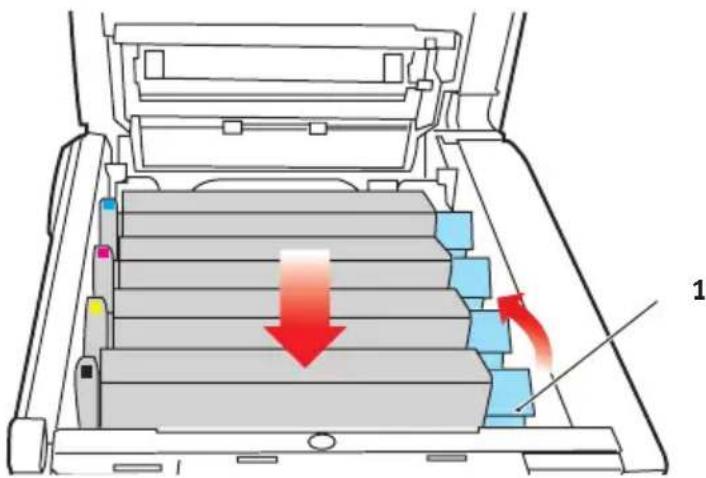
text_image
Diagram of a printer drawer with color-coded compartments and red directional arrows indicating flow or movement, labeled '1' at the bottom.- Finally, close the top cover and press down firmly at both sides so that the cover latches closed.
IMAGE DRUM REPLACEMENT
CAUTION!

Static sensitive devices, handle with care.
The printer contains four image drums: cyan, magenta, yellow and black.
- Press the cover release and open the printer's top cover fully.
WARNING!
If the printer has been powered on, the fuser will be hot. This area is clearly labelled. Do not touch.
- Note the positions of the four cartridges.
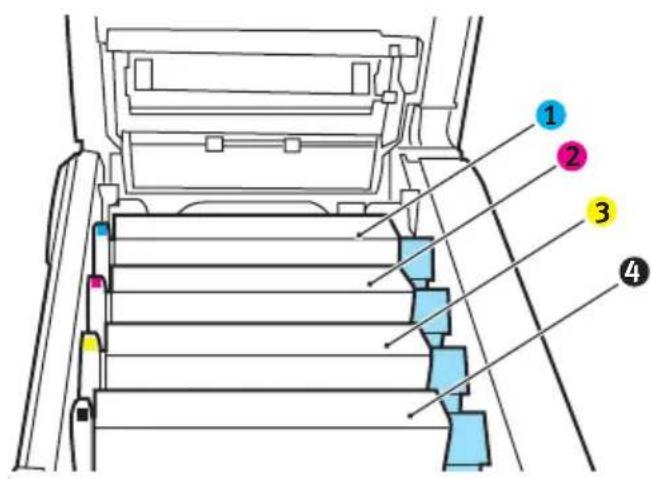
text_image
Diagram of a vehicle interior with numbered components, likely for assembly or maintenance instructions.| 1. Cyan cartridge 2. Magenta cartridge |
| 3. Yellow cartridge 4. Black cartridge |
- Holding it by its top centre, lift the image drum, complete with its toner cartridge, up and out of the printer.
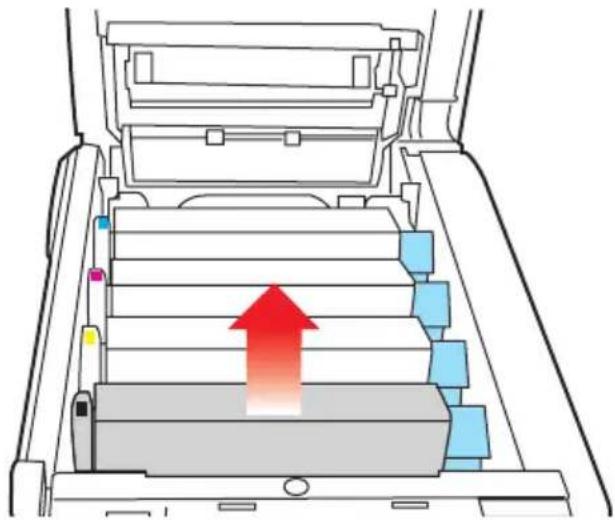
natural_image
Diagram of a printer drawer with color-coded sections and a red upward arrow indicating motion (no text or symbols)- Put the assembly down gently onto a piece of paper to prevent toner from marking your furniture and to avoid damaging the green drum surface.
CAUTION!
The green image drum surface at the base of the cartridge is very delicate and light sensitive. Do not touch it and do not expose it to normal room light for more than 5 minutes. If the drum unit needs to be out of the printer for longer than this, please wrap the cartridge inside a black plastic bag to keep it away from light. Never expose the drum to direct sunlight or very bright room lighting.
- With the coloured toner release lever (1) to the right, pull the lever towards you. This will release the bond between the toner cartridge and the image drum cartridge.
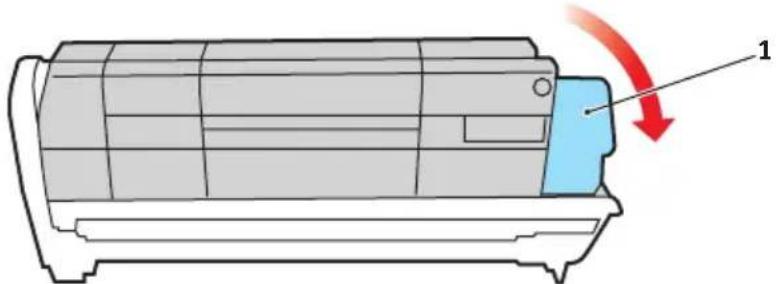
natural_image
Diagram of a gray cylindrical device with a blue internal component and red curved arrow indicating rotation (no text or symbols)Replacing consumable items > 141
- Lift the right-hand end of the cartridge and then draw the cartridge to the right to release the left-hand end as shown, and withdraw the toner cartridge out of the image drum cartridge. Place the cartridge on a piece of paper to avoid marking your furniture.
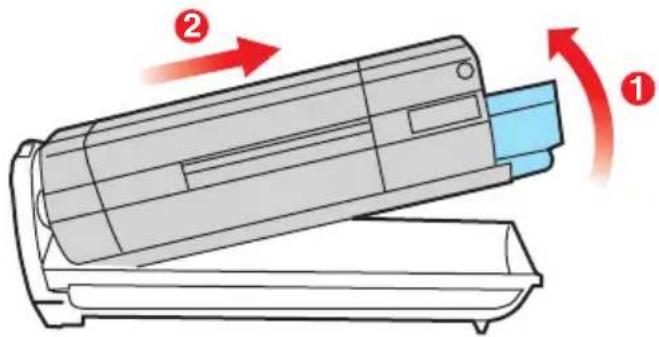
text_image
Diagram of a device with labeled parts and directional arrows indicating motion or movement, marked with numbers 1 and 2.-
Take the new image drum cartridge out of its packaging and place it on the piece of paper where the old cartridge was placed. Keep it the same way round as the old unit. Pack the old cartridge inside the packaging material for disposal.
-
Place the toner cartridge onto the new image drum cartridge as shown. Push the left end in first, and then lower the right end in. (It is not necessary to fit a new toner cartridge at this time unless the remaining toner level is very low.)
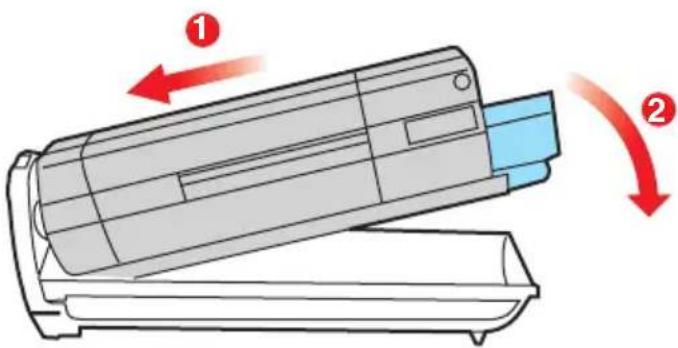
text_image
Diagram showing a device being inserted into a tray, with labeled arrows indicating process flow.- Push the coloured release lever (1) away from you to lock the toner cartridge onto the new image drum unit and release toner into it.
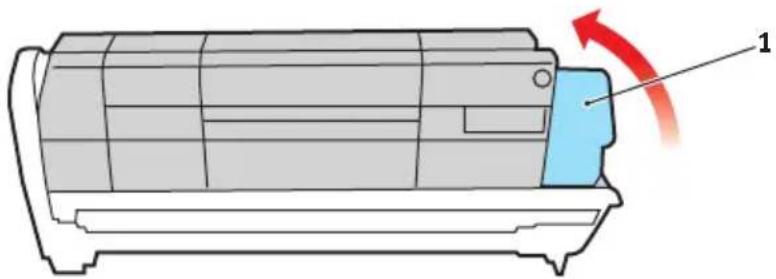
natural_image
Diagram of a car air conditioner unit with a blue component and red directional arrow indicating rotation (no text or symbols)- Holding the complete assembly by its top centre, lower it into place in the printer, locating the pegs at each end into their slots in the sides of the printer cavity.
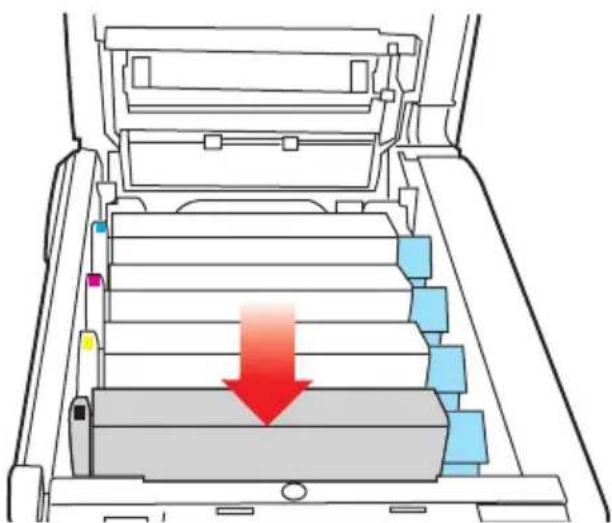
natural_image
Diagram of a printer drawer with color-coded zones and a red downward arrow indicating compression or disassembly (no text or symbols present)- Finally, close the top cover and press down firmly at both sides so that the cover latches closed.
NOTE:
If you need to return or transport your printer for any reason, please make sure you remove the image drum unit beforehand and place in the bag provided. This is to avoid toner spillage.
TRANSFER BELT REPLACEMENT
The belt unit is located under the four image drums. This unit requires replacement approximately every 80,000 pages.
Switch off the printer and allow the fuser to cool for about 10 minutes before opening the cover.
- Press the cover release and open the printer's top cover fully.
WARNING!
If the printer has been powered on, the fuser will be hot. This area is clearly labelled. Do not touch.
- Note the positions of the four cartridges. It is essential that they go back in the same order
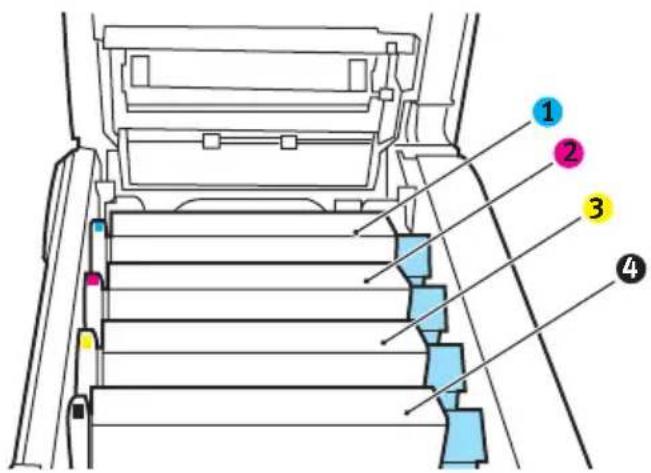
text_image
Technical diagram of a vehicle rearview assembly with numbered components labeled 1 to 4| 1. Cyan cartridge 2. Magenta cartridge |
| 3. Yellow cartridge 4. Black cartridge |
- Lift each of the image drum units out of the printer and place them in a safe place away from direct sources of heat and light.
CAUTION!
The green image drum surface at the base of each cartridge is very delicate and light sensitive. Do not touch it and do not expose it to normal room light for more than 5 minutes. If the drum unit needs to be out of the printer for longer than this, please wrap the cartridge inside a black plastic bag to keep it away from light. Never expose the drum to direct sunlight or very bright room lighting.
- Locate the two fasteners (5) at each side of the belt and the lifting bar (6) at the front end.
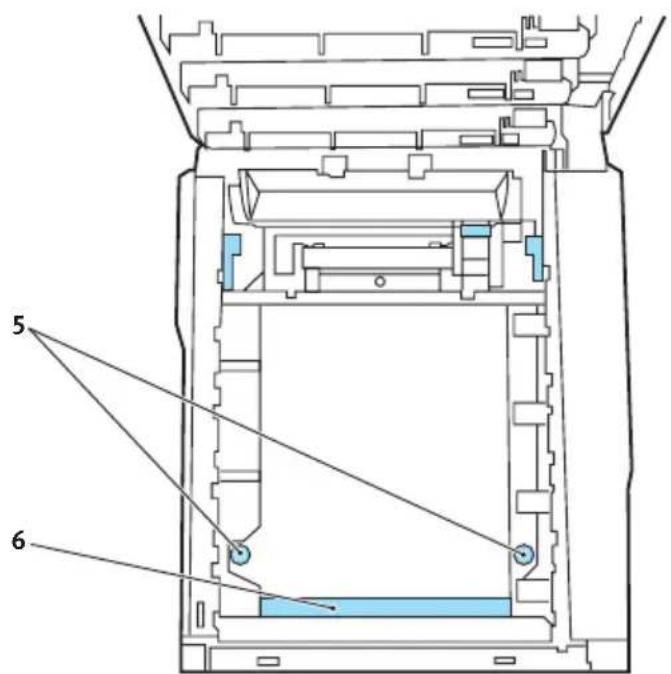
text_image
5 6-
Turn the two fasteners 90^ to the left. This will release the belt from the printer chassis.
-
Pull the lifting bar (6) upwards so that belt tilts up towards the front, and withdraw the belt unit from the printer.
-
Lower the new belt unit into place, with the lifting bar at the front and the drive gear towards the rear of the printer. Locate the drive gear into the gear inside the printer by the rear left corner of the unit, and lower the belt unit flat inside the printer.
-
Turn the two fasteners (5) 90° to the right until they lock. This will secure the belt unit in place.
-
Replace the four image drums, complete with their toner cartridges, into the printer in the same sequence as they came out: cyan (nearest the rear), magenta, yellow and black (nearest the front).
-
Finally, close the top cover and press down firmly at both sides so that the cover latches closed.
FUSER REPLACEMENT
The fuser is located inside the printer just behind the four image drum units.
WARNING!
If the printer has recently been powered on, some fuser components will be very hot. Handle the fuser with extreme care, holding it only by its handle, which will only be mildly warm to the touch. A warning label clearly indicates the area. If in doubt, switch the printer off and wait at least 10 minutes for the fuser to cool before opening the printer cover.
Switch off the printer.
- Press the cover release and open the printer's top cover fully.
- Identify the fuser handle (1) on the top of the fuser unit.
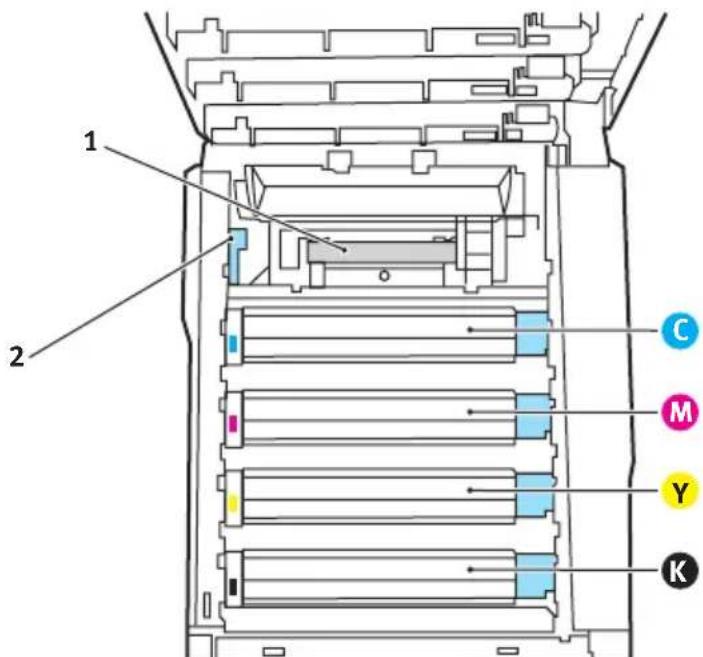
text_image
1 2 C M Y K- Pull the fuser retaining lever (2) towards the front of the printer so that it is fully upright.
-
Holding the fuser by its handle (1), lift the fuser straight up and out of the printer. If the fuser is still warm, place it on a flat surface which will not be damaged by heat.
-
Remove the new fuser from its packaging and remove the transit material.
- Holding the new fuser by its handle, make sure that it is the correct way round. The retaining levers (2) should be fully upright.
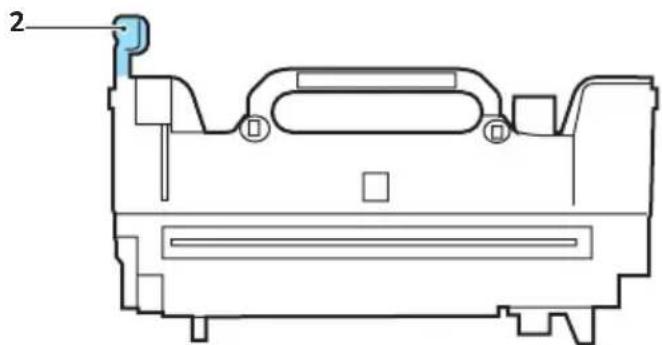
natural_image
Technical line drawing of a mechanical component with no visible text or symbols- Lower the fuser into the printer.
- Push the retaining lever (2) towards the rear of the printer to lock the fuser in place.
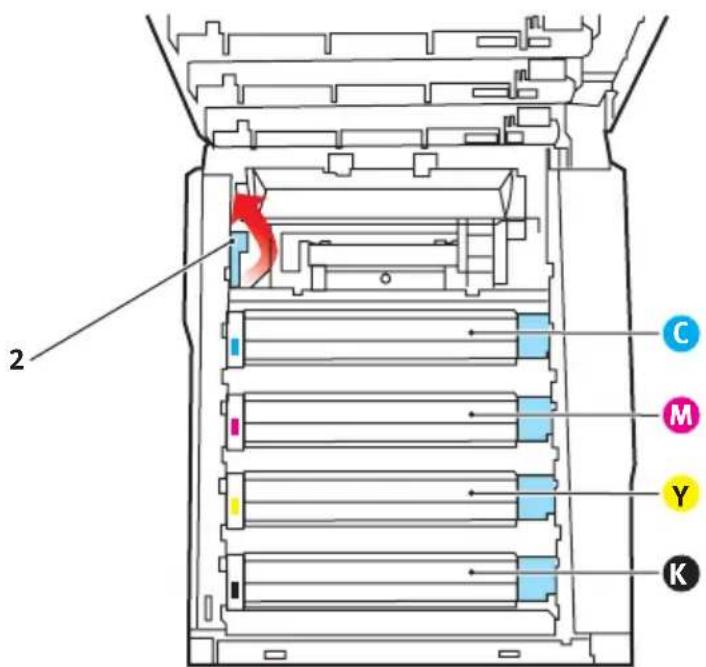
text_image
2 C M Y KFinally, close the top cover and press down firmly at both sides so that the cover latches closed.
- Switch the printer ON.
CLEANING THE LED HEAD
Clean the LED head when printing does not come out clearly, has white lines or when text is blurred.
- Switch off the printer and open the top cover.
- Gently wipe the LED head surface with a soft tissue.
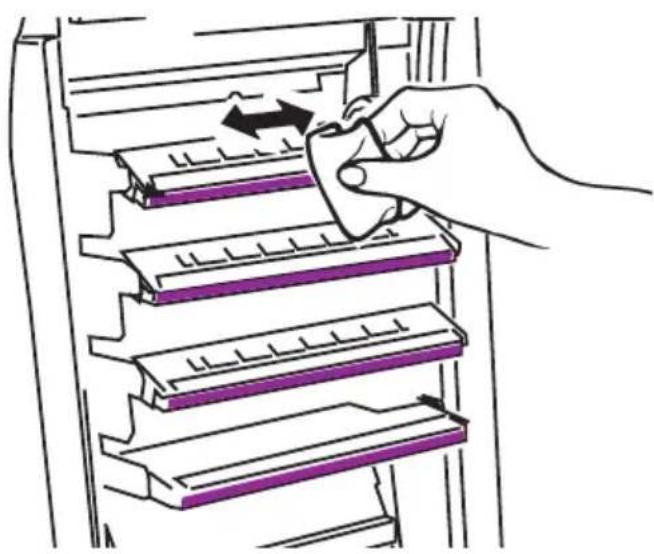
natural_image
Illustration of a hand using a tool to adjust or install electronic components on a multi-tiered shelf (no text or symbols visible)CAUTION!
Do not use methyl alcohol or other solvents on the LED head as damage to the lens surface will occur.
- Close the top cover.
INSTALLING UPGRADES
This section explains how to install optional equipment into your printer. This includes:
duplex (two-sided printing) unit;
Additional Memory
Hard disk drive
additional paper tray
DUPLEX UNIT
The duplex unit adds the function of two-sided printing, using less paper and making large documents easier to handle. It also enables booklet printing, which uses even less paper and makes large documents even easier to handle.
The duplex unit slides straight into the rear of the printer and requires no tools to install.
- Unpack the new unit and remove any transit material from it.
- Switch the printer off. It is not necessary to disconnect the AC power cable.
- Ensure that the unit is the right way up, as shown, and push it into the slot behind the rear panel. The panel will swing inwards as you push the unit into it. Push the unit all the way in until it stops and latches home.
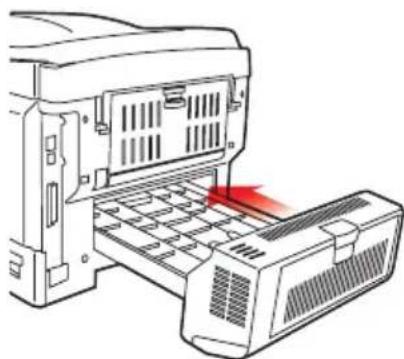
natural_image
Line drawing of a printer's front panel with a red arrow indicating compression or heat transfer (no text or symbols)-
Switch the printer on and wait for it to warm up (about 1 minute).
-
Print a menu map as follows:
(a) Press the + button to access the Information Menu.
(b) Press ENTER once for the menu map.
(c) Press ENTER again to print the menu map.
(d) When the menu map is printed, press ON LINE to exit the menu system.
- Examine the first page of the menu map.
Near the top of the page, between the two horizontal lines, you will see the current printer configuration. This list should indicate that the duplex unit is now installed.
All that remains is to adjust the Windows printer driver to make full use of the new features.
MEMORY UPGRADE
The basic printer model comes equipped with 256MB of main memory. This can be upgraded with an additional memory board of 256MB or 512MB, giving a maximum total memory capacity of 768MB.
Installation only takes a few minutes, and does not require any tools.
CAUTION
Observe antistatic precautions when carrying out this installation.
- Switch the printer off and disconnect the AC power cable.
- Press the cover release and open the printer's top cover fully.
- Lift the front cover latch and pull open the front cover.
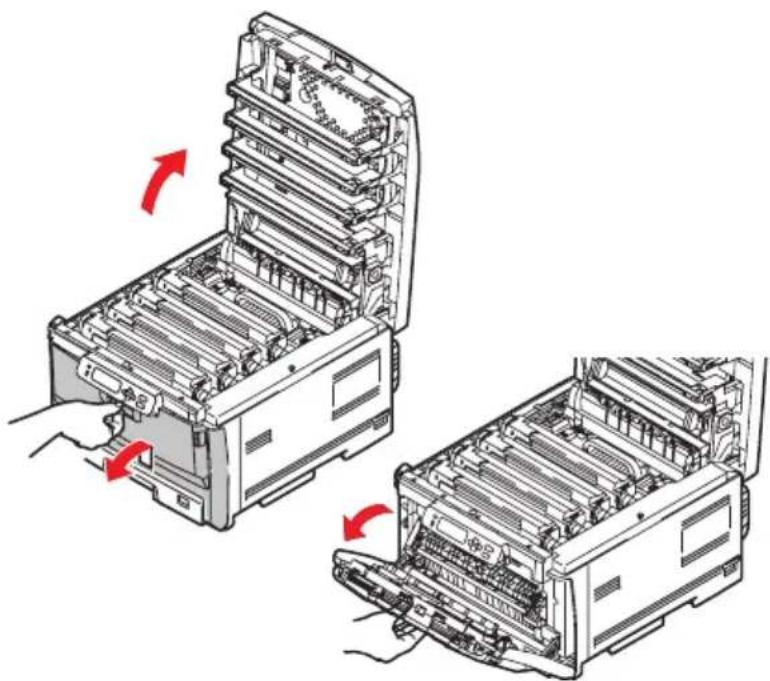
natural_image
Illustration of a computer tower with red arrows indicating file movement or assembly (no text or symbols present)WARNING!
If the printer has been powered on recently, the fuser will be hot. This area is clearly labelled. Do not touch.
- Remove the screw (1) securing the right-hand side cover.
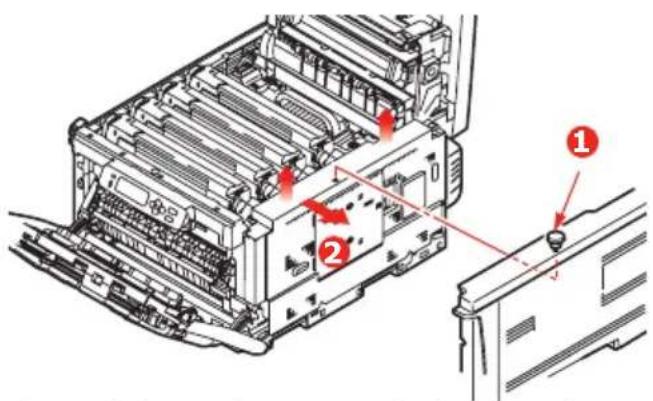
text_image
Technical diagram of a printer internal structure with numbered components and red arrows indicating parts of the device.-
Lift the edge of the side cover slightly at the two points shown, and pull the cover away from the printer at the top. Lift the cover slightly to detach it from the printer. Place it safely to one side.
-
Carefully remove the new memory board from its wrapping. Try to handle the board only by its short edges, avoiding contact with any metal parts as far as possible. In particular, avoid touching the edge connector.
-
Notice that the memory board has a small cutout in the edge connector, which is closer to one end than the other.
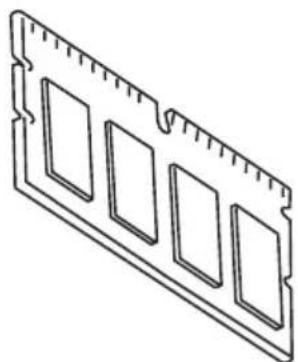
natural_image
Isometric line drawing of a RAM module with four slots and a central slot (no text or symbols)- Slide the access door in the metal plate and open.
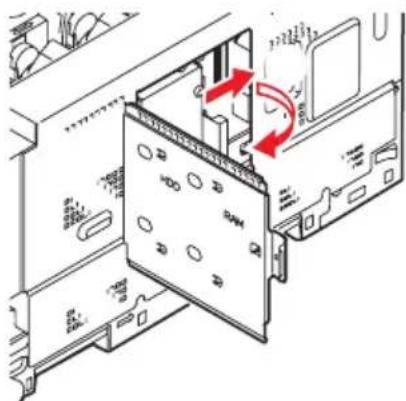
text_image
Technical diagram showing internal components of a device with labeled parts and directional arrows indicating motion or movement.- Identify the RAM expansion slot (1) in the printer.

natural_image
Diagram showing internal components of a server rack with an inset view highlighting a specific rack (no text or symbols present)- If the RAM expansion slot already contains a memory upgrade board, that board will have to be removed before you can install the new one. To remove it, proceed as follows, otherwise skip to step 11.
(a) Grip the board firmly by its short edges and pull it out of the slot.
(b) Place the removed memory board in the antistatic bag which originally contained the new memory board.
-
Hold the new memory board by its short edges, so that the edge connector faces towards the RAM expansion slot.
-
Gently push the board into the RAM expansion slot until it latches in and will not go any further. Press down on the module toward the PCB.
-
Close the access door and slide shut.
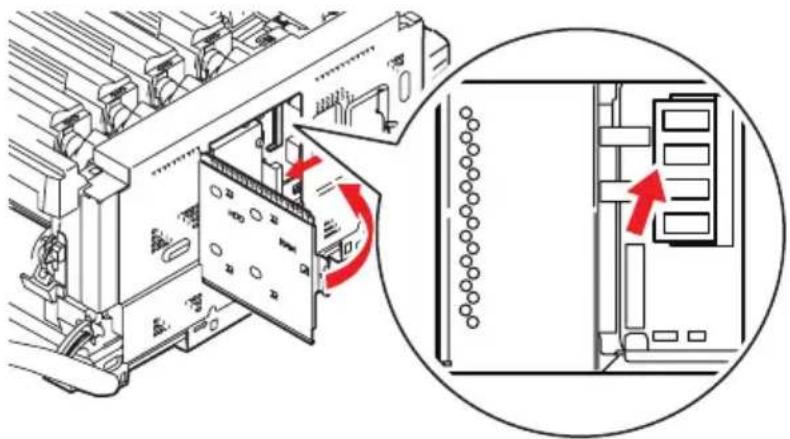
natural_image
Diagram showing a computer rack with a device being inserted, and a close-up of the rack's internal structure (no text or symbols present)-
Locate the three retaining clips at the bottom of the side cover into their rectangular holes near the bottom of the printer.
-
Close the top of the side cover up to the printer and refit the securing screw removed in step 4.
-
Close the front cover and close the top cover, pressing down firmly at each side to latch it closed.
CAUTION!
After installing additional memory (hard disk drive), any covers removed or doors opened must be closed or replaced and secured to prevent risk of fire.
-
Reconnect the AC power cable and switch the printer on.
-
When the printer is ready, print a menu map as follows:
(a) Press the + button to access the Information Menu.
(b) Press ENTER once for the menu map.
(c) Press ENTER again to print the menu map.
(d) When the menu map is printed, press ON LINE to exit the menu system.
- Examine the first page of the menu map.
Near the top of the page, between the two horizontal lines, you will see the current printer configuration. This list contains the figure for total memory size.
This should indicate the total memory now installed.
If you are using the Windows PostScript driver, follow the instructions later in this section to adjust the driver.
HARD DISK DRIVE
The optional internal hard disk drive (HDD) enables collating of printed pages and can be used to store overlays and macros, fonts, and secure or proof documents waiting to be printed.
Installation only takes a few minutes, and does not require any tools.
CAUTION
Observe antistatic precautions when carrying out this installation.
- Switch the printer off and disconnect the AC power cable.
- Press the cover release and open the printer's top cover fully.
- Lift the front cover latch and pull open the front cover.
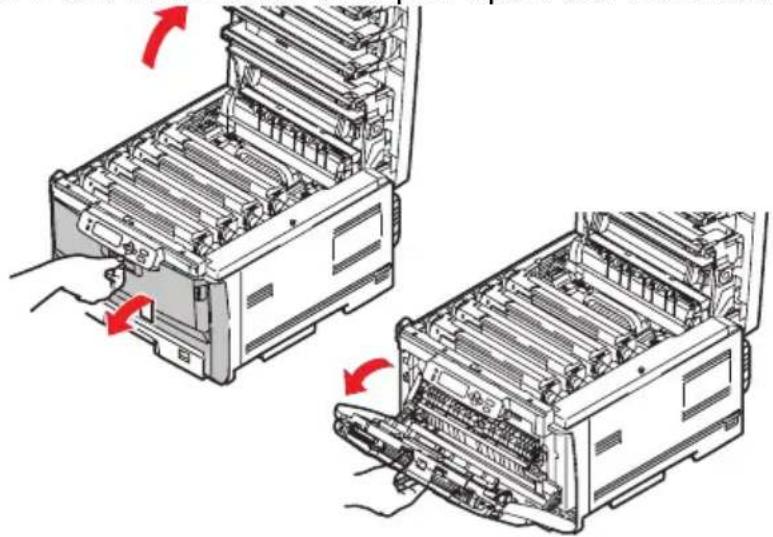
natural_image
Illustration of two views of a computer rack with red arrows indicating process flow (no text or symbols present)WARNING!
If the printer has been powered on recently, the fuser will be hot. This area is clearly labelled. Do not touch.
- Remove the screw (1) securing the right-hand side cover.

text_image
Technical diagram of a computer rack with labeled components and directional arrows indicating movement or assembly.-
Lift the edge of the side cover slightly at the two points shown, and pull the cover away from the printer at the top. Lift the cover slightly to detach it from the printer. Place it safely to one side.
-
Slide the access door in the metal plate and open.
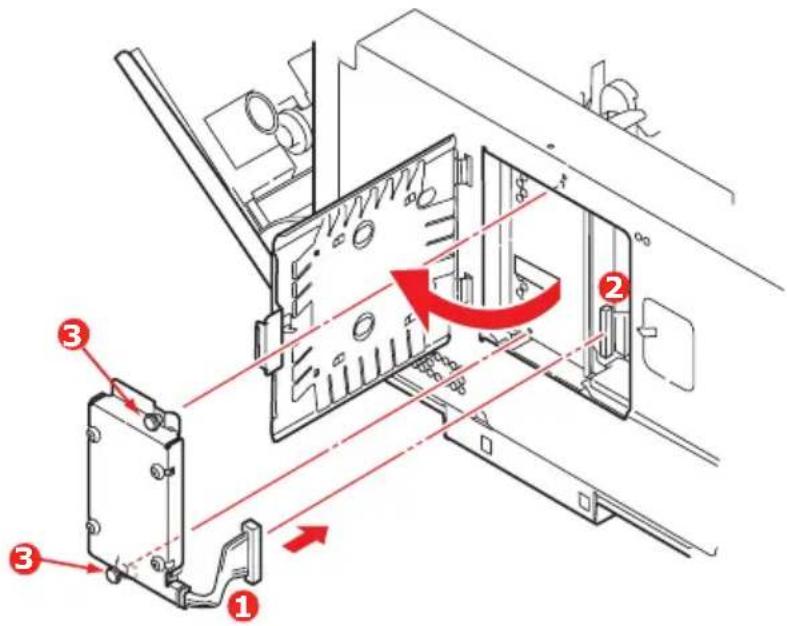
text_image
Technical diagram showing mechanical assembly with numbered components and red directional arrows indicating motion or movement.-
Plug the end of the connecting cable (1) into the disk unit connector (2) in the printer.
-
Tighten the two thumbscrews (3).
-
Close the top of the side cover up to the printer and refit the securing screw removed in step 4.
-
Close the front cover and the top cover, pressing down firmly at each side to latch it closed.
CAUTION!
After installing additional memory (hard disk drive), any covers removed or doors opened must be closed or replaced and secured to prevent risk of fire.
- Reconnect the AC power cable and switch the printer on.
- When the printer is ready, print a menu map as follows:
- Press the + button to access the Information Menu.
- Press ENTER once for the menu map.
- Press ENTER again to print the menu map.
- When the menu map is printed, press ON LINE to exit the menu system.
- Examine the first page of the menu map.
- Near the top of the page, between the two horizontal lines, you will see the current printer configuration. This should now indicate that the hard disk unit is installed.
ADDITIONAL PAPER TRAY
-
Switch the printer off and disconnect the AC power cable.
-
Place additional paper tray on desired location.
-
Observing safety rules for lifting and, using locating guides (a), place printer on top of the additional paper tray.
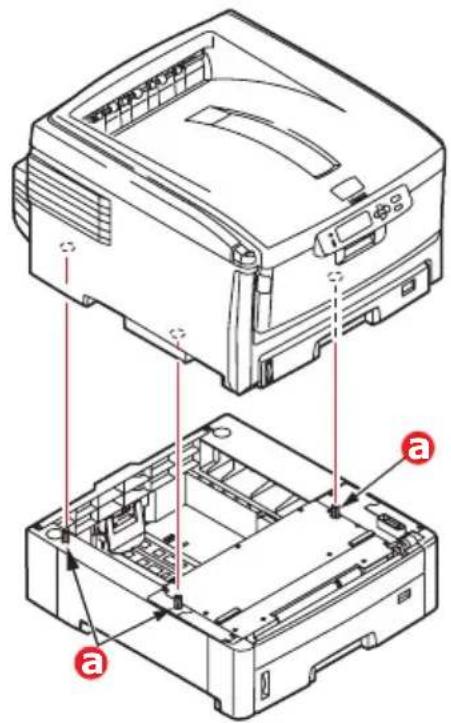
text_image
Technical diagram of a printer with labeled parts, showing internal structure and mounting points- Re-connect the AC power cable and switch the printer ON.
ADJUSTING WINDOWS PRINTER DRIVERS
Once your new upgrade has been installed, you may need to update the Windows printer driver so that the additional features are available to your Windows applications.
Remember that if your printer is shared between users on different computers, the driver must be adjusted on each user's machine.
The illustrations shown here are for Windows XP. Other Windows versions may appear slightly different, but the principles are the same.
If you have installed a memory upgrade it is not necessary to change the printer driver, and you can ignore this section.
If you have installed a duplex unit, proceed as follows:
-
Open the Printers window (called "Printers and Faxes" in Windows XP) via the Start Menu or from the Windows Control Panel.
-
Right-click the printer icon for this printer, and choose Properties from the pop-up menu.
-
On the Device Options tab, check the box for the upgrade you have just installed.
-
Click OK to close the properties window, and then close the Printers window.
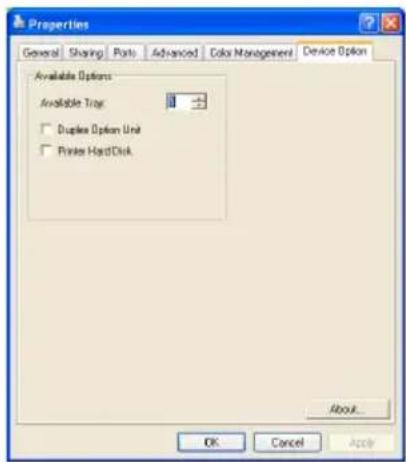
text_image
Properties General Sharing Posts Advanced Colors Management Device Option Available Options Available Tray □ Duplex Option Unit □ Printer HardDisk About... OK Cancel ApplyCLEARING PAPER JAMS
IMPORTANT NOTE:
Please check that the Paper Setting roller switch on the front of the paper tray is set to the size of paper in the tray.
Provided that you follow the recommendations in this guide on the use of print media, and you keep the media in good condition prior to use, your printer should give years of reliable service. However, paper jams occasionally do occur, and this section explains how to clear them quickly and simply.
Jams can occur due to paper misfeeding from a paper tray or at any point on the paper path through the printer. When a jam occurs, the printer immediately stops, and the Alert LED on the Status Panel (together with the Status Monitor) informs you of the event. If printing multiple pages (or copies), do not assume that, having cleared an obvious sheet, others will not also be stopped somewhere along the path. These must also be removed in order to clear the jam fully and restore normal operation.
MAJOR PRINTER COMPONENTS AND PAPER PATH
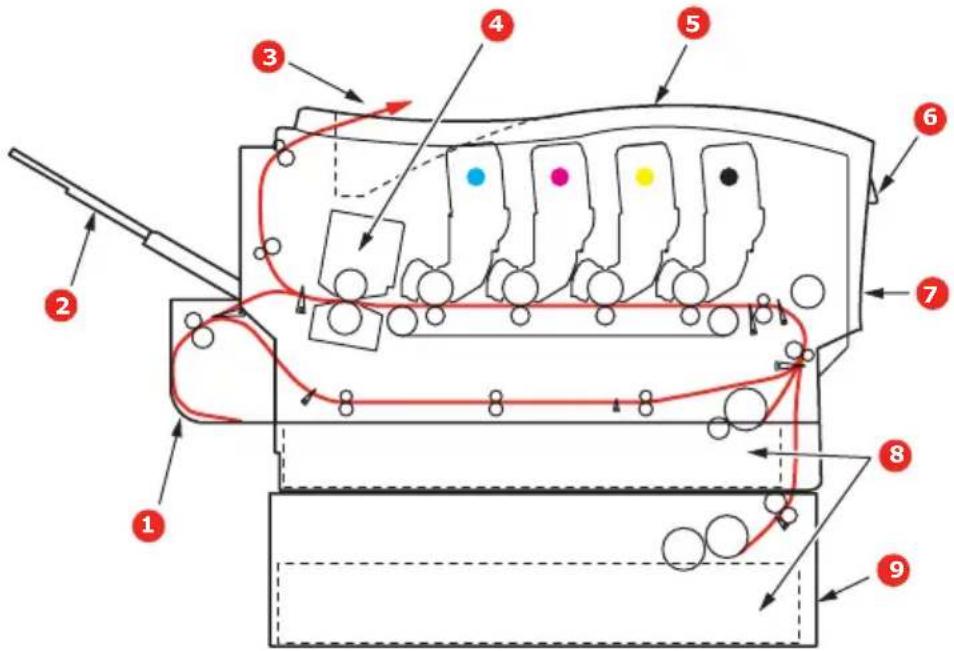
text_image
Technical diagram of a mechanical device with numbered components and colored indicators, likely illustrating assembly or inspection.- Duplex unit (if fitted). 6. Operator panel.
- Face-up stacker. 7. Front cover.
- Paper exit. 8. Paper tray.
- Fuser unit 9. Additional paper tray (if fitted)
- Top cover.
PAPER SENSOR ERROR CODES
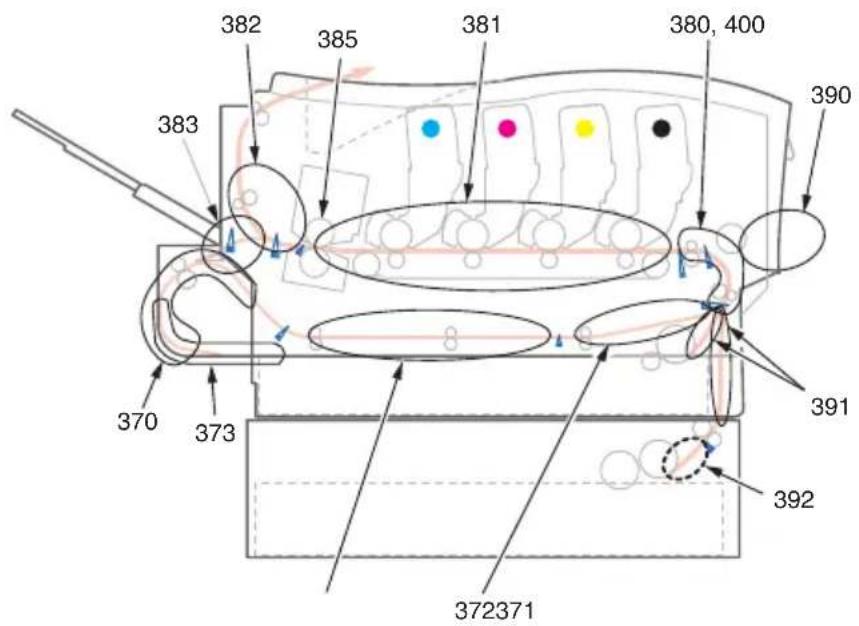
text_image
382 385 381 380, 400 390 383 370 373 391 392 372371CODE # LOCATION CODE # LOCATION
370 Duplex unit * 383 Duplex unit *
371 Duplex unit * 385 Fuser Unit
372 Duplex unit * 390 MP Tray
373 Duplex unit * 391 Paper Tray
380 Paper feed 392
381 Paper path 400 Paper size
382 Paper exit
2^nd Paper tray *
* (if fitted).
-
If a sheet is well advanced out of the top of the printer, simply grip it and pull gently to draw it fully out. If it does not remove easily, do not use excessive force. It can be removed from the rear later.
-
Press the cover release and open the printer's top cover fully.
WARNING!
If the printer has been powered on, the fuser will be hot. This area is clearly labelled. Do not touch.
- Note the positions of the four cartridges.

text_image
Technical diagram of a vehicle rearview system with numbered components labeled 1 to 4| 1. Cyan cartridge 2. Magenta cartridge |
| 3. Yellow cartridge 4. Black cartridge |
It will be necessary to remove the four image drums to gain access to the paper path.
- Holding it by its top centre, lift the cyan image drum, complete with its toner cartridge, up and out of the printer.
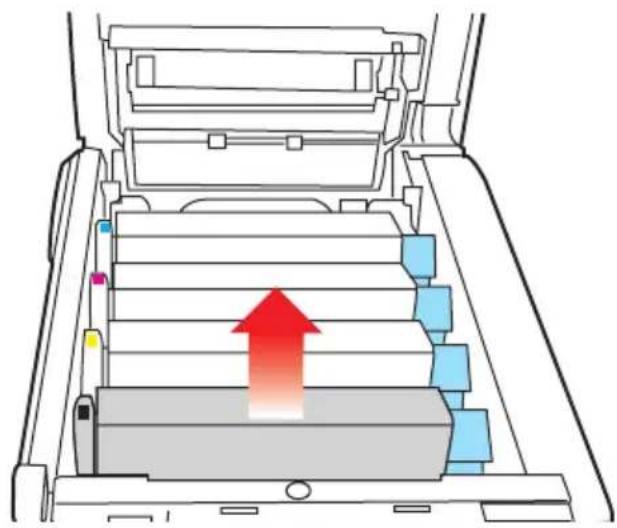
natural_image
Diagram of a printer drawer with a red upward arrow indicating motion or flow (no text or symbols present)- Put the cartridge down gently onto a piece of paper to prevent toner from marking your furniture and to avoid damaging the green drum surface.
CAUTION!
The green image drum surface at the base of the cartridge is very delicate and light sensitive. Do not touch it and do not expose it to normal room light for more than 5 minutes.
-
Repeat this removal procedure for each of the remaining image drum units.
-
Look into the printer to check whether any sheets of paper are visible on any part of the belt unit.
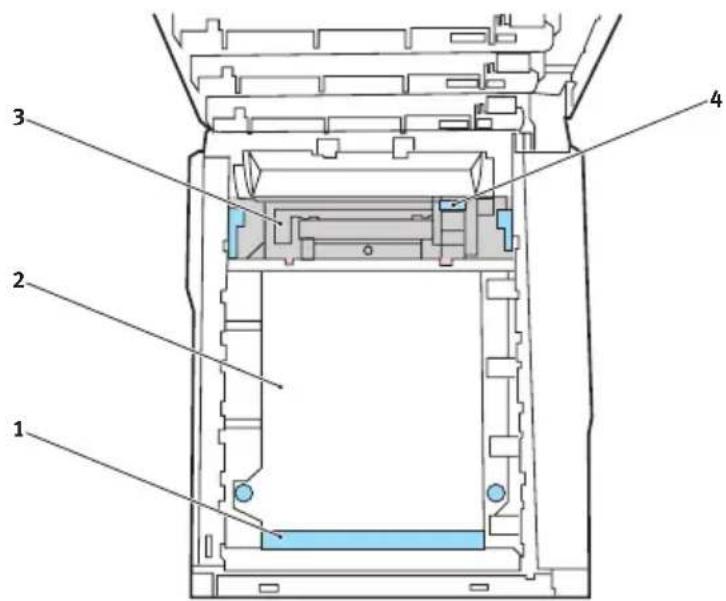
text_image
Technical diagram of a device interior with numbered components labeled 1 to 4To remove a sheet with its leading edge at the front of the belt (1), carefully lift the sheet from the belt and pull it
forwards into the internal drum cavity and withdraw the sheet.
CAUTION!
Do not use any sharp or abrasive objects to separate sheets from the belt. This may damage the belt surface.
To remove a sheet from the central area of the belt (2), carefully separate the sheet from the belt surface and withdraw the sheet.
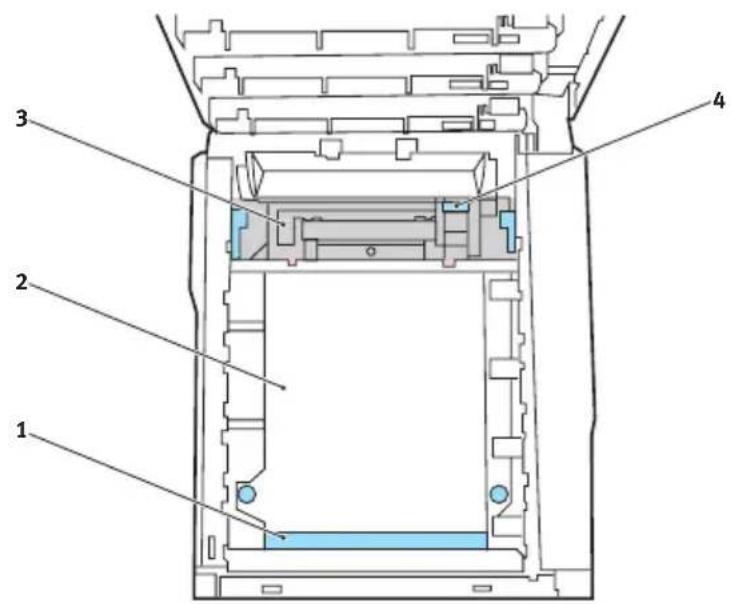
text_image
Technical diagram of a device interior with numbered components labeled 1 to 4To remove a sheet just entering the fuser (3), separate the trailing edge of the sheet from the belt, push the fuser pressure release lever (4) towards the front and down to release the fuser's grip on the sheet, and withdraw the sheet through the drum cavity area. Then allow the pressure release lever to rise again.
NOTE:
If the sheet is well advanced into the fuser (only a short length is still visible), do not attempt to pull it back. Follow the next step to remove it from the rear of the printer.
- Starting with the cyan image drum unit nearest the fuser, replace the four image drums into the drum cavity, making sure to locate them in the correct order.
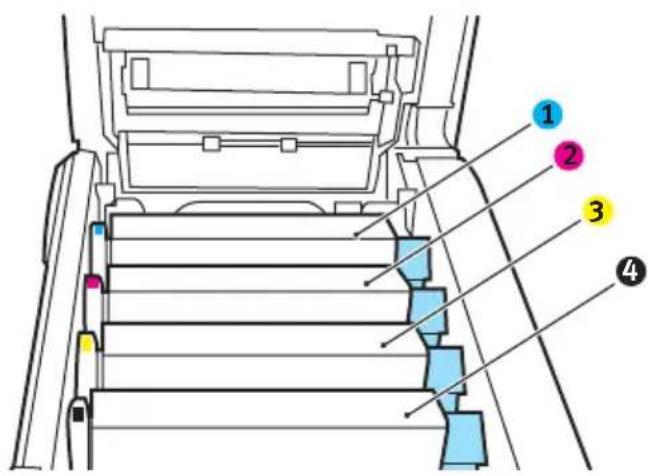
text_image
Technical diagram of a vehicle rear lift with numbered component labels| 1. Cyan cartridge 2. Magenta cartridge |
| 3. Yellow cartridge 4. Black cartridge |
Holding the complete assembly by its top centre, lower it into place in the printer, locating the pegs at each end into their slots in the sides of the printer cavity.
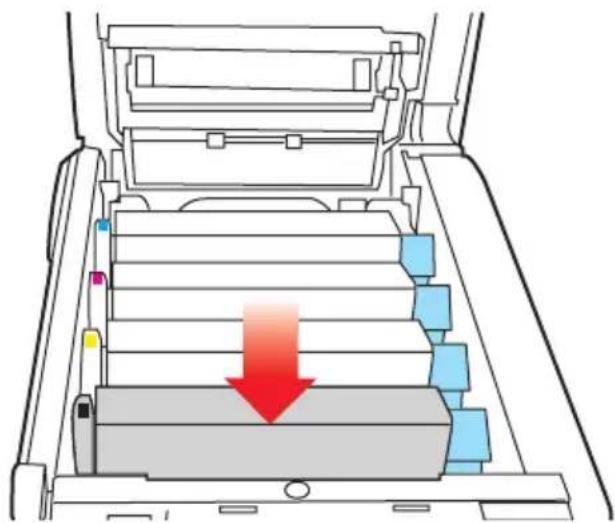
natural_image
Diagram of a printer drawer with color-coded sections and a red downward arrow indicating compression or disassembly (no text or symbols present)-
Lower the top cover but do not press down to latch it closed yet. This will protect the drums from excessive exposure to room lighting while you check the remaining areas for jammed sheets.
-
Open the rear exit tray (5) and check for a sheet of paper in the rear path area (6).
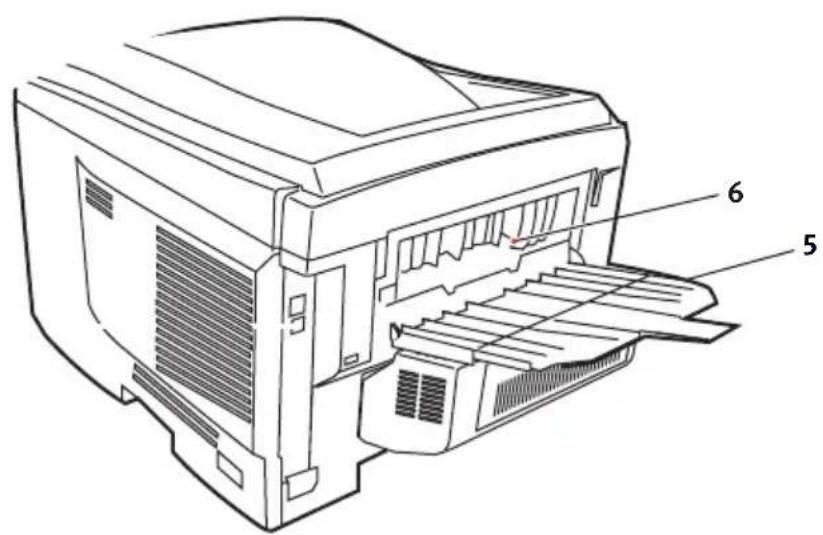
text_image
Technical diagram of a printer with labeled parts 5 and 6, showing internal structure and paper feed path.Pull out any sheets found in this area.
If the sheet is low down in this area and difficult to remove, it is probably still gripped by the fuser. In this case raise the top cover, reach around and press down on the fuser pressure release lever (4).
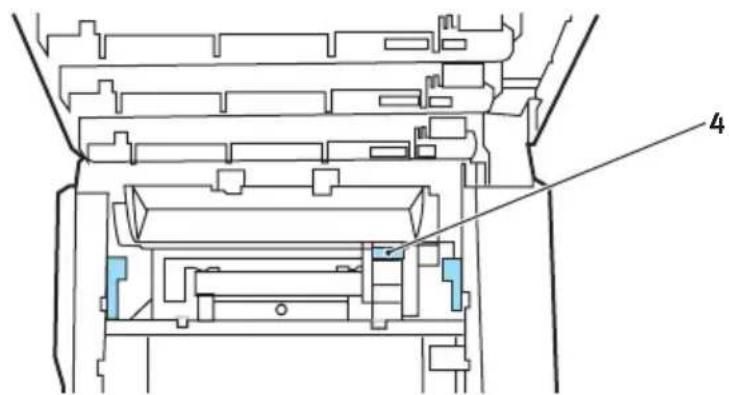
text_image
4-
If you are not using the rear exit tray, close it once paper has been removed from this area.
-
Open the duplex unit cover (if installed) and remove any sheets in this area.
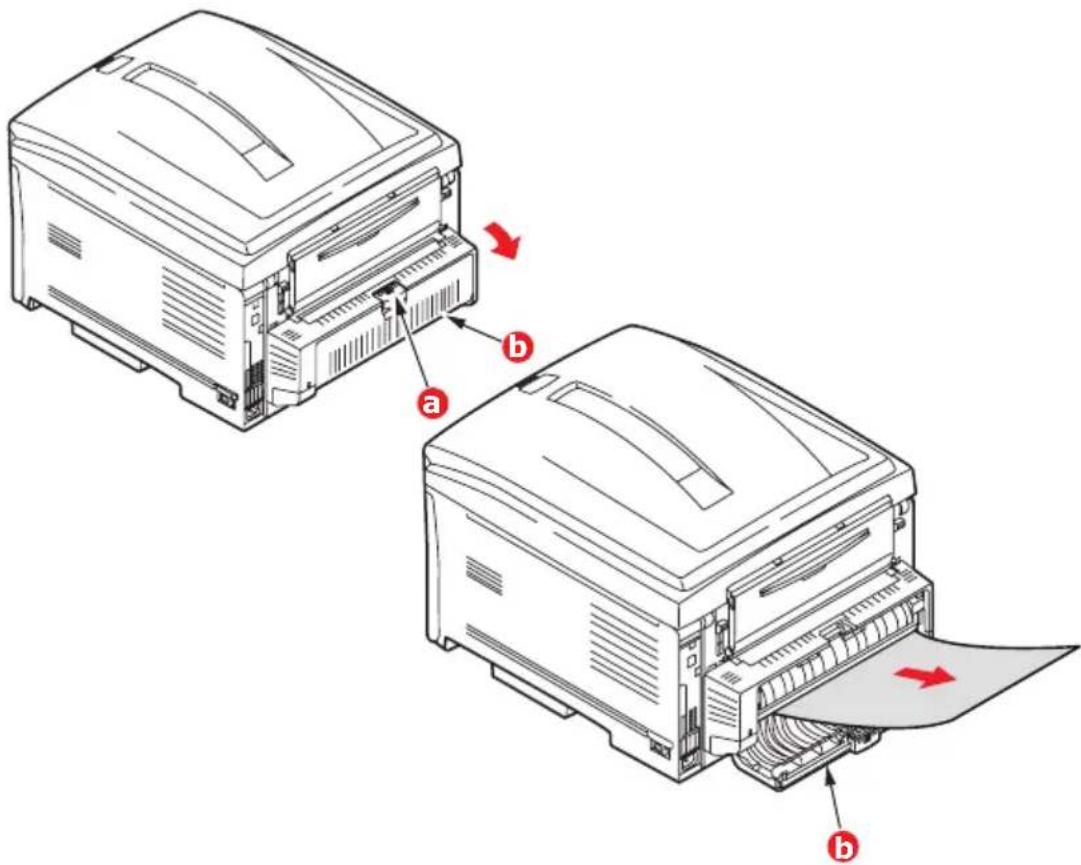
text_image
Technical diagram showing two printer units with labeled parts (a, b) and directional arrows indicating process flow or movement.- Lift the front cover release and pull down the front cover.
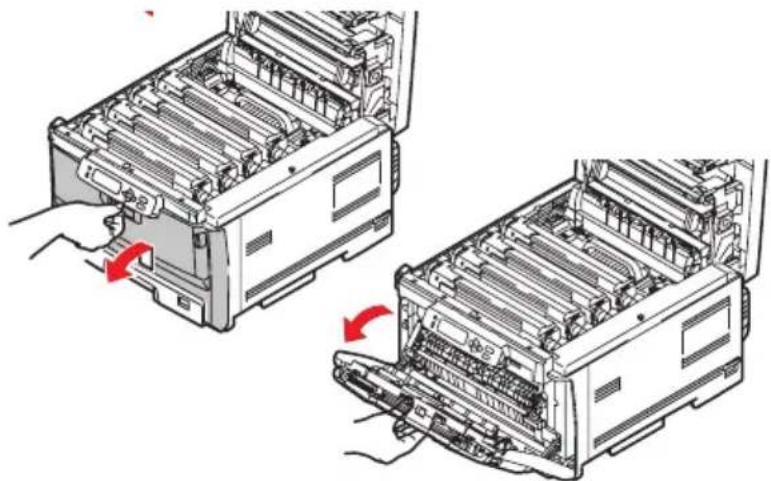
natural_image
Diagram showing two views of a computer rack with internal components and red arrows indicating rotation or movement (no text or symbols present)- Check inside the cover for sheets in this area and remove any that you find, then close the cover.
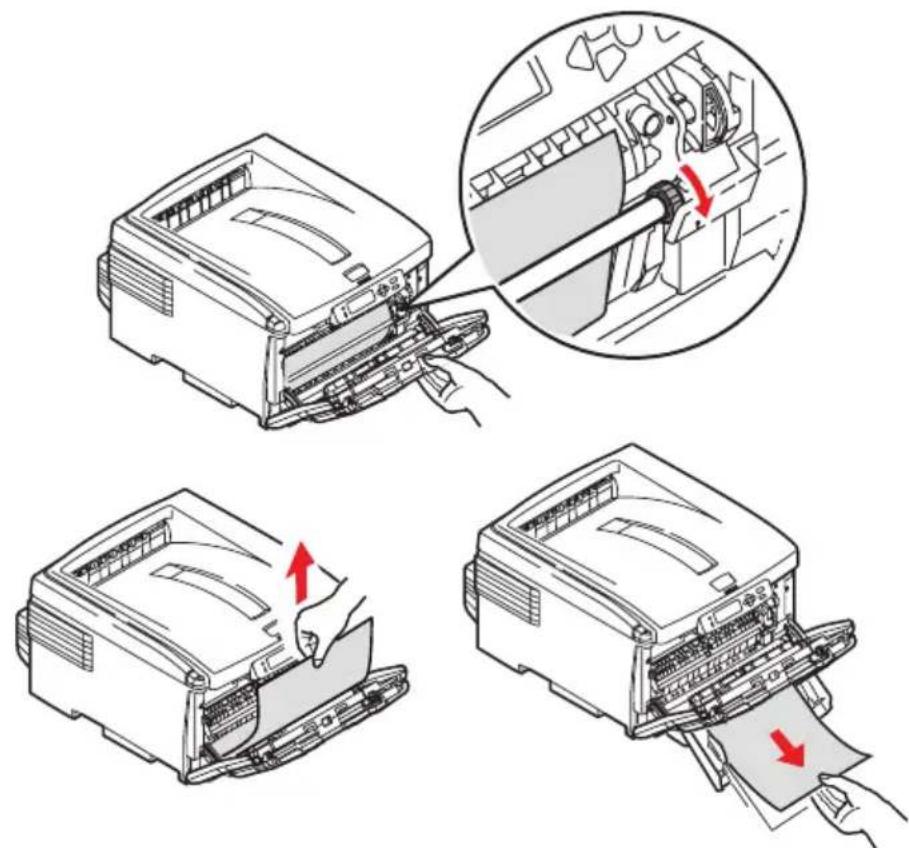
text_image
Technical diagram showing three steps of printer press application: opening, adding to a component, and inserting into a paper.- Pull out the paper tray and ensure that all paper is stacked properly, is undamaged, and that the paper guides are properly positioned against the edges of the paper stack. When satisfied, replace the tray.
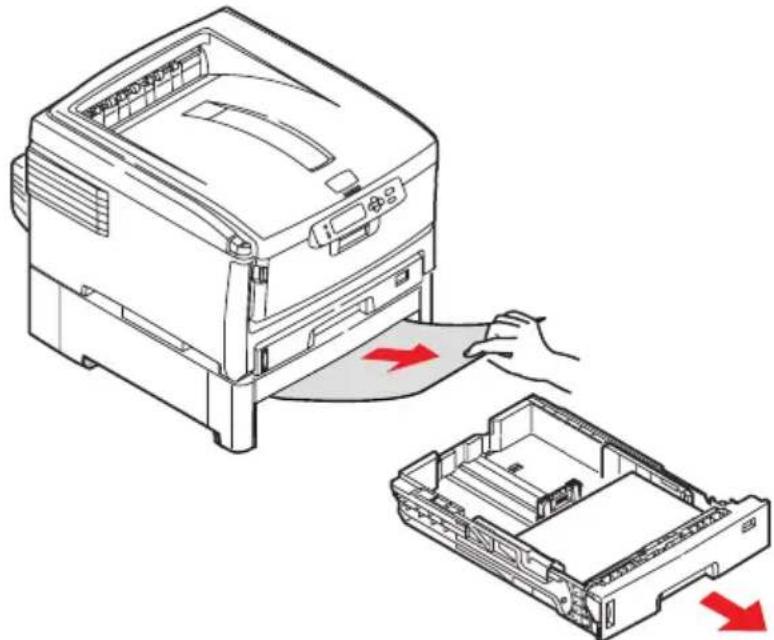
natural_image
Illustration of a printer being inserted into a plastic sheet, showing the process with red arrows indicating the fold (no text or symbols present)- Finally, close the top cover and press down firmly at both sides so that the cover latches closed.
When the jam has been cleared, if Jam Recovery is set to ON in the System Configuration Menu, the printer will attempt to reprint any pages lost due to paper jams.
SPECIFICATIONS
C8800 - N34220B
ITEM SPECIFICATION
Dimensions 485 x 556 x 345mm (W x D x H) without Duplex unit
Weight 36Kg approx. (without Duplex unit)
Print method LED exposed light source electronic photographic
Print speeds 26 pages per minute colour / 32 pages per minute monochrome
Resolution 600 x 600, 1200 x 600dpi or 600 x 600dpi x 2bit (ProQ2400)
Emulations PostScript 3
PCL 5c, HP-GL, PCL XL, PCL 6e
Epson FX
IBM Pro Printer III XL
Auto Features Auto registration
Auto density adjustment
Auto consumable counter reset
Memory, Resident: 256MB
Optional: 256 & 512MB
HDD (option) 40 Gb
Operating platform Windows
2000/XP/XP Pro x64 bit Edition*/Server 2003/Server
2003 x64 bit Edition*, Vista
* x86-64 processors only. Itanium is not supported.
Mac
OS X (10.2 or higher)
Paper capacity 300 sheets in main tray
at 80g/m² 530 sheets in optional 2nd tray
100 sheets in multi purpose tray
Paper weight 64 \~ 120g/m² in main tray
64 \~176g/m² in 2nd tray
64 \~ 200g/m² in multi purpose tray
Duplex:
64 \~ 105g/m²
Paper output 250 sheets in face down (top) stacker @ 80g/m²
100 sheets in face up (rear) stacker @ 80g/m ^4
Paper feed *a
Paper tray, manual feed, optional additional paper tray(s)
Media size - any tray
A3, A4, A5, A6 (tray 1 only), B4, B5, Legal 13/13.5/
14 inch, Lletter, Executive.
Media size - MP tray
A4, A5, A6, B5, Legal 13/13.5/14 inch, Letter, Executive,
Custom (up to 1200mm length), com-10 envelope, DL envelope, C5 envelope, Transparencies
Duplex Legal13, Legal13.5, Legal14, Letter, Executive, A4, B5,
A5,B4,A3,Tabloid,
Custom Size (within wide148.5-297mm and length 182-
420mm /weight 64g/m2-105g/m2 limits)
ITEM SPECIFICATION
| Media type Plain, Letterhead, Transparency, Bond, Recycled, card stock, Rough, Labels and Glossy | |
| Paper capacity (depending on paper weight) | Paper tray: 300 sheets approx.Manual feed: 100 sheets approx.Optional additional paper tray: 530 |
| Exit capacity (depending on paper weight) | Face up: 100 sheets approx.Face down: 500 sheets approx. |
| Print accuracy Start: ±2 mm | |
| Paper skew: ±1 mm/100 mmImage expansion/compression: ±1 mm/100 mm | |
| Interfaces | |
| Universal Serial Bus (USB) | USB specification Version 2.0Connection: USB type BCable: USB specification version2.0 (shielded)Transmission mode: High speed (480Mbps + 0.25% maximum) |
| Network | 10 Base T, 100 Base TX |
| Parallel Interface | 36 pin Centronics type, receptacle - IEEE 1284-1994 |
| Duty cycle 50,000 pages per month max., 10,000 pages per month average | |
| Toner life Starter: | |
| CMYK:2,000 pages at 5% coverageReplacement:CMYK:6,000 pages at 5% coverage | |
| Image drum life 20,000 A4 pages average | |
| Belt life 80,000 A4 pages at 3 pages per job | |
| Fuser life 100,000 A4 pages at 3 pages per job | |
| Power supply 220 to 240VAC @ 50/60 Hz ± 2% | |
| Power consumption | Operating: 1300W peak; 550 W av. (25°C)Stand-by: 200 W av. (25°C)Power saving *b: <17W |
| Operating environment | Operating 10 to 32 °C/20 to 80% RH(optimum 25 °C wet, 2 °C dry)Off: 0 to 43 °C/10 to 90% RH(optimum 26.8 °C wet, 2 °C dry) |
| Print environment | 30 to 73% RH @ 10 °C; 30 to 54% RH @ 32 °C10 to 32 °C @ 30% RH; 10 to 27 °C @ 80% RHColour 17 to 27 °C @ 50 to 0% RH |
| Noise Levels Operating: Mono/Colour - less than 54dBaStandby Mode: less than 37dBaPower Saving Mode: Background level | |
a. Exit method is limited by paper size, media weight and paper feed.
b. To comply with the requirements of Energy Star, when no data is present for a set period of time, the printer goes into a power-saving mode. The printer has a "wake-up" feature which, when initiated from a host device or the operator panel, will revert the printer to its "running" mode.
Specifications subject to change without notice. All trademarks acknowledged.
INDEX
A
About RGB and CMYK colour .....48
B
Belt
how to replace ......144
life expectancy ......133
life remaining 132
Booklet printing
PCL emulation....26
PostScript emulation ......25
Booklets, printing
Windows PS......78
C
Changing the application's driver settings....27
Cleaning the LED head .....149
CMYK ink simulations - CMYK source data ....68
Collating
Windows......80
Colour
adjusting 121
Colour match precision......73
Colour matching 46
application......46
basics 46
choosing image source......43
general advice......39
Graphic Pro 48
Graphics Pro....54
how to access....42
ICC profiles ....55
operating system 47
printer 47
printing colour swatch......44
RGB 48
Cover page 85
Windows PCL......87
Custom page size
Windows XP/2000 PCL......91
Windows XP/2000 PS......89
Customising RGB office colour ..53
D
Duplex
how to install....150
paper size and weight limits ..17
selecting in Windows......25, 26
E
Envelopes
loading 22
F
Finishing options ......76
Collating 80
Cover print 87
Custom page size......89
Duplex (double-sided) printing ....93
Poster printing......99
Printing multiple pages on one sheet (N-up) 96
Scale to page ......100
Watermarks ......101
Fuser
how to replace ......147
life expectancy 133
life remaining 132
G
Graphic pro....54
Graphic pro workflow – overview....56
H
Hard disk drive
how to install....157
I
ICC profiles....55
where to obtain ....56
Image drum
how to replace ......140
life expectancy ......133
Image drums
current usage state......132
L
Labels
recommended types ......15
M
Maintenance menu ......131
Major printer components and paper path....162
Matching the colour of a monitor, scanner or camera ....58
Menu functions ......111
How to change the settings - Administrator....113
How to change the settings - User....112
Menus
Colour menu ......121
factory default settings .....112
FX emulation......127
how to use ......111
Information menu ......114
Maintenance menu......131
Media menu ......119
menu map......114
Network menu......129
PCL emulation menu ...124, 125
Print jobs menu......114
Print menu ......115
resetting....131
System configuration menu .123
Usage menu 132
USB menu 129
Multi purpose tray
how to use 21
paper metrics ......16
N
Network addresses
setting....130
Network protocols
enabling or disabling ......129
0
Office colour - RGB options .....50
Operator Panel ......111
P
Page orientation
portrait or landscape......25
Paper
jam clearing ......162
jam codes....163
loading cassette trays ......18
loading letterhead ......19
Paper jam codes ......163
recommended types ......15
supported sheet sizes .....16
weights and sizes......119
Poster printing......26
Power saving
delay time 123
enabling or disabling ......131
PPR emulation ....125
Print order
face down stacker......20
face up stacker......20
face up/down stacker......25
Print quality
adjusting 131
Print settings
how to save....26
Printer colour management......47
Printer overview ......12
Pure black text / graphics .....73
R
Rendering intents ......72
S
Secure documents
printing......105
Secure printing ....103
Separator page......85
Simulating another printer - RGB source data ....63
Store to hard disk......26, 106
Switching off correctly.....115
T
Toner current usage state....132 how to replace ....135 life expectancy ....133
Transparencies recommended types ....15
Types of ICC profile supported..55
U
Upgrades memory......152
Usage menu ......132
OKI CONTACT DETAILS
Oki Systems (UK) Limited
550 Dundee Road
Slough Trading Estate
Slough, SL1 4LE
Tel:44 (0) 1753 819819
Fax:44 (0) 1753 819899
http://www.oki.co.uk
Oki Systems Ireland Limited
The Square Industrial Complex
Tallaght, Dublin 24, Ireland
Tel:+353 1 4049590
Fax:+353 1 4049591
http://www.oki.ie
OKI Systems (Ireland) Ltd.
40 Sydenham Park
Belfast, BT4 1PW
Tel:+44 44 (0)28 90 20 1110
http://www.oki.ie
Technical Support for all of Ireland:
Tel: +353 1 4049570
Fax: +353 1 4049555
E-mail: tech.support@oki.ie
Oki Data Corporation
4-11-22 Shibaura, Minato-ku,
Tokyo 108-8551, Japan
Tel: (81) 3 5445 6158
Fax: (81) 3 5445 6189
http://www.okidata.co.jp
Oki Data (Singapore) Pte. Ltd.
78 Shenton Way, #09-01,
Singapore 079120
Tel: (65) 221 3722
Fax: (65)421 1688
http://www.okidata.com.sg
Oki Systems (Thailand) Ltd.
956 Udomvidhya Building 6th
Floor, Rama IV Rd., Bangkok
10500, Thailand
Tel: (662) 636 2535
Fax: (662) 636 2536
http://www.okisysthai.com
Oki Hong Kong Limited
Suite 1909, Tower3,
China Hong Kong City,
33 Canton Rd., Tsimshatsui,
Kowloon, Hong Kong
Tel: (852) 2736 0130
Fax: (852) 2376 3725
The IPL Group
63-85 Victoria Street
Beaconsfield NSW 2015,
Australia
Tel: (61) 2 9690 8200
Fax: (61) 2 9690 8300
http://www.oki.com.au
Comworth Systems Ltd.
10 Constellation Drive
Mairangi Bay, Auckland,
New Zealand
Tel: (64) 9 477 0500
Fax: (64) 9 477 0549
http://www.comworth.co.nz
OKI Europe Limited
Central House
Balfour Road, Hounslow
TW3 1HY, United Kingdom
Tel: +44 (0) 20 8219 2190
Fax: +44 (0) 20 8219 2199
WWW.OKIPRINTINGSOLUTIONS.COM