
B2200N - Printer OKI - Free user manual and instructions
Find the device manual for free B2200N OKI in PDF.


User questions about B2200N OKI
0 question about this device. Answer the ones you know or ask your own.
Ask a new question about this device
Download the instructions for your Printer in PDF format for free! Find your manual B2200N - OKI and take your electronic device back in hand. On this page are published all the documents necessary for the use of your device. B2200N by OKI.
USER MANUAL B2200N OKI
text_image
PRINTING SOLUTIONS INVOICE User'sGuideUser'sGuide
B2200/B2400/B2400n
natural_image
Exterior view of a white and gray file scanner (no visible text or symbols)PREFACE
Every effort has been made to ensure that the information in this document is complete, accurate, and up-to-date. Oki assumes no responsibility for the results of errors beyond its control. Oki also cannot guarantee that changes in software and equipment made by other manufacturers and referred to in this guide will not affect the applicability of the information in it. Mention of software products manufactured by other companies does not necessarily constitute endorsement by Oki.
While all reasonable efforts have been made to make this document as accurate and helpful as possible, we make no warranty of any kind, expressed or implied, as to the accuracy or completeness of the information contained herein.
The most up-to-date drivers and manuals are available from the Oki web site:
http://www.okiprintingsolutions.com
Copyright © 2008 Oki Europe Ltd.
Oki and Microline are registered trademarks of Oki Electric Industry Company, Ltd.
Energy Star is a trademark of the United States Environmental Protection Agency.
Microsoft, MS-DOS and Windows are registered trademarks of Microsoft Corporation.
Other product names and brand names are registered trademarks or trademarks of their proprietors.


As an Energy Star Program Participant, the manufacturer has determined that this product meets the Energy Star guidelines for energy efficiency.
This product complies with the requirements of the Council Directives 89/336/EEC (EMC) and 2006/95/EC (LVD) as amended where applicable on the approximation of the laws of the member states relating to electromagnetic compatibility and low voltage.
EMERGENCY FIRST AID

Take care with toner powder:
If swallowed, give small amounts of cold water and seek medical attention. DO NOT attempt to induce vomiting.
If inhaled, move the person to an open area for fresh air. Seek medical attention.
If it gets into the eyes, flush with large amounts of water for at least 15 minutes keeping eyelids open. Seek medical attention.
Spillages should be treated with cold water and soap to help reduce risk of staining skin or clothing.
MANUFACTURER
Oki Data Corporation,
4-11-22 Shibaura, Minato-ku,
Tokyo 108-8551,
Japan
IMPORTER TO THE EU/AUTHORISED REPRESENTATIVE
Oki Europe Limited (trading as OKI Printing Solutions)
Central House
Balfour Road
Hounslow
TW3 1HY
United Kingdom
For all sales, support and general enquiries contact your local distributor.
CONTENTS
Preface 2
Emergency first aid 3
Manufacturer.... 3
Importer to the EU/authorised representative ..... 3
Contents 4
Notes, cautions and warnings.... 5
Introduction 6
Features 6
Parts identification 7
Print media 8
Paper 8
Transparencies and labels 11
Envelopes 12
Print quality adjustments.... 13
Clearing paper jams 14
Setting printing preferences ..... 16
Setup tab 17
Job Options tab 18
Image tab 19
Printer menus 20
Resetting the drum counter 28
LED indicators 29
Status monitor indication. 29
Error indications 29
Specifications 31
Index. 33
Oki contact details 34
NOTES, CAUTIONS AND WARNINGS
NOTE
A note provides additional information to supplement the main text.
CAUTION!
A caution provides additional information which, if ignored, may result in equipment malfunction or damage.
WARNING!
A warning provides additional information which, if ignored, may result in a risk of personal injury.
For the protection of your product, and in order to ensure that you benefit from its full functionality, this model has been designed to operate only with genuine Oki Printing Solutions toner cartridges. These can be identified by the Oki Printing Solutions trademark. Any other toner cartridge may not operate at all, even if it is described as "compatible", and if it does work, your product's performance and print quality may be degraded.
Specifications subject to change without notice. All trademarks acknowledged.
INTRODUCTION
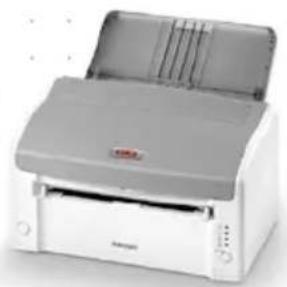
B2200/B2400 desktop printers offer a crisp, high quality, fast printing solution in a lightweight and compact unit that can be conveniently located right at the point of need.
This User's Guide gives day-to-day operating guidance and simple maintenance procedures, and is applicable to all models in the range:
B2200—A compact GDI (Graphics Device Interface) printer for Windows and Macintosh, allowing the host computer to perform most of the page image processing using its native operating system software.
B2400—A compact PCL (Printer Control Language) printer for Windows and Macintosh. The printer performs all page image processing internally, freeing computer resources for other tasks.
B2400n—A enhanced version of B2400 that features built-in network capability, making it easy to share between multiple users on a local area network (LAN).
FEATURES
Compact size offers high quality printing conveniently situated at the point of need.
Up to 20 pages per minute printing speed for high productivity.
150 sheet input tray provides ample capacity ensuring the printer is always ready.
Manual paper feed for occasional printing on non-standard paper, envelopes or transparencies.
30 sheet output tray capacity for multipage documents.
High resolution 1200x600 dots per inch (dpi) for crisp text and graphics.
USB and Centronics connections for quick and simple connection to the host computer.
LAN connection (B2400n only) for direct connection to a network cable for convenient workgroup sharing.
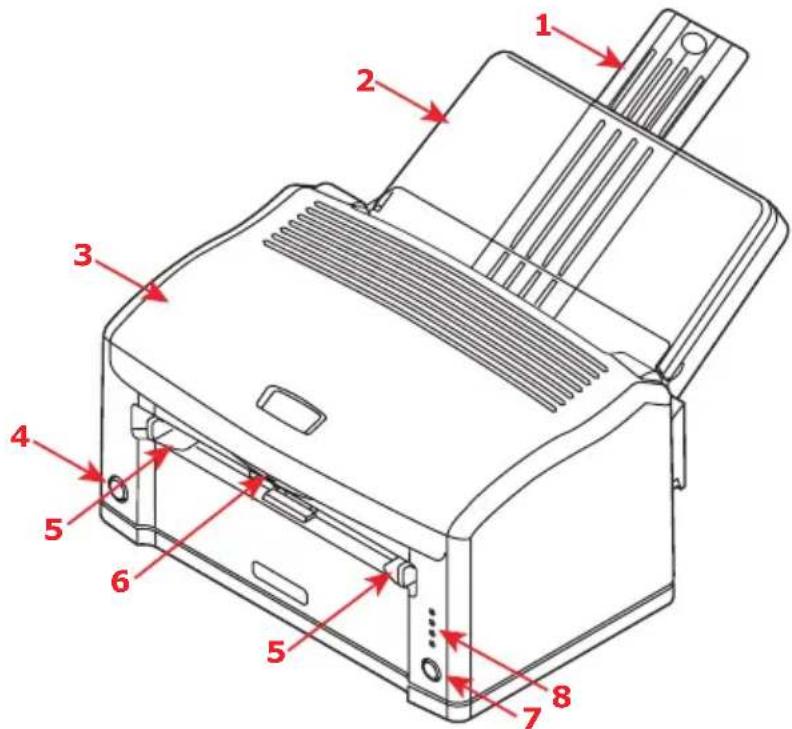
PARTS IDENTIFICATION
text_image
Technical diagram of a printer with numbered parts labeled 1 through 8, showing internal structure and mounting points.1 Paper support.
2 Paper tray (below cover) and output tray (above cover).
3 Top cover.
4 Power on/off button.
5 Manual feed guides.
6 Top cover release button.
7 On-Line button—switches printer on line or off line. To clear a current print job from printer memory, press and hold this button for about 5 seconds.
8 Status lights:
Power On—lights when power is switched on.
Ready/Printing—lights when printer is standing by to receive data, flashes slowly (approx. 2-sec.) when data is being received and processed, flashes faster (approx. 1-sec.) when printer is printing.
Load Paper—Flashes when printer requires paper in manual feeder.
Error—lights when error, such as paper jam or cover open, occurs.
PRINT MEDIA
Print media that can be used with your printer includes standard copier bond paper, certain types of envelope and certain types of transparency.
PAPER
The best type of paper to choose is standard 80-90g/m ^2 bond paper designed for use in plain paper copiers and laser type printers. Pre-printed stationery, such as letterhead paper can also be used as long as the pre-printed parts can withstand a combination of heat and pressure. Experience will determine the suitability or otherwise of particular pre-printed stationery.
Avoid using paper that is damaged in any way, such as folded, perforated, torn or stapled sheets, and avoid feeding the same sheet twice to print on both sides. Also avoid using very glossy or heavily embossed paper.
If the printed page shows signs of fading, streaking or erratic marks, the problem may be cleared by generating a drum cleaning page as follows:
- Start the Status Monitor for the printer.
- Select the Printer Setup tab and click on the Printer Menu button.
- Select the Test Print tab and click on the Cleaning button.
- Using the Manual Feed Tray insert a sheet of A4 plain paper between the paper guides, then click the OK button.
- The printer grips the paper and prints a cleaning page.
- If subsequent printing appears faded or uneven, try replacing the toner cartridge.
Store paper flat and sealed in its original wrapping until required for use. Paper left out tends to absorb moisture from the air. This makes it prone to curling and also less able to retain a permanent image.
The paper tray can hold up to about 150 sheets of standard bond paper. The manual feeder takes just one sheet at a time. Take just enough paper from its wrapping, fan the stack to ensure all sheets are separated from each other, then tap the stack flush again before loading.
Load pre-printed stationery top edge first and face down into the paper tray or face up into the manual feeder.
If plain paper seems to curl excessively during the print process, try turning the stack over in the input tray. You may have been printing on the wrong side.
LOADING PAPER IN THE TRAY
-
Remove up to 150 sheets from their wrapping and carefully reseal the wrapping to preserve the rest of your paper in good condition.
-
Fan the paper stack to ensure all sheets are properly separated, then tap the stack flush again before loading.
-
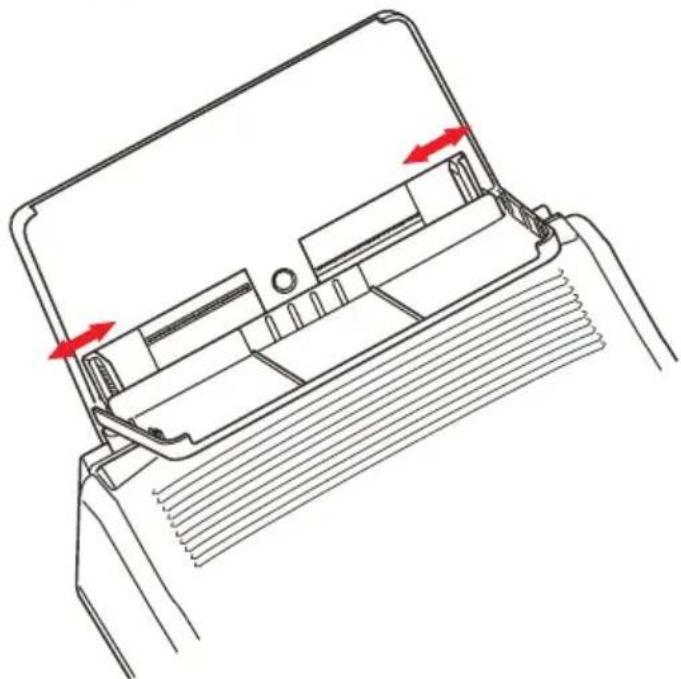
Raise the paper tray cover.
natural_image
Technical line drawing of a device's internal structure with red arrows indicating directional movement (no text or symbols)-
Adjust guides to width of paper stack. They should just touch the sides of the stack but not grip it tightly.
-
Slide the paper stack fully into the tray as far as it will go, print side downwards, top edge into the printer, and ensure the guides just touch each side of the stack.
-
Close the tray cover.
LOADING PAPER IN THE MANUAL FEEDER
natural_image
Line drawing of a printer with paper being inserted, showing paper being placed with red arrows indicating motion (no text or symbols)-
In your computer's Print dialogue, click the printer [Properties] button to display the Printing Preferences dialogue.
-
On the Setup tab, choose the correct size for your paper, set the source to [Manual] (you can click on the manual feeder in the printer graphic if you prefer).
-
On the Job Options tab, set the correct Orientation for your document. [Landscape] rotates the page image 90° left.
-
Click [OK] to close the Printing Preferences dialogue and click [OK] to close the Print dialogue and print the document.
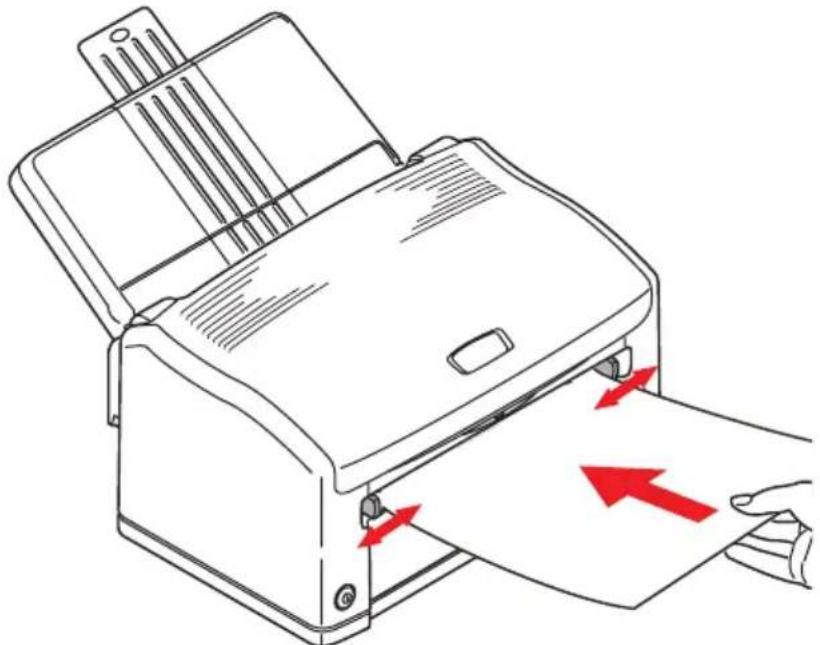
The paper feed light will flash, prompting you to load the paper. Adjust the paper guides to the width of the paper. They should lightly touch each side edge of the paper but not grip it tightly.
- Load the sheet to be printed, top edge first, print side up, into the feeder and push it gently until you feel slight resistance. The printer will advance the paper a short distance and retain it and the Load Paper light will stop flashing.
When the page image has been processed the paper will be drawn into the printer and your printed page will be ejected into the output tray.
NOTE
Pages are ejected face up. For multipage documents you may want to choose reverse print order in your print dialogue if your application offers it.
TRANSPARENCIES AND LABELS
Choose transparencies designed for use in plain paper monochrome copiers, as they are required to withstand high temperature and pressure. These usually have a print side which feels slightly rougher (matt finish) than the back, which is a little more glossy.
CAUTION!
Do not use transparencies designed only for hand marking on an overhead projector. These will melt inside the printer and cause serious damage.
Transparencies tend to feed more reliably in the manual feeder than when stacked in the input tray.
Choose sheets of labels designed for use in laser type printers or copiers. The labels should cover the entire sheet, leaving no part of the backing sheet exposed, otherwise they will tend to peel off inside the printer.
LOADING TRANSPARENCIES AND LABELS
It is recommended to use the manual feeder for this type of media, as described earlier for paper.
ENVELOPES
Envelopes can be directly printed in this printer as long as you choose suitable types. Avoid self sealing envelopes and those with windows or metal clasps. Preferably choose envelopes with rectangular flaps rather than triangular flaps.
LOADING ENVELOPES IN THE MANUAL FEEDER
- When creating your address document, format it to the size of the envelope, remembering to set it to landscape (wide) format for most envelopes. (Standard DL size envelopes are 22cm wide by 11cm tall.)
- In your computer's Print dialogue, click the printer [Properties] button to display the Printing Preferences dialogue.
- On the Setup tab, choose the correct size for your envelope, Source to [Manual] (you can click on the manual feeder in the printer graphic if you prefer), and set the Weight to [Heavy].
- On the Job Options tab, set the Orientation to [Landscape] (if your envelopes are to print this way).
- Click [OK] to close the Printing Preferences dialogue and click [OK] to close the Print dialogue and print the envelope.
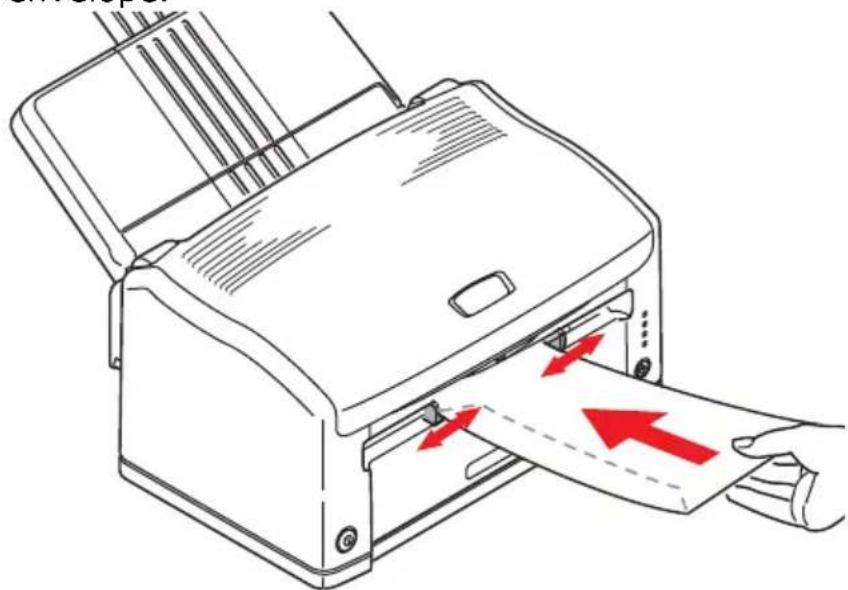
The paper fed light will flash, prompting you to load the envelope.
natural_image
Line drawing of a printer with paper being inserted, showing paper being placed and arrows indicating process flow (no text or symbols)Print media > 12
- Load the envelope, short edge first, print side up, flap folded under and to the left, into the feeder and push it gently until you feel slight resistance. The printer will advance the envelope a short distance and retain it.
The sheet will be drawn into the printer and the printed page will eject normally into the output tray.
PRINT QUALITY ADJUSTMENTS
For most printing on standard bond paper the default (medium) setting for paper thickness is appropriate. However, for printing on other media it may be necessary to make temporary adjustments.
The settings for various types of print media are given in the following table:
| WINDOWS MACINTOSH MEDIA WEIGHT | |
| Heavy Heavy 105–120g/m ^2 | |
| Medium heavy Medium heavy Approx. 90–104g/m ^2 | |
| Medium Medium Approx. 75–89g/m ^2 | |
| Medium light Medium light Approx. 68–74g/m ^2 | |
| Light Light Approx. 60–67g/m ^2 |
ADJUSTING YOUR PRINTER PREFERENCES
Changes you make in the Printing Preferences dialogue at print time are temporary. When you quit from your application the settings will return to their default values. Permanent changes (new default values) are made using the Status Monitor for Windows to adjust using the built in printer menus.
Alternatively, you can set new default values for printing preferences for your PC only using the Printer's Properties dialogue from the Printers and Faxes window.
CLEARING PAPER JAMS
Occasionally it may be necessary to clear a sheet of paper that has become jammed inside the printer. When this happens the printer will stop immediately and the Error light will flash.
After the jam has been cleared and the top cover closed, the printer will automatically reprint the lost page
WARNING!
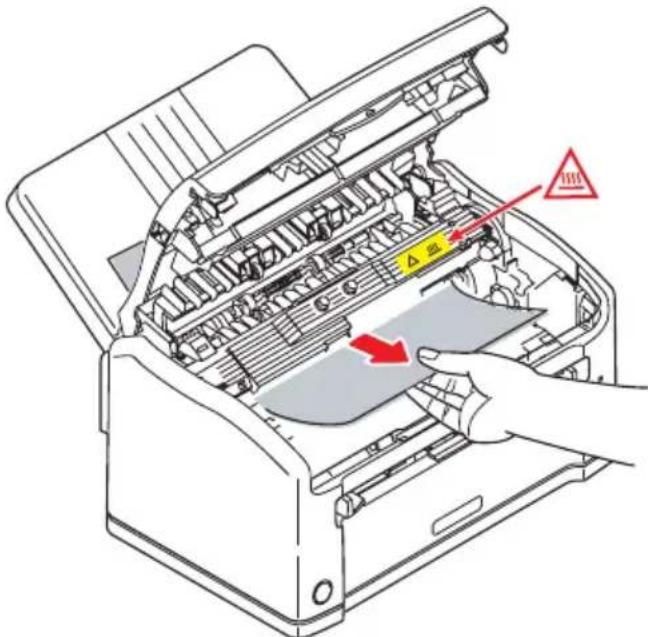
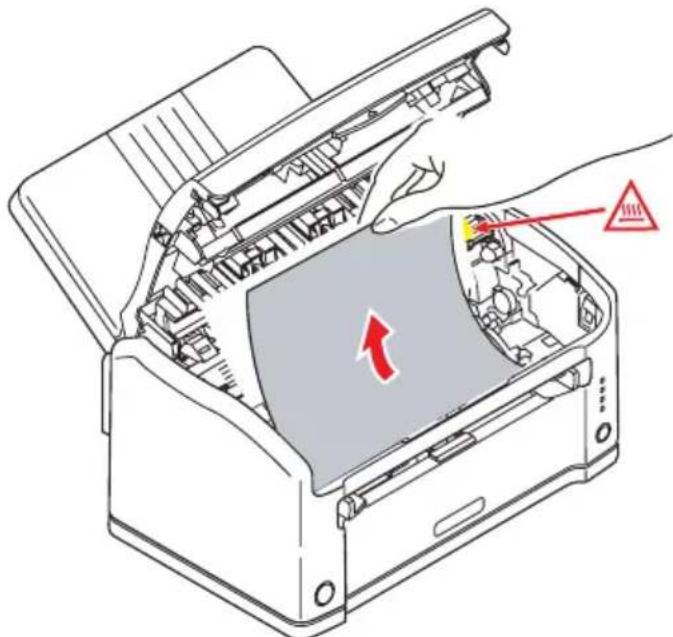
If the printer has been printing for a while the fuser unit will be hot. This unit is clearly marked with a yellow warning label. Do not touch it!
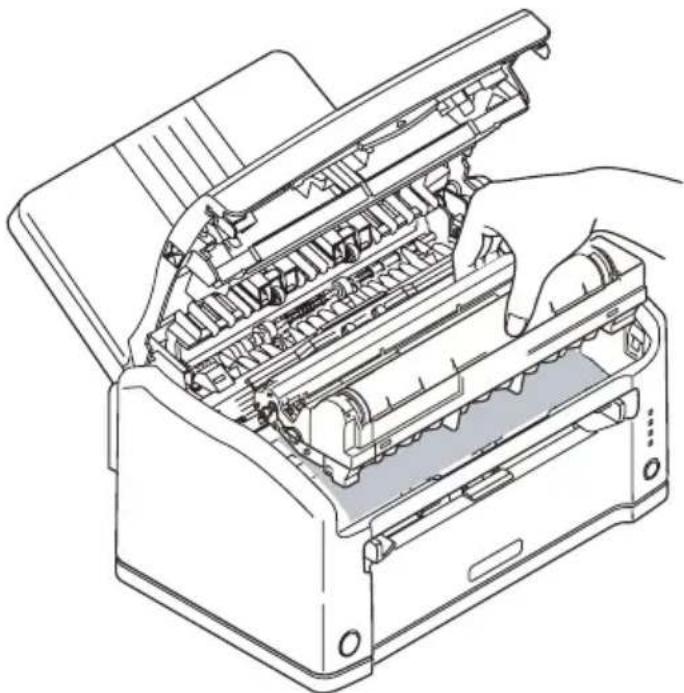
- Open the top cover and carefully remove the print cartridge (image drum and toner cartridge together) as illustrated.
natural_image
Line drawing of a printer internal structure showing internal components and base (no text or symbols)- If the paper was fed from the tray, pull the sheet as illustrated below.
text_image
Technical diagram of a printer internal structure with labeled components and warning indicators- If the paper was feed from the manual feeder, pull the sheet as follows.
text_image
Diagram of a printer internal structure with labeled parts and directional arrow indicating process flow- Carefully reinstall the print cartridge, pressing down firmly at both ends to ensure it is properly seated, and close the top cover.
If the top cover will not close, the print cartridge is not properly installed. Remove it and refit correctly.
SETTING PRINTING PREFERENCES
The Status Monitor for Windows provides access to many options and enables the printer default settings to be changed to meet your every day needs.
The Windows printer driver also contains settings for many of these items. Where items in the printer driver are the same as those in the Status Monitor menus, and you print documents from Windows, the settings in the Windows printer driver will override the printer's default settings.
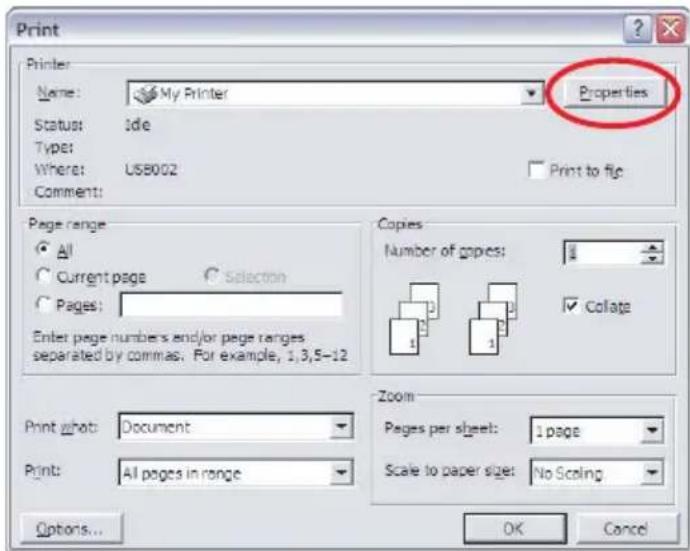
When you choose to print your document from a Windows application program a Print dialogue box appears. This dialogue usually specifies the name of the printer on which you will print your document. Next to the printer name is a Properties button.
text_image
Print Printer: Name: My Printer Status: Idle Type: Where: USB002 Comment: Properties Print to file Page range: All Current page Selection Pages: Enter page numbers and/or page ranges separated by commas. For example, 1,3,5-12 Copies: Number of pages: Collage Print what: Document Print: All pages in range Zoom Pages per sheet: 1 page Scale to paper size: No Scaling Options... OK CancelWhen you click Properties a new window opens the Printing Preferences dialogue. These settings are those which you may want to change for specific applications or documents. Settings you change here will usually only last for as long as the particular application program is running.
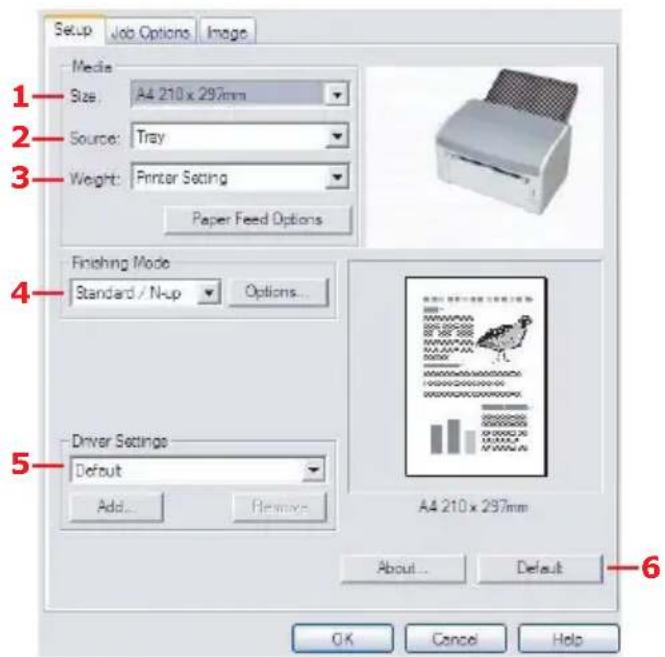
The Printing Preferences dialogue contains three tabs, which are explained in the following sections.
SETUP TAB
text_image
Setup Job Options Image Media Size: A4 210 x 297mm Source: Tray Weight: Printer Setting Paper Feed Options Finishing Mode Standard / N-up Options... Driver Settings Default Add... Remove A4 210 x 297mm About... Default OK Cancel Help- Paper size should be the same as the page size of your document (unless you wish to scale the printout to fit another size), and should also be the same as the size of paper you will feed into the printer.
- You can choose the source of the paper to feed, which may be the standard paper tray or manual feeder. You can also click on the appropriate part of the screen graphic to select your preferred tray.
- Leave the weight as Printer Setting if using your normal paper, or choose a specific setting for special media types.
- A variety of document finishing options can be selected, such as normal one page per sheet, or N-up (where N can be 2 or 4) for printing scaled down pages at more than one page per sheet.
- If you have changed some printing preferences before and saved them as a set, you can recall them to avoid having to set them individually each time you need them.
- A single on-screen button restores the default settings.
JOB OPTIONS TAB
text_image
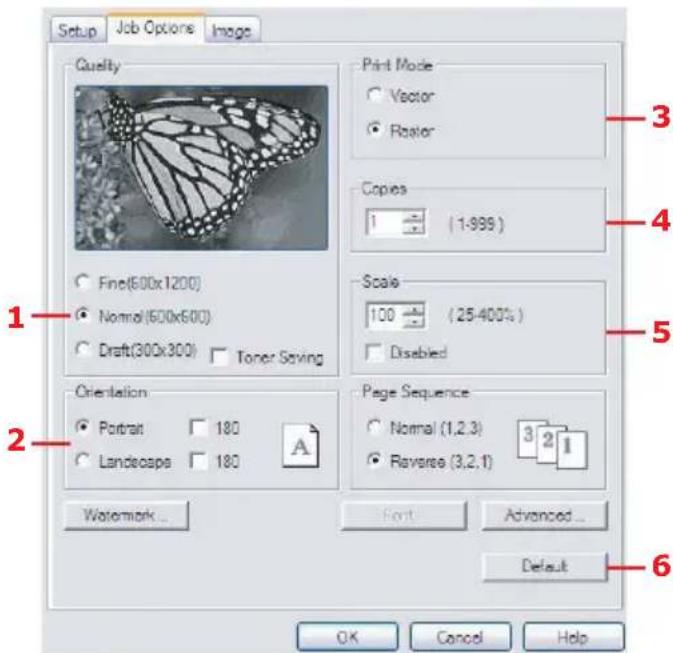
Setup Job Options Image Quality Print Mode Vector Raster Copies 1 (1:999) Fine(600x1200) Normal(600x600) Draft(300x300) Toner Saving Scale 100 (25-400%) Disabled Orientation Portrait 180 Landscape 180 Page Sequence Normal (1,2,3) Reverse (3,2,1) Watermark... First Advanced... Default OK Cancel Help 1 2 3 4 5 6- Set the output resolution of the printed page to meet your needs. If selected, toner saving uses less toner at the expense of print quality.
- Page orientation can be set to either portrait (tall) or landscape (wide). In landscape the page image is rotated 90 degrees to the left (e.g. for printing envelopes).
- If Vector print mode is selected the internal printer fonts may be used. Raster print mode downloads the page as a bitmap image, which may be preferred if you use fonts not resident in the printer.
- You can select up to 999 copies to print consecutively, although you will need to top up the paper tray during such a long print run.
- Your printed pages can be scaled to fit larger or smaller stationery or the scaling function can be disabled by checking the Disable checkbox.
- A single on-screen button restores the default settings.
IMAGE TAB
text_image
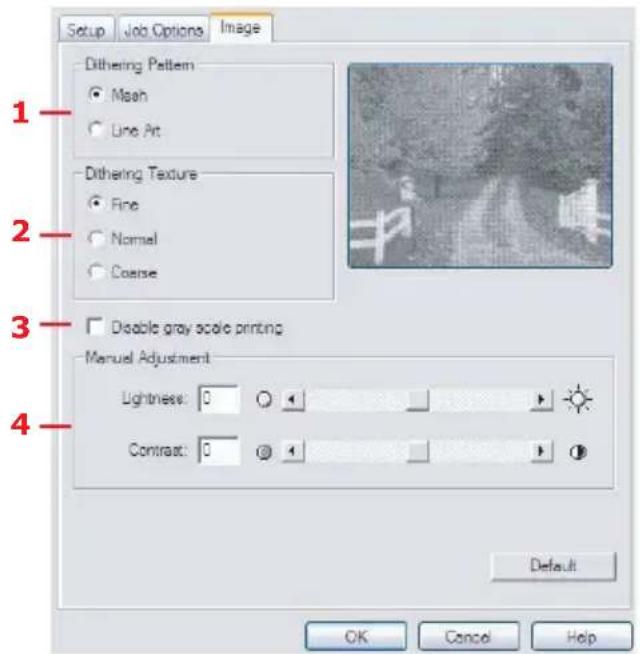
Setup Job Options Image Dithering Pattern ● Mash ○ Line Art Dithering Texture ● Fine ○ Normal ○ Coarse Disable gray scale printing Manual Adjustment Lightness: 0 Contrast: 0 Default OK Cancel Help- Dithering produces an intermediate greyscale by adjusting the combination of dots used in printing. Selecting a setting determines the degree of detail with which a graphics image will be printed. Mesh determines that a screen of dots is used for dithering while Line Art determines that an array of lines is used for dithering.
- Select dithering texture by setting the size of dots used in the halftone screen.
- Set this control to print greyscale effects in black without dithering.
- You can manually adjust lightness (the higher the setting the lighter the print) and contrast (the higher the setting the greater the contrast).
PRINTER MENUS
All the standard settings for the printer are stored within the printer's internal memory. They are accessed via a menu system via the Configuration button in the Status Monitor application.
| CATGORY ITEM FUNCTIONS | |||
| INFO. MENU MENU | MENU MAP Prints menu list. | ||
| PCL FONT Prints | font list for PCL emulation (B2400 models only). | ||
| PRINT IBM PPR FONT | Prints font list for IBM PPR emulation (B2400 models only). | ||
| PRINT EPSON FX FONT | Prints font list for Epson FX emulation (B2400 models only). | ||
| PRINT MENU COPIES No. of copies to print. | |||
| CATEGORY ITEM FUNCTIONS | |||
| USER MENU TRAY SIZE Paper size for main tray. | |||
| SYSTEM CONFIG. MENU (Contd.) | LANGUAGE Specifies language used for report printing. B2400 models only. | ||
| PCL MENU (B2400 models only) | FONT SOURCE | Specifies location of PCL default font. | |
| FONT NO. Specifies the PCL font number. | |||
| FRONT CPI Width of PCL default font in characters per inc when this is a fixed spaced font. | |||
| FONT HEIGHT Height of the PCL default font when this is a proportional spaced font. | |||
| SYMBOL Selects a PCL symbol character) set. | |||
| A4 WIDTH No. of characters per line for A4 paper in PCL mode. | |||
| WHITE PAGE SKIP | Determines whether to omit printing of blank pages in PCL mode. | ||
| CR FUNCTION Determines whether to print carriage return or carriage return plus line feed when a carriage return character is received in PCL mode. | |||
| LF FUNCTION Similar to CR FUNCTION but on receipt of line feed character. | |||
| PRINT MARGIN | Specifies non-printable area of paper. | ||
| PEN ADJUST When enabled and minimum weight of line is specified in PCL mode, the line will be emphasized to ensure that it prints clearly. | |||
| CATGORY ITEM FUNCTIONS | |||
| PPR MENU (B2400 models only) | PITCH Specifies | character pitch. | |
| CONDENSE Specifies | 12CPI pitch for condense mode. | ||
| CHARACTER SET | Determines character set for printing. | ||
| SYMBOL Determines symbol set for printing. | |||
| LETTER 0 Specifies the style that replaces character (9B) or (9D) with (f) and (0). | |||
| ZERO CHARACTER | Specifies use of slashed or non-slashed zero (0) character. | ||
| LINE PITCH Specifies either 6 or 8 lines per inch. | |||
| WHITE PAGE SKIP | Determines whether to omit printing of blank pages. | ||
| CR FUNCTION | See similar for PCL menu on page 22. | ||
| LF FUNCTION | See similar for PCL menu on page 22. | ||
| LINE LENGTH No. of characters per line. | |||
| FORM LENGTH | Length of paper. | ||
| TOF POSITION | Sets position relative to leading edge of paper. | ||
| LEFT MARGIN Sets position relative to left edge of paper. | |||
| FIT TO LETTER | Selects a print mode that can fit 66 lines of print data into the letter size printable area. | ||
| TEXT HEIGHT Either all characters are the same height or their height depends on the selected character pitch. | |||
| CATEGORY ITEM FUNCTIONS | |||
| FX MENU (B2400 models only) | PITCH Specifies | character pitch. | |
| CHARACTER SET | Specifies required character set. | ||
| SYMBOL Specifies | required symbol set. | ||
| LETTER 0 See similar for LETTER 0 in PPR menu on page 23. | |||
| ZERO CHARACTER | See similar for ZERO CHARACTER in PPR menu on page 23. | ||
| LINE PITCH See | similar for LINE PITCH in PPR menu on page 23. | ||
| WHITE PAGE SKIP | See similar for WHITE PAGE SKIP in PPR menu on page 23. | ||
| CR FUNCTION | See similar for PCL menu on page 22. | ||
| LINE LENGTH Sets number of characters per line to 80 or 136. | |||
| FORM LENGTH | Sets form length to Letter, A4 or 12 inch. | ||
| TOF POSITION | Sets first print position relative to top edge of paper. | ||
| LEFT MARGIN Sets first print position relative to left edge of paper. | |||
| FIT TO LETTER | See similar for PPR menu on page 23. | ||
| TEXT HEIGHT | See similar for PPR menu on page 23. | ||
| PARALLEL MENU (B2400 models only) | These hardware interfacing engineering functions set the electrical performance of the parallel interface. | ||
| USB MENU USB | Enables or disables this communication port. | ||
| SOFT RESET Enables or disables this function. | |||
| SERIAL NUMBER | Sets USB serial number if required. | ||
| NETWORK MENU (B2400n only) | IP ADDRESS SET | Sets fixed IP address or uses DHCP. | |
| IP ADDRESS Sets fixed IP address. | |||
| SUBNET MASK | Sets subnet mask. | ||
| GATEWAY ADDRESS | Sets default router address. Leave at 0.0.0.0. if no router. | ||
| WEB Enables or | disables internal web pages for remote configuration. | ||
| SNMP Enables or | disables this protocol. | ||
| HUB LINK SETTING | Sets full or half duplex or enables automatic negotiation. | ||
| MEMORY MENU (B2400 models only) | RECEIVE BUFF SIZE | Sets receive buffer size. | |
| ADJUST MENU (B2400 models only) | X ADJUST Fine adjustment of print image in vertical (direction of paper feed) direction. | ||
| Y ADJUST Fine adjustment of print position in horizontal direction. | |||
| PCL TRAY 0 ID | Sets the number to specify Tray 0 (Manual Feeder) in PCL emulation. | ||
| PCL TRAY 1 ID | Sets the number to specify Tray 1 (main paper tray) in PCL emulation. | ||
| PLACE PAGE Sets the mechanical position to left-based or centre-based. Used when printing on paper narrower than the EDIT SIZE (see page 20). | |||
| CATGORY ITEM FUNCTIONS | |||
| MAINT. MENU E | EEPROM Resets all | programmable settings to factory defaults. | |
| DRUM COUNT RESET | Resets drum count when new image drum installed. (See "Resetting the drum counter" on page 28.) | ||
| SETTING Very fine adjustment of print density to correct streaks, light specks (reduce setting) or faded print (increase setting). | |||
| DARKNESS Sets | print darkness. | ||
| CLEANING Prints | a cleaning page. | ||
| USAGE MENU TOTAL PAGE COUNT | Shows total number of pages that have passed through the fuser unit. | ||
| DRUM LIFE Shows percentage of drum life that has passed. | |||
| TONER Shows toner cartridge capacity (ISO) and percentage remaining. | |||
| CATEGORY ITEM FUNCTIONS | |||
| ADMIN MENU (System administrators only have access to this menu) | ALL CATEGORY | Enables or disables items in this menu. | |
| INFO.PRINTMEDIASYSTEM CONFIG.PCLPPRFXPARALLELUSBNETWORKMEMORYADJUSTMAINT.USAGE | Enables or disables these menus. | ||
| SIDM MN ID Sets the Pn to specify manual feed for the Cut Sheet Feeder control command (ESC EM Pn) in FX and PPR emulations. | |||
| SIDM M2 ID Similar to above but for manual feed 2. | |||
| SIDM T1 ID Similar to above but for main tray. | |||
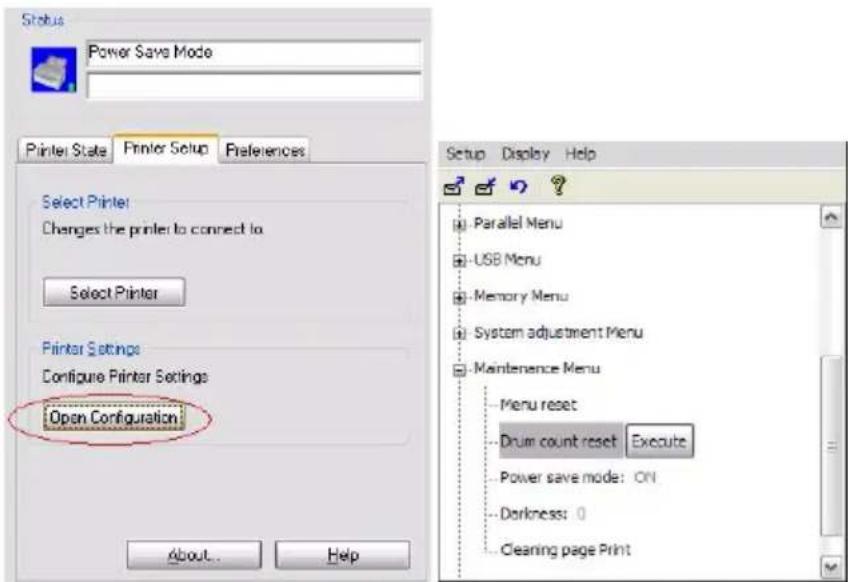
RESETTING THE DRUM COUNTER
After replacing the image drum, reset the drum counter to keep a correct count of the number of pages printed on the image drum.
text_image
Status Power Save Mode Printer State Printer Setup Preferences Select Printer Changes the printer to connect to Select Printer Printer Settings Configure Printer Settings Open Configuration About Help Setup Display Help Parallel Menu USB Menu Memory Menu System adjustment Menu Maintenance Menu Menu reset Drum count reset Execute Power save mode: ON Darkness: 0 Cleaning page Print- Start the Status Monitor for the printer.
- Select the Printer Setup tab, click on the Configuration button and then open the Maintenance Menu.
- Select "Reset Drum Count" and click on the Execute button to reset the drum counter.
LED INDICATORS
On the front panel of your printer are four LED indicators. The upper-most LED is the Power ON/OFF indicator, and is illuminated constantly whenever power is applied and switched on. The other three lights have five conditions of illumination depending on the printer's current status:
- OFF—Not illuminated.
- ON—Constantly illuminated.
- SLOW BLINK—Flashing slowly, approximately once every four seconds.
- MEDIUM BLINK—Flashing approximately once per second.
- FAST BLINK—Flashing very fast, approximately four times per second (flickering).
STATUS MONITOR INDICATION
In most cases the Windows status monitor, installed along with the printer driver software if you used the installer program on the supplied CD, will tell you what the current printer status is. You should first consult this. If the message does not help, then the status LEDs on the front of your printer will provide a secondary indication.
ERROR INDICATIONS
The error LED is the bottom-most LED on the front of your printer.
If your printer detects an error condition the error LED will illuminate, either continuously or flashing. In this situation the printer may refuse to print or stop printing in the middle of a job, depending on the cause of the problem.
PAPER JAM
If the paper jams during printing the printer will stop immediately and the error LED will flash at approximately 1-second intervals. In this case the cause will be fairly obvious, since the jammed sheet will be partially visible out of either the front or the top of the printer. (See "Clearing paper jams" on page 14.)
PRINT CARTRIDGE MIS-INSTALLED
If the print cartridge (combination of image drum and toner cartridge) is not located properly this will also cause the error light to illuminate, and it will usually be impossible to latch the top cover fully down. (See "Step 4" on page 15.)
TONER OR IMAGE DRUM CARTRIDGE INAPPROPRIATE
If you install either a toner cartridge or image drum unit that is incompatible with your printer, the error LED will flash at approximately 1-second intervals and the printer will not start.
LOW TONER CONDITION
If the toner cartridge is out of toner the error LED will flash. In this case you may be able to resume printing for a small number of pages by opening and then closing the top cover. Note also that this condition may be occur even after you have installed a new toner cartridge if you forget to correctly position the coloured toner lever when installing the toner cartridge. (See instruction sheet supplied with new toner cartridge.)
OTHER POSSIBLE ERROR CONDITIONS
If your printer, or the printing preferences on your computer specify a different paper size or media type than the one you are using, this may cause an error condition to occur. (See "Setting printing preferences" on page 16.)
If an error only occurs when trying to print one particular job, it may be that the page contains corrupted data, or data that is too complex for the amount of available printer memory. In this case try to simplify the page content.
HARDWARE FAULT INDICATION
If your printer develops a hardware fault all three status LEDs will flash fast (flicker approximately four times a second). In this case you should contact your service representative or your Oki dealer for advice and support.
SPECIFICATIONS
The following is a summary specification for all models covered in this guide. Specifications are subject to change without notice.
| ITEM B2200 B2400 B2400n | ||
| Model number N22108B N22109B | ||
| Power requirement | 220~240VAC ±10%50/60Hz ± 2Hz | |
| Power consumption (approx.) | Power save mode: >10WIdle: 60WTypical operation: 360WPeak: 660W | |
| Environment Operating: 10~32°C, 20~80% RHNon-operating: 0~43°C, 10~90% RHPackaged shipment: -29~+70°C, 10~90% RH (without drum and toner)-29~+50°C, 10~90% RH (with drum and toner)Temperature and humidity non-condensing. | ||
| Physical (without tray) | Width: 321mmDepth: 204mmHeight: 181mmWeight: 4.8kg | |
| Paper size | Tray: Legal (13 / 14in), A4, US Letter.Manual feeder: Legal (13 / 14in), US Letter, A4, A5, B5, A6, C5, DL, Com-9, Com-10, Monarch, Statement.Min. 89 x 147mm. | |
| Paper weight | Tray: 60~105g/m2Manual feeder: 60~120g/m2 | |
| Print speed | Engine speed: 20 pages per minuteFirst print time: 5sec. (approx.)Warm-up time: 25sec. (approx.) | |
| Print resolution | Max. input: 1200 x 600dpiDraft output: 300 x 300 dpiNormal output: 600 x 600dpiFine output: 1200 x 600dpi | |
| ITEM | B2200 | B2400 | B2400n |
| Internal RAM 8MB | 8MB 16MB | ||
| Toner capacity 2,000 pages (approx.) depending on usage | |||
| Image drum life (approx., without power save) | Continuous: 15,000 pages3 pages/job: 10,000 pages1 page/job: 6,500 pages | ||
| Acoustic noise Operating: 52dBIdle: Background level | |||
| Data interface USB | 2.0 USB 2.0 | IEEE 1284Nibble, ECP | USB 2.0IEEE 1284Nibble, ECPEthernet10Base-T/100Base-Txauto-sensing |
| Emulations GDI PCL5e | PCLXLEpson FXIBM PPR | ||
INDEX
C
Cancelling a print job 7
E
Error
fault indication 30
indications 29
H
http://www.okiprintingsolutions.com.....2
I
Image drum
capacity 32
Resetting counter 28
L
LED
error indications.... 29
fault indication 30
M
Menus
Adjust 25
Administration 27
FX.... 24
Information 20
Maintenance 26
Memory 25
Network.... 25
Parallel 24
PCL 22
PPR 23
Print.... 20
System Configuration ...... 21, 22
Usage.... 26
USB 24
User 21
P
Paper
curling 9
jam indication.... 29
loading manual feeder 11
loading paper tray 9
output tray capacity 6
storage 8
tray capacity 6,9
types to avoid.... 8
types to use 8
weights and measures .... 31
Paper feed guides
main tray 9
manual 10
manual feeder 7
resolution 31
speed 31
S
Status lights 7
T
Toner
capacity....32
Transparencies
recommended type ......11
OKI CONTACT DETAILS
Oki Systems (UK) Limited
550 Dundee Road
Slough Trading Estate
Slough, SL1 4LE
Tel:44 (0) 1753 819819
Fax:44 (0) 1753 819899
http://www.oki.co.uk
Oki Systems Ireland Limited
The Square Industrial Complex
Tallaght, Dublin 24, Ireland
Tel:+353 1 4049590
Fax:+353 1 4049591
http://www.oki.ie
OKI Systems - Northern Ireland
40 Sydenham Park
Belfast, BT4 1PW
Tel:+44 (0)28 90 20 1110
http://www.oki.ie
Technical Support for all Ireland:
Tel:+353 1 4049570
Fax:+353 1 4049555
E-mail: tech.support@oki.ie
Oki Data Corporation
4-11-22 Shibaura, Minato-ku, Tokyo
108-8551, Japan
Tel:(81) 3 5445 6158
Fax:(81) 3 5445 6189
http://www.okidata.co.jp
Oki Data (Singapore) Pte. Ltd.
78 Shenton Way, #09-01,
Singapore 079120
Tel:(65) 221 3722
Fax:(65)421 1688
http://www.okidata.com.sg
Oki Systems (Thailand) Ltd.
956 Udomvidhya Building 6th Floor,
Rama IV Rd., Bangkok 10500, Thailand
Tel:(662) 636 2535
Fax:(662) 636 2536
http://www.okisysthai.com
Oki Hong Kong Limited
Suite 1909, Tower3,
China Hong Kong City,
33 Canton Rd., Tsimshatsui,
Kowloon, Hong Kong
Tel:(852) 2736 0130
Fax:(852) 2376 3725
The IPL Group
63-85 Victoria Street
Beaconsfield NSW 2015, Australia
Tel:(61) 2 9690 8200
Fax:(61) 2 9690 8300
http://www.oki.com.au
Comworth Systems Ltd.
10 Constellation Drive Mairangi Bay,
Auckland,
New Zealand
Tel:(64) 9 477 0500
Fax:(64) 9 477 0549
http://www.comworth.co.nz
OKI EUROPE LIMITED
Central House
Balfour Road
Hounslow TW3 1HY
United Kingdom
Tel: +44 (0) 208 219 2190
Fax: +44 (0) 208 219 2199
WWW.OKIPRINTINGSOLUTIONS.COM