
B710N - Printer OKI - Free user manual and instructions
Find the device manual for free B710N OKI in PDF.


| Product Type | Monochrome Laser Printer |
| Model | B710N |
| Dimensions (W x D x H) | 422 mm x 465 mm x 404 mm |
| Weight | 18.8 kg (without options) |
| Power Supply | 220-240 VAC, 50-60 Hz |
| Power Consumption (Max) | 1200 W (peak) |
| Power Consumption (Idle) | 165 W |
| Power Consumption (Power Save) | 9.8 W |
| Noise Level (Operating) | 67.4 dB(A) (sound pressure) |
| Noise Level (Standby) | 30.0 dB(A) (sound pressure) |
| Paper Capacity (Tray 1) | 150 sheets @ 75 g/m² |
| Paper Capacity (Tray 2) | 550 sheets @ 75 g/m² |
| Media Types Supported | Plain, Envelope, Transparency, Labels, Custom size |
| Print Resolution | Up to 1200 dpi |
| Print Speed (B710) | Up to 30 ppm (A4) |
| Network Connectivity | 10/100 Base-TX Ethernet |
| Interfaces | USB 2.0, Parallel, Serial, Network |
| Direct USB Printing | Yes (PDF, PCL, PS, TXT) |
| Secure Print | Yes (password-protected jobs) |
| Duplex Printing | Optional (requires Duplex Unit) |
| Drum/Toner Cartridge | All-in-one cartridge (drum + toner) |
| Duty Cycle | Up to 40,000 pages per month |
| Energy Star Certified | Yes |
Frequently Asked Questions - B710N OKI
User questions about B710N OKI
0 question about this device. Answer the ones you know or ask your own.
Ask a new question about this device
Download the instructions for your Printer in PDF format for free! Find your manual B710N - OKI and take your electronic device back in hand. On this page are published all the documents necessary for the use of your device. B710N by OKI.
USER MANUAL B710N OKI
text_image
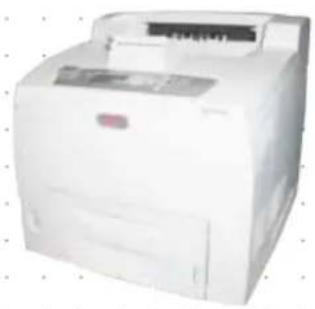
PRINTING SOLUTIONS OKI B710 User's GuideUser's Guide
B710
B720
B730
natural_image
White industrial paper printer with front panel and control buttons (no visible text or labels)PREFACE
Every effort has been made to ensure that the information in this document is complete, accurate, and up-to-date. The manufacturer assumes no responsibility for the results of errors beyond its control. The manufacturer also cannot guarantee that changes in software and equipment made by other manufacturers and referred to in this guide will not affect the applicability of the information in it. Mention of software products manufactured by other companies does not necessarily constitute endorsement by the manufacturer.
While all reasonable efforts have been made to make this document as accurate and helpful as possible, we make no warranty of any kind, expressed or implied, as to the accuracy or completeness of the information contained herein.
The most up-to-date drivers and manuals are available from:
http://www.okiprintingsolutions.com
07108901 Iss.01, Copyright © 2010 Oki Europe Ltd. All rights reserved.
Oki is a registered trademark of Oki Electric Industry Company, Ltd.
Oki Printing Solutions is a trademark of Oki Data Corporation.
Energy Star is a trademark of the United States Environmental Protection Agency.
Microsoft, MS-DOS and Windows are registered trademarks of Microsoft Corporation.
Apple, Macintosh, Mac and Mac OS are trademarks of Apple Inc.
Other product names and brand names are registered trademarks or trademarks of their proprietors.

As an Energy Star Program Participant, the manufacturer has determined that this product meets the Energy Star guidelines for energy efficiency.
| B710n | √ | B720n | x | B730n | x |
| B710dn | √ | B720dn | √ | B730dn | √ |
B720n and B730n achieve Energy Star energy savings; product fully qualifies when packaged (or used) with a duplex unit.

This product complies with the requirements of the Council Directives 2004/108/EC (EMC), 2006/95/EC (LVD) and 2009/125/EC (EuP), as amended where applicable, on the approximation of the laws of the member states relating to Electromagnetic Compatibility, Low Voltage and Energy Using Products.
The following cables were used to evaluate this product to achieve EMC directive 2004/108/EC compliance and configurations other than this may affect that compliance.
| CABLE TYPE LENGTH(METRE) | CORE SHIELD | |
| Power 2.0 | × | |
| USB 3.0 | ✓ | |
| Serial 3.0 | ✓ | |
| Parallel 3.0 | ✓ | |
| LAN 3.0 | ✓ | |
EMERGENCY FIRST AID
Take care with toner powder:
If swallowed, give small amounts of cold water and seek medical attention. DO NOT attempt to induce vomiting.

If inhaled, move the person to an open area for fresh air. Seek medical attention.
If it gets into the eyes, flush with large amounts of water for at least 15 minutes keeping eyelids open. Seek medical attention.
Spillages should be treated with cold water and soap to help reduce risk of staining skin or clothing.
MANUFACTURER/IMPORTER TO THE EU/AUTHORISED REPRESENTATIVE
Oki Europe Limited (trading as Oki Printing Solutions)
Blays House
Wick Road
Egham
Surrey, TW20 0HJ
United Kingdom
For all sales, support and general enquiries contact your local distributor.
ENVIRONMENTAL INFORMATION

text_image
www.okiprintingsolutions.com OKICONTENTS
Preface 2
Emergency first aid ....3
Manufacturer/Importer to the EU/authorised representative .....3
Environmental information ....3
Contents 4
Notes, cautions and warnings....6
About this guide 7
Documentation suite 7
On-line usage 7
Printing Pages. 8
Basic Operations 9
Main Components and Their Functions....9
Standard Configuration 9
With Optional Accessories....10
Internal View 11
Switching On and Off the Power 12
Switching On the Power .....12
Switching Off the Power 12
Power Save Mode 13
Exiting the Power Save Mode 13
Cancelling/Checking Printing. 13
Cancelling Printing. 13
Checking Status of Print Data .....13
Displaying Optional Accessory Configuration and Paper Tray Settings .....14
USB Flash Drive 14
Control Panel....15
About this Chapter 15
Control Panel Features 15
Display....16
Print Screen 16
Menu Screen....16
Navigating the Control Panel Menus. 16
Changing the Display and Reporting Language . . . . . . . . . . . . . . . . . . . . . . . . . . . . . . . . . . . . . . . . 17
Printing the menu map .....17
How to change password - Administrator . . . . . . . . . . . . . . . . . . . . . . . . . . . . . . . . . . . . . . . . . . . . . . . . 17
Printing ....18
Printing options....18
Printing From the Computer .....18
Useful Print Features In Properties Dialog Box .....18
Setting media types....19
Envelopes. 19
Loading and printing on Envelopes .....19
Transparencies 20
Loading and Printing on Transparencies .....20
Labels 21
Loading and printing on labels .....21
Printing on Custom Size Paper/Long Paper . . . . . . . . . . . . . . . . . . . . . . . . . . . . . . . . . . . . . . . . . . . . . . . . . . . . . . . . 22
Loading Custom Size Paper 22
Setting Custom Paper Sizes 23
Printing on Custom Size Paper 24
Special Printing Features .....24
Print Confidential Document - Secure Print . . . . . . . . . . . . . . . . . . . . . . . . . . . . . . . . . . . . . . . . 24
Stored Job 24
Proof Print - Print After Checking Printing Result .....24
Print at a Specified Time - Timed Job. 25
Direct Printing of PDF Files 25
Printing via Electronic Mail - E-mail Printing . . . . . . . . . . . . . . . . . . . . . . . . . . . . . . . . . . . . . . . . . . . . 25
Barcode Printing 25
Printing files from a USB flash drive. 25
Loading Paper 27
Cassette trays. 27
Menu settings....29
Troubleshooting 30
When Paper Jams ....30
Inside Cover A 30
Inside Paper Tray 31
Inside Cover B 32
Inside Cover C (Duplex Unit) 33
Inside Cover D (Offset Catch Trays) 33
When Problems Occur ....33
When the Print Quality is Poor 36
Network Related Troubles....38
Using TCP/IP. 38
Daily Care ....39
Drum/Toner Cartridge Replacement 39
Caution on Handling the Drum/Toner Cartridge. . . . . . . . . . . . . . . . . . . . . . . . . . . . . . . . . . . . . . . . . . . . . . . . . 39
Replacing the Drum/Toner Cartridge .....39
Optional accessories 42
Part Numbers 42
Cleaning the Printer....42
Cleaning the Exterior . . . . . . . . . . . . . . . . . . . . . . . . . . . . . . . . . . . . . . . . . . . . . . . . . 42
Cleaning the Interior . . . . . . . . . . . . . . . . . . . . . . . . . . . . . . . . . . . . . . . . . . . . . . . . . . . . . . . . . . . 43
Cleaning the feed rollers 43
When Moving the Printer 46
Specifications 48
Index 49
Oki contact details. 50
NOTE
A note provides additional information to supplement the main text.
CAUTION!
A caution provides additional information which, if ignored, may result in equipment malfunction or damage.
WARNING!
A warning provides additional information which, if ignored, may result in a risk of personal injury.
For the protection of your product, and in order to ensure that you benefit from its full functionality, this model has been designed to operate only with genuine original toner cartridges. Any other toner cartridge may not operate at all, even if it is described as "compatible", and if it does work, your product's performance and print quality may be degraded.
Use of non-genuine products may invalidate your warranty.
Specifications subject to change without notice. All trademarks acknowledged.
NOTE
Images used in this manual may include optional features that your product does not have installed.
DOCUMENTATION SUITE
This guide is part of a suite of online and printed documentation provided to help you become familiar with your product and to make the best use of its many powerful features. The documentation is summarised as below for reference and is found on the manuals CD unless indicated otherwise:
Installation Safety booklet: provides information for safe use of your product.
This is a paper document that is packaged with the product and should be read before setting up your machine.
Set-up Guide: describes how to unpack, connect and turn on your product.
This is a paper document that is packaged with the product.
This User's Guide: helps you become familiar with your product and make the best use of its many features. Also included are guidelines for troubleshooting and maintenance to ensure that it performs at its best. Additionally, information is provided for adding optional accessories as your printing needs evolve.
Reference Guide: provides additional information on advanced printing features, menu settings, embedded web server and printer error messages.
Network Guide: helps you become familiar with the functionality of the built in network interface card.
This is an electronic document and is available on the support web site (www.okiprintingsolutions.com)
Installation Guides: accompany consumable items and optional accessories to describe how to install them.
These are paper documents that are packaged with the consumables and optional accessories.
Online Help: online information associated with the printer driver and Status Monitor software.
ON-LINE USAGE
This guide is intended to be read on screen using an Adobe Acrobat Reader. Use the navigation and viewing tools provided in Acrobat.
There are many cross-references within this book, each highlighted as blue text. When you click on a cross-reference the display will instantly jump to the part of the manual containing the referenced material.
You can access specific information in two ways:
In the list of bookmarks down the left hand side of your screen, click on the topic of interest to jump to the required topic. (If the bookmarks are not available, use the "Contents" on page 4.)
In the list of bookmarks click on Index to jump to the Index. (If the bookmarks are not available, use the "Contents" on page 4.) Find the term of interest in the alphabetically arranged index and click on the associated page number to jump to the page containing the subject.
PRINTING PAGES
The whole manual, Individual pages, or sections may be printed. The procedure is:
-
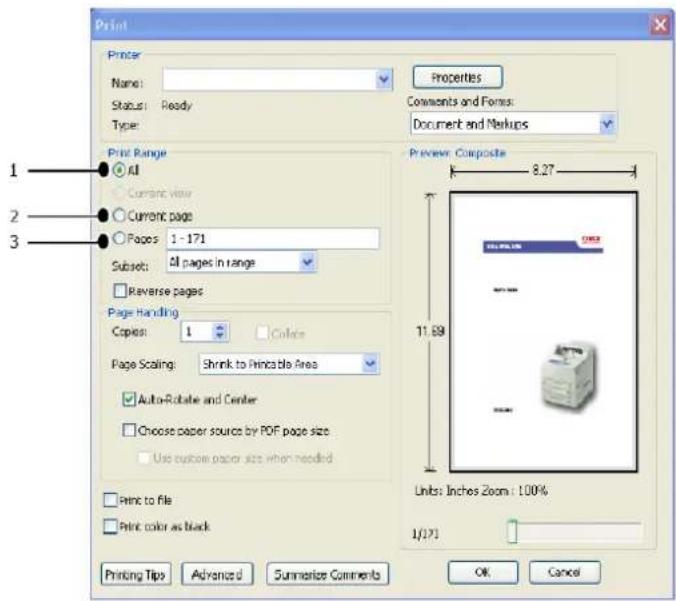
From the toolbar, select File > Print (or press the Ctrl + P keys).
-
Choose which pages you wish to print:
(a) All pages, (1), for the entire manual.
(b) Current page, (2), for the page at which you are looking.
text_image
Print Printer Name: Status: Ready Type: Properties Comments and Forms: Document and Markups Print Range All Current View Current page Pages 1 - 171 Subset: All pages in range Reverse pages Page Handling Copies: 1 Colors Page Scaling: Shrink to Printable Area Auto-Rotate and Center Choose paper source by PDF page size Use custom paper size when needed Print to file Print color as black Printing Tips Advanced Summarize Comments Preview: Composite 8.27 11.69 Units: Inches Zoom : 100% 1/371 OK Cancel(c) Pages from and to, (3), for the range of pages you specify by entering their page numbers.
(d) Click OK.
BASIC OPERATIONS
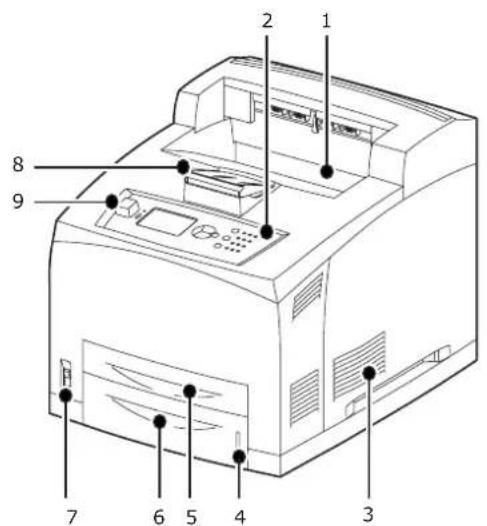
MAIN COMPONENTS AND THEIR FUNCTIONS
STANDARD CONFIGURATION
text_image
Diagram of a printer with numbered parts labeled for identification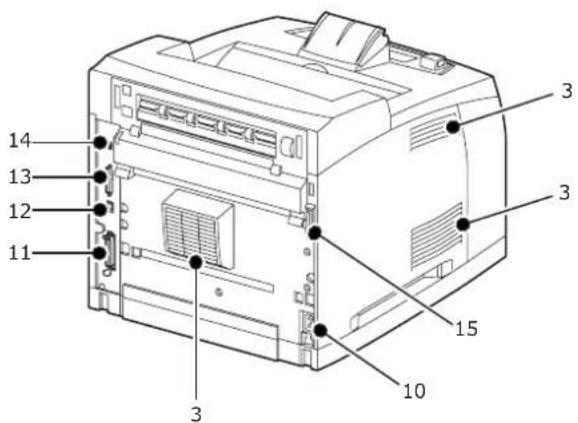
text_image
14 13 12 11 3 3 15 10| NO. | NAME DESCRIPTION | |
| 1. | Centre tray | Print jobs are output here with the printed side facing down. |
| 2. | Control panel Consists | of the essential operation buttons, indicators and display. |
| 3. | Ventilation hole | Releases heat to prevent the interior of the printer from heating up. Do not block. |
| 4. | Paper meter A meter | to check the amount of remaining paper. Attached to the 550 tray. |
| 5. | Tray 1 Sets the 150 tray. | |
| 6. | Tray 2 Sets the 550 tray. | |
| 7. | Power switch Switches | the power of the printer on and off. Pressing the switch to the <|> position switches it on and pressing it to the <0> position switches it off. |
| 8. | Paper extension | Raise this when printing on paper larger than Letter/A4 size. |
| 9. | Host USB port For connecting the USB Flash Drive. | |
| 10. | Power cord cable connector | For connecting the power cord cable. |
| 11. | Parallel connector | For connecting the parallel cable. |
| 12. | Network connector | For connecting the network cable when connecting this printer to the network for use. |
| 13. | USB connector For connecting the USB cable. | |
| 14. | Serial connector | For connecting the serial cable. |
| 15. | Duplex unit connector | For connecting the optional duplex unit. |
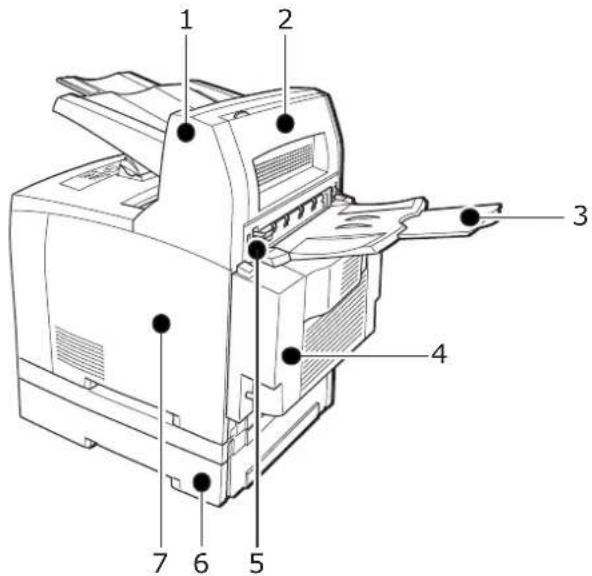
WITH OPTIONAL ACCESSORIES
text_image
Technical diagram of a printer with numbered parts labeled 1 through 7| NO. | NAME DESCRIPTION | |
| 1. | Offset tray (optional) | Allows you to stagger the output position for each print job (offset output). |
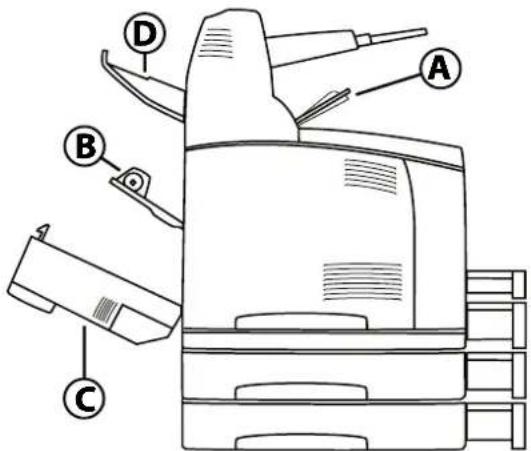
| 2. | Cover D (optional) | Open this when paper is jammed inside the offset catch tray. |
| 3. | Rear tray (optional) | Use this tray if you want to reduce curling of paper when printing heavyweight paper. Print jobs are output here with the printed side facing up. |
| 4. | Duplex unit (Cover C) | Enables 2 sided printing. When paper is jammed inside the duplex unit, it is described as cover C. |
| 5. | Rear output tray lever | When the rear tray has been installed, the paper output location can be switched between it and the centre output tray. Raise the lever to output to the rear tray and lower the lever to output to the centre output tray. |
| 6. | A4 universal tray (optional Tray3 and Tray4) | Can install up to two levels of an Letter/A4 universal tray (550) to this printer. |
| 7. | Right detachable cover | Remove this when installing optional accessories such as hard disk, compact flash and additional DDR memory module. |
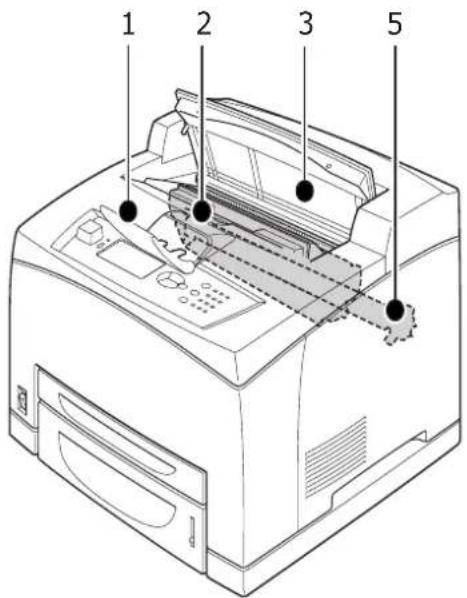
INTERNAL VIEW
text_image
Technical diagram of a printer with numbered parts labeled 1 to 5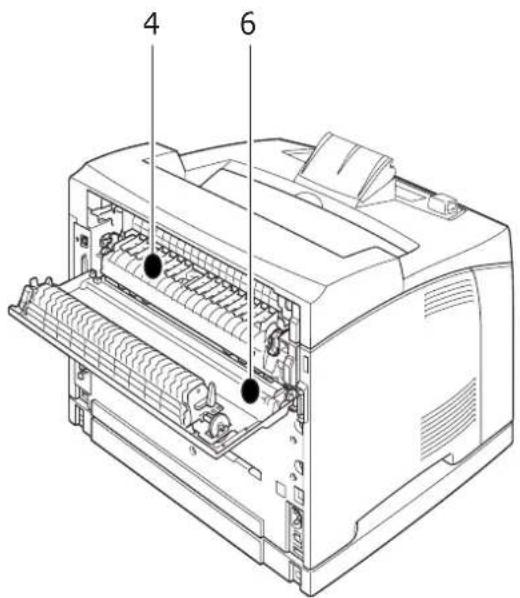
text_image
Technical diagram of a printer with numbered parts labeled 4 and 6| NO. | NAME DESCRIPTION | |
| 1. | Paper extension | Raise this when printing on paper larger than A4 size. |
| 2. | Drum/toner cartridge | Contains the toner and the photosensitive drum. |
| 3. | Cover A Open this when replacing the drum/toner cartridge and removing jammed paper. | |
| 4. | Fuser unit Fixes the toner on the paper. Do not touch this when using the printer as it is hot. | |
| 5. | Transfer or cartridge | Transfers the toner image on the surface of the photosensitive drum to the paper. |
| 6. | Cover B Open this when removing jammed paper. | |
SWITCHING ON AND OFF THE POWER
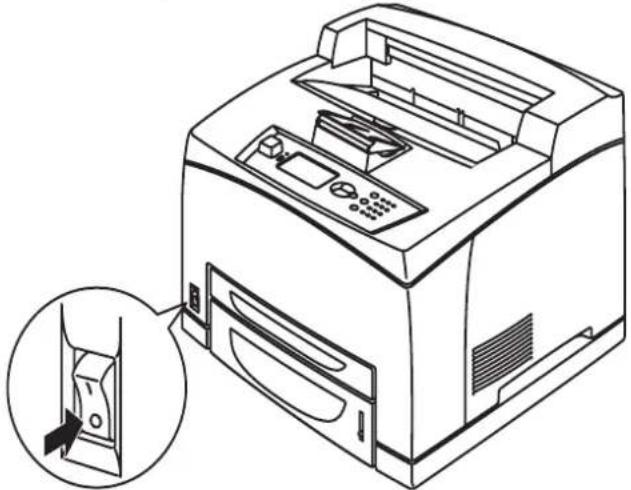
SWITCHING ON THE POWER
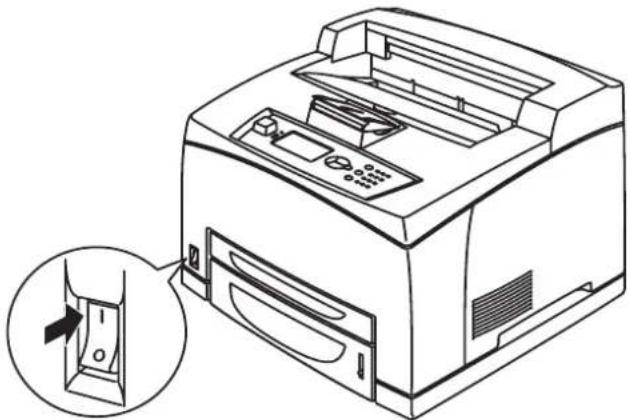
- Press the power switch of the printer to the <|> position.
natural_image
Line drawing of a printer with an inset showing a close-up of its internal components (no text or symbols present)- When the power is switched on, various screens will be displayed on the control panel. Check that this display changes to Ready To Print.
NOTE
If error message is displayed, refer to the Message List in the Reference Guide for guidance on how to fix it.
SWITCHING OFF THE POWER
NOTE
Do not switch off the printer power when printing is in progress. It may lead to a paper jam.
Once the power is switched off, print data remaining in this printer or information saved in the memory of this printer will be deleted.
-
By checking the display on the control panel, confirm that the printer is not processing any data. Ready To Print or Power Save must be displayed.
-
Press the power switch to the
position to switch the power off.
natural_image
Line drawing of a printer with an inset showing a close-up of its internal structure (no text or symbols present)POWER SAVE MODE
This printer is equipped with a Power Save mode to reduce power consumption when it is left idle. The default idle time from last print activity until the printer enters Power Save mode is 5 minutes. This time can be adjusted by the operator to any of the following: 5, 15, 30, 60 or 120 minutes.
When no print data is received within 5 minutes (default) since the last page is printed, the printer will enter Power Save mode. An informative message is displayed on the control panel indicating Power Save Mode. Consumption of power during Power Save mode is 10 Watts or less, and the time required to exit from Power Save mode to a print-ready status is about 10 seconds.
The printer automatically exits from Power Save mode once it receives data from the computer or if any key on the control panel is pressed.
CANCELLING/CHECKING PRINTING
CANCELLING PRINTING
To cancel printing, you can either cancel the print job at this printer or at the computer.
Cancelling a Print Job at the Printer
Press the CANCEL button then press the ON LINE button on the control panel. However, pages being printed at the moment will continue to be printed.
Cancelling Print Jobs at the Computer
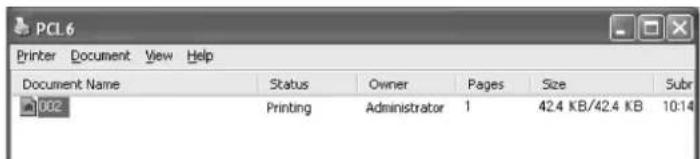
Double-click the printer icon at the bottom right of the taskbar in Windows.
From the displayed window, right click the document name that you wish to delete and click the DELETE key.
text_image
PCL 6 Printer Document View Help Document Name Status Owner Pages Size Subr 002 Printing Administrator 1 42.4 KB/42.4 KB 10:14CHECKING STATUS OF PRINT DATA
Checking in Windows
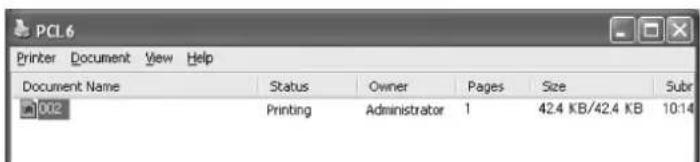
Double-click the printer icon on the task bar at the bottom right of the screen.
From the displayed window, check the column, Status.
text_image
PCL 6 Printer Document View Help Document Name Status Owner Pages Size Sub 002 Printing Administrator 1 42.4 KB/42.4 KB 10:14DISPLAYING OPTIONAL ACCESSORY CONFIGURATION AND PAPER TRAY SETTINGS
When using this printer as a network printer and with SNMP protocol enabled, you can display on the printer driver, the optional accessory configuration and settings configured at the control panel such as paper type or size. These settings are displayed on the Options tab. This section explains the procedure using Windows XP as an example.
NOTE
When using USB or Parallel connection to this printer, this feature cannot be used. You have to manually set the items on the printer driver.
The rear tray information cannot be obtained. You have to manually set the item.
For paper size and paper type settings, you must configure them at the control panel beforehand. Even if you change the settings here, they will not be reflected on the printer itself.
When using this feature, you have to activate the SNMP port (default: Enable) on the printer using the control panel.
Only users with administrator's rights can change the settings. Users without administrator's rights can only check the contents.
- From the Start menu, click Printers and Faxes and then display the properties of the printer to be used.
- Select this printer, right click and select Properties.
- Click the Device Options tab.
- Click Get Information from Printer.
NOTE
The properties of the printer can be displayed on the printer driver.
5. Click OK.
- The contents of the Device Options tab will be updated based on the data obtained from the printer.
USB FLASH DRIVE
You can print PDF files up to PDF version 1.6 directly from a standard USB flash drive without any connection to a host computer. See "Printing files from a USB flash drive" on page 25.
CONTROL PANEL
ABOUT THIS CHAPTER
This chapter introduces the control panel and its functions, and also demonstrates how to navigate through the control panel menus and submenus that allow you to view and change the printer settings.
CONTROL PANEL FEATURES
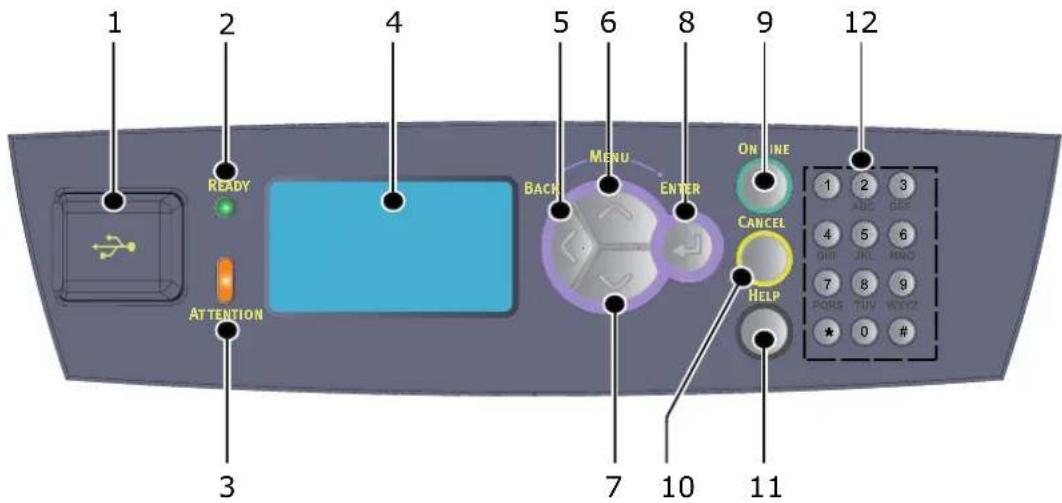
The control panel is located on the front of the printer and contains the display (LCD), indicators and push buttons that allow you to view and change the printer settings.
text_image
1 2 4 5 6 8 9 12 READY BACK MENU ENTER ONLINE CANCEL HELP 3 7 10 11 1 2 3 ABC DEF 4 5 6 GHI JKL MNO 7 8 9 PORS TUV WAYZ * 0 # ATTENTION| NO. NAME DESCRIPTION | ||
| 1. Host | USB port For printing | PDF and other files from a USB flash drive. |
| 2. READY indicator When the light is on, the printer is ready to receive data from the computer. | ||
| 3. | ATTENTION indicator | When the light is on, there is a malfunction in the printer. Operator intervention is required. |
| 4. LCD Displays the setting items, machine status, and messages. | ||
| 5. BACK button Press to move back a step in the Menu structure. | ||
| 6. MENU up button Press to enter Menu screen. | ||
| 7. | MENU down button | Press to enter Menu screen. Press these to move to the required menu, item and candidate value on the display. |
| 8. ENTER button Press to select the currently displayed menu setting. When you are changing the candidate values, pressing the ENTER button runs the currently displayed activity or saves the currently displayed candidate. | ||
| 9. ON LINE button Press to enter the off-line status. When in the off-line status, the machine cannot receive data or process printing. Press again to exit the off-line status and enter the on-line status (where the machine can receive data from the computer). | ||
| 10. CANCEL button Press to cancel printing.Press to exit Menu Mode. | ||
| 11. HELP button When an error occurs, a message is displayed on the LCD to press the Help button for more information on available Help screens. | ||
| 12. Keypad Use to enter numbers, upper-case/lower-case letters and symbols in the Entry Line. | ||
DISPLAY
There are two types of screens shown: Print screen (for displaying printer status) and Menu screen (for setting configuration).
NOTE
The message displayed differs according to the options installed and setting status.
PRINT SCREEN
The Print screen appears when the machine is printing or waiting for data. The following contents are shown on the screen.
Current printer status—e.g. Ready To Print, Printing, etc.
Port receiving data— Which printer port is currently receiving print data, e.g. USB, Net, etc.
Emulation— Which page description language emulation is currently in use, e.g. PCL, PS, etc.
Toner status bar — How much toner is remaining.
MENU SCREEN
Screen for configuring settings related to the printer. This screen appears when you press the MENU buttons. The first of a list of menu appears, and further depressions of the up button or down button cycles through the available printers menus.
NAVIGATING THE CONTROL PANEL MENUS
To navigate the control panel menus, do the following:
- Press the MENU button to enter the Menu.
- Use the up and down buttons on the control panel to scroll through the menus. When the item you want to change is displayed, press ENTER to view the submenus for that item.
- Use the up and down buttons to scroll through the submenu items. When the item you want to change is displayed, press ENTER to display the setting.
- Use the up and down buttons to move up and down through the available settings for the submenu item. When the item you want to change is displayed, press ENTER
to select the setting. An asterisk (*) will appear next to the setting indicating that this setting is currently in effect.
- Do one of the following:
Press the BACK button to move up to the list of menus;
or...
Press ON LINE or CANCEL to exit from the menu system.
CHANGING THE DISPLAY AND REPORTING LANGUAGE
The default language for display messages and printed reports is English. You can change this to a different language as follows.
-
Press the MENU button on the control panel to enter the Menu.
-
Press the down button scroll to Menus and press the ENTER button to select.
-
Press the down button to Sys Config Menu and press the ENTER button to select.
-
Press the down button to scroll to the Language submenu and press the ENTER button.
-
Press the down button to scroll to the language you want and press the ENTER button. An asterisk (*) appears next to the selected language.
-
Do one of the following:
Press the BACK button to move up to the list of menus;
or...
Press ON LINE or CANCEL button to exit from the menu system.
PRINTING THE MENU MAP
To print a menu map from the control panel on your printer:
- Press the MENU button on the control panel.
- Press the down button to scroll to Information Menu and press the ENTER button.
- Press the down button to scroll to Print Menu Map and press the ENTER button.
- Press the ENTER button to execute the printing of the Menu map.
HOW TO CHANGE PASSWORD - ADMINISTRATOR
You can set each category in the user menu and also restrict access to change these settings. The administrator settings are password protected. Refer to the Reference Guide for details on how to change the administrator password.
PRINTING
PRINTING OPTIONS
This printer offers three ways to modify the printing options:
Control Panel
Printer Driver
Embedded Web Server
The printing options on the printer driver can be accessed through the application you are using or through the Printer and Faxes Menu (on Windows). The Embedded Web Server (EWS) contains access to all printer features and presents them as HTML pages. EWS can be accessed from any remote station via HTTP access.
Refer to the Reference Guide for details on how to access the EWS.
NOTE
If there is a conflict between the settings in the Control Panel, Printing Preferences or Embedded Web Server and printer settings set via your application, the application settings supersede any other setting.
The EWS facility is only available when the printer is connected to the network.
PRINTING FROM THE COMPUTER
This section explains the basic flow when printing from application software in a Windows ^® environment. The procedure may differ according to the computer or system configuration used.
NOTE
Do not switch off the power to the printer when printing is in progress. It may lead to a paper jam.
This section explains printing with the PCL driver as an example.
- From the File menu of the application software, select Print.
- Select this printer as the printer to be used to start printing. To use the various print features of this printer, display the printer properties dialog box to set the necessary items.
For details on each item and how to set them, refer to the Online Help for the printer driver.
NOTE
If the paper tray information is not correct, change the settings on the Setup tab of the printer driver before continuing. For details on how to change the settings, refer to the Online Help for the printer driver.
USEFUL PRINT FEATURES IN PROPERTIES DIALOG BOX
The following selections are available in the Setup tab: Paper Size, Media Type, Paper Source, Paper Destination Paper Feed Options*, Finishing Mode**, and 2-sided Printing.
*Paper Feed Options include: Auto Resize, Covers, Auto Tray Change, Media Check, and Skip Blank Pages, Tray 1 Settings, and Media Type.
**Finishing Mode includes: Standard, 2-up, 4-up, 6-up, 8-up, 9-up, 16-up, PosterPrint, and Booklet.
NOTE
You can set the print features in the properties dialog box from the printer icon by selecting Printers and Faxes (or Settings) > Printers depending on the OS). See the Reference Guide for detailed information on features in the Printer Driver.
SETTING MEDIA TYPES
The printer can accommodate a variety of special media. Each media type requires special handling. The most convenient way to set the media is using the Printer Properties in your computer. You can also set the media via the control panel or using the Embedded Web Server (EWS).
ENVELOPES
Envelopes can be printed from all trays. For details on the envelopes that can be used, refer to the Reference Guide. The procedure to print on envelopes is as follows.
LOADING AND PRINTING ON ENVELOPES
Take note of the following points when loading an envelope:
Use envelopes specifically made for laser printers.
The reverse side of the envelope cannot be printed on.
Do not load more than 15 envelopes in Tray 1 or more than 80 envelopes in Trays 2, 3 and 4.
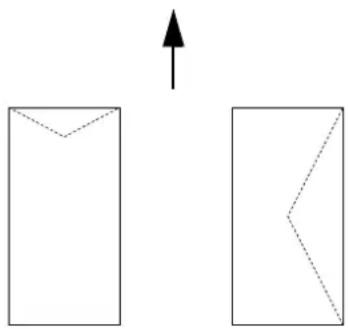
Close the flaps of the envelopes and load them with the address side facing up and the flap side down as shown below.
natural_image
Two geometric shapes with dashed lines and an upward arrow, no text or symbols presentCAUTION!
The heat from the fuser can melt some adhesives and possibly damage your printer.
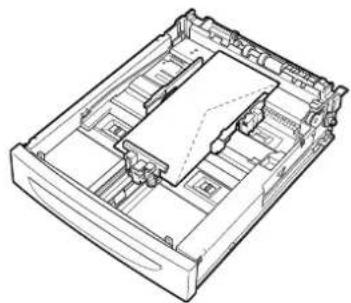
- Load the envelopes in the portrait orientation so that the flaps are turned to the right side.
natural_image
Technical line drawing of a mechanical assembly with internal components (no text or symbols)NOTE
Place C5 envelopes short-edge feed in the tray.
-
Slide the length guide and right width guide to the size of the loaded envelopes.
-
On the control panel, change the paper type to Envelope.
-
On the control panel, change the paper size of the tray to match the type of envelope loaded.
NOTE
You will have to switch off Auto Sense to change settings.
You can also change the settings using the EWS.
-
From the File menu, select Print.
-
Select this printer from the drop down list and click Properties.
-
Select the loaded paper tray from Source or click the Media Type and then select Envelope.
-
Click OK.
-
Click Print in the Print dialog box to start printing.
TRANSPARENCIES
You can print on transparencies from any tray.
LOADING AND PRINTING ON TRANSPARENCIES
The way to load transparencies in the paper tray is the same as the way to load standard size paper. For details refer to "Loading Paper" on page 27. However before loading transparencies consider the following points:
Remove all other media before loading transparencies into the tray.
Do not load transparencies above the fill line; this may cause the printer to jam.
Handle transparencies by the edges to avoid fingerprints and creases that can cause poor print quality.
Do not use transparencies with the stripes side down.
Do not print duplex on transparencies.
Only use transparencies that are designed to withstand heat required for laser printing.Transparencies with white frames or full-colour transparencies cannot be used.
NOTE
Printing transparencies continuously may lead to the output transparencies sticking to each other. As a guide, remove the transparencies from the output tray after about 20 sheets and then fan them to lower their temperatures.
- Fan the transparencies to ensure that all sheets are separated.
- Insert them with the short-edge feed.
- Slide the length guide and right width guide to the size of the loaded transparencies.
- On the control panel, change the paper type to Transparency.
NOTE
You must set Auto-sense to Off before setting the paper type.
You can also change the settings using the EWS.
- From the File menu, select Print.
- Select this printer as the printer to be used and click Properties.
- Click the Media Type drop down box and click on Transparencies.
- From the Source drop down select the loaded paper tray.
- Click the Paper Size drop down and select the size of the original document.
- Click OK.
- Click Print in the Print dialog box to start printing.
LABELS
You can print labels from any tray.
LOADING AND PRINTING ON LABELS
Before loading the labels in the tray, consider the following points:
Use labels specifically made for laser printers.
Print only on one side of the sheet of labels.
Do not load more than 100 labels sheets in Tray 1 or more than 290 in Tray 2, 3 and 4.
Do not load labels above the fill line; this may cause the printer to jam.
- Insert the label sheets short-edge feed and face up.
- Slide the length guide and right width guide to the size of the loaded label sheets.
- On the control panel, change the paper type to Labels.
NOTE
You must set Auto-sense to Off before setting the paper type.
You can also change the settings using the EWS.
- From the File menu, select Print.
- Select this printer as the printer to be used and click Properties.
-
Click the Media Type drop down box and click on Labels.
-
From the Source drop down select the loaded paper tray.
- Click the Paper Size drop down and select the size of the original document.
- Click OK.
- Click Print in the Print dialog box to start printing.
PRINTING ON CUSTOM SIZE PAPER/LONG PAPER
This section explains how to print on custom size paper such as long paper.
The paper sizes that can be set on this printer are as follows:
NOTE
The custom paper size has to be set on the control panel and the printer driver, refer to "Setting Custom Paper Sizes" on page 23.
You must set Auto-sense to Off before setting the paper type.
To load long-size paper with the long edge exceeding 356mm, load the paper with the edge protruding from the tray.
| TRAY LONG EDGE SHORT EDGE | ||
| Tray 1 | 215.9 - 1219.2mm (8.5 - 48in) ^a | 76.2 - 127mm (3 - 5in) |
| Tray 2, 3 and 4 | 215.9 - 355.6mm (8.5 - 14in) ^a | 98.4 - 148mm (3.875 - 5.83in) |
a. Paper that extends beyond 356 mm (14 in.), the print quality on that part of the paper cannot be guaranteed.
LOADING CUSTOM SIZE PAPER
The way to load custom size paper with the long edge shorter than 356 mm in trays 1 to 4 is the same as loading standard size paper. For details, refer to "Loading Paper" on page 27.
To load long paper in Tray1, follow the procedure below:

natural_image
Technical line drawing of a mechanical device casing with internal compartments and mounting holes (no text or symbols)- Pull the paper tray out to its maximum.
NOTE
Pull the extendable part out to its maximum. For details on the procedure to extend the paper tray, refer to "Loading Paper" on page 27.
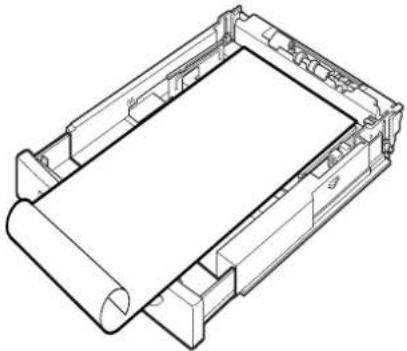
- Load the paper with the side to be printed facing up. Curl up the back end of the paper so that it will not fall from the tray.
natural_image
Technical line drawing of a mechanical assembly with rollers and housing (no text or symbols)- Push the paper tray completely into the printer.
SETTING CUSTOM PAPER SIZES
Before printing, set the custom size on the printer driver.
You have to configure the settings on the control panel too when loading custom size paper in Trays 1 to 4 for printing. For details on setting the control panel, refer to Setting Custom Paper Sizes in the Reference Guide.
CAUTION!
When setting the paper size on the printer driver and the control panel, specify the size of the actual paper used. Setting the wrong size for printing will cause jam detection. This is especially true if you configure a bigger size when using a narrow width paper.
On the printer driver, set the custom size in the Paper Size dialog box. This section explains the procedure using Windows XP as an example.
NOTE
Only users with administrator's rights can change the settings. Users without the rights can only check the contents.
-
From the File menu, click Print.
-
Select Properties then select the Setup tab.
-
Select Option as needed: Source, Media Type, etc.
-
You may select a previously stored custom size from the list or you may add an additional custom size.
-
To add a new custom size:
(a) Select Paper Feed Options.
(b) Click Custom Size.
(c) In the Name Field, Type a name for your custom size.
(d) Click on the Unit of measure radio button for the units you would like to use (mm for millimetres or inch for inches.)
(e) In the Width field, enter the width of the custom size paper.
(f) In the Length field, enter the length of the custom size paper.
(g) Click Add to store the new custom size.
(h) Click OK to close the Dialog Box.
NOTE
You may use the Modify selection to change a previously stored custom size.
You may use the Delete Selection to delete a previously stored custom size.
PRINTING ON CUSTOM SIZE PAPER
The procedure to print on custom size paper is as follows.
NOTE
The way to display the printer properties dialog box differs according to the application software. Refer to the manual of your respective application software.
- From the File menu, select Print.
- Select this printer as the printer to be used and click Preferences.
- Click the Setup tab.
- Select the appropriate tray from Source.
- From Paper Size, select the size of the original document.
- From Media Types, select the registered custom size, and then click OK.
- Click Print in the Print dialog box to start printing.
SPECIAL PRINTING FEATURES
Detailed instructions on how to use these features are contained in the Reference Guide.
NOTE
Use of some of these features requires the optional hard disk or compact flash installed in the printer.
The hard disk may be damaged and erase important data saved in the hard disk. We recommend you back up your data.
PRINT CONFIDENTIAL DOCUMENT - SECURE PRINT
Secure Print is a feature that allows you to attach a password to a print job on the computer, send it to the printer for temporary storage, and then print the job from the printer control panel. When the printing of a Secure Print job is complete, the job is automatically deleted.
STORED JOB
A stored job is the same as a secure print job except that it is not deleted from the storage device after it is printed unless you specifically ask for this at the printer control panel. By storing frequently-used data in the printer, you can print the job from the printer control panel, without sending it from the computer again and again.
PROOF PRINT - PRINT AFTER CHECKING PRINTING RESULT
Proof Print is a feature that allows you to store the print data of multiple copies in the hard disk or compact flash, print out only the first set to check the print result and if satisfactory, print the remaining copies from the control panel.
PRINT AT A SPECIFIED TIME - TIMED JOB
The delayed print feature allows you to store the data in the printer beforehand and then print it out automatically at the specified time.
DIRECT PRINTING OF PDF FILES
You can send a PDF file directly to the printer for printing without using the printer driver. As the print data is sent directly to the printer, the printing process is simpler than printing with the printer driver and it is done at a faster speed.
NOTE
You may not be able to print some PDF files directly by the printer due to the way they were created. When this happens, open the PDF files and use the printer driver to print them.
PRINTING VIA ELECTRONIC MAIL - E-MAIL PRINTING
When the optional hard disk or compact flash has been installed and the printer is connected to a network, enabling it to receive e-mails via TCP/IP communication, e-mails can be sent from the computer to this printer.
Printing of e-mail contents and TIFF or PDF attachments can be done from this printer.
This feature may need to be enabled via the webpage under Networking/Receive Settings.
BARCODE PRINTING
This printer uses standard PCL font selection commands to enable printing of algorithm generated bar codes.
Benefits:
Any size barcode generation
Automatically generates checksums
Automatically adds stop and start characters
Intelligent barcoding
Unlike some barcode solutions, which merely add fonts to a PC or printer, this printer actually extends the PCL5 language. Barcode formatting, error detection and checksum calculation are performed by the printer, reducing the load on the host and the network. Barcodes can be printed in almost any size or rotation, bar width and height. Caption text can be embedded in the bars or printed above or below the bars in a variety of fonts and sizes.
See the Reference Guide for detailed use information on all the above printing features.
PRINTING FILES FROM A USB FLASH DRIVE
The Host USB connector on the control panel can be used to connect a USB Flash Drive. You can print directly from the USB FLash drive. The files stored in the Flash Drive must be of the following formats:
Supported PDF (upto v1.6)
PCL5, PCL6, FX80 or PostScript
Generic Text (e.g. .txt file)
The size of the PDF files is limited to the space available in the standard User Flash memory unless a Compact Flash or Hard Disk Option is installed. The PDF file can be placed in the root directory or sub-directory in the USB Flash Drive.
To print a PDF file:
- Press the ON LINE button to return the printer to online status.
NOTE
If the printer is in Power Save Mode when plugging in the USB Flash Drive the printer will not recognise it.
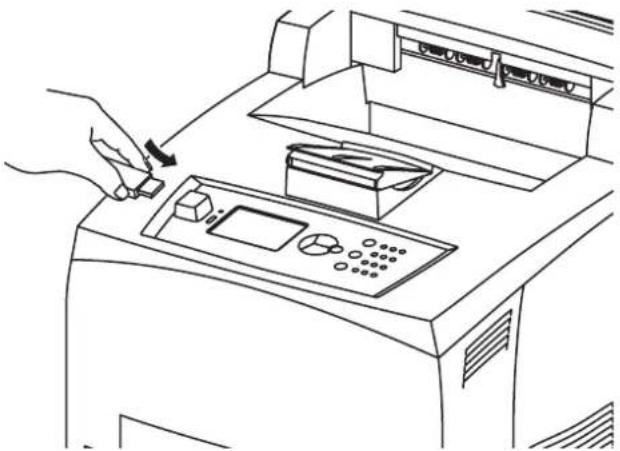
- Plug the USB Flash Drive into the Host USB Connector on the control panel. A brief beep tone is made by the printer on recognising the USB Flash Drive. The USB Drive menu is displayed.
natural_image
Line drawing of a hand inserting a component into a machine control panel (no text or symbols)- In the submenus, Print option is selected by default. Press the ENTER button. A list of files stored in the USB Flash Drive is displayed.
NOTE
If files are placed in a directory, DIR is displayed after the name. Press ENTER to enter the directory.
-
Use the up and down buttons to select the file you want to print and press ENTER.
-
At the No. of Copies prompt, using the keypad enter the number of copies and press ENTER.
The file is now printed.
NOTE
The default value of number of copies is set to 1.
Once the printing is complete, the printer is returned to Ready To Print status. You can now remove the USB Flash Drive.
To cancel a print job:
- Press CANCEL on the control panel.
The message On Line to accept is displayed.
- Press the ON LINE button.
Printing is cancelled and the printer is returned to Ready To Print status.
LOADING PAPER
CASSETTE TRAYS
| SIZE DIMENSIONS WEIGHT LOADING | CAPACITY | ||
| Tray 1 A5, | B5, A4, Executive, Letter. Legal13, Legal 14a | 64 - 216 g/m2 | 150 sheets @ 75 g/m2 |
| Statement | |||
| A6, Envelopes: COM-9, COM-10, Monarch, DL, C5b | |||
| Tray 2 and Optional Trays 3 and 4 | Same as Tray 1 | 64 - 216 g/m2 | 550 sheets @ 75 g/m2 |
a. Standard sizes that can be automatically detected.
b. Requires the paper size to be set on the control panel.
- Place the paper tray on a flat surface and remove the lid (if installed).
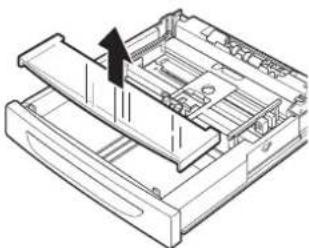
natural_image
Technical line drawing of a mechanical device with an arrow indicating assembly or movement (no text or symbols present)- If the base plate of the paper tray is raised, push it down.
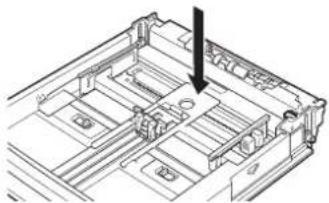
natural_image
Technical line drawing of a mechanical assembly with a black arrow indicating a component (no text or symbols present)- When loading paper longer than A4 size, slide the left and right lock tabs in the paper tray outwards to unlock them.
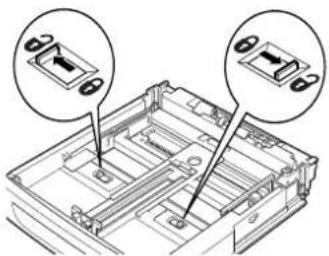
natural_image
Technical diagram of a mechanical assembly with two circular insets showing internal components (no text or symbols)- Hold the grip of the paper tray and pull its extendable part to the front until it reaches its maximum.
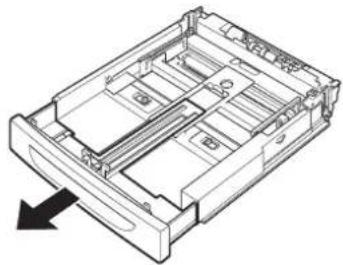
natural_image
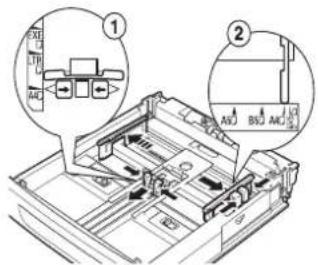
Technical line drawing of a mechanical device casing with internal compartments and mounting holes (no text or symbols)- Squeeze the length guide and slide it to the desired paper size (1). Squeeze the right width guide and slide it to the desired paper size (2).
text_image
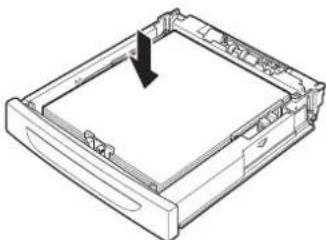
Technical diagram showing mechanical assembly with labeled components and directional arrows indicating movement or force- Load the paper with the side to be printed facing up and with all four corners aligned.
natural_image
Technical line drawing of a rectangular electronic device with a downward arrow indicating a component (no text or symbols present)- Close the lid of the paper tray and push the tray completely into the printer.
CAUTION!
Do not place paper over the right width guide.
Do not load paper exceeding the maximum fill line or the maximum capacity allowed.
Align the right width guide with the paper width correctly. If the right width guide is not in place, the paper will not be properly fed and this may cause paper jams.
The lid of the tray must be firmly closed. If not, the paper might become misaligned.
- Depending on the types and sizes of the loaded paper, you need to configure settings on the control panel. Change the paper type when non-plain paper such as recycled paper, heavyweight paper or transparencies are loaded. Configure the paper size when custom size paper is loaded.
NOTE
You can use Tray1 to manually feed paper. Change the settings in the Printer Driver to Manual Feed. Feed one sheet a time, and press Enter each time a sheet is fed to start printing.
MENU SETTINGS
The printer menu allows you to view and change the printer's internal settings. The settings are grouped into categories or "menus" such as Information Menu or Print Menu.
Some of these settings are similar to those found in your printer driver or application software. The settings that you can change using this software act as the printer's defaults. These can be overridden by the settings in your printer driver or application. For example, if you have set the number of copies in the Printer Menu settings to one, this will be overridden if you select three copies of your document in the printer driver.
Refer to the Reference Guide for details on the Menu settings.
TROUBLESHOOTING
WHEN PAPER JAMS
CAUTION!
When removing jammed paper, make sure that no pieces of torn paper are left in the machine. If a sheet of paper is wrapped around the heat roller, or when clearing a jammed paper that is difficult or impossible to see, do not try to remove it by yourself. Doing so can cause injuries or burns. Switch off the machine immediately, and contact your dealer or service.
Following the message on the control panel, open the cover (covers are identified as illustrated) and remove the jammed paper. If paper is torn, check for any remaining torn pieces of paper.
text_image
Technical diagram of a mechanical device with labeled parts A, B, C, and DINSIDE COVER A
When the optional offset catch tray is installed, fold the tray first before opening cover A.
Open Cover A when a message to remove the drum/toner cartridge is displayed.
-
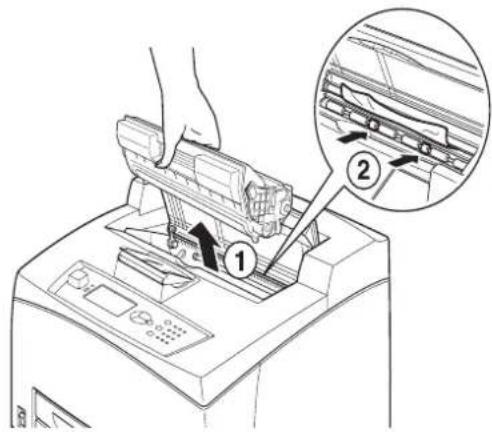
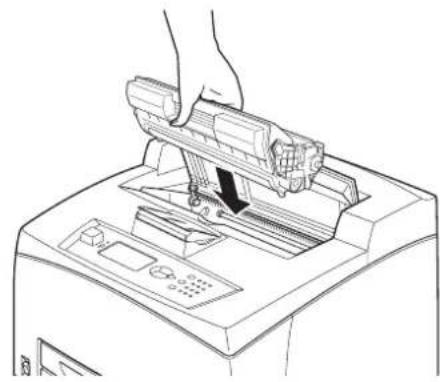
Open cover A (1), and holding the drum/toner cartridge by the grip, remove it from the printer (1).
-
Turn the roll as shown and remove any jammed paper inside (2).
text_image
Diagram showing a printer's internal structure with labeled parts, including a hand inserting a component into the printer.- Return the drum/toner cartridge and cover A to their original positions.
natural_image
Line drawing of a hand using a handheld device to press or install electronic components on a printer (no text or symbols visible)NOTE
When the optional offset catch tray is installed, close cover A first before returning the tray to its original position.
If you continue to print with the offset catch tray folded, this may cause a paper jam. Always use the printer with the tray open.
INSIDE PAPER TRAY
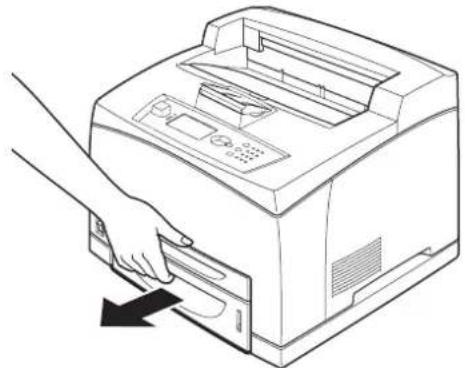
Pulling out paper trays
- Pull out all paper trays and remove any wrinkled paper.
natural_image
Line drawing of a hand inserting a printer into a paper holder (no text or symbols)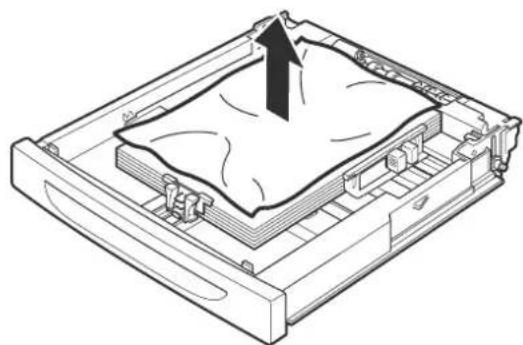
natural_image
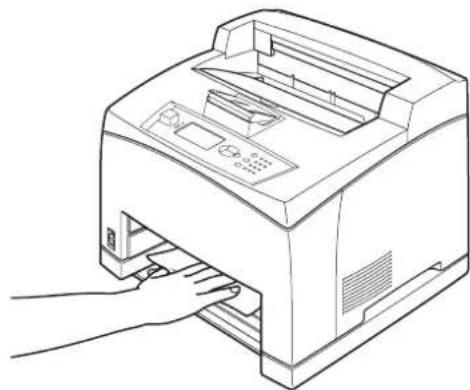
Technical line drawing of a mechanical assembly with a central component and an upward arrow indicating motion (no text or symbols)- Examine the inside of the printer and remove any jammed paper.
natural_image
Line drawing of a printer with a hand inserting a paper into the front panel (no text or symbols)After removing paper,
- Push the paper trays completely back into the printer.
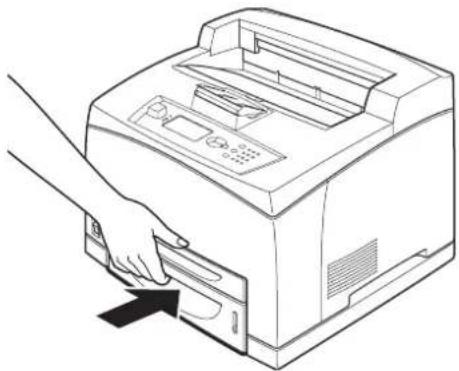
natural_image
Line drawing of a hand inserting a printer into a paper airplane (no text or symbols)- Open and close cover A. Doing this will clear the error message.
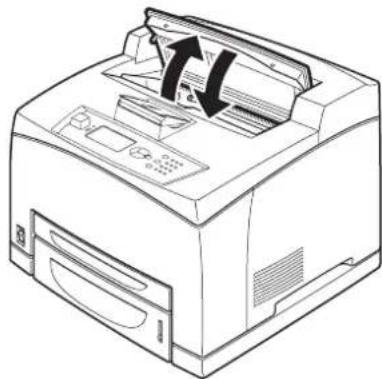
natural_image
Line drawing of a printer with paper feed and paper cladding (no text or symbols)INSIDE COVER B
- Open the Duplex cover, if installed.
- Remove the rear tray when opening the back cover.

text_image
Technical diagram showing mechanical assembly with numbered components and directional arrows indicating motion or movement.- Raise the lever as shown in the diagram and open the cover B (1).
CAUTION!
The fuser unit is hot. You may get burned if you touch it directly.
-
After opening cover B, open the cover of the fuser unit (2) and remove any jammed paper.
-
Close the fuser unit, cover B and then attach the rear tray.
-
Close the duplex unit cover, if installed.
INSIDE COVER C (DUPLEX UNIT)
- Push up the lever shown in the diagram to open the cover.
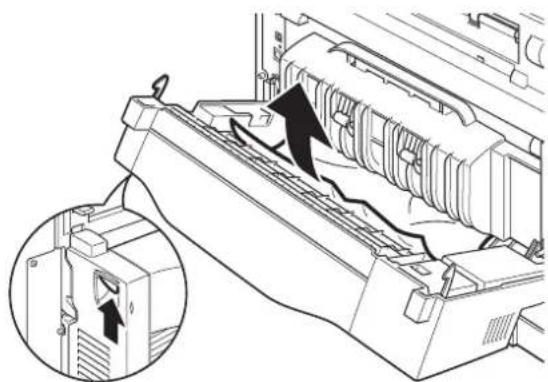
natural_image
Technical line drawing of a printer or printer with an inset showing a close-up of the printer's internal structure (no text or symbols present)- Remove the jammed paper and close the cover.
INSIDE COVER D (OFFSET CATCH TRAYS)
Open the cover and remove paper as shown.
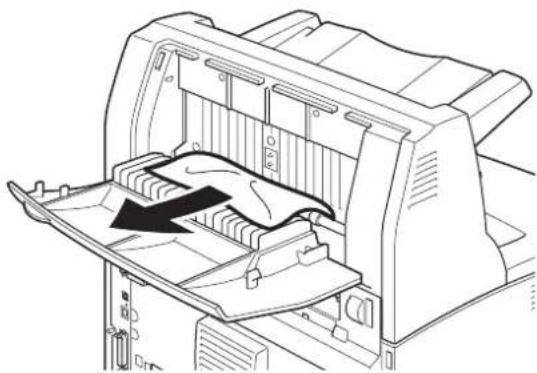
natural_image
Technical line drawing of a mechanical component with internal structure and a black arrow indicating a feature (no text or symbols present)WHEN PROBLEMS OCCUR
Before treating the problem as a machine breakdown, refer to the following table and check the printer condition again.
WARNING!
Never open or remove machine covers that are secured with screws unless specifically instructed in the user guide. A high voltage component can cause electric shock.
Do not try to alter the machine configuration, or modify any parts. An unauthorized modification can cause smoke or fire.
NOTE
Limitations of the printer and incorrect settings at the printer, computer and server corresponding to your network environment may also result in printing problems.
| SYMPTOM REASON/ACTION | |
| No power. Is the | power of the printer switched off? Push the power switch to the <|> position to switch on the power. |
| Is the power cord disconnected or not securely connected? Switch off the power of the printer and connect the power cord to the power outlet again. Then, switch on the power to the printer. | |
| Is the power cord connected to a power outlet with the correct voltage? Connect the printer exclusively to a power outlet with a suitable voltage and current rating. | |
| Cannot print. Is | the light of the READY indicator off? If so, the printer is off-line or in menu setting mode. Press the ON LINE button to return the printer to its on-line status. |
| Is there a message displayed on the control panel? Follow the message to rectify the problem. A list of messages and guidance on how to deal with them is given in the Reference Guide. | |
| When a parallel cable is used for connection, are you using a computer that supports bi-directional communication? See instructions on the Parallel Menu in the Reference Guide. | |
| If the printer has insufficient memory, use one of the following methods to rectify the problem. When the printer driver is set to 1200dpi on the Graphics tab, set it to 600dpi. Install the additional memory (optional) to increase the memory. Reduce the complexity of the print job. | |
| Print job sent but the light of the READY indicator is not blinking or on. | Is the interface cable disconnected? Switch off the power and check the connection of the interface cable. |
| Is the interface configured? Check the port status of the interface. | |
| Is the computer environment correctly set up? Check the computer environment, such as the printer driver. | |
| Light of ATTENTION indicator is on. | Is there an error message displayed on the control panel? Check the displayed message and rectify the error. A list of messages and guidance on how to deal with them is given in the Reference Guide. |
| Light of ATTENTION indicator is blinking. | An error that you cannot rectify yourself has occurred. Record the displayed error message or error code, switch off the power, pull out the power plug from the outlet, and then contact service. |
SYMPTOM REASON/ACTION
| Although no print job is sent, the message "Printing" is displayed on the control panel (when using the parallel interface). | Did you switch on the power of the computer after switching on the power to the printer? Pressing the CANCEL button cancels the printing.Check that you switch on the power of the computer before switching on the power to the printer. |
| Poor print quality. | There may be a problem with the image. Refer to the section after this, "When the Print Quality is Poor" to rectify the problem."When the Print Quality is Poor" on page 36. |
| The correct characters are not printed (printing garbage). | The printer is printing with non-standard built-in fonts. Check the fonts used in the application. Download the necessary fonts when using PostScript. |
| The printout is different from what is displayed on the screen. | Did you change the TrueType font settings to printer fonts? Change to TrueType font printing for Font Substitution on the Setup tab of the printer driver. Online Help for the printer driver |
| Waiting is displayed but nothing is printed. | Printer is waiting for data from the host computer and is in the middle of job. Sometimes a job is sent without normal job termination characters.Press and hold the ON LINE button for 3 seconds until the printer flushes the job buffers and completes the printing of this job. Alternatively, you can simply wait for a timeout to occur, which will automatically flush the buffers and complete the printing of the job. This default timeout is normally 20 seconds and can be adjusted with a control panel command. |
| Printing is very slow. | The receive buffer is insufficient. When printing documents of high resolution, reduce the memory capacity of items not in use.It is recommended to disable ports not in use, and channel the memory to other purposes. |
| Is the printer driver set to 1200dpi on the Graphics tab? Changing the setting to 600dpi will shorten the print time.For guidance refer to the online help in the printer driver. | |
| Printing with TrueType fonts may take up printing time. Change the printing method for TrueType fonts in Specify Font on the Detailed Settings tab of the printer driver.For guidance refer to the online help in the printer driver. | |
| Top section of printed document is missing.Text is reduced. | Are the paper tray guides set in the correct positions? Set the length guide and the right width guide in the correct positions."Loading Paper" on page 27. |
| SYMPTOM REASON/ACTION | |
| Paper cannot be fed.Paper jam.Multiple papers are fed.Papers are fed at an angle.Paper is wrinkled. | Is the paper correctly set? Load the paper correctly.For labels, transparencies or envelopes, fan them well first to allow air to enter between each sheet before loading."Setting media types" on page 19. |
| Is the paper damp? Replace with paper from a new ream. | |
| Is the correct type of paper used? Load the correct type of paper.See "Usable Paper" in the Reference Guide. | |
| Is the paper tray set correctly? Push the paper tray completely into the printer. | |
| Is the printer placed on a flat location? Place the printer on a flat stable surface. | |
| Are the paper tray guides set in the correct positions? Set the length guide and right width guide in the correct positions."Loading Paper" on page 27. | |
| Have you used any picture papers? Clean the feed roll."Cleaning the feed rollers" on page 43. | |
| Papers are fed in more than 1 sheet at a time. Fan the paper to be loaded and load again. Replenish paper only when the paper tray is empty. | |
| Envelope is wrinkled. | Envelopes can get wrinkled depending on the type used. Open cover B of this printer and lift up the levers at both ends of the fuser unit. The wrinkles can be reduced.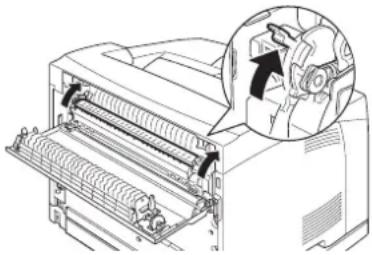 After printing the envelope, remember to return the levers to their original positions. After printing the envelope, remember to return the levers to their original positions. |
| Strange noise. | Is the printer placed on a flat location? Place the printer on a stable surface. |
| Is cover A open? Close cover A securely. | |
| Is the paper tray set correctly? Push the paper tray completely into the printer. | |
| Are there foreign objects inside the printer? Switch off the power and remove any foreign objects inside the printer. If the object cannot be removed unless the printer is disassembled, contact service. | |
WHEN THE PRINT QUALITY IS POOR
When the print quality is poor, select the closest symptom from the following table to rectify the problem.
If the print quality does not improve after carrying out the appropriate action, contact service.
| SYMPTOM REASON/ACTION | |
| Printing is light.(faded, blurred). | The paper is damp. Replace with paper from a new ream."Loading Paper" on page 27. |
| The drum/toner cartridge is defective/damaged or there is no more toner inside the cartridge. Replace with a new drum/toner cartridge."Drum/Toner Cartridge Replacement" on page 39. | |
| The Toner Saving feature is on. Uncheck the Toner Saving checkbox on the Graphics tab of the printer driver.Online Help for the printer driver | |
Levers on both sides of the fuser unit are raised. Open cover B of this printer and push down the levers at both ends of the fuser unit.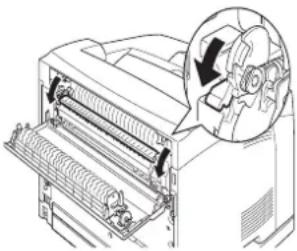 | |
| Black spots or streaks are printed. | The drum/toner cartridge is defective or damaged. Replace with a new drum/toner cartridge."Drum/Toner Cartridge Replacement" on page 39. |
| Dirt appears at equal intervals. | The feed route of the paper is stained. Print a few pages to remove the stains. |
| The drum/toner cartridge is defective or damaged. Replace with a new drum/toner cartridge."Drum/Toner Cartridge Replacement" on page 39. | |
| White dots appear in black filled areas. | The paper used is not suitable. Load the correct type of paper.See "Usable Paper" in the Reference Guide. |
| The drum/toner cartridge is defective or damaged. Replace with a new drum/toner cartridge."Drum/Toner Cartridge Replacement" on page 39. | |
| Printed image smudges when rubbed with your finger.The toner is not fixed on the paper.Paper is smeared with toner. | The paper loaded in the paper tray does not match the paper type set on the control panel. Set the appropriate paper type of the paper loaded in the paper tray on the control panel.See "Usable Paper" and "Setting Paper Types" in the Reference Guide. |
| The paper is damp. Replace with paper from a new ream. | |
| The paper used is not suitable. Load the correct type of paper.See "Usable Paper" in the Reference guide. | |
| The whole piece of paper is printed black. | The drum/toner cartridge is defective or damaged. Replace with a new drum/toner cartridge."Drum/Toner Cartridge Replacement" on page 39. |
| This may be due to breakdown of high voltage power. Contact service. | |
| Nothing is printed. | Multiple sheets of paper are fed simultaneously. Fan the paper well and reload. |
| The drum/toner cartridge is defective/damaged or there is no more toner inside the cartridge. Replace with a new drum/toner cartridge."Drum/Toner Cartridge Replacement" on page 39. | |
| Spots of missing text. | This may be due to breakdown of high voltage power. Contact service. |
| The paper is damp. Replace with paper from a new ream. | |
| The paper used is not suitable. Load the correct type of paper.See "Usable Paper" in the Reference Guide. | |
| Text is blurred. | The paper used is not suitable. Load the correct type of paper.See "Usable Paper" in the Reference Guide. |
| The paper is damp. Replace with paper from a new ream. | |
| Missing characters throughout the length of the paper. | The drum/toner cartridge is defective/damaged or there is no more toner inside the cartridge. Replace with a new drum/toner cartridge."Drum/Toner Cartridge Replacement" on page 39. |
| Text or images are printed at an angle. | The paper tray guides are not set in the correct positions. Set the length guide and the right width guide in the correct positions."Loading Paper" on page 27. |
| Transparencies and envelopes are not printed clearly. | The type of transparency or envelope loaded cannot be used in this printer. Load the correct type of paper. See "Usable Paper" in the Reference Guide. |
| Check that the paper type on the printer driver or the control panel is correctly set.See "Setting Paper Types" in the Reference Guide. | |
| The Draft Mode feature is turned on and the resolution is set at a low level on the printer driver. Change the settings on theDetailed Settingsor Graphicstab of the printer driver. | |
NETWORK RELATED TROUBLES
USING TCP/IP
When a problem occurs in the TCP/IP environment refer to the Reference Guide.
DAILY CARE
DRUM/TONER CARTRIDGE REPLACEMENT
The drum/toner cartridge includes the toner and the photosensitive drum. A message will appear on the control panel when it is about time to replace the drum/toner cartridge. If the message indicates that the printer is still ready to print you should still be able to print about 100 pages before actually replacing the cartridge, otherwise you should replace it immediately.
The possible number of pages that can be printed differs according to factors such as the print contents, paper size, paper type, environment used, and the frequency of switching on/off the power of the machine.
If you continue to print with a drum/toner cartridge whose replacement is long overdue, it may affect the functions of this machine, such as the print quality. It is recommended to install a new drum/toner cartridge.
You can set whether to stop printing when the drum/toner cartridge is due for replacement.
WARNING!
Never expose a drum/toner cartridge to an open flame. It can cause an explosion and you can be burnt.
CAUTION ON HANDLING THE DRUM/TONER CARTRIDGE
When handling the drum/toner cartridge, take note of the following points:
Do not subject it to direct sunlight or strong light.
When installing the drum/toner cartridge, select a location not subject to strong light and try to finish the installation within 5 minutes.
Do not touch the surface of the photosensitive drum. Do not let the drum/toner cartridge stand or place it upside down. The drum might be damaged.
A drum shutter protects the photosensitive drum from light. Do not open the drum shutter.
Although the toner is not harmful to the body, wash it off immediately if your hands or clothes are stained with it.
It is recommended to use the drum/toner cartridge within 1 year after opening it.
REPLACING THE DRUM/TONER CARTRIDGE
- Remove any output paper and open cover A.
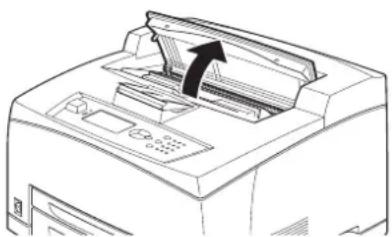
natural_image
Line drawing of a printer with an arrow indicating the paper's direction (no text or symbols present)NOTE
When the offset catch tray (optional) is installed, fold the tray first before opening cover A.
CAUTION!
Do not touch any parts inside the printer.
- Hold the drum/toner cartridge by the grip and pull it out slowly.
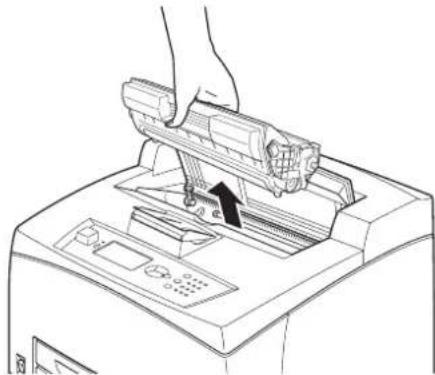
natural_image
Line drawing of a hand using a handheld device to press or install a printer (no text or symbols visible)NOTE
To prevent the toner from dirtying the floor, lay a piece of paper on the floor first before putting the drum/toner cartridge down.
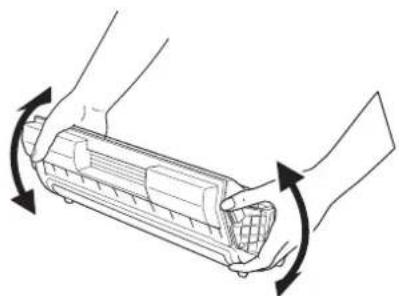
- Take the new drum/toner cartridge out of the packaging box and shake it 7 to 8 times as shown in the diagram.
natural_image
Diagram of hands holding a cylindrical device with arrows indicating rotation or movement (no text or symbols)NOTE
If the toner is not evenly spread out, the print quality may be reduced. Also, if you did not shake the drum/toner cartridge well, there may be operating noise or the interior of the cartridge may be damaged during operation.
Do not touch the surface of the photosensitive drum.
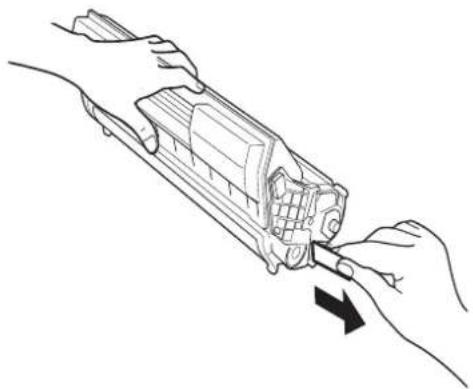
- Place the drum/toner cartridge on a flat surface and pull out the seal horizontally.
natural_image
Line drawing of hands using a tool to adjust or install a device component (no text or symbols present)NOTE
When pulling out the seal, pull it out horizontally. The tape might break if it is pulled out diagonally.
After the seal has been pulled out, do not shake or bump the drum/toner cartridge.
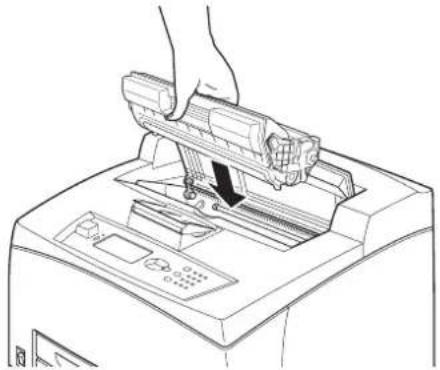
- Hold the drum/toner cartridge by the grip and insert it into the slot inside the printer.
natural_image
Line drawing of a hand using a handheld device to press or install a printer (no text or symbols visible)NOTE
Do not touch any parts inside the printer.
Ensure that the drum/toner cartridge is firmly set.
After opening cover A, remove any dust or stains inside the printer with a dry clean cloth.
- Close cover A securely.
NOTE
If the offset catch tray is folded as in step 1, close cover A and then return the tray to its original position.
If you continue to print with the offset catch tray folded, this may cause a paper jam. Always use the printer with the tray open.
OPTIONAL ACCESSORIES
PART NUMBERS
| OPTION MODEL NO. | PART NO. | |
| Offset Catch Tray JEA - 5A | 01279601 | |
| Additional Paper Trays (Tray3 and Tray4) | JEA - 7 01279501 | |
| Duplex Tray JEA - 8A 0127 | 9401 |
To install the above options, follow the detailed installation sheet that accompanies the option.
CLEANING THE PRINTER
This section describes how to clean the printer in order to maintain it in good condition and print clean printouts all the time.
WARNING!
Be sure to switch off and unplug the machine before accessing the interior of the machine for cleaning, maintenance, or fault clearance. Access to a live machine's interior can cause electric shock.
CLEANING THE EXTERIOR
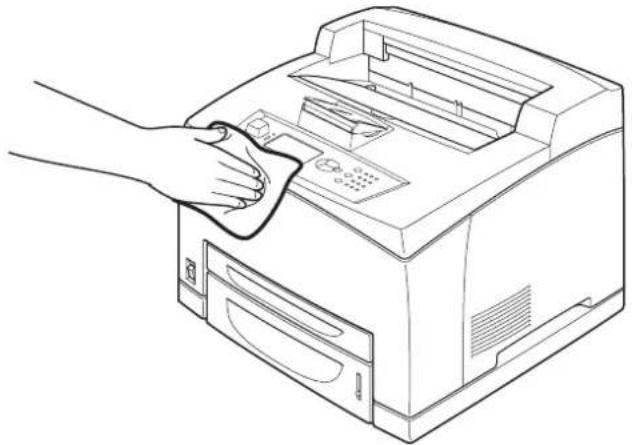
Clean the exterior of the printer about once a month. Wipe the parts with a wet but well-wrung soft cloth. Then wipe with another dry soft cloth. For stubborn stains, moisten a soft cloth with a small amount of neutral detergent, and gently wipe the stain off.
natural_image
Line drawing of a hand cleaning a printer with a cloth (no text or symbols)CAUTION!
Do not spray the detergent directly on the printer. The liquid detergent may enter the printer through a gap and cause problems. Never use cleaning agents other than water or neutral detergent.
CLEANING THE INTERIOR
After clearing paper jams or replacing the drum/toner cartridge, inspect the inside of the printer before closing cover A.
WARNING!
Never touch a labelled area found on or near the heat roller. You can get burned.
If a sheet of paper is wrapped around the heat roller, do not try to remove it by yourself to avoid injuries or burns. Switch off the machine immediately, and contact service.Remove any remaining pieces of paper.
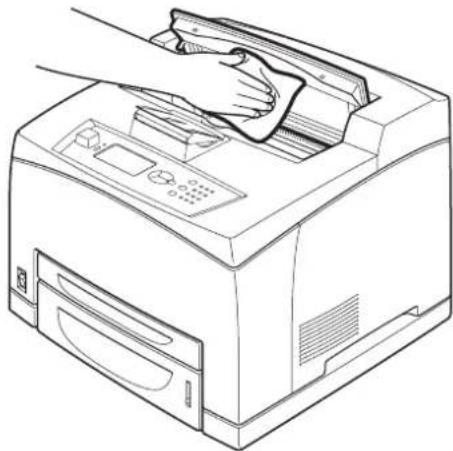
Remove any dust or stains with a clean dry cloth.
natural_image
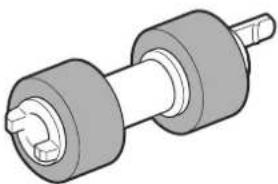
Line drawing of a printer with a hand cleaning the cover (no text or symbols)When feeding cannot be done, follow the procedure below to wipe the feed roll gently with a well-wrung soft cloth.
natural_image
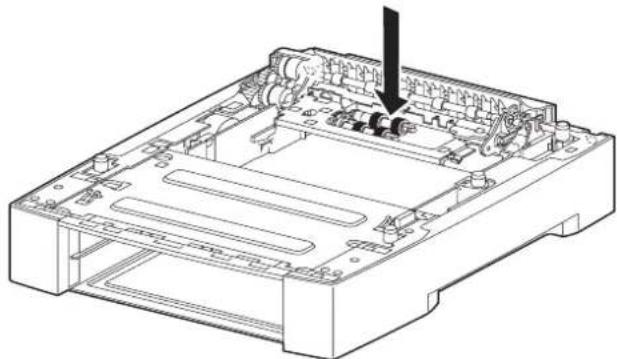
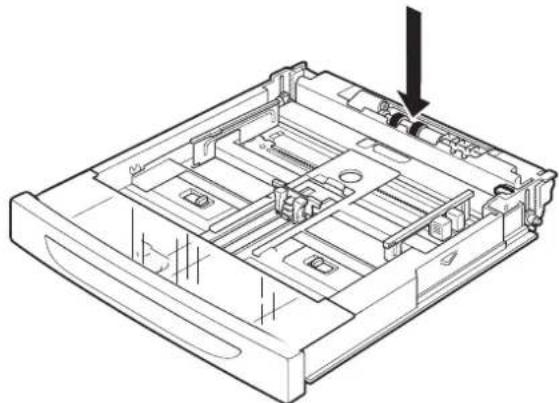
3D rendering of a mechanical shaft assembly with multiple cylindrical components (no text or symbols visible)There are feed rollers in the interior of this printer (two locations, total of four), tray module (one location) and paper tray (one location). Follow the cleaning procedure (page 45) to clean the feed rollers at each location.
Inside of Machine (Two Locations)
Open cover A and after removing the drum/toner cartridge, clean the feed rollers.

natural_image
Technical illustration of a mechanical device with a close-up inset showing internal components (no text or symbols)Tray Module (One Location)
Even without uninstalling the tray module you can clean the feed roller after pulling out the paper tray.
natural_image
Technical line drawing of a mechanical device with internal components and a black arrow indicating a specific part (no text or symbols present)Paper Tray (One Location)
Pull out the paper tray and clean the feed roller.
natural_image
Technical line drawing of a mechanical device casing with internal compartments and a black arrow indicating a component (no text or symbols present)Cleaning Procedure
The following procedure explains how to clean the feed roller set in the paper tray. Follow this procedure also when cleaning the feed rollers inside of the printer and the tray module.
NOTE
The feed roller is a regular replacement part.
- Pull the paper tray out of the printer.
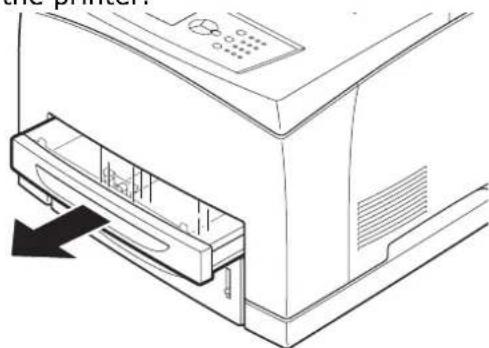
natural_image
Line drawing of a computer printer with a paper insert and control panel (no text or symbols)- While pushing the retard part (see right diagram) down (1), widen the tab on the feed roll to loosen it (2) and then slowly remove the feed roller from the shaft of the paper tray (3).
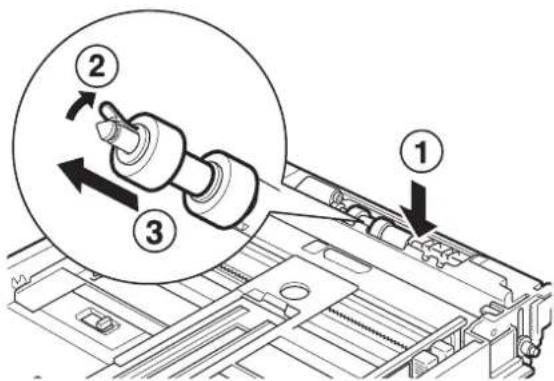
text_image
Technical diagram showing a mechanical assembly with numbered components and directional arrows indicating motion or movement.- Wipe the rubber parts with a wet but well-wrung soft cloth.
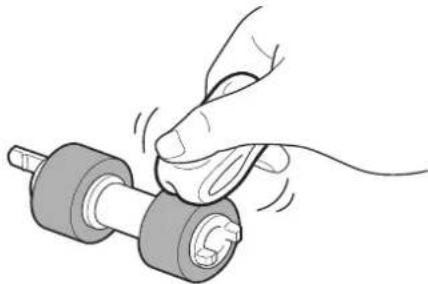
natural_image
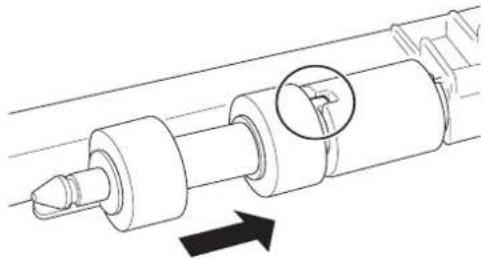
Illustration of a hand turning a mechanical component with rotating parts (no text or symbols)- Turn the short tab (1) of the feed roller to the right and slowly push it onto the shaft of the paper tray.
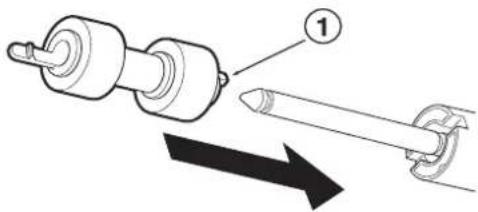
text_image
Technical diagram showing mechanical assembly with labeled component 1 and directional arrow indicating motion or forceBy aligning the slot of the feed roller with that of the shaft, push the feed roll completely in so that the short tab fits into the slot of the shaft.
natural_image
Technical line drawing of a mechanical assembly with no visible text or symbols- Push the paper tray completely into the printer.
WHEN MOVING THE PRINTER
Carry out the following procedure when moving the printer.
WARNING!
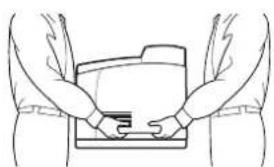
The machine, without the optional accessories, paper trays, consumables and paper, weighs 18.8kg. When moving the equipment, make sure that there are two or more persons carrying it.
If the duplex unit (optional) or A4 universal tray (optional) has been installed, uninstall it before moving the printer. If these are not fixed securely to the printer, they may fall to the ground and cause injuries.
When lifting the machine, be sure to observe the following points, failure to do so may cause the machine to fall and result in injuries.2 persons, one facing the front of the machine (control panel) and the other facing the back, should firmly grip the recessed areas on the bottom part of both sides of the machine. Never try to lift the machine by gripping any other areas.
Bend your knees to avoid possible injuries to your back.
CAUTION!
Do not tilt the machine more than 10 degrees.
natural_image
Line drawing of two hands holding a rectangular object, possibly a device or container (no text or symbols)Correct Moving Procedure
Carry out the following procedure when moving the printer.
-
Press the power switch of this printer to the
position to switch the power off. -
Remove all cords, such as the power cord and interface cables.
-
Remove any paper in the centre output tray and return the paper stopper to its original position if it is raised.
-
Pull out the paper tray from the printer and remove any paper in the tray. Keep the paper wrapped and away from humidity and dirt.
-
Push the paper tray completely into the printer.
-
Open cover A but do not touch any parts inside the printer.
-
Hold the drum/toner cartridge by the grip and pull it out slowly.
CAUTION!
It is necessary to uninstall the drum/toner cartridge. If you move the printer with the drum/toner cartridge installed, the toner may spill out inside of the machine.
Do not shake the drum/toner cartridge after uninstalling it from the printer. The toner will spill.
Put the uninstalled drum/toner cartridge back into its original bag or wrap it with a thick cloth to prevent it from being exposed to strong light.
-
Close cover A securely.
-
Lift the printer and move it gently. If the printer is to be moved over a long distance, pack it inside a box.
SPECIFICATIONS
GENERAL
| PRINTER MODEL MODEL NUMBER | |
| B710 JEB 11 | |
| B720 JEB 12 | |
| B730 JEB 13 | |
A summary of the basic characteristics of your printer appears in the table below:
| ITEM SPECIFICATION | |
| Dimensions 422mm x 465mm x 404mm (W x D x H) | |
| Weight (without options) 18.8 kg | |
| Power supply 220 to 240VAC @ 50 - 60Hz ± 2% | |
| Power consumption Power S | Save Mode: 9.8WIdle: 165WOperation: Simplex: 900W; Duplex: 850WPeak: 1200W |
| Noise level(without options installed) | Operating: Sound PressureB710: 67.4dB(A); B720: 69.4dB(A) and B730: 71.7dB(A)Operating: Sound Power (ISO 7779)B710: 7.1B; B720: 7.2B; B730: 7.3BStandby: Sound Pressure : 30.0dBStandby: Sound Power (ISO 7779)B710: 5.5B; B720, B730: 5.0B |
| Environmental conditions | Operation: 5°C - 35°C; 15% - 85% RHStorage (Packaged without CRU): -20°C - 50°C; 5% - 85% RHStorage (Packaged with CRU): 0°C - 35°C; 15% - 80% RH |
INDEX
A
A4 universal tray.... 10
administrator password .... 17
B
barcode printing.... 25
basic operations power save mode .... 13 switching off the power .... 12 switching on the power .... 12
C
cancel button 13
cancelling printing.... 13
centre output tray 9
cleaning the feed rollers..... 43
cleaning the printer.... 42
configuring optional accessory 14
control panel 9,15
changing the display and reporting language.... 17
navigating the control panel menus.... 16
printing the menu map.... 17
cover A.... 11
cover B.... 11
cover C.... 10
cover D 10
D
daily care 39
delayed Print 25
direct printing of PDF files..... 25
drum/toner cartridge ...... 11
duplex unit 10
E
E-mail Printing 25
F
fuser unit.... 11
L
LCD 16
loading paper cassette trays .... 27 loading envelope .... 19
long size.... 22
M
media types 19
custom size paper ...... 22
envelopes 19
labels 21
transparencies 20
menu settings 29
moving the printer 46
0
offset catch tray.... 10
optional accessories part numbers...... 42
P
paper meter 9
Paper trays centre output tray .... 9
paper trays tray 1....9 tray 2....9
poor print quality 36
power save mode exiting the power save mode .... 13
power save modes.... 13
power switch.... 9
print at a specified time..... 25
print confidential document.... 24
printer specifications.... 48
printing barcode printing .... 25 delayed Print .... 25 direct printing of PDF
files 25
E-mail Printing 25
options.... 18
printing from the computer.... 18
printing on custom size paper/
long paper 22
printing on envelope...... 19
secure print 24
printing on custom size paper/long paper 22
printing on envelope 19
printing on transparencies .... 20
printing options embedded web server..... 18
printing via electronic mail ... 25
Proof Print.... 24
R
rear output tray 10
rear output tray lever ..... 10
replacing the drum/toner cartridge 39
S
secure print.... 24
setting custom paper size..... 23
special printing features ..... 24
stored job 24
switching off the power...... 12
T
transfer roll cartridge...... 11
troubleshooting....15, 30 when paper jams..... 30
U
USB flash drive .....14, 25
cancelling 26
printing...... 26
user's guide printing .... 8 viewing .... 7
W
when moving the printer ..... 46
when paper jams 30
inside cover A.... 30
inside cover B.... 32
inside duplex unit 33
inside offset catch trays ... 33
paper transport section .... 31
when problems occur...... 33
network related troubles 38
when the print quality is poor.... 36
OKI CONTACT DETAILS
Oki Systems (UK) Limited
550 Dundee Road
Slough Trading Estate
Slough, SL1 4LE
Tel:44 (0) 1753 819819
Fax:44 (0) 1753 819899
http://www.oki.co.uk
Oki Systems Ireland Limited
The Square Industrial Complex
Tallaght, Dublin 24, Ireland
Tel:+353 1 4049590
Fax:+353 1 4049591
http://www.oki.ie
Technical Support:
Tel:+353 1 4049570
Fax:+353 1 4049555
E-mail: tech.support@oki.ie
OKI Systems (Ireland) Ltd.
(Norther Ireland)
40 Sydenham Park
Belfast, BT4 1PW
Tel:+44 (0)28 90 20 1110
http://www.oki.ie
Technical Support:
Tel: +44 (0)28 90 221919
E-mail: tech.support@oki.ie
Oki Data Corporation
4-11-22 Shibaura, Minato-ku, Tokyo
108-8551, Japan
Tel:(81) 3 5445 6158
Fax:(81) 3 5445 6189
http://www.okidata.co.jp
Oki Data (Singapore) Pte. Ltd.
438A Alexandra Road #02-11/12
Alexandra Technopark
Singapore 119967
Tel:(65) 6221 3722
Fax:(65) 6594 0609
http://www.oki.com.sg
Oki Systems (Thailand) Ltd.
1168/81-82 Lumpini Tower,
27th Floor, Rama IV Rd.,
Tungmahamek, Sathorn,
Bangkok 10120
Tel: (66) 2679 9235
Fax :(66) 2679 9243
http://www.okisysthai.com
Oki Hong Kong Limited
Unit 607, 6/F, Island Place Tower,
510 Kings Road, North Point,
Hong Kong
Tel: (852) 3543 9200
Fax: (852) 3549 6040
www.okiprintingsolutions.com.hk
Oki Data(S) P Ltd. Malaysia Rep
Office
Suite 21.03, 21st Floor Menara IGB,
Mid Valley City,
Lingkaran Syed Pura 59200,
Kuala Lumpur, Malaysia
Tel: (60) 3 2287 1177
Fax: (60) 3 2287 1166
Oki Data (Australia) Pty. Ltd.
146 O'Riordan Street, Mascot,
NSW 2020 Australia
Tel:(61) 2 9667 7204
Fax:(61) 2 9667 7333
http://www.oki.com.au
Comworth Systems Ltd.
10 Constellation Drive Mairangi Bay,
Auckland, New Zealand
Tel:(64) 9 477 0500
Fax:(64) 9 477 0549
http://www.comworth.co.nz
OKI EUROPE LIMITED
Blays House
Wick Road
Egham
Surrey TW20 0HJ
United Kingdom
Tel: +44 (0) 208 219 2190
Fax: +44 (0) 208 219 2199
WWW.OKIPRINTINGSOLUTIONS.COM