
MC780f+ - Printer OKI - Free user manual and instructions
Find the device manual for free MC780f+ OKI in PDF.


User questions about MC780f+ OKI
0 question about this device. Answer the ones you know or ask your own.
Ask a new question about this device
Download the instructions for your Printer in PDF format for free! Find your manual MC780f+ - OKI and take your electronic device back in hand. On this page are published all the documents necessary for the use of your device. MC780f+ by OKI.
USER MANUAL MC780f+ OKI
User's Manual Basic Guide
natural_image
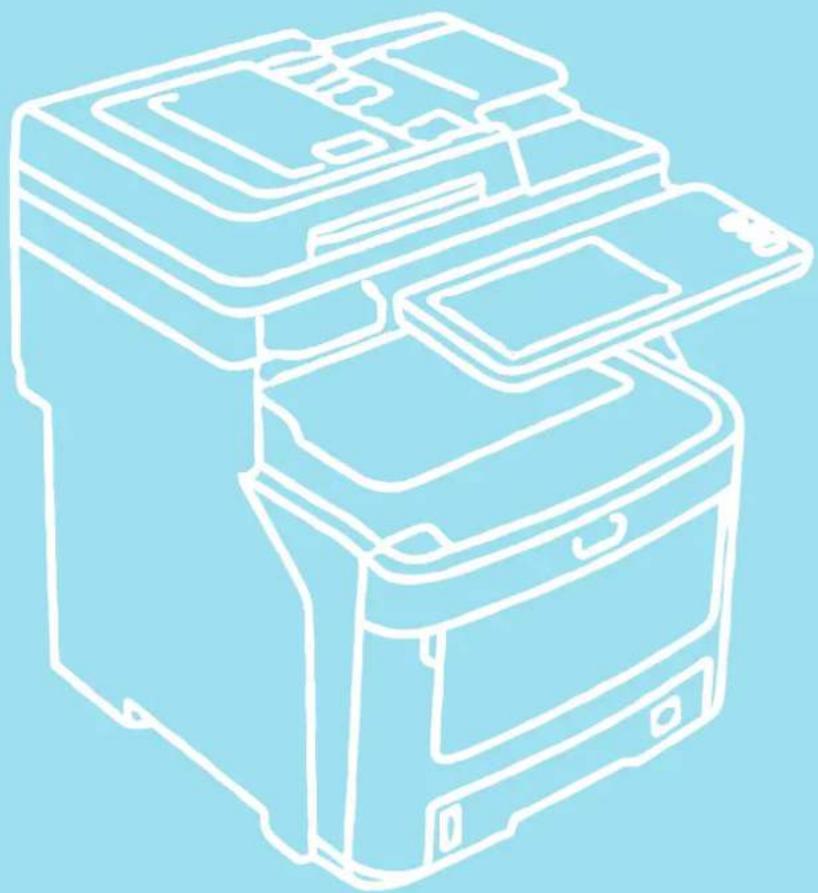
Line drawing of a printer with multiple screens and ports against a light blue background (no text or symbols)This manual contains cautions on how to use this product safety. Before you use this product, please make sure that you read this manual.

About the Manuals
The following user manuals are included with this product.
An electronic manual is included in the software DVD-ROM.
Step
Read the Setup Guide first.
Installing the machine
Setup Guide
Before using this machine, please read the warnings and precautions to ensure the safe use of this machine. We have also provided explanations about necessary preparations such as installation procedures and how to load the paper.
- Checking the Product
• Installing the Machine - Turning Power ON/OFF
- About Paper
- About Document Copies
• Using Each Function
Step
After you have completed the setup of this machine, read the Basic Guide.
Testing the machine, copier, fax, and scanner.
Basic Guide (This manual)
This guide describes each function and basic methods of use. In addition, we have provided an explanation about how to register data in the address book.
- Printing
- Copying
- Fax
- Scanning
- Utilities that can be used with this machine
Step
Read these guides as necessary.
Making full use of the machine
Advanced Guide
This guide describes the use of convenient print functions such as summarizing or sorting, and advanced functions such as job memory, color adjustment, user authentication, and access control. Explanations are also provided about settings that can be configured from the operator panel, as well as network settings.
- Printing Operations
- Copying Operations
• FAX Operations - Scanning Operations
- Registering Functions and Settings
- Setting Items/Printing Reports
When there is a problem or you need to repair the machine
Troubleshooting Guide
This guide describes how to deal with error messages, such as those that accompany paper jams, describes regular maintenance and cleaning of the device, and explains how to replace consumables. The machine specifications are included as well.
- Troubleshooting
- Maintenance

Read these guides as necessary. (continue)
Controlling/Setting from the Computer
Utility Guide
This guide describes the utility software for your computer.
• List of Utilities
- About AddressBook Viewer
- About e-Filing Backup/Restore Utility
- About TWAIN Driver and File Downloader
- About Remote Scan driver
- About WIA driver
Using the TopAccess
TopAccess Guide
This guide describes how to use the TopAccess.
• Overview
• [Device] Tab Page
• [Job Status] Tab Page
• [Logs] Tab Page
• [Registration] Tab Page
• [Counter] Tab Page
• [User Management] Tab Page
• [Administration] Tab Page
• [My Account] Tab Page
- Functional Setups
Using the e-Filing
e-Filing Guide
This guide describes how to use the e-Filing.
• e-Filing OVERVIEW
• OPERATIONS WITH THIS EQUIPMENT
• OVERVIEW OF e-Filing WEB UTILITY
• HOW TO MANAGE USER BOXES/FOLDERS
• MANAGING DOCUMENTS
• EDITING DOCUMENTS
• SYSTEM ADMINISTRATION
Notation used in this manual
The following notations may be used in this manual.
If there is no special description, Windows 7 is used as Windows, Mac OS X 10.7 is used as Mac OS X, and MC770dn is used as the machine for examples in this document.
Depending on your OS or model, the description on this document may be different.
- About the Administrator
- Administrator: The person who makes settings of this equipment and operates the equipment.
When the multiple persons use this equipment, the administrator is the person who manages the equipment.
- Network administrator: The person who manages the computer and the network.
Terms in this document
The following terms are used in this manual.
! Note
- Indicates important information on operations. Make sure to read sections with this mark.
Memo
- Indicates additional information on operations. You should read sections with this mark.

- Indicates where to look when you want to know more detailed or related information.
WARNING
- A warning provides additional information which, if ignored, may result in a risk of personal injury.
CAUTION
- A caution provides additional information which, if ignored, may result in equipment malfunction or damage.
Illustrations in this document
The illustrations of the machine used in this document may be different from what you actually see on your machine.
Table of contents
About the Manuals....2
About This Manual....4
Notation used in this manual....4
Terms in this document....4
Illustrations in this document....4
Convenient Functions ......7
1 Printing.... 11
Installing drivers on your computer.....12
Operating Environment ......13
Windows Operating Environment ......13
Macintosh Operating Environment....13
Preparations to print from Windows.....14
Setup via a network (Windows) ......14
Setup via USB (Windows)....17
Preparations to print from Mac OS X ....19
Setup via a network (Mac OS X)....19
PRINTING FROM WINDOWS ......21
Before Using the Printer Driver ....21
Configuring the options 21
Setting the department code....22
Copying the PPD file for Windows ....24
Printing From Application 24
Considerations and limitations 24
How to print.... 24
PRINTING FROM Macintosh ....26
Printing From Application on Mac OS X .....26
Considerations and limitations 26
How to print from Mac OS X ....26
2 Copying.... 27
HOW TO MAKE COPIES ....28
Before Making Copies....28
Storage of color copies 28
Placing Originals ......28
Acceptable originals.... 28
Placing originals on the document glass.... 28
Book-type originals 29
Using the RADF (Reversing Automatic Document Feeder) 29
Making Copies ....31
Basic copying procedure.... 31
Scanning the next original during copying 33
Interrupting copying and making other copies ..... 33
Proof copy.... 33
Selecting face down/up stacker 34
Bypass Copying 35
Bypass copying on standard size paper 36
Bypass copying on non-standard size paper..... 40
Using the Offline Stapler ....42
BASIC COPY MODES ....43
Before Using Copying Functions ....43
Default settings 43
Confirming the set functions 43
Clearing the set functions 43
Restrictions on function combinations 44
Paper Selection....44
Automatic Paper Selection (APS)...... 44
Selecting desired paper manually.... 44
Copying mixed-size originals in one operation ..... 45
Switching Color Modes 45
Setting Original Modes....46
Density Adjustment ....47
Enlargement and Reduction Copying ....47
Automatic Magnification Selection (AMS)...... 47
Specifying both the original size and the copy paper size separately.... 48
Specifying reproduction ratio manually.... 49
Copying photo originals in the optimal reproduction ratio for copy paper size (PHOTO ZOOM) .... 50
Selecting Finishing Mode ....51
Finishing modes and optional finishing devices..... 51
Sort/Group mode 52
Staple sort mode.... 53
Magazine sort 54
Duplex Copying....54
Making a 1-sided copy....55
Making a 2-sided copy.... 56
Performing Copy & File ....56
Setting share folder.... 58
3 Fax ....59
SENDING/RECEIVING A FAX....60
Sending a Fax 60
Basic procedures 60
Handling an original 61
Setting the transmission conditions 64
Specifying the recipient.... 66
Other transmissions.... 69
Receiving a Fax 71
Reception mode....71
Originals and paper.... 71
CHECKING AND CANCELING THE COMMUNICATIONS....73
Checking Communications ....73
Checking reserved transmissions 73
Checking communication status (log) ....73
Canceling the Transmission....74
Canceling the memory transmission.... 74
Canceling direct transmissions 75
Canceling reserved transmissions 75
4 Scanning 77
Viewing Touch Panel for Scan Menu ....78
Default Settings....78
Scan to e-Filing 79
Scan to File 79
Scan to E-mail....83
Scan to USB 86
Web Service (WS) Scan 88
Using Saved Scan Data 89
Using scan data saved as e-Filing documents ..... 89
Using scan data saved as files 89
Viewing the Scan Job Status and Log .....90
Viewing the scan job status 90
Viewing the scan job log 90
5 Utilities that can be used with this machine 91
List of Utilities ......92
Common Utilities for Windows/Macintosh......92
6 Index.... 93
- Convenient Functions

Copy documents while saving paper
Using the duplex function or multiple page function allows you to combine several different pages onto a single page. For example, you can print 16 pages of a document onto just two pages by printing four pages on each side (multiple page), and by printing on both sides of the paper (duplex). You will save 14 pages compared to copying every page.
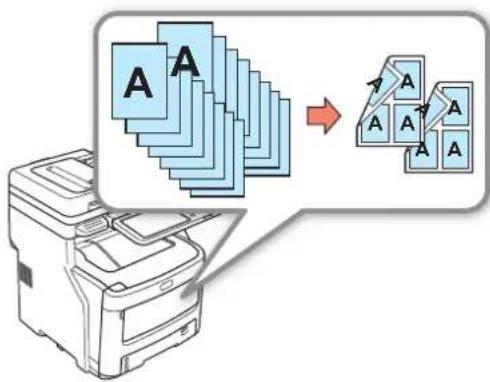
flowchart
graph TD
    A["Printer"] --> B["Document"]
    B --> C["Arrow pointing to Document"]
    style A fill:#cce5ff,stroke:#333
    style B fill:#cce5ff,stroke:#333
    style C fill:#cce5ff,stroke:#333

Automatically rotate sent or received document data
Images are rotated when documents are sent by fax, and the optimum paper size is automatically selected from the available paper, even if the orientation of received fax documents differs from the orientation of the paper. This allows you to send and receive faxes without having to worry about paper size or the orientation of documents.
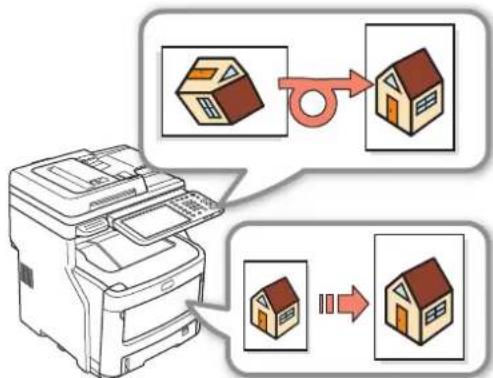
flowchart
graph TD
    A["Printer"] --> B["House Model"]
    B --> C["Output"]
    style A fill:#f9f,stroke:#333
    style B fill:#ccf,stroke:#333
    style C fill:#cfc,stroke:#333

Send received faxes, or save attachments included with sent and received emails
This allows faxes received while you are away from the machine to be sent to a computer to be checked. Configuring the machine to save communication data saves sent and received faxes or email attachments to a pre-configured location.
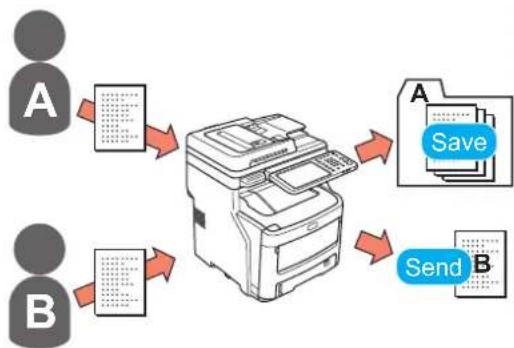
flowchart
graph TD
    A["Input A"] --> C["Printer"]
    B["Input B"] --> C
    C --> D["Output A: Save"]
    C --> E["Output B: Send"]
Scan printed documents
The full-color scanner can scan documents. Scans can be saved in shared folders on computers or USB memory (Scan to Network PC, Scan to USB Memory), or sent as attachments via email (Scan to Email).
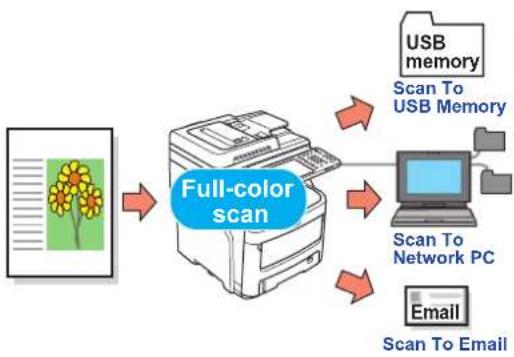
flowchart
graph TD
    A["Input Image"] --> B["Full-color scan"]
    B --> C["USB memory\nScan To USB Memory"]
    B --> D["Scan To Network PC"]
    B --> E["Email\nScan To Email"]
Use the machine as a network printer
High-quality images can be printed at high speed from various applications(printing A4, color/grayscale documents: MC760: 28 pages/min, MC770: 34 pages/min, MC780: 40 pages/min).
The machine can be connected to networks and used to print documents from multiple computers, which saves space in the office and lowers costs.
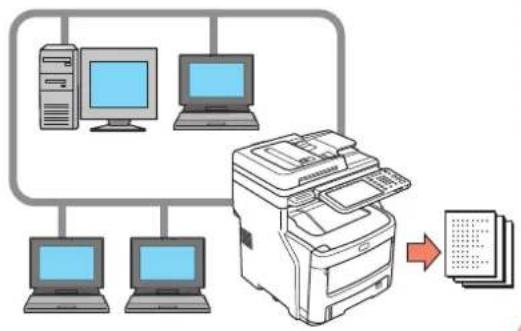
flowchart
graph TD
    A["Desktop Computer"] --> D["Printer"]
    B["Desktop Computer"] --> D
    C["Desktop Computer"] --> D
    D --> E["Output File"]
    style A fill:#f9f,stroke:#333
    style B fill:#f9f,stroke:#333
    style C fill:#f9f,stroke:#333
    style D fill:#ccf,stroke:#333
    style E fill:#cff,stroke:#333

Scan documents with ease
Scan documents with the scanner after scanning with the automatic document feeder, or scan documents with the automatic document feeder after scanning with the scanner. This function is convenient when documents have stapled pages mixed in with them.
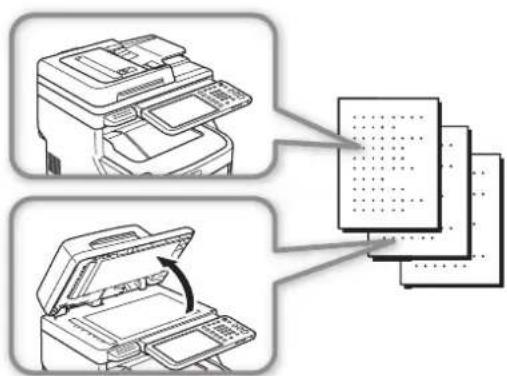
text_image
Diagram illustrating the process of printer printing and sheeting, showing steps from printer to sheeting with a magnified view.Print from various applications
The machine is equipped with PostScript3 emulation and PCL6 emulation, which allows printing from a wide range of applications.
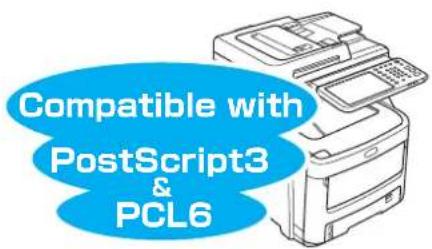
text_image
Compatible with PostScript3 & PCL6Perform several functions at the same time
The machine is capable of performing several functions at the same time, including sending a fax while copying a document, or printing from a computer while scanning a document. This allows several users to use the machine at the same time.
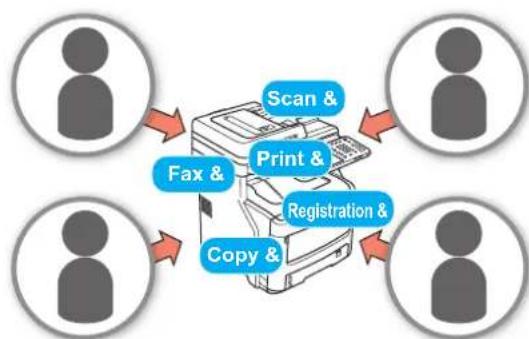
flowchart
graph TD
    A["Scan &"] --> B["Print &"]
    C["Fax &"] --> B
    D["Registration &"] --> B
    E["Copy &"] --> B
    B --> F["User icon"]
Restrict the types of users who can use the machine, or the types of functions that they can use.
Configuring user authentication means the machine can only be used by users who have been authorized by an administrator. This reduces the likelihood that the machine will be accessed by ordinary users, which helps to prevent information from being leaked. Configuring access restrictions means the functions that are available to each user can also be limited. This reduces unnecessary printing, which helps to conserve toner and paper.
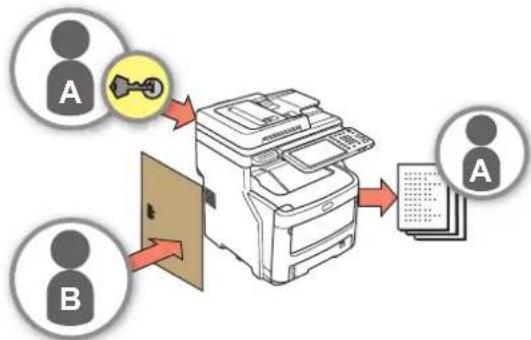
flowchart
graph TD
    A["Input Source A"] -->|Red Arrow| Printer["Printer"]
    B["Input Source B"] -->|Red Arrow| Printer
    Printer -->|Red Arrow| Output["Output Box"]
    Note: Diagram includes a yellow key icon pointing to the printer's key. Text labels 'A' and 'B' appear in the diagram, not part of the main flow.
Reducing power consumption when the machine is not in use
When the machine has been idle for a certain period of time, it automatically enters energy saver mode to reduce power consumption. You can enter the energy saver mode manually by pressing the [POWER SAVE] button on the operator panel. The [POWER SAVE] button will glow green when Energy Saver Mode is active.
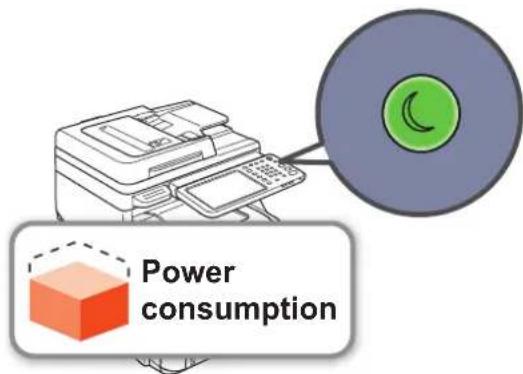
text_image
Power consumption
Store frequently used functions and settings in memory.
• [TEMPLATE]
A series of operations that is used regularly can be stored in [TEMPLATE] on the touch panel. For example, the following steps-"Reduce B4 documents by 81% to A4 size, copy and sort them, and create five sets"-can be stored in [TEMPLATE] and then be completed with a single touch of a key, using fewer keystrokes and greatly simplifying operation.
![OKI MC780f+ - • [TEMPLATE] - 1](/content/2026/05/816767/images/430ec9ab9ffe28cc14b11e7090f1365f3abfe0c41683280e19f600a75ff20363.jpg)
flowchart
graph TD
    A["Original document A4"] --> B["81% reduction A5"]
    B --> C["Sort and copy five sets"]
    D["Operate with a single touch"] --> E["TEMPLATE ?"]
Increase the types and amounts of paper that can be used.
![OKI MC780f+ - • [TEMPLATE] - 2](/content/2026/05/816767/images/89fb0a902effda1277e39222a2233457f77158111e1fca0e7c77f8e19f6aca96.jpg)
natural_image
Illustration of a printer with stacked documents and a stack of papers, no text or symbols present1
Printing
Installing drivers on your computer P.12
Operating Environment P.13
Preparations to print from Windows.... P.14
Preparations to print from Mac OS X P.19
PRINTING FROM WINDOWS ...... P.21
PRINTING FROM Macintosh P.26
Installing drivers on your computer
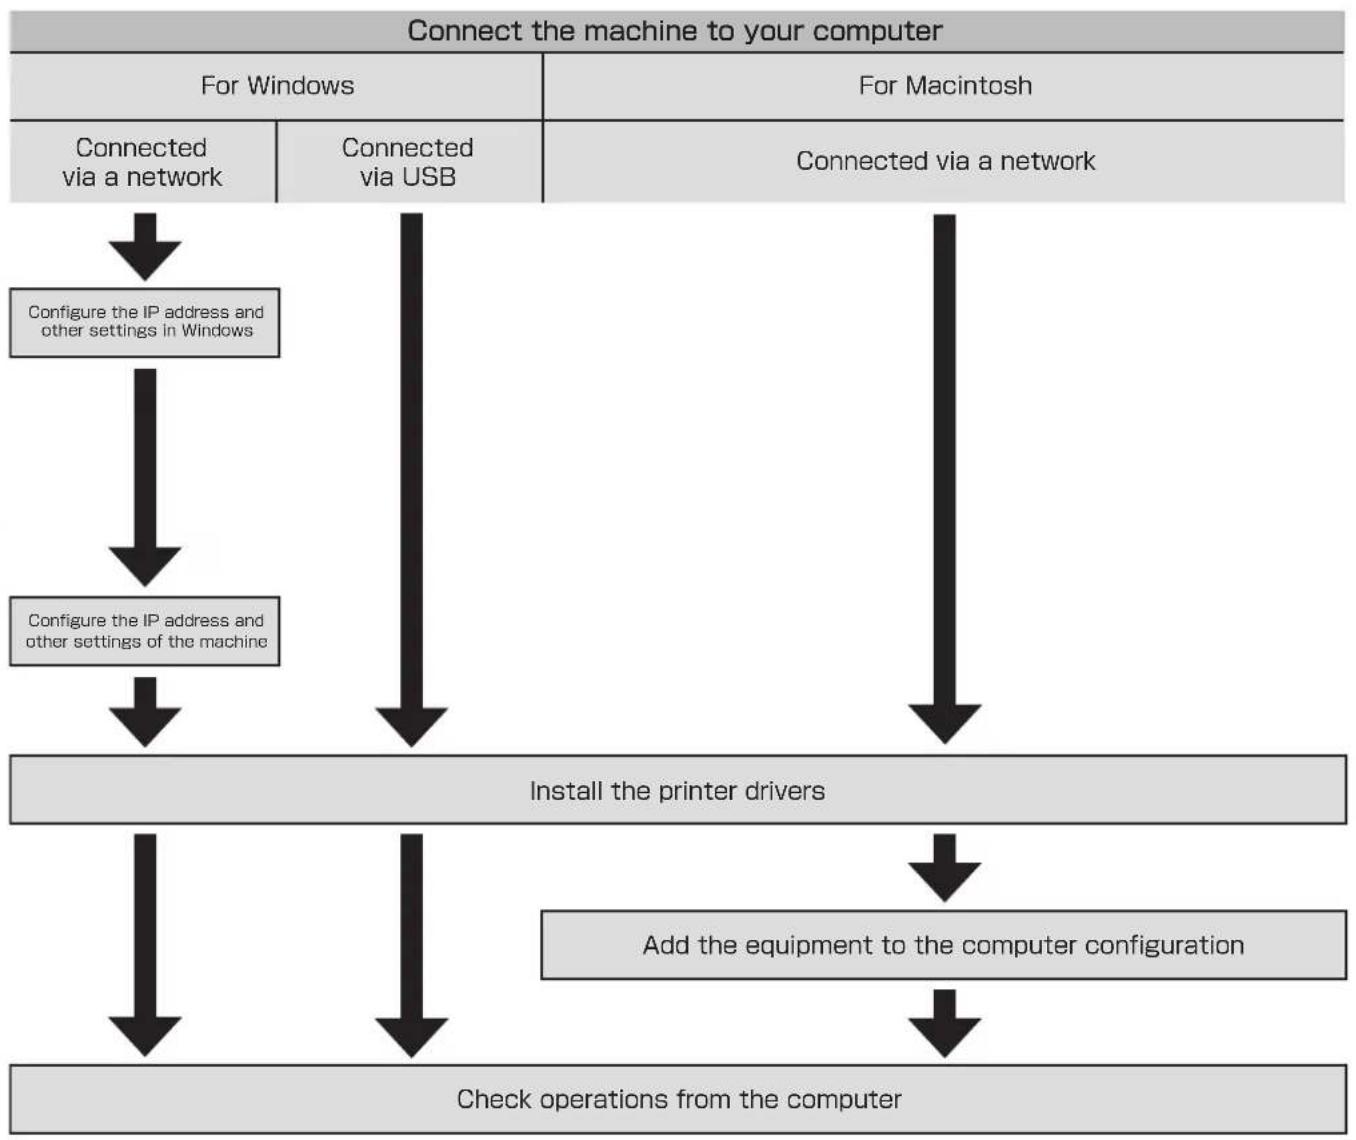
flowchart
graph TD
    A["Connect the machine to your computer"] --> B["For Windows"]
    A --> C["For Macintosh"]
    B --> D["Connected via a network"]
    B --> E["Connected via USB"]
    C --> F["Connected via a network"]
    D --> G["Configure the IP address and other settings in Windows"]
    E --> H["Configure the IP address and other settings of the machine"]
    F --> I["Install the printer drivers"]
    G --> I
    H --> I
    I --> J["Add the equipment to the computer configuration"]
    J --> K["Check operations from the computer"]
Operating Environment
Windows Operating Environment
• Windows 7/Windows 7 (64-bit version)
• Windows 8/8.1, Windows 8/8.1 (64-bit version)
• Windows Server 2008 R2
• Windows Vista/Windows Vista (64-bit version)
- Windows Server 2008/Windows Server 2008 (64-bit version)
- Windows XP/Windows XP (x64 version)
- Windows Server 2003/Windows Server 2003 (x64 version)
• Windows Server 2012
• Windows Server 2012 R2
! Note
• The machine will not operate under Windows 3.1/NT3.51/NT4.0/Me/98/95/2000.
- Printer drivers may differ from the information listed here due to driver updates.
Macintosh Operating Environment
• Mac OS X 10.4 to 10.9
! Note
- Printer drivers may differ from the information listed here due to driver updates.
● Preparations to print from Windows
Setup via a network (Windows)
Setup procedures
Turn the power to the machine and the computer ON.

Configure the IP address and other settings of the computer.

Configure the IP address and other settings of the machine.

Install the drivers and Standard TCP/IP Port using the "software DVD-ROM" supplied with the machine, and configure the network printer.
Set up the equipment
If there is no DHCP server on the network, you will need to configure the IP address of the computer and printer manually. If you have been instructed to configure a static IP address by your company network administrator, internet provider, or router manufacturer, you will need to configure the IP address of the computer and printer manually.
Check the IP address of this equipment by printing the system setting list or pressing the [SETTING] button on the operation panel and [ADMIN] - [NETWORK] - [IPv4].
Note
- An incorrect IP address configuration may prevent the network from working or the internet from connecting. Check with your company network administrator or internet connection provider the IP address and other settings that can be configured for the machine.
- The servers (such as DHCP) that are available on the network may differ depending on the network environment being used. Check with your company network administrator, internet provider, or router manufacturer.
- Administrator rights are required for the setup.
- Unless otherwise noted, procedures required when using Windows 7 are listed in the section "Set up in Windows." Screens and procedures may differ depending on the OS.
Memo
- This machine is compatible with network Plug&Play. If all connected computers are running Windows 7/Windows Vista/Windows XP/Windows Server 2008/Windows Server 2003, or if the connected router is compatible with network Plug&Play, an IP address will be configured automatically, even if there is no server on the network. There is no need to configure an IP address for the computer and printer manually, so start setting up the machine from Step 4.
1 Turn the power to the machine and the computer ON.
2 Configure the IP address and other settings in Windows.
! Note
- Skip to Step 3 if an IP address and other settings have already been configured in Windows, or if they are obtained automatically.
(1) Start Windows.
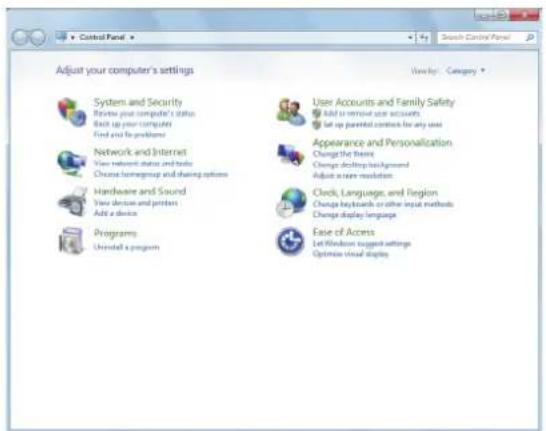
(2) Click [Start] and select [Control Panel].
(3) Click [View network status and tasks].
text_image
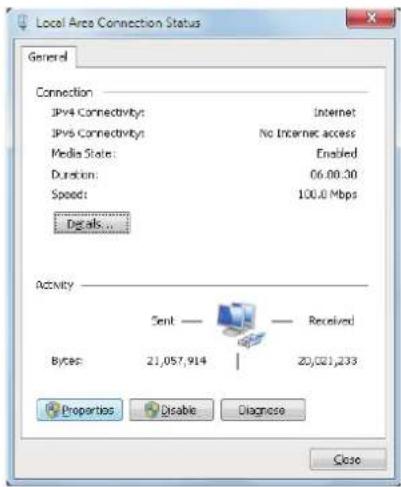
Control Panel Adjust your computer's settings System and Security Review your computer's status Back up your computer Find and to problems Network and Internet View relevant status and basic Choose homegroup and sharing options Hardware and Sound View device and printer Add a device Programs Untitled a program User Accounts and Family Safety Add to remove user accounts Set up parental contacts for any use Appearance and Personalization Change the theme Change desktop background Adjust access resolution. Clock, Language, and Region Change blockchain or other input methods Change display language Ease of Access Let Window support settings Optimize visual displays(4) Click [Local Area Connection], and click [Properties] from the [Local Area Connection Status] screen.
text_image
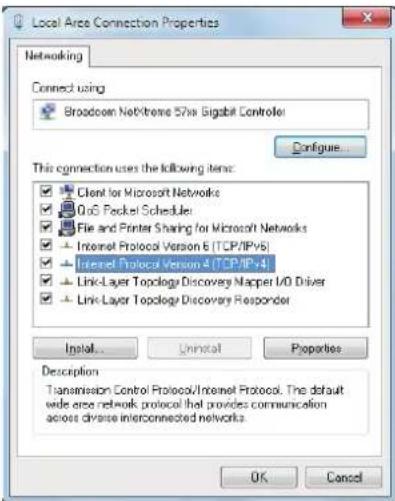
Local Area Connection Status General Connection JPVs Connectivity: Internet JPVs Connectivity: No Internet access Media State: Enabled Duration: 06.00.00 Speed: 100.0 Mbps Details... Activity Sent — Received Bytes: 21,057,914 | 20,021,233 Properties Disable Diagnose Close(5) Select [Internet Protocol Version 4 (TCP/IPv4)] and click [Properties].
text_image
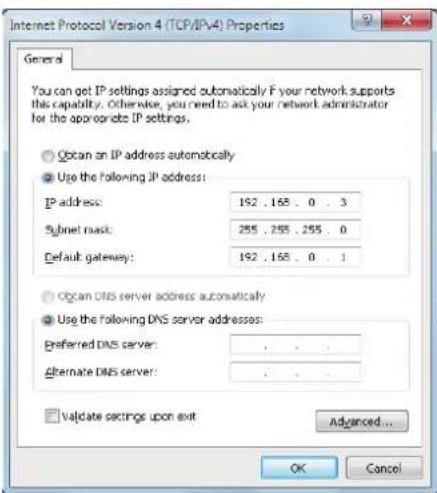
Local Area Connection Properties Networking Connect using Broadcom NetChrome 57a Gigabit Controller Configure... This connection uses the following items: ✓ Client for Microsoft Networks ✓ 0.6 Packet Schedule ✓ File and Printer Sharing for Microsoft Networks + Internet Protocol Version 6 (TCP/IPV6) + Internet Protocol Version 4 (TCP/IP-4) + Link-Layer Topology Discovery Mapper I/O Driver + Link-Layer Topology Discovery Responder Install... Uninstall Properties Description Transmission Control Protocol/Internet Protocol. The default wide area network protocol that provides communication across diverse interconnected networks. OK Cancel(6) Enter the numbers for the IP address, subnet mask, default gateway, and DNS server, and click [OK].
text_image
Internet Protocol Version 4 (TCP/IPV4) Properties General You can get IP settings assigned automatically if your network supports this capability. Otherwise, you need to ask your network administrator for the appropriate IP settings. ○ Obtain an IP address automatically ● Use the following IP address: IP address: 192 . 168 . 0 . 3 Subnet mask: 255 . 255 . 255 . 0 Default gateway: 192 . 168 . 0 . 1 ○ Obtain DNS server address automatically ● Use the following DNS server addresses: Preferred DNS server: . Alternate DNS server: . □ Validate settings upon exit Advanced... OK CancelMemo
- If an IP address is to be obtained automatically from a DHCP server, select [Obtain an IP address automatically] and do not enter an IP address.
- Do not enter numbers for the default gateway and DNS server if they are not being used. Close [Local Area Connection].
(7) Close [Local Area Connection].
3 Configure the IP address and other settings of the machine.
Memo
- Skip to Step 4 if an IP address and other settings have already been configured for the machine, or if they are obtained automatically.
(1) Turn the power to the machine ON, check that Windows has started, and load the "Software DVD-ROM" supplied with the machine.
(2) When [AutoPlay] is displayed, click [Run Setup.exe].
(3) Select the language and click "Next".
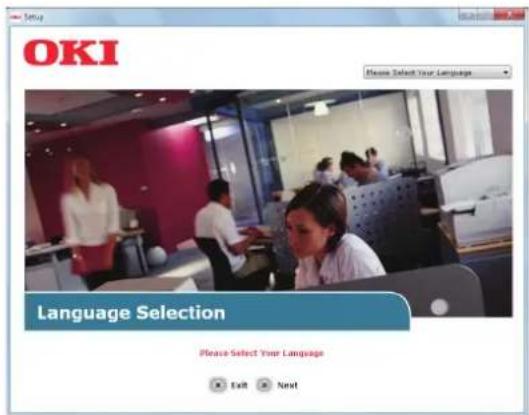
text_image
OKI Please Select Your Language Language Selection Please Select Your Language Exit Next(4) Select the device you want to use and click "Next".
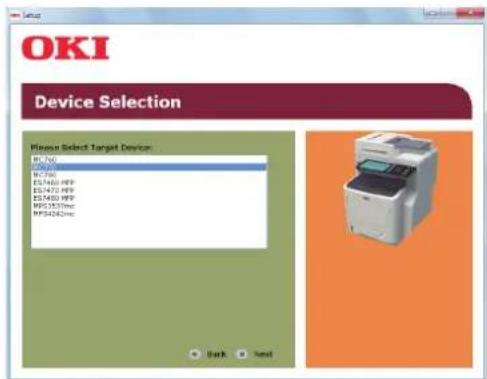
text_image
OKI Device Selection Please Select Target Device: R5760 R5761 R5762 R57480 PFP R57470 PFP R57460 PFP RP13539cm RP34242cm Back Next(5) Read the license agreement and click "I Agree".
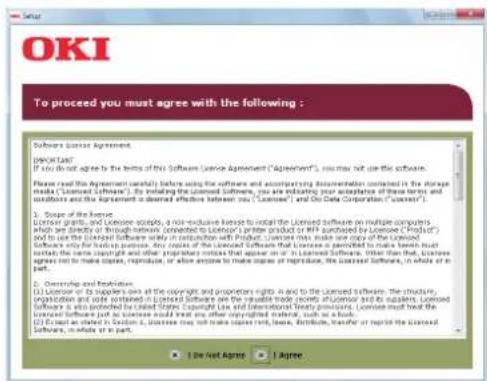
text_image
To proceed you must agree with the following: Software License Agreement. IMPORTANT: If you do not agree to the terms of this Software License Agreement ("Agreement"), you may not use the software. Please read the agreement carefully before using the software and accompanying documentation connected in the storage media ("Licensed Software"). It includes the Licensed Software, you are existing, your accordance of these terms and conditions and the agreement is desired effective between you ("Licensed") and Do Date Corporation ("Acceptor"). 1. Scope of the license: License grants, and License accepts, a non-exclusive license to install the Licensed software to multiple companies. Which are already or through within (connected to Licensed) file prior product or first purchased by Licensed "Product" or to use the Licensed Software directly in connection with Product. License must make one copy of the Licensed Software only for this product purchase. Any claims of the Licensed Software that License is permitted to make them best should take the terms copyright and other proprietary notices that appear on or in the Licensed Software. Other than that, License agrees not to make copies, copyables, or above accounts to make copies or reproduces, the licensed software, in whole or in part. 2. Ownership and Protection: (1) License or its suppliers own at the copyright and property rights and to the Licensed software. The structure, rights and/or rights contained in Licensed Software are the valuable role (most) of License and its suppliers. Licensed Software is also protected by United States Copyright Law and International Treaty provisions. License must bear the link between any of the licensees would treat any other copyrighted material, such as a book. (2) License must be acted in Section 3. License must not make copies print leave, return, transfer or repatriate the Licensed Software, in whole or in part. • Do Not Agree • Agree(6) Read "Environmental Advice for Users" and click "Next".
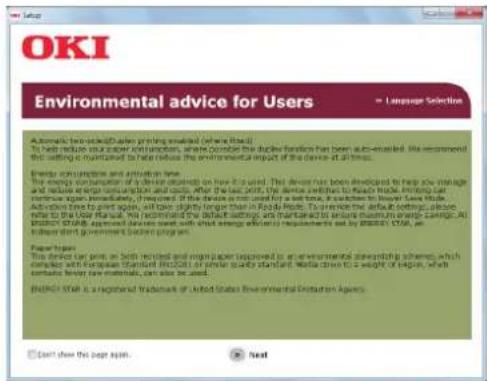
text_image
OKI Environmental advice for Users » Language Selection Automatic network-based printing installed (where fixed) To help reduce your order of operations, where Continue the order functions has been automated. We recommend this setting is guaranteed to take a break in the environmental impact of the device at all times. Energy consumption and activation time The energy consumption of a device is taken on how it is used. The device has been developed to help you manage and replace energy consumption and costs. After the use of OHI, the devices will be kept into a key time, it switches to lower User Mode. Activation time to print again, will take slightly longer than a Radio Mode. To prevent the default settings, please offer the lower User Mode. The default settings will then be set to secure business updates. At WHO STAB approved devices must meet energy efficiency requirements set by WHO STAB, an independent government under program. Power tips This device can pass in both formats and night packages approved to an environmental monitoring scheme, which includes with European Standard WHO or similar quality standards. Media down to a weight of region, which contains lower power models, can also be used. WHO STAB is a recommended trademark of United States Environmental Protection Agency.(7) Select the driver you want to install and click the "Multi Installation" button to install them all at once.
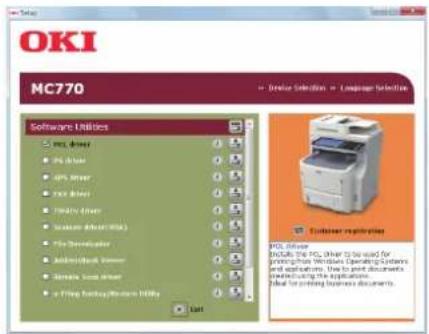
text_image
OKI MC770 Software Utilities PDL Driver PDL Driver 45% Driver PDL Driver 100% Driver 100% Driver (MDS) File Developer Address/Book Button Service Short Driver a Filing Inventory Utility Start Customer registry PDL Driver Include: the PDL Driver to use for printing a new software Operating Systems and applications. Use to print documents including the application. Use for printing business documents.(8) Click Network to search the device.
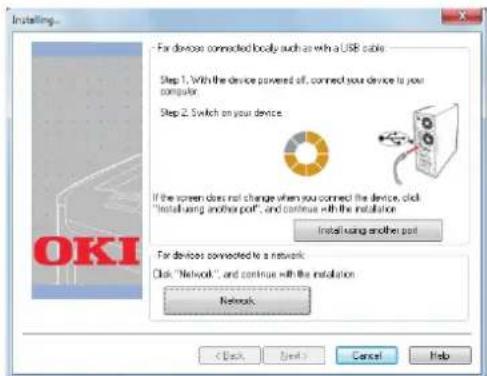
text_image
Installing... - For devices connected locally such as with a USB cable Step 1. With the device powered off, connect your device to your computer. Step 2. Switch on your device. If the screen does not change when you connect the device, click "Install using another port", and continue with the installation. Install using another port For devices converted to a network Click "Network", and continue with the installation. Network < Back Next > Cancel Help(9) When the target device is detected, select the device in the list, then click "Next". The installation begins.
If the device cannot be detected, specify the device's IP address and install it directly.
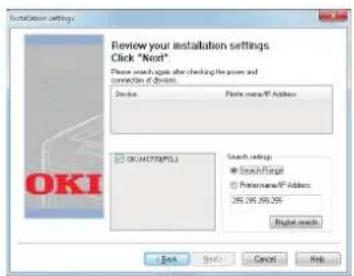
text_image
InstallSet settings Review your installation settings. Click "Next" Please search again after checking the room and connection of devices. Device: File name/XP Address OKI:OKI@XP153 Search settings SearchTarget Pretpenance/XP Address 265.04.89.09 Right search OK Help Cancel Help(10)Click "Finish".
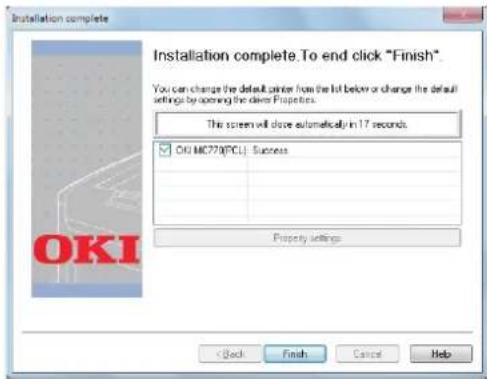
text_image
Installation complete Installation complete. To end click "Finish". You can change the default printer from the list below or change the default settings by opening the driver Properties. This screen will close automatically in 17 seconds. OKI MC770(PCL) Success Property Settings < Back Finish Cancel Help(11)Click "Exit" button to finish.
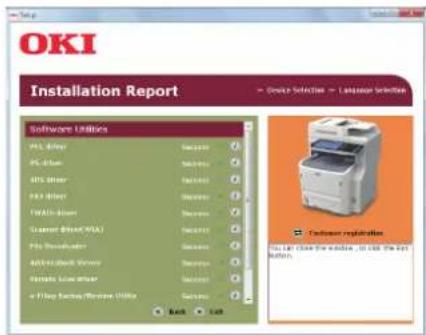
text_image
OKI Installation Report Software Utilities PLC Player PLC Player APS Player PAS Player PWALP Player Constant Effect (WIA) PPL Software Player ADSL/ADSL/ADSL Viewer PPTSL/PSL Viewer or HWay Backlog/Windows 100% Back Back Customer registration CL: LRT, CNTS, TLD, ULS, EDS, RDT, RDT, RDT, RDT, RDT, RDT, RDT, RDT, RDT, RDT, RDT, RDT, RDT, RDT, RDT, RDT, RDT, RDT, RDT, RDT, RDT, RDT, RDT, RDT, RDT, RDT, RDT, RDT, RDT, RDT, RDT, RDT, RDT, RDT4 Select [Start] - [Control Panel] - [Devices and Printers].
Setup is complete when an icon appears in the "Devices and Printers" folder.
Setup via USB (Windows)
Installing PCL printer drivers
! Note
• Computer administrator rights are required.
- Unless otherwise noted, procedures required when using Windows 7 are listed. Screens and procedures may differ depending on the OS.
- Do not turn ON the device power supply until a message stating that the power supply is ON is displayed.
1 Turn the power to the computer ON and start Windows.
The "Add New Hardware Wizard" is displayed when the machine power is ON. If this happens, click [Cancel] and turn the power to the machine OFF before proceeding to the next step.
2 Load the "Software DVD-ROM" supplied with the machine.
3 When [AutoPlay] is displayed, click [Run Setup.exe].
4 Select the language and click "Next".
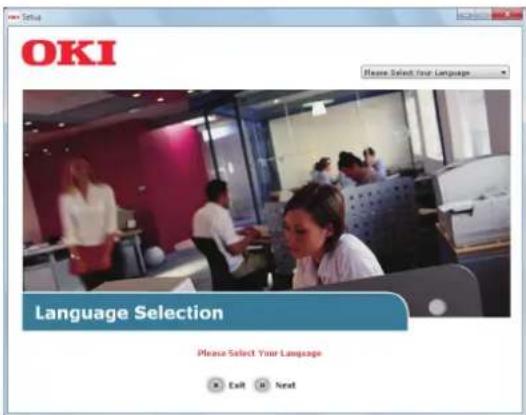
text_image
OKI Please Select Your Language Language Selection Please Select Your Language Exit Next5 Select the device you want to use and click "Next".
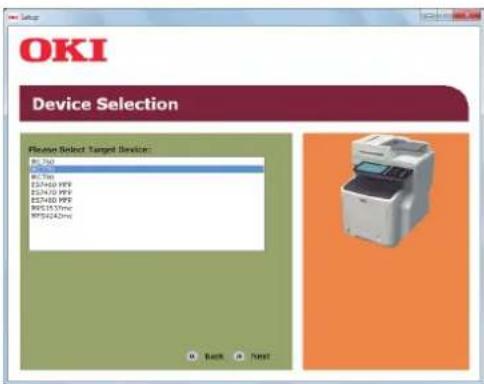
text_image
OKI Device Selection Please Select Target Device: Rc 700 Rc 700 E57400 PPF E57400 PPF E57400 PPF RFS15379m RFS15379m RFS15379m Back Next6 Read the license agreement and click "I Agree".
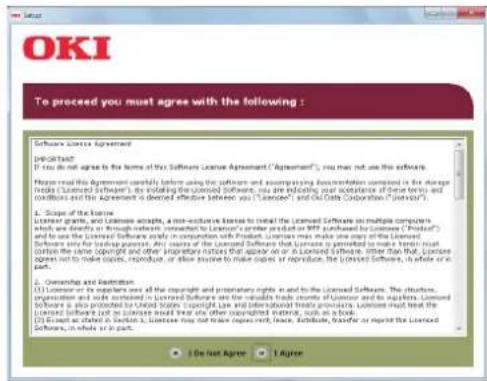
text_image
To proceed you must agree with the following: Software License Agreement DEPARTMENT: If you do not agree to the terms of the Software License Agreement ("Agreement"), you may not use this software. Please read this Agreement carefully before using the software and accompanying documentation together in the storage media ("Licensed Software"). This providing the Licensed Software, you are eligible, your approval of Deutschen and conditions and the Agreement is deemed effective between us ("Licensed" and Go-Oda Corporation ("Leisure permittent�)"). 1. Scope of the license License grant, and License acceptor, a non-excessive license to treat the Licensed Software in multiple companies which will be issued or through research, pursuant to the Licensed software product on MFI purchased by License ("Product") and to use the Licensed Software as a composition with Product. Licensees must make one copy of the Licensed Software only for trading process. Any claims of the Licensed Software shall ensure that Licensees is permitted to make their trust but contain the same copyright and other proprietary notices that appear or not as Licensed Software, either than that, Licensees shall not make copies, reproduce, or allow otherwise to make copies or reproduce, the Licensed Software, is whole or in part. 2. Ownership and Retention (1) License or its suppliers own all the copyright and proprietary rights in and to the Licensed Software. The structure, integration, and distribution of Licenses are the variables traded more of Licensee and to install. Licensed Software is also provided by United States Copyright Law and international trade provisions. Licensees must treat the Local Code or Local Licensee must treat any other copyright existing, such as a book. (2) Excess at this section: 1. Licensee may not take copies writ; lease, attribute, transfer or replicate the Licensed Software, is whole or in part. • Do not Agree • Agree7 Read "Environmental Advice for Users" and click "Next".

text_image
OKI Environmental advice for Users - Language Secrets Activate the environmental settings enabled user rights. To help ensure your power consumption, where people will be able to access the larger function you have been allowed. My recommended this setting is maintained to help reduce the environmental impact of the demand at all times. Energy consumption and utilization time. The energy consumption of a device depends on here in use. This device has been developed to help you manage and provide a better information about the service's role in making up their own services. We continue to follow up again immediately. It required. If the device is not used for a time it, it switches to Power Save Mode. Additional time to print again, we take implicitly longer than in Made Mode. To override the default settings, we refer to the User Manual, the recommended the default settings are maintained to ensure maximum energy efficiency and energy efficiency of ENERGY STAR approved delivery must with other energy efficiency requirements set by ENERGY STAR. On independent government (adjusted program). Key issues: This device can insert an additional and organic paper (required to an environmental implementation scheme), which is equipped with European Standard EXCELIS, or greater quality standard Media down to a weight of Organic, which is also available. For example, it can also be used. ENERGY STAR is a registered trademark of United States Environmental Protection Agency.8 Select the driver you want to install and click the "Multi Installation" button to install them all at once.
text_image
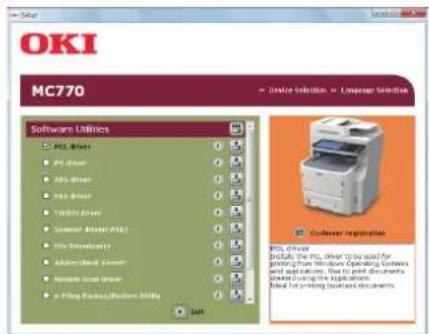
OKI MC770 Software Utilities PCL Driver PCL Driver PCL Driver TWO Driver System Driver (WLS) Time Transferer Administrative Server Remote Scan User -> Filing Backlog/Environment Utility Start Customer Application PCL Driver PCL Driver, the PCL Driver is to be used for printing your Windows Operating System and applications. This is to print documents below using the application. Final for printing business documents.9 Turn on the power of the device by following the on-screen guidance. When the device cannot be detected, click the "Install using another port" button.
text_image
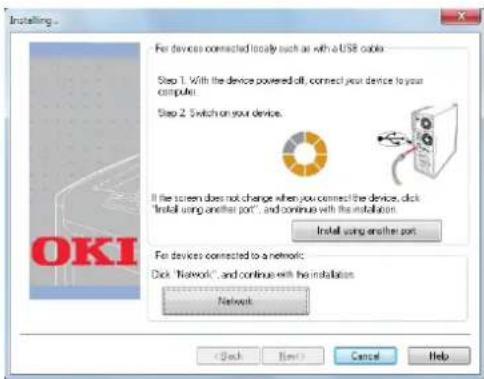
Installing... For devices connected locally such as with a USB cable Step 1. With the device powered off, connect your device to your computer. Step 2. Switch on your device. If the screen does not change when you connect the device, click "Install using another port", and continue with the installation. Install using another port. For devices connected to a network: Click "Network", and continue with the installation. Network < Back Next Cancel Help10 Click "Next".
text_image
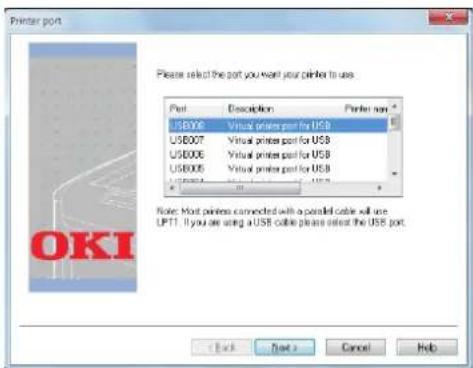
Printer port Please select the port you want your printer to use Port Description Printer port USB006 Virtual printer port for USB USB007 Virtual printer port for USB USB006 Virtual printer port for USB USB005 Virtual printer port for USB OKI Note: Most printers connected with a parallel cable will use UPT1. If you are using a USB cable please select the USB port. Back Next Cancel Help11 Click "Exit" button to finish.
text_image
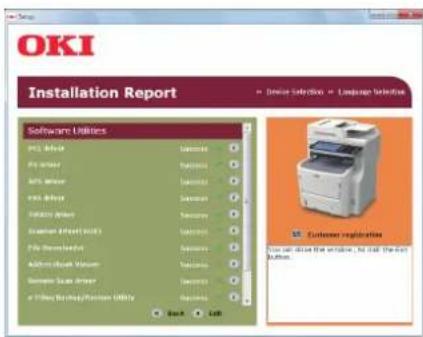
OKI Installation Report ■ Device Selection ▼ Luggage Selection Software Utilities PCI Driver PCI Driver PCI Driver PCI Driver Factory Driver Equipment Driver (ACU) File Environment Driver Address Book Review Service Driver ✓ File Load Protection Utility Back Left Customer registrations Use all, but use the website, no. staff, the copy button.12 Select [Start] - [Control Panel] - [Devices and Printers].
Setup is complete when an icon appears in the "Devices and Printers" folder.
Memo
- To use this machine as a printer, install any of [PCL driver], [PS driver] or [XPS driver].
• To use this machine as a facsimile, install [FAX driver]. - To use this machine as a scanner, install [Scanner driver] and [ActKey].
● Preparations to print from Mac OS X
Setup via a network (Mac OS X)
! Note
• Mac OS X and printer drivers may differ from information listed here due to driver updates.
The print method (protocol)
There is a method available to print from Mac OS X uses Bonjour (Rendezvous).
| Print method Features | |
| Bonjour(Rendezvous) | Uses the functions that are included as standard with Mac OS X |
Setup procedures
Bonjour (Rendezvous)
Install the printer drivers.

Create a network printer.

Configure the machine using Bonjour.
1 Turn the power to the machine ON. 2 Install the printer drivers.
! Note
- Turn OFF any virus protection software.
(1) Insert the "Software DVD-ROM" into the Macintosh.
(2) Double-click [XXXXX.pkg] within the [OKI] > [Drivers] > [OSX] > [OS X 10.7- ] folder.
(3) Enter the administrator password, and click [Install Software].
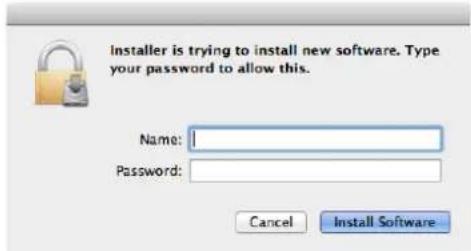
text_image
Installer is trying to install new software. Type your password to allow this. Name: Password: Cancel Install Software(4) Click [Close] after the installation is complete.
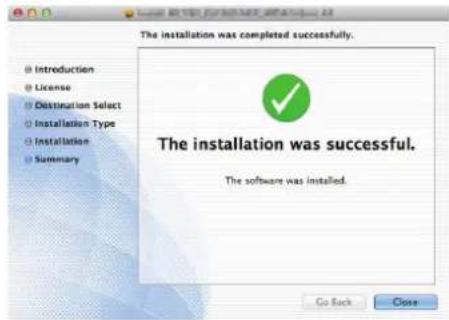
text_image
The installation was completed successfully. Introduction License Destination Select Installation Type Installation Summary The installation was successful. The software was installed. Go Back Close■ Use Bonjour
! Note
- If [Print & Fax] is open, click X to close it.
(1) Select [Apple Menu] - [System Preference].
(2) Click [Print & Scan].
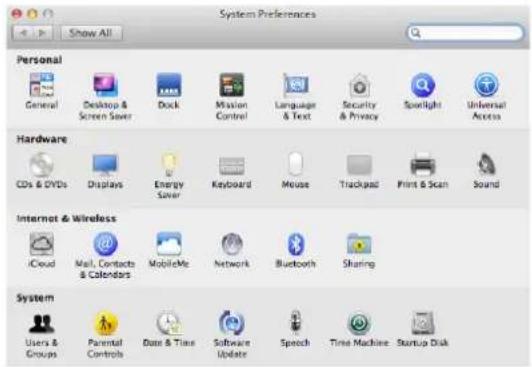
text_image
System Preferences Show All Personal General Desktop & Screen Saver Dock Mission Control Language & Text Security & Privacy Spotlight Universal Access Hardware CDs & DVDs Displays Energy Saver Keyboard Mouse Trackpad Print & Scan Sound Internet & Wireless iCloud Mail, Contacts & Calendars MobileMe Network Bluetooth Sharing System Users & Groups Parental Controls Base & Time Software Update Speech Time Machine Startup Disk(3) Click [+] .
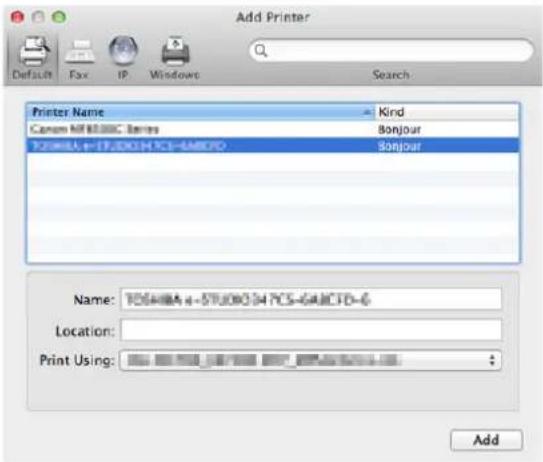
(4) Click [Default] and select the machine name is displayed, then click [Add].
text_image
Add Printer Default Fax IP Windows Search Printer Name Kind Canon MT MUSIC Series Bonjour TOSHA-FTJXCHTCS-AMCFO Bonjour Name: TOSHA-FTJXCHTCS-GAICFD-6 Location: Print Using: Add(5) In [Name] Box, the name that you selected in the list is displayed automatically.
Memo
- Clicking [Device Settings] in the control panel, and [Printer Information] - [Network] displays the MAC address.
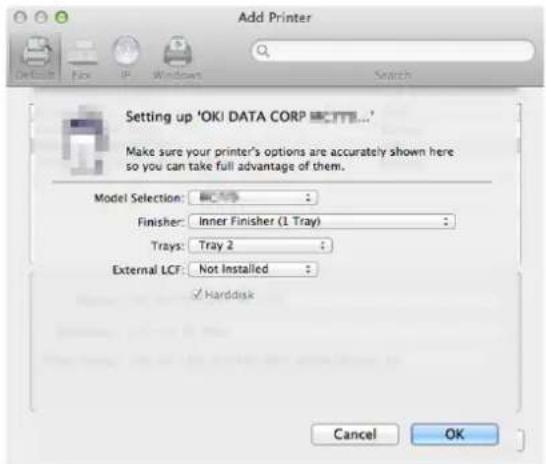
(6) Select the option device, and click [OK].
text_image
Add Printer Setting up 'OKI DATA CORP MCMS... Make sure your printer's options are accurately shown here so you can take full advantage of them. Model Selection: Finisher: Inner Finisher (1 Tray) Trays: Tray 2 External LCF: Not Installed ✓ Harddisk Cancel OK! Note
- The machine name will not be displayed correctly if the printer driver cannot load the PPD file correctly. If this happens, delete the machine and add it again.
PRINTING FROM WINDOWS
Before Using the Printer Driver
Before printing, you have to configure the following options:
- Configuration Settings
To use optional devices such as optional trays or the Finisher, you must first configure these devices. The features of these optional devices are not available unless you inform the system that the optional devices are installed.
Before printing, you can configure the following option if necessary:
• Department Code
You can use department codes to manage each job. For example, a system administrator can check how many sheets of copies a certain department has made. When the Department code is enabled, you are prompted to enter a department code before printing. If you enter the department code in the corresponding field in advance, you can print without having to do this every time. Ask your administrator about the codes. When SNMP communication between the equipment and your computer is enabled, you are also prompted to enter the code before printing.
Configuring the options
To use this equipment properly, you need to save the configuration of the options installed on the [Device Settings] tab menu after you installed the printer drivers. In the default setting, you can obtain the configuration data of options installed automatically by opening the [Device Settings] tab menu. If SNMP communication between this equipment and your computer is not available, or you want to configure options manually, see the following page:
P.21 "Configuring options manually"
! Note
- When SNMP communication between this equipment and your computer is enabled, you can retrieve the option configuration information by clicking [Update Now].
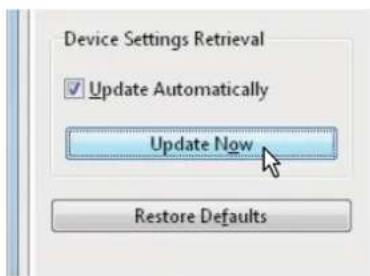
text_image
Device Settings Retrieval Update Automatically Update Now Restore Defaults■ Configuring options manually
If SNMP communication between this equipment and your computer is not available:
Setting the [Device Settings] tab manually
! Note
- You need to log in to Windows with the "Administrator" privilege.
1 Click [Start] menu and select [Devices and Printers].
The Printers folder appears.
2 Select the printer driver for this equipment, and then click [Printer properties] in the [File] menu.
The printer driver properties dialog box appears.
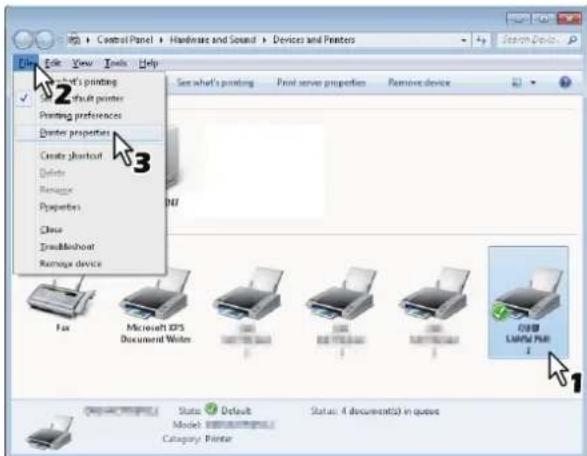
text_image
Control Panel > Hardware and Sound > Devices and Printers Edit View Tools Help 2 Default printer Printing preferences Denter properties Create shortcut Delete Remove Properties Class Doubleboot Rename device See what's printing Print server properties Remove device Fax Microsoft EPS Document Wafer 100 100 100 100 100 100 100 100 100 100 100 100 100 100 100 100 100 100 100 100 100 100 100 100 100 101 Status Default Status (4 documents) in queue Model: 1.0.0.0.0.0.0.0.0.0.0.0.0.0.0.0.0.0.0.0.0.0.0.0.0.0.0.0.0.0.0.0.0.0.0.0.0.0.0.0.0.0.0.0.0.0.0.0.0.0.0.1- If the [File] menu is not displayed, press [Alt].
- If the dialog box displayed does not allow the printer driver properties to be changed, follow the procedure below.
- For Windows 7, some tab menus have a button in the printer driver properties. To change the properties, click on it. If the properties cannot be changed, ask your network administrator.
• To change a network-installed printer driver, the administrator privilege is necessary. Ask your network administrator for details.
3 Display the [Device Settings] tab menu, and set the following options.
![OKI MC780f+ - Display the [Device Settings] tab menu, and set the following options. - 1](/content/2026/05/816767/images/a4d5ff4756a6712ae5392961f523930cbf7ac4542dc53831b4ad2e4e9ed4d35f.jpg)
text_image
OKI MC778(PCL) Properties General Sharing Ports Advanced Color Management Security Device Settings Model Selections MC770 Option Trays: Tray 1 Finisher None Device Settings Retrieval Update Automatically Update Now Restore Defaults Tray Settings Account Settings Customization Version Information OK Cancel Apply HelpModel Selection — This sets the model type. The setup items of the printer driver are changed according to the model selected.
Option — This option sets whether the following optional devices are installed.
- Trays — This sets whether or not the Paper Feed Unit is installed.
- Finisher — This sets whether or not the Inner Finisher is installed.
![OKI MC780f+ - Display the [Device Settings] tab menu, and set the following options. - 2](/content/2026/05/816767/images/7bd79244c4426c8ed8361800ad0406cf477ec38b453b38f3307fc6ee8ff2fa21.jpg)
- Setup items differ depending on the model and the option configuration.
- For more information about each item, see the descriptions about the [Device Settings] tab.
Advanced Guide
4 Click [Tray Settings].
The [Tray Settings] dialog box appears.
5 Set the following options and click [OK].
![OKI MC780f+ - Set the following options and click [OK]. - 1](/content/2026/05/816767/images/84403130e54d35da14c63e8d787f7d3fad49060fc3b9ee975b69585186358365.jpg)
text_image
Tray Settings Paper Size Paper Type Attribute Tray 1: A4 Thick 3 None Tray 2: A4 Plain None Tray 3: A4 Plain None Tray 5: A4 Plain None LGF: A4 Plain None MPT: Automatic Plain None Override Application Paper Source Settings Restore Defaults OK CancelTray 1 — Select the size and type of paper that is loaded in the 1st tray.
Tray 2 — Select the size and type of paper that is loaded in the 2nd tray.
Tray 3 — Select the size and type of paper that is loaded in the 3rd tray.
Tray 4 — Select the size and type of paper that is loaded in the 4th tray.
MPT — Select the type of paper that is loaded in the Multi-Purpose Tray (MPT).
Override Application Paper Source Settings — Select this check box to use the paper source setting in the printer driver rather than the application setting.
![OKI MC780f+ - Set the following options and click [OK]. - 2](/content/2026/05/816767/images/c02e3d3ed63f136a3aa77c3b76668d2b17d3b39fba029cdf22a6b0225d825e1a.jpg)
- Setup items differ depending on the model and the option configuration.
- For more information about each item, see the descriptions about the Tray Settings.
Advanced Guide
6 Click [Apply] or [OK] to save settings.
Setting the department code
When this equipment is managed by department codes, you have to enter yours on the printer driver.
This allows a network administrator to check the number of copies printed by specific department members. Also users can check who submitted the print jobs, by touch panel display and monitoring tools.
Please ask your administrator whether you should enter the Department Code.
! Note
- When the User Management setting is enabled, it is used to manage a print job instead of the Department Code Management setting. In this case, a user name that has been entered to log in to your computer is used for the authentication of the print job. Therefore, you do not need to set your department code to the printer driver but you must register your user name in advance. If your user name is not registered, the print job is processed as an invalid one according to the User Authentication Enforcement setting. Also if a print job is sent in RAW format, it is processed according to the RAW Print Job setting. For more information about the User Authentication Enforcement setting or the RAW Print Job setting, refer to the TopAccess Guide.
- If the No Limit Black function is enabled, you do not have to specify the department code when you print a document with [Black and White] selected for the [Color] option in the [Basic] tab of printer driver.
Memo
- How the equipment performs printing for an invalid department code print job, for which an invalid department code is specified, varies depending on the Invalid Department Code Print Job setting that can be set in the TopAccess Administrator mode and whether SNMP communication is enabled or not.
- When SNMP communication is enabled and Invalid Department Code Print Job is set to [Store to invalid job list], an error message will be displayed when an invalid department code is entered.
- When SNMP communication is disabled and Invalid Department Code Print Job is set to [Store to invalid job list], the invalid department code print job will be stored in the invalid department code print job list without printing.
- When the Invalid Department Code Print Job is set to [Print], the invalid department code print job will be printed.
- When the Invalid Department Code Print Job is set to [Delete], the invalid department code print job will be deleted.
- A department code needs to be entered every time you begin printing. If you have to use a different department code for each print job, enter it when you begin printing.
Entering department code
1 Click [Start] menu and select [Devices and Printers].
The Printers folder appears.
2 Select the printer driver of this equipment, and then click [File] menu and select [Printing Preferences].
![OKI MC780f+ - Select the printer driver of this equipment, and then click [File] menu and select [Printing Preferences]. - 1](/content/2026/05/816767/images/6f1890813e8762e1bf61aa72dd92e265810e078f98c9b3f2526ead76e669cedc.jpg)
text_image
Control Panel > Hardware and Sound > Devices and Printers View Tools Help 1 2 3 See what's printing Print server properties Remove device Printing preferences Printer properties Create Shortout Delete Rename Properties Class Transderboard Remove device Fax Microsoft EPS Document Writing WIN WIN WIN WIN WIN WIN WIN WIN WIN WIN WIN WIN WIN WIN WIN WIN WIN WIN WIN WIN WIN WIN WIN WIN WIN WIN WIN WIN WIN WIN WIN WIN WIN WIN WIN WIN WIN WIN WIN WIN WIN WIN WIN WIN WIN WIN WIN WIN WIN WIN Status Default Status: 4 document(s) in queue- If the [File] menu is not displayed, press [Alt].
- The printing preferences dialog box appears.
3 Display the [Others] tab menu and enter your department code in the [Department Code] box.
![OKI MC780f+ - Display the [Others] tab menu and enter your department code in the [Department Code] box. - 1](/content/2026/05/816767/images/0082f664ff6fe0678e5c92a5aebebe27f2eb1bea95de878d55cdd3642fba95d2.jpg)
text_image
Okt MC270(PCL) Printing Preferences Basic Finishing Paper HandingwerImage Quality Effect Others Templates Print Jobs: Normal Print Default Menu Set Basic 1 TopAccess Tager Save Do not Print Blank Pages Letterhead Print Mode SNMP Communication SNMP Settings Output Devices Add Printer Custom Paper Size User name (Alias): Department Code: Hide Desktop Code(2) Custom Settings File Import Export Restore Defaults Import Export OK Cancel Apply HelpIn the [Department Code] box, you can enter a department code within 63 characters.
Memo
- A department code must consist of one-byte characters such as numbers from 0 to 9, letters of the alphabet from A to Z (both capital and small ones), a hyphen (-), an underscore (_), and a period (.).
4 Click [Apply] or [OK] to save the settings.
Copying the PPD file for Windows
The Client Utilities/User Documentation DVD contains a printer description file for popular Windows applications. For applications not allowing the automatic installation of PPD files, copy the PPD file to a proper directory in order to enable printer-specific settings in the [Print] dialog box or the [Page] Setup dialog box.
Printing From Application
This section describes how to print a document from application.
P.24 "Considerations and limitations"
P.24 "How to print"
Considerations and limitations
- When the User Management setting is enabled, it is used to manage a print job instead of the Department Code Management setting. In this case, a user name that has been entered to log in to your computer is used for the authentication of the print job. Therefore, you do not need to set your department code to the printer driver but you must register your user name in advance. If your user name is not registered, the print job is processed as an invalid one according to the User Authentication Enforcement setting. Also if a print job is sent in RAW format, it is processed according to the RAW Print Job setting. For more information about the User Authentication Enforcement setting or the RAW Print Job setting, refer to the TopAccess Guide. When the Windows Domain Authentication is used for the User Management Setting, your computer must log in the domain.
- If the No Limit Black function is enabled, you do not have to specify the department code when you print a document selecting [Black and White] in the [Color] option in the [Basic] tab of printer driver.
- Some print options can be set from both the application and the printer driver, such as collation. If the collation is set from the application, documents may not be properly printed. If that happens, use the printer driver to set the collation. Depending on the application, some print options such as the orientation need to be set from the application. For print options that can be set from both the application and the driver, refer to the manual of the application.
Cautionary points when using the PS3 printer driver
- When printing with the PS3 printer driver from Adobe Acrobat, this option is disabled.
- When any of the following functions is set in the PS3 printer driver, the print function will work appropriately even if print data are generated in the application side since this happens in the printer driver side by ignoring the pass-through printing of the application.
- Print to Overlay file
- Print Overlay Image
- N i n 1
- Booklet
- Interleave (Duplicate)
- Templates printing
- Print Paper Size
- Image Scale
- Poster Print
- Tandem Print
How to print
Once you have installed the printer driver and configured it properly, you can print directly from most Windows applications. Simply choose the Print command from your application.
You can print using the various functions by setting print options on the printer driver.
Printing from Windows applications
The following describes an example for printing from Notepad on Windows 7.
1 Open a file and select [Print] from the [File] menu of the applications.
The [Print] dialog box appears.
2 Select the printer driver of the equipment to be used and click [Preferences].
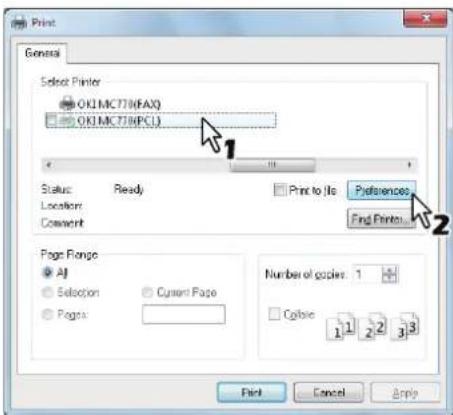
text_image
Print General Select Printer OK1.MC778(FAX) OK1.MC778(PCL) Status Ready Print to Use Preferences Location: Comment Page Fonge All Selection Current Page Pages Number of copies: 1 Color: 1 1 2 2 3 3 Print Cancel EntryThe printing preferences dialog box appears.
Memo
- The procedures for displaying the properties dialog for the printer driver may be different depending on the application that you are using. See your application's manual about displaying the machine properties dialog box.
3 Setting the print options on each tab according to how you want to print.
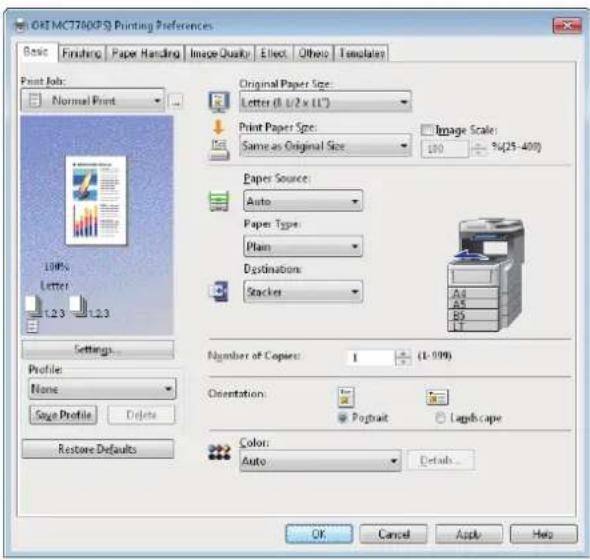
text_image
ORE MCCT700FS Printing Preferences Basic Finishing Paper Handling(Image Quality ElectOthers Templates Print Job: Normal Print Original Paper Size: Letter (1.1/2 x 1.1°) Print Paper Size: Same as Original Size Image Scale: 100 %(25-400) Paper Source: Auto Paper Type: Plain Destinations: Stacker Number of Copies: 1 (1-999) Orientation: Portrait Laghs cape Color: Auto Restore Defaults OK Cancel Apply Help- Setting the print options varies depending on how you want to print a document.
- You can also set the print options using setting profiles.
4 Click [OK] to save the settings.
5 Click [Print] to print a document.
![OKI MC780f+ - Click [Print] to print a document. - 1](/content/2026/05/816767/images/7878b3b5546bd61fddc8e57f205cf1791659393392475aaf8da0f29ab912167b.jpg)
text_image
Print General Select Printer OKI MC770(FAX) OKI MC770(PCL) Status: Ready Location: Comment Print to file References End Printer Page Range All Selection Current Page Pages: Number of copies: 1 Colate: 1 2 3 Print Cancel ApplyCautionary points when the [Enter the user credentials manually] option is used
When this option is enabled on this equipment, you are prompted to enter your user name and password before printing a document.
When the dialog box below appears, enter your user name and password, and then click [OK].
![OKI MC780f+ - Cautionary points when the [Enter the user credentials manually] option is used - 1](/content/2026/05/816767/images/e1cd0f4b7defbd3e25b6c7c2dd2fcf317e1bcc69fe1f308ebc1d91024901efa1.jpg)
text_image
User Authentication Enter user name and password. User Name: User01 Password: ****** OK Cancel! Note
- Up to 128 characters can be entered in the [User Name] box, and up to 64 characters in the [Password] box.
- The values entered in the above boxes are not stored. Therefore, you must enter your user name and password every time you print a document.
- You can make settings for this option on the [Device Settings] tab.
PRINTING FROM Macintosh
Printing From Application on Mac OS X
Considerations and limitations
- If any double-byte character is included in the user name or document name when printing is performed, the printing job is displayed with [OSX User] or [OSX Document] on the touch panel display of the equipment. The user name and document name are displayed as they are only for one-byte characters.
- The Cover Pages option of the Printer Features menu and the booklet printing cannot be used at the same time.
- The Cover Pages option of the Printer Features menu and the N-up printing (multiple pages per sheet) cannot be used at the same time.
- The Cover Pages option of the Printer Features menu and the Cover Page option for sending a print job with a banner page cannot be used at the same time.
- The e-Filing function cannot be used together with Custom Paper Size, Magazine Sort, Twin Color, Printing in 1200 dpi, 600 x 1200 dpi, Hold Print, Proof Print, or Private Print.
- To perform proof printing, private printing, hold printing, scheduled printing or e-Filing on Mac OS X 10.5, use LPR, AppleTalk or Bonjour.
- To perform proof printing, private printing, hold printing, scheduled printing or e-Filing on Mac OS X 10.6.x to Mac OS X 10.9.x, use LPR or Bonjour.
- To use the user authentication function on Mac OS X 10.4.x, perform the domain settings on [Applications] > [Utilities] > [Directory Access] > [Services] > [BSD Flat and NIS].
- To use the user authentication function on Mac OS X 10.5.x, perform the domain settings on [Applications] > [Utilities] > [Directory Utilities] > [Services] > [BSD Flat and NIS].
- To use the user authentication function on Mac OS X 10.6.x to Mac OS X 10.9.x, perform the domain settings on [Accounts] > [Login Option] > [Network Account Server] > [Open the Directory Utility] > [Services] > [BSD Flat and NIS].
How to print from Mac OS X
You do not need to switch printers before starting printing because they are all managed under the setting of [Print & Fax] of [System Preferences]. Once a printer is added to the Printer List, you can select any printer directly from the [Page Setup] dialog box or the [Print] dialog box.
■ Setting options and printing from Macintosh Computers
In Mac OS X applications, print options are set from both the [Page Setup] dialog box and the [Print] dialog box.
Printing from Macintosh applications
1 Open a file and select [Page Setup] from the [File] menu of the application.
2 Select the name of the equipment in the [Format For] box and specify the Page Setup settings for your print job.
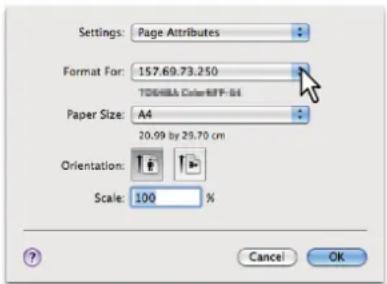
text_image
Settings: Page Attributes Format For: 157.69.73.250 TOMURA COLOR:84-84 Paper Size: A4 20.99 by 29.70 cm Orientation: Scale: 100 % Cancel OKSetting the Page Setup varies depending on how you want to print a document.
3 Click [OK] to save the Page Setup settings.
4 Select [Print] from the [File] menu of the application.
5 In the dialog box that appears, make sure the name of the equipment is selected at the [Printer] box and specify the Print settings for your print job.
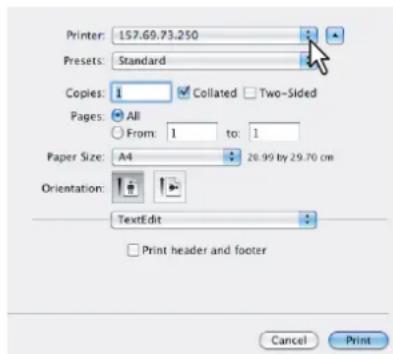
text_image
Printer: 157.69.73.250 Presets: Standard Copies: 1 Collated Two-Sided Pages: All From: 1 to: 1 Paper Size: A4 26.99 by 29.70 cm Orientation: TextEdit Print header and footer Cancel PrintSetting the Print Setup varies depending on how you want to print a document.
! Note
- The [Print] dialog boxes vary depending on applications.
6 Click [Print] to print a document.
! Note
- The content set in the [Print] dialog box can be saved as [Presets]. Select [Save as] in the [Presets] box and save it under the desired name. If you use this preset content as a default setting, select it in the [Presets] box.
2
Copying
HOW TO MAKE COPIES ...... P.28
BASIC COPY MODES P.43
HOW TO MAKE COPIES
Before Making Copies
Storage of color copies
When storing color copies, be careful of the following:
- Avoid a place exposed to light. The colors may fade when they are stored in such a place for a long time.
- If copies are stored pressed between plastic sheets made of chloroethylene for a long time, toner may melt and stick to the plastic. For long-time storage, use polyethylene binders.
- When a color copy is folded, toner at the folded part may flake off. Do not fold color copies when storing them.
- Toner on copies may melt if it touches solvent or ink not fully dried. Keep copies away from them.
- When copies are left under an extremely high temperature environment such as in the vicinity of a heater, toner may melt. Store them at room temperature and avoid extreme temperature changes.
Placing Originals
Acceptable originals
When the RADF (Reversing Automatic Document Feeder) is used, 2-sided originals can be automatically scanned one sheet after another. When the document glass is used, originals such as OHP films, tracing paper, booklet or 3-dimensional objects, that cannot be placed on the RADF can be scanned, as well as plain paper.
| Location | Maximum size | Paper weight | Accetable sizes for automatic size detection |
| Document glass | Length: 215.9mm (8.5")Width: 355.6mm (14") | 20mm or less | Document size cannot be detected automatically. |
| RADF | 60 to 105 g/m2 | Other than North America:mixed-size setting is disabled:A4, A5, B5, Foliomixed-size setting is enabled:A4, FolioNorth America:Letter, Legal, Legal13 |
! Note
- Automatic size detection does not work properly when A/B format originals are used in equipment for North America. It does not work properly when LT format originals are used in equipment other than that for North America.
- In some models, automatic size detection does not work properly when K format paper is used for printing. (K format is a standard paper size in China.)
- Do not place any heavy objects (8 Kg(18lb.) or over) on the document glass and do not press on it with force.
- Be sure to place A5-size originals in a landscape direction when using the RADF.
- A maximum of 1000 sheets can be scanned per 1 copy job or up until the embedded memory becomes full.
Placing originals on the document glass
The document glass can be used for originals such as OHP films or tracing paper, as well as plain paper, that cannot be placed on the RADF.
CAUTION
Do not place any heavy objects (8 Kg(18lb.) or over) on the document glass and do not press on it with force. Breaking the glass could injure you.
1 Raise the RADF.
2 Place the original with its face down on the document glass and align it with the left rear corner of the glass.
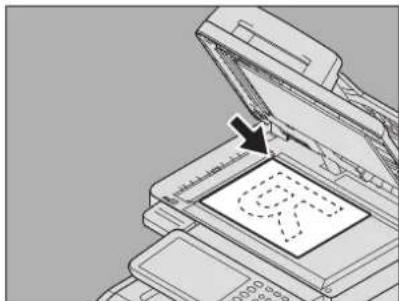
natural_image
Diagram of a printer or scanner with an open lid and a dashed-line cover, showing no text or symbols.When you copy highly transparent originals
When you copy highly transparent originals such as OHP films or tracing paper, place a blank sheet, which is the same size as the original or larger, over the original.
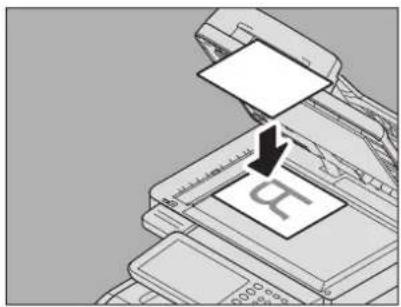
natural_image
Diagram of a printer stack with a paper feeding into a stack of books, showing a black arrow pointing to the paper (no text or symbols present)3 Lower the Original Cover or the RADF carefully.
Book-type originals
You can place book-type originals on the document glass.

CAUTION
Do not place any heavy objects (8 Kg(18lb.) or over) on the document glass and do not press on it with force.
Breaking the glass could injure you.
1 Raise the Original Cover or the RADF.
2 Open the desired page of the original and place it with its face down. Align it with the left rear corner of the document glass.
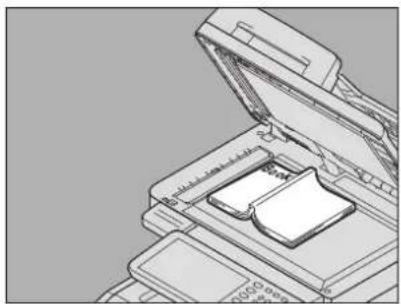
natural_image
Technical line drawing of a mechanical device with an open lid and internal components (no text or symbols)3 Lower the Original Cover or the RADF carefully.
! Note
- Do not lower the Original Cover or the RADF forcibly when the original is very thick. There will be no problem in copying even if it is not fully lowered.
- Do not look directly at the document glass because intensive light may escape during copying.
[1] P.48 "Specifying both the original size and the copy paper size separately"
Using the RADF (Reversing Automatic Document Feeder)

CAUTION
- When scanning the duplex original with the RADF, do not put your hand on the RADF. Paper may damage the hand.
- When scanning the duplex original with the RADF, do not put an object on the RADF. This could cause a paper misfeed.

Precautions
Do not use the types of originals 1 to 9 shown below because such originals may cause misfeeding or damage to the equipment.
- Badly wrinkled, folded or curled originals
- Originals with carbon paper
- Taped, pasted or cut-out originals
- Originals with multiple perforations such as loose leaf paper
- Clipped or stapled originals
- Originals with holes or tears
- Damp originals
- OHP films or tracing paper
- Coated paper (with wax, etc.)
Use the types of originals 10 and 11 shown below with extra care.
- Originals which resist sliding with the fingers, or surface-treated originals (The sheets of such originals may not be separated.)
- Folded or curled originals (They should be fully smoothed out before being used.)
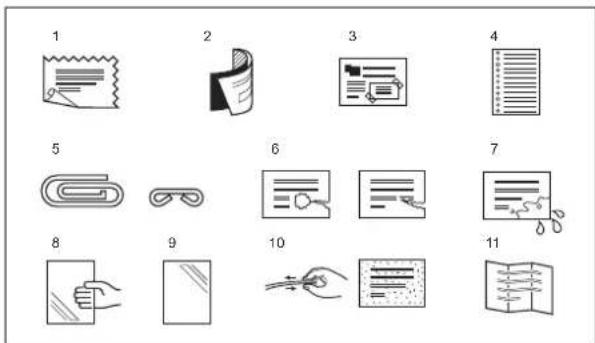
text_image
1 2 3 4 5 6 7 8 9 10 11When black streaks appear
If the scanning area or the guide area is dirty, image trouble such as black streaks may occur on printouts. Weekly cleaning of these areas is recommended.
■ Continuous feed mode
The feeding mode is set at "continuous feed mode" by default. Once you set the originals and then press the [START] button, they are scanned page by page continuously. It is useful when you want to copy more than one original at one time.
1 Align all the originals.
Collate the originals in the order that you want them to be copied. The top sheet of the originals will be copied first.
2 Place the originals with their face up and align the side guides to the original length.
! Note
- Regardless of size, documents can be set to 100 sheets (80g/m² (20 lb.)) or size 10mm (0.39inch) max.
- For mixed-size originals, see the following page:
P.45 "Copying mixed-size originals in one operation"
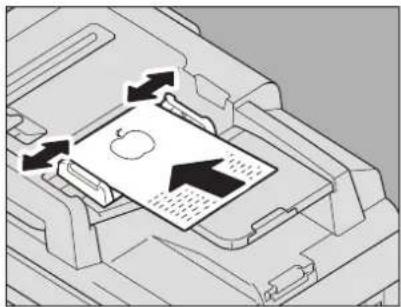
natural_image
Diagram of a device with an apple and directional arrow indicating movement or process (no text or symbols)For long originals
The original stopper prevents the scanned originals from falling off. Pull it out from the RADF and raise the sub-stopper.
! Note
- Lower the sub-stopper and slightly lift the original stopper to push it back in after you have finished using it.
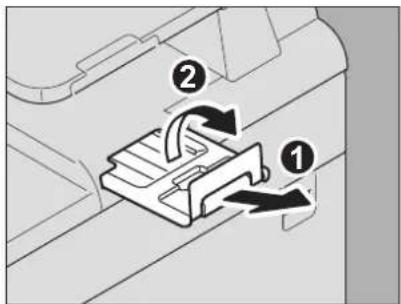
text_image
Diagram showing a mechanical or electrical component with numbered arrows indicating motion or flow, labeled ① and ②.Memo
- When there are too many originals to be scanned at one time, divide the originals into several sets before copying. Place the first set of the originals and then press [CONTINUE] on the touch panel while the data of this set are being scanned. When this scanning is finished, place the next set of the originals and press the [START] button on the control panel. (If you press [CONTINUE], this button may not work shortly before scanning is finished.)
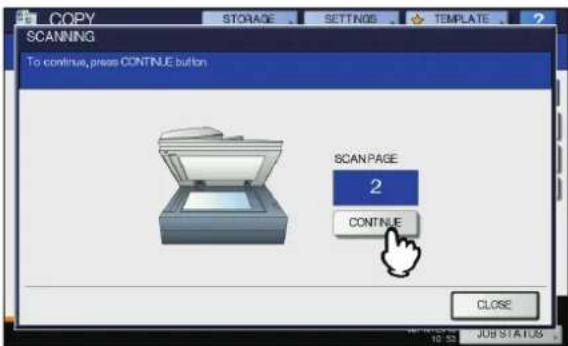
text_image
COPY STORAGE SETTINGS TEMPLATE SCANNING To continue, press CONTINUE button SCAN PAGE 2 CONTINUE CLOSE 10:53 JOB STATUS■ Single feed mode
When the feeding mode is set at "single feed mode", an original is fed automatically as it is placed on the RADF. It is useful when you want to copy only 1 original sheet.
1 Align the side guides to the original length.
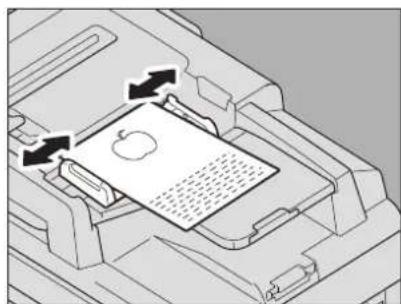
natural_image
Diagram of an Apple processor internal structure showing internal components and airflow arrows (no text or symbols)2 Insert the original with its face up and straight along the side guides.
The original is automatically pulled in and then the menu of step 3 will be displayed on the touch panel.
! Note
- Be sure to let go of the original when it starts being pulled.
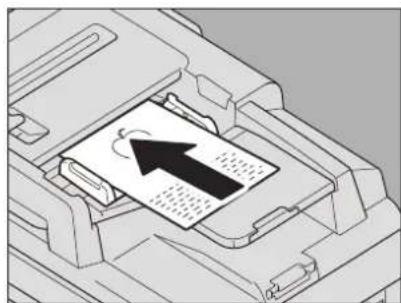
natural_image
Diagram of a printer's internal structure with a paper feeding into a slot, showing no text or symbols.3 If there is another original, insert it in the same way.
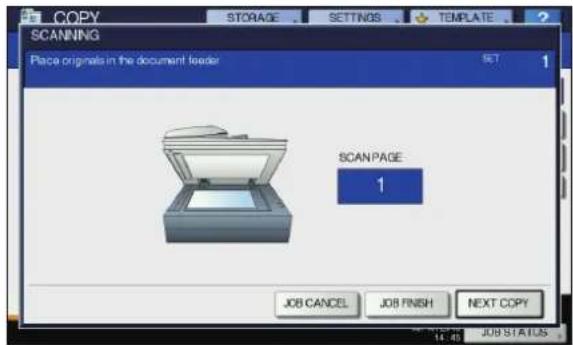
text_image
COPY STORAGE SETTINGS TEMPLATE SCANNING Place origins in the document feeder SET 1 SCAN PAGE 1 JOB CANCEL JOB FINISH NEXT COPY 14.45 JOB STATUS4 After all the originals are pulled in, press [JOB FINISH].
Memo
- If you want to stop copying, press [JOB CANCEL].
Making Copies
Basic copying procedure
Make copies following the procedure below.

text_image
Diagram showing printer assembly steps with labeled components and directional arrows1 Make sure that paper is placed in the tray(s).
For the types and sizes of acceptable paper and how to place it.
2 Place the original(s).
For the types and sizes of originals and how to place them, see the following pages:
P.28 "Acceptable originals"
P.29 "Using the RADF (Reversing Automatic Document Feeder)"
P.28 "Placing originals on the document glass"
P.29 "Book-type originals"
3 Key in the desired number of copies if you want more than one copy.
Press the [CLEAR] button on the control panel to delete the number keyed in.
4 Select the copy modes as required.
P.43 "BASIC COPY MODES"
5 Press the [START] button on the control panel.
Copying starts. The paper exits with its copied side down.
![OKI MC780f+ - Press the [START] button on the control panel. - 1](/content/2026/05/816767/images/37727d59480942f2af15a12136d97792fd6f749d3670fa52420d12420d299415.jpg)
- Be careful because the paper exiting area and the paper itself are hot.
The menu shown below may appear when you are using particular modes.
![OKI MC780f+ - Press the [START] button on the control panel. - 2](/content/2026/05/816767/images/6e874fb50c8ce5fbd2610969ed60cb441a816444c6e0958ee6f4012f2893e606.jpg)
text_image
COPY SCANNING Place origins in the document feeder SCAN PAGE 1 JOB CANCEL JOB FINISH NEXT COPY 14.45 JOB STATUSThis menu appears when "SADF (single feed mode)" is set to the document feeder or in modes where the original is placed on the document glass and the scanned data are temporarily stored in the memory, such as sort copying or 1-sided to 2-sided copying. When this menu appears, follow the procedure below.
![OKI MC780f+ - Press the [START] button on the control panel. - 3](/content/2026/05/816767/images/5892241c117eebcc408db742dc5e154f2f628b31ce881b50f3e320dc678e7c7e.jpg)
- There are different messages displayed on the upper part of the menu for when the originals are scanned through the RADF and for when scanning is performed through the document glass.
6 Place the next original, and then press the [START] button on the control panel or [NEXT COPY] on the touch panel.
Scanning starts. (When "SADF (single feed mode)" is set to the document feeder, an original is fed automatically when it is placed on the RADF.)
7 Press [JOB FINISH] on the touch panel after all the originals have been scanned.
Copying starts.
![OKI MC780f+ - Press [JOB FINISH] on the touch panel after all the originals have been scanned. - 1](/content/2026/05/816767/images/07c8121901603cd76dc287c9ca9a8cdca38a950b14043c9f8e8ae4336d15c2bd.jpg)
- If you want to stop copying, press [JOB CANCEL].
- When the tray runs out of paper during copying, another tray can feed paper instead if it holds paper of the same size and orientation, and copying will not stop. If there is no such tray, copying stops and "Add paper" appears on the touch panel. In this case, add paper to the tray.
■ Stopping and restarting copying
1 Press the [STOP] button on the control panel.
Copying or scanning stops.
![OKI MC780f+ - Press the [STOP] button on the control panel. - 1](/content/2026/05/816767/images/901cf9ff45ee14af8ddd1964ad76736aac9e5d810ad0f91971c0271cfa3a136e.jpg)
text_image
MENU COPY SCAN PRINT Fling Box FAX Data in Memory SETTING INTERRUPT COUNTER ABC DEF GHI JHL MIND PORTS TUV WEXT 7 8 9 * 0 AUTHENTICATION C GREEN PRINT DATA ATTENTION POWER SAVE RESET FC STOP START MAIN POWER2 Press [JOB CANCEL] on the touch panel to stop copying. Press [NEXT COPY] on the touch panel or the [START] button on the control panel to restart.
![OKI MC780f+ - Press [JOB CANCEL] on the touch panel to stop copying. Press [NEXT COPY] on the touch panel or the [START] button on the control panel to restart. - 1](/content/2026/05/816767/images/143b8ae8eaa4a99f846a30fc9d1699732f8aacad802dcc6784d61ce627b341c7.jpg)
text_image
COPY STORAGE SETTINGS TEMPLATE SCANNING Place originals in the document feeder SET 1 SCAN PAGE 1 JOB CANOE JOB FINISH NEXT COPY 14:45 JOB STATUSWhen you press [JOB CANCEL], the scanned data will be deleted and any waiting jobs will be performed.
![OKI MC780f+ - Press [JOB CANCEL] on the touch panel to stop copying. Press [NEXT COPY] on the touch panel or the [START] button on the control panel to restart. - 2](/content/2026/05/816767/images/424bd4f5c9fb5a817e201496182e770848b21ca7b57d54b5cf964cdcbf32fd1e.jpg)
- Even if you do not press [JOB CANCEL], the scanned data will be deleted by means of the automatic function clear.
Scanning the next original during copying
Even if copying is in progress or "READY (WARMING UP)" is displayed on the touch panel, you can scan the next original (auto job start).
1 Place the original(s).
2 Set the number of copy sets and the copy modes as required.

• The new job starts in the copy modes that you previously selected unless you select other modes.
3 Press the [START] button on the control panel.

- A maximum of 1000 sheets can be scanned per 1 copy job or up until the embedded memory becomes full.
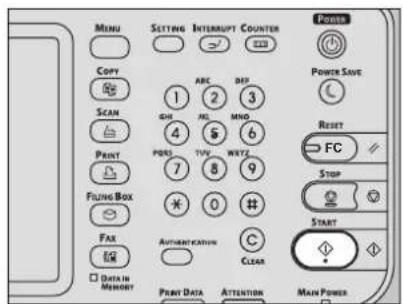
text_image
MENU SETTING INTERRUPT COUNTER POWER COPY 1 ABC DEF SCAN GH ML MNO 4 5 6 PRINT PERS TVW WNTC 7 8 9 Fling Box * 0 # Fax Authentication Clear START Data in Memory Print Data Attention Main PowerConfirming auto jobs
You can confirm which jobs are in waiting on the touch panel or cancel them as required. For details, see the following Guide: Advanced Guide
Canceling jobs being scanned
Press the [STOP] button on the control panel to stop a job while originals are being scanned. When you press [JOB CANCEL] on the touch panel or the [RESET] button on the control panel while the scanning is being paused, the scanning will end. (In this case, the data which were scanned before the job was paused will be copied.) To restart the scanning, press the [START] button.
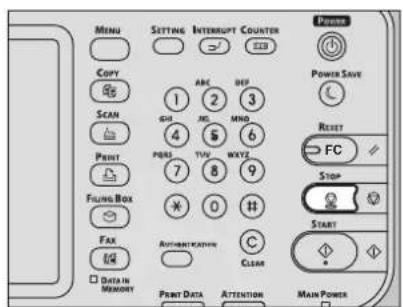
text_image
MENU COPY SCAN PRINT FILING BOX FAX DATA IN MEMORY SETTING 1 ABC 2 DEF GHI MLO MNO 4 S 6 PINS TVW WXYZ 7 8 9 * 0 # Authentication C Clear PRINT DATA ATTENTION Power Save RESET FC Stop START • MAIN POWERInterrupting copying and making other copies
You can interrupt the copy job in progress to make other copies (interrupt copying). When restarting the interrupted job, you do not have to reselect copy modes that have been set because they are memorized in this equipment.

- The following functions cannot be used together with interrupt copying: Cover sheet copying, Sheet insertion copying, Job build, Store to e-Filing, Copy & File - During interrupt copying, the mode cannot be changed to a non-copying one, such as e-Filing, scanning, printing or fax. To change the mode, first press the [INTERRUPT] button to clear the interrupt copying.
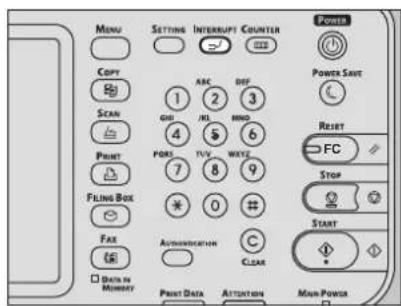
1 Press the [INTERRUPT] button on the control panel.
"Job interrupted job 1 saved" appears, and "COPY(Interrupt)" is displayed on the function display.

- If the original is being scanned, the message above appears after the scanning has finished.
text_image
MENU COPY SCAN PRINT FILING BOX FAX Data in Memory SETTING INTERRUPT COUNTER ABC H1 4 PORS 7 * 0 ACTIVATION Print Data ATTENTION Power Save RESET FC Stop START MAIN POWER2 Replace the original with a new one.
3 Select other copy modes as required and then press the [START] button on the control panel.
4 Press the [INTERRUPT] button again after the interrupt copying has finished.
"Ready to resume job 1" appears and the interrupted job restarts.
Proof copy
When you make a large amount of copies, you can check if they will be made exactly as you desire by copying only one page before copying them all (proof copy). Then you can change the modes or settings (e.g. the number of copy sets, receiving tray, page number, time stamp, sort/stapling) after checking the proof copy.
! Note
- If you want to change settings such as the reproduction ratio, density, original mode or 1/2-sided copying, you must finish the proof copy first. Then change these settings and scan the original again.
1 Place paper in the tray(s).
2 Place the original(s).
3 Select the number of copy sets and copy modes.
4 Press [PROOF COPY] on the touch panel. "PROOF COPY is set. Press START button to copy." appears for approx. 2 seconds.
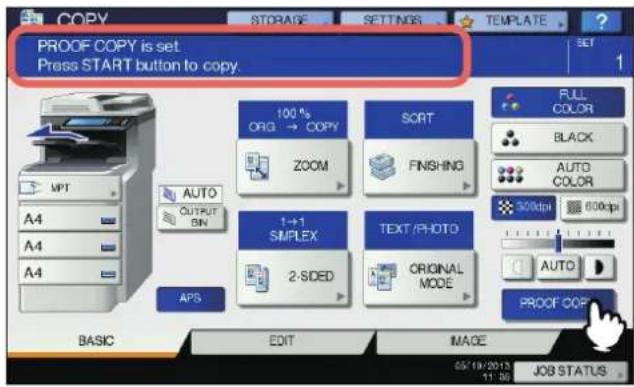
text_image
PROOF COPY is set Press START button to copy. 100 % ORG → COPY ZOOM SORT FINISHING FULL COLOR BLACK AUTO COLOR 320dpi 600dpi AUTO PROOF COPY BASIC EDIT IMAGE 05/19/2013 11:36 JOB STATUS! Note
- If [NON-SORT NON-STAPLE] or [GROUP] is selected as a finishing mode, the mode will be changed to [SORT] automatically.
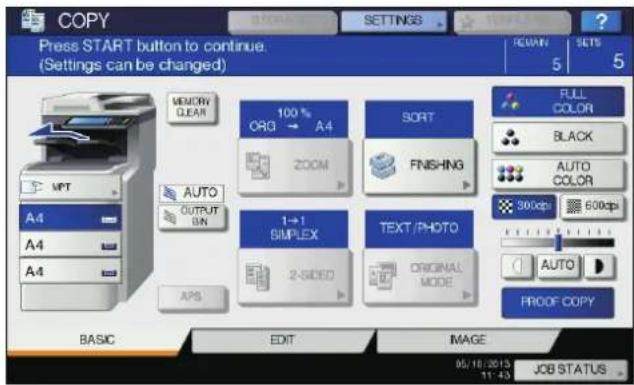
5 Press the [START] button on the control panel.
Scanning starts. 1 set of copies will be printed out.
6 Change the number of copy sets and copy modes as required after checking the proof copy.
Modes or settings such as the number of copy sets, the receiving tray, page number, time stamp, and sort/stapling can be changed.
text_image
COPY Press START button to continue. (Settings can be changed) MEMORY CLEAR 100 % ORG → A4 SORT FULL COLOR BLACK AUTO COLOR A4 A4 A4 ZOOM FINISHING 1→1 SIMPLEX TEXT /PHOTO 2-SIDED ORIGINAL MODE AUTO PROOF COPY BASIC EDIT IMAGE 05/10/2015 11:43 JOB STATUS! Note
- If you want to change settings such as the reproduction ratio, density, original mode or 1/2-sided copying, you must finish the proof copy first. Then change these settings and scan the original again. Press [MEMORY CLEAR] on the touch panel or the [RESET] button on the control panel to end the proof copy.
7 Press the [START] button on the control panel.
If you did not change the number of copies in step 6 above, the number of copies printed out will be one fewer than that previously set because you have already copied one as a proof copy. (However, if the number of copies you previously set was 1, another set of copies will be printed out besides the proof copy.)
Selecting face down/up stacker
You can select the face down/up stacker if the Inner finisher is installed.
! Note
- The available face down/up stacker may be restricted depending on copy modes and paper sizes.
- Face down/up stacker selection is set at automatic selection by default.
Changing the face down/up stacker
The face down/up stacker currently selected is displayed on the equipment status indication area. To change the face down/up stacker, press [OUTPUT BIN]. Every time you press this, the display changes from the face down/up stacker of the equipment, the face down/up stacker of the Inner Finisher, and automatic selection in this order.
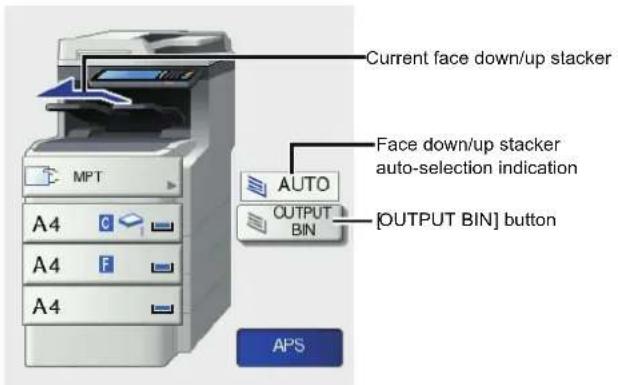
text_image
Current face down/up stacker Face down/up stacker auto-selection indication AUTO OUTPUT BIN [OUTPUT BIN] button APSBypass Copying
When you make copies on OHP film, sticker labels, envelopes or non-standard size paper, place the copy paper on the multi-purpose tray (MPT). Bypass copying is also recommended for copying on standard size paper which is not set in any of the trays.
Memo
- If you select the paper size, you can utilize various functions such as the automatic paper selection (APS) or the automatic magnification selection (AMS). For details, see the following Guide:
Advanced Guide
Open the multi-purpose tray for bypass copying.
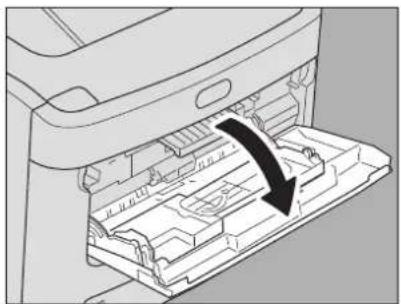
natural_image
Diagram of a printer drawer with an arrow indicating a process or operation (no text or symbols present)If the paper is large, pull out the paper holder.
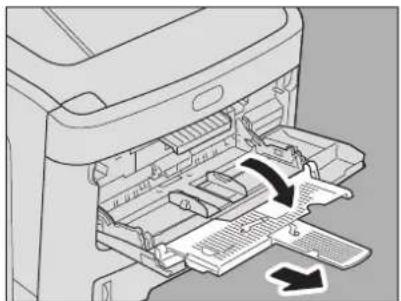
natural_image
Diagram of a printer's internal structure showing paper feed, paper tray, and paper slot (no text or symbols)When placing copy paper, push the blue set button. When removing copy paper, push the multi-purpose tray downwards (so that paper is released).
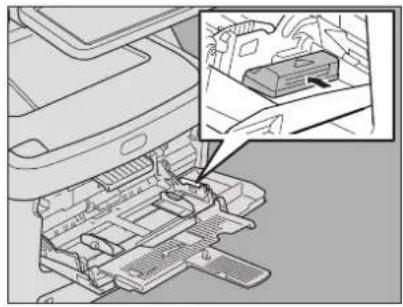
natural_image
Mechanical assembly diagram showing a component inserted into a housing, with an inset close-up of a device (no text or symbols visible)If thick paper cannot be fed, printing takes a long time after feeding or the quality is poor, turn over the paper and place it again as shown in the figure or place fewer sheets.
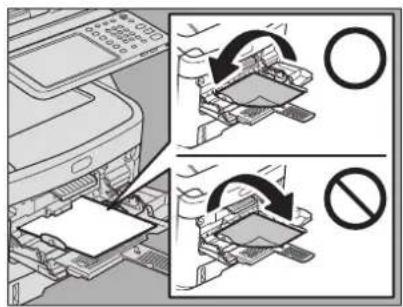
text_image
Diagram illustrating printer press operation with labeled states and prohibition symbolsThe operating procedure for bypass copying differs depending on the paper size to be used. See the table below for the operating procedure of each size.
| Paper size Procedure | ||
| Standard size | Other than North America: A4, A5, B5North America: Letter, Legal | P.36 "Copying on A4, A5 and B5 size paper (in equipment other than for North America)/Letter and Legal size paper (in equipment for North America)" |
| Other than the above | P.38 "Copying on other than the above standard sizes of paper" | |
| Envelope P.39 | "Copying on an envelope" | |
| Others (Non-standard sizes) | P.40 "Bypass copying on non-standard size paper" | |
Memo
- Bypass copying stops when the paper placed on the multi-purpose tray (MPT) runs out during copying, even if the paper of the same size is in any of the trays. Copying restarts when paper is supplied to the multi-purpose tray (MPT).
- When bypass copying has been completed, the [RESET] button on the control panel blinks. Press this button to switch bypass copying to normal copying using the trays.
- (Even if you do not press the [RESET] button, the bypass copying mode will be cleared when the automatic function clear mode kicks in after a specified period of time.)
Bypass copying on standard size paper
■ Copying on A4, A5 and B5 size paper (in equipment other than for North America)/Letter and Legal size paper (in equipment for North America)
1 Place the original(s).
2 Place the paper with its copy side face up on the multi-purpose tray.
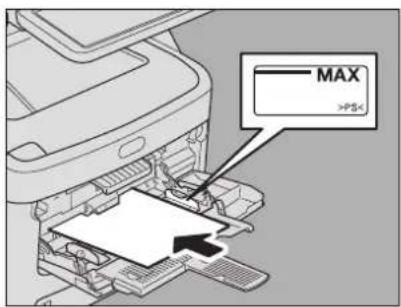
text_image
MAX >PS! Note
- The height of the paper must not exceed the indicator on the side guides.
- When you use more than one sheet of paper, fan the sheets well before placing them on the multi-purpose tray. Be careful not to cut your fingers when fanning.
- Do not push paper into the entrance of the bypass feeder. This could cause a paper misfeed.
3 Align the side guides to the paper length, and push the blue set button.
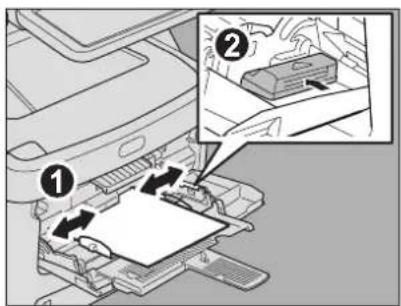
text_image
Diagram showing printer printing process with labeled steps ① and ②, indicating assembly or printing steps.4 Press [MPT] on the touch panel.
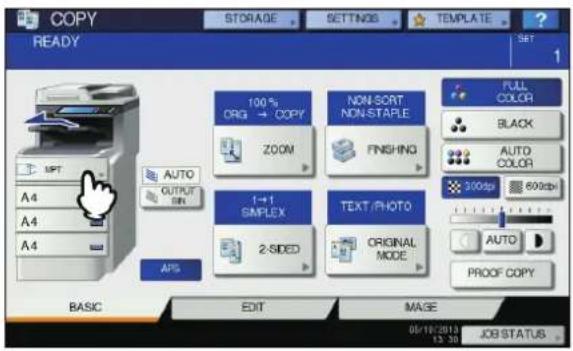
text_image
COPY READY 100% ORG → COPY NON-SORT NON-STAPLE ZOOM FINISHING FULL COLOR BLACK AUTO COLOR 300dpi 600dpi AUTO PROOF COPY A4 A4 A4 OUTPUT SIN 1→1 SIMPLEX TEXT / PHOTO 2-SIDED ORIGINAL MODE APS BASIC EDIT MAGE 05/18/2013 13:30 JOB STATUS5 Press [ZOOM] on the touch panel.
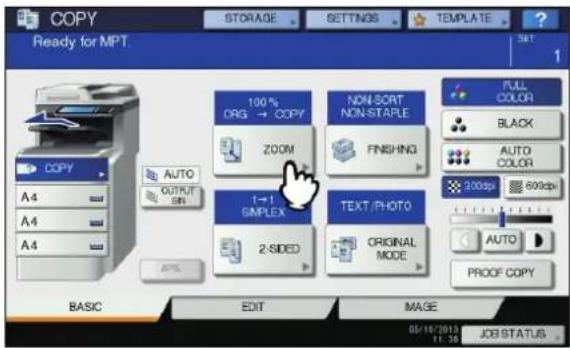
text_image
COPY Ready for MPT. 100 % ORG → COPY ZOOM 1→1 SIMPLEX 2-SIDED NON-SORT NON-STARLE FINISHING TEXT/PHOTO ORIGINAL MODE FULL COLOR BLACK AUTO COLOR 200dpi 600dpi AUTO PROOF COPY AUTO OUTPUT ON A4 A4 A4 BASIC EDIT MAGE 05/10/2013 11:38 JOB STATUS6 Select the same size button under "COPY" as that of the paper you placed on the multi-purpose tray.
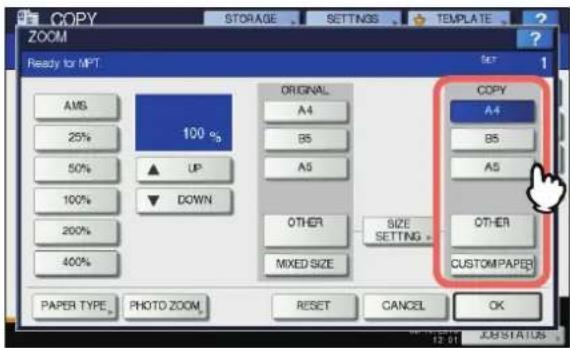
text_image
COPY ZOOM Ready for MPT AMS 25% 50% 100% 200% 400% PAPER TYPE PHOTO ZOOM RESET CANCEL OK ORIGINAL A4 B5 A5 UP DOWN OTHER MIXED SIZE SIZE SETTING COPY A4 B5 A5 OTHER CUSTOM PAPER 12:01 30/01 STATUSThe paper size is now set.
7 Press [PAPER TYPE] on the touch panel if the paper type of the paper you placed on the multi-purpose tray is other than plain paper.
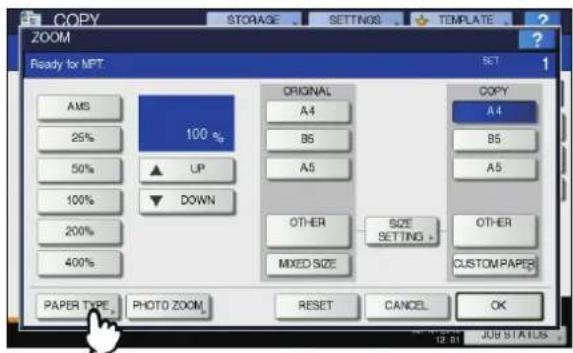
text_image
COPY STORAGE SETTINGS TEMPLATE ? ZOOM Ready for MPT AMS 25% 50% 100% 200% 400% PAPER TYPE PHOTO ZOOM RESET CANCEL OK ORIGINAL A4 B6 A5 DOWN OTHER SIZE SETTING OTHER MIXED SIZE COPY A4 B5 A5 CUSTOM PAPERS JOB STATUS8 Select the paper type.
1) Select the paper type.
2) Press [OK].
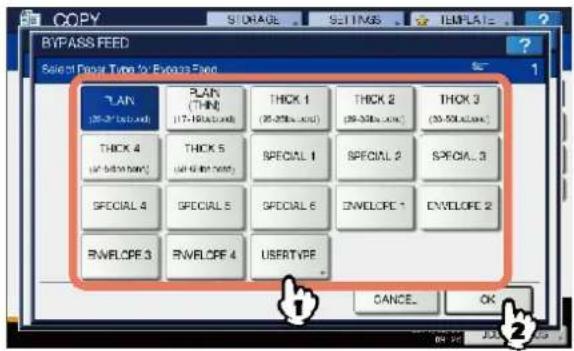
text_image
COPY STORAGE SETTINGS TEMPLATE BYPASS FEED Select Paper Tube to Excess Feed PLAN (25-30x10x10x) THICK 4 (5x bottom row) THICK 5 (5x bottom row) SPECIAL 1 SPECIAL 2 SPECIAL 3 SPECIAL 4 SPECIAL 5 SPECIAL 6 ENVELOPE 7 ENVELOPE 2 ENVELOPE 3 ENVELOPE 4 USERTYPE CANCE OK! Note
- If you select a wrong paper type, this could cause a paper misfeed or significant image trouble.
- When you select a paper type, you can confirm it with the icons displayed on the equipment status indication area as shown below.
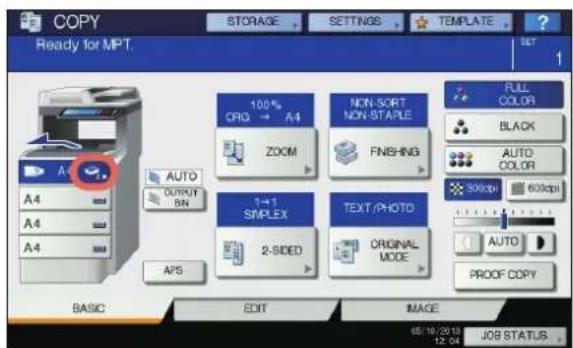
text_image
COPY Ready for MPT. STORAGE SETTINGS TEMPLATE SET 100% CFG → A4 ZOOM NON-SORT NON-STAPLE FINISHING FULL COLOR BLACK AUTO COLOR 360dpi 600dpi AUTO PROOF COPY AUTO OUTPUT SN 1→1 SIMPLEX 2-SIDED TEXT/PHOTO ORIGINAL MODE APS BASIC EDIT IMAGE 05/10/2018 12:04 JOB STATUS| Paper type Icon | |
| PLAIN | — |
| PLAIN (THIN) | |
| THICK 1 | |
| THICK 2 | |
| THICK 3 | |
| THICK 4 | |
| THICK 5 | |
| SPECIAL 1 | |
| SPECIAL 2 | |
| SPECIAL 3 | |
| SPECIAL 4 | |
| SPECIAL 5 | |
| SPECIAL 6 | |
| ENVELOPE 1 | |
| ENVELOPE 2 | |
| ENVELOPE 3 | |
| ENVELOPE 4 |
9 After setting the paper size and type, press [OK].
The menu returns to the BASIC menu.
10 Select other copy modes as required, and then press the [START] button on the control panel.
! Note
- When you copy on sheets of OHP film, remove the copied OHP film one sheet at a time as they exit onto the receiving tray. If the sheets of OHP film pile up, they may get curled and may not be projected properly.
■ Copying on other than the above standard sizes of paper
1 Place the original(s) and paper in the same procedure noted in steps 1 to 5 in "Copying on A4, A5 and B5 size paper (in equipment other than for North America)/Letter and Legal size paper (in equipment for North America)" (P.36)
2 Press [SIZE SETTING] on the touch panel.
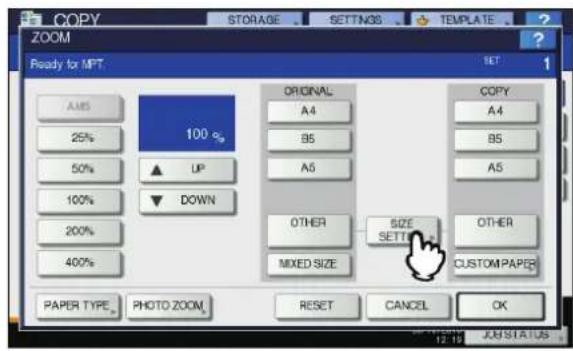
text_image
COPY ZOOM Ready for MPT AMS 25% 50% 100% 200% 400% PAPER TYPE PHOTO ZOOM ORIGINAL A4 95 A5 DOWN OTHER MIXED SIZE SIZE SETTING OTHER CUSTOM PAPER RESET CANCEL OK COPY A4 95 A5 CUSTOM PAPER 12:19 ADMINSTATUS3 Press the button of the same size as the paper you placed on the multi-purpose tray.
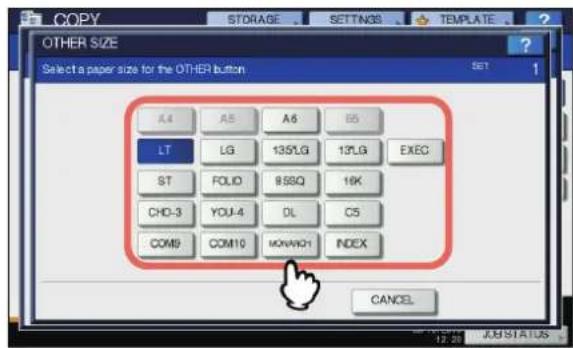
text_image
OTHER SIZE Select a paper size for the OTHER button A4 A5 A6 B5 LT LG 135LG 13LG EXEC ST FOLD 85SQ 16K CHO-3 YOU-4 DL C5 COM9 COM10 MOVACH INDEX CANCEL 12:28 AMSTATUSThe selected size will be registered as an "OTHER" size.
4 Press [OTHER] under "COPY".
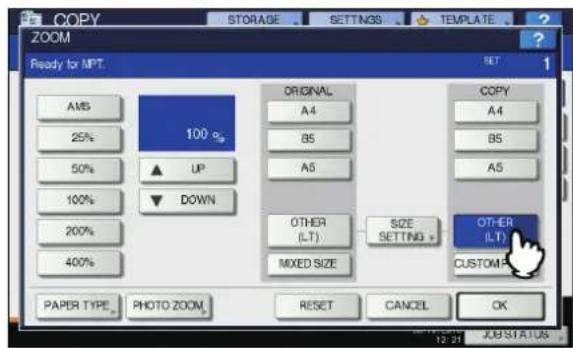
text_image
COPY ZOOM Ready for MPT AMS 25% 50% 100% 200% 400% PAPER TYPE PHOTO ZOOM 100 ug UP DOWN ORIGINAL A4 B5 A5 OTHER (LT) MIXED SIZE SIZE SETTING + OTHER (LT) CUSTOMER RESET CANCEL OK COPY A4 B5 A5 OTHER (LT) CUSTOMER 12:21 JUSTATUSThe paper size is now set to the one registered as "OTHER" size.
! Note
- If the paper size is not selected in this step, copying may be slowed down.
5 Press [PAPER TYPE] if the paper you placed on the multi-purpose tray is other than plain paper.
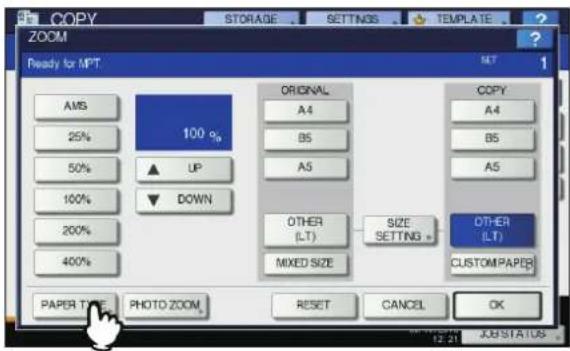
text_image
COPY ZOOM Ready for MPT AMS 25% 50% 100% 200% 400% PAPER TYPE PHOTO ZOOM ORIGINAL A4 B5 A5 UP DOWN OTHER (LT) MIXED SIZE SIZE SETTING + COPY A4 B5 A5 OTHER (LT) CUSTOM PAPER RESET CANCEL OK 12:21 JUSTATUS6 Select the paper type.
1) Select the paper type.
2) Press [OK].
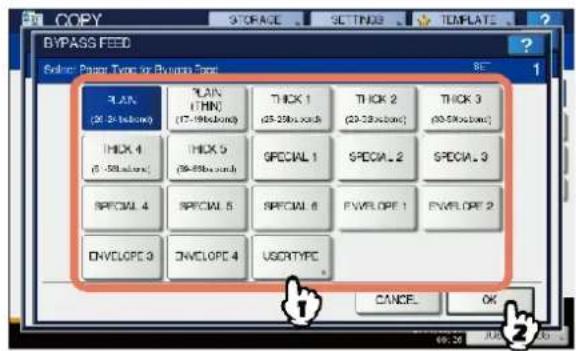
text_image
COPY BYPASS FEED Back menu: Page Type for Bypass Feet PLAN (30.25 KBx100mm) THICK 1 (17-9KBx100mm) THICK 2 (25-25KBx100mm) THICK 3 (20-20KBx100mm) THICK 4 (5-50KBx100mm) THICK 5 (26-26KBx100mm) SPECIAL 1 SPECIAL 2 SPECIAL 3 SPECIAL 4 SPECIAL 5 SPECIAL 6 FVWLOPE 1 FVWLOPE 2 ENVELOPE 3 ENVELOPE 4 USORTYPE ① CANCE... OK ②! Note
- If you select a wrong paper type, this could cause a paper misfeed or significant image trouble.
- When you select a paper type, you can confirm it with the icons displayed on the equipment status indication area. For details, see the following page: Table in step 6 in "Copying on A4, A5 and B5 size paper (in equipment other than for North America)/Letter and Legal size paper (in equipment for North America)" (P.36)
7 After setting the paper size and paper type, press [OK].
The menu returns to the BASIC menu.
8 Select other copy modes as required, and then press the [START] button on the control panel.
■ Copying on an envelope
! Note
- The acceptable envelope sizes are as follows: DL (110 mm x 220 mm), COM10 (4 1/8" x 9 1/2"), Monarch (3 7/8" x 7 1/2"), CHO-3 (120 mm x 235 mm), YOU-4 (105 mm x 235 mm)
Notes for using envelopes
Do not use the following envelopes as they may cause paper misfeeding or damage to the equipment.
- Badly curled, wrinkled or folded envelopes
- Extremely thick or thin envelopes
- Wet or damp envelopes
- Torn envelopes
- Envelopes which include the contents
- Non-standard size envelopes (ones with a special shape)
- Envelopes with eyelets or windows
- Envelopes sealed with adhesive paste or tape
- Partly-opened or perforated envelopes
- Envelopes with special coating on the surface
- Envelopes with glue or double-sided adhesive tape
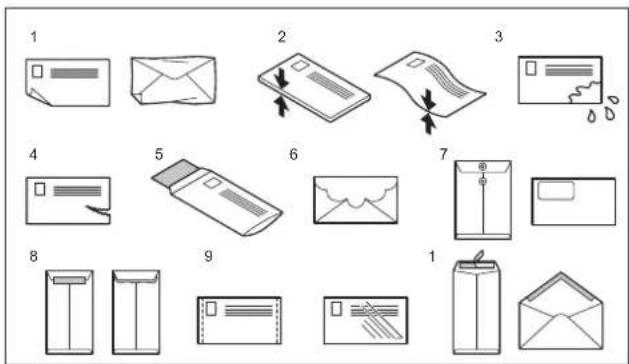
text_image
Illustration of nine different types of envelopes and documents, numbered 1 to 9, with arrows indicating movement or transformation.! Note
- Store envelopes at room temperature and away from heat and moisture.
1 Place the original on the document glass.
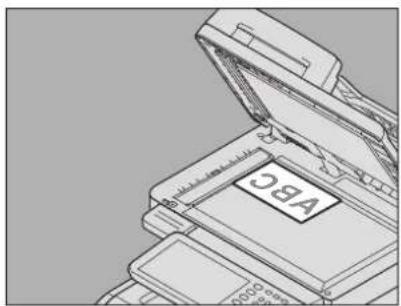
natural_image
Illustration of stacked electronic devices with a labeled 'VBC' on top (no text or symbols beyond label)2 Place the envelope on a flat clean surface and press it with your hands in the direction of the arrow to expel any air.
Press it well to prevent the flap from rolling upward.
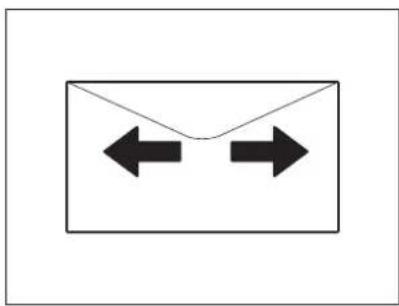
natural_image
Simple diagram of an envelope with two bidirectional arrows (no text or symbols)Correct any bent corners on the envelope.
3 Place the envelope with its copy side face up on the multi-purpose tray.
Place the envelope with its flap side at the front.
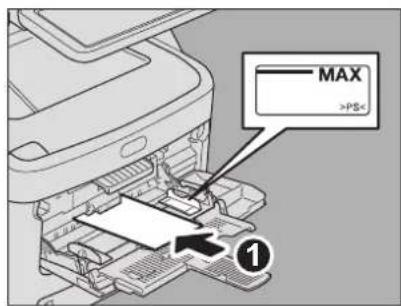
text_image
MAX >PS< ①4 Align the side guides to the length of the envelope, and push the blue set button.
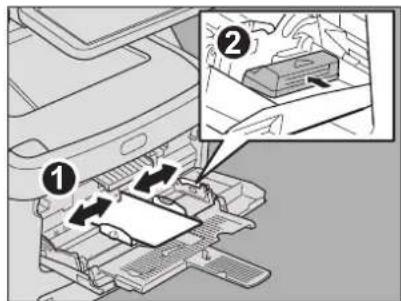
text_image
Diagram showing a printer's internal structure with labeled parts, including a zoomed-in view of the printer's internal components.5 Press [MPT] on the touch panel.
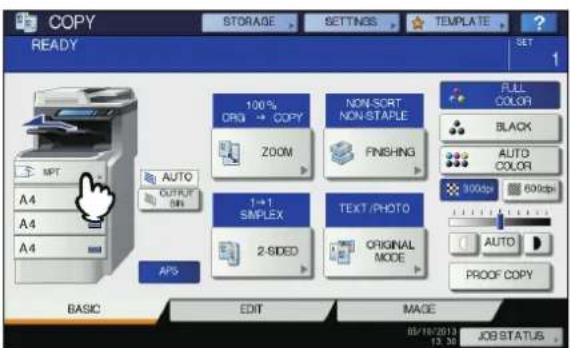
text_image
COPY READY 100% CROI → COPY ZOOM NON-SORT NON-STAPLE FINISHING FULL COLOR BLACK AUTO COLOR 300dpi 600dpi AUTO PROOF COPY A4 A4 A4 AUTO OUTPUT SIMPLEX 2-SIDED TEXT /PHOTO ORIGINAL MODE APS BASIC EDIT MAGE 05/18/2013 15:30 JOB STATUS6 Press [ZOOM] on the touch panel.
![OKI MC780f+ - Press [ZOOM] on the touch panel. - 1](/content/2026/05/816767/images/2bb94c63fefb7d339e9b6839934bf3fab8bc027dfe4fe621d9b96edfacf34201.jpg)
text_image
COPY Ready for MPT. STORAGE SETTING3G TEMPLATE SET 100 % ORG → COPY NON-SCRT NON-STAPLE ZOOM FINISHING FULL COLOR BLACK AUTO COLOR 250dpi 600dpi AUTO PROOF COPY AUTO OUTPUT SIPLEX TEXT/PHOTO 2-SIDED ORIGINAL MODE A4 A4 A4 BASIC EDIT MAGE 06/16/2019 11:30 JOB STATUS7 Press [SIZE SETTING] on the touch panel.
![OKI MC780f+ - Press [SIZE SETTING] on the touch panel. - 1](/content/2026/05/816767/images/1a891c37bbaf037c3d95c4b0975ea873a03aaf9b86ca5f42f3cdc450e751ef59.jpg)
text_image
COPY ZOOM Ready for MPT AMS 25% 50% 100% 200% 400% 100 % UP DOWN ORIGINAL A4 B5 A5 OTHER MIXED SIZE COPY A4 B5 A5 SIZE SETTING OTHER CUSTOM PAPER PAPER TYPE PHOTO ZOOM RESET CANCEL OK 12:16 JOB STATUS8 Press the button of the same size as the envelope you placed on the multi-purpose tray.
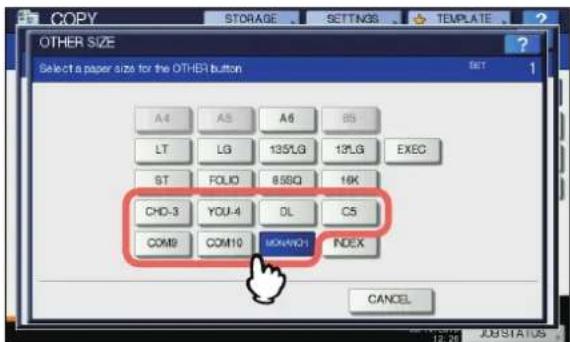
text_image
OTHER SIZE Select a paper size for the OTHER button A4 A5 A6 B5 LT LG 135LG 13LG EXEC ST FOLIO 8550 16K CHD-3 YOU-4 DL C5 COM9 COM10 MOVCH INDEX CANCEL 12.26 JOBSTATUSThe size of the selected envelope will be registered as an "OTHER" size.
9 Press [OTHER] under "COPY".
![OKI MC780f+ - Press [OTHER] under "COPY". - 1](/content/2026/05/816767/images/533735873be7b17af8f4cfb50368ac784f0bdb2b4257e56b76ec5f01e5854592.jpg)
text_image
COPY ZOOM Ready for MPT AMS 25% 50% 100% 200% 400% PAPER TYPE PHOTO ZOOM ORIGINAL A4 B5 A5 UP DOWN OTHER (MONARCH) MIXED SIZE SIZE SETTING * COPY A4 B5 A5 OTHER (MONARCH) CUSTOM PAP PAPER TYPE PHOTO ZOOM RESET CANCEL OK 12:30 JOB STATUSThe paper size is now set to the size of the envelope placed on the multi-purpose tray. The paper type is automatically set to [ENVELOPE].
10 Select other copy modes as required, and then press the [START] button on the control panel.
Copying starts.
When the Inner Finisher is installed, the envelope exits to the receiving tray of the finisher.
! Note
- Every 10 copies, take the envelopes out from the face down/up stacker.
Bypass copying on non-standard size paper
You can use non-standard size paper within the sizes shown on the right.
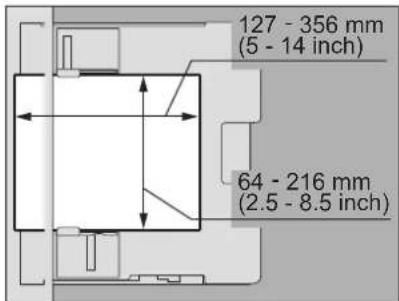
text_image
127 - 356 mm (5 - 14 inch) 64 - 216 mm (2.5 - 8.5 inch)1 Place the original on the document glass.
2 Place the paper with its copy side face up on the multi-purpose tray.
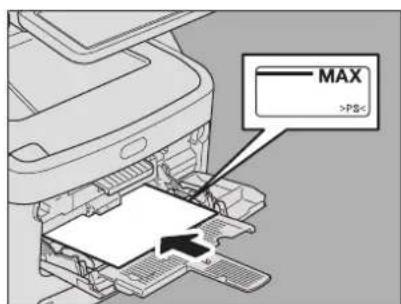
text_image
MAX >PS! Note
- The height of the paper must not exceed the indicator on the side guides.
- When you use more than one sheet of paper, fan the sheets well before placing them on the multi-purpose tray. Be careful not to cut your fingers when fanning.
- Do not push paper into the entrance of the bypass feeder. This could cause a paper misfeed.
3 Align the side guides to the paper length, and push the blue set button.
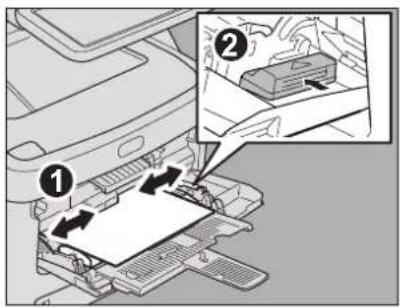
text_image
Diagram showing a printer's internal structure with labeled parts and an inset view of the printer's internal components.4 Press [MPT] on the touch panel.
![OKI MC780f+ - Press [MPT] on the touch panel. - 1](/content/2026/05/816767/images/6003b2ccd87c9e90a663b06b83dc39de5147391726d72eaa5d41595ab8fe38be.jpg)
text_image
COPY READY MPT A.4 A.4 A.4 AUTO OUTPUT BN APS BASIC 100% ORG → COPY ZOOM NON-SORT NON-STAPLE FINISHING 1→1 SIMPLEX 2-SIDED TEXT/PHOTO ORIGINAL MODE FULL COLOR BLACK AUTO COLOR 300dpi 600dpi AUTO PROOF COPY EXIT IMAGE 06/18/2015 13:30 JOB STATUS5 Press [ZOOM] on the touch panel.
![OKI MC780f+ - Press [ZOOM] on the touch panel. - 1](/content/2026/05/816767/images/00a6e17ddbb8461994dcaaa2b3a5e7ae224c19e239079a64cde59619692d08ed.jpg)
text_image
COPY Ready for MPT. 100 % ORG → COPY ZOOM 1→1 SIMPLEX 2-SIDED NON-SORT NON-STAPLE FINISHING TEXT/PHOTO ORIGINAL MODE FULL COLOR BLACK AUTO COLOR 300dpi 600dpi AUTO PROOF COPY AUTO OUTPUT BIN A4 A4 A4 BASIC EXIT MAGE 05/10/2013 11:28 JOB STATUS6 Press [CUSTOM PAPER] on the touch panel.
![OKI MC780f+ - Press [CUSTOM PAPER] on the touch panel. - 1](/content/2026/05/816767/images/5ef109f6723b0260bb1df018096ea70e9a115a0314153f95d9f19e8c36fca720.jpg)
text_image
COPY ZOOM Ready for MPT AMS 25% 50% 100% 200% 400% PAPER TYPE. PHOTO ZOOM. ORIGINAL A4 B6 A5 DOWN OTHER MIXED SIZE SIZE SETTING > OTHER CUSTOMER COPY A4 B5 A5 CUSTOMER RESET CANCEL OK 12:19 JOB STATUS7 Key in the dimension.
1) Press [Length] and key in the value. (127mm to 356mm (5 - 14 inch))
2) Press [Width] and key in the value. (64mm to 216mm (2.5 - 8.5 inch))
3) Press [OK].
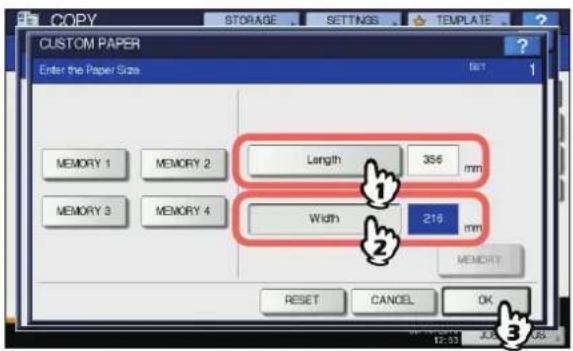
text_image
CUSTOM PAPER Enter the Paper Size 1 MEMORY 1 MEMORY 2 MEMORY 3 MEMORY 4 Length 356 mm Width 219 mm MEMORY RESET CANCEL OKLength and width are indicated as shown on the right:
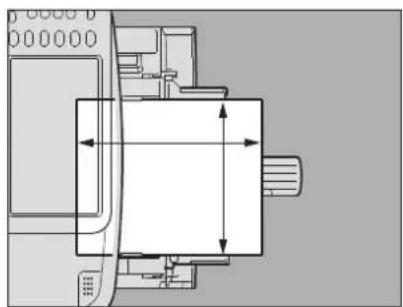
text_image
00000 000000To call up the dimension data registered previously, press the desired button from [MEMORY 1] to [MEMORY 4], and then press [OK].
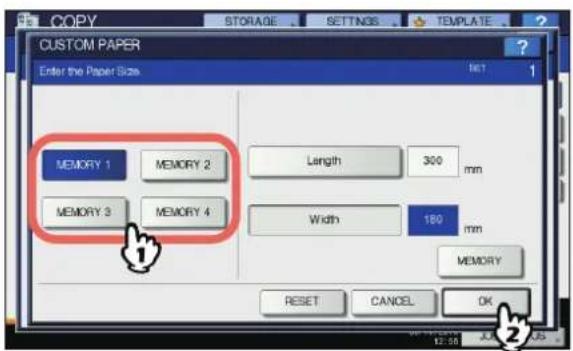
text_image
CUSTOM PAPER Enter the Paper Size MEMORY 1 MEMORY 2 Length 300 mm MEMORY 3 MEMORY 4 Width 180 mm MEMORY RESET CANCEL OKMemo
- To register dimension data into the memory, see the following page:
P.42 "Registering non-standard size in the memory"
8 Select other copy modes as required, and then press the [START] button on the control panel.
■ Registering non-standard size in the memory
1 Follow the same procedure noted in steps 1 to 6 in "Bypass copying on non-standard size paper" (P.40).
2 Register dimensions.
1) Select a desired memory number.
2) Press [Length] and key in the value. (127mm to 356mm (5 - 14 inch))
3) Press [Width] and key in the value. (64mm to 216mm (2.5 - 8.5 inch))
4) Press [MEMORY].
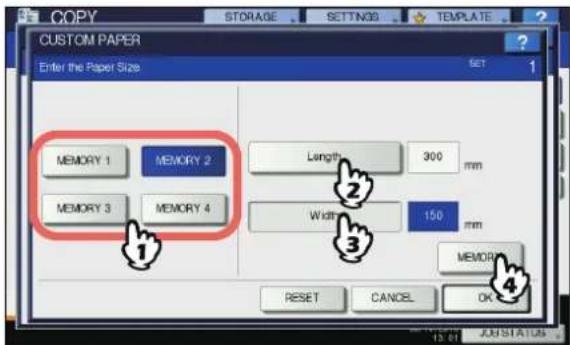
text_image
CUSTOM PAPER Enter the Paper Size SET 1 MEMORY 1 MEMORY 2 MEMORY 3 MEMORY 4 Length 300 mm Width 150 mm MEMORY RESET CANCEL OK ① ② ③ ④ 13:01 JUSTATUSUsing the Offline Stapler
You can use the stapler when installing the offline stapler.
1 Insert paper deep into the stapler. Paper is automatically stapled.
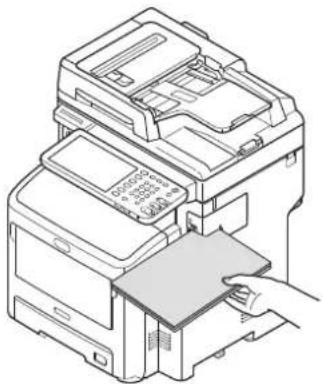
natural_image
Line drawing of a printer's internal components being placed into a base case, with no visible text or symbols.BASIC COPY MODES
Before Using Copying Functions
Default settings
This equipment is under its "default settings" when the power is turned ON, namely, if no setting change has been applied yet, the equipment's settings return to the default ones when the energy saving mode is cleared or the [RESET] button on the control panel is pressed. The default settings for basic copy modes at installation are shown below.
| Item Default setting | |
| Reproduction ratio 100% | |
| Copy quantity 1 | |
| Paper selection Automatic Paper Selection (APS) | |
| Simplex/Duplex 1-sided original -> | 1-sided copy |
| Density adjustment Manual adjustment | |
| Color mode FULL COLOR | |
| Original mode TEXT/PHOTO | |
| Finishing mode When using the document glass:NON-SORT NON-STAPLEWhen using the RADF(Reversing Automatic Document Feeder):SORT | |
| Feeding mode when using the RADF | Continuous feed mode |
The default settings are changeable.
Confirming the set functions
If you press [SETTINGS] on the touch panel, the menu shown below is displayed. On this menu, you can view the functions that are currently set.
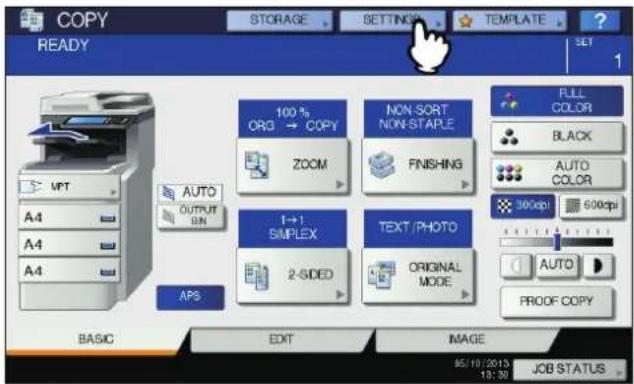
text_image
COPY READY STORAGE SETTING TEMPLATE SET 1 100 % ORG → COPY NON-SORT NON-STAPLE ZOOM FINISHING AUTO OUTPUT RIN 1→1 SIMPLEX TEXT /PHOTO 2-SIDED ORIGINAL MODE ABS FULL COLOR BLACK AUTO COLOR 300dpi 600dpi AUTO PROOF COPY BASIC EXIT IMAGE 85/10/2013 13:30 JOB STATUS
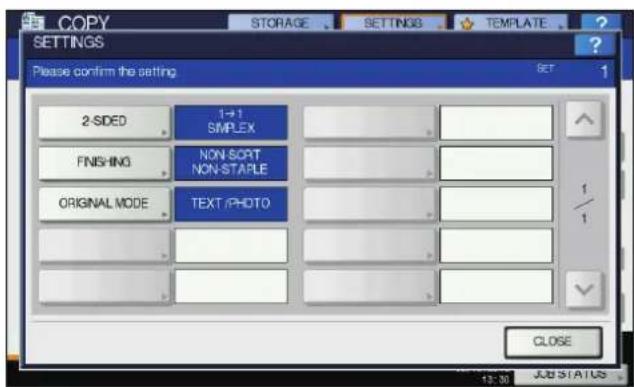
text_image
COPY SETTINGS Please confirm the setting 2-SDED 1-41 SIMPLEX FINISHING NON-SORT NON-STAPLE ORIGINAL MODE TEXT /PHOTO CLOSE 13:30 JOB STATUSSwitching to the function setting menu
To change the functions on the current menu, press the corresponding buttons. The desired setting menu will then appear.
Clearing the set functions
If you want to clear any copy function setting, press [RESET] on the corresponding setting menu.
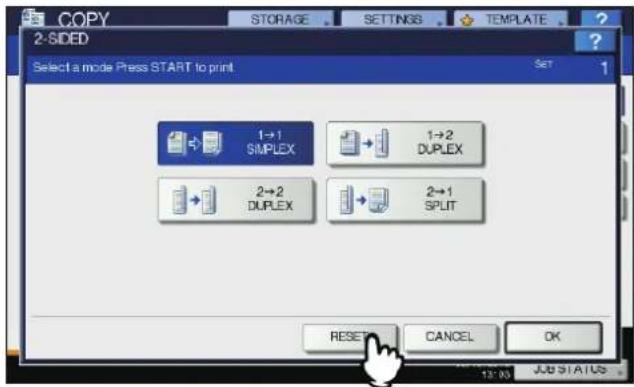
text_image
COPY STORAGE SETTINGS TEMPLATE 2-SIDED Select a mode Press START to print Set 1 1→1 SIMPLEX 1→2 DUPLEX 2→2 DUPLEX 2→1 SPLIT RESET CANCEL OK 13:35 JOB STATUSHowever, for FULL IMAGE on the EDIT menu, also press the highlighted button to clear the setting.
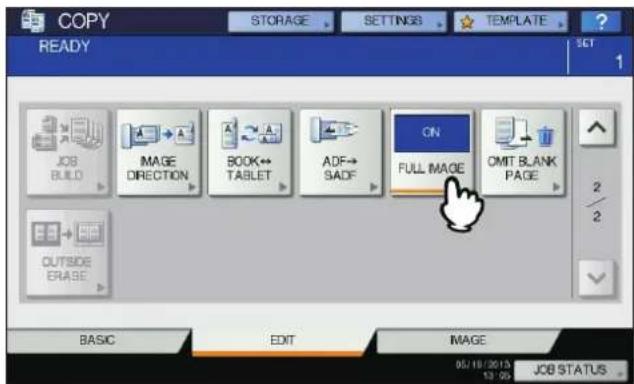
text_image
COPY STORAGE SETTINGS TEMPLATE READY SET 1 JOB BUILD IMAGE DIRECTION BOOK↔ TABLET ADF↔ SADF ON FULL IMAGE OMIT BLANK PAGE 2 2 OUTSIDE ERAGE BASIC EDIT IMAGE 05/18/2015 13:05 JOB STATUSClearing all settings changed
When you press the [RESET] button on the control panel, all the function changes will be cleared.
Even if you do not do so, the changes will be cleared if the equipment is left idle for 45 sec. (default setting).
Restrictions on function combinations
Several copy functions can be used together. However some functions may not be used with other ones. For details, see the following Guide:
Advanced Guide
Paper Selection
Automatic Paper Selection (APS)
If copying from the automatic 2-sided document feeder, this equipment detects the size of an original and selects paper of the same size automatically. This function is called Automatic Paper Selection (APS).
Memo
- For the original sizes detectable, see the following page:
P.28 "Acceptable originals" - Some original sizes may not be detected with this function. In this case, select the desired size manually.
P.44 "Selecting desired paper manually"
1 Place paper in the tray(s).
2 Set the document in the automatic 2-sided document feeder for the device.
3 Press [APS] on the touch panel.

text_image
COPY READY MPT A4 A4 A4 AUTO OUTPUT ON APS BASIC EDIT MAGE 100% CPG → COPY ZOOM NON-SORT NON-STAPLE FINISHING FULL COLOR BLACK AUTO COLOR 300dpi 600dpi AUTO PROOF COPY 05/10/2013 12:30 JOB STATUSThe paper selection mode is now set at Automatic Paper Selection.
Memo
- The paper selection mode is set at Automatic Paper Selection by default.
4 Select other copy modes as required, and then press the [START] button on the control panel.
Selecting desired paper manually
You need to select paper by yourself when copying by placing the original on the document glass, or when copying the following originals whose sizes cannot be detected correctly:
• Highly transparent originals (e.g. OHP film, tracing paper)
• Totally dark originals or originals with dark borders
• Non-standard size originals (e.g. newspapers, magazines)
Memo
- When paper of the size you want to use is not in any tray, place it in a tray or on the bypass multi-purpose tray (MPT).
1.1 P.35 "Bypass Copying"
1 Place paper in the tray(s).
When using bypass copying, be sure to set the paper size.
2 Place the original(s).
3 Press the tray button corresponding to the desired paper size.
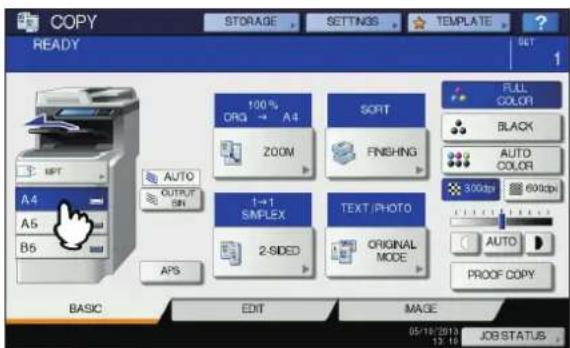
text_image
COPY READY STORAGE SETTINGS TEMPLATE SET 1 A4 A5 B5 AUTO OUTPUT OR 100% ORG → A4 ZOOM SORT FINISHING 1→1 SIMPLEX 2-SIDED TEXT/PHOTO ORIGINAL MODE FULL COLOR BLACK AUTO COLOR 300dpi 600dpi AUTO PROOF COPY BASIC EDIT MAGE 05/18/2013 13:18 JOB STATUS4 Select other copy modes as required, and then press the [START] button on the control panel.
Copying mixed-size originals in one operation
You can copy a set of originals whose sizes are individually different, using the RADF (Reversing Automatic Document Feeder).
The original sizes that can be mixed are as follows:
Other than North America: A4, Folio
North America: Letter, Legal, Legal 13
1 Place paper in the tray(s).
The multi-purpose tray cannot be used. Use the trays.
2 Adjust the side guides to the widest original, and then align the originals against the side guide on the front side.
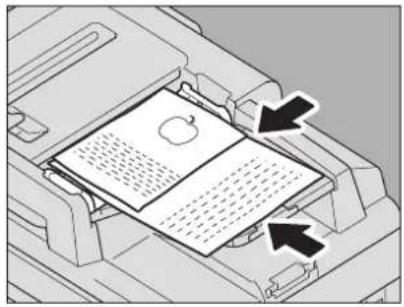
natural_image
Diagram of an open book being placed into a printer, with arrows indicating the page direction (no text or symbols present)3 Press [ZOOM] on the touch panel.
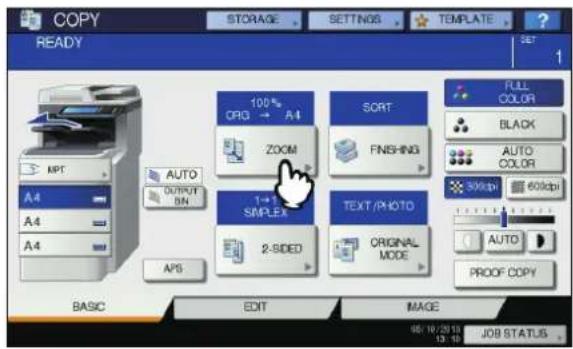
text_image
COPY READY STORAGE SETTINGS TEMPLATE SET 1 A4 A4 A4 AUTO OUTPUT 0 IN APS 100% CPG → A4 ZOOM 1→1 SIMPLEX 2-SIDED SORT FINISHING TEXT/PHOTO ORIGINAL MODE FULL COLOR BLACK AUTO COLOR 30dpi 60dpi AUTO PROOF COPY BASIC EDIT IMAGE 05/10/2019 13:10 JOB STATUS4 Press [MIXED SIZE].
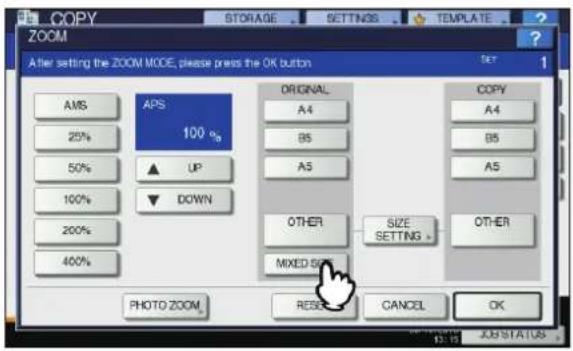
text_image
COPY ZOOM After setting the ZOOM MODE, please press the OK button EMS APS 100 % ORIGINAL A4 B5 A5 OTHER MIXED SIZE SIZE SETTING > COPY A4 B5 A5 OTHER 25% 50% 100% 200% 400% PHOTO ZOOM. RESET CANCEL OK JOB STATUS5 Press [AMS] to make copies on paper in one size. To make copies on paper of the same size as the originals, press [OK] or [CANCEL] so that the menu returns to the BASIC menu, and then press [APS].
When [AMS] is selected:
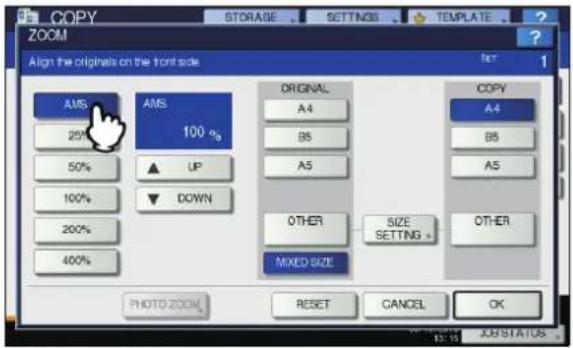
text_image
COPY ZOOM STORAGE SETTINGS TEMPLATE Align the originals on the font side Set 1 AMS 25% 50% 100% 200% 400% AMS 100 % UP DOWN ORIGINAL A4 B5 A5 OTHER SIZE SETTING + OTHER MIXED SIZE COPY A4 B5 A5 SIXE SETTING + RESET CANCEL OK PHOTO ZOOM AS/STATUS! Note
- Before you use Automatic Paper Selection, be sure that all paper sizes corresponding to the original sizes have been placed in the tray.
6 Select other copy modes as required, and then press the [START] button on the control panel.
Switching Color Modes
You can switch the color mode. There are 3 color modes as shown below.
FULL COLOR: All originals are copied in full colors. (Default) BLACK: All originals are copied in black and white.
AUTO COLOR: The equipment automatically judges the type of each color on originals. Colored originals are copied in full colors and black-and-white originals are copied in black and white.
Switching color modes
Press any of [FULL COLOR], [BLACK] or [AUTO COLOR] on the touch panel.
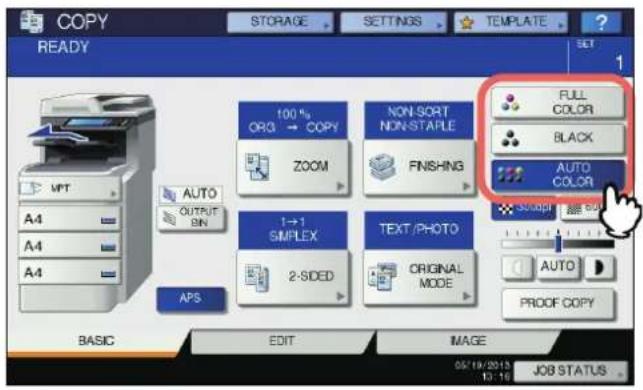
text_image
COPY READY 100 % ORG → COPY NON-SORT NON-STAPLE ZOOM FINISHING AUTO OUTPUT PIN 1+1 SIMPLEX TEXT/PHOTO 2-SIDED ORIGINAL MODE AUTOCO PROOF COPY FULL COLOR BLACK AUTO COLOR SUPPORT BUTTER AUTO BASIC EDIT IMAGE 05/19/2013 12:16 JOB STATUS! Note
- When you select [AUTO COLOR], some originals may not be copied exactly as they look, such as the cases shown below. Select either [FULL COLOR] or [BLACK].
- When color originals are copied in black
Example:
- Originals whose colored area is extremely small
- Originals which are completely black
- Originals whose colors are light
- When black originals are copied in full colors Example:
- Yellowish originals
- Originals with a colored background
Memo
- The sensitivity to detect whether the data scanned in auto color are color or black can be changed. For details, refer to the Advanced Guide.
Setting Original Modes
You can make copies with the optimal image quality by selecting the following modes for your original. The selectable original mode differs depending on the color mode as shown in the table below. Select the color mode first, and then the original mode.
| Original mode Description | |
| TEXT/PHOTO Originals with text and photographs mixed | |
| TEXT Originals with text (or text and line art) only | |
| PRINTED IMAGE | Originals with photogravure (e.g. magazine, brochure) |
| PHOTO | Originals with general photographs on photographic printing paper |
| Originals with photographs | |
| MAP Originals with fine illustrations or text | |
| IMAGE SMOOTHING | Originals with text and photographs mixed (especially originals requiring higher reproducibility on photos) |
| Original mode | Color mode | ||
| FULL COLOR | BLACK | AUTO COLOR | |
| TEXT/PHOTO Yes Yes | Yes | ||
| TEXT Yes Yes Yes | |||
| PRINTED IMAGE Yes | — | Yes | |
| PHOTO | Yes | — | — |
| — | Yes | — | |
| MAP | Yes | — | — |
| IMAGE SMOOTHING | — | Yes | — |
Memo
- TEXT/PHOTO is set by default. The default setting can be changed in each color mode. For details, refer to the Advanced Guide.
1 Press [ORIGINAL MODE] on the touch panel.
![OKI MC780f+ - Press [ORIGINAL MODE] on the touch panel. - 1](/content/2026/05/816767/images/bec20ad11b6397a596541703d0fb935501a5e5e06d4533007407d8ba3e31bf96.jpg)
text_image
COPY READY 100% ORG → COPY ZOOM NON-SORT NON-STAPLE FINISHING FULL COLOR BLACK AUTO COLOR 100dpi 600dpi AUTO PROOF COPY AUTO OUTPUT OR T→1 SIMPLEX 2-SIDED TEXT/PHOTO ORIGINAL MODE APS BASIC EDIT MAGE 05/18/2013 13:30 JOB STATUS2 Select the original mode, and then press [OK].
The selectable original modes differ depending on the color modes currently set.
Example: When the color mode is "FULL COLOR"
![OKI MC780f+ - Select the original mode, and then press [OK]. - 1](/content/2026/05/816767/images/1396773c59551431990fac45d0e6cc2006dda36777c12a99b60a0b521b7353ec.jpg)
text_image
COPY STORAGE SETTINGS TEMPLATE ORIGINAL MODE SET 1 TEXT /PHOTO TEXT PHOTO PRINTED IMAGE MAP RESET CANCEL OK 1 2Density Adjustment
This equipment detects the density level of originals and automatically adjusts the density level of the copied image to the optimal one. Alternatively, you can manually adjust it to the desired level.
Adjusting automatically (automatic density adjustment)
Press [AUTO] on the touch panel.
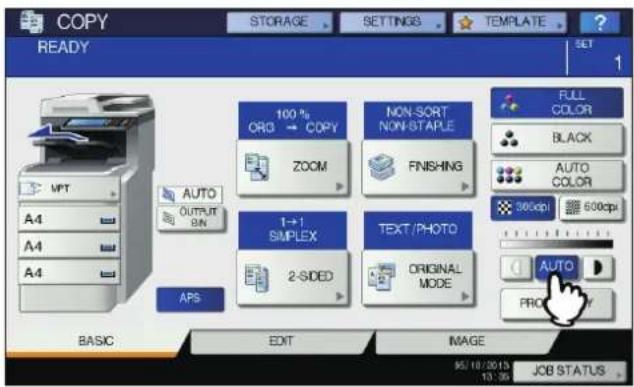
text_image
COPY READY 100 % OR3 → COPY NON-SORT NON-STAPLE FULL COLOR BLACK AUTO COLOR A4 A4 A4 ZOOM FINISHING 1→1 SIMPLEX TEXT /PHOTO 2-SIDED ORIGINAL MODE AUTO PRO BASIC EDIT IMAGE 95/10/2013 13:36 JOB STATUSMemo
- The default setting of the automatic density adjustment is as follows according to the color modes:
FULL COLOR or AUTO COLOR: OFF
BLACK: ON
Adjusting manually
Press either or to select the desired density level.
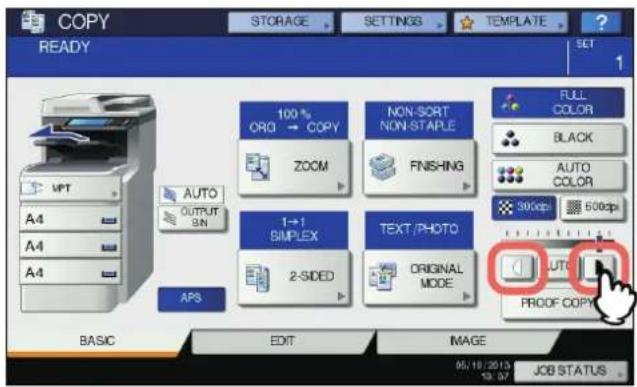
text_image
COPY READY 100 % CRQ → COPY ZOOM NON-SORT NON-STAPE FINISHING FULL COLOR BLACK AUTO COLOR 300dpi 600dpi AUTO PROOF COPY AUT OUTPUT ON 1→1 SIMPLEX 2-SIDED TEXT/PHOTO ORIGINAL MODE APS BASIC EDIT IMAGE 05/10/2013 58.57 JOB STATUSEnlargement and Reduction Copying
You can change the reproduction ratio of copied images in the following procedures:
Automatic Magnification Selection (AMS):
You need to specify the copy paper size in advance. Then this equipment will detect the original size and automatically select the optimal reproduction ratio for the copy paper size.
Specifying both original size and copy paper size separately:
You need to specify both the original size and the copy paper size separately in advance. According to the sizes you specified, the optimal reproduction ratio is selected automatically. This feature is used when Automatic Magnification Selection is not available, such as when copying OHP film originals.
Specifying reproduction ratio manually:
You can select the desired reproduction ratio by pressing [ZOOM] or one-touch zoom buttons on the touch panel.
Copying photo originals in the optimal reproduction ratio for copy paper size (PHOTO ZOOM)
You can copy photo originals in the reproduction ratio best suited to the copy paper size.
Memo
- The available range of reproduction ratio differs depending on whether the original is placed on the document glass or on the RADF (Reversing Automatic Document Feeder). Document glass: 25 to 400% RADF: 25 to 200%
Automatic Magnification Selection (AMS)
If using the automatic 2-sided document feeder, specify the copy paper size in advance so that this equipment will detect the original size and automatically select the optimal reproduction ratio to the copy paper size.
This function is available when the size of the originals is as follows:
North America: Legal, Letter
Other than North America: A4, B5 and Folio (Folio is available only when the RADF is used.)
P.28 "Acceptable originals"
! Note
- If copying documents from the glass screen, this function does not work properly for the originals noted below. Select other methods when copying them.
• Highly transparent originals (e.g. OHP film, tracing paper)
• Totally dark originals or ones with dark borders
• Non-standard size originals (e.g. newspapers, magazines)
1 Place paper in the tray(s).
2 Press [ZOOM] on the touch panel.
![OKI MC780f+ - Press [ZOOM] on the touch panel. - 1](/content/2026/05/816767/images/9198db9e680cb30aaaf9f9557ead4b8e1e203318680f1c12de60b2e1ab9b37c9.jpg)
text_image
COPY READY 100% CRG → COPY ZOOM 1→1 SMPLEX 2-SIDD NON-SCRT NON-STAPLE FINISHING TEXT/PHOTO ORIGINAL MODE FULL COLOR BLACK AUTO COLOR 300dpi 600dpi AUTO PROOF COPY BASIC EDIT MAGE 05/10/2013 13.38 JOB STATUS3 Select the desired paper size, press [AMS] and then [OK].
![OKI MC780f+ - Select the desired paper size, press [AMS] and then [OK]. - 1](/content/2026/05/816767/images/d0bda7e83dfb4eb5c867d27d4054312ca753f160afadfd21000d5af78ec06ec7.jpg)
text_image
COPY STORAGE SETTINGS TEMPLATE After setting the ZOOM MODE, please press the OK button A45 25% 50% 100% 200% 400% ORIGINAL A4 B5 A5 DOWN OTHER MIXED SIZE SIZE SETTING > COPY A4 B5 A5 OTHER PHOTO ZOOM RESET CANCEL OK 13:42 JUN19Memo
- If you want to select a paper size other than the following, you need to register the size as "OTHER". Once you register this size, it will be specified every time you press [OTHER] on the touch panel.
North America: LG, LT, ST
Other than North America: A4, B5
For how to register, see the following page:
P.49 "Registering paper sizes to "OTHER" size"
- Paper sizes can also be registered by pressing the desired tray button of the equipment status indication area on the BASIC menu.
4 Place the original(s).
If the original is placed on the document glass, the reproduction ratio is set when the original is placed. If the original is placed on the RADF, the reproduction ratio is set when the original is scanned.
5 Select other copy modes as required, and then press the [START] button on the control panel.
Specifying both the original size and the copy paper size separately
1 Place paper in the tray(s).
2 Place the original(s).
3 Press [ZOOM] on the touch panel.
![OKI MC780f+ - Press [ZOOM] on the touch panel. - 1](/content/2026/05/816767/images/096f483a4eaf4357bfcba666cfac3fc038b9e41d8e61c33564e341b06bba6693.jpg)
text_image
COPY READY MPT A4 A4 A4 AUTO OUTPUT SH APS BASIC EDIT PAGE STORAGE SETTINGS TEMPLATE 100% CRO → COPY NON-SORT NON-STAPLE ZOOM FINISHING 1→1 SIMPLEX TEXT/PHOTO 2-SIDED ORIGINAL MODE FULL COLOR BLACK AUTO COLOR 300fps 600fps AUTO PROOF COPY 05/18/2013 12:30 JOB STATUS4 Select the desired sizes for the original and copy paper, and then press [OK].
![OKI MC780f+ - Select the desired sizes for the original and copy paper, and then press [OK]. - 1](/content/2026/05/816767/images/2e784d03fcd345a94e006363fd8338f9474aefa24d43dde7f9ac8b7fcfcf988d.jpg)
text_image
COPY STORAGE SETTINGS TEMPLATE ? After setting the ZOOM MODE, please press the OK button AMS 25% 50% 100% 200% 400% ORIGINAL A4 B5 A5 DOWN OTHER MIXED SIZE COPY A4 B5 A5 OTHER SIZE SETTING + OTHER PHOTO ZOOM RESET CANCEL OK 13:45 JOB 3Memo
- If you want to select a size other than the following for the original size and copy paper size, you need to register the size as "OTHER". Once you register this size, it will be specified every time you press [OTHER] on the touch panel.
Other than North America: A4, B5, A5
North America: Letter, Legal
For how to register, see the following page:
P.49 "Registering paper sizes to "OTHER" size"
- Paper sizes can also be registered by pressing the desired tray button of the equipment status indication area on the BASIC menu.
5 Select other copy modes as required, and then press the [START] button on the control panel.
■ Registering paper sizes to "OTHER" size
If you want to select a size other than the following for the original size and copy paper size, you need to register the size as "OTHER" following the procedures below. Once you register this size, it will be specified every time you press [OTHER] on the touch panel.
Other than North America: A4, B5, A5
North America: Letter, Legal
! Note
- You can register only standard sizes as [OTHER] and cannot register any non-standard sizes.
1 Press [SIZE SETTING] on the touch panel.
![OKI MC780f+ - Press [SIZE SETTING] on the touch panel. - 1](/content/2026/05/816767/images/c1e4c172a9d1c27607f3ee7593ebb4bea0299b40034359817e3e8ae01208a0bb.jpg)
text_image
COPY ZOOM After setting the ZOOM MODE, please press the OK button EMS APS 100 % UP DOWN ORIGINAL A4 B5 A5 OTHER MIXED SIZE SIZE SETTING COPY A4 B5 A5 OTHER PHOTO ZOOML RESET CANCEL OK 10.47 JUL-STATLES2 Select the desired size.
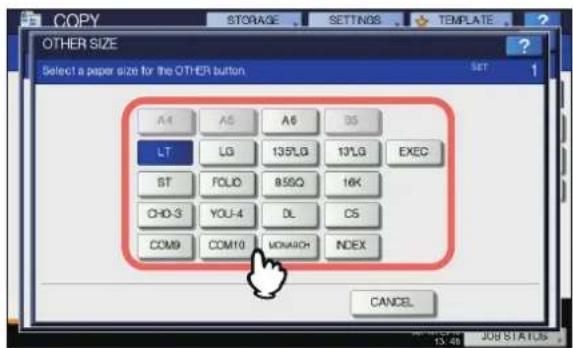
text_image
OTHER SIZE Select a paper size for the OTHER button A4 A5 A6 B5 LT LG 135LG 17LG EXEC ST FOLD 8550 16K CHO-3 YOU-4 DL CS COM9 COM10 MOVATION INDEX CANCELThe selected size will be registered as an "OTHER" size.
Specifying reproduction ratio manually
1 Place paper in the tray(s).
2 Place the original(s).
3 Press [ZOOM] on the touch panel.
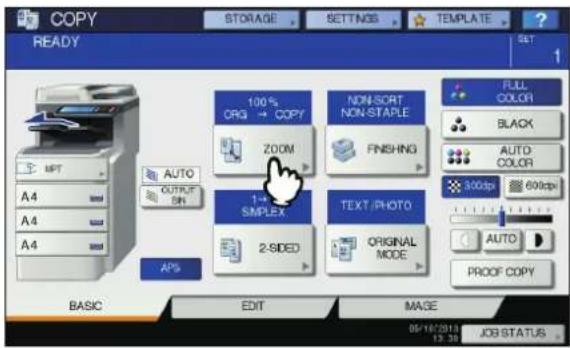
text_image
COPY READY STORAGE SETTINGS TEMPLATE SET 1 AUTO OUTPUT SH A4 A4 A4 APS 100% CRG → COPY ZOOM 1→ SIMPLEX 2-SIDED NON-SORT NON-STAPLE FINISHING TEXT:PHOTO ORIGINAL MODE FULL COLOR BLACK AUTO COLOR 300dpi 600dpi AUTO PROOF COPY BASIC EDIT MAGE 05/18/2013 19:30 JOB STATUS4 Press the buttons below to select the desired reproduction ratio.
[MP] and [DOWN] buttons
The reproduction ratio changes by 1% every time either of them is pressed. When you hold either down, the ratio goes up or down automatically.
One-touch zoom buttons
Select the desired ratio from [400%], [200%], [100%], [50%] and [25%].
! Note
- When the RADF is used, the maximum ratio available is 200%.
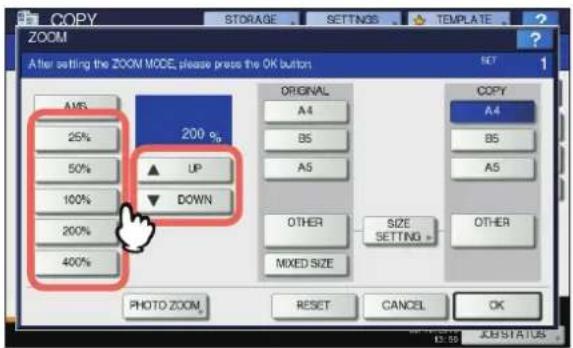
text_image
COPY ZOOM After setting the ZOOM MODE, please press the OK button AMS 25% 50% 100% 200% 400% 200 % UP DOWN ORIGINAL A4 B5 A5 OTHER MIXED SIZE SIZE SETTING + COPY A4 B5 A5 OTHER MIXED SIZE RESET CANCEL OK AUTO AS-36 AS-36 AS-365 Select the desired size, and then press [OK].
![OKI MC780f+ - Select the desired size, and then press [OK]. - 1](/content/2026/05/816767/images/282b062e27fed576359baadcf11ad2f8c9910a8f58a70f8ab3e1a9df664eafbe.jpg)
text_image
COPY ZOOM After setting the ZOOM MODE, please press the OK button. AMS 25% 50% 100% 200% 400% ORIGINAL A4 B5 A5 DOWN OTHER MIXED SIZE SIZE SETTING + COPY A4 B5 A5 OTHER 1 2 3 4 PHOTO ZOOM, RESET CANCEL OK! Note
- If you want to select a paper size other than the following, you need to register the size as "OTHER". Once you register this size, it will be specified every time you press [OTHER] on the touch panel. Other than North America: A4, B5, A5 North America: Letter, Legal For how to register, see the following page:
P.49 "Registering paper sizes to "OTHER" size"
- Paper sizes can also be registered by pressing the desired tray button of the equipment status indication area on the BASIC menu.
6 Select other copy modes as required, and then press the [START] button on the control panel.
Copying photo originals in the optimal reproduction ratio for copy paper size (PHOTO ZOOM)
1 Place paper in the tray(s).
2 Place the original on the document glass in a landscape direction.
3 Press [ZOOM] on the touch panel.
![OKI MC780f+ - Press [ZOOM] on the touch panel. - 1](/content/2026/05/816767/images/a908d2890f2175e1e4683a0f305344cd9813fc330fb7f9808d5b6577f3a5f5a4.jpg)
text_image
COPY READY 100% ORG → COPY NON-SORT NON-STAPLE ZOOM FINISHING 1→ SIMPLEX TEXT /PHOTO 2-SIDED ORIGINAL MODE FULL COLOR BLACK AUTO COLOR 300dpi 600dpi AUTO PROOF COPY A4 A4 A4 AUTO OUTPUT ON A4S BASIC EDIT MAGE 05/18/2013 13:30 JOB STATUS4 Press [PHOTO ZOOM].
![OKI MC780f+ - Press [PHOTO ZOOM]. - 1](/content/2026/05/816767/images/7e2cafed2534ddb3eda2c3d5596c79884cb6d38c83041732290b8d13b5f92292.jpg)
text_image
COPY ZOOM After setting the ZOOM MODE, please press the OK button APT 100 % ORIGINAL A4 B5 A5 OTHER MIXED SIZE SIZE SETTING > COPY A4 B5 A5 OTHER PHOTO ZOOM RESET CANCEL OK5 Select the original size.
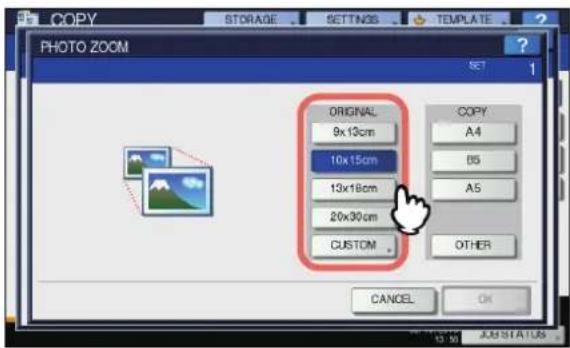
text_image
COPY STORAGE SETTINGS TEMPLATE PHOTO ZOOM ORIGINAL 9x12cm 10x15cm 13x18cm 20x30cm CUSTOM COPY A4 B5 A5 OTHER CANCEL OK! Note
- The actual size for the [3" x 5"] button is 3.5" x 5.0".
Memo
- When the size of the original is other than the ones below, key in the dimension of the original manually. 9 x 13 cm (3.5 x 5 inch), 10 x 15 cm (4 x 6 inch), 13 x 18 cm (5 x 7 inch) or 20 x 30 cm (8 x 12 inch) P.51 "Setting photo originals in other sizes"
6 Select the desired copy paper size, and then press [OK].
! Note
- If you want to select a paper size other than the following, you need to register the size as "OTHER" size. In this case, register it in a landscape direction. Once you register this size, it will be specified every time you press [OTHER] on the touch panel. Other than North America: A4, A5, B5 North America: Letter, Legal For how to register it, see the following page:
P.49 "Registering paper sizes to "OTHER" size"
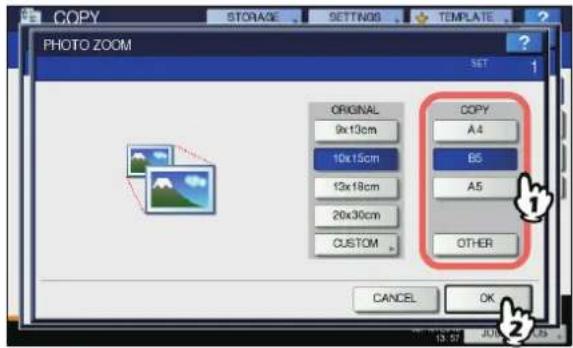
text_image
COPY STORAGE SETTINGS TEMPLATE PHOTO ZOOM SET 1 ORIGINAL 9x13cm 10x15cm 13x18cm 20x30cm CUSTOM COPY A4 B5 A5 OTHER CANCEL OK7 Select other copy modes as required, and then press the [START] button on the control panel.
If "NON-SORT NON-STAPLE" is selected as a sorting mode, scanning of the original starts. If another sorting mode is selected, follow the procedure below.
8 Place the next original, and then press [NEXT COPY] on the touch panel or the [START] button on the control panel.
Scanning of the next original starts. If you have more than one original, repeat this step until the scanning of all the originals is finished.
9 When the scanning of all the originals is finished, press [JOB FINISH] on the touch panel.
Copying starts.
■ Setting photo originals in other sizes 1 Press [CUSTOM] on the touch panel.
![OKI MC780f+ - ■ Setting photo originals in other sizes 1 Press [CUSTOM] on the touch panel. - 1](/content/2026/05/816767/images/2a92a9a766013b91db1b2f96ec29b7e7a297204060c6111e209d21dfaf05fa9d.jpg)
text_image
COPY STORAGE SETTINGS TEMPLATE PHOTO ZOOM SET 1 ORIGINAL 9x13cm 10x15cm 13x18cm 20x30cm CUSTOM COPY A4 B5 A5 OTHER CANCEL OK2 Key in the size of the original.
1) Press [X] on the touch panel and key in its width within 10 to 434 mm (0.39" to 17.09").
2) Press [Y] on the touch panel and key in its length within 10 to 300 mm (0.39" to 11.81").
3) Press [OK] on the touch panel.
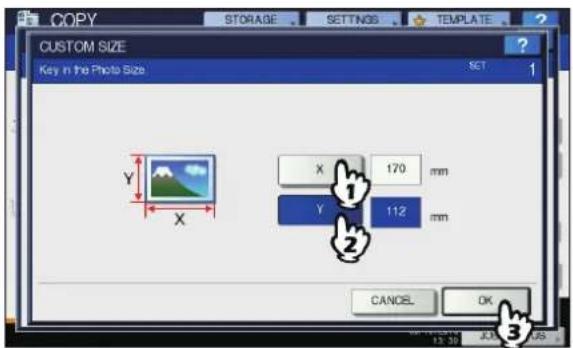
text_image
COPY STORAGE SETTINGS TEMPLATE CUSTOM SIZE Key in the Photo Size SET 1 Y X X 170 mm Y 112 mm CANCEL OK 3Selecting Finishing Mode
Finishing modes and optional finishing devices
See the table below for each finishing mode.
| Finishing mode Description | |
| Non-sort Non-staple Copies exit without being sorted or stapled. | |
| Sort (P.52) | Copies exit in the same page order as the originals one set after another. |
| Group (P.52) | Copies grouped by page exit. |
| Staple sort (P.53) | Copies exit with their corner stapled. |
| Magazine sort (P.54) | Copies exit in a book-type page order. |
The available finishing modes differ depending on the type of optional finishing devices (Inner Finisher) installed. Finishing devices available for this equipment are as follows:
Finisher
- Inner Finisher
Use the table below to check the available finishing modes.
| Finishing mode | Devices | |
| With device No | device | |
| Non-sort Non-staple Yes Yes | ||
| Sort Yes Yes | ||
| Group Yes Yes | ||
| Staple sort Yes — | ||
| Magazine sort Yes Yes | ||
■ Name of each part of the Finisher
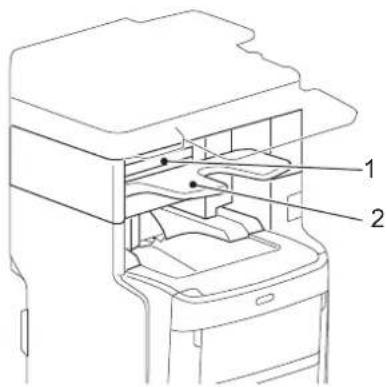
text_image
Technical diagram of a printer internal structure with labeled parts 1 and 2- Upper cover
- Receiving tray
CAUTION
- Do not let your hand come close to the tray moving up or down. The hand may get caught, which may result in personal injury.
Sort/Group mode
When you make more than one set of copies, they can be made to exit in the same page order as that of the originals. This mode is called the sort mode. Copies can also be made to exit grouped by page. This mode is called the group mode.
Sort mode
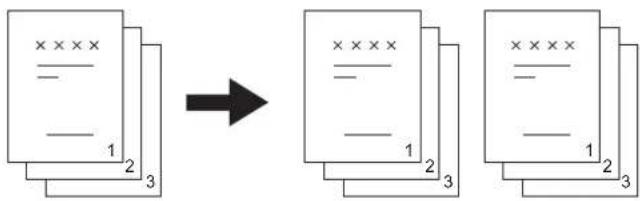
flowchart
graph TD
    A["Rectangular Block with '×' symbols and horizontal lines inside"] --> B["Transformed Block with '×' symbols and horizontal lines inside"]
    B --> C["Rectangular Block with '×' symbols and horizontal lines inside"]
Group mode
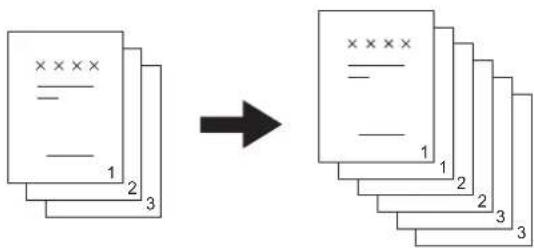
flowchart
graph TD
    A["Document with '××××' and horizontal lines"] --> B["Stacked documents with 1, 2, 3 layers"]
    B --> C["Arrow pointing to the stack of documents"]
1 Place paper in the tray(s).
2 Place the original(s).

- When you place originals on the RADF (Reversing Automatic Document Feeder), the display of the sorting mode button will change to "SORT".
3 Press [FINISHING] on the touch panel.
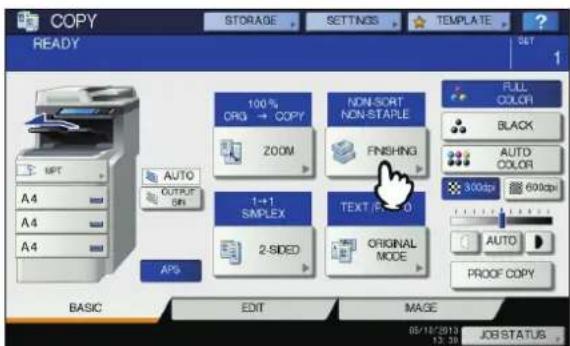
text_image
COPY READY 100% ORG → COPY ZOOM NON-SORT NON-STARLE FINISHING 1→1 SIMPLEX 2-SIDED TEXT/PLC 0 ORIGINAL MODE FULL COLOR BLACK AUTO COLOR 300dpi 600dpi AUTO PROOF COPY AUTO OUTPUT ON APS BASIC EDIT MAGE 05/18/2013 12:39 JOB STATUS4 Select [SORT] or [GROUP], and then press [OK].
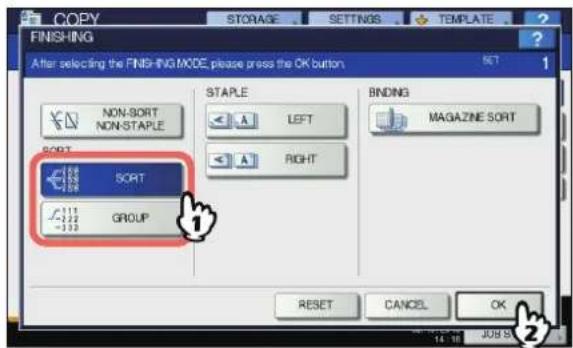
text_image
COPY STORAGE SETTINGS TEMPLATE FINISHING After selecting the FINISHING MODE, please press the OK button SET 1 NON-SORT NON-STAPLE A LEFT RIGHT BINDING MAGAZINE SORT SORT GROUP RESET CANCEL OK5 Key in the desired number of copies.
6 Select other copy modes as required, and then press the [START] button on the control panel.
Staple sort mode
When you make more than one set of copies, the copied paper can be automatically stapled set by set. This mode is called the staple sort mode. You can choose from 2 different stapling positions.
Example: When [LEFT] is selected
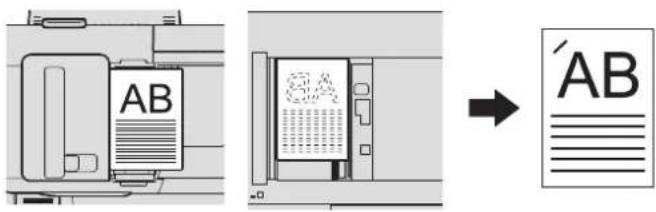
text_image
AB BA AB! Note
- Special paper such as OHP film or sticker labels is not applicable.
- Copies in different sizes cannot be stapled unless their length is the same.
1 Place paper in the tray(s).
When using bypass copying, be sure to set the paper size.
2 Place the original(s).
3 Press [FINISHING] on the touch panel.
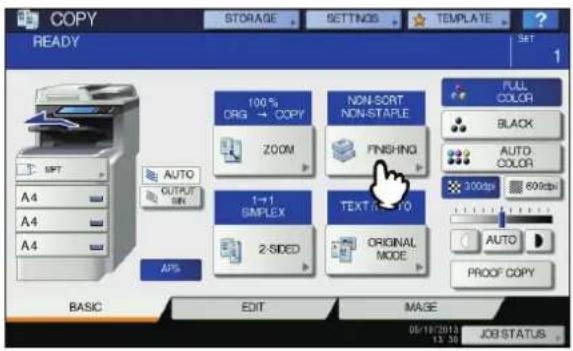
text_image
COPY READY STORAGE SETTINGS TEMPLATE 1 Set 1 100% ORG → COPY NON-SORT NON-STAPLE ZOOM FINISHING 1→1 SIMPLEX TEXT → TO 2-SIDED ORIGINAL MODE FULL COLOR BLACK AUTO COLOR 300dpi 600dpi AUTO PROOF COPY A4 A4 A4 OUTPUT ON APIS BASIC EDIT MAGE 05/18/2013 13:30 JOB STATUS4 Select the desired stapling position from [LEFT] or [RIGHT] and then press [OK].
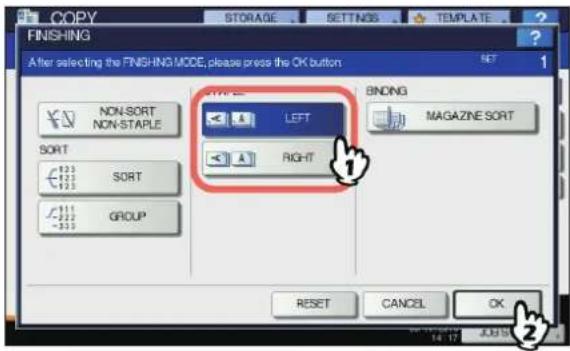
text_image
COPY STORAGE SETTINGS TEMPLATE FINISHING After selecting the FINISHING MODE, please press the OK button SET 1 NON-SORT NON-STAPLE SORT E233 E233 SORT C111 C111 GROUP NEXT LEFT RIGHT BINDING MAGAZINE SORT RESET CANCEL OK 25 Select other copy modes as required, and then press the [START] button on the control panel.
Memo
- When the number of sheets exceeds the maximum number of sheets available for stapling, this equipment automatically enters into the sort mode.
■ Maximum number of sheets available for stapling
The maximum number of sheets available for stapling differs depending on the type of the finishing device installed, paper size or paper weight.
Inner Finisher
| Paper size | Paper weight | |
| 64 - 82 g/m2(16 - 20 lb. Bond) | 83 - 104 g/m2(21 - 28 lb. Bond) | |
| A4, B5, Letter, 8.5"SQ, 16K | 50 sheets 30 sheets | |
| Folio, Legal, 13"Legal, 8K | 30 sheets 15 sheets | |
! Note
- 2 cover sheets (105 to 220g / m^2 (28 lb. Bond to 60 lb. Index)) can be added. In this case, the number of sheets available includes the 2 cover sheets.
Magazine sort
You can copy more than one original and bind them in a booklet format (Magazine sort).
Magazine sort mode
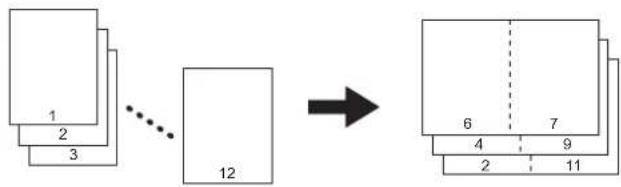
flowchart
graph TD
    A["Layer 1: 1, Layer 2: 2, Layer 3: 3"] --> B["..."]
    B --> C["Block 12"]
    C --> D["Block 6: 4, Block 7: 9, Block 11: vertical dashed line"]
    D --> E["Arrow pointing right"]
1 Place paper in the tray(s).
! Note
- Special paper such as OHP film or sticker labels is not applicable.
2 Select the desired paper size.
3 Place the original(s).
When placing the originals on the RADF, place them according to the illustration on the previous page. When placing the originals on the document glass, place them in the following order:
Magazine sort: Place the first page of the original first.
4 Press [FINISHING] on the touch panel.
![OKI MC780f+ - Press [FINISHING] on the touch panel. - 1](/content/2026/05/816767/images/a2c5f0f00b1b262bfbac05a87ae59d98a10180b567bf246ac3f75df7a3ece1f2.jpg)
text_image
COPY READY STORAGE SETTINGS TEMPLATE 1 SET 1 A4 A4 A4 AUTO OUTPUT 0.0% APS 100% ORG → COPY ZOOM NON-SORT NON-STAPLE FINISHING 1→1 SIMPLEX 2-SIDED TEXT/A-3/200 ORIGINAL MODE FULL COLOR BLACK AUTO COLOR 300dpi 600dpi AUTO PROOF COPY BASIC EDIT MAGE 05/18/2013 13:30 JOB STATUS5 Select the desired mode from [MAGAZINE SORT].
![OKI MC780f+ - Select the desired mode from [MAGAZINE SORT]. - 1](/content/2026/05/816767/images/19683ea4beb5d6159d0ef977c709483e603031dc566154c380ba6e11645fda71.jpg)
text_image
COPY STORAGE SETTINGS TEMPLATE FINISHING After selecting the FINISHING MODE, please press the OK button SET 1 NON-SORT NON-STAPLE SORT 233 233 233 SORT 233 GROUP STAPLE LEFT RIGHT BINDING MAGAZINE SORT 1 RESET CANCEL OK 26 Select other copy modes as required, and then press the [START] button on the control panel
Duplex Copying
You can copy a 1-sided original to a 2-sided copy or vice versa, or copy a 2-sided original to a 2-sided copy. This is useful when you want to save the paper, or when you want to copy a book-type original maintaining the same page order.
1-sided original -> 1-sided copy (☐ P.55)
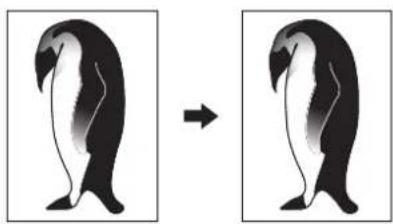
natural_image
Two identical penguin illustrations in a row, showing a change from left to right (no text or symbols)2-sided original -> 1-sided copy (P.55)
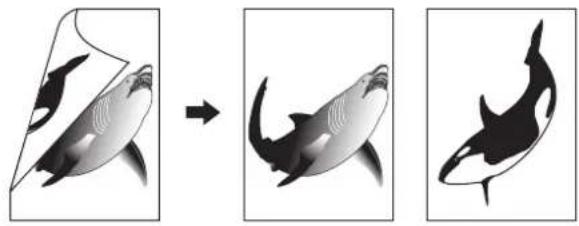
natural_image
Three-panel illustration showing a diver, a whale, and a whale-like shape with internal patterns (no text or symbols)1-sided original -> 2-sided copy (P.56)
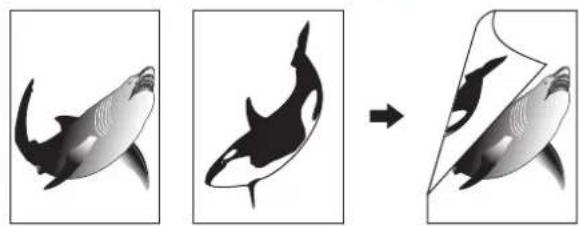
natural_image
Three-panel illustration showing a whale being cut off into its open shell (no text or symbols)2-sided original -> 2-sided copy (☐ P.56)
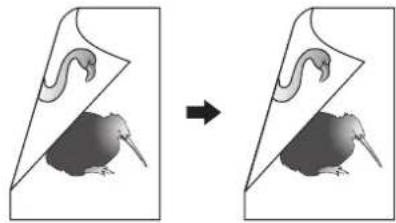
natural_image
Illustration of a snake inside a tent with an arrow indicating transformation (no text or symbols)! Note
- Use plain or THICK 1 for duplex copying.
Making a 1-sided copy
Memo
- When you copy 2-sided portrait originals which open to the left/right on only 1 side of the paper, use the image direction function on the EDIT menu so that all the copied paper will exit in the proper direction.
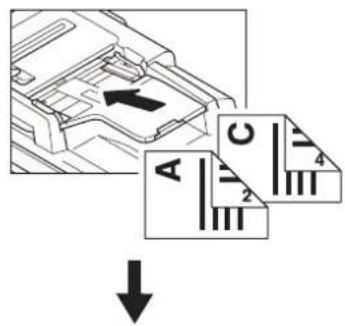
text_image
Diagram showing a device with labeled pins A, C, and D, and an arrow pointing to the component.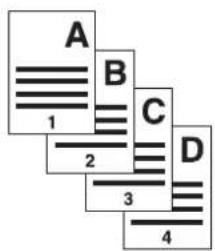
text_image
A B C D 1 2 3 4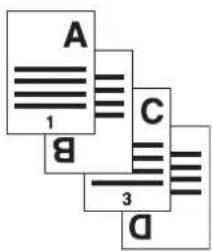
text_image
A 1 B C 3 D1 Place paper in the tray(s).
When using bypass copying, be sure to set the paper size.
2 Place the original(s).
3 Press [2-SIDED] on the touch panel.
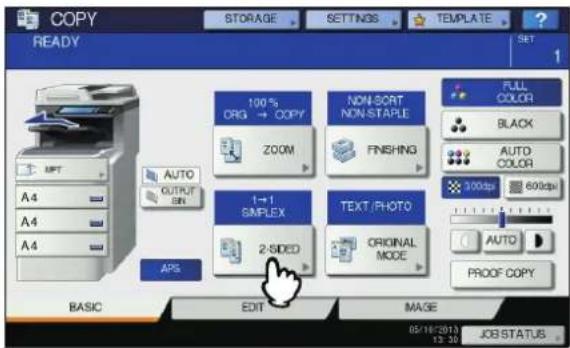
text_image
COPY READY 100 % ORG → COPY ZOOM NON-SORT NON-STAPLE FINISHING FULL COLOR BLACK AUTO COLOR 300dpi 600dpi AUTO PROOF COPY AUTO OUTPUT ON 1→1 SIMPLEX 2-SIDED TEXT:PHOTO ORIGINAL MODE APS BASIC EDIT MAGE 05/18/2013 13:30 JOB STATUS4 Select the desired mode, and then press [OK].
[1->1 SIMPLEX]: 1-sided original to 1-sided copy
[2->1 SPLIT]: 2-sided original to 1-sided copy
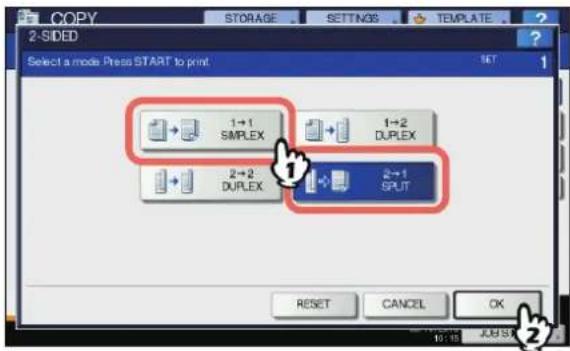
text_image
COPY 2-SIDED Select a mode Press START to print. 1+1 SIMPLEX 1+2 DUPLEX 2+2 DUPLEX 2+1 SPLIT RESET CANCEL OK 10:10 JULS5 Select other copy modes as required, and then press the [START] button on the control panel.
Making a 2-sided copy
Memo
- If 1-sided portrait originals have been placed in a landscape direction and you copy them on both sides of the paper, copied sheets are usually in the open to top/bottom direction. You can make copies in the open to left/right direction with the image direction function.
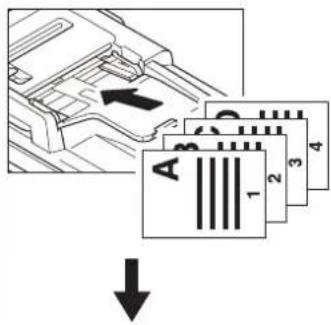
text_image
Diagram showing a connector with labeled pins and an arrow indicating direction, likely from an automotive or electrical component.
text_image
A B C D1 Place paper in the tray(s).
When using bypass copying, be sure to set the paper size.
2 Place the original(s).
3 Press [2-SIDED] on the touch panel.
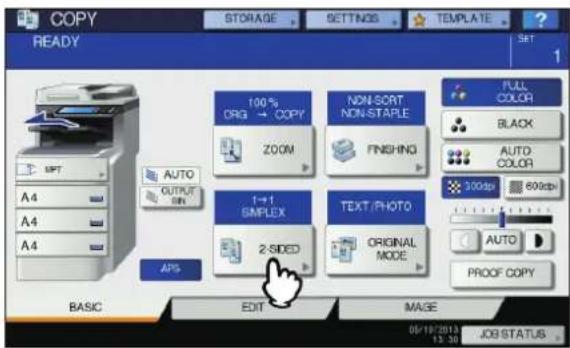
text_image
COPY READY 100% ORG → COPY ZOOM NON-SORT NON-STAPLE FINISHING FULL COLOR BLACK AUTO COLOR 300dpi 600dpi AUTO PROOF COPY AUTO OUTPUT OR A4 A4 A4 APS 1→1 SIMPLEX 2-SIDED TEXT PHOTO ORIGINAL MODE BASIC EDIT IMAGE 05/19/2013 13:30 JOB STATUS4 Select the desired mode, and then press [OK].
[1 -> 2 DUPLEX]: 1-sided original to 2-sided copy
[2 -> 2 DUPLEX]: 2-sided original to 2-sided copy
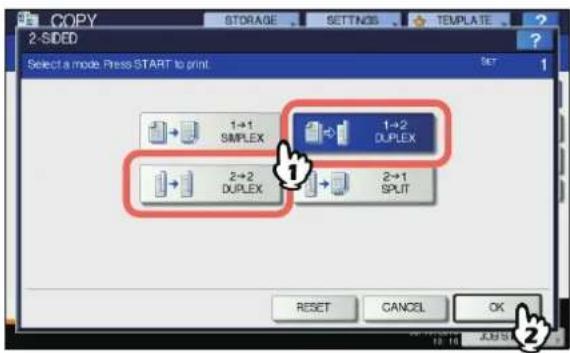
text_image
COPY STORAGE SETTINGS TEMPLATE 2-SIDED Select a mode. Press START to print. 1→1 SIMPLEX 1→2 DUPLEX 2→2 DUPLEX 2→1 SPLIT 1 2 RESET CANCEL OK5 Select other copy modes as required, and then press the [START] button on the control panel.
When placing the original on the document glass, follow steps 6 and 7 on P.31 "Basic copying procedure".
Performing Copy & File
With the Copy & File function, you can store the copied data in the share folder of the hard disk of this equipment or a specified PC on a network. The data can be stored in any of PDF, TIFF and XPS formats.
! Note
- The data will be stored as black images. (Resolution: 600 dpi only) The data stored with this function are suited for printing but not for being imported as an image into your PC. To obtain the optimal image quality for importing, it is recommended to store the data with the Scan to File function of this equipment.
- The network administrator must make settings for Copy & File in advance. For details, refer to the TopAccess Guide.
- It is recommended to back up the data stored in the share folder.
Memo
- You can store data in an e-Filing box with the Store to e-Filing function. For details, refer to the e-Filing Guide.
1 Place the original(s).
2 Press [STORAGE] on the touch panel.
![OKI MC780f+ - Press [STORAGE] on the touch panel. - 1](/content/2026/05/816767/images/c72b26d85e483e9586a426925bc5e9de6688edfd36c588815ba685d0e5324b20.jpg)
text_image
COPY READY MPT A4 A4 A4 AUTO OUTPUT ON APS 100% ORG → COPY ZOOM NON-SORT NON-STAPLE FINISHING 1→1 SIMPLEX 2-SDED TEXT/PHOTO ORIGINAL MODE FULL COLOR BLACK AUTO COLOR 300dpi 600dpi AUTO PROOF COPY BASIC EDIT IMAGE 05/10/2013 13.38 JOB STATUS3 Press [COPY & FILE] on the touch panel.
![OKI MC780f+ - Press [COPY & FILE] on the touch panel. - 1](/content/2026/05/816767/images/2f447e293aaf4f1d2d98e2ca8bb2d99323b66e4dc932def7059bb6ce59762c20.jpg)
text_image
COPY READY STORE TO E-FLING MFP LOCAL REMOTE 1 REMOTE 2 FILE NAME UMFP06995311/FILE_SHARE PDF MULTI/SINGLE MULTI SINGLE RESET CANCEL OK 05/10/2013 19.21 JOB STATUS4 Press the necessary buttons for entering information about the data to be stored. Then press [OK].
![OKI MC780f+ - Press the necessary buttons for entering information about the data to be stored. Then press [OK]. - 1](/content/2026/05/816767/images/3684a1dbec473c877f4b7638292c1d07e2da568fb55340e7f4d403b58b522660.jpg)
text_image
COPY READY STORE TO E-FLNG COPY & FILE MTP_LOCAL IMF06995311/FILE_SHARE REMOTE 1 REMOTE 2 FILE NAME DOC051013 FILE FORMAT PDF MULTI/SINGLE MULTI SINGLE RESET CANCEL OK 08/10/2013 19:21 JOB ST. ①MFP LOCAL: Press this to store the data into the share folder of this equipment.
REMOTE 1, REMOTE 2: Press either of them to store the data into the share folder of a PC that is connected with this equipment via a network.
! Note
- You can select up to 2 of [MFP LOCAL], [REMOTE 1] and [REMOTE 2]. You can cancel the selected item by pressing the same button again. - When a user who has the privilege of changing the setting of [REMOTE 1] and [REMOTE 2] has pressed either of them, the menu for specifying a directory appears. In this case, see the following page to specify the directory:
P.58 "Setting share folder"
FILE NAME: Press this to display the on-screen keyboard. Then enter the file name within 128 letters.
! Note
- The trailing characters in a file name (maximum 74) may be deleted depending on the type of letters used.
FILE FORMAT: Select the file format in which the data are stored from PDF, TIFF or XPS.
MULTI / SINGLE: These are for selecting whether the data are stored as a multiple page file or a single page file. If you select "MULTI", all the scanned data will be stored as one file. If you select "SINGLE", a folder is created and each page of the scanned data will be stored individually as one file in the folder.
5 Press the [START] button on the control panel.
When the original is placed on the RADF (Reversing Automatic Document Feeder), copying and storing start simultaneously.
When the original is placed on the document glass, follow the procedure below.
6 Place the next original on the document glass, and then press [NEXT COPY] on the touch panel or the [START] button on the control panel.
Repeat this step until the scanning of all the originals is finished.
7 When all have been scanned, press [JOB FINISH] on the touch panel.
![OKI MC780f+ - When all have been scanned, press [JOB FINISH] on the touch panel. - 1](/content/2026/05/816767/images/2591bf6d3df895c241fda455d8419388375cd10d96e4407a972575b8083df1a6.jpg)
text_image
COPY SCANNING STORAGE SETTINGS TEMPLATE Place next original on glass Press [START] or [NEXT COPY] to copy. Press [JOB FINSH] to complete scanning SCAN PAGE 1 JOB CANCEL JOB FINSH NEXT COPY JOB STATUSCopying and storing start.
Setting share folder
When a user who has the privilege of setting a share folder has pressed [REMOTE 1] or [REMOTE 2], the menu for specifying a directory appears.
The setting items differ depending on the file transfer protocol to be used. FTP, SMB, NetWare IPX/SPX, NetWare TCP/IP and FTPS are selectable for a file transfer protocol.
FTP / FTPS
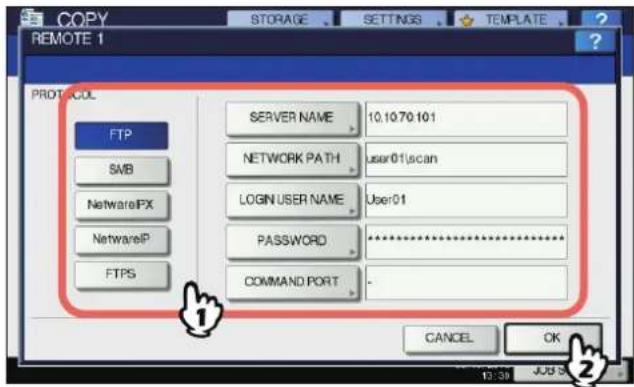
text_image
COPY REMOTE 1 PORT COL FTP SMB NetwareIPX NetwareIP FTPS SERVER NAME 10.10.70.101 NETWORK PATH user01/scan LOGIN USER NAME User01 PASSWORD ********** COMMAND PORT - CANCEL OK 13:39 JUL 5When you press any of the buttons below, the on-screen keyboard appears. Enter with the buttons on the touch panel or the digital keys on the control panel. When you finish the entry, press [OK].
SERVER NAME: Press this to enter the IP address of FTP server. For example, if the data should be transferred to an FTP folder ftp://10.10.70.101/user01/scan/, key in "10.10.70.101".
NETWORK PATH: Press this to enter a network path to an FTP folder where the data are to be stored. For example, if the data should be transferred to an FTP folder ftp://10.10.70.101/user01/scan/, enter "user01\scan".
LOGIN USER NAME: Press this to enter a user name to login to the FTP server. Enter this as required.
PASSWORD: Press this to enter a password to login to the FTP server. Enter this as required.
COMMAND PORT: Press this to key in a command port number for executing commands. Normally “-” is entered in this field, which means that a port number set by the administrator will be used. Change this only when you want to use any other port number.
SMB
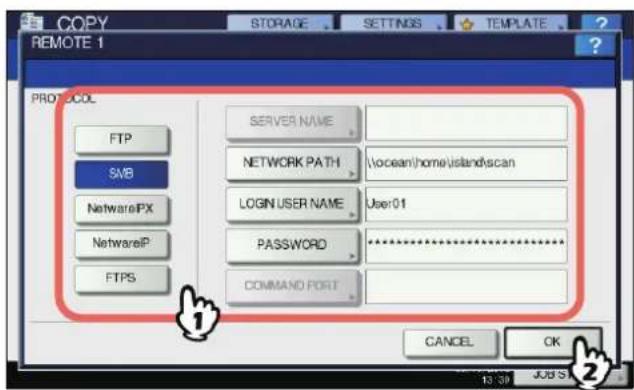
text_image
COPY REMOTE 1 PORT COL FTP SWB NetwareIPX NetwareIP FTPS SERVER NAME NETWORK PATH \ocean\home\islandscan LOGIN USER NAME User01 PASSWORD ****** COMMAND PORT CANCEL OK 13:39 JUSTSWhen you press any of the buttons below, the on-screen keyboard appears. Enter with the buttons on the touch panel or the digital keys on the control panel. When you finish the entry, press [OK].
NETWORK PATH: Press this to enter a network path to the folder where the data are to be stored.
LOGIN USER NAME: Press this to enter a user name to access the network folder. Enter this as required.
PASSWORD: Press this to enter a password to access the network folder. Enter this as required.
Memo
- If you selected [SMB], the settings for [SERVER NAME] and [COMMAND PORT] are not required.
NetWare IPX / NetWare IP
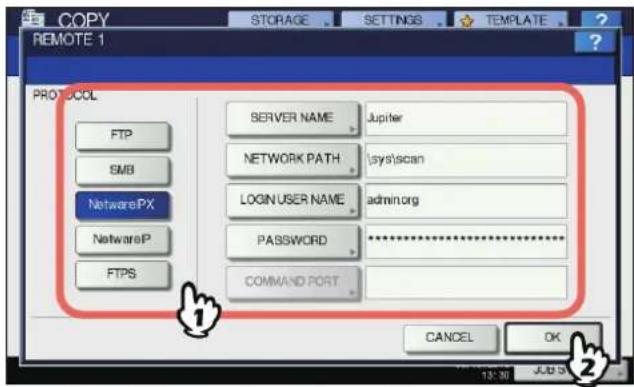
text_image
COPY REMOTE 1 PROTOCOL FTP SMB NetwarePX NetwareP FTPS SERVER NAME Jupiter NETWORK PATH [sys]scan LOGIN USER NAME admin.org PASSWORD ********** COMMAND PORT CANCEL OK 13:30 JUD S 2When you press any of the buttons below, the on-screen keyboard appears. Enter with the buttons on the touch panel or the digital keys on the control panel. When you finish the entry, press [OK].
SERVER NAME: When you select [NetWare IPX], enter either the server name of NetWare server or Tree/Context (if NDS is usable). When you select [NetWare IP], enter the IP address of NetWare server.
NETWORK PATH: Press this to enter a network path to a NetWare server folder where the data are to be stored. For example, if the data should be transferred to a folder "sys\scan" of NetWare server, enter "\sys\scan".
LOGIN USER NAME: Press this to enter a user name to login NetWare server. Enter this as required.
PASSWORD: Press this to enter a password to login NetWare server. Enter this as required.
3
Fax
SENDING/RECEIVING A FAX P.60
CHECKING AND CANCELING THE COMMUNICATIONS P.73
SENDING/RECEIVING A FAX
Note
Initializing the FAX is required to use the FAX for the first time. For details, refer to the Advanced Guide.
Sending a Fax
Basic procedures
This section describes the basic procedures to send a fax. For details of in-depth operations, see the page under each procedure as required.
Besides the basic sending functions described in this page, there are various useful ways to send a fax. These procedures are described in the following pages.
P.69 "Other transmissions"
Advanced Guide
1 Place the original(s).
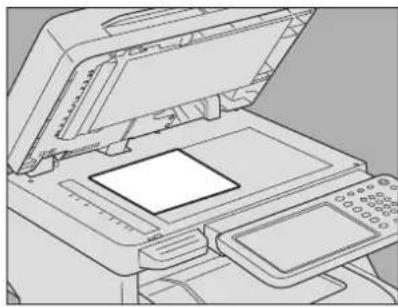
natural_image
Line drawing of an open printer with a blank cover and control panel (no text or symbols)Check the original size and scanning range, etc. Place the original(s) on the document glass or RADF (Reversing Automatic Document Feeder) in the correct direction. (The illustration above shows the original placed on the document glass.)
P.61 "Handling an original"
2 Press the [FAX] button on the control panel.
![OKI MC780f+ - Press the [FAX] button on the control panel. - 1](/content/2026/05/816767/images/6739c1c0223a6a2e952ab8734278c853a85fd9de28a98a786aa883c93fd85a45.jpg)
text_image
PRINT FILING BOX FAX DATA IN MEMORY PQ83 7 IUV 8 WXYZ 9 * 0 # AUTHENTICATION C CLEAR PRINT DATA ATTENTIONThe fax screen is displayed. If you leave the screen unattended for the period of the auto clear setting time (45 sec. by manufacturer default), the screen returns to the default one automatically.
3 Press [OPTION] and set the transmission conditions.
![OKI MC780f+ - Press [OPTION] and set the transmission conditions. - 1](/content/2026/05/816767/images/51987d22969685715067a2bff484e86c053cc8f1621111b3a38bf3bc871bc373.jpg)
text_image
FAX Enter the Address 0000 A4 STANDARD INPUT FAX NO. INPUT @ MULTI DESTINATION. OPTION MONITOR SINGLE 0001 User001 0005 User005 0002 User002 0006 User006 0003 User003 0007 User007 0004 User004 0008 User008 GROUP All Persons ALL CLEAR KNOWND. SEARCH PAUSE BACK SPACE PREVIEW ADDRESS ADVANCED 95/16/2019 16:45 JOB STATUSThe transmission condition setting screen is displayed. Set the transmission conditions such as resolution, original mode, exposure and transmission mode, as required.
P.64 "Setting the transmission conditions"
4 Specify the recipient.
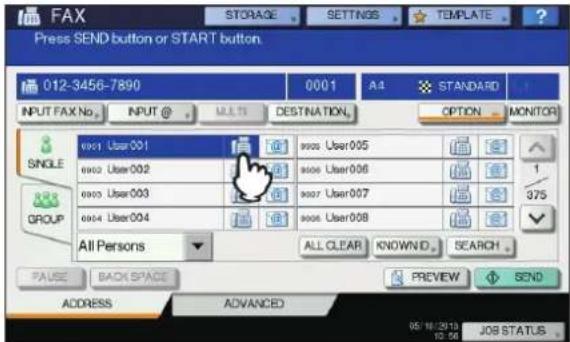
text_image
FAX STORAGE SETTINGS TEMPLATE Press SEND button or START button 012-3456-7890 0001 A4 STANDARD INPUT FAX No. INPUT @ MULTI DESTINATION OPTION MONITOR SINGLE All Persons ALL CLEAR KNOWNID... SEARCH PAUSE BACK SPACE PREVIEW SEND ADDRESS ADVANCED 05/18/2013 10:56 JOB STATUSTo specify the recipient, dial the number using the digital keys on the control panel or use the address book.
P.66 "Specifying the recipient"
5 To display the preview screen, press [PREVIEW].
![OKI MC780f+ - To display the preview screen, press [PREVIEW]. - 1](/content/2026/05/816767/images/7076327049a1282d8e93ce574b965450c58d666be6fa61a05398de953bff0cb4.jpg)
text_image
FAX STORAGE SETTINGS TEMPLATE Press SEND button or START button 012-3456-7890 0001 A4 STANDARD INPUT FAX No. INPUT @ MULTI DESTINATION OPTION MONITOR SINGLE user User 001 user User 002 user User 003 user User 004 005 User 006 006 User 007 007 User 008 ALL Clear KNOWNID... SEARCH PAUGE BACK SPACE PREVIEW SEND ADDRESS ADVANCED 05/12/12 10:50 JOB STATUS6 Press [SEND].
![OKI MC780f+ - Press [SEND]. - 1](/content/2026/05/816767/images/87cd9a54bae6bd37ecb696374ad177e04184873ffaf4f1daf012537617c9767b.jpg)
text_image
FAX STORAGE SETTINGS TEMPLATE Press SEND button or START button 012-3456-7890 0001 A4 STANDARD INPUT FAX No. INPUT @ MULTI DESTINATION OPTION MONITOR SINGLE GROUPE user User 001 user User 002 user User 003 user User 004 SINGLE SINGLE SINGLE SINGLE All Persons ALL CLEAR KNOWNID... SEARCH... PAUSE BACK SPACE PREVIEW SEND ADDRESS ADVANCED 05/10/2012 10:30 JOB STARTThe fax is sent or reserved.
Memo
• Alternatively, you can press the [START] button on the control panel.
- In the memory transmission mode, the original is scanned into memory. Once a connection has been made, this equipment automatically starts sending the scanned document. In the direct transmission mode, the fax number is dialed immediately, and the scanned document will be sent. (Transmission conditions can be set in the transmission condition setting screen.)
- If memory becomes full during scanning in the memory transmission mode, that original will not be stored in memory. When that happens, reduce the number of originals you are sending, or try sending them in the direct transmission mode.
- You can check the status of the current sending. You can also cancel the transmission (deletes the job).
P.73 "CHECKING AND CANCELING THE COMMUNICATIONS"
Redial function
In the memory transmission mode, if the fax cannot be sent due to a busy-line, the fax number is redialed automatically to send the fax. By default, this equipment redials 3 times at 1-minute intervals.
Batch transmission function
If there are multiple transmission jobs to the same recipient in memory, you can send them at once using this function, resulting in reduction of communication costs. However, if their recipients are the same but their transmission conditions vary or if users or departments are different when this equipment is managed under the department management or user management, this function is not applied to those reserved jobs.
Sending the next original
If an original is placed on the document glass and its scanning is completed, the confirmation screen for the next original is displayed. If you want to continue scanning of the next original, place it on the document glass, and then press the [START] button on the control panel. Once all the originals are scanned, press [JOB FINISH]. If you place an original on the RADF (Reversing Automatic Document Feeder) and press the [CONTINUE] button during scanning, the confirmation screen for the next original can be displayed after the scanning is completed.
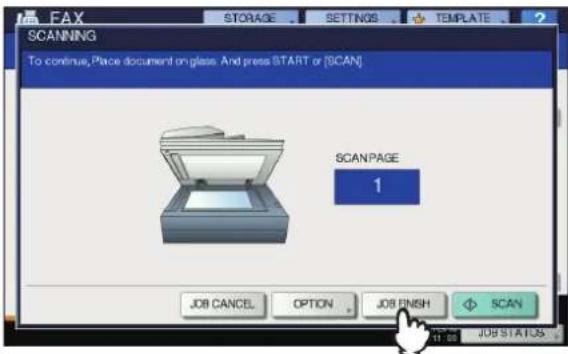
text_image
FAX STORAGE SETTINGS TEMPLATE SCANNING To continue, Place document on glass And press START or [SCAN] SCAN PAGE 1 JOB CANCEL OPTION JOB FINISH SCAN 11:00 JOB STATUS- If you leave the screen unattended for a period of the auto clearance setting time (45 sec. by manufacturer default), a copy of the scanned originals is sent.
- To cancel the transmission in the memory transmission mode, press [JOB CANCEL].
P.74 "Canceling the memory transmission"
- To change the transmission conditions for each page, press [OPTION].
P.65 "Changing the settings for each page"
Handling an original
■ Originals that can be sent
This equipment can send a fax of the following originals. You can place 1-sided or 2-sided originals of the media types, such as standard paper, recycled paper and paper having holes (2, 3 or 4 holes) for filing, on the RADF (Reversing Automatic Document Feeder). On the document glass, you can place 1-sided originals of the above media types as well as OHP film, tracing paper, booklets and three-dimensional objects.
| Location | Maximum size | Paper weight | Original size |
| Document glass | Length:355.6mm(14")Width:215.9mm(8.5") | - A4, A5, B5,Folio, Letter,Legal13,Legal13.5,Legal14,Statement | |
| RADF Length: | 355.6mm(14")Width:215.9mm(8.5") | 60 - 105 g/m2(15.9 - 27.9 lb.) | A4, A5, B5,Folio, Letter,Legal13,Legal13.5,Legal14 |
! Note
- Do not place any heavy objects (8 Kg(18lb.) or over) on the document glass and do not press on it with force.
■ Original scanning range
The following figures show the original scanning area. Any information in the shaded area is not printed on the paper.
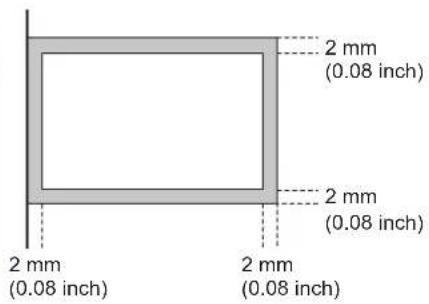
text_image
2 mm (0.08 inch) 2 mm (0.08 inch) 2 mm (0.08 inch) 2 mm (0.08 inch)■ Placing the original(s) on the document glass
This section describes how to set an original on the document glass. Originals are sent in the order they are placed on the document glass.
CAUTION
Do not place any heavy objects (8 kg/18 lb. or over) on the document glass and do not press on it with force. Breaking the glass could injure you.
1 Raise the Original Cover or RADF (Reversing Automatic Document Feeder), and place the original with its face down on the glass.
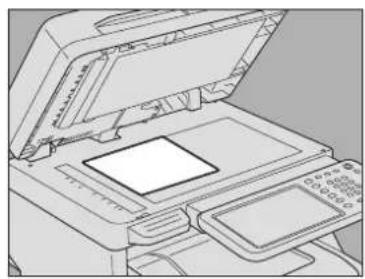
natural_image
Line drawing of an open printer with a blank cover and control panel (no text or symbols)2 Align the original against the left inner corner of the glass.
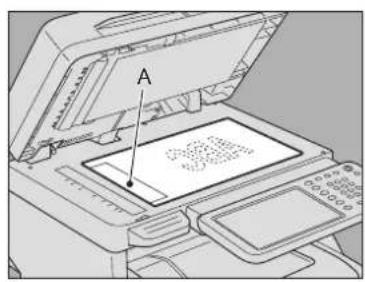
text_image
A 300V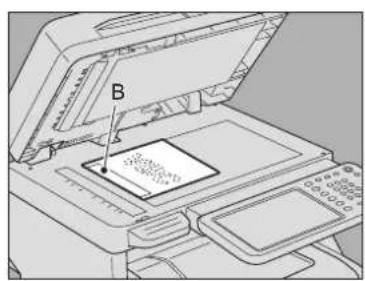
text_image
Diagram of a printer with labeled component B, showing internal components and paper feeding into a printer.- Different size originals can also be sent in one transmission.
- When an original size is placed in the direction shown in the upper figure, transmission to a recipient is carried out so that the pre-entered sender information is printed in position A in the figure.
- When an original size is placed in the direction shown in the lower figure, transmission to a recipient is carried out so that the pre-entered sender information is printed in position B in the figure.
- The pre-entered sender information shows what is registered in the Terminal ID. Advanced Guide
3 Lower the Original Cover or RADF slowly.
■ Placing the original(s) on the RADF
This section describes how to set the original(s) on the RADF (Reversing Automatic Document Feeder). When the originals are placed on the RADF, the uppermost page is the first to be scanned and sent.
CAUTION
- When scanning the duplex original with the RADF, do not put your hand on the RADF. Paper may damage the hand.
- When scanning the duplex original with the RADF, do not put an object on the RADF. This could cause a paper misfeed.
1 After aligning the originals, place them with their face up and slide the guides to rest against the edges of the originals.
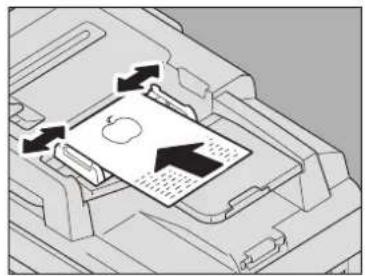
natural_image
Diagram of an Apple processor internal structure with arrows indicating flow or movement (no text or symbols)- Regardless of size, documents can be set to 100 sheets (80g/m² (20 lb.)) or size 10mm (0.39inch) max.
- 2-sided originals can be set and sent. [1] Advanced Guide
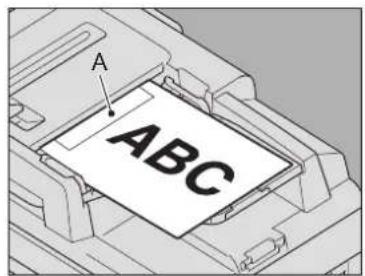
text_image
A ABC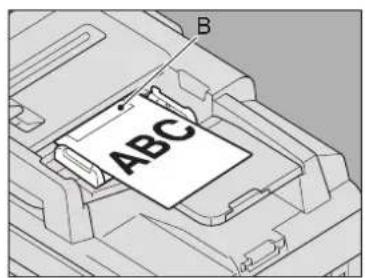
text_image
B ABC- When an original size is placed in the direction shown in the upper figure, transmission to a recipient is carried out so that the pre-entered sender information is printed in position A in the figure.
- When an original size is placed in the direction shown in the lower figure, transmission to a recipient is carried out so that the pre-entered sender information is printed in position B in the figure.
- The pre-entered sender information shows what is registered in the Terminal ID.
Advanced Guide
Sending documents of different sizes
The automatic 2-sided document feeder can be used to set documents of different sizes together. The following combinations of document sizes are possible.
• Other than North America: A4, Folio
• North America: Letter, Legal, Legal 13
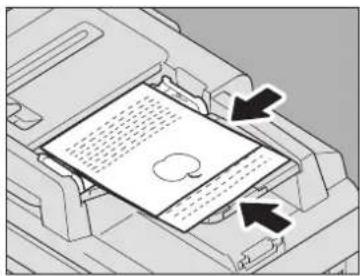
natural_image
Diagram of a printer's internal structure with arrows indicating movement or force (no text or symbols present)Memo
- To send different width originals, you need to enable "MIXED ORIGINAL SIZES" as a transmission condition.
[1] P.64 "Setting the transmission conditions"
Precautions for using the RADF
Do not use the following originals as they may misfeed or become damaged:
(1) Badly wrinkled or folded originals. In particular, originals whose leading edge are curled may fail to be fed.

(2) Originals with carbon paper

(3) Taped, pasted or clipped (cut out) originals

(4) Clipped or stapled originals

(5) Originals with holes or tom originals
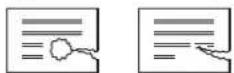
(6) Damp originals (7) OHP film originals
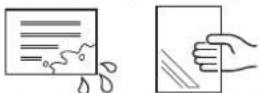
The following originals should be handled carefully:
(1) Folded or curled originals should be smoothed out before being used.

(2) Originals sticking to each other, or originals that are surface-treated may fail to separate properly.
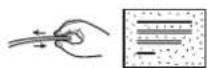
Setting the transmission conditions
You can set the fax transmission conditions.
Memo
- The transmission conditions are only applied to the current transmission. They return to the default settings after the transmission.
• Each default setting of resolution, original mode, exposure, transmission mode and ECM is adjustable.
Advanced Guide
■ Making settings
Pressing [OPTION] on the fax screen will display the transmission condition setting screen as shown below. Set each setting item, and then press [OK].
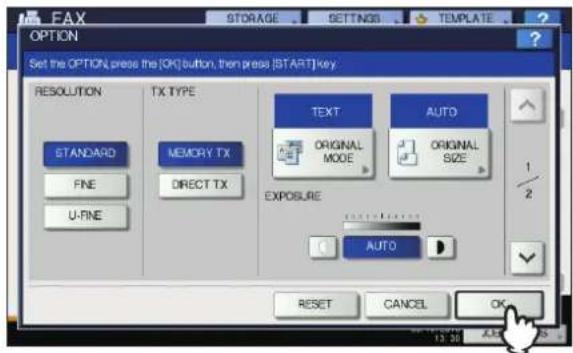
text_image
FAX OPTION Set the OPTION press the (OK) button, then press | START| key: RESOLUTION TX TYPE STANDARD MEMORY TX DIRECT TX FINE U-FINE TEXT ORIGINAL MODE AUTO ORIGINAL SIZE 1/2 EXPOSURE AUTO RESET CANCEL OK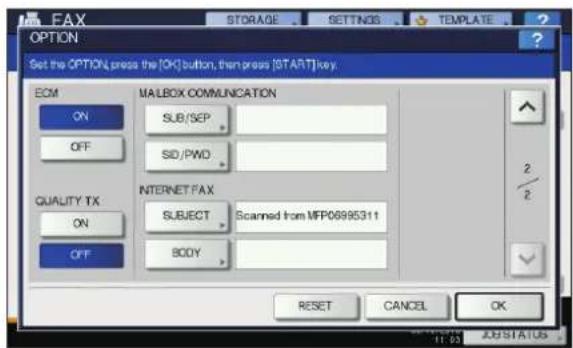
text_image
FAX OPTION Set the OPTION press the [OK] button, then press [START] key. ECM MALBOX COMMUNICATION ON SUB/SEP OFF SID/PWD QUALITY TX ON INTERNET FAX SUBJECT Scanned from MFP06995311 OFF BODY RESET CANCEL OK STORAGE 2 2 11:53 ASISTATUS- Press on to switch the pages.
- To cancel the operation and return to the previous screen, press [RESET].
RESOLUTION
Set the resolution based on the fineness of the original.
STANDARD: This is suitable for an original with regular size text.
FINE: This is suitable for an original with small size text and fine illustrations.
U-FINE: This is suitable for an original with ultra-fine illustrations.
Memo
- If the recipient's fax machine is not capable of receiving originals at the same resolution, the resolution is automatically converted before being sent to the recipient. The higher the resolution is, the longer it takes to send an original.
TX TYPE
Set the fax transmission mode.
MEMORY TX: Send the original after the scanned data are saved in the memory. Up to 100 transmissions of up to 1000 pages per 1 transmission can be reserved.
DIRECT TX: Send the original directly as it is being scanned. Once a page has been scanned and sent, the next page is scanned and sent. Therefore, it takes longer to scan and send all pages. However, you can confirm on the fly that each page is sent to the recipient.
ORIGINAL MODE
Set the scanning mode based on the type of the original.
TEXT: This is suitable for an original with text and line drawings.
TEXT/ This is suitable for an original with a mixture PHOTO: of text and photos.
PHOTO: This is suitable for an original with photos.
Memo
- In the TEXT/PHOTO mode or PHOTO mode, transmission time may be longer than that in the TEXT mode.
ORIGINAL SIZE
Set the scan size of the original.
AUTO: The size of the original is automatically determined before the original is scanned. MIXED Select this function to load the originals with ORIGINAL different width into the RADF (Reversing SIZES: Automatic Document Feeder). Specified The original is scanned at the preset size size: regardless of its actual size.
Memo
- If the recipient's fax machine is not capable of receiving originals of B5 size, this equipment may reduce that size before sending it. To avoid this, when the original to be set is B5 size, specify A4 size respectively.
EXPOSURE
Set the density at which the original is to be scanned.
AUTO: This equipment automatically detects the contrast of the original, and scans it with the optimum density.
Manual: Press ☐ or ☑ to set the desired contrast.
ECM
Switch the ECM (Error Correction Mode) communication ON or OFF. ECM is an internationally standardized communication mode that automatically corrects errors that occur during fax transmissions. With this setting option ON, even when the transmitted data have been affected by noise during communication, this mode allows good communication without image distortion by automatically resending the parts that have been affected.
! Note
- Both the sender and the receiver must have the ECM function to make ECM communication available.
- When affected by noise during communication, communication time is slightly longer than usual. Even when the ECM communication is used, an error may occur depending on the line status.
- The ECM communication is not available for voice communication.
QUALITY TX
Switch Quality TX ON or OFF. When this mode is set to ON, originals are sent at a slower speed than usual and the chances of errors occurring decrease.
For the communication compatible with ITU-T (International Telecommunications Union-Telecommunications) standards, specify a subaddress or password to be sent to the recipient's fax machine. (Up to 20 digits can be entered.)
| SUB(Subaddress): | Information to send data of the original to the fax machine. |
| SEP (Selective Polling): | Information to retrieve data of the original from the fax machine. |
| SID (Sender Identification): | Password for SUB. |
PWD (Password): Password for SEP.
Memo
- To use this function, the recipient's fax machine must be capable of setting an ITU-T compatible subaddress or password.
INTERNET FAX
SUBJECT: The subject of the Internet Fax BODY: The body of the Internet Fax This is not used for sending a standard fax.
■ Changing the settings for each page
You can change the scanning conditions (RESOLUTION, MODE, EXPOSURE and ORIGINAL) for each page.
1 Specify the recipients and press [SEND] to start scanning a document. When the scanning of the original is completed, the confirmation screen for the next original is displayed. Press [OPTION].
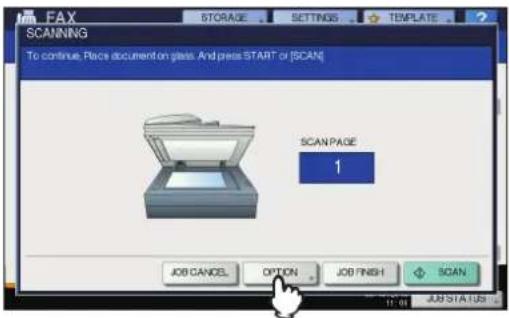
text_image
FAX SCANNING To continue. Place document on glass And press START or [SCAN] SCAN PAGE 1 JOB CANCEL OPTION JOB FINISH SCAN SUB STATUSThe illustration above shows the original placed on the document glass. If you place an original on the RADF (Reversing Automatic Document Feeder) and press the [CONTINUE] button during scanning, the confirmation screen for the next original is displayed after the scanning is completed. If you press the [STOP] button during scanning, the scanning halts and the confirmation screen for the next original can be displayed.
2 The setting screen for the scanning conditions is displayed. Change the setting, and then press [OK].
P.64 "Making settings"
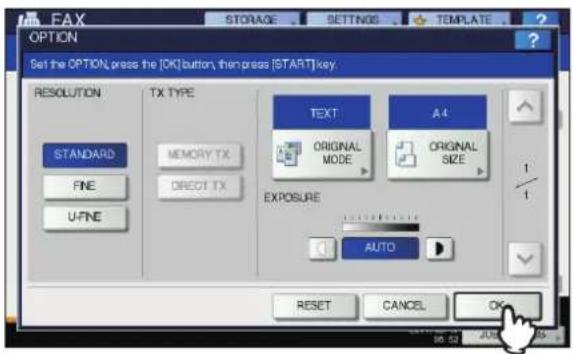
text_image
FAX OPTION Set the OPTION, press the [OK] button, then press [START] key. RESOLUTION TX TYPE STANDARD MEMORY TX FINE DIRECT TX U-FINE TEXT A4 ORIGINAL MODE ORIGINAL SIZE EXPOSURE AUTO RESET CANCEL OKSpecifying the recipient
There are various ways to specify the recipient, such as Direct entry with the control panel and Address book entry.
Memo
- To use the address book, you need to register recipients' fax numbers to the book in advance. For details of the operation, refer to the Advanced Guide or TopAccess Guide.
■ Direct entry with digital keys
You can specify the recipient by entering its fax number on the control panel.
1 Press [INPUT FAX No].
![OKI MC780f+ - Press [INPUT FAX No]. - 1](/content/2026/05/816767/images/52d85d093bf016106bbf305d56d03eb871d28b890abb3ea0eab69eb75963f447.jpg)
text_image
FAX Enter the Address 0000 A4 STANDARD INPUT FAX No. INPUT @ MULTI DESTINATION OPTION MONITOR SINCE User 001 user 005 User 006 user User 002 user 006 user User 003 user 007 User 008 user User 004 user 008 GROUP All Persons ALL CLEAR KNOWNID SEARCH PAUSE BACK SPACE PREVIEW ADDRESS ADVANCED 08/10/2013 19:45 JOB STATUS2 Key in the recipient's fax number and press [OK].
![OKI MC780f+ - Key in the recipient's fax number and press [OK]. - 1](/content/2026/05/816767/images/cd3e6a6ca764f335dc0eb51368e6fd046053eb39758f5aef7f8961487c8bb7ea.jpg)
text_image
FAX Press SEND to 1234567890 INPUT FAX No. Input the FAX number. 1234567890 1 2 3 4 5 6 7 8 9 * 0 # PAUSE BACK SPACE CLEAR MULTI ANDARD OPTION MONITOR 1 375 SEARCH W SEND ADDRESS CANCEL OK JOB STATUS- You can also enter the recipient's address with the digital key on the control panel.
• To delete the entered fax number one number at a time, press [BACK SPACE]. - To delete the entire entered fax number in one go, press the [CLEAR] button.
3 Confirm the fax number displayed on the fax screen.
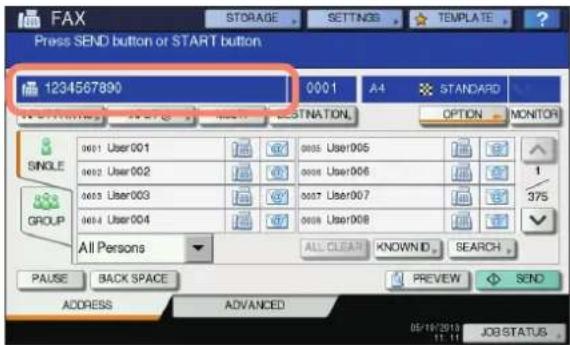
text_image
FAX STORAGE SETTINGS TEMPLATE Press SEND button or START button 1234567890 0001 A4 STANDARD OPTION MONITOR SINGLE 0001 User 001 0002 User 002 0003 User 003 0004 User 004 0005 User 005 0006 User 006 0007 User 007 0008 User 008 ALL Persons ALL CLEAN KNOWNID SEARCH PAUSE BACK SPACE PREVIEW SEND ADDRESS ADVANCED 05/16/2013 11.11 JOB STATUS• To delete each entered value, press [BACK SPACE].
• To delete all the entered values at once, press the [CLEAR] button on the control panel.
- In the memory transmission mode, you can specify multiple recipients to send the same document at once. Press [MULTI], and enter the recipient's fax number. Repeat this operation until all the recipients are specified. You can also specify the recipients' fax numbers by combining with other entry methods. The number of recipients you can simultaneously specify is limited to 400.
• To confirm all the selected recipients or delete unnecessary recipients, press [DESTINATION].
P.69 "Confirming the recipients"
■ Specifying the recipient in the address book
In the address book, you can specify the recipient.
1 Press [SINGLE] tab to display the list of the addresses, and then press the recipient's FAX icon ( )
![OKI MC780f+ - Press [SINGLE] tab to display the list of the addresses, and then press the recipient's FAX icon ( ) - 1](/content/2026/05/816767/images/b1e3edace8f135b59106970cbe38bec399369cc014535409c6e5559da7a6cf82.jpg)
text_image
FAX Enter the Address 0000 A4 STANDARD INPUT FAX No. INPUT @ MLE 13 DESTINATION OPTION MONITOR SINGLE 0001 User001 0002 User002 0003 User003 0004 User004 0005 User005 0006 User006 0007 User007 0008 User008 1 375 All Persons ALL CLEAR KNOWNID. SEARCH PAUSE BACK SPACE PREVIEW ADDRESS ADVANCED 05/18/2013 16:45 JOB STATUS-
Press or to switch the pages.
• Alternatively, you can select the recipient by pressing the address name box. In such case, if a fax number and an E-mail address have been registered to the recipient's address, both of them are selected.
• To cancel the selected recipient, press it again. -
In the memory transmission mode, you can specify multiple recipients to send the same document at once. Repeat the recipient selection operation until all the recipients are selected. For the multi-address transmission, you can also specify recipients by combining with other entry methods. The number of recipients you can simultaneously specify is limited to 400.
- To confirm all the selected recipients or delete unnecessary recipients, press [DESTINATION]. P.69 "Confirming the recipients"
• To refine your search only for items including specified characters, press the pull-up menu. - A list of recipients can be displayed using 11 to 15 characters per name.
Group entry
In the address book, you can specify the group to which you want to send a fax.
1 Press [GROUP] tab to display the list of the groups, and then press the group name.
![OKI MC780f+ - Press [GROUP] tab to display the list of the groups, and then press the group name. - 1](/content/2026/05/816767/images/2d346cd249b219add04b74a47b6803e09e06a5c60eda930b724d98233b2361e6.jpg)
text_image
FAX STORAGE SETTNOS TEMPLATE Press SEND button or START button 0002 A4 STANDARD INPUT FAX No. INPUT @ MULTI DESTINATION OPTION MONITOR SINGLE Group01 CONTENTS 005 Group05 CONTENTS Group02 CONTENTS 008 Group06 CONTENTS Group03 CONTENTS 007 Group07 CONTENTS Group04 CONTENTS 008 Group08 CONTENTS GROUP ALL GROUP ALL CLEAR KNOWNID SEARCH PAGE BACK SPACE PREVIEW SEND ADDRESS ADVANCED 05/10/2012 11:19 JOB STATUS- Press or to switch the pages.
• To cancel the selected group, press it again. - To confirm the addresses registered in that group, press [CONTENTS].
- In the memory transmission mode, you can specify multiple groups to send the same document at once. Repeat the recipient selection operation until all the recipients are selected. For the multi-address transmission, you can also specify recipients by combining with other entry methods. The number of groups you can simultaneously specify is limited to 200 groups of up to 400 recipients per 1 group.
- To confirm all the selected recipients or delete unnecessary recipients, press [DESTINATION]. P.69 "Confirming the recipients"
- To refine your search only for items including specified characters, press the pull-up menu.
■ Searching by ID number
You can search for a specific recipient from the address book using the ID number.
1 Press [KNOWN ID].
![OKI MC780f+ - Press [KNOWN ID]. - 1](/content/2026/05/816767/images/23128e46cda8cf6116efda94097b661ad6bcafd955bd97b9da5937d2c0b42d1d.jpg)
text_image
FAX Enter the Address 0000 A4 STANDARD INPUT FAX No. INPUT @ MULTI DESTINATION OPTION MONITOR SINGLE GROUP 0x01 User001 0x02 User005 0x02 User002 0x03 User006 0x03 User003 0x04 User007 0x04 User004 0x05 User008 All Persons ALL CLEAR KNOWNID SEARCH PAUSE BACK SPACE VIEW ADDRESS ADVANCED 05/16/2019 16:48 JOB STATUS2 Key in the desired ID number (1 to 3000) using the digital keys on the control panel, and then press [OK].
![OKI MC780f+ - Key in the desired ID number (1 to 3000) using the digital keys on the control panel, and then press [OK]. - 1](/content/2026/05/816767/images/e426d2b54e06575361dd384b96309f44ad3814a2d63131870ad19552db287e86.jpg)
text_image
FAX STORAGE SETTINGS TEMPLATE KNOWN ID Enter ID Number: ID NO. 10 CANCEL OKThe ID number is the one shown in the destination name box. The number ranges from 001 to 3000.
3 The page including the entered ID number is displayed. Press the FAX icon ( )
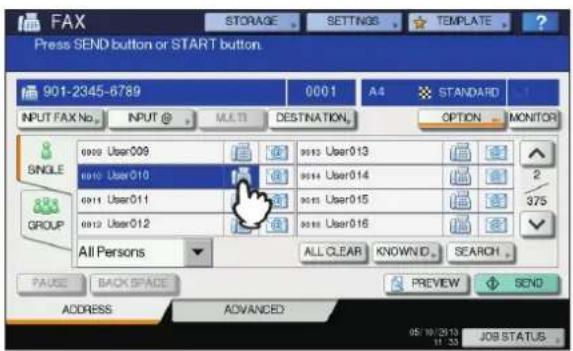
text_image
FAX STORAGE SETTINGS TEMPLATE ? Press SEND button or START button 901-2345-6789 0001 A4 STANDARD INPUT FAX No. INPUT @ MULTI DESTINATION OPTION MONITOR SINGLE 0000 User009 0010 User013 2 0010 User010 0011 User014 375 0011 User011 0012 User015 0012 User012 0013 User016 GROUP All Persons ALL CLEAR KNOWNID SEARCH PAUSE BACK SPACE PREVIEW SEND ADDRESS ADVANCED 05/10/2013 JOB STATUS-
Press OK to switch the pages.
• Alternatively, you can select the recipient by pressing the address name box. In such case, if a fax number and an E-mail address have been registered to the recipient's address, both of them are selected.
• To cancel the selected recipient, press it again. -
In the memory transmission mode, you can specify multiple recipients to send the same document at once. Repeat the recipient selection operation until all the recipients are selected. For the multi-address transmission, you can also specify recipients by combining with other entry methods. The number of recipients you can simultaneously specify is limited to 400.
- To confirm all the selected recipients or delete unnecessary recipients, press [DESTINATION].
P.69 "Confirming the recipients"
■ Searching for the recipient's fax number
You can search for the recipient's fax number from the address book and LDAP server.
Memo
- To search for the recipient's fax number from the LDAP (Lightweight Directory Access Protocol) server, the name of the LDAP server to be connected is required to be registered to this equipment in advance. For details of the LDAP server, ask your network administrator.
1 Press [SEARCH].
![OKI MC780f+ - Press [SEARCH]. - 1](/content/2026/05/816767/images/f610b502a8dcdccb36e773200f95e445307a74e72468345b67cf7ce6be48f0ae.jpg)
text_image
FAX Enter the Address 0000 A4 STANDARD INPUT FAX No. INPUT @ MULTI DESTINATION OPTION MONITOR SINGLE GROUP All Persons ALL CLEAR KNOWNID SEARCH PAUSE BACK SPACE PREVIEW ADDRESS ADVANCED 05/10/2013 10:45 JOB STATUS- To display the recipient search menu, press [SEARCH] while the address list is displayed. Perform this operation when you want to search the LDAP server.
- To display the group search menu, press [SEARCH] while the group list is displayed.
2 Press the button of the keyword category you want to search. Enter the keyword. Press [SEARCH].
![OKI MC780f+ - Press the button of the keyword category you want to search. Enter the keyword. Press [SEARCH]. - 1](/content/2026/05/816767/images/b78e73293dc8961847b0d38f371d5e3bf5d0c91fcf6019d17335524f8a7129be.jpg)
text_image
FAX STORAGE SETTINGS TEMPLATE SEARCH LOCATION MFP LOCAL FIRST NAME USER CORP. LAST NAME DEPT. FAX NO. KEYWORD E-MAIL CLEAR CANCEL SEARCH 1 2- For details of the operation to enter characters, refer to the Setup Guide.
• To cancel the entered keyword, press [CLEAR].
- You can search for the desired recipient's fax number by specifying multiple keywords.
Selecting the LDAP server
To search for the recipient's fax number in the LDAP server, press the pull-down menu in the recipient search menu. The list of the LDAP servers is displayed. Press the LDAP server name you want to search, and then press [OK].

text_image
FAX STORAGE . SETTINGS . TEMPLATE ? SEARCH LOCATION LDAP01 MFP LOCAL LDAP01 FIRST NAME LDAP02 LDAP03 CORP LAST NAME DEPT. FAX NO KEYWORDS E-MAIL CLEAR CANCEL SEARCH 05/10/2010 13:30 2 TUB3 The search result is displayed. Press the desired FAX icon ( ), and then press [OK].
![OKI MC780f+ - The search result is displayed. Press the desired FAX icon ( ), and then press [OK]. - 1](/content/2026/05/816767/images/b414818b2cdc9395219faebd9091a94b3cda96601d0c27e741700f1d5836197e.jpg)
text_image
ADDRESS SEARCH Number of SearchResult 00 012-3456.7890 0001 user1 User001 user2 User002 user3 User003 user4 User004 user5 User005 user6 User006 user7 User007 user8 User008 1 / 8 RESEARCH OK- Press or to switch the pages. Pressing or allows you to skip 5 pages.
- Alternatively, you can select the recipient by pressing the address name box. In such case, if a fax number and an E-mail address have been registered to the recipient's address, both of them are selected.
• To cancel the selected recipient, press it again. - In the memory transmission mode, you can specify multiple recipients to send the same document at once. Repeat the recipient selection operation until all the recipients are selected. For the multi-address transmission, you can also specify recipients by combining with other entry methods. The number of recipients you can simultaneously specify is limited to 400.
- To confirm all the selected recipients or delete unnecessary recipients, press [DESTINATION].
P.69 "Confirming the recipients"
- If you want to change the results of the search, press [RESEARCH]. You will be returned to the Step 2 screen. Specify the search string again.
■ Confirming the recipients
You can confirm the recipients which you specified or delete unnecessary recipients.
1 Press [DESTINATION].
![OKI MC780f+ - Press [DESTINATION]. - 1](/content/2026/05/816767/images/7cc3744a08c7eef41174de7ca68519d8c147c791426310c1dc37c06a89c85371.jpg)
text_image
FAX 678-9012-3456 0006 A4 STANDARD INPUT FAX No. INPUT @ MULTI DESTINATION OPTION MONITOR SINGLE user User 001 user User 002 user User 003 user User 004 SINGLE GROUP All Persons ALL CLEAR KNOWNID SEARCH PREVIEW SEND ADDRESS ADVANCED 05/10/2013 12:01 JOB STATUS2 The recipient list screen is displayed. Select the recipient you want to delete, and then press [DELETE].
![OKI MC780f+ - The recipient list screen is displayed. Select the recipient you want to delete, and then press [DELETE]. - 1](/content/2026/05/816767/images/dc6ded347ed5bee81674b995da98e42c02b172c14a71cbdfa56800090189bf70.jpg)
text_image
FAX DESTINATION STORAGE SETTN3G TEMPLATE ? 0006 User001 User015 User002 User016 User003 - - User014 - DELETE CLOSE 13:38 JOBSTATUS- Press or to switch the pages.
- Press [CLOSE] to return to the previous screen.
Other transmissions
■ On-hook transmission
In this mode, you can dial and perform direct fax transmission without picking up the handset of the external telephone. On-hook Transmission is available when on the upper right of the screen is OFF.
1 Place the original(s).
P.61 "Handling an original"
2 Press the [FAX] button on the control panel.
P.60 "Basic procedures"
3 Press [OPTION] and set the transmission conditions.
P.64 "Setting the transmission conditions"
4 Press [MONITOR].
![OKI MC780f+ - Press [MONITOR]. - 1](/content/2026/05/816767/images/eeb95a307777136318f4c596f9ff7a586d23a40054637598934f2df2a125132e.jpg)
text_image
FAX ON HOOK TRANSMIT 0000 STANDARD 1 INPUT FAX NO. INPUT MULTI DESTINATION OPTION MONITOR SINGLE USER001 User005 USER002 User006 USER003 User007 USER004 User008 375 GROUP All Persons ALL CLEAR KNOWND SEARCH PAUSE BACK SPACE PREVIEW SEND ADDRESS ADVANCED Job STATUS Line connecting 05/18/2013 11:55• Make sure that you hear the dial tone from the built-in speaker.
- To cancel the operation, press [MONITOR] again.
! Note
• To use the [SEARCH] to specify the recipients, you must specify the recipient in advance by following the procedures below. Specify the recipients, and then press [MONITOR].
5 Specify the recipients.
[1] P.66 "Specifying the recipient"
! Note
- For direct entry, each press of a digital key on the control panel dials a number. If you make a mistake when dialing the fax number, press [MONITOR] to cut the line, and then press it again to redial.
- If you specified the recipient with the [SEARCH], press [MONITOR], and then [DIAL].
6 When you hear the answer tone (short high-pitched tone) through the built-in speaker indicating the connection has been made with the recipient's machine, press [SEND].
P.60 "Basic procedures"
! Note
- When you hear the other party's voice answering the call before pressing [SEND], pick up the handset of the external telephone. Then ask him/her to perform operation of the fax reception.
■ Off-hook transmission
In this mode, you can pick up the handset of the external telephone to dial and perform direct fax transmission. Off-hook Transmission is available when on the upper right of the screen is OFF.
1 Place the original(s).
P.61 "Handling an original"
2 Press the [FAX] button on the control panel.
P.60 "Basic procedures"
3 Press [OPTION] and set the transmission conditions.
P.64 "Setting the transmission conditions"
4 Pick up the handset of the external telephone.
5 Use the external telephone to dial the fax number.
P.66 "Specifying the recipient"
![OKI MC780f+ - Press the [FAX] button on the control panel. - 1](/content/2026/05/816767/images/9880e7193df345d06d45af298d9d208710cc706d2a5f1a65f0617748712129ed.jpg)
- When you use the external telephone to dial, the machine dials each number you enter. If you make a mistake when dialing the fax number, replace the handset to cut the line, and then pick up the handset again to redial.
6 When you hear the answer tone (short high-pitched tone) through the built-in speaker indicating the connection has been made with the recipient's machine, press [SEND].
P.60 "Basic procedures"
![OKI MC780f+ - Press the [FAX] button on the control panel. - 2](/content/2026/05/816767/images/be3d7d7d6ae6b8f555b33c50e118a2b77938d49f5129bce9fbd643553dc5896f.jpg)
- When you hear the other party's voice answering the call before pressing [SEND], ask him/her to perform operation of the fax reception.
7 Replace the handset of the external telephone.
■ Displaying the preview
Before sending a fax, you can check the image on the touch panel with this preview function.
1 Press [PREVIEW] on the fax menu.
![OKI MC780f+ - Press the [FAX] button on the control panel. - 3](/content/2026/05/816767/images/c229f82b69f37952ba7d175a70d63fa04ff79b88acda20e058e96e3be9daa9a9.jpg)
text_image
FAX STORAGE SETTINGS TEMPLATE Press SEND button or START button. 012-3456-7890 0001 A4 STANDARD INPUT FAX No. INPUT @ U3.11 DESTINATION OPTION MONITOR SINGLE user User001 user User002 user User003 user User004 user User005 user User006 user User007 user User008 1 375 GROUP All Persons ALL CLEAR KNOWNID... SEARCH PAUSE BACK SPACE PREVIEW SEND ADDRESS ADVANCED 66 12 05 12 05 JOB STATUS- To use the preview function, specify the recipient and then press [PREVIEW].
2 Press [SEND].
![OKI MC780f+ - Press the [FAX] button on the control panel. - 4](/content/2026/05/816767/images/124ad8cc1b74bc33d2f94249fe0a58771051833de4674a22471f520e898f06bd.jpg)
text_image
FAX STORAGE SETTINGS TEMPLATE Press SEND button or START button 012-3456-7890 0001 A4 STANDARD INPUT FAX No. INPUT @ MULTI DESTINATION OPTION MONITOR SINGLE user User001 user User002 user User003 user User004 user User005 user User006 user User007 user User008 ALL PERSONS ALL CLEAR KNOWNID SEARCH PAUSE BACK SPACE PREVIEW SEND ADDRESS ADVANCED 08/16/2013 12:05 JOB STAR=353 Check the fax image after the preview is displayed. Press [OK] if you send it without any change. The fax will then be sent.
![OKI MC780f+ - Press the [FAX] button on the control panel. - 5](/content/2026/05/816767/images/083bd239c70180b3cb579cfcde872555d5baffa0ee759d3d1de99c855dd7c604.jpg)
text_image
FAX STORAGE SETTINGS TEMPLATE PREVIEW To continue, press [START] button. DELETE PAGE REPLACE PAGE INSERT PAGE OPTION CANCEL OK- To send another original, place it on the document glass or RADF (Reversing Automatic Document Feeder), and then press the [START] button on the control panel.
- To delete the page being previewed, press [DELETE PAGE].
- To replace the page being previewed with another page, press [REPLACE PAGE].
- To insert another scan before the page being previewed, press [INSERT PAGE].
- Press [OPTION] to change the setting.
P.64 "Setting the transmission conditions"
Receiving a Fax
Reception mode
This section describes how to receive a fax. Refer to the appropriate section for your current reception mode. The reception mode can be set on the ADMIN menu. For details of the current setting, ask your administrator. Besides the receiving methods described in this page, there are various useful ways to receive a fax. These procedures are described in the following Guide.
Advanced Guide
■ AUTO reception
Faxes are automatically received during an incoming call. Users do not have to do anything when receiving a fax.
■ MANUAL reception
Faxes are manually received by using an external telephone when you have an incoming call.
1 Pick up the handset of the external telephone when you have an incoming call. If the incoming call is a telephone call, you can start talking.
2 If you hear a tone (fax signal) through the handset of the external telephone, press the [FAX] button on the control panel.
P.60 "Basic procedures"
3 Press the [ADVANCED] tab, and then press [MANUAL RECEIVE].
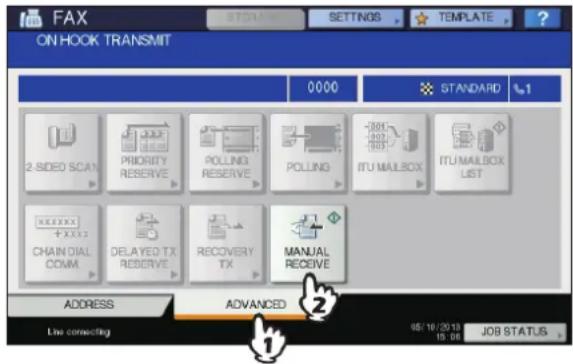
text_image
FAX ON HOOK TRANSMIT 0000 STANDARD %1 2-SIDED SCAN PRIORITY RESERVE POLLING RESERVE POLLING -001 -002 -003 ITU MAILBOX ITU MAILBOX LIST CHAIN DIAL COMM DELAYED TX RESERVE RECOVERY TX MANUAL RECEIVE ADDRESS ADVANCED 2 Line connecting 05/16/2018 15:06 JOB STATUS4 When a message appears indicating that you can send a fax, press the [START] button on the control panel and replace the handset of the external telephone.
■ TEL / FAX auto switching
Any incoming call is determined and answered as a voice call or a fax call automatically.
Incoming fax
The incoming call is answered as a fax call automatically. When an incoming fax arrives, the user does not need to do anything.
Incoming call
When the ring-back tone rings, the user lifts up the handset or the receiver of external telephone to speak. During the mode of remote reception via an external telephone, you can switch to fax reception.
! Note
- The ring-back tone is a pseudo tone signaling that the line is connected and so the opposite party will be charged for this call while it is ringing.
- Even if the opposite party hangs up while the ring-back tone is ringing, the ring-back tone may continue to sound for about another 30 seconds.
■ Memory reception
In the following conditions, faxes cannot be printed. If this happens, received fax data are stored in the memory, and printing is resumed as soon as this equipment is ready. As the memory reception function is always enabled, you do not need to make any setting.
• During copying or printing
- During printing of received copy of the originals
• During printing of lists and reports
- When paper has run out
- When a paper misfeed occurs
- When toner has run out
Originals and paper
■ Acceptable size of paper
A4, A5, B5, Folio, Letter, Legal, Legal 13 and Statement sized paper are available.
The printing range of each size of paper is as follows: As shown in the figures below, if an original document contains any information in the shaded area, it is not printed on the paper.
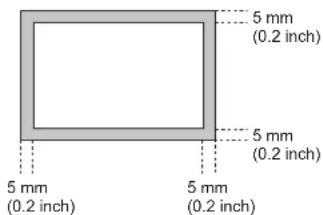
text_image
5 mm (0.2 inch) 5 mm (0.2 inch) 5 mm (0.2 inch) 5 mm (0.2 inch)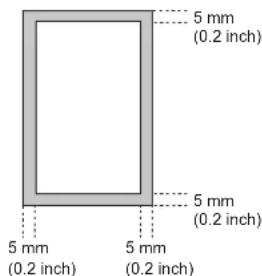
text_image
5 mm (0.2 inch) 5 mm (0.2 inch) 5 mm (0.2 inch) 5 mm (0.2 inch)Memo
- Set the paper in the trays. The multi-purpose tray is not available.
- Regardless of whether or not the Finisher is installed, paper exits on the receiving tray.
- Trays can be set for fax use only.
■ Default setting for RX printing
To print the received fax, the paper with the same width as the original is used. Depending on the length of the original, "RX reduction printing" or "Discard printing" (both of them are set to ON by manufacturer default) are applied.
Advanced Guide
When an original is shorter or the same as the paper printing area
It is printed in the original size.
When an original is longer than the paper printing area
It is printed according to the following priority:
- When an original is up to 10 mm (0.4 inch) longer than the printing area: the part of the originals that exceeds the paper printing area is discarded.
- When an original exceeds the printing area by more than 10mm (0.4 inch): the original image is reduced to 75% (reduction printing). If the image still cannot be fitted into the printing area, paper larger than the original is selected. In case there is no larger paper available, the original is printed with the image divided.
■ Paper priority when there is no same size paper
When both "RX reduction printing" and "Discard printing" are set to ON, paper is selected according to the following priority:
- Paper of the same size as the original
- Paper larger than the original
! Note
- When the corresponding paper size is not available, in most cases, the scanned original is printed on paper of a larger size. However, the sender's fax machine may reduce the scanned original to fit the paper size available in the recipient's fax machine (this equipment).
- The paper priority varies according to the "RX reduction printing" and "Discard printing" settings. For details, contact your dealer.
CHECKING AND CANCELING THE COMMUNICATIONS
Checking Communications
Checking reserved transmissions
You can check reserved fax transmissions.
1 Press [JOB STATUS].
![OKI MC780f+ - Press [JOB STATUS]. - 1](/content/2026/05/816767/images/555b054b95fbcce4b8bd40ce6586d1d1e12594be7a595b308b9e104230b50d3a.jpg)
text_image
FAX Enter the Address 0000 STANDARD INPUT FAX No. INPUT @ MULTI DESTINATION OPTION MONITOR SINGLE 0001 User001 0005 User005 0002 User002 0006 User006 0003 User003 0007 User007 0004 User004 0006 User008 GROUP All Persons ALL CLEAR KNOWNID SEARCH PAUSE BACK SPACE PREVIEW NAME ADDRESS ADVANCED 05/10/2013 10:31 JOB STATUS2 Select [FAX].
![OKI MC780f+ - Select [FAX]. - 1](/content/2026/05/816767/images/9671992ceacb326036aa7d9e189d2c7c4b8d03fc9cea2e0bfe5489351db06c66.jpg)
text_image
JOB STATUS PRINT FAX(SCAN) File No To Data Time Pages Status 011 1234567890 10,1350 1工程项目 012 User002 10,1351 1 Wait 013 User003 10,1351 1 Wait JP \\ \\ \\ \\ \\ \\ \\ \\ \\ \\ \\ \\ \\ \\ \\ \\ \\ \\ \\ \\ \\ \\ \\ \\ \\ JOGS SUGPLY TONER EG/16/2013 JOB STATUS- Reserved transmission jobs are listed in the reversed chronological order from top to bottom.
- Press or to switch the pages.
• To print the list of the reserved transmissions jobs, press [RESERVATION LIST]. - In the "Status" column, the status of each job is indicated as follows:
Line1: Sending on the 1st line.
Network: Reserved for sending via Internet Fax.
Delayed: Reserved with the time to send specified.
Wait: Communication is in the standby queue.
Invalid: Under standby due to an invalid
department code (Network Fax). For details of Network Fax function, refer to the Advanced Guide.
Checking communication status (log)
You can check the log of fax transmissions and receptions.
1 Press [JOB STATUS].
![OKI MC780f+ - Press [JOB STATUS]. - 1](/content/2026/05/816767/images/c008328c60676f6ef6c9f88882aaa68bfae23760940213390e8f9c1f62d39881.jpg)
text_image
FAX Enter the Address 0000 STANDARD INPUT FAX No. INPUT @ MULTI DESTINATION OPTION MONITOR SINGLE GROUP 0001 User001 0005 User005 0002 User002 0006 User006 0003 User003 0007 User007 0004 User004 0008 User008 All Persons ALL CLEAR KNOWNID SEARCH FAUSE BACK SPACE PREVIEW ADDRESS ADVANCED 05/18/2019 10:31 JOB STATUS2 Select the [LOG] tab, and then press [SEND] or [RECEIVE].
![OKI MC780f+ - Select the [LOG] tab, and then press [SEND] or [RECEIVE]. - 1](/content/2026/05/816767/images/aa05aecc8d35d184ead70fbb532f9343c7a3ed852d27d3a386d05923d5adbc03.jpg)
text_image
JOB STATUS PRINT SEND RECEIVE SCAN CLOSE JOBS LOG SUPPLY TONER 05/18/2019 13:57 JOB STATUS3 The list of the communication status is displayed.
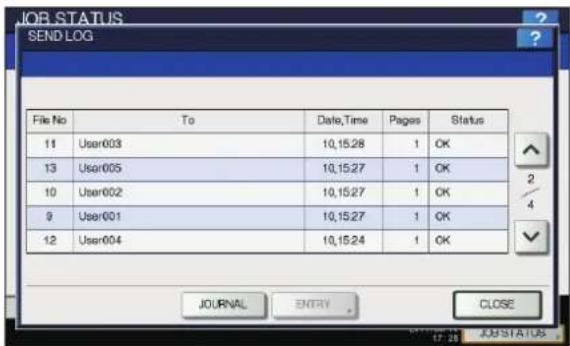
text_image
JOB STATUS SEND LOG File No To Date Time Pages Status 11 User003 10,15:28 1 OK 13 User005 10,15:27 1 OK 10 User002 10,15:27 1 OK 9 User001 10,15:27 1 OK 12 User004 10,15:24 1 OK JOURNAL ENTRY CLOSE 17:28 JOBSTATUS• Transmissions or receptions are listed in the reversed chronological order from top to bottom.
- Press or to switch the pages.
- Up to the latest 40 or 120 transmission/reception records can be listed on the log. The maximum number can be set on the ADMIN menu. For details of the operation, refer to the Advanced Guide.
• To print the log of transmissions or receptions, press [JOURNAL].
Advanced Guide
- In the "Status" column, the status is indicated as follows:
OK: Transmission or reception
succeeded.
4-digit error code: Transmission or reception failed.
Troubleshooting Guide
Registering recipients' fax numbers to the address book
To register recipient's fax numbers in the address book from the send/receive log screen, select a record in the send or receive log, and then press [ENTRY]. For details of the registration to the address book, refer to the Advanced Guide.
! Note
- Fax and E-mail transmissions whose recipients are specified with direct entry or entry using the LDAP server can be registered to the address book from the Send log.
- Polling and E-mail receptions whose recipients are specified with direct entry or entry using the LDAP server can be registered to the address book from the Receive log.
Canceling the Transmission
Canceling the memory transmission
You can cancel the memory transmission during scanning.
■ When using the document glass
This section describes how to cancel the memory transmission when an original is placed on the document glass.
1 When scanning is completed, the confirmation screen for the next original is displayed. Press [JOB CANCEL].
![OKI MC780f+ - When scanning is completed, the confirmation screen for the next original is displayed. Press [JOB CANCEL]. - 1](/content/2026/05/816767/images/2cdaa19865eeb1d3347a6413a7897dd739495420d8bade77b0c9a855d92d52c8.jpg)
text_image
FAX STORAGE SETTINGS TEMPLATE SCANNING To continue, Place document on glass And press START or [SCAN] SCAN PAGE 1 JOB CANCEL OPTION JOB FINISH SCAN 10:25 JOB STATUSIf you leave the screen unattended for a period of the auto clearance setting time (45 sec. by manufacturer default) after the confirmation screen for the next original is displayed, a copy of the scanned originals is sent.
2 The confirmation screen for the deletion is displayed. Press [YES].
![OKI MC780f+ - The confirmation screen for the deletion is displayed. Press [YES]. - 1](/content/2026/05/816767/images/526f1252486bdd0b5413dc1a2d9bffbbcf45af643da89c3cb2445946ee3f286e.jpg)
text_image
FAX SCANNING To continue, Place document or class. And success START or ISCAN! ATTENTION Are you sure you want to cancel job? YES NO JOB CANCEL OPTION JOB FINISH SCAN 13:26 JOB STATUS■ When using the RADF (Reversing Automatic Document Feeder)
This section describes how to cancel the memory transmission when an original is placed on the RADF.
1 Press the [STOP] button on the control panel while the originals are being scanned.
![OKI MC780f+ - Press the [STOP] button on the control panel while the originals are being scanned. - 1](/content/2026/05/816767/images/1f2e338f24d6656caece6c38660caae31d47fe81d70674128b4dca396049f2c2.jpg)
text_image
MENU SETTING INTERRUPT COUNTER POWER COPY SCAN PRINT Filing Box FAX DATA IN MEMORY 1 ABC DEF 2 3 3 MNS 4 5 6 PORTS TUV WEXT. 7 8 9 0 Automaticator C CLEAR START Power Save RESET FC STOP START MAIN POWERScanning is paused.
2 The confirmation screen for the next original is displayed. Press [JOB CANCEL].
![OKI MC780f+ - The confirmation screen for the next original is displayed. Press [JOB CANCEL]. - 1](/content/2026/05/816767/images/ebfd4e7065b83b1c9ae0b50e2cab18d750eb1712609431eb4513ce4407ab7eaa.jpg)
text_image
FAX STORAGE SETTINGS TEMPLATE SCANNING To continue, Place document on glass. And press START or [SCAN] SCAN PAGE 1 JOB CANCEL OPTION JOB FINISH SCAN 10:25 JOB STATUS- If you press [JOB FINISH], the scanned originals are sent.
- If you leave the screen for the next original unattended for the period of the auto clear setting time (45 sec. by manufacturer default) after it appears, the memory transmission is canceled.
3 The confirmation screen for the deletion is displayed. Press [YES].
![OKI MC780f+ - The confirmation screen for the deletion is displayed. Press [YES]. - 1](/content/2026/05/816767/images/6519284cc3d68f56fb854fbf264a3d91c26d01212a8cc24fb756f21cff368eeb.jpg)
text_image
FAX SCANNING STORAGE SETTINGS TEMPLATE To continue, Place document or place And press START or SCAN! ATTENTION Are you sure you want to cancel job? YES NO JOB CANCEL OPTION JOB FINISH SCAN 13:30 JOB STATUSCanceling direct transmissions
You can cancel the direct transmission during scanning.
! Note
- Even if you cancel transmission in the direct TX mode, the part of the original that was scanned before transmission is canceled has been sent.
1 Press the [STOP] button on the control panel while the original is being scanned.
![OKI MC780f+ - Press the [STOP] button on the control panel while the original is being scanned. - 1](/content/2026/05/816767/images/5f786b44a71819244e3f1718c35135df0d16f51cb37c6c4c085f4444ad484171.jpg)
text_image
MENU COPY SCAN PRINT Filing Box FAX DATA MEMORY SETTING INTERRUPT COUNTER ABC DEF GHL MRL MNO 4 5 6 PORT TVW WXTZ 7 8 9 * 0 # Authentication Clear Power Save Reset FC Stop START + PRINT DATA ATTENTION MAIN POWERThe scanning and transmission are stopped.
Canceling reserved transmissions
You can display the list of the reserved transmissions, and cancel the reserved transmissions that are in the queue or in progress.
1 Press [JOB STATUS], and then select the [FAX] tab.
The list of the reserved transmissions is displayed. This step is the same as that for checking the reserved transmission.
P.73 "Checking reserved transmissions"
2 Select the reserved transmission you want to delete, and then press [DELETE].
More than one job can be selected.
![OKI MC780f+ - Select the reserved transmission you want to delete, and then press [DELETE]. - 1](/content/2026/05/816767/images/30643c792cdf635c8caec1d2dade2fd1a27dd7d50935c58bfce34610df911593.jpg)
text_image
JOB STATUS PRINT FAX(SCAN) File No To Date,Time Pages Status 021 1234567890 10,14:17 1工程项目 022 User002 10,14:17 1 Wait 023 User003 10,14:17 1 Wait DELETE RESERVATION SEND CLOSE LOG SUPPLY TONER 05/10/2013 14.18.JOB STATUSIn the "Status" column, you can check the status of the reservation. "Wait" indicates that the data are waiting to be sent. "Line1" indicates that the data are being sent. Delayed transmission reservation and polling transmission/reception can be canceled.
3 The confirmation screen for the deletion is displayed. Press [DELETE].
![OKI MC780f+ - The confirmation screen for the deletion is displayed. Press [DELETE]. - 1](/content/2026/05/816767/images/f0dcd291d17d0128a1c14f935f1cd30fbf9fb72c6c1bfaca5201c62cbbb68636.jpg)
text_image
JOB STATUS PRINT File No 021 12345 022 User0 023 User0 DELETE OK? DELETE CANCEL CLOSE JOBS LOG SUPPLY TONER 05/10/2013 14:19 JOB STATUS4
Scanning
Viewing Touch Panel for Scan Menu
When you press the [SCAN] button on the control panel, the SCAN menu is displayed on the touch panel.
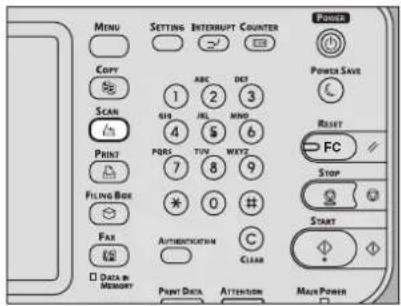
text_image
MENU SETTING INTERRUPT COUNTER Power Save Copy SCAN PRINT FILING BOX FAX DATA IN MEMORY ABC DEF 1 2 3 GPI JHL MIND 4 5 6 PORS TUV WXYZ 7 8 9 * 0 # AUTHENTICATION C CLEAR START Main Power! Note
- If the equipment is managed by the Department Management or User Management features, you need to enter a department code or the user information, such as the user name and password.
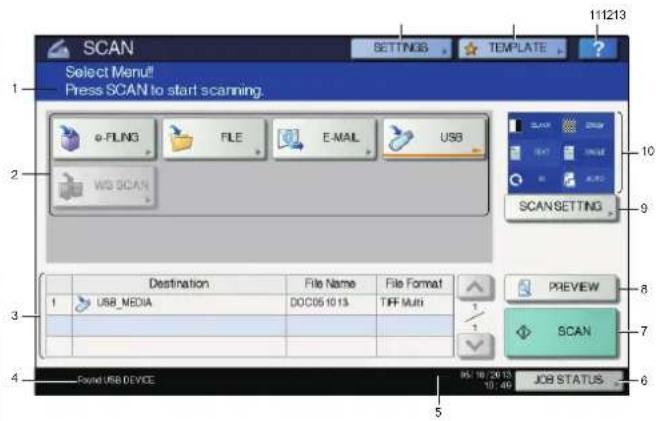
text_image
SCAN 1 Select Menu! Press SCAN to start scanning. e-FLING FILE E-MAIL USB WB SCAN 111213 10 9 SCAN SETTING Destination File Name File Format 1 USB_MEDIA DOC05 10.13 TFF Multi PREVIEW SCAN 7 4 Found USB DEVICE 05:16:20:13 10:49 JOB STATUS 6 51) Message Display Area
Operational instructions and the status of the equipment are displayed.
2) Function Buttons
Press one of these buttons when you select the scan function. Pressing one of these buttons displays the set-up screen specific to the selected scan function.
3) Destination Display Area
The scan jobs are displayed before their performance in the saving destinations or addresses.
4) Alert Message Display Area
Alert messages are displayed when the equipment needs a toner cartridge replacement, the waste toner box needs cleaning, etc. For details on these messages, refer to the Troubleshooting Guide.
5) Date and Time
6) [JOB STATUS]
Press this button when you want to monitor your copy, fax, scan, and/or print jobs or view the job logs.
P.90 "Viewing the scan job status" P.90 "Viewing the scan job log"
7) [SCAN]
Press this button to perform scanning.
8) [PREVIEW]
Press this button when you want to preview your scans.
9) [SCAN SETTING]
Press this button to change scan settings applicable to "Scan to e-Filing", "Scan to File", "Scan to E-mail" and "Scan to USB".
10) Scan Settings Display Area
The selected scan settings are displayed.
11) [?] (Help Button)
Press this button for descriptions on each function or button on the touch panel.
12) [TEMPLATE]
Press this button when you want to use a template.
13) [SETTINGS]
Press this button to display a list of the selected options for scan settings.
Default Settings
A default refers to a setting selected automatically when you turn on the equipment, when the equipment wakes up from Sleep Mode, or when the [RESET] button is pressed on the control panel. To scan your document, the default settings can be used as they are whereas pressing [SCAN SETTING] during the scan operation allows you to select the preferred settings for each scan job.
Advanced Guide
The available settings in the scan mode and their factory defaults are listed in the table below.
| Settings Factory Defaults | |
| Color Mode BLACK | |
| Resolution 200 (dpi) | |
| Original Mode TEXT | |
| Rotation 90 (degrees) | |
| Single/2-sided Scan SINGLE | |
| Original Size AUTO | |
| Compress MID | |
| Omit Blank Page OFF | |
| Outside Erase OFF | |
| Range Adjustment | ±0 |
| Exposure | AUTO |
| Contrast | ±0 |
| Background Adjustment | ±0 |
| Sharpness | ±0 |
| Saturation ±0 | |
| RGB Adjustment | |
| Red (R) | ±0 |
| Green (G) | ±0 |
| Blue (B) | ±0 |
Memo
- To display a list of the selected options for scan settings, press [SETTINGS].
P.78 "Viewing Touch Panel for Scan Menu"
- The default settings can be changed using the [SETTING] button on the control panel.
Scan to e-Filing
With this function, you can scan originals and store the scans in e-Filing boxes. You can scan 200 pages per job.
When saving your scans, you can specify a public box or one of the user boxes. The public box is a pre-defined box and is used to store documents that any users of the equipment may need to work with. A user box is one created by the user. If a password has been set for a user box, you need to enter the correct password to access it.
The stored data can be printed out any time from the touch panel. You can also manage the data using the e-Filing web utility. With the e-Filing web utility, you can create user boxes and folders, print documents, and even merge several documents to create a new one.
For instructions on how to store your scans with Scan to e-Filing, create user boxes, and print e-Filing documents, refer to the e-Filing Guide.
! Note
- The maximum capacity in e-Filing differs depending on your model or operating environment. The total available space in e-Filing and the shared folder can be checked on the [Device] tab in TopAccess.
-
Before saving your scans in a user box, you need to set up the user box.
-
To prevent loss of data, we recommended that you back up the data saved in the equipment's hard disk. You can back up the data with the computer using File Downloader or e-Filing Backup/Restore Utility.
- Delete documents stored in e-Filing when they are no longer needed.
Scan to File
The Scan to File function sends and stores scans to a shared folder in the equipment's hard disk or a specified network folder. The data stored in the shared folder can be accessed directly from the computer via a network.
You can scan up to 1000 pages per job until the equipment's memory is full.
The network administrator has to make settings for storing the scanned data to the client computers. For details, refer to the TopAccess Guide.
! Note
- The maximum capacity in the shared folder differs depending on your model or operating environment. The total available space in the shared folder and e-Filing can be checked on the [Device] tab in TopAccess.
- The shared folder in the equipment's hard disk can contain a maximum of 2000 files.
• We recommend that you back up the data stored in the shared folder. - Delete documents stored in the shared folder when they are no longer needed.
Scanning to files
1 Place the original(s).
2 On the control panel, press the [SCAN] button to enter the SCAN menu.
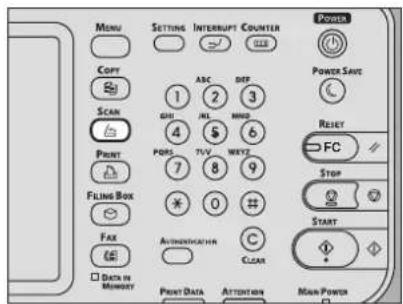
text_image
MENU COPY SCAN PRINT FILING BOX FAX Data in Memory SETTING INTERRUPT COUNTER ABC REF GHI JHL MIND 4 7 PORTS TUV NEXT2 7 8 9 * 0 AUTHORATOR C CLEAR PRINT DATA ATTENTION POWER POWER SAVE RESET FC STOP START MAIN POWER3 Press [FILE].
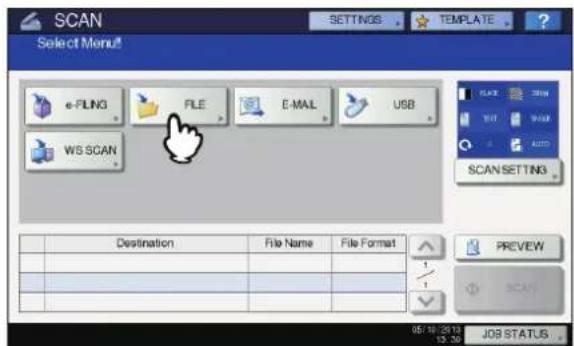
text_image
SCAN Select Menu! e-FLNG FILE E-MAIL USB WS SCAN Destination File Name File Format PREVIEW SCAN 05/10/2013 13:30 JOB STATUS- To store the scan in the equipment's shared folder, proceed to step 4.
• To store the scan in a network folder, proceed to step 5. - Storing data in a network folder requires the administrator to set the equipment configuration. For details, refer to the TopAccess Guide.

4 Make sure that [MFP LOCAL] is selected and highlighted.
![OKI MC780f+ - Make sure that [MFP LOCAL] is selected and highlighted. - 1](/content/2026/05/816767/images/cc4a793dfac633b5416469f56780886db8d9c7df3e110bab65acacae7592b140.jpg)
text_image
SCAN FILE MFP_LOCAL \MFP07317394/FLE_SHARE REF: REMOTE 2 FILE NAME DOC051013 FLE FORMAT TIFF MULTI/SINGLE MULTI SINGLE SECURITY ON OFF RESET CANCEL OK 13:30 JOG STATUSProceed to step 9.
![OKI MC780f+ - Make sure that [MFP LOCAL] is selected and highlighted. - 2](/content/2026/05/816767/images/c88a349b26a3132aad1ed46b3c0c61fe7cb038934e952a5b926f9e3c8c787784.jpg)
- If saving data in a network folder is enabled by the administrator, you can select 2 file destinations from [MFP LOCAL], [REMOTE 1] and [REMOTE 2]. If you select [MFP LOCAL], you can specify a network folder (REMOTE 1 or 2) as a remote destination. To set a network folder as a remote destination, proceed to step 5.
5 To store the scan in a network folder, press [REMOTE 1] or [REMOTE 2].
![OKI MC780f+ - To store the scan in a network folder, press [REMOTE 1] or [REMOTE 2]. - 1](/content/2026/05/816767/images/017dd2c0f09e8e759e4809ce0a98f172e49635ecd1451c43c073eb7eecb169c4.jpg)
text_image
SCAN FILE MFP LOCAL\MFP07317384/FILE_SHARE REMOTE 1 REMOTE 2 FILE DOC061013 FILE FORMAT TIFF MULTI/SINGLE MULTI SINGLE SECURITY ON OFF RESET CANCEL OK 13:30 JOG STATUS- If the selected remote destination (REMOTE 1 or 2) is configured by the administrator so that you can specify a desired network folder, the screen for setting up the remote destination is displayed. Proceed to step 6.
- If the selected remote destination (REMOTE 1 or 2) is already defined by the administrator so that the scan is saved in a specified network folder, pressing the button does not display the screen for specifying the file destination. In this case, you cannot change the file destination. Proceed to step 9. If you need to change the remote destination, ask your network administrator for help.
![OKI MC780f+ - To store the scan in a network folder, press [REMOTE 1] or [REMOTE 2]. - 2](/content/2026/05/816767/images/64d17388a835e5be3726ac9559cd9cc8177b7542e9c8a8c2be889b5ba5f85891.jpg)
- If saving data in a network folder is enabled by the administrator, you can select 2 file destinations from [MFP LOCAL], [REMOTE 1] and [REMOTE 2].
6 Select the desired file destination from the list.
1) Select the file destination.
2) Press [OK].
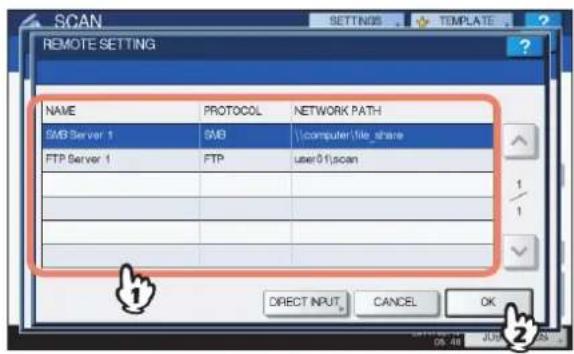
text_image
REMOTE SETTING NAME PROTOCOL NETWORK PATH SMB Server 1 SMB \computer\file_share FTP Server 1 FTP User01\scan 1 1/1 DIRECT INPUT CANCEL OK 06:48 JUL 20- If FTP, NetWare IPX, NetWare IP or FTPS is selected for the file destination, proceed to Step 9.
- If SMB is selected for the file destination, proceed to Step 7.
- If your desired file destination has not been registered in the equipment, press [DIRECT INPUT] and proceed to Step 8.
7 If SMB is selected for the file destination, select the folder to be stored.
1) Select the folder to be stored.
2) Press [OK].
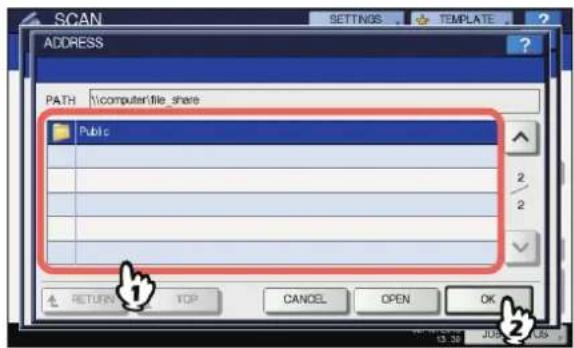
text_image
SCAN SETTINGS TEMPLATE ADDRESS PATH : \computer\file_share Public RETURN TOP CANCEL OPEN OK 1 2 3 4 5 6 7 8 9 10 11 12 13 14 15 16 17 18 19 20 21 22 23 24 25 26 27 28 29 30 31 32 33 34 35 36 37 38 39 40 41 42 43 44 45 46 47 48 49 50 51 52 53 54 55 56 57 58 59 60 61 62 63 64 65 66 67 68 69 70 71 72 73 74 75 76 77 78 79 80 RETURN TOP CANCEL OPEN OKProceed to Step 9.
8 Select a folder for the remote destination.
1) Select FTP, SMB, NetWare IPX, NetWare IP, or FTPS as a protocol to transfer the file.
2) Press [SERVER NAME], [NETWORK PATH], [LOGIN USER NAME], [PASSWORD] and/or [COMMAND PORT] and specify the file destination.
3) Finally, press [OK].
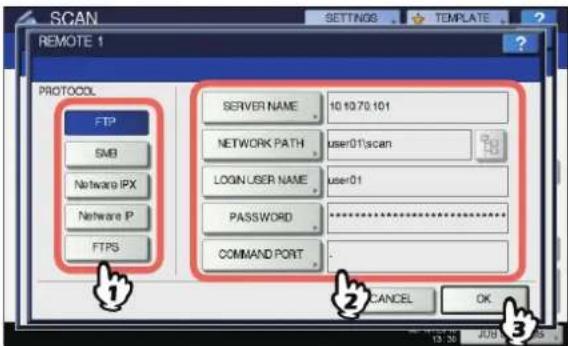
text_image
SCAN REMOTE 1 PROTOCOL FTP SMB Network IPX Network P FTRS SERVER NAME: 10.10.70.101 NETWORK PATH user01:scan LOGIN USER NAME user01 PASSWORD COMMAND PORT CANCEL OK- [SERVER NAME] (FTP, NetWare IPX, NetWare IP, and FTPS only)
When you select [FTP]:
Enter the IP address of the FTP server. For example, to transfer the scanned data to "ftp://10.10.70.101/user01/scan/," enter "10.10.70.101" in this box.
When you select [NetWare IPX]:
Enter the name of the NetWare file server or the Tree/Context (when NDS is available).
When you select [NetWare IP]:
Enter the IP address of the NetWare file server.
When you select [FTPS]:
Enter the IP address of the FTP server. For example, to transfer the scanned data to "ftps://10.10.70.101/user01/scan/," enter "10.10.70.101" in this box.
• [NETWORK PATH]
When you select [FTP]:
Enter the path to a folder in the FTP server where you want to store the scanned data. For example, to transfer the scanned data to "ftp://10.10.70.101/user01/scan/," enter "user01\scan" in this box.
When you select [SMB]:
Enter the network path to the folder where you want to store the scanned data.
When you select [NetWare IPX] or [NetWare IP]:
Enter the path to a folder in the NetWare file server where you want to store the scanned data. For example, to transfer the scanned data to the "sys\scan" folder in the NetWare file server, enter "\sys\scan" in this box.
When you select [FTPS]:
Enter the path to a folder in the FTP server where you want to store the scanned data. For example, to transfer the scanned data to "ftps://10.10.70.101/user01/scan/," enter "user01\scan" in this box.
- [LOGIN USER NAME]
When you select [FTP]:
Enter the log-in user name for the FTP server if required.
When you select [SMB]:
Enter the user name to access the network folder if required.
When you select [NetWare IPX] or [NetWare IP]:
Enter the log-in user name for the NetWare file server if required.
When you select [FTPS]:
Enter the log-in user name for the FTP server if required.
• [PASSWORD]
When you select [FTP]:
Enter the log-in password for the FTP server if required.
When you select [SMB]:
Enter the password for accessing the network folder if required.
When you select [NetWare IPX] or [NetWare IP]:
Enter the log-in password for the NetWare file server if required.
When you select [FTPS]:
Enter the log-in password for the FTP server if required.
• [COMMAND PORT] (FTP and FTPS only)
Enter the port number to be used for command execution. By default, a hyphen "-" is entered in this box, and the port number set by the administrator is used. Change the entry in this box only when you want to use another port number.
Memo
- Pressing each button displays an on-screen keyboard. Enter each item using the keyboard and digital keys, and then press [OK] to set the entry.
- To store files in [SMB], enter the network path, login user name and password then press, so that you can select the folder.
9 Define the settings for the new file as required.
1) Press [FILE NAME] and change the file name.
2) Select an option for each of the FILE FORMAT, MULTI/SINGLE PAGE and/or SECURITY settings.
3) Finally, press [OK].
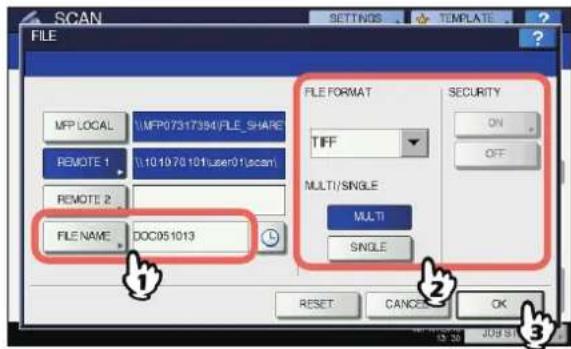
text_image
SCAN FILE MFP LOCAL MFP07317394/FLE_SHARE REMOTE 1 1101070101user01.scam REMOTE 2 FILE NAME: DOC051013 FILE FORMAT TIFF MULTI/SINGLE MULTI SINGLE SECURITY ON OFF RESET CANCE OK ① ② ③Memo
• To clear the settings, press [RESET].
• [ FILE NAME ]
Pressing the button displays an on-screen keyboard. Change the file name using the keyboard and digital keys, and then press [OK] to set the entry. The file name can consist of a maximum of 128 characters.
Memo
- Pressing adds a meaningful number, such as date and time, to the file name. The number is assigned according to the format selected for the Date Format setting, which is available for the administrator on TopAccess. For details, refer to the TopAccess Guide.
•The trailing characters in a file name (maximum 74) may be deleted depending on the type of letters used.
- FILE FORMAT
[PDF] — Press this button to store your scan as a PDF file.
[TIFF] — Press this button to store your scan as a TIFF file.
[XPS] — Press this button to store your scan as an XPS file.
[SLIM PDF] — Press this button to store your scan as a slim PDF file. This option is suitable when minimizing the file size is more important than the image quality. This option is available only when [FULL COLOR] or [GRAY SCALE] is selected for the color mode setting.
[JPEG] — Press this button to store your scan as a JPEG file. This option is available only when [FULL COLOR] or [GRAY SCALE] is selected for the color mode setting.
Memo
•XPS files are supported only by the following operating systems:
- Windows Vista
- Windows 7
- Windows 8
- Windows Server 2008 SP1 or later versions
- Windows XP SP2 or later versions with .NET Framework 3.0 installed
- Windows Server 2003 SP1 or later versions with .NET Framework 3.0 installed
- If the forced encryption setting is enabled, PDF is the only available file format.
• MULTI/SINGLE PAGE
[MULTI] — Press this button to store your scan as a multiple page file. When you scan several pages, the equipment stores all the pages as a single file.
[SINGLE] — Press this button to store your scan as a single file for each page. When you scan several pages, the equipment stores each page as a separate file.
- SECURITY
When PDF is selected for the file format, you can decide whether or not to encrypt the PDF file. To encrypt the PDF file, press [ON]. For further instructions on how to encrypt PDF files, see the following Guide:
Advanced Guide
10 Press [SCAN].
![OKI MC780f+ - Press [SCAN]. - 1](/content/2026/05/816767/images/2bf8c15d2829bdd61ba35f3f4a202e58b881880693eab37d2a8c6c77ba47ceaf.jpg)
text_image
SCAN Select Menu® Press SCAN to start scanning. e-FLNG FILE E-MAIL USB WS SCAN Destination File Name File Format 1 0:10:10.70 10-Fuser01(fscen) DOC65 10/13 TFF Multi PREVIEW SCAN 05:10:20:13 11:04 ATUSMemo
- To scan from the glass screen, select the size of the document to be scanned from [ORIGINAL SIZE] in the [SCAN SETTING].
• To scan 2-sided documents or change settings such as Color Mode and Resolution, press [SCAN SETTING]. - Press [PREVIEW] and then [SCAN] to preview your scans.
- You can select and set [e-FILING], [E-MAIL] or [USB] as another scan function. (Dual Agents)
11 If the screen below appears, place another original on the document glass and press [SCAN] or the [START] button to continue scanning. To finish the job, press [JOB FINISH], followed by the [RESET] button.
![OKI MC780f+ - If the screen below appears, place another original on the document glass and press [SCAN] or the [START] button to continue scanning. To finish the job, press [JOB FINISH], followed by the [RESET] button. - 1](/content/2026/05/816767/images/477d395a673983bc517f76f0eec5bd11d77e11217930fffa5db5f5c19e75de94.jpg)
text_image
SCAN SCANNING To continue, Place document on glass And press START or [SCAN] SCAN PAGE 1 JOB CANCEL SCAN SETTING JOB FINISH SCAN 15.48 JOB STATUS- The above screen is not displayed under the following conditions:
- You scan the original from the Reversing Automatic Document Feeder without pressing [CONTINUE] to scan additional originals.
- A scan preview is displayed.
• To cancel the operation, press [JOB CANCEL].
• To change the scan settings, press [SCAN SETTING].
Advanced Guide
! Note
- When the equipment has scanned more than 1000 pages in a job, the "The number of originals exceeds the limits. Will you save stored originals?" message appears. If you want to save the scans, press [YES].
- When the temporary workspace is full on the equipment's hard disk, a message appears and the job is canceled. The available workspace can be viewed on the TopAccess [Device] tab.
- If the number of jobs waiting to store scans in the equipment's hard disk exceeds 20, a message appears to indicate that the equipment's memory is full. In this case, wait a while until memory becomes available again or delete unnecessary jobs from [JOB STATUS]. P.90 "Viewing the scan job status"
Scan to E-mail
With this scan function, you can send your scans to a specified e-mail address as an attached file.
The mail server and the domain name server are set by the administrator. For details, refer to the TopAccess Guide.
Scanning to e-mail
1 Place the original(s).
2 On the control panel, press the [SCAN] button to enter the SCAN menu.
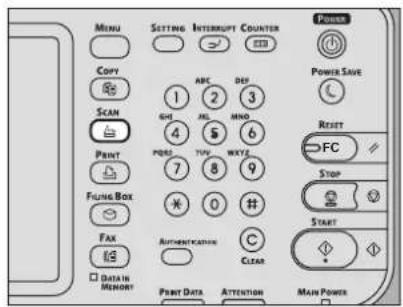
text_image
MENU SETTING INTERRUPT COUNTER COPY SCAN PRINT FILING BOX FAX DATA IN MENRY 1 ABC DEF 2 3 3 MNO 4 6 PORE TUY WXYE 7 8 9 * 0 # Authentication Clear PRINT DATA ATTENTION POWER POWER SAVE RESET FC STOP START MAIN POWER3 Press [E-MAIL].
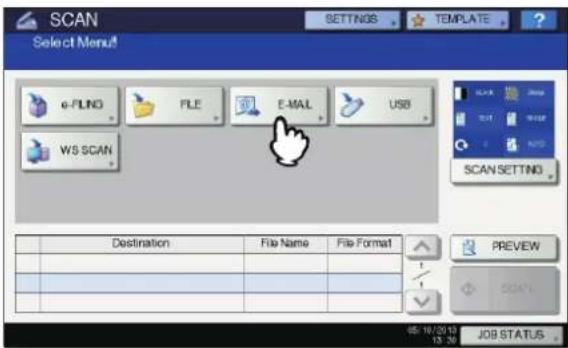
text_image
SCAN Select Menu! e-PLNG FILE E-MAIL USB WS SCAN Destination File Name File Format PREVIEW SCAN 05 18/2013 13:30 JOB STATUS- If the User Authentication for Scan to E-mail setting is enabled by the administrator on TopAccess, the AUTHENTICATION screen is displayed. In this case, proceed to step 4.
- If the User Authentication for the Scan to E-mail setting is disabled by the administrator, proceed to step 5.

- Press [PREVIEW] in this step and then select the scan function in order to preview your scans at the end of the operation.
4 On the AUTHENTICATION screen, complete the user authentication.
1) Press [USER NAME] and enter the user name.
2) Press [PASSWORD] and enter the password.
3) Finally, press [OK].
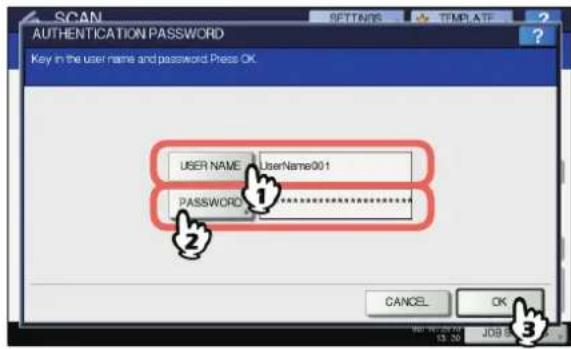
text_image
SCAN AUTHENTICATION PASSWORD Key in the user name and password Press OK USER NAME UserName001 PASSWORD CANCEL OK 3
- Pressing each button displays an on-screen keyboard. Enter each item using the keyboard and digital keys, and then press [OK] to set the entry.

- The above screen is displayed only when the User Authentication for Scan to E-mail setting is enabled on TopAccess by the administrator. If this screen is displayed, you must enter your user name and password to log in to the SCAN TO E-MAIL screen. For the user name and password, ask your network administrator.
5 Press [TO].
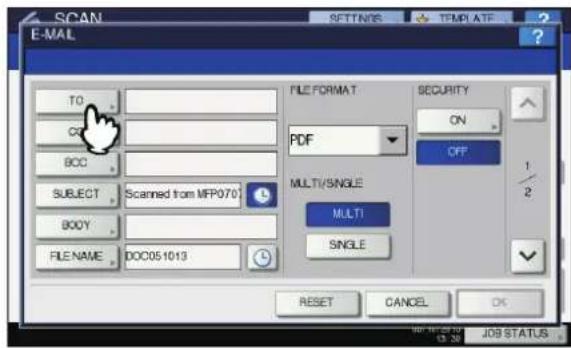
text_image
SCAN E-MAIL TO OFF BCC SUBJECT Scanned from MFP070 BODY FILENAME DOC051013 FILE FORMAT PDF MULTI/SINGLE MULTI SINGLE SECURITY ON OFF 1 2 RESET CANCEL OK MIF 08.00 09:30 JOB STATUS6 Specify the e-mail address(es) that you want to send to.
1) Press [INPUT @].
2) Enter an e-mail address using the keyboard and digital keys, and then press [OK] to set the entry.
3) Finally, press [OK].
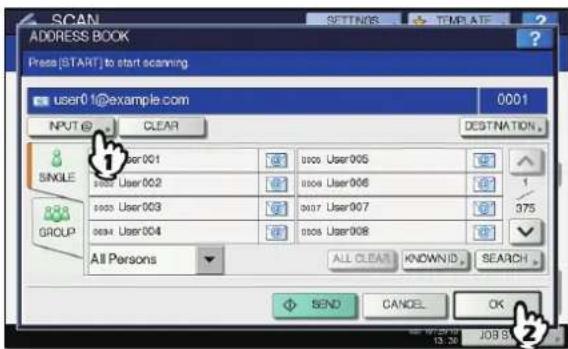
text_image
SCAN ADDRESS BOOK Press [START] to start scanning user01@example.com INPUT @ CLEAR SINGLE GROUP user 001 user 002 user 003 user 004 user 005 user 006 user 007 user 008 user 009 user 010 user 011 user 012 user 013 user 014 user 015 user 016 user 017 user 018 user 019 user 020 user 021 user 022 user 023 user 024 user 025 user 026 user 027 user 028 user 029 user 030 user 031 user 032 user 033 user 034 user 035 user 036 user 037 user 038 user 039 user 040 user 041 user 042 user 043 user 044 user 045 user 046 user 047 user 048 user 049 user 050 user 051 user 052 user 053 user 054 user 055 user 056 user 057 user 058 user 059 user 060 user 061 user 062 user 063 user 064 user 065 user 066 user 067 user 068 user 069 user 070 user 071 user 072 user 073 user 074 user 075 user 076 user 077 user 078 user 079 user 080 user 081 user 082 user 083 user 084 user 085 user 086 user 087 user 088 user 089 user 090You can specify e-mail addresses in various ways. For details, see the following Guide:
Advanced Guide
Memo
- The entry in the FROM ADDRESS box (→ step 9) may already be set by the administrator on TopAccess. (Refer to the TopAccess Guide for descriptions of the E-mail Setting and/or the User Authentication for Scan to E-mail setting.) In this case, you can start sending your scans by specifying the e-mail address(es) and then pressing [SEND] or the [START] button.
7 Press [SUBJECT] and [BODY] and enter each item.
![OKI MC780f+ - Press [SUBJECT] and [BODY] and enter each item. - 1](/content/2026/05/816767/images/adf489fcc8cfc4d464b40483e97a321d1195d09eb22fa4e853dcbf7107174e64.jpg)
text_image
SCAN E-MAIL TO user01@example.com CC BCC SUBJECT Scanned from MFP070 BODY FILE NAME 14013 FILE FORMAT PDF MULTI/SINGLE MULTI SINGLE SECURITY ON OFF 1/2 RESET CANCEL OK SET 2019 15:30 JOB STATUSMemo
• To clear the settings, press [RESET].
- Pressing each button displays an on-screen keyboard. Enter each item using the keyboard and digital keys, and then press [OK] to set the entry. The maximum number of characters allowed for each box is as follows:
- [SUBJECT]: 128 characters
-
[BODY]: 1000 characters
-
To add another contact, press [CC] or [BCC] to add the E-mail address of the contact.
- When the e-mail is sent, the date and time are automatically added to the subject.
- The administrator can change the body text. For details, refer to the TopAccess Guide.
- Pressing adds a meaningful number, such as date and time, to the subject. For details, refer to the TopAccess Guide.
8 If necessary, make the following settings for the attached file.
1) Press [FILE NAME] and change the file name.
2) Select an option for each of the FILE FORMAT, MULTI/SINGLE PAGE and/or SECURITY settings.
3) Finally, press √

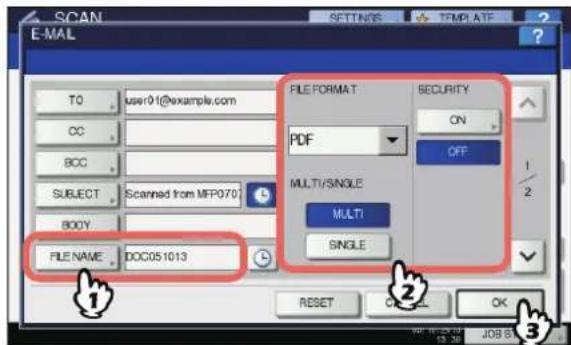
text_image
SCAN E-MAIL T0 user01@example.com CC BCC SUBJECT Scanned from MFP070 BODY FILE NAME DOC051013 FILE FORMAT PDF MULTI/SINGLE MULTI SINGLE SECURITY ON OFF RESET OK ① ② ③• [ FILENAME]
Pressing the button displays an on-screen keyboard. Enter the file name using the keyboard and digital keys, and then press [OK] to set the entry. The file name can consist of a maximum of 128 characters.
Memo
-
Pressing add
-
Pressing adds a meaningful number, such as date and time, to the file name. The number is assigned according to the format selected for the Date Format setting, which is available for the administrator on TopAccess. For details, refer to the TopAccess Guide.
- The trailing characters in a file name (maximum 74) may be deleted depending on the type of letters used.
- FILE FORMAT
[PDF] — Press this button to store your scan as a PDF file.
[TIFF] — Press this button to store your scan as a TIFF file.
[XPS] — Press this button to store your scan as an XPS file.
[SLIM PDF] — Press this button to store your scan as a slim PDF file. This option is suitable when minimizing the file size is more important than the image quality. This option is available only when [FULL COLOR] or [GRAY SCALE] is selected for the color mode setting.
[JPEG] — Press this button to store your scan as a JPEG file. This option is available only when [FULL COLOR] or [GRAY SCALE] is selected for the color mode setting.
Memo
•XPS files are supported only by the following operating systems:
| - | W | i | n | d | o | w | s | V | i | s | t | a |
| - | W | i | n | d | o | w | s | 7 | ||||
| - | W | i | n | d | o | w | s | 8 |
- Windows Server 2008 SP1 or later versions
- Windows XP SP2 or later versions with .NET Framework 3.0 installed
- Windows Server 2003 SP1 or later versions with .NET Framework 3.0 installed
- If the forced encryption setting is enabled, PDF is the only available file format.
- MULTI/SINGLE PAGE
[MULTI] — Press this button to store your scan as a multiple page file. When you scan several pages, the equipment stores all the pages as a single file.
[SINGLE] — Press this button to store your scan as a single file for each page. When you scan several pages, the equipment stores each page as a separate file.
- SECURITY
When PDF is selected for the file format, you can decide whether or not to encrypt the PDF file. To encrypt the PDF file, press [ON]. For further instructions on how to encrypt PDF files.
9 Specify the following items as required, and then press [OK].
![OKI MC780f+ - Specify the following items as required, and then press [OK]. - 1](/content/2026/05/816767/images/bd9620dab10e0cebef5eb1fdbd6e097d8484769a2ffb0fec7e5f84867d7ee1e3.jpg)
text_image
E-MAIL Fragment Message Size(KB) NONE FROM ADDRESS Mtp@example.com FROM NAME MFP RESET CANCEL OK• FRAGMENT MESSAGE SIZE (KB)
Select the size of message fragmentation. If the size of the attached file exceeds that selected here, the equipment transmits the file by dividing the data into smaller blocks.
! Note
- If the data size of the e-mail exceeds the maximum allowed for transmission, the attached file will not be sent. The maximum data size for e-mail transmission can be set by the administrator on the TopAccess SMTP Client page.
• [FROM ADDRESS]
Press this button to edit the sender's e-mail address. You cannot edit the box if the administrator sets the sender's e-mail address so that it cannot be edited.
• [FROMNAME]
Press this button to edit the sender's name.
Memo
- Pressing [FROM ADDRESS] or [FROM NAME] displays an on-screen keyboard. Enter each item using the keyboard and digital keys, and press [OK] to set the entry.
- You can start sending your scans on the above screen by pressing the [START] button on the control panel.
10 Press [SCAN] or the [START] button.
![OKI MC780f+ - Press [SCAN] or the [START] button. - 1](/content/2026/05/816767/images/f78f0230557ac82c85c2c68f0aa6404942ffcaabc63436aa7eabe87399b49e65.jpg)
text_image
SCAN Select Menu! Press SCAN to start scanning e-FLNG FILE E-MAIL USB WB SCAN Destination File Name File Format 1 user31@example.com DOC65 10/13 PDF Multi PREVIEW SCAN 05:10/2013 11:10 STATUSMemo
- To scan from the glass screen, select the size of the document to be scanned from [ORIGINAL SIZE] in the [SCAN SETTING].
• To scan 2-sided documents or change settings such as Color Mode and Resolution, press [SCAN SETTING].
- Press [PREVIEW] and then [SCAN] to preview your scans.
- You can select and set [e-FILING], [E-MAIL] or [USB] as another scan function. (Dual Agents)
11 If the screen below appears, place another original on the document glass and press [SCAN] or the [START] button to continue scanning. To finish the job, press [JOB FINISH], followed by the [RESET] button.
![OKI MC780f+ - If the screen below appears, place another original on the document glass and press [SCAN] or the [START] button to continue scanning. To finish the job, press [JOB FINISH], followed by the [RESET] button. - 1](/content/2026/05/816767/images/e3d5bb7a1c42fc578f5411e1b2eae5f4132f56ff342f42652f19bd80482b2d99.jpg)
text_image
SCAN SCANNING To continue, Place document on glass And press START or [SCAN] SCAN PAGE 1 JOB CANCEL SCAN SETTING JOB FINISH SCAN 15.48 JOB STATES- The above screen is not displayed under the following conditions:
- You scan the original from the Reversing Automatic Document Feeder without pressing [CONTINUE] to scan additional originals.
- A scan preview is displayed.
• To cancel the operation, press [JOB CANCEL].
- To change the scan settings, press [SCAN SETTING].
Advanced Guide
! Note
- When the equipment has scanned more than 1000 pages in a job, the "The number of originals exceeds the limits. Will you save stored originals?" message appears. If you want to save the scans, press [YES].
- When the temporary workspace is full on the equipment's hard disk, a message appears and the job is canceled. The available workspace can be viewed on the TopAccess [Device] tab.
Scan to USB
The Scan to USB function stores scans to a USB storage device.
To store data in a USB storage device, the Save to USB Media setting must be enabled by the administrator. For details, refer to the TopAccess Guide.
! Note
- USB storage devices must meet requirements below. However, some USB storage devices may not be used with this equipment even though the requirements below are met.
- FAT16 or FAT32 format
- Single-partition (USB storage devices with multiple partitions are not supported.)
Scanning to USB
1 Place the original(s).
2 On the control panel, press the [SCAN] button to enter the SCAN menu.
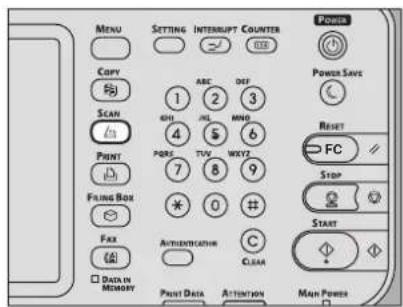
text_image
MENU SETTING INTERRUPT COUNTER Power Copy SCAN PRINT Filing Box Fax Data IN MEMORY PRINT Data ATTENTION ABC DEF 1 2 3 6H JL MND 4 5 6 7 8 9 * 0 AUTHENTICATION C CLEAR Power Save RESET FC Stop START Man Power3 To store scans in a USB storage device, connect the device to the equipment and wait a few seconds.
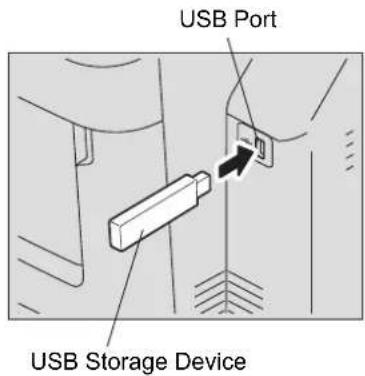
text_image
USB Port USB Storage Device! Note
- Connect the USB storage device to the USB port.
4 When "Found USB DEVICE." message appears on the touch panel, press [USB].
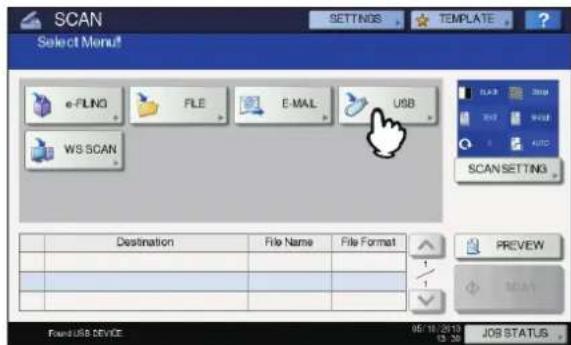
text_image
SCAN Select Menu! e-FLNG FILE E-MAIL USB WS SCAN Destination File Name File Format PREVIEW SCAN File: USB DEVICE 05/18/2013 13:30 JOB STATUS! Note
- When you store scans in a USB storage device, never attempt to remove the device from the equipment until data transmission is completed. Removing the USB storage device during data transmission may corrupt the device.
Memo
- Storing scans to a USB storage device may take a long time depending on the volume of the scans.
- Press [PREVIEW] in this step and then select the scan function in order to preview your scans at the end of the operation.
5 Define the settings for the new file as required.
1) Press [FILE NAME] to change the file name.
2) Select an option for each of the FILE FORMAT, MULTI/SINGLE PAGE and SECURITY settings.
3) After the settings are done, press [OK].
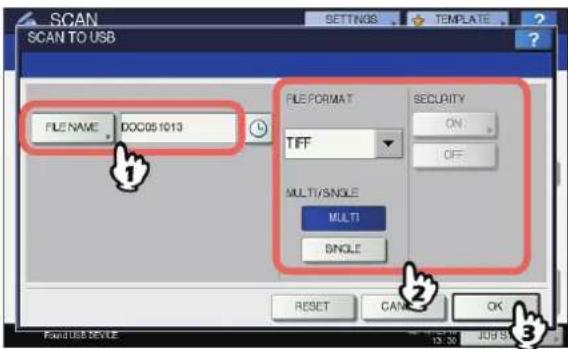
text_image
SCAN SCAN TO USB FILENAME: DOC051013 FILE FORMAT TIFF SECURITY ON OFF MULTI/SINGLE MULTI BINGLE RESET CANCEL OK FANUS DEVICE 13:30 JUN18Memo
• To clear the settings, press [RESET].
• [ FILENAME]
Pressing this button displays an on-screen keyboard. Change the file name using the keyboard and digital keys, and then press [OK] to set the entry. A maximum of 128 letters can be used for the file name.
! Note
- Pressing adds some numbers such as date and time to the file name. These numbers can be set in the format selected in the Date Format setting of the TopAccess menu, which can be set by the administrator. For details, refer to the TopAccess Guide.
•The trailing characters in a file name (maximum 74) may be deleted depending on the type of letters used.
- FILE FORMAT
[PDF] – Press this button to store scans as a PDF file. [TIFF] – Press this button to store scans as a TIFF file. [XPS] – Press this button to store scans as an XPS file. [SLIM PDF] – Press this button to store scans as a slim PDF file. This option is suitable when minimizing the file size is more important than the image quality. This option is available only when [FULL COLOR] or [GRAY SCALE] is selected for the color mode setting. [JPEG] – Press this button to store scans as a JPEG file. This option is available only when [FULL COLOR] or [GRAY SCALE] is selected for the color mode setting.
Memo
•XPS files are supported only by the following operating systems:
- W i n d o w s V i s t a
- W i n d o w s 7
- W i n d o w s 8
- Windows Server 2008 SP1 or later versions
- Windows XP SP2 or later versions with .NET Framework 3.0 installed
- Windows Server 2003 SP1 or later versions with .NET Framework 3.0 installed
- If the forced encryption setting is enabled, PDF is the only format available.
- MULTI/SINGLE PAGE
[MULTI] – Press this button to store scans as a multiple page file. When you scan several pages, the equipment stores all the pages as a single file.
[SINGLE] – Press this button to store scans as a single file for each page. When you scan several pages, the equipment stores each page as a separate file.
- SECURITY
When PDF is selected for the file format, you can decide whether or not to encrypt the PDF file. To encrypt the PDF file, press [ON]. For the details of the encryption setting, see the following Guide:
Advanced Guide
6 Press [SCAN] to scan data.
![OKI MC780f+ - Press [SCAN] to scan data. - 1](/content/2026/05/816767/images/aae6dd9b705b465fbc6fb93379083afe058bc88deb264195f92891397520d8c9.jpg)
text_image
SCAN Select Menu! Press SCAN to start scanning e-FLNG FILE E-MAIL USB WS SCAN Destination File Name File Format 1 USB_MEDIA DOC05 10/13 TFF Multi PREVIEW SCAN 95:18:2013 10:40 STATUSMemo
- To scan from the glass screen, select the size of the document to be scanned from [ORIGINAL SIZE] in the [SCAN SETTING].
- To scan 2-sided documents or set Color Mode or Resolution, etc., press [SCAN SETTING].
- Press [PREVIEW] and then [SCAN] to preview your scans.
- You can select and set [e-FILING], [E-MAIL] or [USB] as another scan function. (Dual Agents)
7 If the screen below appears, place another original on the document glass and press [SCAN] or the [START] button to continue scanning. To finish the job, press [JOB FINISH], followed by the [RESET] button.
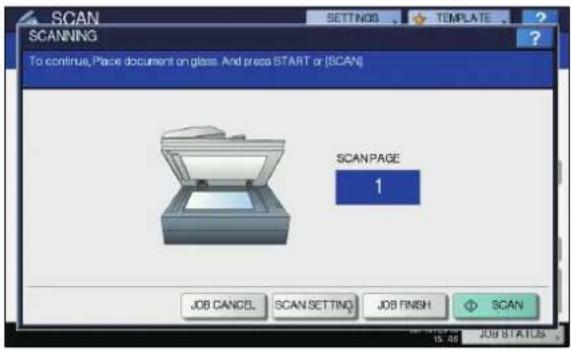
text_image
SCAN SCANNING To continue, Place document on glass. And press START or [SCAN] SCAN PAGE 1 JOB CANCEL SCAN SETTING JOB FINISH SCAN• The above screen is not displayed under the following conditions:
- You scan the original from the Reversing Automatic Document Feeder without pressing [CONTINUE] to scan additional originals.
- A scan preview is displayed.
• To cancel the operation, press [JOB CANCEL].
• To change the scan settings, press [SCAN SETTING].
Advanced Guide
! Note
- When the equipment has scanned more than 1000 pages in a job, the "The number of originals exceeds the limits. Will you save stored originals?" message appears. If you want to save the scans, press [YES].
- When the temporary workspace is full on the equipment's hard disk, a message appears and the job is canceled. The available workspace can be viewed on the TopAccess [Device] tab.
- If the number of jobs waiting to store scans in the equipment's hard disk exceeds 20, a message appears to indicate that the equipment's memory is full. In this case, wait a while until memory becomes available again or delete unnecessary jobs from [JOB STATUS]. P.90 "Viewing the scan job status"
Web Service (WS) Scan
Web Service (WS) Scan uses the functions of Windows operating systems such as Windows Vista to scan images from a client computer through the network. Scanning can be performed through the touch panel operation or from a client computer running Windows operating systems such as Windows Vista. The images scanned on the equipment can be loaded to your client computer and viewed on an application supporting the Windows Imaging Acquisition (WIA) Scan Driver.
System Requirements
The WS Scan function is available under the following environments:
- OS
Windows Vista / Windows 7 / Windows 8 / Windows Server 2008 / Windows Server 2012 - Software
Windows Imaging Acquisition (WIA)-compliant applications
Scan Driver Installation
WS Scan uses the WIA Scan Driver included with Windows operating systems such as Windows Vista. The WIA Scan Driver is automatically installed to your client computer when you install client software for Web Service Printing.
! Note
• To install the WIA Scan Driver on a client computer, the Web Service Scan setting must be enabled by the administrator on TopAccess. For details, refer to the TopAccess Guide.
Memo
- The User Documentation DVD includes the WIA Driver for users of Windows XP/Windows Vista/Windows 7/Windows 8/Windows Server 2003/Windows Server 2008/Windows Server 2012. This driver can be used together with a WIA-compliant application, such as Microsoft Paint supported by Windows XP or Windows Vista, to scan images on the equipment and load them to your client computer.
This guide provides instructions for using the touch panel to scan images on the equipment. For operational instructions on the client computers, refer to the documentation that comes with your WIA-compliant application.
Scanning with Web Service Scan
1 Place the original(s).
2 On the control panel, press the [SCAN] button to enter the SCAN menu.
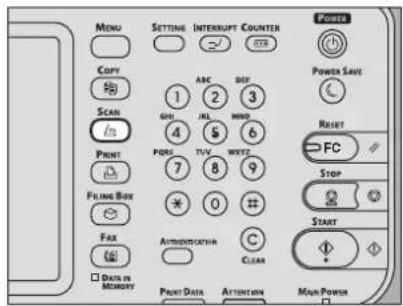
text_image
MENU COPY SCAN PRINT Filing Box FAX DATA IN MEMORY INTERS INTERS INTERS INTERS INTERS INTERS INTERS INTERS INTERS INTERS INTERS INTERS INTERS INTERS INTERS INTERS INTERS INTERS INTERS INTERS INTERS INTERS INTERS INTERS INTERS INTERS INTERS INTERS INTERS INTERS INTERS INTERS INTERS INTERS3 Press [WS SCAN].
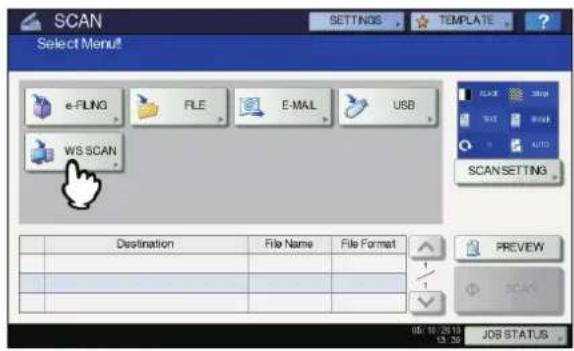
text_image
SCAN Select Menu! e-PLING FILE E-MAIL USB WS SCAN Destination File Name File Format PREVIEW 05/10/2019 13:30 JOB STATUS4 Select the client that fits your needs, and then press [SCAN].
![OKI MC780f+ - Select the client that fits your needs, and then press [SCAN]. - 1](/content/2026/05/816767/images/a525b357ae124f1f977054993c2d71888fed5b933761ac8486bceb94e9057376.jpg)
text_image
SCAN WEB SERVICES SCAN Destinations USER001-PC USER001-PC USER001-PC USER001-PC FAX USER001-PC OCR CANCEL SCAN 15.38 DATA 125![OKI MC780f+ - Select the client that fits your needs, and then press [SCAN]. - 2](/content/2026/05/816767/images/8da47cd68bc6d195fc5e01aa7dd026a954c9884ee37d0ba146e7ed096ee4d7ea.jpg)
- If the desired client name is not shown on the screen, use and to switch between pages.
The following screen is displayed.
![OKI MC780f+ - Select the client that fits your needs, and then press [SCAN]. - 3](/content/2026/05/816767/images/785b0a8e58c3e790766a6672f8d6524fad4f2cb15052bf38fe492bc2225f2db0.jpg)
text_image
COPY STORAGE SETTINGS TEMPLATE SCANNING AND TRANSFERRING Please wait ... CANCEL 15:04 正常 START![OKI MC780f+ - Select the client that fits your needs, and then press [SCAN]. - 4](/content/2026/05/816767/images/b366b1e6c1c1246deace85286a9d4a5c78486a42c9a14f04e32f11cba57fa3f2.jpg)
• To cancel the operation, press [CANCEL].
![OKI MC780f+ - Select the client that fits your needs, and then press [SCAN]. - 5](/content/2026/05/816767/images/ca23dd8d3f7a4f26f57edc8a2e971737fc67f634cf15dac3aa6436ca50ecad0e.jpg)
- If the above screen does not appear, make sure that the selected client is running.
Using Saved Scan Data
Using scan data saved as e-Filing documents
You can display a list of the scan data stored in e-Filing and use it in various ways from the touch panel or with the e-Filing web utility. For instructions on how to use the data stored in e-Filing, refer to the e-Filing Guide.
Using scan data saved as files
To access your scans stored in the equipment's shared folder, a USB storage device, or a network folder, use the Windows Explorer search function or the Macintosh Finder.
■ Using scans saved in MFP LOCAL
When you select [MFP LOCAL] to save your scans, they are stored in the equipment's shared folder named "file_share." You can access this folder from a computer running a Windows OS or Mac OS X 10.3.x or later.

- The equipment's shared folder cannot be accessed from Mac OS X 10.2.x or earlier because these versions do not support SMB.

- If you access the equipment's shared folder from Macintosh OS X 10.3.x or later, connecting to the network from the Finder displays the SMB/CIFS File dialog box. Enter your user name and password in the dialog box as required.
Whether your scans are stored directly in the shared folder or in a sub-folder is controlled by the Local Storage Path setting on TopAccess. The administrator can change this setting from the Setup page by clicking the "Save as file" submenu. For details, refer to the TopAccess Guide.
When scans are sent to a sub-folder:
When the Local Storage Path setting is set to send the scans to a sub-folder in the path, the equipment automatically creates a sub-folder. The name of the sub folder depends on how you operate the Scan to File function.
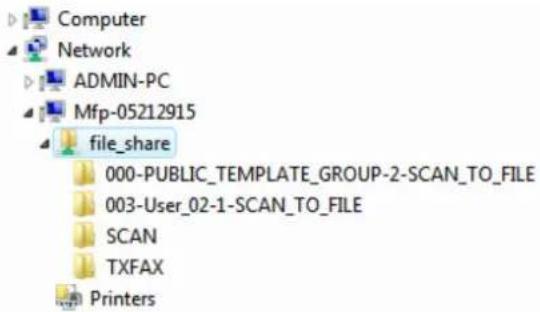
text_image
Computer Network ADMIN-PC Mfp-05212915 file_share 000-PUBLIC_TEMPLATE_GROUP-2-SCAN_TO_FILE 003-User_02-1-SCAN_TO_FILE SCAN TXFAX PrintersThe sub-folders created under "file_share" are as follows:
- "SCAN" — This sub-folder contains files created by the Scan to File function.
- "000-PUBLIC_TEMPLATE_GROUP-[Template Name]" — This sub-folder contains files created using a scan template in the Public Template group.
- “[Group No.]-[Group Name]-[Template Name]” — This sub-folder contains files created using a scan template in the User Template group.
The sub-folders are automatically deleted when the folder becomes empty.
When scans are sent directly to the shared folder:
When the Local Storage Path setting is set to send the scan data directly to storage, they are stored in the equipment under the "file_share" folder.
■ Using scans saved in USB storage device
When you select [USB] to save your scans, they are stored in the USB storage device connected to the equipment.
When you save your scans in the USB storage device, a subfolder is automatically created. The name of the sub-folder depends on how you operate the Scan to USB function.
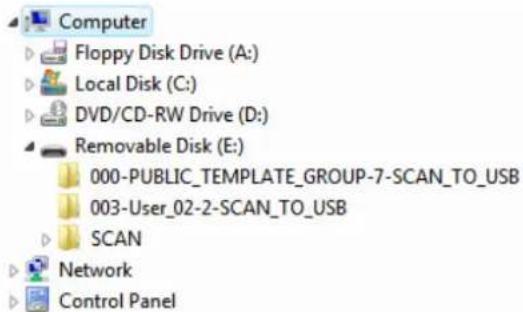
text_image
Computer Floppy Disk Drive (A:) Local Disk (C:) DVD/CD-RW Drive (D:) Removable Disk (E:) 000-PUBLIC_TEMPLATE_GROUP-7-SCAN_TO_USB 003-User_02-2-SCAN_TO_USB SCAN Network Control Panel- "SCAN" — This sub-folder contains files created by the Scan to USB function.
- "000-PUBLIC_TEMPLATE_GROUP-[Template Name]" — This sub-folder contains files created using a scan template in the Public Template group.
- “[Group No.]-[Group Name]-[Template Name]” — This sub-folder contains files created using a scan template in the User Template group.
■ Using scans saved in network folders (REMOTE 1/2)
When you select [REMOTE 1] or [REMOTE 2] to store data, they are stored in the Scan folder automatically created in the specified network folder. When these data contain a template, they are stored in a folder that has been specified in the template setting.
Viewing the Scan Job Status and Log
The status and log of scan jobs can be viewed on the touch panel.

- If the equipment is managed by the User Management feature, you need to enter the user information, such as the user name and password.
Viewing the scan job status
Pressing [JOB STATUS] > [JOBS] > [SCAN] on the touch panel displays a list of the scan jobs in progress. The jobs can be deleted if needed.
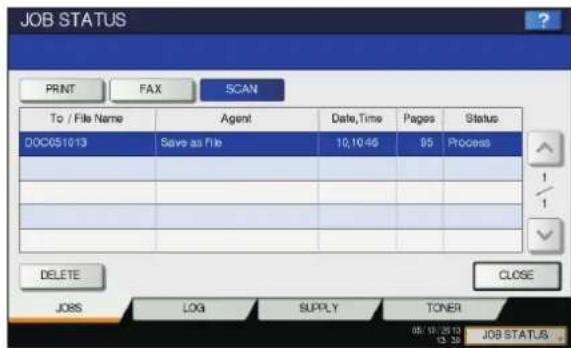
text_image
JOB STATUS PRINT FAX(SCAN) To / File Name Agent Data,Time Pages Status DOC051013 Save as File 10,10:46 95 Process 1/1 DELETE CLOSE JOBS(LOG SUPPLY TONER 05/10/2013 13:30 JOB STATUSIn the list, you can view each job's destination/file name, agent (scan function), date and time, number of pages, and current status. The maximum number of displayed jobs differs depending on your model or operating environment.
To display the previous or next page, press □ or . The number of jobs displayed on a page varies depending on the equipment used.
To delete jobs, select one on the list and press [DELETE]. You can select more than one job to be deleted.
To exit from the JOB STATUS screen, press [CLOSE].
Viewing the scan job log
A record of scan jobs can be displayed on the [LOG] tab of the JOB STATUS screen. To display the record on the touch panel, press [JOB STATUS] > [LOG] > [SCAN].
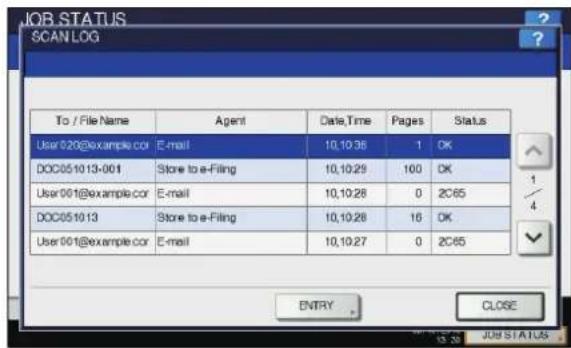
text_image
JOB STATUS SCAN LOG To / File Name Agent Cate,Time Pages Status User020@example.co E-mail 10,10:36 1 OK DOC051013-001 Store to e-Filing 10,10:29 100 OK User001@example.co E-mail 10,10:28 0 2C65 DOC051013 Store to e-Filing 10,10:28 16 OK User001@example.co E-mail 10,10:27 0 2C65 ENTRY CLOSE 13.38 JOB STATUSOn the [LOG] tab, you can view each job's destination/file name, agent (scan function), date and time, number of pages, and status (job result).
Up to 1000 jobs can be listed.
To display the previous or next page, press ☐ or . The number of jobs displayed on a page varies depending on the equipment used.
If you want to register an e-mail address on the list to the address book, press [ENTRY].
Advanced Guide
To exit from the SCAN LOG screen, press [CLOSE].
Memo
- For details of the job record displayed on the [LOG] tab, refer to the TopAccess Guide.
- For details on error codes displayed in the "Status" column, refer to the Troubleshooting Guide.
- The scan job log can be exported to a USB storage device.
5
Utilities that can be used with this machine
List of Utilities P.92
List of Utilities
Common Utilities for Windows/Macintosh
You can use the following utilities.
For details, refer to the Utility Guide.
- AddressBook Viewer
• e-Filing Backup/Restore
• T W A I N D r i v e r - File Downloader
- Remote Scan Driver
• W I A D r i v e r
6
Index
1
2
3
4
5
6
A
Advanced Guide 2
Alert Message Display Area 78
AMS (Automatic Magnification Selection) 47
[APS] 44
APS (Automatic Paper Selection) ..... 44
AUTO COLOR 45
Auto job start 33
Automatic Paper Selection (APS) ..... 44
B
Background Adjustment 79
Basic Guide 2
Batch transmission function 61
BLACK 45
Blue (B) 79
[BODY] 84
Bypass copying bypass copying 35
envelope 39
non-standard size paper 40
standard size paper 36
C
Canceling direct transmissions ..... 75
Canceling reserved transmissions ..... 75
Canceling the memory transmission ... 74
Clearing the set functions 43
Color mode 79
AUTO COLOR 45
BLACK 45
color mode 43,45
FULL COLOR 45
[COMMAND PORT] 81
Communication status 73
Compress 79
Configuration Settings 21
Confirmation screen 43
Considerations 24, 26
Continuous feed mode 30
Contrast 79
Convenient Functions 7
COPY & FILE 56
Copy quantity 43
Copying auto job start 33
basic procedure 31
before making copies 28
book-type originals 29
bypass copying 35
copy & file 56
copy quantity 43
duplex copying 54
envelope 39
interrupting 33
making copies 31
mixed-size originals 45
non-standard size paper 40
number of copies 31
photo originals 50
proof copy 33
reproduction ratio 43, 47
restarting 32
stopping 32
Copying functions
before using copying functions ... 43
clearing the set functions ..... 43
confirming the set functions ..... 43
D
Date and Time 78
Default settings 43,78
Density adjustment 43, 47
Department Code 21, 23
Destination Display Area 78
[Device Settings] tab 22
DIRECT TX 64
Document glass 28
Documents of different sizes 63
Duplex copying
1-sided original -> 1-sided copy ... 54
1-sided original -> 2-sided copy ... 55
2-sided original -> 1-sided copy ... 55
2-sided original -> 2-sided copy ... 55
simplex/duplex setting 54
E
ECM 65
e-Filing 79,89
Enter the user credentials manually ... 25
Envelope 39
EXPOSURE 64
Exposure 79
External telephone 69,71
F
Feeding mode 30
File formats 82, 84
[FILE NAME] 81, 84
Finisher 22
Inner Finisher 52
name of each part 52
Finishing mode
finishing mode 43
group 51, 52
magazine sort 51, 54
non-sort non-staple 51
selecting 51
sort 51, 52
staple sort 51, 53
IMAGE SMOOTHING ....46
Install 12, 14, 17, 19
INTERNET FAX 65
Internet Fax 73
[INTERRUPT] button ....33
Interrupting copying 33
ITU-T 65
J
[JOB STATUS] 78
L
Limitations ......24, 26
List of Utilities 92
Log
scan 90
[LOGIN USER NAME] 81
M
Magazine sort ....51, 54
MAIL BOX COMMUNICATION .....65
MAP 46
MEMORY TX 64
Menu
Scan 78
Message Display Area 78
[MFP LOCAL] 80, 89
Model Selection ......22
Multi/Single 82, 85
Multi-purpose tray (MPT) 36
N
NetWare IP 58
NetWare IPX 58
Network Fax 73
Network folder 79, 90
[NETWORK PATH] 81
Next original 61
Non-sort Non-staple 51
Number of copies 31
0
Off-hook transmission 69
OHP film 35, 37
Omit Blank Page 79
On-hook transmission 69
Operating Environment 13
[OPTION] 60, 64, 65
Original
original scanning range 62
originals that can be sent ....61
placing the original(s) on the
document glass 62
placing the original(s) on the RADF
63
[ORIGINAL MODE] 46
ORIGINAL MODE 64
Original mode 79
IMAGE SMOOTHING 46
MAP 46
original mode 43, 46
PHOTO 46
PRINTED IMAGE 46
TEXT 46
TEXT/PHOTO 46
ORIGINAL SIZE 64
Original size 79
Original stopper 30
Originals
acceptable originals 28
mixed-size originals 45
placing 28
using the RADF 29
Outside Erase 79
Override Application Paper Source
Settings 22
P
Paper
acceptable size of paper 71
default setting for RX printing ..... 71
out of paper 32
paper priority when there is no same size paper 72
Paper holder 35
Paper selection 43, 44
[PASSWORD] 81
PHOTO 46
Photo zoom 50
PPD 24
Preparations 14, 19
[PREVIEW] 61, 70, 78
Print 14, 19
PRINTED IMAGE 46
Printer description file 24
Printer drivers 12
Proof copy 33
Q
QUALITY TX 65
R
RADF (Reversing Automatic Document Feeder)
precautions 29
unacceptable originals 29
using the RADF 29
Range adjustment 79
Receiving
AUTO reception 71
MANUAL reception 71
Memory reception 71
Receiving tray selection 34
Recipient
confirming the recipients ..... 69
direct entry with digital keys ...... 66
group entry 67
searching for by ID number ..... 67
searching for the recipient's fax number 68
specifying the recipient in the address book 66
Red (R) 79
Redial function 61
[REMOTE 1] 80, 90
[REMOTE 2] 80, 90
Reproduction ratio 43,47
Reserved transmissions 73
[RESET] button 35,43
RESOLUTION 64
Resolution 79
RGB adjustment 79
Rotation 79
S
Saturation 79
[SCAN] 78
[SCAN SETTING] 78
Scan Settings Display Area 78
Scan to e-Filing 79
Scan to E-mail 83
Scan to File 79
Scan to USB 86
Security 82, 85
Sending 60
[SERVER NAME] 81
[SETTINGS] 78
Setup Guide 2
Share folder 58
Shared folder 79,89
Sharpness 79
Side guides of the multi-purpose tray 36, 39, 41
Side guides of the RADF
(Reversing Automatic Document Feeder) 30
Simplex/duplex setting 43
Single feed mode 30
Single/2-sided Scan 79
SMB 58
Sort 51, 52
Staple sort 51, 53
[START] button 32, 33
Status
scan job 90
Sticker labels 35
[STOP] button 32
Storage of color copies 28
Sub-folder 89
[SUBJECT] 84
T
[TEMPLATE] 78
TEXT 46
TEXT/PHOTO 46
Touch panel
Scan 78
Transmission conditions
changing the settings for each page
65
making settings 64
Tray 22
Troubleshooting Guide 2
TX TYPE 64
U
USB storage device 90
User Documentation DVD 88
Utility Guide 2
W
Web Service (WS) Scan 88
Windows Imaging Acquisition (WIA) Scan Driver 88
Z
[ZOOM] 48
Oki Data Corporation
4-11-22 Shibaura, Minato-ku, Tokyo 108-8551, Japan
www.okiprintingsolutions.com