CANON imageCLASS LBP7660Cdn - Printer

imageCLASS LBP7660Cdn - Printer CANON - Free user manual and instructions

Find the device manual for free imageCLASS LBP7660Cdn CANON in PDF.

📄 998 pages English EN Download 💬 AI Question 10 questions ⚙️ Specs
Notice CANON imageCLASS LBP7660Cdn - page 2
Pick your language and provide your email: we'll send you a specifically translated version.
Product TypeColor Laser Printer
ModelimageCLASS LBP7660Cdn
Print Speed (A4)Up to 20 ppm (both color and black-and-white)
First Print Time (A4)16 seconds or less (color and black-and-white)
Warm-up Time31 seconds or less (from power on to ready)
Resolution600 dpi
Processor528 MHz + 264 MHz
Memory (RAM)768 MB
Paper Input CapacityDrawer: 250 sheets; Multi-purpose tray: 50 sheets
Paper Output CapacityApprox. 125 sheets (face-down)
Supported Paper SizesA4, B5, A5, Legal, Letter, Executive, Statement, Foolscap, Envelopes (DL, COM10, C5, B5, Monarch), Custom sizes
Duplex PrintingAutomatic (A4, B5, A5, Legal, Letter, Executive, Foolscap)
ConnectivityHi-Speed USB 2.0, Gigabit Ethernet (10/100/1000Base-T)
Network ProtocolsTCP/IP, AppleTalk, NetWare (optional), SMB (optional)
Printer LanguagesUFR II, PCL 5c, PCL 6
Dimensions (W x D x H)414 x 458 x 337 mm (printer only)
Weight (printer unit)Approx. 22.4 kg
Power Supply220-240 V (±10%), 50/60 Hz (±2 Hz)
Max Power Consumption950 W or less
Typical Power Consumption (average operation)Approx. 405 W
Sleep Mode Power (default)Approx. 7.5 W (Sleep Mode 1) / 1 W (Deep Sleep Mode 2)
Operating EnvironmentTemperature: 10-30°C; Humidity: 20-80% RH (no condensation)
ConsumablesCanon Cartridge 718 (Yellow, Magenta, Cyan, Black)
Optional AccessoriesPaper Feeder Unit PF-701 (250 sheets), PS ROM, Barcode Printing Kit

Frequently Asked Questions - imageCLASS LBP7660Cdn CANON

How do I replace the toner cartridge?
Open the front cover, press the lever to pull out the toner cartridge tray, then remove the empty cartridge. Insert the new cartridge until it clicks into place. Close the cover. For more details, see the Toner Cartridge Replacement section.
What paper types and sizes are supported?
The printer supports plain paper, heavy paper, transparencies (B&W only), labels, coated paper, envelopes, and custom sizes. Standard sizes include A4, B5, A5, Legal, Letter, Executive, Statement, and Foolscap. Envelopes: DL, COM10, C5, B5, Monarch. Custom sizes: width 76.2-215.9 mm, length 127.0-355.6 mm (multi-purpose tray).
How do I clear a paper jam?
Follow the on-screen prompts. Common jam locations: multi-purpose tray, paper drawer, back cover, or output area. Remove paper gently to avoid tearing. Refer to Paper Jams in the manual for detailed instructions.
How do I connect the printer to my network?
Use an Ethernet cable to connect the printer to your router/switch. Set the IP address via the control panel or ARP/PING commands. Install the printer driver on your computer and select the network printer. See Configuring the Network Settings.
How do I perform 2-sided (duplex) printing?
In the printer driver, select the 2-sided Printing option. Supported paper sizes: A4, B5, A5, Legal, Letter, Executive, Foolscap. For manuals, the default is 1-sided. Adjust settings from the Finishing sheet on Windows or Layout pane on Mac.
Why are there white streaks or faded colors in printouts?
This may indicate low toner or a dirty laser unit. Check toner levels and replace if needed. Try running a Calibration from the control panel. If streaks persist, clean the inside of the printer (transfer belt, fixing roller). See Poor Printout Results.
How do I enable the sleep mode to save energy?
The printer has two sleep modes: Sleep Mode 1 (default) and Deep Sleep Mode 2. You can adjust the timer via the control panel under Setup Menu > User Maintenance > Sleep Mode. Default sleep times are configurable.
Can I print directly from a USB flash drive?
Yes, the LBP7680Cx model supports USB Direct Print. Insert a USB memory device into the front USB port, and use the control panel to select and print PDF, TIFF, JPEG, or XPS files. The LBP7660Cdn does not have this feature.
How do I reset the printer to factory defaults?
From the control panel, go to Utility Menu > Reset and select Factory Reset. This will erase all custom settings and network configurations. Confirm by selecting [Yes].
What is the recommended maintenance schedule?
Regularly clean the outside with a damp cloth. Clean the transfer belt and fixing roller as needed (see Cleaning the Inside of the Printer). Replace toner cartridges when prompted. For optimal performance, perform calibration periodically.

User questions about imageCLASS LBP7660Cdn CANON

0 question about this device. Answer the ones you know or ask your own.

Ask a new question about this device

The email remains private: it is only used to notify you if someone responds to your question.

No questions yet. Be the first to ask one.

Download the instructions for your Printer in PDF format for free! Find your manual imageCLASS LBP7660Cdn - CANON and take your electronic device back in hand. On this page are published all the documents necessary for the use of your device. imageCLASS LBP7660Cdn by CANON.

USER MANUAL imageCLASS LBP7660Cdn CANON

LBP7680Cx/LBP7660Cdn

Before You Start 12

Legal Notices 13

Legal Limitations on the Usage of Your Product and the Use of Images 15

Using the e-Manual 16

How to Use the e-Manual 17

Operating Environment 18

Installing the e-Manual 19

Uninstalling the e-Manual 22

Screen Layout of the e-Manual 23

Top Page 24

Topic Page 26

Contents Page 27

Search Method 28

Viewing the e-Manual 29

Disclaimer 31

Copyright 32

Trademarks 33

Third Party Software 34

Important Safety Instructions 35

Installation 36

Power Supply 38

Handling 39

Maintenance and Inspections 41

Consumables 43

About This Printer 44

Printer Specifications 45

Introduction of the Optional Accessories 48

Names and Dimensions of Each Part 50

Control Panel 54

Introduction of the Utilities 57

Energy-saving Mode 59

Cautions for Handling the Printer 60

Consumables 61

Maintenance 62

Toner Cartridge Replacement 63

Attention (Toner Cartridge) 65

Replacing Toner Cartridges 67

Storing Toner Cartridges 70

Adjusting the Printing Position 71

Adjusting the Printing Position for All the Jobs 72

Adjusting the Printing Position for Each Paper Source 74

Moving the Printer 79

Cleaning and Maintaining the Printer 82

Adjusting the Color or Color Mismatch (Calibration) 83

Specifying Times and Performing Automatic Calibration 86

Automatically Performing Calibration Immediately after the Printer Is Turned ON 88

If You Want to Adjust Color Balance 90

Cleaning the Inside of the Printer 92

Cleaning the Fixing Roller of the Printer 93

Cleaning the Transfer Belt 95

Cleaning the Outside of the Printer 97

Attention (Cleaning) 99

Location of the Serial Number 100

Printer Installation 101

Attention (Printer Installation) 103

Confirming the Supplied Accessories and Checking the Installation Site 105

Removing the Packing Materials 107

Installing the Paper Feeder 111

Installing the Printer 116

Installing ROM 119

Installing ROM 120

Checking the ROM Installation 124

Removing ROM 126

Installing SD Card (LBP7680Cx Only) 127

Installing SD Card 128

Checking the SD Card Installation 132

Removing SD Card 134

Specifying the Printer's Initial Settings 135

Turning the Power On and Specifying a Language and Time 136

Specifying a Type of Printer Driver 138

Connecting to a Computer 140

Installing the Software 144

For Windows 145

Selecting the Appropriate Printer Driver 146

Installation 147

Other Software Programs 148

For Macintosh 149

Installation 150

Basic Printer Operations 151

Usable Paper 152

Precautions for Paper 156

Printable Area 158

Paper Loading and Output 160

Loading Paper in the Drawer 161

Attention (Drawer) 164

Loading Envelopes and Custom Paper Sizes 165

Loading Paper in the Multi-purpose Tray 168

Attention (Multi-purpose Tray) 171

Registering the Paper Size and Type 172

Configuring the Printer Driver and Printing 174

Attention (Printer Driver Configuration) 179

Turning the Printer ON/OFF 180

Attention (Turning the Printer ON/OFF) 183

Online and Offline 184

Canceling a Job 186

Operations from the Computer 187

Cancelling from the Printer Control Panel 189

Outputting Data (Forced Output) 191

Canceling the Process Currently Being Performed (Soft Reset) 193
Canceling All the Jobs (Hard Reset) 194
Checking the Printer Status 196
Printing on Various Types of Paper 197
Printing on Plain Paper, Heavy Paper, or Index Card 198
Printing on Transparencies (B&W Printing Only) 199
Printing on Labels 200
Printing Coated Paper 201
Printing on Envelopes 202
Printing on Custom Size Paper 204
Paper Loading Orientation 205
Useful Printing Functions 207
Printing from a Computer (Windows) 209
Printing Fundamentals 210
Printing with the Printer Driver 211
Configuring the Print Settings Beforehand 213
Setting the Printer Options 215
Viewing the Online Help 217
Printing Functions 218
Common Functions 219
[Page Setup] Sheet 220
[Finishing] Sheet 221
[Paper Source] Sheet 222
[Quality] Sheet 223
[Device Settings] Sheet 224
Scaling Documents 225
Printing Multiple Pages on One Sheet 228
1-sided Printing and 2-sided Printing 230
Attention (1-sided Printing and 2-sided Printing) 233
Booklet Printing 234
Poster Printing 236
Watermark Printing 238
Setting the Color Mode for Printing 240
Combining and Printing Multiple Files 242
Selecting a Profile for Printing 245
Registering a Profile for Printing 246
Printing from a Computer (Macintosh) 248
Printing Fundamentals 249
Printing with the Printer Driver 250
Configuring the Page Settings Beforehand 253
Setting the Printer Options 255
Viewing the Online Help 258
Viewing the Driver Guide 260
Printing Functions 261
Common Functions 262
[Layout] Preferences Pane 263
[Finishing] Preferences Pane 264
[Paper Source] Preferences Pane 265
[Quality] Preferences Pane 266

[Special Features] Preferences Pane 267
Scaling Documents 268
Printing Multiple Pages on One Sheet 270
2-sided Printing 272
Setting the Color Mode for Printing 275
Using [Presets] for Printing 276
Setting Priority (When Specifying the Same Item Using Multiple Methods) 278
Functions Which Can Be Specified from the Control Panel 279
Printing without the Printer Driver (Direct Print) 280
Printing the PDF File Using the Direct Print Function 282
Printing the PS/EPS File Using the Direct Print Function 292
Printing the TIFF/JPEG File Using the Direct Print Function 296
Printing the XPS File Using the Direct Print Function (LBP7680Cx Only) 303
Direct Printing from Command Prompt 312
Printing Files Directly from USB Memory Devices (USB Direct Print) (LBP7680Cx Only) 313
Printing Directly from USB Memory Device 314
Print Setting Menu List 317
Changing the Default Print Settings and File Sorting Criteria 320
Remove the USB Memory Device 321
Receiving E-mail Data on the Mail Server and Printing (E-mail Print) 323
Printing a Fax Document Transferred from a Multi-function Machine 326
How to Specify the Settings for E-mail Print 327
Attention (How to Specify the Settings for E-mail Print) 330
Receiving and Printing E-mails Manually 332
Printing the E-mail Receive Log List 334
Attention (Printing E-mail Sending/Receiving History) 336
When E-mail Print Fails 337
Printing Files from the Printer Using FTP Client 340
Specifying a Password for a Document and Printing (Secured Print) (LBP7680Cx Only) 342
Attention (Specifying a Password for a Document and Printing (Secured Print)) 344
Saving a Document in the SD Card in the Printer (Stored Job Print) (LBP7680Cx Only) 345
Performing a Stored Job Print Using the Control Panel of the Printer 346
Displaying or Operating the Jobs Stored in a Box (Resume/Delete) 348
Automatically Deleting Files Stored in a Box 352
Changing the Box Settings 355
Giving Priority to a Print Job (Interrupt Printing) (LBP7680Cx Only) 359
Configuring the Network Settings (Sharing the Printer) 360
Checking Your Network Environment 361
Example of a Windows Network 362
Example of a Macintosh Network 364
Example of a UNIX Network 365
Example of a Network Using a Variety of Computers 366
Network Settings for the Printer (Common to Each Protocol) 367
Changing the Network Transmission Speed or Transfer Mode 368
Performing the Configuration Using the Printer's Control Panel (When You First Set it Up) 369
Changing the Settings Using Web Browser (Remote UI) 371
Setting the Spooling Function (LBP7680Cx Only) 375
Performing the Configuration Using the Printer's Control Panel (the Settings to Be Performed First) 376
Changing the Settings Using Web Browser (Remote UI) 378

Specifying the Setting for Startup Waiting Time 382

Performing the Configuration Using the Printer's Control Panel 383

Changing the Settings Using Web Browser (Remote UI) 385

Restricting the Users Who Can Monitor/Change the Settings Using the SNMP Protocol 389

Setting IEEE802.1X Authentication 401

Setting TLS Authentication Information 402

Setting TTLS/PEAP Authentication Information 408

Network Setting Items 414

Initializing the Network Settings 427

Initializing the Network Settings Using the Printer's Control Panel 428

Checking the MAC Address 429

Network Settings for the Printer (TCP/IP) 433

Setting the IP Address (IP v. 4) 434

Setting the IP Address Using the Printer's Control Panel 435

Setting the IP Address Using the ARP/PING Commands 438

Setting the IP Address Using NetSpot Device Installer 440

Configuring the Protocol Settings 441

Attention (Protocol Settings) 465

Setting IP v. 6 467

Configuring a Computer that Performs Printing 475

Features of LPD 476

Features of RAW 477

Features of IPP/IPPS 478

Features of WSD 479

Connecting the Printer (LPD/RAW) 480

Values for Setting a Port 487

Connecting the Printer (IPP/IPPS) 488

Obtaining the Public Key for This Printer When Using SSL Encrypted Communication 494

Connecting the Printer (WSD) 496

Network Settings for the Printer (NetWare) (LBP7680Cx Only) 497

Attention (NetWare Network Settings) 498

Configuring NetWare 499

Configuring the Protocol Settings 503

Network Settings for the Printer (SMB) (LBP7680Cx Only) 509

Attention (SMB Network Settings) 510

Configuring the Protocol Settings 511

Configuring a Computer that Performs Printing 520

Network Settings for the Printer (AppleTalk) 524

Macintosh Network Settings 525

Configuring the Protocol Settings 527

FTP Client (Macintosh) 533

Configuring a Computer that Performs Printing 535

Managing the Printer 536

Software That Can Be Used for Managing the Printer 537

Remote UI 538

Starting the Remote UI 539

Attention (Remote UI) 541

Enabling the Remote UI 542

Screen Layout of the Remote UI (Details on Each Setting Page) 544

Display/Change Message Board Messages and Support Links 565

FTP Client 568

NetSpot Device Installer 571

Managing Print Jobs 572

Attention (Job Manager) 575

Control Panel Setting 576

Attention (Control Panel Setting) 578

Setting Items 579

[Setup] Menu ([Control Menu] Options) 580

[Setup] Menu ([Paper Source] Options) 584

[Setup] Menu ([Network] Options) 586

[Setup] Menu ([Layout] Options) 590

[Setup] Menu ([Quality] Options) 592

[Setup] Menu ([Interface] Options) 595

[Setup] Menu ([User Maintenance] Options) 596

[Setup] Menu ([Print Mode] Options) 599

[Setup] Menu ([PCL] Options) 600

[Setup] Menu ([UFR II] Options) 602

[Setup] Menu ([Imaging] Options) 603

[Setup] Menu ([XPS] Options) (LBP7680Cx Only) 606

[Setup] Menu ([PDF] Options) 609

[Setup] Menu ([PS] Options) 613

[Setup] Menu ([MEAP Settings] Options) (LBP7680Cx Only) 617

[Setup] Menu ([Check Counter] Options) 618

[Utility Menu] Menu 619

[Job] Menu 621

[Reset] Menu 622

[Select Feeder] Menu 623

Checking the Number of the Printed Pages 625

Importing and Exporting Settings 628

Initializing the Settings 632

Initializing the [Setup] Menu Using the Printer's Control Panel 633

Checking the Printer Settings 635

Setting the Administrator Password 637

Specifying the Device Name or Administrator Information 640

Sleep Mode 644

Auto Shutdown 647

Specifying an ID for Each Department (LBP7680Cx Only) 651

Register/Update Software Function (LBP7680Cx Only) 653

Available Functions 654

Installing the System Options/MEAP Applications 655

Installing by Connecting This Printer to an Outside Network (Delivery) 656

Installing by Not Connecting This Printer to an Outside Network (Manual) 659

Downloading the Manuals and Related Software 665

Updating the Firmware 666

Managing the Register/Update Software Function 676

Security Settings 679

Restricting the Users Who Can Print or Perform the Printer Settings 680

Restricting the Users Who Can Access 691

Setting Restrictions for Print Jobs (LBP7680Cx Only) 696

Specifying the Job Operation Permission for End-Users 700

Locking the Keys on the Control Panel (Key Lock Function) 704

Setting Restrictions for USB Direct Print (LBP7680Cx Only) 708

Setting Keys and Certificates 712

Displaying the [Key and Certificate Settings] Page in the Remote UI 713

Newly Creating a Key and Its Certificate 715

Installing a Key/Certificate File on the Printer 721

Registering a Key and Its Certificate in the Printer 724

Checking a Certificate 727

Deleting a Key and Its Certificate 729

Setting CA Certificates 730

Displaying the [CA Certificate Settings] Page in the Remote UI 731

Installing CA Certificate Files on the Printer 733

Registering CA Certificates in the Printer 735

Checking CA Certificates 736

Deleting CA Certificates 737

Setting the SSL Encryption Communication Function 738

Selecting Keys and Certificates 739

Changing the Remote UI Settings 742

Setting the IPSec Encryption Communication Function (LBP7680Cx Only) 746

Displaying the [IPSec Settings] Page on the Remote UI 747

Adding a New Security Policy 749

Editing Security Policies 757

Enabling IPSec Encryption Communication 759

Specifying the Setting for Job Log Display 761

MEAP (LBP7680Cx Only) 765

Available Functions 766

Launching and Closing SMS 768

Before Launching SMS (Preparation) 769

Setting Up HTTP Communication 770

Launching SMS (Log in) 772

Attention (Launching SMS (Log in)) 776

Closing SMS (Logging Out) 777

MEAP Application Settings 778

Installing MEAP Applications 781

Attention (Installing MEAP Applications) 784

Uninstalling MEAP Applications 785

Starting/Stopping MEAP Applications 787

Starting MEAP Applications 788

Stopping MEAP Applications 789

Checking the Details of MEAP Applications 791

MEAP Application License Settings 793

Adding License Files 794

Disabling License Files 797

Downloading Disabled License Files 800

Deleting Disabled License Files 803

Setting Authentication Information for MEAP Applications 806

System Settings 809

Changing the MEAP Applet Display Order 810

Checking Login Services 812

Setting Enhanced System Applications 814

Starting/Stopping Enhanced System Applications 815

Starting Enhanced System Applications 816

Stopping Enhanced System Applications 817

Installing Enhanced System Applications 818

Uninstalling Enhanced System Applications 821

Checking Information 823

Checking System Information 824

Checking Application Information 826

Checking License Files 827

Changing the SMS Password 828

Deleting the MEAP Application Setting Information 830

Managing MEAP Application Log Data 832

Downloading Log Data 833

Deleting Log Data 835

List of Error Messages (MEAP) 837

Errors Relating to the [Login] Page 838

Errors Relating to the [MEAP Application Management] Page 840

Errors Relating to the [Install MEAP Application] Page 842

Errors Relating to the [Authentication Information Settings] Page 847

Errors Relating to the [License Management] Page 848

Errors Relating to the [Enhanced System Application Management] Page 850

Errors Relating to the [Check License] and [Change Password] Pages 855

Errors Relating to the [MEAP Application Setting Information Management] Page 857

Errors Relating to the [MEAP Application Log Management] Page 858

Other Errors 859

Troubleshooting 860

Printing Cannot Be Performed 861

Printing Cannot Be Performed (USB Connection) 862

Printing Cannot Be Performed (LAN Connection) 866

Printing Cannot Be Performed (via the Print Server) 872

The Print Server for Connection Cannot Be Found 876

The Shared Printer Cannot Be Accessed 877

The Printer Takes a Long Time to Start the Print Job 878

You Cannot Turn the Printer ON 879

All the Indicators on the Network Interface Are Off 880

You Cannot Install the Printer Driver 881

The Printer Is Not Recognized Automatically 882

The Printer Cannot Be Searched for 883

You Cannot Uninstall the Printer Driver 884

The Printer Driver Settings Cannot Be Changed 885

"Profiles" Cannot Be Selected or Edited 887

The Status of the Paper Feeder Cannot Be Obtained Automatically 889

Paper Jams 891

Attention (Paper Jams) 892

Clearing Paper Jams (Multi-purpose Tray) 893

Clearing Paper Jams (Paper Drawer) 897

Clearing Paper Jams (Back Cover) 899
Clearing Paper Jams (Output Area) 902
The Message Indicator Is On 904
A Message Appears in the Control Panel 908
Poor Printout Results 925
Paper Curls 927
Paper Creases 929
White Streaks (Lines) Appear 931
Printing Is Uneven 932
Printed Pages Have White Specks 933
Colors Are Uneven or Not Printed Smoothly 934
The Toner Does Not Fix onto the Paper Well 936
The Printed Paper Has Smudge Marks 938
Smudge Marks of Spattering Toner Appear around the Text or Patterns 939
The Back of the Printed Paper Has Smudge Marks 940
The Overall Print Result Is Dark 941
Residual Images Appear on Non-printed Areas 942
White Dust Is Attached to the Printed Transparencies 943
The Overall Print Result Is Faint 944
Thin Lines Are Faded or Halftone Images Are Faint 945
Colored Lines and Text Appear Faded 946
Colored Text Appears Blurred 947
Data Is Not Printed in the Correct Color (Specified Color) Due to Color Mismatch 948
Thin Lines or Fill Patterns Are Not Printed with the Specified Colors or Do Not Appear At All 949
Shaded Patterns Are Not Printed in the Correct Color (Specified Color) 950
Photographs and so on Are Printed in Different Colors from Those Displayed on the Monitor 951
Fill Patterns and Borders Are Not Printed in the Correct Color (Specified Color) Even When the 052
Same Color Is Specified for Them 352
Square Areas That Cannot Be Seen on the Display Appear around Lines or Text and Are Printed in a Different Color from the Other Areas 953
Superimposed Diagrams Are Not Printed in the Correct Color 954
The Printing Position Is Skewed 955
Data Is Printed Diagonally 956
A Portion of the Page Is Not Printed 957
Data Is Reduced and Printed 958
The Next Page Is Printed from Halfway across the Previous Page 959
Printed Data Lies outside Paper 960
Blank Paper Is Output (Nothing Is Printed on the Paper) 961
The Overall Surface of the Paper Is Printed in a Particular Color 962
The Last Page Cannot Be Printed 963
Unreadable Characters Are Printed 964
The Printout Is Different from What Is Displayed on Screen (Windows 2000, XP, and Server 2003) 965
The Flap of the Printed Envelope Sticks 966
Multiple Sheets of Paper Are Fed at a Time 967
Other Problems 968
The Printer Pauses during Printing, and then Printing Repeatedly Starts and Stops 969
The Keys on the Control Panel Do Not Function 970
The SD Card Cannot Be Used 971
Jobs Cannot Be Saved 972
SSL Cannot Be Enabled 973

When SSL Is Enabled, the Remote UI Does Not Start, or the IPP Printing Cannot Be Performed 974

The Printer Cannot Be Accessed from the Remote UI or Network Related Utility Software 975

Restricting the Users Is Not Possible 976

Appendix 977

Basic Operations/Various Information for Windows 978

For Windows 8/Server 2012 Users 987

The Lists Common to All the Settings in the Print Mode 988

The Lists Common to Certain Settings in the Print Mode 990

Font Samples 992

Office Locations 998

0258-000

Legal Notices
Legal Limitations on the Usage of Your Product and the Use of Images
Using the e-Manual

Product Name

Safety regulations require the product's name to be registered.

In some regions where this product is sold, the following name(s) in parentheses ( ) may be registered instead.

LBP7680Cx (F159800)/LBP7660Cdn (F159800)

EMC requirements of EC Directive

This equipment conforms with the essential EMC requirements of EC Directive. We declare that this product conforms with the EMC requirements of EC Directive at nominal mains input 230 V, 50 Hz although the rated input of the product is 220 to 240 V, 50/60 Hz. Use of shielded cable is necessary to comply with the technical EMC requirements of EC Directive.

Laser Safety

This product is certified as a Class 1 laser product under IEC60825-1:2007 and EN60825-1:2007. This means that the product does not produce hazardous laser radiation.

Since radiation emitted inside the product is completely confined within protective housings and external covers, the laser beam cannot escape from the machine during any phase of user operation. Do not remove protective housings or external covers, except as directed by the equipment's manuals.

The label shown below is attached to the laser scanner unit inside the machine.
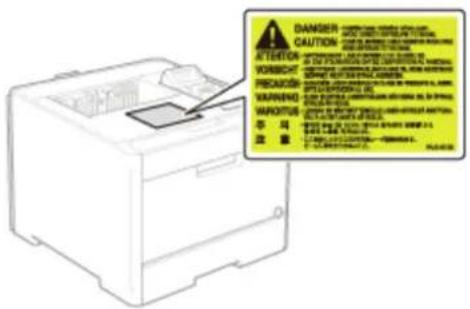
CANON imageCLASS LBP7660Cdn - Laser Safety - 1

CLASS 1 LASER PRODUCT

LASER KLASSE 1

APPAREIL À LASER DE CLASSE 1

APPARECCHIO LASER DI CLASSE 1

PRODUCTO LÁSER DE CLASE 1

APARELHO A LASER DE CLASSE 1

LUOKAN 1 LASER-TUOTE

LASERPRODUKT KLASS 1

CANON imageCLASS LBP7660Cdn - Laser Safety - 2

CAUTION

Use of controls, adjustments, or performance of procedures other than those specified in this manual may result in hazardous radiation exposure.

International ENERGY STAR Program

CANON imageCLASS LBP7660Cdn - International ENERGY STAR Program - 1

As an ENERGY STAR ^® Partner, Canon Inc. has determined that this product meets the ENERGY STAR Program for energy efficiency.

The International ENERGY STAR Office Equipment Program is an international program that promotes energy saving through the use of computers and other office equipment.

The program backs the development and dissemination of products with functions that effectively reduce energy consumption. It is an open system in which business proprietors can participate voluntarily.

The targeted products are office equipment, such as computers, displays, printers, facsimiles, and copiers. The standards and logos are uniform among participating nations.

WEEE Directive

CANON imageCLASS LBP7660Cdn - WEEE Directive - 1

natural_image Two identical hand-drawn trash bin symbols crossed out by diagonal lines (no text or labels)

CANON imageCLASS LBP7660Cdn - WEEE Directive - 2

Only for European Union and EEA (Norway, Iceland and Liechtenstein)

These symbols indicate that this product is not to be disposed of with your household waste, according to the WEEE Directive (2012/19/EU), the Battery Directive (2006/66/EC) and/or national legislation implementing those Directives. If a chemical symbol is printed beneath the symbol shown above, in accordance with the Battery Directive, this indicates that a heavy metal (Hg = Mercury, Cd = Cadmium, Pb = Lead) is present in this battery or accumulator at a concentration above an applicable threshold specified in the Battery Directive.

This product should be handed over to a designated collection point, e.g., on an authorized one-for-one basis when you buy a new similar product or to an authorized collection site for recycling waste electrical and electronic equipment (EEE) and batteries and accumulators. Improper handling of this type of waste could have a possible impact on the environment and human health due to potentially hazardous substances that are generally associated with EEE. Your cooperation in the correct disposal of this product will contribute to the effective usage of natural resources.

For more information about the recycling of this product, please contact your local city office, waste authority, approved scheme or your household waste disposal service or visit www.canon-europe.com/weee, or www.canon-europe.com/battery.

License Notice

This product contains the Universal Font Scaling Technology or UFST ^® under license from Monotype Imaging, Inc. UFST: Copyright © (2013) Monotype Imaging, Inc.

CANON imageCLASS LBP7660Cdn - IPv6 Ready Logo - 1

The protocol stack included in this machine has obtained the IPv6 Ready Logo Phase-1 established by the IPv6 Forum.

0258-002

Using your product to scan, print or otherwise reproduce certain documents, and the use of such images as scanned, printed or otherwise reproduced by your product, may be prohibited by law and may result in criminal and/or civil liability. A non-exhaustive list of these documents is set forth below. This list is intended to be a guide only. If you are uncertain about the legality of using your product to scan, print or otherwise reproduce any particular document, and/or of the use of the images scanned, printed or otherwise reproduced, you should consult in advance with your legal advisor for guidance.

  • Paper Money
  • Travelers Checks
  • Money Orders
  • Food Stamps
  • Certificates of Deposit
  • Passports
  • Postage Stamps (canceled or uncanceled)
  • Immigration Papers
  • Identifying Badges or Insignias
  • Internal Revenue Stamps (canceled or uncanceled)
  • Selective Service or Draft Papers
    • Bonds or Other Certificates of Indebtedness
  • Checks or Drafts Issued by Governmental Agencies
  • Stock Certificates
    • Motor Vehicle Licenses and Certificates of Title
    • Copyrighted Works/Works of Art without Permission of Copyright Owner

0258-003

Even if you do not have the supplied CD-ROM at hand, you can view the e-Manual any time if you install it on your computer beforehand.

For the efficient use of the e-Manual, you can use several search tools to find the desired content.

How to Use the e-Manual

Operating Environment
Installing the e-Manual
Uninstalling the e-Manual

Screen Layout of the e-Manual

Top Page
Topic Page
Contents Page
Search Method

> Viewing the e-Manual

- Selecting between the category icons

From the top page, select a category icon you want.

"Top Page"

- Searching from the list of contents

On the list of contents, you can view the list of whole sections of the e-Manual sorted by category. You can directly display sections in a category.

"Contents Page"

- Whole text search function

You can search by keyword in the e-Manual. You can display the desired description from the search results by entering a keyword you want to search. This function supports AND search.

"Search Method"

0258-004

Click the following links to see the system requirements to use the e-Manual and how to install/uninstall the e-Manual.

Operating Environment

Installing the e-Manual
Uninstalling the e-Manual

0258-005

You need a Web browser to use the e-Manual. Operation of the following Web browsers is guaranteed.

Windows

  • Internet Explorer 6.0/7.0/8.0/9.0
  • Firefox 2.x/3.x/4.x/5.x/6.x/7.x/8.x

Macintosh

  • Safari 2.x/3.x/4.x/5.0/5.1
  • Firefox 2.x/3.x/4.x/5.x/6.x/7.x/8.x

CANON imageCLASS LBP7660Cdn - Macintosh - 1

NOTE

Enabling the script function

Enable the script function for a Web browser before using the e-Manual.

0258-006

Install the e-Manual included in the supplied User Manual CD-ROM on your computer using the following procedure.

For Windows

1

Insert the supplied User Manual CD-ROM in the CD-ROM drive of your computer.
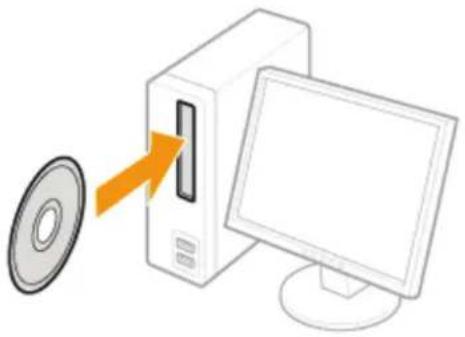
CANON imageCLASS LBP7660Cdn - 1 - 1

natural_image Illustration of a desktop computer with a CD and monitor, showing an orange arrow pointing to a CD (no text or symbols present)

2

Perform the following procedure.

(1) Select your language.
(2) Click [Next].
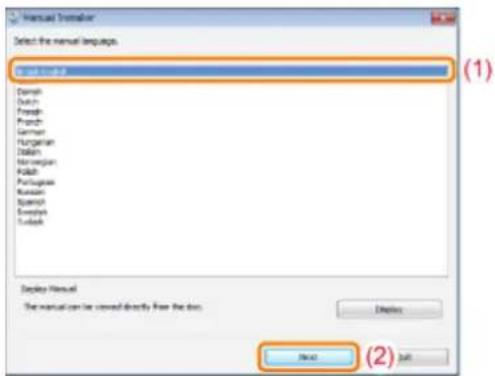
CANON imageCLASS LBP7660Cdn - 2 - 1

text_image Manual Inverter Select the manual language. Enroll tool Denish Dutch French French German Hungarian Italian Non-English Polish Portuguese Russian Spanish English Turkish Display Manual The manual can be saved directly from the disc. Delete Next (2) Help

If the above screen does not appear

"Basic Operations/Various Information for Windows"

? If the [AutoPlay] dialog box appears

Click [Run Maninst.exe].

? If the [User Account Control] dialog box appears

Click [Yes] or [Continue].

3

Follow the on-screen instructions to install the e-Manual.

Double-click [LBP7660C_LBP7680C Manual_eng] created on the desktop.

CANON imageCLASS LBP7660Cdn - 3 - 1

LBP7660C_LBP7

680C

Manual_eng

CANON imageCLASS LBP7660Cdn - 3 - 2

When a security protection message appears

To help protect your security, Internet Explorer has restricted this webpage from running scripts or ActiveX controls that could access your computer. Click here for options..

Perform the following procedure.

  1. Click the information bar, and then select [Allow Blocked Content] from the pop-up menu.

CANON imageCLASS LBP7660Cdn - When a security protection message appears - 1

text_image To help protect your security, Internet Explorer has restricted the webpage from running scripts or ActiveX controls that could access your computer. Click here for options... Allow Blocked Content... What's the Risk? Information Bar Help
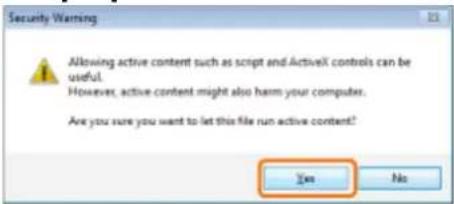
  1. Click [Yes].

CANON imageCLASS LBP7660Cdn - When a security protection message appears - 2

text_image Security Warning Allowing active content such as script and ActiveX controls can be useful. However, active content might also harm your computer. Are you sure you want to let this file run active content? Yes No

CANON imageCLASS LBP7660Cdn - When a security protection message appears - 3

NOTE

Displaying the e-Manual directly from the CD-ROM

You can also display the e-Manual directly from the CD-ROM without installing it in the computer you are using.

  1. Insert the supplied User Manual CD-ROM in the CD-ROM drive of your computer.
  2. Select your language.
  3. Click [Display Manual] → [Display].

† Depending on the operating system you are using, a security protection message is displayed. Allow the contents to be displayed.

For Macintosh

1

Insert the supplied User Manual CD-ROM in the CD-ROM drive of your computer.

2

Drag and drop the [LBP7660C_LBP7680C Manual_eng] folder into a location where you want to save it.
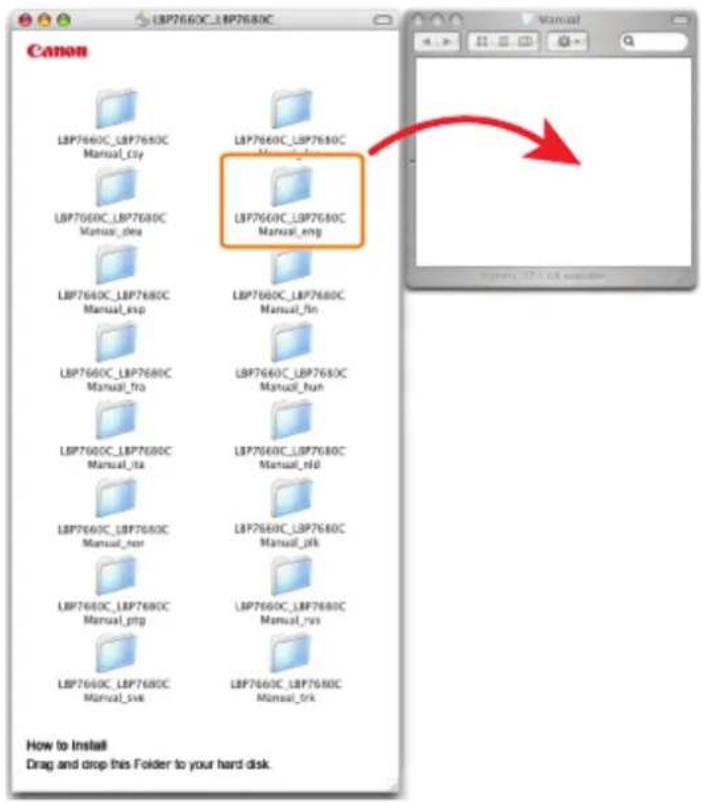
CANON imageCLASS LBP7660Cdn - 2 - 1

text_image Canon LBP7660C_LBP7680C Manual_Cly LBP7660C_LBP7680C Manual_dwa LBP7660C_LBP7680C Manual_exp LBP7660C_LBP7680C Manual_fin LBP7660C_LBP7680C Manual_fra LBP7660C_LBP7680C Manual_hun LBP7660C_LBP7680C Manual_ita LBP7660C_LBP7680C Manual_rtd LBP7660C_LBP7680C Manual_net LBP7660C_LBP7680C Manual_jtk LBP7660C_LBP7680C Manual_ptp LBP7660C_LBP7680C Manual_rvs LBP7660C_LBP7680C Manual_svk LBP7660C_LBP7680C Manual_trk How to Install Drag and drop this Folder to your hard disk.

CANON imageCLASS LBP7660Cdn - 2 - 2

NOTE

Displaying the e-Manual directly from the CD-ROM

You can also display the e-Manual directly from the CD-ROM without installing it in the computer you are using.

  1. Insert the supplied User Manual CD-ROM in the CD-ROM drive of your computer.
  2. Double-click the [LBP7660C_LBP7680C Manual_eng] folder.

CANON imageCLASS LBP7660Cdn - Displaying the e-Manual directly from the CD-ROM - 1

LBP7660C_LBP7680C Manual_eng

  1. Double-click [index.html].

CANON imageCLASS LBP7660Cdn - Displaying the e-Manual directly from the CD-ROM - 2

index.html

0258-007

The process of removing the e-Manual to restore the computer to the same state as before the e-Manual was installed is referred to as uninstallation. To uninstall the e-Manual, perform the following procedure.

For Windows

Delete the files in the following locations manually.

- Manual folder

The following is the file location path in the case where the standard installation location has been selected. If you have selected a different location for e-Manual installation, find it by folder/file name search and delete the files.

Windows 2000 Windows XP Windows Server 2003

The "LBP7660C_LBP7680C Manual_eng" folder in "C:\Documents and Settings\user name)\My Documents\Canon\Manuals"

Windows Vista Windows 7 Windows Server 2008

The "LBP7660C_LBP7680C Manual_eng" folder in "C:\Users\user name)\Documents\Canon\Manuals"

- The "LBP7660C_LBP7680C Manual_eng" shortcut icon on the desktop

For Macintosh

Delete the [LBP7660C_LBP7680C Manual_eng] folder manually which is copied during the installation.

0258-008

This section describes the screen layout of the e-Manual.

The page displayed right after the e-Manual starts is called "Top Page" and the manual description is called "Topic Page" in this section.

The "Contents Page" is displayed from [Contents] which is located on the upper right of the e-Manual and the search dialog box is displayed from each page in another window.

The screen layout is different for each page, so click the following links to see the instruction.

Top Page
Topic Page
Contents Page
Search Method

0258-009
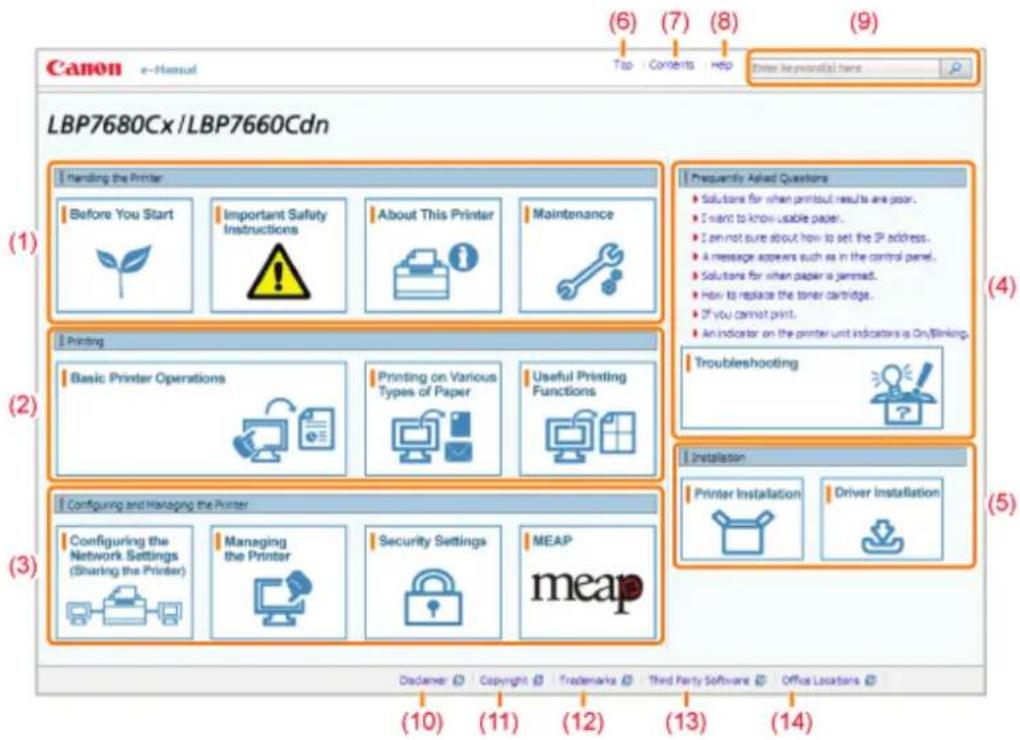
CANON imageCLASS LBP7660Cdn - For Macintosh - 1

text_image Canon e-Manual LBP7680Cx / LBP7660Cdn (6) (7) (8) (9) Tap Contents Help Enter key personal home (1) Handling the Printer Before You Start Important Safety Instructions About This Printer Maintenance (1) Frequently Asked Questions • Solutions for when printout result are poor. • I want to know usable paper. • I am not sure about how to set the IP address. • A message appears such as in the control panel. • Solutions for when paper is jammed. • How to replace the toner cartridge. • If you cannot print. • An indicator on the printer unit indicators is On/Blinking. (4) Printing Basic Printer Operations Printing on Various Types of Paper Useful Printing Functions (2) Troubleshooting (3) Configuring and Managing the Printer Configuring the Network Settings (Sharing the Printer) Managing the Printer Security Settings MEAP meap (5) Instalston Printer Installation Driver Installation (10) (11) (12) (13) (14) Disclaimer © Copyright © Trademarks © Third Party Software © Office Locations ©

(1) Handling the Printer

This section describes the precautions and maintenance methods for handling the printer, and so on.

(2) Printing

This section describes a variety of printing methods, such as basic printing and advanced one that uses the various printing functions.

How to load paper is also described here.

(3) Configuring and Managing the Printer

This section describes how to specify the network settings, how to manage the printer, and so on.

(4) Frequently Asked Questions

Frequently asked questions are featured.

For details on the solutions for the other problems, see [Troubleshooting].

(5) Installation

This section described how to install this printer, how to install the printer driver, and so on.

(6) [Top]

The top page of the e-Manual is displayed.

(7) [Contents]

The entire contents of the e-Manual are displayed.

(8) [Help]

How to use the e-Manual is displayed.

(9) [Enter keyword(s) here]

The search dialog box is displayed by entering a keyword and clicking [ ]

For details, see "Search Method."

(10) [Disclaimer]

The disclaimers are displayed.

(11) [Copyright]

The information of copyrights is displayed.

(12) [Trademarks]

The trademarks are displayed.

(13) [Third Party Software]

The information about the third party software is displayed.

(14) [Office Locations]

Inquiries for this printer are displayed.

0258-00A

CANON imageCLASS LBP7660Cdn - [Office Locations] - 1

text_image Canon e-Manual Category Maintenance Top Contents Help Enter keyword(s) here Category Top Toner Cartridge Replacement Attention (Toner Cartridge) Replacing Toner Cartridges Storing Toner Cartridges Adjusting the Printing Position Hoving the Printer Cleaning and Maintaining the Printer Location of the Serial Number Collose all : Expand all Replacing Toner Cartridges Before replacing toner cartridges see "Attention (Toner Cartridge)" 1 Open the front cover. 2 Press the lever and pull out the toner cartridge tray. (1) (2) (3) (4) (5)

(1) Category contents

This is the list of the contents in the category. Clicking each item displays the description in the topic page. Clicking [+] opens the menu and clicking [ ] closes the menu.

(2) Topic page

The descriptions of each item are displayed.

(3) [Category] menu

You can select a different category from the pull-down menu.

(4) [ ▶ ▶ ]

Click to move to the previous or next category.

(5) [Print]

Prints the e-Manual.

Select either of the following when printing.

[This category] Prints all the contents in a category.
[This topic] Prints onlythe topic page currently displayed.

0258-0S3

(1)
CANON imageCLASS LBP7660Cdn - [Print] - 1

text_image Canon e-Manual Top Contents Help Enter keywords(s) here Handling the Printer Before You Start Important Safety Instructions About This Printer Maintenance Installation Printer Installation Installing the Software Printing Basic Printer Operations Printing on Various Types of Paper Useful Printing Functions Configuring and Managing the Printer Configuring the Network Settings (Sharing the Printer) Managing the Printer Security Settings MEAP (USP7800Cx Only) Frequently Asked Questions Troubleshooting Others Appendix Handling the Printer Before You Start Next Go to top of page Legal Notices Legal Limitations on the Usage of Your Product and the Use of Images Using the e-Manual How to Use the e-Manual Operating Environment Installing the e-Manual Uninstalling the e-Manual Screen Layout of the e-Manual Tap Page Topic Page Contents Page Search Method Viewing the e-Manual Important Safety Instructions Previous Next Go to top of page Disclaimer Copyright Trademarks Third Party Software Office Locators

(2)

(1) Categories

Shows the categories of the e-Manual. Click a category to view the detailed list of the category.

(2) Whole contents

Shows the all categories and sections of the e-Manual. Click an item to view the contents.

0258-00C
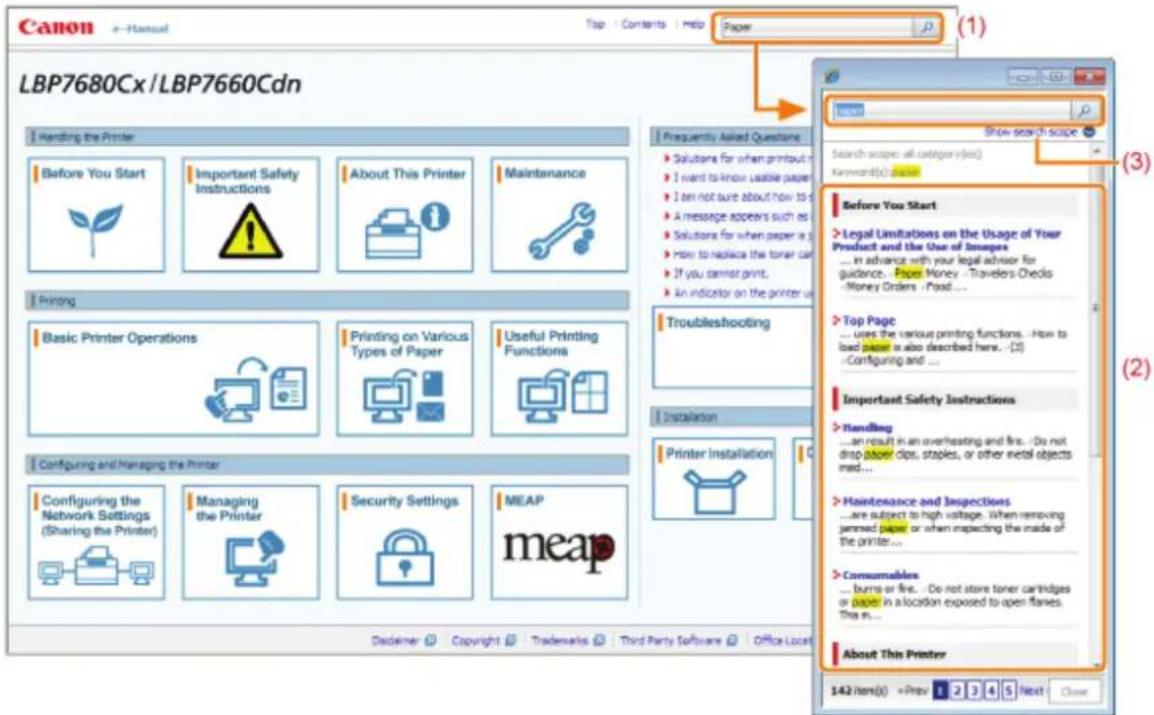
CANON imageCLASS LBP7660Cdn - Whole contents - 1

text_image Canon e-Manual Top Contents Help Paper LBP7680Cx / LBP7660Cdn Forward the Printer Before You Start Important Safety Instructions About This Printer Maintenance Printing Basic Printer Operations Printing on Various Types of Paper Useful Printing Functions Troubleshooting Configuration and Managing the Printer Configuring the Network Settings (Sharing the Printer) Managing the Printer Security Settings MEAP meap Frequently Asked Questions • Solutions for when printout is • I want to know usable papers • I am not sure about how to use • A message appears such as • Solutions for when paper is • How to replace the toner can • If you cannot print. • An indicator on the printer or Printer Installation Printer Installation Show search scope Search scope: all categories(ies) Keyword(s) Before You Start Legal Limitations on the Usage of Your Product and the Use of Images ... in advance with your legal advisor for guidance. Paper Money -Travelers Checks -Money Orders -Padd ... Top Page ... Uses the various printing functions. -How to load paper is also described here. -(2) -Configuring and ... Important Safety Instructions Handling ... an result in an overheating and fire. -Do not drop paper clips, staples, or other metal objects made... Maintenance and Inspections ... are subject to high voltage. When removing jammed paper or when impacting the inside of the printer... Consumables ... burns or fire. - Do not store toner cartridges or paper in a location exposed to open flares. This is... About This Printer 142 items(ies)

(1) [Enter keyword(s) here]

Enter a keyword in the entry field which is located on the upper right of the "Top page" or "Topic page", and then click [ ] . The search dialog box is displayed. You can also search by entering a keyword in the displayed dialog box. Also, the AND search is available in the e-Manual so you can refine the search results by entering two or more keywords. When entering keywords, enter a space between the keywords. \- Example: "Toner Replacement" (if you want to display pages which include words, "Toner" and "Replacement")

(2) Search result

The search results for a keyword are displayed. If the search results are more than 10 results, you can see the other results by clicking [<< Prev], [Next >>], or the number which is located below the result.

(3) [Show search scope]

If you want to specify a search scope, click here, and then select the check box for the category which you want to search.

Symbols Used in the e-Manual

The following are descriptions of warnings and cautions used in the e-Manual to explain handling restrictions, precautions, and instructions that should be observed for your safety. ![](images/48d0b01640c00fc96086cfdd95901b5db87a6ab730e24001f5ed39c0e834fd8b.jpg)

WARNING

Indicates a warning concerning operations that may lead to death or injury to persons if not performed correctly. To use the machine safely, always pay attention to these warnings. ![](images/7a8741bc3abfbc8185a2c162c9969a326d9500582209afc213925311f594bebd.jpg)

CAUTION

Indicates a caution concerning operations that may lead to injury to persons if not performed correctly. To use the machine safely, always pay attention to these cautions. ![](images/3820ff4b2d2058428a9dd840f82a3841728c87c04c8ee52ce2916fa56514be72.jpg)

IMPORTANT

Indicates operational requirements and restrictions. Be sure to read these items carefully to operate the machine correctly, and avoid damage to the machine or property. ![](images/3daf8ce18bc14773f417712ff056c44e3bd3b238ebf2e75721f40881a19d06e7.jpg)

NOTE

Indicates a clarification of an operation, or contains additional explanations for a procedure. Reading these notes is highly recommended. ![](images/c935bc26f9151d412d888aaa183291e2374fc7d03eea20912eead67e04b879ba.jpg) Indicates an operation that must not be performed. Read these items carefully, and make sure not to perform the described operations.

Keys and Buttons Used in This Manual

The following are examples of how control panel keys and on-screen buttons are depicted in the e-Manual.
Type Depiction in the e-Manual Example
Control panel keys[Key icon] + (Key name)[●] (Job Status/Cancel)
Buttons on computer operation screen and so on[Button name and so on] [OK]

Screenshots Used in the e-Manual

The contents of the screenshots used in the e-Manual are the default settings. Depending on the system configuration, the contents of the screenshots may partly differ. The functions of the printer driver may be changed due to upgrade.

Illustrations Used in the e-Manual

\- Although the power cord used in this manual is as the one in the following illustration, the form of the power cord may differ depending on the country or region. ![](images/61ec428585203f7c0c77dc12e2cea68fd3a9200c88ddcfa522d9f10a746c2b49.jpg)
natural_image Diagram showing a power outlet connected to a device via cable, with an open socket inserted (no text or symbols present)

Abbreviations Used in the e-Manual

Abbreviations of Operating Systems

In the e-Manual, operating systems are abbreviated as follows.
Microsoft Windows 2000 operating system Windows2000
Microsoft Windows XP operating system Windows XP
Microsoft Windows Vista operating system WindowsVista
Microsoft Windows 7 operating system Windows 7
Microsoft Windows Server 2003 operating system Windows Server 2003
Microsoft Windows Server 2008 operating system Windows Server 2008
Microsoft Windows operating system Windows
0258-00F The information in this manual is subject to change without notice. CANON INC. MAKES NO WARRANTY OF ANY KIND WITH REGARD TO THIS MATERIAL, EITHER EXPRESS OR IMPLIED, EXCEPT AS PROVIDED HEREIN, INCLUDING WITHOUT LIMITATION, THEREOF, WARRANTIES AS TO MARKETABILITY, MERCHANTABILITY, FITNESS FOR A PARTICULAR PURPOSE OF USE OR AGAINST INFRINGEMENT OF ANY PATENT. CANON INC. SHALL NOT BE LIABLE FOR ANY DIRECT, INCIDENTAL, OR CONSEQUENTIAL DAMAGES OF ANY NATURE, OR LOSSES OR EXPENSES RESULTING FROM THE USE OF THIS MATERIAL. 0258-00H Copyright CANON INC. 2013 No part of this publication may be reproduced or transmitted in any form or by any means, electronic or mechanical, including photocopying and recording, or by any information storage or retrieval system without the prior written permission of Canon Inc. 0258-00J - "MEAP" is a trademark of CANON Inc., referring to an "application platform" for Canon multifunction and single function printers. - Adobe, Adobe Acrobat, and Adobe Reader are trademarks of Adobe Systems Incorporated. - Apple, AppleTalk, Mac, Mac OS, Macintosh, and TrueType are trademarks of Apple Inc., registered in the U.S. and other countries. - EtherTalk and LocalTalk are trademarks of Apple Inc. - Microsoft, Windows, Windows Vista, Windows Server and Internet Explorer are either registered trademarks or trademarks of Microsoft Corporation in the United States and/or other countries. - Ethernet is a trademark of Xerox Corporation. - This product contains the Universal Font Scaling Technology or UFST ^® under license from Monotype Imaging, Inc. UFST ^® is a trademark of Monotype Imaging, Inc. registered in the United States Patent and Trademark Office and may be registered in certain jurisdictions. - UFST: Copyright © 1989 - 1996, 1997, 2003, 2004, 2008, all rights reserved, by Monotype Imaging Inc. Copyright© Unpublished Work of Novell, Inc. All Rights Reserved. ![](images/5788072efcbff5a12e3dea1d54579658817a037a0f8a88f110277e14661bbef0.jpg) \- Java and all Java based trademarks and logos are trademarks or registered trademarks of Oracle and/or its affiliates. ![](images/1a7c102f8f4278ccb757571db42ac6eed5af3445603c2a2e43fc67e5875a9989.jpg)
text_image Adobe® PostScript® 3™
- Adobe, PostScript, and the PostScript logo are either registered trademarks or trademarks of Adobe Systems Incorporated in the United States and/or other countries. Copyright© 2007 -08 Adobe Systems Incorporated. All rights reserved. - Protected by U.S. Patents 5,737,599; 5,781,785; 5,819,301; 5,929,866; 5,943,063; 6,073,148; 6,515,763; 6,639,593; 6,754,382; 7,046,403; 7,213,269; 7,242,415; Patents pending in the U.S. and other countries. - All instances of the name PostScript in the text are references to the PostScript language as defined by Adobe Systems Incorporated unless otherwise stated. The name PostScript also is used as a product trademark for Adobe Systems' implementation of the PostScript language interpreter. - Except as otherwise stated, any reference to a "PostScript printing device," "PostScript display device," or similar item refers to a printing device, display device or item (respectively) that contains PostScript technology created or licensed by Adobe Systems Incorporated and not to devices or items that purport to be merely compatible with the PostScript language. - Adobe, the Adobe logo, PostScript, the PostScript logo, and PostScript 3 are either registered trademarks or trademarks of Adobe Systems Incorporated in the United States and/or other countries. - Linux is a registered trademark of Linus Torvalds. Microsoft and Windows are either registered trademarks or trademarks of Microsoft Corporation in the United States and/or other countries. - All other trademarks are the property of their respective owners. - Other product and company names herein may be the trademarks of their respective owners. 0258-00K A. This product includes third-party software modules. Use and distribution of this software modules, including any updates of such software modules (collectively, the "SOFTWARE") are subject to conditions (1) through (9) below. (1) You agree that you will comply with any applicable export control laws, restrictions or regulations of the countries involved in the event that this product including the SOFTWARE is shipped, transferred or exported into any country. (2) Rights holders of the SOFTWARE retain in all respects the title, ownership and intellectual property rights in and to the SOFTWARE. Except as expressly provided herein, no license or right, expressed or implied, is hereby conveyed or granted by rights holders of the SOFTWARE to you for any intellectual property of rights holders of the SOFTWARE. (3) You may use the SOFTWARE solely for use with the Canon product you purchased (the "PRODUCT"). (4) You may not assign, sublicense, market, distribute, or transfer the SOFTWARE to any third party without prior written consent of rights holders of the SOFTWARE. (5) Notwithstanding the foregoing, you may transfer the SOFTWARE only when (a) you assign all of your rights to the PRODUCT and all rights and obligations under the conditions to transferee and (b) such transferee agrees to be bound by all these conditions. (6) You may not decompile, reverse engineer, disassemble or otherwise reduce the code of the SOFTWARE to human readable form. (7) You may not modify, adapt, translate, rent, lease or loan the SOFTWARE or create derivative works based on the SOFTWARE. (8) You are not entitled to remove or make separate copies of the SOFTWARE from the PRODUCT. (9) The human-readable portion (the source code) of the SOFTWARE is not licensed to you. 0258-00L Read these "Important Safety Instructions" thoroughly before operating the printer. As these instructions are intended to prevent injury to the user and other persons or destruction of property, always pay attention to these instructions. Also, as it may result in unexpected accidents or injuries, do not perform any operation unless otherwise specified in the manual. Improper operation or use of this machine could result in personal injury and/or damage requiring extensive repair that may not be covered under your Limited Warranty. Installation Power Supply Handling > Maintenance and Inspections Consumables ![](images/1fb008a8456d5bb4933546f3937bf3754e0dd5bdff9cdf3a1ba27ceba97c29c7.jpg)

WARNING

- Do not install the printer in a location near alcohol, paint thinner, or other flammable substances. If flammable substances come into contact with electrical parts inside the printer, this may result in a fire or electrical shock. - Do not place the following items on the printer. - Necklaces and other metal objects - Cups, vases, flowerpots, and other containers filled with water or liquids If these items come into contact with a high-voltage area inside the printer, this may result in a fire or electrical shock. If these items are dropped or spilled inside the printer, immediately turn OFF the power switch (1) and disconnect the interface cables if they are connected (2). Then, unplug the power plug from the AC power outlet (3) and contact your local authorized Canon dealer. ![](images/4e3de932cf8793ffe8a76f2136c6ac892c6ea3de2c7d57a5b4a3b8e715c7608a.jpg)
text_image OFF (1) (2) (2) (1) (3)
\- When installing or removing the optional accessories, be sure to turn the printer OFF, unplug the power plug, and then disconnect all the interface cables and power cord from the printer. Otherwise, the power cord or interface cables may be damaged, resulting in a fire or electrical shock. ![](images/893b96d86abfd967fecdbe50c96db9e5f0aef6f250f62311d2225bd2928c9773.jpg)

CAUTION

- Do not install the printer in unstable locations, such as on unsteady platforms or inclined floors, or in locations subject to excessive vibrations, as this may cause the printer to fall or tip over, resulting in personal injury. - The ventilation slots are provided for proper ventilation of working parts inside the printer. Never place the printer on a soft surface, such as a bed, sofa, or rug. Blocking the slots can cause the printer to overheat, resulting in a fire. - Do not install the printer in the following locations, as this may result in a fire or electrical shock. - A damp or dusty location - A location exposed to smoke and steam, such as near a cookery or humidifier - A location exposed to rain or snow - A location near a water faucet or water - A location exposed to direct sunlight - A location subject to high temperatures - A location near open flames - When installing the printer, gently lower the printer to the installation site so as not to catch your hands between the printer and the floor or between the printer and other equipment, as this may result in personal injury. - When connecting the interface cable, connect it properly by following the instructions in the e-Manual. If not connected properly, this may result in malfunction or electrical shock. - Be careful when handling the main board or the ROM. Touching the main board or the sharp parts such as the edges of the ROM may result in personal injury. - When moving the printer, follow the instructions in the e-Manual to hold it correctly. Failure to do so may cause you to drop the printer, resulting in personal injury. "Moving the Printer" ![](images/dd3966bc4c532563315b11f557c700228ee7720a45b104ee2aaaddc1e4b1b611.jpg) IMPORTANT

At high altitudes of about 3,000 meters above sea level, or higher

Machines with a hard disk may not operate properly when used at high altitudes of about 3,000 meters above sea level, or higher. ![](images/507ba9cb5ee4c0ecc6682fc70b6efe9019b85807e5fa07e3c07f86c8509b71a0.jpg)

WARNING

- Do not damage or modify the power cord. Also, do not place heavy objects on the power cord or pull on or excessively bend it, as this can cause electrical damage, resulting in fire or electrical shock. - Keep the power cord away from all heat sources. Failure to do so can cause the power cord insulation to melt, resulting in a fire or electrical shock. - The power cord should not be taut, as this may lead to a loose connection and cause overheating, which could result in a fire. - The power cord may become damaged if it is stepped on, fixed with staples, or if heavy objects are placed on it. Continued use of a damaged power cord can lead to an accident, such as a fire or electrical shock. - Do not plug or unplug the power plug with wet hands, as this can result in electrical shock. - Do not plug the power cord into a multi-plug power strip, as this can result in a fire or electrical shock. - Do not bundle up or tie up the power cord in a knot, as this can result in a fire or electrical shock. - Insert the power plug completely in the AC power outlet. Failure to do so can result in a fire or electrical shock. - If excessive stress is applied to the connection part of the power cord, it may damage the power cord or the wires inside the machine may disconnect. This could result in a fire. Avoid the following situations: - Connecting and disconnecting the power cord frequently. - Tripping over the power cord. - The power cord is bent near the connection part, and continuous stress is being applied to the power outlet or the connection part. - Applying a shock to the power connector. - Do not use power cords other than the one provided, as this can result in a fire or electrical shock. - As a general rule, do not use extension cords. Using an extension cord may result in a fire or electrical shock. ![](images/c0427bcff0186f370177a2de24ddd92088866bd2bf833652ed5f37e160579efa.jpg)

CAUTION

- Do not use a power supply voltage other than that listed herein, as this may result in a fire or electrical shock. - Always grasp the power plug when unplugging the power plug. Do not pull on the power cord, as this may expose the core wire of the power cord or damage the cord insulation, causing electricity to leak, resulting in a fire or electrical shock. - Leave sufficient space around the power plug so that it can be unplugged easily. If objects are placed around the power plug, you may be unable to unplug it in an emergency. ![](images/7bdbc22884c8e9ac6d8637e71f7550d43accca6942eea0b7740c509a78a03634.jpg)

WARNING

- Do not disassemble or modify the printer. There are high-temperature and high-voltage components inside the printer which may result in a fire or electrical shock. - Electrical equipment can be hazardous if not used properly. Do not allow children to touch the power cord, cables, internal gears, or electrical parts. - If the printer makes an unusual noise or emits smoke, heat, or an unusual smell, immediately turn OFF the power switch and disconnect the interface cables if they are connected. Then, unplug the power plug from the AC power outlet and contact your local authorized Canon dealer. Continued use can result in a fire or electrical shock. - Do not use flammable sprays near the printer. If flammable substances come into contact with electrical parts inside the printer, this may result in a fire or electrical shock. - Always turn OFF the power switch and unplug the power plug and interface cables before moving the printer. Failure to do so can damage the cables or cords, resulting in a fire or electrical shock. - Confirm that the power plug or power connector is inserted completely after moving the printer. Failure to do so can result in an overheating and fire. - Do not drop paper clips, staples, or other metal objects inside the printer. Also, do not spill water, liquids, or other flammable substances (alcohol, benzene, paint thinner, and so on) inside the printer. If these items come into contact with a high-voltage area inside the printer, this may result in a fire or electrical shock. If these items are dropped or spilled inside the printer, immediately turn OFF the power switch and disconnect the interface cables if they are connected. Then, unplug the power plug from the AC power outlet and contact your local authorized Canon dealer. - When plugging or unplugging a USB cable when the power plug is plugged into an AC power outlet, do not touch the metal part of the connector, as this can result in electrical shock. ![](images/1963cc033e705fb096806883008681edf0dd5ef0efd29db86343a3fe61ee8e91.jpg)

CAUTION

- Do not place heavy objects on the printer. The object or the printer may fall, resulting in personal injury. - Be careful when handling the main board or the ROM. Touching the main board or the sharp parts such as the edges of the ROM may result in personal injury. - Turn OFF the power switch when the printer will not be used for a long period of time, such as overnight. Turn OFF the printer and unplug the power plug if the printer will not be used for an extended period of time, such as for several days. - Open or close covers and install or remove drawers gently and carefully. Be careful not to hurt your fingers. - Keep your hands and clothing away from the roller in the output area. Even if the printer is not printing, the roller may suddenly rotate and catch your hands or clothing, resulting in personal injury. - The output slot is hot during and immediately after printing. Do not touch the area surrounding the output slot, as this may result in burns. ![](images/1fb7075863aa1e3757fc574960c6d6c2a32532c66bdb736139b8d393e3ee0bb6.jpg)
natural_image Illustration of a printer with a hand holding a paper, accompanied by a yellow prohibition symbol (no text or labels present)
- Printed paper may be hot immediately after being output. Be careful when removing the paper and aligning the removed paper, especially after continuous printing. Failure to do so may result in burns. - The laser beam used in the printer can be harmful to human bodies. The laser beam is confined in the laser scanner unit by a cover, so there is no danger of the laser beam escaping during normal printer operation. Read the following remarks and instructions for safety. - Never open covers other than those indicated in this manual. \- Do not remove the caution label attached to the cover of the laser scanner unit. ![](images/6529c55bb9c0f83c8c7592c43bd51f4d26d36764e5ae825df29ee3fc92d9ed38.jpg)
text_image DANGER CAUTION ATTETER VORIGHT PREADISH WARNING WARIATUS 注意: 注意: 请勿在以下情况下立即停止使用: 注意: 请勿在以下情况下立即停止使用: 注意: 请勿在以下情况下立即停止使用: 注意: 请勿在以下情况下立即停止使用: 注意: 请勿在以下情况下立即停止使用: 注意: 请勿在以下情况下立即停止使用: 注意: 请勿在以下情况下立即停止使用: 注意: 请勿在以下情况下立即停止使用: 注意: 请勿在以下情况下立即停止使用: 注意: 要勿在以下情况下立即停止使用: 注意: 要勿在以下情况下立即停止使用: 注意: 要勿在以下情况下立即停止使用: 注意: 要勿在以下情况下立即停止使用: 注意: 要勿在以下情况下立即停止使用: 注意: 要勿在以下情况下立即停止使用: 注意: 要勿在以下情况下立即停止使用: 注意: 要勿在以下情况下立即停止使用: 注意事项: 注意: 请勿在以下情况下立即停止使用: 注意: 请勿在以下情况下立即停止使用: 注意: 请勿在以下情况下立即停止使用: 注意: 请勿在以下情况下立即停止使用: 注意: 请勿在以下情况下立即停止使用: 注意: 请勿在以下情况下立即停止使用: 注意: 请勿在以下情况下立即停止使用: 注意: 请勿在以下情况下立即停止使用: 注意: 不需要 注意: 不需要 注意: 不需要 注意: 不需要 注意: 不需要 注意: 不需要 注意: 不需要 注意: 不需要 注意: 不需要 注意: 不需要 注意: 不需要 注意: 不需要 注意: 不需要 注意: 不需要 注意: 不需要 注意: 不需要 注意: 不需要 注意: 不需要 注意: 不需要 注意: 不需要 注意: 不需要
\- If the laser beam should escape and enter your eyes, exposure may cause damage to your eyes. ![](images/a3d1d78beea28a50a793f722ed52f361af782a9f9bc8478314fd7646f08733b2.jpg)

WARNING

- When cleaning the printer, turn OFF the printer and computer, remove the interface cables, and then unplug the power plug. Failure to do so can result in a fire or electrical shock. - Unplug the power plug from the AC power outlet periodically and clean the area around the base of the power plug's metal pins and the AC power outlet with a dry cloth to remove all dust and grime. In damp, dusty, or smoky locations, dust can build up around the power plug and become damp, which can cause a short circuit, resulting in a fire. - Clean the printer with a well wrung out cloth dampened with water or mild detergent diluted with water. Do not use alcohol, benzene, paint thinner, or other flammable substances. If flammable substances come into contact with electrical parts inside the printer, this may result in a fire or electrical shock. - Some areas inside the printer are subject to high voltage. When removing jammed paper or when inspecting the inside of the printer, be careful not to allow necklaces, bracelets, or other metal objects to touch the inside of the printer, as this can result in burns or electrical shock. - Do not dispose of used toner cartridges in open flames. This may cause the toner remaining inside the cartridges to ignite, resulting in burns or fire. - If you accidentally spill or scatter toner, carefully gather the toner particles together or wipe them up with a soft, damp cloth in a way that prevents inhalation. Never use a vacuum cleaner that does not have safeguards against dust explosions to clean up spilled toner. Doing so may cause a malfunction in the vacuum cleaner, or result in a dust explosion due to static discharge. - Confirm that the power plug or power connector is inserted completely after cleaning the printer. Failure to do so can result in an overheating and fire. - Check the power cord and plug regularly. The following conditions may result in fire, so contact your local authorized Canon dealer or the Canon help line. - There are burn marks on the power plug. - The blade on the power plug is deformed or broken. - The power is turned OFF or ON when bending the power cord. - The coating of the power cord is damaged, cracked, or dented. - A part of the power cord becomes hot. - Check regularly that the power cord, plug, and connector are not handled in the following manner. This may result in a fire or electrical shock. - The power connector is loosened. - The power plug is loosened. - Stress is being applied to the power cord by a heavy object or by fixing it with staples. - The power cord is tied in a bundle. - A part of the power cord is put in an aisle. - The power cord is put in front of the heating appliance. ![](images/2f6b98211dc668fed1f88b6ad94351dc49fd1437e0e8b268eb1910da1e87ac46.jpg)

CAUTION

\- Never attempt to service this printer yourself, except as explained in this manual. There are no user serviceable parts inside the printer. Adjust only those controls that are covered in the operating instructions. Improper adjustment could result in personal injury and/or damage requiring extensive repair that may not be covered under your Limited Warranty. ![](images/dbeeacaa984f3b525fec8207404e4182ac5ad23052ef13f5753a0c315f107d88.jpg)
text_image CAUTION ATTENTION VORSICHT ATENCIÓN ATTENZIONE CUIDADO 注意 注意 주위 保单
- The fixing unit and its surroundings inside the printer become hot during use. When removing jammed paper or when inspecting the inside of the printer, do not touch the fixing unit and its surroundings, as this may result in burns. - When removing jammed paper or when inspecting the inside of the machine, do not expose yourself to the heat emitted from the fixing unit and its surroundings for a prolonged period of time. Doing so may result in low temperature burns, even though you did not touch the fixing unit and its surroundings directly, as this may result in burns. - If paper is jammed, remove the jammed paper so that any pieces of paper do not remain inside the printer according to the displayed message. Also, do not put your hands forcibly in the parts other than those directed on the screen. Failure to do so may result in burns or injuries. - When removing jammed paper or replacing a toner cartridge, be careful not to get any toner on your hands or clothing, as this will dirty your hands or clothing. If toner gets on your hands or clothing, wash them immediately with cold water. Washing with warm water sets the toner, making it impossible to remove the toner stains. - When removing jammed paper, be careful not to allow the toner on the paper to scatter. The toner may get into your eyes or mouth. If toner gets into your eyes or mouth, wash them immediately with cold water and consult a physician. - When loading paper or removing jammed paper, be careful not to cut your hands with the edges of the paper. - When removing a toner cartridge, remove the toner cartridge carefully so as to prevent the toner from scattering and getting into your eyes or mouth. If toner gets into your eyes or mouth, wash them immediately with cold water and consult a physician. - Do not attempt to disassemble the toner cartridge. The toner may scatter and get into your eyes or mouth. If toner gets into your eyes or mouth, wash them immediately with cold water and consult a physician. - If toner leaks from the toner cartridge, be careful not to inhale the toner or allow it to come into direct contact with your skin. If the toner comes into contact with your skin, wash with soap. If the skin becomes irritated or you inhale the toner, consult a physician immediately. 0258-00X ![](images/458fcf2142d573b18fea57ff6048798a5d76e2cc7bfa7337679404e24a90f0d1.jpg)

WARNING

- Do not dispose of used toner cartridges in open flames. This may cause the toner to ignite, resulting in burns or fire. - Do not store toner cartridges or paper in a location exposed to open flames. This may cause the toner or paper to ignite, resulting in burns or fire. - When disposing of a toner cartridge, place the toner cartridge into a bag to prevent the toner from scattering, and then dispose of the toner cartridge according to local regulations. - If you accidentally spill or scatter toner, carefully gather the toner particles together or wipe them up with a soft, damp cloth in a way that prevents inhalation. Never use a vacuum cleaner that does not have safeguards against dust explosions to clean up spilled toner. Doing so may cause a malfunction in the vacuum cleaner, or result in a dust explosion due to static discharge. ![](images/862816fcb8fe25fbc3c2099815ee2be169f4cc9c799d7f1530df4de390aa1d8f.jpg)

CAUTION

- Keep the toner cartridges and other consumables out of the reach of small children. If the toner or other parts are ingested, consult a physician immediately. - Do not attempt to disassemble the toner cartridge. The toner may scatter and get into your eyes or mouth. If toner gets into your eyes or mouth, wash them immediately with cold water and consult a physician. - If toner leaks from the toner cartridge, be careful not to inhale the toner or allow it to come into direct contact with your skin. If the toner comes into contact with your skin, wash with soap. If the skin becomes irritated or you inhale the toner, consult a physician immediately. - If the sealing tape is pulled out forcefully or stopped at midpoint, toner may spill out. If the toner gets into your eyes or mouth, wash them immediately with cold water and immediately consult a physician. 0258-010 Printer Specifications Introduction of the Optional Accessories > Names and Dimensions of Each Part > Control Panel Introduction of the Utilities Energy-saving Mode > Cautions for Handling the Printer Consumables Hardware Specifications
Type Desktop Page Printer
Printing System Semiconductor laser + xerographic system
Toner fixing system On-demand fixing system
Resolution 600 dpi
Printing speed(Plain paper (60 to 90 g/m2), when printing A4 size paper continuously)Black and white printing: 20 pages/minuteColor printing: 20 pages/minuteThe print speed may drop depending on the paper settings for the size, type, orientation, and number of copies.
Warm up time(Time from power on to printer ready)31 seconds or lessMay vary depending on the usage conditions, such as the availability of the optional accessories and installation environment.
Recovery time(Time from the sleep mode to printer ready)8 seconds when the printer is in Sleep Mode 1 (the Printer Sleep mode)*9 seconds when the printer is in Sleep Mode 2 (the Deep Sleep mode)*It is the default setting. For details on [Sleep Mode], see "Sleep Mode."May vary depending on the output environment.
First print time(When performing 1-sided printing on A4 size paper and outputting face-down)Black and white printing: 16 seconds or lessColor printing: 16 seconds or lessMay vary depending on the output environment.
Paper sizeDrawer 1/Drawer 2 (Optional)- Standard sizes:A4, B5, A5, Legal, Letter, Executive, Statement, Foolscap, Envelope DL, Envelope COM-10, Envelope ISO-C5, and Envelope ISO-B5-Custom paper sizes *1:Width 100.0 to 215.9 mm, Length 148.0 to 355.6 mmIf you are using the UFR II printer driver, you can load custom size paper that is 148.0 to 215.9 mm wide and 148.0 to 215.9 mm long also in landscape orientation.Multi-purpose tray- Standard sizes:A4, B5, A5, Legal, Letter, Executive, Statement, Foolscap, Index Card, Envelope DL, Envelope COM-10, Envelope ISO-C5, Envelope ISO-B5, and Envelope Monarch-Custom paper sizes *1:Width 76.2 to 215.9 mm, Length 127.0 to 355.6 mmIf you are using the UFR II printer driver, you can load custom size paper that is 127.0 to 215.9 mm wide and 127.0 to 215.9 mm long also in landscape orientation.*1 Width must not be greater than length (height).
Paper capacityDrawer 1/Drawer 2 (Optional): Approx. 250 sheetsMulti-purpose tray: Approx. 50 sheets
2-sided printing A4, B5, A5, Legal, Letter, Executive, Foolscap
Paper output Face-down
Output capacity Approx. 125 sheets
Noise(Declared noise emission in accordance with ISO 9296)LwAd (declared A-weighted sound power level (1 B = 10 dB))- During standby: 43 dB or less-During operation: 6.7 B or lessLpAm (declared A-weighted sound pressure level (bystander position))- During standby: 24 dB-During operation: 52 dB
Operating environment(Printer unit only)Operating environment-Temperature range: 10 to 30°C (50 to 86°F)- Humidity range: 20 to 80% RH (no condensation)
Power supply 220 to 240 V (±10%), 50/60 Hz (±2 Hz)
Power consumption (at 20°C (68°F))Maximum: 950 W or lessAverage during operation: Approx. 405 WAverage during standby: Approx. 23 WAverage during Printer Sleep Mode (Sleep Mode 1): Approx. 7.5 WAverage during Deep Sleep Mode (Sleep Mode 2): Approx. 1 W *When the main power switch is turned OFF: 0.1 W or less* It is the default setting. For details on [Sleep Mode], see "Sleep Mode."† Even if the power of the printer is turned OFF, power is consumed only slightly while the power plug is inserted into the AC power outlet.To cut the power consumption completely, unplug the power plug from the AC power outlet.
ConsumablesCanon Cartridge 718 YellowCanon Cartridge 718 MagentaCanon Cartridge 718 CyanCanon Cartridge 718 Black† For details on the yield, see "Replacement Timing" in "Consumables."
WeightPrinter unit and included parts- Printer unit (excluding the toner cartridge): Approx. 22.4 kg-Toner cartridge (each): Approx. 0.7 kgConsumables and optional accessories-Toner cartridge (each) (Canon Genuine Cartridge): Approx. 0.7 kg-Paper Feeder Unit PF-701 (including the drawer): Approx. 4 kg
Controller Specifications
CPU 528 MHz + 264 MHz
Memory (RAM) capacity 768 MB
LBP7680Cx-USB interface:Hi-Speed USB (1)USB (1 front and 1 back)-Network interface:
Host interfaceShared 10BASE-T/100BASE-TX/1000BASE-T (RJ-45)Full duplex/Half duplexLBP7660Cdn-USB interface:Hi-Speed USB (1)USB (1)-Network interface:Shared 10BASE-T/100BASE-TX/1000BASE-T (RJ-45)Full duplex/Half duplex
User interfaceLCD:-132 x 65 dotsF-STN liquid crystal displayLED indicator:-8Operation key:-12 (LBP7680Cx) / 10 (LBP7660Cdn)
ROM slot 1
SD card slot (LBP7680Cx only) 1
Software Specifications
Built-in control commandLBP7680Cx-PCL 5c, PCL 6, PostScript 3 emulation, and UFR IILBP7660Cdn-PCL 5c, PCL 6, and UFR II
Built-in fontsLBP7680Cx-PCL:93 Scalable fonts, 10 Bitmap fonts-PS:136 standard fontsLBP7660Cdn-PCL:45 Scalable fonts, 10 Bitmap fonts
Printable areaPCL 5c/PCL 6:Data cannot be printed within a 4.2 mm margin (10 mm margin for envelopes) on all sides of the paper.UFR II/PS (PS for LBP7660Cdn is an option.):Data cannot be printed within a 5 mm (10 mm for envelopes) margin on all sides of the paper. For details, see "Printable Area."
Network interfaceSupported protocol-TCP/IP (Frame type: Ethernet II)-AppleTalk-NetWare (LBP7680Cx only)-SMB (option) (LBP7680Cx only)Print application-LPD-RAW-IPP/IPPS-FTP-WSD
0258-012 The following optional accessories are available to make full use of the printer functions. For the optional accessories, contact your local authorized Canon dealer.

Paper Feeder

You can load up to 250 sheets of plain paper (90 g/m²) of the following sizes in the paper feeder.
Standard sizesA4, B5, A5, Legal, Letter, Executive, Statement, Foolscap, Envelope DL, Envelope COM-10,Envelope ISO-C5, and Envelope ISO-B5
Custom paper sizesWidth 100.0 to 215.9 mm, Length 148.0 to 355.6 mm *
\* If you are using the UFR II printer driver, you can load custom size paper that is 148.0 to 215.9 mm wide and 148.0 to 215.9 mm long also in landscape orientation. ![](images/3f74d5714449f8273b73da2a3b7a7322279f8c979d536513530bef41b39bfcf3.jpg)
natural_image 3D technical illustration of a mechanical housing or enclosure with internal compartments and mounting points (no text or symbols)
Paper Feeder Unit PF-701 ![](images/aa94a480153061f5a275482a2b936a9fa6f6f0589722104ed65305e3d3b5b49c.jpg)

IMPORTANT

Use a paper feeder designed for this printer. Be sure to use a paper feeder designed for this printer. ![](images/ba0ebbde0d34ad9b2f9ec5ae7fef8f003a54dfe37db2f55c39e60ec3acb2641d.jpg)

NOTE

How to install the paper feeder > "Installing the Paper Feeder"

PS ROM (LBP7660Cdn Only)

By installing PS ROM, "PostScript 3 Emulation" which makes it possible to print with PostScript is available. ![](images/5b3879765623aff4a882af664b71c93b659ce0f5dd67ab511469d2ad41774ec4.jpg) PS Printer Kit-AQ1 ![](images/e30e6282ce5e8c7435e9551653080459f89183a82c62e28b52f976804be7bc49.jpg)

NOTE

How to install PS ROM

Barcode ROM

The following function is available by installing Barcode Printing Kit-F1.

OCR-B - Symb. FontInform - Symbole stethos - BarDIMM ©1997 - USPS ZEBRA+4Stat ![](images/1363574e4e4650192d5e32635ad1ac4145bb4ccbd9b7cca035b5a9c21f08a4f1.jpg)
natural_image Simple 3D diagram of a rectangular device with a top panel and a small cube at the bottom (no text or symbols)
Barcode Printing Kit-F1 ![](images/c85dcbfa91d697c2e90fb1313d05451a8a02ff54ae4c42de966a1b197d76ae07.jpg)

NOTE

How to install Barcode Printing Kit-F1

> "Installing ROM"

SD Card (LBP7680Cx Only)

You can use an SD card that can be built in the printer to save the received print jobs temporarily. By installing the SD card, you can use various functions such as print job spooling, encrypted secured print, secured print, and electronic sort. Before you dispose of this product, prevent personal information from being leaked by physically destroying the product. ![](images/25f9b1ece244a57f2e912618d4856d53323ac0ab5ee7a56332ef87988cb0c5f7.jpg) SD CARD-B1 ![](images/206ff27fca32cd160e89e90f7ae6fe1a639f04d360744934c07f33285c908812.jpg)

NOTE

How to install the SD card

> "Installing SD Card"

Part Name

Front View

![](images/e8620995aee1fcf1eefea1b26c2385d12a9b64d7faabb7e6bf8d5b1a38b2e3d4.jpg)

NOTE

About the film attached to the control panel Remove it before using the panel. ![](images/6c8719aa990d1870dd43f021a3e363e4961ee58b9c19f2de4807a730ea4f2c38.jpg)
text_image (1) (2) (3) (4) (5) (6) (7) (8) (9) (10)
(1) Front Cover (4) Paper Drawer (7) Control Panel (10) Lift Handles (2) Multi-purpose Tray (5) Output Tray (8) USB memory connector\* (3) Manual Feed Transport Guide (6) Power Switch (9) Ventilation Slots \* only for LBP7680Cx

Rear View

![](images/b587ec890827fcc05bb8c82b66d609ebfdf1c6b33b4a701dd18f510dbf05d5a9.jpg)
text_image (1) (2) (3) (4) (5) (6) (7) (8) (9) (10) (6)
(1) USB Connector (for USB devices) (5) USB Connector (for connecting to computer) (9) Back Cover (2) ACT Indicator (Yellow) (6) Ventilation Slots (10) Rating Label (3) LAN Connector (7) Lift Handles (4) LNK Indicator (Green) (8) Power Socket

Interior View

![](images/bf6106ad645916e724295a7ff769827ab251aae3af8a330aca9e92da90c7e5ea.jpg)
text_image (1) (2) (3) (4) (5)
(1) Y (Yellow) Toner Cartridge Slot (4) K (Black) Toner Cartridge Slot (2) M (Magenta) Toner Cartridge Slot (5) Toner Cartridge Tray (3) C (Cyan) Toner Cartridge Slot

Multi-purpose Tray

![](images/341b5f047f5824a8180cc1227ba1208dd3ce90bfdb7d4151d6d41e91774dc82b.jpg)
text_image (1) (2) (3) (1)
(1) Paper Guides (2) Auxiliary Tray (3) Tray Extension Paper Drawer ![](images/c924aec5817b308b359a509fa4b227de7dd72e0b48d1b3816a91203ba157582a.jpg)
text_image (1) (2) (2) (3) (1)
(1) Lock Release Lever (2) Paper Guides (3) Lock Release Lever

Dimensions of Each Part

Printer ![](images/24ae061a40e35ab5bc9dff8eff0abb9a5edf31f94804cea25bbede230a5b02fb.jpg)
text_image Front View Paper Drawer 192 133 121 Back Cover 414 Tray Extension Auxiliary Tray Multi-purpose Tray 337 458 274 257 350 100 499 (mm)
Paper Feeder Unit PF-701 Front View→ (mm) ![](images/90a1b2446a82d5eecd2b01290736a8962fcda0670e4a9175db6ea106a5955ab8.jpg)
text_image 414 458
![](images/348aeb071e8be55d320ea5f50d928c81eadd55f7de56262d68ffd0bcbe23f27a.jpg) 0258-014 The control panel has the indicators and display which show the printer status and the keys for the printer operation. ![](images/1c142d66231f3e4bea8363e3495afe18b01777b1c06c1bb2ba2440567764900a.jpg)
text_image (1) (2) (3) (4) (5) (6) (7) (8) (9) (10) (11) (12) (13) (14) (15) (16) (17)
Indicators
Name StatusRefer to
(1) Ready IndicatorCANON imageCLASS LBP7660Cdn - Dimensions of Each Part - 1(On)The printer is ready to print. -
CANON imageCLASS LBP7660Cdn - Dimensions of Each Part - 2(Blinking)The printer is preparing to print. -
(5) Online IndicatorCANON imageCLASS LBP7660Cdn - Dimensions of Each Part - 3(On)Online (The printer can receive print data from the computer.)If the printer enters Sleep Mode, the → Online indicator is off even when the printer is online."Online and Offline"
(6) Message IndicatorCANON imageCLASS LBP7660Cdn - Dimensions of Each Part - 4(On)A problem has occurred and printing cannot be performed.(If the printer enters Sleep Mode when it is offline, the △ Message indicator comes on even when no problem is occurring.)"The Message Indicator Is On"
(7) Job IndicatorCANON imageCLASS LBP7660Cdn - Dimensions of Each Part - 5(On)The printer is receiving data.Data remains in the printer memory.-
CANON imageCLASS LBP7660Cdn - Dimensions of Each Part - 6(Blinking)The printer is processing data.-
(8) Main Power IndicatorCANON imageCLASS LBP7660Cdn - Dimensions of Each Part - 7(On)The power of the printer is ON.-
(16) Paper Source IndicatorsCANON imageCLASS LBP7660Cdn - Dimensions of Each Part - 8(On)A paper source is selected.-
Printing cannot be performed because no paper is loaded.The paper drawer is not installed."Paper Loading and
![](images/d0c7bed72eaf185573fe2aa14738858ee8cd6e5bcefa4057e6df2bc8a551f02d.jpg) (Blinking) (For the multi-purpose tray, the indicator comes on even when no paper is loaded.) Output" Keys
NameFunction
(2) CANON imageCLASS LBP7660Cdn - Dimensions of Each Part - 9 ; CANON imageCLASS LBP7660Cdn - Dimensions of Each Part - 10When the printer is onlineWhen the printer is offlineWhile the menu is displayed
If pressed when the ➔ Job indicator is on or blinking (When data is being processed or received), displays the job list. Select a job from the list to cancel the job.This key is indicated as [ ● ] ( ➔ Job Status/Cancel) in this manual.Does not function.
(3) CANON imageCLASS LBP7660Cdn - Dimensions of Each Part - 11 (●/●●)Displays the [Utility Menu] menu. Prints information about the printer settings including the current settings. This key is indicated as [ [●/●●] (●/●●) in this manual.Does not function.Goes back up the previous hierarchy. This key is indicated as [ ◀ ] in this manual.
(4) CANON imageCLASS LBP7660Cdn - Dimensions of Each Part - 12 (●/●Back)Does not function.Goes back up the previous hierarchy. This key is indicated as [ ● ] ( ➔ Back) in this manual.
(5) CANON imageCLASS LBP7660Cdn - Dimensions of Each Part - 13 (●/●Online)Switches between online and offline. The printer is online when the indicator under the key is on and is offline when the indicator is off.This key is indicated as [ ● ] (◆ Online) in this manual.
(9) CANON imageCLASS LBP7660Cdn - Dimensions of Each Part - 14 (Energy Saver)Makes the printer to enter or recover from Sleep Mode.This key is indicated as [ ● ] (Energy Saver) in this manual.
(10) CANON imageCLASS LBP7660Cdn - Dimensions of Each Part - 15 (●/●Job)Displays the [Job] menu. You can print various log lists. This key is indicated as [ [●/●●] ( ➔ : Job) in this manual.Does not function.Selects the next upper item in the same hierarchy. When the setting value is numeric, increases the value. If you keep holding down the key, the speed of the value increasing is increased depending on the item. This key is indicated as [ ▲ ] in this manual.
(11) CANON imageCLASS LBP7660Cdn - Dimensions of Each Part - 16 (● Settings)Displays the [Setup] menu. Configure the printing environment including the layout adjustment and scaling print output. This key is indicated as [ [●/●●] (●/●Settings) in this manual.Goes down the hierarchy. This key is indicated as [ ▶ ] in this manual.
(12) CANON imageCLASS LBP7660Cdn - Dimensions of Each Part - 17 (OK)Does not function.Executes the selected item. Otherwise, goes down the hierarchy. This key is indicated as [OK] in this manual.
(13) CANON imageCLASS LBP7660Cdn - Dimensions of Each Part - 18 (●Reset)Displays the [Reset] menu. Performs the printer reset operation, the print data output, and the shutdown operation. This key is indicated as [ [●/●●] (● Reset) in this manual.Selects the next lower item in the same hierarchy. When the setting value is numeric, reduces the value. If you keep holding down the key, the speed of the value decreasing is increased depending on the item. This key is indicated as [▼ ] in this manual.
(14) CANON imageCLASS LBP7660Cdn - Dimensions of Each Part - 19 (Log In/Out)The log in screen for using MEAP functions is displayed.(LBP7680Cx only)↑ If you press this key while logging in, you will log out of the printer.
(15)It will transition to the Menu Screen. Whenever the key is pressed, the Printing Screen switches to → MEAP Application 1 → MEAP Application 2 ... MEAP Application 8 → USB Direct Print → Printing Screen → Menu Screen.(LBP7680Cx only)
CANON imageCLASS LBP7660Cdn - Dimensions of Each Part - 20 CANON imageCLASS LBP7660Cdn - Dimensions of Each Part - 21 Application)This key is indicated as [ ● ] (Application) in this manual.↑ If department ID management is set and you are not logged in to the printer, the log in screen before the MEAP application display is displayed.
(17) CANON imageCLASS LBP7660Cdn - Dimensions of Each Part - 22 CANON imageCLASS LBP7660Cdn - Dimensions of Each Part - 23Displays the [Select Feeder] menu. Specify which paper source is used to print between the paper drawer and multi-purpose tray and the paper size. This key is indicated as [ ● ] (Feeder Selection) in this manual.Does not function.
(17)

Display

The display on the printer's control panel is as shown in the following. It displays the printer status, messages, items and settings of the menu functions. When the printer is ready to print ![](images/b0e83e79dd32bb0a008266bcaafb7802fb0f78ea2e25137ff7151aa79da18e0b.jpg)
text_image (1) Ready to print. A4 Y M C K (2) (3)
When operating the printer using the control panel ![](images/2fdf72361fd5b5ee49ec78f8a92a2d3c0956a2f6f4c29879a8838475081c743b.jpg)
text_image Setup Control Menu Paper Source Network Layout
(1) Status/Operation Field (2) Paper Source/Paper Size Field (3) Toner Remaining Field Displays the printer status and print mode. Displays the size of paper in the currently selected paper source using an abbreviation. The names of the following paper sizes are indicated by an abbreviation. (Legal: LG, Letter: LT, Executive: EX, Statement: ST, Foolscap: FC, Envelope DL: DL, Envelope COM-10: CO, Envelope ISO-C5: EC5, Envelope Monarch: MO, Envelope ISO-B5: EB5, Index Card: IC, Custom Size: 80 to 99, Custom SizeR: 80R to 99R, Mixed Sizes: FR) Displays the amount of toner remaining. 0258-018 The following useful utilities are available to perform the printer management and so on.

You can specify the various settings or operate the printer from a remote location. "Remote UI"

By accessing and operating the printer from the Web browser via a network, you can manage the printer using a computer in a remote location. You can perform various operations, such as checking the current printer status or job logs and specifying various settings. ![](images/0d47075b0d65c1edc739aa324fdf8a09fc75fba2da7852f70237a64e57920e4f.jpg)
flowchart
graph TD
    A["Remote UI"] --> B["Web Server"]
    B --> C["- Checking the printer status"]
    B --> D["- Checking job logs"]
    B --> E["- Specifying various network settings"]

No specific software is needed.

The Remote UI can be operated in a Web browser. You do not need specific software to operate the Remote UI.

Central management of all the printer settings with the administrator password

Only the administrator can configure the settings or perform the operations related to the printer management by setting the administrator password.

You can specify the network settings at a time. "FTP Client"

By accessing the FTP server of the printer, you can specify the network settings, security settings, and so on. Because the setting items are listed in a file, you can specify multiple items all at once. ![](images/0228d79dd30be27cda1b7c7e492e018073bf15b44d14066b3277c0cdf0cf112b.jpg)
flowchart
graph TD
    A["Common Protocol Settings"] --> B["Each Protocol Setting"]
    B --> C["Administrator Information Settings"]
    C --> D["Security Settings"]

No specific software is needed.

You can operate the FTP Client using the Command Prompt supplied with Windows. You do not need specific software to operate the FTP Client.

You can check the various printer statuses. "NetSpot Device Installer"

You can view the list of statuses of the Canon devices on a network easily. Also, you can change the default network settings or basic protocol settings ![](images/d0efffb1bf22967940e78fdf710b959e1dd0d4c23aad3440648d469480d5da63.jpg)
flowchart
graph LR
    A["NetSpot Device Installer"] --> B["Printer (Canon)"]
    B --> C["This Printer"]
    C --> D["Multifunction Printer (Canon)"]

You do not need to install NetSpot Device Installer.

NetSpot Device Installer is software included in the supplied CD-ROM. You can start NetSpot Device Installer directly from the CD-ROM without installing it. You can also install NetSpot Device Installer on a computer. 0258-0U0 You can reduce power consumption of the printer efficiently by using a sleep mode or by shutting down the printer when it is not used for a certain time.

Sleep Mode

You can configure the printer to enter the sleep mode when data is not sent from the computer or when the printer status remains as it is longer than the specified time. ![](images/a6d373d10c2248f75a76e28c885b57f77bc697235bb8e3c54378af7ed0e05895.jpg)
text_image ZZz

> Auto Shutdown

You can configure the printer to shut down when the specified time is elapsed after entering the sleep mode. ![](images/1ef4d84ac22db9df74acb40daafbc66efb0ade954dee5b7cf27ec2d9a6808e27.jpg)
text_image Zzz OFF
0258-019 This printer consists of various electronic and precision optical parts. Read the following section so that you can handle the printer properly.

See "Important Safety Instructions" also.

\- Do not place any objects other than printing paper on the printer, trays, or covers. This may result in damage to the printer. ![](images/f86fe99dc1e1fb92b86599f3b6dc84c457ee54b4d891bf9955ff8d8536fa92cb.jpg)
natural_image Illustration of a printer with a prohibition symbol (no text or labels present)
\- Avoid shaking the printer. This may result in poor print quality or damage to the printer. ![](images/7b21a205edb894d2e96b1d190cd66233214c85578fca172b5bc1f3d530d1577b.jpg)
natural_image Illustration of a hand holding a device next to a machine with a no-smoking symbol (no text or labels present)
- Do not leave any covers open longer than required. Exposing the printer to direct sunlight or strong light may result in deterioration in print quality. - Do not open the covers on the printer during printing. This may result in damage to the printer. - Handle each cover gently when opening or closing it. Failure to do so may result in damage to the printer. - If you want to put a cover on the printer to prevent dust from entering the printer, turn the power OFF and allow the printer to cool down sufficiently before covering the printer. - If you do not plan to use the printer for a long period of time, unplug the power plug from the AC power outlet. - Do not use or store the printer in a room where chemicals are used. 0258-01A The following consumables are provided for this printer. Purchase them at your local authorized Canon dealer. Use the following table as rough guides to replace consumables. However, you may need the replacement earlier than the described lifetimes depending on the printer installation environment, paper size, or document type.
Consumables Replacement Timing Replacement Method
Canon Cartridge718 BlackAverage yield: 3,400 sheets *1 *2Replacing Toner Cartridges
Canon Cartridge718YellowCanon Cartridge718MagentaCanon Cartridge718 CyanAverage yield: 2,900 sheets *1 *2
\*1 The average yield is on the basis of "ISO/IEC 19798"\* when printing A4 size paper with the default print density setting. \* "ISO/IEC 19798" is the global standard related to "Method for the determination of toner cartridge yield for color printers and multi-function devices that contain printer components" issued by ISO (International Organization for Standardization). \*2 When the toner cartridge needs to be replaced soon, the following messages will appear in the control panel. > "Toner Cartridge Replacement" ![](images/43d835921f23096ae86535d60a19edd1eb82331d98f29fbfb2114dc1c57d0dca.jpg)

IMPORTANT

About replacement toner cartridges

For optimum print quality, using Canon genuine toner cartridges is recommended.
Model Name Supported Canon Genuine Toner Cartridge
LBP7680Cx/LBP7660CdnCanon Cartridge 718 YellowCanon Cartridge 718 MagentaCanon Cartridge 718 CyanCanon Cartridge 718 Black

Be careful of counterfeit toner cartridges.

Please be aware that there are counterfeit Canon toner cartridges in the marketplace. Use of counterfeit toner cartridge may result in poor print quality or machine performance. Canon is not responsible for any malfunction, accident or damage caused by the use of counterfeit toner cartridge. For more information, see http://www.canon.com/counterfeit. ![](images/862b3545510fe7336d2badc326b34474ed8460ca41e487bde88205c6c9ba300b.jpg)

NOTE

Toner and Toner Cartridge Availability

Toner cartridge for this machine will be available for at least seven (7) years (or any such longer period as required by applicable laws) after production of this machine model has been discontinued. 0258-01C

> Toner Cartridge Replacement

> Replacing Toner Cartridges Storing Toner Cartridges

Adjusting the Printing Position

Adjusting the Printing Position for All the Jobs Adjusting the Printing Position for Each Paper Source

Moving the Printer

> Cleaning and Maintaining the Printer

Adjusting the Color or Color Mismatch (Calibration) > If You Want to Adjust Color Balance > Cleaning the Inside of the Printer > Cleaning the Outside of the Printer

Location of the Serial Number

0258-01E Toner cartridges are consumable products. When the toner cartridge is almost empty, a message is displayed on the display. Take action according to the message. For details on the toner cartridge yields and replacement toner cartridges, see "Consumables."
MessageWhen message is displayed and causeDescription and Solutions
16* toner cart. will soon reach lifetime.The toner cartridge needs to be replaced soonYou can continue printing.Have ready a replacement toner cartridge of the color that is displayed.We recommend that you replace the toner cartridge before printing a large amount of data.
* toner cartridge will soon reach end of lifetime.The toner cartridge needs to be replaced soonThe printer stops printing.You can continue printing by pressing [ ○ ] (←○ Online).Have ready a replacement toner cartridge of the color that is displayed.We recommend that you replace the toner cartridge before printing a large amount of data.
1G Change* toner cartridge recommended.The toner cartridge has reached the end of its lifeYou can continue printing.Replacing the toner cartridge for the displayed color with a new one is recommended.
Toner cart. lifetime*The toner cartridge has reached the end of its lifeThe printer stops printing.You can continue printing by pressing [ ○ ] (←○ Online).Replacing the toner cartridge for the displayed color with a new one is recommended.
9G* Cart. parts life reached. Chg. recmnd.If there is a possibility that the toner cartridge parts have reached the end of their livesYou can continue to print, but this may cause the printer to malfunction. Replacing these cartridges with new cartridges is recommended.
* cartridge parts lifetime reached. Change recommendedThe toner cartridge parts have reached the end of their livesThe printer stops printing.You can continue printing by pressing [ ○ ] (←○ Online).Continuing to use these cartridges may cause the printer to malfunction, so replacing these cartridges with new cartridges is recommended.
Re-insert or change the* toner cartridge.If there is a possibility that the toner cartridge is not installed correctlyThe printer stops and you cannot continue printing.Remove the toner cartridge that is the color displayed and set it correctly.If after that the message is still displayed, replacing this cartridge with a new one is recommended.
Insert* toner cartridge.A toner cartridge has not been setSet a toner cartridge of the color that is displayed.
Check the location where the* toner cartridge is set.The toner cartridge is not set in the correct positionRemove the toner cartridge that is the color displayed and set it in the correct position.
\* is displayed as C (cyan), M (magenta), Y (yellow) or K (black). When the toner is low, whether "16 toner cart. will soon reach lifetime." or " toner cartridge will soon reach end of lifetime." will be displayed depends on the "Warning Step" setting under the Setup Menu. The printer's default settings are set so that "16 toner cart. will soon reach lifetime." is displayed. See "[Setup] Menu ([Control Menu] Options)" for details on the "Show Warnings" settings. See "Important Safety Instructions" and "Storing Toner Cartridges" also. ![](images/528e1237cb71f895266eeb8cb6ab9b9ec52a994b4ab4b1308b13782a85e5ec59.jpg)

IMPORTANT

About replacement toner cartridges

For optimum print quality, using Canon genuine toner cartridges is recommended.
Model Name Supported Canon Genuine Toner Cartridge
LBP7680Cx/LBP7660CdnCanon Cartridge 718 BlackCanon Cartridge 718 YellowCanon Cartridge 718 MagentaCanon Cartridge 718 Cyan

Be careful of counterfeit toner cartridges.

Please be aware that there are counterfeit Canon toner cartridges in the marketplace. Use of counterfeit toner cartridge may result in poor print quality or machine performance. Canon is not responsible for any malfunction, accident or damage caused by the use of counterfeit toner cartridge. For more information, see http://www.canon.com/counterfeit.

Hold the toner cartridge properly.

When handling the toner cartridge, hold it properly as shown in the figure. Do not place it vertically or upside-down. ![](images/fe3b5b580e8027d98b5ef0f4b303e70fd5ed8a366760fde6d6fa9a340faa70ca.jpg)
natural_image Hand inserting a component into a device casing (no text or symbols visible)

Do not touch the electrical contacts (A), toner cartridge memory (B) or photoconductor drum (C).

Touching the electrical contacts (A) or the toner cartridge memory (B) may cause damage. Print quality may deteriorate if you touch or scratch the photoconductor drum (C). Never touch the drum. ![](images/e2e191548975e336056e16f5838a3e336a4ac21e36c7f448d18596d690e0256c.jpg)
text_image (A) (B)
![](images/ddb6bd9487f07e1ff1cc3de66edf68b5bd1305d6f43bfe9c25a2388b41aa0524.jpg)
text_image (C) Bottom

Do not touch the high-voltage contacts (D).

This may result in damage to the cartridge. ![](images/b79295239b5faaa9a3f502675844349f5ebbd91b030aeced22112176ee5ce461.jpg)
text_image (D)

Precautions when installing toner cartridges

The position of the toner cartridges in the printer is determined by the toner color. Install the toner cartridges in the slots that have labels of the same color. ![](images/c6eb9c84656a5fd51189684eee85d602bad69c1e514ea4d53b3bfac20b246fa4.jpg)
natural_image Line drawing of an open printer drawer with internal compartments (no text or symbols)

Other precautions

- Do not expose the toner cartridge to direct sunlight or strong light. - Do not attempt to disassemble or modify the toner cartridge. - Condensation (water droplets on the inside or outside) may form on the toner cartridge when it is brought into an environment with a sudden change in temperature or humidity. When moving a new toner cartridge to a location with change in temperature, leave the cartridge in the protective bag at the new location for two or more hours to allow it to adjust to the new temperature. - Do not leave the front cover open for a long time with the toner cartridge installed. - Keep toner cartridge away from products that generate magnetic waves, such as a computer or computer display. ![](images/459fc468fbe65abd5bdba0c137400c953b5d912424fc93985ede24a00549bf71.jpg)

NOTE

About the packing materials

The packing materials may be changed in form or placement, or may be added or removed without notice. 0258-01H Before replacing toner cartridges, see "Attention (Toner Cartridge)."

1

Open the front cover. ![](images/cef6e33a469cf03121229b7c86502c699805e7ae1a70c009f12d3aea16f13e0d.jpg)
natural_image Illustration of a hand opening a printer into a drawer with orange arrows indicating rotation (no text or symbols)

2

Press the lever and pull out the toner cartridge tray. ![](images/5c9e7a47e7d9a0974c257f3abb5c28ecc828233fb4bf220f93fe7871d94620fe.jpg)
text_image (1) (2)

3

Hold the toner cartridge to be replaced by its handle and pull it straight up and out of the printer. ![](images/af6252debacfd04a2529f84c1c7f4a101840ded360817b81ec5d2770d5510184.jpg)
natural_image Illustration of a printer being inserted into a rack, with an orange arrow indicating the process (no text or symbols present)

4

Take out the new toner cartridge from the protective bag. You can open the protective bag with your hands from the notch. Keep the protective bag. Do not discard it. You will need it when you remove the toner cartridge for printer maintenance or other purposes. ![](images/dc4abbe47faa2f3b42b6a0da6f8c4fc1fc0fb9e7cf71e3167572d893cd80f662.jpg)
natural_image Technical line drawing of a mechanical component with an orange arrow indicating direction (no text or symbols)

5

Shake the toner cartridge five or six times as shown in the figure to evenly distribute the toner inside the cartridge. Do not remove the drum protective cover (A). ![](images/4fde9432cab6b4053c30092ba8fdc2371a5d4b57abe9cb1f753386fcb5ec2d53.jpg)
text_image (A)
![](images/1105e5651a36eb0a6d1df049a1fe7ca74e44d94f08923f48351c52f4f940bb17.jpg)
text_image Front

6

Place the toner cartridge on a flat surface.

7

Remove the tab, and the pull out the sealing tape. Pull out the sealing tape (approx. 50cm long) gently. ![](images/6e753dc65104676a1238d9a6b8e43f8b99fa87d740cf8417d64bf3804dc31db7.jpg)
text_image (1) (2)
![](images/f2accdfed6e6cff2020483cca164071351e157cfa81d9991c376ace0c24ff17b.jpg)

IMPORTANT

Precautions when pulling out the sealing tape D Do not pull the sealing tape diagonally, upward, or downward. If the tape is severed, this may become difficult to pull out completely. ![](images/e3a1c1ce2ef6c347d4aca1422fd7d73b2c4a8599d2b7ed03ce1eb80e0e6bbad8.jpg)
text_image Top View
- If the sealing tape stops at midpoint, pull it out of the toner cartridge completely. If any tape remains in the toner cartridge, this may result in low print quality. - Dispose of the removed sealing tape according to local regulations.

8

Remove the drum protective cover (A). ![](images/d2610a0d30d24a085615c48e50d0d01b9e5b42bfd46df6c2a8679cfa0ea0fcb6.jpg)
natural_image Illustration showing a hand holding a cylindrical object above a mechanical component, with an orange arrow indicating force or movement (no text or symbols present)

9

Install the toner cartridge. Be careful not to let the drum impact the frame of the toner cartridge tray. ![](images/f9a48532cf362005c83538153bed56c561ef931f651ba4dad0a3ce64762ea00a.jpg)
natural_image Illustration of a printer being inserted into a rack, with an orange arrow indicating the process (no text or symbols present)

10

Push the toner cartridge tray back in.

11

Close the front cover. ![](images/c1c935c163cb902197f3fa36739f9356942b49eec90d683dea8b7c5ca32c9d90.jpg)

you cannot close the front cover

Make sure that the toner cartridge tray is closed. Do not try to forcefully close the front cover, as this may damage the machine. 0258-01J Be careful of the following points when storing a new toner cartridge or handling a toner cartridge that was taken out of the printer for maintenance or moving the printer. ![](images/f42902e6b2b6a752eee5a952a2c8e623d809251d74831858f3fa6e567417f497.jpg)

IMPORTANT

Precautions when storing toner cartridges

To use toner cartridges in a safe and trouble-free manner, store them in a place that fulfills the following conditions. - Do not store toner cartridges in a location exposed to direct sunlight. - Do not store toner cartridges in a location subject to high temperature or humidity or in a location with dramatic changes in temperature or humidity. - Storage temperature range: 0 to 35^ (32 to 95^ ) - Storage humidity range: 35 to 85% RH (no condensation) \- Do not store toner cartridges in a location exposed to corrosive gases, such as ammonia, salt air, or large amounts of dust. \- Keep toner cartridges out of the reach of small children.

Store toner cartridges in the same orientation as when they are installed in the printer.

Do not store toner cartridges vertically or upside-down.

When removing the toner cartridge which is being used from the printer

Immediately attach the drum protective cover (A), put it in the original protective bag or wrap it with a thick cloth. ![](images/8004f31491309d79bb59cfa958025ec117422cc795f75f3e34c9ba691cd605ec.jpg)
natural_image Technical illustration of a mechanical component with an arrow indicating assembly or force (no text or symbols present)

About a new toner cartridge

Do not take a new toner cartridge out of the protective bag until it is ready to be used. ![](images/7e1e11799ba7e68a0126f9024f896e7386c003d168bad3fd0e85e8f56f482dcf.jpg)

NOTE

About condensation

Even when toner cartridges are stored within the recommended humidity range, water droplets may form on the inside or outside of the cartridges when moved to an environment with a sudden change in temperature or humidity. The formation of water droplets is called condensation. Condensation will adversely affect the quality of toner cartridges. 0258-01K

If you want to adjust the printing position for all the jobs

You can adjust the printing position for all the jobs at once. > "Adjusting the Printing Position for All the Jobs"

If you want to adjust the printing position for each paper source

You can adjust the printing position for each paper source by printing the Position Adjustment Print. > "Adjusting the Printing Position for Each Paper Source" 0258-01L Perform [Offset Y] and [Offset X] using the control panel of the printer. ![](images/d7854afcf9f50a076112f6cc8da89621344f6ee17a3ecfdc986f5e7775463be1.jpg)
flowchart
graph TD
    A["Front"] --> B["ABC"]
    C["Back"] --> D["DEF"]
    D --> E["Adjusting in Offset X/Y"]
    E --> F["Range adjusted in [Offset Y"]]
    F --> G["Original margin"]
    H["ABC"] --> I["Y"]
    J["DEF"] --> K["Y"]
    L["Original margin"] --> M["X"]
    N["Original margin"] --> O["X"]
    P["Original margin"] --> Q["X"]
    R["Original margin"] --> S["X"]
![](images/f52c93e3bd97a8da18c49d543163736a17f44b7aff41ce09ba2ae31286f8cc7d.jpg)

IMPORTANT

Confirm the adjustment result.

If any part of the print image lies outside the printable area after adjusting the printing position, the part will be missing in the print result. ![](images/82615bb411677a4a44d6442fccecf226322f7e4c5da95da3f10990343bfe0589.jpg)

NOTE

Adjustable area

You can adjust the printing position between -50.0 mm and +50.0 mm for both the vertical direction and horizontal direction. 1 Press [ ] ( : Settings) 2 Select [Layout] using [ ▲ and [ ], and then press [OK]. ![](images/0257880ebadc6214ba2d24564b5c0ee650341b4aa36b9d2e6fbf45dc23b73c39.jpg)
text_image Setup Control Menu Paper Source Network Layout
3 Select a position you want to correct.

If specifying the setting for [Offset Y]

1. Select [Offset Y] using [▲] and [▼], and then press [OK]. ![](images/220c04cdd1bd45080fb4cce823175ef51caecaa3cf896544f24daf2587fb43b2.jpg)
text_image Layout Copies Offset Y Offset X Binding Location
2. Specify the target numeric value using [▲] and [▼], and then press [OK]. Each time you press [▲], the setting value increases by 0.5 mm, and each time you press [▼] the setting value decreases by 0.5 mm. Also, if you keep pressing [▲] or [▼] without releasing your finger, you can keep increasing or decreasing the value. → The setting value is changed. ![](images/03a89688883694e6492cf9c8d26cb397f463c315c4d0a6d8b1b3b75f3b09a480.jpg)
text_image Offset Y 0.0 (-50.0-+50.0)

If specifying the setting for [Offset X]

1. Select [Offset X] using [▲] and [▼], and then press [OK]. ![](images/7bb462dfae518ab99bc380b69051f7c115c0c9190005623fad7642da85240808.jpg)
text_image Layout Copies Offset Y Offset X Binding Location
2. Specify the target numeric value using [▲] and [▼], and then press [OK]. Each time you press [▲], the setting value increases by 0.5 mm, and each time you press [▼] the setting value decreases by 0.5 mm. Also, if you keep pressing [▲] or [▼] without releasing your finger, you can keep increasing or decreasing the value. → The setting value is changed. ![](images/0f9b53f7433c8034a040b23a17558d5ba18e0ef00191dfecf7975b2f339fe484.jpg)
text_image Offset X 0.0 (-50.0-+50.0)
0258-01R If the printing position is skewed when printing from a certain paper source, you can adjust the position from the control panel. ![](images/481cb740937414d392543694dbacf6592a162b5c52d5b1a7a0523362e649f6b3.jpg)

IMPORTANT

Confirm the adjustment result.

If any part of the print image lies outside the printable area after adjusting the printing position, the part will be missing in the print result. ![](images/883b6d27fb402c2ee3f08dba721f91c2e0acd951bcd810c58120b70972cab1a9.jpg)

NOTE

Be careful of the orientation for 2-sided printing

The orientation of the images on the reverse pages varies depending on the printing orientation or setting for [Binding Location].

Checking the Printing Position

Perform the Printing Position Adjustment Print and check the position and direction to be adjusted. ![](images/5ef6459245ca437e56ddd8ea51310ef6f60f5c649a503186e6395aa3e21ca91e.jpg)

IMPORTANT

Adjusting the printing position for 2-Sided printing

Set [2-Sided Printing] to [On] in advance.

1

Press [ ] ( : Feeder Selection).

2

Select [Paper Source] using [▲ and [ ], then press [OK]. ![](images/2ca0359e9b6c7fe7b88a4e3340bf3217db47082d5f798276073442ab772467f5.jpg)
text_image Select Feeder Paper Source MP Tray Paper Size MP Tray Priority Drawer 1 Size

3

Select the paper source that you want to check the printing position using [ ] and [ ], then press [OK]. When adjusting the printing position for 2-sided printing, select the desired paper source. † [Drawer 2] is displayed only when the optional paper feeder(s) is (are) installed. ![](images/24c299eb5f4d36f9a8be6e981e087c113856e2f2b4c8329f9c91ca3ffaa15a32.jpg)
text_image Paper Source Auto Drawer 1 Multi-Purpose Tray

4

Press [ ] ( : Online). ![](images/a258a897dbad28da524fbb01f0a229c4ba549b4c98aadaa235aa0062fc737f98.jpg)
text_image Ready to print. A4 Y M C K

5

Make sure that the printer is online. If the printer is not online, press [ ○ ] ( : Online).

6

Press [ ]( : Utility).

7

Select [Printing Pos. Print] using [ ▲ and [ ], then press [OK]. ![](images/37facc7dfc121deb124b24b040e6a997fb54d8851d62131dd7d5deb1e784cee1.jpg)
text_image Utility Menu PS Utility Cleaning E-Mail Print Utility Printing Pos. Print

8

Select [Yes] using [▼, then press [OK]. ![](images/d4d7433669e1d034fce263216f319b529f6ff600695057d071678a516081de73.jpg)
text_image Execute? No Yes
→ The Printing Position Adjustment Print is printed. The top of the output paper is the top of the Printing Position Adjustment Print. Next, check the printout results and specify the direction and position to be adjusted in "Adjusting the Printing Position" (See the next item).

Adjusting the Printing Position

Next, check the printout results of the Printing Position Adjustment Print and specify the direction and position to be adjusted. The measurements of "☐" printed on paper are as the following: ![](images/8053c6ed8e3dcac9721d58f775fab2b005850e5048e540e444cfb4febf0e1f6f.jpg) \* 5 mm from each edge of paper This section describes the setting procedure for the following Printing Position Adjustment Print printed with Drawer 1 specified, as an example. In this case, adjust "Y position" by "-5.0 mm" because the printing position of (A) should be moved upward by 5 mm. ![](images/c38191ab0b5c6ff545a6067f7d41005ac2836d65e7404c95731449903c19ac3b.jpg)
text_image Top edge Feeding direction (A)
![](images/6f3cfdd108493930515d4bf2894e30d63666f98288c44f225ba637f93071accf.jpg)

IMPORTANT

Adjusting the printing position for 2-Sided printing

- Adjust the printing position of the first page using [Offset Y (2-Sided)] and [Offset X (2-Sided)]. - The printing position of the second page depends on the settings for each paper source. ![](images/3cbac91a3cbca0b4031c0f3da9333de2adf0b72d4639f7c6d39adbb35bcc5b74.jpg)

NOTE

Adjustable area

The printing position can be adjusted within a range from -5.0 to +5.0 mm.

1

Press [ ] ( : Online). The ← Online indicator goes off, allowing you to specify the settings on the control panel.

2

Press [ ] (: Settings)

3

Select [User Maintenance] using [▲ and [ ], then press [OK]. ![](images/cf350d7db1be45a575b86bf944b50f057207c991169b4f2fc485216b9fb15e7f.jpg)
text_image Setup Layout Quality Interface User Maintenance

4

Select [Adj. Start Position] using [ ▲ and [ ], then press [OK]. ![](images/fb2bf0abc5c519905e5399196a45dca7d8c5500c26c678072efe90af69419847.jpg)
text_image User Maintenance Adj. Start Position Recovery Printing Check Paper Size Substitute Size

5

Select the direction and paper source that you want to check the printing position using [ ] and [ ], then press [OK]. ![](images/29daa302928777f469aad8ff75db59713fcfd88dd7eaf1d6798b9694f04cc0cd.jpg) ![](images/ca1c60661b3a132b33bc2df5218c78b9b369e5f6fa19ca471848c184e2e50822.jpg)
text_image Adj. Start Position Offset Y (MP Tray) Offset X (MP Tray) Offset Y (Drawer 1) Offset X (Drawer 1)

6

Specify the target numeric value using [ ▲ and [ ], then press [OK]. Check the printout results of the Printing Position Adjustment Print and select the numerical value to adjust the position. Each time you press [▲], the value increases in +0.1 mm increments, and each time you press [ ] the value decreases in -0.1 mm increments. If you keep holding down [▲] or [▼], the value changes consecutively. ![](images/1be1bcfeb021a2b1c560375bc78f25ccaf94048e5e3b42e338e31fd5308635a6.jpg)
text_image Offset Y (Drawer 1) 0.0 (-5.0-+5.0)

7

Press [ ] ( : Online). ![](images/22f5ea4a6959c6d924ca620d7878286688e57a00c21f0d1437b2a08032182b0c.jpg)
text_image Ready to print. A4 Y M C K

8

Make sure that the printer is online. If the printer is not online, press [ ○ ] (○ Online).

9

Press [ ]( : Utility).

10

Select [Printing Pos. Print] using [ ] and [ ], then press [OK]. ![](images/48fd2e44634f82f487650757669e71ed4110bcf3378fc98f0fc0b2bca9e94797.jpg)
text_image Utility Menu PS Utility Cleaning E-Mail Print Utility Printing Pos. Print

11

Select [Yes] using [↓, then press [OK]. ![](images/56f714b3881986d50538c890702a9c48a32fc4dabea740b3942426ef551440e7.jpg)
text_image Execute? No Yes
The Printing Position Adjustment Print in which the setting is changed is printed. † Check the printout results to confirm the printing position. To make further adjustment, repeat Steps 1 to 11. 0258-01S When changing the location of the printer or moving the printer for maintenance, be sure to perform the following procedure. For details on the installation site, see "Confirming the Supplied Accessories and Checking the Installation Site." See "Important Safety Instructions" also.

1

Turn the printer OFF, then disconnect the cables or cords from the printer.

† Shut down the printer before turning it OFF. For details on the procedure for shutting down the printer, see "Turning the Printer ON/OFF." ![](images/cf9c075250160c453212b03287adbecc296dcfb56d56bb30ce15d4b592f8fd09.jpg)
flowchart
graph TD
    A["Computer OFF"] --> B["Switch"]
    B --> C["Electrical Outlet"]
    subgraph Component 1
        D["Component (1)"] --> E["Power Switch"]
    end
    subgraph Component 2
        F["Component (2)"] --> G["Power Switch"]
    end
    subgraph Component 3
        H["Component (3)"] --> I["Power Switch"]
    end
    subgraph Component 4
        J["Component (4)"] --> K["Power Switch"]
    end
    subgraph Component 5
        L["Component (5)"] --> M["Power Switch"]
    end
USB cable*(2) Turn the computer OFF.(3) Disconnect the cable from the printer.
LAN cable*(4) Disconnect the cable from the printer.
Power cord(5) Disconnect the power plug from the AC power outlet.(6) Disconnect the cord from the printer.
\* Whether the cable is connected or not varies depending on your environment.

2

Pull out the drawer.

![](images/91be4ee4c64d494ae9d414f088f19c6e397ee60182d4902b43116c6fe5bc26a2.jpg)
natural_image Illustration of a printer with internal components being inserted, showing hand placement (no text or symbols)

3

Carry the printer unit to the installation site.

Carry the printer with two or more people by holding the lift handles on the lower portion of the printer and lifting it up at the same time. ![](images/11566fc443c3407f73ce1538473c6690df646f8d88722af2d4386b514fe983fe.jpg)
text_image Right Side View

If the optional paper feeder is installed

Remove the paper feeder from the printer, place the paper feeder on the new installation site, and then carry the printer to the site. Removing the paper feeder from the printer may be difficult. Be careful when removing the paper feeder from the printer. Do not carry the printer with the paper feeder installed. If you do so, the paper feeder may drop resulting in personal injury. ![](images/08f360254839093232b26fd3c51365b676b6ed988ca86df2d48f7a7a8f46d095.jpg)
natural_image Illustration of two people handling a machine with a no-smoking symbol (no text or labels present)
For details on the procedure for installing the paper feeder, see "Installing the Paper Feeder."

4

Set the drawer in the printer.

Push it in the printer firmly.

5

Connect the removed cable or cord.

USB cable*Connect to the USB connector on the printer.
LAN cable*Connect to the LAN connector on the printer.
Power cord(1) Plug the power cord to the power socket on the printer.(2) Plug the power plug in the AC power outlet.

When transporting the printer unit

To prevent damage to the printer during transport, perform the following. \- Remove the toner cartridge. † See "Storing Toner Cartridges" also. \- Securely pack the printer in the original box with packing materials. Immediately install it in the drum protective cover (A), put it in the original protective bag or wrap it with a thick cloth. ![](images/9ca0b74ba06b655c1583ca2739855908a444ebadc5dcc7d00bc3bce24233e651.jpg)
natural_image Technical illustration of a mechanical component with an arrow indicating assembly or force (no text or symbols present)
If the original box and packing materials are not available, find an appropriate box along with packing materials and pack the printer and the parts appropriately.

Adjusting the Color or Color Mismatch (Calibration)

Perform calibration if colors change or color mismatch occurs and you cannot print the correct colors (the colors you specified) ![](images/ccd4659a85423b50422a51a794501f6d087ab5ac21691e3285d8eb97559c6bb6.jpg)
text_image Diagram showing document processing transformation with a green arrow pointing to an orange flower icon, indicating file conversion or data transfer.

> If You Want to Adjust Color Balance

When all the printout results appear reddish or bluish, or the color balance is not appropriate, you can correct the colors by adjusting each toner density of C (Cyan), M (Magenta), Y (Yellow), and K (Black).

Cleaning the Inside of the Printer

If the printed paper has smudge marks, clean the inside of the printer. Print quality deterioration can be prevented by cleaning the inside of the printer. ![](images/dae0f25c6337cd6e651787e53572185737ca09deb821c691d70bc563f9e81f3b.jpg)
bar | Category | Value | |---|---| | Bar Data (Green) | 80 | | Bar Data (Red) | 75 | | Bar Data (Green) | 85 | | Bar Data (Red) | 90 | | Circle with Dot Pattern | Black dots (dots) on the right side of the circle.

Cleaning the Outside of the Printer

Periodically clean the outer surfaces and ventilation slots of the printer to maintain the optimal printing quality. ![](images/7dd41fddd1be5fbd3cf0746b03a9681989fc75314bce2bbea19c14ccf2fdb915.jpg)
natural_image Two document icons: one with a paper sheet and arrow, the other with a folder and sparkles (no text or symbols)
0258-0LJ There are the following four methods for performing calibration.
Calibration Types OverviewCalibration time (rough estimate)
Color Mismatch CorrectionA color mismatch is adjusted by controlling the shifts of the print start positions of each color. Execute when color mismatch occurs.Approximately 54 seconds
Density ControlControls the maximum print density and median print density. Execute when the colors have changed and the data is not printed in the correct colors (specified colors).Approximately 56 seconds
Density Median ControlControls the median print density. Execute when the colors of the median print density have changed and the data is not printed in the correct colors (specified colors).Approximately 56 seconds
Full CalibrationPerforms [Color Mismatch Corr.] and [Density Control]. Execute when you want to adjust color mismatch and control the print density (adjust color hues) at once.Approximately 100 seconds
This section describes the procedure for performing calibration manually. You can perform calibration from the control panel and the Remote UI. > Performing Calibration Using the Control Panel > Performing Calibration Using the Remote UI ![](images/3198a0ceeff2c2b5258732843e7e5a2e80cb13012b41abbbf76a6b79d9fbda54.jpg)

IMPORTANT

Precautions when performing calibration

- If you perform calibration frequently, this may affect the life of the toner cartridges. - Perform calibration after making sure that the toner remains in the toner cartridges. You can check the status of each color toner cartridge from [Remaining Toner] on the Remote UI portal page. "Remote UI Portal Page" If you perform calibration in the state where the toner cartridges have reached the end of their life, calibration may not finish properly. In this case, replace the toner cartridges, and then perform calibration again. > "Replacing Toner Cartridges" ![](images/712ef6bc6ce05c8bb79e8e22e4b3849cf1ea3d539d37377dae0f153ae6ce8d2f.jpg)

NOTE

Perform calibration at the designated time or immediately after the printer is turned ON.

You can set the printer to automatically perform calibration at the designated time everyday or to perform calibration immediately after the printer is turned ON. > "Specifying Times and Performing Automatic Calibration" "Automatically Performing Calibration Immediately after the Printer Is Turned ON"

Performing Calibration Using the Control Panel

1 Press [ ![](images/dd445670f156e0d54055a38e615878bd1db8938bf09511169867b8549fddc781.jpg)

2

Select [Calibration] using [▲ and [ ], and then press [OK]. ![](images/77ad9aa53efb8bee50e13a0ea4204048e18561c1769d24552cc682f0ffb528d2.jpg)
text_image Utility Menu Configuration Page Network Status Print IPSec Policy List Calibration

3

Select an item which you want to adjust from [Color Mismatch Corr.], [Density Control], [Density Median Cont.], and [Full Calibration] using [▲] and [▼, and then press [OK]. ![](images/a0be68e75954b38e8e9dbff2c3cbf067a70002a746c89dfef207d0271b093e54.jpg)
text_image Calibration Color Mismatch Corr. Density Control Density Median Cont. Full Calibration

4

Select [Yes] using [▼, and then press [OK]. → Calibration is performed. ![](images/57cb8236f4ee414ea029327e09426fc7b2cbbf9776ce8ec67f7fc505252fac5f.jpg)
text_image Execute? No Yes

Performing Calibration Using the Remote UI

1

Start the Remote UI and log on in system manager mode. > "Starting the Remote UI"

2

Select [Calibration] from [Output/Control] under the [Settings/Registration] menu. ![](images/a7bbdeba9cbecff5d0510544d77e760bcf9f6c8cd96465684dd850374167630e.jpg)
text_image Remote UI Settings/Registration: LBP7680C / LBP7680C - Windows Internet Explorer File Edit View Favorites Tools Help Favorites Remote UI Settings/Registration: LBP7680C / LBP... I SENSYS LBP7680C / LBP7680C / Settings/Registration To Portal Login User: System Manager Log Out Mail to System Manager Preferences Control Menu Paper Source Menu Network Layout Menu Quality Menu User Maintenance Menu Output/Control Utility Menu Calibration Device Control Management Settings Department ID Management Security License/Other Settings/Registration Output/Control Calibration Calibration Last Updated 01/04 2011 09:30:28 Select the calibration to perform from the below options, and click [Execute]. Execute Calibration Calibration Options: Color Mismatch Correction Density Control Density Median Control Full Calibration Copyright CANON INC. 2011 All Rights Reserved Done Internet | Protected Mode: Off 100%

3

Perform calibration.

(1) Select the calibration which you want to perform. (2) Click [Execute]. → Calibration is performed. ![](images/1abb2c7ca448153a12562138942f175ae243037134c6da9acabd78607cefd90c.jpg)
text_image Remote UI Settings/Registration: LBP7680C: LBP7680C - Windows Internet Explorer http://192.168.1.225/sdrcalb.cgi File Edit View Favorites Tools Help Favorites Remote UI Settings/Registration: LBP7680C: LBP... I-SENSYS LBP7680C / LBP7680C / To Portal Login User: System Manager Log Out Settings/Registration Mail to System Manager Preferences Control Menu Paper Source Menu Network Layout Menu Quality Menu User Maintenance Menu Output/Control Utility Menu Calibration Device Control Management Settings Department ID Management Security License/Other Settings/Registration Output/Control Calibration Calibration Last Updated 01/04 2011 09:30:28 Select the calibration to perform from the below options, and click [Execute] (2) Execute Calibration Calibration Options: Color Mismatch Correction Density Control Density Median Control Full Calibration Copyright CANON INC, 2011 All Rights Reserved Internet | Protected Mode: Off 100%

Specifying Times and Performing Automatic Calibration

0258-0LK Full calibration can be performed automatically at a specified time every day.

1

Press [ ] ( : Settings)

2

Select [Control Menu] using [ ▲ and [ ],▼ and then press [OK]. ![](images/c21103303bbcb334941229253b0251e14df8bd35f95181bccc0f409c23c5cda4.jpg)
text_image Setup Control Menu Paper Source Network Layout

3

Select [Timer Settings] using [▲ and [ ],▼nd then press [OK]. ![](images/24e6b105a367f7a7150bb48f2637a6a1a0e64e30a02e0291490eaab078f57f24.jpg)
text_image Control Menu Sleep Mode Sleep Even if Error Sleep Migration Time Timer Settings

4

Select [Calibration Timer] using [▲ and [ ],▼ and then press [OK]. ![](images/4f9f1970183de520069fc4b79137a3c8ba41e6c438acff1bf0f2471893bcdad1.jpg)
text_image Timer Settings Wake Up Time Sleep Mode Timer Sleep Mode Time Calibration Timer

5

Select [On] using [ ▲ and [ ], and then press [OK]. ![](images/51dba6b271389da784c683c035e0dd831ebf2e754c414a9b20af688f9c71331e.jpg)
text_image Calibration Timer off On

6

Select [Calibration Time] using [▲and[ ],▼nd then press [OK]. ![](images/0de964624e3ff185af209be67f3b24f18195fe7f3b85ebb47ca63aeeba5b1b05.jpg)
text_image Timer Settings Sleep Mode Timer Sleep Mode Time Calibration Timer Calibration Time

7

Set the time for calibration to be performed automatically, and press [OK]. You can increase or decrease the value using [ ▲] or [▼ and move the position using [ ] and [ ]. ▶ ![](images/75ae84b7e01290cab2f04dc5bac553719ff4bead64b7f011834aad1917b1bb4a.jpg)
text_image Calibration Time 12:00 U/D Keys: Adjust Value R/L Keys: Move Field
![](images/fc133b5934233fcd4abba5acc2ef109f49a484c918dcac9c68235fa471e6d847.jpg)

calibration is not automatically performed

In the following cases calibration will not be performed even if [Calibration Timer] is set to [On]. - When it is receiving data and printing - When operating the control panel

Automatically Performing Calibration Immediately after the Printer Is Turned ON

0258-0LL You can set the timing for performing calibration when the self-diagnostic immediately after the printer is turned ON determines that calibration is necessary.

1

Press [ ] ( : Online). → The Online indicator goes off, allowing you to specify the settings on the control panel.

2

Press [ ] ( : Settings)

3

Select [User Maintenance] using [▲ and [ ],▼ and then press [OK]. ![](images/ef4042e8f1a834d278573c2c5aabafe0493a042130f7728bbf6b27a0314029fe.jpg)
text_image Setup Layout Quality Interface User Maintenance

4

Select [First Calibration] using [▲ and [ ],▼ and then press [OK]. ![](images/aa7bd03bd85d610cea96d34a4a8c23105cd6bf1e98727d285a17358fe13c1692.jpg)
text_image User Maintenance SD Card Maintenance Special Print Mode Update Firmware First Calibration

5

Select [Color Mismatch Corr.] using [▲ and [ ],▼ and then press [OK]. ![](images/f236e72f51a35e3af4eafb5796a3aad4fd2eee587e8c7add984ba640357f2fba.jpg)
text_image First Calibration Color Mismatch Corr. Density Control

6

Set the [Color Mismatch Corr.] operation that is run immediately after the printer is turned ON.

Select [After Jobs] or [Immediately] with [▲] or [▼ and press [OK].
After JobsIt runs color mismatch adjustment after the first print job after the printer is turned ON is completed.
ImmediatelyPrint color mismatch is adjusted immediately after the printer is turned ON. If color mismatch adjustment is run immediately after the printer is turned ON, it will take some time before it is possible to print.
![](images/80f9117a75759b71fd782cf6f205c3adea7a222a39d9da92747fbd7b19a59d42.jpg)
text_image Color Mismatch Corr. After Jobs Immediately

7

Select [Density Control] using [▲and[ ],▼nd then press [OK]. ![](images/172d7d69924a65b4c826cfad9625a86c3252b599f9db32b973c3c5d3d7742966.jpg)
text_image First Calibration Color Mismatch Corr. Density Control

8

Set the [Density Control] operation that is run immediately after the printer is turned ON. Select [Off], [After Jobs] or [Immediately] with [▲] or [▼ and press [OK].
OffIf the printer is used in an environment with wide temperature variation, it may run density control.
After Jobs It runs density control after the first print job after the printer is turned ON is completed.
ImmediatelyIt runs density control immediately after the printer is turned ON. If density control is run immediately after the printer is turned ON, it will take some time before it is possible to print.
→ The setting for [First Calibration] is changed. ![](images/739a814af776255a826c5fe32a305a648cf433ffbe280e50f8a4f56a005ddb71.jpg)
text_image Density Control Off After Jobs Immediately
0258-0R8 The toner density can be specified in the range of "-8" to "+8" and is set to the standard density "0" before shipment. When adjusting the toner density using the control panel, use the following procedure. ![](images/9b1f671e6a62a39dec85560dd9c3b5053d9d3aa4f1c950fea75b79701dca214b.jpg)

IMPORTANT

When adjusting the toner density

Adjusting the toner density little by little, print the defective print data from the computer, and then check the printout results. If you cannot adjust the toner density, reset the density to the default value "0", and then contact your local authorized Canon dealer.

1

Press [ ] ( : Online). The Online indicator goes off, allowing you to specify the settings on the control panel.

2

Press [ ] (: Settings)

3

Select [Quality] using [▲ and [ ], and then press [OK]. ![](images/cbd2941c95cbe3919af9109abf5f980bf3473f05c13de8a6207df1e165b15dfd.jpg)
text_image Setup Paper Source Network Layout Quality

4

Select the toner density of the target color using [ ] and [ ], and then press [OK]. ![](images/e94a3f20e35d00b025d28004f02421826b53b5193055ea448c49fe90f47e3109.jpg)
text_image Quality Density: Cyan Density: Magenta Density: Yellow Density: Black

5

Select the density using [ ▲ and [ ], and then press [OK]. The toner density is lightest when "-8" is selected and densest when "+8" is selected. ![](images/95bb021545b80d0b479cd7c5679e161a472d9e01b5a340657baff0e3f910e3ae.jpg)
text_image Density: Black 0 (-8 Light - +8 Dark)
→ The density is set.

Cleaning the Inside of the Printer

0258-0LR Clean the following if dirt sticks to printed paper or the print quality deteriorates. > "Cleaning the Fixing Roller of the Printer" "Cleaning the Transfer Belt" 0258-01W A4 or Letter plain paper is required to clean the fixing roller. Have A4 or Letter plain paper ready.

1

Load A4 plain paper in the multi-purpose tray. > "Loading Paper in the Multi-purpose Tray"

2

Make sure that the printer is online. If the printer is not online, press [ ○ ] ( : Online).

3

Press [ ] (: Utility).

4

Select [Cleaning] using [▲ and [ ], and then press [OK]. ![](images/195ae09ddf337a732df513d6c9691685df6837784b95c8a2a96749b7d2081fb4.jpg)
text_image Utility Menu Calibration PCL Utility PS Utility Cleaning

5

Select the size of the paper loaded in the multi-purpose tray using [ ] and [ ], and then press [OK]. ![](images/45db5f276c50b3461fe928508d207810c7ec9c2b1be55fb97b6891f113824afc.jpg)
text_image Cleaning A4 LTR

6

Select [Yes] using [↓, and then press [OK]. → is displayed on the display. ![](images/fc2ac9fa9190a021bd9a4aa905bbb341318b46f7ecf422888fde8a84122141fa.jpg)
text_image Execute? No Yes

7

Press [ ]( : Online).

→ The paper is fed in the printer, and the printer starts cleaning the fixing roller. The cleaning is finished when the paper is output completely. † Cleaning the fixing roller cannot be canceled. Please wait until it is completed. ![](images/247207f53e855695ad6b3003d7add1591714bbf588addf5a22b76203fdac6c9e.jpg)
text_image Cleaning... Y □ M □ C □ K □
![](images/c4d7dadf26239f8e2101eae76151c02016f439f23e123f0b3d49d317220dfe83.jpg)

IMPORTANT

Do not touch the paper until it is output completely while cleaning the fixing roller. The paper is once output partially after the front side is printed, and then it is fed again to clean the fixing roller. ![](images/ce48ad99b40dd2f9737e0c5b9d52f80008289e925b644ba93995b5c9fa96b243.jpg)

NOTE

Cleaning time

It takes approximately 114 seconds. 0258-OLS If dirt sticks to the transfer belt on the ITB (Intermediate Transfer Belt), this may result in deterioration of print quality. If this happens, clean the transfer belt using the following procedure.

1

Press [ ] ( : Online). → The Online indicator goes off, allowing you to specify the settings on the control panel.

2

Press [ ] ( : Settings)

3

Select [User Maintenance] using [▲ and [ ],▼nd then press [OK]. ![](images/be9402f715dda68396d4d3794dd720f171d5a4045ecb54cd9a7f2d212cd55c6d.jpg)
text_image Setup Layout Quality Interface User Maintenance

4

Select [ITB Cleaning] using [▲and[ ],▼nd then press [OK]. ![](images/48470f5637e9f402d6dc86892c93c405deb040774d51c76d18e74e3fbbe317fa.jpg)
text_image User Maintenance Check Paper Size Substitute Size Special Image Mode ITB Cleaning

5

Select [Yes] using [▼, and then press [OK]. → "Cleaning..." is displayed on the display, and transfer belt cleaning begins. When the message disappears, cleaning is completed. † Cleaning the Intermediate Transfer Belt cannot be canceled. Please wait until it is completed. ![](images/9695c119785cd44d78270a0d6711e5445d9e92f566a242395a826b3ccfcee79e.jpg)
text_image Execute? No Yes
![](images/23f10fdaca8b964b6ce26c08263e2406f1e7c7c010a997ad44e7d9ba44da85e2.jpg)

NOTE

Cleaning time

It takes approximately 50 seconds. 0258-01X Before cleaning, see "Attention (Cleaning)."

1

Turn the printer OFF, then disconnect the cables or cords from the printer. † Shut down the printer before turning it OFF. For details on the procedure for shutting down the printer, see "Turning the Printer ON/OFF." ![](images/10bf9433bd36b151a726b48e4edeeb0aab70206ac03c50bbad9ad950405968c2.jpg)
flowchart
graph TD
    A["OFF"] --> B["(1)"]
    B --> C["(2)"]
    C --> D["(3)"]
    D --> E["(4)"]
    E --> F["(5)"]
    F --> G["(6)"]
USB cable*(2) Turn the computer OFF.(3) Disconnect the cable from the printer.
LAN cable*(4) Disconnect the cable from the printer.
Power cord(5) Disconnect the power plug from the AC power outlet.(6) Disconnect the cord from the printer.
\* Whether the cable is connected or not varies depending on your environment.

2

Firmly wring a soft cloth dampened with water or a mild detergent diluted with water, and wipe off the dirt. ![](images/75be887e27d29b24f3dc7b7bf01e806ba9cac3506a935fb9cc6fbd8fc74cd4c3.jpg)
natural_image Line drawing of a printer with a hand inserting a clip (no text or symbols)

3

After wiping off the dirt, wipe the printer with a dry cloth.

4

When the printer is completely dry, connect the removed cable or cord.
USB cable*Connect to the USB connector on the printer.
LAN cable*Connect to the LAN connector on the printer.
Power cord(1) Plug the power cord to the power socket on the printer.(2) Plug the power plug in the AC power outlet.
\* Whether the cable is connected or not varies depending on your environment. See "Important Safety Instructions" also. ![](images/93d50e3451d6fdadd0c35fcd228e8283eedf12cdbe0d3a8bc4ea33f854a54398.jpg)

IMPORTANT

Precautions when cleaning the printer

- Do not use a cleaning agent other than water or a mild detergent diluted with water, as this may deform or crack the plastic materials in the printer. - When using a mild detergent, be sure to dilute it with water. Also, if you use a mild detergent for cleaning, be sure to wipe away the detergent with a soft cloth dampened with water. - Grease or oil does not have to be applied to this printer. Be sure not to apply grease or oil.

Location of the Serial Number

0258-020 The serial number is required for receiving maintenance service. You can find the serial number at the location shown in the following figures. Do not remove the labels on which the serial number is indicated. Inside the printer ![](images/fc06aacb4adb9b9c7a9d61bcd86828851c3ac9947e0dec457e4a01b31205ea2e.jpg)
text_image Diagram of a printer with barcode label pointing to the internal structure
Outside view of the packaging box ![](images/9585cf1ce134ee8386d3da5c987f8db760a1664b489281954329138eee4b19e8.jpg)
text_image LBPXXXX XXXXXXX[AA] XXXXXXX00001
0258-021 Perform the following procedures according to your installation preference.
Before installing the printer, see "Attention (Printer Installation)."
1Checking before Installing the PrinterConfirming the Supplied AccessoriesChecking the Installation Site"Confirming the Supplied Accessories and Checking the Installation Site"
2Removing the Packing Materials"Removing the Packing Materials"
3Installing the Paper Feeder(Only when installing the paper feeder)"Installing the Paper Feeder"
Installing ROM(Only when installing ROM)"Installing ROM"
Installing SD Card(Only Installing SD Card)"Installing SD Card (LBP7680Cx Only)"
4Installing the PrinterCarrying the Printer to the Installation SiteConnecting the Power Cord"Installing the Printer"
5Specifying the printer's initial settings"Turning the Power On and Specifying a Language and Time"
Specifying a Type of Printer Driver"Specifying a Type of Printer Driver"
6Loading Paper"Loading Paper in the Drawer""Loading Paper in the Multi-purpose Tray"
7Connecting to a Computer"Connecting to a Computer"
8Installing the Printer Driver"For Windows""For Macintosh"
9Checking the Printing OperationCheck the operations by Test Page in Windows."Basic Operations/Various Information for Windows"
See "Important Safety Instructions" also. ![](images/f784590b7f4790c733c031ca275cf475e86ccb0d751840324278ffe60976a3e6.jpg)

IMPORTANT

Protecting the printer from condensation

\- To prevent condensation from forming inside the printer in the following cases, adjust the printer to the ambient temperature and humidity for at least two hours before use. \- When the room where the printer is installed is heated rapidly \- When the printer is moved from a cool or dry location to a hot or humid location \- If water droplets (condensation) form inside the printer, this can result in paper jams or poor print quality.

Precautions for the power supply

- Use an AC power outlet exclusively for the printer. Do not use the other sockets of the AC power outlet. - Do not plug the power plug in the auxiliary outlet on a computer. - Do not use the same AC power outlet for both the printer and any of the following equipment. - Copy machine - Air conditioner - Shredder – Equipment that consumes a large amount of electricity – Equipment that generates electrical noise - The maximum power consumption of the printer is 950 W or less. - Electrical noise or a dramatic drop in mains voltage may cause the printer or computer to operate incorrectly or lose data.

Do not install the printer in the following locations, as this may result in damage to the printer.

- A location subject to dramatic changes in temperature or humidity • A location subject to condensation - A poorly ventilated location (If you use the printer for a long time or to perform a large amount of printing in a poorly ventilated room, the ozone or other odors generated by the printer may create an uncomfortable working environment. In addition, chemical particles are dispersed during printing. Therefore, it is important to provide adequate ventilation.) - A location near equipment that generates magnetic or electromagnetic waves • A laboratory or location where chemical reactions occur - A location exposed to salt air, corrosive gases, or toxic gases - A location, such as on a carpet or mat, that may warp from the weight of the printer or where the printer is liable to sink

Precautions when preparing the toner cartridge

See "Attention (Toner Cartridge)."

Precautions when connecting the power cord

- Do not plug the power plug of the printer into an auxiliary outlet on a computer. - One AC power outlet should be used exclusively for the printer. - Do not connect this printer to an uninterruptible power source. This may cause printer malfunction or breakdown in the event of a power failure.

When turning ON the printer for the first time after the printer installation

- Before turning ON the printer, be sure to remove the sealing tape from the toner cartridges installed in the printer. - Before turning ON the printer, be sure to insert the drawer in the printer. - Although a sheet of blank paper may be output, this is not an error.

Precautions when installing the paper feeder

\- Do not touch the connector (A) on the paper feeder. This may result in damage to the printer or misfeeds. ![](images/62924306164727a6aaec1e9ef3f2e635bcfef5c200e334fccef7c3f82fbfb7f3.jpg)
text_image (A)
- If you cannot place the printer on the paper feeder properly, lift the printer once, hold it horizontally, and place it again. If you try to place the printer forcefully without lifting it, the connector and positioning pins may be broken. - Be sure to turn the printer ON once when loading paper in the drawer for the first time after installing the paper feeder.

Precautions when installing/removing ROM

- Be sure not to touch the switches on the main board. If you change the switches, the printer does not operate properly. - Observe the following precautions when handling ROM to prevent damage from static electricity. - Touch a metal object to dissipate static electricity before handling them. - When handling ROM, do not touch anything that generates static electricity such as the computer display. - Do not touch the main board parts, printed wire, or connectors with your hands. - Take ROM out of the protective bag right before it is installed. \- Do not touch the main board parts, printed wire, or connectors with your hands. \- When installing ROM, be careful so that any metal objects such as screws do not touch the main board. \- If any of screws, clips, staples, and so on should drop inside the printer, do not plug the power plug in the AC power outlet and contact your local authorized Canon dealer. \- Do not turn the printer ON without the right cover or slot cover attached. This may result in damage to the printer. ![](images/c4edb9bcdbb184b06c046f5ab3a13dbbafc1cd7f99c318b90d1c5b36bcdd6544.jpg)

NOTE

About the toner cartridge included with this printer

\- The average yield of the included toner cartridges is as follows. • Average yield of K (Black) toner cartridge: 1,200 pages \*1 \*2 - Average yield of Composite C (Cyan), M (Magenta), and Y (Yellow) toner cartridges: 1,400 pages \*1 \*2 \*1 The average yield is on the basis of "ISO/IEC 19798"\* when printing A4 size paper with the default print density setting. \* "ISO/IEC 19798" is the global standard related to "Method for the determination of toner cartridge yield for color printers and multi-function devices that contain printer components" issued by ISO (International Organization for Standardization). \*2 The life of the toner cartridges is affected by the following conditions. - Printing environment and conditions - Spaced printing – Paper size and paper type settings - Printing ratio - Toner is used even when printing with a low printing ratio. - Color printing - Multiple color toner cartridges may reach the end of their life at the same time. - Printer configuration - Black-and-white printing may affect the life of the color toner cartridges. \- For purchasing replacement toner cartridges, see "Consumables."

Confirming the Supplied Accessories

Make sure that all the supplied accessories are contained in the box before installing the printer. If an item is missing or damaged, please contact your local authorized Canon dealer. ![](images/bc83672647b59a913fe8f1e634b64c4f9e839ac552e6966f086b7ceef8502646.jpg) (The form of the supplied power cord may differ from the one in the above illustration.) The following parts are already installed. \- Paper Drawer - Toner Cartridg The following are included. \- e-Manual \- Getting Started Guide (Arabic, Bulgarian, Croatian, Estonian, Greek, Latvian, Lithuanian, Persian, Romanian, Slovakian, Slovenian, Ukrai The following are included. \- Printer Driver - Printer Driver Installation Guide The following are included. \- PS Printer Driver \- Printer Driver Installation Guide ![](images/f8c7d288ebf20e90a21a9be8804857eb87c88abd72bb3a9bffcb167741e35797.jpg)

IMPORTANT

Download the printer driver for Macintosh from the Canon Web site

The supplied CD-ROM does not include the printer driver for Macintosh. Download the printer driver for Macintosh that supports this printer from the Canon Web site (http://www.canon.com/). If you cannot find the printer driver for Macintosh that supports this printer on the Canon Web site, contact your local authorized Canon dealer. ![](images/f7965c246eea294ceebdcd707f2f3f7c22820407a9823d45ca6158213260b0c5.jpg)

NOTE

About interface cables

- This printer does not come with an interface cable. Have an appropriate one available for the computer you are using or the connecting method. - Use a USB cable with the following symbol. ![](images/340f4522b9cd4752c29960ff39bf6e34473fb9b18e255323f03d5454eb51637b.jpg)

About the Supplied Manuals

The manuals supplied with this printer consist of the following. Read these manuals according to your purpose and make full use of this printer.

Manual Name Contents

Quick Setup Guide Explains the procedure for installing the printer.
e-ManualExplains all the operations of this printer, such as how to use the printer and troubleshooting.(The contents of "Quick Setup Guide" are also included.)
Getting Started GuideThis is the simple manual (PDF format) written in the following languages.- Arabic, Bulgarian, Croatian, Estonian, Greek, Latvian, Lithuanian, Persian, Romanian, Slovakian, Slovenian, Ukrainian
To view the manual in PDF format, Adobe Reader/Adobe Acrobat Reader is required. If Adobe Reader/Adobe Acrobat Reader is not installed on your system, download it from the Adobe Systems Incorporated Web site.

Checking the Installation Site

In order to use this printer in a safe and trouble-free manner, install the printer in a place that fulfills the following conditions.

Temperature and Humidity Conditions

Temperature range 10 to 30°C (50 to 86°F)
Humidity range 20 to 80% RH (no condensation)

Power Supply Requirements

220 to 240 V (±10%), 50/60 Hz (±2 Hz)

Installation Requirements

• A location with sufficient space Refer to the following dimensions of each part and ensure the installation space. ![](images/b0b63dbe09803e0dbe4ef8eaabe4e0a4cd531e00ad80789d137cea7ffe185cba.jpg)
text_image Front View Paper Drawer 192 133 121 Back Cover Tray Extension Auxiliary Tray Multi-purpose Tray 414 337 458 274 (mm) 257 350 100 499
• A location with good ventilation • A location with a flat, even surface - A location able to fully support the weight of the printer 0258-024 ![](images/16f80955dd485222b2c013ff032d5ab05b696279db9f6e2f8e862478ff553eca.jpg)

NOTE

Store the removed packing materials. They are required when transporting the printer for relocation or maintenance. About the packing materials The packing materials may be changed in form or placement, or may be added or removed without notice. Remove all the orange tape if it is attached to the printer when performing the following procedure.

1

Open the rear cover completely. A loud noise occurs when you remove the packing materials inside the machine. This is not a malfunction. ![](images/d7f22dc4038961550afaea48b63c6bf8b0ca09cba7c787c88bae93f5895a4d46.jpg)
text_image (1) (2)

2

Remove the plastic packing materials with tape. A loud noise occurs when you remove the packing materials with tape. This is not a malfunction. † Remove the protective sheet with them. ![](images/60a1b91ddd9128a3d8836e28a540399f75cf9b1c32d57f9410347e21f738ecc3.jpg)
text_image (1) (2)

3

Close the rear cover.

4

Open the front cover. ![](images/e293b010567d69a97eb4eb5aeeda35d756c39c08ef223b003d94543f1a32574b.jpg)
natural_image Illustration of a hand inserting a device into a box with orange arrows indicating rotation (no text or symbols)

5

Press the lever and pull out the toner cartridge tray. ![](images/1182fe469751d7ef0adfb1fe33ecdd8afab4fdf69318a2a38d3c3dd23853314e.jpg)
text_image (1) (2)

6

Hold down the toner cartridge as shown in the figure. ![](images/8f67ff56263f71b6392ddad46f4548182c6ef7c4522457e5b41f32a0ac0d4766.jpg)
natural_image Line drawing of a hand pressing down on an open computer motherboard (no text or symbols)

7

Remove the tab, and then pull out the sealing tape. Pull out the sealing tape (approx. 50 cm long) gently. ![](images/42500fc7d99c3b4e7e142679d62ba1acd05ada51b22b96b813402e9557fd9eb5.jpg)
text_image (1) (2)
![](images/c15f7361d53c0f46c25f668992343ee79fcf5474b9195b552a1c5c310de76f5e.jpg)

IMPORTANT

When pulling out the sealing tape

- If the sealing tape stops at midpoint, pull it out of the toner cartridge completely. If any tape remains in the toner cartridge, this may result in low print quality. - Dispose of the removed sealing tape according to local regulations.

8

Pull out the sealing tapes of all the toner cartridges.

Make sure that all four sealing tapes have been removed.

9

Push the toner cartridge tray back in.

10

Close the front cover.

![](images/99ec75ca829fb0a5a2ff112e064ad56a393fda6f67ae380867add1b790514049.jpg)

you cannot close the front cover

Make sure that the toner cartridge tray is closed. Do not try to forcefully close the front cover, as this may damage the machine. ![](images/6d006ed5857f5fbfb1a76c5b2f62df0c3779a88470a8f3941d450d36514e7b3d.jpg)

Check!

Checking if the packing materials are removed

Check that the following packing materials are completely removed. ![](images/ba130cadf39d2f04d6711d4538f690e3058bf4c551bd5d6eefc0acc491da790e.jpg) Packing materials with tape ![](images/a4b8a744496ce1a8dc689366147c0f4abb0d31a66831895f281b6f315d47b886.jpg)
natural_image Simple line drawing of a tool with a flat blade and wooden support (no text or symbols)
Packing materials with tape/Protective sheet ![](images/e78401bc38a4caa0965863c9aa9a88d044de905f23b7336f4c0ec284db1f2212.jpg) Sealing tape x 4 † Dispose of the left packing materials according to local regulations. \* Make sure that all the orange tape is completely removed. ![](images/65f06c376e3a1a1cc32b6fb784f44df0f62e42006b67814ee9517730ce86f026.jpg)
natural_image Diagram of a printer with an open drawer and a magnified inset showing a printer's internal structure (no text or symbols)
![](images/e0117781493e69a858692bfd3679ab6c6638dc95cffb4bafc430db696a216391.jpg)
natural_image Diagram of a printer with an orange arrow indicating a process or operation, showing internal components (no text or symbols present)
† Close the covers after you finish checking. Next, perform one of the following procedures.

If you want to use the printer with optional accessories installed

Install the optional accessories before installing the printer. > "Installing the Paper Feeder" > "Installing ROM" > "Installing SD Card" If you want to use the printer without optional accessories installed Install the printer. > "Installing the Printer" 0258-026 By installing the optional paper feeder in addition to the supplied multi-purpose tray and drawer, the printer can feed up to 550 sheets of paper continuously and automatically. ![](images/f3fdd7d2832a70c0fd6afa6429b29572cc232872b04aad4d8920693edf9f83b6.jpg)
natural_image 3D technical illustration of a mechanical housing or enclosure with internal components (no text or symbols)
Paper Feeder Unit PF-701

- When installing the paper feeder in the printer after installing the printer, move the printer to an appropriate location temporarily. > "Moving the Printer" - For details on the precautions for when installing the paper feeder, see "Attention (Printer Installation)." Remove all the orange tape if it is attached to the paper feeder when performing the following procedure.

1

Take the paper feeder out of the box.

2

Pull out the drawer of the paper feeder. ![](images/015c85484811b51908f35247ddc60cd7463aaa12b4db4e2324985adadf47bff4.jpg)
natural_image Diagram showing hands inserting a device into a plastic housing (no text or symbols present)

3

Carry the paper feeder to the installation site. When carrying the paper feeder, hold the lift handles on both sides with both hands. ![](images/c31206af6d812f613450e510d50815f80600633ccc7c31703d9b0968278c54e5.jpg)
natural_image Line drawing of a person holding an open mechanical tray (no text or symbols)

4

Pull out the paper cassette of the printer. ![](images/88e5519ecf90ef3adcb334e4dbdfb4c3050619acb72b58ed5d491895bd0640fa.jpg)
natural_image Diagram of a computer monitor with an open drive and orange arrow indicating compression (no text or symbols)

5

Carry the printer unit to the installation site. Carry the printer with two or more people by holding the lift handles on the lower portion of the printer and lifting it up at the same time. ![](images/454f87283843928f4d6158b56785737be7de567127c34b6903e7af9614a346da.jpg)
text_image Right Side View
![](images/21506b7eb2bfd5470735774882686331d4ccc6dcfd235b335ea6ccb3be1db7a7.jpg)
natural_image Line drawing of two people assembling or inspecting a microwave oven (no text or symbols)
![](images/1b96faeaca6bd88d6f60ca9238bd50485261953734429e46ebe58e04a462a746.jpg)
text_image Illustration showing a person handling a stack of books with a 'No' symbol, indicating no restrictions or prohibition.

6

Gently place the printer on the paper feeder so that each surface of the printer is flush with the front ![](images/edc5f81fbc45e143fe08abefe73f04bf0cab8cc70e148d8c3825c282b4a0ea68.jpg)
natural_image Diagram of a printer with an open base and internal components, showing no text or symbols.
Also, match the positioning pins (A) and connector (B) when placing the printer. ![](images/682f553afba0f187a9332b7037c186ea139e6e7ea2c9daed02971ebd2f8331f1.jpg)
text_image (A) (A) (A) (B)

7

Insert the drawer in the printer and paper feeder. Next, perform the following procedures. - If you want to install the ROM modules, follow the procedure from Step 2 in "Installing ROM." - If you want to install the SD card, follow the procedure from Step 2 in "Installing SD Card." If you install the printer and paper feeder at the same time
1Connect the power cord.> "Connecting the Power Cord"
2Specifying the printer's initial settings.> "Turning the Power On and Specifying a Language and Time"
Specifying a type of printer driver.> "Specifying a Type of Printer Driver"
3Load paper.> "Loading Paper in the Drawer" > "Loading Paper in the Multi-purpose Tray"
4Connecting to a computer.> "Connecting to a Computer"
5Install the printer driver.> "For Windows" > "For Macintosh"
6Register the paper feeder in the printerdriver.> "Setting the Paper Feeder Information"
7Check the printing operation.Check the operations by Test Page in Windows.➤ "Basic Operations/Various Information for Windows"
If you install the paper feeder afterward (If you are using the printer already)
1Connect the cables and cords.Reconnect the cables and power cords that were removed and restart the printer.
2Load paper.(Drawer 2*)➤ "Loading Paper in the Drawer"
3Register the paper feeder in the printer driver.➤ "Setting the Paper Feeder Information"
4Check the printing operation.Check the operations by Test Page in Windows.➤ "Basic Operations/Various Information for Windows"
\*Drawer of the paper feeder

Setting the Paper Feeder Information

After installing the paper feeder, set the paper feeder information. The operation method to use with Windows is explained here. If you are a Macintosh user, see the "Online Manual."

1

Open the printer folder.

> "Basic Operations/Various Information for Windows"

2

Right-click the icon for the printer and select [Printer properties] or [Properties] from the pop-up menu. ![](images/118e99c477ecd0bdf519242297aa762ef2d3d744a77d7ba97105d15c7af88c93.jpg)
text_image Hardware 1... ▶ Devices and Printers File Edit View Tools Help Add a device Add a printer See what's printing Manage default printers ▶ Devices (2) ▶ Printers and Faxes (1) Canon Printer See what's printing ✓ Set as default printer Printing performances Printer properties Create shortcut Troubleshoot Remove device Properties Canon Printer State Default Category: Printer Model: Canon LBP7680C/S280 Status: 0 document(s) in queue

3

Obtain paper feeder information.

(1) Display the [Device Settings] page. (2) Click [Get Device Status]. → Paper feeder information is obtained automatically. ![](images/c2fb4c1a489ce758f2d133ad2373e55833396e40350227b9ceb426e4bca99fa5.jpg)
text_image Canon Printer Properties General Sharing Ports Advanced Color Management (1) Device Settings Profile Device Settings: Manual Paper Source Options: 250 Sheet Driver SD Card Installed Spooling at Host: Auto Department ID Management(L) Set User Information(L) Specify Box Number When Storing Settings... Settings(W)... Details(S)... Form to Tray Assignment... (2) Get Device Status About OK Cancel Apply Help
![](images/75cc78d6ea273b4567d1bfd4c3ec73fee5e94ceae0fc9e9ef826a446e9369ee0.jpg)

NOTE

When paper feeder information cannot be obtained automatically Select the check box for [250 Sheet Drawer] under [Paper Source Options]. 0258-025 If you want to use the printer with optional accessories installed, install them before installing the printer. > "Installing the Paper Feeder" > "Installing ROM" > "Installing SD Card"

Carrying the Printer to the Installation Site

1

Pull out the drawer. ![](images/fc429cfb16bd8223a6b3953ad44a244f32ca78933fe1613aafc2be85d9de354a.jpg)
natural_image Diagram showing a hand inserting a device into a rack with an orange arrow indicating direction (no text or symbols present)

2

Carry the printer unit to the installation site. Carry the printer with two or more people by holding the lift handles on the lower portion of the printer and lifting it up at the same time. ![](images/98542ea009daf90b100d37ad5449eb336753f63bb08a9f5dd4051ce90f33683b.jpg)
text_image Right Side View
![](images/e8c94992be23c9abbfa2c7ad2a0f1ee4d61b93f46392e9496c13116e4e08206a.jpg)
natural_image Line drawing of two people handling a device with a box (no text or symbols visible)

3

Insert the drawer in the printer. Push it in the printer firmly.

Connecting the Power Cord

1

Connect the power cord. ![](images/2563977fa37ec91b75a7e664cc4427a80a4e3910cfc69d070d18b8bcc420f837.jpg)
text_image Diagram showing connection between a printer and an electrical outlet, with close-ups of the device's cable and plug.
![](images/5ddc94d3bbee7db9e42ff91577a498f85eb8c3910f2d3fad3ce6841f43001dc4.jpg) NOTE

The form of the supplied power cord

The form of the supplied power cord may differ from the one in the above illustration.

2

Press the power switch to turn the printer ON.

→ The indicators and display on the control panel come on, and the printer initiates a self-diagnostic test on the printer unit and optional accessories. ![](images/1f949262f03eec02cc9594be0efe53f6ea60a7f23c6302054997aed4cb317052.jpg)
natural_image Diagram of a printer with an orange arrow pointing to a circular button (no text or symbols present)
If no abnormality is found during the self-diagnostic test, the Main Power indicator (green), (Ready) indicator (green), (Online) indicator (green) and Paper Source indicator (green) come on, appears in the display, and the printer is ready to print. ![](images/71c379ff12267c1ec40ce381b168889d8f15bedbdb3d49c098c20f574ee505c1.jpg)
text_image Main Power indicator Ready indicator Paper Source indicator Online indicator
The following information is displayed in the display. ![](images/8edf9b51812f3c6eac8402a1c7667bd01dfab6a1d457b3ce4447d7070d8f3bb1.jpg)
text_image Ready to print. A4 Y □ M □ C □ K □ Amount of t
![](images/c00daf1b830d7287381bf4ccdbe776be06645227d4b6d0e7e3ab3788a8d14537.jpg) Next, perform the following procedures.
1Specifying the printer's initial settings➤ "Turning the Power On and Specifying a Language and Time"
Specifying a type of printer driver➤ "Specifying a Type of Printer Driver"
2Load paper.➤ "Loading Paper in the Drawer"➤ "Loading Paper in the Multi-purpose Tray"
3Connecting to a computer➤ "Connecting to a Computer"
4Install the printer driver.➤ "For Windows"➤ "For Macintosh"
5Check the printing operation.Check the operations by Test Page in Windows.➤ "Basic Operations/Various Information for Windows"
0258-0RR Insert the ROM in the position shown in the following figure. After checking the position of the ROM, perform the work. ![](images/9e3f956344e5c21a14085de7f3671dc7286a722da616e769aa9b1a63cd01ccbe.jpg)
natural_image Line drawing of a printer or printer with a paper clip inserted, showing internal components (no text or symbols)

> Installing ROM

It explains the procedure for inserting the ROM. Insert the ROM correctly using the following procedure.

: Checking the ROM Installation

It explains the procedure for checking whether the ROM is inserted correctly. After inserting, perform a check using the following procedure.

Removing ROM

It explains the procedure for removing the ROM. Use the following procedure when removing the ROM. ![](images/dfb82d76943fc505181843f6754418171576b915b3e1983c621f9d7b8dc6f5f0.jpg)

NOTE

A Phillips screwdriver is required.

Have a screwdriver ready that matches the size of the screws for the slot cover.

1

Turn the printer OFF, then disconnect the cables or cords from the printer.

† Shut down the printer before turning it OFF. For details on the procedure for shutting down the printer, see "Turning the Printer ON/OFF." ![](images/96858c6e208ce3b075203182885c255aab5d21df4ad854e551b3064c39410435.jpg)
flowchart
graph TD
    A["Computer OFF"] --> B["Switch"]
    B --> C["Electrical Outlet"]
    subgraph Component 1
        D["Component (1)"] --> E["Power Switch"]
        F["Component (2)"] --> G["Power Switch"]
        H["Component (3)"] --> I["Power Switch"]
        J["Component (4)"] --> K["Power Switch"]
        L["Component (5)"] --> M["Power Switch"]
        N["Component (6)"] --> O["Power Switch"]
    end
USB cable*(2) Turn the computer OFF.(3) Disconnect the cable from the printer.
LAN cable*(4) Disconnect the cable from the printer.
Power cord(5) Disconnect the power plug from the AC power outlet.(6) Disconnect the cord from the printer.
\* Whether the cable is connected or not varies depending on your environment.

2

Remove the right cover.

(1) While holding the tab (A), open the cover a little. ![](images/49a0f88291c9a5d18afa019fe10f22cf92ced76a23023f1570f0c5a005d2c071.jpg)
text_image (1) (A)
(2) Remove the cover in the direction of the arrow. ![](images/2ae8bf0bac76751464ca8b12d0af25e433734d7547c59de8cc2a9cdefbdf702c.jpg)
natural_image Line drawing of a mechanical device with a highlighted component (2), no text or symbols present

3

Open the slot cover.

(1) Remove the two screws. ![](images/64ce49372e04bfea90bb62214bb053c0ffb0d5f2c0f3dd12f88c500e00688289.jpg)
text_image (1)
(2) Open the slot cover. ![](images/0db655b6e64b0371d2df2cd5b1de078f1017f72e1dc30ab1918aea705ae7217f.jpg)
natural_image Diagram of a device showing an internal component with an orange arrow indicating rotation (no text or symbols present)
![](images/975fb164eb1945fc2e31f7cf5601498e716f7bce494e3665f4d2c5ec65ad861b.jpg)

NOTE

About the location for installing ROM

Confirm the installation location and its orientation before installing the ROM module. ![](images/81003e903f69dab7353ee647587c33458a2e4802eaf6f9516ee18ce17d03c567.jpg)
text_image ROM Slot

4

Install ROM.

Push the ROM module in the printer firmly while aligning the module with the two connectors. ![](images/b060b8d3015df98a07f104ac77632f57f7f10f9482b6bf5fba7a933442054ccd.jpg)
natural_image Diagram of a refrigerator interior with a closed door and internal compartments, showing orange arrows indicating movement or force (no text or symbols)

5

Close the slot cover.

(1) Close the cover. ![](images/27270fc007a3c4534b17bfd960ddea39246a4abe44ce58a6e028d6a5240325ca.jpg)
natural_image Diagram of a device showing an internal component with an orange arrow indicating rotation (no text or symbols present)
(2) Attach and fasten the two screws. ![](images/069f3995074c25a1345adc0eb3ff17ebbf8f7317ce69487a8e845f2e2d08b24d.jpg)
text_image (2)

6

Attach the right cover.

(1) Attach the right cover. (2) Close the cover. ![](images/99085ffc1e3c2b53d11f9f43b7c9da6f92c67c10adfca961e1fcedb257f1fe9e.jpg)
text_image (1) (2)
Next, perform the following procedures. (If you want to install the SD card, follow the procedure from Step 2 in "Installing SD Card".) If you install the printer and ROM at the same time
1Connect the power cord.➤ "Connecting the Power Cord"
2Specifying the printer's initial settings.➤ "Turning the Power On and Specifying a Language and Time"
Specifying a type of printer driver.➤ "Specifying a Type of Printer Driver"
3Load paper.➤ "Loading Paper in the Drawer"➤ "Loading Paper in the Multi-purpose Tray"
4Connecting to a computer.➤ "Connecting to a Computer"
5Install the printer driver.➤ "For Windows"➤ "For Macintosh"
6Check the printing operation.Check the operations by Test Page in Windows.➤ "Basic Operations/Various Information for Windows"
7Check the ROM installation.➤ "Checking the ROM Installation"
8Specify the settings for the ROM module as needed.Specify the settings in the menu functions.➤ "[Setup] Menu ([PS] Options)"For details on the settings for the bar code fonts, see "Bar Code Printing Guide" included in the User Manual CD-ROM.
If you installed ROM afterward (If you are using the printer already)
1Connect the cables and cords.Connect the removed cables and cords again.
2Check the ROM installation."Checking the ROM Installation"
3Specify the settings for the ROM module as needed.Specify the settings in the menu functions."[Setup] Menu ([PS] Options)"For details on the settings for the bar code fonts, see "Bar Code Printing Guide" included in the User Manual CD-ROM.
0258-029 After installing a ROM module, print Configuration Page to check if the module is installed properly. ![](images/8bba436e53c97065eb9d268d694a42675dd6855aba78206da2ed217cbff658d9.jpg)

NOTE

Load A4 size paper.

Configuration Page is designed to be printed on A4 size paper. Be sure to load A4 size paper when printing the Configuration Page.

1

Load A4 size paper in the multi-purpose tray or drawer. > "Paper Loading and Output"

2

Make sure that the printer is online. If the printer is not online, press [ ○ ] (○ Online).

3

Press [ ]( : Utility).

4

Select [Configuration Page] using [▲ and [ ],▼ and then press [OK]. ![](images/df1c2ab846613058b12ffaf4e1f666ba329e7fe139e4907788bc61d24b33cdcb.jpg)
text_image Utility Menu Check Counter Configuration Page Network Status Print IPSec Policy List

5

Select [Yes] using [↓, and then press [OK] to print Configuration Page. ![](images/35d3cbbde860207c0c761dfae8df93e7606c286533a46f8e2c159531e7556d0c.jpg)
text_image Execute? No Yes
![](images/145c5bfa93483c4de6b5b4adfa7bc1fa81c173c662af67d669295fa004e2e638.jpg)

NOTE

How to check the installation PS ROM Confirm that [PS] is displayed in [Controller]. \- Bar DIMM Confirm that [BarDIMM] is displayed in [PCL]. ![](images/ba222f4447afc07615db8733162a838a08450e9afd0463810821bea4fe63a04a.jpg)
text_image Canon Configuration Page BARDIN BARBID: 100 BARBID: 100 BARBID: 100 BARBID: 100 BARBID: 100 BARBID: 100 BARBID: 100 BARBID: 100 BARBID: 100 BARBID: 100 BARBID: 100 BARBID: 100
→ If [PS] or [BarDIMM] is not displayed, see "Removing ROM" and remove the ROM module once. This is a sample of Configuration Page. The contents may differ from the Configuration Page printed by your printer. 0258-02A ![](images/527335e75bc2b21dbfaddfedb8f7fe4f05156b09db52d1542984f8e89fde4987.jpg)

NOTE

How to remove the cover

For details on how to remove the slot cover, see "Installing ROM." Holding the edges of the ROM module, and then pull it out. ![](images/9953528c4c095718572c2746a8a027d0a8ee256da9db600ac83815ec1af247a5.jpg)
natural_image Hand placing a small component into a device casing (no text or symbols visible)
0258-0RS Insert the SD card in the position shown in the following figure. After checking the position of the card, perform the work. ![](images/e4d75c24aadd479dd1315e415fe535ba52ebe935fb423a606b61a8b90e7b4aa5.jpg)
natural_image Technical line drawing of a mechanical device with a highlighted component (no text or symbols)

Installing SD Card

It explains the procedure for inserting the SD card. Insert the SD card correctly using the following procedure.

> Checking the SD Card Installation

It explains the procedure for checking whether the SD card is inserted correctly. After inserting, perform a check using the following procedure.

Removing SD Card

It explains the procedure for removing the SD card. Use the following procedure when removing SD cards. 0258-0RU SD card is installed in the main board of the printer unit using the following procedure. ![](images/42adb591367a38efcf621204e048ae75c4de2c832e4dd1e1bf48a975eba7a262.jpg)

IMPORTANT

When using the "Encrypted Secured Print" function whose security is reinforced for data communication and stored data

You need to install "Encrypted Secured Print Driver Add-in." For details on the installation procedure, see "Readme.txt" in the supplied CD-ROM. We recommend that an encrypted secured print be used when printing secured print jobs.

Before installing SD card

If the SD card is write-protected, release the protection, and then insert the card.

1

Turn the printer OFF, then disconnect the cables or cords from the printer.

† Shut down the printer before turning it OFF. For details on the procedure for shutting down the printer, see "Turning the Printer ON/OFF." ![](images/79d9828e10da29f23f43ebddef4809e9f697ed39c4f8bd394e8c50cb9795e777.jpg)
flowchart
graph TD
    A["OFF"] --> B["(1)"]
    B --> C["(2)"]
    C --> D["(3)"]
    D --> E["(4)"]
    E --> F["(5)"]
    F --> G["(6)"]
USB cable*(2) Turn the computer OFF.(3) Disconnect the cable from the printer.
LAN cable*(4) Disconnect the cable from the printer.
Power cord(5) Disconnect the power plug from the AC power outlet.(6) Disconnect the cord from the printer.
\* Whether the cable is connected or not varies depending on your environment.

2

Remove the right cover.

(1) While holding the tab (A), open the cover a little. ![](images/d83c6c475c62cf5438c96cc23b966e0695d3c26a673a673a3afafb011fef846d.jpg)
text_image (1) (A)
(2) Remove the cover in the direction of the arrow. ![](images/c8932432ffc18b8f88ea56b4751e6e5e6f1860b00600945ff39d22c4375c5d10.jpg)
natural_image Line drawing of a device with a highlighted component labeled (2), no text or symbols present

3

Install SD card.

Insert the SD card in the SD card slot until it clicks. ![](images/c8873a5946ca58a5c0079ab09b457d0a2cd6e9d06b94b517c1fa55d3567296ae.jpg)
natural_image Line drawing of a computer with an orange arrow pointing to the screen, showing a hand inserting a device into the screen (no text or symbols present)

4

Attach the right cover.

(1) Attach the right cover. (2) Close the cover. ![](images/f85b45c673ea86e34fc1f6440f52eb082582cc2c80c5df13490c42cddeeefda6.jpg)
text_image (1) (2)

5

Hard reset or restart the printer.

If appears in the display after the printer starts, the SD card is being formatted. Wait for a moment until the format is completed. ![](images/cd0332e31d3507666c73d694cc257deb110d0774d5df6a2edd4d25878b975135.jpg)

IMPORTANT

If does not appear in the display

Perform [Format] in [SD Card Maintenance] in the common Setup menu. > "[Setup] Menu ([User Maintenance] Options)"

6

Connect all the interface cables.

![](images/f575fb57940c0ef894432b1fe73243ff59e86901245d001a1ff11495d93cb9a9.jpg)

NOTE

Setting after the SD card is installed

Perform the following procedure after the SD card is installed. (1) Display the [Device Settings] sheet in the printer driver. For details on the procedure for displaying the sheet, see "Setting the Printer Options." (2) Click [Get Device Status]. If you cannot obtain the status of the optional accessories automatically, select the [SD Card Installed] check box. For details on the procedure for Macintosh, see "Setting the Printer Options." ![](images/039d43e99de8dc5ad9e41223d43924d82d9141b1b92dfcb60b71659906b8a160.jpg) Next, perform the following procedures. If you install the printer and SD card at the same time
1Connect the power cord.> "Connecting the Power Cord"
2Specifying the printer's initial settings.> "Turning the Power On and Specifying a Language and Time"
Specifying a type of printer driver.> "Specifying a Type of Printer Driver"
3Load paper.> "Loading Paper in the Drawer" > "Loading Paper in the Multi-purpose Tray"
4Connecting to a computer.> "Connecting to a Computer"
5Install the printer driver.> "For Windows" > "For Macintosh"
6Check the printing operation.Check the operations by Test Page in Windows. > "Basic Operations/Various Information for Windows"
Checking the ROM Installation. (Only when installing> "Checking the ROM Installation"
7ROM)
Checking the SD Card Installation.> "Checking the SD Card Installation"
8Specify the settings for the ROM module as needed.Specify the settings in the menu functions.> "[Setup] Menu ([PS] Options)"For details on the settings for the bar code fonts, see "Bar Code Printing Guide" included in the User Manual CD-ROM.
If you installed SD card afterward (If you are using the printer already)
1Connect the cables and cords.Connect the removed cables and cords again.
2Checking the ROM Installation.(Only when installing ROM)> "Checking the ROM Installation"
Checking the SD Card Installation.> "Checking the SD Card Installation"
3Specify the settings for the ROM module as needed.Specify the settings in the menu functions.> "[Setup] Menu ([PS] Options)"For details on the settings for the bar code fonts, see "Bar Code Printing Guide" included in the User Manual CD-ROM.
0258-0RW After installing an SD card, print Configuration Page to check if the module is installed properly. ![](images/8a87155634f3728584856b86e1eeae5c63f0c7b9fd158d4f8f8e824e12209eb7.jpg)

NOTE

Load A4 size paper.

Configuration Page is designed to be printed on A4 size paper. Be sure to load A4 size paper when printing the Configuration Page.

1

Load A4 size paper in the multi-purpose tray or drawer. > "Paper Loading and Output"

2

Make sure that the printer is online. If the printer is not online, press [ ○ ] ( : Online).

3

Press [ ] (: Utility).

4

Select [Configuration Page] using [▲ and [ ],▼ and then press [OK]. ![](images/bc54798887e437e28c302b1877128ebe4fa4bc1ab92771da7b3d45d729f0a880.jpg)
text_image Utility Menu Check Counter Configuration Page Network Status Print IPSec Policy List

5

Select [Yes] using [▼, and then press [OK] to print Configuration Page. ![](images/8041c8c2a49cd62282e2ed8b096dd273746ebb38a320134fabd5e15e4f9fc422.jpg)
text_image Execute? No Yes
![](images/8094eb09f3c22cbab13e1da2a065796a905da243b0e009af1001d474fba6d847.jpg)

NOTE

How to check the installation Check to make sure that [SD Card] under the [Control Menu] is set to [On]. ![](images/18e6fc31bb2d3d1f24d3898339a6f24c2c56b092f7fc283db249399e12bfbed4.jpg)
text_image Canon Configuration Page LCP140 SD Card : On GENERAL ITEMS BAR Chart BAR Chart Group BAR Chart Group FLOOR NAME GROUP FLOOR NAME GROUP REFERENCE NAME GROUP REFERENCE NAME GROUP POST SIZE GROUP POST SIZE GROUP LEFT BEANSHANCE GROUP LEFT BEANSHANCE GROUP GREEN CHAPES GREEN CHAPES GREEN CHAPES GREEN CHAPES GREEN CHAPES GREEN CHAPES GREEN CHAPES GREEN CHAPES GREEN CHAPES GREEN CHAPES GREEN CHAPES GREEN CHAPES GREEN CHAPES GREEN CHAPES GREEN CHAPES GREEN CHAPES GREEN CHAPES GREEN CHAPES GREEN CHAPES GREEN CHAPES GREEN CHAPETS GREEN CHAPETS GREEN CHAPETS GREEN CHAPETS GREEN CHAPETS GREEN CHAPETS GREEN CHAPETS GREEN CHAPETS GREEN CHAPETS GREEN CHAPETS GREEN CHAPETS GREEN CHAPETS GREEN CHAPETS GREEN CHAPETS GREEN CHAPETS GREEN CHAPETS GREEN CHAPETS GREEN CHAPPY GREEN CHAPPY GREEN CHAPPY GREEN CHAPPY GREEN CHAPPY GREEN CHAPPY GREEN CHAPPY GREEN CHAPPY GREEN CHAPPY GREEN CHAPPY GREEN CHAPPY GREEN CHAPPY GREEN CHAPPY GREEN CHAPPY GREEN CHAPPY GREEN CHAPPY GREEN CHAPPY GREEN CHAPPY GREEN CHAPPY GREEN CHAPPY GREEN CHAPPYTENING ITEMS GREEN CHAPPYTENING ITEMS GREEN CHAPPYTENING ITEMS GREEN CHAPPYTENING ITEMS GREEN CHAPPYTENING ITEMS GREEN CHAPPYTENING ITEMS GREEN CHAPPYTENING ITEMS GREEN CHAPPYTENING ITEMS GREEN CHAPPYTENING ITEMS GREEN CHAPPYTENING ITEMS GREEN CHAPPYTENING ITEMS GREEN CHAPPYTENING ITEMS GREEN CHAPPYTENING ITEMS GREEN CHIPPUT TINING ITEMS GREEN CHIPPUT TINING ITEMS GREEN CHIPPUT TINING ITEMS GREEN CHIPPUT TINING ITEMS GREEN CHIPPUT TINING ITEMS GREEN CHIPPUT TINING ITEMS GREEN CHIPPUT TINING ITEMS GREEN CHIPPUT TINING ITEMS GREEN CHIPPUT TINING ITEMS GREEN CHIPPUT TINING ITEMS GREEN CHIPPUT TINING ITEMS GREEN CHIPPUT TINNING ITEMS GREENCHIPPUT TINING ITEMS GREENCHIPPUT TINING ITEMS GREENCHIPPUT TINING ITEMS GREENCHIPPUT TINING ITEMS GREENCHIPPUT TINING ITEMS GREENCHIPPUT TINING ITEMS GREENCHIPPUT TINING ITEMS GREENCHIPPUT TINING ITEMS
→ If [SD Card] is not displayed, see "Removing SD Card" and remove the SD card once. → If the [SD Card] is [Off], set it to [On] using the following procedure. (1) Press [ ] (Settings). (2) Select [Control Menu] using [▲] and [▼], and then press [OK]. (3) Select [SD Card] using [▲] and [▼], and then press [OK]. (4) Select [On] using [ ▲ ] and [ ▼ ], and then press [OK]. (5) Hard reset or restart the printer. → Check that the SD card is not write-protected. If the card is write-protected, release the protection, and then insert the card. The above figure is a sample of Configuration Page. The contents may differ from the Configuration Page printed by your printer. 0258-0RX ![](images/dadc5bba440e313cf25510c67a643a889a4e5e581f5f8089af63a23079a4b564.jpg)

NOTE

How to remove the cover

For details on how to remove the slot cover, see "Installing SD Card."

1

Insert the SD card until it clicks, then release your hand. ![](images/37f56e66a22c5d1333cb6e880e2f8a1f8eddb4839c787d1e4cdd03b2fa378504.jpg)
natural_image Illustration of a hand pressing a button on a device (no text or symbols visible)

2

Remove the SD card. ![](images/006da2b83e565d88c66ca0b8274a87135ae3de9db3416db7f9fa1739ffca2541.jpg)
natural_image Illustration of a hand holding a small electronic device with an orange arrow indicating compression or cooling (no text or symbols)
0258-0RY > Turning the Power On and Specifying a Language and Time > Specifying a Type of Printer Driver 0258-0S1 When the printer is turned ON, the initial setting screen appears. Specify the setting using the following procedure. ![](images/c2836923331aff79b70267c4e65666e4e65bdd99d856a96431b4d9c414759ab2.jpg)

NOTE

About the initial setting screen

The initial setting screen is displayed only when the printer is turned ON for the first time.

1

Press the power switch to turn the printer ON.

→ The indicators and display on the control panel come on, and the printer initiates a self-diagnostic test on the printer unit and optional accessories. ![](images/9a7ee28162c8331e673fd6823a35b0da3b7804f396489b9328a1031d9a6e325d.jpg)
natural_image Diagram of a printer with an orange arrow pointing to a circular button (no text or symbols present)
If no abnormality is found during the self-diagnostic test, the Main Power indicator (green), (Ready) indicator (green), (Online) indicator (green) and Paper Source indicator (green) come on, appears in the display, and the printer is ready to print. ![](images/1c25ba4c34516ea4170b6d0c8bb251987ecb50d6fc323bd36ecf6d112d6f0849.jpg)
text_image Main Power indicator Ready indicator Paper Source indicator Online indicator
![](images/981919ad3f428582aeb95b7e101036a9cef7f29d8e516757ee4c4156e8b1adc3.jpg)

IMPORTANT

Do not turn the printer ON immediately after turning it OFF.

If you want to cycle the power of the printer, wait at least 10 seconds before turning it ON again.

If the printer does not operate properly

> "Troubleshooting"

If an error message appears in the display on the control panel

> "A Message Appears in the Control Panel"

When turning ON the printer for the first time after installing the printer and paper feeder

Do not load paper in the drawer. > "Printer Installation"

Precautions when turning OFF the printer

If you turn the printer OFF, all print data remaining in the printer memory will be erased.

Power consumption when the power is OFF

Even if the power of the printer is turned OFF, power is consumed only slightly while the power plug is inserted in the AC power outlet. To cut the power consumption completely, unplug the power plug from the AC power outlet.

2

Select a display language using [ ] and [ ], and then press [OK]. ![](images/f9c008fc4c144e17a56828755a5233dfb36a994a588a6ea91a671d525253b2bd.jpg)
text_image Panel Language English Čeština Dansk Deutsch

3

Specify a date, and then press [OK]. ![](images/5cb382862379f0b776f47aa906add9363910996348895948e988c0bb467ed476.jpg)
text_image Date 01/01 2011 U/D Keys: Adjust Value R/L Keys: Move Field

4

Specify time, and then press [OK]. ![](images/e66a1206e518f760d699ac40c8d18877709455d5bdd83b8df846c9f4c1392a02.jpg)
text_image Time (24 hour) 19:48:43 U/D Keys: Adjust Value R/L Keys: Move Field
→ The following screen appears, and the settings are completed. ![](images/c96de512d23d12f9f8c00481ccdb8f386616088c2b41eb60e3751b8f7b2ac710.jpg)
text_image Settings complete. Refer to the instruction manual to continue printer set up.
![](images/030810dac1ef700a38cb2b0d2ae8fb54487d17f0b0c3d725fed09bb212d42aba.jpg)

NOTE

About the clock in this printer

The clock in the printer should be accurate within ± 60 seconds per month. Adjust the clock periodically.

When setting time zones and daylight savings time

See "[Setup] Menu ([Control Menu] Options)." 0258-02H When printing from a computer by USB connection, specify which of the following printer drivers is used. • UFR II • UFR II XPS (LBP7680Cx only) PCL5c PCL6 PS3 • XPS (Direct) (LBP7680Cx only) You can select the type of printer driver to be installed at the time. ![](images/1b4b249169e7d32e3cf94654fe0f72789386da5d411729b354587975f17b7dea.jpg)

IMPORTANT

When installing the printer driver manually

Be sure to match the setting of this item and the type of the printer driver to be installed. You cannot use printer drivers of a different type.

1

Press [ ] ( : Settings)

2

Select [Control Menu] using [ ▲ and [ ],▼nd then press [OK]. ![](images/8d7364010d23c6617554c275e482eccd5b0054b49686966baebcb0fa563f3977.jpg)
text_image Setup Control Menu Paper Source Network Layout

3

Select [Select PDL (PnP)] using [▲and [ ],▼nd then press [OK]. ![](images/757277e0e4f18a10ab98b8bc3fdc495625a42eaa45f50caf56a2dba83b0a56bd.jpg)
text_image Control Menu Interrupt Print Sec. Print Del. Time Secure Job Log Select PDL (PnP)
When the message is displayed, press [OK] to continue. Settings effective next time main power is turned ON. Press OK to continue.

4

→ The setting value is changed. ![](images/164f0c48e6abf15f3ceefe0b5c793297a95dac9c5f066cc01322836f3e253316.jpg)
text_image Select PDL (PnP) UFR II UFR II XPS PCL5c PCL6
Cycle the power of the printer or perform a hard reset to make the setting effective.

When Connecting Using a USB Cable

See "Important Safety Instructions" also. ![](images/5dbdec8130491f7472533cd2cd307f90269ea3b08cc8cff5002325c3a447e872.jpg)

IMPORTANT

Do not plug or unplug the USB cable while the printer or computer is ON.

This may cause the printer to malfunction.

About unidirectional communication equipment

The printer performs bi-directional communication. Operation of the printer when connected via unidirectional communication equipment was not tested, and as a result, Canon cannot guarantee printer operation if the printer is connected using unidirectional print servers, USB hubs or switching devices. ![](images/a4ed2128b38e0c07effe8d5f09dc872c9448207f9a0331851b2cedc598f1ec56.jpg)

NOTE

About the USB interface

The appropriate USB interface varies depending on the operating system of the connected computer as follows. For more details, contact your local authorized Canon dealer.
Windows 2000, XP, Vista, 7, Server 2003, and Server 2008:Hi-Speed USB/USB
Mac OS X (10.3.2 or earlier):USB
Mac OS X (10.3.3 or later):Hi-Speed USB/USB

About the interface cables

- This printer does not come with an interface cable. Have an appropriate one available for the computer you are using or the connecting method. - Use a USB cable with the following symbol. ![](images/e856504c10b866c83ec60e0bd11a4311bd1aaa93e141138cde868d25631275f4.jpg)

1

Make sure that the printer and computer are OFF.

Check if the Main Power indicator on the control panel is turned off. ![](images/babff414533e63eee3ccb9b599dc8c6164a639fe5ea3e711a8abdb231f7c70b7.jpg)
text_image Main Power indicator

2

Connect the USB cable.

- Flat end (A): Connects to a USB port on your computer. - Square end (B): Connects to the USB connector on this printer. Do not turn the printer ON at this stage even if you want to install the printer driver. ![](images/04b5d0f47b6bbb9c87a9014061cdeb2cac80fbdd92064665ac4c32481c9573dc.jpg)
text_image Diagram showing two setups (A and B) of a computer setup with labeled connectors and connection points, likely illustrating a device or system setup.

When Connecting with a LAN Cable

![](images/b4465f0c1176c2f9aa96b0f6eef0fd334489229f72ad992b311468dd3b8ae3d8.jpg)

IMPORTANT

If more than one devices are connected to an AppleTalk network

Turn on each device at an interval of ten seconds or longer. ![](images/1db4f86d0f8682cdf821fb60d519003308c874bb8c3a3192a1607842f9595ccc.jpg)

NOTE

About the network environment

This printer supports 10BASE-T, 100BASE-TX and 1000BASE-T connections. ![](images/ece860e6334cf870129bf95e74652c4f072cab84c4ff5a76089dbf6f9680e852.jpg)
flowchart
graph TD
    A["Printer"] -->|LAN Connector| B["Hub"]
    B -->|LAN Cable| C["Computer that supports 10BASE-T"]
    B -->|LAN Cable| D["Computer that supports 100BASE-TX"]
    B -->|LAN Cable| E["Computer that supports 1000BASE-T"]

About the LAN cable

- This printer does not come with a LAN cable or a hub. Have cables or a hub ready as needed. Use a Category 5 or higher twisted pair cable for the LAN. - If you want to connect the printer to a 100BASE-TX or 1000BASE-T Ethernet network, all the devices to be connected to the LAN (hub, LAN cable, and network board for computer) must support 100BASE-TX or 1000BASE-T. For more details, contact your local authorized Canon dealer.

When the printer is connected to a network

\- Check the MAC address of the print server with Network Status Print, and then configure the network operating system (UNIX, etc.) and print server. > "Checking the Printer Settings" > "Configuring the Network Settings (Sharing the Printer)"

1

Attach the ferrite core to the LAN cable as shown in the figure.

Attach the ferrite core at approximately 6 cm of the leading end of the connector connected to the printer. ![](images/6fdd0d26966243d7c74f4f6d581e47b09110e5dd5aabe9af838ca4c846f7cb79.jpg)
text_image Connector that connects to the printer. Approximately 6 cm

2

Connect the LAN cable. ![](images/c82295d0eaeac9daeee53a3ba5765a94a2b3b2e43d565f73015aa56e23da3bac.jpg)
natural_image Diagram showing connection between a device and a network device, with no visible text or symbols

3

Turn the printer ON. ![](images/b93e6051e1c67e2dbb062d4dda78bd527df38881e1d74f506679d20f7315e44d.jpg)
natural_image Diagram of a printer with an orange arrow pointing to a circular button (no text or symbols present)

4

Make sure that the LNK indicator (A) on the network interface is on. ![](images/dae6f7dcd98e513a8bd2f048d31e4b3bf5b22c03e89864b2a3e0c03745ad258e.jpg)
text_image (A)
![](images/5ec272de0fd6d9b5fb9027e21de27469e3ad732272f6061a60a6caea78706919.jpg)

When the LNK indicator is off

\- "All the Indicators on the Network Interface Are Off" 0258-02K

For Windows

> Selecting the Appropriate Printer Driver Installation > Other Software Programs

> For Macintosh

Installation 0258-02L To print from a computer, you must install the printer driver and set up the printer configuration using the printer driver. Selecting the Appropriate Printer Driver Installation Other Software Programs 0258-02R The printer driver is installed from a User Software CD-ROM. Content of Each CD-ROM: ![](images/df9c7d874f7b4350f52e17a8e8ef85fced02269ec00c950d5c78d4209d2000e8.jpg)
text_image Canon UFR II Printer Driver PCL5e/PCL5e/PCL6 Printer Driver HTML Canon PS Printer Driver Printer Driver Installation Guide PS is an option for LBP7660Cdn.

Features of the Printer Driver

• UFR II Printer Driver: Using the UFR II printer driver, the various data processing tasks conventionally executed within the printer are appropriately divided between the host PC and the printer to greatly reduce the overall printing time. The workload can be delegated to match the output data, thus realizing a significant increase in speed through optimization. \- PCL Printer Driver: The PCL5c, PCL5e, and PCL6 printer drivers can be used with most kinds of business application software. The PCL5c printer driver is for color printers, the PCL5e printer driver is for black-and-white printers, and the PCL6 printer driver is for both color and black-and-white printers. PCL6 is an advanced version of PCL5c and PCL5e, and offers superior printing quality and speed. The PCL5e printer driver is provided as standard with black-and-white printers. \- PS Printer Driver: The PS printer driver converts print data from applications into data for use with PS printers, and sends it to the printer. As well as converting print data, it can also enable you to configure settings relating to finishing and detailed settings such as color adjustment, and provides an appropriate print environment for desktop publishing and publishing on demand. ![](images/dcbfc981aaafdae69e0379eb9dcd0670e03498be4506145fd25f74162ec9a033.jpg)

IMPORTANT

To use PS printer drivers in LBP7660Cdn

In order to use PS printer drivers, it is necessary to install the optional PS ROM. 0258-02S From the menu screen of the User Software CD-ROM, you can install the printer driver. For details about the installation procedure, refer to the "Printer Driver Installation Guide." To view the guide, click [Display Manuals] from the CD-ROM menu before you start the installation. CD-ROM Menu: ![](images/0f89e01103045246b7c54d36f2b3491d94b8daa3f6bf6a1a1e10237495430ad5.jpg)
text_image Canon UFR II/PCL CD-ROM Setup You can install software programs etc. on this screen. Select a menu on the right. Installation Additional Software Programs Display Manuals Exit
• [Installation]: Click this button to install the printer driver. - [Display Manuals]: Click this button first to view the Printer Driver Installation Guide. You cannot view the Printer Driver Installation Guide after installation has started. 0258-02U The following software programs are included on the User Software CD-ROM. Available software programs vary depending on the system configuration and CD-ROM.

NetSpot Device Installer

Use this software to specify the initial settings for various devices connected to a network from your computer. For information on installing the software, see the Readme file located in the CD-ROM. 0258-02W To print from a computer, you must install the printer driver and set up the printer configuration using the printer driver. > Installation

Installation

0258-02X For details about the installation procedure, refer to the appropriate Mac driver guide.

Starting Installation:

Double-click the installation icon in the installer set folder to start the installation.

Viewing the Driver Guide:

Double-click the manual icon in the installation set folder to view the driver guide. 0258-02Y

: Usable Paper

> Precautions for Paper > Printable Area

: Paper Loading and Output

Loading Paper in the Drawer > Loading Paper in the Multi-purpose Tray Registering the Paper Size and Type > Configuring the Printer Driver and Printing

: Turning the Printer ON/OFF

> Online and Offline

Canceling a Job

Operations from the Computer > Cancelling from the Printer Control Panel > Outputting Data (Forced Output) Canceling the Process Currently Being Performed (Soft Reset) > Canceling All the Jobs (Hard Reset)

: Checking the Printer Status

0258-030 The following shows the paper sizes that can be used with this printer. ○ : Available : Unavailable
Paper TypeSetting for [Paper Type]*1Paper SizePaper Source2-sided Printing*2
Multi-purpose TrayDrawer 1Drawer 2 (optional)
Plain paper*3 (60 to 74 g/m2)[Plain L]*5[Plain L2]*4A4
B5
A5-
Legal
Letter
Executive
Statement-
Foolscap
Custom size paper○*10 *11 *11-
Plain paper*3 (70 to 84 g/m2)[Plain]*5*6(Default)A4
B5
A5-
Legal
Letter
Executive
Statement-
[Plain H]*6*7Foolscap
Custom size paper○*10 *11 *11-
Plain paper*3 (75 to 90 g/m2)A4
B5
A5-
Legal
Letter
Executive
Statement-
Heavy paper (86 to 119 g/m2)[Heavy 1]A4
B5
A5-
Legal
Letter
Executive
Statement-
Foolscap
Custom size paper○*10 *11 *11-
Heavy paper (120 to 128 g/m2)[Heavy 2]A4
B5
A5-
Legal
Letter
Executive
Statement-
Executive
Statement
Foolscap
Custom size paper ^*10
Index Card *18[Heavy 3] Index Card
Envelope[Envelope][Envelope H]*14Envelope Monarch
Envelope COM-10
Envelope DL
Envelope ISO-C5
Envelope ISO-B5
Coated Paper[Coated 1]*15[Coated 2]*15[Coated 3]*15[Coated 4]*15A4 ^*16
B5 ^*16
A5
Legal ^*16
Letter ^*16
Executive ^*16
Statement
Foolscap ^*16
Custom size paper
\*1 The setting is located in the [Paper Source] sheet in the printer driver. If you print from DOS, UNIX, or other operating system, specify a paper type in [Default Paper Type] in the control panel. \*2 2-sided printing supports paper with a weight of 60 to 163g / m^2 \*3 Recycled paper can be also used. \*4 If 60g / m^2 paper is set to [Plain L] and printed and the print result output paper is curled (the printed side is curved), set it to [Plain L2]. \*5 When printing 70 to 74g / m^2 paper, it is all right to set it to either [Plain] or [Plain L]. \*8 \*6 When printing 75 to 84g / m^2 paper, it is all right to set it to either [Plain] or [Plain H]. \*8 ^*7 When printing 86 to 90 g/m ^2 paper, it is all right to set it to either [Plain H] or [Heavy 1]. ^*8 \*8 If either is set and the following problems occur, set it to the other setting and then print. • The output paper is curled. • After-images appear on the parts that are not printed. \- The toner does not fix well and the printing is faded. \*9 It is only possible to print in black and white. \*10 You can load custom size paper that is 76.2 to 215.9 mm wide and 127.0 to 355.6 mm long. (If you are using the UFR II printer driver, you can load custom size paper that is 127.0 to 215.9 mm wide and 127.0 to 215.9 mm long also in landscape orientation.) \*11 You can load custom size paper that is 100.0 to 215.9 mm wide and 148.0 to 355.6 mm long. (If you are using the UFR II printer driver, you can load custom size paper that is 148.0 to 215.9 mm wide and 148.0 to 215.9 mm long also in landscape orientation.) \*12 You can load 129 to 163g / m^2 heavy paper. \*13 164 to 176 g/m ^2 heavy paper cannot be printed using 2-sided printing. \*14 If it is set to [Envelope] and you would like the print result to have better toner flow, set it to [Envelope H]. \*15 Set the following for coated paper. • 100 to 110 g/m²: [Coated 1] • 120 to 130 g/m²: [Coated 2] • 155 to 165 g/m²: [Coated 3] • 210 to 220 g/m²: [Coated 4] \*16 210 to 220g / m^2 coated paper cannot be printed using 2-sided printing. \*17 If paper curls, set [Paper Type] to [Heavy 2]. \*18 The following Index Card sizes are supported. - 102.0 x 152.0 mm - 127.0 x 203.0 mm ![](images/2d65f0b28bccfe6d1b32fbec567b7a21a9a11fffdb3fc0ffa298d4293d6541db.jpg)

IMPORTANT

About print speed

- The print speed may drop depending on the paper settings for the size, type, orientation, and number of copies. - When continuously printing paper whose width is 202.0 mm or less, the print speed may drop gradually.

Precautions for paper

> "Precautions for Paper" ![](images/3be0554eed5331ff5e23fbe0f91912dcbd678c4b4e994078957487c691a88dad.jpg)

NOTE

Printable area

> "Printable Area"

Envelope sizes

The envelope sizes are as follows.
Envelope Monarch 98.4 mm x 190.5 mm
Envelope COM-10 104.7 mm x 241.3 mm
Envelope DL 110.0 mm x 220.0 mm
Envelope ISO-C5 162.0 mm x 229.0 mm
Envelope ISO-B5 176.0 mm x 250.0 mm

Chlorine-free paper

Chlorine-free paper can be used with this printer.

Paper Which Requires Attention Before Use

When using the following types of paper, this may cause influence to the printout results or printer in some cases.

Paper that was stored poorly

- Creased or folded paper - Torn or damaged paper - Wrinkled paper - Curled paper - Wet or moist paper - Paper with rough edges - Irregularly-shaped paper

Paper with holes or perforations

■ Paper with binding holes - Paper with perforations

Paper with adhesive or a special coating

- Heat-sensitive paper - Paper with adhesive - Carbon paper - Treated color paper - Specially coated paper (coated paper for ink jet printers and so on)

Paper that was printed by another printer

\- Paper that was printed by a copy machine or another printer (The reverse side of the paper is also not usable.)

Paper that is difficult for the toner to fix onto

■ Paper with rough surfaces - Paper containing thick fibers - Paper with an extremely rough or smooth surface - Paper that is thicker or thinner than the specified usable paper > "Usable Paper" ![](images/6714612625de0dcaa60c2029728d181729ef817efb97367f6bc7f138dc11047f.jpg)

IMPORTANT

About paper with staples, clips, ribbons or tape

This kind of paper may result in the printer malfunction or damage to the printer.

About paper that contains ink that melts, burns, evaporates or emits harmful gases at or lower than the heating temperature of the fixing unit

This kind of paper may result in the printer malfunction or damage to the printer.

Printing on the reverse side of paper that was previously printed (Performing 2-sided printing manually)

The printer can manually print the reverse side \* of paper that has been printed once. When printing the reverse side of paper that has been printed once, first stretch out the edges and flatten out curls, load them one sheet at a time in the multi-purpose tray, and then perform the following operation with the printer driver. 1. Display the [Paper Source] page 2. Set [Paper Source] to [Multi-purpose Tray] 3. Select the [Print on the Other Side] check box \* This is only for paper that has been printed using this printer. Also, you cannot print again on the same side of the paper that was printed before.

Storing Paper

The quality of paper may deteriorate if stored improperly even when the paper meets the normal specifications. Inferior paper may cause misfeeds, paper jams, or deterioration in print quality.

How to store paper

Observe the following guidelines when storing and handling paper. - Store paper on a flat surface. - To help paper avoid moisture or dryness, keep paper in its wrapper until it is ready to be used. - Do not place paper in the condition where it may curl or become creased. - Do not store paper vertically or store too many stacks of paper in one pile. Do not store paper in the following locations. • A location exposed to direct sunlight • A location subject to high humidity - A dry location - A location with a temperature or humidity that differs significantly from the location where it will be used

If you print on damp paper

If you print on damp paper, steam may be emitted from the printer output area. Because moisture in the paper is evaporating due to the heat generated when toner fixes, this is not a malfunction. (This is likely to occur when the room temperature is low.)

Storing Printouts

When handling or storing paper printed by this printer, be careful of the following points.

How to store printouts

- Store paper on a flat surface. - Avoid storing printouts in folders made of PVC material, as this may cause the toner to melt and stick to the PVC material. Toner may peel when printouts are folded or creased. - Store printouts in the condition where they are not folded or creased as toner may peel. - Put printouts in a binder when storing for a long period of time (two years or longer). - Printouts may discolor when stored for a long period of time. - Avoid storing printouts in a location subject to high temperatures.

Precautions when sticking printouts with adhesive

- Be sure to use insoluble adhesive. - Test the adhesive on an unneeded printout before using. - Before stacking printouts that stuck with adhesive, check that the adhesive completely dried. 0258-032 ![](images/025015d5a15b38ab9bf42837bff45b1c8e8fd233a0b9faebbfa1cd1ffbf60eca.jpg)

NOTE

If you want to extend the printable area

Specify the following settings in the printer driver.

• UFR II Printer Driver/PCL Printer Driver

1. Click [Advanced Settings] in the [Finishing] sheet. 2. Set [Expand Print Region and Print] to [On].

- PS Printer Driver

See Help of the PS printer driver. † Depending on the document to be printed, part of the edges of the document may not be printed, or when printing in color the printing on the edges of the paper may be blurred.

Plain Paper/Heavy Paper/Transparency/Label/Index Card

The printable areas are as follows. - UFR II/PS Printer Driver ![](images/345107f08980787886303e5933d7f946e9a3f125ebe8b38f9ec0edc2b2d018ea.jpg)
text_image 5 mm 5 mm 5 mm 5 mm
- PCL5e/PCL6 Printer Driver ![](images/3dab01b5de019c1213ab349de9d2e8dbc909c9143725e00ec229d30f5a0d99f8.jpg)
text_image 4.2 mm 4.2 mm 4.2 mm 4.2 mm

Envelope

This printer can print on the following area. You may have to change the printable area before printing, depending on the application you use. ![](images/8ab4b14f4eb79bcbcc5ad62901b9ee0cad542ea7b75ea5a2770352a2a55d313d.jpg)
text_image 10 mm 10 mm 10 mm 10 mm
0258-033 This printer has the following paper sources and output trays. ![](images/4051f3670f256f84f9d308aceafde2be23e5e84ff8f9676a9e22a43b9dc103b1.jpg)
text_image (A) (B) (C) (D)
Paper Source(A): Multi-purpose tray> "Loading Paper in the Multi-purpose Tray"
(B): Drawer 1> "Loading Paper in the Drawer"
(C): Drawer 2 (optional)
Output Tray (D): Output tray Outputs paper with the printed side facing down.

Precautions for Output Trays

Pay attention to the following points when handling the output trays. See "Important Safety Instructions" also. \- During 2-sided printing, do not touch the paper until it is output to the output tray completely. The paper is first output partially after the front side is printed, and then it is fed again to be printed on the reverse side.

Paper Capacity of the Paper Sources and Output Trays

—: Unavailable
Paper TypePaper SourceOutput Tray
Multi-purpose trayDrawer 1Drawer 2 (optional)
Plain paper (90 g/m2)Approx. 50 sheetsApprox. 250 sheetsApprox. 250 sheets150 sheets
Heavy paper (120 g/m2)Approx. 30 sheetsApprox. 200 sheetsApprox. 200 sheets50 sheets
Heavy paper (176 g/m2)Approx. 20 sheetsApprox. 150 sheetsApprox. 150 sheets50 sheets
Transparency Approx.20 sheetsApprox. 10 sheets
Label Approx. 20 sheetsApprox. 50 sheetsApprox. 50 sheetsApprox. 10 sheets
Envelope Approx. 5 sheetsApprox. 10 sheetsApprox. 10 sheetsApprox. 10 sheets
Coated paper Approx.20 sheetsApprox. 50 sheetsApprox. 50 sheets
\* Actual paper capacity varies depending on the installation environment, paper type or paper size to be used. 0258-034 ![](images/9f8d6b4cab615c6ad69d0424beda99f674d01795d888c8307c075cade35e37f2.jpg)

NOTE

When loading envelopes and custom paper sizes

Because the procedure for loading custom size paper is different from that for loading standard size paper, see "Loading Envelopes and Custom Paper Sizes."

Loading Standard Size Paper

For details on the paper that you can load in the drawer, see "Usable Paper." Load paper in Drawer 2 (optional) in the same manner as you load paper in Drawer 1. Before loading paper, see "Attention (Drawer)."

1

Pull out the drawer.

![](images/59aeddd0aae7cd7c62adeb50aa04e6eaf98184a553929179a215f8a503b15dd3.jpg)
natural_image Diagram showing a hand inserting a device into a computer chassis (no text or symbols visible)

2

Slide the paper guides to the position of the size of the paper to be loaded.

While holding the lock release lever (A), adjust the guides. Align the position of (B) with the size mark of the paper to be loaded. ![](images/7a243df24ee0842a10eb9ee55cedb64eacf303f17ee1c9105e1b2c22965db8b3.jpg)
text_image (A) (B) (A) (B)
When loading Legal size paper Pull out the drawer. ![](images/3002bb09efec41ab768d059eee7e548818d92d4cb61ad372319edc55b13a8239.jpg)
natural_image Diagram of a mechanical assembly with an inset showing a close-up of a component (no text or symbols present)

3

Load the paper with the printing side facing up so that the paper stack is aligned with the rear paper guide. ![](images/255bf694f82312b9887ff7b64137de4f61c19be85d19f7ea0c5d236f0d050b42.jpg)
natural_image Diagram of a device casing with an orange arrow indicating direction (no text or symbols)
![](images/0c0b3987c49e0a9937a2363af4a33aeb77d877bc76eaacab7f2d58efc7a34dd0.jpg)

IMPORTANT

About the paper loading orientation

If you are not using the UFR II printer driver, load paper in portrait orientation. Also, be sure to load paper in landscape orientation if all the following conditions are fulfilled. - You are using the UFR II printer driver. - [Drawer 1 Size] and [Drawer 2 Size] are set to [Mixed Sizes]. - Custom size paper whose long edges are 215.9 mm or less is loaded. ![](images/7a31bdb21808d5f148d0f45bdbb785374d86e0a80f80a7e111771db924809e02.jpg)

NOTE

See "Paper Loading Orientation" and load the paper in the correct orientation.

4

Hold down the paper, then set it under the hooks (A) on the paper guides. ![](images/720280ba3b639d3a9a6f48c83a842cb711384ab6bd2944283832ea62b44a5ad2.jpg)
text_image (A) (A) (A)
![](images/9d23e414e905170109f9239fef5f4bb0b79bea00745cf6fd10de2fa4b24c7496.jpg)

IMPORTANT

Be sure to align the paper guides with the paper.

If the paper guides are too loose or too tight, this may result in misfeeds or paper jams. ![](images/a872c519dc98f05d4933fc3a0642d814e75b3998aa7fa617a293e043400b47b0.jpg)
text_image Diagram showing four types of road barrier symbols: no barrier, horizontal beam, curved beam, and straight beam with directional arrows.

5

Make sure that the paper stack does not exceed the load limit mark lines (B).

Be sure that the paper stack does not exceed the load limit mark lines. If the paper stack exceeds the load limit mark lines, this may result in misfeeds. ![](images/90bb448f5feca4c8b2db9a6e389648d9f70e8ac91080751b74b7af6c0769d6df.jpg)
text_image (B) (B)

6

Set the drawer in the printer.

![](images/753f0a758332977de4cda4ff19d1f27a63fb29212e8315b63a0a0f6dce448c2c.jpg)

NOTE

When the drawer is inserted with it extended, the front side of the drawer is not flush with the front surface of the printer as shown in the following figure. ![](images/07860c4132a917324d425c8a742790056e902d4272adc84527d6ba9bf87bf52c.jpg)
natural_image Line drawing of a printer with a drawer and paper holder (no text or symbols)
![](images/2c72de27eaa872c8a5572599c5383c57a1e8ada5f909525c9c69befd78e29499.jpg) Next, register the paper size and type. "Registering the Paper Size and Type" 0258-035 See "Important Safety Instructions" also. ![](images/de0a33db27036a150f8175beb2f1d3d12bc5924e536ef887563da6e98205292b.jpg)

IMPORTANT

When loading paper for the first time after installing the paper feeder Before loading paper, be sure to turn ON the printer once. Do not touch the black rubber pad (A) in the paper drawer. This may result in misfeeds. Do not pull out the drawer during printing. This may result in paper jams or damage to the printer. When using paper that is poorly cut Multiple sheets of paper may be fed at a time. In this case, fan the paper thoroughly, and then align the edges of the stack properly on a hard, flat surface. 0258-0LU ![](images/9b35560ac6092eda7b444ce41bcae7126576e07082f76b484fce191628f81466.jpg)

NOTE

When loading envelopes and custom paper sizes in the multi-purpose tray

Load them the same way as standard size paper. > "Loading Paper in the Multi-purpose Tray"

Loading Envelopes and Custom Paper Sizes in the Paper Drawer

For details on the paper that you can load in the drawer, see "Usable Paper." Load paper in Drawer 2 (optional) in the same manner as you load paper in Drawer 1. Before loading paper, see "Attention (Drawer)."

1

Pull out the drawer. ![](images/587e65281cae7733134c4692c42f589e82fde38b57f8fb70e1712954cbd2cfed.jpg)
natural_image Diagram of a computer monitor with an open drive and a hand inserting a cable (no text or symbols)

2

Slide the paper guides a little wider and longer than the actual paper size.

While holding the lock release lever (A), adjust the guides. ![](images/c8b011295a134a7308b44f5dc56a3a85dea96d08df4918000404eda89f193543.jpg)
text_image (A) (A)

When loading paper that is longer than A4 size

Pull out the drawer. ![](images/1a03a9fd95af37edd4b842d0e2a22c58595875c9a9284c1183c231b097414776.jpg)
natural_image Diagram of a mechanical assembly with an inset showing a component being inserted, no text or symbols present.

3

Load the paper with the printing side facing up so that the edges of the stacked paper are aligned with the rear side of the drawer. ![](images/d1df4864844fdf147b46b558de2b9577100e90ebf86ff12c4370eca8e2d62d27.jpg)
natural_image Diagram of a device casing with an orange arrow indicating direction (no text or symbols)
![](images/4b7d20807663f13e47722249fd3dde95b0ae3f22c49d3bad090ffc6aa7fbd78f.jpg)

IMPORTANT

About the paper loading orientation

If you are not using the UFR II printer driver, load paper in portrait orientation. Also, be sure to load paper in landscape orientation if all the following conditions are fulfilled. - You are using the UFR II printer driver. - [Drawer 1 Size] and [Drawer 2 Size] are set to [Mixed Sizes]. - Custom size paper whose long edges are 215.9 mm or less is loaded.

When loading envelopes

See "Printing on Envelopes" and load the paper in the proper orientation. ![](images/ae946eb22e41041597b5e0426a7698553d8d26153048f0dea095cd3d74c93a6e.jpg)

NOTE

When loading paper with a letterhead or logo

See "Paper Loading Orientation" and load the paper in the correct orientation.

4

Align the paper guides with the loaded paper.

While holding the lock release lever (A), adjust the guides. ![](images/f6fc3879f71c1ef8e1f30452bcaea9f3e39288019dc8a352d27b2107152168a0.jpg)
text_image (A) (A)
![](images/bc9a23e5893fbc76099ad766b26009a97e7762609b79b1441bb4580349416523.jpg)

IMPORTANT

Be sure to align the paper guides with the paper.

If the paper guides are too loose or too tight, this may result in misfeeds or paper jams. ![](images/27c47dd8677689b997abdfcb897a27c30e9881f9e2420e2bd6cf8d4826b50c1e.jpg)
text_image Diagram showing four types of construction elements with a prohibition symbol and corresponding cross-sectional views.

5

Make sure that the paper stack does not exceed the load limit mark lines (A).

† Be sure that the paper stack does not exceed the load limit mark lines. If the paper stack exceeds the load limit mark lines, this may result in misfeeds. ![](images/fab488a076f5352159887fc23e9ad84955f796f766741d6713ec26853d04b352.jpg)
text_image (A) (A)

6

Set the drawer in the printer.

![](images/e66ac19fb9f67e6b974267c9b026dfc0d458c7d0e5f4820c58503da3932c48fe.jpg)

NOTE

When paper is loaded that is longer than A4 size

When the paper drawer is inserted with it extended, the front side of the paper drawer is not flush with the front surface of the printer as shown in the following figure. ![](images/14cca18cf81b50691e263e3b1b0169223fb6b6dc3ff410b53898aa2fbbfe468e.jpg)
natural_image Line drawing of a printer with a drawer and internal components (no text or symbols)
![](images/7fe46909cc693ade3cb9f0a2ecb7c5bea163ea8dd870de282af398ed5e699e32.jpg) Next, register the paper size and type. "Registering the Paper Size and Type" 0258-036 For details on the paper that you can load in the multi-purpose tray, see "Usable Paper." Before loading paper, see "Attention (Multi-purpose Tray)."

1

Open the multi-purpose tray, and then pull out the auxiliary tray. ![](images/8b954e460db0946813e2bed991338fafd974f1d67614ab859a4c6624058e4ed2.jpg)
natural_image Diagram of a computer monitor with an orange arrow pointing to the internal panel (no text or symbols present)
When loading long-size paper Open the tray extension also. ![](images/ab98cd59b9780d26668018e2eb0bec5ead4606ad089d5c3b4446b8d4e89bced9.jpg)
natural_image Diagram of a kitchen appliance with an orange arrow indicating rotation or movement (no text or symbols present)

2

Slide the paper guides a little wider than the actual paper width. ![](images/e91008d6a0b1d064094bb6799b6f9c09319eaa5eb89d0c294f955ce98d84094b.jpg)
natural_image Line drawing of a printer's front panel with an orange cable inserted, no text or symbols present

3

Gently load paper with the printing side facing up until it touches the back of the tray. ![](images/db90416ca4ee7923c48f467dce96797dcbbfc7af63248b2a2f1125dbe15f8314.jpg)
natural_image Line drawing of a computer monitor with an orange arrow pointing to the screen area (no text or symbols)
![](images/254732fd9df36d45e55b6c312c2b00dec57ddd2f38f65b30b754c86df964566f.jpg) ![](images/bb78bc00ba90753a1c9967cd2c0ddf010c6515a469ecf68fa18e1012844d02ff.jpg)

IMPORTANT

About the loading orientation of standard size paper

Be sure to load the paper in portrait orientation.

About the loading orientation of custom size paper

If you are not using the UFR II printer driver, load paper in portrait orientation. Also, be sure to load paper in landscape orientation if all the following conditions are fulfilled. - You are using the UFR II printer driver. - [MP Tray Paper Size] is set to [Mixed Sizes]. - The long edges of the paper are 215.9 mm or less.

About the loading orientation of envelopes

See "Printing on Envelopes" and load envelopes in the correct orientation. ![](images/cf23c8e79f65bdc8c239de8f097be02630576247476b44d1b791c0c2a2907562.jpg)

NOTE

When loading paper with a letterhead or logo

See "Paper Loading Orientation" and load the paper in the correct orientation.

4

Align the paper guides with the width of the paper. ![](images/88a23e76cd9932b8510f14e49ed9954e4ed10ac0a0e8c88597ee2caa4b39d099.jpg)
natural_image Line drawing of a cabinet interior with orange arrows indicating movement or force (no text or symbols)
![](images/55e475c1ab8edb1813d0a0ee89215ef23c4c432a85fffeb07df1421874d6b07e.jpg)

IMPORTANT

Be sure to align the paper guides with the width of the paper.

If the paper guides are too loose or too tight, this may result in misfeeds or paper jams. ![](images/a3fe8f24dbd6c55d9721cdcd5045919c995f5aec5269eb084b7f5c4858aaef60.jpg)
text_image Diagram showing four different types of road cross-sections with no signage, including a prohibition symbol and mechanical components.

5

Be sure that the paper stack is loaded under the load limit guides (A). ![](images/18e276a84200c7cd4d11bfc5ce16c995fb12b8e94c00f4f8df59ba735a605772.jpg)
natural_image Line drawing of a printer with a magnified inset showing the internal structure (no text or symbols)
![](images/da8e5faf022ae717df1ede0648096d5a95fe8d90054b1dce88b88b90b0b972ba.jpg) Next, register the paper size and type. "Registering the Paper Size and Type" See "Important Safety Instructions" also. ![](images/757dca677080bb3330d25bae8e39f6f6e585feec21ce89ee917b431655d8ed54.jpg)

IMPORTANT

Precautions when loading paper in the multi-purpose tray

- Load the paper so that it is straight. - If the rear edge of the paper stack is not properly aligned, this may result in misfeeds or paper jams. - If the paper is curled or folded at corners, flatten it before loading it in the printer.

Do not touch the paper in the multi-purpose tray or pull it out during printing.

This may result in paper jams or damage to the printer.

When using paper that is poorly cut

Multiple sheets of paper may be fed at a time. In this case, fan the paper thoroughly, and then align the edges of the stack properly on a hard, flat surface.

Do not place any objects other than paper on the multi-purpose tray. Do not press the top of or apply excessive force to the multi-purpose tray.

This may result in damage to the multi-purpose tray. 0258-038 This printer cannot automatically detect the paper size. Therefore, you need to register the size of the loaded paper. Also, it is necessary to set the paper type to match the type of paper that is loaded. Register the paper size using the following procedure. (The paper size setting is set to [A4] by default.) ![](images/021cbb621f46a2adfa4eb889ace2505b9df8c4b5372e125d9a6c30a45086ef1c.jpg)

NOTE

Precautions when specifying [Mixed Sizes]

- The printer performs printing without checking the paper settings in the printer driver. Make sure that the paper specified in the printer driver matches that loaded in the paper drawer before using the printer. - If you are using the UFR II printer driver, load custom size paper whose long edges are 215.9 mm or less in landscape orientation.

1

Press [ ] ( : Feeder Selection).

2

Select the paper source whose size is to be registered using [ ] and [ ], and press [OK]. Select either [MP Tray Paper Size], [Drawer 1 Size] or [Drawer 2 Size]. ![](images/5e9ca00bb962057c976dc5a0e6fb3c61b293abdb0f60c477f5585815b02a2a03.jpg)
text_image Select Feeder Paper Source MP Tray Paper Size MP Tray Priority Drawer 1 Size

3

Select a paper size using [ ] and [ ], and then press [OK]. ![](images/5e5affff45574bf7ea7c278b73f3d96b5f6dacbe7ad01c7c1f27d258fe05fd75.jpg)
text_image MP Tray Paper Size A5 B5 A4 LTR
→ Paper size is registered.

4

Select the paper source whose type is to be registered using [ ] and [ ], and press [OK]. Select either [MP Tray Paper Type], [Drawer 1 Type] or [Drawer 2 Type]. Since the printer driver's [Paper Type] default value is [Printer Default], it is normally not necessary to change the printer driver settings. Whenever you change the printer driver settings, match them with the paper settings on the control panel. ![](images/bdc75fd1e53671d6fbf8ef538b09fe3dda7e39cbc54a4c8ac8d74a7615fad3ae.jpg)
text_image Select Feeder Diff. Paper Tray Auto Selection Default Paper Type MP Tray Paper Type

5

Select the paper type with [▲ or [ ],▼ and then press [OK]. → The paper type is registered. ![](images/7bb8de7b4f5dc292b950dcfa2cca1556f96bec5ba344171b35d070d7a509a0b8.jpg)
text_image MP Tray Paper Type Plain Plain L Plain L2 Heavy 1
Next, specify the following settings. When printing from the printer driver on Windows or Macintosh, configure the printer driver. > "Configuring the Printer Driver and Printing" When printing from DOS or UNIX, specify the settings for [Standard Paper Size] and [Default Paper Type] using the control panel. \- "[Setup] Menu ([Paper Source] Options)" 0258-039 After loading paper in a paper source, configure the printer driver to print using the following procedure. This section describes the basic procedure for printing from an application, taking Adobe Reader as an example. The printing procedure may differ depending on the application you are using. Before printing, see "Attention (Printer Driver Configuration)."

1

Load paper in the drawer or multi-purpose tray. > "Paper Loading and Output"

2

Open the PDF file to be printed using Adobe Reader.

3

Select [Print] from the [File] menu. ![](images/030e2d4f763cc64f3412f9f55c1fba9fa5ea99bb61f1235de2562e084d8b704b.jpg)
text_image sample.pdf - Adobe Reader File Edit View Document Tools Window Help Open... Ctrl+O Create Adobe PDE Using Acrobat.com... Collaborate Save a Copy... Shift+Ctrl+S Sage as Text... Attach to Email... Close Ctrl+W Properties... Ctrl+D Digital Editions Print Setup... Shift+Ctrl+P Print... Ctrl+P 1 C:\Users\Public\sample.pdf Exit Ctrl+Q

4

Configure the printing preferences. (1) Select this printer. You can change the printer name in the printer folder (» "Basic Operations/Various Information for Windows"). (2) Configure the printing preferences. ![](images/70ae1cd3d47a87550eb8d345bd7051c03e10e6d4d37dd554a298dc3968f2e465.jpg)
text_image Print Printer Spines: Canon Printer Status: Ready Type: Canon XXXXXXXXXXXXX UPR 10 Print Range ● All ○ Current gsw ○ Current page ○ Pages 1 - 2 Subject: All pages in range □ Abverse pages Page Handling Copies: 1 ○ Delete Page Scaling: Shrink to Printable Area □ Auto-Estate and Center □ Choose paper source by PDF page size □ Use custom paper size when needed □ Print to file (1) series Copments and Forms: Document and Markups Preview: Composite $27 (2) Units: Inches Zoom : 95% 1/2 Printing Tips Advanced OK Cancel

5

Click [Properties].

![](images/d7cef87c0dd204cd871b503d63d77fa4c8b424a3551e6ce398faa8a6ee139f7c.jpg)
text_image Print Printer Name: Canon Printer Status: Ready Type: Canon XXXXXXXXXXXXX UPR II Properties Cognments and Forms: Document and Markups Print Range All Current pages Current page Pages 1 - 2 Subject: All pages in range Agrieme pages Page Handling Copies: 1 Aggregate Page Scaling: Shrink to Printable Area Auto-Epindle and Center Choose paper source by FOP page size Use custom paper size when needed Print to file Units Inches Zoom: 95% 1/2 Printing Tips Advanced OK Cancel

6

Specify the settings for [Page Size] and [Output Size].

(1) Display the [Page Setup] sheet. (2) Select the page size of the document created by an application. (3) Select if the size of the paper to be printed is different from that of the data. ![](images/5a4732679e0cd9b785f0735349e6a27ee265111781d74eaa2054bfa5de3ae4a1.jpg)
text_image Canon Printer Printing Preferences Page Setup (1) Paper Source Quality Profile: Default Settings Add(1) Edit(2) Output Method: Print Page Size: A2 Output Size: B5 Copies 1 [1 to 9999] Orientation A Portrait A Landscape Page Layout: 1 tan 1 Manual Scaling Scaling 86 3.25 to 200 Watermark Watermark None CONFIDENTIAL Edit Watermark... Custom Paper Size... Page Options... Restore Defaults OK Cancel Apply Help
![](images/a9c447edd78de8d5cabecb685d4c77f1525d3e245a4c05308c714e7f0301b647.jpg)

IMPORTANT

If the [Page Size] setting and [Output Size] setting are different The print is automatically reduced or enlarged to fit on the page.

7

Specify the settings for [Paper Source] and [Paper Type].

(1) Display the [Paper Source] sheet. (2) Set the paper source you want to use. (3) Select the type of the paper loaded in the paper source. ![](images/4d2a02d06dbe05a6efcdf5ee1f94c83a8a008d4d4c0d39137f9d68265457c83f.jpg)
text_image Intl Canon Printer Properties Page Setup Finishing Paper Source (1) Profile: Default Settings Add(1) Edit(2) Output Method: Print Paper Selection: Same Paper for All Pages Paper Source: Multi-purpose Tray Drawer 1 Paper Type: Printer Default View Settings Feed Customs Paper Vertically Print on the Other Side Restore Defaults OK Cancel Help
\* Specify the setting according to the paper type as follows.
Paper Type Setting for [Paper Type]
Plain Paper60 g/m2[Plain L2]*1
60 to 74 g/m2[Plain L]*2
70 to 84 g/m2[Plain]*2*3
75 to 90 g/m2[Plain H]*3*4
86 to 119 g/m2[Heavy 1]*4
Heavy paper 120 to 128 g/m2 [Heavy 2]
129 to 176 g/m2 [Heavy 3]*7*10
Index Card [Heavy 3]
Transparency[Transparency]*6
Label [Labels]
Envelope[Envelope][Envelope H]*8
Coated paper100 to 110 g/m2[Coated 1]*9
120 to 130 g/m2[Coated 2]*9
155 to 165 g/m2[Coated 3]*9
210 to 220 g/m2[Coated 4]*9
\*1 If 60~g / m^2 paper is set to [Plain L] and printed and the print result output paper is curled (the printed side is curved), set it to [Plain L2]. ^*2 When printing 70 to 74 g/m ^2 paper, it is all right to set it to either [Plain] or [Plain L]. ^*5 \*3 When printing 75 to 84g / m^2 paper, it is all right to set it to either [Plain] or [Plain H]. \*5 \*4 When printing 86 to 90g / m^2 paper, it is all right to set it to either [Plain H] or [Heavy 1]. \*5 \*5 If either is set and the following problems occur, set it to the other setting and then print. - The output paper is curled. • After-images appear on the parts that are not printed. - The toner does not fix well and the printing is faded. ^*6 It is only possible to print in black and white. \*7 You can load 129 to 163g / m^2 heavy paper. \*8 If it is set to [Envelope] and you would like the print result to have better toner flow, set it to [Envelope H]. \*9 Set the following for coated paper. • 100 to 110 g/m²: [Coated 1] • 120 to 130 g/m²: [Coated 2] • 155 to 165 g/m²: [Coated 3] • 210 to 220 g/m²: [Coated 4] \*10 If paper curls, set [Paper Type] to [Heavy 2]. ![](images/043f0c08af404bab503ad0c418c901ca20154db2bfcd682d2fbc3358eb1b4710.jpg)

NOTE

Using Preview to specify a paper source

You can also specify a paper source by clicking each paper source or [Auto] using Preview when [ ] is selected. ![](images/7a3c5e9f568ab683e0a54717e4e71dece4a7adfa0e4ebff4b2ed47aa7e8c2229.jpg)
text_image Screenshot of a software interface showing a printer icon with an 'Auto' button, likely from an older application or design tool.

8

Specify the other printing preferences as needed.

"Useful Printing Functions" describes the printing procedures that use the various printing functions. Make full use of the functions of this printer. ![](images/1f9579a5206a5fa67d736a183ff3a71085755f0d6df5b08cda2aef2d6cd72b4c.jpg)

NOTE

For details on the settings

9

Confirm the settings, then click [OK].

→ The [Print] dialog box reappears.

10

Click [OK].

→ The printer starts printing. ![](images/059b70a735af19738956a15d3317aacbc79d82bf914a73099753a58a8bb96085.jpg)

If the printer cannot print properly

> "Printing Cannot Be Performed (USB Connection)" > "Printing Cannot Be Performed (LAN Connection)" "Printing Cannot Be Performed (via the Print Server)" ![](images/bf764b1c9c9f87b0456290896dc1af98b32e5253fe6bd32f89669821219cf6ec.jpg)

IMPORTANT

Be sure to match the setting in the control panel.

Match the setting specified in the [Setup] menu and that specified in [Output Size] in the printer driver. If they do not match, the message appears. In this case, the setting for [MP Tray Paper Size], [Drawer 1 Size] or [Drawer 2 Size] is changed to that in the printer driver by pressing [ ] (• Online), allowing you to continue printing. > "Registering the Paper Size and Type" ![](images/41b8d007916bc2270aa7f6f9fd8acbeda5319b6fed42e4c2c09b67f26075ed0f.jpg)

NOTE

About configuration samples

The display may differ depending on the operating system in addition to the type and version of the printer driver.

How to install the printer driver

- If you are using Windows, see "Printer Driver Installation Guide." To view "Printer Driver Installation Guide", see "Installation." - If you are using Macintosh, see "Driver Guide." To view "Driver Guide", see "Viewing the Driver Guide."

When printing on custom size paper

You need to register the custom paper size in the printer driver previously. For details on the procedure for registering a custom paper size, see Help of the printer driver. > "Viewing the Online Help"

About the contents specified in "Configuring the Printer Driver and Printing"

The specified settings apply only to data to be printed from the same application. Exiting the application resets the changed settings to the default settings. For details on the procedure for changing the default values for printing preferences, see "Configuring the Print Settings Beforehand." 0258-03C This section describes the procedures for turning the printer ON/OFF and checking the printer operation. Before printing, see "Attention (Turning the Printer ON/OFF)."

Turning ON the Printer

To use this printer, press the power switch to turn the printer ON. After checking the status of the printer unit and optional accessories, the printer is ready to print.

1

Press the power switch to turn the printer ON. ![](images/58658cc4a406e755fd1db9a3bf1f2a71a520bbd25559fcaf3f953a167104d66c.jpg)
natural_image Diagram of a printer with an orange arrow pointing to a circular button (no text or symbols present)
The indicators and display on the control panel come on, and the printer initiates a self-diagnostic test on the printer unit and optional accessories. If no abnormality is found during the self-diagnostic test, the Main Power indicator (green), 📍 Ready indicator (green), ← Online indicator (green) and Paper Source indicator (green) come on, appears in the display, and the printer is ready to print. ![](images/e4d71fb72ddea784912f25f1a8da50c76738b5824134cc9c7469423709705f1e.jpg)
text_image Main Power indicator Ready indicator Paper Source indicator Online indicator
The following information is displayed in the display. Printable and not processing print data Size of paper in the currently selected paper source ![](images/35a7f4ad9a0fe7a6fb53ae5cd56e1868aec9a1501b199ad7948042407f88c92b.jpg)
text_image Ready to print. A4 Y M C K Amount of toner remaining
To stop the printer properly, use the following procedure for turning the printer OFF.

1

Check that the printer is not performing the following operations.

- Printing - While the printer is running a self-diagnostic test immediately after turning the power ON - While the ➡ Job indicator is on or blinking - When any of the following messages appears - - -

2

![](images/08b1717a597026111ba37ba8f0cac9890115162ca0367b06c1bdc72bcdb4fe8b.jpg)

3

Select [Shut Down] using [▲ and [ ], and then press [OK]. ![](images/8e4044c43f368b21b29d57ed36914918c72b2a2efc918ee40094237adda46c6b.jpg)
text_image Reset Soft Reset Form Feed Shut Down
![](images/d2473e9c54d764e6a384808cb9b6093da71715a8030e0f6932a4a946530440db.jpg)

IMPORTANT

If "Could not execute." is displayed

There is a Secure Print job in the SD card. If shutdown is running, after deleting the job using a soft reset, run the shutdown operation again. If shutdown is not running, press [ ] (• Online). ![](images/865073ca562740f714496e5a40b0285423d1110256151b4705d123f96c4bdd9f.jpg)

NOTE

When you are using WSD printing

The shutdown notifies the computer that the printer is turned OFF.

4

Select [Yes] using [▼, and then press [OK]. ![](images/0250f35bae96c228a357c3e7db3ce0707be3f60a4d93b2977a9473074a0fc9e7.jpg)
text_image Execute? No Yes
→ After the message appears, turn OFF the printer automatically. Shutting down... Wait for prompt to turn OFF main power. ![](images/6e4fea32109aa6227808bd6054269e8feff0c45229be09be74612433e538f55b.jpg) ![](images/c3134d975647b70b5db5253c6cc5f2032c1acead14dd3aadcc34eebf7ca26b6a.jpg)

NOTE

If the printer is not turned OFF immediately

Depending on the process in the printer, it may take up to 10 minutes to turn the printer OFF. ![](images/d77e64eb3245820c414179bfc876cf4f64df8140d632910ffa3ea1643b6d5d3f.jpg)

IMPORTANT

Do not turn the printer ON immediately after turning it OFF.

If you want to cycle the power of the printer, wait at least 10 seconds before turning it ON again.

If the printer does not operate properly

> "Troubleshooting"

If an error message appears in the display on the control panel

"A Message Appears in the Control Panel"

Precautions when turning OFF the printer

- If you turn the printer OFF, all print data remaining in the printer memory will be erased. - When you attempt to turn the printer OFF suddenly, an unexpected error may occur. Use the procedure described in the e-Manual to turn the printer OFF.

Power consumption when the power is OFF

Even if the power of the printer is turned OFF, power is consumed only slightly while the power plug is inserted in the AC power outlet. To cut the power consumption completely, unplug the power plug from the AC power outlet. 0258-03F When the printer can receive data from the computer and print the data, the printer is in the state of "Online", and when the printer is disconnected with the computer and cannot receive data, the printer is in the state of "Offline." To perform the settings for each menu using the control panel, switch the printer status as follows. ○ : The state where you can enter the menu — : The state where you cannot enter the menu
When the printer is onlineWhen the printer is offline
[Setup] menu○ *
[Select Feeder] menu
[Reset] menu
[Job] menu
[Utility Menu] menu
Application menu (LBP7680Cx only)
\* The [User Maintenance] options cannot be specified when the printer is online.

Placing the Printer Online

When printing from the computer, the printer has to be online. If not, place the printer online using the following procedure. 1 Press [ ] ( : Online). The •• Online indicator turns on, and the printer is online. ![](images/c18a28d564d1f4e653b1972455c7ace3495697c17e727af5a9f08c425e0e3d2f.jpg)

IMPORTANT

If you cannot place the printer online

If an error is occurring in the printer, the printer does not come online. Eliminate the cause of the error before you place the printer online. ![](images/9993d5cb74e9910ed6a5a67743a8ec8953f08517311aeb91e8bdbda01bc7b62a.jpg)

NOTE

About the → Online indicator during Sleep Mode

During Sleep Mode, the •• Online indicator is off even when the printer is online.

Placing the Printer Offline

To configure the printer so that it does not receive data from the computer or specify the settings for all the items in the [Setup] menu, place the printer offline using the following procedure. 1 The •• Online indicator goes off, and the printer is offline. ![](images/3347a090cb8c7666fe2c4becad4f3bfa7c38a45feb21215ab84e9d014a7f3b55.jpg)

IMPORTANT

About the automatic online function

- You can specify the time interval until the printer automatically enters the online status. The default is [2 minutes]. > "[Setup] Menu ([Control Menu] Options)" - The printer does not automatically enter online status in the following cases. - The printer is in error status. - The printer is in Sleep mode. - [Auto Reset Time] under [Timer Settings] is set to [Off]. 0258-03H You can cancel a print job using either of the following methods.

Operations from the Computer

You can select jobs from the print queue and cancel them. When the printer is connected to the computer using a LAN cable, you can cancel printing from the Remote UI. "Managing Print Jobs"

> Cancelling from the Printer Control Panel

You can press [ ] ( : Job Status/Cancel) and cancel the job. You can cancel other user's jobs.

Solve the problem using either of the following methods. \- Outputting Data (Forced Output) You can force the printer to output the print data. > "Outputting Data (Forced Output)" \- Canceling the Process Currently Being Performed (Soft Reset) You can cancel the process currently being performed. > "Canceling the Process Currently Being Performed (Soft Reset)"

You can cancel all the jobs using the following method. \- Canceling All the Jobs (Hard Reset) You can delete all the jobs or data which was already sent to the memory. > "Canceling All the Jobs (Hard Reset)" 0258-03J This section describes the procedure for when you are using Windows. If you are using Macintosh, see "Driver Guide." For details on the procedure for viewing Driver Guide, see "Viewing the Driver Guide."

1

Display the print queue.

1. Open the printer folder. > "Basic Operations/Various Information for Windows" 2. Double-click the icon for this printer. ![](images/85b57d3118eac8308b41fb228dfd008880eb614bca03a8b6ab72ff094ade025a.jpg)
text_image Hardware and Sound Devices and Printers Add a name Add a printer box what's printing Print server properties Remove devices Devices (3) XDH00800X XDH00800X USB Mouse Printers and Fawes (3) Canon Printer Microsoft XP5 Document Writer Canon Printer Store Default Model Canon Printer Category Printer Status 4 documents(1) in queue

2

Right-click the job that you want to cancel, then select [Cancel] from the pop-up menu. ![](images/76e069f2d6ba869fdcf78dbaacb4d7f67956cc376d3673ab26bf2944060b8c5c.jpg)
text_image Canon Printer Printer Document View Document Name Status Owner Pages Size Sample1a Pause Printing User_1 1 51.2 KB/30.1 MB Cancel Cancels the sel Properties
![](images/b36bfef1206bd88aab0c24ada58dad9096cbe88f7e7d704b05143e27f64b8e8a.jpg)

If a print job does not appear

Another user's job is not displayed. (For the print server environment, all print jobs are displayed on the print server.) If an error is occurring with a print job from another user, use the [ ] (Job Status/Cancel) key to cancel the job. > "Cancelling from the Printer Control Panel" ![](images/0bad9a38ee76501bbedd1a2ceaa2d0200de82c0e3ad99eacd2bca14c2a9a36f9.jpg)

NOTE

For details on the print queue

See Windows Help.

3

Clicking [Yes] cancels the print job. 0258-03K When you want to cancel printing using the printer's control panel, run "Job Cancel" using the following procedure. A job cancel allows you to cancel the job currently being received or processed. ![](images/19d8c5c58f34ab0d8e2d0180a8d862fc47cc5061701b474b132859e16e7a3ef9.jpg)

IMPORTANT

The data for which the printer started to feed paper cannot be canceled.

If the job is canceled in this state, the next print data may be canceled.

About print jobs for other than the printer driver for this printer

When there is any print data for other than the printer driver for this printer, multiple data may be canceled. ![](images/c4d3cc01612afb0ec9d6c0e7b09cab855e4c6c514d313989b9c6ee8555ee7516.jpg)

NOTE

About print jobs which cannot be canceled

When canceling a job, you may not be able to cancel the job even if is displayed. Also, you cannot cancel the following jobs. \- Jobs saved to boxes Delete such jobs using the Remote UI. > "Remote UI"

1

Make sure that the Job indicator is on or blinking. Cancel the job while the printer is processing the data (while the ➡ Job indicator is on or blinking).

2

Press the [ ]( : Job Status/Cancel) key.

3

Select a job you want to cancel using [ and [ ], and then press [OK]. ![](images/d38417f1cbf479f29606d60241daac81f97242b574e8d76ecd834bf1541c9603.jpg)
text_image Job Status/Cancel 1:user1 sample_1...

4

Select [Yes] using [ ▲ and [ ], and then press [OK]. ![](images/d265b404246f2e38d154b38a69fa1d1dbe7ed9fdca2475f02b370b647270c525.jpg)
text_image Do you want to cancel? No Yes
appears, and the print data being processed is canceled. When appears, the job cancellation completes. ![](images/0a5f6b39f3cfaadb1f407b9a2f29596dbcefdda9e234e705626dd76dc1b437f4.jpg)

IMPORTANT

While is displayed You cannot operate the printer. 0258-03L When a job is canceled from the computer or the data is less than one page, the data may remain in the printer memory, and the job may not be completed properly. As long as the printer remains in this state, you cannot perform printing because the printer cannot receive the next data. In this case, force the printer to output the print data using the following procedure. ![](images/687d6d3e25b13ae774eef32027b164b0f83f68b005bfe91b6cbe29999c67b106.jpg)

IMPORTANT

If you cannot output data

You cannot output data for the following jobs or in the following state. • Data from the PCL/PS/UFR II printer driver - The state where the ⚠ Message indicator is on Perform a soft reset. > "Canceling the Process Currently Being Performed (Soft Reset)"

The data that is being printed is deleted.

When you output data, print it again. ![](images/1975c9af24b3e181ea6f84f1114aefa73fa310f11278c52446ba3dbfa0adcbe0.jpg)

NOTE

About automatic output

When [Timeout] under [Interface] in the Setup Menu is set to [On], even less than a page worth of data is discharged automatically. (Data from the PCL/UFR II printer driver is not output.) [Timeout] for a job is set to 15 seconds in the default settings.

1

Press [ ] ( : Reset).

2

Select [Form Feed] using [▲ and [ ], and then press [OK]. ![](images/023637fdf6542d63dd9d2f6fa4e3308cdccd06fe0cffad9ba81d6aaa8a53f14c.jpg)
text_image Reset Soft Reset Form Feed Shut Down

3

Select [Yes] using [▼, and then press [OK]. ![](images/f1fa93f273130e1c511d6c421a97ab4a5373b36ecbc83690595fad368cd5d18b.jpg)
text_image Execute? No Yes
→ The data remaining in the memory is printed. If the ➔ Job indicator does not go off even after outputting the data Perform a soft reset. > "Canceling the Process Currently Being Performed (Soft Reset)" 0258-03R If you want to cancel the process currently being performed, perform [Soft Reset] using the following procedure. ![](images/29c7c7dab53168cac5afcdc0356fc17c13cb1692a7abbacbeec63605d51d9e35.jpg)

IMPORTANT

The data that is being printed/that is on the print queue/that is being received is deleted.

Performing a soft reset deletes all the jobs (those from other computers and interfaces). Make sure that other users are not printing before performing a soft reset. ![](images/7b6ed2a45f55eb8bc0f0068f67efeb8d3b7af248a09229ab74d26273ff35a468.jpg)

NOTE

About the difference from a hard reset

Hard resets delete all the registered files such as the form data saved in the RAM of the printer, but soft resets do not delete them.

1

Cancel printing from the computer.

2

Press [ ] ( : Reset).

3

Select [Soft Reset] using [ ▲ and [ ], then press [OK]. Holding down the [OK] key 5 seconds or more is the operation for [Hard Reset]. ![](images/c051c49acf7a36f48f66ea7518906138c1753f6c53f34e1010929ec8c570c996.jpg)
text_image Reset Soft Reset Form Feed Shut Down

4

Select [Yes] using [▼, and then press [OK]. ![](images/8b885887bb2a3d029b4c8e496179dd44d2b74e62d0add97dbfb1d2ad08d50294.jpg)
text_image Execute? No Yes
→ When disappears, the soft reset is completed. 0258-03S When you want to delete all the jobs and data sent to memory for some reason, perform [Hard Reset] using the following procedure. ![](images/d4bc4ebf7ca0bb0fb51b90bd223ceb208de94f9fdebd50fa5dd031acee33a2b1.jpg)

IMPORTANT

The data that is being printed/that is on the print queue/that is being received is deleted.

Performing a hard reset deletes all the jobs (those from other computers and interfaces). Make sure that other users are not printing before performing a hard reset.

If the printer is reset while it is receiving data

The data that is not being received will be received after the resetting process completes. However, the data may not be printed properly. ![](images/548fdb3920df72f22d7cfeda6c6dafe699d53b976f32dde1d8d3ede495220cce.jpg)

NOTE

About the difference from a soft reset

Hard resets delete all the registered files such as the form data saved in the RAM of the printer, but soft resets do not delete them.

1

Press [ ] ( : Reset).

2

Select [Soft Reset] using [▼], continue pressing [OK] for at least five seconds, then release your finger. ![](images/33764cd3f3a1ae7a5e1650600172ecf268c0bfcf17d6e46ccc3629f9002d74c8.jpg)
text_image Reset Soft Reset Form Feed Shut Down
→ When you release your finger, is displayed.

3

Select [Yes] using [↓, and then press [OK]. ![](images/b52fa5ce7eed9b101ad422cb9c7ea56287ef8ab241705ebbaf9bf93f258120fa.jpg)
text_image Execute hard reset? No Yes
→ When disappear, the hard reset is completed. ![](images/702198e80d74feedd1becd1584d9c1e571e94e406d5fc84ae674bb571aaaca8d.jpg)

NOTE

0258-03U You can check the current printer status from the Remote UI portal page or the [Status Monitor/Cancel] page. > "Screen Layout of the Remote UI (Details on Each Setting Page)" ![](images/4c2e370ba22e9baae05d46847c06394a63384dd26c2281650edc0219056cdcef.jpg)
text_image Remote UE Status Monitor/Cancel LBP7680C: LBP7680C - Windows Internet Explorer http://192.168.1.225/sytemen.cgi?CSJT>436N8196 File Edit View Favorites Tools Help Favorites Remote UE Status Monitor/Cancel LBP7680C: LB... i SENSYS LBP7680C / LBP7680C / Status Monitor/Cancel To Portal Login User: System Manager Log Out Mail to System Manager Print Job Status Job History E-Mail RX Job History Error Information Device Features Device Information Check Counter Status Monitor/Cancel Print Job Status Print: Job Status Last Updated 05/04 2011 03:14:38 Job No Document Name User Name Status Job Operation Date/Time 10 No Name No Name Printing Cancel Interrupt 05/04 2011 Priority Print Pause 03:14 Copyright CANON INC. 2011 All Rights Reserved Done Internet | Protected Mode: Off 100%

Printing on Various Types of Paper

0258-03W : Printing on Plain Paper, Heavy Paper, or Index Card : Printing on Transparencies (B&W Printing Only) > Printing on Labels : Printing on Envelopes > Printing on Custom Size Paper Paper Loading Orientation

Confirming usable paper

This printer can print plain paper (60 to 90 g/m ^2 ) and heavy paper (86 to 176 g/m ^2 ) of the following sizes or Index Card. ^ Heavy paper of 164 to 176 g/m ^2 can only be loaded in the Multi-purpose tray.
Drawer Multi-purpose Tray
Standard sizesA4*1, B5*1, A5, Legal*1, Letter*1, Executive*1, Statement, and Foolscap*1A4*1, B5*1, A5, Legal*1, Letter*1, Executive*1, Statement, and Foolscap*1
Custom paper sizesWidth 100.0 to 215.9 mm, Length 148.0 to 355.6 mm*2Width 76.2 to 215.9 mm, Length 127.0 to 355.6 mm*3
\*1 Can be used for 2-sided printing (164 to 176g / m^2 heavy paper cannot be used). \*2 If you are using the UFR II printer driver, you can load custom size paper that is 148.0 to 215.9 mm wide and 148.0 to 215.9 mm long also in landscape orientation. \*3 If you are using the UFR II printer driver, you can load custom size paper that is 127.0 to 215.9 mm wide and 127.0 to 215.9 mm long also in landscape orientation. † Recycled paper can be also used. ![](images/4e0c59974814df575be9235b890ea575e36e9deba56c0486c7e4d77e4ef856cd.jpg)

NOTE

When using custom size paper

See "Printing on Custom Size Paper."

Loading paper

The paper which you can load in the drawer or multi-purpose tray varies depending on the paper type. ○ : Available : Unavailable
Paper Type Drawer Multi-purpose Tray
Plain paper (60 to 90 g/m2)
Heavy paper (86 to 163 g/m2)
Heavy paper (164 to 176 g/m2)
Index Card
> "Loading Paper in the Drawer" > "Loading Paper in the Multi-purpose Tray" The following Index Card sizes are supported. - 102.0 x 152.0 mm - 127.0 x 203.0 mm After loading paper, perform printing. > "Configuring the Printer Driver and Printing" The print speed may drop when printing on heavy paper (86 to 176 g/m ^2 ). 0258-03Y

Confirming usable transparencies

This printer can use the following sizes of transparencies. Standard sizes A4, Letter † Transparencies can only be printed in B&W.

Loading transparencies

You can load transparencies only in the multi-purpose tray. > "Loading Paper in the Multi-purpose Tray"

\- Thoroughly fan the transparencies, and then align the edges before loading them as they may stick to each other. If they are not fanned enough, multiple sheets of paper may be fed at once, causing paper jams. ![](images/acbd9ca0a75a8b32275ed62f686bcd6fc5e9f459ee041ce5630cad1fda199c72.jpg)
text_image Fan thoroughly. Align the edges.
- When fanning or aligning the transparencies, try to hold the edges to avoid touching the printing surface. - Take care not to mark or stain the printing surface of the transparencies with fingerprints, dust, or oil. This may result in poor print quality.

Printing from an application

After loading transparencies, perform printing. > "Configuring the Printer Driver and Printing" The print speed drops when printing on transparencies.

Confirming usable labels

This printer can use the following sizes of labels.
Standard sizes A4, B5,A5, Legal, Letter, Executive, Statement, and Foolscap
Custom paper sizesWidth 76.2 to 215.9 mm, Length 127.0 to 355.6 mm *
\* If you are using the UFR II printer driver, you can load custom size paper that is 127.0 to 215.9 mm wide and 127.0 to 215.9 mm long also in landscape orientation. Using the following types of labels may result in paper jams that are difficult to clear or may result in damage to the printer. - Peeled labels or partly used labels - Coated labels that are easily peeled off from the backing sheet - Labels with uneven adhesive

Loading labels

Labels can be loaded in the drawer or the Multi-purpose tray. > "Loading Paper in the Drawer" "Loading Paper in the Multi-purpose Tray"

\- Fan the labels thoroughly, and then align the edges before loading them. If they are not fanned enough, multiple sheets of paper may be fed at once, causing paper jams. ![](images/7fecf824879dac299e94c6c39b9e0aef675113cedcff25f73d689f7ab39f184d.jpg)
text_image Fan thoroughly. Align the edges.
\- Take care not to mark or stain the printing surface of the labels with fingerprints, dust, or oil. This may result in poor print quality.

Printing from an application

After loading labels, perform printing. > "Configuring the Printer Driver and Printing" The print speed may drop when printing on labels.

Checking the Coated Papers that Can be Used

You can use the following sizes of coated papers with this printer.
Standard sizes A4, B5,A5, Legal, Letter, and Executive
Custom paper sizesWidth 76.2 to 215.9 mm, Length 127.0 to 355.6 mm *
\* Coated paper of 210 to 220 g/m² cannot be printed using 2-sided printing. \* When loading paper in portrait orientation (when using UFR II printer driver only): Width 127.0 to 215.9 mm, Length 127.0 to 215.9 mm

Loading Coated Paper

Coated paper can be loaded in the drawer or the Multi-purpose tray. > "Loading Paper in the Drawer" > "Loading Paper in the Multi-purpose Tray"

\- Fan the paper thoroughly and align the edges before loading it. If it is not fanned enough, multiple sheets of paper may be fed at once, causing paper jams. ![](images/ef8f1d2a54dfdd62404b14a492bbe54ce128c8bfac5755add6c45950ca10c1f4.jpg)
text_image Fan thoroughly. Align the edges.
- When fanning or aligning the paper, try to hold the edges to avoid touching the printing surface. - Take care not to mark or stain the printing surface of the paper with fingerprints, dust, or oil. This may result in poor print quality.

Printing from an Application

After loading coated paper, run print. "Configuring the Printer Driver and Printing" † The print speed may drop when printing coated paper.

Confirming usable envelopes

This printer can use the following envelopes. Envelope DL ![](images/a69184facdb9dbcd046c167b81d52b39e1088ec184592f6a963a08ba7ebdd971.jpg)
text_image 220 110
Envelope Monarch ![](images/41775c6448975ad8bae527d6abfc58e95e4e0c49498a70ea4f3b8c79fac3c67b.jpg)
text_image 190.5 98.4
(mm) Envelope No.10 ![](images/5f4314ac58e0ed750f920f7143b6a848ab7ba7b3c7bed88b5af86550b6c0d8a8.jpg)
text_image 241.3 104.7
Envelope ISO-C5 ![](images/e649935ac8c67f006399dde683f069a6d991c2e71de8c63c6e99e46afc65f3ae.jpg)
text_image 229 162
Envelope ISO-B5 ![](images/d729a7f9ee3b8b70829c4efb1c4507a1f7045e4e99da8a6c5567eeeb4d0e8bf0.jpg)
text_image 250 176
Using the following types of envelopes may result in paper jams that are difficult to clear or may result in damage to the printer. - Envelopes with fasteners or snaps - Envelopes with address windows • Envelopes with adhesive on the surface - Wrinkled or creased envelopes - Poorly manufactured envelopes in which the glued parts are uneven - Irregularly-shaped envelopes

Loading envelopes

Envelopes can be loaded in the drawer or the Multi-purpose tray. "Loading Paper in the Drawer" > "Loading Paper in the Multi-purpose Tray"

\- Load envelopes in the correct orientation as follows. ![](images/e0f9652d8e100bffe73616b071b76b7c493ee594a155b08e2c8cf591a205f3d5.jpg) : Feeding direction)

Drawer

![](images/676a0514236877126cc7327ee0b9b8e479fc43319f44c9d9ec54adf32a7b9844.jpg)
text_image Envelope No. 10, Envelope ISO-C5, Envelope DL, and Envelope monarch *Close the flap and load envelope.
Envelope ISO-B5 \*Close the flap and load envelope.

Multi-purpose Tray

![](images/92ba39760f360d868ab5d0d94219e9f0be71318c7cedec7e3ca238d12731a64e.jpg)
text_image Envelope No. 10, Envelope ISO-C5, Envelope DL, and Envelope monarch *Close the flap and load envelope. Envelope ISO-B5 *Close the flap and load envelope.
\- Before loading envelopes, align them as follows. 1. Place the stack of envelopes on a flat surface, and then flatten them to release any remaining air. Then, press the edges tightly. ![](images/8ae07973b63492b1e51baac76d6bfba3ac7e06a429147da2c8292e3ab7b4c97f.jpg)
natural_image Illustration of two hands pressing down on a textured surface with directional arrows (no text or symbols)
2. Loosen any stiff corners of the envelopes and flatten curls as shown in the figure. ![](images/0387f8e76190df5f6670cfbaa9e4a90d0f722ce17bad1a03f9160a5271a89aba.jpg)
natural_image Illustration of two hands holding a flat surface, no text or symbols present
3. Align the edges of the envelopes on a flat surface. ![](images/300a7b448b3f8d9fd39b57a3e9498cf625b053e7a7280a3a4eeb636c7ecfafe0.jpg)
natural_image Illustration of hands holding a rectangular block with an arrow indicating downward motion (no text or symbols)

Printing from an application

After loading envelopes, perform printing. > "Configuring the Printer Driver and Printing" Do not print on the reverse side (glued side) of envelopes. The print speed may drop when printing on envelopes. When envelopes are printed, they may be creased.

Confirming usable custom size paper

This printer can use the following custom size paper.
DrawerWidth 100.0 to 215.9 mm, Length 148.0 to 355.6 mm *1
Multi-purpose trayWidth 76.2 to 215.9 mm, Length 127.0 to 355.6 mm *2
\*1 If you are using the UFR II printer driver, you can load custom size paper that is 148.0 to 215.9 mm wide and 148.0 to 215.9 mm long also in landscape orientation. \*2 If you are using the UFR II printer driver, you can load custom size paper that is 127.0 to 215.9 mm wide and 127.0 to 215.9 mm long also in landscape orientation.

Loading custom size paper

The custom size paper which you can load in the drawer or multi-purpose tray varies depending on the paper type. ○ : Available
Paper Type Drawer Multi-purpose Tray
Plain paper (60 to 90 g/m2)
Heavy paper (86 to 163 g/m2)
Heavy paper (164 to 176 g/m2)
> "Loading Envelopes and Custom Paper Sizes"

Registering a custom paper size

If printing custom size paper, you need to register the custom paper size in the printer driver previously. For details on the procedure for registering a custom paper size, see Help of the printer driver. > "Viewing the Online Help"

Printing from an application

After loading custom size paper, perform printing. > "Configuring the Printer Driver and Printing" The print speed may drop when printing on heavy paper (86 to 176 g/m ^2 ). 0258-044 To print paper with letterheads or logos, load the paper in the proper orientation as follows. When printing on envelopes, see "Printing on Envelopes." (→: Feeding direction)
Portrait Layout Landscape Layout
Drawer (1-sided printing) *1CANON imageCLASS LBP7660Cdn - Printing from an application - 1CANON imageCLASS LBP7660Cdn - Printing from an application - 2
(With the printing side facing up) (With the printing side facing up)
Drawer (1-sided printing) *2CANON imageCLASS LBP7660Cdn - Printing from an application - 3CANON imageCLASS LBP7660Cdn - Printing from an application - 4
(With the printing side facing down) (With the printing side facing down)
Drawer (2-sided printing)CANON imageCLASS LBP7660Cdn - Printing from an application - 5CANON imageCLASS LBP7660Cdn - Printing from an application - 6
(With the front side facing down) (With the front side facing down)
Multi-purpose tray (1-sided printing) *1CANON imageCLASS LBP7660Cdn - Printing from an application - 7CANON imageCLASS LBP7660Cdn - Printing from an application - 8
(With the printing side facing up) (With the printing side facing up)
Multi-purpose tray(1-sided printing) *2CANON imageCLASS LBP7660Cdn - Printing from an application - 9CANON imageCLASS LBP7660Cdn - Printing from an application - 10
(With the printing side facing down) (With the printing side facing down)
Multi-purpose tray(2-sided printing)CANON imageCLASS LBP7660Cdn - Printing from an application - 11CANON imageCLASS LBP7660Cdn - Printing from an application - 12
(With the front side facing down) (With the front side facing down)
\*1 With [Paper Feed Method] set to [Speed Priority] \*2 With [Paper Feed Method] set to [Print Side Priority] For details on [Paper Feed Method], see "[Setup] Menu ([User Maintenance] Options)."

> Printing from a Computer (Windows)

> Printing Fundamentals > Printing Functions > Scaling Documents > Printing Multiple Pages on One Sheet > 1-sided Printing and 2-sided Printing Booklet Printing Poster Printing Watermark Printing > Setting the Color Mode for Printing Combining and Printing Multiple Files > Selecting a Profile for Printing Registering a Profile for Printing

> Printing from a Computer (Macintosh)

> Printing Fundamentals Printing Functions > Scaling Documents > Printing Multiple Pages on One Sheet 2-sided Printing Setting the Color Mode for Printing > Using [Presets] for Printing

Setting Priority (When Specifying the Same Item Using Multiple Methods)

Functions Which Can Be Specified from the Control Panel

> Printing without the Printer Driver (Direct Print)

: Printing Files Directly from USB Memory Devices (USB Direct Print) (LBP7680Cx Only)

Receiving E-mail Data on the Mail Server and Printing (E-mail Print)

> Printing Files from the Printer Using FTP Client

Specifying a Password for a Document and Printing (Secured Print) (LBP7680Cx Only) Saving a Document in the SD Card in the Printer (Stored Job Print) (LBP7680Cx Only) Giving Priority to a Print Job (Interrupt Printing) (LBP7680Cx Only) 0258-046

>Printing Fundamentals

> Printing with the Printer Driver > Configuring the Print Settings Beforehand Setting the Printer Options Viewing the Online Help

: Printing Functions

Common Functions [Page Setup] Sheet [Finishing] Sheet [Paper Source] Sheet [Quality] Sheet [Device Settings] Sheet

Scaling Documents

> Printing Multiple Pages on One Sheet

>1-sided Printing and 2-sided Printing

> Booklet Printing

Poster Printing

Watermark Printing

> Setting the Color Mode for Printing

>Combining and Printing Multiple Files

>Selecting a Profile for Printing

Registering a Profile for Printing

0258-047 This section explains the basic printing method using the printer driver, how to set the printer options, and how to display the online help. > Printing with the Printer Driver > Configuring the Print Settings Beforehand Setting the Printer Options Viewing the Online Help 0258-048 This section explains the basic printing method using the printer driver. ![](images/faa4f798106602d7ca67fb19611fdbc01a8b483612ddd1edc61eb3868e01e870.jpg)

NOTE

Printing methods may differ depending on the application you are using. For details, see the instruction manuals provided with the application.

1.

Select [Print] from the [File] menu of the application. ![](images/2c19f29afd139e78c3470dfaa49e17f3b6510a93c8290ecab1a672cf11b3baff.jpg)
text_image Sample.pdf - Adobe Reader File Edit View Document Tools Window Help Open... Ctrl+O Create Adobe PDE Using Acrobat.com... Collaborate Save a Copy... Shift+Ctrl+S Says as Text... Attach to Email... Close Ctrl+W Properties... Ctrl+D Digital Edrolls Print Setu... Shift+Ctrl+P Print... Ctrl+P C:\Users\user07\Desktop\Sample.pdf Edit Ctrl+Q

2.

Select your printer from [Name] → click [Properties]. ![](images/cc4a797ebfca13e588f6ea04eac524c05153b5ab335b1d81c816a70af2000e57.jpg)
text_image Print Printer Name: Canon Printer Status: Ready Type: Canon XXXXXXXXXX LPR II Print Range All Current View Current page Pages 1 Subset: All pages in range Reverse pages Page Handling Copies: 1 Cabbage Page Scaling: Shrink to Printable Area Auto-Rotate and Center Choose paper source by PDF page size Use custom paper size when needed Print to fix Properties Commence and Forms: Document and Markups Preview Composite 8.27 11.63 Units: Inches Zoom : 100% 1/1 Printing Tips Advanced OK Cancel

3.

Specify the desired settings in the printer driver screen → click [OK]. Click the tabs for the [Page Setup], [Finishing], [Paper Source], and [Quality] sheets, and then specify the desired items. ![](images/e92448e8d708bf059a8c5698575272154a97c21d96dfaff02b462ab14aaeda59.jpg)
text_image Canon Printer Properties Page Setup Finishing Paper Source Quality Profile: Default Settings Add(I) Edit(E) Output Method: Pins Page Size: A4 Output Size: Match Page Size Cypress 1 (1 to 9999) Orientation A Portrait A Landscape Page Layout: 1 1 on 1 Marginal Scaling Scaling 100% 0.25 to 200% Watermark: Weghmann Name: CONFIDENTIAL Edit Watermark... Custom Paper Size... Page Options... Before Defaults OK Cancel Help
![](images/51436b0a1e7212f7e447052efafb762d5a1bd2aac7d26262a734eb2b4be50821.jpg)

NOTE

- The default setting for [Print Style] in the [Finishing] sheet is [2-sided printing]. However, for some driver versions, [1-sided printing] is the default setting. For details, see "1-sided Printing and 2-sided Printing." - For information on available printing functions, see "Printing Functions" or the online help. (See "Viewing the Online Help.")

4.

Click [OK].

![](images/65bdc53fccdb35c4aa650a449bba6e8cc8a0f6e7a54a802a0e5a24538b3880a5.jpg)
text_image Print Printer Name: Canon-Printer Status: Ready Type: Canon_XXXXXXXXXX LPM II Print Range All Current view Current page Pages 3 Subset: All pages in range Remote pages Page Handling Copies: 1 Colorize Page Scaling: Shrink to Printable Area Auto-Rotate and Center Choose paper source by PDF page size Use custom paper size when needed Print to File Printing Tips Advanced Properties Comments and Forms: Document and Markups Preview: Composite 8.27 11.69 Units: Inches Zoom : 100% 2/3 OK Cancel
Printing begins. ![](images/e8bdf05ba5b155598047cb3b0ace78bb6b82579f86ff99facef8fbdfcb09bf45.jpg)

NOTE

If a printer icon is displayed in the task tray at the bottom right of your computer monitor, you can stop printing from your computer. Double-click the printer icon → click the name of the file you want to stop printing → click [Document] → [Cancel]. 0258-049 This section describes how to access the printer setup screen from [Control Panel] and how to configure the printing function settings beforehand. The printer whose settings you have configured will print with those settings every time. When printing, you can change these settings beforehand whenever required. To change the settings, configure them in the [Print] dialog box from the application. ![](images/43163ebe2a14f04465f3fc131454f143004dba3f46db3deda8872be8f692517c.jpg)

IMPORTANT

To change the default print settings, you must log on to your computer as a member of the Administrators or Power Users group.

1.

Open the printer folder. > "Basic Operations/Various Information for Windows"

2.

Right-click the icon of the printer whose settings you want to specify → click [Printing Preferences] (or [Printing preferences]). ![](images/d6be20a6fd85f84176e3d403c6f6c4c0dba38873649d666c05f03dae011eac5e.jpg)
text_image Hardware an... Devices and Printers Edit Edit View Tools Help Add a device Add a printer See what's printing Manage default printers Devices (2) Printers and Faxes (1) See what's printing Set as default printers Printing preferences Printer properties Create shortcut Troubleshoot Remove device Properties Canon Printer Canon Category: Printer Status: 0 document(s) in queue

3.

Specify the desired settings in the printer driver screen → click [OK]. Click the tabs for the [Page Setup], [Finishing], [Paper Source], and [Quality] sheets, and then specify the desired items. ![](images/1dc017a8c530275b7ffe5f97e78b2067f02e8cb5e56d61d1d08169796fb342eb.jpg)
text_image Pc1 Canon Printer Printing Preferences Page Setup Finishing Paper Source Quality Profile Output Method: Default Settings Add(1) Edit(2)... Print Page Size A4 Match Page Size Output Size Copy: 1 [1 to 9999] Orientation A Portrait A Landscape Page Layout 1 1 on 1 Manual Scaling Scaling 100 X (25 to 237) Watermark Watermark Name COFFIDENTIAL Edit Watermark... Custom Paper Size... Page Options... Restore Defaults OK Cancel Apply Help
![](images/769eb545bf70757f1fef20a3e399a5d0a3cd3cb5e283ece68c12ea5574db091e.jpg)

NOTE

For information on available printing functions, see "Printing Functions" or the online help. (See "Viewing the Online Help.") 0258-04A Before printing, you need to set up the printer configuration in order to use the functions of printer options (such as paper feed options, paper output options, etc.) attached to and installed in the machine. The printer configuration can be set up automatically while installing the driver. If the machine cannot be configured during the installation, follow the procedure below. ![](images/de2a20e092f24baabc13f469d18719e2ad2e32a112fb8ccc979f0e967beb9e49.jpg)

IMPORTANT

To configure the printer option settings, you must log on to your computer as a member of the Administrators or Power Users group.

1.

Open the printer folder. > "Basic Operations/Various Information for Windows"

2.

Right-click the icon of the printer whose settings you want to specify → click [Properties] (or [Printer properties]). ![](images/28af72fb86fbd625b6111e26490bee75e23e4859830aed6eb5bc3c4f2994d6b1.jpg)
text_image Hardware an... Devices and Printers Edit Edit View Tools Help Add a device Add a printer See what's printing Manage default printers Devices (2) Printers and Faxes (1) See what's printing ✓ Set as default printer Printing performances Printer properties Create shortcut Troubleshoot Remove device Properties Canon Printer Canon Category: Printer Status: 0 document(s) in queue

3.

Click [Device Settings] → [Get Device Status]. ![](images/4ebb05c6677b77013e5c286168e0c3287f26da5adb98769539d20ddc516fb9da.jpg)
text_image Canon Printer Properties General Shaking Ports Advanced Color Management Secure Device Settings Help Device Settings: Manual Paper Source Options: 250 Sheet Drawer □ SD Card Installed Spooling at Host: Auto □ Department ID Management(S) Settings... □ Set User Information(L) Settings(K)... □ Specify Box Number When Storing Details(C)... Forms to Tray Assignment... Get Device Status About OK Cancel Apply Help

4.

Confirm the settings such as paper source options and output options → click [OK]. ![](images/29976b2af0128ed2c5769c7805fa45235975de9e383deece7d3cc76f28472c84.jpg)

NOTE

- If the information request returns an error message, you need to configure the settings (such as paper feed options, paper output options, etc.) manually. - If the printer and computer are connected via USB or a WSD (Web Services on Devices) port, the [Get Device Status] function is unavailable. You need to configure the settings manually. 0258-04C You can display the online help by clicking [Help] on the printer driver screen. The online help includes additional information about each printing option. If the e-Manual does not provide the information you need, see the online help.

1.

Click [Help].

![](images/d91938910aac096c38cb4f7a140b54786e0108607abd2920028eaad0e0057c9b.jpg)
text_image Canon Printer Properties Page Setup Finishing Paper Source Quality Profile: Default Settings Add(T)... Edit(C)... Output Method: Print Page Size: All Output Size: Match Page Size Copies: 1 to [1 to 5555] Orientation A Portrait A Landscapes Page Layout: 1 on 1 Margual Scaling Scaling: 100 x (25 to 300) Watermark: Watermark Name: CONFIDENTIAL... Buy Watermark... Option Paper Size... Page Options... Elastore Defaults OK Cancel Help View Settings
The online help is displayed. ![](images/8c70239b3fc26ce4b82b0bb2eb901c45bf72d7c3937e39742d66725739a9e603.jpg)
text_image [Page Setup] Sheet Enables you to configure the settings for page formatting. NOTE: [Page Size], [Orientation], and other settings specified in this sheet may not be valid when printing from certain applications. If these settings are not available, click the [File] menu, then click [Print Setup], [Page Setup], or a similar command in the application you are using to configure these settings. Settings > [Profile] > [Output Method] > [Lucky] > [Preview] > [Page Size] > [Output Size] > [Copies] > [Orientation] > [Page Layout] > [Page Order] > [Manual Scaling] > [Paper Type]
Topic pane (right side): Displays the description of the information. Navigation pane (left side): Click [Contents] / [Index] / [Search] to search for information. 0258-04E This section explains printing functions which can be configured in the printer driver screen. Common Functions [Page Setup] Sheet [Finishing] Sheet [Paper Source] Sheet [Quality] Sheet [Device Settings] Sheet ![](images/9231e01dc0335c94377b25987927045842ab9badb42a1f627bab9e1af74902bd.jpg)

NOTE

The items displayed in the printer driver screen and available functions differ according to the printer model you are using. 0258-04F The following functions are common to the [Page Setup], [Finishing], [Paper Source], and [Quality] sheets. ![](images/55e0e51cb483e4156cf3cc4d070e345e8913797ef91d817c2731fc69bbbd1b8a.jpg)
text_image Canon Printer Printing Preferences Page Setup Finishing Paper Source Quality Profile 1 Default Settings Add(1) Edit(2)... Output Method 3 Print 2 Page Size A4 Output Size Match Page Size Copies 1 (1 to 9500) Orientation A Portrait A Landscape Page Layout 1 Magual Scaling 1 on 1 Scaling 100% (75% to 2000) Watermark Watermark Name ConfIDENTIAL Edit Watermark... View Settings Custom Paper Size... Page Options... Restore Defaults OK Cancel Apply Help
1.ProfilesYou can select a profile to conveniently repeat the same print settings (see "Selecting a Profile for Printing").2.Adding/Editing ProfilesYou can add and edit profile settings.
3.Changing the Output MethodYou can change output methods.Example:[Edit and Preview]: Combines multiple sets of print data and configure print settings for the combined data (see "Combining and Printing Multiple Files").4.PreviewThe settings configured in each sheet are displayed in the preview.
5.Verifying SettingsYou can verify the settings specified in each sheet.
![](images/a055d1384d1cacf8bfdd9927bb7e39a10869ab26701078ff97985494cb7fad26.jpg)

NOTE

For instructions on how to display the printer driver screen, see "Printing with the Printer Driver" or "Configuring the Print Settings Beforehand." 0258-04H ![](images/32411d915ad35507998ddcac798346fe823c6fae62446caf1a73c467c24727e5.jpg)
text_image Canon Printer Printing Preferences Page Setup Finishing Paper Source Quality Profile Default Settings Add(1)... Edit(2)... Output Method Print Page Size 1 A4 Output Size: Match Page Size Copies 1/3/5 (10x 9999) Orientation 2 A Portrait A Landscape Page Layout: 3 1 on 1 Magual scaling Scaling: 100 x 1.25 x 2.00 Watermark Watermark Paper ConfIDENTIAL Edit Watermark... Custom Paper Size 5/6 Page Options... Restore Defaults OK Cancel Apply Help
1.Output Paper SizeCANON imageCLASS LBP7660Cdn - NOTE - 1Enables you to select the paper size actually output from the printer (see "Scaling Documents").2.Print DirectionCANON imageCLASS LBP7660Cdn - NOTE - 2Sets the print direction relative to the orientation of the paper.
3.Page LayoutCANON imageCLASS LBP7660Cdn - NOTE - 3Prints multiple pages arranged on one sheet of paper (see "Printing Multiple Pages on One Sheet").4.WatermarkCANON imageCLASS LBP7660Cdn - NOTE - 4Prints pages with a watermark (such as "COPY") superimposed on the document (see "Watermark Printing").
5.Page BorderCANON imageCLASS LBP7660Cdn - NOTE - 5Prints each page with a border.6.Header/FooterCANON imageCLASS LBP7660Cdn - NOTE - 6Prints pages with headers and/or footers with the date, page number, etc.
![](images/8885722841f957539be660b99be92c97c1318ba522e5d71d0020f09a8327c943.jpg)

NOTE

For instructions on how to display the printer driver screen, see "Printing with the Printer Driver" or "Configuring the Print Settings Beforehand." 0258-04J ![](images/fe80d56da804fefd38abb86e4a71a7c17029c5159753a16ac6d1733326003c8f.jpg)
text_image Canon Printer Printing Preferences Page Setup Finishing Paper Source Quality Profile Default Settings Add(1)... Add(2)... Output Method: Print Print Style 1/2 1-sided Printing Builder Print in Different Orientations Binding Location: Lang Edge [Left] Gutter... Finishing: Off 3/4 All [Scaling: Auto] View Settings Advanced Settings... Restore Defaults OK Cancel Apply Help
1.1-sided/2-sided PrintingCANON imageCLASS LBP7660Cdn - NOTE - 1Prints on one or both sides of the paper. The default setting for [Print Style] is [2-sided printing]. However, for some driver versions, [1-sided printing] is the default setting.2.Booklet PrintingCANON imageCLASS LBP7660Cdn - NOTE - 2Prints pages in a sequence that allows them to be folded and grouped into a booklet when output (see "Booklet Printing").
3.CollatingCANON imageCLASS LBP7660Cdn - NOTE - 3When printing multiple sets of copies, outputs each set separately in page order.4.GroupingCANON imageCLASS LBP7660Cdn - NOTE - 4When printing multiple sets of copies, outputs the pages in groups according to their page numbers.
![](images/011c989aa5018a1e0e1df84ecf5d3e7e53161deb020c823833fb71aed14da970.jpg)

NOTE

For instructions on how to display the printer driver screen, see "Printing with the Printer Driver" or "Configuring the Print Settings Beforehand." 0258-04K ![](images/91a1fc241ce7a458a710cb6ee7dbd5e12726e33c58430a5e3e20149bc5c4f846.jpg)
text_image Canon Printer Printing Preferences Page Setup Finishing Paper Source Quality Profile Default Settings Add(1)... Add(2)... Output Method: Print Paper Selection: 1 Same Paper for All Pages Paper Source: 1 Auto Multipurpose Tray Drawer 1 Auto All [Scaling: Auto] Paper Type Printer Default View Settings Fixed Custom Paper Vertically Print on the Other Side Restore Defaults OK Cancel Apply Help

1. Specifying the Paper

![](images/b6f1dc20a9ec270c9d6d799027c99f5df27a322f1cbc8123f00f3e80ce2964a2.jpg)
natural_image Stack of overlapping document sheets with no visible text or symbols
When you want to print on a specific type of paper, specify the paper source containing the paper, or the paper type. ![](images/911c21ea45d03a412c4c82486c21594ab40aacfa90734e5913d1f0a08eba98d2.jpg)

NOTE

For instructions on how to display the printer driver screen, see "Printing with the Printer Driver" or "Configuring the Print Settings Beforehand." 0258-04L ![](images/73537b9fe1ec9df00bd20204d1512d35773615df38ccace45a26ae42054de588.jpg)
text_image Canon Printer Printing Preferences Page Setup Finishing Paper Source Quality Profile Default Settings Add(1)... Add(2)... Output Method Print Objective 3 General Publications Graphics Vivid Photo Designs (CAD) This mode is used when printing documents in general Advanced Settings... View Settings Color Mode 1/2 Auto (Color/B&W) Manual Color Settings Color Settings About Restore Defaults OK Cancel Apply Help
1.Black and White PrintingCANON imageCLASS LBP7660Cdn - NOTE - 1Prints color documents in black and white (see "Setting the Color Mode for Printing").2.Color/Black & White Auto DetectCANON imageCLASS LBP7660Cdn - NOTE - 2Switches between color and black and white according to the color content of each page (see "Setting the Color Mode for Printing").
3.ObjectiveCANON imageCLASS LBP7660Cdn - NOTE - 3Enables you to conveniently select the appropriate settings for the current content.4.Toner ReductionCANON imageCLASS LBP7660Cdn - NOTE - 4Prints with a reduced amount of toner.
![](images/cd0bca20c85de98ed33de0a7a0f74b3fe3ed6e827e8f1f12c0421902371ac1ee.jpg)

NOTE

For instructions on how to display the printer driver screen, see "Printing with the Printer Driver" or "Configuring the Print Settings Beforehand." 0258-04R ![](images/75815f568c86b0c7bbe95932923b0a2d8de6cf7efded2ed6e8c2702750d504c9.jpg)
text_image Canon Printer Properties General Shaking Pots Advanced Color Management Security Device Settings Profile Device Settings: Manual Paper Source Options: 1 250 Sheet Drawer SD Card Installed Spooling at Host: Auto Department ID Management(S) Set User Information(L) Specify Box Number When Storing Settings... Settings(R)... 2 VCA/Service... 3 Control - Log Management... Get Device Status About OK Cancel Apply Help
1.Set OptionsYou can set the printer options (such as paper feed options, paper output options, etc.) attached to the machine.2.Obtain Device InformationYou can obtain device information and update the settings displayed in the sheet (see "Setting the Printer Options").
3.Display Version InformationYou can display version information.
![](images/7d65119f8a31e42d1cadccc80577e1c50da83fd44ccbd6cb861b8f117fc790cb.jpg)

NOTE

For instructions on how to display the printer properties dialog box, see "Setting the Printer Options." 0258-04S You can enlarge or reduce documents to match the output paper size. There are two methods for scaling a document: select the output size of the document to scale it automatically, or specify the scaling value manually.

1.

Click [Page Setup]. ![](images/e1c61cd671e1a7b107de6a3da48babc449684aa637cbb84eff10c02b7540cdb9.jpg)
text_image Canon Printer Printing Preferences Page Setup Fishing Paper Source Quality Profile Default Settings Add(1) Edit(2) Output Method: Print Page Size All Output Size Match Page Size Copies 1 [1 to 9999] Orientation Portrait Landscape Page Layout 1 on 1 Manual Scaling Scaling 100 % (25 to 260) Watermark Watermark Name CONFIDENTIAL Edit Watermark... Custom Paper Size Page Options Features Defaults OK Cancel Apply Help
For instructions on how to display the printer driver screen see "Printing with the Printer Driver" or "Configuring the Print Settings Beforehand."

2.

Select page size of the document you created in the application from [Page Size]. ![](images/e3a34d713f00ef382507ed3e3edc45f541bfc1907a4c98d5d17ea9f55e849eb4.jpg)
text_image Canon Printer Printing Preferences Page Setup Finishing Paper Source Quality Profile Default Settings Add(1)... Eld(2)... Output Method: Past Page Size:A4 Output Size:Match Page Size Copies: 1 [1 to 9999] Orientation A Portrait A Landscape Page Layout: 1 on 1 Manual Scaling Scaling 100% 5 (20 to 200) Watermark Watermark Name: CONFRIDENTIAL Edit Watermark... Custom Paper Size... Page Options... Pastore Defaults OK Cancel Apply Help

3.

Select output size of the document from [Output Size]. ![](images/c71b2a6229548f7c07ca1dd78bce91aa2f2707a7b08103a2ebb8aec3cd19e911.jpg)
text_image Canon Printer Printing Preferences Page Setup Finishing Paper Source Guality Profile: Default Settings Add(1)... Eld(2)... Output Method: Past Page Size:A4 Output Size:85 Copies: 1 [1to 9999] Orientation A Portrait A Landscape Page Layout 1 on 1 Manual Scaling Scaling 96 % [25 to 301] Watermark Watermark Name: CONFIDENTIAL Edit Watermark... Custom Paper Size... Page Options... Restore Defaults OK Cancel Apply Help
The document is scaled automatically according to the settings made in [Page Size] and [Output Size].

4.

If you want to increase or decrease the magnification manually, select [Manual Scaling] → specify the scaling ratio for [Scaling]. ![](images/8fa985097ce8c43f88bf3e6c0843e016edb015190656cbedb9c1e4a9f0145362.jpg)
text_image Canon Printer Printing Preferences Page Setup Finishing Paper Source Quality Profile Default Settings Add(1)... Eld(2)... Output Method Pass Page Size:A4 Output Size:85 Copies 1 [1 to 9999] Orientation A Portrait A Landscape Page Layout: 1 on 1 Manual Scaling Scaling: 05 % (25 to 200) Watermark Watermark Name: ConfIDENTIAL Edit Watermark ... Custom Paper Size... Page Options... Fixtures Defaults OK Cancel Apply Help

5.

Click [OK]. ![](images/31c143eef211e16d0e392a01ece5c06d984f0cd54cbfad4a9128442242eebe71.jpg)

NOTE

- Depending on the selected page size and printer model you are using, you may not be able to magnify the document. - Depending on the printer model you are using, you may not be able to magnify the document to the optimum ratio for the selected page size. \- The display may vary according to the operating system, as well as the type and version of the printer driver. Multiple pages can be printed on one sheet of paper. 0258-04U

1.

Click [Page Setup].

![](images/2e90dd0f73c2c7ed61e1a13b6a98f50fbe3e3f8f6f45eec704d9427e8d630afd.jpg)
text_image Canon Printer Printing Preferences Page Setup Finishing Paper Source Quality Profile Default Settings Add(1) Edit(2) Output Method Print Page Size Att Output Size: Match Page Size Copies: 1 [1 to 9999] Orientation A Portrait A Landscape Page Layout: 1 on 1 Manual Scaling Scaling: 100% Watermark Watermark Name CONFIDENTIAL Edit Watermark... Custom Paper Size... Page Options... Restore Defaults OK Cancel Apply Help
For instructions on how to display the printer driver screen see "Printing with the Printer Driver" or "Configuring the Print Settings Beforehand."

2.

Select [N in 1] from [Page Layout] (where "N" is the number of pages you want to print on the sheet). ![](images/8a4beb2a777e0ef01e8db4ba77f9acf06561c5d9f2fbf8dc0288628f13b0cf12.jpg)
text_image Canon Printer Printing Preferences Page Setup Finishing Paper Source Quality Profile: Default Settings Add(1) Edit(2) Output Method: Past Page Size: 4x Output Size: 85 Copies: 1 (1 to 9999) Orientation Portrait Landandscape Page Layout: 2 cm 1 Page Order: Left to Right Watermark Watermark Name: CONFIDENTIAL Edit Watermark... Custom Paper Size... Page Options... Restore Defaults OK Cancel Apply Help
![](images/9c0ebd7eb7aec7a56e0d3d6ffc3617e9abfb66d11db99881916f0198ecaa504a.jpg)

Note

If you cannot select the options for [Page Layout], display the [Device Settings] sheet, and then select [Auto] or [Enabled] from [Spooling at Host]. For instructions on how to display the [Device Settings] sheet, see "Setting the Printer Options."

3.

Select the page order from [Page Order]. ![](images/49d7f21e21a788986b682873b223140c7c021a9072e25e5a9b6a817fc7ab134b.jpg)
text_image Canon Printer Printing Preferences Page Setup Freaking Paper Source Quality Profile: Default Settings Add(1) Edit(2) Output Method: Past Page Size: A4 Output Size: B5 Copies: 1 (1 to 9999) Orientation Portrait Landcape Page Layout: 2 on 1 Page Order: Left to Right Watermark Watermark Name: CONFIDENTIAL Edit Watermark... Custom Paper Size... Page Options... Restor Defaults OK Cancel Apply Help
The output image is displayed in the preview area.

4.

Click [OK]. ![](images/6183271441e3f485efb5f826b5e2b4f0207a0b093bbe2a7f9df4c4fdc8b52d54.jpg)

NOTE

- You cannot enlarge and reduce manually when using this function. - Although there may be a function for printing multiple copies depending on the application you are using, do not use it together with this function. If you do, printing may not be executed correctly. - The display may vary according to the operating system, as well as the type and version of the printer driver. 0258-04W You can select whether to print on one side or both sides of each sheet of paper. The default setting for [Print Style] is [2-sided printing]. However, for some driver versions, [1-sided printing] is the default setting.
Paper Type Paper Size
Plain paper(60 to 90 g/m2)Heavy paper(91 to 163 g/m2)Standard size:A4, Legal, Letter
Before performing 2-sided printing, see "Attention (1-sided Printing and 2-sided Printing)." ![](images/28e04708d7138c4376b665ea1f750d399b3da14a6273071d8bcbe6d7609fb3ec.jpg)

IMPORTANT

Precautions when performing 2-sided printing

\- Do not touch the paper during 2-sided printing until it is output completely. The paper is first output partially after the front side is printed, and then it is fed again to be printed on the reverse side.

Printing on the reverse side of paper that was previously printed (Performing 2-sided printing manually)

The printer can manually print the reverse side \* of paper that has been printed once. When printing the reverse side of paper that has been printed once, first stretch out the edges and flatten out curls, load them one sheet at a time in the multi-purpose tray, and then perform the following operation with the printer driver. 1. Display the [Paper Source] page 2. Set [Paper Source] to [Multi-purpose Tray] 3. Select the [Print on the Other Side] check box \* This is only for paper that has been printed using this printer. Also, you cannot print again on the same side of the paper that was printed before. \* If you are using A5 paper, the reverse side may not be printed correctly.

1.

Click [Finishing]. ![](images/3dd7efcd6102ca338928dca7a0d57cef4f946c20b12a9bf3e5445acf4555a18c.jpg)
text_image Canon Printer Printing Preferences Page Setup | Finishing | Paper Source | Quality Profile: Default Settings Add(1)... Edit(2)... Output Method: Print Print Style: 1-sided Printing Dividing... Print in Different Orientations Binding Location: Long Edge [Left] Gutter... Finishing: Off View Settings Advanced Settings... Restore Defaults OK Cancel Apply Help
For instructions on how to display the printer driver screen see "Printing with the Printer Driver" or "Configuring the Print Settings Beforehand."

2.

Select [1-sided Printing] or [2-sided Printing] from [Print Style]. ![](images/ec63ea66d50fe42966ae1bf19c852b3fe6f95e4f3f0d61bec29d547afb7a7df6.jpg)
text_image Canon Printer Printing Preferences Page Setup Finishing Paper Source Quality Profile Default Settings Add(1) Add(2) Output Method Print Print Style: 2nded Printing Booklet... Print in Different Orientations Binding Location: Long Edge [Left] Gutter... Finishing: Off View Settings Advanced Settings... Finish Defaults OK Cancel Apply Help

3.

Select the binding edge from [Binding Location]. ![](images/e315922cac5266c5eb0902dbba4f25c0d89df7c7ed60da3056e99554dc1b6771.jpg)
text_image Canon Printer Printing Preferences Page Setup Finishing Paper Source Quality Profile Default Settings Add(1)... Este(2) Output Method Past Print Style 2-sided Printing Device... Print in Different Orientations Binding Location Long Edge [Left] Gutter... Finishing Off View Settings Advanced Settings... Restore Defaults OK Cancel Apply Help
The output image is displayed in the preview area.

4.

Click [OK]. ![](images/58641b96804be6748c51980f0c1d656c50222b5a10e671d274de5b761e387951.jpg)

Note

\- The display may vary according to the operating system, as well as the type and version of the printer driver. ![](images/c7c97701da10a0dd114ed6fb60d2cd037eae66db744d012389b5378a2adcf224.jpg)

NOTE

Paper loading orientation

On 2-sided printing, the reverse side of the paper is printed first, therefore the paper should be loaded in the opposite orientation to that for 1-sided printing. If printing on such paper with letterheads, in which faces and directional orientations are specified, see "Paper Loading Orientation" and load the paper in the proper orientation.

In the case where the last page is 1-sided printing

In cases such as where the last page for the 2-sided printing is 1-sided printing, specifying the following setting allows you to print faster than normal 2-sided printing. 1. Press [ ] ( Settings). 2. Select [Layout] using [▲] and [▼], and then press [OK]. 3. Select [Alternative Method] using [▲] and [▼], and then press [OK]. 4. Select [On] using [▲] and [▼], and then press [OK]. However, when performing 2-sided printing on punched paper or previously printed paper, the orientation or printing surface of the last page may differ from other pages. In this case, set to [Off]. 0258-04Y You can print two pages of a document on each side of each sheet, then fold the sheets in half to create a booklet.
Paper Type Paper Size
Plain paper(60 to 90 g/m2)Heavy paper(91 to 163 g/m2)• Standard size:A4, Legal, Letter
![](images/cb572f8ef902ee3804e55b46b43f860219962c56b3d26dafd84af1705295dde3.jpg)

IMPORTANT

Precautions when performing booklet printing

\- Do not touch the paper during booklet printing until it is output completely. The paper is first output partially after the front side is printed, and then it is fed again to be printed on the reverse side.

1.

Click [Finishing].

![](images/737f0b91036f3f904ca68ef22dd6b3668040e2451d5ba87b6e3fa5669b0f6b19.jpg)
text_image Canon Printer Printing Preferences Page Setup: Finishing Paper Source Quality Profile: Default Settings Add(1)... Edit(2)... Output Method: Post Print Style: 1-sided Printing Booklet... Print in Different Orientations Binding Location: Long Edge [Left] Gutter... Finishing: Off A4 [Scaling: Auto] View Settings Advanced Settings... Restore Defaults OK Cancel Apply Help
For instructions on how to display the printer driver screen see "Printing with the Printer Driver" or "Configuring the Print Settings Beforehand."

2.

Select [Booklet Printing] from [Print Style].

![](images/ae0d7ad43f330a8ade9c5243494dd1749631bcb0afdf292c2d20717f7c0b46ab.jpg)
text_image Canon Printer Printing Preferences Page Setup Finishing Paper Source Quality Profile: Default Settings Add(1)... Edit(2) Output Method: Print Print Style: Booklet Printing Booklet... Print in Different Orations Binding Location: Long Edge (Left)... Gutter... Finishing: Delete At x2 -> All View Settings Detailed Settings for Booklet Booklet Printing Method All Pages at Once Divide Info Sets Sheets per Set: P5000 Sheets (3 to 10) Specify Booklet Gutter Booklet Gutter: 5x4 mm (3 to 10) OK Cancel Help
You can also configure detailed settings such as the opening direction and gutter width for booklet printing in the [Detailed Settings for Booklet] dialog box, displayed by clicking [Booklet]. The output image is displayed in the preview area. ![](images/04de4ab21c284be4302eea41939be769c501eff1fed53daef77a425d42850c5a.jpg)

NOTE

For details about the various settings in the [Detailed Settings for Booklet] dialog box, view the online help. (See "Viewing the Online Help.")

3.

Click [OK].

![](images/6138b9888df1a16bec79cf70c6af121b8e01cf55611877797b7f9d2eb4ef631c.jpg)

NOTE

- You cannot specify the [Finishing] options in the [Finishing] sheet when performing Booklet Printing. - The display may vary according to the operating system, as well as the type and version of the printer driver. 0258-050 You can enlarge a one-page image and print it over multiple pages. You can then glue the printed pages together to create a poster.

1.

Click [Page Setup].

![](images/a5566a490cfc2bfcbf6e0116bb6ef423d2dfc387758a159d80476d0dd50341a9.jpg)
text_image Canon Printer Printing Preferences Page Setup Finishing Paper Source Quality Profile: Default Settings Add(1)... Edit(2)... Output Method: Print Page Size: All Output Size: Match Page Size Copies: 1 (1 to 9999) Orientation A Portrait A Landscape Page Layout: 1 on 1 Manual Scaling Scaling: 100% 0 (25 to 201) Watermark Watermark Name: CONFIDENTIAL Edit Watermark... Custom Paper Size... Page Options... Restore Defaults OK Cancel Apply Help
For instructions on how to display the printer driver screen see "Printing with the Printer Driver" or "Configuring the Print Settings Beforehand."

2.

Select [Poster [N x N]] (N = 2, 3, or 4) from [Page Layout].

![](images/3cec6113f03c460136f34eb825e44b74002df0c7bc9d3ea6b647383c240ae6bd.jpg)
text_image Canon Printer Printing Preferences Page Setup Finishing Paper Source Quality Profile: Default Settings Add(1).... Eld(2)... Output Method: Print Page Size: All Output Size: Match Page Size Copies: 1 [1 to 9999] Orientation A Portrait A Landscape Page Layout: 10 Paper (4 x 4) Watermark Watermark Name: CONFIDENTIAL Edit Watermark... Custom Paper Size... Page Options... Restore Defaults OK Cancel Apply Help
The output image is displayed in the preview area. ![](images/cc54884e691cc76428a5b85b8105d753d124713e07e73ed69a0ba8ad935a52a1.jpg)

NOTE

If you cannot select the options for [Page Layout], display the [Device Settings] sheet, and then select [Auto] or [Enabled]

3.

Click [OK].

![](images/638485556d1a7b5b4f6969393fe39b48e6d2d71312cd740880ccd6467a92b6da.jpg)

NOTE

- When outputting the pages face up, the print sequence for the pages (the sheets into which the image is divided) starts from the top left proceeds to the right. When outputting the pages face down, the sequence starts from the bottom right and proceeds to the left. - Poster printing cannot be used together with "Watermark Printing", "Scaling Documents", or "Printing Multiple Pages on One Sheet." - The display may vary according to the operating system, as well as the type and version of the printer driver. 0258-051 You can print a watermark (such as "CONFIDENTIAL" or "COPY") on a document created using an application. You can register the customized watermark other than the various predefined watermarks.

1.

Click [Page Setup].

![](images/905051c7fc3b43813a4cfe48ddbeb95c623e5aaeb107252d25b03cf191b63fa5.jpg)
text_image Canon Printer Printing Preferences Page Setup Finishing Paper Source Quality Profile Default Settings Add(1)... Edit(2)... Output Method Print Page Size Add Output Size: Match Page Size Copies: 1 (1 to 9999) Orientation A Portrait A Landscapes Page Layout: 1 on 1 Manual Scaling Scaling: 100% Watermark Watermark Name: CONFIDENTIAL Edit Watermark... Custom Paper Size... Page Options... Restore Defaults OK Cancel Apply Help
For instructions on how to display the printer driver screen see "Printing with the Printer Driver" or "Configuring the Print Settings Beforehand."

2.

Select [Watermark] → select watermark for printing.

![](images/f79390e5f9d8946302042ce1e9f31ce23f63e01cd1258826d7f305621ab36d03.jpg)
text_image Canon Printer Printing Preferences Page Setup Finishing Paper Source Quality Profile: Default Settings Add(1)... Edit(2)... Output Method: Print Page Size: All Output Size: Match Page Size Copies: 1 (1 to 9999) Orientation Portrait Landscapes Page Layout: 1 on 1 Manual Scaling Scaling: 100 (5 (25 to 200)) Watermark Watermark Name: CONFIDENTIAL CORE/CRONTAL COPY DRAFT FILE COPY FINAL PRELIMINARY PROOF TOP SECRET Custom Paper Size... Page O...
The output image is displayed in the preview area. ![](images/6225e41f3e455fca98afec79d78214a2643f78a1b927286c187fe7c1c301b89d.jpg)

NOTE

By clicking [Edit Watermark], you can create and register new watermarks. For details, view the online help (see "Viewing

3.

Click [OK].

![](images/428214d10ec82e739e359ab04a0ac3466dd978a79fac4100ed59c390692d5895.jpg)

NOTE

- You can register up to 50 watermarks, not including the watermarks already provided. - The display may vary according to the operating system, as well as the type and version of the printer driver. 0258-0F2 You can switch between color and grayscale printing while outputting print data.

1.

Click [Quality]. ![](images/5abf07b66af238c278b219b962ba620c703c7a8f753c328c4e98f99b44171aa3.jpg)
text_image Canon Printer Printing Preferences Page Setup | Finishing | Paper Source | Quality Profile Default Settings Add(1)... Edit(2)... Output Method: Edit and Preview Lock(4) Objective: Current Publications Graphics Voted Photo Designs [CAD] This mode is used when printing documents in general. Advanced Settings... View Settings Color Mode: Auto [Color/BWW] Manual Color Settings Color Settings... About Restore Defaults OK Cancel Apply Help
For instructions on how to display the printer driver screen see "Printing with the Printer Driver" or "Configuring the Print Settings Beforehand."

2.

Select [Black and White], [Color], or [Auto [Color/B&W]] from [Color Mode]. ![](images/0db6bcc3c7b1ea903a5031e0696ecc3ec4600e688d8002066e225e702aecd804.jpg)
text_image Canon Printer Printing Preferences Page Setup Finishing Paper Source Quality Profile: Default Settings Edit(1).... Edit(2)... Output Method: Edit and Preview Lock(4) Objective: Materials Publications Graphics Used Photo Designs (CAD) This mode is used when printing documents in general. Advanced Settings... View Settings Color Mode: Auto [Color/6x8] Black and White Color Auto [Color/6x8] Manual Color Settings About Restore Defaults OK Cancel Apply Help
[Auto [Color/B&W]] switches automatically between color printing and black-and-white printing according to the type of data.

3.

![](images/c90940cca5b4d3115cd759ba8227e039872c0b5825d7b0cfa748872c679a12d5.jpg)

NOTE

The display may vary according to the operating system, as well as the type and version of the printer driver. 0258-052 You can combine two or more files created using different applications and edit and print them as a single file.

1.

Select [Edit and Preview] from [Output Method]. ![](images/ed5b21c2bf1a945c0e3854c4a1edb4ade861013f05dcbf3562d46989296aca9e.jpg)
text_image Canon Printer Printing Preferences Page Setup Finishing Paper Source Quality Profile Default Settings Add(1)... Edit(2)... Output Method Edit and Preview Lock(4) Page Size A4 Output Size Match Page Size Copies 1 [1 to 9999] Orientation A Portrait A Landscapes Page Layout $ 1 on 1 Manual Scaling Scaling 100 0 [5 to 30] Watermark Watermark Name CONFIDENTIAL Edit Watermark... Custom Paper Size Page Options... Restore Defaults OK Cancel Apply Help
For instructions on how to display the printer driver screen see "Printing with the Printer Driver" or "Configuring the Print Settings Beforehand."

2.

Specify the desired settings in the printer setup screen → click [OK]. Click the tabs for the [Page Setup], [Finishing], [Paper Source], and [Quality] sheets, and then specify the desired items. ![](images/1288cbfe680121038c22fe78bb7e1c428898f28976e1842ffc22143da95c7189.jpg)
text_image Canon Printer Printing Preferences Page Setup Finishing Paper Source Quality Profile Default Settings Add(1)... Edit(2)... Output Method: Edit and Preview Lock(4) Page Size: A4 Output Size: Match Page Size Copies: 1 [1 to 9999] Orientation Portrait Landscape Page Layout: 1 on 1 Manual Scaling Scaling: 100 % [25 to 200] Watermark Watermark Name: CONFIDENTIAL Edit Watermark... Custom Paper Size Page Options... Restore Defaults OK Cancel Apply Help
![](images/a195c4cd237eb4c5d935b14dc17154b1151abf33605f67bfcb2f2920315b0b09.jpg)

NOTE

For information on available printing functions, see "Printing Functions" or the online help. (See "Viewing the Online Help.")

3.

Click [OK] in the [Print] dialog box. The [Canon PageComposer] dialog box is displayed.

4.

For each file you want to combine, repeat steps 1 to 3.

5.

Select the files you want to combine from [Document Name] → click [] (Combine Documents). ![](images/ae3efbfb3cc8424202a0c8f096e9f6c22d4b7b33553f119596218b4e35904581.jpg)
text_image Canon PageComposer - Canon Printer - user07 File Edit Move to Help Document Name Pages Layout Informati... Comments compl03.pdf.pdf 2 1 on 1 compl02.pdf.pdf 2 1 on 1 For Help, press F1.

6.

If you want to edit the print settings of the combined file, click [Print Settings] → specify the desired settings → click [Combine]. ![](images/d5981d78248a01b207c12d18e237239a2e1e9e5d5436663a0c55a480632c0576.jpg)
text_image Combine Document Name: Combined Documents 1 Sheets: 4 1 2 3 4 Document List Print Settings Copies: [1 to 9999] Print Style 3-Sided/Painting Output Size Consistency Layout Consistency Page IDs Print Next Document Icon Details... Reverse Defaults Combine Cancel Help

7.

Select the combine file you want to print from [Document Name] → click [] (Print). ![](images/551f0e763f7f005692868a131955e8ac5aca81ba1d5ecc6d5a37da524ec8596b.jpg)
text_image Canon PageComposer - Canon Printer - user67 File Edit Move to Help Document Name Pages Layout Information Comments Combined Documents 4 For Help, press F2.
![](images/e773b8a47fb251181b7cbb1018deb176363cc007a79a6c15ae7eb285dfb164d1.jpg)

NOTE

- For details on settings of Canon PageComposer, see the Canon PageComposer online help. - The display may vary according to the operating system, as well as the type and version of the printer driver. 0258-053 Combinations of printer driver settings corresponding to a variety of printing purposes are provided with the printer driver as "profiles." This enables you to print documents according to a desired objective by simply selecting a profile from the [Profile] list. You can register the customized profiles other than the various predefined profiles. (See "Registering a Profile for Printing.")

1.

Select a profile from the [Profile] list according to your objective. ![](images/7334fab28049058d189d98692266b0e2e9a42ffe83029877d859229cfe1b7dd5.jpg)
text_image Canon Printer Properties Page Setup Finishing Paper Source Quality Profile: Output Method Default Settings Default Settings 2 on 1 [1-sided] 2 on 1 [2-sided] 2 ended Confidential B & W Documents Scale to Rt. A4 Add(T) Edit(C) Default Settings This setting enables you to print with all factory default settings. This setting is suitable for printing general business documents that include text and listes. R4 Match Page Size 1 (1 to 9999) Orientation A Portrait A Landscape Page Layout 1 1 on 1 Manual Scaling Scaling 100% 8 (25 to 200) Watermark Watermark Name: CONFIDENTIAL Edit Watermark... Custom Paper Size... Page Options... Restore Defaults OK Cancel Help
For instructions on how to display the printer driver screen see "Printing with the Printer Driver" or "Configuring the Print Settings Beforehand." The output image is displayed in the preview area.

2.

Click [OK]. ![](images/5ee538a647387d984a4f788503023c16ba616343b7d25d473208ca04622cee47.jpg)

NOTE

- To select a profile, you need to select [Allow Profile Selection] in the [Profile] sheet of the printer properties dialog box. (See "Configuring the Print Settings Beforehand.") If you are using Windows 2000/Windows XP/Windows Server 2003, to change this setting, you need full control access for the device. Full control access is available for users who are registered as Administrators or Power Users in the Windows system settings. - The display may vary according to the operating system, as well as the type and version of the printer driver. 0258-054 If you have registered frequently used settings as "profiles," you can apply the settings by simply selecting them from the [Profile] list.

1.

Specify the desired settings in the printer driver screen → click [Add]. ![](images/1a08f13a3e92de12c654165bd95627d349849c1812cdf9d3a4fc458d36a1f038.jpg)
text_image Canon Printer Printing Preferences Page Setup Finishing Paper Source Quality Profile Default Settings Add(1)... Edit(2)... Output Method Print Page Size:A4 Output Size:Match Page Size Copies: 1 [1 to 9999] Orientation A Portrait A Landscapes Page Layout: 1 on 1 Manual Scaling Scaling 100% 0 (25 to 30) Watermark Papermark Name: CONPIDENTIAL Edit Watermark... Custom Paper Size... Page Options... Restore Defaults OK Cancel Apply Help
Click the tabs for the [Page Setup], [Finishing], [Paper Source], and [Quality] sheets, and then specify the desired items. For instructions on how to specify the print settings, see "Printing with the Printer Driver" or "Configuring the Print Settings Beforehand." For information on available printing functions, see "Printing Functions" or the online help (see "Viewing the Online Help").

2.

Set [Name] and [Icon] → click [OK]. ![](images/9a8edb7509b9044d63d706d932b818ef2537a889940cf8d29fcef79a871d436c.jpg)
text_image Add Profile Name: Icon: Comment: View Settings OK Cancel Help
Enter additional information in [Comment] if necessary. ![](images/c2dcd1c4b8dfc5dafa17064c6e839f4ba65e911168ad9ac1a993339dda5c9603.jpg)

NOTE

- To edit or delete a profile, in the printer driver screen, click [Edit] at the right of [Profile]. However, pre-defined profiles cannot be modified. - If you cannot select a profile, display the printer properties dialog box from [Control Panel] and click the [Profile] tab, then check whether [Allow Profile Selection] and [Allow Setting Addition] are selected. For details about how to display the printer properties dialog box, see "Setting the Printer Options." ![](images/17a944b58c204390545ddb008d5b28d6ac8de3eef5f1609de2b638db546343a2.jpg) 0258-055

>Printing Fundamentals

> Printing with the Printer Driver > Configuring the Page Settings Beforehand Setting the Printer Options Viewing the Online Help Viewing the Driver Guide

> Printing Functions

Common Functions > [Layout] Preferences Pane > [Finishing] Preferences Pane > [Paper Source] Preferences Pane [Quality] Preferences Pane > [Special Features] Preferences Pane

> Scaling Documents

> Printing Multiple Pages on One Sheet

2-sided Printing

> Setting the Color Mode for Printing

> Using [Presets] for Printing

0258-056 This section explains the basic printing method using the printer driver, how to set the printer options, and how to display the online help. > Printing with the Printer Driver > Configuring the Page Settings Beforehand Setting the Printer Options Viewing the Online Help Viewing the Driver Guide 0258-057 This section explains the basic printing method using the printer driver. ![](images/3c77d621e96414fa2b88f23a6175cc9fc5e90166f6f416bd2222b59770e5367d.jpg)

NOTE

Printing methods may vary depending on the application you are using. For details, see the instruction manuals provided with the application.

1.

Select [Page Setup] from the [File] menu of the application. ![](images/516f90a10344b4296d5d5a1ab0d84d01dfcd302983c672673f1abe2d29ddcbc4.jpg)
text_image File Edit Format Windc New ⌘N Open... ⌘O Open Recent ▶ Close ⌘W Save ⌘S Save As... ⌘S Save All Revert to Saved Show Properties ⌘P Page Setup ⌘P
![](images/7586e324dfa45098b0e7db0bc2a0ad8ba7915d2a2414eeebffce08ca662ecb38.jpg)

NOTE

In Mac OS X 10.5.x, the [Page Setup] dialog box may not be displayed, depending on the application you are using. If this is the case, you can specify the page size, page orientation, and scaling in the [Print] dialog box.

2.

Select [Page Attributes] from [Settings]. ![](images/288c0cb251339d2a9733f73e0e03c606e517a20abe661d957b9e09beb1479986.jpg)
text_image Settings: Page Attributes Format for: Canon Printer Canon LBPXXXX UFR II (XI) Paper Size: A4 20.99 by 29.70 cm Orientation: Scale: 100 % Cancel OK

3.

Select your printer from [Format for] → set [Paper Size], [Orientation], and [Scale] as necessary → click [OK].

4.

Select [Print] from the [File] menu. ![](images/c79c6e4159282d4d6a32e217ad47ee56ede5fe743234532d6032c18879272e4a.jpg)
text_image File Edit Format Windc New ⌘N Open... ⌘O Open Recent ▶ Close ⌘W Save ⌘S Save As... ⌘S Save All Revert to Saved Show Properties ⌘P Page Setup ⌘P Print... ⌘P

5.

Select your printer from [Printer] → set the number of copies, which pages to print, etc. ![](images/24341749f7ae74d513e76272780ca0426bc2fa396dd32329cb257b53a90a0640.jpg)
text_image Printer: Canon Printer Presets: Standard Copies 1 Collated Pages All From: 1 to: 1 Paper Size A4 20.99 by 29.70 cm Orientation Layout Pages per Sheet: 1 Layout Direction: Border: None Two-Sided: Off Reverse Page Orientation PDF Cancel Print

6.

Select the appropriate preferences panes, and configure the print settings. ![](images/ec1b4aecd736250e6b35f66a4fce75debec73dd65058d372854f25d0e1afe183.jpg)
text_image Printer: Canon Printer Presets: Standard Copies: 1 Collated Pages: All From: 1 to: 1 Paper Size: A4 20.99 by 29.70 cm Orientation TextEdit Layout Color Matching Paper Handling Paper Source Cover Page Scheduler Finishing Quality Special Features About Summary PDF Cancel Print
![](images/d34246b0776d0a12b5ac2aa13e25031e17ad57b90e9aa3b01b5f6883671115d1.jpg)

NOTE

For information on available printing functions, see "Printing Functions" or the online help. (See "Viewing the Driver Guide.")

7.

Click [Print]. 0258-058 The procedure for configuring the page settings prior to printing is as follows.

1.

Select [Page Setup] from [File] menu of the application. ![](images/52ede23ac5f94babb5ad8af0ad630f111c8fd04e2c83e5c7b7a8ccd04f86e464.jpg)
text_image File Edit Format Windo New #N Open... #O Open Recent ▶ Close #W Save #S Save As... 0 #S Save All Revert to Saved Show Properties ⌘#P Page Setup... 0 #P

2.

Select [Page Attributes] from [Settings]. ![](images/068a5db11a71f0b9a0240741b5c0f768f7cf91dbab28a98bddcc0da1c37e0baf.jpg)
text_image Settings: Page Attributes Format for: Canon Printer Canon LBPXXXX UFR II (XX) Paper Size: US Letter 8.50 by 11.00 inches Orientation: Scale: 100 % Cancel OK

3.

Select your printer from [Format for] → set [Paper Size], [Orientation], and [Scale] as necessary.

4.

Select [Save As Default] from [Settings] → click [OK]. ![](images/e651f1e8353b530c588941c7ec849692ce2f327c54eea6f3d86f6786ea8e9e92.jpg)
text_image Settings ✓ Page Attributes Save As Default Format For: Canon LBPXXXXI UFB II (XII) Paper Size: A4 20.99 by 29.70 cm Orientation: Scale: 100 % Cancel OK
![](images/cc2191a2d7e45e0809772a46f92287afbe9c11876f0dcf62fafe6fb563ae5100.jpg)

NOTE

- In Mac OS X 10.5.x, the [Page Setup] dialog box differs according to the application. - The screen may vary according to the operating system, as well as the type and version of the printer driver. 0258-059 When using the printer driver for the first time, or changing the printer settings, follow the procedure below to obtain the printer information and set the installable options. Mac OS X 10.4.x > Mac OS X 10.5 and later Mac OS X 10.4.x

1.

Open [System Preferences] → click [Print & Fax]. ![](images/536da38e1f8fbabcc4256b4b67d680542f9bd8aafb0bfdd196dc5da1a84196b7.jpg)
text_image System Preferences Show All Personal Appearance Dashboard & Expose Desktop & Screen Saver Dock International Security Spotlight Hardware CDs & DVDs Displays Energy Saver Keyboard & Mouse Print & Fax Sound Internet & Network Mac Network QuickTime Sharing System Accounts Classic Date & Time Software Update Speech Startup Disk Universal Access

2.

Click [Printing] → select your printer → click [Printer Setup]. ![](images/960e69736a505af911131a15f59de946d8d889843b99b62174bca2a3181558e0.jpg)
text_image Print & Fax Show All Printing Faxing Sharing Canon Printer Name: Canon Printer Location: Kind: Canon XXXX LFR II (UK) Status: Idle Print Queue... Printer Setup... Selected Printer in Print Dialog: Last Printer Used Default Paper Size in Page Setup: A4 Click the lock to prevent further changes.

3.

Select [Installable Options] → configure the options attached to and installed in the printer → click [Apply Changes]. ![](images/df1d764da644dc9c1537180aae14479a6f22d2c9909d620ac93c260c302e8c1f.jpg)
text_image Canon Printer Installable Options Paper Source Options: None Function Version: 1.0 or later Paper Type of Multi-purpose Tray: Plain Paper Paper Type of Cassette 1: Plain Paper Paper Type of Cassette 2: Plain Paper Apply Changes
The options installed in the printer are ready to use. ![](images/20bde8a736a73a3ffd35c864d05c52931814a52a2523a827decb23092f2921f9.jpg)

IMPORTANT

\- Be sure to select only those options that are actually installed in the printer. ![](images/1c849278eabcf11f0a2ef2af487ae1eefda942bcc914ff1e641933a73e159ee7.jpg)

NOTE

\- If you close the [Printer Info] dialog box without clicking [Apply Changes] the setting you have made will not be saved.

Mac OS X 10.5 and later

1.

Open [System Preferences] → click [Print & Fax]. ![](images/2ceced06d943830c087b9a8c72c3b158c60771ac4ffeca567bc318f4944f342e.jpg)
text_image System Preferences Show All Personal Appearance Desktop & Dock Expose & International Security Spotlight Hardware Bluetooth CDs & DVDs Displays Energy Saver Keyboard & Mouse Print & Fax Sound Internet & Network Mac Network QuickTime Sharing System Accounts Date & Time Parental Controls Software Update Speech Startup Disk Time Machine Universal Access

2.

Select the printer you are using → click [Options & Supplies]. ![](images/12956b7e2edc11030b2e8634a7241e4273f7c217bc1ce4bfa393da5e8a5b7165.jpg)
text_image Print & Fax Show All Printers Canon Printer - file, Default Canon Printer Share this printer locations: Kind: Canon LBPXXXX UFR # (XX) Status: file, Default Open Print Queue... Options & Supplies... Default Printer: Last Printer Used Default Paper Size in Page Setup: A4 Click the lock to prevent further changes.

3.

Click [Driver] → confirm that your printer is selected for [Print Using] → configure the options attached to and installed in the printer. ![](images/42bff49a924f9d5eb04146580cc1bed93a092613d99154c9a1faa319a78a06eb.jpg)
text_image General Driver Supply Levels Print Using: Canon LBPXXXX UFR 8 (XX) To take full advantage of your printer's options, confirm that they are accurately shown here. For information on your printer and its optional hardware, check the printer's documentation. Paper Source Options None Hard Disk Job Accounting Function Version: 1.0 or later Paper Type of Multi-purpose Tray Plain Paper Paper Type of Cassette 1: Plain Paper Paper Type of Cassette 2: Plain Paper Cancel OK

4.

Click [OK]. ![](images/5a4331fba4b22b41c07ac07c41755e19e25181a6b2727ef1c53c0db7d01647fc.jpg)

IMPORTANT

\- Be sure to select only those options that are actually set in the printer. ![](images/7dac3b5936d8601d8474b57b2c8d0e45920d14a3238af140142e36c72b48f3ba.jpg)

NOTE

- The screen may vary according to the operating system, as well as the type and version of the printer driver. - Depending on the type and version of the printer driver, [Printer Info] may be displayed in the [Print] dialog box. If so, click [Printer Info] to obtain or verify printer information. 0258-05A You can display the online help by clicking [?] in the [Page Setup] dialog box or the [Print] dialog box. The online help includes additional information about every printing option. If this manual does not provide the information you need, see the online help.

1.

Select your printer from [Printer] → select a preferences pane → click []? ![](images/f3ed31a3002667fd6f53969d2ce9d8045540d6cad7e18f74fa4e91d18bc45635.jpg)
text_image Printer: Canon Printer Presets: Standard Copies: 1 Collated Pages: All From: 1 to: 1 Paper Size: A4 20.99 by 29.70 cm Orientation: Finishing Print Style: 1-sided Printing Binding Location: Long Edge (Left) Gutter... Printer Info Finishing Details... PDF Cancel Print
Select one of the following preferences panes: • [Paper Source] preferences pane • [Finishing] preferences pane • [Quality] preferences pane • [Special Features] preferences pane The online help is displayed. ![](images/926edb92feead3aa5711284308fab9c5a647f427d0512fe14413bc3d3dbb29ae.jpg)
text_image Canon UFR 9 Printer Driver Help Ask a Question Top > Contents (printers other than D500 series/MF4400 Series/MF4500 Series) > Panes and Dialog boxes > [Finishing] preferences pane [Finishing] preferences pane This pane lets you specify paper output settings such as print style (1-sided Printing, 2-sided Printing, etc.), paper output method, and gutter width. The available items differ depending on the printer model and optional units you are using. IMPORTANT In Mac OS X version 10.5 and later, depending on the application, the settings in each preferences pane are displayed at the bottom. Printer: Epson-Ramp Prints: Standard Color: Page: All Drawn: Power Size: 44 GB/MPa (3x7.6" Orientation: Top Producing: 80 Print Size: 1-sided Printing Binding Location: Long Type-Left: 80 Producing: Options: Paper Output: Auto: 10 Producing Details... OK Next NOTE For details about the conditions supported by (Perfect Binding), such as paper sizes etc., refer to *Supported Conditions for Perfect
![](images/04da70ed32167925e7a5b6fe3876732bf2f540b972403d4b6893ff32673e85bd.jpg)

NOTE

- For details about how to display the [Page Setup] dialog box and the [Print] dialog box, see "Printing with the Printer Driver." - The screen may vary according to the operating system, as well as the type and version of the printer driver. 0258-05C To view the driver guide, follow the procedure below.

1.

Open the [Documents] folder in the printer driver install set folder. The location of the [Documents] folder may vary depending on the type and version of the printer driver.

2.

Double-click the "index.html" icon. ![](images/cb638a41d4d8b384af69f0370400836042e04984ac0f9034c939fcf771b6a5ad.jpg)
text_image guides DEVICES SHARED PLACES SEARCH FOR contents frame_htmls frame_images index_html JSONS pdfs SCRIPTS styles 8 items, 24.5 MB available
The driver guide is displayed. ![](images/1609c072ac2dda669412994fc068d494765c28c66e251a8917b8db758842ae76.jpg)

NOTE

- The location of the [Documents] folder may vary depending on the type and version of the printer driver. - Depending on the printer model you are using, the installation guide may be a PDF file. If so, double-click the PDF icon in the [Documents] folder. 0258-05E This section explains printing functions which can be configured in the printer driver screen. Common Functions > [Layout] Preferences Pane [Finishing] Preferences Pane > [Paper Source] Preferences Pane [Quality] Preferences Pane > [Special Features] Preferences Pane ![](images/e113a601f30450e0ee46e34ecde1e0adf9b6ef6954ad9b34ff65e1c01782b0b9.jpg)

NOTE

- Available settings may differ according to the operating system, as well as the type and version of the printer driver. - If you are using Mac OS X 10.5.x, click [▼] to display all of the settings in the [Print] dialog box. 0258-05F Selecting [Print] from the [File] menu of the application displays the [Print] dialog box. ![](images/ea728b1254e901574042db0a6a9bc975735976908977ce0c919ca37c5453ed1d.jpg)
text_image 1 Printer: Canon Printer 2 Presets: Standard 4 Copies: 1 Collated 5 6 Pages: All From: 1 to: 1 Paper Size: A4 20.99 by 29.70 cm Orientation: Layout Pages per Sheet: 1 Layout Direction: Border: None Two-Sided: OFF Reverse Page Orientation 3 PDF Cancel Print
1.Printer SelectionSelects the printer to use from those previously added to the [Printing] pane of the [Print & Fax] dialog box in the [System Preferences].2.PresetsCombinations of frequently used settings can be saved as presets. These saved presets can then be selected for printing (see "Using [Presets] for Printing").
3.Save As PDFSaves the document as a PDF file.4.CopiesSpecifies the number of copies to print.
5.CollatedCANON imageCLASS LBP7660Cdn - NOTE - 1If two or more copies are to be printed, enables them to be output in sets.6.PagesSpecifies the range of pages to be printed.
![](images/0ee470212082cba7fe18f9fab9502e007d6b0ad45fbebeadf039d4bdefebe2e8.jpg)

NOTE

- The displays may differ between operating systems, printer driver types, and functions. - If you are using Mac OS X 10.4.x, you can set the above functions in the [Copies & Pages] dialog box. 0258-05H ![](images/c1c5d4a6643d70808b0feb7760a930ef9c9036de8c76f810d380b262ff1f63ec.jpg)
text_image Printer: Canon Printer Presets: Standard Copies: 1 Collated Pages: All From: 1 to: 1 Paper Size: A4 20.99 by 29.70 cm Orientation: Layout Pages per Sheet: 4 Layout Direction: 3 Border: None 1/2 3 Reverse Page Orientation PDF Cancel Print
1.Page LayoutCANON imageCLASS LBP7660Cdn - NOTE - 1Prints multiple pages on one sheet of paper(see "Printing Multiple Pages on One Sheet").2.Layout DirectionCANON imageCLASS LBP7660Cdn - NOTE - 2Sets the page layout direction.
3.Page BorderCANON imageCLASS LBP7660Cdn - NOTE - 3Prints each page with a border.
![](images/3e53aa08b13279587ab97ca327cff6b1ccee5f17740545f90efe9a42abc4d143.jpg)

NOTE

The displays may differ between operating systems, printer driver types, and functions. 0258-05J ![](images/8c1939cd8d742bda239bf3656deb2c67b01410387d0acf19f783d87416c75562.jpg)
text_image Printer: Canon Printer Presets: Standard Copies: 1 Collated Pages: All From: 1 to: 1 Paper Size: A4 20.99 by 29.70 cm Orientation: Finishing Print Style: 2-sided Printing Binding Location: Long Edge (Left) Cutter... Printer Info 3 Finishing Details... PDF Cancel Print
1.2-sided PrintingCANON imageCLASS LBP7660Cdn - NOTE - 1Prints on the front and back of the paper (see "2-sided Printing").2.Binding Location/GutterSets the orientation and width of the gutter.
3.Printer InfoObtains printer information (the name of the printer model, installed options, and paper source status).
![](images/233e4855b8d0b4ec657affd240a15e51a355764fefcfff3a96be3a2a3159aec5.jpg)

NOTE

The displays may differ between operating systems, printer driver types, and functions. 0258-05K ![](images/68bf852d29d1c70a4e72e487fc604b5853e07b20dc8754b60888ee3426f3f7ee.jpg)
text_image Printer: Canon Printer Presets: Standard Copies: 1 Collated Pages: All From: 1 to: 1 Paper Size: A4 20.99 by 29.70 cm Orientation: Paper Source Paper Source: Auto Paper Type: Plain Paper Print on the Other Side Insert Interleaf Sheets: Auto Print on Interleaf Sheets Printer Info 2 PDF Cancel Print
1.Paper SourceCANON imageCLASS LBP7660Cdn - NOTE - 1When you want to print on a specific type of paper, specify the paper source containing the paper, or the paper type.2.Printer InfoObtains printer information (the name of the printer model, installed options, and paper source status).
![](images/ebb90cd9d615164ed5a08544cd0370caf18f0ab67ffe28f3bea77ef53997c522.jpg)

NOTE

The displays may differ between operating systems, printer driver types, and functions. 0258-05L ![](images/d48ec8ab45874aa22d1992a1f5ca15cae3f4bc8e31292044993c3d4f9fe9a295.jpg)
text_image Printer: Canon Printer Presets: Standard Copies: 1 Collated Pages: All From: 1 to: 1 Paper Size: A4 20.99 by 29.70 cm Orientation: Quality 1 Quality Settings... 2 Color Mode: Color Color Settings... Printer Info 3 PDF Cancel Print
1.Quality SettingsEnables you to configure settings relating to print quality.2.Black and White PrintingPrints color documents in black and white (see "Setting the Color Mode for Printing").
3.Printer InfoObtains printer information (the name of the printer model, installed options, and paper source status).
![](images/357ba46bca49ecb5ec7185a4f4993ce18c2969c43c8ffc934fa09053c0e56d36.jpg)

NOTE

The displays may differ between operating systems, printer driver types, and functions. 0258-05R ![](images/0d427fe5f7e6ff4d3af61475516a7b5a345450cb037426494897ad0744d656b8.jpg)
text_image Printer: Canon Printer Presets: Standard Copies: 1 Collated Pages: All From: 1 to: 1 Paper Size: A4 20.99 by 29.70 cm Orientation: Special Features Job Processing: Print 1 Printer Info 2 PDF Cancel Print
1.Job ProcessingEnables you to change the output method so that print data is saved to a mail box in the printer memory etc.2.Printer InfoObtains printer information (the name of the printer model, installed options, and paper source status).
![](images/8de88c819ec71e5c771703cfcacb000210efbcbd684c3efb16e89888b6fdc7a4.jpg)

NOTE

The displays may differ between operating systems, printer driver types, and functions. 0258-05S You can enlarge or reduce the size of the document to be printed. There are two methods for scaling a document: select the paper size to be printed to scale it automatically, or specify the scaling value manually.

1.

Select [Page Attributes] from [Settings] in the [Page Setup] dialog box. For details on how to display the [Page Setup] dialog box, see "Configuring the Page Settings Beforehand."

2.

Select your printer → select a paper size for printing from [Paper Size]. ![](images/798fc81997f9df617e09c06a0e7d2461489be197e18aafa179007dd605501ea7.jpg)
text_image Settings: Page Attributes Format for: Canon Printer Canon LBPXXXX UFR II (XII) Paper Size: A4 20.99 by 29.70 cm Orientation: Scale: 100 % Cancel OK
Where the paper size specified in the application and that specified in this preferences pane differ, scaling is set automatically. If you want to increase or decrease the magnification manually, specify the zoom ratio for [Scale].

3.

Click [OK].

4.

Select [Print] from the [File] menu.

5.

Select your printer → specify the desired settings → click [Print]. ![](images/61c301a9d7762840dc026b3e22a2b1c10d8be2543ccb047517fbca0dbd040190.jpg)

NOTE

- Depending on the printer model you are using, you may not be able to magnify the document to the optimum ratio for the selected page size. - In Mac OS X 10.5.x, the [Page Setup] dialog box may not be displayed, depending on the application you are using. If this is the case, you can specify the page size, page orientation, and scaling in the [Print] dialog box. For details about how to display the [Print] dialog box, see "Printing with the Printer Driver." - The screen may vary according to the operating system, as well as the type and version of the printer driver. 0258-05U A multiple pages can be printed on one sheet of paper.

1.

Select [Print] from the [File] menu of the application.

2.

Select your printer from [Printer] → [Layout] → the number of pages you want to print onto one sheet of paper from [Pages per Sheet]. ![](images/2473fd513add5d5560432764c0483c2df2d5c096d3e38f5815394579acf29d7e.jpg)
text_image Printer: Canon Printer Presets: Standard Copies: 1 Collated Pages: All From: 1 to: 1 Paper Size: A4 20.99 by 29.70 cm Orientation: Layout Pages per Sho 1 2 4 6 9 16 Layout Direction Border Two-Side Reverse Page Orientation PDF Cancel Print

3.

Select the page order from [Layout Direction]. ![](images/81f08853260c8adaefb260f6295405e90b5aec5aba1b4bebeca54e31bac9dd13.jpg)
text_image Printer: Canon Printer Presets: Standard Copies: 1 Collated Pages: All From: 1 to: 1 Paper Size: A4 20.99 by 29.70 cm Orientation: Layout Pages per Sheet: 4 Layout Direction: Border: None Two-Sided: Off Reverse Page Orientation PDF 1 of 1 Cancel Print

4.

If you want to add a border to each page, select the line type from [Border]. ![](images/4e63b043a34d16e33a9ff0fc7bab284f121af8fece65104acc89dff89698aa59.jpg)
text_image Printer: Canon Printer Presets: Standard Copies: 1 Collated Pages: All From: 1 to: 1 Paper Size: A4 20.99 by 29.70 cm Orientation: Layout Pages per Sheet: 4 Layout Direction: None Single Hairline Single Thin Line Double Hairline Double Thin Line Two-Side: PDF Cancel Print

5.

Click [Print]. ![](images/5fb4034fcaf5faadb810316e13e5f693ec2f9d0e1d05f941f82424bc91f25be2.jpg)

NOTE

- You cannot enlarge and reduce manually when using this function. - The screen may vary according to the operating system, as well as the type and version of the printer driver. 0258-05W You can print a document on both sides of the paper.
Paper Type Paper Size
Plain paper(60 to 90 g/m2)Heavy paper(91 to 120 g/m2)Standard size:A4, Legal, LetterCustom size:127.0 to 215.9 mm wide and 279.4 to 355.6 mm long
Before performing 2-sided printing, see "Attention (1-sided Printing and 2-sided Printing)." ![](images/282a6fc3c30419ffc9a80bb6c2255da43bdc171696d16d0fbd4084322752c13d.jpg)

IMPORTANT

Precautions when performing 2-sided printing

- Do not touch the paper during 2-sided printing until it is output completely. The paper is first output partially after the front side is printed, and then it is fed again to be printed on the reverse side. - Be sure to close the output selection cover before performing 2-sided printing. "Paper Loading and Output"

Printing on the reverse side of paper that was previously printed (Performing 2-sided printing manually)

Using the multi-purpose tray, this printer enables you to perform 2-sided printing manually by inserting the reverse side of the paper ^* that was previously printed. When printing on the reverse side of paper that was previously printed, flatten the curl and load one sheet of paper at a time in the multi-purpose tray. \* You can use only paper printed by this printer. Also, you cannot print on the printed side again.

1.

Select [Print] from the [File] menu of the application.

2.

Select your printer from [Printer] → [Finishing] → [2-sided Printing] from [Print Style]. ![](images/4b198baeab8019c176ba312b21e3229c0970aa2deb1cbb2964236e1ca9d600c7.jpg)
text_image Printer: Canon Printer Presets: Standard Copies: 1 Collated Pages: AJ From: 1 to: 1 Paper Size: US Letter 8.50 by 11.60 inches Orientation: Finishing Print Style: ✓ 1-sided Printing 2-sided Printing Long Edge (Left) Cutter... Printer Info Finishing Details... PDF Cancel Print

3.

Select the binding edge from [Binding Location]. ![](images/983f79bc566a7e2398ac99c129651585059d8cce4df4acf08ed569d264d98ea1.jpg)
text_image Printer: Canon Printer Presets: Standard Copies: 1 Collated Pages: All From: 1 to: 1 Paper Size: A4 20.99 by 29.70 cm Orientation: Finishing Print Style: 2-sided Printing Binding Location: ✓ Long Edge (Left) Long Edge (Right) Short Edge (Top) Short Edge (Bottom) Cutter... Printer Info Finishing Details... PDF ▼ Cancel Print
The output image is displayed in the preview area.

4.

If you want to set the gutter width, click [Gutter]. ![](images/89c4141968f6ec8577296308b130778a89b676a75851edea8f25f41aa4ea28fa.jpg)
text_image Printer: Canon Printer Presets: Standard Copies: 1 Collated Pages: All From: 1 to: 1 Paper Size: A4 20.99 by 29.70 cm Orientation: Finishing Print Style: 2-sided Printing Binding Location: Long Edge (Left) Cutter... Printer Info Finishing Details... PDF Cancel Print
If you do not set the gutter width, skip to step 6.

5.

Specify the gutter width → click [OK]. ![](images/1804f52e9290380350bca16380e1613636d95a4cc4c9af7a9fd37f27bf6e7eb3.jpg)
text_image Gutter Settings Gutter: 0 mm (0 to $0) Cancel OK

6.

Click [Print]. ![](images/5edc1e694202dce0a90b1d9fcea7562bc0002c3b4484222b1bc26bf76b23e06c.jpg)

NOTE

The screen may vary according to the operating system, as well as the type and version of the printer driver. 0258-0F3 You can switch between color and grayscale printing while outputting print data.

1.

Select [Print] from the [File] menu of the application.

2.

Select your printer → [Quality].

3.

Select [Black and White] or [Color] from [Color Mode]. ![](images/d76e6ac7cd046144b8c824899e422d3bf7ba92e2a19c1f3825d3a30dd07916bd.jpg)
text_image Printer: Canon Printer Presets: Standard Copies: 1 Collated Pages: All From: 1 to: 1 Paper Size: A4 20.99 by 29.70 cm Orientation: Quality Black and White Color Color Settings... Printer Info PDF Cancel Print

4.

Click [Print]. ![](images/079a0e2cfdf40841f8a744329d7417e6873132275c6fe9a3c35a4ca8081ae857.jpg)

NOTE

The display may vary according to the operating system, as well as the type and version of the printer driver. 0258-05X You can save print settings that you specified in each preferences pane of the [Print] dialog box use as a preset. A preset is a combination of settings that you use frequently, saved as a single setting. If you select a preset when printing a file, the file will be printed with the saved settings.

1.

Select [Print] from the [File] menu of the application.

2.

Select your printer from [Printer] → in each preferences pane of the [Print] dialog box, specify the print settings you want to save as a preset. ![](images/80eb3e571c10805fe42307fa00e51567b6094c42664681e936c3a56dc3b96498.jpg)

Note

For information on available printing functions, see "Printing Functions" or the online help. (See "Viewing the Online Help.")

3.

Select [Save As] from [Presets]. ![](images/b62faa66ebc38adf7dc04eff65b6bc5458f4f2f983560423e93941de65eac202.jpg)
text_image Printer: Canon Printer Presets ✓ Standard Last Used Settings Copies Page Save As Rename... Delete Paper Size 0 cm Orientation: Layout Pages per Sheet: 1 Layout Direction: Border: None Two-Sided: OFF Reverse Page Orientation PDF ▼ Cancel Print

4.

Enter a name in [Save Preset As] → click [OK]. ![](images/07957af53980a75b3eaeeb77610f7b95afff48ae662d5e1372500a8a482f7bd6.jpg)
text_image Save Preset As: Standard-1 Cancel OK
The saved preset will be displayed in [Presets] in the [Print] dialog box.

5.

To print a file using a preset, select the preset from [Presets] in the [Print] dialog box → click [Print]. ![](images/ec1034dbe9c78a999d6649fa02c053c5659f1dcb0a45626a274fa7288d680d56.jpg)

NOTE

- To edit a preset, in the [Print] dialog box, select the preset → specify the printer driver settings → select [Save] from [Presets]. - To change a preset's name, select the preset → select [Rename] from [Presets]. - To delete a preset, select the preset → select [Delete] from [Presets].

Setting Priority (When Specifying the Same Item Using Multiple Methods)

0258-05Y When the setting values for the same item are different between an application or the printer driver and the menu functions, the setting specified in the application or printer driver is effective. When specifying an item only in the menu functions using the control panel or the Remote UI, the most recently specified setting is effective. ![](images/202110e6106106e28e4b35c0586b34c6f8e8de53cef0174a0727e77d61547a0e.jpg)
text_image Priority High Low Application Software Printer Driver Control Panel Remote UI The latest setting is effective.

Setting priority of direct print

The direct print function gives priority to the contents specified using the [Direct Print] menu in the Remote UI or tags in IFD (Image file directory) that the header of TIFF data of image file has over those specified using the control panel or the [Preferences] menu in the Remote UI. ![](images/ca7384e8ba87055d98147c31e6f0eee1b4e40d4e6a8c8228281005ca2e27dafc.jpg)
flowchart
graph LR
    A["High Priority Low"] --> B["[Direct Print"] Menu in the Remote UI Tags in TIFF data]
    A --> C["[Preferences"] Menu in the Remote UI Control Panel]
Some of the tag function that the header of TIFF data has may not become valid. 0258-060 This printer allows you to specify the printing functions from the printer driver. However, some printing functions are specified from the control panel or the Remote UI. The following table shows the functions to be specified from the control panel or the Remote UI. For details on the items you can manage using the control panel, see "Setting Items."
Function Overview of the Function
Multi-purpose tray paper sizeSpecifies the size of the paper loaded in the multi-purpose tray.➢"[Setup] Menu ([Paper Source] Options)"➢"[Select Feeder] Menu"
Multi-purpose tray prioritySpecifies whether the printer should detect the paper source in order starting with the multi-purpose tray.➢"[Setup] Menu ([Paper Source] Options)"
Drawer N (N = 1, 2) sizeSpecifies the size of the paper loaded in the drawer (Drawer 1 or 2).➢"[Setup] Menu ([Paper Source] Options)"➢"[Select Feeder] Menu"
Standard paper sizeSince paper size cannot be specified when printing from DOS, UNIX or other operating system, specify it using this setting.➢"[Setup] Menu ([Paper Source] Options)"
Invalid paper traySpecifies what the printer does when paper that is the same size as the paper size of the received data is not loaded in the selected paper source.➢"[Setup] Menu ([Paper Source] Options)"
Auto selectionSpecifies the paper source to be automatically selected.➢"[Setup] Menu ([Paper Source] Options)"
Standard paper typeSince paper type cannot be specified when printing from DOS, UNIX or other operating system, specify it using this setting.➢"[Setup] Menu ([Paper Source] Options)"
Alternative methodIf the last page for the 2-sided printing is 1-sided printing, 1-sided printing is applied to the last page.➢"[Setup] Menu ([Layout] Options)"
Advanced SmoothingSet whether to use the smoothing process to print the jagged edges of text and graphics.➢"[Setup] Menu ([Quality] Options)"
Recovery printingSpecifies whether to print the partially printed page when the printer stops printing due to a paper jam or an error occurring.➢"[Setup] Menu ([User Maintenance] Options)"
Check paper sizeSpecifies whether the printer should stop printing, displaying the messageor continue printing.➢"[Setup] Menu ([User Maintenance] Options)"
Substitute sizeThe printer switches the paper size if the paper of the size to be used is not loaded in the printer.➢"[Setup] Menu ([User Maintenance] Options)"
Plain paper curl adjustmentIf printed plain paper curls, specify the setting for this item.➢"[Setup] Menu ([User Maintenance] Options)"
0258-061 The direct print function is a function that transmits a file from the host terminal to the printer without the printer driver and allows the printer to detect the file and print. Therefore, you do not need to open a file to print.

Direct Print from the Remote UI

You can specify PDF, TIFF, JPEG, PS, EPS, or XPS format image files from the remote UI and perform Direct Print. For details on operating the Remote UI, see "Remote UI." > Printing the PDF File Using the Direct Print Function > Printing the PS/EPS File Using the Direct Print Function > Printing the TIFF/JPEG File Using the Direct Print Function ▶ Printing the XPS File Using the Direct Print Function (LBP7680Cx Only)

You can Direct Print using the LPR command line. > "Direct Printing from Command Prompt" ![](images/26d2f859e1bd61e59c1dd2c4add66ce7b328f18c1f71351e852aec19f52b6856.jpg)

IMPORTANT

When printing PDF files using the direct print function

- The PDF version that is supported is version 1.7. - Decoding of encrypted PDF files is supported. The following encryption algorithms can be handled. - RC4 128bit - AES 128bit

When printing image files using the direct print function

Note the following when printing image files using the direct print function. - JPEG data is in compliance with the specifications of ITU-T recommendation T.81. TIFF data is in compliance with the specifications of Adobe TIFF Revision 6.0. - The supporting status of encoding methods for JPEG data is as follows. – Supported encoding method DCT baseline \- Unsupported encoding methods DCT extension Reversible compression Hierarchical \- The supporting status of encoding methods for TIFF data is as follows. \- Supported encoding methods Uncompressed ITU-T recommendation T.4 One-dimensional coding ITU-T recommendation T.4 Two-dimensional coding ITU-T recommendation T.6 Basic facsimile coding
ITU-T recommendation T.81 JPEG (Basic DCT only)
PackBits (Apple Macintosh PackBits)
LZW
- Unsupported encoding methods
ITU-T recommendation T.82 JBIG
ITU-T recommendation T.43 JBIG
ITU-T recommendation T.44 MRC 
† Printing may not be performed properly depending on the data. ![](images/665ae9b14ade25066a865ebd6339ac9ded1a4e29cb0100f9742135dd4233c763.jpg)

NOTE

If you cannot print a file using the direct print function or if the printing position is skewed

The file may be printed properly by opening it from an application and using the printer driver. 0258-0F4 ![](images/dcc24fae5ec33a6701ddfcb9401b2476e39c261474dbb6a970974abe2376b57f.jpg)

IMPORTANT

When Using LBP7660Cdn

In order to print PDF files directly, it is necessary to install the optional PS ROM.

1

Start the Remote UI.

> "Starting the Remote UI"

2

Select [PDF File] from the [Direct Print] menu.

![](images/081ac793713b61be79e4845f20963c2794960dc20d075f95ddf89a1a829f831b.jpg)
text_image Remote UI Print PDF Files: LBP7680C: LBP7680C - Windows Internet Explorer http://182.168.1.225/pdfprint.cgi/CSUTs-637438248 File Edit View Favorites Tools Help Favorites Remote UI Print PDF Files: LBP7680C: LBP7680C I-SENSYS LBP7680C / LBP7680C / Direct Print Mail to System Manager Direct Print: Print PDF Files Print PDF Files Last Updated: 9/04/2011 10:13:43 Enter the PDF file path or the URL. Click [Browse] to select a file. Forwarding the file may take some time. Do not click [Start Printing] more than one time. Start Printing Restore Defaults Select PDF File Specify File: File Path URL User Name: Password: Document Password: Policy Server User Name: Policy Server Password: Done Internet | Protected Mode: Off 100%

3

Specify [Select PDF File].

When specifying [File Path]

Click [Browse...], select the file, and then click [Open...].

When specifying [URL]

Enter the URL of the PDF file that you want to print. If you specify a URL that requires user authentication, enter [User Name] and [Password]. When specifying a URL and printing, the next print job cannot be performed until the PDF is finished downloading or the connection with the Web server is terminated. The protocol for specifying a URL and printing only supports HTTP. ![](images/1316baa17b373826d911911934429b41fb16a756bed6a6ae1620694d95484b60.jpg)
text_image Remote Ub Print PDF Files: LBP7680C / LBP7680C - Windows Internet Explorer https://192.168.1.225.pdfprint.cgi/CSUTa/05388392 File Edit View Favorites Tools Help Favorites Remote Ub Print PDF Files: LBP7680C / LBP7680C L-SENSYS LBP7680C / LBP7680C / Direct Print Mail to System Manager Direct Print: Print PDF Files Print PDF Files Last Updated: 05/04 2011 09:15:00 Enter the PDF file path or the URL. Click (Browse) to select a file. Forwarding the file may take some time. Do not click [Start Printing] more than one time. Start Printing Restore Defaults Select PDF File Specify File: File Path URL Browse... User Name: Password: Document Password: Policy Server User Name: Policy Server Password: Done Trusted sites | Protected Mode Off 100%

4

Enter the password in [Document Password] when a password is specified for opening the document or when it is necessary to enter a password to print. If printing is attempted without entering a password, is displayed, and printing is cancelled. When printing PDF files with settings that do not allow them to be printed or when printing in high resolution PDF files with settings that only allow them to be printed in low resolution, enter the master password. When you print a PDF file linked to a policy server, enter [Policy Server User Name] and [Policy Server Password]. ![](images/eb0addea6c1b2e86130794ed764abf4a8761129519ce5e9157a725573b17bc9f.jpg)
text_image Remote Ub Print PDF Files: LBP7680C / LBP7680C - Windows Internet Explorer http://192.168.1.225/pdfprint.org/CSUT=637430248 File Edit View Favorites Tools Help Favorites Remote Ub Print PDF Files: LBP7680C / LBP7680C LSENSYS LBP7680C / LBP7680C / To Portal Login User: System Manager Log Out Direct Print Mail to System Manager PDF File PS File Image File XPS Files Direct Print. Print PDF Files Print PDF Files Last Updated: 01/04 2011 10:13:43 Enter the PDF file path or the URL. Click [Browse] to select a file. Forwarding the file may take some time. Do not click [Start Printing] more than one time. Start Printing Restore Defaults Select PDF File Specify File: File Path: URL: User Name: Password: Document Password: Policy Server User Name: Policy Server Password: Done Internet | Protected Mode Off 100%

5

Specify the setting for [Specify Print Range].

![](images/156030b3d7b8fa993a74b454f67f4cd2beafc78c0346ea6bbef2dd2dce72c353.jpg)
text_image Remote U6 Print PDF Files: LBP7680C: LBP7680C - Windows Internet Explorer http://192.168.1.225/pdfprint.cgi/CSHT=637430248 File Edit View Favorites Tools Help File Edit View Favorites Tools Help Favorites Remote U6 Print PDF Files: LBP7680C: LBP7680C Specify Print Range Print Range: All Pages First Page Last Page Quality Settings Gradation: High 1 Halftones Em Diffusion Text: Resolution Gradation Graphics: Resolution Gradation Image: Resolution Gradation Advanced Smoothing Advanced Smoothing: Off Smooth 1 Smooth 2 Graphics Text Done Internet | Protected Mode: Off 100%
[All] Select if you want to print all the pages.
[Pages]Select [Pages], and then enter the starting page number and ending page number if you want to specify the print range.

6

Specify the settings for [Quality Settings] as the following, as needed.

![](images/d0310dc665e84fdeb36bad66791f2cc5322b8024229c34566d75bf5287e4e8ba.jpg)
text_image Remote Ub Print PDF Files: LBP7680C: LBP7680C - Windows Internet Explorer http://892.168.1.225/pdfprint.cgi/CSJITs-637438248 File Edit View Favorites Tools Help Favorites Remote Ub Print PDF Files: LBP7680C: LBP7680C Specify Print Range Print Range: All Pages First Page Last Page Quality Settings Gradation High 1 Halftones Exr Diffusion Text: Resolution Gradation Graphics: Resolution Gradation Image: Resolution Gradation Advanced Smoothing Advanced Smoothing Off Smooth 1 Smooth 2 Graphics Text Done Internet | Protected Mode: Off 100%
[Gradation]Specify the gradation process for printing the data. It is effective to set [High 1] when printing photographs at standard quality, and to set [High 2] when printing at a higher quality.

7

Specify the settings for [Halftones] as the following, as needed.

![](images/82a9ce5e9f84381a9d027b45cb0b1ff3567e2afd988bafa7f04ba637f84a75ab.jpg)
text_image Remote U5 Print PDF Files: LBP7680C: LBP7680C - Windows Internet Explorer http://192.168.1.225/pdfprint.zg/CSUITs-637438249 File Edit View Favorites Tools Help Favorites Remote U5 Print PDF Files: LBP7680C: LBP7680C Specify Print Range Print Range: All Pages First Page Last Page Quality Settings Gradation: High 1 Halftones Em Diffusion Text: Resolution Gradation Graphics: Resolution Gradation Image: Resolution Gradation Advanced Smoothing Advanced Smoothing: Off Smooth 1 Smooth 2 Graphics Text Done Internet | Protected Mode: Off 100%
[Err Diffusion]Specify the halftone display method when printing.You can set it for these data types: [Text], [Graphics] or [Image].[Resolution]: You can print in fine detail so that the edges of text data can be seen clearly. It is suitable for printing data containing text and fine lines.[Gradation]: You can perform printing that combines smooth gradation with edge quality.It is suitable for printing graphics or graphs that use gradation.

8

Specify the settings for [Advanced Smoothing] as the following, as needed. ![](images/7a72c923d7d9b4c67d6222a6be973855cfee9c4b79230273ffa87e8c339d4932.jpg)
text_image Remote U5 Print PDF Files: LBP7680C: LBP7680C - Windows Internet Explorer http://192.168.1.225/pdfprint.cgi/CSU/Ts-637438248 File Edit View Favorites Tools Help Favorites Remote U5 Print PDF Files: LBP7680C: LBP7680C Specify Print Range Print Range: All Pages First Page Last Page Quality Settings Gradation High 1 Halftones Em Diffusion Text: Resolution Gradation Graphics: Resolution Gradation Image: Resolution Gradation Advanced Smoothing Advanced Smoothing Off Smooth 1 Smooth 2 Graphics Text Done Internet | Protected Mode: Off 100%
Specify whether to use the smoothing process to smooth the edges of graphics (illustrations created in other applications) or text. [Smooth 2] is better than [Smooth 1] for performing a smoothing process that provides more smoothing. First, set it to [Smooth 1], and if the data is still not smooth, set it to [Smooth 2].
[Advanced Smoothing]In addition, by selecting [Graphics] and [Text], you can select what to smooth.This item specifies the smoothing process for graphics data and text data. Image data cannot be specified.[Graphics] and [Text] settings on the printer console are suitable only when [Advanced Smoothing] on the printer driver is set to [Printer Default].The effects of advanced smoothing differ depending on the pattern of the text or the graphics.
![](images/96fbdc6ed3db63527d3b14f53dc4acf06a8a9b9e6039d0f1b2e5d52c267e21f5.jpg) Specify the settings for [Color Settings] as the following, as needed. ![](images/24df26bd94b8772034f87216e365caeef00364aad5978536c716723a9edcc2f0.jpg)
text_image Remote UI Print PDF Files: LBP7680C: LBP7680C - Windows Internet Explorer http://192.168.1.225/pdfprint.cgi/CSUT-683880611 File Edit View Favorites Tools Help Favorites Remote UI Print PDF Files: LBP7680C: LBP7680C Color Settings Color Mode: Auto (Color/Black and White) RGB Source Profile: sRGB v3.0 (Canon) Canon HDTV gamma 1.5 Monitor Canon HDTV gamma 1.8 Monitor Canon HDTV gamma 2.4 Monitor None CMYK Simulation Profile: JapanColor(Canon) U.S. Web Coated v1.00 (Canon) Euro Standard v1.00 (Canon) None Output Profile: Normal Photo TR Normal TR Photo Use RGB Pure Black Process Use CMYK Pure Black Process Matching Method: Perceptual Use Grayscale Profile Use Pure Black Text Use Black Overprinting Use Composite Overprinting Brightness 100% Grayscale Conversion: sRGB NTSC Uniform RGB Done Internet | Protected Mode: Off 300%
[Color Mode]Specify color printing or B&W printing.[Auto (Color/Black and White)]: It automatically switches between color and black and white printing depending on the type of document.[Black and White]: Even color documents are printed in black (Bk) only.[Color]: It prints in 4 colors: cyan (C), magenta (M), yellow (Y) and black (Bk).
[RGB Source Profile]You can select an RGB profile that is suitable for the features of the monitor that you are using. Set it when printing images drawn with an RGB color model or documents that contain images.[sRGB v3.0 (Canon)]: It can be set to general Windows computer monitor profiles defined by industry standards. When using monitors that support sRGB, you can print colors close to the colors displayed on the monitor.[Canon HDTV gamma 1.5 Monitor]: You can adjust the gamma correction level of RGB data. The higher the value, the darker the printing.[Canon HDTV gamma 1.8 Monitor]: [CanonHDTVgamma 2.4Monitor]:[None]: It performs color separation from RGB data to CMYK without applying an RGB profile.
[CMYK Simulation Profile]You can set a simulation target when printing CMYK data. The machine converts CMYK data to a device-dependent CMYK color model in accordance with the simulation target selected by the CMYK simulation profile.[JapanColor(Canon)]: Use JapanColor profile. Use it for printing in colors that are close to Japanese printing standards.[U.S. Web Coated v1.00 (Canon)]: Use U.S. Web Coated profile. Use it for printing in colors that are close to U.S. printing standards.[Euro Standard v1.00 (Canon)]: Use the Euro Standard profile. Use it for printing in colors that are close to European printing standards.[None]: It prints CMYK data using a device-dependent CMYK color model, without applying a CMYK simulation profile.
[Output Profile]You can define suitable profiles for data that you are trying to print.[Normal]: It matches with colors close to the colors displayed on the monitor, and prints.[Photo]: It matches with colors similar to photographs, and prints.[TR It matches with colors close to the colors displayed on the monitor and prints, Normal]: while also controlling the bleeding of toner into text and fine lines.[TR It matches with colors similar to photographs, and prints, while also controlling Photo: the bleeding of toner into text and fine lines.
[Use RGB Pure Black Process]When device-dependent RGB data is converted to device-dependent CMYK using [RGB Source Profile] in this machine, set what type of processing to use for black and gray data that becomes R=G=B.If uneven gradation or staining is visible when printing black or gray data, do not set this item. Set [Output Profile] to [Normal].If this item is not set, a combination of settings enable gray data (C=M=Y=0 color) to be printed using black (Bk) toner. An example is shown below.-If [Use Pure Black Text] is selected-When [RGB Source Profile] is set as [None]-When [Output Profile] is set as [TR Normal] or [TR Photo]-When the printer driver's [Use 100% GCR Profile] is enabledIf [RGB Source Profile] is set as [None], the setting for this item becomes invalid.
[Use CMYK Pure Black Process]When device-dependent CMYK is processed using [CMYK Simulation Profile] in this machine, set what type of printing to use for grey data (C=M=Y=0).Even if this item is not selected, a combination of settings enable grey data (C=M=Y=0 color) to be printed using black (Bk) toner, as shown below. An example is shown below.-If [Use Pure Black Text] is selected-If [CMYK Simulation Profile] is set as [None]-When [Output Profile] is set as [TR Normal] or [TR Photo]-When the printer driver's [Use 100% GCR Profile] is enabledIf [CMYK Simulation Profile] is set as [None], the setting for this item becomes invalid.
[Matching Method]Specify the printing method when [RGB Source Profile] is applied. You can select color rendering style on the machine, as shown below.[Perceptual]: It provides colors suitable for printing photos and bitmap images.[Saturation]: It provides colors suitable for printing artwork and graphs for use in presentations.[Colorimetric]: It reproduces as accurately as possible the RGB color values that arewithin the machine's color gamut.
[Use Grayscale Profile]You can use this machine's grayscale profile to convert device-dependent grey data to CMYK data. However, it may be reproduced using black (Bk) toner only, by using the [Output Profile] or [Use Pure Black Text] settings.
[Use Pure Black Text]You can print data for black colors created by applications using only 100% black toner. Since monochrome (black) toner only is used for black text, there is never the problem of color toner slurring around the edges of the characters.
[Use Black Overprinting]If the check box for this option is selected, the printer prints black text over a color background. If this option is used with [Use Pure Black Text], the printer prints all the background first, and then prints the text over the color background using only the black (Bk) toner. This alleviates the phenomenon in which the outlines of the printed black text are rimmed with white.
[Use Composite Overprinting]You can overprint device-dependent CMYK data as composite output. Since all the colors used in the data are overprinted to a single palette, you can check the result without performing color separation.
[Brightness]You can adjust the brightness of the whole image. You can use this item to set from 85% to115% at intervals of 5%. The smaller the value the brighter it becomes. The larger the value the darker it becomes.
[Grayscale Conversion]Select the method for converting color print data to grayscale for printing.This setting is for converting color data to B&W data.The setting for this item becomes invalid for B&W data.If [Color Mode] is set as [Auto (Color/Black and White)], the setting for this item becomes invalid.[sRGB]: It calculates the grayscale value using the sRGB standard color conversion method.[NTSC]: It calculates the grayscale value using the NTSC standard color conversion method.[Uniform RGB]: It takes the average value of the Red, Green and Blue color values as the grayscale value.

10

Specify the settings for [Print Settings] as the following, as needed. ![](images/b1182e24447aff393b3ed8a12d44a3b10f251a31446e796275735f10aa7f64f7.jpg)
text_image Remote UE Print PDF Files: LBP7680C: LBP7680C - Windows Internet Explorer http://192.168.1.225/pdfprint.org/CSUTs-403880613 File Edit View Favorites Tools Help Favorites Remote UE Print PDF Files: LBP7680C: LBP7680C Print Settings Copies: 1 (1-9999) Paper Size: Auto Paper Type: Plain Manual Feed Enlarge/Reduce to Fit Paper Size Enlarge Print Area 2-Sided Printing Print 2-Sided Binding Location: Long Edge N on 1 N on 1: Off Page Order: Left to Right Finishing Finishing: Off Comment Print Comment Print: Auto Store in Box Store in Box Box Number (90-99): 90 - * If the document password is incorrectly input when storing an encrypted PDF in a box, the PDF will be stored but you will not be able to print it. Done Internet | Protected Mode: Off 100%
[Copies] Specify the number of copies to be printed.
[Paper Size]Specify the size of paper to print.If data is input that is outside the engine's maximum and minimum paper size range when the paper size is automatic, it is printed on the paper size that is set with [Standard Paper Size].[Auto]: It selects the most suitable paper source for the PDF file page size, and prints.Other It prints so that the long side of the page size of the PDF file and the long side than of the selected paper size go in the same direction.[Auto]:
[Paper Type] Specify the type of paper to print.
[Manual Feed] You can fix the paper source in the multi-purpose tray.
[Enlarge/Reduce to Fit Paper Size]If the check box is selected, it fixes the aspect ratio and scales it to fit with the effective print area of the paper size that is set and prints. However if [Paper Size] is set as [Auto], this item cannot be set.
[Enlarge Print Area]Specify whether to expand the printable area and print.Depending on the document to be printed, part of the edges of the paper may not be printed.
[Print 2-Sided] Specify1-sided or 2-sided printing.
[Binding Location]Set the binding position on the long side of the paper (long-edged binding) or the short side of the paper (short-edged binding). If binding is set from the printer side, the position of the "gutter" is automatically adjusted on the front and back sides of the paper.
[N on 1]You can print multiple pages of the PDF file data arranged on one page.When printing multiple pages side by side, set [Paper Size] to a setting other than [Auto].
[Page Order]The [N on 1] setting enables you to set the order the pages will be arranged on the paper when printing multiple pages on one page.
[Finishing]It collates and prints in page or section units.[Off]: Print the number of copies specified for every page.[Collate]: The specified number of pages are collated in order of pages.
[Comment Print]Specify whether to print the notes of PDF files.[Off]: The notes are not printed.[Auto]: It only prints the notes that are specified within the PDF file as printable.
[Store in Box](It is only displayed when an SD card is used.)When storing it in a box, check the [Store in Box] check box before selecting the box where you want to store it.

11

Click [Start Printing].

Do not keep clicking [Start Printing] while the file is transferring. Sometimes it takes time to transfer a file, but if you keep clicking during the transfer, a file failure may occur and it may be impossible to transfer it. ![](images/528fa6e88c84cf8f4af58964deb5e6809418996651e8f6ec5521ebf0b4bfb693.jpg)
text_image Remote Ub: Print PDF Files: LBP7680C; LBP7680C - Windows Internet Explorer http://192.168.1.225/pdfprint.cgi/CSUTs-637438248 File Edit View Favorites Tools Help Favorites Remote Ub: Print PDF Files: LBP7680C; LBP7680C i-SENSYS LBP7680C / LBP7680C / Direct Print Mail to System Manager Direct Print: Print PDF Files Print PDF Files Last Updated: 01/04 2011 10:13:43 Enter the PDF file path or the URL. Click [Browse] to select a file. Forwarding the file may take some time. Do not click [Start Printing] more than one time. Start Printing Restore Defaults Select PDF File Specify File: File Path URL User Name: Password: Document Password: Policy Server User Name: Policy Server Password: Done Internet | Protected Mode: Off 100%
→ When the print job has finished sending, the display switches and the following message is displayed. Press [To Job List] to check the print job that was sent. ![](images/a07ecfcd5cf509e2851d634b6fdc53322a4927a3c352c0226444a8b94c5e9455.jpg)
text_image Remote UI : LBP7680C LBP7680C - Windows Internet Explorer http://192.168.1.225-pdfprint.cgi?Page=OK File Edit View Favorites Tools Help Favorites Remote UI : LBP7680C LBP7680C I-SENSYS LBP7680C / LBP7680C / To Portal Login User: System Manager Log Out Direct Print Mail to System Manager PDF File PS File Image File XPS Files Sending the direct print job is complete. Check this job in the job list To Job List Back to Previous Page Copyright CANON INC. 2011 All Rights Reserved Done Internet | Protected Mode: Off 100%
0258-0F5 ![](images/7a7c7c9b0f0b598700d2bbf831b280e42ca8101004082ecd6eb798772ae3cadc.jpg)

IMPORTANT

When Using LBP7660Cdn

In order to print PS/EPS files directly, it is necessary to install the optional PS ROM.

1

Start the Remote UI.

"Starting the Remote UI"

2

Select [PS File] from the [Direct Print] menu.

![](images/f91568cefc793aa81057809870d9f1374f5a1f164cbe0fa701ef54501d7357d0.jpg)
text_image Remote UI Print PS/EPS Files: LBP7680C / LBP7680C - Windows Internet Explorer https://192.168.1.225/psprint.cgi/CSUTo-1241398415 File Edit View Favorites Tools Help Favorites Remote UI Print PS/EPS Files LBP7680C LBP7680C L-SENSYS LBP7680C / LBP7680C / Direct Print Mail to System Manager Direct Print: Print PS/EPS Files Print PS/EPS Files Last Updated: 05/04 2011 09:27:50 Enter the PS or EPS file location. Click [Browse] to select a file. Forwarding the file may take some time. Do not click [Start Printing] more than one time. Start Printing Restore Defaults Select PS/EPS File Specify File: Browse... Color Settings Color Mode: Auto (Color/Black and White) ▼ Print Settings Copies: 1 (1-9999) Print 2-Sided Binding Location: Long Edge ▼ Store in Box Box Number (00-99): 00 ▼ Done Trusted sites | Protected Mode: Off 100%

3

Specify [Select PS/EPS File].

Click [Browse...], select the file, and click [Open...]. ![](images/3f6aa953ed4333b6cf5719e82cd35780abe5caedf2021e962686c7f38c2bf099.jpg)
text_image Remote-UI Print PS/EPS Files: LBP7680C / LBP7680C - Windows Internet Explorer https://192.168.1.225/gxprint.cgi/CSJ/Tx-124138M41S File Edit View Favorites Tools Help Favorites Remote UI Print PS/EPS Files: LBP7680C / LBP7680C L-SENSYS LBP7680C / LBP7680C / Direct Print Mail to System Manager PDF File PS File Image File XPS Files Direct Print: Print PS/EPS Files Print PS/EPS Files Last Updated: 05/04 2011 09:27:58 Enter the PS or EPS file location. Click (Browse) to select a file. Forwarding the file may take some time. Do not click (Start Printing) more than one time. Start Printing Restore Defaults Select PS/EPS File Specify File Browse... Color Settings Color Mode: Auto (Color/Black and White) Print Settings Copies: 1 (1-9999) Print 2-Sided Binding Location: Long Edge Store in Box Box Number (00-99): 00 Done Trusted sites | Protected Mode Off 100%

4

Specify the setting for [Color Settings].

![](images/76a83bfec6e62c82b3c0d3b48398c94bd1595263c18f031f822f90788164b8e0.jpg)
text_image Remote U5 Print PS/EPS Files: LBP7680C / LBP7680C - Windows Internet Explorer https://192.168.1.225/psprint.cgi/CSU/Ta-LBHL3M8415 File Edit View Favorites Tools Help Favorites Remote U5 Print PS/EPS Files: LBP7680C / LBP7680C L-SENSYS LBP7680C / LBP7680C / To Portal Login User: System Manager Log Out Direct Print Mail to System Manager PDF File PS File Image File XPS Files Direct Print: Print PS/EPS Files Print PS/EPS Files Last Updated 05/04 2011 09:27:58 Enter the PS or EPS file location. Click [Browse] to select a file. Forwarding the file may take some time. Do not click [Start Printing] more than one time. Start Printing Restore Defaults Select PS/EPS File Specify File: Browse... Color Settings Color Mode: Auto (Color/Black and White) ▼ Print Settings Copies: 1 (-9999) Print 2-Sided Binding Location: Long Edge - Store in Box Box Number (00-99): 00 - Done Trusted sites | Protected Mode: Off 100%
[Color Mode]Specify color printing or B&W printing.[Auto (Color/Black and White)]: It automatically switches between color and black and white printing depending on the type of document.[Black and White]: Even color documents are printed in black (Bk) only.

5

Specify the settings for [Print Settings] as the following, as needed.

![](images/344acc25ec14edaa2c1082adac2054f7537696e76b61f6ce73f70bde45bd3194.jpg)
text_image Remote UB Print PS/EPS Files: LBP7680C / LBP7680C - Windows Internet Explorer https://192.168.1.225/psprint.org/CSU/Tx-124138415 File Edit View Favorites Tools Help Favorites Remote UB Print PS/EPS Files: LBP7680C / LBP7680C I.SENSYS LBP7680C / LBP7680C / Direct Print Mail to System Manager Direct Print: Print PS/EPS Files Print PS/EPS Files Last Updated 05/04/2011 09:27:58 Enter the PS or EPS file location. Click [Browse] to select a file. Forwarding the file may take some time. Do not click [Start Printing] more than one time. Start Printing Restore Defaults Select PS/EPS File Specify File: Browse... Color Settings Color Mode: Auto [Color/Black and White] Print Settings Copies: 1 (1-9999) Print 2-Sided Binding Location: Long Edge Store in Box Box Number (00-99): 00 - Done Trusted sites | Protected Mode: Off 100%
[Copies] Specify the number of copies to be printed.
[Print 2-Sided] Specify1-sided or 2-sided printing.
[Binding Location] Select the binding location from [Short Edge] and [Long Edge].
[Store in Box]When storing it in a box, check the [Store in Box] check box before selecting the box where you want to store it.
![](images/c5daffe22680ec7f6ee74a24f63fb68dd075ed0978b46c2478d2bd02ed3bd26b.jpg)

Click [Start Printing].

Do not keep clicking [Start Printing] while the file is transferring. Sometimes it takes time to transfer a file, but if you keep clicking during the transfer, a file failure may occur and it may be impossible to transfer it. ![](images/e9875c06ead78626614a5d15b5d1f30d6181964e4cd775277c5e9e7c8491a56c.jpg)
text_image Remote Ub Print PS/EPS Files: LBP7680C: LBP7680C - Windows Internet Explorer https://192.168.1.225/sprint.org/ICSU/Tx-1241388415 File Edit View Favorites Tools Help Favorites Remote Ub Print PS/EPS Files: LBP7680C: LBP7680C L-SENSYS LBP7680C / LBP7680C / Direct Print Mail to System Manager Direct Print Print PS/EPS Files Print PS/EPS Files Last Updated 05/04 2011 09:27:58 Enter the PS or EPS file location. Click [Browse] to select a file. Forwarding the file may take some time. Do not click [Start Printing] more than one time Start Printing Restore Defaults Select PS/EPS File Specify File Browse... Color Settings Color Mode: Auto (Color/Black and White) Print Settings Copies: 1 (1-9999) Print 2-Sided Binding Location: Long Edge Store in Box Box Number (00-99): 00 Done Trusted sites | Protected Mode Off 200%
→ When the print job has finished sending, the display switches and the following message is displayed. Press [To Job List] to check the print job that was sent. ![](images/2f8caa9c2948f9905e2f9a1e20036b939e39dd0761ca7266318bf5e2e86e9cf9.jpg)
text_image Remote UK+Direct Print> : LBP7680C LBP7680C - Windows Internet Explorer http://192.168.1.225/pdfprint.cgi?pagec:OK File Edit View Favorites Tools Help Favorites Remote UK+Direct Print> : LBP7680C LBP7680C I-SENSYS LBP7680C / LBP7680C / Direct Print Mail to System Manager PDF File PS File Image File XPS Files Sending the direct print job is complete. Check this job in the job list. To Job List Back to Previous Page Copyright CANON INC. 2011 All Rights Reserved Done Internet | Protected Mode: Off 100%
0258-0F6

1

Start the Remote UI. > "Starting the Remote UI"

2

Select [Image File] from the [Direct Print] menu. ![](images/007d04b0ccbc77691e0df4702dad5026717a994093ebbeda8761540ee7cd7a01.jpg)
text_image Remote U3 Print Image Files: LBP7680C: LBP7680C - Windows Internet Explorer http://180.168.1.225/imgprint.cgi?CSU#e2114052109 File Edit View Favorites Tools Help Favorites Remote U3 Print Image Files: LBP7680C: LBP7680C I SENSYS LBP7680C / LBP7680C / To Portal Login User: System Manager Log Out Direct Print Mail to System Manager Direct Print: Print Image Files Print Image Files Last Updated: 01/04/2011 10:19:41 Enter the TIFF or JPEG file location. Click [Browse] to select a file. Forwarding the file may take some time. Do not click [Start Printing] more than one time. Start Printing Restore Defaults Select Image File Specify File Browse... Specify Print Range Print Range: All Pages First Page Last Page: Quality Settings Gradation: High 1 Halftones: Resolution Gradation Error Diffusion Done Internet | Protected Mode: Off 100%

3

Specify [Select Image File]. Click [Browse...], select the file, and click [Open...]. ![](images/18d065d7ec2a698b09e0f9f7160910ae0e997c5fd46b6eeaad67e6170042336e.jpg)
text_image Remote UE: Print Image Files: LBP7680C / LBP7680C - Windows Internet Explorer http://192.168.1.225/imgprint.cgi?CSU/Tc2114052109 File Edit View Favorites Tools Help Favorites Remote UE: Print Image Files: LBP7680C / LBP7680C I SENSYS LBP7680C / LBP7680C / To Portal Login User: System Manager Log Out Mail to System Manager Direct Print Mail to System Manager Direct Print: Print Image Files Print Image Files Last Updated: D196d 2011 10 19 41 Enter the TIFF or JPEG file location. Click [Browse] to select a file. Forwarding the file may take some time. Do not click [Start Printing] more than one time. Start Printing Restore Defaults Select Image File Specify File Browse... Specify Print Range Print Range: All Pages First Page Last Page: Quality Settings Gradation: High 1 Halftones: Resolution Gradation Error Diffusion Done Internet | Protected Mode: Off 100%

4

Specify the setting for [Specify Print Range]. ![](images/0deee0a053d6143d27a41bf74c9a0506eebfc02bf6eb4ff3b2e8a3abeddda3c5.jpg)
text_image Remote U: Print Image Files: LBP7680C / LBP7680C - Windows Internet Explorer http://192.168.1.225/emgprint.cgi?CSUTs-2114052109 File Edit View Favorites Tools Help Favorites Remote U: Print Image Files: LBP7680C: LBP7680C I SENSYS LBP7680C / LBP7680C / To Portal Login User System Manager Log Out Mail to System Manager Direct Print Print Image Files Last Updated 01/06 2011 10:19:41 Enter the TIFF or JPEG file location. Click [Browse] to select a file. Forwarding the file may take some time. Do not click [Start Printing] more than one time. Start Printing Restore Defaults Select Image File Specify File Browse... Specify Print Range Print Range: All Pages First Page Last Page: Quality Settings Gradation: High 1 Halftones: Resolution Gradation Error Diffusion Done Internet | Protected Mode: Off 100%
[All] Select if you want to print all the pages.
[Pages]Select [Pages], and then enter the starting page number and ending page number if you want to specify the print range.

5

Specify the setting for [Quality Settings]. ![](images/3753f38f77da0836c45d36196c963f53d03693ae7bd3b91c1e0c27931006201a.jpg)
text_image Remote UE Print Image Files: LBP7680C / LBP7680C - Windows Internet Explorer http://192.168.1.225/imgprint.cgi/CSU/Tc214852100 File Edit View Favorites Tools Help Favorites Remote UE Print Image Files: LBP7680C: LBP7680C I SENSYS LBP7680C / LBP7680C / To Portal Login User: System Manager Log Out Mail to System Manager Direct Print Direct Print: Print Image Files Print Image Files Last Updated 01/06 2011 10 19:41 Enter the TIFF or JPEG file location. Click [Browse] to select a file. Forwarding the file may take some time. Do not click [Start Printing] more than one time. Start Printing Restore Defaults Select Image File Specify File Browse... Specify Print Range Print Range: All Pages First Page Last Page: Quality Settings Gradation: High 1 Halftones: Resolution Gradation Error Diffusion Done Internet | Protected Mode: Off 100%
[Gradation]Specify the gradation process for printing the data. It is effective to set [High 1] when printing photographs at standard quality, and to set [High 2] when printing at a higher quality.
[Halftones]Specify the halftone display method when printing.[Resolution]: You can print in fine detail so that the edges of text data can be seen clearly. It is suitable for printing data containing text and fine lines.[Gradation]: You can perform printing that combines smooth gradation with edge quality. It is suitable for printing graphics or graphs that use gradation.[Error Diffusion]: It is possible to print at a higher resolution than [Resolution], but texture stability is slightly inferior. It is suitable for printing data containing text and fine lines and data such as CAD data that is printed with sharp edges.

6

Specify the setting for [Color Settings].

![](images/27c57c4efbcfbe47c0812fe02b78d677d86ba5a28db305abb6ee7efaa7443721.jpg)
text_image Remote U3: Print Image Files: LBP7680C: LBP7680C - Windows Internet Explorer http://192.168.1.225/imgprint.asp/CSU/T:1342249910 File Edit View Favorites Tools Help Favorites Remote U3: Print Image Files: LBP7680C: LBP7680C Color Settings Color Mode: Auto (Color/Black and White) RGB Source Profile: sRGB v3.0 (Canon) Canon HDTV gamma 1.5 Monitor Canon HDTV gamma 1.0 Monitor Canon HDTV gamma 2.4 Monitor CMYK Simulation Profile: JapanColor(Canon) U.S. Web Coated v1.00 (Canon) Euro Standard v1.00 (Canon) Output Profile: Normal Photo Matching Method: Perceptual Photo Optimizer PRO Red-Eye Correction Red-eye Correction Level: Standard Face Brightener Face Brightener Level: Standard Grayscale Conversion: sRGB NTSC Uniform RGB Done Internet | Protected Mode: Off 200%
[Color Mode]Specify color printing or B&W printing.[Auto (Color/Black and White)]: It automatically switches between color and black and white printing depending on the type of document.[Black and White]: Even color documents are printed in black (Bk) only.
[RGB Source Profile]You can select an RGB profile that is suitable for the features of the monitor that you are using. Set it when printing images drawn with an RGB color model or documents that contain images.In order to enable this setting, set [CMS (Matching)/Gamma] as [CMS].[sRGB v3.0 (Canon)]: It can be set to general Windows computer monitor industry standard image quality. When using monitors that support sRGB, it can match the colors displayed on the monitor and the colors printed in the printer and print colors close to the colors displayed on the monitor.[Canon HDTV gamma 1.5 Monitor]: It adjusts the brightness of the printed result so that the brightest and darkest parts of the data are not lost. Set it to adjust the brightness, such as when the print result is brighter than the colors displayed on the monitor. The larger the gamma value, the darker it is printed. [Canon HDTV gamma 1.8 Monitor]: [Canon HDTV gamma 2.4 Monitor]:
[CMYK Simulation Profile]You can set a simulation target when printing CMYK data. The machine converts CMYK data to a device-dependent CMYK color model in accordance with the simulation target selected by the CMYK simulation profile.[JapanColor(Canon)]: Use JapanColor profile. Use it for printing in colors that are close to Japanese printing standards.[U.S. Web Coated v1.00 (Canon)]: Use U.S. Web Coated profile. Use it for printing in colors that are close to U.S. printing standards.[Euro Standard v1.00 (Canon)]: Use the Euro Standard profile. Use it for printing in colors that are close to European printing standards.
[Output Profile]You can define suitable profiles for data that you are trying to print.[Normal]: It matches with colors close to the colors displayed on the monitor, and prints.[Photo]: It matches with colors similar to photographs, and prints.
[Matching Method]Specify the printing method when [RGB Source Profile] is applied. You can select color rendering style on the machine, as shown below.[Perceptual]: It provides colors suitable for printing photos and bitmap images.[Saturation]: It provides colors suitable for printing artwork and graphs for use in presentations.[Colorimetric]: It reproduces as accurately as possible the RGB color values that are within the machine's color gamut.
[Photo Optimizer PRO](It is only displayed when an SD card is used.)Correct the contrast, color balance, saturation and gradation of photos and illustrations to your preference.The setting for this item becomes invalid for B&W data.If the [Color Mode] setting is set as [Black and White], the setting for this item becomes invalid.
(It is only displayed when an SD card is used.)It detects and corrects red eye caused by flash or strobe light when shooting. Also, if only half of a face shows up in a photo, it can be corrected.
[Red-Eye Correction]You can set the amount of correction using the [Red-eye Correction Level].
[Weak]: The amount of correction can be set a little smaller.
[Standard]:The amount of correction can be set in the middle between weaker and stronger.
[Strong]: The amount of correction can be set a little larger.
[Face Brightener](It is only displayed when an SD card is used.)It can correct photographs in which people's faces are dark due to insufficient backlighting or underexposure so that the entire image is brightened and the people's faces are the preferred brightness.It can only correct images which are at least 100 pixels both horizontally and vertically.The setting for this item becomes invalid for B&W data.If [Color Mode] is set as [Black and White], the setting for this item becomes invalid.The face brightening effect may differ depending on the data.You can set the amount of [Face Brightener Level] correction.
[Weak]: The amount of correction can be set a little smaller.
[Standard]:The amount of correction can be set in the middle between weaker and stronger.
[Strong]: The amount of correction can be set a little larger.
[Grayscale Conversion]Select the method for converting color print data to grayscale for printing.This setting is for converting color data to B&W data.The setting for this item becomes invalid for B&W data.If [Color Mode] is set as [Auto (Color/Black and White)], the setting for this item becomes invalid.[sRGB]: It calculates the grayscale value using the sRGB standard color conversion method.[NTSC]: It calculates the grayscale value using the NTSC standard color conversion method.[Uniform RGB]: It takes the average value of the Red, Green and Blue color values as the grayscale value.
7 Specify the settings for [Print Settings] as the following, as needed. ![](images/5104697a7dbcc4dd2a711d66044d74cd15b008b24134b17f4caba698fb442099.jpg)
text_image Remote UI: Print Image Files: LBP7680C: LBP7680C - Windows Internet Explorer http://192.168.1.225/emgpint.cgi?CSUTc1342049910 File Edit View Favorites Tools Help Favorites Remote UI: Print Image Files: LBP7680C: LBP7680C Face Brightener Level: Standard Grayscale Conversion: sRGB NTSC Uniform RGB Print Settings Copies: 1 (1-9999) Paper Size: A4 Paper Type: Plsn Image Orientation: Auto Print Position: Auto Zoom: Off Enlarge Print Area Print 2-Sided Binding Location: Long Edge Show Warnings: Print Copyright CANON INC. 2011 All Rights Reserved Done Internet | Protected Mode: Off 100%
[Copies] Specify the number of copies to be printed.
[Paper Size] Specify the size of paper to print.
[Paper Type] Specify the type of paper to print.
[Image Orientation] Select the orientation of the images from [Auto], [Vertical] or [Horizontal].
[Print Position]Set the location of the images from [Auto], [Center] or [Top Left]. When [Auto] is selected, if the print location is specified in the TIFF format data, it will print at the specified location. If the print location is not set, it will print centered. Since print location is not specified in JPEG format, if [Auto] is selected, it will print centered.
[Zoom]Specify whether to enlarge or reduce the printing. When it is set to [Auto], it automatically scales them to match with the effective print area of the paper and prints.
[Enlarge Print Area]Specify whether to expand the printable area and print.Depending on the document to be printed, part of the edges of the paper may not be printed.
[Print 2-Sided] When it is set, it will print 2-sided.
[Binding Location]Set the binding position on the long side of the paper (long-edged binding) or the short side of the paper (short-edged binding).If binding is set from the printer side, the position of the "gutter" is automatically adjusted on the front and back sides of the paper.
[Show Warnings]You can select a job processing method for when it detects an Imaging function error.When it is set to [Print], the error description list is printed at the same time.[Print] The error description is printed on the paper and the job is terminated.[Panel] The error message is displayed on the printer's display, and printing stops.[Off] Even if an error occurs and nothing is displayed, the job is terminated.

8

Click [Start Printing].

Do not keep clicking [Start Printing] while the file is transferring. Sometimes it takes time to transfer a file, but if you keep clicking during the transfer, a file failure may occur and it may be impossible to transfer it. ![](images/06c7612c5d44dca36c41414d6a502ccbb2bc4ba71f74074eeaa2fd3b45e2f633.jpg)
text_image Remote UI: Print Image Files: LBP7680C / LBP7680C - Windows Internet Explorer http://192.168.1.225/imgprint.cgi?CSU/Tc214852109 File Edit View Favorites Tools Help Favorites Remote UI: Print Image Files: LBP7680C / LBP7680C SFNSYS LBP7680C / LBP7680C / To Portal Login User: System Manager Log Out Mail to System Manager Direct Print Direct Print: Print Image Files Print Image Files LastUpdated 01/04 2011 10:19:41 Enter the TIFF or JPEG file location. Click [Browse] to select a file. Forwarding the file may take some time. Do not click [Start Printing] more than one time. Start Printing Restore Defaults Select Image File Specify File Browse... Specify Print Range Print Range: All Pages First Page Last Page: Quality Settings Gradation: High 1 Halftones: Resolution Gradation Error Diffusion Done Internet | Protected Mode: Off 100%
→ When the print job has finished sending, the display switches and the following message is displayed. Press [To Job List] to check the print job that was sent. ![](images/7e1b5bf93d185c9e0dc6c2e048cea1350531fdecce44bb453c042a4b9ccd1c6c.jpg)
text_image Remote UI : LBP7680C LBP7680C - Windows Internet Explorer http://192.168.1.225/pdfprint.cgi?pages:OK File Edit View Favorites Tools Help Favorites Remote UI : LBP7680C LBP7680C I SENSYS LBP7680C / LBP7680C / Direct Print To Portal Login User: System Manager Log Out Mail to System Manager PDF File PS File Image File XPS Files Sending the direct print job is complete. Check this job in the job list To Job List Back to Previous Page Copyright CANON INC: 2011 All Rights Reserved Done Internet | Protected Mode: Off 100%
0258-0F7

1

Start the Remote UI. > "Starting the Remote UI"

2

Select [XPS Files] from the [Direct Print] menu. ![](images/ada05ca6849b33034ecc39ac26978dc0559dcec691e47069c16c5aadfb3c4b24.jpg)
text_image Remote UB Print XPS Files: LBP7680C; LBP7680C - Windows Internet Explorer http://192.168.1.225/xpsprint.cgi/CSUTc1677809147 File Edit View Favorites Tools Help Favorites Remote UB Print XPS Files: LBP7680C; LBP7680C I.SENSYS LBP7680C / LBP7680C / Direct Print Mail to System Manager PDF File PS File Image File XPS Files Direct Print Print XPS Files Print XPS Files LastUpdated: 01/04/2011 10:23:42 Enter the XPS file path or the URL. Click [Browse] to select a file. Forwarding the file may take some time. Do not click [Start Printing] more than one time. Start Printing Restore Defaults Specify XPS File: Browse... Prioritize Print Ticket Specify Print Range Print Range All Pages First Page Last Page Quality Settings Gradation: High 1 Done Internet | Protected Mode: Off 100%

3

Specify [Specify XPS File].

(1) Click [Browse...], select the file, and then click [Open...]. (2) Clear the [Prioritize Print Ticket] check box. If the [Prioritize Print Ticket] check box is selected, some items cannot be set via the Remote UI. To use all the print settings made via the Remote UI, clear the [Prioritize Print Ticket] check box. ![](images/3baa715907edc472983d6a99e6338a995d261ca7d84e63d0f3cbdfd49ac337ad.jpg)
text_image Remote UI: Print XPS Files: LBP7680C: LBP7680C - Windows Internet Explorer http://192.168.1.225/xpsprint.cgi?CSU/T=1877809147 File Edit View Favorites Tools Help Favorites Remote UI: Print XPS Files: LBP7680C: LBP7680C I SENSYS LBP7680C / LBP7680C / To Portal Login User: System Manager Log Out Mail to System Manager Direct Print Print XPS Files Last Updated: 01/04 2011 10:23:42 Enter the XPS file path or the URL. Click [Browse] to select a file. Forwarding the file may take some time. Do not click [Start Printing] more than one time. Start Printing Restore Defaults Specify XPS File: Browse... Prioritize Print Ticket Specify Print Range: Print Range All Pages First Page Last Page Quality Settings Gradation High 1 Done Internet | Protected Mode: Off 100%

4

Specify the setting for [Specify Print Range]. ![](images/969c5e8df80507a39d22c532e7e1f9ea2c9065861cf911518772ffa14e4c7fe4.jpg)
text_image Remote UI: Print XPS Files: LBP7680C: LBP7680C - Windows Internet Explorer http://192.168.1.225/xpprint.cgi/CSUTs1677809147 File Edit View Favorites Tools Help Favorites Remote UI: Print XPS Files: LBP7680C: LBP7680C L-SENSYS LBP7680C / LBP7680C / To Portal Login User: System Manager Log Out Direct Print Mail to System Manager PDF File PS Fil Image Fil XPS Fil Direct Print: Print XPS Files Print XPS Files LastUpdated 01/04 2011 10:23:42 Enter the XPS file path or the URL. Click [Browse] to select a file. Forwarding the file may take some time. Do not click [Start Printing] more than one time. Start Printing Restore Defaults Specify XPS File: Browse... Prioritize Print Ticket Specify Print Range Print Range: All Pages First Page Last Page Quality Settings Gradation: High 1 Done Internet | Protected Mode: Off 100%
[All] Select if you want to print all the pages.
[Pages]Select [Pages], and then enter the starting page number and ending page number if you want to specify the print range.

5

Specify the settings for [Quality Settings] as the following, as needed. ![](images/4d19fe28f8238d5e38e5bd4459021a7f8fd35ae9a990e9cb4a278d0e5410eb56.jpg)
text_image Remote UE Print XPS Files: LBP7680C: LBP7680C - Windows Internet Explorer http://192.168.1.225/gpsprint.cgi?CSLT=1677809147 File Edit View Favorites Tools Help Favorites Remote UE Print XPS Files: LBP7680C: LBP7680C Quality Settings Gradation High 1 Halftones En Diffusion Text: Resolution Gradation Graphics: Resolution Gradation Image: Resolution Gradation Advanced Smoothing Advanced Smoothing: Off Smooth 1 Smooth 2 Graphics Text Color Settings Color Mode: Auto (Color/Black and White) Matching Mode: ICC Profile Done Internet | Protected Mode: Off 100%
[Gradation]Specify the gradation process for printing the data. It is effective to set [High 1] when printing photographs at standard quality, and to set [High 2] when printing at a higher quality.
![](images/92979f55f40c587535cdf884fa436114eb44ccc96516704fd7fe9e59dbb9391b.jpg) Specify the settings for [Halftones] as the following, as needed. ![](images/fd7bba875a29fae9a8deeb9655a1f674ff5ee21fb9e8f74037ca933d3bb14dfd.jpg)
text_image Remote UE: Print XPS Files: LBP760C: LBP760C - Windows Internet Explorer http://192.168.1.225/xpsprint.cgi?CSUT=1677809147 File Edit View Favorites Tools Help Favorites Remote UE: Print XPS Files: LBP760C: LBP760C Quality Settings Gradation: High 1 Halftones En Diffusion Text: Resolution Gradation Graphics: Resolution Gradation Image: Resolution Gradation Advanced Smoothing Advanced Smoothing: Off Smooth 1 Smooth 2 Graphics Text Color Settings Color Mode: Auto (Color/Black and White) - Matching Mode: ICC Profile - Done Internet | Protected Mode: Off 100%
[Err Diffusion]Specify the halftone display method when printing.You can set it for these data types: [Text], [Graphics] or [Image].[Resolution] You can print in fine detail so that the edges of text data can be seen clearly.It is suitable for printing data containing text and fine lines.[Gradation] You can perform printing that combines smooth gradation with edge quality. It is suitable for printing graphics or graphs that use gradation.

7

Specify the settings for [Advanced Smoothing] as the following, as needed.

![](images/af80babd0250e1fc0f52229b47d7ba1dc7b98f286948fc198bc8dcb93642801e.jpg)
text_image Remote UI: Print XPS Files: LBP7680C: LBP7680C - Windows Internet Explorer http://192.168.1.225/epzprint.cgi?CSU/T=1677809147 File Edit View Favorites Tools Help Favonlves Remote UI: Print XPS Files: LBP7680C: LBP7680C Quality Settings Gradation: High 1 Halftones Err Diffusion Text: Resolution Graptics: Resolution Image: Resolution Advanced Smoothing Advanced Smoothing: Off Smooth 1 Smooth 2 Graphics Text Color Settings Color Mode: Auto (Color/Black and White) Matching Mode: ICC Profile Done Internet | Protected Mode: Off 100%
[Advanced Smoothing]Specify whether to use the smoothing process to smooth the edges of graphics (illustrations created in other applications) or text. [Smooth 2] is better than [Smooth 1] for performing a smoothing process that provides more smoothing. First, set it to [Smooth 1], and if the data is still not smooth, set it to [Smooth 2].In addition, by selecting [Graphics] and [Text], you can select what to smooth.This item specifies the smoothing process for graphics data and text data. Image data cannot be specified.[Graphics] and [Text] settings on the printer console are suitable only when [Advanced Smoothing] on the printer driver is set to [Printer Default].The effects of advanced smoothing differ depending on the pattern of the text or the graphics.

8

Specify the settings for [Color Settings] as the following, as needed.

![](images/9bf365d28520e5f1ea3c6c816e51f57a732d19ce7a65e8b9dd37687047a0f4b0.jpg)
text_image Remote U3 Print XP5 Files: LBP7680C: LBP7680C - Windows Internet Explorer http://192.168.1.225/npasprint.cgi/ICSUT-2677808147 File Edit View Favorites Tools Help Favorites Remote U3 Print XP5 Files: LBP7680C: LBP7680C Color Settings Color Mode Auto (Color/Black and White) Matching Mode ICC Profile RGB Source Profile Text: sRGB v3.0 (Canon) Canon HDTV gamma 1.5 Monitor Canon HDTV gamma 1.8 Monitor Canon HDTV gamma 2.4 Monitor Graphics: sRGB v3.0 (Canon) Canon HDTV gamma 1.5 Monitor Canon HDTV gamma 1.8 Monitor Canon HDTV gamma 2.4 Monitor Image: sRGB v3.0 (Canon) Canon HDTV gamma 1.5 Monitor Canon HDTV gamma 1.8 Monitor Canon HDTV gamma 2.4 Monitor Output Profile Text: Normal Photo Graphics: Normal Photo Image: Normal Photo Matching Method Text: Saturation Graphics: Perceptual Image: Perceptual Gamma Correction Text: 1.4 Graphics: 1.4 Image: 1.4 Photo Optimizer PRO Photo Optimizer PRO Red-Eye Correction Red-Eye Correction Red-eye Correction Level: Standard Face Brightener Face Brightener Face Brightener Level: Standard Grayscale Conversion Text: sRGB NTSC Uniform RGB Graphics: sRGB NTSC Uniform RGB Image: sRGB NTSC Uniform RGB Gray Compensation Text: On Off Graphics: On Off Image: On Off Print Settings Copies: 1 (1-9999) Done Internet | Protected Mode: Off
[Color Mode]Specify color printing or B&W printing.[Auto (Color/Black and White)]: It automatically switches between color and black and white printing depending on the type of document.[Black and White]: Even color documents are printed in black (Bk) only.[Color]: It prints in 4 colors: cyan (C), magenta (M), yellow (Y) and black (Bk).
It sets which color matching method to apply for each piece of text, diagram or image that make up a print job, or for every color space such as RGB or CMYK. You can select whether to use methods such as ICC profile and gamma for processing. The items that can be set
[Matching Mode]depend on the PDL type.[ICC You can select a matching method, which is an adjustment method for bridging Profile]: the difference in input and output color space width between the input profile that depends on the color space of the input data, and the output file that defines the device-dependent color space.[Gamma]: You can select a gamma correction value selection for adjusting the brightness in relation to the median color (color value with the maximum and minimum values taken away) of the entered data.
[RGB Source Profile]You can select an RGB profile that is suitable for the features of the monitor that you are using. Set it when printing images drawn with an RGB color model or documents that contain images.You can set it for these data types: [Text], [Graphics] or [Image].[sRGB v3.0 It can be set to general Windows computer monitor profiles defined by (Canon)]: industry standards. When using monitors that support RGB, you can print colors close to the colors displayed on the monitor.[Canon You can adjust the gamma correction level of RGB data. The higher the HDTV gamma 1.5Monitor]: [Canon HDTV gamma 1.8Monitor]: [Canon HDTV gamma 2.4Monitor]:
[Output Profile]You can define suitable profiles for data that you are trying to print.You can set it for these data types: [Text], [Graphics] or [Image].[Normal]: It matches with colors close to the colors displayed on the monitor, and prints.[Photo]: It matches with colors similar to photographs, and prints.
[Matching Method]Specify the printing method when [RGB Source Profile] is applied. You can select color rendering style on the machine, as shown below.You can set it for these data types: [Text], [Graphics] or [Image].[Perceptual]: It provides colors suitable for printing photos and bitmap images.[Saturation]: It provides colors suitable for printing artwork and graphs for use in presentations.[Colorimetric]: It reproduces as accurately as possible the RGB color values that are within the machine's color gamut.
[Gamma Correction]It adjusts the brightness of the printed result so that the brightest and darkest parts of the document are not lost. Set it when the print result is brighter than the original (such as a photograph prior to being scanned or a graphic created on a monitor) or when you want to change the brightness of the output. The larger the setting value, the darker it is printed. [1.4] shows no correctionYou can set it for these data types: [Text], [Graphics] or [Image].
[Photo Optimizer PRO]Correct the contrast, color balance, saturation and gradation of photos and illustrations to your preference.The setting for this item becomes invalid for B&W data.If [Color Mode] is set as [Black and White], the setting for this item becomes invalid.
It detects and corrects red eye caused by flash or strobe light when shooting. Also, if only half of a face shows up in a photo, it can be corrected.
[Red-Eye Correction]The setting for this item becomes invalid for B&W data. • If [Color Mode] is set as [Black and White], the setting for this item becomes invalid. You can set the amount of [Red-eye Correction Level] correction.
[Weak] The amount of correction can be set a little smaller.
[Standard]The amount of correction can be set in the middle between weaker and stronger.
[Strong] The amount of correction can be set a little larger.
[Face Brightener]It can correct photographs in which people's faces are dark due to insufficient backlighting or underexposure so that the entire image is brightened and the people's faces are the preferred brightness. • It can only correct images which are at least 100 pixels both horizontally and vertically. • The setting for this item becomes invalid for B&W data. • If [Color Mode] is set as [Black and White], the setting for this item becomes invalid. • The face brightening effect may differ depending on the data. You can set the amount of [Face Brightener Level] correction.
[Weak] The amount of correction can be set a little smaller.
[Standard]The amount of correction can be set in the middle between weaker and stronger.
[Strong] The amount of correction can be set a little larger.
[Grayscale Conversion]Select the method for converting color print data to grayscale for printing. • You can set it for these data types: [Text], [Graphics] or [Image]. • This setting is for converting color data to B&W data. • The setting for this item becomes invalid for B&W data. • If [Color Mode] is set as [Auto (Color/Black and White)] and [Color], the setting for this item becomes invalid. [sRGB]: It calculates the grayscale value using the RGB standard color conversion method. [NTSC]: It calculates the grayscale value using the NTSC standard color conversion method. [Uniform RGB]: It takes the average value of the Red, Green and Blue color values as the grayscale value.
[Gray Compensation]Specify whether to print grey data in Bk only. • You can set it for these data types: [Text], [Graphics] or [Image]. • When it is set to [On], black and grey data is printed in Bk only. You can prevent color registration errors. • When it is set to [Off], CMYK 4 color will also be used for black and gray data, and it will be printed in black and gray. The reproduction of dark color gradation will be better than when the check box is selected.
![](images/8f76bec1d77022fa4087aa5a8136e75d4443678aa1cf779ad9b69fb23d5409f4.jpg) Specify the settings for [Print Settings] as the following, as needed. ![](images/4301becfbb5d4cca252c446a86e3ec3046e9ddcef7738aa874b74a319079f531.jpg)
text_image Remote UE: Print XPS Files: LBP7680C: LBP7680C - Windows Internet Explorer http://192.168.1.225/xpsprint.cgi/CSU/Tc1677809147 File Edit View Favorites Tools Help Favors Remote UE: Print XPS Files: LBP7680C: LBP7680C Print Settings Copies: 1 (1-9999) Paper Size: All Paper Type: Plsm Manual Feed Enlarge/Reduce to Fit Paper Size Enlarge Print Area 2-Sided Printing Print 2-Sided Binding Location: Long Edge N on 1 N on 1: Off Page Order: Left to Right Finishing Finishing: Off Store in Box Store in Box Box Number (00-99): 00 - Done Internet | Protected Mode: Off 100%
[Copies] Specify the number of copies to be printed.
[Paper Size]Specify the size of paper to print.If data is input that is outside the engine's maximum and minimum paper size range when the paper size is automatic, it is printed on the paper size that is set with [Standard Paper Size].[Auto]: It selects the most suitable paper source for the XPS file page size, and prints.Other than It prints so that the long side of the XPS file and the long side of the selected [Auto]: paper size go in the same direction.
[Paper Type] Specify the type of paper to print.
[Manual Feed] You can fix the paper source in the multi-purpose tray.
[Enlarge/Reduce to Fit Paper Size]If the check box is selected, it fixes the aspect ratio and scales it to fit with the effective print area of the paper size that is set and prints. However if [Paper Size] is set as [Auto], this item cannot be set.
[Enlarge Print Area]Specify whether to expand the printable area and print.Depending on the document to be printed, part of the edges of the paper may not be printed.
[Print 2-Sided] Specify1-sided or 2-sided printing.
[Binding Location]Set the binding position on the long side of the paper (long-edged binding) or the short side of the paper (short-edged binding). If binding is set from the printer side, the position of the "gutter" is automatically adjusted on the front and back sides of the paper.
[N on 1]You can print multiple pages of the XPS file data arranged on one page.When printing multiple pages side by side, set [Paper Size] to a setting other than [Auto].
[Page Order]The [N on 1] setting enables you to set the order the pages will be arranged on the paper when printing multiple pages on one page.
[Finishing]It collates and prints in page or section units.[Off]: Print the number of copies specified for every page.[Collate]: The specified number of copies are collated.
[Store in Box]When storing it in a box, check the [Store in Box] check box before selecting the box where you want to store it.

10

Click [Start Printing].

Do not keep clicking [Start Printing] while the file is transferring. Sometimes it takes time to transfer a file, but if you keep clicking during the transfer, a file failure may occur and it may be impossible to transfer it. ![](images/0fb9263f13c55ce69cf58144577d09cf3817b70e89c8298b8f9c438977f59c49.jpg)
text_image Remote UI: Print XPS Files: LBP7680C: LBP7680C - Windows Internet Explorer http://192.168.1.225/xpsprint.cgi?CSU/T=1677809147 File Edit View Favorites Tools Help Favorites Remote UI: Print XPS Files: LBP7680C: LBP7680C L-SENSYS LBP7680C / LBP7680C / To Portal Login User: System Manager Log Out Direct Print Mail to System Manager Direct Print: Print XPS Files Print XPS Files Last Updated: 01/04 2011.10.23.42 Enter the XPS file path or the URL. Click [Browse] to select a file. Forwarding the file may take some time. Do not click [Start Printing] more than one time. Start Printing Restore Defaults Specify XPS File: Browse Prioritize Print Ticket Specify Print Range Print Range All Pages First Page Last Page Quality Settings Gradation High 1 Done Internet | Protected Mode Off
→ When the print job has finished sending, the display switches and the following message is displayed. Press [To Job List] to check the print job that was sent. ![](images/e71822bd621a3ffbfc479db0e254bb38c20b168bf69b9ebe4207ae090ac76e4c.jpg)
text_image Remote UE Direct Print> | LBP7680C LBP7680C - Windows Internet Explorer http://192.168.1.225/pdfprint.cgi?pages:OK File Edit View Favorites Tools Help Favorites Remote UI : LBP7680C LBP7680C I-SENSYS LBP7680C / LBP7680C / Direct Print Send the direct print job is complete. Check this job in the job list To Job List Back to Previous Page Copyright CANON INC, 2011 All Rights Reserved Done Internet | Protected Mode: Off 100%
0258-0F8 The command of the following format is effective. lpr (a space) -S (a space) (a space) -P (a space) (a space)
The printer nameEnter the printer name. You can check the printer name in [Device Name] on the Remote UI portal page.
The file name Enter thename of the file to be printed.

- Input Example

Ipr -S 192.168.0.215 -P LBP-Printer sample.jpg ![](images/8e69111aa479213fe53643f1b86748824bad523f9f7f96d8705193eb51de4c3b.jpg)

NOTE

The settings which can be used for Direct Print

The settings specified using the printer's control panel become effective. You can use the following [Setup] menus. - "[Setup] Menu ([Control Menu] Options)" - "[Setup] Menu ([Paper Source] Options)" - "[Setup] Menu ([Layout] Options)" - "[Setup] Menu ([Quality] Options)" - "[Setup] Menu ([Imaging] Options)" "[Setup] Menu ([XPS] Options) (LBP7680Cx Only)" - "[Setup] Menu ([PDF] Options)" - "[Setup] Menu ([PS] Options)"

Printing Files Directly from USB Memory Devices (USB Direct Print) (LBP7680Cx Only)

0258-0F9 You can print data in USB memory device directly from the machine. Because it is possible to print without a computer, you can easily print data stored in a USB memory device at a location where the machine is installed. This makes immediate handling possible when printed documents are needed quickly.

> Printing Directly from USB Memory Device

You can print files directly from a USB memory device that is connected to the printer. You can change the settings when printing.

> Changing the Default Print Settings and File Sorting Criteria

You can change the default print settings and default file display sorting criteria. Settings that are often used can be conveniently set in advance as defaults.

Remove the USB Memory Device

Remove the USB memory device after printing has stopped. Use the correct method to remove the USB memory device.

IMPORTANT

In order to use USB memory devices, the following settings are necessary.

\- Set [MEAP Driver] to [Off] (1) Press [ ] (□: Settings), and select [Interface] with [▲] and [▼], and then press [OK]. (2) Select [Interface Selection] with [▲] and [▼] and then press [OK]. (3) Select [USB Storage Device] with [▲] and [▼] and then press [OK]. (4) Select [MEAP Driver] with [▲] and [▼] and then press [OK]. (5) Select [Off] with [▲] and [▼] and then press [OK]. \- Enable [USB Direct Print] under [USB Direct Print Settings] in the Remote UI. > "Setting Restrictions for USB Direct Print (LBP7680Cx Only)"

Supported USB memory format

The only format this printer supports is FAT32.

1

Insert the USB memory device in the USB memory slot on the printer.

2

Press [ ] ( : Application). The "USB Direct Print Mode Screen" is displayed. When department ID management is set, the screen is displayed when the departmental ID and PIN are entered. After entering the department ID and PIN, select [], and then press [OK]. ![](images/be5a797b3ae8815811b58da8505bd63c7ed2311e628692bfa521023f03b492e3.jpg)
text_image Ready to print files from USB memory. Select File(s) Sort Files
![](images/3b9b313e6f8fcfd2ae61b0b2afe05a006af0486827f0897a7e7a631b53a17c54.jpg)

NOTE

In order to automatically display the USB direct print mode screen

When the [Automatically Display USB Direct Print Screen] setting is checked on [USB Direct Print] in the [USB Direct Print Settings] on the Remote UI, the "USB Direct Print Mode Screen" is displayed automatically when a USB memory device is inserted. > "Starting the Remote UI"

3

Select [Select File(s)] with [▲and[ ],▼nd then press [OK]. ![](images/577a7c65cc5fb5a122eea1b5a479610386ae3e280adebf3646da5dfc5b31d18d.jpg)
text_image Ready to print files from USB memory. Select File(s) Sort Files

Changing the order the files are displayed in Step 5

(1) Select [Sort Files] with [▲] and [▼], and then press [OK]. ![](images/b86f3f44d563a16bcb0d5f6e9ab240689e47b05803875b6afb4ff56e6d05fff3.jpg)
text_image Ready to print files from USB memory. Select File(s) Sort Files
(2) Since the message is displayed, press [OK]. (3) Select the sorting criteria with [▲] and [▼], and then press [OK]. ![](images/9bb87af5a6b6f3c732e2a04b1db74e441913f554424e260aea70a3d767b944e8.jpg)
text_image Sort Files Name (Ascending) Name (Descending) Date/Time (Ascend.) Date/Time (Descend.)

4

Select the type of file to print with [ ] and [ ], and then press [OK]. ![](images/cb44eb685adf73293b17336dc6168f73c4643751983a90b45595cdcd5f3314b2.jpg)
text_image Select File(s) PDF XPS JPEG TIFF

5

Select the file to print with [ ▲ and [ ], ▼nd then press [OK]. [ √ ] will be attached to the file name. If a file with [ √ ] attached is selected, and [OK] is pressed again, the selection is removed. If a folder is selected, and [OK] is pressed, the list of files inside the folder is displayed. If [] is selected, all the file selections are removed. ↑ Up to 10 files in the same folder can be selected. If the folder hierarchy is moved, all of the file selections are removed. ![](images/6d4d10e04808d2e647c6486223edb5538ee9b310032ca0a207b75a051fbfd1a2.jpg)
text_image Root Directory ✓ sample_1.pdf sample_2... 01/01 10

6

Select [] with [ ▲ and [ ],▼ and then press [OK]. ![](images/0d55733098fdcd472f12f71d76865f4f863da4b4bf27f6d426808576777bd5ef.jpg)
text_image Root Directory ✓ sample_1.pdf sample_2... 01/01 10
When printing using an XPS file print ticket (1) Select [] with [▲] and [▼], and then press [OK]. ![](images/82fd603b3eb48e9e3b0c4880df1666d4e854062b01c249c49bada216ef56d365.jpg)
text_image Root Directory
(2) Select [] with [▲] and [▼], and then press [OK]. It is printed using the print settings specified inside the file.

7

Select [] with [ ▲ and [ ],▼nd then press [OK].

To confirm/ change the print settings, select the setting to be confirmed/changed with [▲] and [▼], and then press [OK]. For details on print settings, see "Print Setting Menu List." The selected file begins printing. ![](images/21a052e1269982c70705c162ccbb636904feb60aa47beed4f5e6ec631819c952.jpg)
text_image Print Settings :1 No. of Copies
Remove the USB memory device after printing has finished. "Remove the USB Memory Device" You can set the following items when printing. ![](images/56932ca7aaeb0a0da87cffd6bc7f6e8515dc8c8ef3f258bcabb744d72aac1932.jpg)

NOTE

Viewing the Tables

- The default value for each setting is displayed in bold text. To change the default values, see "Changing the Default Print Settings and File Sorting Criteria." - The items and setting values marked with "\*" may or may not be displayed depending on the availability of the optional accessories or the content of the setting. Items that can be set for all file formats
Setting Item Setting Value Setting
[No. of Copies] 1 to 9999Specify the number of copies to be printed. Only the number of copies specified by the setting value are printed.
[Color Mode][Auto(Color/Black)] / [Black]Specify color printing or B&W printing.When it is set to [Auto (Color/Black)], it automatically switches between color and black and white printing depending on the file's color settings.When it is set to [Black], it prints color files in black (Bk) only.
[2-Sided Printing] [Off] / [On]Specify whether to print on one side or both sides of the paper.When it is set to [On], it prints on both sides of the paper.
[Binding Location][Long Edge] / [Short Edge]It sets the binding location on the long side of the paper (long-edged binding) or the short side of the paper (short-edged binding). During 2-sided printing, the binding location is automatically adjusted on both the front and back sides.When it is set to [Long Edge], the binding location is on the long side of the paper.When it is set to [Short Edge], the binding location is on the short side of the paper.
[Enlarge Print Area] [Off] / [On]Specify whether to expand the printable area and print.When it is set to [On], the printable area is expanded and printed.When it is set to [Off], the effective print area becomes that area except for 5mm at the top, bottom right and left edges.† When it is set to [On], images on the edges of the paper may be partially cut off.
[Finishing] [Off] / [Collate]Specify the finishing options.When it is set to [Off], the number of copies set for each page is printed.When it is set to [Collate], the specified number of copies are collated.
Items that can be set for PDF/XPS formats
Setting Item Setting Value Setting
[Print Range][Designation Method]: [All] / [Specified Pages]Specify the print range. Only the range specified by the setting value is printed.When [All] is selected, all the pages are printed.When [Specified Pages] is selected, and the page range is entered, only the specified page range is printed. If the page
[Page Range] : [First Page] / [Last Page]range is selected, select $$, and then press [OK].† [Page Range] is only displayed when [Specified Pages] is selected in [Designation Method].
[Select Paper][Auto] / [Multi-Purpose Tray] / [Drawer 1] / [Drawer 2]*Specify the size of paper to output.When it is set to [Auto], it selects the most suitable paper source for the page size of the file to be printed, and prints.When it is not set to [Auto], it prints so that the long side of the page size of the file to be printed and the long side of the selected paper size go in the same direction.
[Halftones][Error Diffusion] : [Off] / [On][Resolution/Gradation] : [Text] / [Graphics] / [Image][Text] : [Resolution] / [Gradation][Graphics] : [Resolution] / [Gradation][Image] : [Resolution] / [Gradation]Specify the halftone display method when printing.The [Error Diffusion] is that it is possible to print at a higher resolution than [Resolution/Gradation], but texture stability is slightly inferior. It is suitable for printing data containing text and fine lines and data such as CAD data that is printed with sharp edges.You can set [Resolution/Gradation] as [Text], [Graphics] or [Image] for these data types.[Resolution] allows you to print in fine detail so that the edges of text data can be seen clearly. It is suitable for printing data containing text and fine lines.Gradation] allows you to perform printing that combines smooth gradation with edge quality. It is suitable for printing graphics or graphs that use gradation.[Resolution/Gradation] is only displayed when [Off] is selected in [Error Diffusion].
[Match Paper Size] [Off] / [On]When it is set to [On], it automatically scales them to match with the effective print area of the output paper and prints. However, if the [Select Paper] setting on the printer for is set to [Auto], this setting is not available.
[N on 1][Off] / [2 on 1] / [4 on 1] / [6 on 1] / [8 on 1] / [9 on 1] / [16 on 1]You can print multiple pages of the file data to be printed arranged on one page.When printing multiple pages side by side, set [Select Paper] to a setting other than [Auto].
Items that can be set for JPEG/TIFF formats
Setting ItemSetting ValueSetting
[Print Range (TIFF)][Designation Method] : [All] / [Specified Pages] [Page Range] : [First Page] / [Last Page]Specify the print range. Only the range specified by the setting value is printed.When [All] is selected, all the pages are printed.When [Specified Pages] is selected, and the page range is entered, only the specified page range is printed.If the page range is selected, select $, and then press [OK]. \dagger $ [Page Range] is only displayed when [Specified Pages] is selected in [Designation Method].
[Select Paper][Auto] / [Multi-Purpose Tray] / [Drawer 1] / [Drawer 2]*Specify the size of paper to output.When it is set to [Auto], it selects the most suitable paper source for the page size of the file to be printed, and prints.When it is not set to [Auto], it prints so that the long side of the page size of the file to be printed and the long side of the selected paper size go in the same direction.
[Halftones][Error Diffusion] / [Resolution] / [Gradation]Specify the halftone display method when printing.The [Error Diffusion] is that it is possible to print at a higher resolution than [Resolution] or [Gradation], but texture stability is slightly inferior. It is suitable for printing data containing text and fine lines and data such as CAD data that is printed with sharp edges.[Resolution] allows you to print in fine detail so that the edges of text data can be seen clearly. It is suitable for printing data containing text and fine lines.[Gradation] allows you to perform printing that combines smooth gradation with edge quality. It is suitable for printing graphics or graphs that use gradation.
[Zoom] [Off] / [On]Specify whether to enlarge or reduce the printing.When it is set to [On], it automatically scales them to match with the effective print area of the output paper and prints.
[Image Orientation][Auto] / [Vertical] / [Horizontal]Specify whether to print the image vertically or horizontally.
[Print Position][Auto] / [Center] / [Top Left]Specify the location where the image will be printed.
0258-0FE

1

Press [ ] ( : Application).

The "USB Direct Print Mode Screen" is displayed. When department ID management is set, the screen is displayed when the departmental ID and PIN are entered. After entering the department ID and PIN, select [], and then press [OK]. ![](images/e9554ed0e260dd707bedd5add69a3a81262b6c5857d347fd2dcd4b5d0aa489d8.jpg)
text_image Ready to print files from USB memory. Select File(s) Sort Files

2

Select [USB Print Settings] with [] and [], and then press [OK]. ![](images/50ec7d20b30cdada3b135309d1cfb0294ffc932dde630227cc83f40890e0daf2.jpg)
text_image Ready to print files from USB memory. Select File(s) Sort Files USB Print Settings

3

Select items for which to set default values using [] or [], and then press [OK].

Set default print settings

(1) Select [PDF/XPS Default Set.] or [JPEG/TIFF Def. Set.] using [▲] or [▼ and then press [OK]. (2) Set the default value of each item. For details on the settings, see "Print Setting Menu List."

Setting default values for file display sorting criteria

(1) Select [File Sort Def. Set.] with [▲] and [▼] and then press [OK]. (2) Select the default sorting criteria using [▲] or [▼] and then press [OK]. 0258-0FF ![](images/718120b17926192808dfa0f126521961f44bd3fdf3fdd1ebc9ca9c21b9460530.jpg)

IMPORTANT

When removing USB memory devices

Always use the following procedure when removing USB memory devices. Using other methods to remove USB memory devices may result in damage to the device and the printer. The following procedure is explained when the "USB Direct Print Mode Screen" is displayed. Remove the USB memory device using the same procedure even when the "Printer Setup Screen" is displayed.

1

Display the "USB Direct Print Mode Screen" or the "Printer Setup Screen." When other screens are displayed, press [ ] ( : Back) or [ ] ( : Application) until the "USB Direct Print Mode Screen" or the "Printer Setup Screen" is displayed.

2

Select [] with [ ] and [ ], and then press [OK]. ![](images/dbb2d92d19041bfedb70dff4236e0a169ef1bcdbaec9f168b7a734ca263ebcc4.jpg)
text_image Ready to print files from USB memory. Select File(s) Sort Files

3

Select [Yes] with [] and [], and then press [OK]. ![](images/1a60e48ca9d7b1d50de07234fce9a51b7f703479b44480a10f32e6ad0c28c2b7.jpg)
text_image Remove USB Memory? No Yes

4

When the following message is displayed, remove the USB memory device from the printer. ![](images/8119a595b2e72fe8bc372541e8d9576aa4c0f3a913066b5eeb58db682165c98b.jpg)
text_image USB memory can now be safely removed.
![](images/ea68642ddc07b4eb1d2cbeae99fbe0abadef01133d584735d35c352a85c94ba1.jpg)
natural_image Line drawing of a printer with a spool and orange flame (no text or symbols)
If an error message is displayed, wait a few seconds before starting the removal procedure again from the beginning. Processing... Do not remove the USB memory until complete. 0258-0FH E-mail print is a function in which this printer receives e-mails sent from the host terminal and prints the text as well as the attached files. Therefore, you do not need to use a printer driver or open the attached files to print.
Available Protocol Requirements
POP3The UIDL command of the POP3 protocol needs to be supported. You can access the mail server but cannot receive e-mails in the following circumstances. For details on the mail server, ask your network administrator.The UIDL command is not supportedThe response to the UIDL command is negative ("-ERR")
Select the [POP3 RX] check box.*
SMTPSet the IP address of the printer."Setting the IP Address (IP v. 4)"
Select the [SMTP RX] check box.*
\* For other settings and the setting procedures, see "How to Specify the Settings for E-mail Print" and specify them as needed.

> Printing a Fax Document Transferred from a Multi-function Machine

You can print a fax document transferred from a Canon multi-function machine.

> How to Specify the Settings for E-mail Print

You can set e-mail print settings from the printer control panel, Remote UI or FTP client.

> Receiving and Printing E-mails Manually

You can receive and print e-mails manually. There are two types of manual printing methods: printing from the printer control panel and printing from the Remote UI.

> Printing the E-mail Receive Log List

You can print the e-mail sending/receiving history. You can print the subject and sender in sending/receiving history. There are two ways of printing e-mail sending/receiving history: from the printer control panel and from the Remote UI.

When E-mail Print Fails

If for some reason an email does not print normally, an error message is displayed on the printer display or Remote UI and network status print, or an error code is displayed in the e-mail sending/receiving history. Take action according to the displayed error messages and error codes. ![](images/95692ed7274267317aa1339b2c66c3d6dbeae9efd8a578bb05ea88bea797183d.jpg)

IMPORTANT

Restrictions for E-mail Print

- Attached files are printable only when they are in TIFF or JPEG format. - The number of attached files has to be 3 or less for each mail. If the number exceeds 3, the first 3 files are printed. However, the files of the 4th or later are not printed. - The body of an HTML e-mail is printed as a plain text message. - E-mail text is printed with its mail header information. - If the number of characters in one text line (without a line break) in an e-mail exceeds 998, an automatic linefeed is performed. Because of this, the text in the next line may not be printed properly. - When the toner cartridge is nearing the end of its lifetime, reception of e-mails becomes impossible. > Toner Cartridge Replacement

Restrictions for E-mail Print (Only when the optional SD card is installed)

- If text data of an e-mail exceeds 25 MB, the text is not printed. - If header data of an e-mail exceeds 20 KB, the excess part of 20 KB or more header data is not printed. - Attached files are printable only when the size of each file is 100 MB or less. Attached files of more than 100 MB are not printed. - If the size of an e-mail exceeds 1.5 GB, the e-mail text is not printed. - Emails cannot be printed if there is no free space on the SD card.

JPEG data is in compliance with the specifications of ITU-T recommendation T.81.

On e-mail print with this printer, JPEG data is in compliance with the specifications of ITU-T recommendation T.81. TIFF data is in compliance with the specifications of Adobe TIFF Revision6.0 and IETF RFC2301 (File Format for Internet FAX).

Internet FAX Simple Mode is supported.

The e-mail print function of this printer supports Internet FAX Simple Mode.

About the supporting status of encoding methods for JPEG data

For this printer, the supporting status is as follows. • Supported encoding method DCT baseline - Unsupported encoding methods DCT extension Reversible compression Hierarchical

About the supporting status of encoding methods for TIFF data

For this printer, the supporting status is as follows. • Supported encoding methods Uncompressed ITU-T recommendation T.4 One-dimensional coding ITU-T recommendation T.4 Two-dimensional coding ITU-T recommendation T.6 Basic facsimile coding ITU-T recommendation T.81 JPEG (Basic DCT only) PackBits (Apple Macintosh PackBits) LZW • Unsupported encoding methods ITU-T recommendation T.82 JBIG ITU-T recommendation T.43 JBIG ITU-T recommendation T.44 MRC

About the supporting status for encoding types

For this printer, the supporting status is as follows. 7bit 8bit - binary - quoted-printable - base64 - uuencode x-uuencode

About the supporting status for character sets

For this printer, the supporting status is as follows. (If no character sets are specified, the data is processed with "us-ascii.") us-ascii - iso-8859-1 - iso-8859-15 0258-0U4 Setting up the printer as an SMTP server allows you to print a fax document transferred from a Canon multi-function machine. To use this function, the necessary settings and operations must be performed on the multi-function machine for transfer of documents to this printer using an Internet Fax (I-Fax) address. ![](images/14d0462170b63a0ab9a65425ccd0eec8749380c3ebf3fa572ef02db1550ccad6.jpg)
flowchart
graph TD
    A["Multi-function machine (by Canon)"] --> B["(1) Transmission of fax document"]
    A --> C["(2) Data transfer"]
    A --> D["(3) Printing"]
    B --> E["FAX"]
    C --> F["This printer"]
Usable protocol Requirements
SMTPSet the IP address of the printer.➢ "Setting the IP Address (IP v. 4)"
Select the [SMTP RX] check box.➢ "How to Specify the Settings for E-mail Print"
![](images/43d8fd698dec729af275221bb7cbea11b94ae0f160ba5204041ce4125ccd7f32.jpg)

IMPORTANT

Restrictions for the Internet Fax

- Attached files are printable only when they are in TIFF format. - Only one attached file can be handled at a time. When multiple files are attached, only the first attached file is printed. The second and following files will not be printed. - When the toner cartridge is nearing the end of lifetime, reception of fax documents becomes impossible. If the toner cartridge is nearing the end of lifetime when the printer is receiving or printing a fax document, the printer stops printing. > "Toner Cartridge Replacement" Fax documents that this printer cannot receive will be printed on the Canon multi-function machine as the document transfer source.

Restrictions for the Internet Fax (only when the optional SD card is installed)

\- The maximum printable size of attached file is 100 MB per file. Files of greater than 100 MB in size will not be printed. 0258-0FJ Before performing the setup, see "Attention (How to Specify the Settings for E-mail Print)." This section describes the procedures for registering or changing the settings using a Web browser (Remote UI).

1

Start the Remote UI, and then log in as Administrator. > "Starting the Remote UI"

2

Select [Network] under [Preferences] in the [Settings/Registration] menu. ![](images/1cde4ee2118a781eb29c87b1e1b4f5146c303c97edd26bb520a40292e3913773.jpg)
text_image Remote UE Settings/Registration: LBP7680C / LBP7680C - Windows Internet Explorer http://192.168.1.225/netmenu.org File Edit View Favorites Tools Help Favorites Remote UI Settings/Registration: LBP7680C: LBP... Settings/Registration To Portal Login User: System Manager Log Out Mail to System Manager Preferences Control Menu Paper Source Menu Network Layout Menu Quality Menu User Maintenance Menu Output/Control Utility Menu Collibration Device Control Management Settings Department ID Management Security License/Other Settings/Registration: Preferences: Network Network Last Updated: 01/04 2011 10:32:30 Network TCP/IP Settings IPv4 Settings IPv6 Settings WINS Configuration ARPIPING Settings FTP Settings LPD Print Settings RAW Print Settings IPP Print Settings WSO Print Settings HTTP Settings SSL Settings Proxy Settings Multicast Discovery Settings SNTP Settings NetWare Settings AppleTalk Settings SNTP Settings Done Internet | Protected Mode: Off 100%

3

Click [Edit...] on the right side of [E-Mail Print Settings]. ![](images/0f16d7265931a948a27b3e438ade423d355e8789bcfe054afe8f7716f9603ac5.jpg)
text_image Remote UI Settings/Registration: LBP7680C / LBP7680C - Windows Internet Explorer File Edit View Favorites Tools Help Favorites Remote UI Settings/Registration: LBP7680C UBP... I-SENSYS LBP7680C / LBP7680C / To Portal Login User: System Manager Log Out Settings/Registration Mail to System Manager Preferences Control Menu Paper Source Menu Network Layout Menu Quality Menu User Maintenance Menu Output/Control Utility Menu Calibration Device Control Management Settings Department ID Management Security License/Other Settings/Registration: Preferences: Network > E-Mail Print Settings E-Mail Print Settings Last Updated 01/04 2011 10:35:00 E-Mail Rx Edit... E-Mail Print Settings POP3 Server Name: POP3 User Name: POP3 Password Not set. POP3 RX Interval 0 minutes POP3 RX Off POP3 Server Port Number 110 SMTP RX Off SMTP Server Port Number 25 Copyright CANON INC. 2011 All Rights Reserved Done Internet | Protected Mode: Off 100%

4

Specify the settings for the e-mail print function. ![](images/c5c59a917736ed54ce3e69a16fde3c4d853a5817fc9ceb6ba60df220208f4143.jpg)
text_image Remote US Settings/Registration: LBP7680C / LBP7680C - Windows Internet Explorer http://192.168.1.225/netemail.log/Actions=GET_EMAIL&CSUTa-1845404098 File Edit View Favorites Tools Help Favorites Remote US Settings/Registration: LBP7680C / LBP... I-SENSYS LBP7680C / LBP7680C / To Portal Login User: System Manager Log Out Settings/Registration Mail to System Manager Preferences Control Menu Paper Source Menu Network Layout Menu Quality Menu User Maintenance Menu Output/Control Utility Menu Calibration Device Control Management Settings Department ID Management Security License/Other Settings/Registration: Preferences: Network > E-Mail Print Settings > Edit E-Mail Print Settings Edit E-Mail Print Settings Last Updated: 01/04 2011 10:30:05 The settings will be changed as follows: OK Cancel E-Mail Print Settings POP3 Server Name: POP3 User Name: Set/Change Password Password: (Max 32 characters) Confirm: (Max 32 characters) POP3 RX Interval: 0 minutes (0-90) POP3 RX POP3 Server Port Number: 110 (0-65535) SMTP RX SMTP Server Port Number: 25 * Changes effective after the main power is turned OFF and ON. Done Internet | Protected Mode: On 100%
If you want to use the POP3 protocol
[POP3 Server Name]Specifies the name or sets the IP address of the server which receives e-mails.
[POP3 User Name]Specifies the name of the user which receives e-mails.You can enter up to 32 alphanumeric characters.
[Set/Change Password]Specifies the password for the name of the user which receives e-mails.
[Password]Select the check box when setting/changing the password.You can enter up to 32 alphanumeric characters.
[Confirm] For confirmation, enter the same [Password] again.
[POP3 RX Interval]Set the interval for automatically connecting to the server that receives e-mail in minute units.Receive e-mail at specified intervals and print it automatically.You can set from [0] (minutes) to [90] (minutes).When it is set to [0], it does not automatically receive e-mail from the server.When it is set to [0] and when you want to connect to the server before it automatically connects to the server that receives e-mail, you can receive e-mail manually.➤ "Receiving and Printing E-mails Manually"
[POP3 RX] Specifies whether to enable the e-mail print function.
[POP3 Server Port Number]Specifies the port number for the server which receives e-mails. You can specify the port number between [0] and [65535].
If you want to use the SMTP protocol
[SMTP RX]When it is checked, e-mail is relayed using SMTP protocol and it is automatically received and printed.
[SMTP Server Port Number]Specifies the port number for the server which receives e-mails. You can specify the port number between [0] and [65535].

5

Click [OK].

![](images/99bf0aa17c0631bcbf363a1c85a4a93b13540ad28215d5cb060a6d1680646e01.jpg)
text_image Remote UB Settings/Registration: LBP7680C / LBP7680C - Windows Internet Explorer http://192.168.1.225/netemail.log?actions/GET_BMAB&CSUTa-184584988 File Edit View Favorites Tools Help Favorites Remote UB Settings/Registrations: LBP7680C / LBP... L.SENSYS LBP7680C / LBP7680C / To Portal Login User: System Manager Log Out Settings/Registration Mail to System Manager Preferences Control Menu Paper Source Menu Network Layout Menu Quality Menu User Maintenance Menu Output/Control Utility Menu Calibration Device Control Management Settings Department ID Management Security License/Other Settings/Registration Preferences Network > E-Mail Print Settings > Edit E-Mail Print Settings Edit E-Mail Print Settings Last Updated: 01/04 2011 10:30:05 The settings will be changed as follows. OK Cancel E-Mail Print Settings POP3 Server Name: POP3 User Name: POP3 Password: POP3 RX Interval 0 minutes (0-90) POP3 RX POP3 Server Port Number: 110 (0-65535) SMTP RX SMTP Server Port Number: 25 * Changes effective after the main power is turned OFF and ON. Copyright CANON INC. 2011 All Rights Reserved Done Internet | Protected Mode Off 100%
0258-0FK The following are settings for printing e-mails. You can set them from the printer control panel, Remote UI or FTP client. ○: Can be specified : Cannot be specified Settings for Using the POP3 Protocol
Option SettingSetting Method
Control PanelRemote UIFTP Client
POP3 Server NameSpecifies the name or sets the IP address of the server which receives e-mails.
POP3 User Name Specifies the name of the user which receives e-mails.
PasswordSpecifies the password for the name of the user which receives e-mails.
POP3 RX IntervalSet the interval for automatically connecting to the server that receives e-mails in minute units. Receive e-mail at specified intervals and print it automatically.
POP3 RXSpecifies whether to enable the e-mail print function. When it is enabled, e-mail is automatically received and printed.
POP3 Server Port NumberSpecifies the port number for the server which receives e-mails.
E-Mail RX Performs manual receiving of e-mails.
Settings for Using the SMTP Protocol
Option SettingSetting Method
Control PanelRemote UIFTP Client
SMTP RXSelect whether to enable the e-mail printing function. When it is enabled, e-mail is automatically received and printed.
SMTP Server Port NumberSpecifies the port number for the server which receives e-mails.
Other Settings
Option SettingSetting Method
Control PanelRemote UIFTP Client
Print History List (E-Mail Print)Prints e-mail print logs.
Show WarningsSpecifies whether a message should appear or any indicator should blink when a reception error has occurred on printing e-mails.
Print E-Mail TextSpecifies whether the printer should print the text on printing e-mails.
Limit E-Mail PrintSpecifies whether to limit the number of the print pages of e-mail text.
![](images/a6026508a1fcadd9f3348b178343ff91774514dd78e88dc2090a7c75b4e77e87.jpg)

IMPORTANT

Receiving E-mails

The printer can receive e-mails only when it is online.

When using POP3 protocol

When it is set to receive e-mail automatically using [POP3 RX Interval], if you attempt to receive e-mail manually while e-mail is being received automatically, your actions will be ignored. > "How to Specify the Settings for E-mail Print"

When using SMTP protocol

It automatically receives and prints e-mails. There is no need to manually receive and print them. > "How to Specify the Settings for E-mail Print"

Printing from the Printer Control Panel

1

Make sure that the printer is online. If the printer is not online, press [ ○ ] ( : Online).

2

Press [ ]( : Utility) to display the Utility menu.

3

Press [▲ and [ ],▼ select [E-Mail Print Utility], and then press [OK].

4

Press [▲ and [ ],▼ select [Received E-Mails], and then press [OK].

5

When is displayed, press [] select [Yes] and press [OK]. The printer is connected to the mail server. The printer receives e-mails addressed to the printer and print them.

Printing from a Remote UI

1

Start the Remote UI.

2

Select [Network] under [Preferences] in the [Settings/Registration] menu. ![](images/fd270d503daf418c9513073f8630082047035e8af95e0484bd36801515d7bce2.jpg)
text_image Remote UE Settings/Registration: LBP7680C: LBP7680C - Windows Internet Explorer File Edit View Favorites Tools Help Favorites Remote UI Settings/Registration: LBP7680C: LBP... Settings/Registration To Portal Login User: System Manager Log Out Mail to System Manager Preferences Control Menu Paper Source Menu Network Layout Menu Quality Menu User Maintenance Menu Output/Control Utility Menu Calibration Device Control Management Settings Department ID Management Security License/Other Settings/Registration Preferences Network Network Last Updated: 01/04 2011 10:32:30 Network TCP/IP Settings IPv4 Settings IPv6 Settings WNS Configuration ARP/PNG Settings FTP Settings LPD Print Settings RAW Print Settings IPP Print Settings WSO Print Settings HTTP Settings SSL Settings Proxy Settings Multicast Discovery Settings SNTP Settings NetWare Settings AppleTalk Settings SNTP Settings Done Internet | Protected Mode: Off 100%

3

Click [E-Mail RX] that is on the right side of [E-Mail Print Settings]. The printer is connected to the mail server. The printer receives e-mails addressed to the printer and print them. ![](images/ce92c4001fc6bf1f33e412cc4101d51301c8b35443ee34f27fca34671482ee5e.jpg)
text_image Remote UI Settings/Registration: LBP7680C: LBP7680C - Windows Internet Explorer File Edit View Favorites Tools Help Favorites Remote UI Settings/Registration: LBP7680C: LBP... Settings/Registration To Portal Login User: System Manager Log Out Mail to System Manager Preferences Control Menu Paper Source Menu Network Layout Menu Quality Menu User Maintenance Menu Output/Control Utility Menu Calibration Device Control Management Settings Department ID Management Security License/Other Settings/Registration: Preferences: Network > E-Mail Print Settings E-Mail Print Settings Last Updated: 01/04 2011 10:35:00 E-Mail Rx Edit... E-Mail Print Settings POP3 Server Name: POP3 User Name: POP3 Password: Not set. POP3 RX Interval: 0 minutes POP3 RX: Off POP3 Server Port Number: 110 SMTP RX: Off SMTP Server Port Number: 25 Copyright CANON INC. 2011 All Rights Reserved Done Internet | Protected Mode: Off 100%
0258-0FR Before beginning to print, see "Attention (Printing E-mail Sending/Receiving History)."

Printing from the Printer Control Panel

1

Make sure that the printer is online. If the printer is not online, press [ ○ ] ( : Online).

2

Press [ ] ( : Utility) to display the Utility menu.

3

Press [▲and [ ],▼elect [E-Mail Print Utility], and then press [OK].

4

Press [▲ and [ ],▼elect [Received E-mail List], and then press [OK].

5

When is displayed, press [] select [Yes] and press [OK]. The e-mail receive log list is printed.

Printing from a Remote UI

1

Start the Remote UI, and then log in as Administrator. > "Starting the Remote UI"

2

Click [Utility Menu] under [Output/Control] in the [Settings/Registration] menu. ![](images/62e7b8d256027863511716ae990b786ac47642b3fe10286a00c506cb3634ee34.jpg)
text_image Remote UB Settings/Registration: LBP7680C: LBP7680C - Windows Internet Explorer File Edit View Favorites Tools Help Favorites Remote UB Settings/Registration: LBP7680C: LBP... Settings/Registration Mail to System Manager Preferences Control Menu Paper Source Menu Network Layout Menu Quality Menu User Maintenance Menu Output/Control Utility Menu Calibration Device Control Management Settings Department ID Management Security License/Other Settings/Registration: Output/Control Utility Menu Utility Menu Last Updated 01/04 2011 10:39:00 Select the utility to output from the below options, and click [Execute]. Execute Utility Menu Output Options: Configuration Page Network Status Print E-Mail RX History List Printing Position Adjustment Print PCL Font List PS Configuration Page PS Font List Print History List (Print Job/Direct Print) Print History List (Stored Job) Print History List (Report) Print History List (E-Mail Print) All Cleaning LTR Cleaning Counter Report Page Count List Print MEAP System Information Done Internet | Protected Mode: Off 100%

3

Select [E-Mail RX History List], and click [Execute].

The e-mail receive log list is printed. ![](images/1392411b5b7e6762a5d6f7dbf29a8e28e4445a3c738690f12a64f9e7fb4736f0.jpg)
text_image Remote UI Settings/Registration: LBP7680C: LBP7680C - Windows Internet Explorer File Edit View Favorites Tools Help Favorites Remote UI Settings/Registration: LBP7680C: LBP... Settings/Registration Mail to System Manager Preferences Control Menu Paper Source Menu Network Layout Menu Quality Menu User Maintenance Menu Output/Control Utility Menu Calibration Device Control Management Settings Department ID Management Security License/Other Settings/Registration: Output/Control Utility Menu Utility Menu Last Updated 01/04 2011 10:39:00 Select the utility to output from the below options, and click [Execute]. Execute Utility Menu Output Options: Configuration Page E-Mail RX History List PCL Font List PS Configuration Page PS Font List Print History List (Print Job/Direct Print) Print History List (Stored Job) Print History List (Report) Print History List (E-Mail Print) All Cleaning LTR Cleaning Counter Report Page Count List Print MEAP System Information Done Internet | Protected Mode Off 100%
0258-0FS ![](images/392a9649774d6b82c52999102d30e5bd1ea6af7acca4c02b7ebd3174aedd3f81.jpg)

IMPORTANT

Deleting all the e-mail receive logs

Delete them using the following procedure. \- When the optional SD card is installed Formatting the SD card in [SD Card Maintenance] > "[Setup] Menu ([User Maintenance] Options)" - When the optional SD card is not installed Turn the printer OFF. "Turning the Printer ON/OFF" ![](images/acd4b7770d99013891371c3c4af8c692dc8e8cf0d652838a1c661ffd84f103f1.jpg)

NOTE

About the e-mail receive log

Up to 60 e-mail receive logs can be printed.

If an e-mail is not printed properly for some reason

An error code is printed in [RX Results] in the e-mail receive log. See "When E-mail Print Fails." 0258-0FU Perform the following actions depending on the displayed error messages and error codes. Error messages and error codes are displayed in the following locations. - Printer Display ■ Network Status Print "The Lists Common to All the Settings in the Print Mode" • E-Mail Sending/Receiving History \- Remote UI ([Error Information] page in the [Status Monitor/Cancel] menu) See "Printing the E-mail Receive Log List" for printing methods. The error messages that appear in the display, Remote UI, and Network Status Print
Error MessageCause Remedy
DisplayRemote UI, Network Status Print
EM POP3 server error.POP3 Server Connection ErrorCould not connect to the POP3 server when printing e-mails.Check the following points. Whether the following settings in the [Network] page in the Remote UI are correct - [POP3 Server Name] and [POP3 Server Port Number] in [E-Mail Print Settings] - DNS in [TCP/IP Settings] Whether the POP3 server and the DNS server are operating properly
POP3 Server User Name ErrorFailed to authenticate the user name in the POP3 server when printing e-mails.Check the following points. Whether the setting for [POP3 User Name] in [E-Mail Print Settings] in the [Network] page in the Remote UI is correct Whether the user name is registered in the POP3 server properly
POP3 Server Password ErrorFailed to authenticate the password in the POP3 server when printing e-mails.Check the following points. Whether the setting for [Password] in [E-Mail Print Settings] in the [Network] page in the Remote UI is correct Whether the password is registered in the POP3 server properly
POP3 Server UIDL ErrorCould not connect to the POP3 server when printing e-mails, because the server does not support the UIDL command.Use a POP3 server that supports UIDL.
EM E-mail access error.The printer could not connect to the POP3 server because an error had occurred in its hard disk.Clear the hard disk error on the POP3 server.
The error codes that are displayed in the e-mail receive log list\* - If multiple errors have occurred, only the error of the highest priority is displayed (high: 407 > low: 499).
Error Code Cause Remedy
407The connection to the POP server was disconnected.Consult your network administrator.If errors occur many times on the same e-mail data, check if the e-mail data is normal.
Could not receive data of 1 Kbyte (1024 byte) for 10 minutes while receiving e-mails.
408The responsewas returned from the POP server.Consult your network administrator.
412Could not receive data of 1 Kbyte (1024 byte) for 10 minutes while receiving e-mails.Consult your network administrator.If errors occur many times on the same e-mail data, check if the e-mail data is normal.
420The size of the e-mail data exceeded 1.5 GB.Reduce the size of the e-mail data to 1.5 GB or less.
421The size of the e-mail text exceeded 25 MB.Reduce the amount of the e-mail text.
422The size of the attached files exceeded 100 MB.Reduce the size of the attached files to 100 MB or less.
423An attached file in an unsupported format was sent.Change the format of the attached file into TIFF or JPEG.
424The number of the attached files exceeded 3.Reduce the number of the attached files to 3 or less.
430An e-mail in which [From] is blank was sent.Enter a name in [From].
431Received a divided mail.Apply the following remedies to send the e-mail so that it is not divided.Reducing the size of the e-mail to be sent (Reducing it to the size which cannot be divided).Specifying the application settings so that the e-mail is sent without being divided.
An e-mail which included unsupported encoding or character encoding was sent.Change the encoding or character encoding into that supported by this printer."Receiving E-mail Data on the Mail Server and Printing (E-mail Print)."
Received a mail of an unsupported type (message type).Change the content type into any one of the following types that are supported by this printer.text/plainimage/jpegimage/tiffimage/tiff-fxapplication/octet-stream
Received an unsupported multipart mail.Change the content type of the multipart mail into any one of the following types that are supported by this printer.multipart/mixedmultipart/parallelmultipart/alternativeIf the mail is nested, the mail is supported only when "multipart/alternative" is nested in "multipart/mixed."
432 Invalid data was sent. Check if the sent e-mail data is normal.
433 An e-mail in HTML format was sent.This printer does not support e-mails in HTML format. The body of an HTML e-mail is printed as a plain text message.
434 The e-mail does not contain a text. Enter the text.
440The job was canceled for some reason.
441An error has occurred during the process.
499 An error has occurred in the printer.See "A Message Appears in the Control Panel" for more details.
0258-062 You can print files from the printer by accessing the FTP server of the printer using FTP Client. ![](images/47adf1f29047b94b710dee1de117cd4088cbb1d947d5240c87504fb814809711.jpg)

IMPORTANT

When performing FTP printing, select the [Use FTP Print] check box. > "Configuring the Protocol Settings"

1

Run Command Prompt. ![](images/19401fb5a4e99e388b73a2fd5975a4c3c05f84e4d88885a73098a65a7e06fe46.jpg)

NOTE

If you are using Windows

Run Command Prompt using the following procedure. \- From the [Start] menu, select [All Programs] or [Programs] → [Accessories] → [Command Prompt].

If you are using UNIX

Display the console screen.

2

Copy the file to be printed in the directory displayed in Command Prompt.

3

Enter "ftp " in Command Prompt, and then press the [ENTER] key on your keyboard. \- Input Example: "ftp 192.168.0.215" ![](images/091c251f98765a3896529055d7a2c0fb4bd761426e4f1e962ded8d5ebecc981e.jpg) If you are not sure about the IP address of the printer Consult your network administrator.

4

Enter the FTP print user name, then press the [ENTER] key on your keyboard. † The default user name is "guest". † You cannot perform an anonymous login.

5

Enter the FTP print password, then press the [ENTER] key on your keyboard. † The default password is "7654321".

6

Enter "put ", and then press [ENTER] on your keyboard. - Input Example: "put sample.txt" → The file is printed from the printer. ![](images/9d8fae2811d52311f63affba2571e1aebdc721f54e0cc081e005813cf1c03275.jpg)

IMPORTANT

When printing a file

Print the file in the binary mode.

7

Enter "quit", then press the [ENTER] key on your keyboard.

8

Enter "exit", then press the [ENTER] key on your keyboard. → Command Prompt closes.

Specifying a Password for a Document and Printing (Secured Print) (LBP7680Cx Only)

0258-0FW In a secured print or encrypted secured print, a print job for which a password is specified is saved in the SD card of the printer, and the job is printed by entering the password using the printer's control panel. This function is convenient when you print a confidential document etc. that you do not want others to read. Before beginning to print, see "Attention (Specifying a Password for a Document and Printing (Secured Print))." It is used only when the optional SD card is installed.

1

Print a secured print job or encrypted secured print job using the printer driver. ![](images/2faff271361392525d41d67eeea9621104b2eeef7f981aa3991d0aeda15c0c64.jpg)

NOTE

How to print a secured print job

Print a secured print job by selecting [Secured Print] in the printer driver, and then entering the user name and password.

The number of characters which can be specified for a secured print job

Specify the user name for a secured print with 15 or less alphanumeric characters and the password with 1 to 7 characters.

For details on the encrypted secured print

For details on the restriction for the number of characters of an encrypted secured print password and how to print the job, see Help of "Encrypted Secured Print Driver Add-in." You can display Help from the print driver after installing "Encrypted Secured Print Driver Add-in."

2

Move to the printer when printing.

3

Make sure that the printer is online. If the printer is not online, press [ ○ ] (○ Online).

4

Press ![](images/fe78d8f9b139dfa26c9ef33f44d3b972e008f785a8b31f3d037e0b92907a386d.jpg) ob)

5

Select [Secured Print] or [Encrypted Print] using [] and [], and then press [OK]. ![](images/d90f31f223a3a1fb82f365d41d97a4c6676755cb95483737593cfb8435366c93.jpg)
text_image Job Secured Print Job Print Log List Stored Job Print Log Report Print Log

6

If the user names appear, select the target user name using [ ] and [ ], and then press [OK]. ![](images/e93ea50804a3c95fc0217acd5551e8be05a85f32e82a5c6908f970e1fd4f3d68.jpg)
text_image Secured Print user1 user2 user3

7

If the file names appear, select the target file name using [] and [], and then press [OK]. ![](images/b5349c23ebcbdae889e62f9b5b282bcc7d4476d2b76d7438cd7f589cb4d7cfea.jpg)
text_image Secured Print sample_1-1.pdf sample_1-2.pdf

8

Enter [PIN], and then press [OK]. Increase or decrease a number using [▲] and [▼] and then move the cursor using [ ] and [ ]. ![](images/87a2028202c20495a8f2c84451728bb4a885f3861b211387c7d44d998481641a.jpg)
text_image PIN 1234 U/D Keys: Adjust Value R/L Keys: Move Cursor
→ The specified file is printed. ![](images/3318eaca3c1b2394150bac6c72e75fa344bbc4001c359846850dd276836a3ef2.jpg)

NOTE

Entering a password using the control panel Only numbers can be entered. If a password includes alphabetical characters or symbols Alphabetical characters or symbols can be specified for a password depending on the encrypted secured print driver version. In this case, print an encrypted secured print job from the Remote UI. For details on the procedure for operating the Remote UI, see "Remote UI."

Attention (Specifying a Password for a Document and Printing (Secured Print))

0258-0FX ![](images/6644fb29fca3238fed56e2a0307f58ada0a0ccead2d33fd3916ea7a94009a43d.jpg)

NOTE

The environment in which this function is unavailable

You cannot use this function on the DOS application, UNIX or other computer on which the printer driver cannot be used. Print jobs are processed in the [Print] mode.

When the amount of data or number of jobs that you can save on the SD card exceeds the limit

The message appears. When the message is displayed, perform the following procedure. (1) Press [ ○ ] (← : Online) to skip the error. (The job for which the error was skipped will be deleted.) (2) Delete any unnecessary jobs from among the jobs saved on the SD card. (3) Save the secured print jobs again.

When using the "Encrypted Secured Print" function whose security is reinforced for data communication and stored data

You need to install "Encrypted Secured Print Driver Add-in." For details on the installation procedure, see "Readme.txt" in the supplied CD-ROM. We recommend that an encrypted secured print be used when printing secured print jobs.

Timing to delete secured print jobs

Secured print jobs/encrypted secured print jobs are deleted in the following circumstances: - When the printer is turned OFF - When a hard reset or soft reset is performed - After a secured print job/encrypted secured print job is printed - When no printing operation has been performed by the printer's control panel or Remote UI for a fixed period - The time interval from when no printing operation is not performed by the Remote UI or printer's control panel for a fixed period until the printer deletes jobs is set to "1 hour" in the default settings. You can change the setting for the time interval. "> "[Setup] Menu ([Control Menu] Options)"

Saving a Document in the SD Card in the Printer (Stored Job Print) (LBP7680Cx Only)

0258-0FY You can save print jobs in the SD card (box) in the printer by selecting [Store] from the printer driver for this printer. In addition, stored jobs can perform the following operations from the printer's control panel and the Remote UI.

Performing a Stored Job Print Using the Control Panel of the Printer

You can print data by selecting the saved box or job.

Displaying or Operating the Jobs Stored in a Box (Resume/Delete)

You can check or operate the jobs stored in a box. You can perform operations of Resume (Print) and Delete. You can also check the jobs in detail. This operation is performed from the Remote UI.

Changing the Box Settings

You can change the name of the box in which data is saved or password. This operation is performed from the Remote UI. ![](images/5ad99e2d099bf553538215e2af0b749d24b4fb72d41f4a9175b99873d1e16a69.jpg)

NOTE

About stored jobs

- The stored jobs can be displayed or operated only when the SD card is installed, and [SD Card] is set to [On]. For details on the settings for [SD Card], see "[Setup] Menu ([Control Menu] Options)." - The saved jobs are saved on the SD card even after printing, and they are not deleted even after turning the printer OFF. When you want to delete the saved jobs, use the Remote UI. - Up to the total of 100 jobs in all the boxes can be saved. - You can change the name of the stored job in the printer driver before printing.

When the amount of data or number of jobs that you can save on the SD card exceeds the limit

The message is displayed. When the message is displayed, perform the following procedure. (1) Press [ ○ ] (← : Online) to skip the error. (The job for which the error was skipped will be deleted.) (2) Delete any unnecessary jobs from among the jobs saved on the SD card. (3) Save the jobs again.

Operating the Remote UI

"Remote UI." 0258-0H0

1

Select [Store] from [Output Method] in the printer driver, specify the box in which you want to store the job, and then send it.

2

Move to the printer when printing.

3

Make sure that the printer is online. If the printer is not online, press [ ○ ] (← Online).

4

Press [ ![](images/ca7a931a104bc7cc8c799362a3c93bdfa76400b40abbb1f8b2cdff54078d05e8.jpg) ob)

5

Select [Stored Job Print] using [] and [], and then press [OK]. ![](images/cb705f385f6fb9b57008555f0c3ed173be266b1e1b15540182c8f4f9d2c8f299.jpg)
text_image Job Secured Print Stored Job List Stored Job Print Job Print Log List

6

Select the number for the box in which the job is stored using [ ] and [ ], and then press [OK]. ![](images/ea222a51ba1c255e74e2d616858547aba81ad8345b60e7a967b8cc1333eeb5a6.jpg)
text_image Stored Job Print Box No. 0 Box No. 1 Box No. 2 Box No. 3

7

If [PIN] appears, enter the password, and then press [OK]. Increase or decrease a number using [▲] and [▼] and then move the cursor using [ ] and [ ]. ![](images/adaddb6df28eac421ebdfcf657861aec77cfecf69dc8430b39f6d0544b8a3f5c.jpg) ![](images/2ce5d05c6e95ba256f41fa3f1c88c8e7fd3e3bef0c873ee2352ab1f1dba9abb2.jpg)
text_image PIN 1234 U/D Keys: Adjust Value R/L Keys: Move Cursor
![](images/cdc5bbd4cc1f1d7cd21c1c3c51d41a2b087e72ecc8ef8c467c76e41b5e87625e.jpg) Select the name of the target file using [] and [], and then press [OK]. The specified file is printed. ![](images/e66783011fb46c0b53116b74a19c566767e0142bfaae5f9d12ff770d07b10320.jpg)
text_image Stored Job Print sample_1.pdf sample_2.pdf
0258-0H1

1

Start the Remote UI, and then log in as Administrator. > "Starting the Remote UI"

2

Select [Box] Menu. ![](images/2a85318fd70685a07a71b769e522ca8ef51c724021ee3eaf3d0b54ad3e2bffef.jpg)
text_image Remote UI Portal: LBPXXXXLBPXXXX - Windows Internet Explorer http:// Favors Suggested Sites Web Slice Gallery Remote UI Portal: LBPXXXXLBPXXXX Device Name: LBPXXXX Product Name (Serial No.): LBPXXXX Location: Login User: System Manager Log Out Language English Mail to System Manager Last Updated: 29/05 2012 10:03:42 Device Basic Information Device Status The printer is ready Error Information There is no error Consumables Information Paper Information Paper Source Remaining Paper Paper Size Paper Type Multi-Purpose Tray None A4 Free (Mixed Types) Drawer 1 Loaded A4 Free (Mixed Types) Remaining Toner Item Name Remaining Toner Cyan Toner 16-100% Status Monitor/Cancel Settings/Registration Basic Tools Box Direct Print Management Tools Service Management Service

3

Enter the box number of the box where the job that you want to check or operate is stored, and click [Open...]. You can also display the job list inside the box by clicking on the icon displayed on the Box Number. If a password is specified for the box, enter the password, and then click [OK]. ![](images/de1e9b80aaa5da0b1c94ef66e7491d791dd690704fab61d8c1ef95874f08fd91.jpg)
text_image Remote U: Box: LBP7680C / LBP7680C - Windows Internet Explorer http://192.168.1.225/jboc.cgi File Edit View Favorites Tools Help Favorites Remote U: Box: LBP7680C : LBP7680C I SENSYS LBP7680C / LBP7680C / To Portal Login User: System Manager Log Out Box Mail to System Manager Box Box Box Last Updated 05/04 2011 03:48:53 Enter the box number to open and then click [Open...], or select the number from below. Box Number (00-99) 00 Open... Box Box Number Name Number of Jobs (Total Max 100) 00 1 01 0 02 0 03 0 04 0 05 0 06 0 Done Internet | Protected Mode: Off

4

When you want to operate any stored job, perform the following procedure.

(1) Select the [Select] check box by the first job on the list. (2) Click the operation buttons. [Print...] : Prints the selected job. [Delete]: Deletes the selected job. You can display the page that allows you to change the print copies etc. by clicking [Print...]. ![](images/997720d7f6008dcdc0190c1cdf3d7f0682fb27f3ec3855536f33b333f7e3032c.jpg)
text_image Remote UI Box: LBP7680C / LBP7680C - Windows Internet Explorer http://192.168.1.225/index.cgi/CSU/Tz-301863323 File Edit View Favorites Tools Help Favorites Remote UI Box: LBP7680C: LBP7680C I.SENSYS LBP7680C / LBP7680C / Box To Portal Login User: System Manager Log Out Mail to System Manager Box Box > Box Box 00 Last Updated 05/04 2011 03:53:48 Settings... Files in Box '00' Print Delete Select Type File Name Pages Date/Time Sample pdf 05/04 2011 03:48 Copyright CANON INC. 2011 All Rights Reserved Done Internet | Protected Mode: Off 100%
(3) Change the settings, and then click [Start Printing]. ![](images/6d27dbf6f9b8df7cae7094aa25d5dda7373abf9c23dc45512ab0ab614e1d763a.jpg)
text_image Remote UI Box: LBP7680C / LBP7680C - Windows Internet Explorer http://192.168.1.225/bpptx.rgiPC.md/TypeStart&ubIDc3415R1919A&CSUT File Edit View Favorites Tools Help Favorites Remote UI Box: LBP7680C LBP7680C I SENSYS LBP7680C / LBP7680C / To Portal Login User: System Manager Log Out Box Mail to System Manager Box Box Box Box 00 > Print File Print File Start Printing Cancel Print File Copies: 1 (1-9999) User Name: Example Copyright CANON INC. 2011 All Rights Reserved Done Internet | Protected Mode: Off 100%
![](images/6d628c1725d92e5142b434d6239b68880cad31a9c56766dd3ac78cf44fcad8d0.jpg)

NOTE

Changing the number of the print copies

You cannot change the number of the print copies depending on the job. Also, changes to print runs of saved jobs that have [Prioritize Print Ticket] set in XPS format will be ignored.

Displaying a document name

A job file name of up to 32 characters can be displayed for a document name. If the file name has more than 32 characters, the characters after the limited number are not displayed. Also, depending on the application, the application name may be added to the beginning of the file name.

5

Click the document name to display details of the saved job.

![](images/1f6d882d405b4a149ed105af829ab2f7c60bf6891fb86c2c5965752df033f8d3.jpg)
text_image Remote UI Box: LBP7680C / LBP7680C - Windows Internet Explorer http://192.168.1.225/bidocs.org/CSU/Ts-10086323 File Edit View Favorites Tools Help Favorites Remote UI Box: LBP7680C: LBP7680C I-SENSYS LBP7680C / LBP7680C / To Portal Login User: System Manager Log Out Box Mail to System Manager Box Box > Box Box 00 Last Updated: 05/04 2011 03:53:48 Settings... Files in Box '00' Print Delete Select Type File Name Pages Date/Time Sample.pdf 05/04 2011 03:48 Copyright CANON INC. 2011.All Rights Reserved Internet | Protected Mode: Off 100%

The detailed information of the stored jobs is displayed.

![](images/6d6ba157eb1284d22bc84aa1f1e586f8e9f91db80ee92abf4fcf25f105524788.jpg)
text_image Remote UI Box: LBP7680C / LBP7680C - Windows Internet Explorer http://192.168.1.225/bdprtp.cgi?linkID=2413808104&CSU/T=1543597179 File Edit View Favorites Tools Help Favorites Remote UI Box: LBP7680C LBP7680C I-SENSYS LBP7680C / LBP7680C 7 To Portal Login User: System Manager Log Out Box Mail to System Manager Box Box Box > Box 00 > File Details File Details Job No: 5 Document Name: Sample pdf Status: Stored User Name: DIRECT PRINT Stored Date/Time: 05/04 20/11 03:48 Pages x Copies: -- Size: 98 KB Copyright CANON INC. 2011 All Rights Reserved Done Internet | Protected Mode: Off 100%

Automatically Deleting Files Stored in a Box

0258-0SW Stored jobs can be deleted automatically by setting a length of time to pass between storing of the jobs and their deletion. This setting is made using the Remote UI.

1

Start the Remote UI, and then log in as Administrator. > "Starting the Remote UI"

2

Click [Settings/Registration]. ![](images/a51c5918ecdeaba4722067916ff2feb99483af83874bd6be44ad313bb705a663.jpg)
text_image Remote UI Portal: LBP/XXXX: LBP/XXXX - Windows Internet Explorer http:// F Preferences Suggested Sites Web Slice Gallery Remote UI Portal: LBP/XXXX: LBP/XXXX Device Name: LBP/XXXX Product Name (Serial No.): LBP/XXXX Location: Login User: System Manager Log Out Language English Mail to System Manager Last Updated: 29/05 2012 10 03:42 Device Basic Information Device Status The printer is ready Error Information There is no error Consumables Information Paper Information Paper Source Remaining Paper Paper Size Paper Type Multi-Purpose Tray None A4 Free (Mixed Types) Drawer 1 Loaded A4 Free (Mixed Types) Remaining Toner Item Name Remaining Toner Cyan Toner 16-100% Status Monitor/Cancel Settings/Registration Basic Tools Box Direct Print Management Tools Service Management Service

3

Select [Control Menu] from the [Preferences] menu. ![](images/19f85579d0ab73a886850d5e6a87a2bfd962c56f11fb2c7c5b0095317b56c7d3.jpg)
text_image Remote UI Control Menu: LBPXXX - LBPXXX - Windows Internet Explorer http:// Suggested Sleep Web Slice Gallery Remote UI Control Menu: LBPXXX - LBPXXX LBPXXX / LBPXXX? Settings/Registration Preferences Control Menu Paper Source Menu Network Layout Menu Quality Menu User Maintenance Menu Output/Control Utility Menu Calibration Device Control Management Settings Department ID Management Security License/Other Settings/Registration Preferences: Control Menu Control Menu Last Updated: 24/04/2012/21/27/23 Edit... Sleep Settings Sleep Mode High (Deep Sleep) Sleep Even if Error On Sleep Migration Time 5 minutes Timer Settings Wake Up Timer Off Wake Up Time 12:00 Auto Reset Time 2 minutes Sleep Timer Off Sleep Time: 12:00 Auto Shutdown Timer On Auto Shutdown Time After 4 hours Auto Shutdown Weekly Timer Off Calibration Timer Off Calibration Time 12:00 Done Internet | Protected Mode On

4

Click [Edit...].

![](images/bee3d46a1178a68d0aaaed0d9e9e345dd10beedebe143a16e1091819292f36a7.jpg)
text_image Remote UI Control Menu: LBPXXX - Windows Internet Explorer https://www.wk.net Favorites Suggested Sites Web Site Gallery Remote UI Control Menu: LBPXXX - LBPXXX Settings/Registration To Portal Login Bus System Manager Log Out Mail to System Manager Preferences Control Menu Paper Source Menu Network Layset Menu Quality Menu User Maintenance Menu Output/Control Utility Menu Calibration Device Control Management Settings Department ID Management Security License/Other Settings/Registration Preferences: Control Menu Control Menu List U00816 2404.2912.21.31.23 Edit... Sleep Settings Sleep Mode High (Deep Sleep) Sleep Even if Error On Sleep Migration Time 5 minutes Timer Settings Wake Up Timer Off Wake Up Time 12:00 Auto Reset Time 2 minutes Sleep Timer Off Sleep Time: 12:00 Auto Shutdown Timer On Auto Shutdown Time After 4 hours. Auto Shutdown Weekly Timer Off Calibration Timer Off Calibration Time 12:00 Done Internet | Protected Model On

5

Set a length of time to pass before deletion of stored jobs. ![](images/ebf0658a9cc26a7d56ca04a67d7879db30a150f148e5aebf99074e02a39bb62c.jpg)
text_image Remote UI Settings/Registration: LEP103 - LEP103 - Windows Internet Explorer Http:// Bing Favorites Suggested Sites Web Site Gallery Remote UI Settings/Registration: LEP103 - LEP103 Passel Display/Notification Settings Panel Language: English Animated Instruction Show Timer Gauge Settings Completed Notification: 3 seconds Scrolling Speed: Normal Others Use SD Card Allow Interrupt Print Securing Time: 1 hour Stored Job Deletion Time: 3 days Secure Job History Copyright ONION INC. 2012 All Rights Reserved Name Internet | Protected Mode On 100%
The default setting is [3 days]. † To not delete automatically, select [Off]. ![](images/cd2cc976a33cac8c68a10858ebb2ced5795ed0db2edad39a34890894fa096409.jpg)

Click [OK].

![](images/49a5e6d0d4963cddd1d06532af3065c36899b26bd1a08933c708d5d4e4fec198.jpg)
text_image Remote US Edit Control Menu: LBPXXX - Windows Internet Explorer http:// Favorites Suggested Sites Web Slice Callkey Remote US Edit Control Menu: LBPXXX LBPXXX / LBPXXX/ Settings/Registration Preferences Control Menu Paper Source Menu Network Layout Menu Quality Menu User Maintenance Menu Output/Control Utility Menu Calibration Device Control Management Settings Department ID Management Security License/Other Settings-Registration: Preferences: Control Menu > Edit Control Menu Edit Control Menu LBPXXX 94052812 075628FPM The settings will be changed as follows. (Some changes are effective after the main power is turned OFF and ON.) OK Cancel Sleep Settings Sleep Mode High (Deep Sleep) Sleep Even if Error Sleep Migration Time: 5 minutes Timer Settings Use Wake Up Timer Wake Up Time: 12 00 Change Auto Reset Time Auto Reset Time: 2 minutes Use Sleep Timer Sleep Time: 12 00 Done Internet | Protected Mode On
0258-0H2 ![](images/c7f50839bfada6805dce2ed5538ff8b2fddb9456856f9a491254267ad9a968bc.jpg)

NOTE

You can change the settings only if you have logged on as Administrator. > "Remote UI"

1

Start the Remote UI, and then log in as Administrator. > "Starting the Remote UI"

2

Select the [Box] menu. ![](images/db42e960d135f3b8ff67ff3a55a32be5ce5691ff19634c9ad4ede2f78275e556.jpg)
text_image Remote UI: Portal LBPXXXX: LBPXXXX - Windows Internet Explorer Http:// Bing Favorites Suggested Sites Web Slice Gallery Remote UI Portal: LBPXXXX: LBPXXXX Device Name: LBPXXXX Product Name (Serial No.): LBPXXXX Location: Login User: System Manager Log Out Language English Mail to System Manager Last Updated: 29/05 2012 10:03:42 Device Basic Information Device Status The printer is ready Error Information There is no error. Consumables Information Paper Information Paper Source Remaining Paper Paper Size Paper Type Multi-Purpose Tray None A4 Free (Mixed Types) Drawer 1 Loaded A4 Free (Mixed Types) Remaining Toner Item Name Remaining Toner Cyan Toner 16-100% Status Monitor/Cancel Settings/Registration Basic Tools Box Direct Print Management Tools Service Management Service

3

Enter the box number of the box where the job that you want to check or operate is stored, and click [Open...]. You can also display the job list inside the box by clicking on the icon displayed on the Box Number. If a password is specified for the box, enter the password, and then click [OK]. ![](images/d3c9e7f8bdde7160303f1cb567153f41c34436c8c5c0ca9430e5446d7d24e163.jpg)
text_image Remote U: Box: LBP7680C / LBP7680C - Windows Internet Explorer http://192.168.1.225/jboc.cgi File Edit View Favorites Tools Help Favorites Remote U: Box: LBP7680C : LBP7680C I SENSYS LBP7680C / LBP7680C / To Portal Login User: System Manager Log Out Box Mail to System Manager Box Box Box Last Updated 05/04 2011 03:48:53 Enter the box number to open and then click [Open...], or select the number from below. Box Number (00-99) 00 Open... Box Box Number Name Number of Jobs (Total Max 100) 00 1 01 0 02 0 03 0 04 0 05 0 06 0 Done Internet | Protected Mode: Off

4

Click [Settings...]. ![](images/add1b25e17f3392753b332ce8858b45f1baa87a565c821f081b3d26782d8c06e.jpg)
text_image Remote UI Box: LBP7680C / LBP7680C - Windows Internet Explorer http://192.168.1.225/bdoxz.rgi/CSUT-301863023 File Edit View Favorites Tools Help Favorites Remote UI Box: LBP7680C : LBP7680C I-SENSYS LBP7680C / LBP7680C / Box To Portal Login User: System Manager Log Out Mail to System Manager Box Box > Box Box 00 Last Updated 05/04 2011 03:52:46 Settings... Files in Box '00' Print Delete Select Type File Name Pages Date/Time Sample.pdf — 05/04 2011 03:48 Copyright CANON INC. 2011 All Rights Reserved Internet | Protected Mode: Off

5

Enter the box name in [Box Name]. Up to 32 characters can be entered. ![](images/e91e508257dc2cdf81b86af24675a4d2edc91484c15b7b54edf5d4a04580b0de.jpg)
text_image Remote UI Box: LBP7680C / LBP7680C - Windows Internet Explorer http://192.168.1.225/bpmp.rgi?&CSUT=147648325 File Edit View Favorites Tools Help Favorites Remote UI Box: LBP7680C: LBP7680C I-SENSYS LBP7680C / LBP7680C / Box To Portal Login User: System Manager Log Out Mail to System Manager Box Box Box > Box > Set/Register Boxes SetRegister Boxes The settings will be changed as follows. OK Cancel SetRegister Boxes Box Number 00 Box Name: Set PIN PIN: (Max 7 digits) Confirm: (Max 7 digits) Copyright CANON INC. 2011 All Rights Reserved Done Internet | Protected Mode: Off 100%

6

Specify the password.

When specifying a password for a box

(1) Select the [Set PIN] check box. ![](images/7826480b29fdad17730dc2c2239d8d6227fdc3b9e3119b939236fc13f22cb904.jpg)
text_image Remote UI Box: LBP7680C / LBP7680C - Windows Internet Explorer http://192.168.1.225/lbprsp.cgi?f&CU/T=1476481325 File Edit View Favorites Tools Help Favorites Remote UI Box: LBP7680C: LBP7680C i SENSYS LBP7680C / LBP7680C / Box To Portal Login User: System Manager Log Out Mail to System Manager Box Set/Register Boxes The settings will be changed as follows. OK Cancel Set/Register Boxes Box Number: 00 Box Name: example Set PIN PIN: (Max 7 digits) Confirm: (Max 7 digits) Copyright CANON INC. 2011 All Rights Reserved Internet | Protected Mode: Off 100%
(2) Enter the password that you want to specify in [PIN], and then enter the same number in [Confirm] as the one you entered in [PIN]. ![](images/75067fe66e46f62e5a315a3d21a6d428e74a78b5c24bdc214f1072c0b28a0f50.jpg)
text_image Remote UI Box: LBP7680C / LBP7680C - Windows Internet Explorer http://192.168.1.225/bpmp.cgi&CSUTc1406481325 File Edit View Favorites Tools Help Favorites Remote UI Box: LBP7680C / LBP7680C i-SENSYS LBP7680C / LBP7680C / To Portal Login User: System Manager Log Out Box Mail to System Manager Box Set/Register Boxes The settings will be changed as follows. OK Cancel Set/Register Boxes Box Number: 00 Box Name: example Set PIN PIN (Max 7 digits) Confirm (Max 7 digits) Copyright CANON INC. 2011 All Rights Reserved Internet | Protected Mode: Off

When not specifying a password for a box

Clear the [Set PIN] check box. In [PIN] and [Confirm], you can enter the number of 1 to 7 digits except for "0."

7

Click [OK].

![](images/bf40946986c3a113f8cf85e5ed7526d7a2497c6a42b30353ffece9efdb46f6bd.jpg)
text_image Remote UI Box: LBP7680C / LBP7680C - Windows Internet Explorer http://192.168.1.225/bprep.rgi?6/CSUT=1476481325 File Edit View Favorites Tools Help Favorites Remote UI Box: LBP7680C LBP7680C I-SENSYS LBP7680C / LBP7680C / Box To Portal Login User: System Manager Log Out Mail to System Manager Box Box > Box > Set/Register Boxes Set/Register Boxes The settings will be changed as follows. OK Cancel Set/Register Boxes Box Number: 00 Box Name: example Set PIN PIN: **** (Max 7 digits) Confirm: **** (Max 7 digits) Copyright CANON INC. 2011 All Rights Reserved Internet | Protected Mode: Off 100%
0258-0H3 This mode is used for pausing the job currently being processed and start printing the specified job on ahead. The paused print jobs are saved on the SD card in the printer and printed again after the print job that interrupted is completed. Select [Interrupt Print] from [Output Method] in the printer driver, and then print. ![](images/51ff36d6c120dc8e41a72a955fd27e9ab2e2c4140e12813d95918a3d9b1645bb.jpg)

NOTE

If a print job for interrupt printing has already being processed You cannot give priority anymore to another print job.

> Checking Your Network Environment

Example of a Windows Network Example of a Macintosh Network Example of a UNIX Network Example of a Network Using a Variety of Computers

Network Settings for the Printer (Common to Each Protocol)

Changing the Network Transmission Speed or Transfer Mode Setting the Spooling Function (LBP7680Cx Only) > Specifying the Setting for Startup Waiting Time Restricting the Users Who Can Monitor/Change the Settings Using the SNMP Protocol Setting IEEE802.1X Authentication Network Setting Items > Initializing the Network Settings > Checking the MAC Address

> Network Settings for the Printer (TCP/IP)

Setting the IP Address (IP v. 4) > Configuring the Protocol Settings Setting IP v. 6 > Configuring a Computer that Performs Printing

Network Settings for the Printer (NetWare) (LBP7680Cx Only)

Configuring NetWare Configuring the Protocol Settings

Network Settings for the Printer (SMB) (LBP7680Cx Only)

> Configuring the Protocol Settings > Configuring a Computer that Performs Printing

Network Settings for the Printer (AppleTalk)

Macintosh Network Settings > Configuring the Protocol Settings > Configuring a Computer that Performs Printing 0258-064 Check the network environment to which the printer is connected and perform the requisite tasks referring to the following figures. Example of a Windows Network Example of a Macintosh Network Example of a UNIX Network Example of a Network Using a Variety of Computers 0258-065 When the NetWare Server is on the Network When the NetWare Server is not on the Network

When the NetWare Server is on the Network

In the network environment as shown in the following figure, TCP/IP or NetWare can be used. ![](images/b6f9417d0b2ce9c0e1a9f66af88965b3bcb8267ad3d9b6cf0eec49ee9b5a5cc2.jpg)
flowchart
graph TD
    A["Windows"] --> B["NetWare Server"]
    C["Windows"] --> D["NetWare Server"]
    B --> E["Printer"]
    D --> E
    style A fill:#f9f,stroke:#333
    style C fill:#f9f,stroke:#333
    style B fill:#ccf,stroke:#333
    style D fill:#ccf,stroke:#333
    style E fill:#cff,stroke:#333
See the following and perform the requisite tasks according to the protocol to be used.

Network Settings for the Printer (Common to Each Protocol)

> "Changing the Network Transmission Speed or Transfer Mode" > "Specifying the Setting for Startup Waiting Time"

Network Settings for the Printer (TCP/IP)

> "Setting the IP Address (IP v. 4)" > "Configuring the Protocol Settings" > "Setting IP v. 6" > "Configuring a Computer that Performs Printing"

Network Settings for the Printer (NetWare) (LBP7680Cx Only)

> "Configuring NetWare" "Configuring the Protocol Settings"

Network Settings for the Printer (SMB) (LBP7680Cx Only)

> "Configuring the Protocol Settings"

When the NetWare Server is not on the Network

In the network environment as shown in the following figure, TCP/IP can be used. ![](images/4bb9cb63b025d514aabb16c877bc7efcd34c99b7a040f3cde761ad75474326d1.jpg)
flowchart
graph TD
    A["Windows"] --> B["Printer"]
    C["Windows"] --> B["Printer"]
    style A fill:#f9f,stroke:#333
    style C fill:#f9f,stroke:#333
    style B fill:#ccf,stroke:#333
See the following and perform the requisite tasks according to the protocol to be used.

Network Settings for the Printer (Common to Each Protocol)

> "Changing the Network Transmission Speed or Transfer Mode" > "Specifying the Setting for Startup Waiting Time"

Network Settings for the Printer (TCP/IP)

> "Setting the IP Address (IP v. 4)" > "Configuring the Protocol Settings" "Setting IP v. 6" > "Configuring a Computer that Performs Printing"

Network Settings for the Printer (SMB) (LBP7680Cx Only)

> "Configuring the Protocol Settings" ![](images/8ef469b85681d3228e276301b20eb332e8468c10c6207ac4ab92fe3c1434e413.jpg)

IMPORTANT

About SMB printing

You can use SMB printing only when an SD card is installed. ![](images/fe09f0ebcdbd323c64e67d5a1a212de2097f9f4e89a61da534b3edb8d0a1eb1b.jpg)

NOTE

To manage the printer effectively

By performing the above tasks, computers on a network can be connected to the printer directly. When using a TCP/IP protocol, you can manage the printer effectively by specifying Windows on the network as the print server. For details on the procedure for configuring the print server, see "Printer Driver Installation Guide." For details on the procedure for viewing "Printer Driver Installation Guide", see "Installation."

About NetBEUI

This printer does not support NetBEUI. 0258-066 A Macintosh network can use either of an AppleTalk protocol or TCP/IP protocol. ![](images/c95d6c9c48123180fe9da3e4c16a846ea3d248d200c6c910a868297934991ced.jpg)
flowchart
graph TD
    A["Macintosh"] --> B["Printer"]
    C["Macintosh"] --> D["Printer"]
    B --> E["Protocol: AppleTalk, TCP/IP"]
    D --> E
See the following and perform the requisite tasks according to the protocol to be used.

Network Settings for the Printer (Common to Each Protocol)

> "Changing the Network Transmission Speed or Transfer Mode" > "Specifying the Setting for Startup Waiting Time"

Network Settings for the Printer (AppleTalk)

"Macintosh Network Settings" > "Configuring the Protocol Settings" > "Configuring a Computer that Performs Printing"

Network Settings for the Printer (TCP/IP)

:"Setting the IP Address (IP v. 4)" > "Configuring the Protocol Settings" "Setting IP v. 6" > "Configuring a Computer that Performs Printing" ![](images/51a677590e6e8b714678d657077f2f370e293bb47fff51e910fa16cbde49bbd9.jpg)

IMPORTANT

About a LocalTalk network

This printer does not support a Macintosh LocalTalk network. 0258-067 A UNIX network uses a TCP/IP protocol. ![](images/dfb0e6808184e7ad4b2a48e7c9a9cdec0428d4dd6359117a751b318798cdf1a4.jpg)
flowchart
graph TD
    A["Solaris (SunOS)"] --> B["Printer"]
    C["IBM-AIX"] --> B
    D["HP-UX"] --> B
    E["Linux"] --> B
    B --> F["Protocol: TCP/IP"]
See the following and perform the requisite tasks.

Network Settings for the Printer (Common to Each Protocol)

> "Changing the Network Transmission Speed or Transfer Mode" > "Specifying the Setting for Startup Waiting Time"

Network Settings for the Printer (TCP/IP)

> "Setting the IP Address (IP v. 4)" > "Configuring the Protocol Settings" > "Setting IP v. 6" > "Configuring a Computer that Performs Printing" 0258-068 If there are a variety of computers on a network, specify the settings appropriate to each computer. For example, if you are using Windows and Macintosh on the same network, perform both "Example of a Windows Network" and "Example of a Macintosh Network." ![](images/b2b12d1906198cd47935c53d3cf0bb8c02b00625b27ea8b7f4d1de4eced0962f.jpg)
flowchart
graph TD
    A["Windows"] --> B["NetWare Server"]
    C["Macintosh"] --> D["NetWare Server"]
    E["Printer"] --> F["NetWare Server"]
    B --> G["Protocol: TCP/IP, AppleTalk, NetWare"]
    D --> G
    F --> G
See the following and perform the requisite tasks according to the protocol to be used.

Network Settings for the Printer (Common to Each Protocol)

"Changing the Network Transmission Speed or Transfer Mode" > "Specifying the Setting for Startup Waiting Time"

Network Settings for the Printer (TCP/IP)

> "Setting the IP Address (IP v. 4)" > "Configuring the Protocol Settings" > "Setting IP v. 6" > "Configuring a Computer that Performs Printing"

Network Settings for the Printer (NetWare) (LBP7680Cx Only)

> "Configuring NetWare" "Configuring the Protocol Settings"

Network Settings for the Printer (SMB) (LBP7680Cx Only)

"Configuring the Protocol Settings" > "Configuring a Computer that Performs Printing"

Network Settings for the Printer (AppleTalk)

"Macintosh Network Settings" > "Configuring the Protocol Settings" > "Configuring a Computer that Performs Printing" ![](images/be50d0cfe69d0b16e5a2e5b24e26c0cb5f677b3536ac290468d42f626fd40b5d.jpg)

IMPORTANT

About SMB printing

You can use SMB printing only when an SD card is installed. 0258-069 This section describes the setting items which are common to each protocol to use this printer in a network environment.

Selecting a Communication Method or Ethernet Type

If you want to fix the type of communication method and Ethernet type, set [Auto Detect] on the Ethernet Drive Setting to [Off]. (This printer can detect the communication method and Ethernet type automatically. Normally, you do not need to specify the setting.) > "Changing the Network Transmission Speed or Transfer Mode"

Specifying the Setting for Startup Waiting Time

If the printer cannot be connected to a network, see the following item and specify the setting for the startup waiting time. (Normally, you do not need to change the setting for startup waiting time.) > "Specifying the Setting for Startup Waiting Time"

Setting the Spooling Function (LBP7680Cx Only)

You can speed up the exiting time of the computer to which you send print jobs, see the following item and configure the spooler function. > "Setting the Spooling Function (LBP7680Cx Only)"

Restricting the Users Who Can Monitor and Change the Settings

If you want to restrict the users who can monitor and change the settings, see the following items and configure the SNMP protocol. > "Restricting the Users Who Can Monitor/Change the Settings Using the SNMP Protocol"

Setting IEEE802.1X Authentication

You can specify the settings for using IEEE802.1X authentication with the printer. "Setting IEEE802.1X Authentication "

Network Setting Items

This section describes the setting items which you can change using a Web browser (Remote UI), FTP Client, or NetSpot Device Installer. > "Network Setting Items"

Initializing the Network Settings

You can reset the network settings for the printer to the default values. "Initializing the Network Settings"

Checking the MAC Address

You can check the MAC address by printing Network Status Print. > "Checking the MAC Address" 0258-06A Configure the Ethernet driver for this printer using either of the following methods. > "Performing the Configuration Using the Printer's Control Panel (When You First Set it Up)" Configure the Ethernet driver using the control panel while checking the display on the printer. > "Changing the Settings Using Web Browser (Remote UI)" Change the settings for the Ethernet driver by accessing the printer from a Web browser via the network. ![](images/c5f01af8fbac7de9515060d2b5117f97e9a590ee888e00ad64e8fe93b6839d07.jpg)

IMPORTANT

When configuring the interface first

Use the printer's control panel. After configuring the TCP/IP protocol settings, you can change the settings for the interface using the Web browser (Remote UI). ![](images/9baa34a67d9f85316d699fd869c043b551ed4d2c6aa94b70a37b265b71b7c99f.jpg)

NOTE

Ethernet

Ethernet is a LAN standard, and this printer supports 10Base-T/100Base-TX/1000Base-T connections. When this printer is used on a network, the Ethernet driver controls the communication method and Ethernet type.

Performing the Configuration Using the Printer's Control Panel (When You First Set it Up)

0258-06C When configuring the interface using the printer's control panel, use the following menu hierarchy. ![](images/dabe6a82e2d4272b8827e618154aecaba4b83c40789b80741a8888a407b73f38.jpg)
flowchart
graph TD
    A["Setup"] --> B["Control Menu"]
    B --> C["Network"]
    C --> D["TCP/IP Settings"]
    D --> E["Ethermet Driver"]
    E --> F["Auto Detect"]
    F --> G["On"]
    F --> H["Off"]
    E --> I["Communication Mode"]
    I --> J["Half Duplex"]
    I --> K["Full Duplex"]
    E --> L["Ethermet Type"]
    L --> M["10 Base-T"]
    L --> N["100 Base-TX"]
    L --> O["1000 Base-T"]
    style A fill:#ccc
    style B fill:#ccc
    style C fill:#ccc
    style D fill:#ccc
    style E fill:#ccc
    style F fill:#ccc
    style G fill:#ccc
    style H fill:#ccc
    style I fill:#ccc
    style J fill:#ccc
    style K fill:#ccc
    style L fill:#ccc
    style M fill:#ccc
    style N fill:#ccc
    style O fill:#ccc
\*1 [Communication Mode] and [Ethernet Type] are displayed when [Auto Detect] is set to [Off]. \*2 [Communication Mode] appears only when [Ethernet Type] is set to a setting other than [1000 Base-T]. - Pressing [ ] (Settings) displays the common Setup menu. ![](images/343f95698a4d47bd209b67370ca8cc34edd454cc78a63befa8370fb3d02aa701.jpg) indicates that the procedure is performed by pressing [▲] or [▼] on the control panel. ![](images/4d078a9f81e13ab1a827d39c083793e24892105ddebf8d4895368d7b80edf2e3.jpg) indicates that the procedure is performed by pressing [OK] on the control panel. ![](images/09037d957755e1679f572ab40198bd47c661d5a21b2a8096a9b5cb27cfaf408b.jpg)

IMPORTANT

After performing the configuration

To enable the settings, perform a hard reset or restart the printer. For details on a hard reset, see "Canceling All the Jobs (Hard Reset)."

To go back up the hierarchy

Press [●] ( :Back).

About the control panel

For details on the control panel, see "Control Panel."

1

Press [ ] ( : Settings) select [Network] using [ ] and [ ], and then press [OK].

When the message is displayed, press [OK]. You can specify the settings when the printer is either online (the ← Online indicator is on) or offline (the ← Online indicator is off).

2

Select [Ethernet Driver] using [▲ and [ ], and then press [OK].

3

Configure the Ethernet driver.

This printer can detect the communication method and Ethernet type automatically. Normally, set [Auto Detect] to [On]. If you want to fix the communication method and Ethernet type, set [Auto Detect] to [Off]. If you are using a hub, match the settings for the hub and the printer. For the settings of the hub you are using, consult your network administrator.

(Example)

- Hub settings - Communication mode: Full duplex – Ethernet type: 10 Base-T - Printer settings - [Auto Detect]: [Off] - [Communication Mode]: [Full Duplex] – [Ethernet Type]: [10 Base-T]

When detecting the Ethernet driver automatically (Default)

(1) Select [Auto Detect] using [▲] and [▼], and then press [OK]. (2) Select [On] using [▲] and [▼], and then press [OK].

When detecting the Ethernet driver manually

(1) Select [Auto Detect] using [▲] and [▼], and then press [OK]. (2) Select [Off] using [▲] and [▼], and then press [OK]. (3) Select [Communication Mode] using [▲] and [▼], and then press [OK]. (4) Select an Ethernet communication method appropriate for your network environment using [ ▲ ] and [ ▼], and then press [OK].
[Half Duplex]: Receives and transmits data alternately, not simultaneously.
[Full Duplex]: Receives and transmits data simultaneously.
(5) Select [Ethernet Type] using [▲] and [▼], and then press [OK]. (6) Select an Ethernet type appropriate for your network environment using [ ▲ ] and [ ▼], and then press [OK].

4

Perform a hard reset or restart the printer.

After performing a hard reset or restarting the printer, the settings are effective. ![](images/e59d3e0561ac8b310d389e4dd93a5f8c722971b3330a6e26a22cb96397839c3a.jpg)

NOTE

For details on a hard reset

See "Canceling All the Jobs (Hard Reset)." 0258-06E

1

Start the Remote UI, and then log in as Administrator. > "Starting the Remote UI"

2

Click [Settings/Registration]. ![](images/696792d6e4804e47313b14f8ce7e90eb179a6d29efe59dd4c8a5bdf40d7dedcf.jpg)
text_image Remote UI Portal: LBPXXXX: LBPXXXX - Windows Internet Explorer Favors Suggested Sites Web Slice Gallery Remote UI Portal: LBPXXXX: LBPXXXX Device Name: LBPXXXX Product Name (Serial No.): LBPXXXX Location: Login User: System Manager Log Out Language English Mail to System Manager Last Updated: 29/05 2012 10:03:42 Device Basic Information Device Status The printer is ready Error Information There is no error Consumables Information Paper Information Paper Source Remaining Paper Paper Size Paper Type Multi-Purpose Tray None A4 Free (Mixed Types) Drawer 1 Loaded A4 Free (Mixed Types) Remaining Toner Item Name Remaining Toner Cyan Toner 16-100% Status Monitor/Cancel Settings/Registration Basic Tools Box Direct Print Management Tools Service Management Service

3

Select [Network] from the [Preferences] menu. ![](images/4dd6c1b4e005e5a400183e2eab85b8173f4ecceb1a4c4d5b24dcd2e3e81249b5.jpg)
text_image Remote UI Settings/Registration: LBP7680C: LBP7680C - Windows Internet Explorer File Edit View Favorites Tools Help Favorites Remote UI Settings/Registration: LBP7680C: UBP... Settings/Registration Mail to System Manager Preferences Control Menu Paper Source Menu Network Layout Menu Quality Menu User Maintenance Menu Output/Control Utility Menu Calibration Device Control Management Settings Department ID Management Security License/Other Settings/Registration: Preferences: Network Network Last Updated: 01/04 2011 10:32:30 Network TCP/IP Settings IPv4 Settings IPv6 Settings WINS Configuration ARP/PING Settings FTP Settings LPD Print Settings RAW Print Settings IPP Print Settings WSD Print Settings HTTP Settings SSL Settings Proxy Settings Multicast Discovery Settings SNTP Settings NetWare Settings AppleTalk Settings SNTP Settings Done Internet | Protected Mode: Off

4

Click [Ethernet Driver Settings].

![](images/f6cb621e20be86bde0606da6ef36d1bb829e5ab149eaeff63d1bb989af3ce068.jpg)
text_image Remote UE Settings/Registration LBP7680C: LBP7680C - Windows Internet Explorer http://192.168.1.225/netmenu.org File Edit View Favorites Tools Help Favorites Remote UE Settings/Registration LBP7680C: LBP... Output Control Utility Menu Calibration Device Control Management Settings Department ID Management Security License/Other LPD Print Settings Raw Print Settings IPP Print Settings WSD Print Settings HTTP Settings SSL Settings Proxy Settings Multicast Discovery Settings SNTP Settings NetWare Settings AppleTalk Settings SMB Settings SNMP Settings SNMPv1 Settings SNMPv3 Settings Speaker Status Time Settings Ethernet Driver Settings IEEE 802 TX Settings E-Mail Print Settings Copyright CANON INC. 2011 All Rights Reserved Done Internet | Protected Mode: Off 100%

5

Click [Edit...].

![](images/6ab6017e611d2c72ee5fb160131f434f4e4250122cfe06ad0feaa2eb113db050.jpg)
text_image Remote UE Settings/Registration: LBP7680C: LBP7680C - Windows Internet Explorer http://192.168.1.225-ethernet.cgi File Edit View Favorites Tools Help Favorites Remote UE Settings/Registrations LBP7680C: LBP... I SENSYS LBP7680C / LBP7680C / To Portal Login User: System Manager Log Out Settings/Registration Mail to System Manager Preferences Control Menu Paper Source Menu Network Layout Menu Quality Menu User Maintenance Menu Output/Control Utility Menu Coibration Device Control Management Settings Department ID Management Security License/Other Settings/Registration Preferences Network > Ethernet Driver Settings Ethernet Driver Settings Last Updated 01/04 2011 11:10:42 Edit... Ethernet Driver Settings Auto Detect: On Communication Mode: Half Duplex Ethemat Type: 10 Base-T MAC Address: 8887171ab61 Copyright CANON INC. 2011 All Rights Reserved Done Internet | Protected Mode: Off 100%
(1) Set the Ethernet driver. If you want the communication method and Ethernet type to be set automatically, select the [Auto Detect] check box. If you want to fix the settings for communication method and Ethernet type, clear the [Auto Detect] check, box, and set the following. \- Using [Communication Mode], select the Ethernet communication method that matches the network environment you are using.
[Half Duplex]Sending and receiving are not performed simultaneously. They are performed alternately.
[Full Duplex] Sending and receiving are performed simultaneously.
If you select half duplex when fixing the Ethernet type, sending and receiving are not performed simultaneously. They are performed alternately. If you select full duplex, sending and receiving are performed simultaneously. If you are using a hub, match the settings for the hub and the printer. For the settings of the hub you are using, consult your network administrator. (Example) \- Hub settings \- Communication mode: Full duplex – Ethernet type: 10 Base-T \- Printer settings -[Auto Detect]: [Off] - [Communication Mode]: [Full Duplex] - [Ethernet Type]: [10 Base-T] \- Using [Ethernet Type], Select the Ethernet type that matches the network environment you are using. (2) Click [OK]. ![](images/e789abbfcdbb5b786e21b2b7817943bc94216007d86a660fd1a6e2329a896f8b.jpg)
text_image Remote UI Settings/Registration: LBP7680C: LBP7680C - Windows Internet Explorer File Edit View Favorites Tools Help Favorites Remote UI Settings/Registration: LBP7680C: UBP... I SENSYS LBP7680C / LBP7680C / Settings/Registration To Portal Login User: System Manager Log Out Mail to System Manager Preferences Control Menu Paper Source Menu Network Layout Menu Quality Menu User Maintenance Menu Output/Control Utility Menu Calibration Device Control Management Settings Department ID Management Security License/Other Settings/Registration Preferences Network > Ethernet Driver Settings > Edit Ethernet Driver Settings Edit Ethernet Driver Settings Last Updated 01/04 2011 11 12:12 The settings will be changed as follows. (Changes affective after the main power is turned OFF and ON.) (2) OK Cancel Ethernet Driver Settings Auto Detect Communication Mode: Half Duplex Full Duplex Ethernet Type: 10 Base-T 100 Base-TX 1000 Base-T MAC Address: 8887171ab951 Copyright CANON INC. 2011 All Rights Reserved Done Internet | Protected Mode: Off 100%

6

Perform a hard reset or restart the printer.

→ After performing a hard reset or restarting the printer, the settings are effective. ![](images/c722f3aaa0b62afff3409fa72f67990b5e97388aaf695f7977cd009241af909f.jpg)

NOTE

To perform a hard reset

You can perform a hard reset using the following procedure. 1. Click [Settings/Registration]. 2. Select [Device Control] from the [Output/Control] menu. 3. Select [Hard Reset], then click [Execute]. 0258-0KA Specify the setting for the spooler function using either of the following methods. "Performing the Configuration Using the Printer's Control Panel (the Settings to Be Performed First)" Specify the setting for the spooler function using the control panel while checking the display on the printer. > "Changing the Settings Using Web Browser (Remote UI)" Specify the setting for the spooler function by accessing the printer from a Web browser via the network. ![](images/7ac6544346f1a1a6c42f5eb7a3be18bfd8ec4b0b9eb77ffab83d33bd2317c161.jpg)

IMPORTANT

When specifying the setting for startup waiting time first

Use the printer's control panel. After configuring the TCP/IP protocol settings, you can change the settings using the Web browser (Remote UI) or FTP Client. Because the options which can be specified vary depending on the software, see "Network Setting Items" and use each software appropriate to the environment you are using or options that you want to specify.

The Spooling Function

It can only be used when the SD card is installed. ![](images/296c4c12521b61742f99b047d3dab468e9d379ef0e9038ed98415edf58f213be.jpg)

NOTE

Changing the settings using FTP Client

You can also specify the setting for startup waiting time using FTP Client. > "FTP Client"

Performing the Configuration Using the Printer's Control Panel (the Settings to Be Performed First)

0258-0KC When configuring the spooler function using the printer's control panel, use the following menu hierarchy. ![](images/7a3b071bd71c21c1adacb7a35b34ae9ce5ebef9d21e7e35545585e4444c6c216.jpg)
flowchart
graph TD
    A["Setup"] --> B["Control Menu"]
    B --> C["..."]
    D["Network"] --> E["TCP/IP Settings"]
    E --> F["..."]
    G["Spooler"] --> H["On"]
    G --> I["Off"]
\- Pressing [ ] ( : Settings) displays the common Setup menu. ![](images/1f4e02eb6c3c0379dba34fbc4363cd70762bef19589d3f1a9c4a5c9007577232.jpg) indicates that the procedure is performed by pressing [▲] or [▼] on the control panel. ![](images/428499609c09796f2de68b8a106639ecf34f803aa41f7b001156f54840457419.jpg) indicates that the procedure is performed by pressing [OK] on the control panel. ![](images/3f695571fc67471b3c0a7670b781082ba0d925899d593fe50e15b5d430f4ae5f.jpg)

IMPORTANT

After performing the configuration

To enable the settings, perform a hard reset or restart the printer. For details on a hard reset, see "Canceling All the Jobs (Hard Reset)."

To go back up the hierarchy

Press [●] ( :Back).

About the control panel

For details on the control panel, see "Control Panel."

1

Press [ ] ( : Settings), select [Network] using [ ] and [ ], and then press [OK]. When the message is displayed, press [OK]. † You can specify the settings when the printer is either online (the •• Online indicator is on) or offline (the •• Online indicator is off).

2

Select [Spooler] using [▲ and [ ], and then press [OK].

3

Specify the setting for the spooler function using [ ] and [ ], and then press [OK].

4

After performing a hard reset or restarting the printer, the settings are effective. ![](images/955b6d07a56400bb6ae95c7d1af0990382ce0433d391b936cb760928c1519dce.jpg) NOTE For details on a hard reset See "Canceling All the Jobs (Hard Reset)."

Changing the Settings Using Web Browser (Remote UI)

0258-0KE

1

Start the Remote UI, and then log in as Administrator. > "Starting the Remote UI"

2

Click [Settings/Registration]. ![](images/1b4b57a8da5a5bf5cdb07d7969fa68101e2278da398d9f73002ca03c8bd0b79a.jpg)
text_image Remote UI Portal: LBPXXXX: LBPXXXX - Windows Internet Explorer Favors Suggested Sites Web Slice Gallery Remote UI Portal: LBPXXXX: LBPXXXX Device Name: LBPXXXX Product Name (Serial No.): LBPXXXX Location: Login User: System Manager Log Out Language English Mail to System Manager Last Updated: 29/05 2012 10:03:42 Device Basic Information Device Status The printer is ready Error Information There is no error Consumables Information Paper Information Paper Source Remaining Paper Paper Size Paper Type Multi-Purpose Tray None A4 Free (Mixed Types) Drawer 1 Loaded A4 Free (Mixed Types) Remaining Toner Item Name Remaining Toner Cyan Toner 16-100% Status Monitor/Cancel Settings/Registration Basic Tools Box Direct Print Management Tools Service Management Service

3

Select [Network] from the [Preferences] menu. ![](images/e68ede4875affabacc9a28aaf91e01abe9d61cda25525aef8215aadb32f247e8.jpg)
text_image Remote UI Settings/Registration: LBP7680C / LBP7680C - Windows Internet Explorer File Edit View Favorites Tools Help Favorites Remote UI Settings/Registration: LBP7680C / LBP7680C Settings/Registration To Portal Login User: System Manager Log Out Mail to System Manager Preferences Control Menu Paper Source Menu Network Layout Menu Quality Menu User Maintenance Menu Output/Control Utility Menu Calibration Device Control Management Settings Department ID Management Security License/Other Settings/Registration Preferences Network Network LastUpdated 01/04 2011 10:32:30 Network TCP/IP Settings IPv4 Settings IPv6 Settings WING Configuration ARP/PING Settings FTP Settings LPD Print Settings RAW Print Settings IPP Print Settings WSD Print Settings HTTP Settings SSL Settings Proxy Settings Multicast Discovery Settings SNTP Settings NetWare Settings AppleTalk Settings SNTP Settings Done Internet | Protected Mode: Off 100%

4

Click [Spooler].

![](images/1efd72296e2291bec682e39af071ace01c4b17553dc6394c90de2c219a5dcafc.jpg)
text_image Remote U: Settings/Registration: LBP7680C: LBP7680C - Windows Internet Explorer http://192.168.1.225/netmemu.cgs File Edit View Favorites Tools Help Favorites Remote U: Settings/Registration: LBP7680C: LBP... Output Control Utility Menu Calibration Device Control Management Settings Department ID Management Security License/Other LPD Print Settings Raw Print Settings IPP Print Settings WSD Print Settings HTTP Settings SSL Settings Proxy Settings Multicast Discovery Settings SNTP Settings NetWare Settings AppleTalk Settings SMB Settings SNMP Settings SNMPv1 Settings SNMPv3 Settings Spooler Startup Time Settings Ethernet Driver Settings IEEE802 1X Settings E-Mail Print Settings Copyright CANON INC: 2011 All Rights Reserved Done Internet | Protected Mode: Off 100%

5

Click [Edit...].

![](images/072c4c1e4b2f4817ede59a6db4713e8247f951378236051184c792cb726fbcc9.jpg)
text_image Remote UI Settings/Registration: LBP7680C: LBP7680C - Windows Internet Explorer http://192.168.1.225/spooler.cgi/CSJ/Ts-333454590 File Edit View Favorites Tools Help Favorites Remote UI Settings/Registration: LBP7680C: LBP... SENSYS LBP7680C / LBP7680C / To Portal Login User: System Manager Log Out Settings/Registration Mail to System Manager Preferences Control Menu Paper Source Menu Network Layout Menu Quality Menu User Maintenance Menu Output/Control Utility Menu Calibration Device Control Management Settings Department ID Management Security License/Other Settings/Registration Preferences Network > Spooler Spooler Last Updated 01/04 2011 11 13:54 Edit... Spooler Use Spooler Off Copyright CANON INC. 2011 All Rights Reserved Done Internet | Protected Mode: Off 100%

6

Specify the setting for the spooler function.

(1) When using the spooling function, select the [Use Spooler] check box. (2) Click [OK]. ![](images/977dab8e4f56b96552ceb6e2dfb95bec2af4fb1255191c8d0d347779273985bb.jpg)
text_image Remote UB Settings/Registration: LBP7680C: LBP7680C - Windows Internet Explorer http://192.168.1.225/spooleredit.cgi/CSU/Tz144296664 File Edit View Favorites Tools Help Favorites Remote UB Settings/Registration: LBP7680C: LBP... L.SENSYS LBP7680C / LBP7680C / To Portal Login User: System Manager Log Out Settings/Registration Mail to System Manager Preferences Control Menu Paper Source Menu Network Layout Menu Quality Menu User Maintenance Menu Output/Control Utility Menu Calibration Device Control Management Settings Department ID Management Security License/Other Settings/Registration: Preferences Network > Spooler > Edit Spooler Edit Spooler Last Updated 01/04 2011 11:14:43 The settings will be changed as follows. (Changes effective after the main power is turned OFF and ON.) OK Cancel Spooler Use Spooler Copyright CANON INC. 2011 All Rights Reserved Done Internet | Protected Mode: Off 100%

7

Perform a hard reset or restart the printer.

→ After performing a hard reset or restarting the printer, the settings are effective. ![](images/a66fcee797dfb1bc21c3663c10a23784cee3dfdf528f6f24b24a09f926dd382e.jpg)

NOTE

To perform a hard reset

You can perform a hard reset using the following procedure. 1. Click [Settings/Registration]. 2. Select [Device Control] from the [Output/Control] menu. 3. Select [Hard Reset], then click [Execute]. 0258-06F Specify the setting for startup waiting time using either of the following methods. > "Performing the Configuration Using the Printer's Control Panel" Specify the setting for startup waiting time using the control panel while checking the display on the printer. > "Changing the Settings Using Web Browser (Remote UI)" Specify the setting for startup waiting time by accessing the printer from a Web browser via the network. Normally, you do not need to change the setting for startup waiting time (the time from when you turn the printer ON to when the printer starts communication). Specify the setting for the startup waiting time only when the printer cannot be connected to the network. ![](images/4d770d2ca9ea84b35e6834b6c6f5b407e2ab1163e2cede6f1c4d1dcd772a8deb.jpg)

NOTE

If this printer is connected to a switching hub etc.

The printer may not be able to be connected to the network even when the network settings are correct. This is because the printer and hub cannot communicate each other immediately after this printer is connected to the hub due to a spanning tree process. In this case, it is necessary to set a delay before establishing the network connection with the printer using this setting. For details on the functions of a switching hub, contact the manufacturer of the switching hub.

Changing the settings using FTP Client

You can also specify the setting for startup waiting time using FTP Client. > "FTP Client" 0258-06H When configuring the startup waiting time using the printer's control panel, use the following menu hierarchy. ![](images/8a0820b1245a6b5a82fae8054bcd1ed986a4363c5c6a1534b161070ba9fdb8da.jpg)
flowchart
graph TD
    A["Setup"] --> B["Control Menu"]
    B --> C["..."]
    D["Network"] --> E["TCP/IP Settings"]
    E --> F["..."]
    G["Network Delay Time"] --> H["0 second"]
    I["300 seconds"] --> J["..."]
\- Pressing [ ] ( : Settings) displays the common Setup menu. indicates that the procedure is performed by pressing [▲] or [▼] on the control panel. indicates that the procedure is performed by pressing [OK] on the control panel. ![](images/5deaf556cb9cc5ac48afc59eea6998913df40cb3e6f5f05277c92273f896c236.jpg)

IMPORTANT

After performing the configuration

To enable the settings, perform a hard reset or restart the printer. For details on a hard reset, see "Canceling All the Jobs (Hard Reset)."

To go back up the hierarchy

Press [●] ( :Back).

About the control panel

For details on the control panel, see "Control Panel."

1

Press [ ] ( : Settings) select [Network] using [ ] and [ ], and then press [OK]. When the message is displayed, press [OK]. You can specify the settings when the printer is either online (the ← Online indicator is on) or offline (the ← Online indicator is off).

2

Select [Network Delay Time] using [▲ and [ ], and then press [OK].

3

Specify the setting for startup waiting time using [ ▲ and [ ], ▼nd then press [OK]. Set a delay of between 0 and 300 seconds from the time the printer is turned ON until it begins communicating.

4

Perform a hard reset or restart the printer. After performing a hard reset or restarting the printer, the settings are effective. ![](images/90b08dec38e1376b32bc4b140fb4a48d041488c27243a6f9a0ec00661b1a765e.jpg) NOTE

For details on a hard reset

See "Canceling All the Jobs (Hard Reset)." 0258-06J

1

Start the Remote UI, and then log in as Administrator. > "Starting the Remote UI"

2

Click [Settings/Registration]. ![](images/e3817e12bc8912868c509a506f1b63313971850954779f78d75aa5283c2c0452.jpg)
text_image Remote UI Portal: LBPXXXX: LBPXXXX - Windows Internet Explorer Favors Suggested Sites Web Slice Gallery Remote UI Portal: LBPXXXX: LBPXXXX Device Name: LBPXXXX Product Name (Serial No.): LBPXXXX Location: Login User: System Manager Log Out Language English Mail to System Manager Last Updated: 29/05 2012 10:03:42 Device Basic Information Device Status The printer is ready Error Information There is no error Consumables Information Paper Information Paper Source Remaining Paper Paper Size Paper Type Multi-Purpose Tray None A4 Free (Mixed Types) Drawer 1 Loaded A4 Free (Mixed Types) Remaining Toner Item Name Remaining Toner Cyan Toner 16-100% Status Monitor/Cancel Settings/Registration Basic Tools Box Direct Print Management Tools Service Management Service

3

Select [Network] from the [Preferences] menu. ![](images/5c909611aa317d4cd9ef942316857a5bface42bb2b413c780daf3a8c7228fc19.jpg)
text_image Remote UI Settings/Registration: LBP7680C / LBP7680C - Windows Internet Explorer File Edit View Favorites Tools Help Favorites Remote UI Settings/Registration: LBP7680C / LBP7680C Settings/Registration To Portal Login User: System Manager Log Out Mail to System Manager Preferences Control Menu Paper Source Menu Network Layout Menu Quality Menu User Maintenance Menu Output/Control Utility Menu Calibration Device Control Management Settings Department ID Management Security License/Other Settings/Registration Preferences Network Network LastUpdated 01/04 2011 10:32:30 Network TCP/IP Settings IPv4 Settings IPv6 Settings WING Configuration ARP/PING Settings FTP Settings LPD Print Settings RAW Print Settings IPP Print Settings WSD Print Settings HTTP Settings SSL Settings Proxy Settings Multicast Discovery Settings SNTP Settings NetWare Settings AppleTalk Settings SNTP Settings Done Internet | Protected Mode: Off 100%

4

Click [Startup Time Settings].

![](images/fe2a3aa8126135e86ad05a846c3de310216140db745400f235d5bc11420484df.jpg)
text_image Remote UE Settings/Registration: LBP7680C: LBP7680C - Windows Internet Explorer http://192.168.1.225/memertui.cgs File Edit View Favorites Tools Help Favorites Remote UE Settings/Registration: LBP7680C: LBP... Output Control Utility Menu Calibration Device Control Management Settings Department ID Management Security License/Other LPD Print Settings Raw Print Settings IPP Print Settings WSD Print Settings HTTP Settings SSL Settings Proxy Settings Multicast Discovery Settings SNTP Settings NetWare Settings AppleTalk Settings SMB Settings SNMP Settings SNMPv1 Settings SNMPv3 Settings Spoolar Startup Time Settings Ethernet User Settings IEEE802 1X Settings E-Mail Print Settings Copyright CANON INC: 2011 All Rights Reserved Done Internet | Protected Mode: Off 100%

5

Click [Edit...].

![](images/75e78dae188d9e920ec6b206d689e4270986590776c500421f561bc5c4d05be1.jpg)
text_image Remote UI Settings/Registration: LBP7680C / LBP7690C - Windows Internet Explorer http://192.168.1.225/startuptime.cgi File Edit View Favorites Tools Help Favorites Remote UI Settings/Registration: LBP7680C: LBP... I-SENSYS LBP7680C / LBP7680C / To Portal Login User: System Manager Log Out Settings/Registration Mail to System Manager Preferences Control Menu Paper Source Menu Network Layout Menu Quality Menu User Maintenance Menu Output/Control Utility Menu Calibration Device Control Management Settings Department ID Management Security License/Other Settings/Registration Preferences Network > Startup Time Settings Startup Time Settings Last Updated 01/04 2011 11:15:50 Edit... Startup Time Settings Startup Time 0 seconds Copyright CANON INC. 2011 All Rights Reserved Done Internet | Protected Mode: Off 100%

6

Specify the setting for startup time.

(1) Enter the Startup Time from when you turn the printer ON to when the printer starts communication (0 to 300 seconds). (2) Click [OK]. ![](images/50c717e0a9f2eb72141c4e7d0752767e7403cdd6d6e991a5e1e7f3296e8f37d0.jpg)
text_image Remote UE Settings/Registration: LBP7680C: LBP7680C - Windows Internet Explorer http://192.168.1.225/startupsc.org/Actions:GET_STARTUPTIME&CSUT=13k File Edit View Favorites Tools Help Favorites Remote UE Settings/Registration: LBP7680C: LBP... L.SENSYS LBP7680C / LBP7680C / To Portal Login User: System Manager Log Out Settings/Registration Mail to System Manager Preferences Control Menu Paper Source Menu Network Layout Menu Quality Menu User Maintenance Menu Output/Control Utility Menu Calibration Device Control Management Settings Department ID Management Security License/Other Settings/Registration: Preferences Network > Startup Time Settings > Edit Startup Time Settings Edit Startup Time Settings Last Updated: 91/04 2011 11:16:49 The settings will be changed as follows. (Changes effective after the main power is turned OFF and CN.) OK Cancel Startup Time Settings Startup Time: seconds (0-300) Copyright CANON INC. 2011 All Rights Reserved Done Internet | Protected Mode: Off 100%

7

Perform a hard reset or restart the printer.

→ After performing a hard reset or restarting the printer, the settings are effective. ![](images/5ff31ec7bc3808329ffb5b0396922ad1523cf036294199e5d1de15c748a933ec.jpg) NOTE To perform a hard reset You can perform a hard reset using the following procedure. 1. Click [Settings/Registration]. 2. Select [Device Control] from the [Output/Control] menu. 3. Select [Hard Reset], then click [Execute].

Restricting the Users Who Can Monitor/Change the Settings Using the SNMP Protocol

0258-06K You can restrict the users who can specify and browse the settings using the SNMP protocol using a Web browser (Remote UI).

1

Start the Remote UI, and then log in as Administrator. > "Starting the Remote UI"

2

Click [Settings/Registration]. ![](images/5eb8eda1519bec6d1afe970c4ac6c04eeb0b7bc0f553275b7f6f5b512856b9ed.jpg)
text_image Remote UI Portal: LBPXXXXLBPXXXX - Windows Internet Explorer http:// Bing Favorites Suggested Sites Web Slice Gallery Remote UI Portal: LBPXXXXLBPXXXX Device Name: LBPXXXX Product Name (Serial No.): LBPXXXX Location: Login User: System Manager Log Out Language English Mail to System Manager Last Updated: 29/05 2012 10:03:42 Device Basic Information Device Status The printer is ready Error Information There is no error Consumables Information Paper Information Paper Source Remaining Paper Paper Size Paper Type Multi-Purpose Tray None A4 Free (Mixed Types) Drawer 1 Loaded A4 Free (Mixed Types) Remaining Toner Item Name Remaining Toner Cyan Toner 16-100% Status Monitor/Cancel Settings/Registration Basic Tools Box Direct Print Management Tools Service Management Service

3

Select [Network] from the [Preferences] menu. ![](images/882d4c8b21449729eab08c256d8e07f4548239b0957aa1ab3037c4214ab04ec0.jpg)
text_image Remote UI Settings/Registration: LBP7680C / LBP7680C - Windows Internet Explorer File Edit View Favorites Tools Help Favorites Remote UI Settings/Registration: LBP7680C / LBP7680C Settings/Registration To Portal Login User: System Manager Log Out Mail to System Manager Preferences Control Menu Paper Source Menu Network Layout Menu Quality Menu User Maintenance Menu Output/Control Utility Menu Calibration Device Control Management Settings Department ID Management Security License/Other Settings/Registration Preferences Network Network LastUpdated 01/04 2011 10:32:38 Network TCP/IP Settings IPv4 Settings IPv6 Settings WINS Configuration ARP/PING Settings FTP Settings LPD Print Settings RAW Print Settings IPP Print Settings WSD Print Settings HTTP Settings SSL Settings Proxy Settings Multicast Discovery Settings SNTP Settings NetWare Settings AppleTalk Settings SNTP Settings Done Internet | Protected Mode: Off 100%

4

Click [SNMP Settings].

![](images/096480b68da56595152db05e265387eb814febedba276907009d849bd309d038.jpg)
text_image Remote U8 Settings/Registration: LBP7680C: LBP7680C - Windows Internet Explorer http://192.168.1.225/netmertui.cgs File Edit View Favorites Tools Help Favorites Remote U8 Settings/Registrations: LBP7680C: LBP... Output Control Utility Menu Calibration Device Control Management Settings Department ID Management Security License/Other LPD Print Settings Raw Print Settings IPP Print Settings WSD Print Settings HTTP Settings SSL Settings Proxy Settings Multicast Discovery Settings SNTP Settings NetWare Settings AppleTalk Settings SMB Settings SNMP Settings SNMPv1 Settings SNMPv3 Settings Spooler Startup Time Settings Ethernet Driver Settings IEEE802-1X Settings E-Mail Print Settings Copyright CANON INC. 2011 All Rights Reserved Done Internet | Protected Mode: Off 100%

5

Click [Edit...].

![](images/b2b5c08635cf7611aec3c27cf48d6c9c5084c8a02c686ed3b6f1afcb8ad94714.jpg)
text_image Remote UE Settings/Registration: LBP7680C / LBP7680C - Windows Internet Explorer http://192.168.1.225/snmp.rgi/CSUTs144/927863 File Edit View Favorites Tools Help Favorites Remote UE Settings/Registration: LBP7680C: LBP... I-SENSYS LBP7680C / LBP7680C / Settings/Registration To Portal Login User: System Manager Log Out Mail to System Manager Preferences Control Menu Paper Source Menu Network Layout Menu Quality Menu User Maintenance Menu Output/Control Utility Menu Calibration Device Control Management Settings Department ID Management Security License/Other SNMP Settings Last Updated 2/04 2013 11:17:47 Edit... SNMPv1 Settings Use SNMPv1: On Use Community Name 1: On Community Name 1: public MB Access Permission: Read Only Use Community Name 2: Off Community Name 2: public2 MB Access Permission: Read Only Dedicated Community Settings Dedicated Community 1: Read/Write Dedicated Community 2: Read/Write Done Internet | Protected Mode: Off 100%

6

Specify the settings for SNMP.

Configuring the SNMP Protocol > Specifying User Information to Be Used in the SNMP v. 3 Protocol > Specifying Context Information to Be Used in the SNMP v. 3 Protocol

Configuring the SNMP Protocol

(1) Configure the SNMP v. 1 protocol.

![](images/d767a2005a320227ff8cb957920dafa4d9b660728dba37bf2d52e61186cd7fd9.jpg)
text_image Remote UI Settings/Registration: LBP7680C: LBP7680C - Windows Internet Explorer File Edit View Favorites Tools Help Favorites Remote UI Settings/Registration: LBP7680C: LBP... Settings/Registration To Portal Login User: System Manager Log Out Mail to System Manager Preferences Control Menu Paper Source Menu Network Layout Menu Quality Menu User Maintenance Menu Output/Control Utility Menu Calibration Device Control Management Settings Department ID Management Security License/Other SNMPv1 Settings Use SNMPv1 Use Community Name 1 Community Name 1: public MIB Access Permission: Read Only Use Community Name 2 Community Name 2: public2 MIB Access Permission: Read Only Dedicated Community Settings Done Internet | Protected Mode: Off 100%

When using SNMPv1 protocol

a. Select the [Use SNMPv1] check box. b. When using Community Name 1, select the check box for [Use Community Name 1], and set the following items. - Set the SNMP Community Name in [Community Name 1]. Up to 32 characters can be entered. The default setting is [public]. - Using [MIB Access Permission], select whether to operate the SNMPv1 agent in one of [Read/Write] or [Read Only] modes. c. When using Community Name 2, select the check box for [Use Community Name 2], and set the following items. - Set the SNMP Community Name in Community Name 2. Up to 32 characters can be entered. The default setting is [public2]. - Using [MIB Access Permission], select whether to operate the SNMPv1 agent in one of [Read/Write] or [Read Only] modes.

When you are not using SNMPv1 protocol

Clear the [Use SNMPv1] check box. ![](images/eea92bc142a2e3ebd7ece2333dc226f3f260e929cc942706985db28af3e408cc.jpg)

IMPORTANT

When the [Use SNMPv1] check box is cleared

The following problems may occur. \* You may not be able to use some functions of Canon utility software or to use the software properly due to an error occurring. \* You may not be able to specify or browse each option for this printer from utility software that uses the SNMP v. 1 protocol to obtain information. If you clear the [Use SNMPv1] check box, set it after consulting with the network administrator.

(2) Set a dedicated community.

![](images/f8326d039fa3cf6f7af14c49d3d440e7ca7ce08cf03853f7a48510e394510613.jpg)
text_image Remote UB Settings/Registration: LBP7680C: LBP7680C - Windows Internet Explorer https://192.168.1.225/snmpedit.cgi?Actions:GET_SNMP&CSUT=000003 File Edit View Favorites Tools Help Favorites Remote UB Settings/Registration: LBP7680C: LBP... Dedicated Community Settings Dedicated Community 1: Off Read/Write Read Only Dedicated Community 2: Off Read/Write Read Only SNMPv3 Settings Use SNMPv3 User Settings 1 Enable User User Name initial MB Access Permission: Read/Write Security Settings: Authentication Yes/Encryption Yes Authentication Algorithm: MD5 SHA1 Set/Change Password Authentication Password: (6 to 16 characters) Confirm: (6 to 16 characters) Done Trusted sites | Protected Mode: Off 100%
a. In the [Dedicated Community 1] settings, select from [Off], [Read/Write] or [Read Only]. b. In the [Dedicated Community 2] settings, select from [Off], [Read/Write] or [Read Only].

(3) Configure the SNMP v. 3 protocol.

![](images/1b584ea2a411a29296177f410920a16d6d3531f5237c884cd06038e1a69083f3.jpg)
text_image Remote UB Settings/Registration: LBP7680C: LBP7680C - Windows Internet Explorer https://192.168.1.225/snmpedk.org/Actions:GET_SNMP&CSUT-000003 File Edit View Favorites Tools Help Favorites Remote UB Settings/Registration: LBP7680C: LBP... Dedicated Community Settings Dedicated Community 1: Off Read/Write Read Only Dedicated Community 2: Off Read/Write Read Only SNMPv3 Settings Use SNMPv3 User Settings 1 Enable User User Name initial MIB Access Permission: Read/Write Security Settings Authentication Yes/Encryption Yes Authentication Algorithm: MD5 SHA1 Set/Change Password Authentication Password: (6 to 16 characters) Confirm: (6 to 16 characters) Done Trusted sites | Protected Mode: Off 100%

When using SNMPv3 protocol

a. Select the [Use SNMPv3] check box. b. When setting user information used by SNMPv3 protocol, set user information using [User Settings 1] to [User Settings 5]. See "Specifying User Information to Be Used in the SNMP v. 3 Protocol" for the method for setting user information. c. When setting context information used by SNMPv3 protocol, set context information using [Context Settings]. See "Specifying Context Information to Be Used in the SNMP v. 3 Protocol" for the method for setting context information.

When you are not using SNMPv3 protocol

Clear the [Use SNMPv3] check box.

(4) Specify [Obtain Printer Management Information from Host] as needed.

If the [Obtain Printer Management Information from Host] check box is selected, when the printer driver is installed in Windows Vista/7/Server 2008, port monitoring by SNMP is activated automatically. ![](images/9198338b70749244cf13bb63e4fd5a2bcbe13810f998d4360e32e1f5901083e2.jpg)
text_image Remote UI Edit SHMP Settings: LBP035 - LBP035 - Windows Internet Explorer Favorites Supported Status Win Slice Gallery Remote UI Edit SHMP Settings: LBP035 - LBP035 Authentication Password: (5 to 16 characters) Confirm: (5 to 16 characters) Encryption Algorithm: DES AES Set/Change Password Encryption Password: (5 to 16 characters) Confirm: (5 to 16 characters) Context Settings Context Name 1: Context Name 2: Context Name 3: Context Name 4: Context Name 5: Others Obtain Poster Management Information from Host Reject SHMP Pacrivate While in Sleep Mode Copyright CANON INC. 2013 All Rights Reserved Done Informat | Protected Mode On 100%
![](images/763cec025361d81ce98019c5142a359110cd03b54828e824e455ab967cf93e2e.jpg) NOTE

The port monitoring function by SNMP

The port monitoring function by SNMP is a function of Standard TCP/IP Port, and it periodically obtains printer management information such as information about print applications and ports, using SNMP.

(5) Make a setting for rejecting to receive SNMP packets while in sleep mode, as necessary.

If you select the check box for [Reject SNMP Packets While in Sleep Mode], you may be unable to access the printer from Canon software (iW Series) or applications using the SNMP protocol. ![](images/8dded6939d36fce5b88563d003cccae837bdaee479042554e690b8989ba9b39c.jpg)
text_image Remote UI Edit SNMP Settings: LEP001: LEP002 - Windows Internet Explorer http:// Siny Favorites Supportset Show Web Slice Gallery Remote UI Edit SNMP Settings: LEP003: LEP004 Authentication Password: (6 to 16 characters) Confins: (6 to 16 characters) Encryption Algorithm: DES AES Set/Change Password Encryption Password (5 to 16 characters) Confins: (5 to 16 characters) Context Settings Context Name 1: Context Name 2: Context Name 3: Context Name 4: Context Name 5: Others Obtain Poster Management Information from Host Reject SNMP Packets While in Sleep Mode Copyright CANON INC. 2013 All Rights Reserved Done Internet | Protected Metric On 100%
(6) Proceed to Step 7.

Specifying User Information to Be Used in the SNMP v. 3 Protocol

(1) Specify the user information to be used in the SNMP v. 3 protocol.

> If You Want to Register/Edit User Information > If You Want to Change the Status (Valid/Invalid) of User Information

If You Want to Register/Edit User Information

1. Select the [Enable User] check box under [User Settings 1]. ![](images/1a590d07611a6cc2ee6ef31683ed1da2f30a99e723dcd85149a72a6a9f10b86a.jpg)
text_image Remote UI Edit SNMP Settings: LIF003: LIF003 - Windows Internet Explorer http:// Zing Favorites Supported Show Web Use Safety Remote UI Edit SNMP Settings: LIF003: LIF003 SNMPv3 Settings Use SNMPv3 User Settings 1 Enable User User Name: Initial MB Access Permission: ReadWrite Security Settings: Authentication Yes/Encryption Yes Authentication Algorithm: MD6 SHA1 Set/Change Password Authentication Password: (5 to 16 characters) Confirm: (5 to 16 characters) Encryption Algorithm: DE8 AES Set/Change Password Encryption Password: (5 to 16 characters) Confirm: (5 to 16 characters) User Settings 2 Enable User Dens Internet | Protected Metric On 100%
2. In [User Name], enter the user name to be used in the SNMP v. 3 protocol. Up to 32 alphanumeric characters can be entered. ![](images/923434126a24532fa0be27153166df8da8e6d2e01740668d3196637dd20b85f7.jpg)
text_image Remote US Edit SNMP Settings: LBP0001. LBP0001 - Windows Internet Explorer http:// Suglasses Show Web Watch Gallery Remote US Edit SNMP Settings: LBP0001. LBP0001 SNMPv3 Settings Use SNMPv3 User Settings 1 Enable User User Name: initial MB Access Permission: Read/Write Security Settings: Authentication Yes/Encryption Yes Authentication Algorithm: MD5 SHA1 Set/Change Password Authentication Password: (6 to 16 characters) Confins: (6 to 16 characters) Encryption Algorithm: DES AES Set/Change Password Encryption Password: (6 to 16 characters) Confins: (6 to 16 characters) User Settings 2 Enable User Done Internet | Protected Music On 100%
3. For [MIB Access Permission], select in which mode the SNMP v. 3 agent can operate, [Read/Write] or [Read Only]. ![](images/1c9e5476c0176d2110deb93cdfec7d7636edf45da8b4ca3e853835cd6aee915b.jpg)
text_image Remote UI Edit SNMP Settings: LEP000 - LEP000 - Windows Internet Explorer http:// Sany Favorites Supported Sites Web Site Gallery Remote UI Edit SNMP Settings: LEP000 - LEP000 SNMPv3 Settings Use SNMPv3 User Settings 1 Enable User User Name: initial MB Access Permission ReadWrite Security Settings: Authentication Yes/Encryption Yes Authentication Algorithm: MD5 SHA1 Set/Change Password Authentication Password: (5 to 16 characters) Confirm: (5 to 16 characters) Encryption Algorithm: DES AES Set/Change Password Encryption Password: (5 to 16 characters) Confirm: (5 to 16 characters) User Settings 2 Enable User Done Internet | Protected Music On 9.100%
4. Under [Security Settings], select from [Authentication Yes/Encryption Yes], [Authentication Yes/Encryption No] or [Authentication No/Encryption No] for the security used by SNMPv3. ![](images/5da2f73db9878f41a07758eddc7f9bfbdb8bbeb456a3e422923c342736d099b0.jpg)
text_image Remote UE Grid SNMP Settings: LBP0001: LBP0001 - Windows Internet Explorer http:// Sany Favorites Supported Show Web Site Gallery Remote US Edit SNMP Settings: LBP0001: LBP0001 SNMPv3 Settings Use SNMPv3 User Settings 1 Enable User User Name: initial MB Access Permission: Road/Write Security Settings: Authentication Yes/Encryption Yes Authentication Algorithm: MD8 SHA1 Set/Change Password Authentication Password: (5 to 16 characters) Confirm: (5 to 16 characters) Encryption Algorithm: DES AES Set/Change Password Encryption Password: (5 to 16 characters) Confirm: (5 to 16 characters) User Settings 2 Enable User Done Internet | Protected Music On 100%
5. If [Authentication Yes/Encryption Yes] or [Authentication Yes/Encryption No] is set for [Security Settings], select [MD5] or [SHA1] for [Authentication Algorithm] as the authentication algorithm used by SNMPv3. ![](images/0403f1d65532e586c1f42279150b93d63705f4ab7ca9bd728d21a84dce967310.jpg)
text_image Remote US Edit SNMP Settings: LEP003: LEP003 - Windows Internet Explorer http:// Sany Favorites Supported Since Show Since Gallery Remote US Edit SNMP Settings: LEP003: LEP003 SNMPv3 Settings Use SNMPv3 User Settings 1 Enable User User Name: initial MB Access Permission: ReadWrite Security Settings: Authentication Yes/Encryption Yes Authentication Algorithm: MD5 SHA1 Set/Change Password Authentication Password: (6 to 16 characters) Confirm: (6 to 16 characters) Encryption Algorithm: DES AES Sub/Change Password Encryption Password: (6 to 16 characters) Confirm: (6 to 16 characters) User Settings 2 Enable User Done Internet | Protected Music On 100%
6. When [Authentication Yes/Encryption Yes] is set using [Security Settings], set an authentication password. [Authentication Password]: Enter the password to be used for the authentication function of the authentication algorithm. 6 to 16 alphanumeric characters can be entered. [Confirm]: To confirm the password, enter the entered [Authentication Password] again. ![](images/8c39ad98134d4fb20872a615c3b61ae87db682b3eb7568907da94254160fcd82.jpg)
text_image Remote UI Edit SNMP Settings: LEP001: LEP001 - Windows Internet Options http:// Siny Favorites Supported Site Web Site Gallery Remote UI Edit SNMP Settings: LEP001: LEP001 SNMPx3 Settings Use SNMPx3 User Settings 1 Enable User User Name: initial MB Access Permission: ReadWrite Security Settings: Authentication Yes/Encryption Yes Authentication Algorithm: MD5 SHA1 Set/Change Password Authentication Password: (E to 16 characters) Confirm: (E to 16 characters) Encryption Algorithm: DES AES Set/Change Password Encryption Password: (E to 16 characters) Confirm: (E to 16 characters) User Settings 2 Enable User Done Internet | Protected Media On 100%
If the SSL encrypted communication function is not used, this item cannot be set by the Remote UI. Either enable the SSL encrypted communication function, or set from the control panel using the following procedure. a. Press [OK] (Setup) and select [Network] → [SNMP v. 3 Settings], and set [SNMP v. 3] to [On]. b. Set each password using [Auth. Password] from [User Settings 1] to [User Settings 5]. For details on the SSL encrypted communication function, see "Setting Keys and Certificates." 7. If [Security Settings] are set to [Authentication Yes/Encryption Yes], set an encrypted password. Set [Encryption Algorithm] to [DES] or [AES]. [Encryption Password]: Enter the password to be used for the encryption function of the encryption algorithm. 6 to 16 alphanumeric characters can be entered. [Confirm]: To confirm the password, enter the entered [Encryption Password] again. ![](images/dccdba244ddefb8afd4e375bfbb7609369097884c7868ac58c9c7b9dea023a12.jpg)
text_image Remote UI Edit SNMP Settings: LIP903: LIP903 - Windows Internet Explorer http://www.wimtp.cn/ Favorites Supportless Show Hide Slice Gallery Remote UI Edit SNMP Settings: LIP903: LIP903 SNMPv3 Settings Use SNMPv3 User Settings 1 Enable User User Name: initial MB Access Permission ReadWrite Security Settings: Authentication You/Encryption You Authentication Algorithm MDI SHA1 Set/Change Password Authentication Password: **** (6 to 16 characters) Confirm: **** (6 to 16 characters) Encryption Algorithm DES AES Set/Change Password Encryption Password (6 to 16 characters) Confirm: (6 to 16 characters) User Settings 2 Enable User Done Internet | Protected Mode On 100%
If the SSL encrypted communication function is not used, this item cannot be set by the Remote UI. Either enable the SSL encrypted communication function, or set from the control panel using the following procedure. a. Press [ ] (Setup) and select [Network] → [SNMP v. 3 Settings], and set ![](images/970b9998051be0a64eda174dcdcd76b89779664ae5fc3b87f2b1477ebfea8d49.jpg) [SNMP v. 3] to [On]. b. Set each password using [Auth. Password] from [User Settings 1] to [User Settings 5]. For details on the SSL encrypted communication function, see "Setting Keys and Certificates." 8. Set [User Settings 2] to [User Settings 5] using the same procedure as needed.

If You Want to Change the Status (Valid/Invalid) of User Information

To enable registered user information, select the [Enable User] check box at the top of the targeted user information. To disable registered user information, clear the [Enable User] check box at the top of the targeted user information. ![](images/b78067f3146bbaeae29ce1b1da962c80e51d5a0747f236e1bda9c3c8b38dbd9a.jpg)
text_image SNMPv3 Settings User SNMPv3 User Settings 1 Enable User User Name: Initial MB Access Permission: ReadWhite Security Settings: Authentication Yes/Encryption Yes Authentication Algorithm: MS8 SHA1 Set/Change Password Authentication Password: (5 to 16 characters) Confirm: (5 to 16 characters) Encryption Algorithm: DES AES Set/Change Password Encryption Password: (5 to 16 characters) Confirm: (5 to 16 characters) User Settings 2 Enable User Done Internet | Protected Mode On 40%

(2) Proceed to Step 7.

Specifying Context Information to Be Used in the SNMP v. 3 Protocol

(1) Specify the context information to be used in the SNMP v. 3 protocol.

> If You Want to Register Context Information If You Want to Erase Context Information

If You Want to Register Context Information

(1) Enter the context names used by the SNMPv3 protocol in [Context Name 1] to [Context Name 5] under [Context Settings]. Up to 32 characters can be entered. ![](images/e1195f4edd2f5c310e63d2e8a393980fd86e5f96cd9494d7bf036c180ae96527.jpg)
text_image Remote UI Edit SNMP Settings LEPDDI: LEPDDI - Windows Internet Explorer http:// Sag Favorites Supportset Shock White Slice Gallery Remote UI Edit SNMP Settings LEPDDI: LEPDDI Authentication Password: (5 to 16 characters) Confirm: (5 to 16 characters) Encryption Algorithm: DES AES Set/Change Password Encryption Password (5 to 16 characters) Confirm: (5 to 16 characters) Context Settings Context Name 1 Context Name 2 Context Name 3 Context Name 4 Context Name 5 Others Obtain Poster Management Information from Host Reject SNMP Packets While in Sleep Mode Copyright CANON INC. 2013 All Rights Reserved Date Internet | Protected Music On 100%

If You Want to Erase Context Information

(1) Delete the context names that are entered in [Context Name 1] to [Context Name 5] under [Context Settings] that you want to delete. ![](images/2f72d8b7cf779cae43e96ff4de2464bfe5529feb45ce501810a7d79b03dbe3bc.jpg)
text_image Remote US Exit SNMP Settings: LEPID3: LEPID3 - Windows Internet Explorer http:// Favorites Supported Site Web Site Gallery Remote US Exit SNMP Settings: LEPID3: LEPID3 Authentication Password: (5 to 16 characters) Confirm: (5 to 16 characters) Encryption Algorithm: OES AES Set/Change Password Encryption Password: (5 to 16 characters) Confirm: (5 to 16 characters) Context Settings Context Name 1 example Context Name 2 Context Name 3 Context Name 4 Context Name 5 Others Obtain Poster Management Information from Host Reject SNMP Packets While in Sleep Mode Copyright CANON INC. 2013 All Rights Reserved Done Internet | Protected Mode On 80%
(2) Proceed to Step 7. 7 Click [OK]. ![](images/9258965d1269f860008ce7fa6b0acda31393440ca8e40f1ac84269cf391aa21d.jpg)
text_image Remote UI Settings/Registration: LBP7680C: LBP7680C - Windows Internet Explorer http://192.168.1.225/snmpedit.org/actions:GET_SNMP&CSU>T=405201463 File Edit View Favorites Tools Help Favorites Remote UI Settings/Registration: LBP7680C: UBP... I-SENSYS LBP7680C / LBP7680C / To Portal Login User: System Manager Log Out Settings/Registration Mail to System Manager Preferences Control Menu Paper Source Menu Network Layout Menu Quality Menu User Maintenance Menu Output/Control Utility Menu Calibration Device Control Management Settings Department ID Management Security License/Other Settings/Registration: Preferences Network > SNMP Settings > Edit SNMP Settings Edit SNMP Settings LastUpdated 01/04 2011 11 14:30 The settings will be changed as follows. (Changes effective after the main power is turned OFF and ON.) OK Cancel SNMPv1 Settings Use SNMPv1 Use Community Name 1 Community Name 1: public MB Access Permission: Read Only Use Community Name 2 Community Name 2: public2 MB Access Permission: Read Only Dedicated Community Settings Done Internet | Protected Mode: Off 100%

8

Perform a hard reset or restart the printer.

→ After performing a hard reset or restarting the printer, the settings are effective. ![](images/9afd8d66ea7a8c065c50a49e94df7b246f1c15e3623c61714c615f5bd8b78a00.jpg)

NOTE

To perform a hard reset

You can perform a hard reset using the following procedure. 1. Click [Settings/Registration]. 2. Select [Device Control] from the [Output/Control] menu. 3. Select [Hard Reset], then click [Execute]. 0258-0L6 Specify the settings for using IEEE802.1X authentication with the printer. See the following sections according to the protocol to be used for authentication. "Setting TLS Authentication Information" > "Setting TTLS/PEAP Authentication Information" ![](images/59be9f7d1f91db53607a741b4f0fccc454fa31bf1de43d05b61cc85f7c70d6da.jpg)

IMPORTANT

Conditions for Using IEEE802.1X Authentication

In order to use IEEE802.1X authentication, an authentication server (RADIUS server) is required. ![](images/cdf2703c084cd5d3854b3f7a77fee54f8c2f681c8727210b3d2980686fd2c164.jpg)

NOTE

IEEE802.1X Authentication Protocol

- The printer supports TLS, TTLS and PEAP IEEE802.1X authentication. TLS performs mutual authentication using the certificate sent from the authentication server and the certificate set in the printer. TTLS and PEAP perform mutual authentication using the certificate sent from the authentication server and the user name and password set in the printer. Note the following when simultaneously specifying multiple options from TLS, TTLS, and PEAP: - To select TLS: TTLS or PEAP cannot be specified. - To select TTLS: TLS cannot be specified. PEAP can be specified. - To select PEAP: TLS cannot be specified. TTLS can be specified. The network authentication method to use is determined by the configuration of the authentication server in use. Choose the method based on the configuration of the authentication server.

IEEE802.1X Authentication Settings

\- We recommend that network settings be performed by the network administrator. 0258-0L7 Set authentication information for using TLS with the IEEE802.1X authentication method. TLS performs mutual authentication using the authentication server's certificate and the printer's certificate. ![](images/4d6a54b003e1f95c109b90ef40163bc5f959a7b7fcc2abefd8f980e6362e7a6a.jpg)

IMPORTANT

In order to set up TLS authentication

You need to register a key and certificate or a CA certificate used for authentication to the printer in advance. > "Setting Keys and Certificates" > "Setting CA Certificates"

1

Start the Remote UI, and then log in as Administrator. > "Starting the Remote UI"

2

Click [Settings/Registration]. ![](images/e6ab4c1de8cbbf236e1f26fd1532da500afc2b6482ba7cb6f9ae22f5028362c1.jpg)
text_image Remote UI Portal: LBP/XXII: LBP/XXII - Windows Internet Explorer http:// Favontes Suggested Sites Web Slice Gallery Remote UI Portal: LBP/XXII: LBP/XXII Device Name: LBP/XXII Product Name (Serial No.): LBP/XXII Location: Login User: System Manager Log Out Language English Mail to System Manager Last Updated: 29/05 2012 10 03:42 Device Basic Information Device Status The printer is ready. Error Information There is no error Consumables Information Paper Information Paper Source Remaining Paper Paper Size Paper Type Multi-Purpose Tray None A4 Free (Mixed Types) Drawer 1 Loaded A4 Free (Mixed Types) Remaining Toner Item Name Remaining Toner Cyan Toner 16-100% Status Monitor/Cancel Settings/Registration Basic Tools Box Direct Print Management Tools Service Management Service

3

Select [Network] from the [Preferences] menu. ![](images/13110cfff01e5b7bac35aa74f2187af66ec0f05d826c7c8d23154ef27157b5bb.jpg)
text_image Remote UI Settings/Registration: LBP7680C / LBP7680C - Windows Internet Explorer File Edit View Favorites Tools Help Favorites Remote UI Settings/Registration: LBP7680C / LBP7680C Settings/Registration To Portal Login User: System Manager Log Out Mail to System Manager Preferences Control Menu Paper Source Menu Network Layout Menu Quality Menu User Maintenance Menu Output/Control Utility Menu Calibration Device Control Management Settings Department ID Management Security License/Other Settings/Registration Preferences Network Network LastUpdated 01/04 2011 10:32:30 Network TCP/IP Settings IPv4 Settings IPv6 Settings WING Configuration ARP/PING Settings FTP Settings LPD Print Settings RAW Print Settings IPP Print Settings WSD Print Settings HTTP Settings SSL Settings Proxy Settings Multicast Discovery Settings SNTP Settings NetWare Settings AppleTalk Settings SNTP Settings Done Internet | Protected Mode: Off 100%

4

Click [IEEE802.1X Settings].

![](images/6a0ce6f6a80fb18bbeff6d8aa2289f1cf67cb2ffe6473478569ff3e1315bddb9.jpg)
text_image Remote UI Settings/Registration: LBP7680C: LBP7680C - Windows Internet Explorer http://192.168.1.225/netnetenu.cgs File Edit View Favorites Tools Help Favorites Remote UI Settings/Registration: LBP7680C: LBP... Output Control Utility Menu Calibration Device Control Management Settings Department ID Management Security License/Other LPD Print Settings RAW Print Settings IPP Print Settings WSD Print Settings HTTP Settings SSL Settings Proxy Settings Multicast Discovery Settings SNTP Settings NetWare Settings AppleTalk Settings SMB Settings SNMP Settings SNMPv1 Settings SNMPv3 Settings Spooler Startup Time Settings Ethernet Driver Settings IEEE802.1X Settings E-Mail Print Settings Copyright CANON INC: 2011 All Rights Reserved Done Internet | Protected Mode: Off 100%

5

Click [Edit...].

![](images/8e21bdd7351042ef83cc808568fee1fbd73af523cfe3ec0741473f6ce2c1d576.jpg)
text_image Remote UI Settings/Registration: LBP7680C / LBP7680C - Windows Internet Explorer File Edit View Favorites Tools Help Favorites Remote UI Settings/Registration: LBP7680C: LBP... SENSYS LBP7680C / LBP7680C / To Portal Login User: System Manager Log Out Settings/Registration Mail to System Manager Preferences Control Menu Paper Source Menu Network Layout Menu Quality Menu User Maintenance Menu Output/Control Utility Menu Calibration Device Control Management Settings Department ID Management Security License/Other Settings/Registration Preferences Network > IEEE802 1X Settings IEEE802.1X Settings Last Updated 01/04 2011 11:24:00 Edit... IEEE802.1X Settings Use IEEE802 1X Off Login Name: Use TLS: Off Use TLS: Off TTLs (Internal Protocol) to use: MSCHAPv2 Use PEAP: Off Use Login Name as User Name: On Copyright CANON INC. 2011 All Rights Reserved Done Internet | Protected Mode: Off 100%

6

Enter the login name.

Up to 24 alphanumeric characters can be entered. ![](images/d04998be133d1bb4055e34a3d232bd6e4ddd9aef597f15c22fb74d18e1aeeb4a.jpg)
text_image Remote UI Settings/Registration: LBP7680C / LBP7680C - Windows Internet Explorer http://192.168.1.225:/www402 sediment.cgi File Edit View Favorites Tools Help Favorites Remote UI Settings/Registration: LBP7680C / LBP... SENSYS LBP7680C / LBP7680C / To Portal Login User: System Manager Log Out Settings/Registration Mail to System Manager Preferences Control Menu Paper Source Menu Network Layout Menu Quality Menu User Maintenance Menu Output/Control Utility Menu Calibration Device Control Management Settings Department ID Management Security License/Other Settings/Registration Preferences Network > IEEE802 1X Settings > Edit IEEE802 1X Settings Edit IEEE802.1X Settings Last Updated: 01/04 2011 11:25:04 The settings will be changed as follows. (Changes effective after the main power is turned OFF and ON.) OK Cancel IEEE802.1X Settings Use IEEE802.1X Login Name: Use TLS Name of Key to Use: Not set Key and Certificate ... Use TTLS TTLS (Internal Protocol) to use: MSCHAPv2 PAP Use PEAP Use Login Name as User Name Done Internet | Protected Mode: Off 100%

7

Select the [Use TLS] check box. ![](images/466c0cfcf981936320e7c486fff82f602682e047559e0a68477715e7b4962063.jpg)
text_image Remote UI Settings/Registration: LBP7680C: LBP7680C - Windows Internet Explorer http://192.168.1.225/news02.credit.cgi File Edit View Favorites Tools Help Favorites Remote UI Settings/Registration: LBP7680C: LBP... SENSYS LBP7680C / LBP7680C / Settings/Registration To Portal Login User: System Manager Log Out Mail to System Manager Preferences Control Menu Paper Source Menu Network Layout Menu Quality Menu User Maintenance Menu Output/Control Utility Menu Calibration Device Control Management Settings Department ID Management Security License/Other Settings/Registration: Preferences Network > IEEE802 1X Settings > Edit IEEE802 1X Settings Edit IEEE802.1X Settings LastUpdated: D1UG4 2011 11:25:04 The settings will be changed as follows. (Changes effective after the main power is turned OFF and ON.) OK Cancel IEEE802.1X Settings Use IEEE802.1X Login Name example Use TLS Name of Key to Use: Not set Key and Certificate... Use TTLS TTLS (Internal Protocol) to use: MSCHAPv2 PAP Use PEAP Use Login Name as User Name Done Internet | Protected Mode: Off 100%

8

Click [Key and Certificate...].

![](images/d68e4ef8915da2597e1d3f6d9fbe6fd78dc174b7d9e23958d9ff5f35c5d282c5.jpg)
text_image Remote UE Settings/Registration: LBP7680C: LBP7680C - Windows Internet Explorer http://192.168.1.225/eee802.credit.cgi File Edit View Favorites Tools Help Favorites Remote UE Settings/Registration: LBP7680C: LBP... I.SENSYS LBP7680C / LBP7680C / Settings/Registration To Portal Login User: System Manager Log Out Mail to System Manager Preferences Control Menu Paper Source Menu Network Layout Menu Quality Menu User Maintenance Menu Output/Control Utility Menu Calibration Device Control Management Settings Department ID Management Security License/Other Settings/Registration Preferences Network > IEEE802 1X Settings > Edit IEEE802 1X Settings Edit IEEE802.1X Settings Last Updated: 01/04 2011 11:25:04 The settings will be changed as follows. (Changes effective after the main power is turned OFF and ON.) OK Cancel IEEE802.1X Settings Use IEEE802 1X Login Name example Use TLS Name of Key to Use: Not as Key and Certificate... Use TTLS TTLS (Internal Protocol) to use: MSCHAPv2 PAP Use PEAP Use Login Name or User Name Done Internet | Protected Mode: Off 100%

9

Select the key to use, and then click [Default Key Settings]. ![](images/dbf1b59b8c06be005a472cebb90d138927d6b63f06e70ed3eab10bca72731d81.jpg)
text_image Remote UI Settings/Registration: LBP7680C: LBP7680C - Windows Internet Explorer http://192.168.1.225\www802credit.cgi File Edit View Favorites Tools Help Favorites Remote UI Settings/Registration: LBP7680C: LBP... I SENSYS LBP7680C / LBP7680C / To Portal Login User: System Manager Log Out Settings/Registration Mail to System Manager Preferences Control Menu Paper Source Menu Network Layout Menu Quality Menu User Maintenance Menu Output/Control Utility Menu Calibration Device Control Management Settings Department ID Management Security License/Other Settings/Registration: Preferences: Network > IEEE802 1X Settings > Edit IEEE802 1X Settings > Key and Certificate Settings Key and Certificate Settings Last Updated: 01/04 2011 11:29:34 Default Key Settings Registered Key and Certificate Select Key Name Key Usage Certificate Example [SSL] Copyright CANON INC. 2011 All Rights Reserved Done Internet | Protected Mode: Off 100%

10

Select the [Use IEEE802.1X] check box. ![](images/d8f64964fcbdcd25ba9865e892baff59bd1cf64cdfc3e096870629d992f8b265.jpg)
text_image Remote UE Settings/Registration: LBP7680C: LBP7680C - Windows Internet Explorer http://192.168.1.225/eine802.credit.cgi File Edit View Favorites Tools Help Favorites Remote UE Settings/Registration: LBP7680C: LBP... I-SENSYS LBP7680C / LBP7680C / Settings/Registration To Portal Login User: System Manager Log Out Mail to System Manager Preferences Control Menu Paper Source Menu Network Layout Menu Quality Menu User Maintenance Menu Output/Control Utility Menu Calibration Device Control Management Settings Department ID Management Security License/Other Settings/Registration: Preferences: Network > IEEE802 1X Settings > Edit IEEE802 1X Settings Edit IEEE802.1X Settings Last Updated: 01/04 2011.11.25.34 The settings will be changed as follows. (Changes effective after the main power is turned OFF and ON.) OK Cancel IEEE802.1X Settings Use IEEE802.1X Login Name example Use TLS Name of Key to Use: Not set Key and Certificate... Use TLS TTLs (Internal Protocol) to use: MSCHAPv2 PAP Use PEAP Use Login Name or User Name Done Internet | Protected Mode: Off 100%
![](images/e4a98b9409a6eec623b9e0b44912b85f7fbf2411f97fd066d5cdcecc383a67a1.jpg)

If a Message Appears

A message will be displayed if there is anything wrong with the settings. See Steps 6 to 9, and check the settings.

11

Click [OK]. ![](images/6fae2eb577546db769d39793b6d4e6bb0a4d27d1737a49e6012a70584d320df2.jpg)
text_image Remote UE Settings/Registration: LBP7680C: LBP7695C - Windows Internet Explorer http://192.168.1.225/week02/credit.cgi File Edit View Favorites Tools Help Favorites Remote UE Settings/Registration: LBP7680C: LBP... I-SENSYS LBP7680C / LBP7680C / Settings/Registration To Portal Login User: System Manager Log Out Mail to System Manager Preferences Control Menu Paper Source Menu Network Layout Menu Quality Menu User Maintenance Menu Output/Control Utility Menu Calibration Device Control Management Settings Department ID Management Security License/Other Settings/Registration: Preferences: Network > IEEE802 1X Settings > Edit IEEE802 1X Settings Edit IEEE802.1X Settings LastUpdated 01/04 2011 11:29:53 The settings will be changed as follows. (Changes effective after the main power is turned OFF and ON ) OK Cancel IEEE802.1X Settings Use IEEE802.1X Login Name example Use TLS Name of Key to Use: Not set Key and Certificate... Use TTLS TTLS (Internal Protocol) to use: MSCHAPv2 PAP Use PEAP Use Login Name or User Name Done Internet | Protected Mode: Off 100%

12

Perform a hard reset or restart the printer.

Perform a hard reset or restart the printer. → After performing a hard reset or restarting the printer, the settings are effective. ![](images/a5f62cf7ee5614a7a843947c24d1976ed0411476b75f4b93c058902846889daa.jpg)

NOTE

To perform a hard reset

You can perform a hard reset using the following procedure. 1. Click [Settings/Registration]. 2. Select [Device Control] from the [Output/Control] menu. 3. Select [Hard Reset], then click [Execute]. 0258-0L8 Set authentication information for using TTLS or PEAP with IEEE802.1X authentication. TTLS and PEAP perform mutual authentication using the authentication server's certificate and the user name and password set in the printer. ![](images/80f69a4bf7b4e15098c4b3bbbf11991c6f1d2d7343016102a0816f4970d8613f.jpg)

IMPORTANT

In order to set a user name and password

You need to set up the SSL encryption communication function in advance. Setting the SSL Encryption Communication Function

1

Start the Remote UI, and then log in as Administrator. Starting the Remote UI

2

Click [Settings/Registration]. ![](images/63b8073667d3e8734ea9a4b93eb954a28511846d1ddbd93363588a21b89a9302.jpg)
text_image Remote UI Portal: LBPXXXXL: LBPXXXX - Windows Internet Explorer Http:// Bing Favorites Suggested Sites Web Slice Gallery Remote UI Portal: LBPXXXXL: LBPXXXXL Device Name: LBPXXXXL Product Name (Serial No.): LBPXXXXL Location: Login User: System Manager Log Out Language English Mail to System Manager Last Updated: 29/05 2012 10 03:42 Device Basic Information Device Status The printer is ready. Error Information There is no error Consumables Information Paper Information Paper Source Remaining Paper Paper Size Paper Type Multi-Purpose Tray None A4 Free (Mixed Types) Drawer 1 Loaded A4 Free (Mixed Types) Remaining Toner Item Name Remaining Toner Cyan Toner 16-100% Status Monitor/Cancel Settings/Registration Basic Tools Box Direct Print Management Tools Service Management Service

3

Select [Network] from the [Preferences] menu. ![](images/7d934cdce4ce20d52d58067da1559d2baf373a02fa27a9df163925879f676116.jpg)
text_image Remote UI Settings/Registration: LBP7680C / LBP7680C - Windows Internet Explorer File Edit View Favorites Tools Help Favorites Remote UI Settings/Registration: LBP7680C / LBP7680C Settings/Registration To Portal Login User: System Manager Log Out Mail to System Manager Preferences Control Menu Paper Source Menu Network Layout Menu Quality Menu User Maintenance Menu Output/Control Utility Menu Calibration Device Control Management Settings Department ID Management Security License/Other Settings/Registration Preferences Network Network LastUpdated 01/04 2011 10:32:30 Network TCP/IP Settings IPv4 Settings IPv6 Settings WING Configuration ARP/PING Settings FTP Settings LPD Print Settings RAW Print Settings IPP Print Settings WSD Print Settings HTTP Settings SSL Settings Proxy Settings Multicast Discovery Settings SNTP Settings NetWare Settings AppleTalk Settings SNTP Settings Done Internet | Protected Mode: Off 100%

4

Click [IEEE802.1X Settings].

![](images/26f485eac19e8bb68c7fcf23a1612de7ee439802952cae62bd8e3bf36e353512.jpg)
text_image Remote UI Settings/Registration: LBP7680C: LBP7680C - Windows Internet Explorer http://192.168.1.225/netnetenu.cgs File Edit View Favorites Tools Help Favorites Remote UI Settings/Registration: LBP7680C: LBP... Output Control Utility Menu Calibration Device Control Management Settings Department ID Management Security License/Other LPD Print Settings RAW Print Settings IPP Print Settings WSD Print Settings HTTP Settings SSL Settings Proxy Settings Multicast Discovery Settings SNTP Settings NetWare Settings AppleTalk Settings SMB Settings SNMP Settings SNMPv1 Settings SNMPv3 Settings Spooler Startup Time Settings Ethernet Driver Settings IEEE802.1X Settings E-Mail Print Settings Copyright CANON INC: 2011 All Rights Reserved Done Internet | Protected Mode: Off 100%

5

Click [Edit...].

![](images/a75047dcf2f24d1acb85f5dd3377e89f9ee33f18795c23bae1d06aa4b78fe958.jpg)
text_image Remote UI Settings/Registration: LBP7680C / LBP7680C - Windows Internet Explorer http://192.168.1.225/eew802.x.cgi File Edit View Favorites Tools Help Favorites Remote UI Settings/Registration: LBP7680C: LBP... I-SENSYS LBP7680C / LBP7680C / To Portal Login User: System Manager Log Out Settings/Registration Mail to System Manager Preferences Control Menu Paper Source Menu Network Layout Menu Quality Menu User Maintenance Menu Output/Control Utility Menu Calibration Device Control Management Settings Department ID Management Security License/Other Settings/Registration: Preferences: Network > IEEE802 1X Settings IEEE802.1X Settings Last Updated 01/04 2011 11:24:00 Edit... IEEE802.1X Settings Use IEEE802 1X Off Login Name: Use TLS: Off Use TLS: Off TTLs (Internal Protocol) to use: MSCHAPv2 Use PEAP: Off Use Login Name as User Name: On Copyright CANON INC. 2011 All Rights Reserved Done Internet | Protected Mode: Off 100%

6

Enter the login name.

Up to 24 alphanumeric characters can be entered. ![](images/0cc6c9637e1da32bbe82584ab42b478564857351255b6b4c24ed0f6c660c7a47.jpg)
text_image Remote UE Settings/Registration: LBP7680C: LBP7680C - Windows Internet Explorer http://192.168.1.225\week02\svdit.cgi File Edit View Favorites Tools Help Favorites Remote UE Settings/Registrations LBP7680C: LBP... I SENSYS LBP7680C / LBP7680C / Settings/Registration To Portal Login User: System Manager Log Out Mail to System Manager Preferences Control Menu Paper Source Menu Network Layout Menu Quality Menu User Maintenance Menu Output/Control Utility Menu Calibration Device Control Management Settings Department ID Management Security License/Other Settings/Registration: Preferences: Network > IEEE802 1X Settings > Edit IEEE802 1X Settings Edit IEEE802.1X Settings Last Updated 01/04 2011 11:25:04 The settings will be changed as follows. (Changes effective after the main power is turned OFF and ON.) OK Cancel IEEE802.1X Settings Use IEEE802.1X Login Name Use TLS Name of Key to Use: Not set Key and Certificate ... Use TLS TTLs (Internal Protocol) to use: MSCHAPv2 PAP Use PEAP Use Login Name or User Name Done Internet | Protected Mode: Off 100%

7

Select the [Use TTLS] or [Use PEAP] check box. ![](images/a331ae5ae8f2a6a18c660a6ba9cd80badd5a1319bcfc69a86254519248fd53f8.jpg)
text_image Remote UB Settings/Registration: LBP7680C: LBP7680C - Windows Internet Explorer File Edit View Favorites Tools Help Favorites Remote UB Settings/Registration: LBP7680C: LBP... SENSYS LBP7680C / LBP7680C / Settings/Registration To Portal Login User: System Manager Log Out Mail to System Manager Preferences Control Menu Paper Source Menu Network Layout Menu Quality Menu User Maintenance Menu Output/Control Utility Menu Calibration Device Control Management Settings Department ID Management Security License/Other Settings/Registration Preferences Networks > IEEE802 1X Settings > Edit IEEE802 1X Settings Edit IEEE802.1X Settings Last Updated 01/04 2011 11:29:53 The settings will be changed as follows. (Changes effective after the main power is turned OFF and ON.) OK Cancel IEEE802.1X Settings Use IEEE802.1X Login Name: example Use TLS Name of Key to Use: Not set Key and Certificate Use TTLS TILS (Internal Protocol) to use: MSCHAP/2 PAP Use PEAP Use Login Name as User Name User Name/Password Settings: Change User Name/Password... Internet | Protected Mode Off 200%

When using TTLS

Select the internal TTLS authentication method. (1) Select the [MSCHAPv2] or [PAP] check box.

8

Click [Change User Name/Password...].

When using the log in name entered in Step 6 as the user name

Select the [Use Login Name as User Name] check box.

9

Enter user name.

Up to 24 alphanumeric characters can be entered. ![](images/508037f58d56803058266dc9c775b2f21ad0f8c0da4e84aeffeb0fdf296f76db.jpg)
text_image Remote UI Settings/Registration: LBP7680C: LBP7680C - Windows Internet Explorer https://192.168.1.225/eve80Dcredit.cgi File Edit View Favorites Tools Help Favorites Remote UI Settings/Registration: LBP7680C: LBP... Settings/Registration Mail to System Manager Preferences Control Menu Paper Source Menu Network Layout Menu Quality Menu User Maintenance Menu Output/Control Utility Menu Calibration Device Control Management Settings Department ID Management Security License/Other Settings/Registration: Preferences: Network > IEEE802, TX Settings > Edit IEEE802, TX Settings > Change User Name/Password Last Updated: 05/04 2011 05 10:47 The settings will be changed as follows. (Changes effective after the main power is turned OFF and ON.) OK Cancel Change User Name/Password User Name: Charles (Max 24) Change Password Password: Charles (Max 24) Confirm: Charles (Max 24) Done Trusted sites | Protected Mode: Off 100%

10

Enter password.

(1) Select the [Change Password] check box. (2) Enter password. You can enter up to 24 characters. (3) Enter the same password in the [Confirm] field. (4) Click [OK].

11

Select the [Use IEEE802.1X] check box.

![](images/9a712933a9e506b57d142f0a58f9bc2b08af8faad2373a430cfe61d6b8030f7c.jpg)
text_image Remote UE Settings/Registration: LBP7680C / LBP7680C - Windows Internet Explorer https://192.168.1.225/IEEE802.credit.cgi File Edit View Favorites Tools Help Favorites Remote UE Settings/Registration: LBP7680C: LBP... I-SENSYS LBP7680C / LBP7680C / To Portal Login User; System Manager Log Out Settings/Registration Mail to System Manager Preferences Control Menu Paper Source Menu Network Layout Menu Quality Menu User Maintenance Menu Output/Control Utility Menu Calibration Device Control Management Settings Department ID Management Security License/Other Settings/Registration Preferences Network > IEEE802 1X Settings > Edit IEEE802 1X Settings Edit IEEE802.1X Settings LastUpdated: 05/04 2011 05 13:43 The settings will be changed as follows. (Changes effective after the main power is turned OFF and ON.) OK Cancel IEEE802.1X Settings Use IEEE802 1X Login Name example Use TLS Name of Key to Use: Not set: Key and Certificate... Use TLS TLS (Internal Protocol) to use: MSCHAP42 PAP Use PEAP Use Login Name or User Name Trusted sites | Protected Mode: Off 100%
![](images/7889aef8b6001d4b3f4543eae6371f28b22512a173caf659ebffbc4769e9bb5f.jpg)

If a Message Appears

A message will be displayed if there is anything wrong with the settings. See Steps 6 to 10, and check the settings.

12

Click [OK].

![](images/9ec124f8412b573e9d04195f3596ac40dd916b974e9db3149c66d56204529ddc.jpg)
text_image Remote UE Settings/Registration: LBP7680C: LBP7680C - Windows Internet Explorer https://192.168.1.225/eee802/sndlt.cgi File Edit View Favorites Tools Help Favorites Remote UE Settings/Registration: LBP7680C: LBP... I-SENSYS LBP7680C / LBP7680C / To Portal Login User: System Manager Log Out Settings/Registration Mail to System Manager Preferences Control Menu Paper Source Menu Network Layout Menu Quality Menu User Maintenance Menu Output/Control Utility Menu Calibration Device Control Management Settings Department ID Management Security License/Other Settings/Registration: Preferences: Network > IEEE802 1X Settings > Edit IEEE802 1X Settings Edit IEEE802.1X Settings Last Updated: 05/04 2011 05 13:43 The settings will be changed as follows. (Changes effective after the main power is turned OFF and ON.) OK Cancel IEEE802.1X Settings Use IEEE802.1X Login Name example Use TLS Name of Key to Use: Not set Key and Certificate... Use TTLS TTLS (Internal Protocol) to use: MSCHAP#2 PAP Use PEAP Use Login Name as User Name Done Trusted sites | Protected Mode: Off 100%

13

Perform a hard reset or restart the printer.

→ After performing a hard reset or restarting the printer, the settings are effective. ![](images/490587be9efe254a615b347355e310a17fa2f2e3966873b4e635974bdd781394.jpg)

NOTE

To perform a hard reset

You can perform a hard reset using the following procedure. 1. Click [Settings/Registration]. 2. Select [Device Control] from the [Output/Control] menu. 3. Select [Hard Reset], then click [Execute]. 0258-06L You can change the network settings using various methods. Network Setting Items Software That Can Be Used for the Network Settings

Network Setting Items

The setting items you can change using NetSpot Device Installer, FTP Client, or the control panel on the printer are as follows. ![](images/63883d451671a6b87034b49897fb617629fa1345183491d7d706df28a40ac87a.jpg)

NOTE

The settings that you cannot specify using FTP Client, NetSpot Device Installer, or the control panel on the printer

Specify them using a Web browser (Remote UI). (However, you cannot specify the settings with even using the Remote UI.)

About the item names

In the following table, the characters shown in parentheses are exclusively for FTP Client. For example, "[IP Address] (INT\_ADDR)" is displayed differently as follows, depending on the application. ■ Web browser (Remote UI): [IP Address] - NetSpot Device Installer: [IP Address] - config file of FTP Client: [INT\_ADDR] ■ Control Panel: [IP Address]

General Settings

○: Can be specified : Cannot be specified
Option Contents DefaultSettings Using NetSpot Device InstallerSettings Using FTP ClientSettings Using the Control Panel
[System Manager Password](ROOT_PWD)Up to 16 characters (Blank)
[System Manager](SYS_CONTACT)Up to 32 characters (Blank)
[Device Name](DEVICE_NAME)Up to 32 characters LBP7680C/LBP7660C
[Location](SYS_LOC)Up to 32 characters (Blank)
[Permit End-User's Job Operation](USER_JOB_CONT)ON, OFF OFF
Support Link
[URL](LINK_URL1)Up to 128 alphanumeric charactershttp://www.canon.com
○: Can be specified : Cannot be specified
Option Contents DefaultSettings Using NetSpot Device InstallerSettings Using FTP ClientSettings Using the Control Panel
[Use IPv4] (IPV4_USE) ON, OFF ON-
[DHCP] (DHCP_ENB) ON, OFF OFF
[RARP] (RARP_ENB) ON, OFF OFF
[BOOTP] (BOOTP_ENB) ON, OFF OFF
[IP Address] (INT_ADDR) IP address0.0.0.0
[Subnet Mask] (NET_MASK) IP address0.0.0.0
[Gateway Address] (DEF_GW) IP address0.0.0.0
[Primary DNS Server Address] (DNS_PADDR)IP address 0.0.0.0-
[Secondary DNS Server Address] (DNS_SADDR)IP address 0.0.0.0-
[Host Name] (HOST_NAME) Up to 47 characters"Canon" + "Last 6 digits of the MAC address"--
[Domain Name] (DOMAIN_NAME) Up to 47 characters (Blank)--
[DNS Dynamic Update] (DDNS_ENB)ON, OFF OFF--
[WINS Resolution] (WINS_ENB)ON, OFF OFF-
[WINS Server Address] (WINS_SERVER)IP address 0.0.0.0--
[Scope ID] (WINS_SCOPEID)Up to 63 characters(Blank)--
[SMB Server Name] (SMB_SERVER)Up to 15 alphanumeric characters(Blank)--
[SMB Workgroup Name] (SMB_WG)Up to 15 alphanumeric characters(Blank)--
[Use ARP/PING] (ARP_PING_ENB)ON, OFF ON-
[Use FTP Print] (FTP_PRINT_ENB)ON, OFF OFF-
[FTP Print User Name] (FTP_PRINT_USER)Up to 24 characters(Blank)--
[Password] (FTP_PRINT_PWD)Up to 24 characters(Blank)--
[FTP Settings]ON, OFF OFF--
[Use LPD Printing] (LPD_ENB)ON, OFF ON-
[Print LPD Banner Page] (LPD_BANN)ON, OFF OFF--
[Use RAW Printing] (RAW_ENB) ON, OFF ON-
[Use Bidirectional Communication](RAW_BIDIR_ENB)ON, OFF OFF--
[Use IPP Print] (IPP_ENB) ON, OFF OFF-
[SSL]ON, OFF (Fixed at OFFwhen a key is not registered.)OFF--
[IPP Authentication](IPP_AUTH_ENB)ON, OFF ON--
[User Name](IPP_AUTH_ACCUNT1)Up to 24 characters (Must be entered when using IPP Authentication)(Blank)--
[Password](IPP_AUTH_PASSWD1)Up to 24 characters (Must be entered when using IPP Authentication)(Blank)--
[Use WSD Printing] (WSD_ENB) ON, OFF OFF-
[Use WSD Browsing](WSD_BROWSING)ON, OFF OFF-
[Use Multicast Discovery](WSD_MULTICAST_DISCOVERY)ON, OFF OFF-
[Use HTTP] (HTTP_ENB) ON, OFF ON-
[Use Proxy] ON, OFF OFF--
[HTTP Proxy Server Address]Up to 128 alphanumeric characters(Blank)--
[HTTP Proxy Server Port Number] 0 to 99999 80--
[Use Proxy Within Same Domain] ON, OFF OFF--
[Proxy Authentication] ON, OFF OFF--
[User Name]Up to 24 alphanumeric characters(Blank)--
[Password]Up to 24 alphanumeric characters(Blank)--
[Discovery Response](DISCOVERY_ENB)ON, OFF ON-
[Scope Name](DISCOVERY_SCOPE_NAME)Scope name to be used for discovery using utility software such as NetSpot Device Installer. (Up to 32 characters*)default--
[Use SNTP] (SNTP_ENB) ON, OFF OFF-
[NTP Server Name](SNTP_ADDR)IP address or host name (Blank)--
[Polling Interval](SNTP_INTERVAL)Interval for synchronizing time (1 to 48 hours)24--
\* You cannot use any of the following characters: "(", ")", "", "!", "<", ">", "=", "\~",;", "+", "\*", ".

TCP/IP (IP v. 6) Settings

○: Can be specified : Cannot be specified
Option Contents DefaultSettings Using NetSpot Device InstallerSettings Using FTP ClientSettings Using the Control Panel
[Use IPv6] (IPV6_USE) ON, OFF OFF
[Use Stateless Address](IPV6_STATELESS_USE)ON, OFF ON
[Use Manual Address](IPV6_MANUAL_ADDR_USE)ON, OFF OFF
[IP Address](IPV6_MANUAL_ADDR_SET)IP address(Blank)
[Prefix Length](IPV6_MANUAL_ADDR_PREFIX)0 to 128 64
[Default Router Address](IPV6_MANUAL_ROUTER_ADDR)IP address(Blank)
[Use DHCPv6] (IPV6_DHCPV6_USE) ON, OFF OFF
[Primary DNS Server Address](IPV6_DNS_ADDRESS_PRI)IP address(Blank)
[Secondary DNS Server Address](IPV6_DNS_ADDRESS_SEC)IP address(Blank)
[Use IPv4 Host/Domain Names](IPV6_DNS_NAME_SAME_AS_IPV4)ON, OFF OFF
[Host Name](IPV6_DNS_HOST_NAME_V6)Up to 47 characters"Canon" + "Last 6 digits of the MAC address"
[Domain Name](IPV6_DNS_DOMAIN_NAME_V6)Up to 47 characters(Blank)
[DNS Dynamic Update](IPV6_DNS_DYNAMIC_SET)ON, OFF OFF
[Register Manual Address](IPV6_DNS_MANUAL)ON, OFF OFF
[Register Stateful Address](IPV6_DNS_STATEFUL)ON, OFF OFF
[Register Stateless Address](IPV6_DNS_STATELESS)ON, OFF OFF

NetWare Network Settings

○: Can be specified : Cannot be specified
Option Contents DefaultSettings Using NetSpot Device InstallerSettings Using FTP ClientSettings Using the Control Panel
[Use NetWare] (NW_ENB) ON, OFF OFF
[Frame Type] (NW_FRAME_TYPE)Frame type used by NetWareAutoSense ([Auto Detect])
[IPX External Network Number] (Display only)
[Node Number] (Display only)----
[Print Service] (NW_PRINT_SERVICE)Print service to be usedndsPserver([NDS PServer])
Bindery PServer
[File Server Name](NW_PSERVER_FILE_SERVER_NAME)Name of the NetWare file server to which the NetWare print server belongs (1 to 47 characters)(Blank)-
[Print Server Name](NW_PSERVER_PRINT_SERVER_NAME)NetWare print server name to be used (1 to 47 characters)(Blank)-
[Print Server Password](NW_PSERVER_PASSWD)Password for accessing the print server (0 to 20 characters)(Blank)-
[Printer Number](NW_PSERVER_PRINTER_NO)Number for the printer connected to the NetWare print server (0 to 15)0-
[Service Mode](NW_PSERVER_SERVICE_MODE)Service mode to be used psMode1: Only the currently loaded paper can be serviced. psMode2: Paper can be changed as needed. psMode3: The order of the jobs is rearranged to minimize the frequency of changing paper. psMode4: The order of the jobs in a queue is rearranged to minimize the frequency of changing paper.psMode4-
[Printer Form](NW_PSERVER_PRINTER_FORM)Paper Define Form (0 to 255)0-
[Polling Interval](NW_PSERVER_POLLING_INT)Interval for checking the jobs (1 to 15 seconds)5-
[Buffer Size](NW_PSERVER_BUFFER_SIZE)Data BufferSize (1 to 20 KB)20-
NDS PServer
[Tree Name](NW_NDSSERVER_TREE_NAME)Name of the NDS tree to which the NetWare print server belongs (1 to 32 characters)(Blank)-
[Context Name](NW_NDSSERVER_CONTEXT_NAME)Name of the context to which the NetWare print server belongs (1 to 255 characters)(Blank)-
[Print Server Name](NW_NDSSERVER_PRINT_SERVER_NAME)NetWare print server name to be used (1 to 64 characters)(Blank)-
[Print Server Password](NW_NDSSERVER_PRINT_SERVER_PASSWORD)Password for accessing the print server (0 to 20 characters)(Blank)-
[Printer Number](NW_NDSSERVER_PRINTER_NO)Number for the printer connected to the NetWare print server (0 to 254)0-
[Service Mode](NW_NDSSERVER_SERVICE_MODE)Service mode to be used psMode1: Only the currently loaded paper can be serviced. psMode2: Paper can be changed as needed. psMode3: The order of the jobs is rearranged to minimize the frequency of changing paper. psMode4: The order of the jobs in a queue is rearranged to minimize the frequency of changing paper.psMode4-
[Printer Form](NW_NDSSERVER_PRINTER_FORM)Paper Define Form (0 to 255)0-
[Polling Interval](NW_NDSSERVER_POLLING_INT)Interval for checking the jobs (1 to 255 seconds)5-
[Buffer Size](NW_NDSSERVER_BUFFER_SIZE)Data Buffer Size (3 to 20 KB)20-
RPrinter
[File Server Name](NW_RPRINTER_FILE_SERVER_NAME)Name of the NetWare file server to which the NetWare print server belongs (1 to 47 characters)(Blank)-
[Print Server Name](NW_RPRINTER_PRINT_SERVER_NAME)NetWare print server name to be used (1 to 47 characters)(Blank)-
[Printer Number](NW_RPRINTER_PRINTER_NO)Number for the printer connected to the NetWare print server (0 to 15)0-
NPrinter
[Tree Name](NW_NPRINTER_TREE_NAME)Name of the NPrinter tree to which the NetWare print server belongs (1 to 32 characters)(Blank)-
[Context Name](NW_NPRINTER_CONTEXT_NAME)Name of the context to which the NetWare print server belongs (1 to 256 characters)(Blank)-
[Print Server Name](NW_NPRINTER_PRINT_SERVER_NAME)NetWare print server name to be used (1 to 64 characters)(Blank)-
[Printer Number](NW_NPRINTER_PRINTER_NO)Number for the printer connected to the NetWare print server (0 to 254)0-
AppleTalk Settings ○: Can be specified : Cannot be specified
Option Contents DefaultSettings Using NetSpot DeviceSettings Using FTPSettings Using the Control
InstallerClientPanel
[Use AppleTalk](ATLK_ENB)ON, OFF OFF
[Phase]Fixed at [Phase 2] [Phase 2]
[Service Name](APRINT_1)Up to 32 characters *1LBP7680Cx/LBP7660Cdn
[Zone](ATK_ZONE)Up to 32 characters *2*
[Print Mode]*3[Open Both Spool and Direct],[Open Spool], [Open Direct][Open Both Spool and Direct]
\*1 "=" , "@", "\*", ":, and "\~" cannot be used. \*2 "=", "@", ":", and "\~" cannot be used. \*3 Can be specified only when PS ROM or PS/Barcode ROM is installed.

SMB Settings (LBP7680Cx Only)

○ : Can be specified : Cannot be specified
Option Contents DefaultSettings Using NetSpot Device InstallerSettings Using FTP ClientSettings Using the Control Panel
[Use SMB Server](SMB_ENB) ON, OFF OFF
[Server Name](SMB_SERVER)Up to 15 characters *(Blank)
[Workgroup Name](SMB_WG)Up to 15 characters *(Blank)
[Comments](SMB_COMMENT)Up to 48 characters(Blank)
[Use LM Announce](SMB_LM_ENB)ON, OFF OFF
[Use SMB Printing](SMB_PRINT_ENB)ON, OFF OFF
[Printer Name](SMB_PRINTER)Up to 13 characters *(Blank)
\* You cannot enter a space between characters.

SNMP Settings

○ : Can be specified : Cannot be specified
Option Contents DefaultSettings Using NetSpot Device InstallerSettings Using FTP ClientSettings Using the Control Panel
[Use SNMPv1](SNMP_V1_ENB)ON, OFF ON
[Use Community Name 1](SNMP_COMMUNITY1_ENB)ON, OFF ON
[Community Name 1](SNMP_COMMUNITY1_NAME)Up to 32 characterspublic
[MIB Access Permission](SNMP_COMMUNITY1_ACCESS)RW, RO([Read/Write],[Read Only])RO([Read Only])
[Use Community Name 2](SNMP_COMMUNITY2_ENB)ON, OFF OFF
[Community Name 2](SNMP_COMMUNITY2_NAME)Up to 32 characterspublic2
[MIB Access Permission](SNMP_COMMUNITY2_ACCESS)RW, RO([Read/Write],[Read Only])RO([Read Only])
[Use SNMPv3](SNMP_V3_ENB)ON, OFF OFF
[Obtain Printer Management Information from Host](SNMP_GET_PRT_MNG_INFO)ON, OFF OFF
[Reject SNMP Packets While in Sleep Mode]ON, OFF OFF

User Settings (SNMPv3)

○: Can be specified : Cannot be specified
Option Contents DefaultSettings Using NetSpot Device InstallerSettings Using FTP ClientSettings Using the Control Panel
[User Name] Up to 32 alphanumeric characters initial
[MIB Access Permission][Read/Write], [Read Only] [Read/Write]
[Security Settings][Authentication Yes/Encryption Yes], [Authentication Yes/Encryption No], [Authentication No/Encryption No][Authentication Yes/Encryption Yes]
[Authentication Algorithm][MD5], [SHA1] [MD5]
[Authentication Password]*6 to 16 alphanumeric characters initial
[Encryption Algorithm][DES], [AES] [DES]
[Encryption Password]*6 to 16 alphanumeric characters initial
\* Can be specified only when the printer is in the state of SSL encrypted communication. (If the printer is not in the state of encrypted communication, specify the setting using the printer's control panel.)

Context Settings (SNMPv3)

○: Can be specified : Cannot be specified
Option Contents DefaultSettings Using NetSpotSettings Using FTPSettings Using the Control Panel
Device InstallerClient
[Context Name 1] - [Context Name 5]Up to 32 alphanumeric characters(Blank)

Spooler Settings (LBP7680Cx Only)

○: Can be specified : Cannot be specified
Option Contents DefaultSettings Using NetSpot Device InstallerSettings Using FTP ClientSettings Using the Control Panel
[Use Spooler](SPOOL_ENB)ON, OFF OFF

Startup Time Setting

○: Can be specified : Cannot be specified
Option Contents DefaultSettings Using NetSpot Device InstallerSettings Using FTP ClientSettings Using the Control Panel
[Startup Time](STRT_DELAY_TIME)Waiting time from when you turn the printer ON to when the printer starts obtaining the address (0 to 300 seconds)0

Ethernet Driver Setting

○: Can be specified : Cannot be specified
Option Contents DefaultSettings Using NetSpot Device InstallerSettings Using FTP ClientSettings Using the Control Panel
[Auto Detect] ON, OFF ON
[Communication Mode][Half Duplex], [Full Duplex][Half Duplex]
[Ethernet Type][10 Base-T], [100 Base-TX], [1000 Base-T][10 Base-T]

E-Mail Print Settings

○: Can be specified : Cannot be specified
Option Contents DefaultSettings Using NetSpot Device InstallerSettings Using FTP ClientSettings Using the Control Panel
[POP3 Server Name](EMAIL_POP_ADDR)Up to 48 characters(Blank)
[POP3 User Name](EMAIL_POP_ACCOUNT)Up to 32 characters(Blank)
[Password](EMAIL_POP_PASSWD)Up to 32 characters(Blank)
[POP3 RX Interval](EMAIL_POP_INTERVAL)0 to 90 minutes 0*
[POP3 RX](EMAIL_PRINT_ENB) ON,OFF OFF
[POP3 Server Port Number](EMAIL_POP_PORTNO)0 to 65535 110
[SMTP RX] ON, OFF OFF
[SMTP Server Port Number] 0 to 65535 25
\* When [0] is set, auto e-mail reception to the server is not performed.

Remote UI Settings

○: Can be specified : Cannot be specified
Option Contents DefaultSettings Using NetSpot Device InstallerSettings Using FTP ClientSettings Using the Control Panel
[Remote UI](RUI_ENB)*Turing ON or OFF the Remote UION
[Use SSL] ON, OFF OFF
\* Can be specified only by FTP Client or the printer's control panel

Permitted Receiving MAC Address Settings

○: Can be specified : Cannot be specified
Option Contents DefaultSettings Using NetSpot Device InstallerSettings Using FTP ClientSettings Using the Control Panel
[MAC Address Filter]ON, OFFOFF
[MAC Address](Display only)

Software That Can Be Used for the Network Settings

You can perform the network settings for this printer using the following software. ○: Specifiable —: Not specifiable △: Can perform a part of the settings
Setting TypeWeb Browser (Remote UI)FTP ClientNetSpot Device InstallerARP/PING CommandControl Panel of the Printer
Configuring the Ethernet Driver "Changing the Network
Transmission Speed or Transfer Mode"
Setting the Spooling Function (LBP7680Cx only) > "Setting the Spooling Function (LBP7680Cx Only)"--
Configuring the Communication Environment > "Specifying the Setting for Startup Waiting Time"--
Setting the IP Address of the Printer > "Setting the IP Address (IP v. 4)"-
Setting the TCP/IP Protocol > "Configuring the Protocol Settings"-
Setting IP v. 6 > "Setting IP v. 6"-
Preparing the NetWare Protocol Settings > "Configuring NetWare"----
Setting the NetWare Protocol > "Configuring the Protocol Settings"--
Setting the AppleTalk Protocol > "Network Settings for the Printer (AppleTalk)"-
Changing the Device Name or Administrator Information > "Specifying the Device Name or Administrator Information"--
Changing the Administrator Password➤ "Setting the Administrator Password"
Specifying the Job Operation Permission for End-users➤ "Specifying the Job Operation Permission for End-Users"
Restricting the Job Requests by Certain Devices➤ "Restricting the Users Who Can Print or Perform the Printer Settings"
Keylock Settings➤ "Locking the Keys on the Control Panel (Key Lock Function)"
Changing E-Mail Print Settings➤ "Receiving E-mail Data on the Mail Server and Printing (E-mail Print)"
0258-06R If you want to reset the network settings for the printer to the default values, use the printer's control panel.

> "Initializing the Network Settings Using the Printer's Control Panel"

Initialize the network settings using the control panel while checking the display on the printer. ![](images/349c40df503322200711eb074ed3d9ad7b3b6a30c1f53314ee9bf34b0a560c4b.jpg)

IMPORTANT

Precautions when initializing the network settings

Make sure that the printer is not operating before initializing the network settings. If you initialize the network settings while the printer is printing or receiving data, the received data may not be printed properly, or may result in paper jams or damage to the printer. ![](images/19abde7ef4f726804965bb9bcc98f75090fb1c08ca3256caf86b7ec736c78de0.jpg)

NOTE

When checking the current settings

> "Checking the Printer Settings"

1

Press [ ] ( : Settings)

2

Select [Network] using [ ▲ and [ ], then press [OK]. ![](images/90504cb513ffecce20dd8cbe29f23650a10b66139a1b22d126dc9f3236b9a0bf.jpg)
text_image Setup Control Menu Paper Source Network Layout
When the message is displayed, press [OK]. ![](images/e09f058b7c56861c0e2e4f8cd39d022563e85291f76cbb65048f01bdb33079ed.jpg)
text_image Settings effective next time main power is turned ON. Press OK to continue.

3

Select [Init. Network Set.] using [ ▲ and [ ], then press [OK]. ![](images/3b8878823b0616d3080cfba01540fedae21a09685b35de976d07de5eb9975fef.jpg)
text_image Network Address Filter MAC Address E-Mail Print Set. Init. Network Set.

4

Select [Yes] using [ ↓, then press [OK]. ![](images/3bfdc362ccad555ec975077fb224df02f74642a822981866b94d0898afe6ad2e.jpg)
text_image Execute? No Yes
0258-06W You need the MAC address of the printer to set the IP address using NetSpot Device Installer or the ARP/PING command. There are the following two methods for checking MAC addresses. > "Checking the Network Ethernet Driver Screen from a Remote UI" "Printing a Network Status Print from the Printer's Control Panel and Checking It"

Checking the Network Ethernet Driver Screen from a Remote UI

1

Start the Remote UI, and then log in as Administrator. > "Starting the Remote UI"

2

Click [Settings/Registration]. ![](images/325930ac0477c0bb304c96143d0bc0efbc1f8ecff83b61717051cde3ca25989e.jpg)
text_image Remote UI Portal: LBPXXXXLBPXXXX - Windows Internet Explorer Favonites Suggested Sites Web Slice Gallery Remote UI Portal: LBPXXXXLBPXXXX Device Name: LBPXXXX Product Name (Serial No.): LBPXXXX Location: Login User: System Manager Log Out Language English Mail to System Manager Last Updated: 29/05 2012 10:03:42 Device Basic Information Device Status The printer is ready. Error Information There is no error. Consumables Information Paper Information Paper Source Remaining Paper Paper Size Paper Type Multi-Purpose Tray None A4 Free (Mixed Types) Drawer 1 Loaded A4 Free (Mixed Types) Remaining Toner Item Name Remaining Toner Cyan Toner 16-100% Status Monitor/Cancel Settings/Registration Basic Tools Box Direct Print Management Tools Service Management Service

3

Select [Network] from the [Preferences] menu. ![](images/c48a8db1be034917961aadd404e90aa4d142af1e1dd73553d4ab413a1d61da19.jpg)
text_image Remote UI Settings/Registration: LBP7680C: LBP7680C - Windows Internet Explorer File Edit View Favorites Tools Help Favorites Remote UI Settings/Registration: LBP7680C: UBP... Settings/Registration Mail to System Manager Preferences Control Menu Paper Source Menu Network Layout Menu Quality Menu User Maintenance Menu Output/Control Utility Menu Calibration Device Control Management Settings Department ID Management Security License/Other Settings/Registration: Preferences: Network Network Last Updated: 01/04 2011 10:32:30 Network TCP/IP Settings IPv4 Settings IPv6 Settings WINS Configuration ARP/PING Settings FTP Settings LPD Print Settings RAW Print Settings IPP Print Settings WSD Print Settings HTTP Settings SSL Settings Proxy Settings Multicast Discovery Settings SNTP Settings NetWare Settings AppleTalk Settings SNTP Settings Done Internet | Protected Mode: Off

4

Click [Ethernet Driver Settings].

![](images/cd9fec39b3f782d9439555739753fddcd908d79ccc954b37d1cfcd444d776a12.jpg)
text_image Remote UE Settings/Registration LBP7680C: LBP7680C - Windows Internet Explorer http://192.168.1.225/netmenu.org File Edit View Favorites Tools Help Favorites Remote UE Settings/Registration LBP7680C: LBP... Output Control Utility Menu Calibration Device Control Management Settings Department ID Management Security License/Other LPD Print Settings Raw Print Settings IPP Print Settings WSD Print Settings HTTP Settings SSL Settings Proxy Settings Multicast Discovery Settings SNTP Settings NetWare Settings AppleTalk Settings SMB Settings SNMP Settings SNMPv1 Settings SNMPv3 Settings Speaker Status Time Settings Ethernet Driver Settings IEEE 802 1X Settings E-Mail Print Settings Copyright CANON INC. 2011 All Rights Reserved Done Internet | Protected Mode: Off 100%

5

Check the MAC address.

![](images/0434362a8dd21a36871f7908b934d376c992d563567735f6f169122ff64830f3.jpg)
text_image Remote UI Settings/Registration: LBP7680C; LBP7680C - Windows Internet Explorer File Edit View Favorites Tools Help Favorites Remote UI Settings/Registration: LBP7680C; UBP... I SENSYS LBP7680C / LBP7680C / To Portal Login User: System Manager Log Out Settings/Registration Mail to System Manager Preferences Control Menu Paper Source Menu Network Layout Menu Quality Menu User Maintenance Menu Output/Control Utility Menu Calibration Device Control Management Settings Department ID Management Security License/Other Settings/Registration Preferences Network > Ethernet Driver Settings Ethernet Driver Settings Last Updated 01/04 2011 11:10:42 Edit... Ethernet Driver Settings Auto Detect: On Communication Mode: Half Duplex Ethernet Tun: 10 Base.T MAC Address: 8887171ab61 Copyright CANON INC. 2011 All Rights Reserved Done Internet | Protected Mode: Off 100%

Printing a Network Status Print from the Printer's Control Panel and Checking It

![](images/ef81caf0f67c6cb2df45da0e7780cee92e2a6e9b034cf9e887b894a95d59d708.jpg)

NOTE

Loading A4 paper

The Network Status Print is designed to be printed on A4 paper. Be sure to load A4 paper when printing the Network Status Print.

1

Load A4 paper in the multi-purpose tray or paper drawer. Paper Loading and Output

2

![](images/fc957b94ecef40f6ba617d584307976b8315ca7097dbc7c403c0d6deed54259e.jpg)

3

Select [Network Status Print] using [ ▲ and [ ], then press [OK]. ![](images/3dc8ffe74deafb53f73d4d287b1708cd38dee97df337029faded0a82975ff25b.jpg)
text_image Utility Menu Check Counter Configuration Page Network Status Print IPSec Policy List

4

Select [Yes] using [▼, then press [OK]. ![](images/c5354be196d8d7463461c0ecc3b03649d629cc65e413afe7900a02d368167dd5.jpg)
text_image Execute? No Yes
Network Status Print is printed. The MAC address (A) is indicated in [Ethernet Driver Settings] on the upper left of the Network Status Print. ![](images/4862a57a3b25d293f32d0f8daadf81b0744c03b25c387a8a9e936e253e962196.jpg)
text_image CANOH NETWORK STATUS PRINT Network Print Server MAC Address :00:1e:8f:7c:56:c5 (A)

Network Settings for the Printer (TCP/IP)

0258-06X The requisite tasks to use the printer in the TCP/IP network are as follows. ![](images/87422ade3b48c8129b052c172fb2a7fcfd26277b37ad58aabbde9e1ed0d81ba6.jpg)
flowchart
graph TD
    A["Setting the IP Address (IP v. 4)"] --> B["Configuring the Protocol Settings"]
    B --> C["Setting IP v. 6"]
    C --> D["Configuring a Computer that Performs Printing"]
> Setting the IP Address (IP v. 4) Configuring the Protocol Settings Setting IP v. 6 Configuring a Computer that Performs Printing 0258-06Y There are the following three methods for setting the IP address.

Setting the IP Address Using the Printer's Control Panel

Set the IP address using the control panel while checking the display on the printer.

> Setting the IP Address Using the ARP/PING Commands

Set the IP address using the ARP/PING command in Command Prompt.

Setting the IP Address Using NetSpot Device Installer

Set the IP address using NetSpot Device Installer in the supplied CD-ROM. ![](images/a3f832b50bb2f9a0475a08d819ea489bb7da27136a2d336eb2b161ef693d5319.jpg)

IMPORTANT

When setting the IP Address using the ARP/PING command or NetSpot Device Installer

The MAC address of the printer is required. For details on the procedure for checking the MAC address, see "Checking the MAC Address."

Before setting the IP address

Make sure that the printer is connected to the network and the printer is ON. ![](images/a32d39fd5f5a0c3e6930852834d260daf65d9dc8d3845327bd07652a992f9d1d.jpg)

NOTE

If you changed the IP address after installing the printer driver

Specify the port to be used again in the printer driver. > "Configuring a Computer that Performs Printing" 0258-070 To set the IP address using the printer's control panel, use the following menu hierarchies. ![](images/c612f3a1f6b104b4d903e6af4cf6164e83d1ec1bfbb20ecfd85266d8a514aa44.jpg)
flowchart
graph TD
    A["Setup"] --> B["Control Menu"]
    B --> C["Network"]
    C --> D["TCP/IP Settings"]
    D --> E["IPv4 Settings"]
    E --> F["Continues to (1)"]

    subgraph "(1)"
        G["IPv4"] --> H["Off"]
        G --> I["On"]
        J["IP Mode"] --> K["Auto"]
        J --> L["Manual"]
        M["Protocol"] --> N["Use DHCP"]
        M --> O["Use BOOTP"]
        M --> P["Use RARP"]
        Q["IP Address Settings"] --> R["IP Address"]
        S["Subnet Mask"] --> T["(Enter a numeric value.)"]
        U["Gateway Address"] --> V["(Enter a numeric value.)"]
    end

    style G fill:#f9f,stroke:#333
    style J fill:#f9f,stroke:#333
    style M fill:#f9f,stroke:#333
    style Q fill:#f9f,stroke:#333
\* [Protocol] is displayed when [IP Mode] is set to [Auto]. \- Pressing [ ] (Settings) displays the common Setup menu. ![](images/2b19dce9aafc84ee4be987561d7dc40c481d0b6b3a586db718950ade71d4c34b.jpg) indicates that the procedure is performed by pressing [▲] or [▼] on the control panel. ![](images/4012dc6a4df70b3fd192de35ff7a45b0728704db6a05aa042d562867d19668bb.jpg) indicates that the procedure is performed by pressing [OK] on the control panel. ![](images/da40e71d88757e79b575064ab0e30d833775ac905c54b7ff971d4579486bfd61.jpg)

IMPORTANT

After setting the IP address

To enable the settings, perform a hard reset or restart the printer. For details on a hard reset, see "Canceling All the Jobs (Hard Reset)."

To go back up the hierarchy

Press [●] ( :Back).

About the control panel

For details on the control panel, see "Control Panel."

1

Press [ ] ( : Settings) select [Network] using [ ] and [ ], and then press [OK]. When the message is displayed, press [OK]. You can specify the settings when the printer is either online (the ← Online indicator is on) or offline (the ← Online indicator is off).

2

Select [TCP/IP Settings] using [▲and [ ],▼nd then press [OK].

3

Select [IPv4 Settings] using [▲and[],▼nd then press [OK].

4

Set it to use [IPv4]. (1) After selecting [IPv4] using [▲] or [▼press [OK]. (2) After selecting [On] using [▲] or [▼, press [OK].

5

Select the method for setting the IP address. (1): Select [IP Mode] using [▲] and [▼], and then press [OK]. (2): Select a method for setting the IP address using [ ▲ ] and [ ▼], and then press [OK].
[Auto]:When setting the IP address using any one of DHCP, BOOTP, or RARP, select this option.
[Manual]: When specifying the IP address to the printer directly, select this option.

6

Set the IP address. If You Selected [Auto] in Step 5 If You Selected [Manual] in Step 5 If You Selected [Auto] in Step 5 1. Select [Protocol] using [▲ and [ ],▼ and then press [OK]. 2. Select [On] for the option to be used when setting the IP address.
[Use DHCP]: Obtains an IP address using DHCP. (The DHCP server needs to be running.)
[Use BOOTP]: Obtains an IP address using BOOTP. (The BOOTP daemon needs to be running.)
[Use RARP]: Obtains an IP address using RARP. (The RARP daemon needs to be running.)
![](images/52f98f4d001e1bc3d6231f416536c1de87e3d17f1c420de37b1d70af9122d32c.jpg)

NOTE

When using DHCP, BOOTP, or RARP

- You can select only one from RARP, BOOTP, or DHCP. One of the following can be used: DHCP, BOOTP, or RARP. When any of the settings is turned [On], the remaining two settings are automatically turned [Off]. - Because it takes approximately two minutes to check whether DHCP, BOOTP, and RARP are available, we recommend that you set the unused protocol(s) to [Off].

When using DHCP

If you cycle the power of the printer, you may not be able to print. This is because a different IP address from the one that has been used is assigned. When using DHCP, consult your network administrator and perform either of the following settings. - Specifying the DNS Dynamic Update function > "Configuring the Protocol Settings" - Specifying the settings so that the same IP address is always assigned when the printer starts up

3. Set the IP address, the subnet mask, and the gateway address manually as needed.

When setting them manually, go back up the hierarchy by pressing [ ] ( :Back), and then perform the procedure in "If You Selected [Manual] in Step 5." Even if you are using any one of DHCP, BOOTP, or RARP, specify the IP address, subnet mask, and gateway address. If you cannot obtain information from the servers of DHCP, BOOTP, and RARP, the values specified manually are used. ![](images/0d1d746fd7c2d14e7c17f151f538d98ecb4b439a2193c9871c66fb5c446b38d6.jpg)

NOTE

When using DHCP, BOOTP, or RARP

You can select only one from RARP, BOOTP, or DHCP. After the printer restarts, the values obtained from DHCP, BOOTP, and RARP are displayed. (If the values were specified previously, they overwrite the obtained ones.)

4. Proceed to Step 7.

If You Selected [Manual] in Step 5

1. Select [IP Address Settings] using [ ] and [ ], and then press [OK]. 2. Select [IP Address], [Subnet Mask] and [Gateway Address] using [▲] and [▼, press [OK]. 3. [IP Address], [Subnet Mask] and [Gateway Address] are each set. ![](images/043eca8f4d432e04127790a551ad4148c0f278d0c6bc59136c0de6ddd219f319.jpg)

NOTE

How to enter values in [IP Address], [Subnet Mask] and [Gateway Address].

1. Press [◀] and [▶] to move the cursor to each field (an area separated by periods to enter three-digit numbers) in which you want to enter respective values of the address. (The numbers in the field blinks, allowing you to enter the value.) 2. Enter the value. (Pressing [ ▲ ] increases the value and [ ▼ decreases the value.) 3. After entering values in all the fields, press [OK] to confirm the setting.

4. Proceed to Step 7.

7

Perform a hard reset or restart the printer.

After performing a hard reset or restarting the printer, the settings are effective. ![](images/d0e7395b81afe4c441aee7fbd2a01c7f84709732ff48cc46acb1c868e5616a46.jpg)

NOTE

For details on a hard reset

See "Canceling All the Jobs (Hard Reset)." ![](images/200254e1942318caa857ff7479956fc2ddca1c3c4769235f8a48dbfe8b9016cc.jpg)

NOTE

If your computer and the printer are connected via the router You cannot set the IP address using the ARP/PING command.

1

Run Command Prompt.

![](images/618bfc3e9e7b312d509cf607d25853e8df9a0ce8d1860c515ec8edc4f8b69c8b.jpg)

NOTE

If you are using Windows

Run Command Prompt using the following procedure. \- From the [Start] menu, select [All Programs] or [Programs] → [Accessories] → [Command Prompt].

If you are using Macintosh

Perform the following procedure. 1 Run Terminal. \- Select the hard disk you use [Applications] the [Utilities] folder, and then double-click the [Terminal] icon. 2 Enter "su", and then press the [return] key on your keyboard. 3 "Password:" is displayed. Enter the root password, and then press the [return] key on your keyboard.

If you are using UNIX

Display the console screen, and then log in as a super user.

2

Enter "arp -s ", then press the [ENTER] key on your keyboard.
Enter the IP address to assign to the printer.Specify the address with four numbers (from 0 to 255) separated with a period (.).
Enter the MAC address of the printer.When entering the number, separate the number every two digits with a hyphen (-) (a colon (:) for Macintosh/UNIX).
- Input Example (Windows): "arp -s 192.168.0.215 00-1E-8F-46-80-2e" - Input Example (Macintosh/UNIX): "arp -s 192.168.0.215 00:1E:8F:46:80:2e" ![](images/34f719b910cd79c003ba717d0125e7bd646413603d024d19431f084b65c42e75.jpg)

NOTE

If you are using IBM-AIX

Enter "arp -s ether "

3

Enter the following command, then press the [ENTER] key on your keyboard. - If you are using Windows: "ping -I 479" - If you are using Macintosh: "ping -c 1 -s 479 " - If you are using Solaris 1.x/2.x: "ping -s 479" - If you are using IBM-AIX: "ping 479" - If you are using HP-UX: "ping 487" - If you are using Linux: "ping -s 479 " : Enter the same IP address as the one entered in Step 2. Enter a lowercase "L" for "-l." \- Input Example (Windows): "ping 192.168.0.215 -I 479" → The IP address is set for the printer. The subnet mask and gateway address are set to [0.0.0.0].

4

Enter "exit", then press the [ENTER] key on your keyboard. → Command Prompt closes. 0258-072 For details on other procedures for starting and using NetSpot Device Installer, see the following. \- Starting method: "Printer Driver Installation Guide" For details on the procedure for viewing "Printer Driver Installation Guide", see "Installation." \- Usage: Help of NetSpot Device Installer Help is displayed by clicking [Help] in the [Help] menu. ![](images/195386d14de3e94aa75a7ee600d8b5609629c6a66f9608ca9c09a8f3cc068ac1.jpg)

IMPORTANT

If Windows Firewall is enabled

Before starting NetSpot Device Installer, configure Windows Firewall to unblock NetSpot Device Installer. For details on the configuration procedure, see the Readme file of NetSpot Device Installer.

For operating systems not compatible with NetSpot Device Installer

Perform the settings from another computer on the network or by using the printer's control panel or the ARP/PING command. 0258-073 This section describes the procedure for specifying the settings using the Remote UI. In the Remote UI, you can specify the settings by accessing the printer from a Web browser via a network. Before specifying the settings, see "Attention (Protocol Settings)." ![](images/cac083484c811c34ad7d78cb72b543a1eea4a706922b36ffb28a16a36242b3d0.jpg)

NOTE

When specifying the settings using software other than the Remote UI

You can also specify the settings using the following software. > "FTP Client" You can specify the settings by accessing the FTP server of the printer using Command Prompt. > "NetSpot Device Installer" You can specify the settings using the Canon software, NetSpot Device Installer, in the supplied CD-ROM. If you want to configure the settings such as the DNS server settings, use the Remote UI or FTP Client. The specifiable options vary depending on the software. See "Network Setting Items" and use software appropriate to the network environment you are using or options that you want to specify.

1

Start the Remote UI, and then log in as Administrator. > "Starting the Remote UI"

2

Click [Settings/Registration]. ![](images/da914e80a7cb1a202f1a598819cef6eed5cd68ba95be14fa9b045fb7f9fec606.jpg)
text_image Remote UI Portal: LBPXXXX: LBPXXXX - Windows Internet Explorer http:// Favorite Suggested Sites Web Slice Gallery Remote UI Portal: LBPXXXX: LBPXXXX Device Name: LBPXXXX Product Name (Serial No.): LBPXXXX Location: Login User: System Manager Log Out Language English Mail to System Manager Last Updated: 29/05 2012 10:03:42 Device Basic Information Device Status The printer is ready Error Information There is no error Consumables Information Paper Information Paper Source Remaining Paper Paper Size Paper Type Multi-Purpose Tray None A4 Free (Mixed Types) Drawer 1 Loaded A4 Free (Mixed Types) Remaining Toner Item Name Remaining Toner Cyan Toner 16-100% Status Monitor/Cancel Settings/Registration Basic Tools Box Direct Print Management Tools Service Management Service

3

Select [Network] from the [Preferences] menu.

![](images/8421874dfd300732176d06545a0b064e0bd1f83911f0962abcf09c8a2a281b7e.jpg)
text_image Remote UB Settings/Registration: LBP7680C: LBP7680C - Windows Internet Explorer File Edit View Favorites Tools Help Favorites Remote UB Settings/Registration: LBP7680C: LBP... Settings/Registration To Portal Login User: System Manager Log Out Mail to System Manager Preferences Control Menu Paper Source Menu Network Layout Menu Quality Menu User Maintenance Menu Output/Control Utility Menu Calibration Device Control Management Settings Department ID Management Security License/Other Settings/Registration: Preferences: Network Network Last Updated: 01/04 2011 10:32:38 Network TCP/IP Settings IPv4 Settings IPv6 Settings WMS Configuration ARP/PING Settings FTP Settings LPD Print Settings RAW Print Settings IPP Print Settings WSO Print Settings HTTP Settings SSL Settings Proxy Settings Multicast Discovery Settings SNTP Settings NetWare Settings AppleTalk Settings ONIP Settings Done Internet | Protected Mode: Off 100%

4

Click [TCP/IP Settings].

![](images/fa8d4d8cd86ee228cccf0df544da17824c0546d6e6ed1d59f3cf6cff91be944a.jpg)
text_image Remote UE Settings/Registration: LBP7680C; LBP7680C - Windows Internet Explorer http://192.168.1.225/netmenu.cgi File Edit View Favorites Tools Help Favorites Remote Ub Settings/Registration: LBP7680C; LBP... Settings/Registration Mail to System Manager Preferences Control Menu Paper Source Menu Network Layout Menu Quality Menu User Maintenance Menu Output/Control Utility Menu Calibration Device Control Management Settings Department ID Management Security License/Other Settings/Registration: Preferences: Network Network Last Updated: 01/04 2011 10:32:30 Network TCP/IP Settings IPv4 Settings IPv6 Settings WINS Configuration ARP/PBNG Settings FTP Settings LPD Print Settings RAW Print Settings IPP Print Settings WSO Print Settings HTTP Settings SSL Settings Proxy Settings Multicast Discover Settings SNTP Settings NetWare Settings AppleTalk Settings SNTP Settings Done Internet | Protected Mode: Off 100%

5

Configure the protocol settings.

IP Address Settings WINS Settings ARP/PING Settings FTP Settings LPD Settings RAW Settings > IPP/IPPS Settings WSD Settings HTTP Settings Setting SSL Keys and Certificates Proxy Settings Multicast Discovery Settings SNTP Settings

IP Address Settings

(1) Click [Edit...] in [IPv4 Settings].

![](images/69f728d48921fe8863e73129518525fd14b09f493dbd66e531bf97517744a6b5.jpg)
text_image Remote UI Settings/Registration: LBP7680C: LBP7680C - Windows Internet Explorer File Edit View Favorites Tools Help Favorites Remote UI Settings/Registration: LBP7680C: LBP... Settings/Registration Mail to System Manager Preferences Control Menu Paper Source Menu Network Layout Menu Quality Menu User Maintenance Menu Output/Control Utility Menu Calibration Device Control Management Settings Department ID Management Security License/Other Settings/Registration: Preferences: Network > TCP/IP Settings TCP/IP Settings Last Updated 01/04 2011 11:30:04 IPv4 Settings Edit... IP Address Settings Use IPv4: On Select Protocol: Off IP Address: 192.168.1.225 Subnet Mask: 0.0.0.0 Gateway Address: 0.0.0.0 DNS Settings Primary DNS Server Address: 0.0.0.0 Secondary DNS Server Address: 0.0.0.0 Host Name: Canon1ABF61 Domain Name: Internet | Protected Mode: Off 100%

(2) Set the IP address.

![](images/724ef77b6f1941b5ecc957bb5418376ade6288857710936426501bd8ec42db71.jpg)
text_image Remote UE Settings/Registration: LBP7680C: LBP7680C - Windows Internet Explorer http://192.168.1.225/netipv4.cgi?CSUT=469865962 File Edit View Favorites Tools Help Favorites Remote UE Settings/Registration LBP7680C: LBP... I SENSYS LBP7680C / LBP7680C / To Portal Login User: System Manager Log Out Settings/Registration Mail to System Manager Preferences Control Menu Paper Source Menu Network Layout Menu Quality Menu User Maintenance Menu Output/Control Utility Menu Collibration Device Control Management Settings Department ID Management Security License/Other Settings/Registration Preferences Network > TCP/IP Settings > Edit IPv4 Settings Edit IPv4 Settings Last Updated 01/04/2011 11:49:28 The settings will be changed as follows. (Changes effective after the main power is turned OFF and ON.) OK Cancel IPv4 Settings IP Address Settings Use IPv4 Select Protocol: Off IP Address: 192.168.1.225 Submit Mask: 0.0.0.0 Gateway Address: 0.0.0.0 DNS Settings Primary DNS Server Address 0.0.0.0 Done Internet | Protected Mode: Off 100%
[Use IPv4] When the check box is selected, use IPv4.
[Select Protocol] Select the protocol used from [Off], [DHCP], [RARP] or [BOOTP].
When [Off] is selected using [Select Protocol], set the following items.
[IP Address] Enter the printer's IP address.
[Subnet Mask] Enter the subnet mask used by the TCP/IP network. [Gateway Address] Enter the gateway address used by the TCP/IP network. (3) Set DNS. ![](images/b90ceadf8c043b903f19be65e6f7060d3525e50edd32aab98f6ba1816b5e9804.jpg)
text_image Remote UI Settings/Registration: LBP7680C: LBP7680C - Windows Internet Explorer http://192.168.1.225/netpvc4.cgi?CSUT=466865062 File Edit View Favorites Tools Help Favorites Remote UI Settings/Registration: LBP7680C: LBP... Utility Menu Calibration Device Control Management Settings Department ID Management Security License/Other Use IPv4 Select Protocol: Off IP Address: 192.168.1.225 Subnet Mask: 0.0.0.0 Gateway Address: 0.0.0.0 DNS Settings Primary DNS Server Address: 0.0.0.0 Secondary DNS Server Address: 0.0.0.0 Host Name: Canon1ABF61 Domain Name: DNS Dynamic Update DNS,P Option Settings Acquire Host Name DNS Dynamic Update Copyright CANON INC. 2011 All Rights Reserved Internet | Protected Mode: Off 100%
[Primary DNS Server Address]Enter the IP address of the primary DNS server.
[Secondary DNS Server Address]Enter the IP address of the secondary DNS server.
[Host Name]Enter the host name to be added to the DNS server. Up to 47 characters can be entered.
[Domain Name]Enter the name of the domain to which the printer belongs. Up to 47 characters can be entered. Entry example: "example.com"
[DNS Dynamic Update]Set it to [On] when using the DNS Dynamic Update function. When you are not using the DNS Dynamic Update Function, set it to [Off]. ↑ Using the DNS Dynamic Update function, by registering the [Host Name] and [Domain Name] to the DNS server, the printer's IP address can be used without being fixed.
(4) Set DHCP option settings. ![](images/6fc9aae19d4182c443afda2046811a95f023596d0505da2ab5558774caeb459c.jpg)
text_image Remote UE Settings/Registration: LBP7680C: LBP7680C - Windows Internet Explorer http://192.168.1.225/netipv4.cgi?CSUT=46865962 File Edit View Favorites Tools Help Favorites Remote UE Settings/Registration LBP7680C: LBP... Utility Menu Calibration Device Control Management Settings Department ID Management Security License/Other Use IPv4 Select Protocol: Off IP Address: 192.168.1.225 Subnet Mask: 0.0.0.0 Gateway Address: 0.0.0.0 DNS Settings Primary DNS Server Address: 0.0.0.0 Secondary DNS Server Address: 0.0.0.0 Host Name: Canon1ABF61 Domain Name: DNS Dynamic Update DHCP Option Settings Acquire Host Name DNS Dynamic Update Copyright CANON INC. 2011 All Rights Reserved Internet | Protected Mode: Off 100%
[Acquire Host Name]When obtaining the host name using DHCP, select the [Acquire Host Name] check box.
[DNS Dynamic Update]When updating the host name using DHCP, select the [DNS Dynamic Update] check box.
(5) Click [OK]. ![](images/7f8c0bd0ab7f827cba71e20f2072c1f7c8a7b590176c2e0202b17ce8df316a85.jpg)
text_image Remote UI Settings/Registration: LBP7680C: LBP7680C - Windows Internet Explorer http://192.168.1.225/netipv4.cgi?CSJT=469865962 File Edit View Favorites Tools Help Favorites Remote UI Settings/Registration LBP7680C: LBP... I.SENSYS LBP7680C / LBP7680C / To Portal Login User: System Manager Log Out Settings/Registration Mail to System Manager Preferences Control Menu Paper Source Menu Network Layout Menu Quality Menu User Maintenance Menu Output/Control Utility Menu Calibration Device Control Management Settings Department ID Management Security License/Other Settings/Registration Preferences Network > TCP/IP Settings > Edit IPv4 Settings Edit IPv4 Settings Last Updated: 01/04.2011 11:40:23 The settings will be changed as follows. (Changes effective after the main power is turned OFF and ON.) OK Cancel IPv4 Settings IP Address Settings Use IPv4 Select Protocol Off IP Address: 192.168.1.225 Subnet Mask: 0.0.0.0 Gateway Address: 0.0.0.0 DNS Settings Primary DNS Server Address: 0.0.0.0 Done Internet [ Protected Mode: Off ] 100%
![](images/dedb3f5160c6ebf515a2fc9edd9c97a31d25be119d4c6b60ad5a4da2628a877f.jpg) Proceed to Step 6 if you do not specify the settings for the other options.

WINS Settings

(1) Click [Edit...] in [WINS Configuration]. ![](images/8e6be2204998cc68babc16c5b2b20636a23b0a20620c7c2509ecc895eaebac58.jpg)
text_image Remote UI Settings/Registration: LBP7680C: LBP7680C - Windows Internet Explorer https://192.166.1.225/nettppv.cgi File Edit View Favorites Tools Help Favorites Remote UI Settings/Registration LBP7680C: LBP... WINS Configuration Edit WINS Resolution: Off Node Type: None SMB Server Name: SMB Workgroup Name: ARP/PING Settings Edit... Use ARP/PING: On FTP Print Settings Edit... Use FTP Print: Off FTP Print User Name: guest Done Trusted sites | Protected Mode: Off 100%
(2) Set WINS. ![](images/d5ba2808ec74cd95b4b75c5e9bf876dd864acd6b81a0b9b0f2b14a5050f0fc4f.jpg)
text_image Remote UI Settings/Registration: LBP7680C / LBP7680C - Windows Internet Explorer http://192.168.1.225/netains.exp/CSJ/Tc637629719 File Edit View Favorites Tools Help Favorites Remote UI Settings/Registration: LBP7680C / LBP... I-SENSYS LBP7680C / LBP7680C / To Portal Login User: System Manager Log Out Settings/Registration Mail to System Manager Preferences Control Menu Paper Source Menu Network Layout Menu Quality Menu User Maintenance Menu Output/Control Utility Menu Calibration Device Control Management Settings Department ID Management Security License/Other Settings/Registration Preferences Network > TCP/IP Settings > Edit WINS Configuration Edit WINS Configuration Last Updated 01/04 2011 11:45:11 The settings will be changed as follows. (Changes effective after the main power is turned OFF and ON.) OK Cancel WINS Configuration WINS Resolution WINS Server Address 0 0 0 0 Node Type None Scope ID: SMB Server Name: SMB Workgroup Name:

When Using WINS Resolution

Select the [WINS Resolution] check box, and set the following items.
[WINS Server Address]Enter the IP address of the WINS server.† When using the IP address settings specified by DHCP, if you obtain the WINS server IP address from the DHCP server, the IP address obtained from the DHCP server is overwritten.
[Scope ID]Enter [Scope ID] as needed. You can enter up to 63 characters.† The scope ID is an identifier to determine the range available for printers and computers. The scope ID is browsed regardless of the WINS resolution settings.† When a scope ID is not specified for the computer in your network environment, leave the [Scope ID] field blank.
Set the following items when registering printers on the WINS server.
[SMB Server Name]Enter the name of the WINS server. You can enter up to 15 characters.(spaces cannot be entered between the characters)† Set the server name that was set here using the SMB function.(LBP7680Cx only)
[SMB Workgroup Name]Enter the workgroup name. You can enter up to 15 characters.(spaces cannot be entered between the characters)† Set the workgroup name that was set here using the SMB function.(LBP7680Cx only)

When not Using WINS Resolution

Clear the [WINS Resolution] check box. (3) Click [OK]. Proceed to Step 6 if you do not specify the settings for the other options.

ARP/PING Settings

Select whether to use the ARP/PING function. (1) Click [Edit...] in [ARP/PING Settings]. ![](images/0ebf5a9160b0ca9038e4f4ca3d08b5e8ed570f0a0debb74b18f294b78646bbac.jpg)
text_image Remote UI Settings/Registations LBP7680C: LBP7680C - Windows Internet Explorer https://192.168.1.225/mettrapi.cpi File Edit View Favorites Tools Help Favorites Remote UI Settings/Registration LBP7680C: LBP... WINS Configuration Edit... WINS Resolution: Off Node Type: None SMB Server Name: SMB Workgroup Name: ARP/PING Settings Edit... Use ARP/PING On FTP Print Settings Edit... Use FTP Print: Off FTP Print User Name: guest Done Trusted sites | Protected Mode: Off 100%
(2) Set ARP/PING. ![](images/a174c66bb7ff3b214ad8d4ba73f80d7f0538f9d87b317355ed6f935b783a84c9.jpg)
text_image Remote UB Settings/Registration: LBP7680C: LBP7680C - Windows Internet Explorer http://192.168.1.225/meterp.cgi?CSU/Tc-1241480127 File Edit View Favorites Tools Help Favorites Remote UB Settings/Registration: LBP7680C: LBP... I-SENYS LBP7680C / LBP7680C / To Portal Login User: System Manager Log Out Settings/Registration Mail to System Manager Preferences Control Menu Paper Source Menu Network Layout Menu Quality Menu User Maintenance Menu Output/Control Utility Menu Calibration Device Control Management Settings Department ID Management Security License/Other Settings/Registration Preferences Network > TCP/IP Settings > Edit ARP/IPING Settings Edit ARP/IPING Settings Last Updated: 01/04 2011 11:48:02 The settings will be changed as follows. (Changes effective after the main power is turned OFF and ON.) OK Cancel ARP/IPING Settings Use ARP/IPING Copyright CANON INC. 2011 All Rights Reserved Done Internet | Protected Mode: Off 100%
[Use ARP/PING] When the check box is selected, you can change the IP address settings from the client using the ARP/PING command. (3) Click [OK]. ![](images/91be8316bc171b003f86fba1ef08b6bd939fb3ce71d2de5b0668512a32fee0de.jpg)
text_image Remote UI Settings/Registration: LBP7680C / LBP7680C - Windows Internet Explorer http://192.168.1.225-metarp.cgi/CSJFz-4.2414001.27 File Edit View Favorites Tools Help Favorites Remote UI Settings/Registration: LBP7680C / LBP... SENSYS LBP7680C / LBP7680C / Settings/Registration To Portal Login User: System Manager Log Out Mail to System Manager Preferences Control Menu Paper Source Menu Network Layout Menu Quality Menu User Maintenance Menu Output/Control Utility Menu Calibration Device Control Management Settings Department ID Management Security License/Other Settings/Registration: Preferences: Network > TCP/IP Settings > Edit ARP/IPING Settings Edit ARP/IPING Settings Last Updated: 01/04 2011 11:48:02 The settings will be changed as follows. (Changes effective after the main power is turned OFF and ON.) OK Cancel ARP/IPING Settings Use ARP/IPING Copyright CANON INC. 2011 All Rights Reserved Done Internet | Protected Mode Off 100%
![](images/c14bdcc7f8f5bc9c3a15c04a3fb0fe52a3631e32799011c8e5dc34a54d85fbfc.jpg)

IMPORTANT

When the [Use ARP/PING] check box is cleared You cannot set the IP address using the ARP/PING command. ![](images/67d956c4d7ce4f4dcf120cdce9d4ad1d74ae3d3bde897c1bf3b897c10a0d9e62.jpg) Proceed to Step 6 if you do not specify the settings for the other options.

FTP Settings

(1) Click [Edit...] in [FTP Print Settings]. ![](images/2275cc00341f5fa4ba9df160c90fafc2d381ea2295ddc93739b875d7fc1f10af.jpg)
text_image Remote UI Settings/Registration: LBP7680C: LBP7680C - Windows Internet Explorer https://192.168.1.225-metecapi.org File Edit View Favorites Tools Help Favorites Remote UI Settings/Registration: LBP7680C: LBP... FTP Print Settings Edit... Use FTP Print: Off FTP Print User Name: guest Password: Set. FTP Settings: Off LPD Print Settings Edit... Use LPD Printing: On Print LPD Banner Page: Off RAW Print Settings Edit... Use RAW Printing: On Done Trusted sites | Protected Mode: Off 100%
(2) Set FTP print. ![](images/7e44d0ded9b11bb82afa5208814ff748100a5928769ee990cc08fb6bff48b6b9.jpg)
text_image Remote UI: Settings/Registration: LBP7680C: LBP7680C - Windows Internet Explorer https://192.168.1.225/meltp.cgi?CSUT=1912732543 File Edit View Favorites Tools Help Favorites Remote UI: Settings/Registration: LBP7680C: LBP... Settings/Registration To Portal Login User: System Manager Log Out Mail to System Manager Preferences Control Menu Paper Source Menu Network Layout Menu Quality Menu User Maintenance Menu Output/Control Utility Menu Calibration Device Control Management Settings Department ID Management Security License/Other Settings/Registration Preferences Network > TCP/IP Settings > Edit FTP Print Settings Edit FTP Print Settings Last Updated 04/04 2011 05:47:36 The settings will be changed as follows. (Changes effective after the main power is turned OFF and ON.) OK Cancel FTP Print Settings Use FTP Print FTP Print User Name: guest Set/Change Password Password: (Max 24 characters) Confirm: (Max 24 characters) FTP Settings Done Trusted sites | Protected Mode: Off 100%
[Use FTP Print]When the check box is selected, you can access the printer's FTP server using the FTP client and print files.
[FTP Print User Name]Enter the user name for logging in to the FTP server. Up to 24 characters can be entered.† You cannot set "root."
[Password]Enter the password for logging in to the FTP server. Up to 24 characters can be entered.
[Confirm] To confirm the password, enter the entered [Password] again.
[FTP Settings] When the check box is selected, changing settings from the FTP client is allowed.
(3) Click [OK]. ![](images/048f9ac956a685c6c42a1307698eabf196f66aca4b993b853aec2ec3ba7859c3.jpg)
text_image Remote UE Settings/Registration: LBP7680C: LBP7680C - Windows Internet Explorer https://192.168.1.225/meltp.org/IC9UT=1912732583 File Edit View Favorites Tools Help Favorites Remote UE Settings/Registration LBP7680C: LBP... Settings/Registration Mail to System Manager Preferences Control Menu Paper Source Menu Network Layout Menu Quality Menu User Maintenance Menu Output/Control Utility Menu Calibration Device Control Management Settings Department ID Management Security License/Other Settings/Registration Preferences Network > TCP/IP Settings > Edit FTP Print Settings Edit FTP Print Settings LastUpdated 04/04 2011 05:47:36 The settings will be changed as follows. (Changes effective after the main power is turned OFF and ON.) OK Cancel FTP Print Settings Use FTP Print FTP Print User Name guest Set/Change Password Password (Max 24 characters) Confirm (Max 24 characters) FTP Settings Done Trusted sites | Protected Mode: Off 100%
Proceed to Step 6 if you do not specify the settings for the other options.

LPD Settings

(1) Click [Edit...] in [LPD Print Settings]. ![](images/dc1ce22f097975aaa4c3d8d80ce8b98e7463dc802fa4b6c54f9449695f3dc19a.jpg)
text_image Remote UI Settings/Registration: LBP7680C: LBP7680C - Windows Internet Explorer https://192.168.1.225-nettapi-epi File Edit View Favorites Tools Help Favorites Remote UI Settings/Registration: LBP7680C: LBP... FTP Print Settings Edit... Use FTP Print: Off FTP Print User Name: guest Password: Set. FTP Settings: Off LPD Print Settings Edit... Use LPD Printing: On Print LPD Banner Page: Off RAW Print Settings Edit... Use RAW Printing: On Done Trusted sites | Protected Mode: Off 100%
(2) Set LPD print. ![](images/4f8eb078b59a366f24eafe5e4e096feab4a4a0eb98986ad89e56eff5440ef325.jpg)
text_image Remote UI Settings/Registration: LBP7680C / LBP7680C - Windows Internet Explorer http://192.168.1.225/netipd.cgi?CSU/To-870988231 File Edit View Favorites Tools Help Favorites Remote UI Settings/Registration: LBP7680C: LBP... Settings/Registration To Portal Login User; System Manager Log Out Mail to System Manager Preferences Control Menu Paper Source Menu Network Layout Menu Quality Menu User Maintenance Menu Output/Control Utility Menu Calibration Device Control Management Settings Department ID Management Security License/Other Settings/Registration Preferences Network > TCP/IP Settings > Edit LPD Print Settings Edit LPD Print Settings Last Updated 01/04.2011 11:54 10 The settings will be changed as follows. (Changes effective after the main power is turned OFF and ON.) OK Cancel LPD Print Settings Use LPD Printing Print LPD Banner Page Copyright CANON INC. 2011 All Rights Reserved Done Internet | Protected Mode: Off 100%
[Use LPD Printing] When the check box is selected, the LPD print function is enabled.
[Print LPD Banner Page]When the check box is selected, whenever it prints using LPD applications, a banner page is printed simultaneously. Banner page printing is set for each job. If the [Print LPD Banner Page] check box is selected, a banner page is printed simultaneously for jobs that are set to print banners. Banner pages are not printed for jobs that are set not to print banner pages.If you are not printing pages, clear the [Print LPD Banner Page] check box. If the [Print LPD Banner Page] check box is cleared, it will not always print banner pages.
(3) Click [OK]. ![](images/b9cb017b5de7bdfb7c5ff60c20cd5c63ea37ada6f8468125c39d19bc99f3daf1.jpg)
text_image Remote UI Settings/Registration: LBP7680C; LBP7680C - Windows Internet Explorer http://192.168.1.225/netlpd.rgi/ICSUT=470888231 File Edit View Favorites Tools Help Favorites Remote UI Settings/Registration: LBP7680C: LBP... I-SENSYS LBP7680C / LBP7580C / Settings/Registration To Portal Login User: System Manager Log Out Mail to System Manager Preferences Control Menu Paper Source Menu Network Layout Menu Quality Menu User Maintenance Menu Output/Control Utility Menu Calibration Device Control Management Settings Department ID Management Security License/Other Settings/Registration: Preferences Network > TCP/IP Settings > Edit LPD Print Settings Edit LPD Print Settings Last Updated: 01/04 2011 11:54 10 The settings will be changed as follows. (Changes effective after the main power is turned OFF and ON.) OK Cancel LPD Print Settings Use LPD Printing Print LPD Banner Page Copyright CANON INC. 2011 All Rights Reserved Done Internet | Protected Mode: Off 100%
Proceed to Step 6 if you do not specify the settings for the other options.

RAW Settings

Normally, you do not need to change the settings for this option. (1) Click [Edit...] in [RAW Print Settings]. ![](images/50cf574c3c5640f99f12341d4a51d45c74ec44de55172f771b51f1b530395b3e.jpg)
text_image Remote UB Settings/Registration: LBP7680C: LBP7680C - Windows Internet Explorer https://192.168.1.225/mntcrpip.cgi File Edit View Favorites Tools Help Favorites Remote UB Settings/Registration: LBP7680C: LBP... RAW Print Settings Edit... Use RAW Printing: On Use Bidirectional Communication: Off IPP Print Settings Edit... Use IPP Print: Off SSL: Off IPP Authentication: On User Name: guest Password: Set. WSD Print Settings Edit... Done Trusted sites | Protected Mode: Off 100%
(2) Set RAW printing. ![](images/be07f5acd59e8b32960bd10526387b790de38bc545ae6bea11f847d8ec64bfb0.jpg)
text_image Remote UI Settings/Registration: LBP7680C: LBP7680C - Windows Internet Explorer http://192.168.1.225 networks.cg/CSUTc-13435648 File Edit View Favorites Tools Help Favorites Remote UI Settings/Registration LBP7680C: LBP... SENSYS LBP7680C / LBP7680C / To Portal Login User: System Manager Log Out Settings/Registration Mail to System Manager Preferences Control Menu Paper Source Menu Network Layout Menu Quality Menu User Maintenance Menu Output/Control Utility Menu Calibration Device Control Management Settings Department ID Management Security License/Other Settings/Registration Preferences Network > TCP/IP Settings > Edit RAW Print Settings Edit RAW Print Settings Last Updated 01/04 2011 11:56:45 The settings will be changed as follows. (Changes effective after the main power is turned OFF and ON.) OK Cancel RAW Print Settings Use RAW Printing Use Bidirectional Communication Copyright CANON INC. 2011 All Rights Reserved Internet | Protected Mode: Off 100%
[Use RAW Printing] When the check box is selected, the RAW printing function is enabled.
[Use Bidirectional Communication]When the check box is selected, bidirectional communication is performed.
(3) Click [OK]. ![](images/c893ba7c0cf6095ee0996a34baded99895f6e9baff95c879f9ff709e2ec506c1.jpg)
text_image Remote UE Settings/Registration: LBP7680C: LBP7680C - Windows Internet Explorer http://192.168.1.225/netbox.rgi/CSUT=-134139649 File Edit View Favorites Tools Help Favorites Remote UE Settings/Registration LBP7680C: LBP... I-SENSYS LBP7680C / LBP7680C / To Portal Login User: System Manager Log Out Settings/Registration Mail to System Manager Preferences Control Menu Paper Source Menu Network Layout Menu Quality Menu User Maintenance Menu Output/Control Utility Menu Calibration Device Control Management Settings Department ID Management Security License/Other Settings/Registration Preferences Network > TCP/IP Settings > Edit RAW Print Settings Edit RAW Print Settings Last Updated 01/04 2011 11:56:45 The settings will be changed as follows. (Changes effective after the main power is turned OFF and ON.) OK Cancel RAW Print Settings Use RAW Printing Use Bidirectional Communication Copyright CANON INC. 2011 All Rights Reserved Internet | Protected Mode: Off 100%
Proceed to Step 6 if you do not specify the settings for the other options.

IPP/IPPS Settings

(1) Click [Edit...] in [IPP Print Settings]. ![](images/6dab6a5e031bde9ad010b1ef8c23b1063c1b2664566d6d000bc2f302138b3d6d.jpg)
text_image Remote UI Settings/Registration: LBP7680C: LBP7680C - Windows Internet Explorer https://192.168.1.225/nettcpip.cgi File Edit View Favorites Tools Help Favorites Remote UI Settings/Registration: LBP7680C: LBP... RAW Print Settings Edit... Use RAW Printing: On Use Bidirectional Communication: Off IPP Print Settings Edit... Use IPP Print: Off SSL: Off IPP Authentication: On User Name: guest Password: Set. WSD Print Settings Edit... Done Trusted sites | Protected Mode: Off 100%
(2) Set IPP print. ![](images/68628cb5eaeffe811ddc2d3f09f38f6f3d015e7f0b509f2f5696150d75aa96c6.jpg)
text_image Remote UI Settings/Registration: LBP7680C: LBP7680C - Windows Internet Explorer File Edit View Favorites Tools Help Favorites Remote UI Settings/Registration LBP7680C: LBP... Settings/Registration Preferences Control Menu Paper Source Menu Network Layout Menu Quality Menu User Maintenance Menu Output/Control Utility Menu Calibration Device Control Management Settings Department ID Management Security License/Other Settings/Registration Preferences Network > TCP/IP Settings > Edit IPP Print Settings Edit IPP Print Settings Last Updated 01/04 2011 11:58:45 The settings will be changed as follows. (Changes effective after the main power is turned OFF and ON.) OK Cancel IPP Print Settings Use IPP Use SSL Use IPP Authentication User Name: guest Set/Change Password Password: (Max 24 characters) Confirm: (Max 24 characters) Done Internet | Protected Mode: Off 100%

To Use IPP/IPPS Printing

Select the [Use IPP] check box, and set the following items.
[Use SSL]When the check box is selected, you can use IPPS (encryption of IPP communication data using SSL).† You can only use IPPS when the SSL encrypted communication function is enabled.† You cannot select the [Use SSL] check box if a key and certificate have been created but the use key is not registered.See "Selecting Keys and Certificates" for more information about SSL encrypted communication functions and key registration procedures.
[Use IPP Authentication]When the check box is selected, use the IPP print user authentication function.
When the [Use IPP Authentication] check box is selected, set the following items.
[User Name]Enter the user name used for the IPP print user authentication function. Up to 24 characters can be entered.
[Set/Change Password]Select the check box when setting/changing the password.
[Password]Enter the password used for the IPP print user authentication function. Up to 24 characters can be entered.
[Confirm] For confirmation, enter the same [Password] again.
![](images/56a33db5a6175ed1972a4c061dd6524ff47a676306e938fa9e8db1ba11f2ef6d.jpg)

IMPORTANT

When the [Use IPP] check box is selected

The HTTP setting [Use HTTP] turns [On] automatically. > "HTTP Settings"

When Not Using IPP/IPPS Printing

Clear the [Use IPP] check box. (3) Click [OK]. ![](images/fc95ca02f7edc6639a864084233b3753a30c4e54dee74344f8a51c8cbe1f6e39.jpg)
text_image Remote UI Settings/Registration: LBP7680C: LBP7680C - Windows Internet Explorer http://92.168.1.225/netipp-cg/ICU/T=234774611 File Edit View Favorites Tools Help Favorites Remote UI Settings/Registration LBP7680C: LBP... I-SENSYS LBP7680C / LBP7680C / To Portal Login User: System Manager Log Out Settings/Registration Mail to System Manager Preferences Control Menu Paper Source Menu Network Layout Menu Quality Menu User Maintenance Menu Output/Control Utility Menu Calibration Device Control Management Settings Department ID Management Security License/Other Settings/Registration Preferences Network > TCP/IP Settings > Edit IPP Print Settings Edit IPP Print Settings Last Updated 01/04 2011 11:58:45 The settings will be changed as follows. (Changes effective after the main power is turned OFF and ON.) OK Cancel IPP Print Settings Use IPP Use SSL Use IPP Authentication User Name: guest Set/Change Password Password: (Max 24 characters) Confirm: (Max 24 characters) Done Internet | Protected Mode: Off 100%
![](images/395d4effc8f46239282cefb5aa9436b79ae1671bb8c7cf1f4208893f27c399c7.jpg) Proceed to Step 6 if you do not specify the settings for the other options.

WSD Settings

(1) Click [Edit...] in [WSD Print Settings]. ![](images/a123352d3261c9e01486cb467ffd3f9f1ac8efac8ad0845c04f26d64e6bf5895.jpg)
text_image Remote UI Settings/Registration: LBP7680C: LBP7680C - Windows Internet Explorer https://192.168.1.225/metrtcpip.cgi File Edit View Favorites Tools Help Favorites Remote UI Settings/Registration: LBP7680C: LBP... WSD Print Settings Edit... Use WSD Printing: Off Use WSD Browsing: Off Use Multicast Discovery: Off HTTP Settings Edit... Use HTTP: On SSL Settings Key and Certificate... Key and Certificate Settings: Set. Settings that use SSL Remove UI OnOff Done Trusted sites | Protected Mode: Off 100%
(2) Set WSD printing. ![](images/6a554edef2941dc53a198c832f8ace04bd97a1553afc3a06e6ddd9545eb7625c.jpg)
text_image Remote UI Settings/Registration: LBP7680C / LBP7680C - Windows Internet Explorer http://192.168.1.225/netamd.cgi/CSUTc1610731164 File Edit View Favorites Tools Help Favorites Remote UI Settings/Registration LBP7680C LBP... L-SENSYS LBP7680C / LBP7680C / To Portal Login User: System Manager Log Out Settings/Registration Mail to System Manager Preferences Control Menu Paper Source Menu Network Layout Menu Quality Menu User Maintenance Menu Output/Control Utility Menu Calibration Device Control Management Settings Department ID Management Security License/Other Settings/Registration Preferences Network > TCP/IP Settings > Edit WSD Print Settings Edit WSD Print Settings Last Updated 01/04 2011 12:00 14 The settings will be changed as follows. (Changes effective after the main power is turned OFF and ON.) OK Cancel WSD Print Settings Use WSD Printing Use WSD Browsing Use Multicast Discovery Copyright CANON INC. 2011 All Rights Reserved Done Internet | Protected Mode: Off 100%
[Use WSD Printing] Select the check box to use WSD printing.
[Use WSD Browsing]When the check box is selected, it obtains printer information using WSD reference.↑ If you select the [Use WSD Printing] check box, the [Use WSD Browsing] check box will always be selected.You can only clear the [Use WSD Browsing] check box when the [Use WSD Printing] check box is cleared.
[Use Multicast Discovery]Select the check box to use Multicast Discovery.

(3) Click [OK].

![](images/f156238924a984f28f421220e483436d741173a79eae5f8c60ee76f134b55e0f.jpg)
text_image Remote UE Settings/Registration: LBP7680C / LBP7680C - Windows Internet Explorer https://192.168.1.225/netwsd.cgi?ICUT=161073164 File Edit View Favorites Tools Help Favorites Remote UE Settings/Registration LBP7680C: LBP... I SENSYS LBP7680C / LBP7680C / To Portal Login User: System Manager Log Out Settings/Registration Mail to System Manager Preferences Control Menu Paper Source Menu Network Layout Menu Quality Menu User Maintenance Menu Output/Control Utility Menu Calibration Device Control Management Settings Department ID Management Security License/Other Settings/Registration Preferences Network > TCP/IP Settings > Edit WSD Print Settings Edit WSD Print Settings Last Updated 01/04 2011 12:00:14 The settings will be changed as follows. (Changes effective after the main power is turned OFF and ON.) OK Cancel WSD Print Settings Use WSD Printing Use WSD Browsing Use Multicast Discovery Copyright CANON INC. 2011 All Rights Reserved Done Internet | Protected Mode: Off 100%
Proceed to Step 6 if you do not specify the settings for the other options.

HTTP Settings

Specify whether to use the HTTP function. (1) Click [Edit...] in [HTTP Settings]. ![](images/a0f0a483e2ae374721008209af2b57a029ea79ee9ec9c5df9121ad0efd7e5428.jpg)
text_image Remote UI Settings/Registration: LBP7680C: LBP7680C - Windows Internet Explorer https://192.168.1.225/swtrtpapi.cgi File Edit View Favorites Tools Help Favorites Remote UI Settings/Registration: LBP7680C: LBP... WSD Print Settings Edit... Use WSD Printing: Off Use WSD Browsing: Off Use Multicast Discovery: Off HTTP Settings Edit... Use HTTP: On SSL Settings Key and Certificate Key and Certificate Settings: Set: Settings that use SSL Done Trusted sites | Protected Mode: Off 100%
(2) Set HTTP. ![](images/a0bb595cd816ff2454d862bdc4a88f13357ff83c7ec332d0ecbda33d0aabe626.jpg)
text_image Remote UI Settings/Registration: LBP7680C LBP7680C - Windows Internet Explorer http://192.168.1.225/nethttp.cgi/CSU/Tc-370304959 File Edit View Favorites Tools Help Favorites Remote UI Settings/Registration LBP7680C LBP... I SENSYS LBP7680C / LBP7680C / To Portal Login User: System Manager Log Out Settings/Registration Mail to System Manager Preferences Control Menu Paper Source Menu Network Layout Menu Quality Menu User Maintenance Menu Output/Control Utility Menu Calibration Device Control Management Settings Department ID Management Security License/Other Settings/Registration Preferences Network > TCP/IP Settings > Edit HTTP Settings Edit HTTP Settings Last Updated 01/04 2011 12/01 12 The settings will be changed as follows. (Changes effective after the main power is turned OFF and ON.) OK Cancel HTTP Settings Use HTTP Copyright CANON INC. 2011 All Rights Reserved Done Internet | Protected Mode: Off 100%
[Use HTTP] When the check box is selected, you can access the printer using HTTP. ![](images/c48174366209dea8f3cc8e46a78e00fee5b4800cbb35210cc0e2b25e25a1eeef.jpg)

IMPORTANT

When the [Use HTTP] check box is cleared

The settings on the functions using HTTP change automatically, as shown below.
[Use IPP Print] [Off]
[Remote UI]* [Off]
\* Can only be set from the printer's control panel and the FTP client If the [Use HTTP] check box is cleared, you will not be able to use IPP print or Remote UI, so consult with the network administrator before you set it. (3) Click [OK]. ![](images/3458542d60fd123ddaf734f73743648adb9ede226b8d0bf484360af6e7a1a643.jpg)
text_image Remote UI Settings/Registration: LBP7680C / LBP7680C - Windows Internet Explorer http://192.168.1.225/net/http.cgi/CSUTc=570304959 File Edit View Favorites Tools Help Favorites Remote UI Settings/Registration: LBP7680C: LBP I.SENSYS LBP7680C / LBP7680C / To Portal Login User; System Manager Log Out Settings/Registration Mail to System Manager Preferences Control Menu Paper Source Menu Network Layout Menu Quality Menu User Maintenance Menu Output/Control Utility Menu Calibration Device Control Management Settings Department ID Management Security License/Other Settings/Registration Preferences Network > TCP/IP Settings > Edit HTTP Settings Edit HTTP Settings Last Updated: 01/04 2011 12.01.12 The settings will be changed as follows. (Changes effective after the main power is turned OFF and ON.) OK Cancel HTTP Settings Use HTTP Copyright CANON INC. 2011 All Rights Reserved Done Internet | Protected Mode: Off 100%
Proceed to Step 6 if you do not specify the settings for the other options.

Setting SSL Keys and Certificates

Check the key used for SSL. See "Selecting Keys and Certificates" for more information about SSL encrypted communication functions and key registration and selection procedures.

Proxy Settings

(1) Click [Edit...] in [Proxy Settings]. ![](images/864b073309b467f8e49bcf23fb450d8376108e47b5ed0ab166e6f96cfe6d0234.jpg)
text_image Remote UI Settings/Registration: LBP7680C LBP7680C - Windows Internet Explorer https://192.168.1.225/nettccps.cgi File Edit View Favorites Tools Help Favorites Remote UI Settings/Registration: LBP7680C LBP... Proxy Settings Edit... Use Proxy: Off HTTP Proxy Server Address: HTTP Proxy Server Port Number: 80 Use Proxy Within Same Domain: Off Proxy Authentication: Off User Name: Password: Not set. Multicast Discovery Settings Edit... Discovery Response: On Scope Name: default SNTP Settings Done Trusted sites | Protected Mode: Off 100%
(2) Set proxy functions. ![](images/cf4204ba4415b574d580d371b56cff2875b9b117e1efc7f5113a98c2f155ee6c.jpg)
text_image Remote UB Settings/Registration: LBP7680C: LBP7680C - Windows Internet Explorer http://192.168.1.225/netproxy.org/PC5V/Tz1878148165 File Edit View Favorites Tools Help Favorites Remote UB Settings/Registration: LBP7680C: LBP... I-SENYS LBP7680C / LBP7680C / To Portal Login User: System Manager Log Out Settings/Registration Mail to System Manager Preferences Control Menu Paper Source Menu Network Layout Menu Quality Menu User Maintenance Menu Output/Control Utility Menu Calibration Device Control Management Settings Department ID Management Security License/Other Settings/Registration Preferences Network > TCP/IP Settings > Edit Proxy Settings Edit Proxy Settings Last Updated 01/04 2011 12:02:30 The settings will be changed as follows. (Changes effective after the main power is turned OFF and ON ) OK Cancel Proxy Settings Use Proxy HTTP Proxy Server Address: HTTP Proxy Server Part Number: 80 Use Proxy within Same Domain Use Proxy Authentication User Name: Set/Change Password Password: (Max 24 characters) Confirm: (Max 24 characters) Done Internet | Protected Mode: Off 100%

When using proxy functions

Select the [Use Proxy] check box, and set the following items.
[HTTP Proxy Server Address]Enter the address of the proxy server used by the proxy functions.
[HTTP Proxy Server Port Number]Enter the port number of the proxy server used by the proxy functions. You can set it between [0] and [99999].
[Use Proxy within Same Domain]When the check box is selected, use the proxy function within the same domain.

When not using proxy functions

Clear the [Use Proxy] check box. (3) Set proxy authentication functions. ![](images/5673675c5510a5ee5777a3148ef65e1d89f61973b9300381bfae19875652f0a0.jpg)
text_image Remote UI Settings/Registration: LBP7680C: LBP7680C - Windows Internet Explorer http://82.168.1.225/netproxy.cg/CSUT=1870148165 File Edit View Favorites Tools Help Favorites Remote UI Settings/Registration LBP7680C:LBP... SENSYS LBP7680C / LBP7680C / To Portal Login User: System Manager Log Out Settings/Registration Mail to System Manager Preferences Control Menu Paper Source Menu Network Layout Menu Quality Menu User Maintenance Menu Output/Control Utility Menu Calibration Device Control Management Settings Department ID Management Security License/Other Settings/Registration: Preferences: Network > TCP/IP Settings > Edit Proxy Settings Edit Proxy Settings Last Updated 01/04 2011 12:02:35 The settings will be changed as follows. (Changes effective after the main power is turned OFF and ON.) OK Cancel Proxy Settings Use Proxy HTTP Proxy Server Address: HTTP Proxy Server Port Number: 80 Use Proxy within Same Domain Use Proxy Authentication User Name: Set/Change Password Password: (Max 24 characters) Confirm: (Max 24 characters) Done Internet | Protected Mode Off 100%
When using proxy authentication functions Select the [Use Proxy Authentication] check box, and set the following items.
[User Name]Enter the user name used for proxy authentication. Up to 24 characters can be entered.
[Set/Change Password]Select the check box to use a password for proxy authentication. When you are not using a password for proxy authentication, clear the check box.
[Password]When [Set/Change Password] is selected, enter the password used for proxy authentication. Up to 24 characters can be entered.
[Confirm] To confirm the password, enter the entered [Password] again.

When not using proxy authentication functions

Clear the [Use Proxy Authentication] check box. (4) Click [OK]. ![](images/a185448740a7bc390521fe6435eb239933648668175496ccad75c4c98dc71126.jpg)
text_image Remote UB Settings/Registration: LBP7680C: LBP7680C - Windows Internet Explorer http://192.168.1.225/netproxy.zg/CS/S/Tc:1879148145 File Edit View Favorites Tools Help Favorites Remote UB Settings/Registration: LBP7680C: LBP... I-SEN5YS LBP7680C / LBP7680C / To Portal Login User: System Manager Log Out Settings/Registration Mail to System Manager Preferences Control Menu Paper Source Menu Network Layout Menu Quality Menu User Maintenance Menu Output/Control Utility Menu Calibration Device Control Management Settings Department ID Management Security License/Other Settings/Registration, Preferences, Network > TCP/IP Settings > Edit Proxy Settings Edit Proxy Settings Last Updated 01/04 2011 12:02:35 The settings will be changed as follows. (Changes effective after the main power is turned OFF and ON.) OK Cancel Proxy Settings Use Proxy HTTP Proxy Server Address: HTTP Proxy Server Port Number: 80 Use Proxy within Same Domain Use Proxy Authentication User Name: Set/Change Password Password: (Max 24 characters) Confirm: (Max 24 characters) Done Internet | Protected Mode: Off 100%
![](images/4c62444f41064bf20b4784263a14c55b3b2039be4780cd09dbb90446966a0eed.jpg) Proceed to Step 6 if you do not specify the settings for the other options.

Multicast Discovery Settings

Set whether the printer will respond to device searches over the network using Multicast Discovery. (1) Click [Edit...] in [Multicast Discovery Settings]. ![](images/0599a80b84746ec107ab9e55db8d6b50aa00367393d65c8fcfa6e370ca32b0b6.jpg)
text_image Remote UI Settings/Registration: LBP7680C: LBP7680C - Windows Internet Explorer https://192.168.1.223/mettrpp.cgi File Edit View Favorites Tools Help Favorites Remote UI Settings/Registration: LBP7680C: LBP... Proxy Settings Edit... Use Proxy: Off HTTP Proxy Server Address: HTTP Proxy Server Port Number: 80 Use Proxy Within Same Domain: Off Proxy Authentication: Off User Name: Password: Not set. Multicast Discovery Settings Edit... Discovery Response: On Scope Name: default SNTP Settings Done Trusted sites | Protected Mode: Off 100%
(2) Set Multicast Discovery. ![](images/b1b0aa51934142c92fb6fd55a6892a87a1778aa1371ca7de1fccdb2a6164c0ce.jpg)
text_image Remote UI Settings/Registration: LBP7680C: LBP7680C - Windows Internet Explorer http://192.168.1.225/mntdiscovery.cgi/CSUTs-0373666712 File Edit View Favorites Tools Help Favorites Remote UI Settings/Registration: LBP7680C: LBP... Settings/Registration To Portal Login User: System Manager Log Out Mail to System Manager Preferences Control Menu Paper Source Menu Network Layout Menu Quality Menu User Maintenance Menu Output/Control Utility Menu Calibration Device Control Management Settings Department ID Management Security License/Other Settings/Registration: Preferences: Network > TCP/IP Settings > Edit Multicast Discovery Settings Edit Multicast Discovery Settings Last Updated: 01/04 2011 12:03:43 The settings will be changed as follows. (Changes effective after the main power is turned OFF and ON.) OK Cancel Multicast Discovery Settings Respond to Discovery Scope Name: default Copyright CANON INC. 2011 All Rights Reserved Done Internet | Protected Mode: Off 100%
[Respond to Discovery]Select the check box to allow it to respond to a multicast search request.
[Scope Name]Enter the scope name used when a specified device is searched from utility software such as NetSpot Device Installer using multicast. Up to 32 characters can be entered.† You cannot use any of the following characters: "(", ")", ".", "!", "<", ">", "=","~", ";", "+", "*", "."
(3) Click [OK]. ![](images/b2797d68d682528d339b00093543bc9402f256e51279799d796bf0dc56d53617.jpg)
text_image Remote UI Settings/Registration: LBP7680C / LBP7680C - Windows Internet Explorer http://192.168.1.225/metdiscovery.org/CSUT=0073666712 File Edit View Favorites Tools Help Favorites Remote UI Settings/Registration LBP7680C LBP... I.SENSYS LBP7680C / LBP7680C / To Portal Login User: System Manager Log Out Settings/Registration Mail to System Manager Preferences Control Menu Paper Source Menu Network Layout Menu Quality Menu User Maintenance Menu Output/Control Utility Menu Calibration Device Control Management Settings Department ID Management Security License/Other Settings/Registration Preferences Network > TCP/IP Settings > Edit Multicast Discovery Settings Edit Multicast Discovery Settings Last Updated 01/04 2011 12:03:43 The settings will be changed as follows. (Changes effective after the main power is turned OFF and ON.) OK Cancel Multicast Discovery Settings Respond to Discovery Scope Name: default Copyright CANON INC. 2011 All Rights Reserved Done Internet | Protected Mode: Off 100%
Proceed to Step 6 if you do not specify the settings for the other options.

SNTP Settings

Set whether to synchronize the printer time with the NTP server. (1) Click [Edit...] in [SNTP Settings]. ![](images/f9dfea254a1bd380a9860c091791d63c18ce9df31131853002c81c7d3d410005.jpg)
text_image Remote UI Settings/Registration LBP7680C: LBP7680C - Windows Internet Explorer https://192.166.1.225/nettcapi.cgi File Edit View Favorites Tools Help Favorites Remote UI Settings/Registration LBP7680C: LBP... Multicast Discovery Settings Edit... Discovery Response: On Scope Name: default SNTP Settings Edit... Use SNTP: Off NTP Server Name: Polling interval: 24 hours Check NTP Server Connection Check NTP Server Connection Copyright CANON INC. 2011 All Rights Reserved Done Trusted sites | Protected Mode: Off 100%
(2) Set SNTP. ![](images/e0d39ef15b31e0e1bb7f0b66174befe61c23a0eb678da61c009be808895b4c11.jpg)
text_image Remote UI Settings/Registration: LBP7680C / LBP7680C - Windows Internet Explorer http://192.168.1.225/remsntp.cgi?CSUTs-402544818 File Edit View Favorites Tools Help Favorites Remote UI Settings/Registration LBP7680C: LBP... i-SENSYS LBP7680C / LBP7680C / To Portal Login User: System Manager Log Out Settings/Registration Mail to System Manager Preferences Control Menu Paper Source Menu Network Layout Menu Quality Menu User Maintenance Menu Output/Control Utility Menu Calibration Device Control Management Settings Department ID Management Security License/Other Settings/Registration Preferences Network > TCP/IP Settings > Edit SNTP Settings Edit SNTP Settings Last Updated: 01/04 2011 12:04:57 The settings will be changed as follows. (Changes effective after the main power is turned OFF and ON.) OK Cancel SNTP Settings Use SNTP NTP Server Name: Polling Interval: 24 hours (1-48) Copyright CANON INC. 2011 All Rights Reserved Done Internet | Protected Mode: Off 100%
When using the SNTP client function to obtain time information from the NTP server Select the [Use SNTP] check box, and set the following items.
[NTP Server Name]If DNS is set, enter the server name of the NTP server in [NTP Server Name]. If DNS is not set, enter the IP address of the NTP server in [NTP Server Name].
[Polling Interval]Set the interval for the printer to poll the NTP server for time information. You can set intervals of [1] to [48] (hours).
![](images/efa7a69bc06d868215541b0b9aa992602a576de89db07a09e596b569e4e4be0d.jpg)

NOTE

NTP Server

It is a public time information server on the Internet.

When not Using the SNTP Client Function

Clear the [Use SNTP] check box. (3) Click [OK]. ![](images/8617315122ae1d5b32d8e3d8aa54af1f4c7bd8fdd31764be72722afe3884c019.jpg)
text_image Remote UI Settings/Registration: LBP7680C LBP7680C - Windows Internet Explorer http://192.168.1.225/netsntp.cgi/CSUTz-402548013 File Edit View Favorites Tools Help Favorites Remote UI Settings/Registration: LBP7680C LBP... SENSYS LBP7680C / LBP7680C / To Portal Login User: System Manager Log Out Settings/Registration Mail to System Manager Preferences Control Menu Paper Source Menu Network Layout Menu Quality Menu User Maintenance Menu Output/Control Utility Menu Calibration Device Control Management Settings Department ID Management Security License/Other Settings/Registration Preferences Network > TCP/IP Settings > Edit SNTP Settings Edit SNTP Settings Last Updated 01/04 2011 12:04:57 The settings will be changed as follows. (Changes effective after the main power is turned OFF and ON.) OK Cancel SNTP Settings Use SNTP NTP Server Name: Polling Interval: 24 hours (1-48) Copyright CANON INC. 2011 All Rights Reserved Done Internet | Protected Mode: Off 100%

6

Perform a hard reset or restart the printer.

→ After performing a hard reset or restarting the printer, the settings are effective. ![](images/c4cc77c1be0b2b18b135daf61177ebd534a1f70623f1b00f397529e3f0dd4f8b.jpg)

NOTE

To perform a hard reset

You can perform a hard reset using the following procedure. 1. Click [Settings/Registration]. 2. Select [Device Control] from the [Output/Control] menu. 3. Select [Hard Reset], then click [Execute].

When setting the IP address

![](images/6d0a509b58c368a9b5863cdeeddfa9c1a6ab995e4e285e0d31e0e7b89e2f9006.jpg)

NOTE

If you changed the IP address after installing the printer driver

Specify the port to be used again in the printer driver. > "Configuring a Computer that Performs Printing"

When using DHCP, BOOTP, or RARP

- One of the following can be used: DHCP, BOOTP, or RARP. When any of the settings is turned [On], the remaining two settings are automatically turned [Off]. - Because it takes one to two minutes to check whether DHCP, BOOTP, and RARP are available, we recommend that you set the unused protocol(s) to [Off]. - Each server or daemon (the DHCP server, BOOTP daemon, or RARP daemon) must be running on the network. - Even if you are using DHCP, BOOTP, or RARP, specify the settings for [IP Address], [Subnet Mask], and [Gateway Address] manually. If you cannot obtain information from the servers of DHCP, BOOTP, and RARP, the values specified manually are used. - After the printer restarts, the values obtained from DHCP, BOOTP, and RARP are displayed. (If the values have been specified previously, they overwrite the obtained ones.)

When using DHCP

If you cycle the power of the printer, you may not be able to print. This is because a different IP address from the one that has been used is assigned. When using DHCP, consult your network administrator and perform either of the following settings. - Specifying the DNS Dynamic Update function - Specifying the settings so that the same IP address is always assigned when the printer starts up

When configuring the DNS Settings

![](images/5b312e02fc5afdbd22c46c6dd593b0792d30349ddaba420e40f932ac87d8bffb.jpg)

IMPORTANT

DNS Dynamic Update

DNS Dynamic Update is a function that adds the IP address of the device and the names specified as the host name and domain name to the DNS server automatically. This function can be used in the environment in which a Dynamic DNS server is being used.

When using the DNS Dynamic Update function

You need to set the IP address, host name, and domain name of the DNS server.

When configuring the WINS Settings

![](images/647248319efbe22edc6820142c47a90b9b3ae7107ecd9cb79d21bc3919b18c4d.jpg)

IMPORTANT

WINS

WINS (Windows Internet Name Service) is a service that maps NetBIOS names (names of computers or printers) to IP addresses. A WINS server is required to use WINS.

If [Scope ID] is specified

The printer cannot communicate with the computers that have a different scope ID.

When configuring the Multicast Discovery Settings

![](images/05bdeea9bf549395cc3aa97e584426353b22459ba0fb59e9002653ffdd7525ce.jpg)

NOTE

Multicast discovery

This is a function that searches for certain devices using Service Location Protocol (SLP). By using the multicast discovery function, you can search for only the devices whose values in [Scope Name] are verified, using the service location protocol (SLP) from utility software, such as NetSpot Device Installer.

When configuring the SNTP Settings

![](images/4d482f253d41ed1bce119ce82adafb9df329177f4cd6399168ba9b4192d414b0.jpg)

NOTE

When the check box for [Use SNTP] is selected

[Check NTP Server Connection] is displayed on the [TCP/IP Settings] page on the [Network]. When [Check NTP Server Connection] is clicked, the printer communicates with the specified NTP server, and the result of the communication is displayed in [NTP Server Connection Check Result]. [OK] is displayed if the printer communicated with the NTP server successfully, and [Error] is displayed if the printer could not communicate with the NTP server due to any reason such as a setting mistake or communication error. 0258-075 This section describes the procedure for setting IP v. 6. Specify the settings for IP v. 6 using the Remote UI after specifying the settings for IP v. 4. ![](images/d2fa8ec1bfc4e030115960424229462721d0d6e80f23b0d1b5561b30fa228821.jpg)

IMPORTANT

\- IPSec encryption (Security Architecture for Internet Protocol) is not supported for LBP7660Cdn. ![](images/bd318f0cd79b09341413415fe6f79d6b6d50ca17bbafbafd53a251a37296df01.jpg)

NOTE

About the IP v. 6 address

This printer can have up to seven IP v. 6 addresses of the following types. (Only one address can be registered manually.) IP v. 6 communication allows you to use multiple IP v. 6 addresses simultaneously.
TypeRegistrable NumberOverview
Link-Local Address 1A link local address is an IPv6 address that is generated automatically using the specific prefix (information indicating to which network the machine belongs) "fe80::" and an interface identifier generated from the MAC address of the printer.Because this address is valid only within the same prefix, it cannot traverse the router. One link-local address is specified for this printer whenever IP v. 6 is being used.
Manual Address 0 to 1A manual address is a fixed address entered manually. By setting the IP address manually, you can specify the prefix length and the default router address.
Stateless Address 0 to 4A stateless address is a temporary IPv6 address that is automatically generated using the prefix included in the RA (Router Advertisement) that is notified from the router and the printer's MAC address. If the created IPv6 addresses do not overlap on the network, they may be allocated as the printer's IP address.
Stateful Address 0 to 1You can obtain a stateful address from the DHCP server using DHCP v. 6.

1

Start the Remote UI, and then log in as Administrator. > "Starting the Remote UI"

2

Click [Settings/Registration]. ![](images/8f13bb4352002fe029b3d505fd5ca82d7e727a8b9983d535029031ebb3ff6d22.jpg)
text_image Remote UI Portal: LBPXXXX: LBPXXXX - Windows Internet Explorer Http:// Bing Favorites Suggested Sites Web Slice Gallery Remote UI Portal: LBPXXXX: LBPXXXX Device Name: LBPXXXX Product Name (Serial No.): LBPXXXX Location: Login User: System Manager Log Out Language English Mail to System Manager Remote UI: Portal Last Updated: 29/05 2012 10:03:42 Device Basic Information Device Status The printer is ready. Error Information There is no error. Consumables Information Paper Information Paper Source Remaining Paper Paper Size Paper Type Multi-Purpose Tray None A4 Free (Mixed Types) Drawer 1 Loaded A4 Free (Mixed Types) Remaining Toner Item Name Remaining Toner Cyan Toner 16-100% Status Monitor/Cancel Settings/Registration Basic Tools Box Direct Print Management Tools Service Management Service

3

Select [Network] from the [Preferences] menu. ![](images/020d9ec09e70fa26f6aa84323bf9b24f1702f92d5b7dc8928e870b688a77b765.jpg)
text_image Remote UI Settings/Registrations: LBP7680C: LBP7680C - Windows Internet Explorer http://192.168.1.225/netmenu.cgi File Edit View Favorites Tools Help Favorites Remote UI Settings/Registrations LBP7680C: LBP... Settings/Registration Mail to System Manager Preferences Control Menu Paper Source Menu Network Layout Menu Quality Menu User Maintenance Menu Output/Control Utility Menu Calibration Device Control Management Settings Department ID Management Security License/Other Settings/Registration Preferences Network Network LastUpdated 01/04 2011 10:32:30 Network TCP/IP Settings IPv4 Settings IPv6 Settings WNS Configuration ARP/FNG Settings FTP Settings LPD Print Settings RAW Print Settings IPP Print Settings WSO Print Settings HTTP Settings SSL Settings Proxy Settings Multicast Discovery Settings SNTP Settings NetWare Settings AppleTalk Settings SPAP Settings Done Internet | Protected Mode: Off 100%

4

Click [TCP/IP Settings]. ![](images/83ed62ed54a33c22297cac6cee3481eaa4ba8e8721afd4a886702407762fdede.jpg)
text_image Remote UI Settings/Registration: LBP7680C / LBP7680C - Windows Internet Explorer http://192.168.1.225/netnews.cgi File Edit View Favorites Tools Help Favorites Remote UI Settings/Registration: LBP7680C LBP... I SENSYS LBP7680C / LBP7680C / Settings/Registration To Portal Login User: System Manager Log Out Mail to System Manager Preferences Control Menu Paper Source Menu Network Layout Menu Quality Menu User Maintenance Menu Output/Control Utility Menu Calibration Device Control Management Settings Department ID Management Security License/Other Settings/Registration Preferences Network Network Last Updated 01/04 2011-10:32:30 Network TCP/IP Settings IPv4 Settings IPv6 Settings WINS Configuration ARP/PING Settings FTP Settings LPD Print Settings RAW Print Settings IPP Print Settings WSD Print Settings HTTP Settings SSL Settings Proxy Settings Multicast Discovery Settings SNTP Settings NetWare Settings AppleTalk Settings NETS Server Done Internet | Protected Mode: Off

5

Click [Edit...] under [IPv6 Settings]. ![](images/10928baf8236c7076372fb3651bd4ecf8f7b23706a2eacbe576f8a71b1ca5032.jpg)
text_image Remote UE Settings/Registration: LBP7680C: LBP7680C - Windows Internet Explorer https://192.168.1.225/metrcapi.cgi File Edit View Favorites Tools Help Favorites Remote UI Settings/Registration: LBP7680C: LBP... IPv6 Settings Edit... IP Address Settings Use IPv6: Off Link-Local Address: Prefix Length: Use Stateless Address: On Use Manual Address: Off IP Address: Prefix Length: 64 Default Router Address: Use DHCP6: Off Stateful Address: Prefix Length: DNS Settings Primary DNS Server Address: Secondary DNS Server Address: Use IPv4 Host/Domain Names: Off Done Trusted sites | Protected Mode: Off 100%

6

Select the [Use IPv6] check box. ![](images/7da24ff0f43ee1d268ecd00122f09a43a4c4bd0f83d682a7748047cb63328571.jpg)
text_image Remote UB Settings/Registration: LBP7680C / LBP7680C - Windows Internet Explorer File Edit View Favorites Tools Help Favorites Remote UB Settings/Registration: LBP7680C: LBP... Settings/Registration Mail to System Manager Preferences Control Menu Paper Source Menu Network Layout Menu Quality Menu User Maintenance Menu Output/Control Utility Menu Calibration Device Control Management Settings Department ID Management Security License/Other Settings/Registration: Preferences: Network > TCP/IP Settings > Edit IPv6 Settings Edit IPv6 Settings Last Updated 01/04 2011 12.06:48 The settings will be changed as follows. (Changes effective after the main power is turned OFF and ON.) OK Cancel IPv6 Settings IP Address Settings Use IPv6 Link-Local Address: Prefix Length: Use Stateless Address Use Manual Address IP Address: Prefix Length: 64 (0-128) Default Router Address: Use DHCPv6 Stateful Address: Prefix Length: Internet | Protected Mode: Off 100%

7

Specify the stateless address.

Check the [Use Stateless Address] check box when using a stateless address. ![](images/a77e423bd7141b3ae62357d475923f10918a24e9e482075f7c328e9f154d1c81.jpg)
text_image Remote UB Settings/Registration: LBP7680C: LBP7680C - Windows Internet Explorer http://192.168.1.225/netipv6.cgi/CSUTs-973LSB305 File Edit View Favorites Tools Help Favorites Remote UB Settings/Registration: LBP7680C: LBP... I-SENSYS LBP7680C / LBP7680C / Settings/Registration Mail to System Manager Preferences Control Menu Paper Source Menu Network Layout Menu Quality Menu User Maintenance Menu Output/Control Utility Menu Calibration Device Control Management Settings Department ID Management Security License/Other Settings/Registration: Preferences: Network > TCP/IP Settings > Edit IPv6 Settings Edit IPv6 Settings Last Updated 01/04 2011 12:05:48 The settings will be changed as follows. (Changes effective after the main power is turned OFF and ON.) OK Cancel IPv6 Settings IP Address Settings Use IPv6 Link-Local Address: Prefix Length: Use Stateless Address Use Manual Address IP Address: Prefix Length: 64 (0-128) Default Router Address: Use DHCPv6 Stateful Address: Prefix Length: Internet | Protected Mode: Off 100%
![](images/1aac0b900efc5b5d5662b35376732722b36ec7dc7038b2d65aee9ed73bf271e7.jpg)

NOTE

Stateless Address Retention

After the [Use Stateless Address] check box is selected and the printer is restarted, the stateless address is displayed automatically. This stateless address is discarded when the printer is turned OFF.

If you want to use a manual address, specify the following settings.

If you do not want to use a manual address, proceed to Step 9. ![](images/ebe7c3cba066c911669ca6612fbe70569e69cc5ead8d93ac3e6fa238518df990.jpg)
text_image Remote UB Settings/Registration: LBP7680C / LBP7680C - Windows Internet Explorer http://192.168.1.225/netgpd.cgz?CSUTv@7158305 File Edit View Favorites Tools Help Favorites Remote UB Settings/Registration: LBP7680C : LBP... I-SENSYS LBP7680C / LBP7680C / Settings/Registration To Portal Login User: System Manager Log Out Mail to System Manager Preferences Control Menu Paper Source Menu Network Layout Menu Quality Menu User Maintenance Menu Output/Control Utility Menu Calibration Device Control Management Settings Department ID Management Security License/Other Settings/Registration: Preferences: Network > TOP/IP Settings > Edit IPv6 Settings Edit IPv6 Settings Last Updated: 91/04 2011 12:06:48 The settings will be changed as follows. (Changes effective after the main power is turned OFF and ON.) OK Cancel IPv6 Settings IP Address Settings Use IPv6 Link-Local Address: Prefix Length: Use Stateless Address Use Manual Address IP Address: Prefix Length: 64 (0-128) Default Router Address: Use DHCP6 Stateful Address: Prefix Length: Internet | Protected Mode Off 100%
(1) Select the [Use Manual Address] check box. (2) Enter [IP Address]. (3) Enter [Prefix Length]. (4) Enter [Default Router Address] as needed. ![](images/adc0998feb6ce23effabd8907654a7095026acad5041632c4a9a9c05403c9559.jpg)

IMPORTANT

Addresses which cannot be entered in [IP Address] and [Default Router Address]

- An address which starts with "ff" (multicast address) - An address which starts with "0:0:" ![](images/8df2da2c861c9b1c0df30a4850364232da894bb4d762a04f236094d63eda8204.jpg)

Specify DHCP v. 6.

When using the stateful address, select the [Use DHCPv6] check box. ![](images/a6170ee9e15bf96555f02c222b0be0d86eeba1460e8bf40763ce54b02b83ddd2.jpg)
text_image Remote UB Settings/Registration: LBP7680C: LBP7680C - Windows Internet Explorer File Edit View Favorites Tools Help Favorites Remote UB Settings/Registration: LBP7680C: LBP... Settings/Registration Mail to System Manager Preferences Control Menu Paper Source Menu Network Layout Menu Quality Menu User Maintenance Menu Output/Control Utility Menu Calibration Device Control Management Settings Department ID Management Security License/Other Settings/Registration: Preferences: Network > TCP/IP Settings > Edit IPv6 Settings Edit IPv6 Settings Last Updated 01/04 2011 12.06.48 The settings will be changed as follows. (Changes effective after the main power is turned OFF and ON.) OK Cancel IPv6 Settings IP Address Settings Use IPv6 Link-Local Address: Prefix Length: Use Stateless Address Use Manual Address IP Address: Prefix Length: 64 (0-128) Default Router Address: Use DHCPv6 Stateful Address: Prefix Length: Internet | Protected Mode: Off 100%

10

If you want to use the DNS server, specify the following settings. If you do not want to use the DNS server, proceed to Step 11. ![](images/16d499990fd8bc7ae91f63ddc2dfa16ede766d441e8b5a4bf44a63b61972bb33.jpg)
text_image Remote UI Settings/Registration: LBP7680C: LBP7680C - Windows Internet Explorer https://192.166.1.225/melipv6.cgi?CSU/T=1275135093 File Edit View Favorites Tools Help Favorites Remote UI Settings/Registrations LBP7680C: LBP... Default Router Address: Use DHCPv6 Stateful Address: Prefix Length: DNS Settings Primary DNS Server Address: Secondary DNS Server Address: Use IPv4 Host/Domain Names Host Name Canon1ABF61 Domain Name: DNS Dynamic Update Register Manual Address Register Stateful Address Register Stateless Address Copyright CANON INC: 2011 All Rights Reserved Done Trusted sites | Protected Mode: OFF 100%
You can specify the following [IPv6 Settings]. (1) Enter the IP address of the primary DNS server in [Primary DNS Server Address]. (2) Enter the IP address of the secondary DNS server in [Secondary DNS Server Address]. (3) Set [Host Name] and [Domain Name]. \- Select the [Use IPv4 Host/Domain Names] check box to use the same host name and domain name as IPv4. After the printer is restarted, the host name and domain name set by IPv4 are set automatically. \- When using a host name and domain name that are different from IPv4, enter [Host Name] and [Domain Name]. You can enter up to 47 characters. • Example of [Domain Name] entry: "example.com"

11

If you want to use DNS Dynamic Update, specify the following settings.

If you do not want to use the DNS server, proceed to Step 12. ![](images/389e44d1c72f2a35a77a1a0c0925f149271f2a30d215450525f772989fb6224e.jpg)
text_image Remote UI Settings/Registration: LBPN80C: LBPN80C - Windows Internet Explorer https://192.168.1.225/metgvp6.org?CSU/Tc1.2751350X File Edit View Favorites Tools Help Favorites Remote UI Settings/Registration: LBPN80C: LBP... Default Router Address: Use DHCPv6 Stateful Address: Prefix Length: DNS Settings Primary DNS Server Address: Secondary DNS Server Address: Use IPv4 Host/Domain Names Host Name: Canon1ABF61 Domain Name: DNS Dynamic Update Register Manual Address Register Stateful Address Register Stateless Address Copyright CANON INC. 2011 All Rights Reserved Done Trusted sites | Protected Mode: Off 100%
(1) Select the [DNS Dynamic Update] check box. Using the DNS Dynamic Update function, by registering the [Host Name] and [Domain Name] to the DNS server, the printer's IP address can be used without being fixed. (2) Set whether to register the IPv6 address to the DNS server during DNS dynamic updates. - If you select the [Register Manual Address] check box, a manual address is registered to the DNS server. - If you select the [Register Stateful Address] check box, a stateful address is registered to the DNS server. - If you select the [Register Stateless Address] check box, a stateless address is registered to the DNS server. ![](images/be8d70d4a0dc6dfe22946b3436adf0a8a0309a2edd1db4cab5f04773504bc6d8.jpg)

IMPORTANT

DNS Dynamic Update

DNS Dynamic Update is a function that adds the IP address of the device and the names specified as the host name and domain name to the DNS server automatically. This function can be used in the environment in which a Dynamic DNS server is being used.

When using the DNS Dynamic Update function

You need to set the IP address, host name, and domain name of the DNS server.

12

Click [OK].

![](images/fc6ac73e380bc4606c6d73f5c52956a08f51a3db888b15a95139a3e8621b462a.jpg)
text_image Remote UI Settings/Registration: LBP7680C / LBP7680C - Windows Internet Explorer http://192.168.1.225/netipv6.org/IC/SJT=97358003 File Edit View Favorites Tools Help Favorites Remote UI Settings/Registration: LBP7680C: LBP... I-SENSYS LBP7680C / LBP7680C / To Portal Login User: System Manager Log Out Settings/Registration Mail to System Manager Preferences Control Menu Paper Source Menu Network Layout Menu Quality Menu User Maintenance Menu Output/Control Utility Menu Calibration Device Control Management Settings Department ID Management Security License/Other Settings/Registration Preferences Network > TCP/IP Settings > Edit IPv6 Settings Edit IPv6 Settings Last Updated 01/04 2011 12:06:48 The settings will be changed as follows. (Changes effective after the main power is turned OFF and ON.) OK Cancel IPv6 Settings IP Address Settings Use IPv6 Link-Local Address Prefix Length Use Stateless Address Use Manual Address IP Address Prefix Length 64 (0-128) Default Request Address: Internet | Protected Mode: Off 100%

13

Perform a hard reset or restart the printer.

→ After performing a hard reset or restarting the printer, the settings are effective. ![](images/1a61f19c79b89a91d3eb116a05ed30cfe563eff21532edef2e9246bb818f6650.jpg)

NOTE

To perform a hard reset

You can perform a hard reset using the following procedure. 1. Click [Settings/Registration]. 2. Select [Device Control] from the [Output/Control] menu. 3. Select [Hard Reset], then click [Execute]. 0258-076 After completing the protocol settings for the printer, configure each computer to be used for printing. This section describes the procedure for when you are using Windows. If you are using Macintosh, see "Configuring a Computer that Performs Printing" in "Network Settings for the Printer (AppleTalk)."

Connecting to a TCP/IP Network

Install TCP/IP client software on all the computers to be used for printing to make them able to use a TCP/IP network. For more details, see the instruction manual for the operating system. This printer supports the following print applications when being used on a TCP/IP network. LPD RAW - IPP/IPPS - FTP WSD ![](images/f8d9eb1d816cd66fbbeab0b36ea86152feaddcc04b02f2fa927f7e1bb8845f92.jpg)

NOTE

A print application is software that receives print data sent via a network and outputs the data to the printer. A print application is required to print to the printer on a network.

About the printer connection

The setting procedure for the printer connection varies depending on the print application. Perform the settings for the printer connection after installing the printer driver. \- For details on the features of print applications, see the following. > "Features of LPD" > "Features of RAW" > "Features of IPP/IPPS" > "Features of WSD" \- For details on the procedure for configuring a print application, see the following. "Connecting the Printer (LPD/RAW)" > "Connecting the Printer (IPP/IPPS)" > "Connecting the Printer (WSD)" ![](images/75788ae9b6ec80ea3fd588d13d7b28efb62f17eec0e780af46cc7c33c07d595d.jpg)

NOTE

When using FTP Client

You can print using FTP client software. For details on the procedure for printing using FTP client software, see "FTP Client."

To manage the printer effectively

You can manage the printer effectively as follows by specifying Windows on the network as the print server. The print server manages print data. If you install an alternative printer driver previously, other computers can install the printer driver via the network. For details on the procedure for configuring the print server, see "Printer Driver Installation Guide." For details on the procedure for viewing "Printer Driver Installation Guide", see "Installation." 0258-077 ![](images/b24f998cde5afce6faa7109a86130d719959e64c0441343165507052097c5789.jpg)
flowchart
graph TD
    LAN -->|TCP/IP| PC["PC"]
    LAN --> Printer["Printer"]
This is a print application that can be used on Windows, Mac OS X, UNIX, and Linux. LPD is generally used for a TCP/IP network environment.
AdvantagesLPD printing is the most common network printing method supported by Windows, Mac OS X, UNIX, and Linux as standard.You can also print a banner page.Even if you should restart the printer while the printer is printing, the print data is guaranteed because the print job is retransmitted (when a byte count is specified on printing).
DisadvantageYou cannot obtain the detailed information about print jobs.
Usage ExampleWhen sharing the printer by multiple users (because it is easy to identify the owner of the print data by using the banner page)When there are a variety of computers (operating systems) in the same network environment, and you want to print using only one print application
Setting Method"Connecting the Printer (LPD/RAW)"
0258-078 ![](images/72554cb62035f62ddcc1d33d4008ffed6d0e93caee9c7487f07fb56f0c2ccab9.jpg)
flowchart
graph TD
    LAN -->|TCP/IP| PC["PC"]
    LAN --> Printer["Printer"]
This is a print application that can be used on Windows. By using this printer application, you can generally print faster than when using LPD.
AdvantagesYou can print relatively faster than when using other applications.When printing in Windows, the print settings using RAW are easier than using other print applications.
DisadvantageYou cannot obtain the detailed information about print jobs.RAW is supported as standard by only Windows, not supported by Macintosh, UNIX, and Linux.
Usage ExampleIf you are using Windows and want to use the printer immediately after installing it
Setting Method"Connecting the Printer (LPD/RAW)"
0258-079 ![](images/c87ff8f1f9bc8a44dfb37083fd897270c22bf52570b6e2a7c1cb1fdad7b2fab6.jpg)
flowchart
graph TD
    A["PC"] --> B["Router"]
    B --> C["Internet"]
    D["Printer"] --> E["TCP/IP (HTTP)"]
    E --> F["Router"]
    F --> C
    style A fill:#f9f,stroke:#333
    style D fill:#ccf,stroke:#333
    style B fill:#cfc,stroke:#333
    style F fill:#fcc,stroke:#333
IPP is a print application that can be used on Windows etc. By using this print application, you can print not only to a printer on your LAN, but also to a remote printer via the Internet. IPPS is a print application that performs SSL encrypted communication when using IPP. IPPS can be used on Windows when the SSL encrypted communication function is enabled.
AdvantagesYou can print using the printer on the Internet.You can obtain information about print jobs and the printer.
DisadvantagePrinting takes relatively more time than other print applications do.
Usage ExampleWhen printing using a remote printer via the Internet
Setting Method"Connecting the Printer (IPP/IPPS)"
0258-07A ![](images/77e5b202ce1703b65c5410397ed63260d988d5eaacad74493c14370a7922c194.jpg)
flowchart
graph TD
    LAN -->|TCP/IP| PC["PC"]
    LAN --> Printer["Printer"]
This is a print application that can be used on Windows Vista, 7, and Server 2008. By using WSD, you can search for the printer automatically as well as obtain information about jobs and the printer, using the WSD protocol.
AdvantagesYou can search printers on a network automatically.Installation of the printer driver is easy.WSD can notify the computer of job completion and obtain the printer's configuration information automatically.
DisadvantageWindows Vista, 7, and Server 2008 are only operating systems that support WSD.
Usage ExampleIf you are using Windows Vista, 7 or Server 2008 and want to use the printer immediately after installing it
Setting Method"Connecting the Printer (WSD)"
0258-07C Configure the protocol settings. > If You Are Using Windows > If You Are Using UNIX

If You Are Using Windows

When Installing the Printer Driver from the Beginning

1

Install the printer driver.

Following the procedure for automatically searching the printer on a network in "Printer Driver Installation Guide", install the printer driver. For details on the procedure for viewing "Printer Driver Installation Guide", see "Installation." ![](images/9dc368c53a564a708ef5bc488508a5f44ba39d94a1df9ae876f5e5648f232d49.jpg)

NOTE

When using LPD

When the printer driver is installed using the above method, RAW is specified as the print application to be used. If you want to use LPD, install the printer driver using the above procedure, and then change a port.

When Changing a Port

1

Open the printer folder.

> "Basic Operations/Various Information for Windows"

2

Right-click the icon for this printer, and then select [Printer properties] or [Properties] from the pop-up menu.

3

Perform the following procedure.

(1) Display the [Ports] sheet. (2) Click [Add Port]. ![](images/97edd0d9ba611288ba00bdfc569b966dbafda7edb81ceedd6e8bdac1a1785ce6.jpg)
text_image Canon Printer Properties General Share Ports (1) Cable Management Security生产设备 Settings Profile Canon Printer Print to the following portfolio. Documents will print to the first free checked port. Port Description Printer COMB: Serial Port COMD: Serial Port COMS: Serial Port FILE: Print to File USB001 Virtual printer port for... IP_192... Standard TCP/IP Port Cancor Printer Add Port... (2) data Port Configure Port... Double bidirectional support Enable printer pooling OK Cancel Apply Help

4

Select the port type.

(1) Select [Standard TCP/IP Port]. (2) Click [New Port]. ![](images/ef6a03b010dc80b591c7f0d48fbd4813d4f962a598d7766e36dbf5ed5b059bce.jpg)
text_image Printer Ports Available port types Standard TCP/IP Port New Port Type... New Port... (1) (2) xl

5

Click [Next].

![](images/bb9ea130696258e0a1298c51e11efcbee63882cacd8de63001bbf3c24447404e.jpg)
text_image Add Standard TCP/IP Printer Port Wizard Welcome to the Add Standard TCP/IP Printer Port Wizard This wizard helps you add a port for a network printer. Before continuing to use that: 1. The device is fused on. 2. The network is connected and configured. To continue, click Next. < Back Next > Cancel

6

Enter the IP address or name of the printer.

(1) Enter the IP address or name \* of the printer in [Printer Name or IP Address]. \* The DNS name to be registered on the DNS server (up to 78 characters) (2) Click [Next]. ![](images/269747b93b55e7fba19bd798a2a8b37fac89c05ce66041f4cac1a464f06e9c29.jpg)
text_image Add Standard TCP/IP Pocket Port Wizard Add port For which device do you want to add a port? Enter the Printer Name or IP address, and a port name for the desired device. Printer Name or IP Address: 182.168.0.215 Port Name: IP_182.168.0.215 (1) < Back Next > (2) add
![](images/59bbaf0e0c614315f90f477d90695338654ebd6c87f53595e40629cff84b1246.jpg)

IMPORTANT

If the printer cannot be detected

The following screen appears. Perform either of the following operations. - Follow the on-screen instructions and search again for the printer. - Specify the setting for [Device Type]. (1) Select [Standard], and then select [Canon Network Printing Device with P9100]. (2) Click [Next]. ![](images/4f59322ffb826462fffb873d9a62f7344aadea441d3d051df90ac9297cca6f71.jpg)
text_image Add Standard TCP/IP Ports Wizard Additional port information required The device could not be identified. The device is not found on the network. Be sure that 1. The device is turned on 2. The network is connected 3. The device is properly configured 4. The address on the previous page is correct. If you think the address is not correct, click Back to return to the previous page. Then correct the address and perform another search on the network. If you are sure the address is correct, select the device type below. Device Type Standard Custom Canon Network Printing Device with PSL06 Settings < Back Next > (2) No
![](images/edd7f8aada9529a384a4bed43993a7eea034aa23445752f6d2cc420f5f74d485.jpg)

NOTE

If you are not sure about the value to enter

The value to be entered varies depending on how the IP address of the printer was set. For more details, see "Values for Setting a Port" or ask your network administrator.

7

Click [Finish].

![](images/122e7d7a048c18805d5a29697541d42d7fd1d7e0bdcb9f3958b65a4b3b30ff87.jpg)
text_image Add Standard TCP/IP Printer Port Wizard Completing the Add Standard TCP/IP Printer Port Wizard You have selected a port with the following characteristics. SNMP: No Protocol RAW, Port $100 Device 182.168.0.215 Port Name IP_182.168.0.215 Adapter Type Canon Network Printing Device will To complete this wizard, click Finish. a Back Push Cancel

Click [Close].

![](images/5e71ec58823533a9ca3779e7e4a9df8699f4bc4b7342fb93f1db364135c86198.jpg)
text_image Finder Ports Available port types Local Port Standard 11.2.3" Port New Port Types... New Sort... Close

9

Click [Apply].

![](images/3b21e002f2a4a1e5e79590f8216449a9ad20e8360d0ef32a4276545bd11c27f9.jpg)
text_image Canon Printer Properties General Sharing Ports Advanced Cable Management Security Device Settings Profiles Canon Printer Print to the following port(s). Documents will print to the first free Checked port. Port Description Printer COMX: Serial Port COMB: Serial Port COMN: Serial Port FSL: Print to File USB01 Virtual printer port for... IP_192... Standard TCP/IP Port Cancel Printer IP_193... Standard TCP/IP Port Add Port... Delete Portinameu Port... Enable bidirectional support Enable printer pooling Open Cancel Help
If you want to use LPD, proceed to Step 10. If you want to use RAW, proceed to Step 11.

10

If you want to use LPD, change the port configuration information.

When using LPD printing, set up the LPR protocol using the procedure below. (1) Click [Configure Port]. ![](images/9d1727d9662856b6249f594115e457eafd1eff4301b31ab7dbbe4754f5467de9.jpg)
text_image Canon Printer Properties General Shares Ports Advanced Color Management Secure Device Settings Profile Canon Printer Print to the following port(s). Documents will print to the first free Checked port. Port Description Pirater COMB: Serial Port COMB: Serial Port COMM: Serial Port FILE: Print to File USB901 Virtual printer port for... IP_192... Standard TCP/IP Port Canon Printer IP_188... Standard TCP/IP Port Add Port... Delete Port Configure Port... Enable Directional support Enable pointer pooling OK Cancel Apply Help
(2) Select [LPR]. (3) Enter "Ip" in [Queue Name]. (4) Click [OK]. ![](images/adab76af2d85b27933a0acfffb2c4ba995599a618bcefa73d27d1e6024b2255c.jpg)
text_image Configure Standard TCP/IP Port Monitor Port Settings Port Name: IP_202.168.0.215 Printer Name or IP Address: 202.168.0.215 Protocol Base @ LPR Raw Settings Port Sample: 2030 LPR Settings Queue Name: fp LPR Byte Counting Enabled SNMP Status Enabled Community Name: packets SNMP Device Index: 1 OK (4)

11

Click [OK]. ![](images/9f5e10f05bf5a06ee165dd4ae9699d7f83b52076b9a3049cf8fff9bd1d84733d.jpg)

NOTE

When deleting an unnecessary port

Select the unnecessary port on the [Ports] sheet, and then click [Delete Port].

If You Are Using UNIX

This section describes the preparation for printing using LPD. For details on the procedure for printing using FTP, see "FTP Client." ![](images/3d0baf02e38bb319c781998aae9920ef31a416c9dfe3ba770720ee295193c63b.jpg)

IMPORTANT

About the setting procedure

- The procedure described here is a setting example. Depending on the system environment, the setting procedure may be different. - Specify the settings also when using a computer on which UNIX OS is installed as a stand-alone workstation along the procedure described here.

1

Log in to the UNIX server as a root user. ![](images/a99b876438e81973eddc7e6d00a0cb502ef67b011d436772e906a780fb3ba7ee.jpg)

IMPORTANT

If you do not have the root user permission on the UNIX server Consult your network administrator.

2

Edit the "/etc/hosts" file to add the printer to the local network. 1. Open the "/etc/hosts" file using a text editor. 2. Add the following line. - Form: (a tab) (a tab) # - Input Example: 192.168.0.215 LBP7680Cx/LBP7660Cdn #the printer to be added If you specified [DNS Host Name] of the printer, specify the same character string as [DNS Host Name] in . For more details on [DNS Host Name], see "Configuring the Protocol Settings."

3. After saving the "/etc/hosts" file, exit the text editor.

![](images/751e4d59262af750f85a02862c2fbb1ee32c3b9f931730233b2ec2fd58d3c77f.jpg)

IMPORTANT

Be sure to assign a fixed IP address to the printer.

When printing from UNIX OS, be sure to assign a fixed IP address to the printer. For details on the procedure for setting the IP address, see "Setting the IP Address (IP v. 4)."

3

Set up the spooling system on the UNIX server.

Example of When Using Solaris 1.x Example of When Using Solaris 2.x or Later Example of When Using HP-UX Example of When Using IBM-AIX

Example of When Using Solaris 1.x

1. Enter the following in the "/etc/printcap" file.

- Form: :<Print queue name>|<comment>:\
    :lp=<the device special file>:\
    :sd=<the spool directory>:\
    :if=<the log file directory>:\
    :rm=<the IP address or name of the printer> 
- Input Example: :print_queue_name|comments:\
    :lp=/var/spool/print_queue_name/.null:\
    :sd=/var/spool/print_queue_name:\
    :if=/var/spool/print_queue_name/log:\
    :rm=printer_host_name 
In the line of "rm", enter the same contents that you entered in .

2. Create the spool directory for the printer. Execute the following commands.

- Form: mkdir -p chown daemon - Input Example: mkdir -p /var/spool/print\_queue\_name chown daemon /var/spool/print\_queue\_name In , enter the same character string that you added in the "/etc/printcap" file.

3. Create the log file for the printer. Execute the following commands.

- Form: cp /dev/null - Input Example: cp /dev/null /var/spool/print\_queue\_name/log

4. Proceed to Step 4.

Example of When Using Solaris 2.x or Later

1. Run "admintool."

The "admintool" utility is supplied with an operating system. For more details, see the manual for the operating system. 2. Select [Browse] → [Printers]. 3. Select [Edit] → [Add] → [Access to Printer]. 4. Enter an arbitrary print queue name in [Printer Name], and then enter the IP address or name of the printer in [Print Server]. 5. Select [OK]. 6. Proceed to Step 4.

Example of When Using HP-UX

1. Run "SAM."

The "SAM" utility is supplied with an operating system. For more details, see the manual for the operating system. 2. Select [Printers and Plotters]. 3. Select [LP Spooler] from the [Printers and Plotters] menu. 4. Select [Printers and Plotter] from the [LP Spooler] menu. 5. Select [Add Remote Printer/Plotter] from the [Action] menu. 6. Enter an arbitrary print queue name in [Printer Name], and then enter the IP address or name of the printer in [Remote System Name]. 7. Enter "Ip" in [Remote Printer Name]. 8. Select [Remote Printer is on a BSD System]. 9. Select [OK]. 10. Proceed to Step 4.

Example of When Using IBM-AIX

1. Run "SMIT."

The "SMIT" utility is supplied with an operating system. For more details, see the manual for the operating system. 2. Select [Print Spooling] → [Add a Printer Queue] → [remote]. 3. Select [Standard processing]. 4. Enter an arbitrary print queue name in [remote queue name] and the IP address or name of the printer in [Hostname of Remote Server]. 5. Enter "lp" in [name of the queue] on the remote server. 6. Enter "BSD" in [type of print spooler] on the remote server. 7. Proceed to Step 4.

4

Enter the following commands and check if you can print.

- Form: lp -d - Input Example: lp -d print\_queue\_name report 0258-07E Depending on the method for setting the IP address of the printer, the value to be entered in [Printer Name or IP Address] on the following screen displayed in the process of port setting varies. ![](images/d8756ac9239d3587310d4ce49725a854243204a840950732b8010c59b8d616fb.jpg)
text_image Add Standard TCP/IP Printer Port Wizard Add port For which device do you want to add a port ? Enter the Primer Name or IP address, and a port name for the desired device. Printer Name or IP Address: Port Name: ✓ Back Next > Cancel

If you want to set the IP address to be assigned to the printer manually (If you know the IP address to use)

- Enter the IP address in [Printer Name or IP Address]. - If you want to set the IP address using the DNS server, specify the DNS settings for the printer. Then, enter the printer name (the DNS name registered on the DNS server) within up to 78 characters in [Printer Name or IP Address]. For example, enter the printer name as "AAA.BBB.com" if you specified the host name as "AAA" and the domain name as "BBB.com." However, enter "AAA.CCC.com" if you can obtain the domain name (CCC.com) simultaneously when you obtain the IP address from DHCP and so on.

If you want to set the IP address to be assigned to the printer using DHCP and so on

- Specify the settings such as the DHCP settings so that the same IP address is always assigned to the printer when you start the printer. For more details, see "If you want to set the IP address to be assigned to the printer manually" above. - If a different IP address is assigned to the printer each time the printer starts, specify the DNS settings for the printer first. Then, enter the printer name (the DNS name registered on the DNS server) within up to 78 characters in [Printer Name or IP Address]. For example, enter the printer name as "AAA.BBB.com" if you specified the host name as "AAA" and the domain name as "BBB.com." However, enter "AAA.CCC.com" if you can obtain the domain name (CCC.com) simultaneously when you obtain the IP address from DHCP and so on. ![](images/a8e619162b8c24cea71733c68ec11d882b2fa3a32e6c019cb061363982cc4b43.jpg)

NOTE

About the DNS settings

See "Configuring the Protocol Settings." > If You Are Using Windows Vista, 7 or Server 2008 > If You Are Using Windows 2000, XP, or Server 2003 0258-07F

If You Are Using Windows Vista, 7 or Server 2008

![](images/6947b89847be1448ab2023c3d9ef697399d258495629761457d68b7f524dc807.jpg)

IMPORTANT

When using IPPS printing

You need to obtain the public key for this printer and install it on Windows Vista, 7 or Server 2008. For details on the procedure for obtaining the public key, see "Obtaining the Public Key for This Printer When Using SSL Encrypted Communication." ![](images/8af28f7abe27e9b083749818e8e0d769ed85e654bf367a46189060ebc3d0d86a.jpg)

NOTE

About the screenshots

This procedure is described using screenshots from Windows 7.

1

Confirm the setting for [Receive/Print Range Setting].

Make sure that the IP address of the computer on which the printer driver is installed is not restricted to print. "Restricting the Users Who Can Print or Perform the Printer Settings" ![](images/3081befb2a463889c2ff19478f647817730f5881b16a491b9453c694eda96957.jpg)

IMPORTANT

If printing is restricted

You cannot install the printer driver.

If printing is restricted after the installation

If the IP address of the computer on which the printer driver is installed is restricted to perform printing in [Receive/Print Range Setting], you cannot print from the computer.

2

Open the printer folder.

> "Basic Operations/Various Information for Windows"

3

Click [Add a printer].

4

Click [Add a network, wireless or Bluetooth printer].

![](images/4f17176d89a6a85e892415a0ba639e4159e994e7d9cc9dc1aab54bca419646bb.jpg)
text_image Add Printer What type of printer do you want to install? Add a local printer Use this option only if you don't have a USB printer. (Windows automatically installs USB printers when you plug them in.) Add a network, wireless or Bluetooth printer Make sure that your computer is connected to the network, or that your Bluetooth or wireless printer is turned on. Next Cancel

5

Click [The printer that I want isn't listed]. ![](images/0355fa0ea28456be8b7b40c98d6f066f67956c65623e6aaac93d8f5ab7b156a5.jpg)
text_image Add Printer Searching for available printers... Printer Name Address The printer that I want isn't listed Stop Next Cancel

6

Perform the following procedure. (1) Select [Select a shared printer by name]. (2) Enter "http:///ipp." When you want to perform IPPS printing using SSL encrypted communication, enter "https:///ipp." (3) Click [Next]. ![](images/f0bbc820884365c07fbfacbe16c5accafa37eaadf945da98f09018634abef696.jpg)
text_image Add Printer Find a printer by name or TCP/IP address ○ Replace for a printer ● Select a shared printer by name https://992.368.0.215/ipp Example: V.computesname\printesname or http://www.rpubetames/printers/proteensname/ printer ○ Add a printer using a TCP/IP address or hostname Next (3)
![](images/04b30cc1fc74c4d6a4b2b7cd6217abf4597b873046cd414c796c6cc2c1ae2d8f.jpg)

IMPORTANT

About IPPS

IPPS can be used only when the SSL encrypted communication function is enabled.

7

Click [Have Disk], then specify the folder that contains the printer driver from the CD-ROM drive. ![](images/957b8bba52fc47e5c1feb24367ba21c9d23ed71dbe0abb40c5fef7442633fd5c.jpg)
text_image Add Printer Wizard Select the manufacturer and model of your printer. If your printer covers with an installation disk, click Have Disk. If your printer is not listed, consult your printer documentation for a compatible printer. Manufacturer Brother Canton Eason Fujit Xenx General Persons Brother CCP-119C Brother CCP-117C Brother CCP-123C Brother CCP-129C Brother CCP-138C The driver is digitally signed. Tell me why driver screen is important Drive Disk OK Cancel
![](images/b21b07f591fccba32f2e59390bafd1184e832f6b49a34bc554b2d3fba8ee70be.jpg)

NOTE

When you are using the IPP authentication function

If you are asked to enter the password, enter the user name and password, and then click [OK]. For details on the settings for the IPP authentication function, see "Configuring the Protocol Settings."

8

Follow the on-screen instructions to install the printer driver. If You Are Using Windows 2000, XP, or Server 2003

1

Confirm the setting for [Receive/Print Range Setting]. Make sure that the IP address of the computer on which the printer driver is installed is not restricted to print. "Restricting the Users Who Can Print or Perform the Printer Settings" ![](images/c4eb93410ea5d35f5a15f1fa29202374381272ec7094fdc0523ccc74bc286f80.jpg)

NOTE

If printing is restricted

You cannot install the printer driver.

If printing is restricted after the installation

If the IP address of the computer on which the printer driver is installed is restricted to perform printing in [Receive/Print Range Setting], you cannot print from the computer.

2

Open the printer folder. > "Basic Operations/Various Information for Windows"

3

Display [Add Printer Wizard].

Windows 2000 Double-click [Add Printer]. Windows XP Click [Add a printer]. Windows Server 2003 Double-click [Add Printer].

4

Click [Next].

![](images/80ad45095ae2bc97b33549745b2575c1b22b5d72feaa3b65971ff814f7d6b768.jpg)
text_image Add Printer Wizard Welcome to the Add Printer Wizard This wizard helps you install a printer or make printer connections. If you have a Plug and Plug printer that connects through a USB port for any other hot pluggable port, such as (EEE 1394, infrared, and zoom), you do not need to use this wizard. Click Cancel to close the wizard, and then plug the printer's cable into your computer or point the printer toward your computer's infrared port, and turn the printer on. Windows will automatically install the printer for you. To continue, click Next. Next > Cancel

5

Select a printer type.

Windows 2000 (1) Select [Network printer]. (2) Click [Next]. Windows XP Professional Windows Server 2003 (1) Select [A network printer, or a printer attached to another computer]. (2) Click [Next]. ![](images/6b24af9c613ca8817511aaf80cbcbf75bd457c7002de2424e5f34f6e701b2024.jpg)
text_image Add Printer Wizard Local or Network Printer The wizard needs to know which type of printers to set up. Select the option that describes the printers you want to use: ○ Local printer attached to this computer ● A network printer, or a printer attached to another computer (1) To set up a network printer that is not attached to a print server, use the "Local printer" option. ( Back Next ) (2) end

6

Select the printer to be connected.

Windows 2000 Select [Connect to a printer on the Internet or on your intranet]. Windows XP Professional Windows Server 2003 Select [Connect to a printer on the Internet or on a home or office network]. ![](images/8dce30ea6bf93fc8d37e6ad805b903755014fc5ecc7ca1bd174c50cd23dd9c97.jpg)
text_image Add Printer Wizard Specify a Printer If you don't know the name or address of the printers, you can search for a printer that meets your needs. What printers do you want to connect to? ○ Bagasse for a printer ○ Connect to this printer (or to browse for a printer, select this option and click Next) Name: Example: UserView/printer ● Connect to a printer on the Internet or on a home or office network. URL: Example: http://server/printers/#pagevier/ printer < Back Next > Cancel

7

Enter [URL].

(1) Enter "http:///ipp." When you want to perform IPPS printing using SSL encrypted communication, enter "https:///ipp." (2) Click [Next]. ![](images/06e6c5979837bd9a7af5b3a2739d8a4f75358ba52c928d0870fad7a64ec4c3fd.jpg)
text_image Add Printer Wizard Specify a Printer If you don't know the name or address of the printer, you can search for a printer that needs your needs. What printer do you want to connect to? ○ Brugas for a printer ○ Connect to this printer (or to browse for a printer, select this option and click Next) Name: Example: Viewer/printer ○ Connect to a printer on the Internet or on a home or office network: URL: (1) Example: http://service/printers/regpinau printer < Back Next > (2) real
![](images/801b4797ee3ddc2b0c3e8d4c4e3edf00929749f98d43eadc6a79d162a5f232be.jpg)

IMPORTANT

About IPPS

IPPS can be used only when the SSL encrypted communication function is enabled. For details on the SSL encrypted communication function, see "Setting Keys and Certificates."

8

Click [Have Disk], then specify the folder that contains the printer driver from the CD-ROM drive. ![](images/8fe0ab1a537a149870a3ea605362bbdddf957c891ead1c197f969d551f5c9539.jpg)
text_image Add Printer Wizard Select the manufacturer and model of your printers. If your printers came with an installation disk, click Have Disk. If your printer is not listed, consult your printer documentation for a compatible printer. Manufacturer Agris Alps Apollo Apple APS-PS AST Printers AGFA-AccusSet v52.3 AGFA-AccusSetF v52.3 AGFA-AccusSet 800 AGFA-AccusSet 800SF v52.3 AGFA-AccusSet 800SF v2013 108 This drive is digitally signed. Follow this drive prints is mounted. Have Disk.
![](images/c9d16fb639b7747ad2b7d6194c4f182a2d5beccf5858dd1d1a521d2917b78aa1.jpg)

NOTE

When you are using the IPP authentication function

If you are asked to enter the password, enter the user name and password, and then click [OK]. For details on the settings for the IPP authentication function, see "Configuring the Protocol Settings." ![](images/ad0d66f62a5085fcb24fd0e16346ecb9d8d1b63bc34222c03e44794b96de0200.jpg) Follow the on-screen instructions to install the printer driver.

Obtaining the Public Key for This Printer When Using SSL Encrypted Communication

0258-07H If you want to use IPPS printing, you need to obtain the public key for this printer using the following procedure and install it on Windows Vista, 7 or Server 2008.

1

Start the Web browser.

2

Enter "https:///" in the address field, and then press the [ENTER] key on your keyboard. ![](images/e0e38307858619f2b78560bb8b14bf5380075c07f4b80f5a24b1aa3551ddc50c.jpg)

IMPORTANT

Note on entry of the address

For the IP address or FQDN, enter the same character string as the [Common Name] of the certificate. > "Setting Keys and Certificates"

3

Click [Continue to this website (not recommended).] to display the Remote UI screen.

4

Double-click [Internet | Protected Mode] on the lower right of the Web browser.

5

Select [Trusted sites], then click [Sites].

6

Make sure that "https://" is displayed, and then click [Add] → [Close].

7

If the [Enable Protected Mode (requires restarting Internet Explorer)] check box is selected, clear the check box.

8

Click [OK] to redisplay the Remote UI screen.

9

Exit the Web browser once, then restart it.

10

Repeat Steps 1 to 3 to start the Remote UI, and then click [Continue to this website (not recommended).].

11

Click [Certificate Error] on the right of the address entry field, then select [View certificates].

12

Click [Install Certificate] in the displayed dialog box to run the Certificate Import Wizard.

13

Click [Next], select [Place all certificates in the following store], and then click [Browse].

14

Select [Trusted Root Certification Authorities], then complete the Wizard following the instructions on the screen.

15

If you cleared the [Enable Protected Mode (requires restarting Internet Explorer)] check box in Step 7, select the check box. ![](images/3944af540f18bee11aade8855bee33eeb56a8b601cbfd5769581eb1c7384dc26.jpg)

NOTE

If the confirmation dialog box appears during the procedure

Enter the user name and password. For more details, see the manual etc. supplied with the operating system.

1

Confirm the setting for [Receive/Print Range Setting].

Make sure that the IP address of the computer on which the printer driver is installed is not restricted to print. "Restricting the Users Who Can Print or Perform the Printer Settings" ![](images/80e2c47cd415176c1f55a456e591f984f347a7e37546e5b513e275a70734bb2e.jpg)

IMPORTANT

If printing is restricted

You cannot install the printer driver.

If printing is restricted after the installation

If the IP address of the computer on which the printer driver is installed is restricted to perform printing in [Receive/Print Range Setting], you cannot print from the computer.

2

Install the printer driver.

Following the procedure for when you are using a WSD network environment in "Printer Driver Installation Guide", install the printer driver. For details on the procedure for viewing "Printer Driver Installation Guide", see "Installation."

Network Settings for the Printer (NetWare) (LBP7680Cx Only)

0258-07K The requisite tasks to use the printer in the NetWare network are as follows. Before starting NetWare network settings, see "Attention (NetWare Network Settings)." ![](images/b5c29be89f9de1ce82052fc753a764fa63df232c141cae0fdbb7b76c5db68ab1.jpg)
flowchart
graph TD
    A["Configuring NetWare"] --> B["Configuring the Protocol Settings"]
Configuring NetWare Configuring the Protocol Settings ![](images/00fdef9b63fa041b1b10181f474fae13701c7c066d0cb3d9311e1a41dd253f6a.jpg)

IMPORTANT

Configuring a Computer that Performs Printing

After completing the NetWare network settings, configure each computer to be used for printing.

(1) Connecting to an NetWare Network

Install NetWare client software on all the computers that perform printing, and then log in to the NetWare server or to the tree. For details on the NetWare Network connection, see the instruction manual for NetWare or the operating systems.

(2) Connecting the Printer

Install the printer driver using the procedure for installing the printer driver for a local area connection or network environment in "Printer Driver Installation Guide." When you install the printer driver, select [Network printer] for the printer connection, and then select the print queue created in "Configuring NetWare." If a screen for selecting a port appears during the installation, select [Network], and then click [Settings]. From the list, select the print queue created in "Configuring NetWare." 0258-07R To perform printing using a NetWare network, you need to configure the print service such as the print server and queue and the printer protocols. ![](images/8f8be6b71ff0d326801c38e0790ad2063bce50fe861918e7a38d846c96b696e1.jpg)

IMPORTANT

About the print service settings

When specifying the print service settings using NetSpot Device Installer or NetWare Administrator, Novell Client (a NetWare client from Novell, Inc.) needs to be installed as a client software on the computer on which NetWare Administrator will run.

Types of the Print Service

Before configuring the print service, select the type of the print service referring to the following descriptions. ![](images/61c9a7fb31843e35057f878e6ac9444472b1e7e6891b9c153dd3c1c8fe3c599b.jpg)

NOTE

About describing the print service in this manual

Usually, select the print service of NDS for NetWare 4.x or later and the print service in Bindery Mode for NetWare 3.x. This manual does not describe the other settings.

About NDPS

You can also use NDPS as the print service on NetWare 5.x or later. When using NDPS, use Novell Printer Gateway supplied with NetWare as the gateway. This manual does not describe the procedure for setting NDPS. For the setting procedure, see the instruction manual of NetWare.

• NDS (Novell Directory Services) and Bindery Mode

This printer supports both NDS and Bindery Mode. Select the appropriate mode for your network environment. If you are using NetWare 3.x, you can use only Bindery Mode.

- Queue Server Mode and Remote Printer Mode

This printer supports both the Queue server mode and Remote Printer mode.

- Queue Server Mode

When using Queue Server Mode, you do not need any other hardware or software for the print server because this printer is provided with all the functions of the print server. NDS Queue Server Mode (NDS PServer) uses a NDS print server for printing. Bindery Queue Server Mode (Bindery PServer) uses a Bindery print server for printing. Queue Server Mode requires one NetWare user license per printer.

- Remote Printer Mode

In Remote Printer Mode, this printer is controlled by a NetWare print server. Therefore, you need a NetWare print server other than this printer. NDS Remote Printer Mode (NPrinter) uses a NDS print server for printing. Bindery Remote Printer Mode (RPrinter) uses a Bindery print server for printing.

Configuring NetWare

If there is any operating system that supports NetSpot Device Installer on the network, configure the NetWare print server using NetSpot Device Installer. If there is no operating system that supports NetSpot Device Installer on the network, configure the NetWare print server using NetWare Administrator or PCONSOLE.

Settings Using NetSpot Device Installer

For details on the procedures for installing or using NetSpot Device Installer, see the Readme file in the following folder in Printer Driver Software CD-ROM.

Settings Using NetWare Administrator (When Using the Printer in NDS Queue Server Mode/NDS Remote Printer Mode)

1

Log in to NetWare as "Admin" (or a user who has the equivalent permissions), and then run NetWare Administrator.

1. Select [Print Services Quick Setup] from the [Tools] menu. 2. In [Print Server name], enter an arbitrary name. To use an existing print server, click the button on the right of [Print Server name], and then select the print server from the list. 3. In [Name] for the printer, enter an arbitrary name. 4. When using the printer in Queue Server Mode, select [Other/Unknown] in [Type]. 5. When using the printer in Remote Printer Mode, select [Parallel] in [Type], and then click [Communication]. Set [Port] to [LPT1] and [Connection type] to [Manual load]. 6. In [Name] for the print queue, enter an arbitrary name. 7. In [Volume], enter the volume object (the object that indicates the physical volume on the network) that creates the queue. You can select the volume object from a list by clicking the button on the right. 8. Specify the other settings, then click [OK]. ![](images/f188df6e5de554737912d25ef54cf404441405ba0fff325e1687ad5a18ba0f54.jpg)

NOTE

About entering the print server name

Because the print server name is required for the protocol settings for the printer, note it down.

About Quick Setup

If you perform Quick Setup, the printer is allocated to the printer number "0." When using the printer in Queue Server Mode, do not change the printer number from "0."

2

When using the printer in Remote Printer Mode, start the print server.

When using the NetWare file server as the print server, enter "LOAD PSERVER.NLM" in the file server, and then press the [ENTER] key on your keyboard. → The settings for NetWare print service are now completed. ![](images/47676d5286764a0df7d92b6d68253ec3aa7ffe6f3a4435936dd2db0f10df4356.jpg)

NOTE

About Queue Server Mode

When using the printer in Queue Server Mode, you do not need to specify these settings.

3

Next, configure the NetWare protocol settings for the printer.

For details on the procedure for configuring the NetWare protocol, see "Configuring the Protocol Settings."

Settings Using PCONSOLE (When Using the Printer in Bindery Queue Server Mode/Bindery Remote Printer Mode)

1

Log in to NetWare as the Supervisor, then start PCONSOLE.

2

If you have not created a print server, create the print server. 1. Select [Print Server Information] from [Available Options], then press the [ENTER] key on your keyboard. 2. Press the [INSERT] key on your keyboard. 3. Enter the name of the print server to be created, then press the [ENTER] key on your keyboard. 4. Press the [ESC] key on your keyboard to go back to the [Available Options] list. ![](images/8a8648ea850466c60db74a52fad8606e68a1ad8b3b7dc4e8288ac954ae83e3c9.jpg)

NOTE

About entering the print server name

Because the print server name is required for the protocol settings for the printer, note it down.

About using multiple NetWare servers

If you are using multiple NetWare servers and want to use this printer in Queue Server Mode, use the same print server name for all the NetWare servers.

3

Create a queue, then assign the print server to the queue. 1. From [Available Options] select [Print Queue Information], then press the [ENTER] key on your keyboard. 2. Press the [INSERT] key on your keyboard. 3. Enter the name of the queue to be created, then press the [ENTER] key on your keyboard. 4. Select the name of the created queue, then press the [ENTER] key on your keyboard. 5. Select [Queue Servers], then press the [ENTER] key on your keyboard. 6. Press the [INSERT] key on your keyboard. 7. Select the print server created in Step 2, then press the [ENTER] key on your keyboard. 8. Press the [ESC] key on your keyboard repeatedly to go back up to [Available Options].

4

Assign the printer to the print server. 1. Select [Print Server Information] from [Available Options], then press the [ENTER] key on your keyboard. 2. Select the print server created in Step 2, then press the [ENTER] key on your keyboard. 3. Select [Print Server Configuration], then press the [ENTER] key on your keyboard. 4. Select [Printer Configuration], then press the [ENTER] key on your keyboard. 5. From the [Configured Printers] list, select the printer number, and then press the [ENTER] key on your keyboard. When using the printer in Queue Server Mode, select the printer number "0." When using the printer in Remote Printer Mode, you can select an arbitrary printer number.

5

Specify the name or type of the printer. 1. Enter an arbitrary printer name in [Name], then press the [ENTER] key on your keyboard. 2. When using the printer in Queue Server Mode, select [Defined] in [Type]. 3. When using the printer in Remote Printer Mode, select [Remote Parallel] in [Type], and then set [Port] to [LPT1]. 4. Specify the settings for the other options, then press the [ESC] key on your keyboard. 5. If the confirmation box appears, select [Yes], and then press the [ENTER] key on your keyboard. 6. Press the [ESC] key on your keyboard to go back to the [Print Server Configuration] list.

6

Assign a queue to the printer.

1. Select [Queues Serviced by Printer], then press the [ENTER] key on your keyboard. 2. Select the printer name specified in Step 5, then press the [ENTER] key on your keyboard. 3. Press the [INSERT] key on your keyboard. 4. Select the queue created in Step 3, then press the [ENTER] key on your keyboard.

7

Press the [ESC] key on your keyboard until the [Exit PCONSOLE] window appears, and then select [Yes] to exit PCONSOLE.

8

When using the printer in Remote Printer Mode, start the print server. 1. When you are using a computer exclusively as the print server, enter "PSERVER.EXE" in the computer as the print server name, and then press the [ENTER] key on your keyboard. 2. When using the NetWare file server as the print server, enter "LOAD PSERVER.NLM " in the file server, and then press the [ENTER] key on your keyboard. → The settings for NetWare print service are now completed. ![](images/fb78c9c7c7c2ce1c62f0b4d262b97ac17eed1676696f9f088de06dd6c7afbc0d.jpg)

NOTE

About Queue Server Mode

When using the printer in Queue Server Mode, you do not need to specify these settings.

9

Next, configure the NetWare protocol settings for the printer. For details on the procedure for configuring the NetWare protocol, see "Configuring the Protocol Settings." 0258-07S This section describes the procedure for specifying the settings using the Remote UI. In the Remote UI, you can specify the settings by accessing the printer from a Web browser via a network. ![](images/3ec84d06651d2941aff84e430a48316e837368b55fbc639cd85732be8cc70696.jpg)

IMPORTANT

Before configuring the protocol settings

- When configuring the protocol settings for the printer using the above software, the TCP/IP protocol must be able to be used in your network environment. - Make sure that each setting option for TCP/IP is specified, the printer and computer are connected properly, and the printer is ON. ![](images/7eca5e7ce27eb20a1cd054d2e58223a3df7550e655078da6d609d47b6ec823d0.jpg)

NOTE

When specifying the settings using software other than the Remote UI

You can also specify the settings using the following software. > "FTP Client" You can specify the settings by accessing the FTP server of the printer using Command Prompt. The specifiable options vary depending on the software. See "Network Setting Items" and use software appropriate to the network environment you are using or options that you want to specify.

1

Start the Remote UI, and then log in as Administrator. > "Starting the Remote UI"

2

Click [Settings/Registration]. ![](images/ac97804735aa9d419190742897195de977d1c9e7288870d791b9c5d6f05ebfe3.jpg)
text_image Remote UI Portal: LBPXXXX: LBPXXXX - Windows Internet Explorer Http:// Bing Favorites Suggested Sites Web Slice Gallery Remote UI Portal: LBPXXXX: LBPXXXX Device Name: LBPXXXX Product Name (Serial No.): LBPXXXX Location: Login User: System Manager Log Out Language English Mail to System Manager Remote UI: Portal Last Updated: 29/05 2012 10:03:42 Device Basic Information Device Status The printer is ready. Error Information There is no error. Consumables Information Paper Information Paper Source Remaining Paper Paper Size Paper Type Multi-Purpose Tray None A4 Free (Mixed Types) Drawer 1 Loaded A4 Free (Mixed Types) Remaining Toner Item Name Remaining Toner Cyan Toner 16-100% Status Monitor/Cancel Settings/Registration Basic Tools Box Direct Print Management Tools Service Management Service

3

Select [Network] from the [Preferences] menu. ![](images/1aecf3d2991e075eb6c8b239e80fc81f7d191dc91ce145770e1ab1d703eb2d73.jpg)
text_image Remote UI Settings/Registrations: LBP7680C: LBP7680C - Windows Internet Explorer http://192.168.1.225/netmenu.cgi File Edit View Favorites Tools Help Favorites Remote UI Settings/Registrations LBP7680C: LBP... Settings/Registration Mail to System Manager Preferences Control Menu Paper Source Menu Network Layout Menu Quality Menu User Maintenance Menu Output/Control Utility Menu Calibration Device Control Management Settings Department ID Management Security License/Other Settings/Registration Preferences Network Network LastUpdated 01/04 2011 10:32:30 Network TCP/IP Settings IPv4 Settings IPv6 Settings WNS Configuration ARP/FNG Settings FTP Settings LPD Print Settings RAW Print Settings IPP Print Settings WSO Print Settings HTTP Settings SSL Settings Proxy Settings Multicast Discovery Settings SNTP Settings NetWare Settings AppleTalk Settings SPAP Settings Done Internet | Protected Mode: Off 100%

4

Click [NetWare Settings]. ![](images/b08caf0e6142f38afa37f537fe5b5e78535e355e9ff514843713939448b3b686.jpg)
text_image Remote UE Settings/Registration: LBP7680C: LBP7680C - Windows Internet Explorer http://192.168.1.225=netemns.cgi File Edit View Favorites Tools Help Favorites Remote UE Settings/Registrations LBP7680C: LBP... SENSYS LBP7680C / LBP7680C / Settings/Registration To Portal Login User: System Manager Log Out Mail to System Manager Preferences Control Menu Paper Source Menu Network Layout Menu Quality Menu User Maintenance Menu Output/Control Utility Menu Calibration Device Control Management Settings Department ID Management Security License/Other Settings/Registration Preferences Network Network LastUpdated 01/04 2011 10:32:30 Network TCP/IP Settings IPv4 Settings IPv6 Settings WNS Configuration ARP/PING Settings FTP Settings LPD Print Settings RAW Print Settings IPP Print Settings WSD Print Settings HTTP Settings SSL Settings Proxy Settings Multicast Discovery Settings SNTP Settings NetWare Settings AppleTalk Settings Done Internet | Protected Mode: Off 100%

5

Click [Edit...]. ![](images/ac87d49d0bd22d76d731edfbb1b93dbb00ef2aec5144b959b322dacec0af48f2.jpg)
text_image Remote UI Settings/Registration: LBP7680C / LBP7680C - Windows Internet Explorer http://192.1681.225/networkNetWare.cgi File Edit View Favorites Tools Help Favorites Remote UI Settings/Registration: LBP7680C LBP... L-SENSYS LBP7680C / LBP7680C / Settings/Registration To Portal Login User: System Manager Log Out Mail to System Manager Preferences Control Menu Paper Source Menu Network Layout Menu Quality Menu User Maintenance Menu Output/Control Utility Menu Calibration Device Control Management Settings Department ID Management Security License/Other Settings/Registration Preferences Network > NetWare Settings NetWare Settings Last Updated 01/04 2011 12:12:42 Edit... NetWare Settings NetWare Settings Use NetWare: Off Frame Type: Auto Detect IPX External Network Number: 0000000 Node Number: 00000000000 Print Service: NDS PServer NDS PServer Tree Name: Context Name: Print Server Name: Print Server Reported: Not not Done Internet | Protected Mode: Off 100%

6

Select the [Use NetWare] check box. ![](images/6caa700642921c215a26718d9b361a283ad530c07676e2e75663e746ba2af879.jpg)
text_image Remote UI Settings/Registration: LBP7680C / LBP7680C - Windows Internet Explorer http://192.168.1.225/network/seneeEdit.cgi File Edit View Favorites Tools Help Favorites Remote UI Settings/Registration: LBP7680C / LBP7680C Settings/Registration Mail to System Manager Preferences Control Menu Paper Source Menu Network Layout Menu Quality Menu User Maintenance Menu Output/Control Utility Menu Calibration Device Control Management Settings Department ID Management Security License/Other Settings/Registration: Preferences: Network > NetWare Settings > Edit NetWare Settings Edit NetWare Settings LastUpdated 01/04 2011 12:13:27 The settings will be changed as follows. (Changes effective after the main power is turned OFF and ON.) OK Cancel NetWare Settings NetWare Settings Use NetWare Frame Type: Auto Detect IPX External Network Number: 00000000 Node Number: 000000000000 Print Service: NDS PServer Bindery PServer File Server Name: Print Server Name: Internet | Protected Mode: Off
![](images/11f1e2d543755a542c3d0560991044120d9ffb53561d3817d52822e53110de2d.jpg)

NOTE

When the [Use NetWare] check box is cleared The printer is not detected on the NetWare network.

7

Set [Frame Type].

Select the frame type that is used by the system environment you are using from [Auto Detect], [Ethernet II], [Ethernet 802.2], [Ethernet 802.3] or [Ethernet SNAP]. ![](images/3f15771998b7fbbe83c49123d110d3bc49ecb5ec647bb17564c048d0cb7143da.jpg)
text_image Remote UI Settings/Registration: LBP7680C: LBP7680C - Windows Internet Explorer http://192.168.1.225/networkNetWareEdit.cgi File Edit View Favorites Tools Help Favorites Remote UI Settings/Registration: LBP7680C: LBP... I-SENSYS LBP7680C / LBP7680C / To Portal Login User: System Manager Log Out Settings/Registration Mail to System Manager Preferences Control Menu Paper Source Menu Network Layout Menu Quality Menu User Maintenance Menu Output/Control Utility Menu Calibration Device Control Management Settings Department ID Management Security License/Other Settings/Registration: Preferences: Network > NetWare Settings > Edit NetWare Settings Edit NetWare Settings Last Updated 01/04 2011 12:13:27 The settings will be changed as follows. (Changes effective after the main power is turned OFF and ON.) OK Cancel NetWare Settings NetWare Settings Use NetWare Frame Type: Auto Detect IPK External Network Number: 00000000 Node Number: 000000000000 Print Service: NDS PServer Blindery PServer File Server Name: Print Press Name: Internet | Protected Mode: Off 100%

When using Bindery PServer: Queue Server Mode (the print server of Bindery Mode)

1. Select [Bindery PServer] from [Print Service]. 2. In [File Server Name], enter the file server name created in "Configuring NetWare." 3. In [Print Server Name], enter the print server name created in "Configuring NetWare." 4. In [Print Server Password], enter the password for the print server. 5. In [Printer Number], enter the same printer number as the one specified in "Configuring NetWare." 6. Specify the settings for [Service Mode], [Printer Form], [Polling Interval], and [Buffer Size] as needed.

When using NDS PServer: Queue Server Mode (the print server of NDS)

1. Select [NDS PServer] from [Print Service]. 2. In [Tree Name] and [Context Name], enter the name of the tree to which the print server belongs and the context name. 3. In [Print Server Name], enter the print server name created in "Configuring NetWare." 4. In [Print Server Password], enter the password for the print server. 5. In [Printer Number], enter the same printer number as the one specified in "Configuring NetWare." 6. Specify the settings for [Service Mode], [Printer Form], [Polling Interval], and [Buffer Size] as needed.

When using RPrinter: Remote Printer Mode (the print server of Bindery Mode)

1. Select [RPrinter] from [Print Service]. 2. In [File Server Name], enter the file server name created in "Configuring NetWare." 3. In [Print Server Name], enter the print server name created in "Configuring NetWare." 4. In [Printer Number], enter the same printer number as the one specified in "Configuring NetWare."

When using NPrinter: Remote Printer Mode (the print server of NDS)

1. Select [NPrinter] from [Print Service]. 2. In [Tree Name] and [Context Name], enter the name of the tree to which the print server belongs and the context name. 3. In [Print Server Name], enter the print server name created in "Configuring NetWare." 4. In [Printer Number], enter the same printer number as the one specified in "Configuring NetWare." ![](images/f787df5aabe4f20d0e3329a216328c48a46294e480198dec63058c1fccaabf11.jpg)

Click [OK].

![](images/989f1aa512c5c0750386de2e05af3e489a171bf5b3640ebfdb9a90bd470b601d.jpg)
text_image Remote UE Settings/Registration: LBP7680C; LBP7690C - Windows Internet Explorer http://192.168.1.225/metworkhatWareEdit.cgi File Edit View Favorites Tools Help Favorites Remote UE Settings/Registration: LBP7680C; LBP... Settings/Registration Mail to System Manager Preferences Control Menu Paper Source Menu Network Layout Menu Quality Menu User Maintenance Menu Output/Control Utility Menu Calibration Device Control Management Settings Department ID Management Security License/Other Settings/Registration: Preferences Network > NetWare Settings > Edit NetWare Settings Edit NetWare Settings Last Updated 01/04 2011 12:13:27 The settings will be changed as follows. (Changes effective after the main power is turned OFF and ON.) OK Cancel NetWare Settings NetWare Settings Use NetWare Frame Type: Auto Detect IPX External Network Number: 00000000 Node Number: 00000000000 Print Service: NDS PServer Bindery P Server File Server Name: Print Server Name: Internet | Protected Mode: Off 100%
→ After performing a hard reset or restarting the printer, the settings are effective. ![](images/e06431091a288bfd7d23a4d0a2207296e975683058c8d6d8a2fbd2b3f13c6f97.jpg)

NOTE

To perform a hard reset

You can perform a hard reset using the following procedure. 1. Click [Settings/Registration]. 2. Select [Device Control] from the [Output/Control] menu. 3. Select [Hard Reset], then click [Execute].

Network Settings for the Printer (SMB) (LBP7680Cx Only)

0258-0KF The requisite tasks to use the printer in the SMB network are as follows. Before starting SMB network settings, see "Attention (SMB Network Settings)." ![](images/3a84d690b3d1006d415d88de22e8d5c9f872e139fc67d7fb2660241f3ee94468.jpg)
flowchart
graph TD
    A["Configuring the Protocol Settings"] --> B["Configuring a Computer that Performs Printing"]
Configuring the Protocol Settings Configuring a Computer that Performs Printing 0258-0KH ![](images/0b1f69e6606b093dc8b3c96d19b166336a69a6c5da763d5de669ca66a4f630d7.jpg)

IMPORTANT

Configuring a Computer that Performs Printing

After completing the protocol settings for the printer, configure each computer to be used for printing.

About the protocol used in an SMB network

An SMB network supports only NetBIOS over TCP/IP, but not NetBEUI. You need to install TCP/IP client software on all the computers to be used for printing to make them able to use a TCP/IP network. For more details, see the instruction manual for the operating system. 0258-0KJ This section describes the procedure for specifying the settings using the Remote UI. In the Remote UI, you can specify the settings by accessing the printer from a Web browser via a network. ![](images/abfb08135c9b827c08c3a37d6947edb2eea83eb065cb8b72c913b7ba04d50f78.jpg)

IMPORTANT

Before configuring the protocol settings

- When configuring the protocol settings for the printer using the above software, the TCP/IP protocol must be able to be used in your network environment. - Make sure that each setting option for TCP/IP is specified, the printer and computer are connected properly, and the printer is ON.

About SMB printing

You can use SMB printing only when an SD card is installed. ![](images/1e67daa2734e019637d8898773841869cadc8420d292dfbd762aa72e89d0974c.jpg)

NOTE

When specifying the settings using software other than the Remote UI

You can also specify the settings using the following software. "FTP Client" You can specify the settings by accessing the FTP server of the printer using Command Prompt. The specifiable options vary depending on the software. See "Network Setting Items" and use software appropriate to the network environment you are using or options that you want to specify.

About the screenshots

This procedure is described using screenshots from Windows 7.

1

Start the Remote UI, and then log in as Administrator. > "Starting the Remote UI"

2

Click [Settings/Registration]. ![](images/399e0bab0f1ee29437765fcb25852b9c7d4afd4424bb90db64d1b609a58559b4.jpg)
text_image Remote UI Portal: LBPXXXX: LBPXXXX - Windows Internet Explorer Http:// Bing Favorites Suggested Sites Web Slice Gallery Remote UI Portal: LBPXXXX: LBPXXXX Device Name: LBPXXXX Product Name (Serial No.): LBPXXXX Location: Login User: System Manager Log Out Language English Mail to System Manager Remote UI: Portal Last Updated: 29/05 2012 10:03:42 Device Basic Information Device Status The printer is ready. Error Information There is no error. Consumables Information Paper Information Paper Source Remaining Paper Paper Size Paper Type Multi-Purpose Tray None A4 Free (Mixed Types) Drawer 1 Loaded A4 Free (Mixed Types) Remaining Toner Item Name Remaining Toner Cyan Toner 16-100% Status Monitor/Cancel Settings/Registration Basic Tools Box Direct Print Management Tools Service Management Service

3

Select [Network] from the [Preferences] menu. ![](images/be1fd64a8fa3a197ddc364eb16c80b109de512f6be724ae254c0d2cc3a9d69ce.jpg)
text_image Remote UI Settings/Registrations: LBP7680C: LBP7680C - Windows Internet Explorer http://192.168.1.225/netmenu.cgi File Edit View Favorites Tools Help Favorites Remote UI Settings/Registrations LBP7680C: LBP... Settings/Registration Mail to System Manager Preferences Control Menu Paper Source Menu Network Layout Menu Quality Menu User Maintenance Menu Output/Control Utility Menu Calibration Device Control Management Settings Department ID Management Security License/Other Settings/Registration Preferences Network Network LastUpdated 01/04 2011 10:32:30 Network TCP/IP Settings IPv4 Settings IPv6 Settings WNS Configuration ARP/FNG Settings FTP Settings LPD Print Settings RAW Print Settings IPP Print Settings WSO Print Settings HTTP Settings SSL Settings Proxy Settings Multicast Discovery Settings SNTP Settings NetWare Settings AppleTalk Settings SPAP Settings Done Internet | Protected Mode: Off 100%

4

Click [SMB Settings]. ![](images/dfd3089f542ac131d0b3837e91fc10f1ef268c7f87e4bfbf0c0830181c72f5e2.jpg)
text_image Remote UI Settings/Registration: LBP7680C: LBP7680C - Windows Internet Explorer http://192.168.1.225/netmem.cgi File Edit View Favorites Tools Help Favorites Remote UI Settings/Registration: LBP7680C: UBP... Output Control Utility Menu Calibration Device Control Management Settings Department ID Management Security License/Other LPD Print Settings RAW Print Settings IPP Print Settings WSD Print Settings HTTP Settings SSL Settings Proxy Settings Multicast Discovery Settings SNTP Settings NetWare Settings AppleTalk Settings SMB Settings SNMP Settings SNMPv1 Settings SNMPv3 Settings Spooler Startup Time Settings Ethernet Driver Settings IEEE802 1X Settings E-Mail Print Settings Copyright CANON INC. 2011 All Rights Reserved Done Internet | Protected Mode: Off 100%

5

Click [Edit...]. ![](images/fdd4a50732c2bb97f074b54d06b60a4795ee0c761662f96163a800d18771c304.jpg)
text_image Remote UI Settings/Registration: LBP7680C / LBP7680C - Windows Internet Explorer File Edit View Favorites Tools Help Favorites Remote UI Settings/Registration: LBP7680C UBP... I-SENSYS LBP7680C / LBP7680C To Portal Login User: System Manager Log Out Settings/Registration Mail to System Manager Preferences Control Menu Paper Source Menu Network Layout Menu Quality Menu User Maintenance Menu Output/Control Utility Menu Calibration Device Control Management Settings Department ID Management Security License/Other Settings/Registration: Preferences Network > SMB Settings SMB Settings Last Updated: 01/04 2011 12:14:54 Edit... SMB Settings Use SMB Server: Off Server Name: Workgroup Name: Comments: Use LM Announce: Off Use SMB Printing: Off Printer Name: Copyright CANON INC. 2011 All Rights Reserved Done Internet | Protected Mode: Off 100%

6

Select the [Use SMB Server] check box. ![](images/22caa29b9410039ef0b9cffae89beb9df196b5bbd9f56126de69589aea06ccef.jpg)
text_image Remote UI Settings/Registration: LBP7680C: LBP7690C - Windows Internet Explorer File Edit View Favorites Tools Help Favorites Remote UI Settings/Registrations: LBP7680C: LBP... SENSYS LBP7680C / LBP7680C / To Portal Login User: System Manager Log Out Settings/Registration Mail to System Manager Preferences Control Menu Paper Source Menu Network Layout Menu Quality Menu User Maintenance Menu Output/Control Utility Menu Calibration Device Control Management Settings Department ID Management Security License/Other Settings/Registration: Preferences Network > SMB Settings > Edit SMB Settings Edit SMB Settings Last Updated 2011-12-15:35 The settings will be changed as follows. (Changes effective after the main power is turned OFF and ON.) OK Cancel SMB Settings Use SMB Server Server Name: Workgroup Name: Comments: Use LM Announce Use SMB Printing Printer Name: Done Internet | Protected Mode: Off 100%
![](images/4ecba74427ec46e3559eaa0981c719ba67c44df7d821d05102957c0213287477.jpg)

NOTE

When the [Use SMB Server] check box is cleared

The printer is not detected on the SMB network.

7

Specify the settings for SMB.

![](images/5115ac9c4b05e345130f2fe7f6e1b203aff408ae5ac4a7b71279bfe081ffffb4.jpg)
text_image Remote UI Settings/Registration: LBP7680C LBP7680C - Windows Internet Explorer http://192.168.1.225/smbedit.cgi File Edit View Favorites Tools Help Favorites Remote UI Settings/Registration: LBP7680C LBP... I-SENSYS LBP7680C / LBP7680C / To Portal Login User: System Manager Log Out Settings/Registration Mail to System Manager Preferences Control Menu Paper Source Menu Network Layout Menu Quality Menu User Maintenance Menu Output/Control Utility Menu Calibration Device Control Management Settings Department ID Management Security License/Other Settings/Registration Preferences Network > SMB Settings > Edit SMB Settings Edit SMB Settings Last Updated 01/04 2011 12.15.25 The settings will be changed as follows. (Changes effective after the main power is turned OFF and ON.) OK Cancel SMB Settings Use SMB Server Server Name: Workgroup Name: Comments: Use LM Announce Use SMB Printing Printer Name: Done Internet | Protected Mode: Off 100%
[Server Name]Enter the computer name to which the printer belongs. Up to 15 characters can be entered.† Enter a name that does not overlap with the names used on the other computers or the printers on the network.† You cannot enter a space between characters.
Enter the name of the work group to which the printer belongs. Up to 15 characters can be entered.
[Workgroup Name]† If there is no workgroup in your system environment, create a workgroup on Windows, and then enter the workgroup name.† You cannot enter a space between characters.
[Comments] If necessary, enter comments about the printer. You can enter up to 48 characters.
[Use LM Announce]When announcing the existence of the printer to the LAN Manager, select the [Use LM Announce] check box. When not making an announcement, clear [Use LM Announce].† When it is not necessary for the LAN Manager to reference the printer, you can clear the [Use LM Announce] check box and reduce network traffic.

8

Specify the settings for SMB printing.

![](images/ec728b0fd5ab3872c5185ad38407058bdc6cffab5c580e629f18470d8a9786bf.jpg)
text_image Remote UI Settings/Registration: LBP7680C LBP7680C - Windows Internet Explorer http://192.168.1.225/smbedit.org File Edit View Favorites Tools Help Favorites Remote UI Settings/Registration LBP7680C LBP... Settings/Registration Mail to System Manager Preferences Control Menu Paper Source Menu Network Layout Menu Quality Menu User Maintenance Menu Output/Control Utility Menu Calibration Device Control Management Settings Department ID Management Security License/Other Settings/Registration Preferences Network > SMB Settings > Edit SMB Settings Edit SMB Settings Last Updated 01/04 2011 12:15:25 The settings will be changed as follows. (Changes effective after the main power is turned OFF and ON.) OK Cancel SMB Settings Use SMB Server Server Name: Workgroup Name: Comments: Use LM Announce Use SMB Printing Printer Name: Done Internet | Protected Mode: Off 100%

When using SMB printing

1. Select the [Use SMB Printing] check box. 2. Enter the name of this printer in [Printer Name]. Up to 13 alphanumeric characters can be entered. † You cannot enter a space between characters.

When not using SMB printing

Clear the [Use SMB Printing] check box.

9

Click [OK].

![](images/a7a9793dc6fa8a988acbc056b181ba77f76ab415f23739b65a06dee9fda99178.jpg)
text_image Remote UI Settings/Registration: LBP7680C: LBP7680C - Windows Internet Explorer File Edit View Favorites Tools Help Favorites Remote UI Settings/Registration: LBP7680C: LBP... SENSYS LBP7680C / LBP7680C / Settings/Registration To Portal Login User: System Manager Log Out Mail to System Manager Preferences Control Menu Paper Source Menu Network Layout Menu Quality Menu User Maintenance Menu Output/Control Utility Menu Calibration Device Control Management Settings Department ID Management Security License/Other Settings/Registration: Preferences: Network > SMB Settings > Edit SMB Settings Edit SMB Settings Last Updated 01/04 2011 12:15:25 The settings will be changed as follows. (Changes effective after the main power is turned OFF and ON.) OK Cancel SMB Settings Use SMB Server Server Name: Workgroup Name: Comments: Use LM Announce Use SMB Printing Printer Name: Done Internet | Protected Mode: Off 100%
If you want to specify the settings for WINS, proceed to Step 10. If you do not want to specify the settings for WINS, proceed to Step 14.

10

When setting WINS, select [Network] in [Preferences]. ![](images/148fba45efbb64f47a62282f3fa36f7b86473b533a851726e1b09da02d70a58d.jpg)
text_image Remote UI Settings/Registration: LBP7680C: LBP7680C - Windows Internet Explorer File Edit View Favorites Tools Help Favorites Remote UI Settings/Registration: LBP7680C: LBP... SENSYS LBP7680C / LBP7680C / Settings/Registration To Portal Login User: System Manager Log Out Mail to System Manager Preferences Control Menu Power Source Menu Network Layout Menu Quality Menu User Maintenance Menu Output/Control Utility Menu Calibration Device Control Management Settings Department ID Management Security License/Other Settings/Registration: Preferences: Network > SMB Settings > Edit SMB Settings Edit SMB Settings Last Updated: 01/04 2011 12 15:26 The settings will be changed as follows. (Changes effective after the main power is turned OFF and ON.) OK Cancel SMB Settings Use SMB Server Server Name: Workgroup Name: Comments: Use LM Announce Use SMB Printing Printer Name: Done Internet | Protected Mode: Off 100%

11

Click [TCP/IP Settings]. ![](images/66bef926b28022806f053375fb9f1a442b65755be7654af33b75d6a8fd3b8fd4.jpg)
text_image Remote UI Settings/Registration: LBP7680C: LBP7680C - Windows Internet Explorer http://192.168.1.225/netmsens.cgi File Edit View Favorites Tools Help Favorites Remote UI Settings/Registration: LBP7680C: LBP... Settings/Registration Mail to System Manager Preferences Control Menu Paper Source Menu Network Layout Menu Quality Menu User Maintenance Menu Output/Control Utility Menu Calibration Device Control Management Settings Department ID Management Security License/Other Settings/Registration: Preferences: Network Network Last Updated 01/04 2011-10:32:38 Network TCP/IP Settings IPv4 Settings IPv6 Settings WINS Configuration ARP/PING Settings FTP Settings LFD Print Settings RAW Print Settings IPP Print Settings WSD Print Settings HTTP Settings SSL Settings Proxy Settings Multicast Discovery Settings SNTP Settings NetWare Settings AppleTalk Settings SNPS Settings Done Internet | Protected Mode: Off 100%

12

Click [Edit...] in [WINS Configuration]. ![](images/e3d93f628074b6326a2681a224301f4963ec0ee278eb887b2a4189c998775ec7.jpg)
text_image Remote UI Settings/Registration: LBP7680C: LBP7680C - Windows Internet Explorer https://192.168.1.225/mntcapi.cpi File Edit View Favorites Tools Help Favorites Remote UI Settings/Registration: LBP7680C: LBP... WINS Configuration Edit... WINS Resolution: Off Node Type: None SMB Server Name: SMB Workgroup Name: ARP/PING Settings Edit... Use ARP/PING: On FTP Print Settings Edit... Use FTP Print: Off FTP Print User Name: guest Done Trusted sites | Protected Mode: Off 100%

13

Set WINS.

When Using WINS Resolution

Select the [WINS Resolution] check box, and set the following items.
[WINS Server Address]Enter the IP address of the WINS server.† When using the IP address settings specified by DHCP, if you obtain the WINS server IP address from the DHCP server, the IP address obtained from the DHCP server is overwritten.
[Scope ID]Enter [Scope ID] as needed. You can enter up to 63 characters.† The scope ID is an identifier to determine the range available for printers and computers. The scope ID is browsed regardless of the WINS resolution settings.† When a scope ID is not specified for the computer in your network environment, leave the [Scope ID] field blank.
Set the following items when registering printers on the WINS server.
[SMB Server Name]Enter the WINS server name set in Procedure 7.
[SMB Workgroup Name]Enter the workgroup name set in Procedure 7.

When not Using WINS Resolution

Clear the [WINS Resolution] check box. ![](images/e88c1902b572fd4341fa24b2db2828affc4024dc6d8543c12e6a5c52117f3144.jpg)

IMPORTANT

If [Scope ID] is specified

The printer cannot communicate with the computers that have a different scope ID.

14

Click [OK].

![](images/668b8934821c83679945b3f7631fb73999881d92318d515ec68e2a7d1c53cd37.jpg)
text_image Remote UI Settings/Registration: LBP7680C: LBP7680C - Windows Internet Explorer http://192.168.1.225/netvins.cgi/CSUT=637628319 File Edit View Favorites Tools Help Favorites Remote UI Settings/Registration: LBP7680C: LBP... I-SENSYS LBP7680C / LBP7680C / To Portal Login User: System Manager Log Out Settings/Registration Mail to System Manager Preferences Control Menu Paper Source Menu Network Layout Menu Quality Menu User Maintenance Menu Output/Control Utility Menu Calibration Device Control Management Settings Department ID Management Security License/Other Settings/Registration Preferences Network > TCP/IP Settings > Edit WINS Configuration Edit WINS Configuration Last Updated: 01/04 2011 11:45:11 The settings will be changed as follows. (Changes effective after the main power is turned OFF and ON.) OK Cancel WINS Configuration WINS Resolution WINS Server Address: 0.0.0.0 Node Type: None Scope ID: SMB Server Name: SMB Workgroup Name:

15

Perform a hard reset or restart the printer.

→ After performing a hard reset or restarting the printer, the settings are effective. ![](images/54b81b4f98233a06ba42550de17c3e1780539ae5d0b252fdca778d93bf95dbea.jpg)

NOTE

To perform a hard reset

You can perform a hard reset using the following procedure. 1. Click [Settings/Registration]. 2. Select [Device Control] from the [Output/Control] menu. 3. Select [Hard Reset], then click [Execute]. 0258-0KK Configure all the computers to be used for printing so that they can be used on an SMB network.

Connecting to an SMB Network

1

Perform the following procedure.

Windows 2000 From the [Start] menu, select [Settings] → [Network and Dial-Up Connections]. Windows XP From the [Start] menu, select [Control Panel], and then click [Network and Internet Connections] → [Network Connections]. Windows Vista From the [Start] menu, select [Control Panel], and then click [View network status and tasks] → [Manage network connections]. Windows 7 Windows Server 2008 R2 From the [Start] menu, select [Control Panel], and then click [View network status and tasks] → [Change adapter settings]. Windows Server 2003 From the [Start] menu, select [Control Panel] → [Network Connections] → [Local Area Connection]. Windows Server 2008 From the [Start] menu, select [Control Panel], double-click [Network and Sharing Center], and then click [Manage network connections].

2

Display the [Local Area Connection Properties] dialog box.

Windows 2000 Windows XP Windows Vista Windows 7 Windows Server 2008 Right-click the [Local Area Connection] icon, then select [Properties] from the pop-up menu. ![](images/7734e41b333b5c14bacdc197f0c7b00f7e1189cdc5b940b24ad38a395109905f.jpg)
text_image Control Panel > Network and Internet > Network Connections > Search Network Connections File Edit View Tools Advanced Help Organize Disable this network device Diagnose this connection Rename this connection > Disable Status Diagnose Bridge Connections Create Shortcut Delete Rename Properties

Windows Server 2003

Click [Properties]. ![](images/deaa583a2a21010b646efa0dd0519c31c0f067977106634f042f8be7540c1eb1.jpg)
text_image Local Area Connection Status General | Support | Connection Status: Connected Duration: 00102.42 Speed: 100.0 Mbps Activity Send — Received Packets: 50 | 26 Properties Quick Close
? If the [User Account Control] dialog box appears Click [Yes] or [Continue].

3

Make sure that the check boxes for the following options are selected. • [Client for Microsoft Networks] - [Internet Protocol Version 4 (TCP/IPv4)] (or [Internet Protocol (TCP/IP)]) If the check boxes are not selected, select them. ![](images/002730a3900ab5084445500f06dae08247181ca3d6b8dc37bbb6fc61a99b55b9.jpg)
text_image Local Area Connection Properties Networking Sharing Connect using: Realtek RTL8168D/8111D Family PCIe Gigabit Ethernet Configure... This connection uses the Information Type: ✓ Client for Microsoft Networks ✓ One E Pocket Solutions ✓ File and Printer Sharing for Microsoft Networks ✓ Internet Protocol Version 5 (TCP/IPV6) ✓ Internet Protocol Version 4 (TCP/IPN4) ✓ Link-Layer Topology Discovery Mapper I/O Driver ✓ Link-Layer Topology Discovery Responder Install Uninstall Processes Description Allows your computer to access resources on a Microsoft network. OK Cancel

4

Double-click [Internet Protocol Version 4 (TCP/IPv4)] (or [Internet Protocol (TCP/IP)]). ![](images/22726c3a4e1bd675250bb8364ffd33b21f60c97275bab593549b87b1f8298cad.jpg)
text_image Local Area Connection Properties Networking Sharing Connect using: Realtek RTL81680/8111D Family PCIe Gigabit Ethernet Configure This ognlection uses the following items: □ Clients for Microsoft Networks □ Gas Packet Scheduler □ File and Printer Sharing for Microsoft Networks □ Internet Protocol Version 4 (TCP/IPv4) □ Link Layer Topology Discovery Manager U-D Driver □ Link-Layer Topology Discovery Responder Install Install Properties Description Allows your computer to access resources on a Microsoft network. OK Cancel

5

Click [Advanced] in the [General] sheet.

![](images/bc0d89dcbfb21ec73b264e3f1e43f0a492ad22540603d7756cdf8f7396ed2d95.jpg)
text_image Internet Protocol Version 4 (TCP/IPv4) Properties General Alternate Configuration You can get IP settings assigned automatically if your network supports the capability. Otherwise, you need to ask your network administrator for the appropriate IP settings. Obtain an IP address automatically Use the following IP address: IP address: . Aligned needs: . Default gateway: . Obtain DNS server address automatically Use the following DNS server addresses: Preferred DNS server: 192 , 168 , 1 , 28 Alternate DNS server: . Validate settings upon exit Advanced... OK Cancel

6

Enable NetBIOS over TCP/IP.

(1) Display the [WINS] sheet. (2) Select [Enable NetBIOS over TCP/IP]. (3) Click [OK]. ![](images/f3e04733a598f2738a7ae6b03914b7010dbe31a77677349177b0fc8aa81d8ef3.jpg)
text_image Advanced TCP/IP Settings IP Settings DNS WINS (1) WINS addresses, in order of use: Add... Edit... Remove IF LIMHOSTS lookup is enabled, it applies to all connections for which TOP/IP is enabled. ■ Enable LIMHOSTS lookup Import LIMHOSTS... NetBIOS setting ● Default: Use NetBIOS setting from the DHCP server. If static IP address is used or the DHCP server does not provide NetBIOS setting, Enable NetBIOS over TCP/IP ○ Enable NetBIOS over TCP/IP ○ Enable NetBIOS over TCP/IP (2) (3) OK Cancel

7

Continue to click [OK] until all the dialog boxes close.

![](images/1aff3fe64a6c26084f0a687f16dd733bd9d7284b0e1e8098e4186091be8cb15f.jpg) If a message that prompts you to restart the computer appears Restart the computer.

Installing the Printer Driver

A printer driver is required for printing. Following "Printer Driver Installation Guide", install the printer driver. For details on the procedure for viewing "Printer Driver Installation Guide", see "Installation." ![](images/4ae8bad174b02f542aafbe4abd48cdfd5eb4f6049d687c98ef7b5962f9e0b4ce.jpg)

NOTE

If the screen that prompts you to select a port appears during the installation

Perform the following procedure. 1. Click [Add Port]. 2. Select [Network], then click [OK]. 3. From the list, select [Workgroup Name], [Server Name], and [Printer Name] specified in "Configuring the Protocol Settings" respectively.

Network Settings for the Printer (AppleTalk)

0258-07U The requisite tasks to use the printer in the AppleTalk network are as follows. If you are using Mac OS X 10.6, see "Network Settings for the Printer (TCP/IP)", and specify the settings for the network. ![](images/fda9fa60be7838611938f8be3f3bb412f7f6da49b7fc515d9d982edc1987493d.jpg)
flowchart
graph TD
    A["Macintosh Network Settings"] --> B["Configuring the Protocol Settings"]
    B --> C["Configuring a Computer that Performs Printing"]
> Macintosh Network Settings Configuring the Protocol Settings Configuring a Computer that Performs Printing 0258-07W Configure the Macintosh network settings.

1

Select [System Preferences] from the Apple menu.

2

Click [Network]. ![](images/6e3889ba395bb738c77c09b91337648df99e5bbaef8b1cce04c058cb72fe05bd.jpg)
text_image System Preferences Show All Personal Appearance Dashboard & Expose Desktop & Screen Saver Deck International Security Spotlight Hardware Bluetooth CDs & DVDs Displays Energy Saver Keyboard & Mouse Print & Fax Sound Internet & Network .Mac Network QuickTime Sharing System Accounts Classic Date & Time Software Update Speech Startup Disk Universal Access Other Crowd

3

Check the settings for the network port. (1) Select [Network Port Configurations] from [Show]. (2) Make sure that the [Built-in Ethernet] check box is selected. (If the check box is not selected, select it.) ![](images/d9e50665471c48da02b728d7c80949a201a01ed00af39614a6146d8517f5670d.jpg)
text_image Network Location: Automatic Show: Network Port Configurations (1) Check a configuration to make it active. Drag configurations into the order you want to try them when connecting to a network. On | Port Configurations ✓ Internal Modem ✓ Built-in Ethernet (2) New... Rename Delete... Duplicate Click the lock to prevent further changes. Assist me... Apply Now

4

Make sure AppleTalk is active.

(1) Select [Built-in Ethernet] from [Show]. (2) Click [AppleTalk]. (3) Make sure that the [Make AppleTalk Active] check box is selected. (If the check box is not selected, select it.) ![](images/ff27885c6038b2d1a10b1220118adb79ab574d02dcf140defb8e75868be346c5.jpg)
text_image Network Show All Location: Automatic Show: Built-in Ethernet TCP/IP PPPoE AppleTalk (2) es Ethernet Make AppleTalk Active (3) Computer Name: My computer (Can be changed in Sharing Preferences) AppleTalk Zone: Configure: Automatically Click the lock to prevent further changes. Assist me... Apply Now
![](images/ad678b98c364214ce2a202b25f1c1f2c4c63ab68ded820005658539e6f564c92.jpg)

NOTE

If [Built-in Ethernet] does not appear in [Show]

Select [Network Port Configurations], and then select the [Built-in Ethernet] check box.

5

Close the [Network] dialog box, then save the settings. 0258-07X This section describes the procedure for specifying the settings using the Remote UI. In the Remote UI, you can specify the settings by accessing the printer from a Web browser via a network. ![](images/c997d1b7cf463be728130aeebc91e31e781eb1c64a3853c1df0c549a9ce54757.jpg)

IMPORTANT

Before configuring the protocol settings

- When configuring the protocol settings for the printer using the above software, the TCP/IP protocol must be able to be used in your network environment. - Make sure that each setting option for TCP/IP is specified, the printer and computer are connected properly, and the printer is ON. ![](images/37c35f446ad5a6c58a5b988f620ac47562804e34adc50912ef70cac15f2d5b97.jpg)

NOTE

When specifying the settings using software other than the Remote UI

You can also specify the settings using the following software. > "FTP Client (Macintosh)" You can specify the settings by accessing the FTP server of the printer using Command Prompt. The specifiable options vary depending on the software. See "Network Setting Items" and use software appropriate to the network environment you are using or options that you want to specify.

About the screenshots

This procedure is described using screenshots from Windows 7.

1

Start the Remote UI, and then log in as Administrator. > "Starting the Remote UI"

2

Click [Settings/Registration]. ![](images/7dbf79e0501003daf3c0165d3d01666115363e535473d434e3f954cc3b903f0b.jpg)
text_image Remote UI Portal: LBPXXXX: LBPXXXX - Windows Internet Explorer Http:// Bing Favorites Suggested Sites Web Slice Gallery Remote UI Portal: LBPXXXX: LBPXXXX Device Name: LBPXXXX Product Name (Serial No.): LBPXXXX Location: Login User: System Manager Log Out Language English Mail to System Manager Remote UI: Portal Last Updated: 29/05 2012 10:03:42 Device Basic Information Device Status The printer is ready. Error Information There is no error. Consumables Information Paper Information Paper Source Remaining Paper Paper Size Paper Type Multi-Purpose Tray None A4 Free (Mixed Types) Drawer 1 Loaded A4 Free (Mixed Types) Remaining Toner Item Name Remaining Toner Cyan Toner 16-100% Status Monitor/Cancel Settings/Registration Basic Tools Box Direct Print Management Tools Service Management Service

3

Select [Network] from the [Preferences] menu. ![](images/ee1cea1cb838171c1ad80d0984334238d5a82e16963db58edaa07d8cc20742db.jpg)
text_image Remote UI Settings/Registrations: LBP7680C: LBP7680C - Windows Internet Explorer http://192.168.1.225/netmenu.cgi File Edit View Favorites Tools Help Favorites Remote UI Settings/Registrations LBP7680C: LBP... Settings/Registration Mail to System Manager Preferences Control Menu Paper Source Menu Network Layout Menu Quality Menu User Maintenance Menu Output/Control Utility Menu Calibration Device Control Management Settings Department ID Management Security License/Other Settings/Registration Preferences Network Network LastUpdated 01/04 2011 10:32:30 Network TCP/IP Settings IPv4 Settings IPv6 Settings WNS Configuration ARP/FNG Settings FTP Settings LPD Print Settings RAW Print Settings IPP Print Settings WSO Print Settings HTTP Settings SSL Settings Proxy Settings Multicast Discovery Settings SNTP Settings NetWare Settings AppleTalk Settings SPAP Settings Done Internet | Protected Mode: Off 100%

4

Click [AppleTalk Settings]. ![](images/8bd82de10c911ca42d04c538624ec7c11ab6bb3cd42c494247bb730580103271.jpg)
text_image Remote UI Settings/Registration: LBP7680C LBP7680C - Windows Internet Explorer http://192.168.1.225/nettntenu.cgi File Edit View Favorites Tools Help Favorites Remote UI Settings/Registration: LBP7680C LBP... SENSYS LBP7680C / LBP7680C / Settings/Registration To Portal Login User: System Manager Log Out Mail to System Manager Preferences Control Menu Paper Source Menu Network Layout Menu Quality Menu User Maintenance Menu Output/Control Utility Menu Calibration Device Control Management Settings Department ID Management Security License/Other Settings/Registration Preferences Network Network Last Updated 01/04 2011-10-32:30 Network TCP/IP Settings IPv4 Settings IPv6 Settings WINS Configuration ARP/PING Settings FTP Settings LPD Print Settings RAW Print Settings IPP Print Settings WSO Print Settings HTTP Settings SSL Settings Proxy Settings Multicast Discovery Settings SMTP Settings NetWare Settings AppleTalk Settings Done Internet | Protected Mode: Off 100%

5

Click [Edit...].

![](images/ad7e2ca5725056bdee5bab8902f0320f0732bb1d131009301a6a3764f8e398af.jpg)
text_image Remote UE Settings/Registration: LBP7680C: LBP7680C - Windows Internet Explorer http://192.168.1.225/networkAppleTalk.cgi File Edit View Favorites Tools Help Favorites Remote UE Settings/Registration: LBP7680C: LBP... I.SENSYS LBP7680C / LBP7680C / To Portal Login User: System Manager Log Out Settings/Registration Mail to System Manager Preferences Control Menu Paper Source Menu Network Layout Menu Quality Menu User Maintenance Menu Output/Control Utility Menu Calibration Device Control Management Settings Department ID Management Security License/Other Settings/Registration Preferences Network > AppleTalk Settings AppleTalk Settings Last Updated 01/04 2011 12:17:52 Edit... AppleTalk Settings Use AppleTalk: Off Phase: Phase 2 Service Name: LBP7680C Zone: * Print Mode: Open Both Spool and Direct Copyright CANON INC. 2011 All Rights Reserved Done Internet | Protected Mode: Off 100%

6

Select the [Use AppleTalk] check box.

![](images/963a7d9da86dc93ba66e9f0bacd092995408c4e893eb5e3e35b4d20172ef051f.jpg)
text_image Remote UI Settings/Registration: LBP7680C: LBP7680C - Windows Internet Explorer File Edit View Favorites Tools Help Favorites Remote UI Settings/Registrations: LBP7680C: LBP... SENSYS LBP7680C / LBP7680C / Settings/Registration To Portal Login User: System Manager Log Out Mail to System Manager Preferences Control Menu Paper Source Menu Network Layout Menu Quality Menu User Maintenance Menu Output/Control Utility Menu Calibration Device Control Management Settings Department ID Management Security License/Other Settings/Registration Preferences Network > AppleTalk Settings > Edit AppleTalk Settings Edit AppleTalk Settings Last Updated 01/04 2011 12 18:55 The settings will be changed as follows. (Changes effective after the main power is turned OFF and ON.) OK Cancel AppleTalk Settings Use AppleTalk Phase Phase 2 Service Name: LBP7680C Zone: Print Mode: Open Both Spool and Direct Open Spool Open Direct Done Internet | Protected Mode: Off 100%
![](images/19bb048631193b5bd980c7901445d69c2493b775f15225376d7ec9719ce95066.jpg)

NOTE

When the [Use AppleTalk] check box is cleared

The printer is not detected on the AppleTalk network.

7

Specify the settings for AppleTalk.

![](images/537f2a4396ec8c9b7a34f6f947db52c19afee20ad659e0d5fb3ba5ad884f32f6.jpg)
text_image Remote UE Settings/Registration: LBP7680C: LBP7680C - Windows Internet Explorer File Edit View Favorites Tools Help Favorites Remote UE Settings/Registration: LBP7680C: LBP... Settings/Registration Settings/Registration: Preferences: Network > AppleTalk Settings > Edit AppleTalk Settings Edit AppleTalk Settings Last Updated: 01/04 2011 12:18:55 The settings will be changed as follows. (Changes effective after the main power is turned OFF and ON.) OK Cancel AppleTalk Settings Use AppleTalk Phase: Phase 2 Service Name: LBP7680C Zone: Print Mode: Open Both Spool and Direct Open Spool Open Direct Done Internet | Protected Mode: Off 100%
1. Enter the name of the printer in [Service Name]. Up to 32 characters can be entered. The name specified in this option is displayed on the printer list of Macintosh. 2. If any zone is set up on the network, enter the zone name in [Zone]. Up to 32 characters can be entered. 3. In [Print Mode], specify a printing process to be used. If you want to fix the printer to be used, select the check box only for the printer. - [Open Both Spool and Direct]: Prints documents with a choice of "Spool" or "Direct" from the computer. • [Open Spool]: Prints documents at high speed. • [Open Direct]: Prints documents at high quality. ![](images/0ea8e580422d35cf70ca7694bb1e83872b9a8cc47eee3b532efc895bfad9ebe7.jpg)

IMPORTANT

About [Phase]

[Phase] is fixed at [Phase 2], and you cannot specify the setting.

About [Service Name]

You cannot specify a name which includes "=", "@", "\*", ":, and "\~."

About [Zone]

You cannot specify a name which includes "=", "@", ":", and "\~."

If multiple printers are in the same zone

Specify a specific name for each printer. It is not possible to clear both [Open Spool] and [Open Direct] together.

8

Click [OK].

![](images/f7127bdf894f57d28f6e785935d54e28676aca1fddb3cb61cbf8b1b71f95f657.jpg)
text_image Remote UE Settings/Registration: LBP7680C: LBP7680C - Windows Internet Explorer File Edit View Favorites Tools Help Favorites Remote UI Settings/Registrations: LBP7680C: LBP... I-SENSYS LBP7680C / LBP7680C / To Portal Login User: System Manager Log Out Settings/Registration Mail to System Manager Preferences Control Menu Paper Source Menu Network Layout Menu Quality Menu User Maintenance Menu Output/Control Utility Menu Calibration Device Control Management Settings Department ID Management Security License/Other Settings/Registration Preferences Network > AppleTalk Settings > Edit AppleTalk Settings Edit AppleTalk Settings LastUpdated 01/04 2011 12:18:55 The settings will be changed as follows. (Changes effective after the main power is turned OFF and ON.) OK Cancel AppleTalk Settings Use AppleTalk Phase Phase 2 Service Name: LBP7680C Zone: Print Mode: Open Both Spool and Direct Open Spool Open Direct Copyright CANON INC, 2011 All Rights Reserved Done Internet | Protected Mode: Off 100%

9

Perform a hard reset or restart the printer.

→ After performing a hard reset or restarting the printer, the settings are effective. ![](images/2129e29c7234f9366c32ad86a71e44502170ba0eb3dd426b2bed1c64f682dee2.jpg)

NOTE

To perform a hard reset

You can perform a hard reset using the following procedure. 1. Click [Settings/Registration]. 2. Select [Device Control] from the [Output/Control] menu. 3. Select [Hard Reset], then click [Execute]. 0258-07Y This section describes the procedure for when Terminal supplied with Mac OS X as standard is used. ![](images/4126d46a6b257f6eab9fc886bf04f92f0a264b57c42983234c501dd803996f9a.jpg)

IMPORTANT

If the [FTP Settings] check box is not selected in the [TCP/IP Settings] page in [Settings/Registration] - [Preferences] - [Network], settings cannot be specified from the FTP client. > "Configuring the Protocol Settings"

1

Enter "ftp the IP address of the printer", then press the [return] key on your keyboard. \- Input Example: "ftp 192.168.0.215" ![](images/dd5da6a26e57ff02e52d9ce029cb107ced963f4ad7c27e22009d2ec47759b7a9.jpg) If you are not sure about the IP address of the printer Print and confirm Network Status Print while referring to "Checking the Printer Settings", or consult your network administrator.

2

Enter "root" as the user name, then press the [return] key on your keyboard.

3

Enter the administrator password, then press the [return] key on your keyboard. The default password is "7654321".

4

Enter "cd config", then press the [return] key on your keyboard.

5

Enter "get CONFIG ", and then press [return] on your keyboard. Enter "CONFIG" as all upper case characters. → The config file is downloaded. The characters entered for become the name of the downloaded config file. ![](images/7a167512e2876abd7f33a0bd68e6756edf6407846680f967b2ea5588c40eba86.jpg)

NOTE

If the config file cannot be found

Search for the config file using the file search function of your operating system. (The download directory for the config file varies depending on the operating system or settings.)

6

Edit the downloaded config file in "TextEdit" or a similar text editor. For details on descriptions of each option, see "Setting Items."

7

Enter "put CONFIG", and then press [return] on your keyboard. Enter "CONFIG" as all upper case characters. → The edited config file uploads. In , enter the name of the config file that was entered when the file was downloaded.

8

Enter "get reset", then press the [return] key on your keyboard. When the printer is restarted the settings will be enabled. After checking that the printer has restarted, press the [c] key while holding down the [Ctrl] key, and return to the ftp command prompt.

9

Enter "quit", then press the [return] key on your keyboard.

10

Enter "exit", then press the [return] key on your keyboard.

11

Select [Quit Terminal] from the [Terminal] menu. 0258-080 After completing the protocol settings for the printer, configure each Macintosh to be used for printing.

Installing the Printer Driver

A printer driver is required for printing. Following "Printer Driver Installation Guide", install the printer driver. For details on the procedure for viewing "Printer Driver Installation Guide", see "Installation." ![](images/1e7cd86fec1cf60c235e25e38ac3b82cdd303cf12dbaaf331c9b326585e6eb88.jpg)

IMPORTANT

The supplied CD-ROM does not include the printer driver for Macintosh.

Download the printer driver for Macintosh that supports this printer from the Canon Web site (http://www.canon.com/). If you cannot find the printer driver for Macintosh that supports this printer on the Canon Web site, contact your local authorized Canon dealer.

Setting the Printer Destination

After installing the printer driver, set the printer destination. Following "Driver Guide", set the printer destination. For details on the procedure for displaying "Driver Guide", see "Viewing the Driver Guide." 0258-081

Software That Can Be Used for Managing the Printer

Remote UI FTP Client NetSpot Device Installer

Managing Print Jobs

Control Panel Setting

> Setting Items

> Checking the Number of the Printed Pages

> Initializing the Settings

> Checking the Printer Settings

> Setting the Administrator Password

Specifying the Device Name or Administrator Information

Sleep Mode

> Auto Shutdown

Specifying an ID for Each Department (LBP7680Cx Only)

Register/Update Software Function (LBP7680Cx Only)

Software That Can Be Used for Managing the Printer

0258-082 You can manage the printer using the control panel and the following software. Because the items you can manage differ respectively, use each software according to your environment or the item you want to manage. For details on the items you can manage using the control panel, see "Setting Items." ○: Can be managed —: Cannot be managed △: Can be managed partly
Management ItemControl PanelRemote UI FTPClient NetSpotDevice Installer
Managing Print Jobs
Checking the Number of the Printed Pages
Checking the Printer Settings
Setting the Administrator Password
Specifying the Device Name or Administrator Information
Sleep Mode
Configuring the Network Settings (Sharing the Printer)
Security Settings
[Settings/Registration] Menu
Specifying an ID for Each Department (LBP7680Cx Only)
0258-083 The Remote UI allows you to manage the printer using a Web browser.

- No specific software is needed.

You can operate the Remote UI in a Web browser. You do not need specific software to operate the Remote UI.

- You can manage the printer from a remote location.

By accessing and operating the printer from the Web browser via a network, you can manage the printer using a computer in a remote location. You can perform various operations, such as checking the current printer status or job logs and specifying various network settings in the Remote UI.

- Central management of all the printer settings with the administrator password.

Only the administrator can configure the settings or perform the operations related to the printer management by setting the administrator password. Before starting the Remote UI, see "Attention (Remote UI)."

Starting the Remote UI

Screen Layout of the Remote UI (Details on Each Setting Page)

System Requirements of the Remote UI
Web BrowserInternet Explorer 6 or laterNetscape Navigator 6.0 or later
Operating System An operating system on which the above Web browsers can run
DisplayResolution: 800 x 600 pixels or moreDisplay colors: 256 colors or more

1

Start the Web browser.

2

Enter "http:///" in the address field, and then press the [ENTER] key on your keyboard. \- Input Example: "http://192.168.0.215/" If the host name of the printer is registered in the DNS server, you can enter ["host name"."domain name"] instead of the IP address. \- Input Example: http://my\_printer.xy\_dept.company.com/ If you want to use SSL encrypted communication, enter "https:///" . If the [Security Alert] dialog box or other dialog box appears, follow the directions in the message. \- Input Example:https://192.168.0.215/ ![](images/dae06b3d16f26fc5d573333fb94934ce503b1040748143208e8ef71db7b21c87.jpg)
text_image Remote UI: Portal: LBP7680C: LBP7680C - Windows Internet Explorer Http://192.168.0.215 File Edit View Favorites Tools Help Favorites Remote UI: Portal: LBP7680C: LBP7680C
![](images/6d42ead63945ec1331df960260012c5afc3f3b581a22f9a6f8e0a8b12f3e7f6f.jpg)

If the Remote UI top page is not displayed

Check the following points. - The Remote UI is enabled. > "Enabling the Remote UI" - The printer and computer are connected properly via a network. ■ The printer is turned ON. - The IP address or ["host name"."domain name"] is entered correctly.

3

Log in as Administrator or End-User.

Logging in as Administrator By logging in as Administrator, you can perform all the operations and settings of the Remote UI. > Logging in as End-User By logging in as End-User, you can check the device status, confirm the settings, and view the jobs.

Logging in as Administrator

(1) Select [Management Mode]. (2) Enter any value in [Password]. The default password is "7654321". > "Setting the Administrator Password" (3) Click [Log In]. ![](images/ef1a113fc500181a49bff7279660ef1fc3786901d0a1ab57ba25b8b3f23b19cb.jpg)
text_image Remote UI: Login: LBP7680C / LBP7680C - Windows Internet Explorer https://192.166.1.187/login.cgi/Actions:TOPP4GE Favorites Suggested Sites Web Slice Gallery Remote UI: Login: LBP7680C / LBP7680C Canon Login LBP7680C / LBP7680C / (1) Language: English Management Mode Password: End-User Mode User Name: (2) (3) Log In Copyright CANON INC. 2011 All Rights Reserved Done Trusted sites | Protected Mode: Off 100%

Logging in as End-User

(1) Select [End-User Mode]. (2) Enter [User Name] as needed. (3) Click [Log In]. ![](images/f13f2b3a3755b8fe23f4af631a32c91d0e21870192d9e7441ec36fb5eb662ff0.jpg)
text_image Remote UI Login: LBP7680C / LBP7680C - Windows Internet Explorer https://192.168.1.187/Login.org/Actions:TOPPAGE Favorites Suggested Sites Web Slice Gallery Remote UI Login: LBP7680C / LBP7680C Canon Login LBP7680C / LBP7680C / Language: English Management Mode Password: End-User Mode User Name: (1) (2) (3) Login Copyright CANON INC. 2011 All Rights Reserved Done Trusted sites | Protected Mode: Off 100%
![](images/14a6dcd6fa6329ddb8607636eeaae7531c6afb41e8d3ecc98eedadd6f6242001.jpg)

NOTE

About [User Name]

- If you want to log in by entering [User Name], permit job operations by end-users in [Management Settings] in the [Settings/Registration] - [Management Settings] - [Security] page. > "Specifying the Job Operation Permission for End-Users" - Although it is possible to log in without entering any value for [User Name], logging in by entering the user name enables to operate the jobs for which the user names correspond with each other. - The value to be entered for [User Name] is the user name you entered when logging in to the computer.

About department ID management (LBP7680Cx only)

When the department ID management function is enabled, you can log in by entering the department ID and password. > "Specifying an ID for Each Department (LBP7680Cx Only)" ![](images/47e5b002df65b5c48450579fa60409397a8deb70b9d964f2feafad76f246aebd.jpg)

NOTE

When using SSL encrypted communication

To use SSL encrypted communication, a key and its certificate need to have been created and the key needs to have been registered as the default key. For details on the SSL encrypted communication function and the procedure for registering a key, see "Setting Keys and Certificates."

If the Remote UI does not start when SSL is enabled

There is a possibility that the file related to key management is broken. Perform the following procedure. 1. Press [OK] (OK: Settings) on the control panel, select [Network] → [Remote UI Settings] → [SSL], and then make sure that [SSL] is set to [Off]. 2. Restart the printer. 3. Regenerate the key and certificate and specify the settings for SSL from the Remote UI. > "Setting Keys and Certificates" 4. Restart the printer.

When using a proxy server

If you cannot connect the computer to the printer via a proxy server when using a proxy server, add the IP address of the printer to [Exceptions] (the addresses that do not use the proxy server) on the settings for the proxy server of the Web browser. The setting varies depending on the network environment. Consult your network administrator.

About Cookies

Configure your Web browser to enable cookies.

Setting priority

For details on the setting priority for when specifying the same item using a method other than the Remote UI as that specified using the Remote UI, see "Setting Priority (When Specifying the Same Item Using Multiple Methods)."

Starting the Remote UI

- If the Remote UI is running on multiple computers at a time, the latest settings are valid. - If you want to log in as Administrator, we recommend that only one Remote UI should be running at a time. - You can change language displayed in the login screen from the Setup menu. (LBP7680Cx only) > "[Setup] Menu ([Control Menu] Options)" - The following message may be displayed before the login screen appears depending on your environment. (LBP7680Cx only) "Processing... Wait a moment." 0258-086 This section describes the procedure for enabling the Remote UI using the printer's control panel. ![](images/6cfe21d8c295bfa8c841869b0d07b055434f6d5ed348a09c66ac391e3baf7a67.jpg)

NOTE

When enabling the Remote UI using software other than the Remote UI

You can also enable the Remote UI using the following software. > "FTP Client" You can enable the Remote UI by accessing the FTP server of the printer using Command Prompt.

1

Press [ ] ( : Settings) select [Network] using [ ] and [ ], and then press [OK]. When the message is displayed, press [OK]. ![](images/d68f0639b712d12774f278e1208416a7ed770fa5fc8d31c8b3c98d4885921942.jpg)
text_image Setup Control Menu Paper Source Network Layout

2

Select [Remote UI Settings] using [▲ and [ ], and then press [OK]. ![](images/8083f95cdaeaec9370e5b29a31f3cd09bda63e442e46d9ef2b10346f8e9f4378.jpg)
text_image Network SNMP v. 3 Settings Spooler Network Delay Time Remote UI Settings

3

Select [Remote UI] using [ ] and [ ], and then press [OK]. ![](images/89d60f8b42b044794f5b86229e1cb2061473cfe86e51c38988aa276aeddf5577.jpg)
text_image Remote UI Settings Remote UI SSL

4

Select [On] using [ ] and [ ], and then press [OK]. ![](images/efd07c29018871d220914753a458594fd8b3f98ee33507a9b0aedfe4b23a2d8c.jpg)
text_image Remote UI off On

5

Perform a hard reset or restart the printer. After performing a hard reset or restarting the printer, the settings are effective. ![](images/6333451643fb1a624df90c6cebbd2830e669a89532749e6d47c0a6004484c03c.jpg) NOTE For details on a hard reset See "Canceling All the Jobs (Hard Reset)."

Remote UI Portal Page

The screen shown below, which is displayed when the Web browser is launched and you have logged in to the Remote UI, is called the Portal Page. ![](images/815a4785815c0f0c77a50c36ce581ea648bc5aa0036099ebc5704d88f1ca5ace.jpg)
text_image Remote UI: Portal LBP7680C: LBP7680C - Windows Internet Explorer https://192.1681.225/portal.org/CSUTs402762746 File Edit View Favorites Tools Help Favorites Remote UI Portal LBP7680C: LBP7680C Device Name: LBP7680C Product Name (Serial No.: LBP7680C(MKBA000021) Location: Login User: System Manager Log Out Remote UI: Portal Language: English Mail to System Manager Last Updated: 04/04 2011 03:17:10 Device Basic Information Device Status The printer is ready Error Information There is no error Consumables Information Paper Information Paper Source Remaining Paper Paper Size Paper Type Multi-Purpose Tray None A4 Free Magenta Toner 5-100% (Mixed Types) Drawer 1 Loaded A4 Free Magenta Toner (Mixed Types) Remaining Toner Item Name Remaining Toner Cyan Toner 5-100% Magenta Toner 5-100% Yellow Toner 5-100% Black Toner 5-100% Message Board Message from System Manager. Support Link Support Link: http://www.canon.com Status Monitor/Cancel Settings/Registration Basic Tools Box Direct Print Management Tools Service Management Service Copyright CANON INC. 2011 All Rights Reserved Done Internet | Protected Mode: Off 100%

(1) [Device Basic Information]

[Device Status]

The indicators and status messages show the current printer status. You can see the status of the printer from the indicator colors, as shown below.
Indicator Color Printer Status Solution
[D7CB] (Gray):Offline (not accepting print data) Go back online and print.
CANON imageCLASS LBP7660Cdn - [Device Status] - 1 (Green):Normal status (able to print)
CANON imageCLASS LBP7660Cdn - [Device Status] - 2 (Yellow):There is no printing trouble, but some type of action is required (a warning message is displayed)Follow the onscreen instructions shown in [Error Information] below and solve the problem.
CANON imageCLASS LBP7660Cdn - [Device Status] - 3 (Red):Printing is not possible for some reason (an error message is displayed)

[Error Information]

It displays error information generated by the printer.

(2) [Consumables Information]

[Paper Information]

It displays paper level, size and type for each of the paper sources.

[Remaining Toner]

It displays the amount remaining in each color toner cartridge.
Item NameRemaining Toner*1Status Solution
Toner Cartridge5-100% Ableto print -
1-5%The toner cartridge needs to be replaced soon·Printing will continue or stop. *2·If printing has stopped, press [ ] ( : ← Online) on the printer control panel and printing will continue.·Have a replacement toner cartridge ready.·We recommend that you replace the toner cartridge before doing a large amount of printing. ➤ "Replacing Toner Cartridges"
0%The toner cartridge has reached the end of its life·Printing will continue or stop. *2·If printing has stopped, press [ ] ( : ← Online) on the printer control panel and printing will continue.·Since continuing the printing in this condition may cause the printer to malfunction, we recommend that you replace the toner cartridge with a new one. ➤ "Replacing Toner Cartridges"
The toner cartridge is not installed·Install the toner cartridge properly.
\*1 The remaining amount displayed is just a rough indication, and may be different from the actual amount. \*2 Whether the printer continues or stops printing when the toner cartridge needs to be replaced soon depends on the setting for [Warning Step] in the [Setup] menu. > "[Setup] Menu ([Control Menu] Options)"

(3) [Message Board]

It displays messages from the administrator. > "Display/Change Message Board Messages and Support Links" It displays links to information concerning printer support. > "Display/Change Message Board Messages and Support Links"

(5) [Language]

You can change the screen display language from the drop-down list.

(6) [Mail to System Manager]

You can send e-mail to the system manager.

(7) Update Button

Refresh the portal page display to the latest status.

(8) [Status Monitor/Cancel]

You can check and change the status of jobs the printer is processing. You can also check device status. "> "[Status Monitor/Cancel] Menu "

(9) [Settings/Registration]

You can set/change the various printer settings. The items that can be set/changed differ depending on whether you log in as administrator or end user. "> "[Settings/Registration] Menu "

(10) [Box] (LBP7680Cx only)

When the optional SD card is installed, you can print, copy and send documents that are saved in the printer's box.

(11) [Direct Print]

Using the printer, you can print PDF files, PS/EPS files, image files and XPS files that are saved to the computer you are using as is, without opening them. > "Printing without the Printer Driver (Direct Print)"

(12) [Service Management Service] (LBP7680Cx only)

It displays the SMS (Service Management Service) screen. > "MEAP (LBP7680Cx Only)"

[Status Monitor/Cancel] Menu

The following pages are in the [Status Monitor/Cancel] menu. > Print: [Job Status] Page > Print: [Job History] Page E-Mail RX: [Job History] Page [Error Information] Page [Device Features] Page > [Device Information] Page [Check Counter] Page You can check the status of jobs that are currently printing and manage them using cancel/resume. ![](images/882b22eb5d8678798d5c205fe42bd21ff03ad5c65e6b6cde2e1bc0c9194ecc47.jpg)
text_image Remote UE Status Monitor/Cancel LBP7680C: LBP7680C - Windows Internet Explorer http://92.168.1.225/eysmon.cgi/CSUTz-43680198 File Edit View Favorites Tools Help Favorites Remote UE Status Monitor/Cancel LBP7680C: LB... I SENSYS LBP7680C / LBP7680C / Status Monitor/Cancel To Portal Login User: System Manager Log Out Mail to System Manager Print Job Status Job History E-Mail RX Job History Error Information Device Features Device Information Check Counter Status Monitor/Cancel Print Job Status Print: Job Status Last Updated: 05/04 2011 03:14:36 Job No Document Name User Name Status Job Operation Date/Time 10 No Name No Name Printing Cancel Interrupt 05/04 2011 Priority Print Pause 03:14 Copyright CANON INC. 2011 All Rights Reserved Done Internet | Protected Mode: Off 100%

(1) [Job No.]

The Job No. of the job is displayed. When you click the Job No., the job's details are displayed.

(2) [Document Name]

The name of the job is displayed. For e-mail printing jobs, the subject of the e-mail is displayed.

(3) [User Name]

The user name of the job is displayed. For e-mail printing jobs, the e-mail sender is displayed.

(4) [Status]

The status of the job is displayed.

(5) [Job Operation]

It runs the job operation. Click the button for the operation that you want to run. > "Managing Print Jobs" [Cancel] It cancels the printing of the job that you clicked on and deletes the job. When the SD card is installed, you can run the following operations. (LBP7680Cx only)
[Interrupt]It pauses the job that is currently being output, and makes the new job the printing priority. When the new job is finished printing, it resumes printing the paused job.
[Priority Print] The output order of the job is moved up by one.
[Pause]/[Resume]When you click [Pause], it pauses the job output. The button for the paused job changes to [Resume].When you click [Resume], the paused job resumes. The button for the resumed job goes back to [Pause].
![](images/d8cfcb6667cb8c2939ebcd5fb46a7224a4932f889cb0bf5d4ce55175374c5b92.jpg)

NOTE

[Job Operation]

When logged on in End-User mode, it is possible to operate jobs with user names that match using [Management Settings] of [Settings/Registration] - [Management Settings] - [Security] only when job operation by end users is permitted.

(6) [Dept. ID]

If department ID is set, the department ID for the job is displayed. (LBP7680Cx only)

(7) [Date/Time]

The date and time the job was input is displayed.

(8) Update Button

It refreshes the [Job Status] page display to the latest status.

(9) [Back to Page Top]

It moves the scroll box up to the top of the page. The Print Job/Direct Print, saved job, report printing and e-mail Job History are displayed. ![](images/8ffa2510df88008eca5bc14165e220e2f297c478668bdb2da9779858255bd725.jpg)

NOTE

[Job History] Page Display

It is possible to display Job History only when displaying job history is permitted by [Display Job History] of [Settings/Registration] – [Management Settings] – [Security]. ![](images/2f0865770d3329ec791be145d9584c93af539d69aeb3aa7fdfaaf46cf4a0c6d2.jpg)
text_image Remote UE Status Monitor/Cancel: LBP7680C / LBP7680C - Windows Internet Explorer http://192.168.3.225/joblog.org/CSUT-771839466 File Edit View Favorites Tools Help Favorites Remote UE Status Monitor/Cancel: LBP7680C / LB... i.SENSYS LBP7680C / LBP7680C / To Portal Login User: System Manager Log Out Status Monitor/Cancel Mail to System Manager Print Job Status Job History E-Mail RX Job History Error Information Device Features Device Information Check Counter Status Monitor/Cancel Print Job History Print Job History Last Updated 04/04/2011 03:24:12 Print Job/Direct Print Display Job No. Result Total Impression Count Start Time End Time Document Name User Name 01/04 01/04 5 Cancel 0 2011 2011 Sample pdf DIRECT PRINT 10.17 11.45 Copyright CANON INC. 2011 All Rights Reserved Done Internet | Protected Mode: Off 100%

(1) Display Toggling

Select the job history to display. Only the selected type of job history is displayed in the list. [Print Job/Direct Print] [Stored Job] (LBP7680Cx only) [Report] [E-Mail Print]

(2) Display Job History

The output job history list is displayed.

(3) Update Button

It refreshes the [Job History] page display to the latest status.

(4) [Back to Page Top]

It moves the scroll box up to the top of the page.

E-Mail RX: [Job History] Page

It displays the received e-mail history. ![](images/55d1fcbdd07ca124262c7996518295358c483bdc1d02e3a7a238757098160152.jpg)
text_image Remote UE Status Monitor/Cancel: LBP7680C / LBP7680C - Windows Internet Explorer http://192.168.1.225/emmailblog.cgi/CS#Tc738276612 File Edit View Favorites Tools Help Favorites Remote UE Status Monitor/Cancel: LBP7680C / LB... I-SENSYS LBP7680C / LBP7680C / To Portal Login User: System Manager Log Out Status Monitor/Cancel Mail to System Manager Print Job Status Job History E-Mail RX Job History Error Information Device Features Device Information Check Counter Status Monitor/Cancel E-Mail RX Job History E-Mail RX: Job History Last Updated 04/04 2011 03:25:31 Subject From Received Date/Time RX Results Copyright CANON INC. 2011 All Rights Reserved Done Internet | Protected Mode: Off 100%

(1) Display Job History

The received e-mail history list is displayed.

(2) Update Button

It refreshes the [Job History] page display to the latest status.

(3) [Back to Page Top]

It moves the scroll box up to the top of the page.

[Error Information] Page

Information about errors occurring in the printer is displayed. ![](images/b1c03479370d3ccfa65c2ece25d5b92409826bee9fd90952b9810a57019ea841.jpg)
text_image Remote UI: Status Monitor/Cancel: LBP7680C / LBP7680C / Windows Internet Explorer http://192.168.1.225/eroinfoz.org/CSUTc368215087 File Edit View Favorites Tools Help Favorites Remote UI: Status Monitor/Cancel: LBP7680C / LB... I-SENSYS LBP7680C / LBP7680C / Status Monitor/Cancel To Portal Login User: System Manager Log Out Mail to System Manager Print Job Status Job History E-Mail RX Job History Error Information Device Features Device Information Check Counter Status Monitor/Cancel: Error Information Error Information LastUpdated: 04/04 2011 03:26:25 There is no error. Copyright CANON INC. 2011 All Rights Reserved Done Internet | Protected Mode: Off 100%

(1) [Error Information] (Number of Errors)

It displays whether or not errors have occurred, and if there are errors, the number of errors.

(2) [Error Information] (Information)

It displays status and solutions for the error information occurring in the printer. The meanings of the displayed icons are shown below. ![](images/d31dc85bb5dcfc19e4abf164e478a118c96724ddd5ffc5c4a764b370af86de2c.jpg)
text_image Remote UI: Status Monitor/Cancel LBP7680C: LBP7680C - Windows Internet Explorer http://192.168.1.225 errorsinfo.csglTCUT=369219607 File Edit View Favorites Tools Help Favorites Remote UI: Status Monitor/Cancel LBP7680C: LB... I SENSYS LBP7680C / LBP7580C / Status Monitor/Cancel To Portal Login User: System Manager Log Out Mail to System Manager Print Job Status Job History E-Mail RX Job History Error Information Device Features Device Information Check Counter Status Monitor/Cancel Error Information Error Information Last Updated: 04/04 2011 03:33:01 Errors have occurred. Error Information Status Details The front cover is open. Securely close the front cover. Copyright CANON INC: 2011.All Rights Reserved Done Internet | Protected Mode: Off 100%

(3) Update Button

It refreshes the [Error Information] page display to the latest status.

(4) [Back to Page Top]

It moves the scroll box up to the top of the page.

[Device Features] Page

The printer equipment information and the functions that can be used in the current equipment status are displayed. ![](images/bdd7c345e9aea4558fe2606c98b46bdfad17b59ca60662672280a3c71d51956a.jpg)
text_image Remote UB Status Monitor/Cancel LBP7680C / LBP7680C - Windows Internet Explorer https://192.168.1.225/idfeature.cgi/CSJTo-134126769 File Edit View Favorites Tools Help Favorites Remote UB Status Monitor/Cancel LBP7680C LB... I-SENSYS LBP7680C / LBP7680C / Status Monitor/Cancel To Portal Login User: System Manager Log Out Mail to System Manager Print Job Status Job History E-Mail RX Job History Error Information Device Features Device Information Check Counter Status Monitor/Cancel Device Features Device Features Last Updated: 04/04 2011 03:34:44 Basic Specifications Total RAM Size 786432 KB SD Card: Installed Maximum Print Speed: 20 ppm (Black) 20 ppm (Color) Full Color Printing Enable Number of Drawers: 1 Duplex Unit: Attached Toner Toner Cartridge: Canon Cartridge 718 Cyan Canon Cartridge 718 Magenta Canon Cartridge 718 Yellow Canon Cartridge 718 Black PDL PDL: UFR II PS PCL PDF XPS Direct Print Direct Print: PDF PS JPEG TIFF XPS Copyright CANON INC. 2011 All Rights Reserved Done Internet | Protected Mode: Off 100%

(1) [Basic Specifications]

The amount of RAM installed in the printer console, the installed options and the basic printing performance are displayed.

(2) [Toner]

Information about the toner cartridges installed in the printer is displayed.

(3) [PDL]

The page description languages that can be used by the printer are displayed.

(4) [Direct Print]

The file formats and document formats that can be used by Direct Print are displayed.

(5) Update Button

It refreshes the [Device Features] page display to the latest status.

(6) [Back to Page Top]

It moves the scroll box up to the top of the page.

[Device Information] Page

The basic information about the printer and the system manager information are displayed. ![](images/93a9ee00dfa4ee244c4e91784d913942a79c7c94e04e8b9264ba5e00c3ec88ae.jpg)
text_image Remote UI Status Monitor/Cancel LBP7680C / LBP7680C - Windows Internet Explorer http://92.168.1.225/index.org?CSUTs-1107225036 File Edit View Favorites Tools Help Favorites Remote UI Status Monitor/Cancel LBP7680C: UI... I-SENSYS LBP7680C / LBP7680C / To Portal Login User: System Manager Log Out Status Monitor/Cancel Mail to System Manager Print Job Status Job History E-Mail RX Job History Error Information Device Features Device Information Check Counter Status Monitor/Cancel Device Information Device Information Last Updated: 04/04 2011 01:37:02 Device Basic Information Manufacturer: CANON INC. Device Name: LBP7680C Location: Product Name: LBP7680C Serial Number: MKBA000021 Version Information Controller Version: R1.24/H System Manager Information System Manager: Contact Information E-Mail Address: Support Link: http://www.canon.com System Manager Comment: Usage Information Total Printed Pages: 0000055 Last Color Mismatch Correction: 01/04 2011 11:45 Total Printed Pages in Last Color Mismatch Correction: 0000055 Last Density Control/Density Median Control: 15/03 2011 06:09 Total Printed Pages in Last Density Control/Density Median Control: 0000038 Copyright CANON INC. 2011 All Rights Reserved Internet | Protected Mode Off 100%

(1) [Device Basic Information]

The basic information about the printer is displayed.

(2) [Version Information]

The printer controller version is displayed.

(3) [System Manager Information]

Information about the registered system manager is displayed.

(4) [Usage Information]

The number of pages printed and the date of the last maintenance are displayed.

(5) Update Button

It refreshes the [Device Information] page display to the latest status.

(6) [Back to Page Top]

It moves the scroll box up to the top of the page.

[Check Counter] Page

The number of pages printed is displayed. > "Checking the Number of the Printed Pages" ![](images/fdb00083848649451eb519984df572087ad6bc620d0a829f302e7fa4e2da333a.jpg)
text_image Remote UI Status Monitor/Cancel: LBP7680C / LBP7680C - Windows Internet Explorer http://192.168.1.225/dcasure.org/CSU/Tc-268344834 File Edit View Favorites Tools Help Favorites Remote UI Status Monitor/Cancel: LBP7680C / LB... i SENSYS LBP7680C / LBP7680C / Status Monitor/Cancel To Portal Login User: System Manager Log Out Mail to System Manager Print Job Status Job History E-Mail RX Job History Error Information Device Features Device Information Check Counter Status Monitor/Cancel Check Counter Check Counter Last Updated 04/04 2011 03:30:34 Main Counter Type Total 113 : Total (Black/Small) 14 123 : Total (Full Color + Single Color/Small) 41 Copyright CANON INC. 2011 All Rights Reserved Done Internet | Protected Mode: Off 100%

(1) [Main Counter]

The number of pages printed for each counter is displayed.

(2) Update Button

It refreshes the [Check Counter] page display to the latest status.

(3) [Back to Page Top]

It moves the scroll box up to the top of the page.

[Settings/Registration] Menu

The following pages show the settings that can be checked using the [Settings/Registration] menu.

[Preferences]

[Control Menu] Page [Paper Source Menu] Page [Network] Page > [Layout Menu] Page [Quality Menu] Page [User Maintenance Menu] Page

[Output/Control]

> [Utility Menu] Page > [Calibration] Page [Device Control] Page

[Management Settings]

> [Department ID Management] Page (LBP7680Cx Only) [Security] Page [License/Other] Page/[Message Board/Support Link] Page

[Control Menu] Page

It displays the operation settings for energy-saving mode (Sleep Mode) and when errors occur. For details on the settings, see "[Setup] Menu ([Control Menu] Options)." ![](images/64092d1e0258ba57e62956132ff97b414acfe31d8ec28294f74e0327266240f7.jpg)
text_image Remote US Settings/Registration: LBP7680C: LBP7680C - Windows Internet Explorer http://192.1481.225/scbf.org/CS/SU/Tz-1870613703 File Edit View Favorites Tools Help Favorites Remote US Settings/Registration: LBP7680C: LBP... SENSYS LBP7680C / LBP7680C / Settings/Registration To Portal Login User: System Manager Log Out Mail to System Manager Preferences Control Menu Paper Source Menu Network Layout Menu Quality Menu User Maintenance Menu Output/Control Utility Menu Calibration Device Control Management Settings Department ID Management Security License/Other Settings/Registration Preferences Control Menu Control Menu Last Updated: 04/04 2011 03:39:49 Edit... Sleep Settings Sleep Mode Deep Sleep Sleep Even if Error On Sleep Migration Time: 5 minutes Timer Settings Wake Up Timer: Off Wake Up Time: 12:00 Sleep Timar: Off Sleep Time: 12:00 Calibration Timer: Off Calibration Time: 12:00 Warning Step Toner Cartridge Lifetime Warning: Continue Printing Show Warnings Toner Cartridge Lifetime Warning On Drawer Empty On E-Mail Transmission Error On Auto Skip Error: Off Alarm: On PDL Selection (Plug n Play) PDL Selection (PnP): UFR # Date/Time Settings Date (dd/mm yyyy): 04 / 04 2011 Time (hh mm ss): 03 : 39 : 49 Daylight Saving Time: Off Start Date/Time: March Final Sunday 02:00 End Date/Time: October Final Sunday 03:00 Time Zone GMT 00:00 Panel Display/Notification Settings Panel Language English Animated Instruction On Show Toner Gauge On Settings Completed Notification 3 seconds Scrolling Speed Normal Others SD Card: On Interrupt Print: On Securing Time: 1 hour Secure Job History: Off Copyright CANON INC. 2011 All Rights Reserved Done Internet | Protected Mode Off 100%
(1) [Sleep Settings] The settings related to sleep mode operation are displayed. (2) [Timer Settings] The settings related to timer operation are displayed. (3) [Warning Step] The settings related to warning display are displayed. (4) [PDL Selection (Plug-n-Play)] The currently selected page description language is displayed. (5) [Date/Time Settings] The settings related to date and time are displayed. (6) [Panel Display/Notification Settings] The settings related to control panel display are displayed. (7) [Others] Other operation settings not included in the above categories are displayed.

(8) [Back to Page Top]

It moves the scroll box up to the top of the page. ![](images/2ab28c37a76e8898a4add4797b473b72802f1b93083180e571326219883ef258.jpg)

NOTE

Changing Settings

You can only change settings when you are logged on in system manager mode.

[Paper Source Menu] Page

It displays the settings for paper size, etc. when printing from the multi-purpose tray or paper drawer. For details on the settings, see "[Setup] Menu ([Paper Source] Options)" or "[Select Feeder] Menu." ![](images/3423b142faf3a8bc2dfd1f1214d65da2d78d7b5c59ede69b90a2f56e883225c8.jpg)
text_image Remote UI Settings/Registration: LBP7680C / LBP7680C - Windows Internet Explorer http://292.168.1.225-rpapenhdl.cgi/CSLT=164562K125 File Edit View Favorites Tools Help Favorites Remote UI Settings/Registration: LBP7680C / LBP... SENSYS LBP7680C / LBP7680C / Settings/Registration To Portal Login User System Manager Log Out Mail to System Manager Preferences Control Menu Paper Source Menu Network Layout Menu Quality Menu User Maintenance Menu Output/Control Utility Menu Calibration Device Control Management Settings Department ID Management Security License/Other Settings/Registration: Preferences: Paper Source Menu Paper Source Menu Last Updated 04/04/2011 03:42:15 Edit... Paper Source Paper Source Auto Paper Size Standard Paper Size: A4 Multi-Purpose Tray Paper Size: A4 Drawer 1 Paper Size: A4 Tray Multi-Purpose Tray Priority: Off Diff. Paper Tray: Off Auto Selection Multi-Purpose Tray: On Drawer 1: On Paper Type Default Paper Type: Plain Multi-Purpose Tray Paper Type: Free (Mixed Types) Drawer 1 Paper Type: Free (Mixed Types) 2-Sided Settings Manual 2-Sided: 1st Side 2-Sided Printing: Off Copyright CANON INC. 2011 All Rights Reserved Internet | Protected Mode: Off 100%

(1) [Paper Source]

The currently selected paper source is displayed.

(2) [Paper Size]

The paper size selected for each paper source is displayed.

(3) [Tray]

The operation settings related to the multi-purpose tray are displayed.

(4) [Auto Selection]

It displays whether to recognize the paper source for auto selection when [Auto] is set for [Paper Source] for each paper source.

(5) [Paper Type]

The paper type selected for each paper source is displayed.

(6) [2-Sided Settings]

The settings related to 2-sided printing are displayed.

(7) [Back to Page Top]

It moves the scroll box up to the top of the page. ![](images/ec27ba06d7cdbf4cd8657ac30c2ad739c1f4b05ac5ec0c53451c7ddb5f326bce.jpg)

NOTE

Changing Settings

You can only change settings when you are logged on in system manager mode.

[Network] Page

It displays the printer's network settings, etc. ![](images/1a47e3bbe15fead5b1146bf86fd2b26e255e676acc1c754ab6ab204b4450cc10.jpg)
text_image Remote US Settings/Registration: LBP7680C / LBP7680C - Windows Internet Explorer http://82.168.1.225/netmets.cgi File Edit View Favorites Tools Help Favorites Remote US Settings/Registration: LBP7680C / LBP... Settings/Registration To Portal Login User: System Manager Log Out Mail to System Manager Preferences Control Menu Paper Source Menu Network Layout Menu Quality Menu User Maintenance Menu Output/Control Utility Menu Calibration Device Control Management Settings Department ID Management Security License/Other Settings/Registration Preferences Network Network Last Updated 01/04 2011 10:32:36 Network TCP/IP Settings IPv4 Settings IPv6 Settings WINS Configuration ARP/FPG Settings FTP Settings LPD Print Settings RAW Print Settings IPP Print Settings WSD Print Settings HTTP Settings SSL Settings Proc Settings Multicast Discovery Settings SNTP Settings NetWare Settings AppleTalk Settings SMB Settings SNMP Settings SNMPv1 Settings SNMPv3 Settings Spoiler Startup Time Settings Ethernet Driver Settings IEEE802 1X Settings E-Mail Print Settings Copyright CANON INC. 2011 All Rights Reserved Done Internet | Protected Mode Off 100%

(1) [TCP/IP Settings]

It displays the TCP/IP settings. † How to change settings > "Configuring the Protocol Settings"

(2) [NetWare Settings] (LBP7680Cx only)

It displays the NetWare settings. † How to change settings "Network Settings for the Printer (NetWare) (LBP7680Cx Only)"

(3) [AppleTalk Settings]

It displays the AppleTalk settings. How to change settings > "Configuring the Protocol Settings"

(4) [SMB Settings] (LBP7680Cx only)

It displays the SMB settings. † How to change settings "Network Settings for the Printer (SMB) (LBP7680Cx Only)"

(5) [SNMP Settings]

It displays the SNMP settings. † How to change settings 5 > "Restricting the Users Who Can Monitor/Change the Settings Using the SNMP Protocol"

(6) [Spooler] (LBP7680Cx only)

It displays the spool function settings when the SD card is installed. † How to change settings > "Setting the Spooling Function (LBP7680Cx Only)"

(7) [Startup Time Settings]

It displays the startup time settings. † How to change settings > "Specifying the Setting for Startup Waiting Time"

(8) [Ethernet Driver Settings]

It displays the network interface settings. † How to change settings > "Changing the Network Transmission Speed or Transfer Mode"

(9) [IEEE802.1X Settings]

It displays IEEE802.1X security settings. † How to change settings "Setting IEEE802.1X Authentication "

(10) [E-Mail Print Settings]

It displays the e-mail print settings. † How to change settings "Receiving E-mail Data on the Mail Server and Printing (E-mail Print)"

(11) [Back to Page Top]

It moves the scroll box up to the top of the page.

NOTE

Changing Settings

You can only change settings when you are logged on in system manager mode.

[Layout Menu] Page

It displays the settings relating to print appearance, such as adjustment of print position and setting gutter margins. For details on the settings, see "[Setup] Menu ([Layout] Options)." ![](images/04757e06f8f4f1e3fad23c1b0e46f33b694fbd628c947d0cde908bff59016d77.jpg)
text_image Remote UI Settings/Registration: LBP7680C / LBP7680C - Windows Internet Explorer http://192.168.1.225/slayout.cgi/CSUT=1274678121 File Edit View Favorites Tools Help Favorites Remote UI Settings/Registration: LBP7680C / LBP... SENSYS LBP7680C / LBP7680C / To Portal Login User: System Manager Log Out Settings/Registration Mail to System Manager Preferences Control Menu Paper Source Menu Network Layout Menu Quality Menu User Maintenance Menu Output/Control Utility Menu Calibration Device Control Management Settings Department ID Management Security License/Other Settings/Registration Preferences Layout Menu Layout Menu Last Updated 04/04 2011 03:45:24 Edit Layout Menu Copies 1 Offset Y: 0 mm Offset X: 0 mm Binding Location Long Edge Gutter: 0 mm Alternative Method On Copyright CANON INC. 2011 All Rights Reserved Done Internet | Protected Mode: OR 100%

(1) [Layout Menu]

The settings for number of pages and print appearance are displayed.

(2) [Back to Page Top]

It moves the scroll box up to the top of the page. ![](images/32d070a0c76ab2df773c3d8baa764306e25e188088e427b1a23e07d2b613bca4.jpg)

NOTE

Changing Settings

You can only change settings when you are logged on in system manager mode.

[Quality Menu] Page

It displays the settings related to print quality, such as toner density adjustment. For details on the settings, see "[Setup] Menu ([Quality] Options)." ![](images/86ba76a63e7b5d5747ddb1a1b7c249e3bee980b679e4460aa879a4ae711ecb07.jpg)
text_image Remote UI Settings/Registration: LBP760C: LBP760C - Windows Internet Explorer http://182.168.1.225/squality.org/CSuTv3476463877 File Edit View Favorites Tools Help Favorites Remote UI Settings/Registration: LBP760C: LBP... I-SENSYS LBP760C / LBP760C / Settings/Registration To Portal Login User: System Manager Log Out Mail to System Manager Preferences Control Menu Paper Source Menu Network Layout Menu Quality Menu User Maintenance Menu Output/Control Utility Menu Calibration Device Control Management Settings Department ID Management Security License/Other Settings/Registration Preferences Quality Menu Quality Menu Last Updated 04/04 2011 03:46:35 Edit... Basic Settings Gradation Level High 1 Toner Save Off Toner Density C (Cyan): 0 Toner Density M (Magenta): 0 Toner Density Y (Yellow): 0 Toner Density K (Black): 0 Color Mode: Auto (Colo/Black) Halftones Error Diffusion Off Text: Resolution Graphics Gradation Image: Gradation Gray Compensation Text: On Graphics On Image: On CMS CMS (Matching) Selection Printer CMS (Matching)/Gamma Text: Gamma Graphics Gamma Image: Gamma RGB Source Profile Text: sRGB v3.0 (Canon) Graphics sRGB v3.0 (Canon) Image: sRGB v3.0 (Canon) Output Profile Text: Normal Graphics Normal Image: Photo Matching Method Text: Saturation Graphics Perceptual Image: Perceptual Gamma Correction Text: 1.4 Graphics 1.4 Image: 1.4 Gradation Settings Gradation Off Graphics On Image: On Advanced Smoothing Advanced Smoothing Smooth 1 Graphics Off Text: On Others Toner Volume Correction Normal Line Control Resolution Priority Reduce Quality: Continue Printing Special Smoothing Mode Mode 1 Copyright CANON INC. 2011 All Rights Reserved

(1) [Basic Settings]

It displays the settings related to printing resolution and toner.

(2) [Halftones]

It displays the settings related to halftone representation method when printing.

(3) [Gray Compensation]

It displays the settings related to gray compensation.

(4) [CMS]

It displays the settings related to color management.

(5) [Gradation Settings]

It displays the settings related to gradation processing.

(6) [Advanced Smoothing]

It displays the settings related to gradation processing.

(7) [Others]

The settings related to other print quality are displayed.

(8) [Back to Page Top]

It moves the scroll box up to the top of the page.

[User Maintenance Menu] Page

It displays the settings for printer adjustment from a specified paper source if a problem occurs, such as adjustment of print position and recovery printing. For details on the settings, see "[Setup] Menu ([User Maintenance] Options)." ![](images/f5ce375c0ed3571c8836026b8c3d359866b64c24f9eba659cb441efdd94bd770.jpg)
text_image Remote UI Settings/Registration: LBP7680C / LBP7680C - Windows Internet Explorer http://282.168.1.225/cusernet.org/CSJ/Tc1879147540 File Edit View Favorites Tools Help Favorites Remote UI Settings/Registration: LBP7680C / LBP... SENSYS LBP7680C / LBP7680C / Settings/Registration To Portal Login User: System Manager Log Out Mail to System Manager Preferences Control Menu Paper Source Menu Network Layout Menu Quality Menu User Maintenance Menu Output/Control Utility Menu Calibration Device Control Management Settings Department ID Management Security License/Other Settings/Registration: Preferences: User Maintenance Menu User Maintenance Menu ListUpdated 04/04 2011 03:51:00 Edit... Adjust Print Position Offset Y (Tray): 0.0 mm Offset X (Tray): 0.0 mm Offset Y (Drawer 1): 0.0 mm Offset X (Drawer 1): 0.0 mm Offset Y (Duplex Unit): 0.0 mm Offset X (Duplex Unit): 0.0 mm Others Recovery Printing: On Check Paper Size: Off Paper Size Substitution: Off Special Image Mode: Off ITB Cleaning Special Print Mode Curl Correction: Off Rough Paper Adjustment: Off Special Envelope Mode: Off First Calibration Color Mismatch Correction: After Jobs Density Control: Off Paper Feed Method Switch Multi-Purpose Tray: Speed Priority Drawer 1: Speed Priority MEAP Settings Select Default Screen Print Screen Copyright CANON INC. 2011 All Rights Reserved Done Internet | Protected Mode: Off 100%

(1) [Adjust Print Position]

It displays the print position adjustment settings for each paper source.

(2) [Others]

It displays the settings for operation and maintenance if a problem occurs.

(3) [Back to Page Top]

It moves the scroll box up to the top of the page. ![](images/7eba6dc94de69c583ff578800772c6e6ecce0acbd0a42be6ec7e0c155627f4d1.jpg)

NOTE

Changing Settings

You can only change settings when you are logged on in system manager mode.

[Utility Menu] Page

You can print each type of management report. Select the item to output, and then click [Execute]. For details on the settings, see "[Utility Menu] Menu." ![](images/06fcd47ba95a9b8fea773953743d8f74d2e1b846d7ba650d6d75aa02711a6448.jpg)
text_image Remote UI Settings/Registration: LBP7680C: LBP7680C - Windows Internet Explorer http://282.168.1.225/disc4k.npi File Edit View Favorites Tools Help Favorites Remote UI Settings/Registration: LBP7680C: LBP... Settings/Registration Mail to System Manager Preferences Control Menu Paper Source Menu Network Layout Menu Quality Menu User Maintenance Menu Output/Control Utility Menu Calibration Device Control Management Settings Department ID Management Security License/Other Settings/Registration: Output/Control Utility Menu Utility Menu List Updated 04/04 2011 01:53:33 Select the utility to output from the below options, and click [Execute] Execute Utility Menu Output Options: Configuration Page Network Status Print E-Mail RX History List Printing Position Adjustment Print POL Font List PS Configuration Page PS Font List Print History List (Print Job/Direct Print) Print History List (Stored Job) Print History List (Report) Print History List (E-Mail Print) A4 Cleaning LTR Cleaning Counter Report Page Count List Print MEAP System Information Copyright CANON INC. 2011 All Rights Reserved Done Internet | Protected Mode Off 100%
The following management reports can be output. - Configuration Page • Network Status Print • E-Mail RX History List - Printing Position Adjustment Print - Stored Job List (LBP7680Cx only)\* - PCL Font List • PS Configuration Page (LBP7680Cx only) • PS Font List (LBP7680Cx only) • Print History List (Print Job/Direct Print) • Print History List (Stored Job) (LBP7680Cx only)\* • Print History List (Report) • Print History List (E-Mail Print) A4 Cleaning - LTR Cleaning - Counter Report • Page Count List (LBP7680Cx only) • Print MEAP System Information (LBP7680Cx only) \* Only when the optional SD card is installed

[Calibration] Page

You can run each type of calibration. Select the item to run, and then click [Execute]. For details on the settings, see "[Utility Menu] Menu" or "Troubleshooting." ![](images/028b4a3016c505afbe680441170e9040bbe4df25a250b763272e8063a38da416.jpg)
text_image Remote UI Settings/Registration: LBP7680C: LBP7680C - Windows Internet Explorer File Edit View Favorites Tools Help Favorites Remote UI Settings/Registration: LBP7680C: LBP... SENSYS LBP7680C / LBP7680C / Settings/Registration To Portal Login User: System Manager Log Out Mail to System Manager Preferences Control Menu Paper Source Menu Network Layout Menu Quality Menu User Maintenance Menu Output/Control Utility Menu Calibration Device Control Management Settings Department ID Management Security License/Other Settings/Registration Output/Control Calibration Calibration Last Updated 01/04 2011 09:30:28 Select the calibration to perform from the below options, and click (Execute). Execute Calibration Calibration Options Color Mismatch Correction Density Control Density Median Control Full Calibration Copyright CANON INC. 2011 All Rights Reserved Done Internet | Protected Mode: Off 100%

[Device Control] Page

It controls the printer. Select the item to run, and then click [Execute]. For details on the settings, see "[Reset] Menu" or "Basic Printer Operations." ![](images/2363a92a330619f28b9f0740f458d311be092d5c6c47d5eb806ad10c1c030c89.jpg)
text_image Remote UI Settings/Registration: LBP7680C: LBP7680C - Windows Internet Explorer http://192.168.1.225/sddevvctrl.cgi File Edit View Favorites Tools Help Favorites Remote UI Settings/Registration: LBP7680C: LBP... Settings/Registration Mail to System Manager Preferences Control Menu Paper Source Menu Network Layout Menu Quality Menu User Maintenance Menu Output/Control Utility Menu Calibration Device Control Management Settings Department ID Management Security License/Other Settings/Registration Output/Control Device Control Device Control Last Updated 04/04 2011 03:55:26 Select the device control from the below options, and click [Execute] Execute Device Control Device Control Options: Online Offline Soft Reset Hard Reset Sleep Copyright CANON INC. 2011 All Rights Reserved Done Internet | Protected Mode: Off 100%

[Department ID Management] Page (LBP7680Cx Only)

If department ID management is set, it displays the number of pages printed by each registered department. For details on the settings, see "Specifying an ID for Each Department (LBP7680Cx Only)." ![](images/68466988403fce3fd73f4d4c231011da314cd3ebbc62b93feda75c5fd67b2b6c.jpg)
text_image Remote UI Settings/Registration: LBP7680C / LBP7680C - Windows Internet Explorer http://192.168.1.225/sk/dist.cgi File Edit View Favorites Tools Help Favorites Remote UI Settings/Registration LBP7680C: LBP... I SENSYS LBP7680C / LBP7680C / To Portal Login User: System Manager Log Out Settings/Registration Mail to System Manager Preferences Control Menu Paper Source Menu Network Layout Menu Quality Menu User Maintenance Menu Output/Control Utility Menu Calibration Device Control Management Settings Department ID Management Security License/Other Settings/Registration Management Settings Department ID Management Department ID Management Last Updated: 04/04 2011-03-06:25 Clear All Counts Settings... Department ID Page Total Register New Department... Dept. ID: 1 to 100 Display Dept. ID Printed Pages Color Black 1234567 0 0 Delete Jobs With Unknown IDs 0 0 Utility. E-Mail Print 0 0 Copyright CANON INC. 2011 All Rights Reserved Done Internet | Protected Mode: Off 100%

(1) [Department ID Page Total]

It displays the number of pages printed by each department.

(2) [Back to Page Top]

It moves the scroll box up to the top of the page.

[Security] Page

It displays printer information and security settings. ![](images/307d9ee415202b55f2309d691ef915bb2059fe13a5daec205f74edce535f85a3.jpg)
text_image Remote UI Settings/Registration: LBP7680C: LBP7680C - Windows Internet Explorer File Edit View Favorites Tools Help Favorites Remote UI Settings/Registration: LBP7680C: LBP... Settings/Registration Mail to System Manager Preferences Control Menu Paper Source Menu Network Layout Menu Quality Menu User Maintenance Menu Output/Control Utility Menu Calibration Device Control Management Settings Department ID Management Security License/Other Settings/Registration: Management Settings Security Security Last Updated: 04/04 2011 03:57:16 Security Management Settings Remote UI Settings Key and Certificate Settings CA Certificate Settings IPSec Settings Display Job History IP Address Filter IPv4 Address: TX Filter IPv4 Address: RX Filter IPv6 Address: TX Filter IPv6 Address: RX Filter MAC Address Filter TX Filter RX Filter Done Internet | Protected Mode: Off 100%

(1) [Management Settings]

It displays general information about the printer. † How to change settings > "Setting the Administrator Password" > "Specifying the Device Name or Administrator Information" > "Setting Restrictions for Print Jobs (LBP7680Cx Only)" > "Specifying the Job Operation Permission for End-Users" "Locking the Keys on the Control Panel (Key Lock Function)" > "Setting Restrictions for USB Direct Print (LBP7680Cx Only)"

(2) [Remote UI Settings]

It displays whether the Remote UI is set to use the SSL encrypted communication function. † How to change settings > "Changing the Remote UI Settings"

(3) [Key and Certificate Settings]

It displays information on registered keys and certificates. † How to change settings > "Displaying the [Key and Certificate Settings] Page in the Remote UI"

(4) [CA Certificate Settings] (LBP7680Cx only)

It displays information on registered keys and certificates. † How to change settings > "Displaying the [CA Certificate Settings] Page in the Remote UI"

(5) [IPSec Settings] (LBP7680Cx only)

It displays the IPSec security policy list. † How to change settings > "Setting the IPSec Encryption Communication Function (LBP7680Cx Only)"

(6) [Display Job History]

It displays whether it is set to allow job history to be displayed. † How to change settings > "Specifying the Setting for Job Log Display"

(7) [IP Address Filter]

It displays information restricting users who can print and change settings. † How to change settings "Restricting the Users Who Can Print or Perform the Printer Settings"

(8) [MAC Address Filter]

It displays information restricting users who have access. † How to change settings "Restricting the Users Who Can Access"

(9) [Back to Page Top]

It moves the scroll box up to the top of the page. ![](images/7ebb12f1e9b1083a84388b3f5d842d234a018f03e3bbfe012b59d630fc94e19a.jpg)

NOTE

Changing the settings

You can only change settings when you are logged on in system manager mode.

For LBP7680Cx

It displays the pages that the settings for message boards or support links, or registering or updating software are performed. ![](images/b945398589d41148684c0b9a7feda66711c9ca456880f18445c6b17c05847f33.jpg)
text_image Remote UI Settings/Registration: LBP7680C: LBP7680C - Windows Internet Explorer http://192.168.1.225/lesence.cgi File Edit View Favorites Tools Help Favorites Remote UI Settings/Registration: LBP7680C: LBP... I-SENSYS LBP7680C / LBP7680C / To Portal Login User: System Manager Log Out Settings/Registration Mail to System Manager Preferences Control Menu Paper Source Menu Network Layout Menu Quality Menu User Maintenance Menu Output/Control Utility Menu Calibration Device Control Management Settings Department ID Management Security License/Other Settings/Registration Management Settings License/Other License/Other Last Updated 04/04 2011 03:58:05 License/Other Message Board/Support Link Register/Update Software Copyright CANON INC. 2011 All Rights Reserved Done Internet | Protected Mode: Off 100%
It displays messages from the administrator and links to support pages. † How to change settings > "Display/Change Message Board Messages and Support Links"

(2) [Register/Update Software]

It displays the pages that registering or updating software is performed. † How to change settings > "Register/Update Software Function (LBP7680Cx Only)"

For LBP7660Cdn

It displays messages from the administrator and links to support pages. See "Display/Change Message Board Messages and Support Links" for setting procedures. ![](images/1e9cea4431947cce675f0610a45d3cadfd161e807385e24ccd52f94b628afcf2.jpg)
text_image Remote UE Settings/Registration: LBP7680C: LBP7680C - Windows Internet Explorer http://192.168.1.225/slink.cgi?CIU/T=46775H574 File Edit View Favorites Tools Help Favorites Remote UE Settings/Registrations: LBP7680C: LBP... I-SENSYS LBP7680C / LBP7680C / Settings/Registration To Portal Login User: System Manager Log Out Mail to System Manager Preferences Control Menu Paper Source Menu Network Layout Menu Quality Menu User Maintenance Menu Output/Control Utility Menu Calibration Device Control Management Settings Department ID Management Security License/Other Settings/Registration: Management Settings: License/Other > Message Board/Support Link Message Board/Support Link Last Updated 04/04 2011 03:59:27 Edit... Message Board Message Support Link URL http://www.canon.com Copyright CANON INC. 2011 All Rights Reserved Done Internet | Protected Mode: Off 100%
![](images/d2e3755b706a7511a40281443a5642cef8e4db2a4cdcedf336be892ed8031d85.jpg)

NOTE

Changing the settings

You can only change settings when you are logged on in system manager mode. 0258-089 You can post messages from the administrator on a message board on the portal page of the Remote UI. Also, you can set links to information about printer support in the portal page support link, and make it accessible from the Remote UI when necessary. When you are logged in in system manager mode, you can change the messages on the message board and change the link destination of support links.

Displaying a Support Page

1

From [Support Link] on the portal page, click the link destination on the support page. ![](images/cee1708fc4de1c9b4c787b88a841b5834e0840c7ada663f8fe428797d2974079.jpg)
text_image Remote UI: Portal LBP7680C: LBP7680C - Windows Internet Explorer http://82.168.1.225/portal.org/CSUTs402761796 File Edit View Favorites Tools Help Favorites Remote UI Portal LBP7680C: LBP7680C Device Name: LBP7680C Product Name (Serial No.) LBP7680C(MKBA000021) Location: Login User: System Manager Log Out Remote UI: Portal Language English Mail to System Manager Last Updated: 04/04 2011 03:17:10 Device Basic Information Device Status The printer is ready. Error Information There is no error Consumables Information Paper Information Paper Source Remaining Paper Paper Size Paper Type Multi-Purpose Tray None A4 Free (Mixed Types) Drawer 1 Loaded A4 Free (Mixed Types) Remaining Toner Item Name Remaining Toner Cyan Toner 5-100% Magenta Toner 5-100% Yellow Toner 5-100% Black Toner 5-100% Message Board Message from System Manager: Support Link Support Link: http://www.canon.com Copyright CANON INC. 2011 All Rights Reserved Done Internet | Protected Mode Off 100%

1

Select [Message Board/Support Link].

LBP7680Cx

From the [Settings/Registration] menu, select [Message Board/Support Link] in [License/Other] under [Management Settings].

LBP7660Cdn

Select [Message Board/Support Link] under [Management Settings] in the [Settings/Registration] menu. ![](images/8e57bc968a2c914ea735c16fd3fff32d53ea1ddef1bf70310353d07cc6d124dd.jpg)
text_image Remote UI Settings/Registration: LBP7680C LBP7680C - Windows Internet Explorer http://192.168.1.225-lisence.cgi File Edit View Favorites Tools Help Favorites Remote UI Settings/Registration LBP7680C LBP... I SEN SYS LBP7680C / LBP7680C / To Portal Login User: System Manager Log Out Settings/Registration Mail to System Manager Preferences Control Menu Paper Source Menu Network Layout Menu Quality Menu User Maintenance Menu Output/Control Utility Menu Calibration Device Control Management Settings Department ID Management Security License/Other Settings/Registration: Management Settings License/Other License/Other Last Updated 04/04 2011 03:58:05 License/Other Message Board/Support Link register/update software Copyright CANON INC. 2011 All Rights Reserved Done Internet | Protected Mode: Off 100%

2

Click [Edit...].

![](images/8fdbfc20631c6c9f3ebe5592b8278f6007e9957d4a043a676af77179858712e1.jpg)
text_image Remote UE Settings/Registration: LBP7680C / LBP7680C - Windows Internet Explorer http://192.168.1.225/link.cgi?CSJT=4077594574 File Edit View Favorites Tools Help Favorites Remote UE Settings/Registration LBP7680C/LBP... I-SENSYS LBP7680C / LBP7680C / Settings/Registration Mail to System Manager Preferences Control Menu Paper Source Menu Network Layout Menu Quality Menu User Maintenance Menu Output/Control Utility Menu Calibration Device Control Management Settings Department ID Management Security License/Other Settings/Registration Management Settings License/Other > Message Board/Support Link Message Board/Support Link Last Updated 04/04 2011 03:59:27 Edit... Message Board Message Support Link URL http://www.canon.com Copyright CANON INC. 2011 All Rights Reserved Done Internet | Protected Mode: Off 100%
![](images/cac5ba197ab22f8af8154cad65a3fd3a4c1c8a732aa719065e00141f0ded6c7b.jpg)

If [Edit...] does not appear

Log in as Administrator. > "Starting the Remote UI"

3

(1) Set message board messages when necessary. (2) Set support link URL when necessary. (3) Click [OK]. ![](images/7b8786df7a159ae292ad7d78643c467045a7c27d31b2e7e8a9bf7f7d9a5761ea.jpg)
text_image Remote UI: Settings/Registration : LBP7680C : LBP7680C - Windows Internet Explorer http://192.168.1.225/dlink.cgi?Action=GET_SUPLINK&CSUT=333632650 File Edit View Favorites Tools Help Favorites Remote UI: Settings/Registration : LBP7680C : LB... I.SENSYS LBP7680C / I BP7680C / To Portal Login User: System Manager Log Out Settings/Registration Mail to System Manager Preferences Control Menu Paper Source Menu Network Layout Menu Quality Menu User Maintenance Menu Output/Control Utility Menu Calibration Device Control Management Settings Department ID Management Security License/Other Settings/Registration: Management Settings: License/Other > Message Board/Support Link > Edit Message Board/Support Link Edit Message Board/Support Link Last Updated 04/04 2011 05:14:14 The settings will be changed as follows. (3) OK Cancel Message Board Message: Support Link URL: http://www.canon.com Copyright CANON INC. 2011 All Rights Reserved Done Internet | Protected Mode: Off 100%
[Message] Enter messages from the administrator.
[URL] Enter the URL address of the support link.
0258-08A In FTP Client, you can specify the network settings, security settings, and so on by accessing the FTP server of the printer using Command Prompt.

\- No specific software is needed. You can operate the FTP Client using the Command Prompt supplied with Windows. You do not need specific software to operate the FTP Client. \- You can specify the network settings at a time. Because the setting items are listed in a file, you can specify multiple items all at once. To manage the printer using FTP Client, perform the following procedure. ![](images/c96aa63628adbb87ffa4755af7878e5bc7f852782468b98565660b8c0700592d.jpg)

IMPORTANT

If the [FTP Settings] check box is not selected in the [TCP/IP Settings] page in [Settings/Registration] - [Preferences] - [Network], settings cannot be specified from the FTP client. "Configuring the Protocol Settings" ![](images/d3febc93fbb59642aaaf3acedf74314d8a5114c9e415463c69f8510aee9bb5d8.jpg)

NOTE

For Macintosh users

For details on the procedure for Macintosh, see "FTP Client (Macintosh)."

1

Run Command Prompt.

![](images/03b3968987e6e4e2f5bdcca03d8cdc79ad3f0ca6fee72e18ca54d2519539ae66.jpg)

NOTE

If you are using Windows

Run Command Prompt using the following procedure. \- From the [Start] menu, select [All Programs] or [Programs] → [Accessories] → [Command Prompt].

If you are using UNIX

Display the console screen.

2

Enter "ftp ", then press the [ENTER] key on your keyboard. \- Input Example: "ftp 192.168.0.215" ![](images/04fe454f36574d39101258a3f3b404bd0d5ad506583ac0f74012e556ccccd36f.jpg)

If you are not sure about the IP address of the printer

Print and confirm Network Status Print while referring to "Checking the Printer Settings", or consult your network administrator.

3

Enter "root" as the user name, then press the [ENTER] key on your keyboard.

4

Enter the administrator password, then press the [ENTER] key on your keyboard. The default password is "7654321".

5

Enter "cd config", then press the [ENTER] key on your keyboard.

6

Enter "get CONFIG ", and then press the [ENTER] key on your keyboard. Enter "CONFIG" as all upper case characters. → The config file is downloaded. The characters entered for become the name of the downloaded file. ![](images/e35f87f5fa0d6013fad4171ea01e3cee0a6c87041665f65f6be48aa3aa83a6dc.jpg)

If you cannot find the config file

Search for the config file using the file search function of your operating system. (The download directory for the config file varies depending on the operating system or settings.)

7

Edit the downloaded config file in Notepad or a similar text editor. For details on descriptions of each option, see "Network Setting Items."

8

Enter "put CONFIG", and then press [ENTER] key on your keyboard. Enter "CONFIG" as all upper case characters. → The edited config file uploads. In , enter the name of the config file that was entered when the file was downloaded.

9

Enter "get reset", then press the [ENTER] key on your keyboard. → When the printer is restarted the settings will be enabled. After checking that the printer has restarted, press the [c] key while holding down the [Ctrl] key, and return to the ftp command prompt.

10

Enter "quit", then press the [ENTER] key on your keyboard.

11

Enter "exit", then press the [ENTER] key on your keyboard. → Command Prompt closes. 0258-08C NetSpot Device Installer is the Canon software included in the supplied CD-ROM.

- You do not need to install NetSpot Device Installer.

You can start NetSpot Device Installer directly from the CD-ROM without installing it. You can also install NetSpot Device Installer on a computer.

- You can check the various printer statuses.

You can view the list of statuses of the Canon devices on a network easily. Also, you can change the default network settings or basic protocol settings. For details on other procedures for starting and using NetSpot Device Installer, see the following. \- Starting method: "Printer Driver Installation Guide" For details on the procedure for viewing "Printer Driver Installation Guide", see "Installation." • Usage: Help of NetSpot Device Installer † Help is displayed by clicking [Help] in the [Help] menu. ![](images/2d686a43062a903518c98c48bba640b189235942349b6175f0b149ed1d91500c.jpg)

IMPORTANT

If Windows Firewall is enabled

Before starting NetSpot Device Installer, configure Windows Firewall to unblock NetSpot Device Installer. For details on the configuration procedure, see the Readme file of NetSpot Device Installer.

About operating systems that NetSpot Device Installer supports

For details on the latest NetSpot Device Installer, see the Canon Web site (http://www.canon.com/). 0258-08E You can check/delete the job currently being printed or check job histories using the Remote UI. You can also delete the job currently being printed using a method other than the Remote UI. > "Canceling a Job" Before managing print jobs, see "Attention (Job Manager)."

Checking/Deleting the Job Currently Being Printed

1

Start the Remote UI. > "Starting the Remote UI"

2

From the [Status Monitor/Cancel] menu, select [Job Status] to display the job currently being printed. ![](images/2d4d52224802f6c62956818f6ac4ec9e01bb05c04bcab31bb1cfa54e0ae40fe4.jpg)
text_image Remote US Status Monitor/Cancel: LBP7680C / LBP7680C - Windows Internet Explorer http://192.168.1.225/syamom.cgi?CSUTs-43688196 File Edit View Favorites Tools Help Favorites Remote US Status Monitor/Cancel: LBP7680C / LB... I SENSYS LBP7680C / LBP7680C / To Portal Login User: System Manager Log Out Status Monitor/Cancel Mail to System Manager Print Job Status Job History E-Mail RX Job History Error Information Device Features Device Information Check Counter Status Monitor/Cancel Print Job Status Print: Job Status Last Updated: 05/04 2011 03:14:35 Job No. Document Name User Name Status Job Operation Date/Time 10 No Name No Name Printing Cancel Interrupt 05/04 2011 Priority Print Pause 03:14 Copyright CANON INC. 2011 All Rights Reserved Done Internet | Protected Mode: Off 100%

3

If you want to delete the job, perform the following procedure. Using job operation, click [Cancel] on the job you want to delete. ![](images/2d0a5edebe9b66e00c42c08c5b2684cde2d4958c864d45a7b87894221372187f.jpg)
text_image Remote UE Status Monitor/Cancel: LBP7680C: LBP7680C - Windows Internet Explorer http://192.168.1.225/symron.cgi/CSUT>=4369(L198) File Edit View Favorites Tools Help Favorites Remote UE Status Monitor/Cancel: LBP7680C: LB... I-SENSYS LBP7680C / LBP7680C / Status Monitor/Cancel To Portal Login User: System Manager Log Out Mail to System Manager Print Job Status Job History E-Mail RX Job History Error Information Device Features Device Information Check Counter Status Monitor/Cancel Print Job Status Print: Job Status Last Updated: 05/04 2011 03:14:35 Job No Document Name User Name Status Job Orientation Date/Time 10 No Name No Name Printing Cancel Interrupt 05/04 2011 Priority Print Pause 03:14 Copyright CANON INC. 2011 All Rights Reserved Done Internet | Protected Mode: Off 100%

Checking Job History

1

Start the Remote UI. > "Starting the Remote UI"

2

Select [Job History] from the [Status Monitor/Cancel] menu. ![](images/4b7437271ba81fe06e42f85d7723da5de1091e4c141754e6a571a34f72b89177.jpg)
text_image Remote UI: Status Monitor/Cancel LBP7680C / LBP7680C - Windows Internet Explorer http://192.168.1.225/joblog.cgi/C30/Tc721836466 File Edit View Favorites Tools Help Favorites Remote UI: Status Monitor/Cancel LBP7680C / LB... I.SENSYS LBP7680C / LBP7680C / To Portal Login User: System Manager Log Out Status Monitor/Cancel Mail to System Manager Print Job Status Job History E-Mail RX Job History Error Information Device Features Device Information Check Counter Status Monitor/Cancel Print Job History Print: Job History Last Updated 04/04 2011 03:24:12 Print Job/Direct Print Print Job/Direct Print Display Job No. Result Total Impression Count Start Time End Time Document Name User Name 01/04 01/04 5 Cancel 0 2011 2011 Sample pdf DIRECT PRINT 10.17 11.45 Copyright CANON INC. 2011 All Rights Reserved Done Internet | Protected Mode: Off 100%

3

Select the options that you want to display. ![](images/9828ca80729c9f9eb431e20175a39073422bb3e3b269a5acf7a4437604f62d83.jpg)
text_image Remote UE Status Monitor/Cancel LBP7680C: LBP7680C - Windows Internet Explorer http://192.168.1.225/skbing.cgi/CSUTz771874966 File Edit View Favorites Tools Help Favorites Remote UE Status Monitor/Cancel LBP7680C: LB... I.SENSYS LBP7680C / LBP7680C / To Portal Login User: System Manager Log Out Status Monitor/Cancel Mail to System Manager Print Job Status Job History E-Mail RX Job History Error Information Device Features Device Information Check Counter Status Monitor/Cancel Print Job History Print Job History Last Updated 04/04 2011 03:24:12 Print Job/Direct Print Print Job/Direct Print Display Job No. Result Total Impression Count Start Time End Time Document Name User Name 01/04 01/04 5 Cancel 0 2011 2011 Sample pdf DIRECT PRINT 10:17 11:45 Copyright CANON INC. 2011 All Rights Reserved Done Internet | Protected Mode: Off 100%
[Print Job/Direct Print]: The printed job history is displayed from the computer. [Stored Job]: The printing history of jobs stored in BOX is displayed. (LBP7680Cx only) [Report]: The utility print printing history is displayed. [E-Mail Print]: The history of jobs received by e-mail and printed is displayed. ![](images/3bca268a875018d9627719b899f0cd5be5f476c9729b461f71f7ceba82b0af3d.jpg)

IMPORTANT

Deleting the print logs

The print logs are deleted by turning the printer OFF or performing a hard reset. ![](images/8d46a8965e93cab63cce3690ff70a16a97ffc119f458b60ed8cc6d1f49c8427b.jpg)

NOTE

About [Document Name]

A job file name of up to 32 characters can be displayed. If the file name has more than 32 characters, the characters after the limited number are not displayed. Also, depending on the application, the application name may be added to the beginning of the file name.

About the job histories

\- The maximum numbers of the print logs that you can check are as follows. When the number of the jobs exceeds the maximum, the job histories are deleted starting from the oldest one.

LBP7680Cx

- [Print Job/Direct Print]: 200 - [Stored Job]:128 - [Report]: 128 - [E-Mail Print]: 128

LBP7660Cdn

- [Print Job/Direct Print]: 48 - [Report]: 16 - [E-Mail Print]: 128 - If the jog log display is not specified in [Display Job History] in the [Settings/Registration] - [Management Settings] - [Security] page, you cannot display the job histories. > "Specifying the Setting for Job Log Display" This section describes the menu operation for this printer.

Procedure for the Menu Operation

The menu consists of three hierarchies: "Option", "Item", and "Setting Value." Select the target options in each hierarchy. As an example of the setting procedure, this section describes the procedure for setting [Gradation Level] in the [Quality] options to [High]. Start the key operation from Step 1. Before specifying the setting, see "Attention (Control Panel Setting)."
Operation ProcedureKey Operation
1 Place the printer offline.Press [ ○ ] (← Online).
When the printer is online, the [Setup] menu can be displayed, however, the [User Maintenance] options cannot be specified.
2Display the [Setup] menu.CANON imageCLASS LBP7660Cdn - Procedure for the Menu Operation - 1Press [ ] (Settings).OK
The [Setup] menu is displayed.
3Select the option.When the [Quality] options are selectedCANON imageCLASS LBP7660Cdn - Procedure for the Menu Operation - 2Press [▲ or [ ].▼
The target option is displayed.
4Display the item.CANON imageCLASS LBP7660Cdn - Procedure for the Menu Operation - 3Press [OK].
The selected item is displayed.
5Select the item.When [Gradation Level] is selectedCANON imageCLASS LBP7660Cdn - Procedure for the Menu Operation - 4Press [▲ or [ ].▼
The target item is displayed.
Press [OK].
6Select the item.CANON imageCLASS LBP7660Cdn - Procedure for the Menu Operation - 5The selected setting value is displayed.
7Select the setting value.When [High 2] is selectedGradation LevelHigh 1High 2Press [▲] or [▼]
The target setting value is displayed.
8Determine the selected setting value.Settings Changed.Press [OK].
The target setting value is specified.The setting completion screen is displayed for 3 seconds. You can change the display time for the screen using [Set. Comp. Notify] in the [Setup] menu.
9Go out of the setting menu.Press [○] (←Online).

Printer Status to Enter the Menu Operation

You can enter each menu when the printer is in the following status. ○ : The state where you can enter the menu — : The state where you cannot enter the menu
When the printer is ready to print *1When an error is occurring *2
When the printer is onlineWhen the printer is offline
[Setup] Menu○ *3
[Select Feeder] Menu
[Reset] Menu○ *4
[Job] Menu
[Utility Menu] Menu
\*1 The printer is ready to print when the Ready indicator is on. \*2 An error is occurring in the printer when the Message indicator is on. \*3 The [User Maintenance] options cannot be specified. \*4 You cannot perform [Form Feed]. ![](images/d51eae7383fbf85f8bbdd608d3d4db9aa6a477bdfca149cb0e6e6a67ee8b819c.jpg)

NOTE

If you want to go back up the previous hierarchy or cancel a selected item

- To go back up the previous hierarchy or cancel a selected item, press [ ] ( :Back) or [ ]. - Pressing [ ] (← : Online) on the screen during the menu operation cancels a selected item and places the printer online or offline.

The state where the printer can be placed offline

The printer can switch back to the offline state when it is ready to print (when the ⬤ Ready indicator is on).

About setting values

Depending on the item, some settings become effective after restarting the printer.

Setting priority

For details on the setting priority for when specifying the same item using a method other than the control panel as that specified using the control panel, see "Setting Priority (When Specifying the Same Item Using Multiple Methods)."

About items displayed in the display

Some items are added and displayed only when an optional accessory is installed, and you can select such items.

About the exclusive [Setup] menu

When the exclusive [Setup] menu is selected in the "Option" hierarchy, see the following about each option. - PCL: "[Setup] Menu ([PCL] Options)" ■ UFR II: ▷ "[Setup] Menu ([UFR II] Options)" - Imaging: > "[Setup] Menu ([Imaging] Options)" - XPS: -> "[Setup] Menu ([XPS] Options) (LBP7680Cx Only)" - PS: > "[Setup] Menu ([PS] Options)" - PDF: " [Setup] Menu ([PDF] Options)"

About [Initialize Menu]

[Initialize Menu] does not have a lower hierarchy than "Option." For details on the procedure for the initialization, see "Initializing the [Setup] Menu Using the Printer's Control Panel." 0258-08K

>[Setup] Menu

[Setup] Menu ([Control Menu] Options) [Setup] Menu ([Paper Source] Options) [Setup] Menu ([Network] Options) >[Setup] Menu ([Layout] Options) >[Setup] Menu ([Quality] Options) >[Setup] Menu ([Interface] Options) [Setup] Menu ([User Maintenance] Options) >[Setup] Menu ([Print Mode] Options) > [Setup] Menu ([PCL] Options) > [Setup] Menu ([UFR II] Options) [Setup] Menu ([Imaging] Options) [Setup] Menu ([XPS] Options) (LBP7680Cx Only) > [Setup] Menu ([PDF] Options) > [Setup] Menu ([PS] Options) [Setup] Menu ([MEAP Settings] Options) (LBP7680Cx Only) [Setup] Menu ([Check Counter] Options)

> [Utility Menu] Menu

: [Job] Menu

> [Reset] Menu

[Select Feeder] Menu

![](images/f62ec18f4bb2bd75e6ed5e555c6014243c792c01099ab5ef2b06a2166f39cc60.jpg)

NOTE

Table description

- Bold values in the table indicate the default settings. - After changing the setting items with "\*1", cycle the power of the printer or perform a hard reset to make the settings effective. - The setting items or setting values with "\*2" may not be displayed depending on the availability of the optional accessories and other settings.
Setting Item Setting Value Setting
[Sleep Mode] [High (Deep Sleep)], [Mid (Printer Sleep)]Set the sleep mode.➤ "Sleep Mode"
[Sleep Even if Error] [Off], [On]
[Sleep Migration Time][5 minutes], [10 minutes], [15 minutes], [30 minutes], [60 minutes]
[Timer Settings]
[Wake Up Timer] [Off], [On] Set sleep modes (printer sleep mode anddeep sleep mode) to cancel automatically.➤ "Sleep Mode"
[Wake Up Time] 00:00 to 12:00 to 23:59
[Auto Reset Time][Off], [10 seconds], [20 seconds], [30 seconds], [40 seconds], [50 seconds], [1 minute], [2 minutes], [3 minutes], [4 minutes], [5 minutes], [6 minutes], [7 minutes], [8 minutes], [9 minutes]Specifies whether one of the following transitions is to take place when no key operation has been performed in a particular screen.▪ A transition to the MEAP authentication screen (LBP7680Cx only)▪ A transition to the ready status screen and the screen for using MEAP applications (LBP7680Cx only)▪ A transition from offline status to online status↑ When no key operation has been performed during a job processing session, this function is also executed depending on the current screen or current position in a menu.➤ "Online and Offline"
[Sleep Mode Timer][Off], [On]Specifies whether the sleep timer function is used to put the printer into a sleep mode (printer sleep mode or deep sleep mode) when the printer is not used for a certain time.➤ "Sleep Mode"
[Sleep Mode Time]00:00 to 12:00 to 23:59
[Calibration Timer] [Off], [On] Set whether to run calibration automaticallyat set times.➤ "Specifying Times and Performing Automatic Calibration"
[Calibration Time] 00:00 to 12:00 to 23:59
[Warning Step]
[Toner Cart.Warning][Continue Printing], [Stop Printing]Specifies whether the printer should continue or stop printing whensoon reach end of lifetime> appears.
[Auto Continue] [Off], [On]Specifies whether the printer should automatically use the function that, when an error is occurring, releases the printer from the error temporarily (Error Skip) and continues the job.
[Panel Language][Čeština], [Dansk], [Deutsch], [English], [Español], [Français], [Italiano], [Magyar], [Nederlands], [Norsk], [Polski], [Português], [Русский], [Suomi], [Svenska], [Türkçe], [中文(体)], [ ]Specifies the language to be displayed in the display.† This setting allows you to change language displayed in the Remote UI login screen (LBP7680Cx only).
[Alarm] [Off], [On]Specifies an alarm sound for when an error occurs.
[Show Warnings]
[Toner Cart. Warning][Off], [On]Specifies whether the printer should display <16 C toner cart. will soon reach lifetime.> <16 M toner cart. will soon reach lifetime.> <16 Y toner cart. will soon reach lifetime.> <16 K toner cart. will soon reach lifetime.> when the toner cartridge needs to be replaced soon.
[Drawer Empty] [Off], [On]Specifies whether the printer should blink the Paper Source indicator for the paper drawer that ran out of paper.
[E-Mail Trans. Error][Off], [On]Specifies whether the printer should display an error message when a communication error occurs in the e-mail printing.
[Date/Time Settings]
[Date] 01/01/2001 to31/12/2030 Specify date or time when the clock is not keeping correct date or time.➢ "Turning the Power On and Specifying a Language and Time"
[Time (24 hour)] 00:00 to 23:59:59
[Daylight Savings]*1
[DST Settings] [Off], [On]Specifies whether to set the daylight saving time.
[Start Date/Time]/[End Date/Time][Month], [Week], [Day], [Time]Specifies the time duration of the daylight saving time.
[Time Zone]*1GMT-12:00 to GMT+12:00Specifies the time zone according to the region where the printer is being used.
[SD Card]*1*2[Off], [On]Specify whether to use SD cards. When the optional SD card is installed, you will be able to use the following functions.Interrupt printChanging the order of print data (Priority print)Pausing/Resuming print data processing (Pausing/Resuming printing)Saving print data on the SD card (boxes) (Stored job print)SpoolerSMB printImporting and Exporting SettingsStored Job ListPrint History List (Stored Job)
[Interrupt Print]*2[Off], [On]Set whether to allow the job printing to be interrupted."Giving Priority to a Print Job (Interrupt Printing) (LBP7680Cx Only)"
[Sec. Print Del.Time]*1*2[1 hour], [2 hours], [3 hours], [6 hours], [12 hours], [24 hours]Set the amount of time before secure print jobs are automatically deleted."Specifying a Password for a Document and Printing (Secured Print)(LBP7680Cx Only)"
[Secure Job Log]*1*2[Off], [On]If [On] is specified for this item, the print log of the job being printed is saved, and the total number of printed pages (page counter) is counted even when you turn the printer OFF.
[Select PDL(PnP)]*1*2[UFR II], [UFR II XPS]*2, [PCL5c], [PCL6],[PS3]*2, [XPS (Direct)]*2If you want to connect the printer and computer with a USB cableThe printer driver for this printer may be installed automatically when the USB cable is connected.You can select the type of the printer driver ("UFR II", "UFR II XPS", "PCL5c", "PCL6", "PS3", or "XPS (Direct)", ) to be installed in this item at the time.If you want to connect the printer and computer with a LAN cableIf you are using Windows Vista, you can detect the printer automatically using the WSD (Web Service on Devices) protocol.You can select the type of the printer driver ("UFR II", "UFR II XPS", "PCL5c", "PCL6", "PS3", or "XPS (Direct)", ) to be installed on the automatically detected printer in this item.
[Mng. Settings]
[Settings Key Lock] [Off], [On]When you set to [On], CANON imageCLASS LBP7660Cdn - Table description - 1 (Settings) is locked and you cannot operate the Setup menu.When you set to [Off], [Settings Key Lock] is not locked.* You can unlock the locked Settings key only from the Remote UI.
[Adjust Screen]
[Contrast] -3 to 0 to +3If the display is not clear, adjust the contrast or brightness to the desired level.
[BacklightBrightness][Off], [Level 1], [Level 2], [Level 3]
[AnimatedInstruction][Off], [On]Specifies whether the printer should display an animated picture in the display when a paper jam occurs or when a toner cartridgeis replaced.
[Show Toner Gauge][Off], [On]Specifies whether the printer should display the icon that indicates the toner remaining.
[Set. Comp. Notify] [Off], [1 second], [2 seconds], [3 seconds]Specifies the display time of messages that are displayed when the setting completes. If [Off] is specified, no setting completion message is displayed.
[Scrolling Speed] [Slow], [Normal], [Fast]Set the scrolling speed for the message display on the control panel.
![](images/5d561870ecdb515ae7aff84dab8845e536bd35113f00edb08f39a913f99ee93f.jpg)

NOTE

Table description

- Bold values in the table indicate the default settings. - The setting items or setting values with "\*" may not be displayed depending on the availability of the optional accessories and other settings.

About the icons

Printer Driver

The settings for the printer driver are prioritized for this item. :

DOS/UNIX

When you are printing from DOS, UNIX, or other operating systems which do not use the printer driver, the settings are enabled for this item.
Setting Item Setting Value Setting
[Paper Source][Auto], [Drawer 1], [Drawer 2]*, [Multi-Purpose Tray]Select the default paper source that is used when printing.
[MP Tray Paper Size][A5], [B5], [A4], [LTR], [LGL], [EXEC], [Mixed Sizes], [Custom Size], [Custom Size R], [Env. ISO-C5], [Env. Monarch], [Env. No.10], [Env. DL], [Env. ISO-B5], [Index Card], [STMT], [FLSC]Specifies the size of the paper loaded in the multi-purpose tray.➤ "Registering the Paper Size and Type"
[MP Tray Priority] [Off], [On]Specifies whether the printer should detect the paper source in order starting with the multi-purpose tray when [Paper Source] is set to [Auto] in "[Select Feeder] Menu."
[Drawer 1 Size]/[Drawer 2 Size]*[A5], [B5], [A4], [LTR], [LGL], [EXEC], [Mixed Sizes], [Custom Size], [Custom Size R], [Env. ISO-C5], [Env. No.10], [Env. DL], [Env. ISO-B5], [STMT], [FLSC]Specifies the size of the paper loaded in the paper drawer.➤ "Registering the Paper Size and Type"
[Standard Paper Size]DOS/UNIX[A5], [B5], [A4], [LTR], [LGL], [EXEC], [Env. ISO-C5], [Env. Monarch], [Env. No.10], [Env. DL], [Env. ISO-B5], [Index Card], [STMT], [FLSC]If you cannot specify the paper size or if you print from DOS, UNIX, or other operating system, specify the paper size in this item.➤ "Loading Paper in the Drawer"➤ "Loading Paper in the Multi-purpose Tray"
[Diff. Paper Tray] [Off], [On]Specifies whether the printer should feed paper from the multi-purpose tray when paper of the size for the received data is not loaded in the paper drawer.
[Auto Selection]● [Multi-Purpose Tray]: [Off], [On]● [Drawer 1]: [Off], [On]● [Drawer 2]*: [Off], [On]Specifies the paper source to be automatically selected when [Paper Source] is set to [Auto] in "[Select Feeder] Menu."If [On] is specified, the printer selects the paper source as the one to be automatically selected.
[Default Paper Type][Plain], [Plain L], [Plain L2], [Plain H], [Heavy 1], [Heavy 2], [Heavy 3], [Transparency],If you cannot specify the paper type or if you print from DOS, UNIX, or other
DOS/UNIX[Envelope], [Envelope H], [Coated 1], [Coated 2], [Coated 3], [Coated 4], [Labels]operating system, specify the paper type in this item.
[MP Tray Paper Type][Plain], [Plain L], [Plain L2], [Plain H], [Heavy 1], [Heavy 2], [Heavy 3], [Transparency], [Envelope], [Envelope H], [Coated 1], [Coated 2], [Coated 3], [Coated 4], [Labels], [Mixed Types]Set the type of paper that is loaded in the multi-purpose tray.➢ "Registering the Paper Size and Type"➢ "Usable Paper"
[Drawer 1 Type]/[Drawer 2 Type]*[Plain], [Plain L], [Plain L2], [Plain H], [Heavy 1], [Heavy 2], [Heavy 3], [Envelope], [Envelope H], [Coated 1], [Coated 2], [Coated 3], [Coated 4], [Labels], [Mixed Types]Set the type of paper that is loaded in the paper drawer.➢ "Registering the Paper Size and Type"➢ "Usable Paper"
[Manual 2-Sided (MP)][1st Side], [2nd Side]Set the printing side of the paper that is loaded in the multi-purpose tray manually for 2-sided printing.·When it is set to [1st Side], it is printed on the front of the paper (the side that is first be printed).·When it is set to [2nd Side], it is printed on the back of the paper (the reverse side of the paper that has already been printed).
[2-Sided Printing]Printer Driver[Off], [On]Specifies whether the printer should print on one side or both sides of the paper.
![](images/3cf0897fdc592996947fa60099eb1b19845c6638b2e10e740178e5aed9ef0247.jpg)

NOTE

Table description

- After changing the settings for this item, cycle the power of the printer or perform a hard reset to make the settings effective. - This item is displayed only when the following condition is fulfilled. - [Network] in [Interface Selection] is set to [On]. - Bold values in the table indicate the default settings. - The setting items or setting values with "\*" may not be displayed depending on the availability of the optional accessories and other settings.
Setting Item Setting Value Setting
[TCP/IP Settings]Specifies the TCP/IP setting for the print server equipped with this printer.
[IPv4 Settings][IPv4]: [Off], [On] When using IPv4, set it to [On].
[IP Mode]: [Auto], [Manual]Select the method for setting the IP address.When setting the IP address using any one of DHCP, BOOTP, or RARP, select [Auto].When specifying the IP address to the printer directly, select [Manual].
[Protocol]:[Use DHCP]: [Off], [On][Use BOOTP]: [Off], [On][Use RARP]: [Off], [On]If you set [IP Mode] to [Auto], select which protocol you want to use. Set each of [Use DHCP], [Use BOOTP], and [Use RARP] to [On] (use) or [Off] (do not use).
[IP Address Settings]:[IP Address]: 0.0.0.0[Subnet Mask]: 0.0.0.0[Gateway Address]: 0.0.0.0Specify [IP Address], [Subnet Mask], and [Gateway Address]. For the method for entering the addresses, see "Method for entering addresses" below the table.
[DNS]:[Primary Address]: 0.0.0.0[Secondary Address]: 0.0.0.0Specify [Primary Address] and [Secondary Address] for DNS.For the method for entering the addresses, see "Method for entering addresses" below the table.Specify the settings for [Host Name], [Domain Name], and [DNS Dynamic Update] from the Remote UI."Configuring the Protocol Settings"
[DHCP Option]:[Acquire Host Name]: [Off], [On][DNS Dynamic Update]: [Off], [On]Set DHCP options when [IP Mode] is set to [Manual] and [Use DHCP] is set to [On].When obtaining the host name using DHCP, set [Acquire Host Name] to [On].When updating the host name using DHCP, set [DNS Dynamic Update] to [On].
[IPv6 Settings] [IPv6]: [Off], [On]If you want to use IP v. 6, specify [On].Specify the setting for IP v. 6 from the Remote UI."Setting IP v. 6"
[WINS Resolution] [Off], [On]If you want to use WINS Resolution, specify [On].* Specify the following settings from the Remote UI.·[WINS Server Address]·[Scope ID]·[SMB Server Name]·[SMB Workgroup Name]➤ "Configuring the Protocol Settings"
[ARP/PING] [Off], [On]When it is set to [On], you can change the IP address settings from the client using ARP/PING commands.
[FTP]·[FTP Print]: [Off], [On]·[FTP Settings]: [Off], [On]When it is set to [On], you can access the printer's FTP server using the FTP client and print the files.If you want to perform the settings using FTP Client, set [FTP Settings] to [On].* Specify the settings for [FTP Print User Name] and [Password] from the Remote UI.➤ "Configuring the Protocol Settings"
[LPD Print] [Off], [On]If you want to use LPD Print, specify [On].* Specify the setting for [Print LPD Banner Page] from the Remote UI.➤ "Configuring the Protocol Settings"
[RAW Print] [Off], [On]If you want to use RAW Print, specify [On].* Specify the setting for [Use Bidirectional Communication] from the Remote UI.➤ "Configuring the Protocol Settings"
[IPP Print] [Off], [On]If you want to use IPP Print, specify [On].* Specify the settings for [IPP Authentication], [User Name], and [Password] from the Remote UI.➤ "Configuring the Protocol Settings"
[WSD]·[WSD Print]: [Off], [On]·[WSD Browsing]*: [Off], [On]·[Multicast Discovery]: [Off], [On]If you want to use WSD Print, set [WSD Print] to [On], and then specify the following settings.·If you want to obtain printer information using WSD, set [WSD Browsing] to [On]. If you set [WSD Print] to [On], [WSD Browsing] is not displayed. ([WSD Browsing] is fixed at [On].)·If you want to set the printer to respond to requests from multicast discovery, set [Multicast Discovery] to [On].
[HTTP] [Off], [On]·When it is set to [On], you will be able to access the printer using HTTP.·When this is set to [Off], the message appears, disallowing you to use the Remote UI or perform IPP printing.
[Proxy]: [Off], [On]If you want to use the proxy function, specify [On].
[Server Address]*: -Enter the proxy server address to be used for the proxy function.
[Port Number]*: 0 to 80 to 99999Enter the port number of the proxy server to be used for the proxy function. You can specify between [0] and [99999].
[Proxy Settings]*[Same Domain]*: [Use Proxy],[Do Not Use Proxy]If you want to use the proxy function also for the same domain, specify [Use Proxy].
[Proxy Authentication]*: [Off],[On]If you want to use the proxy authentication function, specify [On].
[User Name]*: -Enter the user name to be used for the proxy authentication. Up to 24 alphanumeric characters can be entered.
[Password]*: -Enter the password to be used for the proxy authentication. Up to 24 alphanumeric characters can be entered.
[SNTP] [Off], [On]When obtaining time using the SNTP Client function, specify [On].* Specify the settings for [NTP Server Name] and [Polling Interval] from the Remote UI.> "Configuring the Protocol Settings"
[Discovery Response][Off], [On]If you want to set the printer so that it responds to searches that used the multicast discovery function, specify [On].* Specify the setting for [Scope Name] from the Remote UI.> "Configuring the Protocol Settings"
[IPSec] [Off], [On]When using the IPSec function, set it to [On].> "Setting the IPSec Encryption Communication Function (LBP7680Cx Only)"
[NetWare Settings]• [NetWare]: [Off], [On]• [Frame Type]*: [Auto Detect], [Ethernet II], [Ethernet 802.2], [Ethernet 802.3], [Ethernet SNAP]• [Print Service]*: [Bindery PServer], [RPrinter], [NDS PServer], [NPrinter]Configures the NetWare network settings.> "Configuring the Protocol Settings"
[AppleTalk] [Off], [On]Specifies whether the printer should use AppleTalk.> "Configuring the Protocol Settings"
[SMB]*[SMB Server]: [Off], [On][SMB Print]: [Off], [On]Specifies whether the printer should use SMB.> "Network Settings for the Printer (SMB) (LBP7680Cx Only)"
[SNMP Settings]Specify the settings related to SNMP protocol.> "Restricting the Users Who Can Monitor/Change the Settings Using the SNMP Protocol"
[SNMP v. 1 Settings]Specify the settings related to SNMP v. 1 protocol.
[SNMP v. 1][Off], [On]Specify whether to use the SNMP v. 1 protocol.
[Dctd.Community Set.]• [Dctd.Community 1]: [Off], [Read/Write], [Read Only]• [Dctd.Community 2]: [Off], [Read/Write], [Read Only]• [Dctd.Community 1]Specifies access privileges for the Management Information Base (MIB) of the community (canon_admin) that SNMP manages.• [Dctd.Community 2]Specifies access privileges for the Management Information Base (MIB) of the community (canon_user) that SNMP manages.
[SNMP v. 3][SNMP v. 3]: [Off], [On][User Settings 1] to [User
Settings]Settings 5]:• [Auth. Password]• [Encryption Password]Specify the settings related to SNMP v. 3 protocol.
[Rjct Packet in Sleep][Off], [On]Specifies whether to discard the SNMP packets received while in sleep mode.† If you set this item to [On], you may be unable to access the printer from Canon software (iW Series) or applications using the SNMP protocol.
[Spooler]* [Off], [On]When using the spooling function, set it to [On].➤ "Setting the Spooling Function (LBP7680Cx Only)"
[Network Delay Time]*0 to 300 secondsSpecifies the time interval from when the printer is turned ON to when the protocol starts.➤ "Specifying the Setting for Startup Waiting Time"
[Remote UI Settings]• [Remote UI]: [Off], [On]• [SSL]*: [Off], [On]*Specifies whether the printer should use the Remote UI. Also, whether to use SSL for communication by the Remote UI is specified.➤ "Setting Keys and Certificates"
[Ethernet Driver]*• [Auto Detect]: [Off], [On]• [Communication Mode]*: [Half Duplex], [Full Duplex]• [Ethernet Type]*: [10 Base-T], [100 Base-TX], [1000 Base-T]Configures the Ethernet driver.➤ "Changing the Network Transmission Speed or Transfer Mode"
[IEEE802.1X] [Off], [On]When using the IEEE802.1X function, set it to [On].➤ "Setting IEEE802.1X Authentication"
[Address Filter] [Off], [On]When using the address filter function, set it to [On].➤ "Restricting the Users Who Can Print or Perform the Printer Settings"➤ "Restricting the Users Who Can Access"
[MAC Address]*(Display only) Displays the MAC address of the printer.
[E-Mail Print Set.][POP3 RX Interval]: 0 to 90 (minutes)[POP3 RX]: [Off], [On][SMTP RX]: [Off], [On]Set e-mail print.➤ "Receiving E-mail Data on the Mail Server and Printing (E-mail Print)"
[Init. Network Set.] -By the initialization in this item, you can reset the network settings to the default settings.➤ "Initializing the Network Settings"

Method for entering addresses

1. Move the cursor to each field (an area separated by periods to enter three-digit numbers) in which you want to enter the address, by pressing [◀] or [▶]. (The number in the field blinks, allowing you to enter a value.) 2. Enter the numbers. ([ ▲ ] increases the value and [ ▼ decreases the value.) 3. After entering values in all the fields, press [OK] to confirm the settings. 0258-08U ![](images/b9d9cd612f045b3ecb07bce6c0bc32766ae65e4df6a1fbe13f053f2fc83347d5.jpg)

NOTE

Table description

Bold values in the table indicate the default settings.

About the icon

Printer Driver : The settings for the printer driver are prioritized for this item.
Setting ItemSetting ValueSetting
[Copies]Printer Driver1 to 9999Specifies the number of copies to be printed.The printer prints the specified number of copies.
[Offset Y]/[Offset X]-50.0 to0.0 to+50.0(mm)Adjusts the printing position in the vertical direction (Y) or the horizontal direction (X) by the specified value.> "Adjusting the Printing Position for All the Jobs"
[Binding Location]Printer Driver[Long Edge],[Short Edge]Specifies which edge of the paper, the long edge or short edge, is to be bound.When performing 2-sided printing, the printer adjusts the binding location automatically according to the paper surface.If [Long Edge] is specified, the binding location is created on the long edge of the paper.When loading paper in portrait orientation and performing 2-sided printingWhen loading paper in landscape orientation and performing 2-sided printingCANON imageCLASS LBP7660Cdn - About the icon - 1CANON imageCLASS LBP7660Cdn - About the icon - 2If [Short Edge] is specified, the binding location is created on the short edge of the paper.When loading paper in portrait orientation and performing 2-sided printingWhen loading paper in landscape orientation and performing 2-sided printingCANON imageCLASS LBP7660Cdn - About the icon - 3CANON imageCLASS LBP7660Cdn - About the icon - 4
[Gutter]Printer Driver-50.0 to0.0 to+50.0(mm)Specifies the gutter width for printing with the binding location created. A gutter is created with the image shifted by the specified value.You can shift the image in the "+" direction with a positive value and in the "-" direction with a negative value.CANON imageCLASS LBP7660Cdn - About the icon - 5
[Alternative Method][Off],[On]If this item is set to [On] and if the last page for the 2-sided printing is 1-sided printing, 1-sided printing is applied to the last page. (Printing can be performed faster than normal 2-sided printing.)However, when performing 2-sided printing on punched paper or previously printed paper, the orientation or printing surface of the last page may differ from other pages. In this case, specify [Off].
![](images/76bfece0e734c5828296da9ae4f3d73cf25048e04a965cec89f29117e40fc73f.jpg)

NOTE

Table description

Bold values in the table indicate the default settings.

About the icons

Printer Driver

The settings for the printer driver are prioritized for this item. :

Panel Priority

The settings in the control panel are enabled for this item because the settings are prioritized for the default settings for the printer driver. : Check the settings in the control panel even when using the printer driver.
Setting Item Setting Value Setting
[Gradation Level] [High 1], [High 2]Specify the data gradation process when printing. It is effective to set [High 1] when printing photographs at standard quality, and to set [High 2] when printing at a higher quality.
[Toner Save] [Off], [On][Toner Save] is used for test printing. When you use [Toner Save], you can save toner when you print.† When it is set to [On], the print density becomes lower, and sometimes it does not print well.
[Density: C]-8 Light to 0 to +8 DarkAdjust the print density for each color when printing. The larger the setting value, the greater the print density.
[Density: M]-8 Light to 0 to +8 Dark
[Density: Y]-8 Light to 0 to +8 Dark
[Density: K]-8 Light to 0 to +8 Dark
[Color Mode][Auto (Color/Black)], [Color], [Black]Specify color printing or B&W printing.When it is set to [Auto (Color/Black)], it automatically switches between color and black and white printing depending on the original type.When it is set to [Color], it prints in 4 colors: cyan (C), magenta (M), yellow (Y) and black (Bk).When it is set to [Black], it prints color documents in black (Bk) only.
[Halftones][Error Diffusion]: [Off], [On][Resolution/Grad.]: [Text]: [Resolution], [Gradation][Graphics]: [Resolution], [Gradation][Image]:Specify the halftone display method when printing. When [Error Diffusion] is set to [On], it uses error diffusion that excels at subtle expression of text and fine lines. It is suitable for printing small text or particularly fine lines. When [Error Diffusion] is set to [Off], you can select the halftone display method from [Resolution] and [Gradation] using [Resolution/Grad.].[Resolution] allows you to print in fine detail so that the edges of text data can be seen clearly. It is suitable for printing data containing text and fine lines.[Gradation] allows you to perform printing that combines smooth
[Resolution], [Gradation]gradation with edge quality. It is suitable for printing graphics or graphs that use gradation.
[Gray Compensation][Text]: [Off], [On][Graphics]: [Off], [On][Image]: [Off], [On]When printing in color, for RGB equivalent, set whether to print in black (K) toner only to print in CMYK 4-color toner.When it is set to [On], black and gray data is printed in black (K) only. This can prevent color registration errors.When it is set to [Off], it is printed with CMYK 4-color toner. The gradation of dark colors is reproduced more faithfully than when it is set to [On].
[CMS]
[CMS Selection] [Printer], [Host]Set which side will perform color processing, the printer side or the host side (printer driver).
[CMS/Gamma][Text]: [CMS], [Gamma][Graphics]: [CMS], [Gamma][Image]: [CMS], [Gamma]Set whether to perform color matching or to perform color correction by setting a gamma value.
[RGB Source Profile][Text]: [sRGB v3.0 (Canon)], [Canon HDTV gamma 1.5], [Canon HDTV gamma 1.8], [Canon HDTV gamma 2.4][Graphics]: [sRGB v3.0 (Canon)], [Canon HDTV gamma 1.5], [Canon HDTV gamma 1.8], [Canon HDTV gamma 2.4][Image]: [sRGB v3.0 (Canon)], [Canon HDTV gamma 1.5], [Canon HDTV gamma 1.8], [Canon HDTV gamma 2.4]Select a suitable profile for RGB data that matches the monitor that you are using.When it set to [sRGB v3.0 (Canon)], it is set to the industry standard image quality for general Windows (PC) monitors. When using monitors that support sRGB, it can match the colors displayed on the monitor and the colors printed in the printer and print colors close to the colors displayed on the monitor.When it is set to [Canon HDTV gamma X.X], it adjusts the brightness of the printed result so that the brightest and darkest parts of the data are not lost. Set it to adjust the brightness, such as when the print result is brighter than the colors displayed on the monitor. The larger the gamma value, the darker it is printed.
[Output Profile][Text]: [Normal], [Photo][Graphics]: [Normal], [Photo][Image]: [Normal], [Photo]Set the output profile. The output profile is applied to all of the print data.
[Matching Method][Text]: [Perceptual], [Saturation], [Colorimetric][Graphics]: [Perceptual], [Saturation], [Colorimetric][Image]: [Perceptual], [Saturation], [Colorimetric]Since the colors displayed on the computer monitor and the colors that the printer can reproduce differ, adjust the colors. Select the adjustment method depending your use or preference.When it is set to [Perceptual], matching is performed by making it prioritize shades (hues).When it is set to [Saturation], it provides colors suitable for printing artwork and graphs for use in presentations.When it is set to [Colorimetric], it matches so that the color difference between originals such as logos and the output color is minimized.
[Text]: [1.0], [1.4], [1.8], [2.2]
[Gamma Correction][Graphics]: [1.0], [1.4], [1.8], [2.2] [Image]: [1.0], [1.4], [1.8], [2.2]It adjusts the brightness of the printed result so that the brightest and darkest parts of the document are not lost. The larger the setting value, the darker it is printed. [1.4] shows no correction.
[Gradation Settings][Gradation]: [Off], [Smooth 1], [Smooth 2] [Graphics]: [Off], [On] [Image]: [Off], [On]Set this item when you cannot print the gradations of image data such as graphics (illustrations created in other applications) and images (bitmaps) smoothly (color transitions stand out). [Smooth 2] is better than [Smooth 1] for performing a smoothing process that provides smoother gradation. You also can select what to smooth by switching [Graphics] and [Image] [On]/[Off].
[Advanced Smoothing][Advanced Smoothing]: [Off], [Smooth 1], [Smooth 2] [Graphics]: [Off], [On] [Text]: [Off], [On]Specify whether to use the smoothing process to smooth the edges of graphics (illustrations created in other applications) or text. [Smooth 2] is better than [Smooth 1] for performing a smoothing process that provides more smoothing.You can select what to smooth by switching [Graphics] and [Text] [On]/[Off].
[Toner Volume Corr.][Normal], [Gradation Priority], [Text Priority]Set the correction method for when the toner volume has exceeded the printer's limit value when printing high density parts.When it is set to [Normal], it prints text and lines using the toner volume that will preserve resolution, and it prints the other data with the toner volume that will preserve hue.When it is set to [Gradation Priority], it prints all the data using the toner volume that will preserve hue.When it is set to [Text Priority], it prints all the data using the toner volume that will preserve resolution.
[Line Control][Resolution Priority], [Gradation Priority]Set image processing for lines.When it is set to [Resolution Priority], it processes lines in the same way as text so that resolution is preserved.When it is set to [Gradation Priority], it processes lines in the same way as graphics so that gradation is preserved.
[Reduce Quality][Continue Printing], [Stop Printing]Specifies whether the printer should continue printing with the image quality of the data being lowered automatically or stop printing displaying the following error message when the memory required for the process runs out.If [Continue Printing] is specified, the printer prints with the image quality level being lowered automatically without displaying a message.If [Stop Printing] is specified, the printer stops printing, displaying a message. In this case, the printer resumes printing with the image quality of the data being lowered by pressing [○] (← Online).
[Sp. Smoothing Mode][Mode 1], [Mode 2], [Mode 3], [Mode 4], [Mode 5], [Mode 6]Set it to solve print quality problems."Colors Are Uneven or Not Printed Smoothly"
![](images/a1b2ba8626e7fd8034e971a1c66b57ff29ac8b0b50c8066d5bd36972974c216b.jpg)

NOTE

Table description

- Bold values in the table indicate the default settings. - After changing the setting items with "\*1", cycle the power of the printer or perform a hard reset to make the settings effective. - The setting items or setting values with "\*2" may not be displayed depending on the availability of the optional accessories and other settings.
Setting Item Setting Value Setting
[Interface Selection]*1Specifies the settings for the interfaces used for communication with the computer or other device.
[USB]• [Use USB Connection]: [Off], [On]• [Recog. USB Connect.]: [Mode 1], [Mode 2]• [Use USB Connection]Specifies whether to use the USB interface.• [Recog. USB Connect.]Switches the USB connection recognition mode.Normally, set it as [Mode 1].
[Network][Off], [On]Specifies whether to use the network interface.
[USB Storage Device]*2[MEAP Driver]: [Off], [On]Specifies the setting for the device driver when using USB memory devices.
[Timeout]• [Timeout]: [Off], [On]• [Timeout Time]: 5 to 15 to 300 secondsSpecifies the function to finish a job automatically.
[Connection Recog.]*1[Off], [On]When you print using the standard network, you may not obtain proper printout results. (Unreadable characters are printed, overlay printing fails, etc.) In this case, specify [Off] for this item.
[Extended RX Buffer]*1*2[Off], [On]If this item is set to [On], the memory capacity of the printer's receive buffer that receives the data is increased. You can speed up the time the computer exits when you send a large amount of data or complicated data from the computer.
![](images/0e8285607a8df1691451fda78d9cdafdbb290fbd2fbe46b9653410d113f41f46.jpg)

NOTE

Table description

- Bold values in the table indicate the default settings. - The setting items or setting values with "\*" may not be displayed depending on the availability of the optional accessories and other settings.
Setting Item Setting Value Setting
[Adj. Start Position]· [Offset Y (MP Tray)]: -5.0 to 0.0 to +5.0 (mm)· [Offset X (MP Tray)]: -5.0 to 0.0 to +5.0 (mm)· [Offset Y (Drawer 1)]: -5.0 to 0.0 to +5.0 (mm)· [Offset X (Drawer 1)]: -5.0 to 0.0 to +5.0 (mm)· [Offset Y (Drawer 2)]*: -5.0 to 0.0 to +5.0 (mm)· [Offset X (Drawer 2)]*: -5.0 to 0.0 to +5.0 (mm)· [Offset Y (2-Sided)]: -5.0 to 0.0 to +5.0 (mm)· [Offset X (2-Sided)]: -5.0 to 0.0 to +5.0 (mm)Specifies the printing position of the paper in the specified paper source. Adjusts the position in the vertical direction (Y) or the horizontal direction (X) by the specified value.The setting values are indicated in millimeters (mm), and you can adjust the position using [ ▲ ] and [ ▼].If you do not adjust the printing position, specify [0.0] for this item.Adjust the printing position for 2-sided printing as follows.· Adjust the printing position of the first page using [Offset Y (2-Sided)] and [Offset X (2-Sided)].· The printing position of the second page depends on the settings for each paper source.➢ "Adjusting the Printing Position for Each Paper Source"
[Recovery Printing] [Off], [On]Specifies whether to print the partially printed page when the printer stops printing due to a paper jam or an error occurring.
[Check Paper Size] [Off], [On]Specifies whether the printer should stop printing, displaying the messageor continue printing when [MP Tray Paper Size], [Drawer 1 Size], [Drawer 2 Size] is set to [Mixed Sizes].
[Substitute Size] [Off], [On]When the paper of the target size is not loaded in the printer, the printer prints on paper of the following sizes. Size of the Paper to Be Printed Printer Driver Setting Letter → A4 A4 → Letter
[Special Image Mode][Off], [Level 1], [Level 2]If the centers of dense text or lines are not being printed, set this to [Level 1]. If the problem still persists after setting it to [Level 1], set it to [Level 2]. ↑ When [Special Image Mode] is used, the print density becomes lower.
[ITB Cleaning]Run the ITB Cleaner. ➢ "Cleaning the Transfer Belt"
[SD Card Maintenance]
[Format] [No], [Yes]Delete the contents of the SD card.
[Special Print Mode]
[Curl Correction][Off], [On]When printed paper curls, set this item to [On].
[Rough Paper Adj.][Off], [On]If images with toner of two or more overlapping colors are printed too lightly when using rough paper, set this item to [On].
[Special Env. Mode][Off], [On]Sometimes, depending on the type of envelope and the use environment (especially humid environments), the envelope flap gets glued down. In such a case, set this item to [On].
[Update Firmware]
[USB]This option is to be executed only when the firmware of the printer needs to be updated.
[Network]
[First Calibration]
[Color Mismatch Corr.][After Jobs], [Immediately]Set the operation when there is a request for color shift adjustment calibration during the printer startup diagnostics. ➢ "Adjusting the Color or Color Mismatch (Calibration)"
[Density Control][Off], [After Jobs], [Immediately]Set the operation when there is a request for density control and density measurement calibration during the printer startup diagnostics. ➢ "Adjusting the Color or Color Mismatch (Calibration)"
[Paper Feed Method]· [Multi-Purpose Tray]: [Speed Priority], [Print Side Priority] · [Drawer 1]: [Speed Priority], [Print Side Priority] · [Drawer 2]*[Speed Priority], [Print Side Priority]Specifies on which side of the loaded paper the printer should print. Perform printing after selecting the paper drawer or tray to feed paper. Select the paper source. ➢ "[Setup] Menu ([Paper Source] Options)" The setting of this item determines which side of paper is printed on. Load the paper in proper orientation. ➢ "Paper Loading Orientation" · If [Speed Priority] is specified, the printing sides of the paper for 1-sided printing and 2-sided printing do not match. CANON imageCLASS LBP7660Cdn - Table description - 1 · If you specify [Print Side Priority], the printer matches the printing sides of the paper for 1-sided printing and 2-sided printing. Therefore, when you print previously printed paper, you do not needto reload the paper each time you switch between the settings.CANON imageCLASS LBP7660Cdn - Table description - 2† If you specify [Print Side Priority], the print speed drops.
[Show Job List] [Off], [On]Specifies whether to display the job list when [ ● ] (Job Status/Cancel) is pressed.• If [On] is specified, the printer displays the job list.• If [Off] is specified, the printer does not display the job list.
[IMPORT/EXPORT][EXPORT], [IMPORT]You can save and read printer settings.> "Importing and Exporting Settings"
![](images/3b3c9684d94778037a2016cb1a8b2206a0ef979e2804cd44999708602f79f2e2.jpg)

NOTE

Table description

- Bold values in the table indicate the default settings. - The setting items or setting values with "\*" may not be displayed depending on the availability of the optional accessories and other settings.
Setting Item Setting Value Setting
[Auto Mode Selection][Auto Selection], [PCL], [PS]*, [PDF], [XPS]*Specifies the mode in which this printer operates when you print without using the printer driver for this printer.If the print mode is not appropriate, such a printing problem as unreadable characters being printed may occur. Specify this item according to the job to be printed.
[Auto Select]• [PCL]: [Off], [On]• [PS]* [Off], [On]• [PDF]: [Off], [On]• [XPS]*: [Off], [On]Specifies the print mode to be automatically switched if [Auto Mode Selection] is set to [Auto Selection].If [On] is specified, the mode is to be automatically switched to.
[Mode Priority][None], [PCL], [PS]*, [PDF], [XPS]*You can specify [Mode Priority] to be switched to by priority for when [Auto Mode Selection] is set to [Auto Selection] and this printer cannot identify the control command of the data.If you specify [None], the printer does not specify the mode priority. If this printer cannot identify the control command of the data, it determines the mode automatically.
![](images/692d24d6b4355c0a7325686d0f8ae4c3f7dbfadbc8b0583381be66037c738570.jpg)

NOTE

Table description

- Bold values in the table indicate the default settings. - The setting items or setting values with "\*" may not be displayed depending on the availability of the optional accessories and other settings.
Setting Item Setting Value Setting
[Paper Save] [Off], [On]Specifies whether the printer outputs the blank page that can be created due to no data existing between two Form Feed codes sent from an application.
[Orientation][Portrait], [Landscape]Enables you to set the paper orientation.
[Font Number] 0 to 104Enables you to set the default font for this printer function using the corresponding font numbers. Valid font numbers are from 0 to 104.
[Point Size]*4.00 to 12.00 to 999.75 pointIf the number selected in [Font Number] is that of a proportionally spaced scalable font, this option appears in the [PCL] options. It enables you to specify a point size for the default font. The point size can be adjusted in increments of 0.25 pts.
[Pitch]*0.44 to 10.00 to 99.99 cpiIf the number selected in [Font Number] is that of a fixed pitch scalable font, Pitch appears in the [PCL] options. It enables you to specify the pitch for the default font. The pitch can be adjusted in increments of 0.01 cpi (characters per inch).
[Form Lines] 5 to 64 to 128 linesEnables you to specify the number of lines to be printed on a page. You can specify from 5 to 128 lines.
[Character Code][PC8], [ROMAN8], [ROMAN9], [ISOL1], [ISOL2], [ISOL5], [ISOL6], [ISOL9], [PC775], [PC8DN], [PC850], [PC852], [PC858], [PC8TK], [PC1004], [WINL1], [WINL2], [WINL5], [WINBALT], [DESKTOP], [PSTEXT], [LEGAL], [ISO4], [ISO6], [ISO11], [ISO15], [ISO17], [ISO21], [ISO60], [ISO69], [WIN 30], [MCTEXT], [PC864], [ARABIC8], [WINARB], [PC866], [ISOCYR], [WINCYR], [PC851], [GREEK8], [ISOGRK], [PC8GRK], [WINGRK], [PC862], [HEBREW7], [HEBREW8], [ISOHEB]Enables you to select the symbol set most suited to the needs of the host computer.
[Custom Size] [Do Not Set], [Set]Enables you to specify a custom paper size. If [Set] is selected, you can enter a custom size.
[Unit of Measurement]*[Inches], [Millimeters]Enables you to specify the unit of measurement you would like to use to specify your custom paper size.
[X Dimension]*98.4 to 215.9 mm; 215.9 mm (3.87 to 8.50 in.; 8.50 in.)Enables you to specify the X dimension of the custom paper. The X dimension can be adjusted between 98.4 mm and 215.9 mm in increments of 0.1 mm.
[Y Dimension]*148.0 to 355.6 mm; 355.6 mm(5.82 to 14.00 in.; 14.00 in.)Enables you to specify the Y dimension of the custom paper. The Y dimension can be adjusted between 148.0 mm and 355.6 mm in increments of 0.1 mm.
[Append CR to LF] [Yes], [No]Enables you to specify whether to append a carriage return (CR) when line feed code (LF) is received.CANON imageCLASS LBP7660Cdn - Table description - 1
[Enlarge A4 Prt Width][Off], [On]Determines whether to expand the printable area of A4 paper to that of Letter size in width.
[BarDIMM]*[Enable], [Disable]You can enable or disable the Bar Code Printing function of the printer.
[FreeScape]*[Off], [~], ["], [#], [$], [/], [\], [?], [{}, [}], [!]You can specify the AEC (Alternate Escape Code) to be used for bar code commands when the host computer does not support the standard Escape Code.
0258-092 ![](images/5b5791a7306303353891fc787fcc7c20333dc6f90a5c26e90d92592dfde8567b.jpg)

NOTE

Table description Bold values in the table indicate the default settings.
Setting ItemSetting ValueSetting
[Paper Save][Off], [On]Specifies whether the printer outputs the blank page that can be created due to no data existing in the page data sent from an application.
![](images/72d1215bab2fbde3e03ac56663b4856665fe788ee6258cd157f4d6938fa5b5b8.jpg)

NOTE

Table description

- Bold values in the table indicate the default settings. - The setting items or setting values with "\*" may not be displayed depending on the availability of the optional accessories and other settings.
Setting Item Setting Value Setting
[Image Orientation][Auto], [Vertical], [Horizontal]Specifies whether the printer should print an image in portrait (vertical) orientation or in landscape (horizontal) orientation.
[Zoom] [Off], [Auto]Specifies whether the printer should print with scaling outputs according to the printable area.
[Print Position][Auto], [Center], [Top Left]Specifies the printing position for an image.
[Print Guarantee]*[Off], [On]Set the processing method for received TIFF data.When it is set to [Off], the processing time is shortened by processing received TIFF data sequentially.When it is set to [On], it is possible to prevent errors from occurring, since all the TIFF data is received before processing begins. However, the printing speed will drop.↑ After specifying, perform a hard reset or restart the printer to enable the settings.
[Show Warnings] [Off], [Print], [Panel]Specifies the display setting for the error message in case of an error occurring.
[Print E-Mail Text] [On], [Off] Set e-mail print.> "Receiving E-mail Data on the Mail Server and Printing (E-mail Print)"
[Limit E-Mail Print] [Off], [On]
[Enlarge Print Area] [Off], [On]Specifies whether the printer should print a document with its printable area expanded.
[RGB Source Profile][sRGB v3.0 (Canon)], [Canon HDTV gamma 1.5], [Canon HDTV gamma 1.8], [Canon HDTV gamma 2.4]Select a suitable profile for RGB data that matches the monitor that you are using.When it set to [sRGB v3.0 (Canon)], it is set to the industry standard image quality for general Windows (PC) monitors. When using monitors that support sRGB, it can match the colors displayed on the monitor and the colors printed in the printer and print colors close to the colors displayed on the monitor.When it is set to [Canon HDTV gamma X.X], it adjusts the brightness of the printed result so that the brightest and darkest parts of the data are not lost. Set it to adjust the brightness, such as when the print result is brighter than the colors displayed on the monitor. The larger the gamma value, the darker it is printed.
[CMYK Sim. Profile][Euro Standard v1.00], [JapanColor (Canon)], [U.S. Web Coated v1.0]You can set a simulation target when printing CMYK data. The machine converts CMYK data to a device-dependent CMYK color model in accordance with the simulation target selected by the CMYK simulation profile.When it is set to [JapanColor (Canon)], it uses JapanColor profile.When it is set to [U.S. Web Coated v1.0], it uses U.S. Web
Coated profile.When it is set to [Euro Standard v1.00], it uses Euro Standard profile
[Output Profile] [Normal], [Photo]You can define suitable profiles for data that you are trying to print.When it is set to [Normal], it matches with colors close to the colors displayed on the monitor, and prints.When it is set to [Photo], it matches with colors similar to photographs, and prints.
[Matching Method][Perceptual],[Saturation],[Colorimetric]Specify the printing method when [RGB Source Profile] is applied.You can select color rendering style on the machine, as shown below.When it is set to [Perceptual], it provides colors suitable for printing photos and bitmap images.When it is set to [Saturation], it provides colors suitable for printing artwork and graphs for use in presentations.When it is set to [Colorimetric], it reproduces as accurately as possible the RGB color values that are within the machine's color gamut.
[Halftones][Resolution],[Gradation], [Error Diffusion]Specify the halftone display method when printingWhen it is set to [Resolution], you can print in fine detail so that the edges of text data can be seen clearly. It is suitable for printing data containing text and fine lines.When it is set to [Gradation] you can perform printing that combines smooth gradation with edge quality. It is suitable for printing graphics or graphs that use gradation.When it is set to [Error Diffusion], it uses error diffusion that excels at subtle expression of text and fine lines. It is suitable for printing small text or particularly fine lines.
[Photo Corr (CL Only)]*
[Photo Optimizer PRO][Off], [On]Set whether to correct image contrast, color balance, saturation, and gradation automatically and print.↑ If [Color Mode] is set as [Black], the setting for this item becomes invalid.
[Red-Eye Correction][Off], [On]Set whether to detect and correct red eye caused by flash or strobe light when shooting and print.↑ If [Color Mode] is set as [Black], the setting for this item becomes invalid.
[Red-Eye Correct.Lv.][Weak],[Standard],[Strong]When [Red-Eye Correction] is set to [On], set the red-eye correction strength.
[Face Brightener] [Off], [On]Set whether or not to correct and print photographs in which people's faces are dark due to insufficient backlighting or underexposure so that the entire image is brightened and the people's faces are the preferred brightness.↑ If [Color Mode] is set as [Black], the setting for this item becomes invalid.
[Face BrightenerLv.][Weak],[Standard],[Strong]When [Face Brightener] is set to [On], set the correction strength for brightening the entire image.
Select the method for converting color print data to grayscale for printing.
[Grayscale Conversion][sRGB], [NTSC], [Uniform RGB]When it is set to [sRGB], it calculates the grayscale value using the sRGB standard color conversion method.When it is set to [NTSC], it calculates the grayscale value using the NTSC standard color conversion method.When it is set to [Uniform RGB], it takes the average value of the Red, Green and Blue color values as the grayscale value.
![](images/1f638e9d8ea9b292e5d61c2a23a9be87c108f600f22bd6a897cd3da422736438.jpg)

NOTE

Table description Bold values in the table indicate the default settings.
Setting Item Setting Value Setting
[Matching Mode][ICC Profile], [Gamma]Set whether to perform color matching or to perform color correction by setting a gamma value.
[ICC Profile Settings]
[RGB Source Profile][Text]: [sRGB v3.0 (Canon)], [Canon HDTV gamma 1.5], [Canon HDTV gamma 1.8], [Canon HDTV gamma 2.4] [Graphics]: [sRGB v3.0 (Canon)], [Canon HDTV gamma 1.5], [Canon HDTV gamma 1.8], [Canon HDTV gamma 2.4] [Image]: [sRGB v3.0 (Canon)], [Canon HDTV gamma 1.5], [Canon HDTV gamma 1.8], [Canon HDTV gamma 2.4]Select a suitable profile for RGB data that matches the monitor that you are using.When it set to [sRGB v3.0 (Canon)], it is set to the industry standard image quality for general Windows (PC) monitors.When using monitors that support sRGB, it can match the colors displayed on the monitor and the colors printed in the printer and print colors close to the colors displayed on the monitor.When it is set to [Canon HDTV gamma X.X], it adjusts the brightness of the printed result so that the brightest and darkest parts of the data are not lost. Set it to adjust the brightness, such as when the print result is brighter than the colors displayed on the monitor. The larger the gamma value, the darker it is printed.
[Output Profile][Text]: [Normal], [Photo] [Graphics]: [Normal], [Photo] [Image]: [Normal], [Photo]You can define suitable profiles for data that you are trying to print.When it is set to [Normal], it matches with colors close to the colors displayed on the monitor, and prints.When it is set to [Photo], it matches with colors similar to photographs, and prints.
[Matching Method][Text]: [Perceptual], [Saturation], [Colorimetric] [Graphics]: [Perceptual], [Saturation], [Colorimetric] [Image]: [Perceptual], [Saturation], [Colorimetric]Specify the printing method when [RGB Source Profile] is applied. You can select color rendering style on the machine, as shown below.When it is set to [Perceptual], it provides colors suitable for printing photos and bitmap images.When it is set to [Saturation], it provides colors suitable for printing artwork and graphs for use in presentations.When it is set to [Colorimetric], it reproduces as accurately as possible the RGB color values that are within the machine's color gamut.
[Gamma Settings][Gamma Correction]: [Text]: [1.0], [1.4], [1.8], [2.2] [Graphics]: [1.0], [1.4], [1.8], [2.2] [Image]: [1.0], [1.4], [1.8], [2.2]It adjusts the brightness of the printed result so that the brightest and darkest parts of the document are not lost. The larger the setting value, the darker it is printed. [1.4] shows no correction.
[Photo Corr (CL Only)]
[Photo Optimizer PRO][Off], [On]Set whether to correct image contrast, color balance, saturation, and gradation automatically and print.↑ If [Color Mode] is set as [Black], the setting for this item becomes invalid.
[Red-Eye Correction] [Off], [On]Set whether to detect and correct red eye caused by flash or strobe light when shooting and print.↑ If [Color Mode] is set as [Black], the setting for this item becomes invalid.
[Red-Eye Correct.Lv.][Weak], [Standard],[Strong]When [Red-Eye Correction] is set to [On], set the red-eye correction strength.
[Face Brightener] [Off], [On]Set whether or not to correct and print photographs in which people's faces are dark due to insufficient backlighting or underexposure so that the entire image is brightened and the people's faces are the preferred brightness.↑ If [Color Mode] is set as [Black], the setting for this item becomes invalid.
[Face Brightener Lv.][Weak], [Standard],[Strong]When [Face Brightener] is set to [On], set the correction strength for brightening the entire image.
[Halftones]
[Error Diffusion] [Off], [On]Specify the halftone display method when printing. When [Error Diffusion] is set to [On], it uses error diffusion that excels at subtle expression of text and fine lines. It is suitable for printing small text or particularly fine lines.
[Resolution/Gradation][Text]: [Resolution],[Gradation][Graphics]: [Resolution],[Gradation][Image]: [Resolution],[Gradation]When [Error Diffusion] is set to [Off], you can select the halftone display method from [Resolution] and [Gradation] using [Resolution/Grad.].• [Resolution] allows you to print in fine detail so that the edges of text data can be seen clearly. It is suitable for printing data containing text and fine lines.• [Gradation] allows you to perform printing that combines smooth gradation with edge quality. It is suitable for printing graphics or graphs that use gradation.
[Gray Compensation][Text]: [Off], [On][Graphics]: [Off], [On][Image]: [Off], [On]When printing in color, for RGB equivalent, set whether to print in black (K) toner only to print in CMYK 4-color toner.· When it is set to [On], black and gray data is printed in black (K) only. This can prevent color registration errors.· When it is set to [Off], it is printed with CMYK 4-color toner. The gradation of dark colors is reproduced more faithfully than when it is set to [On].
[Advanced Smoothing][Advanced Smoothing]: [Off],[Smooth 1],[Smooth 2][Graphics]: [Off], [On][Text]: [Off], [On]Specify whether to use the smoothing process to smooth the edges of graphics (illustrations created in other applications) or text.[Smooth 2] is better than [Smooth 1] for performing a smoothing process that provides more smoothing.You can select what to smooth by switching [Graphics] and [Text]: [On]/[Off].
[Text]: [sRGB],[NTSC], [UniformSelect the method for converting color print data to grayscale for printing.· When it is set to [sRGB], it calculates the grayscale value using the sRGB standard color conversion method.
[Grayscale Conversion]RGB][Graphics]: [sRGB], [NTSC], [Uniform RGB][Image]: [sRGB], [NTSC], [Uniform RGB]When it is set to [NTSC], it calculates the grayscale value using the NTSC standard color conversion method.When it is set to [Uniform RGB], it takes the average value of the Red, Green and Blue color values as the grayscale value.If [Color Mode] is set as [Auto (Color/Black)] and [Color], the setting for this item becomes invalid.
![](images/ac1d61f5ce8fd20b733394ca39fb356cfa8887d8d65b1e475b93ffccb3357d6c.jpg)

NOTE

Table description Bold values in the table indicate the default settings.
Setting Item Setting Value Setting
[Fit to Page] [Off], [On]Set it to enlarge or reduce to fit the effective print area of the specified paper.† This setting fixes the aspect ratio and scales the page size of the PDF file.
[Enlarged Print Area][Off], [On]Set whether to expand the effective print area to the edges of the paper without leaving margins around the edges of the paper.† When it is set to [On], images on the edges of the paper may be partially cut off.
[N on 1][Off], [2 on 1], [4 on 1], [6 on 1], [8 on 1], [9 on 1], [16 on 1]You can print multiple pages of the PDF file data arranged on one page. When multiple pages are printed, they are arranged from the top left.
[Comment Print] [Off], [Auto]Specify whether to print the comments inside the PDF file that are specified for printing.
[ICC Profile Settings]
[RGB Source Profile][sRGB v3.0 (Canon)], [Canon HDTV gamma 1.5], [Canon HDTV gamma 1.8], [Canon HDTV gamma 2.4], [None]Select a suitable profile for RGB data that matches the monitor that you are using.When it is set to [sRGB v3.0 (Canon)], it is set to the industry standard image quality for general Windows (PC) monitors.When using monitors that support sRGB, it can match the colors displayed on the monitor and the colors printed in the printer and print colors close to the colors displayed on the monitor.When it is set to [Canon HDTV Gamma X.X], it adjusts the brightness of the printed result so that the brightest and darkest parts of the data are not lost. Set it to adjust the brightness, such as when the print result is brighter than the colors displayed on the monitor. The larger the gamma value, the darker it is printed.When it is set to [None], it performs color separation from RGB data to CMYK without applying an RGB profile.
[CMYK Sim. Profile][Euro Standard v1.00], [JapanColor (Canon)], [U.S. Web Coated v1.0], [None]You can set a simulation target when printing CMYK data.The machine converts CMYK data to a device-dependent CMYK color model in accordance with the simulation target selected by the CMYK simulation profile.When it is set to [U.S. Web Coated v1.0], it uses U.S. Web Coated profile.When it is set to [Euro Standard v1.00], it uses Euro Standard profile.When it is set to [None], it prints CMYK data using a device-dependent CMYK color model, without applying a CMYK simulation profile.† If this item is set to [None], dark color gradation may
collapse, depending on the data.
[Grayscale Profile] [Off], [On]Set what type of processing to use for device-dependent gray data.When it is set to [On], it uses the printer's "Grayscale Profile" to convert it to CMYK data. However, it may be reproduced using black (Bk) toner only, by using the [Output Profile] or [Pure Black Text] settings.When it is set to [Off], it is reproduced using black (Bk) toner only.
[Output Profile][PS Normal], [PS Photo], [PS TR Normal], [PS TR Photo]You can define suitable profiles for data that you are trying to print.When it is set to [PS Normal], it matches with colors close to the colors displayed on the monitor, and prints.When it is set to [PS Photo], it matches with colors similar to photographs, and prints.When it is set to [PS TR Normal], it matches with colors close to the colors displayed on the monitor and prints, while also controlling the bleeding of toner into text and fine lines.When it is set to [PS TR Photo], it matches with colors similar to photographs, and prints, while also controlling the bleeding of toner into text and fine lines.† When [RGB Source Profile] and [CMYK Sim. Profile] are set to [None], or [Grayscale Profile] is set to [Off], this setting is not applied to device-dependent color data.
[Matching Method][Perceptual], [Saturation], [Colorimetric]Specify the printing method when [RGB Source Profile] is applied.When it is set to [Perceptual], it provides colors suitable for printing photos and bitmap images.When it is set to [Saturation], it provides colors suitable for printing artwork and graphs for use in presentations.When it is set to [Colorimetric], it reproduces as accurately as possible the RGB color values that are within the machine's color gamut.† When [RGB Source Profile] or [CMYK Sim. Profile] are set to [None], if the printer receives a device-dependent color space definition that has been processed by the host computer, the setting for this item becomes invalid.
[RGB Pure Black Mode][Off], [On]When device-dependent RGB data is converted to device-dependent CMYK using [RGB Source Profile] in this machine, set what type of processing to use for black and gray data that becomes R=G=B.When it is set to [On], it prints using black (Bk) toner only, regardless of the [Output Profile] setting that is selected.When it is set to [Off], it prints according to the selected [Output Profile] setting.† If uneven gradation or staining is visible when printing black or gray data, set this item to [Off], and set [Output Profile] to [Normal].
[CMYK Pure Black] [Off], [On]When device-dependent CMYK is processed using [CMYK Sim. Profile] in this machine, set what type of printing to use for grey data (C=M=Y=0).When it is set to [On], it prints using black (Bk) toner only, regardless of the [Output Profile] setting that is selected.When it is set to [Off], it converts it and prints according to the selected [Output Profile] setting.† If [CMYK Sim. Profile] is set as [None], the setting for this
item becomes invalid.
[Pure Black Text] [Off], [On]CANON imageCLASS LBP7660Cdn - NOTE - 1When it is set to [On], it prints data for black colors created by applications using only 100% black toner. The text is never printed with color toner slurring around the edges.CANON imageCLASS LBP7660Cdn - NOTE - 2
[Black Overprint] [Off], [On]Set how to print black (R=G=B=0% and C=M=Y=100%/BK=N% or C=M=Y=0%/Bk=100%) text.When it is set to [On], if black text is on a colored background, there is never a white rim around the edges of the text, so that the black text is not printed set out from the background with white edges.CANON imageCLASS LBP7660Cdn - NOTE - 3When it is set to [Off], if black text is on a colored background, after the black text is printed set out from the background with white edges, black text is printed on the white edges.The print may be fainter than the print result if it were set to [On], and the edges of the text may be rimmed with white.CANON imageCLASS LBP7660Cdn - NOTE - 4
[Brightness] 85 to 100 to 115%You can adjust the brightness of the whole image.You can use this setting to set from 85 to115% at intervals of 5%.The smaller the value the brighter it becomes. The larger the value the darker it becomes.
[Halftones]
[Error Diffusion] [Off], [On]Specify the halftone display method when printing. When [Error Diffusion] is set to [On], it uses error diffusion that excels at subtle expression of text and fine lines. It is suitable for printing small text or particularly fine lines.
[Resolution/Grad.][Text]: [Resolution], [Gradation] [Graphics]: [Resolution],When [Error Diffusion] is set to [Off], you can select the halftone display method from [Resolution] and [Gradation] using [Resolution/Grad.].When it is set to [On], it uses the printer's "Grayscale Profile" to convert it to CMYK data. However, it may be reproduced using
[Gradation][Image]: [Resolution],[Gradation]black (Bk) toner only, by using the [Output Profile] or [Pure Black Text] settings.When it is set to [Off], it is reproduced using black (Bk) toner only.
[CMYK Overprint] [Off], [On]You can overprint device-dependent CMYK data as composite output.Since all the colors used in the data are overprinted to a single palette, you can check the result without performing color separation.† If [CMYK Sim. Profile] is set as a value other than [None], the setting for this item becomes invalid.
[Advanced Smoothing][Advanced Smoothing]: [Off],[Smooth 1], [Smooth 2][Graphics]: [Off], [On][Text]: [Off], [On]Specify whether to use the smoothing process to smooth the edges of graphics (illustrations created in other applications) or text.[Smooth 1] is better than [Smooth 2] for performing a smoothing process that provides more smoothing.You can select what to smooth by switching [Graphics] and [Text]: [On]/[Off].
[Grayscale Conversion][sRGB], [NTSC],[Uniform RGB]Select the method for converting color print data to grayscale for printing.When it is set to [sRGB], it calculates the grayscale value using the sRGB standard color conversion method.When it is set to [NTSC], it calculates the grayscale value using the NTSC standard color conversion method.When it is set to [Uniform RGB], it takes the average value of the Red, Green and Blue color values as the grayscale value.† If [Color Mode] is set as [Auto (Color/Black)] and [Color], the setting for this item becomes invalid.
![](images/1028dca9a39db3b62869d4c924af6dbe40bb54030e875cb97a440cfd2a6869b2.jpg)

NOTE

Table description Bold values in the table indicate the default settings.
Setting Item Setting Value Setting
[Job Timeout] 0 to 3600 secondsIf the time specified in this item has elapsed since a job process was started, the printer automatically finishes the job and receives the next job.If you do not want to specify the timeout, specify "0 seconds."
[Print PS Errors] [Off], [On]Specifies whether an error page should be printed when a PostScript error is occurring.
[ICC Profile Settings]
[RGB Source Profile][sRGB v3.0 (Canon)], [Canon HDTV gamma 1.5], [Canon HDTV gamma 1.8], [Canon HDTV gamma 2.4], [None]Select a suitable profile for RGB data that matches the monitor that you are using.When it set to [sRGB v3.0 (Canon)], it is set to the industry standard image quality for general Windows (PC) monitors. When using monitors that support sRGB, it can match the colors displayed on the monitor and the colors printed in the printer and print colors close to the colors displayed on the monitor.When it is set to [Canon HDTV gamma X.X], it adjusts the brightness of the printed result so that the brightest and darkest parts of the data are not lost. Set it to adjust the brightness, such as when the print result is brighter than the colors displayed on the monitor. The larger the gamma value, the darker it is printed.When it is set to [None], it performs color separation from RGB data to CMYK without applying an RGB profile.
[CMYK Sim. Profile][Euro Standard v1.00], [JapanColor (Canon)], [U.S. Web Coated v1.0], [None]You can set a simulation target when printing CMYK data. The machine converts CMYK data to a device-dependent CMYK color model in accordance with the simulation target selected by the CMYK simulation profile.When it is set to [JapanColor (Canon)], it uses JapanColor profile.When it is set to [U.S. Web Coated v1.0], it uses U.S. Web Coated profile.When it is set to [Euro Standard v1.00], it uses Euro Standard profile.When it is set to [None], it prints CMYK data using a device-dependent CMYK color model, without applying a CMYK simulation profile.† If this item is set to [None], dark color gradation may collapse, depending on the data.
[Grayscale Profile] [Off], [On]Set what type of processing to use for device-dependent gray data.When it is set to [On], it uses the printer's "Grayscale Profile" to convert it to CMYK data. However, it may be reproduced using black (Bk) toner only, by using the [Output Profile] or [Pure Black Text] settings.When it is set to [Off], it is reproduced using black (Bk) toner
only.† If this item is set to [None], dark color gradation may collapse, depending on the data.
[Output Profile][PS Normal], [PS Photo], [PS TR Normal], [PS TR Photo]You can define suitable profiles for data that you are trying to print.When it is set to [PS Normal], it matches with colors close to the colors displayed on the monitor, and prints.When it is set to [PS Photo], it matches with colors similar to photographs, and prints.When it is set to [PS TR Normal], it matches with colors close to the colors displayed on the monitor and prints, while also controlling the bleeding of toner into text and fine lines.When it is set to [PS TR Photo], it matches with colors similar to photographs, and prints, while also controlling the bleeding of toner into text and fine lines.† When [RGB Source Profile] and [CMYK Sim. Profile] are set to [None], or [Grayscale Profile] is set to [Off], this setting is not applied to device-dependent color data.
[Matching Method][Perceptual], [Saturation], [Colorimetric]Specify the printing method when [RGB Source Profile] is applied.When it is set to [Perceptual], it provides colors suitable for printing photos and bitmap images.When it is set to [Saturation], it provides colors suitable for printing artwork and graphs for use in presentations.When it is set to [Colorimetric], you can reproduce the RGB color values that are within the machine's color gamut as accurately as possible.† When [RGB Source Profile] or [CMYK Sim. Profile] are set to [None], if the printer receives a device-dependent color space definition that has been processed by the host computer, the setting for this item becomes invalid.
[RGB Pure Black Mode][Off], [On]When device-dependent RGB data is converted to device-dependent CMYK using [RGB Source Profile] in this machine, set what type of processing to use for black and gray data that becomes R=G=B.When it is set to [On], it prints using black (Bk) toner only, regardless of the [Output Profile] setting that is selected.When it is set to [Off], it prints according to the selected [Output Profile] setting.† If uneven gradation or staining is visible when printing black or gray data, set this item to [Off], and set [Output Profile] to [Normal].
[CMYK Pure Black] [Off], [On]When device-dependent CMYK is processed using [CMYK Sim. Profile] in this machine, set what type of printing to use for grey data (C=M=Y=0).When it is set to [On], it prints using black (Bk) toner only, regardless of the [Output Profile] setting that is selected.When it is set to [Off], it converts it and prints according to the selected [Output Profile] setting.† If [CMYK Sim. Profile] is set as [None], the setting for this item becomes invalid.
Set how to print black (R=G=B=0% and C=M=Y=100%/BK=N% or C=M=Y=0%/Bk=100%) text.When it is set to [On], it prints data for black colors created by
[Pure Black Text] [Off], [On]applications using only 100% black toner. The text is never printed with color toner slurring around the edges.CANON imageCLASS LBP7660Cdn - NOTE - 1When it is set to [Off], it prints black text according to the selected [Output Profile] setting.CANON imageCLASS LBP7660Cdn - NOTE - 2
[Black Overprint] [Off], [On]Set how to print black (R=G=B=0% and C=M=Y=100%/BK=N% or C=M=Y=0%/Bk=100%) text.When it is set to [On], if black text is on a colored background, there is never a white rim around the edges of the text, so that the black text is not printed set out from the background with white edges.CANON imageCLASS LBP7660Cdn - NOTE - 3When it is set to [Off], if black text is on a colored background, after the black text is printed set out from the background with white edges, black text is printed on the white edges. The print may be fainter than the print result if it were set to [On], and the edges of the text may be rimmed with white.CANON imageCLASS LBP7660Cdn - NOTE - 4
[Brightness] 85 to 100 to 115%You can adjust the brightness of the whole image. You can use this setting to set from 85 to115% at intervals of 5%. The smaller the value the brighter it becomes. The larger the value the darker it becomes.
[Halftones]
[Error Diffusion] [Off], [On]Specify the halftone display method when printing. When [Error Diffusion] is set to [On], it uses error diffusion that excels at subtle expression of text and fine lines. It is suitable for printing small text or particularly fine lines.
[Resolution/Grad.][Text]: [Resolution], [Gradation] [Graphics]: [Resolution], [Gradation] [Image]: [Resolution], [Gradation]When [Error Diffusion] is set to [Off], you can select the halftone display method from [Resolution] and [Gradation] using [Resolution/Grad.].[Resolution] allows you to print in fine detail so that the edges of text data can be seen clearly. It is suitable for printing data containing text and fine lines.[Gradation] allows you to perform printing that combines smooth gradation with edge quality. It is suitable for printing graphics or graphs that use gradation.
[CMYK Overprint] [Off], [On]You can overprint device-dependent CMYK data as compositeoutput. Since all the colors used in the data are overprinted to a single palette, you can check the result without performing color separation.† If [CMYK Sim. Profile] is set as a value other than [None], the setting for this item becomes invalid.
[Advanced Smoothing][Advanced Smoothing]: [Off], [Smooth 1], [Smooth 2][Graphics]: [Off], [On][Text]: [Off], [On]Specify whether to use the smoothing process to smooth the edges of graphics (illustrations created in other applications) or text.[Smooth 2] is better than [Smooth 1] for performing a smoothing process that provides more smoothing.You can select what to smooth by switching [Graphics] and [Text]: [On]/[Off].
[Grayscale Conversion][sRGB], [NTSC], [Uniform RGB]Select the method for converting color print data to grayscale for printing.When it is set to [sRGB], it calculates the grayscale value using the sRGB standard color conversion method.When it is set to [NTSC], it calculates the grayscale value using the NTSC standard color conversion method.When it is set to [Uniform RGB], it takes the average value of the Red, Green and Blue color values as the grayscale value.† If [Color Mode] is set as [Auto (Color/Black)] and [Color], the setting for this item becomes invalid.
0258-0KS ![](images/2b0749bea12c1bf4373f65764ee18dcd95a2e86c1be13bdcd9d71335f679f5c3.jpg)

NOTE

Table description Bold values in the table indicate the default settings.
Setting ItemSetting ValueSetting
[Select Def. Screen][Print Screen], [MEAP]Set the initial screen of the control panel that is displayed after the printer starts up.When it is set to [Print Screen], the printer's print standby screen is displayed.When it is set to [MEAP], the MEAP menu screen is displayed.If department ID management is set, the log in screen is displayed after the printer is started. After you log in, the selected menu screen is displayed.After the printer starts, you can toggle the menu screens by pressing CANON imageCLASS LBP7660Cdn - NOTE - 1 (DZH7) on the control panel.
0258-0KU
Setting Item Setting Value Setting
[Check Counter]LBP7680Cx[113: Total (Black/S)], [123:Total(Full+1C/S)]LBP7660Cdn[Color Total], [B&W Total]
Check the number of pages printed for each counter selected.Each counter shows the number of pages printed of the following.LBP7680Cx[113: Total (Black/S)]: Number of single-sided pages printed in black and white[123:Total(Full+1C/S)]: Number of single-sided pages printed in colorLBP7660Cdn[Color Total]: Number of pages printed in color[B&W Total]: Number of pages printed in black and white> "Checking the Number of the Printed Pages"
![](images/be51586b67a2b32567c2c1c14e686628484859f3e2819f8e7b511a4a6c60670a.jpg)

NOTE

Table description

The setting items or setting values with "\*" may not be displayed depending on the availability of the optional accessories and other settings.

About samples

For Configuration Page, Network Status Print, and Printing Position Adjustment Print, see the following. "The Lists Common to All the Settings in the Print Mode"
Setting Item Setting Value Setting
[Check Counter]LBP7680Cx[113: Total (Black/S)], [123:Total(Full+1C/S)]LBP7660Cdn[Color Total], [B&W Total]Check the number of pages printed for each counter selected. Each counter shows the number of pages printed of the following.LBP7680Cx[113: Total (Black/S)]: Number of single-sided pages printed in black and white[123:Total(Full+1C/S)]: Number of single-sided pages printed in colorLBP7660Cdn[Color Total]: Number of pages printed in color[B&W Total]: Number of pages printed in black and white"Checking the Number of the Printed Pages"
[Configuration Page] -Prints the capacity of the built-in memory (RAM) or the contents specified in the common [Setup] menu. You can select this item regardless of the setting for the print mode.
[Network Status Print]-Prints the version number and the settings of the print server equipped with this printer.
[IPSec Policy List]* - Print the IPSec policy that is registered in the printer.
[Calibration][Color Mismatch Corr.], [Density Control], [Density Median Cont.], [Full Calibration]Run each type of calibration."Adjusting the Color or Color Mismatch (Calibration)"
[PCL Utility] [Font List]A list of the fonts that can be used in the PCL mode is printed.
[PS Utility]*[Configuration Page], [Font List]· [Configuration Page]Prints the content specified in the [PS] options.· [Font List]A list of the fonts that can be used in the PS mode is printed.
[Cleaning] [A4], [LTR]The printer cleans the fixing roller by printing a cleaning page."Cleaning the Fixing Roller of the Printer"
[E-Mail Print Utility][Received E-Mails], [Received E-mail List]Manage e-mail printing."Receiving E-mail Data on the Mail Server and Printing (E-mail Print)"
[Printing Pos. Print] -The printing position adjusted in [Adj. Start Position] is printed. Check the printout results to confirm the setting for [Adj. Start Position]."Adjusting the Printing Position for Each Paper Source"
If department ID management is set, print an aggregate report
[Page Count List] -of the number of pages printed by each department.
[Counter Report] -Print an aggregate report of the number of pages printed for each counter.➤ "Checking the Number of the Printed Pages"
[Print MEAP Sys. Info]-Print information about applications installed on MEAP and parts of the system applications.
[Total Printed Pages]- Display the total number of pages printed up to now.
[Serial Number] (Display only) Displays the serial number of the printer.
[Consumables][Paper Information], [Toner Cart. Model], [Remaining Toner]• [Paper Information]Displays information about the loaded paper such as size, type, and remaining amount for each paper source.• [Toner Cart. Model]Displays the model numbers of the toner cartridges of each color.• [Remaining Toner]Displays the amount of toner remaining in the cartridge.You can use this item to estimate when the toner cartridge will need to be replaced.
![](images/0ad986b2ad6c00b695d87a65e563fd191b04b329e0f30576fef8964a32e0182c.jpg)

NOTE

Table description

- The items and setting values marked with "\*1" may or may not be displayed depending on the availability of the optional accessories or the content of the setting. - The items and setting values marked with "\*2" are only displayed when the check box for [Display Job History] is selected on the Remote UI.
Setting Item Setting Value Setting
[Encrypted Print]*1User Name,Job Name, [PIN]Print secure jobs stored on the SD card or encrypted secure jobs.> "Specifying a Password for a Document and Printing (Secured Print) (LBP7680Cx Only)"
[Secured Print]*1User Name,Job Name, [PIN]
[Stored Job List]*1-Print the list of jobs stored on the SD card.
[Stored Job Print]*1[Box No.N] (N=1 to 100), [PIN], Job Name
[Job Print Log List]*2-Prints the job logs printed from the computer.File names, print dates, and other information are printed on the job log list.
[Stored Job Print Log]*1*2- Print the history of jobs printed from BOX.
[Report Print Log]*2-Prints the logs of the printed Configuration Page and Network Status Print.
[E-Mail Print Log]*2- Print the history of jobs received by e-mail and printed.
0258-097
Setting ItemSetting ValueSetting
[Soft Reset] ([Hard Reset])-Resets the printer when a problem is occurring or you want to cancel printing.➤ "Canceling the Process Currently Being Performed (Soft Reset)"➤ "Canceling All the Jobs (Hard Reset)"
[Form Feed] -When a job is canceled from the computer or the data is less than one page, the data may remain in the printer memory, and the job may not be completed properly. As long as the printer remains in this state, you cannot print the next job because the printer cannot receive the next data. In this case, force the printer to output the print data using the procedure for this item.➤ "Outputting Data (Forced Output)"
[Shut Down] -Shuts down the functions of the printer.If you are using WSD printing, the shutdown notifies the computer that the printer is turned OFF.After executing a shut down, the printer cannot receive data, and panel operation becomes invalid.Cycle the power of the printer if you want to print the data again.➤ Turning the Printer ON/OFF
![](images/c508ce636ac6cf603a09bb53eb317fb8474ba21977f300b0dee87c9122510338.jpg)

NOTE

Table description

- Bold values in the table indicate the default settings. - The setting items or setting values with "\*" may not be displayed depending on the availability of the optional accessories and other settings.

About the icon

Printer Driver The settings for the printer driver are prioritized for this item.
Setting Item Setting Value Setting
[Paper Source]Printer Driver[Auto], [Drawer 1], [Drawer 2]*, [Multi-Purpose Tray]Selects the drawer or tray from which the printer feeds paper. After a paper source is selected, the corresponding Paper Source indicator comes on.
[MP Tray Paper Size][A5], [B5], [A4], [LTR], [LGL], [EXEC], [Mixed Sizes], [Custom Size], [Custom Size R], [Env.ISO-C5], [Env. Monarch], [Env. No.10], [Env. DL], [Env. ISO-B5], [Index Card], [STMT], [FLSC]Specifies the size of the paper loaded in the multi-purpose tray.➤ "Registering the Paper Size and Type"
[MP Tray Priority] [Off], [On]Specifies whether the printer should detect the paper source in order starting with the multi-purpose tray when [Paper Source] is set to [Auto].
[Drawer 1 Size]/[Drawer 2 Size]*[A5], [B5], [A4], [LTR], [LGL], [EXEC], [Mixed Sizes], [Custom Size], [Custom Size R], [STMT], [FLSC]Specifies the size of the paper loaded in the paper drawer.➤ "Registering the Paper Size and Type"
[Standard Paper Size][A5], [B5], [A4], [LTR], [LGL], [EXEC], [Env.ISO-C5], [Env. Monarch], [Env. No.10], [Env. DL], [Env.ISO-B5], [Index Card], [STMT], [FLSC]If you cannot specify the paper size or if you print from DOS, UNIX, or other operating system, specify the paper size in this item.➤ "Loading Paper in the Drawer"➤ "Loading Paper in the Multi-purpose Tray"
[Diff. Paper Tray] [Off], [On]Specifies whether the printer should feed paper from the multi-purpose tray when paper of the size for the received data is not loaded in the paper drawer.
[Auto Selection][Multi-Purpose Tray]: [Off], [On][Drawer 1]: [Off], [On][Drawer 2]*: [Off], [On]Specifies the paper source to be automatically selected when [Paper Source] is set to [Auto] in "[Select Feeder] Menu."If [On] is specified, the printer selects the paper source as the one to be automatically selected.
[Default Paper Type][Plain], [Plain L], [Plain L2], [Plain H], [Heavy 1], [Heavy 2], [Heavy 3], [Transparency], [Envelope], [Envelope H], [Coated 1], [Coated 2], [Coated 3], [Coated 4], [Labels]Specifies whether the printer should print on one side or both sides of the paper.
[MP Tray Paper Type][Plain], [Plain L], [Plain L2], [Plain H], [Heavy 1], [Heavy 2], [Heavy 3], [Transparency], [Envelope], [Envelope H], [Coated 1], [Coated 2], [Coated 3], [Coated 4], [Labels], [Mixed Types]Set the type of paper that is loaded in the multi-purpose tray.➢ "Registering the Paper Size and Type"➢ "Usable Paper"
[Drawer 1 Type]/[Drawer 2 Type]*[Plain], [Plain L], [Plain L2], [Plain H], [Heavy 1], [Heavy 2], [Heavy 3], [Envelope], [Envelope H], [Coated 1], [Coated 2], [Coated 3], [Coated 4], [Labels], [Mixed Types]Set the type of paper that is loaded in the paper drawer.➢ "Registering the Paper Size and Type"➢ "Usable Paper"
[Manual 2-Sided (MP)][1st Side], [2nd Side]Set the printing side of the paper that is loaded in the multi-purpose tray manually for 2-sided printing.·When it is set to [1st Side], it is printed on the front of the paper (the side that is first be printed).·When it is set to [2nd Side], it is printed on the back of the paper (the reverse side of the paper that has already been printed).
[2-Sided Printing]Printer Driver[Off], [On]Specifies whether the printer should print on one side or both sides of the paper.

Checking the Number of the Printed Pages

0258-099 If you want to check the number of the printed pages, use either of the following methods. > Checking the Counter Using the Printer's Control Panel - Checking the Counter Using a Web Browser (Remote UI)

Checking the Counter Using the Printer's Control Panel

You can check the number of the printed pages using the control panel.

1

Press [ ] (: Settings)

2

Select [Check Counter] using [▲] or [▼], and then press [OK]. ![](images/2adc80f733947ea71f1efae902dc15c3179eb34136040925a192724d777b765a.jpg)
text_image Setup PDF PS MEAP Settings Check Counter

3

Select the counters to check using [ ] and [ ], and then press [OK]. LBP7680Cx ![](images/d19f15f26f11b9b2f064b69b5fe52b4ef930939ae359ec57c9cb5ca744a413cf.jpg)
text_image Check Counter 113: Total (Black/S) 123:Total(Full+1C/S)
LBP7660Cdn ![](images/871da27bb291c5590e207c9be37baeb7b558739defdaa210a64b70c2f269ea6c.jpg)
text_image Check Counter Color Total B&W Total

4

Check the number of the printed pages. LBP7680Cx ![](images/e359651e0dc965586b29ff4ea89f887e8416c59759509a8462efc7462d037dc3.jpg)
text_image 113: Total (Black/S) 263
LBP7660Cdn
Color Total
263

Checking the Counter Using a Web Browser (Remote UI)

You can check the number of the printed pages using the Remote UI.

1

Start the Remote UI, and then log in as Administrator. > "Starting the Remote UI"

2

Select [Check Counter] from the [Status Monitor/Cancel] menu. ![](images/2348b137070bac35ee5d04417248b360e43d025e576a04a98bf03fba61036b84.jpg)
text_image Remote UI: Status Monitor/Cancel LBP7680C / LBP7680C - Windows Internet Explorer http://192.168.1.325/document.cgi?CSI/Tc=26834834 File Edit View Favorites Tools Help Favorites Remote UI: Status Monitor/Cancel LBP7680C / LB... i-SENSYS LBP7680C / LBP7680C / To Portal Login User: System Manager Log Out Status Monitor/Cancel Mail to System Manager Print Job Status Job History E-Mail RX Job History Error Information Device Features Device Information Check Counter Status Monitor/Cancel Check Counter Check Counter Last Updated: 04/04 2011 03:38:34 Main Counter Type Total 113 : Total (Black/Small) 14 123 : Total (Full Color + Single Color/Small) 41 Copyright CANON INC. 2011 All Rights Reserved Done Internet | Protected Mode: Off 100%

3

Check the number of the printed pages. ![](images/eb7a0c11d88a5c7c39f21a0067c4c3bb01e42af7f60373a92f67ec86b1f91e6f.jpg)
text_image Remote UE Status Monitor/Cancel: LBP7680C / LBP7680C - Windows Internet Explorer http://192.168.1.225/skoume.cgi/CSUTs-268348834 File Edit View Favorites Tools Help Favorites Remote UE Status Monitor/Cancel: LBP7680C / LB... I SENSYS LBP7680C / LBP7680C / Status Monitor/Cancel To Portal Login User: System Manager Log Out Mail to System Manager Print Job Status Job History E-Mail RX Job History Error Information Device Features Device Information Check Counter Status Monitor/Cancel Check Counter Check Counter Last Updated 04/04 2011 03:38:34 Main Counter Type Total 113 : Total (Black/Small) 14 123 : Total (Full Color + Single Color/Small) 41 Copyright CANON INC. 2011 All Rights Reserved Done Internet | Protected Mode Off 100%
0258-0LH You can save (export) printer settings that are set in the operation panel or Remote UI to USB memory devices or SD cards. In addition, you can read (import) saved printer settings any time. ![](images/55e0b1b5529a30374c33489d0053ba2c41a4da47b78bbb59f24a8787f15ff21a.jpg)

IMPORTANT

Slots for USB memory devices

\- The USB ports on the front and back of the printer can be used concurrently. If USB memory drives are inserted into both ports, the one on the front has higher priority.

About USB memory support

- The file format FAT32 is supported only. - USB memory drives cannot be read by this printer if: - these drives are partitioned – these drives contain encrypted data

Printers that can be imported

\- You can import the settings only to the same model from which you export the settings. ![](images/613af8344e022e640990b235b397cf19062a2d6ddf23588c4bea15c594fb7487.jpg)

NOTE

When saving/reading settings using USB memory devices and SD cards

Connect a USB memory device or an SD card to the printer's USB port or SD card slot. The saving location/writing source priority is shown below. "USB memory" > "SD card"

Saving printer settings (export)

Save printer settings to USB memory devices or SD cards (LBP7680Cx only).

1

Insert the USB memory device or the SD card (LBP7680Cx only) into the printer.

2

Press [ ] ( : Online). The Online indicator goes off, allowing you to specify the settings on the control panel.

3

Press [ ] ( : Settings)

4

Select [User Maintenance] with [] and [], and then press [OK]. ![](images/b0dbe4aaf1c8ede456b9ba0f98556d54fa7d10d7f77c3e9d529cca519836ce86.jpg)
text_image Setup Layout Quality Interface User Maintenance

5

Select [IMPORT/EXPORT] with [] and [], and then press [OK]. ![](images/b716687c3e055413785366f2ca3eb9c27e9adb9bb9a976f3b5a44a338e3fc9e9.jpg)
text_image User Maintenance First Calibration Paper Feed Method Show Job List IMPORT/EXPORT

6

Select [EXPORT] with [ ] and [ ], and then press [OK]. ![](images/c8a0d8f9e12cf050282026ee5b9a5d55ea13df7874e241da49f56ba9f61affa7.jpg)
text_image IMPORT/EXPORT EXPORT IMPORT

7

When [Yes] is selected using []#[OK] is pressed, the printer's settings are saved to the targeted saving location. ![](images/f98186029e291ef44fa6197844f81d3a6db63e320fb805fdcc5262173cd2a3f9.jpg)
text_image Execute? No Yes
→ When the saving has finished, is displayed.

Reading printer settings (import)

Read printer settings that have been saved to USB memory devices or SD cards (LBP7680Cx only).

1

Insert the USB memory device or the SD card (LBP7680Cx only) into the printer.

2

Press [ ] ( : Online). The Online indicator goes off, allowing you to specify the settings on the control panel.

3

Press ![](images/63e39429ef240d6967c5a461d5a91edd3cf6fbbfc5643a5b8c943981e5a7c354.jpg)

4

Select [User Maintenance] with [] and [], and then press [OK]. ![](images/0e865cb787ba2af52dcdd4c0709b3c397054294630d5278afa2c2a9d9c713e64.jpg)
text_image Setup Layout Quality Interface User Maintenance

5

Select [IMPORT/EXPORT] with [] and [], and then press [OK]. ![](images/591fd414bf63745deb2031df79fdb3296a7129a38e9b1a6eba6d643d34b5748b.jpg)
text_image User Maintenance First Calibration Paper Feed Method Show Job List IMPORT/EXPORT

6

Select [IMPORT] with [] and [], and then press [OK]. ![](images/6a78588d0263a68aa63412056fc7160d4c4ef94c7a2cc5970b580173647f32b1.jpg)
text_image IMPORT/EXPORT EXPORT IMPORT

7

When [Yes] is selected using [] and [OK] is pressed, the printer's settings are read from the targeted writing source. ![](images/9ff45c39a245005d8a1044ee987dc75a6abf685ddfaa4503ea662cf74693f37b.jpg)
text_image Execute? No Yes
→ When the reading has finished, is displayed.

8

Perform a hard reset or restart the printer. After performing a hard reset or restarting the printer, the settings are effective. ![](images/3f1987883c06b03b216a23b126701d5df782eeec75a6538927b4592716c39066.jpg)

NOTE

For details on a hard reset

See "Canceling All the Jobs (Hard Reset)."

If you want to initialize the [Setup] menu using the control panel

You can restore the printer's common setup menus and dedicated setup menus to their default settings. > "Initializing the [Setup] Menu Using the Printer's Control Panel"

If you want to initialize the network settings

You can reset the network settings for the printer to the default values. > "Initializing the Network Settings" ![](images/0de4fc59c0b05bd32e860d8290570feb27f503f2eb67e4c07264cc0b1b83cfdb.jpg)

NOTE

Initializing using NetSpot Device Installer

You can also initialize the network settings using NetSpot Device Installer. For details on the procedure for initializing the network settings using NetSpot Device Installer, see Help. Help is displayed by clicking [Help] in the [Help] menu. 0258-09C Initialization of the [Setup] menu resets the settings specified in the common [Setup] menu and exclusive [Setup] menu to the default settings. Initialize the settings by selecting [Initialize Menu] in the hierarchy of "Options" in the [Setup] menu. Start the key operation from Step 1. ![](images/75440478e4a7b8833766f252125e213b24924c766cf0deccb038d17ca8f75671.jpg)

IMPORTANT

Setting items which are not initialized

The following setting items are not initialized. - [Network] Options - [Adj. Start Position] ([User Maintenance] Options)

If is displayed

If the message appears when the initialization of the [Setup] menu is executed, the [Setup] menu is not initialized. Make sure that the ➔ Job indicator is off, and then perform [Initialize Menu] again.

Do not turn the printer OFF during the initialization.

The printer memory may be damaged.

About some setting items

Some setting items do not become effective unless you cycle the power of the printer or perform a hard reset after initializing the [Setup] menu. ![](images/d0c30ebb5846e8919f4f72370d4fc8d2bbca6b4043b9c177531794cda36d81dc.jpg)

NOTE

Canceling the initialization

If you press [ ○ ] (←: Online) during the operation, the operation is canceled. However, you cannot cancel the operation when is displayed even if you press [ ○ ] (←Online).

1

Press [ ] ( : Settings)

2

Select [Initialize Menu] using [▲] or [▼], and then press [OK]. ![](images/f4cbd92e4302accfa9218502878a1a9c8ced8b2a46cf492ecc080f403854dbcc.jpg)
text_image Setup PS MEAP Settings Check Counter Initialize Menu

3

Select [Yes] using [▼, and then press [OK]. → While the initialization is being performed, is displayed. is displayed after the initialization is completed. ![](images/d1dcdba2b7759d47ceb1fbb02fa6ff6e762d35fc23da7b3d635d98a0fc80f0c5.jpg)
text_image Execute? No Yes
0258-09E You can check the printer status, network settings, and so on by printing Configuration Page or Network Status Print. Configuration Page or Network Status Print is designed to be printed on A4 paper. Be sure to use A4 paper. You can also check the network settings and so on using the following software. "Remote UI" "FTP Client" "NetSpot Device Installer"

1

Load A4 paper in the multi-purpose tray or paper drawer. > "Paper Loading and Output"

2

Make sure that the printer is online (the Online indicator is on). If the Online indicator is off, press [ ] ( : Online).

3

Press [ ] (:Utility).

4

Select [Configuration Page] or [Network Status Print] using [▲] or [▼], and then press [OK]. ![](images/7d264d459d037c71edf0aa0182b776af0f5a80e9e2f92e2626efc5e1cbfffe5c.jpg)
text_image Utility Menu Check Counter Configuration Page Network Status Print IPSec Policy List

[Configuration Page]

Prints the list of currently available functions for the printer and setting values of the menus, and so on.

[Network Status Print]

Prints the TCP/IP settings including the IP address and information including security settings.

5

Select [Yes] using [▼, and then press [OK] to print Status Print. ![](images/0294cc8b668906d249f5ea5e2bac7ffa9d32eb8122b70a1228e644ca8735defb.jpg)
text_image Execute? No Yes
0258-09F Only the administrator (user who knows the password) can configure the settings or perform the operations related to the printer management by setting the administrator password. Also, the administrator password can be changed anytime. This section describes the procedure for specifying the settings using the Remote UI. In the Remote UI, you can specify the settings by accessing the printer from a Web browser via a network. ![](images/589f39a10e0cde8f6cdbf758f42887c1482c379243e87119666b003e8c2e9b94.jpg)

NOTE

When specifying the settings using software other than the Remote UI

You can also specify the settings using the following software. > "FTP Client" You can specify the settings by accessing the FTP server of the printer using Command Prompt.

1

Start the Remote UI, and then log in as Administrator. > "Starting the Remote UI"

2

Select [Security] under [Management Settings] in the [Settings/Registration] menu. ![](images/61fc91838d4ce13dcd7a05fb675a100309a38308be0818b05ab5db85ed7e8271.jpg)
text_image Remote UI Settings/Registration: LBPXXXX: LBPXXXX - Windows Internet Explorer http:// Favorites Suggested Sites Web Shoe Gallery Remote UI Settings/Registration: LBPXXXX: LBPXET... LBPXXXX / LBPXXXX1/ To Portal Login User: System Manager Log Out Settings/Registration Mail to System Manager Preferences Control Menu Paper Source Menu Network Layout Menu Quality Menu User Maintenance Menu Output/Control Utility Menu Calibration Device Control Management Settings Department ID Management Security License/Other Settings/Registration: Management Settings: Security Security Last Updated: 11/04 2011 13:54:15 Security Management Settings Remote UI Settings Key and Certificate Settings CA Certificate Settings IPSec Settings Display Job History IP Address Filter IPv4 Address: TX Filter IPv4 Address: RX Filter IPv6 Address: TX Filter IPv6 Address: RX Filter MAC Address Filter TX Filter RX Filter Internet | Protected Mode: On 100%

3

Click [Management Settings]. ![](images/03de7f6c4aae4fb23ea98759081f22e5fce1cb20b47bb1095a667ef586ac0c16.jpg)
text_image Remote US Settings/Registration: LBPXXXX: LBPXXXX - Windows Internet Explorer http:// Favonites Suggested Sites Web Slice Gallery Remote US Settings/Registration: LBPXXXX: LBPXX... LBPXXXX / LBPXXXX / To Portal Login User: System Manager Log Out Settings/Registration Mail to System Manager Preferences Control Menu Paper Source Menu Network Layout Menu Quality Menu User Maintenance Menu Output/Control Utility Menu Calibration Device Control Management Settings Department ID Management Security License/Other Settings/Registration Management Settings: Security Security Last Updated: 11/04 2011 13:54:15 Security Management Settings Remote UI Settings Key and Certificate Settings CA Certificate Settings IPSec Settings Display Job History IP Address Filter IPv4 Address: Tx Filter IPv4 Address: Rx Filter IPv6 Address: Tx Filter IPv6 Address: Rx Filter MAC Address Filter Tx Filter Rx Filter Internet | Protected Mode: On

4

Click [Edit...] under [Management Settings]. ![](images/ae45c797a927734462025a6504cdacd294449bc4cca30f410b4deaa5bbb5295f.jpg)
text_image Remote UI Settings/Registration: LBPXXXX: LBPXXXX - Windows Internet Explorer http:// Suggested Sites Web Slice Gallery Remote UI Settings/Registration: LBPXXXX: LBPXXXX_ Settings/Registration Mail to System Manager Preferences Control Menu Paper Source Menu Network Layout Menu Quality Menu User Maintenance Menu Output/Control Utility Menu Calibration Device Control Management Settings Department ID Management Security License/Other Settings/Registration: Management Settings: Security > Management Settings Management Settings ListUpdated: 04/18/2011 05:57:24 AM Edit... System Manager Information System Manager Password: Set System Manager: Contact Information: E-Mail Address: System Manager Comment: Device Information Manufacturer: CANON INC. Device Name: LBPXXXX Location: Product Name: LBPXXXX Done Internet | Protected Mode: On 100%

5

Enter the password currently set for [Current System Manager Password]. ![](images/bf4e3424c189132e113791438ba5a9f1dd142e767ceff095eaeac7cedd48a065.jpg)
text_image Remote UB Settings/Registration: LBPXXXX: LBPXXXX - Windows Internet Explorer Http:// Suggested Sites Web Site Gallery Remote UB Settings/Registration: LBPXXXX: LBPXXXX... LBPXXXX/ LBPXXXX/ Settings/Registration Mail to System Manager Preferences Control Menu Paper Source Menu Network Layout Menu Quality Menu User Maintenance Menu Output/Control Utility Menu Calibration Device Control Management Settings Department ID Management Security License/Other Settings/Registration: Management Settings: Security > Management Settings > Edit Management Settings Edit Management Settings Last Updated 15/09 2011 16:43:22 The settings will be changed as follows. OK Cancel Authentication of Edit Management Settings Current System Manager Password: System Manager Information System Manager Password: Sat: Set/Change Password Password: (Max 16 characters) Confirm: (Max 16 characters) System Manager: Contact Information: Done Internet | Protected Mode: On 100%
![](images/d80dc4ff595e0f85634e27954d8f27ccc8cb58347f19cefebdd26d625c3c146e.jpg)

Set the administrator password.

(1) Select the [Set/Change Password] check box. (2) Set the administrator password. (3) Click [OK]. ![](images/313d46cf7f193f0e6dc9803bc5384fcf3ab2a0e5e5eb169bac0174ec16a9080c.jpg)
text_image Remote UI Settings/Registration: LBP7680C: LBP7680C - Windows Internet Explorer Http://192.169.1.225/system.cgi?Actions=GET_SYSTEMAbCSU/Tx-1543403713 Frequencies Suggested Sites Web Slice Gallery Remote UI Settings/Registration: LBP7680C: LBP... Settings/Registration Mail to System Manager Preferences Control Menu Paper Source Menu Network Layout Menu Quality Menu User Maintenance Menu Output/Control Utility Menu Calibration Device Control Management Settings Department ID Management Security License/Other Settings/Registration: Management Settings: Security > Management Settings > Edit Management Settings Edit Management Settings Last Updated: 15/09 2011 16:43:22 The settings will be changed as follows: (3) OK Cancel Authentication of Edit Management Settings Current System Manager Password: ****** System Manager Information System Manager Password: Sat. Set/Change Password Password: (Max 16 characters) Confirm: (Max 16 characters) System Manager: Contact Information: Done Internet | Protected Mode On
[Set/Change Password] Select the check box when setting/changing the password.
[Password] Enter a new desired password.
[Confirm] To confirm the password, enter the password entered in [Password] again.
0258-09H This section describes the procedure for specifying the settings using the Remote UI. In the Remote UI, you can specify the settings by accessing the printer from a Web browser via a network. ![](images/5ceec76cc57e43af07fb47efd3bf497f4df8875ac33f3a4b424922492831760e.jpg)

NOTE

When specifying the settings using software other than the Remote UI

You can also specify the settings using the following software. > "FTP Client" You can specify the settings by accessing the FTP server of the printer using Command Prompt. "NetSpot Device Installer" You can specify the settings using the Canon software, NetSpot Device Installer, in the supplied CD-ROM.

1

Start the Remote UI, and then log in as Administrator. > "Starting the Remote UI"

2

Select [Security] under [Management Settings] in the [Settings/Registration] menu. ![](images/b17e3ecefa9998ca43614fcf53d5e08709ea5028853555143c44179a6c2335f8.jpg)
text_image Remote UI Settings/Registration: LBPXIII: LBPXIII - Windows Internet Explorer http:// Suggested Site Web Slice Gallery Remote UI Settings/Registration: LBPXIII: LBPXIII... LBPXIII/ LBPXIII/ To Portal Login User System Manager Log Out Settings/Registration Mail to System Manager Preferences Control Menu Paper Source Menu Network Layout Menu Quality Menu User Maintenance Menu Output/Control Utility Menu Calibration Device Control Management Settings Department ID Management Security License/Other Settings/Registration: Management Settings: Security Security Last Updated 11/04 2011 12:54:15 Security Management Settings Remote UI Settings Key and Certificate Settings CA Certificate Settings IPSec Settings Display Job History IP Address Filter IPv4 Address: TX Filter IPv4 Address: RX Filter IPv6 Address: TX Filter IPv6 Address: RX Filter MAC Address Filter TX Filter RX Filter Internet | Protected Mode: On 100%

3

Click [Management Settings]. ![](images/660deefc0cdf306711118939ccf23d8916d7f6df82506dd1b2142634ab3580b2.jpg)
text_image Remote US Settings/Registration: LBPXXXX: LBPXXXX - Windows Internet Explorer http:// Suggested Sites Web Slice Gallery Remote US Settings/Registration: LBPXXXX: LBPXX... LBPXXXX / LBPXXXX / To Portal Login User: System Manager Log Out Settings/Registration Mail to System Manager Preferences Control Menu Paper Source Menu Network Layout Menu Quality Menu User Maintenance Menu Output/Control Utility Menu Calibration Device Control Management Settings Department ID Management Security License/Other Settings/Registration Management Settings: Security Security Last Updated: 11/04 2011 13:54:15 Security Management Settings Remote UI Settings Key and Certificate Settings CA Certificate Settings IPSec Settings Display Job History IP Address Filter IPv4 Address: Tx Filter IPv4 Address: Rx Filter IPv6 Address: Tx Filter IPv6 Address: Rx Filter MAC Address Filter Tx Filter Rx Filter Internet | Protected Mode: On

4

Click [Edit...] under [Management Settings]. ![](images/eac938c4fffafc9b9953310e51b6589e17d20e4b84e117eb260d4a022f39a19d.jpg)
text_image Remote UI Settings/Registration: LBPXXXX: LBPXXXX - Windows Internet Explorer http:// Suggested Sites Web Slice Gallery Remote UI Settings/Registration: LBPXXXX: LBPXXXX_ Settings/Registration Mail to System Manager Preferences Control Menu Paper Source Menu Network Layout Menu Quality Menu User Maintenance Menu Output/Control Utility Menu Calibration Device Control Management Settings Department ID Management Security License/Other Settings/Registration: Management Settings: Security > Management Settings Management Settings ListUpdated: 04/18/2011 05:57:24 AM Edit... System Manager Information System Manager Password: Set System Manager: Contact Information: E-Mail Address: System Manager Comment: Device Information Manufacturer: CANON INC. Device Name: LBPXXXX Location: Product Name: LBPXXXX Done Internet | Protected Mode: On 100%

5

Enter the password currently set for [Current System Manager Password]. ![](images/fce5d4008781b355d2f602bfe03471d178e0fda3228a32c299c43eb2851f1054.jpg)
text_image Remote UB Settings/Registration: LBPXXXX: LBPXXXX - Windows Internet Explorer Http:// Suggested Sites Web Site Gallery Remote UB Settings/Registration: LBPXXXX: LBPXXXX... Settings/Registration Mail to System Manager Preferences Control Menu Paper Source Menu Network Layout Menu Quality Menu User Maintenance Menu Output/Control Utility Menu Calibration Device Control Management Settings Department ID Management Security License/Other Settings/Registration: Management Settings: Security > Management Settings > Edit Management Settings Edit Management Settings Last Updated 15/09 2011 16:43:22 The settings will be changed as follows: OK Cancel Authentication of Edit Management Settings Current System Manager Password: System Manager Information System Manager Password: Sat. Set/Change Password Password: (Max 16 characters) Confirm: (Max 16 characters) System Manager: Contact Information: Done Internet | Protected Mode On 100%

6

Specify the device name or administrator information.

(1) Specify the settings for each option as needed. (2) Click [OK]. ![](images/872a8ed9772954c4d5613298788a34b0e89f375d0237ccc9a753cb2ef5144ada.jpg)
text_image Remote UI Settings/Registration: LBP7680C / LBP7680C - Windows Internet Explorer https://182.168.1.225/system.cgi?Action=GET_SYSTEM&CSUT=LSX483763 Favorites Suggested Sites Web Slice Gallery Remote UI Settings/Registration: LBP7680C: LBP... Page Safety Tools I-SENSYS LBP7680C / LBP7680C / To Portal Login User: System Manager Log Out Settings/Registration Mail to System Manager Preferences Control Menu Paper Source Menu Network Layout Menu Quality Menu User Maintenance Menu Output/Control Utility Menu Calibration Device Control Management Settings Department ID Management Security License/Other Settings/Registration: Management Settings: Security > Management Settings > Edit Management Settings Edit Management Settings Last Updated 2009 2011 15:29:23 The settings will be changed as follows. (2) OK Cancel Authentication of Edit Management Settings Current System Manager Password: ***** System Manager Information System Manager Password: Set: Set/Change Password Password: (Max 16 characters) Confirm: (Max 16 characters) System Manager: Contact Information: E-Mail Address: System Manager Comment: Device Information Device Name: LBPXXX Location: Done Internet | Protected Mode On 100%
[System Manager] Enter the name of the system manager.
[Contact Information]Enter the system manager's contact information.
[E-Mail Address] Enterthe system manager's email address.
[System ManagerComment]Enter the system manager's comments.
[Device Name] Enter the name of the printer.
[Location] Enter the location of the printer.
0258-09J You can specify the settings for sleep mode using the following procedures. > "Setting the Printer to Sleep Mode" > "Types of Sleep Mode" > "Releasing Sleep Mode" ![](images/028ad798b0781111c2928fcd28e124fea683f89024eaf2c724e0543f1d2b1fd0.jpg)

IMPORTANT

Power consumption when the power is OFF

Even if the power of the printer is turned OFF, power is consumed only slightly while the power plug is inserted in the AC power outlet. To cut the power consumption completely, unplug the power plug from the AC power outlet.

Setting the Printer to Sleep Mode

There are the following four methods for setting the printer to Sleep Mode.
Setting the printer to Sleep Mode automatically when it is not operatingSpecify the time interval until the printer enters Sleep Mode in [Sleep Migration Time]. You can specify the time interval between [5 minutes] and [60 minutes]. The default is [10 minutes].† We recommend that you use this option in the default setting.
Setting the printer to Sleep Mode using the printer's control panelPress [ ] (Energy Saver) on the printer's control panel.
Setting the printer to Sleep Mode from a network computerSelect [Sleep] from [Settings/Registration] on the Remote UI → [Output/Control] → [Device Control], and click [Execute].
Setting the printer to Sleep Mode on the designated time every daySet the [Sleep Mode Timer] under [Timer Settings] to [On], and set the time when it automatically goes in the Sleep Mode in [Sleep Mode Time].
If the above operations or settings are performed, and the entering conditions described in "Types of Sleep Mode" are fulfilled, the printer enters Sleep Mode.

Types of Sleep Mode

There are the following two types of Sleep Mode, and they vary in the entering conditions.
Types of Sleep ModeSettings for [Sleep Mode] Which the Printer Can EnterEntering Conditions
[Mid (Printer Sleep)][High (Deep Sleep)]
Sleep Mode 1(Printer Sleep)Panel operation has not been performed.No data has been sent from the computer.The printer is not starting up.A shutdown is not being performed.There is no job on the print queue.A service call is not occurring.A paper jam is not occurring.No cover is open.
Mode)Power saving effect: MiddleThe toner cartridge is installed.A toner cartridge has not reached the end of its life.The printer is not cooling down. (The cooling fan stops.)† The printer takes up to about 5 minutes to fully cool down.† It is not accessing USB memory.
Sleep Mode 2(Deep Sleep mode)Power saving effect: Large-The conditions to enter Sleep Mode 2 are fulfilled.The following setting items in the [Network] options are set to [Off].-[WINS Resolution] in [TCP/IP Settings]-[IPSec] in [TCP/IP Settings] (LBP7680Cx only)-[AppleTalk]-[SMB Server] in [SMB] (LBP7680Cx only)The printer has not communicated on the network for more than 15 seconds.An interface cable is not connected.The SNTP or DHCP communication is not to be performed within 1 minute.It is not accessing USB memory or the SD card (LBP7680Cx only)The Wake Up function is not to be performed within 1 minute.
![](images/730690d50f9e113cd86502c0f8acf491c724ef28619e23782d2878b49ed81af1.jpg)

NOTE

To check which Sleep Mode the printer has entered

You can check Sleep Mode using indicators on the control panel. \- Sleep Mode 1 The ⬇ Ready indicator and Main Power indicator come on. However, the following indicator may come on. \- ⚠ Message Indicator Comes on if the printer enters Sleep Mode when it is offline. \- Sleep Mode 2 Only the Main Power indicator comes on.

To configure the printer so that it does not enter Sleep Mode when an error occurs

Set [Sleep Even if Error] to [Off]. When you are using some type of utility software related to network and you set Sleep Mode to [High (Deep Sleep)], communications may fail. When using such type of utility software, please release Sleep Mode.

Releasing Sleep Mode

The following are the methods to release Sleep Mode.
Releasing Sleep Mode using the printer's control panelPress the key on the printer's control panel.If the printer has entered Sleep Mode 2, however, you can release the mode only when [ (Energy Saver) is pressed.
Releasing Sleep Mode on the designated time every daySet the [Wake Up Timer] under [Timer Settings] to [On], and set the time when it automatically cancels the Sleep Mode in [Wake Up Time].
Releasing Sleep Mode from a computer \- Send data to the printer. \- Perform the following in the Remote UI. \- Perform the operations in the [Output/Control] menu under [Settings/Registration] \- Display and set the [User Maintenance Menu] page in the [Preferences] menu under [Settings/Registration] ![](images/18dc6b0030b08f368a15c4000a244956068e61c15ba308474991e652c4482a5e.jpg)

NOTE

Sleep Mode is released also in the following cases.

- When an error is occurring

Sleep Mode 1 is released also when an error is occurring. However, Sleep Mode 2 may not be released depending on the error type.

- When connecting a network cable

The printer enters Sleep Mode 1 from Sleep Mode 2.

- When the printer is connected to a network or receives the unicast packet

Sleep Mode 2 is released.

- When devices on a network are searched from application software or utility software

Sleep Mode 2 is released. 0258-0U1 You can specify the settings for auto shutdown using the following procedure. This setting is made using the Remote UI.

1

Start the Remote UI, and then log in as Administrator. > "Starting the Remote UI"

2

Click [Settings/Registration]. ![](images/1946e5647779cd859703e1f0701257bd4cf18c095b2e2c99987d47a422be2e7d.jpg)
text_image Remote UI Portal: LBP/XXXX: LBP/XXXX - Windows Internet Explorer http:// F Preferences Suggested Sites Web Slice Gallery Remote UI Portal: LBP/XXXX: LBP/XXXX Device Name: LBP/XXXX Product Name (Serial No.): LBP/XXXX Location: Login User: System Manager Log Out Language English Mail to System Manager Last Updated: 29/05 2012 10:03:42 Device Basic Information Device Status The printer is ready. Error Information There is no error. Consumables Information Paper Information Paper Source Remaining Paper Paper Size Paper Type Multi-Purpose Tray None A4 Free (Mixed Types) Drawer 1 Loaded A4 Free (Mixed Types) Remaining Toner Item Name Remaining Toner Cyan Toner 16-100% Status Monitor/Cancel Settings/Registration Basic Tools Box Direct Print Management Tools Service Management Service

3

Select [Control Menu] from the [Preferences] menu. ![](images/96f4f3c0a9abe0d207a49e286316b980c27e11790bdcaa28786d5bf2e86e223f.jpg)
text_image Remote U3 Control Menu: LBPXXX - Windows Internet Explorer http:// Suggested Discs Web Site Gallery Remote U3 Control Menu: LBPXXX - LBPXXX LBPXXX / LOPX001? Settings/Registration Preferences: Control Menu Control Menu LBPXXX 24/04/21/21:22 Edit... Preferences ■ Control Menu ■ Paper Source Menu ■ Network ■ Layout Menu ■ Quality Menu ■ User Maintenance Menu Output/Control ■ Utility Menu ■ Calibration ■ Device Control Management Settings ■ Department ID Management ■ Security ■ License/Other Settings/Registration Preferences: Control Menu Sleep Settings Sleep Mode High (Deep Sleep) Sleep Even if Error On Sleep Migration Time 5 minutes Timer Settings Wake Up Timer Off Wake Up Time 12.00 Auto Reset Time 2 minutes Sleep Timer Off Sleep Time: 12.00 Auto Shutdown Timer On Auto Shutdown Time After 4 hours Auto Shutdown Weekly Timer Off Calibration Timer Off Calibration Time 12.00 Done Internet | Protected Mode On

4

Click [Edit...].

![](images/ec17eddad516bea60eeeeed3fded10188dbe8a212c67e7179edbaad554238283.jpg)
text_image Remote US Control Menu: LBPX001: LBPX001 - Windows Internet Explorer http:// S Bing Favorites Suggested Sites Web Site Gallery Females US Control Menu: LBPX001: LBPX001 LBPX001 / LBPX001/ Settings/Registration To Portal Login User System Manager Log Out Mail to System Manager Preferences Control Menu Paper Source Menu Network Layout Menu Quality Menu User Maintenance Menu Output/Control Utility Menu Calibration Device Control Management Settings Department ID Management Security License/Other Settings/Registration: Preferences: Control Menu Control Menu Last Updated 24/04/2012-21-31-20 Edit... Sleep Settings Sleep Mode High (Deep Sleep) Sleep Eyes if Error On Sleep Migration Time 5 minutes Timer Settings Wake Up Timer Off Wake Up Time 12:00 Auto Reset Time 2 minutes Sleep Timer Off Sleep Time: 12:00 Auto Shutdown Timer On Auto Shutdown Time After 4 hours Auto Shutdown Weekly Timer Off Calibration Timer Off Calibration Time 12:00 Done Internet | Protected Mode On 108%

5

Specify the settings for auto shutdown.

(1) Select the [Use Auto Shutdown Timer] check box. † The default setting is that it is enabled. (2) Specify the time to shut down in [Auto Shutdown Time]. ![](images/8e751a4aabc033dcafa5e260cde41ee9ab509b29043ed9b871376f770198c3d2.jpg)
text_image Remote UI Edit Control Menu: LSP001: LSP001 - Windows Internet Explorer http:// Sling Favorites Suggested Sites Web Site Safari Remote UI Edit Control Menu: LSP001: LSP001 Management Settings Department ID Management Security License/Other Timer Settings Use Wake Up Timer Wake Up Time: 12 : 00 Change Auto Reset Time Auto Reset Time: 2 minutes Use Sleep Timer Sleep Time: 12 : 00 Use Auto Shutdown Timer Auto Shutdown Time: After 1 hour Set Auto Shutdown Weekly Timer Sunday: Monday: Tuesday: Wednesday: Thursday: Friday: Saturday: Use Calibration Timer Calibration Time: 12 : 00 Done Internet | Protected Mode On 100%
![](images/59eb528b3f49a511db8de3e2e5254f51bfede223bda1ac05421927714c850f75.jpg)

NOTE

About the setting for the time to execute auto shutdown

When [Auto Shutdown Time] is changed during sleep mode, the specified time to execute auto shutdown becomes effective in the following cases. - When the printer is recovered from sleep - When the power of the printer is cycled You can specify [Auto Shutdown Time] for auto shutdown with 1 hour increments between [After 1 hour] and [After 8 hours]. If you specify the setting for this option shorter than the default setting, this may shorten the life of the toner cartridges (the default setting is "4" hours).

If the printer is not turned OFF immediately

Depending on the process in the printer, it may take up to 10 minutes to turn the printer OFF. ![](images/49bc581786a8da8f1b455e279ab22643ab33dafad524a7f4ec2eeb1055a37b30.jpg)

Set the auto shutdown weekly function as needed.

(1) Select the [Set Auto Shutdown Weekly Timer] check box. (2) Specify the day and time when to execute auto shutdown. All the default settings are that it is disabled. ![](images/7a6da83bc29e90fcb479703e351b1321fb5abc02a86e88c5735ca5ab76cb335c.jpg)
text_image Remote UI Edit Control Menu LSP001 (LSP001 - Windows Internet Explorer Favrutes Suggested Sites Web Site Safari Remote UI Edit Control Menu: LSP002: LSP003 Management Settings Department ID Management Security License/Other Timer Settings Use Wake Up Timer Wake Up Time: 12 : 00 Charge Auto Reset Time Auto Reset Time: 2 minutes Use Sleep Timer Sleep Time: 12 : 00 Use Auto Shutdown Timer Auto Shutdown Time: After 5 hours Set Auto Shutdown Weekly Timer Sunday: 12 : 00 Monday: Tuesday: Wednesday: Thursday: Friday: Saturday: Use Calibration Timer Calibration Time: 12 : 00 Done Internet / Protected Mode On

7

Click [OK].

![](images/0be572116392d941f90cd47ef818200316097b511646d1bdb0261b09932ca272.jpg)
text_image Remote US Soft Control Menu: LBP1XXX / LBPX001 - Windows Internet Explorer https://423.com/ Females Suggested Sites Link Site Gateway Remote US Edit Control Menu: LBP1XXX / LBPX001 LBP1XXX / LBPX001/ To Portal: Login User: System Manager Log Out Settings/Registration Mail to System Manager Preferences Control Menu Paper Source Menu Network Layout Menu Quality Menu User Maintenance Menu Output/Control Utility Menu Calibration Device Control Management Settings Department O Management Security License/Other Settings/Registration: Preferences: Control Menu > Edit Control Menu Edit Control Menu Last Updated 04/05/2012 07:56:28PM The settings will be changed as follows. (Some changes are effective after the main power is turned OFF and ON) OK Cancel Sleep Settings Sleep Mode: High (Deep Sleep) Sleep Even if Enter Sleep Migration Time: 5 minutes Timer Settings Use Wake Up Timer Wake Up Time: 12 00 Change Auto Reset Time: Auto Reset Time: 2 minutes Use Sleep Timer: Sleep Time: 12 00 Done Internet | Protected Mode On

Displaying or Changing the Departmental ID Management Settings

You can manage the number of [Printed Pages] ^* on a departmental basis by specifying IDs for each department and entering an ID when printing. \* [Printed Pages] indicates the number of printed surfaces. If you perform 2-sided printing on a sheet of paper, the number of the printed surfaces is two. ![](images/14a6a5b7e8f9f73fb0f5a9734b566432900b748846dbc23e4138012522b365ff.jpg)

IMPORTANT

Register more than one Department IDs before enabling Department ID Management, which will have no effect with no Department ID registered. ![](images/94ebc4f38d7a5378cf269a3a3b802ef19be0a590e2d5821426d1fc1744504f89.jpg)
text_image Remote UE Settings/Registration: LBP7680C: LBP7680C - Windows Internet Explorer http://192.168.1.225/sdldt.cgi File Edit View Favorites Tools Help Favorites Remote UE Settings/Registrations LBP7680C: LBP... SENSYS LBP7680C / LBP7680C / To Portal Login User: System Manager Log Out Settings/Registration Mail to System Manager Preferences Control Menu Paper Source Menu Network Layout Menu Quality Menu User Maintenance Menu Output/Control Utility Menu Coilibration Device Control Management Settings Department ID Management Security License/Other Settings/Registration Management Settings Department ID Management Department ID Management Last Updated 04/04 2011 03:56:25 Clear All Counts Settings... Department ID Page Total Register New Department... Dept. ID: 1 to 100 Display Dept. ID Printed Pages Color Black 1234567 0 0 Delete Jobs With Unknown IDs 0 0 Utility, E-Mail Print 0 0 Copyright CANON INC. 2011 All Rights Reserved Done Internet | Protected Mode: Off 100%

(1) [Register New Department]

(Displayed only if you have logged on in Administrator Mode.) Clicking this button displays the [Register New Department] page. You can specify the following settings.
[Department ID] Enter the department ID using a number with up to seven digits.
[PIN] Enter the password using a number with up to seven digits.
[Confirm] Enter the number specified in [PIN].

(2) [Dept. ID]

(Clickable only if you have logged on in Administrator Mode.) Clicking the department ID displays the [Edit Department] page. You can specify the following settings.
[Department ID] Enter the department ID using a number with up to seven digits.
[PIN] Enter the password using a number with up to seven digits.
[Confirm] Enter the number specified in [PIN].
[Clear Count](Not displayed depending on the settings.)Click [Printed Pages] ([Total Print], [Black Print] and [Color Print]) for this Department ID.
[Total Print] Displays the number of printed surfaces.
[Black Print] It displays the number of pages printed in black and white.

(3) [Settings...]

(Displayed only if you have logged on in Administrator Mode.) Clicking this button displays the [Department ID Management Settings] page. You can specify the following settings.
[Enable Department ID Management]If the check box for this option is selected, you need to enter a department ID and password when printing. You also need to enter a department ID and password when you perform direct printing or manipulate boxes from the Remote UI. Jobs which failed to be authenticated are deleted.
[Accept Print Jobs With Unknown IDs]If the check box for this option is selected, you can print jobs with unknown IDs. Jobs with unknown IDs indicate the following kinds of jobs.Jobs printed by a printer driver which does not support the department ID managementJobs directly printed using a method other than the Remote UI

(4) [Printed Pages]

Displays the number of printed surfaces.

(5) Delete the Selected Department

(Displayed only if you have logged on in Administrator Mode.) If you click [Delete] to the right of the Dept. ID to be deleted, the selected Dept. ID is deleted.

(6) [Clear All Counts]

(Not displayed depending on the settings.) Clears [Total Print] of all the departments. 0258-0S6

Available Functions

Installing the System Options/MEAP Applications

Installing by Connecting This Printer to an Outside Network (Delivery) Installing by Not Connecting This Printer to an Outside Network (Manual) > Downloading the Manuals and Related Software

> Updating the Firmware

> Managing the Register/Update Software Function

Installing the System Options/MEAP Applications

Using the Register/Update Software function, you can install the System Options/MEAP Applications to the printer. You can use this function from both the touch panel display and the computer (Remote UI).

Installing by Connecting This Printer to an Outside Network

You can install the System Options/MEAP Applications by accessing the delivery server from this printer. ![](images/ed88fe759399289b6af5a1b58bcd673c74e3dfc1c23eb3c040c78411a13b7331.jpg)
flowchart
graph LR
    A["This Printer"] -->|Access Using the Remote UI| B["Computer"]
    B --> C["Delivery Server"]
    D["License Authentication/MEAP Application Delivery"] --> A

Installing by Not Connecting This Printer to an Outside Network

You can install the System Options/MEAP Applications by using the license file/license key that you obtained from the License Management System. ![](images/4afe06c8abf82d38d3a47a104d70255fb4dcecea3a3f9464122ae1a66e0a0e7f.jpg)
flowchart
graph LR
    A["Obtain the License Key/License File"] --> B["Install the License File Using the Remote UI (System Options/MEAP Applications*)"]
    B --> C["*For the MEAP applications, an application file is necessary."]
    C --> D["This Printer"]

Updating the Firmware

Using the Register/Update Software function, you can update the firmware of the printer to the most recent version. You can use this function from the computer (Remote UI).

Updating by Connecting This Printer to an Outside Network

You can update the firmware by accessing the delivery server from this printer. ![](images/12f35d465ab268491fa08b3be908610e9c547cfb59510d3f9bed2e9151782f86.jpg)
flowchart
graph LR
    A["This Printer"] -->|Updating the Firmware| B["Access Using the Remote UI"]
    B --> C["Delivery Server"]
    C -->|Delivering the Firmware| B
0258-0S8 The procedures to install the system options or MEAP applications on the printer differ, depending on whether the printer is connected or not to an outside network. Select the procedure that matches your conditions using the references below.

Installing by Connecting this Printer to an Outside Network

Install from the Remote UI. ![](images/0c12eb671c77dded83c8921f317d97d013abbacb87aa40d33cecf50c0d6f5bd3.jpg)

NOTE

Communication test

To check that the transmission with the delivery server is properly operating, if necessary, perform a communication test before installation. > "Testing Communication Using the Remote UI"

Installing by Not Connecting this Printer to an Outside Network

Installing System Options

Install using one of the following procedures. ![](images/dfa4c8cc47f7dce6eeb8c594206cb637ce2d1cefb9d8065e0061c6ca0819781f.jpg)

NOTE

If you install multiple system options

We recommend that you install from the Remote UI.
Procedure Necessary Steps Reference Page
Using the Remote UI to install1. Obtain the license file from the License Management System➤ "Obtaining the License File"
2. Install the license file using the Remote UI➤ "Installing the System Options Using the Remote UI"

Installing MEAP Applications

Use the following procedure to install.
Procedure Necessary Steps Reference Page
Using the Remote UI to install1. Obtain the license file from the License Management System> "Obtaining the License File"
2. Install the license file and application file using the Remote UI> "Installing the MEAP Applications Using the Remote UI"
3. Start the MEAP applications from SMS> "Starting the MEAP Applications"

Installing by Connecting This Printer to an Outside Network (Delivery)

0258-0S9 If the printer is connected to an outside network, you can install the system options and MEAP applications from the Remote UI by linking with the delivery server. ![](images/4aa58959c45d60a9ccdb6bb79d07e4ad23bd7204c082f6e562b7a65e1787e9be.jpg)

NOTE

Preparing a license access number certificate

Make sure that the license access number that is included with the package is available.

1

Start the Remote UI, and then log in as Administrator. > "Starting the Remote UI"

2

From the top page of the Remote UI, click [Settings/Registration] → [License/Other] → [Register/Update Software]. ![](images/68ca9eea236426ced77eb2cfbd261b5419574536e96bd871474b58f60e18eef4.jpg)
text_image To Portal Login User: System Manager Log Out Settings/Registration Mail to System Manager Preferences □ Control Menu □ Paper Source Menu □ Network □ Layout Menu □ Quality Menu □ User Maintenance Menu Output/Control □ Utility Menu □ Calibration □ Device Control Management Settings □ Department ID Management □ Security ■ License/Other Settings/Registration: Management Settings: License/Other License/Other Last Updated 01/04 2011 11:09:25 License/Other Message Board/Support Link Register/Update Software Copyright CANON INC. 2011 All Rights Reserved

3

Click [Delivered Installation]. ![](images/a024da5ef084e825eb51148da1b0f3fb5d89ac1922f49ef2beb376c5653724c4.jpg)
text_image Register/Update Software Device Serial Number: Install Application/Option □ Manual Installation □ Delivered Installation Update Firmware □ Delivered Update Software Management Settings □ Display Logs/Communication Test □ Scheduled Update Settings Install Application/Option > Manual Installation Manual Installation Next > License File Path: Browse... Application File Path: Browse... Version 3.1.9.18 Copyright CANON INC. 2011 All Rights Reserved

4

Enter the license access number → click [Next]. ![](images/c15cc225d0a4d84a7c58fae421185ad9ce9eb90e9f6e69c78cefee80867e3e87.jpg)
text_image Register/Update Software Device Serial Number: Install Application/Option □ Manual Installation □ Delivered Installation Update Firmware □ Delivered Update Software Management Settings □ Display Logs/Communication Test □ Scheduled Update Settings Install Application/Option > Delivered Installation Delivered Installation Enter the license access number to install MEAP application/R option through the internet, and then click [Next]. Next = License Access Number: Version 3.1.9.18 Copyright CANON INC. 2011 All Rights Reserved
Once the license access number is confirmed after contacting the delivery server, information for the system options/MEAP applications you can install are displayed.

5

Select the system options and MEAP applications → click [Start Installation]. ![](images/e73e40235c5395066f78ad591e0344a1d002d43a938985b1f40053667503ea88.jpg)
text_image Select applications/options to install, and set the status after installation Start Installation Cancel Operational Setting Status after Installation * Start C Stop Installable Applications Options Available Storage Space: 1019345KB Application/Option Name Memory (KB) Size (KB) Sample_1 1.0 10 10 Sample_2 1.0 10 10 Sample_3 1.0 10 10
Status after Installation: Start: Starts the installed MEAP applications. Stop: Stops the installed MEAP applications. ![](images/7ada77f0ab213ff3a44ae3e5f4694ce9fa6797df0eb8fdd0d8a08e6d5cef0c02.jpg)

IMPORTANT

If [Stop] is selected when installing MEAP applications

You need to start the application before using the MEAP application. > "Starting/Stopping MEAP Applications" If the agreement screen is displayed, read the agreement. If you abide with the agreement, click [Accept]. ![](images/08accaf244c49269ff0f68c5d21a8e0e07130973044fbaf29b186a44b96e5d1a.jpg)

Check the Installation Result page.

![](images/d3e62cf14c70a3630b212003fd06fd137113fb9625a0cfdac7dd5bab3a060477.jpg)
text_image The following MEAP applications/IR options are installed. - Sample_1 Ver.1.0 : Succeeded : Start - Sample_2 Ver.1.0 : Succeeded : Start - Sample_3 Ver.1.0 : Succeeded : Start Download Manual: http://canon.com/fau/downloads To Delivered Installation
When the installation of the system options is completed, the message appears. Restart the printer to enable the function. To return to the Delivered Installation screen, click [To Delivered Installation]. ![](images/fa59327e9d9202616c227bc8e13dc66f24b51facc4c78111aca96344f25af82c.jpg)

NOTE

The manual for system options/MEAP applications

You can download the manual for the installed system options/MEAP applications by accessing the URL for the manual download site displayed on the Installation Result screen. > "Downloading the Manuals and Related Software"

Installing by Not Connecting This Printer to an Outside Network (Manual)

0258-0SA This section describes how to install the system options and MEAP applications without connecting the printer to an outside network.

Obtaining the License File

Obtain the license file. License file: Obtain the license file when installing the system options/MEAP applications using the Remote UI. ![](images/e1905f1fa769d543fc5bada6610a9cfc5987d689f56aad8b8883f3328aa0a171.jpg)

NOTE

Preparing a license access number certificate

Make sure that the license access number that is included with the package is available.

License access number is not printed on the package of the MEAP application

If the license access number is not printed on the package of the MEAP application you are using, the license file is issued by the distributor of the MEAP application. You do not need to obtain the license file explained in this section. For more information, see the manual for each MEAP application.

1

Check the management number you need to obtain the license file.

To obtain the license file, the following management number is required. - License Access Number: Check the license access number certificate. - Device Serial Number: You can check from the control panel. "> "[Utility Menu] Menu"

2

Access http://www.canon.com/lms/license/.

3

Follow the instructions on the screen and obtain the license file. Next, install the system options or the MEAP applications.

Installing the System Options Using the Remote UI

You can install the system options to the printer using the Remote UI.

1

Start the Remote UI, and then log in as Administrator.

> "Starting the Remote UI"

2

From the top page of the Remote UI, click [Settings/Registration] → [License/Other] → [Register/Update Software]. ![](images/7f3d54f2d886b79858ac3cd6b3174ff82452ae8f2a596e86651e808e1f8410de.jpg)
text_image To Portal - Login User: System Manager Log Out Settings/Registration Mail to System Manager Preferences Control Menu Paper Source Menu Network Layout Menu Quality Menu User Maintenance Menu Output/Control Utility Menu Calibration Device Control Management Settings Department ID Management Security License/Other Settings/Registration: Management Settings: License/Other License/Other Last Updated 01/04 2011 11:09:25 License/Other Message Board/Support Link Register/Update Software Copyright CANON INC. 2011 All Rights Reserved

3

Click [Manual Installation]. ![](images/4fd80943834d7cc1062e0ff89165402ff31ac470a8a53c08f6a4b600b6e6b8e6.jpg)
text_image Register/Update Software Device Serial Number: Install Application/Option Manual Installation Delivered Installation Update Firmware Delivered Update Software Management Settings Display Logs/Communication Test Scheduled Update Settings Install Application/Option > Manual Installation Manual Installation Next > License File Path: Browse... Application File Path: Browse... Version 3.1.0.18 Copyright CANON INC. 2011 All Rights Reserved

4

Click [Browse...] → select the license file to install → click [Next]. ![](images/148564c432528919e6f3e227e79a1e42297c8445da60382388d2945a15fefc68.jpg)
text_image Register/Update Software Device Serial Number: Install Application/Option Manual Installation Delivered Installation Update Firmware Delivered Update Software Management Settings Display Logs/Communication Test Scheduled Update Settings Install Application/Option > Manual Installation Manual Installation Next > License File Path: Browse... Application File Path: Browse... Version 3.1.0.18 Copyright CANON INC. 2011 All Rights Reserved
File extensions: License File: A file with the [lic] extension.

5

Check the contents that will be installed on the confirmation screen → click [Install].

Installing the MEAP Applications Using the Remote UI

You can install the MEAP applications to the printer using the Remote UI. ![](images/c20778c025e9e09b9083737555235fff085d55e1d605a2852e9e7191a70b0658.jpg)

NOTE

The number of MEAP applications that can be installed

You can install up to eight applications.

Memory area that can be used

The maximum amount of memory allocated to install MEAP applications is 32MB.

For details on MEAP applications

There may be other system requirements for installation, depending on the MEAP applications. For instructions on settings, see the manual provided with the MEAP application.

1

Start the Remote UI, and then log in as Administrator. > "Starting the Remote UI"

2

From the top page of the Remote UI, click [Settings/Registration] → [License/Other] → [Register/Update Software]. ![](images/b72760001b5c960bcabaa324dad671810b6c4e665e68e8267d509a36d3439a61.jpg)
text_image To Portal Login User: System Manager Log Out Settings/Registration Mail to System Manager Preferences □ Control Menu □ Paper Source Menu □ Network □ Layout Menu □ Quality Menu □ User Maintenance Menu Output/Control □ Utility Menu □ Calibration □ Device Control Management Settings □ Department ID Management □ Security ■ License/Other Settings/Registration: Management Settings: License/Other License/Other Last Updated 01/04 2011 11:00:25 License/Other Message Board/Support Link Register/Update Software Copyright CANON INC. 2011 All Rights Reserved

3

Click [Manual Installation].

![](images/a2860f29b3bf2509cbd2c97c5a067fe655bc1271f0ee4a37b1bd9240bc1beb69.jpg)
text_image Register/Update Software Device Serial Number: Install Application/Option Manual Installation Delivered Installation Update Firmware Delivered Update Software Management Settings Display Logs/Communication Test Scheduled Update Settings Install Application/Option > Manual Installation Manual Installation Next > License File Path: Browse... Application File Path: Browse... Version 3.1.9.18 Copyright CANON INC. 2011 All Rights Reserved

4

Click [Browse...] → select the license file and the application file to install → click [Next].

![](images/c9f5332ed197352a0cf3a8e5e42020866579868b90bed7ed5a74c92c4ef4b6ca.jpg)
text_image Register/Update Software Device Serial Number: Install Application/Option Manual Installation Delivered Installation Update Firmware Delivered Update Software Management Settings Display Logs/Communication Test Scheduled Update Settings Install Application/Option > Manual Installation Manual Installation Next > License File Path: Browse... Application File Path: Browse... Version 3.1.9.18 Copyright CANON INC. 2011 All Rights Reserved
File extensions: License File: A file with the [lic] extension. Application File: A file with the [jar] extension. ![](images/e9d48f296f6550c348946d06aab573246c61179c3d2814b0333ee44fcdf95369.jpg)

IMPORTANT

When you install MEAP applications

- You cannot install license files only. - When installing the MEAP application, make sure you specify the license file. You cannot install the MEAP application without specifying the license file.

5

Confirm the information displayed on the install confirmation page → click [Yes]. ![](images/1663b44568c0e47988e7fc1e8c5cd48c7a166d7a45edd2d4db26414e2e857663.jpg)
text_image Are you sure you want to install the following details? Yes No Application Information Application Name: Sample Application 1 Version: 1.0 Application ID: 11111111-tbbb-3333-ddd-55555555001 Manufacturer: Canon Inc. Copyright: Sample Description: Sample License Information Serial Number: * Application ID: 11111111-tbbb-3333-ddd-55555555001 Expires after: 10 days Counter Usage Limit PrintedImpressions-Color-Large: 101 PrintedImpressions-Color-Small: 102 PrintedImpressions-Color: 103 PrintedImpressions-UniColor-Large: 104 PrintedImpressions-UniColor-Small: 105 PrintedImpressions-UniColor: 106 PrintedImpressions-BW-Large: 107 PrintedImpressions-BW-Small: 108 PrintedImpressions-BW: 109 PrintedImpressions: 110 ScannedImpressions-Color: 111 ScannedImpressions-BW: 112
Depending on the MEAP application, a software license agreement screen may be displayed. Confirm the information displayed on the screen → click [OK]. If you are installing a new MEAP application, the following information is displayed on the screen. • Application Information - License Information The following information is displayed when you overwrite a MEAP application. - Current Application Information • Application Information after Overwrite Installation will start after the message is displayed again. After the installation, click [To Manual Installation] to display the Manual Installation screen. ![](images/ab5d4d44e2d029ab422d858c04c79aa63e606bf3044f3044a410585061acc141.jpg)

IMPORTANT

To use MEAP applications

To use the installed MEAP application, you must start the MEAP application. > "Starting/Stopping MEAP Applications"

Starting the MEAP Applications

This section describes how to start the installed MEAP application from the SMS screen. ![](images/953e53e2c1e1977d4070b04b2c5dc01c453ac30c3f9545c8559bfd643accd195.jpg)

NOTE

1

From the top page of the SMS, click [MEAP Application Management]. ![](images/10fa862645d1e025f43d989221250787a54525c2251d6aad04b15f00d3261ec2.jpg)
text_image Service Management Service Device Serial Number MEAP Application Management Install MEAP Application System Management Enhanced System Application Management System Application Management System Information MEAP Application Information Check License Change Password MEAP Application Management MEAP Application Management Updated On Jan/16/2008 01 06:11 Application Name Installed on Status License Sample Application 1 1.0.0.1 Jan/16/2008 Installed Sheet Unavailable Unnecessary Sample Application 2 1.0 Jan/16/2008 Installed Sheet Unavailable Installed Sample Application 3 0.6.1 Jan/14/2009 Started Sheet Unavailable Not installed Resource Information Resource Name Amount Used Remaining Percent Used Storage 31102 KB 1017474 KB 3% Memory 11746 KB 21022 KB 36% Threads 36 220 14% Sockets 34 222 13% File Descriptor 9 347 4%* meap Version 3.0.1.1 Copyright CANON INC, 2009 All Rights Reserved.

2

Select the application you want to start → click [Start]. ![](images/6d0d3d9fc22be8a00ad236ccf1b519b86cccdb616aef890d6ec962b807448ac1.jpg)
text_image Service Management Service Device Serial Number: MEAP Application Management Install MEAP Application System Management Enhanced System Application Management System Application Management System Information MEAP Application Information Check License Change Password MEAP Application Management MEAP Application Management Updated On-Jan/18/2009 01 06:11 Application Name Installed on Status License Sample Application 1 1.0.0.1 Jan/18/2009 Installed Sstart Unavailable Unnecessary Sample Application 2 1.0 Jan/18/2009 Installed Sstart Unavailable Installed Sample Application 3 0.6.1 Jan/14/2009 Started Skip Unavailable Not Installed Resource Information Resource Name Amount Used Remaining Percent Used Storage 31182 KB 1017474 KB 3% Memory 11746 KB 21022 KB 36% Threads 36 220 14% Sockets 34 222 13% File Descriptor 9 247 4%+ meap PONIONE P.T. Version 3.0.1.3 Copyright CANON INC, 2009 All Rights Reserved.
0258-0SC You can download the manuals for the installed system options/MEAP applications and their related software from the following URL. http://canon.com/fau/downloads ![](images/d0b1f5117a1fea097f0ba57525ea146f95a43089ca0490a60171477d905555f5.jpg)

NOTE

- Make sure that the license access number that is included with the package is available. - If you installed from the Remote UI, you can jump to the above URL from the link displayed on the Installation Result screen. If you do so, the license access number is entered automatically.

1

Start the Web browser on your computer.

2

Enter the URL in [Address].

3

After entering the license access number, follow the instructions on the screen to download the manuals and related software. If software is downloaded, refer to the manual of that software to install. 0258-0SE Update from the Remote UI. ![](images/5d14469e48ed230a876b9ecf2ab78230051de3f4e100ae02b54d11d310699e3a.jpg)

NOTE

Communication test

To check that the transmission with the delivery server is properly operating, if necessary, perform a communication test before installation. > "Testing Communication Using the Remote UI"

Updating by Connecting This Printer to an Outside Network

If the printer is connected to an outside network, you can update to a most recent firmware by linking with the delivery server. ![](images/26946cb8acafc52bb1d497e920cb1cb186cee744ffc5d49435099eec46b9e1ef.jpg)

IMPORTANT

Estimated time required to apply firmware

The time required to apply the downloaded firmware is approximately 20 minutes. This operation may take more time depending on the system configuration and network environment of your printer.

Checking the New Firmware/Specifying the Delivery Settings

You can check the new firmware that is applicable with the printer and specify the delivery settings.

1

Start the Remote UI, and then log in as Administrator. "Starting the Remote UI"

2

From the top page of the Remote UI, click [Settings/Registration] → [License/Other] → [Register/Update Software]. ![](images/e4d3c24a71fdd52818cd770e32ff722484210344078230818ef458d2b37f3bca.jpg)
text_image To Portal Login User: System Manager Log Out Settings/Registration Mail to System Manager Preferences □ Control Menu □ Paper Source Menu □ Network □ Layout Menu □ Quality Menu □ User Maintenance Menu Output/Control □ Utility Menu □ Calibration □ Device Control Management Settings □ Department ID Management □ Security ■ License/Other Settings/Registration: Management Settings License/Other License/Other Last Updated: 01/04 2011 11:00:25 License/Other Message Board/Support Link Register/Update Software Copyright CANON INC. 2011 All Rights Reserved

3

Click [Delivered Update].

![](images/ded2f3e949bf8ec011e58a32e010ae47da811a68bd9ddad216af36421a73b61b.jpg)
text_image Register/Update Software Device Serial Number: Install Application/Option Manual Installation Delivered Installation Update Firmware Delivered Update Software Management Settings Display Logs/Communication Test Scheduled Update Settings Install Application/Option > Manual Installation Manual Installation Next > License File Path: Browse... Application File Path: Browse... Version 3.1.0.18 Copyright CANON INC. 2011 All Rights Reserved

4

Click [Confirm New Firmware].

![](images/02f454e6dc247628d04e07d6f11cabf8e30fd116edb219e1f109c4c471ae272e.jpg)
text_image Register/Update Software Device Serial Number: Install Application/Option □ Manual Installation □ Delivered Installation Update Firmware □ Delivered Update Confirm Delivery Server □ Display Logs/Communication Test Update Firmware > Delivered Update Delivered Update Updated On 2009 06/22 4:15:58 Confirm New Firmware Scheduled Delivery Firmware Downloaded Firmware: None Apply Firmware Delete Firmware Scheduled Delivery Date and Time: None Delete Scheduled Delivery Version 3.0.1.19f Copyright CANON INC, 2009 All Rights Reserved
Contact the delivery server for information on whether an applicable new firmware is available or not. ![](images/4ac6270a651004620872130f0337160fc3353d4f147284881a7826e1607a6bdc.jpg)
text_image Confirming firmware information... Please wait. Do not turn off the device during the process.

5

Verify the displayed information → specify necessary settings → click [Execute]. If the agreement screen is displayed, read the agreement. If you abide with the agreement, press [I Accept]. ![](images/ecea25d0104a4828a0200dbf426893803714935e6eb586bda0a4239bede775dd.jpg)
text_image Select necessary languages and set the delivery settings If you set [Deliver now] for the delivery schedule, and set [Auto] for the timing to apply, the applicable firmware will be delivered and updated automatically, and the device will restart. Execute Cancel Finishware Current Version: V80.06 ENGLISH Applicable Firmware: V80.10 ENGLISH Release Note: Sample Sample Sample Sample Sample Select Language Language Name: FND Delivery Settings Delivery Schedule: Delivery now Delivery at specified data and time Year: 2022 Month: 5 Date: 14 Time: 9 3 43 Timing to Apply: Auto Manual Deliver Update: On Off E-mail Address: Comments:
Details of each item are shown below. \- Firmware: Current Version: Displays the version of the current firmware. Applicable Firmware: Displays the new firmware that is applicable with the printer. Release Note: If the new firmware has a release note, that information is displayed. Delivery Settings: \- Delivery Schedule: Click "Deliver now" or "Deliver at specified date and time." You can specify a date/time up to 30 days later for delivery schedule. [Deliver now]: Downloads the firmware after the delivery setting is specified. [Deliver at specified date and time]: Select the date/time (year, month, date, and time) to download the firmware from the drop-down list. \- Timing to Apply: Click [Auto] or [Manual]. [Auto]: The firmware is automatically applied after the download of the firmware is completed. [Manual]: Only downloads the firmware. To apply the downloaded firmware, set from [Apply Firmware]. \- Deliver Update: Click [On] or [Off]. [On]: Downloads only the difference between the current firmware and the new firmware. [Off]: Downloads the new firmware entirely. - E-Mail Address: Enter the e-mail address of the administrator. You can receive e-mails regarding the update status that is sent from the delivery server. You can enter up to 64 characters for the e-mail address (excluding "(","), "<," >," ", ", ", ", ", "", and "\"). - Comments: Enter the comment that will automatically be added to the e-mail. If the model name is entered, you can identify which device status the e-mail is about. You can enter up to 128 characters in Comment. ![](images/d3a339461e8b1c66f3a531d6dc5d6c02f4d85d7610815759372688b9631585d6.jpg) NOTE

Delivery Schedule and Timing to Apply

\- When the Delivery Schedule is set to [Deliver now] and the Timing to Apply is set to [Auto] The firmware is applied after the new firmware is downloaded from the delivery server. When the application is completed, the printer automatically restarts. The \$software is updated. Device will automatically restart. To Delivered Update \- When the Delivery Schedule is set to [Deliver now] and the Timing to Apply is set to [Manual]. The new firmware is downloaded. The firmware was retrieved from delivery server. To Delivered Update \- When the Delivery Schedule is set to [Deliver at specified date and time] The scheduled delivery is set to the specified date/time. The delivery information is registered. To Delivered Update

Applying the Downloaded Firmware

You can apply the downloaded firmware to the printer. ![](images/a9e9100675a416fb9f7977e5944062b8575546d2e3ee73c422387f2c30c15241.jpg)

NOTE

If the Timing to Apply in Delivery Settings is set to [Auto], this step is not necessary.

1

Start the Remote UI, and then log in as Administrator. "Starting the Remote UI"

2

From the top page of the Remote UI, click [Settings/Registration] → [License/Other] → [Register/Update Software]. ![](images/5c2537550763cded3023692b077bb637b47bd3b3c52ebb0f3485b27e12bbecea.jpg)
text_image To Portal Login User: System Manager Log Out Settings/Registration Mail to System Manager Preferences Control Menu Paper Source Menu Network Layout Menu Quality Menu User Maintenance Menu Output/Control Utility Menu Calibration Device Control Management Settings Department ID Management Security License/Other Settings/Registration: Management Settings: License/Other License/Other Last Updated 01/04 2011.11.09.25 License/Other Message Board/Support Link Register/Update Software Copyright CANON INC. 2011 All Rights Reserved

3

Click [Delivered Update]. ![](images/795a8c822f75064663f393ef987e61433d7a9adfbc83b66298306e9387f14e96.jpg)
text_image Register/Update Software Device Serial Number: Install Application/Option Manual Installation Delivered Installation Update Firmware Delivered Update Software Management Settings Display Logs/Communication Test Scheduled Update Settings Install Application/Option > Manual Installation Manual Installation Next > License File Path: Browse... Application File Path: Browse... Version 3.1.9.18 Copyright CANON INC. 2011 All Rights Reserved

4

Click [Apply Firmware]. ![](images/0ae5f4c4c87b02c34048f48a1d76c7db1e15c961f6a18c972bda1f4ba7faa17a.jpg)
text_image Register/Update Software Device Serial Number: Install Application/Option Manual Installation Delivered Installation Update Firmware Delivered Update Confirm Delivery Server Display Logs/Communication Test Update Firmware > Delivered Update Delivered Update Updated On 2009 06/22 4:22:18 Confirm New Firmware Scheduled Delivery Firmware Downloaded Firmware Downloaded Apply Firmware Delete Firmware Download Date 2009 06/22 4:21:12 Label ENGLISH Version: 129 Scheduled Delivery Date and Time: None Delete Scheduled Delivery Version 3.0.1.19f Copyright CANON INC. 2009 All Rights Reserved

5

Confirm the firmware to apply → click [Yes]. ![](images/7fb8c0abb1ad83503545223284512e93db21cd91af39bd6901ef555c3ed01d24.jpg)
text_image Register/Update Software Device Serial Number Install Application/Option Manual Installation Delivered Installation Update Firmware Delivered Update Confers Delivery Server Display Logs/Communication Test Update Date: Are you sure you want to update firmware of device to var. Downloaded and restart the device? Updated On: 2009-06/22 4:22:18 Confirm New Firmware Yes No Downloaded Firmware Downloaded Apply Firmware Delete Firmware Download Date: 2009 06/22 4:21:12 Label: ENGLISH Version: 129 Scheduled Delivery Date and Time: None Delete New product (Inventory) Version 3.0.1.19T Copyright CANON INC, 2009 All Rights Reserved
The new firmware is applied to the printer. When the application is completed, the printer automatically restarts. ![](images/6cea22c2db476739bba3228832fdcc34fb5ab3d1ed2d3078e0b33d5293a7445e.jpg)
text_image The firmware is updated. Device will automatically restart. To Delivered Update

Deleting the Downloaded Firmware

You can delete the downloaded firmware.

1

Start the Remote UI, and then log in as Administrator. > "Starting the Remote UI"

2

From the top page of the Remote UI, click [Settings/Registration] → [License/Other] → [Register/Update Software]. ![](images/53e07a8ed6a00245c142efc2385d4b7820d7fefc301e763608b31acbdabef9ae.jpg)
text_image To Portal Login User: System Manager Log Out Settings/Registration Mail to System Manager Preferences □ Control Menu □ Paper Source Menu □ Network □ Layout Menu □ Quality Menu □ User Maintenance Menu Output/Control □ Utility Menu □ Calibration □ Device Control Management Settings □ Department ID Management □ Security ■ License/Other Settings/Registration: Management Settings License/Other License/Other Last Updated 01/04 2011 11:09:25 License/Other Message Board/Support Link Register/Update Software Copyright CANON INC. 2011 All Rights Reserved

3

Click [Delivered Update].

![](images/e480445fe745e2ed29220803cde092358c06af0c482e4cf7c8d312cb53df19e7.jpg)
text_image Register/Update Software Device Serial Number: Install Application/Option Manual Installation Delivered Installation Update Firmware Delivered Update Software Management Settings Display Logs/Communication Test Scheduled Update Settings Install Application/Option > Manual Installation Manual Installation Next > License File Path: Browse... Application File Path: Browse... Version 3.1.0.18 Copyright CANON INC. 2011 All Rights Reserved

4

Click [Delete Firmware].

![](images/ddbbfbb6d5c25184d2ecc38e6a108f5e95fafb408fab96888e7a0365e866caf7.jpg)
text_image Register/Update Software Device Serial Number: Install Application/Option □ Manual Installation □ Delivered Installation Update Firmware □ Delivered Update Confirm Delivery Server □ Display Logo/Communication Test Update Firmware > Delivered Update Delivered Update Updated On 2009 06/22 4:22:18 Confirm New Firmware Scheduled Delivery Firmware Downloaded Firmware Downloaded Apply Firmware Delete Firmware Download Date 2009 05/22 4:21:12 Label ENGLISH Version 129 Scheduled Delivery Date and Time: None Delete Scheduled Delivery Version 3.0.1.19f Copyright CANON INC: 2009 All Rights Reserved

5

Confirm the firmware to delete → click [Yes]. ![](images/72ac4f109549897dea939d2cfdb7356a5ba2e89316a1e13d7e618d0a756fd58d.jpg)
text_image Register/Update Software Device Serial Number Install Application/Option Manual Installations Delivered Installations Update Firmware Delivered Update Confirm Delivery Server Display Logo/Communications Test Upgrade Firmware Delivered U Are you sure you want to delete the downloaded firmware? Yes No Updated Del: 2009-06/22 4:21:57 Confirm New Firmware Scheduled Delivery Firmware Downloaded Firmware: Downloaded Apply Firmware: Delete Firmware Download Date: 2009 06/22 4:21:12 Label: ENGLISH Version: 129 Scheduled Delivery Date and Time: None Delete Scheduled Delivery Version 3.0.1.19f Copyright CANON INC. 2009 All Rights Reserved
The firmware is deleted. ![](images/a8d38223ced1c0924a609458e2dde8f08b08f4d6f9a4578cbd5b003693a85bff.jpg)
text_image The firmware was deleted. To Delivered Update

Deleting the Scheduled Delivery

You can delete the scheduled delivery of the firmware.

1

Start the Remote UI, and then log in as Administrator. > "Starting the Remote UI"

2

From the top page of the Remote UI, click [Settings/Registration] → [License/Other] → [Register/Update Software]. ![](images/111d548530a48e45ae2d24fd5661064c94c48ce3638b493092049e5a5be3bb7c.jpg)
text_image To Portal Login User: System Manager Log Out Settings/Registration Mail to System Manager Preferences □ Control Menu □ Paper Source Menu □ Network □ Layout Menu □ Quality Menu □ User Maintenance Menu Output/Control □ Utility Menu □ Calibration □ Device Control Management Settings □ Department ID Management □ Security ■ License/Other Settings/Registration: Management Settings: License/Other License/Other LastUpdated 01/04 2011.11.09.25 License/Other Message Board/Support Link Register/Update Software Copyright CANON INC. 2011 All Rights Reserved

3

Click [Delivered Update].

![](images/faec2dd52d1272237cdfbd4dbe21ded2fd0770f58346747ff6c87582064a44c3.jpg)
text_image Register/Update Software Device Serial Number: Install Application/Option Manual Installation Delivered Installation Update Firmware Delivered Update Software Management Settings Display Logs/Communication Test Scheduled Update Settings Install Application/Option > Manual Installation Manual Installation Next > License File Path: Browse... Application File Path: Browse... Version 3.1.0.18 Copyright CANON INC. 2011 All Rights Reserved

4

Click [Delete Scheduled Delivery].

![](images/55719608c73c3ceba1c99437db2380110cbed58e7962831238884b4045b5e89e.jpg)
text_image Register/Update Software Device Serial Number: Install Application/Option □ Manual Installation □ Delivered Installation Update Firmware □ Delivered Update Confirm Delivery Server □ Display Logs/Communication Test Update Firmware > Delivered Update Delivered Update Updated On 2009 00:22 4:30:13 Confirm New Firmware Scheduled Delivery Firmware Downloaded Firmware None Apply Firmware Delete Firmware Scheduled Delivery Date and Time 2009 06/28 4:29:41 Delete Scheduled Delivery Label ENGLISH Version 129 Version 3.0.1.18F Copyright CANON INC. 2009 All Rights Reserved

5

Confirm the information of the scheduled delivery → click [Yes]. ![](images/a1feaf849c3673cdce9dbc080a01b0dc5c088028d9f3833b67595254f709f5c1.jpg)
text_image Register/Update Software Device Serial Number Install Application/Option Manual Installation Delivered Installation Update Firmware Delivered Update Confirm Delivery Server Display Logo/Communication Test Update Form: 1 Are you sure you want to delete the scheduled delivery? Delivered Us Yes No Updated On 2009-08/22 4.20.13 Confirm New Form: Scheduled Delivery Form: None Downloaded Firmware None Apply Form: Delete Form: Scheduled Delivery Date and Time: 2009 06/28 4:29:41 Label: ENGLISH Version: 129 Delete Scheduled Delivery Version 3.0.1.19 Copyright CANON INC, 2009 All Rights Reserved
The scheduled delivery is deleted. ![](images/47f246e0d073422761f8012b45971fcc7db6a1af60a1774dd069ac901714906f.jpg)
text_image The scheduled delivery was deleted. To Delivered Update
0258-0SJ You can display the installation logs and test communication using the Remote UI.

Displaying the Installation/Update Log Using the Remote UI

You can check the installation logs of the system options/MEAP applications and the update log of the firmware.

1

Start the Remote UI, and then log in as Administrator. > "Starting the Remote UI"

2

From the top page of the Remote UI, click [Settings/Registration] → [License/Other] → [Register/Update Software]. ![](images/4837209681bdb8a820eba3daac20627f117d1668f6a82545eee1b80e297789dd.jpg)
text_image To Portal Login User: System Manager Log Out Settings/Registration Mail to System Manager Preferences Control Menu Paper Source Menu Network Layout Menu Quality Menu User Maintenance Menu Output/Control Utility Menu Calibration Device Control Management Settings Department ID Management Security License/Other Settings/Registration: Management Settings License/Other License/Other Last Updated: 01/04 2011 11:08:25 License/Other Message Board/Support Link Register/Update Software Copyright CANON INC. 2011 All Rights Reserved

3

Click [Display Logs /Communication Test]. ![](images/d36fee471e1af7480993f25a60a3e3c1cc119a4e187dc6e4d92c4f6d62d2c141.jpg)
text_image Register/Update Software Device Serial Number: Install Application/Option Manual Installation Delivered Installation Update Firmware Delivered Update Software Management Settings Display Logs/Communication Test Scheduled Update Settings Install Application/Option > Manual Installation Manual Installation Next > License File Path: Browse... Application File Path: Browse... Version 3.1.9.18 Copyright CANON INC. 2011 All Rights Reserved

4

From the Log View drop-down list, select [Update Logs] → click [Switch]. The installation logs of the system options/MEAP applications and the update log of the firmware are displayed. ![](images/3fc048e9525559f0748e510a3819e790b138b6e9a95996b4b9f96dd2b4b0adef.jpg)
text_image Register/Update Software Device Serial Number Install Application/Option □ Manual Installation □ Delivered Installation Update Firmware □ Delivered Update Confirm Delivery Server □ Display Logs/Communication Test Confirm Delivery Server > Display Logs/Communication Test Display Logs/Communication Test Communication Test Log View: Update Logs ▼ Switch [2009/10/01 12:30:00] sample log [OK] [2009/10/01 12:40:00] sample log [OK] [2009/10/02 12:50:00] sample log [OK] [2009/10/02 13:00:00] sample log [OK] Version 3.0.1.19f Copyright CANON INC. 2009 All Rights Reserved

Testing Communication Using the Remote UI

You can check whether the printer can properly communicate with the delivery server.

1

Start the Remote UI, and then log in as Administrator. > "Starting the Remote UI"

2

From the top page of the Remote UI, click [Settings/Registration] → [License/Other] → [Register/Update Software]. ![](images/64a68c3e5ba72bd7de7e43eee2ba31c020765c24bc9e05ee626bf60c7c6e51c3.jpg)
text_image To Portal Login User: System Manager Log Out Settings/Registration Mail to System Manager Preferences Control Menu Paper Source Menu Network Layout Menu Quality Menu User Maintenance Menu Output/Control Utility Menu Calibration Device Control Management Settings Department ID Management Security License/Other Settings/Registration: Management Settings License/Other License/Other Last Updated 01/04 2011 11:09:25 License/Other Message Board/Support Link Register/Update Software Copyright CANON INC. 2011 All Rights Reserved

3

Click [Display Logs /Communication Test] → [Communication Test]. ![](images/5ad3856e27b785c5c54ee6066f630f97e60b4f5062fc197b04f76744064cc662.jpg)
text_image Register/Update Software Device Serial Number: Install Application/Option □ Manual Installation □ Delivered Installation Update Firmware □ Delivered Update Confirm Delivery Server □ Display Logo/Communication Test Confirm Delivery Server > Display Logs/Communication Test Display Logo/Communication Test Communication Test Log View: Update Logs Switch [2009/10/01 12:30:00] sample log [OK] [2009/10/01 12:40:00] sample log [OK] [2009/10/02 12:50:00] sample log [OK] [2009/10/02 13:00:00] sample log [OK] Version 3.0.1.19 Copyright CANON INC. 2009 All Rights Reserved
When the confirmation dialog is displayed, click [Yes]. Contents for the test are downloaded from the delivery server. When the communication test is completed, the communication test result screen is displayed. ![](images/e637a7192dc6abcf7cab4eebb25ab003c5fb02c7a3d2384f759a5538f4cd1781.jpg)
text_image Communication test has been completed - Connect to Delivery Server: OK - Retrieve Data: OK - Communication Speed: 5514.0186bps Back
![](images/fdd45e8c6c646a163416e322f4824a4dbb59958da9b9dcbe66f0390f999348c1.jpg)

NOTE

If [Failed] is displayed on the communication test result

If [Failed] is displayed on the communication test result screen, check that the network cable is connected and that the network settings are correct. If the problem is not resolved, contact your local authorized Canon dealer. 0258-09L Restricting the Users Who Can Print or Perform the Printer Settings > Restricting the Users Who Can Access > Specifying the Job Operation Permission for End-Users > Locking the Keys on the Control Panel (Key Lock Function) Setting Restrictions for USB Direct Print (LBP7680Cx Only) > Setting Keys and Certificates > Setting CA Certificates Setting the SSL Encryption Communication Function Setting the IPSec Encryption Communication Function (LBP7680Cx Only) > Specifying the Setting for Job Log Display ![](images/9aae7c16c0cfcec34801602cdfc9b99f2d9bb8da945b52ee8f472a802cfb04d7.jpg)

NOTE

Software to be used for the security settings

You can specify the settings using the following software. \- Remote UI You can specify the settings by accessing the printer from a Web browser via the network. \- FTP Client You can specify the settings by accessing the FTP server of the printer using Command Prompt. This section describes the procedure for specifying the settings using the Remote UI. To specify the settings using FTP Client, see "FTP Client."

Restricting the Users Who Can Print or Perform the Printer Settings

0258-09R You can restrict the users who can print or perform the printer settings with IP addresses by using a Web browser (Remote UI). Restriction Using the IP v. 4 Address Restriction Using the IP v. 6 Address Always use the Remote UI to specify the IP address. The control panel allows you only to switch the address filter setting between On and Off. [Setup] Menu ([Network] Options)

Restriction Using the IP v. 4 Address

1

Start the Remote UI, and then log in as Administrator. > "Starting the Remote UI"

2

Click [Settings/Registration]. ![](images/e2528f87eb17e348ec7c89477f35b4556ed116f9d6df912dfeac80d0d39c40e2.jpg)
text_image Remote UI: Portal: LBPXXXXL: LBPXXXX - Windows Internet Explorer http:// Suggested Sites Web Slice Gallery Favorite Remote UI: Portal: LBPXXXXL: LBPXXXXL Device Name: LBPXXXXL Product Name (Serial No.): LBPXXXXL Location: Login User: System Manager Log Out Language English Mail to System Manager Last Updated: 29/05 2012 10:03:42 Device Basic Information Device Status The printer is ready. Error Information There is no error. Consumables Information Paper Information Paper Source Remaining Paper Paper Size Paper Type Multi-Purpose Tray None A4 Free (Mixed Types) Drawer 1 Loaded A4 Free (Mixed Types) Remaining Toner Item Name Remaining Toner Cyan Toner 16-100% Status Monitor/Cancel Settings/Registration Basic Tools Box Direct Print Management Tools Service Management Service

3

Select [Security] from the [Management Settings] menu. ![](images/50f46a1cb72b1ceaf6791f3d0e87d9e1c1449f95bc3d2b1c33dd7e178ff4171d.jpg)
text_image Remote UI Settings/Registration: LBPXXXI: LBPXXXXI - Windows Internet Explorer http:// Suggested Sites Web Slice Gallery Remote UI Settings/Registration: LBPXXXXI: LBPXXI... LBPXXXI/LBPXXXI/ To Portal Login User System Manager Log Out Settings/Registration Mail to System Manager Preferences Control Menu Paper Source Menu Network Layout Menu Quality Menu User Maintenance Menu Output/Control Utility Menu Calibration Device Control Management Settings Department ID Management Security License/Other Settings/Registration: Management Settings: Security Security Last/Updated: 11/04 2011 13:54:15 Security Management Settings Remote UI Settings Key and Certificate Settings CA Certificate Settings IPSec Settings Display Job History IP Address Filter IPv4 Address: TX Filter IPv4 Address: RX Filter IPv5 Address: TX Filter IPv6 Address: RX Filter MAC Address Filter TX Filter RX Filter Internet | Protected Mode: On

4

Click [IP Address Filter]. ![](images/ab2422eeb1f96dca6002c3f55d8390538ab90407eb2db3435282144f6d285bd2.jpg)
text_image Remote UI Settings/Registration: LBP7680C: LBP7680C - Windows Internet Explorer http://192.168.1.225/senewsui.cgi File Edit View Favorites Tools Help Favorites Remote UI Settings/Registration: LBP7680C: LBP... I-SENSYS LBP7680C / LBP7680C / To Portal Login User: System Manager Log Out Settings/Registration Mail to System Manager Preferences Control Menu Paper Source Menu Network Layout Menu Quality Menu User Maintenance Menu Output/Control Utility Menu Calibration Device Control Management Settings Department ID Management Security License/Other Settings/Registration: Management Settings: Security Security Last Updated: 04/04 2011 03:57:16 Security Management Settings Remote UI Settings Key and Certificate Settings CA Certificate Settings IPSec Settings Display Job History IP Address Filter IPv4 Address: TX Filter IPv4 Address: RX Filter IPv6 Address: TX Filter IPv6 Address: RX Filter MAC Address Filter TX Filter RX Filter Done Internet | Protected Mode: Off 100%

5

Click [Edit...] under [IPv4 Address: TX Filter] or [IPv4 Address: RX Filter]. ![](images/c6af0121f0ee84c0a1cca98c38ea738c626c241c73b031a6bb37787540e87125.jpg)
text_image Remote UB Settings/Registration: LBP7680C; LBP7680C - Windows Internet Explorer https://192.168.1.225/gfilter.cgi/CSU/Tx2114020607 File Edit View Favorites Tools Help Favorites Remote UB Settings/Registration: LBP7680C: LBP... L-SENSYS LBP7680C / LBP7680C / To Portal Login User: System Manager Log Out Settings/Registration Mail to System Manager Preferences Control Menu Paper Source Menu Network Layout Menu Quality Menu User Maintenance Menu Output/Control Utility Menu Calibration Device Control Management Settings Department ID Management Security License/Other Settings/Registration: Management Settings Security > IP Address Filter IP Address Filter Last Updated: 04/04 2011 05:53:01 IPv4 Address: TX Filter Edit... TX Filter: Off IPv4 Address: RX Filter Edit... RX Filter: Off IPv6 Address: TX Filter Edit... TX Filter: Off IPv6 Address: RX Filter Edit... RX Filter: Off Done Trusted sites | Protected Mode: Off 100%
[IPv4 Address: TX Filter]It limits the sending of data from the printer.
[IPv4 Address: RX Filter]It limits the sending of data to the printer.
![](images/84a2921b5866230c4ecbaa5ef7ea70f48e2fe4d4ce594e58451a885e6ec9a04d.jpg) Select the [Use Filter] check box, and select [Default Policy]. ![](images/212f44515d997ac75b23ed77dd2284ec7230c56644983c5d9d19dd6856ff1b7f.jpg)
text_image Remote UB Settings/Registration: LBP7680C: LBP7680C - Windows Internet Explorer https://192.168.1.225/ip/item4b.cgi/ActionsGET_IPVETX&CSUTx-3003 File Edit View Favorites Tools Help Favorites Remote UB Settings/Registration: LBP7680C: LBP... L-SENSYS LBP7680C / LBP7680C / Settings/Registration To Portal Login User: System Manager Log Out Mail to System Manager Preferences Control Menu Paper Source Menu Network Layout Menu Quality Menu User Maintenance Menu Output/Control Utility Menu Calibration Device Control Management Settings Department ID Management Security License/Other Settings/Registration: Management Settings: Security > IP Address Filter > IPv4 Address: Edit TX Filter Last Updated: 04/04 2011 05:54:16 The settings will be changed as follows. (Changes effective after the main power is turned OFF and ON.) OK Cancel Set TX Filter Use Filter Default Policy: Allow Reject Exception Addresses Register Address: Add *To enter multiple IP addresses at the same time, use a hyphen as follows: xxx.xxx.xxx.xxx.xxx.xxx.xxx.xxx.xxx.xxx* *To specify the prefix length, enter the IP address as follows: xxx.xxx.xxx.xxx/xx (Prefix Length: 0-32) Delete Copyright CANON INC: 2011 All Rights Reserved Done Trusted vites | Protected Mode Off 100%
- If you select [Reject], you will only be able to transmit or print from users (clients) entered in the [Exception Addresses] field. - If you select [Allow], you will not be able to transmit or print from users (clients) entered in the [Exception Addresses] field. - If you clear the [Use Filter] check box, you will be able to transmit and print from all users (clients).

7

Set the IP address.

(1) Enter the IP address for which you want to reject or permit to print. Enter the IPv4 address, which is a decimal value, by adding "." (periods) as delimiters. (2) Click [Add]. You can set up to 16 IP addresses (16 sets of IP address for when you have specified with [Register Address]). ![](images/f5874b7583c877e51b5ab0237e07a158973963d2e2269351a1eb9febfe0c6c55.jpg)
text_image Remote US Settings/Registration: LBP7680C / LBP7680C - Windows Internet Explorer https://192.168.1.225/gfItem#ts.org/Actions:GET_IPv4Tx&CSUTa-1001 File Edit View Favorites Tools Help Favorites Remote US Settings/Registrations: LBP7680C / LBP... I-SENSYS LBP7680C / LBP7680C / Settings/Registration To Portal Login User: System Manager Log Out Mail to Systems Manager Preferences Control Menu Paper Source Menu Network Layout Menu Quality Menu User Maintenance Menu Output/Control Utility Menu Calibration Device Control Management Settings Department ID Management (1) Security License/Other Settings/Registration: Management Settings: Security > IP Address Filter > IPv4 Address: Edit TX Filter IPv4 Address: Edit TX Filter Last Updated 04/04 2011 05:54:16 The settings will be changed as follows. (Changes effective after the main power is turned OFF and ON.) OK Cancel Set TX Filter Use Filter Default Policy: Allow Reject Exception Addresses Register Address: Add (2) *To enter multiple IP addresses at the same time, use a hyphen as follows: xxx.xxx.xxx.xxxxxx.xxx.xxx.xxx.xxx* *To specify the prefix length, enter the IP address as follows: xxx.xxx.xxx.xxx/xx (Prefix Length: 0-32) Delete Copyright CANON INC. 2011 All Rights Reserved Done Trusted sites | Protected Mode Off 100%
You can also enter IP addresses as follows.
Input example of the IP addressesMethod for entering IP addresses
192.168.0.1-192.168.0.10If you want to enter the IP addresses of consecutive numbers, place "-" (hyphen) between the address of the smallest number and that of the largest number.
192.168.0.0/16In order to specify the subnet range (prefix length), enter a "/" (slash) after the normal IP address symbol, then enter another prefix length (maximum 32).
![](images/9cc173f869dce37dfa567e9733b8496ee8cc7673a3ada0b948c1bfb2f86ad0db.jpg)

NOTE

When "0" is entered in [Prefix Length]

All the IP addresses become the target for rejection or permission.

When "32" is entered in [Prefix Length]

The IP address of the printer becomes the target for rejection or permission.

When deleting a set IP address

(1) Select an IP address you want to delete. (2) Click [Delete]. ![](images/70cd643dfbd0c0e995945c288e5e9fe9a59a29daa5942491a4b17df951c086c3.jpg)
text_image Remote UB Settings/Registration: LBP7680C / LBP7680C - Windows Internet Explorer https://192.168.1.225/gflihenv4tu.cgi?ActionsGET_IPVITX&CSUTx-1005 File Edit View Favorites Tools Help Favorites Remote UB Settings/Registration: LBP7680C, LBP... L.SENSYS LBP7680C / LBP7680C / To Portal Login User: System Manager Log Out Settings/Registration Mail to System Manager Preferences Control Menu Paper Source Menu Network Layout Menu Quality Menu User Maintenance Menu Output/Control Utility Menu Calibration Device Control Management Settings Department ID Management Security License/Other Settings/Registration: Management Settings Security > IP Address Filter > IPv4 Address: Edit TX Filter Last Updated 04/04 2011 05:54:15 The settings will be changed as follows. (Changes effective after the main power is turned OFF and ON.) OK Cancel Set TX Filter Use Filter Default Policy: Allow Reject Exception Addresses Register Address: Add *To enter multiple IP addresses at the same time, use a hyphan as follows: xxx.xxx.xxx.xxx-xxx.xxx.xxx.xxx.xxx *To specify the prefix length, enter the IP address as follows: xxx.xxx.xxx.xxx/xx (Prefix Length: 0-32) (1) (2) Delete Copyright CANON INC. 2011 All Rights Reserved Done Trusted sites | Protected Mode: Off 100%

8

Click [OK].

9

Perform a hard reset or restart the printer. → After performing a hard reset or restarting the printer, the settings are effective. ![](images/5e43000a3dbf664061c22c2b269c6cc1b9ad4c7fa8a3a6d2e9a369539b110fea.jpg)

NOTE

To perform a hard reset

You can perform a hard reset using the following procedure. 1. Click [Settings/Registration]. 2. Select [Device Control] from the [Output/Control] menu. 3. Select [Hard Reset], then click [Execute].

Restriction Using the IP v. 6 Address

1

Start the Remote UI, and then log in as Administrator. ![](images/1139ca8088686c33cde569317123e2153b329634cc2a8927c68ae11a8a5fd33e.jpg) "Starting the Remote UI"

2

Click [Settings/Registration].

![](images/42ebe91ffa582154f77e3d06af8655dbb952ede8649ea7350321cfe1d36a8324.jpg)
text_image Remote UI Portal: LBPXXXX: LBPXXXX - Windows Internet Explorer http:// Bing Favorites Suggested Sites Web Slice Gallery Remote UI Portal: LBPXXXX: LBPXXXX Device Name: LBPXXXX Product Name (Serial No.): LBPXXXX Location: Login User: System Manager Log Out Language English Mail to System Manager Last Updated: 29/05 2012 10 03:42 Device Basic Information Device Status The printer is ready. Error Information There is no error. Consumables Information Paper Information Paper Source Remaining Paper Paper Size Paper Type Multi-Purpose Tray None A4 Free (Mixed Types) Drawer 1 Loaded A4 Free (Mixed Types) Remaining Toner Item Name Remaining Toner Cyan Toner 16-100% Status Monitor/Cancel Settings/Registration Basic Tools Box Direct Print Management Tools Service Management Service

3

Select [Security] from the [Management Settings] menu.

![](images/a2cc6795cf05cada11f9598a54e1a71652c5af85555d2616aa1ffc84fbbaf164.jpg)
text_image Remote UI Settings/Registration: LBPXXX: LBPXXXX - Windows Internet Explorer http:// Suggested Sites Web Slice Gallery Remote UI Settings/Registration: LBPXXX: LBPXX... LBPXXX/LBPXXX/ To Portal Login User: System Manager Log Out Settings/Registration Mail to System Manager Preferences Control Menu Paper Source Menu Network Layout Menu Quality Menu User Maintenance Menu Output/Control Utility Menu Calibration Device Control Management Settings Broadcast ID Management Security License/Other Settings/Registration: Management Settings: Security Security Last Updated 11/04 2011 12:54:15 Security Management Settings Remote UI Settings Key and Certificate Settings CA Certificate Settings IPSec Settings Display Job History IP Address Filter IPv4 Address: TX Filter IPv4 Address: RX Filter IPv6 Address: TX Filter IPv6 Address: RX Filter MAC Address Filter TX Filter RX Filter Internet | Protected Mode: On 100%

4

Click [IP Address Filter].

![](images/7ebafd4fbfc2b6b2151a73d5767d82f0233938303755dba4879b245104784444.jpg)
text_image Remote UI Settings/Registration: LBP7680C: LBP7690C - Windows Internet Explorer File Edit View Favorites Tools Help Favorites Remote UI Settings/Registration: LBP7690C: LBP... Settings/Registration Mail to System Manager Preferences Control Menu Paper Source Menu Network Layout Menu Quality Menu User Maintenance Menu Output/Control Utility Menu Calibration Device Control Management Settings Department ID Management Security License/Other Settings/Registration Management Settings Security Security Last Updated 04/04 2011 03:57:16 Security Management Settings Remote UI Settings Key and Certificate Settings CA Certificate Settings IPSec Settings Display Job Monetary IP Address Filter IPv4 Address: TX Filter IPv4 Address: RX Filter IPv6 Address: TX Filter IPv6 Address: RX Filter MAC Address Filter TX Filter RX Filter Done Internet | Protected Mode: Off 100%

5

Click [Edit...] under [IPv6 Address: TX Filter] or [IPv6 Address: RX Filter]. ![](images/cf000801aab3c84bfbded31d99ded61567d7bd4dbd824383c7bc0faaea26a7f0.jpg)
text_image Remote UI Settings/Registration: LBP7680C: LBP7680C - Windows Internet Explorer https://192.168.1.325/pfilter.cgi?CSUT=2114020607 File Edit View Favorites Tools Help Favorites Remote UI Settings/Registration: LBP7680C: LBP... L-SENYS LBP7680C / LBP7680C / To Portal Login User: System Manager Log Out Settings/Registration Mail to System Manager Preferences Control Menu Paper Source Menu Network Layout Menu Quality Menu User Maintenance Menu Output/Control Utility Menu Calibration Device Control Management Settings Department ID Management Security License/Other Settings/Registration: Management Settings: Security > IP Address Filter IP Address Filter Last Updated: 04/04 2011 05:53:01 IPv4 Address: TX Filter Edit... TX Filter: Off IPv4 Address: RX Filter Edit... RX Filter: Off IPv6 Address: TX Filter Edit... TX Filter: Off IPv6 Address: RX Filter Edit... RX Filter: Off Done Trusted sites | Protected Mode: Off 100%
[IPv6 Address: TX Filter]It limits the sending of data from the printer.
[IPv6 Address: RX Filter]It limits the sending of data to the printer.

6

Select the [Use Filter] check box, and select [Default Policy]. ![](images/2abacd96a2f2ded4bf66e8aa8f530feb2d011b19bb0b0c96dc09785ef4d275df.jpg)
text_image Remote UI Settings/Registration: LBP7680C, LBP7680C - Windows Internet Explorer https://192.168.1.225/IP/item/ftx.cgi?ActionsGET_IP/BTX&CSUTs17284 File Edit View Favorites Tools Help Favorites Remote UI Settings/Registration: LBP7680C: LBP... I-SENSYS LBP7680C / LBP7680C / Settings/Registration To Portal Login User: System Manager Log Out Mail to System Manager Preferences Control Menu Paper Source Menu Network Layout Menu Quality Menu User Maintenance Menu Output/Control Utility Menu Calibration Device Control Management Settings Department ID Management Security License/Other Settings/Registration: Management Settings, Security > IP Address Filter > IPv6 Address Edit TX Filter IPv6 Address: Edit TX Filter Last Updated: 04/04 2011 08:01:24 The settings will be changed as follows. (Changes effective after the main power is turned OFF and Off.) OK Cancel Set TX Filter Use Filter Default Policy: Allow Reject Exception Addresses Register Address: Add *To specify the prefix length, enter the IP address as follows: xxxx.xxxx.xxxx.xxxx.xxxx.xxxx.xxxx.xxxx.xxxx (Prefix Length: 0-128) Delete Copyright CANON INC. 2011 All Rights Reserved Done Trusted sites | Protected Mode: Off 100%
- If you select [Reject], you will only be able to transmit or print from users (clients) entered in the [Exception Addresses] field. - If you select [Allow], you will not be able to transmit or print from users (clients) entered in the [Exception Addresses] field. - If you clear the [Use Filter] check box, you will be able to transmit and print from all users (clients).

7

Set the IP address.

(1) Enter the IP address for which you want to reject or permit to print. Enter the IPv6 address, which is a hexadecimal value, by adding ":" (colons) as delimiters. (2) Click [Add]. You can set up to 16 IP addresses (16 sets of IP address for when you have specified with [Register Address]). ![](images/a4361b1992def81f4f58bcb58d314a2da3fd2a990c157b8113553a99322e662a.jpg)
text_image Remote UI Settings/Registration: LBP7680C / LBP7680C - Windows Internet Explorer https://192.168.1.225/IP/item-fits.cgi?ActionsGET_IPVSTx&CSUTx377M File Edit View Favorites Tools Help Favorites Remote UI Settings/Registration: LBP7680C: LBP... I-SENSYS LBP7680C / LBP7680C / Settings/Registration To Portal Login User: System Manager Log Out Mail to System Manager Preferences Control Menu Paper Source Menu Network Layout Menu Quality Menu User Maintenance Menu Output/Control Utility Menu Calibration Device Control Management Settings Department ID Management Security License/Other Settings/Registration: Management Settings, Security > IP Address Filter > IPv6 Address: Edit TX Filter IPv6 Address: Edit TX Filter Last Updated: 04/04 2011 01:01:26 The settings will be changed as follows. (Changes effective after the main power is turned OFF and ON.) OK Cancel Set TX Filter Use Filter Default Policy: Allow Reject Exception Addresses Register Address: Add (2) *To specify the prefix length, enter the IP address as follows: xxxx.xxxx.xxxx.xxxx.xxxx.xxxx.xxxx.xxxx.xxxx.xxxx (Prefix Length: 0-128) Delete Copyright CANON INC. 2011 All Rights Reserved Done Trusted sites | Protected Mode: Off 100%
You can also enter IP addresses as follows.
Input example of the IP addressesMethod for entering IP addresses
fe80::0000/64In order to specify the subnet range (prefix length), enter a "/" (slash) after the normal IP address symbol, then enter another prefix length (maximum 128).
![](images/aa045365e4fd76780f2fa883559cc4377785b066eae828bfea7ba210b6f2a7ba.jpg)

NOTE

When "0" is entered in [Prefix Length]

All the IP addresses become the target for rejection or permission.

When "128" is entered in [Prefix Length]

The IP address of the printer becomes the target for rejection or permission.

When deleting a set IP address

(1) Select an IP address you want to delete. (2) Click [Delete]. ![](images/f53c21497cf2189f7052093922ac45ce28e944f298ebd33c713bf9703f721ad3.jpg)
text_image Remote UI Settings/Registration: LBP7680C / LBP7680C - Windows Internet Explorer https://192.168.1.225/spltbenfku.org/ActiveoGET_IPV6TX&CSUT=177M File Edit View Favorites Tools Help Favorites Remote UI Settings/Registration: LBP7680C, LBP... I SENSYS LBP7680C / LBP7680C / To Portal Login User: System Manager Log Out Settings/Registration Mail to System Manager Preferences Control Menu Paper Source Menu Network Layout Menu Quality Menu User Maintenance Menu Output/Control Utility Menu Calibration Device Control Management Settings Department ID Management Security License/Other Settings/Registration: Management Settings Security > IP Address Filter > IPv6 Address Edit TX Filter IPv6 Address: Edit TX Filter Last Updated: 04/04 2011 06:01:24 The settings will be changed as follows. (Changes effective after the main power is turned OFF and ON.) OK Cancel Set TX Filter Use Filter Default Policy: Allow Reject Exception Addresses Register Address: Add *To specify the prefix length, enter the IP address as follows: xxxxxxxxxxxxxxxxxxxxxxxxxxxxxx/xx (Prefix Length: 0-128) (1) (2) Delete Copyright CANON INC. 2011 All Rights Reserved Done Trusted sites | Protected Mode Off 100%

8

Click [OK].

9

Perform a hard reset or restart the printer. → After performing a hard reset or restarting the printer, the settings are effective. ![](images/60cb0bc564f234858c9d52ca4a5501c5d46296c063e6ebbc1fa25405f77218e3.jpg)

NOTE

To perform a hard reset

You can perform a hard reset using the following procedure. 1. Click [Settings/Registration]. 2. Select [Device Control] from the [Output/Control] menu. 3. Select [Hard Reset], then click [Execute]. 0258-09S You can restrict the users who can access with MAC addresses using a Web browser (Remote UI). Always use the Remote UI to specify the MAC address. The control panel allows you only to switch the address filter setting between On and Off. >[Setup] Menu ([Network] Options)

1

Start the Remote UI, and then log in as Administrator. > "Starting the Remote UI"

2

Click [Settings/Registration]. ![](images/6478571abfc9f3a53bc3e2080377f67360144f21b6831afec440681da9cd2a74.jpg)
text_image Remote UI Portal: LBPXXXX: LBPXXXX - Windows Internet Explorer Http:// Suggested Sites Web Slice Gallery Device Name: LBPXXXX Product Name (Serial No.): LBPXXXX Location: Login User: System Manager Log Out Language English Mail to System Manager Last Updated: 29/05 2012 10:03:42 Device Basic Information Device Status The printer is ready Error Information There is no error. Consumables Information Paper Information Paper Source Remaining Paper Paper Size Paper Type Multi-Purpose Tray None A4 Free (Mixed Types) Drawer 1 Loaded A4 Free (Mixed Types) Remaining Toner Item Name Remaining Toner Cyan Toner 16-100% Status Monitor/Cancel Settings/Registration Basic Tools Box Direct Print Management Tools Service Management Service

3

Select [Security] from the [Management Settings] menu. ![](images/8608ddffd089f80e3824801e05a14d7ac05863fa85c4d16789ccba77f24f1b5f.jpg)
text_image Remote UI Settings/Registration: LBPXXX: LBPXXXX - Windows Internet Explorer http:// Favorites Suggested Sites Web Slice Gallery Remote UI Settings/Registration: LBPXXX: LBPXX... LBPXXXI/LBPXXXI/ To Portal Login User: System Manager Log Out Settings/Registration Mail to System Manager Preferences Control Menu Paper Source Menu Network Layout Menu Quality Menu User Maintenance Menu Output/Control Utility Menu Calibration Device Control Management Settings Department ID Management Security License/Other Settings/Registration: Management Settings: Security Security Last/Updated: 11/04 2011 13:54:15 Security Management Settings Remote UI Settings Key and Certificate Settings CA Certificate Settings IPSec Settings Display Job History IP Address Filter IPv4 Address: TX Filter IPv4 Address: RX Filter IPv5 Address: TX Filter IPv6 Address: RX Filter MAC Address Filter TX Filter RX Filter Internet | Protected Mode: On

4

Click [MAC Address Filter].

![](images/6c24c2fa63c2719e7b8a5e805dfed86796690b9393ba5e4a8288702798aeadec.jpg)
text_image Remote UB Settings/Registration: LBP7680C: LBP7680C - Windows Internet Explorer http://192.168.1.225/secntntui.logi File Edit View Favorites Tools Help Favorites Remote UB Settings/Registration: LBP7680C: LBP... I-SENSYS LBP7680C / LBP7680C / Settings/Registration To Portal Login User: System Manager Log Out Mail to System Manager Preferences Control Menu Paper Source Menu Network Layout Menu Quality Menu User Maintenance Menu Output/Control Utility Menu Calibration Device Control Management Settings Department ID Management Security License/Other Settings/Registration: Management Settings Security Security Last Updated: 04/04 2011 03:57:16 Security Management Settings Remote UI Settings Key and Certificate Settings CA Certificate Settings IPSec Settings Display Job History IP Address Filter IPv4 Address: TX Filter IPv4 Address: RX Filter IPv6 Address: TX Filter IPv6 Address: RX Filter MAC Address Filter TX Filter RX Filter Done Internet | Protected Mode: Off 100%

5

Click [Edit...] under [TX Filter] or [RX Filter]. ![](images/1441fd7b7d81a460bda902d3c7dbe8f32e98840a95baab95961de266b5a5f70b.jpg)
text_image Remote UI Settings/Registration: LBP7680C / LBP7680C - Windows Internet Explorer https://192.168.1.225/merifiber.com/CSUTs1644265002 File Edit View Favorites Tools Help Favorites Remote UI Settings/Registration: LBP7680C: LBP... I.SENSYS LBP7680C / LBP7680C / To Portal Login User: System Manager Log Out Settings/Registration Mail to System Manager Preferences Control Menu Paper Source Menu Network Layout Menu Quality Menu User Maintenance Menu Output/Control Utility Menu Calibration Device Control Management Settings Department ID Management Security License/Other Settings/Registration Management Settings Security > MAC Address Filter MAC Address Filter Last Updated 34/04 2011 06:34:06 TX Filter Edit... TX Filter: Off RX Filter Edit... RX Filter: Off Copyright CANON INC. 2011 All Rights Reserved Done ✓ Trusted sites | Protected Mode: Off 100%
[TX Filter] It limits the sending of data from the printer.
[RX Filter] It limits the sending of data to the printer.

6

Select the [Use Filter] check box, and select [Default Policy].

![](images/32fe97ae946d0f14de9a215221351cb090cf04f59c838e5b9a5775c87f97ff48.jpg)
text_image Remote UB Settings/Registration: LBP7680C: LBP7680C - Windows Internet Explorer https://192.168.1.225/macifilters.cgi?Actions:GET_MACTX&CSUTs-988 File Edit View Favorites Tools Help Favorites Remote UB Settings/Registration: LBP7680C: LBP... L-SENSYS LBP7680C / LBP7680C / To Portal Login User: System Manager Log Out Settings/Registration Mail to System Manager Preferences Control Menu Paper Source Menu Network Layout Menu Quality Menu User Maintenance Menu Output/Control Utility Menu Calibration Device Control Management Settings Department ID Management Security License/Other Settings/Registration: Management Settings Security > MAC Address Filter > Edit TX Filter Edit TX Filter Last Updated 04/04 2011 06 05:53 The settings will be changed as follows. (Changes effective after the main power is turned OFF and ON.) OK Cancel TX Filter Use Filter Default Policy: Allow Reject Exception Addresses: Delete Register Address: Add Edit Done Trusted sites | Protected Mode: Off 100%
- If you select [Reject], you will not be able to transmit or print from users (clients) entered in the [Exception Addresses] field. - If you select [Allow], you will only be able to transmit or print from users (clients) entered in the [Exception Addresses] field. - If you clear the [Use Filter] check box, you will be able to transmit and print from all users (clients).

7

Set the MAC address.

(1) Enter the MAC address of a device of which you want to permit to access. Enter the MAC address without the hyphens (-), for example, AABBCCDDEEFF. (2) Click [Add]. † You can set up to 50 addresses. ![](images/a36d569663d299254a0f442669855c65d56b9423a13a187d005c40f5e6470e1a.jpg)
text_image Remote UI Settings/Registration: LBP7680C: LBP7680C - Windows Internet Explorer https://192.168.1.225/macfilets.org/actions/SET_MACTX&CSUTs-3RR File Edit View Favorites Tools Help Favorites Remote UI Settings/Registration: LBP7680C: LBP... I-SENSYS LBP7680C / LBP7680C / To Portal Login User: System Manager Log Out Settings/Registration Mail to System Manager Preferences Control Menu Paper Source Menu Network Layout Menu Quality Menu User Maintenance Menu Output/Control Utility Menu Calibration Device Control Management Settings Department ID Management Security License/Other Settings/Registration: Management Settings Security > MAC Address Filter > Edit TX Filter Edit TX Filter Last Updated 04/04 2011 06 05:53 The settings will be changed as follows. (Changes effective after the main power is turned OFF and ON) OK Cancel TX Filter Use Filter Default Policy: Allow Reject Exception Addresses: Delete Register Address: Add Done Trusted sites | Protected Mode: Off 100%
![](images/ce0b5b35bef1fbc91d4ef12d6cd1022382f62738408178be24ed953b5d1265e3.jpg)

NOTE

When deleting a set MAC address

(1) Select a MAC address you want to delete. (2) Click [Delete]. ![](images/f1b3d9319a59bbfbc8ddcc9578a9376a4a4708a874eeb71918fc9a6b39975a61.jpg)
text_image Remote UI Settings/Registration: LBP7680C / LBP7680C - Windows Internet Explorer https://102.168.1.225/macfilters.org/lications/GET_MACT&CSUTe-368 File Edit View Favorites Tools Help Favorites Remote UI Settings/Registrations: LBP7680C: LBP... I-SENSYS LBP7680C / LBP7680C / To Portal Login User: System Manager Log Out Settings/Registration Mail to System Manager Preferences Control Menu Paper Source Menu Network Layout Menu Quality Menu User Maintenance Menu Output/Control Utility Menu Calibration Device Control Management Settings Department ID Management Security License/Other Settings/Registration, Management Settings, Security > MAC Address Filter > Edit TX Filter Edit TX Filter Last Updated: 04/04.2011 05:05:53 The settings will be changed as follows. (Changes effective after the main power is turned OFF and ON.) OK Cancel TX Filter Use Filter Default Policy: Allow Reject Exception Addresses: (1) Delete (2) Register Address: Add Edit Done Trusted sites | Protected Mode: Off 100%

8

Click [OK].

![](images/207c94c823f12ad8605981f461a716ad37f957389bf3143093939d799d687dbb.jpg)
text_image Remote Ub Settings/Registration: LBP7680C: LBP7680C - Windows Internet Explorer https://192.168.1.225/macfilters.rgi/Actions=GET_MACTX&CSUT=368 File Edit View Favorites Tools Help Favorites Remote Ub Settings/Registration: LBP7680C: LBP... Settings/Registration Mail to System Manager Preferences Control Menu Paper Source Menu Network Layout Menu Quality Menu User Maintenance Menu Output/Control Utility Menu Calibration Device Control Management Settings Department ID Management Security License/Other Settings/Registration: Management Settings, Security > MAC Address Filter > Edit TX Filter Edit TX Filter Last Updated: 04/04/2011 06.05:53 The settings will be changed as follows. (Changes effective after the main power is turned OFF and ON) OK Cancel TX Filter Use Filter Default Policy: Allow Reject Exception Addresses: Delete Register Address: Add Edit Done Trusted sites | Protected Mode Off 100%

9

Perform a hard reset or restart the printer.

→ After performing a hard reset or restarting the printer, the settings are effective. ![](images/31c8274af669d3090fcd5f39bc4c9af72511691de57cd4d633ca73394f40f86c.jpg)

NOTE

To perform a hard reset

You can perform a hard reset using the following procedure. 1. Click [Settings/Registration]. 2. Select [Device Control] from the [Output/Control] menu. 3. Select [Hard Reset], then click [Execute].

Setting Restrictions for Print Jobs (LBP7680Cx Only)

0258-0SU You can use a Web browser (Remote UI) to set restrictions for print jobs. ![](images/6667e11eca2987e28aadee629c258755eae10da2a0392feea464bccd2bb7dcda.jpg)

IMPORTANT

When restrictions for print jobs are set, the effect will be as follows.
Type of job Restriction
Printer Driver Will be stored in a box.
Direct PrintImage FileWill not be displayed in the menu.*
PS/PDF Willbe stored in a box.
XPS Will bestored in a box.
USB Direct Print Cannot be output.
Utility Menu There are no restrictions.
\* The settings will be enabled after a hard reset or after the printer is restarted. > "Canceling All the Jobs (Hard Reset)"

1

Start the Remote UI, and then log in as Administrator. > "Starting the Remote UI"

2

Click [Settings/Registration]. ![](images/48cf6b76c9cb958b4fbb263dd14d0136c1146dd721229c7cc48fc61b9ce3cf1a.jpg)
text_image Remote UI Portal: LBPXXXX: LBPXXXX - Windows Internet Explorer Http://7 Bing Favorites Suggested Sites Web Slice Gallery Remote UI Portal: LBPXXXX: LBPXXXX Device Name: LBPXXXX Product Name (Serial No.): LBPXXXX Location: Login User: System Manager Log Out Language English Mail to System Manager Remote UI: Portal Last Updated: 29/05 2012 10:03:42 Device Basic Information Device Status The printer is ready. Error Information There is no error. Consumables Information Paper Information Paper Source Remaining Paper Paper Size Paper Type Multi-Purpose Tray None A4 Free (Mixed Types) Drawer 1 Loaded A4 Free (Mixed Types) Remaining Toner Item Name Remaining Toner Cyan Toner 16-100% Status Monitor/Cancel Settings/Registration Basic Tools Box Direct Print Management Tools Service Management Service

3

Select [Security] from the [Management Settings] menu.

![](images/570ce2deef49f914667c330cbeda634ad4e93733a5b355d97710738331dcaf9c.jpg)
text_image Remote UI Settings/Registration: LBPXXXX: LBPXXXX - Windows Internet Explorer http:// Favorites Supported Sites Web Slice Gallery Remote UI Settings/Registration: LBPXXXX: LBPX... Settings/Registration To Portal Login User: System Manager Log Out Mail to System Manager Preferences Control Menu Paper Source Menu Network Layout Menu Quality Menu User Maintenance Menu Output/Control Utility Menu Calibration Device Control Management Settings Management ID Management Security LICENSED/Other Settings/Registration: Management Settings: Security Security Last Updated 11/04 2017 13:54:15 Security Management Settings Remote UI Settings Key and Certificate Settings CA Certificate Settings IPSec Settings Display Job History IP Address Filter IPv4 Address, TX Filter IPv4 Address, RX Filter IPv6 Address, TX Filter IPv6 Address, RX Filter MAC Address Filter TX Filter RX Filter Internet | Protected Mode: On 100%

4

Click [Management Settings].

![](images/721573c5c7ee79530aa1bbd6f01441811c85a99b0cf4caec884c33a8cab233fd.jpg)
text_image Remote UI Settings/Registration: LBPXXXX: LBPXXXX - Windows Internet Explorer http:// Suggested Sites Web Slice Gallery Remote UI Settings/Registration: LBPXXXX: LBPXIX... LBPXXXX / LBPXXXX/ To Portal Login User: System Manager Log Out Settings/Registration Mail to System Manager Preferences Control Menu Paper Source Menu Network Layout Menu Quality Menu User Maintenance Menu Output/Control Utility Menu Calibration Device Control Management Settings Department ID Management Security License/Other Settings/Registration: Management Settings Security Security Last Updated: 11/04 2011 13:54:15 Management Settings Remote UI Settings Key and Certificate Settings CA Certificate Settings IPSec Settings Display Job History IP Address Filter IPv4 Address, TX Filter IPv4 Address, RX Filter IPv6 Address, TX Filter IPv6 Address, RX Filter MAC Address Filter TX Filter RX Filter Internet | Protected Mode: On

5

Click [Edit...].

![](images/56bdb9ad1e15e6c0d8d328c97bf7e7961e4c8a6ca7d5ffc5a5e42126a4789456.jpg)
text_image Remote UI Settings/Registration: LBPXXXX: LBPXXXX - Windows Internet Explorer http:// Favorites Suggested Sites Web Slice Gallery Remote UI Settings/Registration: LBPXXXX: LBPX... LBPXXXX/LBPXXXX/ To Portal Login User System Manager Log Out Settings/Registration Mail to System Manager Preferences Control Menu Paper Source Menu Network Layout Menu Quality Menu User Maintenance Menu Output/Control Utility Menu Calibration Device Control Management Settings Department ID Management Security License/Other Settings/Registration Management Settings Security > Management Settings Management Settings Last Updated 04/18/2011 05:57:24 AM Edit ... System Manager Information System Manager Password Set System Manager Contact Information: E-Mail Address: System Manager Comment: Device Information Manufacturer CANON INC_ Device Name: LBPXXXX Location: Product Name: LBPXXXX Done Internet | Protected Mode: On 100%

6

Enter the current password in [Current System Manager Password].

![](images/952fb4195ac8e41c1ae0ca919cab7a983a3a8d544cd8f4c69cb4b7c6e97e138b.jpg)
text_image Remote UI Settings/Registration: LBPXXX - LBPXXX - Windows Internet Explorer Http:// Suggested Sites Web Site Gallery Remote UI Settings/Registration: LBPXXX: LBPX... LBPXXXI/LBPIXII/ To Portal Login User: System Manager Log Out Settings/Registration Mail to System Manager Preferences Control Menu Paper Source Menu Network Layout Menu Quality Menu User Maintenance Menu Output/Control Utility Menu Calibration Device Control Management Settings Department ID Management Security License/Other Settings/Registration: Management Settings: Security > Management Settings > Edit Management Settings Edit Management Settings Last Updated: 15/09 2011 18:43:22 The settings will be changed as follows. OK Cancel Authentication of Edit Management Settings Current System Manager Password: System Manager Information System Manager Password: Set. Set/Change Password Password: (Max 16 characters) Confirm: (Max 16 characters) System Manager: Contact Information: Done Internet | Protected Mode On 100%

7

Set restrictions for print jobs.

(1) Select the [Restrict Printer Jobs] check box. (2) Click [OK]. ![](images/37569bee0f9548c771835bd10a9fcbb068e926c9a74428990d55629c4ecb6a43.jpg)
text_image Remote UI Settings/Registration: LBP1000, LBP1000 - Windows Internet Explorer Fovrats Suggested Sites Web Site Gallery Remote UI Settings/Registrators: LBP1000, LBP1000 Device Information Device Name LBP1000 Location Restrict Printer Jobs Restrict Printer Jobs End-User Job Operation Settings Allow End-User's Job Operation Key Lock Settings Keys to Lock: Settings Key Job Key Job Status/Stop Key OK Key Reset Key Feeder Selection Key Utility Key Control Panel Power Switch (Sub Power Supply) Application Key ID Key USB Direct Print Settings Done Internet | Protected Mode On 100%

Specifying the Job Operation Permission for End-Users

0258-09U You can specify the job operation permission for end-users using a Web browser (Remote UI). If the job operation by end-users is permitted, the job operation by the name entered when logging on (the user name) becomes enabled when you are using the Remote UI in End-User Mode.

1

Start the Remote UI, and then log in as Administrator. > "Starting the Remote UI"

2

Click [Settings/Registration]. ![](images/a39f8965574a1e0040953cf698e35a466b50244e3d661806d7ba905e6bebc6a1.jpg)
text_image Remote UI Portal: LBPXXXXL: LBPXXXX - Windows Internet Explorer http:// Suggested Sites Web Slice Gallery Favorite Remote UI Portal: LBPXXXXL: LBPXXXXL Device Name: LBPXXXXL Product Name (Serial No.): LBPXXXXL Location: Login User: System Manager Log Out Remote UI: Portal Language English Mail to System Manager Last Updated: 29/05 2012 10 03:42 Device Basic Information Device Status The printer is ready. Error Information There is no error. Consumables Information Paper Information Paper Source Remaining Paper Paper Size Paper Type Multi-Purpose Tray None A4 Free (Mixed Types) Drawer 1 Loaded A4 Free (Mixed Types) Remaining Toner Item Name Remaining Toner Cyan Toner 16-100% Status Monitor/Cancel Settings/Registration Basic Tools Box Direct Print Management Tools Service Management Service

3

Select [Security] from the [Management Settings] menu. ![](images/af8720c1cb42f3fb3517545282930c3966eed7f72ffc5ff0899c8f830538316e.jpg)
text_image Remote UI Settings/Registration: LBPXXX: LBPXXXX - Windows Internet Explorer http:// Favorites Suggested Sites Web Slice Gallery Remote UI Settings/Registration: LBPXXX: LBPXX... LBPXXX / LBPXXX / Settings/Registration Mail to System Manager Preferences Control Menu Paper Source Menu Network Layout Menu Quality Menu User Maintenance Menu Output/Control Utility Menu Calibration Device Control Management Settings Department ID Management Security LICENSED/Other Settings/Registration: Management Settings: Security Security Last Updated: 11/04 2011 13:54:15 Security Management Settings Remote UI Settings Key and Certificate Settings CA Certificate Settings IPSec Settings Display Job History IP Address Filter IPv4 Address: TX Filter IPv4 Address: RX Filter IPv5 Address: TX Filter IPv6 Address: RX Filter MAC Address Filter TX Filter RX Filter Internet | Protected Mode: On

4

Click [Management Settings].

![](images/a5e2138b883dedbbf16092180e70f7cf0d983cfdd7b9447447adadb96ba1e8fd.jpg)
text_image Remote UE Settings/Registration: LBPXXXX: LBPXXXX - Windows Internet Explorer http:// Favorites Suggested Sites Web Site Gallery Remote UI Settings/Registration: LBPXXXX: LBPXX... LBPXXXX/LBPXXXX/ To Portal Login User: System Manager Log Out Settings/Registration Mail to System Manager Preferences Control Menu Paper Source Menu Network Layout Menu Quality Menu User Maintenance Menu Output/Control Utility Menu Calibration Device Control Management Settings Department ID Management Security License/Other Settings/Registration: Management Settings: Security Security Last Updated: 11/04/2011 12:54:15 Management Settings Remote UI settings Key and Certificate Settings CA Certificate Settings IPSec Settings Display Job History IP Address Filter IPv4 Address: Tx Filter IPv4 Address: RX Filter IPv6 Address: Tx Filter IPv6 Address: RX Filter MAC Address Filter Tx Filter RX Filter Internet | Protected Mode: On 100%

5

Click [Edit...].

![](images/1ecf7bcea34c08b174705f0ed88c3ef8be200bd547c1ad2b8584ead265e175b4.jpg)
text_image Remote UI Settings/Registration: LBPXXXX: LBPXXXX - Windows Internet Explorer Http:// Suggested Sites Web Slice Gallery Remote UI Settings/Registration: LBPXXXX: LBPXXXX LBPXXXX/LBPXXXX/ To Portal Login User System Manager Log Out Settings/Registration Mail to System Manager Preferences Control Menu Paper Source Menu Network Layout Menu Quality Menu User Maintenance Menu Output/Control Utility Menu Calibration Device Control Management Settings Department ID Management Security License/Other Settings/Registration Management Settings Security > Management Settings Management Settings Last Updated: 04/19/2011 05 57:24 AM Edit... System Manager Information System Manager Password: Set. System Manager: Contact Information: E-Mail Address: System Manager Comment: Device Information Manufacturer CANON INC. Device Name: LBPXXXX Location: Product Name: LBPXXXX Done Internet | Protected Mode: On 100%

6

Enter the password currently set for [Current System Manager Password].

![](images/4c94a399809d9ea47dc3fd2d6de74d968024d89c063df86ccba3da8e07cb6efa.jpg)
text_image Remote UI Settings/Registration: LBPXXXX: LBPXXXX - Windows Internet Explorer Http:// Favorites Suggested Sites Web Slice Gallery Remote UI Settings/Registration: LBPXXXX: LBPXXXX... LBPXXXX/ LBPXXXX/ To Portal Login User: System Manager Log Out Settings/Registration Mail to System Manager Preferences Control Menu Paper Source Menu Network Layout Menu Quality Menu User Maintenance Menu Output/Control Utility Menu Calibration Device Control Management Settings Department ID Management Security License/Other Settings/Registration: Management Settings, Security > Management Settings > Edit Management Settings Edit Management Settings Last Updated 15/09 2011 16:43:22 The settings will be changed as follows. OK Cancel Authentication of Edit Management Settings Current System Manager Password: System Manager Information System Manager Password: Sat. Set/Change Password Password: (Max 16 characters) Confirm: (Max 16 characters) System Manager: Contact Information: Done Internet | Protected Mode: On 100%

7

Specify the job operation permission for end-users.

(1) Select the [Allow End-User's Job Operation] check box. If the check box is cleared, End-User cannot operate all the jobs. (2) Click [OK]. ![](images/548b302361abe425e6d03d3fd59f0bc3016fb0ab4019c89512232e8192bb5c11.jpg)
text_image Remote UI Settings/Registration: LBP7680C: LBP7680C - Windows Internet Explorer File Edit View Favorites Tools Help Favorites Remote UI Settings/Registration: LBP7680C: LBP... End-User Job Operation Settings Allow End-User's Job Operation Key Lock Settings Keys to Lock: Settings Key Job Key Job Status/Stop Key OK Key Reset Key Feeder Selection Key Utility Key Control Panel Power Switch (Sub Power Supply) Application Key ID Key USB Direct Print Settings USB Direct Print Automatically Display USB Direct Print Screen Done Trusted sites | Protected Mode Off 100%
0258-0S4 You can set the key lock function using a Web browser (Remote UI). When using the key lock function, you can lock the keys on the control panel, prohibiting the change of the printer settings by a user other than the administrators. ![](images/86035a084d963d0b5eb447f9d6dd15cd8d9891b6c41d98fc2edb9df48e30aaec.jpg)

IMPORTANT

If pressing a locked key

The printer beeps and the message is displayed on the display.

Precautions when setting the key lock function

Set the key lock function while the keys are not being operated. If the key lock function is set while the keys are being operated, the key lock function is enabled after the key operation.

1

Start the Remote UI and log on in system manager mode. > "Starting the Remote UI"

2

Click [Settings/Registration]. ![](images/4cded22c571116c1ba29e503091f1eb3fb4a46c08ac4cc239b2d00eae8087915.jpg)
text_image Remote UI Portal: LBPXXXX: LBPXXXX - Windows Internet Explorer http:// Suggested Sites Web Slice Gallery Device Name: LBPXXXX Product Name (Serial No.): LBPXXXX Location: Login User: System Manager Log Out Language English Mail to System Manager Last Updated: 29/05 2012 10:03:42 Device Basic Information Device Status The printer is ready Error Information There is no error. Consumables Information Paper Information Paper Source Remaining Paper Paper Size Paper Type Multi-Purpose Tray None A4 Free (Mixed Types) Drawer 1 Loaded A4 Free (Mixed Types) Remaining Toner Item Name Remaining Toner Cyan Toner 16-100% Status Monitor/Cancel Settings/Registration Basic Tools Box Direct Print Management Tools Service Management Service

3

Select [Security] in the [Management Settings] menu. ![](images/7107e80ead59aab9a93cd9ff6dedeab63eea2b3559c0c2f9d3b3b54239e0d32f.jpg)
text_image Remote UI Settings/Registration: LBPXXX: LBPXXXX - Windows Internet Explorer http:// Favorites Suggested Sites Web Slice Gallery Remote UI Settings/Registration: LBPXXX: LBPXX... LBPXXX / LBPXXX / Settings/Registration Mail to System Manager Preferences Control Menu Paper Source Menu Network Layout Menu Quality Menu User Maintenance Menu Output/Control Utility Menu Calibration Device Control Management Settings Department ID Management Security LICENSED/Other Settings/Registration: Management Settings: Security Security Last Updated: 11/04 2011 13:54:15 Security Management Settings Remote UI Settings Key and Certificate Settings CA Certificate Settings IPSec Settings Display Job History IP Address Filter IPv4 Address: TX Filter IPv4 Address: RX Filter IPv5 Address: TX Filter IPv6 Address: RX Filter MAC Address Filter TX Filter RX Filter Internet | Protected Mode: On

4

Click [Management Settings].

![](images/fbf9605bf789414b14d8fc90502bb0f9a386661efd5822287a9a6e1cec247462.jpg)
text_image Remote UE Settings/Registration: LBPXXXX: LBPXXXX - Windows Internet Explorer http:// Favorites Suggested Sites Web Store Gallery Remote UI Settings/Registration: LBPXXXX: LBPXX... LBPXXXX/LBPXXXX/ To Portal Login User: System Manager Log Out Settings/Registration Mail to System Manager Preferences Control Menu Paper Source Menu Network Layout Menu Quality Menu User Maintenance Menu Output/Control Utility Menu Calibration Device Control Management Settings Department ID Management Security License/Other Settings/Registration: Management Settings: Security Security Last Updated: 11/04/2011 12:54:15 Management Settings Remote UI settings Key and Certificate Settings CA Certificate Settings IPSec Settings Display Job History IP Address Filter IPv4 Address: Tx Filter IPv4 Address: RX Filter IPv6 Address: Tx Filter IPv6 Address: RX Filter MAC Address Filter Tx Filter RX Filter Internet | Protected Mode: On 100%

5

Click [Edit...].

![](images/181d53f930134cb96e4b6cc3f9c5a5d864ec6371b282f637341bb62f47bb342d.jpg)
text_image Remote UI Settings/Registration: LBPXXXX: LBPXXXX - Windows Internet Explorer Http:// Suggested Sites Web Slice Gallery Remote UI Settings/Registration: LBPXXXX: LBPXXXX LBPXXXX/LBPXXXX/ To Portal Login User System Manager Log Out Settings/Registration Mail to System Manager Preferences Control Menu Paper Source Menu Network Layout Menu Quality Menu User Maintenance Menu Output/Control Utility Menu Calibration Device Control Management Settings Department ID Management Security License/Other Settings/Registration Management Settings Security > Management Settings Management Settings Last Updated: 04/19/2011 05 57:24 AM Edit... System Manager Information System Manager Password: Set. System Manager: Contact Information: E-Mail Address: System Manager Comment: Device Information Manufacturer CANON INC. Device Name: LBPXXXX Location: Product Name: LBPXXXX Done Internet | Protected Mode: On 100%

6

Enter the password currently set for [Current System Manager Password]. ![](images/4833d1e4ac15c2c8a1b6eb294303873add1166ea6c555a2432e3cf5c3ddf22b7.jpg)
text_image Remote UI Settings/Registration: LBPXXXXLBPXXXX - Windows Internet Explorer Http:// Suggested Sites Web Slice Gallery Remote UI Settings/Registration: LBPXXXXLBPXXXX... To Portal Login User: System Manager Log Out Settings/Registration Mail to System Manager Preferences Control Menu Paper Source Menu Network Layout Menu Quality Menu User Maintenance Menu Output/Control Utility Menu Calibration Device Control Management Settings Department ID Management Security License/Other Settings/Registration: Management Settings, Security > Management Settings > Edit Management Settings Edit Management Settings Last Updated 15/09 2011 16:43:22 The settings will be changed as follows. OK Cancel Authentication of Edit Management Settings Current System Manager Password: System Manager Information System Manager Password: Sat. Set/Change Password Password: (Max 16 characters) Confirm: (Max 16 characters) System Manager: Contact Information: Done Internet | Protected Mode: On 100%

7

Specify the keys which you want to lock. (1) Select the check boxes respectively for keys, which you want to lock, on the control panel on the printer. For details on the keys, see "Control Panel." (2) Click [OK]. ![](images/69c80b5b0d69479449e89fc2875687735737c5ce1b2daedffd98bfe0bbff07f6.jpg)
text_image Remote UB Settings/Registration: LBP7680C: LBP7680C - Windows Internet Explorer File Edit View Favorites Tools Help Favorites Remote UB Settings/Registration: LBP7680C: LBP... Key Lock Settings Keys to Lock Settings Key Settings Key Job Key Job Status/Stop Key OK Key Reset Key Feeder Selection Key Utility Key Control Panel Power Switch (Sub Power Supply) Application Key ID Key USB Direct Print Settings USB Direct Print Automatically Display USB Direct Print Screen Done Trusted sites | Protected Mode: Off 100%
0258-0U2 You can use the Web browser (Remote UI) to set restrictions for USB Direct Print.

1

Start the Remote UI, and then log in as Administrator. > "Starting the Remote UI"

2

Click [Settings/Registration]. ![](images/89b070fa873031cf27f276222624b626dae2ec45ebcf003cb68a983b075f722c.jpg)
text_image Remote UI Portal: LBPXXXXLBPXXXX - Windows Internet Explorer http:// Favonites Suggested Sites Web Slice Gallery Remote UI Portal: LBPXXXXLBPXXXX Device Name: LBPXXXXL Product Name (Serial No.): LBPXXXXL Location: Login User: System Manager Log Out Language English Mail to System Manager Last Updated: 29/05 2012 10:03:42 Device Basic Information Device Status The printer is ready. Error Information There is no error Consumables Information Paper Information Paper Source Remaining Paper Paper Size Paper Type Multi-Purpose Tray None All Free (Mixed Types) Drawer 1 Loaded All Free (Mixed Types) Remaining Toner Item Name Remaining Toner Cyan Toner 16-100% Status Monitor/Cancel Settings/Registration Basic Tools Box Direct Print Management Tools Service Management Service

3

Select [Security] from the [Management Settings] menu. ![](images/ee143509fadfab8db4b3818005abbbb2d542d66b0706cad7938e2b88277f94e4.jpg)
text_image Remote UI Settings/Registration: LBPXXX: LBPXXXX - Windows Internet Explorer http:// Favorites Suggested Sites Web Slice Gallery Remote UI Settings/Registration: LBPXXX: LBPXX... LBPXXX / LBPXXX / Settings/Registration Mail to System Manager Preferences Control Menu Paper Source Menu Network Layout Menu Quality Menu User Maintenance Menu Output/Control Utility Menu Calibration Device Control Management Settings Department ID Management Security LICENSED/Other Settings/Registration: Management Settings: Security Security Last Updated: 11/04 2011 13:54:15 Security Management Settings Remote UI Settings Key and Certificate Settings CA Certificate Settings IPSec Settings Display Job History IP Address Filter IPv4 Address: TX Filter IPv4 Address: RX Filter IPv5 Address: TX Filter IPv6 Address: RX Filter MAC Address Filter TX Filter RX Filter Internet | Protected Mode: On

4

Click [Management Settings].

![](images/9565654d965d9d84be2d2af4ebee86cde14c0f28323d92687ea0cb4bb12bb68e.jpg)
text_image Remote UE Settings/Registration: LBPXXXX: LBPXXXX - Windows Internet Explorer http:// Favorites Suggested Sites Web Store Gallery Remote UI Settings/Registration: LBPXXXX: LBPXX... LBPXXXX/LBPXXXX/ To Portal Login User: System Manager Log Out Settings/Registration Mail to System Manager Preferences Control Menu Paper Source Menu Network Layout Menu Quality Menu User Maintenance Menu Output/Control Utility Menu Calibration Device Control Management Settings Department ID Management Security License/Other Settings/Registration: Management Settings: Security Security Last Updated: 11/04/2011 12:54:15 Management Settings Remote UI settings Key and Certificate Settings CA Certificate Settings IPSec Settings Display Job History IP Address Filter IPv4 Address: Tx Filter IPv4 Address: RX Filter IPv6 Address: Tx Filter IPv6 Address: RX Filter MAC Address Filter Tx Filter RX Filter Internet | Protected Mode: On 100%

5

Click [Edit...].

![](images/d70338d8115ea8b537bf835e5bdafaa46ca8304da4c81951d2d822cc57c1b721.jpg)
text_image Remote UI Settings/Registration: LBPXXXX: LBPXXXX - Windows Internet Explorer Http:// Suggested Sites Web Slice Gallery Remote UI Settings/Registration: LBPXXXX: LBPXXXX LBPXXXX/LBPXXXX/ To Portal Login User System Manager Log Out Settings/Registration Mail to System Manager Preferences Control Menu Paper Source Menu Network Layout Menu Quality Menu User Maintenance Menu Output/Control Utility Menu Calibration Device Control Management Settings Department ID Management Security License/Other Settings/Registration Management Settings Security > Management Settings Management Settings Last Updated: 04/19/2011 05 57:24 AM Edit... System Manager Information System Manager Password: Set. System Manager: Contact Information: E-Mail Address: System Manager Comment: Device Information Manufacturer CANON INC. Device Name: LBPXXXX Location: Product Name: LBPXXXX Done Internet | Protected Mode: On 100%

6

Enter the current password in [Current System Manager Password].

![](images/0211ce41158dea97031d40da45fe369d0dc6bbc3256ff49b171226033f08fadc.jpg)
text_image Remote UI Settings/Registration: LBPXXXX: LBPXXXX - Windows Internet Explorer Http:// Favorites Suggested Sites Web Slice Gallery Remote UI Settings/Registration: LBPXXXX: LBPXXXX... LBPXXXX/ LBPXXXX/ To Portal Login User: System Manager Log Out Settings/Registration Mail to System Manager Preferences Control Menu Paper Source Menu Network Layout Menu Quality Menu User Maintenance Menu Output/Control Utility Menu Calibration Device Control Management Settings Department ID Management Security License/Other Settings/Registration: Management Settings, Security > Management Settings > Edit Management Settings Edit Management Settings Last Updated 15/09 2011 16:43:22 The settings will be changed as follows. OK Cancel Authentication of Edit Management Settings Current System Manager Password: System Manager Information System Manager Password: Sat. Set/Change Password Password: (Max 16 characters) Confirm: (Max 16 characters) System Manager: Contact Information: Done Internet | Protected Mode: On 100%

7

Set restrictions for USB Direct Print.

(1) Clear the [USB Direct Print] check box. If the check box is selected, the USB Direct Print function is enabled. If the [Automatically Display USB Direct Print Screen] check box is selected, the USB Direct Print screen is automatically displayed when the USB memory device is inserted. (2) Click [OK]. ![](images/0516e7275db704cf14d9a780653b3106a62ae6c6a41ea35c5f378b7389173a67.jpg)
text_image Remote UL Settings/Registration: LBP7680C: LBP7680C - Windows Internet Explorer File Edit View Favorites Tools Help Favorites Remote UL Settings/Registration: LBP7680C: LBP... Key Lock Settings Keys to Lock: Settings Key Job Key Job Status/Stop Key OK Key Reset Key Feeder Selection Key Utility Key Control Panel Power Switch (Sub Power Supply) Application Key ID Key USB Direct Print Settings ✓ USB Direct Print ✓ Automatically Display USB Direct Print Screen Done Trusted sites | Protected Mode: Off 100%
0258-09W When using SSL encrypted communication, IEEE802.1X authentication or IPSec encrypted communication, authentication settings are necessary for the user to check the public key for encryption, the private key for decryption and key information. See the following according to your system environment and the options that you want to specify. \- When creating and using a key and its certificate with this printer Displaying the [Key and Certificate Settings] Page in the Remote UI Newly Creating a Key and Its Certificate Newly create a key pair (the public key and private key) and its certificate. Checking a Certificate Confirm the contents of the certificate of a created key. > Deleting a Key and Its Certificate Delete a created key and its certificate. \- When using a key/certificate file created by a device other than this printer > Displaying the [Key and Certificate Settings] Page in the Remote UI > Installing a Key/Certificate File on the Printer Install a key/certificate file created by a device other than this printer on this printer. Registering a Key and Its Certificate in the Printer Register a key pair (the public key and private key) and its certificate in a key/certificate file installed on this printer so that you can use them in the printer. > Checking a Certificate Confirm the contents of the certificate of a created key. > Deleting a Key and Its Certificate Delete a created key and its certificate. ![](images/1114731efb45f4b4469a83f1df3d9b08a5d8b4b40ab680380619f27c5e554484.jpg)

IMPORTANT

The number of key and certificate which you can create, register, or install

You can create and register up to six "keys and certificates" (the total includes the one that is installed). Also, only one key and certificate file can be installed. If you cannot create, register or install them, delete unnecessary keys and certificates.

About a Key/Certificate File which can be installed on this printer

- The key generation algorithm is "RSA". You can only install files with the extensions ".P12" or ".PFX". - The file format which you can register is a PKCS#12 file in DER (binary encoding) format.

1

Start the Remote UI, and then log in as Administrator. > "Starting the Remote UI"

2

Click [Settings/Registration]. ![](images/c161008bb85809b3bd39262365bda23a931b7c8190bf463033593bd862b0a6ef.jpg)
text_image Remote UI Portal: LBPXXXX: LBPXXXX - Windows Internet Explorer Favors Suggested Sites Web Slice Gallery Remote UI Portal: LBPXXXX: LBPXXXX Device Name: LBPXXXX Product Name (Serial No.): LBPXXXX Location: Login User: System Manager Log Out Language English Mail to System Manager Last Updated: 29/05 2012 10:03:42 Device Basic Information Device Status The printer is ready Error Information There is no error Consumables Information Paper Information Paper Source Remaining Paper Paper Size Paper Type Multi-Purpose Tray None A4 Free (Mixed Types) Drawer 1 Loaded A4 Free (Mixed Types) Remaining Toner Item Name Remaining Toner Cyan Toner 16-100% Status Monitor/Cancel Settings/Registration Basic Tools Box Direct Print Management Tools Service Management Service

3

Select [Security] from the [Management Settings] menu. ![](images/1b176063e94ec4a95588f2e648187372f13137fcc30ae0f41fddd5648af3c0af.jpg)
text_image Remote UI Settings/Registration: LBPXIII: LBPXIII - Windows Internet Explorer http:// Favorites Suggested Sites Web Slice Gallery Remote UI Settings/Registration: LBPXIII: LBPXIII LBPXIII/LBPXIII/ Settings/Registration To Portal Login User System Manager Log Out Mail to System Manager Preferences Control Menu Paper Source Menu Network Layout Menu Quality Menu User Maintenance Menu Output/Control Utility Menu Calibration Device Control Management Settings Department ID Management Security License/Other Settings/Registration: Management Settings: Security Security Last Updated: 11/04/2011 12:54:15 Security Management Settings Remote UI Settings Key and Certificate Settings CA Certificate Settings IPSec Settings Display Job History IP Address Filter IPv4 Address: TX Filter IPv4 Address: RX Filter IPv6 Address: TX Filter IPv6 Address: RX Filter MAC Address Filter TX Filter RX Filter Internet | Protected Mode On

4

Click [Key and Certificate Settings].

![](images/9d6892a7d74294badc8425f162e32da37bdac23ce44f808671a4ad199cb9b054.jpg)
text_image Remote UI Settings/Registration: LBP7680C / LBP7680C - Windows Internet Explorer http://192.168.1.225/secemens.cgi File Edit View Favorites Tools Help Favorites Remote UI Settings/Registrations LBP7680C: LBP... Settings/Registration Mail to System Manager Preferences Control Menu Paper Source Menu Network Layout Menu Quality Menu User Maintenance Menu Output/Control Utility Menu Calibration Device Control Management Settings Department ID Management Security License/Other Settings/Registration: Management Settings: Security Security Last Updated: 04/04 2011 03:57:16 Security Management Settings Remove UI Settings Key and Certificate Settings IP-Certificate Settings IPSec Settings Display Job History IP Address Filter IPv4 Address: TX Filter IPv4 Address: RX Filter IPv6 Address: TX Filter IPv6 Address: RX Filter MAC Address Filter TX Filter RX Filter Done Internet | Protected Mode: Off 100%
0258-0A0

1

Click [Generate Key...]. ![](images/ed32824f128c0bffcf4d108f82918c42379ec1f5111248aa99d56b951091e737.jpg)
text_image Remote UB Settings/Registration: LBP7680C / LBP7680C - Windows Internet Explorer https://192.168.1.225/keymanage.cgs File Edit View Favorites Tools Help Favorites Remote UB Settings/Registration/ LBP7680C / LBP... I-SENSYS LBP7680C / LBP7680C / To Portal Login User: System Manager Log Out Settings/Registration Mail to System Manager Preferences Control Menu Paper Source Menu Network Layout Menu Quality Menu User Maintenance Menu Output/Control Utility Menu Calibration Device Control Management Settings Department ID Management Security License/Other Settings/Registration: Management Settings: Security > Key and Certificate Settings Key and Certificate Settings Last Updated 04/04 2011 06:37:20 Register Key and Certificate... Registered Key and Certificate Generate Key... Key Name Key Usage Certificate Example [SSL] example Delete Copyright CANON INC: 2011 All Rights Reserved Done Trusted sites | Protected Mode: Off 100%

2

Enter the name of the key to be newly created. Up to 24 alphanumeric characters can be entered. ![](images/af7fe314ffd0e99ffc2e821a8a968d00627a16a64a68f41a58e6d07ac2edd1dd.jpg)
text_image Remote UB Settings/Registration: LBP7680C: LBP7680C - Windows Internet Explorer https://192.168.1.225/keymanage.cgi?Actions=GET_NEWKEY File Edit View Favorites Tools Help Favorites Remote UB Settings/Registration: LBP7680C: LBP... I-SENSYS LBP7680C / LBP7680C / Settings/Registration To Portal Login User: System Manager Log Out Mail to System Manager Preferences Control Menu Paper Source Menu Network Layout Menu Quality Menu User Maintenance Menu Output/Control Utility Menu Calibration Device Control Management Settings Department ID Management Security License/Other Settings/Registration: Management Settings Security > Key and Certificate Settings > Generate Key Generate Key Last Updated: 04/04 2011 05.17.58 OK Cancel Key Settings Key Name: Signature Algorithms: SHA1 Key Algorithm: RSA 512 bit Certificate Settings Validity Start Date: Day Month Year Validity End Date: Day Month Year Country/Region: State: City: Organization: Organization Unit: Common Name: Copyright CANON INC. 2011 All Rights Reserved Trusted sites | Protected Mode Off 20%

3

Select [Signature Algorithm].

Select from [SHA1], [SHA256], [SHA384], or [SHA512]. ![](images/49d9236dac81c8ea919daeb49488a8d376f16a7f221556c102b4eff0774222cc.jpg)
text_image Remote UI Settings/Registration: LBP7680C: LBP7680C - Windows Internet Explore https://102.168.1.225/keymanage.cgi?Actions=GIT_NEWKEY File Edit View Favorites Tools Help Favorites Remote UI Settings/Registration: LBP7680C: LBP... L-SENSYS LBP7680C / LBP7680C / To Portal Login User: System Manager Log Out Settings/Registration Mail to System Manager Preferences Control Menu Paper Source Menu Network Layout Menu Quality Menu User Maintenance Menu Output/Control Utility Menu Calibration Device Control Management Settings Department IO Management Security License/Other Settings/Registration: Management Settings: Security > Key and Certificate Settings > Generate Key Generate Key Last Updated: 04/04 2011 06:17:58 OK Cancel Key Settings Key Name: Signature Algorithm SHA1 SHA1 SHA256 SHA384 SHA512 Key Algorithm: RSA Certificate Settings Validity Start Date: Day Month Year Validity End Date: Day Month Year Country/Region: State: Trusted sites | Protected Mode Off 100%

4

Select [Key Algorithm].

Select from [512 bit], [1024 bit], [2048 bit], or [4096 bit]. When you select [SHA384] and [SHA512] in [Signature Algorithm], you can create a key only when selecting other than [512 bit]. ![](images/7b22441a4fa82c15d3abac903747c139f6466db821040bc2b963f8630150b062.jpg)
text_image Remote Ub Settings/Registration: LBP7680C: LBP7680C - Windows Internet Explorer https://192.168.1.225/?keymanage.org?Actions?GET_NEWKEY File Edit View Favorites Tools Help Favorites Remote Ub Settings/Registration: LBP7680C: LBP... I-SENSYS LBP7680C / LBP7680C / To Portal Login User: System Manager Log Out Settings/Registration Mail to System Manager Preferences Control Menu Paper Source Menu Network Layout Menu Quality Menu User Maintenance Menu Output/Control Utility Menu Calibration Device Control Management Settings Department ID Management Security License/Other Settings/Registration: Management Settings: Security > Key and Certificate Settings > Generate Key Generate Key Last/Updated: 04/04 2011 08:17:58 OK Cancel Key Settings Key Name: Signature Algorithm: SHA1 Key Algorithm: RSA 512 bit 512 bit 1024 bit 2048 bit Certificate Settings 5006 bit Validity Start Date: Day Month Year Validity End Date: Day Month Year Country/Region: State: Trusted sites | Protected Mode: Off 100%
![](images/d981ff2e94945814c78ddcb52bdd067d50b68a070244dfa7d7e3ae8efffad653.jpg)

NOTE

Key Generation Algorithm

The generation algorithm when the printer generates a key is RSA.

About the key length

Although using the longer key makes it more difficult to decode data, the processing speed on encryption and decryption is slower. Select the key length according to the needs of security for data communication.

5

Specify the effective date and expiration date of the self-sign server certificate.

You can enter date between 1/1/2000 (1 Day 1 Month 2000 Year) and 31/12/2037 (31 Day 12 Month 2037 Year). ![](images/be5fdf3c18a28cf95e064283ce8ea147ecc577831188ec11f010531480569397.jpg)
text_image Remote UB Settings/Registration: LBP7680C: LBP7680C - Windows Internet Explorer https://192.168.1.225/keymanage.cgi/Actions=GET_NEWKEY File Edit View Favorites Tools Help Favorites Remote UB Settings/Registration: LBP7680C: LBP... L-SENSYS LBP7680C / LBP7680C / To Portal Login User: System Manager Log Out Settings/Registration Mail to System Manager Preferences Control Menu Paper Source Menu Network Layout Menu Quality Menu User Maintenance Menu Output/Control Utility Menu Calibration Device Control Management Settings Department ID Management Security License/Other Settings/Registration: Management Settings: Security > Key and Certificate Settings > Generate Key Generate Key Last Updated: 04/04 2011 05 17:58 OK Cancel Key Settings Key Name: Signature Algorithm: SHA1 Key Algorithm: RSA 512 bit Certificate Settings Validity Start Date: Day Month Year Validity End Date: Day Month Year Country/Region: State: City: Organization: Organization Unit: Common Name: Copyright CANON INC. 2011 All Rights Reserved Trusted sites | Protected Mode: Off 100%

6

Specify the country/region name for the self-sign server certificate.

Enter the Internet country code with 2 or less characters. ![](images/075263a4ac1ddf89f38e04dd0300aa1b598da8b3f921af1af6a98d23438e6a04.jpg)
text_image Remote UI Settings/Registration: LBP7680C - LBP7680C - Windows Internet Explorer https://192.168.1.225/keymanage.cgi?Actions=GET_NEARY File Edit View Favorites Tools Help Favorites Remote UI Settings/Registration: LBP7680C / LBP... i-SENSYS LBP7680C / LBP7680C / To Portal Login User: System Manager Log Out Settings/Registration Mail to System Manager Preferences Control Menu Paper Source Menu Network Layout Menu Quality Menu User Maintenance Menu Output/Control Utility Menu Calibration Device Control Management Settings Department ID Management Security License/Other Settings/Registration: Management Settings: Security > Key and Certificate Settings > Generate Key Generate Key Last Updated: 04/04 2011 05 17:58 OK Cancel Key Settings Key Name: Signatures Algorithm: SHA1 Key Algorithm: RSA 512 bit Certificate Settings Validity Start Date: Day Month Year Validity End Date: Day Month Year Country/Region: State: City: Organization: Organization Unit: Common Name: Copyright CANON INC. 2011 All Rights Reserved Trusted sites | Protected Mode: Off 100%

7

Specify the required information for the self-sign server certificate.

![](images/b4a81fd43363b7cd9d2cb3978897c787460a66dfd46dfa7935850c8e9a7315ee.jpg)
text_image Remote UI Settings/Registration: LBP7680C / LBP7680C - Windows Internet Explorer https://192.168.1.225/keymanage.cgi?ActionsGET_NEWKEY File Edit View Favorites Tools Help Favorites Remote UI Settings/Registration: LBP7680C / LBP... I-SENSYS LBP7680C / LBP7680C / To Portal Login User: System Manager Log Out Settings/Registration Mail to System Manager Preferences Control Menu Paper Source Menu Network Layout Menu Quality Menu User Maintenance Menu Output/Control Utility Menu Calibration Device Control Management Settings Department ID Management Security License/Other Settings/Registration: Management Settings: Security > Key and Certificate Settings > Generate Key Generate Key Last Updated 04/04 2011 05:17:58 OK Cancel Key Settings Key Name: Signature Algorithm: SHA1 Key Algorithm: RSA 512 bit Certificate Settings Validity Start Date: Day Month Year Validity End Date: Day Month Year Country/Region: State: City: Organization: Organization Unit: Common Name: Copyright CANON INC. 2011 All Rights Reserved Trusted sites | Protected Mode Off 100%
[State]: Enter the name of the state. Up to 24 alphanumeric characters can be entered.
[City]: Enter the name of the city. Up to 24 alphanumeric characters can be entered.
[Organization]: Enter the name of the organization. Up to 24 alphanumeric characters can be entered.
[Organization Unit]:Enter the organization unit such as a section name. Up to 24 alphanumeric characters can be entered.
[Common Name]:Enter the IP address or FQDN (in the style of "xyz.company.com") of this printer. Up to 41 alphanumeric characters can be entered.
![](images/dc334fbae5f0d9fa68dcd677299a64512429aee3cbf7aaa70697bb62c23efa33.jpg)

IMPORTANT

To issue the self-sign server certificate

Specify the setting for at least one of the options among [Country/Region], [State], [City], [Organization], [Organization Unit], and [Common Name]. When all the fields are blank, the self-sign server certificate is not issued.

If you are using Windows Vista, 7 or Server 2008

[Common Name] needs to be the same as the name (FQDN) or IP address that is specified for IPPS connection. - For FQDN, enter "FQDN" in [Common Name]. - For IP address, enter the IP address of this printer in [Common Name]. Obtaining the Public Key for This Printer When Using SSL Encrypted Communication

8

Click [OK].

→ The key and certificate creation starts. ![](images/6ba334597f6cdfc8747838915e49ac1c6f55561607dc7d164f2cec94be59801b.jpg)
text_image Remote UI Settings/Registration: LBP7680C / LBP7680C - Windows Internet Explorer https://192.168.1.225/keymanage.org?Actions=GET.NEKEY File Edit View Favorites Tools Help Favorites Remote UI Settings/Registration: LBP7680C / LBP... L-SENSYS LBP7680C / LBP7680C / Settings/Registration To Portal Login User: System Manager Log Out Mail to System Manager Preferences Control Menu Paper Source Menu Network Layout Menu Quality Menu User Maintenance Menu Output/Control Utility Menu Calibration Device Control Management Settings Department ID Management Security License/Other Settings/Registration: Management Settings: Security > Key and Certificate Settings > Generate Key Generate Key Last Updated: 04/04 2011 06.17.58 OK Cancel Key Settings Key Name: Signature Algorithm: SHA1 Key Algorithm: RSA 512 bit Certificate Settings Validity Start Date: Day Month Year Validity End Date: Day Month Year Country/Region: State: City: Organization: Organization Unit: Common Name: Copyright CANON INC. 2011 All Rights Reserved Trusted sites | Protected Mode: Off 100%
0258-0A1

1

Click [Register Key and Certificate...]. ![](images/0ebfff61202e08c45fa9547b5e0dead86f4cb3f3e78549888b287b284cc2aa3d.jpg)
text_image Remote UB Settings/Registration: LBP7680C: LBP7680C - Windows Internet Explorer https://192.168.1.225/Keymanage.org File Edit View Favorites Tools Help Favorites Remote UB Settings/Registration: LBP7680C: LBP... L-SENSYS LBP7680C / LBP7680C / To Portal Login User: System Manager Log Out Settings/Registration Mail to System Manager Preferences Control Menu Paper Source Menu Network Layout Menu Quality Menu User Maintenance Menu Output/Control Utility Menu Calibration Device Control Management Settings Department ID Management Security License/Other Settings/Registration: Management Settings: Security > Key and Certificate Settings Key and Certificate Settings Last Updated: 04/04 2011 06:37:20 Register Key and Certificate... Registered Key and Certificate Generate Key ... Key Name Key Usage Certificate Example [SSL] example Delete Copyright CANON INC: 2011 All Rights Reserved Done ✓ Trusted sites | Protected Mode: Off 100%

2

Click [Install...]. ![](images/9c522b5df0f547ae8fe82e2666d9f2d328b8cd402c046468512a34a45dcf5d7a.jpg)
text_image Remote UB Settings/Registration: LBP7680C / LBP7680C - Windows Internet Explorer https://192.168.1.225/keymanage.org?Actions=GET_KXIREG File Edit View Favorites Tools Help Favorites Remote UB Settings/Registration: LBP7680C / LBP... I-SENSYS LBP7680C / LBP7680C / To Portal Login User: System Manager Log Out Settings/Registration Mail to System Manager Preferences Control Menu Paper Source Menu Network Layout Menu Quality Menu User Maintenance Menu Output/Control Utility Menu Calibration Device Control Management Settings Department ID Management Security License/Other Settings/Registration: Management Settings: Security > Key and Certificate Settings > Register Key and Certificate Register Key and Certificate Last Updated 04/04 2011 06:29:14 Installed Key and Certificate Install File Name Copyright CANON INC: 2011 All Rights Reserved Done Trusted sites | Protected Mode: Off 100%

3

Specify the directory of a key/certificate file.

Click [Browse...] to select the key/certificate file or enter the directory for the saved key/certificate file. ![](images/8c58e1120ce0ce5da82ce745df9440a42291c28467eb4a4240dbd9d3cb0f5848.jpg)
text_image Remote UB Settings/Registration: LBP7680C: LBP7680C - Windows Internet Explorer https://192.168.1.225/keymanage.cgi?Actions=GET_KEYNIST File Edit View Favorites Tools Help Favorites Remote UB Settings/Registration: LBP7680C: LBP... I-SENSYS LBP7680C / LBP7680C / To Portal Login User: System Manager Log Out Settings/Registration Mail to System Manager Preferences Control Menu Paper Source Menu Network Layout Menu Quality Menu User Maintenance Menu Output/Control Utility Menu Calibration Device Control Management Settings Department ID Management Security License/Other Settings/Registration: Management Settings: Security > Key and Certificate Settings > Register Key and Certificate > Install Key and Certificate Install Key and Certificate Last Updated: 04/04 2011 06:30:03 Specify the file path of the key and certificate to install. Click [Browse] to select a file. Start Installation Cancel Installation of Key and Certificate File Path: Browse... Copyright CANON INC: 2011 All Rights Reserved Done Trusted sites | Protected Mode: Off 100%
![](images/7d0b6f512f33059dba2a5c59e9332e3834bd0b210891883fc47dcc337ed116c4.jpg)

NOTE

About the name of the key/certificate file

Except for the extension up to 20 alphanumeric characters can be specified in [File Path] for the file name. Specify the file name so that its length is 20 characters or less.

4

Click [Start Installation].

→ The installation of the key/certificate file starts. ![](images/b7b8b5d4f10ec85b82c0ec5e269ab14f86d16c38735a5bd385991ddb2995b431.jpg)
text_image Remote UI Settings/Registration: LBP7680C / LBP7680C - Windows Internet Explorer https://192.168.1.225/keymanage.org?Action=GET_KEYINGST File Edit View Favorites Tools Help Favorites Remote UI Settings/Registration: LBP7680C / LBP... I-SEN/SYS LBP7680C / LBP7680C / To Portal Login User: System Manager Log Out Settings/Registration Mail to System Manager Preferences Control Menu Paper Source Menu Network Layout Menu Quality Menu User Maintenance Menu Output/Control Utility Menu Calibration Device Control Management Settings Department ID Management Security License/Other Settings/Registration: Management Settings: Security > Key and Certificate Settings > Register Key and Certificate > Install Key and Certificate Install Key and Certificate Last Updated: 04/04 2011 06:30:03 Specify the file path of the key and certificate to install. Click [Browse] to select a file Start Installation Cancel Installation of Key and Certificate File Path: C:\Users\user07\Desktop/Example.p12 Browse... Copyright CANON INC. 2011 All Rights Reserved Done Trusted sites | Protected Mode: Off 100%
To specify the key pair (the public key and private key) and its certificate in a key/certificate file installed on this printer so that you can use them in the printer, see "Registering a Key and Its Certificate in the Printer" and register the key pair (the 0258-0A2

1

Click [Register Key and Certificate...]. ![](images/323a1bbcf441fe7df2d8c4ae4b584b80ef6c2e836b7aaf7b2667d2d02f33eaa4.jpg)
text_image Remote UI Settings/Registration: LBP7680C: LBP7680C - Windows Internet Explorer https://192.168.1.225/keymanage.cgi File Edit View Favorites Tools Help Favorites Remote UI Settings/Registration: LBP7680C: LBP... L-SENSYS LBP7680C / LBP7680C / To Portal Login User: System Manager Log Out Settings/Registration Mail to System Manager Preferences Control Menu Paper Source Menu Network Layout Menu Quality Menu User Maintenance Menu Output/Control Utility Menu Calibration Device Control Management Settings Department ID Management Security License/Other Settings/Registration: Management Settings, Security > Key and Certificate Settings Key and Certificate Settings Last Updated: 04/04 2011 06:37:20 Register Key and Certificate... Registered Key and Certificate Generate Key... Key Name Key Usage Certificate Example [SSL] example Delete Copyright CANON INC: 2011 All Rights Reserved Done Trusted sites | Protected Mode: Off 100%

2

Click [Register...]. ![](images/d31464d4ab044a43b8cc0fcd6345cd6741affdf8cfd10ca356244cc67fdab125.jpg)
text_image Remote UB Settings/Registration: LBP7680C: LBP7680C - Windows Internet Explorer https://192.168.1.225keymanage.org?Actions=GET_KHYREG File Edit View Favorites Tools Help Favorites Remote UB Settings/Registration: LBP7680C: LBP... I-SENSYS LBP7680C / LBP7680C / To Portal Login User: System Manager Log Out Settings/Registration Mail to System Manager Preferences Control Menu Paper Source Menu Network Layout Menu Quality Menu User Maintenance Menu Output/Control Utility Menu Calibration Device Control Management Settings Department ID Management Security License/Other Settings/Registration: Management Settings: Security > Key and Certificate Settings > Register Key and Certificate Register Key and Certificate Last Updated: 04/04 2011 06:32:12 Installed Key and Certificate Install: File Name EXAMPLE P12 Register Delete Copyright CANON INIC: 2011 All Rights Reserved Done Trusted sites | Protected Mode: Off 100%

3

Enter the name of the key to be registered.

Up to 24 alphanumeric characters can be entered. ![](images/1f874c1b21eb308fe8124c112c7602983409828e9b72a86456fe6d0873fa64e1.jpg)
text_image Remote UB Settings/Registration: LBP7680C / LBP7680C - Windows Internet Explorer https://193.168.1.225 Alaska Manage.org?Actions=GET_KEYPASSWDBFileNi File Edit View Favorites Tools Help Favorites Remote UB Settings/Registration: LBP7680C: LBP... I-SENSYS LBP7680C / LBP7680C / To Portal Login User: System Manager Log Out Settings/Registration Mail to System Manager Preferences Control Menu Paper Source Menu Network Layout Menu Quality Menu User Maintenance Menu Output/Control Utility Menu Calibration Device Control Management Settings Department ID Management Security License/Other Settings/Registration: Management Settings, Security > Key and Certificate Settings > Register Key and Certificate > Enter Private Key Password Enter Private Key Password Last Updated: 04/04 2011 06:33:10 Enter the private key password for this file. File Name: EXAMPLE P12 OK Cancel Enter Private Key Password Key Name: Password: Copyright CANON INC: 2011 All Rights Reserved Done Trusted sites | Protected Mode: Off 100%

4

Enter the password specified for the private key.

Up to 24 alphanumeric characters can be entered. ![](images/1ed986d31ea7fb20477f1132c4bb93752d3db06fd24be11d47bdff004ae4933b.jpg)
text_image Remote UB Settings/Registration: LBP7680C / LBP7680C - Windows Internet Explorer https://192.168.1.225/keymanage.org?Actions=GET_KEYPASSWDB&File#1 File Edit View Favorites Tools Help Favorites Remote UB Settings/Registration: LBP7680C: LBP... L-SENSYS LBP7680C / LBP7680C / To Portal Login User: System Manager Log Out Settings/Registration Mail to System Manager Preferences Control Menu Paper Source Menu Network Layout Menu Quality Menu User Maintenance Menu Output/Control Utility Menu Calibration Device Control Management Settings Department ID Management Security License/Other Settings/Registration: Management Settings, Security > Key and Certificate Settings > Register Key and Certificate > Enter Private Key Password Enter Private Key Password Last Updated 04/04 2011 06:33:10 Enter the private key password for this file. File Name: EXAMPLE P12 OK Cancel Enter Private Key Password Key Name: example Password: Copyright CANON INC: 2011 All Rights Reserved Trusted sites | Protected Mode: Off 100%

5

Click [OK].

→ The key and certificate registration starts. ![](images/49bc1945cdaebc416dc6efccb9a73fc7e4229ef6dcdf10909a18f979ee568adc.jpg)
text_image Remote US Settings/Registration: LBP7680C: LBP7680C - Windows Internet Explorer https://192.168.1.225/keymanage.cgi?Actions=GET_KD#PASSWDBFileNi File Edit View Favorites Tools Help Favorites Remote US Settings/Registration: LBP7680C: LBP... L-SENSYS LBP7680C / LBP7680C / Settings/Registration To Portal Login User: System Manager Log Out Mail to System Manager Preferences Control Menu Paper Source Menu Network Layout Menu Quality Menu User Maintenance Menu Output/Control Utility Menu Calibration Device Control Management Settings Department ID Management Security License/Other Settings/Registration: Management Settings: Security > Key and Certificate Settings > Register Key and Certificate > Enter Private Key Password Enter Private Key Password Last Updated: 04/04 2011 06:32:10 Enter the private key password for this file. File Name: EXAMPLE P12 OK Cancel Enter Private Key Password Key Name: example Password: ****** Copyright CANON INC: 2011 All Rights Reserved Done Trusted sites | Protected Mode: Off 100%
0258-0A4

1

Click the icon of the certificate to be confirmed. [ ] is displayed only when a certificate has been issued for the created key. ![](images/9ef3120cf0d6d3d4d5757ab447ccbef7e75f6407f9ebaea9e38cd83d9ef622c1.jpg)
text_image Remote UB Settings/Registration: LBP7680C: LBP7680C - Windows Internet Explorer https://192.168.1.225/keymanage.cgs File Edit View Favorites Tools Help Favorites Remote UB Settings/Registration: LBP7680C: LBP... L-SENSYS LBP7680C / LBP7680C / To Portal Login User: System Manager Log Out Settings/Registration Mail to System Manager Preferences Control Menu Paper Source Menu Network Layout Menu Quality Menu User Maintenance Menu Output/Control Utility Menu Calibration Device Control Management Settings Department ID Management Security License/Other Settings/Registration: Management Settings Security > Key and Certificate Settings Key and Certificate Settings Last Updated 04/04 2011 06:37:20 Register Key and Certificate... Registered Key and Certificate Generate Key... Key Name Key Usage Certificate Example [SSL] example Delete Copyright CANON INC. 2011 All Rights Reserved Done Trusted sites | Protected Mode: Off 100%

2

If you want to verify the certificate, click [Certificate Verification]. → The verification result is displayed. ![](images/9ea453b96e9d4f43e30c755094d35cd3becd90d030522c8338630e07b4259eb1.jpg)
text_image Remote UE Settings/Registration: LBP7680C / LBP7680C - Windows Internet Explorer http://192.168.1.187/keymanage.csp/?Action=GET_KEYDETAIL&KeyID=1 File Edit View Favorites Tools Help Favorites Remote UE Settings/Registration: LBP7680C: LBP... I.SENSYS LBP7680C / LBP7680C / Settings/Registration To Portal Login User: System Manager Log Out Mail to System Manager Preferences Control Menu Paper Source Menu Network Layout Menu Quality Menu User Maintenance Menu Output/Control Utility Menu Calibration Device Control Management Settings Department ID Management Security License/Other Settings/Registration: Management Settings: Security > Key and Certificate Settings > Certificate Details Certificate Details LastUpdated 06/04 2011 17:34:45 Certificate Verification Certificate Details Version: X,509v1 Serial Number: 00 Signature Algorithm: SHA1RSA Issue Destination: C=GB, ST=a, L=b, O=c, OU=d, CN=192.168.1.187 Validity Start Date: 1 / 1 2011 Validity End Date: 1 / 1 2012 Issuer: C 0258-0A5

1

Click [Delete] for the key and its certificate that you want to erase. ![](images/4f28a41c873e0ca5779b0bf5252cb2512004aeee889fa3f29bb98ac9f07ba57a.jpg)
text_image Remote UB Settings/Registration: LBP7680C: LBP7680C - Windows Internet Explorer https://192.168.1.225/keymanage.cgi File Edit View Favorites Tools Help Favorites Remote UB Settings/Registration: LBP7680C: LBP... I-SENSYS LBP7680C / LBP7680C / To Portal Login User: System Manager Log Out Settings/Registration Mail to System Manager Preferences Control Menu Paper Source Menu Network Layout Menu Quality Menu User Maintenance Menu Output/Control Utility Menu Calibration Device Control Management Settings Department ID Management Security License/Other Settings/Registration: Management Settings, Security > Key and Certificate Settings Key and Certificate Settings Last Updated: 04/04 2011 06:37:20 Register Key and Certificate Registered Key and Certificate Generate Key... Key Name Key Usage Certificate Example [SSL] example Delete Copyright CANON INC: 2011 All Rights Reserved Done Trusted sites | Protected Mode: Off 100%
![](images/9bd3c318ce6c258184aa406df51e48be31bc2324932410e95b9f612056b72179.jpg)

NOTE

About [Delete]

\- [Delete] is displayed only when the key is not specified as the default key.

2

Click [OK]. → The selected key and its certificate are deleted. ![](images/fa80eefeed03a1b8599a26083e083ff270f53400f119701c6261174b29cded85.jpg)
text_image Message from webpage Are you sure you want to delete the key and certificate? OK Cancel
0258-0KX Set CA certificates needed by the server in order to use SSL server communication. See the following sections. > "Displaying the [CA Certificate Settings] Page in the Remote UI" > "Installing CA Certificate Files on the Printer" > "Registering CA Certificates in the Printer" "Checking CA Certificates" > "Deleting CA Certificates" ![](images/09f488152c576a00f46bb9ff74b791a31c500120ca2fc17aab71c9ca919d8de3.jpg)

IMPORTANT

Number of CA Certificates that can be Registered/Installed

Registered: 4 Installed: 2 If you cannot register or install one, delete unnecessary keys and certificates.

Displaying the [CA Certificate Settings] Page in the Remote UI

0258-0KY

1

Start the Remote UI, and then log in as Administrator. > "Starting the Remote UI"

2

Click [Settings/Registration]. ![](images/0c989159a4d0372d528bb080295745712196df2042ddd721723c0652c22becf5.jpg)
text_image Remote UI Portal: LBPXXXX: LBPXXXX - Windows Internet Explorer Favors Suggested Sites Web Slice Gallery Remote UI Portal: LBPXXXX: LBPXXXX Device Name: LBPXXXX Product Name (Serial No.): LBPXXXX Location: Login User: System Manager Log Out Language English Mail to System Manager Last Updated: 29/05 2012 10:03:42 Device Basic Information Device Status The printer is ready Error Information There is no error. Consumables Information Paper Information Paper Source Remaining Paper Paper Size Paper Type Multi-Purpose Tray None A4 Free (Mixed Types) Drawer 1 Loaded A4 Free (Mixed Types) Remaining Toner Item Name Remaining Toner Cyan Toner 16-100% Status Monitor/Cancel Settings/Registration Basic Tools Box Direct Print Management Tools Service Management Service

3

Select [Security] from the [Management Settings] menu. ![](images/3ff00e43f259eb54dd6f026f65d9789cd19553899ee0cceed3f755e8e9640784.jpg)
text_image Remote UE Settings/Registration: LBPXIII: LBPXIII - Windows Internet Explorer http:// Favonites Suggested Sites Web Slice Gallery Remote UI Settings/Registration: LBPXIII: LBPXIII LBPXIII/LBPXIII/ To Portal Login User: System Manager Log Out Settings/Registration Mail to System Manager Preferences Control Menu Paper Source Menu Network Layout Menu Quality Menu User Maintenance Menu Output/Control Utility Menu Calibration Device Control Management Settings Department ID Management Security License/Other Settings/Registration: Management Settings: Security Security Last Updated: 11/04/2011 12:54:15 Security Management Settings Remote UI Settings Key and Certificate Settings CA Certificate Settings IPSec Settings Display Job History IP Address Filter IPv4 Address: TX Filter IPv4 Address: RX Filter IPv5 Address: TX Filter IPv6 Address: RX Filter MAC Address Filter TX Filter RX Filter Internet | Protected Mode On

4

Click [CA Certificate Settings].

![](images/6a27184041ed9fb2519093f69a6b1c0f09b639c283900cbb732df341b5696759.jpg)
text_image Remote UI Settings/Registration: LBP7680C / LBP7680C - Windows Internet Explorer http://192.168.1.225/sememsi.cgi File Edit View Favorites Tools Help Favorites Remote UI Settings/Registration: LBP7680C: LBP... I-SENSYS LBP7680C / LBP7680C / To Portal Login User: System Manager Log Out Settings/Registration Mail to System Manager Preferences Control Menu Paper Source Menu Network Layout Menu Quality Menu User Maintenance Menu Output/Control Utility Menu Calibration Device Control Management Settings Department ID Management Security License/Other Settings/Registration: Management Settings: Security Security LastUpdated 04/04 2011 03:57:16 Security Management Settings Remote UI Settings Key and Certificate Settings CA Certificate Settings IP Sec Settings Display Job History IP Address Filter IPv4 Address: TX Filter IPv4 Address: RX Filter IPv6 Address: TX Filter IPv6 Address: RX Filter MAC Address Filter TX Filter RX Filter Done Internet | Protected Mode: Off 100%
0258-0L0

1

Click [Register CA Certificate...].

![](images/48bbc5fc5688654eab67040528dba8b8bf5eeb59f386ec3de5986cca7c07e443.jpg)
text_image Remote US Settings/Registration: LBP7680C: LBP7680C - Windows Internet Explorer https://192.168.1.225/camrange.cgi File Edit View Favorites Tools Help Favorites Remote US Settings/Registration: LBP7680C: LBP... I-SEN5YS LBP7680C / LBP7680C / To Portal Login User: System Manager Log Out Settings/Registration Mail to System Manager Preferences Control Menu Paper Source Menu Network Layout Menu Quality Menu User Maintenance Menu Output/Control Utility Menu Calibration Device Control Management Settings Department ID Management Security License/Other Settings/Registration: Management Settings, Security > CA Certificate Settings CA Certificate Settings Last Updated: 04/04 2011.06:30:34 Register CA Certificate... Registered CA Certificate Issue Destination Issuer Express C

2

Click [Install...].

![](images/38411db403a34a9ab69f1e895a4f4c490713c227b48b8cedc40f60790c2eff07.jpg)
text_image Remote UB Settings/Registration: LBP7680C / LBP7680C - Windows Internet Explorer https://192.168.1.225/camnageszgl?ActionsuGET_KEYREG File Edit View Favorites Tools Help Favorites Remote UB Settings/Registration: LBP7680C / LBP... I-SENSYS LBP7680C / LBP7680C / Settings/Registration To Portal Login User: System Manager Log Out Mail to System Manager Preferences Control Menu Paper Source Menu Network Layout Menu Quality Menu User Maintenance Menu Output/Control Utility Menu Calibration Device Control Management Settings Department ID Management Security License/Other Settings/Registration: Management Settings: Security > CA Certificate Settings > Register CA Certificate Register CA Certificate Last Updated: 04/04 2011 06:40:24 Installed CA Certificate Install File Name Copyright CANON INC: 2011 All Rights Reserved Done Trusted sites | Protected Mode: Off 100%

3

Specify the location of the CA certificate file.

Either select the CA certificate file by clicking [Browse...], or enter the location where CA certificate file is stored. ![](images/12f5aa17aa9704cc21da842b8d58318069872c9ad6c94767a480eeb0e0e5080d.jpg)
text_image Remote UB Settings/Registration: LBP7680C / LBP7680C - Windows Internet Explorer https://192.168.1.225/csmemage.cgi?Actions=GET_KEYINST File Edit View Favorites Tools Help Favorites Remote UB Settings/Registration: LBP7680C / LBP... I-SENSYS LBP7680C / LBP7680C / To Portal Login User: System Manager Log Out Settings/Registration Mail to System Manager Preferences Control Menu Paper Source Menu Network Layout Menu Quality Menu User Maintenance Menu Output/Control Utility Menu Calibration Device Control Management Settings Department ID Management Security License/Other Settings/Registration: Management Settings: Security > CA Certificate Settings > Register CA Certificate > Install CA Certificate Last Updated: 04/04 2011 06:41:02 Specify the file path of the CA certificate to install. Click [Browse] to select a file. Start Installation Cancel Install CA Certificate File Path: Browse... Copyright CANON INC: 2011 All Rights Reserved Done Trusted sites | Protected Mode: Off 100%

4

Click [Start Installation].

→ The CA file installation starts. ![](images/25a9f52b205e385415ffb94bc249b2970d25f5c0998fb3a66a5a06f7ef6d071b.jpg)
text_image Remote UB Settings/Registration: LBP7680C / LBP7680C - Windows Internet Explorer https://192.168.1.225/csmnages.cgi?Actions=GET_KEYNST File Edit View Favorites Tools Help Favorites Remote UB Settings/Registration: LBP7680C / LBP... L-SENSYS LBP7680C / LBP7680C / To Portal Login User: System Manager Log Out Settings/Registration Mail to System Manager Preferences Control Menu Paper Source Menu Network Layout Menu Quality Menu User Maintenance Menu Output/Control Utility Menu Calibration Device Control Management Settings Department ID Management Security License/Other Settings/Registration: Management Settings: Security > CA Certificate Settings > Register CA Certificate > Install CA Certificate Last Updated: 04/04 20/11 06:41:02 Specify the file path of the CA certificate to install: Click [Browse] to select a file. Start Installation Cancel Install CA Certificate File Path: C:\Users\user\G7\Desktop\Example.cer Browse... Copyright CANON INC: 2011 All Rights Reserved Done Trusted sites | Protected Mode Off 100%
To enable the printer to use the CA certificate installed on the printer, after the CA certificate installation is complete, refer to "Registering CA Certificates in the Printer" and register the CA certificate in the printer. 0258-0L1

1

Click [Register CA Certificate...].

![](images/96d10b2b68a6284614912d39b073cec1eda7f2bd70632155824861a7358949b5.jpg)
text_image Remote UB Settings/Registration: LBP7680C / LBP7680C - Windows Internet Explorer https://192.168.1.225/camnage.cgi File Edit View Favorites Tools Help Favorites Remote UB Settings/Registration: LBP7680C / LBP... I-SENSYS LBP7680C / LBP7680C / To Portal Login User: System Manager Log Out Settings/Registration Mail to System Manager Preferences Control Menu Paper Source Menu Network Layout Menu Quality Menu User Maintenance Menu Output/Control Utility Menu Calibration Device Control Management Settings Department ID Management Security License/Other Settings/Registration: Management Settings, Security > CA Certificate Settings CA Certificate Settings Last Updated: 04/04 2011 06:30:34 Register CA Certificate... Registered CA Certificate Issue Destination Issuer Expires C=US, O=VenSign, Inc... C=US, O=VenSign, Inc... 02/08 Delete OU=Class 3 Public Primary OU=Class 3 Public Primary 2028 Certification Authority Certification Authority Copyright CANON INC: 2011 All Rights Reserved Done ✓ Trusted sites | Protected Mode Off 100%

2

Click [Register].

→ The CA file registration begins. ![](images/e9b04ded9bb8fc78ca9f9e03f62c1fe5ae85fd94e7415b32c38a4301eb89eb21.jpg)
text_image Remote UB Settings/Registration: LBP7680C / LBP7680C - Windows Internet Explorer https://192.168.1.225/csmenage.cgi?Actions=GET_KEY#G File Edit View Favorites Tools Help Favorites Remote UB Settings/Registrations: LBP7680C / LBP... L-SEN/SYS LBP7680C / LBP7680C / To Portal Login User: System Manager Log Out Settings/Registration Mail to System Manager Preferences Control Menu Paper Source Menu Network Layout Menu Quality Menu User Maintenance Menu Output/Control Utility Menu Calibration Device Control Management Settings Department ID Management Security License/Other Settings/Registration Management Settings Security > CA Certificate Settings > Register CA Certificate Register CA Certificate Last Updated 04/04 2011 06:43:01 Installed CA Certificate Install File Name EXAMPLE CER Register Delete Copyright CANON INC: 2011 All Rights Reserved Done Trusted sites | Protected Mode Off 100%
0258-0L2

1

Click the icon of the CA certificate to be confirmed. ![](images/02a7eb4f91f7c51edc2b6db7ba512e22e4e4365966e0ac95d567adc5629606a4.jpg)
text_image Remote UB Settings/Registration: LBP7680C: LBP7680C - Windows Internet Explorer https://192.168.1.225/csmnage.cgi File Edit View Favorites Tools Help Favorites Remote UB Settings/Registration: LBP7680C: LBP... I-SENSYS LBP7680C / LBP7680C / To Portal Login User: System Manager Log Out Settings/Registration Mail to System Manager Preferences Control Menu Paper Source Menu Network Layout Menu Quality Menu User Maintenance Menu Output/Control Utility Menu Calibration Device Control Management Settings Department ID Management Security License/Other Settings/Registration: Management Settings: Security > CA Certificate Settings CA Certificate Settings Last Updated: 04/04 2011 06:30:34 Register CA Certificate... Registered CA Certificate Issue Destination Issuer Express C=US, O=VenSign, Inc.. C=US, O=VenSign, Inc.. 02/08 OU=Class 3 Public Primary OU=Class 3 Public Primary Certification Authority 2028 Delete Copyright CANON INC: 2011 All Rights Reserved Done. ✓ Trusted sites | Protected Mode: ON ✓ 100%

2

If you want to verify the certificate, click [Certificate Verification]. → The verification result is displayed. ![](images/725e91f6debec083879e3b0602d7c4518d6a9a6e47355b8ae99029cea8f07e7f.jpg)
text_image Remote UB Settings/Registration: LBP7680C / LBP7680C - Windows Internet Explorer https://192.168.1.225/camage.org?Actions=GET_KEYDETAIL&KeyIDv1 File Edit View Favorites Tools Help Favorites Remote UB Settings/Registration: LBP7680C: LBP... L-SEN-SYS LBP7680C / LBP7680C / To Portal Login User: System Manager Log Out Settings/Registration Mail to System Manager Preferences Control Menu Paper Source Menu Network Layout Menu Quality Menu User Maintenance Menu Output/Control Utility Menu Calibration Device Control Management Settings Department ID Management Security License/Other Settings/Registration, Management Settings, Security > CA Certificate Settings > Certificate Details Certificate Details Last Updated: 04/04 2011 06:44:45 Certificate Verification Certificate Details Version: X 509v1 Serial Number: 70BAE41D10092934B638CA7B03CCBABF Signature Algorithm: MD2RSA Issue Destination: C=US, O=VeriSign, Inc., OU=Class 3 Public Primary Certification Authority Validity Start Date: 29 / 1 1996 Validity End Date: 2 / 8 2028 Issuer: C=US, O=VeriSign, Inc., OU=Class 3 Public Primary Certification Authority Public Key: RSA 1024bit Certificate Thumbprint: 742C 3192 E607 E424 EB45 4954 2BE1 BBCS 3E61 74E2 Done Trusted sites | Protected Mode Off 100%
Check the verification result, and then click [Back to Certificate Details]. 0258-0L3

1

Click [Delete].

![](images/943aa2b5bbb1157765ac416f24d3c98aecd87acf75649291f34d490447484b80.jpg)
text_image Remote UB Settings/Registration: LBP7680C: LBP7680C - Windows Internet Explorer https://192.168.1.225/csmengage.cgi File Edit View Favorites Tools Help Favorites Remote UB Settings/Registration: LBP7680C: LBP... I-SENSYS LBP7680C / LBP7680C / To Portal Login User: System Manager Log Out Settings/Registration Mail to System Manager Preferences Control Menu Paper Source Menu Network Layout Menu Quality Menu User Maintenance Menu Output/Control Utility Menu Calibration Device Control Management Settings Department ID Management Security License/Other Settings/Registration: Management Settings: Security > CA Certificate Settings CA Certificate Settings Last Updated: 04/04 2011 06:39:34 Register CA Certificate... Registered CA Certificate Issue Destination Issuer Express C=US, O=VenSign, Inc.. C=US, O=VenSign, Inc.. 02/08 Delete OU=Class 3 Public Primary OU=Class 3 Public Primary 2028 Certification Authority Certification Authority Copyright CANON INC: 2011 All Rights Reserved Done ✓ Trusted sites | Protected Mode: Off 100%

2

Click [OK].

→ The CA certificate is deleted. ![](images/26cb3d3ce3043989a2f299d5fa198652f360c7a0b7b218ffd3b94d954f7d5c7b.jpg)
text_image Message from webpage Are you sure you want to delete the CA Certificate? OK Cancel
0258-0L4 Specify settings in order to use the SSL encryption communication function with this printer. See the following sections. "Selecting Keys and Certificates" "Changing the Remote UI Settings" ![](images/d6b7d57c417ac521b75b637f389f8b00154528a30eb9d3f51591ead82e64f471.jpg)

NOTE

SSL encrypted communication function

This is a function that enables exchange of encrypted data between this printer and a computer when performing IPP printing in which data is printed via a network or when using the Remote UI in which you manage the printer with the Web browser. Using the SSL encrypted communication function achieves safer printing environments by preventing theft and falsification of data.

To perform SSL encrypted communication

A key pair (the public key for encryption and private key for decryption) is required. Registering the key pair in this printer and opening the public key to the users allows you to perform the following. - The users can encrypt data to send to the printer. - Only this printer can decrypt the encrypted data with the private key. In this printer, a certificate is also created when a key pair is created. The users can check information about the key with the certificate. 0258-0L5 Select keys and certificates used by SSL encrypted communication functions. ![](images/78260a3e6d7a68ad27cfcf24e0491eeed81e37d8616581e387242264fb7eaeae.jpg)

NOTE

When Selecting Keys and Certificates

A key and certificate need to be generated for encrypted SSL traffic. For more information, see "Setting Keys and Certificates."

About [Default Key Settings]

- [Default Key Settings] is only displayed when the key is not specified as use key. - To prevent keys in use from being changed, [Default Key Settings] is not displayed in the following cases. - [Use SSL] under [Remote UI Settings] is set to ON. - [SSL] under [TCP/IP Settings] is set to On for IPP printing. If you want to set the key as use key, first disable the above settings and then set the key as use key.

1

Start the Remote UI, and then log in as Administrator. > "Starting the Remote UI"

2

Click [Settings/Registration]. ![](images/80d6ad6c173f0121493676649b70eec8c5f484903939fdfe79e5b7de1d69235e.jpg)
text_image Remote UI Portal: LBPXXXX: LBPXXXX - Windows Internet Explorer http:// Favorites Suggested Sites Web Slice Gallery Remote UI Portal: LBPXXXX: LBPXXXX Device Name: LBPXXXX Product Name (Serial No.): LBPXXXX Location: Login User: System Manager Log Out Language English Mail to System Manager Last Updated: 29/05 2012 10:03:42 Device Basic Information Device Status The printer is ready. Error Information There is no error. Consumables Information Paper Information Paper Source Remaining Paper Paper Size Paper Type Multi-Purpose Tray None A4 Free (Mixed Types) Drawer 1 Loaded A4 Free (Mixed Types) Remaining Toner Item Name Remaining Toner Cyan Toner 16-100% Status Monitor/Cancel Settings/Registration Basic Tools Box Direct Print Management Tools Service Management Service

3

Select [Network] from the [Preferences] menu. ![](images/697bf3cba678efcb24b1dce7e7fb3af5eebe69f4509417963c50bcdf79bf813e.jpg)
text_image Remote UI Settings/Registration: LBP7680C; LBP7680C - Windows Internet Explorer File Edit View Favorites Tools Help Favorites Remote UI Settings/Registration: LBP7680C; UBP... Settings/Registration To Portal Login User: System Manager Log Out Mail to System Manager Preferences Control Menu Paper Source Menu Network Layout Menu Quality Menu User Maintenance Menu Output/Control Utility Menu Calibration Device Control Management Settings Department ID Management Security License/Other Settings/Registration Preferences Network Network LastUpdated 01/04 2011.10.32.38 Network TCP/IP Settings IPv4 Settings IPv6 Settings WING Configuration ARP/PING Settings FTP Settings LFD Print Settings RAW Print Settings IPP Print Settings WSD Print Settings HTTP Settings SSL Settings Proxy Settings Multicast Discovery Settings SNTP Settings NetWare Settings AppleTalk Settings ONIP Options Done Internet | Protected Mode: Off 100%

4

Click [TCP/IP Settings].

![](images/5291d6d959b70ee27d0f8ddf9a948f3332a09ff154e9fcfb0f47759d342a06b1.jpg)
text_image Remote UE Settings/Registration: LBP7680C; LBP7680C - Windows Internet Explorer http://192.168.1.225/netnetmetsi.cgi File Edit View Favorites Tools Help Favorites Remote UB Settings/Registration: LBP7680C; LBP... I.SENSYS LBP7680C / LBP7680C / Settings/Registration To Portal Login User: System Manager Log Out Mail to System Manager Preferences Control Menu Paper Source Menu Network Layout Menu Quality Menu User Maintenance Menu Output/Control Utility Menu Calibration Device Control Management Settings Department ID Management Security License/Other Settings/Registration: Preferences Network Network LastUpdated: 01G4 2011 10:32:38 Network TCP/IP Settings IPv4 Settings IPv6 Settings WINS Configuration ARPIPING Settings FTP Settings LPD Print Settings RAW Print Settings IPP Print Settings WSD Print Settings HTTP Settings SSL Settings Proxy Settings Multicast Discovery Settings SNTP Settings NetWare Settings AppleTalk Settings SNETP Settings Done Internet | Protected Mode: Off 100%

5

Click [Key and Certificate...] under [SSL Settings]. ![](images/ff3e8022c1306c205810db21b0108c0161c813f08d91aadf4cd3b59b5a15ea30.jpg)
text_image Remote UI Settings/Registration: LBP7680C: LBP7680C - Windows Internet Explorer https://192.166.1.225/mnttrpi@cgj File Edit View Favorites Tools Help Favorites Remote UI Settings/Registration: LBP7680C: LBP... WSD Print Settings Edit... Use WSD Printing: Off Use WSD Browsing: Off Use Multicast Discovery: Off HTTP Settings Edit... Use HTTP: On S.S.L. Settings Key and Certificate... Key and Certificate Settings: Set. Settings that use S.S.L. Done Trusted sites | Protected Mode: Off 100%

6

Select the key to use, and then click [Default Key Settings].

![](images/d1567027552334e55fe3211dccb2c324a8e570c1f8a357acd704725201c3ab58.jpg)
text_image Remote UI Settings/Registration: LBP7680C: LBP7680C - Windows Internet Explorer http://192.168.1.225/metsui.cgi/CSU/T:803374672 File Edit View Favorites Tools Help Favorites Remote UI Settings/Registration LBP7680C: LBP... I-SENSYS LBP7680C / LBP7680C / Settings/Registration To Portal Login User: System Manager Log Out Mail to System Manager Preferences Control Menu Paper Source Menu Network Layout Menu Quality Menu User Maintenance Menu Output/Control Utility Menu Calibration Device Control Management Settings Department ID Management Security License/Other Settings/Registration: Preferences Network > TCP/IP Settings > SSL Key and Certificate Settings SSL Key and Certificate Settings Last Updated 04/04 2011 07:04:11 Default Key Settings Registered Key and Certificate Select Key Name Key Usage Certificate Example [SSL] example Copyright CANON INC. 2011 All Rights Reserved Internet | Protected Mode: Off 100%
0258-0A7 Specify whether the SSL encrypted communication function should be used for the Remote UI.

1

Start the Remote UI, and then log in as Administrator. > "Starting the Remote UI"

2

Click [Settings/Registration]. ![](images/ffbb599c36e79d6dbafb91c5f535120baef93ea20e569893940634ee9ee41579.jpg)
text_image Remote UI Portal: LBPXXXXL: LBPXXXX - Windows Internet Explorer http:// Favonites Suggested Sites Web Slice Gallery Remote UI Portal: LBPXXXXL: LBPXXXX Device Name: LBPXXXXL Product Name (Serial No.): LBPXXXXL Location: Login User: System Manager Log Out Language English Mail to System Manager Last Updated: 29/05 2012 10:03:42 Device Basic Information Device Status The printer is ready. Error Information There is no error Consumables Information Paper Information Paper Source Remaining Paper Paper Size Paper Type Multi-Purpose Tray None A4 Free (Mixed Types) Drawer 1 Loaded A4 Free (Mixed Types) Remaining Toner Item Name Remaining Toner Cyan Toner 16-100% Status Monitor/Cancel Settings/Registration Basic Tools Box Direct Print Management Tools Service Management Service

3

Select [Security] from the [Management Settings] menu. ![](images/63750353be991e23db41516346860f0ac4e55b9cd526d07c416fe5fc4e24be22.jpg)
text_image Remote UI Settings/Registration: LBPXIII: LBPXIII - Windows Internet Explorer https:// Favonites Suggested Sites Web Slice Gallery Remote UI Settings/Registration: LBPXIII: LBPXIII To Portal Login User System Manager Log Out Settings/Registration Mail to System Manager Preferences Control Menu Paper Source Menu Network Layout Menu Quality Menu User Maintenance Menu Output/Control Utility Menu Calibration Device Control Management Settings Department ID Management Security License/Other Settings/Registration: Management Settings: Security Security Last Updated: 11/04/2011 12:54:15 Security Management Settings Remote UI Settings Key and Certificate Settings CA Certificate Settings IPSec Settings Display Job History IP Address Filter IPv4 Address: TX Filter IPv4 Address: RX Filter IPv5 Address: TX Filter IPv6 Address: RX Filter MAC Address Filter TX Filter RX Filter Internet | Protected Mode On

4

Click [Remote UI Settings].

![](images/26d2066bc4cce3d5560c632d319354537d2b5a4b7d7ac6072f43b9c9ed4b342c.jpg)
text_image Remote UI Settings/Registration: LBP7680C / LBP7680C - Windows Internet Explorer File Edit View Favorites Tools Help Favorites Remote UI Settings/Registration: LBP7680C / LBP... Settings/Registration Mail to System Manager Preferences Control Menu Paper Source Menu Network Layout Menu Quality Menu User Maintenance Menu Output/Control Utility Menu Calibration Device Control Management Settings Department ID Management Security License/Other Settings/Registration: Management Settings: Security Security Last Updated: 04/04 2011 03:57:16 Security Management Settings Remote UI Settings Key and Certificate Settings CA Certificate Settings IPSec Settings Display Job History IP Address Filter IPv4 Address: TX Filter IPv4 Address: RX Filter IPv6 Address: TX Filter IPv6 Address: RX Filter MAC Address Filter TX Filter RX Filter Done Internet | Protected Mode: Off 100%

5

Click [Edit...].

![](images/d544e51a4f14ec92d01c57254596e3e0b3f41658f5515f3d554185fbd0db0eff.jpg)
text_image Remote UI Settings/Registration: LBP7680C / LBP7680C - Windows Internet Explorer File Edit View Favorites Tools Help Favorites Remote UI Settings/Registration: LBP7680C / LBP7680C I-SENSYS LBP7680C / LBP7680C / To Portal Login User: System Manager Log Out Settings/Registration Mail to System Manager Preferences Control Menu Paper Source Menu Network Layout Menu Quality Menu User Maintenance Menu Output/Control Utility Menu Calibration Device Control Management Settings Department ID Management Security License/Other Settings/Registration Management Settings Security > Remote UI Settings Remote UI Settings Last Updated 04/04 2011 07:36:15 Remote UI Settings Edit... Use SSL: Off Copyright CANON INC. 2011 All Rights Reserved Done Internet | Protected Mode: Off 100%

6

Change the Remote UI settings.

(1) Select the [Use SSL] check box. If you clear the check box, the remote UI cannot use SSL encrypted communication. (2) Click [OK]. ![](images/67ea83f2c4ae5aba0fec5917a1885f9848b9127515d4d7e3250bb566e08a2eab.jpg)
text_image Remote UI Settings/Registration: LBP7680C: LBP7680C - Windows Internet Explorer http://192.168.1.225/secsuieEdit.cgi File Edit View Favorites Tools Help Favorites Remote UI Settings/Registration: LBP7680C: LBP... I.SENSYS LBP7680C / LBP7680C / To Portal Login User: System Manager Log Out Settings/Registration Mail to System Manager Preferences Control Menu Paper Source Menu Network Layout Menu Quality Menu User Maintenance Menu Output/Control Utility Menu Calibration Device Control Management Settings Department ID Management Security License/Other Settings/Registration: Management Settings, Security > Remote UI Settings > Edit Remote UI Settings Edit Remote UI Settings Last Updated: 04/04 2011 07:07:13 The settings will be changed as follows. (Changes effective after the main power is turned OFF and ON.) (2) OK Cancel Remote UI Settings Use SSL Copyright CANON INC. 2011 All Rights Reserved Done Internet | Protected Mode: Off 100%
![](images/4d704ebe553f3f68d7caf1fb7d63af99d53ad68abf347133b8a4ad788c6387c1.jpg)

IMPORTANT

If you cannot set [Use SSL]

When a key is not selected for SSL, [Use SSL] cannot be checked. Setting Keys and Certificates Selecting Keys and Certificates → After performing a hard reset or restarting the printer, the settings are effective. ![](images/721307750ef6830b3ea1a460144d76b38d2f234aa79f7cc357fde6a0b99c398a.jpg)

NOTE

To perform a hard reset

You can perform a hard reset using the following procedure. 1. Click [Settings/Registration]. 2. Select [Device Control] from the [Output/Control] menu. 3. Select [Hard Reset], then click [Execute].

Setting the IPSec Encryption Communication Function (LBP7680Cx Only)

0258-0L9 Specify the settings for using IPSec encryption with the printer. See the following sections, depending on the items you wish to set. \- Registering/Editing Security Policies In order to use the IPSec encryption communication function, it is necessary to set a security policy in advance. Displaying the [Key and Certificate Settings] Page in the Remote UI > Adding a New Security Policy Editing Security Policies \- Enabling and Disabling IPSec Encryption Communication Function Settings > Displaying the [Key and Certificate Settings] Page in the Remote UI Enabling IPSec Encryption Communication ![](images/79bceafe05a1d0efd4e552301b92222c4032940ff36691555afba9dcd1ffdadb.jpg)

NOTE

IPSec Encryption Communication

IPSec is a protocol that maintains security by protecting IP packets transmitted over the IP network from threats such as theft, falsification, spoofing. Its advantage is that it can be used to add a security function to the basic Internet Protocol (IP) without being dependent on software or network configuration.

Communication Mode

Of the IPSec communication modes, the printer supports only the transport mode. Certificates and encryption can only be applied to the data parts of IP packets. ![](images/453a6405ea93986ac76caed685435ae53c72e8ea2ccb8abc1dd19910e815d2fa.jpg)

IMPORTANT

Packets that are not applied by IPSec encrypted communication The following packets are not applied by IPSec encrypted communication. IKE(IPv4/IPv6) - UDP port number: 500 - Loopback address - IPv4 address: 127.0.0.1 - IPv6 address: ::1 - Multicast address - IPv4 address: 244.0.0.0 /4 - IPv6 address: FF00:: /8 - Broadcast address - IPv4 address: 255.255.255.255

Displaying the [IPSec Settings] Page on the Remote UI

0258-0LA

1

Start the Remote UI, and then log in as Administrator. > "Starting the Remote UI"

2

Click [Settings/Registration]. ![](images/9810b581c2371109dd54200c0ada78f2dfb7b8e09622d8ca5378a4785430c7fe.jpg)
text_image Remote UI Portal: LBPXXXX: LBPXXXX - Windows Internet Explorer Favors Suggested Sites Web Slice Gallery Remote UI Portal: LBPXXXX: LBPXXXX Device Name: LBPXXXX Product Name (Serial No.): LBPXXXX Location: Login User: System Manager Log Out Language English Mail to System Manager Last Updated: 29/05 2012 10:03:42 Device Basic Information Device Status The printer is ready Error Information There is no error Consumables Information Paper Information Paper Source Remaining Paper Paper Size Paper Type Multi-Purpose Tray None A4 Free (Mixed Types) Drawer 1 Loaded A4 Free (Mixed Types) Remaining Toner Item Name Remaining Toner Cyan Toner 16-100% Status Monitor/Cancel Settings/Registration Basic Tools Box Direct Print Management Tools Service Management Service

3

Select [Security] from the [Management Settings] menu. ![](images/59ab91765046acddb83bd68ec5b1a3b181ed3b07fe6282bc473050a4ade8b030.jpg)
text_image Remote UI Settings/Registration: LBPXIII: LBPXIII - Windows Internet Explorer https:// Favorites Suggested Sites Web Slice Gallery Remote UI Settings/Registration: LBPXIII: LBPXIII LBPXIII/LBPXIII/ To Portal Login User System Manager Log Out Settings/Registration Mail to System Manager Preferences Control Menu Paper Source Menu Network Layout Menu Quality Menu User Maintenance Menu Output/Control Utility Menu Calibration Device Control Management Settings Department ID Management Security License/Other Settings/Registration: Management Settings: Security Security Last Updated: 11/04/2011 12:54:15 Security Management Settings Remote UI Settings Key and Certificate Settings CA Certificate Settings IPSec Settings Display Job History IP Address Filter IPv4 Address: TX Filter IPv4 Address: RX Filter IPv5 Address: TX Filter IPv6 Address: RX Filter MAC Address Filter TX Filter RX Filter Internet | Protected Mode On 100%

4

Click [IPSec Settings].

![](images/8d2bafa7fed5f1802609410b9867fbae24c3448cf5db22ee8bba49e2536d1249.jpg)
text_image Remote UE Settings/Registration: LBP7680C / LBP7680C - Windows Internet Explorer http://192.168.1.225/sccemens.org File Edit View Favorites Tools Help Favorites Remote UE Settings/Registrations LBP7680C: LBP... I.SENSYS LBP7680C / LBP7680C / To Portal Login User: System Manager Log Out Settings/Registration Mail to System Manager Preferences Control Menu Paper Source Menu Network Layout Menu Quality Menu User Maintenance Menu Output/Control Utility Menu Calibration Device Control Management Settings Department ID Management Security License/Other Settings/Registration: Management Settings: Security Security LastUpdated: 04/04 2011 03:57:16 Security Management Settings Remote UI Settings Key and Certificate Settings CA Certificate Settings IPSec Settings Display Job History IP Address Filter IPv4 Address: TX Filter IPv4 Address: RX Filter IPv6 Address: TX Filter IPv6 Address: RX Filter MAC Address Filter TX Filter RX Filter Done Internet | Protected Mode: Off 100%
0258-0LC ![](images/7b6c18c0fda3b5a6de0b47ab2a563214873e7d163ffea875e3d836e719659bdd.jpg)

NOTE

Number of security policies that can be registered

You can register up to 10. If you cannot register one, delete unnecessary security policies.

1

Click [IPSec Policy List...] on the [IPSec Settings] page. ![](images/75c0a7cc089632741a9cc0e5e8706ebf03556f57a6f53c3bbaf05af9f81f33d3.jpg)
text_image Remote UE Settings/Registration: LBP7680C: LBP7680C - Windows Internet Explorer http://192.168.1.225/ipec.cgi File Edit View Favorites Tools Help Favorites Remote UE Settings/Registrations LBP7680C: LBP... I-SENSYS LBP7680C / LBP7680C / To Portal Login User: System Manager Log Out Settings/Registration Mail to System Manager Preferences Control Menu Paper Source Menu Network Layout Menu Quality Menu User Maintenance Menu Output/Control Utility Menu Calibration Device Control Management Settings Department ID Management Security License/Other Settings/Registration: Management Settings: Security > IPSec Settings IPSec Settings Last Updated 04/04 2011 07:09:30 IPSec Settings IPSec Policy List... Edit... Use IPSec: Off Receive Non-Policy Packets: Allow Copyright CANON INC. 2011 All Rights Reserved Done Internet | Protected Mode: Off 100%

2

Click [Register IPSec Policy...]. ![](images/ff391d4fba7b1ec0b9034844d7d68a5ca07d17d2538bf43adac5aa95ab21290f.jpg)
text_image Remote UI Settings/Registration: LBP7680C: LBP7680C - Windows Internet Explorer File Edit View Favorites Tools Help Favorites Remote UI Settings/Registration: LBP7680C: LBP... Settings/Registration Mail to System Manager Preferences Control Menu Paper Source Menu Network Layout Menu Quality Menu User Maintenance Menu Output/Control Utility Menu Calibration Device Control Management Settings Department ID Management Security License/Other Settings/Registration: Management Settings Security > IPSec Settings > IPSec Policy List IPSec Policy List Last Updated 04/04 2011 07.09.27 The settings will be changed as follows. (Changes effective after the main power is turned OFF and ON.) Register IPSec Policy... IP Sec Policy List Priority Policy Name Status 1 2 3 4 5 6 7 8 9 Done Internet | Protected Mode: Off

3

Enter the name of the new security policy to be registered.

Up to 24 alphanumeric characters can be entered. ![](images/f83ad4fd804ad85117669008a5a7cceb96ba8c26d66cadb450a91b2b82ccdd20.jpg)
text_image Remote UB Settings/Registration: LBP7680C / LBP7680C - Windows Internet Explorer http://892.168.1.225/policyget.cgi\CmdTypes:Regist&CSUTs(738457003) - File Edit View Favorites Tools Help Favorites Remote UB Settings/Registration: LBP7680C: LBP... L.SENSYS LBP7680C / LBP7680C / Settings/Registration Mail to System Manager Preferences Control Menu Paper Source Menu Network Layout Menu Quality Menu User Maintenance Menu Output/Control Utility Menu Calibration Device Control Management Settings Department ID Management Security License/Other Settings/Registration: Management Settings: Security > IPSec Settings > IPSec Policy List > Register IPSec Policy Registrar Policy Last Updated: 04/04 20/11 07:10:00 The settings will be changed as follows. (Changes effective after the main power is turned OFF and ON.) OK Cancel Offline Settings Policy Name (Max 24 characters) Enable Policy Selector Settings Local Address Settings Local Address: All IP Addresses IPv4 Address IPv6 Address IPv4 Manual Settings Done Internet | Protected Mode: Off 100%

4

Select the [Enable Policy] check box.

If the check box is cleared, the security policy cannot be used. ![](images/6dade7996572222c858c42c296a7c85f455dcb66c9fef203c5bb4e6cdccb717f.jpg)
text_image Remote UB Settings/Registration: LBP7680C: LBP7680C - Windows Internet Explorer File Edit View Favorites Tools Help Favorites Remote UB Settings/Registration: LBP7680C: LBP... I-SENSYS LBP7680C / LBP7680C / Settings/Registration Mail to System Manager Preferences Control Menu Paper Source Menu Network Layout Menu Quality Menu User Maintenance Menu Output/Control Utility Menu Calibration Device Control Management Settings Department ID Management Security License/Other Settings/Registration: Management Settings Security > IPSec Settings > IPSec Policy List > Register IPSec Policy Register Policy Last Updated: 04/04 2011 07:10:00 The settings will be changed as follows. (Changes effective after the main power is turned OFF and ON.) OK Cancel Policy Settings Policy Name example (Max 24 characters) Enable Policy Selector Settings Local Address Settings Local Address: All IP Addresses IPv4 Address IPv6 Address IPv4 Manual Settings Internet | Protected Mode: Off 100%

5

Set [Local Address Settings] and [Remote Address Settings]. ![](images/877d3ac9015c0e3ffe21d2b54207cac9e80788482daab4d91ce978be05fb1bae.jpg)
text_image Remote U5 Settings/Registration: LBP7680C: LBP7680C - Windows Internet Explorer http://192.168.1.225/policygst.cgi\CmdTypes:Regist&CSUT\v170457003 File Edit View Favorites Tools Help Favorites Remote U5 Settings/Registration: LBP7680C:LBP... Output/Control Utility Menu Calibration Device Control Management Settings Department ID Management Security License/Other Policy Settings Policy Name example (Max 24 characters) Enable Policy Selector Settings Local Address Settings Local Address: All IP Addresses IPv4 Address IPv6 Address IPv4 Manual Settings IPv6 Manual Settings Addresses to Set Manually: *To enter multiple IP addresses at the same time, use a hyphen as follows: xxx.xxx.xxx.xxx xxx.xxx.xxx.xxx *To specify the IPv6 prefix length, enter the IP address as follows: xxxx.xxxx.xxxx.xxxx.xxxx.xxxx.xxxx.xxxx/xix (Prefix Length: 0-128) Subnet Settings: Remote Address Settings Remote Address: All IP Addresses IPv4 Address IPv6 Address IPv4 Manual Settings IPv6 Manual Settings Addresses to Set Manually: *To enter multiple IP addresses at the same time, use a hyphen as follows: xxx.xxx.xxx.xxx- xxx.xxx.xxx.xxx *To specify the IPv6 prefix length, enter the IP address as follows: xxxx.xxxx.xxxx.xxxx.xxxx.xxxx.xxxx.xxxx/xix (Prefix Length: 0-128) Subnet Settings: Done Trusted sites | Protected Mode Off 100%
The packets setting the security policy are specified as follows.
TransmissionPackets Applying the Security Policy
RXPackets with "destination IP addresses" that match IP addresses specified here
[Local Address]
TXPackets with "departure IP addresses" that match IP addresses specified here
[Remote Address]RXPackets with "departure IP addresses" that match IP addresses specified here
TXPackets with "destination IP addresses" that match IP addresses specified here

When [IPv4 Manual Settings]/[IPv6 Manual Settings] is selected

Enter the IP address in the [Addresses to Set Manually] field. You can enter the IP address in the following way.
IP Address Entry ExampleIP Address Entry Method
192.168.0.1-192.168.0.10fe80::1000-fe80::2000If you want to enter the IP addresses of consecutive numbers, place "-" (hyphen) between the address of the smallest number and that of the largest number.
192.168.0.0/16fe80::0000/64In order to specify the subnet range (prefix length), enter a "/" (slash) after the normal IP address symbol, then enter another prefix length (maximum 32 for IPv4 and maximum 128 for IPv6).
![](images/f7845e349c1029701fd91afd2d133cde9c01c7e7efbbc594e8056eb20d77669c.jpg) Set [Port Settings]. ![](images/41c3220d116a866373a016af995b62ba00aa0ffdc6b12bed77daf6471e8340ab.jpg)
text_image Remote UI Settings/Registration: LBP780C: LBP780C - Windows Internet Explorer http://192.168.1.225-policypet.cgi?CmdTypesReginit&CSUTa177845700 File Edit View Favorites Tools Help Favorites Remote UI Settings/Registration: LBP780C: LBP... Port Settings Local Port: All Ports Single Port (1-65535) Remote Port: All Ports Single Port (1-65535) IKE Settings IKE Mode Main Aggressive AUTH Method: Pre-Shared Key Method: Shared Key Settings. Digital Signature Method: Key Not set. Name: Key and Certificate... Authentication/Encryption Algorithm Auto Authentication: SHA1 and MDS - Encryption: SOES-CBC and AES-CSC - DH Group: Group 2 (1024) - Done Internet | Protected Mode Off 100%
The packets setting the security policy are specified as follows.
TransmissionPackets Applying the Security Policy
[Local Port]RX Packets with"destination ports" that match IP addresses specified here
TX Packets with"departure ports" that match IP addresses specified here
[Remote Port]RX Packets with"departure ports" that match IP addresses specified here
TX Packets with"destination ports" that match IP addresses specified here

If you want to select all ports

Select the [All Ports] check box.

If you want to select a single port

(1) Select the [Single Port] check box. (2) Enter the port number (0 to 65535).

7

Set [IKE Mode] and [AUTH Method] under [IKE Settings].

![](images/9370fbd94436e36ceb120071c09e14813ebbf76936607f4678b028258e54061d.jpg)
text_image Remote UB Settings/Registration: LBP768DC: LBP768DC - Windows Internet Explorer http://82.168.1.225/policyget.cgi/CmaTypes/RegistbCSUTv1738457061 File Edit View Favorites Tools Help Favorites Remote UB Settings/Registration: LBP768DC: LBP... Port Settings Local Port: All Ports Single Port (1-66535) Remote Port: All Ports Single Port (1-66535) IKE Settings IKE Mode: Main Aggresses AUTH Method: Pre-Shared Key Method: Shared Key Settings. Digital Signature Method: Key Name Not set. Key and Certificate... Authentication/Encryption Algorithm: Auto Authentication: SHA1 and MDS - Encryption: XOES-CBC and AES-CBC - DH Group: Group 2 (1024) - Done Internet | Protected Mode Off 100%
(1) Select [Main] or [Aggressive] under [IKE Mode]. (2) Select [AUTH Method].

If you want to specify [Pre-Shared Key Method]

a. Select the [Pre-Shared Key Method] check box. b. Click [Shared Key Settings...]. c. Enter the name of the shared key (up to 24 characters), and click [OK].

If you want to specify [Digital Signature Method]

a. Select the [Digital Signature Method] check box. b. Click [Key and Certificate...]. c. Select the key to use, and then click [Default Key Settings]. ![](images/af372f24254bbdce6cebf8dfe9a284ffb14c3b2b3524079ffb5ca50ab9ff7c64.jpg)

NOTE

[AUTH Method] Settings

\- In order to set [Pre-Shared Key Method], the SSL encrypted communication function must be enabled. > "Setting the SSL Encryption Communication Function" \- We recommend that network settings be performed by the network administrator. > "Setting Keys and Certificates"

8

Set [Authentication/Encryption Algorithm] under [IKE Settings].

![](images/d2b27306a4bbe13e76c7281f7db01358a5779f23ed5f70dea0e9aa2753df3c84.jpg)
text_image Remote Ub Settings/Registration: LBP7680C: LBP7680C - Windows Internet Explorer http://82.168.1.225/policyregt.cgi?CmdTypes=RegimB/CSUTa1778457001 File Edit View Favorites Tools Help Favorites Remote Ub Settings/Registration: LBP7680C: LBP... Port Settings Local Port: All Ports Single Port (1-6653S) Remote Port: All Ports Single Port (1-6653S) IKE Settings IKE Mode: Main Aggressive AUTH Method: Pre-Shared Key Method: Shared Key Settings. Digital Signature Method: Key Not set. Name: Key and Certificate... Authentication/Encryption Algorithm: Auto Authentication: SHA1 and MD5 - Encryption: 30ES-CBC and AES-CBC - DH Group: Group 2 (1024) - Done Internet | Protected Mode Off 100%

When setting automatically

Select the [Auto] check box.

When setting manually

Set the following items.
[Authentication] Selectthe authentication algorithm from [SHA1], [MD5] or [SHA1 and MD5].
[Encryption] Select theencryption algorithm from [3DES-CBC], [AES-CBC] or [3DES-CBC and AES-CBC].
[DH Group] Select theDiffie-Hellman group from [Group 1 (768)], [Group 2 (1024)] or [Group 14 (2048)].

9

Set the PFS for [IPSec Network Settings] and [Validity].

![](images/8c724397419170e7d029bf7e488c975ff34f0b9ab508f465f709dda4069972fc.jpg)
text_image Remote UE Settings/Registration: LBP7680C: LBP7680C - Windows Internet Explorer http://192.168.1.225-policyrgst.cgi/CmsITypes:Regust&CSUTz1778(57003) File Edit View Favorites Tools Help Favorites Remote UE Settings/Registration: LBP7680C: LBP... (1) Use PFS Validity: ✓ 480 minutes (1- Specify 66535) by Time Specify 1 MB (1-65535) by Size Authentication/Encryption Algorithm: ● Auto ESP ESP SHA1 and MD5 Authentication: ESP 3DES-CBC and AES-CBC Encryption AH AH SHA1 and MD5 Authentication: Connection Mode Transport Copyright CANON INC. 2011 All Rights Reserved Done Internet | Protected Mode: Off 100%
(1) When using PFS, select the [Use PFS] check box. (2) Set [Validity].

When specifying by time

a. Select the [Specify by Time] check box. b. Enter the time (1 to 65535 minutes).

When specifying by size

a. Select the [Specify by Size] check box. b. Enter the size (1 to 65535 MB). ![](images/04586989ba5a1d608e85bdedf7baed08b301dbd845ba0f7d4852c02fd5e39812.jpg)

NOTE

About PFS

If PFS is used, the key generation process becomes complex. Even assuming one key is deciphered, it does not mean that later keys will be deciphered easily.

10

Set [Authentication/Encryption Algorithm] under [IPSec Network Settings].

![](images/c535e7525848bde3d26e69816b56ed4df42205ea83ee7dd313755db158f11c69.jpg)
text_image Remote UI Settings/Registration: LBP7680C: LBP7680C - Windows Internet Explorer http://192.168.1.225/policyrgst.cgi/?cmdType:Regist&CSU/?c1778457003 File Edit View Favorites Tools Help Favorites Remote UI Settings/Registration: LBP7680C: LBP... IP Sec Network Settings Use PFS Validity: Specify 480 minutes (1- by Time 65535) Specify 1 MB (1-65535) Specify by Size Authentication/Encryption Algorithm: Auto ESP ESP SHA1 and MD5 Authentication: ESP 3DES-CBC and AES-CBC Encryption: AH AH SHA1 and MD5 Authentication: Connection Mode Transport Copyright CANON INC: 2011 All Rights Reserved Done Internet | Protected Mode: Off 100%

When setting automatically

Select the [Auto] check box.

When setting authentication using ESP protocol

(1) Select the [ESP] check box. (2) Select the authentication algorithm from [SHA1], [MD5], [SHA1 and MD5] or [NULL] under [ESP Authentication]. (3) Select the encryption algorithm from [3DES-CBC], [AES-CBC], [3DES-CBC and AES-CBC] or [NULL] under [ESP Encryption].

When setting authentication using AH protocol

(1) Select the [AH] check box. (2) Select the authentication algorithm from [SHA1], [MD5] or [SHA1 and MD5] under [AH Authentication].

11

Click [OK].

![](images/8a1eaa25165503887cd02e351bbf92a094d2b78dbaa835599c4899fbe6cc6f69.jpg)
text_image Remote UB Settings/Registration: LBP7680C / LBP7680C - Windows Internet Explorer http://192.168.1.225/policyregat.cgi/CmsTypeRegist&CSUTc1778(5200) File Edit View Favorites Tools Help Favorites Remote UB Settings/Registration LBP7680C: LBP... I SENSYS LBP7680C / LBP7680C / To Portal Login User: System Manager Log Out Settings/Registration Mail to System Manager Preferences Control Menu Paper Source Menu Network Layout Menu Quality Menu User Maintenance Menu Output/Control Utility Menu Calibration Device Control Management Settings Department ID Management Security License/Other Settings/Registration: Management Settings Security > IPSec Settings > IPSec Policy List > Register IPSec Policy Last Updated: 04/04 2011 07 10:00 The settings will be changed as follows. (Changes effective after the main power is turned OFF and ON.) OK Cancel Policy Settings Policy Name: example (Max 24 characters) Enable Policy Selector Settings Local Address Settings Local Address: All IP Addresses IPv4 Address IPv6 Address Done Internet | Protected Mode: Off 100%

12

Perform a hard reset or restart the printer.

→ After performing a hard reset or restarting the printer, the settings are effective. ![](images/665d40631bbbeda1b3f1c98dbab02c20cf5834ec755b27f89452e87da5200a48.jpg)

NOTE

To perform a hard reset

You can perform a hard reset using the following procedure. 1. Click [Settings/Registration]. 2. Select [Device Control] from the [Output/Control] menu. 3. Select [Hard Reset], then click [Execute].

1

Click [IPSec Policy List...] on the [IPSec Settings] page. ![](images/04e1940bf2b165f4f43c1d84797a59dc775d6fb12cf0805cf91bf82094a96cde.jpg)
text_image Remote UE Settings/Registration: LBP7680C: LBP7680C - Windows Internet Explorer https://192.168.1.225/IPsec.cgi File Edit View Favorites Tools Help Favorites Remote UE Settings/Registration LBP7680C: LBP... I.SENSYS LBP7680C / LBP7680C / To Portal Login User: System Manager Log Out Settings/Registration Mail to System Manager Preferences Control Menu Paper Source Menu Network Layout Menu Quality Menu User Maintenance Menu Output/Control Utility Menu Calibration Device Control Management Settings Department ID Management Security License/Other Settings/Registration Management Settings Security > IPSec Settings IPSec Settings Last Updated 04/04 2011 07:09:30 IPSec Settings IPSec Policy List... Edit... Use IPSec: Off Receive Non-Policy Packets Allow Copyright CANON INC. 2011 All Rights Reserved Done Internet | Protected Mode: Off 100%

2

Perform the necessary operations on the [IPSec Policy List] page. ![](images/6eab54f7f31e403bb2009eac4bd69ea1c7ccdf86ebc81c19f7babba2cafd1d35.jpg)
text_image Remote UE Settings/Registration: LBP7680C: LBP7680C - Windows Internet Explorer https://192.166.1.225/policylist.org?CSUT=201235672 File Edit View Favorites Tools Help Favorites Remote UE Settings/Registration LBP7680C: LBP... I.SENSYS LBP7680C / LBP7680C To Portal Login User: System Manager Log Out Settings/Registration Mail to System Manager Preferences Control Menu Paper Source Menu Network Layout Menu Quality Menu User Maintenance Menu Output/Control Utility Menu Calibration Device Control Management Settings Department ID Management Security License/Other Settings/Registration Management Settings Security > IPSec Settings > IPSec Policy List IPSec Policy List Last Updated 05/04 2011 05:48:58 The settings will be changed as follows. (Changes effective after the main power is turned OFF and ON.) List Print Register IPSec Policy... IP Sec Policy List Priority Policy Name Status 1 example On Raise Priority Lower Priority Delete 2 3 4 5 6 7 8 Done Trusted sites | Protected Mode Off 100%

When editing security policies

(1) Click the policy name displayed in the [Policy Name] field. (2) See "Adding a New Security Policy", and edit the content.

When deleting security policies

(1) Click [Delete] on the security policy you wish to delete. (2) Click [OK].

When changing the priority of security policies

The higher up the list the security policy is, the higher its priority. Click [Raise Priority] or [Lower Priority] for the security policy whose priority you wish to change, and change the priority.

3

Perform a hard reset or restart the printer.

→ After performing a hard reset or restarting the printer, the settings are effective. ![](images/b273ab5ae01d0ac7259f0bea3fb3fe27356ce786c3f8c205489360afd5fb9592.jpg)

NOTE

To perform a hard reset

You can perform a hard reset using the following procedure. 1. Click [Settings/Registration]. 2. Select [Device Control] from the [Output/Control] menu. 3. Select [Hard Reset], then click [Execute].

1

Click [Edit...] on the [IPSec Settings] page. ![](images/a2a6461bbaee69a859d3d878810a1a00dec6ac1fdc89a18a0cd74b61e0270b2e.jpg)
text_image Remote UE Settings/Registration: LBP7680C: LBP7680C - Windows Internet Explorer http://192.168.1.225/gsec.cgi File Edit View Favorites Tools Help Favorites Remote UE Settings/Registration: LBP7680C: LBP... I.SENSYS LBP7680C / LBP7680C / To Portal Login User: System Manager Log Out Settings/Registration Mail to System Manager Preferences Control Menu Paper Source Menu Network Layout Menu Quality Menu User Maintenance Menu Output/Control Utility Menu Calibration Device Control Management Settings Department ID Management Security License/Other Settings/Registration: Management Settings: Security > IPSec Settings IPSec Settings Last Updated 04/04 2011.07.08.30 IPSec Settings IPSec Policy List... Edit... Use IPSec: Off Receive Non-Policy Packets: Allow Copyright CANON INC. 2011 All Rights Reserved Done Internet | Protected Mode: Off 100%

2

Select the [Use IPSec] check box. In order to allow receipt of non-policy packets, select the [Allow Receive Non-Policy Packets] check box. ![](images/4e7a79ac13ec784a6eb56cde3eea24e62e9299aec4c09782def45ccd7b3299a0.jpg)
text_image Remote UI: Settings/Registration: LBP7680C: LBP7680C - Windows Internet Explorer http://192.168.1.225 ipsecredit.cgi File Edit View Favorites Tools Help Favorites Remote UI: Settings/Registration: LBP7680C: LBP... I-SENSYS LBP7680C / LBP7680C / To Portal Login User: System Manager Log Out Settings/Registration Mail to System Manager Preferences Control Menu Paper Source Menu Network Layout Menu Quality Menu User Maintenance Menu Output/Control Utility Menu Calibration Device Control Management Settings Department ID Management Security License/Other Settings/Registration: Management Settings: Security > IPSec Settings > Edit IPSec Settings Edit IPSec Settings Last Updated: 04/04 2011 07:28 41 The settings will be changed as follows. (Changes effective after the main power is turned OFF and CFI.) OK Cancel IPSec Settings Use IPSec Allow Receive Non-Policy Packets Copyright CANON INC. 2011 All Rights Reserved Done Internet | Protected Mode: Off 100%
→ After performing a hard reset or restarting the printer, the settings are effective. ![](images/83960d695cea2a7d9b9b80f9e5c1ce62add6a7903f5c83cf5886acb4f0ee6d16.jpg)

NOTE

To perform a hard reset

You can perform a hard reset using the following procedure. 1. Click [Settings/Registration]. 2. Select [Device Control] from the [Output/Control] menu. 3. Select [Hard Reset], then click [Execute]. 0258-0A8 You can specify the setting for Job Log Display using a Web browser (Remote UI).

1

Start the Remote UI, and then log in as Administrator. > "Starting the Remote UI"

2

Click [Settings/Registration]. ![](images/0359ac5d2493c2a9a6d7a9c478ab858e0ca9b3cb2432094bcd8b551ad0b30847.jpg)
text_image Remote UI Portal: LBPXXXXLBPXXXX - Windows Internet Explorer http:// Favonites Suggested Sites Web Slice Gallery Remote UI Portal: LBPXXXXLBPXXXX Device Name: LBPXXXXL Product Name (Serial No.): LBPXXXXL Location: Login User: System Manager Log Out Language English Mail to System Manager Last Updated: 29/05 2012 10:03:42 Device Basic Information Device Status The printer is ready. Error Information There is no error Consumables Information Paper Information Paper Source Remaining Paper Paper Size Paper Type Multi-Purpose Tray None A4 Free (Mixed Types) Drawer 1 Loaded A4 Free (Mixed Types) Remaining Toner Item Name Remaining Toner Cyan Toner 16-100% Status Monitor/Cancel Settings/Registration Basic Tools Box Direct Print Management Tools Service Management Service

3

Select [Security] from the [Management Settings] menu. ![](images/037a46677c3523c58b5f72803e3651d0e37db1d10b784c80a1da7fdd1d2a33cf.jpg)
text_image Remote UI Settings/Registration: LBPXXX: LBPXXXX - Windows Internet Explorer http:// Suggested Sites Web Slice Gallery Remote UI Settings/Registration: LBPXXX: LBPXX... LBPXXXI/LBPXXXI/ To Portal Login User: System Manager Log Out Settings/Registration Mail to System Manager Preferences Control Menu Paper Source Menu Network Layout Menu Quality Menu User Maintenance Menu Output/Control Utility Menu Calibration Device Control Management Settings Department ID Management Security License/Other Settings/Registration: Management Settings: Security Security Last/Updated: 11/04 2011 13:54:15 Security Management Settings Remote UI Settings Key and Certificate Settings CA Certificate Settings IPSec Settings Display Job History IP Address Filter IPv4 Address: TX Filter IPv4 Address: RX Filter IPv5 Address: TX Filter IPv6 Address: RX Filter MAC Address Filter TX Filter RX Filter Internet | Protected Mode: On

4

Click [Display Job History].

![](images/81a3b8047fe7dfae03706533c025fc6face676eaf0524bfa87e804f518be1151.jpg)
text_image Remote UE Settings/Registration: LBP7680C: LBP7680C - Windows Internet Explorer http://192.168.1.225/secretui.cgi File Edit View Favorites Tools Help Favorites Remote Ub Settings/Registration: LBP7680C: LBP... I-SENSYS LBP7680C / LBP7680C / Settings/Registration Mail to System Manager Preferences Control Menu Paper Source Menu Network Layout Menu Quality Menu User Maintenance Menu Output/Control Utility Menu Calibration Device Control Management Settings Department ID Management Security License/Other Settings/Registration: Management Settings Security Security Last Updated: 04/04 2011 03:57:16 Security Management Settings Remote UI Settings Key and Certificate Settings CA Certificate Settings IDPass Settings Display Job History IP Address Filter IPv4 Address: TX Filter IPv4 Address: RX Filter IPv6 Address: TX Filter IPv6 Address: RX Filter MAC Address Filter TX Filter RX Filter Done Internet | Protected Mode: Off 100%

5

Click [Edit...].

![](images/fe513e9e9ff540d67f1e0579d1f23da683603a7ab0b3cb0bc60bbcd4b7c4518f.jpg)
text_image Remote UI Settings/Registration: LBP7680C / LBP7680C - Windows Internet Explorer http://192.168.1.225/senjoblog.cgi File Edit View Favorites Tools Help Favorites Remote UI Settings/Registration: LBP7680C: UBP... SENSYS LBP7680C / LBP7680C / To Postal Login User: System Manager Log Out Settings/Registration Mail to System Manager Preferences Control Menu Paper Source Menu Network Layout Menu Quality Menu User Maintenance Menu Output/Control Utility Menu Calibration Device Control Management Settings Department ID Management Security License/Other Settings/Registration: Management Settings: Security > Display Job History Display Job History Last Updated 04/04 2011 07:31:08 Display Job History Edit... Display Job History: On Obtain Job History from Management Software: Allow Copyright CANON INC. 2011 All Rights Reserved Done Internet | Protected Mode: Off 100%

6

Specify whether the printer should display the job logs.

![](images/d88117a858614872bba6f503d3c61f97ff8b65c2ab8ee7d2f3becfeaa08322ad.jpg)
text_image Remote UI Settings/Registration: LBP7680C: LBP7680C - Windows Internet Explorer http://192.168.1.225/sec@blogedit.cgi File Edit View Favorites Tools Help Favorites Remote UI Settings/Registration LBP7680C: LBP... I-SENSYS LBP7680C / LBP7680C To Portal Login User: System Manager Log Out Settings/Registration Mail to System Manager Preferences Control Menu Paper Source Menu Network Layout Menu Quality Menu User Maintenance Menu Output/Control Utility Menu Calibration Device Control Management Settings Department ID Management Security License/Other Settings/Registration Management Settings Security > Display Job History > Edit Display Job History Edit Display Job History Last Updated 04/04 2011 07:32:21 The settings will be changed as follows. OK Cancel Display Job History ✓ Display Job History ✓ Allow Obtain Job History from Management Software Copyright CANON INC. 2011 All Rights Reserved Done Internet | Protected Mode: Off 100%
If the [Display Job History] check box is selected, you can display the job logs ^* . If the [Display Job History] check box is cleared, the job logs ^* are not displayed. \* The [Job History] page in the [Status Monitor/Cancel] menu

7

Select whether to permit management software to obtain job logs.

![](images/f761ff9e06fd6bad73e4a421ee8365b435c211f3acb8a36618df292c1a796963.jpg)
text_image Remote UI Settings/Registration: LBP7680C: LBP7680C - Windows Internet Explorer File Edit View Favorites Tools Help Favorites Remote UI Settings/Registration: LBP7680C: LBP... Settings/Registration Mail to System Manager Preferences Control Menu Paper Source Menu Network Layout Menu Quality Menu User Maintenance Menu Output/Control Utility Menu Calibration Device Control Management Settings Department ID Management Security License/Other Settings/Registration: Management Settings Security > Display Job History > Edit Display Job History Edit Display Job History Last Updated 04/04 2011 07:32:21 The settings will be changed as follows. OK Cancel Display Job History ✓ Display Job History ✓ Allow Obtain Job History from Management Software Copyright CANON INC. 2011 All Rights Reserved Done Internet | Protected Mode: Off 100%
If the [Allow Obtain Job History from Management Software] check box is selected, you can obtain the job logs from management software. If the [Allow Obtain Job History from Management Software] check box is cleared, job logs cannot be obtained from management software. ![](images/cbde5aba273a744902b587f802d643009853b746b3e58ff99e274a9fc5e44a48.jpg)

NOTE

If the [Display Job History] check box is selected

The [Allow Obtain Job History from Management Software] check box is selected automatically.

8

Click [OK].

![](images/0542b25569e9a83f9d270679892bc133c7ac1ab68d83c3b54e3c9319b9e7078a.jpg)
text_image Remote UI: Settings/Registration: LBP7680C: LBP7680C - Windows Internet Explorer http://192.168.1.225/secjoblogsedit.cgi File Edit View Favorites Tools Help Favorites Remote UI: Settings/Registrations: LBP7680C: LBP... I.SENSYS LBP7680C / LBP7680C / To Portal Login User: System Manager Log Out Settings/Registration Mail to System Manager Preferences Control Menu Paper Source Menu Network Layout Menu Quality Menu User Maintenance Menu Output/Control Utility Menu Calibration Device Control Management Settings Department ID Management Security License/Other Settings/Registration: Management Settings: Security > Display Job History > Edit Display Job History Edit Display Job History Last Updated 04/04 2011 07:32:21 The settings will be changed as follows. OK Cancel Display Job History Display Job History Allow Obtain Job History from Management Software Copyright CANON INC. 2011 All Rights Reserved Done Internet | Protected Mode: Off 100%
0258-0H4 Available Functions > Launching and Closing SMS MEAP Application Settings > System Settings > List of Error Messages (MEAP) 0258-0H5 SMS (Service Management Service) is software that accesses the printer over the network from an existing Web browser, and can install and manage MEAP applications (called "applications" in this document). Since the software (Web server) for using SMS is embedded in the printer, there is no need for any software other than a Web browser. If a printer on the network is connected to a computer, it can use SMS. You can perform the following operations using SMS. ![](images/2e1703323b6b9e79c39b85674591f9a7d17786b595ab5bf01bc1183c90f23b1b.jpg)
flowchart
graph TD
    A["Printer"] --> B["Applications"]
    B --> C["Install"]
    C --> D["SMS"]

You can check application information from computers on the network

You can access the printer via the network and display the status and information of installed applications. After SMS launches and you log in by entering your password in the [Log In] page, the following top page is displayed. ![](images/5809e1fb766afc2eed1744c3e4b3b8aae5dd98eda27e2e280494f3719a3b50ff.jpg)
text_image Service Management Service : LBP7680C : LBP7680C - Windows Internet Explorer https://192.168.1.187-6463/sms/ Favorites Suggested Sites Web Slice Gallery Service Management Service : LBP7680C : LBP768... To Remote UI Log Out from SMS LBP7680C / LBP7680C / Service Management Service Device Serial Number: MKHA00000G MEAP Application Management Install MEAP Application System Management Panel Display Order Settings Enhanced System Application Management System Application Management System Information MEAP Application Information Check License Change Password MEAP Application Setting Information Management MEAP Application Log Management MEAP Application Management Updated On: 12/04 2011 17:28:27 Application Name Installed on Status License LoginTool 2.01.00 12/04 2011 Started Stop Uninstall Uppnecessary License Generator 4.4.0 11/04 2011 Installed Start Uninstall Installed Resource Information Resource Name Amount Used Remaining Percent Used Storage 13293 KB 19475 KB 41% Memory 3400 KB 17080 KB 17% Threads 14 114 11% Sockets 6 122 5% File Descriptors 4 124 3% meap Version 3.1.9.19 Copyright CANON INC. 2011 All Rights Reserved Done ✓ Trusted sites | Protected Mode: Off ✓ 100%

(1) [MEAP Application Management]

It can display the status of applications that are installed in the printer. > "MEAP Application Settings"

(2) [Install MEAP Application]

Install the MEAP application. > "Installing MEAP Applications"

(3) [System Management]

MEAP system administrator settings are used for setting system application settings, displaying information and changing passwords, etc. > "System Settings"

You can install and uninstall applications

You can install and uninstall applications that support this printer from the computer. > "Installing MEAP Applications" > "Uninstalling MEAP Applications"

You can update installed applications and license files

If the license for the installed applications has expired, you can reinstall and update it. > "Adding License Files" 0258-0H6 Log in is required to use SMS. Before Launching SMS (Preparation) > Launching SMS (Log in) Closing SMS (Logging Out) ![](images/da3200fe0289b111f6c7338cde072284fd3707301e89111589b8d197b17d3af0.jpg)

NOTE

Web Browser Settings

The following settings are required. - JavaScript must be enabled - The use of session cookies must be enabled - When a proxy server is used, using the proxy server settings of your Web browser, add the IP address of the printer to the [Exceptions] (addresses that do not use a proxy) list. Since settings differ depending on the network environment, consult with your network administrator.

Launching SMS

Multiple users cannot log in to SMS at the same time.

Automatic SMS Logout

While SMS is in use, if it is not accessed for approximately five minutes or more it times out and the user is automatically logged out. If that happens, log in again from the [Login] page.

Do not use the Web browser's [Back] navigation button

If you use the Web browser's [Back] navigation button, SMS may not operate properly.

SMS System Environment

SMS operation is guaranteed in the following system environments.
Web BrowsersInternet Explorer 6 Service Pack 1, or laterSafari 1.3.2 or later
Operating systemWindows XP Professional SP3Windows Vista SP2Windows 7Mac OS X 10.4.9 or later
0258-0H7 Set the following before launching SMS.
Step 1Set [Network].> "Configuring the Network Settings (Sharing the Printer)"
Step 2Check the printer's IP address.> "Checking the Printer Settings"
Step 3Set it so that the printer can be accessed from the Web browser.> "Setting Up HTTP Communication"
0258-0H9 In order to use MEAP functions from the Web browser, HTTP communication must be enabled. Follow the steps in the procedure below to configure the settings. (The default settings are [On].)

1

Press [ ] ( : Settings) select [Network] with [ ] and [ ], and then press [OK]. After the message is displayed, press [OK].

2

Select [TCP/IP Settings] with [▲and [ ],▼nd then press [OK]. ![](images/672e8ba2ca3dea8a48bb99f98cad1d28cdfc23d243af016ced02783a0c9dd76e.jpg)
text_image Network TCP/IP Settings NetWare Settings AppleTalk SMB

3

Select [HTTP] with [ ] and [ ], and then press [OK]. ![](images/081125598767e8e85b3b64fc04661502e88726798f18fb5fc4cd447747d24258.jpg)
text_image TCP/IP Settings RAW Print IPP Print WSD HTTP

4

Select [On] with [▲ and [ ], and then press [OK]. ![](images/66d0794623919c00647b23f372ad608ce1d6c58135b9ca25c240d5a505a0a6eb.jpg)
text_image HTTP off On
[On] It uses HTTP.
[Off] It does not use HTTP.

5

Hard reset or restart the printer. ![](images/965a6299e2625f7b2a7a7767162196b7c187323a55dab9b3874c601823fa1f09.jpg)

NOTE

Details about Hard Resets

See "Canceling All the Jobs (Hard Reset)." 0258-0HA The following two methods are used for launching SMS. > Launching SMS directly from the Web browser > Launching SMS from a Remote UI Before launching SMS, see "Attention (Launching SMS (Log in))."

Launching SMS directly from the Web browser

1

Start the Web browser.

2

Enter "https://:8443/sms/" in the address bar, and press [ENTER] from the Enter key on the keyboard. • Entry Example: https://192.168.0.215:8443/sms/ If the printer's host name is registered in the DNS server, you can enter [host name.domain name] instead of the IP address. - Input Example: http://my\_printer.xy\_dept.company.com:8443/sms/ ![](images/522609aeafccb0b381214ffaed1af80296306d49ef378a0dd69ce741d9bc32fa.jpg)
text_image Service Management Service : LBP7680C : LBP7680C - Windows Internet Explorer https://192.168.0.215443/sms/ Bing Favorites Suggested Sites Web Slice Gallery Service Management Service : LBP7680C : LBP768... Page Safety Tools LBP7680C / LBP7680C / To Remote UI Service Management Service Device Serial Number: MKHA000006 Login Enter password Password: Log In meap Version 3.1.0.19 Copyright CANON INC, 2011 All Rights Reserved Done Trusted sites | Protected Mode Off 100%
![](images/ec5b9e10708cbd2ddae421fcfb9f369316c2196f7dddfaf82e58c1510f587549.jpg)

If SMS does not launch

Check the following. - HTTP communication is enabled. :"Setting Up HTTP Communication" - The computer and printer are connected properly over the network. - The printer is turned ON. - The IP address or [host name.domain name] are entered correctly. ![](images/50c75f0137cc0c308e7de58c7559e6f74dcdbf1ada44cf02311395fef45a4ee8.jpg)

NOTE

Device Serial Number

The printer's device serial number is displayed on the upper left of the screen. (The device serial number is required to obtain the license file from the license management system.)

3

Enter the password, and click [Login].

The default password is "MeapSmsLogin" (case sensitive). ![](images/a1cf4cf6390c6e842c4760f8220b4e58301313b74df0e5d10acc152a33eb3505.jpg)
text_image Service Management Service : LBP760C : LBP760C - Windows Internet Explorer https://192.168.0.215.8443/sms/ Favorites Suggested Sites Web Slice Gallery Service Management Service : LBP760C : LBP760C... To Remote UI Service Management Service Device Serial Number: MKHA000006 Login Enter password Password: ******** Log In meap Version 3.1.0.19 Copyright CANON INC; 2011 All Rights Reserved Done: Trusted sites | Protected Mode: Off 100%
![](images/570f75409c8848357413047b36bde5e4aa921b9e0d912609216aea45d1413f67.jpg)

If you cannot log in

If you cannot log in because the password is not correct, a message is displayed prompting you to re-enter your password. Enter the correct password, and click [Login]. If you do not log in within approximately 5 minutes after the login page is displayed, you will not be able to log in even if you enter the correct password. A switch license file is required to initialize passwords. After clicking on [Browse] in [Initialize Password] in the screen that displays the message prompting password re-entry, select Switch License File, and click [Initialize]. Contact your local authorized Canon dealer or sales representatives.

Launching SMS from a Remote UI

1

Start the Remote UI and log on in system manager mode.

> "Starting the Remote UI"

2

Click [Service Management Service] on the portal page. ![](images/811a6c1361bcd88898297c9aacc4090b176576c29f0ad66e6bcdc4a476d271a8.jpg)
text_image Remote UI: Portal LBP7680C: LBP7680C - Windows Internet Explorer http://192.168.1.225/portal.cgi?CSUT=469851453 File Edit View Favorites Tools Help Favorites Remote UI: Portal LBP7680C: LBP7680C Device Name: LBP7680C Product Name (Serial No.: LBP7680C(MKBA000021)) Location: Login User: System Manager Log Out Remote UI: Portal Language English Mail to System Manager Last Updated: 01/04 2011 11:47:02 Device Basic Information Device Status The printer is ready Error Information There is no error. Consumables Information Paper Information Paper Source Remaining Paper Paper Size Paper Type Multi-Purpose Tray None A& Free Mixer (Mixed Types) Drawer 1 Loaded A& Free Mixer (Mixed Types) Status Monitor/Cancel Settings/Registration Basic Tools Box Direct Print Management Tools Service Management Service Done Internet | Protected Mode: Off 100%

3

Enter the password, and click [Login].

The default password is "MeapSmsLogin" (case sensitive). ![](images/85fcd080a4ca150e659120872dc49e6f363eba60beafaa191f07cb63ab7786cd.jpg)
text_image Service Management Service | LBP7680C : LBP7680C - Windows Internet Explorer https://192.168.0.215:8463/sms/ Favorites Supported Sites Web Slice Gallery Service Management Service : LBP7680C : LBP7680C... To Remote UI LBP7680C / LBP7680C / Service Management Service Device Serial Number: MKHA000006 Login Enter password Password ****** Log In meap Version 3.1.0.19 Copyright CANON INC. 2011 All Rights Reserved Done Trusted sites | Protected Mode Off 100%

If you cannot log in

If you cannot log in because the password is not correct, a message is displayed prompting you to re-enter your password. Enter the correct password, and click [Login]. If you do not log in within approximately 5 minutes after the login page is displayed, you will not be able to log in even if you enter the correct password. A switch license file is required to initialize passwords. After clicking on [Browse] in [Initialize Password] in the screen that displays the message prompting password re-entry, select Switch License File, and click [Initialize]. ![](images/90427f227629dec4c6c374f9775bf015744c27aa191191f3a01663ab74ee0c2e.jpg)

IMPORTANT

SMS Password

- To prevent unauthorized access, We recommend that the administrator change the password before SMS use is begun. See "Changing the SMS Password" when changing passwords. - This password is to prevent unauthorized operation of the printer. Do not let anyone know except the administrator. - Make sure that you do not forget your password. If you forget your password, you will not be able to use SMS. If this happens, contact your local dealer. 0258-0HE Click [Log Out from SMS] to close SMS. If you close the Web browser without clicking [Log Out from SMS], SMS becomes temporarily unusable. ![](images/0bde13ed3ae921e3f2e2c702271a682abaf3ca955e53887c3004bf9b0facc56a.jpg)
text_image Service Management Service : LBP7680C | LBP7680C - Windows Internet Explorer https://192.168.1.187-64KG/sms/ Favorites Suggested Sites Web Slice Gallery Service Management Service : LBP7680C | LBP7680C To Remote U Log Out from SMS LBP7680C / LBP7680C / Service Management Service MEAP Application Management Install MEAP Application System Management Panel Display Order Settings Enhanced System Application Management System Application Management System Information MEAP Application Information Check License Change Password MEAP Application Setting Information Management MEAP Application Log Management MEAP Application Management Updated On 12/04 2011 17:28:27 Application Name Installed on Status License LoginTool 2.01.00 12/04 2011 Started Stop Uninstall Unnecessary License Generator 4.4.0 11/04 2011 Installed Start Uninstall Installed Resource Information Resource Name Amount Used Remaining Percent Used Storage 13293 KB 19475 KB 41% - Memory 3400 KB 17080 KB 17% - Threads 14 114 11% - Sockets 6 122 5% - File Descriptors 4 124 3% - meap Version 3.1.0.19 Copyright CANON INC, 2011 All Rights Reserved Done Trusted sites | Protected Mode: Off 100%
0258-0HF MEAP applications are set from the [MEAP Application Management] and the [Install MEAP Application] menus. ![](images/0ce57dfa0ee93680d66ddea10ca75f70c1aaa65d6865a8dfc79b97142ee06d59.jpg)
text_image Service Management Service : LBP7680C : LBP7680C - Windows Internet Explorer https://92.168.1.187-0443/psm/ Favonbe Suggested Sites Web Site Gallery Service Management Service : LBP7680C : LBP768... LBP7680C / LBP7680C / To Remote UI Log Out from SMS Service Management Service MEAP Application Management MEAP Application Management Updated On 12/04 2011 17:31:12 MEAP Application Management Application Name Installed on Status License LoginTool 2.01.00 12/04 2011 Started Stop Uninstall Unnecessary License Generator 4.4.0 11/04 2011 Installed Start Unclass Installed Resource Information Resource Name Amount Used Remaining Percent Used Storage 13293 KB 19475 KB 41% - Memory 3400 KB 17080 KB 17% - Threads 14 114 11% - Sockets 6 122 5% - File Descriptors 4 124 3% - meap Version 3.1.0.19 Copyright CANON INC. 2011 All Rights Reserved Done Trusted sites | Protected Mode OR 100%
![](images/868970a7e19f4a4b6eca9adf9c531d54057185f393ebbd1b0dc278698daa8567.jpg)
text_image Service Management Service : LBP7680C | LBP7680C - Windows Internet Explorer https://192.168.1.187-6443/sms/ Favorites Suggested Sites Web Slice Gallery Service Management Service : LBP7680C : LBP768... LBP7680C / LBP7680C / To Remote UI Log Out from SMS Service Management Service Device Serial Number MKHA000006 MEAP Application Management Install MEAP Application system management Panel Display Order Settings Enhanced System Application Management System Application Management System Information MEAP Application Information Check License Change Password MEAP Application Setting Information Management MEAP Application Log Management Install MEAP Application/License Install MEAP Application/License Application File Path: Browse... License File Path: Browse... meap Version 3.1.0.19 Copyright CANON INC. 2011 All Rights Reserved Done Trusted sites | Protected Mode: Off 100%

Items shown in the [MEAP Application Management] menu

[Application Name]The name of the application is displayed.
[Installed on] The date on which the application was installed is displayed.
[Status]The status of the application is displayed.[Installed]:The application has been installed, but not started.Or, the printer was turned OFF after the application stopped, and after the printer was restarted the application was not yet started.[Started]:The application is running.
• [Stopped]:The application is stopped.• [Starting]:The application is starting up.• [Stopping]:The application is closing down.
[License]The license status of the application is displayed.• [Installed]:A valid license file has been installed.• [Not Installed]:The license file has been disabled.• [Over Limit]:The license file that is installed has an expiration date, and multiple types of counters have been set. One or more of the counter values has exceeded the upper limits of the counter.• [Invalid]:The installed license file has passed its expiration date.Or, the current counter value has exceeded the upper limit of the license file.* When upper limits have been set for multiple types of counters, the license will become invalid at the point in time when any counter exceeds its upper limit.• [Unnecessary]:The application does not require a license file for startup.
[Resource Information]The resources being used by the applications are displayed.• [Storage]:The amount of storage being used. It is shown in kilobyte units (KB).• [Memory]:The amount of memory being used. It is shown in kilobyte units (KB).• [Threads]:The number of threads.• [Sockets]:The number of sockets.• [File Descriptors]:The number of file descriptors.
NOTETiming of [Resource Information] Updates[Resource Information] is updated at the following times.
Item Timing of Updates
[Storage] When the application is installed or uninstalled
[Memory][Threads][Sockets][File Descriptors]When the application starts or stops
[Install MEAP Application] Menu Settings
[Install MEAP Application/License]Install the MEAP application. • [Install]: Specify the application file and license file to be installed, and click [Install] to start the installation. • [Application File]: Specify the application file to be installed.

• [License File]:

Specify the license file. See the following section for settings that use the [MEAP Application Management] and [Install MEAP Application] menus. > Installing MEAP Applications > Uninstalling MEAP Applications Starting/Stopping MEAP Applications > Checking the Details of MEAP Applications MEAP Application License Settings > Setting Authentication Information for MEAP Applications 0258-0HH Before starting the following operation, see "Attention (Installing MEAP Applications)."

1

Start SMS (Service Management Service). > "Launching SMS (Log in)"

2

Click [Install MEAP Application]. ![](images/29a942d1319ac8ae5bbd712a9f42027824f42c06bc6f9bfe57c7e4941b97349b.jpg)
text_image Service Management Service : LBP76B0C | LBP76B0C - Windows Internet Explorer https://192.168.1.187-0443/sms/ Frequencies Suggested Sites Web SkEx Gallery Service Management Service : LBP76B0C : LBP76B... LBP76B0C / LBP76B0C / To Remote UI Log Out from SIMS Service Management Service Device Serial Number: MKHA000006 MFAP Application Management Install MEAP Application System Management Panel Display Order Settings Enhanced System Application Management System Application Management System Information MEAP Application Information Check License Change Password MEAP Application Setting Information Management MEAP Application Log Management Install MEAP Application/License Install MEAP Application/License Application File Path: Browse... License File Path: Browse... meap Version 3.1.0.19 Copyright CANON INC. 2011 All Rights Reserved Done Trusted sites | Protected Mode: Off 100%

3

Set [Application File Path] and [License File Path]. Either select the file by clicking [Browse...], or enter the location where the file is stored. ![](images/d37ff6a8ed054239c45dca331e7dee42390f4cc17a2e3d98fa6bb7d499c74ebe.jpg)
text_image Service Management Service : LBP7680C : LBP7680C - Windows Internet Explorer https://192.166.1.187.8443/rms/ Favorites Suggested Sites Web Slice Gallery Service Management Service : LBP7680C : LBP768... To Remote UI Log Out from SMS Service Management Service Device Serial Number: MKHA000005 MEAP Application Management Install MEAP Application System Management Panel Display Order Settings Enhanced System Application Management System Application Management System Information MEAP Application Information Check License Change Password MEAP Application Setting Information Management MEAP Application Log Management Install MEAP Application/License Install MEAP Application/License Application File Path: Browse... License File Path: Browse... meap Version 3.1.0.19 Copyright CANON INC. 2011 All Rights Reserved Done Trusted sites | Protected Mode: Off 100%
[Application File Path]Specify a file with a "jar" extension.
[License File Path]Specify a file with a "lic" extension.

4

Click [Install].

5

Confirm the information on the install confirmation page, and click [Yes]. When the [License Agreement] appears, confirm the information, and click [I Accept]. → The installation begins.

If you are installing a new application

[Application Information]Information about the application
[License Information]The expiration date of the application

If you are updating an application

[Application Information][Current Application Information] Information about the current application
[Application Information after Overwrite] Application information after overwrite
[License Information][Expires after] The expiration date of the targeted application
[Current Counter Usage Limit] Current counter information
[Counter Usage Limit after Overwrite] Counter information after overwrite
![](images/d3fe449a9efc19ef1f9686d2286198a550788d1c36ce6ebc204d7ceaf51ce3cb.jpg) the install is cancelled If the shutdown process for the printer starts while an application is being installed, an error message may be displayed on the [Install] page for SMS, and the installation cancelled. If this happens, install the application again after restarting the printer by turning the main power switch OFF and then back ON again. ![](images/29fca0f830f19673e2ffcc28dfe471adb49fa203f0179c30184cf90312f4f790.jpg) After the install is completed, click [To MEAP Application Management]. ![](images/99df7f03cdbd878462454a2650ebf527bffea73c68dc92cf0b057050e137f1e2.jpg)

NOTE

When using the installed application

Start the application. > "Starting MEAP Applications" ![](images/641321bf765be6905ee9c983b27b55809208c0f4a3dd1fb80600b78dfd4df873.jpg)

IMPORTANT

Installing Applications

- There may be other specific requirements for installation, depending on the application. For more information, see the instruction manual provided with the application. - You can install up to eight applications. - You cannot install license files only. Specify both the application file and the license file. To only add a license file for an application that is already installed, see "Adding License Files."

Obtaining License Files

- In order to install an application, a valid license file is required. If you have a license access number in your application package, obtain a valid license file from License Management System (http://www.canon.com/lms/license/). In order to obtain a license file, a license access number and a device serial number (the number displayed on the upper left of the SMS screen) are required. - If you do not have a license access number in your application package, it will be provided by the dealer where you purchased the application. For more information, see the instruction manual provided with the application.

Storage Area

The application can use a maximum storage area of 32MB. You can confirm the storage space used by the application "Storage", under resource information displayed on the [MEAP Application Management] page.

When you are updating an application

Stop the application before installing the new version. > "Stopping MEAP Applications" ![](images/3d4b451743773f3f4c3e1bc8c757de1ed9f4c5284c7e65427b7178c22ed23e9e.jpg)

IMPORTANT

If the license status is not "Not Installed"

Uninstall the application after disabling and deleting the license files. > "Disabling License Files" "Deleting Disabled License Files"

1

Start SMS (Service Management Service).

> "Launching SMS (Log in)"

2

Click [MEAP Application Management].

![](images/7df9eaea9a48ad5b4fb1f026a71265a2f7e2d791d96f2b667fb055e7e7ffd51f.jpg)
text_image Service Management Service : LBP7680C : LBP7680C - Windows Internet Explorer https://292.168.1.187-8443/yyms/ Favorites Suggested Sites Web Site Gallery Service Management Service : LBP7680C : LBP768... To Remote UI Log Out from SMS LBP7680C / LBP7680C / Service Management Service MEAP Application Management MEAP Application Management Updated On 12/04 2011 17:31:12 MEAP Application Management Application Name Installed on Status License LoginTool 2.01.00 12/04 2011 Started Stop Uninstall Unnecessary License Generator 4.4.0 11/04 2011 Installed Start Uninstall Installed Resource Information Resource Name Amount Used Remaining Percent Used Storage 13293 KB 19475 KB 41% Memory 3400 KB 17080 KB 17% Threads 14 114 11%# Sockets 6 122 5%# File Descriptors 4 124 3%* meap Done Version 3.1.0.19 Copyright CANON INC. 2011 All Rights Reserved Trusted sites | Protected Mode: Off

3

Click [Uninstall] for the application to uninstall.

Applications with [Uninstall] grayed out cannot be deleted.

4

Click [Yes].

→ The uninstall begins. ![](images/871e43a41c0bc84e816db02f5227ef5e497ad5b6958b03e2edc639ff540e630f.jpg)

IMPORTANT

If is displayed and you uninstall the application that displayed this message, you may not be able to use other applications.

Starting/Stopping MEAP Applications

0258-0HL Starting MEAP Applications > Stopping MEAP Applications

1

Start SMS (Service Management Service). > "Launching SMS (Log in)"

2

Click [MEAP Application Management]. ![](images/71eab10244eac20100565d253f25e43db1cec567acad3cc9e8afae87c425db83.jpg)
text_image Service Management Service : LBP768DC : LBP768DC - Windows Internet Explorer https://292.168.1.187-0443/sms/ Favorites Supported Sites Web Site Gallery Service Management Service : LBP768DC : LBP768_ To Remote UI Log Out from SMS Service Management Service MEAP Application Management MEAP Application Management Updated On: 12/04 2011 17:31:12 MEAP Application Management Application Name Installed on Status License LoginTool 2.01.00 12/04 2011 Started Stop Uninstall Unnecessary License Generator 4.4.0 11/04 2011 Installed Start Uninstall Installed Resource Information Resource Name Amount Used Remaining Percent Used Storage 13293 KB 19475 KB 41% Memory 3400 KB 17080 KB 17% Threads 14 114 11% Sockets 6 122 5% File Descriptors 4 124 3% meap Done Version 3.1.10.19 Copyright CANON INC. 2011 All Rights Reserved Truited sites | Protected Mode: Off

3

Click [Start] for the application to start. ![](images/507107182bfec6787292f19e1f358aa5b5143c0e03bfa2af54373657cc39466a.jpg)

If the application does not start

Check the following. • The required license file has been installed - There is sufficient [Memory], [Threads], [Sockets] and [File Descriptors] under [Resource Information] ![](images/1bc12efda6a88dfc2bc9d739c9279c133dab6f5bf0551879ae39ae542b62046d.jpg)

When the restart prompt message is displayed

Follow the onscreen instructions to restart the printer. 0258-0HS

1

Start SMS (Service Management Service). > "Launching SMS (Log in)"

2

Click [MEAP Application Management]. ![](images/d8ae8b6f694741ee1c88393a2c85e769546ce02722e85f4d2d3aada5af59fb98.jpg)
text_image Service Management Service : LBP7680C - LBP7680C - Windows Internet Explorer https://292.168.1.187-9443/sms/ Favorites Suggested Sites Web Slice Gallery Service Management Service : LBP7680C : LBP768... To Remote UI Log Out from SMS Service Management Service MEAP Application Management MEAP Application Management Updated On: 12/04 2011 17:31:12 MEAP Application Management Application Name Installed on Status License LognTool 2.01.00 12/04 2011 Started Stop Uninstall Unnecessary License Generator 4.4.0 11/04 2011 Installed Start Uninstall Installed Resource Information Resource Name Amount Used Remaining Percent Used Storage 13293 KB 19475 KB 41% Memory 3400 KB 17080 KB 17% Threads 14 114 11% Sockets 6 122 5% File Descriptors 4 124 3% meap Version 3.1.10.19 Copyright CANON INC. 2011 All Rights Reserved Done ✓ Trusted sites | Protected Mode: Off + 100%

3

Click [Stop] for the application to stop. ![](images/79f3499ac57ce071d170ef0092b1aceda454a1a8b91ba30da52b37fa7009878d.jpg)
text_image Service Management Service : LBP7680C : LBP7680C - Windows Internet Explorer https://192.168.1.187.5443.com/ Favorites Suggested Sites Web Slice Gallery Service Management Service : LBP7680C : LBP768... To Remote UI Log Out from SMS LBP7680C / LBP7680C / Service Management Service Device Serial Number: MKHA000005 MEAP Application Management Install MEAP Application System Management Panel Display Order Settings Enhanced System Application Management System Application Management System Information MEAP Application Information Check License Change Password MEAP Application Setting Information Management MEAP Application Log Management MEAP Application Management Updated On: 12/04 2011 17:31:12 Application Name Installed on Status License LoginTool 2.01.00 12/04 2011 Started Stop Uninstall Unnecessary License Generator 4.4.0 11/04 2011 Installed Start uninstall Installed Resource Information Resource Name Amount Used Remaining Percent Used Storage 13293 KB 19475 KB 41% Memory 3400 KB 17080 KB 17% Threads 14 114 11% Sockets 6 122 5%* File Descriptors 4 124 3% * meap Version 3.1.0.19 Copyright CANON INC. 2011 All Rights Reserved Done Trusted sites | Protected Mode: Off 100%
![](images/9ea2f1c4e2725edbbb1684b89f392b0ea1cdd25f5f4d3a07cb9ff35d24556bf2.jpg)

When the restart prompt message is displayed

Follow the onscreen instructions to restart the printer. 0258-0HU Check the details of installed applications.

1

Start SMS (Service Management Service). > "Launching SMS (Log in)"

2

Click [MEAP Application Management]. ![](images/a19a8e563c6823f900da6504eecd728be31db97e49ef3099e5bcb2b2ffb88d8d.jpg)
text_image Service Management Service : LBP76B0C : LBP76B0C - Windows Internet Explorer https://92.168.1.187-8443/sms/ Favorites Suggested Sites Web Slice Gallery Service Management Service : LBP76B0C : LBP76B0C... To Remote UI Log Out from SMS Service Management Service MEAP Application Management MEAP Application Management Updated On: 12/04 2011 17:31:12 MEAP Application Management Application Name Installed on Status License LoginTool 2.01.00 12/04 2011 Started Stop Uninstall Unnecessary License Generator 4.4.0 11/04 2011 Installed Start Uninstall Installed Resource Information Resource Name Amount Used Remaining Percent Used Storage 13293 KB 19475 KB 41% Memory 3400 KB 17080 KB 17% Threads 14 114 11% - Sockets 6 122 5% - File Descriptors 4 124 3% - meap Version 3.1.0.19 Copyright CANON INC. 2011 All Rights Reserved Done ✓ Trusted sites | Protected Mode: Off + 100%

3

Click the application to check the details. → [Application/License Information] is displayed on the screen. ![](images/f81941d13fe572ca3ee7b5bb3f88f285802194d117ce0811bc15c845c1283bec.jpg)
text_image Service Management Service | LBP7680C : LBP7680C - Windows Internet Explorer https://192.166.1.187-8443/sms/ Favorites Suggested Sites Web Store Gallery Service Management Service : LBP7680C : LBP768... To Remote UI Log Out from SMS LBP7680C / LBP7680C / Service Management Service Device Serial Number: MKHA000006 MEAP Application Management Install MEAP Application System Management Panel Display Order Settings Enhanced System Application Management System Application Management System Information MEAP Application Information Check License Change Password MEAP Application Setting Information Management MEAP Application Log Management MEAP Application Management > Application/License Information Application/License Information Authentication Information Settings Back Application Information Application Name: License Generator Version: 4.4.0 Application ID: c7cfa585-f319-4f24-b511-bbd9c8f690cc Installed on: 11/04 2011 Description: genlc Manufacturer: Canon Inc. Import Package: javax.servlet javax.servlet.http org osgi.service.http com.canon.meap.service.http Import Service: com.canon.meap.service.http HttpService Resources Used Storage: 10000 KB Memory: 850 KB Threads: 1 Sockets: 0 File Descriptors: 3 License Information License Management Status: Installed Serial Number: MKHA000006 Expires after: Does not Expire meap Version 3.1.0.19 Copyright CANON INC. 2011 All Rights Reserved Done Trusted sites | Protected Mode Off 100%
![](images/738462e7b0bb7ff4742ad7e5a9ea076510076877708a30117f60ef90910a6793.jpg)

When [Authentication Information Settings] is displayed

Set the authentication information. "Setting Authentication Information for MEAP Applications" 0258-0HW You can add, disable and delete license files for installed applications. > Adding License Files Disabling License Files > Downloading Disabled License Files Deleting Disabled License Files

IMPORTANT

Disabling Licenses

- You cannot disable a license file if the application is still running. > "Stopping MEAP Applications" - When a disabled license file is generated, the status of that license file becomes and the application becomes unusable.

Downloading and Deleting Licenses

- You can only download or delete disabled license files. - Some license files need to be downloaded after they have been disabled. - Once you have deleted the disabled license file, you cannot download it from the printer again. We recommend downloading and backing it up before deleting it.

Reinstalling License Files

You can reinstall disabled or downloaded license files in the same printer. 0258-0HX You can install license files for applications that are already installed. You can also increase counter values and extend terms of validity by adding license files.

1

Start SMS (Service Management Service). > "Launching SMS (Log in)"

2

Click [MEAP Application Management]. ![](images/08ce6c9b1237e29cce336ebf4041f8a9d0651ef601e3a743fc23336a07157ff5.jpg)
text_image Service Management Service : LBP7680C : LBP7680C - Windows Internet Explorer https://192.168.1.187-843/sms/ Favorites Suggested Sites Web Slice Gallery Service Management Service : LBP7680C : LBP768... To Remote UI Log Out from SMS Service Management Service MEAP Application Management MEAP Application Management Updated On 12/04 20:11 17:31:12 MEAP Application Management Application Name Installed on Status License LoginTool 2.01.00 12/04 2011 Started Stop Uninstall Unnecessary License Generator 4.4.0 11/04 2011 Installed Start Uninstall Installed Resource Information Resource Name Amount Used Remaining Percent Used Storage 13293 KB 19475 KB 41% Memory 3400 KB 17080 KB 17% Threads 14 114 11% Sockets 6 122 5% File Descriptors 4 124 3% meap Done Version 3.1.9.19 Copyright CANON INC. 2011 All Rights Reserved Trusted sites | Protected Mode: Off 100%

3

Click the name of the application to which a license file will be added. ![](images/0faa46207e6df0f2091aa2744955713aaab3064018f08aa501225ed6a9e3a239.jpg)
text_image Service Management Service : LBP7680C : LBP7680C - Windows Internet Explorer https://192.166.1.187.6443.com/ Favorites Suggested Sites Web Slice Gallery Service Management Service : LBP7680C : LBP768... To Remote UI Log Out from SMS Service Management Service Device Serial Number: MKHA000005 MEAP Application Management Install MEAP Application System Management Panel Display Order Settings Enhanced System Application Management System Application Management System Information MEAP Application Information Check License Change Password MEAP Application Setting Information Management MEAP Application Log Management MEAP Application Management Updated On 12/04 2011 17:31:12 Application Name Installed on Status License LoginTool 2.01.00 12/04 2011 Started Stop Uninstall Unnecessary License Generator 4.4.0 11/04 2011 Installed Start Uninstall Installed Resource Information Resource Name Amount Used Remaining Percent Used Storage 13293 KB 19475 KB 41% Memory 3400 KB 17080 KB 17% Threads 14 114 11% Sockets 6 122 5%* File Descriptors 4 124 3% * meap Version 3.1.0.19 Copyright CANON INC. 2011 All Rights Reserved Done ✓ Trusted sites | Protected Mode: OFF + 100%

4

Click [License Management].

![](images/e9442a2de5f902f91dc51c32a75f9c48f2698c052a8dd14003360e7c0439e5d1.jpg)
text_image Service Management Service : LBP7680C : LBP7680C - Windows Internet Explorer https://192.168.1.187-8443/sms/ Favorites Suggested Sites Web Slice Gallery Service Management Service : LBP7680C : LBP7680C To Remote UI Log Out from SMS Service Management Service Device Serial Number: MKHA000006 MEAP Application Management Install MEAP Application System Management Panel Display Order Settings Enhanced System Application Management System Application Management System Information MEAP Application Information Check License Change Password MEAP Application Setting Information Management MEAP Application Log Management MEAP Application Management > Application/License Information Application/License Information Authentication Information Settings Back Application Information Application Name: License Generator Version: 4.4.0 Application ID: c7cfs585-f15-4f24-b511-bbd9c8f690cc Installed on: 11/04 2011 Description: genlc Manufacturer: Canon Inc. Import Package: javax.sendst javax.sendst.http org osgi service.http com.canon.meap.service.http Import Service: com.canon.meap.service.http HttpService Resources Used Storage: 10000 KB Memory: 850 KB Threads: 1 Sockets: 0 File Descriptors: 3 License Management License: Installed Serial Number: MKHA000006 Expires after: Does not Expire meap Version 3.1.0.18 Copyright CANON INC. 2011 All Rights Reserved Done Trusted sites | Protected Mode Off 100%

5

Specify the license file.

(1) Click [Browse], and select the license file to be added. (2) Click [Install].

6

Confirm the information on the install confirmation page, and click [Yes]. → The license file is installed. ? If you are adding a license file to an [Over Limit] or [Invalid] application you may need to restart the application. > "Starting/Stopping MEAP Applications" 0258-0HY After you disable a license file, you can download and save it to a computer or delete it. ![](images/deef5840ed974bad13d80c29d87d0023ca330c23e4c1506cb2312f2a52e7adf6.jpg)

IMPORTANT

Disabling Licenses

- You cannot disable a license file if the application is still running. > "Stopping MEAP Applications" - When a disabled license file is generated, the status of that license file becomes and the application becomes unusable.

Reinstalling License Files

You can reinstall disabled license files in the same printer.

1

Start SMS (Service Management Service).

> "Launching SMS (Log in)"

2

Click [MEAP Application Management].

![](images/126efd041699dfb273dcace08b4c2b975f599056cee7b54c65d3b1b5ff961dd2.jpg)
text_image Service Management Service : LBP7680C : LBP7680C - Windows Internet Explorer https://192.168.1.187-8443/sms/ Favorites Suggested Sites Web Site Gallery Service Management Service : LBP7680C : LBP768... LBP7680C / LBP7680C / To Remote UI Log Out from SMS Service Management Service MEAP Application Management MEAP Application Management Updated On: 12/04 2011 17:31:12 Application Name Installed on Status License LoginTool 2.01.00 12/04 2011 Started Stop Uninstall Unnecessary License Generator 4.4.0 11/04 2011 Installed Start Uninstall Installed Resource Information Resource Name Amount Used Remaining Percent Used Storage 13293 KB 19475 KB 41% - Memory 3400 KB 17080 KB 17% - Threads 14 114 11% - Sockets 6 122 5% - File Descriptors 4 124 3% - meap Version 3.1.9.19 Copyright CANON INC. 2011 All Rights Reserved Done ✓ Trusted sites | Protected Mode: Off + 100%

3

Click the name of the application for which to disable to license file. ![](images/067d1bc7e974c924f85c756e9a3ec527f823e49eab248046548d40be97299dc0.jpg)
text_image Service Management Service : LBP7680C : LBP7680C - Windows Internet Explorer https://192.166.1.187.6443.com/ Favorites Suggested Sites Web Slice Gallery Service Management Service : LBP7680C : LBP768... To Remote UI Log Out from SMS Service Management Service Device Serial Number: MKHA000005 MEAP Application Management Install MEAP Application System Management Panel Display Order Settings Enhanced System Application Management System Application Management System Information MEAP Application Information Check License Change Password MEAP Application Setting Information Management MEAP Application Log Management MEAP Application Management Updated On 12/04 2011 17:31:12 Application Name Installed on Status License LoginTool 2.01.00 12/04 2011 Started Stop Uninstall Unnecessary License Generator 4.4.0 11/04 2011 Installed Start Uninstall Installed Resource Information Resource Name Amount Used Remaining Percent Used Storage 13293 KB 19475 KB 41% Memory 3400 KB 17080 KB 17% Threads 14 114 11% Sockets 6 122 5%* File Descriptors 4 124 3% * meap Version 3.1.0.19 Copyright CANON INC. 2011 All Rights Reserved Done ✓ Trusted sites | Protected Mode: OFF + 100%

4

Click [License Management].

![](images/c59e9830cc10d894c7c661ebce5e6c76f268743d8fb4cdbc3ac421ef0c67c7a5.jpg)
text_image Service Management Service : LBP7680C : LBP7680C - Windows Internet Explorer https://192.168.1.187-8443/sms/ Favorites Suggested Sites Web Slice Gallery Service Management Service : LBP7680C : LBP7680C To Remote UI Log Out from SMS Service Management Service Device Serial Number: MKHA000006 MEAP Application Management Install MEAP Application System Management Panel Display Order Settings Enhanced System Application Management System Application Management System Information MEAP Application Information Check License Change Password MEAP Application Setting Information Management MEAP Application Log Management MEAP Application Management > Application/License Information Application/License Information Authentication Information Settings Back Application Information Application Name: License Generator Version: 4.4.0 Application ID: c7cfs585-f15-4f24-b511-bbd9c8f690cc Installed on: 11/04 2011 Description: genlc Manufacturer: Canon Inc. Import Package: javax.sendst javax.sendst.http org osgi service.http com.canon.meap.service.http Import Service: com.canon.meap.service.http HttpService Resources Used Storage: 10000 KB Memory: 850 KB Threads: 1 Sockets: 0 File Descriptors: 3 License Management License: Installed Serial Number: MKHA000006 Expires after: Does not Expire meap Version 3.1.0.18 Copyright CANON INC. 2011 All Rights Reserved Done Trusted sites | Protected Mode Off 100%

5

Click [Disable].

![](images/76bbf7ebe041ac6af0a6f9efecc9bfa18473f25a3000e0ecbd4f60fdc71d3a94.jpg)
text_image Service Management Service : LBP7680C : LBP7680C - Windows Internet Explorer https://192.168.1.187-843/psm/ Favorites Suggested Sites Web Slice Gallery Service Management Service : LBP7680C : LBP768... To Remote UI Log Out from SMS LBP7680C / LBP7680C / Service Management Service Device Serial Number: MKHA000006 MEAP Application Management Install MEAP Application System Management Panel Display Order Settings Enhanced System Application Management System Application Management System Information MEAP Application Information Check License Change Password MEAP Application Setting Information Management MEAP Application Log Management MEAP Application Management > Application/License Information > License Management License Management Back Install License License File Path Browse... Install Disable License File Disable Download/Delete Disabled License File It is recommended that you download the disabled license file to your computer before deleting it. Download Delete meap Version 3.1.8.19 Copyright CANON INC. 2011 All Rights Reserved Done Trusted sites | Protected Mode Off 100%

6

Click [Yes].

→ The license file is disabled. 0258-0J0 Download and back up disabled license files to the computer. ![](images/7b90985b7cd13a45d5e77f0897763eb6c04aeffd711e81bcf9085fbeacdb998d.jpg)

IMPORTANT

Downloading Licenses

- You can only download disabled license files. - Some license files need to be downloaded after they have been disabled.

Reinstalling License Files

You can reinstall downloaded and disabled license files in the same printer.

1

Start SMS (Service Management Service). > "Launching SMS (Log in)"

2

Click [MEAP Application Management]. ![](images/6ff81aa2add393d93c1793eaf9897c1cad704a59847710d9ada0c7e54c905e09.jpg)
text_image Service Management Service : LBP76B0C : LBP76B0C - Windows Internet Explorer https://192.168.1.187.8443/sms/ Favorites Suggested Sites Web Site Gallery Service Management Service : LBP76B0C : LBP76B0C To Remote UI Log Out from SMS Service Management Service MEAP Application Management MEAP Application Management Updated On: 12/04 2011 17:31:12 MEAP Application Management Application Name Installed on Status License LoginTool 2.01.00 12/04 2011 Started Stop Uninstall Unnecessary License Generator 4.4.0 11/04 2011 Installed Start Uninstall Installed Resource Information Resource Name Amount Used Remaining Percent Used Storage 13293 KB 19475 KB 41% Memory 3400 KB 17080 KB 17% Threads 14 114 11% Sockets 6 122 5%* File Descriptors 4 124 3%* meap Version 3.1.0.19 Copyright CANON INC. 2011 All Rights Reserved Done: Trusted sites | Protected Mode: Off 100%

3

Click the name of the application for which to download to license file. ![](images/31445592301ff492737e5eb4639de8c97a65077e82ea68ff2ec9a4a6c59909f1.jpg)
text_image Service Management Service : LBP7680C : LBP7680C - Windows Internet Explorer https://192.166.1.187.6443.com/ Favorites Suggested Sites Web Slice Gallery Service Management Service : LBP7680C : LBP768... To Remote UI Log Out from SMS Service Management Service Device Serial Number: MKHA000005 MEAP Application Management Install MEAP Application System Management Panel Display Order Settings Enhanced System Application Management System Application Management System Information MEAP Application Information Check License Change Password MEAP Application Setting Information Management MEAP Application Log Management MEAP Application Management Updated On 12/04 2011 17:31:12 Application Name Installed on Status License LoginTool 2.01.00 12/04 2011 Started Stop Uninstall Unnecessary License Generator 4.4.0 11/04 2011 Installed Start Uninstall Installed Resource Information Resource Name Amount Used Remaining Percent Used Storage 13293 KB 19475 KB 41% Memory 3400 KB 17080 KB 17% Threads 14 114 11% Sockets 6 122 5%* File Descriptors 4 124 3% * meap Version 3.1.0.19 Copyright CANON INC. 2011 All Rights Reserved Done Trusted sites | Protected Mode: Off 100%

4

Click [License Management].

![](images/146bf332440a19027a0cfe0b8814ac17d6800650f58ff6c606ddc615f08fe186.jpg)
text_image Service Management Service : LBP7680C : LBP7680C - Windows Internet Explorer https://192.168.1.187-8443/sms/ Favorites Suggested Sites Web Slice Gallery Service Management Service : LBP7680C : LBP7680C To Remote UI Log Out from SMS Service Management Service Device Serial Number: MKHA000006 MEAP Application Management Install MEAP Application System Management Panel Display Order Settings Enhanced System Application Management System Application Management System Information MEAP Application Information Check License Change Password MEAP Application Setting Information Management MEAP Application Log Management MEAP Application Management > Application/License Information Application/License Information Authentication Information Settings Back Application Information Application Name: License Generator Version: 4.4.0 Application ID: c7cfs585-f15-4f24-b511-bbd9c8f690cc Installed on: 11/04 2011 Description: genlc Manufacturer: Canon Inc. Import Package: javax.sendst javax.sendst.http org osgi service.http com.canon.meap.service.http Import Service: com.canon.meap.service.http HttpService Resources Used Storage: 10000 KB Memory: 850 KB Threads: 1 Sockets: 0 File Descriptors: 3 License Management License: Installed Serial Number: MKHA000006 Expires after: Does not Expire meap Version 3.1.0.18 Copyright CANON INC. 2011 All Rights Reserved Done Trusted sites | Protected Mode Off 100%

5

Click [Download].

![](images/7b1cfdc23d6ab9b6e6753534ffddfb93faeb0a9a8e9bd750858efe9b979a098e.jpg)
text_image Service Management Service : LBP7680C : LBP7680C - Windows Internet Explorer https://192.168.1.187-6443/sms/ Favorites Suggested Sites Web Slice Gallery Service Management Service : LBP7680C : LBP768... To Remote UI Log Out from SMS LBP7680C / LBP7680C / Service Management Service Device Serial Number: MKHA000006 MEAP Application Management Install MEAP Application System Management Panel Display Order Settings Enhanced System Application Management System Application Management System Information MEAP Application Information Check License Change Password MEAP Application Setting Information Management MEAP Application Log Management MEAP Application Management > Application/License Information > License Management License Management Back Install License License File Path: Browse... Install Disable License File Disable Download/Delete Disabled License File it is recommended that you download the disabled license file to your computer before deletion it. Download Delete meap Version 3.1.9.19 Copyright CANON INC. 2011 All Rights Reserved Done Trusted sites | Protected Mode Off 100%

6

Follow the on-screen instructions and specify a file storage directory. → The license file is saved. 0258-0J1 To uninstall an application, you must first delete the license file. ![](images/8eb44db27e4b7a3b07cb658b83de453dcda9da01db3a14f407dcda4c6aea773c.jpg)

IMPORTANT

Deleting Licenses

- You can only delete disabled license files. - Once you have deleted the disabled license file, you cannot download it again. We recommend downloading and backing it up before deleting it.

1

Start SMS (Service Management Service). > "Launching SMS (Log in)"

2

Click [MEAP Application Management]. ![](images/10d27958b5f9a566586d193f2dabadd5a26deab3017b3e52262ef763c08c7363.jpg)
text_image Service Management Service : LBP7680C : LBP7680C - Windows Internet Explorer https://192.168.1.187.843/sms/ Favorites Suggested Sites Web Shoe Gallery Service Management Service : LBP7680C : LBP768... To Remote UI Log Out from SMS Service Management Service MEAP Application Management MEAP Application Management Updated On: 12/04 2011 17:31:12 MEAP Application Management Application Name Installed on Status License LoginTool 2.01.00 12/04 2011 Started Stop Uninstall Unnecessary License Generator 4.4.0 11/04 2011 Installed Start Uninstall Installed Resource Information Resource Name Amount Used Remaining Percent Used Storage 13293 KB 19475 KB 41% Memory 3400 KB 17080 KB 17% Threads 14 114 11% Sockets 6 122 5% File Descriptors 4 124 3% meap Done Version 3.10.19 Copyright CANON INC. 2011 All Rights Reserved Trusted sites | Protected Mode Off

3

Click the name of the application to which to delete a license file. ![](images/2c917d7914fa877ffb9c51d73a41fcd7d9a0d70a43c23b90e75a5f49851c1058.jpg)
text_image Service Management Service : LBP7680C : LBP7680C - Windows Internet Explorer https://192.166.1.187.6443.com/ Favorites Suggested Sites Web Slice Gallery Service Management Service : LBP7680C : LBP768... To Remote UI Log Out from SMS Service Management Service Device Serial Number: MKHA000005 MEAP Application Management Install MEAP Application System Management Panel Display Order Settings Enhanced System Application Management System Application Management System Information MEAP Application Information Check License Change Password MEAP Application Setting Information Management MEAP Application Log Management MEAP Application Management Updated On 12/04 2011 17:31:12 Application Name Installed on Status License LoginTool 2.01.00 12/04 2011 Started Stop Uninstall Unnecessary License Generator 4.4.0 11/04 2011 Installed Start Uninstall Installed Resource Information Resource Name Amount Used Remaining Percent Used Storage 13293 KB 19475 KB 41% Memory 3400 KB 17080 KB 17% Threads 14 114 11% Sockets 6 122 5%* File Descriptors 4 124 3% * meap Version 3.1.0.19 Copyright CANON INC. 2011 All Rights Reserved Done Trusted sites | Protected Mode: Off 100%

4

Click [License Management].

![](images/faee402452893685424b28d59a5a34947442ef21296c2015a085af5140f718fd.jpg)
text_image Service Management Service : LBP7680C : LBP7680C - Windows Internet Explorer https://192.168.1.187-8443/sms/ Favorites Suggested Sites Web Slice Gallery Service Management Service : LBP7680C : LBP7680C To Remote UI Log Out from SMS Service Management Service Device Serial Number: MKHA000006 MEAP Application Management Install MEAP Application System Management Panel Display Order Settings Enhanced System Application Management System Application Management System Information MEAP Application Information Check License Change Password MEAP Application Setting Information Management MEAP Application Log Management MEAP Application Management > Application/License Information Application/License Information Authentication Information Settings Back Application Information Application Name: License Generator Version: 4.4.0 Application ID: c7cfs585-f15-4f24-b511-bbd9c8f690cc Installed on: 11/04 2011 Description: genlc Manufacturer: Canon Inc. Import Package: javax.sendst javax.sendst.http org osgi service.http com.canon.meap.service.http Import Service: com.canon.meap.service.http HttpService Resources Used Storage: 10000 KB Memory: 850 KB Threads: 1 Sockets: 0 File Descriptors: 3 License Management License: Installed Serial Number: MKHA000006 Expires after: Does not Expire meap Version 3.1.0.18 Copyright CANON INC. 2011 All Rights Reserved Done Trusted sites | Protected Mode Off 100%

5

Click [Delete].

![](images/60ef0bd16e2350e136103c29fc41e146d49dfeed840b37128ba5fb8c4935669c.jpg)
text_image Service Management Service : LBP7680C : LBP7680C - Windows Internet Explorer https://192.168.1.187.643/psm/ Favorites Suggested Sites Web Site Gallery Service Management Service : LBP7680C : LBP768... LBP7680C / LBP7680C / To Remote UI Log Out from SMS Service Management Service Device Serial Number: MKHA000006 MEAP Application Management Install MEAP Application System Management Panel Display Order Settings Enhanced System Application Management System Application Management System Information MEAP Application Information Check License Change Password MEAP Application Setting Information Management MEAP Application Log Management MEAP Application Management > Application/License Information > License Management License Management Back Install License License File Path Browse... Install Disable License File Disable Download/Delete Disabled License File It is recommended that you download the disabled license file to your computer before deleting it Download Delete meap Version 3.1.0.19 Copyright CANON INC. 2011 All Rights Reserved Done Trusted sites | Protected Mode Off 100%

6

Click [Yes].

→ The license file is deleted. ![](images/c20452cf10b0af268bd308dde09f4c315e84cddfa83763544ed30128c612561b.jpg)
text_image Service Management Service : LBP7680C : LBP7680C - Windows Internet Explorer https://192.168.1.187-8443/sms/ Favorites Suggested Sites Web Slice Gallery Service Management Service | LBP7680C | LBP768... Are you sure you want to delete the disabled license file? It is recommended that you download the disabled license file to your computer before deleting it. Yes No Done Trusted sites | Protected Mode: Off 100%

Setting Authentication Information for MEAP Applications

0258-0J2 When processing jobs from applications that do not require operation from the printer, you must first set the authentication information.

1

Start SMS (Service Management Service). > "Launching SMS (Log in)"

2

Click [MEAP Application Management]. ![](images/f2cc62fa80d984c159ca137e8271f804e3e525c03251a6c1e2c058c92fecb9c5.jpg)
text_image Service Management Service : LBP7680C : LBP7680C - Windows Internet Explorer https://192.168.1.187-8443/ems/ Favorites Suggested Sites Web Store Gallery Service Management Service : LBP7680C : LBP768... To Remote UI Log Out from SMS Service Management Service MEAP Application Management MEAP Application Management Updated On: 12/04 2011 17:31:12 MEAP Application Management Application Name Installed on Status License LoginTool 2.01.00 12/04 2011 Started Stop Uninstall Unnecessary License Generator 4.4.0 11/04 2011 Installed Start Uninstall Installed Resource Information Resource Name Amount Used Remaining Percent Used Storage 13293 KB 19475 KB 41% Memory 3400 KB 17080 KB 17% Threads 14 114 11% Sockets 6 122 5% File Descriptors 4 124 3% meap Version 3.1.0.19 Copyright CANON INC. 2011 All Rights Reserved Done ✓ Trusted sites | Protected Mode Off + 100%

3

Click the name of the application for which to set authentication information. ![](images/59c70f3ee20c23a3dc611ee6dcf060b2465fd39be1467f2ef04aa34ba9149f73.jpg)
text_image Service Management Service | LBP7680C : LBP7680C - Windows Internet Explorer https://192.166.1.187.6463/svm/ Favorites Suggested Sites Web Slice Gallery Service Management Service : LBP7680C : LBP768... To Remote UI Log Out from SMS Service Management Service Device Serial Number: MKHA000005 MEAP Application Management Install MEAP Application System Management Panel Display Order Settings Enhanced System Application Management System Application Management System Information MEAP Application Information Check License Change Password MEAP Application Setting Information Management MEAP Application Log Management MEAP Application Management Updated On: 12/04 2011 17:31:12 Application Name Installed on Status License LoginTool 2.01.00 12/04 2011 Started Stop Uninstall Unnecessary License Generator 4.4.0 11/04 2011 Installed Start Install Installed Resource Information Resource Name Amount Used Remaining Percent Used Storage 13293 KB 19475 KB 41% Memory 3400 KB 17080 KB 17% Threads 14 114 11% Sockets 6 122 5%* File Descriptors 4 124 3%* meap Version 3.1.0.19 Copyright CANON INC. 2011 All Rights Reserved Done ✓ Trusted sites | Protected Mode: Off + 100%

4

Click [Authentication Information Settings]. ![](images/224c4865fdf44849afc8533d952b414ab898c5a63ddf10795421a8b219f294d5.jpg)
text_image Service Management Service : LBP7680C : LBP7680C - Windows Internet Explorer https://192.166.3.187-8443/sms/ Favorites Suggested Sites Web Slice Gallery Service Management Service : LBP7680C : LBP768... To Remote UI Log Out from SMS LBP7680C / LBP7680C / Service Management Service Device Serial Number: MKHA000006 MEAP Application Management Install MEAP Application System Management Panel Display Order Settings Enhanced System Application Management System Application Management System Information MEAP Application Information Check License Change Password MEAP Application Setting Information Management MEAP Application Log Management MEAP Application Management > Application/License Information Application/License Information Authentication Information Settings Back Application Information Application Name: License Generator Version: 4.4.0 Application ID: c7cfa585-f319-4f24-b511-bbd5k:BF690cc Installed on: 11/04 2011 Description: genlc Manufacturer: Canon Inc. Import Package: javax.sendlet javax.sendlet.http org.osgi.service.http com.canon.meap.service.http Import Service: com.canon.meap.service.http HttpService Resources Used Storage: 10000 KB Memory: 850 KB Threads: 1 Sockets: 0 File Descriptors: 3 License Information. License Management Status: Installed Serial Number: MKHA000006 Expires after: Does not Expre meap Version 3.1.0.19 Copyright CANON INC. 2011 All Rights Reserved Done Trusted sites | Protected Mode: Off 100%

5

Enter the authentication information. If you use department ID management Enter the department ID and password in the fields marked [Department ID] and [PIN].

If you do not use department ID management

Enter an arbitrary ID and password in the fields marked [Department ID] and [PIN]. ![](images/065950b8722fb1c67c958af75be484964eb580685b9daf0e2b647b9695fb3a06.jpg)
text_image Service Management Service : LBP7680C : LBP7680C - Windows Internet Explorer https://192.168.1.187/b443/ums/ Bing Favorites Suggested Sites Web Slice Gallery Service Management Service : LBP7680C : LBP7680C To Remote UI Log Out from SMS LBP7680C / LBP7680C / Service Management Service Device Serial Number: MKHA000005 MEAP Application Management Install MEAP Application System Management Panel Display Order Settings Enhanced System Application Management System Application Management System Information MEAP Application Information Check License Change Password MEAP Application Setting Information Management MEAP Application Log Management MEAP Application Management > Application/License Information > Authentication Information Settings Authentication Information Settings Update Delete Cancel Authentication information is not set Department ID: PIN: meap Version 3.1.0.19 Copyright CANON INC. 2011 All Rights Reserved Done Trusted sites | Protected Mode: Off 100%

6

Click [Update].

→ Authentication information is set. ![](images/2b0e82d8423591bfb34829c4fb6b6688bdedbfa3f46d91110b95bdb6df096d83.jpg)
text_image Service Management Service / LBP7680C / LBP7680C - Windows Internet Explorer https://192.168.1.187.6443/sms/ Favorites Suggested Sites Web Slice Gallery Service Management Service / LBP7680C / LBP7680C To Remote UI Log Out from SMS Service Management Service Device Serial Number: MKHA000005 MEAP Application Management Install MEAP Application System Management Panel Display Order Settings Enhanced System Application Management System Application Management System Information MEAP Application Information Check License Change Password MEAP Application Setting Information Management MEAP Application Log Management MEAP Application Management > Application/License Information > Authentication Information Settings Authentication Information Settings Update Delete Cancel Authentication information is not set. Department ID: example PIN: ********** meap Version 3.1.9.19 Copyright CANON INC. 2011 All Rights Reserved Done Trusted sites | Protected Mode: Off 100%
![](images/4c25cd4964ad0837ada841f219faf676d6c638ecedd57f8a9742809d1b61998f.jpg)

IMPORTANT

When cancelling authentication information Click [Delete]. 0258-0J3 The [System Management] menu contains the following items. ![](images/7d1c70a3e870a26836f3fffb71c448cc668721c873f5e3f0eee1c8e21b63a9bb.jpg)
text_image Service Management Service : LBP7680C : LBP7680C - Windows Internet Explorer https://192.168.1.187/840/sms/ Favorites Suggested Sites Web Slice Gallery Service Management Service : LBP7680C : LBP768... To Remote UI Log Out from SMS LBP7680C / LBP7680C / Service Management Service Device Serial Number MKHA000006 MEAP Application Management Install MEAP Application System Management Panel Display Order Settings Enhanced System Application Management System Application Management System Information MEAP Application Information Check License Change Password MEAP Application Setting Information Management MEAP Application Log Management System Management > Enhanced System Application Management Enhanced System Application Management Updated On 12/04 2011 17:44:44 Login Service Application Name Installed on Application ID Status Sample Login Application 3 1.0.0.1 08/04 2011 f1a168e9-012b-1000- befb-00e000c4ae6f Installed SWITCH Uninstall Default Authentication 6.0.0.11 05/04 2011 e7654b49-3e65-4cd5- 9d29-c4a5a436061a Started SWITCH Uninstall Other System Applications Application Name Installed on Application ID Status Install Enhanced System Application/License Enhanced System Application File Path: License File Path: Browse... Browse... Install meap Version 3.1.9.19 Copyright CANON INC. 2011 All Rights Reserved Done Trusted sites | Protected Mode: Off 100%
[Panel Display Order Settings]It sets the order MEAP applets are displayed on the operation panel.➢ "Changing the MEAP Applet Display Order"
[Enhanced System Application Management]It displays enhanced system application status and performs settings. You can also set log in service settings.➢ "Setting Enhanced System Applications"
[System Application Management]It displays system application status and performs start/stop operations.
[System Information]It displays versions and system application information, etc.➢ "Checking System Information"
[MEAP Application Information]It displays the details about MEAP applications.➢ "Checking Application Information"
[Check License]It checks the content of the license file before it is installed.➢ "Checking License Files"
[Change Password]It changes the SMS log in password.➢ "Changing the SMS Password"
[MEAP Application Setting Information Management]It deletes the details about MEAP applications.➢ "Deleting the MEAP Application Setting Information"
[MEAP Application Log Management]It downloads and deletes log data obtained by MEAP applications.➢ "Managing MEAP Application Log Data"

Changing the MEAP Applet Display Order

0258-0JR The applet display order changes when you press [●] (图标:Application) on the control panel. ![](images/dee9811e780901f5d9cf2f5f691fc2330e3e73ff4609cefe32f50ba3745f0469.jpg)
text_image Control panel interface with Chinese labels and a highlighted button labeled '按钮' (button)

1

Start SMS (Service Management Service). > "Launching SMS (Log in)"

2

Click [Panel Display Order Settings]. ![](images/68134a673817e8ac4dc4cbe81dd3e62dc609c3c266565700ae2af57f9d51f0e3.jpg)
text_image Service Management Service : LBP7680C / LBP7680C - Windows Internet Explorer https://192.166.1.187-5443/sms/ Favorites Suggested Sites Web Slice Gallery Service Management Service : LBP7680C : LBP768... To Remote UI Log Out from SMS LBP7680C / LBP7680C / Service Management Service MEAP Application Management Device Serial Number: MKHA000006 MEAP Application Management Install MEAP Application System Management Panel Display Order Settings Enhanced System Application Management System Application Management System Information MEAP Application Information Check License Change Password MEAP Application Setting Information Management MEAP Application Log Management MEAP Application Management Updated On 12/04 2011 17:31:12 Application Name Installed on Status License LoginTool 2.01.00 12/04 2011 Started Stop Uninstall Unnecessary License Generator 4.4.0 11/04 2011 Installed Start Simnntel Installed Resource Information Resource Name Amount Used Remaining Percent Used Storage 13293 KB 19475 KB 41% - Memory 3400 KB 17080 KB 17% - Threads 14 114 11% - Sockets 6 122 5% - File Descriptors 4 124 3% - meap Version 3.1.9.19 Copyright CANON INC, 2011 All Rights Reserved Done ✓ Trusted sites | Protected Mode: Off + 300%

3

Select the check boxes for the applets whose display order you wish to change. ![](images/c6b4c62dfaaea8767630f2b519e7286e90381cfcea19ecc2bedb59960b202440.jpg)
text_image Service Management Service : LBP7680C : LBP7680C - Windows Internet Explorer https://192.166.1.187/b443/sms/ Favorites Suggested Sites Web Store Gallery Service Management Service : LBP7680C : LBP768... LBP7680C / LBP76B0C / To Remote UI Log Out from SMS Service Management Service Device Serial Number: MKHA000006 MEAP Application Management Install MEAP Application System Management Panel Display Order Settings Enhanced System Application Management System Application Management System Information MEAP Application Information Check License Change Password MEAP Application Setting Information Management MEAP Application Log Management System Management > Panel Display Order Settings Panel Display Order Settings Update Reset Applets Displayed on Panel Up Down Display Order Applet Name Application ID 1 LoginTool 01234567-85ab-cdef-0123-456789abcdef 2 LAVSSample aa40517d-012b-1000-bf/d-00e000c4a6f meap Version 3.1.0.19 Copyright CANON INC. 2011 All Rights Reserved Done Trusted sites | Protected Mode: Off 100%

4

The display order changes.

(1) Move the applets up and down by clicking [Up] and [Down]. (2) Click [Update]. ![](images/fa5f1cbc19ff53f7da27608e71c5ff2df192a979ff5aaa0b7f4e4c4e6c8a97ab.jpg)
text_image Service Management Service | LBP760C : LBP760C - Windows Internet Explorer https://192.166.1.187.6443/sms/ Favorites Suggested Sites Web Slice Gallery Service Management Service : LBP760C : LBP760C To Remote UI Log Out from SMS Service Management Service Device Serial Number: MKHA000005 MEAP Application Management Install MEAP Application System Management Panel Display Order Settings Enhanced System Application Management System Application Management System Information MEAP Application Information Check License Change Password MEAP Application Setting Information Management MEAP Application Log Management System Management > Panel Display Order Settings Panel Display Order Settings Update Reset Applet Displayed on Panel Up Down Display Order Applet Name Application ID 1 LoginTool 01234567-89ab-cdef-0123-456789abcdef 2 LAVSSample aa40517d-012b-1000-bf/d-00e000c4ae6f meap Version 3.1.9.19 Copyright CANON INC. 2011 All Rights Reserved Done Trusted sites | Protected Mode: Off 100%
0258-0J6 Check the login services that perform user authentication.

1

Start SMS (Service Management Service). > "Launching SMS (Log in)"

2

Click [Enhanced System Application Management]. ![](images/e9f72ba359bae899bd34a7a5d5a09fa3a3ff24211343297d44213ebf75174243.jpg)
text_image Service Management Service / LBP7680C / LBP7680C - Windows Internet Explorer https://192.168.1.187-6443/sms/ Favorites Suggested Sites Web Slice Gallery Service Management Service / LBP7680C / LBP768... To Remote UI Log Out from SMS Service Management Service Device Serial Number: MKHA000006 MEAP Application Management Install MEAP Application System Management Panel Display Order Settings Enhanced System Application Management System Application Management System Information MEAP Application Information Check License Change Password MEAP Application Setting Information Management MEAP Application Log Management MEAP Application Management Updated On 12/04 2011 17:31:12 Application Name Installed on Status License LoginTool 2.01.00 12/04 2011 Started Stop Uninstat Unnecessary License Generator 4.4.0 11/04 2011 Installed Start Uninstat Installed Resource Information Resource Name Amount Used Remaining Percent Used Storage 13293 KB 19475 KB 41% Memory 3400 KB 17080 KB 17% Threads 14 114 11%_ Sockets 6 122 5%_ File Descriptors 4 124 3%_ meap Version 3.1.0.19 Copyright CANON INC. 2011 All Rights Reserved Done Trusted sites | Protected Mode: Off 300%

3

Check the status of log in service. ![](images/3da1ece4ebd29ded54bbce074cd397e671f6c610dd492c3bb0ab3b1197452da2.jpg)
text_image Service Management Service | LBP7680C : LBP7680C - Windows Internet Explorer https://192.168.1.187-b443/vms/ Favorites Suggested Sites Web Slice Gallery Service Management Service : LBP7680C : LBP768... LBP7680C / LBP7680C / To Remote UI Log Out from SMS Service Management Service Device Serial Number MKHA009006 MEAP Application Management Install MEAP Application System Management Panel Display Order Settings Enhanced System Application Management System Application Management System Information MEAP Application Information Check License Change Password MEAP Application Setting Information Management MEAP Application Log Management System Management > Enhanced System Application Management Enhanced System Application Management Updated On 12/04 2011 17:44:44 Login Service Application Name Installed on Application ID Status Sample Login Application 3 1.0.0.1 08/04 2011 Fla168e9-012b-1000-befb-00e000c4a6f Installed SWITCH Uninstall Default Authentication 6.0.0.11 05/04 2011 e7654b49-3e65-4cd5-9d29-c4a5a436061a Started SWITCH Uninstall Other System Applications Application Name Installed on Application ID Status Install Enhanced System Application/License Enhanced System Application File Path: License File Path: Browse... Browse... Install meap Version 3.1.9.19 Copyright CANON INC. 2011 All Rights Reserved Done ✓ Trusted sites | Protected Mode: Off ▼ 100%
0258-0J7 They perform the operations of the enhanced system applications that enhance the system applications (the basic applications that make up the MEAP system).

Starting/Stopping Enhanced System Applications

Starting Enhanced System Applications Stopping Enhanced System Applications

> Installing Enhanced System Applications

> Uninstalling Enhanced System Applications

Starting/Stopping Enhanced System Applications

0258-0J8 Starting Enhanced System Applications > Stopping Enhanced System Applications 0258-0J9

1

Start SMS (Service Management Service). > "Launching SMS (Log in)"

2

Click [Enhanced System Application Management]. ![](images/57badf1ef152e819c9e430b96ee99106b78dfffee9c11df5dd730c91ef1157ed.jpg)
text_image Service Management Service | LBP7680C | LBP7680C - Windows Internet Explorer https://192.168.1.187-b43/sms/ Favorites Suggested Sites Web Slice Gallery Service Management Service | LBP7680C | LBP768... LBP7680C / LBP7680C / To Remote UR Log Out from SMS Service Management Service Device Serial Number: MKHA000006 MEAP Application Management Install MEAP Application System Management Panel Display Order Settings Enhanced System Application Management System Application Management System Information MEAP Application Information Check License Change Password MEAP Application Setting Information Management MEAP Application Log Management System Management > Enhanced System Application Management Enhanced System Application Management Updated On 12/04 2011 17:44:44 Login Service Application Name Installed on Application ID Status Sample Login Application 3 1.0.0.1 08/04 2011 f1a168e9-0-12b-1000- befb-00e000c4ae6f Installed SWITCH Uninstall Default Authentication 6.0.0.11 05/04 2011 e7654b49-3e65-4cd5- 9d29-c4a5a436061a Started SWITCH Uninstall Other System Applications Application Name Installed on Application ID Status Install Enhanced System Application/License Enhanced System Application File Path: License File Path: Browse... Browse... Install meap Version 3.1.9.19 Copyright CANON INC. 2011 All Rights Reserved Done ✓ Trusted sites | Protected Mode OFF % 100%

3

Click [Start] for Other System Applications, and then start the application. When the [License Agreement] appears, confirm the information, and click [I Accept]. 0258-0JA

1

Start SMS (Service Management Service). > "Launching SMS (Log in)"

2

Click [Enhanced System Application Management]. ![](images/b57efe7b984043ac795270ab15c35f8488d1ea50e59f0076e61dbe353149a1f2.jpg)
text_image Service Management Service | LBP7680C | LBP7680C - Windows Internet Explorer https://192.168.1.187-b443/sms/ Favorites Suggested Sites Web Slice Gallery Service Management Service | LBP7680C | LBP768... LBP7680C / LBP7680C / To Remote UR Log Out from SMS Service Management Service Device Serial Number: MKHA000006 MEAP Application Management Install MEAP Application System Management Panel Display Order Settings Enhanced System Application Management System Application Management System Information MEAP Application Information Check License Change Password MEAP Application Setting Information Management MEAP Application Log Management System Management > Enhanced System Application Management Enhanced System Application Management Updated On 12/04 2011 17:46:44 Login Service Application Name Installed on Application ID Status Sample Login Application 3 1.0.0.1 08/04 2011 f1a168e9-0-12b-1000- befb-00e000c4ae6f Installed SWITCH Uninstall Default Authentication 6.0.0.11 05/04 2011 e7654b49-3e65-4cd5- 9d29-c4a5a436061a Started SWITCH Uninstall Other System Applications Application Name Installed on Application ID Status Install Enhanced System Application/License Enhanced System Application File Path: License File Path: Browse... Browse... Install meap Version 3.1.9.19 Copyright CANON INC. 2011 All Rights Reserved Done Trusted sites | Protected Mode: Off 100%

3

Click [Stop] for Other System Applications, and then stop the application. 0258-0JC

1

Start SMS (Service Management Service). > "Launching SMS (Log in)"

2

Click [Enhanced System Application Management]. ![](images/4115778b08b7449032a4f50fcbcadb375ee31da1df43eb74f208d1d57a47c2cc.jpg)
text_image Service Management Service : LBP760C : LBP760C - Windows Internet Explorer https://192.166.1.187-6443/rms/ Favorites Suggested Sites Web Since Gallery Service Management Service : LBP760C : LBP760... To Remote UI Log Out from SMS Service Management Service MEAP Application Management MEAP Application Management Updated On 12/04 2011 17:31:12 Application Name Installed on Status License LoginTool 2.01.00 12/04 2011 Started Stop UmInstall Unnecessary License Generator 4.4.0 11/04 2011 Installed Start UmInstall Installed Resource Information Resource Name Amount Used Remaining Percent Used Storage 13293 KB 19475 KB 41% Memory 3400 KB 17080 KB 17% Threads 14 114 11% Sockets 6 122 5% File Descriptors 4 124 3% meap Version 3.1.9.19 Copyright CANON INC. 2011 All Rights Reserved Done Trusted sites | Protected Mode: Off 100%

3

Set [Enhanced System Application File Path] and [License File Path]. Either select the file by clicking [Browse...], or enter the location where the file is stored. ![](images/0cc93cca6dd51305d37c665c3615be8e6705248c05ee5c55f599ca0693d06729.jpg)
text_image Service Management Service : LBP7680C : LBP7680C - Windows Internet Explorer https://192.168.1.187-8431/nms/ Favorites Suggested Sites Web Slice Gallery Service Management Service : LBP7680C : LBP768... LBP7680C / LBP7680C / To Remote UI Log Out from SMS Service Management Service Device Serial Number: MKHA000006 MEAP Application Management Install MEAP Application System Management Panel Display Order Settings Enhanced System Application Management System Application Management System Information MEAP Application Information Check License Change Password MEAP Application Setting Information Management MEAP Application Log Management System Management > Enhanced System Application Management Enhanced System Application Management Updated On 12/04 2011 17:46:44 Login Service Application Name Installed on Application ID Status Sample Login Application 3 1.0.0.1 08/04 2011 f1a168e9-012b-1000- befb-00e000c4ae6f Installed SWITCH Uninstall Default Authentication 6.0.0.11 05/04 2011 e7654b43-3e65-4cd5- 9d29-c4a5a436061a Started SWITCH Uninstall Other System Applications Application Name Installed on Application ID Status Install Enhanced System Application/License Enhanced System Application File Path: License File Path: Browse... Browse... Install meap Version 3.1.9.19 Copyright CANON INC. 2011 All Rights Reserved Done Trusted sites | Protected Mode ON 100%
[Enhanced System Application File Path]Specify a file with a "jar" extension.
[License File Path] Specify a file with a "lic" extension.
![](images/fd66199677104c93eebf7e1d2d76b1a4609630d5beec23f6bdf1249a538290df.jpg)

IMPORTANT

When specifying a file Specify both the application file and the license file.

4

Click [Install]. ![](images/624145872c2abe75b97d70ce0f4910fe90d1b99d00bc2335ce6aa56588b3af5b.jpg)
text_image Service Management Service : LBP7680C : LBP7680C - Windows Internet Explorer https://192.168.1.187b443/vms/ Favorites Suggested Sites Web Slice Gallery Service Management Service : LBP7680C : LBP768... LBP7680C / LBP7680C / To Remote UI Log Out from SMS Service Management Service Device Serial Number: MKHA000006 MEAP Application Management Install MEAP Application System Management Panel Display Order Settings Enhanced System Application Management System Application Management System Information MEAP Application Information Check License Change Password MEAP Application Setting Information Management MEAP Application Log Management System Management > Enhanced System Application Management Enhanced System Application Management Updated On 12/04 2011 17:44:44 Login Service Application Name Installed on Application ID Status Sample Login Application 3 1.0.0.1 08/04 2011 fla168e9-012b-1000- befb-00e000c4ae6f Installed SMITCH Uninstall Default Authentication 6.0.0.11 05/04 2011 e7654b49-3e65-4cd5- 9d29-c4a5a436061a Started SMITCH Uninstall Other System Applications Application Name Installed on Application ID Status Install Enhanced System Application/License Enhanced System Application File Path: License File Path: Browse... Browse... Install meap Version 3.1.0.19 Copyright CANON INC. 2011 All Rights Reserved Done Trusted sites | Protected Mode: OFF 100%

5

Confirm the information on the install confirmation page, and click [Yes].

When the [License Agreement] appears, confirm the information, and click [I Accept]. → The installation begins. 0258-0JE ![](images/2c7d7de14d0434439d6cc98db295929062a099ef29f4cfb67373d1db6797ea7c.jpg)

NOTE

Deleting License Files

There is no need to delete license files before uninstalling enhanced system applications.

1

Start SMS (Service Management Service). "Launching SMS (Log in)"

2

Click [Enhanced System Application Management]. ![](images/6b6315773920d37fef0c47ea01622a25e860f89b233e93565a87eb963eb6aed2.jpg)
text_image Service Management Service | LBP760C | LBP760C - Windows Internet Explorer https://192.168.1.187-043/rms/ Favorites Supported Sites Web Slice Gallery Service Management Service : LBP760C | LBP760C To Remote UI Log Out from SMS LBP760C / LBP760C / Service Management Service Device Serial Number: MKHA000006 MEAP Application Management Install MEAP Application System Management Panel Display Order Settings Enhanced System Application Management System Application Management System Information MEAP Application Information Check License Change Password MEAP Application Setting Information Management MEAP Application Log Management MEAP Application Management Updated On: 12/04 2011 17:31:12 Application Name Installed on Status License LoginTool 2.01.00 12/04 2011 Started Stop Uninstall Umnecessary License Generator 4.4.0 11/04 2011 Installed Start Install Installed Resource Information Resource Name Amount Used Remaining Percent Used Storage 13293 KB 19475 KB 41% Memory 3400 KB 17080 KB 17% Threads 14 114 11% Sockets 6 122 5%* File Descriptors 4 124 3%* meap Version 3.1.9.19 Copyright CANON INC. 2011 All Rights Reserved Done Trusted sites | Protected Mode: Off 100%

3

Click [Uninstall] for the application to uninstall. Applications with [Uninstall] grayed out cannot be deleted. ![](images/0bc4bd4269e936f9c3fe4342b2026fca5e4f090bcb1ae61b07ffd3e1ecf6ea74.jpg)
text_image Service Management Service : LBP7680C : LBP7680C - Windows Internet Explorer https://192.168.1.187/b443/rms/ Favorites Suggested Sites Web Slice Gallery Service Management Service : LBP7680C : LBP768... LBP7680C / LBP7680C / To Remote UI Log Out from SMS Service Management Service Device Serial Number: MKHA000006 MEAP Application Management Install MEAP Application System Management Panel Display Order Settings Enhanced System Application Management System Application Management System Information MEAP Application Information Check License Change Password MEAP Application Setting Information Management MEAP Application Log Management System Management > Enhanced System Application Management Enhanced System Application Management Updated On 12/04 2011 17:44:44 Login Service Application Name Installed on Application ID Status Sample Login Application 3 1.0.0.1 08/04 2011 fla168e9-012b-1000- befb-00e000c4ae6f Installed SWITCH Uninstall Default Authentication 6.0.0.11 05/04 2011 e7654b49-3e65-4cd5- 9d29-c4a5a436061a Started SWITCH Other System Applications Application Name Installed on Application ID Status Install Enhanced System Application/License Enhanced System Application File Path: License File Path: Browse... Browse... Install meap Version 3.1.9.19 Copyright CANON INC. 2011 All Rights Reserved Done ✓ Trusted sites | Protected Mode: Off ✓ 100%

4

Click [Yes].

→ The uninstall begins.

Checking Information

0258-0JF > Checking System Information > Checking Application Information > Checking License Files 0258-0JH You can check the version information of platforms such as Java virtual machine and version information, date of installation and status of system applications.

1

Start SMS (Service Management Service). > "Launching SMS (Log in)"

2

Click [System Information]. ![](images/2f1e066dfaa1931e9464c19bc82dfe5a8da47f26e99c1e2fae2bbe8445426407.jpg)
text_image Service Management Service : LBP7680C | LBP7680C - Windows Internet Explorer https://192.168.1.187/8443/sms/ Favorites Suggested Sites Web Slice Gallery Service Management Service : LBP7680C | LBP768... To Remote UI Log Out from SMS LBP7680C / LBP7680C / Service Management Service Device Serial Number: MKHA000006 MEAP Application Management Install MEAP Application System Management Panel Display Order Settings Enhanced System Application Management System Applications Management System Information MEAP Application Information Check License Change Password MEAP Application Setting Information Management MEAP Application Log Management System Management > System Information System Information Updated On 12/04.2011 17:45:42 Platform Information Name Version MEAP Specifications 15.19.25.26.27.29.34.39.45.47.50.51.52.54.55.57.58.60.61.62.63 MEAP Contents 01.30 Java Virtual Machine 06.60.3 System Application Information Display Details Application Name Installed on Application ID Status DSL Installer Service 3.0.4.5 05/04 2011 2ca34a18-7f8a-4fd9-8da9- SMS Installer Service 3.1.0.19 05/04 2011 c7059d0-c691-49e19c23- Service Management Service 2.11.0.9 05/04 2011 c6b7B400-9a49-45a7-a08e- 9aa393e62287 Started meap Version 3.1.0.19 Copyright CAVON INC, 2011 All Rights Reserved Trusted sites | Protected Mode Off 100%
Click [Display Details] to check detailed information. ![](images/f28d0650858d7a62e42c9f872778c36777292e309f78f49333380877f01663d2.jpg)
text_image Service Management Service : LBP760C : LBP760C - Windows Internet Explorer https://192.168.1.187.8443/xxx/ Favorites Suggested Sites Web Site Gallery Service Management Service : LBP760C : LBP760C To Remote UI Log Out from SMS Service Management Service Device Serial Number: MKHA000005 MEAP Application Management Install MEAP Application System Management Panel Display Order Settings Enhanced System Application Management System Application Management System Information MEAP Application Information Check License Change Password MEAP Application Setting Information Management MEAP Application Log Management System Management > System Information System Information Updated On 12/04 2011 17:45:42 Platform Information Name Version MEAP Specifications 15.19.25.26.27.29.34.39.45.47.50.51.52.54.55.57.58.60.61.62.63 MEAP Contents 01.30 Java Virtual Machine 06.00.3 System Application Information Display Details Application Name Installed on Application ID Status DSL Installer Service 3.0.4.5 05/04 2011 2ca34a18-7fBa-4fB-8daB-511e2963b733 Started SMS Installer Service 3.1.0.19 05/04 2011 c70590d0-c691-4fBaf-3c23-3df9b452194db Started Service Management Service 2.11.0.9 05/04 2011 c6b78400-9a49-45a7-a08e-9aa793ef62267 Started meap Version 3.1.0.19 Copyright CANON INC. 2011 All Rights Reserved Trusted sites | Protected Mode: Off 100%
0258-0JJ You can check the information about installed or uninstalled applications (except for system applications).

1

Start SMS (Service Management Service). > "Launching SMS (Log in)"

2

Click [MEAP Application Information]. ![](images/eeadcd46d3fdbbd4d76362afef33f2a995d8ced3ccd9f77ab2bf80818d15271a.jpg)
text_image Service Management Service : LBP7680C : LBP7680C - Windows Internet Explorer https://192.168.1.187-b443/ms/ Favorites Suggested Sites Web Slice Gallery Service Management Service : LBP7680C : LBP768... LBP/FSB0C / LBP/FSB0C / To Remote UI Log Out from SMS Service Management Service Device Serial Number: MKHA000006 MEAP Application Management Install MEAP Application System Management Panel Display Order Settings Enhanced System Application Management System Application Management System Information MEAP Application Information Check License Change Password MEAP Application Setting Information Management MEAP Application Log Management System Management > MEAP Application Information MEAP Application Information Updated On 12/04 2011 17:46:43 Application View: installed Switch "LoginTool" Information Application Name: LoginTool Application ID: 01234567-89ab-cdef-0123-456789abcdef Installed on: 12/04 2011 Status: Started License Status: Unnecessary License Generator Information Application Name: License Generator Application ID: c7cle585-f319-4f24-b611-bbd5c0f690cc Installed on: 11/04 2011 Status: Installed Trusted sites | Protected Mode: Off 100%

3

Information about applications is displayed. (1) Select [Installed] or [Uninstalled]. (2) Click [Switch].
[Installed] Information about installed applications (except for system applications) is displayed.
[Uninstalled] Information about uninstalled applications (except for system applications) is displayed.
0258-0JK You can check the content of the license file before it is installed.

1

Start SMS (Service Management Service). > "Launching SMS (Log in)"

2

Click [Check License]. ![](images/45def4df1009ab89a8f639f019d4ca0c602c28a6a8d92d9daac5c4c9ea074e1c.jpg)
text_image Service Management Service / LBP7680C / LBP7680C - Windows Internet Explorer https://192.168.1.187-6443/arms/ Favorites Suggested Sites Web Slice Gallery Service Management Service / LBP7680C / LBP768... To Remote UI Log Out from SMS LBP7680C / LBP7680C / Service Management Service Device Serial Number MKHA000006 MEAP Application Management Install MEAP Application System Management Panel Display Order Settings Enhanced System Application Management System Application Management System Information MEAP Application Information Check License Change Password MEAP Application Setting Information Management MEAP Application Log Management System Management > Check License Check License License File Path: Browse... meap Version 3.1.0.19 Copyright CANON INC, 2011 All Rights Reserved Done Trusted sites | Protected Mode: Off 100%

3

Either select the file by clicking [Browse], or enter the location where the file is stored.

4

Click [Check]. → The content of the license file is displayed. ![](images/ee1b5d21b029b54fcad005228caea4688f306f1bf316adfd536095399c9ac50a.jpg)

IMPORTANT

SMS Password

- To prevent unauthorized access, We recommend that the administrator change the password before SMS use is begun. - This password is to prevent unauthorized operation of the printer. Do not let anyone know except the administrator. - Make sure that you do not forget your password. If you forget your password, you will not be able to use SMS. If this happens, contact your local dealer.

1

Start SMS (Service Management Service). > "Launching SMS (Log in)"

2

Click [Change Password]. ![](images/0cda8caeda49fd977b78361dd751abc52284080ef3a442fe59505c6fe5dd9260.jpg)
text_image Service Management Service : LBP7680C : LBP7680C - Windows Internet Explorer https://192.168.1.187.6443/snm/ Favorites Suggested Sites Web Site Gallery Service Management Service : LBP7680C : LBP768... To Remote UI Log Out from SMS Service Management Service Device Serial Number: MKHA000006 MEAP Application Management Install MEAP Application System Management Panel Display Order Settings Enhanced System Application Management System Application Management System Information MEAP Application Information Check License Change Password MEAP Application Setting Information Management MEAP Application Log Management System Management > Change Password Change Password Change Reset Old Password: New Password: Confirm: meap Version 3.1.0.19 Copyright CANON INC. 2011 All Rights Reserved Trusted sites | Protected Mode: Off 100%

3

Set the password. (1) Set the password. (2) Click [Change]. Enter between 8 and 32 alphanumeric characters (a to z, A to Z, and 0 to 9) for the password. [Old Password] Enter the password that is currently used.
[New Password] Enter the new password.
[Confirm] Enter the same password again in [New Password].
0258-0JS Deletes the application data.

1

Start SMS (Service Management Service). > "Launching SMS (Log in)"

2

Click [MEAP Application Setting Information Management]. ![](images/714a5e4955247ab3b8cc3eedf2fbe500ef3aefa9172e015863e05e745e8c0cac.jpg)
text_image Service Management Service | LBP7680C | LBP7680C - Windows Internet Explorer https://192.168.1.187-643/sms/ Favorites Suggested Sites Web Slice Gallery Service Management Service | LBP7680C | LBP768... To Remote UI Log Out from SMS LBP7680C / LBP7680C / Service Management Service Device Serial Number: MKHA000006 MEAP Application Management Install MEAP Application System Management Panel Display Order Settings Enhanced System Application Management System Application Management System Information MEAP Application Information Check License Change Password MEAP Application Setting Information Management MEAP Application Log Management MEAP Application Management Updated On 12/04 2011 17:31:12 Application Name Installed on Status License LoginTool 2.01.00 12/04 2011 Started Stop Uninstal Unnecessary License Generator 4.4.0 11/04 2011 Installed Start Uninstal Installed Resource Information Resource Name Amount Used Remaining Percent Used Storage 13293 KB 19475 KB 41%_ Memory 3400 KB 17080 KB 17%_ Threads 14 114 11%_ Sockets 6 122 5%_ File Descriptors 4 124 3%_ meap Version 3.1.0.19 Copyright CANON INC. 2011 All Rights Reserved Done Trusted sites | Protected Mode: Off 100%

3

Select the check box for the application whose setting information you wish to delete, and click [Delete]. Click [Select All] to select all of the applications. ![](images/9605a64918ca96b8a3d08044c383e8709e7b84758cd908f065bd22a3bb4abd61.jpg)
text_image Service Management Service : LBP7680C : LBP7680C - Windows Internet Explorer https://192.166.1.187-5443/xxx/ Favorites Suggested Sites Web Shock Gallery Service Management Service : LBP7680C : LBP768... LBPT680C / LBP7680C / To Remote UI Log Out from SMS Service Management Service Device Serial Number: MKHA000006 MEAP Application Management Install MEAP Application System Management Panel Display Order Settings Enhanced System Application Management System Application Management System Information MEAP Application Information Check License Change Password MEAP Application Setting Information Management MEAP Application Log Management System Management > MEAP Application Setting Information Management MEAP Application Setting Information Management Updated On 12/04 2011 17:00:23 Select All Clear All Delete Application Name Application ID Uninstalled 9a2c9d3a-011a-1000-ac45-00e000c4ae6f Uninstalled 10563dbc-0119-1000-BF57-00e000c4ae6f Uninstalled 10563dbe-0119-1000-9ae2-00e000c4ae6f meap Version 3.1.0.19 Copyright CANON INC. 2011 All Rights Reserved Done Trusted sites | Protected Mode Off 100%

4

Click [Yes].

→ The setting information of the application is deleted.

Managing MEAP Application Log Data

0258-0JU It downloads and deletes log data obtained by MEAP applications. > Downloading Log Data > Deleting Log Data 0258-0JW

1

Start SMS (Service Management Service). > "Launching SMS (Log in)"

2

Click [MEAP Application Log Management]. ![](images/defb4888eae6c1c2ab6f01cb7ca87c1c4e5d7153075d9e2733fbbab4378d6c64.jpg)
text_image Service Management Service : LBP7680C : LBP7680C - Windows Internet Explorer https://192.168.1.187.6443/sms/ Favorites Suggested Sites Web Site Gallery Service Management Service : LBP7680C : LBP768... To Remote UI Log Out from SMS Service Management Service Device Serial Number: MKHA000006 MEAP Application Management Install MEAP Application System Management Panel Display Order Settings Enhanced System Application Management System Application Management System Information MEAP Application Information Check License Change Password MEAP Application Setting Information Management MEAP Application Log Management MEAP Application Management Updated On 12/04 2011 17:31:12 Application Name Installed on Status License LoginTool 2.01.00 12/04 2011 Started Stop Uninstall Unnecessary License Generator 4.4.0 11/04 2011 Installed Start Uninstall Installed Resource Information Resource Name Amount Used Remaining Percent Used Storage 13293 KB 19475 KB 41% Memory 3400 KB 17080 KB 17% Threads 14 114 11% Sockets 6 122 5% File Descriptors 4 124 3%* meap Version 3.1.9.19 Copyright CANON INC. 2011 All Rights Reserved Done Trusted sites | Protected Mode: Off 100%

3

Click [Download Application Logs]. ![](images/3ac5bd42ed9f747044fc985754978189ada28a9297c204da2022ba840f7a7e33.jpg)
text_image Service Management Service : LBP7680C : LBP7680C - Windows Internet Explorer https://192.166.1.187.8443/sms/ Favorites Suggested Sites Web Since Gallery Service Management Service : LBP7680C : LBP7680C To Remote UI Log Out from SMS Service Management Service Device Serial Number: MKHA000005 MEAP Application Management Install MEAP Application System Management Panel Display Order Settings Enhanced System Application Management System Application Management System Information MEAP Application Information Check License Change Password MEAP Application Setting Information Management MEAP Application Log Management System Management > MEAP Application Log Management MEAP Application Log Management Download Application Logs LEAVE Application Log meap Version 3.1.0.19 Copyright CANON INC. 2011 All Rights Reserved Done Trusted sites | Protected Mode: Off 100%

4

Follow the on-screen instructions and specify a file storage directory. → The log file is saved. 0258-0JX

1

Start SMS (Service Management Service). > "Launching SMS (Log in)"

2

Click [MEAP Application Log Management]. ![](images/31241bad6476ee0f37cf16c8b13a0160d8abca8216bcb26172d2e88fc73d66b6.jpg)
text_image Service Management Service : LBP7680C : LBP7680C - Windows Internet Explorer https://192.168.1.187.6443/sms/ Favorites Suggested Sites Web Site Gallery Service Management Service : LBP7680C : LBP768... To Remote UI Log Out from SMS Service Management Service Device Serial Number: MKHA000006 MEAP Application Management Install MEAP Application System Management Panel Display Order Settings Enhanced System Application Management System Application Management System Information MEAP Application Information Check License Change Password MEAP Application Setting Information Management MEAP Application Log Management MEAP Application Management Updated On: 12/04 2011 17:31:12 Application Name Installed on Status License LoginTool 2.01.00 12/04 2011 Started Stop UncInstall Unnecessary License Generator 4.4.0 11/04 2011 Installed Start UncInstall Installed Resource Information Resource Name Amount Used Remaining Percent Used Storage 13293 KB 19475 KB 41% Memory 3400 KB 17080 KB 17% Threads 14 114 11%_ Sockets 6 122 5%_ File Descriptors 4 124 3%_ meap Version 3.1.9.19 Copyright CANON INC. 2011 All Rights Reserved Done Trusted sites | Protected Mode: Off 100%

3

Click [Delete Application Logs]. ![](images/09580b085487343c864db0319ff6422ae0829c6dad94a8e40e066e003666c906.jpg)
text_image Service Management Service : LBP7680C : LBP7680C - Windows Internet Explorer https://192.166.1.187.643.com/ Favorites Suggested Sites Web Slice Gallery Service Management Service : LBP7680C : LBP768... To Remote UI Log Out from SMS LBP7680C / LBP7680C / Service Management Service Device Serial Number: MKHA000005 MEAP Application Management Install MEAP Application System Management Panel Display Order Settings Enhanced System Application Management System Application Management System Information MEAP Application Information Check License Change Password MEAP Application Setting Information Management MEAP Application Log Management System Management > MEAP Application Log Management MEAP Application Log Management Download Application Logs Delete Application Logs meap Version 3.1.0.19 Copyright CANON INC. 2011 All Rights Reserved Done Trusted sites | Protected Mode: Off 100%

4

Click [Yes].

→ The log data is deleted. 0258-0JY This section describes how to handle error messages that are displayed when logging in to or operating SMS. The error messages are divided into separate pages. Click the following links and perform the necessary actions. > Errors Relating to the [Login] Page Errors Relating to the [MEAP Application Management] Page Errors Relating to the [Install MEAP Application] Page > Errors Relating to the [Authentication Information Settings] Page > Errors Relating to the [License Management] Page Errors Relating to the [Enhanced System Application Management] Page > Errors Relating to the [Check License] and [Change Password] Pages Errors Relating to the [MEAP Application Setting Information Management] Page Errors Relating to the [MEAP Application Log Management] Page Other Errors 0258-0K0 - - - - - - - - >

The specified file does not exist or the file path is incorrect. Try to specify the path again.

Problem The file does not exist on the specified path or the file path is incorrect. Action Specify the file path correctly.

The contents of the specified file are incorrect or information is missing. Check the file.

Problem The specified file is not a switch license file. Action Check to make sure that the specified file is a switch license file for password initialization. Problem Information is missing from the specified file. Action The password cannot be initialized using the specified file. Check the content of the file.

The specified switch license file cannot be used for password initialization. Try to specify the file again.

Problem The specified file is not a switch license file for initializing the password. Action Specify a switch license file for initializing the password.

Cannot initialize password because a used switch license file is specified. Try to specify the file again.

Problem The specified license file has already been installed. License files that have been installed once cannot be installed again. Action Since the specified license file cannot be installed, specify another file.

Cannot initialize the password because another application is being installed, or the firmware being updated.

Please wait a moment and then try again.

Problem Either it is installed in another application outside of SIMS, or it cannot initialize the password because the firmware is being updated. Action Wait until the processing stops before initializing the password. You do not have permissions to use Service Management Service. Log in with administrator rights.
ProblemOnly users with administrator rights can log in to SMS with the user name and password that they use for logging in to the printer. The user trying to log in cannot do so because they do not have administrator rights.
Action Login again with the user name and password of a user with administrator rights.
Cannot login because another user is logged in or logout operations have not been successfully performed. Please wait a moment and then try this operation again.
ProblemCannot log in for a period of time because either another user is logged in or when the user was logged in before, the logout procedure was not performed properly.
ActionIf another user is logged in, wait until the user logs out. If another user is not logged in, wait for the lock to be cancelled.
Error:
ProblemAn error has occurred for some reason. Seefor details.
ActionIf the solutions given inare unclear, contact your local authorized Canon dealer or sales representatives.
0258-0K1 - - -
- > - - - > Cannot start this application because there is no distributable software in the application. Get a distributable software.

Problem

The application cannot be started because it does not contain any redistributable modules. Action Contact the application developer. Cannot start this application because the number of bootable applets has exceeded the limit. Start this application after stopping other applications.

Problem

The application that you are attempting to launch contains applets. If the application was launched, the number of applets that would be booted on the system would exceed the limit (five applets), so the application cannot be launched.

Action

First, reduce the number of applets running on the system by stopping an application running on the system which includes an applet, and then restart the application. A license is needed to start this application. Try to start it again after installing a license. Problem Cannot start the application because a license file is not installed. Action Install the license file, and then restart the application. Cannot start this application because system resources (memory, threads, sockets, file descriptors, disk space, or screen size) required to start the application may not be available.

Problem

The application cannot be started because the system resources for opening the application may not be available to be allocated.

Action

Restart this application after stopping other applications. It may be able to start this time. Cannot uninstall this application because the license file has not been deleted. Uninstall the application after deleting the license in the [License Management] page.

Problem

The application cannot be uninstalled because the license file for the application still exists inside the printer.

Action

Uninstall the application after deleting the license on the [License Management] page. The name listed in the file for the application and the applet name to register with Applet Viewer Service are different. Check the file.
ProblemThe application cannot be started because the applet name the application is trying to register in the Applet Viewer Service differs from the applet name included in the application file.
ActionSince it is necessary to make corrections to the application file, contact the application developer.
Error:
ProblemAn error has occurred for some reason. Seefor details.
ActionIf the solutions given inare unclear, contact your local authorized Canon dealer or sales representatives.
0258-0K2 - - - - - - > - > - - - - - - - - - - - - - - - - - - - - > The file for the application to install does not exist or the file path is incorrect. Try to specify the path again. Problem The specified file does not exist or the file path is incorrect. Action Specify the file path correctly. The file for the license to install does not exist or the file path is incorrect. Try to specify the path again. Problem The license file does not exist on the specified path or the file path is incorrect. Action Specify the file path correctly.

The manifest is not listed in the specified file. Check the file.

Problem A manifest does not exist for the file specified as the application file. Action This application cannot be installed. Contact the application developer.

The contents of the file for the application to install are incorrect or information is missing. Check the file.

Problem Either the content of the files specified as application files is not correct or information is missing. Action This application file cannot be installed. Check the file. If there are no problems with the files, contact the application developer or the application support help desk.

The contents of the file for the license to install are incorrect or information is missing. Check the file.

Problem Either the content of the files specified as license files is not correct or information is missing. Action This license file cannot be installed. Check the file. If there are no problems with the files, contact the application developer or the application support help desk.

The following information is missing in file for the specified application. Check the file.

Problem The application cannot be installed because required information is not included in the application file. Action Check the file. If there are no problems with the files, contact the application developer or the application support help desk concerning the .

The following information in the specified application is incorrect. Check the file.

Problem 1 in the application file cannot be recognized as correct information. Action Contact the application developer or the application support help desk. Problem 2 If the is the MEAP Specifications, the application's MEAP specification values and the printer's MEAP specification values do not match. Action Contact your local authorized Canon dealer or sales representatives.

Cannot install this application because a code signing has not been confirmed to be valid. Get a valid code signing.

Problem 1 Cannot confirm that there is a valid code signature inside the application file. Action Perform the correct code signing operation for the application. Problem 2 The file may have been altered. Action Contact the application developer.

Cannot install this license because the specified application and license do not correspond. Try to specify a path for the license file again.

Problem The application cannot be installed because the specified license file does not correspond to the specified application. Action Specify the license file that corresponds to the application. The number of applications that can be installed has exceeded the limit. Try to install this application after uninstalling other applications.
ProblemThe maximum number of applications that can be installed is eight. You are attempting to install an application that will exceed that number.
ActionYou can install it if you first uninstall another installed application (unless it is a system application).
Cannot install this license because the number of license file ID logs that can be saved has exceeded the limit. Contact your service representative.
ProblemThe license file cannot be installed because the number of license file ID information logs contained in the license file exceeds the number that can be saved.
Action Contact your local authorized Canon dealer or sales representatives.
Cannot install because a used license file is specified. Try to specify the file again.
ProblemLicense files that have been installed once cannot be installed again. The specified license file has already been installed.
Action Since the specified license file cannot be installed, specify another file.
To install the specified application, a license file must be installed at the same time. Specify a license file.
ProblemYou cannot install the application unless you specify the license file that corresponds to the application at the same time.
ActionSpecify the corresponding license file when specifying the application, and then install them.
The specified file is a system application. Install the application from the [Enhanced System Application Management] page.
ProblemThe specified file is a system application. It cannot be installed from this [Install MEAP Application] page.
Action Install it from the [Enhanced System Application Management] page.
The specified application does not require a license.
ProblemAn application file and license file were specified, but the specified application file does not require a license file.
Action Install the application without specifying a license file.
The specified license does not match this device. Specify an installable license.
ProblemLicense files contain the serial number information of printers in which the license file can be installed. The specified license cannot be installed because it does not contain the printer's serial number information.
ActionSpecify a license file that matches the printer's serial number.
The specified application does not support this device.
ProblemSome applications can only be installed in certain printer models. It cannot be installed in this model.
ActionSpecify an application that supports this printer.
Cannot install this application because an applet included in the specified application has exceeded the area that can be displayed in the device panel.
ProblemThe application cannot be installed because the display area of an applet included in the application exceeds the area that can be displayed on the operation panel of the printer.
Action Install an application that contains applets that support this printer.
The specified file is an update file. Stop the application that you want update and then install the file.
ProblemThe specified application file is a file for updating an application which is already installed. It is necessary to stop the application which is to be updated before updating.
Action Stop the application that you want to update, and then perform the update again.
Cannot install the application because the license requirement is different. Uninstall the specified application, and then try to install the application again.
ProblemYou have tried to upgrade an application which is already installed using a version of the same application with different license requirements.
Action Upgrade using the same license conditions.
Cannot install this application because storage space has been exceeded. Uninstall other applications and then try to install it again.
ProblemThe application cannot be installed because there is not enough free storage capacity.
ActionMake storage capacity available by uninstalling an application that is not being used.
Could not cancel installation. Installation has been successfully completed.
ProblemThe [Cancel] button was pressed when the installation operation could not be cancelled.
ActionDisable the license file, download it from the [License Management] page, and then uninstall it.
This application does not support the MEAP version of the device. Contact your service representative after checking the application version.
ProblemThe specified application cannot be installed because it does not support the MEAP version on this printer.
Action Contact the application developer.
The specified application cannot be installed on this device.
ProblemThe specified application cannot be installed because there is not enough memory in the printer.
ActionContact your local authorized Canon dealer or sales representatives.
The process is canceled because the system has been shut down. Restart the system, and then perform the process again.
ProblemThe installation could not be completed because it conflicted with a system shutdown.
Action Restart the printer and perform the install again.
Cannot install the application or license because another application is being installed, or the firmware being updated. Please wait a moment and then try again.
ProblemEither it is installed in another application outside of SMS, or the application cannot be installed because the firmware has been updated.
Action Wait until the processing stops before installing the application.
Error:
ProblemAn error has occurred for some reason. Seefor details.
ActionIf the solutions given inare unclear, contact your local authorized Canon dealer or sales representatives.
0258-0K3 - - - - -

Settings are incorrect.

- Check to see if the password is incorrect. - Enter Dept. ID within 7 digits. - Check to see if the Department. ID is registered with the device.

Problem

Cannot set authentication information because either the Dept. ID entered does not exist, or the PIN was entered incorrectly. Action Enter a Dept. ID and PIN that are registered in the printer.

The [Department ID] is incorrect.

Enter an integer for the [Department ID].

Problem

The Dept. ID that was entered is a positive integer, but the registered Dept. ID is not a positive integer. Action Enter the correct Dept. ID that is registered in the device.

The [Department ID] is not entered.

Problem The Dept. ID is blank. Action Specify a Dept. ID.

Could not set authentication information because an error occurred.

Problem

An error has occurred for some reason, so authentication information could not be set. Action Contact your local authorized Canon dealer or sales representatives.

Could not delete authentication information because an error occurred.

Problem

An error has occurred for some reason, so authentication information could not be deleted. Action Contact your local authorized Canon dealer or sales representatives. 0258-0K4 - - - - - - - - - - > The specified file does not exist or the file path is incorrect. Try to specify the path again. Problem The file does not exist on the specified path or the file path is incorrect. Action Specify the file path correctly. The contents of the file for the license to install are incorrect or information is missing. Check the file. Problem Either the content of the file is not correct or information is missing. Action This license file cannot be installed. Contact the application developer. Cannot install this license because the specified license does not correspond to this application. Try to specify a path for the license file again. Problem The specified license file does not correspond to the application, so they cannot be installed. Action Specify the license file that corresponds to the application. Check to make sure that the manifest file listed inside the license file is correct. Cannot install this license because the number of license file ID logs that can be saved has exceeded the limit. Contact your service representative. Problem The license file cannot be installed because the number of license file ID information logs contained in the license file exceeds the number that can be saved. Action Contact your local authorized Canon dealer or sales representatives. Cannot install because a used license file is specified. Try to specify the file again. Problem According to the specifications, a license file which is already installed cannot be installed again. The specified license file has already been installed. Action Since the specified license file cannot be installed, specify another file. The specified license does not match this device. Specify an installable license. Problem License files contain lists of printers in which they can be installed. The specified license file cannot be installed in this printer. Action Specify a license file that can be installed in this printer. Could not cancel installation. Installation has been successfully completed.
ProblemThe [Cancel] button was pressed when the installation operation could not be cancelled.
ActionDisable the license file, download it from the [License Management] page, and then uninstall it.
Cannot install the license because another application is being installed, or the firmware being updated. Please wait a moment and then try again.
ProblemEither it is installed in another application outside of SMS, or the license file cannot be installed because the firmware has been updated.
Action Wait until the processing stops before installing the license file.
Cannot disable the license file because this application has been started. Disable the license file after stopping the application.
Problem You cannot disable a license if the corresponding application is still running.
Action Stop the application that corresponds to the license before disabling the license.
Error:
ProblemAn error has occurred for some reason. Seefor details.
ActionIf the solutions given inare unclear, contact the application developer.
0258-0K5 - - - > - - - - - - - - - - - - - - > - > - - - - - - - - - - >

Cannot start this application because there is no distributable software in the application. Get a distributable software.

Problem

The application cannot be started because it does not contain any redistributable modules. Action Contact the application developer.

Cannot start this application because the number of bootable applets has exceeded the limit. Start this application after stopping other applications.

Problem

The application that you are attempting to launch contains applets. If the application was launched, the number of applets that would be booted on the system would exceed the limit (five applets), so the application cannot be launched.
ActionFirst, reduce the number of applets running on the system by stopping an application running on the system which includes an applet, and then restart the application.
Cannot start this application because system resources (memory, threads, sockets, file descriptors, disk space, or screen size) required to start the application may not be available.
ProblemThe application cannot be started because the system resources for opening the application may not be available to be allocated.
ActionRestart this application after stopping other applications. It may be able to start this time.
The name listed in the file for the application and the applet name to register with Applet Viewer Service are different. Check the file.
ProblemThe application cannot be started because the applet name the application is trying to register in the Applet Viewer Service differs from the applet name included in the application file.
ActionSince it is necessary to make corrections to the application file, contact the application developer.

The following login services cannot be uninstalled:

- The currently set login service - Login services that will be enabled after the device is restarted - Default Authentication login services The currently set login service can be uninstalled after the device is restarted.
ProblemThe currently set login service, a login service that will be enabled after restarting the machine, and the Default Authentication login service cannot be uninstalled.
ActionDo not uninstall the currently set login service, a login service that will be enabled after restarting the machine, or the Default Authentication login service. To uninstall the currently set login service, uninstall it after restarting the machine.
The file for the application to install does not exist or the file path is incorrect. Try to specify the path again.
Problem The specified file does not exist or the file path is incorrect.
Action Specify the file path correctly.
The manifest is not listed in the specified file. Check the file.
Problem A manifest does not exist for the file specified as the application file.
Action This application cannot be installed. Contact the application developer.
The file for the license to install does not exist or the file path is incorrect. Try to specify the path again.
Problem The specified file does not exist or the file path is incorrect.
Action Specify the file path correctly.
The contents of the file for the application to install are incorrect or information is missing. Check the file.
ProblemEither the content of the files specified as application files is not correct or information is missing.
ActionThis application file cannot be installed. Check the file. If there are no problems with the files, contact the application developer or the application support help desk.
The contents of the file for the license to install are incorrect or information is missing. Check the file.
ProblemEither the content of the files specified as license files is not correct or information is missing.
ActionThis license file cannot be installed. Check the file. If there are no problems with the files, contact the application developer or the application support help desk.
Cannot install this application because a code signing has not been confirmed to be valid. Get a valid code signing.
Problem 1 Cannot confirm that there is a valid code signature inside the application file.
Action Perform the correct code signing operation for the application.
Problem 2 The file may have been altered.
Action Contact the application developer.
Cannot install this license because the specified application and license do not correspond. Try to specify a path for the license file again.
ProblemThe application cannot be installed because the specified license file does not correspond to the specified application.
ActionSpecify the license file that corresponds to the application.
The specified file is not system application. Check the file.
ProblemThe specified file is not system application. It cannot be installed from the [Enhanced System Application Management] page.
Action Install it from the [Install MEAP Application] page.
Cannot install this license because the number of license file ID logs that can be saved has exceeded the limit. Contact your service representative.
ProblemThe license file cannot be installed because the number of license file ID information logs contained in the license file exceeds the number that can be saved.
Action Contact your local authorized Canon dealer or sales representatives.
Cannot install because a used license file is specified. Try to specify the file again.
ProblemLicense files that have been installed once cannot be installed again. The specified license file has already been installed.
Action Since the specified license file cannot be installed, specify another file.
To install the specified application, a license file must be installed at the same time. Specify a license file.
ProblemYou cannot install the application unless you specify the license file that corresponds to the application at the same time.
ActionSpecify the corresponding license file when specifying the application, and then install them.
The following information in the specified application is incorrect. Check the file.
Problem 1in the application file cannot be recognized as correct information.
Action Contact the application developer or the application support help desk.
Problem 2If theis the MEAP Specifications, the application's MEAP specification values and the printer's MEAP specification values do not match.
Action Contact your local authorized Canon dealer or sales representatives.
The following information is missing in file for the specified application. Check the file.
ProblemThe application cannot be installed because required information is not included in the application.
ActionCheck the file. If there are no problems with the files, contact the application developer or the application support help desk concerning the.
The specified application does not support this device.
ProblemSome applications can only be installed in certain printer models. It cannot be installed in this model.
ActionSpecify an application that supports this printer.
The specified license does not match this device. Specify an installable license.
ProblemLicense files contain the serial number information of printers in which the license file can be installed. The specified license cannot be installed because it does not contain the printer's serial number information.
ActionSpecify a license file that matches the serial number of this printer.
Cannot install this application because an applet included in the specified application has exceeded the area that can be displayed in the device panel.
ProblemThe application cannot be installed because the display area of an applet included in the application exceeds the area that can be displayed on the operation panel of the printer.
Action Install an application that contains applets that support this printer.
The specified file is an update file. Stop the application that you want update and then install the file.
ProblemThe specified application file is a file for updating an application which is already installed. It is necessary to stop the application which is to be updated before updating.
Action Stop the application that you want to update, and then perform the update again.
The specified file is an update file for a login service that is currently set. Switch to another login service, restart the device, and then install the file.
ProblemAlthough the specified application file is an update file for the login service that is currently set, it cannot update a login service that has already started.
Action To install the update file for the login service, start another login service, and then install the update file. Cannot install this application because storage space has been exceeded. Uninstall other applications and then try to install it again.
ProblemThe application cannot be installed because there is not enough free storage capacity.
ActionMake storage capacity available by uninstalling an application that is not being used.
Could not cancel installation. Installation has been successfully completed.
ProblemThe [Cancel] button was pressed when the installation operation could not be cancelled.
ActionDisable the license file, download it from the [License Management] page, and then uninstall it.
The process is canceled because the system has been shut down. Restart the system, and then perform the process again.
ProblemThe installation could not be completed because it conflicted with a system shutdown.
Action Restart the printer and perform the install again.
Cannot install the application or license because another application is being installed, or the firmware being updated. Please wait a moment and then try again.
ProblemEither it is installed in another application outside of SMS, or the application cannot be installed because the firmware has been updated.
Action Wait until the processing stops before installing the application.
Error:
ProblemAn error has occurred for some reason. Seefor details.
ActionIf the solutions given inare unclear, contact your local authorized Canon dealer or sales representatives.
0258-0K6 - - - - - - - - - >

The specified file does not exist or the file path is incorrect. Try to specify the path again.

Problem The file does not exist on the specified path or the file path is incorrect. Action Specify the file path correctly.

The contents of the specified file are incorrect or information is missing. Check the file.

Problem 1 The content of the file is not correct. (A file other than a license file was specified.) Action Check to make sure that the specified file is a license file. Problem 2 Information is missing from the file. Action Check the content of the file.

The specified switch license file cannot be used to delete the license file ID log. Try to specify the path again.

Problem The specified file is not a switch license file for deleting license file ID logs. Action Try specifying the file path for the switch license for deleting license file ID logs.

The specified license is already installed. Installed license file information cannot be displayed.

Problem Information about license files that have already been installed in this printer cannot be displayed. Action Specify another license file.

Cannot perform the operation because another application is being installed, or the firmware being updated.

Please wait a moment and then try again.

Problem

Either it is installed in another application outside of SMS, or the license file information cannot be displayed because the firmware has been updated. Action Wait until the processing stops before displaying the license information.

The old password is incorrect.

ProblemThe text string entered as the current password is different from the current password.
ActionEnter the correct password.
The new password is incorrect. Enter the password with 8 to 32 single-byte alphanumeric characters.
ProblemThe new password has under 8 characters or more than 33 characters. Illegal characters that cannot be used in passwords have been used.
ActionEnter a new password of between 8 and 32 alphanumeric characters (a to z, A to Z, and 0 to 9).
The new password and password to confirm do not match.
ProblemThe password cannot be changed because the new password and the confirmation password do not match.
Action Enter a new password and the same text string as the confirmation password.
Error:
ProblemAn error has occurred for some reason. Seefor details.
ActionIf the solutions given inare unclear, contact your local authorized Canon dealer or sales representatives.

Errors Relating to the [MEAP Application Setting Information Management] Page

0258-0K7 \-

Could not delete MEAP application setting information because an error occurred.

Problem

An error has occurred for some reason, so the setting information could not be deleted. Action Return to the previous page using the [Back] button. 0258-0K8 - - \-

Cannot download application logs because application logs do not exist.

Problem The application log does not exist. Action Return to the previous page using the [Back] button.

Could not download application logs because an error occurred.

Problem An error has occurred for some reason, so the log could not be downloaded. Action Return to the previous page using the [Back] button.

Could not delete application logs because an error occurred.

Problem An error has occurred for some reason, so the log could not be deleted. Action Return to the previous page using the [Back] button. 0258-0K9 \- Cannot find the specified application. It may have been uninstalled by another user. Problem The application for the attempted operation does not exist. Action Return to the previous page using the [Back] button. 0258-0A9 ![](images/58772d0194a575b44c588bc56152d7a4cff1f52cf2f1615b9123ea4405663f61.jpg)

Printer Unit Problems

> Printing Cannot Be Performed The Printer Takes a Long Time to Start the Print Job > You Cannot Turn the Printer ON > All the Indicators on the Network Interface Are Off ![](images/8eb5c13ab79d08c4ccb2c7469e226700190dbadd9e8e5993d4d1d9ab0b9efa01.jpg)

Driver Problems

You Cannot Install the Printer Driver > You Cannot Uninstall the Printer Driver The Printer Driver Settings Cannot Be Changed > "Profiles" Cannot Be Selected or Edited The Status of the Paper Feeder Cannot Be Obtained Automatically ![](images/72f2a05e7bd1731677ef75f62e191456cd0bb8db712aedc1472b1e4e67b08e65.jpg)

Paper Jams

Paper Jams ![](images/c0390b2d2cc8caa8dad7aa223dd11e75ecf19342670d5d3b3da2d0e94cba37de.jpg)

Error Display

The Message Indicator Is On A Message Appears in the Control Panel ![](images/3c6ff46a949c16d53b123e0ee7420dcb744501b94bed5039d199585c2499c283.jpg)

Printout Problems

> Poor Printout Results ![](images/684dca761431c31941035769c33ca1ac40c3924f4518dd9c2eb1f469d9bf6987.jpg)

Other Problems

0258-0AA The solutions for when printing cannot be performed vary depending on your environment. See the solutions according to your environment. If You Are Using the Printer by Direct Connection
If the printer is connected by a USB cableCANON imageCLASS LBP7660Cdn - Other Problems - 1> "Printing Cannot Be Performed (USB Connection)"
If the printer is connected by a LAN cableCANON imageCLASS LBP7660Cdn - Other Problems - 2> "Printing Cannot Be Performed (LAN Connection)"
If You Are Using the Printer in the Print Server Environment ![](images/ac301f55117a7654835d72ad0b43a4aa2695ed197e4d8931e1e79adebfc6ec19.jpg)
flowchart
graph LR
    A["Printer"] -->|USB Cable /LAN Cable| B["Print Server"]
    B -->|LAN Cable| C["Client"]
    C --> D["Client"]
If your computer is the print server➤ "Printing Cannot Be Performed (USB Connection)"➤ "Printing Cannot Be Performed (LAN Connection)"
If your computer is a client computer➤ "Printing Cannot Be Performed (via the Print Server)"
0258-0AC If you cannot print when the printer is connected to the computer by a USB cable, check the problem following the questions below. ![](images/a72ed80e1278fd2233d78a749a8d7879da3dd93d61c969eb68807e5ff4dd02c8.jpg)

NOTE

For Macintosh users

This section describes the procedure for Windows as an example. For details on the procedure for Macintosh, see "Driver Guide." For details on the procedure for displaying "Driver Guide", see "Viewing the Driver Guide."

Is the printer turned ON?

Check if the Main Power indicator on the control panel is turned on. ![](images/79299330eeb74f89ef3facea9a21e1ca2b6db372cc776c1b332647512c8d05a0.jpg)
text_image Main Power indicator
ON To
OFF Turn the printer ON.
Cannot be turned ON"You Cannot Turn the Printer ON"

Check the indicators on the printer unit.

![](images/688ef0ec56f14c3fefb2785fdd66df0de3c259b0f90ae7011d4627b731ba0790.jpg)
text_image Job Indicator Ready Indicator Message Indicator Paper Source Indicators
The Ready indicator is on.To
The ⬇ Ready indicator is blinking.The printer is warming up. Please wait a moment.
The ⚠ Message indicator is on.➤ "The Message Indicator Is On"
The ➕ Job indicator is on.The printer is operating. Please wait a moment.If the printer does not perform printing for a while, perform the print data output or soft reset.➤ "Canceling a Job"
The ➕ Job indicator is blinking.
The Paper Source indicator is blinking.It is out of paper. Load paper.➤ "Paper Loading and Output"
Check the .Online indicator. ![](images/9bc6191db69e168d05a188764083075916f121e576e95174dacf4a499cee80af.jpg)
The *Online indicator is on.To
The ← Online indicator is off.The printer is offline.Place it online.➤ "Online and Offline"

Can you print Configuration Page?

"Checking the Printer Settings" ![](images/bba57da1846b448a5c17bc6bcb59f0373367de5d74f87af3d76300b167fe192c.jpg)
text_image Canon Configuration Page 1. RENTAGE TITLE: 2014 DESCRIPTION: 2014 ITEMS: 2014 POTATO: 2014 ORDER BY: 2014 POTATO NAME: 2014 POTATO Pinyin: 2014 POTATO QTY: 2014 POTATO QTY'QTY'QTY'QTY'QTY'QTY'QTY'QTY'QTY'QTY'QTY'QTY' POTATO PRICE: $25.00 POTATO MOUNT: $25.00 POTATO MOUNT'QTY'QTY'QTY'QTY'QTY'QTY'QTY' POTATO PRICE'QTY'QTY'QTY'QTY'QTY'QTY'QTY' POTATO MOUNT'QTY'QTY'QTY'QTY'QTY'QTY' POTATO PRICE'QTY'QTY'QTY'QTY'QTY'QTY'QTY' POTATO MOUNT'QTY'QTY'QTY'QTY'QTY'QTY' POTATO PRICE'QTY'QTY'QTY'QTY'QTY'QTY'QTY' POTATO MUNTION POTATO PRICE'QTY'QTY'QTY'QTY'QTY'QTY'QTY' POTATO MOUNT'QTY'QTY'QTY'QTY'QTY'QTY' POTATO PRICE'QTY'QTY'QTY'QTY'QTY'QTY'QTY' POTATO MUNTION POTATO PRICE'QTY'QTY'QTY'QTY"QTY' POTATO MUNTION POTATO PRICE'QTY'QTY'QTY'QTY'QTY' POTATO PRICE'QTY'QTY'QTY'QTY'QTY' POTATO MUNTION POTATO PRICE'QTY'QTY'QTY'QTY'QTY' POTATO MUNTION POTATO PRICE'QTY'QTY'QTY'QTY' POTATO PRICE'QTY'QTY'QTY'QTY' POTATO MUNTION POTATO PRICE'QTY'QTY'QTY'QTY' POTATO MUNTION POTATO PRICE'QTY'QTY'QTY'QTY' POTATO PRICE'QTY' POTATO MUNTION POTATO PRICE'QTY'QTY'QTY' POTATO MUNTION POTATO PRICE'QTY' POTATO MUNTION POTATO PRICE'QTY' POTATO MUNTION POTATO PRICE' POTATO MUNTION POTATO PRICE' POTATO MUNTION POTATO PRICE' POTATO MUNTION POTATO PRICE' POTATO MUNTION POTATO PRICE' POTATO MUNTION POTATO PRICE' POTATO MUNTION POTATO PRICE' POTATO MUNTION POTATO PRICE' POTATO MUNTION POTATO PRICE' POTUTO NAME: PTOTO NAME: PTOTO NAME: PTOTO NAME: PTOTO NAME: PTOTO NAME: PTOTO NAME: PTOTO NAME: PTOTO NAME: PTOTO NAME: PTOTO NAME: PTOTO NAME: PTOTO NAME: PTOTO NAME: PTOTO NAME: PTOTO NAME: PTOTO NAME: PTOTO NAME: PTOTO NAME: PTOTO NAME: PTOTO NAME: PTOTO NAME: PTOTO NAME: PTOTO NAME: PTOTO NAME: PTOTO NAME: PTUTO NAME: PTUTO NAME: PTUTO NAME: PTUTO NAME: PTUTO NAME: PTUTO NAME: PTUTO NAME: PTUTO NAME: PTUTO NAME: PTUTO NAME: PTUTO NAME: PTUTO NAME: PTUTO NAME: PTUTO NAME: PTUTO NAME: PTUTO NAME: PTUTO NAME: PTUTO NAME: PTUTO NAME: PTUTO NAME: PTUTO NAME: PTUTO NAME: PTUTO NAME: PTUTO NAME: PTUTO NAME: PTOTO NAME: PTUTO NAME: PTUTO NAME: PTUTO NAME: PTUTO NAME: PTUTO NAME: PTUTO NAME: PTUTO NAME: PTUTO NAME: PTUTO NAME: PTUTO NAME: PTUTO NAME: PTUTO NAME: PTUTO NAME: PTUTO NAME: PTUTO NAME: PTUTO NAME: PTUTO NAME: PTUTO NAME: PTUTO NAME: PTUTO NAME: PTUTO NAME: PTUTO NAME: PTUTO NAME: PTOTO NAME: PTOTO NAME: PTUTO NAME: PTUTO NAME: PTUTO NAME: PTUTO NAME: PTUTO NAME: PTUTO NAME: PTUTO NAME: PTUTO NAME: PTUTO NAME: PTUTO NAME: PTUTO NAME: PTUTO NAME: PTUTO NAME: PTUTO NAME: PTUTO NAME: PTUTO NAME: PTUTO NAME: PTUTO NAME: PTUTO NAME: PTUTO NAME: PTUTO NAME: PTUTO NAME: PTOTO NAME: PTUTO NAME: PTOTO NAME: PTUTO NAME: PTUTO NAME: PTUTO NAME: PTUTO NAME: PTUTO NAME: PTUTO NAME: PTUTO NAME: PTUTO NAME: PTUTO NAME: PTUTO NAME: PTUTO NAME: PTUTO NAME: PTUTO NAME: PTUTO NAME: PTUTO NAME: PTUTO NAME: PTUTO NAME: PTUTO NAME: PTUTO NAME: PTUTO NAME: PTUTO NAME: PTUTO NAME: PTOTO NAME: PTOTO NAME: PTOTO NAME: PTUTO NAME: PTUTO NAME: PTUTO NAME: PTUTO NAME: PTUTO NAME: PTUTO NAME: PTUTO NAME: PTUTO NAME: PTUTO NAME: PTUTO NAME: PTUTO NAME: PTUTO NAME: PTUTO NAME: PTUTO NAME: PTUTO NAME: PTUTO NAME: PTUTO NAME: PTUTO NAME: PTUTO NAME: PTUTO NAME: PTUTO NAME: PTOTO NAME: PTUTO NAME: PTUTO NAME: PTOTO NAME: PTUTO NAME: PTUTO NAME: PTUTO NAME: PTUTO NAME: PTUTO NAME: PTUTO NAME: PTUTO NAME: PTUTO NAME: PTUTO NAME:
Printable To
Not printableIf an error message is displayed, solve the problem following the message.➤ "A Message Appears in the Control Panel"

Is the USB cable connected properly?

![](images/85e3c6f4d7663055a4f57d34afc6c0a2e682797f8432bb1faaf0971c8b77fa79.jpg)
text_image Diagram showing two setups (A and B) of a computer connected to a device, with labeled components and connection arrows.
ConnectedTry the following points.If you are using a hub, connect the printer to the computer directly.If you are using a long USB cable, replace it with the short one.If you have another USB cable, use it.If printing does not work, proceed to.

Check the settings for [Interface Selection].

> "[Setup] Menu ([Interface] Options)" ![](images/dc1575160bcb60d5346b212c0558ce47a94b22c6908b1ffa69699e64a4ae343f.jpg)
text_image Setup Network Layout Quality Interface
[USB] is set to [On]. To [USB] is set to [Off]. Set it to [On].

Can you print a test page in Windows?

> "Basic Operations/Various Information for Windows" ![](images/a00a32ae8b220e1c6e8222cb089dc8d88ae0c6d6a778692da0e3844a9123e515.jpg)
text_image Windows Presser Test Page 1. 2017年,Windows 2017-2018年版式会社(以下简称“公司”)发布了《关于公司使用部分闲置募集资金进行现金管理的公告》(公告编号:2017-036)。公司于2017年4月25日发布了《关于使用部分闲置募集资金进行现金管理的公告》(公告编号:2017-037)。公司于2017年4月26日发布了《关于使用部分闲置募集资金进行现金管理的公告》(公告编号:2017-038)。公司于2017年4月27日发布了《关于使用部分闲置募集资金进行现金管理的公告》(公告编号:2017-039)。公司于2017年4月28日发布了《关于使用部分闲置募集资金进行现金管理的公告》(公告编号:2017-040)。公司于2017年4月29日发布了《关于使用部分闲置募集资金进行现金管理的公告》(公告编号:2017-041)。公司于2017年4月30日发布了《关于使用部分闲置募集资金进行现金管理的公告》(公告编号:2017-042)。公司于2017年5月1日发布了《关于使用部分闲置募集资金进行现金管理的公告》(公告编号:2017-043)。公司于2017年5月2日发布了《关于使用部分闲置募集资金进行现金管理的公告》(公告编号:2017-044)。公司于2017年5月3日发布了《关于使用部分闲置募集资金进行现金管理的公告》(公告编号:2017-045)。公司于2017年5月4日发布了《关于使用部分闲置募集资金进行现金管理的公告》(公告编号:2017-046)。公司于2017年5月5日发布了《关于使用部分闲置募集资金进行现金管理的公告》(公告编号:2017-047)。公司于2017年5月6日发布了《关于使用部分闲置募集资金进行现金管理的公告》(公告编号:2017-048)。公司于2017年5月7日发布了《关于使用部分闲置募集资金进行现金管理的公告》(公告编号:2017-049)。公司于2017年5月8日发布了《关于使用部分闲置募集资金进行现金管理的公告》(公告编号:2017-050)。公司于2017年5月9日发布了《关于使用部分闲置募集资金进行现金管理的公告》(公告编号:2017-051)。公司于2017年5月10日发布了《关于使用部分闲置募集资金进行现金管理的公告》(公告编号:2017-052)。公司于2017年5月11日发布了《关于使用部分闲置募集资金进行现金管理的公告》(公告编号:2017-053)。公司于2017年5月12日发布了《关于使用部分闲置募集资金进行现金管理的公告》(公告编号:2017-054)。公司于2017年5月13日发布了《关于使用部分闲置募集资金进行现金管理的公告》(公告编号:2017-055)。公司于2017年5月14日发布了《关于使用部分闲置募集资金进行现金管理的公告》(公告编号:2017-056)。公司于2017年5月15日发布了《关于使用部分闲置募集资金进行现金管理的公告》(公告编号:2017-057)。公司于2017年5月16日发布了《关于使用部分闲置募集资金进行现金管理的公告》(公告编号:2017-058)。公司于2017年5月17日发布了《关于使用部分闲置募集资金进行现金管理的公告》(公告编号:2017-059)。公司于2017年5月18日发布了《关于使用部分闲置募集资金进行现金管理的公告》(公告编号:2017-060)。公司于2017年5月19日发布了《关于使用部分闲置募集资金进行现金管理的公告》(公告编号:2017-061)。公司于2017年5月20日发布了《关于使用部分闲置募集资金进行现金管理的公告》(公告编号:2017-062)。公司于2017年5月21日发布了《关于使用部分闲置募集资金进行现金管理的公告》(公告编号:2017-063)。公司于2017年5月22日发布了《关于使用部分闲置募集资金进行现金管理的公告》(公告编号:2017-064)。公司于2017年5月23日发布了《关于使用部分闲置募集资金进行现金管理的公告》(公告编号:2017-065)。公司于2017年5月24日发布了《关于使用部分闲置募集资金进行现金管理的公告》(公告编号:2017-066)。公司于2017年5月25日发布了《关于使用部分闲置募集资金进行现金管理的公告》(公告编号:2017-067)。公司于2017年5月26日发布了《关于使用部分闲置募集资金进行现金管理的公告》(公告编号:2017-068)。公司于2017年5月27日发布了《关于使用部分闲置募集资金进行现金管理的公告》(公告编号:2017-069)。公司于2017年5月28日发布了《关于使用部分闲置募集资金进行现金管理的公告》(公告编号:2017-070)。公司于2017年5月29日发布了《关于使用部分闲置募集资金进行现金管理的公告》(公告编号:2017-071)。公司于2017年5月30日发布了《关于使用部分闲置募集资金进行现金管理的公告》(公告编号:2017-072)。公司于2017年6月3日发布了《关于使用部分闲置募集资金进行现金管理的公告》(公告编号:2017-073),本公司董事会审议通过了《关于使用部分闲置募集资金进行现金管理的议案》,具体内容详见公司在指定信息披露媒体上。 特此公告。
PrintableThere is no problem with the printer and driver.Check the printing preferences in the application.
Not printable To

Is the port to be used selected correctly?

> "Basic Operations/Various Information for Windows" ![](images/7809e3716386a53cf587c84ab2a65822b5ff95569191741e48a7c17591c81416.jpg)
text_image Canon Printer Properties General Sharing Ports Advanced Color Management Security Device Settings Profile Canon Printer Print to the following portfolio. Documents will print to the first free checked port. Port Description Printer □ LPT3: Printer Port □ COMB: Serial Port □ COMD: Serial Port □ COME: Serial Port □ COMF: Serial Port □ PBI03: Virtual printer port for... Canon Printer Add Port... Separate Port Configure Port... □ Double buttoned support □ Tryable printer pooling OK Cancel Apply Help
Selected To
Not selected Select the correct port.

The port to be used cannot be found.

Install the printer driver again. For details on the procedure for installing and uninstalling the printer driver, see "Printer Driver Installation Guide." For details on the procedure for viewing "Printer Driver Installation Guide", see "Installation."

Is bi-directional communication enabled?

> "Basic Operations/Various Information for Windows"

![](images/fa41efbdcdd3b17b9ede538dfc75d85df645f3a8054ccf08d97b7cb45677da97.jpg)
text_image Canon Printer Properties General Sharing Pots Advanced Color Management Security Device Settings Profile Canon Printer Print to the following port(s). Documents will print to the first free checked port. Port Description Printer □ UPT3: Printer Port □ COMB: Serial Port □ COMD: Serial Port □ COME: Serial Port □ FILE: Print to File □ CBMS: Virtual printer port for... Canon Printer Add Port... Delete Port Configure Port... □ Double Directional support □ Double portier pooling OK Cancel Apply Help
Enabled To Not enabled Enable bi-directional communication and restart the computer and printer.

Try the following points.

• Make resident software invalid including security software. - If any other devices are connected to your computer by USB connection, disconnect those unneeded. - If drivers or software of any other devices (USB connection) is installed on your computer, uninstall those unneeded. - Connect the USB cable to another USB port on your computer. - Connect the printer to another computer with a USB cable. If printing does not work, proceed to .

Install the printer driver again.

For details on the procedure for installing the printer driver, see "Printer Driver Installation Guide." For details on the procedure for viewing "Printer Driver Installation Guide", see "Installation." If printing does not work, proceed to .

Uninstall the USB class driver, and then install the printer driver again.

For details on the procedure for uninstalling the USB class driver and installing the printer driver, see "Printer Driver Installation Guide" on the User Software CD-ROM. For details on the procedure for viewing "Printer Driver Installation Guide", see "Installation." If printing does not work, contact your local authorized Canon dealer. 0258-0AE If you cannot print when the printer is connected to the computer by a LAN cable, check the problem following the questions below. ![](images/41bdd5f77ec37425f3e1f36b6fcf80bbb6893ebc6b52230432e4ddcaf204a740.jpg)

NOTE

For Macintosh users

This section describes the procedure for Windows as an example. For details on the procedure for Macintosh, see "Driver Guide." For details on the procedure for displaying "Driver Guide", see "Viewing the Driver Guide."

Is the printer turned ON?

Check if the Main Power indicator on the control panel is turned on. ![](images/6f87878afabcebb247abb3b9f25c6011c10a0b8ec5f40abefe54177f318b425c.jpg)
text_image Main Power indicator
ON To
OFF Turn the printer ON.
Cannot be turned ON"You Cannot Turn the Printer ON"

Check the indicators on the printer unit.

![](images/fe096fefa20d8ad0dc406e0fc659d5c645425ffcf411f7221b100134b4560371.jpg)
text_image Job Indicator Ready Indicator Message Indicator Paper Source Indicators
The Ready indicator is on.To
The ⬇ Ready indicator is blinking.The printer is warming up. Please wait a moment.
The ⚠ Message indicator is on.➤ "The Message Indicator Is On"
The ➕ Job indicator is on.The printer is operating. Please wait a moment.If the printer does not perform printing for a while, perform the print data output or soft reset.➤ "Canceling a Job"
The ➕ Job indicator is blinking.
The Paper Source indicator is blinking.Load paper.➤ "Paper Loading and Output"
Check the .Online indicator. ![](images/79180edc2a17972e715654c72b9de7e30192c96b969fcad99cabb4f97ec12dfa.jpg)
The *Online indicator is on.To
The ← Online indicator is off.The printer is offline.Place it online.➤ "Online and Offline"

Can you print Configuration Page?

"Checking the Printer Settings" ![](images/2dc12741cd3d531454bb5caecd2097abb3ae182b7a8196fa5da30bb82a5d983f.jpg)
text_image Canon Configuration Page TITLE: 100 CODE: 20000000000000000000000000000000000000000000000000000000000000000000000000000000000000000 TITLE: 15.44 CODE: 25.64 SIZE: 35.64 DESCRIPTION: NO GROUP ITEMS: 127 ITEMS: 127 ITEMS: 127 ITEMS: 127 ITEMS: 127 ITEMS: 127 ITEMS: 127 ITEMS: 127 ITEMS: 127 ITEMS: 127 ITEMS: 127 ITEMS: 127 ITEMS: 127 ITEMS: ITEMS: ITEMS: ITEMS: ITEMS: ITEMS: ITEMS: ITEMS: ITEMS: ITEMS: ITEMS: ITEMS: ITEMS: ITEMS: ITEMS: ITEMS: ITEMS: ITEMS: ITEMS: ITEMS: ITEMS: ITEMS: ITEMS: ITEMS: ITEMS: ITEMS: ITEMS: ITEMS: ITEMS: ITEMS: ITEMS: ITEMS: ITEMS: ITEMS: 15.44 CODE: 25.64 SIZE: 35.64 ITEMS: 127 ITEMS: 127 ITEMS: 127 ITEMS: 127 ITEMS: 127 ITEMS: ITEMS: ITEMS: ITEMS: ITEMS: ITEMS: ITEMS: ITEMS: ITEMS: ITEMS: ITEMS: ITEMS: ITEMS: ITEMS: ITEMS: ITEMS: ITEMS: ITEMS: ITEMS: ITEM S: ITEM S: ITEM S: ITEM S: ITEM S: ITEM S: ITEM S: ITEM S: ITEM S: ITEM S: ITEM S: ITEM S: ITEM S: ITEM S: ITEM S: ITEM S: ITEM S: ITEM S: ITEM S: ITEM S: ITEM S: ITEM S: ITEM S: ITEM S: ITEM S: ITEM S: ITEM S: ITEM S: ITEM S: ITEM S: ITEM S: ITEM S: ITEM S: ITEM S 15.44 CODE: 25.64 SIZE: 35.64 ITEMS: 127 ITEMS: 127 ITEMS: 127 ITEMS: 127 ITEMS: 127 ITEMS: 127 ITEMS: 15.44 CODE: 25.64 SIZE: 35.64 ITEMS: 127 ITEMS: 127 ITEMS: 127 ITEMS: 127 ITEMS: 127 ITEMS: 15.44 CODE: 25.64 SIZE: 35.64 ITEMS: 127 ITEMS: 127 ITEMS: 127 ITEMS: 127
Printable To
Not printableIf an error message is displayed, solve the problem following the message.➤ "A Message Appears in the Control Panel"

Is the LAN cable connected properly?

![](images/f930de3bb0f90d8750fb77591261a1b4f53b69a9c2e9ed05a343161060eda748.jpg)
natural_image Diagram showing connection between a device and a network device, with no visible text or symbols
Connected To
UnconnectedConnect the cable properly.➤ "Connecting to a Computer"
![](images/c1c71b083d59d0b2cff19b4dd9c4db3326db0809d92fe8fdd01e347838c48595.jpg)
text_image ACT Indicator LNK Indicator
The ACT indicator is on.To
The LNK indicator is on.
All the indicators are off.> "All the Indicators on the Network Interface Are Off"

Check the settings for [Interface Selection].

"> "[Setup] Menu ([Interface] Options)" ![](images/0ff44a22bae2f1d552bffecd88206a44271976eb122f10032c33ecfd6b1884a7.jpg)
text_image Setup Network Layout Quality Interface
[Network] is set to [On]. To
[Network] is set to [Off]. Set it to [On].

Can you print a test page in Windows?

> "Basic Operations/Various Information for Windows" ![](images/98a99a595d8c950645866909fd0b87718775feddc0d3fda73842e1122f8b0970.jpg)
text_image Windows Primer Test Page Test Page 1: Windows 2017, 1983. For the following: - Windows 2017 (1983) - Windows 2017 (1984) - Windows 2017 (1985) - Windows 2017 (1986) - Windows 2017 (1987) - Windows 2017 (1988) - Windows 2017 (1989) - Windows 2017 (1989) - Windows 2017 (1990) - Windows 2017 (1990) - Windows 2017 (1991) - Windows 2017 (1991) - Windows 2017 (1992) - Windows 2017 (1992) - Windows 2017 (1993) - Windows 2017 (1993) - Windows 2017 (1994) - Windows 2017 (1994) - Windows 2017 (1995) - Windows 2017 (1995) - Windows 2017 (1996) - Windows 2017 (1996) - Windows 2017 (1997) - Windows 2017 (1997) - Windows 2017 (1998) - Windows 2017 (1998) - Windows 2017 (1999) - Windows 2017 (1999) - Windows 2017 (2000) - Windows 2017 (2000) - Windows 2017 (2001) - Windows 2017 (2001) - Windows 2017 (2002) - Windows 2017 (2002) - Windows 2017 (2003) - Windows 2017 (2003) - Windows 2017 (2004) - Windows 2017 (2004) - Windows 2017 (2005) - Windows 2017 (2005) - Windows 2017 (2006) - Windows 2017 (2006) - Windows 2017 (2007) - Windows 2017 (2007) - Windows 2017 (2008) - Windows 2017 (2008) - Windows 2017 (2009) - Windows 2017 (2009) - Windows 2017 (2010) - Windows 2017 (2010) - Windows 2017 (2011) - Windows 2017 (2011) - Windows 2017 (2012) - Windows 2017 (2012) - Windows 2017 (2013) - Windows 2017 (2013) - Windows 2017 (2014) - Windows 2017 (2014) - Windows 2017 (2015) - Windows 2017 (2015) - Windows 2017 (2016) - Windows 2017 (2016) - Windows 2017 (2017) - Windows 2017 (2017) - Windows 2017 (2018) - Windows 2017 (2018) - Windows 2017 (2019) - Windows 2017 (2019) - Windows 2017 (2020) - Windows 2017 (2020)
PrintableThere is no problem with the printer and driver. Check the printing preferences in the application.
Not printable To

Which network protocol are you using?

TCP/IP To
NetWare or SMB To
AppleTalk To

Is the IP address set properly?

Check that the IP address is set properly using the PING command. > "Basic Operations/Various Information for Windows"
Set To
Not setSet the IP address properly.➤ "Setting the IP Address (IP v. 4)"

Is the port to be used selected correctly?

> "Basic Operations/Various Information for Windows" ![](images/97a28f3138196f4195479fa20c984b8a0f4abb075d3de6e86dda8d3af39ecccb.jpg)
text_image Canon Printer Properties General Shamp Ports Advanced Color Management Security Device Settings Profile Canon Printer Print to the following port(s). Documents will print to the first free checked port. Port Description Printer COM2: Serial Port COM3: Serial Port COM4: Serial Port FILE: Print to File USB007 Virtual printer port for... USB006 Virtual printer port for... IP_192....Standard TCP/IP Port Cancor Printer Add Port... Delete Port Configure Port... Enable bidirectional support Enable printer pooling Close Cancel Apply Help
Selected To
Not selected Select the correct port.
The port to be used cannot be found.Create a port.➤ "Connecting the Printer (LPD/RAW)"
The IP address was changed.

Check the following points.

• The printer is specified as the default printer. • The TCP/IP protocol is running. • The users who can print are not restricted. > "Restricting the Users Who Can Print or Perform the Printer Settings" > "Restricting the Users Who Can Access" ![](images/c95899371038900e82846160805e07e9950a5427ea0aa15d2af538330f440c80.jpg) If printing does not work, proceed to .

Try the following points.

- Change the printing protocol to LPR. > "Basic Operations/Various Information for Windows" - Enable the LPR byte count. > "Basic Operations/Various Information for Windows" - Shorten the name of the file to be printed. ![](images/d4f6cb2a54b76ec3e63475614b4f620496e7c3b4ec7a22d1debfb07bee388614.jpg) If printing does not work, proceed to .

Is NetWare or SMB set properly?

- When using NetWare > "Configuring NetWare" > "Configuring the Protocol Settings" - When using SMB > "Configuring the Protocol Settings" If you are using the DHCP server and WINS server, check if the servers are linked properly.
NetWare or SMB is set properly.Try the following point.● Set [Network Delay Time] longer than usual.➤ "Specifying the Setting for Startup Waiting Time"▼If printing does not work, proceed to.
NetWare or SMB is not set properly.Set NetWare or SMB properly.

Is the IP address set properly?

"Basic Operations/Various Information for Windows" SMB printing does not support IP v. 6.
The IP address is set properly. To.
The IP address is not set properly.Set the IP address properly.➤ "Setting the IP Address (IP v. 4)"

Is the port to be used selected correctly?

> "Basic Operations/Various Information for Windows"
The port is selected correctly. To.
The port is not selected properly.OrThe settings for NetWare or SMB are changed.Create the appropriate port.When using NetWare> "Network Settings for the Printer (NetWare) (LBP7680Cx Only)"When using SMB> "Network Settings for the Printer (SMB) (LBP7680Cx Only)"

Is AppleTalk set properly?

> "Configuring the Protocol Settings" In particular, make sure that the zone in which the printer exists is configured properly in [Zone].
Set To
Not set Set AppleTalk properly.

Check the following points.

- The printer destination is set properly. - AppleTalk is available. For details on the procedure for setting the printer destination, see "Driver Guide." For details on the procedure for displaying "Driver Guide", see "Viewing the Driver Guide."
Set To
Not set Set them properly.

Connect the printer and computer directly with the cross-type \* LAN cable.

\* This is a LAN cable which is used to connect a printer and computer directly without a hub (LAN network). If printing does not work or if you cannot prepare a cross-type LAN cable, proceed to .

Install the printer driver again.

For details on the procedure for installing the printer driver, see "Printer Driver Installation Guide." For details on the procedure for viewing "Printer Driver Installation Guide", see "Installation." If printing does not work, proceed to .

Can you print from another computer (LAN connection)?

![](images/1205fe89f3222a3d7998110a62e1937571df5cef165d1c317f825a8de967de5e.jpg)
text_image Illustration showing computer setup transformation with tower and monitor icons
Printable Make resident software invalid including security software. Not printable Contact your local authorized Canon dealer. 0258-0AF If you cannot print when the printer is used via the print server, check the problem following the questions below. ![](images/639a7be273cdf381b104e8b75f01f4cae179cbece2d722235dd43d981f647e44.jpg)

NOTE

For Macintosh users

This section describes the procedure for Windows as an example. For details on the procedure for Macintosh, see "Driver Guide." For details on the procedure for displaying "Driver Guide", see "Viewing the Driver Guide."

Is the printer turned ON?

Check if the Main Power indicator on the control panel is turned on. ![](images/2d6fed6107aa48d8ce1689d82ed70f2e76b6e808cb6eb25ac4abcb31d5e2c127.jpg)
text_image Main Power indicator
ON To
OFF Turn the printer ON.
Cannot be turned ON"You Cannot Turn the Printer ON"

Check the indicators on the printer unit.

![](images/208ace70344a228fbe4c78acab5b616abda483de1306a287bb8caf838ce16fc4.jpg)
text_image Job Indicator Ready Indicator Message Indicator Paper Source Indicators
The Ready indicator is on.To
The ⬇ Ready indicator is blinking.The printer is warming up. Please wait a moment.
The ⬇ Message indicator is on.➤ "The Message Indicator Is On"
The ➕ Job indicator is on.The printer is operating. Please wait a moment.If the printer does not perform printing for a while, perform the print data output or soft reset.➤ "Canceling a Job"
The ➕ Job indicator is blinking.
The Paper Source indicator is blinking.Load paper.➤ "Paper Loading and Output"
Check the .Online indicator. ![](images/e6b709c55f968ff0a90550b9b97ef029d7acf2fbd28cfc167245fc973653790f.jpg)
The •Online indicator is on.To
The ↔ Online indicator is off.The printer is offline.Place it online.➤ "Online and Offline"

Can you print Configuration Page?

> "Checking the Printer Settings" ![](images/c5fab2f156f798c1856f44896ba858e5d9431dbaff72b57ce83905618ca0555b.jpg)
text_image Canon Configuration Page CANO - 2013 CANO POTTER BREAD GROUP FOR POTTER BREAD GROUP FOR POTTER BREAD GROUP FOR POTTER BREAD GROUP FOR POTTER BREAD GROUP FOR POTTER BREAD GROUP FOR POTTER BREAD GROUP FOR POTTER BREAD GROUP FOR POTTER BREAD GROUP FOR POTTER BREAD GROUP FOR POTTER BREAD GROUP FOR POTTER BREAD GROUP FOR POTTER BREAD GROUP FOR POTTER BARES GROUP FOR POTTER BARES GROUP FOR POTTER BARES GROUP FOR POTTER BARES GROUP FOR POTTER BARES GROUP FOR POTTER BARES GROUP FOR POTTER BARES GROUP FOR POTTER BARES GROUP FOR POTTER BARES GROUP FOR POTTER BARES GROUP FOR POTTER BARES GROUP FOR POTTER BARES GOURD FOR POTTER BARES GOURD FOR POTTER BARES GOURD FOR POTTER BARES GOURD FOR POTTER BARES GOURD FOR POTTER BARES GOURD FOR POTTER BARES GOURD FOR POTTER BARES GOURD FOR POTTER BARES GOURD FOR POTTER BARES GOURD
Printable To
Not printableIf an error message is displayed, solve the problem following the message.➤ "A Message Appears in the Control Panel"

Is the printer connected to the print server properly?

![](images/5cd3801058f8bfddee45ef3c696fe40a21913602e4ac119b7ac455cae5fa9ed4.jpg)
natural_image Line drawing of a printer connected to a desktop computer (no text or symbols)
Connected To
UnconnectedConnect them properly.➤ "Connecting to a Computer"

Can your computer be connected to the print server or the shared printer?

![](images/14f01c7f4147ee6ba1722cd0b8c71dc0b87f78cb3ff85b067ea385cb80dda0d1.jpg)
flowchart
graph TD
    A["Computer"] --> B["Printer"]
    B --> C["Monitor"]
    C --> A
Can be connected To
Cannot be connected"> "The Print Server for Connection Cannot Be Found""> "The Shared Printer Cannot Be Accessed"

Check the following points.

• The print server is connected to the network properly. - The additional driver (alternate driver) is updated properly. - Printing can be performed from the print server. If printing does not work, proceed to .

Can you print a test page in Windows?

> "Basic Operations/Various Information for Windows" ![](images/53cccbf0a5fa67e93f9f8714bf2cbf17a37eb5017902b327848037c1d0098408.jpg)
text_image Windows Printer Test Page Test Page 1: Windows 10.1.2013 Test Page 2: Windows 10.1.2013 Test Page 3: Windows 10.1.2013 Test Page 4: Windows 10.1.2013 Test Page 5: Windows 10.1.2013 Test Page 6: Windows 10.1.2013 Test Page 7: Windows 10.1.2013 Test Page 8: Windows 10.1.2013 Test Page 9: Windows 10.1.2013 Test Page 10: Windows 10.1.2013 Test Page 11: Windows 10.1.2013 Test Page 12: Windows 10.1.2013 Test Page 13: Windows 10.1.2013 Test Page 14: Windows 10.1.2013 Test Page 15: Windows 10.1.2013 Test Page 16: Windows 10.1.2013 Test Page 17: Windows 10.1.2013 Test Page 18: Windows 10.1.2013 Test Page 19: Windows 10.1.2013 Test Page 20: Windows 10.1.2013 Test Page 21: Windows 10.1.2013 Test Page 22: Windows 10.1.2013 Test Page 23: Windows 10.1.2013 Test Page 24: Windows 10.1.2013 Test Page 25: Windows 10.1.2013 Test Page 26: Windows 10.1.2013 Test Page 27: Windows 10.1.2013 Test Page 28: Windows 10.1.2013 Test Page 29: Windows 10.1.2013 Test Page 30: Windows 10.1.2013 Test Page 31: Windows 10.1.2013 Test Page 32: Windows 10.1.2013 Test Page 33: Windows 10.1.2013 Test Page 34: Windows 10.1.2013 Test Page 35: Windows 10.1.2013 Test Page 36: Windows 10.1.2013 Test Page 37: Windows 10.1.2013 Test Page 38: Windows 10.1.2013 Test Page 39: Windows 10.1.2013 Test Page 40: Windows 10.1.2013 Test Page 41: Windows 10.1.2013 Test Page 42: Windows 10.1.2013 Test Page 43: Windows 10.1.2013 Test Page 44: Windows 10.1.2013 Test Page 45: Windows 10.1.2013 Test Page 46: Windows 10.1.2013 Test Page 47: Windows 10.1.2013 Test Page 48: Windows 10.1.2013 Test Page 49: Windows 10.1.2013 Test Page 50: Windows 10.1.2013 Test Page 51: Windows 10.1.2013 Test Page 52: Windows 10.1.2013 Test Page 53: Windows 10.1.2013 Test Page 54: Windows 10.1.2013 Test Page 55: Windows 10.1.2013 Test Page 56: Windows 10.1.2013 Test Page 57: Windows 10.1.2013 Test Page 58: Windows 10.1.2013 Test Page 59: Windows 10.1.2013 Test Page 60: Windows 10.1.2013 Test Page 61: Windows 10.1.2013 Test Page 62: Windows 10.1.2013 Test Page 63: Windows 10.1.2013 Test Page 64: Windows 10.1.2013 Test Page 65: Windows 10.1.2013 Test Page 66: Windows 10.1.2013 Test Page 67: Windows 10.1.2013 Test Page 68: Windows 10.1.2013 Test Page 69: Windows 10.1.2013 Test Page 70: Windows 10.1.2013 Test Page 71: Windows 10.1.2013 Test Page 72: Windows 10.1.2013 Test Page 73: Windows 10.1.2013 Test Page 74: Windows 10.1.2013 Test Page 75: Windows 10.1.2013 Test Page 76: Windows 10.1.20
PrintableThere is no problem with the printer and driver. Check the printing preferences in the application.
Not printable To

Is the printer on the print server displayed on the network?

> "Basic Operations/Various Information for Windows" ![](images/6787c388f6e0f0bdae10ee6569131998b7ee4643604f8b0bc2870bc4771b9ff3.jpg)
text_image Network PRINTSERVER Organies Network and Sharing Camer View remote printers Favorites Libraries Computer Network PRINTSERVER Canon Printer 1 item
Displayed To Not displayed Ask your network administrator about the problem.

Install the printer driver again.

For details on the procedure for installing the printer driver, see "Printer Driver Installation Guide." For details on the procedure for viewing "Printer Driver Installation Guide", see "Installation." If printing does not work, proceed to .

Can another client print?

![](images/5d1e89176be596d9460ac83c796e9d0eaca02486ea927284a4d19ff2d8d89dd4.jpg)
text_image Diagram showing computer setup transformation, showing desktop computer connected to tower via an arrow
Printable Make resident software invalid including security software. Not printable Contact your local authorized Canon dealer. Perform one of the following solutions according to the cause.

The LAN cable is not connected properly.

Solution Connect the print server to the client computer with the LAN cable properly.

The print server has not been started up.

Solution Start up the print server.

The printer is not specified as a shared printer.

Solution

Specify the printer as a shared printer. For details, see the following item in "Printer Driver Installation Guide." \- "Installation" - "Print Server Settings" For details on the procedure for viewing "Printer Driver Installation Guide", see "Installation."

The user does not have permission to access the print server or printer.

Solution Ask your network administrator to change the user permissions.

[Network discovery] is not enabled. (Windows Vista, 7, and Server 2008)

Solution

Perform either of the following procedures.

Windows Vista

1. From the [Start] menu, select [Control Panel]. 2. Click [View network status and tasks]. 3. Set [Network discovery] to [On].

Windows 7 Windows Server 2008 R2

1. From the [Start] menu, select [Control Panel]. 2. Click [View network status and tasks]. 3. Click [Change advanced sharing settings]. 4. Specify [Turn on network discovery] in [Network discovery].

Windows Server 2008

1. From the [Start] menu, select [Control Panel]. 2. Double-click [Network and Sharing Center]. 3. Set [Network discovery] to [On]. 0258-0AJ Perform one of the following solutions according to the cause. The user of the computer to be used is not registered, or the password is not specified.

Solution

Register the user of the computer to be used or specify the password on the print server. For more details, ask your network administrator.

The path to the network is not correct.

Solution 1

Check printers in the print server. > "Basic Operations/Various Information for Windows" ![](images/5efbaacba7a90e94a5dc47002daf13d0d19976da826fa99cb63a176d17a95911.jpg)
text_image Network PRINTSERVER Organix Network and Sharing Center View remote printers Favorites Libraries Computer Network PRINTSERVER Canon Printer 1 item
\- If the icon for this printer is not displayed Ask your network administrator about the problem. \- If the icon for this printer is displayed You can install the printer driver by performing either of the following procedures and following the instructions on the screen. - Double-clicking the icon for this printer - Dragging and dropping the icon for this printer in the printer folder

Solution 2

If you want to specify the network path directly, check if the network path is specified correctly as "\the print server name (the computer name of the print server)\the printer name." 0258-0AK Perform one of the following solutions according to the cause.

The printer is cooling down to maintain print quality. (Especially after narrow paper is printed)

Solution

Wait a moment. The printer automatically cools down the inside. After cooling is completed, the printer resumes printing.

This problem may occur in some applications depending on the processing type of the print data. (Windows 2000/XP/Server 2003)

Solution

If you are using the PCL/UFR II printer driver, performing the following procedure may be able to solve the problem.

• UFR II Printer Driver

1. Display the [Finishing] sheet. 2. Click [Advanced Settings]. 3. Change the [EMF Spooling] setting.

- PCL Printer Driver

See Help of the PCL printer driver. 0258-0AL Perform one of the following solutions according to the cause.

The power plug is unplugged from the AC power outlet.

Solution Plug the power plug in the AC power outlet.

The printer is plugged to an extension cord or multiple power strip.

Solution Plug the power plug directly in the AC power outlet.

The breakers have tripped.

Solution Reset the breakers on the switch board.

There is a break in the power cord.

Solution

If the printer can be turned ON after replacing the power cord with one that is of the same type, then purchase a new power cord and replace the broken one. 0258-0AR Perform one of the following solutions according to the cause.

The LAN cable is not connected properly or broken.

Solution 1 Remove the LAN cable once, then connect it again. Solution 2 Replace the LAN cable with another one, then connect it. Solution 1 Connect the LAN cable to the port on the hub with an "X" mark. Solution 2 If the hub has an UP-LINK (cascade) switch, switch to "X."

A cross LAN cable is being used.

Solution 1 Replace the cable with a straight LAN cable. Solution 2 Connect the cross LAN cable to the UP-LINK (cascade) port on the hub. If the hub has an UP-LINK (cascade) switch, switch to the " = " side.

Cannot communicate with the hub.

Solution 1 Make sure that the power of the hub is on. Solution 2 Specify the communication settings for the print server according to the transmission speed of the connected hub. "Changing the Network Transmission Speed or Transfer Mode"

The hardware of the printer is in an abnormal condition.

Solution Contact your local authorized Canon dealer to request service. 0258-0AS ![](images/5d8db43bf47c245596aa281c34bae93c9e820d85470f0628c1d75a83b4e7bdbd.jpg)

NOTE

For Macintosh users

This section describes the procedure for Windows as an example. For details on the procedure for Macintosh, see "Driver Guide." If a symptom that is not indicated in this section occurs, see "Chapter 6 Troubleshooting" in Driver Guide. For details on the procedure for displaying "Driver Guide", see "Viewing the Driver Guide."

If a problem occurs during the installation

Select a problem during the installation from any of the following.
Connection with a USB cableCANON imageCLASS LBP7660Cdn - If a problem occurs during the installation - 1> "The Printer Is Not Recognized Automatically"
Connection with a LAN cableCANON imageCLASS LBP7660Cdn - If a problem occurs during the installation - 2> "The Printer Cannot Be Searched for"
Connection via the print server (Client)CANON imageCLASS LBP7660Cdn - If a problem occurs during the installation - 3> "The Print Server for Connection Cannot Be Found" > "The Shared Printer Cannot Be Accessed"

If the printer driver is not installed properly

Perform the following procedure.
Solution 1Install the printer driver again.For details on the procedure for uninstalling or installing the printer driver, see "Printer Driver Installation Guide."For details on the procedure for viewing "Printer Driver Installation Guide", see "Installation."
Solution 2(Only when connecting with USB)Uninstall the USB class driver, and then install the printer driver again.For details on the procedure for uninstalling the USB class driver and installing the printer driver, see "Printer Driver Installation Guide."For details on the procedure for viewing "Printer Driver Installation Guide", see "Installation."
Perform one of the following solutions according to the cause.

The printer is not turned ON.

Solution Turn the printer ON.

The USB cable is not connected properly.

Solution

Make sure that the printer and computer are properly connected with the USB cable. > "Connecting to a Computer"

The USB cable was already connected and the printer was turned ON before the printer driver was installed.

Solution

Perform the following procedure. 1. Turn the printer OFF. 2. Disconnect the USB cable. 3. Connect the USB cable again. 4. While the following screen appears, turn the printer ON. ![](images/09355321e59ec6625b6494c510805c322cc3a5b5c3d57248c2ece8314f0f0e67.jpg)
text_image USB Connection Installing Printer Driver with Plug and Play. Status: 1. Connect the USB cable to the printer. 2. If the printer power is off, turn on the printer. The printer will be recognized automatically and installation of printer drivers will start. If the printer is not automatically recognized even with the USB cable connected, disconnect the cable from the printer after turning off the printer, and then connect the cable again.

An inappropriate USB cable is being used.

Solution

Use a USB cable that is appropriate for the USB interface environment of the printer and has the following symbol. ![](images/9159b201efdc10bc5e68b9d4ca557088b5b66fe6f26b0a1446b44bff1b610547.jpg) The following is the USB interface environment of this printer. - Hi-Speed USB USB

The USB class driver is installed.

Solution

Uninstall the USB class driver. For details, see the following item in "Printer Driver Installation Guide." \- "Appendix" - "If You Cannot Install a USB Class Driver" For details on the procedure for viewing "Printer Driver Installation Guide", see "Installation." 0258-0AW If the printer cannot be searched for when you are in the process of installing the printer driver, perform the following procedure.

1

Make sure that the LAN cable is connected properly, and the printer is turned ON. > "Connecting to a Computer"

2

Search for the printer on the network again. If the printer cannot be searched for (no devices are displayed) even by performing the above procedure

1. Set [Interface Selection] in [Network] to [On]. "> "[Setup] Menu ([Interface] Options)" 2. Set the IP address. > "Setting the IP Address (IP v. 4)" > "Setting IP v. 6" 3. Recover your printer from Sleep mode. "Sleep Mode" 0258-0AX Perform the following procedure.
Solution 1Use Uninstaller supplied with User Software CD-ROM to uninstall the printer driver.For details, see the following item in "Printer Driver Installation Guide.""Update/Uninstallation" - "Uninstalling the Printer Driver"For details on the procedure for viewing "Printer Driver Installation Guide", see "Installation."
Solution 2(Only when connecting with USB)Uninstall the USB class driver.For details, see the following item in "Printer Driver Installation Guide.""Appendix" - "If You Cannot Install a USB Class Driver"For details on the procedure for viewing "Printer Driver Installation Guide", see "Installation."
0258-0AY If [Spooling at Host] (whether the print data are processed in the computer) is set to [Disabled], you cannot change the driver settings because some options are unavailable. To change the settings, set [Spooling at Host] to [Auto] using the following procedure.

1

Open the printer folder.

> "Basic Operations/Various Information for Windows"

2

Right-click the icon for this printer, and then select [Printer properties] or [Properties] from the pop-up menu. ![](images/b836edac94f84d48351a3545f84496a7fcb03dfce5f4eb49b8b997a861f5c38d.jpg)
text_image Control Panel > Hardware and Sound > Devices and Posters Add a device Add a printer See what's printing Print server properties Remove devices Devices (3) X000000000 X00000000 USB Mouse Printers and Kases (3) Fob Canon See default's printing Set as default printer Printers/conferences/ Printer properties Create shortcut Troublesheet Remove devices Properties Canor Printer Status: E document(s): 4 queries Category: Printer

3

Change the setting for [Spooling at Host].

(1) Display the [Device Settings] sheet. (2) Select [Auto] for [Spooling at Host]. ![](images/3fb393dcd3c091489215d94d2ce19487779251f49e58c89cd59e74a29d328590.jpg)
text_image Canon Printer Properties General Sharing Ports Advanced Color Management Secure Device Settings (1) Device Settings: Manual Paper Source Options: 250 Sheet Drawer SD Card Installed Spooling at Host: Auto Department ID Management(L) Set User Information(L) Specify Box Number When Storing Settings... Settings(W)... Details(C)... Form to Tray Assignment... Get Device Status About OK Cancel Apply Help
![](images/5a2d7ff8fa04a286ae43e603a4b88618a7a9a40aed0773d87df045b73ef8da22.jpg)

If you cannot change the setting

You need administrative rights to change the setting. Contact your system administrator.

4

Click [OK]. 0258-0C0 When the [Allow Profile Selection] and [Allow Setting Edition] check boxes are cleared, selecting and editing a "Profile" are restricted. To select or edit a "Profile", select the check box using the following procedure.

1

Open the printer folder.

> "Basic Operations/Various Information for Windows"

2

Right-click the icon for this printer, and then select [Printer properties] or [Properties] from the pop-up menu. ![](images/c501448459bc49a12c932e3b4baaf40eac411d6b842a1f92a302dfe77bf0bf79.jpg)
text_image Control Panel > Hardware and Sound > Devices and Printers Add a device Add a printer See what's printing Print server properties Remove devices Devices (3) X000000000 X00000000 USB Mouse Printers and Kases (3) Fut Canon See what's printing Set as default printer Printing conference Printer properties Create shortcut Troublesheet Remove devices Properties Canor Printer Status: 2 documents(1) or queue Category: Printer

3

Change the settings for [Define Document Property].

(1) Display the [Profile] sheet. (2) Select the [Allow Profile Selection] and [Allow Setting Edition] check boxes. ![](images/01123517f177a4c75b771ac549339f809d42e1594cf9cf275d0302c3a7c378ba.jpg)
text_image Canon Printer Properties General Sharing Paste Advanced Data Management Security Device Settings Profile Profile List Default Settings Paste 2 on 1 (1-ended) 2 on 1 (2-ended) 2 ended Scale to Pt Center Confidential High Gradation Name Default Settings Comment This setting enables you to port with all factory default settings. This setting is suitable for printing general business documents that include lost and tables. View Settings Add... Cash... Delete... Import... Export... Define Document Property Now Profile Selection Now Setting Edition (2) OK Cancel Apply Help
![](images/199f2be413ba1a1270260dceb6cc9fdb59a76a4a8d09ccb974676c01d4fc68bd.jpg)

If you cannot change the setting

You need administrative rights to change the setting. Contact your system administrator.

4

Click [OK].

The Status of the Paper Feeder Cannot Be Obtained Automatically

0258-0C1 If you cannot specify the settings for Drawer 2 in [Paper Source] in the printer driver, specify the status of the paper feeder using the following procedure. ![](images/63d110d8a4d0068a4a5f8e21987e234e21f3f90b4c7efc8dbe4dd4f25ae7e605.jpg)

NOTE

For Macintosh users

This section describes the procedure for Windows as an example. For details on the procedure for Macintosh, see "Driver Guide." For details on the procedure for displaying "Driver Guide", see "Viewing the Driver Guide."

1

Open the printer folder.

> "Basic Operations/Various Information for Windows"

2

Right-click the icon for this printer, and then select [Printer properties] or [Properties] from the pop-up menu. ![](images/067960aec745c3561df175960ef1b9f7a3a6d697f53ab98464f291358cc4848d.jpg)
text_image Control Panel > Hardware and Sound > Devices and Printers Add a device Add a printer See what's printing Print server properties Remove devices Devices (3) X000000000 X00000000 USB Mouse Printers and Kases (3) Fan Canon See what's printing Set as default printer Printing software Printer properties Create checkout Troubleshoot Remove device Properties Canpa Printer Category: Printer Status 5 documents(s) in queue

3

Obtain the status of the paper feeder.

(1) Display the [Device Settings] sheet. (2) Click [Get Device Status]. (3) Click [Yes] to obtain the status of the paper feeder. ![](images/f475f17d5643a80855dd1c86fc383d9ee76a806eeed27d2f14f30fd3c7f6d27d.jpg)
text_image Cancer Printer Properties General Sharing Ports Advanced Cable Management Security Device Settings To (1) Device Settings: Auto Paper (Source Options) Name Signoff at Host: Auto Department ID (Managements) Set User Information: Settings... Settings(0) Details(2) Font to Stay Assignment (2) Get Device Status OK Cancel Customations Get information from the device? OK (3)
![](images/d3dbd9be5fe14e9c64e59f5a6bb229964e1e2006e784abb8052dac616cfe4dcc.jpg)

If the status of the paper feeder is not obtained

Remove the paper feeder once, and then install it again. If the status of the paper feeder cannot be obtained even by installing it again, see the following and make sure that the printer and computer can communicate with each other. > "Printing Cannot Be Performed (USB Connection)" > "Printing Cannot Be Performed (LAN Connection)" > "Printing Cannot Be Performed (via the Print Server)"

4

Click [OK]. 0258-0C2 Before removing jammed paper, see "Attention (Paper Jams)." When a paper jam occurs, the printer beeps, displaying the message in the display. This section describes the procedure for when [Animated Instruction] is set to [On] (default setting). If [Animated Instruction] is set to [Off], the above screen is not displayed. ![](images/1eebfee975a7ea943a5ec8c34999db41079582d93e9637cf25f09ba9a86d08b4.jpg)
text_image Paper is jammed. Press the right key to go to next step when the right key mark is displayed.
Messages appear one at a time. Confirm all of them. As the messages disappear when the cover is open, take a note of them if required. ![](images/bf97361329492a1ce75befca5106b77a027935a6235f9302218d3bc5a00166ae.jpg) Remove the jammed paper according to the displayed message. ![](images/e74e29cd59f1b555cec88c6baed393f2e046ce768cb89aaf6f5a0e60ddd796ee.jpg)
text_image Multi-purpose Tray Drawer 1 Drawer 2 Paper Feeder Unit (Optional) Paper flow for 1-sided printing Paper flow for 2-sided printing
Paper Jam Area Message Clearance Procedure
(1) Multi-purpose tray> "Clearing Paper Jams (Multi-purpose Tray)"
(2) Drawer 1 <Drawer 1 area>> "Clearing Paper Jams (Paper Drawer)"
(3) Drawer 2*Only when the paper feeder is installed> "Clearing Paper Jams (Paper Drawer)"
(4) Back cover area <back cover area>> "Clearing Paper Jams (Back Cover)"
(5) Output area <Output area>> "Clearing Paper Jams (Output Area)"
See "Important Safety Instructions" also. ![](images/ce320eb8dacb526b6a41e60e2a1ed802a5af729286f2568e48818589c08e10f5.jpg)

IMPORTANT

Leave the printer ON when removing the jammed paper.

If the power is turned OFF, the data being printed will be deleted.

Do not remove the jammed paper forcefully.

Removing jammed paper with excess force may cause the paper to tear or damage the inside of the printer. Remove the paper by pulling it gently.

If the paper is torn

Remove all remaining pieces of paper.

Do not touch the transfer roller (A).

Print quality may deteriorate. ![](images/784a376922d15d25adc4ba81234d2ab93c32304e76434fd87f822b14ef8d88ec.jpg)
text_image (A)

Do not touch the output tray and its surroundings.

The area surrounding the output tray is hot during and immediately after printing. Do not touch the area surrounding the output tray when removing paper or clearing a paper jam. ![](images/1686354c1bbaa95b14bd1d955153ed938502fbece736ccce40a62d04d707fb15.jpg)
natural_image Illustration of a printer with a prohibition symbol (no text or labels present)
0258-0C4 Referring to the procedure on the display, follow the steps below to remove jammed documents.

1

Press [ ] Paper is jammed. Press the right key to go to next step when the right key mark is displayed.

2

Remove the paper by pulling it gently. ![](images/b2d0b65f00cc64a7bb9d53a55b4d044dd577bd2e861c51a4795c64defaf8be6e.jpg)
natural_image Diagram showing a device with an orange arrow pointing to a gray sheet, no text or symbols present
If the jammed paper cannot be removed easily Do not try to remove it forcefully but proceed to Step 3.

3

Close the multi-purpose tray. ![](images/7bee9a3b476429c296c3f3f1ab4ec4e07761669b44049a23bc6d140a2e3ac2d8.jpg)
natural_image Illustration of a person inserting into a device (no text or symbols visible)
![](images/87b982e5ad602d591900e6ae75d2dbb3de3ef2fa799e7df6fb8134b998846460.jpg)
natural_image Diagram showing a device with an orange arrow pointing to a component, no text or symbols present

4

Pull out the drawer. ![](images/3b8ed616d2e849e69fbe79a00d5edd4ee3f52a40f9e35afcc7280c25e13f7eed.jpg)
natural_image Illustration of a hand inserting a device into a computer case (no text or symbols visible)

5

Lower the manual feed transport guide. (1) Hold the tabs (A) on both sides. (2) Push them down. ![](images/ed67bbc38bb57c1cf07a0c2a12012b593ea77966c454e730ac221290a9155982.jpg)
natural_image Diagram of a printer with a cable inserted into the base, labeled (A), showing no text or symbols on the device itself.
![](images/2c4ca7a50331c062c8e085a026adf12dd5e5fbac41024d735281e8078460e57f.jpg)

IMPORTANT

Do not touch the rubber pad (A). Touching it may result in deterioration in print quality. ![](images/7a0d46e2ebcf6701aeae7cbb76a35ade067dc13586d7e279c03fafab5fe73bc4.jpg)
natural_image Diagram showing a printer with a prohibition symbol and a hand inserting a plug into it, labeled (A) (no text or symbols on the diagram itself)

6

Remove the paper by pulling it gently. ![](images/d0690a787362e36dd465f6de85b2376322dc9b936070fa5b04818f07310c598a.jpg)
natural_image Diagram showing a printer's internal structure with an orange arrow indicating a process or movement (no text or symbols present)
If the jammed paper cannot be removed easily Do not try to remove it forcefully but proceed to Step 7.

7

Return the manual feed transport guide to its original position. ![](images/9a4de98819df629bc88bec131e208af9fec12ac575310a01f70b0d880d776f5f.jpg)
natural_image Line drawing of a printer with visible internal components (no text or symbols)

8

Insert the drawer in the printer.

9

When the following screen appears, press [OK]. The machine is ready to print. Is all of the jammed paper removed? End: Press OK Previous: Press Back ![](images/664fc938741c831d942c0c387342a2a13a645020e408936b7361b799d88a0da9.jpg) If the screen does not appear Open or close the front cover. ![](images/cc221ced8f89f7df2a53979f1f92bb836f0b20fc85f80b507f7a268722949ac4.jpg) NOTE If the jammed paper cannot be removed in Step 6 See "Clearing Paper Jams (Back Cover)" and remove the jammed paper. Next, proceed to the clearing procedure for another area which is displayed in the message. (1) "Clearing Paper Jams (Multi-purpose Tray)" (2) "Clearing Paper Jams (Paper Drawer)" (3) "Clearing Paper Jams (Back Cover)" (4) "Clearing Paper Jams (Output Area)" 0258-0C5 Referring to the procedure on the display, follow the steps below to remove jammed documents.

1

Press [ ] ![](images/2282d1a778dcbfb634a8d0c5c27218007cafcf3e53baaa30623225f53039d2e0.jpg)
text_image Paper is jammed. Press the right key to go to next step when the right key mark is displayed.

2

Pull out the paper drawer. Hold the paper drawer with both hands. ![](images/c9d8c3e780fd5387528a385ff75a0891d47b5a450f75e5938c4a53f84957311c.jpg)
natural_image Diagram showing a hand inserting a device into a computer case (no text or symbols present)
If the paper feeder is installed, pull out the drawer of the paper feeder also.

3

Remove the paper by pulling it gently. ![](images/319a52877eee18cd31f0fd0a9db938847a8c5ce8acb03530dbd907f3227f0439.jpg)
natural_image Diagram showing a printer's internal structure with an orange arrow indicating a process or movement (no text or symbols present)

4

Insert the drawer in the printer. If the paper feeder is installed, insert the drawer of the paper feeder also.

5

When the following screen appears, press [OK].

The machine is ready to print. Is all of the jammed paper removed? End: Press OK Previous: Press Back

If the screen does not appear

Open or close the front cover. Next, proceed to the clearing procedure for another area which is displayed in the message. (1) "Clearing Paper Jams (Multi-purpose Tray)" (2) "Clearing Paper Jams (Paper Drawer)" (3) "Clearing Paper Jams (Back Cover)" (4) "Clearing Paper Jams (Output Area)" 0258-0C6 Referring to the procedure on the display, follow the steps below to remove jammed documents.

1

Press [ ] Paper is jammed. Press the right key to go to next step when the right key mark is displayed.

2

Open the back cover. ![](images/ce9c92fe8d52a8016ebf803d6aeafa189a475751c3f472b89c8c9687069fc118.jpg)
text_image (1) (2)

3

Open the paper output guide by holding the green tab (A). ![](images/8dfdecac3d4c19802be54b7c3328c6ee0cc76f2c8ba96daf35011978b1b10bb9.jpg)
text_image Diagram showing a hand inserting a component into a device, with an inset magnified view labeled (A) highlighting the component.

4

Remove the paper by pulling it gently. ![](images/49cc7f6298b2b587165cad3a3c64f94999729f994800d39ac2544108759484e1.jpg)
natural_image Diagram of a printer internal structure with an orange arrow indicating a component (no text or symbols present)
Make sure that no paper is jammed inside the paper output guide, and then close it.

5

Remove the paper by pulling it gently. ![](images/490bee675969eedaf407bc5a62c8ad6a310aeb3fdd8d8107c32aa51cd75971c0.jpg)
natural_image Diagram of an open printer with internal components and orange arrows indicating flow or movement (no text or symbols)

6

Holding the tabs (A) on both sides, close the 2-sided unit. Close the guide firmly until it clicks. ![](images/0f147046d9e314240dac44c6856f9aa99ba09b1241fc0fca1b3859c69bc1e1eb.jpg)
text_image (A) (A)

7

Remove the paper by pulling it gently. ![](images/96576ed3ea71ce5a06ca5060fea3f2274ed83196a1806604036869a5ee665ac3.jpg)
natural_image Diagram of a printer with internal structure and paper feed, showing no text or symbols
The machine is ready to print. Next, proceed to the clearing procedure for another area which is displayed in the message. (1) "Clearing Paper Jams (Multi-purpose Tray)" (2) "Clearing Paper Jams (Paper Drawer)" (3) "Clearing Paper Jams (Back Cover)" (4) "Clearing Paper Jams (Output Area)" 0258-0C7 Referring to the procedure on the display, follow the steps below to remove jammed documents.

1

Press [ ] Paper is jammed. Press the right key to go to next step when the right key mark is displayed.

2

Open the front cover. ![](images/0ce909b2461ac20affb56c670ccc42b88874225c9098da8a2302c5ffb9132229.jpg)
natural_image Illustration of a hand inserting a file into a printer with orange arrows indicating rotation (no text or symbols)

3

Remove the paper by pulling it gently. ![](images/b336233602804544913416951872ceace13d1c98fe909c3cbf7eeae6db013230.jpg)
natural_image Diagram of a printer internal structure showing paper feed, paper tray, and paper slot (no text or symbols)

4

Close the front cover. The machine is ready to print. ![](images/d7eace3466b91ae2084a17105f97fc7ae5867c1a197fe0d686d39e8603b76aef.jpg) If a message does not disappear Paper may be jammed in another area. Check another area also and remove the paper. (1) "Clearing Paper Jams (Multi-purpose Tray)" (2) "Clearing Paper Jams (Paper Drawer)" (3) "Clearing Paper Jams (Back Cover)" (4) "Clearing Paper Jams (Output Area)" 0258-0CA When the Message indicator is on, implement the following solutions. ![](images/bcb22ab44186e4ced802c06e017c26f2358cb11a94f1e302c7908d05f99afdc7.jpg)
text_image On
The Service Call Appears in the Display ("n" Represents an Alphanumeric Character) A Message Appears in the Display The Display Is Turned Off

The Service Call Appears in the Display ("n" Represents an Alphanumeric Character)

Implement the following solutions according to the displayed message.
Message Cause Solution
E001-nnnnA problem occurred in the fixing unit.Follow the procedure in "If a Fixing Unit Error Is Displayed", and then contact your local authorized Canon dealer.
E003-nnnn
("n" represents an alphanumeric character.)
Ennn-nnnnA problem occurred inside the printer.Following the procedure in "If a Service Error or a Message Is Displayed", cycle the power of the printer.
("n" represents an alphanumeric character.)
F9-nn PwR OFF>ONA problem occurred while the printer was processing print data.
("n" represents an alphanumeric character.)

If a Fixing Unit Error Is Displayed

1

Turn the printer OFF, then disconnect the cables or cords from the printer. ![](images/17159a505c165eb03dd58ea1b440e873cad4ca02c66ae6df76d3dabdcaae4159.jpg)
flowchart
graph TD
    A["Computer OFF"] --> B["Switch"]
    B --> C["Electrical Outlet"]
    subgraph Component 1
        D["Component (1)"] --> E["Power Switch"]
    end
    subgraph Component 2
        F["Component (2)"] --> G["Power Switch"]
    end
    subgraph Component 3
        H["Component (3)"] --> I["Power Switch"]
    end
    subgraph Component 4
        J["Component (4)"] --> K["Power Switch"]
    end
    subgraph Component 5
        L["Component (5)"] --> M["Power Switch"]
    end
USB cable*(2) Turn the computer off.(3) Disconnect the cable from the printer.
LAN cable*(4) Disconnect the cable from the printer.
Power cord(5) Disconnect the power plug from the AC power outlet.(6) Disconnect the cord from the printer.
\* Whether the cable is connected or not varies depending on your environment. ![](images/0115a66310f8d117958b2a8631443ea84b49a423723fa30dd74886cb02a52b0d.jpg)

IMPORTANT

Do not turn ON the printer again. A fixing unit error is displayed. Do not turn ON the printer after turning it OFF.

2

Contact your local authorized Canon dealer. If you are not sure what the problem is, contact your local authorized Canon dealer.

If a Service Error or a Message Is Displayed

1

Turn the printer OFF, wait for 10 seconds or longer, and then turn it ON again. If the message does not reappear, the printer is ready. ![](images/1a7ba56ea04bcb697d0e0542a871899436be4ecfb1eb91425b571b1f822b56b1.jpg)
text_image After 10 seconds
![](images/3a8d2230d9f17316351519df9425f5cad4d8882a5a1fe2825abfd129904b4389.jpg) If the message reappears, you need to request service. Follow the procedure below, and then contact your local authorized Canon dealer to request service.

2

Note down the error code displayed in the display.

3

Turn the printer OFF, then disconnect the cables or cords from the printer. ![](images/c3bc2c1ca44a6a86e2865683391e66e15d481196d5d8c20462e9f146fb8a8f6f.jpg)
flowchart
graph TD
    A["Computer OFF"] --> B["Switch"]
    B --> C["Device 1"]
    B --> D["Device 2"]
    B --> E["Device 3"]
    B --> F["Device 4"]
    B --> G["Device 5"]
    B --> H["Device 6"]
    B --> I["Switch 6"]
    style A fill:#f9f,stroke:#333
    style B fill:#ccf,stroke:#333
    style C fill:#cfc,stroke:#333
    style D fill:#fcc,stroke:#333
    style E fill:#cff,stroke:#333
    style F fill:#ffc,stroke:#333
    style G fill:#cfc,stroke:#333
    style H fill:#fcc,stroke:#333
    style I fill:#cfc,stroke:#333
USB cable*(2) Turn the computer off.(3) Disconnect the cable from the printer.
LAN cable*(4) Disconnect the cable from the printer.
Power cord(5) Disconnect the power plug from the AC power outlet.(6) Disconnect the cord from the printer.
\* Whether the cable is connected or not varies depending on your environment.

4

Contact your local authorized Canon dealer to request service. When contacting your Canon dealer, please report also the error code which you noted down in Step 2. If you are not sure what the problem is, contact your local authorized Canon dealer.

A Message Appears in the Display

![](images/bee6d02bc5a8f851e2d2e8ffc30f02e3acf1f9e2b47c8c9e89f6449b3144ec88.jpg)
text_image Paper is jammed. Press the right key to go to next step when the right key mark is displayed.
See the following and solve the problem according to the message. "A Message Appears in the Control Panel"

The Display Is Turned Off

![](images/c3710812fbc2d28b7769c832e1fcb36db01ac930b69cfbd0213287276056e306.jpg)
natural_image Blank gray rectangle with rounded corners (no text or symbols)
The printer has entered Sleep Mode while it is offline. - Release Sleep Mode. "Sleep Mode" - Place the printer online. > "Online and Offline" 0258-0CC If an error is occurring for some reason during printing, a message appears in the display of the control panel. Perform solutions according to the displayed message.
Service call messageCANON imageCLASS LBP7660Cdn - The Display Is Turned Off - 1It is an error state in which the printer cannot print.
Warning messageCANON imageCLASS LBP7660Cdn - The Display Is Turned Off - 2It is a warning state in which the printer can print, but some solution is required. Depending on the message type, the message does not appear if [ShowWarnings] is set to [Off]. "[Setup] Menu ([Control Menu] Options)"
Error messageCANON imageCLASS LBP7660Cdn - The Display Is Turned Off - 3It is an error state in which the printer cannot print.
Mark Description
For a message with this mark, perform the following procedure according to the situation.·When you want to skip an error (error skip) and continue to print1. Press [ ]: Online) to skip the error. (Printing is continued.)2. If print data is missing or is not printed properly, print again.↑If [Auto Continue] is set to [On], you can skip the error automatically.➤ "[Setup] Menu ([Control Menu] Options)"·If you want to cancel a job1. Perform a soft reset.➤ "Canceling the Process Currently Being Performed (Soft Reset)"2. Solve the problem according to the displayed message (this item).3. Press [ ]: Online) and print again.

NOTE

If multiple warning states are occurring at the same time Warning messages are displayed alternately. If an error state and warning state are occurring at the same time A warning message is not displayed. Service Call Message "Ennn-nnnn ("n" represents a number.) " \- "E001-nnnn ("n" represents a number.) " "E003-nnnn ("n" represents a number.) " \- "E004-nnnn ("n" represents a number.)"

Warning Message

\- "1F Output tray is full." \- "80 Do not turn the main power OFF. (LBP7680Cx only)" \- "BT Clock error." \- "EM E-Mail access error." \- "EM POP3 server error." \- "FD Check firmware." \- "IE An unknown error has occurred." \- "IE Cannot analyze the certificate." \- "IE Change the password." \- "IE Check auth. settings" \- "IE No reply from the destination." \- "IE Set necessary authentication info." \- "IE Set the correct authentication info." \- "IE The certificate has expired." \- "IE The certificate is incorrect." \- "NW Competing IP add. found on the network."

Error Message

\- "An error occurred while receiving. " \- "Cannot communicate with AMS auth. server." \- "Cannot decode data. " \- "Cannot decode PDF data." \- "Cannot feed paper." \- "Cannot perform 2-Sided Printing. " \- "Cannot print with the specified resolution. " \- "Cannot print. Reg. Table is full. " \- "Cannot read PDF data." \- "Cannot receive PDF data. Set the receivable size. " \- "Cannot start printing because job is restricted. " \- "Cannot store. " \- "Change to Black, or change paper type settings. " \- "Check ITB unit. Remove packing material (sheet)." \- "Check paper size." \- "Check toner cart. Remove packing materials." \- "Close XXXX cover. (XXXX shows the cover name)" \- "IEEE802.1X error. Set the necessary auth. information." \- "Image browse data error." \- "Image data error." • "Key management file is corrupt or deleted." \- "Load paper. \- "Not enough display list memory. " \- "Not enough download memory. " \- "Not enough memory for PDF processing." \- "Not enough memory for XPS processing. " \- "Not enough spool memory. " \- "Not enough system memory. " \- "Not enough work memory. " \- "Output tray is full. Remove paper." \- "Paper is jammed." \- "PDF error." \- "PDF print range error." \- "Print data version error." ■ "55 SD Card error. " \- "56 SD Card error." \- "Set below paper." \- "Set cleaning paper and press the Online key. " \- "Syntax error." \- "Turn OFF main power. Check options." \- "XPS document data error. (LBP7680Cx Only)" \- "XPS font data error. " \- "XPS image data error. " \- "XPS page data error. " \- "XPS print range error. " \- "XPS rendering error." \- "XPS unsupported image error. " \- "A4 nn Error ("nn" represents two-digit alphanumeric characters.) " \- "A5 nn Error ("nn" represents two-digit alphanumeric characters.) " \- "A7 nn ERROR ("nn" represents two-digit alphanumeric characters.) " \- "D7 nn Error ("nn" represents two-digit alphanumeric characters.) " \- "D8 nn Error ("nn" represents two-digit alphanumeric characters.) " \- "D9 nn Error ("nn" represents two-digit alphanumeric characters.) "

Ennn-nnnn ("n" represents a number.)

A problem is occurring inside the printer. Solution Solve the problem following the instructions in "If a Service Error or a Message Is Displayed." A problem is occurring with the fixing unit of the printer.

Solution

Follow the procedure in "If a Fixing Unit Error Is Displayed" in "The Message Indicator Is On", and then contact your local authorized Canon dealer.

E003-nnnn ("n" represents a number.)

A problem is occurring with the fixing unit of the printer.

Solution

Follow the procedure in "If a Fixing Unit Error Is Displayed" in "The Message Indicator Is On", and then contact your local authorized Canon dealer.

E004-nnnn ("n" represents a number.)

A problem is occurring with the fixing unit of the printer.

Solution

Follow the procedure in "If a Fixing Unit Error Is Displayed" in "The Message Indicator Is On", and then contact your local authorized Canon dealer.

1F Output tray is full.

The output tray is filled to the limit. Solution Remove the paper in the output tray.

80 Do not turn the main power OFF. (LBP7680Cx only)

A MEAP application is running. Solution Wait until the message disappears.

BT Clock error.

The clock in this printer has a problem.

Solution

Though printing is possible as is, logs such as the job histories cannot be recorded correctly. Contact your local authorized Canon dealer.

EM E-Mail access error.

The printer could not connect to the POP3 server because an error had occurred in its hard disk. Solution Clear the hard disk error on the POP3 server.

EM POP3 server error.

The printer could not connect to the POP3/SMTP server when printing e-mails, or the settings for the POP3/SMTP server are not correct. Check the error in detail using the Remote UI or Network Status Print.

Solution

"Receiving E-mail Data on the Mail Server and Printing (E-mail Print)"

FD Check firmware.

There is an old version of the file inside the firmware.

Solution

Update the firmware. > "[Setup] Menu ([User Maintenance] Options)"

IE An unknown error has occurred.

An unknown IEEE802.1X authentication error has occurred.

Solution

Restart the printer. If the error message still appears after restarting this printer, contact your local authorized dealer.

IE Cannot analyze the certificate.

During IEEE802.1X authentication, analysis of the certificate received from the authentication server failed. Solution Check the authentication server's certificate.

IE Change the password.

The password used for IEEE802.1X authentication has expired.

Solution

Change the password registered in the authentication server, and reset the IEEE802.1X authentication password. > "Setting IEEE802.1X Authentication"

IE Check auth. settings

The printer and the authentication server use different IEEE802.1X authentication systems.

Solution

Change IEEE802.1X authentication systems. > "Setting IEEE802.1X Authentication "

IE No reply from the destination.

During IEEE802.1X authentication, and error occurred while communicating with the authentication server. Solution Check to see if the cable is disconnected.

IE Set necessary authentication info.

There is information missing from the IEEE802.1X authentication settings.

Solution

Check the IEEE802.1X settings, and reconfigure them. > "Setting IEEE802.1X Authentication" An error was returned from the authentication server because the certificate used for IEEE802.1X authentication is not correct.
SolutionThe certificate used for TLS authentication is not correct. Check the certificate, and reconfigure it. ➤ "Setting IEEE802.1X Authentication "
SolutionIf the printer's certificate is correct, check the authentication server's CA certificate.

IE The certificate has expired.

During IEEE802.1X authentication, the certificate received from the authentication server was an expired certificate.
SolutionCheck the authentication server's certificate.
SolutionCheck the printer's and the authentication server's time settings.➤ "Turning the Power On and Specifying a Language and Time"

IE The certificate is incorrect.

During IEEE802.1X authentication, an error occurred as a result of the verification by the CA certificate of the certificate received from the authentication server.
SolutionCheck the authentication server's certificate.
SolutionInstall the CA certificate in the printer.➤ "Security Settings"

NW Competing IP add. found on the network.

The IPv4 address set for the printer overlaps with another host on the network.
SolutionChange the printer's IPv4 address and restart. ➤ "Setting the IP Address (IP v. 4)"

An error occurred while receiving.

The printer received any unanalyzable data while it is receiving a job, or it timed out.
Solution 1Press [ ○ ] (←Online) to cancel printing, then print again.
Solution 2A problem may be occurring in the network you are using. Check the status of the network that you are using.

Cannot communicate with AMS auth. server.

It cannot communicate with the imageWARE Access Management System authentication server.
Solution 1Press [○] (○ Online), and continue printing. However, the data that generated the error cannot be printed.
Solution 2Check the network settings, check the connection with the server, and then start the imageWARE Access

Cannot decode data.

The printer could not analyze encrypted secured print data. Solution Perform a soft reset using the Reset menu, then print again.

Cannot decode PDF data.

An incorrect password was entered to print the PDF data. Solution Enter the correct password. The PDF data security settings do not permit printing. Solution Change the settings to permit printing.

Cannot feed paper.

Paper of the size or type that cannot be fed from the multi-purpose tray or paper drawer is specified.
Solution 1If a paper source is specified, press [ ● ] ( Feeder Selection), and then set [Paper Source] to [Auto].➤ "[Select Feeder] Menu"
Solution 2Press [ ● ] ( Feeder Selection) to select another paper source.
Solution 3Load paper appropriate for the paper source.➤ "Usable Paper"
Solution 4Specify the following items.[Standard Paper Size][Default Paper Type]➤ "[Setup] Menu ([Paper Source] Options)"
Solution 5Press [ ○ ] (← : Online), then print from the currently selected paper source. However, this may result in deterioration in print quality.

Cannot perform 2-Sided Printing.

The printer received 2-sided printing data of paper sizes (including the orientation) or paper types unavailable for automatic 2-sided printing.
Solution 1Press [ ○ ] (← : Online) to continue printing. However, the data on each side is printed on two pages.
Solution 2Perform the following procedure.1. Perform a soft reset.➤ "Canceling the Process Currently Being Performed (Soft Reset)"2. Change the setting to a paper size or type available for automatic 2-sided printing, and then print again.
The printer cannot process the data because it is too complicated.
Solution 1Press [ ○ ] (← : Online) to continue printing. In this case, the printer prints with the image quality level being lowered.
Solution 2Perform the following procedure.1. Perform a soft reset.➤ "Canceling the Process Currently Being Performed (Soft Reset)"2. Set [Gradation Level] to [High 1], and then print again.➤ "[Setup] Menu ([Quality] Options)"

Cannot print. Reg. Table is full.

The total number of binders inside a single job exceeds 16, or the number of documents inside a single binder exceeds 16.
Solution 1Press [ ○ ] (○ Online) to continue printing. However, the data may not be printed properly.
Solution 2Confirm the data to be printed, then print again.

Cannot read PDF data.

An error has occurred when the PDF data was read.
SolutionPerform the following procedure.1. Perform a soft reset.➤ "Canceling the Process Currently Being Performed (Soft Reset)"2. Print the PDF data in a format which this printer supports again.

Cannot receive PDF data. Set the receivable size.

There is not sufficient free space to print the PDF file using the direct print function.
Solution 1Press [ ○ ] (← : Online) to cancel the job. Afterward, perform the following processes (decreasing the size of the PDF file), and then print again.▪ Optimizing the PDF file▪ Dividing the PDF file into multiple files
Solution 2Send the file again using one of the following methods. (LBP7680Cx only)▪ Insert the SD card into the slot and send the file again.▪ Send the file directly from the USB memory device.➤ "Installing SD Card (LBP7680Cx Only)"➤ "Printing Files Directly from USB Memory Devices (USB Direct Print) (LBP7680Cx Only)"

Cannot start printing because job is restricted.

Print job restrictions are set.
Press [ ○ ] (← : Online) to cancel the job. If print job restrictions are set, only the data stored in a box

Solution

can be printed. Store the data you want to print in a box. > "Setting Restrictions for Print Jobs (LBP7680Cx Only)"

Cannot store.

[SD Card] in the Control Menu options in the Setup menu is set to [Off].

Solution

Perform the following procedure. 1. [○] Cancel printing by pressing (♦ Online). 2. Set [SD Card] to [On] and print again. "> "[Setup] Menu ([Control Menu] Options)" The number of the jobs exceeded the amount of jobs the printer can save (You can save up to 100 jobs in the SD card.)

Solution 1

The printer is ready to print by pressing [ ] (• Online), ignoring the print data.

Solution 2

elete unnecessary stored jobs. The number of the jobs exceeded the number of jobs you can save in the SD card.

Solution 1

The printer is ready to print by pressing [ ] ( : Online), ignoring the print data.

Solution 2

elete unnecessary stored jobs. The specified box number is not correct.

Solution

Specify the correct box number. Change to Black, or change paper type settings. You have attempted to print color transparencies.

Solution

Perform the following procedure. 1. Perform a soft reset. "Canceling the Process Currently Being Performed (Soft Reset)" 2. Either prints them in black and white or uses paper other than transparencies. Check ITB unit. Remove packing material (sheet). There is packing material (sheet) remaining in the output area.

Solution

Turn OFF the printer, remove the packing material (sheet) from inside the back cover, and then turn the printer back ON.

Check paper size.

The size of the paper loaded in a paper source is different from the following settings. \- Setting for [Output Size] in the [Page Setup] sheet in the printer driver \- [MP Tray Paper Size], [Drawer 1 Size] or [Drawer 2 Size] in the [Select Feeder] menu

Solution

Specify the setting properly. > "Registering the Paper Size and Type" > "Configuring the Printer Driver and Printing" When the following settings in the [Select Feeder] menu are set to [Mixed Sizes], custom size paper whose long edges are 215.9 mm or less is loaded in portrait orientation and printed (only when the UFR II printer driver is used). ■ [MP Tray Paper Size] - [Drawer 1 Size] - [Drawer 2 Size] Solution Load the paper in landscape orientation, then print again. When the UFR II printer driver was not used, custom size paper was loaded in landscape orientation to be printed. Solution Load the paper in portrait orientation, then print again. [Check Paper Size] in the common [Setup] menu ([User Maintenance] options) is set to [On].

Solution

Set [Check Paper Size] to [Off], and then print again. > "[Setup] Menu ([User Maintenance] Options)" Check toner cart. Remove packing materials. The toner cartridge was installed with the sealing tapes still attached.

Solution

Remove the sealing tapes and set the toner cartridge in the correct position. "Toner Cartridge Replacement" Close XXXX cover. (XXXX shows the cover name) A cover is open.

Solution

Close the cover firmly. If the printer is not online, press [ ○ ] (\* Online). IEEE802.1X error. Set the necessary auth. information. There is information missing from the IEEE802.1X authentication settings.

Solution

Check the IEEE802.1X settings, and reconfigure them. > "Setting IEEE802.1X Authentication" Image browse data error. Data which this printer cannot process is included in TIFF data. Solution 1 (LBP7680Cx Perform the following procedure. 1. Install the SD card. Installing SD Card 2. On the control panel, select [Imaging] → [Print Guarantee] → [On].
Only)[Setup] Menu ([Imaging] Options)3. Restart the printer.
Solution 2This printer cannot print the data. Press [ ○ ] (○ Online) to cancel the job.

Image data error.

Data which this printer cannot process is included in TIFF data or JPEG data.
SolutionThis printer cannot print the data. Press [ ○ ] (• Online) to cancel the job.

Key management file is corrupt or deleted.

The file related to key management is broken.
SolutionPerform the following procedure.1. Select [Network] → [Remote UI Settings] → [SSL] using the control panel, and then make sure that [SSL] is set to [Off].2. Restart the printer, and then regenerate the key and certificate and specify the settings for SSL from the Remote UI.➤ "Security Settings"3. Restart the printer.

Load paper.

Paper of the size specified in the application is not loaded in the paper source (in all the paper sources when [Paper Source] is set to [Auto] and in the specified paper source when the setting is fixed).
Solution 1Refill or load paper.
Solution 2Press [ ●] ( Feeder Selection), then select other paper source for the same paper size or larger paper size.➤ "[Select Feeder] Menu"

Not enough display list memory.

The memory required for processing has run out and overflowed.
Solution 1Press [○] (← : Online) to continue printing. However, the job with which an error has occurred is not printed.
Solution 2Perform the following procedure.1. Perform a soft reset.➤ "Canceling the Process Currently Being Performed (Soft Reset)"2. After the soft reset, either performs a hard reset or turns the printer back ON, increase memory capacity and prints again. (All data in the memory will be erased.)➤ "Canceling All the Jobs (Hard Reset)"

Not enough download memory.

The memory for registering overlay forms and custom characters ran out and overflowed.
Solution 1Press [ ○ ] (○ Online) to continue printing. However, the overflowed data cannot be registered.
Solution 2Perform the following procedure.1. Perform a soft reset.➤ "Canceling the Process Currently Being Performed (Soft Reset)"2. After the soft reset, either perform a hard reset or turn the printer back ON, increase memory capacity and print again. (All data in the memory will be erased.)➤ "Canceling All the Jobs (Hard Reset)"

Not enough memory for PDF processing.

There is not enough memory to process a PDF file.
SolutionPerform the following procedure.1. Perform a soft reset.> "Canceling the Process Currently Being Performed (Soft Reset)"2. Decrease the size of the PDF file or divide it into multiple files, and then print again.† The PDF data may be printed properly by opening it from an application and using the printer driver.

Not enough memory for XPS processing.

There is not enough memory for XPS processing.
Solution 1Press [ ○ ] (← : Online), and continue printing. However, the data that generated the error will not be printed correctly.
Solution 2If images such as Progressive JPEG are handled inside the XPS, convert them to TIFF or Baseline JPEG and then print.

Not enough spool memory.

Because spool memory ran out, the printer cannot print.
Solution 1Press [ ○ ] (← : Online) to continue printing. However, the page with which an error is occurring is not printed.
Solution 2Perform the following procedure.1. Perform a soft reset.➤ "Canceling the Process Currently Being Performed (Soft Reset)"2. Specify the paper size smaller, and then print again.
Solution 3Perform the following procedure.1. Perform a soft reset.➤ "Canceling the Process Currently Being Performed (Soft Reset)"2. Set [Gradation Level] to [Standard], and then print again."> "[Setup] Menu ([Quality] Options)"
Solution 4If [2-Sided Printing] is set to [On], specify [Off], and then print again."> "[Setup] Menu ([Paper Source] Options)"
Solution 5Change the setting for [Halftones], and then print again."> "[Setup] Menu ([Quality] Options)"

Not enough system memory.

The work memory required for the printer process ran out while the system was processing the data (mainly the graphics data and text data).
Solution 1Press [ ○ ] (← : Online) to continue printing. However, the data with which an error is occurring is not printed properly.
Solution 2Perform the following procedure.1. Perform a soft reset.➤ "Canceling the Process Currently Being Performed (Soft Reset)"2. After the soft reset, either perform a hard reset or turn the printer back ON, increase memory capacity and print again. (All data in the memory will be erased.)➤ "Canceling All the Jobs (Hard Reset)"

Not enough work memory.

The work memory for each print mode cannot be secured.
Solution 1Press [ ○ ] (← : Online) to continue printing. However, the data with which an error is occurring is not printed properly.
IMPORTANTWhen continuing printing by pressing [ ○ ] (←Online)Be aware that the data of overlay or macro that is already registered may be deleted.
Solution 2Perform the following procedure.1. Perform a soft reset.➤ "Canceling the Process Currently Being Performed (Soft Reset)"2. After the soft reset, either perform a hard reset or turn the printer back ON, increase memory capacity and print again. (All data in the memory will be erased.)➤ "Canceling All the Jobs (Hard Reset)"

Output tray is full. Remove paper.

The output tray is filled to the limit. Solution Remove the paper in the output tray. Paper is jammed. Paper is jammed inside the printer.
SolutionRemove the jammed paper and set the paper drawer and covers to the original position. If the printer is not online, press [ ○ ] (* Online).➤ "Clearing Paper Jams (Multi-purpose Tray)"➤ "Clearing Paper Jams (Paper Drawer)"➤ "Clearing Paper Jams (Back Cover)"➤ "Clearing Paper Jams (Output Area)"
![](images/e06cb1d9aaa533794276ce1737ba91e796816ee13f322146a82951e5cf15e787.jpg)

IMPORTANT

- If paper jams occur at multiple areas at the same time, the areas appear in the display by rotation. - If you removed the jammed paper without opening any cover, be sure to open and close the front cover once, and then press [ ○ ] (← Online).

PDF error.

PDF data which this printer cannot process was sent.
SolutionPerform the following procedure.1. Perform a soft reset.➤ "Canceling the Process Currently Being Performed (Soft Reset)"2. Print the PDF data in a format which this printer supports again.

PDF print range error.

The specified print range is incorrect. Solution Specify the print range correctly, then print again. A problem is occurring with the fixing unit of the printer. Solution 1 Press [ ○ ] (○ Online) to continue printing. However, the data may not be printed properly. Solution 2 Print the data again from the printer driver for the printer.

55 SD Card error.

An SD error has occurred.
Solution 1If [ ○ ] (← : Online) is pressed, settings that do not use the SD card are activated. However, you cannot print with functions that use the SD card.
Solution 2Turn OFF the printer, and make sure that the SD card is inserted correctly.
Solution 3Contact your local dealer for repairs.

56 SD Card error.

An SD error has occurred. Solution 1 Turn the printer OFF, wait for 10 seconds or longer, and then turn it ON again. Solution 2 Run SD card quick format or standard format. Solution 3 Contact your local dealer for repairs.

Set below paper.

The paper of the size specified in the application is not loaded in the paper drawer or multi-purpose tray, or the paper source for the different paper size is selected.
Solution 1Load the paper of the size selected in the application (or the one specified by scaling factors).➤ "Paper Loading and Output"
Solution 2Press [ ○ ] (← : Online), and then print to the currently loaded paper forcibly. If you are using the multi-purpose tray, the setting for [MP Tray Paper Size] in the [Select Feeder] menu automatically changes to the paper size specified in the application.
The paper size specified in the application software is different from the following setting. \- [MP Tray Paper Size], [Drawer 1 Size] or [Drawer 2 Size] in the [Select Feeder] menu
SolutionSpecify the setting properly.> "Registering the Paper Size and Type"
Improper paper source is selected.
SolutionSpecify the setting for [Paper Source] in the [Select Feeder] menu properly.➢ "[Select Feeder] Menu"
IMPORTANTWhen the messageappearsIf the front cover is opened, the message may disappear. However, be sure to follow the directions in the displayed message to change the paper.

Set cleaning paper and press the Online key.

The printer is waiting to print cleaning paper.
SolutionLoad Letter size or A4 paper in the multi-purpose tray, and then press [ ○ ] (• Online).

Syntax error.

Invalid data is sent when printing using the UFR II printer driver.
Solution 1Press [ ○ ] (← : Online) to continue printing from the next data. However, the page with which an error is occurring and its subsequent pages are not printed.
Solution 2Confirm the data to be printed, then print again.

Turn OFF main power. Check options.

The optional paper feeder is not installed properly.
SolutionTurn the power OFF, install the paper feeder properly, and then turn it ON again.
Any optional paper feeder is installed or removed when the printer is ON.

Solution

Turn the power OFF, install or remove the paper feeder, and then turn the printer ON again. > "Printer Installation" The connector of the optional paper feeder is disconnected.

Solution

Turn the printer OFF, unplug the power plug from the AC power outlet and contact your local authorized Canon dealer for servicing. A paper feeder that is not for this printer is installed.

Solution

Turn the power OFF, install the paper feeder for this printer, and then turn it ON again. > "Printer Installation"

XPS document data error. (LBP7680Cx Only)

The XPS data or the data extracted from the XPS data are invalid.

Solution

Check to make sure that the data that was input is normal, restart it and print again. A high volume file was sent directly.

Solution 1

Press [ ○ ] (← : Online) to cancel the job. Afterward, perform the following processes (decreasing the size of the XPS file), and then print again. \- Optimizing the XPS file \- Dividing the XPS file into multiple files

Solution 2

Send the file again using one of the following methods. \- Insert the SD card into the slot and send the file again. \- Send the file directly from the USB memory device. > "Installing SD Card (LBP7680Cx Only)" "Printing Files Directly from USB Memory Devices (USB Direct Print) (LBP7680Cx Only)"

XPS font data error.

Incorrect font data was received.

XPS image data error.

Incorrect image data was received. Solution Check the output result for missing images, and correct the data.

XPS page data error.

Pages cannot be generated because the description is invalid. Solution Check the output result for missing pages, and correct the data.

XPS print range error.

The specified print page range is invalid. Solution Check the page range, and print again.

XPS rendering error.

An error has occurred in the XPS data rendering system. Solution Contact your local dealer.

XPS unsupported image error.

Unsupported images such as HD Photo images are included in the XPS data. Solution Change the images in the XPS file to TIFF or JPEG format.

A4 nn Error ("nn" represents two-digit alphanumeric characters.)

A problem is occurring and the printer does not operate properly.

Solution

Cycle the power of the printer. If the message appears even after cycling the power of the printer, note down the message in the display, and contact your local authorized Canon dealer.

A5 nn Error ("nn" represents two-digit alphanumeric characters.)

A problem is occurring and the printer does not operate properly.

Solution

Cycle the power of the printer. If the message appears even after cycling the power of the printer, note down the message in the display, and contact your local authorized Canon dealer.

A7 nn ERROR ("nn" represents two-digit alphanumeric characters.)

A problem is occurring and the printer does not operate properly.

Solution

Cycle the power of the printer. If the message appears even after cycling the power of the printer, note down the message in the display, and contact your local authorized Canon dealer.

D7 nn Error ("nn" represents two-digit alphanumeric characters.)

A problem is occurring and the printer does not operate properly.

Solution

Cycle the power of the printer. If the message appears even after cycling the power of the printer, note down the message in the display, and contact your local authorized Canon dealer.

D8 nn Error ("nn" represents two-digit alphanumeric characters.)

A problem is occurring and the printer does not operate properly.

Solution

Cycle the power of the printer. If the message appears even after cycling the power of the printer, note down the message in the display, and contact your local authorized Canon dealer.

D9 nn Error ("nn" represents two-digit alphanumeric characters.)

A problem is occurring and the printer does not operate properly.

Solution

Cycle the power of the printer. If the message appears even after cycling the power of the printer, note down the message in the display, and contact your local authorized Canon dealer. ![](images/9e9b489cb2e65c91900874d8ed428d6173b0f48ee043c522613119891364ba0a.jpg)

Paper curls or creases.

Paper Curls Paper Creases ![](images/976bf3456368e6c282d9a6dfc6729f14dc77717ce0896e7b17d3763f8984f11d.jpg)

Streaks (lines) appear.

White Streaks (Lines) Appear ![](images/a4bcd95b9e8dbfc3f19da4e21893edbc1869b5b2a8b1440fdf87b6e16cf04dd6.jpg)

Unevenness or smudge marks appear.

> Printing Is Uneven Printed Pages Have White Specks > Colors Are Uneven or Not Printed Smoothly The Toner Does Not Fix onto the Paper Well The Printed Paper Has Smudge Marks Smudge Marks of Spattering Toner Appear around the Text or Patterns The Back of the Printed Paper Has Smudge Marks The Overall Print Result Is Dark > Residual Images Appear on Non-printed Areas White Dust Is Attached to the Printed Transparencies ![](images/6e3a894dda2932e5577997d774c3731b77dbfe28f0981eaee3b4471f5aadb86f.jpg)

Printing is faint, is faded, has a problem with color, and so on.

The Overall Print Result Is Faint Thin Lines Are Faded or Halftone Images Are Faint Colored Lines and Text Appear Faded Colored Text Appears Blurred Data Is Not Printed in the Correct Color (Specified Color) Due to Color Mismatch Thin Lines or Fill Patterns Are Not Printed with the Specified Colors or Do Not Appear At All Shaded Patterns Are Not Printed in the Correct Color (Specified Color) Photographs and so on Are Printed in Different Colors from Those Displayed on the Monitor Fill Patterns and Borders Are Not Printed in the Correct Color (Specified Color) Even When the Same Color Is Specified for Them - Square Areas That Cannot Be Seen on the Display Appear around Lines or Text and Are Printed in a Different Color from the Other Areas Superimposed Diagrams Are Not Printed in the Correct Color The Printing Position Is Skewed Data Is Printed Diagonally A Portion of the Page Is Not Printed Data Is Reduced and Printed The Next Page Is Printed from Halfway across the Previous Page Printed Data Lies outside Paper ![](images/66c530b07e434b708abede177422ba3275597767ed0646bca3abfb5ddce4a3fa.jpg)

Others

Blank Paper Is Output (Nothing Is Printed on the Paper) The Overall Surface of the Paper Is Printed in a Particular Color The Last Page Cannot Be Printed Unreadable Characters Are Printed The Printout Is Different from What Is Displayed on Screen (Windows 2000, XP, and Server 2003) The Flap of the Printed Envelope Sticks > Multiple Sheets of Paper Are Fed at a Time ![](images/e959df447e40f984683c8f9b7ff21d880276b90611824694bddb9bcf3d7ad110.jpg)

NOTE

Contacting your local authorized Canon dealer

If a problem that is not indicated in the e-Manual occurs, if none of the suggested measures solve the problem, or if you cannot determine the problem, contact your local authorized Canon dealer. 0258-0CF ![](images/deb1124e53b59fd18f959cdb529259bd4161f8e4563a4e2083b3dc1b95e755d9.jpg)
pie | Category | Value | |---|---| | Slice 1 | 50% | | Slice 2 | 30% | | Slice 3 | 20% | | Slice 4 | 15% | | Slice 5 | 10% |
Perform one of the following solutions according to the cause.

Damp paper is used.

Solution

Replace the paper with new paper in an unopened package. > "Precautions for Paper"

Appropriate paper is not being used.

Solution

Replace the paper with that which can be used with this printer. > "Usable Paper"

Depending on the paper type or the operating environment, the paper may curl as either of the following.

![](images/78923905361fb8cd213e524eb6d6edb1158c0e0c5ee533a2cdf560efa7866963.jpg)
natural_image Pure technical line drawing of a mechanical component without any text, numbers, or symbols
![](images/563e01bce2e7fe6f2bcb7b4b154797ca4286ad2c2f9ad1cb4460e00415f53f1e.jpg)
natural_image Line drawing of a printer with a curved cover (no text or symbols)

Solution 1

Perform the following procedure in the printer driver. 1. Display the [Paper Source] sheet. 2. Set [Paper Type] to one of the following settings.
Currently Selected SettingSetting to be Selected
[Plain L] [Plain L2]
[Plain] [Plain L]
[Plain H] [Plain]
[Heavy 1] [Plain H]
[Heavy 2] [Heavy 1]
[Heavy 3] [Heavy 2]
[Envelope H] [Envelope]
[Coated 2] [Coated 1]
[Coated 3] [Coated 2]
[Coated 4] [Coated 3]
If you change the settings, the toner may not fix onto paper well, and the printing may come out faint.
Solution 2Select [Curl Correction] under [Special Print Mode] set it to [On] and print again."[Setup] Menu ([User Maintenance] Options)"If you change the settings, the toner may not fix onto paper well, and the printing may come out faint.If you specify this setting, printing speed drops.
Depending on the paper type or the operating environment, the paper may curl as either of the following. ![](images/c5120164f4021b726663c4d28a76bcfc70eee22589633f99d886ac10a4847599.jpg)
natural_image Simple line drawing of a rectangular object with internal features and a curved line above it (no text or symbols)
![](images/73d56e180f7534a0e6305f9dfde985bfdff2ca2a6a61ce02eb0f487f37cc5457.jpg)
natural_image Line drawing of a printer with a curved cover (no text or symbols)

Solution

Perform the following procedure in the printer driver. 1. Display the [Paper Source] sheet. 2. Set [Paper Type] to one of the following settings.
Currently Selected SettingSetting to be Selected
[Plain L2] [Plain L]
[Plain L] [Plain]
[Plain] [Plain H]
[Plain H] [Heavy 1]
[Heavy 1] [Heavy 2]
[Heavy 2] [Heavy 3]
[Envelope] [Envelope H]
[Coated 1] [Coated 2]
[Coated 2] [Coated 3]
[Coated 3] [Coated 4]
When the settings are changed, sometimes residual images appear on non-printed areas. 0258-0CH ![](images/e86833276cfd29716b8a7c37fcd7377b902d8f6f09e673d6565d453eed6dd608.jpg)
pie | Category | Value | |---|---| | Pie Chart | 100% | | Bar Chart | 50% |
Perform one of the following solutions according to the cause. Paper is not loaded properly in the paper drawer or multi-purpose tray.

Solution

Load the paper properly. > "Loading Paper in the Drawer" > "Loading Paper in the Multi-purpose Tray" Damp paper is used.

Solution

Replace the paper with new paper in an unopened package. > "Precautions for Paper" Appropriate paper is not being used.

Solution

Replace the paper with that which can be used with this printer. > "Usable Paper" There is a foreign object inside the printer. Solution Remove the foreign object inside the printer. Depending on the paper type or the operating environment, the paper may be creased.

Solution 1

Perform the following procedure in the printer driver. 1. Display the [Paper Source] sheet. 2. Set [Paper Type] to one of the following settings.
Currently Selected SettingSetting to be Selected
[Plain L] [Plain L2]
[Plain] [Plain L]
[Plain H] [Plain]
[Heavy 1] [Plain H]
[Heavy 2] [Heavy 1]
[Heavy 3] [Heavy 2]
[Envelope H] [Envelope]
[Coated 2] [Coated 1]
[Coated 3] [Coated 2]
[Coated 4] [Coated 3]
If you change the settings, the toner may not fix onto paper well, and the printing may come out faint.

Solution 2

Select [Curl Correction] under [Special Print Mode] set it to [On] and print again. "> "[Setup] Menu ([User Maintenance] Options)" If you change the settings, the toner may not fix onto paper well, and the printing may come out faint. If you specify this setting, printing speed drops. 0258-0CJ ![](images/743cbb3dd860cc87706d1365f99bc6e03570d3a8ebf729ced1299cda27ab3397.jpg)
natural_image Illustration of a pink rose and green leaves next to a purple circular object with vertical stripes (no text or symbols)
Perform the following procedure. The drum in the toner cartridge is deteriorated.

Solution

Replace the toner cartridge with a new one. > "Toner Cartridge Replacement" 0258-0CK ![](images/fded7e26997f93cfc210ed99f468103cb6727b58d22d668aa37d903cf54c8478.jpg)
natural_image Blue circular icon with a document and arrow pointing to it, no text or symbols present.
Perform one of the following solutions according to the cause.

Paper is too moist or too dry.

Solution

Replace the paper with new paper in an unopened package. "Precautions for Paper"

The toner cartridge has run out of toner, has deteriorated, or is damaged.

Solution

Check the status of the toner cartridge, and replace the color toner cartridge that is almost empty. > "Remote UI" > "Toner Cartridge Replacement"

The drum in the toner cartridge is deteriorated.

Solution

Replace the toner cartridge with a new one. "Toner Cartridge Replacement" 0258-0CL ![](images/1f866251d545ea510ace35e9772ae1579cb23938406ef088b231d940bde5410e.jpg)
bar | Category | Value | |---|---| | Bar 1 | 35 | | Bar 2 | 40 | | Bar 3 | 38 | | Bar 4 | 42 | | Bar 5 | 36 | | Bar 6 | 41 | | Bar 7 | 39 | | Bar 8 | 43 | | Bar 9 | 37 | | Bar 10 | 44 | | Circle (Green) | 5 | | Circle (Red) | 5 | | Circle (Blue) | 5 | | Circle (Purple) | 5 | | Circle (White) | 5 |
Perform one of the following solutions according to the cause.

Appropriate paper is not being used.

Solution

Replace the paper with that which can be used with this printer. > "Usable Paper"

Damp paper is used.

Solution

Replace the paper with new paper in an unopened package. > "Precautions for Paper"

The drum in the toner cartridge is deteriorated.

Solution

Replace the toner cartridge with a new one. > "Toner Cartridge Replacement" 0258-0S0 ![](images/eefd6669392c5748fa0561d206de3024148337bd9aa2da79f16892adbcef0908.jpg)
natural_image Abstract color blocks with blue and gray sections, no text or symbols present
Large characters, thick lines, or diagrams with high color density were printed. Perform the following procedure using the printer driver. 1. Display the [Finishing] sheet. 2. Click [Advanced Settings]. 3. Select the appropriate mode for [Special Smoothing Mode]. Normally, select [Mode 1] for [Special Smoothing Mode]. If the following conditions occur when [Mode 1] is selected, select any setting between [Mode 2] and [Mode 6]. \- If diagrams with high color density, large characters, or thick lines are not printed smoothly ![](images/8551251c28cac1dc0ec7a383b5fa917e71c2cd7f69b97313567272c9c6d59211.jpg) → Set [Special Smoothing Mode] to [Mode 2]. \- If the following problems occur at the same time Diagrams with high color density, large characters, or thick lines are not printed smoothly. ![](images/ec5e78e087b42f0ad2216edb2d357f5bfba6b0303fcc8cdf3f76708229aefed1.jpg) Diagrams with low color density, characters, or lines are not printed smoothly. ![](images/efb5bd1421af882225093b1473c00cc8d60b04c6add841b7163c70ffdb22b6e4.jpg) Characters and lines that are filled on the background are not printed smoothly. ![](images/c46d21ed5f7920115579523a262e0f6112879c88943abe6c63d91715de847cc6.jpg) → Set [Special Smoothing Mode] to [Mode 3]. \- If diagrams with low color density, characters, or lines are not printed smoothly ![](images/2574a5dd4075799cb5bba28a8cd71a5333c6d440e3f56cb1c92f36011a888501.jpg)

Solution

→ Set [Special Smoothing Mode] to [Mode 4]. \- If strip-shaped unevenness appears on images (photographs), diagrams, gradations, or shaded patterns ![](images/f34ad032339a71a28342ea97f7df995b89e62c57568eba6869352b18dd7a8051.jpg) → Set [Special Smoothing Mode] to [Mode 5]. \- If the overall print result is not printed smoothly → Set [Special Smoothing Mode] to [Mode 6]. ![](images/ab166f385b8ec5844feef685061096b6f6be8215f0181f6e94674be3dc575651.jpg)

IMPORTANT

Precautions when setting [Special Smoothing Mode]

- When [Mode 2] or [Mode 4] is selected, color unevenness may appear on a low color density area. - When [Mode 3] is selected, color unevenness may appear on a low color density area and shaded patterns. - When [Mode 5] is selected, characters, lines, and areas around diagrams may not be printed smoothly. - When [Mode 6] is selected, color unevenness may appear. 0258-0CR ![](images/240f5f63b9ce4d38f755b2d03d165722336b250c99269b60fd413e10eeac9617.jpg)
bar | Category | Value | |---|---| | Blue Bar | 100 | | Orange Bar | 75 |
Perform one of the following solutions according to the cause.

The setting for [Paper Type] is not specified properly.

Solution

Specify [Paper Type] properly. > "Configuring the Printer Driver and Printing"

Appropriate paper is not being used.

Solution

Replace the paper with that which can be used with this printer. > "Usable Paper"

Depending on the paper type, toner fixation may deteriorate.

Solution 1

• UFR II Printer Driver

Perform the following procedure in the printer driver. 1. Display the [Quality] sheet. 2. Click [Advanced Settings]. 3. Set [Gray Compensation] to one of the following \- Images Only \- Text and Images ■ Graphics and Images All

- PCL/PS Printer Driver

See Help of the PCL/PS printer driver. You can specify the same setting from the printer's control panel. > "[Setup] Menu ([Quality] Options)"

Perform the following procedure in the printer driver.

1. Display the [Paper Source] sheet. 2. Set [Paper Type] to one of the following settings.
Currently Selected SettingSetting to be Selected
[Plain L2] [Plain L]
[Plain L] [Plain]
[Plain] [Plain H]
[Plain H] [Heavy 1]

Solution 2

[Heavy 1] [Heavy 2]
[Heavy 2] [Heavy 3]
[Envelope] [Envelope H]
[Coated 1] [Coated 2]
[Coated 2] [Coated 3]
[Coated 3] [Coated 4]
When the settings are changed, sometimes residual images appear on non-printed areas.
Solution 3Perform the following procedure.
1. Press [ ○ ] (← Online).2. Select [Special Print Mode] in [User Maintenance].3. Set [Rough Paper Adj.] to [On].

Toner does not fix to the paper in places with high density.

SolutionSet [Special Image Mode] to [Level 1].▼If the problem still persists, set it to [Level 2].➤ "[Setup] Menu ([User Maintenance] Options)"
† Normally, set [Special Image Mode] to [Off]. Do not set [Level 1] or [Level 2] unless the problems described above occur.
† If it is set to [Level 1] or [Level 2], the print density may be lower than if it was set to [Off].

A problem is occurring inside the printer.

SolutionIfappears in the display, follow the procedure in "The Message Indicator Is On" to solve the problem.

The Printed Paper Has Smudge Marks

0258-0CS ![](images/bf37d5599f19a47d49015b7e945d000abecec768c71638f6fa7035fe7602498b.jpg)
text_image Diagram showing a circular diagram with colored vertical bars and scattered dots, alongside a separate chart with bar data.
Perform the following procedure.

The fixing roller is dirty.

Solution

Clean the fixing roller. "Cleaning the Fixing Roller of the Printer"

Smudge Marks of Spattering Toner Appear around the Text or Patterns

0258-0CW ![](images/cb25619b21ccddfcba87edb7802be4347c31164b0792854185d0eea2f4c0974b.jpg)
text_image Image showing a document with colored lines and a large 'ABC' logo, likely indicating a test or publication context.
Perform the following procedure. Appropriate paper is not being used.

Solution

Replace the paper with that which can be used with this printer. "Usable Paper"

The Back of the Printed Paper Has Smudge Marks

0258-0CX ![](images/219909c75230cc204bc90116abc2555f862ca05f240c0c1f4d48eb864f42f6d5.jpg)
natural_image Abstract grayscale image with a faint pink circular shape and a curved white line (no text or symbols)
Perform the following procedure. The size of the print data was larger than that of the loaded paper. Solution Check if the size of the print data matches that of the loaded paper. 0258-0CY ![](images/097af6eb41f223a425b7f50c93f76d2fdd30bb0131c259dd153fd1dc005b637d.jpg)
text_image Diagram showing transformation of a yellow sunflower with green leaves to a blank document, with an orange arrow indicating the process.
Perform one of the following solutions according to the cause.

The setting for [Density] is not appropriate.

Solution

Adjust [Density] for each color. "> "[Setup] Menu ([Quality] Options)"

The printer is exposed to direct sunlight or strong light.

Solution

Move the printer. "Moving the Printer" 0258-0E0 ![](images/371043a538c67202fdc20686d089cd0c53cdd5b91700fd60055510012b1d8017.jpg)
natural_image Illustration of two orange tulips with green leaves (no text or symbols)
Perform one of the following solutions according to the cause.

Appropriate paper is not being used.

Solution

Replace the paper with that which can be used with this printer. > "Usable Paper"

Depending on the paper type or the operating environment (high humidity or high temperature environment), residual images may appear on non-printed areas.

Solution

Perform the following procedure in the printer driver. 1. Display the [Paper Source] sheet. 2. Set [Paper Type] to one of the following settings.
Currently Selected SettingSetting to be Selected
[Plain L] [Plain L2]
[Plain] [Plain L]
[Plain H] [Plain]
[Heavy 1] [Plain H]
[Heavy 2] [Heavy 1]
[Heavy 3] [Heavy 2]
[Envelope H] [Envelope]
[Coated 2] [Coated 1]
[Coated 3] [Coated 2]
[Coated 4] [Coated 3]
If you change the settings, the toner may not fix onto paper well, and the printing may come out faint.

The drum in the toner cartridge is deteriorated.

Solution

Replace the toner cartridge with a new one. > "Toner Cartridge Replacement" 0258-0E1 ![](images/cb65bd960db086225f762011dfdd7fb36c682d3d021d44f575bc9841ff5e3ee0.jpg)
natural_image Illustration of a document with charts and a circular abstract pattern (no text or symbols)
Perform the following procedure. You print transparencies after printing paper other than transparency continuously. Solution Wipe and remove the chipped paper with a soft cloth. 0258-0E2 ![](images/faacef3712a2955e23d796a298307709b032000924df671f3c831e45eabbf07a.jpg)
text_image Diagram showing transformation of a potted flower with purple flowers into a document, indicating image or text conversion.
Perform one of the following solutions according to the cause.

The setting for the toner density is not appropriate.

Solution

Adjust the toner density for printing to a darker setting. "> "[Setup] Menu ([Quality] Options)"

[Toner Save] is enabled.

Solution

• UFR II Printer Driver

Perform the following procedure in the printer driver. 1. Display the [Quality] sheet. 2. Click [Advanced Settings]. 3. Set [Toner Save] to [Off].

• PCL/PS Printer Driver

See Help of the PCL/PS printer driver. You can specify the same setting from the printer's control panel. > "[Setup] Menu ([Quality] Options)"

Thin Lines Are Faded or Halftone Images Are Faint

0258-0LW ![](images/a98eea38b4542f1da46d6f8078fe749b37eb09e86aa9ce1fb4ae5fa115fa51b8.jpg)
bar | Category | Value 1 | Value 2 | Value 3 | Value 4 | Value 5 | | -------- | ------- | ------- | ------- | ------- | ------- | | Bar | 100 | 80 | 60 | 40 | 20 | | Line | 100 | 80 | 60 | 40 | 20 |
Perform the following procedure.

Appropriate paper is not being used.

Solution

Replace the paper with that which can be used with this printer. > "Usable Paper" 0258-0LX ![](images/b0c1ffacadc20f6ac16f186a6e5b77a66ef43910162690ade6f06d1aaa4e2dee.jpg)
bar | Category | Series 1 | Series 2 | Series 3 | |---|---|---|---| | A | Blue Bar | Orange Bar | Green Bar | | B | Red Bar | Orange Bar | Green Bar | | C | Red Bar | Orange Bar | Green Bar |
Perform the following procedure.

Thin lines or text was printed.

Solution

Perform the following procedure in the printer driver. 1. Display the [Finishing] sheet. 2. Click [Advanced Settings]. 3. Set [Special Fine Line Processing] to [Mode 1]. ![](images/f661643bc287325e97f2368ac69a3a50ed3b1140dfa550171cdd7dad2ca5c783.jpg) If the problem still persists, set it to [Mode 2]. When [Special Fine Line Process] is set to [Mode 2], text may be collapsed when printing multiple pages on one sheet (N in 1 printing). Also, the printed result may differ from the display in gradation.

The toner cartridges have reached the end of their life.

Solution

Check the toner cartridges status and replace the toner cartridges of the colors have reached the end of their life. > "Toner Cartridge Replacement" 0258-0LY ![](images/055199bba3b49b143bd40c7910e315690d970296fa9d8e11f0dcecc8d50fd521.jpg)
text_image Icon showing a document with text lines and a green 'AB' symbol, likely representing a document or report.
Perform one of the following solutions according to the cause.

A bold font is being used for the colored text.

Solution

Perform the following procedure in the printer driver. 1. Display the [Quality] sheet. 2. Select the [Manual Color Settings] check box. 3. Click [Color Settings]. 4. Display the [Matching] sheet. 5. Set [Matching Method] to [Perceptual [Monitor Color Matched]]. You can specify the same setting from the printer's control panel. "> "[Setup] Menu ([Quality] Options)"

Colored text appears blurred due to a color mismatch.

Solution

Perform the described solutions in "Data Is Not Printed in the Correct Color (Specified Color) Due to Color Mismatch."

Data Is Not Printed in the Correct Color (Specified Color) Due to Color Mismatch

0258-0R0 ![](images/79dd9ccb521e54c3e96db630a90f58b18aae354de2e198dd731e587bcc58a7e6.jpg)
text_image Icon showing a document with text lines and a large green letter 'AB' inside a circle, suggesting a document or report section.
Perform one of the following solutions according to the cause.

The toner cartridges are not installed properly.

Solution

Check the installation status of the toner cartridges. > "Replacing Toner Cartridges"

Any of the four color toner cartridges is almost out of toner, or the drum in any of the toner cartridges has deteriorated.

Solution 1

Check the installation status of the toner cartridges. > "Replacing Toner Cartridges"

Solution 2

Correct the color mismatch. > "Adjusting the Color or Color Mismatch (Calibration)"

Solution 3

Check the status of the toner cartridges. Replace the toner cartridge that is almost empty with a new one. "Remote UI" > "Toner Cartridge Replacement"

Appropriate paper is not being used.

Solution

Replace the paper with that which can be used with this printer. "Usable Paper"

Data was sent before completing calibration or when the printer was turned ON.

Solution

Make sure that calibration is completed before sending data to the printer. You can specify whether or not to perform calibration when turning the printer ON. > "Adjusting the Color or Color Mismatch (Calibration)"

Laser printers are manufactured with technology of high precision. A color mismatch may be slightly conspicuous depending on the print image. Please note that this is due to the structure of laser printers and is not a printer malfunction.

Thin Lines or Fill Patterns Are Not Printed with the Specified Colors or Do Not Appear At All

0258-0R1 ![](images/be6b10f319a92c4dfa53d3b250225290b0dccf6ade822f8c42a74f108a1016cd.jpg)
text_image Diagram showing a document transforming into a colorful flower graphic, illustrating the process of transformation or simplification.
Perform one of the following solutions according to the cause.

Some of the colors cannot be reproduced because of the combination of colors or patterns.

Solution 1Adjust the colors in the application and print again.See the instruction manual supplied with the application.
Solution 2Change the patterns in the application and print again. See the instruction manual supplied with the application.

The colors may appear different depending on the halftone pattern.

Solution 1Readjust to a darker color and print again.See the instruction manual supplied with the application.
Solution 2Reload paper to change the feeding direction, then print again.
0258-0R2 ![](images/d398a2c1e038bfd3731d0834310009912c78c6a6e69fca11da418aa95f758123.jpg)
natural_image Two identical photos showing a yellow tulip with green leaves, separated by an orange arrow (no text or symbols)
Perform the following procedure. The shaded pattern of the print data and the dither pattern of the printer are interfering with one another.
Solution 1Print again without specifying a shaded pattern in the application. See the instruction manual supplied with the application.
Solution 2Perform the following procedure in the printer driver.1. Display the [Quality] sheet.2. Click [Advanced Settings].3. Set [Halftones] to [Gradation].You can specify the same setting from the printer's control panel."[Setup] Menu ([Quality] Options)"
Solution 3Perform the following procedure in the printer driver.1. Display the [Quality] sheet.2. Click [Advanced Settings].3. Set [Halftones] to [Error Diffusion].You can specify the same setting from the printer's control panel."[Setup] Menu ([Quality] Options)"

Photographs and so on Are Printed in Different Colors from Those Displayed on the Monitor

0258-0R3 ![](images/d64cbe2f98c1e7cb6576834965459caba2b6aadb50f813ef5330d64c96bece79.jpg)
text_image Diagram illustrating the transformation of a bar chart to a pie chart, showing distribution and conversion process.
Perform the following procedure. The methods for adjusting the color on the screen (RGB) and in the printer (YMC) are different. Therefore, the color on the screen may not be printed out exactly as it appears.
Solution 1Perform the following procedure in the printer driver.1. Display the [Quality] sheet.2. Select the [Manual Color Settings] check box.3. Click [Color Settings].4. Display the [Matching] sheet.5. Set [Matching Method] to [Perceptual [Monitor Color Matched]].You can specify the same setting from the printer's control panel."[Setup] Menu ([Quality] Options)"
Solution 2Perform the following procedure in the printer driver.1. Display the [Quality] sheet.2. Select the [Manual Color Settings] check box.3. Click [Color Settings].4. Display the [Matching] sheet.5. Select [Gamma Adjustment] in [Matching Mode].6. Change the gamma value for [Gamma].† The larger the value is, the darker in color the data is printed.You can specify the same setting from the printer's control panel."[Setup] Menu ([Quality] Options)"

Fill Patterns and Borders Are Not Printed in the Correct Color (Specified Color) Even When the Same Color Is Specified for Them

0258-0R4 ![](images/e0bb713743ee2672f0e60c533466431b372cb153ed7499c4dd180ec8739f71b0.jpg)
flowchart
graph LR
    A["Blue Header"] --> B["Orange Arrow"]
    C["Blue Header"] --> D["Green Header"]
Perform the following procedure. A special process may be applied depending on the line width of the border so that thin lines are printed clearly.
Solution 1Perform the following procedure in the printer driver.1. Display the [Quality] sheet.2. Select the [Manual Color Settings] check box.3. Click [Color Settings].4. Display the [Matching] sheet.5. Set [Matching Method] for [Text] and [Graphics] to the same settings.You can specify the same setting from the printer's control panel."[Setup] Menu ([Quality] Options)"
Solution 2Perform the following procedure in the printer driver.1. Display the [Quality] sheet.2. Select the [Manual Color Settings] check box.3. Click [Color Settings].4. Display the [Matching] sheet.5. Select [Gamma Adjustment] in [Matching Mode].6. Change the gamma value for [Gamma].† The larger the value is, the darker in color the data is printed.You can specify the same setting from the printer's control panel."[Setup] Menu ([Quality] Options)"

Square Areas That Cannot Be Seen on the Display Appear around Lines or Text and Are Printed in a Different Color from the Other Areas

0258-0R5 ![](images/4c54da7896e79698eeedb0c2cbcd5ffcc9fbecc499018164a490574853d812fd.jpg)
text_image ABC
Perform the following procedure. A process that is different from the specified halftone process or color process may be applied depending on the operating system or application.
Solution 1Perform the following procedure in the printer driver.▪ UFR II Printer Driver1. Display the [Quality] sheet.2. Click [Advanced Settings].3. Set [Gray Compensation] to [All] or [Disabled].▪ PCL Printer DriverSee Help of the PCL printer driver.You can specify the same setting from the printer's control panel.➤ "[Setup] Menu ([Quality] Options)"
Solution 2Perform the following procedure in the printer driver.▪ UFR II Printer Driver1. Display the [Quality] sheet.2. Click [Advanced Settings].3. Set [Halftones] to [Resolution] or [Gradation].▪ PCL Printer DriverSee Help of the PCL printer driver.You can specify the same setting from the printer's control panel.➤ "[Setup] Menu ([Quality] Options)"
Solution 3Perform the following procedure in the printer driver.▪ UFR II Printer Driver1. Display the [Quality] sheet.2. Select the [Manual Color Settings] check box.3. Click [Color Settings].4. Display the [Matching] sheet.5. Set [Matching Method] for [Text], [Graphics], and [Images] to the same settings.▪ PCL Printer DriverSee Help of the PCL printer driver.You can specify the same setting from the printer's control panel.➤ "[Setup] Menu ([Quality] Options)"
0258-0R6 ![](images/d9ed845cae4b952f9524dbb1505dff155804586fe17c70f73a9500f5f96043b0.jpg)
natural_image Abstract geometric illustration with a green triangle, purple circle, and orange rectangle (no text or symbols)
Perform the following procedure.

Because the superimposed areas are misaligned due to enlarged or reduced printing, or any complicated superimpose process is specified in the application, the following problems occur.

- Streaks appear. - Diagrams are printed with their colors partially different from the data. - Diagrams that are not filled in with any color do not appear through another data and cannot be printed in the correct color.

Solution

• UFR II Printer Driver

Perform the following procedure in the printer driver. 1. Display the [Quality] sheet. 2. Click [Advanced Settings]. 3. Set [Mode Details] to [High Quality].

• PCL 6 Printer Driver

See Help of the PCL 6 printer driver. 0258-0E3 ![](images/cfafb645a0fe14d857d8f9f5343b3ef9c5d0f5aba025a9ed2d009f81970a563b.jpg)
natural_image Illustration of a green Christmas tree with red arrows pointing to its height, enclosed in a yellow border (no text or symbols)
Perform one of the following solutions according to the cause.

[Gutter] is specified.

SolutionPerform the following procedure in the printer driver.1. Display the [Finishing] sheet.2. Click [Gutter].3. Set [Gutter] to "0."You can specify the same setting from the printer's control panel.➤ "[Setup] Menu ([Layout] Options)"

[Offset Y] and [Offset X] are specified.

SolutionSet [Offset Y] and [Offset X] to "0." > "Adjusting the Printing Position for All the Jobs"

"Top Margin" and "Paper Position" in the application are not specified properly.

SolutionSpecify the settings for "Top Margin" and "Paper Position" in the application properly. See the instruction manual supplied with the application.

The printing position is adjusted in [Adj. Start Position].

SolutionAdjust the printing position to an appropriate value in [Adj. Start Position]. ➤ "Adjusting the Printing Position for Each Paper Source"
0258-0S5 ![](images/2ba57740a9a426dac007f13b8d3ec7a77d61617c553e67d668da9351a51bbfd9.jpg)
bar | Category | Value | |---|---| | Bar 1 | 30 | | Bar 2 | 45 | | Bar 3 | 25 | | Bar 4 | 50 | | Bar 5 | 35 |
Implement the following solutions according to the causes.

Printed on curled paper.

Solution Flatten curls and print again.

The positions of the paper guides does not fit to paper.

Solution Align the paper guides with paper. If the paper guides are too loose or too tight, paper is not fed properly. ![](images/32957d01957a7571c6eb8c9ff82652bae8907b6eaa2f7a5b9d31fca4d5d19f2d.jpg)

Printing from the multi-purpose tray

Solution Solution Load paper in the paper drawer. > "Loading Envelopes and Custom Paper Sizes" 0258-0E4 ![](images/f1512d9312647995704f010e3eb7ac0679798379588363d72da69e253f9d2912.jpg)
natural_image Illustration of a red flower with green stem and leaves on a light yellow background (no text or symbols)
Perform one of the following solutions according to the cause. The setting for the scaling factor is not appropriate.
Solution 1Perform the following procedure in the printer driver.
1. Display the [Page Setup] sheet.2. Clear the [Manual Scaling] check box.
If the [Manual Scaling] check box is cleared, the scale factor will be set according to [Page Size] and [Output Size] automatically.
Solution 2Perform the following procedure in the printer driver.
Display the [Page Setup] sheet.Select the [Manual Scaling] check box, then specify an appropriate scale factor according to the paper size to be used.
Paper is not loaded properly in the paper drawer or multi-purpose tray.
SolutionLoad the paper properly.
> "Loading Paper in the Drawer"
> "Loading Paper in the Multi-purpose Tray"
A document with no margins was printed.
Solution 1Data is printed with a margin of 5 mm (10 mm for envelopes). Provide a margin around the data.➤ "Printable Area"
Solution 2Perform the following procedure in the printer driver.1. Display the [Finishing] sheet.2. Click [Advanced Settings].3. Set [Expand Print Region and Print] to [On].↑ Depending on the print data to be printed, the edge of paper may be missing partly during printing or may blot during color printing.
![](images/06ed941a60d00d3723c465f56d6d1b7da11a8ad7438a59d84526a9d01902473a.jpg)
bar | Category | Value | |---|---| | Bar Chart | 100 | | Line Chart | 250 |
0258-0E5 Perform the following procedure. The setting for the scaling factor is not appropriate.
Solution 1Perform the following procedure in the printer driver.1. Display the [Page Setup] sheet.2. Clear the [Manual Scaling] check box.† If the [Manual Scaling] check box is cleared, the scale factor will be set according to [Page Size] and [Output Size] automatically.
Solution 2Perform the following procedure in the printer driver.1. Display the [Page Setup] sheet.2. Select the [Manual Scaling] check box, then specify an appropriate scale factor according to the paper size to be used.
0258-0E6 ![](images/6d04b218226c44af1339aef67ef55fca71a942d255e91a90693eaf3035f13cac.jpg)
text_image 1 2 3
Perform one of the following solutions according to the cause. "Line Spacing" or "Lines/Page" in the application is not specified properly.
SolutionSpecify the settings for "Line Spacing" or "Lines/Page" in the application so that the data fits in one page, and then print again.See the instruction manual supplied with the application.
When [Auto Mode Selection] is set to [Auto Selection], the number of seconds specified in [Timeout Time] is too short.
SolutionSet [Auto Mode Selection] to a setting other than [Auto Selection], or increase the number of seconds specified in [Timeout Time] sufficiently.➢ "[Setup] Menu ([Print Mode] Options)"➢ "[Setup] Menu ([Interface] Options)"
0258-0R9 ![](images/031b34ce6501d90620abd78b5ece1a1115bf67a8fc65d7ab344661d2a47a2a04.jpg)
natural_image Simple illustration of a red flower with green stem and leaves on a yellow background (no text or symbols)
Perform one of the following solutions according to the cause. When the following settings in the [Select Feeder] menu are set to [Mixed Sizes], custom size paper whose long edges are 215.9 mm or less is loaded in landscape orientation and printed (only when the UFR II printer driver is used). • Size of the paper in the multi-purpose tray - Drawer N (N = 1, 2) size Solution Load the paper in portrait orientation, then print again. When the UFR II printer driver was not used, custom size paper was loaded in portrait orientation to be printed. Solution Load the paper in landscape orientation, then print again. Paper is not loaded properly in the paper drawer or multi-purpose tray.

Solution

Load the paper properly. > "Loading Paper in the Drawer" > "Loading Paper in the Multi-purpose Tray" The printing position is adjusted in [Adj. Start Position].

Solution

The printing position is adjusted in [Adj. Start Position]. > "Adjusting the Printing Position for Each Paper Source" 0258-0E7 ![](images/a3f3a33df3328383a3c3e3a483899fdae8e4a24f093e7ab69373e000248b3735.jpg)
text_image Diagram showing a potted plant with purple flowers next to a green header, followed by an orange arrow pointing to a blank document.
Perform one of the following solutions according to the cause.

The toner cartridge was installed with the sealing tape still attached.

Solution

Take the toner cartridge out of the printer, pull out the sealing tape, and reinstall the toner cartridge. > "Toner Cartridge Replacement"

Multiple sheets of paper are fed at a time.

Solution

Fan the paper thoroughly, and then align the edges of the stack properly on a hard, flat surface. ![](images/34a4903ae124f8dd53a2ad55cf163ac8119cf8b676c3b18ed79ecdc0bc402939.jpg)
text_image Fan thoroughly. Align the edges.

The size of the paper loaded in a paper source is different from the following settings.

- Setting for [Output Size] in the [Page Setup] sheet in the printer driver • [MP Tray Paper Size], [Drawer 1 Size], or [Drawer 2 Size] in the [Select Feeder] menu

Solution

When the message appears in the display, perform the described solutions in "A Message Appears in the Control Panel." 0258-0E8 ![](images/ea04e45261a42fb6173646c9b9916272083867fad325b26670dfabb474c25742.jpg)
text_image Diagram showing a potted plant with purple flowers next to a document with text lines, alongside an orange arrow pointing to a green rectangle.
Perform one of the following solutions according to the cause.

The drum in any of the toner cartridges has deteriorated or is damaged.

Solution

Replace the toner cartridge with a new one. > "Toner Cartridge Replacement"

A problem is occurring inside the printer.

Solution

If appears in the display, follow the procedure in "The Service Call Appears in the Display ("n" Represents an Alphanumeric Character)" in "The Message Indicator Is On" to solve the problem. 0258-0E9 Perform the following procedure. The command that notifies of the end of the data is not sent from the computer. (The Job indicator is on.)

Solution

Press [ ] (• Online) to place the printer offline, and then select [Form Feed] in the Reset menu. > "Outputting Data (Forced Output)" If you print using an application that does not have a printing function, [Form Feed] is performed because the last page in which data is less than one page remains in the memory. 0258-0EA ![](images/1ea17427351898d882104fe104fb9da723bec51f8e24f1f1f179276b16b0a4a2.jpg)
text_image æi f® ã?é éf%o àã?
Perform one of the following solutions according to the cause. The data is printed from Windows without the supplied printer driver installed for Windows.

Solution

Install the supplied printer driver for Windows, then print again. For details on the procedure for installing the printer driver, see "Printer Driver Installation Guide." The printer setting in the DOS application is not appropriate.

Solution

Specify the printer setting in the DOS application to the one that is compatible with this printer.

The Printout Is Different from What Is Displayed on Screen (Windows 2000, XP, and Server 2003)

0258-0EC Perform the following procedure. This problem may occur in some applications depending on the processing type of the print data.

Solution

If you are using the PCL/UFR II printer driver, performing the following procedure may be able to solve the problem. 1. Display the [Finishing] sheet. 2. Click [Advanced Settings]. 3. Change the [EMF Spooling] setting. 0258-0EE Perform the following procedure. The envelope is inappropriate.
Solution 1Replace the envelope with that which can be used with this printer.➤ "Usable Paper"
Solution 2Set [Special Env. Mode] to [On].➤ "[Setup] Menu ([User Maintenance] Options)"† Normally, use the printer with [Special Env. Mode] set to [Off]. Change the settings only if the described problems occur.
0258-0EF ![](images/2cb9ee82fe1887b33c0f77ad72765cc0cc95cd51810034e479ed78c5b3dd046d.jpg)
bar | Category | Series 1 | Series 2 | Series 3 | |---|---|---|---| | Row 1 | 0.5 | 0.8 | 0.6 | | Row 2 | 0.7 | 1.0 | 0.9 | | Row 3 | 0.9 | 1.2 | 1.1 | | Row 4 | 1.1 | 1.4 | 1.3 | | Row 5 | 1.3 | 1.6 | 1.5 | | Row 6 | 1.5 | 1.8 | 1.7 | | Row 7 | 1.7 | 2.0 | 1.9 | | Row 8 | 1.9 | 2.2 | 2.1 | The values for the first two series are estimated based on the visual scale of the bars.
Perform the following procedure.

You are using paper which tends to be fed at a time.

Solution

Fan the paper thoroughly, and then align the edges of the stack properly on a hard, flat surface. Fan thoroughly. Align the edges. ![](images/72088fd33da3094d639c71e54d4a7e68d01367cb4ce23686728d986ef47a4009.jpg)
natural_image Illustration showing two hands holding a folded document or sheet, with arrows indicating fold changes (no text or symbols present)
0258-0EJ The Printer Pauses during Printing, and then Printing Repeatedly Starts and Stops The Keys on the Control Panel Do Not Function The SD Card Cannot Be Used : Jobs Cannot Be Saved > SSL Cannot Be Enabled When SSL Is Enabled, the Remote UI Does Not Start, or the IPP Printing Cannot Be Performed The Printer Cannot Be Accessed from the Remote UI or Network Related Utility Software Restricting the Users Is Not Possible

The Printer Pauses during Printing, and then Printing Repeatedly Starts and Stops

0258-0RH Perform the following procedure. If the printer is used continuously for an extended period of time, the internal temperature of the printer increases, activating a safety mechanism and pausing printing temporarily.

Solution

Please wait a moment. When the inside of the printer cools down, printing resumes. If the internal temperature of the printer has not decreased sufficiently, the safety mechanism is reactivated and printing is paused temporarily. When the inside temperature cools down sufficiently, the printer resumes the normal printing speed. The time until the safety mechanism activates or until the printer resumes the normal printing speed varies depending on the printer usage conditions. 0258-0RJ Perform one of the following solutions according to the cause. Here is data remaining in the memory. (The Job indicator is on.)

Solution

Press [ ] (• Online) to place the printer offline, and then select [Form Feed] in the Reset menu. > "Outputting Data (Forced Output)" The keylock function is enabled. (The "Pi" alarm sounds when the key is pressed and appears in the display.)

Solution

Disable the keylock function from the Remote UI. Contact the printer administrator. 0258-0RK Perform one of the following solutions according to the cause. [SD Card] in the Control Menu options in the Setup menu is set to [Off].
SolutionSet [SD Card] to [On], and then perform a hard reset.➢"[Setup] Menu ([Control Menu] Options)"➢"Canceling All the Jobs (Hard Reset)"
An error has occurred in the SD card.
SolutionPerform formatting in [SD Card Maintenance] in the User Maintenance options in the Setup menu. If the same error still occurs, replace the SD card.➢ "[Setup] Menu ([User Maintenance] Options)"➢ "Installing SD Card (LBP7680Cx Only)"
The SD card is not installed properly.
SolutionTurn the printer OFF, then check if the SD card is installed properly.> "Installing SD Card (LBP7680Cx Only)"
The data cannot be saved on the SD card because there is not sufficient free space in the SD card.
SolutionDelete any unnecessary jobs from among the jobs saved on the SD card.➢ "Saving a Document in the SD Card in the Printer (Stored Job Print) (LBP7680Cx Only)"➢ "Remote UI"
The SD card is write-protected.
SolutionCheck that the SD card is not write-protected. If the card is write-protected, release the protection, and then insert the card.
0258-0RL Perform one of the following solutions according to the cause. The data cannot be saved on the SD card because there is not sufficient free space in the SD card.
Solution 1The data cannot be saved on the SD card because there is not sufficient free space in the SD card. The printer is ready to print by pressing [ ○ ] (← Online), ignoring the print data. The data of 3 GB or larger in total cannot be saved.
Solution 2Delete any unnecessary jobs from among the jobs saved on the SD card.➤ "Saving a Document in the SD Card in the Printer (Stored Job Print) (LBP7680Cx Only)"➤ "Remote UI"
The number of the jobs exceeded the number of jobs you can save in the SD card.
Solution 1The printer is ready to print by pressing [ ○ ] (○ Online), ignoring the print data. Up to 100 jobs can be saved all together.
Solution 2Delete any unnecessary jobs from among the jobs saved on the SD card.➤ "Saving a Document in the SD Card in the Printer (Stored Job Print) (LBP7680Cx Only)"➤ "Remote UI"
0258-0EK Perform the following procedure.

The key pair and its certificate to be used are not registered.

Solution

Register the key pair and server certificate that are used. > "Setting Keys and Certificates" In order to use the SSL encryption communication function, it is necessary to create keys and certificates and to register the key pair and server certificate that are used.

When SSL Is Enabled, the Remote UI Does Not Start, or the IPP Printing Cannot Be Performed

0258-0EL Perform the following procedure.

Solution

Perform the following procedure. 1. Select [Network] → [Remote UI Settings] → [SSL] using the control panel, and then make sure that [SSL] is set to [Off]. 2. Restart the printer. 3. Regenerate the key and certificate and specify the settings for SSL from the Remote UI. > "Setting Keys and Certificates" 4. Restart the printer. 0258-0SX Perform the following procedure.

The IP Address Filter or MAC Address Filter Is Set to On.

SolutionSelect [Network] → [Address Filter] using the control panel, and then make sure that [Address Filter] is set to [Off].➤ "[Setup] Menu ([Network] Options)"† If you have once set it to [Off], set it back to [On] after confirmation of the setting.† Use the control panel to make a setting for the address filter function.
0258-0SY Perform the following procedure.

The IP Address Filter or MAC Address Filter Is Not Set to On.

Solution

Select [Network] → [Address Filter] using the control panel, and then make sure that [Address Filter] is set to [On]. "> "[Setup] Menu ([Network] Options)" Use the control panel to make a setting for the address filter function.

Appendix

0258-0ES > Basic Operations/Various Information for Windows For Windows 8/Server 2012 Users The Lists Common to All the Settings in the Print Mode The Lists Common to Certain Settings in the Print Mode Font Samples 0258-0EU > Displaying the Top Page of the User Manual CD-ROM > Checking the IP Address Using the PING Command > Checking the Processor Version of Windows Vista, 7, or Server 2008 > Printing a Test Page in Windows > Checking the Bi-directional Communication > Displaying the Printer Folder > Checking Printers in the Print Server > Checking the Port Changing the Printing Protocol Setting for [Device Type] when Setting a Port

Displaying the Top Page of the User Manual CD-ROM

If the top page of the User Manual CD-ROM does not appear even after inserting the CD-ROM, perform the following procedure. The CD-ROM drive name is indicated as "D:" in this manual. The CD-ROM drive name may differ depending on the computer you are using. Windows 2000 Windows XP Windows Server 2003 1. From the [Start] menu, select [Run]. 2. Enter "D:\Maninst.exe." ![](images/8b79d26b2dcb1f8e42ecc10e3edfeb2f45ab777d611268f5d2c7fb513399ca91.jpg)
text_image Run Type the name of a program, folder, document, or Internet resource, and Windows will open it for you. Open D:\Manestras OK Cancel Browse...
3. Click [OK]. Windows Vista Windows 7 Windows Server 2008 1. Enter "D:\Maninst.exe" in [Search programs and files] or [Start Search] under the [Start] menu. ![](images/842dfed72f03a86e5499ca548145c131a03d2dc71b0c212d83a17cb0a9930567.jpg) 2. Press the [ENTER] key on the keyboard.

Checking the IP Address Using the PING Command

1

Run Command Prompt.

From the [Start] menu, select [All Programs] or [Programs] → [Accessories] → [Command Prompt].

2

Enter "ping ", then press the [ENTER] key on your keyboard. - Input example: "ping 192.168.0.215" Correctly enter the IP address which is set for the printer. If the wrong IP address is entered, you cannot obtain an appropriate check result.

3

Check the displayed result.

- When "Packets: Sent = 4, Received = 4, Lost = 0 (0% loss)," is displayed The IP address is set properly. - When "Packets: Sent = 4, Received = 0, Lost = 4 (100% loss)," is displayed Ask your network administrator about the problem.

4

Enter "exit", and then press [ENTER] on the keyboard to exit Command Prompt.

![](images/8ffded8190ee7c1f8e0285d79b52df46b583434c004b0ccf20c4e9ef713f9c55.jpg)

NOTE

When using DHCP, BOOTP, or RARP

Consult your network administrator and perform either of the following settings. - Set the DNS Dynamic Update function. > "Configuring the Protocol Settings" - Configure DHCP or other settings so that the same IP address is always assigned to the printer when the printer is started. > "Configuring the Protocol Settings"

Checking and configuring the subnet

Enter "ipconfig" as a command in Command Prompt. The network setting information of the computer appears. Confirm that the computer and printer are on the same subnet.

Example:

Setting in a computer \- Subnet mask: "255.255.255.0" \- IP Address: "192.168.0.10" The IP address of the printer needs to be "192.168.0.xxx". (xxx indicates an arbitrary number.)

Checking the Processor Version of Windows Vista, 7, or Server 2008

If you are not sure whether you are using 32-bit Windows Vista/7/Server 2008 or 64-bit Windows Vista/7/Server 2008, you can check that using the following procedure.

1

From the [Start] menu, select [Control Panel].

2

Display [System].

Windows Vista Windows 7 Windows Server 2008 R2 Click [System and Security] or [System and Maintenance] → [System]. Windows Server 2008 Double-click [System].

3

Check the processor version.

For a 32-bit operating system

[32-bit Operating System] is displayed.

For a 64-bit operating system

[64-bit Operating System] is displayed. ![](images/b8e869ddd3eefff25e948079e87415da0b12efd4459a30c3b3d05205386e3422.jpg)
text_image Control Panel Home Device Manager Remote settings System protection Advanced system settings View basic information about your computer Windows addition Windows 7 Ultimate Copyright © 2008 Microsoft Corporation. All rights reserved. System Rating: Windows Experience Index Processor: Intel® Core(TMSE Duo CPU 88430 @ 5.30GHz, 3.09 GHz) Installed memory (RAM): 2.00 GB System type: 32-bit Operating System Pen and Touch: No Pen or Touch Input is available for this Display

Printing a Test Page in Windows

You can check the operations of the printer driver by printing a test page in Windows.

1

Load A4 paper in the multi-purpose tray or paper drawer. > "Paper Loading and Output"

2

Open the printer folder. > "Displaying the Printer Folder"

3

Right-click the icon for this printer, and then select [Printer properties] or [Properties] from the pop-up menu. ![](images/74080e1fbff906aa516e17eb1bed9e33c863e744b1651e04c2c870c880e43940.jpg)
text_image Control Panel > Hardware and Sound > Devices and Forms Add a device Add a printer Set what's printing Print server properties Remove devices Devices (3) X000000000 X00000000 USB Mouse Printers and Fases (3) Fan Canon See what's printing Set as default printer Printing preferences Printer properties Create shortcut Troublesheet Remove devices Properties Canos Printer Category: Printer Status: 2 documents(s) is unique

4

(1) Display the [General] sheet. (2) Click [Print Test Page] to print a test page. ![](images/1a436fca05b3ba1b42453cbfcaba57275eafb7441ec58c476f6ef15bef3b7536.jpg)
text_image Canon Printer Properties General : (1) Fonts | Advanced | Color Management | Security | Device Settings | Profile Canon Printer Locations: Comment: Model: Canon 00000000001 UPR.B Features Color No. Double audio Yes. Staple No. Speed: 40 ppm Maximum resolution: 688 dpi Papers available Letter Preferences... Print Text Page (2) OK Cancel Apply Help

Checking the Bi-directional Communication

1

Open the printer folder.

> "Displaying the Printer Folder"

2

Right-click the icon for this printer, and then select [Printer properties] or [Properties] from the pop-up menu. ![](images/56df7d412d3523eed0fc93914c4d0371f6345ca52289205d4836c87b9392ac15.jpg)
text_image Control Panel > Hardware and Sound > Devices and Printers Add a device Add a printer See what's printing Print server properties Remove device Devices (3) X00000000X X0000000X USB Mouse Printers and Fases (3) Fan Canon See what's printing Set as default printer Printing conference Printer proposition Create shortcut Troublesheet Remove device Properties Canics Printer Category: Printer Status: Endowment(s): 14 queries

3

Check the bi-directional communication.

(1) Display the [Ports] sheet. (2) Check the [Enable bidirectional support] check box is selected. ![](images/740d3b7eb9dbd7f3ecd33a80ee002aa14d468f4b533596e914ab42064c5c069e.jpg)
text_image Canon Printer Properties General Shares Ports (1) Cable Management Security生产设备 Settings Profile Canon Printer Print to the following port(s): Documents will print to the first free checked port. Port Descripton Printer LPT3: Printer-Port COM1: Serial Port COM2: Serial Port COM3: Serial Port COM4: Serial Port FILE: Print to File SABXX: Virtual printer port for... Canon Printer Add Port... Delete Port Configure Port... Enable Directional support (2) Enable printer packing
![](images/e172c89924d2e8c67b792cc78be12f5fe15911755cfe2f696dca9ef15e138c98.jpg)

IMPORTANT

Do not clear the [Enable bidirectional support] check box. If the check box is cleared, you cannot perform printing.

Displaying the Printer Folder

Windows 2000 From the [Start] menu, select [Settings] → [Printers]. Windows XP Professional Windows Server 2003 From the [Start] menu, select [Printers and Faxes]. Windows XP Home Edition From the [Start] menu, select [Control Panel], and then click [Printers and Other Hardware] → [Printers and Faxes]. Windows Vista From the [Start] menu, select [Control Panel], and then click [Printer]. Windows 7 Windows Server 2008 R2 From the [Start] menu, select [Devices and Printers]. Windows Server 2008 From the [Start] menu, select [Control Panel], and then double-click [Printers].

1

Display [Windows Explorer]. From the [Start] menu, select [All Programs] or [Programs] → [Accessories] → [Windows Explorer].

2

Check printers in the print server. (1) Select the print server from [Network] or [My Network Places]. (2) Check the icon for this printer is displayed. ![](images/44e581d27740991234cd35d5bccd34ba8c0353c64bc5cd99e703cd04ff8d578b.jpg)
text_image Network PRINTSERVER Organics Network and Sharing Center View remote printers Favorites Libraries Computer Network PRINTSERVER (1) Canon Printer (2) 1 item

Checking the Port

1

Open the printer folder. > "Displaying the Printer Folder"

2

Right-click the icon for this printer, and then select [Printer properties] or [Properties] from the pop-up menu. ![](images/bd410639721a9c4001eae9c2e0942a46e720851e05448bac598813eba215bccf.jpg)
text_image Control Panel > Hardware and Sound > Devices and Format Add a device Add a printer Set what's printing Print sensor properties Ferrone device Devices (3) X0000000000 X000000000 USB Mouse Printers and Fases (3) Fan Canon See what's printing Set as default printer Printers conference? Printer properties Create shortcut Troublesheet Remove device Properties Canon Printer Category: Printer Status: 5 documents(1) or qwen

3

Check a port.

(1) Display the [Ports] sheet. (2) Confirm the port is selected properly. ![](images/2839c46b28b8e9604c47d59451e22f536924efef2c09e76decea2be8be0f56ef.jpg)
text_image Canon Printer Properties General Shares Forts (1) Color Management Security Device Settings Profile Canon Printer Print to the following port(s). Documents will print to the first free checked port. Port Description Printar COM2: Serial Port COM3: Serial Port COM4: Serial Port COM5: Serial Port FILE: Print to File USB2: Select to other ports SRS... Standard TCP/IP Port Case Printer Add Port... Delete Port Configure Port... Enable Directional support Enable printer pending

Changing the Printing Protocol

Change the printing protocol to LPR and specify the setting for the LPR byte count using the following procedure.

1

Open the printer folder.

> "Displaying the Printer Folder"

2

Right-click the icon for this printer, and then select [Printer properties] or [Properties] from the pop-up menu. ![](images/9925a80c8f9b74298a1b1cb272d42d40ce2556e2c480cef1bfb9672b9fed7b01.jpg)
text_image Control Panel > Hardware and Sound > Devices and Posters Add a device Add a printer Save what's printing Print server properties Remove device Devices (3) X0000000000 X000000000 USB Maxes Printers and Servers (3) Fok Canon See what's printing Set as default printer Printing conference Printer properties Create shortcut Troubleshoot Remove devices Properties Canon Printer Status: Extinction(s) in queue Category: Printer

3

Display the [Ports] sheet.

4

Click [Configure Port].

![](images/0a84111224af777cd353d91ea66d9eadf4ea33725d780cf844366d2a620a1fea.jpg)
text_image Canon Printer Properties General Sharing Ports Advanced Data Management Security Device Settings Profile Canon Printer Event to the following portfolio: Documents will print to the first free checked port. Port Description Printer COMD: Serial Port COMD: Serial Port COMD: Serial Port FILE: Print to File US$001: Virtual printer port 1st... F:\202 - Standard TCP/IP Port Custom Printer Add Port... Delete Port Configure Port... Double Directional Support Cryable ports pooling OK Cancel Apply Help

5

Perform the following procedure.

(1) To change the printing protocol to LPR, select [LPR] for [Protocol]. (2) To enable the LPR byte count, select the [LPR Byte Counting Enabled] check box. ![](images/a457f6c596213549f744778dbd36c844ec731b3bd5d47031eb2dcfc6cbdd1832.jpg)
text_image Configure Standard TCP/IP Port Monitor Port Settings Port Name: IP_382.168.0.215 Printer Name or IP Address: 192.168.0.215 Protocol Base LPR Raw Settings Port Description: 93.88 LPR Settings Device Name: LPR Byte Counting Enabled SNMP Status Enabled Community Name: public SNMP Device Index: 1 OK Cancel

6

Click [OK].

Setting for [Device Type] when Setting a Port

If the printer cannot be detected when setting a port, set [Device Type] as follows. (1) Select [Standard], and then select [Canon Network Printing Device with P9100]. (2) Click [Next]. ![](images/ee67202b185fd9e39faa2100e66aedcc41fc1f565a4abab3f175f5dea56ce824.jpg)
text_image Add Standard TCP/IP Device Port Wizard Additional port information required The device could not be identified. The device is not based on the network. Be sure that 1. The device is turned on. 2. The network is connected. 3. The device is properly configured. 4. The address on the previous page is correct. If you think the address is not correct, click back to return to the previous page. Then correct the address and perform another search on the network. If you are sure the address is correct, select the device type below. Device Type Standard Canon Network Printing Device with P8106 Options Settings... < Back Next > (2) >
0258-0U3 This printer supports Windows 8/Server 2012 operating system. For operation and description on Windows 8/Server 2012, refer to Windows Vista/7 sections. This section describes notes on using this printer with Windows 8/Server 2012. Read this section carefully before using the printer.

Precautions

Use the desktop mode when performing the followings. - Installing/Uninstalling the printer driver - Setting the printer driver \* Please note that the setting specified on the desktop may not be reflected to all Windows Store applications.

For Windows 2000 Users

This printer does not support Windows 2000. For details on the latest status of the supported operating systems and service packs, see the Canon web site (http://www.canon.com/).

The Lists Common to All the Settings in the Print Mode

0258-0EW Configuration Page Network Status Print > Printing Position Adjustment Print ![](images/22e47a720c4176a5251c44baf059acea624eb6eff472507d9d59beb61519e4f7.jpg)

IMPORTANT

The following lists are samples. The contents may partially differ from the lists printed by your printer.

Configuration Page

The printer information and the settings for printing environment are printed. 1. Make sure that the printer is online. 2. Press [ ] ( Utility ) to display the [Utility Menu] menu. 3. Select [Configuration Page] using [▲] and [▼], and then press [OK]. 4. Select [Yes] using [▼] in the [Execute?] display, and then press [OK] to output the page. ![](images/235c20ee8de01153b7be23f84dbb1579c8a6c8ba3e104d68c61cfe8052ecfbc2.jpg)
text_image Canon Configuration Page 1.02/2023 CANTAL BIGG GROUP FORUM BIGG GROUP AFTER BIGG GROUP AFTER BIGG GROUP BARCLAY BIGG GROUP BARCLAY BIGG GROUP BARCLAY BIGG GROUP BARCLAY BIGG GROUP BARCLAY BIGG GROUP BARCLAY BIGG GROUP BARCLAY BIGG GROUP BARCLAY BIGG GROUP BARCLAY BIGG GROUP BARCLAY BIGG GROUP BARCLAY BIGG GROUP BARCLAY BIGG GROUP BARCLAY BIGG GROUP BARCLAY BIGG GROUP BARCLAY BIG G BARCLAY BIG G BARCLAY BIG G BARCLAY BIG G BARCLAY BIG G BARCLAY BIG G BARCLAY BIG G BARCLAY BIG G BARCLAY BIG G BARCLAY BIG G BARCLAY BIG G BARCLAY BIG G BARCLAY BIG G BARCLAY BIG G BARCLAY BIG G BARCLAY BIG G BARCLAY BIG G BARCLAVY BIG G BARCLAVY BIG G BARCLAVY BIG G BARCLAVY BIG G BARCLAVY BIG G BARCLAVY BIG G BARCLAVY BIG G BARCLAVY BIG G BARCLAVY BIG G BARCLAVY BIG G BARCLAVY BIG G BARCLAVY BIG G BARCLAVY BIG G BARCLAVY BIG G BARCLAVY BIG C BARCLAVY BIG C BARCLAVY BIG C BARCLAVY BIG C BARCLAVY BIG C BARCLAVY BIG C BARCLAVY BIG C BARCLAVY BIG C BARCLAVY BIG C BARCLAVY BIG C BARCLAVY BIG C BARCLAVY BIG C BARCLAVY BIG C BARCLAVY BIG C BARCLAVY BIG C BASF BIGG GROUP FORUM BIGG GROUP AFTER BIGG GROUP AFTER BIGG GROUP BPF BIGG GROUP BPF BIGG GROUP BPF BIGG GROUP BPF BIGG GROUP BPF BIGG GROUP BPF BIGG GROUP BPF BIGG GROUP BPF BIGG GROUP BPF BIGG GROUP BPF BIGG GROUP BPF BIGG GROUP BPF BIGG GROUP BPF BIGG GROUP BPF BIGG GROUP BPF BIGG GROUP BPF BIGG GROUP BPF BIGG GROUP

Network Status Print

Prints the version number and the settings of the print server equipped with this printer. 1. Make sure that the printer is online. 2. Press [ ] ( Utility to display the [Utility Menu] menu. 3. Select [Network Status Print] using [▲] and [▼], and then press [OK]. 4. Select [Yes] using [▼] in the [Execute?] display, and then press [OK] to output the page. ![](images/be94ca2f0c45ee95d9c9aa4824f7211edfa69e4890f8bee706104de39aee367a.jpg)
text_image Canon NETWORK STATUS PRINT Network Print Server WINING NET PRICE $1.00 NEW PRICE NEW PRICE NEW PRICE NEW PRICE NEW PRICE NEW PRICE NEW PRICE NEW PRICE NEW PRICE NEW PRICE NEW PRICE NEW PRICE NEW PRICE NEW PRICE NEW PRICE NEW PRICE NEW PRICE NEW PRICE NEW PRICE NEW PRICE NEW PRICE NEW PRICE NEW PRICE NEW PRICE NEW PRICE NEW PRICE NEW PRICE NEW PRICE NEW PRICE NEW PRICE NEW PRICE NEW PRICE NEW PRICE NEW PRICE

Printing Position Adjustment Print

Displays the current printing positions of each paper source. Adjust the printing positions referring to this print. For more details, see "Adjusting the Printing Position for Each Paper Source." 1. Press [ ] ( Feeder Selection). 2. Select [Paper Source] using [▲] and [▼], and then press [OK]. 3. Select the paper source that you want to check the printing position using [▲] and [▼], and then press [OK]. 4. Press [ ○ ] (← Online). 5. Make sure that the printer is online. If the printer is not online, press [ ] (• Online). 6. Press [ ] (v: Utility) to display [Utility Menu] menu. 7. Select [Printing Pos. Print] using [▲] and [▼], and then press [OK]. 8. Select [Yes] using [▼] in the [Execute?] display, and then press [OK] to output the page. ![](images/496b8da1c6bc530b8ebd5c1a65cd29197af3edf48e82d03329af4c9b8f827492.jpg)
natural_image Blank white image with no visible text, symbols, or markings

The Lists Common to Certain Settings in the Print Mode

0258-0EX PCL Font List > PS Configuration Page PS Font List ![](images/f14f010aeebf6c89db89a89b12d79ab4a1962deab41aa23b9c65c81a51a4512b.jpg)

IMPORTANT

The following lists are samples. The contents may partially differ from the lists printed by your printer.

PCL Font List

A list of the fonts that can be used in the PCL mode is printed. 1. Make sure that the printer is online. 2. Press [ ] ( Utility ) to display the [Utility Menu] menu. 3. Select [PCL Utility] using [▲] and [▼], and then press [OK]. 4. Select [Font List] using [▲] and [▼], and then press [OK]. 5. Select [Yes] using [▼] in the [Execute?] display, and then press [OK] to output the page. ![](images/64ca64d8fc9991550349161b252c534a0ec794816e3d90b9e32a4c46675389ab.jpg)
text_image Font List PAGE 001 POS. EXTERIOR PAGES REV. Style METHI SPECTA Page Number POS/POST Sentence Sample 2018 Dingono 1 2 3 4 5 6 7 8 9 10 11 12 13 14 15 16 17 18 19 20 21 22 23 24 25 26 27 28 29 30 31 32 33 34 35 36 37 38 39 40 41 42 43 44 45 46 47 48 49 50 51 52 53 54 55 56 57 58 59 60 61 62 63 64 65 66 67 68 69 70 71 72 73 74 75 76 77 78 79 80 81 82 83 84 85 86 87 88 89 90 91 92 93 94 95 96 97 98 99 100

PS Configuration Page

The settings of the [PS] options are printed. 1. Make sure that the printer is online. 2. Press [ ] ( Utility to display the [Utility Menu] menu. 3. Select [PS Utility] using [▲] and [▼], and then press [OK]. 4. Select [Configuration Page] using [▲] and [▼], and then press [OK]. 5. Select [Yes] using [▼] in the [Execute?] display, and then press [OK] to output the page. ![](images/d04f05efcf29b80d395825c38d0741098cad831dfe71cd31e0e4c75bf1f4d8eb.jpg)
text_image Canon PS Configuration Page PS Settings Avea Hoad PS Speed PS Quick Space Six Seconds New Period Past 90 Days R3D Press Quick Physics PROM/Bit Pack Power Free Pack Time Black Elements Bip Shares Gesamt/Changka Cigarette Collection ICC Profile Settings MSI-Box Format COM11 Dimensional Media Top Express Media Spicy Box Media Racing Network Hottens To Diffuse Box Dramble Unstable Unstable Advanced Smoothing Standard Screening Customs Box Balance 1 100 100 100 100 100 100 100 100 100 100 100 100 100 100 100 100 100 100 100 100 100 100 100 100 100 102

PS Font List

A list of the fonts that can be used in the PS mode is printed. 1. Make sure that the printer is online. 2. Press [ ] ( Utility to display the [Utility Menu] menu. 3. Select [PS Utility] using [▲] and [▼], and then press [OK]. 4. Select [Font List] using [▲] and [▼], and then press [OK]. 5. Select [Yes] using [▼] in the [Execute?] display, and then press [OK] to output the page. ![](images/792f79298ce0d4104524bda48cc53ac036b6f085d6c6cb4973dc13b28f8ff601.jpg)
text_image Font List 1923.001 PF: Fosilla Font Name: English Aldenium Aldenium Aldenium Aldenium Aldenium Aldenium Aldenium Aldenium Aldenium Aldenium Aldenium Aldenium Aldenium Aldenium Aldenium Aldenium Aldenium Aldenium Aldenium Aldenium Aldenum Aldenum Aldenum Aldenum Aldenum Aldenum Aldenum Aldenum Aldenum Aldenum Aldenum Aldenum Aldenum Aldenum Aldenum Aldenum Aldenum Aldenum Aldenum Aldenum Aldenums Aldenums Aldenums Aldenums Aldenums Aldenums Aldenums Aldenums Aldenums Aldenums Aldenums Aldenums Aldenums Aldenums Aldenums Aldenums Aldenums Aldenums Aldenums Aldenums Aldenum Aldenum Aldenum Aldenum Aldenum Aldenum Aldenum Aldenum Aldenum Aldenum Aldenum Aldenum Aldenum Aldenum Aldenum Aldenum Aldenum Aldenum Aldenum Aldenur Aldenur Aldenur Aldenur Aldenur Aldenur Aldenur Aldenur Aldenur Aldenur Aldenur Aldenur Aldenan- Aldenan- Aldenan- Aldenan- Aldenan- Aldenan- Aldenan- Aldenan- Aldenan- Aldenan- Aldenan- Aldenan- Aldenan- Aldenan- Aldenan- Aldenan- Aldenan- Aldenan- Aldenan- Aldenan- Aldenan- Aldenan- Aldenan- Aldenan- Aldenan- Aldenan-
0258-0EY The fonts lists printed from the [Utility Menu] menu are a comprehensive listing of all fonts currently available. The listing contains the names and print samples of the fonts stored on the printer. > Scalable Fonts (PCL) OCR Code Scalable Fonts (PCL) > Bitmapped Fonts (PCL) PCL Fonts for Windows Scalable Fonts (PCL)
CourierABCDEFGHIJKLMNOPQRSTUVWXYZ
CG TimesABCDEFGHIJKLMNOPQRSTUVWXYZ
CG Times BoldABCDEFGHIJKLMNOPQRSTUVWXYZ
CG Times ItalicABCDEFGHIJKLMNOPQRSTUVWXYZ
CG Times Bold ItalicABCDEFGHIJKLMNOPQRSTUVWXYZ
CG OmegaABCDEFGHIJKLMNOPQRSTUVWXYZ
CG Omega BoldABCDEFGHIJKLMNOPQRSTUVWXYZ
CG Omega ItalicABCDEFGHIJKLMNOPQRSTUVWXYZ
CG Omega Bold ItalicABCDEFGHIJKLMNOPQRSTUVWXYZ
CoronetABCDEFGHIJKLMNOPQRSTUVWXYZ
Clarendon Condensed BoldABCDEFGHIJKLMNOPQRSTUVWXYZ
Univers MediumABCDEFGHIJKLMNOPQRSTUVWXYZ
Univers BoldABCDEFGHIJKLMNOPQRSTUVWXYZ
Univers Medium ItalicABCDEFGHIJKLMNOPQRSTUVWXYZ
Univers Bold ItalicABCDEFGHIJKLMNOPQRSTUVWXYZ
Univers Condensed MediumABCDEFGHIJKLMNOPQRSTUVWXYZ
Univers Condensed BoldABCDEFGHIJKLMNOPQRSTUVWXYZ
Univers Condensed Medium ItalicABCDEFGHIJKLMNOPQRSTUVWXYZ
Univers Condensed Bold ItalicABCDEFGHIJKLMNOPQRSTUVWXYZ
Antique OliveABCDEFGHIJKLMNOPQRSTUVWXYZ
Antique Olive BoldABCDEFGHIJKLMNOPQRSTUVWXYZ
Antique Olive ItalicABCDEFGHIJKLMNOPQRSTUVWXYZ
Garamond AntiquaABCDEFGHIJKLMNOPQRSTUVWXYZ
Garamond HalbfettABCDEFGHIJKLMNOPQRSTUVWXYZ
Garamond KursivABCDEFGHIJKLMNOPQRSTUVWXYZ
Garamond Kursiv HalbfettABCDEFGHIJKLMNOPQRSTUVWXYZ
MarigoldABCDEFGHIJKLMNOPQRSTUVWXYZ
Albertus MediumABCDEFGHIJKLMNOPQRSTUVWXYZ
Albertus Extra BoldABCDEFGHIJKLMNOPQRSTUVWXYZ
RyadhABCDEFGHIJKLMNOPQRSTUVWXYZ
Ryadh BoldABCDEFGHIJKLMNOPQRSTUVWXYZ
MaikaABCDEFGHIJKLMNOPQRSTUVWXYZ
Maika BoldABCDEFGHIJKLMNOPQRSTUVWXYZ
Maika ItalicABCDEFGHIJKLMNOPQRSTUVWXYZ
DoritABCDEFGHIJKLMNOPQRSTUVWXYZ
Dorit BoldABCDEFGHIJKLMNOPQRSTUVWXYZ
NaarnitABCDEFGHIJKLMNOPQRSTUVWXYZ
Naarnit BoldABCDEFGHIJKLMNOPQRSTUVWXYZ
ArialABCDEFGHIJKLMNOPQRSTUVWXYZ
Arial BoldABCDEFGHIJKLMNOPQRSTUVWXYZ
Arial ItalicABCDEFGHIJKLMNOPQRSTUVWXYZ
Arial Bold ItalicABCDEFGHIJKLMNOPQRSTUVWXYZ
Times New RomanABCDEFGHIJKLMNOPQRSTUVWXYZ
Times New Roman BoldABCDEFGHIJKLMNOPQRSTUVWXYZ
Times New Roman ItalicABCDEFGHIJKLMNOPQRSTUVWXYZ
Times New Roman Bold ItalicABCDEFGHIJKLMNOPQRSTUVWXYZ
HelveticaABCDEFGHIJKLMNOPQRSTUVWXYZ
Helvetica BoldABCDEFGHIJKLMNOPQRSTUVWXYZ
Helvetica ObliqueABCDEFGHIJKLMNOPQRSTUVWXYZ
Helvetica Bold ObliqueABCDEFGHIJKLMNOPQRSTUVWXYZ
Helvetica NarrowABCDEFGHIJKLMNOPQRSTUVWXYZ
Helvetica Narrow BoldABCDEFGHIJKLMNOPQRSTUVWXYZ
Helvetica Narrow ObliqueABCDEFGHIJKLMNOPQRSTUVWXYZ
Helvetica Narrow Bold ObliqueABCDEFGHIJKLMNOPQRSTUVWXYZ
Palatino RomanABCDEFGHIJKLMNOPQRSTUVWXYZ
Palatino BoldABCDEFGHIJKLMNOPQRSTUVWXYZ
Palatino ItalicABCDEFGHIJKLMNOPQRSTUVWXYZ
Palatino Bold ItalicABCDEFGHIJKLMNOPQRSTUVWXYZ
ITC Avant Garde Gothic BookABCDEFGHIJKLMNOPQRSTUVWXYZ
ITC Avant Garde Gothic DemiABCDEFGHIJKLMNOPQRSTUVWXYZ
ITC Avant Garde Gothic Book ObliqueABCDEFGHIJKLMNOPQRSTUVWXYZ
ITC Avant Garde Gothic Demi ObliqueABCDEFGHIJKLMNOPQRSTUVWXYZ
ITC Bookman LightABCDEFGHIJKLMNOPQRSTUVWXYZ
ITC Bookman DemiABCDEFGHIJKLMNOPQRSTUVWXYZ
ITC Bookman Light ItalicABCDEFGHIJKLMNOPQRSTUVWXYZ
ITC Bookman Demi ItalicABCDEFGHIJKLMNOPQRSTUVWXYZ
New Century Schoolbook RomanABCDEFGHIJKLMNOPQRSTUVWXYZ
New Century Schoolbook BoldABCDEFGHIJKLMNOPQRSTUVWXYZ
New Century Schoolbook ItalicABCDEFGHIJKLMNOPQRSTUVWXYZ
New Century Schoolbook Bold ItalicABCDEFGHIJKLMNOPQRSTUVWXYZ
Times RomanABCDEFGHIJKLMNOPQRSTUVWXYZ
Times BoldABCDEFGHIJKLMNOPQRSTUVWXYZ
Times ItalicABCDEFGHIJKLMNOPQRSTUVWXYZ
Times Bold ItalicABCDEFGHIJKLMNOPQRSTUVWXYZ
ITC Zapf Chancery Medium ItalicABCDEFGHIJKLMNOPQRSTUVWXYZ
SymbolABXΔΕΦΓΗΙΘΚΛΜΝΟΠΟΡΣΤΥζΩΞΨΖ
SymbolPSABXΔΕΦΓΗΙΘΚΛΜΝΟΠΟΡΣΤΥζΩΞΨΖ
WingdingsΔΚΑΣ→ΔΡΣ⊗⊗⊗⊗⊗+○⊕⊕+†⊕⊕⊕☆C
ITC Zapf Dingbats⊗+⊗+⊗+◇★☆○★★★★☆**********
Courier BoldABCDEFGHIJKLMNOPQRSTUVWXYZ
Courier ItalicABCDEFGHIJKLMNOPQRSTUVWXYZ
Courier Bold ItalicABCDEFGHIJKLMNOPQRSTUVWXYZ
Letter GothicABCDEFGHIJKLMNOPQRSTUVWXYZ
Letter Gothic BoldABCDEFGHIJKLMNOPQRSTUVWXYZ
Letter Gothic ItalicABCDEFGHIJKLMNOPQRSTUVWXYZ
NaskhABCDEFGHIJKLMNOPQRSTUVWXYZ
Naskh BoldABCDEFGHIJKLMNOPQRSTUVWXYZ
KoufiABCDEFGHIJKLMNOPQRSTUVWXYZ
Koufi BoldABCDEFGHIJKLMNOPQRSTUVWXYZ
CourierPSABCDEFGHIJKLMNOPQRSTUVWXYZ
CourierPS BoldABCDEFGHIJKLMNOPQRSTUVWXYZ
CourierPS ObliqueABCDEFGHIJKLMNOPQRSTUVWXYZ
CourierPS Bold ObliqueABCDEFGHIJKLMNOPQRSTUVWXYZ
OCR Code Scalable Fonts (PCL)
OCR-AABCDEFGHIJKLMNOPQRSTUVWXYZ
OCR-BABCDEFGHIJKLMNOPQRSTUVWXYZ
Bitmapped Fonts (PCL)
Line Printer (10U) ABCDEFGHIJKI60RN^*
Line Printer (8U) ABCDEFGHIJKAAGEE11^***
Line Printer (0N) ABCDEFGHIJKi4EoV|S^**
Line Printer (11U) ABCDEFGHIJKI60RNNOO_i^2
Line Printer (12U) ABCDEFGHIJKI60RN^*
Line Printer (1U) ABCDEFGHIJK
Line Printer (2N) ABCDEFGHIJKA^-LoC'SS^-
Line Printer (5N) ABCDEFGHIJKi4EoV|S^**
Line Printer (6N) ABCDEFGHIJKAEGITKSLDOTZ-UN
Line Printer (9N) ABCDEFGHIJKi4EeVSSS^**
PCL Fonts for Windows ![](images/9141f9cc59f7dd9babd85e7b8c2509dae2ec36e6fcf2b9a04581daa5649ac71f.jpg)

NOTE

66 PCL fonts for Windows are included in the User Manual CD-ROM supplied with this printer.
Albertus MediumABCDEFGHIJKLMNOPQRSTUVWXYZ
Albertus Extra BoldABCDEFGHIJKLMNOPQRSTUVWXYZ
Antique OliveABCDEFGHIJKLMNOPQRSTUVWXYZ
Antique Olive ItalicABCDEFGHIJKLMNOPQRSTUVWXYZ
Antique Olive BoldABCDEFGHIJKLMNOPQRSTUVWXYZ
Clarendon CondensedABCDEFGHIJKLMNOPQRSTUVWXYZ
CoronetABCDEFGHIJKLMNOPQRSTUVWXYZ
Garamond AntiquaABCDEFGHIJKLMNOPQRSTUVWXYZ
Garamond KursivABCDEFGHIJKLMNOPQRSTUVWXYZ
Garamond HalbfettABCDEFGHIJKLMNOPQRSTUVWXYZ
Garamond Kursiv HalbfettABCDEFGHIJKLMNOPQRSTUVWXYZ
LetterGothicABCDEFGHIJKLMNOPQRSTUVWXYZ
LetterGothic-ItalicABCDEFGHIJKLMNOPQRSTUVWXYZ
LetterGothic-BoldABCDEFGHIJKLMNOPQRSTUVWXYZ
MarigoldABCDEFGHIJKLMNOPQRSTUVWXYZ
CG OmegaABCDEFGHIJKLMNOPQRSTUVWXYZ
CG Omega-ItalicABCDEFGHIJKLMNOPQRSTUVWXYZ
CG Omega-BoldABCDEFGHIJKLMNOPQRSTUVWXYZ
CG Omega-Bold ItalicABCDEFGHIJKLMNOPQRSTUVWXYZ
CG TimesABCDEFGHIJKLMNOPQRSTUVWXYZ
CG Times-BoldABCDEFGHIJKLMNOPQRSTUVWXYZ
CG Times-ItalicABCDEFGHIJKLMNOPQRSTUVWXYZ
CG Times-Bold ItalicABCDEFGHIJKLMNOPQRSTUVWXYZ
Univers MediumABCDEFGHIJKLMNOPQRSTUVWXYZ
Univers Medium ItalicABCDEFGHIJKLMNOPQRSTUVWXYZ
Univers BoldABCDEFGHIJKLMNOPQRSTUVWXYZ
Univers Bold ItalicABCDEFGHIJKLMNOPQRSTUVWXYZ
Univers Medium CondensedABCDEFGHIJKLMNOPQRSTUVWXYZ
Univers Medium Condensed ItalicABCDEFGHIJKLMNOPQRSTUVWXYZ
Univers-Condensed-BoldABCDEFGHIJKLMNOPQRSTUVWXYZ
Univers-Condensed-Bold ItalicABCDEFGHIJKLMNOPQRSTUVWXYZ
ITC Avant Garde Gothic BookABCDEFGHIJKLMNOPQRSTUVWXYZ
ITC Avant Garde Gothic DemiABCDEFGHIJKLMNOPQRSTUVWXYZ
ITC Avant Garde Gothic ObliqueABCDEFGHIJKLMNOPQRSTUVWXYZ
ITC Avant Garde Gothic Demi ObliqueABCDEFGHIJKLMNOPQRSTUVWXYZ
ITC Bookman LightABCDEFGHIJKLMNOPQRSTUVWXYZ
ITC Bookman Light ItalicABCDEFGHIJKLMNOPQRSTUVWXYZ
ITC Bookman DemiABCDEFGHIJKLMNOPQRSTUVWXYZ
ITC Bookman Demi ItalicABCDEFGHIJKLMNOPQRSTUVWXYZ
CourierABCDEFGHIJKLMNOPQRSTUVWXYZ
Courier ObliqueABCDEFGHIJKLMNOPQRSTUVWXYZ
Courier BoldABCDEFGHIJKLMNOPQRSTUVWXYZ
Courier Bold ObliqueABCDEFGHIJKLMNOPQRSTUVWXYZ
HelveticaABCDEFGHIJKLMNOPQRSTUVWXYZ
Helvetica ObliqueABCDEFGHIJKLMNOPQRSTUVWXYZ
Helvetica BoldABCDEFGHIJKLMNOPQRSTUVWXYZ
Helvetica Bold ObliqueABCDEFGHIJKLMNOPQRSTUVWXYZ
Helvetica NarrowABCDEFGHIJKLMNOPQRSTUVWXYZ
Helvetica Narrow ObliqueABCDEFGHIJKLMNOPQRSTUVWXYZ
Helvetica Narrow BoldABCDEFGHIJKLMNOPQRSTUVWXYZ
Helvetica Narrow Bold ObliqueABCDEFGHIJKLMNOPQRSTUVWXYZ
New Century Schoolbook RomanABCDEFGHIJKLMNOPQRSTUVWXYZ
New Century Schoolbook ItalicABCDEFGHIJKLMNOPQRSTUVWXYZ
New Century Schoolbook BoldABCDEFGHIJKLMNOPQRSTUVWXYZ
New Century Schoolbook Bold ItalicABCDEFGHIJKLMNOPQRSTUVWXYZ
Palatino RomanABCDEFGHIJKLMNOPQRSTUVWXYZ
Palatino ItalicABCDEFGHIJKLMNOPQRSTUVWXYZ
Palatino BoldABCDEFGHIJKLMNOPQRSTUVWXYZ
Palatino Bold ItalicABCDEFGHIJKLMNOPQRSTUVWXYZ
SymbolPSABCDEFGHIJKLMNOPQRSTUVWXYZ
Times RomanABCDEFGHIJKLMNOPQRSTUVWXYZ
Times ItalicABCDEFGHIJKLMNOPQRSTUVWXYZ
Times BoldABCDEFGHIJKLMNOPQRSTUVWXYZ
Times Bold ItalicABCDEFGHIJKLMNOPQRSTUVWXYZ
ITC Zapf Chancery Medium ItalicABCDEFGHIJKLMNOPQRSTUVWXYZ
ITC Zapf Dingbats**********
0258-0F0

CANON INC.

30-2, Shimomaruko 3-chome, Ohta-ku, Tokyo 146-8501, Japan

CANON MARKETING JAPAN INC.

16-6, Konan 2-chome, Minato-ku, Tokyo 108-8011, Japan

CANON U.S.A., INC.

One Canon Park, Melville, NY 11747, U.S.A.

CANON EUROPA N.V.

Bovenkerkerweg 59, 1185 XB Amstelveen, The Netherlands

CANON CHINA CO. LTD.

15F Jinbao Building No.89, Jinbao Street, Dongcheng District, Beijing 100005, PRC

CANON SINGAPORE PTE LTD

1 HarbourFront Avenue, #04-01 Keppel Bay Tower, Singapore 098632

CANON AUSTRALIA PTY LTD

1 Thomas Holt Drive, North Ryde, Sydney NSW 2113, Australia

CANON GLOBAL WORLDWIDE SITES

http://www.canon.com/
Table of contents Click a title to access it
Manual assistant
Powered by Anthropic
Waiting for your message
Product information

Brand : CANON

Model : imageCLASS LBP7660Cdn

Category : Printer