
WF-HD100FS - Washing machine LG - Free user manual and instructions
Find the device manual for free WF-HD100FS LG in PDF.


User questions about WF-HD100FS LG
0 question about this device. Answer the ones you know or ask your own.
Ask a new question about this device
Download the instructions for your Washing machine in PDF format for free! Find your manual WF-HD100FS - LG and take your electronic device back in hand. On this page are published all the documents necessary for the use of your device. WF-HD100FS by LG.
USER MANUAL WF-HD100FS LG
Please read this manual carefully before operating your washing machine and retain it for future reference.
T1203AFPT1/T1203AFPTO
WF-HD100FS/WF-HD110GV
WF-D110S

Droduct Features

The Turbo Drum DD washing machine does not operate with the lid open.
If the lid is opened during wash, rinse and spin cycles, the machine will stop automatically.

Please close the door gently. Closing the door in an aggressive manner can cause damage and or injury.
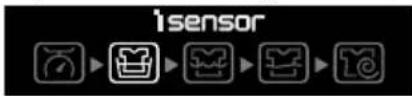
1 sensors
- The sensor automatically detects the quantity of Detergent put in by a user and the temperature and quality of the water to produce the best algorithm for washing and rinsing, to give the best washing results.
Smart Drum achieved by DD Motor Technology
● Smart Drum with Drum Washing Type is more hygienic and cleaner washer tub that protects the fabric and prevents damages.
Smart Drum™
with Direct Drive Technology
FUZZY logic control
- A built-in load sensor automatically detects and measures the laundry load and a microprocessor optimizes washing conditions such as ideal water consumption and washing time.
● Advanced technology is built into the Electronic Control System which ensures the best washing result.

flowchart
graph LR
    A["START"] --> B["SENSING\nLaundry Sensor\nWater Level Sensor"]
    B --> C["SETTING\nOptimum\nWashing\nCondition"]
    C --> D["WASHING"]
    D --> E["AUTO POWER OFF"]
New DD type washing with fabric care

text_image
Diagram illustrating a four-step process of a chemical or biological process with labeled stages and directional arrows.It rotates the tub and creates cannon water flow making the effect of the detergent faster improving the washing effect and preventing fabric damages
The half cycle rotation of the tub to the left/right helps the melting of the detergent for easy washing
The half cycle rotation of the washing rotors to the left/right removes the stains
The half cycle rotation of the tub to the left/right balances the laundry
Low Noise Direct Drive System
- The advanced Brushless DC motor rotates the Tub directly without belt and clutch, thereby reducing the noise of the washer.
● The washing machine adjusts to optimum speed according to the type of clothing in the load.
natural_image
Line drawing of a washing machine with handle and ear (no text or symbols)READ THIS MANUAL
Inside you will find many helpful hints on how to use and maintain your washer properly. Just a little preventive care on your part can save you a great deal of time and money over the life of your washer. You will find many answers to common problems in the Troubleshooting section. If you review our chart of Troubleshooting Tips first, you may not need to call for service at all.
| Introduction | 4noitan | |
| 7straP fo | ||
| 8noitan | ||
| Before Starting to Wash | Preparation Before Washing | 9 |
| Use of Water, Dispenser Drawer, Detergent and Softener | 10 | |
| Special Guide for Stain Removal | 13 | |
| Function of each Button | 14 | |
| Washing Programs | FUZZY Wash (Normal Wash) | 16 |
| WOOL Wash | 16 | |
| QUICK WASH | 16 | |
| JEANS Wash | 16 | |
| SMART CLEANING | 16 | |
| SOAK Wash | 18 | |
| FAVORITE Wash | 19 | |
| SILENT Wash | 20 | |
| Additional Function Program | ANUE | 12 |
| DRI | 22 | |
| DB | 22 | |
| Option Washing | 23 | |
| DELAY START (RESERVATION) Wash | 24 | |
| Other Useful Functions | 25 | |
| Installation | Placing and Leveling | 26 |
| Connecting Water Supply Hose | 27 | |
| Connecting Drain Hose | 30 | |
| Care and Maintenance | domgnidnuorG | 13 |
| Cleaning and Maintenance | 32 | |
| Use of Handle Locker | 34 | |
| Troubleshooting | Common washing problems | 35 |
| gnitoshlbuorT | 36 | |
| SMART DIAGNOSISTM | 37 | |
| Terms of Warranty | mTe ytnaWa | 38 |
| Specification | noitacificepS | 93 |
Safety Information
Read carefully and thoroughly through this booklet as it contains important safety information that will protect the user from unexpected dangers and prevent potential damages to the product.
| This booklet is divided into 2 parts: Warning and Caution. | |
| : This is a warning sign specifying user's applications which might be dangerous. | |
| : This is a sign specifying 'Strictly Forbidden' applications. | |
| WARNING: Failure to comply with the instructions under this sign may result in major physical injuries or death. | |
| CAUTION: Failure to comply with the instructions under this sign may result in minor physical injuries or damages to the product. | |
| WATERHEATER SAFETY | WARNING |
| ·Under certain conditions hydrogen gas may be produced in a water heater that has not been used for two weeks or more. Hydrogen gas can be explosive under these circumstances. If the HOT water has not been used for two weeks or more, prevent the possibility of damage or injury by turning on all Hot water faucets and allowing them to run for several minutes. Do this before using any electrical appliance which is connected to the HOT water system. This simple procedure will allow any built-up hydrogen gas to escape. Since the gas is flammable, do not smoke or use an open flame or appliance during this process. | |
| PROPER INSTALLATION | CAUTION |
| ·The base opening must not be obstructed by carpeting when the washing machine is installed on a carpeted floor.·Install or store where it will not be exposed to temperatures below freezing or exposed to the weather. If the product is exposed to such conditions, electric shock, fire, break down or deformation may occur.·Properly ground washer to conform with all governing codes and ordinances. Follow details in Installation Instructions.If not grounded properly, break down and leakage of electricity may occur, which may cause electric shock.·Must be positioned so that the plug is accessible.If the plug is placed between the wall and the machine, it may get damaged, possibly causing fire or electric shock.·Make sure the plug is completely pushed into the outlet.Failure to do so may cause electric shock and fire due to overheating. |
Safety Information
| YOUR LAUNDRY AREA |  WARNING WARNING |
| ·Keep the area underneath and around your appliances free of combustible materials such as lint, paper, rags, chemical, etc.Operating with such materials around the machine may trigger explosion or fire.·Close supervision is necessary if this appliance is used by or near children.Do not allow children to play on, with, or inside this or any other appliance.There is potential danger that children might drown or suffocate in the tub.Do not touch the power plug with a wet hand.It will cause electric shockDo not put your hand, foot or anything under the washing machine while the washing machine is in operation.There is a rotating mechanism under the machine, so you could be injured. | |
| WHEN USING THE WASHER | CAUTION |
| ·Use this appliance only for its intended purpose as described in this Owner's Manual.·The laundry process can reduce the flame retardancy of fabrics. To avoid such a result, carefully follow the garment manufacturer's wash and care instructions.·This appliance is not intended for use by persons (including children) with reduced physi sensory or mental capabilities, or lack of experience and knowledge, unless they have be supervision or instruction concerning use of the appliance by person responsible for their Children should be supervised to ensure that they do not play with the appliance·To minimize the possibility of electric shock, unplug this appliance from the power supply or disconnect the washer at the household distribution panel by removing the fuse or switching off the circuit breaker before attempting any maintenance or cleaning.NOTE: Pressing Circuit button to turn off does NOT disconnect the appliance from the power supply.·Make sure that drainage is working properly.If water is not drained properly, your floor may get flooded. Flooded floors may induce electricity leakage, further resulting in electric shock or fire.·If, during spinning, opening the lid does not stop the tub within about 15 seconds, immediately discontinue operating the machine.Call for repair. A machine that spins with its door open may cause injuries.Never reach into washer while it is moving.Wait until the machine has completely stopped before opening the lid.Even slow rotation can cause injury.Never attempt to operate this appliance if it is damaged, malfunctioning, partially disassembled, or has missing or broken parts, including a damaged cord or plug.Operating with a damaged plug may cause electric shock.Do not use water hotter than 50°C.Use of excessively hot water may cause damage to fabrics or cause leakage of water. |
Safety Information
| WHEN USING THE WASHER | WARNING |
| Do not use a plug socket and wiring equipment for more than their rated capacity.Exceeding the limit may lead to electric shock, fire , break down, and/or deformation of parts.Do not mix chlorine bleach with ammonia or acids such as vinegar and/or rust remover.Mixing different chemicals can produce toxic gases which may cause death.Do not wash or dry articles that have been cleaned in, washed in, soaked in, or spotted with combustible or explosive substances (such as wax, oil, paint, gasoline, dry-cleaning solvents, kerosene, etc). Do not add these substances to the wash water.Do not use or place these substances around your washer or dryer during operation.It may ignite or explode. | |
| WHEN NOT IN USE | CAUTION |
| Turn off water faucets to relieve pressure on hoses and valves and to minimize leakage if a break or rupture should occur. Check the condition of the fill hoses; they may need replacement after 5 years.When the air temperature is high and the water temperature is low, condensation may occur and thus wet the floor.Wipe off dirt or dust on the contacts of the power plug.Using unclean power plug may cause fire.Before discarding a washer, or removing it from service, remove the washer lid to prevent children from hiding inside.Children may be trapped and suffocated if the lid is left intact.Do not attempt to repair or replace any part of this appliance unless specifically recommended in this Owner's Manual, or in published user-repair instructions that you understand and have the skills to carry out.Operating the machine with improperly replaced parts may be a cause for fire or electric shock.Do not tamper with controls.It may lead to electric shock, fire , break down, deformation.Do not yank the power cord in an attempt to disconnect the power plug.Securely hold the power plug to unplug the machine.Failure to observe these instructions may cause electric shock or fire due to short-circuit.When you are cleaning the washing machine, do not apply water directly to any part of the washing machine.It will cause short circuit and electric shock. |
dentification of Parts
Body
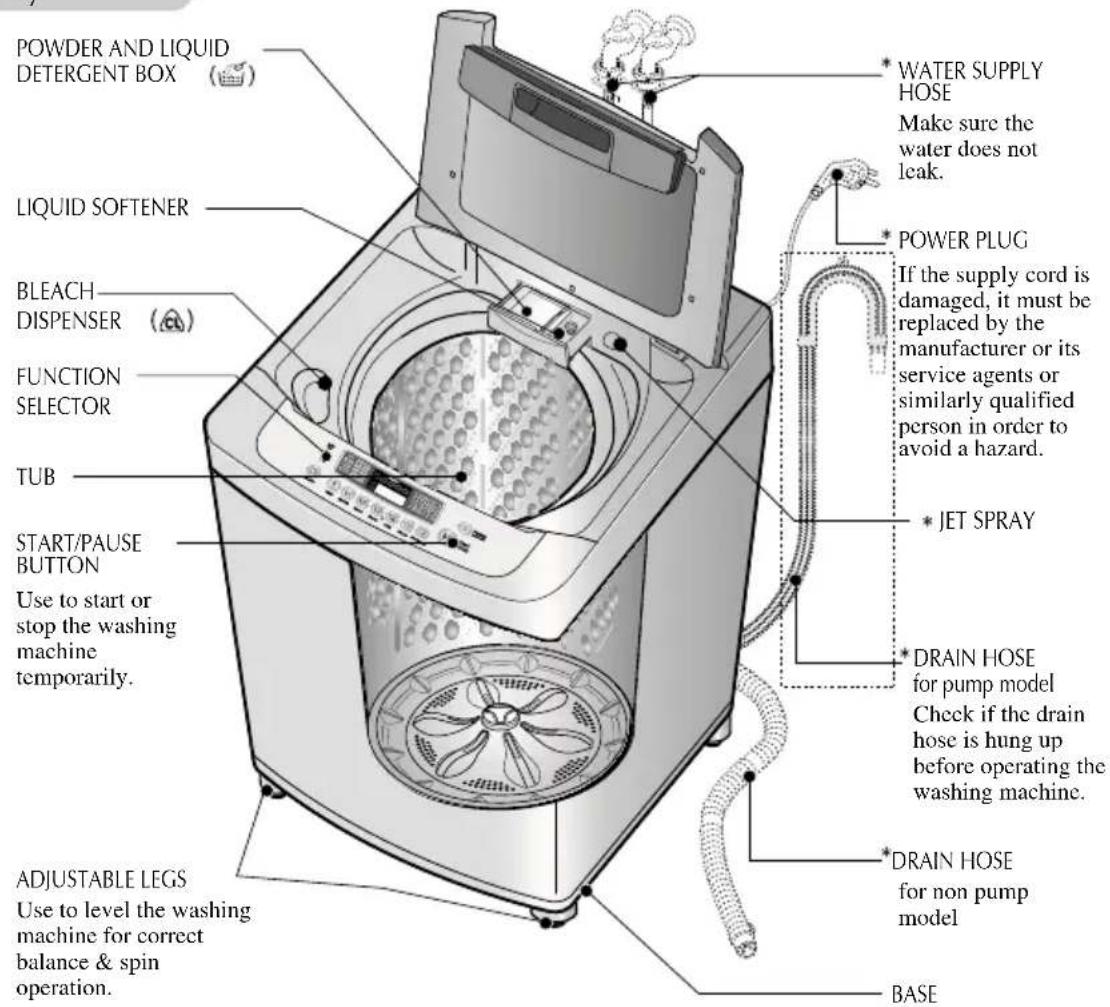
text_image
POWDER AND LIQUID DETERGENT BOX LIQUID SOFTENER BLEACH DISPENSER FUNCTION SELECTOR TUB START/PAUSE BUTTON Use to start or stop the washing machine temporarily. ADJUSTABLE LEGS Use to level the washing machine for correct balance & spin operation. * WATER SUPPLY HOSE Make sure the water does not leak. * POWER PLUG If the supply cord is damaged, it must be replaced by the manufacturer or its service agents or similarly qualified person in order to avoid a hazard. * JET SPRAY * DRAIN HOSE for pump model Check if the drain hose is hung up before operating the washing machine. * DRAIN HOSE for non pump model BASEAccessories
Water supply hoses
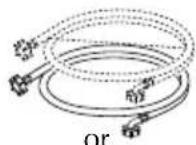
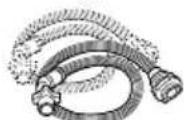
1 Each for COLD and HOT water
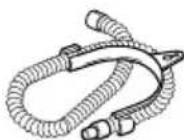
Drain hose Anti-rat cover (option)
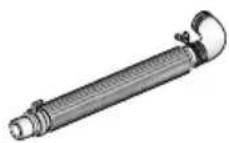
or
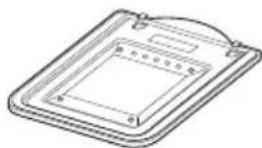
NOTE
“*” Part can be different according to the model.
Function Information Our machine provides various w.
Our machine provides various washing methods which suits various conditions and types of laundry.
Different types of laundry washing
FUZZY(Normal) Wash
Use this Program for everyday washing e.g. sheets, towels, T-shirts. (refer to page 16)
JEANS Wash
Use this Program for heavily soiled durable garments e.g. overalls, jeans.
Thick and heavy clothes or those which are excessively dirty like jeans or working uniforms can be washed. (refer to page 16)
SMART CLEANING
Use this program to get better rising performance. (refer to page 16)
WOOL Wash
Wool clothes (lingeric, wool, etc.) which may be easily damaged can be washed. (refer to page 16)
The fibers of machine washable woolens have been specifically modified to prevent felting when they are machine washed.
Most handknitted garments are not made of machine washable wool and we recommend that you hand wash them
- Before washing your woolens check the care label for the washing instructions.
- When washing woolens use a mild Detergent recommended for washing wool.
- Hand washed woolens may be spun in a washing machine to reduce the time they take to dry.
- To dry woolens lay down them flat on a towel and pat into shape. Dry woolens out of direct sunlight.
(The heat and tumble action of a dryer may cause shrinkage or felting of woolen garments.)
Some wool underlays and sheepskin products can be washed in a washing machine but may cause pump blockages.
(Ensure that the whole article is suitable for machine washing and not just the backing material.)
You may wish to handwash these articles and place them in the machine to spin dry.
FAVORITE Wash
This setting allows you to store your FAVORITE wash conditions in the normal cycle memory. (refer to page 19)
SILENT Wash
Use this program to wash quietly at night. (refer to page 20)
Washing according to the condition of laundry
QUICK WASH
QUICK WASH can be selected to wash lightly soiled clothes of less than 2.0 kg in a short time. (refer to page 16)
SOAK Wash
SOAK Wash can be selected to wash heavily soiled laundry by soaking in water for some time to remove dirt and grime. (refer to page 18)
Other washing method
TUB CLEAN
Use this program to clean the inside of washing machine especially Inner tub & Outer tub. (refer to page 21)
DELAY START Wash
DELAY START Wash is used to delay the finishing time of the operation.
The number of hours to be delayed can be set by the user accordingly. (refer to page 24)
OPTION WASH
When the user needs only SPIN, RINSE/SPIN, RINSE, WASH/RINSE, WASH, WASH/RINSE/SPIN, SOAK/WASH/RINSE/SPIN. (refer to page 23)
D reparation Before Washing
Care Labels
* Look for a care label on your clothes. This will tell you about the fabric content of your garment and how it should be washed.
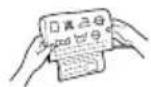
Sort clothes into loads that can be washed with the same wash cycle, Water Temperature and spin speed.
Sorting
To get the best results, different fabrics need to be washed in different ways.
• SOIL (Heavy, Normal, Light) Separate clothes according to the type and amount of soil.
• COLOR (Whites, Lights, Darks) Separate white fabrics from colored fabrics.
• LINT (Lint producers, Collectors) Separate lint producers and lint collectors.
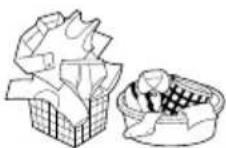
Lint Producers Terry cloth, Chenille, Towels, Nappies, Diapers
Lint Collectors Synthetics, Corduroy, Permanent Press, Socks
Check before Loading
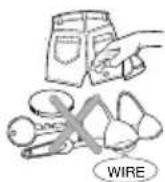
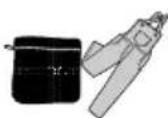
- Check all pockets to make sure that they are empty. Things such as nails, hairclips, matches, pens, coins, and keys can damage both your washer and your clothes.
- Mend any torn garments or loose buttons. Tears or holes may become larger during washing.
- Remove belts, underwires, etc. to prevent damage to the machine or your clothes.
- Pretreat any dirt and stains.
• Make sure the clothes are washable in water.
- Check the washing instructions.
- Remove tissue in pockets.
Pretreatment on stains or heavy soil
- Pretreat shirt collars and cuffs with a pre-wash product or liquid Detergent when placing them in the washer. Before washing treat special stains with bar soaps, liquid Detergent or a paste of water and granular Detergent.
- Use a pretreat soil and stain remover. Treat stains AS SOON AS POSSIBLE. The longer they are left the harder they are to remove.
(For more detail refer to page13)
Loading
Do not wash fabrics containing flammable materials (waxes, cleaning fluids, etc.).
Load Size
The WATER LEVEL should just cover the clothes. Adjust the load size accordingly. Loosely load clothes no higher than the top row of holes in the washer tub. To add items after washer has started, press Start button and submerge additional items. Close the lid and press Start button again to restart.
Light and Large-sized clothing
Clothes like downs and woollens are light weight, large and float easily. Use a nylon net and wash them in a small amount of water. If the laundry floats during the wash cycle, it may become damaged. Use dissolved Detergent to prevent the Detergent from clumping.
WARNING
Fire Hazard
Never place items in the washer that are dampened with gasoline or other flammable fluids.
No washer can completely remove oil. Do not dry anything that has ever had any type of oil on it (including cooking oils). Doing so can result in death, explosion, or fire.
Long laundry items
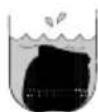
Use nylon nets for long, DELICATE items. For laundry with long strings or long length, a net will prevent tangling during washing. Fasten zippers, hook, and strings to make sure that these items don't snag on other clothes.
※ Nylon net is not supplied by LG.

se of Water, Dispenser Drawer, Detergent and Softener
Using Water
Amount of WATER LEVEL
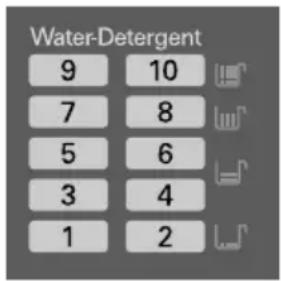
- This machine detects the quantity of laundry automatically, then sets the WATER LEVEL and proper amount of Detergent.
- When you select a wash program, the WATER LEVEL will be shown on the control panel.
- The following table shows the amount of water.
- When the WATER LEVEL is automatically detected, it may differ depending on the quantity of laundry even though the same WATER LEVEL is indicated on the control panel.
text_image
Water-Detergent 9 10NOTE
[ Minimum water amount ]
It depends on laundry load and washer model. Or manually you can pour a certain amount water into tub directly to some height. That's because if water level reaches to the some height sensed by washer itself, washer automatically operates. In other words, it is needed to pour water to the point when washer starts operating.
Water Temperature (for 2 valve model)
- The machine sets the appropriate temperature automatically according to the wash program.
- The temperature of the water impacts the effectiveness of all laundry additives and therefore, the cleaning results. We recommend temperatures of:
- HOT 49\~60°C...(120-140°F) White items, diapers, underclothing and heavily soiled, colorfast items.
- WARM 29\~40°C...(85-105°F)Most items
- COLD* 18\~24°C...(65-75°F)Only very bright colors with light soil.
- When washing in COLD water additional steps may be needed:
- Adjust Detergent amount and pre-dissolve Detergent in WARM water
- Pretreat spots and stains
- Soak heavily soiled items
- Use appropriate bleach
* Temperature below 18°C... (65°F) will not activate laundry additives and may cause lint, residue, poor cleaning, etc. In addition, Detergent manufactures and care labels define COLD water as 26\~29°C... (80-85°F). If the temperature of the water in the tub is too cold for your hands, the Detergent will not activate and clean effectively.
NOTE
If iron is present in the water the clothes may become an all-over yellow or they may be stained with brown or orange spots or streaks. Iron is not always visible. Installation of water softener or an iron filter may be necessary for severe cases.
Using the Dispenser Drawer
The dispenser drawer contains 2 compartments:
- Liquid Fabric Softener
-
Liquid or Powder Low-Sudsing, High-Efficiency Detergent
The dispenser automatically dispenses additives at the proper time in the wash cycle. -
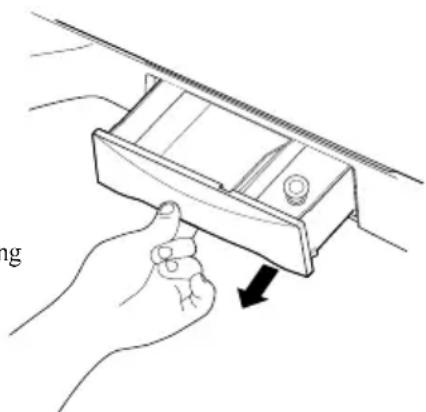
Slowly open the dispenser drawer by pulling the drawer out until it stops.
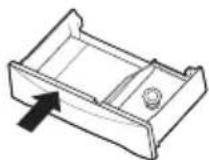
- After adding laundry products, slowly close the dispenser drawer. Closing the drawer too quickly could result in early dispensing of additives.
- Avoid overfilling or splashing when adding laundry products to the dispenser. Doing so could result in early dispensing of laundry products.
At the end of the cycle, you may see water in the compartments. This is part of the normal operation of the washer.
NOTE : Do not use bleach in the dispenser drawer.
natural_image
Illustration of a hand holding a mechanical component with a black arrow indicating direction (no text or symbols)Using Detergent
Detergent
Follow the Detergent package directions. Using too much Detergent is a common cause of laundry problems Use more Detergent if you have hard water, large loads, greasy or oily soils or higher Water Temperature.
Choosing the right Detergent
We recommend the use of front loader type, low sudsing high efficiency Detergent(powder,liquid or concentrated).
Soap flakes or granulated soap powders should not be used in your washing machine. When washing woolens Remember to use Detergent suitable for washing woolens.
Using Detergent
How much Detergent
The correct amount of Detergent will vary depending on the amount of soil in your clothes (Jeans and work clothes may need more Detergent, while bath towels usually need less.).
For liquid and concentrated Detergents, follow the recommendations of the Detergent manufacturer.
Note: To check you are using the correct amount of Detergent, lift the lid of your machine about halfway through the wash. There should be a thin layer of foam over the surface of the water. Lots of foam may look good, but it does not contribute to cleaning your clothes. No foam means not enough Detergent has been used; soil and lint can settle back on the clothes or the washing machine.
If excess Detergent is used, the rinse will not be as clean and efficient. Also, it could cause environmental pollution, And long term scrud build up.
Adding Detergent
Add measured detergent to the detergent compartment of the dispenser drawer.
We recommend the use of powdered detergent in the dispenser when using a delay wash function.
We recommend to dissolve measured detergent in 1 liter warm water before addition to the machine.
Detergent is flushed through the dispenser at the beginning of the wash phase.
Detergent usage may need to be adjusted for water temperature, water hardness, size and soil level of the load. Avoid using too much detergent in your washer, as it can lead to oversuding and detergent residue being left on the clothes.
Using Liquid Bleach
- Check clothing care label for special instructions and separate the laundry to be bleached
• Dilute liquid chlorine bleach. - Measure the recommended amount of liquid bleach carefully following instructions on the bottle.
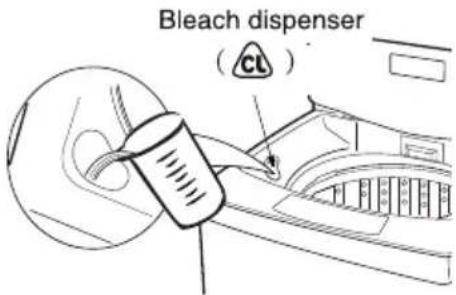
- Before starting the washer, pour measured amount of bleach directly into bleach dispenser. Avoid splashing or overfilling. Powdered bleach should be mixed with water before pouring.
text_image
Bleach dispenser (CL)Attention
■ Never pour undiluted liquid bleach directly onto clothes or into the wash basket.
This may cause change of color or damage the laundry.
■ Do not pour powdered bleach into bleach dispenser.
se of Water, Dispenser Drawer, Detergent and Softener
Using Fabric Softener
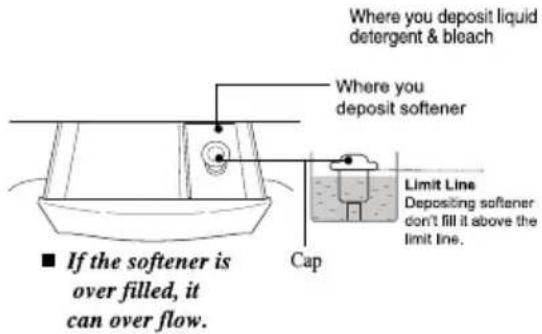
If desired, pour the recommended amount of liquid fabric softener into the right-hand compartment.
Use only liquid fabric softener. Diluting the softener may be necessary for best results.
Add the softener to the maximum fill line.
- Do not exceed the maximum fill line.
Overfilling can cause early dispensing of the fabric softener, which could stain clothes.
NOTE : Do not pour fabric softener directly on the wash load. It may stain the clothes.
: Fabric softener is automatically dispensed in the final rinse with indication beep.
text_image
Where you deposit liquid detergent & bleach Where you deposit softener Limit Line Depositing softener don't fill it above the limit line. ■ If the softener is over filled, it can over flow. CapAttention
■ Do not mix with Detergent or bleach.
■ Never pour fabric softener directly on clothes. It may stain them.
■ Do not stop the washer during the first spin for timely dispensing.
■ Option washing is not designed to be used with fabric softener dispenser.
Scrud(Waxy Build up)
Scrud is the name given to the waxy build-up that can occur within any washer when the fabric softener comes into contact with Detergent. This build-up is not brought about by a fault in the machine.
If scrud is allowed to build-up in the machine it can result in stains on your clothes or an unpleasant smell in your washer.
If you wish to use fabric softener we recommend
• Using fabric softener sparingly.
- When filling the dispenser, do not splash or overfill.
- Clean dispenser as soon as the cycle is finished.
- Clean your machine regularly. (refer to page 21 or 32)
- Cold water washing increases the chance of this build-up occurring. We recommend a regular WARM or HOT wash e.g. every 5th wash should be at least a warm one.
- Fabric softener of thinner consistency is less likely to leave residue on the dispenser and contribute to a build-up.
WARNING
■ Do not use or mix liquid chlorine bleach with other household chemicals such as toilet cleaners, rust removers, acid or products containing ammonia. These mixtures can produce dangerous fumes which can cause serious injury or death.
■ To reduce the risk of fire or serious injury to persons or property, comply with the basic warnings listed below:
- Read and comply with all instructions on stain removal products.
- Keep stain removal products in their original labeled containers and out of children's reach.
• Thoroughly wash any utensil used.
- Do not combine stain removal products, especially ammonia and chlorine bleach. Dangerous fumes may result.
- Never wash items which have been previously cleaned in, washed in, soaked in or spotted with gasoline, dry cleaning solvents or other flammable or explosive substances because they give off vapors that could ignite or explode.
- Never use highly flammable solvents, such as gasoline, inside the home. Vapors can explode on contact with flames or sparks.
For successful stain removal:
- Remove stains promptly.
- Determine the kind of stain, then follow the recommended treatment in the stain removal chart below.
- To pretreat stains, use a prewash product, liquid Detergent, or a paste made from granular Detergent and water.
- Use COLD water on unknown stains because HOT water can set stains.
- Check care label instructions for treatments to avoid on specific fabrics.
- Check for colorfastness by testing stain remover on an inside seam.
- Rinse and wash items after stain removal.
natural_image
Line drawing of a blouse with ruffled collar and pleated collar (no text or symbols)Follow fabric care label instructions
| Stain Removal | |
| STAIN | TREATMENT |
| Adhesive tape, chewing gum, rubber cement | Apply ice. Scrape off excess. Place stain face down on paper towels. Saturate with prewash stain remover or nonflammable dry cleaning fluid. |
| Baby formula, dairy products, egg | Use product containing enzymes to pretreat or soak stains. |
| Beverages (coffee, tea, soda, juice, alcoholic beverages) | Pretreat stain. Wash using COLD water and bleach safe for fabric. |
| Blood | Rinse with COLD water. Rub with bar soap. Or pretreat or soak with product containing enzymes. Wash using bleach safe for fabric. |
| Candle wax, crayon | Scrape off surface wax. Place stain face down between paper towels. Press with warm iron until wax is absorbed. Replace paper towels frequently. Treat remaining stain with prewash stain remover or nonflammable dry cleaning fluid. Hand wash to remove solvent. Wash using bleach safe for fabric. |
| Chocolate | Pretreat or soak in WARM water using product containing enzymes. Wash using bleach safe for fabric. |
| Collar or cuff soil, cosmetics | Pretreat with prewash stain remover or rub with bar soap. |
| Dye transfer on white fabric | Use packaged color remover. Wash using bleach safe for fabric. |
| Grass | Pretreat or soak in WARM water using product containing enzymes. Wash using bleach safe for fabric. |
| Grease, oil, tar (butter, fats, salad dressing, cooking oils, car grease, motor oils) | Scrape residue from fabric. Pretreat. Wash using hottest water safe for fabric. For heavy stains and tar, apply nonflammable dry cleaning fluid to back of stain. Replace towels under stain frequently. Rinse thoroughly. Wash using hottest water safe for fabric. |
| Ink | Some inks may be impossible to remove. Washing may set some inks. Use prewash stain remover, denatured alcohol or nonflammable dry cleaning fluid. |
| Mildew, scorch | Wash with chlorine bleach if safe for fabric. Or, soak in oxygen bleach and HOT water before washing. Badly mildewed fabrics may be permanently damaged. |
| Mud | Brush off dry mud. Pretreat or soak with product containing enzymes. |
| Mustard, tomato | Pretreat with prewash stain remover. Wash using bleach safe for fabric. |
| Nail polish | May be impossible to remove. Place stain face down on paper towels. Apply nail polish remover to back of stain. Repeat, replacing paper towels frequently. Do not use on acetate fabrics. |
| Paint, varnish | WATER BASED : Rinse fabric in cool water while stain is wet. Wash. Once paint is dry, it cannot be removed, OIL BASED AND VARNISH : Use solvent recommended on can label. Rinse thoroughly before washing. |
| Rust, brown or yellow discoloration | For spots, use rust remover safe for fabric. For discoloration of an entire load, use phosphate Detergent and nonchlorine bleach. Do not use chlorine bleach because it may intensify discoloration. |
| Shoe polish | LIQUID : Pretreat with a paste of granular Detergent and water. PASTE : Scrape residue from fabric. Pretreat with prewash stain remover or nonflammable dry cleaning fluid. Rub Detergent into dampened area, Wash using bleach safe for fabric. |

unction of each Button
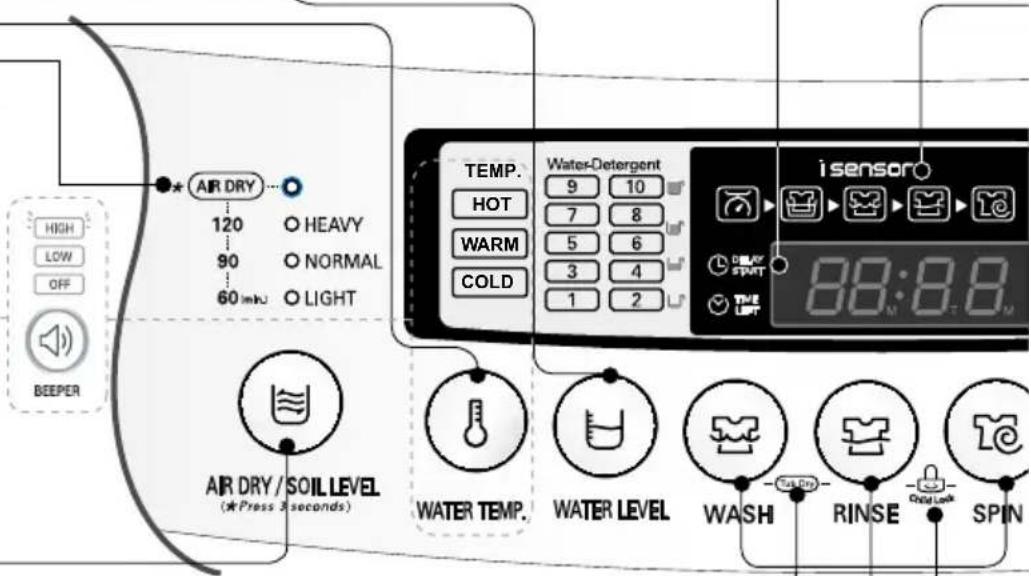
• This function is used to reduce the drying time of the laundry by allowing air to circulate within the bowl in order to reduce moisture levels. It does not dry the clothes completely.
• Air dry selections light up in sequence as follows.
60 ▶ 90 ▶ 20 60 as the button is pushed.
- Press the button for 3 seconds to select and press the Power button to cancel the operation (refer to page 22)
WATER TEMPERATURE BUTTON (OPTION)
• Use to select Water Temperature.
Pressing the button allows you to select COLD ▶
WARM ▶ HOT ▶
HOT & COLD ▶ COLD
respectively.
WATER BUTTON
- Use to select the proper amount of water in relation to the weight and type of laundry.
• Automatically controlled, but can be selected manually by pressing the WATER Botton. - WATER is automatically selected for FUZZY(normal) program.
The following settings are indicated as the button is pushed
TIME LEFT, DELAY START (RESERVATION), ALARM INDICATION
- Time left - During operation, the remaining time is indicated.
- DELAY START INDICATION (RESERVATION) - When DELAY START (RESERVATION) program is selected, it indicates the finishing time. (RES.=DELAY)
- Alarm indication - When an error occurs, an error message appears to indicate the abnormality. For example, dE indicates that the lid is open.
AIR DRY
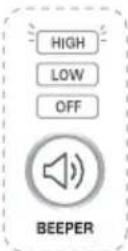
BEEPER BUTTON (Only 1 valve)
• If you want to use the washing machine without alarm signal
sounds, press BEEPER
buttons allow you to select: HIGH ▶ OFF ▶ LOW ▶ HIGH respectively. Default setting is HIGH.
(refer to page 25)
text_image
AIR DRY 120 O HEAVY 90 O NORMAL 60 min O LIGHT TEMP. HOT WARM COLD Water-Detergent 9 10 7 8 5 6 3 4 1 2 i sensor 88:88 AIR DRY/SOIL LEVEL (★Press 3 seconds) WATER TEMP. WATER LEVEL WASH RINSE SPIN High LOW OFF BEEPERSOIL LEVEL BUTTON
• This button allows you to select the strength of the wash action.
• Power option selections light up in sequence as follows Normal ▶ Heavy
▶ Light ▶ Normal as the button is pushed.
This can be selected for any program.
- Adjustment can be made while washing.
TUB DRY
- Use this when you want to dry the empty tub after a wash.
- This can be set/canceled by pressing the Wash button and Rinse button simultaneously. (refer to page 22)
WASH. RINSE. SPIN BUTTON
- Use when wash, rinse, spin time need to be adjusted.
• The time increases when the button is pressed. - If adjustments are needed during the wash, press the [start/pause] button before making any changes.
- When the button is pressed during washing, the remaining time is displayed.
CHILD LOCK FUNCTION
- Use to lock or unlock the control buttons to prevent settings from being changed by a child.
To lock, push the RINSE and SPIN buttons simultaneously and to unlock push them one more time during the washing process.
(refer to page 25)
NOTE
* For optimizing the washing algorithm, the displaying time may be changed during washing-increased by 4 minutes at maximum and decreased by 2 minutes at maximum.
* If the Detergent quantity is put more than the standard, for increasing the rinsing performance, it automatically adds rinsing, and the remaining time may be increased.
* The standard detected by the sensor changing the algorithm is set by the normal standard. It may not be same to the washing habit of a specific user. So, it does not matter that the user uses it according to her/his washing habit.
* The sensor for a Detergent quantity is designed to detect based on a synthetic Detergent powder. If you put a liquid one or a natural one or too much bleaching agent, the detecting ability of the sensor may be decreased.
WASHING CONDITION INDICATOR (OPTION)
- It only operates in FUZZY Program.
- During being detected by the sensor, the LED flashes green, orange and red in turn. And, after detecting, the LED lights a specific color according to the detecting condition as follows:
※ If the current washing condition (Detergent quantity, Water Temperature, water quality, etc.) is determined as better than the standard one, it optimizes the algorithm to save the energy by decreasing washing time/strength, and the LED automatically turns to red.
※ If the current washing condition is determined as worse than the standard one, it optimizes the algorithm by increasing washing time/strength, and the LED automatically turns to orange.
※ If the current washing condition is determined as equal to the standard one, the algorithm has no change and the LED turns to green.
text_image
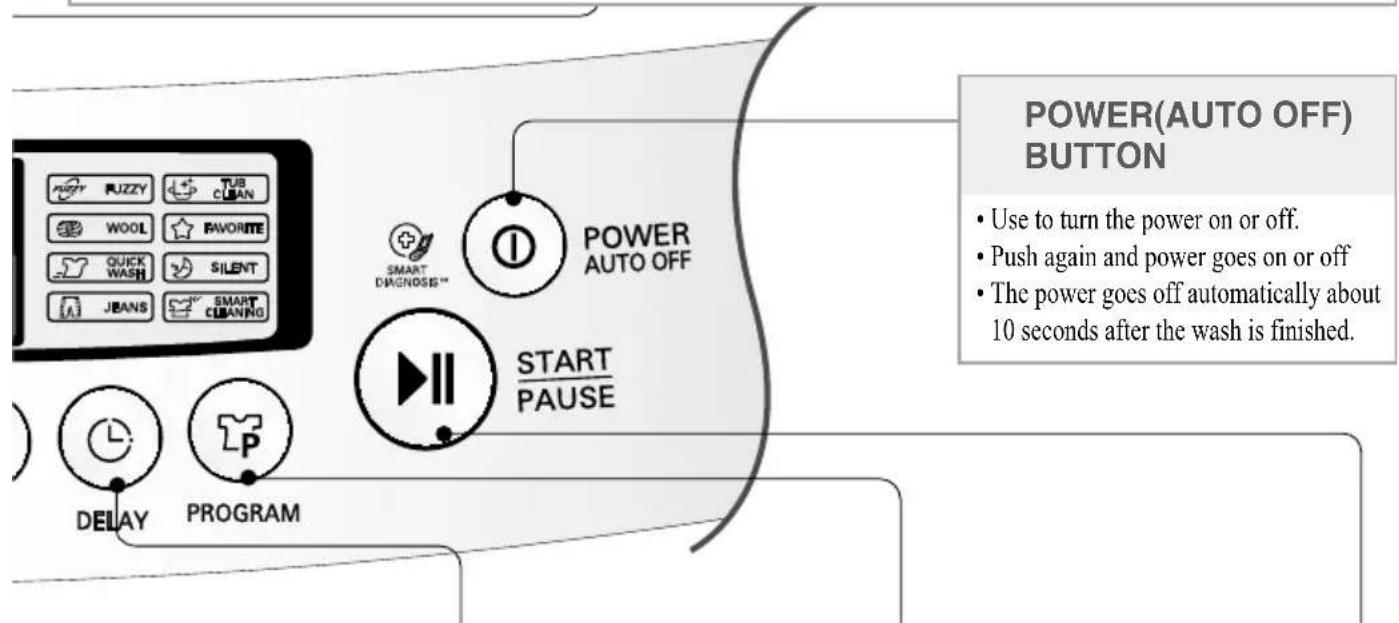
POWER(AUTO OFF) BUTTON • Use to turn the power on or off. • Push again and power goes on or off • The power goes off automatically about 10 seconds after the wash is finished.DELAY START (RESERVATION) BUTTON
- Use to set a delayed finishing time.
• The time increases when the button is pushed.
• The following settings are indicated as the button is pushed 3 ▶4 ▶5 ▶... 11 ▶2 14 ▶16 ... ▶16 48 ▶▶3 HOUR.
• To cancel delay time, turn the power switch off.
(refer to page 24)
PROGRAM BUTTON
- Use for selecting wash program.
• This button allows you to select 8 different programs for different kinds of laundry and dirtiness. - program selections light up in sequence as follows: FUZZY(Normal) ▶ WOOL ▶ QUICK WASH JEANS SMART CLEANING SILENT FAVORITE ▶ TUB CLEAN FUZZY(Normal) etc.
Select the desired program by pressing the button.
START/PAUSE BUTTON
• Use to start or pause the washing process.
• Repeats start and pause by pushing the button.
Washing Programs
| Washing Programs | POWER AUTO OFF | Add the laundry | PROGRAM | Add the Detergent |
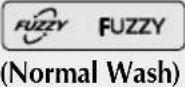 Used for normal loads, this mode automatically selects the most appropriate conditions and completes the sequence in one operation. The built-in sensor detects the size of the load and the ideal wash power and wash, rinse and spin times are set accordingly. Used for normal loads, this mode automatically selects the most appropriate conditions and completes the sequence in one operation. The built-in sensor detects the size of the load and the ideal wash power and wash, rinse and spin times are set accordingly. |  |  |  |  Add the appropriate quantity of Detergent as indicated by the WATER LEVEL.Or follow the Detergent manufacturer's instructions Add the appropriate quantity of Detergent as indicated by the WATER LEVEL.Or follow the Detergent manufacturer's instructions |
 ingdelicate fabrics such as lingerie and woolens. (wash only "water washable" clothes)Before washing your woolens check the care label for the washing instructions.(wash only water washable clothes) ingdelicate fabrics such as lingerie and woolens. (wash only "water washable" clothes)Before washing your woolens check the care label for the washing instructions.(wash only water washable clothes) |  |  |  Select the WOOL program on the Control panel. Select the WOOL program on the Control panel. |  Use neutral Detergent appropriate for the laundry.When washing woolens use a mild Detergent recommend- ed for washing wool. Use neutral Detergent appropriate for the laundry.When washing woolens use a mild Detergent recommend- ed for washing wool. |
 Use this mode when washing lightly soiled clothes for a short time. The highly recommended laundry amount is under 2.0kg. Use this mode when washing lightly soiled clothes for a short time. The highly recommended laundry amount is under 2.0kg. |  |  |  Select the QUICK WASH program on the Control panel. Select the QUICK WASH program on the Control panel. |  Add the appropriate quantity of Detergent as indicated by the WATER LEVEL.Or follow the Detergent manufacturer's instructions Add the appropriate quantity of Detergent as indicated by the WATER LEVEL.Or follow the Detergent manufacturer's instructions |
 Use Jear washing Jeans of different sizes Use Jear washing Jeans of different sizes |  |  the jean evenly in the tub the jean evenly in the tub |  JEANS program on the Control panel. JEANS program on the Control panel. |  |
 ase rinsing performance.This would include underwear and baby clothes.If someone has sensitive skin or skin trouble,use this program. ase rinsing performance.This would include underwear and baby clothes.If someone has sensitive skin or skin trouble,use this program. |  |  |  Select the SMART CLEANING program on the Control panel. Select the SMART CLEANING program on the Control panel. |  |
 START PAUSE START PAUSE | Close the lid Finish Caution & Note | ||
 |  |  | |
| The pulsator rotates for 8 seconds to detect the laundry load.Then the WATER LEVEL and the amount of Detergent to be used will be shown and water will be supplied. | Water will be supplied for 2 minutes after the start of the wash to supplement the water the laundry has absorbed. | When the wash program ends, the buzzer will ring for 10 seconds before the Power goes off automatically. | If water is already in the tub, or putting wet laundry into the tub before starting will increase the WATER LEVEL.With lightweight bulky loads, WATER LEVEL can be set low. |
 |  |  | When setting the WATER LEVEL manually, do not set to Medium to prevent damage to laundry.Washing with HOT water may damage the laundry (Water is set to cold automatically). Ensure that the load is under 2kg.In order to avoid damage to laundry, the spin cycle may appear slow.This also avoids wrinkles and clothing may still contain some water. This is normal. |
 |  |  | When static pressure of water is more than 2 kg/cm^2 , |
 |  |  | |
 |  |  | |
SOAK Wash Use this mode to w
Use this mode to wash normal clothes or thick and heavy clothes which are excessively dirty. SOAK mode can be used with FUZZY or JEAN or SILENT or FAVORITE program.
1 Press the POWER (AUTO OFF) button to turn power on.

POWER AUTO OFF
2 Press the PROGRAM button to select the washing program.

3 Press the WASH button, to select SOAK program.
- Keep pressing the WASH button until the light turns on 'SOAK' and 'WASH' simultaneously as next image.
- SOAK program only works when socking time is 40, 50 or 60 minutes.
flowchart
graph LR
    A["Clock"] --> B["Arrow Icon"]
    B --> C["Arrow Icon"]
    C --> D["Arrow Icon"]
    D --> E["Arrow Icon"]
4 Add the Detergent.
- Add the appropriate quantity of Detergent as the Detergent manufacture instruction.
5 Add the laundry and press the START/PAUSE button.

START PAUSE
- The WATER LEVEL will be shown and water will be supplied.
6 Close the lid.
• Water will be supplied for 2 minutes after the start of the wash to supplement the absorbed water by the laundry.
Finish
- When the wash program ends, the buzzer will ring for 10 seconds before the Power goes off automatically.
NOTE
• Order of Soak-Wash timing
Soak-Wash

flowchart
graph LR
    A["14"] --> B["15"]
    B --> C["18"]
    C --> D["21"]
    D --> E["25"]
    E --> F["40"]
    F --> G["50"]
    G --> H["60"]
    H --> I["Lamp Off"]
    I --> J["3"]
    J --> K["6"]
    K --> L["9"]
    L --> M["10"]
    M --> N["13 min/min min r"]
- Select soaking time 40 minutes, 50 minutes, or 60 minutes (including washing time) by pressing the Wash button repeatedly.
- If necessary, select the times of Rinse and the time for Spinning by pressing the Rinse or Spin buttons till you reach the desired times.
AVORITE Wash
Pressing the FAVORITE button allows you to store your FAVORITE wash conditions in the normal cycle memory and then recall it for use at a later time.
1 Press the POWER (AUTO OFF) button to turn power on.
2 Select the FAVORITE program.

3 Select your FAVORITE wash conditions.
- Press the WATER button to select WATER.
- Press the WASH button, the RINSE button & the SPIN button to select wash time, rinse time & spin time respectively you want to store.
4 Press the START/PAUSE button to store & start your FAVORITE wash cycle. Power turns off automatically after wash.
NOTE
To recall your FAVORITE cycle.
- Press POWER on.
- Select the FAVORITE cycle by pressing the PROGRAM.
- Press the START/PAUSE button. Then the wash cycle starts.
SILENT Wash Use this program to w
Use this program to wash quietly in SILENT especially during late night and dawn.
1 Press the POWER (AUTO OFF) button to turn power on.

POWER AUTO OFF
2 Press the PROGRAM button to select SILENT program.

3 Add the laundry into the washing tub.
4 Press the START/PAUSE button.

START PAUSE
5 Add the Detergent and close the lid.
NOTE
- SILENT program takes longer washing time than FUZZY(Normal) program.
- To reduce noise in spinning, spin rpm is lower than normal spinning rpm. So the laundry has more moisture than normal.
T UB CLEAN
If scrud is allowed to build-up in the machine it can result in stains on your clothes or unpleasant smell in your washer.
Scrud is the way build-up that can occur within any washer when the fabric softener comes into contact with Detergent, and according to particular degree of dirtiness or quality of water to be use, in these case, use this program to clean inner tub and outer tub.
1 Press the POWER (AUTO OFF) button to turn power on.
2 Press the PROGRAM button to select the TUB CLEAN program.

3 Press the START/PAUSE button. • Left time is displayed.

4 After 10 minutes of water supplement. Add the oxygenated bleach (about 300m).
- Do not use Detergent box.
- Do not place any laundry inside tub.
5 Close the lid. When the lid is open the machine will not operate, and an operation will be done to the lid.
NOTE
- Before using this program remove lint inside lint filter.
- When using this program, do not place any laundry inside tub.
- This program takes about 3 hours to be completed.
• After using this program, remove dirt inside filter.
• After finishing this program, open the lid of wash to remove irritant odor. - Do not pour bleach into the tub directly. It might cause damage the tub.
- Do not leave diluted oxygenated bleach inside tub for long time. It rusts the tub must drain the remained diluted oxygenated water out.
- Use this program once for every month.
- Do not use this program repeatedly.
AIR DRY
AIR DRY for your laundry.
1 Press the POWER (AUTO OFF) button to turn power on.
2 When you press the Air dry button for 3 seconds, the Air dry course will be selected.

- When the Air dry is selected, other buttons will be inactive.
- If you want to cancel the Air dry function, press the Power button.
AIR DRY/SOL LEVEL Off/Pass 3 seconds!
3 Press the START/PAUSE button.
4 When the Complete buzzer goes off, the power will automatically be turned off in 10 seconds.
NOTE
■ When you select Air dry for more than 60 minutes
1) You can reduce the drying time by minimizing the moisture in the laundry.
2) Always keep the laundry amount to 2kg or less and make sure to spread it out evenly.
3)Select 60 minutes for cotton laundry and 120 minutes for synthetic fiber laundry for effective Moisture removal.
T UB DRY
1 Press the POWER (AUTO OFF) button.
2 When you press the Wash and Rinse button simultaneously, the Tub Dry course will be set or canceled.
- When you select the Tub Dry, do not put any laundry in the drum.
- When Tub Dry is selected, other buttons will be inactive.
3 Press the START/PAUSE button.
4 When the Complete buzzer goes off, the poser will automatically be turned off in 10 seconds.
NOTE
■ When you select Tub Dry
1) Use this function to minimize the growth of mold from the residual moisture within the laundry.
2) When you select the Tub Dry course, do not put any laundry or detergent in the drum.
3) It is good to use this about once a week.

ption Washing
When you only need the Wash, Wash/Rinse or Rinse cycles, these can be set manually.
1 Press the POWER (AUTO OFF) button to turn power on.

POWER AUTO OFF
| Only Wash | Only Rinse | Only Spin |
Press theWASHbutton to select the desired timing. WASH WASH | Press theRINSEbutton to select the desired times of rinse. RINSE RINSE | Press theSPINbutton to select the desired times of spin. SPIN SPIN |
| Only Wash,Rinse | Only Rinse,Spin | Only Drain |
Press theWASHbutton to select the desired timing. WASHPress theRINSEbutton to select the desired times of rinse. WASHPress theRINSEbutton to select the desired times of rinse. RINSEYou can use this option for preventing wrinkles of laundry RINSEYou can use this option for preventing wrinkles of laundry | Press theRINSEbutton to select the desired times of rinse. RINSEPress theSPINbutton to select the desired times of spin. RINSEPress theSPINbutton to select the desired times of spin. SPIN SPIN | When you want to only drain, wait until the water in the washing tub drains completely. |
3 Press the WATER button, to control the water level according to the amount of laundry. If you do not choose anything, it is set the middle water level automatically.

WATER LEVEL
4 Add the laundry into the washing tub.
5 Press the START/PAUSE button.

START PAUSE
6 Add the detergent and close the lid.
NOTE
- When a Wash, Wash/Rinse or Rinse only option is selected, after the wash is completed the water will not be drained off. If you wish to drain the water, press SPIN button and wait until the water in the tub has drained completely. Then press the START/PAUSE button.
- If you do not specify the water level, then Medium will be automatically selected.
- If only Rinse is selected, the process will start from Water Supply.
DELAY START (RESERVATION) Wash
DELAY START (RESERVATION) Wash is used to delay the finishing time of the operation.
The hours to be delayed can be set by the user accordingly.
The time on the display is the finishing time, not the start time.
1 Press the POWER (AUTO OFF) button to turn power on.

POWER AUTO OFF
2 Press the PROGRAM button to select the washing program.

- Select the program for laundry on the Control panel. This program will not work in WOOL and TUB CLEAN Program.
3 Press the DELAY START (RESERVATION) button.
- The light will 'DELAY' turn on and 'TIME LEFT' 83:88 will be marked.
- Press the button repeatedly to set the desired finishing time. For example, To finish washing in 9 hours from now, by make the number 9:00 pressing the DELAY START (RESERVATION) button repeatedly.
(RES.=DELAY)

4 Add the Detergent.
- Add the appropriate quantity of Detergent as the Detergent manufacture instruction.
- When the lid is open the machine will not operate, and an alarm signal will remind you to close the lid
5 Add the laundry and press the START/PAUSE button.

START PAUSE
- When you press the START/PAUSE button the light will blink.
6 Close the lid.
- Water will be supplied for 2 minutes after the start of the wash to supplement the water the laundry has absorbed.
Finish
- The washing will be finished according to the delayed time.
NOTE
- Finishing time can be delayed from 3\~48 hours. Delaying from 3\~12 hours can be done in 1 hour time intervals and from 12\~48 hours in 2 hour time intervals.
- If the lid is open, the machine will not work, and an alarm signal will alarm to remind you to close the lid.
- To select washing time, rinsing times, spinning time, water level, hot/cold or wash power manually, press the DELAY START (RESERVATION) button and select the desired option. Then press the START/PAUSE button.
- When the laundry cannot be taken out immediately after the wash program ends, it is better to omit the spinning program. (The laundry will be wrinkled if left for a long time after spinning.)

ther U sefu I Functions
Child Lock Function
If you want to lock all the keys to prevent settings from being changed by a child, you can use the child lock option.
How to Lock
1 Press the POWER (AUTO OFF) button.

POWER AUTO OFF
- Turn Power on.
2 Press the START/PAUSE button to start washing.

START PAUSE
• After all washing conditions are set according to the manual.
3 Press both the RINSE button and the SPIN button simultaneously.
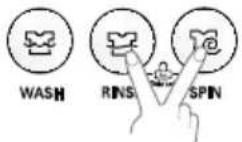
- During the wash program, all the buttons are locked until washing is completed or it is child-lock function is deactivated manually.
How to Unlock
If you want to unlock during wash, press both the RINSE and the SPIN button simultaneously again.
NOTE
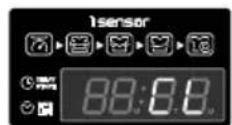
- “ [L] & the remaining time are alternatively shown on the display while they are locked.
Beeper Option (For only 1 valve)
If you want to use the washing machine without alarm signal sounds, press BEEPER buttons allow you to select: HIGH ▶ OFF ▶ LOW ▶ HIGH respectively. Default setting is HIGH.
To make buzzer work, press both the BEEPER buttons simultaneously one more time.
Seeing Remaining Time
To see the remaining time for each process, press one of the WASH, RINSE and SPIN buttons. The remaining time for each process will appear for about 1 second.
D lacing and Leveling
Please ensure that transit restraint has been removed before operating your machine.
1 Place the machine on a flat and firm surface which allows proper clearance.
We suggest a minimum clearance of 2 cm to the right side and left sides of the machine for ease of installation. At the rear, a minimum clearance of 10 cm is suggested.

text_image
more than 2 cm more than 2 cm more than 10 cm more than 2 cmNOTE
If the washer is installed on a uneven,weak or tilted floor causing excessive vibration, spin failure or “UE” error can happen to it. It must be placed on a firm and level floor to prevent spin failure.
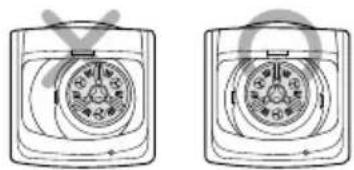
2 Check that the machine is level
Open the lid and look from above to see if it is same as shown.
Top view of the machine
natural_image
Two identical diagrams showing a circular device with internal components, no text or symbols present.3 Leveling the machine
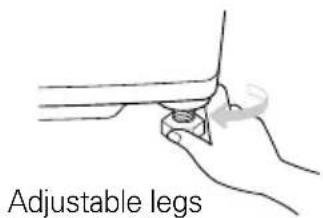
Lift the front of the washing machine and twist the Adjustable Leg until the surface bubble is placed in the center.
text_image
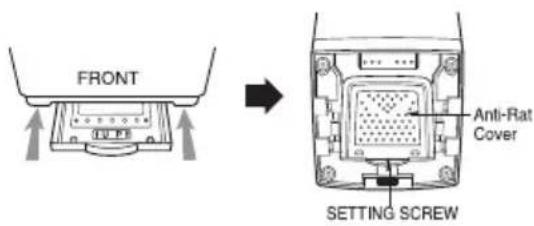
Adjustable legs※ Installing the Anti-Rat Cover (option) Insert the anti-rat cover to be firmly fixed from the back or front of washing machine and screw it
text_image
FRONT Anti-Rat Cover SETTING SCREWCaution
If the power is supplied from a cord extension set or generator, the cord extension set or electrical portable outlet device should be positioned so that it is not exposed to splashing or ingress of moisture.
Connecting Water Supply Hose
Before connecting the Water Supply Hose to the water tap, check the hose type and then choose the correct instruction here under.
Note that the Water Supply Hose supplied may vary from country to country, Make sure to connect the blue inlet hose to the COLD water tap, and the orange inlet hose to the HOT water tap.
Connecting Water Supply Hose to water tap
Normal Type
(Normal tap without thread & screw type inlet hose.)
1 Untighten the screw
Untighten the screw of the connector so that the tap can be placed in the middle.
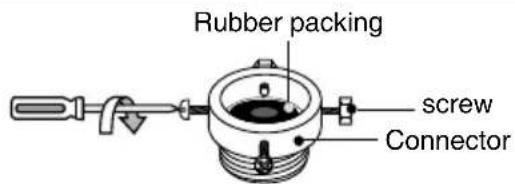
text_image
Rubber packing screw Connector2 Fixing the connector to the tap
Push the upper connector up till the rubber packing is in tight contact with the tap. Then tighten the 4 screws.
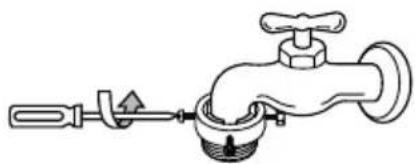
natural_image
Line drawing of a faucet with valve and handle (no text or symbols)3 Attach the water supply hose securely to the connector
Push the water supply hose vertically upwards so that the rubber seal within the hose can adhere completely to the tap.
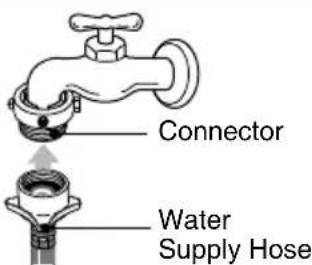
text_image
Connector Water Supply Hose4 Fixing the connector to the water supply hose
Attach the water supply hose to the connector and then tighten it by screwing it to the right.

natural_image
Line drawing of a faucet with handle and valve (no text or symbols)5 Check the connection of water supply hose and the connector
After connecting the hose, open the tap to check for any water leakage.
If the water leaks, close the tap and start again from step 1
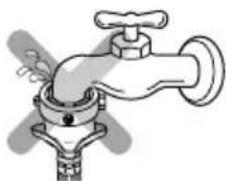
natural_image
Illustration of a faucet with a handle and valve, showing water flowing from the drain (no text or symbols)NOTE
The washing machine is to be connected to the water mains using new hose-sets and old hose-sets should not be reused.
onnecting Water Supply Hose
Normal Type
(Normal tap without thread & one touch type inlet hose.)
1 Separate Middle connector from Water Supply Hose
Separate Middle connector from the Water Supply Hose by pulling the Pressing Rod and the Pressing Handle that is attached to the Water Supply Hose.
Middle connector
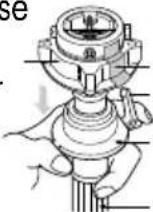
Fixed Sticker Pressing Handle Pressing Rod
Water Supply Hose
2 Loosen the fixed nuts to connect the connector to the tap
Untighten the screw of the connector so that the tap can be placed in the middle.
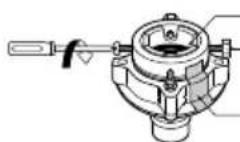
Rubber packing screw Fixed sticker
NOTE
In case tap is too large.
If the tap diameter is too large or is square, untighten the 4 screws and remove the guide plate. Then follow step1.

text_image
Guide plate Rubber packing3 Fixing Connectors to the Tap
Push the upper connector up till the rubber packing is in tight contact with the tap. Then tighten the 4 screws.
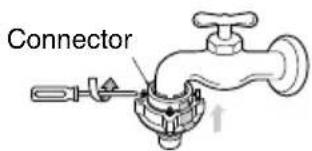
text_image
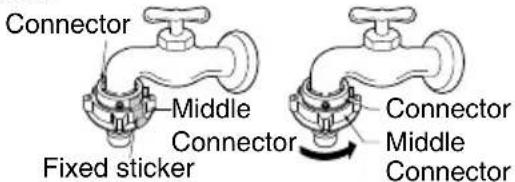
Connector4 Fixing Upper Connector and Middle Connector
Remove the fixed sticker in between the Upper and Middle Connectors. Tighten the connectors by holding one connector and twist middle connector to the right.
text_image
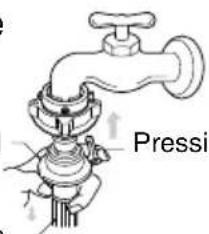
Connector Middle Connector Fixed sticker Connector Middle Connector5 Connecting Middle Connector and Water Supply Hose
Press down the pressing rod of the Water Supply Hose which was separated from middle connector (refer to Step1) and then join it to the middle connector.
Water Supply Hose
Pressing rod
text_image
PressiPressing handle
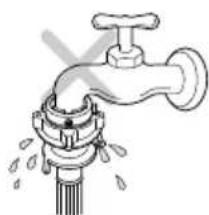
6 Check for water leakage
After connecting the hose, open the tap to check for any water leakage.
If the connection leaks, close the tap and start again from step 1.
If you skip step 1, water leakage may occur.
natural_image
Illustration of a faucet with water splashing (no text or symbols)Screw Type
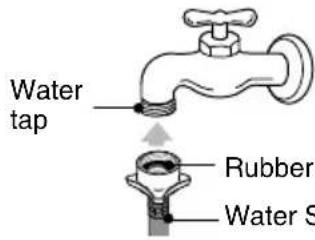
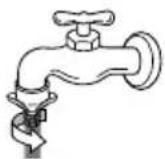
1 Attach the water supply hose to the tap.
Push the water supply hose up so that the rubber packing within the hose can adhere completely to the tap.
text_image
Water tap Rubber Water SRubber Packing
Water Supply Hose
2 Connect the water supply hose to the tap.
Connect the water supply hose to the tap and then tighten it by screwing it to the right.
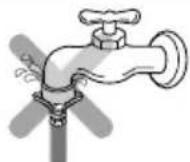
3 Check water leakage.
After connecting the hose, open the tap to check for any water leakage.
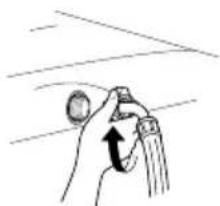
Connecting Water Supply Hose to the machine
- Connect the water supply hose to inlet valve of the washing machine, and then lock it by turning the hose connecting part.
natural_image
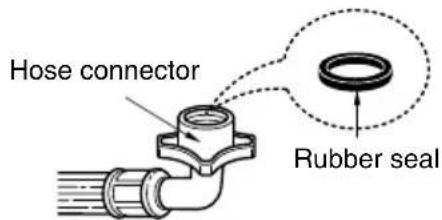
Hand holding a small object with an arrow indicating motion (no text or symbols)- Check to see if there is a rubber seal inside the connector.
text_image
Hose connector Rubber sealConnecting Drain Hose
Before connecting Drain Hose, check your Drain Hose model and choose the correct instructions.
Pump Model
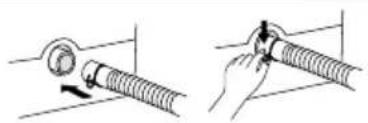
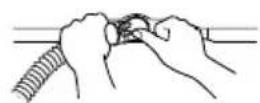
1 Fit the end of the drain hose to the outlet of the drain pump and tighten the clamp.
2 Put the other end of the drain hose over the standpipe or wash tub.
natural_image
Illustration of two hands adjusting a coiled tube with a handle, showing mechanical assembly (no text or symbols)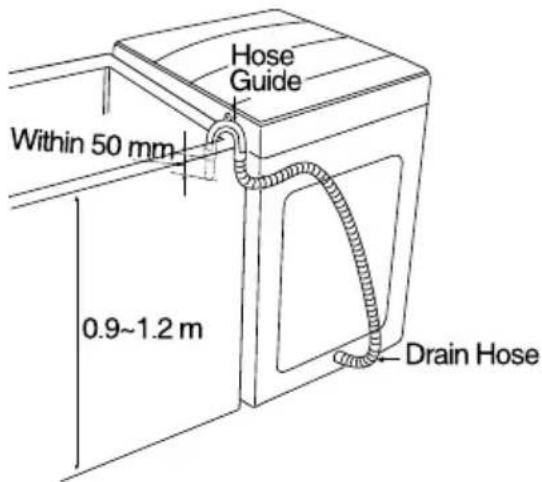
text_image
Hose Guide Within 50 mm 0.9~1.2 m Drain HoseNote
• To prevent siphoning, the drain hose should not extend more than 50 mm from the end of the hose guide.
• The discharge height should be approximately 0.9 \~ 1.2 m from the floor.
Non-Pump Model
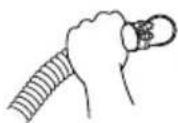
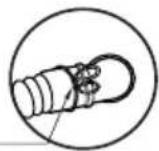
1 Before connecting Ensure that the hose clip is set as indicated here.
Clip
2 Connect the Elbow Hose Push the elbow hose toward the body of the washing machine.
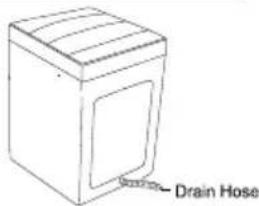
text_image
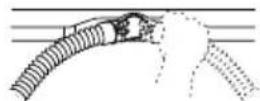
Drain Hose3 Place the Drain Hose To change the direction of the hose, pull out the elbow hose and change the direction. Repeat Step 2.

rounding Method
Earth wire should be connected.
If the earth wire is not connected, there is possible a danger of electric shock caused by the current leakage.
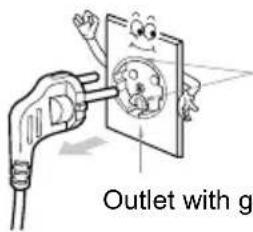
Grounding Method with Ground insert space Terminal
If the AC current outlet has a ground terminal, then separate grounding is not required. Note that AC power outlet configurations may differ from country to country
text_image
Outlet with gGround Terminal
Outlet with ground terminal.
Caution
CAUTION concerning the Power Cord
Most appliances recommend they be placed upon a dedicated circuit; that is, a single outlet circuit which powers only that appliance and has no additional outlets or branch circuits. Check the specification page of this owner's manual to be certain. Do not overload wall outlets. Overloaded wall outlets, loose or damaged wall outlets, extension cords, frayed power cords, or damaged or cracked wire insulation are dangerous. Any of these conditions could result in electric shock or fire. Periodically examine the cord of your appliance, and if its appearance indicates damage or deterioration, unplug it, discontinue use of the appliance, and have the cord replaced with an exact replacement part by an authorized servicer. Protect the power cord from physical or mechanical abuse, such as being twisted, kinked, pinched, closed in a door, or walked upon. Pay particular attention to plugs, wall outlets, and the point where the cord exits the appliance.
Other Grounding Method
Burying Copper Plate
Connect the Ground Wire to a Ground Copper Plate and bury it more than 75cm in the ground.
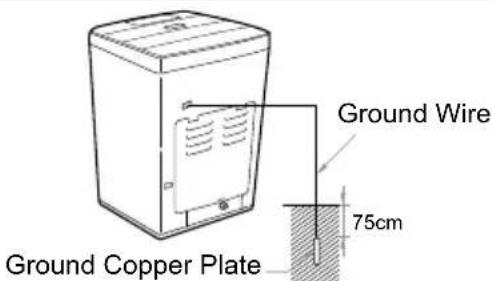
text_image
Ground Wire 75cm Ground Copper PlateUsing Ground Wire
Connect the ground Wire to the socket provided exclusively for Grounding.
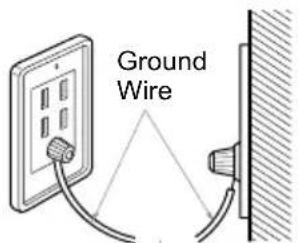
text_image
Ground WireUsing a Short Circuit Breaker
If grounding methods described above are not possible, a separate circuit breaker should be employed and installed by a qualified electrician
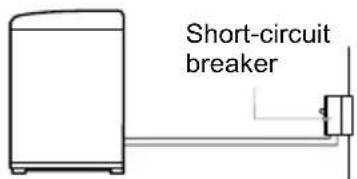
text_image
Short-circuit breakerCaution
• To prevent a possible explosion, do not connect ground to a gas pipe
- Do not connect ground to telephone wires or lightning rods. This may be dangerous during electrical storms
- Connecting ground to plastic has no effect
- Ground wires should be connected when an extension cord is used.

leaning and Maintenance
Cold water washing
- If you always use COLD water, we recommend that a WARM or HOT wash be used at a regular intervals e.g. every 5th wash should be at least a WARM one.
When you have finished
- Turn off taps to prevent the chance of flooding should a hose burst.
• Always unplug the power cord after use.
When water supply into the tub is not clean or the filter is clogged with particles (such as sand), clean the filter in the inlet valve occasionally.
(The figure of power cord and water tap may vary according to the country)
To Clean the Filter in the Inlet Valve
1 Close the tap before turning off the power. HOT/COLD(WARM) and then press the [START/PAUSE] button to remove water from the machine completely.
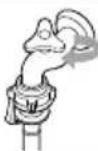
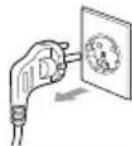
2 Turn off the power before pulling out the cord.
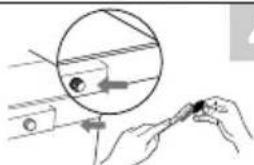
3 After removing the water supply hose pull out the filter. Then use a brush to clean the filter.
natural_image
Illustration of a hand holding a small object with a circular diagram overlay (no text or symbols)4 Replace the filter after cleaning it.
NOTE
- Before cleaning the filter, the impurities in the water supply hose should be removed.
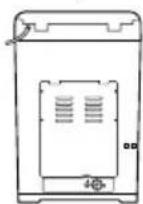
To Clean the Pump casing (for pump model)
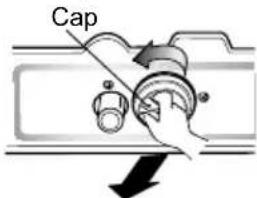
1 Place a travel on the floor under the drain pump cap. Excess water may flow out.
Turn the cap counter-clockwise and pull it out.
Remove any foreign objects and fluff inside pump casing and from the filter.
Replace the cap. Insert the filter along the guide ribs inside the pump casing. Filter must face the guide ribs inside pump casing and securely turn the cap clockwise.
text_image
Cap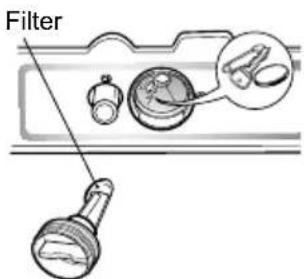
text_image
Filter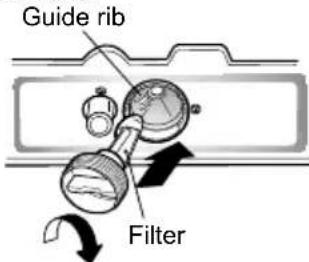
text_image
Guide rib FilterNOTE
- Check if water leaks after reassembling. (The Rubber ring is in the cap)
When there is a fear of freezing
- Close the water taps and remove the Water Supply Hose.
- Remove the water which remains in the water supply.
- Lower the drain hose and drain the water in the bowl and the drain hose by spinning.
If frozen
- Remove the water supply hose, and immerse it in HOT water at approx.. 40^ .
- Pour approx.. 2 liters of HOT water at approx.. 40^ , into the bowl and let it stand for 10 minutes.
- Connect the water supply hose to the water tap and confirm that the washing machine performs the supply and drainage of water.
| Wash Inner-tub | Leave the lid open after washing to allow moisture to evaporate. If you want to clean the inner-tub use a clean soft cloth dampened with liquid Detergent, then rinse. (Do not use harsh or gritty cleaners.) |
| Inlet Hoses Exterior | Hoses connecting washer to faucet should be replaced every 5 years.Immediately wipe off any spills. Wipe with damp cloth. Try not to hit surface with sharp objects. |
| Long Vacations | Be sure water supply is shut off at faucets. Drain all water from hoses if weather will be below freezing. |
Cleaning the Inside of your Washer
If you use fabric softener or do regular COLD water washing, it is very important that you occasionally clean the inside of your washer.
- Fill your washer with HOT water.
- Add about two cups of a powdered Detergent that contains phosphate.
- Let it operate for several minutes.
- Stop the washer, open the lid and leave it to soak overnight.
• After soaking, drain the washer and run it through a normal cycle.
Or use TUB CLEAN PROGRAM periodically.
We do not recommend that you wash clothes during this procedure.
Products that might damage your washing machine
- Concentrated bleaches and diaper sanitizer will cause damage to the paintwork and components of your washer.
- Hydrocarbon solvents i.e. petrol, paint thinners and lacquer thinners, etc. can dissolve plastic and blister paint (Be careful when washing garments stained with these solvents as they are flammable DO NOT put them in washer or dryer.)
- Some pretreatment sprays or liquids can damage your washer's control panel.
- Use of dyes in your washer may cause staining of the plastic components. The dye will not damage the machine but we suggest you thoroughly clean your washer afterwards. We do not recommend the use of dye strippers in your washer.
- Do not use your washer lid as a work surface.
Use of Handle Locker
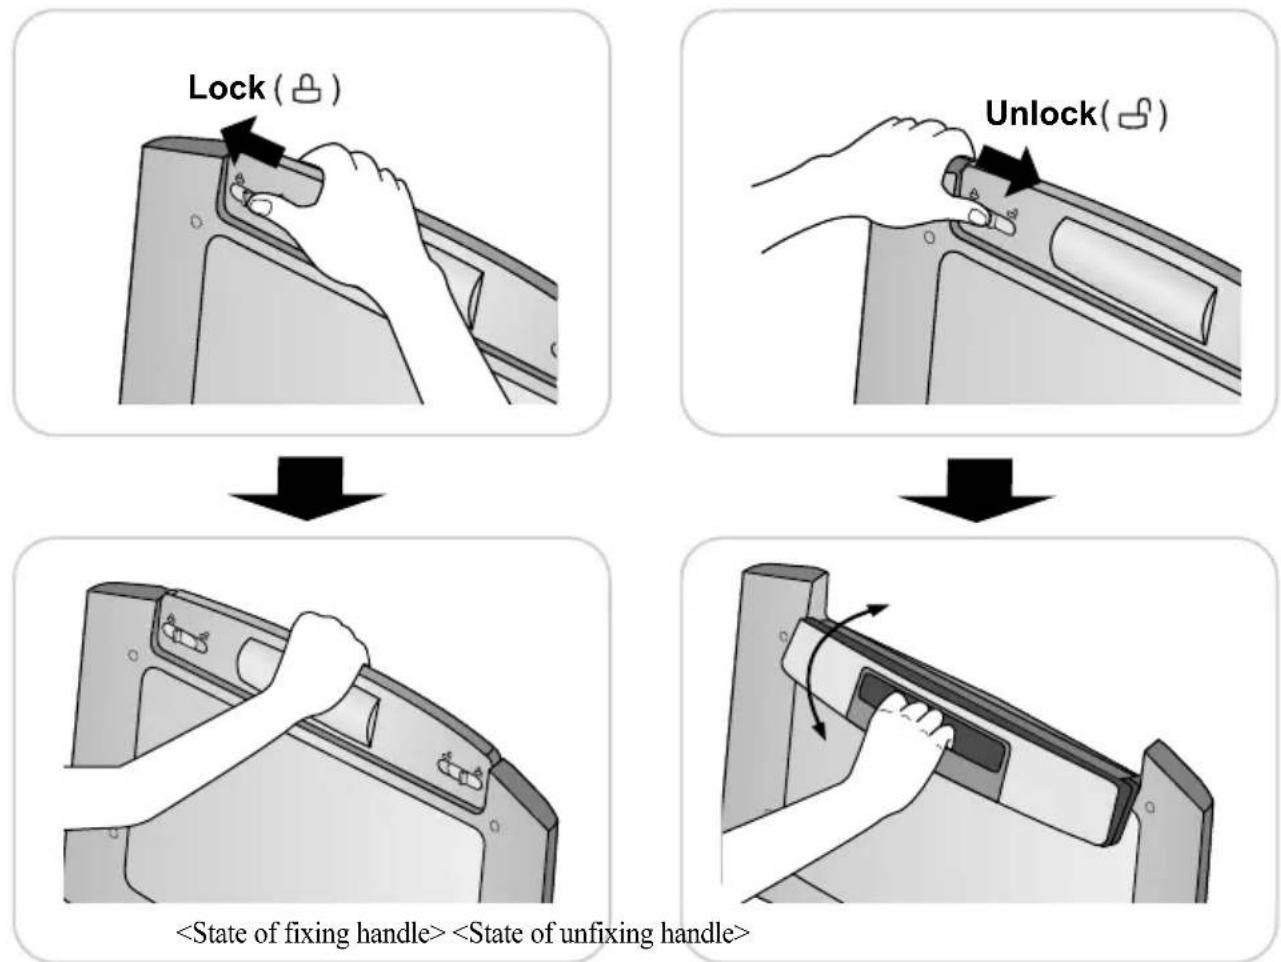
You can use handle hold function if you like to use.
Handle hold function is operated by holder under the handle.
- Slide holder to left/right side until you listen to Click sound to holding handle.
- Do opposite to loose the Handle holding.
NOTE
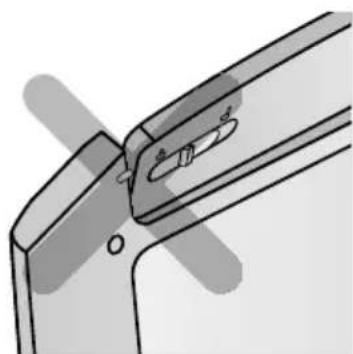
If you operate door like the below picture that, you can hurt so use after check locker was fixing or not.
natural_image
Technical line drawing of a mechanical clamp or bracket component (no text or symbols)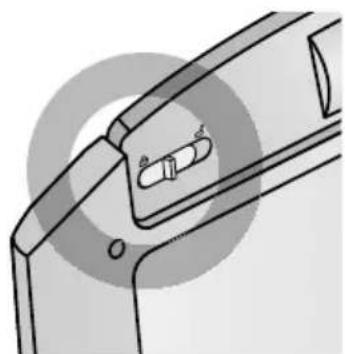
natural_image
Technical line drawing of a mechanical component with a central slot and mounting holes (no text or symbols)WASH PROBLEM
| Problems | Possible Causes | Solutions & Preventive Measures |
| Poor soil removal | Not enough DetergentWash Water Temperature too low.Overloading the washerIncorrect wash cycleIncorrect sortingDo not pretreat stain | Use correct amount of Detergent for load size, amount of soil and water Hardness.Different Water Temperature may be required according to soil type.Reduce load size.Wash with JEAN or SOAK & JEAN wash cycle for heavy soiled laundry.Separate heavily soiled items from lightly soiled ones.Pretreat stain and heavy soil according to directions shown on page 9. |
| Blue Stains | Undiluted fabric softener dispensed directly onto fabric | Rub the stain with bar soap. Wash.Do not overfill fabric softener dispenser and do not pour liquid fabric softener directly onto fabric.See page 12 for more instructions. |
| Black or gray marks on clothes | A buildup caused by the interaction of fabric softener and Detergent can flake off and mark clothesNot enough Detergent | Keep the recommendations against Scrud(waxy buildup). (refer to scrud page12.)Use correct amount of Detergent for load size, amount of soil and water Hardness. |
| Yellow or brown rust stains | Iron or manganese in water supply, water pipes, or water heater | To restore discolored load of whites, use rust remover safe for fabric.Install nonprecipitating water softener or an iron filter in your water supply system for an ongoing problem.Before washing, run water for a few minutes to clear lines. |
| Lint | Incorrect sortingTissues left in pocketOverloading the washer | Wash lint givers cg towels, flannelette sheets, separately from lint collectors eg synthetic fabrics and remove tissues in pockets before wash. See page 9 for sorting and caring before loading.Do not overload the washer |
| Residue or Detergent | Overloading the washerUndissolved DetergentUse too much Detergent | Do not overload the washer.Some Detergents need to be pre-dissolved, check the Detergent instructions. Try pre-dissolving the Detergent.Increase Water Temperature using HOT water safe for fabric.Use proper amount of Detergent. |
| Holes, tears, or snags | Incorrect use of chlorine bleach.Unfastened zippers, hooks, bucklesRibs, tears and broken threadsOverloading the washerDegradation of fabric | Never pour chlorine bleach directly on fabric.See page 11 for adding liquid bleach.Fasten zippers, hooks, and buckles.Remove objects in pockets. See page 9 for caring before loading.Do not overload the washer. |
Troubleshooting
Before calling for service, check the problem against the list bellows.
| Symptom Error Message | Check up | |
| Water Supply Failure | 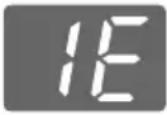 | • Is the water tap shut off?• Is the water supply cut off?• Is the tap or water supply hose frozen?• Is the water pressure low or is the filter of the inlet valve clogged with impurities?• Is the Hot hose connected to cold?• Is the Cold hose connected to hot? |
| Drainage Failure | 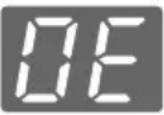 | • Is the drain hose positioned correctly?• Is the drain hose bent or placed too high?• Is the internal part of the hose or drain pump (only pump model) clogged with impurities?• Check if electric power has gone off. |
| Spin Failure | 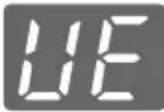 | • Is the laundry evenly balanced?• Is the washing machine placed on a flat surface? |
| Door(Lid) Open | 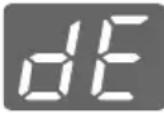 | • Is the lid closed? |
| Abnormal water level sensing | 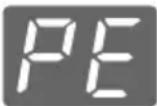 | • Please call your nearest LG Electronics service center for help. |
| Overflow failure | 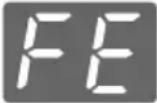 | |
| Abnormal motor | 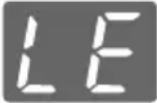 | |
| I-Sensor Error | 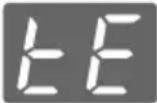 | |
| Clutching Error | 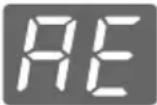 | |
Troubleshooting
USING SMARTDIAGNOSISTM
- Only use this feature when instructed to do so by the call center. The transmission sounds similar to a fax machine, and so has no meaning except to the call center.
- SmartDiagnosis™ cannot be activated if the washer does not power up. If this happens, then troubleshooting must be done without SmartDiagnosis™.
If you experience problems with your washer, call to Customer information center. Follow the call center agent's instructions, and do the following steps when requested:
1 Press the POWER button to turn on the washer. Do not press any other buttons or turn the cycle selector knob.
② When instructed to do so by the call center, place the mouthpiece of your phone very close to the POWER button.
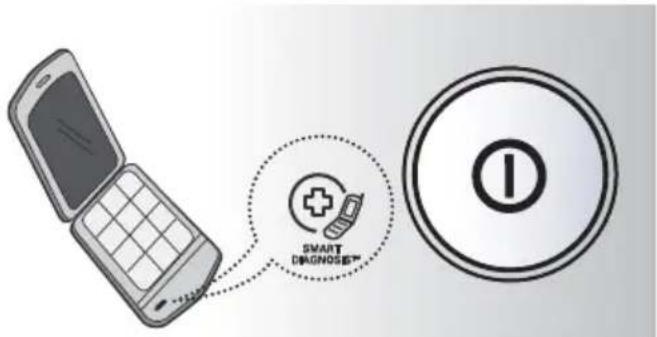
text_image
SMART DIAGNOSER™3 Press and hold the TEMP button for three seconds, while holding the phone mouthpiece to the icon or POWER button.
④ Keep the phone in place until the tone transmission has finished. This takes about 17 seconds, and the display will count down the time.
- For best results, do not move the phone while the tones are being transmitted.
- If the call center agent is not able to get an accurate recording of the data, you may be asked to try again.
- Pressing the POWER button during the transmission will shut off the SmartDiagnosis™.
5 Once the countdown is over and the tones have stopped, resume your conversation with the call center agent, who will then be able to assist you using the information transmitted for analysis at the call center.
Terms of Warranty
What Is Not Covered:
- Service trips to your home to teach you how to use the product.
- If the product is connected to any voltage other than that shown on the rating plate.
- If the fault is caused by accident, neglect, misuse or Act of God.
- If the fault is caused by factors other than normal domestic use or use in accordance with the owner's manual.
- Provide instruction on use of product or change the set-up of the product.
- If the fault is caused by pests for example, rats or cockroaches etc..
- Noise or vibration that is considered normal for example water drain sound, spin sound, or warming beeps.
- Correcting the installation for example, levelling the product, adjustment of drain.
- Normal maintenance which recommended by the owner's manual.
- Removal of foreign objects / substances from the machine, including the pump and inlet hose filter for example, grit, nails, bra wires, buttons etc.
- Replace fuses in or correct house wiring or correct house plumbing.
• Correction of unauthorized repairs. - Incidental or consequential damage to personal property caused by possible defects with this appliance.
- If this product is used for commercial purpose, it is not warranted.
(Example : Public places such as public bathroom, lodging house, training center, dormitory)
If the product is installed outside the normal service area, any cost of transportation involved in the repair of the product, or the replacement of a defective part, shall be borne by the owner.
S
pecification
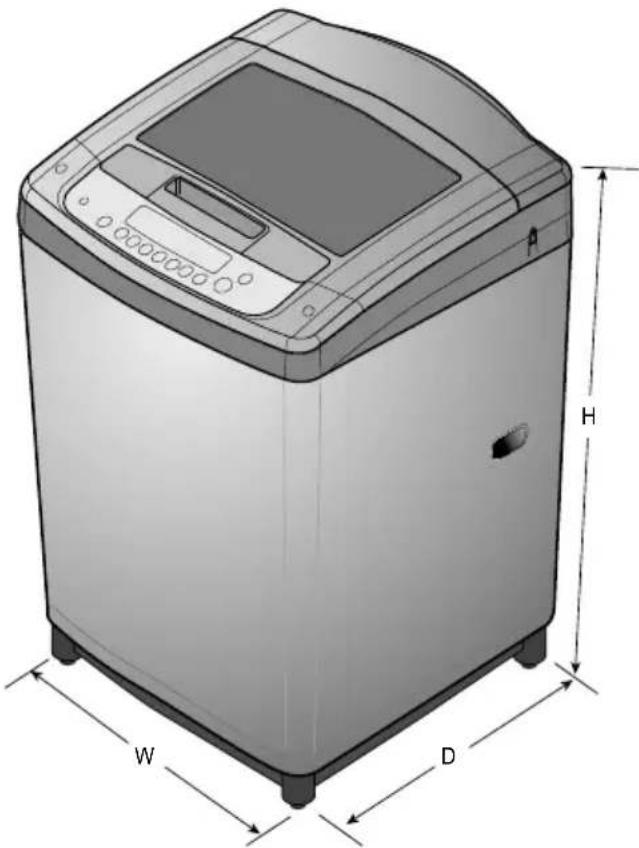
text_image
W D H| Model | T1203AFPT0T1203AFPT0 | WF-HD110GVWF-D110S | WF-HD100FS |
| Water tab pressure | 50 - 600 kPa (0.5 - 6.0 kgf/cm ^2 ) | ||
| Weight | 43.5 kg | ||
| Wash capacity | 12.0 kg | 11.0 kg | 10.0 kg |
| Dimensions | 590(Anchura) x606(Profundidad) x992(Altura) mm | ||
※ In our continuing effort to improve the quality of our appliances, it may be necessary to make changes to the appliance without revising this manual.

LG
Life's Good