
VM182CL - Air-conditioner LG - Free user manual and instructions
Find the device manual for free VM182CL LG in PDF.


User questions about VM182CL LG
0 question about this device. Answer the ones you know or ask your own.
Ask a new question about this device
Download the instructions for your Air-conditioner in PDF format for free! Find your manual VM182CL - LG and take your electronic device back in hand. On this page are published all the documents necessary for the use of your device. VM182CL by LG.
USER MANUAL VM182CL LG
Please read this manual carefully before operating your set and retain it for future reference.
TYPE : WALL MOUNTED INVERTER
MODELS
Indoor Unit Outdoor Unit
ASNQ122BSA1(VM122CL NB1)
ASNW122BSA1(VM122HLNB1)
ASNQ182CSA1(VM182CLNC1)
ASNW182CSA1(VM182HL NC1)
ASNQ242CSA1(VM242CL NC1)
ASNW242CSA1(VM242HL NC1)
ASUQ122BSA1(VM122CL UB1)
ASUW122BSA1(VM122HL u81)
ASUQ182CSA1(VM182CL UC1)
ASUW182CSA1(VM182HL uci)
ASUQ242CSA1(VM242CL UC1)
ASUW242CSA1(VM242HL UC1)
TABLE OF CONTENTS
A. Safety Precautions ......3
B. Electrical Safety......6
Temporary Use of an Adapter ......6
Temporary Use of an Extension Cord ...6
Symbols used in this Manual......6
C. Product Introduction......7
Indoor Units 7
Operation Indication Lamps .....7
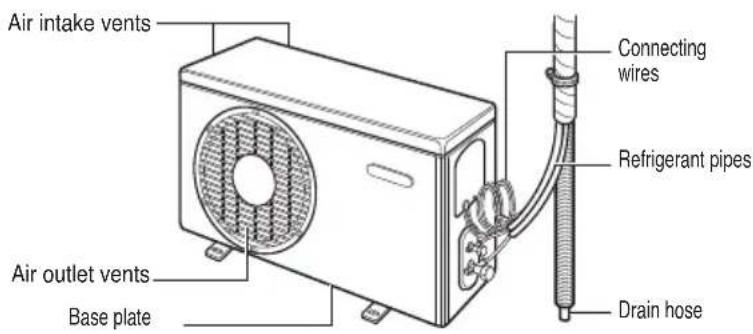
Outdoor Unit 7
D. Operating Instructions......8
How to insert the Batteries ....8
Wireless Remote Controller Maintenance....8
Operating Method......8
Wireless Remote Controller....9
Operation Mode....10
Auto Operation....11
Healthy Dehumidification Operation....11
Air Circulation Operation 12
Auto Clean Operation....12
Energy-Saving Cooling Mode ....13
Display Luminosity 13
Setting the Current Time ....13
Timer Setting 14
To cancel the timer setting .....14
Sleep Mode Operation ....14
Horizontal Vane Control 15
Jet Cool Operation 15
Forced operation 16
Auto Restart Function......16
E. Maintenance and Service......17
Indoor Unit....17
Outdoor Unit 18
Operation Tips!......18
Self-Diagnosis Function .....18
Troubleshooting Tips! Save time and money!....19
Call the service immediately in the following situations 19
FOR YOUR RECORDS
Write the model and serial numbers here:
Model #
Serial #
You can find them on a label on the side of each unit.
Dealer's Name
Date Purchased
■Staple your receipt to this page in the event you need it to prove date of purchase or for warranty issues.

READ THIS MANUAL
Inside you will find many helpful hints on how to use and maintain your air conditioner properly. Just a little preventive care on your part can save you a great deal of time and money over the life of your air conditioner.
You'll find many answers to common problems in the chart of troubleshooting tips. If you review our chart of
Troubleshooting Tips first, you may not need to call for service at all.

PRECAUTION
- Contact the authorized service technician for repair or maintenance of this unit.
- Contact the installer for installation of this unit.
- The air conditioner is not intended for use by young children or invalids without supervision.
- Young children should be supervised to ensure that they do not play with the air conditioner.
- When the power cord is to be replaced, replacement work shall be performed by authorized personnel only using only genuine replacement parts.
• Installation work must be performed in accordance with the National Electric Code by qualified and authorized personnel only. - If the appliance is supplied from a cord extension set or an electrical portable outlet device, the cord extension set on electrical portable outlet device must be positioned so that it is not subject to splashing or ingress of moisture.
text_image
plashing or ingress of moisture.Safety Precautions
To prevent injury to the user or other people and property damage, the following instructions must be followed.
■ Incorrect operation due to ignoring instruction will cause harm or damage. The seriousness is classified by the following indications.

WARNING
This symbol indicates the possibility of death or serious injury.

CAUTION
This symbol indicates the possibility of injury or damage.
■Meanings of symbols used in this manual are as shown below.


Be sure not to do.
Be sure to follow the instruction.

WARNING
Always use a power plug and socket with a ground terminal.
• There is a risk of electric shock.
For electrical work, contact the dealer, seller, a qualified electrician, or an Authorized Service Center. Do not disassemble or repair the product by yourself.
• There is risk of fire or electric shock.
Use the correctly rated breaker or fuse.
• There is risk of fire or electric shock.
Do not install the product on a defective installation stand. Be sure that the installation area does not deteriorate with age.
- It may cause product to fall.
In outdoor unit the step-up capacitor supplies high voltage electricity to the electrical components. Be sure to discharge the capacitor completely before conducting the repair work.
- An charged capacitor can cause electrical shock.
Do not use a defective or underrated circuit breaker. Use the correctly rated breaker and fuse.
• There is risk of fire or electric shock.
Always ground the product as per the wiring diagram. Do not connect the ground wire to gas or water pipes lightening rod or telephone ground wire.
• There is risk of fire or electric shock.
Do not modify or extend the power cable. If the power cable or cord has scrathes or skin peeled off or deteriorated then it must be replaced.
• There is risk of fire or electric shock.
Never install the outdoor unit on a moving base or a place from where it can fall down.
• The falling outdoor unit can cause damage or injury or even death of a person.
When installing the unit, use the installation kit provided with the product.
- Otherwise the unit may fall and cause severe injury.
Do not use a multi consent. Always use this appliance on a dedicated circuit and breaker.
- Otherwise it can cause electric shock or fire.
Install the panel and the cover of control box securely. - There is risk of fire or electric shock due to dust, water etc.
For installation, removal or reinstall, always contact the dealer or an Authorized Service Center. - There is risk of fire, electric shock, explosion, or injury.
When the product is soaked (flooded or submerged) in water, contact an Authorized Service Center for repair before using it again. - There is risk of fire or electric shock.
Be sure to use only those parts which are listed in the svc parts list. Never attempt to modify the equipment. - The use of inappropriate parts can cause an electrical shock, excessive heat generation or fire.
| Indoor/outdoor wiring connections must be secured tightly and the cable should be routed properly so that there is no force pulling the cable from the connection terminals. | Safely dispose off the packing materials. Like screws, nails, batteries, broken things etc after installation or svc and then tear away and throw away the plastic packaging bags. | Make sure to check that the power cable plug is not dirty, loose or broken and then only insert the plug completely. |
| • Improper or loose connections can cause heat generation or fire. | • Children may play with them and cause injury. | • Dirty, loose or broken power plug can cause electric shock or fire. |
| Be sure to check the refrigerant to the used. Please read the label on the product. | Don't use a power cord, a plug or a loose socket which is damaged. | Do not touch , operate, or repair the product with wet hands. Hold the plug by hand when taking out |
| • Incorrect refrigerant used can prevent the normal operation of the unit. | • Otherwise it may cause a fire or electrical shock. | • There is risk of electric shock or fire. |
| Do not place a heater or other heating appliances near the power cable. | Do not allow water to run into electric parts. Install the unit away from water sources. | Do not store or use or even allow flammable gas or combustibles near the product. |
| • There is risk of fire and electric shock. | • There is risk of fire, failure of the product, or electric shock. | • There is risk of fire. |
| Do not use the product in a tightly closed space for a long time. Perform ventilation regularly. | Do not open the front grille of the product during operation. (Do not touch the electrostatic filter, if the unit is so equipped.) | If strange sounds, smell or smoke comes from product.Immediately turn the breaker off or disconnect the power supply cable. |
| • Oxygen deficiency could occur and hence harm your health. | • There is risk of physical injury, electric shock, or product failure. | • There is risk of electric shock or fire. |
| Ventilate the product room from time to time when operating it together with a stove, or heating element etc. | Turn the main power off and unplug the unit when cleaning or repairing the product. | When the product is not to be used for a long time, disconnect the power supply plug or turn off the breaker. |
| • Oxygen deficiency can occur and hence harm your health. | • There is risk of electric shock. | • There is risk of product damage or failure, or unintended operation. |
| Take care to ensure that nobody especially kids could step on or fall onto the outdoor unit. | Take care to ensure that power cable could not be pulled out or damaged during operation. | Do not place ANYTHING on the power cable. |
| • This could result in personal injury and product damage. | • There is risk of fire or electric shock. | • There is risk of fire or electric shock. |
Do not plug or unplug the power supply plug to turn the unit ON/OFF.
• There is risk of fire or electric shock.
When flammable gas leaks, turn off the gas and open a window for ventilation before turn the product on.
- Do not use the telephone or turn switches on or off. There is risk of explosion or fire.
For inner cleaning, contact an Authorized Service Center or a dealer. Do not use harsh detergent that causes corrosion or damage on the unit.
- Harsh detergent may also cause failure of product, fire, or electronic shock.
CAUTION
Two or more people must lift and transport the product.
- Avoid personal injury.
Keep level even when installing the product.
- To avoid vibration or noise.
Do not install the product where it will be exposed to sea wind (salt spray) directly.
- It may cause corrosion on the product.
Do not install the product where the noise or hot air from the outdoor unit could damage or disturb the neighborhoods.
- It may cause a problem for your neighbors and hence dispute.
Install the drain hose to ensure that the condensed water is drained away properly.
- A bad connection may cause water leakage.
Always check for gas (refrigerant) leakage after installation or repair of product.
- Low refrigerant levels may cause failure of product.
| Do not use the product for special purposes, such as preserving foods, works of art, etc. It is a consumer air conditioner, not a precision refrigeration system. | Do not block the inlet or outlet of air flow. | Use a soft cloth to clean. Do not use harsh detergents, solvents or splashing water etc . |
| • There is risk of damage or loss of property. | • It may cause product failure. | • There is risk of fire, electric shock, or damage to the plastic parts of the product. |
| Do not touch the metal parts of the product when removing the air filter. | Do not step on or put anything on the product. (outdoor units) | Always insert the filter securely after cleaning. Clean the filter every two weeks or more often if necessary. |
| • There is risk of personal injury. | • There is risk of personal injury and failure of product. | • A dirty filter reduces the efficiency. |
| Do not insert hands or other objects through the air inlet or outlet while the product is operating. | Be cautious when unpacking and installing the product. | If the refrigerant gas leaks during the repair, do not touch the leaking refrigerant gas. |
| • There are sharp and moving parts that could cause personal injury. | • Sharp edges could cause injury. | • The refrigernat gas can cause frostbite (cold burn) |
| Do not tilt the unit when removing or uninstalling it. | Do not mix air or gas other than the specified refrigerant used in the system . | If the refrigerant gas leaks during the installation, ventilate the area immediately. |
| • The condensed water inside can spill . | • If air enters the refrigerant system, an excessively high pressure results, causing equipment damage or injury. | • Otherwise it can be harmfull for your health. |
| Dismantling the unit, treatment of the refrigerant oil and eventual parts should be done in accordance with local and national standards. | Replace the all batteries in the remote control with new ones of the same type. Do not mix old and new batteries or different types of batteries. | Do not recharge or disassemble the batteries. Do not dispose off batteries in a fire. |
| • There is risk of fire or product failure. | • They may burn or explode. | |
| If the liquid from the batteries gets onto your skin or clothes, wash it well with clean water. Do not use the remote if the batteries have leaked. | Do not let the air conditioner run for a long time when the humidity is very high and a door or a window is left open. | Do not expose your skin or kids or plants to the cool or hot air draft. |
| • The chemicals in batteries could cause burns or other health hazards. | • Moisture may condense and wet or damage furniture. | • This could harm to your health. |
| If you eat the liquid from the batteries, brush your teeth and see doctor. Do not use the remote if the batteries have leaked. | Do not drink the water drained from the product. | Use a firm stool or ladder when cleaning, maintaining or repairing the product at an height. |
| • The chemicals in batteries could cause burns or other health hazards. | • It is not sanitary and could cause serious health issues. | • Be careful and avoid personal injury. |
Operation ranges
The table below indicates the temperature ranges the air conditioner can be operated within.
| Mode Indoor temperature outdoor temperature | |
| Cooling 18°C~32°C 18°C~48°C | |
| Heating 16°C~30°C -5°C~24°C |
Electrical Safety
▲ WARNING
• This appliance must be properly grounded.
To minimize the risk of electric shock, you must always plug into a grounded outlet.
- Do not cut or remove the grounding prong from the power plug.
- Attaching the adapter ground terminal to the wall receptacle cover screw does not ground the appliance unless the cover screw is metal and not insulated, and the wall receptacle is grounded through the house wiring.
- If you have any doubt whether the air conditioner is properly grounded, have the wall receptacle and circuit checked by a qualified electrician.
Temporary Use of an Adapter
We strongly discourage the use of an adapter due to potential safety hazards. For temporary connections, use only a genuine adapter, available from most local hardware stores. Ensure that the large slot in the adapter is aligned with the large slot in the receptacle for a proper polarity connection.
To disconnect the power cord from the adapter, use one hand on each to avoid damaging the ground terminal. Avoid frequently unplugging the power cord as this can lead to eventual ground terminal damage.
▲ WARNING
- Never use the appliance with a broken adapter.
Temporary Use of an Extension Cord
We strongly discourage the use of an extension cord due to potential safety hazards.
▲ WARNING
This appliance should be installed in accordance with national wiring regulations. This manual acts as a guide to explain the product features.
Symbols used in this Manual

This symbol alerts you to the risk of electric shock.

This symbol alerts you to hazards that may cause harm to the air conditioner.
NOTE
This symbol indicates special notes.
Product Introduction
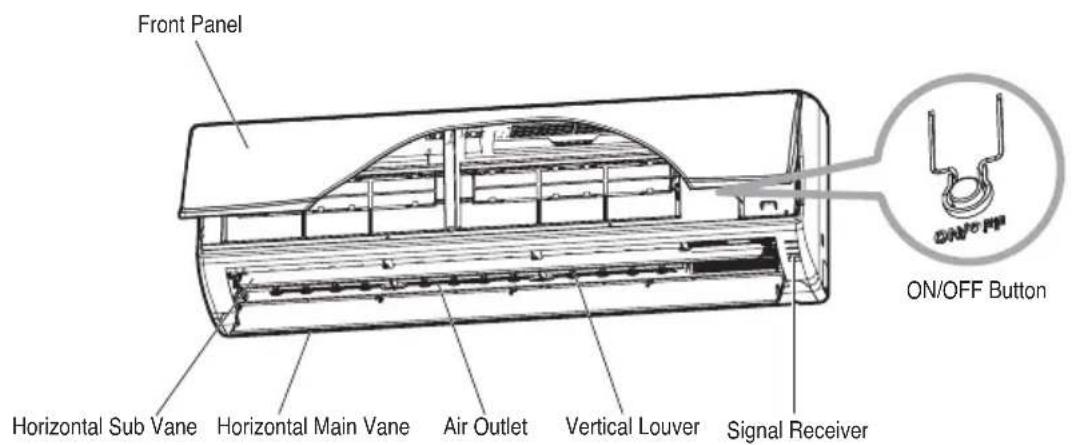
Here is a brief introduction of the indoor and outdoor units.
Indoor Unit
text_image
Front Panel ON/OFF Button Horizontal Sub Vane Horizontal Main Vane Air Outlet Vertical Louver Signal ReceiverOutdoor Unit
text_image
Air intake vents Connecting wires Refrigerant pipes Air outlet vents Base plate Drain hose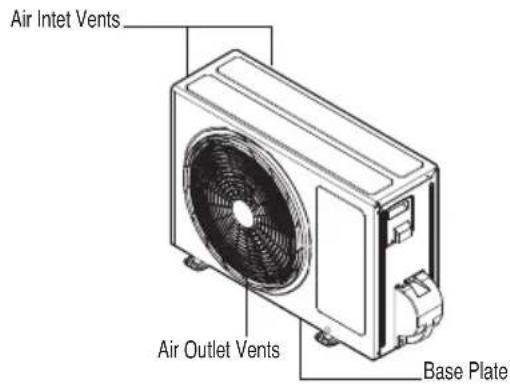
text_image
Air Intet Vents Air Outlet Vents Base PlateOperating Instructions
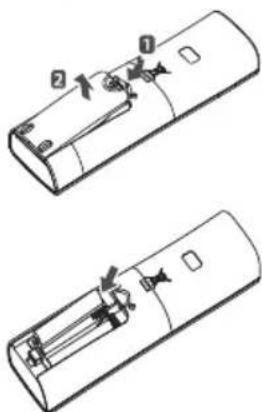
How to insert the Batteries
- Remove the battery cover by pulling it according to the arrow direction.
- Insert new batteries making sure that the (+) and (-) of battery are installed correctly.
- Reattach the cover by sliding it back into position.
NOTE
- Always use/replace both batteries of same type.
- If the system is not to be used for a long time, remove the batteries to save their working life.
- If the display screen of remote controller starts, fading replace both of the batteries.
- Use 2 AAA(1.5 volt) batteries.
natural_image
Two technical line drawings of a remote control casing with internal components and mounting holes (no text or symbols)Wireless Remote Controller Maintenance
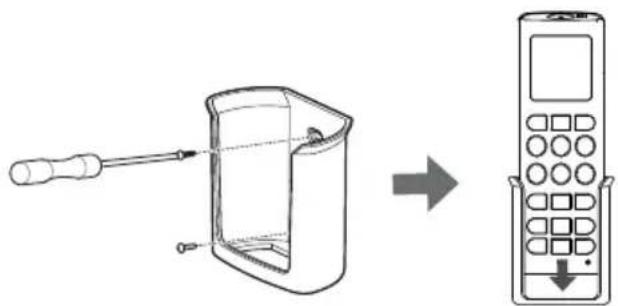
- Choose a suitable place where its safe & easy to reach.
- Fix the holder to wall etc with the supplied screws firmly.
- Slide the remote controller inside the holder.
NOTE
- Remote controller should never be exposed to direct sunlight.
- Signal transmitter & receiver should always be clean for proper communication. Use a soft cloth to clean them.
text_image
Diagram showing a tool interacting with a device and then to an open mobile phone, illustrating the process of adding a component.- In case some other appliances also get operated with remote control, change their position or consult your serviceman.
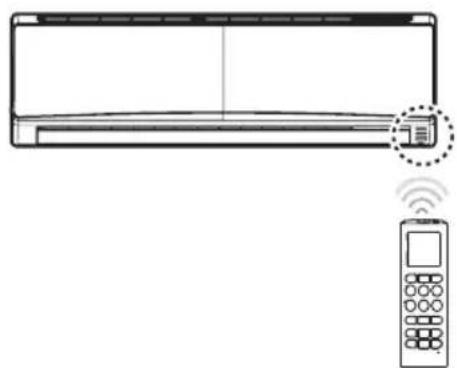
Operating Method
- The signal receiver is inside the unit.
- Aim the remote controller towards the unit to operate it. There should not be any blockage in between.
natural_image
Line drawing of a wall-mounted air conditioner with a remote control unit and wireless signal icon (no text or symbols)Wireless Remote Controller
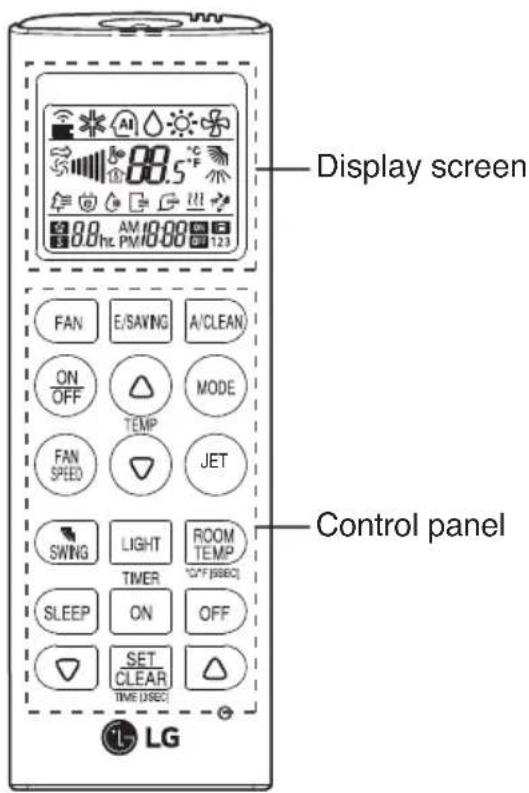
text_image
Display screen Control panel FAN E/SAVING A/CLEAN ON OFF MODE TEMP FAN SPEED JET SWING LIGHT ROOM TEMP TIMER "OFF [0000] SLEEP ON OFF SET CLEAR TIME (DSEC) LG| Control panel | Display screen | Description |
 |  | Fan button: Air come out from the indoor unit below to the room without air temperature change. |
 |  | Sleep mode auto button*: Sets the sleep mode auto operation. |
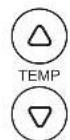
 |  / °C / °C | Temperature adjustment buttons: Adjusts the room temperature when cooling and heating. |
 | - | On/Off button: Turns the power on/off. |
| [FAN SPEED] |  [BCZH] [BCZH] | Indoor fan speed button: Adjusts the fan speed. |
| [0672] | [CTZW] [WTEK] | Operation mode selection button*: Selects the operation mode. Cooling operation (※) / Auto operation or auto changeover (AI) / Dehumidifying operation (◇) / Heating operation (☀) |
 |  | Jet cooling/heating button*: Warms up or cools down the indoor temperature within a short period of time. |
| [X430] | [ADZZ] | Air flow direction button: Adjusts the air flow direction vertically. |
| [XDOK] |  | Temperature display button: Displays the room temperature. Press ROOM TEMP for 5 sec, conversion °C / °F |
| [X855] | 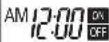 | Timer button: Sets the current time and the start / end time. |
 |  [SC43] [SC43] | Navigation and functions button*: Adjusts the time and sets the special functions. ☐: Auto clean / ☑: Operates energy saving cooling |
| [YCK] | [179] | [0022] |
| [180] | [189] |  |
| [074W] | [HT2T] |
* Some functions may not be supported, depending on the model.
- Reset (display): When you press the reset button, all the functions shown on the screen of remote controller (above image), will be visible on the display. But some of these functions are optional for your product and may not actually function.
Operation Mode
1 Press the ON/OFF BUTTON to turn the unit on. The unit will respond with a beep.

2 Open the cover of the remote controller and press the operation mode button. Each time the button is pressed, the operation mode is shifted in the direction of the arrow.


flowchart
graph LR
    A["Cooling"] --> B["Auto Operation"]
    B --> C["Heating Dehumidification"]
3 For cooling operation set the desired indoor temperature by pressing the ROOM TEMPERATURE SETTING BUTTONS. For cooling the temperature can be set within 18°C\~30°C.
4 Set the fan speed with the remote controller. You can select the fan speed.

Natural wind
☐ For fresher feeling, press the INDOOR FAN SPEED SELECTION BUTTON and set to Natural wind mode. In this mode, the wind blows like a natural breeze by automatically changing fan speed.
Auto Operation
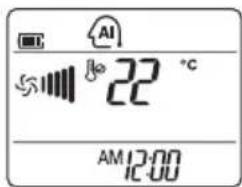
text_image
AI 22 °C AM 12:00The temperature and fan speed are automatically set by the electronic controls based on the actual room temperature.

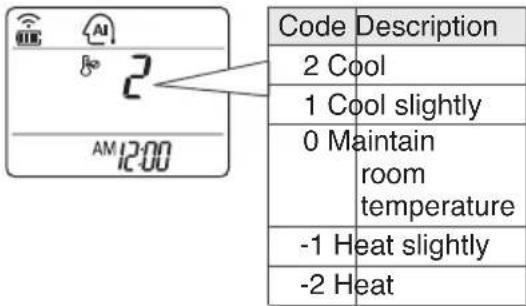
If you feel hot or cold, press TEMPERATURE SETTING buttons for more cooling or heating effect.
You cannot switch the indoor fan speed. It has already been set by the Auto Operation Mode rule.
text_image
Code Description 2 Cool 1 Cool slightly 0 Maintain room temperature -1 Heat slightly -2 HeatHealthy Dehumidification Operation
text_image
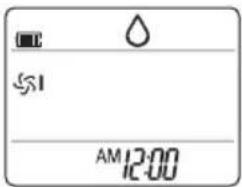
W S1 AM 12:00During Healthy Dehumidification Operation
☐If you select the dehumidification mode on the OPERATION MODE SELECTION BUTTON, the product starts to run the dehumidification function.

It automatically sets the room temperature and airflow volume to the best condition for dehumidification, based on the sensed current room temperature.
In this case, however, the setting temperature is not displayed on the remote controller and you are not able to control the room temperature either.
☐During the healthy dehumidification function, the fan speed is automatically set according to the optimization algorithm responding to the current room temperature status, so that the room condition is kept healthy and comfortable even in the very humid season.
Air Circulation Operation
text_image
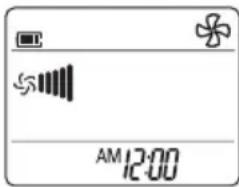
AM 12:00This operation circulates the air without cooling. It can be activated by pressing the OPERATION MODE SELECTION BUTTON. Once the air circulation is activated you can select the fan speed by pressing the INDOOR FAN SPEED SELECTION BUTTON.

NOTE
: During this opertion, 'Cooling' lamp lights up.
Auto Clean Operation
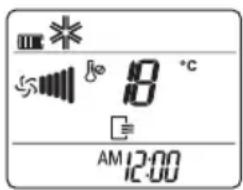
☐ During Auto Clean Operation, moistures left in indoor units after cooling operation or healthy dehumidification operation can be removed.
text_image
00 50 18 °C E AM 12:00Select Auto Clean Operation by the function setting button( A/CLEAN ) .

Now whenever the unit is turned off, the indoor fan is still running for about 30 minutes internally without cooling or dehumidification operation. This function dries up any remains of moisture & cleans the unit internally. If you push the Auto Clean button again, this function is cancelled.
NOTE
☐ During Auto Clean fuction, only ON/OFF button, Plasma button, Auto Clean button is used. During this operation, 'Cooling' lamp lights up.
Energy-Saving Cooling Mode
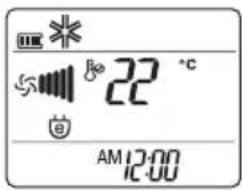
Energy-saving cooling mode can save energy in cooling operation, because it can operate efficiently by setting body-adaptation time according to the change of time and temperature and adjusting desired temperature automatically.
text_image
22 °C AM 12:00- Press the ON/OFF BUTTON to start the unit.
- Open the cover of the remote controller. Select cooling operation.
- Press the ENERGY-SAVING COOLING MODE BUTTON.
- To cancel the energy-saving cooling mode, press the ENERGY-SAVING COOLING MODE BUTTON again and unit will operate in previous mode(Cooling mode), but temperature remains 22°C.
E/SAVING
Display Luminosity
The unit display Luminosity can be adjusted by using the remote controller. Open the cover of the remote controller and press the LED LUMINOSITY button. Display LED will be dark. Press the button again to set bright display.
LIGHT
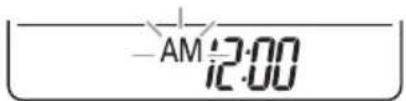
Setting the Current Time
1
Press the SET CLEAR BOTTON For 3 seconds.

text_image
-AM 12:002
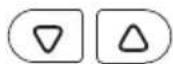
Press the TIMER SETTING BUTTONS until the desired time is set.
3
Press the SET/CLEAR button.

NOTE
Check the indicator for a.m. and p.m.
Timer Setting
| Description | Button on the Remote Controller | Indication on the LCD Display |
| 1 Press the Timer button once to set on the Reserved 'On' or 'Off'. |  | 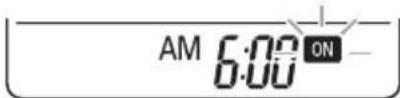 |
| 2 Press the Time Setting buttons until the desired time is set. |  | 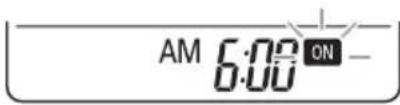 |
| 3 Press the SET/CLEAR BUTTON |  | 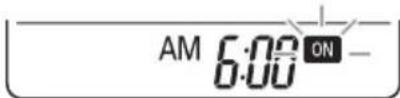 |
To cancel the timer setting
- If you wish to cancel all timer setting, press the SET/CLEAR button.
Sleep Mode Operation
Press the SLEEP Button to set the time, you can adjust the time by pressing Setting Button.
Press the SET/CLEAR BUTTON
SLEEP MODE AUTO BUTTON 1 to 7 times. The sleep mode is available for 1 to 7 hours.

NOTE
- The sleep mode will operate indoor fan at super low speed in cooling mode for pleasant sleep. In cooling mode or healthy dehumidification mode:
The setting temperature will rise automatically two times by 1^ C over next consecutive 30 minutes (Maximum 2^ C) for a comfortable sleep. This will be the final setting temperature as long as sleep mode is functioning.
Horizontal Vane Control
- To adjust the direction of the air flow horizontally, press SWING repeatedly and select the desired direction.
- Select 📋 to adjust the direction of the air flow automatically.
- To adjust the direction of the air flow vertically, press SWING repeatedly and select the desired direction.
- Select to adjust the direction of the air flow automatically.
NOTE
- Adjusting the air flow direction vertically may not be supported, depending on the model.
- Adjusting the air deflector arbitrarily may cause product failure.
- If you restart the air conditioner, it starts to operate with the previously set direction of air flow, so the air deflector may not match the icon displayed on the remote control. When this occurs, press SWING or SWING to adjust the direction of the air flow again.
Jet Cool Operation
text_image
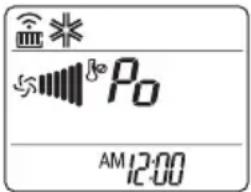
Wire S Po AM 12:00Jet cool function can be used to cool the room quickly in hot summer. When this function is turned on, the air conditioner runs in cooling operation mode with super high fan speed and 18^ C setting temperature for 30 minutes for fast and effective cooling.
You can activate this operation by pressing the JET COOL BUTTON.
To change from jet cool mode to high fan speed cooling mode, press the JET COOL BUTTON or INDOOR FAN SPEED SELECTOR BUTTON or the ROOM TEMPERATURE SETTING BUTTON again.

NOTE
- Jet Cool operation cannot be activated during Air Circulation operation.
Forced operation
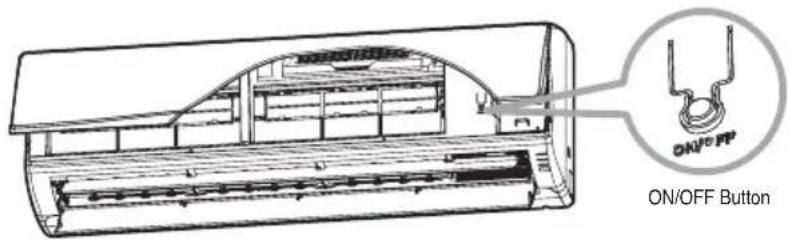
Forced operation is used when the remote controller can't be used. The operation will be started if the ON/OFF button is pressed. If you want to stop the operation, re-press the button.
text_image
ON/OFF PP ON/OFF Button| Operating mode Cooling | |
| Indoor FAN Speed High | |
| Setting Temperature 22°C |
Test operation
During the TEST OPERATION, the unit operates in cooling mode at high speed fan, regardless of room temperature and resets in 18 minutes. During test operation, if remote controller signal is received, the unit operates as remote controller sets. If you want to use this operation, Press and hold the ON/OFF button for 3\~5 seconds, then the buzzer sound 1 'beep'. If you want to stop the operation, re-press the button.
NOTE
If you do not have the remote controller around here, you can start to operate the forced operation. If you force to close the front panel, some parts may be damaged.
Auto Restart Function
This function is useful in the situation of power failure.
When power regains after a failure this feature restore the previous operating condition and the air conditioner will run in the same settings.
NOTE
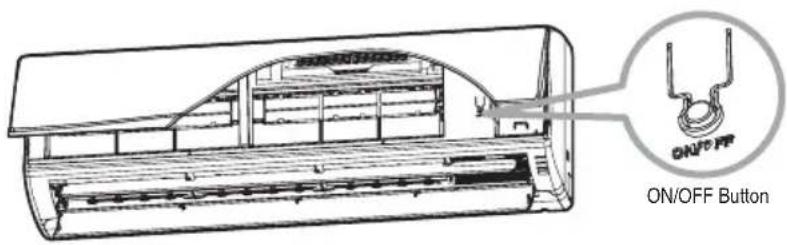
This feature is enabled by factory default setting, but you can disable it by pressing the ON/OFF button for 6 seconds. The unit will beep twice and the lamp will blink 6 times. To enable it, press the button again for 6 seconds. The unit will beep twice and the blue lamp will blink 4 times.
text_image
ON/OFF ButtonMaintenance and Service
CAUTION
Before performing any maintenance, turn off the main power to the system, disconnect the circuit breaker and unplug the power cord.
Indoor Unit
Clean the unit with a soft dry cloth. Do not use bleach or abrasives.
▲ WARNING
For inner cleaning, contact an Authorized Service Center or a dealer.
Do not use harsh detergent that causes corrosion or damage on the unit.
- Harsh detergent may also cause failure of product, fire, or electronic shock.
CAUTION
Never use any of these
- Water hotter than 40^ C . It may cause deformation and discoloration.
- Volatile substances. They may damage the surface of the air conditioner.
Air Filters
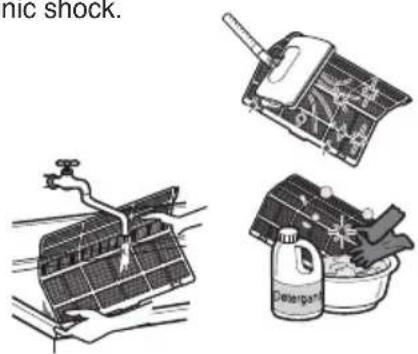
The air filters behind the front panel / grill should be checked and cleaned once in every 2 weeks or more often if necessary. To remove the filters see the self explanatory diagrams for each model type. Clean the filters with a vacuum cleaner or warm soapy water. If dirt is not easily removed, wash with a solution of detergent in luke warm water. Dry well in shade after washing and reinstall the filters back in place.
text_image
mic shock.Removal of Filters
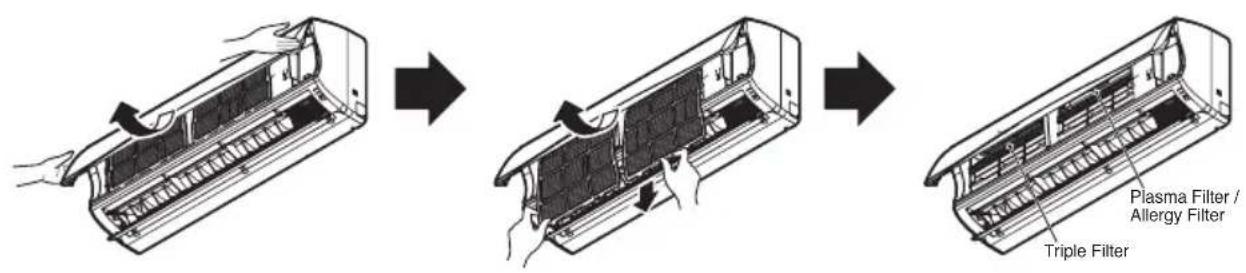
Open the front panel as shown.
Then pull the filter tab slightly forward to remove the air filter.
text_image
Plasma Filter / Allergy Filter Triple FilterOutdoor Unit
The heat exchanger coils and panel vents of the outdoor unit should be checked regularly. If clogged with dirt or soot, the heat exchanger and panel vents may be professionally steam cleaned.
NOTE
Dirty or clogged coils will reduce the operating efficiency of the system and cause higher operating costs.
Operation Tips!
Do not overcool the room.
This is not good for the health and wastes electricity.
Keep blinds or curtains closed.
Do not let direct sunshine enter the room when the air conditioner is in operation.
Keep the room temperature uniform.
Adjust the vertical and horizontal airflow direction to ensure a uniform temperature in the room.
Make sure that the doors and windows are shut thight.
Avoid opening doors and windows as much as possible to keep the cool air in the room.
Clean the air filter regularly.
Blockages in the air filter reduce the airflow and lower cooling and dehumidifying effects. Clean at least once every two weeks.
Ventilate the room occasionally.
Since windows are kept closed, it is a good idea to open them and ventilate the room now and ten.
Use high fan speed for effective and fast cooling.
The unit gives its rated cooling capacity when the fan speed is high.
Self-Diagnosis Function
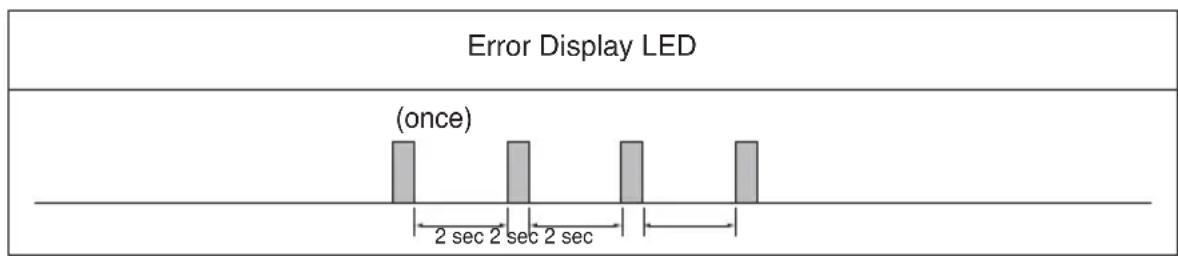
This unit has an inbuilt error diagnosis capability. Unit LED will blink in case if thermistor fails. Please contact your serviceman/dealer in such a situation
text_image
Error Display LED (once) 2 sec 2 sec 2 secTroubleshooting Tips! Save time and money!
The air conditioner may be operating abnormally when:
| Problem | What To DoPossible Cau | |
| Air conditioner does not start | ■The air conditioner is unplugged. | ·Make sure the air conditioner plug is pushed completely into the outlet. |
| ■The fuse is blown/circuit breaker is tripped. | ·Check the house fuse/circuit breaker box and replace the fuse or reset the breaker. | |
| ■Power failure. | ·If power failure occurs, turn the mode control to OFF.When power is restored, wait 3 minutes to restart the air conditioner to prevent tripping of the compressor overload. | |
| ■High or low voltage. | ·If the voltage is unusually very high or low the circuit Breaker will trip. | |
| Air conditioner does not cool as it should | ■Airflow is restricted. | ·Make sure there are no curtains, blinds, or furniture blocking the front of the air conditioner. |
| ■The air filter is dirty. | ·Clean the filter at least every 2 weeks.See the Maintenance and Service section. | |
| ■The room may have been hot. | ·When the air conditioner is first turned on, you need to allow time for the room to cool down. | |
| ■Cold air is escaping. | ·Check for open furnace floor registers and cold air returns. | |
| ■Check the temperature settings. | ·Make sure they are correct. | |
| ■There might be any heating source in the room. | ·Check and remove such source or turn it off while using the air conditioner. |
Call the service immediately in the following situations
- Anything abnormal such as burning smell, loud noise etc. happen. Stop the unit and turn the breaker off. Never try to repair by yourself or restart the system in such cases.
- Main power cord is too hot or damaged.
- Error code is generated by self diagnosis.
- Water leaks from indoor unit even if the humidity is low.
- Any switch, breaker (safety, earth) or fuse fails to work properly
User must carry routine checkup & cleaning to avoid unit's poor performance. In case of special situation, the job must be carried out by service person only. ELECTRICAL SPECIFICATIONS:
220 V \~ 50/60 Hz Since this manual refers to different models, you are invited to pay special attention to the sticker placed on your product to check the consumption of your model.

LG
Life's Good