S5611C - Washing machine SanGiorgio - Free user manual and instructions
Find the device manual for free S5611C SanGiorgio in PDF.


User questions about S5611C SanGiorgio
0 question about this device. Answer the ones you know or ask your own.
Ask a new question about this device
Download the instructions for your Washing machine in PDF format for free! Find your manual S5611C - SanGiorgio and take your electronic device back in hand. On this page are published all the documents necessary for the use of your device. S5611C by SanGiorgio.
USER MANUAL S5611C SanGiorgio
User Manual Use and Maintenance
natural_image
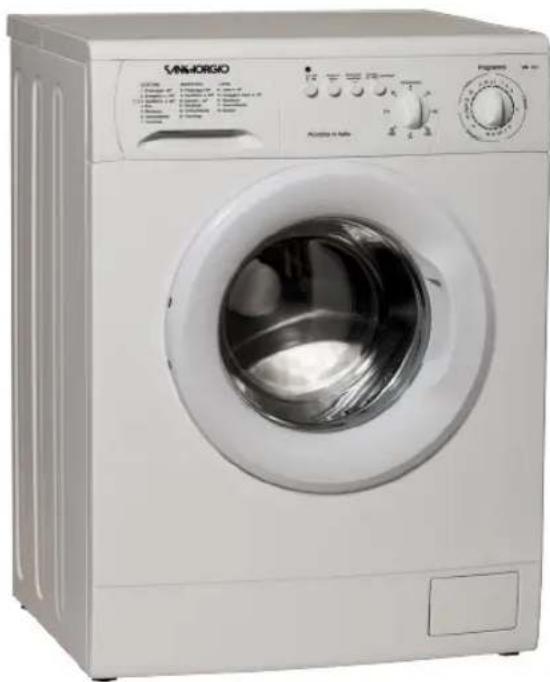
White Samsung washing machine with open lid and control panel (no visible text or symbols)Please read the instructions carefully
before handling, installing and using your home appliance so as to prevent any damage to yourself and to your washing machine
IMPORTANT OPERATIONAL INSTRUCTIONS
text_image
INFO Carefully read the instruction bookletPHASE 1: REMOVAL OF FIXING SCREWS
Fig.1
text_image
Diagram of a mechanical device with numbered components and directional arrows indicating motion or assembly.Fig.2
natural_image
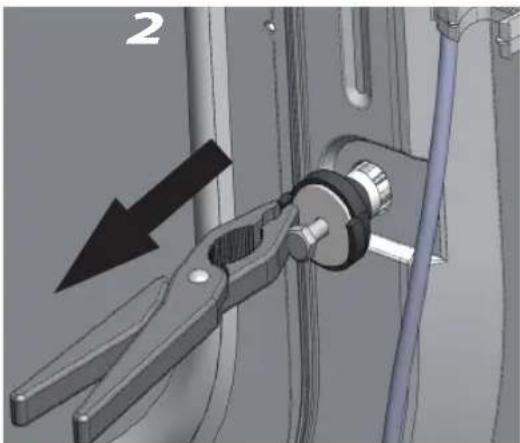
Mechanical assembly diagram showing a clamping tool interacting with a mechanical component (no text or symbols visible)Remove the screws include spacers by pulling outward (Figure 2.)
natural_image
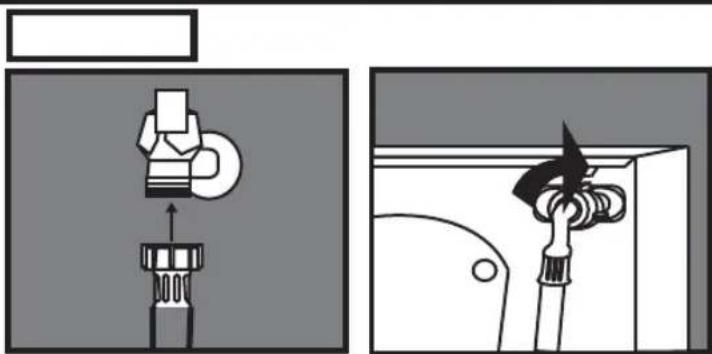
Two-panel diagram showing a mechanical device and a valve mechanism (no text or symbols)Check for leaks after connection to the water supply.
PHASE 3:PLACEMENTPHASE 2:WATI
natural_image
Mechanical assembly diagram showing a bolt and nut assembly with directional arrows (no text or labels)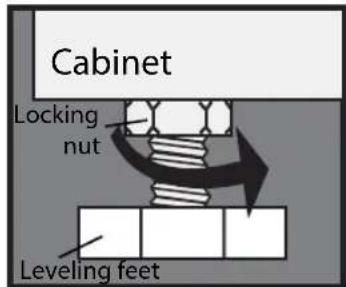
text_image
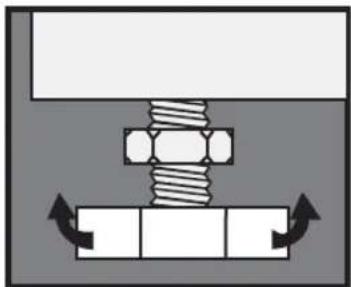
Cabinet Locking nut Leveling feetPlace the washing machine on a non-elevated level or plain of the floor. After offsetting any unevenness by the regulating the leveling feet, it should be locked by the locking nut.
PHASE 4: ELECTRICAL SPECIFICATIONS THIS MACHINE REUIRES GROUNDING (EARTHING)
text_image
Technical diagram of an electrical outlet with labeled components A, B, and C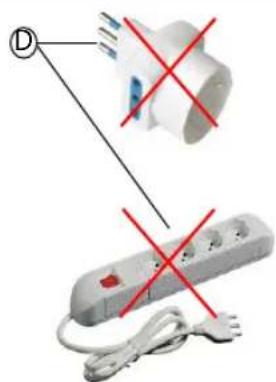
text_image
Diagram showing two types of electrical plug devices with red X marks indicating prohibition or disapproval.Electric shock hazard: the lack of these warnings can be harmful to health.
For your personal safety, this washing machine must be connected to earth device.
If earthing device not installed, it must be installed by a qualified technician before starting the machine.
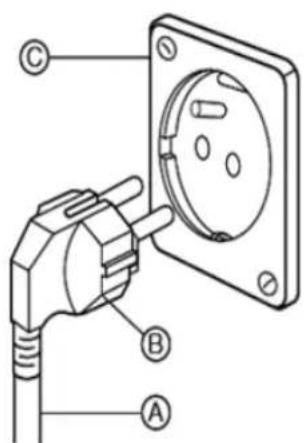
This washing machine is equipped with a power cord (A) and with a plug (B).
To minimize the risk of electric shock, the cable must be plugged into a wall socket (C) that accepts the plug (B).
If the wall socket is not available it is a personal responsibility and th duty of the client to have it installed by a qualified electrician.
Do not change/modify the power cord and do not use adapters or extension cords (D).
Dear Customer,
First of all we would like to thank you for choosing us and purchasing an original Italian product.
This product has been fully manufactured in ITALY with the best materials, in accordance to RoHS and Reach regulations with special attention to human health and environment.
Key issues like quality and safety are supported by strict controls on our products, which have been certified according to inter-national regulations such as EN 60456:2016, EN 62233:2010, EN 61770:2009, EN ISO3741:2010, EN 60456:2016, EN 60335:2014, EN 61770:2009, EN ISO 3741:2010, EN 60704:2012, EN 6100:2014, EN 55019:2015 through certifications issued by VDE and IMQ, the latter being certifying bodies of excellence. This manual contains instructions for the use, maintenance and warranty.
Before using the machine for the first time, please carefully read this user manual and the warranty certifi cate placed at the end of this manual. There you can find important instructions for the safety, use and maintenance of the washing machine. This is to protect yourself from any possible injury and to avoid damages to the appliance.
Always keep your purchase receipt with you which will be useful to activate the warranty. To be valid for warranty, the receipt must show the date of purchase, type of the appliance and model.
SANGIORGIO
Responsabile Marketing

text_image
A#P#YOUR CONTRIBUTION TO THE PROTECTION OF THE ENVIRONMENT
DISPOSING OF PACKAGING
The packaging has the purpose of protecting the good from any possible damage which could occur during transport operations. All materials used for the packaging are reusable and selected according to eco friendly standards so that they can be easily recycled in order to be reused into the production process. On the one hand, this mechanism allows to reduce waste and on the other, it makes possible a more rational use of non-renewable resources.
WASTE ELECTRIC AND ELECTRONIC EQUIPMENT (RAEE)
In accordance with Directive on waste electric and electronic equipment, the symbol of the crossed-out wheeled bin means that the end-of-life product must be disposed separately from domestic household waste.

The user should, therefore, take the product to an appropriate recycling centre for waste electrical and electronic equipment or give it back to the retailer at the time of purchasing new similar equipment, on a one for one basis.
The proper separate disposal of the decommissioned product and its eco-compatible recycling, treatment and scrapping contribute to avoid possible negative effects on the environment and human health, and encourage the recycling of the materials comprising the product.
The manufacturer has always been focused on developing products and technologies that make as little impact on the environment as possible and has been continuously engaged
in high R&D investments which are required in the fi elds of ecology.
For the waste management and disposal of the household appliances, the manufacturer registered with the consortium ERP Italia.
natural_image
Recycling symbol with washing machine, oven, and paper inside green arrows (no text or symbols)The illegal disposal of the product by the user leads to the application of administrative sanctions in accordance with current laws and regulations.
TABLE OF CONTENT
Table of content....5
Safety instructions and warnings......6
Intended use....6
Definition of children....7
Electrical safety....7
Water safety....8
Positioning....8
Correct use....8
Installation....10
General information....10
Fixing screwing removal....10
Positioning of appliance....10
Installation under worktop....11
Water supply inlet horse....11
Water drainage....13
Electrical connection....12
Control panel....14
Description of controls....15
Detergent dispense....15
Pilot lamp....15
ON/OFF....15
Extra rinse....15
Spin exclution....15
Spin reduction....15
Temperature knob....15
Programme knob....15
Washprogrammes,durationandoptions....16
Product data sheet....18
Laundry symbols for washing machine....20
Instructions and warnings......25
Washing instruction....25
Laundry selection....25
Loading laundry....26
Detergent dosage....26
Liquid detergent bulkhead insert....26
Starting washing programme....26
Starting washing cycle....27
Pause washing....27
Detergent drawer....27
Maintenance....28
Cabinet....28
Detergent drawer....28
Cleaning detergent drawer....28
Emptying procedure....29
Cleaning of electro-valve and
water supply hose filters....29
Water loading test....29
Possible remedies....31
After sales service....32
Warranty certificate....33
SAFETY INSTRUCTIONS AND WARNINGS
This washing machine complies with current safety norms and regulations. If improperly used, it can provoke damage to people and/or goods around you. Before using the washing machine for the first time, please read this user guide carefully. It contains important instructions for the safety, use and maintenance of the washing machine. This will prevent any possible danger for yourself and damage to the appliance. Please keep the user guide with you and give it to other users, if necessary.
INTENDED USE
Please, note that this washing machine is only for domestic use and only to wash clothes which have been indicated by the manufacturer as suitable for washing in water on the label. Any other use can turn dangerous. The manufacturer cannot be held liable for damages caused by an improper and/or incorrect use of the household appliance.
In other cases, the washing machine must not exceed one washing cycle a day. Some example are:
- staff kitchen areas in shops, offi ces and other working environments;
- farm houses;
- by clients in hotels, motels and other residential type environments;
• bed and breakfast type environments; - areas for communal use in blocks of flats or in launderettes.
USE BY CHILDREN OR VERY VULNERABLE PEOPLE
This appliance can be used by children of at least 8 years and by people with limited physical, sensorial or mental ability or with no required knowledge, as long as they are kept under surveillance or they have been instructed about safety norms to apply for the use of the appliance and possible risks. Children shall not play with the appliance. Cleaning and maintenance operations must not be made by children without supervision.
Children under the age of 3 must be supervised while the appliance is in function.
CAUTION!
When washing at high temperature, be aware that the door glass could become very hot (about 90°C). Prevent children from touching it.
DEFINITIONS OF CHILDREN
Very young children
Up to 3 years old.
Young children
Between 3 and 8 years old.
Older children
Between 8 and i 14 years old.
Vulnerable people
People with limited physical, sensorial or mental ability (i.e. partially disabled, adults with limited physical and mental ability), or without the required knowledge (i.e. older children).
ELECTRICAL SAFETY
Before plugging the washing machine into the electrical socket, be sure that the power supply is in line with the data (power, frequency) indicated in the technical data label. If any doubt, consult a qualified electrician.
The electrical safety of the appliance can only be guaranteed when it is connected to an electrical system which is compliant with all legal standards and equipped with a separate magneto thermal differential switch (circuit breaker) and earthed. Do not use extension leads or adapters.
This is a key safety requirement. Verify this condition and in case of any doubt, it is advised to call a qualified electrician who shall check the electrical system.
N.B. The manufacturer should not be held liable for damages resulting from an electrical system compliant with all legal standards.
The appliance can only be repaired by an Authorized Technician. If it is not the case, the manufacturer cannot be held liable for any
possible damage that could arise. If not properly repaired, the user may be exposed to serious danger, for which the manufacturer cannot be held liable.
If the power supply cable is damaged, it must be replaced by an authorized technician in order to avoid any possible danger.
In the event of faults, prolonged absences or to clean the appliance, disconnect it from the electrical mains.
The appliance is considered to be disconnected from the mains when:
- The power cable is unplugged from the socket.
- The central switch has been turned off.
WATER SAFETY
To connect the appliance to the water supply, use only new hoses. Do not use old hoses.
Be sure that during the washing cycle, the detergent drawer is always closed and turn off the water tap at the end of each washing cycle.
It is not possible to make modifi cations to the appliance without a prior authorization by the manufacturer. Before connecting the draining hose to the sink, make sure that the water is easily drained.
Secure the draining hose so that it cannot move because the strong flow of water could push it out of the sink.
POSITIONING
The appliance must not be installed on roofs, balconies, under canopies or in places where it may be exposed to atmospheric agents.
CORRECT USE
Before using the appliance for the first time, remove the transport securing screws from the rear (see installation chapter).
If those screws are not removed, it will damage the appliance or adjacent furniture or other appliances during the spinning. Make sure garments are not washed together with foreign objects (i.e. nails, needles, coins, paper clips). These foreign objects may damage the appliance (i.e. the drum or the tub) and, in turn,
the damaged parts may damage the garments. Garments that have been pre-treated with solvents or products containing solvents, have to be carefully rinsed with clean water before washing in the appliance. Never use detergents with solvents (i.e. petrol, trichloroethylene). These products may damage some components of the appliance and produce toxic vapors which could potentially provoke fi res, blasts or damaged surfaces.
N.B. The manufacturer cannot be held liable for damages caused as a result of not following the instructions in the manual.
INSTALLATION
GENERAL INFORMATION
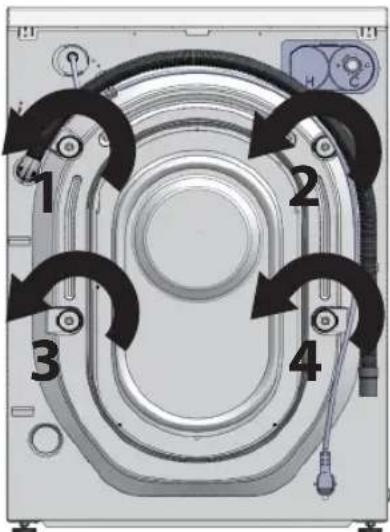
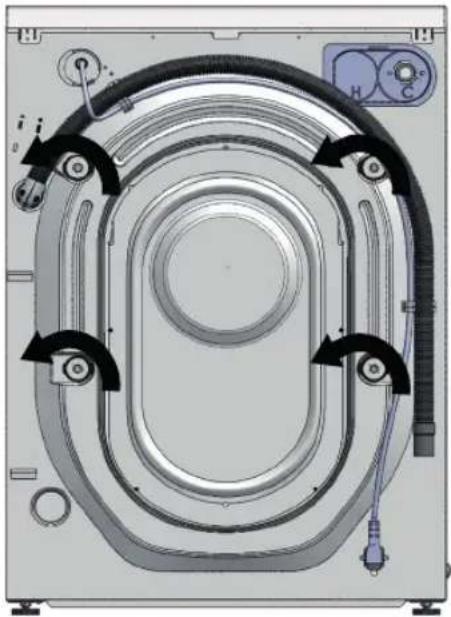
The assembled group of the appliance is secured by 4 fi xing screws (which protect it during handling and transport operations), figure 1.
Figure 1
natural_image
Technical diagram of a mechanical component with concentric rings and directional arrows indicating motion (no text or symbols)FIXING SCREWS REMOVAL
Before using the appliance, it is necessary to remove the fixing screws by turning counter clockwise.
N.B. If the fi xing screws are not removed, this will cause strong vibrations and irregular movements during the washing cycle with subsequent damages.
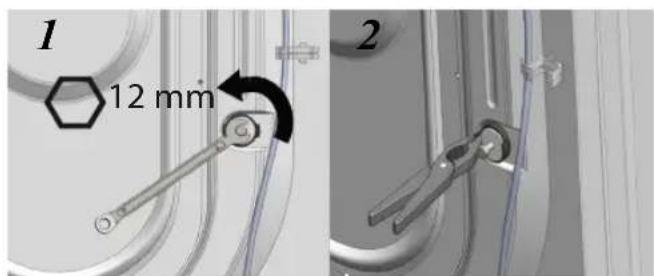
Once unscrewed, pull them out with spacer bushes as shown in figure 2.
Figure 2
text_image
1 12 mm 2Seal the holes with the appropriate caps provided as shown in figure 3.
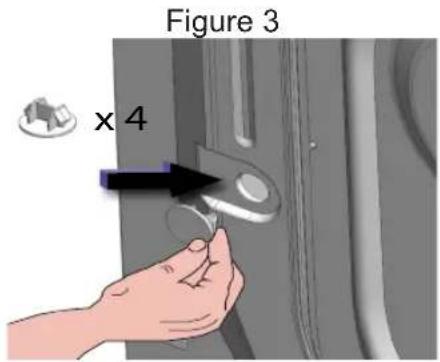
text_image
Figure 3 x 4POSITIONING OF APPLIANCE
In order to avoid damages or malfunctions, the appliance must not be installed on roofs, balconies, under canopies or in places where it may be exposed to atmospheric agents.
Make sure the electrical cable and hoses (water inlet and drain hoses) on the rear of the appliance are not pressed.
To ensure the stability of the appliance, avoiding strong vibrations during washing and spinning cycles, it is necessary to put the appliance on a levelled, smooth, dry, solid surface not raised from the floor level. In order to balance any difference in levels of the floor, it is possible to intervene on the feet modifying the height by screwing and unscrewing in accordance with the necessities as shown in figure 4.
Figure 4
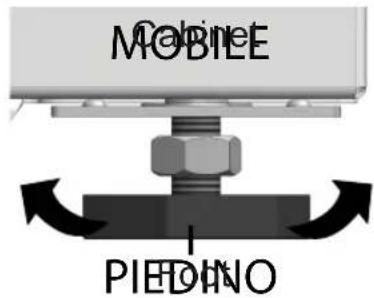
text_image
MOBILE PIEDINOAfter regulating the feet, since vibration may modify its level, it is advisable to tighten the docking nut on the feet until it is blocked as shown by the figure below.
Figure 5
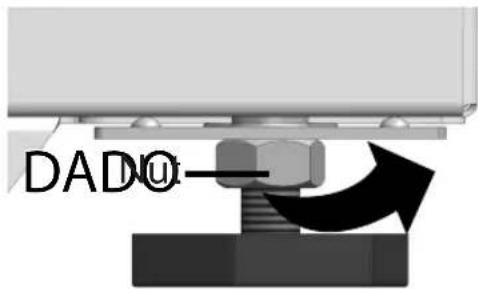
text_image
DADIt is recommended to avoid putting cardboard, pieces of wood or similar material upon or around the appliance since it may obstruct the air flow.
INSTALLATION UNDER WORKTOP
It is possible to position the appliance under a worktop only if there is place of minimum 3cm on the upper side, 8cm on the sides and 8cm on the back side. An example of a typical installation is represented in figure 6. The top table of the appliance (TOP) cannot be removed for electric and mechanical safety reasons.
Figure 6
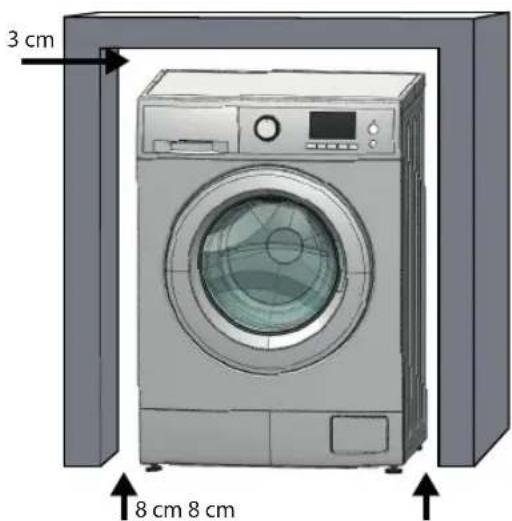
text_image
3 cm 8 cm 8 cmWATER SUPPLY INLET HOSE
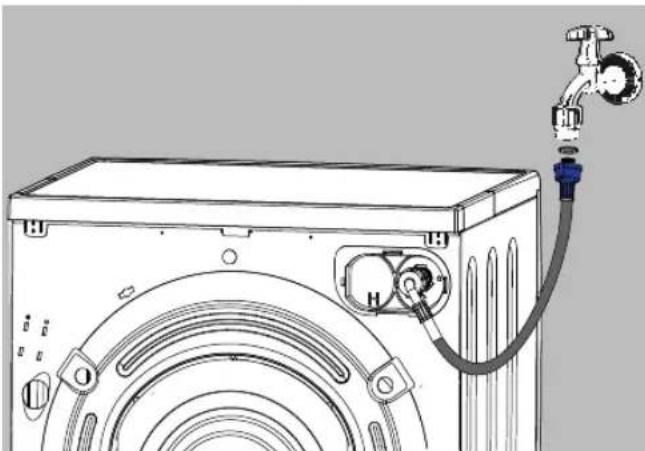
The water supply inlet hose has to be connected to a cold water tap with threaded hole of 3/4" and to the appliance. Only use the hose supplied with the appliance and make sure that the rubber gaskets are properly placed on the ends of the hose.
Figure 7
natural_image
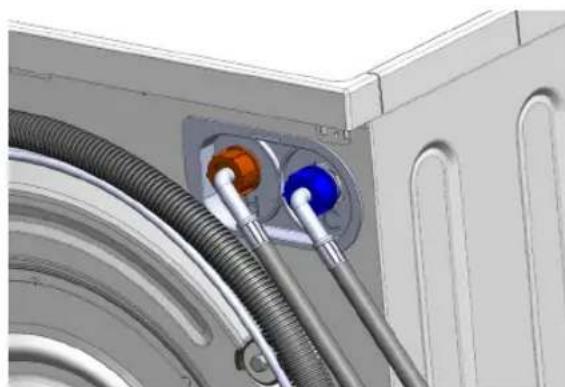
Technical line drawing of a washing machine with attached piping and valve (no text or symbols)If the water supply system is new or it has not been used for a long time, before connecting the hose it is necessary to let the water run until it is clear. Figure 8 shows the connection to hot water. This option is available only on demand.
Figure 8
natural_image
3D rendering of a mechanical assembly with coiled tubing and two orange/blue connectors (no text or symbols visible)Be sure the hot water temperature does not exceed 55^ C in order to avoid damages to the clothing and to the washing machine. Use only the water supply inlet hose which is supplied with the appliance.
WATER DRAINAGE
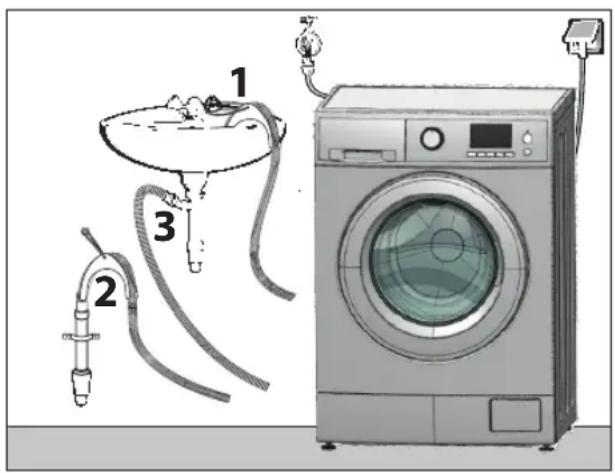
The water drain hose can be positioned in three different ways (Figure 9):
- On the edge of a sink, using a U-hook plastic (NOT SUPPLIED) Make sure the hose is well fixed on the sink.
- Into a drainage line placed at a minimum height of 60cm and not exceeding 90cm.
- Direct drain into the siphon of the sink. It is advisable to use a hose clamp (NOT INCLUDED)
Example of installation
Figure 9
text_image
Diagram showing three labeled components of a washing machine: sink, hose, and air conditioner unit.N.B. It is not advisable to use hose extensions for the water drainage hose.
BEFORE USE
Before using the washing machine for the first time, it is necessary to do a washing cycle (self-clean programme, where present or cotton programme set at 90 °C) with detergent and without laundry.
ELECTRICAL CONNECTION
The appliance is supplied with a power cable and a schuko plug for the connection to the \~ 230V 50Hz AC grid. Make sure the schuko plug is always accessible so that washing machine can be disconnected from the mains if necessary. The electrical system must meet the provisions VDE 0100. The maximum consumption of the washing machine is 10 Ampere. It is strongly recommended never to connect the appliance using extension cables, multiple sockets or similar devices in order to avoid overheating and a potential fire hazard. The manufacturer accepts no liability for damages resulting from lack or interruption of the protective earth conductor. With the purpose of increasing the safety level, VDE institute, by Directive DIN VDE 0100 part 739, recommends to equip the appliance with an automatic differential switch (circuit breaker) with trip off current of 30mA (DIN VDE 0664).
If an automatic differential switch is used, make sure it is of type A, in accordance with DIN VDE 0664 and sensitive to pulsating currents.
The identification plate provides information about the nominal power consumption and its appropriate protection. Please compare these data with the data of the electrical mains.
THIS APPLIANCE REQUIRES AN EARTH WIRING.
For individual personal safety and of the environment, this appliance must be connected to the mains with an earthing which provides a direct path to the ground, correctly verified and in compliance with current laws and regulations. It installation must be equipped with a magneto thermal differential switch (circuit breaker).
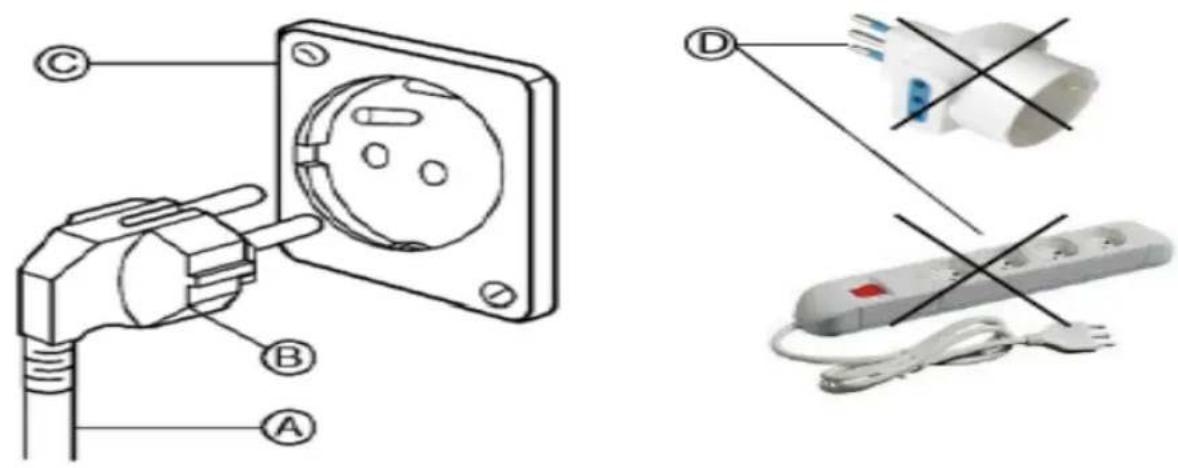
This appliance is supplied with a type (A) power cord and a type (B) plug.
In order to avoid risks of electrical shocks/fi res, the cable must be connected to a wall socket (C) suitable for the type of plug (B).
Do not modify the connection cable nor use adaptors or extension leads (D).
If the wall socket is not available, it is the customer's responsibility and obligation to install it by a qualified electrician.
Do not change/modify the electrical power cord and do not use adaptors or extension leads (D)
HYBRID WASHING MACHINE CONTROL PANEL
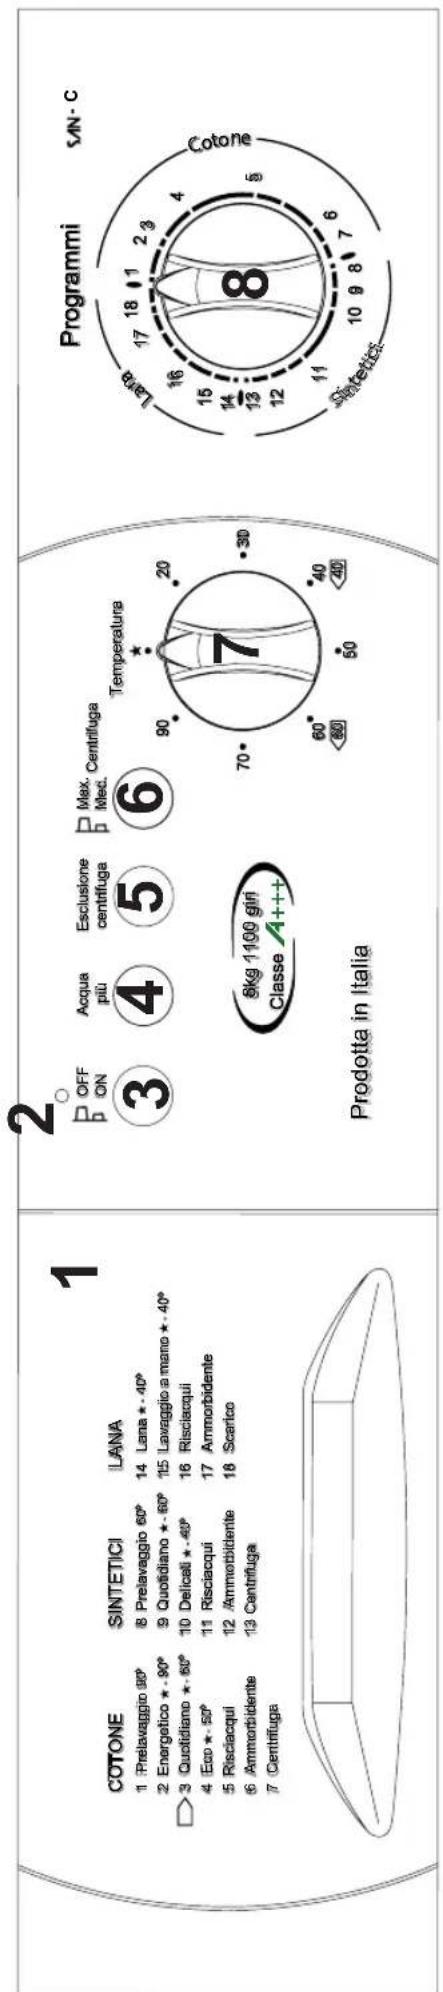
text_image
COTONE 1 Prelavaggio 90° 2 Energetico ★ - 90° 3 Quotidiano ★ - 80° 4 Eco ★ - 50° 5 Risciacqui 6 Ammorbidente 7 Centrifuga SINTETICI 8 Prelavaggio 60° 9 Quotidiano ★ - 60° 10 Delicati ★ - 40° 11 Risciacqui 12 /Ammorbidente 13 Centrifuga LANA 14 Lana ★ - 40° 15 Lavaggio a mano ★ - 40° 16 Risciacqui 17 Ammorbidente 18 Scarico 2. OFF ON 3 4 5 6 Acqua più Esclusione centrifuga Max. Med. Centrifuga Temperatura 8kg 1100 giri Classe A+++. Prodotta in Italia Programmi SAN-C Lata 17 18 1 2 3 4 5 6 70° 60° 50° 40° 40° Sletetti 81 - Detergent drawer 3 - On/Off 5 - Spin exclusion 7 - Temperature selection knob
2 - Pilot lamp 4 - Rinse plus 6 - Spin reduction 8 - Programme selection knob
DESCRIPTION OF CONTROLS
1. Detergent drawer
It consists of three compartments. For any type of program, the detergent must be poured into the central compartment.
The far left compartment, must be loaded with detergent if the "prewash" programme is carried out. In the far right compartment, the softener should be poured, without spilling over the grid.
2. Pilot lamp
When the light is on, it indicates that the machine is in operation and that the door is electrically locked.
3. On/Off
The On/Off button must be pressed after selecting the desired programme. If you want to suspend or change a selected programme, the button must be set to the "Off" position "Off".
4. Rinse plus
If the button is pressed, the function is activated and it adds more water to the rinsing phase. It is recommended where the is an excessive use of detergent or for those with problems of allergic skin.
5. Spin exclusion
It allows for the exclusion the centrifuge from washing programmes.
6. Spin reduction
It allows for spin speed reduction in washing programmes.
7. Temperature selection knob
Allows for manual change and selection of temperature, but only below the maximum foreseen in the selected programme. If, for example, the “delicate 40°” programme has been selected, the temperature cannot exceed 40°8..
8. Programme selection knob
Turn the knob clockwise to select the desired washing programme.
N.B. This selection must be performed with the machine in its off.
WASHING PROGRAMS, DURATION AND OPTIONS
The “Eco 40-60” programme is able to clean normally soiled cotton laundry declared to be washable at 40^ C or 60^ C, together in the same cycle. This programme is used to assess the compliance with the EU eco-design legislation. It is the most efficient programme in terms of energy consumption. The programme generally performs at lower temperatures and longer time.
All available commercial powdered and liquid detergent for washing machine are suitable of use in the washer. For the recommended washing temperatures and programmes, refer to the detergent manufacturers' prescription.
Noise and remaining moisture are contents are influenced by the spinning speed. The higher the spinning speed in the spinning phase, the higher the noise and the lower the remaining moisture content.
Information on each model can be capture and viewed in the weblink using the QR code. Access is possible on with a QR scanner.
Cotton Programme
| Programme | Type of laundry | Description of cycle | Nominal capacity (kg) | Max dry load (kg) | *Cycle time | |
| 1 | Prewash 90° | White coloured and very dirty | Prewash at 90°C, main wash, rinse, intermediate and final spin | 5 | 5 | 3 h 15 min. |
| 6 | 6 | |||||
| 7 | 7 | |||||
| 8 | 8 | |||||
| 2 | Energetic 90° | White coloured and very dirty | Main wash at 90°C rinse, intermediate and final spin | 5 | 5 | 2 h 58 min. |
| 6 | 6 | |||||
| 7 | 7 | |||||
| 8 | 8 | |||||
| 3 | Eco 40-60 | White coloured and normal stained | Main wash at 60°C rinse, intermediate and final spin | 5 | 5 | 2 h 25 min. |
| 6 | 6 | |||||
| 7 | 7 | |||||
| 8 | 8 | |||||
| 4 | Lingerie * - 50° | White coloured normal stained | Main wash at 50°C rinse, intermediate and final spin Wash at 60°C rinse, intermediate and final spin | 5 | 5 | 1 h 46 min. |
| 6 | 6 | |||||
| 7 | 7 | |||||
| 8 | 8 | |||||
| 5 | Rinse | White and coloured | Rinse, intermediate and final spin | -- 36 m.n. | ||
| 6 | Softener | White and coloured | Rinse with softener, intermediate and final spin | -- 14 m.n. | ||
| 7 | Spin | White and coloured | Final spin and distribution | -- 8 min. | ||
Synthetic Programme
| Programme | Type of laundry | Description of cycle | Nominal capacity (kg) | Max dry load (kg) | *Cycle time | |
| 8 | Prewash | Mixed and light stained synthetics | Prewash at 60°C, main wash, rinse and final spin | 5 2,5 | 1 h 45 min. | |
| 6 | 3 | |||||
| 7 3.5 | ||||||
| 8 | 4 | |||||
| 9 | Quotidiano 60° | Sintetici delicati e sintetici con colore delicato | Main wash at 60°C, rinse and final spin | 5 2,5 | 1 h 30 min. | |
| 6 | 3 | |||||
| 7 3.5 | ||||||
| 8 | 4 | |||||
| 10 | Delicate 40° All synthetics | Main wash at 40°C, rinse and final spin | 5 2,5 | 1 h 25 min. | ||
| 6 | 3 | |||||
| 7 3.5 | ||||||
| 8 | 4 | |||||
| 11 | Rinse All synthetics | Rinse and final spin - - 46 min. | ||||
| 12 | Softener All synthetics | Rinse with softener and final spin | - - 19 min. | |||
| 13 | Spin All synthetics | Final spin and distribu-tion | - - 9 min | |||
Wool Programme
| Programme | Type of laundry | Description of cycle | Nominal capacity (kg) | Max dry load (kg) | *Cycle time | |
| 14 | Wool 40° Wool and silk | silk | Main hand wash at 40°C, rinse and final spin | 5 | 1 | 1 h 10 min. |
| 6 1,5 | ||||||
| 7 2 | ||||||
| 8 2,5 | ||||||
| 15 | Hand wash 40° Wool and silk | silk | Main hand wash at 40°C, rinse and final spin | 5 | 1 | 58 min. |
| 6 1,5 | ||||||
| 7 2 | ||||||
| 8 2,5 | ||||||
| 16 | Rinse | Wool and silk | Rinse and final spin | - | - | 30 min. |
| 17 | Softener | Wool and silk | Rinse with softener and final spin | -- 17 min. | ||
| 18 | Drain Wool and silk | Final spin and distribution | -- | 3 min. | ||
PRODUCT DATA SHEET IN ACCORDANCE WITH EU DIRECTIVE 1061/2010
| Model | Nominal capacity (kg) | Energy class | Energy consumption Eco 40-60 (kWh/cycle) | Water consumption Eco 4060 (l/cyclc) | Maximum temperature of treated fabrics (C°) | Remaining moisture content (%) | Spln speed (rpm) | ( w re n c ) | ||||||
| a* | b* | c* | a* | b* | c* | a* | b* | c* | ||||||
| S4210C | 5 | C | 0,537 | 30 | 37 | 35 | 36 | 47 | 47 | 51 | 1000 | 1000 | 1000 | |
| S5510C | 7 | D | 0,653 | 37 | 39 | 36 | 36 | 60 | 50 | 55 | 1000 | 1000 | 1000 | |
| SDG7C | 7 | D | 0,653 | 37 | 39 | 36 | 36 | 60 | 50 | 55 | 1000 | 1000 | 1000 | |
| UNIS710C | 7 | D | 0,653 | 37 | 39 | 36 | 36 | 60 | 50 | 55 | 1000 | 1000 | 1000 | |
| S5611C | 8 | D | 0,710 | 42 | 45 | 40 | 38 | 47 | 46 | 50 | 1150 | 1150 | 1150 | |
Legend:
a* -> Nominal capacity
b* -> Half load
c* -> Quarter load
The following data are the same for all washing machines.
Type of washing machine: Stand alone.
Electrical connection: Power 2200 Watt – Voltage 220/230 Volt – Maximum current 10 Ampere.
Inlet water pressure: Min. 0,05 Mpa – Max: 1 Mpa.
- Energy class A indicates more efficiency, while energy class G indicates lower efficiency.
- The annual energy consumption in kWh is based on 220 standard cotton washes cycles at 60^ C and of full, half and quarter load. The real consumption depends on how the washing machine is effectively used.
- The annual water consumption in litre is based on 220 standard cotton washes cycles at 60^ C and of full, and half and quarter load. The real consumption depends on how the washing machine is effectively used.
- Spin efficiency "A" indicates less quantity of water left on laundry, while spin efficiency "G" indicates more quantity of water on laundry.
- The programme Eco 40-60 at 60°C is the standard wash programme. This programme is used to wash cotton garments with a regular stain and it is the more efficient programme in terms of combined consumption of water and energy.
The distributed product complies with the most recent European regulations and directives:
Low Voltage Directive (LVD) 2014/35/EC
Electro-magnetic Compatibility (EMC) Laws and Directive 2014/30/EU
Eco design requirements for household washing machines Directive 2019/2023/EU
| Class of weighted remaining moisture content | Programme duration (hour:min) | Noise emission in spinning (db) | Class of noise emission | Power consumption (W) Dimensions (cm) | Type of installation | Ions release during washing | Rilascio ioni lavaggio | ||||||||
| Off (W) | Stand-by (W) | Stand-by in rete (W) | Delay start (W) | H | W | L | |||||||||
| C | 3:13 | 2:44 | 2:41 | 73 | B | 0,08 | 0,09 | N/A | N/A | 84 | 59,5 | 52 | 62 | Libera | No |
| C | 3:25 | 2:40 | 2:38 | 73 | B | 0,08 | 0,09 | N/A | N/A | 84 | 59,5 | 55 | 63 | Libera | No |
| C | 3:25 | 2:40 | 2:38 | 73 | B | 0,08 | 0,09 | N/A | N/A | 84 | 59,5 | 55 | 63 | Libera | No |
| C | 3:25 | 2:40 | 2:38 | 73 | B | 0,08 | 0,09 | NA | N/A | 84 | 59,5 | 55 | 63 | Libera | No |
| C | 3:20 | 2:14 | 2:16 | 79 | C | 0,08 | 0,09 | N/A | N/A | 84 | 59,5 | 55 | 71 | Libera | No |
Legend:
a* -> Nominal capacity
b* -> Half load
c* -> Quarter load
Where is the Type?
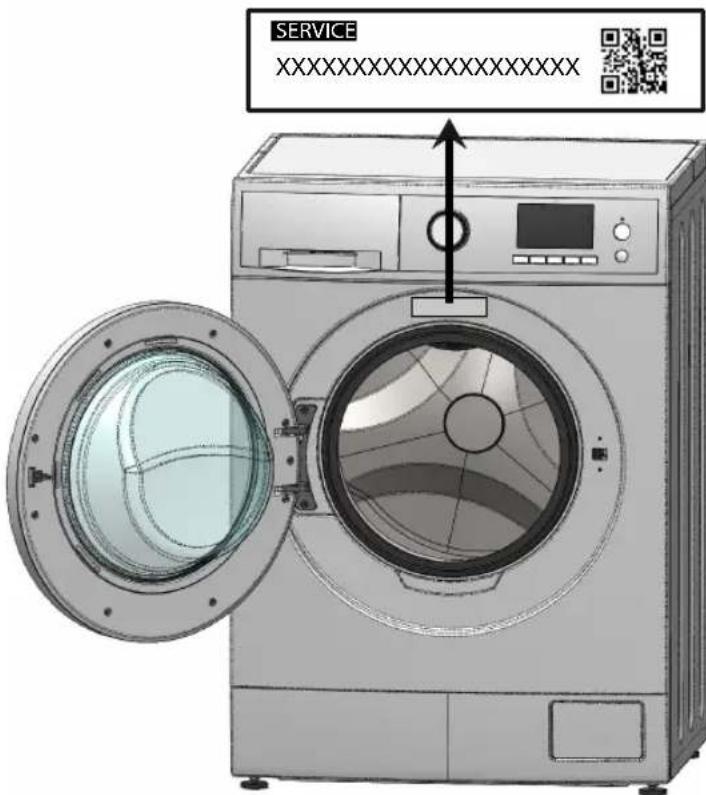
It is possible to extrapolate the type starting from the first 8 digits of the serial code and excluding the final 0. The serial code is printed on the label visible on the upper side of the door when it is opened and/or on the backside of the washing machine.
Example of label
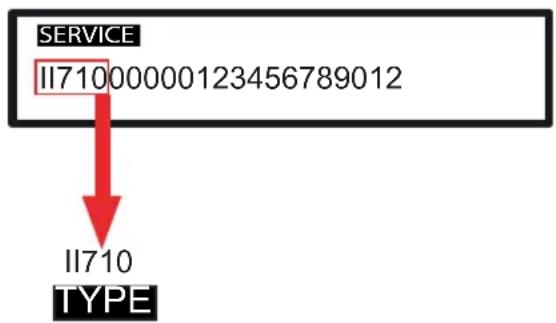
flowchart
graph TD
    A["SERVICE\nII71000000123456789012"] --> B["TYPE"]
| REFERENCE LAUNDRY LOAD WEIGHT FOR WASHING MACHINE | |
| Terry bathrobe 1200 g | |
| Terry towels 900 g | |
| Bedspreads 700 g | |
| Pyjamas 500 g | |
| Tablecloth 250 g | |
| Pillowcases and Towels 200 g | |
| Place mats and underwear 100 g | |
PROGRAMMES TECHNICAL DATA UE 2019/2023 REGULATION
Consumption values for 5kg washing machine
| Programme | Wash load | Duration (h:min) | Energy consump. (kWh/cycle) | Water con- sump. (l/cycle) | Maximum temperature for 5 min. (°C) | Residual humidity (%) |
| 1000 rpm | ||||||
| Cotton 20°C 5 1:43 0,20 | 35 18 63 | |||||
| Cotton 60°C + Prewash | 5 2:35 1,20 42 50 63 | |||||
| Cotton 90°C 5 2:40 1,65 | 50 69 63 | |||||
| Synthetic 60°C 3 1:40 0,70 | 31 48 75* | |||||
| Wool 40 °C 1 1:18 0,53 | 55 37 59** |
Consumption values for 7kg washing machine
| Programme | Wash load | Duration (h:min) | Energy consump. (kWh/cycle) | Water consump. (l/cycle) | Maximum temperature for 5 min. (°C) | Residual humidity (%) | ||
| 1000 rpm | 1200 rpm | 1400 rpm | ||||||
| Cotton 20°C 7 | 1:45 0,20 | 46 | 18 60 47 | 46 | ||||
| Cotton 60°C + Prewash | 7 2:38 | 1,26 56 | 50 | 60 47 46 | ||||
| Cotton 90°C | 7 | 2:40 | 1,71 | 66 | 69 | 60 | 47 | 46 |
| Synthetic 60°C | 3,5 | 1:40 | 0,76 | 41 | 48 | 75* | 75* | 75* |
| Wool 40 °C | 2 | 1:20 | 0,59 | 73 | 37 | 59** | 59** | 59** |
Consumption values for 8kg washing machine
| Programme | Wash load | Duration (h:min) | Energy consump. (kWh/cycle) | Water consump. (l/cycle) | Maximum temperature for 5 min. (°C) | Residual humidity (%) | |
| 1200 rpm | 1400 rpm | ||||||
| Cotton 20°C | 8 | 1:45 | 0,22 | 42 | 18 | 48 | 47 |
| Cotton 60°C + Prewash | 8 | 2:35 | 1,43 | 57 | 50 | 48 | 47 |
| Cotton 90°C | 8 | 2:45 | 2,15 | 62 | 68 | 48 | 47 |
| Synthetic 60°C | 4 | 1:45 | 0,97 | 53 | 50 | 75* | 75* |
| Wool 40 °C | 2,5 | 1:25 | 0,82 | 77 | 37 | 59** | 59** |
(*) Residual humidity value at 800 rpm.
(**) Residual humidity value at 600 rpm.
TYPE - MODEL ASSOCIATIVE TABLE
| MODELLO TYPE QR CODE | ||
| S4210C II5 | 10 |  503844 503844 |
| S5510C II6 | 10 |  525456 525456 |
| S5611C II8 | 10 |  525458 525458 |
| SDG7C II6 | 10 |  525464 525464 |
| UNIS710C | II610 |  543865 543865 |
| Programme sequence | ||||
| Programme | Rinse Spin | |||
| Numbers of rinses(the last rinse take the softener) | Intermediate | |||
| COTTON | 1 Prewash 90°C 3 √ | |||
| 2 Energetic 90°C 3 √ | ||||
| 3 Eco 40-60 3 √ | ||||
| 4 Lingerie 50°C 3 √ | ||||
| 5 Rinse 3 √ | ||||
| 6 Softener 1 - | ||||
| 7 Spin - - | ||||
| SYNTHETIC | 8 Prewash 3 √ | |||
| 9 Daily 60°C 3 √ | ||||
| 10 | Delicate 40°C | 3 √ | ||
| 11 | Rinse 3 √ | |||
| 12 | Softener 1 - | |||
| 13 | Spin - - | |||
| LANA | 14 | Wool 40°C | 3 - | |
| 15 | Hand wash | 3 - | ||
| 16 | Rinse 3 - | |||
| 17 | Softener 1 - | |||
| Drain | - | - | ||
LAUNDRY SYMBOLS FOR WASHING MACHINE
The number inside the basket indicates the maximum temperature at which laundry can be washed.
| Icon Description Icon Description | |||
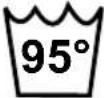 | Normal washmax 90° - 95°C |  | Delicate washmax 60°C |
 | Normal washmax 60°C | 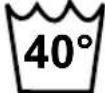 | Delicate washmax 40°C |
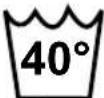 | Normal washmax 40°C |  | Delicate washmax 30°C |
 | Normal washmax 30°C |  | Do not spin |
LAUNDRY SYMBOLS NOT FOR MACHINE WASHING
| NOT IN WASHING MACHINE | IRONING BLEACHING DRYING | ||
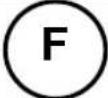 Dry-cleaning with hydrocarbon Dry-cleaning with hydrocarbon | 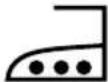 about 200°C about 200°C |  Bleaching allowed Bleaching allowed |  Delicate dry No heat Delicate dry No heat |
 Dry-cleaning with perchloroethylene Dry-cleaning with perchloroethylene | 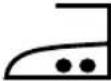 about 150°C about 150°C |  Only use oxygen bleach Only use oxygen bleach |  Delicate dry Low heat Delicate dry Low heat |
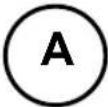 Dry-cleaning with all solvents Dry-cleaning with all solvents | 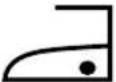 about 110°C about 110°C | 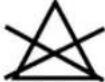 Do not bleach Do not bleach |  Delicate dry Medium heat Delicate dry Medium heat |
 Do not dry clean Do not dry clean Do not dry clean Do not dry clean | 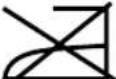 Do not iron Do not iron |  Low heat dry Low heat dry | |
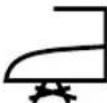 No steam added to iron No steam added to iron |  Do not tumble dry Do not tumble dry | ||
CHOICE OF DETERGENTS FOR PROGRAMMES
| Programme | Universal powdered detergent1 | Liquid deter-gent | Liquid coloured deter-gent | Deli-cates in wool | Special | Tempera-tures (°C) | ||
| COTON | 1 P | Prewash 90°C | ◆◆◆◇◇ | 0 | -90 | |||
| 2 E | Energetic 90°C | ◆◆◆◇◇ | 0 | -90 | ||||
| 3 E | co 40-60 | ◆◆◆◇◇ | 40 - | 60 | ||||
| 4 L | Lingerie 50°C | ◆◆◆◇◇ | 0 - | 50 | ||||
| SYNTHETIC | 8 P | Prewash | ◆◆◆◇◇ | 0 - 60 | ||||
| 9 D | Daily 60°C | ◆◆◆◇◇ | 0 - 60 | |||||
| 10 | Delicate 40°C | ◇◇ | ◇◆◆0 | -40 | ||||
| WOOL | 14 | Wool 40°C | ◇◇ | ◇◆◆0 | -40 | |||
| 15 | Hand wash | ◇◇ | ◇◆◆0 | -40 | ||||
INSTRUCTIONS AND WARNINGS
WASHING INSTRUCTIONS
- The appliance shall not be used by children or vulnerable persons without appropriate supervision.
- Children shall not be allowed to play with the appliance.
- For each garment, follow the washing instructions written on the clothing labels
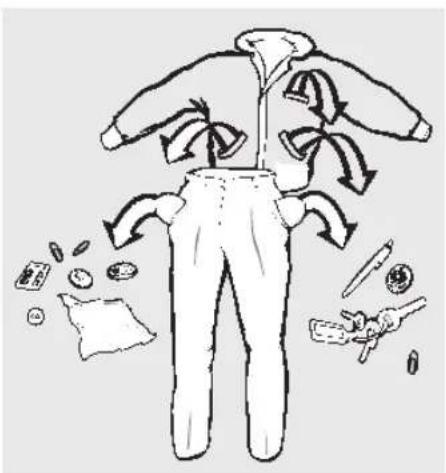
• Make sure there are no coins, pins etc. into the pockets of the garments to be washed.
Figure 10
natural_image
Illustration of a person in a suit with arrows indicating movement or flow, surrounded by scattered items including cash, scissors, and coins (no text or symbols)- Do not use gasoline, alcohol, trychlorethylene etc. on garments destined to be washed into the appliance.
- It is advisable to put small size pieces of laundry like socks, belts etc. into a mesh laundry bag before washing them; thus preventing them from getting caught and snag into the drum.
- Use the softener within the maximum recommended dose, since an excessive quantity may damage the garments.
- When the appliance is switched off, let the door half-opened, thus better preserving the gasket and avoiding musty odours.
- Before opening the door, always make sure that the water has been drained.
• Always turn off the water tap at the end of every washing cycle. - Unplug the appliance if it is not used for long periods of time.
LAUNDRY SELECTION
To ensure you are getting the best from your washing machine, clothing shall belong to one of the following types:
- White clothes
- Coloured
- Synthetics
- Delicates
- Wool
More specifically, it is important to consider that:
- White clothes will lose their "whiteness" if washed together with coloured clothes;
- New coloured clothes may stain the first washing. Therefore it is advisable to always wash them separately.
Moreover, it is important to follow the washing instructions of the fabric labels and make sure that there are no metallic objects (such as clips, needles, screws, coins, curtain hooks etc.) in tje laundry.
Before washing, it may be needed to previously remove stains from particularly dirty clothing with a special detergent.
Carpets, damaged clothes, hair, threads, dirty substances in general may clog up the drainage system.
LOADING LAUNDRY
To get the best washing results, it is necessary to place the laundry in the drum, one item at a time thus preventing it from knotting and twisting. Efficiency results are strongly affected by quantity and by the way garments are loaded into the appliance, An excessive load or lower than half the rated load capacity may undermine the reliability of the washing machine and it makes the appliance more noisy.
In case of excessive load or lower than half the rated load capacity, it is recommended to reduce to a minimum the spin speed in order to avoid strong vibrations during the spinning cycle.
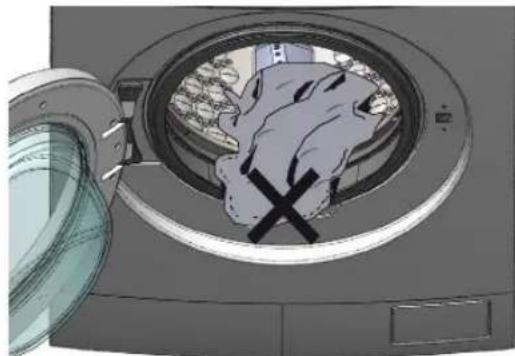
Before closing the door, make sure that no garment has been left on the edge of the gasket. This is to prevent any damage to the gasket. Please close the door with a slight push.
Figure 11
natural_image
Illustration of a washing machine with a hand inside, showing no text or symbols on the machine itself.DETERGENT DOSAGE
For each washing cycle, the correct amount of detergent has to be decided depending on the soil intensity of the laundry, as well as considering the load size and water hardness. Anyway, for each washing cycle, both detergent and softener have to be put before starting to wash.
LIQUID DETERGENT BULKHEAD INSERT
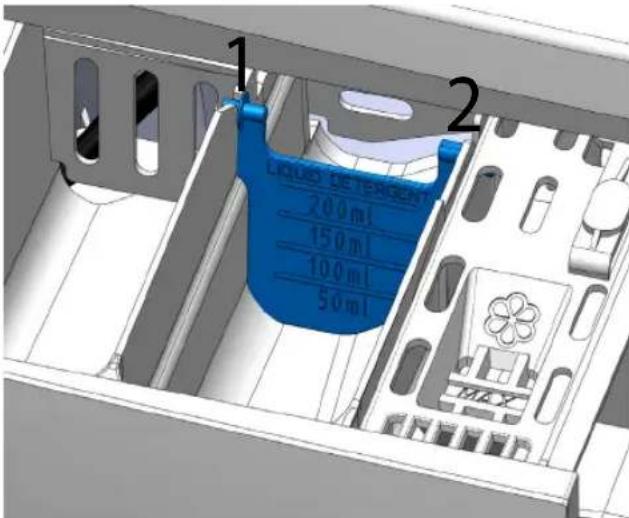
To use the liquid detergent, it is necessary to put the bulkhead insert provided in the kit with the appliance (figure 12):
Figure 12
text_image
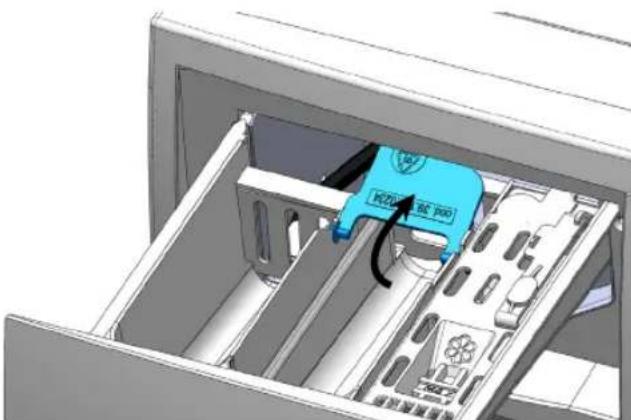
1 2 LIQUO DETERGENT 200ml 150ml 100ml 50mlRaise the bulkhead insert to use powder detergent (fi gure 13).
Figure 13
natural_image
3D diagram of a computer tower internal structure showing a blue component labeled 'BC P40' and an arrow indicating rotation (no text or symbols beyond labels)STARTING WASHING PROGRAMME
- To start the wash programme, turn the programme knob onto programme a desired programme.
- Consider the opportunity to personalize the wash programme by regulating the temperature and/or spinning and the selection of one or more special options
STARTING WASHING CYCLE
After achieving all above mentioned operations, it is possible to start washing pressing the Start/Pause button.
PAUSE WASHING
It is possible to stop the washing cycle by pressing the button Start/Pause. This way, the appliance switches to pause mode. To turn off the machine in order to change programme, turn the knob n° 1 to the OFF position and then select the new programme. At the end of the washing cycle, the red light turns off and the door can be opened only after checking the water level thus avoiding water leakages.
DETERGENT DRAWER

natural_image
Technical diagram of a mechanical assembly with labeled sections I, II, III (no text or symbols beyond labels)I - Detergent compartment to be used during pre-wash and soak cycle.
II - Detergent compartment for powder and liquid detergent for main wash.
III - Compartment for liquid additives (softener, starch).
WARNING: Do not exceed the indicated MAX level.
MAINTENANCE
CABINET
It is recommended to clean the cabinet of the appliance with lukewarm water thus preserving its original brightness for a long time.
During the cleaning of floors, absolutely avoid appliance coming into contact with detergents and/or corrosive cleaning agents to maintain the original shininess unchanged over time, avoiding areas of rust.
DETERGENT DRAWER
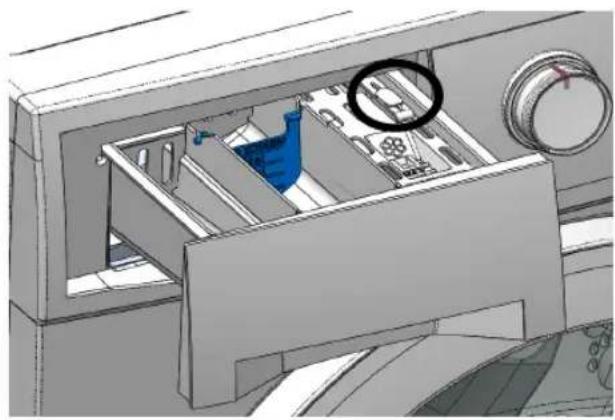
To remove detergent deposits, it is recommended to pull out the detergent drawer by pressing the rounded area as shown in figure 14.
Figure 14
natural_image
3D mechanical assembly diagram showing internal components with a magnified inset (no text or symbols)CLEANING DETERGENT DRAWER
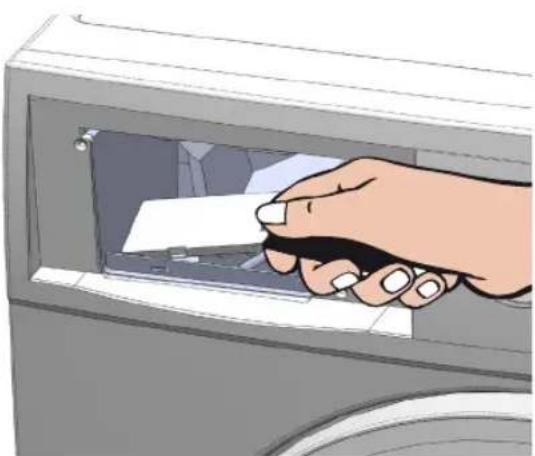
Once pulled the drawer out, remove the steam absorber divider as shown in the picture below.
Figure 15
natural_image
Illustration of a hand inserting a card into a computer case (no text or symbols visible)Figure 16
natural_image
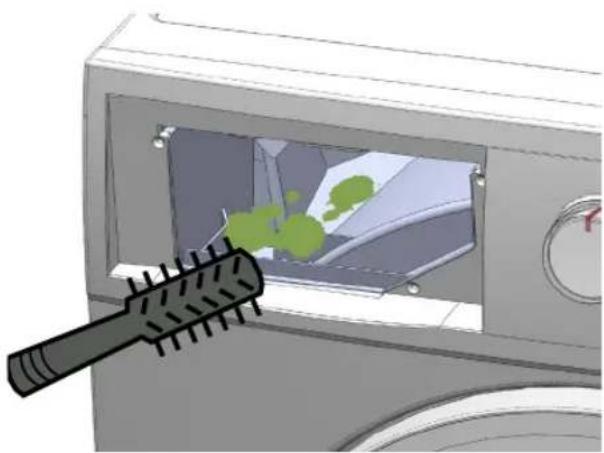
Illustration of a washing machine with a brush applying material inside, showing green liquid and a small container (no text or symbols)In case the draining hole of the drawer is obstructed by detergent deposits or foreign objects, it is recommended to remove the obstacle making sure not to push it to the bottom because it may clog up the internal circuit. We remind you that the detergent can be easily removed with hot water.
DRAIN PUMP FILTER CLEANING
It is recommended to periodically clean the drain pump fi Iter. To clean the fi Iter, follow instructions below:
- Drain out the remaining water by selecting the "Drain" programme;
- Turn off the washing machine;
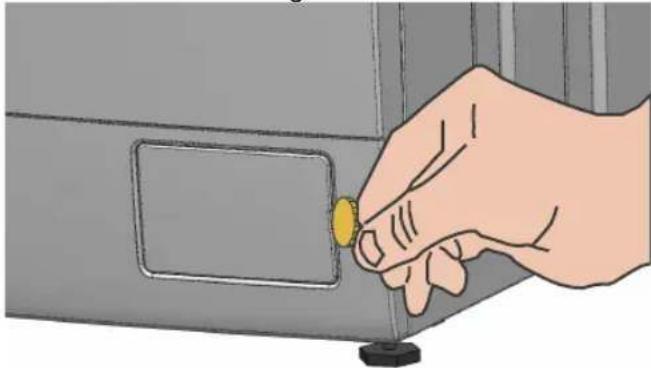
- Get a coin.
Insert the coin into the slot on the side in order to open the cover
Figure 17
natural_image
Hand inserting a yellow coin into a gray device panel (no text or symbols visible)N.B If the drain circuit is clogged, there could be consistent quantity of water in the appliance (max. 25l).
EMPTYING PROCEDURE
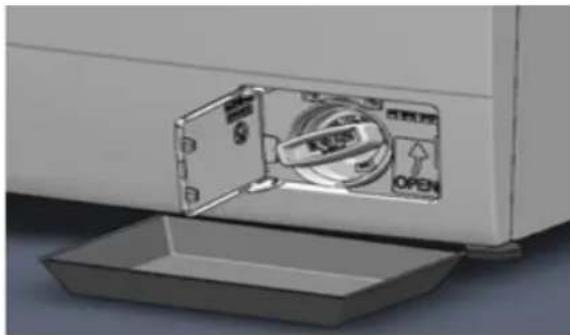
1) Place a tray between the cabinet and the end of the filter.
Figure 18
natural_image
Diagram of a refrigerator interior showing the door, fan, and tray with an open lid (no text or symbols)Warning! After a wash ! cycle with high temperature, wait until it is cooled down. Danger of burning.
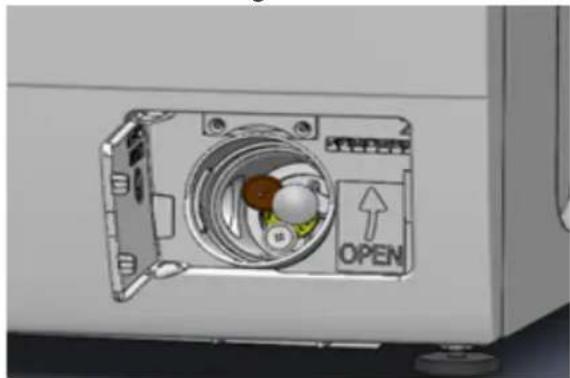
2) Loosen the filter using the appropriate holder in order to let the water flow.
Figure 19

natural_image
Illustration of a washing machine with blue liquid being poured into a tray (no text or symbols)When there is no more water coming out, unscrew the fi liter completely and clean it carefully. Remove any foreign objects from the fi liter.
Figure 20
natural_image
Interior view of a device showing a circular opening with internal components and a directional arrow labeled 'OPEN' (no text or symbols beyond the label)Reinsert the drain filter and tighten it firmly until it locks.
! Warning! If you do not reinsert the fi Iter or you do not screw it until it is blocked, the water will come out of the machine.
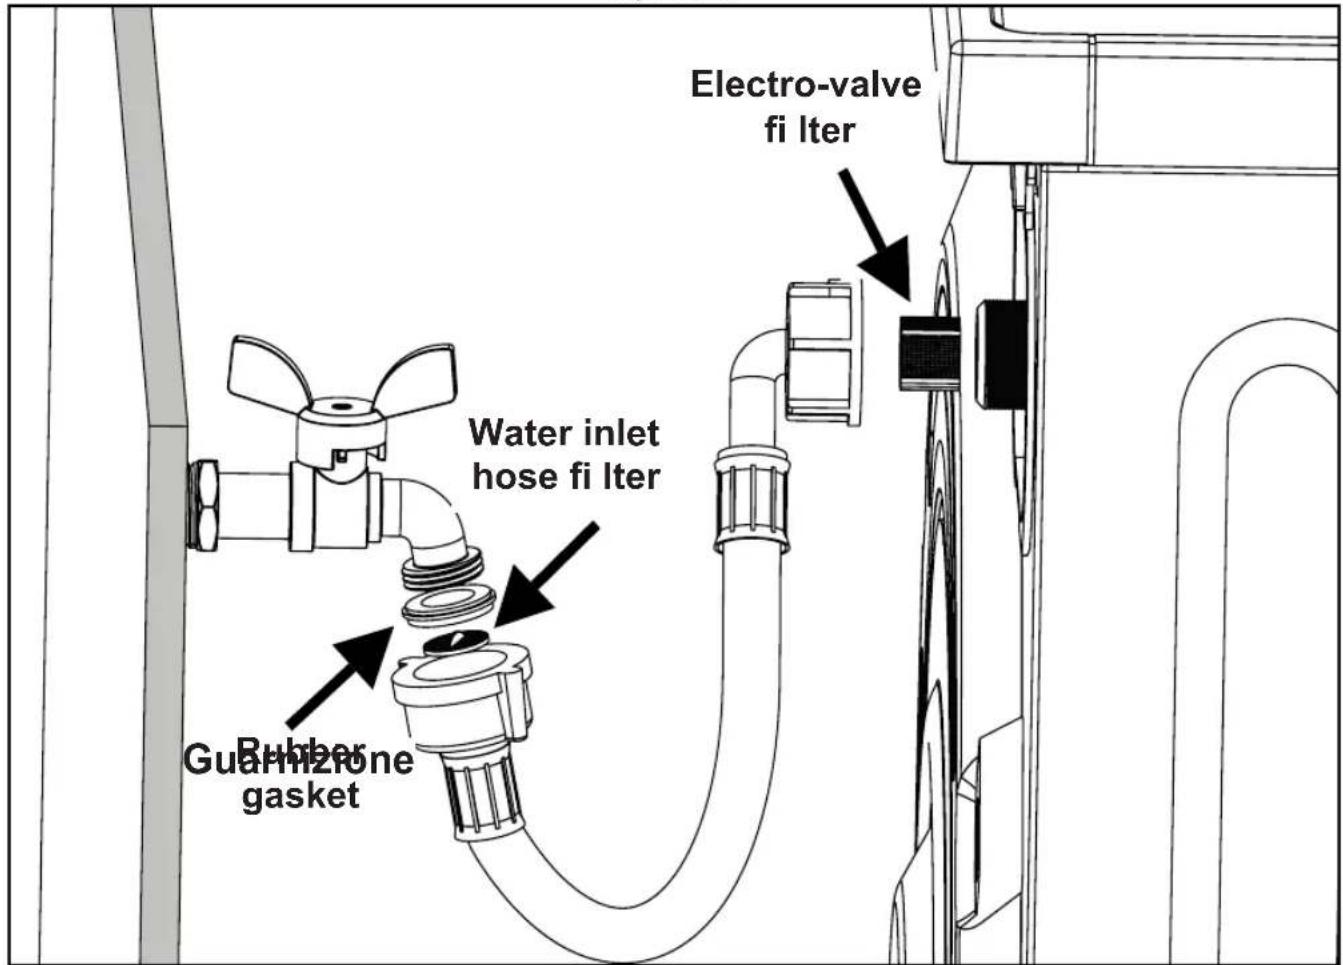
CLEANING OF ELECTRO-VALVE AND WATER SUPPLY HOSE FILTERS
To clean the filters follow the instructions below:
- Turn off the washing machine and disconnect the power cable.
- Close the water and disconnect the water supply inlet hose from the water tap and from the washing machine.
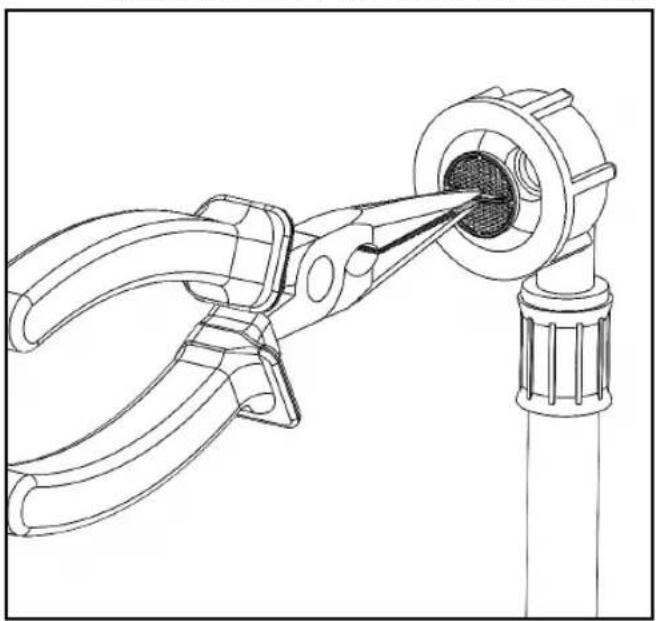
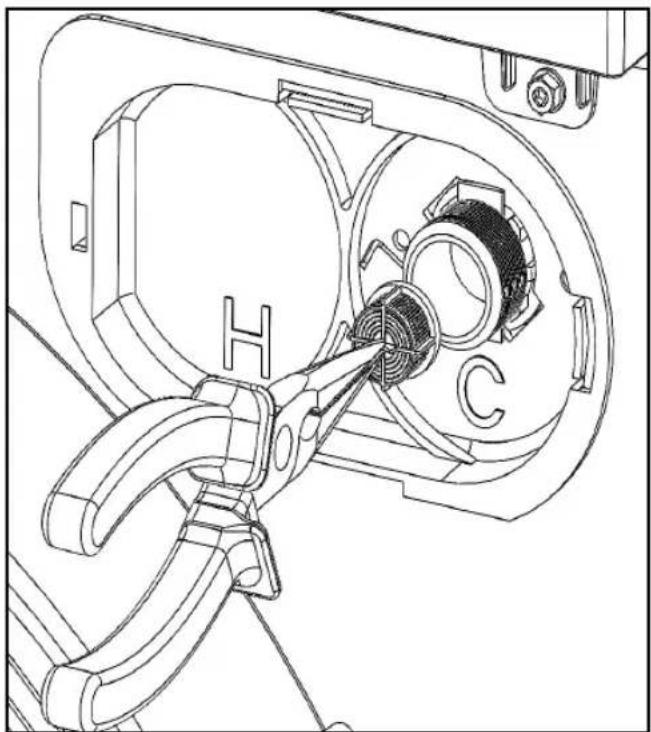
• Get pair of tweezers and a tooth brush. - Remove the filters from their place (fi gure 21)
- Clean the filters with running water making use of the tooth brush.
WATER LOADING TEST
- Get a stopwatch;
- Turn the programme knob to drain and let it run for about two minutes;
- Turn the programme knob to cotton programme simultaneously start the programme and the stopwatch;
- From the moment the washing machine drum starts turning, make sure the stopwatch does not exceed 80-90 seconds;
- If that value exceeds, it is necessary to ensure the right grid pressure and check that the water supply hose fi liter and/or solenoid valve hose fi liter are not obstructed.
Figure 21
text_image
Electro-valve fi Iter Water inlet hose fi Iter Rubber gasket GuamizoneExtraction water inlet hose fi Iter* Extraction water valve fi Iter
natural_image
Technical line drawing of a manual pliers tool inserting into a mechanical component (no text or symbols)*Before extracting the fi lter from the wateinlet hose, remove the gasket indicated in fi gure 21.
natural_image
Technical line drawing of a mechanical assembly with labeled components (H, C), no readable text or symbols present.| Problem Possible solution | |
| The washing machine does not switch on | Make sure the power plug is inserted.Make sure there is power in the socket.Make sure the ON-OFF button is on and that the program knob is in position 1 Cotton.Make sure the door is properly closed. |
| The machine does not take water and/or does not spin | Reopen the door and close it again with a slight momentum |
| The machine does not take in water and/or it does not start | Make sure the drain pump filter is not clogged.Make sure the drain hose is not choked and that the inside diameter of the drain duct is wider than the outside diameter of the washing machine drain hose. |
| The door does not open | Make sure the Red LED is off.Press on the door on the side of the closure or give it a light stroke and at the same time try to open it. |
| There is water on the floor | Make sure the inlet and drain hoses are intact and that they do not lose water.The detergent may not be suitable or be in excessive quantity (Exit the drawer).Reduce the amount of detergent. |
| The machine continuously take in water even when it is off | Reduce the pressure of water supply or pumping unit.Close the tap after washing. |
SERVICE APRÈS-VENTE
REPAIR
Many problems can be solved independently by the user using the information on the faults reported in these instructions or available on our website www.sangiorgioelettrodomestici.it.
If this is not possible, please contact our customer service. We always find an adequate solution and try to avoid unnecessary visits by service technicians.
text_image
SERVICE XXXXXXXXXXXXXXIt is ensure that the appliance is repaired only with original spare parts and by specially trained customer service personnel, both during the warranty coverage and upon expiry of the same. For safety reasons, only adequately specialized and trained personnel can carry out repairs on the appliance. The warranty is void in the event of interventions or repairs are carried out by persons not authorized by the producer or in the event that the appliance is equipped with non-original spare parts, supplementary parts and accessories due to which a defect arises.
The original spare parts relevant for operation according to the Ecodesign regulation are available from our customer service department for a period of at least 10 years starting from the day of marketing of the appliance within the European community.
If any repairs are required, contact an authorised after sales service calling the number indicated. Always specify the model of the appliance and its serial number as reported on the rating plate on the cabinet visible on the upper side of the door when it is opened and/or on the back side of the washing machine.
WARRANTY CERTIFICATE
1. Terms and Conditions of the Conventional Warranty
This conventional warranty is to be considered additional and not replacing ant other right of the customer, being understood that customer is exclusively the physical person beyond any managerial or professional activity, who uses the household appliance for domestic/private use - ex Legislative Decree 6 September 2005, n. 206.
The conventional warranty has to be considered as a guarantee to free replacement or repair of parts of the appliance that show defects of conformity within 24 months of the date of purchase (12 months if purchased through commercial invoice and not fi scal receipt).
The conventional warranty is valid only on Italian territory including the Republic of San Marino and Vatican City and may be proved by a document issued by the retailer or other documentary proof (ie. fi scal receipt, invoice or document of delivery) reporting the name of the seller, date of delivery of the household appliance and, identifi cation details of the latter (type of model).
2. Validity of the warranty
This warranty has full validity during the above mentioned period if:
The user claims the conformity defect within two months of its discovery; All operations such as installing, connecting to the domestic system and functioning of the appliance shall be executed following the use and maintenance instructions on the user manual carefully; All operations such as use, maintenance and daily care of the washing machine shall be executed in accordance with the prescriptions and instructions reported in this user guide.
Make sure any repair intervention is made exclusively by technicians belonging to After-Sale Service Centers authorized by the Manufacturer and using original spare parts only.
3. Intervention with warranty
During the validity period of this Warranty (24 months after the date of purchase), in case the authorized after-sale service has acknowledged a lack of conformity due to manufacturing defects, the manufacture commits itself to repair/replace the household appliance without costs for the customer.
The replacement of the appliance can take place only in case it is objectively possible and not disproportionate compared to repair.
According to art. 130 of the Consumer Code, the requested solution is “disproportionate” if it imposes costs on the seller which, in comparison to other remedies, are unreasonable, taking into account the value the goods would have if there were no lack of conformity, the signifi cance of the lack of conformity, and whether the alternative remedy could be completed without signifi cant inconvenience to the consumer.
All requests regarding replacement or repair of the household appliance have to be evaluated by the After-Sale Service whose opinion is binding and indisputable. Any repair/replacement of components or appliance do not extend the duration of this warranty which shall continue, in any case, until its expiry date as provided for in previous clause 1.
As from more than 6 months after the date of delivery of the product to the consumer, period of time during which the defect of conformity can be considered to be already existed on that date (art. 132 of Consumer Code), and only when the malfunction does not depend on a vice of conformity, SANGIORGIO IT Wash may ask the reimbursement of the cost to the consumer – always reasonable and previously indicated – incurred for the verification of the malfunctioning.
4. Exclusion clauses
This Conventional Manufacturer Warranty does not cover interventions and/or repairs and/or spare parts which shall result defective for the following reasons:
a) Damages caused by transport or handling of the household appliance, or damages arising from circumstances and/or events caused by force majeure, which, in any case, cannot be connected to manufacturing defects of the household appliance.
b) Operations of installation and assembly (for example: fault connection/power supply; lack of the protective earth connection; inadequate water supply/drain; removal of the fi xing brackets on the tub; any possible regulation such as the floor level under the household appliance).
c) An incorrect, improper or incomplete installation, lack of capacity to use by the Consumer or Installer, if there is no enough place to operate around the product (at least 3 cm on the upper side, 8 cm on both sides and 8 cm on the rear) or excessively high/low temperature of the environment (in case the household appliance has been placed on balconies, terraces, roofs, in direct contact with atmospheric agents: sun, rain, cold and lightning).
d) Interventions where the claimed defect was not found, due to a misleading impression of the consumer (for example: noise, vibration or hooping, excessive foam, no spinning, it does not wash properly, it tears the garments, etc.).
e) Intervention on products placed in improper positions or in dangerous areas (roofs, etc.) which may not guarantee the operator safety as established by Law 626-94 concerning safety at work.
f) Damages caused by weathering agents (lightning, earthquakes, fires, floods, etc.)
g) If the serial number results to be removed, erased or modified.
h) Failure to comply with the instructions for use and maintenance as reported in the correspondent user manual (drain fi iter and water supply, removal of foreign objects, excessive load, etc.).
i) Maintenance, repair, modifi cations or tampering operations (removal of the top, back plate, etc.) executed by personnel not authorized by the manufacturer and/or use of non original spare parts.
j) Lack of fi scal documents or when they appear to be counterfeited or not related to the product.
k) Negligence and carelessness and/or improper use of the appliance (not for domestic use and differently in any way from what established by the manufacturer).
I) For any other external circumstance not related to manufacturing defects of the household appliance.
This warranty only covers defects of conformity of the product and therefore it does not include regular check and maintenance operations. Consequently, in case there has been an intervention at the request of the consumer made by a technician of the after-sale service centre, for reasons related to above mentioned situations, the costs for the intervention and any spare part needed shall be totally charged to the consumer.
5. Limitations to the Manufacturer Liability
The manufacturer cannot be held liable for damages that could affect, directly or indirectly, persons or goods resulting from failure to comply with instructions included into the correspondent user manual, in particular those regarding the installation, use and maintenance of the household appliance.
This Warranty is the unique Warranty given by the manufacturer. No third party is authorised to modify its terms or to give other oral or written warranties.
6. Expiration of the Warranty
Once elapsed the warranty period established by this Manufacturer Conventional Warranty as indicated in clause 1, any repair and/or replacement intervention shall be at the expenses of the consumer, in line with the current tariffs of the network of authorized After-Sale Service centres.
** Failure to comply with the instructions on use not only is extremely dangerous for your own safety but it will result in an exclusion of all assistance provided this warranty.