
Camedia P-330 - Printer OLYMPUS - Free user manual and instructions
Find the device manual for free Camedia P-330 OLYMPUS in PDF.


| Product Type | Digital Color Printer |
| Model | Olympus Camedia P-330 (also known as P-300U) |
| Printing Method | Sublimation dye transfer (Yellow/Magenta/Cyan 3-pass) |
| Effective Pixels | 1376 (H) x 1024 (V) dots |
| Print Size | 4.5 x 3.375 inches (114 x 85 mm) |
| Color Depth | 256 levels per color (24-bit), approx. 16.7 million colors |
| Print Speed | Approx. 95 seconds per sheet (excluding data transfer) |
| Input/Output Connectors | Centronics Parallel Interface, Mini DIN 8-pin Serial Interface |
| Ink Ribbon Cartridge | Standard, sticker, 16-cut sticker: 60 sheets per cartridge |
| Print Paper | Standard paper, sticker, 16-cut sticker: 4 x 5.625 inches (100 x 140 mm) |
| Power Requirements | 110-120 V AC, 60 Hz, 0.9 A |
| Operating Temperature | 41°F to 95°F (5°C to 35°C) |
| Operating Humidity | 20% to 80% |
| Dimensions (with feeder) | 10.875 x 2.875 x 14.375 inches (274 x 73 x 362 mm) |
| Weight (with feeder) | Approx. 4 lb 7 oz (2.0 kg) |
| Automatic Feeder Capacity | Up to 30 sheets (standard paper) |
| Direct Print | Compatible with Olympus Digital Cameras via serial or parallel connection |
| Computer Compatibility | Windows 95/98/3.1, Macintosh (serial connection) |
| Safety Features | Thermal head protection, power overload protection, automatic shutdown on jam |
| Maintenance | Clean exterior with soft dry cloth; replace ink ribbon and paper as needed; clear paper jams manually |
| Spare Parts / Consumables | Standard set P-60NE, Sticker set P-60NS1E, Sticker (16-cut) set N-60NS16E |
Frequently Asked Questions - Camedia P-330 OLYMPUS
User questions about Camedia P-330 OLYMPUS
0 question about this device. Answer the ones you know or ask your own.
Ask a new question about this device
Download the instructions for your Printer in PDF format for free! Find your manual Camedia P-330 - OLYMPUS and take your electronic device back in hand. On this page are published all the documents necessary for the use of your device. Camedia P-330 by OLYMPUS.
USER MANUAL Camedia P-330 OLYMPUS
- This Installation Guide explains how to install and use the Digital Color Printer P-330 for Windows 95/98, 3.1 and Macintosh software.
- Keep this guide handy for future reference and refer to it when requesting service.
Notice for users
Program © 1998 Olympus Optical Co., Ltd.
All rights reserved. This manual or the software described herein, in whole or in part, may not be reproduced, translated or reduced to any machine readable form without prior written approval from Olympus Optical Co., Ltd.
IN NO EVENT SHALL OLYMPUS OPTICAL CO., LTD. BE LIABLE FOR ANY INCIDENTAL, CONSEQUENTIAL OR SPECIAL DAMAGES, WHETHER BASED ON TORT, CONTRACT, OR OTHERWISE, ARISING OUT OF OR IN CONNECTION WITH THIS MANUAL, THE SOFTWARE OR OTHER INFORMATION CONTAINED HEREIN OF THE USE THEREOF.
By breaking the seal of the envelope of the CD-ROM package, you accept all the terms and conditions of this agreement. If you do not accept these terms and conditions, please return this disk envelope unopened, along with the rest of the package, immediately to the dealer where you obtained it.
OLYMPUS OPTICAL CO., LTD. reserves the right to make any modification to this manual or the information contained herein at any time without notice.
Trademarks
• IBM and PC/AT are trademarks of IBM Corporation.
- Microsoft and Windows are registered trademarks of Microsoft Corporation in the United States and other countries.
• Macintosh is a trademark licensed to Apple Computer Inc., registered in the U.S.A. and other countries.
- All other product names mentioned herein may be the trademarks or registered trademarks of their respective companies.
Furthermore, "TM" and "®" are not mentioned in each case in this manual.
Contents
For Windows 95/98 (from page 4)
System requirements .... 4
Installing the software .... 5 Uninstalling the software .... 7
Printing .... 8 Stopping printing .... 10 Hints for better printout .... 11
Setting the resolution 12
Adjusting the picture quality ..... 13
Making the split print 14
Making multiple prints at high speed 15
For Windows 3.1 (from page 17)
System requirements ...... 17
Installing the software .... 18 Uninstalling the software .... 21
Printing .... 22 Stopping printing .... 24 Hints for better printout .... 24
Setting the resolution 25
Adjusting the picture quality ..... 26
Making the split print 27
Making multiple prints at high speed 28
For Macintosh (from page 29)
System requirements ...... 29
Installing the software 30
Printing .... 32 Stopping printing .... 35 Hints for better printout .... 35
Adjusting the picture quality .... 36 Making the split print .... 38 Previewing the image .... 39
For Windows 95/98/3.1, Macintosh (from page 41)
Troubleshooting 41
System requirements
Notes
• This software is subject to be upgraded without notice.
- The pictures used in this manual may be different from the actual screen of the software.
Your computer and system software must meet the following minimum requirements to run the printer driver.
• IBM PC/AT compatible personal computer
Supporting Windows 95/98 with i486SX and above CPU (Pentium or later recommended)
- Memory
8MB or more (32 MB or more is recommended depending on the application software used to print)
- Hard disk space
15MB or more free space (30MB or more is recommended)
Larger pictures and more pages require more hard disk space.
- Video monitor
A video board or video driver which displays 256 colors or better (32,000 colors or more is recommended)
- Drive
CD-ROM drive (needed for installation)
For the latest information, refer to the "readme.txt" contained in the "English\Win95-98" directory of the supplied CD-ROM.
Installing the software
Install the software containing the printer driver for Windows 95/98 in the supplied CD-ROM.
1 Connect the printer to the computer.
See the operating instructions of the Digital Color Printer.
2 Turn on the printer and the computer. Then start Windows 95/98.
3 If the following [New Hardware Found] screen is displayed, check [Do not install a driver] and click [OK].

If the following [Update Device Driver Wizard] screen is displayed, click [Next] and then [Finish].
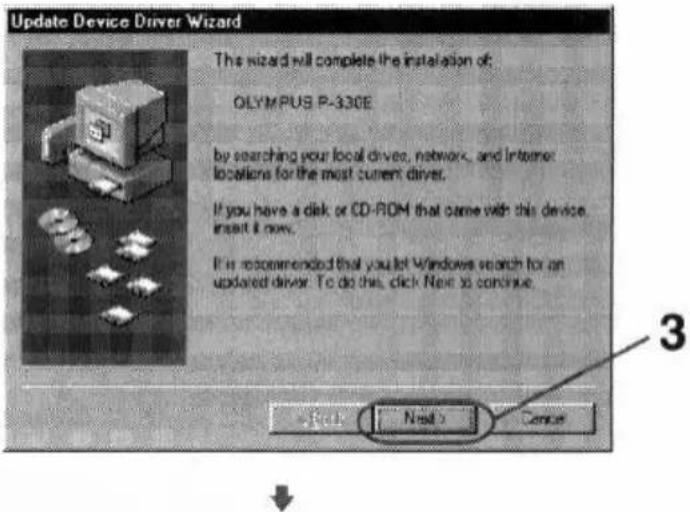
Notes
- When the dialog prompting you to insert the Windows CD-ROM or floppy disk appears during installation, insert the specified CD-ROM or floppy disk and click [OK]. If the Windows Setup starts after the Windows CD-ROM is inserted, finish the Setup program.
- You can install the software without performing steps 1 through 3. Start Windows 95/98 and then perform steps 4 through 6. If the dialog of step 3 appears after the computer is restarted, perform step 3.
- If the Setup does not start automatically after the supplied CD-ROM is inserted, or if you stop Setup midway and resume it later, double-click the [Setup.exe] icon contained in the "English\Win95-98" directory of the supplied CD-ROM.
Tip
For the latest information, refer to the "readme.txt" contained in the "English\Win95-98" directory of the supplied CD-ROM.

4 Insert the supplied CD-ROM into the CD-ROM drive.
The Setup starts automatically and the Setup dialog appears.
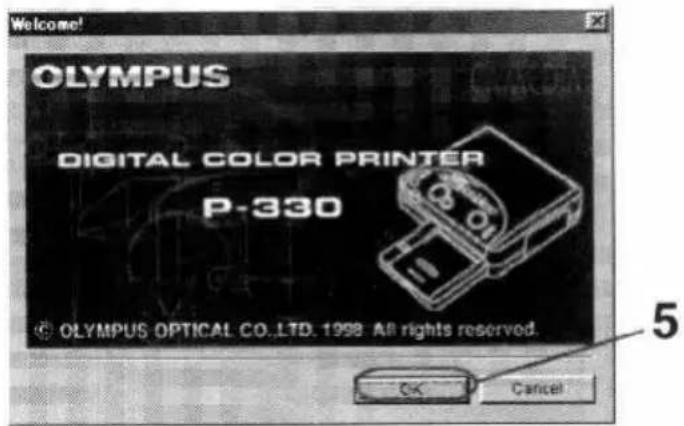
5 Click [OK] repeatedly until the screen notifying that the Setup is complete appears.
6 Click [OK].
Installation finishes.
Uninstalling the software
When the driver software becomes unnecessary, remove all the software files from your hard disk as follows:
1 Click the Windows [Start] button, click [Settings], and click [Printers].
The [Printers] dialog appears.
2 Click to select [OLYMPUS P-330].
3 Click [Delete] from the [File] menu.
4 Follow the on screen instructions to remove the OLYMPUS P-330 Printer Driver from your hard disk.
Printing
Tip
When you print in 306 dpi in the application software, set the picture size up to 1376 x 1024 pixels.
Note
If the message "This printer is not supported by the driver currently associated with it. Windows will use OLYMPUS P-330 instead." appears, click [OK].
Notes
- Use the set of the print paper and ink ribbon cartridge supplied together in the same carton. Also make sure to set [Size] in the combination shown in the table. If you use them in different combination, proper printing results may not be obtained or other trouble may occur.
- For the details on print paper and ink ribbon cartridge, refer to the operating instructions of the printer.
1 Start the application software used to print, and select the image to be printed.
2 Click [Printer Setup] from the [File] menu of the application.
The [Print Setup] dialog appears.
3 Set the printer.
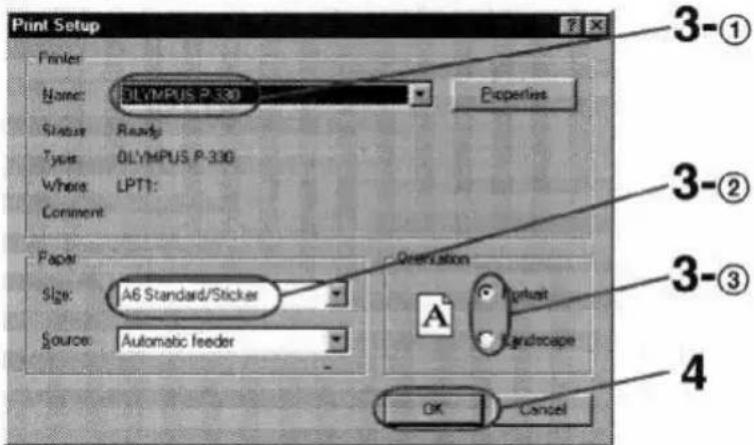
The above dialog is of the OLYMPUS C-2.0W95 as an example. The dialog differs depending on the application.
① Set [Printer] to [OLYMPUS P-330].
② Set [Size] referring to the combination below.
| Print paper loaded | Ink ribbon cartridge loaded | [Size] setting |
| Standard paper | Standard type | A6 Standard/Sticker |
| 4-,16-Cut Sticker | Standard type | A6 Standard/Sticker |
| Passport photo paper | Passport photo type | A6 Passport photo paper |
③ Set [Orientation].
To print in portrait (tall) format, select Portrait. To print in landscape (wide) format, select Landscape.
4 Click [OK] to close the [Print Setup] dialog.
5 Click [Print] from the [File] menu of the application.
The [Print] dialog appears.
6 Set [Copies].
You can set up to 30 copies. You can print continuously using the supplied automatic feeder.
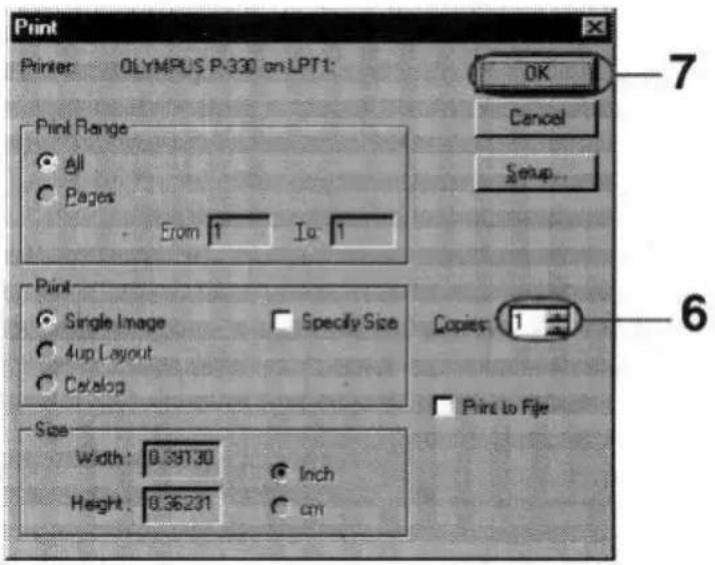
The above dialog is of the OLYMPUS C-2.0W95 as an example. The dialog differs depending on the application.
For further settings and operations
You can make split printing (page 14), adjust resolution (page 12) or picture quality (page 13).
Notes on the high speed print mode
• Data transmission speed depends on the computer.
- If an error occurs, set to OFF.
Note
If the printing of the data has already started, don't try to cancel printing. Doing so will cause the paper to jam.
7 Click [OK].
The next dialog appears.
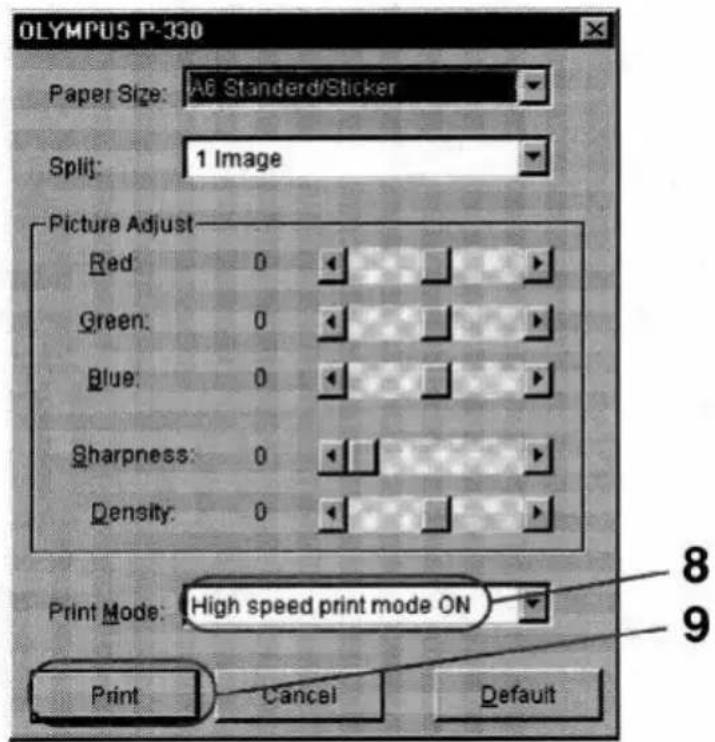
8 Set [Print Mode] to "High speed print mode ON." The data transmission is accelerated.
9 Click [Print]. The printer starts printing.
Stopping printing
When a "printing" message is on the screen
Click the [Stop] button or the [Cancel] button. The printing is canceled.
When the data is in the print spooler of Windows 95/98
1 Click [Start].
2 Point to [Settings] and click [Printers].
3 Double-click [OLYMPUS P-330] and open the [OLYMPUS P-330] window.
4 Click the "Document Name" waiting to be printed.
5 Click [Document] in the menu and then click [Cancel Printing]. Refer to the manual of the Windows 95/98 for details.
Hints for better printout
To obtain better print result, read the application software manual carefully. Changing the resolution and image size are very important.
The following information will be useful.
Make the environment in full-color
With some application software, the colors used to print depends on the display color setting of the computer you use. To print in full-color, prepare the environment which can display 64,000 or 16,770,000 colors.
Adjust the image size and resolution (If the application is to print according to the printer's resolution)
If you can adjust the image size on your application software, make the resolution within 306 dpi and size 1376 x 1024 pixels or 153 dpi and size 688 x 512 pixels. If you print an image larger than the above, the image may be printed split into pieces depending on the application software. Set the resolution in the paper setting dialog according to the image resolution to make better printout.
Setting the resolution
Maximum picture size
• 1376 x 1024 pixels at 306 dpi
- 688 x 512 pixels at 153 dpi
Tip
To print the picture smaller than 688 x 512 pixels, select 153 dpi. Printing is performed more quickly.
Note
You cannot set Dithering, Intensity and Color in this dialog.
You can set the resolution depending on the image you print.
1 Start the application software used to print, and click [Printer Setup] from the [File] menu.
The [Print Setup] dialog appears.
2 Set [Printer] to [OLYMPUS P-330], click [Properties] and then click [Graphics].
3 Set the resolution to 306 dpi or 153 dpi.
306 dpi is recommended. Set to 153 dpi for a small image or to print at high speed.

4 Click [OK] to close the [Properties] dialog.
5 Click [OK] to close the [Print Setup] dialog.
Adjusting the picture quality
Note
If the application software has the same adjustment item as the driver software, do the adjustment on the application software, not on the driver software. If you adjust the same item on both the application software and the driver software, the image may be printed with unexpected result.
You can adjust the picture quality of the prints.
1 Click [Print] from the [File] menu of the application, and in the [Print] dialog click [OK]. The [OLYMPUS P-330] dialog appears.
2 Adjust the picture.
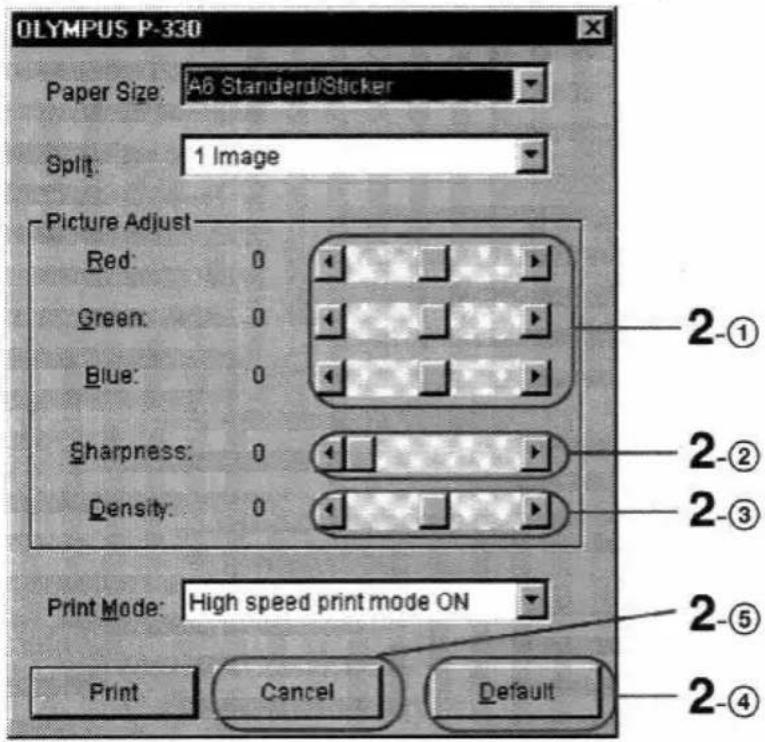
| 1 Red/Green/Blue | Move the Red/Green/Blue sliders to adjust the level of each color ranging from +20% (stronger) to -20% (weaker) by 1%. |
| 2 Sharpness | Move the slider to adjust the sharpness by 6 steps ranging from 0, 1 (weak) to 5 (strong). |
| 3 Density | Move the slider to adjust the density by 15 steps ranging from +7 (thick) to -7 (thin). |
| 4 Default | Click to restore the default settings. |
| 5 Cancel | Click to cancel the adjustments and close the dialog. |
Making the split print
To make the split print correctly
If the application is to print according to the printer's resolution, set the image size as follows:
- 688 x 512 pixels in 153 dpi
• 1376 x 1024 pixels in 306 dpi
See the application's manual for setting the image size.
Notes
- Since the length and breadth ratio of the image does not match that of the paper, the image of the 2-split or 4-split printing is partly cut off.
- The 16-split images printed on the 16-cut sticker are partly cut off because the cut size of the sticker is smaller than the printed size. The 4-split images printed on the 4-cut sticker are also cut off.
- The 16-split and 4-split images are adjusted and printed to the size of sticker print paper.
- You cannot preview the printed image.
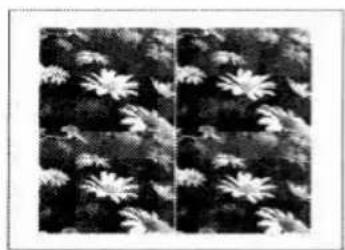
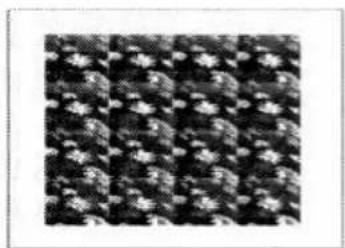
You can make a 2-, 4-, 9-, or 16-split print with an image inset in each split-plane.
1 Click [Print] from the [File] menu of the application, and in the [Print] dialog click [OK]. The [OLYMPUS P-330] dialog appears.
2 Select the desired number of images per sheet in [Split]. You can select 1, 2, 4, 9, or 16 images per sheet.

1 image
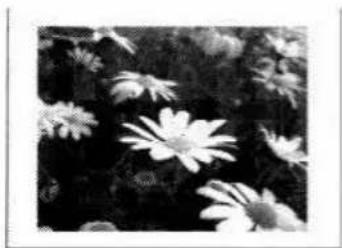
4 images
2 images
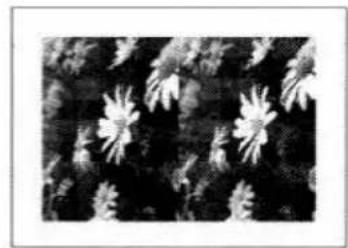
9 images
16 images

Making multiple prints at high speed
To print multiple copies at high speed or with limited hard disk space, check [Print directly to the printer] in the [Spool Settings] window before you start printing.
1 Click [Start].
2 Point to [Settings] and click [Printers].
3 Double-click [OLYMPUS P-330] and open the [OLYMPUS P-330] window.
4 Click [Printer] on the menu bar, click [Properties] and click [Details].
5 Click [Transmission retry] of [Timeout settings] to 300 seconds.
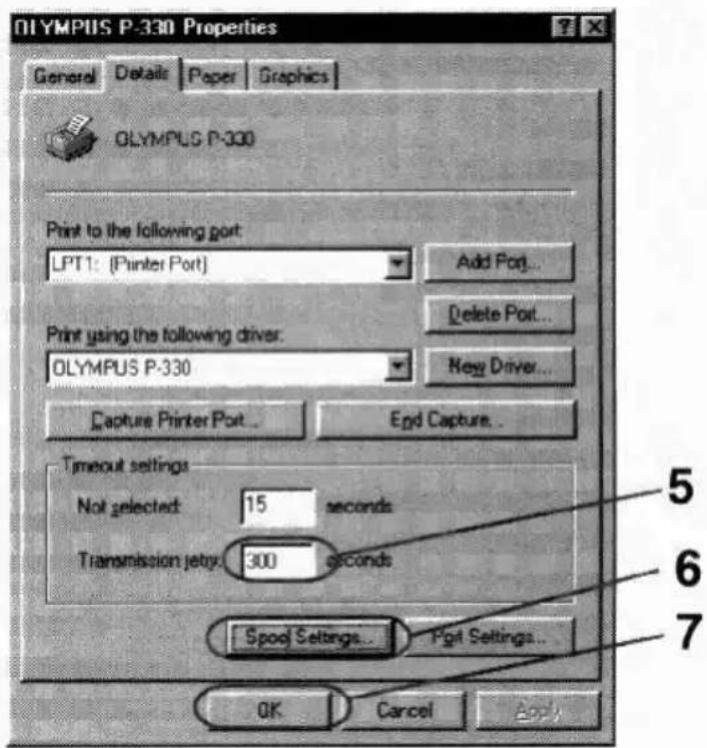
6 Click [Spool Settings] to open the [Spool Settings] window.
Note
You cannot operate the computer until the printing is completed.
7 Check [Print directly to the printer].
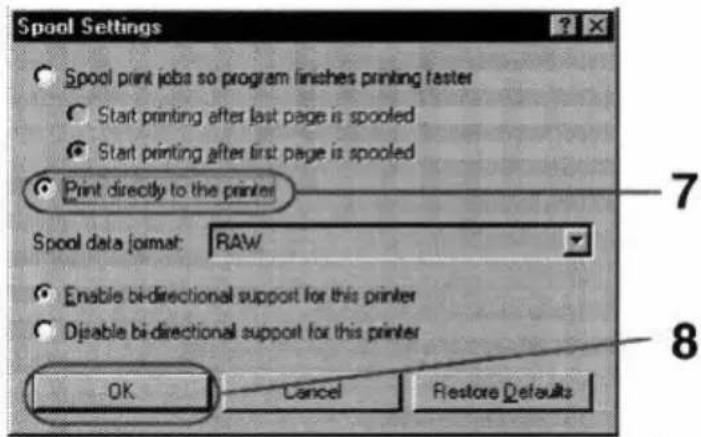
8 Click [OK] and close the [Spool Settings] window.
9 Click [OK] and close the [OLYMPUS P-330 Properties] window.
System requirements
Notes
• This software is subject to be upgraded without notice.
- The pictures used in this manual may be different from the actual screen of the software.
Your computer and system software must meet the following minimum requirements to run the printer driver.
- IBM PC/AT compatible personal computer
Supporting Windows 3.1 with i386 and above CPU
• Memory 8MB or more (32 MB or more is recommended depending on the application software used to print) - Hard disk space 15MB or more free space (30MB or more is recommended)
Larger pictures and more pages require more hard disk space.
• Video monitor
A video board or video driver which displays 256 colors or better (32,000 colors or more is recommended)
- Drive
CD-ROM drive (needed for installation)
For the latest information, refer to the "readme.txt" contained in the "English\Win31" directory of the supplied CD-ROM.
Installing the software
Install the software containing the printer driver for the Windows 3.1 in the supplied CD-ROM.
1 Connect the printer to the computer.
See the operating instructions of the Digital Color Printer.
2 Turn on the printer and the computer. Then start the Windows 3.1.
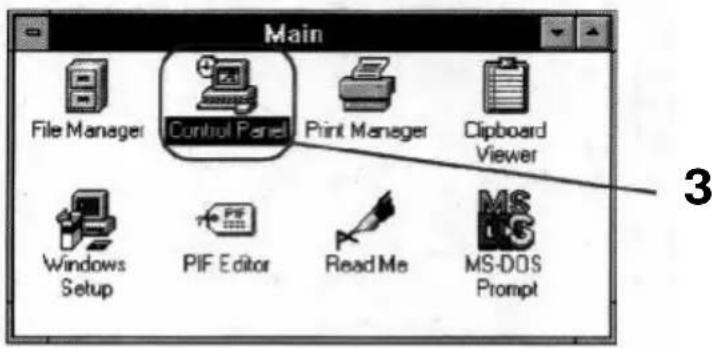
3 Double-click the [Control Panel] icon in the [Main] window.
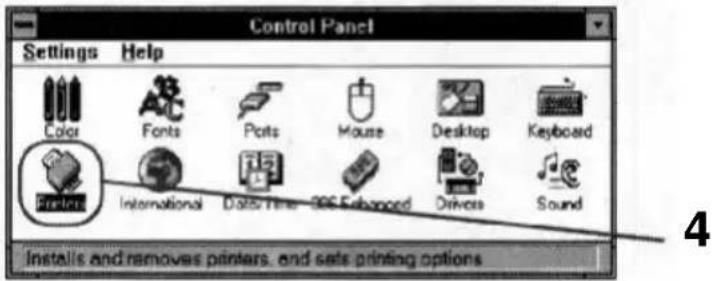
4 Double-click the [Printers] icon.
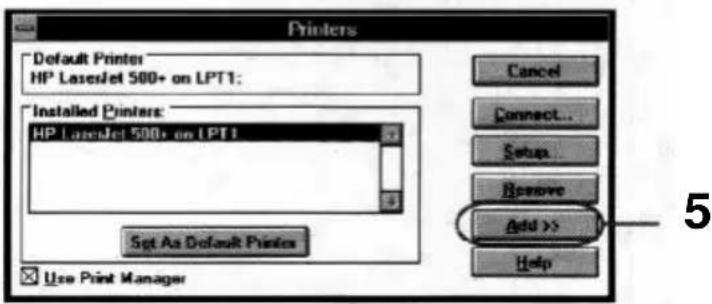
5 Click [Add].
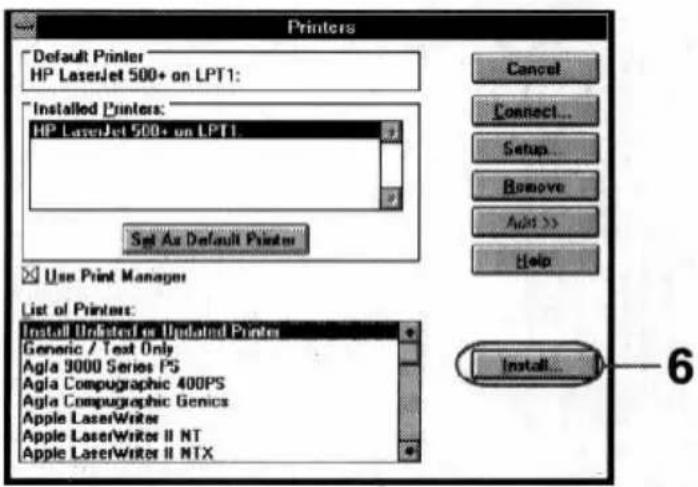
6 Click [Install].
7 Insert the supplied CD-ROM.
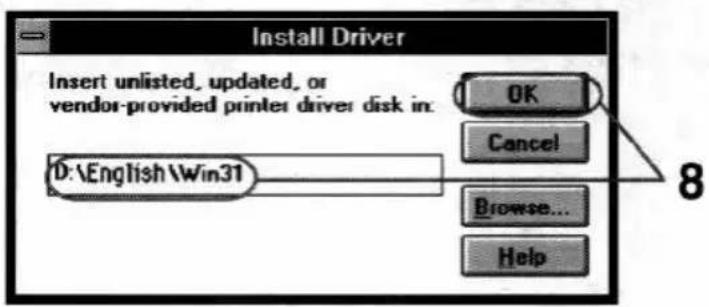
8 Input "D:\English\Win31" and click [OK].
Input your CD-ROM drive for "D." You can also select from [Browse].
9 Make sure that "OLYMPUS P-330" is selected and click [OK].
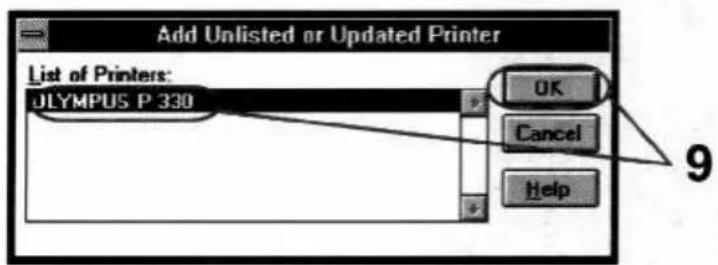
Note
You cannot print without checking "Fast Printing Direct to Port."
10 Make sure that "OLYMPUS P-330 on LPT1:" is added in the [Installed Printers:] box and click [Connect].
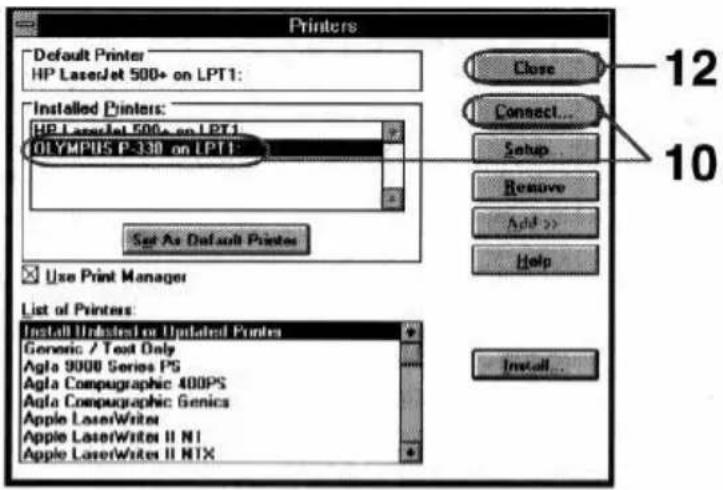
11 Set [Transmission Retry] to "300," check "Fast Printing Direct to Port," and click [OK].
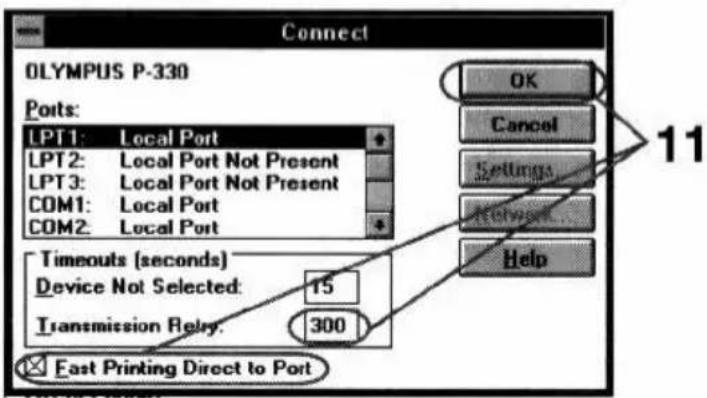
12 Click [Close].
Installation finishes.
Uninstalling the software
When the driver software becomes unnecessary, remove all the software files from your hard disk as follows:
1 Double-click the [Control Panel] icon in the [Main] window.
2 Double-click the [Printers] icon in the [Control Panel] window.
3 Click to select "OLYMPUS P-330 on LPT1:" in the [Installed Printers:] box.
4 Click [Remove]. The confirmation window appears.
5 Click [Yes].
Printing
Tip
When you print in 306 dpi in the application software, set the picture size to 1376 x 1024 pixels.
Notes
- Use the set of the print paper and ink ribbon cartridge supplied together in the same carton. Also make sure to set [Size] in the combination shown in the table. If you use them in different combination, proper printing results may not be obtained or other trouble may occur.
- For the details on print paper and ink ribbon cartridge, refer to the operating instructions of the printer.
1 Start the application software used to print, and select the image to be printed.
2 Click [Print] from the [File] menu of the application.
The [Print] dialog appears.
3 Click [Setup].
The [Print Setup] dialog appears.
4 Set the printer.
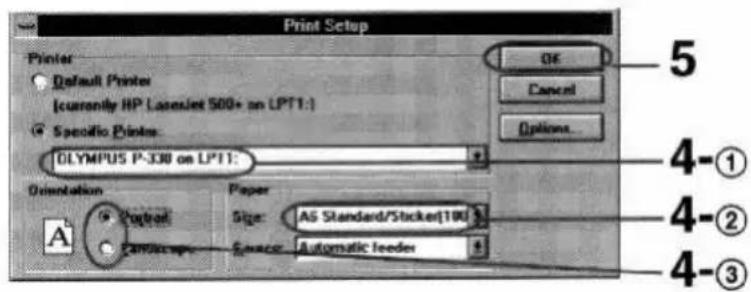
The dialog differs depending on the application.
① Set [Specific Printer] to [OLYMPUS P-330].
② Set [Size] referring to the combination below.
| Print paper loaded | Ink ribbon cartridge loaded | [Size] setting |
| Standard paper | Standard type | A6 Standard/Sticker |
| 4-,16-Cut Sticker | Standard type | A6 Standard/Sticker |
| Passport photo paper | Passport photo type | A6 Passport photo paper |
③ Set [Orientation].
To print in portrait (tall) format, select Portrait. To print in landscape (wide) format, select Landscape.
Tip
You can make split prints (page 27), set resolution (page 25) or adjust the picture quality (page 26).
5 Click [OK].
The [Print] dialog appears.
6 Set [Copies].
You can set up to 30 copies. You can print continuously using the supplied automatic feeder.
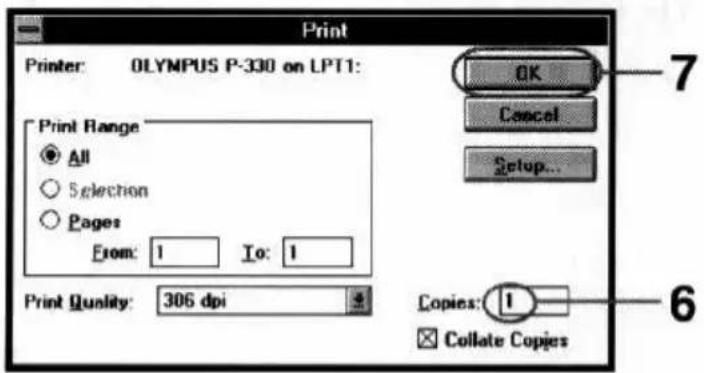
7 Click [OK].
The next dialog appears.
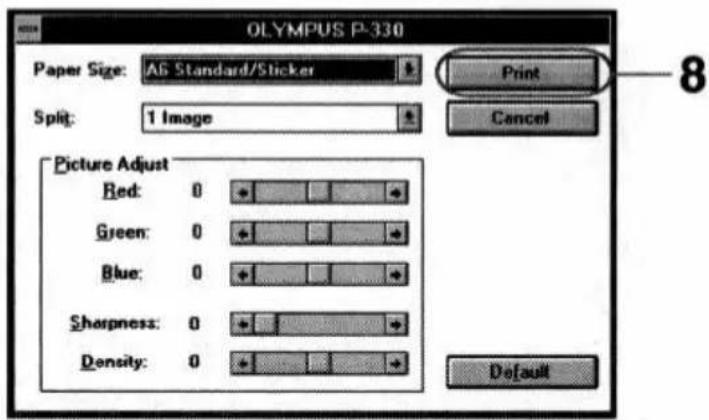
8 Click [Print].
The printer starts printing.
Note
If the printing of the data has already started, don't try to cancel printing. Doing so will cause the paper to jam.
Stopping printing
When a "printing" message is on the screen
Click the [Stop] button or the [Cancel] button. The printing is canceled.
When the data is in the Print Manager
Double-click the [Print Manager] in the [Main] window. Click the "file" waiting to be printed and then click [Delete].
Hints for better printout
To obtain better print result, read the application software manual carefully. Changing the resolution and image size are very important.
The following information will be useful.
Make the environment in full-color
With some application software, the colors used to print depends on the display color setting of the computer you use. To print in full-color, prepare the environment which can display 64,000 or 16,770,000 colors.
Adjust the image size and resolution (If the application is to print according to the printer's resolution)
If you can adjust the image size on your application software, make the resolution within 306 dpi and size 1376 x 1024 pixels or 153 dpi and size 688 x 512 pixels. If you print an image larger than the above, the image may be printed split into pieces depending on the application software. Set the resolution in the paper setting dialog according to the image resolution to make better printout.
Setting the resolution
Maximum picture size
• 1376 x 1024 pixels at 306 dpi
- 688 x 512 pixels at 153 dpi
Tips
• To print the picture smaller than 688 x 512 pixels, select 153 dpi. Printing is performed more quickly.
- When the application software does not have [Print Quality] setting in the [Print] dialog, click [Options] in the [Print Setup] dialog.
You can set the resolution depending on the image you print.
1 Start the application software used to print, and click [Print] from the [File] menu.
The [Print] dialog appears.
2 Set [Print Quality].
You can select 306 dpi or 153 dpi.
306 dpi is recommended. Set to 153 dpi for a small image or to print at high speed.
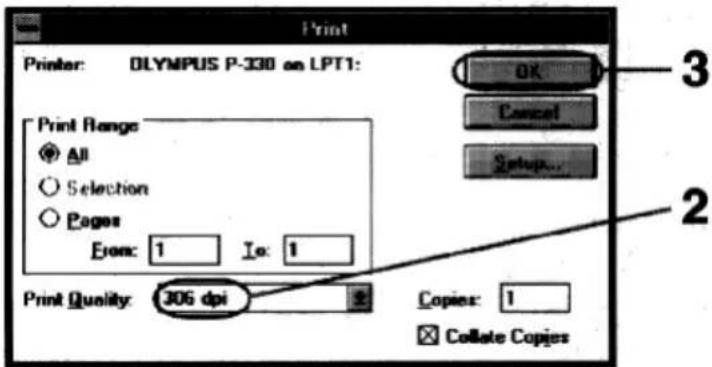
3 Click [OK] to close the [Print] dialog.
Adjusting the picture quality
Note
If the application software has the same adjustment item as the driver software, do the adjustment on the application software, not on the driver software. If you adjust the same item on both the application software and the driver software, the image may be printed with unexpected result.
You can adjust the picture quality of the prints.
1 Click [Print] from the [File] menu of the application, and in the [Print] dialog click [OK]. The [OLYMPUS P-330] dialog appears.
2 Adjust the picture.
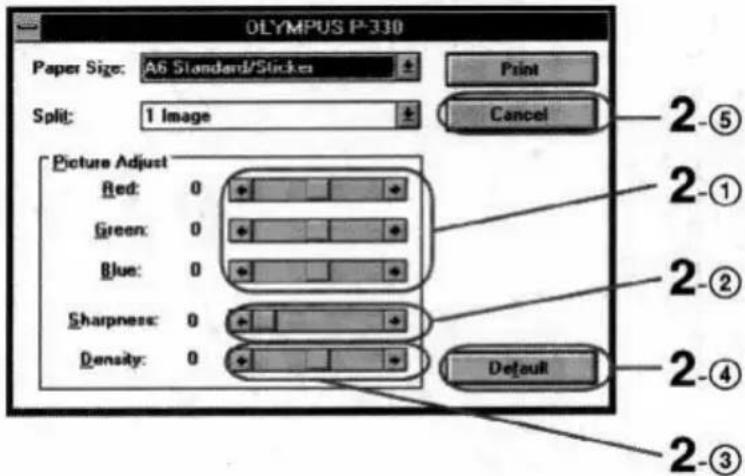
| 1 Red/Green/Blue | Move the Red/Green/Blue sliders to adjust the level of each color ranging from +20% (stronger) to -20% (weaker) by 1%. |
| 2 Sharpness | Move the slider to adjust the sharpness by 6 steps ranging from 0, 1 (weak) to 5 (strong). |
| 3 Density | Move the slider to adjust the density by 15 steps ranging from +7 (thick) to -7 (thin). |
| 4 Default | Click to restore the default setting. |
| 5 Cancel | Click to cancel the adjustments and close the dialog. |
Making the split print
To make the split print correctly
If the application is to print according to the printer's resolution, set the image size as follows:
- 688 x 512 pixels in 153 dpi
• 1376 x 1024 pixels in 306 dpi
See the application's manual for setting the image size.
Notes
- Since the length and breadth ratio of the image does not match that of the paper, the image of the 2-split or 4-split printing is partly cut off.
- The 16-split images printed on the 16-cut sticker are partly cut off because the cut size of the sticker is smaller than the printed size. The 4-split images printed on the 4-cut sticker are also cut off.
• The 16-split and 4-split images are adjusted and printed to the size of sticker print paper. - You cannot preview the printed image.
You can make a 2-, 4-, 9-, or 16-split print with an image inset in each split-plane.
1 Click [Print] from the [File] menu of the application, and in the [Print] dialog click [OK]. The [OLYMPUS P-330] dialog appears.
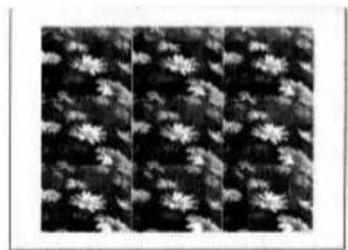
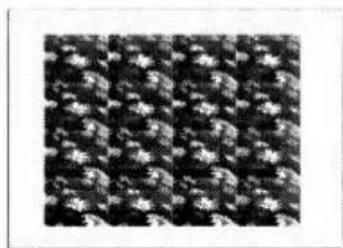
2 Select the desired number of images per sheet in [Split]. You can select 1, 2, 4, 9, or 16 images per sheet.
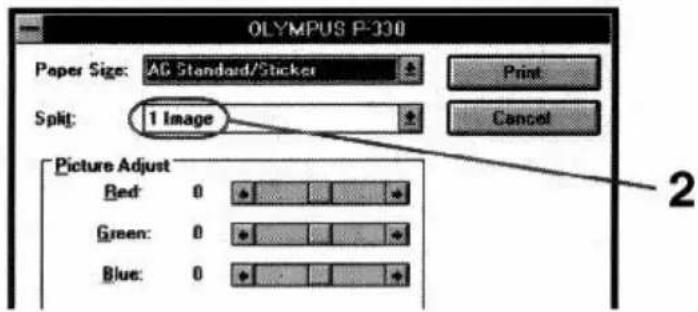
1 image
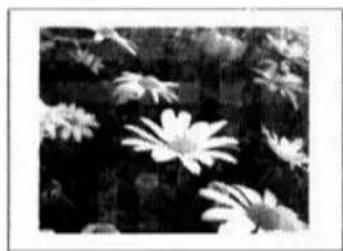
4 images
2 images
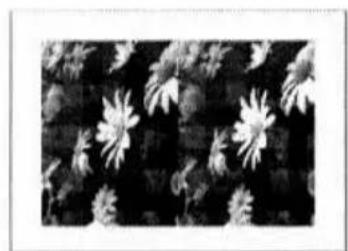
9 images
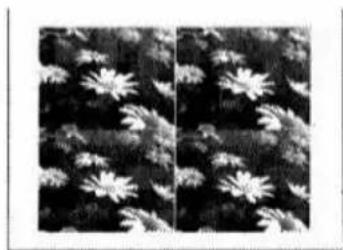
16 images
Making multiple prints at high speed
To print multiple copies at high speed or with limited hard disk space, uncheck [Use Print Manager] in the [Printers] dialog before you start printing.
1 Double-click [Control Panel] in the [Main] window, and then double-click [Printers] to open the [Printers] dialog.
2 Uncheck [Use Print Manager].
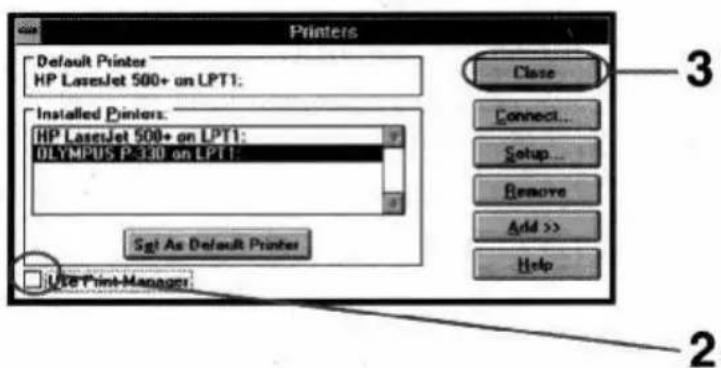
3 Click [Close] to close the dialog.
System requirements
Notes
- If an application to increase memory virtually or to accelerate the process speed is installed, this software may not operate properly.
- If you use a facsimile modem and set to automatic reception, this software may not operate properly.
- If the printer doesn't operate when you connect it to the modem port, connect it to the printer port. This may happen with some Macintosh models which incorporate the modem.
• This software is subject to be upgraded without notice.
- The pictures used in this manual may be different from the actual screen of the software.
- This printer driver does not support "QuickDrawGX."
- This printer driver does not support printing via "AppleTalk."
Your computer and system software must meet the following minimum requirements to run the printer driver.
- An Apple Macintosh compatible computer with a 68030 processor or later and serial port model
Supporting Apple system software version 7.1 or higher.
- Memory
8 MB or more free space
- Hard disk space
10 MB or more free space
Larger pictures and more pages require more hard disk space.
- Video monitor
A video board or video driver which displays 256 colors or better (32,000 colors or more is recommended)
- Drive
CD-ROM drive (needed for installation)
For the latest information, refer to the "Readme" contained in the "English" folder in the supplied CD-ROM.
Installing the software
Install the software containing the printer driver for the Macintosh in the supplied CD-ROM.
1 Connect the printer to the computer.
See the operating instructions of the Digital Color Printer.
2 Turn on the printer and the computer. Then start the Macintosh.
3 Insert the supplied CD-ROM into the CD-ROM drive.
4 Select the software language by double-clicking the corresponding folder.
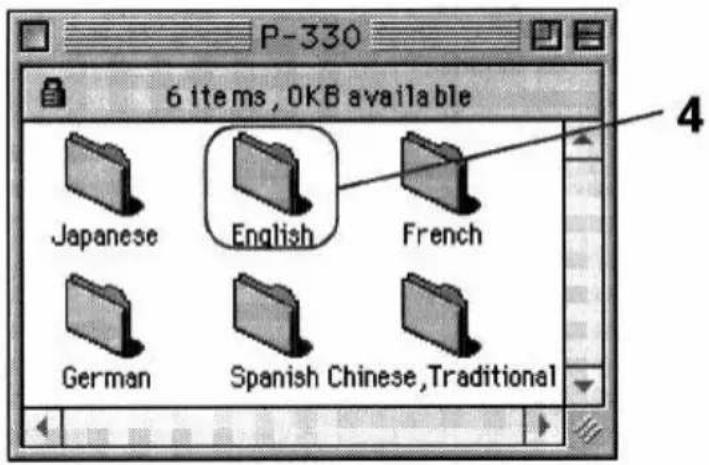
The above screen is an example and may be different from the actual screen.
5 Double-click the [Installer] icon.
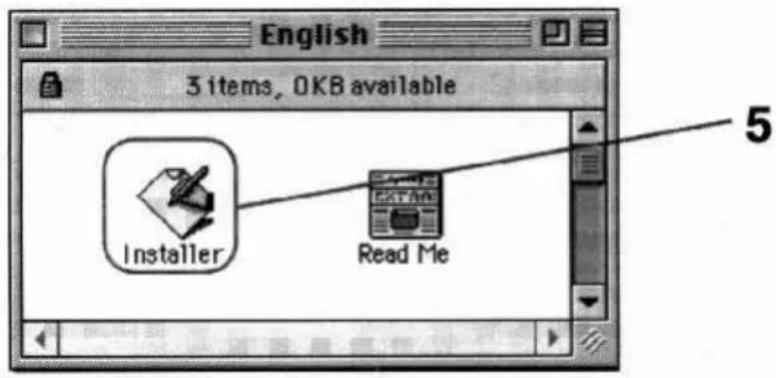
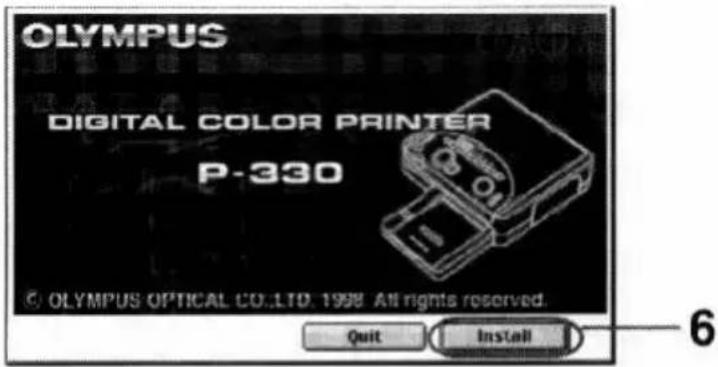
6 Click [Install].
Installation starts up.
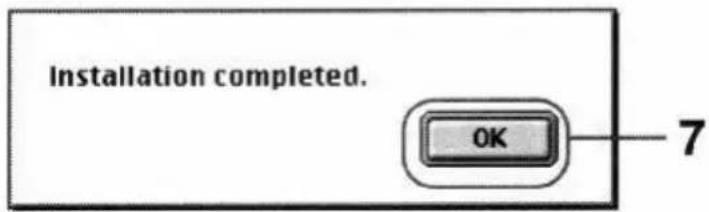
7 When the software is installed successfully, the next screen appears. Click [OK].
Printing
1 Set [Chooser].
① Select [Chooser] from the [Apple] menu. The [Chooser] window is displayed.
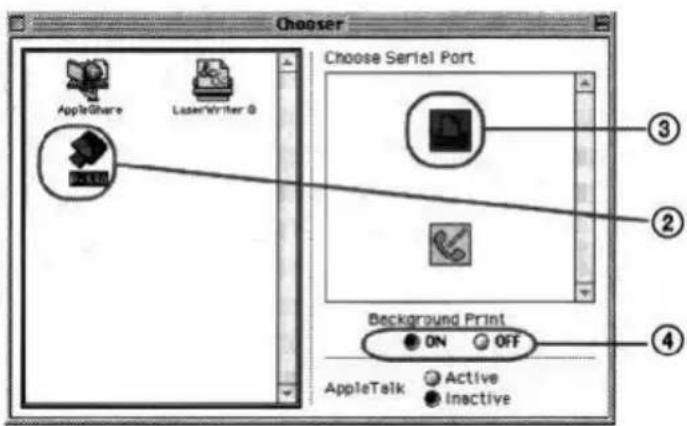
② Click the [P-330] icon in the left box.
③ Select the icon in the right box according to the port you connected the printer.
| When the printer is connected to | Click |
| Printer port | Printer icon |
| Modem port | Modem icon |
④ Select [ON] or [OFF] for the [Background Print].
| Select | To |
| ON | Use computer for other work while printing documents. |
| OFF | Print at high speed, but cannot use computer for other work. |
⑤ Click the close button to close the [Chooser] window.
2 Start the application software used to print, and select the image to be printed.
Tip
When you print in 306 dpi in the application software, set the picture size to 1376 x 1024 pixels.
Notes
- Use the set of the print paper and ink ribbon cartridge supplied together in the same carton. Also make sure to set [Size] in the combination shown in the table. If you use them in different combination, proper printing results may not be obtained or other trouble may occur.
- For the details on print paper and ink ribbon cartridge, refer to the operating instructions of the printer.
3 Display the [Page setup] dialog in the [File] menu from the application and set the printing conditions.
![graph LR A["P-330 Driver"] --> B["Paper: Standard/Sticker"] B --> C["Resolution: 153dpi 206dpi"] C --> D["Orientation: Enlarge/Reduce(%): 100%"] D --> E["OK"] E --> F["Cancel"] style A fill:#f9f,stroke:#333 style B fill:#ccf,stroke:#333 style C fill:#cfc,stroke:#333 style D fill:#fcc,stroke:#333 sty…](/content/2026/05/816050/images/6582dd650a2ea14d0d18843e2f7388aed8a953416f153e1b200e82deba760c75.jpg)
The dialog differs depending on the application software.
| 1 Paper | Click the box and set the print paper while referring to the combinations below. |
| 2 Orientation | Select the landscape icon to print a wide image. Select the portrait icon to print a tall image. |
| 3 Enlarge/Reduce (%) Set the size of the printed image. | |
| 4 Resolution | You can set 306 dpi or 153 dpi. 306 dpi is recommended. Set to 153 dpi for a small image or to print at high speed. |
| Print paper loaded | Ink ribbon cartridge loaded | [Paper] setting |
| Standard paper | Standard type | Standard/Sticker |
| 4-,16-Cut Sticker | Standard type | Standard/ Sticker |
| Passport photo paper | Passport photo type | Passport photo paper |
4 When you have set the above, click [OK]. The paper setting dialog closes.
5 Display the [Print] dialog in the [File] menu from the application and set the pages and quantity for printing.
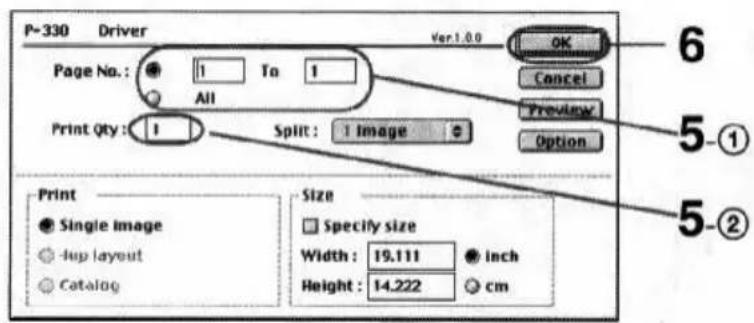
The dialog differs depending on the application software.
| 1 Page No. | To print all the pages, select [All]. To print the selected pages, input the pages in the boxes to start and end the printing with. |
| 2 Print Qty | You can set up to 30 copies. You can print continuously using the supplied automatic feeder. |
6 Click [OK].
The printer starts printing.
To adjust the picture quality, see page 36.
To make split printing, see page 38.
To preview the printed image, see page 39.
Stopping printing
When a "printing" message is on the screen
Click the [Stop] button or the [Cancel] button. Or you may press the period (.) key while holding the command ( ) key down. The printing is canceled.
When using the Print Monitor
Click the [Cancel] button to cancel printing.
If printing has already started
You cannot stop printing. Wait until the print paper is outlet.
Hints for better printout
To obtain better print results, read the application software manual carefully. Changing the resolution and image size are very important.
The following information will be useful.
Adjust the image size and resolution
If you can adjust the image size on your application software, make the resolution within 306 dpi and size 1376 x 1024 pixels or 153 dpi and size 688 x 512 pixels. If you print an image larger than the above, the image may be printed split into pieces depending on the application software. Set the resolution in the paper setting dialog according to the image resolution to make better printout.
To print characters
Use True Type fonts to avoid jagged edges. Refer to the Macintosh manual for details.
Adjusting the picture quality
Adjusting the picture quality may result in better printout depending on images.
Adjust the picture quality as described below.
1 Display the [Print] dialog in the [File] menu from the application software.
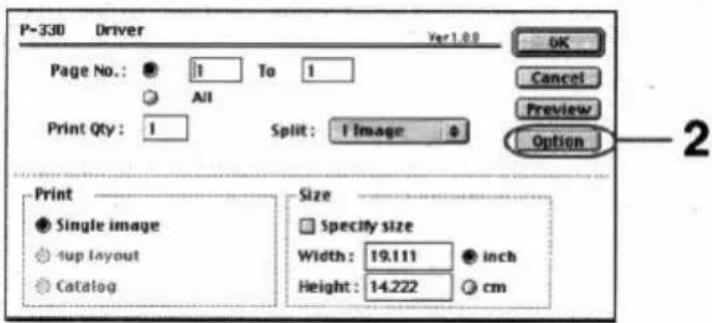
2 Click [Option]. The picture adjust dialog appears.
Note
If the application software has the same adjustment item as the driver software, do the adjustment on the application software, not on the driver software. If you adjust the same item on both the application software and the driver software, the image may be printed with unexpected result.
3 Adjust the Color Balance, Sharpness and Density.
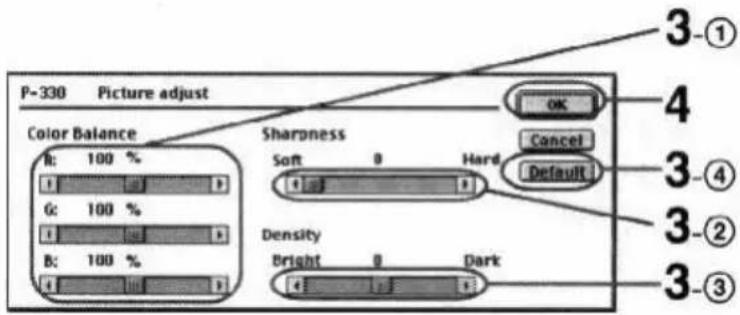
| 1 Color Balance | Changes the color balance by adjusting the balance of red, green and blue.Move the R/G/B sliders to adjust the level of each color ranging from 120 % (stronger) to 80% (weaker) by 1 %. You can adjust the color balance also on the [Preview] screen (page 39). |
| 2 Sharpness | Adjusts the degree of emphasis of edges in the printout. Move the slider to adjust the sharpness by 6 steps ranging from +5 (Hard) to 0 (Soft). |
| 3 Density | Move the slider to adjust the density by 15 steps ranging from +7 (Dark) to -7 (Bright). |
| 4 Default | Resets the above items to the default setting. Color balance becomes 100 %, sharpness and density become 0. |
If you click the [Cancel] button, the adjusting is canceled and the previous setting is restored.
4 Click [OK].
The [Print] dialog appears.
Making the split print
Tips
• To preview the printed image, see page 39.
- You can set [Split] also on the [Preview] screen (page 39).
Note
The 16-split images printed on the 16-cut sticker are partly cut off due to the size of the sticker. The 4-split images printed on the 4-cut sticker are also cut off.
You can make a 2-, 4-, 9-, or 16-split print with an image inset in each split-plane.
1 Display the [Print] dialog in the [File] menu from the application software.

2 Select the desired number of images per sheet in [Split].
You can select 1, 2, 4, 9, or 16 images per sheet.
1 image
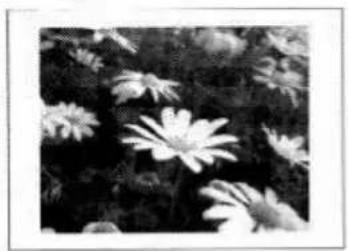
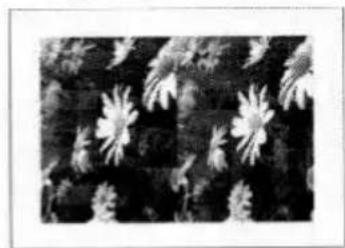
4 images
2 images
9 images

16 images
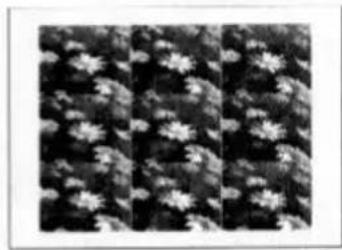
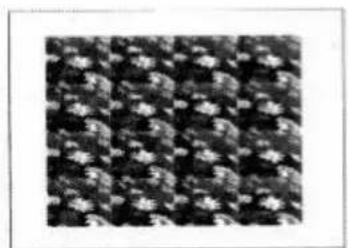
Previewing the image
Previewing function lets you confirm on the monitor screen how the printed image will appear before printing.
1 Display the [Print] dialog in the [File] menu from the application software.
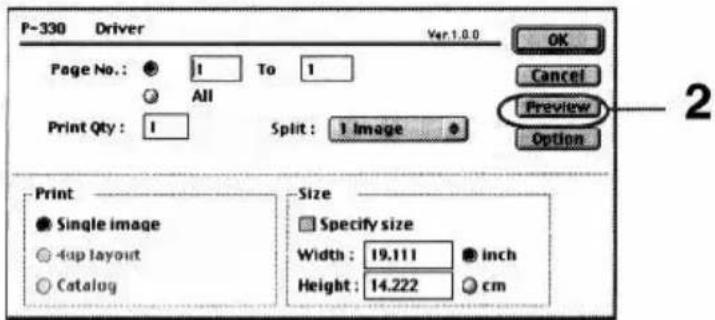
2 Click [Preview].
The preview screen appears.

You can also set [Split] and adjust color balance on this screen.
3 Check that the image is placed within the print paper, and click [Print this page] or [Print this page onward].
The printer starts printing.
If you click [Print this page onward], the printer prints from the current page through the last page.
If you decide not to print the page after previewing
2-① Click the [Next page] button to go to the next page if there are more pages. If there are no more pages, previewing is canceled. The dialog closes.
2-② To cancel previewing, click the [Cancel] button. The dialog closes.
Troubleshooting
Use the following measures to solve problems you experience with your printer. If the problem persists, contact your dealer for information on what to do next.
The printer prints the image split into pieces.
- The resolution of the image is incorrectly set or the size of the image is too large.
→ Edit the image within 306 dpi and 1376 x 1024 pixels or 153 dpi and 688 x 512 pixels.
The edges of the printed image are jagged.
• The image may be stretched as it is being printed.
→ Edit the image within 306 dpi and 1376 x 1024 pixels or 153 dpi and 688 x 512 pixels.
The edges of the printed characters are jagged.
- As the digital color printer prints in 153 dpi, the printed characters may look jagged depending on the size.
→ Print using an application which can apply anti-aliasing to characters.
The printer does not start printing.
- No print paper, no ink ribbon, or paper jam can be the cause.
→ Check the indicators on the printer's front panel and eliminate the cause by inserting print paper, etc. Refer to the printer's operating instructions.
→ Make sure that the correct ink ribbon cartridge is loaded for the print paper.
- It may take a long time to set up the data for printing depending on the computer or application software. It may also take long time when you set to print many copies.
→ Wait until the computer completes the processing.
• The printer may be malfunctioning.
→ Check the indicators of the printer or the error messages of the computer.
→ If printer does not start printing in 5 minutes after print paper is installed when there is nothing wrong with the printer or computer, turn off the printer and turn it on again. Then try printing again. It may take more than 5 minutes when you set to print many copies.
• The hard disk space is not enough.
→ Check the hard disk. If there is not enough space, increase the space enough for the driver software.
- In the [Spool Settings] window, [Enable bidirectional support for this printer] is selected (for Windows 95/98).
→ Select [Disable bi-directional support for this printer]. In this setting, the print monitor is not displayed and the high speed print mode is disabled.
Cannot install from the CD-ROM
• The hard disk free space is not enough.
→ Check the hard disk. If there is not enough space, increase the space enough for the driver software.
- Paintings, photographs, and books under copyright cannot be duplicated without permission of the copyright holder.
- Olympus reserves the right to alter the features and contents of this guide without obligation or advance notice.
- Olympus reserves the right to alter the features and contents of this publication of specifications without obligation or advance notice.
- Olympus assumes no responsibility whatsoever with respect to the use of the information contained in this written material or of the software.
© OLYMPUS OPTICAL CO., LTD. 1998. All rights reserved.
DIGITAL VISION
Digital Camera
P-300U
Digital color printer
Instructions
- Thank you for purchasing this Olympus digital color printer.
- Before using this product, read this manual carefully to ensure correct use.
Owner's Record
The model and serial numbers are located at the rear. Record the serial number in the space provided below. Refer to them whenever you call upon your dealer regarding this product.
Model No. P-300U
SerialNo. ____
Information
This equipment has been tested and found to comply with the limits for a Class B digital device, pursuant to Part 15 of the FCC rules. These limits are designed to provide reasonable protection against harmful interference in a residential installation. This equipment generates, uses, and can radiate radio frequency energy and, if not installed and used in accordance with the instructions, may cause harmful interference to radio communications.
However, there is no guarantee that interference will not occur in a particular installation. If this equipment does cause harmful interference to radio or television reception, which can be determined by turning the equipment off and on, the user is encouraged to try to correct the interference by one or more of the following measures:
- Reorient or relocate the receiving antenna.
- Increase the separation between the equipment and receiver.
- Connect the equipment into an outlet on a circuit different from that to which the receiver is connected.
- Consult the dealer or an experienced radio/TV technician for help.
You are cautioned that any changes or modifications not expressly approved in this manual could void your authority to operate this equipment.
Declaration of Conformity
Trade Name: OLYMPUS
Model No.: P-300U
Responsible Party: OLYMPUS AMERICA INC.
Address: 2 Corporate Center Drive, Melville, New York 11717-3157, U.S.A.
Telephone No.: 516-844-5000
This device complies with Part 15 of the FCC Rules. Operation is subject to the following two conditions: (1) This device may not cause harmful interference, and (2) this device must accept any interference received, including interference that may cause undesired operation.
Table of contents
Introduction......4
Precautions....4
Safety Precautions 4
Getting Started
Unpacking the printer.... 10
What you can do with the Digital Color Printer P-300U.... 11
Identifying the parts.... 12
Loading the ink ribbon cartridge 14
Inserting the print paper 16
Inserting the print paper into the automatic feeder .... 16
Installing the automatic feeder to the printer 18
Printing
Printing an image recorded by OLYMPUS Digital Cameras.... 19
DIGITAL VISION D-320L/D-220L/D-220 Digital Cameras.... 19
DIGITAL VISION D-300L/D-200L Digital Cameras.... 22
DIGITAL VISION D-600L/D-500L Digital Cameras.... 25
Printing an image from the computer.... 26
Printing while directly inserting print paper 28
For Your Information
Troubleshooting....29
If the indicators are on.... 30
If the print paper is jammed 32
Specifications....33
Precautions on the ink ribbon cartridge and print paper.... 34
Introduction
Thank you for purchasing this OLYMPUS digital color printer.
Read this manual and warranty for future reference and use them when requesting service.
Make sure that the date of purchase and dealer's name are included on your warranty.
Precautions
Before using the printer, read the safety precautions given on pages 4 through 9 and follow them to ensure proper handling. Keep this manual handy for future reference.
Restrictions on duplication
If duplicating documents with the printer, pay special attention to the following.
- Duplication of banknotes, coins, or securities is against the law.
- Duplication of blank certificates, licenses, passports, private securities, or unused postal stamps is also against the law.
- Paintings, photographs, and books under copyright cannot be duplicated without permission of the copyright holder, unless you use the duplications for private purpose.
Safety precautions
It is dangerous to tamper with the printer because this can cause fire or electric shock possibly resulting in death or serious injury. Before use, read the safety precautions thoroughly and follow them for proper handling.
This manual uses the following icons to indicate hazardous situations.
| Icon | Description |
| WARNING | Indicates a hazardous situation that, if not avoided, may cause fire or electric shock possibly resulting in death or serious injury. |
| NOTE | Indicates a hazardous situation that, if not avoided, may cause an electric shock or other accidents possibly resulting in minor injury and/or property damage. |

WARNING
If anything strange occurs with the printer, unplug the power cord.
If the printer emits smoke, strange smells, or strange sounds, turn off and unplug the printer to prevent fire or electric shock. Then contact Olympus.
- Should any liquid or foreign object penetrate the printer, unplug the power cord.
Do not allow any liquids, metals, or inflammable objects to infiltrate the printer through the vent. This may cause fire or electric shock. Turn off and unplug the printer, and then contact Olympus.
If the printer cabinet is damaged, unplug the power cord.
Using the printer when the cabinet is damaged may cause fire or electric shock. Turn off and unplug the printer, and then contact Olympus.
■ If the power cord is damaged, unplug it.
A damaged power cord may result in fire or electric shock. Turn the printer off and unplug the power cord while being careful not to touch the wires in the cord. Then contact Olympus.
■ Do not damage the power cord.
A damaged power cord may result in fire or electric shock.
To prevent the cord from being damaged, pay attention to the following.
- Do not pull the cord with a jerk.
- Do not bend the cord excessively.
- Do not heat the cord.
- Do not place heavy objects on the cord.
- Do not rewire the cord.
If the power cord is damaged, contact Olympus.
WARNING
■ Do not disassemble or modify the printer.
The printer has both hot and high voltage parts on the inside. To prevent an electric shock or printer malfunction, do not attempt to disassemble or modify the printer. For service or repair, contact Olympus.
■ Do not place liquids on the printer.
Should any liquid penetrate the printer, it may result in fire or electric shock.
■ Do not place heavy objects on the printer.
Doing so may deform the printer cabinet, resulting in fire or electric shock. If the printer falls out of place or is dropped, it may cause damage.
■ Do not install the printer in the following places.
To prevent fire, electric shock, and printer malfunction do not install the printer in the following places.
• Dusty, humid, or oily places
Should any dust or liquid penetrate the printer, it may result in fire or electric shock.
• Extremely hot places
Do not expose the printer to direct sunlight or extremely high temperature such as near a heater. Doing so may deform the printer cabinet, resulting in fire or electric shock.
Use the printer at the ambient temperature of 41 to 95°F (5 to 35°C ) and humidity of 20 to 80% .
■ Do not use the printer with a power supply other than that specified.
Incorrect voltage may damage printer parts, possibly resulting in fire or electric shock.
■ Connect the power cord correctly.
For example, if the power cord is plugged in loosely, it may cause a fire or electric shock. Push the plug all the way into the outlet.

WARNING
■ Make sure that excessive dust and foreign matter do not accumulate on the power cord.
Dust and foreign matter conduct electricity, which can cause fire and electric shock. If excessive dust and foreign matter accumulate on the cord, unplug the cord and remove them.
- Immediately unplug the power cord when an electric storm starts outside.
The induced electricity from storms may cause fire, electric shock, or printer malfunction.
■ Do not overload the power outlet.
This printer should be plugged into a separate 110 -120 V AC, 60 Hz circuit. If the printer is on a circuit with other appliances, an overload may cause fire or electric shock.

NOTE
■ Do not block the vent.
Doing so may cause the printer to heat up, possibly resulting in fire or electric shock.
- Do not block the top or side vent.
- Do not put the printer in the following places.
- Badly-ventilated place
- On a soft surface like a rug or bed
■ Do not put the printer on an unstable surface such as a shaky table.
If the printer falls out of place, it may injure someone. This may also damage the printer or cause the printer to malfunction.
■ Do not touch the non-user-serviceable parts inside the printer.
Doing so may cause injury or burns. This applies especially to children and those unfamiliar with the printer.
■ Do not move the printer while the power cord is taut.
Doing so may damage the cord, possibly resulting in fire or electric shock. When moving the printer, unplug and bundle the power cord.
■ Do not pull the cord with a jerk.
To unplug the power cord, hold it by the plug.
Pulling the cord may damage it, possibly resulting in fire or electric shock.
■ Do not hold the power cord plug with wet hands.
Doing so may cause an electric shock. Be sure hands are dry before handling.

NOTE
■ Unplug the power cord from the power outlet before cleaning the printer.
Accidentally touching a non-user-serviceable part may cause electric shock.
■ Unplug the printer if it is not used for an extended period of time, for example while you are on a long trip.
Otherwise, deteriorated insulation or leakage current may cause fire or electric shock.
■ Beware of moisture condensation.
Moisture condensation means that water vapor in the air becomes liquid and sticks to the printer surface. This phenomenon is caused by the following.
- Rapidly heating the room in which the printer is placed
- Cool air (from an air conditioner, etc.) blown directly to the printer
- Moving the printer from a cold place to a warm place
Moisture in the air will condense on the paper, deteriorating print quality or causing paper jams.
Under conditions where moisture condensation has occurred or may occur, keep the printer turned on and wait until there is no possibility that condensation will occur.
- Do not spray volatile solvent on the printer or allow the printer to be in contact with rubber or plastic products for an extended period of time.
For example, spraying an insecticide on the printer or wiping it with thinner or benzine may deteriorate or discolor the printer cabinet. Such deterioration and discoloring also occurs if the printer is in contact with rubber or plastic products for an extended period of time.
Unpacking the printer
Make sure that the following accessories are supplied with your printer.
• Automatic feeder (1)
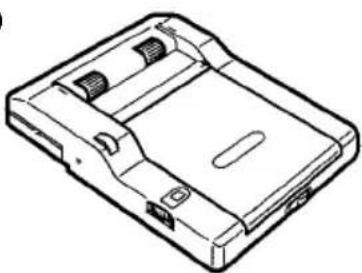
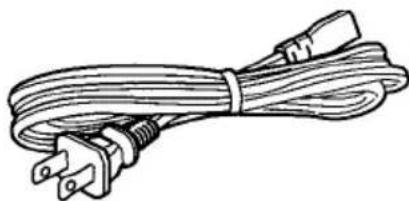
- Power cord (1)
• CD-ROM (for Windows 95, 3.1 and Macintosh) (1)
• Instruction Manual (1)
• Installation Guide (1)
• Sample kit (Ribbon, 10 sheets of exclusive paper)
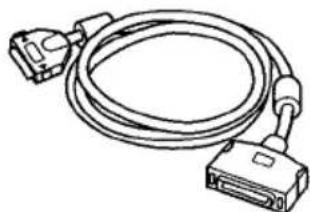
- Connecting cable for D-600L/D-500L Digital Cameras (1)
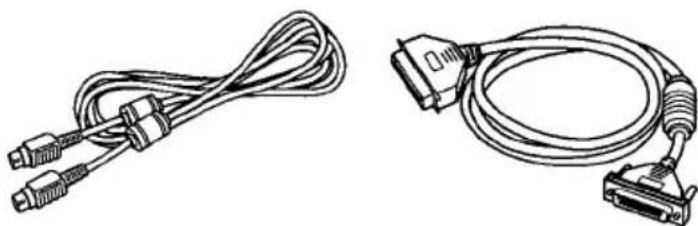
- Connecting cable for computer (for Macintosh x 1, for IBM PC/AT and compatibles x 1)
- Warranty card (1)
- Registration card (1)
What you can do with the Digital Color Printer P-300U
The Digital Color Printer P-300U enables you to directly print the image you recorded using the OLYMPUS Digital Cameras.
By connecting the P-300U to your PC or Macintosh, you can make prints of images from your computer.
Direct printing of the image recorded by the OLYMPUS Digital Camera
You can print just by pressing the direct print button. (See pages 19 to 25 for the models you can use with P-300U.)
Printing of the image from a PC or Macintosh
The P-300U is supplied with a CD-ROM in which you will find the printer driver for Windows 95, 3.1 and Macintosh.
Printing 30 sheets continuously
The supplied automatic feeder enables you to print up to 30 sheets continuously.
Identifying the parts
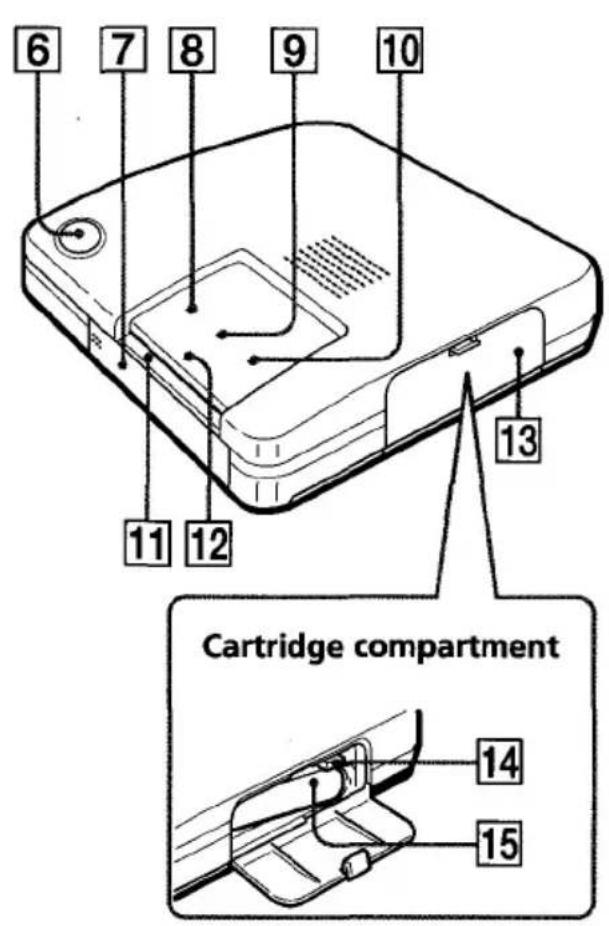
See the pages given in parenthesis for use of the parts.
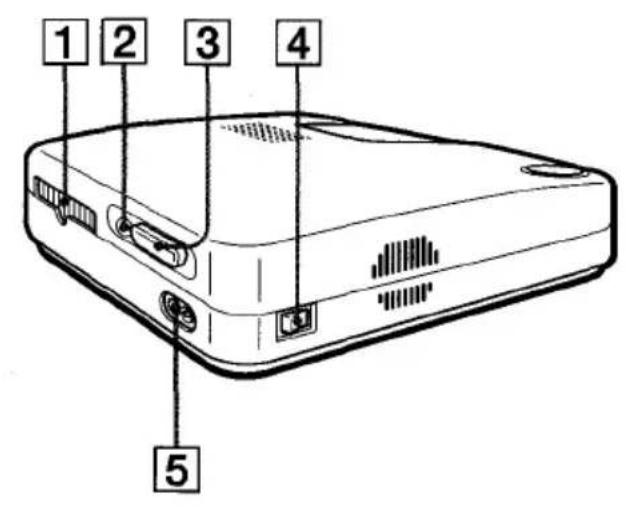
1 Paper outlet (p. 32)
② Serial port (p. 19, 22, 27)
3 Parallel port (p. 25,26)
4 Power switch (p. 18)
5 AC power connector (p. 18)
6 Direct print button (p. 21,24)
7 Automatic feeder compartment lid (p. 18)
8 READY indicator (p. 19, 22, 25, 28, 30,31)
9 PRINTING indicator (p. 28-31)
10 RIBBON indicator (p. 30, 31)
11 Paper inlet for manual feeding (p. 28)
12 PAPER indicator (p. 30, 31)
13 Cartridge compartment lid (p. 14)
14 Eject lever (p. 15)
15 Ink ribbon cartridge (p. 14,15)
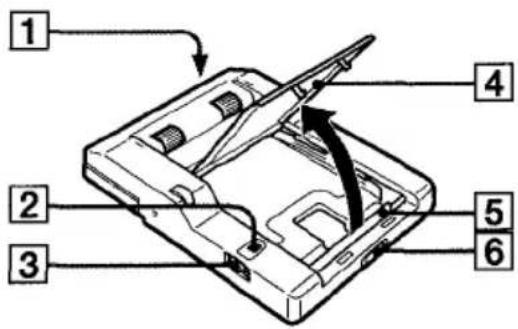
Automatic feeder
1 Connecting terminal
② Window showing number of copies
③ (number of copies) dial (p. 21, 24)
4 Cover (p. 16)
5 Spacer (p. 16)
6 Slide switch (p. 16)
Loading the ink ribbon cartridge
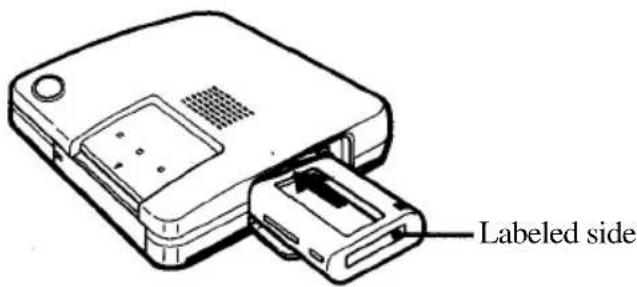
Insert the ink ribbon cartridge into the printer.
Use only the ink ribbon cartridge supplied with the print paper packed in the same carton.
1 While pressing down the lever, open the cartridge compartment lid.

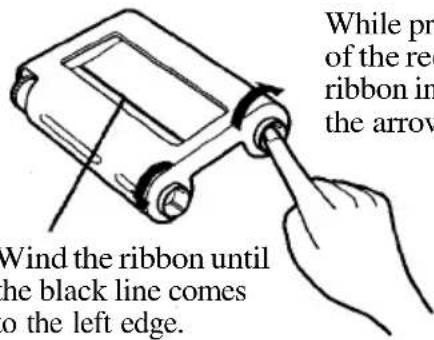
2 Wind up the ink ribbon to remove the slack.
3 Insert the ink ribbon cartridge firmly until it clicks into place and dose the cartridge compartment lid.
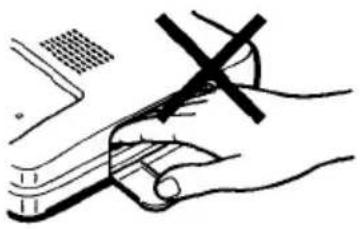
Caution
Never put your hand into the cartridge compartment. The thermal head reaches high temperatures, especially after repeated printing.
Notes
- When installing the ink ribbon cartridge, stand it as illustrated so that dust will not get on the ink ribbon.
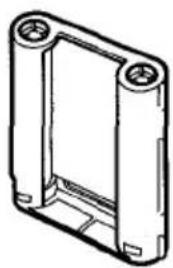
- Do not touch the ink ribbon or place the ink ribbon cartridge in a dusty location. Fingerprints or dust on the ink ribbon may result in imperfect printing.
If the cartridge compartment lid does not close
Remove the ink ribbon cartridge, and then reinsert it.
To remove the used ink ribbon cartridge
Open the cartridge compartment lid and push up the eject lever.
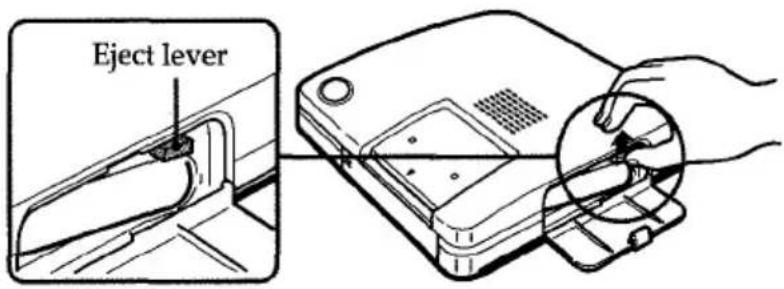
To load the half-used ink ribbon cartridge
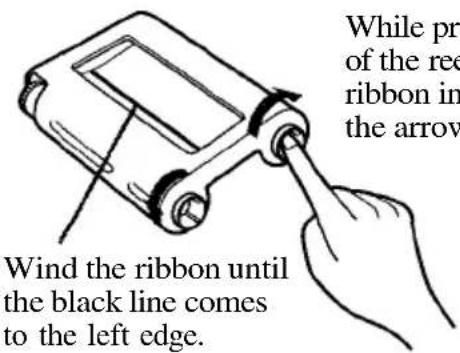
While pressing the center of the reel, wind the ink ribbon in the direction of the arrow.
If ink ribbon should tear
Repair the ribbon with transparent tape. There should be no problem with using the remaining portion of the ribbon. Before loading the ink ribbon cartridge into the printer, turn the reel until the transparent tape hides.
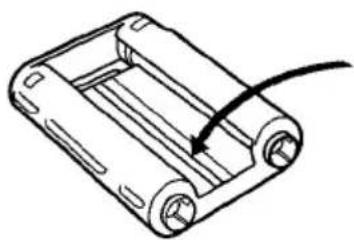
Repair with transparent tape.
Inserting the print paper
Notes
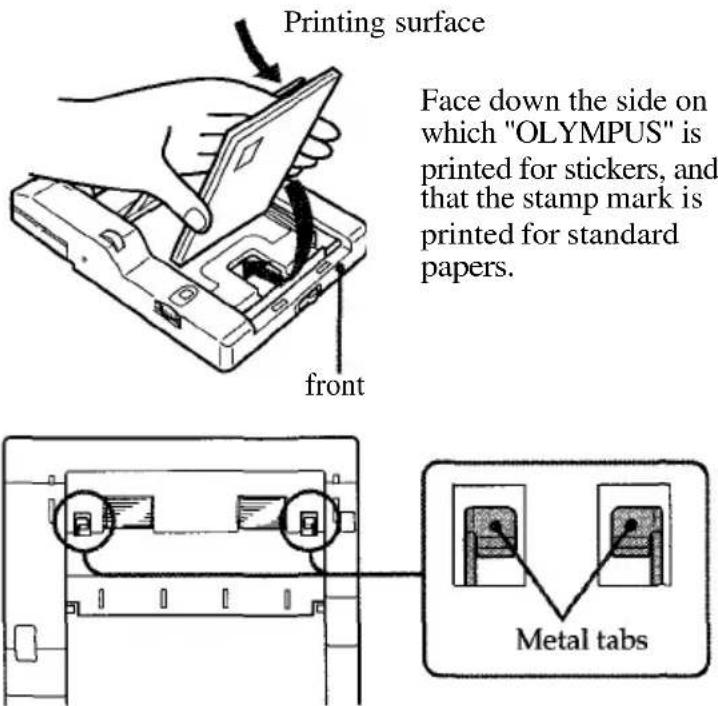
- Insert the print paper with the glaring/shiny side facing up. Face down the side on which "OLYMPUS" is printed for stickers, and that the stamp mark is printed for standard papers.
- Do not touch the printing surface (the side where nothing is printed).
- Do not place the print paper in a dusty location. Fingerprints or dust on the printing surface may result in imperfect printing.
- Use the print paper recommended for this printer only. If you use a different type of paper, it may cause problems and the printer may not print properly.
• To prevent paper from jamming, do not insert another sheet of print paper before you take out the printout.
- Do not write or type anything on the reverse side of the print paper before printing. This may cause paper jamming, or failure in printing.
You can use the print papers mentioned in "Optional supplies (print packs)" on page 34.
First insert the print paper into the supplied automatic feeder, and then install the automatic feeder to the printer.
You may insert the print paper directly into the printer.
Inserting the print paper into the automatic feeder
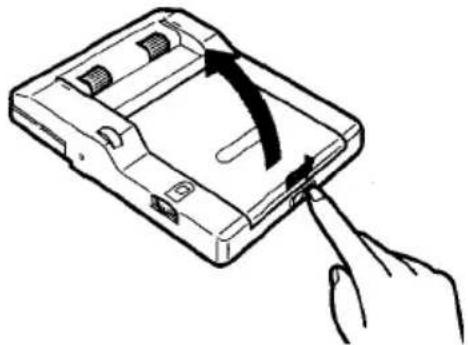
1 To open the cover, slide the front switch to the right.
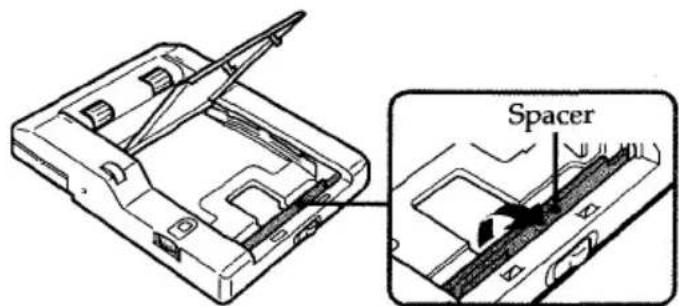
2 Adjust the spacer for the print paper you are using. To print on a standard paper or (16-cut) sticker, stand the spacer up.
- You cannot type on the printing surface; use an oil ink pen to write greetings or other characters or drawings on the printing surface.
- The automatic feeder can hold up to 30 sheets of standard paper or sticker paper. When you add paper to a partially full feeder, be careful that the total number of sheets does not exceed this limit to prevent paper jams.
- Do not place different types of paper in the automatic feeder to prevent paper jams.
- Do not use the sticker papers which have been peeled off.
- Do not fold or bend the print paper.
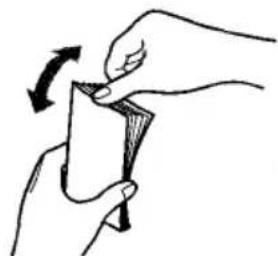
3 To avoid paper jamming, fan the print paper. Make sure not to touch the printing surface (glaring/shiny side).
4 Insert print paper with its printing surface (glaring/shiny side) facing up.
You can load up to 30 sheets of standard paper into the automatic feeder.
Do not push the paper too hard into the automatic feeder. Make sure that the metal tabs in the automatic feeder are not covered by the paper.
5 Close the automatic feeder cover.
Inserting the print paper (continued)
Installing the automatic feeder to the printer
1 Connect the supplied power cord to the printer, and then to the AC outlet.
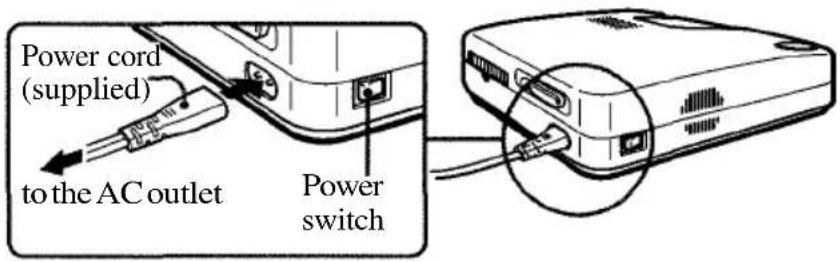
2 Push the automatic feeder compartment. The lid of the automatic feeder compartment opens.
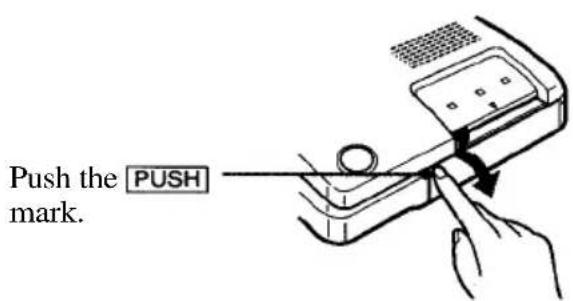
To close the lid, press PUSH until it clicks shut.
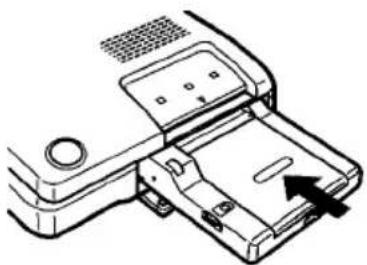
3 Insert the automatic feeder firmly into the compartment.
Printing an image recorded by OLYMPUS Digital Cameras
You can directly print the image recorded by OLYMPUS Digital Cameras.
Printing operation differs depending on the model as described below.
DIGITAL VISION D-320L/D-220L/D-220 Digital Cameras
Note
Before printing, be sure to close the lens barrier of the digital camera.
1 Check that the printer and digital camera are turned off.
2 Connect the serial port of the printer to the data in/out port of the digital camera with a direct print cable of the serial type (not supplied).
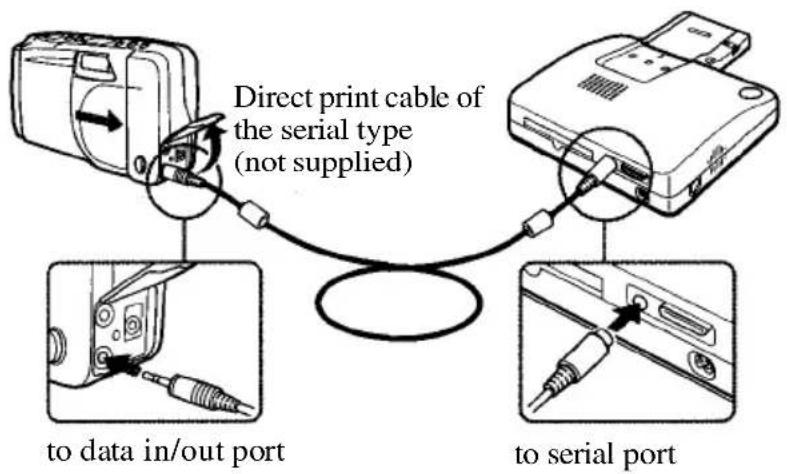
3 Turn on the printer.
• Make sure that the READY indicator of the printer turns on.
• Make sure that the control panel of the digital camera turns on and then goes off after a few seconds.
continued
Printing an image recorded by OLYMPUS Digital Cameras (continued)
4 Press the LCD ON/OFF button of the digital camera to turn on the playback mode.
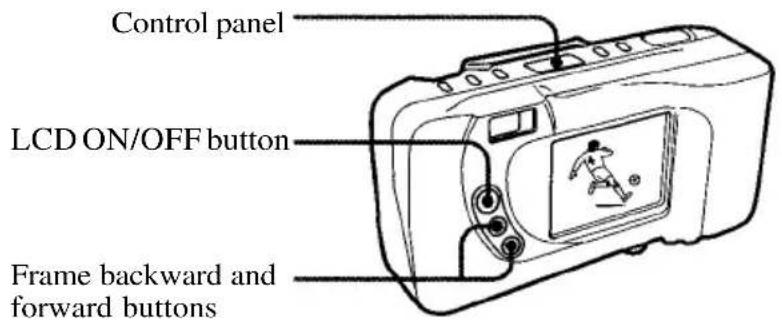
5 Select the photo to be printed using the frame backward and forward buttons on the digital camera.
Notes
- Press the direct print button only after the image you had selected was displayed.
• We recommend using the digital camera with the AC power adapter. - It may take longer to print the photo recorded in HQ mode than other modes of D-320L.
To stop continuous printing
Set the dial of the automatic feeder to 1. The printer stops after the current printing.
Tips
• Besides the above standard print, Random print, Multi print, Mirror print, Index print, and Date print are available. See the instruction manual of the digital camera for details.
- The image displayed on the digital camera is printed in the direction as shown below.
Displayed image
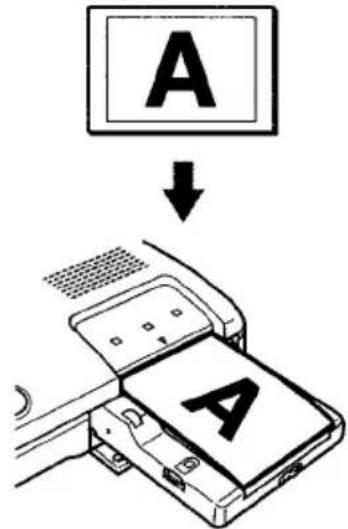
Printed image
6 Turn the dial of the automatic feeder to set the number of copies to be printed.
You can set 1, 2, 3, 5, 10, 15 or 30 copies.
Turn the dial until the desired number appears in the window. Make sure it clicks at that time. Otherwise, you may get the wrong number of copies.
When you want to have other number of copies, set the dial to 30. Remove the automatic feeder from the printer and insert the necessary sheets (maximum 30 sheets). Then install the automatic feeder to the printer.
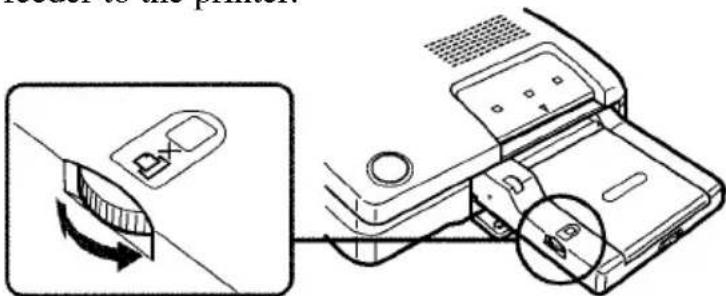
Dial to set the number of copies
When you want to print only one, you may insert the print paper directly into the printer (see page 28).
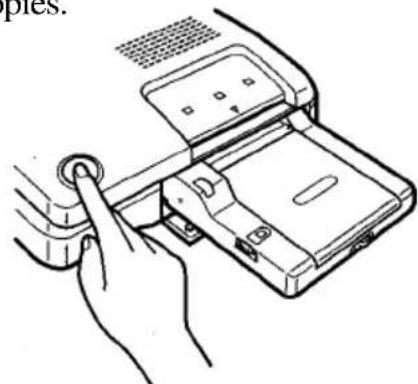
7 Press the direct print button of the printer to start printing.
The printer prints the number of copies you have set.
If print papers run out on the way of printing, remove the automatic feeder from the printer and insert the print paper. Then install the automatic feeder to the printer. The printer prints the remaining copies.
Printing an image recorded by OLYMPUS Digital Cameras (continued)
Note
Before printing, be sure to close the lens barrier of the digital camera.
DIGITAL VISION D-300L/D-200L Digital Cameras
1 Check that the printer and digital camera are turned off.
2 Connect the serial port of the printer to the communication port of the digital camera with the Macintosh connecting cable (supplied).
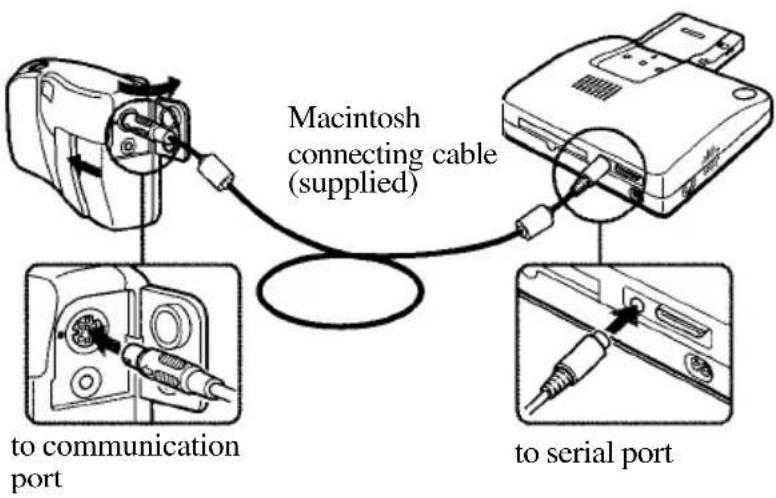
3 Turn on the printer.
• Make sure that the READY indicator of the printer turns on.
- Make sure that the control panel of the digital camera turns on and then goes off after a few seconds.
4 Press the LCD ON/OFF button of the digital camera to turn on the playback mode.
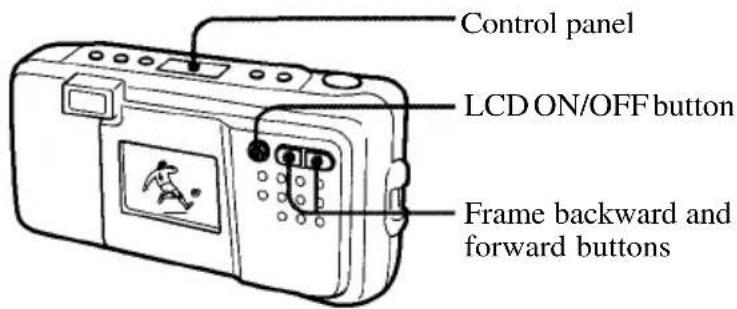
5 Select the photo to be printed using the frame backward and forward buttons on the digital camera.
continued
Printing an image recorded by OLYMPUS Digital Cameras (continued)
Notes
- Press the direct print button only after the image you had selected was displayed.
• We recommend using the digital camera with the AC power adapter.
To stop continuous printing
Set the dial of the automatic feeder to 1. The printer stops after the current printing.
Tip
The image displayed on the digital camera is printed in the direction as shown below.
Displayed image
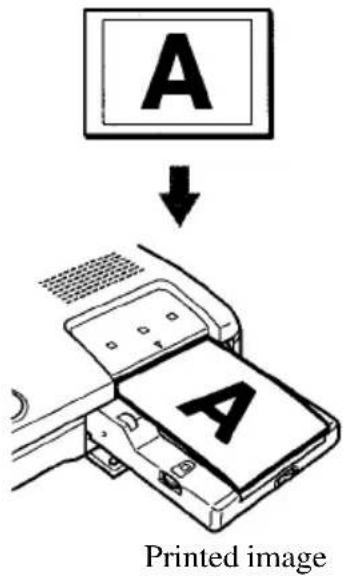
6 Turn the dial of the automatic feeder to set the number of copies to be printed.
You can set 1,2,3,5,10,15 or 30 copies.
Turn the dial until the desired number appears in the window. Make sure it clicks at that time. Otherwise, you may get the wrong number of copies.
When you want to have other number of copies, set the dial to 30. Remove the automatic feeder from the printer and insert the necessary sheets (maximum 30 sheets). Then install the automatic feeder to the printer.
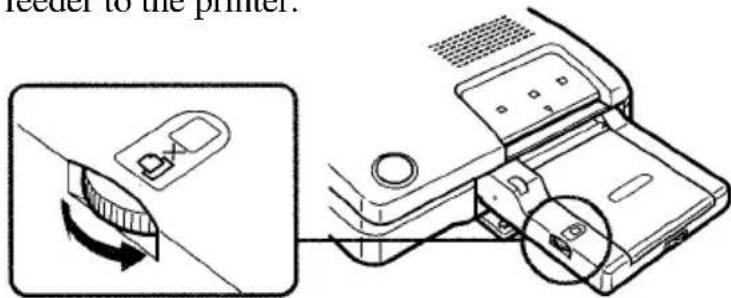
Dial to set the number of copies
When you want to print only one, you may insert the print paper directly into the printer (see page 28).
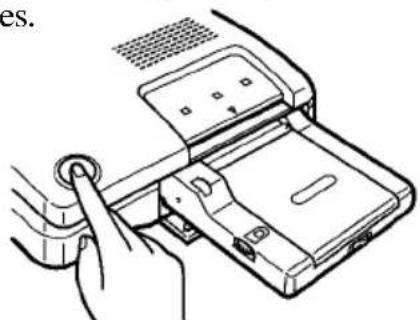
7 Press the direct print button of the printer to start printing.
The printer prints the number of copies you have set.
If print papers run out on the way of printing, remove the automatic feeder from the printer and insert the print paper. Then install the automatic feeder to the printer. The printer prints the remaining copies.
Tips
- One-sheet print, Index print, Multi print, Mirror print, All print, Random print, and Date print are available. See the instruction manual of the digital camera for details.
- The image displayed on the digital camera is printed in the direction as shown below.
Displayed image
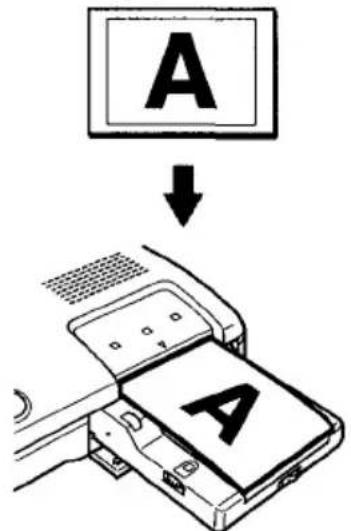
Printed image
DIGITAL VISION D-600L/D-500L Digital Cameras
1 Check that the printer and digital camera are turned off.
2 Connect the parallel port of the printer to the printer port of the digital camera with the supplied direct print cable.
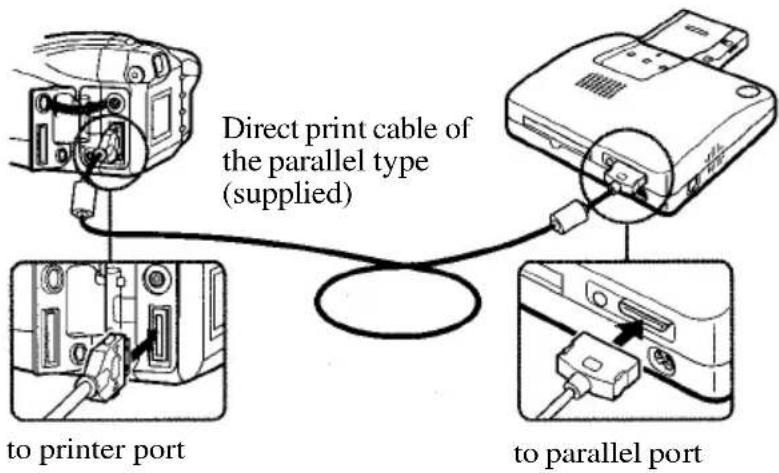
3 Turn on the printer.
Make sure that the READY indicator of the printer turns on.
4 Press the power button of the digital camera to turn it on.
5 Operate the digital camera to print.
See the instruction manual of the digital camera. You cannot use the direct print button of the printer.
Printing an image from the computer
To print an image from the computer, first install the supplied printer driver to your computer.
Notes on connection
- Use a shielded printer cable which is shorter than 2m.
- Connect only one of the serial or parallel cable.
- If a camera is connected, you cannot print from the computer. Disconnect the camera.
For IBM PC/AT: If your computer does not match the plug
Use a commercially available cable having an Anfenole 36-pin plug to connect to the printer and a matching plug to connect the computer.
Note
You may not be able to use the printer and the driver software on the network or a commercially available printer buffer.
1 Connect to the computer
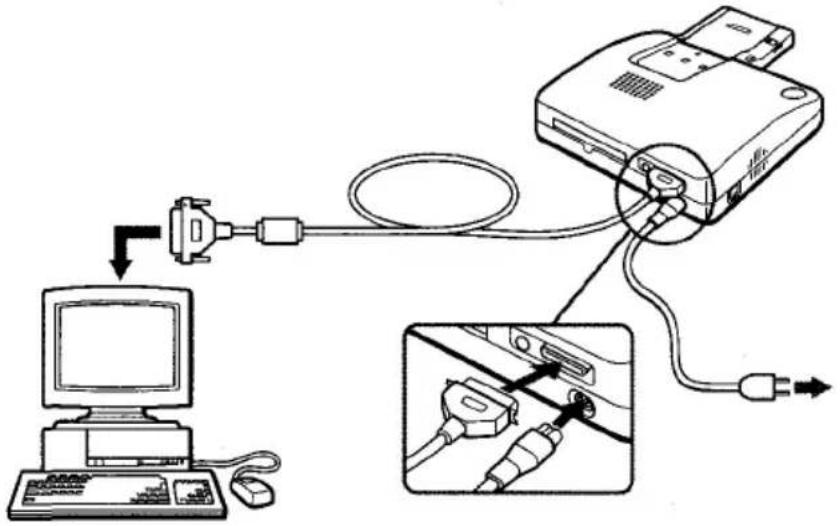
Connect the printer to your computer. Turn off the power to the computer and to the printer before connecting.
To make the connection, also refer to the computer's manual.
Connecting to an IBM PC/AT and its compatible
Use the supplied cable.
For Macintosh: If your computer does not match the plug
Use a commercially available cable having a Mini DIN 8-pin plug to connect the printer and a matching plug to connect the computer. (Standard Macintosh serial cable)
Note
You cannot use the printer and the driver software on a network. Connect the printer directly to the computer.
Note on the power
If you connect the printer to the computer via other devices (such as OLYMPUS ES-10 film scanner), turn on all devices connected.
Tip
The image of the computer is printed in the direction as shown below.
Image of the computer
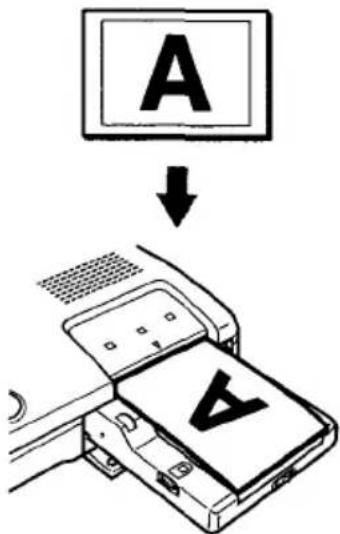
Printed image
Connecting to a Macintosh and its compatible
Use the supplied cable(Mini DIN 8-pin/Mini DIN 8-pin).
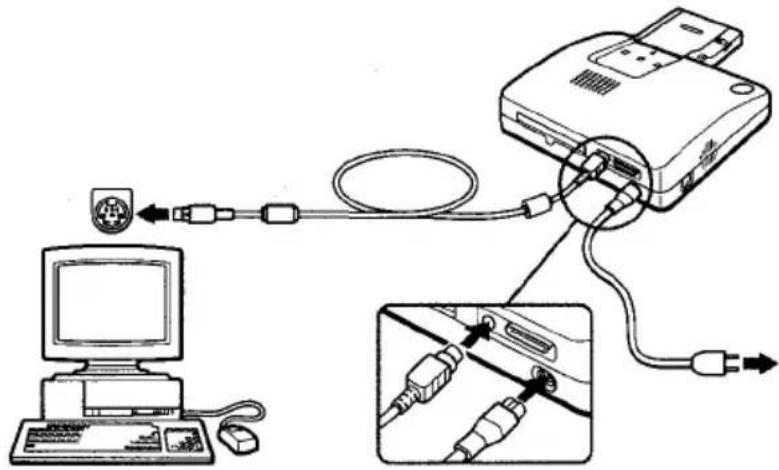
2 Turn on the printer and the computer
3 Install the printer driver
See the supplied Installation Guide for the installation procedure.
4 Feed the data from the computer
See the supplied Installation Guide for the printing operation.
Printing while directly inserting print paper
1 Send the print command from the computer or digital still camera.
The PAPER indicator ( ) is on, and then the READY indicator starts flashing.
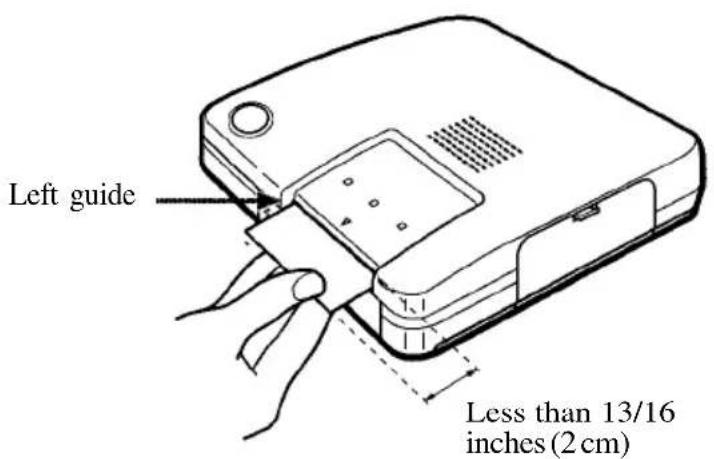
Notes
- Align the print paper to the left guide, and insert the print paper straight.
- When you insert the paper manually, remove the automatic feeder.
2 Insert a sheet of print paper into the paper inlet until less than 13/16 inches (2 cm) of the print paper is left out of the paper inlet.
When the unit starts printing, the print paper is automatically loaded into the printer.
Troubleshooting
Use the following measures to solve problems you may experience with your printer. If the problem persists, contact your dealer for information on what to do next.
• The power is not turned on.
→ Connect the AC power cord to an AC outlet securely.
- Cannot remove the ink ribbon cartridge.
→ Turn the printer off then on. After the motor sound stops, try to remove the cartridge.
- Printing takes longer than usual.
→ If the PRINTING indicator is flashing, see "If the indicators are on."
- Cannot print.
→ Connect the printer to the digital camera or to the computer properly.
→ Install the printer driver in the computer.
→ If the READY indicator is not on, see "If the indicators are on."
• The beeps sound.
→ Insert the print paper to the automatic feeder.
→ Insert the ink ribbon cartridge properly.
→ See "If the indicators are on."
- Cannot make the direct-print.
→ In case of DIGITAL VISION D-320L/D-220L/D-220, D-300L/D-200L, if you press the direct print button before turning on the LCD of the camera, an error occurs. Turn off the printer and the camera. Check the connection, and try printing again after several seconds.
continued
Troubleshooting (continued)
If the indicators are on
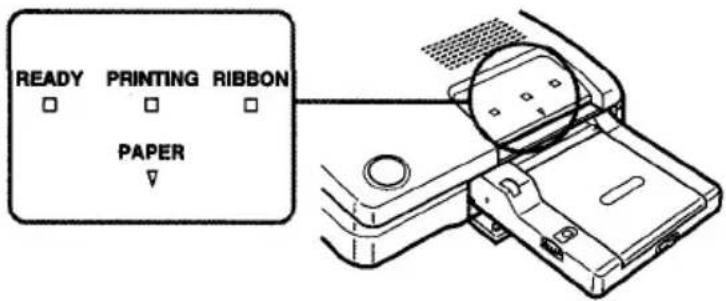
If you cannot print, check the indicators on the front panel.
• The RIBBON indicator is on.
→ The ink ribbon cartridge is not loaded.
→ The ink ribbon has run out. Change the ink ribbon cartridge. The printer will start printing automatically.
• The PAPER indicator (▼) is on.
→ No print paper is inserted in the automatic feeder. Remove the automatic feeder from the printer. Insert the print paper and install the automatic feeder to the printer.
→ No print paper is inserted.
• The PRINTING indicator is flashing.
→ Next printing command is input during printing. Wait until the printer starts printing.
→ It takes some time to start printing or to print continuously. Wait until the printer starts printing.
- The READY indicator does not light or all indicators are flashing.
→ Print paper is jammed.
Remove the jammed paper from the paper outlets on the front and rear panels.
→ Remove the automatic feeder from the printer and see if the paper jammed. - The PRINTING indicator and the PAPER indicator (▽) are flashing.
→The camera battery is low. Change the battery or use the AC adapter. Turn off the printer and the camera. Then try printing again. - The RIBBON indicator and the PAPER indicator are flashing.
→ The communication data has noise. Turn off the printer and the camera. Then try printing again.
Troubleshooting (continued)
Notes
- If the READY indicator does not turn on after having removed the jammed paper, turn the power off and on again. Try printing from the camera or computer again.
• If you cannot remove the jammed paper, contact Olympus.
If the print paper is jammed
If the print paper is jammed, all indicators flash and printing stops. Turn off the power and remove the jammed paper.
Remove the jammed paper from the paper outlet on the rear panel
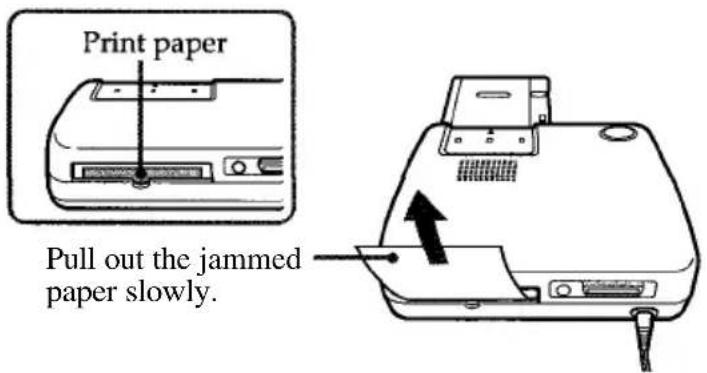
Remove the jammed paper from the paper inlet on the front panel
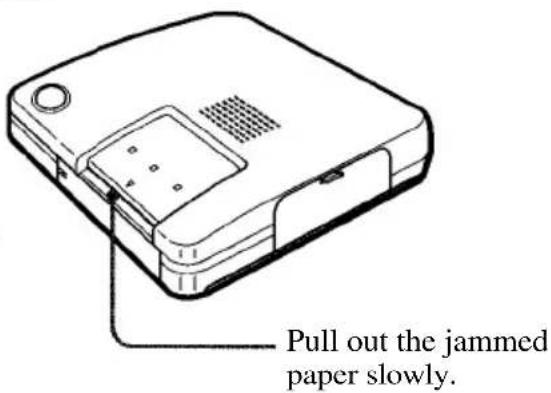
Remove the jammed paper from the automatic feeder

Pull out the jammed paper slowly.
Specifications
Printer
| Printing system | Sublimation dye transfer printing (Yellow/Magenta/Cyan 3 pass) |
| Effective pixels | 1376 (H) x 1024 (V) dot |
| Printing size | 4 1/2 (H) x 3 /8 (V) inches(114 x 85 mm) |
| Gradations | 256 levels (8 bits), per color (24 bits)Approx. 16 million colors |
| Printing time (excluding data transmission time) | |
| Input/output connectors | Approx. 95 seconds per sheetCentronics Parallel InterfaceMini DIN 8-pin Serial Interface |
| Ink ribbon cartridge | For standard paper, sticker, 16-cut sticker: 60 sheets |
| Print paper | Standard paper, sticker, 16-cut sticker paper4 x 55/8 inches (100 x 140 mm) |
| Power requirements | 110 - 120 V AC, 60 Hz, 0.9 A |
| Operating temperature | 41 °F to 95 °F (5°C to 35 °C) |
| Operating humidity | 20 % to 80 % |
| Dimensions | Approx. 107/8 × 27/8 × 143/8 inches(w/h/d, excluding protruding parts)(274 x 73 x 362 mm)Without the automatic feeder:Approx. 107/8 × 27/8 × 95/8 inches(w/h/d, excluding protruding parts)(274 x 73 x 242 mm) |
| Mass | Approx. 4 lb 7 oz (2.0 kg) |
Automatic feeder
| Maximum printing quantity | |
| 30 sheets (standard paper) | |
| Print paper | Standard paper, sticker, 16-cut sticker 4 × 55/8 inches ( 100 × 140 mm) |
| Operating temperatures | 41°F to 95°F ( 5°C to 35°C ) |
| Operating humidity | 20 % to 80 % |
| Dimensions | Approx. 57/8 × 17/16 × 77/8 inches (w/h/d, excluding protruding parts)( 149 × 32 × 185 mm) |
| Mass | Approx. 13 oz (360 g) |
Supplied accessories
See page 10.
Design and specifications are subject to change without notice.
Precautions on the ink ribbon cartridge and print paper
Notes on storing the ink ribbon cartridge
- Avoid placing the cartridge in a location subject to:
- high temperatures
- high humidity
- excessive dust
- direct sunlight
- When you are going to store a partially-used cartridge for an extended period of time, store it in its original bag.
Notes on storing the print paper
- Avoid placing the print paper in a location subject to:
- high temperatures
- high humidity
- excessive dust
-
direct sunlight
-
When you are going to store the partially-used print paper for an extended period of time, store it in its original bag.
- Avoid storing the paper with the printed faces contacting each other to prevent the ink on one face from transferring on to another face.
- Do not allow the printed faces to come into contact with rubber or plastic products including vinyl chloride or plasticizer for an extended period of time to prevent the ink from transferring on to them.
Read the notes printed on the ink ribbon cartridge and printing paper package, along with the notes described here.
Optional supplies (print packs)
You need an optional set of print paper and ink ribb cartridge for printing.
Make sure to use the following set.
Standard set P-60NE (Standard papers)
One ink ribbon cartridge and 60 sheets of standard papers
Sticker (1-cut) set P-60NS1E (Adhesive-label sheets)
One ink ribbon cartridge and 60 sheets of 1-cut sticker
Sticker (16-cut) set N-60NS16E (Adhesive-label sheets)
One ink ribbon cartridge and 60 sheets of 16-cut sticker
- IBM PC/AT is a registered trademark of International Business Machines Corporation of the U.S.A.
- MS-DOS and Windows are registered trademarks licensed to Microsoft Corporation, registered in the U.S.A. and other countries.
• Macintosh is a trademark licensed to Apple Computer Inc., registered in the U.S.A. and other countries. - All other product names mentioned herein may be the trademarks or registered trademarks of their respective companies.
Furthermore, "TM" and "®" are not mentioned in each case in this manual.
© OLYMPUS OPTICAL CO., LTD. 1997. All rights reserved
- No portion of this manual may be copied or reproduced by any means without the prior written permission of OLYMPUS.
- All contents of this manual are subject to change without notice.
- All specifications and design are subject to change without notice.
- OLYMPUS shall assume no responsibility for any problems caused by this product. OLYMPUS shall also assume no responsibility for any accidental or consequential damages (including lost business benefits, suspended business activities, and lost information) caused by use or malfunction of the product, even if the damages are possibly attributable to the product. When filing for damages, the user cannot claim compensation higher than the cost for which he / she purchased the product, even if the damages result from breach of contract, illegal operations (including errors), and problems with the product's reliability.
OLYMPUS®
Two Corporate Center Drive, Melville, NY 11747-3157, U.S.A. Tel. 516-844-5000
OLYMPUS OPTICAL CO. (EUROPA) GMBH.
(Lieferadresse) Wendenstraße 14-16, 20097 Hamburg, Germany. Tel. 040-237730
(Postanschrift) Postfach 10 49 08, 20034 Hamburg, Germany.
OLYMPUS OPTICAL CO. (U.K.) LTD.
2-8 Honduras Street, London EC1Y 0TX, United Kingdom, Tel 0171-253-2772
For technical support, please contact Olympus at DISTEC@olympus.com or 1-888-55-DIGITAL.
For additional product information, please contact Olympus at www.olympus.com.
- Notice for users
- Trademarks
- Contents
- For windows 95/98 (from page 4)
- For windows 3.1 (from page 17)
- For macintosh (from page 29)
- For windows 95/98/3.1, macintosh (from page 41)
- System requirements
- Notes
- Ibm pc/at compatible personal computer
- Memory
- Hard disk space
- Video monitor
- Drive
- Installing the software
- Tip
- Uninstalling the software
- Printing
- Note
- For further settings and operations
- Notes on the high speed print mode
- 7 Click [ok]
- Stopping printing
- When a "printing" message is on the screen
- When the data is in the print spooler of windows 95/98
- Hints for better printout
- Make the environment in full-color
- Adjust the image size and resolution (if the application is to print according to the printer's resolution)
- Setting the resolution
- Maximum picture size
- Adjusting the picture quality
- Making the split print
- To make the split print correctly
- Making multiple prints at high speed
- 6 Click [install]
- 5 Click [ok]
- 6 Set [copies]
- 8 Click [print]
- Tips
- 7 When the software is installed successfully, the next screen appears. click [ok]
- 1 Set [chooser]
- When using the print monitor
- If printing has already started
- Adjust the image size and resolution
- To print characters
- 3 Adjust the color balance, sharpness and density
- 4 Click [ok]
- Previewing the image
- If you decide not to print the page after previewing
- Troubleshooting
- The printer prints the image split into pieces
- The edges of the printed image are jagged
- The edges of the printed characters are jagged
- The printer does not start printing
- Cannot install from the cd-rom
- Digital vision
- P-300U
- Instructions
- Owner's record
- Information
- Declaration of conformity
- Table of contents
- Getting started
- For your information
- Introduction
- Precautions
- Restrictions on duplication
- Safety precautions
- Warning
- Do not disassemble or modify the printer
- Do not place liquids on the printer
- Do not place heavy objects on the printer
- Do not install the printer in the following places
- Do not use the printer with a power supply other than that specified
- Connect the power cord correctly
- Do not block the vent
- Do not put the printer on an unstable surface such as a shaky table
- Do not touch the non-user-serviceable parts inside the printer
- Do not move the printer while the power cord is taut
- Do not pull the cord with a jerk
- Do not hold the power cord plug with wet hands
- Unpacking the printer
- What you can do with the digital color printer P-300U
- Direct printing of the image recorded by the Olympus digital camera
- Printing of the image from a pc or macintosh
- Printing 30 sheets continuously
- Identifying the parts
- Automatic feeder
- Loading the ink ribbon cartridge
- Caution
- If the cartridge compartment lid does not close
- To remove the used ink ribbon cartridge
- To load the half-used ink ribbon cartridge
- If ink ribbon should tear
- Inserting the print paper
- Inserting the print paper into the automatic feeder
- Inserting the print paper (continued)
- Installing the automatic feeder to the printer
- Printing an image recorded by Olympus digital cameras
- Digital vision D-320L/D-220L/D-220 digital cameras
- Printing an image recorded by Olympus digital cameras (continued)
- To stop continuous printing
- Digital vision D-300L/D-200L digital cameras
- Digital vision D-600L/D-500L digital cameras
- Printing an image from the computer
- Notes on connection
- For ibm pc/at: if your computer does not match the plug
- 1 Connect to the computer
- Connecting to an ibm pc/at and its compatible
- For macintosh: if your computer does not match the plug
- Note on the power
- Connecting to a macintosh and its compatible
- 2 Turn on the printer and the computer
- 3 Install the printer driver
- 4 Feed the data from the computer
- Printing while directly inserting print paper
- Troubleshooting (continued)
- If the indicators are on
- If the print paper is jammed
- Remove the jammed paper from the paper outlet on the rear panel
- Remove the jammed paper from the paper inlet on the front panel
- Remove the jammed paper from the automatic feeder
- Specifications
- Precautions on the ink ribbon cartridge and print paper
- Notes on storing the ink ribbon cartridge
- Notes on storing the print paper
- Optional supplies (print packs)
- Standard set P-60NE (standard papers)
- Sticker (1-cut) set P-60NS1E (adhesive-label sheets)
- Sticker (16-cut) set N-60NS16E (adhesive-label sheets)
- Olympus®
Brand : OLYMPUS
Model : Camedia P-330
Category : Printer