HUS-WC168S - Fridge Husky - Free user manual and instructions
Find the device manual for free HUS-WC168S Husky in PDF.


User questions about HUS-WC168S Husky
0 question about this device. Answer the ones you know or ask your own.
Ask a new question about this device
Download the instructions for your Fridge in PDF format for free! Find your manual HUS-WC168S - Husky and take your electronic device back in hand. On this page are published all the documents necessary for the use of your device. HUS-WC168S by Husky.
USER MANUAL HUS-WC168S Husky
natural_image
Line drawing of a refrigerator with open door and side panel (no text or symbols)MODEL:
HUS-WC33S/HUS-WC33D
HUS-WC66B/HUS-DC66B
HUS-WC54S/HUS-WC54D/HUS-DC54
HUS-WC72S/HUS-WC72D
HUS-WC128S/HUS-WC128D
HUS-WC168S/HUS-WC168D/HUS-WC168T
CONTENTS
Important Safety Notes 3
Warnings 4
Components 5
Operation Instruction 9
Care and Maintenance 13
Troubleshooting 14
Important Safety Notes:
• Always ensure you read the instructions before use
- Ensure the unit is placed in a safe, well ventilated, dry environment away from direct sunlight
- Do not use the wine cooler if it is damaged
- For safety the wine cooler must be properly earthed in accordance with specifications
- Always ensure the wine cooler is switched off before cleaning, moving or carrying out repairs
- All repairs should be carried out by a qualified engineer
- Do not allow children near the appliance, sit on the appliance or hang on the door of the appliance
- Do not attempt to move the appliance when full with stock
- Do not obstruct or cover the ventilation cover on the front of the unit
- If you require the unit to be turned off, do not restart for at least 15 minutes after switch off.
- Always allow the Wine Cooler to sit for 12 hours after initial delivery/ movement before switching on.
This appliance is not intended for use by persons (including children) with reduced physical, sensory or mental capabilities, or lack of experience and knowledge, unless they have been given supervision or instruction concerning use of the appliance by a person responsible for their safety.
Warnings
- This Wine Cooler must be plugged into an earthed 220/240v 13amp socket (Europe and Australia) or a grounded 120v AC circuit (USA)
- Do not attempt to service or repair the item yourself
- If your refrigerator uses r600a refrigerant, please note this can be flammable or explosive. Repairs must always be carried out by a r600a qualified engineer
- When positioning the wine cooler ensure the supply cord is not trapped or damaged
- Do not locate/use extension cables or charging transformers/ power supplies adjacent to the compressor at the back of the unit, this could cause overheating
- If the thermosts is set too low this may cause bottles to freeze and even break, please take care when setting the temperature
- Do not place any items on top of the chiller which may fall when the door is opened
- Do not place hot items on the Wine Cooler as it may damage the paintwork
- Ensure the unit is positioned on a flat, hard floor
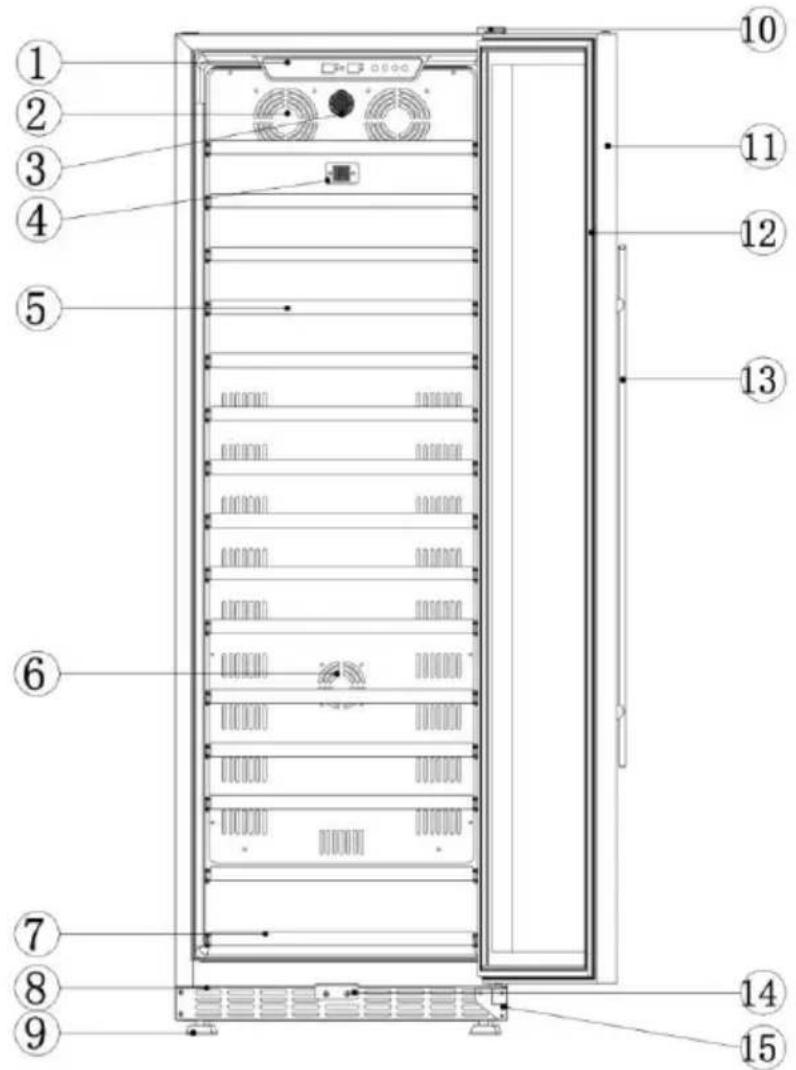
Components of Wine Coolers (Single Zone)
1.HUS-WC33S/HUS-WC54S/HUS-DC54/HUS-WC72S/HUS-WC128S/HU
S-WC168S
component diagram:
text_image
Diagram of a server rack with numbered components for identification and assembly reference.(1) Control panel (2) Ventilation fan (3) Active carbon filter
(4)Sensor (5)Full wooden shelf (6)Heater fan
(7)Small wooden shelf (8)Ventilation base (9)Adjustable feet
(10) Upper hinge (11) Glass door (12) Door seal (13) Handle
(14) Latch Hook (15) Lower hinge
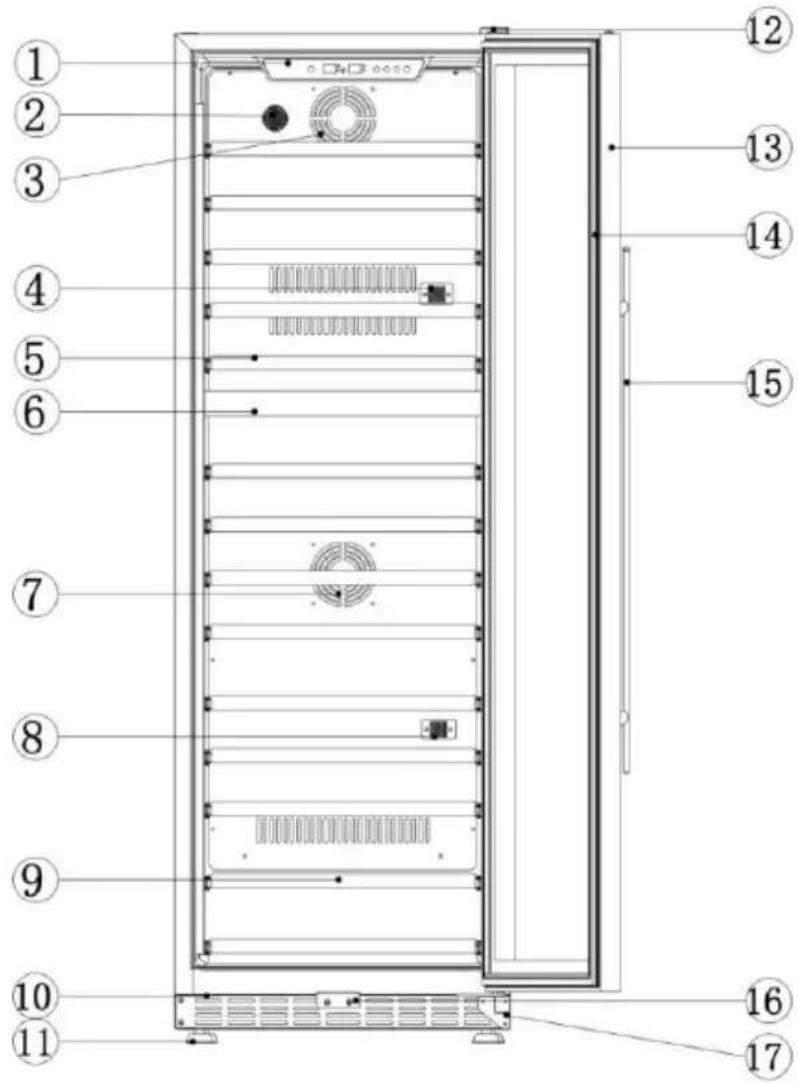
Components of Wine Coolers (Dual Zone)
HUS-WC33D/HUS-WC54D/HUS-WC72D/HUS-WC128D/HUS-WC168D
component diagram:
text_image
Technical diagram of a server rack with numbered components for identification(1)Control panel (2)Active carbon filter (3)Ventilation fan (4)Sensor
(5)Full wooden shelf (6)Baffle plate (7)Heater fan (8)Sensor
(9)Small wooden shelf (10)Ventilation base (11)Adjustable feet
(12) Upper hinge (13) Glass door (14) Door seal (15) Handle
(16) Latch hook (17) Lower hinge
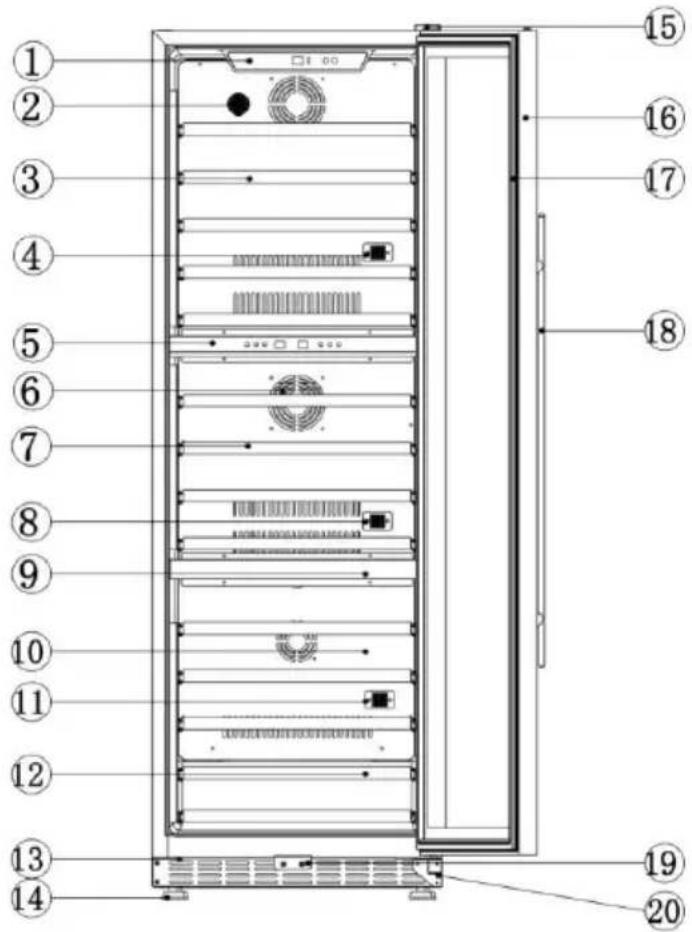
Components of Wine Coolers (Triple Zone)
HUS-WC168T
component diagram:
text_image
Diagram of a server rack with numbered components for identification and assembly reference.(1) Control panel (2) Active carbon filter (3) Big wooden shelf
(4) Sensor (5) Control panel (6) Middle ventilation fan
(7) Big wooden shelf (8) Sensor (9) Baffle plate (10) Heater fan
(11) Sensor (12) Small wooden shelf (13) Ventilation base
(14) Adjustable feet (15) Upper hinge (16) Glass door
(17) Door seal (18) Handle (19) Lock hook (20) Lower hinge
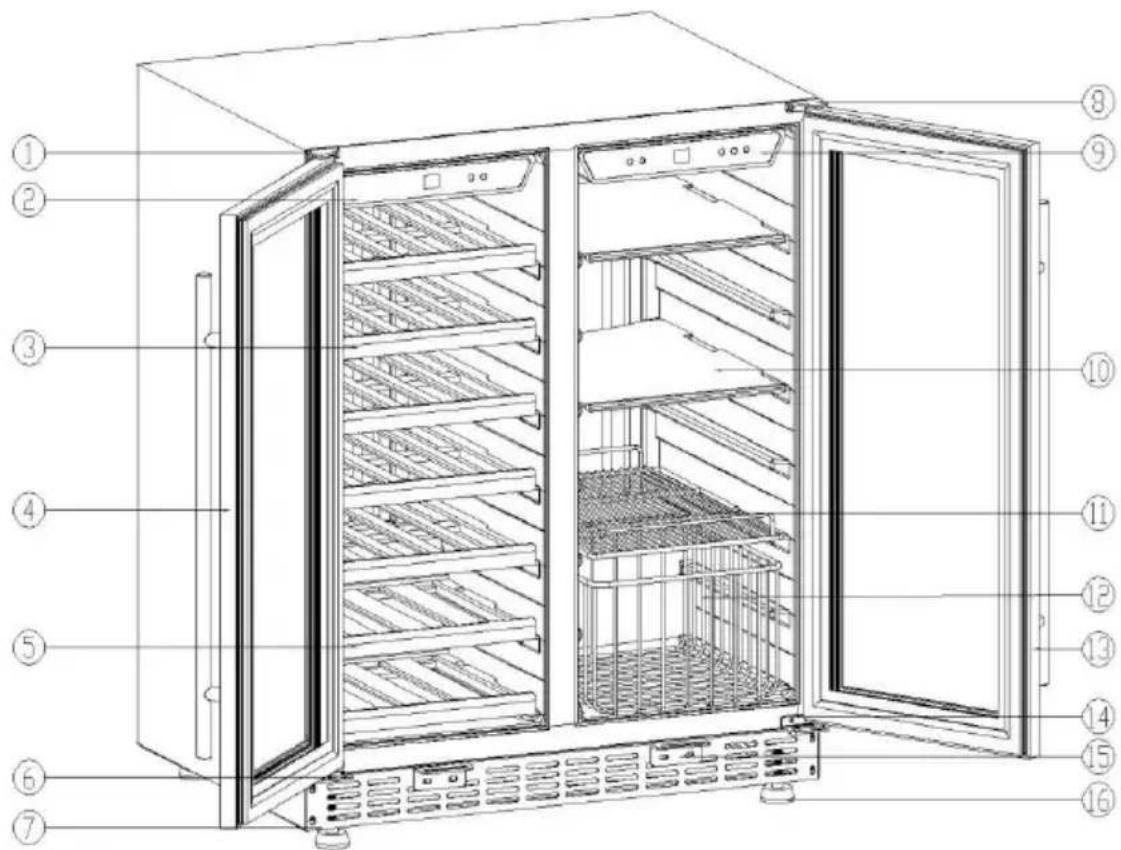
Components of Wine Coolers (Side by side)
HUS-WC66B
component diagram:
text_image
Technical diagram of a multi-level refrigerator with numbered labels pointing to each panel.(1) Left upper hinge
(4) Left door with hand
(6) Left lower hinge
(9) Right control panel
(12) Wire basket
(15) Lock hook
(2) Left control panel
/gasket/lock
(7) Front vent
(10) Glass shelf
(13) Right door
(16)Feet
(3) Large wooden shelf
(5) Small wooden shelf
(8) Right upper hinge
(11) Wire shelf
(14)Right lower hinge
Installation
Before Using Your Wine Cooler
- Remove the exterior and interior packing.
- Before connecting the Wine Cooler to the power source, let it stand upright for approximately 12 hours. This will reduce the possibility of a malfunction in the cooling system from handling during transportation.
- Clean the interior surface with lukewarm water and a soft cloth.
- The cooler is specially designed for wine storage, please do not use for other items.
Installation:
- Where possible good ventilation should be around the units
- Place your wine cooler on a flat floor that is strong enough to support the unit when it is fully loaded. To level your Wine Cooler, adjust the front leveling leg at the bottom of the Wine Cooler.
- Locate the Wine Cooler away from direct sunlight and sources of heat (stove, heater, radiator, etc.). Extreme cold ambient temperatures may also cause the unit not to perform properly.
- Avoid locating the unit in moist areas.
- Plug in the proper power socket
- Please also read 'Warnings' Page of this manual
Operation Instructions
It is recommended you install the appliance in a place where the ambient temperature is between 72-78°F(22-25°C). If the ambient temperature is above or below recommended temperatures, the performance of the unit may be affected.).
Recommended Temperatures for Chilling Wine.
| Red Wines | 58 - 65 °F | 14 - 18 °C |
| Dry / White Wines | 48 - 57 °F | 10 - 13 °C |
| Rose Wines | 49 - 51 °F | 9 - 11 °C |
| SparklingWines | 40 - 47 °F | 5 - 8 °C |
Wine Chiller Control Panel
Model: HUS-WC33S / HUS-WC54S / HUS-WC72S / HUS-WC128S / HUS-WC168S/HUS-DC54/HUS-WC66B (Single Zone)

text_image
0/℃ °F/℃ 8.8 V A ▽ ○Model: HUS-WC33D / HUS-WC54D / HUS-WC72D / HUS-WC128D HUS-WC168D (Dual Zone)

Model: HUS-WC-168T
(Triple Zone)
Top Zone:

text_image
88 1 7Middle and Bottom Zones:

text_image
Toolbar with icons for zoom, zoom, and zoom controls, including a numeric display and radio buttonsYou can select temperature display setting from Fahrenheit or Celsius. Push the °F/°C button. Fahrenheit or Celsius degrees' indicator will appear in blue color on the temperature display window.
ON/OFF POWER
To turn the appliance On/OFF press for 3 seconds.

SETTING THE TEMPERATURE CONTROL (Single Zone)
First press the ⏻ button. The numbers in the display window will flash, You
can press
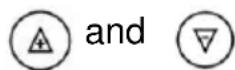
marks to control the internal temperature.
SETTING THE TEMPERATURE CONTROL (Dual Zone)
First press the button, the display for the lower zone will flash. Follow the single zone procedure to set. Press again to set the Upper Zone and repeat procedure.
NOTE:
- If the unit is unplugged or turned off, you must wait 3 to 5 minutes before restarting the unit. If you attempt to restart before this time, the Wine Chiller will not start.
- When you use the wine chiller for the first time or restart the wine chiller there could be a few degrees variance between the temperature you select and the one indicated on the LED readout. This is normal and will revert itself in due course
Shelf Change
Your Wine Cooler comes complete with telescopic pull out shelving.
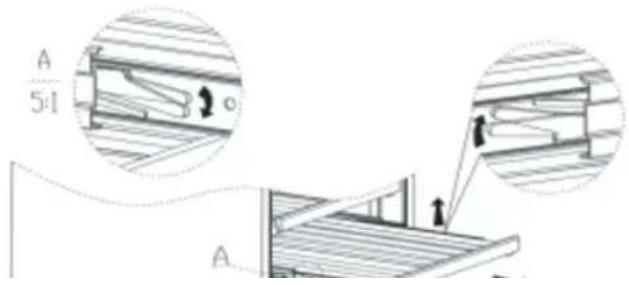
These shelves can be taken out completely by following these
instructions:
Firstly switch off the unit and empty the shelf. Press down the left lever on side of shelf at same time as pulling up lever on right hand side of shelf. At this time pull and the shelf will release. Your unit also comes with adjustable shelf runners. Once the shelf is removed you can release these runners and re position accordingly.
text_image
A 5:1 A- Reversing the door swing of your appliance
The unit is delivered to you with the door opening from the left side (hinge on right side). The door of this appliance is capable of opening from either the left or right side. To reverse the door hinge of your cooler please follow the instructions below:
NOTE: All parts removed must be saved to allow the door hinge to be reversed.
IMPORTANT: 2 ADULTS REQUIRED
- Pry open the on the top hinge cover of the cabinet and the cap of the door spindle carefully.
- Open the door and whilst unscrewing all the reaming screws have the second person hold the door steady, unscrew the remaining screws. Once released the door will become free, lift door off bottom door hinge pin and remove safely.
- Repeat the proceed of removing the bottom hinge. Then replace and screw the bottom hinge into the pre-punched hole locations on the opposite side of the cabinet.
Before replacing the door you will need to replace the handle on the opposite side of the door before reattaching the door to the cabinet:
- Gently prise open the 2 hole locator covers on the door frame of the unit being careful not to scratch the frame. Peel away the door gasket gently from behind the handle, here 2 screws will become exposed, undo these screws and the handle will be released.
Repeat this procedure on the opposite side of the door to fix the handle in the new position. Replace the 2 locating hole covers to the door where the handle was originally fixed to. Ensure the door gasket is firmly pushed back into position.
- Again using 2 people locate the door onto the bottom hinge pin, align the door to the cabinet edge and fix the top hinge pin in place. Ensure the door gasket is flat to the cabinet all around the door.
5. Care and Maintenance
Cleaning Your Wine Cooler
- Turn off the power, unplug the appliance.
● Wash the inside surfaces with warm water - Wash the shelves with a mild detergent solution.
- Wash the outside of the cabinet with warm water and mild liquid detergent. Rinse well and wipe dry with a clean soft cloth.
Power Failure
- Most external power cuts are corrected within a few hours and will not affect the temperature of your appliance if you minimize the number of times the door is opened.
- If the power is going to be off for a longer period of time, you need to take the proper steps to protect your contents.
Moving Your Wine Cooler
- Remove all items.
- Securely tape down all loose items (shelves) inside your appliance.
- Adjust the leveling feet.
- Ensure the door is shut and secured.
- Be sure the appliance stays secure in the upright position during transportation. Also protect outside of appliance with a blanket, or similar item.
Energy saving Tips
- The Wine Cooler should be located in the coolest area of the room, away from heat producing appliances, and out of the direct sunlight.
6. Troubleshooting
TROUBLESHOOTING GUIDE
| PROBLEM | POSSIBLE CAUSE |
| Wine Cooler does not operate. | Not plugged in.The appliance is turned off.A blown fuse. |
| Wine Cooler is not cold enough. | Check the temperature control setting.Ensure product is away from heat sources.The door is opened too often.The door is not closed properly.The door gasket does not seal properly. |
| The Unit turns on and off frequently. | The room temperature is hotter than normal.A large amount of contents has recently been added to the Wine Cooler.The door is opened too often.The door is not closed completely.The temperature control is not set correctly.The door gasket does not seal properly. |
| The light does not work. | Not plugged in.The appliance is turned offA blown fuseThe light button is “OFF”. |
| Vibrations. | The unit is not on a level surface |
| The Wine Cooler is noisy | It is normal for some noise to come from a refrigerator. Any ratting noise may come from the refrigerant flow in the wine Cooler.As each cycle ends, you may hear gurgling sounds caused by the flow of refrigerant in your Wine Cooler.Contraction and expansion of the inside walls may cause popping and crackling noises.All the above should be at a minimum.The Wine Cooler is not on level surface |
| The door will not close properly. | The Wine Cooler is not on level surfaceThe door gasket is dirty or damagedThe shelves are out of position. |