GM Li 10.8 - Multifunction tool STIGA - Free user manual and instructions
Find the device manual for free GM Li 10.8 STIGA in PDF.

| Product Type | Cordless Grass and Shrub Shear |
| Brand | STIGA |
| Model | GM Li 10.8 |
| Battery Voltage | 10.8 V DC |
| Battery Type | Lithium-Ion, 2.5 Ah |
| Charging Time | 3-5 hours |
| Operating Time | Approx. 100 minutes |
| Weight | 0.65 kg |
| Noise Pressure Level | 75.7 dB(A) (K=3.0 dB(A)) |
| Vibration Level | < 2.5 m/s² (K=1.5 m/s²) |
| Cutting Movements (Grass) | 1000 min⁻¹ |
| Cutting Movements (Shrub) | 2000 min⁻¹ |
| Cutting Width (Grass) | 80, 110, or 130 mm (depending on blade) |
| Cutting Length (Shrub) | 180 or 200 mm (depending on blade) |
| Cutting Thickness (Shrub) | Max. 8 mm |
| Pruning Cutter Blade Diameter | 65 mm |
| Grubber Working Width | 95 mm |
| Telescopic Handle | Yes, adjustable length and cutting height |
| Swiveling Switch | Yes, 90° pivot for ergonomic use |
| Safety Key | Yes, prevents accidental start |
| Blade Guard | Included for storage and transport |
| Charging Unit | Included, model-specific |
Frequently Asked Questions - GM Li 10.8 STIGA
User questions about GM Li 10.8 STIGA
0 question about this device. Answer the ones you know or ask your own.
Ask a new question about this device
Download the instructions for your Multifunction tool in PDF format for free! Find your manual GM Li 10.8 - STIGA and take your electronic device back in hand. On this page are published all the documents necessary for the use of your device. GM Li 10.8 by STIGA.
USER MANUAL GM Li 10.8 STIGA
natural_image
Close-up of a robotic arm with articulated fingers and meshing (no text or symbols visible)STIGA®
GM Li 7.2
GM Li 10.8
CESOIE TOSAERBA
НОЖИЦА ЗА ТРЕВА
MAKAZE ZA TRAVU
NÚŽKY NA TRÁVU
GRÆSKLIPPER AF SAKSETYPEN
RASENSCHERE
ŠKARE ZA TRAVU I GRMLJE
FÜNYÍRÓ OLLÓ
INSTRUKTIONSMANUAL ....DA
1 Accumulator
2 Charging device for accumulator
3 Grass cutting blade
4 Housing
5 Shrub cutting blade
6 Switch-on lock
7 Switch
8 Telescopic handle
9 Pruning cutter (separate attachment)
10 Grubber (separate attachment)
ET
1 Aku
2 Akulaadija
3 Muruterad
4 Korpus
5 Puhmaterad
6 Sisselülituslukk
7 Lüliti
8 Teleskooppide
9 Oksalõikur (eraldi tarvik)
10 Kobesti (eraldi tarvik)
FR
natural_image
Mechanical component diagram showing a lever mechanism with labeled Y component (no text or symbols beyond label)
natural_image
3D rendering of a hair cutting tool with a power plug and labeled component X (no text or symbols beyond label)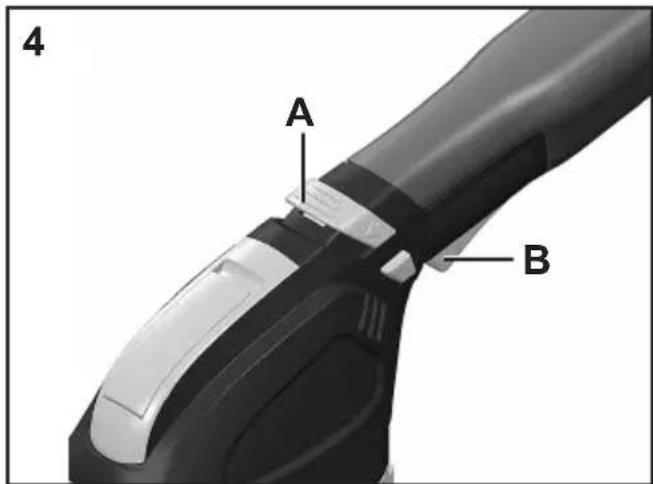
natural_image
Illustration of a mechanical tool with gear-like blades and motion arrows (no text or symbols)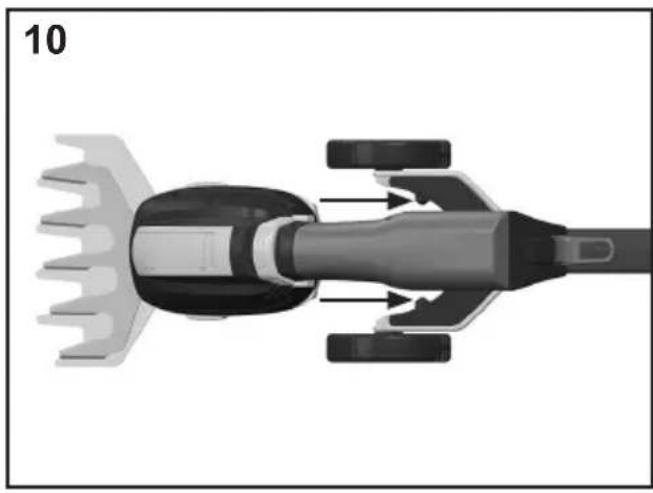
natural_image
Top-down view of a mechanical device with a gear-like component and internal components (no text or symbols visible)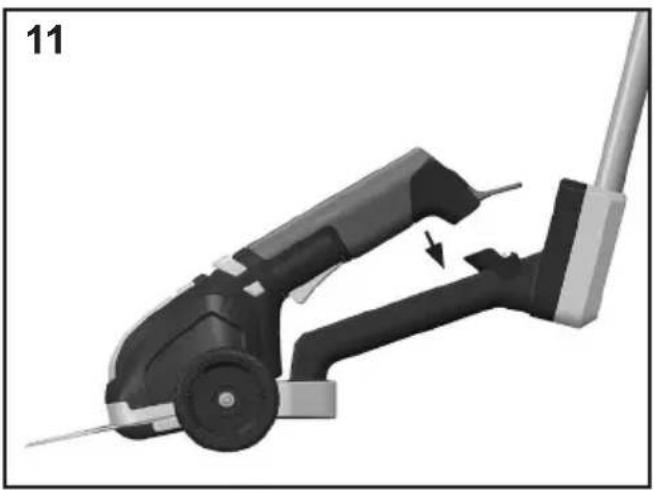
natural_image
Mechanical device with articulated arm and lever mechanism, no visible text or symbols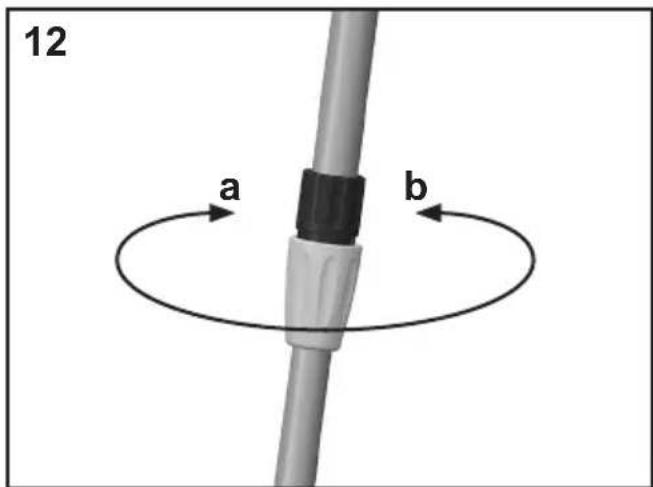
natural_image
Illustration of a hair curling machine with a tool and wheels, showing motion direction (no text or symbols)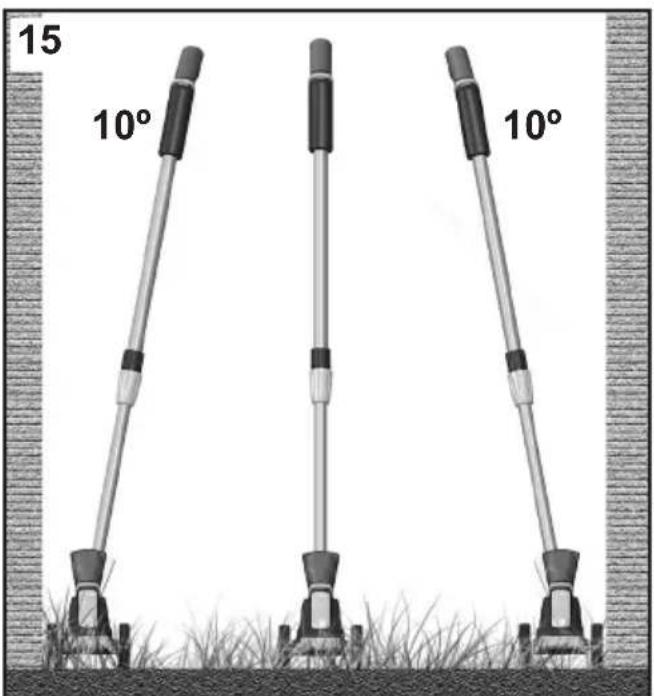
Pictogram illustration and explanation
1 Use protective means for eyes and ears!
2 Warning!
3 After-running of the appliance!
4 Read the operation instructions
5 Do not use tool in wet weather conditions
6 Keep third persons out of the danger zone
7 Defective accumulators should be recycled!
8 Attention: Environmental Protection! This device may not be disposed of with general/household waste. Disposeof only at a designated collection point.
9 Polarity of the plug connector
10 Only for indoor use.
11 Protection class III / safety extra low voltage
12 Confirms the conformity of the power tool with the directives of the European Community.
Guaranteed acoustic capacity level L_WA 86 dB(A)
14 Protective temperature limite
ES
EN | Operating Instruction
Accu-Grass- and Shrub shear
Dear customer,
We have created this instruction manual for you in order to ensure the reliable operation of your clippers. By following the instructions, your machine will always work to your satisfaction and we can guarantee its long lifetime.
Our machines were tested under extremely severe conditions prior to production. They were also subjected to continuous testing during production. This series of tests guarantees the consumer a high quality product.
Design and performance are subject to change, without prior notice, due to improvements.
CONTENT
Page
Illustrations 1 - 4
Pictogram illustration and explanation 5 - 7
- Technical Specifications.... GB-2
- Intended use...... GB-3
- General safety instructions.... GB-3
3.1 Working area
3.2 Electrical safety
3.3 Personal safety
3.4 Careful handling and use of power tools
3.5 Appropriate handling and use of battery-operated power tools
3.6 Service
- Safety instructions for grass- and shrub shear.... GB-4
- Grass shears safety warning...... GB-5
- Before starting...... GB-6
6.1 Safety key
6.2 Charging the battery
- Switching the tool on/off GB-6
- Refitting the tool / Changing the shear systems...... GB-6
- Hints for your work with the tool.... GB-7
- Maintenance...... GB-7
- Storage...... GB-7
- Waste disposal and environmental protection.... GB-7
- Assistance and repairs.... GB-7
- Warranty coverage...... GB-8
EN | Operating Instruction
1. Technical Specifications
Model GM Li 7.2 GM Li 10.8
| Battery voltage/operation voltage V/DC | 7,2 | 10,8 | ||
| Battery type | Lithium-Ionen | 2,5 Ah | ||
| Charging current | mA | 380 | 500 | |
| Charging time | h | 3-5 Std. | ||
| Operating time | min | ~ 80 | ~ 100 | |
| Weight kg 0,58 0,65 | ||||
| Noise pressure level | dB (A)K=3,0 dB (A) | 75,7 | ||
| Vibrations | m/s2 | < 2,5K=1,5 m/s2 |
Accessories
Grass cutting blade (GM GB8, GM GB10, GM GB13)
| Cutting movements | min^-1 | 1000 |
| Cutting width | mm | 80, 110, 130 |
Shrub cutting blade (GM SB18, GM SB20)
| Cutting movements | min^-1 | 2000 | |
| Cutting length | mm | 180, 200 | |
| Cutting thickness | mm | max. 8 |
Pruning cutter (GM PD)
| Saw blade diameter | mm | 65 |
| Saw blade rotation speed | min^-1 | 200 |
Grubber (GM RK)
| Working motion | min^-1 | 1000 | |
| Working wide | mm | 95 |
- The specified vibration emission value was measured by a standardized test methods and can compare with other power tools are used.
- The specified vibration emission value can also be necessary for the assessment of work breaks are used.
- The specified vibration emission value can vary during the actual use of the electric tool by specifying the value, depending on the way how to use the power tool.
• Note: You create the privilege against vascular pulsations of the hands in time breaks. - Try to keep the stress due to vibration as low as possible. For example, measures to reduce vibration stress are wearing gloves when using the tool and limiting the work time. All phase of the operating cycle must be considered in this regard, (for example, times when the power tool is switched off, and times when the power tool is switched on but is not running under load).
• Always keep hands and feet away from the cutting tools, particularly when switching on the motor!

ATTENTION! Noise protection! Please observe the local regulations when operating your device
2. Intended use
As required, this device may be converted via simple replacement of the included attachments into grass shears or bush shears, or with separate interchangeable equipments into pruning cutters or grubbers.
Hints for your work with the tool
The shrub trimmer cuts ornamental shrubs and light undergrowth or bushes. The device is also well-suited for ornamental cuts as, for example, for the care of graves.

The battery-powered grass and shrub shear can not and should not replace your hedge shears.
They are exclusively designed to trim and cut back ornamental shrubs and brush -wood with a low wood thickness. Any other use is not deemed appropriate and the manufacturer/ supplier is not liable for damages resulting from such use.
The grass shears allow for clean cuts of lawn edges or hardly accessible lawn areas.
Each type of use other than those given in these instructions for use can damage the machine and cause serious risk to the user.
Please always observe the safety instructions in order to safeguard your guarantee claim and in the interests of product safety. Due to the machine's design, we are unable to fully exclude all residual risks.
Residual dangers
Residual risks always remain even if the hedge trimmer is used properly. The hedge trimmer's design can entail the following hazards:
- Contact can be made with the unprotected blade (resulting in cutting injuries)
- Reaching into or grabbing the hedge trimmer while it is in operation (resulting in cutting injuries)
- Unanticipated, sudden movement of the plant material being cut (resulting in cutting injuries)
- Ejection or catapulting of damaged cutting teeth
- Ejection or catapulting of the plant material being cut
- Hearing damage if the specified hearing protection is not worn
• Inhalation of cut materials
3. General safety instructions
ATTENTION! Read all instructions contained herein. Failure to observe the following instructions may result in electric shock, burns and/or severe injury. The term 'power tool' used in the following includes both mains-operated tools (with mains supply) and battery-operated tools (without mains supply).
KEEP THESE INSTRUCTIONS CAREFULLY!
3.1 Working area
- Keep your working area clean and tidy. Untidy and poorly lit working areas may lead to accidents.
- Do not operate the tool in potentially explosive environments containing combustible fluids, gases or dusts. Power tools generate sparks that may ignite dusts or fumes.
- Keep children and other persons away when you are operating the power tool. Distractions may result in the operator loosing control over the tool.
3.2 Electrical safety
- The mains plug of the power tool must fit into the mains socket. The plug must not be modified in any way. Do not use adapter plugs/connectors in combination with tools with protective earthing. Unmodified plugs and fitting sockets reduce the risk of electric shock.
- Avoid physical contact with earthed surfaces as pipes, heaters, ovens and refrigerators. There is an increased risk of electric shock if your body earthed.
- Keep the tool out of the rain. The penetration of water into a power tool increases the risk of electric shock.
- Do not use the cable to carry or hang up the tool or to pull the plug out of the socket. Keep the cable away from heat, oil and sharp edges or moving parts of the tool. Damaged or tangled cables increase the risk of electric shock.
3.3 Personal safety
- Always pay attention to what you do and apply reasonable care when working with a power tool. Do not use the tool when you are tired or under the influence of medication, drugs or alcohol. When working with power tools even a short moment of inattentiveness may result in severe injury.
- Wear personal protection equipment and always wear eye protection (safety goggles). Wearing personal protection equipment as a dust mask, nonslip safety shoes, safety helmet or ear protectors (depending on the type and use of the tool) reduces the risk of injury.
- Avoid unintentional activation. Ensure that the electrical tool is switched off before you connect
EN | Operating Instruction
it to the power supply and/or the battery, pick it up, or carry it. If you have your finger on the switch while carrying the electrical tool or connect the device to the power supply with the switch activate, then this may cause accidents.
- Do not overestimate your abilities. Take care of a safe footing and keep your balance at all times. This will allow you to better control the tool in unexpected situations.
- Wear suitable clothes. Do not wear wide clothing or jewellery. Keep your hair, clothes and gloves clear of all moving parts. Loose clothing, jewellery or long hair may get caught in moving parts.
3.4 Careful handling and use of power tools
- Do not overtax the power tool. Use the power tool intended for your type of work in each case. The use of the suitable power tool within the stated range of performance makes working more effective and safer.
- Do not use a power tool with a damaged switch. A power tool that cannot be switched on or off any more is dangerous and must be repaired.
- Pull out the safety key before you change the device settings, change accessories, or put away the device. These care instructions prevent the device from starting unintentionally.
- Store power tools out of the reach of children. Do not allow persons to use the tool if they are not familiar with the tool or these instructions. Power tools are dangerous if used by inexperienced persons.
- Thoroughly maintain your power tool. Check whether moving parts are working properly and are not jamming/sticking, and whether parts are broken or otherwise damaged in a way that affects the function of the tool. Have damaged parts repaired before using the tool. Many accidents are the result of poorly maintained power tools.
- Keep cutting tools sharp and clean. Thoroughly looked-after cutting tools with sharp cutting edges are jamming less often and are easier to guide.
- Use power tools, accessories, add-on tools, etc. in accordance with these instructions and in the way prescribed for the respective type of tool. You should also consider the working conditions and the work to be carried out. The use of power tools for purposes other than those intended for the respective tool may result in dangerous situations.
3.5 Appropriate handling and use of battery-operated power tools
-
Only use charging devices recommended by the manufacturer to charge the batteries. Charging units are usually designed for certain types of batteries; if used with other types there is a risk of fire!
-
Only use batteries designed for your power tool. The use of other batteries may lead to injury and risk of fire!
- Keep unused batteries clear of paper clips, coins, keys, nails, screws or other small metal objects that may bridge the contacts. A short circuit between the battery contacts may lead to burns or fire!
- Improper use may result in fluid leaking out of the battery. Avoid any contact with battery fluid. Flush with water in case of contact. If battery fluid should get into your eyes seek medical advice additionally. Leaking battery fluid may lead to irritations of the skin or burns!
3.6 Service
- Have the power tool serviced by qualified technical personnel only; repairs should be carried out using exclusively original spare parts. This will ensure the safe operation of the power tool.
4. Safety instructions for grass-and shrub shear
- Keep all parts of your body away from the cutting blades. Do not try to remove cut-off matter with the tool running. Do not try to hold material to be cut off with your hand. Remove cut-off matter that is stuck between the blades only with the tool being switched off! When working with hedge trimmers even a short moment of inattentiveness may result in severe injury.
-
Carry the hedge trimmer at the handle with the cutting blades standing still. Always put on the protection cover when transporting or storing the hedge trimmer. Careful handling reduces the risk of injury through the cutting blades.
-
Only hold the power tool on the insulated handle surfaces, because the cutting blade can come into contact with concealed power lines. If the cutting blade comes into contact with an energised line, device parts can become energised and cause an electric shock.
- Before starting work, search the hedge for concealed objects, e.g. wire, etc. Pay careful attention to ensure that the cutting tool does not come into contact with wire or other metal objects.
- Hold the power tool properly, e.g. with both hands on the handles, if two handles are present. Losing control of the device can result in injuries.
5. Grass shears safety warning
- This product is not intended for use by persons (including children) with reduced physical, sensory or mental capabilities, or lack of experience and knowledge.
EN | Operating Instruction
- This machine may cause serious injuries. Please read the instruction manual carefully as to the correct handling, the preparations, the maintenance and the proper use of the hedge trimmer. Familiarize yourself with the machine before the first use and also have yourself introduced to practical use of the machine.
- The cutting tool continues to run after the device is switched off.
- Turn off power before cleaning.
- Beware! Keep your fingers away from the cutting area!
- Only switch on the device if your hands and feet are away from the cutting tools.
- Remove all debris from the working area before use and pay attention to such debris while working!
- Turn the machine off before transporting and wait until the blade stops moving. Maintenance and cleaning should be performed only when the machine is turned off.
• Children and teenagers under 16 years of age must never use this device! - Never permit children or persons who are not familiar with the operating instructions to use this device.
- Statutory regulations can restrict the age of the operator.
- Be aware of third persons in the work area.
- Use of the machine must be prevented is people, especially children and house pets are present.
- Only use the shear in daylight or sufficiently bright artificial illumination.
- The clippers must be subjected to regular maintenance and checks. Damaged blades must be replaced as a pair. Professional repair is required if damage occurs due to impact.
- The machine should be inspected and maintained regularly by a responsible repair service only.
- Wear suitable working clothes, i.e. protective glasses, protective means for ears, non-slippery shoes and working gloves. Do not wear broad clothes which could be caught by the moving parts.
- After you finish using the clippers and before cleaning them, it is necessary to ensure that the machine cannot be accidentally turned on, such as by unlocking the switch.
- Check the cutting unit regularly for damage
- Never hold the clippers by the blades, you may run the risk of injury even when the clippers are not moving!
- Never touch moving blades in an attempt to remove debris or if the blades are blocked. Always switch off the device.
- Keep the machine away from children and store it
in a safe place.
- When working with the shears, always take a stable standing position, particularly when you are using steps or a ladder.
- Do not use shears with a damaged or excessively worn-out cutting part
- Ensure that all protective devices and handles are installed on the machine. Never try to put an incomplete machine in operation.
• Always use the protective part designed for the blade when transporting and storing the shears. - Before starting the work, make yourself familiar with the surroundings and possible dangers which you may not hear because of the noise.
- Only use the spare parts and accessories recommended by the manufacturer.
- Note that the user shall be responsible himself for accidents and hazards that result to other people or their property.
- Prior to using the machine, inspect it visually for damaged, missing, or incorrectly attached protective devices or coverings.
- Never use the machine with damaged coverings or protective devices or without the covering or protective devices.
- Eye protection, long pants, and sturdy footwear must be worn the entire time the machine is used.
- The machine should not be used in case of poor weather conditions, especially in case of lightning.
• Always switch off the machine - if the machine is left unattended.
- before inspecting or working on the machine
- after contact with foreign objects
- if the machine begins to vibrate strangely
- Always ensure that the ventilation openings are kept free of foreign objects.
- Always maintain your balance to stand securely on slopes. Walk, don't run.
- Warning! Do not touch moving dangerous parts before the machine has been switched off and the moving dangerous parts have come to a complete standstill.
- A tingling feeling or numbness in the hands is sign of excessive vibration. Limit the operating time, take sufficiently long work breaks, distribute the work between several people or wear anti-vibration gloves when using the tool for extended periods.
6. Before starting
6.1 Safety key
The power tool is equipped with a fuse to prevent accidental activation. Therefore, the safety key Y must first be inserted before charging and using. For this open the flap in the front area and insert the safety key in appropriate openings (Fig.2). Removing the key can also serve as a child safety lock. For this keep the key in a place inaccessible to children.
6.2 Charging the battery
Safety Instructions:
The tool is delivered with the lithium-ion battery charged. However, we recommend recharging the battery before the tool is operated for the first time.
- Use the included charging unit for charging the battery only. It is specially designed to match the tool's battery.
- Never use other charging unit. This will result in f and/or explosion hazard!
- Always keep the charging unit clear of rain or moisture. Hazard of electric shock! - Never charge battery in the open without protection, always choose a dry, protected place.
- Never try to charge third-party batteries with this charging unit. This will result in fire and/or explosion hazard!
- Check the housing, plug and cable for damage before each use of the charging unit. Do not use the unit if you detect damage.
- Do not open the charging unit by force. In case of a defect, the charging unit must be replaced.
- The charging unit heats up during the charging process. Do not place the unit on a flammable surface or operate it in a flammable environment. Fire hazard!
- Never open the battery cells. Hazard of short circuits!
- In case of damage to the battery, hazardous vapours or fluids may escape. In case of incidental con flush with water and seek medical advice immediately. The fluid may have irritating or caustic effects on the skin.
- Protect the battery from heat, intense insolation and fire. Explosion hazard!
Charging process:
- To charge the battery connect the charging unit to an electrical socket. Then open the flap in front area and connect the plug of the charging cable to the charging socket of the grass and shrub shears or trimmer (Fig. 3)
- The start of the charging process is indicated by the green control light X (Fig. 3) is shown with flat green indicator light next to the safety key. If the battery is completely empty the charging time is about 3-5 hours. After the charging process has been completed, the electronic control automatically switches
off the charging process. The green control light lights up permanently and thereby indicating the end of the charging process. It is not required to monitor the charging time
- The charging unit and the handle of the tool heat up during the charging process. This is nothing unusual.
- Pull the plug of the charging unit if it is not in use.
- The tool must never be switched on during the charging process!
- Recharge the battery every time you realise a considerable decrease of the tool's cutting performance. The battery additionally features an electronic total discharge protection that protects the battery from damage. This feature switches the battery off if the discharging threshold is reached. Do not switch the tool on afterwards and make sure to recharge the battery first.
7. Switching the tool on/off
Slide the switch-on lock A (Fig. 4) forward and push fire switch B. After the tool has been switched on, you do not have to hold the switch-on lock A any longer.
To switch off just let go of the switch B.
the

ATTENTION! The blades will coast for a certain time after switch-off!
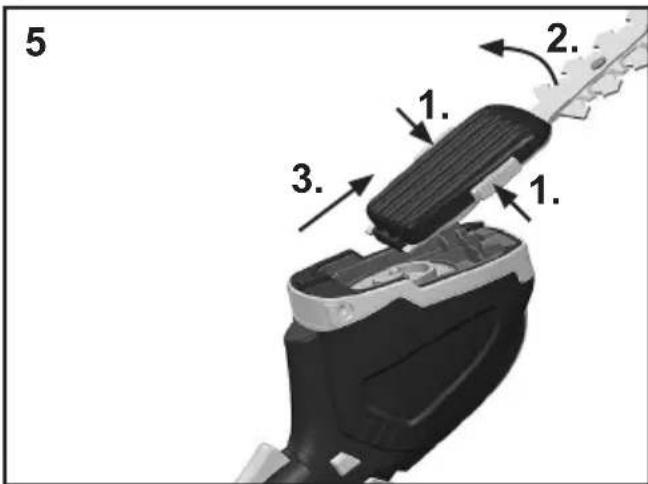
8. Refitting the tool / Changing the cutting blades
Put the included blade guard into the blade(s) and use protective gloves to protect yourself from injury.
We also recommend removing the security key so that the device is not accidentally switched on.
Push both lateral push buttons (Fig. 5.1) concurrently and re-move the shearing blades (Fig. 5).
Remove any dirt from the gear area (if necessary).
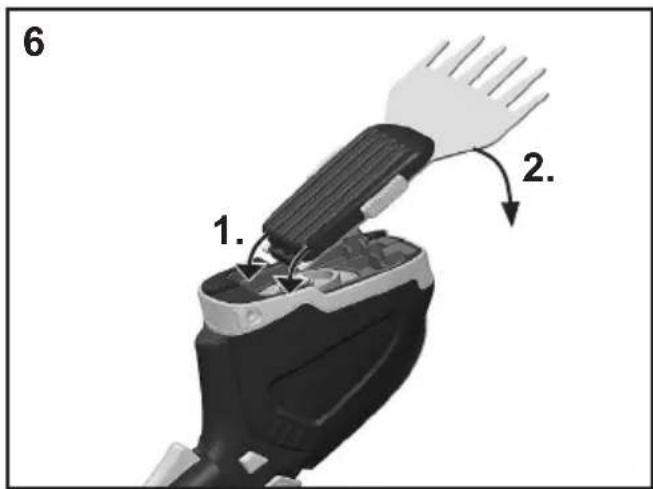
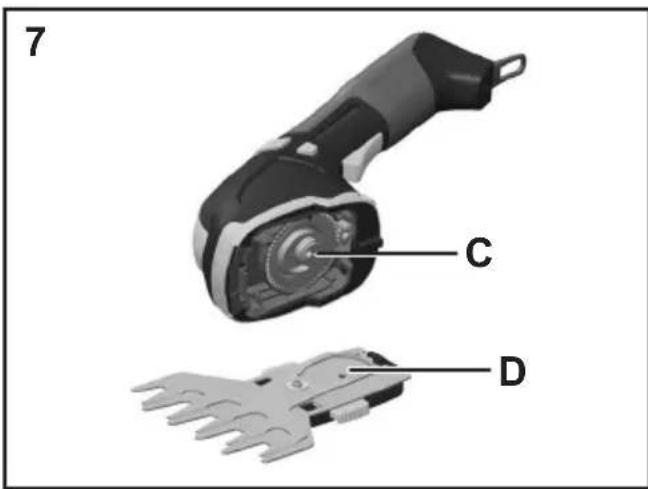
Please slightly grease the drive area C using commercial universal grease as described in the Maintenance section before putting the replacement shears in place (Fig. 7).
Lead the cutting blades with the rear holding toe into the housing of the grass shears as shown in Fig. 6 and lock the click system in place by strongly pushing on the blade base plate.
The position of the eccentric drive does not have to be considered when changing the blades. When the device is switched on, the gear eccentric unit automatically engages into the appropriate relief in the cutting blade.
The device is now ready for operation.
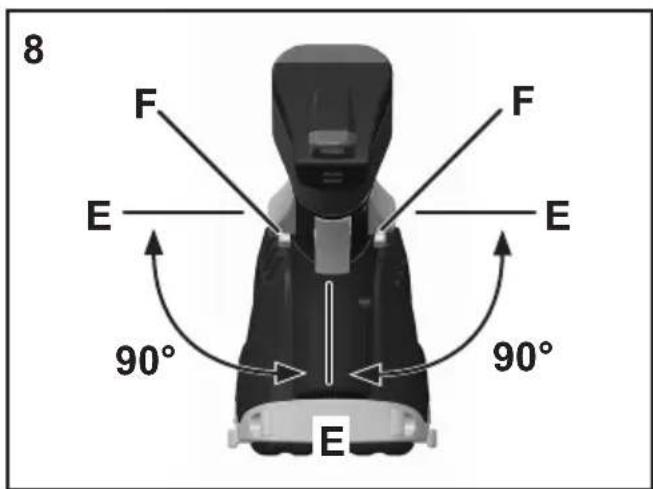
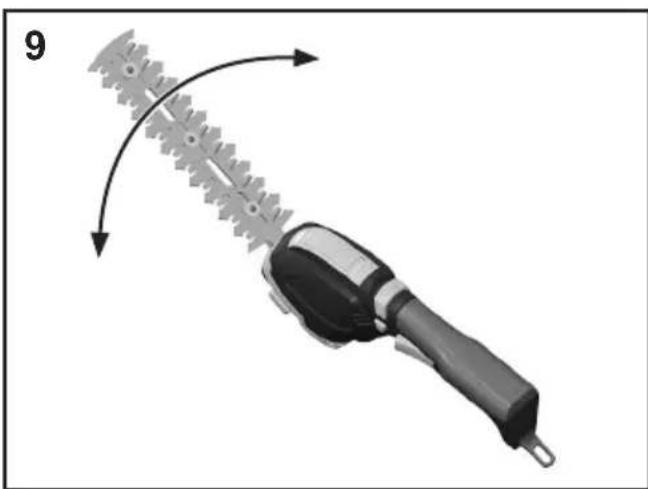
The GM Li 10.8 units are equipped with a swiveling switch E for improved ergonomics (Fig. 8). Especially with vertical cutting movements, it is advantageous to pivot the switch 90^ to the handle axis (Fig. 9). The device is switched off and one of the two locking buttons F is pressed. Now turn the segment with the switch to the
end position. This is where the segment noticeably locks in. During panning, the switch is locked off for safety reasons and the device cannot be turned on.
9. Hints for your work with the tool
The shrub trimmer cuts ornamental shrubs and light undergrowth or bushes. The device is also well-suited for ornamental cuts as, for example, for the care of graves.
The grass shears allow for clean cuts of lawn edges or hardly accessible lawn areas.

As the device is operated with one hand please be careful not to move the other hand near the running cutting tools.
Working with telescopic handle
Longer working with the grass shears can be greatly facilitated by the use of the telescopic handle. For this purpose, the grass shears are threaded into the intended fixing points of the telescope handle (Fig. 10) and locked in place (Fig. 11). Depending on the body size, the telescopic handle can now be adjusted in the handle height. For this purpose loosen the clamping nut in the middle of the tube (Fig. 12a). Now it is possible to move the tubes against each other until the desired length is reached. The position is fixed by tightening the clamping nut (Fig. 12b).
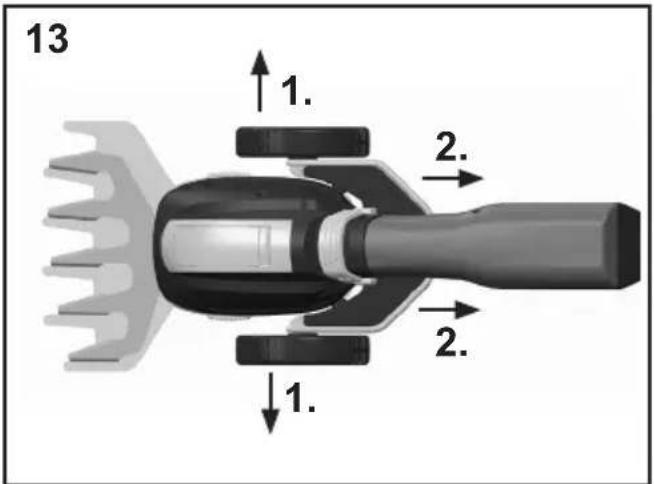
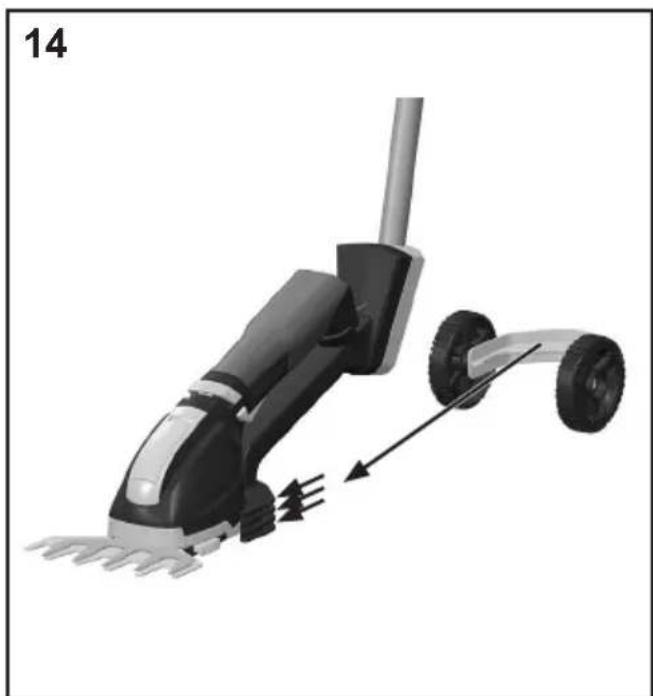
On the telescopic handle, the cutting height of the grass shears can be adjusted. When delivered, the axle with the wheels is in the middle position. To change the height, the wheels are pulled apart slightly. As a result, the fixation is released and the axle can be pulled backwards (Fig. 13). Depending on the desired cutting height, the axle is now inserted and locked into one of the three grooves (Fig. 14).
In order to avoid injuries when working on walls or fences, the telescopic handle can be bent 10^ to the left or right. The joint noticeably locks in one of the three positions and fixes itself (Fig. 15).
10. Maintenance (Fig. 7)
Clean the blade from any crushed plants and dirt. The blades should be detached at least once a season for the removal of debris. Lubricate the C pinion and the D back of the blade with a light oil. Do not lubricate the motor and other parts. Should the blade become dull after a long period of use, a spare part can be ordered.
Warning! The leading edges of the blades must be oiled to ensure proper lubrication. If the leading edges are not oiled, blade durability may be adversely affected.
If the cutting blades have become dull after long use please replace them with original spare parts.
Clean the device using only a brush or cloth. Do never wash down the device with water and do never dip the device into water.
Apply protective spray to the blades after each use.
Replace blunt blades.
Always put on the blade guard after use.
Examine the tool for obvious defects and have it repaired in an authorised service shop if required.
11. Storage
Always store the tool in a dry, clean place outside the reach of children. Make sure that the place of storage is frost-free.
12. Waste disposal and environmental protection

Please observe the following directions for the disposal of your accumulator/battery.
Batteries are not to be put into the rubbish. As a consumer you are legally obliged to return used batteries and accumulators.

At the end of the duration of your apparatus, the batteries or accumulators have to be taken from the apparatus, disposing of them separately.
Batteries are not to be put into the rubbish. As a consumer you are legally obliged to return used batteries and accumulators. At the end of the duration of your apparatus, the batteries or accumulators have to be taken from the apparatus, disposing of them separately. You have the possibility of delivering your old batteries and accumulators to the local collecting points of your municipality or to your dealer or to the distribution centers.
If your device should become useless somewhere in the future or you do not need it any longer, do not dispose of the device together with your domestic refuse, but dispose of it in an environmentally friendly manner.
Please dispose of the device itself at an according collecting/recycling point. By doing so, plastic and metal parts can be separated and recycled. Information concerning the disposal of materials and devices are available from your local administration.
13. Assistance and repairs
This manual provides all the necessary information to run the machine and for correct basic maintenance operations which can be performed by the user. Any regulations and maintenance operations not described herein must be carried out by your Dealer or Authorised Service Centre, which have the necessary knowledge and equipment to ensure that the work is carried out correctly, maintaining the correct degree of safety and the original operating conditions of the machine. Any operations performed in unauthorized centres or by unqualified persons will totally invalidate the Warranty and all obligations and responsibilities of the Manufacturer.
EN | Operating Instruction
- Only authorized service workshops can carry out guaranteed repairs and maintenance.
- The authorized service workshops only use genuine spare parts. Genuine spare parts and accessories have been designed specifically for machines.
- Non-original parts and attachments are not approved; use of non-original spare parts and attachments will jeopardize the safety of the machine and relieve the Manufacturer from all obligations or liabilities.
14. Warranty coverage
The warranty conditions are intended for consumers only, i.e. non-professional operators. The warranty covers all material quality and manufacturing defects recognised during the warranty period by your Dealer or Authorised Service Centre. The warranty is restricted to the repair or replacement of components recognised as faulty. It is advisable to send your machine once a year to an authorized service workshop for servicing, assistance and safety device inspection. The warranty only applies to machines subjected to regular maintenance. The user must follow all the instructions provided in the accompanying documentation. The warranty does not cover damages resulting from:
-
Failure to become familiar with the documentation accompanying the machine (Instruction manuals).
• Professional use.
• Carelessness, negligence. -
External causes (lightning, impact, presence of foreign bodies inside the machine) or incidents.
- Incorrect use or assembly or prohibited by the manufacturer.
- Poor maintenance.
- Modifi cation to the machine.
- Use of non-genuine spare parts (adaptable parts).
- Use of accessories not supplied or approved by the manufacturer.
The warranty does not cover:
- The routine/extraordinary maintenance operations (described in the instruction manual).
- Normal wear and tear of consumables, such as drive belts, cutting means, headlights, wheels, safety bolts and cabling.
• Normal wear and tear. - Deterioration in the appearance of the machine due to use.
• Cutting means supports. - Any ancillary expenses related to the enforcement of the warranty, such as costs incurred to travel to the user's location, transfer of the machine to the Dealer, rental of replacement equipment or calling of independent enterprises to perform maintenance work.
The user is protected by his or her own national legislation. The user's rights under the national laws or his or her own country are not in any way restricted by this warranty.
IT
GARANZIA
For this electric tool, the company provides the end user - independently from the retailer's obligations resulting from the purchasing contract - with the following warranties:
The warranty period is 24 months beginning from the hand-over of the device which has to be proved by the original purchasing document. For commercial use and use for rent, the warranty period is reduced to 12 months. Wearing parts, rechargeable batteries and defects caused by the use of non fitting accessories, repair with parts that are not original parts of the manufacturer, use of force, strokes and breaking as well as mischievous overloading of the motor are excluded from this warranty. Warranty replacement does only include defective parts, not complete devices. Warranty repair shall exclusively be carried out by authorized service partners or by the company's customer service. In the case of any intervention of not authorized personnel, the warranty will be held void.
All postage or delivery costs as well as any other subsequent expenses will be borne by the customer.
ES
D. Lgs. 262/2002, ANNEX V (Italy)