Lite - Microphone Catchbox - Free user manual and instructions
Find the device manual for free Lite Catchbox in PDF.


User questions about Lite Catchbox
0 question about this device. Answer the ones you know or ask your own.
Ask a new question about this device
Download the instructions for your Microphone in PDF format for free! Find your manual Lite - Catchbox and take your electronic device back in hand. On this page are published all the documents necessary for the use of your device. Lite by Catchbox.
USER MANUAL Lite Catchbox
text_image
catch box catch box catchbox POWER VOLUME
lite
user manual
Copyright 2020 Catchbox SIA

text_image
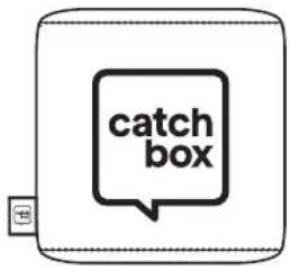
catch boxCatchbox Cover
natural_image
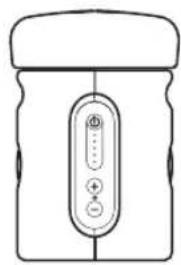
Line drawing of a device with a central control panel (no text or symbols)Catchbox Lite Transmitter
text_image
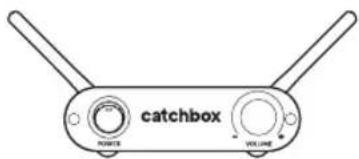
catchbox POWER VOLUMECatchbox Lite Receiver
Catchbox
Wireless Charger
Contents
1 Safety Instructions 4
2 Quick Start.... 5
Setting Up Catchbox.... 5
Throwing Catchbox 11
Speaking into Catchbox.... 12
3 Product Description 13
Overview.... 13
GHz radio Spectrum Overview.... 14
4 General System Specifications 15
Transmitter Specifications.... 16
Receiver Specifications.... 17
Wireless Charger Specifications.... 18
Catchbox Cover Specifications 19
Catchbox Microphone Unit.... 20
5 Operations.... 21
Opening the Catchbox Microphone.... 21
Locking the Transmitter to the Cover 22
Setting up the Receiver.... 23
Setting up the Transmitter 24
Pairing the Transmitter and the Receiver.... 26
Charging the Transmitter with the USB cable 27
Charging the Transmitter with the Wireless Charger.... 28
6 Troubleshooting....29
7 Maintenance, Storage, and Disposal.... 31
8 Certification....33
1 Safety Instructions

NOTICE
- Before using the product, read and understand the user manual and inform others of proper usage.
- Follow all warnings and instructions on the product and in this manual.
- Keep this user manual and always include it when passing the equipment on to third parties.

WARNING
- Not heeding these warnings may lead to serious injury or property damage.
- Never throw Catchbox at a persons head or face and always make sure everyone is aware of the situation before throwing.
- Do not use in situations with fragile objects, hot liquids, or people susceptible to injury, like the very young or old.
- Do not throw long passes (>5 m / 16 ft) or hard passes.
• Properly lock the into the Cover before use. Always use the Cover and the foam cap on the Transmitter when using the product. - Operating or storing this product at temperatures above 50 degrees Celsius or 122 degrees Fahrenheit will cause the locking mechanism to fail permanently.
- The use of other antennas than those provided by the manufacturer is strictly prohibited.
- This product contains magnets which could affect the functioning of pacemakers and other electronic implants. These could stop working or switch into test mode, causing illness. If you wear these devices keep sufficient distance to magnets. Warn others who wear these devices about the risks of getting too close to magnets.

CAUTION
- Magnets produce a far-reaching, strong magnetic field. Keep magnets away from devices and objects that could be damaged by strong magnetic fields, like laptops and other electrical equipment.
- Do not place the product near heat sources such as heating ducts or radiators and do not expose it to direct sunlight, excessive dust, moisture, rain, mechanical vibrations or shock.
- Do not use near water. Use equipment indoors only. If the equipment comes into contact with a liquid, turn off the product, shut down the sound system and disconnect the power cable from the power outlet immediately.
- Avoid excessive volume. Do not exceed 70dBa for airborne noise.
- Operate the equipment only with the included power supply.
- Clean the equipment with a moistened (not wet) cloth only. Be sure to disconnect the equipment from the power outlet before cleaning the equipment. Unplug the apparatus during lightning storms or when not in use.
- Protect the power supply cord from being walked on or pinched.
- The equipment should be opened, serviced, and repaired by qualified service personnel only.
- Do not attempt to modify this product or its accessories and use only accessories and attachments, like antennas and power supply, specified by the manufacturer.
- Changes or modifications to the equipment not expressly approved by manufacturer can void the warranty and user's authority to operate the equipment.
- The Wireless Charger component uses strong electromagnetic field to operate. Keep the equipment away from metallic objects as those can heat up and cause injury or property damage.
2 Quick Start
Setting up the Catchbox
Step 1
Identify your Use Case
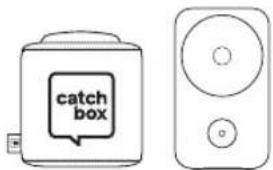
text_image
catch boxUse Case A
Catchbox with an Audio System
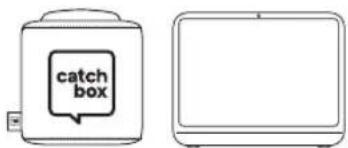
text_image
catch boxUse Case B
Catchbox with a Computer

To reduce setup time, each Catchbox Lite Receiver and Catchbox Lite
Transmitter unit have been paired before being shipped.
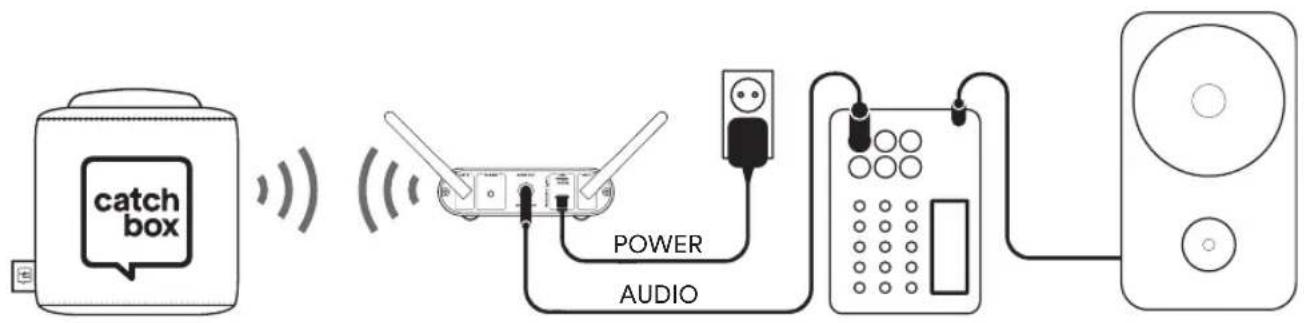
Use Case A
Catchbox with an Audio System
- Connect the power supply to the receiver and plug the cord into an AC power source.
- Plug the included audio cable into the Receiver's balanced audio output and connect it to the input of your Audio System (mixer board, amplifier or other audio device).
- Turn on both the Transmitter and the Receiver.
flowchart
graph LR
    A["catch box"] -->|Signal| B["Power"]
    B --> C["Audio"]
    C --> D["Speaker"]

Depending on the input type of your Audio device, you may need to use additional audio adapters (purchased separately). Please refer to the wiring diagram of the Receiver's audio output (page 17)
6 Catchbox Lite
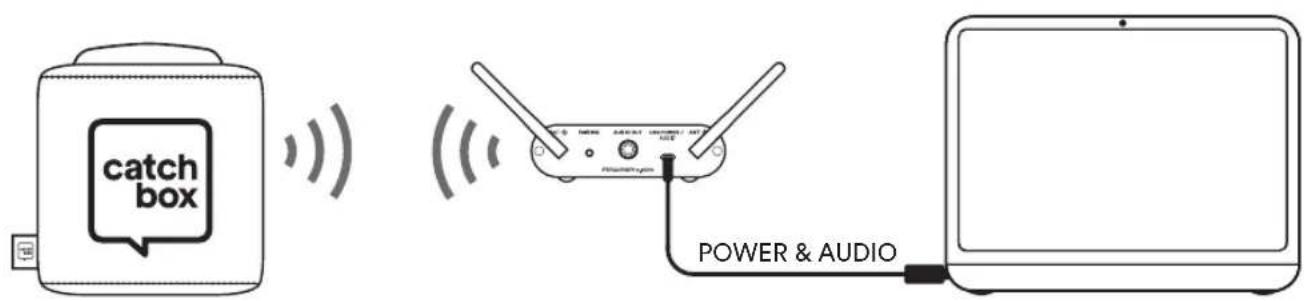
Use Case B
Catchbox with a Computer
- Plug the included USB audio adapter to the computer's USB port and connect it to the Receiver's audio-output using provided audio cable.
- Turn on both the Transmitter and the Receiver.
- Go to your computer's audio settings and enable the input signal from Catchbox. See detailed instructions on Page 26.
text_image
catch box POWER & AUDIOStep 2
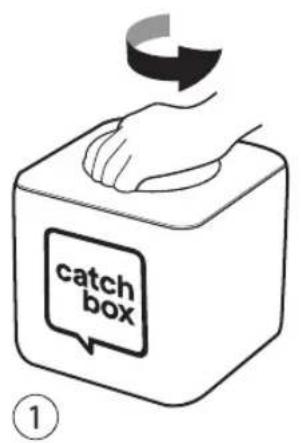
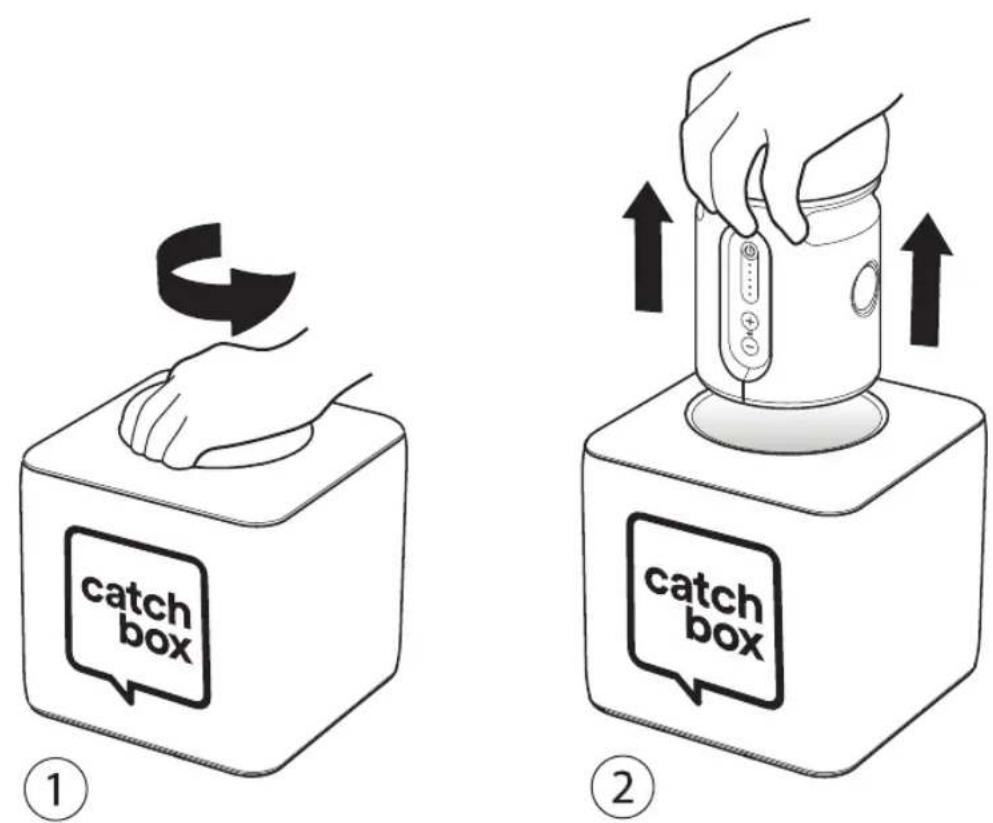
Remove the Transmitter from the Cover by twisting it 90 degrees and pulling upwards. This motion will misalign the internal magnets and allow for easy removal of the Transmitter unit.
text_image
catch box ①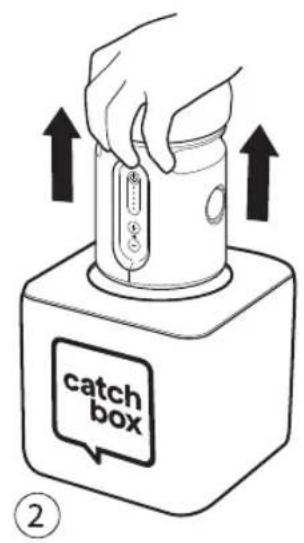
text_image
catch box ②Step 3
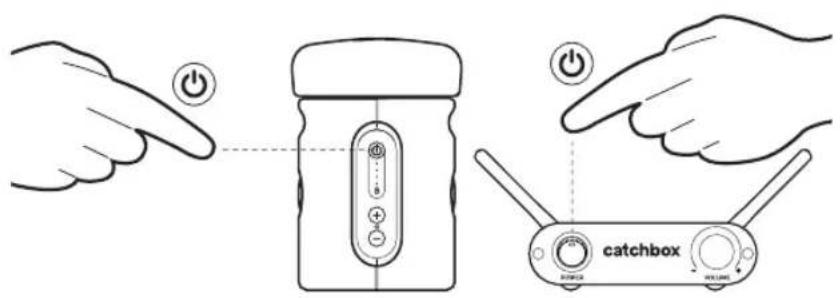
To turn on the Transmitter, press and hold the power button. LEDs on the front panel will turn on.
Connect the Receiver to the power source. Turn On the Receiver using the switch on the front panel of the device. The LED in the front panel will turn on green.
text_image
catchboxStep 4
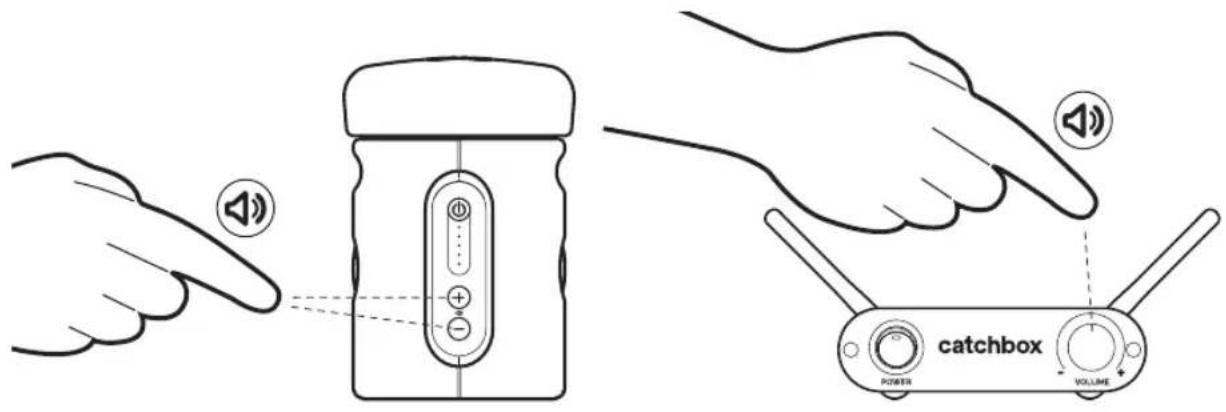
Adjust the volume using the volume buttons on the Transmitter and the volume knob on the Receiver.
text_image
Diagram illustrating the use of a sound device to interact with a jar, showing speaker and power button placement.
Avoid excessive volume. Do not exceed 70 dBa for airborne noise.
Step 5
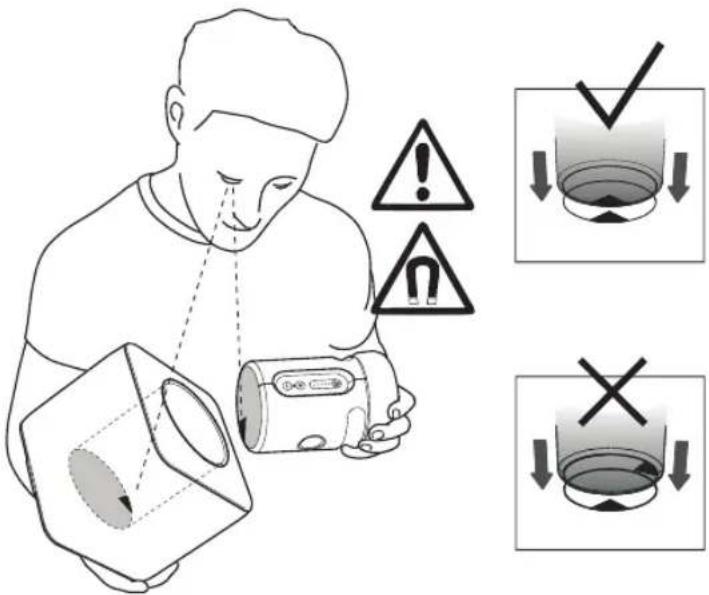
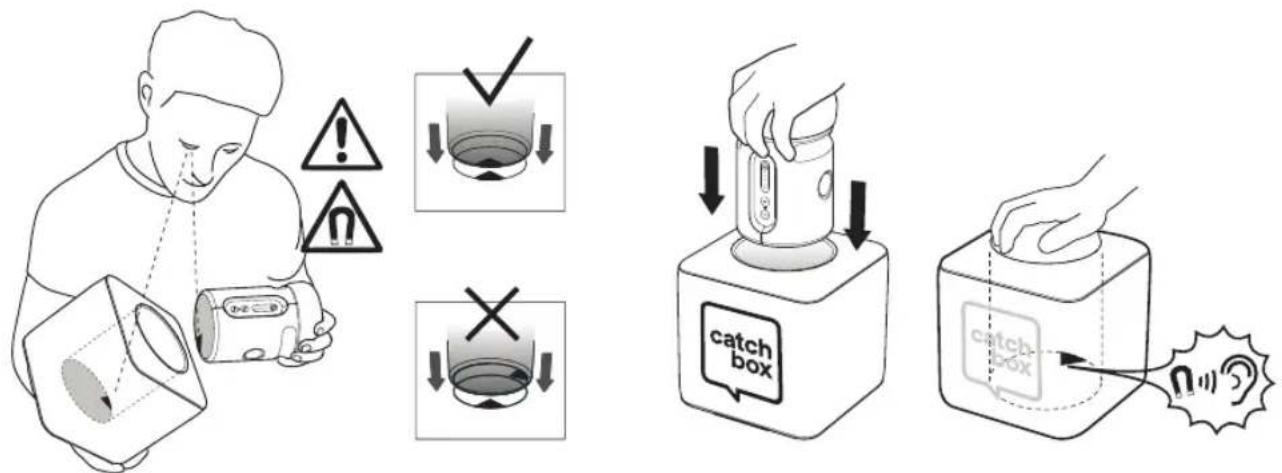
Place the Transmitter into the Cover, making sure to align the magnetic locking mechanism to ensure the transmitter is securely fitted. Use the visual marks for guidance.
text_image
Safety warning illustration showing a person using a device to inspect a container, with warning symbols and three labeled diagrams (✓, ↓, ×) indicating different conditions.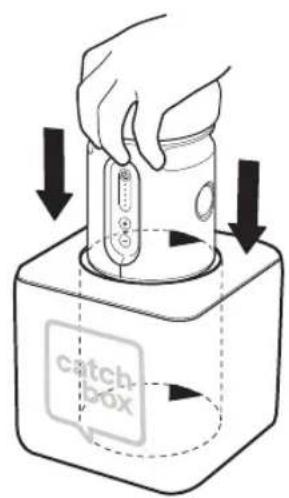
text_image
catchbox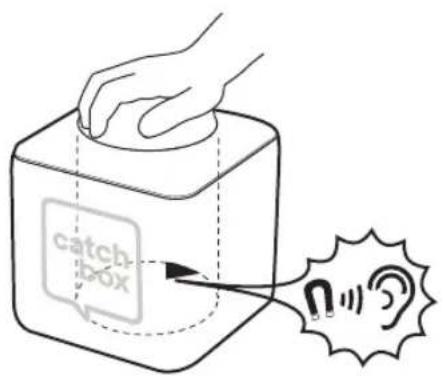
text_image
catch box
Always properly lock the Transmitter unit, with the attached foam cap, into the Cover before use. Improperly locking the Transmitter, or a failed locking mechanism, will result in the Transmitter unit coming out during use, potentially leading to serious injury and/or property damage.
Throwing Catchbox
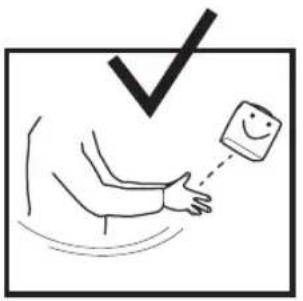
To throw the Catchbox microphone, find someone in the audience who wants to ask a question or make a comment. Make sure that the person and those around him or her are aware of the situation and are prepared to catch.
text_image
Hand-drawn diagram showing a person holding a smiley face with a checkmark above, likely indicating a satisfaction or approval.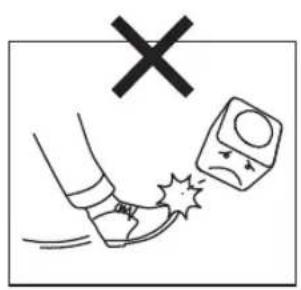
text_image
Safety warning illustration showing a hand using a tool to mark a defect or explosion, with a 'X' symbol above.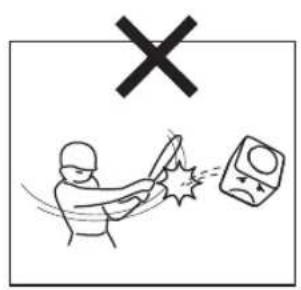
text_image
Safety warning sign showing a person using a tool to strike a damaged object, with a 'X' symbol above.
Short, underhand passes of up to 5 m / 16 ft distance are recommended.

If someone further away has a question, try to get the entire audience involved by having members pass the Catchbox short distances to the person who wants it. This is a great way to activate the crowd.

Improper throwing and use of the device can lead to serious injury and/or property damage. Never throw Catchbox at a persons head or face and always make sure everyone is aware of the situation before throwing. Do not use in situations with fragile objects, liquids, or people susceptible to injury. Do not kick or hit the Catchbox.
Speaking into Catchbox
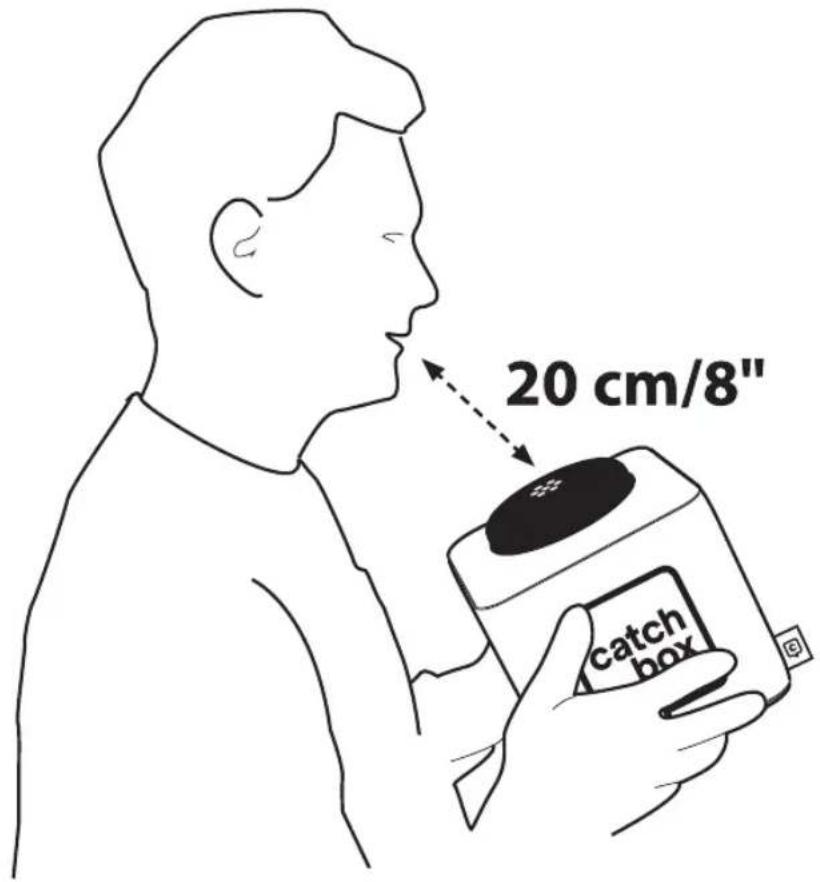
To use Catchbox, simply speak into the foam cap located on top of the Transmitter. An optimal distance of 20 cm / 8 in will provide the clearest sound while not blocking the face of the person speaking.
text_image
20 cm/8" catch box
Avoid using Catchbox near loudspeakers as this can cause audio feedback.
3 Product Description
Overview
Catchbox Lite is the world's first wireless throwable microphone intended for both small and medium sized audiences of up to 100 people. The soft cube can be quickly passed from one audience member to the next in crowded spaces, making it an easy and fun way to get audience members to ask questions and make comments, whether it be in a lecture, a meeting, a workshop, or even a conference. Operating in the 2.4 GHz frequency band, the device is free to use without a license worldwide. Digital transmission, adaptive frequency hopping, and antenna diversity ensure a clear wireless audio transmission. The unique automute technology turns off the audio signal when the microphone is being thrown ensuring the system doesn't make any unwanted noises when being passed around. Wireless Charger is optionally available.
Transmitter capsule comes with a rechargeable Li-ion battery that can be recharged using the included power with USB-C connector supply or the Wireless Charger. Catchbox automatically turns off when placed onto the Wireless Charger and turns back on when picked up eliminating the need for active device management. The unique patented Automute technology turns off the audio signal when the microphone is being thrown ensuring the system doesn't make any unwanted noises when passed around (US Patent: US9936319B2).
Key Features
• 2.4 GHz transmission for global, license-free use
• Digital signal ensures no audio distortion
- Adaptive frequency hopping and management
• Automute technology
• Diversity receiver with two antennas
- Rechargeable battery
- Wireless Charging
2.4 GHz radio Spectrum Overview
The Catchbox Lite uses the 2.4 GHz ISM frequency band as free to use without a license. While this is very convenient, it also creates limitations and drawbacks, mainly caused by the prevalence of other devices which also work in the same frequency band. To ensure flawless operation, the Catchbox Lite uses adaptive frequency hopping, antenna diversity, intelligent frequent management, and two way audio packet control and buffering. This said, by understanding the limitations of 2.4 GHz systems and knowing of ways to improve signal strength users can make sure that their device works as intended.
Limitations of 2.4 GHz Systems
Devices that operate in the 2.4 GHz frequency band have a limited range, usually around 20-30m / 65-100 ft in ideal working conditions. This, in turn, means the Catchbox Lite may not work in large events where there is a long distance between the transmitter and the receiver. 2.4 GHz frequency signals are also easily absorbed by walls, metallic materials and human bodies. This means one should not place the Catchbox Lite Receiver into another room from the transmitter, or place it inside a cupboard, specifically a metal one. If there are many other devices that operate in the 2.4 GHz spectrum in the same space (WiFi and Bluetooth enabled devices, such as smartphones and laptops) dropouts may occur due to the frequency band being overcrowded. To avoid this, do not use the product in audiences with over 100 people, like large conferences or exhibitions.
Improving signal strength
Users can improve the performance of the system through the following measures:
- Ensure that there are no objects or walls between the receiver and transmitter.
- Keep the distance between the transmitter and the receiver short.
- Position the antennas of the receiver in a 45 degree pattern, like the letter V.
- Do not place the receiver or transmitter near other 2.4 GHz devices, such as laptops or WiFi routers.
- Avoid heavy wireless network activities, like downloading movies, in the same space.

!WARNING!
This product may cause interference to other products and devices operating in the 2.4 GHz frequency band. These other devices can also interfere with the wireless transmission of the device, causing signal dropouts.
4 General System Specifications
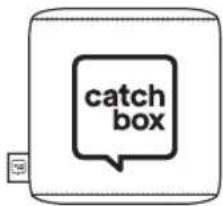
Catchbox Lite
Transmitter
text_image
catch boxCatchbox Cover
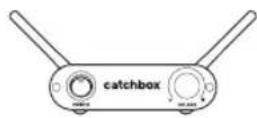
Catchbox Lite
Receiver
Catchbox
Wireless Charger
Included components:
• Catchbox Lite Transmitter
- Catchbox Cover
• Catchbox Lite Receiver with power supply
- Audio cable
• USB-C audio data cable
- Catchbox Wireless Charger with power supply (optional)
Specifications
| Working range | 30 m / 100 ft(Line of Sight)* |
| Frequency band | 2.4 GHz ISM band(2400 to 2485 MHz) |
| Max radio output power | 10 mW |
| Signal type Digital | |
| Adaptive frequency hopping | Yes |
| Antenna diversity Yes | |
| Max # of systems in one space | Up to 4 |
| Audio latency 20 ms | |
| Operating temperature range | 0 °C (32 °F) to 30 °C (86 °F) |
| Storage temperature range | 0 °C (32 °F) to 50 °C (122 °F) |
Note: Frequency response is measured with attached foam cap
* The actual operating range depends upon the surroundings, the signal absorption, signal reflection and signal interference
Transmitter Specifications
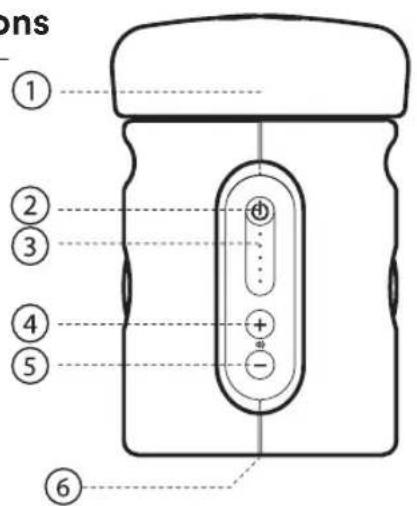
Parts
- Foam Cap
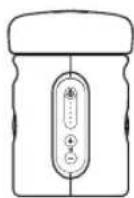
- Power button
- LEDs
- Volume up button
- Volume down button
- Magnetic lock
- Power jack (USB-C)
text_image
ons ① ② ③ ④ ⑤ ⑥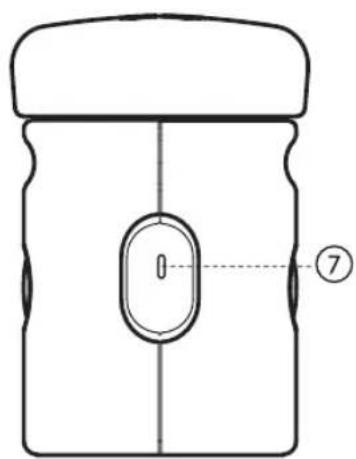
text_image
0 ⑦Front view Rear view
Specifications
| Weight 370 g / 13.05 oz | |
| Dimensions | 180 x 180 x 180 mm/ 7 x 7 x 7 in |
| Built-in Automute technology | Yes |
| Microphone element | Electret condenser, omni-directional |
| Audio frequency response 30 to 20000 Hz | |
| Gain offset range(Volume control) | 12 dB in steps of 3 dB |
| Battery type Li-ion, rechargeable | |
| Battery life 12h | |
| Battery charge time | Wireless: 4hUSB: 2h |
| Wireless charger compatible | Yes (Catchbox proprietary protocol) |
Audio frequency response
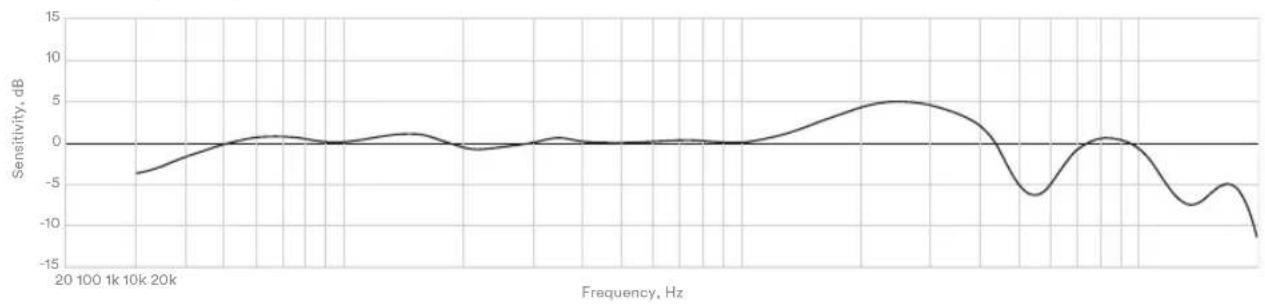
line
| Frequency, Hz | Sensitivity, dB | | ------------- | --------------- | | 20 | -4 | | 100 | -2 | | 1k | 0 | | 10k | 1 | | 20k | 0 | | 30k | -1 | | 40k | 0 | | 50k | 1 | | 60k | 3 | | 70k | 4 | | 80k | 2 | | 90k | -6 | | 100k | -8 | | 110k | -5 | | 120k | -12 |Note: Frequency response is measured with attached foam cap
Catchbox Lite Receiver
Parts
- Power Switch
- Status LED
- Volume knob
- Antenna 1 & 2
- Antenna port 1 & 2
- Pairing button
- Audio output
- Power jack (USB-C)
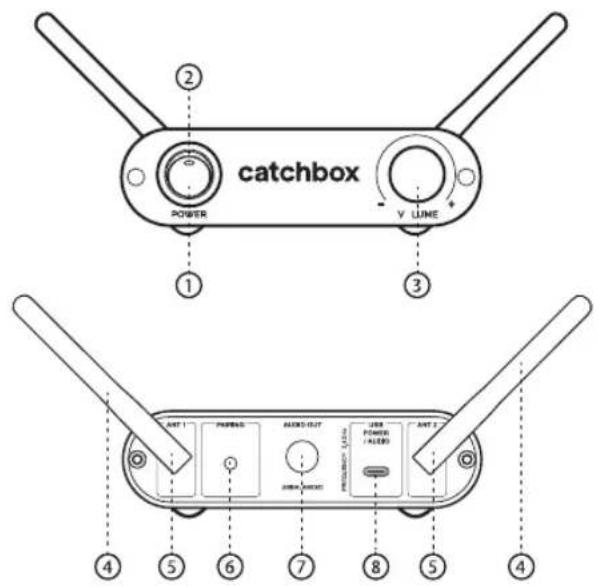
text_image
catchbox POWER V LIME ① ③ ④ ⑤ ⑥ ⑦ ⑧ ⑤ ④Specifications
| Weight | 270 g / 9.5 oz |
| Dimensions (without antennas) | 13 x 12.5 x 3.5 mm / 5.1 x 5 x 1.4 in |
| Power supply 5V 1A USB-C | |
Audio out 6.3 mm / 1/4 in jack
socket - unbalanced, Line level USB-C - digital output
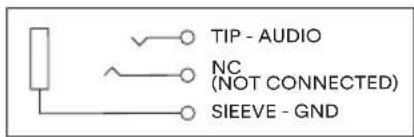
text_image
TIP - AUDIO NC (NOT CONNECTED) SIEEVE - GNDStatus LED Meaning
| Off The receiver is not powered | |
| Blinking (----|----|----|----) | The receiver is |
Blinking rapidly (-|-|-|-|-|-|-|-) The receiver is attempting to pair to a transmitter
Audio out The receiver is on and is paired to a transmitter
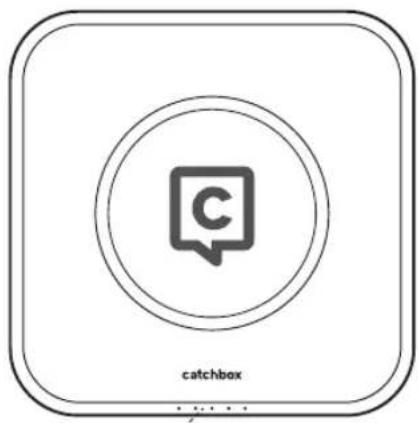
Wireless Charger Specifications
Parts
- Indication LEDs
- Power jack (USB-C)
text_image
catchbox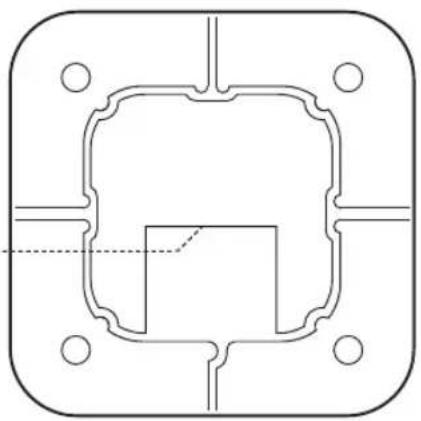
natural_image
Pure technical diagram of a mechanical component with no text, numbers, or symbols①
②
Specifications
Weight
385 g / 13.58 oz
Dimensions 190 x 190 x 28 mm / 7.4 x 7.4 x 1.1 in
Wireless charging protocol Proprietary

The Wireless Charger is optimized for charging only Catchbox products and will not charge other electronic devices such as mobile phones. Do not place electronic devices with the Wireless Charger as doing so may damage the Wireless Charger and/or the device placed on it.
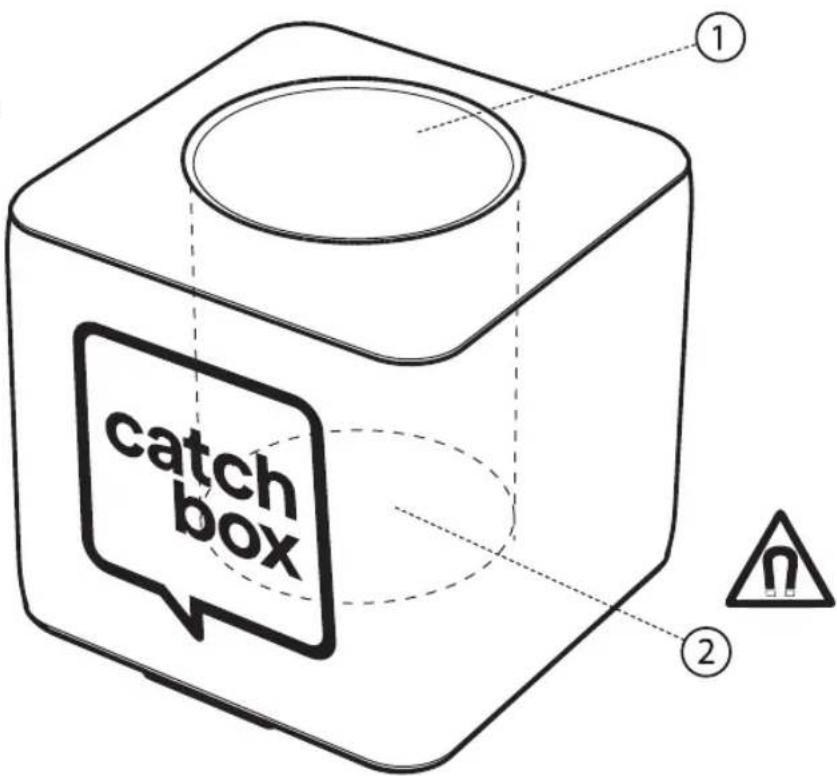
Catchbox Cover Specifications
Parts
1) Opening for transmitter unit
2) Magnetic lock
text_image
catch box ① ②Specifications
Weight 200 g / 7 oz
Dimensions 18 x 18 x 18 cm / 7 x 7 x 7 in
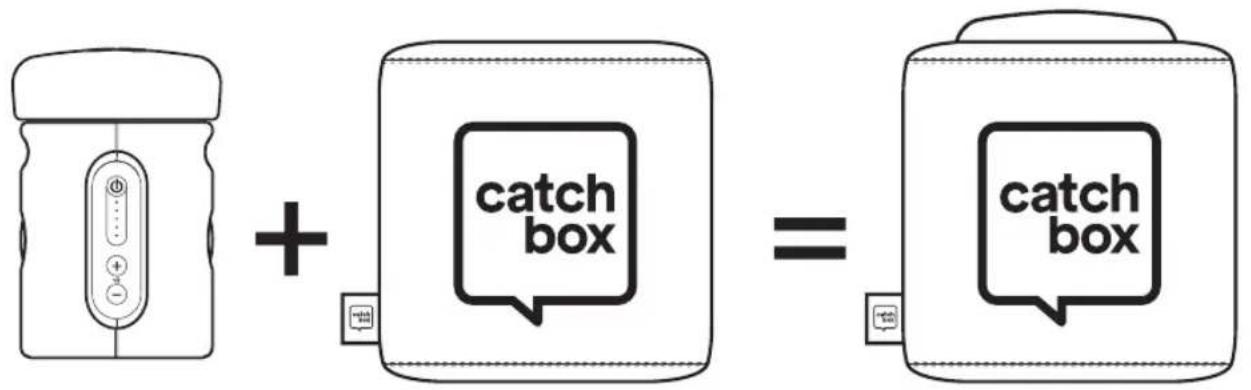
Catchbox Microphone Unit
text_image
Diagram illustrating the addition of a device to a box, showing the resulting product.Specifications
Weight 365 g / 12.8 oz
Dimensions 18 x 18 x 18 cm / 7 x 7 x 7 in
5 Operations
Opening the Catchbox Microphone
The locking mechanism is composed of two magnets that attract each other when correctly aligned. Remove the Transmitter from the outer Cover by twisting it 90 degrees and pulling upwards. This motion will misalign the internal magnets and allow for easy removal of the Transmitter unit.
Locking the Transmitter to the Cover
The locking mechanism is composed of two magnets that attract each other when correctly aligned. To lock the Transmitter unit into the Cover, align the marks located at the bottom of the Transmitter and bottom of the Cover with each other. Slide the Transmitter gently inside the opening of the Cover until you hear a click. Test whether the locking has been successful by pulling on the Transmitter and trying to remove it with a vertical force. If it does not come out with significant force, the magnets are correctly aligned.
text_image
Illustration showing a person using a can to detect heat, with warning symbols and process steps including detection, confirmation, and ear disturbance.Step 1 Step 2 Step 3

Always properly lock the Transmitter unit and attached foam cap into the Cover before use. Improperly locking the Transmitter may result in the Transmitter unit coming free during use, which could potentially result in serious injury and/or property damage.
Setting up the Receiver
Turning on the Receiver
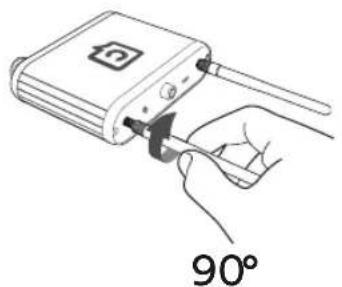
Connect the two antennas to the receiver unit by screwing them clockwise into the antenna ports located at the back. After the antennas have been connected, position them in a V shape to maximise their effectiveness.
- Make sure that Receiver is properly powered.
- Turn on the Receiver by slipping the switch on the front panel of the device.
- LED on the front panel will light up indicating the device is on.
natural_image
Illustration of a hand inserting a plug into a device labeled '90°' (no text or symbols on the diagram itself)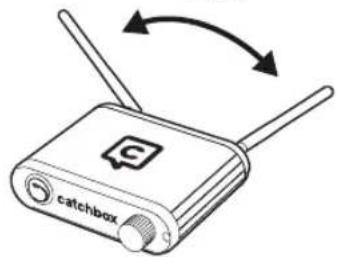
natural_image
Illustration of a two-wire device labeled 'catchbox' with bidirectional arrow indicating rotation (no text beyond label)Adjusting the volume
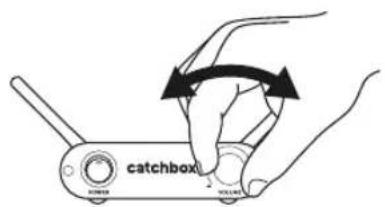
To adjust the volume, simply turn the volume knob located on the front of the receiver unit.
Clockwise rotation increases volume while anti-clockwisereduces it.
text_image
catchbox
The use of other antennas than those provided by the manufacturer is strictly prohibited.

Avoid excessive volume. Do not exceed 70dBa for airborne noise. Before turning on the device make sure the volume knob is turned to zero (fully counterclockwise), to ensure that no unexpected loud noises appear when the device is turned on.
Setting up the Transmitter
Turning on the Transmitter
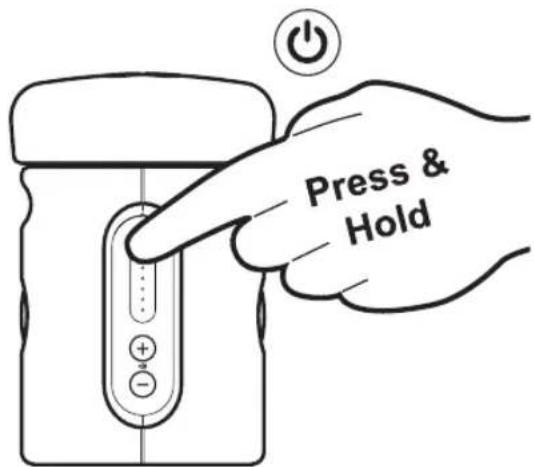
- Press and hold the power button on the front panel of the device.
- Green LED will light up indicating that device is powered. If LED is slowly blinking, it indicates that the Receiver is turned off.
Adjusting the volume
- Press the «+» or «-» buttons located on the front panel of the device.
- LEDs will briefly light up indicating the volume level.
text_image
Press & Hold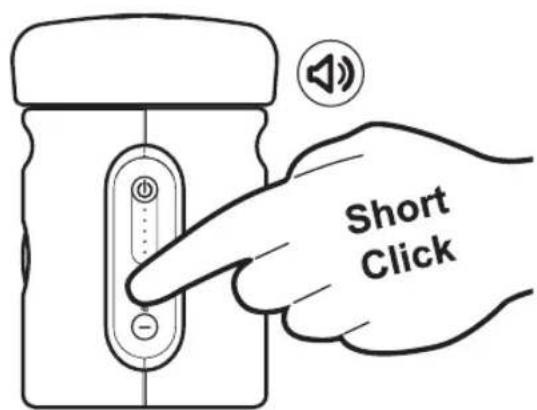
text_image
Short Click
If the battery is critically low the Transmitter will not turn on and an LED will blink rapidly. In this case the battery can only be charged with the AC Power adapter
Checking the battery level
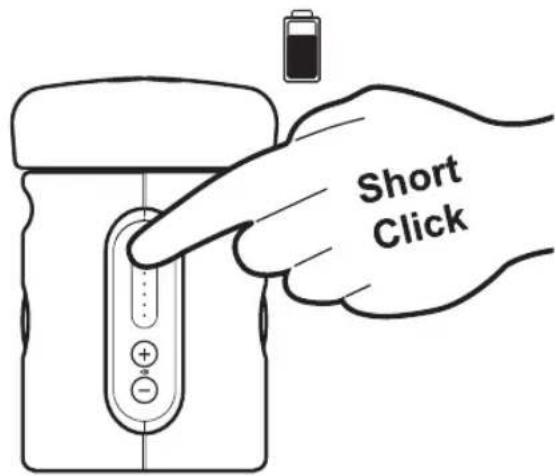
- When the Transmitter is turned on press the power button on the front panel of the device.
- LEDs will briefly light up indicating the battery charge level.
Hardware reset
- Press and hold the power button for approx. 10s.
- Green LED will light up indicating that device is powered.
text_image
Short Click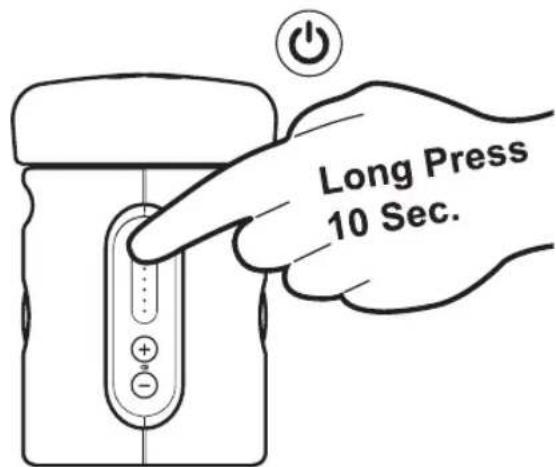
text_image
Long Press 10 Sec.Pairing the Transmitter and the Receiver
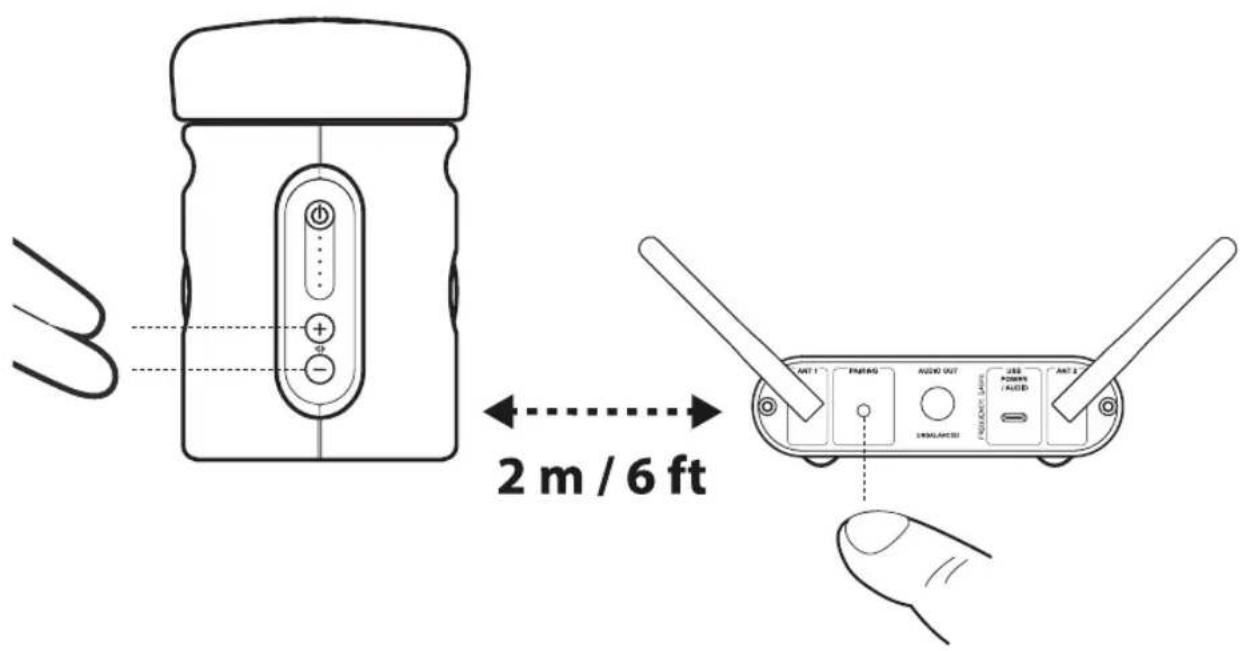
In order to function properly, the Catchbox Lite Transmitter unit needs to be paired with a Catchbox Lite Receiver unit. To pair the two units, follow these steps:
- Turn on both devices and place them within 2 m / 6 ft of each other.
- On the Transmitter simultaneously press and hold both volume <<+>> and <<->> buttons.
- LEDs on the Transmitter will display a sequence indicating that it is in Pairing mode and looking for a Receiver.
- While Transmitter is in the Pairing mode press Pairing button on the Receiver.
- Wait until connection is established.
- Once devices are paired the LEDs on both devices will light up steadily and the audio signal will be passed from the Transmitter to the Receiver.
text_image
2 m / 6 ft ANT 1 FABRIC AUDIO OUT LED POWER /AUD INT 1 EIMBALANCED FABRIC AUDIO OUT LED POWER /AUD INT 1 EIMBALANCEDCharging the Transmitter with USB cable
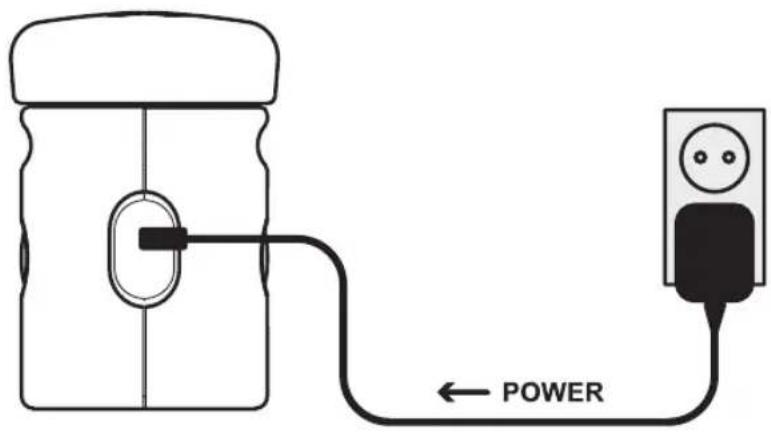
- Plug the included Power supply to AC mains outlet and connect it to the USB-C socket located on the rear of the Transmitter.
- LEDs on the front of the Transmitter will light up indicating the state of charge of the battery. Blinking will indicate the charging process is ongoing.
- When all LEDs are lit the battery is fully charged.
text_image
POWER
Note: Do not use for charging the included USB data cable with a computer as it may provide insufficient amount of power and will result in a long charging time.

Always use the included Power supply to charge the Transmitter. Other devices may provide insufficient amount of power which will result in long charging time.
Charging the Transmitter with the Wireless Charger
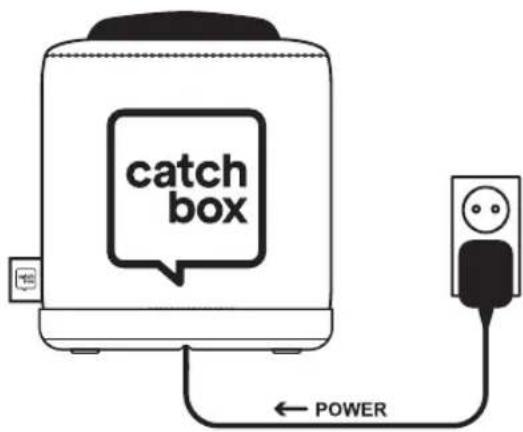
- Plug the included Power supply to AC mains outlet and connect it to the USB-C socket on the Wireless Charger. The Green LED on the Wireless Charger will turn on indicating that device is powered.
- Place the Transmitter (securely attached inside the Cover) in its natural position to start the charging. Always ensure there are no foreign objects located between the Catchbox and the surface of the Wireless Charger.
text_image
catch box ← POWER
If all LEDs are blinking it indicates an error. Please see section Troubleshooting (page 29)

Always use the included Power supply to power the Wireless Charger. Other devices may provide insufficient amount of power which will result in long charging time.

The Wireless Charger emits strong electromagnetic field which could affect the functioning of pacemakers and other electronic implants. These could stop working or switch into test mode, causing illness. If you wear these devices, keep sufficient distance to device and warn others who wear these devices from getting too close to the device.
6 Troubleshooting
| Problem Possible Cause Solution | ||
| No sound 1. The Transmitter and the Receiver are not paired.2. The Transmitter or the Receiver is not powered.3. Volume on the Receiver is on mute indicated by red light on the volume LEDs. | 1. Pair the Transmitter and the Receiver units. See how to pair devices in Operations section.2. Turn on the Transmitter. Plug the Receiver into a wall socket and turn on.3. Increase the volume level on the Receiver. | |
| Audio signal dropouts or breaks | 1. The Transmitter and the Receiver are located too far from each other.2. There are obstacles in between the Transmitter and the Receiver | 1. Place the Transmitter and the Receiver closer to increase signal strength.2. Place the Receiver unit in clear view of the Transmitter. |
| Distorted sound 1. Audio cable or adapter piece is broken or not properly attached.2. Volume level is too high. | 1. Check the audio cable connection and adapter piece. If problem persists, replace the cable and/or adapter.2. Decrease the volume on the Transmitter or the Receiver. | |
| Audio feedback 1. Catchbox is situated too close to the loudspeakers.2. Volume level is too high. | 1. Move Catchbox away from the loudspeakers.2. Decrease the volume on the Transmitter or the Receiver. | |
| Transmitter does not turn on | 1. Battery level is critically low indicated by rapidly blinking LED | 1. Charge the Transmitter using the AC Power adapter. |
| Transmitter is not charging with the AC power adapter | 1. AC Power adapter does not provide enough power.2. Power cable is broken or not properly attached. | 1. Use the included AC Power adapter.2. Check the cable connection. If the problem persists replace the AC Power adapter. |
| Wireless Charger is not working | 1. Wireless Charger is not powered.2. Battery level of the Transmitter's battery is critically low. | 1. Attach the power cable to the Wireless Charger.2. Charge the Transmitter with the AC Power adapter. |
| Wireless Charger all LEDs are blinking | 1. There is a foreign object between the Transmitter and the Wireless Charger2. Catchbox is not properly placed on the Wireless Charger.3. The Transmitter is placed on the Wireless Charger without a Cover.4. Transmitter has been heating up.5. AC Power adapter does not provide enough power. | 1. Remove the foreign object and place Catchbox on the Wireless Charger.2. Place Catchbox at the center of the Wireless Charger.3. Place the Transmi tter in Cover and place Catchbox on the Wireless Charger.4. Remove the Transmitter from the Cover and let it cool down. Check the ambient temperature in the room not to be above 30 degrees Celsius5. Use the included AC Power adapter |

For more technical assistance
- contact us by email info@catchbox.com
- chat on our website www.catchbox.com
- visit our Youtube channel
7 Maintenance, Storage, and Disposal
Proper maintenance and storage of the Catchbox Lite wireless system will help ensure the product remains operational and safe to use. Improper maintenance or storage, in turn, can lead to equipment failure which can cause serious injury during use. Always refer to this user manual for proper maintenance, storage, and disposal instructions and do not throw away this user manual. Always keep it near the product for reference by other users.
Cleaning
- Clean the equipment with a moistened (not wet) cloth only. Be sure to disconnect the equipment from the power outlet before cleaning.
- To clean the outer Cover, first remove the Transmitter unit from the inside. Only use dry cleaners and do not place the outer Cover in a washing machine. Always remember to inform cleaners that the device contains a magnet and should not be treated in temperatures in excess of 50 degrees Celsius or 122 degrees Fahrenheit or near equipment sensitive to strong magnetic fields
Storage
- Magnets produce a far-reaching, strong magnetic field. Keep magnets away from devices and objects that could be damaged by strong magnetic fields, like laptops and other electrical equipment.
- Always store the product in temperatures between 0 to 50 degrees Celsius (32 to 122 degrees Fahrenheit)
- Exposing this product to temperatures above 50 degrees Celsius or 122 degrees Fahrenheit will cause the locking mechanism to fail permanently. This, in turn, will cause the Transmitter capsule to fall out of the Cover during use, potentially leading to personal injury or property damage.
- Do not place the equipment near heat sources such as heating ducts or radiators and do not expose it to direct sunlight, excessive dust, moisture, rain, mechanical vibrations, or shock.
- Do not use or store near water. If the equipment comes into contact with a liquid, disconnect the power cable from the power outlet immediately.
Disposal
- To dispose of a broken or defective unit, send the unit back to the manufacturer or consult your local waste management professional.
Maintenance of the lithium-ion battery
This product contains rechargeable lithium-ion battery. Please follow these guidelines:
- Do not open or modify the product to access or replace the battery.
- Do not damage or pierce the battery. It may lead to accumulation of hazardous gases and cause explosion or fire leading to injury and property damage.
- Always carefully follow the instructions for charging the battery.
- Do not expose the product to water or fire.
- Always use the product in temperatures between 0 to 30 degrees Celsius (32 to 86 degrees Fahrenheit).
- Rechargeable lithium-ion battery will gradually lose its capacity over time resulting in decreased operation time for the product.
- Typical estimated life time of a lithium-ion battery is about three years or 500 cycles of full discharge whichever happens first.
- Do not leave the battery unused for extended periods of time. Charge the battery every 6 months. It is advisable to charge the battery to approximately 50% prior storage.
- To dispose of an old battery send the product back to the manufacturer or consult your local waste management professional.
- Never throw away the battery or the product to a regular garbage container. Always use the specialized waste containers for electronics or batteries.
8 Certification
The Catchbox Lite wireless system consists of:
- Catchbox Lite Transmitter (Model #: CB24TX002)
- Catchbox Lite Receiver (Model #: CB24RX001)
- Catchbox Wireless Charger (Model #: CBWCH0002)

text_image
CE FCCatchbox Lite Transmitter
(Model #: CB24TX002)
Product meets the essential requirements of the European RED directive 2014/53/EU and is found to comply with the following standards:
EN 300328 v1.8.1
EN 301 489-1 V2.1.1 (2017-02)
EN 301 489-17 V3.1.1 (2017-02)
Certifien under FCC part 15.
FCC ID: 2AP8UCB24TX002
Certified under IC in Canada under RSS-247 and RSS-GEN.
IC: 11942A-CB24TX002
Compliant with Australian /
New Zealand
AS/NZS 4268:2012
Complies with IMDA Standarts DA105282
Catchbox Lite Receiver
(Model #: CB24RX001)
Product meets the essential requirements of the European RED directive 2014/53/EU and is found to comply with the following standards:
EN 300328 v1.8.1
EN 301489-1 v1.9.2
EN 301489-17 v2.2.1
EN 60950-1
EN 55022
Certified under FCC Part 15.
FCC ID: 2AB78CB24RX001
Certified under IC in canada under RSS-210 and
RSS-GEN.
IC: 11942A-CB24RX001
Compliant with Australian /
New Zealand regulations
AS/NZS 4268:2012
Complies with IMDA Standarts DA105282
Catchbox Wireless Charger
(Model #: CBWCH0002)
Product meets the essential requirements of the European RED directive 2014/53/EU and is found to comply with the
following standards:
EN 301 406 V2.2.2
EN 303 417 V1.1.1
EN 55032:2015 & EN 55035:2017
EN 301 489-3 V2.1.1 & ETSI EN 301 489-1 V2.1.1
Certified under FCC CFR 47 Part 15 Subpart D.
FCC ID: 2AP8UCBWCH0001
Certified under IC in Canada under ISED RSS-213 Issue 3, ISED RSS-GEN Issue 4..
IC: 11942A-CBWCH0001
Complies with IMDA Standarts DA105282
Information to the user
This device contains licence-exempt transmitter(s)/receiver(s) that comply with part 15 of the FCC Rules and with Innovation, Science and Economic Development Canada's licence-exempt RSS(s). Operation is subject to the following two conditions:
(1) This device may not cause interference.
(2) This device must accept any interference, including interference that may cause undesired operation of the device.
The installer of this radio equipment must ensure that the antenna is located or pointed such that it does not emit RF field in excess of Health Canada limits for the general population; consult Safety Code 6, obtainable from Heath Canada's website www.hc-sc.gc.ca/rpb.
catch box
www.catchbox.com