
DC E520 - Camera BENQ - Free user manual and instructions
Find the device manual for free DC E520 BENQ in PDF.


| Product Type | Compact Digital Camera |
| Brand | BenQ |
| Model | DC E520 |
| Megapixels | 5.0 Megapixels |
| Optical Zoom | 3x |
| Digital Zoom | 4x |
| Sensor Type | CCD |
| LCD Screen Size | 2.0 inches |
| Dimensions (W x H x D) | 91 x 61 x 28 mm |
| Weight (without battery) | 130 g |
| Power Source | 2x AA batteries or Rechargeable Li-ion |
| Storage Media | SD/MMC card |
| Internal Memory | 32 MB |
| Image Resolution | Up to 2592 x 1944 pixels |
| Video Resolution | 640 x 480 @ 30fps |
| Shutter Speed | 1/2000 to 8 sec |
| ISO Range | Auto, 64, 100, 200, 400 |
| Focus Range (Normal) | 50 cm to infinity |
| Focus Range (Macro) | 6 cm |
| Battery Life | Approximately 200 shots (alkaline) |
| Cleaning Instructions | Use a soft, dry cloth to clean the exterior. Use a blower to remove dust from lens. |
| Safety Warning | Avoid exposure to water, extreme heat, and strong magnetic fields. |
| Spare Parts & Repairability | Batteries, chargers, and memory cards are available from third-party sellers. Manufacturer no longer supports repairs. |
| General Information | Compact camera with user-friendly interface, suitable for everyday photography. |
Frequently Asked Questions - DC E520 BENQ
User questions about DC E520 BENQ
0 question about this device. Answer the ones you know or ask your own.
Ask a new question about this device
Download the instructions for your Camera in PDF format for free! Find your manual DC E520 - BENQ and take your electronic device back in hand. On this page are published all the documents necessary for the use of your device. DC E520 by BENQ.
USER MANUAL DC E520 BENQ
DC E520 Digital Camera User's Manual
Welcome

Copyright
Copyright 2005 by BenQ Corporation. All rights reserved. No part of this publication may be reproduced, transmitted, transcribed, stored in a retrieval system or translated into any language or computer language, in any form or by any means, electronic, mechanical, magnetic, optical, chemical, manual or otherwise, without the prior written permission of this company.

Disclaimer
BenQ Corporation makes no representations or warranties, either expressed or implied, with respect to the contents hereof and specifically disclaims any warranties, merchantability or fitness for any particular purpose. Further, BenQ Corporation reserves the right to revise this publication and to make changes from time to time in the contents hereof without obligation of this company to notify any person of such revision or changes.

Taking care of your camera
- Do not use your camera in the following environmental range: temperature below 0^ or above 40^ .
-
Do not use or store your camera in the environments listed below:
-
Direct sunlight
– High and dusty places - Next to an air conditioner, electric heater or other heat sources
– In a closed car that is in direct sunlight -
Unstable locations
-
If your camera becomes wet, wipe it with a dry cloth as soon as possible.
- Salt or seawater may cause severe camera damage.
- Do not use solvents, such as alcohol, to clean your camera.
- If the lens is dirty, use a lens brush or soft cloth to clean the lens. Do not touch the lens with your fingers.
- To prevent electric shock, do not attempt to disassemble or repair your camera by yourself.
- Water may cause a fire or electric shock. Therefore, store your camera in a dry place.
- Do not use your camera outdoors when it is raining or snowing.
- Do not use your camera in or near water.
- If a foreign substance or water gets in your camera, please turn the power off immediately and disconnect the batteries and the power adapter. Remove the foreign substance or water, and send it to the maintenance center.
- Transfer the data to the computer as soon as possible to avoid losing your images and/or video clips.
Table of Contents
1. Touring your DC E520.... 1
1.1 Checking the Package Contents .... 1
1.2 DC E520 Components.... 1
1.2.1 Front View.... 1
1.2.2 Rear View.... 2
1.2.3 Status LED Indicator 2
2. Preparing Your DC E520 for Use .... 3
2.1 Installing the Battery 3
2.2 Charging the Battery.... 3
2.3 Inserting and Removing an SD Memory Card 4
2.4 Setting the Date and Time 4
3. Using the DC E520 5
3.1 Snapshot Mode 5
3.1.1 Getting started with capturing images.... 5
3.1.2 Snapshot Mode LCD Monitor Information ...... 6
3.1.3 Changing Camera Settings....7
3.1.4 Setting Shooting Mode 7
3.1.5 Using the Flash.... 8
3.1.6 Using the Self-timer 9
3.1.7 Using the Optical Zoom....9
3.1.8 Using the Digital Zoom.... 10
3.1.9 Changing the Focus.... 10
3.1.10 Adjusting the EV.... 10
3.1.11 Snapshot Mode Menu Settings 10
3.1.11.1 Snapshot Mode Menu.... 10
3.1.11.2 Using the Interval Shoot 12
3.2 Movie Mode.... 13
3.2.1 Movie Mode LCD Monitor Information...... 13
3.2.2 Movie Mode Menu Settings 13
3.2.2.1 Movie Mode Menu.... 13
3.2.3 Timer Recording.... 15
3.3 Playback Mode.... 15
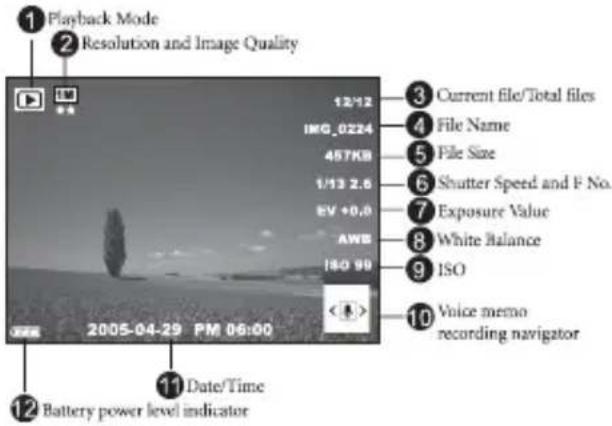
3.3.1 Playback Mode LCD Monitor Information (Image).. 15
3.3.2 Viewing Images 16
3.3.2.1 Magnifying Images 16
3.3.2.2 Thumbnail Display (Index Playback)...... 16
3.3.2.3 Voice Memo.... 16
3.3.3 Deleting Files 17
3.3.4 Playback Mode Menu Settings.... 17
3.3.4.1 Playback Mode Menu 17
3.3.5 Playback Mode LCD Monitor Information (Video) .. 19
3.3.6 Playing Back Video Clips.... 19
3.4 Setup Mode.... 19
- PC DEPENDENT FEATURES.... 23
4.1 Bundled Software 23
4.2 USB Mode.... 24
4.3 PictBridge Mode 24
-
Troubleshooting 25
-
Specifications 27
-
Service Information.... 28

TOURING YOUR DC E520
1.1 Checking the Package Contents
Carefully unpack your kit box and ensure that you have the following items.
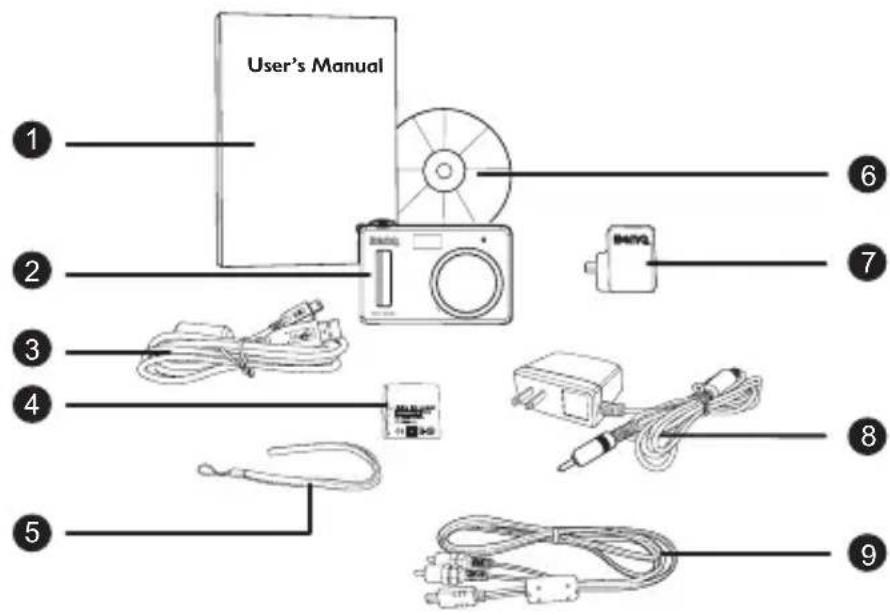
- User's Manual
- DC E520 digital camera
- USB cable
- Lithium-ion battery
- Hand strap
- DC E520 software CD-ROM
- Conversion adapter
- AC power adapter
- AV cable
If any of the items are missing or appear to be damaged, contact your dealer. Save the packaging in case you need to ship your camera for service.
1.2 DC E520 Components
1.2.1 Front View
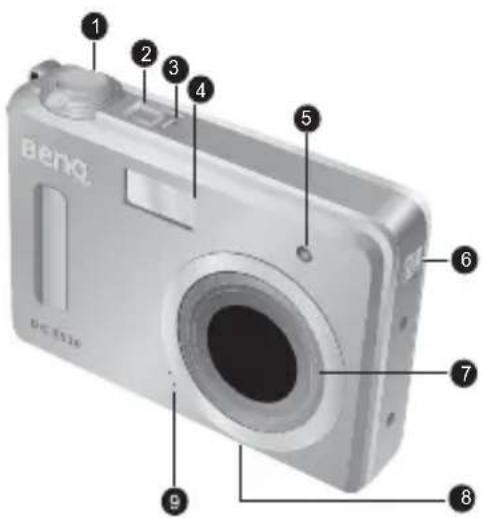
- Shutter button
- Power button
- Status LED
- Built-in flash
- Self-timer LED
- Speaker
- Lens/Lens cover
- Tripod mount
- Microphone
1.2.2 Rear View
- LCD monitor
- Strap eyelet
- Conversion adapter terminal
- Inst. Play button
- Inst. REC button
- Navigator -- four-way and OK buttons
- DISP button
- Menu button
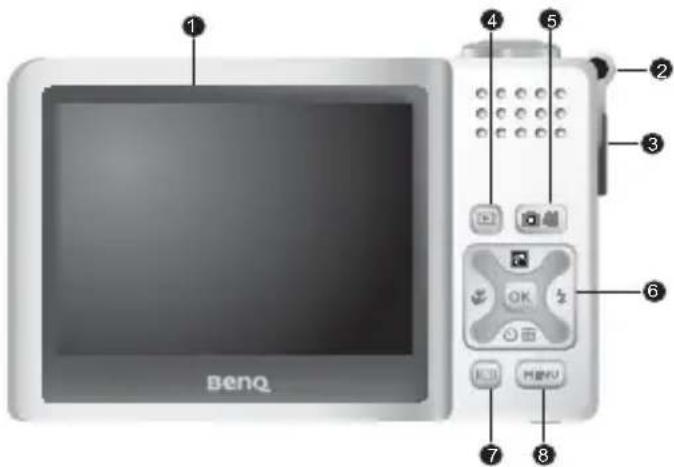

- The Inst. REC button, i.e. Instant Record button, allows you to power up the camera and quickly access Snapshot Mode/Movie Mode in sequence, without pressing the [] button. To activate this special feature, refer to the table in "Setup Mode Menu" on page 20.
- The Inst. Play button, i.e. Instant Play button, allows you to power up the camera and quickly access Playback Mode, without pressing the [] button. To activate this special feature, refer to the table in “Setup Mode Menu” on page 20.
1.2.3 LED Indicators
| Indicators State Description | ||
| Status LED | Solid green • The | DC E520 is powered up and ready to be used.• The USB connection is in progress.• The DC E520 is in the power saving mode. |
| Blinking green • | The DC E520 is processing or accessing data. | |
| Blinking orange • | There are error or warning messages. | |
| Self-timer LED | Solid red • The sound recording or movie recording functions are activated. | |
| Blinking red • The self-timer function is activated. | ||
| Conversion adapter LED | Solid Red • The DC E520 is charging. | |
| Solid green • The charging process is complete. | ||

- The LCD on the digital camera is manufactured with sophisticated technology; however, the display may have some light spots or show unusual colors. This is normal and does not indicate display malfunction, nor will this affect the pictures you take with the camera.
2.1 Installing the Battery
We highly recommend that you use only the specified rechargeable lithium-ion battery for your camera. Make sure that the power of the camera is off before inserting or removing the battery.
To insert the battery:
- Open the battery/SD memory card cover (A).
- Insert the battery in the correct direction shown (B).
- Move the battery lock lever in the direction of the arrow (C) to secure the battery.
- Close the battery/SD memory card cover (D).
To remove the battery:
- Open the battery/SD memory card cover.
- Release the battery lock lever.
- When the battery has come out a little, gently pull it out the rest of the way.
2.2 Charging the Battery
The battery charge status affects the performance of the DC E520. To maximize the performance and life of the battery, it is recommended that you fully charge the battery using the AC power adapter, and then fully discharge it through the normal use at least one time. Make sure that the power of the camera is off before inserting the battery.
- Insert the conversion adapter into the conversion adapter terminal of the camera as shown in the illustration.
- Connect one end of the AC power adapter to the DC IN terminal of the conversion adapter.
- Connect the other end of the AC power adapter to a wall outlet.
The length of the charging time depends on the ambient temperature and the status of the battery.

- The DC E520 must be used with the specified AC power adapter. Damage caused by the use of an incorrect adapter is not covered under the warranty. Always make sure that the camera is off before removing the battery.
- The battery may be warm after being charged or used. This is normal and not a malfunction.

- When using the camera in cold environments, keep the camera and its battery warm by holding it inside your jacket or other warm protective environment.
- You can also charge the battery through a USB port, which is especially convenient in your business travel.
2.3 Inserting and Removing an SD Memory Card
The DC E520 is equipped with 32 MB internal memory, allowing you to record video clips, capture images, or make voice files in the camera. You can also expand the memory capacity by using an optional SD (Secure Digital) memory card to store more files.
- Always make sure the camera is turned off before inserting or removing a memory card.
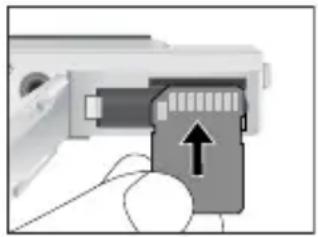
- Insert an SD memory card in the correct direction, as shown in the illustration.
- Close the battery/SD memory card cover. To remove the SD memory card, make sure the camera is turned off. Press lightly on the edge of the memory card and it will eject.

- Be sure to format the SD memory card with this camera before the initial use.
- To prevent valuable data from being accidentally erased from an SD memory card, you can slide the write-protect tab (on the side of the SD memory card) to "LOCK".
• To save, edit, or erase data on an SD memory card, you must unlock the card. - While formatting the internal memory, do not insert a memory card into the camera. Otherwise, the memory card is formatted instead of the camera's internal memory.
- Formatting is an irreversible action and data cannot be recovered at a later time. Back up your data before formatting.
- An SD memory card having read or write problems may not be properly formatted.
2.4 Setting the Date and Time
Before using your camera for the first time, please set the date and time. For more information, refer to the table in 3.4.1 “Setup Mode Menu” on page 20.
natural_image
Close-up of a hand inserting a card into a device, showing the card being inserted with an arrow indicating the direction (no text or symbols present)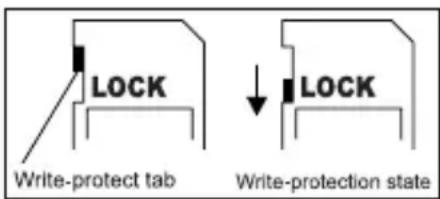
3.1 Snapshot Mode
3.1.1 Getting started with capturing images
- Press the [💡] button for more than one second to turn on the camera.
- Compose your image in the LCD monitor under Snapshot Mode.
-
Press the shutter button down halfway (1), and then press it down fully (2).
-
Pressing the shutter button down halfway automatically focuses and adjusts the exposure.
- The focus area frame turns green when the camera is focused and the exposure is determined.
- When the focus or exposure is not suitable, the frame of the focus area turns red.

• To review the last captured image, press the [T button.
Press the [button to return to Snapshot Mode.
• The LCD monitor darkens in strong sunlight or bright light. This is not a malfunction.
• To prevent your images from being blurred while pressing the shutter button, always hold the camera steady. This is especially important when you are shooting under low lighting conditions, under which your camera may reduce the shutter speed to ensure your images are properly exposed.
- Pressing the [☐] button changes the LCD display in the sequence of: OSD Normal → Detailed Info. → Info. Off.
- If QuickView is set to "On", the captured image will be displayed while the image is being written onto the memory.
3.1.2 Snapshot Mode LCD Monitor Information
1. Shooting Mode
| [ ] | A | u | t | o | |
| [ ] | M | a | n | u | a |
| [ ] | P | o | r | t | r |
| [ ] | L | a | n | d | s |
| [ ] | N | i | g | h | t |
| [ ] | S | p | o | r | t |
| [ ] | B | a | c | k | L |
![1 2 3 4 5 6 7 8 9 10 a i t c a p e S c e [n e] i g h t A u t o ③ n ⑫ T W ⑪](/content/2026/05/815399/images/faae13ea672f2361e29b74fd0b0202e7a9f53adc2821f0fa1862f24a5d50053d.jpg)
2. Flash mode
| [ ] | F | l | a | s | h |
| [ ] | F | l | a | s | h |
7_f Metering
| [∅] | F | l | a | s | h | O |
| [∅] | R | e | d | E | y | e |
| [∅S] | S | l | o | w | S | y |
| [ ] | C | e | n | t | e | r | A | v |
| [ ] | S | p | o | t |
3. Self-timer icon (if used)
| [ ] | S | e |
| [ ] | self-timer (10s) | |
[ ] A v e r a g e
[ ] I n t e r v
[ ★★] F i n e
[ ★ ] Normal o o t
4. White Balance (if chosen [Detailed Info] display)
| [ ] | A | u | t | o | W | B |
| [ ] | S | u | n | n | y | |
| [ ] | C | l | o | u | d | y |
| [ ] | T | u | n | g | s | t |
| [ ] | F | l | u | o | r | e |
| [5m60 x 1920 |
| [3m48 x 1536 |
| [2m00 x 1200 |
| [1m80 x 960 |
| [nVGA0 x 480 |
5. EV (Exposure Value)
-0.3, -0.6, -1.0, -1.3, -1.6, -2.0, +0.3, +0.6, +1.0, +1.3, +1.6, +2.0
s10. cAvailable number of shots
-
zoom status
-
AF Area
-
Battery power level indicator
[ ]Full battery power
| [ IED A] | I | S | O | A | u | t | o |
| [ IFO 100 | |||||||
| [ IFO 200 | |||||||
| [ IFO 400 |
[ ]Medium battery power
[ ] Low battery power
[Virtually no battery power]
[ ] C h a r g i n g
3.1.3 Changing Camera Settings
Camera settings can be changed with the following four-way and OK buttons.
-
Up/EV:
-
Scrolls upwards in menus.
-
Enables you to adjust the EV settings.
-
Left/Focus:
-
Scrolls left in menus.
-
Enables you to choose the appropriate focus settings.
-
Down/Self-Timer/Delete
-
Scrolls downwards in menus.
- Toggles the self-timer settings.
-
Delete images, video clips or voice memos.
-
Right/Flash:
-
Scrolls right in menus.
-
Enables you to choose the appropriate flash settings.
-
OK: Confirms the chosen setting.
3.1.4 Setting Shooting Mode
You can set Shooting Mode for capturing images according to the following steps.
-
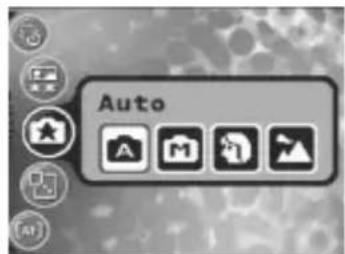
In Snapshot Mode, press the [MENU] button. Shooting Mode menu is displayed.
-
Use the [ ] [ ] buttons to select the desired mode, and then press the OK button to confirm.
The table below will help you choose appropriate Shooting Mode:
| Icon Shooting Mode Description | ||
| [ ] | Auto Select this mode when you want to leave the settings up to the camera to capture images with ease. | |
| [ ] | Manual Select this mode when you want to adjust the settings of White Balance, Metering, and ISO. These menus are only available in Manual mode. | |
| [ ] | Portrait Select this mode when you want to capture an image that makes the person stand out against a defocused (blurred) background. The flash is fixed at [ which is effective in reducing the red-eye phenomenon. | |
| [ ] | Landscape | Select this mode to enhance the color saturation in mountains, forests and other landscape scenery or to take portraits that feature a landmark in the background. The flash is fixed at [ |
| [ ] | Night Scene | Select this mode when you want to take a photograph with an evening or night scene background. The flash is fixed at [ |
| Icon | Shooting Mode | Description |
 | Sport Select this mode when you want to capture fast-moving subjects. The flash is fixed at  | |
 | Back Light Select this mode while capturing images with the light coming from behind the subject. The flash is fixed at [ [IMAGE] | |
- The description of each Shooting Mode serves as a general guide for your convenience. Set the digital still camera to suit your preferences.
- Shooting Mode can be set only in Snapshot Mode.
3.1.5 Using the Flash
The flash is designed to function automatically when lighting conditions warrant the use of flash. You can capture an image using a flash mode suitable to your circumstances. If you change the flash mode, the camera will retain that setting even if the camera is turned off.
- In Snapshot Mode, Flash Auto

is activated by default.
- Toggle the [ʒ] button to select other flash modes, if desired. When you are satisfied with a specific mode, press the OK button.
- Compose your image and press the shutter button.
The table below will help you choose the appropriate flash mode.
| Icon Flash Description | ||
 | Flash Auto The flash fires automatically according to the photographic conditions. | |
 | Flash On The flash will always fire regardless of the surrounding brightness. Select this mode for capturing images with high contrast (backlighting) and deep shadows. | |
 | Flash Off | The flash will not fire. Select this mode in a place where flash photography is prohibited, or when the distance to the subject is beyond the effective range of the flash. |
 | Red Eye | This mode can reduce the red-eye phenomenon when you want to capture natural-looking images of people and animals in low-light conditions.When capturing images, the red-eye phenomenon can be reduced by asking the subject (person) to look at the camera lens or get as close to the camera as possible. |
 | Slow Sync | This mode opens the shutter for a longer than normal period and fires the flash just before it closes. Select this mode for illuminating a foreground subject yet allowing a darker background to be rendered as well. It is appropriate for capturing the night scene with people in the foreground. |

• The flash cannot be used in Movie Mode.
- If you select Slow Sync, to avoid blur, using a tripod and photographing static subjects are recommended.
3.1.6 Using the Self-timer
The self-timer can be set in Snapshot Mode. This feature is useful for situations when you may wish to be part of the picture.
- Secure the camera to a tripod or place it on a stable surface.
- In Snapshot Mode, toggle the [心血] button to select the desired self-timer mode.
| Icon Self-timer Description | |
 | | | Self-timer (2s) The camera automatically takes a picture after two seconds delay. |
 | | | Self-timer (10s) The camera automatically takes a picture after ten seconds delay. |
 | | | Interval Shoot The camera automatically takes a picture every preset time till media full or battery empty. |
-
Compose your image and press the shutter button.
-
The self-timer function is activated and the countdown status is displayed on the LCD monitor.
- The self-timer LED flashes and the image will be captured after the preset time has elapsed.
- To cancel the self-timer at any time, press the [MENU] button.
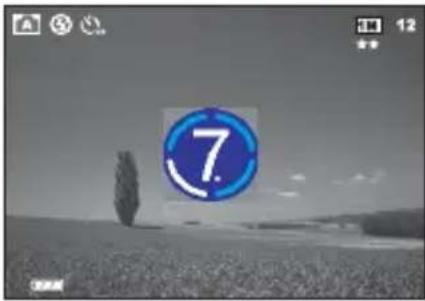

- The self-timer setting is automatically turned off after an image is captured.
3.1.7 Using the Optical Zoom
Zoom photography allows you to capture images magnified up to 3 times or wide-angle photography depending on the distance up to the subject. You can further enlarge the center of the screen and capture images using the digital zoom.
- Press the [] button to enter Snapshot Mode or Movie Mode.
-
Compose the image with the zoom key.
-
Adjusting the key to the right zooms in on the subject, and enlarges the subject on the LCD monitor.
- Adjusting the key to the left provides a wide angle image.
-
The lens position moves according to the zoom setting only in optical zoom period.
-
Press the shutter button down halfway to set the focus and exposure, and then press it down fully to capture the image.

- Zoom function cannot be used while a video clip is being recorded. Set the zoom before you start recording.
3.1.8 Using the Digital Zoom
Using a combination of 3X optical zoom and 4X digital zoom permits zoom photography up to 12X to suit the subject and the distance. Digital zoom is a useful feature; however, the more an image is enlarged (zoomed), the more pixelated (grainy) the image will appear.
3.1.9 Changing the Focus
- In Snapshot Mode, toggle the [ ] button to switch between the following modes.
| Icon | Focus | Description |
| Normal (AF) | Normal Auto Focus (50 cm to infinity). | |
 | Macro | Macro Auto Focus (6 cm). The flash is fixed at [ ] . |
 | Pan Focus (PF) This option can decrease the time of focusing and enhance the efficiency of capturing images. It helps you capture fast-moving subjects or subjects in the dark easily. | |
- Compose the image.
- Press the shutter down halfway, and then press it down fully.
3.1.10 Adjusting the EV
The EV (exposure value) enables you to lighten or darken an image. Use this setting when the brightness between the subject and the background is not balanced, or when the subject occupies only a small part of the photograph.
- In Snapshot Mode, make sure Shooting Mode is set to [Auto] or [Manual]. For more information on setting Shooting Mode, refer to 3.1.4 "Setting Shooting Mode" on page 7.
- Press the [ ] button. The EV adjustment bar will be displayed on the bottom of the LCD monitor.
- By default, the EV is 0. It can be adjusted between -2.0 to +2.0.
• To increase the EV bias, press the [⚡] button and then press the OK button.
• To decrease the EV bias, press the [ ] button and then press the OK button.
3.1.11 Snapshot Mode Menu Settings
3.1.11.1 Snapshot Mode Menu
- In Snapshot Mode, press the [MENU] button to access the menu, and then use the [TAG[] buttons to select the menu settings you want to change.
- Use the [ ] [ ] buttons to select the desired item in the menu, and then press the OK button.
- To exit from the menu, press the [MENU] button.
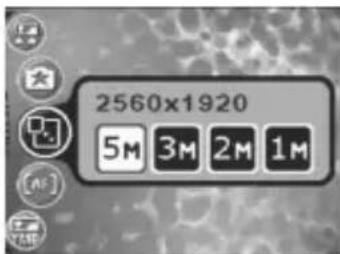
| Icon Item Option Functional Description | |||
| [ ] | Resolution | [5x60 x 1920[3n48 x 1536[2n00 x 1200[1n80 x 960[VG40 x 480 | Sets the size of the image that will be captured. Higher resolution images require more memory. If you wish to store more images in a limited amount of memory, use a lower image size. |
| [ ] | Image Quality | [ ★★] F i[ ★] N o | Sets the quality (compression rate) at which the image is captured. r m a l |
| [ ] | AF Area | [ [ ] S p[ [ ] M u | Determines how the focus area is selected. o t l t i |
| [ ] | Interval Shoot | Captures images according to the settings specified. For details, see 3.1.11.2 “Using the Interval Shoot” on page 12. | |
| [ ] | Date Stamp | [ ON][ OFF] | Prints the current date on the bottom right corner of images captured. This function must be activated before the image is captured. For more information on setting the date and time or the date format, refer to the table of 3.4 “Setup Mode” on page 19. |
| [ ] | White Balance(Only available in Manual mode) | [ [ ] Auto WB[ [ ] S u[ [ ] C l[ [ ] T u[ [ ] fluorescent | Sets the white balance when capturing images under specific lighting conditions. - Auto WB: Automatically adjust the white balance. - Sunny: Suitable for bright daylight conditions. - Cloudy: Suitable for cloudy, twilight, or shady conditions. t e n - Tungsten: Suitable for subjects lit by tungsten (incandescent) lighting. - Fluorescent: Suitable for subjects lit by fluorescent lighting. |
| [ ] | Metering(Only available in Manual mode) | [ [ ] C e[ [ ] S p[ [ ] Average | Adjusts the region of the subject or frame on which the camera measures light. A v g . - Center Avg.: The camera metering is set for the average brightness of objects in the center region of the frame. - Spot: The camera metering is set for the brightness of the object at the center of the frame. - Average: The camera metering is set for the average brightness of all objects in the frame. |
| Icon Item | Option | Functional Description |
| Effect | N o | Applies a tone or color to your pictures to create an artistic effect. m a l |
| B & | -Normal: Standard RGB color settings suitable for general photography. | |
| S e | -B & W: Black and white pictures with shades of grey. | |
| V i | Sepia: Produces a warm, old-fashioned style of pictures, in which the colors are more brown and orange.- Vivid: Produces sharper and more vibrant colors. | |
| ISO (Only available in Manual mode) | ISO Auto | Configures the camera's sensitivity to light.- ISO Auto: Automatically sets the ISO value.- ISO 100: Equivalent to color ISO 100 film. Use for outdoor photography in bright sunlight.- ISO 200: Equivalent to color ISO 200 film. Use for outdoor or brightly lit indoor photography.- ISO 400: Equivalent to color ISO 400 film. Use for fast-moving subjects. |

- Setting the White Balance
The human eye adapts to changes in light so that white objects still appear white even when the light changes. With a digital camera, however, the color of the subject is influenced by the color of the light surrounding it. This color adjustment is called "white balance adjustment". This setting allows you to set the white balance when capturing images under specific lighting conditions.
3.1.11.2 Using the Interval Shoot
The camera provides interval image capturing based on the setting. This mode is available in the self-timer photography. You may specify the interval and counts of images captured.
To adjust Interval Shoot settings:
-
In Snapshot Mode, select Interval Shoot menu.
-
Use the [ ] button to toggle between Interval and Count, and then press the OK button.
- Interval:
[15 sec.]: The recording interval is 15 seconds.
[1 min.]: The recording interval is 1 minute.
[3 min.]: The recording interval is 3 minutes.
[10 min.]: The recording interval is 10 minutes.
[60 min.]: The recording interval is 60 minutes.
- Count: 2 \~ 99 counts (specifying how many shots can be taken).
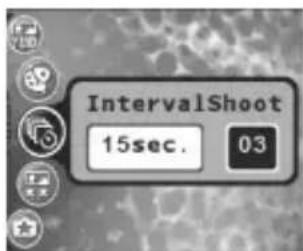
- Use the [☐]/[☐] buttons to adjust the settings, and then press the OK button.
To capture images with Interval Shoot function:
- In Snapshot Mode, toggle the [ ] button to select Interval Shoot mode.
- Press the shutter button to start. Images will be captured according to the preset Interval and Count.
- If you wish to stop, press the shutter button.
3.2 Movie Mode
With the specially designed pause function of the DC E520, you can pause your recording session whenever you want to best suit your need. Experience this feature with the following easy steps.
-
Toggle the [] button to enter Movie Mode. The video clip recording screen is displayed.
-
Frame the subject in the LCD screen with the zoom button, if desired.
• Optical zoom should be set before recording.
• Optical zoom cannot be used during recording.
- Press the shutter button to start recording.
• To stop the recording session, press the shutter button again.
- To pause the recording session, press the OK button. To resume, press the OK button again.
• The flash cannot be used in Movie Mode.
• EV compensation cannot bet set or activated in Movie Mode.
- While a video is being recorded to an SD memory card, neither open the battery/SD memory card cover, nor remove the battery/SD memory card. Doing so might damage the SD memory card or destroy the data.
- The length of the recording depends on the remaining capacity of your memory card or the camera's built-in memory. The remaining time is displayed on the upper right corner of the LCD monitor.
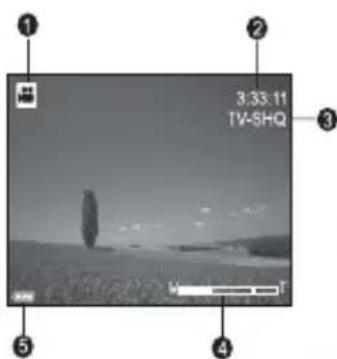
3.2.1 Movie Mode LCD Monitor Information
- Movie Mode
- Available recording time
- Movie Quality
- Zoom status
- Battery power level indicator
3.2.2 Movie Mode Menu Settings
3.2.2.1 Movie Mode Menu
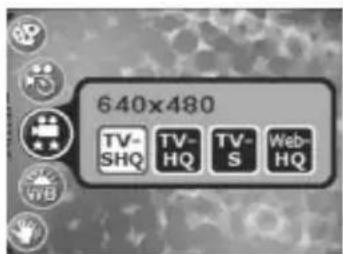
- In Movie Mode, press the [ ] button to access the menu, and then use the [72] buttons to select the menu settings you want to change.
- Use the [ ] button to select the desired item in the menu, and then press the OK button.
- To exit from the menu, press the [ ] button.


| Icon Item | Option Functional Description | ||
 | Movie Quality |  T V T V T V T V T V T V W e W e W e W e | Sets the quality and size of the video clip that will be recorded.- TV-SHQ: 640 x 480- TV-HQ: 640 x 480 Fine- TV-S: 320 x 240 Fine- Web-HQ: 320 x 240b- Web-S: 160 x 128b - S |
 | White Balance |  Auto WB Auto WB S u S u C l C l T u T u fluorescent fluorescent | Sets the white balance when recording subjects under specific lighting conditions.- Auto WB: Automatically adjust the white balance.o - Sunny: Suitable for bright daylight conditions.n - Cloudy: Suitable for cloudy, twilight, or shady conditions.- Tungsten: Suitable for subjects lit by tungsten (incandescent) lighting.- Fluorescent: Suitable for subjects lit by fluorescent lighting. |
 | Effect |  N o N o B & B & S e S e V i V i | Sets the color of the video clip that will be recorded. a I-Normal: Standard RGB color settings suitable for general recording.p - B & W: Black and white video clips with shades of grey.v - Sepia: Produces a warm, old-fashioned style of video clips, in which the colors are more brown and orange.- Vivid: Produces sharper and more vibrant colors. |
 | Timer REC |  | Allows you to set recording session in advance. For more information on setting Timer Recording, refer to 3.2.3 “Timer Recording” on page 15. |
 | Stabilizer |  [OFF] [OFF] | Prevents the shaking and enhances the quality and clarity of the video clips. |
3.2.3 Timer Recording
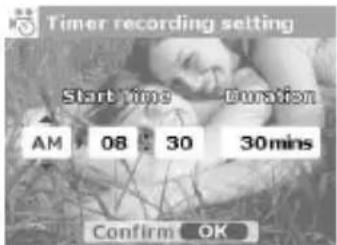
With the special “Timer Recording” feature, you can set recording session in advance, by following the steps below.
-
In Movie Mode, press the [ ] button to access the menu, and then scroll to [Timer REC].
-
Press [ ] SET
The [Timer recording setting] screen is displayed.
- Press the [ ] button to set each item. Press the
[ ] [ ] buttons to move to the next item.
-
After you set the Start Time and Duration, press the OK button to confirm.
-
The [Timer Recording Standby] screen is displayed. You can press the zoom key to adjust the distance.
- To activate the setting, press the shutter. - To exit, press any of the [☐]/[☐]/[☐]/[☐] buttons.
-
The [Timer Recording] screen is displayed. The camera enters the Standby mode and shows the information of your session. If you wish to cancel the action, press the shutter.
-
When the recording session begins, the camera enters the Recording mode. After the recording session is complete, the camera will power off automatically.
3.3 Playback Mode
In Playback Mode, you can view, magnify, resize, trim, delete images, play video clips, record a voice memo, or run a slide show. This mode also provides a thumbnail image display, allowing you to quickly search for the desired image.
-
Press the [回] button to enter Playback Mode.
-
Use the [ ] [ ] buttons to select the desired images.
• To view the previous image, press the [ ] button.
• To view the next image, press the [ʒ] button.
3.3.1 Playback Mode LCD Monitor Information (Image)
3.3.2 Viewing Images
3.3.2.1 Magnifying Images
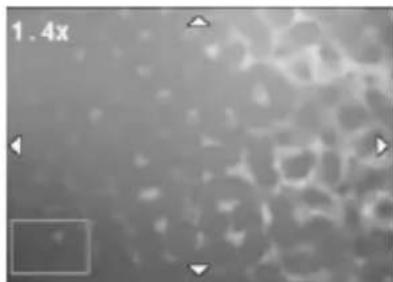
While reviewing your images, you may enlarge a selected portion of an image. This magnification allows you to view the details of the image. The DC E520 provides 4X magnification during playback.
- Set the zoom ratio by adjusting the zoom key.
• To zoom in, adjust the zoom key to the right.
• To zoom out, adjust the zoom key to the left.
- The magnification factor is displayed on the LCD monitor.
- To view a different portion of the images, press the
[2] [3] / buttons to adjust the display area.
natural_image
Microscopic view of cellular or porous structure with no visible text or symbolsYou will see a frame with a square box inside. The frame indicates the entire image, while the square box shows the location of the currently enlarged area.
- To return to the regular display, adjust the zoom key to the left until the normal image (1X magnification) appears on the screen. Or, you can press the [] button to exit directly.

- If there is no image stored in the internal memory or memory card, a [No File!] message will appear on the LCD monitor.
- Pressing the [☐] button while playing back images changes the LCD display in the sequence of: OSD Normal → Detailed Info. → Info. Off.
3.3.2.2 Thumbnail Display (Index Playback)
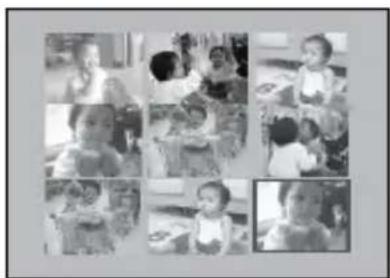
This function allows you to view nine thumbnail images on the LCD monitor simultaneously, so that you can search for the image you need easily.
-
Adjust the zoom key to the left. Nine thumbnail images are displayed simultaneously.
-
Use the [ ] / [ 心话 [ ] buttons to select the image to be displayed at the regular size, and then press the OK button to display the selected image in the full screen mode.
natural_image
Grid of nine black-and-white photos showing children eating together in a daily or weekly setting (no visible text or symbols)3.3.2.3 Voice Memo
Adding a voice memo is a useful way of adding notes and reminders to images.
-
In Playback Mode, select an image. The [icon is displayed on the bottom right corner of the LCD monitor.
-
Press the OK button to start recording. The time elapsed is displayed on the LCD monitor. You are allowed to add a voice memo up to 20 seconds for each image.
-
Press the OK button again to stop recording.
-
Press the OK button again to play the voice memo.
-
If you wish to remove the voice memo, press the [ ] button, choose [Delete Voice], and then press the OK button.
3.3.3 Deleting Files
When you are not satisfied with the images, video clips or voice memos, you can choose to delete them one by one or all at once. Please note that the deleted files cannot be recovered.
- In Playback Mode, press the [] button to delete files.
• To delete the current unwanted file, choose [Delete One] and press the OK button.
• To delete all the files, choose [Delete All] and press the OK button.
- To delete an image which contains a voice memo, choose [Delete Voice] and press the OK button.
- To cancel the action, choose [Exit].
- You can press the [☐] button to power up the camera and enter Playback Mode directly without pressing the [ ] button.
- Protected files cannot be deleted.
3.3.4 Playback Mode Menu Settings
3.3.4.1 Playback Mode Menu
- Press the [] button to enter Playback Mode.
- Press the [MENU] button to access the menu, and then use the [Z]/[心图标] buttons to select the menu settings you want to change.
- Use the [ ] [ ] buttons to select the desired item in the menu, and then press the OK button.
- To exit from the menu, press the [] button.
| Icon Item | Option Functional Description | |
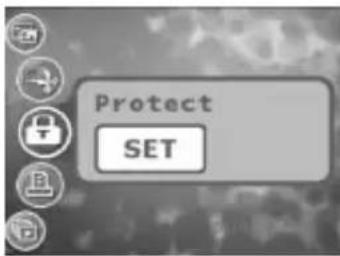
 | Protect |  Sets the files to the read-only status to prevent them from being erased by mistake.To protect your files, follow the steps below.1. Press [SET] when the [Protect] menu is displayed.2. You can choose to protect or unprotect the files as follows.- Choose [Protect One] and press the OK button to protect the current selected file. If you wish to cancel protecting the current file, choose [Unprotect One] and press the OK button.- Choose [Protect All] and press the OK button to protect all the files. If you wish to cancel protecting all the files, choose [Unprotect All] and press the OK button.- To quit the menu, press [Exit].An icon will be displayed if the file is protected. Sets the files to the read-only status to prevent them from being erased by mistake.To protect your files, follow the steps below.1. Press [SET] when the [Protect] menu is displayed.2. You can choose to protect or unprotect the files as follows.- Choose [Protect One] and press the OK button to protect the current selected file. If you wish to cancel protecting the current file, choose [Unprotect One] and press the OK button.- Choose [Protect All] and press the OK button to protect all the files. If you wish to cancel protecting all the files, choose [Unprotect All] and press the OK button.- To quit the menu, press [Exit].An icon will be displayed if the file is protected. |
 | PictBridge |  Allows you to connect the camera directly to a PictBridge compliant printer, so that images can be printed directly without being transferred to your computer. For more information, refer to 4.3 “PictBridge Mode” on page 24. Allows you to connect the camera directly to a PictBridge compliant printer, so that images can be printed directly without being transferred to your computer. For more information, refer to 4.3 “PictBridge Mode” on page 24. |
 | Trim |  Allows you to trim a portion of a captured image.To trim a captured image, follow the steps below.1. In Playback Mode, choose Trim and then press [SET].2. Use the zoom key and [/][button] buttons to move to the portion you want.3. Press the OK button.A trimmed image will be saved as another file and has a smaller size. Allows you to trim a portion of a captured image.To trim a captured image, follow the steps below.1. In Playback Mode, choose Trim and then press [SET].2. Use the zoom key and [/][button] buttons to move to the portion you want.3. Press the OK button.A trimmed image will be saved as another file and has a smaller size. |
 | Slideshow |  1 s 1 s 3 s 3 s 5 sThis function enables you to set the time interval while playing back your images automatically in sequential order as a slide show. This is a very useful and entertaining feature for reviewing captured images and for presentations. Once you select an option, the slideshow will begin immediately. If you wish to stop, just press the OK button. 5 sThis function enables you to set the time interval while playing back your images automatically in sequential order as a slide show. This is a very useful and entertaining feature for reviewing captured images and for presentations. Once you select an option, the slideshow will begin immediately. If you wish to stop, just press the OK button. |
 | Resize |  8 x 1536[22D3] 0 x 1200 8 x 1536[22D3] 0 x 1200 0 x 960 0 x 960 x 480Allows you to change the size of a captured image.To resize a captured image, follow the steps below.1. In Playback Mode, choose Resize and then select the desired option.2. Press the OK button.A resized image will be saved as another file and has a smaller size. x 480Allows you to change the size of a captured image.To resize a captured image, follow the steps below.1. In Playback Mode, choose Resize and then select the desired option.2. Press the OK button.A resized image will be saved as another file and has a smaller size. |
3.3.5 Playback Mode LCD Monitor Information (Video)
- Playback Mode
- Current file/Total files
- File Name
- File Size
- Playback navigator
- Date/Time
- Battery power level indicator
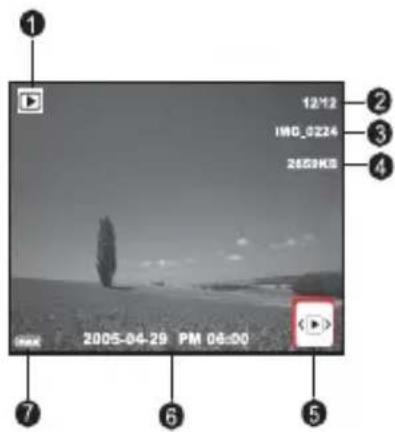
3.3.6 Playing Back Video Clips
In Playback Mode, use the playback navigator on the bottom right corner of the LCD monitor to control the playback of video clips.
- Press the OK button to start playing back a video clip.
• To pause or resume the video playback, press the OK button.
• To stop the video playback, press the [ ] button. - To play back the video clip with slow motion, press the [ ] button.
• To start the fast forward video playback, press the [⚡] button.
• To start the fast reverse video playback, press the [] button.

- The zoom function cannot be activated while playing back video clips.
- To play back video clips on the computer, we recommend that you use Windows Media Player 9.0 (WMP 9.0) or above. Installing the driver Xvid in advance is required for playing the recorded video clips normally. You may download the free driver from Internet or link to the path: \VideoSt\Driver\Xvid from the bundled CD.
- Xvid is a MPEG4 codec, which enables you to import or create video files compressed with Xvid. For detail, visit Xvid web site, http://www.xvidmovies.com.
3.4 Setup Mode
Whatever mode you are currently using, Setup Mode can always be accessed. Select your preferences for the camera with this mode.
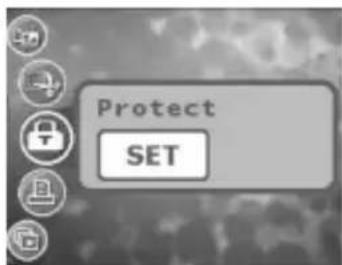
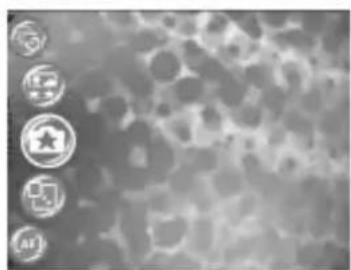
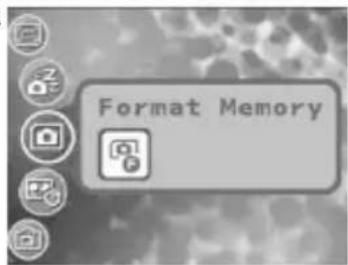
- In whichever mode (Snapshot Mode, Movie Mode, or Playback Mode), press the [J-button (Step A).
- Press the [] button twice to enter Setup Mode (Step B and Step C).
- Use the [ ]/2 buttons to select the menu settings you want to change.
- Use the [ ] [ ] buttons to select the desired item in the menu, and then press the OK button.
- To exit from the menu, press the [ ] button twice.
A
B
natural_image
Microscopic view of cellular or porous structure with circular markers and star symbols (no readable text or labels)C
| Icon Item | Option Functional Description | |
 | Memory |  mat Memory mat Memory F o F o py to Card py to Card |
| Icon Item Option | Functional Description | ||
 | | | Startup Image |  | To set a startup image that is displayed every time you power on the camera, follow the steps below.1. Select [SET]d then you will be prompted to select a startup image. Use the[ ][ ][ ][ ][ ][ ][ ][ ][ ][ ][ ][ ][ ][ ][ ][ ][ ][ ][ ][ ][ ][ ][ ][ ][ ][ ][ ][ ][ ][ ][ ][ ][ ][ ][ ][ ][ ][ ][ ][ ][ ][ ][ ][ ][ ][ ][ ][ ][ ][ ][ ][ ][ ][ ][ ][ ][ ][ ][ ][ ][ ][ ][ ][ ][ ][ ][ ][ ][ ][ ][ ][ ][ ][ ][ ][ ][ ][ ][ ][ ][ ][ ][ ][ ][ ][ ][ ][ ][ ][ ][ ][ ][ ][ ][ ][ ][ ][ ][ ][ ][ ] |
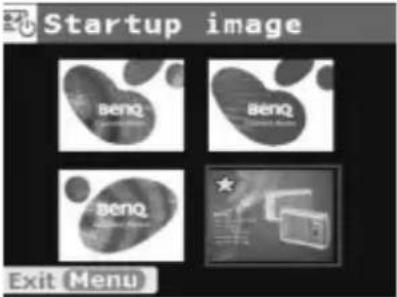 2. If you are not satisfied with the pre-installed images, you may move to the bottom right corner of the LCD monitor to customize your startup image by selecting the images you like.3. After the selection is done, press the OK button to confirm, and then press the [to exit. 2. If you are not satisfied with the pre-installed images, you may move to the bottom right corner of the LCD monitor to customize your startup image by selecting the images you like.3. After the selection is done, press the OK button to confirm, and then press the [to exit. | |||
 | | | Power Save | 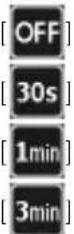 | If the camera is idle for a certain period of time while the camera is powered on, it will switch to power-saving state according to your settings. If the camera is in power-saving state, re-activate it by pressing any button.- Off/30 sec./1 min./3 min.If the camera is idle for 5 minutes, the camera will power off automatically. |
 | | | QuickView |  | Allows you to get a quick preview immediately after an image is captured. The preview shows briefly and then you may continue to capture the next image.- On / Off |
 | | | Digital Zoom |  | Allows you to activate or deactivate Digital Zoom according to your preferences.- On / Off |
 | | | Power On |  | Allows you to activate or deactivate the function of powering up from Inst. REC and Inst. Play buttons.[On]: enables the function of powering up the cam-era from the Inst. REC and Inst. Play buttons.[Off]: disable the function of powering up the cam-era from Inst. REC and Inst. Play buttons. |
 | | | Volume Allows you to adjust the volume of the video clips or voice memos. You may set the volume level with the [][ ][ ][ ][ ][ ][ ][ ][ ][ ][ ][ ][ ][ ][ ][ ][ ][ ][ ][ ][ ][ ][ ][ ][ ][ ][ ][ ][ ][ ][ ][ ][ ][ ][ ][ ][ ][ ][ ][ ][ ][ ][ ][ ][ ][ ][ ][ ][ ][ ][ ][ ][ ][ ][ ][ ][ ][ ][ ][ ][ ][ ][ ][ ][ ][ ][ ][ ][ ][ ][ ][ ][ ][ ][ ][ ][ ][ ][ ][ ][ ][ ][ ][ ][ ][ ][ ][ ][ ][ ][ ][ ][ ][ ][ ][ ][ ][ ][ ][ ][ [ ] buttons. | ||
| Icon Item | Option Functional Description | ||
 | System Sound |  [OFF] [OFF] | Allows you to toggle system sound effects on or off, such as the beep when pressing or scrolling. |
 | LCD Brightness |  N o [ ] [ ] [ ] [ ] [ ] [ ] [ ] [ ] [ ] [ ] [ ] [ ] [ ] [ ] [ ] [ ] [ ] [ ] [ ] [ ] [ ] [ ] [ ] [ ] [ ] [ ] [ ] [ ] [ ] [ ] [ ] [ ] [ ] [ ] [ ] [ ] [ ] [ ] [ ] [ ] [ ] [ ] [ ] [ ] [ ] [ ] [ ] [ ] [ ] [ ] [ ], [ ] [ ] [ ] [ ] [ ] [ ] [ ] [ ] [ ] [ ] [ ] [ ] [ ] [ ] [ ] [ ] [ ] [ ] [ ] [ ] [ ] [ ] [ ] [ ] [ ] [ ] [ ] [ ] [ ] [ ] [ ] [ ] [ ] [ ] [ ] [ ] [ ] [ ] [ ] [ ] [ ] [ ] [ ] [ ] [ ] [ ] [ ] [ ] [ ] [ ] N o [ ] [ ] [ ] [ ] [ ] [ ] [ ] [ ] [ ] [ ] [ ] [ ] [ ] [ ] [ ] [ ] [ ] [ ] [ ] [ ] [ ] [ ] [ ] [ ] [ ] [ ] [ ] [ ] [ ] [ ] [ ] [ ] [ ] [ ] [ ] [ ] [ ] [ ] [ ] [ ] [ ] [ ] [ ] [ ] [ ] [ ] [ ] [ ] [ ] [ ] [ ], [ ] [ ] [ ] [ ] [ ] [ ] [ ] [ ] [ ] [ ] [ ] [ ] [ ] [ ] [ ] [ ] [ ] [ ] [ ] [ ] [ ] [ ] [ ] [ ] [ ] [ ] [ ] [ ] [ ] [ ] [ ] [ ] [ ] [ ] [ ] [ ] [ ] [ ] [ ] [ ] [ ] [ ] [ ] [ ] [ ] [ ] [ ] [ ] [ ] [ ]
 | Allows you to set the brightness of the LCD monitor to Normal for Bright. [ ] [ ] [ ] [ ] [ ] [ ] [ ] [ ] [ ] [ ] [ ] [ ] [ ] [ ] [ ] [ ] [ ] [ ] [ ] [ ] [ ] [ ] [ ] [ ] [ ] [ ] [ ] [ ] [ ] [ ] [ ] [ ] [ ] [ ] [ ] [ ] [ ] [ ] [ ] [ ] [ ] [ ] [ ] [ ] [ ] [ ] [ ] [ ] [ ] [ ) |
 | Date Format |  [MDY][DMY][ ] [MDY][DMY][ ] | Allows you to select the date format used for the [Date Stamp] feature.- [ ] YAK- Month - Date-[ ] MDYth - Date - Year-[ ] DMY- Month - Year |
 | Video Out |  [PAL][ ] [PAL][ ] | The camera's TV out port provides video output for viewing images or video clips on a standard TV screen. Set the video output mode to either NTSC or PAL. Refer to your local authorities for information on whether NTSC or PAL is used in your coun-try/region. |
 | Language Allow | o set the language  | that is displayed on the LCD monitor. |
 | Reset | [ ] [ ] [ ] [ ] [ ] [ ] [ ] [ ] [ ] [ ] [ ] [ ] [ ] [ ] [ ] [ ] [ ] [ ] [ ] [ ] [ ] [ ] [ ] [ ] [ ] [ ] [ ] [ ] [ ] [ ] [ ] [ ] [ ] [ ] [ ] [ ] [ ] [ ] [ ] [ ] [ ] [ ] [ ] [ ] [ ] [ ] [ ] [ ] [ ] [ ] | |
 | Firmware Ver. | Displays the installed firmware version number. | |
PC DEPENDENT FEATURES
4.1 Bundled Software
The DC E520 is supplied with the following software. To install the software, refer to the information supplied with respective CDs.
| Ulead Photo Express | Ulead®Photo ExpressTM 5.0 SE is a complete photo project software for digital images. Acquire photos effortlessly from digital cameras or scanners. Edit and enhance images using easy-to-use editing tools and cool photographic filters and effects. Assemble creative photo projects and share results via e-mail and multiple print options. |
| Ulead Photo Explorer | Ulead®Photo ExplorerTM 8.0 SE Basic provides an efficient way to transfer, browse, modify and distribute digital media. It is an all-in-one tool for owners of digital cameras, webcams, DV camcorders, scanners, or for anyone who strives to effectively handle digital media. |
Ulead VideoStudio Ulead® VideoStudio™ 8 SE VCD is home video editing software that makes editing movies as fun as shooting them. Users can make a movie in three easy steps using the new Movie Wizard mode. Share finished projects on VCD, tape, the web, and mobile devices.
4.2 USB Mode
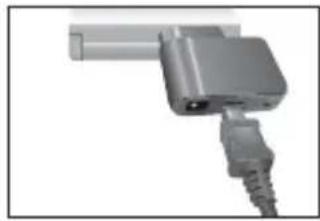
- Insert the conversion adapter into the conversion adapter terminal of the camera as shown in the illustration.
- Connect the end of the smaller plug of the USB cable to the conversion adapter.
- Connect the other end of the USB cable to an available USB port on your computer.
- Turn on the camera. The USB screen is displayed.
- A "Removable Disk" icon appears in "My Computer." Click this icon to access your images or video clips.

- When connecting to a computer, it is necessary to install a battery or use an AC power adapter.
- The DC E520 is USB 2.0 high-speed compatible, which makes the transmitting speed efficient.
natural_image
Close-up of a metallic electrical connector with a cable (no visible text or symbols)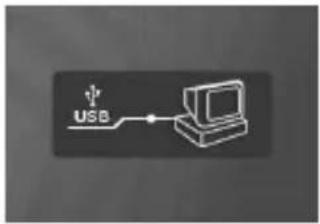
4.3 PictBridge Mode
If a printer that supports PictBridge is available, images can be printed without using a computer by connecting the camera directly to a PictBridge compliant printer.
Connecting the Camera to a PictBridge compliant Printer
- In Playback Mode, press the [MENU]
button and scroll to PictBridge.
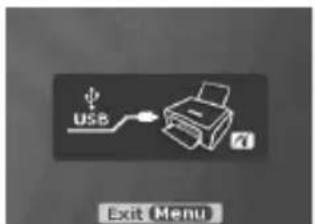
- Select [] 511 then you will be prompted to connect a USB cable to the camera and the PictBridge compliant printer.
• To establish the connection, connect a USB cable.
• To cancel, press the [MENU] button.
-
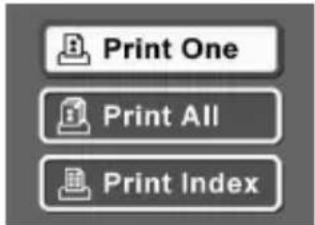
When the connection is established, you will be asked to select [Print One], [Print All], or [Print Index]. Select the desired option and then press the OK button.
-
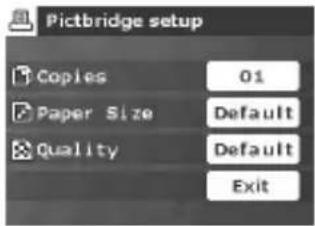
[Setup], [Print], and [Exit] options will be displayed on the bottom of the LCD monitor.
-
If you select [Setup], [Pictbridge setup] screen will be displayed. You may set [Copies], [Size], and [Quality], if desired.
- If you are satisfied with the settings, select [Print] to proceed.
- If you want to cancel, select [Exit].

- The functions described above may differ due to the design of the printer you connect to.
TROUBLESHOOTING
Refer to the symptoms and solutions listed below before shipping your camera for service. If the problem persists, contact your local reseller or service center.
| Symptom Cause Solution | ||
| The camera cannot be powered up. | There is no battery or the battery is not inserted correctly. | Insert the battery correctly. |
| The battery has no power. Recharge the battery or use the AC power adapter. | ||
| The AC power adapter is not connected correctly. | Connect the AC power adapter properly. | |
| The battery power is draining quickly. | The external temperature is extremely low. | — |
| Many shots are being captured in dark places, requiring a flash. | — | |
| The battery was not fully charged. The battery has not been used for an extended period of time after being charged. | Fully charge the battery and discharge it for at least one complete cycle before use. | |
| The battery or camera is warm. | The camera or flash was used continuously over a long period of time. | — |
| The flash does not fire. The flash does not recharge. | The camera flash is turned off. Set the flash to Auto Flash. | |
| The light source is sufficient. — | ||
| Even though the flash fired, the image is dark. | The distance to the subject is greater than the flash's effective range. | Get closer to the subject and shoot. |
| The image is too bright or too dark. | The exposure is excessive or inadequate. | Reset exposure compensation. |
| I cannot format a memory card. | The memory card is write-protected. | Remove the write protection. |
| End of the memory card life. Insert a new memory card. | ||
| I cannot download images. | The free space on the hard disk of your computer is insufficient. | Ensure that the hard disk has enough space for running Windows and that the drive for loading image files has free space equal to or greater than the memory card in the camera. |
| There is no power being supplied to the camera. | Turn on the power. Use the AC power adapter or recharge the battery if necessary. | |
| The camera does not shoot even when pressing the shutter button. | The battery is running low. Recharge | or use the AC power adapter. |
| The camera is not in Shooting Mode. | Switch to Shooting Mode. | |
| The shutter button was not pressed all the way down. | Press the shutter button all the way down. | |
| The internal memory or memory card does not have any free space. | Load a new card or delete unwanted files. | |
| The flash is recharging. Wait until the | flash mode icon, indicated on the screen, stops flashing. | |
| The camera does not recognize the memory card. | Format the memory card before the initial use or before using with another camera. | |
| I cannot print images with PictBridge compliant printers. | The camera is connected to the printer when the camera is powered off. | Please turn on the camera, select PictBridge and then connect to the printer. |
| Image Sensor 1/2.5-inch CCD | |
| LCD Display 2.5-inch color LTPS LCD (960 x 240 pixels) | |
| Lens Focal Length: f = 5.8 - 17.4 mm (35 mm - 105 mm; 35 mm Equivalent) | |
| Focusing TTL Auto Focus | |
| Shutter Mechanical shutter: Up to 1/2000 sec. | |
| Shooting Mode | Auto/Manual/Portrait/Landscape/Night/Sport/Backlight |
| Flash Modes: Auto/Forced flash/Red-eye reduction/Flash off/Slow Sync | |
| Self-timer 10 sec, 2 sec | |
| Exposure Compensation: ±2 EV (1/3 EV/step) | |
| ISO | Auto/100/200/400 |
| White Balance Auto/Sunny/Cloudy/Sunset/Tungsten/Fluorescent | |
| File Format Still Image: JPEG format (EXIF2.2), DCFImage Size: 2560 x 1920, 2048 x 1536, 1600 x 1200, 1280 x 960, 640 x 480 pixels | |
| Storage | Built-in memory: 32 MB/SD memory card compatible. |
| Image Play | Single image/AVI play/Thumbnails/Slide show |
| Interface (with conversion adapter) | Digital output: USB 2.0 high speed compatibleDC input 5VAudio/Video output (NTSC/PAL) |
| Power Source | Rechargeable Lithium-ion Battery (1230mAh)/AC adapter |
| Dimensions (W x H x D) | 88 x 58 x 23.7 mm |
| Weight | Approx. 133 g (w/o battery, SD memory card) |
| System Requirements (For Windows) | |
| * Pentium 166 Mhz or higher CPU* 64 MB RAM* CD-ROM drive | * Windows XP/ME/2000* 128 MB free hard disk space* Available USB port |

SERVICE INFORMATION
Technical Supp or t
If you have any problem or question regarding the DC E520, you can visit the following web site for further assistance:
http://support.BenQ.com
For free driver updates, product information and news releases, visit the following web site:
http://www.BenQ.com
- DC E520 Digital Camera User's Manual
- Welcome
- Copyright
- Disclaimer
- Taking care of your camera
- Table of Contents
- Touring your DC E520.... 1
- Preparing Your DC E520 for Use .... 3
- Using the DC E520 5
- Movie Mode.... 13
- TOURING YOUR DC E520
- Checking the Package Contents
- DC E520 Components
- Front View
- Rear View
- LED Indicators
- Installing the Battery
- Charging the Battery
- Inserting and Removing an SD Memory Card
- Setting the Date and Time
- Snapshot Mode
- Getting started with capturing images
- Snapshot Mode LCD Monitor Information
- Shooting Mode
- Flash mode
- Self-timer icon (if used)
- White Balance (if chosen [Detailed Info] display)
- EV (Exposure Value)
- Changing Camera Settings
- Setting Shooting Mode
- Using the Flash
- Using the Self-timer
- Using the Optical Zoom
- Using the Digital Zoom
- Changing the Focus
- Adjusting the EV
- Snapshot Mode Menu Settings
- Snapshot Mode Menu
- Using the Interval Shoot
- Movie Mode
- Movie Mode LCD Monitor Information
- Movie Mode Menu Settings
- Movie Mode Menu
- Timer Recording
- Playback Mode
- Playback Mode LCD Monitor Information (Image)
- Viewing Images
- Magnifying Images
- Thumbnail Display (Index Playback)
- Voice Memo
- Deleting Files
- Playback Mode Menu Settings
- Playback Mode Menu
- Playback Mode LCD Monitor Information (Video)
- Playing Back Video Clips
- Setup Mode
- PC DEPENDENT FEATURES
- Bundled Software
- USB Mode
- PictBridge Mode
- TROUBLESHOOTING
- SERVICE INFORMATION
- Technical Supp or t
Brand : BENQ
Model : DC E520
Category : Camera