
DR-2000 - Blu-ray player ONKYO - Free user manual and instructions
Find the device manual for free DR-2000 ONKYO in PDF.

| Product type | DVD Receiver / Home Theater System |
| Brand | Onkyo |
| Model | DR-2000 |
| Dimensions (W x H x D) | 435 x 108 x 421 mm (17 1/8 x 4 1/4 x 16 5/8 in) |
| Weight | 9.1 kg (20.1 lb) |
| Power supply | AC 120 V, 60 Hz, 165 W or AC 220-230 V, 50/60 Hz, 155 W |
| Power output (FTC) | 30 W per channel min. RMS into 6 ohms, 2 channels driven, 1 kHz, ≤0.6% THD |
| Power output (EIAJ) | 40 W per channel into 6 ohms, 1 kHz |
| Playable discs | DVD-Video, VIDEO CD, Audio CD, finalized CD-R |
| Video DAC | 27 MHz / 10-bit |
| Audio DAC | 96 kHz / 24-bit |
| Decoders | DTS, Dolby Digital, PCM |
| Analog inputs | 4 stereo audio (VIDEO 1, VIDEO 2, TV/LINE, TAPE/MD); 2 S-Video, 2 composite video |
| Digital inputs | 1 optical (VIDEO 1), 1 coaxial (VIDEO 2) |
| Digital output | 1 optical |
| Component video output | Yes (Y, Pb, Pr) |
| Subwoofer preout | Yes |
| Tuner | FM/AM, 30 presets |
| Remote control | Learning remote (RC-437M) with AUDIO, DVD, TA/MD, TV modes |
| Speaker setup | Smart Configuration for Onkyo speakers; manual distance and level adjustment |
| Safety features | Class 1 laser product; auto power-off; moisture condensation prevention |
| Accessories included | Remote controller, batteries, FM/AM antennas, audio/video cable, S-video cable, FM antenna adapter |
Frequently Asked Questions - DR-2000 ONKYO
User questions about DR-2000 ONKYO
0 question about this device. Answer the ones you know or ask your own.
Ask a new question about this device
Download the instructions for your Blu-ray player in PDF format for free! Find your manual DR-2000 - ONKYO and take your electronic device back in hand. On this page are published all the documents necessary for the use of your device. DR-2000 by ONKYO.
USER MANUAL DR-2000 ONKYO
Before Using Your DVD Receiver 2
DVD Receiver
DR-2000
Instruction Manual
Getting Started
Basic Operation
Advanced DVD/VIDEO CD/Audio CD Operation
Thank you for purchasing the Onkyo DVD Receiver.
Please read this manual thoroughly before making connections and turning on the power.
Following the instructions in this manual will enable you to obtain optimum performance and listening enjoyment from your new DVD Receiver.
Please retain this manual for future reference.
Additional Operation
Other
WARNING:
TO REDUCE THE RISK OF FIRE OR ELECTRIC SHOCK, DO NOT EXPOSE THIS APPLIANCE TO RAIN OR MOISTURE.
CAUTION:
TO REDUCE THE RISK OF ELECTRIC SHOCK, DO NOT REMOVE COVER (OR BACK). NO USER-SERVICEABLE PARTS INSIDE. REFER SERVICING TO QUALIFIED SERVICE PERSONNEL.


The lightning flash with arrowhead symbol, within an equilateral triangle, is intended to alert the user to the presence of uninsulated “dangerous voltage” within the product’s enclosure that may be of sufficient magnitude to constitute a risk of electric shock to persons.

The exclamation point within an equilateral triangle is intended to alert the user to the presence of important operating and maintenance (servicing) instructions in the literature accompanying the appliance.
Important Safeguards
- Read Instructions - All the safety and operating instructions should be read before the appliance is operated.
- Retain Instructions - The safety and operating instructions should be retained for future reference.
- Heed Warnings - All warnings on the appliance and in the operating instructions should be adhered to.
- Follow Instructions - All operating and use instructions should be followed.
- Water and Moisture - The appliance should not be used near water - for example, near a bathtub, washbowl, kitchen sink, laundry tub, in a wet basement, or near a swimming pool, and the like.
- Carts and Stands - The appliance should be used only with a cart or stand that is recommended by the manufacturer.
PORTABLE CART WARNING
PORTABLE CART WARNING
6A. An appliance and cart combination should be moved with care. Quick stops, excessive force, and uneven surfaces may cause the appliance and cart combination to overturn.

S3125A
- Wall or Ceiling Mounting - The appliance should be mounted to a wall or ceiling only as recommended by the manufacturer.
- Ventilation - The appliance should be situated so that its location or position does not interfere with its proper ventilation. For example, the appliance should not be situated on a bed, sofa, rug, or similar surface that may block the ventilation openings; or if placed in a built-in installation, such as a bookcase or cabinet that may impede the flow of air through the ventilation openings, there should be free space of at least 20 cm (8 in.) and an opening behind the appliance.
-
Heat - The appliance should be situated away from heat sources such as radiators, heat registers, stoves, or other appliances (including amplifiers) that produce heat.
-
Power Sources - The appliance should be connected to a power supply only of the type described in the operating instructions or as marked on the appliance.
-
Polarization - If the appliance is provided with a polarized plug having one blade wider than the other, please read the following information: The polarization of the plug is a safety feature. The polarized plug will only fit the outlet one way. If the plug does not fit fully into the outlet, try reversing it. If there is still trouble, the user should seek the services of a qualified electrician. Under no circumstances should the user attempt to defeat the polarization of the plug.
-
Power-Cord Protection - Power-supply cords (mains leads) should be routed so that they are not likely to be walked on or pinched by items placed upon or against them, especially near plugs, convenience receptacles, and the point where they exit from the appliance.
-
Cleaning - The appliance should be cleaned only as recommended by the manufacturer.
-
Power Lines - An outdoor antenna (aerial) should be located away from power lines.
-
Nonuse Periods - The power cord (mains lead) of the appliance should be unplugged from the outlet (the mains) when left unused for a long period of time.
-
Object and Liquid Entry - Care should be taken so that objects do not fall and liquids are not spilled into the enclosure through openings.
-
Damage Requiring Service - The appliance should be serviced by qualified service personnel when:
A. The power-supply cord (mains lead) or the plug has been damaged; or
B. Objects have fallen, or liquid has been spilled into the appliance; or
C. The appliance has been exposed to rain; or
D. The appliance does not appear to operate normally or exhibits a marked change in performance; or
E. The appliance has been dropped, or the enclosure damaged.
-
Servicing - The user should not attempt to service the appliance beyond that described in the operating instructions. All other servicing should be referred to qualified service personnel.
-
Outdoor Antenna (Aerial) Grounding - If an outside antenna (aerial) is connected to the receiver, be sure the antenna (aerial) system is grounded so as to provide some protection against voltage surges and built up static charges. Article 810 of the National Electrical Code, ANSI/NFPA 70, provides information with regard to proper grounding of the mast and supporting structure, grounding of the lead-in wire to an antenna- (aerial-) discharge unit, size of grounding conductors, location of antenna- (aerial-) discharge unit, connection to grounding electrodes, and requirements for the grounding electrode. See FIGURE 1.
FIGURE 1:
EXAMPLE OF ANTENNA (AERIAL) GROUNDING AS PER NATIONAL ELECTRICAL CODE, ANSI/NFPA 70
S2898A
CAUTION:
VISIBLE LASER RADIATION WHEN OPEN AND INTERLOCK FAILED OR DEFEATED. DO NOT STARE INTO BEAM.
CAUTION:
THIS PRODUCT UTILIZES A LASER. USE OF CONTROLS OR ADJUSTMENTS OR PERFORMANCE OF PROCEDURES OTHER THAN THOSE SPECIFIED HEREIN MAY RESULT IN HAZARDOUS RADIATION EXPOSURE.
This unit contains a semiconductor laser system and is classified as a "CLASS 1 LASER PRODUCT." So, to use this model properly, read this Instruction Manual carefully. In case of any trouble, please contact the store where you purchased the unit. To prevent being exposed to the laser beam, do not try to open the enclosure.

This label on the rear panel states that:
- This unit is a CLASS 1 LASER PRODUCT and employs a laser inside the cabinet.
- To prevent the laser from being exposed, do not remove the cover. Refer servicing to qualified personnel.
1. Regional Restriction Codes (Region Number)
Regional restriction codes are built into DVD players and DVD videos for each sales region. If the regional code of the DVD Receiver does not match one of the regional codes on the DVD video, playback is not possible.
The regional number can be found on the rear panel of the DVD Receiver. (e.g. 3) for Region 3)
2. About This Manual
This manual explains the basic procedures for operating the DVD Receiver. Some DVD videos do not support the full potential of the DVD technology. Your DVD Receiver may therefore not respond to all operating commands. Refer to instruction notes on discs.
A "mark may appear on the TV screen during operation. It means that the operation is not permitted by the DVD Receiver or the disc.
3. Warranty Claim
You can find the serial number on the rear panel of the unit. In case of warranty claim, please report this number.
4. Recording Copyright
Recording of copyrighted material for other than personal use is illegal without permission of the copyright holder.
5. AC Fuse
The fuse is located inside the chassis and is not user-serviceable. If power does not come on, contact your Onkyo authorized service center.
6. Power
WARNING
BEFORE PLUGGING IN THE UNIT FOR THE FIRST TIME, READ THE FOLLOWING SECTION CAREFULLY.
The voltage of the available power supply differs according to country or region. Be sure that the power supply voltage of the area where the unit will be used meets the required voltage (AC220-230V 50/60Hz or AC120V 60Hz) written on the rear panel.
7. Do not touch the unit with wet hands
Do not handle the unit or power cord (mains lead) when your hands are wet or damp. If water or any other liquid enters the case, take the unit to an authorized service center for inspection.
8. Location of the unit
- Place the unit in a well-ventilated location.
Take special care to provide plenty of ventilation on all sides of the unit especially when it is placed in an audio rack. If ventilation is blocked, the unit may overheat and malfunction. - Do not expose the unit to direct sunlight or heating units as the unit's internal temperature may rise and shorten the life of the pickup.
- Avoid damp and dusty places and places directly affected by vibrations from the speakers. In particular, avoid placing the unit on or above one of the speakers.
- Be sure the unit is placed in a horizontal position. Never place it on its side or on a slanted surface as it may malfunction.
- When you place the unit near a TV, radio, or VCR, the playback picture may become poor and the sound may be distorted. In this case, place the unit away from the TV, radio, or VCR.
9. Care
From time to time you should wipe the front and rear panels and the cabinet with a soft cloth. For heavier dirt, dampen a soft cloth in a weak solution of mild detergent and water, wring it out dry, and wipe off the dirt. Following this, dry immediately with a clean cloth. Do not use rough material, thinners, alcohol or other chemical solvents or cloths since these could damage the finish or remove the panel lettering.
10. Notes on Handling
- When shipping the unit, use the original shipping carton and packing materials. For maximum protection, repack the unit as it was originally packed at the factory.
- Do not use volatile liquids, such as insect spray, near the unit. Do not leave rubber or plastic products in contact with the unit for a long time. They will leave marks on the finish.
- The top and rear panels of the unit may become warm after a long period of use. This is not a malfunction.
- When the unit is not in use, be sure to remove the disc and turn off the power.
- If you do not use the unit for a long period, the unit may not function properly in the future. Turn on and use the unit occasionally.
11. To Obtain a Clear Picture
The unit is a high technology, precision device. If the optical pick-up lens and disc drive parts are dirty or worn down, the picture quality becomes poor. To obtain a clear picture, we recommend regular inspection and maintenance (cleaning or parts replacement) every 1,000 hours of use depending on the operating environment. For details, contact your nearest dealer.
12. Notes on Moisture Condensation
Moisture condensation damages the unit.
Please read the following carefully.
• What is moisture condensation?
Moisture condensation occurs, for example, when you pour a cold drink into a glass on a warm day. Drops of water form on the outside of the glass. In the same way, moisture may condense on the optical pick-up lens inside the unit, one of the most crucial internal parts of the unit.
- Moisture condensation occurs in the following cases.
- When you bring the unit directly from a cold place to a warm place.
- When you use the unit in a room where you just turned on the heater, or a place where the cold wind from the air conditioner directly hits the unit.
- In summer, when you use the unit in a hot and humid place just after you move the unit from an air conditioned room.
- When you use the unit in a humid place.
- Do not use the unit when moisture condensation may occur. If you use the unit in such a situation, it may damage discs and internal parts. Remove the disc, connect the power cord (mains lead) of the unit to the wall outlet (the mains), turn on the unit, and leave it for two or three hours. After a few hours, the unit will have warmed up and evaporated any moisture. Keep the unit connected to the wall outlet (the mains) and moisture condensation will seldom occur.
Important Safeguards/Precautions/Table of Contents.... 2–5
Getting Started
Features 6
Supplied Accessories 7
Preparing the Remote Controller 8
Notes on Discs 9
Connecting to a TV 10
Connecting to Audio/Video Equipment 11
RI Connection for the Onkyo Cassette Tape Deck.... 12
Positioning Speakers.... 12
Connecting Speakers....13
Making Antenna (Aerial) Connections 14
Connecting the Power/Turning on the DVD Receiver.... 16
Speaker Setup 17
Basic Operation
Playing DVD Videos/VIDEO CDs/Audio CDs 22
Listening to the Radio 28
Playing the Connected Source.... 30
Various Functions Common to all the Sources 32
Enjoying the Sound Effects 34
Advanced DVD/VIDEO CD/Audio CD Operation
Playing Repeatedly 41
Playing in a Favorite Order.... 42
Playing in Random Order 43
Zooming in on a Picture 44
Selecting the Camera Angle 45
Turning on/off Subtitles/Selecting the Subtitle Language.... 46
Selecting Audio Language/Sound Included on the Disc 47
Changing the Sound Signal Conversion Method 48
Using Information on the On-Screen Display and the DVD Receiver's Display .. 50
Customizing the Function Settings 52
Table of Languages 60
Additional Operation
Recording Using the Connected Equipment 61
Programming the Remote Controller to Your TV 63
Other
Troubleshooting 65
Specifications 67
Index to Parts and Controls 68
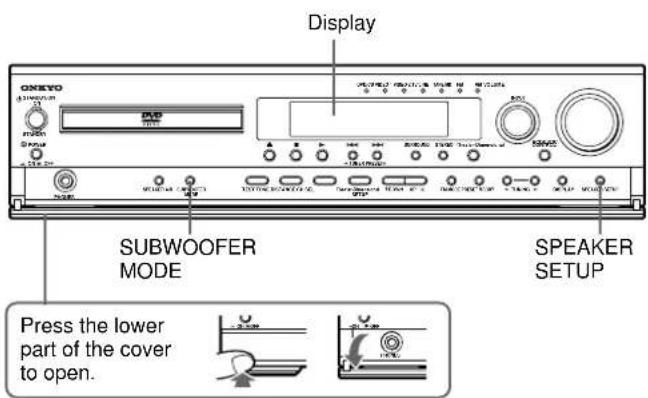
Features
■ Receiver Features
- 5 · 40 W/Ch into 6 ohms
● 96 kHz/24-Bit DAC System
● DTS* & Dolby** Digital Decoders
● Acoustic Control
● 2 Digital Inputs/1 Output - Subwoofer Preout
● 4 Audio Inputs/2 Outputs
● 2 S-Video Inputs/2 Outputs - Multichannel Theater-Dimensional***
● Easy-Set Speaker Configuration
● 30 FM/AM Random Presets
● Full-Function Learning Remote
■ DVD/CD Player Features
● DTS, Dolby Digital, and PCM Compatible
● Component-Video Output
● 27 MHz/10-Bit Video DAC
● Plays DVDs, CDs, CD-Rs and Video CDs
● Enhanced Black-Level Control
● High-Resolution Onscreen Display
- 3-Mode Zoom Function
● Program Memory Playback
- Auto Last Play
● Dual-Wavelength Optical Pickup
● Sand-Blasted Aluminum Front Panel
* Manufactured under license from Digital Theater Systems, Inc. US Pat. No.5,451,942 and other worldwide patents issues and pending, "DTS" and "DTS Digital Surround" are trademarks of Digital Theater Systems, Inc. ©1996 Digital Theater Systems, Inc. All Rights reserved.
** Manufactured under license from Dolby Laboratories. "Dolby", "Pro Logic" and the double-D symbol are trademarks of Dolby Laboratories. Confidential Unpublished Works. ©1992-1997 Dolby Laboratories. All rights reserved.
*** "Theater-Dimensional" and are trademarks of Onkyo Corporation.
Memory Preservation
This unit does not require memory preservation batteries. A built-in memory power backup system preserves the contents of memory during power failures and even when the POWER switch is set to OFF.
The POWER switch must be set to ON in order to charge the backups system. The memory preservation period after the unit has been turned off varies depending on climate and placement of the unit. On average, memory contents are protected over a period of a few weeks after the time the unit has been turned off. This period is shorter when the unit is exposed to a very humid climate.
Supplied Accessories
Make sure your box contains everything listed below. If any pieces are missing, contact your nearest Onkyo dealer.
The number of accessories is indicated in brackets.
natural_image
Line drawing of a person standing with hands placed on a table (no text or symbols)![Remote controller (RC-437M) [1] Batteries (size AA/R6/UM3) [2]](/content/2026/05/815336/images/0633c7374435f56d1872338e8b1794fa63ad90cfa4073ea58943754142a3cc7a.jpg)
![FM outdoor antenna (aerial) adapter [1]](/content/2026/05/815336/images/d72cff8f7f6eca7a55fb03d1570c404aa9b7b72ef87ab425bd1458d281315511.jpg)
![FM antenna (aerial) [1] AM loop antenna (aerial) [1]](/content/2026/05/815336/images/9058a71134ea8e3c2f75fd40a595aff5451f619f0eb5315584db71e17f126a4f.jpg)

natural_image
Simple line drawing of a device with a cable and rectangular base (no text or symbols)![Audio/video connection cable [1]](/content/2026/05/815336/images/3a136b247a83f0af4bc86f73f0ead7cf3646595d20175a53a9fe8b70ea042811.jpg)
![S video cable [1]](/content/2026/05/815336/images/05b1c40a09ab9cba2ce9415e0c395f2caaf103a463b8160b7de2fd9ac4b5f836.jpg)
Preparing the Remote Controller
Inserting the Batteries
① Detach the battery cover.
②Insert the two size AA/R6/UM3 batteries.
Be sure to match the + and - ends of the batteries with the diagram inside the battery compartment.
③Attach the battery cover.
Notes
- When the batteries are getting weak, the SEND/LEARN indicator on the remote controller starts flashing. In this case, replace the batteries with new ones.
For the other functions of this indicator, see "Pointing the remote controller in the right direction" on the right, and page 63. - Do not mix new batteries with old batteries or different kinds of batteries.
• To avoid corrosion, remove the batteries if the remote controller is not to be used for a long time. - Remove dead batteries immediately to avoid damage from corrosion. If the remote controller does not operate smoothly, replace both batteries at the same time.
- The life of the supplied batteries is about six months but this varies depending on usage.
SEND/LEARN indicator
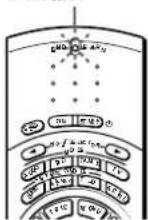
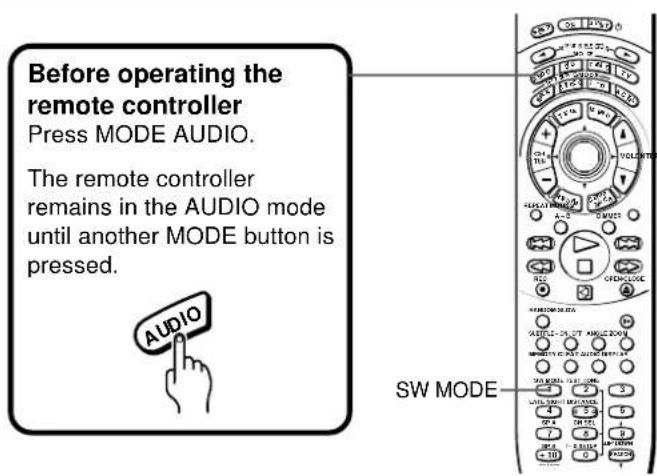
Using the Remote Controller
■ Switching the remote controller function modes
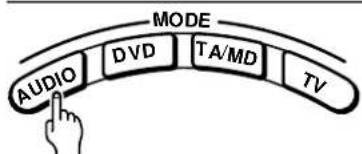
Some buttons on the remote controller have two or more functions. To set the functionality of these buttons, press one of the four MODE (AUDIO, DVD, TA/MD, TV) buttons in advance.
The function mode remains the same until another MODE button is pressed.
(Details about the functions and the related function modes are explained in each section.)

MODE buttons
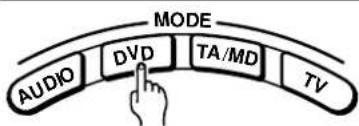
Press MODE DVD first before operating the built-in DVD player.
flowchart
graph TD
    A["AUDIO"] --> B["DVD"]
    B --> C["TA/MD"]
    C --> D["TV"]
Press MODE AUDIO first before operating the speaker setting and sound related operations.

flowchart
graph TD
    A["AUDIO"] --> B["DVD"]
    B --> C["TA/MD"]
    C --> D["TV"]
    style A fill:#f9f,stroke:#333
    style B fill:#ccf,stroke:#333
    style C fill:#cfc,stroke:#333
    style D fill:#fcc,stroke:#333
Press MODE TA/MD first before operating the Onkyo MD recorder or RI-connected cassette tape deck (see pages 12 and 31).
Press MODE TV first before operating your TV. To operate the TV with the supplied remote controller, you need to let the remote controller learn the TV remote control signals (see pages 31 and 63).
■ Pointing the remote controller in the right direction
Point the remote controller toward the remote control sensor.
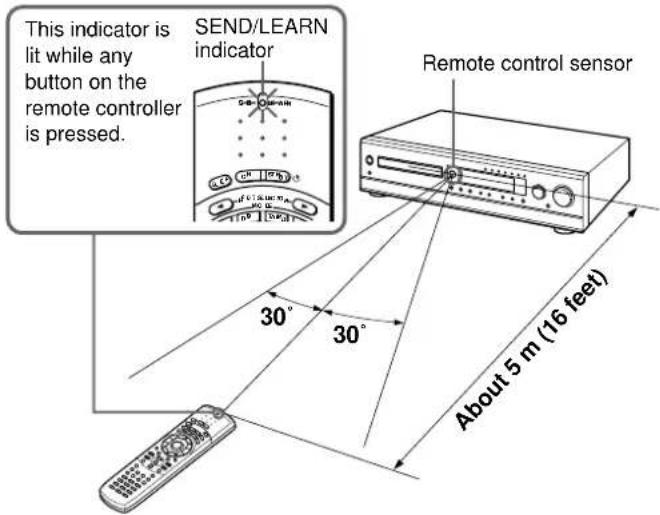
Notes
- Place the unit away from strong light such as direct sunlight or inverted fluorescent light which can prevent proper operation of the remote controller.
- Using another remote controller of the same type in the same room or using the unit near equipment which uses infrared rays may cause operational interference.
- Do not put any object (such as a book) on the remote controller. The buttons of the remote controller may be pressed by mistake and drain the batteries.
- Make sure the audio rack doors do not have colored glass. Placing the unit behind such doors may prevent proper remote controller operation.
- If there is any obstacle between the remote controller and the remote control sensor, the remote controller will not operate.
This section shows you how to handle, clean, and store discs.
playable Discs
This DVD Receiver can playback the following discs.
| Disc mark | Contents | Disc size | Maximum playback time | |
| DVD videos |  | Audio + Video (moving pictures) | 12 cm | Approx. 4 hours (single sided disc) |
| Approx. 8 hours (double sided disc) | ||||
| 8 cm | Approx. 80 minutes (single sided disc) | |||
| Approx. 160 minutes (double sided disc) | ||||
| VIDEO CDs |  | Audio + Video (moving pictures) | 12 cm | Approx. 74 minutes |
| 8 cm | Approx. 20 minutes | |||
| Audio CDs* |  | Audio | 12 cm | Approx. 74 minutes |
| 8 cm (CD single) | Approx. 20 minutes |
* Finalized CD-Rs are also playable. Such CD-Rs that TOC (Table of Contents) information (such as truck numbers) are recorded on to the PMA — a special area in the disc is described as finalized CD-Rs.
- You cannot playback discs other than those listed above.
- You cannot play discs such as CD-RW, CD-ROM, DVD-RAM, DVD-RW, etc., even if the marks in the above table are labeled on those discs.
- This DVD Receiver uses the PAL/NTSC color system, and cannot playback DVD videos recorded in any other color system (SECAM, etc.).
- Avoid using heart-shaped or octagonal discs. Playing irregularly shaped discs may damage the internal mechanism of the DVD Receiver.

- Do not use discs that have residue from adhesive tape, rental discs that have peeling labels, or discs that have custom labels or stickers. Otherwise, you may not be able to eject the discs or the DVD Receiver may become inoperative.
Handling Discs
- Do not touch the playback side of the disc.

- Do not attach paper or tape to discs.

Cleaning Discs
- Fingerprints and dust on the disc cause picture and sound deterioration. Wipe the disc from the center outwards with a soft cloth. Always keep the disc clean.

- If you cannot wipe off the dust with a soft cloth, wipe the disc lightly with a slightly moistened soft cloth and finish with a dry cloth.
- Do not use any type of solvent such as thinner, benzine, commercially available cleaners or antistatic spray for vinyl LPs. It may damage the disc.
Storing Discs
- Do not store discs in a place subject to direct sunlight or near heat sources.
- Do not store discs in places subject to moisture and dust such as a bathroom or near a humidifier.
- Store discs vertically in a case. Stacking or placing objects on discs outside of their case may cause warping.
About VIDEO CDs
This DVD Receiver supports VIDEO CDs equipped with the PBC (Version 2.0) function. (PBC is the abbreviation for Playback Control.)
You can enjoy two playback variations depending on the type of disc.
• VIDEO CD not equipped with PBC function (Version 1.1)
Sound and movies can be played on this DVD Receiver in the same way as an audio CD.
- VIDEO CD equipped with PBC function (Version 2.0)
In addition to operation of a VIDEO CD not equipped with the PBC function, you can enjoy playback with interactive software and search function using the menu displayed on the TV screen (Menu Playback). Some of the functions described in this Instruction Manual may not work with some discs.
Notes on Copyright
It is forbidden by law to copy, broadcast, show, broadcast on cable, play in public, and rent copyrighted material without permission.
DVD videos are copy protected, and any recordings made from these discs will be distorted.
This product incorporates copyright protection technology that is protected by method claims of certain U.S. patents and other intellectual property rights owned by Macrovision Corporation and other rights owners. Use of this copyright protection technology must be authorized by Macrovision Corporation, and is intended for home and other limited viewing uses only unless otherwise authorized by Macrovision Corporation. Reverse engineering or disassembly is prohibited.
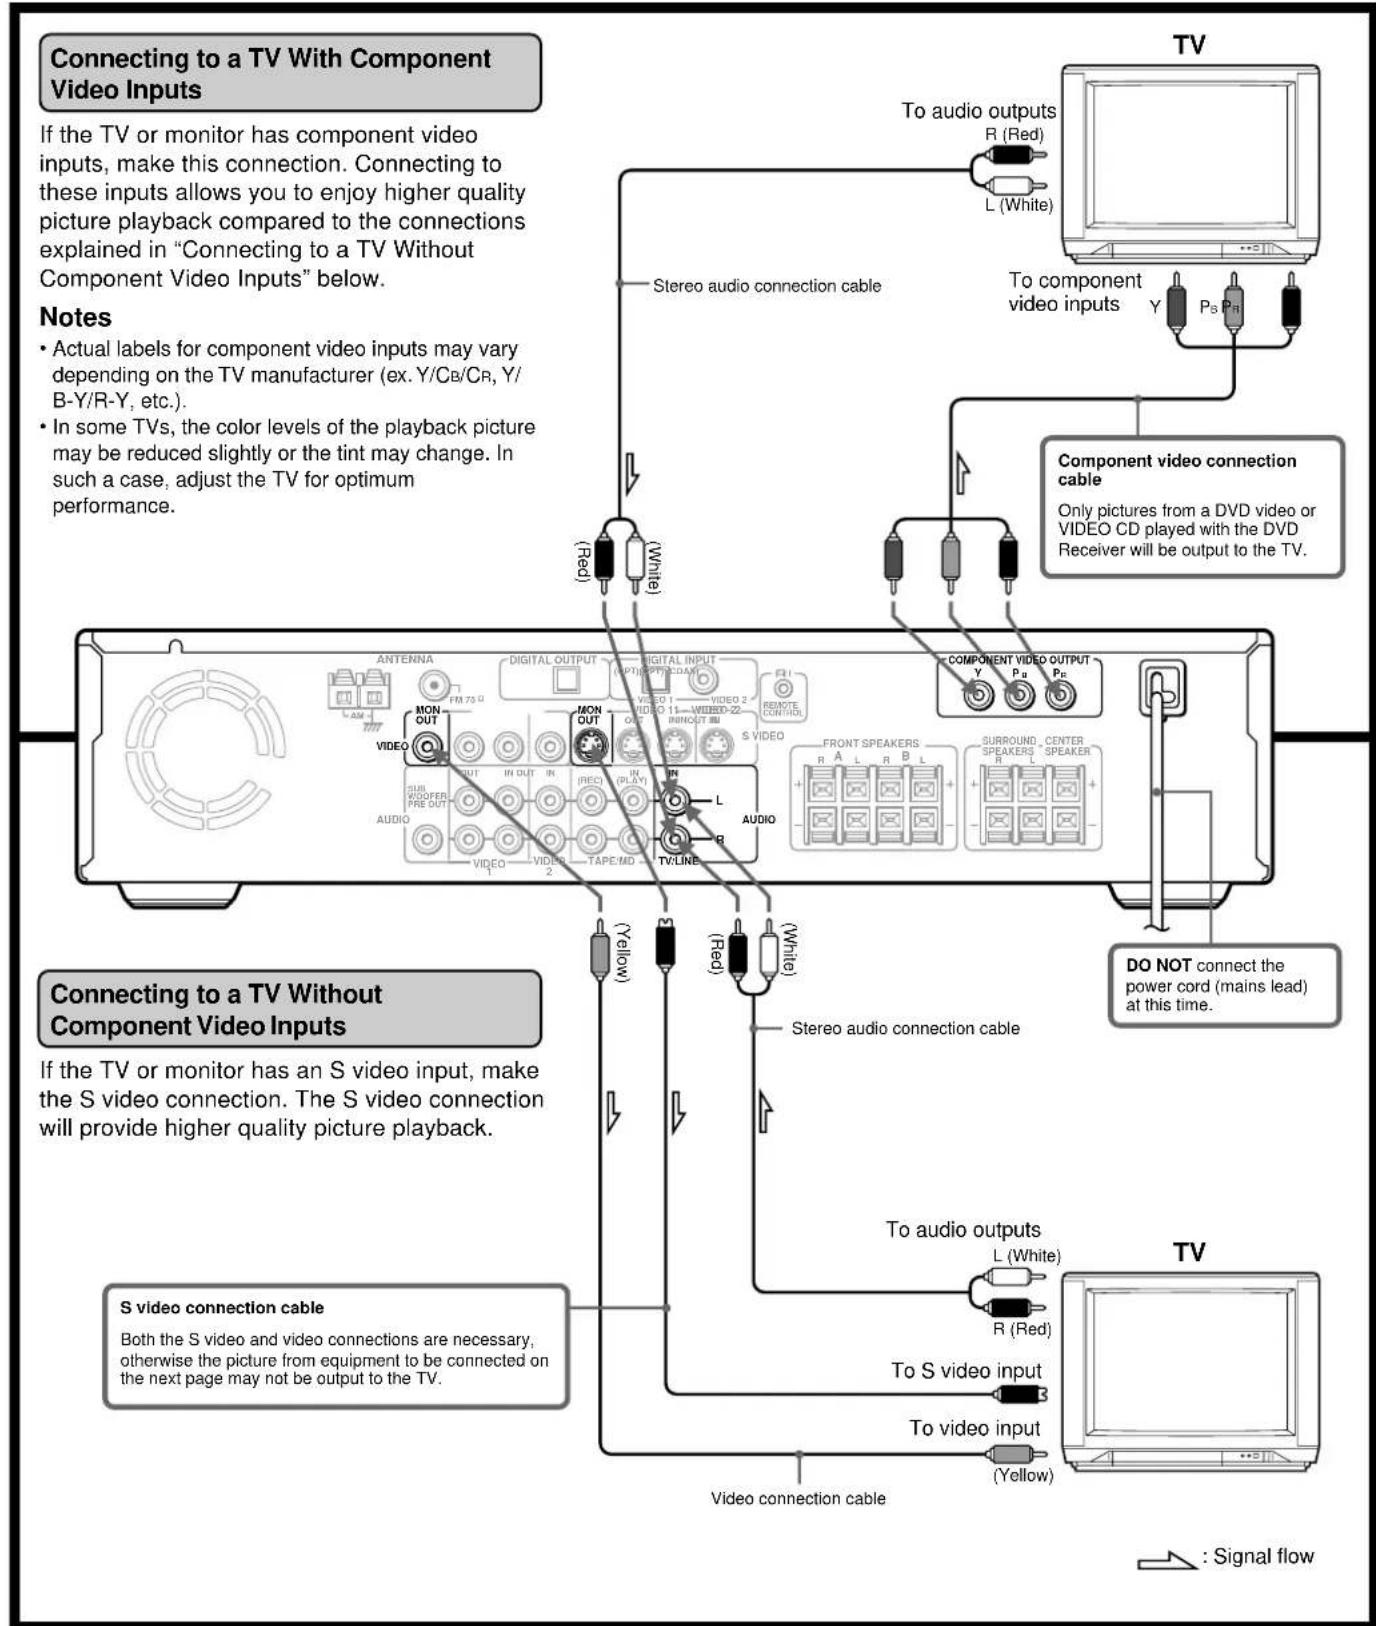
Connecting to a TV
Before connecting
• Refer also to the instruction manual of the TV.
- When you connect the DVD Receiver to the TV, be sure to turn off the power and unplug both the units from the mains before making any connections.
- Connect the DVD Receiver to the TV directly. If you connect the DVD Receiver to a VCR, TV/VCR combination, or video selector, the playback picture may be distorted as DVD videos are copy protected.
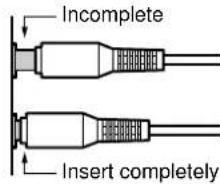
- Connect the plugs securely.
- Note that one audio/video connection cable and one S video connection cable are supplied.
flowchart
graph TD
    A["TV"] --> B["To audio outputs R (Red)"]
    A --> C["L (White)"]
    A --> D["To component video inputs Y"]
    A --> E["Ps PR"]
    A --> F["Component video connection cable"]
    G["TV Without Component Video Inputs"] --> H["Antenna"]
    G --> I["Digital Output"]
    G --> J["Digital Input"]
    G --> K["Remote Control"]
    G --> L["Front Speakers"]
    G --> M["Surround Center Speaker"]
    G --> N["Audio"]
    G --> O["Video 1"]
    G --> P["Video 2"]
    G --> Q["Tape/MD"]
    G --> R["TV/LINE"]
    G --> S["(Red)"]
    G --> T["(White)"]
    U["TV Without Component Video Inputs"] --> V["(Yellow)"]
    U --> W["(Red)"]
    U --> X["(White)"]
    Y["TV Without Component Video Inputs"] --> Z["(Yellow)"]
    Y --> AA["(Red)"]
    Y --> AB["(White)"]
    AC["Connecting to a TV With Component Video Inputs"] --> AD["Actual labels for component video inputs may vary depending on the TV manufacturer (ex. Y/CB/CR, Y/B-Y/R-Y, etc.)"]
    AC --> AE["In some TVs, the color levels of the playback picture may be reduced slightly or the tint may change. In such a case, adjust the TV for optimum performance."]
    AF["Connecting to a TV Without Component Video Inputs"] --> AG["S video connection cable"]
    AH["TV Without Component Video Inputs"] --> AI["Both the S video and video connections are necessary, otherwise the picture from equipment to be connected on the next page may not be output to the TV."]
    AJ["TO audio outputs L (White)"]
    AK["TO audio outputs R (Red)"]
    AL["TO S video input B"]
    AM["TO video input (Yellow)"]
    AN["DO NOT connect the power cord (mains lead) at this time."]
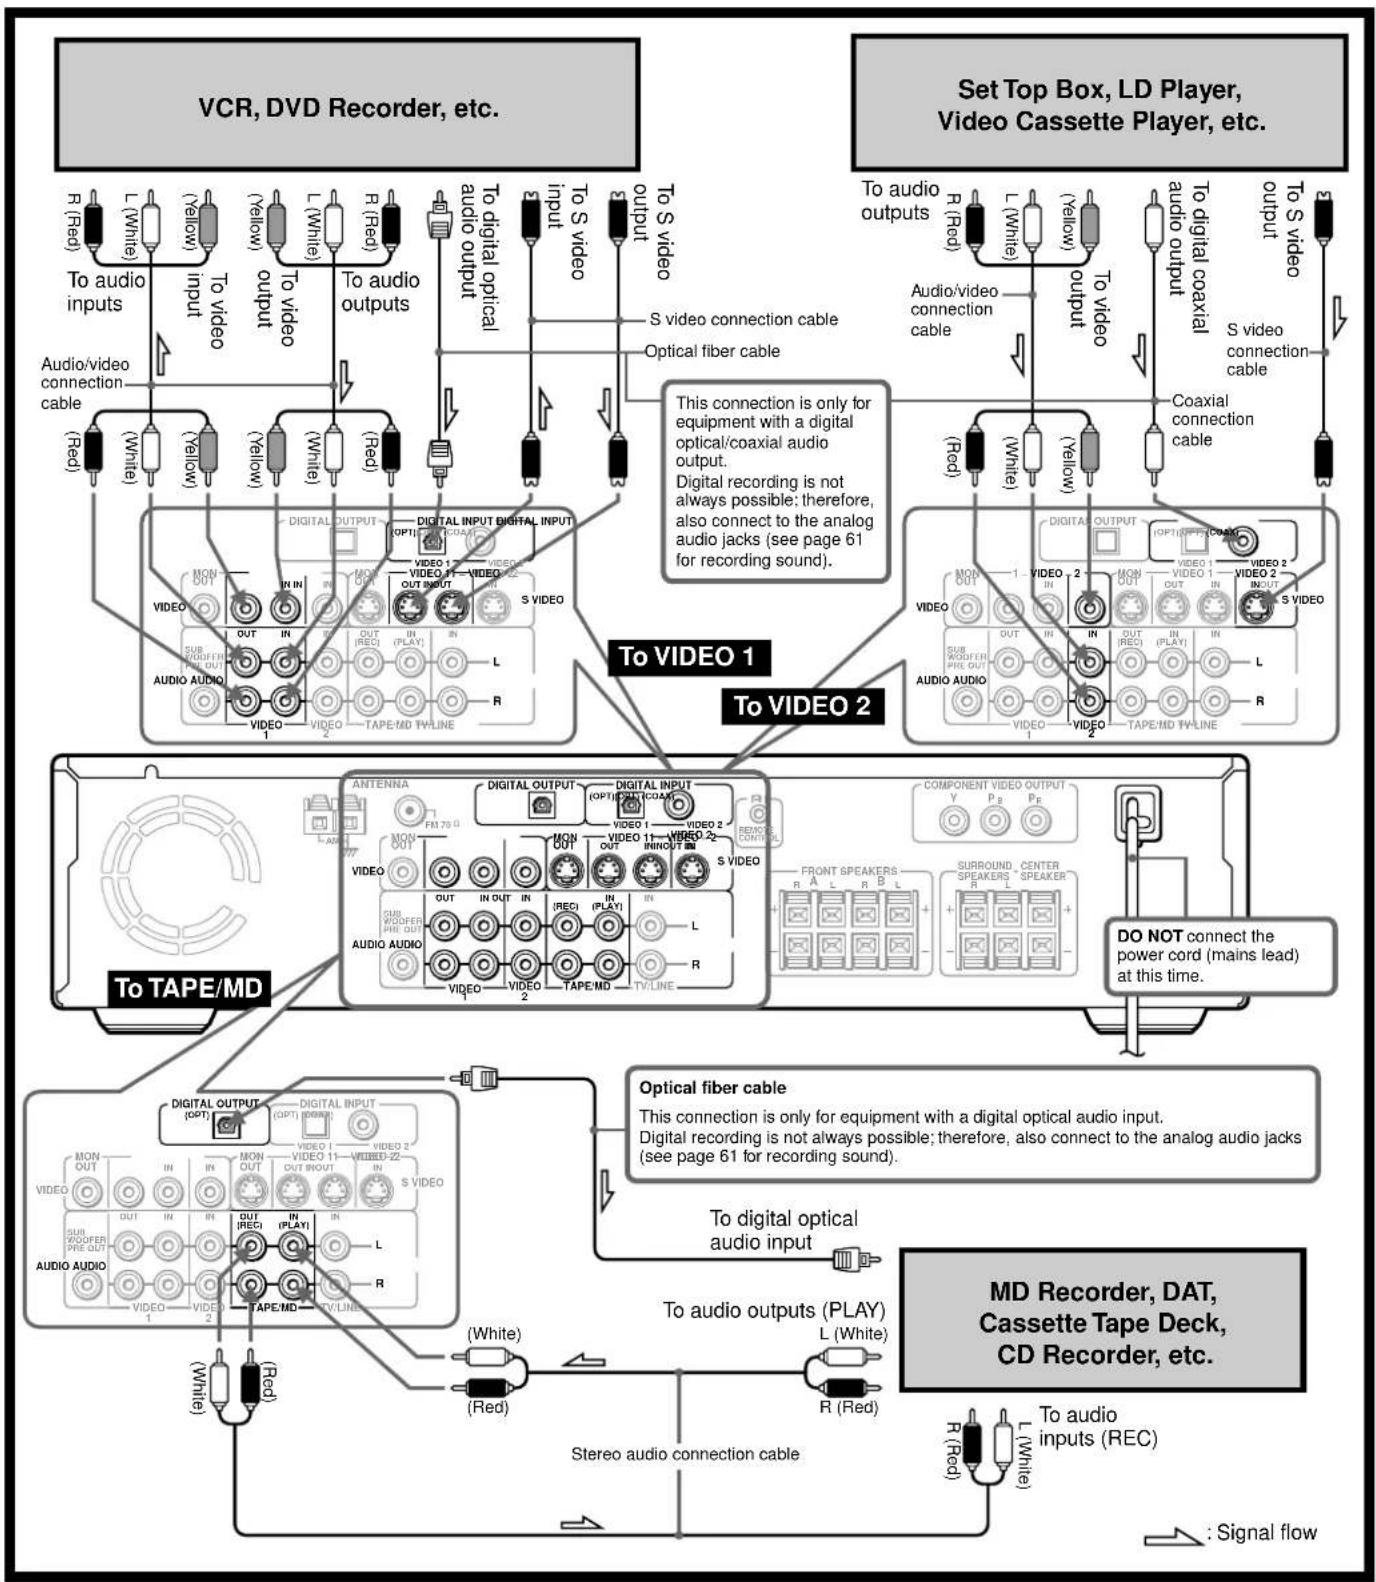
Connecting to Audio/Video Equipment
Before connecting
- Refer also to the instruction manual of each component to be connected.
- When you connect the DVD Receiver to audio/video equipment, be sure to turn off the power and unplug all the units from the mains before making any connections.
- About the DIGITAL INPUT (OPT) and DIGITAL OUTPUT (OPT) connectors
Remove the protective caps before making connections. When not in use, be sure to replace them.
- About the VIDEO 1 and VIDEO 2 jacks/connectors
The video input/output connections are also necessary even if you make the S video input/output connections. - Connect the plugs securely.
- Note that one audio/video connection cable and one S video connection cable are supplied (if not used in the connection on the opposite page).

flowchart
graph TD
    subgraph_VCR["Set Top Box, LD Player, Video Cassette Player"]
        A1["VCR"] --> A2["To audio inputs"]
        A2 --> A3["To video output"]
        A3 --> A4["To audio outputs"]
        A4 --> A5["To digital optical audio output"]
        A5 --> A6["To S video output"]
        A6 --> A7["S video connection cable"]
        A7 --> A8["Optical fiber cable"]
        A8 --> A9["To video 1"]
        A9 --> A10["To video 2"]
        A10 --> A11["To video 1"]
        A11 --> A12["To video 2"]
        A12 --> A13["To video 1"]
        A13 --> A14["To video 2"]
        A14 --> A15["To video 1"]
        A15 --> A16["To video 2"]
        A16 --> A17["To video 1"]
        A17 --> A18["To video 2"]
        A18 --> A19["To video 1"]
        A19 --> A20["To video 2"]
    end

    subgraph_SetTopBox["Set Top Box, LD Player, Video Cassette Player"]
        B1["VCR"] --> B2["R (Red)"]
        B2 --> B3["L (White)"]
        B3 --> B4["To audio inputs"]
        B4 --> B5["To video output"]
        B5 --> B6["To video outputs"]
        B6 --> B7["To audio outputs"]
        B7 --> B8["To digital optical audio output"]
        B8 --> B9["To S video output"]
        B9 --> B10["To S video output"]
        B10 --> B11["S video connection cable"]
        B11 --> B12["Optical fiber cable"]
        B12 --> B13["To video 1"]
        B13 --> B14["To video 2"]
        B14 --> B15["To video 1"]
        B15 --> B16["To video 2"]
        B16 --> B17["S VIDEO"]
        B17 --> B18["TO VIDEO 1"]
        B18 --> B19["TO VIDEO 2"]
        B19 --> B20["TO VIDEO 1"]
        B20 --> B21["S VIDEO"]
        B21 --> B22["TO VIDEO 2"]
    end

    subgraph_ToVideo["To Video 1"]
        C1["VCR"] --> C2["R (Red)"]
        C2 --> C3["L (White)"]
        C3 --> C4["To audio inputs"]
        C4 --> C5["To video output"]
        C5 --> C6["To audio outputs"]
        C6 --> C7["To digital optical audio output"]
        C7 --> C8["To S video output"]
        C8 --> C9["S video connection cable"]
        C9 --> C10["To audio outputs"]
        C10 --> C11["S video connection cable"]
        C11 --> C12["To video 1"]
        C12 --> C13["To video 2"]
        C13 --> C14["S VIDEO"]
        C14 --> C15["TO VIDEO 1"]
        C15 --> C16["TO VIDEO 2"]
        C16 --> C17["S VIDEO"]
        C17 --> C18["S VIDEO"]
        C18 --> C19["S VIDEO"]
        C19 --> C20["S VIDEO"]
    end

    subgraph ToVideo_2
        D1["VCR"] --> D2["R (Red)"]
        D2 --> D3["L (White)"]
        D3 --> D4["To audio inputs"]
        D4 --> D5["To video output"]
        D5 --> D6["To audio outputs"]
        D6 --> D7["S VIDEO"]
        D7 --> D8["S VIDEO"]
        D8 --> D9["S VIDEO"]
        D9 --> D10["S VIDEO"]
        D10 --> D11["S VIDEO"]
        D11 --> D12["S VIDEO"]
        D12 --> D13["S VIDEO"]
        D13 --> D14["S VIDEO"]
        D14 --> D15["S VIDEO"]
        D15 --> D16["S VIDEO"]
        D16 --> D17["S VIDEO"]
    end

    subgraph_ToTAPE["To TAPE/MD"]
        E1["VCR"] --> E2["R (Red)"]
        E2 --> E3["L (White)"]
        E3 --> E4["To audio inputs"]
        E4 --> E5["To video output"]
        E5 --> E6["S VIDEO"]
        E6 --> E7["S VIDEO"]
        E7 --> E8["S VIDEO"]
        E8 --> E9["S VIDEO"]
    end

    subgraph ToAudio
        F1["VCR"] --> F2["R (Red)"]
        F2 --> F3["L (White)"]
        F3 --> F4["To audio inputs"]
        F4 --> F5["To video output"]
        F5 --> F6["S VIDEO"]
        F6 --> F7["S VIDEO"]
        F7 --> F8["S VIDEO"]
    end

    subgraph ToAudio_2
        G1["VCR"] --> G2["R (Red)"]
        G3["L (White)"]
        G4["S VIDEO"] --> G5["S VIDEO"] & G6["S VIDEO"] & G7["S VIDEO"] & G8["S VIDEO"] & G9["S VIDEO"] & G10["S VIDEO"] & G11["S VIDEO"] & G12["S VIDEO"] & G13["S VIDEO"] & G14["S VIDEO"] & G15["S VIDEO"] & G16["S VIDEO"] & G17["S VIDEO"] & G18["S VIDEO"] & G19["S VIDEO"] & G20["S VIDEO"] & G21["S VIDEO"] & G22["S VIDEO"] & G23["S VIDEO"] & G24["S VIDEO"] & G25["S VIDEO"] & G26["S VIDEO"] & G27["S VIDEO"] & G28["S VIDEO"] & G29["S VIDEO"] & G30["S VIDEO"] & G31["S VIDEO"] & G32["S VIDEO"] & G33["S VIDEO"] & G34["S VIDEO"] & G35["S VIDEO"] & G36["S VIDEO"] & G37["S VIDEO"] & G38["S VIDEO"] & G39["S VIDEO"] & G40["S VIDEO"] & G41["S VIDEO"] & G42["S VIDEO"] & G43["S VIDEO"] & G44["S VIDEO"] & G45["S VIDEO"] & G46["S VIDEO"] & G47["S VIDEO"] & G48["S VIDEO"] & G49["S VIDEO"] & G50["S VIDEO"] & G51["S VIDEO"] & G52["SVIDEO"] & G53["SVIDEO"] & G54["SVIDEO"] & G55["SVIDEO"] & G56["SVIDEO"] & G57["SVIDEO"] & G58["SVIDEO"] & G59["SVIDEO"] & G60["SVIDEO"] & G61["SVIDEO"] & G62["SVIDEO"] & G63["SVIDEO"] & G64["SVIDEO"] & G65["SVIDEO"] & G66["SVIDEO"] & G67["SVIDEO"] & G68["SVIDEO"] & G69["SVIDEO"] & G70["SVIDEO"] & G71["SVIDEO"] & G72["SVIDEO"] & G73["SVIDEO"] & G74["SVIDEO"] & G75["SVIDEO"] & G76["SVIDEO"] & G77["SVIDEO"] & G78["SVIDEO"] & G79["SVIDEO"] & G80["SVIDEO"] & G81["SVIDEO"] & G82["SVIDEO"] & G83["SVIDEO"] & G84["SVIDEO"] & G85["SVIDEO"] & G86["SVIDEO"] & G87["SVIDEO"] & G88["SVIDEO"] & G89["SVIDEO"] & G90["SVIDEO"] & G91["SVIDEO"] & G92["SVIDEO"] & G93["SVIDEO"] & G94["SVIDEO"] & G95["SVIDEO"] & G96["SVIDEO"] & G97["SVIDEO"] & G98["SVIDEO"] & G99["SVIDEO"] & H00["DO NOT connect the power cord (mains lead) at this time"]

    subgraph ToAudio
        I["Antenna"] --> I
    end

    subgraph ToAudio_2
        J[Antenna Audio Audio Audio Audio Audio Audio Audio Audio Audio Audio Audio Audio Audio Audio Audio Audio Audio Audio Audio Audio Audio Audio Audio Audio Audio Audio Audio Audio Audio Audio Audio Audio Audio Audio Audio Audio Audio Audio Audio Audio Audio Audio Audio Audio Audio Audio Audio Audio Audio Audio Audio Audio Audio Audio Audio Audio Audio Audio Audio Audio Audio Audio Audio Audio Audio Audio Audio Audio Audio Audio Audio Audio Audio Audio Audio Audio Audio Audio Audio Audio Audio Audio Audio Audio Audio Audio Audio Audio Audio Audio Audio Audio Audio Audio Audio Audio Audio Audio Audio Audio Video
    end

    subgraph ToAudio_2
        K[Antenna Digital Output
            |
    end

    subgraph ToAudio_2
        L[Antenna Digital Input
            |
    end

    subgraph ToAudio_2
        M[Antenna Digital Output
            |
    end

    subgraph ToAudio_2
        N[Antenna Digital Input
            |
    end

    subgraph ToAudio_2
        O[Antenna Digital Output
            |
    end

    subgraph ToAudio_2
        P[Antenna Digital Input
            |
    end

    subgraph ToAudio_2
        Q[Antenna Digital Output
            |
    end

    subgraph ToAudio_2
        R[Antenna Digital Input
            |
    end

    subgraph ToAudio_2
        S[Antenna Digital Output
            |
    end

    subgraph ToAudio_2
        T[Antenna Digital Input
            |
    end

    subgraph ToAudio_2
        U[Antenna Digital Output
            |
    end

    subgraph ToAudio_2
        V[Antenna Digital Input
            |
    end

    subgraph ToAudio_2
        W[Antenna Digital Output
            |
    end

    subgraph ToAudio_2
        X[Antenna Digital Input
            |
    end

    subgraph ToAudio_2
        Y[Antenna Digital Output
            |
    end

    subgraph ToAudio_2
        Z[Antenna Digital Input
            |
    end

    subgraph ToAudio_2
        AA[Antenna Digital Output
            |
    end

    subgraph ToAudio_2
        AB[Antenna Digital Input
            |
    end

    subgraph ToAudio_2
        AC[Antenna Digital Output
            |
    end

    subgraph ToAudio_2
        AD[Antenna Digital Input
            |
    end

    subgraph ToAudio_2
        AE[Antenna Digital Output
            |
    end

    subgraph ToAudio_2
        AF[Antenna Digital Input
            |
    end

    subgraph ToAudio_2
        AG[Antenna Digital Output
            |
    end

    subgraph ToAudio_2
        AH[Antenna Digital Input
            |
    end

    subgraph ToAudio_2
        AI[Antenna Digital Output
            |
    end

    subgraph ToAudio_2
        AJ[Antenna Digital Input
            |
    end

    subgraph ToAudio_2
        AK[Antenna Digital Output
            |
    end

    subgraph ToAudio_2
        AL[Antenna Digital Input
            |
    end

    subgraph ToAudio_2
        AM[Antenna Digital Output
            |
    end

    subgraph ToAudio_2
        AN[Antenna Digital Input
            |
    end

    subgraph ToAudio_2
        AO[Antenna Digital Output
            |
    end

    subgraph ToAudio_2
        AP[Antenna Digital Input
            |
    end

    subgraph ToAudio_2
        AQ[Antenna Digital Output
            |
    end

    subgraph ToAudio_2
        AR[Antenna Digital Input
            |
    end

    subgraph ToAudio_2
        AS[Antenna Digital Output
            |
    end

    subgraph ToAudio_2
        AT[Antenna Digital Input
            |
    end

    subgraph ToAudio_2
        AU[Antenna Digital Output
            |
    end

    subgraph ToAudio_2
        AV[Antenna Digital Input
            |
    end

    subgraph ToAudio_2
        AW[Antenna Digital Output
            |
    end

    subgraph ToAudio_2
        AX[Antenna Digital Input
            |
    end

    subgraph ToAudio_2
        AY[Antenna Digital Output
            |
    end

    subgraph ToAudio_2
        AZ[Antenna Digital Input
            |
    end

    subgraph ToAudio_2
        BA[Antenna Digital Output
            |
    end

    subgraph ToAudio_2
        BB[Antenna Digital Input
            |
    end

    subgraph ToAudio_2
        BC[Antenna Digital Output
            |
    end

    subgraph ToAudio_2
        BD[Antenna Digital Input
            |
    end

    subgraph ToAudio_2
        BE[Antenna Digital Output
            |
    end

    subgraph ToAudio_2
        BF[Antenna Digital Input
            |
    end

    subgraph ToAudio_2
        BG[Antenna Digital Output
            |
    end

    subgraph ToAudio_2
        BH[Antenna Digital Input
            |
    end

    subgraph ToAudio_2
        BI[Antenna Digital Output
            |
    end

    subgraph ToAudio_2
        BJ[Antenna Digital Input
            |
    end

    subgraph ToAudio_2
        BK[Antenna Digital Output
            |
    end

    subgraph ToAudio_2
        BL[Antenna Digital Input
            |
    end

    subgraph ToAudio_2
        BM[Antenna Digital Output
            |
    end

    subgraph ToAudio_2
        BN[Antenna Digital Input
            |
    end

    subgraph ToAudio_2
        BO[Antenna Digital Output
            |
    end

    subgraph ToAudio_2
        BP[Antenna Digital Input
            |
    end

    subgraph ToAudio_2
        BPB[Antenna Digital Output
R I Connection for the Onkyo Cassette Tape Deck
The supplied remote controller has the following three extended functions in addition to operating the DVD Receiver:
- First, operating the TV (see page 31),
- Second, operating the Onkyo MD recorder (no RI connection is needed) (see page 31), and
- Third, operating the RI connected Onkyo cassette tape deck through the DVD Receiver (see page 31).
To use the third function, you need to make the RI connection between the cassette tape deck and the DVD Receiver. The RI cable to make the RI connection is supplied with the cassette tape deck.
If you start playing back the cassette tape deck after making the RI connection, the DVD Receiver automatically changes its input source to the cassette tape deck — Direct Change function.

Notes
- Connect the plugs securely.
- Be sure to connect to the RI connectors using the RI cable.
- The connections on page 11 are needed even if RI connection is made.
- Do not connect the DVD Receiver's RI connector to any component other than an Onkyo product. It may cause malfunction.
Positioning Speakers
Two speaker systems (SPEAKERS A and SPEAKERS B) can be connected to the DVD Receiver.
The SPEAKERS A system is to be placed in the main room, and the SPEAKERS B system is to be placed in a second room.
The configuration of the SPEAKERS A system
The SPEAKERS A system consists of the front left, center, and right speakers, surround left and right speakers, and subwoofer.
You can reproduce the sounds such as Dolby surround and DTS surround.
The configuration of the SPEAKERS B system
The SPEAKERS B system consists of the front left and right speakers.
You can reproduce only monaural and stereo sounds.
■ Standard speaker placement of the SPEAKERS A system
Speaker placement plays an important role in the reproduction of Surround sound. The placement of the speakers varies depending on the size of the room and the wall coverings used in the room. The illustration below shows an example of a layout for standard speaker placement. Refer to this example when you position the speakers in order to experience the best of Surround sound.
For ideal Surround effects, all speakers should be installed.
If a center speaker or subwoofer is not connected, the sound from the unused channel is distributed to the connected speakers in order to reproduce the best Surround sound possible.
Front
The center speaker reproduces a richer sound image by enhancing the perception of the sound's source and movement.
The left, right, and center speakers should face the seated listener and be placed at ear level.
Surround
The surround speakers reproduce the feel of a moving sound while creating the sensation of being in the middle of the action.
Place the left and right surround speakers 1 meter (3 feet) above the listener's ear level and facing toward the sides of the room, making sure that the listener is within the speakers' dispersion angle.
flowchart
graph TD
    TV["TV"] --> FrontLeftSpeaker["Front left Speaker"]
    TV --> Subwoofer["Sub-woofer"]
    TV --> FrontCenterSpeaker["Front Center Speaker"]
    TV --> FrontRightSpeaker["Front right Speaker"]
    FrontLeftSpeaker --> SurroundLeftSpeaker["Surround left Speaker"]
    Subwoofer --> SurroundLeftSpeaker
    FrontCenterSpeaker --> SurroundLeftSpeaker
    FrontRightSpeaker --> SurroundRightSpeaker["Surround right Speaker"]
Subwoofer
Install a subwoofer with a built-in power amplifier for powerful bass sounds.
The placement of the subwoofer does not affect the final quality of the sound image much, therefore, you can install it wherever it is convenient.
Refer to the speakers' instruction manuals for details.
Connecting Speakers
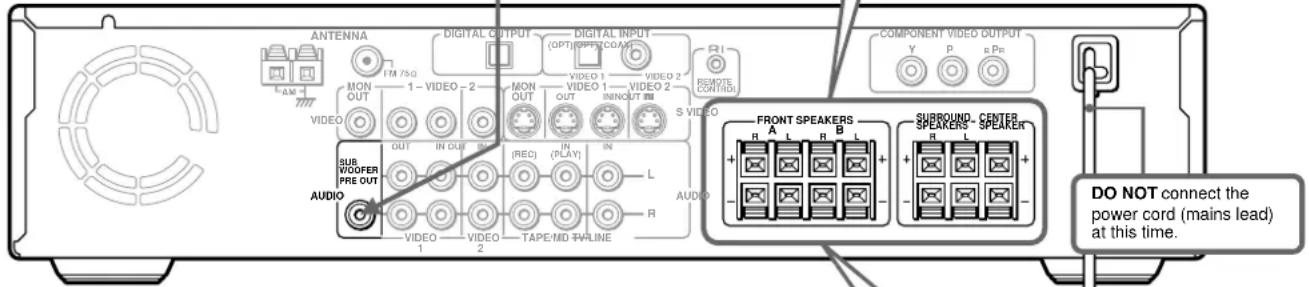
Before connecting
• Refer also to the instruction manuals of the speakers.
- This DVD Receiver is designed to reproduce optimum sound quality when speakers with the impedances specified below are connected. Please check the following information and choose speakers with appropriate impedances for the connections.
Front speakers: 6 ohms min. per speaker
Center speaker: 6 ohms min.
Surround Speakers : 6 ohms min. per speaker
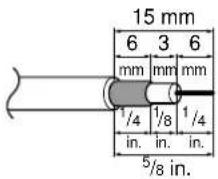
- Strip 10 mm from the end of each cord, then twist the exposed wires tightly.


- To prevent damage to circuits, never short-circuit the positive (+) and negative (−) speaker wires.
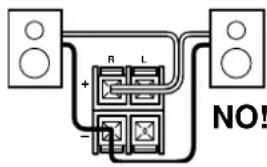
- Do not connect the speaker cable to the L and R connectors at the same time and do not connect more than one speaker to the same speaker connectors.
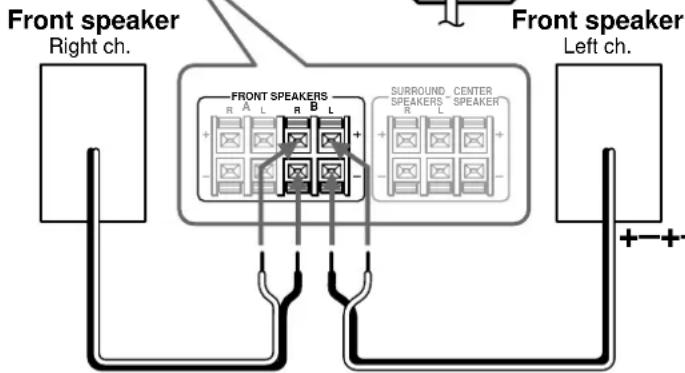
Connecting to SPEAKERS A
The main speaker system is SPEAKERS A. Follow the illustration on the right.
How to connect to the speaker connectors

Press and hold the lever.
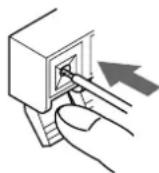
Insert the stripped end of the cord.
By releasing the lever, the lever is replaced.
Connecting to SPEAKERS B
To place the additional speaker system for the second room, make the SPEAKERS B connection on the right.
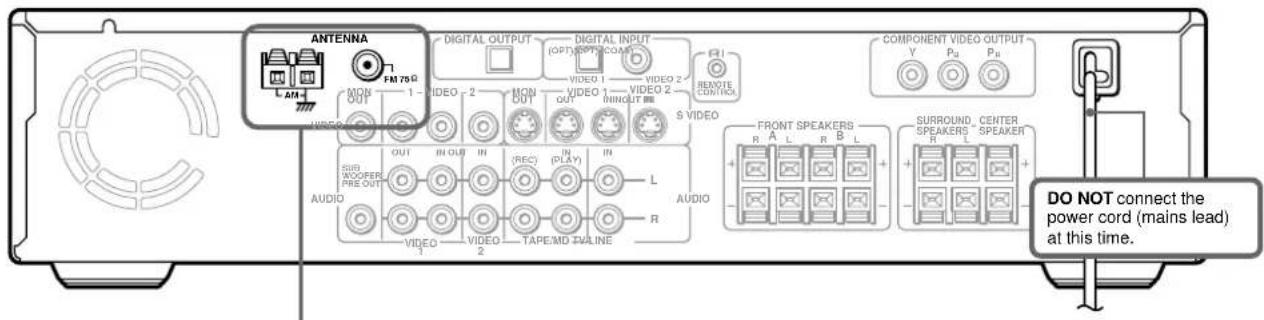
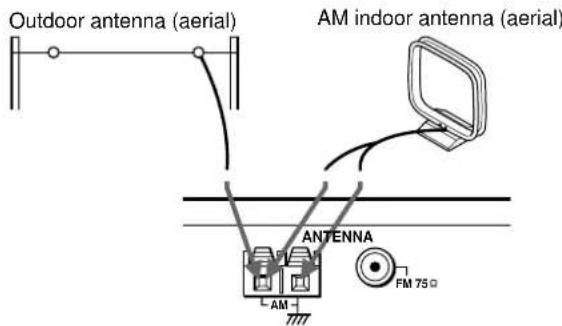
Making Antenna (Aerial) Connections
Connecting the Supplied FM and AM Indoor Antennas (Aerials)
Press up and hold the lever.
Insert the end of the cord.
Release the lever to secure the connection.
AM indoor antenna (aerial)
FM indoor antenna (aerial)
Note
Insert one end of the AM antenna (aerial) cord to either of the AM antenna (aerial) connectors and the other end to the other connector. There is no difference between one end of the AM antenna (aerial) cord and the other end unlike the speaker cords which have positive and negative poles.
■ Adjusting the position of the FM indoor antenna (aerial)
While listening to an FM program (see page 28), extend the antenna (aerial) and move it in various directions until the clearest signal is received, then secure the antenna (aerial) with push pins in the position with the least distortion.
■ Adjusting the position of the AM indoor antenna (aerial)
While listening to an AM program (see page 28), set the antenna (aerial) in the direction and position where you receive the clearest sound. Put it as far away as possible from the unit, TVs, speaker cables, and power cords (mains leads).
Connecting an AM Outdoor Antenna (Aerial)
An outdoor antenna (aerial) will be more effective if it is stretched horizontally above a window or outside.
Leave the supplied AM indoor antenna (aerial) connected.
Note
To avoid the risk of lightning and electrical shock, grounding is necessary. Follow item 19 of the "Important Safeguards" on page 2 when you install an outdoor antenna (aerial).
Connecting an FM Outdoor Antenna (Aerial)
If the FM reception is not very clear with the supplied antenna (aerial), connect an FM outdoor antenna (aerial) instead of the indoor FM antenna (aerial).
Connecting coaxial cable to a 75/300 ohm antenna (aerial) adapter
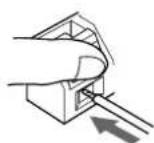
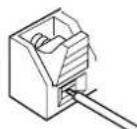
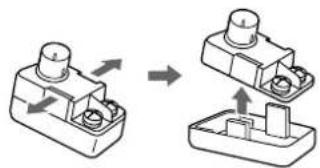
① Strip the end of the coaxial cable.
② With your fingernail or a small screwdriver, press the stoppers outward and remove the cover.
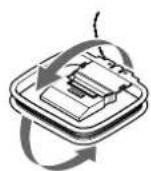
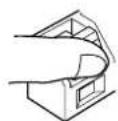
natural_image
Diagram showing two mechanical components before and after assembly, with arrows indicating direction of movement (no text or symbols)③ Remove the transformer wire A from slit B and insert it into slit C.
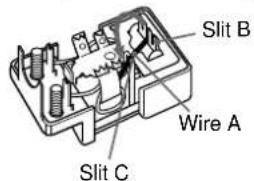
④ Insert the end of the cable. ⑤ Clamp it in place with pliers.
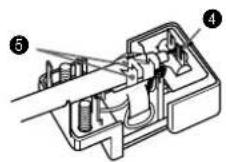
⑧Reinstall the cover.
FM outdoor antenna (aerial)

Notes
• Install the antenna (aerial) well away from tall buildings and in an area where FM stations can directly be received.
- Keep the antenna (aerial) away from noise sources (neon signs, busy roads, etc.).
- It is dangerous to put the antenna (aerial) close to power lines. Keep it well away from power lines, transformers, etc.
- To avoid the risk of lightning and electrical shock, grounding is necessary. Follow item 19 of the "Important Safeguards" on page 2 when you install the outdoor antenna (aerial).
■ Directional linkage
Do not use the same antenna (aerial) for both FM and TV (or VCR) reception since the FM and TV (or VCR) signals can interfere with each other. If you must use a common FM/TV (or VCR) antenna (aerial), use a directional linkage type splitter.
To DVD Receiver To TV (or VCR)
Connecting the Power/Turning on the DVD Receiver
Before connecting
- Make sure that all the connections from pages 10 to 15 are complete (the connection to the TV is required).
- Turning on the DVD Receiver may cause a momentary power surge, which might interfere with other electrical equipment such as computers. If this happens, use a wall outlet on a different circuit.

3 Press ⓂSTANDBY/ON on the DVD Receiver or ON on the remote controller.
The DVD Receiver turns on.
The ON indicator lights up in orange.
At the same time, the STANDBY indicator goes off.
The first time you turn on the DVD Receiver, the FIRST SETUP screen appears. In the FIRST SETUP screen, select the On-Screen Language and TV Shape according to the aspect ratio of the TV screen (see pages 54 and 55).
1 Press ▲/▼ to select "On-Screen Language," then press ENTER.
2 Select a language with ▲/▼, then press ENTER.
3 Press ▼ to select "TV Shape," then press ENTER.
4 Press ▲/▼ to select the aspect ratio of the TV screen, then press ENTER.
5 Finally press SETUP.
All of your selections are set and the FIRST SETUP screen disappears.
Notes
- To turn off the DVD Receiver, press Ⓧ STANDBY/ON on the DVD Receiver, or STNBY Ⓞ on the remote controller. The DVD Receiver enters standby mode. Be sure to set the volume to minimum before turning off the DVD Receiver.
- You can change the above settings later with "Customizing the Function Settings" on page 52.

flowchart
graph TD
    A["ENT"] --> B["ENTER"]
    B --> C["SETUP TV/VCR"]
You need to set up the speaker configuration for the speaker system connected to the SPEAKERS A connectors (see page 13.)
(There is no speaker configuration setup for the SPEAKERS B system.)
Notes
- Speaker setup cannot be done if;
- Headphones are connected (see page 33), or
– The SPEAKERS B system is On (see page 32).
- It is not necessary to set the parameters again once you have completed the setup (with one exception*) unless you change the speaker configuration.
* See "To Listen to a High-Frequency/High-Quantization Format Source in its Original Sound Quality – 96k Sound" on page 48.
Setting up the Onkyo Speakers — Smart Configuration Setting
Check that your speakers are listed in the table below.
- If any of your speakers are listed in the tables, then follow the steps in "Setting up the speaker configuration using Smart Configuration" on the next page.
- If no speaker is listed, follow the steps in “Setting up Non-Onkyo Speakers” on page 19.
■ Onkyo speakers and their identification numbers
The number to the left of each speaker model name in the tables is the speaker identification number you will use when setting the speaker configuration using Smart Configuration.
Front left and right speakers
| (Front left and right speakers must be connected.) | |
| 1 | D-105F/D-30 |
| 2 | D-205F |
| 3 | D-305F |
| 4 | D-602F/D-40 |
| 5 | D-605F |
| 6 | D-80 |
| 7 | D-202AX/D-202AXLTD |
| 9 | Other Brand |
Center Speaker
| 0 Set “0” if no center speaker is connected. |
| 1 D-105F/D-30 |
| 2 D-205F |
| 3 D-305C |
| 4 D-602F/D-40 |
| 5 D-605F |
| 6 D-80 |
| 7 SKC-301/305 |
| 8 D-30C |
| 9 Other Brand |
Surround left and right speakers
| 0 Set “0” if no surround speaker is connected. | |
| 1 D-105F/D-30 | |
| 2 D-205F | |
| 3 D-305SR | |
| 4 D-602F/D-40 | |
| 5 D-605F | |
| 6 D - 8 0 | |
| 7 SKR-301/305 | |
| 9 Other Brand |
Subwoofer
| 0 Set “0” if no subwoofer is connected. | |
| 1 SKW-205* | |
| 2 SKW-305* | |
| 3 SKW-310* | |
| 4 SKW-320* | |
| 5 SL-7 | |
| 6 SL-10 | |
| 9 Other Brand |
* Set "MOVIE/MUSIC" (of the subwoofer setting) to "MUSIC."
■ Setting up the speaker configuration using Smart Configuration
Press SPEAKER SETUP.
"SmartConfig" appears in the display, then "SP- * * * * " appears shortly after.
Note
If any display appears other than "SmartConfig," press the button repeatedly until "SmartConfig" appears.
Each “*” is the field to enter the speaker identification number.
The flashing field is currently selected.
Press ▼DOWN/UP ♠n the unit or UP ▲DOWN ♦n the remote controller to enter the speaker identification number.
Find the speaker identification number in the tables on the previous page.

Press CH SEL to select the next field.
Repeat steps 2 and 3 until you finish the subwoofer field.

Remote controller
Smart Configuration is complete when the subwoofer field is set.

Complete
Tips
- If a speaker field is set to "9," adjust its volume balance manually. See "Adjusting Each Speaker's Relative Volume Balance – Test Tone" on page 21.
- For precise setting, carry out "Setting the Distance From the Listening Position to Each Speaker" on page 20.
Setting up Non-Onkyo Speakers
■ Selecting the number of speaker channels
| Unit onlySPEAKER SETUP | Press SPEAKER SETUP repeatedly to select the number of channels for the SPEAKERS A system.Speaker 3chAlthough “SmartConfig” may appear in the display, do not select “SmartConfig” in this step.Within three seconds, press the button repeatedly. The number of channels changes as follows (the corresponding speaker configuration is described in parentheses):→SmartConfigDo not select this in this step. If “SP- * * * * * appears, you can move to the next setting by pressing SPEAKER SETUP.↓Speaker 2ch(Front left and right speakers)↓Speaker 3ch(Front left, center, and right speakers)↓Speaker 4ch(Front left and right, plus surround left and right speakers)↓Speaker 5ch(Front left, center, and right, plus surround left and right speakers) |
| The normal display resumes in three seconds.Notes• The listening mode will automatically be set to “Stereo” (see page 38) once you set or reset the number of channels.• To check the present setting while the normal display is displayed, press SPEAKER SETUP once. To change the setting, press the button repeatedly within three seconds. |
■ Setting the Subwoofer Mode
| UnitSUBWOOFER MODERemote controllerSW MODE1 | Press SUBWOOFER MODE on the unit or SW MODE on the remote controller.SW Mode 2With the first press of the button, you can check the present setting. Then each press of the button changes the subwoofer mode as follows (a tip on how to select the right subwoofer mode is in parentheses):SW Mode 2(When large-wideband-front speakers are connected)↓SW Off(When no subwoofer is connected)↓SW Mode 1(When small-with limited bass signal handling-front speakers are connected)The normal display resumes in three seconds. |
Setting the Distance From the Listening Position to Each Speaker
Before starting the procedure below, measure the distances from each speaker to the listening position.
For pair speakers such as front left and right speakers, the distance from the listening position to one speaker should be the same as the distance to the other.
In the procedure below, select the values which approximate the actual distances.
| 1UnitDISTANCERemote controllerDISTANCE5 | Press DISTANCE.The distance entry display for the front left and right speakers appears. |
| Front:12 ft3.6m | |
| 2UnitDOWN UP | Press ▼DOWN/UP ▲on the unit or UP ▲DOWN ▲on the remote controller to select the front left and right speaker distance. |
| Remote controller9UP/DOWNSEARCH | Front:14 ft4.2mYou can select a distance between 0.3 m and 9 m (1 ft. and 30 ft.). |
| 3UnitDISTANCE↓ | Press DISTANCE, then press ▼DOWN/UP ▲on the unit or UP ▲DOWN ▲on the remote controller repeatedly to select the center speaker distance. |
| Centr:11 ft3.3mYou cannot enter the following distances:Distances longer than the distance set for the front speakers.Distances shorter than the distance obtained by subtracting “1.5 m (5 ft.)” from the distance entered for the front speakers. |
| NoteIf you selected a speaker configuration with no center speaker on the page 18 or 19, this step will be skipped. | |
| 4 Unit DISTANCE↓DOWN UP Remote controller DISTANCE○5↓UP/ DOWN SEARCH | Press DISTANCE, then press ▼DOWN/UP ▲on the unit or UP /▲DOWN ▼on the remote controller repeatedly to select the surround left and right speaker distance.Surr. :11 ft3.3mYou cannot enter the following distances:• Distances longer than the distance set for the front speakers.• Distances shorter than the distance obtained by subtracting “4.5 m (15 ft.)” from the distance entered for the front speakers.NoteIf you selected a speaker configuration with no surround speakers on page 18 or 19, this step will be skipped. |
| 5 Unit DISTANCERemote controller DISTANCE○5 | Press DISTANCE.The normal display resumes. |
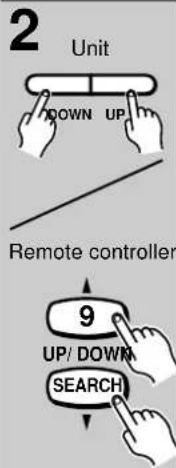
Adjusting Each Speaker's Relative Volume Balance – Test Tone
Adjust each speaker's relative volume balance so that the volumes of all speakers' test tones sound equal at the listening position.
Remote controller
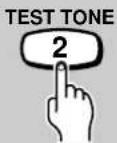
Press TEST TONE.
Each speaker emits the test tone (pink noise) and the display shows the speaker emitting the test tone in the following order:
Left → Center
(Front left ch.) (Center ch.)
↑ ↓
Subwfr Right
(Subwoofer) (Front right ch.)
↑ ↓
Surr L ← Surr R
(Surround left ch.) (Surround right ch.)

Note
No test tone will be emitted from the speaker which is not included in the speaker configuration on page 18 or 19 even if it is actually connected.
2
Unit


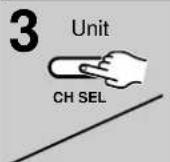
Remote controller
CH SEL


Press CH SEL repeatedly to select the speaker, then press ▼ DOWN/UP ▲ on the unit or UP ▲/DOWN ▼ on the remote controller to adjust the volume level.
The volume level can be adjusted between -12dB and +12dB.
3
Unit
Remote controller
TEST TONE

When you have completed the adjustment by repeating step 2, press TEST TONE.
The test tone stops and the normal display resumes.
Note
Even if you don't press TEST TONE, the test tone will stop after 10 cycles.
Playing DVD Videos / VIDEO CDs / Audio CDs
Before playing
- DVD Videos, VIDEO CDs, and audio CDs can be played with the DVD Receiver (see " playable Discs" on page 9). Do not play anything else.
- When playing DVD videos and VIDEO CDs, turn on the TV and set the TV to the DVD Receiver's input.
About the DVD, VCD, and CD marks in the pages related to DVD video/VIDEO CD/audio CD operation
DVD means "The function or title is related to DVD operation."
VCD means "The function or title is related to VIDEO CD operation."
CD means "The function or title is related to audio CD operation."

If the screen on the right appears – Screen Saver
If you pause a picture for a long while, the screen saver operates.
To resume normal display, press ▶.
(You can set this function to Off. See page 57.)


To play NTSC discs (Multisystem TV is needed)
VCD Set "PAL/Auto" to "Auto" using the menu explained in "Customizing the Function Settings" starting from page 52. See page 55 for direct information.
DVD VCD CD
Basic Playback
1
Press ▲.
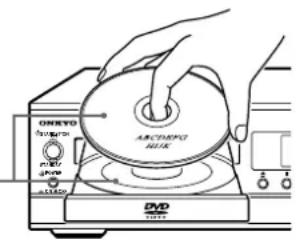
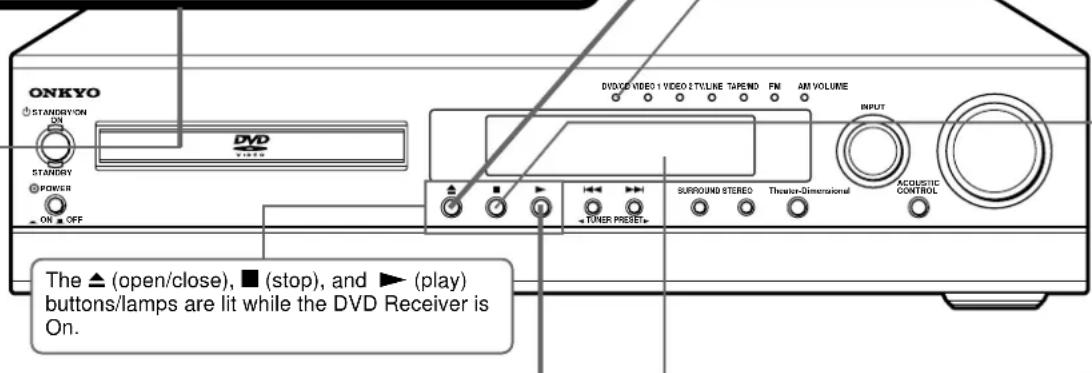
The disc tray opens.
If the DVD Player is in standby mode when the button is pressed The DVD Player turns on and the disc tray opens. In this case, it takes several seconds until the disc tray opens.
2
Place the disc on the disc tray.
Put the disc in the tray with the label side facing up. There are two different disc sizes. Place the disc in the correct guide on the disc tray.
Lit while the input source is the built-in DVD player.
CAUTION
Keep your fingers well clear of the disc tray as it is closing.
Neglecting to do so may cause serious personal injury.
3
Press ▶.
The disc tray closes and playback starts. If you press ▲ to close the tray after step 2, playback may automatically start depending on the disc.
One of the indicators, which indicate the digital sound format of the playing source, lights.
DOLBY DIGITAL, DTS, MPEG (for MPEG2 sound), PCM (2 channel digital stereo)
DOLBY DIGITAL DTS MPEG PCM
DVD
The type of the inserted disc lights. For the other information that appears in the display, see pages 50 and 51.

If a title menu appears on the TV screen
The DVD video has a title menu, or the VIDEO CD is equipped with the PBC (Playback Control) function. Follow steps 2 and 3 in "Locating a title using the title menu" on page 25.
For details about the PBC function, see "About VIDEO CDs" on page 9. To start playback with or without using the PBC function, see page 59.

If a sound selection menu appears on the TV screen
See "Enjoying the Sound Effects" on page 34 for details of the sound systems. Select the appropriate sound using ▲
▼/▲, then press ENTER (see the illustration of the remote controller on the opposite page).
For example, if you need to select either "DTS" or "Stereo," select "DTS" since the DVD Receiver is able to reproduce DTS (Digital Theater System) Surround sound.

If the sound is not reproduced from the beginning of the disc
See the first note in the lower right corner of the opposite page.

Tip to obtain a higher quality picture
Occasionally, some picture noise not usually visible during a normal broadcast may appear on the TV screen while playing a DVD video because the high resolution pictures on these discs include a lot of information. While the amount of noise depends on the TV you use, you should generally adjust the TV to reduce sharpness when viewing DVD videos.
■ To remove the disc

Press ▲ to open the disc tray.
Remove the disc after the disc tray opens completely. After removing the disc, be sure to press the button again to close the tray.
■ To pause playback (still mode)

Press (remote controller only) during playback.
To start playback, press ▶.
DVD
To play frame by frame
VCD Press repeatedly during pause. Each time you press, that picture advances one frame. To resume normal playback, press ▶.
Note
The sound is muted during still mode and frame by frame playback.
■ To stop playback

Press ■.
When you press ▶ to restart playback, playback starts from the location where you stopped playback because the location index is stored in memory.
Note
The location where playback resumes may vary depending on the disc or the stopped scene.
Resuming playback from the beginning
Press ■ again after stopping playback to clear the location index memory, then press ▶ to start playback.
DVD
Playback starts from the beginning of the current title.
To start playback from the beginning of the DVD video, open and close the disc tray (press ▲ twice), then press ▶ to start playback.
VCD
Playback starts from the beginning of the disc.
CD
Note
The location index memory will also be cleared when:
• The power cord (mains lead) is unplugged,
- The DVD Receiver has entered standby mode,
• The disc tray is opened,
- The parental lock setting is changed (see page 58) or a disc menu language is selected (see page 54), or
- The other input source is selected.
Before operating the remote controller
Press MODE DVD.

Notes
- When you start playing a CD, the sound may not be reproduced briefly while the DVD Receiver recognizes the sound system (DTS Surround or PCM). If this happens, stop playback by pressing ■ twice, then press ▶ to restart playback. The sound will be reproduced from the beginning of the disc.
- Do not move the DVD Receiver during playback. Doing so may damage the disc.
- Use ▲ on the remote controller or DVD Receiver to open and close the disc tray. Do not touch the disc tray while it is moving. Doing so may cause the DVD Receiver to malfunction.
- Do not press down on the disc tray or put any objects other than playable discs on the disc tray. Doing so may cause the DVD Receiver to malfunction.
- In many instances, a menu screen appears when playback of a movie is complete. Prolonged display of an on-screen menu may damage your television set, permanently etching that image onto its screen. To avoid this, be sure to press ■ once the movie is complete.
■ To play in fast forward or fast reverse


Press ▶▶ (Fast Forward) or ◀◀ (Fast Reverse) during playback.

The playback speed becomes two times the normal speed.
Each press of the same button changes the playback speed as follows:
Notes
- No sound is reproduced and no subtitles appear during fast forward or reverse playback.
- The · 2, · 8 , and · 30 speeds are only approximate speeds. These speeds may vary slightly from disc to disc.

With each press of the same button, the playback speed alternates with the other as follows:

To check the marks on the right while playing a CD, turn on the TV and set the TV to the DVD Receiver's input.
When ▶▶▶ is pressed
Note
No sound is reproduced and no subtitles appear while playing back a VIDEO CD, whereas the sound is reproduced while playing back an audio CD.
When is pressed

To resume normal playback, press ▶.
■ To play in slow-motion


Press ▶ during playback.
Each press of the button changes the slow-motion speed as follows:
Note
The sound is muted during slow-motion playback.
To resume normal playback, press ▶.
Various Functions While Playing Discs
To use the following functions, see page 32.
- Turning on/off the SPEAKERS A/SPEAKERS B Systems
- Adjusting the Volume
- Muting the Sound
• Listening Through Headphones - Controlling the Brightness of the Lights on the DVD Receiver
• Using the Sleep Timer
Enjoying the Sound Effects
See page 34.
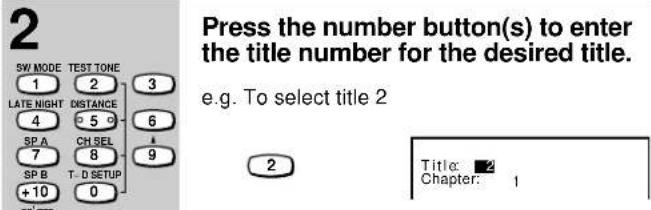
Locating a Specific Title/Chapter/Track/Location
Normally, DVD videos are divided into titles, and the titles are subdivided into chapters. VIDEO CDs and audio CDs are divided into tracks.
You can quickly locate any specific title, chapter, or track.

■ Locating a title using the title menu DVD
If a DVD video contains a title menu, you can locate a specific title using the title menu function.
1 Remote controller only

Press TITLE. (Depending on the DVD video, press MENU.)
The title menu appears on the TV screen. Example of a title menu.


Press ▲/▼ to select the title you want.
If the titles in the title menu are assigned a number, you can also directly locate a specific title by entering its assigned number using the number buttons.
Press ENTER.
The DVD Receiver starts playback from chapter 1 of the selected title.
Notes
- The instructions above describe basic procedures which may vary depending on the contents of the DVD video. If different instructions appear on the TV screen, follow those instructions.
- If you display the title menu during playback and press TITLE again without selecting any title, the DVD Receiver usually resumes playback from the point where you first pressed TITLE. (There may be exceptional cases depending on the discs.)
- This method of locating a title is available only on a disc that contains a title menu.
- Instruction notes of discs may refer to the button that displays the title menu as "TOP MENU."
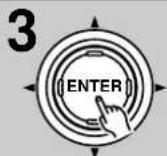
■ Locating a specific title and chapter by DVD entering the numbers
If a DVD video contains the numbers corresponding to the titles and chapters, you can locate a specific chapter in a specific title directly by entering the numbers.


If you do not need to change the chapter number appearing below the title number, skip steps 3 and 4 and go to step 5.
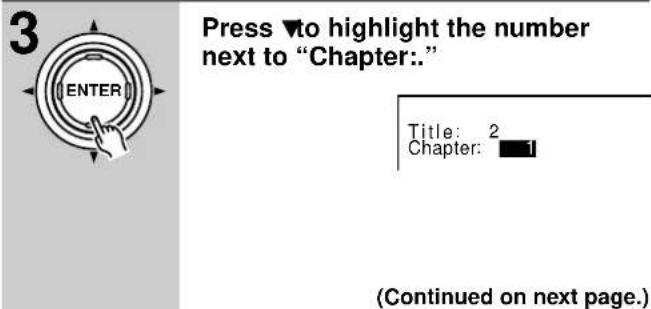
(Continued on next page.)
Notes
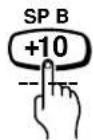
• To enter a number between 10 and 99, you can also use (plus ten button) as follows:

- This location method is available only on a disc that contains the numbers corresponding to the titles and chapters.
- To cancel the entered title and chapter numbers, press CLEAR before pressing ▶. The tile and chapter numbers in step 1 will be displayed.
- To close the Title/Chapter display, press SEARCH several times (the number of times you press SEARCH varies depending on the disc).
■ Locating a specific track directly VCD CD
You can locate the desired track by entering the number.

Notes
• To enter a number between 10 and 99, you can also use (plus ten button) as follows:


- To cancel the entered track number, press CLEAR before pressing ▶. The current track number will be displayed.
■ Locating a specific chapter or track consecutively

You can locate consecutive chapters or tracks.
Press I◄◄ or ►►I (repeatedly) to select the chapter or track you wish to start playing
Press I◄◄ once to start playback from the beginning of the current chapter or track.
Press I▶▶ repeatedly to select the former chapters or tracks in reverse order.
Press ▶▶▶I repeatedly to select the next chapter or track in order.
Notes
- Some title may not display chapter numbers.
- When you set "Title Stop" to "Off" (see page 59), you can locate consecutive chapters in another title. If you go back to the preceding title by pressing ◀◀◀, the DVD Receiver locates the first chapter of the title. When "Title Stop" is set to "On," you can locate consecutive chapters only within the current title.
- If you select the chapter or track during pause (while in still mode), you need to press ▶ to start playback.
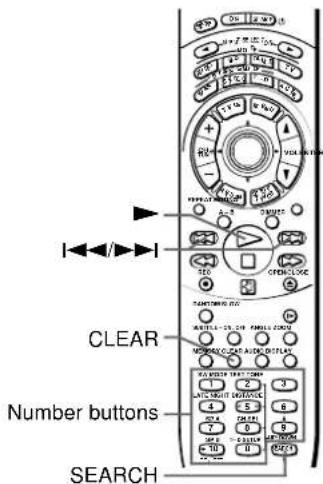
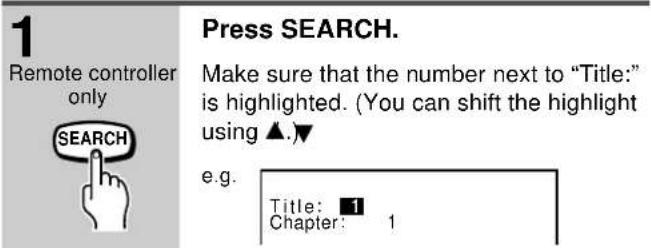
■ Locating a specific location by entering the time

You can locate a specific location by entering its corresponding time (hours, minutes, and seconds).
| 1Remote controller only | Press SEARCH twice.You may need to press the button more than twice (depending on the disc) until the following display appears.Time |
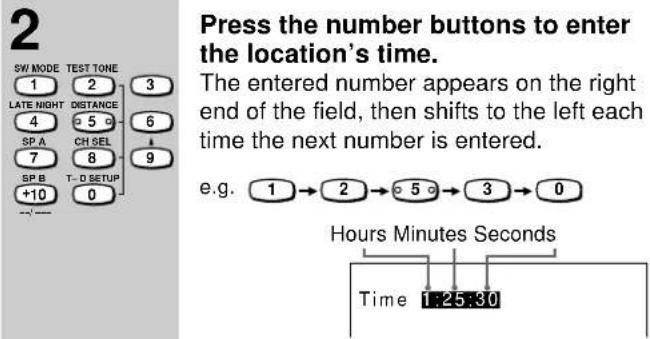 | |
| NoteIf the location time you enter exceeds the total playing time of the disc, the setting will be cancelled. | |
 |
Notes
- You can also use +10 (plus ten button) to add ten to the hours, minutes, or seconds.
- Some discs may not respond to this procedure.
• Some scenes may not be located precisely. - This method for accessing specific locations is available only within the current title of the DVD video or within the current track of the VIDEO CD/audio CD.
There are two ways to select radio stations:
- Manual tuning
- Presetting radio stations then selecting the preset channels
Tuning Manually
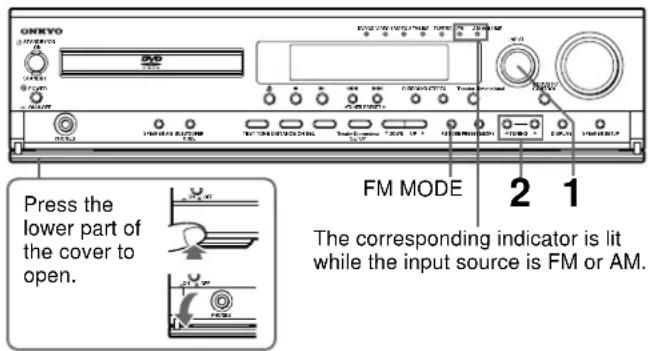
Turn INPUT to select the band (FM or AM).
e.g. When FM is selected.
$$ 8 7. 5 0 \mathrm{MHz} - - - \mathrm{ch} $$
Note
You can also select the band with the remote controller. See next page.
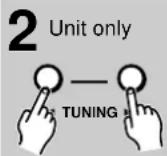
Press TUNING ◀/▶ to select the frequency.
Appears when a broadcast is received.
$$ 8 8. 1 0 M H z - - - c h $$
- The frequency changes in 50 kHz steps in FM and 9 kHz in AM each time you press TUNING /
- In FM, if either of the buttons is held continuously for more than 0.5 seconds during manual tuning, the frequencies are scanned automatically — FM auto tuning mode. When a broadcast is received, scanning stops.
Tuning in a weak frequency (only for FM stations)
When you tune in a stereo FM station, the FM ST indicator lights up if the signal is sufficiently strong.

If the signal is weak, you may not be able to tune to the station. In this case, press FM MODE. The FM MUTE indicator goes off. Then select the station to which you want to listen.
(At this time, the station will be in mono and interstation noise will be heard.)


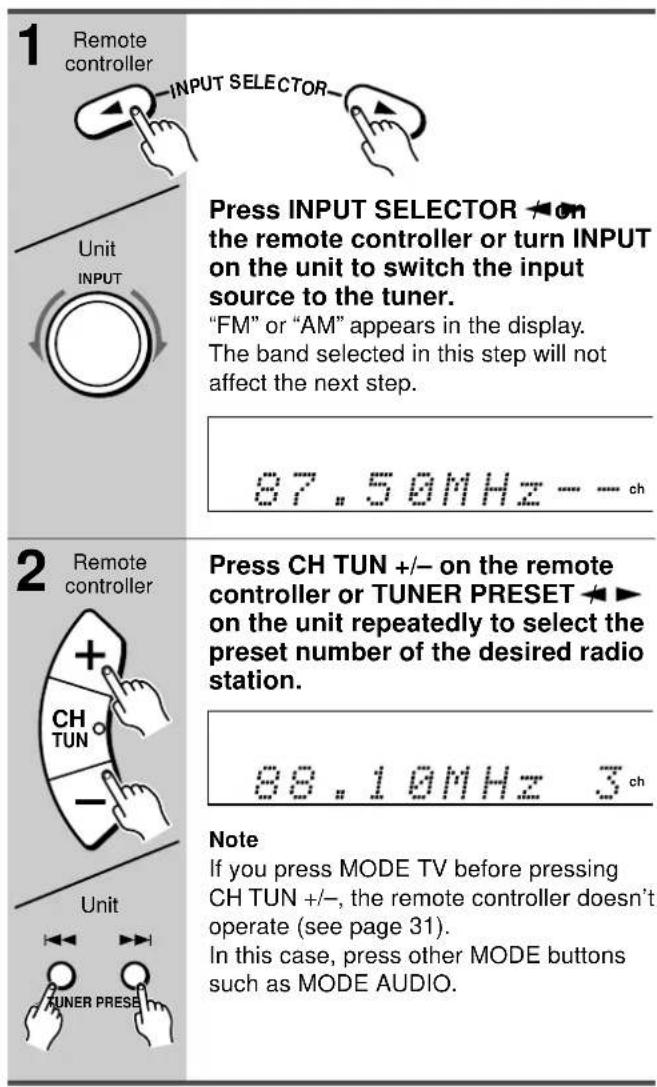
Presetting Radio Stations
You can preset up to 30 stations.
1
Tune in the radio station you wish to preset (see steps in the left column of this page).
2
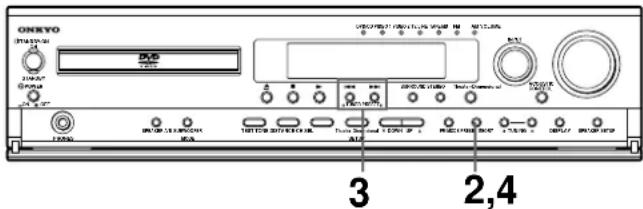
Unit only

PRESET MEORY
Press PRESET MEMORY.
The MEMORY indicator lights and the preset number starts flashing in the display.
88.10MHz

3
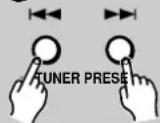
While the MEMORY indicator is lit (for about 8 seconds), press TUNER PRESET ◀/▶ to select the preset number.
88.10MHz

4

PRESET MEORY
Press PRESET MEMORY.
The radio station is registered to the preset channel. To register another preset station, repeat steps 1 to 4.
Selecting Preset Stations
Before selecting preset stations, you need to preset the radio stations. See "Presetting Radio Stations" on the previous page.
Erasing a Preset Station
| Select the preset channel you wish to erase (see steps in the left column of this page). | |
| 2 Unit onlyPRESET MEORY | Press PRESET MEMORY.“Erase?” appears in the display.Erase?3ch |
| 3 PRESET MEORY | While “Erase?” is displayed (for about 8 seconds), press PRESET MEMORY again.The selected preset channel will be erased. |
Various Functions While Listening to Radio Programs
To use the following functions, see page 32.
- Turning on/off the SPEAKERS A/SPEAKERS B Systems
- Adjusting the Volume
- Muting the Sound
- Listening Through Headphones
- Controlling the Brightness of the Lights on the DVD Receiver
• Using the Sleep Timer
Enjoying the Sound Effects While Listening to the Radio Programs
See page 34.
Playing the Connected Source
This section shows you how to play the sources connected to the DVD Receiver.
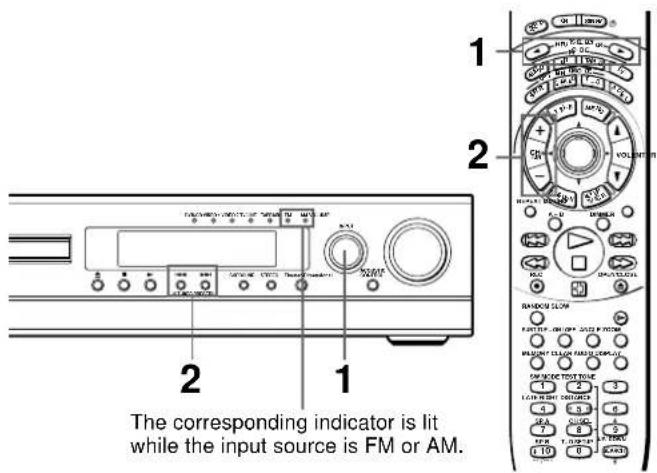
You may need to see "Connecting to a TV" on page 10 and "Connecting to Audio/Video Equipment" on page 11 while following the steps in this section.
SELECTOR

Press INPUT SELECTOR 📄 on the remote controller or turn INPUT on the unit to select one of the following input sources:
The selected input source appears in the multipurpose display. Also the selected input source indicator is lit until the DVD Receiver is switched to another input source.
e.g. The display when VIDEO 1 is selected.
VIDEO 1
e.g. The input source indicators when VIDEO 1 is selected.
Start playing the selected source.
■ About digital sound
If the equipment is digitally connected to the DVD Receiver, the sound from the digital input will automatically be selected and reproduced instead of the analog sound as explained below.
- When the VIDEO 1 source is selected, the digital sound from the VIDEO 1 DIGITAL INPUT (OPT) connector is reproduced.
- When the VIDEO 2 source is selected, the digital sound from the VIDEO 2 DIGITAL INPUT (COAX) connector is reproduced.
When the digital sound is reproduced, the DOLBY DIGITAL, DTS, or PCM (2 channel digital stereo) indicator lights up according to the received sound system in the DVD Receiver's display.

Note
The DVD Receiver only reproduces DOLBY DIGITAL, DTS, and PCM sound formats from connected equipment.
■ Enjoying the picture with the sound of another source
Play the VIDEO 2 source and select TAPE/MD, FM, AM, or TV/LINE. Then you can enjoy the VIDEO 2 picture and the sound from the selected input source at the same time.
Various Functions While Playing the Connected Source
To use the following functions, see page 32.
- Turning on/off the SPEAKERS A/SPEAKERS B Systems
- Adjusting the Volume
- Muting the Sound
- Listening Through Headphones
- Controlling the Brightness of the Lights on the DVD Receiver
• Using the Sleep Timer
Enjoying the Sound Effects While Playing the Connected Source
Operating the TV and Onkyo MD Recorder/Cassette Tape Deck With the Supplied Remote Controller
■ Operate your TV
First, let the remote controller learn the TV remote control signals (see page 63).
Point the remote controller directly toward the TV when you want to operate this equipment.
■ To operate the Onkyo MD recorder
No RI connection is needed.
Point the remote controller directly toward the MD recorder when you want to operate this equipment.
■ Operating the Onkyo cassette tape deck
First, connect the cassette tape deck to the DVD Receiver with the RI cable (see page 12).
Point the remote controller toward the DVD Receiver when you want to operate this equipment.
Press MODE TV first.

You can program the TV remote control buttons' signals to the buttons shadowed in the illustration below.
Press MODE TA/MD first.

| MD recorder | Cassette tape deck | |
| ▶ | Play | Play |
| REPEAT | Repeat mode | - |
| I◀◀▶▶▶ | DownUp | RewindFast forward |
| ◀◀▶▶ | Fast ReverseFast Forward | -- |
| ▲ | Eject | Open/Close the tray(This function is available only on some models.) |
| ■ | Stop/Cancel | Stop |
| ◀◀ | Pause | Reverse play |
| ● REC | Record | Record/Recording pause |
| 1–9, 0+10--/-- | Number buttons | - |
Various Functions Common to all the Sources

Turning on/off the SPEAKERS A/ SPEAKERS B Systems
You can turn on or off the speaker systems connected to the SPEAKERS A and SPEAKERS B connectors individually.
Note
If you turn on the SPEAKERS B system, the SPEAKERS A system also reproduces stereo sound automatically. (The listening mode is set to "Stereo." See page 38.)
Even if you turn off the SPEAKER B system later, the listening mode remains to "Stereo" until you select another listening mode.
The lit SP A and SP B indicators indicate the corresponding speaker systems are On.
■ Operating with the remote controller

Press SP A to turn on or off the SPEAKERS A system.
Press SP B to turn on or off the SPEAKERS B system.
Note
It is impossible to turn off both speakers at the same time.
■ Operating with the unit

Press SPEAKER A/B repeatedly.
Each press of the button changes the On/Off mode as follows:
Only the SPEAKERS A system turns on. Only the SPEAKERS B system turns on. Both the SPEAKERS A and B systems turn on.
Adjusting the Volume
The volume of the front left and right, center, surround left and right, and subwoofer speakers will be adjusted at the same time.
When headphones are connected (see next page), you can adjust the volume of the sound through the headphones.
■ Operating with the remote controller

Press VOL ▲ .▼
■ Operating with the unit
Turn VOLUME clockwise to increase the volume, or counterclockwise (anticlockwise) to decrease the volume.
Muting the Sound
Remote controller only MUTING

Press MUTING.
"Muting" appears in the multipurpose display for about three seconds. Also the MUTING indicator flashes in the display during the muting mode.
To restore the sound, press MUTING again.
Tip
If you turn off the unit during muting, and turn it on again, the sound will be restored.
Correlation between the MODE buttons and operation buttons explained on pages 32 and 33.
| Operationbuttons | MODE buttons | |||
| AUDIO DVD | TA/MD | TV | ||
| SLEEP | . | . | . | - |
| VOL ▲/▼ | . | . | . | *1 |
| MUTING | . | . | . | *1 |
| DIMMER | . | . | - | - |
| SP A | . | *2 | *3 | - |
| SP B | . | *2 | *3 | - |
- Operates the function explained on pages 32 and 33.
- Does not operate.
*1 If the button is programmed (see page 63), it operates the TV. If the button is not programmed, it doesn't operate.
*2 Functions as one of the number buttons to operate the built-in DVD player.
*3 Functions as one of the number buttons to operate the Onkyo MD recorder.
Listening Through Headphones
Connect the plug of the stereo headphones to the PHONES jack on the DVD Receiver.
natural_image
Line drawing of an orange headphones connected to a power cord next to a device labeled ONKYO (no text or symbols on the devices themselves)Notes
- The speakers will not reproduce sound while headphones are connected.
- The listening mode is set to "Stereo" after connecting the headphones to the PHONES jack.
- When you disconnect the headphones, the listening mode returns to the previous mode.
Controlling the Brightness of the Lights on the DVD Receiver
Remote controller only DIMMER

Press DIMMER.
Each press of the button changes the brightness as follows:
The display becomes less bright. ↓ The display is dimmed. ↓ The display is dimmed, and the ▲ (open/close), ■ (stop), and ▶ (play) lamps (buttons) go off (see page 22). ↓ The display resumes the original brightness and the △, ■, and ▶ lamps (buttons) light.
Using the Sleep Timer
Remote controller only

Press SLEEP.
"Sleep 90min" appears in the multipurpose display for about five seconds, which means the DVD Receiver will turn off and enter standby mode in 90 minutes. Also the SLEEP indicator is lit in the display while the sleep timer is On.
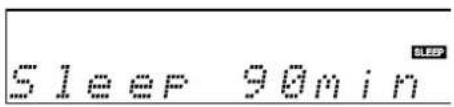
Each press of the button makes the remaining time shorter by 10 minutes.
■ Checking the remaining time
Press SLEEP while the Sleep Timer is On.
If you press SLEEP while the remaining time is displayed, the remaining time is reduced by 10 minutes.
■ Canceling the Sleep Timer
Press SLEEP repeatedly until the SLEEP indicator goes off.
The surround sound of the DVD Receiver enables you to enjoy the presence of a movie theater or concert hall in your room. Before using any sound effect, make sure the Speaker Setup configurations have been set (see page 17). The speaker configuration is very important for the surround sound. See "Connecting Speakers" on page 13 and "Positioning Speakers" on page 12. Following are the sound systems the DVD Receiver can reproduce.
■ DOLBY DIGITAL Surround and DTS (Digital Theater System) Surround
Minimum required speaker system
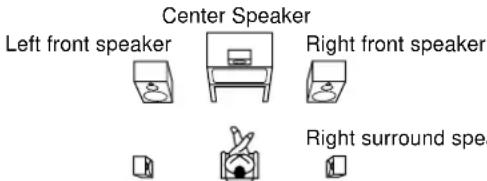
This 5.1 channel digital surround format enables you to individually play five full-range (20Hz-20kHz) channels (left and right front, center, and two surround channels) plus an LFE (Low Frequency Effect) channel for the low-range effect sound. It will create a realistic sound like that heard in theaters and concert halls.
DOLBY DIGITAL Surround
DVD videos that have the ☐☐☐DOLBY DIGITAL mark are recorded using this system.
To playback DOLBY DIGITAL Surround sound from connected equipment, you must make the digital connection in addition to the above speaker configuration.
DTS Surround
DVD videos and audio CDs that have the □mark are recorded using this system.
To playback DTS Surround sound from connected equipment such as an LD player, you must make the digital connection in addition to the above speaker configuration.
Notes on DTS Surround
- If you play a DTS Surround encoded disc with the DVD Receiver, or a DTS encoded disc using a digitally connected player, you may hear a noise for a short while until the DTS decoder of the DVD Receiver recognizes the DTS encoded signal and starts operating. This is not a malfunction.
- If you play a DTS Surround source in fast reverse or fast forward, pause, or skip a chapter or track, noise may be heard. This is not a malfunction.
- Even when playback of the DTS Surround source stops and the DTS signal transmission ends, the DVD Receiver remains in DTS mode and the DTS indicator remains lit. This is to prevent noise when you pause, fast forward, fast reverse, or skip a chapter or track of the playback source. Therefore, if the source switches from the DTS signal to a PCM (2 channel digital stereo) signal immediately, the PCM signal may not be played. In such a case, stop playback for about three seconds, then resume playback.
- Some CD players (if connected to the DVD Receiver) and LD players may be unable to play DTS Surround sources correctly even if you connect the player to the DVD Receiver digitally. In such a case, the digital signals (such as the output level, sampling frequency, frequency response, etc.) processed by the player cannot be recognized as DTS data by the DVD Receiver and you may hear noise instead of the proper sound.
■ DOLBY PRO LOGIC Surround
This surround format consists of four channels (left and right front, center, and monaural surround channel). This format is very effective for panning music, conversation, and three-dimensional sound movement output from three front channels. It also simulates the atmosphere and surround effects of the sound reflected from the side and rear walls of the theater.
VHS video cassettes, VHS Hi-Fi video cassettes, LDs, and DVD videos that have the ☐ Dolby Surround mark are suitable sources for this listening mode.
■ Onkyo's original Digital Signal Processing (DSP) modes
The DVD Receiver offers the following special Onkyo sound effects for sources other than Dolby Digital and DTS sounds.
Orchestra
This mode is suitable for classical and opera music. The center channel is cut and the surround channels are emphasized to widen the stereo image. It simulates a natural reverberation as created in a large hall.
Unplugged
This mode is suitable for acoustic instrumental sounds, vocals, and jazz music. By emphasizing the front stereo image, it simulates the acoustics in front of the stage.
Studio-Mix
This mode is suitable for rock and popular music. Lively sounds with a powerful acoustic image will make you feel as if you are in a club.
TV Logic
This mode offers the realistic acoustics of a TV program being aired in the TV studio. It enhances the entire surround sound and clarity of conversation.
All Ch Stereo
This mode is useful for background music. The front and surround channels will create a stereo image.
Theater-Dimensional (T-D)\* mode

□ □
□ □
Theater-Dimensional
The ideal home theater is realized by the multichannel sound reproduction with the complete speaker configuration and speaker positioning described on page 12. However, sometimes it is difficult to meet all those conditions. In reality, you may only have front speakers, or not be able to place the surround speakers in position.
Even if your speaker system is not complete, you can enjoy the multichannel surround sound by using the Theater-Dimensional mode. Theater-Dimensional mode sets the output channels to generate the most suitable virtual surround reproduction according to the number of the speaker channels set in "Speaker Setup" on page 18 or 19.
The importance of the speaker setup
Calibrating each speaker's sound pressure is essential for home theater sound reproduction. The same thing can be said for the virtual surround sound reproduction. Especially level matching and the time alignment of the two speakers that reproduce virtual surround signals becomes an even more important factor than with normal multichannel reproduction.
For the DVD Receiver, the calibration for the multichannel reproduction (see speaker distance setting on page 20 and test tone adjustment on page 21) provides the most appropriate level matching.
Notes
- For the input sources which include the surround channel signals like multichannel DOLBY DIGITAL and DTS surround sounds, the virtual processing is applied to those surround channel signals.
- For the 2 channel input sources, the surround channel elements are automatically extracted with the DOLBY PRO LOGIC processing before the virtual processing is applied.
- For the monaural or front 3 channel stereo sources, the virtual surround effect does not work since those input sources do not include the surround channel signals.
* Theater-Dimensional is a virtual surround technology developed by Onkyo. This technology is approved by Dolby Laboratories for the virtual surround processing of the Virtual Dolby Digital and Virtual Dolby Surround products.
The Input Sources and Available Listening Modes
The available listening modes varies depending on the sound type of the input source. The table below shows the correlation between the input source types and listening modes.
(· marked listening modes can be chosen with a particular type of a source.)
| Input Source Signals → | Analog/PCM | Dolby Digital | DTS |
| Possible sourcesListening Modes↓ | Audio cassette, audio CD,VIDEO CD, Record, FM broadcast, AM broadcast | DVD video, LD,Digital (satellite) broadcast | DVD video, audio CD, LD |
| Stereo · · | · | ||
| Theater-Dimensional · | · | · | |
| DOLBY DIGITAL · | |||
| DTS · | |||
| DOLBY PRO LOGIC/3 Stereo* | · | ||
| Orchestra · | |||
| Unplugged · | |||
| Studio-Mix | · | ||
| TV Logic | · | ||
| All Ch Stereo | · |
* See "Using Dolby Pro Logic/Onkyo's Original DSP Modes" on page 38.
Notes
- To reproduce MPEG2 sounds from a DVD video, you need to change the sound conversion method to "96k Sound" or "PCM." See "Reproducing MPEG2 Sounds from DVD Videos" on page 49.
- If you set the sound conversion method to "96k Sound," then the listening mode is set to "Stereo."
- If you set the sound conversion method to "PCM," then you can choose the same listening modes as "Analog/PCM" in the above table.
- The listening mode is set to "Stereo" when the PCM sound whose sampling frequency is higher than 48kHz is played. Such high-resolution sounds are reproduced from sources such as DVD video.
- If you wish to set the listening mode to "Stereo" when playing DTS sources, select "Speaker 2ch" by repeating the procedure in "Selecting the number of speaker channels" on page 19. If any setting other than "Speaker 2ch" is selected, some sources may not reproduce desirable sound.
Checking the Sound System of the Playing Source
The DVD Receiver will automatically detect the sound system when DOLBY DIGITAL Surround (DOLBY DIGITAL), DTS Surround (TMS), MPEG (MPEG2 sounds from the built-in DVD player), or PCM DIGITAL (2 channel digital stereo) is played back. The corresponding sound system indicator lights in the DVD Receiver's display.
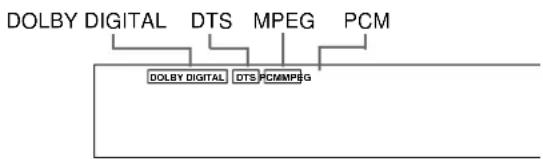
Choosing Theater-Dimensional Mode
Theater-Dimensional mode is the technology which controls the characteristics of the sounds reaching the listener's left and right ears, therefore, there is a sweet spot where you can best experience the Theater-Dimensional effects. You need to adjust the location of the sweet spot and these other factors for the best possible Theater-Dimensional effect.
■ Listening angle
("Lisng. Angle" appears in the display.)
Left speaker Right speaker

The longer the distance between the two speakers is, the wider the angle is.
The listening angle is the angle at the listening position where the two lines from the left and right speakers meet.
You need to adjust the listening angle in the following cases:
- If you set the surround left and right speaker field to "0" on page 18, or
if you set "Speaker 2ch" or "Speaker 3ch" in "Speaker Setup" on page 19.
Consider the listening angle as being formed from the left and right front speakers since the virtual surround signals are output from the front speakers.
- If you cannot place the surround speakers in the correct position.
- Place each surround speaker on top of or on the outer side of each front speaker of the same side.
- Consider the listening angle as being formed from the left and right surround speakers since the virtual surround signals are output from the surround speakers.
Set "Lisng. Angle" to one of the following settings, which you feel is most effective (the listening angles in the parentheses are the ideal degrees):
- Normal (30°)
- Wide (40°)
- Narrow (20°)
■ Corner mode
("Corner" appears in the display.)


Theater-Dimensional controls the direct sounds from the speakers not the sounds reflected from the walls. Therefore, if the distances between the speakers and the walls are too short such as when the speaker system is placed in the corner of the room, and because of it, the reflected sounds reach the listener's ears too soon, the reflected sounds interfere with the virtual surround sounds.
In such a case, set "Corner" to "On," then the CORNER indicator lights up in the display. This may enhance the sound depending on the situation.
(The factory setting is "Off," which is the normal mode.)
CORNER
Note
If the virtual surround sound is not enhanced with the corner mode, change the speaker positioning or cover the walls with acoustic materials.
Balance mode
("Balance" appears in the display.)
Left speaker Right speaker
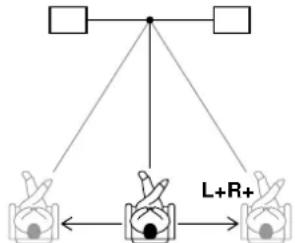
flowchart
graph TD
    A[" "] --> C[" "]
    B[" "] --> C[" "]
    D[" "] --> E[" "]
    F[" "] --> E[" "]
    G[" "] --> E[" "]
    H[" "] --> I[" "]
    J[" "] --> I[" "]
    K[" "] --> I[" "]
    L[" "] --> M[" "]
    N[" "] --> M[" "]
    O[" "] --> P[" "]
    Q[" "] --> P[" "]
    R[" "] --> S[" "]
    T[" "] --> S[" "]
    U[" "] --> V[" "]
    W[" "] --> V[" "]
    X[" "] --> Y[" "]
    Z[" "] --> Y[" "]
R+5 R+1 0 L+1 L+5
The listener should be on the center line between the left and right speakers. But if the situation does not allow you to sit in such an ideal position, you can adjust the balance.
Set "Balance" to one of the following 11 values, which you feel is most effective:
R+5, R+4, R+3, R+2, R+1, 0, L+1, L+2, L+3, L+4, and L+5.
The following tips may help you select the value:
- If the listener sits on the center line, then the factory setting "0" should be set as the balance, and
- If the listener sits on the right side of the center line towards the front speakers, select "L+." If the listener sits on the left side, select "R+" A larger value should be selected as the listening position becomes farther from the center line.
Notes
- The effect obtained with the balance adjustment may become less effective compared to the effect you obtain when you are actually on the center line.
- If the listening position is too far from the center line, the balance adjustment may not be able to correct the balance completely.
■ Dialog mode
("Dialog Mode" appears in the display.)
The dialog in the film may sound less clear because of the music or other sounds depending on the movie or scene.
In such a case, set "Dialog" to "Enhance." (The factory setting is "Normal" which is the normal mode.)
Notes
- This function emphasizes the dialog in the center channel since the dialog sound, in most films, is allocated to the center channel. Therefore, if the dialog is not in the center channel, the sound will not be enhanced.
- Depending on the type of source, this mode is not very effective.
■ Activating Theater-Dimensional mode
See "The Input Sources and Available Listening Modes" on page 35.
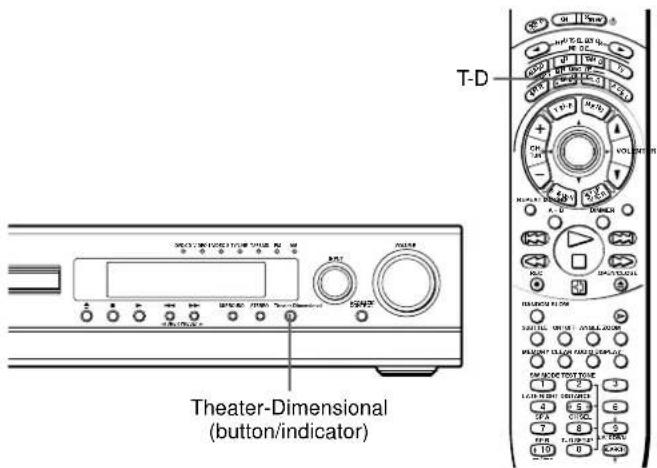
Remote controller
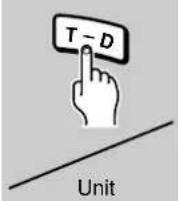
Theater-Dimensional

Press T-D on the remote controller or Theater-Dimensional on the unit.
"Theater-Dimensional" scrolls across in the display and the Theater-Dimensional indicator on the unit lights.
Theater-Dim

Notes
• Theater-Dimensional mode cannot be activated if;
- The sound is muted (see page 32),
- Headphones are connected (see page 33),
- SPEAKERS B system is On (see page 32), or
- The source is PCM sound with a sampling frequency higher than 48kHz.
- Theater-Dimensional mode will be canceled and the Theater-Dimensional indicator goes off when:
- Another listening mode is chosen (see page 38), or
- The input source is switched to a type of source which Theater-Dimensional mode cannot process.
■ Adjusting Theater-Dimensional mode
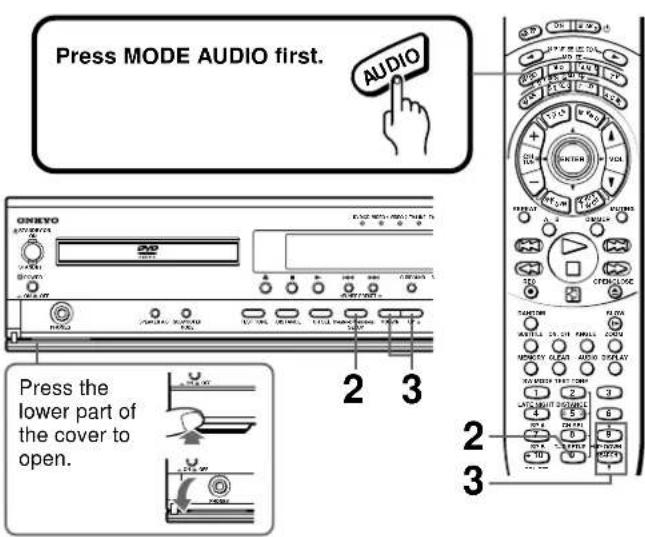
| 1 | Activate Theater-Dimensional (see the steps in the left column of this page). |
| 2 Remote controllerT–D SETUPUnitTheater-Dimensional SETUP | Press T-D SETUP on the remote controller or Theater-Dimensional SET UP on the unit repeatedly to select the Theater-Dimensional item (see on the previous page).Lisng.AngleEach press of the button changes the item as follows:Lisng. Angle↓Corner↓Balance↓Dialog Mode↓The normal display resumes. |
3 Remote controller 9 Press UP ▲DOWN ▼on the remote controller or ▼DOWN/UP ▼on the unit to select the setting of the item.
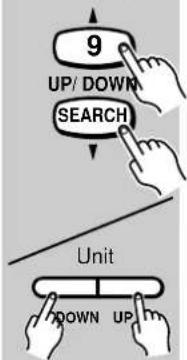
Press UP ▲DOWN ▼on the remote controller or ▼DOWN/UP ▼on the unit to select the setting of the item.
• To change the setting of another item, repeat steps 2 and 3.
- To end the Theater-Dimensional setup, press T-D SETUP on the remote controller or Theater-Dimensional on the unit repeatedly until the normal display resumes.
Using Dolby Pro Logic/ Onkyo's Original DSP Modes
See "The Input Sources and Available Listening Modes" on page 35.

Remote controller
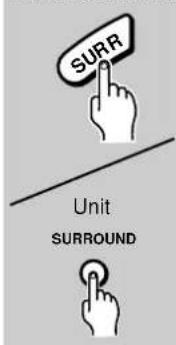
Press SURR on the remote controller or SURROUND on the unit to choose "Dolby Pro Logic" or the DSP mode.
The current listening mode appears in the display when the button is pressed once, then each press of the button changes the listening mode as follows:
Dolby Pro Logic* → Orchestra
↑ ↓
All Ch Stereo Unplugged
↑ ↓
TV Logic ← Studio-Mix

* - Suitable for Dolby Surround sources
- In the display, "Pro Logic" appears and the DOLBY PRO LOGIC indicator lights up.
DOLBY PROLOGIC
Pro Logic
- "3 Stereo" appears instead of "Pro Logic" if the surround left and right speaker field is set to "0" on page 18, or if "Speaker 3ch" is selected on page 19.
"3 Stereo" stands for DOLBY 3 STEREO.
- Skipped if both the center speaker field and surround left and right speaker field are set to "0" on page 18, or if "Speaker 2ch" is selected on page 19.
A tip to apply a DSP mode to the DOLBY DIGITAL Surround sound of a DVD video
You can change the format of the sound signal being output to the speakers and output jacks using the menu (see page 48).
This means, for example, even if DOLBY DIGITAL Surround sound is played by the DVD Receiver, you can output sound to the speakers in the 48 kHz/16 bit format, which lets you to use the DSP sound effects instead of DOLBY DIGITAL Surround.
Changing the Sound to Stereo
See "The Input Sources and Available Listening Modes" on page 35.
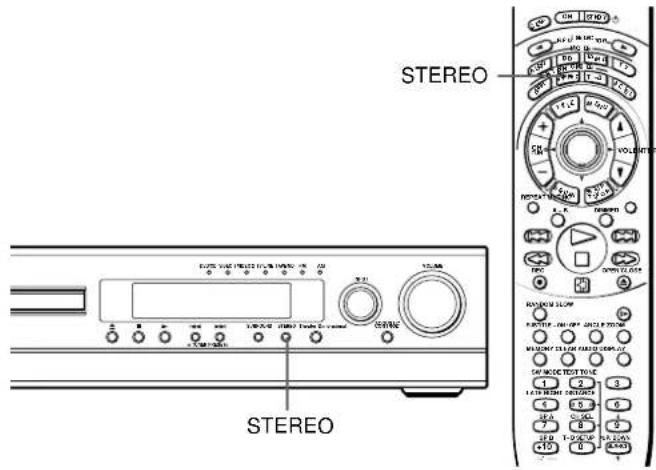
Remote controller
In the display, "Stereo" appears and the STEREO indicator lights up.


Adjusting Each Speaker's Relative Volume Balance Temporarily
You can readjust each speaker's relative volume balance according to your preference while listening to the sound.
The adjusted values will return to the values set on page 21 when the DVD Receiver enters standby mode, or the main power is switched off unless you save the values.
Press MODE AUDIO first.

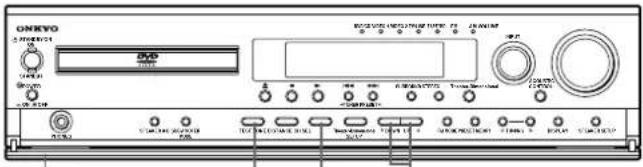
TEST TONE
TEST TONE
1,2
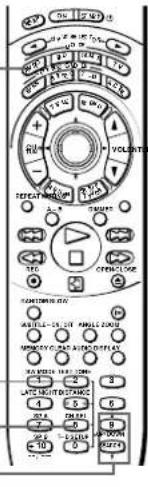
2
Press the lower part of the cover to open.

21,2
1
Remote controller
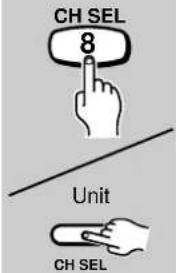
(Checking each speaker's relative volume balance)
While playing the source, press CH SEL repeatedly.
Each press of the button changes the speaker which outputs the sound and the selected speaker appears in the display in the following order:
Left (Front left ch.)
Center (Center ch.)
Right (Front right ch.)
Surr R (Surround right ch.) ↓
Surr L (Surround left ch.) ↓
Subwfr (Subwoofer)
Speaker volume adjustment mode off
Left
0 dB
Note
Any speaker that is not included in the speaker configuration on page 18 or 19 is not selected even if it is actually connected.
2
Remote controller
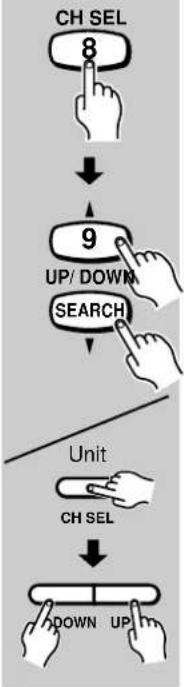
flowchart
graph TD
    A["CH SEL 8"] --> B["9 UP/ DOWN SEARCH"]
    B --> C["Unit CH SEL"]
    C --> D["CH SEL DOWN UP"]
(Adjusting each speaker's relative volume balance)
Press CH SEL repeatedly to select the speaker, then press UP ▲/ DOWN ▼ on the remote controller or ▼ DOWN/UP ▲ on the unit to adjust the volume level.
The volume level can be adjusted between -12dB and +12dB.
Repeat this step to change another speaker's volume balance.
■ Saving the adjusted values
Remote controller
Press TEST TONE.
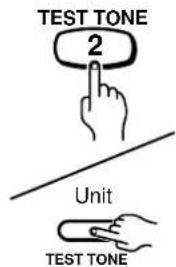
Using the LATE NIGHT/FRONT EFFECT Function
- The LATE NIGHT function operates when the sound is DOLBY DIGITAL Surround. If you play a movie at low volume at night, set this function to "Low" or "High" to narrow the dynamic range of the sound and make it easier to hear.
- The FRONT EFFECT function operates with DSP modes other than All Ch Stereo. If you use one of the DSP sound effects with a source containing acoustic reverberation, the sound may become unclear because of too much reverberation. In such case, set this function to "Off." The DSP sound effect will not add additional reverberation to the sound output to the three front speakers.
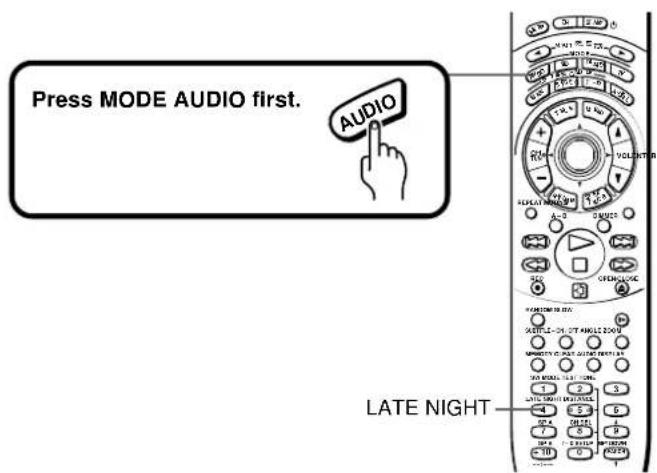
Remote controller only

Press LATE NIGHT.
The current setting appears in the display. To change the setting, press the button repeatedly while the current setting is displayed.
- When the button is pressed while DOLBY DIGITAL Surround sound is being reproduced
"L-Night Low," "L-Night High," or "L-Night Off" can be selected.
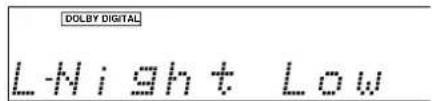
- When the button is pressed while one of the DSP sound effects is being used "F-Effect Off" or "F-Effect On" can be selected.

Boosting the Super Bass Sounds/High Frequency Sounds
You can enjoy more dynamic sounds by boosting the super bass/high frequency sounds, even with decreased volume.
Remote controller
ACOUSTIC CONTROL

Press A.CTRL on the remote controller or ACOUSTIC CONTROL on the unit.
Each press of the button changes the acoustic mode as follows:
"A. Ctrl 1" appears in the display and the ACOUSTIC CONTROL indicator on the unit lights in orange.
The super bass sounds are boosted.
"A. Ctrl 2" appears in the display and the ACOUSTIC CONTROL indicator on the unit lights in green.
The super bass sounds are further reinforced and the high frequency sounds are also reinforced.
"A. Ctrl Off" appears in the display and the ACOUSTIC CONTROL indicator goes off.
A. Ctrl 2

Note
The LATE NIGHT effect is determined by each DOLBY DIGITAL sound source. Some sources may produce little or no effect.
Playing Repeatedly
You can play a specific title, chapter, track, or segment repeatedly (Title repeat, chapter/track repeat, A-B repeat).
Repeating a Title, Chapter, or Track
You can play the same title, chapter, or track repeatedly (Title, chapter/track repeat).
| 1 | Select the title, chapter, or track you want to repeat. (See pages 25 to 27.) |
2Remote controller onlyREPEAT | Press REPEAT.The REPEAT indicator lights up in the DVD Receiver's display.Each time you press REPEAT, the repeat mode and its display on the TV screen change as follows.  |
■ To resume normal playback

Press CLEAR.
Note
Some discs may not permit repeat operation.
DVD VCD CD
Repeating a Specific Segment
You can play a specific segment repeatedly (A-B repeat).
| 1Remote controller onlyA-B | Press A-B at the beginning of the segment (point A) you want to play repeatedly.The A point is fixed.“A-” flashes on the TV screen, and the A-B REPEAT indicator lights up in DVD Receiver’s display.A- |
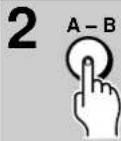 | Press A-B again at the end of the segment (point B).The B point is fixed.The DVD Receiver automatically returns to point A and starts repeat playback of the selected segment (A-B).“A-B” appears on the TV screen, and the A-B REPEAT indicator in the DVD Receiver’s display remains lit.A-B |
■ To resume normal playback

Press CLEAR.
Notes
- Some discs may not permit A-B repeat operation.
- You can play a specific segment only within the current title or track.
- You cannot set the A-B repeat function for segments that include multiple camera angles.
- There may be a slight difference between the A point and the location where playback actually resumes depending on the disc.
Playing in a Favorite Order
You can combine your favorite titles, chapters, or tracks and play them in any order. You can program up to 28 selections into the memory (Memory playback).

flowchart
graph LR
    A["Title: 2 Chapter: 25"] --> B["Chapter: 12"]
    B --> C["Chapter: 1"]
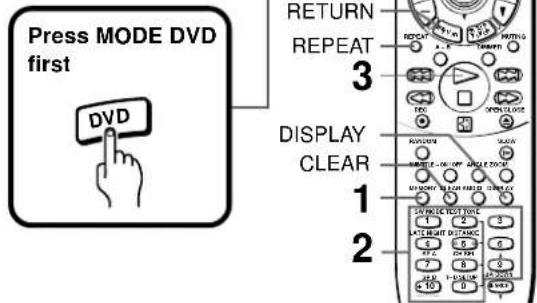
DVD VCD CD
Setting Titles, Chapters, or Tracks in a Favorite Order
The DVD Receiver automatically plays titles, chapters, or tracks in the order you program.
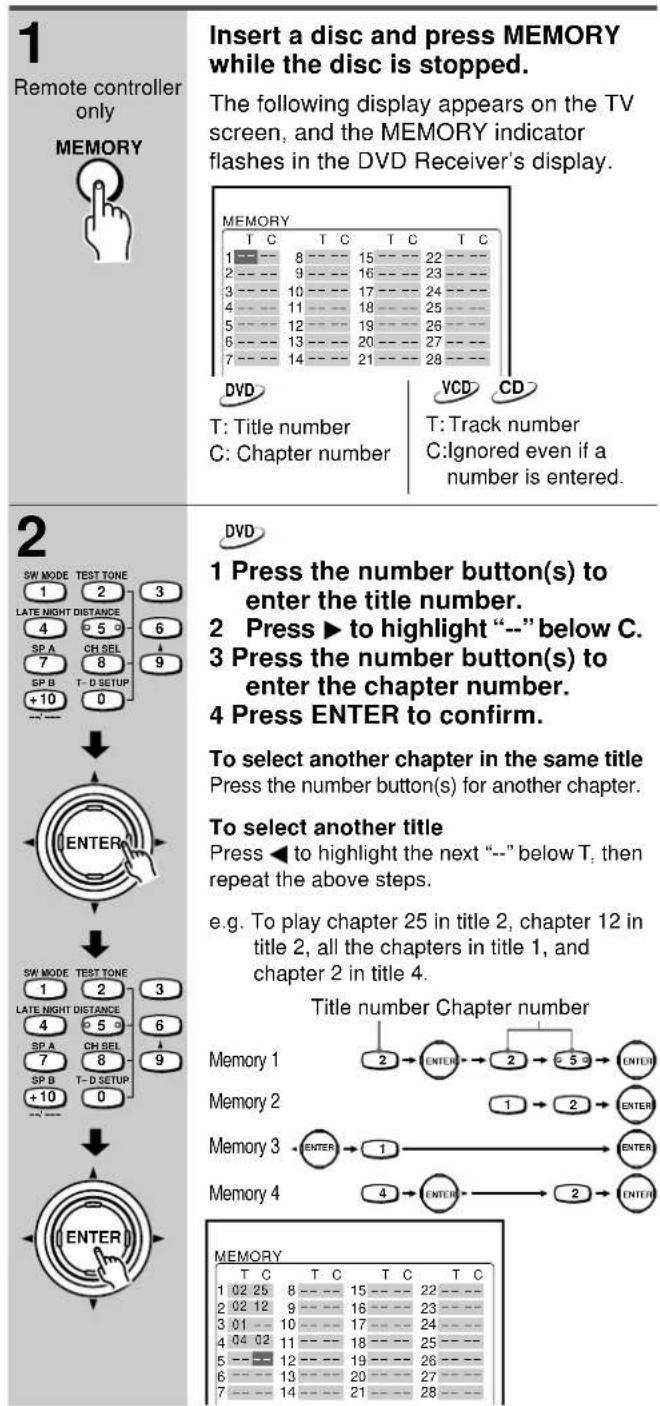
| SW MODE TEST TONE 1 2 3 LATE NIGHT DISTANCE 4 5 6 SP A CH SEL 7 8 9 SP B T- D SETUP +10 0 | VCD CD Press the number button(s) to select the track number, then press ENTER to confirm. Repeat this step to select the next track. |
| 3 | While the MEMORY display is displayed, press ▶. The DVD Receiver starts memory playback. The MEMORY indicator in the DVD Receiver's display lights steadily. |
■ To change or cancel the entered program
While the MEMORY display is displayed, press ▲ to highlight the item.
• To select another title/chapter or track follow step 2.
• To cancel, press CLEAR.
■ To resume normal playback
Press CLEAR.
■ To program during playback
If you press MEMORY during playback, the display to accept your programming appears.
To display the MEMORY display, press DISPLAY, then follow steps 2 and 3.
Notes
- You can also use +10 (plus ten button) to add ten to the number.
- Some discs may not permit memory playback operation.
- If you press REPEAT during memory playback, the DVD Receiver repeats the current memory playback.
- Although you can select title, chapter, and track numbers not included on the disc, those numbers are ignored.
- If you press MEMORY or RETURN while the MEMORY display is displayed, the MEMORY display disappears.
- The programmed selections will be cleared when you turn off the DVD Receiver.
Playing in Random Order
You can play chapters, titles, or tracks, or chapters within a title, in random order (Random playback).
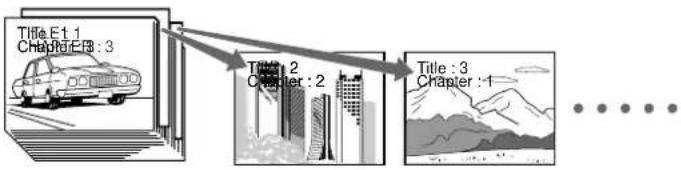
flowchart
graph LR
    A["Title E1.1 Chapter E1B : 3"] --> B["Chapter 2"]
    B --> C["Chapter 3"]
    C --> D["..."]
DVD VCD CD
Playing Chapters, Titles, or Tracks in a Disc in Random Order
The DVD Receiver automatically selects the chapters or titles in a DVD video, or tracks in a VIDEO CD/audio CD, and plays them randomly.
| 1Remote controller onlyRANDOM | DVDPress RANDOM twice while the disc is stopped.Then, press RANDOM repeatedly to change the random play mode as follows:Chapter Random → Title RandomRandom offTitle RandomVCD CDPress RANDOM once while the disc is stopped.To cancel random playback, press RANDOM again.Track RandomTrack :If you press RANDOM during playback, the DVD Receiver automatically starts random playback after finishing the current chapter (when Chapter Random is selected), title (when Title Random is selected), or track. |
 | Within 5 seconds, press ▶.The DVD Receiver starts random playback. |
■ To resume normal playback
CLEAR

Notes
- Some discs may not permit random playback operation.
- You cannot use the random playback function together with the memory playback function.
- If you press ▶▶▶ I during random playback, the DVD Receiver goes to another chapter, title, or track and continues random playback.
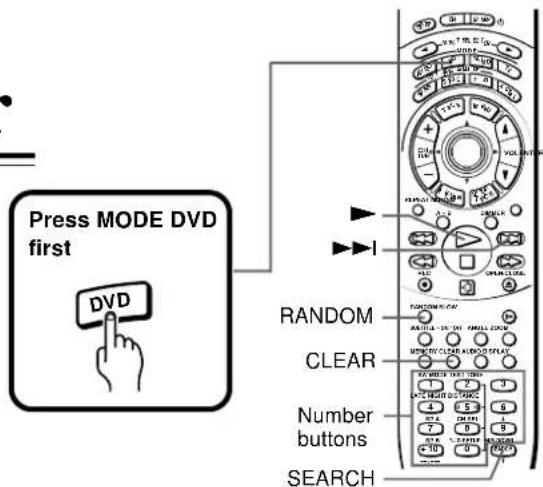
DVD
Playing Chapters in a Selected Title in Random Order
The DVD Receiver automatically selects the chapters in a title and plays them randomly.
| 1Remote controller only | Press SEARCH, then press the appropriate number button(s) for the title which contains the chapters you want to play in random order.e.g. To play the chapters in title 2 in random order |
| SW MODE TEST TONE1 2 3LATE NIGHT DISTANCE4 5 6SP A CH SEL7 8 9SP B T-D SETUP+10 0 | SEARCH→2Title:■2Chapter:1 |
| 2 RANDOM | Press RANDOM while the disc is stopped.Chapter RandomTitle:■2Chapter:1If you press RANDOM during playback, the DVD Receiver automatically starts random playback after finishing the current chapter. |
| 3 | Within 5 seconds, press ▶.The DVD Receiver starts random playback. |
■ To resume normal playback

Press CLEAR.
Notes
- You can also use +10 (plus ten button) to add ten to the number.
- Some discs may not permit random playback operation.
- You cannot use the random playback function together with the memory playback function.
- If you press ▶▶▶I during random playback, the DVD Receiver goes to another chapter and continues random playback.
Zooming in on a Picture
You can magnify areas within a picture.
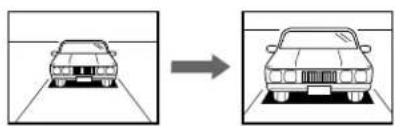
natural_image
Diagram showing a car moving on a road before and after change, with no text or symbols present.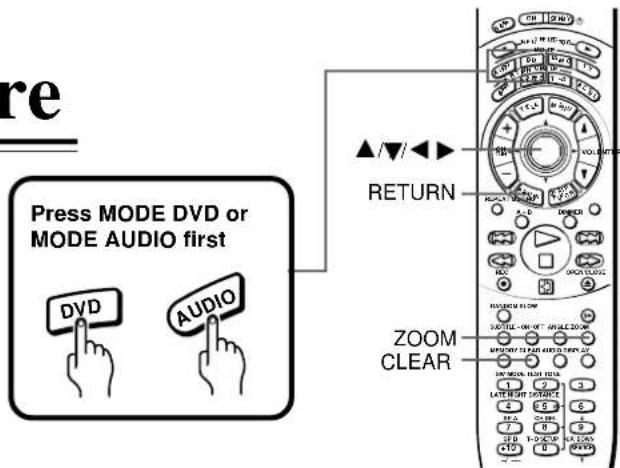
DVD
Zooming in on a Picture and Shifting the Zoom Point
You can zoom in on a picture. You can also shift the zoom point.
| Remote controller only | Press ZOOM during normal, slow, or still playback. |
 | If you press ZOOM repeatedly, the magnification level increases. |
| Zoom 1↓ | |
| Zoom 2↓ | |
| Zoom 3 | |
 | To reduce the magnification level Press RETURN. |
 | To shift the zoom point Press ▲/▼. ◀▶When the zoom point reaches an edge of the picture, the color of “Zoom” changes. |
 | To restore the original zoom point (center of the picture) Press CLEAR. |
■ To resume normal playback

Press ZOOM repeatedly until "Zoom" disappears.
Notes
- Some discs may not permit zoom operation.
- During some scenes, the buttons may not work as explained in the step.
- Zooming does not work on subtitles or menu screens included on DVD videos.
- The magnification level varies depending on the picture size you select. (See pages 52 and 55.)
Selecting the Camera Angle
You can select a preferred camera angle to watch a scene.

flowchart
graph LR
    A["Car"] --> B["Car with Angle: 2°, Angle: 3°, Angle: 1°"]
    B --> C["Car with Angle: 3°, Angle: 1°"]
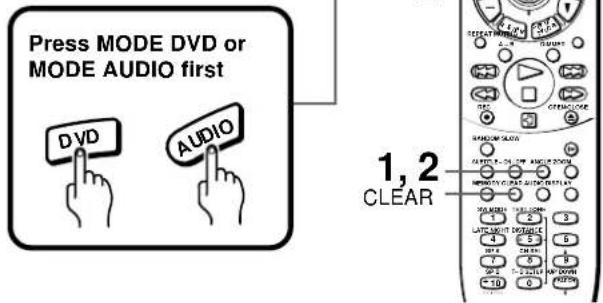
DVD
Changing the Camera Angle
If the scene was recorded from multiple angles, you can easily change the camera angle of the scene you are watching.
| 1 Remote controller only ANGLE | Press ANGLE while playing a scene recorded with multiple angles. While playing a scene recorded with multiple angles, the angle icon (_) appears on the TV screen and flashes in the DVD Receiver's display. Press ANGLE while the angle icon is displayed. Angle: Angle icon Current angle number |
| 2 ANGLE ENT | Press ANGLE or ▲ while the angle number is displayed on the TV screen. Each time you press ANGLE or ▲ the camera angle changes. Angle: Angle: Angle: Angle: ▼ : Cycles backwards You can also change the camera angle directly by pressing the number buttons corresponding to the angle number. |
■ To turn off the angle number display

Press CLEAR.
■ To disable the angle icon display on the TV
Set "On-Screen Displays" to "Off" using the setting menu (see pages 52 and 57). Monitor the DVD Receiver's display to check that the scene has multiple angles. The angle indicator (∞) flashes in the DVD Receiver's display.

natural_image
Blank white rectangle with a small decorative symbol in the top-right corner (no text or symbols)Notes
- You can change the camera angle during still playback. The camera angle changes to the new setting when you resume normal playback.
- If you pause a picture immediately after changing the camera angle, the resumed playback picture may not use the new camera angle.
Turning on/off Subtitles Selecting the Subtitle Language
You can display subtitles on the TV screen and select a subtitle language from those included on the DVD video.

DVD
Turning Subtitles on/off
Remote controller only
SUBTITLE - ON / OFF


Press SUBTITLE – ON/OFF during playback.
Each press of the button turns subtitles on or off.
(The current subtitle setting is displayed for about 3 seconds.)
flowchart
graph TD
    A["Displayed for about 3 seconds"] --> B["Subtitle : 1 ENG On"]
    B --> C["Good evening!"]
    C --> D["Subtitle : 1 ENG Off"]
    D --> E["↑"]
    D --> F["↓"]
Notes
- Some DVD videos are set to display subtitles automatically, and you cannot turn them off even if you set the subtitle function to "Off."
- During some scenes, the subtitles may not appear immediately after you select "On."
- Some DVD videos will allow you to make subtitle selections and turn subtitles on or off only by using the disc menu.
DVD
Selecting a Subtitle Language
You can select a subtitle language from those included on the DVD video.
1
Remote controller only
SUBTITLE - ON / OFF


Press SUBTITLE during playback.
The current subtitle setting is displayed for about 3 seconds.
The abbreviation of the language appears instead of the language name. See the list of languages and their abbreviations on page 60.
2
SUBTITLE - ON / OFF

Press SUBTITLE or ▲while the subtitle setting is displayed on the TV screen.
Each time you press SUBTITLE or ▲the subtitle language changes to the next language included on the DVD video.
e.g.
▼: Cycles backwards
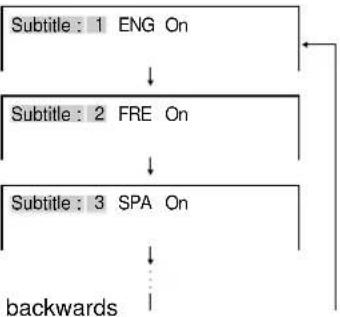
flowchart
graph TD
    A["Subtitle: 1 ENG On"] --> B["Subtitle: 2 FRE On"]
    B --> C["Subtitle: 3 SPA On"]
    C --> D["backwards"]
■ To turn off the subtitle setting display
CLEAR

Press CLEAR.
Notes
- When you turn on the DVD Receiver or replace a disc, the DVD Receiver returns to the automatic setting in the setting menu (see pages 52 and 54).
- When you select a subtitle language which is not included on the disc, the DVD Receiver plays the default language programmed on the disc.
- During some scenes, the subtitles may not appear immediately after you change the subtitle language by pressing ▲.▼
Selecting Audio Language/Sound Included on the Disc
You can select a preferred audio language and sound system.

flowchart
graph LR
    A["Good morning!"] --> B["Bon jour!"]
    B --> C["Buenos días!"]
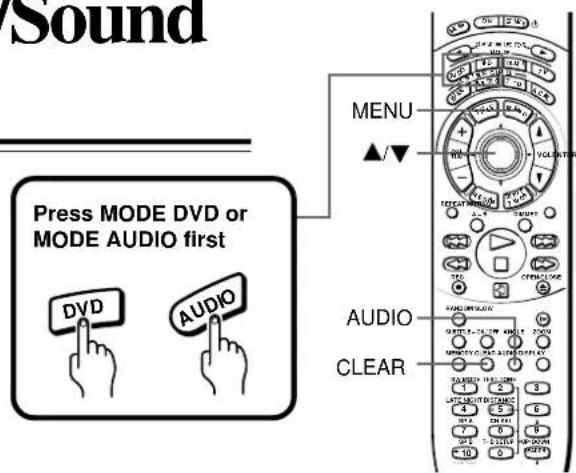
DVD
Selecting a Playback Audio Setting
You can select a set of preferred audio language and sound system from those included on the DVD video.
This function enables you to temporarily change the audio language which has been selected as the automatic setting in the setting menu (see pages 52 and 54), and select the sound system if the DVD video is recorded in more than one sound format.
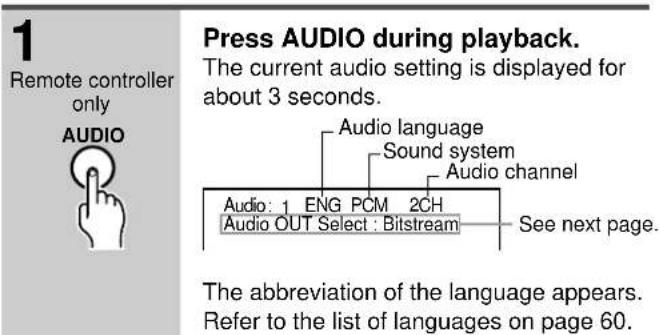
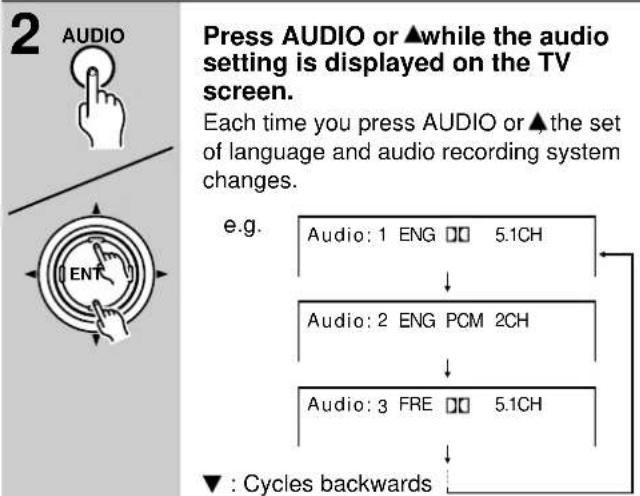
flowchart
graph TD
    A["Audio: 1 ENG 5.1CH"] --> B["Audio: 2 ENG PCM 2CH"]
    B --> C["Audio: 3 FRE 5.1CH"]
    D["ENT"] --> E["Next Step"]
    style A fill:#f9f,stroke:#333
    style B fill:#ccf,stroke:#333
    style C fill:#cfc,stroke:#333
    style D fill:#fcc,stroke:#333
    style E fill:#ffc,stroke:#333
Note
Dolby Digital 5.1 Channel sound may be displayed as "☐OH."
■ About recording systems
This DVD Receiver uses the Dolby Digital (H1CH), DTS, MPEG2, and PCM (2 channel digital stereo) systems and cannot play DVD videos recorded in any other sound system.
Notes
- Some discs only allow you to change audio selections by using the disc menu. If this is the case, press MENU and choose the appropriate language from the selections in the disc menu.
- Some discs may have only one set of audio language and sound recording system and you cannot make this selection.
- When you turn on the DVD Receiver or replace a disc, the DVD Receiver returns to the automatic setting in the setting menu (see page 54).
VCD
Selecting Sound Channels on VIDEO CDs
A VIDEO CD may have left and right sound channels which contain sounds or languages on each channel. You can switch these two channels to hear a preferred sound or language.
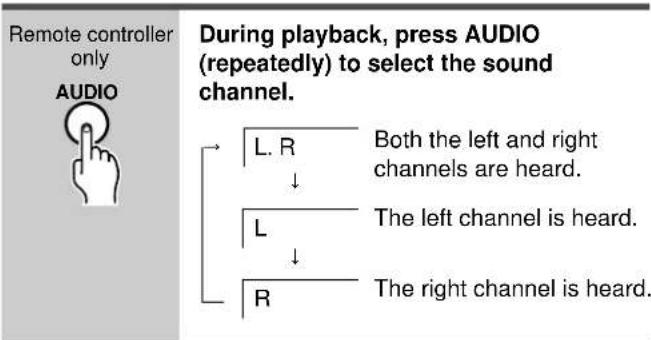
■ To turn off the audio setting display

Press CLEAR.
Changing the Sound Signal Conversion Method
The reproduced disc sound will be output in the most suitable format automatically through the connected speakers and output connector/jacks on the DVD Receiver when "Audio Out Select" in the setting menu is set to "Bitstream" (see page 56).
However, you may need to convert the sound format in different ways depending on your purpose and preference.
For example, when you wish to:
- Listen to the high-frequency (kHz)/high-quantization (bit) format source in its original sound quality (see below), or
- Record the DVD video sound reproduced in the DOLBY DIGITAL format using recording equipment such as an MD recorder connected to the DIGITAL OUTPUT (OPT) connector on the DVD Receiver (see next page).
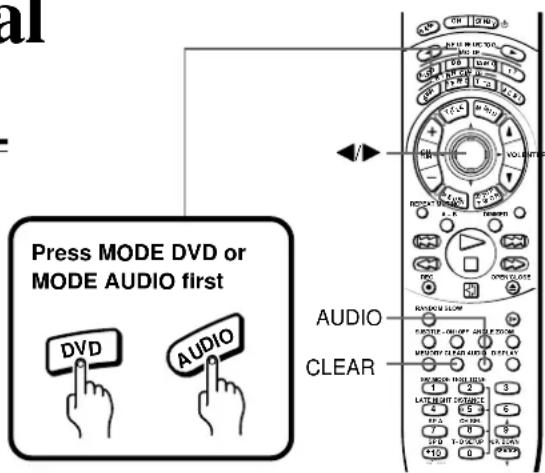
This function enables you to temporarily change the sound signal conversion method which has been selected automatically according to the automatic setting in the setting menu (see pages 52 and 56).
DVD VCD CD
Changing the Sound Signal Conversion Method Temporarily
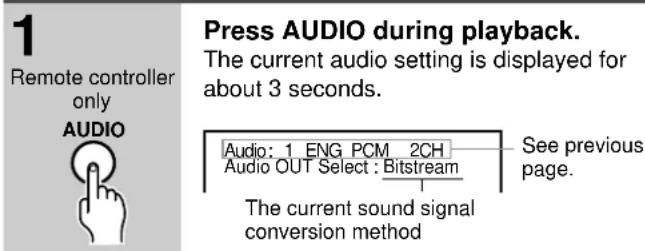


Each time you press ◀, the setting changes as follows:
Bitstream 96k Sound PCM
For details about "Bitstream," "96k Sound," and "PCM," see the explanation on page 56 and the table on the opposite page.
■ To turn off the audio setting display
CLEAR

Press CLEAR.
Notes
- The "Audio Out Select" setting in the setting menu (see page 56) is for automatic selection of the sound conversion method when the disc is inserted. Therefore, the selection in this section will not change the setting of "Audio Out Select" in the setting menu.
- When you turn on the DVD Receiver or replace a disc, the DVD Receiver returns to the automatic setting in the setting menu. (See page 56.)
DVD
To Listen to a High-Frequency/High-Quantization Format Source in its Original Sound Quality – 96k Sound
The high frequency/high quantization sound signals below are converted into 48 kHz/16 bit sound signals and sent to the speakers when the "Audio Out Select" (sound signal conversion method) is set to the standard setting, "Bitstream."
High frequency/high quantization signals
• 48 kHz/24 bit
• 96 kHz/16 bit
- 96 kHz/20 bit
• 96 kHz/24 bit
To listen to the high-frequency (kHz)/hight-quantization (bit) format sounds in their original sound quality, follow the steps below.
| 1 | Change the sound signal conversion method to “96k Sound” following the steps on the left.See a in the table titled “Sound from the speakers” on the opposite page.The DVD videos recorded in 48 kHz/24 bit, 96 kHz/16 bit, 96 kHz/20 bit, and 96 kHz/24 bit are reproduced through the speakers at the same kHz and bit rate respectively. |
| 2 | If a subwoofer is connected, set the subwoofer mode to “SW Off.”See “Setting the Subwoofer Mode” on page 19. |
| 3 | Change the sound to stereo.See “Changing the Sound to Stereo” on page 38. |
Note
If the speakers were setup using Smart Configuration (see page 17), the subwoofer data such as characteristic frequency will be erased by the above steps. To recover the data, carry out the Smart Configuration setup again.
DVD
Changing the DOLBY DIGITAL Surround Sound Format to the Digitally Recordable Frequency (kHz)/Quantization (bit)
Change the sound signal conversion method to "PCM" following the steps in "Changing the Sound Signal Conversion Method Temporarily" on the opposite page.
Referring to Ⓐ in the table below, the DOLBY DIGITAL Surround format will be converted into the 48 kHz/16 bit format which is recordable.
DVD
Reproducing MPEG2 Sounds from DVD Videos
Referring to ⑨ in the table below, MPEG2 sound is not reproduced from the speakers when the sound signal conversion method is the factory setting, "Bitstream."
To reproduce MPEG2 sound from DVD Videos, change the sound signal conversion method to "96k Sound" or "PCM" following the steps in "Changing the Sound Signal Conversion Method Temporarily" on the opposite page.
DVD
Changing the MPEG2 Sound Format of the DVD video to Analog Signals for Recording
Digital recording of MPEG2 sounds is impossible regardless of the sound signal conversion methods. However, analog recording of MPEG2 is possible if you change the sound format to analog signals.
To record MPEG2 sounds from the analog output jacks, change the sound signal conversion method to "96k Sound" or "PCM" following the steps in "Changing the Sound Signal Conversion Method Temporarily" on the opposite page.
Referring to ⓘ in the table below, the MPEG2 format will be converted into the recordable analog signals using the 48 kHz/16 bit format, whereas the MPEG2 sounds are not output to the analog output jacks when the sound signal conversion method is "Bitstream" (h in the table below).
■ Output sound conversion tables
Symbols in the tables
- The symbols a , c , g , h , and i are referred to on the previous page and this page.
- The symbols b, c, d, e, and f are referred to on page 62 in "Recording Using the Connected Equipment."
Sound from the speakers
| Conversion methods*2 | |||||
| Discs | Sound systems*1 | Bitstream | 96k Sound | PCM | |
| DVD videos | DOLBY DIGITAL | DOLBY DIGITAL | 48 kHz/16 bit | ||
| Linear PCM | 48 kHz/16 bit | Same kHz/bit as the source | |||
| 48 kHz/20 bit | 48 kHz/16 bit | 48 kHz/16 bit | |||
| 48 kHz/24 bit | |||||
| 96 kHz/16 bit | 8kHz/16 bit as the source | ||||
| 96 kHz/20 bit | |||||
| 96 kHz/24 bit | |||||
| DTS | DTS | f No sound | |||
| MPEG2 | 9 No sound 48 kHz/16 bit | ||||
| VIDEO CDs | MPEG1 | 44.1 kHz/16 bit | |||
| Audio CDs | Linear PCM 44.1kHz/16 bit | Same kHz/bit as the source | |||
| DTS | DTS | ||||
*1 Some discs have more than one sound system that can be selected (see page 47).
*2 You can change the conversion method temporarily as described on the previous page, or permanently using the setting menu (see pages 52 and 56).
Sound signals from the digital output and kHz/bit used to convert digital signals to analog signals
| Digital output signals from the DIGITAL OUTPUT (OPT) connector | kHz/bit when converting Digital Signals to Analog Signals for Analog jacks | |||||||
| Conversion methods*2 | Conversion methods*2 | |||||||
| Discs | Sound systems*1 | Bitstream | 96k Sound | PCM | Bitstream | 96k Sound | PCM | |
| DVD videos | DOLBY DIGITAL | b Bitstream | c 48 kHz/16 bit | 48 kHz/20 bit | 48 kHz/20 bit | 48 kHz/20 bit | ||
| Linear PCM | 48 kHz/16 bit | Same kHz/bit as the source | 48 kHz/16 bit | 48 kHz/16 bit | 48 kHz/16 bit | |||
| 48 kHz/20 bit | 48 kHz/16 bit | d No signal is output. | 48 kHz/16 bit | 48 kHz/20 bit | 48 kHz/20 bit | 48 kHz/20 bit | ||
| 48 kHz/24 bit | 48 kHz/24 bit | |||||||
| 96 kHz/16 bit | 48 kHz/16 bit | 96 kHz/16 bit | 48 kHz/16 bit | |||||
| 96 kHz/20bit | 48 kHz/20 bit | 96 kHz/20 bit | 48 kHz/20 bit | |||||
| 96 kHz/24 bit | 96 kHz/24 bit | |||||||
| DTS | Bitstream | f No signal | e No signal | |||||
| MPEG2 | Bitstream (7.1ch) | Bitstream (2ch) | 48 kHz/16 bit | h No signal | i 48 kHz/16 bit | |||
| VIDEO CDs | MPEG1 | 44.1 kHz/16 bit | 44.1 kHz/16 bit | |||||
| Audio CDs | Linear PCM 44.1 kHz/16 bit | Same kHz/bit as the source | 44.1 kHz/16 bit | |||||
| DTS | Bitstream | e No Signal | ||||||
Using Information on the On-Screen Display and the DVD Receiver's Display
You can view information about a disc and its operational status on the TV screen and the DVD Receiver's display.
Note
Some DVD videos may not display the chapter number or elapsed time.
DVD VCD CD
Checking the Total Number of Titles/Tracks, Current Title/Chapter/Track, Remaining and Elapsed Time, etc.
| When the disc is inserted in the DVD ReceiverThe following information appears in the DVD Receiver's display for about five seconds. | ||
DVD video*e.g.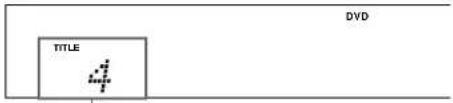 Total numberof titles Total numberof titles | *Playback may automatically start depending on the DVD video. In this case, the information on the left doesn't appear. | |
Remote controller DISPLAY /Unit /Unit DISPLAY DISPLAY | Press DISPLAY while the disc is stopped.Each time you press DISPLAY, the on-screen display on the TV screen changes as follows.DVD videoe.g.Current title number Current chapter number VIDEO CD/Audio CDe.g. VIDEO CD/Audio CDe.g.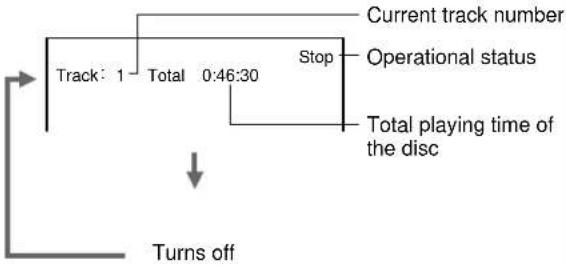 | Each time you press DISPLAY, the DVD Receiver's display changes as follows.DVD videoe.g.Current title number Current chapter number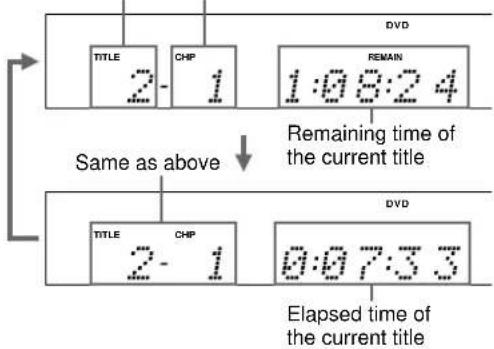 VIDEO CD/Audio CDe.g. (When an audio CD is in the DVD Receiver.) VIDEO CD/Audio CDe.g. (When an audio CD is in the DVD Receiver.)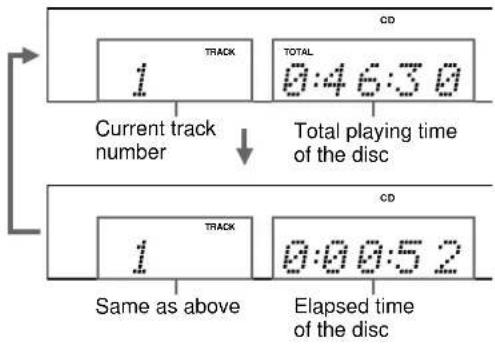 |
When the disc is inserted in the DVD Receiver
DVD video\*
Total number of titles
* Playback may automatically start depending on the DVD video. In this case, the information on the left doesn't appear.
VIDEO CD/Audio CD
Total number of tracks
Total playing time of the disc
Remote controller
DISPLAY
Unit
Press DISPLAY while the disc is stopped.
DVD video
Current title number Current chapter number
VIDEO CD/Audio CD
DVD video
Current title number Current chapter number
VIDEO CD/Audio CD
e.g. (When an audio CD is in the DVD Receiver.)
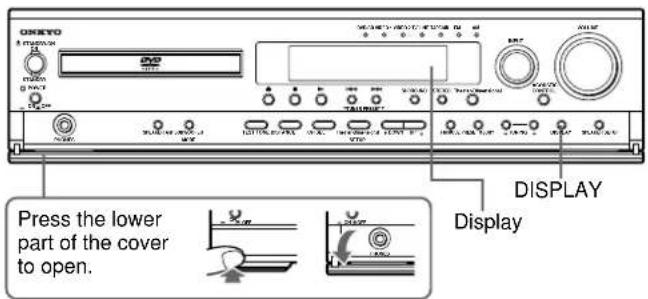
Remote controller
DISPLAY

Unit

Press DISPLAY during playback.
Each time you press DISPLAY, the on-screen display on the TV screen changes as follows.
DVD video
e.g.
flowchart
graph TD
    A["Playback mode"] --> B["Current title number"]
    A --> C["Current chapter number"]
    A --> D["Operational status"]
    B --> E["Play"]
    C --> F["Elapsed Remain"]
    D --> G["Elapsed time and remaining time of the current title"]
    D --> H["Elapsed time and remaining time of the current chapter"]
    E --> I["Title: 3"]
    E --> J["Chapter: 2"]
    F --> K["0:10:15 0:50:45"]
    F --> L["0:03:08 0:10:24"]
    G --> M["0:03:08 0:10:24"]
    I --> N["Chapter Repeat"]
    J --> O["Chapter Repeat"]
    K --> P["Audio: 1 ENG D□ 2CH"]
    L --> Q["Subtitle: 12 ENG Off"]
    M --> R["Angle: 1"]
    N --> S["Current audio setting"]
    N --> T["Current subtitle setting"]
    N --> U["Current angle setting"]
    S --> V["Bit Rate: 0.11Mbit/s 10"]
    T --> W["Data transfer rate (Mbit/s): The amount of picture, sound and subtitle data in the DVD video transferred per second. The larger value is, the faster data is processed, but this does not necessarily ensure better picture quality."]
    U --> X["Turns off."]
VIDEO CD/Audio CD
e.g.
flowchart
graph TD
    A["Playback mode"] --> B["Current track number"]
    B --> C["Operational status"]
    C --> D["Elapsed time and remaining time of the current track"]
    C --> E["Elapsed time and remaining time of the disc"]
    F["Track : 3 Disc"] --> G["Elapsed Remain 0:01:20 0:02:00 0:05:12 0:43:00 Track Repeat"]
    G --> H["Turns off."]
Each time you press DISPLAY, the DVD Receiver's display changes as follows.
DVD video
e.g.
Current title number Current chapter number
flowchart
graph TD
    A["TITLE CHP 3-2"] --> B["Same as above"]
    C["TITLE CHP 3-2"] --> D["Elapsed time of the current title"]
    E["REMAIN 0:50:45"] --> F["Remaining time of the current title"]
    G["TITLE CHP 3-2 0:10:15"] --> H["Same as above"]
    I["TITLE CHP 3-2 0:10:15"] --> J["Elapsed time of the current title"]
VIDEO CD/Audio CD
e.g. (When an audio CD is in the DVD Receiver.)
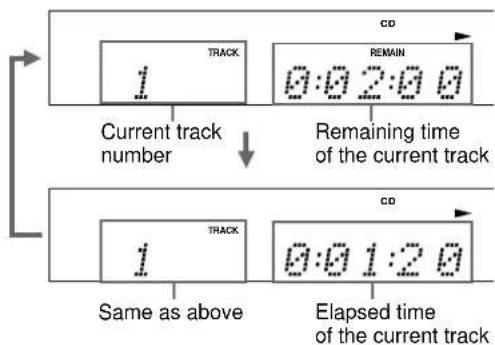
flowchart
graph TD
    A["Track 1"] -->|Current track number| B["CD"]
    C["Track 2"] -->|Remaining time of the current track| D["CD"]
    E["Track 3"] -->|Same as above| F["CD"]
    G["CD"] --> H["Elapsed time of the current track"]
Customizing the Function Settings
When you insert a DVD Video, VIDEO CD, or audio CD, the various functions of the DVD Receiver will be set (reset) according to the setting menu. You can customize this setting menu according to your preference.


Before operating
SETUP can function even during normal playback. However, if an operation is inaccessible, a message will appear. In this case, try again after playback is stopped.
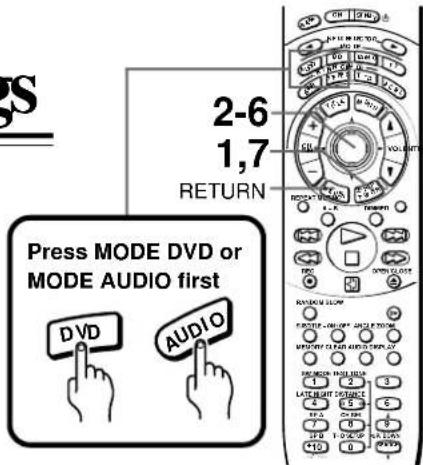
DVD VCD CD
Setting Steps
| 2 | Press ▲ to select a category symbol for the setting you want to change. |
| Setting languages | |
| Setting playback picture conditions | |
| Setting sound output | |
| Setting displays | |
| Setting operational options | |
| 3 | Press ▲ to select the item you want to change, then press ENTER.e.g. When you select "PICTURE" as the category in step 2, then select "TV Shape" as the item in this step. |
 |
■ To return to the previously displayed menu

Press RETURN.
Reference Table of the Setting Menu
Category
Symbol Menu item Related to Details Page
 | On-Screen Language | DVD | VCD | CD | To select a preferred language for on-screen displays | 54 |
| Disc Menu Language | DVD | To select a preferred language for disc menus | 54 | |||
| Audio Language | DVD | To select a preferred language for the sound track | 54 | |||
| Subtitle Language | DVD | To select a preferred language for subtitles | 54 |
| TV Shape | DVD | To select a picture size according to the aspect ratio of your TV | 55 |
| Black Level | DVD VCD | To select the black level of playback picture | 55 |
| PAL/Auto | DVD VCD | To select the video system of a disc | 55 |
| TV Shape | DVD | To select a picture size according to the aspect ratio of your TV | 55 |
| Black Level | DVD VCD | To select the black level of playback picture | 55 |
| PAL/Auto | DVD VCD | To select the video system of a disc | 55 |
| Audio Out Select | DVD VCD CD | To select a sound signal conversion method according to your purpose and preference | 56 |
| Dynamic Range Control | DVD | To turn on or off a function that makes faint sounds easier to hear even if you lower the volume during late night playback | 56 |
| Karaoke Vocal | DVD | To turn on or off the vocal output during KARAOKE disc playback | 56 |
| Extended Audio Feature | DVD | To turn on or off narration for visually impaired persons | 56 |
| On-Screen Displays | DVD VCD CD | To turn on or off the operational status display (On-screen display) on the TV screen | 57 |
| OSD Background Color | DVD VCD CD | To select the background color for on-screen displays | 57 |
| Extended Subtitle Features | DVD | To turn on or off special subtitles for hearing impaired persons | 57 |
| Screen Saver | DVD | To turn on or off the screen saver | 57 |
| OPERATION | Pause/Still | DVD | To select the resolution of still pictures (Field/Frame) | 58 |
| Parental Lock | DVD | To turn on or off the parental lock function | 58 | |
| Title Stop | DVD | To turn on or off a feature that automatically stops playback after a title has finished | 59 | |
| PBC | VCD | To use the menu screen when playing a PBC-controllable VIDEO CD | 59 |
Explanation of Each Item in the Language Category

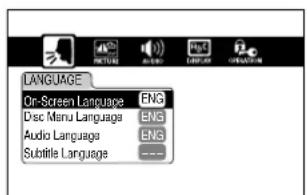
On-Screen Language

Select an on-screen language from the following:
- English
- Chinese
- Malaysian
Disc Menu Language

Select a disc menu language from the following:
- English
- Chinese
- Malaysian
- Others → Continue to “Choosing Another Language” in the right column of this page.
Note
Some DVD videos may not include your pre-selected language. In this case, the DVD Receiver automatically displays disc menus consistent with the disc's initial language setting.
Audio Language

Select an audio language from the following:
- English
- Chinese
- Malaysian
- Others → Continue to “Choosing Another Language” in the right column of this page.
Note
Some DVD videos may be played in a different language than you selected because an initial language may be programmed on the disc.
Note
To know the factory setting for each item, see the on-screen illustration on the left.
Subtitle Language

Select a subtitle language or no subtitle setting from the following:
- English
- Chinese
- Malaysian
- No Subtitles: Select this when you disable subtitles.
- Others → Continue to "Choosing Another Language" below.
Notes
- Some DVD videos may be set to display subtitles in a different language than you selected.
- Some DVD videos allow you to change subtitle selections only by using the disc menu. If this is the case, press MENU and choose the appropriate subtitle language from the selection on the disc menu.
■ Choosing Another Language
After pressing ENTER in step 4 of "Setting Steps" on page 52:
1 Obtain the abbreviation of the preferred language from the Table of Languages on page 60.
2 Select the first character of the abbreviation by pressing ▲/▼.
3 Press / move the cursor to the next column, then select the second character of the abbreviation by pressing ▲/▼.
4 Press ENTER.
e.g. When you select "Others" in "Disc Menu Language."
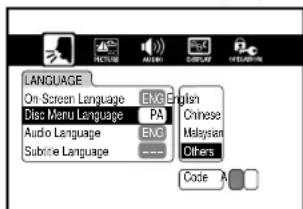
Explanation of Each Item in the Picture Category

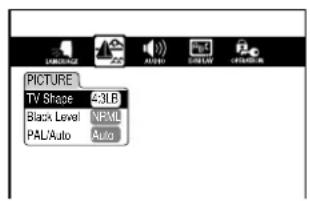
TV Shape

- 4:3 Letterbox: Select when a 4:3 TV is connected.
Displays widescreen images with masking bars above and below the picture.
- 4:3 Normal: Select when a 4:3 TV is connected.

Displays pictures cropped to fill your TV screen. Either or both sides of the picture are cut off.
- 16:9 Widescreen: Select when a 16:9 wide TV is connected.
Notes
- The displayable picture size is preset on each DVD video. Therefore, the playback picture of some DVD videos may not conform to the picture size you select.
- When you play a DVD video recorded in the 4:3 picture size only, the playback picture always appears in the 4:3 picture size regardless of the TV shape setting.
- If you select "16:9Widescreen" and you own a 4:3 TV set, the DVD playback picture will be horizontally distorted during playback. Images will appear to be horizontally compressed. Make sure the TV Shape conforms to the actual TV in use.
Black Level

Set according to your preference and the TV's capability.
• Normal: Standard black level
• Light: Brighter than in "Normal"
Note
To know the factory setting for each item, see the on-screen illustration on the left.
PAL/Auto


• PAL: Select to play PAL discs.
Connect a PAL TV to view pictures.
- Auto: The DVD Receiver automatically detects PAL and NTSC video systems of discs. Connecting a multisystem TV (PAL/NTSC compatible) is needed to view pictures.
Note
A playback picture may be distorted temporarily when the detected signal changes between PAL and NTSC on the disc.
Explanation of Each Item in the Audio Category

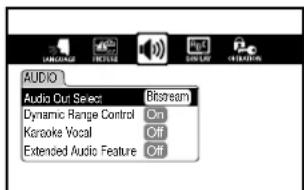
Audio Out Select

The output sound format can be changed according to your purpose and preference by changing the sound signal conversion method.
The sound signal conversion method is selected from among the three listed below. (Note that the three items are sound signal conversion methods, not the sound signal format the sound signals are converted into.)
When “Audio Out Select” is set to “Bitstream,” the sound is output in the most suitable format automatically through the speakers and output connector/jacks. Therefore, although you can change the sound signal conversion method using the menu, leaving the “Audio Out Select” setting to “Bitstream” and changing the method according your purpose temporarily as described on page 48 is recommended.
For details (tips on using of this function, sampling frequency and quantization bit conversion table, etc.), see pages 48 and 49.
Bitstream
Normally use this setting.
96k Sound
Select when you wish to listen to sources recorded in the following frequency/quantization bit in their original sound quality:
- 96 kHz/24 bit
- 96 kHz/20 bit
- 96 kHz/16 bit
- 48 kHz/24 bit
For instructions on how to reproduce the above original sounds, see page 48.
PCM
Select to convert DOLBY DIGITAL sound into the sound format recordable by equipment such as an MD recorder connected to the DIGITAL OUTPUT (OPT) connector on the DVD Receiver (see pages 11 and 49).
Note
To know the factory setting for each item, see the on-screen illustration on the left.
Dynamic Range Control

- Off: Full dynamic range is maintained.
- On: Dynamic range is reduced.
Notes
- This function works only with playback of Dolby Digital recorded discs.
- The level of Dynamic Range Reduction may differ depending on the DVD video.
Karaoke Vocal

The vocal output feature is used during playback of Dolby Digital (multichannel) recorded DVD KARAOKE discs. This feature allows you to turn off vocal audio tracks, or restore them for background accompaniment.
- Off: The primary vocal is not output.
- On: The primary vocal is output if it is recorded on the disc.
Extended Audio Feature

Some DVD videos contain a narration track for visually impaired persons. The DVD Receiver automatically plays the narration track by setting this item to "On."
- Off: The narration track is not played.
- On: The narration track is played automatically.
Explanation of Each Item in the Display Category

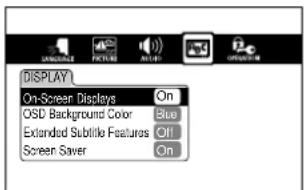
On-Screen Displays

- Off: Operational modes are not displayed on the TV screen.
- On: Operational modes are displayed on the TV screen (e.g. "PLAY", 📄).
OSD Background Color

- Blue: Blue background.
- Gray: Gray background.
Extended Subtitle Features

Some DVD videos contain special subtitles, an enhancement of closed captions for hearing impaired persons. The DVD Receiver automatically displays these special subtitles by setting this item to "On."
- Off: The extended subtitles are not displayed.
- On: The extended subtitles are displayed automatically.
Screen Saver

- Off: The screen saver is disabled.
- On: The screen saver is enabled.
Note
To know the factory setting for each item, see the on-screen illustration on the left.
Explanation of Each Item in the Operation Category

Pause/Still

• Auto: Select for normal use.
The image can be paused without shaking.
- Frame: The resolution of the still pictures is improved so that you can make a motionless picture clearer when you pause it.
Parental Lock

DVD videos equipped with the parental lock function are rated according to their content. The content allowed by a parental lock level and the way a DVD video can be controlled may vary from disc to disc. For example, some discs allow you to edit out violent scenes unsuitable for children and replace them with more suitable scenes, or lock out playback of the disc altogether.
Off: Select to disable the parental lock feature. Then, carry out "Further Steps" in the right column of this page.
On: Select to activate the parental lock feature or change the settings. Then, carry out "Further Steps" in the right column of this page.
Note
DVD videos may or may not respond to the parental lock settings. This is not a defect in the DVD Receiver. Make sure this function works with your DVD videos.
Note
To know the factory setting for each item, see the on-screen illustration on the left.
Further Steps
After pressing ENTER in step 4 of "Setting Steps" on page 52,
1 Press the number buttons to create a personal 4-digit security code, then press ENTER.
(To reenter the security code, before pressing ENTER, press CLEAR then enter the security code.)
- When you select "Parental Lock On" Continue to the next step.
- When you select "Parental Lock Off" The parental lock is disabled.
2 Press ◀/▶ to select the country whose standards were used to rate the DVD video.
3 Press ▲/▼to select the parental lock level, then press ENTER.

The parental lock is activated.
You cannot play DVD videos rated higher than the level you select unless you cancel the parental lock function. For example, when you select level 7, discs rated higher than level 7 are locked out and cannot be played.
■ To change the parental lock level
Follow the above procedure.
■ To change your 4-digit security code
After selecting "On" or "Off" and pressing ENTER in step 4 of "Setting Steps" on page 52:
1 Press ■ four times on the remote controller, then press ENTER.

The 4-digit security code is cleared.
2 Press the number buttons to create a new 4-digit security code.
3 Press ENTER.
Title Stop

- Off: The DVD Receiver continues playback after playback of a title is complete.
- On: The DVD Receiver stops playback after playback of a title is complete.
PBC

PBC is the abbreviation for Playback Control (see "About VIDEO CDs" on page 9.)
- Off: Select to play a PBC-featured VIDEO CD without using the menu screen.
- On: Select to view the menu screen when playing a PBC-featured VIDEO CD.
Table of Languages and Their Abbreviations
| Abbreviation of the Language | Language | Abbreviation of the Language | Language | Abbreviation of the Language | Language | Abbreviation of the Language | Language |
| — No alternate language | EO | Esperanto | LN Lingala | Lithuanian | SL | Slovenian | |
| ET Estonian | LO Laotian | Lithuanian | SM | Samoan | |||
| CHI (ZH) Chinese | EU | Basque | LT | Lithuanian | SN | Shona | |
| DUT (NL) Dutch | FA | Persian | LV | Latvian,Lettish | SO | Somali | |
| ENG (EN) English | FI | Finnish | MG | Malagasy | SQ | Albanian | |
| FRE (FR) French | FJ | Fiji | MI | Maori | SR | Serbian | |
| GER (DE) German | FO | Faroese | MK | Macedonian | SS Siswati | ||
| ITA (IT) Italian | FY Frisian | ML | Malayalam | ST Sesotho | |||
| JPN (JA) Japanese | GA | Irish | MN | Mongolian | SU | Sundanese | |
| KOR (KO) Korean | GD | Scottish,Gaelic | MO | Moldavian | SV Swedish | ||
| MAY (MS) Malay | GL Galician | MR | Marathi | SW | Swahili | ||
| SPA (ES) Spanish | GN | Guarani | MT | Maltese | TA | Tamil | |
| AA Afar | GU | Gujarati | MY | Burmese | TE Telugu | ||
| AB Abkhazian | HA | Hausa | NA | Nauru | TG | Tajik | |
| AF Afrikaans | HI | Hindi | NE | Nepali | TH Thai | ||
| AM | Amharic | HR | Croatian | NO | Norwegian | TI | Tigrinya |
| AR | Arabic | HU | Hungarian | OC | Occitan | TK Turkmen | |
| AS Assamese | HY | Armenian | OM | (Afan) Oromo | TL | Tagalog | |
| AY | Aymara | IA | Interlingua | OR | Oriya | TN Setswana | |
| AZ Azerbaijani | IE | Interlingue | PA | Panjabi | TO Tongan | ||
| BA Bashkir | IK | Inupiak | PL | Polish | TR Turkish | ||
| BE Belorussian | IN | Indonesian | PS Pashto,Pushto | TS Tsonga | |||
| BG | Bulgarian | IS | Icelandic | PT Portuguese | TT | Tatar | |
| BH | Bihari | IW | Hebrew | QU | Quechua | TW | Twi |
| BI | Bislama | JI | Yiddish | RM | Rhaeto-Romance | UK | Ukrainian |
| BN Bengali,Bangla | JW | Javanese | RN | Kirundi | UR | Urdu | |
| BO | Tibetan | KA Georgian | RO | Rumanian | UZ Uzbek | ||
| BR | Breton | KK Kazakh | RU | Russian | VI | Vietnamese | |
| CA | Catalan | KL | Greenlandic | RW | Kinyarwanda | VO | Volapük |
| CO | Corsican | KM | Cambodian | SA Sanskrit | WO | Wolof | |
| CS | Czech | KN | Kannada | SD | Sindhi | XH | Xhosa |
| CY | Welsh | KS Kashmiri | SG | Sango | YO Yoruba | ||
| DA Danish | KU | Kurdish | SH | Serbo-Croatian | ZU Zulu | ||
| DZ Bhutani | KY Kirghiz | SI | Singhalese | ||||
| EL | Greek | LA | Latin | SK Slovak | |||
Recording Using the Connected Equipment
You can record according to the following using the connected recording equipment:
- Sound/picture of discs played back by the DVD Receiver,
• Sound of FM/AM programs, and - Sound/picture of the connected source.
Note
Many discs and sources are copy protected. Copy protected sources are impossible to record.
■ Simplified diagram of the connected equipment (See also pages 10 and 11 for the actual connections.)
flowchart
graph TD
    A["Equipment connected to TAPE/MD"] --> B["MD recorder/DAT/CD recorder Cassette tape deck"]
    B --> C["DVD Receiver"]
    C --> D["TV"]
    C --> E["Video 1 DIGITAL INPUT (OPT)"]
    C --> F["Video 2 DIGITAL INPUT (COAX)"]
    C --> G["Video cassette player"]
    C --> H["LD player/Set Top Box"]
    C --> I["VCD recorder"]
    C --> J["VCR"]
    C --> K["Analog Sound"]
    C --> L["Analog Sound"]
    C --> M["Analog Sound"]
    C --> N["Analog Sound"]
    C --> O["Analog Sound"]
    C --> P["Analog Sound"]
    C --> Q["Analog Sound"]
    C --> R["Analog Sound"]
    C --> S["Analog Sound"]
    C --> T["Analog Sound"]
    C --> U["Analog Sound"]
    C --> V["Analog Sound"]
    C --> W["Analog Sound"]
    C --> X["Analog Sound"]
    C --> Y["Analog Sound"]
    C --> Z["Analog Sound"]
    C --> AA["Analog Sound"]
    C --> AB["Analog Sound"]
    C --> AC["Analog Sound"]
    C --> AD["Analog Sound"]
    C --> AE["Analog Sound"]
    C --> AF["Analog Sound"]
    C --> AG["Analog Sound"]
    C --> AH["Analog Sound"]
    C --> AI["Analog Sound"]
    C --> AJ["Analog Sound"]
    C --> AK["Analog Sound"]
    C --> AL["Analog Sound"]
    C --> AM["Analog Sound"]
    C --> AN["Analog Sound"]
    C --> AO["Analog Sound"]
    C --> AP["Analog Sound"]
    C --> AQ["Analog Sound"]
    C --> AR["Analog Sound"]
    C --> AS["Analog Sound"]
    C --> AT["Analog Sound"]
    C --> AU["Analog Sound"]
    C --> AV["Analog Sound"]
    C --> AW["Analog Sound"]
    C --> AX["Analog Sound"]
    C --> AY["Analog Sound"]
    C --> AZ["Analog Sound"]
    C --> BA["Analog Sound"]
    C --> BB["Analog Sound"]
    C --> BC["Analog Sound"]
    C --> BD["Analog Sound"]
    C --> BE["Analog Sound"]
    C --> BF["Analog Sound"]
    C --> BG["Analog Sound"]
    C --> BH["Analog Sound"]
    C --> BI["Analog Sound"]
    C --> BJ["Analog Sound"]
    C --> BK["Analog Sound"]
    C --> BL["Analog Sound"]
    C --> BM["Analog Sound"]
    C --> BN["Analog Sound"]
    C --> BO["Analog Sound"]
    C --> BP["Analog Sound"]
    C --> BQ["Analog Sound"]
    C --> BR["Analog Sound"]
    C --> BS["Analog Sound"]
    C --> BT["Analog Sound"]
    C --> BU["Analog Sound"]
    C --> BV["Analog Sound"]
    C --> BW["Analog Sound"]
    C --> BX["Analog Sound"]
    C --> BY["Analog Sound"]
    C --> BZ["Analog Sound"]
    C --> CA["Analog Sound"]
    C --> CB["Analog Sound"]
    C --> CC["Analog Sound"]
    C --> CD["Analog Sound"]
    C --> CE["Analog Sound"]
    C --> CF["Analog Sound"]
    C --> CG["Analog Sound"]
    C --> CH["Analog Sound"]
    C --> CI["Analog Sound"]
    C --> CJ["Analog Sound"]
    C --> CK["Analog Sound"]
    C --> CR["Analog Sound"]
    C --> CS["Analog Sound"]
    C --> CT["Analog Sound"]
    C --> CU["Analog Sound"]
    C --> CV["Analog Sound"]
    C --> CW["Analog Sound"]
    C --> CX["Analog Sound"]
    C --> CY["Analog Sound"]
    C --> CZ["Analog Sound"]
    C --> DA["Analog Sound"]
    C --> DB["Analog Sound"]
    C --> DC["Analog Sound"]
    C --> DD["Analog Sound"]
    C --> DE["Analog Sound"]
    C --> DF["Analog Sound"]
    C --> DG["Analog Sound"]
    C --> DH["Analog Sound"]
    C --> DI["Analog Sound"]
    C --> DJ["Analog Sound"]
    C --> DK["Analog Sound"]
Basic Recording Procedure
| 1 | Set the recording equipment (MD recorder, DAT, Cassette tape deck, VCR, DVD recorder, CD recorder, etc.) to recording pause. |
| 2 | Select the input source to be recorded, then set it to play pause.To play and pause a DVD video, VIDEO CD, or audio CD, see page 23.To select an FM/AM program, see page 28.To select a connected source, see page 30.Refer to the manuals of the connected source equipment for instructions on how to play and pause. |
| 3 | Release the recording pause set in step 1 to start recording. |
| 4 | Start playback of the selected source in step 2. |
Notes
- If you select another input source during recording, the selected source will be recorded.
- Sound effects described on pages 34 to 40 do not affect the recorded sounds whereas the sound set in the AUDIO setting menu (see pages 52 and 56) will be recorded.
■ Recording the Picture and Sound From Different Sources at the Same Time
The picture from the playing VIDEO 2 source is output through the VIDEO OUT jacks when you select any audio source (TAPE/MD, FM, or AM) or TV/LINE.
Play the VIDEO 2 source and select TAPE/MD, FM, AM, or TV/LINE, then you can record the picture from the VIDEO 2 source and the sound from the selected input source at the same time, using the recording equipment connected to the VIDEO 1 jacks.
■ Digital recording from the source connected to the digital input connectors to the digital recording equipment connected to the digital output connector
The digital input connectors are as follows:
• The VIDEO 1 DIGITAL INPUT (OPT) connector, and
- The VIDEO 2 DIGITAL INPUT (COAX) connector.
The digital output connector is the DIGITAL OUTPUT (OPT) connector.
Recording digital sound signals from sources connected to the digital input connectors using digital recording equipment connected to the digital output is possible unless:
- The recording is against SCMS (Serial Copy Management System) rules (for details of SCMS rules, refer to the manual of the digital recording equipment),
- The digital signals are in bitstream format (the recordable digital signal format is PCM — two channel digital stereo sound signals), or
- The sampling frequency is out of the recordable range of the recording equipment (for recordable sampling frequency, refer to the manual of the digital recording equipment). Note that the maximum signal frequency output from the DVD Receiver is 48 kHz.
■ Analog recording from a DVD Video played using the DVD Receiver

The digital sound signals are converted to analog signals and output to the analog output jacks unless the DVD video is recorded in the DTS Surround or MPEG2 system.
MPEG2 sounds can be recorded by changing the sound signal conversion method to "96k Sound" or "PCM." For details, see page 49.
Although the speakers can reproduce DTS Surround sounds, DTS signals are not output to the analog output jacks. See Ⓔ in the table on page 49.
Note
If the sound signal conversion method is set to "96k Sound," reproduced PCM signals may not be output from the digital output connector (DIGITAL OUTPUT (OPT)) depending on the frequency and quantization. See also the second note in "Digital recording from a DVD video played by the DVD Receiver" in the right column of this page.
■ Digital recording from a DVD video played by the DVD Receiver
DVD
The digital sound signals are output to the DIGITAL OUTPUT (OPT) connector in the most suitable format when the sound signal conversion method is set to "Bitstream" (see page 56). However, if the conversion method is set to "Bitstream" or "96k Sound" when DOLBY DIGITAL Surround sound is reproduced, the signals will be output in the bitstream format from the DIGITAL OUTPUT (OPT) connector as in b in the table on page 49. The bitstream signals are unrecordable. Therefore, to record the sounds recorded in the DOLBY DIGITAL Surround sound format, you need to change the conversion method to "PCM." Once the conversion method is changed to "PCM," the DOLBY DIGITAL sound signals are converted into the 2 channel 48 kHz/16 bit PCM format as in c in the same table mentioned above.
Digital recording of MPEG2 sounds is impossible regardless of the sound signal conversion methods. (Analog recording is possible. See on the left.)
DTS Surround sound is unrecordable from both the digital output connector and analog output jacks regardless of the sound signal conversion methods.
Notes
- If the conversion method is set to "PCM," the DTS Surround sounds of a DVD video will not be reproduced from the speakers nor output to the DIGITAL OUTPUT (OPT) connector. See ⓘ in the tables on page 49.
- If the sound signal conversion method is set to "96k Sound," the DIGITAL OUTPUT (OPT) connector will not output any signals depending on the frequency and quantization as in ⓐ in the table on page 49.
To digitally record high frequency PCM sound signals, the conversion method must be set to "Bitstream" or "PCM," so that the frequency/quantization are converted to the 48 kHz/16 bit format, which is recordable.
■ Analog and Digital recording from a VIDEO CD played using the DVD Receiver
VCD
VIDEO CDs are recorded in the MPEG1 format. MPEG1 sounds are recordable regardless of the conversion method. MPEG1 sound signals are output to the DIGITAL OUTPUT (OPT) connector in the 44.1 kHz/16 bit format, and at the same time, converted to analog signals and output to the analog jacks.
■ Analog and Digital recording from an audio CD played using the DVD Receiver
CD
PCM sound signals are output to the DIGITAL OUTPUT (OPT) connector, and converted to analog signals and output to the analog output jacks regardless of the conversion method.
DTS Surround sound is unrecordable. Because DTS Surround sound signals of an audio CD are output to the DIGITAL OUTPUT (OPT) connector in the bitstream format and no signal will be output to the analog output jacks regardless of the conversion method. For details, see the tables on page 49.
Programming the Remote Controller to Your TV
You can program the supplied remote controller (RC-437M) to operate your TV.
Note
The programmed buttons of the DVD Receiver's remote controller may lose their data if the batteries become weak or dead, or due to other causes. In such a case, you need to repeat programming from the beginning using the TV's remote control. Therefore, keep the TV's remote control in a safe place even if it is not in use.
Before programming the remote controller
- If the SEND/LEARN indicator flashes three times, the programming is unsuccessful. Repeat from step 2.
- Use new batteries for the remote controller and the TV's remote control. Using old batteries may result in a failure in programming or cause the programmed remote controller buttons to operate improperly.
- The remote controller and most other remote controls transmit infrared rays, however, if the other remote control uses another method, programming is impossible.
- Although seven buttons are prepared for operating the TV, the number of programmable buttons varies depending on the manufacturer and type of the other remote control.
- Switch off the main power of the DVD Receiver and TV to prevent the units from undesired operation during programming.
- The remote control buttons on some TVs may have more than one function; however, only one function can be programmed per button.
- Refer also to the TV's instruction manual for details on its remote control operation and other information.
Programming the Remote Controller
Programming is carried out by copying the signal patterns of the TV's remote control buttons.
1
Place both the DVD Receiver's remote controller and the TV's remote control facing with each other on a flat level surface.
TV's remote control
Must be 5 cm to 10 cm apart
2

At the same time

Press and hold MODE TV, then press SEARCH once.
The SEND/LEARN indicator lights up and the remote controller enters the programming mode.
Lights up.
Proceed to the next step within 30 seconds.
(Continued on next page.)
3
Press one of the programmable buttons on the DVD Receiver's remote controller.
The SEND/LEARN indicator goes off while the button is pressed, then lights up again.
Lights up again shortly after going off
Proceed to the next step within 30 seconds.
To select another programmable button
Press one of the other programmable buttons within 30 seconds.
4
One of the TV's remote control buttons
Press and hold the desired TV's remote control button until the SEND/LEARN indicator flashes.
If the function is successfully copied, the SEND/LEARN indicator flashes twice.
- Flashes twice when the programming is successful.
- Flashes three times if the programming has failed.
- Flashes six times if the programming is failed because the data capacity of the programmable button has been exceeded. TV buttons whose data size overwhelms the capacity of the programmable buttons are unable to be used for programming.
■ Programming another function to the programmed button
Carry out the steps from 1 to 4.
The previous function will be erased when the programming is successful.
■ Resuming the factory setting for a particular programmable button
After step 2, press the programmable button you wish to resume to the factory setting twice.
- When the factory setting resumes, the SEND/LEARN indicator flashes twice.
- If failed, the SEND/LEARN indicator flashes three times. In this case, no change has been made to the programmable button.
■ Resuming the factory settings for all the programmable buttons
1 Press and hold MODE TV, then press SEARCH twice.
The SEND/LEARN indicator flashes twice, then lights steadily.
Proceed to the next step within 30 seconds.
2 Press MODE TV.
- When the factory settings resume, the SEND/LEARN indicator flashes twice.
- If failed, the SEND/LEARN indicator flashes three times. In this case, no change has been made to the programmable buttons.
If the programmed buttons do not operate properly
- If the SEND/LEARN indicator doesn't light up when you press one of the programmed buttons, reprogram the button.
- If the remote controller operates only at a short distance or there is a slow response from the TV, check the batteries.
If the batteries are not weak, the pressed button is not properly programmed. Reprogram the button. - If the remote controller remains without batteries for 10 minutes or more, the programmed data will be erased. In such a case, install new batteries, then reprogram the buttons.
Using the Programmed Buttons
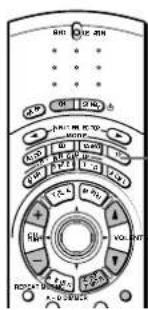
Press MODE TV first, then press the programmed TV operation buttons.
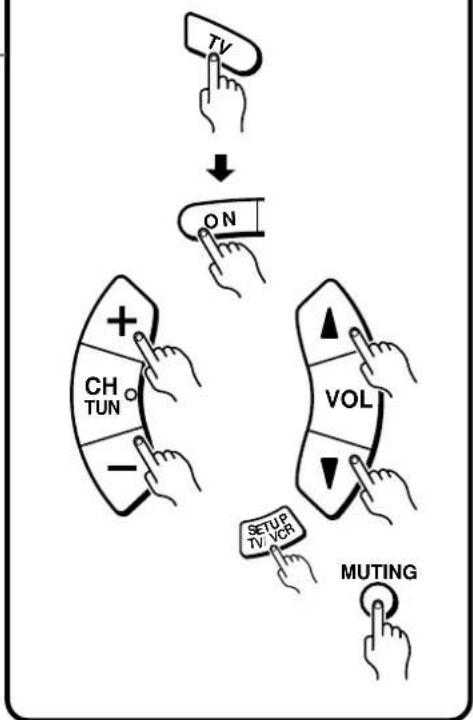
flowchart
graph TD
    A["Hand Press"] --> B["ON"]
    B --> C["VOL"]
    C --> D["MUTING"]
    D --> E["SETUP TV/VCR"]
    E --> F["CH TUN"]
    F --> G["+"]
    G --> H["-"]
Troubleshooting
Check the following guide for the possible cause of a problem before contacting service. Refer also to the respective instruction manuals of the connected components and TV.
| Symptoms | Causes | Remedles | Pages | |
| Amplifier | The DVD Receiver doesn't switch on. | · The power cord (mains lead) is disconnected.· The main power is set to OFF.· There is external noise interfering with the computer circuits of the DVD Receiver.· The AC fuse is blown. | · Check the connection of the power cord (mains lead).· Turn on the main power.· Switch off the main power, then switch it on again. If not recovered, disconnect the power cord (mains lead), then connect it again.· Contact your nearest Onkyo service center. | 161616- |
| No sound is reproduced. | · The muting function is activated.· The DVD Receiver is not properly connected.· The amplifier protection circuitry has activated. (The STANDBY indicator flashes.)· Headphones are connected. | · Deactivate the muting function.· Check the connections to the DVD Receiver.· Contact your nearest Onkyo service center.· Decrease the volume, then disconnect the headphones. | 3210-16-33 | |
| No sound or very little sound is reproduced from the center speaker. | · The speakers are not properly connected.· The listening mode is set to "Stereo" or "Orchestra."· The volume level of the center speaker ("Center") is set to minimum.· A speaker configuration without the center speaker is selected. | · Check the speaker connections.· No sound is reproduced from the center speaker when the listening mode is "Stereo" or "Orchestra."· Adjust the volume level of the center speaker.· Check that the selected speaker configuration includes the center speaker. | 133821, 3918, 19 | |
| No picture appears on the TV screen. | · The TV is not set to receive the output signals from the DVD Receiver.· The video cable is not connected securely.· Only the S video connection is made. | · Set the TV to the DVD Receiver's input.· Check the connections between the DVD Receiver and TV set.· Also make the video connection. | -1010, 11 | |
| The sound of the playback source is not heard. | · Another input source is selected. | · Select the appropriate input source. | 30 | |
| The buttons on the remote controller and DVD Receiver do not operate. | · Power supply fluctuations or other abnormalities such as static electricity may interrupt correct operation. | · Switch off the main power, then switch it on again. If not recovered, disconnect the power cord (mains lead), then connect it again. | 16 | |
| DVD (VIDEO CD/Audio CD) | The DVD Receiver does not start playback. | · No disc is inserted.· The region number of the disc is unmatched to the DVD Receiver.· An unplayable disc is inserted.· The disc is placed upside down.· The disc is not placed within the disc tray guide.· The disc is dirty.· The parental lock function is activated. | · Insert a disc. (Check that "DVD," "VCD," or "CD" is lit in the DVD Receiver's display.)· See the rear panel of the unit to check the playable region number.· Check the playable discs.· Place the disc with the playback side down.· Place the disc within the proper guide on the disc tray.· Eject the disc and clean it.· Deactivate the parental lock function or change the parental lock level. | 2249222223, 958 |
| The DVD related operation buttons do not work. | · The SETUP button is pressed and the DVD Receiver stands by for the next function setting command. | · Press SETUP once. If the buttons still don't work, press ▲. | 52, 23 | |
| Brightness is unstable or noise is visible in the playback picture. | · Copy protection is activated. | · Connect the DVD Receiver directly to the TV. Avoid connecting the DVD Receiver to the TV through a VCR. | 10 | |
| The playback picture is occasionally distorted. | · The disc is dirty.· It is in fast forward or fast reverse playback. | · Eject the disc and clean it.· Sometime a small amount of picture distortion may appear. This is not a malfunction. | 23, 924 | |
| Playback doesn't follow the course of the disc's programs. | · The DVD Receiver is in repeat playback mode, memory playback mode, or random playback mode, etc. | · Resume normal playback. | 41, 42, 43 | |
| The picture from the DVD Receiver doesn't appear on the TV screen. | · The TV is not set to receive the output signals from the DVD Receiver. | · Set the TV to the DVD Receiver's input. | - | |
| No sound is reproduced. | · A wrong sound signal conversion method is selected. | · Check the current sound signal conversion method, and select the right one. | 48, 56 |
Troubleshooting
| Symptoms | Causes | Remedies | Pages | |
| Tuner | Too much noise is heard or sound is interrupted occasionally. (The FM ST indicator does not light steadily.) | FM stereo waves may produce a hiss noise when a certain level is reached.The position or direction of the FM antenna (aerial) is incorrect.The station is too weak. | Switch the frequency receiving mode to mono.Adjust the position, height, and direction of the FM antenna (aerial).Connect an FM outdoor antenna (aerial).Try to use an antenna (aerial) with more elements.[For installation of the outdoor antenna (aerial), consult your nearest dealer as it requires special skills and experience.] | 281415 |
| Sound is distorted or sound volume decreases. | The radio wave is distorted.Cars are running or airplanes are flying near the house. | - | - | |
| Sound is excessively distorted. | There is a tall building or a mountain nearby.[The waves transmitted from the transmission center (direct waves) and the waved reflected by buildings or mountains (diffraction waves) interfere with each other causing multi pass distortion.] | - | - | |
| No preset channels are selected. | The power cord (mains lead) is unplugged, or the main power is switched off, for a long time. | The preset data in memory is lost. Preset the radio stations again. | 28 | |
| Recording | Sound is reproduced from the speakers but not recorded. | The sound system you are trying to record is DTS Surround.A wrong sound signal conversion method is selected. | DTS Surround sound is unable to be recorded regardless of the sound signal conversion method.Check the current sound signal conversion method and select the right one for recording. | 6248, 56 |
| Remote controller | The buttons on the DVD Receiver operate but the buttons on the remote controller do not operate. | No batteries are inserted in the remote controller.The batteries are worn out.The remote controller is not pointed at the remote sensor of the DVD Receiver.The remote controller is too far from the DVD Receiver.Any wrong MODE button is pressed. | Insert new batteries.Replace with new batteries.Point the remote controller at the remote sensor of the DVD Receiver.Operate the remote controller within 5 m (16 feet).Press the appropriate MODE button. | 88888 |
This unit contains a sensitive microcomputer, which under certain circumstances might fail to operate due to excessive noise interference. If this happens, press the DVD Receiver's SPEAKER A/B button and ⏻ STANDBY/ON button at the same time until "Clear" appears in the DVD Receiver's display. The DVD Receiver turns into the standby mode, then all the custom settings in the DVD Receiver's memory will be erased. Please repeat the custom settings from the beginning.
| AMPLIFIER SECTION | |||
| Power Output (FTC) | All channels 30 watts per channel min. RMS. into 6 ohms two channel driven, 1,000 Hz with no more than 0.6 % total harmonic distortion. | Output Level and Impedance | |
| DIGITAL OUTPUT (OPT) | -21 to -15 dBm | ||
| REC OUT (TAPE/MD, VIDEO 1) | 200 mV, 2.2 kohms | ||
| PRE OUT (SUBWOOFER) | 1 V, 2.2 kohms | ||
| Power Output (EIAJ) | All channels 40 watts at 6 ohms, 1 kHz | Composite (MON OUT, VIDEO 1) | 1 Vp-p, 75 ohms |
| Continuous Power Output (DIN) | All channels 30 watts per channel min. RMS. into 6 ohms two channel driven, 1,000 Hz. | S-VIDEO (MON OUT, VIDEO 1) | Y: 1 Vp-p, 75 ohms |
| COMPONENT VIDEO OUTPUT | C: 0.28 Vp-p, 75 ohms | ||
| Y: 1.0 Vp-p, 75 ohms | |||
| Pb/Pr: 0.7 Vp-p, 75 ohms | |||
| Total Harmonic Distortion | 0.6 % at rated power | Frequency Response | 20 to 30,000 Hz : +/- 0.8 dB |
| 0.2 % at 1 watt output | Acoustic Control | 1: +6 dB at 40 Hz | |
| IM Distortion | 0.6 % at rated power | 2: +10 dB at 55 Hz | |
| 0.2 % at 1 watt output | +5 dB at 10,000 Hz | ||
| Damping Factor | 40 at 8 ohms | Signal-to-noise Ratio | 100 dB (IHF) |
| Input Sensitivity and Impedance | Muting -∞ dB | ||
| VIDEO 1 DIGITAL INPUT (OPT) | -21 to -15 dBm | ||
| VIDEO 2 DIGITAL INPUT (COAX) | 0.5 Vp-p, 75 ohms | ||
| LINE (VIDEO 1, 2, TV/LINE, TAPE/MD) | 200 mV/50 kohms | ||
| Composite (VIDEO 1, 2) | 1 Vp-p, 75 ohms | ||
| S-VIDEO (VIDEO 1, 2) | Y: 1 Vp-p, 75 ohms | ||
| C: 0.28 Vp-p, 75 ohms | |||
| DVD SECTION | |||
| Signal readout system | Optical non-contact | Frequency response | 4 Hz - 20 kHz (44.1 kHz), |
| Linear velocity 3.49 m/s (Single Layer), 3.84 m/s (Dual Layer) | 4 Hz - 22 kHz (48 kHz), | ||
| 4 Hz - 44 kHz (96 kHz) | |||
| Error correction system | Reed Solomon Product Code | Wow and flutter | Below threshold of measurability |
| Signal system | PAL/3.58 NTSC | ||
| TUNER SECTION | |||
| Tuning Range FM: 87.50 to 108.00 MHz (50 kHz steps) | |||
| AM: 531 to 1602 kHz (9 kHz steps) | |||
| Usable Sensitivity FM: Mono 11.2 dBf, 1.0 μV (75 ohms IHF) | |||
| Stereo 17.2 dBf, 2.0 μV (75 ohms IHF) | |||
| AM: 30 μV | |||
| 50 dB Quieting Sensitivity FM: Mono 17.2 dBf, 2.0 μV (75 ohms) | |||
| Stereo 37.2 dBf, 20.0 μV (75 ohms) | |||
| Capture Ratio FM: 2.0 dB | |||
| Image Rejection Ratio FM: 85 dB | |||
| IF Rejection Ratio FM: 90 dB | |||
| Signal-to-noise Ratio FM: Mono 76 dB, IHF | |||
| Stereo 70 dB, IHF | |||
| AM: 40 dB | |||
| Alternate Channel Att. (+/- 400 kHz) FM: Mono 55 dB, IHF | |||
| Selectivity FM: 50 dB, DIN | |||
| AM Suppression Ratio FM: 50 dB | |||
| Harmonic Distortion | FM: Mono 0.2 % | ||
| Stereo 0.3 % | |||
| AM: 0.7 % | |||
| Frequency response FM: 30 to 15,000 Hz (+/- 1.0 dB) | |||
| Stereo Separation FM: 45 dB at 1,000 Hz | |||
| Stereo Threshold FM: 17.2 dBf, 20 μV (75 ohms) | |||
| GENERAL | |||
| Power Supply Rating and Power Consumption | Dimensions (W x H x D) | 435 · 108 · 421 mm | |
| AC 120 V, 60 Hz 165W or AC 220-230 V, 50/60 Hz 155W | Weight | (17 ^1/_8 · 4 ^1/_4 · 16 ^5/_8 ins.) | |
| 9.1 kg (20.1 lb.) | |||
For operational instructions, refer to the page indicated in brackets.
■ Front panel and its display
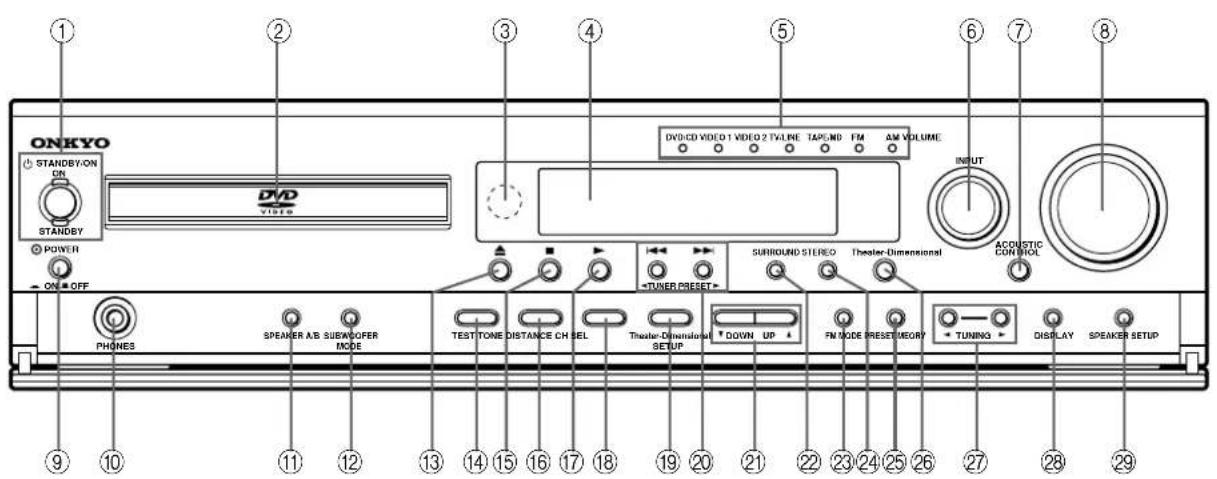
① ⏻STANDBY/ON button,
ON indicator, STANDBY indicator [16]
② Disc tray [22]
③ Remote control sensor [8]
④ Display [33, 69]
⑤ Input source indicators [22, 28, 29, 30]
⑥ INPUT selector [28, 29, 30]
⑦ ACOUSTIC CONTROL button/indicator [40]
⑧ VOLUME control [32]
⑨ ⓄPOWER switch [16]
⑩ PHONES jack [33]
⑪ SPEAKER A/B button [32]
⑫ SUBWOOFER MODE button [19]
⑬ ▲ (open/close) button/lamp [22, 23, 33]
⑭ TEST TONE button [21, 39]
⑮ (stop) button/lamp [23, 33]
⑯ DISTANCE button [20]
⑰ ▶(play) button/lamp [22, 33]
⑱ CH SEL button [21, 39]
⑲ Theater-Dimensional SETUP button [37]
⑳ I◀◀/▶▶I buttons [27]
TUNER PRESET ← buttons [28, 29]
② ▲ DOWN/UP buttons [18, 20, 21, 37, 39]
②2 SURROUND button [38]
②3 FM MODE button [28]
⑳ STEREO button [38]
⑲ PRESET MEMORY button [28, 29]
⑳ Theater-Dimensional button/indicator [37]
⑳ TUNING▶buttons [28]
⑳ DISPLAY button [50, 51]
⑲ SPEAKER SETUP button [18, 19]
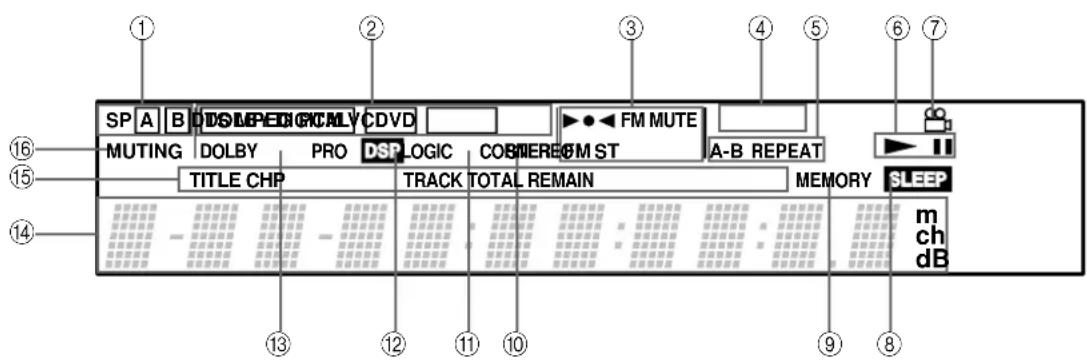
① SP A/B indicators [32]
② Sound system indicators [22, 30, 35]
③ Tuned, FM MUTE, FM ST indicators [28]
④ Inserted disc indicator [22]
⑤ REPEAT/A-B REPEAT indicators [41]
⑥ ▶(playing)/II (pausing) indicators
⑦ Camera angle indicator [45]
⑧ SLEEP indicator [33]
⑨ MEMORY indicator [42]
⑩ CORNER indicator [36]
⑪ STEREO indicator [38]
⑫ DSP indicator [38]
⑬ DOLBY PRO LOGIC indicator [38]
⑭ Multipurpose display
⑮ TITLE, CHP, TRACK, TOTAL, REMAIN indicators [50, 51]
⑯ MUTING indicator [32]
■ Remote controller
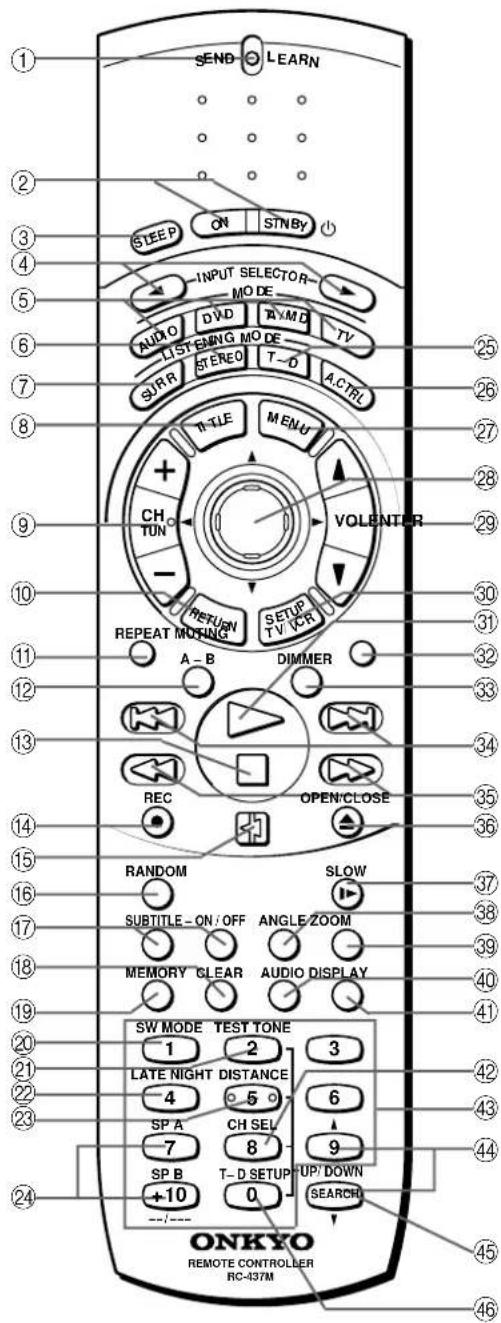
① SEND/LEARN indicator [8, 63, 64]
② ON button [16, 31, 63]
STANDBY 📁 button [16]
③ SLEEP button [33]
④ INPUT SELECTOR▶buttons [29, 30]
⑤ MODE AUDIO, DVD, TA/MD, TV buttons [8]
⑥ STEREO button [38]
⑦ SURR button [38]
⑧ TITLE button [25]
⑨ CH TUN button [29, 31, 63]
⑩ RETURN button [42, 44, 52]
⑪ REPEAT button [31, 41, 42]
⑫ A-B button [41]
⑬ ■(stop) button [23, 31, 59]
⑭ ● REC (record) button [31]
⑮ play pause) button [23, 31]
⑯ RANDOM button [43]
⑰ SUBTITLE/SUBTITLE-ON/OFF buttons [46]
⑱ CLEAR button [41-48]
⑲ MEMORY button [42]
⑳ SW MODE button [19]
②1 TEST TONE button [21, 39]
② LATE NIGHT button [40]
②3 DISTANCE button [20]
⑳ SP A, SP B button [32]
②5 T-D button [37]
②6 A.CTRL button [40]
⑳ MENU button [25, 47]
⑳ Cursor ▲ ▼ ▶ ENTER)
[16, 22, 25, 42, 44–48, 52]
⑲ VOL ▲ /▼buttons [31, 32, 63]
③0 SETUP button [16, 52]
TV/VCR button [31, 63]
③1 ▶(play) button [22, 31]
③2 MUTING button [31, 32, 63]
③ DIMMER button [33]
③4 I◀◀ (up)/▶▶I (down) button [27, 31, 43]
③5 ◀◀ (fast reverse) /▶▶ (fast forward) buttons [24, 31]
③6 OPEN/CLOSE/▲ (eject) button [22, 23, 31]
③7 ▶(slow playback) button [24]
38 ANGLE button [45]
⑲ ZOOM button [44]
④0 AUDIO button [47, 48]
④1 DISPLAY button [42, 50, 51]
④2 CH SEL button [21, 39]
④3 Number buttons [25–27, 31, 42, 43, 59]
④4 UP ▲ /DOWN ▼ buttons [18, 20, 21, 37, 39]
④5 SEARCH button [25, 27, 43, 63]
④6 T-D SETUP button [37]
ONKYO CORPORATION
Sales & Product Planning Div.: 2-1, Nisshin-cho, Neyagawa-shi, OSAKA 572-8540, JAPAN
Tel: 072-831-8111 Fax: 072-833-5222 http://www.onkyo-intl.com
18 Park Way, Upper Saddle River, N.J. 07458, U.S.A.
Tel: 201-785-2600 Fax: 201-785-2650 http://www.onkyousa.com
ONKYO EUROPE ELECTRONICS GmbH
Liegnitzerstrasse 6, 82194 Groebenzell, GERMANY
Tel: +49-8142-4401-0 Fax: +49-8142-4401-555 http://www.onkyo.net
ONKYO CHINA LIMITED
Units 2102-2107, Metroplaza Tower I, 223 Hing Fong Road, Kwai Chung,
N.T., HONG KONG Tel: 852-2429-3118 Fax: 852-2428-9039 http://www.onkyochina.com
ONKYO
HOMEPAGE