HD-400S - Receiver MVision - Free user manual and instructions
Find the device manual for free HD-400S MVision in PDF.


| Product Type | Satellite Receiver |
| Brand | MVision |
| Model | HD-400S |
| Power Supply | AC 90-250V, 50-60Hz, 30W max |
| Video Resolution | 576i, 576p, 720p, 1080i |
| Audio Decoding | MPEG/Musicam Layer I & II |
| Connectivity | HDMI, SCART, RCA, USB, Optical S/PDIF, F-type input |
| Smart Card Slots | 2 (ISO 7816) |
| LNB Power | 13.5/18.5V DC, 500mA max |
| DiSEqC Control | Version 1.2, USALS compatible |
| PVR Function | Yes (via USB), supports recording and timeshift |
| Games | Tetris, Othello, Sudoku |
| Remote Control | Included with batteries |
| User Manual | Included (PDF available online) |
| Maintenance | Clean with soft cloth and mild soap; unplug before cleaning |
| Safety | Keep ventilation clear, avoid liquids, unplug during storms/long absence |
| Spare Parts | Remote control, batteries, SCART cable (not supplied) |
| Reparability | Refer to qualified service personnel; do not open cover |
Frequently Asked Questions - HD-400S MVision
User questions about HD-400S MVision
0 question about this device. Answer the ones you know or ask your own.
Ask a new question about this device
Download the instructions for your Receiver in PDF format for free! Find your manual HD-400S - MVision and take your electronic device back in hand. On this page are published all the documents necessary for the use of your device. HD-400S by MVision.
USER MANUAL HD-400S MVision
Please read this User's Manual carefully before installing this receiver.
TABLE OF CONTENTS
GENERAL SAFETY....2
I. UNPACKING....2
II. REMOTE CONTROL UNIT (RCU)....3
III. FRONT PANEL....5
IV. REAR PANEL....5
V. INSTALLING EQUIPMENT 6
VI. CHANNEL LIST GUIDE ...... 6
VII. MENU GUIDE....7
- EDIT CHANNEL 8
- INSTALLATION 9
- SYSTEM SETUP .... 10
- TOOLS....10
- GAME....11
- REC....11
- SMARTCARD 11
VIII. TROUBLESHOOTING .... 11
IX. SPECIFICATIONS....13
GENERAL SAFETY
GENERAL SAFETY
WARNING
Please read the following recommended instructions carefully to avoid the risk of your physical Injury before the product is operated.
Do not cover the receiver and keep clear space around the receiver for sufficient.
Check the receiver's operation voltage 90\~250V, 50Hz\~60Hz Max, 30W Keep liquid away from the receiver.
The receiver shall not be exposed to dripping or splashing and no objects that filled with liquid shall not be placed on the receiver.
Unplug the receiver from the wall outlet before cleaning.
Use a soft cloth and a mild solution of washing-up liquid to clean the casing.
Do not block the receiver's ventilation slots which are provided for ventilation and protection from overheating.
Please maintain the receiver in a free airflow.
Do not allow the receiver to be exposed to hot, cold or humid condition.
Do not use any cable and attachment that are not recommended as these may damage your equipment.
Please unplug the receiver from the wall outlet and disconnect the cable between the receiver and the antenna when you will not use it for long time.
Do not remove the cover to reduce the risk of electric shock.
Do not attempt to service the receiver yourself.
Refer all serving to qualified service personnel.
Manual may be updated as new features.
I. UNPACKING
Please ensure that the following items are included with the receiver in your packing.
1) Remote Control Unit (RCU)
2) Batteries (2EA)
3) User's Manual
REMOTE CONTROL UNIT (RCU)
II. REMOTE CONTROL UNIT (RCU)
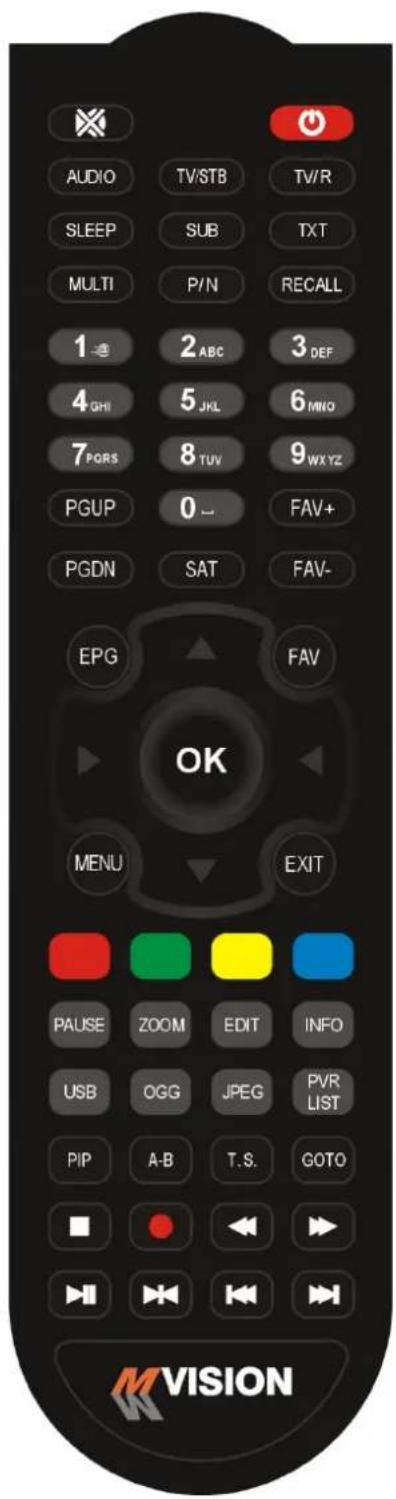
REMOTE CONTROL UNIT (RCU)
| 1. POWER | Switches the receiver between operation and standby mode. |
| 2. MUTE | Enables or disables the audio. |
| 3. Audio | Changes the audio languages. |
| 4. TV/STB | Switches between TV or STB (Receiver) |
| 5. TV/R | Switches between TV and Radio |
| 6. SLEEP | Selects the time to turn on/off receiver |
| 7. SUB | Selects the subtitles |
| 8. TXT | Selects teletext |
| 9. MULTI | Multi picture in the viewing mode |
| 10. P/N | Display mode is used to switch the display mode |
| 11. RECALL | Selects the previous watching channel |
| 12. Numeric buttons | Selects the TV or Radio service channels and individual menu. |
| 13. PGUP | Move up a page in the channel list |
| 14. PGDN | Move down a page in the channel list |
| 15. SAT | Toggles the selected satellite |
| 16. FAV+/FAV- | Switches up/down in favorite list |
| 17. EPG | Displays the TV or Radio program guide (Electronic Program Guide) |
| 18. FAV | Toggles the selected favorite mode. |
| 19. MENU | Displays the main menu on screen. |
| 20. EXIT | Returns to the previous menu or normal viewing mode from a menu. |
| 21. ▲▼ | Changes channels or moves to the item in the menu. |
| 22. ◀▶ | Adjusts the volume or moves to left or move item in the menu. |
| 23. OK | Executes the selected item and displays channel lists when watching a channel |
| 24. Red/Green/ Yellow/Blue | Buttons used in teletext and/or determined functions in menu. |
| 25. PAUSE | Pauses the playing picture or go to normal mode. |
| 26. ZOOM | Zoom the picture or video you are watching |
| 27. EDIT | Change setting In selected channel. |
| 28. INFO | Displays the program information box on the screen and edit the name of favorite channel list. |
| 29. USB | Displays the USB port memory content |
| 30. OGG | Displays the USB port audio OGG memory content |
| 31. JPEG | Displays the USB port JPEG memory content |
| 32. PVR LIST | Displays the recorded memory content in USB port |
| 33. PIP | Watch two channels from same transponder at the same time |
| 34. A-B | Switch only between last two chosen channels without interruption |
| 35. T.S. Time Shift request. | |
| 36. GOTO | Jump to input time program. |
| 37. TECLAS PVR | Stop, record, skip Image forward or back, play, pause, fast forward, fast rewind. |
FRONT PANEL & REAR PANEL
III. FRONT PANEL
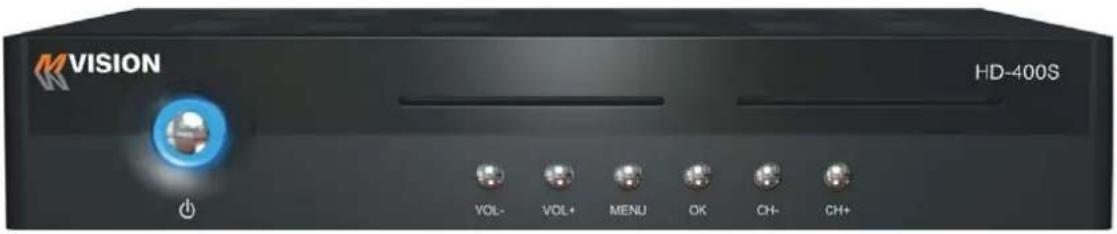
- POWER Switches the receiver power On and Standby.
- MENU Enter main menu.
- OK Executes selected option.
- CH Up/Down Channel up / down or selects the item of Menu.
- VOL Up/Down Volume up/down or selects the item of Menu.
- Smartcard Slot Insert Smart Card.
IV. REAR PANEL

- USB PORT Connects USB Device.
- IF IN Connects Satellite Antenna Cable
- IF OUT Connects to other STB
- VIDEO Connects VIDEO to the TV or other equipment.
- AUDIO-R Connects AUDIO RIGHT to TV or other equipment.
- AUDIO-L Connects to AUDIO LEFT to TV or other equipment.
- HDMI HDMI Output (High Definition)
- Optical S/PDIF Output for digital amplifier
- TV SCART Connect SCART cable to TV.
- POWER SUPPLY 90\~250V AC, 50/60Hz, 30W.
- POWER BUTTON Turns on/off.
V. INSTALLING EQUIPMENT
This section explains several ways of connecting the receiver to your existing TV, VCR and Hi-Fi system.
You can choose one of the following setups that we recommend.
If you have any problem or need help, consult your dealer or service provider.
Please ensure that the following items are included with the receiver in your packing.
I. CONNECTING THE RECEIVER TO TV
I-1. Connecting the receiver to TV with the SCART cable
Connect one end of the SCART cable to the TV SCART socket on the rear panel of the
receiver and the other end to a SCART socket on the TV.
II. CONNECTING THE RECEIVER TO TV WITH CINCH CABLE (RCA)
II-1. Connecting the receiver to TV with the CINCH cable
Connect one end of the CINCH cable to the Audio-R(Red), the Audio-L(White) and the Video (Yellow) socket on the rear panel of the receiver and other end to the Audio-R(Red), the Audio-L(White) and the VIDEO(Yellow) socket on the TV.
III. CONNECTING THE RECEIVER TO TV WITH HDMI CABLE
Connect one end of the HDMI cable to HDMI connector of receiver and the other end to the HDMI connector of the TV.
VI. CHANNEL LIST GUIDE
1. Normal Live Mode
a) When you select one channel, information bar appears automatically on the screen for few seconds. This bar provides you the current channel information.
b) Press INFO button to see the information during normal live mode.
2. Simple Channel List
a) Press OK on the normal live mode to go to the channel list.
b) When detail channel list is displayed on screen press RED button to go to simple channel list.
3. Detail Channel List
a) Press OK on the normal live mode to go to the channel list.
b) When simple channel list is displayed on screen press RED button to go to detail channel list.
c) Press ◀ ▶ and ▲▼ to sort by Alphabet.
d) Press SAT button to sort by Satellite and FAV button for Favorite 1\~8.
e) Press GREEN button to return to All Channel or EXIT to return to the current live channel.
FRONT PANEL & REAR PANEL
f) Press the SAT key to show Satellite Pop-UP Window then select satellite. Channel list of selected satellite will be displayed.
g) Press the FAV key to show Favorite Pop-UP Window then select FAV list.
Channel list of selected FAV will be displayed.
h) Press the Green key then all searched channel list will be displayed.
i) Press MENU key then cursor will move to ALL, placed on the left.
j) Sort Key (Yellow Key)\~A\~Z/Z\~A/FAT/CAS.
k) Press Yellow key for sorting A\~Z/Z\~A/FAT/CAS. If you want to go back to unsort from the selected CAS go back to Pop-UP Window then select unsort.
- EPG (Electronic Program Guide)
a) Press EPG button on the live mode.
b) EPG of the current channel appears on the screen.
c) Select the channel that you want to watch program.
d) To reserve program with recording function, press REC(●) button.(PVR model only)
e) It will be appear like right side picture.
f) If you reserve program, then it will be record automatically at reserved time.(PVR model only)
g) Press Select button twice to return to current live channel.
5. ZOOM IN/OUT
a) By selecting ZOOM key in a normal live mode you can use Zoom In/Out function.
b) From the Pop-Up Window of Zoom function you can select(1-2-4-6-8-12) by ZOOM, for EXIT Zoom press EXIT button.
c) When you move cursor of Zoom focus by key
( ◀ ▶ and ▲ ▼ ) then you can select Zoom In/Out on the focused point by pressing page up/down keys. Press Pause key then live mode will be paused on the mode of Zoom.
VII. MENU GUIDE
Press the MENU button on the RCU to open Main
Page on the screen. Main Page will be displayed.
- You can move into the main page using ◀▶ on the RCU.
- Press OK to confirm your selection.
-
Press EXIT to return to the previous menu or press or MENU to go to the current live channel.
-
EDIT CHANNEL
- INSTALLATION
- SYSTEM SETUP
- TOOLS
- GAME
- REC
- SMARTCARD
FRONT PANEL & REAR PANEL
1. EDIT CHANNEL
This section may help you to organize channels according to your preference.
- Select Channel Manager in the Main Page with ◀▶ and press OK.
- TV Channel Manager Page displays on the screen.
- Select the mode that you want using ▲▼.
- To see the channel that you choose, go to the channel and then press RED button.
- Press EXIT to return to the previous menu or press MENU to go to the current live channel.
1-1. Favorite
1-2. Rename
1-3. Move
1-4. Lock
1-5. Delete
1-1. Favorite
- Using ▲▼ go to the Favorite mode then press YELLOW button to choose Favorite 1\~8.
- Press OK on the channel that you want to add or delete.
- will be marked at the end of selected channel name bar. To delete press OK again.
- Selected channels will be automatically saved.
- If you want to check the saved Favorite Channel List go to other mode (Rename \~ Delete) except Favorite and then press FAV button to check Favorite 1\~8.
- Press EXIT to return to the previous menu or press MENU to go to the current live channel.
1-2. Rename
- Use blue button to go to the Edit Menu.
- Display will appear EDIT (red), Change Name (green) and Delete (blue)
- Select the channel that you want to edit using ▲▼ and then press a desired color.
- Edit the name entering NUMBERS and / or WORDS in the Keypad Dialog.
- Press EXIT to return to the previous menu or press MENU to go to the current live channel.
1-3. Move
- Use yellow button to go to the Move mode.
- Select channels which you want to move by pressing OK key.
- Move cursor that you want to place on than press OK button.
- Press EXIT to return to the previous menu or press MENU to go to the current live channel.
1-4. Lock
- Use RED button to go to the Lock mode.
FRONT PANEL & REAR PANEL
- Select the channel that you want to lock and then press OK. will be marked at the end of the selected channel name bar. To delete press OK again.
- Press EXIT to go to Main Page or press MENU to go to the current live channel.
1-5. DELETE
- Use green button to go to the Delete mode.
- Select the channel that you want to Delete and then press OK. will be marked on the selected channel number.
To delete press OK button again.
- Press EXIT to return to the previous menu or press MENU to go to the current live channel.
2. INSTALLATION
This section may help you to set up antenna and scan satellite or transponder, etc. Select Installations in Main Page using °,°Â and press OK.
Press EXIT to return to the previous menu or press MENU to go to the current live channel.
2-1. Antenna Connection
2-2. Satellite List
2-3. Antenna Setup
2-4. Single Satellite Search
2-5. Multi Satellite Search
2-6. TP List
2-1. Antenna Connection.
- You can select between Fixed antenna and motorized Antenna.
2-2. Satellite List
- You can select between pre-programmed satellites. You can also edit, add and delete satellite
- You can mark the satellite with OK button.
2-3 Antenna Setup
- You can select the antenna mode, between USALS and DiSEqC 1.2 after we select motorized antenna in antenna connection or select a Fixed dish and LNB type.
2-4 Single Satellite Search
- you can mark satellite to search channels in that marked satellite.
2-5 Multi Satellite Search
- We can mark satellites to search channels in the sequence of chosen satellites.
2-6 TP List
- With the buttons ◀▶ we can select the satellites in which we want to see the pre-programmed TP list. We can edit, add, delete and even search for new transponders in this menu.
FRONT PANEL & REAR PANEL
3. SYSTEM SETUP
This section may help you to set up OSD language, time, etc. pressing OK.
Press EXIT to return to the previous menu or press MENU to go to the current live channel.
3-1. OSD Settings
3-2. TV System
3.3 Local Time Setup
3.4 Parental Lock
3-1. OSD Settings
- You can select inside this menu the OSD language, first audio, second audio and teletext
3-2. TV System
Inside this menu you can modify different video formats like:
- Video Resolution - Choose between 480i, 576i, 576p, 720p, 720p-60, 1080i, 1080i_30. By source, By Native TV.
- Aspect mode - Choose between Auto, 16:9, 4:3PS, 4:3LB.
- Video EUROCONNECT - Output mode of Video-Audio by SCART-Output
Inside this menu you can also modify brightness, contrast and saturation.
3.3 Local Time Setup
Inside this menu you can modify:
- Use GMT in your time zone.
- Activate or deactivate Summer Time
- Time and Date in case of not using GMT.
3.4 Parental Lock
Inside this menu you can change and configure de passwords for:
- Block menus
- Block channels
- Change Passwords (default password is 0000)
4. TOOLS
This section helps you to:
- Information: See Software information of STB.
-
Factory Setting: Reset STB to return to factory setting.
-
Upgrade S/W: Software upgrade in any mode.
- USB: See USB memory content and select them depending on extension.
- Disconnect USB memory in a save way.
FRONT PANEL & REAR PANEL
5. GAME
In this section you can select games:
- Tetris
- Othello
- Sudoku
6. REC
In this section you can select the PVR options of STB.
- Record manager
- Timer Setting
Inside this menu you can configure up to 8 recording programs. Selecting Channel, date, starting time and recording duration.
- USB storage information.
- DVR configuration: Configure Time Shift options and the recording format like TS and PS.
7. SMARTCARD
In this section you can see the smartcard type information.
VIII. TROUBLESHOOTING
Problem
- Nothing appears on the Front Panel or No power supply
- Check that the power cable is plugged into the power socket.
Solution
Problem
- No Picture
Solution
- Check the dish and adjust it.
- Check the cable connection and correct it.
- The channel is off the air or scrambled.
- Check channel and video output.
Problem
-No Sound
Solution
- Check the volume level of the TV and receiver.
- Check the mute status of TV and receiver.
- Check the cable connection and correct.
Problem
- Remote Control Unit does not work
FRONT PANEL & REAR PANEL
Solution
- Replace batteries.
- Aim the remote control unit directly to the receiver.
- Checking that nothing blocks the front panel.
Problem
- "No Signal" on the screen
Solution
- Check the signal strength and the signal quality in the menu.
- Check the LNB and replace the LNB if necessary.
- Check the LNB cable.
- Check the Dish and adjust it.
Problem
- You have forgotten your secret PIN Code
- Contact your Service Provider.
Solution
QUICK INSTALLATION GUIDE
IX. SPECIFICATIONS
1. Conditional Access Module Interface
Item
Specification
SMART CARD (Optional) 2 SLOT, ISO 7816, GSM11.11 and EMV (payment systems) compatibility
2. Tuner & Channel
| Input Connector | F-type (Output loop-through), IEC 169-24, Female |
| Signal Level | -25 to -65 dBm |
| LNB Power | Vertical : +13.5/18.5Vdc±5% |
| Polarization | Horizontal : +18.5Vd dc± |
| Current: | Max.500mA.Overload protected |
| 22KHz Tone | Frequency : 22KHz±2KHz |
| DiSEqC Control | Amplitude : 0.8±0.2V |
Version 1.2 USALS Compatible
Demodulation QPSK
Input Symbol Rate
2\~45Ms/s Convolution Code Rate
1/2, 2/3, 3/4, 5/6, 7/8 with Constraint Length K=7
3. A/V & Data In/Out
| TV Scart Output | CVBS, RGB, L, R Output with Volume Control |
| RCA Output | CVBS(Yellow), L, R Output(White, Red)with Volume Control |
| Digital Bitstream out (Coaxial) | Bit Rate 115,200baud |
| Data Interface Connector | 9-Pin D-Sub Male type |
| USB | Type A Connector |
4. MPEG Transport Stream & A/V Decoding
| Transport Stream | MPEG-2 ISO/IEC 13818 / Transport stream Specification |
| Profile Level | MPEG-2 MP@ML, MP@ML, MPEG-4 H.264/AVC |
| Input Rate | Max 90 Mbit/ |
| Video Resolution | 576i, 576P, 720p, 720i, 1080i |
| Aspect Ratio | 4:3, 16:9 |
| Audio Decoding | MPEG/Musicam Layer I & II |
| Audio Mode | Single channel/Dual channel Joint Stereo/Stereo |
| Teletext | VBI & OSD(Optional) |
| Sampling Rate | 32,44.1 and 48KHz |
5. Power Supply
| Input Voltage | AC 90 to 250V, 50~60Hz |
| Power Consumption | Max 30W |
| Protection | Separate Internal Fuse |
| Type SMPS |
- TABLE OF CONTENTS
- GENERAL SAFETY
- WARNING
- UNPACKING
- REMOTE CONTROL UNIT (RCU)
- FRONT PANEL & REAR PANEL
- FRONT PANEL
- REAR PANEL
- INSTALLING EQUIPMENT
- CONNECTING THE RECEIVER TO TV
- CONNECTING THE RECEIVER TO TV WITH CINCH CABLE (RCA)
- CONNECTING THE RECEIVER TO TV WITH HDMI CABLE
- CHANNEL LIST GUIDE
- Normal Live Mode
- Simple Channel List
- Detail Channel List
- ZOOM IN/OUT
- MENU GUIDE
- EDIT CHANNEL
- 1-1. Favorite
- 1-2. Rename
- 1-3. Move
- 1-4. Lock
- 1-5. Delete
- INSTALLATION
- 2-1. Antenna Connection
- 2-2. Satellite List
- 2-3. Antenna Setup
- 2-4. Single Satellite Search
- 2-5. Multi Satellite Search
- 2-6. TP List
- 2-1. Antenna Connection.
- 2-3 Antenna Setup
- 2-4 Single Satellite Search
- 2-5 Multi Satellite Search
- 2-6 TP List
- SYSTEM SETUP
- 3-1. OSD Settings
- 3-2. TV System
- Local Time Setup
- Parental Lock
- TOOLS
- GAME
- REC
- SMARTCARD
- TROUBLESHOOTING
- Problem
- Solution
- QUICK INSTALLATION GUIDE
- SPECIFICATIONS
- Conditional Access Module Interface
- Tuner & Channel
- A/V & Data In/Out
- MPEG Transport Stream & A/V Decoding
- Power Supply
Brand : MVision
Model : HD-400S
Category : Receiver