HD-100S - Receiver MVision - Free user manual and instructions
Find the device manual for free HD-100S MVision in PDF.


| Product Type | Digital Satellite HD Receiver |
| Brand | MVision |
| Model | HD-100S |
| Dimensions (W x D x H) | 160 x 140 x 40 mm |
| Weight | 0.5 kg |
| Power Supply | 100-240VAC, 50/60Hz, 20V, 0.8A |
| Power Consumption | Max 16 watts |
| Video Decoding | MPEG-4, MPEG-2, MPEG-1 compatible |
| Video Output | RCA (CVBS), TV SCART, HDMI |
| Audio Decoding | MPEG-2/MPEG-1 Layer I & II |
| LNB Control | 13/18V, 300mA max; DiSEqC 1.0, 1.1, 1.2; 22KHz; Toneburst |
| PVR Function | Yes (via USB or external HDD) |
| USB Playback | Music (MP3), Pictures (JPG), Video, Recordings |
| EPG Support | Yes (Electronic Program Guide) |
| Remote Control | Infrared, included |
| Front Panel Display | 4-digit/7-segment LED |
| Rear Connections | SAT IF IN, S/PDIF Coaxial, Video/Audio RCA, TV SCART, USB, HDMI, DC IN |
| Operating Temperature | +5° to +40°C |
| Storage Temperature | -20° to +70°C |
| Cleaning Instructions | Use a soft cloth lightly moistened with mild detergent; power off first |
| Safety Warnings | Do not expose to liquids or naked flames; ensure 5cm ventilation; use only specified power supply; do not open cabinet |
| Parts Replacement | Use only manufacturer-specified replacement parts; refer to qualified service personnel |
| Battery Disposal | Do not expose to excessive heat; dispose according to environmental guidelines |
Frequently Asked Questions - HD-100S MVision
User questions about HD-100S MVision
0 question about this device. Answer the ones you know or ask your own.
Ask a new question about this device
Download the instructions for your Receiver in PDF format for free! Find your manual HD-100S - MVision and take your electronic device back in hand. On this page are published all the documents necessary for the use of your device. HD-100S by MVision.
USER MANUAL HD-100S MVision
 |  |  |
| The lightening flash with arrowhead symbol, within an equilateral triangle, is intended to alert the user to "dangerous voltage" and to prevent from a risk of electric shock. | Warning:To reduce the risk of electric shock, don't open the cabinet. Refer servicing to qualified personnel only. | The exclamation point within an equilateral triangle is intended to alert the user to important operating and maintenance (servicing). |
WARNING: The apparatus shall not be exposed to dripping or splashing and that no objects filled with liquids, such as vases, shall be placed on the apparatus.
WARNING: Do not place naked flame sources, such as lighted candles on the apparatus; otherwise, there is the danger of fire.
WARNING: The unit should be connected to a power supply only of the type descry bed in the operating instructions or as marked on the unit. If you are not sure of the type of power supply (for example: 120 or 230V) to your home, consult your local dealer or local power company.
WARNING: Do not open the cabi net or touch any parts in the inner mechanism. Consult your local dealer for technical service if the opening is required.
WARNING: The main s plug is used as the disconnect device, the disconnect device shall remain readily operable.
WARNING: Take attention to the environmental aspects of battery disposal. The battery of remote control should not be exposed excessive heat such as sunshine, fire or the like.
WARNING: Maintena nce man must use the appointed screw in the rear plate.
WARNING: Ensu re a minimum distance of 5 cm around the apparatus for sufficient ventilation.
WARNING: Ensue that the ventilation is not impeded by covering the ventilation openings with items such as newspapers, table-cloths, curtains, etc.
WARNING: Use the app aratus only in moderate climates (not in tropical climates).
Note: Do not open the cabinet to avoid the unit direct exposure to radiation.
Unit Cleaning: After the unit power is turned off, you can clean the cabinet, panel and remote control with a soft cloth lightly moistened with a mild detergent solution.
Attachments: Never add any attachments and/or equipment without the manufacturer consent; as such additions may result in the risk of fire, electric shock or other personal injury.
Locating: Slots and openings in the cabinet are provided for ventilation to protect it from overheating. Do not block these openings or allow them to be blocked by placing the STB on a bed, sofa or other similar surface, nor should it be placed over a radiator or heat register.
Power-Cord Protection: Place the power-supply cord out of the way, where it will not be walked on. Please take special attentions to cords at plugs, convenience receptacles and the point where they exit from the unit.
Object and Liquid Entry: Never put objects of any kind into this STB through openings, as they may touch dangerous voltage points or short-out parts that could result in a fire or electric shock. Never spill any liquid on the STB.
Note: Moisture may be formed inside the unit in the following conditions: When the unit is suddenly moved from a cold environment or an air-condition room to a warm place.
Immediately after a heater has been turned on.
In a steamy or very humid room.
If the moisture forms inside the unit, it may not operate properly. To correct this problem, turn on the power and wait about two hours for the moisture to evaporate.
Parts Replacement: When the unit parts need to be replaced, user should make sure the service technician use the replacement parts specified by the manufacturer or having the same characteristics as the original part. Unauthorized replacement may put the unit in the risk of fire, electric shock or other hazards.
Safety Check: After all the maintenances and repairs are done, user is required to request the service technician to conduct the overall safety check to ensure the machine is in the proper condition.
Dolby Digital Audio Coding System
All products must be marked with:
Manufactured under license from Dolby Laboratories.
"Dolby" and the double-D symbol are trademarks of Dolby Laboratories.
Additionally, software products running on a computer must also be marked with:
Confidential unpublished works. Copyright 1992-1997 Dolby Laboratories. All rights reserved.
Contents
1. Remote Control & Panel Description....3
1.1 Front Panel Description 3
1.2 Rear Panel Description.... 4
1.3 Remote Control Description 5
2. Basic Operations....6
2.1 Switch on STB 6
2.2 Standby Mode 6
2.3 Mute 7
2.4 Channel Number 7
2.5 SAT 7
2.6 PAUSE 7
2.7 MENU 7
2.8 EXIT 7
2.9 CH▲/▼ 7
2.10 V◄/► 8
2.11 OK 8
2.11 RECALL 8
2.12 TV/Radio 8
2.13 EPG....9
2.14 Audio 9
2.15 SUB 10
2.16 ZOOM.... 10
2.17 INFO....10
2.18 ■ 11
2.19 ● 11
2.20 FAV 11
2.21 ▶II.... 12
2.22 ◀◀/▶▶ 12
2.23 GOTO 12
2.24 No Signal! 12
3. Channel Manager....13
3.1 TV List 13
3.1.1 Favorite.... 14
3.1.2 Move.... 14
3.1.3 Sort 15
3.1.4 Lock 15
3.1.5 Find.... 17
3.2 Radio List 17
4. Installation....18
4.1 Single Search 18
4.2 Multi Search 20
4.3 TP Scan....20
4.4 Satellite List 22
4.5 TP List 23
4.6 Satellite Guide 25
4.7 Unicable Configuration 25
5. Configuration....26
5.1 OSD Setting 26
5.2 TV System 28
5.3 Sleep Timer 28
5.4 Local Time Setting 28
5.5 Parental Lock 29
5.6 Power setting....30
6. Utility....32
6.1 Information 32
6.2 Software Upgrade.... 32
6.2.1 USB Upgrade.... 32
6.2.2 Backup To USB 33
6.2.3 OTA Upgrade 34
6.3 Factory Default 34
7. USB 35
7.1 All 35
7.2 Music....39
7.3 Picture 39
7.4 Video 39
7.5 Music List 39
7.6 Picture List 40
7.7 Video list 40
7.8 Record list 40
8. PVR 43
8.1 Record Management 43
8.2 Timer 43
8.3 PVR Options....45
8.4 Disk Information 45
9. Technical Specification....46
1. Remote Control & Panel Description
1.1 Front Panel Description

- POWER: Is used to switch between the working mode and the standby mode.
- CH+/-: To change channels or for navigating and changing values in menus.
- Display (4-Digit/7-Segment): Displays the received channel number while operating and time while in standby mode.
- Remote Sensor: Detect the infrared signals from the remote control unit.
1.2 Rear Panel Description
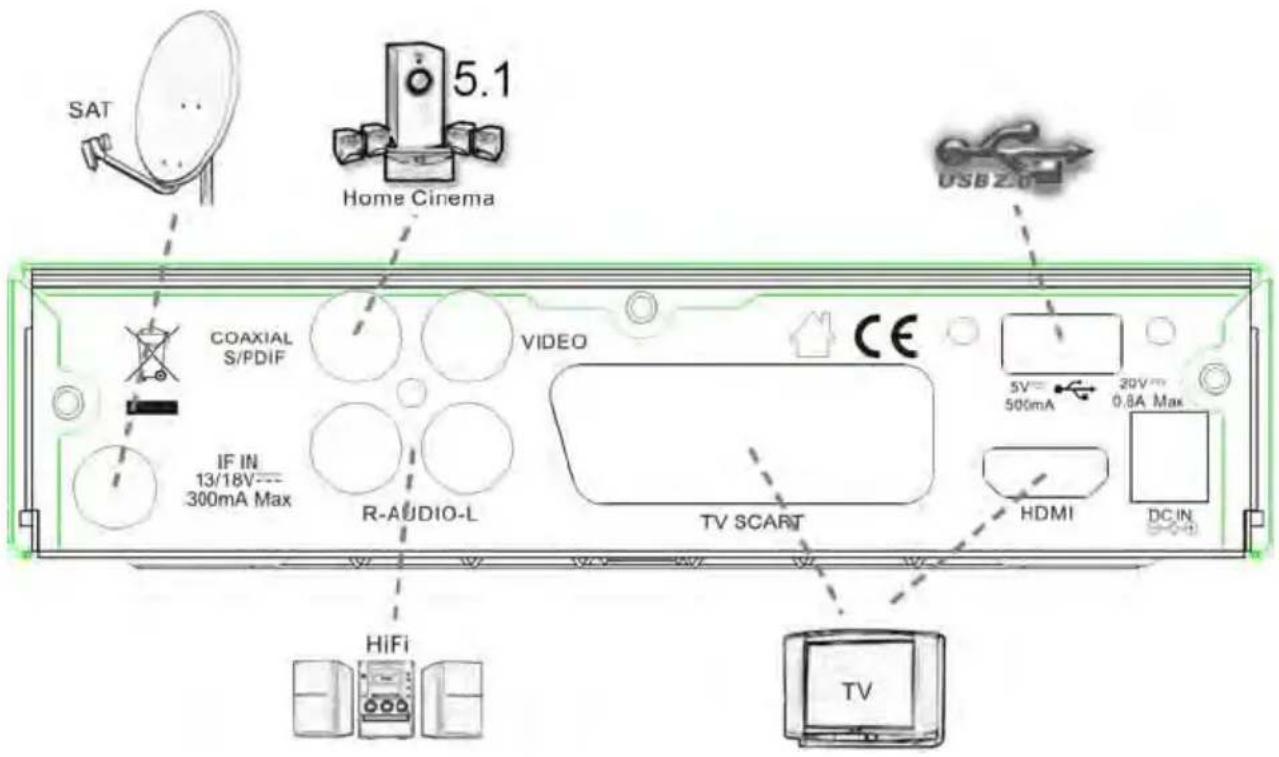
- IF IN: Satellite input.
- S/PDIF: Coaxial output for digital audio (AC3).
- VIDEO: CVBS video output for TV AV in.
- AU DIO: HiFi outputs for stereo set.
- TV SCART : Output SCART for the connection to a TV set.
- USB : To connect with USB disk.
- HDMI : HDMI output for the connection to a TV set.
- AC IN : 100-240V, 50/60Hz
1.3 Remote Control Description
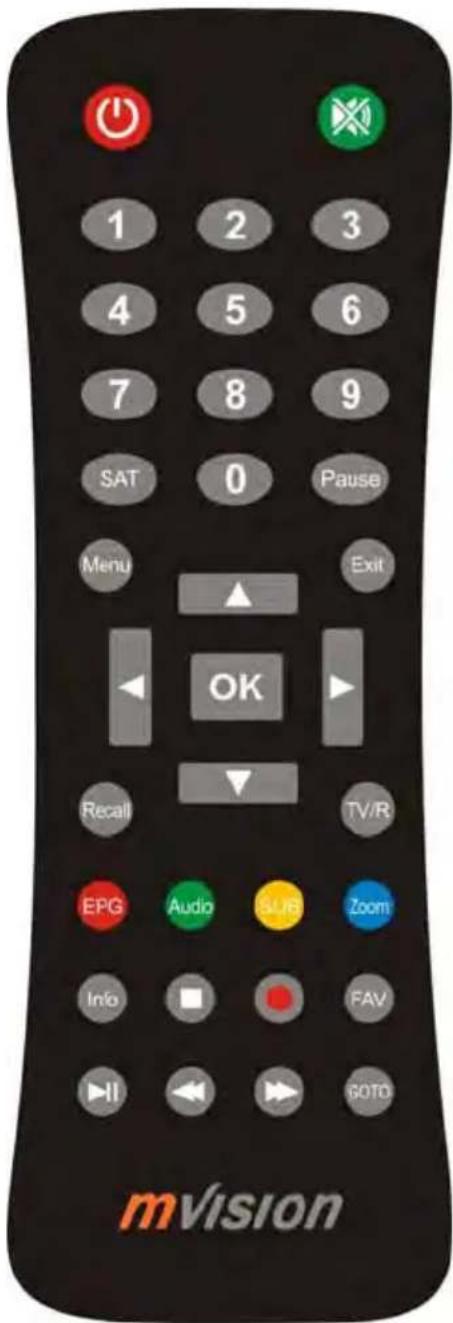
2. Basic Operations
2.1 Switch on STB
Switch the [Device's Main Power] switch on.
When the STB is first used it will display “Quick Setup” window. you will set Language, First Audio, Second Audio, LNB Power, Antenna Setup and Multi Search.
? Frequently Asked Question
Q: The power of my STB is on and it is running in TV mode but the TV screen shows nothing:
A: Make sure the TV set has been set to the correct video input(not the TV channels). For example, if you have connected the unit to the video1 input of the TV set then you need to select the corresponding input of the TV. Mostly it is done with the AV button of the TVs remote control unit.
Q: My STB is running in TV mode but the TV screen shows nothing except one ball and “No Signal”.
A: That means the channel you selected has no signal. This can be caused by several reasons:
-
The channel you selected is not from the satellite to which your dish is pointing. Select another channel.
-
The signal of current TV channel is too weak. You can try to change to other channels with a stronger signal. If the problems still exist, please consult your local dealer or installer for technical service.
-
You selected the wrong LNB type in the installation menu or your DiSEqC switch configuration is not correct.
2.2 Standby Mode
- Press [Power] button to switch from TV/radio mode to standby mode
- In standby mode press [Power] button again to switch back to TV/radio mode. The last active channel will be showed.
- To switch off the STB complete press the main power button.
2.3 Mute
- Press the [Mute] button to mute the sound. On the scree n an icon will be displayed to indicate the muted sound.
- Press the [Mute] button again to restore the sound.
2.4 Channel Number
In TV mode you can enter the channel number directly with your remote control unit and confirm the number with the OK button to change to the desired channel.
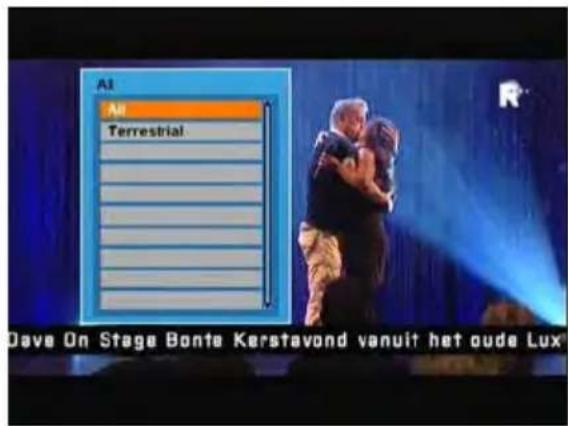
2.5 SAT
-
In TV mode, press [SAT] button to open channel list and select there, then press [OK] to open "TV Channel List" menu, select channel of the current.
-
In TV mode, press [Page Up/Down] to switch directly between satellites.
- In playing mode, press [PAUSE], the picture will be paused, but the sound of the channel will still continues.
- Press [PAUSE] again, the screen's picture will skip over to the current playing picture, and the sound of the channel will corresponding playing.
2.7 MENU
Press [Menu] button to enter or exit the current menu.
2.8 EXIT
Press [Exit] button to exit the current menu.
2.9 CH▲/▼
In TV/Radio mode press [CH▲/▼] to change channel.
2.10 V◄/►
In TV/Radio mode, press [Vol◄/►] to adjust volume.
2.11 OK
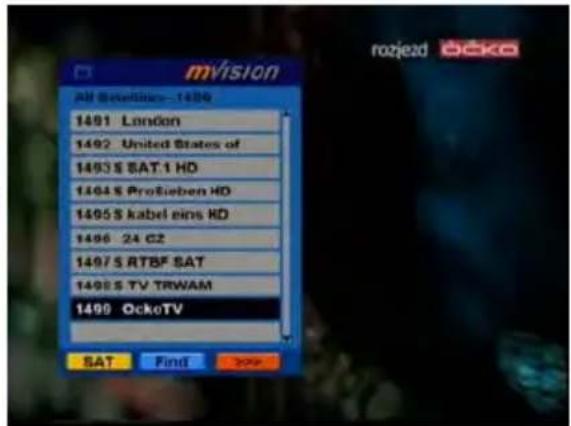
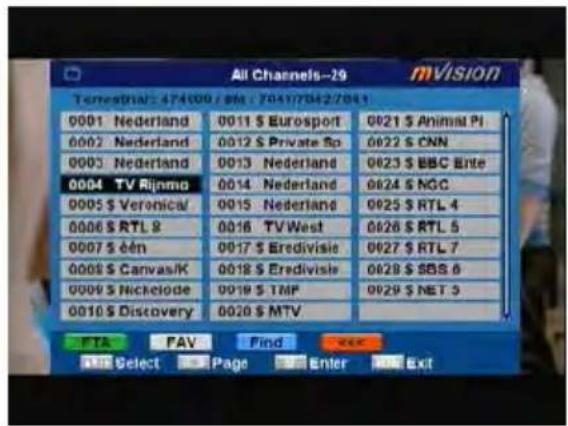
- In TV mode press [OK] button to open the Channel List window.
- Press the [Red] exchange screen.
- Press [Green] button to sort the channels by free and scrambled channels. Free channel are listed first and scrambled channels last
- Press [Yellow] button to open the SAT
list. After selecting a satellite the channel list will be reduced to the
channels of this satellite.
- Press [FAV] button to open FAV list. After selecting a Favorite Group the channel list will be reduced to the channels of this group.
- Press [Blue] button to open the Find window. You can use this feature to find channel by their names.
- Press [OK] to change and display the marked channel.
2.11 RECALL
Pressing the [Recall] button allows you to toggle between the actual and the last selected channel.
2.12 TV/Radio
In TV mode, press [TV/Radio] to switch to Radio mode. In Radio mode press [TV/Radio] again to switch back to TV mode.
2.13 EPG
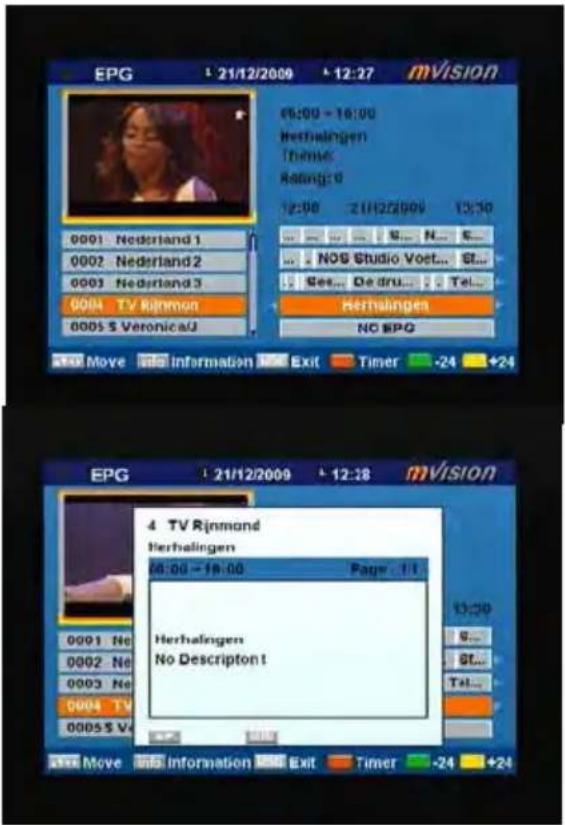
The STB supports Electronic Program Guides (EPG) to give you information about the actual programs of certain channels like event name, subtitle, description, start and finish time. This feature is depending on the service of the channel provider.
Press [EPG] to open the EPG window.
- You can move the highlighted channel with [CH ▲ /▼] and view the highlighted program in the preview window. with [Vol◄/►] and display the event's detailed description.
- Press the [INFO] button in the EPG menu to display the detailed information of the actual event in the selected channel.
- To close the EPG menu press [Exit / Menu].
- Press the [Red] button in the EPG menu to program a timer with the actual events data.
- Press the [Green / Yellow] to select date.
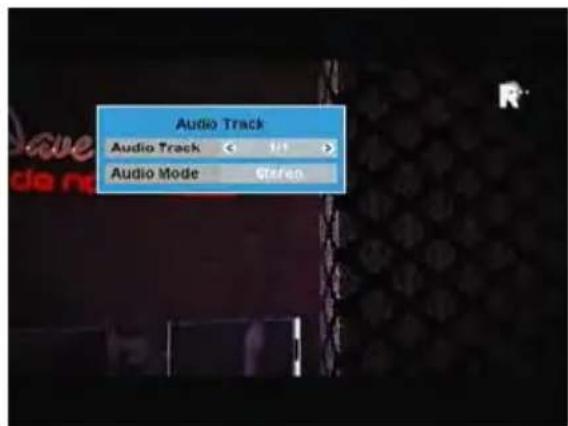
2.14 Audio
- In TV mode, press the [Audio] button to open the Audio Mode window.
- Select the item you want to adjust with [CH▲/▼] and change the value with [VOL◄/►].
2.15 SUB
In “Subtitle Display”menu. Subtitle: Press [VOL◄/►] to select “standard” or “Off”. Press [Vol◄/►] to select languages. If the current channel has subtitle information, it will be displayed if this function is “On”. If this function is “Off” subtitles won’t be displayed.
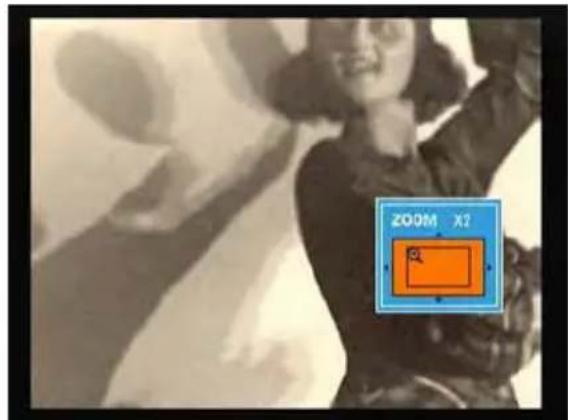
2.16 ZOOM
-
The [Zoom] key allows you to magnify a certain area on the images and the current screen will show
-
Press [Zoom] key again, the image will enlarge rotate as x1, x2, x4, x6, x8, x12, x16.
-
In "x2 \~ x16" image, using [CH▲/▼ / VOL◄/►] keys to move the image center area you want to see.
-
In zoom mode, press [Exit] to close "Zoom" window.
2.17 INFO
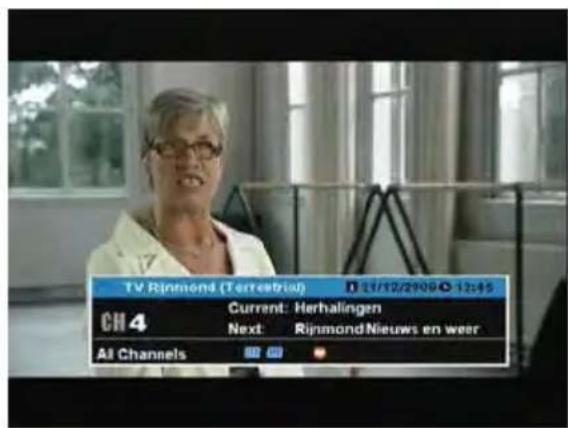
In TV mode, press [INFO] button can open information screen, in the window shows the parameters of current channel.
Two dynamic bars at the bottom of the window reflect the signal intensity and signal quality of the current channel.
2.18
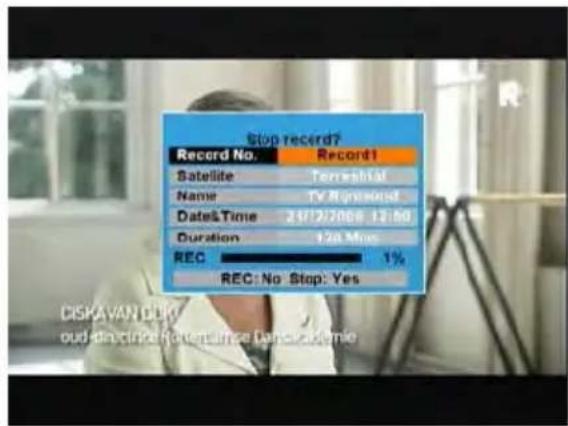
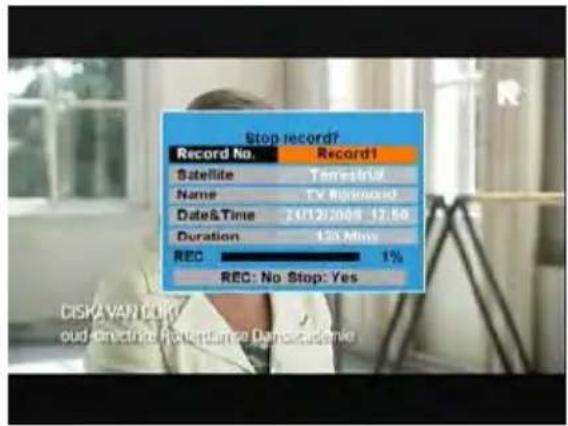
When you play a recorded program, press [■] button will stop the recorded channel playing and back to the Record Management menu. When you are recording a program, press [■] button you will be asked to "Do you want to stop record?" menu.
2.19
In TV mode, press [●] button you will be asked to "Do you want to record?" menu.
2.20 FAV
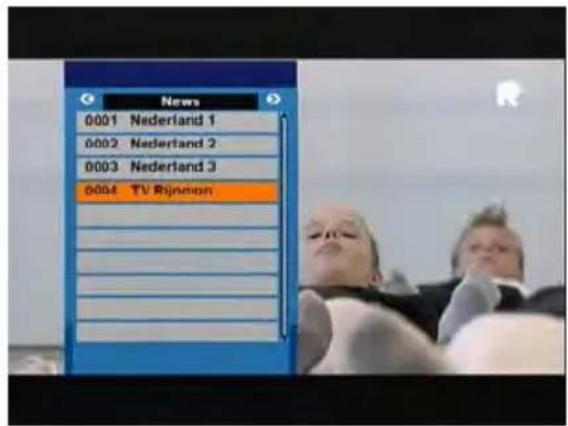
- In TV mode press the [FAV] button to display the Favorite Group window on the screen as the picture beside shows.
- In the Favorite Group window you can select the desired favorite channel with [CH▲/▼] and confirm it with [OK] to switch to it. In bigger groups you can navigate with [PGUP/ PGDN].
- With [VOL ◀/▶]ou can select different Favorite Groups.
- Press [Exit] to close the Favorite Group window.
? Frequently Asked Question
Q: Why the screen displays “No Favorite Channel” after pressing the [Favorite] button?
A: No channels have been assigned to a Favorite Group yet. You can do this in the channel menu.
When you play a current or recorded program, press [▶II] will stop the program, press [▶II] again will play the program continually, And Timeshift is started by this key.
2.22 ◀ ◀/▶ ▶
When you play a recorded channel, press [◀◀] button to back the program fast and Press [▶▶] to fast forward the program.
Selection: 2x, 4x, 8x speed.
2.23 GOTO
When you play the recorded channels, press [Goto] button, the “Jump to” message box will pop up, input the Time and press [OK], then the receiver will back to the input time point and play the program from that point continually. (If the input time is more than the recorded time, the picture will back to last picture, please noted.)
2.24 No Signal!
When No Signal, it will notify user on screen "No Signal!" Please check your cables and connections for shorts. When the short is removed the warning message will disappear.
3. Channel Manager
Press [Menu] in the TV/radio mode to enter the main menu.
- Press [CH▲/▼] to select the channel item.
- Press [OK] to enter the selected item.
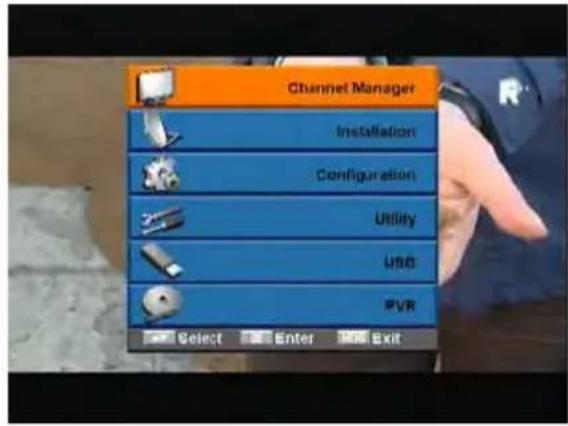
In the channel menu:
Press [CH▲/▼] to select the wanted menu item among TV Channel List, Radio Channel List, Channel setup, Favorite group list name and Delete All.
Press [OK] to enter the selected item.
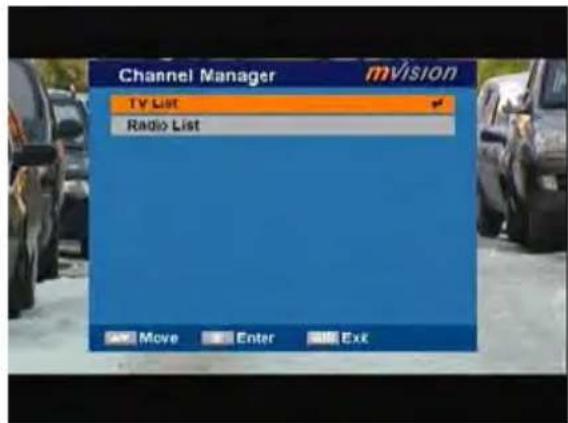
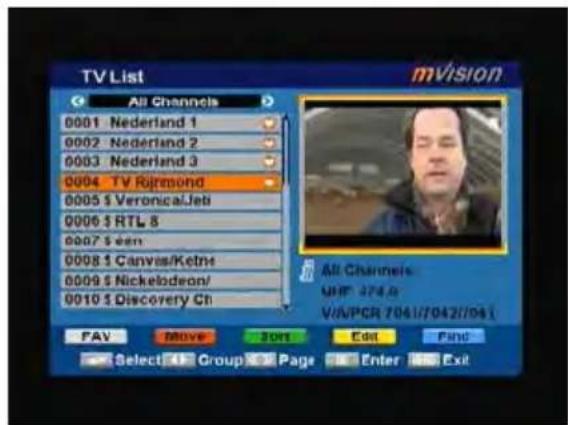
3.1 TV List
If you enter the channel list menu a window like the one below will open.
- You can move the highlighted channel with [CH ▲ / ▼] and press [OK] to preview the highlighted program in the preview window.
- Press [PGUP/PGDN] on the RCU to jump between the channels by pages.
- Press [Vol◄/►] to switch satellite of the program group.
- Press [Menu] or [Exit] buttons to enter TV playing mode.
- The color buttons offer further functions to manage the channel list.
3.1.1 Favorite
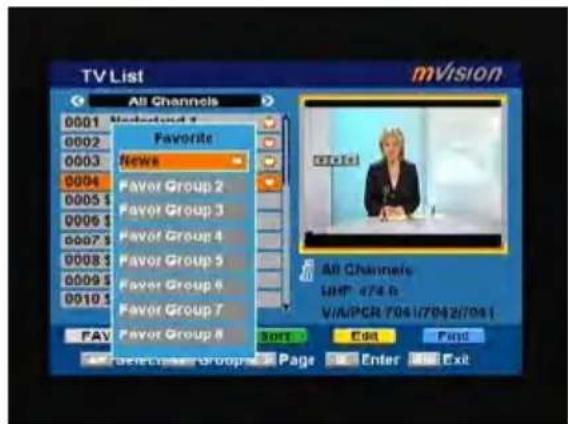
- Press [FAV] to open the favorite window.
- You can select between 32 favorite groups with [CH▲/▼]. Press [OK] to assign the channel to a favorite group, press [EXIT] to exit favorite group.
- Press [OK] again to remove the channel from the marked favorite group.
- Press [MENU] button you will be asked
"Are you sure to save?". Select "Yes" to save the marked favorite group. Select "No" to cancel the operation.
- To return to the TV channel list. The channels of favorite groups are indicated with a favorite icon behind the name.
3.1.2 Move
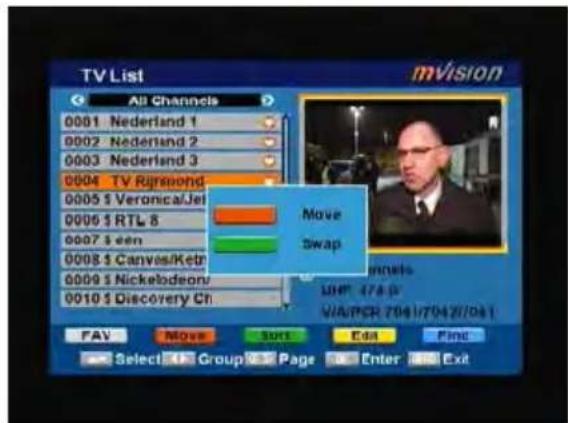
Pressing the [Red] button in the TV channel list will open another window where you can choose between move the actual channel and swap the actual channel to the desired position, press [OK] to confirm it.
a) Move
- Press [Red] button to show a moving icon behind the channel name.
- Mdesi the channel to the red position with [CH▲/▼]. Press [OK] to confirm the position.
b) Swap
- Press [G reen] button to show a moving icon behind the channel name.
- Move the channel to the desired position with [CH▲/▼]. Press [OK], then the selected channel will exchange the postions with the channel name on this position immediately.
3.1.3 Sort
Press [Green] to open the sort window. Press [CH▲/▼] to select and [OK] to confirm your choice.
The ways of sorting are:
◆ Default: Sort channel factory default.
- FTA/CAS: Sort channel by free and scrambled sequence. Free channels will be listed first and scrambled channels behind in the channel list.
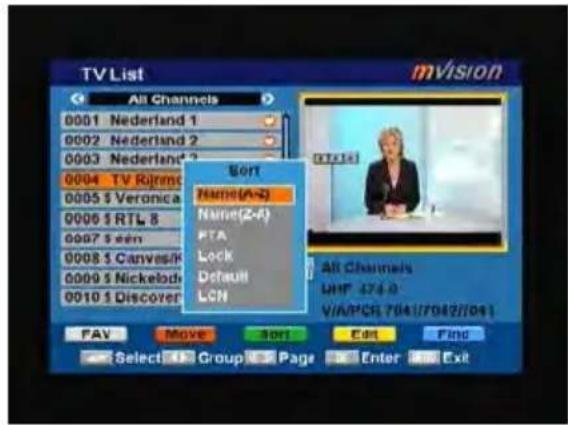
◆ Lock: Unlocked channels are listed first end locked channels at the end.
◆ Name(A-Z): Sorting in Alphabetical order, ignoring "\$" symbol.
◆ Name(Z-A): Sorting in Alphabetical order, ignoring "\$" symbol.
3.1.4 Lock
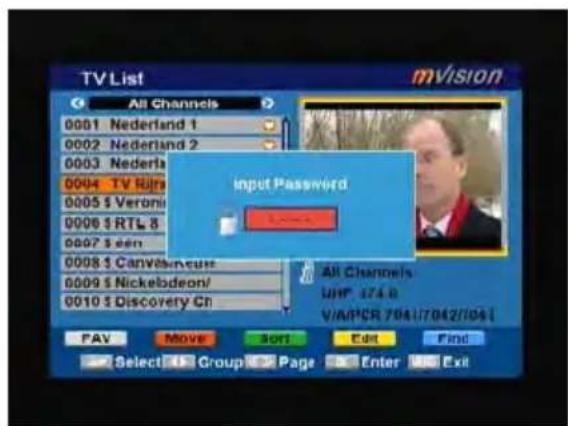
After pressing the [Yellow] button a window for entering the password will open. The default password is "0000".
You can delete, skip, lock and edit the channel.
Press [MENU] to leave the channel editing. The system will ask you to confirm the saving of the changes you made.
3.1.4.1 Delete
In channel edit menu press [Red] button will open another window where you can choose between delete one channel and delete all channel.
Del One
Press [Red] button to mark a channel for deleting. Marked channel will be deleted after you confirm to save the changes when you leave this menu.
Del All
a) Press [Green] button to show a deleting icon behind all channel name.
b) Press [MENU] button you will be asked "Are you sure to save?". Select "OK" to delete all channel. Select "Cancel" to cancel the operation.
3.1.4.2 Skip
In channel edit menu, press [Green] button to place a skip icon behind the name of the highlighted channel. Marked channels will be skipped when you change channels in TV mode after you confirm to save the changes when you leave this menu.
3.1.4.3 Lock
In channel edit menu, press [Yellow] button to place a lock icon behind the name of the highlighted channel. Marked channels will be locked and displayed only after password has been entered if you confirm to save the changes when you leave this menu.
3.1.4.4 Edit
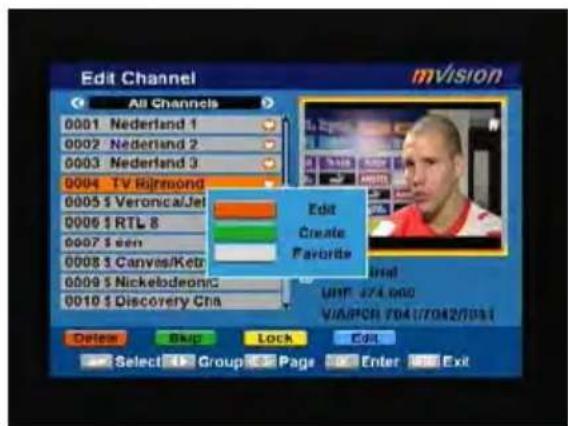
Pressing the [Blue] button in the TV channel list edit menu will open another window where you can choose between edit the actual channel and create a new channel.
◆ Edit
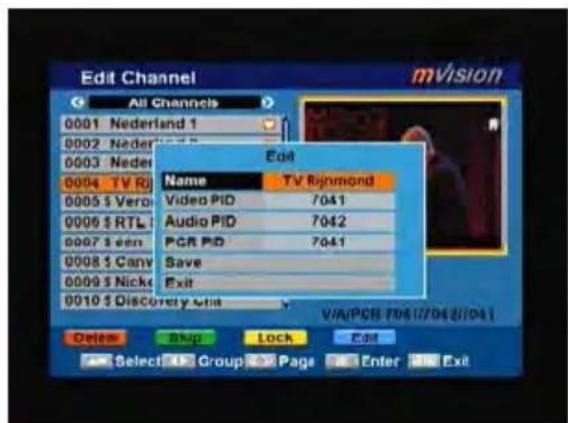
Press [Red] button to edit the channel.
- Selecting the name item with [OK] will display a button pad to show you how to edit the channel name.
- “Oide the PID”, “Audio PID” and “PCR PID” items you can input numbers to modify the item’s value.
- After seolodifica ect "Save" and press [OK] button to save the modified values and exit "Edit" mode. Or select "Exit" and press
[OK] to leave edit mode without saving the modifications.
♦ Crea te
Press [Green] button to open the create channel window.
-
Press [OK] on the "Satellite" item to display the satellite list. You can select the satellite for which you want to create a new channel.
-
With marked "TP Index" item press [OK] to display TP list, use [CH/] to select for which you want to create a new channel. Press [OK] to display the TP number where the channel can be
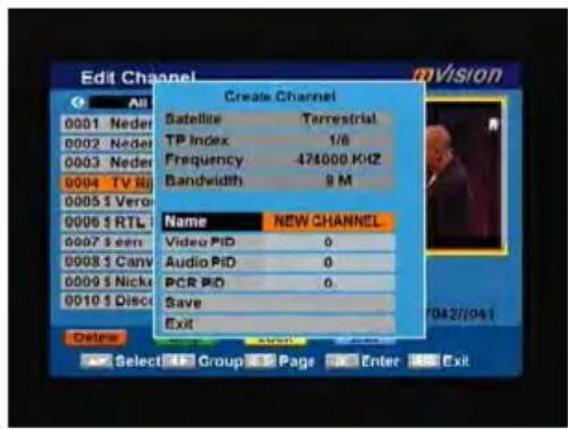
found. The next three items will show the related parameters.
-
Highlight the "Name" item and press [OK] to display the button pad and edit the new channel's name. In "Video PID", "Audio PID" and "PCR PID" items you can enter the numbers directly to set these parameters of the new channel.
-
After modification select "Save" and press [OK] to save the new channel and leave the edit mode. Select "Exit" and press [OK] to exit the edit mode without saving the new channel.
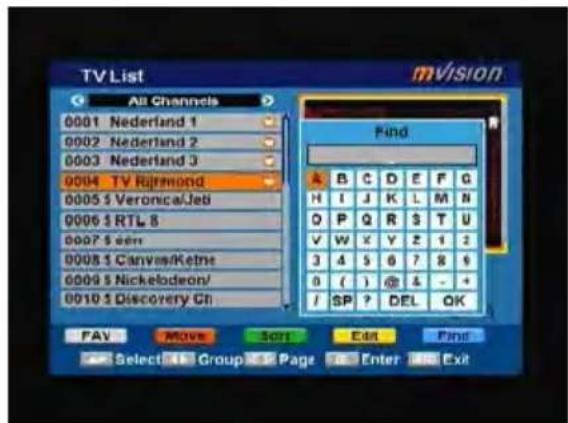
3.1.5 Find
-
Press [Blue] button to open the "Find" window like showed beside. Press [CH▲/▼] / [Vol◄/►] to select the leading character of the channel name and press [OK] to confirm it.
-
After entering the character(s) highlight "OK" in the window and press [OK] on the RCU.
-
Press [Exit] button to close the find window and brings you back to the channel list.
3.2 Radio List
Basically the operation of “Radio Channel List” is same as “TV Channel List”, except that in the small channel window the radio Logo will be displayed.
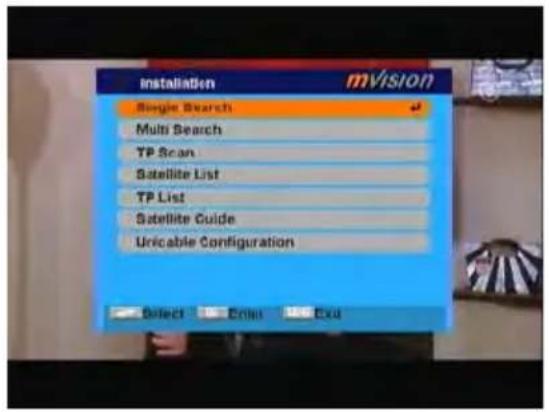
4. Installation
After selecting the installation menu you can see the window like beside.
In "Installation" menu;
-
Press [CH▲/▼] to select menu items among Single Search, Multi Search, TP Scan, Satellite List, TP List, Satellite Guide and Unicable Configuration.
-
Press [OK] to enter the selected item.
4.1 Single Search
After selecting "Single Search" you will see a window like beside:
-
In the "Satellite" item press [Vol◄/►] to select the satellite which you want to scan or press [OK] to open the "satellite list" to select directly with [CH▲/▼], press [OK] to confirm it.
-
LNB Configuration: Press [OK] to enter LNB configuration, you will see a window like beside:
to switch among "Standard", "User" and "Universal" mode.
For Example: If you use a Dual LNB, then you should select "User" option in "LNB Type" and set the correct frequency in LNB type.
22K: Use [Vol◄/►] to switch "ON" and
![Single Search mVision Satellite ASTRA[6 19.2] LNS Configuration DiseEqC1.3 4Port LNM1 TP Index 209 FTA only No Scan Channel TV + Radiol Scan Mode Press Scan Search Signal Intensity 88% Signal Quality 85% Select Change Enter Exit](/content/2026/05/815298/images/b1654a9d28ce17fb6c829f004e7bca57d22384f015dc5ed8800cbb80f4f219ab.jpg)
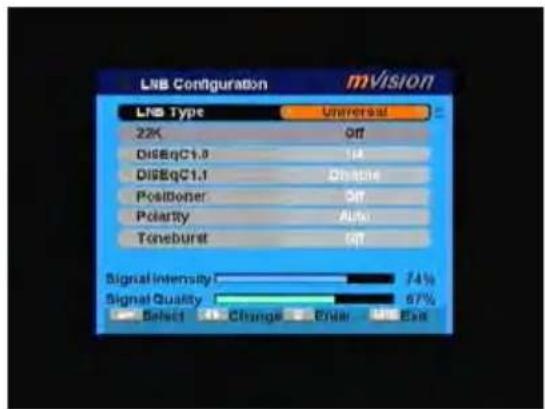
"Off". The 22KHz signal is used in KU universal LNBs to change between low band and high band.
!Notice: After choosing LNB type “Universal” you cannot modify 22K.
DiSEqC1.0: Use [Vol◀/▶] to switch the options or press [OK] to open the DiSEqC1.0 option list to select directly with [CH▲/▼], press [OK] to confirm it.
DiSEqC1.1: Use [Vol◄/►] to switch DiSEqC1.1 option or press [OK] to enter DiSEqC1.1 option to select directly with [CH▲/▼], press [OK] to confirm it. The options of this item are: Disable / CCard1 M1 Port1 / CCard1 M1 Port2 / CCard1 M1 Port3 / CCard1 M1 Port4 / CCard1 M2 Port1 / CCard1 M2 Port2 / CCard1 M2 Port3 / CCard1 M2 Port4 / CCard1 M3 Port1 / CCard1 M3 Port2 / CCard1 M3 Port3 / CCard1 M3 Port4 / CCard2 Port1 / CCard2 Port2 / CCard2 Port3 / CCard2 Port4 / CCard2 Port5 / CCard2 Port6 / CCard2 Port7 / CCard2 Port8 / CCard2 Port9 / CCard2 Port10 / CCard2 Port11 / CCard2 Port12 / CCard2 Port13 / CCard2 Port14 / CCard2 Port15 / CCard2 Port16.
Positioner: Press [Vol ◀/▶] to select between “Off / DiSEqC1.2 / USALS”. ! Notice: When you select “DiSEqC1.2 or USALS”, “DiSEqC1.0” and “DiSEqC1.1” items will be disabled.
Polarity: Press [Vol◀/▶] to switch between "Auto / H / V".
Toneburst: Press [Vol◄/►] to switch this function "On" or "Off".
-
DiSEqC1.0 4Port: Use [Vol◄/►] to switch the options of DiSEqC1.0. Between Disable / LNB1 / LNB2 / LNB3 / LNB4.
-
TP Index: Use [Vol◀/▶] to select the desired transponder or press [OK] to open the TP list to select directly with [CH▲/▼], press [OK] again to display the TP number where the channel can be found.
-
FTA Only: Press [Vol◄/►] to select to scan only free channels or even scrambled channels. If you select "Yes" it will scan free channels only.
-
Scan Channel: Press [Vol◄/►] to select to scan TV + radio channels, or just TV channels or just radio channels.
-
Scan Mode: You can select "Auto Scan", "Pre set Scan" or "NIT Search" to blind scan preset transponders or network transponders of the selected satellite.
-
Search: Press [OK] to start scanning. In the lower part of the window the progress of scanning and the found channels are displayed.
4.2 Multi Search
When you enter the “Multi Search” menu a window like the one beside will open.
- In the "Satellite" item press [Vol◄/►] to select the satellite which you want to scan or press [OK] to open the "satellite list" to select directly with [CH▲/▼], and press [OK] to mark/unmark and [MENU] to finish the selection. You can select several
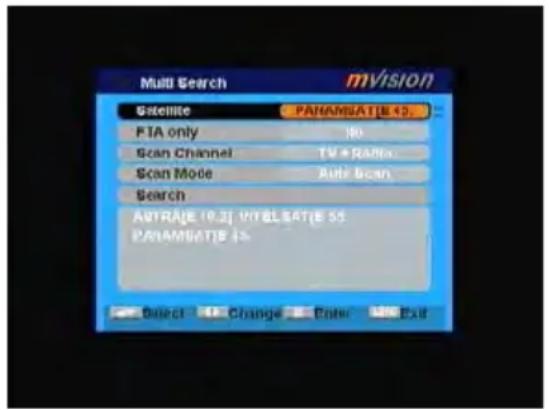
satellites in this menu. The system will use DiSEqC1.0/1.1, DiSEqC1.2 and USALS functions to search the marked satellites and scan channels.
- On “FTA Only” item, press [Vol◀/▶] to select scanning of all channels or just scanning of free channels. If you select “Yes”, it will scan free channels only.
- On "Scan Channel" item, press [Vol◄/►] to select the scanning range from TV + radio channels, only TV channels or only radio channels.
- On "Scan Mode" item, you can select "Auto Scan", "Preset Scan" or "NIT Search" to blind scan preset transponders or network transponders of the selected satellite.
- Select "Search" and press [OK] to start scanning. In the lower part of the window the progress of scanning and the found channels are displayed.
- Press [Menu/Exit] to cancel or finish the scanning and saving the found channels.
4.3 TP Scan
When you enter "TP Scan" menu a window like the one beside will be displayed.
- In the “Satellite” item press [Vol◀/▶] to select the satellite which you want to scan or press [OK] to open the “satellite list” to select directly with [CH▲/▼], press [OK] to confirm it.
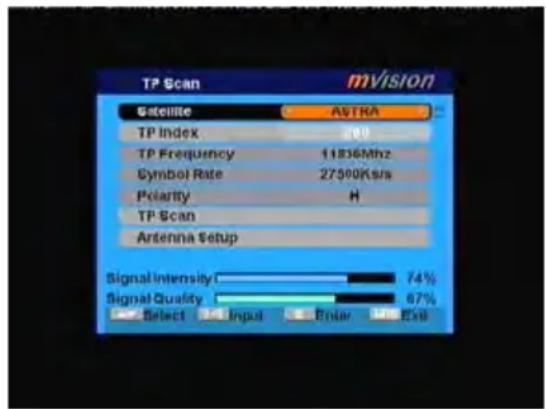
- TP Index: Use [Vol◀/▶] to select the desired transponder or press [OK] to open the TP list to select directly with [CH▲/▼], press [OK] again to display the TP number where the channel can be found. Press [Red / Green / Yellow] key on the RCU for the related functions.
When you press [Red] it will display “New TP” in “TP Index” item. You have to set the parameters of “TP Frequency”, “Symbol Rate” for this new transponder. Therefore use the number buttons of the RCU. The available range are “3000\~13450MHz” and “1000\~45000KS/s”.
When you press [Green] a safety question will be displayed for confirmation to delete the current transponder or not. If you select "OK", the current transponder will be deleted and the total number of transponders will be reduced.
When you press [Yellow] a safety question will be displayed for confirmation to delete all transponders or not. If you select "OK", the all transponders on current satellite will be deleted.
- For existing transponders you also can use number buttons to modify the parameters of "TP Frequency" and "Symbol Rate" or [Vol◄/►] to change the value directly. "Polarity" and "FTA only" are used for setting scans conditions. Press [Vol◄/►] to select a different mode.
On “TP Scan” item, press [OK] will open another window where you can set “Scan Mode”, “Program Type” and “NIT Search”. Press [Menu/Exit] to return to the previous menu.
Press [Red] button to add a new TP.
Press [Green] button to delete the current TP.
Press [Yellow] button to delete all transponders on current satellite.
- Antenna Setup: Press [OK] to enter LNB configuration, you will see a window like beside:
LNB Type: Press [Vol◄/►] to switch among “Standard”, “User” and “Universal” mode.
For Example: If you use a Dual LNB, then you should select "User" option in "LNB Type" and set the correct frequency in LNB type.
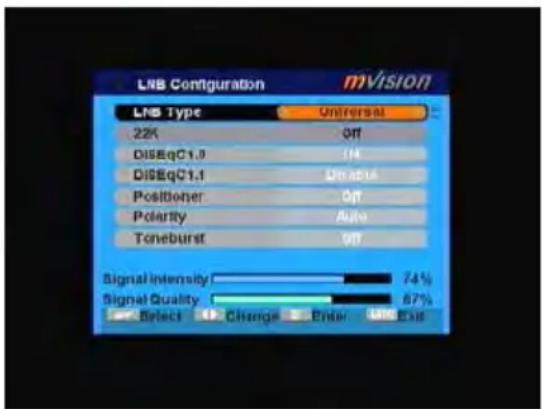
22K: Use [Vol◄/►] to switch "ON" and "Off". The 22KHz signal is used in KU universal LNBs to change between low band and high band.
!Notice: After choosing LNB type "Universal" you cannot modify 22K.
DiSEqC1.0: Use [Vol◀/▶] to switch the options or press [OK] to open the DiSEqC1.0 option list to select directly with [CH▲/▼], press [OK] to confirm it.
DiSEqC1.1: Use [Vol◄/►] to switch DiSEqC1.1 option or press [OK] to enter DiSEqC1.1 option to select directly with [CH▲/▼], press [OK] to confirm it. The options of this item are: Disable / CCard1 M1 Port1 / CCard1 M1 Port2 / CCard1 M1 Port3 / CCard1 M1 Port4 / CCard1 M2 Port1 / CCard1 M2 Port2 / CCard1 M2 Port3 / CCard1 M2 Port4 / CCard1 M3 Port1 / CCard1 M3 Port2 / CCard1 M3 Port3 / CCard1 M3 Port4 / CCard2 Port1 / CCard2 Port2 / CCard2 Port3 / CCard2 Port4 / CCard2 Port5 / CCard2 Port6 / CCard2 Port7 / CCard2 Port8 / CCard2 Port9 / CCard2 Port10 / CCard2 Port11 / CCard2 Port12 / CCard2 Port13 / CCard2 Port14 / CCard2 Port15 / CCard2 Port16.
Positioner: Press [Vol◄/►] to select between "Off / DiSEqC1.2 / USALS". Notice: When you select "DiSEqC1.2 or USALS", "DiSEqC1.0" and "DiSEqC1.1" items will be disabled.
Polarity: Press [Vol◄/►] to switch between "Auto / H / V".
Toneburst: Press [Vol◄/►] to switch this function "On" or "Off".
- After you completed your modification, on the "TP Scan" item, press [OK] twice to start scanning.
4.4 Satellite List
When you enter the "Satellite List" menu you can see a window like the one beside:
![Satellite List mVision [1] HOT BIRD E 12.0 [2] ASTRA E 16.2 [3] INTEL SAT E 80.0 [4] NSS 703 E 57.0 [5] BONUM E 58.0 [6] INTEL SAT E 95.0 [7] EXPRESS E 53.1 [8] PANAMSAT E 45.0 [9] TURKSAT IC E 42.0 [10] EXPRESS E 40.0 Angc FORMZ Lagen Add Delete New Select Exit](/content/2026/05/815298/images/31f7cf27d941cff55fbe956525e908de75ee60906c2f4c7f3a4216589ef254cb.jpg)
- Press [Red] button to enter edit satellite menu. You can edit the satellite's name and its longitude.
![Satellite List HVVISION [1] HOT BIRD E 12.0 [2] ASTRA E 16.2 Exit Satellite Satellite ASTRA Satellite Length 0116.2 Save Exit [9] TURKSAT 1C E 42.0 [10] EXPRESS E 40.0 Exit Add Delete Move Select Exit](/content/2026/05/815298/images/de7323971d8ba4198a5dcec99c23fea46be76a5f44522dd485a93f2b587476ed.jpg)
- Press [Green] button to open the "Add satellite" window.
![Satellite List mVision [1] HOT BIRD E 12.0 [2] ASTRA E 16.2 New Satellite Satellite New Satellite Satellite Length 0000 Save Exit [3] TURBSAT 1C E 42.0 [10] EXPRESS E 40.0 Exit Add Delete Move Select Exit](/content/2026/05/815298/images/bf99e32d3a6617e74108b00079a2ea4611e99d6e38c3ba7dfcbcd0fab5ca87d7.jpg)
- After pressing [Yellow] button you will be asked "Are you sure to delete?". Select "OK" to delete the marked satellite. Select "Cancel" to cancel the operation.
![[1] HOT BIRD E 13.0 [2] ASTRA E 16.2 Are you sure to delete? OK Cancel [7] EXPRESS E 53.1 [8] PANAMSAT E 45.0 [9] TURKSAT 1C E 42.0 [10] EXPRESS E 40.0 Edit Add Delete Move Select Exit](/content/2026/05/815298/images/81e11d7eb956d62df979ac7d4bbb14aa70fd49bc0dbcd18861c4332f03831f9f.jpg)
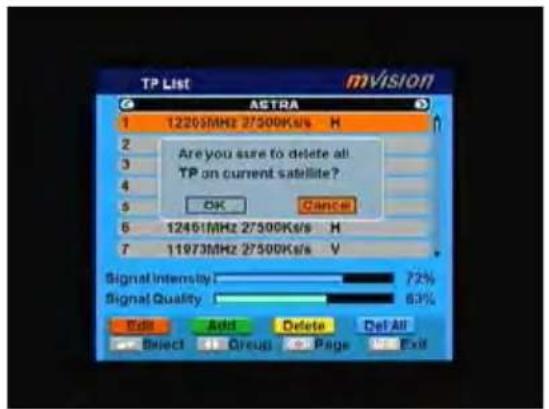
4.5 TP List
When you open the "TP List" menu you will see a window like the one beside.
- Press [Vol◄/►] to change the marked satellite.
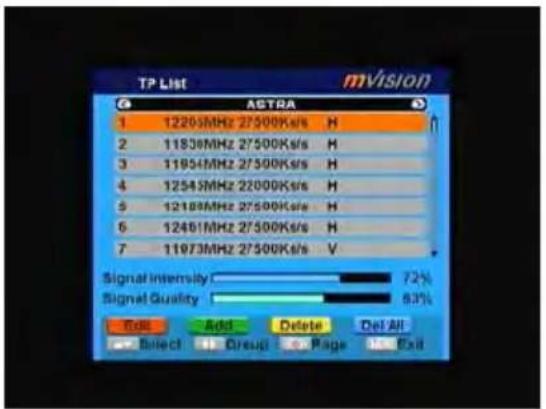
- Press [Red] button to open the "Edit TP" menu. Here you can edit the transponder's data.

- Press [Green] button to open the "Add TP" menu. Here you can add a new TP and setup its parameters.

- Press [Yellow] button will open a dialog box asking you to confirm the
deletion of the current TP. If you select "OK" all the related channels will be deleted. If you select "Cancel" the operation will be cancelled.
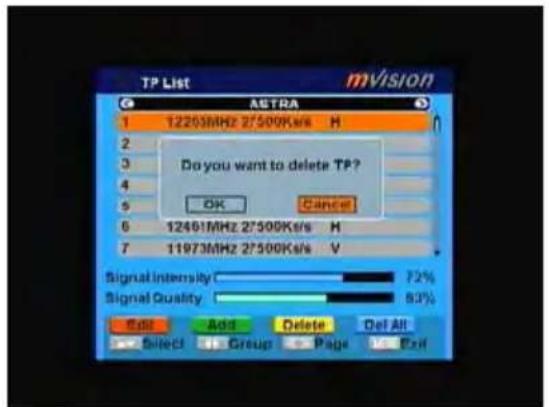
- Pressing the [Blue] button will open a dialog box asking you to confirm the deletion of all TP on current satellite. If
you select "OK", all TP of the current satellite will be deleted. If you select "Cancel" the operation will be cancelled.
4.6 Satellite Guide
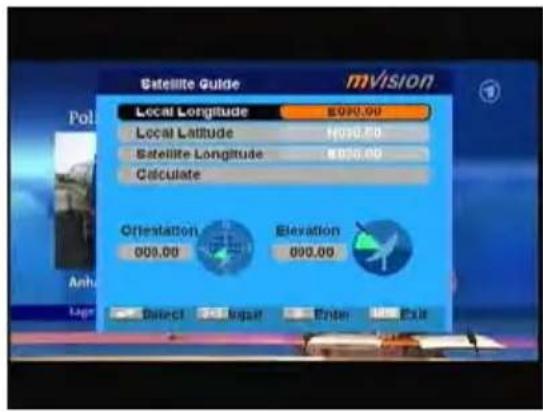
When you enter "Satellite Guide" menu, you will see the screen like beside:
Here you can enter your local longitude and latitude and the satellite's longitude. The receiver calculates the antenna's orientation and elevation to point your antenna to the selected satellite.
- Use the [Number] buttons to input the values of "Local Longitude", "Local Latitude" and "Satellite Longitude".
-
In the “Calculate” item press [OK], the receiver auto calculates the antenna’s orientation and elevation to point your antenna to the selected satellite.
-
Press [Menu / Exit] to return to the previous menu.
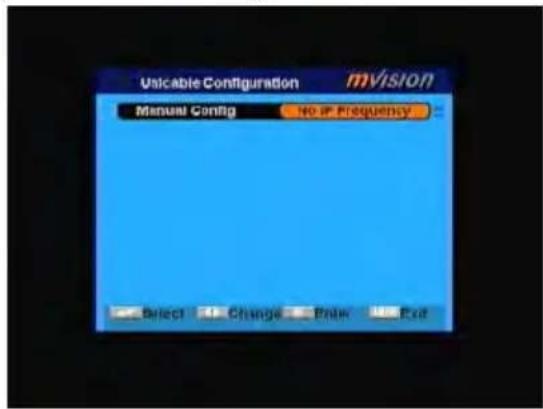
4.7 Unicable Configuration
Here you have two way to detect the frequency of Unicable LNB:
- Auto Config: just press [OK], and you will see below window, after the massage disappear, press [Vol◄/►] to choose the frequency, then "exit".
- Manual Config: Press [OK] and you will see below menu.
Here you need to know the IF Channel and IF Frequency of the Unicable LNB you are using, then press [Vol◄/►] to choose the IF Channel and IF Frequency accordingly, then press "exit" for saving data.
- Installation→Single search→LNB Configuration→LNB type
Settings must be as below:
LNB type: Unicable
First Frequency: 9750MHz (press [Vol◄/►] to choose)
Sencond Frequency: 10600MHz. (press [Vol◄/►] to choose)
Save all above settings, and back to "Single Search" menu, and start to search.
5. Configuration
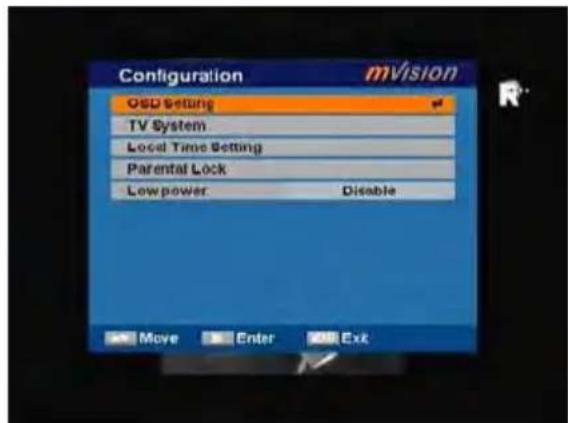
When you open the "System Setup" menu a window like the one beside will be opened. In "System Setup" menu:
-
Press [CH▲/▼] to sect menu items among Language, TV System, Time & Timer setting, OSD Setting, Parental Lock and Power setting.
-
eReebsite[OK] to open the sel
5.1 OSD Setting
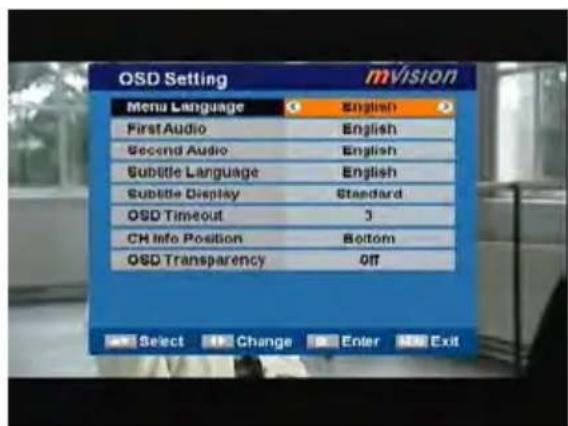
After selecting the "Language" menu you will see a window like beside:
- Menu Language: Press [Vol◄/►] to select languages. The selection of language include: English, German, French, Spanish, Italian, Portuguese, Turkish, Polish, Russian, Danish, Greek, Hungarian, Arabic, Farsi and Dutch.
-
:SomeAudchannels offer more than one audio language. This function allows you to set the preferred audio language for those channels. If a channel offers the same audio language as the "First Audio" you set the system will play this audio language as default. If the channel does not offer this audio language then the system will compare the offered languages with the second audio language. The selections of audio language include: English, German, French, Spanish, Italian, Portuguese, Turkish, Polish, Russian, Danish, Greek, Hungarian, Arabic, Farsi and Dutch.
-
As follows the channel has no audio language that corresponds with "First Audio" but with "Second Audio" the system will play the second audio language as default. If no audio language corresponds with the "Second Audio" then the default language of the current channel will be played instead. The selections of audio language include: English, German,
French, Spanish, Italian, Portuguese, Turkish, Polish, Russian, Danish, Greek, Hungarian, Arabic, Farsi and Dutch.
- Subtitle Language: In “OSD Setting” menu, use [Vol◀/▶] to select “On” or “Off”. If the current channel has subtitle information, it will be displayed if this function is “On”. If this function is “Off” subtitles won’t be displayed. The selections of subtitle language include: English, German, French, Spanish, Italian, Portuguese, Turkish, Polish, Russian, Danish, Greek, Hungarian, Arabic, Farsi and Dutch.
- tdeltext/ Press [To exp] the teletext page. This service is depending on the support of the channel provider. If the channel does not support teletext information, it will show "No Teletext Data" on the screen. The selections of teletext language include: English, German, French, Spanish, Italian, Portuguese, Turkish, Polish, Russian, Danish, Greek, Hungarian, Arabic, Farsi and Dutch.
- aRe"ese[Menu/Exit] to return back from "Langu
More Options
- Subtitle D isplay: Press [Vol◀/▶] to select "Off", "Standard" or "Teletext Subtitle". If the current channel has subtitle information, it will be displayed if this function is "Standard" or "Teletext Subtitle". If this function is "Off" subtitles won't be displayed.
- dSBmTimes the Ibratisettinge info window is displayed on the screen when you change channels. Press [Vol ◀/▶] to set the time between 1 to 10 seconds.
- position between [Vap and] select the
- OSD Transparency: With this parameter you can set the transparency of the menus. Press [Vol◄/►] select the value between 10%, 20%, 30%, 40% and "Off"(means no transparency function).
- mageaFrom USB: Press [Vol◄/►] to select "Off" and "On". Set the i background.
- tllroadOSD:Se you want to reset your OSD settings to the default settings then select this item and press [OK].
- Press [Exit] button to leave the "OSD Setting" menu.
5.2 TV System
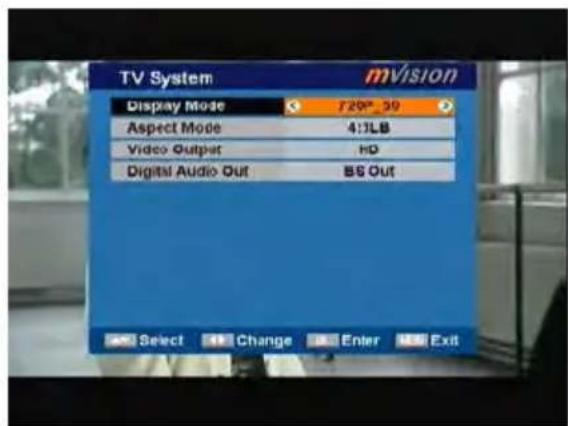
When you enter the "TV System" menu you will see the screen like below:
- Display Mode is used to switch the display mode. You can select from PAL / NTSC. Press [Vol◄/►] to switch the desired mode.
- Aspect Mode is used to switch the screen aspect ratio mode. You can select the needed mode from Auto / 4:3 PS / 4:3 LB / 16:9 with [Vol ◀/▶].
- Video output is use for switching the screen a spect ratio mode. Now we provide below options: SD / HD. You can press [Vol◄/►] key to select each mode circularly.
- Digital Audio Out is used to switch the output audio mode. You can select the needed mode from LPCM Out / BS Out with [Vol ◀/▶].
- Press [Menu/Exit] to return to the previous menu.
5.3 Sleep Timer
Sleep Timer: Select “Sleep Timer” item and press [OK] to set the sleep timer. You will see “Sleep timer OFF / Sleep timer 10 / Sleep timer 30 / Sleep timer 60 / Sleep timer 90 / Sleep timer 120”.
If you set a sleep time, the system will change to standby mode after the chosen time period.
5.4 Local Time Setting
- Local Time Setting: When you select "Local Time Setting" and press [OK] then you will see a window like the one beside:
♦ GMT Usage: This item is used to set the time by using the time signal from the satellite. Press [Vol◄/►] to change the setting.
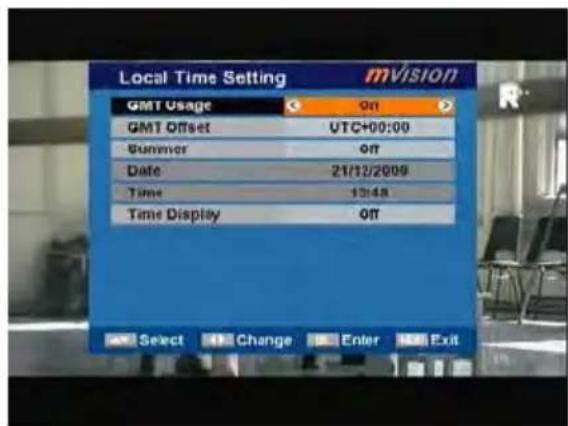
- The “GMT Offset” item is only available when “GMT Usage” is set to “On”. Press [Vol◀/▶] to set the “GMT Offset” value. With every time you press the button the time offset will be increased/decreased by half an hour.
◆ Summer: Press [Vol◄/►] to switch this function "On" or "Off".
◆ “Date” and “Time” items are only available when the “GMT Usage” is set to “Off”. Press [Vol◀/▶] to select one item and use number buttons to input time and date directly.
Time Display: Press [Vol◀/▶] to switch this function "On" or "Off".
NOTE: If the current channel provides the correct time information, you will see the current time after you entered “Local Time Setting” menu. If the channel doesn’t provide time information, you have to input the date and time information manually. The most channels support the time signal.
◆ Press [Exit] to leave the “Time” menu.
- Sleep Timer: Select "Sleep Timer" item and press [OK] to set the sleep timer. You will see "Sleep timer OFF / Sleep timer 10 / Sleep timer 30 / Sleep timer 60 / Sleep timer 90 / Sleep timer 120".
If you set a sleep time, the system will change to standby mode after the chosen time period.
5.5 Parental Lock
You can set a password for anyone who wishes to operate the “Installation” menu. You can also set the password to lock channels. Below you find how to set and change the password.
-
On "Parental Lock" press [OK] to open a dialogue box and input the password. After you entered the correct password, you will see a screen like beside:
-
Menfu Menu Lock is set to "Y
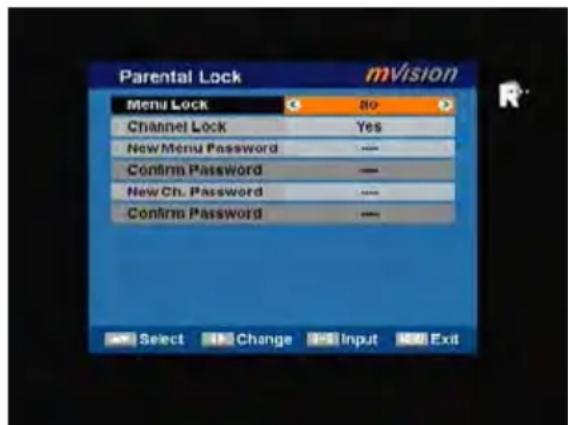
es" then you need to enter the
password every time you want to open the menu. If set to "No" then you can open the menu without entering the password first.
- Channel Lock: If set to "Yes" then you need to enter the password before you can see those channels which have been marked as locked channels in the channel menu. If set to "No" then even those channels can be selected without entering the password first.
- New Menu Password: Here you can change the existing password. You should do this after you set up the receiver the first time and every time when you think that your password is known by unauthorized persons. To change the password enter the new password in the “New Menu Password” item and repeat the same one in the “Confirm Password” item. If the passwords are not identically then you will see a warning message. If you entered the same new password in both fields then you will see the message “Saving Data, Please Wait...”. From now on you need to use the new password to open locked menus or locked channels.
NOTE: The default password is 0000.
- Basically the operation of "New Chan(channel) Password" is same as "New Menu Password".
- Press [Exit] to leave the "Parent al Lock" menu.
5.6 Power setting
When you select this option, you will see a screen like beside:
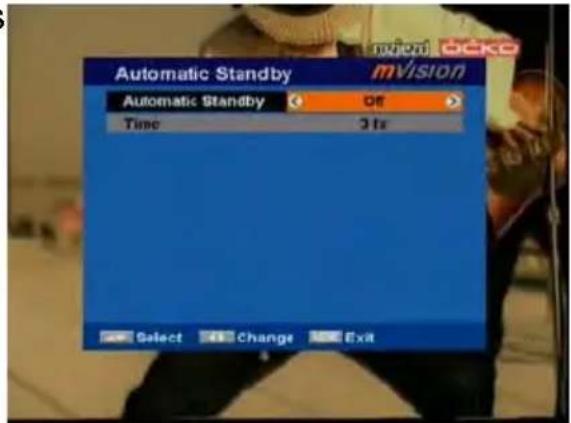
- Automatic Standby: press [OK] to open the "Automatic Standby" menu.
➢ Automatic Standby: Press [Vol◀/▶] to select “Off” and “On”.
Time: Press [Vol◀/▶] to select "1hr" \~ "8hr".
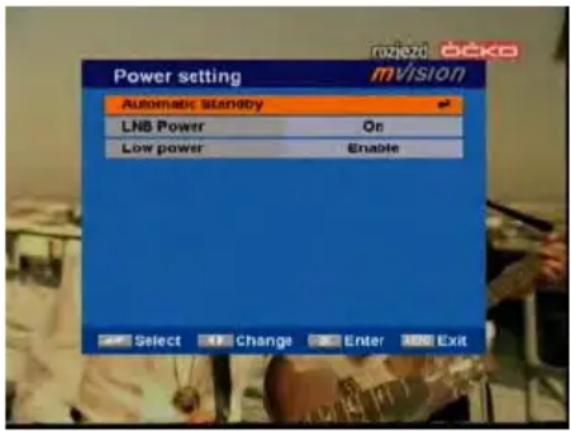
- LNB Power: If your receiver is
connected to the LNB directly then you need to set the LNB Power to "On". If your receiver is connected to a multi switch (SMATV signal distribution system) then it may be that you don't need to provide the power to the LNB. But since this is depending on the kind of installed distribution system we
recommend you to contact your installer or to refer to the user manual of this system to get the correct information.
You also just can change this setting and check if you still can receive the channels. If the LNB Power is off and you still can see all channels then we recommend this setting.
- Low Power Consumption: At this option, you could Enable / Disable the low power consumption mode. This mode allows saving current consumption when the receiver is stand-by.
Low power consumption mode only can be enabled when the VCR Loopthrought option (see point 5.2.) is STB master selected. By the other way, if you choose VCR master, then the Low Power Consumption option will not be active and the receiver will not be in LPC mode.
-
Press [Exit] button to leave this menu.
-
Press [Exit] button to leave this menu.
6. Utility
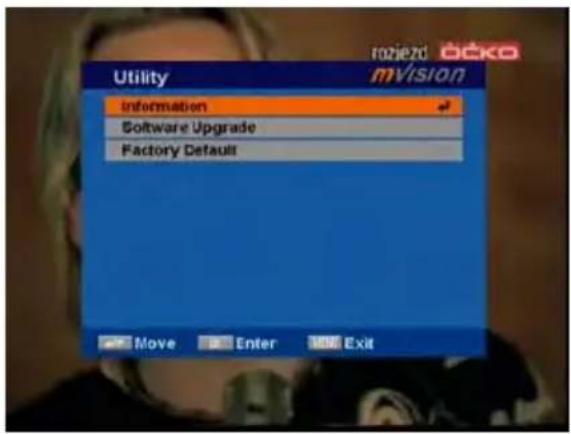
When you enter to "Utility" menu, you will see a screen like beside:
In "Utility" menu:
-
Press [CH▲/▼] to select the wanted item among Information, Software Upgrade and Factory Default.
-
Press [OK] to enter the selected item.
6.1 Information
-
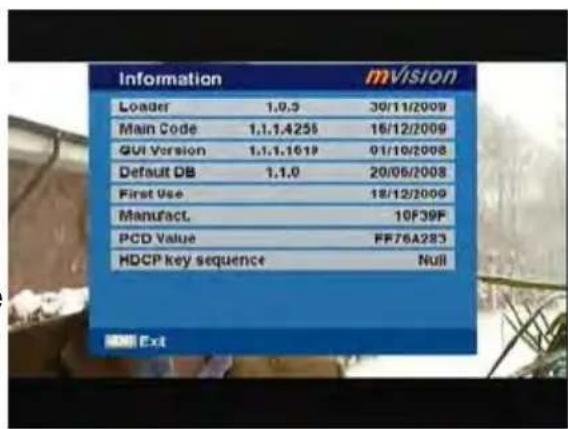
When you select the "Information" menu you will see a screen like beside. The screen displays data about the current channel.
-
Press [Exit] button to leave the information display.
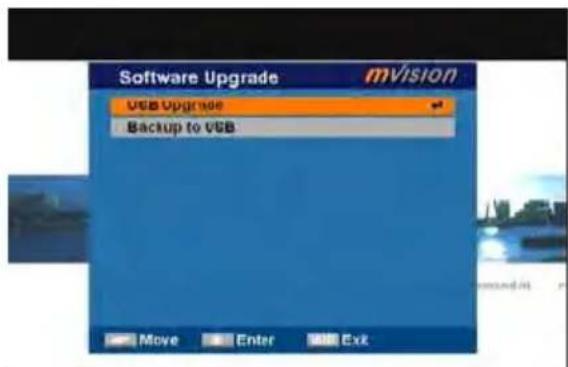
6.2 Software Upgrade
When you enter to "Software Upgrade" menu, you will see a screen like beside:
-
Press [CH▲/▼] to select the wanted item among USB Upgrade and Backup To USB.
-
Press [OK] to enter the selected item.
6.2.1 USB Upgrade
This option allows updating the software of the receiver with the received data from a USB memory device. To do it, connect a USB memory device to the receiver and accede to this menu option.
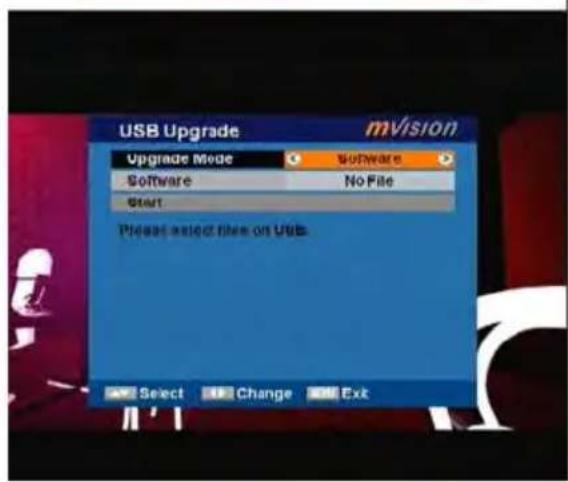
The last software version to be loaded must be placed at the root path of your USB device.
- Upgrade Mode: the mode of the upgrade to be chosen, Press [Vol◀/▶] to select Software, Whole, User Interface, Default DB, CAS and Ch.List & Setting.
- In the "Software" item press [Vol◄/►] to select the file which you want to scan or press [OK] to open the "USB list" to select directly with [CH▲/▼], and press [OK] to finish the selection.
- Start: Press [OK] to start upgrade.
- Once the file has been loaded, it requires the conformity to end the upgrading process, writing into the receiver "Are you sure to burn flash ?". Press [OK] to upgrade the receiver. In case during the reading of the file, it is corrupted or it would be a not appropriated for this model of receiver, an alert message would appear "Error reading the USB disk".
- After pressing [OK] the receiver will write into the Flash memory, and it will reboot to end the upgrading process.
NOTE: The upgrade file is the binary file, *.bin. Only the files, which extend name is bin, would be displayed. User need put the upgrade file under root of USB card.
6.2.2 Backup To USB
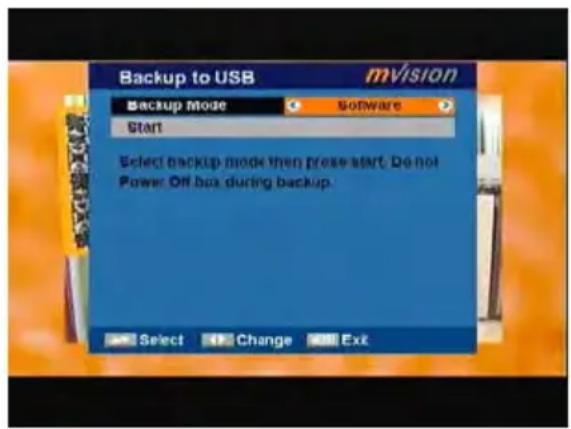
This function allows you Dump Software and Ch.List & Setting fo the receiver to external hard drives.
- press [Vol◄/►] to change the backup mode. backup mode include: Dump Software and Ch.List & Setting.
- Mark "Start" on the master receiver and press [OK] to start Backup.
- Press [MENU/EXIT] to save the setting without Backup.
6.2.3 OTA Upgrade
This function can upgrade the software of your receiver through data sent by a satellite. At the moment we offer satellite updates only through ASTRA1 and Hotbird satellites.
- Select the satellite and TP or input the TP value and download PID.
- Then mark "Start" and press [Enter] to begin the download of the upgrade.
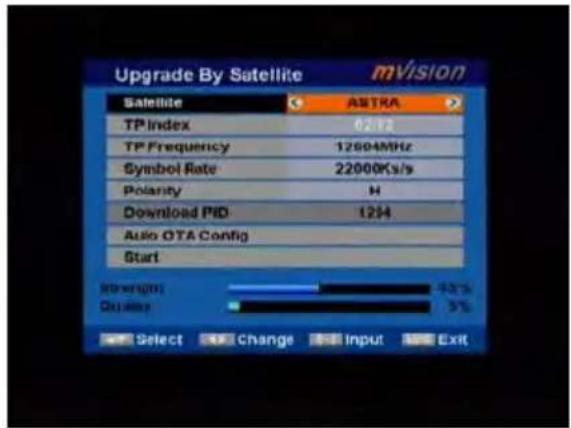
This may need up to 60 minutes. Therefore we suggest using of this function only if you don't intent to watch TV during this time.
- Auto OTA Config: The system could upgrade automatically in standby mode.
6.3 Factory Default
When you press [OK] on the "Factory Default" item:
-
A dialogue box will occur where you need to enter the password.
-
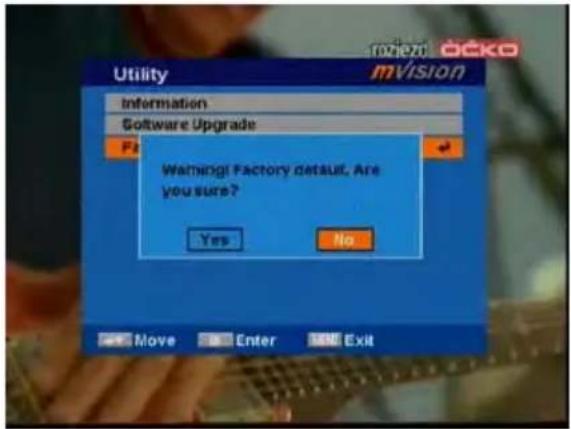
After you input the correct password a warning message will be displayed like the one beside.
-
If you select "Yes" then all changes you made will be reset to default values. Make sure you really want to do
-
Press [Exit] in both steps will close the window without resetting the receiver.
7. USB
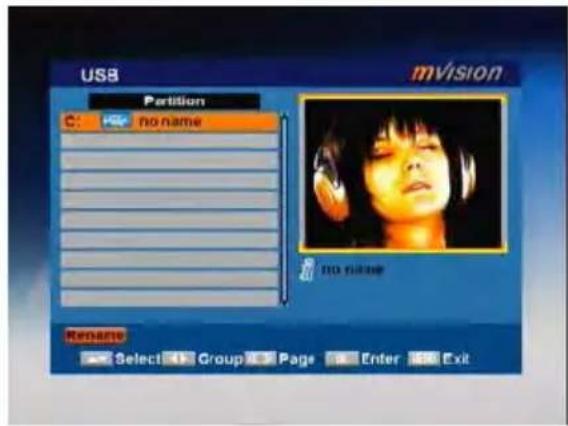
Press [CH▲/▼] to select the wanted item partition.
Press [Red] button to open the "Rename" window like showed beside. Press [CH▲/▼] / [Vol◄/►] to select the leading character of the channel name and press [OK] to confirm it.
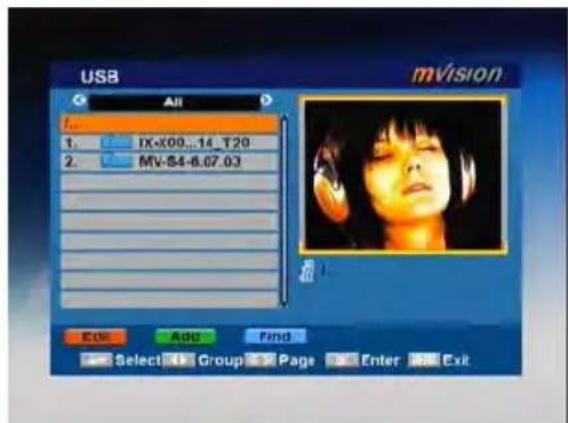
If you enter the USB menu a window like the one below will open.
- Press [Vol◄/►] select the all, mp3, image, video, music list, picture list, video list, Record list.
- You can move the highlighted Record with [CH▲/▼] to preview the highlighted program in the preview window.
-
Press [PGUP/PGDN] on the RCU to jump between the channels by pages.
-
Press [Menu] or [Exit] buttons to enter TV playing mode.
-
The color buttons offer further functions to manage.
7.1 All
[Edit]
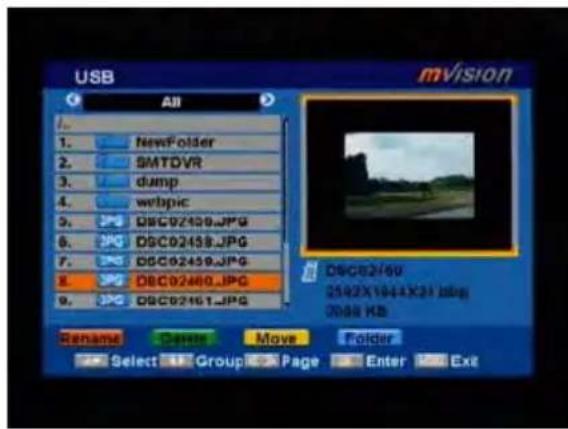
Press [Red] button to open the "Edit" window like showed beside.
The color buttons offer further functions to manage.
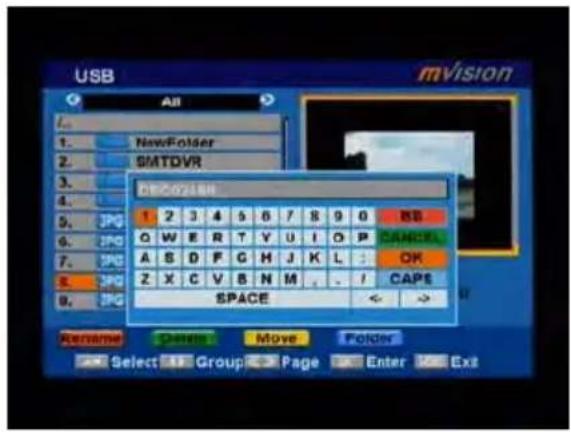
1. Rename
- Press [Red] button to open the "Rename" window like showed beside. Press [CH▲/▼] / [Vol◄/►] to select the leading character of the channel name and press [OK] to confirm it.
◆ After entering the character(s) highlight “OK” in the window and press [OK] on the RCU.
◆ Press [Exit] button to close the find window and brings you back to the Record list.
2. Delete
In all edit menu press [Green] button will open another window where you can choose between delete one and delete all.
Del One
Press [Red] button to mark a "mp3 / image / video" for deleting. Marked "mp3 / image / video" will be deleted after you confirm to save the changes when you leave this menu.
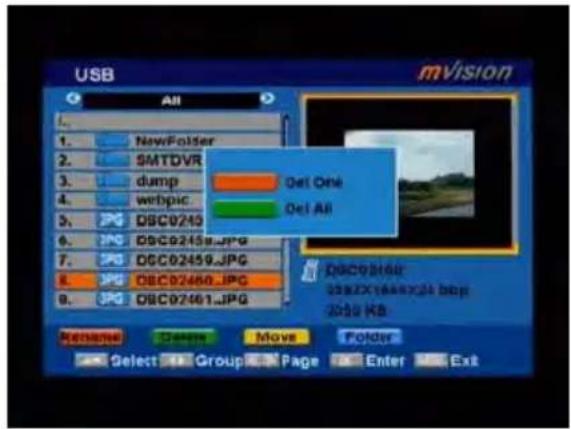
♦ Del All
a) Press [Green] button to show a deleting icon behind all "mp3 / image / video" name.
b) Press [MENU] button you will be asked "Are you sure to save?". Select "OK" to delete all "mp3 / image / video". Select "Cancel" to cancel the operation.
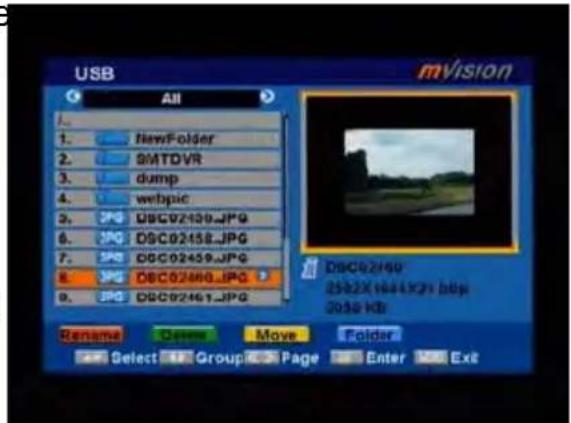
3. Move
- Press [Yellow] button to show a moving icon behind the "mp3 / image / video / folder" name.
- Move the "mp3 / image / video / folder" to the desired folder list with [CH▲/▼]. Press [OK] to confirm the position.
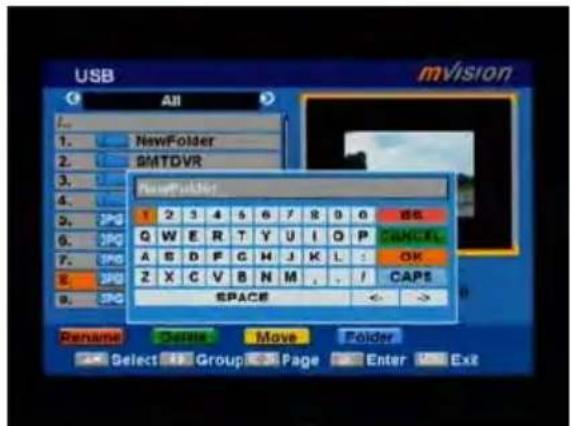
4. Folder
- Press [Blue] button to open the “New Folder” window like showed beside. Press [CH▲/▼] / [Vol◄/►] to select the leading character of the folder name and press [OK] to confirm it.
◆ After entering the character(s) highlight “OK” in the window and press [OK] on the RCU.
◆ Press [Exit] button to close the find window and brings you back to the all list.
[Add]
In all menu press [Green] button will open another window where you can choose between add one and add all.
- Add One
Press [Red] button to mark a "mp3 / image / video" for add. Marked "mp3 / image / video" will be add after you confirm to save the changes when you leave this menu.
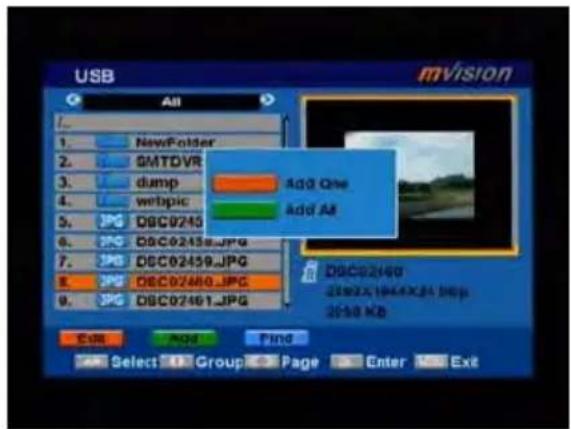
♦ Add All
a) Press [Green] button to show a add icon behind all "mp3 / image / video" name.
b) Press [MENU] button you will be asked "Are you sure to save?". Select "OK" to add all "mp3 / image / video". Select "Cancel" to cancel the operation.
[Find]
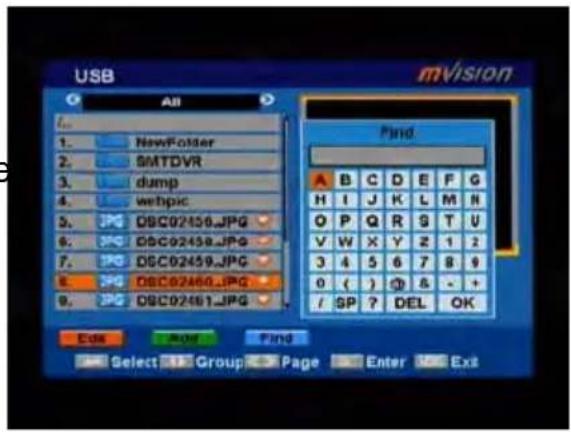
Press [Blue] button to open the "Find" window like showed beside. Press [CH▲/▼] / [Vol◄/►] to select the leading character of the channel name and press [OK] to confirm it.
After entering the character(s) highlight "OK" in the window and press [OK] on the RCU.
Press [Exit] button to close the find window and brings you back to the all list.
[play]
The play offer further functions to manage. If you enter the play menu a window like the one below will open.
The color buttons offer further functions to manage the channel list.
Red: Whe n you play music program, press [Red] will stop the program, press [Red] again will play the program continually.
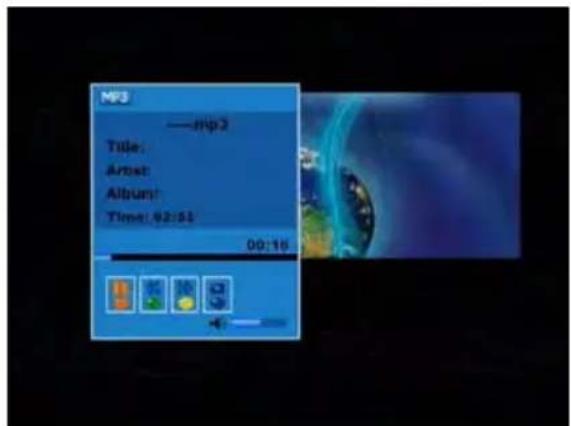
Green: When you play music program, press [Green] button to back the program fast.
Yellow: When you play music program, press [Yellow] button to fast forward the program.
Blue: Change play mode by [Blue] Key, and play mode include: Sequential / Random / Single repeat / all repeat.
Press [Exit] to return to the previous menu.
7.2 Music
Basically the operation of "mp3" is same as "all".
7.3 Picture
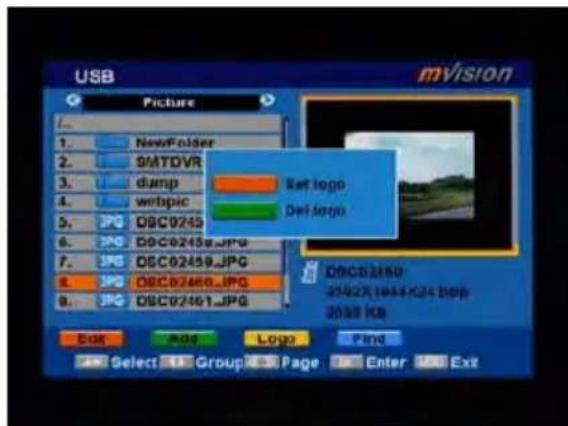
Basically the operation of “Picture” is same as “all”, except that in the Yellow buttons offer further functions to manage.
In image menu press [Yellow] button will open another window.
press [Red] to set the image as background.
press [Green] to delete the image as background.
7.4 Video
Basically the operation of "video" is same as "all".
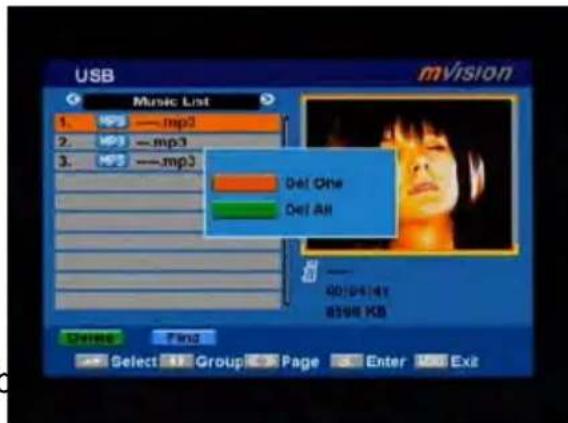
7.5 Music List
The color buttons offer further functions to manage.
[Delete]
In media list menu press [Green] button will open another window where you can choose between add one image and add all image.
Del One
Press [Red] button to mark a image for add. Marked image will be add after you confirm to save the changes when you leave this menu.
Del All
a) Press [Green] button to show a add icon behind all image name.
b) Press [MENU] button you will be asked "Are you sure to save?".
Select "OK" to add all image. Select "Cancel" to cancel the operation.
[Find]
Basically the operation of "Music List → Find" is same as "all → Find".
7.6 Picture List
Basically the operation of "Picture List" is same as "Music List", except that in the Yellow (Setup) buttons offer further functions to manage.
Press [Yellow] button to open the "Setup" window.
Select the item you want to adjust with [CH▲/▼] and change the value with [VOL◄/►]
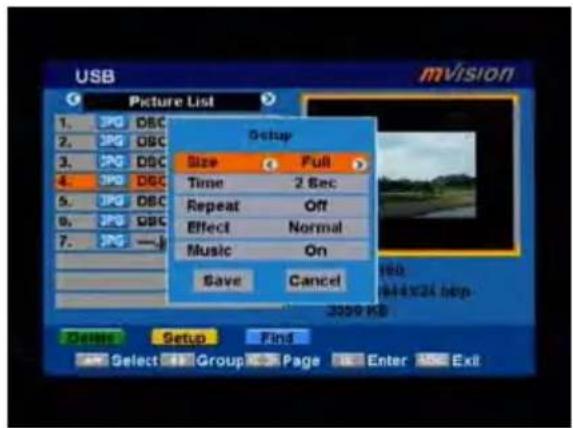
Size: Full and Real.
Time: 0 Sec, 1 Sec, 2 Sec, 3 Sec, 4 Sec, 5 Sec, 6 Sec, 7 Sec, 8 Sec and 9 Sec.
Repeat: On and Off.
Effect: Normal, Shutters, Brush, Slide, Random and Fade.
Mp3: On and Off.
7.7 Video list
Basically the operation of "Video List" is same as "Music List".
7.8 Record list
If you enter the Record list menu a window like the one below will open.
The color buttons offer further functions to manage the channel list.
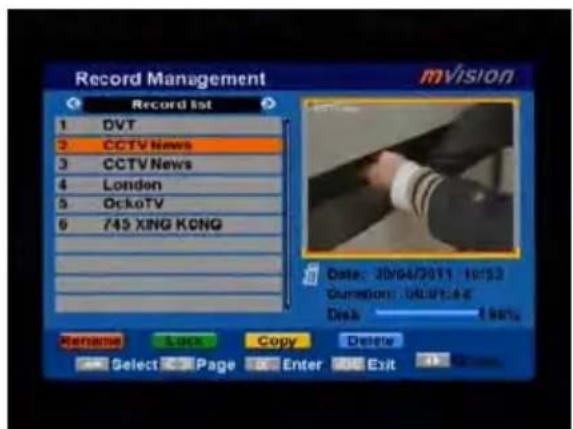
[Rename]
- Press [Red] button to open the "Rename" window like showed beside.
Press [CH▲/▼] / [Vol◄/►] to select
the leading character of the channel name and press [OK] to confirm it.
-
After entering the character(s) highlight "OK" in the window and press [OK] on the RCU.
-
Press [Exit] button to close the find window and brings you back to the Record list.
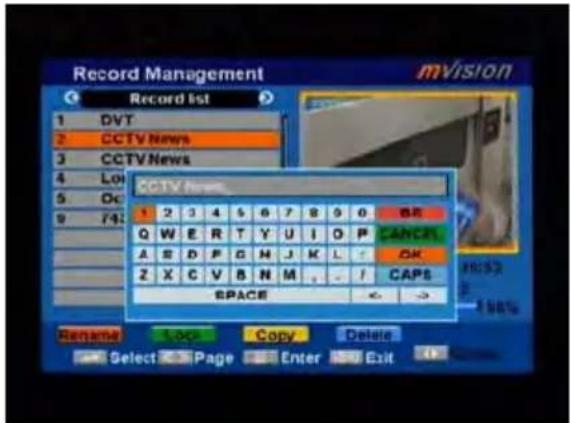
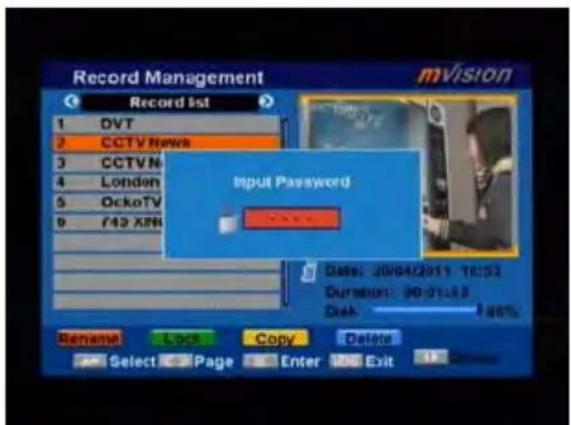
[Lock]
In channel Record menu, press [Green] button to place a lock icon behind the name of the highlighted Record. Marked Records will be locked and displayed only after password has been entered if you confirm to save the changes when you leave this menu.
[Copy]
In channel Record menu, press [Yellow] button copy the recorded programme to another disk.
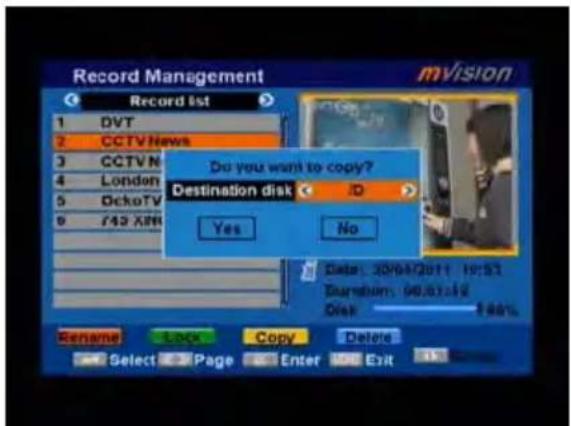
Press [Vol ◀/▶] to switch select copy path, Select "OK" to add all image. Select "Cancel" to cancel the operation.
[Delete]
In channel Record menu, press [Red] button will open another window where you can choose between add one image and add all image.
♦ Del One
Press [Red] button to mark a image for add. Marked image will be add after you confirm to save the changes when you leave this menu.
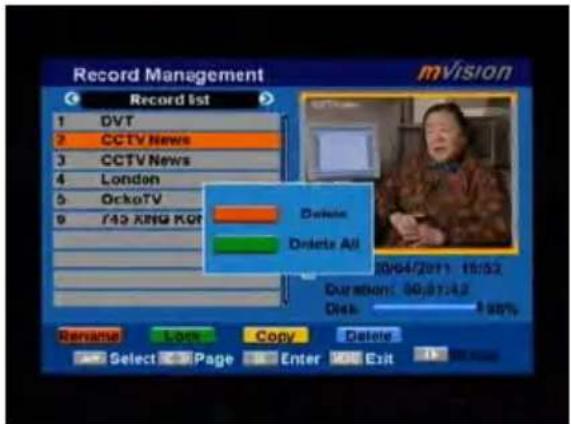
Del All
c) Press [Green] button to show a add icon behind all image name.
d) Press [MENU] button you will be asked "Are you sure to save?". Select "OK" to add all image. Select "Cancel" to cancel the operation.
8. PVR
When you enter to "PVR" menu, you will see a screen like beside:
In "PVR" menu:
-
Press [CH▲/▼] to select the Record Management, Timer, PVR Options and Disk Information.
-
Press [OK] to enter the selected item.
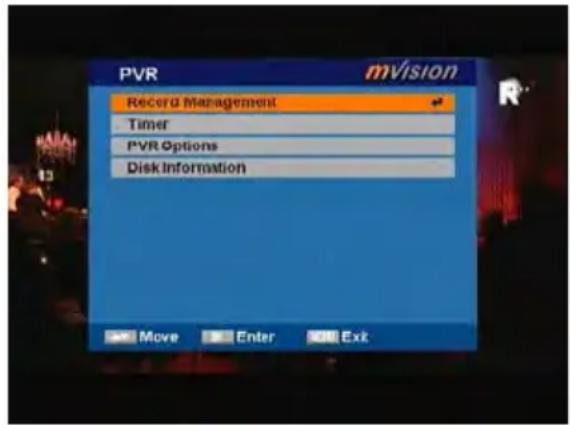
8.1 Record Management
Basically the operation of "Record Management" is same as "USB",
8.2 Timer
When you enter “Time & Timer Setting” a menu with this 3 items will be opened.
- Timer: Select "Timer" item and press [OK] to enter the "Timer" menu.
You can press [CH▲/▼] to select item.
- The current time will be displayed in the first column. If the current time is incorrect, please modify it with the [Number] buttons.
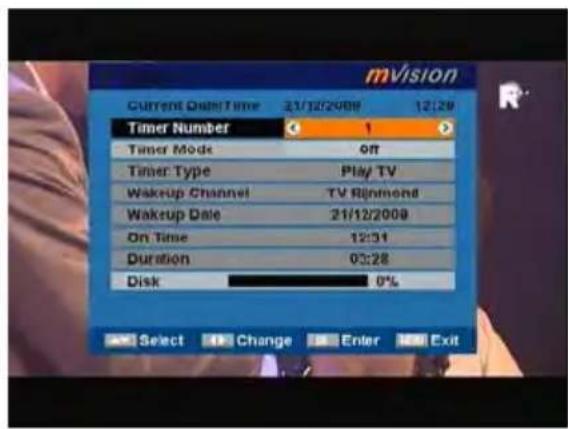
◆ Timer Number: You can press [Vol◄/►] to switch the timer number. There are totally 16 timers.
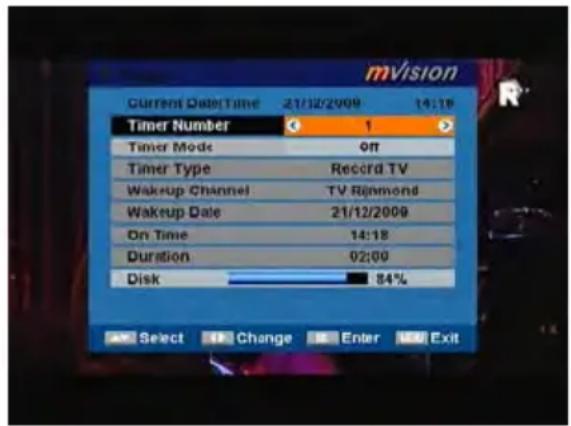
◆ Timer Mode: Select how often the timer is running: Once, Daily, Weekly, Monthly and Yearly, or switch the timer to off.
◆ Timer Service: Select between TV Channel, Radio Channel and Message.
When you select "TV Channel / Radio Channel"(timer setting for channel change and Wakeup channel / date) then you have further options you need to set:
Wakeup Channel: Press [OK] to enter the channel list, and select the channel you want to see with [CH▲/▼], press [OK] to confirm it.
Wakeup Date: Use number buttons to input your wakeup date.
On Time: Use number buttons to input your wakeup time. If date and time are reached then no matter if the system is in standby mode or in playing mode, it will automatically switch to the channel you set and start to play.
Duration: Here you can set the time you want to see or play this channel. When the time is reached, whenever the system is in standby mode or playing a channel, the system will automatically switch to the channel you select and play the channel within the duration time you set. The minimum duration unit is one minute. After the duration time, the system will automatically switch to Standby mode.
- When you select “Message”(reminding message) option in “Timer Service” then you can enter additional data:
Wakeup Message: Press [Vol◄/►] to select the category
➢ of the wakeup message from Birthday, Anniversary and General.
➢ Wakeup Date: Use the [Number] buttons to input your wakeup date.
On Time: Use the [Number] buttons to input your wakeup time. If date and time are reached, no matter if the system is in standby mode or in playing mode, it will automatically show a reminding message. The message will be displayed on the screen until you press [Exit] to close it.
➢ Duration: Here you can set the time you want to see or play this channel. When the time is reached, whenever the system is in standby mode or playing a channel, the system will automatically switch to the channel you select and play the channel within the duration time you set. The minimum duration unit is one minute. After the duration time, the system will automatically switch to Standby mode.
◆ Press [Exit] to leave the “Timer” menu.
8.3 PVR Options
- Reserved TMS Size: Press [Vol◄/►] to switch between "0 MB / 200 MB and 500 MB".
Select "MENU / EXIT", press [MENU / EXIT] to reset to make tms size valid now. Select "Cancel" press [OK] to cancel the operation.
- Jump Step Value: Press [Vol◄/►] to switch between "1 mins / 3 Mins / 5 Mins / 10 Mins / 15 Mins".
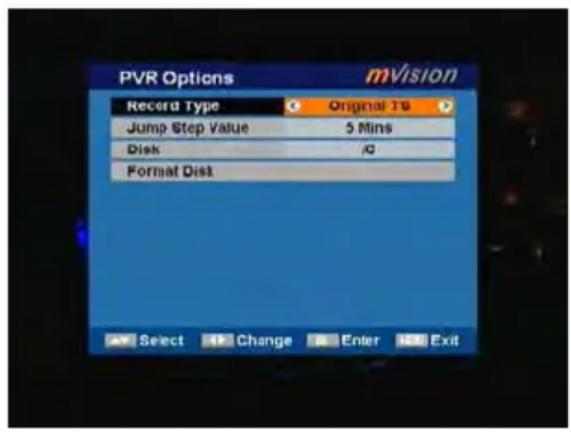
The value control the step of I ◀ ◀/▶ ▶ I operation.
- Record Type: Press [Vol◄/►] to switch between "TS and PS".
- Disk: Press [Vol◄/►] to switch between /C /D.....
- Format Disk: If you want to delete the hard disk totally, you can do it with the [OK] Button Format and the hard disk will be completely erased.
Caution: This process will delete also saves you have made with Backup tools.
8.4 Disk Information
-
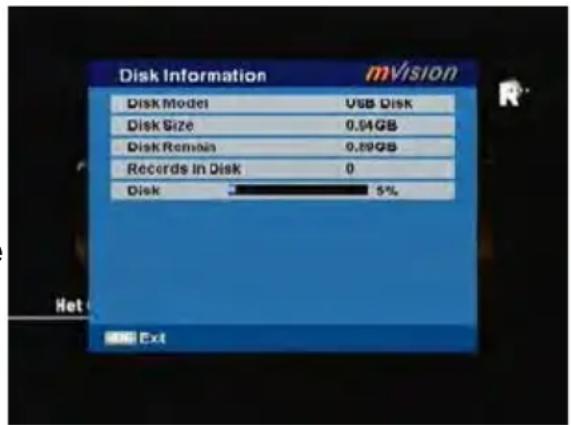
When you select the "Disk Information" menu you will see a screen like beside. The screen displays data about the current HDD.
-
Press [Exit] button to leave the information display.
9. Technical Specification
V I D E O
Decoding MPEG-4 & MPEG-2 & MEPGatiblemp
B i t r a t e M a x
O u t p u t P A L / N
Aspect ratio 4:3, 16:9, Auto
Active pixel SD: 720x480 @ 30fps; 720x576 @ 25fps
HD: 480p, 576p, 720i, 720p, 1080i
Output connector RCA, TV SCART, HDMI
AUDIO
Decoding MPEG-2/MPEG-1 layer I & II
Mode Mono, Dual, Stereo, Joint stereo
Bit rate Max 384Kbps
DEMODULATOR
Demodulation QPSK & 8PSK
Symbol rate SCPC/MCPC
Outer code RS (204, 188, 8)
Inner code ALL DVB rates
Energy dispersion DVB-S recommendation
INPUT SIGNAL
Frequency 950MHz \~ 2150MHz
Input level -65dBm \~ -25dBm
Channel bandwidth 36MHz
Input socked F-type connector
LNB CONTROL
Power supply 13/18V (300mA max)
Polarized control 13/18V polarization (vertical/horizontal)
DiSEqC control DiSEqC1.0, DiSEqC1.1 and DiSEqC1.2
MISCELLANEOUS
| Supply voltage | 100-240VAC, | 20V,0.8A |
| Power consumption Max. 16 watts | ||
| Operation temperature +5° to +40° | ||
| Storage temperature | -20° to | +70° |
| Dimension (W * D * H) | 160 * 140 * 40 mm | |
| Weight | 0.5 Kg | |
- Dolby Digital Audio Coding System
- Contents
- Remote Control & Panel Description....3
- Basic Operations....6
- Channel Manager....13
- Installation....18
- Configuration....26
- Utility....32
- USB 35
- PVR 43
- Technical Specification....46
- Remote Control & Panel Description
- Front Panel Description
- Rear Panel Description
- Remote Control Description
- Basic Operations
- Switch on STB
- ? Frequently Asked Question
- Standby Mode
- Mute
- Channel Number
- SAT
- MENU
- EXIT
- CH▲/▼
- V◄/►
- OK
- RECALL
- TV/Radio
- EPG
- Audio
- SUB
- ZOOM
- INFO
- 2.18
- 2.19
- FAV
- ◀ ◀/▶ ▶
- GOTO
- No Signal!
- Channel Manager
- TV List
- Favorite
- Move
- a) Move
- b) Swap
- Sort
- Lock
- Delete
- Del One
- Del All
- Skip
- Lock
- Edit
- ◆ Edit
- ♦ Crea te
- Find
- Radio List
- Installation
- Single Search
- Multi Search
- TP Scan
- Satellite List
- TP List
- Satellite Guide
- Unicable Configuration
- Configuration
- OSD Setting
- More Options
- TV System
- Sleep Timer
- Local Time Setting
- Parental Lock
- NOTE: The default password is 0000.
- Power setting
- Utility
- Information
- Software Upgrade
- USB Upgrade
- Backup To USB
- OTA Upgrade
- Factory Default
- USB
- All
- [Edit]
- Rename
- Delete
- ♦ Del All
- Move
- Folder
- [Add]
- - Add One
- ♦ Add All
- [Find]
- [play]
- Music
- Picture
- Video
- Music List
- [Delete]
- Picture List
- Video list
- Record list
- [Rename]
- [Lock]
- [Copy]
- ♦ Del One
- PVR
- Record Management
- Timer
- PVR Options
- Disk Information
- Technical Specification
- V I D E O
- AUDIO
- DEMODULATOR
- INPUT SIGNAL
- LNB CONTROL
Brand : MVision
Model : HD-100S
Category : Receiver