
HannsPad Titan 2 - Tablet HANNSPREE - Free user manual and instructions
Find the device manual for free HannsPad Titan 2 HANNSPREE in PDF.


| Product Type | Tablet |
| Brand | Hannspree |
| Model | HannsPad Titan 2 |
| Operating System | Android (version unspecified) |
| Display Size | 10.1 inches |
| Display Resolution | 1280 x 800 pixels |
| Processor | Quad-core 1.3 GHz |
| RAM | 1 GB |
| Internal Storage | 16 GB |
| Expandable Storage | microSD up to 32 GB |
| Rear Camera | 5 MP |
| Front Camera | 2 MP |
| Connectivity | Wi-Fi 802.11 b/g/n, Bluetooth 4.0 |
| Ports | Micro USB, 3.5mm headphone jack |
| Sensors | Accelerometer |
| Battery | Li-ion 4000 mAh |
| Dimensions | 240 x 160 x 9 mm |
| Weight | 500 g |
| Power Input | 5V DC, 2A via micro USB |
| Functions | Web browsing, video playback, app support, email, GPS (optional) |
| Maintenance & Cleaning | Wipe with a soft dry cloth; avoid solvents and water |
| Safety | Keep away from moisture and extreme heat; use only approved charger |
| Spare Parts & Repairability | Replacement parts: battery, charging port, screen assembly; repair by qualified technician recommended |
| General Information | Designed for everyday use; user manual available for download |
Frequently Asked Questions - HannsPad Titan 2 HANNSPREE
User questions about HannsPad Titan 2 HANNSPREE
0 question about this device. Answer the ones you know or ask your own.
Ask a new question about this device
Download the instructions for your Tablet in PDF format for free! Find your manual HannsPad Titan 2 - HANNSPREE and take your electronic device back in hand. On this page are published all the documents necessary for the use of your device. HannsPad Titan 2 by HANNSPREE.
USER MANUAL HannsPad Titan 2 HANNSPREE
2. Initial Operation....9
2.1 Managing and Charging the Battery....9
2.2 Connecting to the Wi-Fi Network....10
2.3 Connecting PC and Data Transmission 12
2.4 Use Micro SD card 12
3. The Android™ Interface.... 13
3.1 Home Screen 13
3.2 Customizing the Home Screen Panels....14
3.3 Managing Applications .... 14
3.4 Creating Application Folders 15
4. System Firmware Update.... 15
5. Product Specifications.... 16
6. Appendix......17
Control information
This device is in accordance with the requirements in Radio Equipment Directive 2014/53/EU
This device complies with the requirements in EMC Electromagnetic Compatibility Directive 2014/30/EU and Low Voltage Directive 2014 /35/EU.
The highest CE SAR value for the device is 0.7 W/Kg and the SAR limit is 2.0 W/Kg
Recycling information
Hannspree attaches great importance to our environmental policy, and firmly believe that we can better protect the "health" of the earth by properly disposing and recycling the industrial technological equipment that has reached service life.
These devices contain recyclable materials, which can be re-added to new material after decomposition. In contract, other materials are classified as dangerous and toxic substances. We sincerely hope that you contact the relevant institutions based on the information we provide to recycle this product.
For more information, please visit: http://www.hannspree.eu/
Preventing Hearing Loss

Caution: Permanent hearing loss may occur if earphones or headphones are used at high volume for prolonged periods of time.
This device have been tested to comply with the Sound Pressure Level requirement laid down in the applicable EN 50332-1 and/or EN 50332-2 standards.
Trademark Notice:
HDMI Hannspree products incorporate High-Definition Multimedia Interface (HDMI ^TM ) technology.
The terms HDMI and HDMI High-Definition Multimedia Interface, and the HDMI Logo are trademarks or registered trademarks of HDMI Licensing LLC in the United States and other countries.
Android, Google, Google Play, and other marks are trademarks of Google Inc.
For the correct use and good performance of the device, the user must fully understand the manual as well as strictly follow the instructions provided.
- Please avoid high temperatures (over 35^ ) or low temperatures (below 0^ ).
• Never knock the main machine violently. - Never let the device come in contact with chemicals such as benzene, thinner etc.
- Do not let the device get close to strong magnetic field, electric field etc.
- Keep away from direct sunlight or heating appliances.
- Never privately dissem ble, repair or modify the device.
- Never use higher volume, which may damage your hearing ability.
- Please charge under the following circumstances:
• Using the device and the earpiece during bicycling, car and motorcycle driving is likely to cause danger.
A. The battery icon shows no power (☐) on the upper-right corner of the screen.
B. The system automatically shuts down, and immediately shuts down after a re-start.
C. The operating button does not respond.
D. The product displays the red icon (☐) on the upper-right corner of the screen.
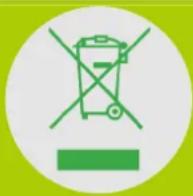
DO NOT throw the battery in municipal waste.
The crossed out wheeled bin symbol indicates that the battery should NOT be placed in municipal waste.
HANNspree Europe Holdings BV:
Newtonweg 25, 5928 PN Venlo The Netherlands
HANNspree UK Ltd: Breakspear Park, Breakspear Way, Hemel Hempstead, Hertfordshire, HP2 4TZ
Do not attempt to replace the battery of your HannsPad yourself, you may damage the battery and this could cause overheating and injury. The lithium-ion battery in you HannsPad should be replaced only by HANNspree or a HANNspree Authorized Service Provider, and must be recycled or disposed of separately from household waste. Do not incinerate the battery. For more information about battery recycling and replacement, go to http://www.hannspree.eu/en/support/battery-replacement
Declaration
- The information in this manual may not, except under written license by The Company, be copied, transmitted, distributed, or stored.
- Although efforts have been made for the correctness and completeness during the preparation of the manual, there is no guarantee that this manual is free from any error or omission. The Company assumes no reliability regarding the errors or omissions that might exist in the manual.
- For sustainable development, The Company reserves the right to modify and improve any product described in this manual without prior notice.
- Under no circumstance shall the Company assume any liability, direct or indirect, related to data or income loss, or any special, accidental, incidental or indirect losses.
What's in the box
Check Supplied Items
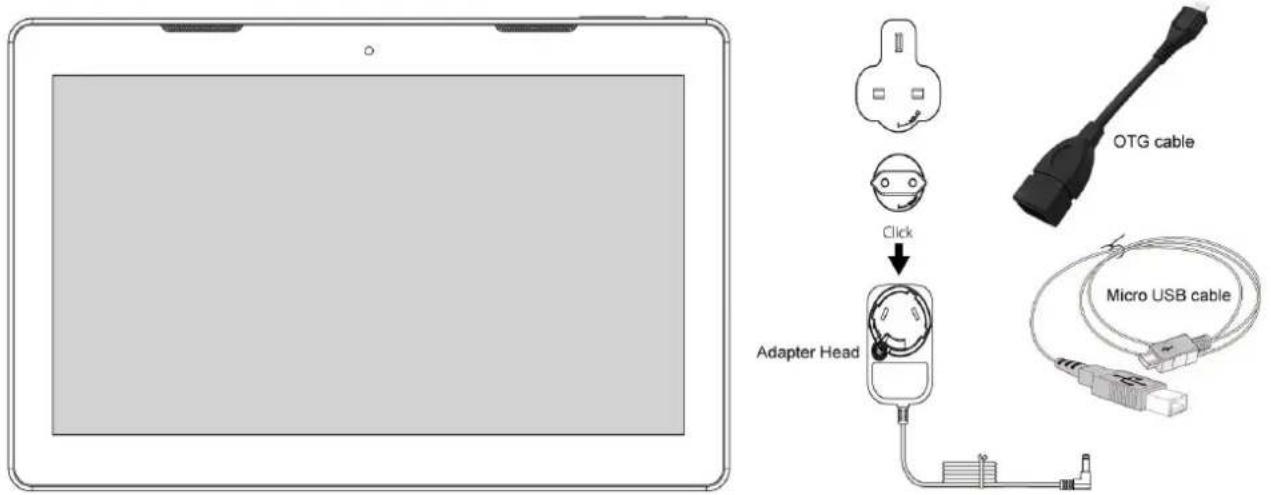
text_image
OTG cable Click Adapter Head Micro USB cableTablet PC SN14TP1(HSG1351)
NOTE:
- The included adapter head may vary depending on the region.
- The illustrations in this document may appear differently from your model.
This Quick Start Guide and a Warranty card are also included.
- If any item is damaged or missing, contact your point of purchase for assistance.
- Use only approved accessories.
• Accessories may vary by country or region.
1. Product Overview
1.1 Front View
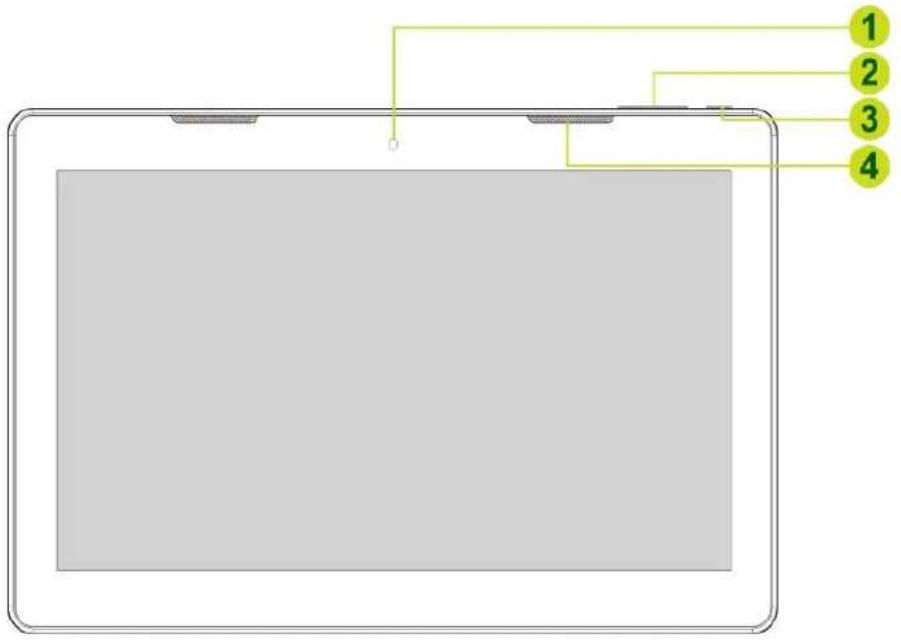
text_image
1 2 3 4No. Item Description
| 1 Front Camera | For video chatting or taking self-portrait pictures. |
| 2 Volume Keys Press to adjust the volume | |
| 3 Power Key | • Press and hold to turn the device on or off.• Press to turn the backlight on/off and put the device into sleep mode. |
4 Speaker Emits sound output
About the Power key:
• Power on: Press and hold the key for 4\~5 seconds until the device is turned on.
- Power off: Press and hold the key until the option menu appears on the screen. Select Power off and tap OK to turn the device off.
1.2 Back View
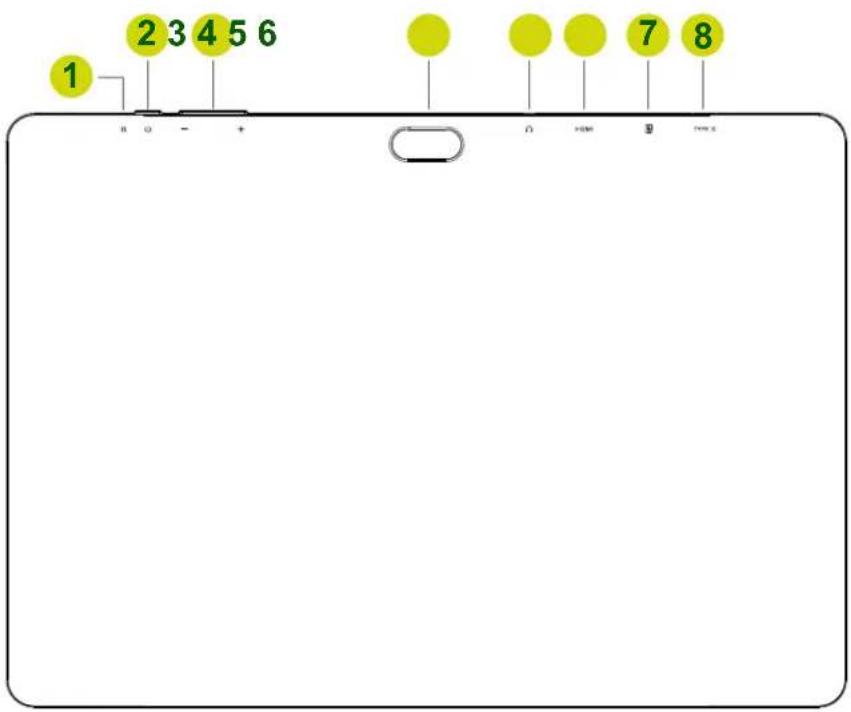
text_image
1 2 3 4 5 6 7 8 n o - + O + w B + x| No. | Item Description | |
| 1 | Reset Hole | Insert a small pin or other sharp object into the reset hole to reset the Tablet PC. |
| 2 | Power buttons | Connects the device to charge the battery. |
| 3 | Volume Keys | Press to adjust the volume. |
| 4 | Back camera | For taking pictures or recording videos. |
| 5 | Earphone Jack | Connects to an earphone using a 3.5 mm audio jack. |
| 6 | HDMI Port Output images using HDMI cable (sold separately) to an HDMI television or display device. | |
| 7 | Micro SD Card Slot | Insert a Micro card for additional storage space. |
| 8 | Power Input | Connects the device to charge the battery. |
2. Initial Operation
2.1 Managing and Charging the Battery
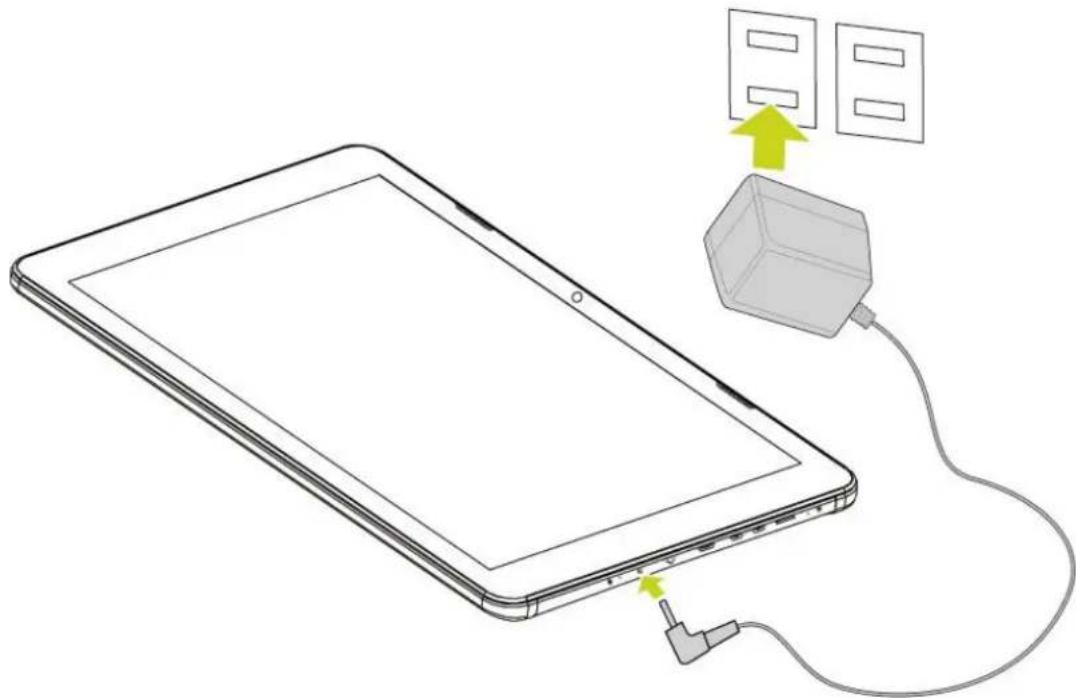
Before using the tablet PC for the first time, fully charge the battery. This tablet PC has a built-in polymer battery; use only the dedicated charger to charge the device.
In order to prolong the service life of the device, use the device until the battery is depleted before charging the battery the first two times.
To charge the battery, connect the charger / adapter to the device and the Micro USB Port.
natural_image
Illustration of a tablet connected to a 3D cube via cable, with two wall-mounted panels above (no text or symbols)NOTE:
- For the first two times of charging the battery, the charging time may take up to 10 hours; succeeding times may take up to 5 hours.
- During charging, the battery icon on the screen will scroll.
- When charging is complete, the battery icon will turn blue and stop scrolling.
- When you plug in the charger after the device shuts down due to low power, it may take a while before the system enters the Home screen.
When the device is not in use, be sure to turn off the device.
If the device will not be used for a long time, be sure to discharge and then charge the battery once a month.
The built-in polymer battery must be recharged regularly. Battery damage caused by depletion or by the use of an unauthorized charger are not covered by the warranty.
2.2 Connecting to the Wi-Fi Network
A Wi-Fi connection makes it easy to connect to the Internet. Once you have successfully connected to a Wi-Fi network, the device will automatically connect to the network when you are within range.
To configure the Wi-Fi connection, do the following:
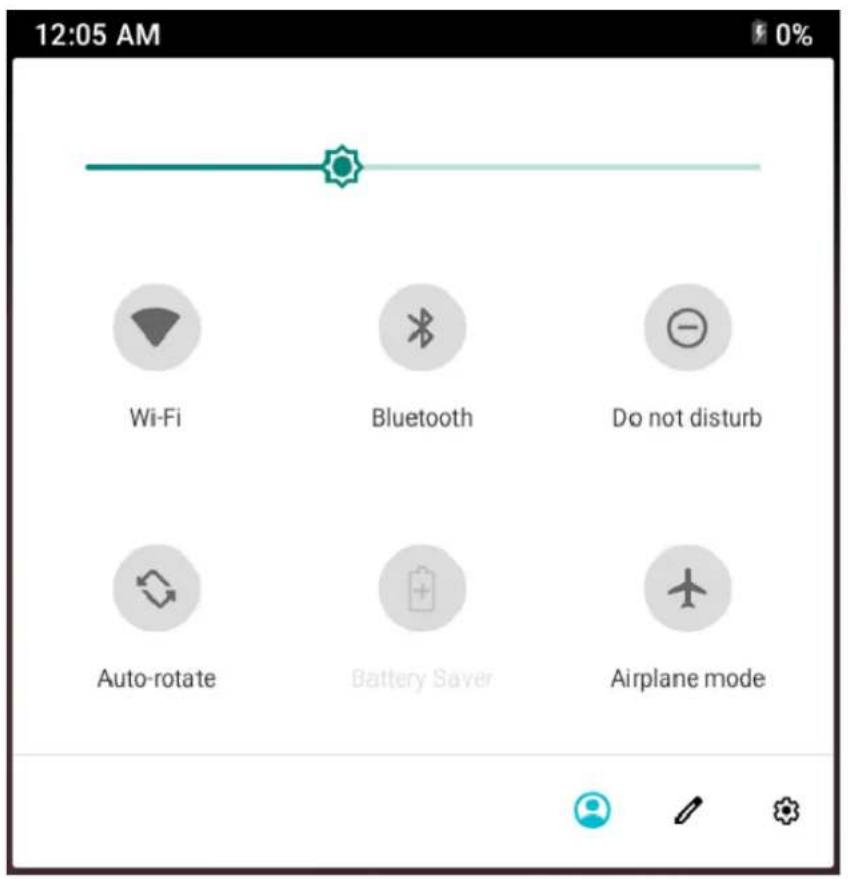
- Tap and drag the status bar downward to open the notification panel.
- On the Quick Settings screen, tap SETTINGS.
text_image
12:05 AM Wi-Fi Bluetooth Do not disturb Auto-rotate Battery Saver Airplane mode- Turn on Wi-Fi. The device searches for available networks within range and displays the searched Access Point (AP) names on the right panel.

text_image
Wi-Fi Use Wi-FiNOTE:
Tap the Wi-Fi switch button to turn Wi-Fi on or off.
• The Wi-Fi icon showing indicates Wi-Fi is turned off.
• The Wi-Fi icon showing indicates Wi-Fi is turned on.
-
Tap an access point name that you want to connect to. If the selected access point is protected by a password, the device will prompt for the password.
-
If prompted, enter the password to connect to the AP.
NOTE:
- The password entry is required only when connecting to the AP for the first time.
- To make the Wi-Fi password visible while typing it, select the "Show password" checkbox.
6. Tap Connect.
NOTE:
- Some public places offer free wireless internet access. This means no password is required to establish the connection.
- For secured networks, you may need to enter several parameters to complete the settings. If you are not sure about the parameters, please contact your local Internet Service Provider (ISP).
- This tablet PC keeps track and recognizes Wi-Fi networks that have been connected before. Once Wi-Fi is turned on and a known connection is detected, the device automatically connects to that network.
2.3 Connecting PC and Data Transmission
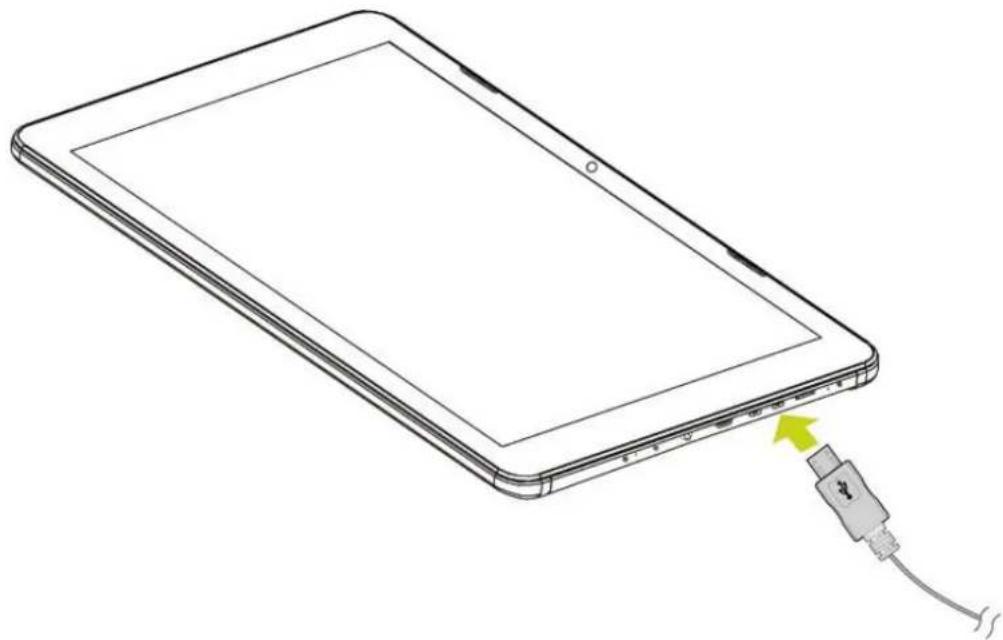
Use the supplied USB cable, connect the device to the PC to transfer data or power up the device.
natural_image
Line drawing of a tablet device with a cable and connector, no text or symbols presentNOTE: USB charging only supports 500mA. If the battery power is lower than 4%, the device cannot be turned on.
2.4 Use Micro SD card
After connecting the device to a PC, you will find two removable disks, the front one is the built-in-memory disk, the other one is the Micro SD card disk. If there is no card plugged in, the second disk cannot be opened. The device supports up to 32GB Micro SD card expansion.
Plug-in: insert the memory card with the side with prints facing to the front of the device. Push the memory card into the card slot until it is firmly seated. Now the device can access the data and play the files stored on the card.
Plug-out: push Micro SD card slightly inward to release it from the slot. Then gently pull it out of the card slot.
3. The Android Interface
3.1 Home Screen
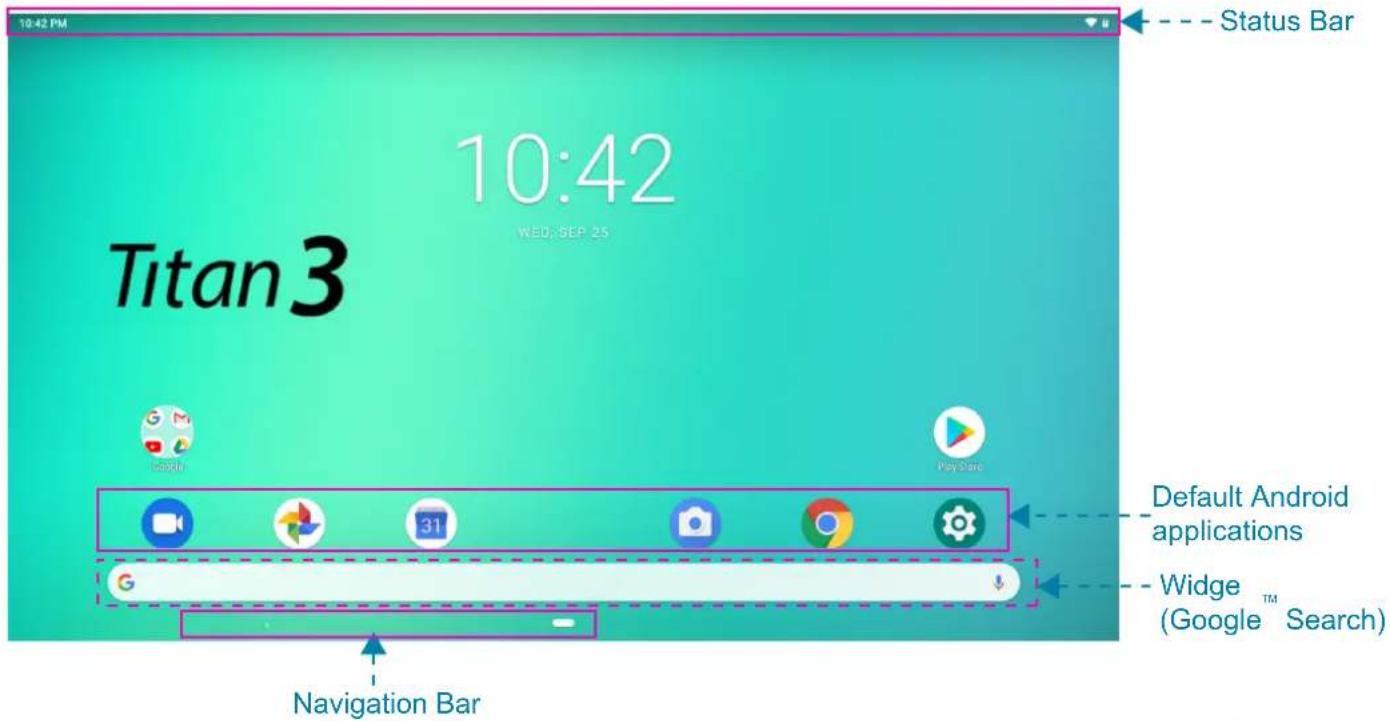
After powering on the device, the locked Home screen is displayed. After you unlock the screen, the main Home screen appears.
The following describes the main touch screen area and some tips on how to use the touch screen.
text_image
10:42 PM Titan 3 10:42 WED, SEP 25 Status Bar Google PlayShare Default Android applications 31 G Navigation Bar Widge™ (Google Search)Item Description
Status Bar Display notifications and system icons such as Wi-Fi connection status, battery power/ battery charging status, current time, and USB connection status.
Widget (Google Search) Enter the text you want to search in the search box.
Default Android applications Tap an icon to open the corresponding application.
| Item Description | ||
| Navigation Bar | Back key( < ) | Tap to return to the previous screen. |
| Home key( □ ) | Tap to return to the Home screen. | |
| Shortcut key( □ ) | Swipe to view the most-recently accessed applications.• To access the specific application, tap directly on the icon. |
3.2 Customizing the Home Screen Panels
You can customize the wallpaper of your Home screen with the default wallpaper or with the photos stored in the device. Long press the touch-screen, the Wallpaper option menu will appear on the screen. Then choose the desired option from the list.
3.3 Managing Applications
- Add application shortcuts: Long press an application icon from the application menu and then drag the icon to the Home screen to add as shortcut.
- Moving application shortcuts: Long press an application icon in the Home screen until the positioning gridlines appear. Then drag the icon to the desired location and release your finger.
- Remove application shortcuts: Long press an application icon in the Home screen, the top of the screen displays ✗. Drag the application icon towards ✗ until it turns red, and then release your finger to remove the application shortcut.
3.4 Creating Application Folders
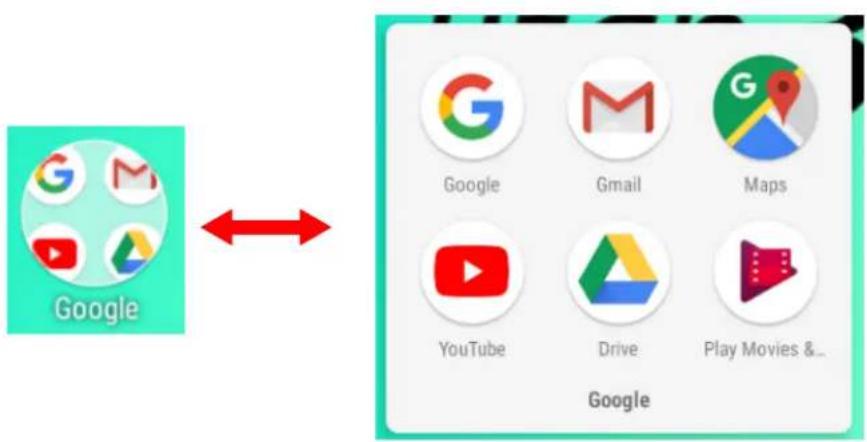
You can combine several similar applications in a folder. Simply, drag one application icon over another application icon and release it. A folder is automatically created.
text_image
Google Google G M Maps YouTube Drive Play Movies & Google4. System Firmware Update
Android devices automatically receive over-the-air (OTA) updates. To manually check for a firmware update, select Settings > About tablet > System updates.
5. Product Specifications
| Platform | Operating System Android | 9.0 |
| Processor RK3368 Cortex | A53 Octa 1.5 GHz | |
| Memory 2 GB | ||
| Storage Storage 16 GB eMMC | ||
| Display | Brightness | LCD Panel with LED backlight, 210 cd/m2 |
| Resolution 13.3 inch, 1920x1080 | ||
| Type Capacitive type | ||
| Sensor (points) | Multi touch | |
| Communications | WLAN WLAN(802.11 b/g/n) | |
| Bluetooth BT4.0 | ||
| Camera | Front camera: 0.2MPRear camera: 5MP (AF) | |
| Sensor | 3 axis Accelerometer | Yes, Supported x/y/z axis and +/- direction |
| G Sensor Yes, resolution: | 10 bits | |
| I/O Port | DC power port DC Jack in x1 | |
| Headphones | 3.5mm x1 | |
| Microphone | Built-in | |
| USB 2.0 | Micro USB 2.0 x1 (OTG), Supported USB K/B, Mouse, USB flash disk,battery charging function | |
| Card reader | Micro SD x1, Max. supported 32GB | |
| Speakers output spec. | 8ohm, 1W x2 | |
| HW button | Power | Yes |
| Volume | Yes | |
| Power | Battery | 3.7V Li-Polymer, 10000mAh |
| Operation Battery Life | >= 5 hours @ 720p Videp playback, WiFi off, WebCam off, brightness 60%, Volume 50% | |
| Battery Operating Temperature | Standard charge: 0~450CDischarge: 0~550C | |
| Adaptor | AC 100V~240V, DC 5V/2.5A | |
| Dimension | Dimension(W*D*H mm) | 383mm x 249mm x 11.5mm |
6. Appendix
Warranty and Service
Warranty and service and related information, please refer to, the warranty card or Hannspree support site below for further help and support with your device including how to install software updates if available and much more:
http://www.hannspree.eu/
FAQ
FAQ (Frequent Asked Questions) please refer to the below link:
http://www.hannspree.eu/
Resetting Your Device to Factory Defaults
If you need to reset your device to the factory default settings for any reason please follow the process below:
WARNING!!!
Please be aware any information currently on the device will be permanently erased by following this procedure.
- From the Home screen, tap Settings.
- Tap System & Reset options.
- Erase all data(factory reset)
- Leave the erase SD card option unchecked and tap Reset tablet.
- Tap erase everything.
The unit will now reset itself back to factory reset and any previous information/data will have been permanently erased.
NOTE: Some of the applications downloaded from Play Store or produced by other third party are not fully supported on this device.