RM406 - Receiver Adastra - Free user manual and instructions
Find the device manual for free RM406 Adastra in PDF.


User questions about RM406 Adastra
0 question about this device. Answer the ones you know or ask your own.
Ask a new question about this device
Download the instructions for your Receiver in PDF format for free! Find your manual RM406 - Adastra and take your electronic device back in hand. On this page are published all the documents necessary for the use of your device. RM406 by Adastra.
USER MANUAL RM406 Adastra
Caution: Please read this manual carefully before operating Damage caused by misuse is not covered by the warranty
Introduction
Thank you for choosing the Adastra RM406 rackmount 6-zone mixer-amplifier as part of your public address system. This unit is designed to offer high quality, dependable service for mobile and installed systems. Please read this manual to gain the best results from your product and avoid damage through misuse.
SAFETY SYMBOL AND MESSAGE CONVENTIONS

CAUTION RISK OF ELECTRIC SHOCK DO NOT OPEN
AVIS RISQUE DE CHOC ELECTRIQUE NE PAS OUVRIR


This symbol indicates that dangerous voltage constituting a risk of electric shock is present within this unit

This symbol indicates that there are important operating and maintenance instructions in the literature accompanying this unit.

SAFETY NOTICE
- Prior to use, read through this manual
- Keep the manual in good condition
- Pay attention to safety warnings
- Observe all operating requirements
- Do not use the device near water or wet areas
- For cleaning, only use a lint-free, dry cloth
- Install according to the specifications
- Place away from heat sources or heating appliances
- Use mains lead provided and avoid damage to cable or connectors
- Unplug power from mains during stormy weather or if unused for long periods
- In case of malfunction, water ingress or other damage, consult qualified service personnel
- Do not place in damp areas or near liquids or moisture. Do not spill liquids on the housing
- Please pay attention to warning symbols during transit and placement
- Terminals marked with the 12 symbol are HAZARDOUS LIVE and should only be connected by qualified personnel
- Ensure that the apparatus is connected to a mains socket with a protective EARTH connection
- Ensure correct operation of the mains switch
Warning
To prevent the risk of fire or electric shock, do not expose any components to rain or moisture.
If liquids are spilled on the casing, stop using immediately, allow unit to dry out and have checked by qualified personnel before further use. Avoid impact, extreme pressure or heavy vibration to the case
No user serviceable parts inside – Do not open the case – refer all servicing to qualified service personnel.
Safety
- Check for correct mains voltage and condition of IEC lead before connecting to power outlet
• Use double insulated speaker wire with adequate current rating for 100V speaker connections
• Only use 1 type of output per zone – i.e. 4Ω, 8Ω or 100V – do not mix or combine these outputs on a single zone
• Do not connect 4Ω or 8Ω speakers to the 100V terminal or 100V speakers to the 4Ω or 8Ω terminals - Do not allow any foreign objects to enter the case or through the ventilation grilles
Placement
• For rack-mounting, ensure adequate support for the weight of the amplifier
- Ensure adequate air-flow and do not cover cooling vents at the sides of the amplifier
- Ensure adequate access to controls and connections
Cleaning
• Use a soft cloth with a neutral detergent to clean the casing as required
• Use a vacuum cleaner to clear ventilation grilles of any dust or debris build-ups
- Do not use strong solvents for cleaning the unit
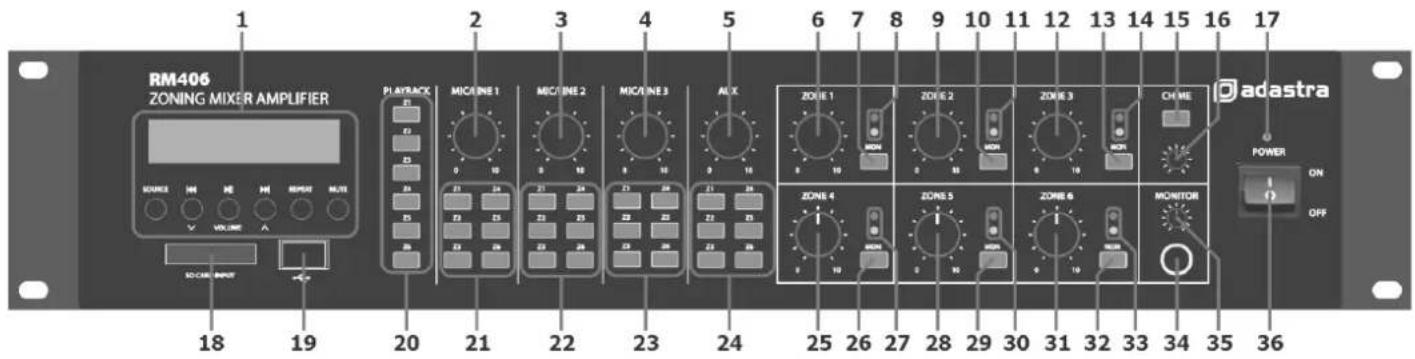
Front panel
text_image
RM406 ZONING MIXER AMPLIFIER 1 2 3 4 5 6 7 8 9 10 11 12 13 14 15 16 17 SOURCE M4 HE HI RESET MULTI VOLUME A SO-CARE INPUT 18 19 20 21 22 23 24 25 26 27 28 29 30 31 32 33 34 35 36 PLAYER MICINE 1 MICINE 2 MICINE 3 AUX ZONE 1 ZONE 2 ZONE 3 CHIME POWER ON OFF ZONE 4 ZONE 5 ZONE 6 MONITOR- Media player
- Mic/Line 1 level control
- Mic/Line 2 level control
- Mic/Line 3 level control
- Auxiliary line input level control
- Zone 1 output level control
- Zone 1 monitor send button
- Zone 1 output LED indicators
- Zone 2 output level control
- Zone 2 monitor send button
- Zone 2 output LED indicators
- Zone 3 output level control
- Zone 3 monitor send button
- Zone 3 output LED indicators
- Chime button
- Chime output level control
- Power indicator
-
SD card slot
-
USB port
- Media playback zone assign buttons
- Mic/Line 1 zone assign buttons
- Mic/Line 2 zone assign buttons
- Mic/Line 3 zone assign buttons
- Auxiliary line input zone assign buttons
- Zone 4 output level control
- Zone 4 monitor send button
- Zone 4 output LED indicators
- Zone 5 output level control
- Zone 5 monitor send button
- Zone 5 output LED indicators
- Zone 6 output level control
- Zone 6 monitor send button
- Zone 6 output LED indicators
- Monitor headphones output
- Monitor output level control
- Power on/off switch
Rear panel

text_image
37 170-264 Vdc 50Hz Fuse T3. 5A, 250V 38 39 40 41 42 43 44 45 46 47 48 49 50 51 52 53 54 55 56 adastra RM-406 ZONING MIXER AMPLIFIER CAUTIONS BUTTER, 10V/10W, 10V/10W, 10V/10W, 10V/10W, 10V/10W, 10V/10W, 10V/10W, 10V/10W, 10V/10W, 10V/10W, 10V/10W, 10V/10W Items ref: 953.160UK adastra.avsi.com Zone 6 ZONE 8 ZONE 1 OUT Zone 6 ZONE 4 ZONE 2 MOTION AUX MICLINE 3 MICLINE 2 MICLINE 1 PRONETT Antenna- Voltage selector
- Zone 1 speaker output terminals
- Zone 3 speaker output terminals
- Zone 5 speaker output terminals
- Zones 1-6 line level outputs (RCA)
- Channel 4 Auxiliary input (2 x RCA)
- Channel 3 Mic/Line input (XLR/jack)
- Channel 2 Mic/Line input (XLR/jack)
45 Channel 1 Mic/Line input (XLR/jack) -
Antenna connection
-
Mains power inlet (IEC) and fuse holder
- Zone 2 speaker output terminals
- Zone 4 speaker output terminals
- Zone 6 speaker output terminals
- Monitor line level output (2 x RCA)
- Channel 3 DIP switches (mic/line + phantom)
- Channel 2 DIP switches (mic/line + phantom)
- Channel 1 DIP switches (mic/line + phantom)
- Channel 1 priority switch
- 24V emergency mute contacts
Introduction
The RM406 is a versatile and powerful mixer amplifier with 4 input channels which can be assigned in a matrix to any of 6 zone outputs. In addition to external signal sources, the RM406 has and integrated Bluetooth® receiver, FM tuner and USB/SD audio player for comprehensive audio playback options. Please read the following instructions to get the best results from the equipment and avoid damage through misuse.
Connection and setup
With the RM406 power switched off (36), connect the rear IEC inlet (47) to the mains using the supplied mains lead (or an equivalent approved type). Ensure that the voltage is correct as indicated on the voltage selector (37) and that the mains outlet is switched on.
The RM406 has 4 input channels and an integral multi-source audio player.
Channels 1, 2 and 3 are designed for either microphones or line level sources (such as a CD/mp3 player or output from a mixer) via combo connectors on the rear panel.
These can accept either XLR or 6.3mm plugs for balanced or unbalanced signals.
DIP switches

Mic/Line inputs 1, 2 and 3 each have 2 DIP switches on the rear panel (52, 53, 54) to set the input level and/or activate +20V phantom power for use with condenser microphones.
Set the level correctly for the type of input source connected (Mic or Line)
If the source connected is a condenser microphone which requires phantom power, make sure that the phantom is switched on for that channel.
Be sure to make these DIP switch settings when the amplifier is switched off. Making any changes when the amplifier is powered up may cause loud bangs through the system which can damage the speakers.
Priority and Emergency Activation
The Mic/Line 1 input also has a Priority switch (55), which attenuates all other channels when Mic/Line 1 signal is detected and returns them to normal when Mic/Line 1 signal is silent.
For buildings with a main emergency alarm panel (for fire alerts etc.), the RM406 has Mute contacts on the rear panel (46), which will mute all audio except for channel 1 when activated by a 24V trigger voltage.
This leaves channel 1 active for evacuation announcements in the case of an emergency.
(The 24V contacts can be connected with either polarity +/- or -/+ to operate)
The screw terminal plug can be pulled out to make connection easier. 2-core bell wire is appropriate for this.
Connect a 24Vdc output from the alarm control panel observing the correct polarity shown on the contacts.
Signal Inputs and Outputs
Connect microphones or line signals to Mic/Line 1, 2 and 3 inputs (43, 44, 45) using good quality signal leads. A stereo or mono line level source can be connected to the Auxiliary channel 4 input on 2 RCA connectors (42)
For checking the output of any zone, an assignable Monitor output can be connected to headphones from the front panel 6.3mm jack (34) or as a line output (e.g. to active speakers) from RCA connectors at the rear (51)
Each zone output has a dedicated RCA signal output on the rear panel (41), which can be connected to the line inputs of active speakers or amplifiers. These are in addition to the speaker outputs detailed below.
An antenna input (46) is provided on the rear panel for connection to an external aerial for FM tuning.
Speaker outputs
The RM406 has a separate speaker output for each zone, connected via 3 large modular terminal plugs. Each plug can be removed from the rear panel for convenient connection of speaker outputs to 2 zones.
Each zone output can be used to power either 100V line speakers or standard low impedance speakers. These 2 configurations cannot be used together, so it is important to decide which will be used at the start.
100V line systems
For 100V speakers, connect the selected zone output to the first speaker in the zone using double-insulated speaker wire which has adequate current rating to handle the total output of the amplifier.
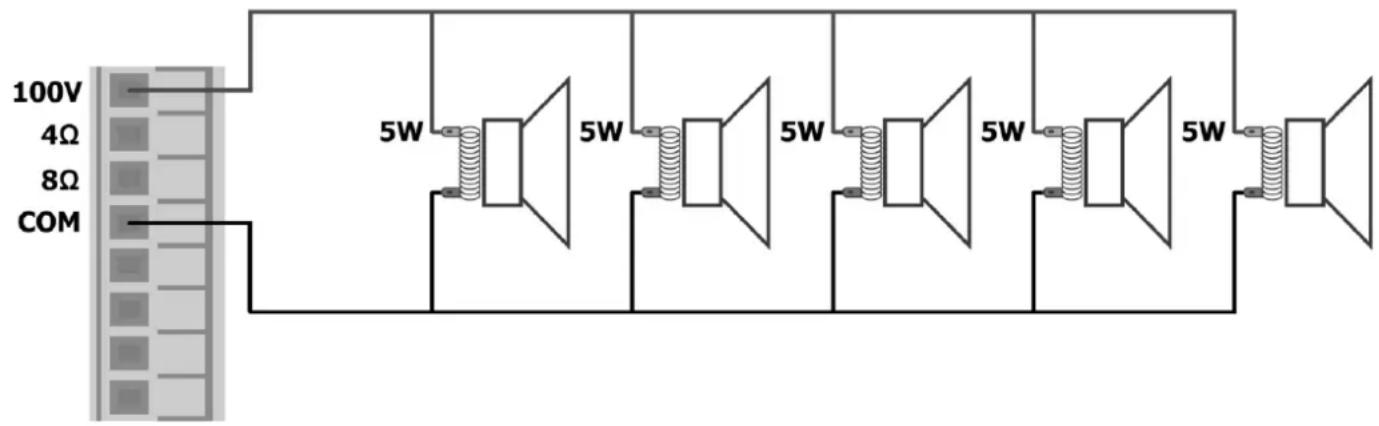
Connect the "100V" output terminal for the selected zone to the positive (+) connection of the speaker and "COM" output to the negative (-) connection of the speaker. Connect further speakers in parallel to the first speaker with all positive terminals and connected together and all negative terminals connected together as shown below.
text_image
100V 4Ω 8Ω COM 5W 5W 5W 5W 5W 5WA 100V line speaker system can comprise of many speakers connected together. The determining factor for how many speakers can be used on a single amplifier is the power rating. For most purposes, it is advised to connect as many speakers as needed with a combined wattage of no more than 90% of the amplifier's output power rating (in the case of the RM406, this is 40W per zone output)
The terminals of a 100V speaker are connected via a transformer and if necessary, this transformer may be "tapped" for different power ratings. These tappings can be used to adjust the wattage (and output volume) of each speaker in a zone to help achieve the ideal total power of the system for the relevant zone output.
Low impedance systems
Alternatively, each zone output of the RM406 is capable of powering one or more low impedance speakers. There is an option on each zone for either a 4Ω or 8Ω speaker output to determine the minimum impedance. It is essential to select the correct output terminal when opting for low impedance speakers.
For a single 8Ω speaker, connect the positive (+) wire to the "8Ω" terminal and the negative (-) wire to "COM" For a single 4Ω speaker or for 2 x 8Ω speakers connected in parallel, connect the positive (+) wire to the "4Ω" terminal and the negative (-) wire to "COM"
In either case, the connected load should have a combined impedance no lower than stated on the terminal. Lower impedance may cause irreparable damage to the amplifier.
The connected speaker(s) must also have a power handling to accept up to 40Wrms from the zone output. Lower power handling may risk damage to the speakers.
Operation
When all connections to the amplifier are made, turn all rotary controls down and switch on the power (36) and the power LED (17) will illuminate.
To check for correct operation of the system, select an input source and output zone for testing. In the following example, Mic/Line 1 input and Zone 1 output have been selected.
- Turn up Zone 1 level control (6) part way for testing
• Make sure that the "Z1" assign button for Mic/Line channel 1 (21) is pressed in - If a line input is connected to channel 1, make sure that the signal is playing from the audio source
- If a microphone is connected to channel 1, speak into the microphone
• Gradually turn up the Mic/Line 1 level control (2) whilst checking for output to Zone 1 - Increase the Zone 1 output level to the maximum required volume for that zone
- Reduce the Mic/Line level to compensate
If Zone 1 cannot be heard from the location of the RM406, use the monitoring feature as follows
• Turn down the Monitor level control (35) and connect headphones to the Monitor output (34)
• Make sure that the Monitor button for Mic/Line 1 is pressed in and listen through the headphones
• Gradually turn up the Monitor level control and check for the output to Zone 1
Each zone output has 2 LED indicators to show the signal status (8, 11, 14, 27, 30, 33) The green LED follows the audio to show that the signal is present.
If the red LED lights for more than very short flashes, this indicates overload to that zone.
In this instance, the zone level control should be reduced until the red LED does not light.
The above process can be extended to check all zones and other input channels can be checked in the same way as for Mic/Line 1 (note: in the case of Aux channel 4, this can only accept line level input)
If preferred, the system can be checked using the onboard multi-source audio player. Full information on the operation of this feature is detailed below.
Onboard Multi-Source Audio Player
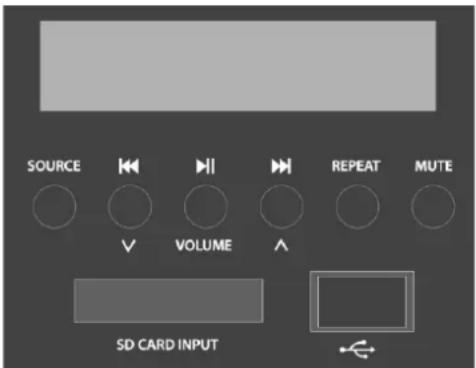
The RM406 is fitted with a built-in audio player, operated via a backlit LCD display and transport buttons. This section provides access to a Bluetooth receiver, FM radio tuner and USB/SD audio player In order to play audio to one of the zones, it is necessary to press in one of the "Playback" buttons (20).
text_image
SOURCE V VOLUME REPEAT MUTE SD CARD INPUTSOURCE Select between Bluetooth, FM tuning, USB or SD playback
Previous track or FM channel select
Play/Pause track or FM auto tuning
Next track or FM channel select
REPEAT Select RT1 repeat single, RTA repeat all or RND random
MUTE Mute playback (press and hold to switch the player on/off)
When the RM406 is powered up, the media player display will illuminate with an initial greeting "Welcome". This message will then change to show the mode, output volume and media status.
If no USB or SD media are connected, the initial mode of the audio player will be Bluetooth.
Bluetooth
The Bluetooth function allows connection of a smart phone or tablet to the media player section for playback of stored files or streamed digital audio. It will be necessary to pair the device to the receiver as follows.
- Open the Bluetooth settings menu on the smart phone or tablet (or other sending device)
- Scan for Bluetooth devices and look for "adastra 0000" in the list of available devices (ensure that the RM amp is powered on and within reception range)
- Select "adastra 0000" and the sending device should confirm that it is connected as an audio device. (note that "0000" may be a different number if it has been edited – see below)
- Play audio from the sending device, ensuring that volume controls are not turned down/muted
- Turn up the LN5/USB volume control on the amplifier to the required level.
The Previous, Next and Play/pause buttons will operate in Bluetooth as remote playback controls. Holding the Previous track or Next track buttons (29, 31) will adjust the output volume of the player.
The Bluetooth name can be customized to enable identification of individual nearby amplifiers.
To customize the Bluetooth number press and hold the Play/Pause button until adastra 0000 is displayed with one of the characters flashing. Press Previous or Next buttons to edit the number and Play/Pause to select another character. Hold Play/Pause to store the ID and exit.
Note: Android devices have the facility to re-name devices within the Bluetooth settings menu.
If the Bluetooth ID has been re-named on the Android device, editing the Bluetooth ID on the media player will not affect the name displayed on that Android device.
FM Tuner
Press the Source button to switch to the FM tuner function. For good FM reception, it will be necessary to connect an external aerial to the Antenna connector on the rear panel using good quality coaxial RF cable terminated with an F-type connector.
To auto-tune available stations, press and hold the Play/Pause button to begin auto tuning, which scans available stations and automatically stores them as channels within the FM tuner.
Alternatively, to tune the station presets manually, press the Play/Pause button briefly to enter manual tuning mode (MANU). Use Previous/Next track buttons to select the desired frequency and press REPEAT, then use Previous/Next track buttons to select the preset and press REPEAT again to store the frequency in that preset (display will show "OK"). Repeat for all ten presets P01 to P10. Press MUTE to exit the manual tuning mode.
To step through pre-set stations, press the Previous or Next buttons.
Hold down the REPEAT button to delete a stored station.
Holding the Previous track or Next track buttons will adjust the output volume of the player.
USB/SD Player
The RM406 audio player has inputs for a USB pen drive or SD card with standard compressed digital audio files on them. Inserting either or both of these will switch the player to read from these sources and the display will show "Music Mode".
Whichever device is connected last will take priority and playback will start from that source. The display will show the source selected, track number, repeat mode, volume level and track name (scrolling for longer text). Pressing the Source button will now step through Bluetooth, FM and either or both USB and SD media.
If the selected media had been playing previously, selecting it again will return to the last point played.
Pressing play/pause will play or pause the selected track. The Mute button will mute or un-mute the output.
Pressing Previous or Next buttons will select through audio files on the selected media.
Pressing the Repeat button will select through 3 modes. Repeat All tracks, repeat single track or random play.
Specifications
| Power supply | 1710-2664Vac, 50Hz (IEC) |
| Output power | 6 x 40Wrms |
| Audio source | USB/SD/FM/BT audio player |
| Inputs | 3 x mic/line (XLR/jack), auxiliary 2 x RCA |
| Zone outputs: line | 6 x RCA (mono) |
| Zone outputs: speaker | 6 x terminal outputs 100V / 8 Ohms / 4 Ohms / Com |
| Phantom power | +20V switchable to each XLR |
| Monitor outputs | 6.3mm stereo phones, 2 x RCA line |
| Mute | +24V relay contacts |
| THD | <0.76% @ 1kHz |
| Input impedance | 1k Ohms (mic/line) |
| Input sensitivity | -11dB (line), -46dB (mic) |
| SNR | 84dB (line), 82dB (mic) |
| Bluetooth version | 2.0 |
| Frequency response | 100Hz - 24kHz |
| Dimensions | 433 x 89 x 302mm |
| Weight | 8.5kg |
Troubleshooting
| No power LED on control panel | Ensure IEC lead is in good condition and connected properly |
| Ensure that the voltage selector is switched to the correct value for the supply | |
| Ensure POWER switch is on and check mains inlet fuse | |
| Power LED is on but no other LEDs and no output | Check input signals and condition of input connection leads |
| Check that the selected zone output is assigned on the active input channel | |
| Check Zone, Mic/Line, Aux or BT/FM/USB/SD volume controls are turned up | |
| Power light and zone output LEDs lighting but no output | Use monitor function to check zone signal using headphones |
| Check speaker output terminals are connected correctly | |
| Check speakers are working (test on another amp if available) | |
| LCD display on audio player is not lit | If main power is on, press and hold the Mute button until the display is lit |
| No output from audio player | Ensure that Mute function is off and volume is not set too low |
| Check that Mic/Line 1 priority or 24V mutes are not overriding playback | |
| No playback via Bluetooth | Ensure that the sending device is paired and connected as audio to “BT001” |
| Check playback status and volume setting of sending device | |
| USB/SD player will not play audio from media | Press Play/Pause button to check if track is paused |
| Press the Source button to ensure that the required device is selected | |
| Check memory device is connected properly (remove and re-insert) | |
| Check file types - standard compressed digital audio files are required | |
| Check memory device works on a PC or Mac for standard playback | |
| Output is very loud or distorted | Check level of input signal is not too high |
| Reduce relevant Mic/Line, Aux, USB/SD and/or Zone level controls | |
| Output is working but at very low level | Check input audio source level is not too low |
| Increase relevant Mic/Line, Aux, USB/SD and/or Zone level controls | |
| Check for quiet recording of media files on USB/SD/BT devices | |
| Check Mic/Line 1 priority is not unintentionally suppressing other channels | |
| No microphone output | Check phantom power is enabled if using condenser microphones |
| Amplifier overheating | Ensure cooling vents are clear from debris and dust |
| Check that 4Ω or 8Ω speakers are not connected to 100V terminals | |
| Ensure total 100V speaker wattage is lower than the max rating for any zone | |
| Ensure that 100V and 8Ω speakers are not connected simultaneously | |
| Ensure that total load connected to 4Ω or 8Ω output is not less than stated |



Disposal: The "Crossed Wheelie Bin" symbol on the product means that the product is classed as Electrical or Electronic equipment and should not be disposed with other household or commercial waste at the end of its useful life. The goods must be disposed of according to your local council guidelines.
Hereby, AVSL Group Ltd. declares that the radio equipment type 953.160UK is in compliance with Directive 2014/53/EU
The full text of the EU declaration of conformity is available at the following internet address: http://www.avsl.com/assets/exportdoc/9/5/953160UK%20CE.pdf