
C9 Max - Smartphone NEFFOS - Free user manual and instructions
Find the device manual for free C9 Max NEFFOS in PDF.


User questions about C9 Max NEFFOS
0 question about this device. Answer the ones you know or ask your own.
Ask a new question about this device
Download the instructions for your Smartphone in PDF format for free! Find your manual C9 Max - NEFFOS and take your electronic device back in hand. On this page are published all the documents necessary for the use of your device. C9 Max by NEFFOS.
USER MANUAL C9 Max NEFFOS
Chapter 1. Get started ....1
1.1 Overview....1
1.2 Buttons .... 1
1.3 Put in the cards....3
1.4 Initial setup....4
1.5 Charge your phone....4
Chapter 2. Basics ....5
2.1 Touchscreen gestures....5
2.2 Home screen....7
2.3 Status bar....11
2.4 Notification Panel 12
2.5 Quick Settings Panel 13
2.6 Type text....14
2.7 Take a screenshot....14
Chapter 3. Network and Share ...... 15
3.1 Connect to a WLAN network .....15
3.2 Enable mobile data....15
3.3 Transfer data between your phone and computer .....15
3.4 Bluetooth 16
3.5 Share your mobile data with other devices....17
Chapter 4. Calls and Contacts.... 18
4.1 Make a call ....18
4.2 Answer or reject a call....19
4.3 Contacts....19
Chapter 5. Messages.... 21
5.1 Send and reply to a message....21
5.2 Manage messages....22
Chapter 6. Camera and Photos ...... 23
6.1 Camera at a glance....23
6.2 Take a photo 24
6.3 Record a video 24
6.4 Shooting modes 24
6.5 Photos....24
Chapter 7. Clock....26
7.1 Alarm 26
7.2 Worldclock....26
7.3 Timer 26
7.4 Stopwatch 27
Chapter 8. Browser.... 28
8.1 Go to a webpage .....28
8.2 Browser tabs....29
Chapter 9. Themes.... 30
9.1 Change the theme....30
9.2 Change the wallpaper 30
9.3 Change the icon style .... 31
Chapter 10.Weather 32
10.1 Add a city 32
10.2 Check the weather 32
10.3 Remove a city 32
Chapter 11. Tools.... 33
11.1 Files....33
11.2 Downloads....34
11.3 Calculator....34
11.4 Sound Recorder....35
11.5 FM Radio....36
11.6 Migration assistant....36
Chapter 12.Settings ...... 37
12.1 Dual SIM settings....37
12.2 Enable data saver ....38
12.3 Airplane mode....38
12.4 Apps and notifications....38
12.5 Battery....39
12.6 Display....39
12.7 Sound....40
12.8 Storage 41
12.9 Security....41
-
10 Location ....42
-
11 Accounts....42
-
12 Accessibility ....42
-
13 Change system language....43
-
14 Gestures .... 43
-
15 Date and time ....43
-
16 Backup and reset ....43
-
17 System update....44
-
18 About phone ....44
Appendix A: Specifications.... 45
Appendix B: Technical Support 48
Appendix C: Explanation of the symbols on the product label..... 54
Appendix D: Authentication 55
About this guide
This guide is a complement to Quick Start Guide. The Quick Start Guide provides instructions for quick setup, while this guide provides details of each function and shows how to configure the smart phone appropriate to your needs.
When using this guide, please notice that features of the device may vary slightly depending on the model and software version you have, and on your location, language, and internet service provider. All screenshots, images, parameters and descriptions documented in this guide are used for demonstration only.
Conventions
In this guide, the following conventions are used:
| ConventionDescription | |
| Smart phone/phone Stands for Neffos C9s and C9 Max without any explanation. | |
| Parameters | Parameters provided in the screenshots are just references for configuring the smart phone, which may be different from the actual situation. You can set the parameters according to your demand. |
| Underlined | Underlined words or phrases are hyperlinks. You can click to redirect to a specific section for more details. |
| Screenshots | The demonstrated screenshots may look a little different from the actual UI of your smart phone due to the various firmware versions. Please just configure your phone based on the actual UI. |
| > | The menu structure which shows the path to enter the corresponding page. For example, Settings > WLAN means the WLAN function page is under the Settings menu. |
| Note: | Highlights important information and tips, and provides additional information. |
| Caution: | Indicates potential problems that may arise if proper care or attention is not given. |
1 Get started
This chapter introduces the smart phone's hardware information and guides you how to assemble your phone when you get started on using your new phone.
- Overview
- Buttons
- Put in the cards
- Initial setup
- Charge your phone
1.1 Overview
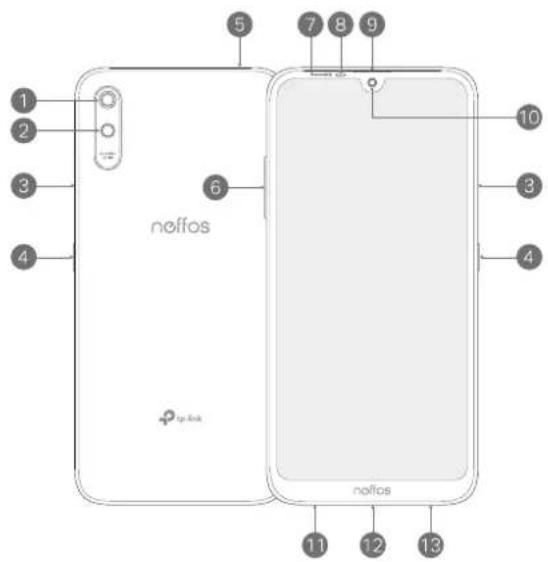
text_image
neffos ip lock 1 2 3 4 5 6 7 8 9 10 3 4 11 12 13 neffos1 Rear camera
2 Flash
3 SIM/SD card tray
4 Power button
5 Headphone jack
6 Volume buttons
7 LED indicator
8 Ambient light & proximity sensor
9 Earpiece
10 Front camera
11 Speaker
12 Charging/data port
13 Microphone
1.2 Buttons
The buttons you use with Neffos include virtual ones and physical ones.
Power button
- Lock Neffos: Locking your phone makes the phone sleep, saves the battery and prevents unmeant operations on the screen. You can still receive phone calls, text messages, alarms
and notifications as well as listen to music and adjust the volume. Press the Power button to manually lock the screen. Neffos locks the screen automatically in a given period of inactivity.
- Unlock Neffos: Press the Power button to wake the screen.
- Turn Neffos on: Press and hold the Power button until your phone vibrates and the screen turns on.
Note: If your phone does not respond after holding down the Power button for 10 seconds, the battery may be empty. Connect your phone to a charger to charge the battery.
- Turn Neffos off: Press and hold the Power button, and then tap ⏻ Power off.
- Reboot Neffos: Press and hold the Power button, and then tap ⏻ Restart.
• Take a screenshot: Press and hold the Power button, and then tap 📋 Screenshot.
Volume button
- Adjust volume
Press the Volume-up or Volume-down button to adjust the audio volume when you're on the phone, listening to songs, watching movies or using other media. You can adjust volume in following two ways:
- Press and hold the Volume-up or Volume-down button until the ring volume meets your needs.
- Press the Volume-up or Volume-down button, and drag the slider for ring volume. Tap 🔗 to expand the panel to adjust media and alarm volume.
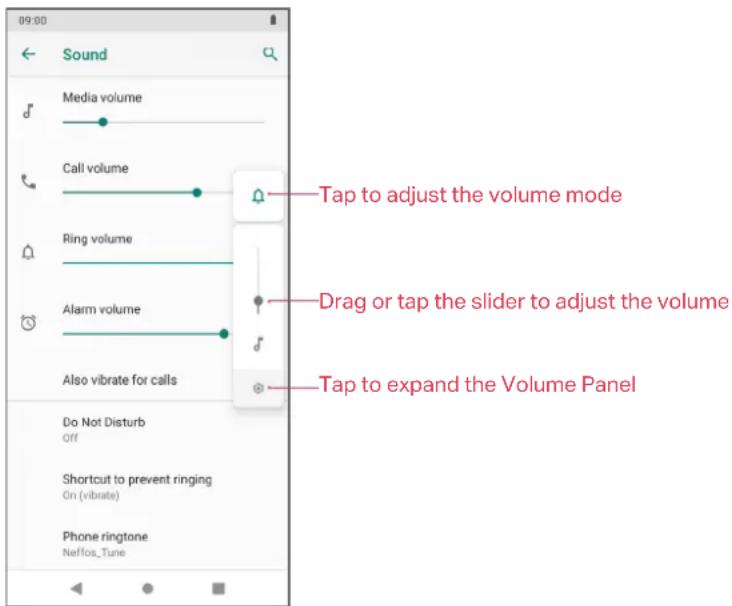
text_image
09:00 Sound Media volume Call volume Ring volume Alarm volume Also vibrate for calls Do Not Disturb Off Shortcut to prevent ringing On (vibrate) Phone ringtone Neffos_Tune Tap to adjust the volume mode Drag or tap the slider to adjust the volume Tap to expand the Volume Panel• Take a picture
Press the Volume button to take a picture. Refer to Take a photo to learn more.
• Take a screenshot
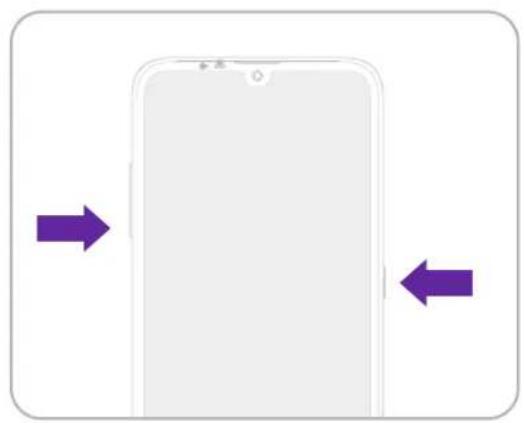
Press the Power button and Volume-down button at the same time to take a screenshot.
Navigation buttons
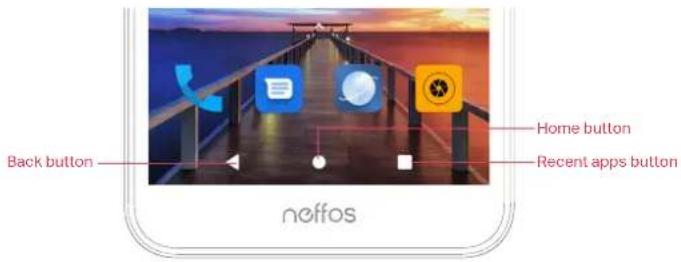
text_image
Back button Home button Recent apps button neffos- Home button
Tap Home button to return to the default Home screen.
Tap and hold Home button to open GoogleAssistant.
- Back button
Tap Back button to return to the previous screen or close an app. When entering text, tap Back button to close the onscreen keyboard.
- Recent apps button
Tap Recent apps button to display recently used apps.
Double-tap Recent apps button to switch to the previous app.
1.3 Put in the cards
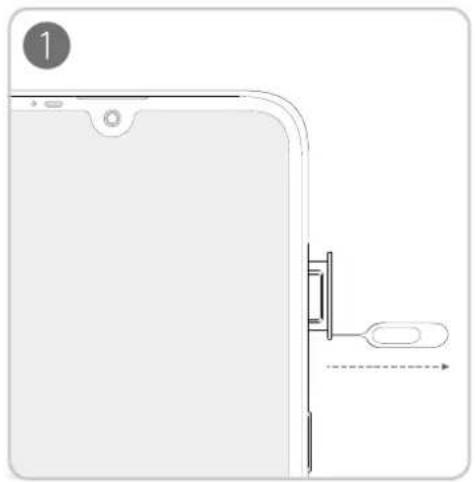
Insert Nano SIM cards and microSD card (optional)
-
Eject the SIM card tray by inserting the SIM ejector pin provided into the hole on the tray.
-
Place the card(s) into the tray with the gold contacts face down. The card tray can support two Nano-SIM cards and a mircoSD card.
-
Insert the card tray back into your phone in the correct orientation.
Caution: Take care not to scratch your device or harm yourself when using the SIM ejector pin. Store the SIM ejector pin out of the reach of children to prevent accidental swallowing or injury.
natural_image
Diagram of a device with a vertical lock and connector, showing a dashed arrow indicating direction (no text or symbols)
text_image
2 nano-SIM nano-SIM or nano-SIM micro SD1.4 Initial setup
It is recommended to insert your SIM cards before you start the initial setup.
Press and hold the Power button to turn on your phone, and then follow the onscreen step-by-step instructions to complete the initial setup.
Note: To avoid low battery power, your phone will shut down automatically if not operated on initial setup screen in 30 minutes.
1.5 Charge your phone
Your device displays a low battery warning when the battery is nearly empty, and your phone will turn off automatically. Charge your device immediately to prevent it from switching off automatically.
Caution:
- When charging your phone, only use genuine Neffos batteries, chargers, and USB cables. Third-party accessories are a potential safety hazard and may impair your phone's performance.
- Avoid using your phone when it is charging. Do not cover your phone or the power adapter.
- It is entirely normal that your phone may become warm after prolonged use or when exposed to high ambient temperatures. If your phone becomes hot to the touch, stop charging it and disable unnecessary features. Place your phone in a cool location and allow it to cool down to room temperature. Avoid prolonged contact with the surface of your phone if it becomes hot.
Use the charger to charge your device
Connect your phone to a mains socket using the charger and USB cable that came with your phone.
Use a USB port to charge your device
Charge your device by connecting it to a computer with a USB cable.
If another USB connection mode has been selected, swipe down from the status bar to open the Notification Panel. Tap the notification of USB connection mode, and then select Charge this device.
2
Basics
Learn about your smart phone's basic features.
- Touchscreen gestures
- Home screen
- Status bar
- Notification Panel
- Quick Settings Panel
- Type text
• Take a screenshot
2.1 Touchscreen gestures
Use simple touchscreen gestures to perform a variety of tasks, such as launching apps, scrolling through lists, and zooming images.
Tap: Simply tap an item once. For example, tap to select an option or open an app.
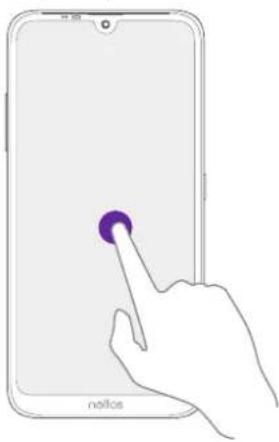
natural_image
Hand pressing a purple button on a smartphone screen labeled 'nellos' (no other text or symbols visible)Double-tap: Tap the target area of the screen twice in quick succession. For example, double-tap an image in full screen mode to zoom in or out.
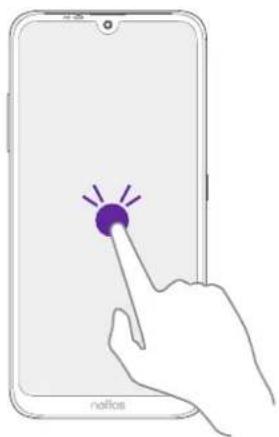
natural_image
Illustration of a hand pointing at a smartphone screen with a purple button and 'neftos' watermark (no text or symbols on the device itself)Tap and hold: Tap and leave your finger on the screen for 2 seconds or more to activate onscreen items. For example, tap and hold a widget on the Home screen to move it.
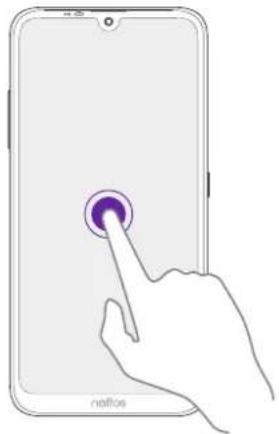
natural_image
Hand pressing a button on a smartphone screen (no text or symbols visible)Swipe: Place your finger on the screen, and drag your finger to the direction you want. For example, you can swipe to scroll through the Home screen or a list.
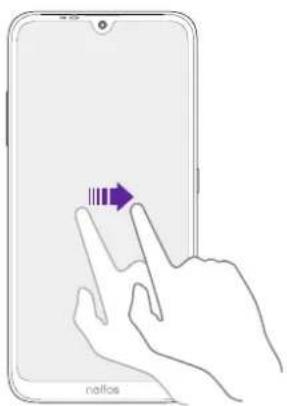
natural_image
Illustration of a hand interacting with a smartphone screen, showing finger movement and a purple arrow (no text or symbols)Drag: Tap and hold an item and then move it to another position. For example, you can rearrange apps and widgets on the Home screen.
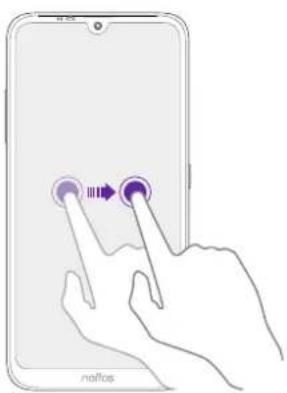
text_image
neftosPinch fingers together: Pinch two fingers together on the screen. For example, pinch two fingers together to zoom out on a picture.
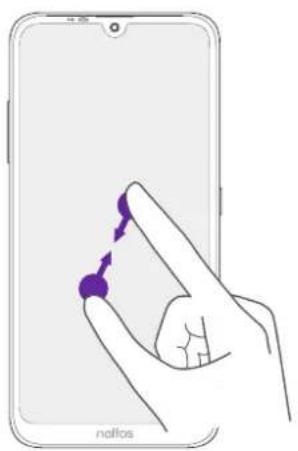
natural_image
Illustration of a hand holding a smartphone with purple arrows pointing to a small object (no text or symbols)Spread fingers apart: Spread two fingers apart on the screen. For example, pinch two fingers out to zoom in on a picture.
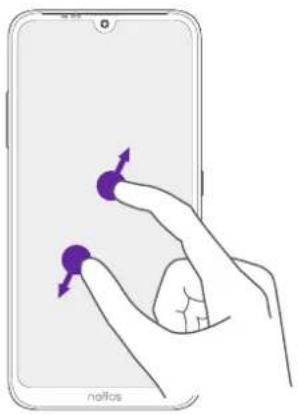
text_image
Diagram showing hand gesture application on smartphone with purple directional arrows indicating movement or action2.2 Home screen
Use the Home screen to access your apps and widgets.
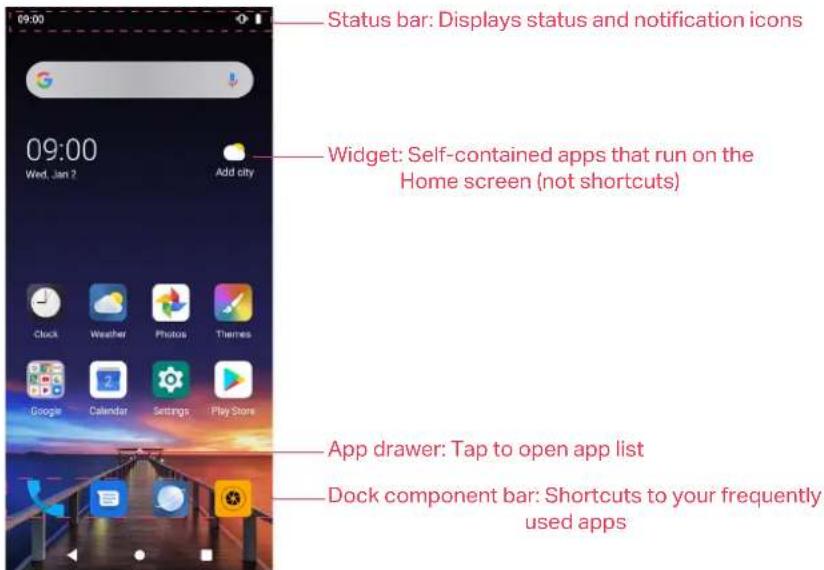
text_image
09:00 Status bar: Displays status and notification icons 09:00 Wed, Jan 2 Add city Widget: Self-contained apps that run on the Home screen (not shortcuts) Clock Weather Photos Themes Google Calendar Settings Play Store App drawer: Tap to open app list Dock component bar: Shortcuts to your frequently used appsOrganize widgets on the Home screen
- Add a widget to the Home screen
Add frequently used widgets to the Home screen for quick access.
- On the Home screen, tap and hold a blank area (or pinch two fingers together) to access the Home screen editor.
- Tap + Widgets. Swipe right or left to view and select a widget. Drag the widget to the target area.
- Tap a blank area on the Home screen (or tap Home button or Back button) to quit the Home screen editor.
Note: You must have enough space on the Home screen to add widgets. If there is not enough space, add another Home screen (see Add a Home screen) or free up some space.
- Move a widget
On the Home screen, tap and hold a widget and then drag it to the desired location.
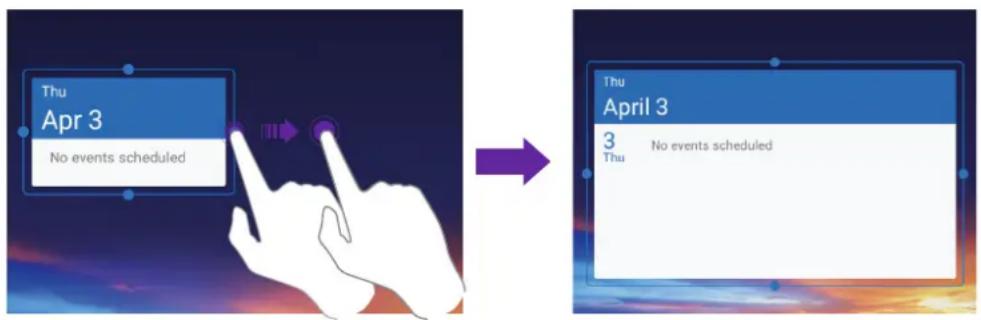
- Adjust a widget size
- Tap and hold the widget, and then drag a dot on the contour line to adjust the size.
- Tap a blank area (or tap Home button or Back button) to finish.
text_image
Thu Apr 3 No events scheduled Thu April 3 3 Thu No events scheduled- Delete a widget
On the Home screen, tap and hold the widget you want to delete and drag it to Remove in the status bar.
Access and organize apps on the Home screen
- Launch an app
- From the Home screen: Tap an icon to launch the corresponding app.
- From the Lock screen: Swipe up to launch the Camera app.
- Switch between apps
You can switch between apps in following ways:
- Tap the Home button to return to the Home screen, and then tap the icon of the app you want to open.
- Tap Recent apps button to view the recently used apps, then tap the app you want to open.
- Double-tap Recent apps button to switch to the previous app.
• Viewing recently used apps
Tap Recent apps button to display the list of recently used apps. You can swipe left or right to view the apps, and swipe up to close the app. Swipe right and tap CLEAR ALL to close all the background apps.
- App pop up box
On the Home screen, tap and hold an app to open the pop up box.

text_image
Widget App information Shortcut Clock New reminder New event Google Calendar Settings Play Store• View app info: Tap . ⓘ
- Shortcut: Tap the shortcut to go to the target interface quickly. Tap and hold the shortcut and drag it to the target area to add it on the Home screen, so that you can find it more easily.
- Widget to Home screen: Tap 🎨 to view the widgets. Tap and hold the widget and drag it to your target area to add it on the Home screen.
Note: Widget and shortcut only appear when the app includes related content.
- App drawer
On the Home screen, tap ▲ or swipe it up on the dock component bar to expand the App drawer. You can enter some key words in search bar to search the app you need.
- Add an app icon to the Home screen
-
On the Home screen, tap ▲ or swipe it up on the dock component bar to expand App drawer.
-
Tap and hold an app and drag it to the target area.
- Move an app
On the Home screen, tap and hold an app and then drag it to the desired location.
- Uninstall an app
On the Home screen, tap and hold the app and then drag it to Uninstall in the status bar.
Note: Some pre-installed system apps cannot be uninstalled.
- Remove an app icon
On the Home screen, tap and hold the app you want to remove, then drag it to Remove in the status bar.
- Align all the icons quickly
-
On the Home screen, tap and hold a blank area on the screen (or pinch two fingers together) to access the Home screen editor.
-
Tap ▪ Adjustment and slide upward or downward with two fingers within icon display area to automatically arrange the Home screen icons.
- Batch moving icons
-
On the Home screen, tap and hold a blank area on the screen (or pinch two fingers together) to access the Home screen editor.
-
Tap ☐ Adjustment. Tap or drag the icons to put them in the adjustment at the bottom.
-
Swipe left or right to choose the target Home screen.
-
Tap or drag the icons from the bottom to add them to the target Home screen.
-
Tap a blank area on the Home screen (or tap Home button or Back button) to quit the Home screen editor.
Organize folders on the Home screen
Organize your apps into folders so that you can find them more easily.
- Create a folder
- On the Home screen, drag an icon onto another icon to create a folder containing both apps.
- To name the new folder, open the folder, tap Unnamed Folder and enter the folder name. Tap a blank area or tap Home button (or Back button) to finish.
- Rename a folder
- On the Home screen, open the folder.
- Tap the folder name, and enter the new name you like.
- Tap a blank area or tap Home button (or Back button) to finish.
- Add apps to a folder
On the Home screen, tap and hold the app you want to remove, and then drag it onto the folder you want to add it to.
- Remove apps from a folder
On the Home screen, open the folder. Tap and hold the app you want to remove, and then drag it out of the folder.
- Delete a folder
You can delete a folder in two ways:
- On the Home screen, open the folder. Remove all the apps in it, then the folder will be automatically deleted.
- Tap and hold the folder and drag it to Remove in the status bar. The folder and icons in it will be deleted together.
Manage Home screen
You can customize Home screens as you like.
On the Home screen, tap and hold a blank area on the screen (or pinch two fingers together) to open the Home screen editor. You can:
- Add a Home screen
Swipe left and tap - on the rightest screen to add a new screen.
- Delete a Home screen
Tap - on the Home screen to delete it.
Note: Only blank Home screen can be deleted.
- Adjust screen order
Tap and hold the screen you want to move and drag left or right to adjust page order.
- Set the default Home screen
Tap at the top of a Home screen to set it as default Home screen. On the default Home screen, is displayed at the top.
2.3 Status bar
Use the status bar to access the Quick Settings Panel, Notification Panel and check your phone's status.
Status icons
Status icons are displayed on the right-hand side of the status bar and tell you about your phone's status, including network connections, signal strength, battery, and time.
| Status icons Indications | |
| Battery low | |
| Charging | |
| Battery full | |
| Signal strength | |
| No service | |
| E | Connected over GPRS |
| 3G | Connected over 3G |
| 4G | Connected over 4G |
| Headset mic inserted | |
| WLAN connected | |
| Vibrate mode enabled | |
| Bluetooth enabled | |
| Hotspot enabled | |
| Do not disturb enabled | |
| Airplane mode enabled | |
| Data saver enabled | |
| Alarms enabled | |
Notification icons
Notification icons are displayed on the left-hand side of the status bar when you receive a new message and other notifications.
| Notifications icons | Indications |
| ↓ | Downloading status |
| ↑ | Uploading data |
| ✓ | Download complete |
| Call in progress | |
| Missed calls | |
| New messages | |
| Screenshots | |
| USB tethering active |
2.4 Notification Panel
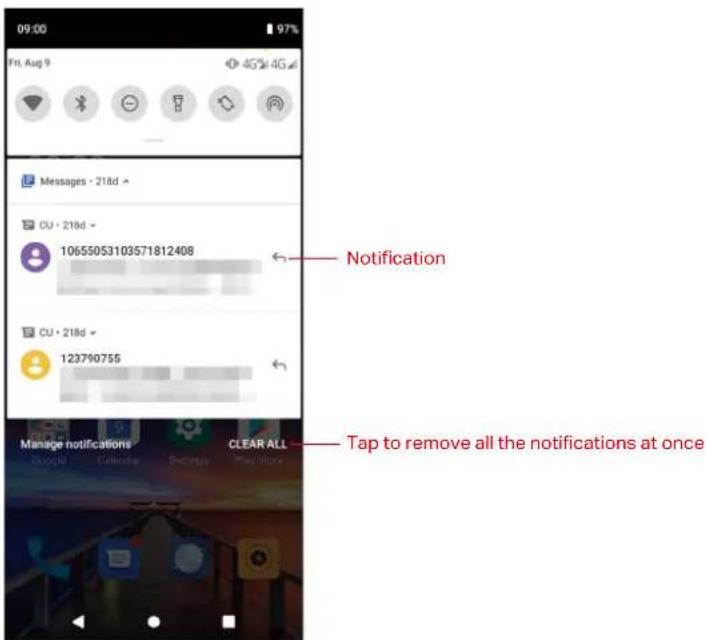
Notification Panel collects all the notifications and alerts so that you can review them whenever you like.
Use Notification Panel
text_image
09:00 97% Fri, Aug 9 4G 5G 4G Messages - 218d > CU - 218d - 10655053103571812408 CU - 218d - 123790755 Notification Tap to remove all the notifications at once Manage notifications Clear All- Open Notification Panel: Swipe down from the status bar to open the Notification Panel.
- View a notification: When there is a notification reminder, you can open the Notification Panel and tap the notification item to view the details. From the Lock screen, new notifications, such as missed calls and messages are displayed on it. Double-tap it to view the details.
- Clear notifications: Swipe the notification left or right to remove it from the list. You can also tap CLEAR ALL to remove all the notifications at once. From the Lock screen, swipe left or right to remove the notification.
- Close Notification Panel: Swipe up, or tap the Home button or Back button.
2.5 Quick Settings Panel
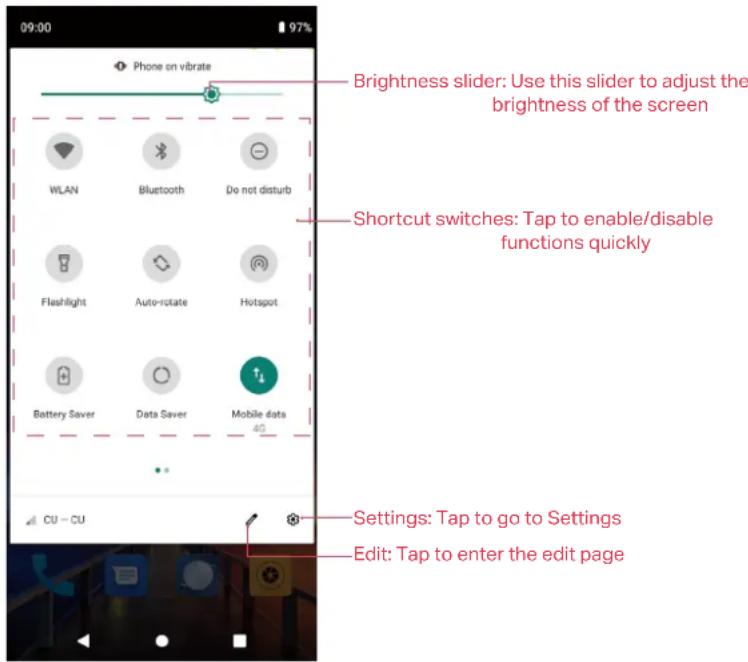
Use shortcut switches on the Quick Settings Panel to enable or disable functions quickly without using a settings menu.
Use Quick Settings Panel
- Open the Quick Settings Panel: Swipe down twice from the status bar to open the Quick Settings Panel. On the Lock screen, swipe only once to open it.
- Use shortcut switches: Tap the shortcut switches on the Quick Settings Panel to turn on or turn off the functions. Tap and hold the shortcut icon to enter the feature's settings page.
- Close the Quick Settings Panel: Swipe up, or tap the Home button or Back button.
text_image
09:00 Phone on vibrate Brightness slider: Use this slider to adjust the brightness of the screen WLAN Bluetooth Do not disturb Flashlight Auto-rotate Hotspot Battery Saver Data Saver Mobile data CU - CU Shortcut switches: Tap to enable/disable functions quickly Settings: Tap to go to Settings Edit: Tap to enter the edit pageAdjust the position of shortcut switches
Open the Quick Settings Panel and tap to enter the edit page. You can:
- Rearrange shortcut switches: Tap and hold a shortcut switch, then drag the icon to a position of your choice.
- Add a shortcut switch: Drag a shortcut switch from the bottom section of the panel to the top section.
- Remove a shortcut switch: Drag a shortcut switch from the top section of the panel to the bottom section.
- Reset Quick Settings Panel: Tap > Reset to reset the Quick Settings Panel to default settings.
2.6 Type text
Enter text
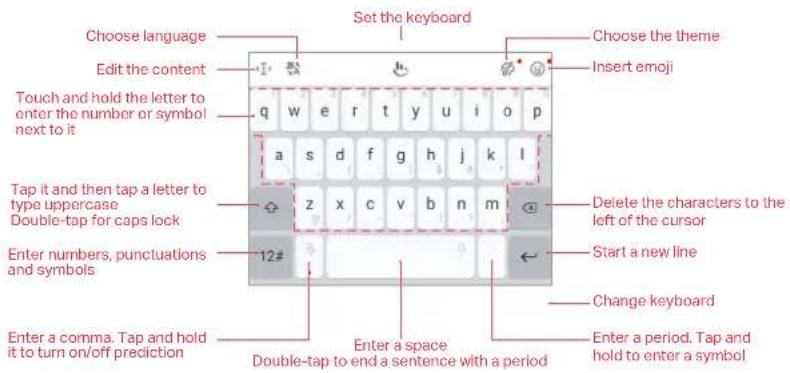
The keyboard enables you to enter text when needed. Your phone uses Touchpal by default.
text_image
Set the keyboard Choose language Edit the content Touch and hold the letter to enter the number or symbol next to it Tap it and then tap a letter to type uppercase Double-tap for caps lock Enter numbers, punctuations and symbols Enter a comma. Tap and hold it to turn on/off prediction Set the keyboard Choose the theme Insert emoji Delete the characters to the left of the cursor Start a new line Change keyboard Enter a period. Tap and hold to enter a symbol Double-tap to end a sentence with a period① Note: The image shows the layout of the American English keyboard. The layout may vary depending on the specific language used.
Switch input method
-
On the Home screen, tap Settings > System > Languages & input > Virtual keyboard.
-
Select an input method you need.
2.7 Take a screenshot
Press the Power button and Volume-down button simultaneously for about 1 second to take a screenshot.
natural_image
Diagram of a smartphone with two purple arrows indicating left and right motion (no text or symbols)3
Network and Share
Share your phone data with others by various kinds of connections.
- Connect to a WLAN network
- Enable mobile data
• Transfer data between your phone and computer - Bluetooth
- Share your mobile data with other devices
3.1 Connect to a WLAN network
Connect to a WLAN network to access the internet and reduce mobile data usage.
Note: Your personal data and financial information may be at risk if you connect to insecure public WLAN networks.
- Swipe down from the status bar to open the Quick Settings Panel.
-
Tap and hold ⬇WLAN and select the WLAN network you want to connect to:
-
If the WLAN network does not require a password, just tap it to automatically connect.
- If the network is protected, enter the password when prompted and tap CONNECT.
-
If you can't find the target WLAN network on the list, tap Add network and enter the network information and save.
-
After connected, will be displayed in the status bar. Your phone will remember WLAN networks that you have joined before and reconnect to them automatically.
3.2 Enable mobile data
Enable mobile data to access the internet when WLAN is not available. You can enable mobile data in following ways:
- Swipe down twice from the status bar to open the Quick Settings Panel and then tap ↗ Mobile data to enable mobile data.
- Go to Settings > Network & internet > Mobile network, select a SIM card if you have inserted two cards, and then turn on Mobile data switch.
Note:
- Before using mobile data, ensure that you have a data plan with your carrier to avoid incurring excessive data charges.
- If a WLAN connection to the internet isn't available, apps and services may transfer data over your carrier's cellular network, which may result in additional fees. Contact your carrier for information about you cellular data plan rates.
- When you don't need to access the internet, disable mobile data to save battery power and reduce data usage.
3.3 Transfer data between your phone and computer
Use a USB cable to transfer the data between your phone and computer.
-
Use a USB cable to connect your phone to the computer.
-
Swipe down from the status bar to open the Notification Panel, tap Charging this device via USB to expand the notification. Then you can choose one of the following USB connection modes:
-
File Transfer: Transfer files between your phone and the computer.
- USB tethering: Use a USB cable to share your phone's mobile internet with a computer.
- MIDI: Use your phone as a MIDI input device and play MIDI files on the computer.
- PTP: Transfer images between your phone and the computer.
- No data transfer: Charge your phone only.
3.4 Bluetooth
Use Bluetooth to share data on your phone with other devices. And you can use Bluetooth to connect your phone to Bluetooth headsets and in-car Bluetooth to navigate or listen to music while you drive. You can also connect your phone to Bluetooth wearables to record and manage fitness data. Connecting Bluetooth devices to your phone does not increase power consumption significantly.
Enable Bluetooth and pair your phone with another device
- Swipe down from the status bar to open the Quick Settings Panel.
- Tap and hold Bluetooth to enter the Bluetooth settings screen.
- Tap Pair new device. Your phone will automatically list available devices. If the device you want to pair is not displayed, swipe down to refresh available devices list, or check whether the device is discoverable.
① Note: To quickly pair the devices you have paired before, tap Previously connected devices and tap the target device.
- Select the device you want to pair and then follow the onscreen instructions to complete pairing.
Send and receive files using Bluetooth
Check that both devices are paired before attempting to transfer files.
- Send files: Tap the file you want to send and tap < > Bluetooth, and then select the receiving device to send the file.
-
Receive files: When another device tries to send you files using Bluetooth, select ACCEPT from the dialog box that appears.
• View received files: You can view received files in following ways: -
Swipe down from the status bar to open the Notification Panel. Then tap the downloaded notification to view file transfer progress.
- Go to Bluetooth screen and tap Connection preferences > Received files.
- On the Home screen, go to Tools > Downloads > ≡ > Recent.
Manage paired devices
On the Currently connected list, tap a paired device to configure the followings settings:
- Rename paired devices: Tap 🔔 and then enter the new name and tap RENAME.
- Manage permissions: Turn on the Internet access switch to set your internet and contact permissions.
• Unpair Bluetooth devices: Tap FORGET.
Rename your device
-
Tap and hold ➕ Bluetooth in the Quick Settings Panel to enter the Bluetooth screen and tap Connection preferences > Bluetooth > Device name.
-
Edit the device name and tap RENAME to save.
3.5 Share your mobile data with other devices
You can use WLAN hotspot, USB cable, or Bluetooth to share your mobile data with other devices (such as phones, tablets, or computers).
Use WLAN hotspot
Set up a portable WLAN hotspot to share your phone's mobile internet with other devices. Compared with Bluetooth tethering, the portable WLAN hotspot feature offers quicker, longer range connections, but power consumption is higher.
-
On the Home screen, go to 📋 Settings > Network & internet > Hotspot & tethering > WLAN hotspot.
-
Turn on the switch. After enabling your personal WLAN hotspot, ⬤ will be displayed in the status bar.
-
Change the hotspot name and password and other settings as needed.
Use USB tethering
Use a USB cable to share your phone's mobile internet with a computer. This is useful if your computer's internet connection stops working. To enable mobile data, see Enable mobile data.
To enable USB tethering:
-
Connect your phone to a computer using a USB cable.
-
On the Home screen, tap Settings > Network & internet > Hotspot & tethering.
-
Switch on USB tethering. After enabling USB tethering, ⏻ will be displayed in the status bar. Then you can use the computer to access the internet.
Note: Depending on your computer's operating system, you may need to install phone drivers on the computer or establish a network connection in order to use USB tethering. Please read the instructions for your operating system.
Use Bluetooth tethering
Use Bluetooth tethering to turn your phone into a wireless router and share your mobile internet with other devices. Compared with a portable hotspot, Bluetooth tethering offers a slower internet connection, but consumes less power.
-
Establish a Bluetooth connection between two devices and check that they are paired. For more information about Bluetooth connection, see Enable Bluetooth and pair your phone with another device.
-
On the Home screen, tap 📋 Settings > Network & internet > Hotspot & tethering, and switch on Bluetooth tethering.
-
On your device, swipe down from the status bar to open the Quick Settings Panel, then tap and hold ➕ to go to the Bluetooth screen. On the Currently connected list, tap the paired device and switch on Internet access to share your mobile data with the paired device.
4
Calls and Contacts
Make calls with your phone to contact one quickly.
- Make a call
• Answer or reject a call - Contacts
4.1 Make a call
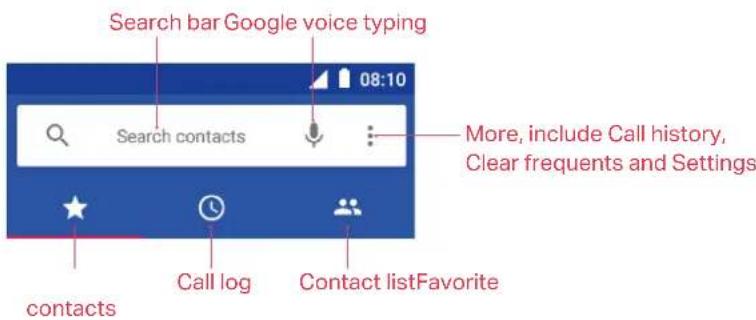
text_image
Search bar Google voice typing 08:10 Search contacts More, include Call history, Clear frequents and Settings contacts Call log Contact listFavoriteMake a call
-
On the Home screen, tap Phone > .
-
Enter a phone number and tap 📋 to make a call. When entering part of the phone number or the first letter of the contact's name, your Phone will automatically search for the relevant contacts and call log. Tap the contact you want to call in the list. If you have inserted two SIM cards and didn't set the default SIM for calls, select SIM1 or SIM2 to dial.
Note: If you want to change the default SIM card, or if you want to deactivate one of them, go to Settings > Network & internet > SIM cards to configure. For more information about dual SIM settings, see Dual SIM settings.
Make an international call
-
On the Home screen, tap Phone > .
-
Tap and hold 0 key to enter a + symbol, and then enter the country code, area code, and phone number.
-
Tap to call.
Make an emergency call without SIM cards
In the event of an emergency, you can make emergency calls from your device, even without a SIM card.
• Make an emergency from unlock screen
- On the Home screen, tap Phone > .
- Enter the emergency number for your location in the dialer and tap
• Make an emergency from Lock screen
If you enabled the device protection (pattern, PIN or password), you can make an emergency from Lock screen in the following way:
-
Wake up the screen and swipe up on the screen.
-
Tap EMERGENCY.
-
Enter the emergency number of your location in the dialer and tap
Note:
-
You must be in an area with cellular coverage, when you have to make an emergency call.
-
The ability to make emergency calls depends on local regulations and carriers in your area.
-
Poor network coverage or environmental interference may prevent your call from being connected. Never rely solely on your device for essential communication during emergencies.
Make a conference call
You can make another call while a call is in progress.
-
Call the first participant.
-
While making a call, tap on the in-call menu.
-
Enter another phone number or choose another contact, then tap to dial.
Note: This function needs the support of local operator. Contact your carrier to find out how to use this feature.
Call Waiting
When you want to answer a new incoming call while you are calling someone, you can use the call waiting function.
-
Swipe up to answer the new call and hold the ongoing call.
-
When you want to reactivate the previous call and place the new caller on hold, tap
① Note: This function needs the support of local operator. Contact your carrier to find out how to use this feature.
4.2 Answer or reject a call
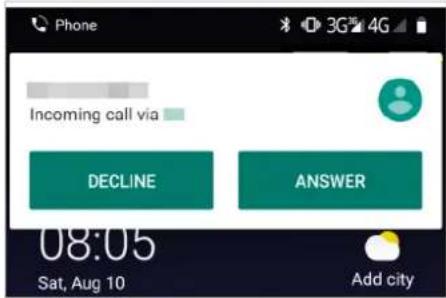
When a call comes in, tap ANSWER to answer the call. Tap DECLINE to reject the call.
Note: When a call comes in, you can press the Volume button or Power button to mute the ringtone.
text_image
Phone Incoming call via DECLINE ANSWER 08:05 Sat, Aug 10 Add city4.3 Contacts
Add a contact
You can create a new contact or add a number to a contact in following ways:
- Add a contact in
Contacts
-
On the Home screen, tap Tools > Contacts > to add a new contact.
-
Select the storage location you want to store the contact to.
-
Enter the contact's information.
4. Tap SAVE
- Add a contact in Message
- On the Home screen, tap Message.
- On the message list, tap a conversation, then tap:> Add contact.
- Choose a contact to add the number or tap + Create new contact.
- Select the storage location you want to store the contact to.
- Enter the contact's information.
- Tap SAVE
- Add a contact in Phone
- Tap 🔒, tap a number and tap Create new contact. Enter the contact's information and tap SAVE to add the number as a new contact. Or tap Add to a contact and choose a contact to add the number to the contact.
- Tap > Create new contact. Enter the contact's information and tap SAVE.
- Tap 📷, enter the number and tap Create new contact or Add to a contact. Enter the contact's information and tap SAVE
Search a contact
On the Home screen, tap Tools > Contacts. Tap and enter the name, initials, or number of a contact in the dialer contact.
Manage a contact
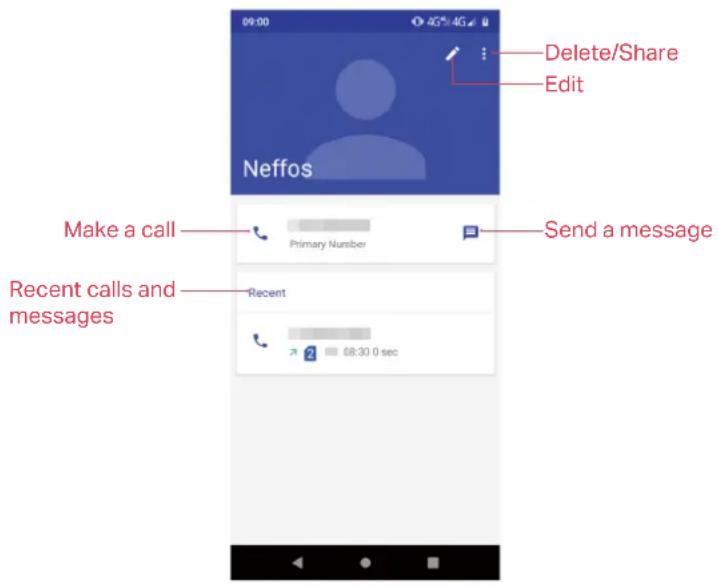
- On the Home screen, tap Tools > 🙏 Contacts, and then choose a contact.
- Tap: and you can copy, share, delete the contact, create shortcut, link or ringtone for the contact, and more.
text_image
09:00 4G*4G Delete/Share Edit Neffos Make a call Primary Nurniber Send a message Recent calls and messages Recent 08:30 0 sec5
Messages
Use Messages to keep in touch with your friends through SMS or MMS.
- Send and reply to a message
- Manage messages
5.1 Send and reply to a message
Send messages
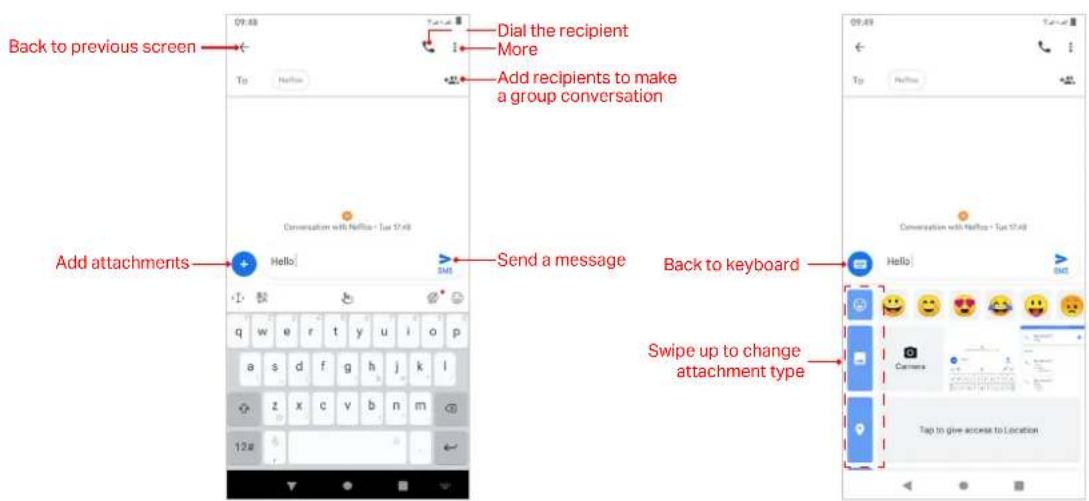
- On the Home screen, tap Messages > guide to start a new message.
- Enter a contact name, phone number, or email to search the contact.
- Start composing your message. Tap to add an attachment.
- Then tap to send out the message. For detailed information about sending messages, refer to the descriptions below:
text_image
Back to previous screen Dial the recipient More Add recipients to make a group conversation Send a message Back to keyboard Swipe up to change attachment typeMake a group conversation
When you make a group conversation with several people, every one in the group can see and reply each other's messages. To make a group conversation, you can:
- On the Home screen, tap Messages > + Start group conversation.
- Enter a contact name, phone number, or email to search the contacts. Tap to continue.
- Compose your message, then tap to send out.
Reply to a message
You can reply to a message in following ways:
- On the Home screen, tap □ Messages and the received message to view the conversation thread. Compose your message, and then tap ▶ to send out.
- Swipe down from the status bar to open the Notification Panel and tap the received message. Compose your message, and then tap to send out.
5.2 Manage messages
- On the Home screen, tap □ Messages to go to the conversation list.
-
Tap a conversation, swipe the screen down or up to select the message you want to manage, then tap and hold the message, and you can:
-
Copy the message: Tap to copy the message.
- Delete the message: Tap .
- Share the message: Tap: > Share, and then follow the onscreen instructions to complete.
• Forward the message: Tap : > Forward.
• View details about the message: Tap : > View details.
6
Camera and Photos
Use multiple features of your camera to capture your precious moments.
- Camera at a glance
• Take a photo - Record a video
- Shooting modes
- Photos
6.1 Camera at a glance
Launch your camera
- On the Home screen: Tap Camera.
- On the Lock screen: Just swipe up.
Camera screen
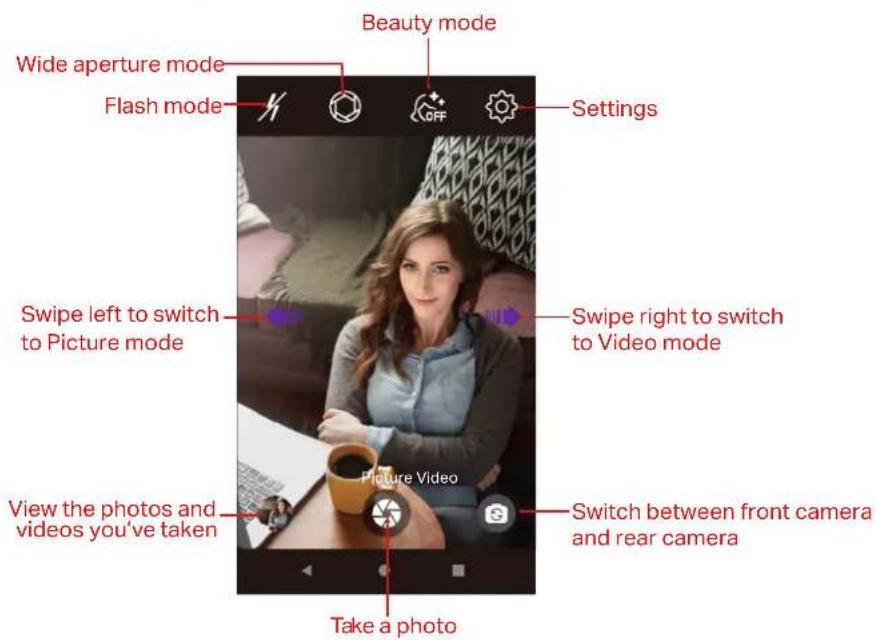
On the Home screen, tap 📄Camera and then you can:
text_image
Beauty mode Wide aperture mode Flash mode Settings Swipe left to switch to Picture mode Swipe right to switch to Video mode View the photos and videos you've taken Picture Video Switch between front camera and rear camera Take a photoTap to switch flash mode:
• _A Automatically enable or disable the flash based on the ambient brightness.
- Enable the flash.
- Disable the flash.
6.2 Take a photo
- On the Home screen, tap 📄Camera.
- Pinch two fingers together or spread them apart on the viewfinder to find the area you want.
- Tap to switch between the front camera and rear camera.
- Tap Scene mode to select a filter.
- Tap ➤ to take a photo.
6.3 Record a video
- On the Home screen, tap 📍 Camera > Video.
- Pinch two fingers together or spread them apart on the viewfinder to find the area you want.
- Tap ▶ to start recording. Tap ▶ to pause the recording and tap ▶ to continue the recording. Tap ▶ on the screen during recording to save the current scene as a photo.
- Tap to stop and save recording.
6.4 Shooting modes
Your phone features a variety of different camera modes for different shooting scenarios.
Burst mode
Use Burst mode when you want to take continuous shot of a moving subject, such as during a football match. The camera will capture several images in quick succession and save the photos.
- On the Home screen, tap 📄Camera.
- Tap and hold the ⚙ to start the burst sequence. The number of captured photos will be displayed in the bottom of the viewfinder.
- Release to stop the burst shooting.
Face beauty mode
- On the Home screen, tap 📄Camera.
- Tap OFF > and configure the settings as needed.
- Tap to take a photo.
6.5 Photos
View photos and videos
On the Home screen, tap Photos to view the following photos and videos:
- Photos and videos shot with the camera.
- Photos and videos that your friends shared with you.
- Photos and videos synced from your computer.
- Photos and videos saved from messages, emails, or websites, as well as screenshots.
Edit an image
You can use the image editing tools to bring your photos to life.
-
Select an image you want to edit and tap
-
Tap to add a filter.
- Tap to adjust image parameters to make your image look more vivid.
- Tap and you can:
- Crop an image: Drag the dotted edges to crop the image to the desired size. Tap 📋 to choose a proportion.
- Straighten an image: Slide the scaleplate to make a slight adjustment to the angle of the photo and crop the excess part of the photo to maintain the original aspect ratio.
-
Rotate an image: Tap to adjust the angle of rotation.
-
Then tap Done to save the editing. If the effect is not satisfied, tap Reset to reset.
- After editing, tap Save copy to save the edited image.
Edit a video
You can use the photos' video editing tools to edit a video.
- On the Home screen, tap 📋 Photos and select a video you want to edit.
- Tap and you can:
• Stabilize: Tap to stabilize the video.
- Rotate: Tap to rotate the video.
- After editing, tap Save to save the edit.
Manage photos and videos
On the Home screen, tap 📋 Photos, and you can do the following options:
- Share a photo or video: Select a photo or a video, tap ✻, choose a sharing method and follow the onscreen instructions to share it.
- Edit a photo or video: Select a photo or a video, tap → to edit. For more information about editing a photo or a video, see Edit an image or Edit a video.
- View details: Select a photo or a video, tap to view the detailed information.
- Move to trash: Select a photo or a video, tap 📋 > Move to trash to move it to trash.
- View the photos as slideshow: Select a photo, tap: > Sildeshow to view the photos as slideshow. Tap the screen to stop the slideshow.
- Use a photo as wallpaper or contact photo: Select a photo, tap: > Use as to use the selected picture as wallpaper or contact photo.
- Print a photo: Select a photo, tap: > Print. Configure the settings and then print out the photo.
- Edit in OfficeSuite: Select a photo, tap : > Edit in OfficeSuite. Then follow the onscreen instructions to install File Commander Free to edit the photo.
- Loop video: Select a video, tap: > Loop video to enable loop playing the video.
• View in: Select a video, tap : > View in to view the video in specific apps.
- Delete from device: Select a photo or a video, tap :> Delete from device to delete it.
7
Clock
In the Clock app, you can add alarms, view world times, use the stopwatch and timer features.
- Alarm
- Worldclock
- Timer
- Stopwatch
7.1 Alarm
Set an alarm to wake you up or remind you about important events.
- On the Home screen, tap Clock > .
- Tap +. Then you can either toggle the pointer to choose a time for the alarm, or you can tap to manually type the alarm time. After choosing the time, tap OK.
- Configure the settings as desired for the alarm:
- Tap to save.
7.2 Worldclock
Check the time in various cities around the world using Worldclock.
On the Home screen, tap Clock > . You can:
- Add a city: Tap ☑ Check the city you want; or you can tap ☐ enter a city name in the search bar and check the city from the search result list. Then tap the Back button.
- Delete a city: Tap 📋. Uncheck the city you want to delete from the Selected Cities. Then tap the Back button.
7.3 Timer
Set a timer to count down and alert you when time's up.
- On the Home screen, tap Clock > .
-
Set a specific time that you want to count down and then tap. You can:
-
Tap to pause counting and tap to continue. Tap RESET to restart the count down.
- Tap Label to create a label for the timer.
- Tap +1:00 to add one minute to the timer.
- Tap ADD TIMER to add another timer. When there are two or more timers, swipe the screen up or down to toggle the timer.
-
Tap DELETE to delete the timer.
-
When the timer goes off, you can:
-
Stop the ringtone: Tap 📋 on the screen or tap STOP on the pop-up prompt to stop the ringtone.
- Add 1 minute for your timer: Tap ADD 1 MIN on the popup prompt to add 1 minute for your timer.
7.4 Stopwatch
You can use Stopwatch to keep time or record lap times.
- On the Home screen, tap Clock > .
- Tap to start timing. While timing, you can:
- Tap LAP to count laps. Laps data will be displayed on the screen.
- Tap to pause timing. When pausing, you can share or reset the stopwatch.
8
Browser
Use Browser to surf the internet and find out all that you are curious about.
- Go to a webpage
- Browser tabs
8.1 Go to a webpage
View a webpage
- On the Home screen, tap Browser.
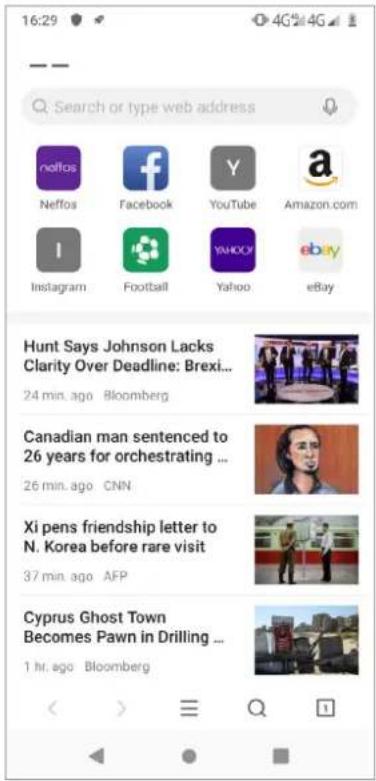
- Read Browser Terms of Service and tap AGREE. Then you can view weather, news and websites on the homepage.
- Tap the address bar and enter the web address you want to visit.
- Tap Go on the keyboard.
text_image
16:29 Search or type web address neffos Neffos Facebook YouTube Amazon.com Instagram Football Yahoo eBay Hunt Says Johnson Lacks Clarity Over Deadline: Brexi... 24 min. ago Bloomberg Canadian man sentenced to 26 years for orchestrating ... 26 min. ago CNN Xi pens friendship letter to N. Korea before rare visit 37 min. ago AFP Cyprus Ghost Town Becomes Pawn in Drilling ... 1 hr. ago BloombergDo more options about the web page
- Tap to go back to the previous page.
- Tap to go to the next page.
- Tap to search.
- Tap to display the browser tabs.
- Tap to do more options, such as add a bookmark, view the history, share the web page and so on.
8.2 Browser tabs
You can view multiple pages simultaneously using tabs. Tap the icon 1 and all the pages will be displayed. The number on the icon means the current number of the web pages.
Open a new tab
You can open a tab by the following ways:
- Tap Browser > > .1 +
- Tap 📄 Browser > 1 > : > New tab.
Close tabs
Tap 📄 Browser > 1. And drag the tab left or right to close the tab or tap ✗ to close the tab.
To close all the tabs one time, tap 📄 Browser > 1 > : > Close all tabs.
9
Themes
Themes helps you to personalize your Home screen by changing the theme, wallpaper, Lock screen style, and icon style.
- Change the theme
- Change the wallpaper
- Change the icon style
9.1 Change the theme
- On the Home screen, tap Themes.
- Select a theme, then the preview of the currently selected theme will be displayed on the screen.
- Tap APPLY to apply the theme.
9.2 Change the wallpaper
Wallpaper settings let you set an image or photo as wallpaper for the Lock screen or Home screen.
Launch the wallpaper
There are three ways to Launch the wallpaper:
- On the Home screen, go to 📋 Themes > CUSTOM > Lock screen wallpaper/Home screen wallpaper.
- Tap Settings > Display > Wallpaper.
- Tap and hold the Home screen's blank area or pinch two fingers together on the Home screen, then tap Wallpapers.
Change the wallpaper with system-provided wallpapers
- On the Home screen, go to 📋 Themes > CUSTOM > Lock screen wallpaper/Home screen wallpaper.
- Select a desired wallpaper from system-provided wallpapers.
- Tap the screen to toggle Lock screen preview or Home screen preview which shows a preview of the currently selected wallpaper without applying it. You can swipe the screen left or right to change the wallpaper.
- Tap APPLY, and then follow the onscreen instructions to set it as the Home screen or Lock screen wallpaper or both.
Customize your Wallpaper
- On the Home screen, go to 📋 Themes > CUSTOM > Lock screen wallpaper/Home screen wallpaper.
- Tap and select an album. Then select a picture and tap it.
-
Tap the screen to toggle Lock screen preview or Home screen preview which shows a preview of the currently selected wallpaper without applying it. You can zoom in the picture, swipe it and select the part you want. On Home screen preview screen, check Scroll on the Home screen, and you can zoom and move the image to adjust the maximum display area of the wallpaper.
-
Tap APPLY, and then follow the onscreen instructions to set it as the Home screen or Lock screen wallpaper or both.
9.3 Change the icon style
- On the Home screen, go to 📋 Themes > CUSTOM > Icons.
- Tap one of the icon styles and swipe the screen left or right to preview the icon style effect.
- Select the desired icon style and tap APPLY.
10 Weather
Weather allows you to check the current weather and multi-day forecast for your location and many other destinations around the world.
- Add a city
- Check the weather
- Remove a city
10.1 Add a city
Add multiple cities to the weather application so that you can keep track of the weather in cities of interest to you.
Note: To use 📄 Weather, please connect to the mobile data or connect to WLAN. When using 📄 Weather for the first time, please read the Weather Terms of Service on the pop-up prompts and tap AGREE.
-
On the Home screen, tap Weather.
-
Enter a city name in the City field. Or you can tap Add current location to quickly get the weather of your current location.
-
You can add more cities by tapping and then enter the city name.
10.2 Check the weather
- On the Home screen, tap 📋 Weather > ≡ to log into the City list.
- Tap a city to view the weather information. swipe the screen down to refresh the weather information; swipe the screen up to view the future weather and detailed information of the day: relative humidity, UV, wind speed, dew point, visibility and pressure. Slide the screen left or right to view the weather information of different cities.
10.3 Remove a city
- On the Home screen, tap 📋 Weather > ≡ to log into the City list.
- Swipe left the city you don't need and tap to remove the city.
11 Tools
Use Tools to enjoy more features of your phone.
- Files
- Downloads
- Calculator
- Sound Recorder
• FM Radio - Migration assistant
11.1 Files
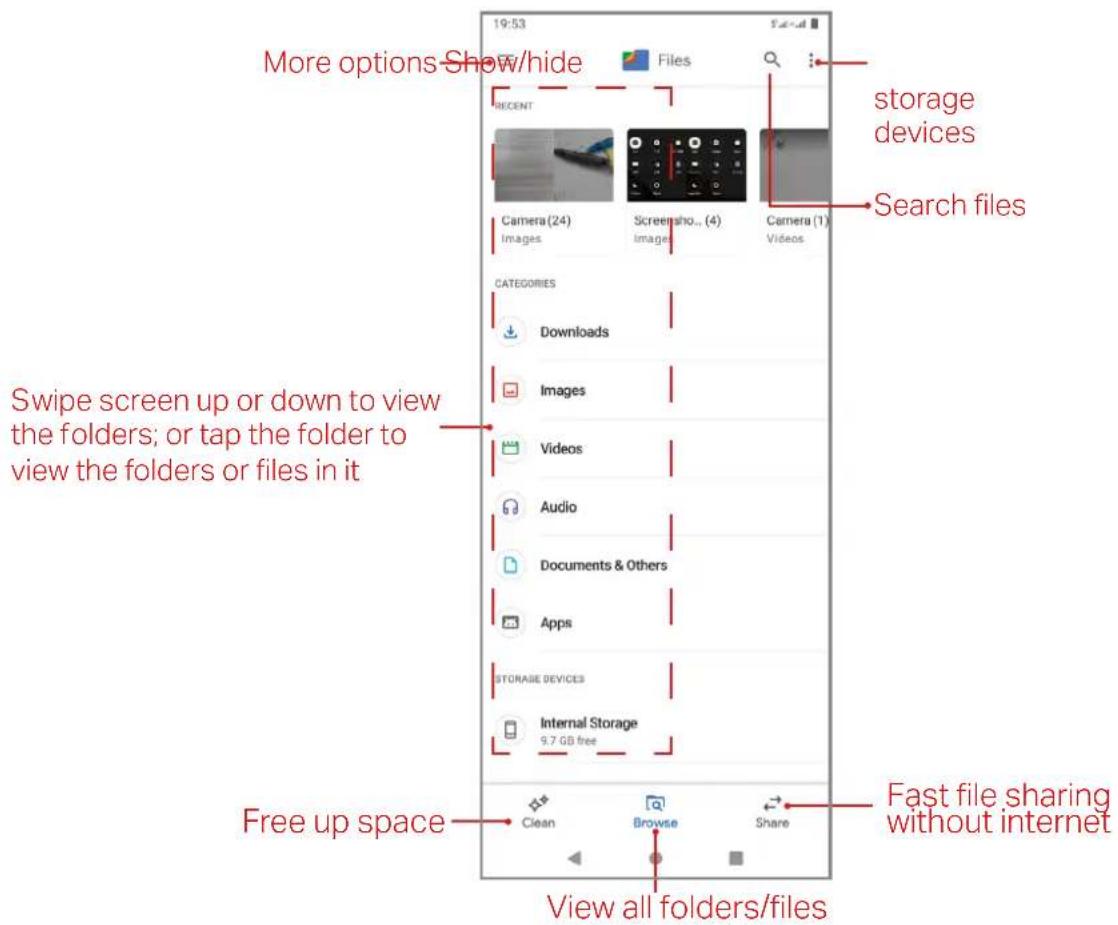
- On the Home screen, tap ▲ Files, and you can do the following operations:
- Tap and hold a file or folder to manage it, such as share or delete it, move or rename it, and more.
text_image
More options Show/hide files recient Camera (24) Images Search files Screensho... (4) Image Camera (1) Videos Categories Downloads Images Videos Audio Documents & Others Apps STORAGE DEVICES Internal Storage 9.7 GB free Free up space Clean Browse Share Fast file sharing without internet View all folders/files11.2 Downloads
Use Downloads to view and manage the downloaded and downloading information.
View files
On the Home screen, tap Tools > Downloads > ≡, and you can use the following options:
• View images: Tap Images to view the images taken by your phone or you have downloaded or received from other devices.
• View videos: Tap Videos to view the videos taken by your phone or you have downloaded or received from other devices.
• View audio: Tap Audio to view audios captured by your phone or you have downloaded or received from other devices.
• View the recent downloads: Tap Recent to view the files generated by your phone or you have downloaded or received from other devices recently.
View internal storage:
On the Home screen, tap Tools > Downloads > Neffos C9s/Neffos C9 Max.
11.3 Calculator
- On the Home screen, tap Calculator to open the standard calculator.
- Use one of the following methods to switch between the standard and scientific calculators:
- Tap the blue part on the right.
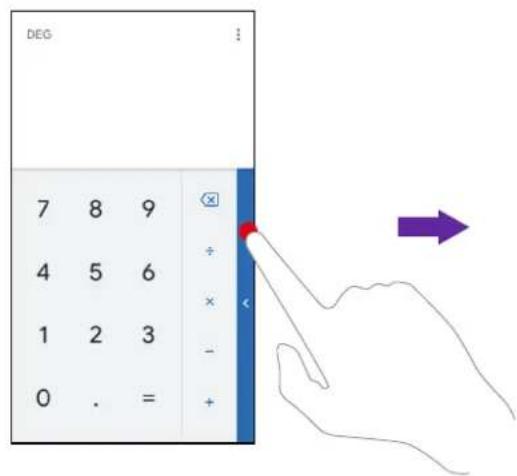
text_image
DEG 7 8 9 4 5 6 1 2 3 0 . =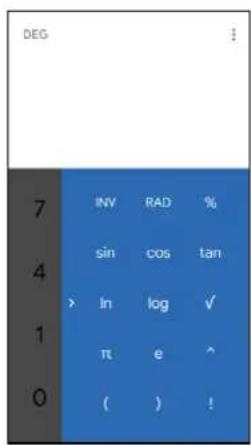
text_image
DEG 7 INV RAD % 4 sin cos tan > ln log ✓ 1 π e ^ 0 ( ) !- Swipe left the blue part on the right (the area in red dotted box below).
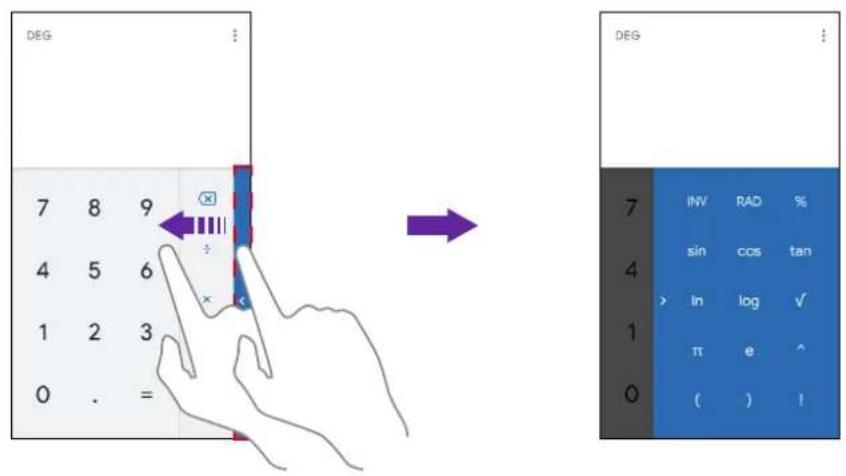
text_image
DEG 7 8 9 4 5 6 1 2 3 0 . = DEG 7 INV RAD % sin cos tan > ln log ✓ π e ^ 0 ( ) !- Swipe down from the status bar to open the Quick Settings Panel and tap 📄 Auto-rotate to enable it; then rotate the screen to access the scientific calculator.
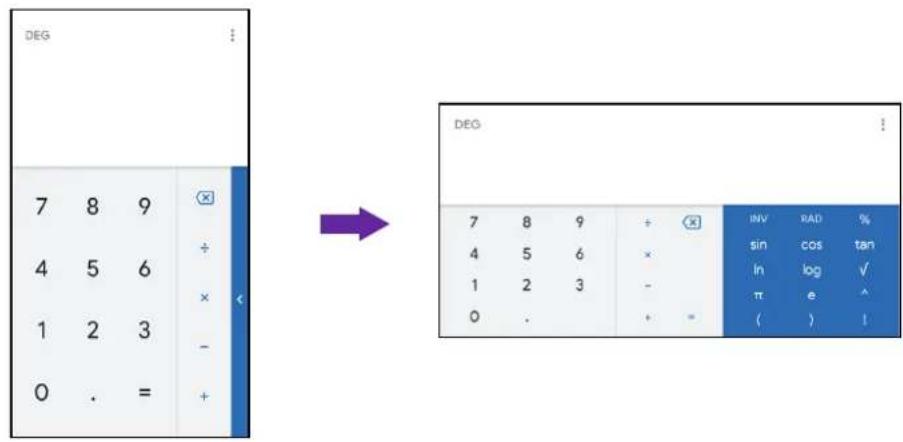
text_image
DEG 7 8 9 4 5 6 1 2 3 0 . = +- Tap numbers and use the arithmetic feature to complete an operation.
11.4 Sound Recorder
Record sound
- In order to ensure optimum recording quality, place your phone on a flat surface and do not cover the microphone.
- On the Home screen, go to Tools > ⚠️ Sound Recorder.
- Tap to start recording.
- When recording, tap to pause and tap to continue recording.
- Tap ■ to stop recording, and then tap SAVE or DISCARD.
Play a record
- On the Home screen, go to Tools > ⚙️ Sound Recorder > :≡
- Tap the record you want to play.
Delete records
-
On the Home screen, tap Sound Recorder > .
-
Tap and hold a record and check the records you want to delete, then tap
11.5 FM Radio
Scan for all FM stations
-
Connect a headset to the phone.
-
On the Home screen, tap Tools > FM Radio > to scan for all FM stations.
-
Tap one station and listen to it.
Listen to FM radio
-
Connect a headset to the phone.
-
On the Home screen, tap Tools > FM Radio.
-
Tap 🔒 to choose to listen to the radio with your Earphone or Speaker.
-
Tap to play the radio.
-
Tap ▶ to play the next station; tap ◀ to play the previous station; tap ◀ or ▶ to manually adjust the channel bit by bit.
-
Tap to pause playing.
Add FM stations to favorites
You can add FM stations to favorites in following ways:
- Connect a headset to the phone. On the Home screen, tap Tools > FM Radio > to open the radio stations list. Tap of a radio station to add to favorites.
- Connect a headset to the phone. When listening radios, you can also tap ☆ on FM Radio screen to add to favorites.
Remove FM stations from favorites
You can remove FM stations from favorites in following ways:
- Connect a headset to the phone. On the Home screen, tap Tools > FM Radio > to open the radio stations list. Tap of a radio station you want to remove from favorites.
- Connect a headset to the phone. When listening radios, you can also tap ★ on FM radio screen.
- Connect a headset to the phone. In Favorites list, tap: on the FM station you want to remove from favorites, and then tap Remove favorite.
11.6 Migration assistant
Use Migration Assistant to migrate your data from your old phone to new phone.
-
On the Home screen, tap ▲ > ⚙ Migration Assistant and agree the Migration Assistant Terms of Service.
-
On your old phone, tap Send data. On your new phone, tap Receive data to generate a receiving code.
-
Use your old phone to scan the QR code on your new phone to connect. After connected, select the data you want to migrate, and then tap SEND.
-
When complete sending, tap DONE on your old phone and GOT IT on your new phone.
Note: For more information about Migration Assistant, tap : > FAQs or tap : > About Migration Assistant.
12 Settings
This chapter contains the following sections:
- Dual SIM settings
- Enable data saver
- Airplane mode
- Apps and notifications
- Battery
- Display
- Sound
- Storage
- Security
- Location
- Accounts
- Accessibility
• Change system language - Gestures
- Date and time
- Backup and reset
- System update
- About phone
12.1 Dual SIM settings
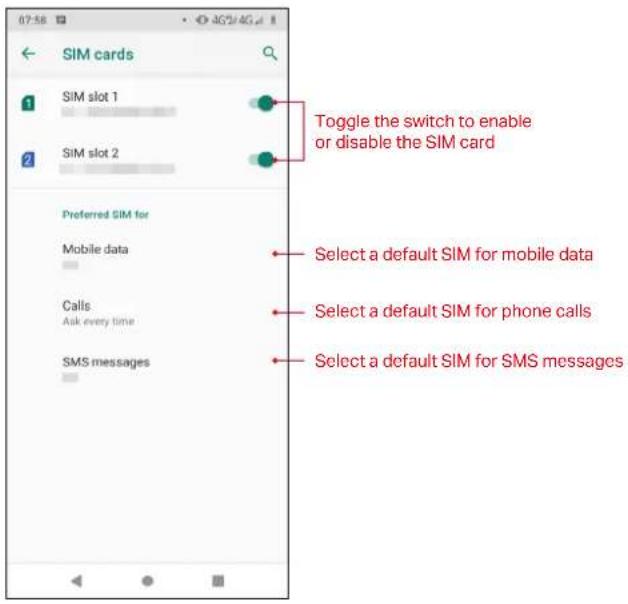
When two SIM cards are inserted, you can configure the default card for mobile data, phone calls and SMS messages according to your plan.
text_image
SIM cards 1 Sim slot 1 2 SiM slot 2 Preferred SIM for Mobile data Calls Ask every time SMS messages Toggle the switch to enable or disable the SIM card Select a default SIM for mobile data Select a default SIM for phone calls Select a default SIM for SMS messages- On the Home screen, tap Settings > Network & internet > SIM cards.
- Toggle the switch next to the SIM card to enable or disable the SIM card. You can tap SIM slot 1 or SIM slot 2 to edit the SIM name, change the color, view the carrier and SIM number.
- Choose the preferred SIM for mobile data, calls or SMS messages.
Note:
- If you disable a SIM card, you will be unable to use it to make calls, send messages, or use mobile data.
- You can configure whether you want to select a SIM card manually or use the default SIM card each time you make a call. If you choose to use the default SIM card, your phone will use that SIM card for all outgoing calls.
- Your phone supports only dual card dual standby single pass, which means you cannot use both SIM cards for calls or data services simultaneously.
12.2 Enable data saver
- On the Home screen, tap Settings > Network & internet > Data usage > Data saver:
- Turn on the Use Data saver switch to enable it, and then some apps will be prevented from sending or receiving data in the background.
Note: You can have some apps allowed to use unrestricted data when Data saver is on. Tap Unrestricted data and turn on the switch next to the app you want to enable using unrestricted data.
12.3 Airplane mode
To avoid interference, please enable airplane mode or power off your phone when you are on board a plane. When enabled, call, mobile data, Bluetooth, and WLAN will be disabled. You can enable Bluetooth and WLAN manually, and you can still be able to play music, watch videos and use apps that do not require an internet connection.
Use any of the following methods to enable or disable airplane mode:
- Use the shortcut switch: Swipe down twice from the status bar to open the Quick Settings Panel, and tap Airplane mode to switch on.
- Go to Settings: On the Home screen, tap 📋 Settings > Network & internet > Advanced and switch on Airplane mode.
12.4 Apps and notifications
View and configure apps
- On the Home screen, tap ⚙️ Settings > Apps & notifications and view recently opened apps, all apps, installed apps, and disabled apps in your phone.
- Tap an app and you can disable or uninstall the app, configure notification and permission settings for the app, view and configure data and battery usage of the app, and so on.
Configure app permissions
Your phone comes with a permission manager that you can use to restrict app permissions and protect your personal data.
- On the Home screen, tap 📋 Settings > Apps & notifications > App Permissions.
- Select an app and you can enable or disable the relevant permissions for the app.
Configure app notifications
On the Home screen, tap 📋 Settings > Apps & notifications > Notifications to configure the
following settings:
- Notifications on the Lock screen: Tap On lock screen and you can choose Show all notification content, Hide sensitive notification content or Don't show notifications at all for apps in your phone.
- Notification dots: Turn on the switch to enable notification dots for all the apps.
- Default notification sound: Tap to choose or add a desired ringtone for notifications.
- Do not disturb: Tap Do Not Disturb to configure Do not disturb mode. For more information about Do not disturb mode, see Do not disturb.
12.5 Battery
Use Battery to view detailed battery usage statistics and optimize performance as well as reduce power consumption.
On the Home screen, tap ⚙️ Settings > Battery to configure the following settings:
View battery usage statistics
- View the remaining capacity of battery and the power usage of screen and apps. You can tap > Battery usage to view more battery usage.
- Switch on Battery percentage to show battery percentage in the status bar.
- Slide down to the bottom of the screen to see the time when last full charge and screen usage since full charge.
Enable Battery manager
Tap Battery Manager and turn on Use Battery Manager to enable your device detect when apps drain battery.
Enable Battery saver
- Tap Battery Saver and switch on Turn on automatically:
- Adjust the slider to select the battery percentage.
12.6 Display
Configure the display settings to personalize your phone. For example, you can change the wallpaper, font size, and screen-off time.
On the Home screen, tap ⚙️ Settings > Display, and you can configure the following options:
Adjust screen brightness
- Tap Brightness level, a slider will display on the screen.
- Drag the slider left or right to adjust the screen brightness to suit your needs.
Note: To adjust the screen brightness quickly, you can swipe down twice from the status bar, and adjust the slider on the Quick Settings Panel directly.
Enable night light
- Tap Night Light, and set the schedule and intensity.
- Tap TURN ON NOW to tints your screen amber, making it easier to look at your screen or read in dim light, and may help you fall asleep more easily.
Enable adaptive brightness
Tap Adaptive brightness, and turn on the switch to enable it. Then your screen brightness will automatically adjust to your environment and activities.
Enable LED indicator
Tap Advanced > LED indicator and enable Notification indicator or Charging indicator.
Automatically lock screen
Tap Advanced > Sleep and select a time to make the phone lock automatically after a certain time of inactivity.
Auto-rotate screen
Tap Advanced and switch on Auto-rotate screen, and your screen's orientation will switch automatically depending on how you hold your phone when performing certain operations, such as browsing a web page or viewing a picture. To quickly enable auto-rotate screen, you can swipe down from the status bar to open the Quick Settings Panel and tap Auto-rotate.
Adjust font size
-
Tap Advanced > Font size, and then tap or drag the slider to set a desired font size (small/default/large). A thumbnail preview will display on the screen for your reference.
-
After setting the font size, tap the Back button to save and exit.
Adjust display size
-
Tap Advanced > Display size, and then tap or drag the slider to set a desired font size (small/default/large/larger). A thumbnail preview will display on the screen for your reference.
-
After setting the display size, tap the Back button to save and exit.
Enable screen saver
Tap Advanced > Screen saver to change the screen saver, set the style of screen saver, enable night mode and set when to start.
12.7 Sound
Change the volume, vibration effects, ringtones and other sounds settings for your device.
On the Home screen, tap ⚙️ Settings > Sound, and you can configure the following settings:
Volume
Tap or drag the slider to adjust the media volume, call volume, ring volume or alarm volume.
Also vibrate for calls
Turn on the switch to make the phone vibrate for incoming calls.
Do not disturb
Do Not Disturb mode allows you to work or relax in peace. Your device will only notify you about important calls or messages.
- Tap Do Not Disturb to configure the settings:
- Tap TURN ON NOW to enable Do Not Disturb mode.
Shortcut to prevent ringing
Tap Shortcut to prevent ringing > Press Power & Volume Up together and choose an effect.
Phone ringtone
Tap Phone ringtone, select one from the list, or tap Add ringtone to select a desired phone ringtone.
Sounds and vibrations
Tap Advanced, and you can configure the default notification and alarm sound, dial pad tones, screen locking sounds, charging sounds, touch sounds, touch vibration and sound enhancement.
12.8 Storage
On the Home screen, tap 📋 Settings > Storage to view storage use of your phone.
Free up space
- Tap FREE UP SPACE button.
- Remove the backed up storage to free up space.
Storage manager
- Turn on Storage manager switch.
- Tap Storage manager to manage the storage.
12.9 Security
Use screen lock method and other features to provide added security to your personal information.
On the Home screen, tap 📋 Settings > Security & location to configure the following settings:
Add screen lock method
Tap Screen lock, choose one of the following methods and follow the onscreen instructions to add a screen lock method.
- None: Set no screen lock for your phone.
- Swipe: Swipe on the screen to unlock your phone. After you have set swipe as your screen lock method, you can tap 🙏 next to Screen lock and edit the Lock screen message.
- Pattern: Use a pattern to unlock your phone. After you have set pattern as your screen lock method, you can tap ✿ next to Screen lock and switch on Make pattern visible, and then you can see the pattern when you enter the pattern on the Lock screen.
• PIN: Use PIN to unlock your phone. - Password: Use password to unlock your phone.
Enable Face unlock
If you have registered face data before, switch on Face Unlock to enable it. Note: Before enabling face unlock, follow the steps below to register face data first.
- Tap Face Unlock Enroll and enter the correct screen lock method.
- Tap Add face data, and follow the screen instruction to register face data.
Remove face data
- Tap Face Unlock Enroll and enter the correct screen lock method.
- Tap Remove Face data.
12. 10 Location
Enable location-based services to ensure that map, navigation, weather and other apps can access your location information.
On the Home screen, tap 📋 Settings > Security & location > Location, turn on Use location switch and you can view the recent location requests, your location services and configure the App-level permissions and Scanning to improve location services.
12.11 Accounts
When you use your phone for the first time, you can set up a connection with your existing account or create a new account.
On the Home screen, tap ⚙️ Settings > Accounts to configure the following settings:
Add an account
-
Tap -Add account.
-
Select an account type, and then follow the onscreen instructions to enter your account information.
Delete an account
Tap the account that you want to delete, and tap REMOVE ACCOUNT.
Synchronize accounts
Enable the sync feature to keep all of your phone's data up-to-date and prevent data loss. You can sync emails, contacts, and other data from your old phone or computer. The type of data that can be synced depends on the account type. Some apps may not support syncing for all data types.
Synchronize accounts according to your needs:
- Auto sync data of all accounts: Switch on Automatically sync data to let apps refresh data automatically. Then any changes you make to your accounts on the web will be automatically copied to your phone. Some accounts may also automatically copy any changes you make on the phone to the web. A Google account works this way.
- Auto sync data of certain accounts: Select the account you want to synchronize and tap Account sync. Turn on the switches of apps you want to sync, and tap :> Sync now.
12. 12 Accessibility
Accessibility features make it easier for users with impaired vision or hearing to use their phone. On the Home screen, tap ⚙️ Settings > Accessibility and configure the following options:
Volume key shortcut
-
Tap Volume key shortcut and turn on the Use service switch.
-
Tap Shortcut service and select a shortcut service for Volume key.
Text-to-speech output
This feature converts text into speech for visually impaired users. Text-to-Speech (TTS) output requires TalkBack to be enabled.
-
Tap Text-to-Speech output.
-
Set preferred engine, language and adjust the speech rate and pitch, and then tap PLAY.
12. 13 Change system language
-
On the Home screen, tap 📋 Settings > System > Languages & input > Languages > + Add a language and select the language you need.
-
Drag ≡ of the language you want to the top of the list, and then the system language will change as you need.
12. 14 Gestures
On the Home screen, tap ⚙️ Settings > System > Gestures and use gestures to configure the following options:
- Jump to camera: Switch on Jump to camera to quickly open Camera by pressing the Power button twice from any screen.
- Prevent ringing: Tap Prevent ringing > Press Power & Volume Up together and choose an effect.
12. 15 Date and time
On the Home screen, tap 📋 Settings > System > Date & time to configure the following settings:
- Automatic date & time: Turn on the switch to use network-provided time. Turn off the switch and manually adjust date and time by tapping Set date and Set time.
- Automatic time zone: Turn on the switch to use the network-provided time zone. Turn on the switch to manually adjust the time zone by tapping Select time zone.
- Automatic 24-hour-format: Turn on the switch to use automatic 24-hour-format of locale default time.
- Use 24-hour format: Turn on the switch to enable 24-hour format.
12. 16 Backup and reset
Backups help ensure that you never lose your data. You can back up app data, WLAN passwords and other settings to Google servers. Restore your phone to its factory settings if it crashes or is slow to respond.
Backup your data
- On the Home screen, tap 📋 Settings > System > Backup and switch on Back up to Google Drive.
- Select an account and follow the onscreen instruction to complete the backup.
Reset factory settings
Restore your phone to its factory settings if it crashes or is slow to respond. Restoring factory settings will erase all personal data from your phone's internal storage, including your Google account, system and app data and settings, downloaded apps, music, photos and other user data. Back up important data on your phone before restoring factory settings. For more information about data backup, see Backup your data.
On the Home screen, tap 📋 Settings > System > Advanced > Reset options > Erase all data (factory reset) > RESET PHONE to restore your phone to factory settings. Your phone will restart automatically when the process is complete. If you have set a screen lock, you will need to confirm your pattern, PIN, or password first so as to continue.
12. 17 System update
Update your phone's system to the latest version to enhance performance.
- Connect the mobile network or WLAN network, and ensure that your phone has at least 30% battery power remaining.
- On the Home screen, tap Settings > System > System update, your phone will automatically download update packages over WLAN by default.
- Tap DOWNLOAD NOW.
12. 18 About phone
On the Home screen, tap ⚙️ Settings > System > About phone to view information about the status, Android™ version, model number, build number and more.
Appendix A: Specifications
| Specificaitons for C9s | |
| Size and Weight | Height: 148.3 mmWidth: 72.3mmDepth: 8.85 mmWeight: TBD |
| Color Black/Red | |
| Display | 5.71inches, HD+(1520x 720), V-notch295PPIIPS |
| CPU | MTK MT67614x2.0GHzGPU: IMG GE8300 660Mhz |
| Memory | 2GB RAM+16GB ROM2GB RAM+32GB ROM(C Version Only) |
| External Memory 128 GB | |
| Camera | Front 5 Mega-pixelRear 13 Mega-pixel, Auto Focus |
| Network | Dual Nano SIM Cards (Dual SIM Dual Standby)4G LTE/3G WCDMA/2G GSMTP7061A:2G:Band 2/3/5/83G:Band 1/5/84G:Band 1/3/5/7/8/20TP7061C:2G: Band 2/53G: Band 2/4/54G: Band 2/4/7/28 A&B |
| Sensors | Compass, Accelerometer, Ambient Light Sensor, Proximity Sensor |
| Audio | Audio Format:MP3,AAC,WAV,M4A,OGG,OGA,AMR,AWB,FLAC,MID,MIDI,XMF,IMY,RTTTL,RTX,MP4,3GPSingle Mic |
| Video | Video Format:M4V,MP4,MOV,AVI,3GP,3G2,FLV,MKV,WEBMDecoder: 1080P/30fpsEncoder: 1080P/30fps |
| Connectivity | Wi-Fi 802.11a/b/g/n/ac, 2.4G,5GMicro USBBluetooth: 5.0 |
| Location Technology | GPS/A-GPS, GLONASS,GALILEO |
| Cloud Service Supported | |
| Operation System | Android P(9.0) |
| Battery | 3000mAh(typical) |
| In the box | Neffos C9sChargerUSB CableQuick Start GuideWarranty NoticeSafety Notice |
| Specificaitons for C9 Max | |
| Size and Weight | Height: 157.5 mmWidth: 75mmDepth: 8.8 mmWeight: 150g (TP7061); 162g (TP7062) |
| Color | Black/Red |
| Display | 6.09inches, HD+(1560x 720), V-notch282PPIIPS |
| CPU | MTK MT67614x2.0GHzGPU: IMG GE8300 660Mhz |
| Memory | 2GB RAM+32GB ROM |
| External Memory | 128 GB |
| Camera | Front 5 Mega-pixelRear 13 Mega-pixel, Auto Focus |
| Network | Dual Nano SIM Cards (Dual SIM Dual Standby)4G LTE/3G WCDMA/2G GSMTP7062A:2G:Band 2/3/5/83G:Band 1/5/84G:Band 1/3/5/7/8/20TP7062C:2G: Band 2/53G: Band 2/4/54G: Band 2/4/7/28 A&B |
| Sensors | Compass, Accelerometer, Ambient Light Sensor, Proximity Sensor |
| Audio | Audio Format:MP3,AAC,WAV,M4A,OGG,OGA,AMR,AWB,FLAC,MID,MIDI,XMF,IMY,RTTTL,RTX,MP4,3GPSingle Mic |
| Video | Video Format:M4V,MP4,MOV,AVI,3GP,3G2,FLV,MKV,WEBMDecoder: 1080P/30fpsEncoder: 1080P/30fps |
| Connectivity | Wi-Fi 802.11a/b/g/n/ac, 2.4G,5GMicro USBBluetooth: 5.0 |
| Location Technology | GPS/A-GPS, GLONASS,GALILEO |
| Cloud Service | Supported |
| Operation System | Android P( 9.0) |
| Battery | 3000mAh(typical) |
| In the box | Neffos C9 MaxChargerUSB CableQuick Start GuideWarranty NoticeSafety Notice |
Appendix B: Technical Support
| Countries/Regions | Support | ||
| Global | Website www.neffos.com | ||
| Tel+86 755 26504400 | |||
| info@neffos.comsupport@neffos.com | |||
| Address | South Building, No.5 Keyuan Road, Central Zone, Science & Technology Park, Nanshan, Shenzhen, P. R. ChinaPostcode: 518057 | ||
| Brazil | Website www.neffos.com.br | ||
| Tel | 4007-2172 (Capitais e Regiões metropolitanas)0800-608-9799 (Demais localidades)11 2222-1245 (SP)21 3180-0092 (RJ) | ||
| E-mail suporte.br@neffos.com | |||
| Service Time | segunda a sexta-feira das 09:00 as 18:00 Sábado das 09:00 as 15:00 | ||
| Americas | Mexico | Website www.neffos.com.mx | |
| Tel+52 55 91388104 | |||
| sales.mx@tp-link.comsupport.mx@tp-link.com | |||
| Address | Goldsmith 53, Piso 1, Col. Polanco Chapultepec Del. Miguel Hidalgo, México , Distrito Federal C.P. 11560. | ||
| Columbia | Website www.neffos.com/co | ||
| Tel+57 (1)8773545 | |||
| E-mail support.co@tp-link.com | |||
| Address | Autop. Medellín Km 1.5 Vía Parque la Florida, Bod. 45 Parque Ind. Terrapuerto, Cota, Cund. | ||
| Peru | Website www.neffos.com.pe | ||
| Tel+51 1 2402960 Anexo 2967 | |||
| E-mail Alejandro.torres@tp-link.com | |||
| Address | Avenida Republica de Panamá 3545 Oficina 802. San Isidro. Lima Perú | ||
| Americas Venezuela | United Arab Emirates | Website www.neffos.com.ve | |
| Tel+86 755 265 | 04400 | ||
| info@neffos.comsupport@neffos.com | |||
| Address | South Building, No.5 Keyuan Road, Central Zone, Science & Technology Park, Nanshan, Shenzhen, P. R. ChinaPostcode: 518057 | ||
| Middle East & Africa | Website www.neffos.ae | ||
| Tel | +971-4-396-6356 (UAE)+966-9200-07658 (Saudi) | ||
| E-mail support.mea@neffos.com | |||
| Address | Office 501, The Business Center, Khalid Bin Al Waleed Road, P.O. Box 125857, Dubai, U.A.E | ||
| Europe | Germany | Website www.neffos.de | |
| Tel | +49 1806-633367(Mon-Fr 8: 00-17: 00; 20ct/Anruf aus dem dt. Festnetz) | ||
| support.de@neffos.comsales.de@neffos.com | |||
| Address | TP-LINK Deutschland GmbH, Robert-Bosch-Straße 9, 65719 Hofheim am Taunus | ||
| France | Website www.neffos.fr | ||
| Tel+33 (0)5 63 21 27 41 | |||
| support.fr@neffos.com (Support technique)info.fr@neffos.com (Questions d'ordres générales)sales.fr@neffos.com (Commercial)rma.fr@neffos.com (Service après-vente) | |||
| Address | 16-18 avenue Morane Saulnier, 78140 Vélizy-Villacoublay, France. | ||
| Greece | Website www.neffos.gr | ||
| Tel210-5197500 | |||
| E-mail support.gr@neffos.com | |||
| Service time 09 00 - 17.00 | |||
| Address ∧. Kηφού38 – 38A, 104-42 | |||
| Portugal Website www.neffos.com.pt | |||
| Europe | Portugal | Tel+351 707 101 414 | |
| E-mail suporte.pt@neffos.com | |||
| Service time | De Segunda a Sexta (excepto feriados), das 09h00 às 13h00 e das 14h00 às 18h00. | ||
| Address Rua Gonçalo Sampaio, N°271, 1° 4150-367 Porto | |||
| Italy | Website www.neffos.it | ||
| Tel | +39 0221116579 (Supporto tecnico post vendita) +39 02 92392211 (Informazioni per il tuo business) | ||
| support.it@neffos.com (Supporto tecnico post vendita) sales.it@neffos.com (Informazioni per il tuo business) | |||
| Address Via Gobetti 2/A, 20063 Cernusco sul Naviglio (MI) | |||
| Russia | Website www.neffos.ru | ||
| Tel | 8 (495) 228 55 668 (495) 228-55-60 (для Москвы и Московской области)8 (800) 250-55-60 (бесплатно из любого региона РФ) | ||
| Info.ru@neffos.com support.ru@neffos.com service.ru@neffos.com | |||
| Address г. Москва, ул. Электрозаводская, 27 стр. 7 офис 501 | |||
| Spain | Website www.neffos.es | ||
| Tel902 060 365 | |||
| info.es@neffos.com soporte.es@neffos.com | |||
| Address | Calle Quintanavides 17, 3a planta Puerta E, 28050 Madrid | ||
| Bulgaria | Website www.neffos.bg | ||
| Tel | +40 311 070 963 +40 311 011 290 | ||
| support.ro@neffos.com info.ro@neffos.com service.ro@neffos.com sales.ro@neffos.com | |||
| Europe | Czech | Website cz.neffos.com | |
| Tel | CZ +420 212 812 625SK +421 233 056 981 | ||
| sales.cz@neffos.com | |||
| Address Kutvirtova 339/5, Praha 5, 150 00 | |||
| Romania | Website www.neffos.ro | ||
| Tel | +40 311 070 963+40 311 011 290 | ||
| support.ro@neffos.cominfo.ro@neffos.comservice.ro@neffos.comsales.ro@neffos.com | |||
| Poland | Website www.neffos.pl | ||
| Tel | +48 (0) 801 002 228+48 22 360 63 90 (dla połączeń z telefonów komórkowych)Opłata: Zgodnie z taryfą operatora | ||
| Service time Od | poniedziałku do piątku w godzinach 9:00-17:00 | ||
| neffos.pl@tp-link.comsupport.pl@neffos.com (Wsparcie techniczne) | |||
| Address ul. Ożarowska 40/42, Duchnice 05-850, Poland | |||
| Turkey | Website www.neffos.com/tr | ||
| Tel0212 359 0 359 / 0212 287 27 27 | |||
| support.tr@neffos.comsales.tr@neffos.com | |||
| Address | Genpa Telekomünikasyon ve İletişim Hizmetleri San. Tic.A.Ş.Etiler Mah. Nispetiye Cad.No:101 34337 Etiler Beşiktaş / İstanbul | ||
| Europe Ukraine | Website www.neffos.com/ru-ua | ||
| Tel | 0 (800) 505-508 3 вонки бесплатные (стоимость звонков на горячую линию согласно тарифам вашего оператора) и (044) 590-51-14 (звонки платные),ПН-ЧТ, с 10:00 до 22:00, ПТ с 10:00 до 21 : 00, СБ, ВС - нерабочие дни.+38 (044) 590-51-77(Сервисный центр) | ||
| service.ua@tp-link.comsales.ua@tp-link.com | |||
| Address | Украина, 04053, Киев, ул. Металлистов, 20, Офисний центр VEDA, 2-й этаж | ||
| Asia-pacific | India | Website www.neffos.in | |
| E-mail marketing.in@neffos.com | |||
| Address | 401, peninsula heights, C.D. Barfiwala Road, Juhu lane.Andheri (west) Mumbai 400058 - India. | ||
| Indonesia | Website www.neffos.co.id | ||
| Tel+86 755 26504400 | |||
| info@neffos.comsupport@neffos.com | |||
| Address | South Building, No.5 Keyuan Road, Central Zone, Science & Technology Park, Nanshan, Shenzhen, P. R. ChinaPostcode: 518057 | ||
| Malaysia | Website www.neffos.my | ||
| Tel1800 22 8887 | |||
| E-mail support.my@neffos.com | |||
| Address | Lot 3.01 - Lot 3.02, 3rd Floor, Podium Block, Plaza Berjaya, 12, Jalan Imbi 55100 Kuala Lumpur | ||
| Thailand | Website www.neffos.com/th | ||
| Tel02-4400029 | (к่าบริการขึ้นอยู่กับเครือช่ายที่ใช้งาน) | ||
| Service time 08 | 30 - 17:30 วันจันทร์-เสาร์ | ||
| E-mail support.th@neffos.com | |||
| Address | บริษัท ทีพี-ลิงค์ เอ็นเตอร์ไพรส์ (ประเทศไทย) จํากัด (ล้านักงานใหญ่) 77/159อาคารสินสารรส方面เวอร์ ชั้น 36 ถนนกรุงธนบุรี แขวงคลองดันไทร เขตคลองスタン กรุงเทพฯ 10600 | ||
| Asia-pacific | Vietnam | Website www.neffos.vn | |
| Tel+84 8 66894 | 777 (Gi ở hành chính) | ||
| press.vn@neffos.comsupport.vn@neffos.comsales.vn@neffos.com/ sales.vn@tp-link.com | |||
| Address | 12A-15 Tòa nhà Vincom, 45A Lý T ự Trọng, Quận 1, TP.Hồ Chí Minh, Việt Nam | ||
| Banglad-esh | Website | www.neffos.com/bd | |
| Tel | +86 755 26504400 | ||
| info@neffos.comsupport@neffos.com | |||
| Address | South Building, No.5 Keyuan Road, Central Zone,Science & Technology Park, Nanshan, Shenzhen, P. R.ChinaPostcode: 518057 | ||
| Singapore | Website | www.neffos.sg | |
| Tel | +65 6727 4987 (Service Centre, 9:00 am – 7:30 pm Mon-Fri)+65 6727 4973 (Service Centre, 9:00 am – 5:30 pm Mon-Fri)+65 6727 4980 (24/7 Global Support Hotline) | ||
| sales.sg@tp-link.com | |||
| Address | 12 Kallang Avenue #03-30 Aperia Singapore 339511,9:00 am to 7:30 pm (Mon - Fri) | ||
Appendix C: Explanation of the symbols on the product label
The meaning of symbols on the product label is explained below.
| Symbol Explanation | |
 | RECYCLINGThis product bears the selective sorting symbol for Waste electrical and electronic equipment (WEEE). This means that this product must be handled pursuant to European directive 2012/19/EU in order to be recycled or dismantled to minimize its impact on the environment. User has the choice to give his product to a competent recycling organization or to the retailer when he buys a new electrical or electronic equipment. |
 | To prevent possible hearing damage, do not listen at high volume levels for long periods. |
Appendix D: Authentication
COPYRIGHT & TRADEMARKS
Specifications are subject to change without notice. n/aregistered trademark of TP-Link
Technologies Co., Ltd. Other brands and product names are trademarks or registered trademarks of their respective holders.
No part of the specifications may be reproduced in any form or by any means or used to make any derivative such as translation, transformation, or adaptation without permission from TP-Link Technologies Co., Ltd. Copyright © 2019 TP-Link Technologies Co., Ltd. All rights reserved.
Google, Android, Google Play and other marks are trademarks of Google LLC; Oreo is a trademark of Mondelez International, Inc. group.
The Bluetooth ^® word mark and logos are registered trademarks owned by Bluetooth SIG, Inc. And any use of such marks by TP-Link Technologies Co., Ltd. is under license.
http://www.neffos.com
FCC STATEMENT
This equipment has been tested and found to comply with the limits for a Class B digital device, pursuant to part 15 of the FCC Rules. These limits are designed to provide reasonable protection against harmful interference in a residential installation. This equipment generates, uses and can radiate radio frequency energy and, if not installed and used in accordance with the instructions, may cause harmful interference to radio communications. However, there is no guarantee that interference will not occur in a particular installation. If this equipment does cause harmful interference to radio or television reception, which can be determined by turning the equipment off and on, the user is encouraged to try to correct the interference by one or more of the following measures:
- Reorient or relocate the receiving antenna.
- Increase the separation between the equipment and receiver.
- Connect the equipment into an outlet on a circuit different from that to which the receiver is connected.
- Consult the dealer or an experienced radio/ TV technician for help.
This device complies with part 15 of the FCC Rules. Operation is subject to the following two conditions:
- This device may not cause harmful interference.
- This device must accept any interference received, including interference that may cause undesired operation.
Any changes or modifications not expressly approved by the party responsible for compliance could void the user's authority to operate the equipment.
Note: The manufacturer is not responsible for any radio or TV interference caused by unauthorized modifications to this equipment. Such modifications could void the user's authority to operate the equipment.
FCC RF Radiation Exposure Statement
The exposure recommendations for mobile phones use a measurement unit known as the Specific Absorption Rate (SAR). The SAR limit recommended by the ICNIRP for the mobile phones used by the general public is 1.6W/kg averaged over one gram of tissue by IEEE Std 1528 for the head. The highest SAR value for this model phone when tested was 1.02 W/kg for head, 0.93 W/kg for Body-worn and 0.93 W/kg for hotspot.
For limiting the radio waves exposure, it is recommended to reduce the mobile phone call duration or to use a headset. The purpose of those precautions is to take the mobile phone away from the head and the body. For body worn operation, this phone has been tested and meets FCC RF exposure guidelines when used with an accessory that contains no metal and that positions the handset a minimum of 10mm from the body. For hotspot operation, the distance is 10mm. Use of other accessories may not ensure compliance with FCC RF exposure guidelines.

Personal information and data security
The use of some functions or third-party applications on your device could result in your personal information and data being lost or becoming accessible to others. Several measures are recommended to help you protect personal and confidential information.
Place your device in a safe area to prevent it from unauthorized use.
- Set your device screen to lock and create a password or unlock pattern to open it.
- Periodically back up personal information kept on your USIM card, memory card, or stored in your device memory. If you change to a different device, be sure to move or delete any personal information on your old device.
- If you are worried about viruses when you receive messages or emails from a stranger, you can delete them without opening them.
- If you use your device to browse the internet, avoid websites that might pose a security risk to avoid theft of your personal information.
- If you use services such as WLAN tether or Bluetooth, set passwords for these services to prevent unauthorized access. When these services are not in use, turn them off.
• Install or upgrade device security software and regularly scan for viruses. - Be sure to obtain third-party applications from a legitimate source. Downloaded third-party applications should be scanned for viruses.
• Install security software or patches released by Neffos or third-party application providers. - Some applications require and transmit location information. As a result, a third-party may be able to share your location information.
- Your device may provide detection and diagnostic information to third-party application providers. Third party vendors use this information to improve their products and services.
- If you have concerns about the security of your personal information and data, please contact support@neffos.com.
Legal notice
Copyright © 2019 TP-Link Technologies Co., Ltd. All rights reserved.
Trademarks and permissions
neffos is a registered trademark of TP-Link Technologies Co., Ltd.
The Bluetooth ^® word mark and logos are registered trademarks owned by Bluetooth SIG, Inc. and any use of such marks by TP-Link Technologies Co., Ltd. is under license.
Other trademarks, product, service and company names mentioned may be the property of their respective owners.
Third-Party software statement
Neffos does not own the intellectual property of the third-party software and applications that are delivered with this product. Therefore, Neffos will not provide any warranty of any kind for third party software and applications. Neither will Neffos provide support to customers who use third-party software and applications, nor be responsible or liable for the functions or performance of third-party software and applications.
Third-party software and applications services may be interrupted or terminated at any time, and Neffos does not guarantee the availability of any content or service. Third-party service providers provide content and services through network or transmission tools outside of the control of Neffos. To the greatest extent permitted by applicable law, it is explicitly stated that Neffos shall not compensate or be liable for services provided by third-party service providers, or the interruption or termination of third-party contents or services. Neffos shall not be responsible for the legality, quality, or any other aspects of any software installed on this product, or for any uploaded or downloaded third-party works in any form, including but not limited to texts, images, videos, or software etc. Customers shall bear the risk for any and all effects, including incompatibility between the software and this product, which result from installing software or uploading or downloading the third-party works.
This product is based on the open-source Android platform. Neffos has made necessary changes
to the platform.
Therefore, this product may not support all the functions that are supported by the standard Android platform or may be incompatible with third-party software. Neffos does not provide any warranty or representation in connect with any such compatibility and expressly excludes all liability in connection with such matters.
DISCLAIMER
ALL CONTENTS OF THIS MANUAL ARE PROVIDED "AS IS". EXCEPT AS REQUIRED BY APPLICABLE LAWS, NO WARRANTIES OF ANY KIND, EITHER EXPRESS OR IMPLIED, INCLUDING BUT NOT LIMITED TO, THE IMPLIED WARRANTIES OF MERCHANTABILITY AND FITNESS FOR A PARTICULAR PURPOSE, ARE MADE IN RELATION TO THE ACCURACY, RELIABILITY OR CONTENTS OF THIS MANUAL.
TO THE MAXIMUM EXTENT PERMITTED BY APPLICABLE LAW, IN NO EVENT SHALL NEFFOS BE LIABLE FOR ANY SPECIAL, INCIDENTAL, INDIRECT, OR CONSEQUENTIAL DAMAGES, OR LOSS OF PROFITS, BUSINESS, REVENUE, DATA, GOODWILL SAVINGS OR ANTICIPATED SAVINGS REGARDLESS OF WHETHER SUCH LOSSES ARE FORSEEABLE OR NOT.
THE MAXIMUM LIABILITY (THIS LIMITATION SHALL NOT APPLY TO LIABILITY FOR PERSONAL INJURY TO THE EXTENT APPLICABLE LAW PROHIBITS SUCH A LIMITATION) OF NEFFOS ARISING FROM THE USE OF THE PRODUCT DESCRIBED IN THIS MANUAL SHALL BE LIMITED TO THE AMOUNT PAID BY CUSTOMERS FOR THE PURCHASE OF THIS PRODUCT.
Privacy policy
To better understand how we protect your personal information, please see the privacy policy at www.neffos.com.
Safety information
This section contains important information about the operation of your device. It also contains information about how to use the device safely. Read this information carefully before using your device.
Electronic device
Do not use your device if using the device is prohibited. Do not use the device if doing so causes danger or interference with other electronic devices.
Interference with medical equipment
- Follow rules and regulations set forth by hospitals and health care facilities. Do not use your device where prohibited.
- Some wireless devices may affect the performance of hearing aids or pacemakers. Consult your service provider for more information.
- Avoid using your device within a 15 cm range of a pacemaker if possible, as your device can interfere with the pacemaker. To minimize possible interference with a pacemaker, use your device only on the side of your body that is opposite the pacemaker.
- If you use medical equipment, contact the equipment manufacturer before using your device to determine whether or not the equipment will be affected by radio frequencies emitted by the device.
- Do not use your device near devices or apparatuses that emit radio frequencies, such as sound systems or radio towers Radio frequencies may cause your device to malfunction.
- Do not use your device near devices or apparatuses that emit radio frequencies, such as sound systems or radio towers. Radio frequencies may cause your device to malfunction.
- Electronic devices in your car may malfunction, due to radio interference from your device. Contact the manufacturer for more information.
Protecting your hearing when using a headset
- To prevent possible hearing damage, do not listen at high volume levels for long periods.
- Using a headset at high volumes may damage your hearing. To reduce this risk, lower the headset volume to a safe and comfortable level.
- Exposure to high volumes while driving may cause distraction and increase your risk of an accident.
- Do not use a headset while driving or riding. Doing so may distract your attention and cause an accident, or may be illegal depending on your region.
Areas with flammables and explosives
- Turn off your device in potentially explosive environments instead of removing the battery. Always comply with regulations, instructions and signs in potentially explosive environments.
- Do not use your device at refueling points (petrol stations), near fuels or chemicals, or in blasting areas.
- Do not store or carry flammable liquids, gases, or explosive materials in the same compartment as the device, its parts, or accessories.
Traffic security
- Observe local laws and regulations while using the device. To reduce the risk of accidents, do not use your wireless device while driving.
- Concentrate on driving. Your first responsibility is to drive safely.
- Do not hold the device while driving. Use hands-free accessories.
- When you must make or answer a call, pull of the road safely and park the vehicle first.
- RF signals may affect the electronic systems of motor vehicles. For more information, consult the vehicle manufacturer.
- Do not place the device over the air bag or in the air bag deployment area in a motor vehicle. Doing so may hurt you because of the strong force when the air bag inflates.
- On an aircraft, using electronic devices can interfere with the aircraft's electronic navigational instruments. Make sure the device is turned off during takeoff and landing. After takeoff, you can use the device in flight mode if allowed by aircraft personnel.
Operating environment
- Do not expose the device to heavy smoke or fumes. Doing so may damage the outside of the device or cause it to malfunction.
- Do not use or store your device in areas with high concentrations of dust or airborne materials. Dust or foreign materials can cause your device to malfunction and may result in fire or electric shock.
- Do not use your device during thunderstorms to protect your device against any danger caused by lightning.
- Avoid exposing your device and battery to very cold or very hot temperatures. Extreme temperatures can damage the device and reduce the charging capacity and life of your device and battery.
- Prevent the battery from coming into contact with metal objects, as this can create a connection between the + and – terminals of your battery and lead to temporary or permanent battery damage.
- Do not expose your device to direct sunlight (such as on a car dashboard) for prolonged periods.
-
To protect your device or accessories from fire or electrical shock hazards, avoid rain and moisture.
-
Keep the device away from sources of heat and fire, such as a heater, microwave oven, stove, water heater, radiator, or candle.
- Do not place sharp metal objects, such as pins, near the earpiece or speaker. The earpiece may attract these objects and result in injury.
- Prevent the multipurpose jack and the small end of the charger from contact with conductive materials, such as liquids, dust, metal powders, and pencil leads. Conductive materials may cause a short circuit or corrosion of the terminals, which may result in an explosion or fire.
- Stop using your device or applications for a while if the device is overheated. If skin is exposed to an overheated device for an extended period, low temperature burn symptoms, such as red spots and darker pigmentation, may occur.
- Do not touch the device's antenna. Otherwise, communication quality may be reduced.
- Do not allow children or pets to bite or suck the device or accessories. Doing so may result in damage or explosion.
- Observe local laws and regulations, and respect the privacy and legal rights of others.
- Do not use your device's camera flash directly in the eyes of people or pets. Otherwise temporary loss of vision or damage to the eyes may occur.
- While using your device, leave some lights on in the room and do not hold the screen too close to your eyes.
Child's safety
- Comply with all precautions with regard to child's safety. Letting children play with the device or its accessories may be dangerous. The device includes detachable parts that may present a choking hazard. Keep away from children.
- The device and its accessories are not intended for use by children. Children should only use the device with adult supervision.
Accessories
- Using an unapproved or incompatible power adapter, charger or battery may cause fire, explosion or other hazards.
- Use manufacturer-approved batteries, chargers, accessories, and supplies
- Using generic batteries or chargers may shorten the life of your device or cause the device to malfunction. They may also cause a fire or cause the battery to explode.
- TP-LINK cannot be responsible for the user's safety when using accessories or supplies that are not approved by TP-LINK.
Charger safety
- For pluggable devices, the socket-outlet shall be installed near the devices and shall be easily accessible.
- Unplug the charger from electrical outlets and the device when not in use.
- Do not drop or cause an impact to the charger.
- Do not use damaged power cords or plugs, or loose electrical sockets. Unsecured connections can cause electric shock or fire.
- Never use a damaged charger or battery.
- Do not touch the device or the charger with wet hands. Doing so may lead to short circuits, malfunctions, or electric shocks.
- If your charger has been exposed to water, other liquids, or excessive moisture, take it to an authorized service center for inspection.
-
Ensure that the charger meets the requirements of Clause 2.5 in IEC60950-1/EN60950-1 and has been tested and approved according to national or local standards.
-
Connect the device only to products with the USB-IF logo or with USB-IF compliance program completion.
- Do not bend or damage the power cord. Doing so may cause electric shock or fire.
- Do not use your device while it is charging or touch your device with wet hands. Doing so may cause electric shock.
- Do not short-circuit the charger or the device. Doing so may cause electric shock or fire, or the battery may malfunction or explode.
Battery safety
- Do not connect battery poles with conductors, such as keys, jewelry, or other metal materials. Doing so may short-circuit the battery and cause injuries or burns.
- Keep the battery away from excessive heat and direct sunlight. Do not place it on or in heating devices, such as microwave ovens, stoves, or radiators. Batteries may explode if overheated.
- Do not attempt to modify or remanufacture the battery, insert foreign objects into it, or immerse or expose it to water or other liquids. Doing so may lead to fire, explosion, or other hazards.
- If the battery leaks, ensure that the electrolyte does not make direct contact with your skins or eyes. If the electrolyte touches your skins or splashes into your eyes, immediately flush with clean water and consult a doctor.
- In case of battery deformation, color change, or overheating while charging or storing, immediately stop using the device and remove the battery. Continued use may lead to battery leakage, fire, or explosion.
- Do not put batteries in fire as they may explode. Damaged batteries may also explode.
- Dispose of used batteries in accordance with local regulations. Improper battery use may lead to fire, explosion, or other hazards.
- Do not bite or suck the device or the battery. Doing so may damage the device or result in an explosion or fire.
- Do not smash or pierce the battery, or expose it to high external pressure. Doing so may lead to a short circuit or overheating.
- Do not drop the device or battery. If the device or battery is dropped, especially on a hard surface, and may be damaged.
- If the device standby time shortens significantly, replace the battery.
- Do not handle a damaged or leaking Lithium Ion (Li-Ion) battery. For safe disposal of your Li-Ion battery, contact your nearest authorized service center.
- If you notice strange smells or sounds coming from your device or the battery, or if you see smoke or liquids leaking from the device or battery, stop using the device immediately and take it to a TP-LINK Service Centre. Failure to do so may result in fire or explosion.
CAUTION
RISK OF EXPLOSION IF BATTERY IS REPLACED BY AN INCORRECT TYPE. DISPOSE OF USED BATTERIES ACCORDING TO THE INSTRUCTIONS.
Cleaning and maintenance
- Keep the device and accessories dry. Do not attempt to dry it with an external heat source, such as a microwave oven or hair dryer. Do not turn on your device if it is wet. If your device is already on, turn it off and remove the battery immediately (if the device will not turn off or you cannot remove the battery, leave it as-is). Then, dry the device with a towel and take it to a service canter.
- Do not expose your device or accessories to extreme heat or cold. These environments may interfere with proper function and may lead to fire or explosion.
-
Avoid collision, which may lead to device malfunctions, overheating, fire, or explosion.
-
Before you clean or maintain the device, stop using it, stop all applications, and disconnect all cables connected to it.
- Do not use any chemical detergent, powder, or other chemical agents (such as alcohol and benzene) to clean the device or accessories. These substances may cause damage to parts or present a fire hazard. Use a clean, soft, and dry cloth to clean the device and accessories.
- Do not store your device near magnetic fields for extended periods of time. Your device may malfunction or the battery may discharge from exposure to magnetic fields. Magnetic stripe cards, including credit cards, phone cards, passbooks, and boarding passes, may be damaged by magnetic fields.
- Do not use your device with the back cover removed. The battery may fall out of the device, which may result in damage or malfunction.
- Do not dismantle or remanufacture the device and its accessories. This voids the warranty and releases the manufacturer from liability for damage. In case of damage, contact an authorized service center for assistance or repair.
- If the device screen is broken in a collision, immediately stop using the device. Do not touch or attempt to remove the broken parts. Promptly contact an authorized service center.
- Do not store your device with metal objects, such as coins, keys, and necklaces. Your device may be scratched or may malfunction. If the battery terminals come into contact with metal objects, this may cause a fire.
Emergency calls
The availability of emergency calls is subject to your cellular network quality, service provider policy, and local laws and regulations. Never rely solely on your device for critical communications like medical emergencies.
Environmental protection
- The device and its accessories (if included), such as the power adapter, headset, and battery should not be disposed of with household garbage.
- Disposal of the device and its accessories is subject to local regulations. Support proper collection and recycling.
Disposal and recycling information
This marking on the product, accessories or literature indicates that the product and its electronic accessories (e.g. charger, batteries, headset, USB cable) should not be disposed of with other household waste.
To prevent possible harm to the environment or human health from uncontrolled waste disposal, please separate these items from other types of waste and recycle them responsibly to promote the sustainable reuse of material resources.
Household users should contact either the retailer where they purchased this product, or their local government office, for details of where and how they can take these items for environmentally safe recycling.
Business users should contact their supplier and check the terms and conditions of the purchase contract. This product and its electronic accessories should not be mixed with other commercial wastes for disposal.
This product is RoHS compliant.
EU regulatory conformance.
Body worn operation
The device complies with RF specifications when used near your ear or at a distance of 5mm from your body. Ensure that the device accessories, such as a device case and device holster, are
not composed of metal components. Keep the device away from your body to meet the distance requirement.
Certification information (SAR)
This device meets guidelines for exposure to radio waves. Your device is a low-power radio transmitter and receiver. As recommended by international guidelines, the device is designed not to exceed the limits for exposure to radio waves. These guidelines were developed by the International Commission on Non-Ionizing Radiation Protection (ICNIRP), an independent scientific organization, and include safety measures designed to ensure the safety of all users, regardless of age and health.
The Specific Absorption Rate (SAR) is the unit of measurement for the amount of radio frequency energy absorbed by the body when using a device. The SAR value is determined at the highest certified power level in laboratory conditions, but the actual SAR level during operation can be well below the value. This is because the device is designed to use the minimum power required to reach the network.
The SAR limit adopted by Europe is 2.0 W/kg averaged over 10 grams of tissue, and the highest SAR value for this device complies with this limit.
The highest SAR value reported for TP7061 when tested at the ear is 0.973 W/kg, and when properly worn on the body is 0.990 W/kg.
The highest SAR value reported for TP7062 when tested at the ear is 0.894 W/kg, and when properly worn on the body is 0.835 W/kg.
Frequency
TP7061&TP7062:
EGSM900: 880-915 MHz(TX); 925-960 MHz(RX)
DCS1800: 1710-1785 MHz(TX); 1805-1880 MHz(RX)
WCDMA B1:1920-1980 MHz(TX), 2110-2170 MHz (RX)
WCDMA B8:880-915 MHz (TX), 925-960 MHz(RX)
LTE B1:1920-1980 MHz(TX), 2110-2170 MHz(RX)
LTE B3:1710-1785 MHz(TX), 1805-1880 MHz(RX)
LTE B8: 880-915 MHz(TX), 925-960 MHz(RX)
LTE B7: 2500-2570 MHz(TX), 2620-2690 MHz(RX)
LTE B20: 832-862 MHz(TX), 791-821 MHz(RX)
Bluetooth/BLE: 2402-2480 MHz(TX) (RX)
2.4G Wi-Fi: 2412-2472 MHz/2422-2462MHz(TX) (RX)
5G Wi-Fi: 5150-5250 MHz(TX) (RX)
GPS L1/GLONASS G1/ Galileo E1: 1559-1610 MHz(RX)
MAX.Of Transmit power:
TP7061:
EGSM900: 33dBm(GMSK), 28dBm(8PSK)
DCS1800: 30dBm(GMSK), 26dBm(8PSK)
WCDMA900/2100: 23dBm
LTE Band 1/3/7/8/20: 24dBm
2.4G Wi-Fi: 17.55dBm(802.11b), 16.29dBm(802.11g)
16.00dBm(802.11n20), 16.22dBm(802.11n40)
5G Wi-Fi: 12.06dBm(802.11a), 11.89dBm(802.11n20), 11.61dBm(802.11n40)
11.89dBm(802.11ac20), 11.67dBm(802.11ac40), 11.55dBm(802.11ac80)
Bluetooth: 5.55dBm, BLE 1M: 4.49dBm, BLE 2M: 4.44dBm
TP7062:
EGSM900: 34dBm(GMSK), 28dBm(8PSK)
DCS1800: 30dBm(GMSK), 26dBm(8PSK)
WCDMA900/2100: 23dBm
LTE Band 1/3/7/8/20: 23dBm
2.4G Wi-Fi: 17.19dBm(802.11b), 17.74dBm (802.11g)
17.16dBm(802.11n20), 16.55dBm(802.11n40)
5G Wi-Fi: 14.90dBm (802.11a), 14.62dBm(802.11n20), 14.91dBm(802.11n40)
14.66dBm (802.11ac20), 14.74dBm(802.11 ac40), 14.65dBm(802.11 ac80)
Bluetooth: 9.62dBm, BLE 1M: 6.26dBm, BLE 2M: 6.24dBm
Declaration of conformity:
TP-Link hereby declares that the device is incompliance with the essential requirements and other relevant provisions of Directive 2014/53/EU, Directive 2014/30/EU, Directive 2014/35/EU, Directive 2011/65/EU, Directive (EU) 2015/863.
The original EU declaration of conformity may be found at http://www.neffos.com/en/ce.
The following marking is included in the product:
CE
This device may be operated in all member states of the EU. Observe national and local regulations where the device is used.
This device may be restricted for use, depending on the local network.