Premium 1200 - Safe WALDIS - Free user manual and instructions
Find the device manual for free Premium 1200 WALDIS in PDF.


| Product Type | Electronic Security Safe |
| Model | Premium 1200 |
| Brand | WALDIS |
| Exterior Dimensions (H x W x D) | Approx. 1200 x 500 x 450 mm |
| Interior Dimensions (H x W x D) | Approx. 1150 x 450 x 350 mm |
| Weight | Approx. 120 kg |
| Locking Mechanism | Electronic keypad with emergency key override |
| Power Supply | 4 x AA batteries (not included) |
| Battery Life | Approx. 1 year under normal use |
| Number of User Codes | 1 master code + up to 9 user codes |
| Code Length | 4-8 digits |
| Construction Material | Steel body, solid steel door |
| Security Features | Drill-resistant hard plate, anti-pry bolts, relocker |
| Fire Resistance | Not specified (assume up to 30 minutes at 800°C based on similar models) |
| Mounting Options | Floor and wall bolt holes (fixing bolts not included) |
| Interior Features | Removable shelf, carpeted floor |
| Included Accessories | 2 emergency keys, mounting template, user manual |
| Cleaning and Maintenance | Wipe with dry cloth; avoid abrasive cleaners. Replace batteries annually. |
| Spare Parts / Repairability | Replacement batteries and emergency keys available; electronic lock serviceable by a locksmith. |
| Warranty | 2 years against manufacturing defects |
Frequently Asked Questions - Premium 1200 WALDIS
User questions about Premium 1200 WALDIS
0 question about this device. Answer the ones you know or ask your own.
Ask a new question about this device
Download the instructions for your Safe in PDF format for free! Find your manual Premium 1200 - WALDIS and take your electronic device back in hand. On this page are published all the documents necessary for the use of your device. Premium 1200 by WALDIS.
USER MANUAL Premium 1200 WALDIS
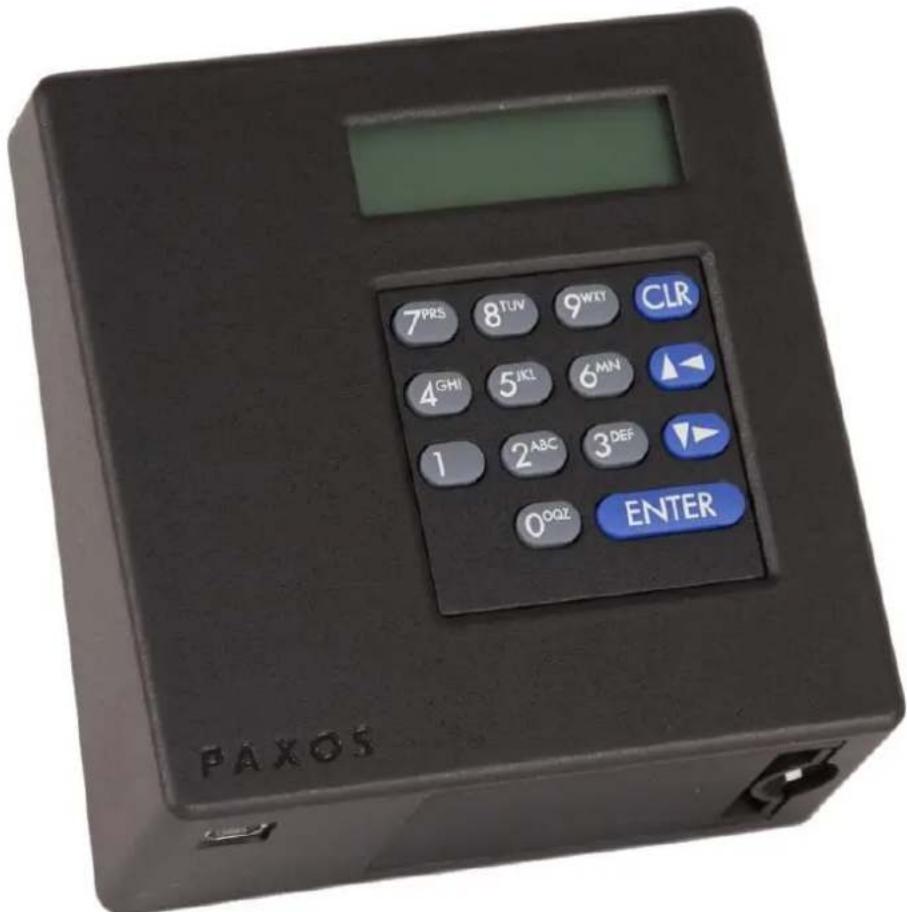
Instructions electronic Paxos Advance double lock keypad lock
text_image
7PRS 8TUV 9WTT CLR 4GHI 5JKL 6MN 1 2ABC 3DEF 0OQZ ENTER PAXOS
text_image
MADE SWISSMANY THANKS!
You have chosen a product tested according to EN1143-1.
A Swiss quality product with VdS-tested security.
Please read these instructions carefully before operating your safe!
Opening the lock
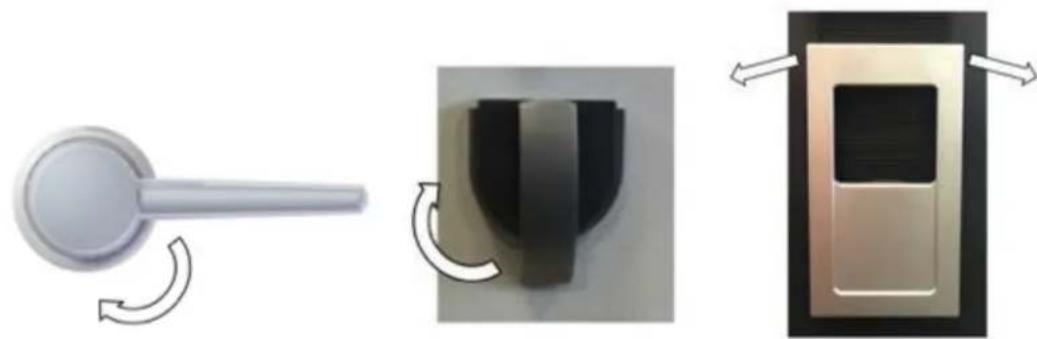
"CLOSE" position
natural_image
Three-step diagram showing a door handle, a U-shaped object with black and gold sections, and a rectangular device with a dark square panel (no text or symbols)
= "OPEN" position
- First turn the opening handle anti-clockwise in the closed position (horizontal). This will release the bolt.
- Press Enter and the display will show 'date, time and secured'. Press Enter again and the display will show 'Open menu'.
- Press Enter and the display will show 'code lock 1......'. Enter code OCa1 11 22 33 10 or code OCb1 11 22 33 20 and confirm by pressing Enter.
- The message 'Lock 1 opening' will be displayed, followed by 'lock opened' and 'code lock 2 .....'. Enter code OCa2 12 22 33 10 or code OCb2 12 22 33 20 and confirm by pressing Enter. 'Lock 2 opening' will be displayed, followed by 'Locks open, open bolt'. Now the opening handle can be pushed down to open the safe door. Display will show 'Unlocked' as well as the date and time.
- The CLR button can be used if a mistake is made while entering the code or if you want to go one step back in the menu while programming.
Closing the lock
- Close the safe door. Turn the opening handle anti-clockwise into the closed position (horizontal). The lock closes automatically and is therefore secured.
Important information:
The Paxos Advance lock system (double-lock version) contains 2 user codes and 1 master code. Up to 95 staff codes can also be defined per lock. The following factory codes are pre-programmed:
The following codes must be changed: The following codes can be changed:
Lock 1:
User code 01 (OCa1): 11 22 33 10 Master code 00 (MA1): 11 99 88 77
User code 02 (OCb1): 11 22 33 20
Lock 2:
User code 01 (OCa2): 12 22 33 10 Master code 00 (MA2): 12 99 88 77
User code 02 (OCb2): 12 22 33 20 (The lock cannot be opened with the master codes; they are required for defining the staff codes)
The electronic Paxos Advance high security lock is usually in 'Sleep mode' (energy-saving mode). The lock can be 'woken up' by pressing the ENTER button.
Code reprogramming
WARNING: User codes 1 and 2 for locks 1 and 2 must both be reprogrammed, because a third party could be aware of the factory code and may therefore be able to open the safe.
User code 01 (OCa1) Lock 1
- When the lock is open, press ENTER, confirm request 'Code functions' by pressing ENTER again
- Select '01 OCa1' using the arrow key and confirm by pressing ENTER
- Display shows 'change', confirm by pressing ENTER
- Enter current code 1 (OCal1) (11 22 33 10 at first use) and confirm by pressing ENTER
- Enter new code (6-8 digits) and confirm by pressing ENTER
- Re-enter new code and confirm by pressing ENTER. Display shows 'Code saved'
- Turn the opening handle upward, the lock closes, test the new code at least 3 times with the door open
User code 02 (OCb1) Lock 1
- When the lock is open, press ENTER, confirm 'Code functions' by pressing ENTER
- Select '02 OCb1' using the arrow key and confirm by pressing ENTER
- Display shows 'change', confirm by pressing ENTER
- Enter current code 2 (OCb1) (11 22 33 20 at first use) and confirm by pressing ENTER
- Enter new code (6-8 digits) and confirm by pressing ENTER
- Re-enter new code and confirm by pressing ENTER. Display shows 'Code saved'
- When the door is open, turn the opening handle upward to close the lock. Test the new code at least 3 times with the door open
User code 01 (OCa2) Lock 2
- When the lock is open, press ENTER and confirm 'Code functions' request by pressing ENTER again
- Select '01 OCa2' using the arrow key and confirm by pressing ENTER
- Display shows 'change', confirm by pressing ENTER
- Enter current code 1 (OCa2) (12 22 33 10 at first use) and confirm by pressing ENTER
- Enter new code (6-8 digits) and confirm by pressing ENTER
- Re-enter new code and confirm by pressing ENTER. Display shows 'Code saved'
- Turn the opening handle upward, the lock closes, test the new code at least 3 times with the door open
User code 02 (OCb2) Lock 2
- When the lock is open, press ENTER and confirm 'Code functions' request by pressing ENTER again
- Select '02 OCb2' using the arrow key and confirm by pressing ENTER
- Display shows 'change', confirm by pressing ENTER
- Enter current code 2 (OCb2) (12 22 33 20 at first use) and confirm by pressing ENTER
- Enter new code (6-8 digits) and confirm by pressing ENTER
- Re-enter new code and confirm by pressing ENTER. Display shows 'Code saved'
- Turn the opening handle upward, the lock closes, test the new code at least 3 times with the door open
Master code 00 (MA1) Lock 1
- When the lock is open, press ENTER and confirm 'Code functions' request by pressing ENTER
- Confirm 'Code functions S 1' by pressing ENTER and confirm '00 MA1' by pressing ENTER
- The display will show 'Change MA1'. Confirm by pressing ENTER
- The display will show 'Code lock 1 (MA)'. Enter current master code (11 99 88 77 at first use) and confirm by pressing ENTER
- Enter new code (6-8 digits) and confirm by pressing ENTER
- Re-enter new code and confirm by pressing ENTER. Display shows 'Code saved'
Recommendation: Use the same code for the master code and user code 01 OCa1 or leave the master code on the factory setting. The lock cannot be opened with the master code.
Master code 00 (MA2) Lock 2
- When the lock is open, press ENTER, confirm 'Code functions' by pressing ENTER
- Select lock 2 using the arrow key and confirm by pressing ENTER
- Confirm 'Code functions S2' by pressing ENTER and confirm '00 MA2' by pressing ENTER
- Confirm 'Change MA2' by pressing ENTER
- Enter current 'Code lock 2 (MA)' code (12 99 88 77 at first use) and confirm by pressing ENTER
- Enter 'new code MA2' (6-8 digits) and confirm by pressing ENTER
- 'Confirm MA2', re-enter new code and confirm by pressing ENTER. Display shows 'Code saved'
Staff codes 03 OCc1 to 95 OC95-1 (Lock 1)
- When the lock is open, press ENTER, confirm 'Code functions' by pressing ENTER
- Confirm 'Code functions Lock 1' by pressing ENTER
- Select 'Code functions S1, + inactive codes' using the arrow key and confirm by pressing ENTER
- Select opening code 03 OCc1, 04 OCd1, 05 OCe1 to 95 OC95-1 using the arrow key and confirm by pressing ENTER
- Enter master code 1 (11 99 88 77 at first use) and confirm by pressing ENTER
- Enter new code (6-8 digits) and confirm by pressing ENTER
- Re-enter new code and confirm by pressing ENTER. Display shows 'Code saved'
- Turn the opening handle upward, the lock closes, test the new code at least 3 times with the door open
Staff codes 03 OCc2 to 95 OC95-2 (Lock 2)
- When the lock is open, press ENTER, confirm 'Code functions' by pressing ENTER
- Select 'Code functions Lock 2' using the arrow key and confirm by pressing ENTER
- Select 'Code functions S2, + inactive codes' using the arrow key and confirm by pressing ENTER
- Select opening code 03 OCc2, 04 OCd2, 05 OCe2 to 95 OC95-2 using the arrow key and confirm by pressing ENTER
- Enter master code 2 (12 99 88 77 at first use) and confirm by pressing ENTER
- Enter new code (6-8 digits) and confirm by pressing ENTER
- Re-enter new code and confirm by pressing ENTER. Display shows 'Code saved'
- When the door is open, turn the opening handle upward to close the lock. Test the new code at least 3 times
Changing a staff code 03 OCc1 to OC95-1 (Lock 1)
- When lock is open, press ENTER, confirm request 'Code functions' by pressing ENTER again
- Confirm 'Code functions Lock 1' by pressing ENTER
- Select opening code 03 OCc1, 04 OCd1, 05 OCe1 to 95 OC95-1 using the arrow key and confirm by pressing ENTER
- Display shows 'change', confirm by pressing ENTER
- Enter the staff code and confirm by pressing ENTER (if you do not know the staff code, the master code can be used instead)
- Enter new code (6-8 digits) and confirm by pressing ENTER
- Re-enter the new code (6-8 digits) and confirm by pressing ENTER. The display will show 'Code saved'
Changing a staff code 03 OCc2 to OC95-2 (Lock 2)
- When lock is open, press ENTER, confirm request 'Code functions' by pressing ENTER again
- Select 'Code functions Lock 2' using the arrow key and confirm by pressing ENTER
- Select opening code 03 OCc2, 04 OCd2, 05 OCe2 to 95 OC95-2 using the arrow key and confirm by pressing ENTER
- Display shows 'change', confirm by pressing ENTER
- Enter the staff code and confirm by pressing ENTER (if you do not know the staff code, the master code can be used instead)
- Enter new code (6-8 digits) and confirm by pressing ENTER
- Re-enter the new code (6-8 digits) and confirm by pressing ENTER. The display will show 'Code saved'
Deleting a staff code 03 OCc1 to OC95-1 (Lock 1)
- When lock is open, press ENTER, confirm request 'Code functions' by pressing ENTER again
- Select opening code 03 OCc1, 04 OCd1, 05 OCe1 to 95 OC95-1 using the arrow key and confirm by pressing ENTER
- Select 'Delete' using the arrow key and confirm by pressing ENTER
- Enter current opening code or master code MA1 and confirm by pressing ENTER, then confirm 'Delete code?' request by pressing ENTER
- Display will show 'Code deleted'
Deleting a staff code 03 OCc2 to OC95-2 (Lock 2)
- When lock is open, press ENTER, confirm request 'Code functions' by pressing ENTER again
- Select 'Code functions Lock 2' using the arrow key and confirm by pressing ENTER
- Select opening code 03 OCc2, 04 OCd2, 05 OCe2 to 95 OC95-2 using the arrow key and confirm by pressing ENTER
- Select 'Delete' using the arrow key and confirm by pressing ENTER
- Enter current opening code or master code MA2 and confirm by pressing ENTER, then confirm 'Delete code?' request by pressing ENTER
- Display will show 'Code deleted'
Opening the safe under threat
If the locking system is connected to an alarm system, a silent (i.e. not audible to you) alarm can be triggered at the alarm centre when entering the code to open the lock. To trigger the threat alarm, add 3 to the value of the opening code. The entry will trigger the alarm and open the lock.
| Syntax: | Addition | Input |
| 96 + 3 =99 | 99 | |
| 97 + 3 =100 | 00 | |
| 98 + 3 =101 | 01 | |
| 99 + 3 =102 | 02 | |
| 00 + 3 =03 | 03 | |
| 05 + 3 =08 | 08 |
Examples: If your opening code is 192739 the code for triggering the threat alarm will be 192742, if the opening code is 4719226 the alarm code will be 4719229 and if your opening code is 22315698 your alarm code will be 22315601.
WARNING: Care must be taken to ensure that this addition does not produce a valid opening code
Programming the date and time
- When the lock is open, press ENTER. The display will show 'Code functions'. Use the arrow key to select 'Time functions' again and confirm by pressing ENTER.
- Confirm 'Time functions Lock 1' by pressing ENTER.
- Enter master code MA1 and confirm by pressing ENTER.
- The display will show 'Time functions S1, date/time'. Confirm by pressing ENTER.
- Enter the date and time using digits and confirm by pressing ENTER. The date and time are now saved.
Note: All the remaining time functions have their own instructions
Tamper protection
After five incorrect entries, you will be locked out for 6.5 minutes. After another incorrect entry, you will be locked out for another 6.5 minutes. After the tenth consecutive incorrect entry, you will be locked out for 20 minutes.
External connections on the I/O box
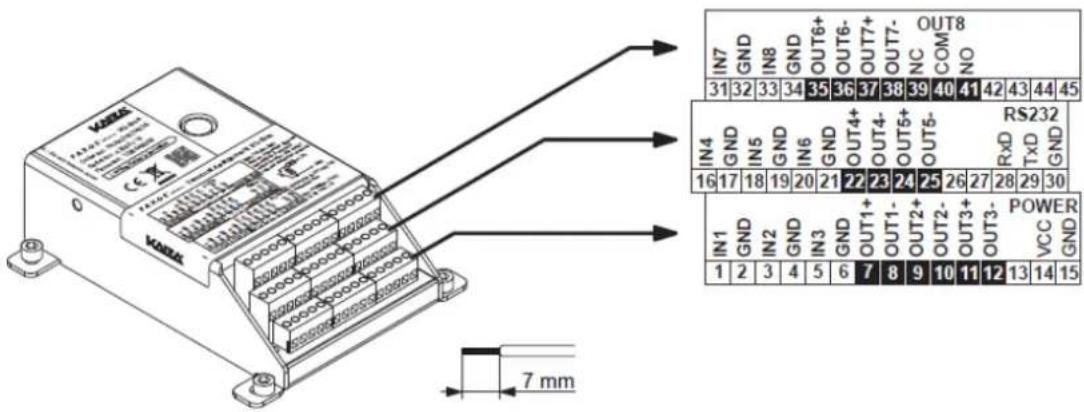
Clamp positioning of the I/O box
The I/O box features connectors for the power supply and an RS232 port for every 8 inputs and outputs.

The I/O box functions are only available when the I/O box is connected to an external power supply. In the event of a power failure, the batteries in the input unit maintain the locking function but not the functions of the I/O box.
text_image
VASOL IN7 GND IN8 GND OUT6+ OUT6- OUT7+ OUT7- NC OUT8 COM NO 31 32 33 34 35 36 37 38 39 40 41 42 43 44 45 IN4 GND IN5 GND IN6 GND OUT4+ OUT4- OUT5+ OUT5- RS232 RXD TXD GND 16 17 18 19 20 21 22 23 24 25 26 27 28 29 30 IN1 GND IN2 GND IN3 GND OUT1+ OUT1- OUT2+ OUT2- OUT3+ OUT3- POWER VCC GND 1 2 3 4 5 6 7 8 9 10 11 12 13 14 15 7 mmI/O box terminal assignment
I/O box connection data
| Clamp | Description | Capacity/notes |
| 1 (IN1) / 2 (GND) ** | Input 1Standard: Remote lockout | 12 ... 24 VDC (min. 5mA)* Connection without tamper monitoring switch (factory configuration):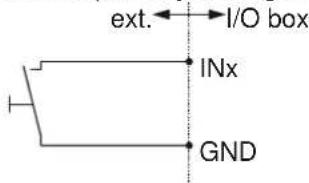 ** Connection with tamper monitoring switch (factory configuration): ** Connection with tamper monitoring switch (factory configuration):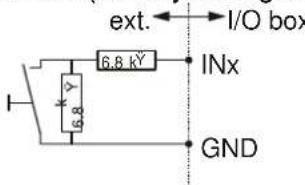 |
| 3 (IN2) / 4 (GND) * | Input 2Standard: Bypassing opening delay | |
| 5 (IN3) / 6 (GND) * | Input 3Standard: Lock-out time interruption | |
| 16 (IN4) / 17 (GND) * | Input 4Standard: external tamper contact | |
| 18 (IN5) / 19 (GND) * | Input 5Standard: not established | |
| 20 (IN6) / 21 (GND) * | Input 6Standard: not established | |
| 31 (IN7) / 32 (GND) * | Input 7Standard: not established | |
| 33 (IN8) / 34 (GND) * | Input 8Standard: not established | |
| 7 (OUT1+) / 8 (OUT1-) | Output 1Standard: Open lock 1 | Output voltage: 24 VACPower load output:0.4 A at 25°C0.3 A at50°C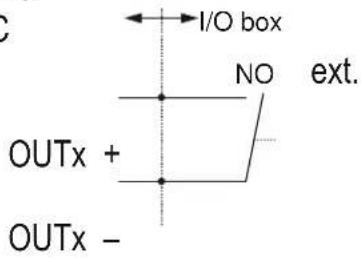 |
| 9 (OUT2+) / 10 (OUT2-) | Output 2Standard: All locks and door bolts open | |
| 11 (OUT3+) / 12 (OUT3-) | Output 3Standard: Resistance surveillance input sabotaged | |
| 22 (OUT4+) / 23 (OUT4-) | Output 4Standard: External tamper input | |
| 24 (OUT5+) / 25 (OUT5-) | Output 5Standard: Threat alarm impulse | |
| 35 (OUT6+) / 36 (OUT6-) | Output 6Standard: Threat alarm with code | |
| 37 (OUT7+) / 38 (OUT7-) | Output 7Standard: Battery case open | |
| 39 (NC) / 40 (COM) / 41 (NO) | Output 8Standard: Monitoring the external power supply | Output voltage: 24 VACPower load output:0.4 A at 25°C - 0.3 Aat 50°C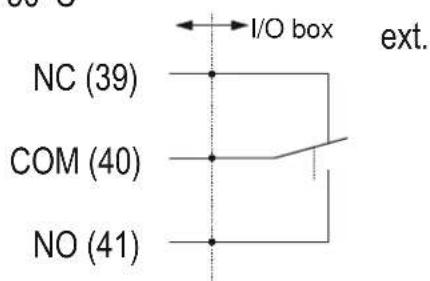 |
| 14 (VDC) / 15 (GND) | External power supply | 12 VDC ... 24 VDC / 700 ... 200 mAext. I/O box12...24 VDC (14)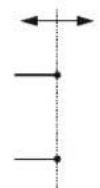 GND (15) GND (15) |
| 28 (RxD) / 29 (TxD) / 30 (GND) | Serial ports (e.g. for online logging) | 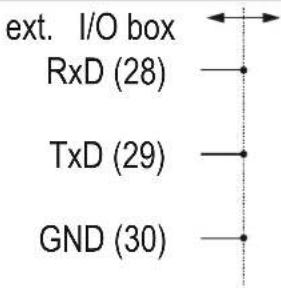 |
Power supply
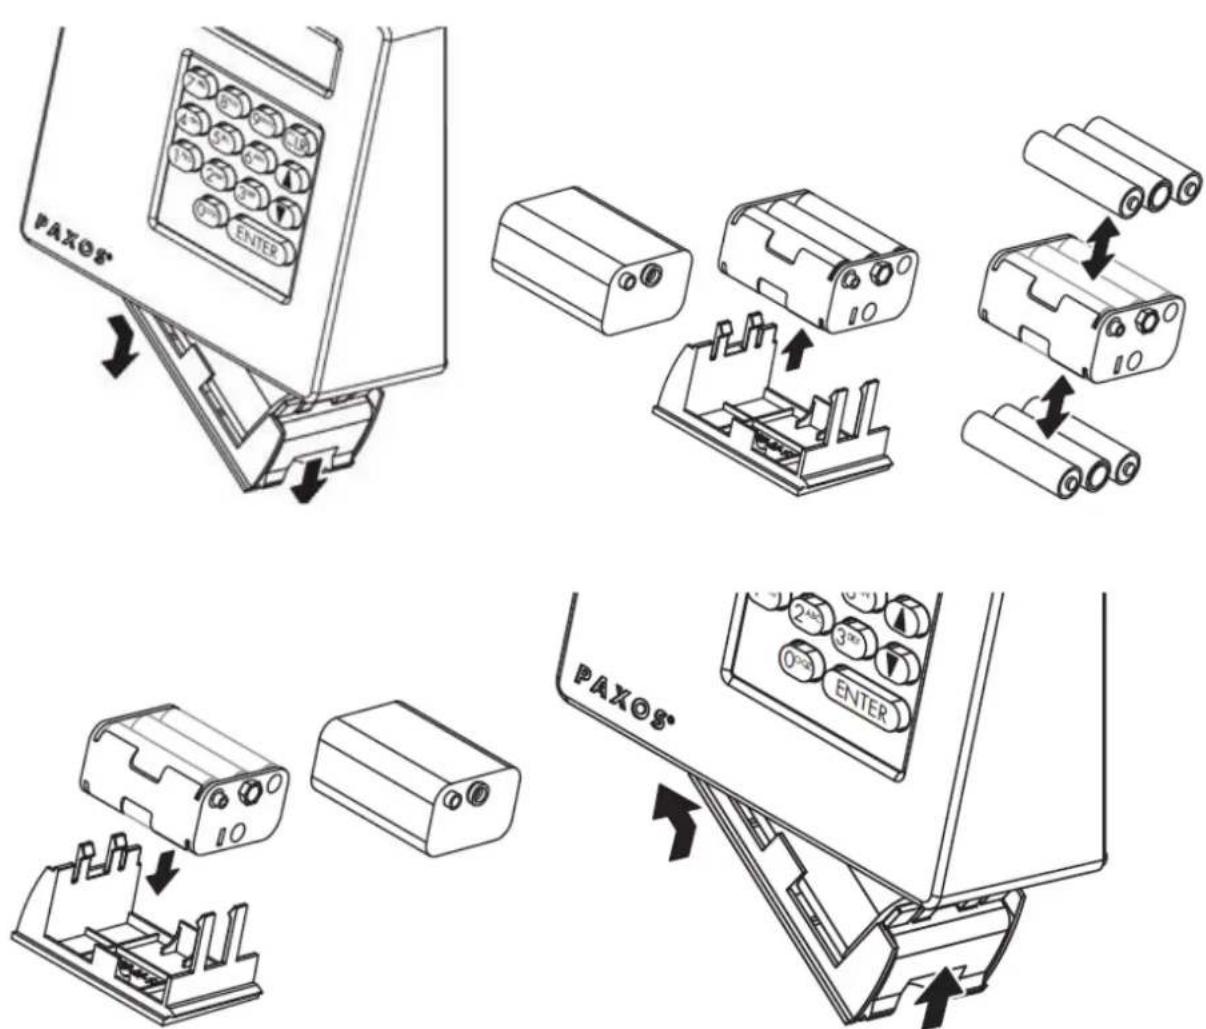
The electronic Paxos Advance lock is operated by 6 batteries (1.5V alkaline, type UM3 or LR6). When the batteries become depleted, the display shows 'Batteries empty'. However, the lock can still be opened. When the battery power drops below 6.5V, the lock will no longer open and the batteries must be changed. This does not delete the codes or reset any programming. Do not use rechargeable batteries, as their capacity is insufficient to ensure trouble-free operation.
Opening the battery case
The battery case is located underneath the input unit. Open the case carefully with your finger and slide the battery case downwards.
After changing the batteries, the display will show the message 'batt. case opened, battery inserted'.
On pressing ENTER, this message will disappear and the battery code will be requested. Enter the master code(MA 1 or MA 2) and check the date/time. The lock can then be used normally again.
Basic rules when selecting a password
Avoid using obvious passwords
- Do not use trivial values such as 000000, 0815, 123456.
- Do not use your own birthday, vehicle registration number, telephone number or name (i.e. your own name, the name of your spouse, names of children or pets, name of your company or place of residence etc.) as a password. Do not use any standard passwords such as "Password" or "Safe".
- Writing a number/word backwards is also too simple.
- Do not use a password that you have already used.
- Important passwords should not have any logical structure.
How do you come up with a secure password?
- The golden rule here is that a password is only secure if it is also kept secret.
• Always remember your passwords - never write them down. - Consider as many keys as possible (traces of wear and tear on the keypad reveal the individual figures over the course of time)
- The solution: come up with a fantasy password. For example:
- I only like ice cream in the summer - First letter of every word: lolicits - in numbers: 47542488
o to be or not to be - First letter of every word: tbontb - in numbers: 817681
○ My mother is 42 years old - First letter of every word: Mmi42yo - in numbers: 6644207
Last but not least
Think about how the password can be obtained if it can no longer be revealed by the owner (e.g. in the event of their death). Deposit a sealed envelope with your notary.
Notes:
Notes:
General Terms and Conditions of Business
The Customer acknowledges the terms of delivery stated below upon conclusion of the contract. All verbal agreements and agreements made by telephone must be confirmed in writing in order for them to be binding.
Conclusion of the contract
The contract shall enter into force following our written confirmation of your order.
Prices
Our prices are net "ex works" from our Rümlang factory. Transportation, packaging, insurance, assembly, installation and any subsequent application support shall be charged separately. In the event of significant changes to production costs resulting from currency fluctuations, increases in import costs, increases in material prices or wages, we shall reserve the right to make proportionate price changes between the conclusion of the contract and the delivery date.
Payment terms
Our invoices are due for payment 30 days from the invoice date (date of expiry). They must be paid in Swiss francs without any discount deducted. Once the payment term has expired, the Customer shall immediately be in default without any reminder being sent, and we shall be entitled to charge late payment interest of 5% p.a. in such cases. Counter-claims or objections regarding the purchased item shall not justify any withholding of payment.
Time of the deliveries
We shall endeavour to deliver the goods at the time specified in the order confirmation, but shall not accept any liability for delivery delays.
Warranty
WALDIS shall provide a warranty for a duration of 24 months from the date of transfer of the benefits and risks that the purchased item is free from manufacturing defects and defective workmanship. The customer undertakes to inspect the purchased item immediately upon delivery and notify any objections within 8 days of their discovery. In the event the goods are defective, WALDIS shall be entitled to either replace the defective parts free of charge, repair the purchased item or offer a reduction in the purchase price to a level deemed acceptable for the customer.
Warranty against burglary
WALDIS shall provide a warranty for resistance grade 2 or higher safes for the theft resistance of the secure storage unit according to the Euro standard EN 1143-1, and shall do so for the duration specified in the order confirmation. WALDIS may restrict this warranty in locations that are particularly at risk or make it dependent on additional measures, such as the existence of an alarm system. In these particular cases, the alarm system must have been fully functional and in focus at the time of the burglary and must have actually triggered and conveyed this to the alarm. If not, then the burglary warranty shall expire with immediate effect.
The warranty against burglary means that WALDIS undertakes to replace the secure storage unit in question free of charge following the successful burglary of the secure storage unit mounted in place at the premises by WALDIS, but shall not oblige it to cover any consequential damages or extra costs resulting from the burglary, such as the transportation and assembly of the new secure storage unit, or the dismantling or disposal of the old secure storage unit. The customer shall in particular not be entitled to any compensation for or replacement of the contents of the secure storage item. The warranty against burglary only relates to burglaries on the premises in which the secure storage unit was located and mounted in a minimum four-point manner by WALDIS or an authorised partner company, in accordance with the most recent operating instructions. If the secure storage unit was not located, mounted or moved by WALDIS or an authorised partner company, then the burglary warranty shall expire with immediate effect.
Disclaimer
The aforementioned warranty as well as the burglary warranty include a final arrangement as regards the delivery of the purchased item. Any additional liability shall be excluded in full. In terms of any additional duties of WALDIS to be agreed separately, such as transportation, packaging, insurance, assembly and installation services, WALDIS' liability shall be limited to intentional damages or damages resulting from gross negligence (Art. 100 para. 1 OR). The customer also acknowledges the right of WALDIS to call in the services of third party companies in connection with the aforementioned obligations, whereby the liability of WALDIS in such cases shall be limited to ensuring the careful selection of and issuing of instructions to the third party companies called in (Art. 399 para. 2 CO).
Documents and drawings
Documents and drawings are protected by copyright and shall not be made available to a third party or exploited by the customer for its own benefit without our written consent to do so. Offenders shall be liable to pay full compensation here.
Retention of title
The goods shall remain the property of WALDIS until payment is made in full. The customer hereby authorises WALDIS to enter the relevant retention of title in the retention of title register (Eigentumsvorbehaltsregister). If such entry in the retention of title register does not materialise, or if the purchased items are built-in to the customer's property, then the customer undertakes to re-assign ownership upon becoming in arrears with the payment of the purchase price. All costs in conjunction with said re-assignment shall be borne by the customer.
Applicable law and place of jurisdiction
All purchase agreements including any assembly contracts shall be exclusively subject to Swiss law. Application of the United Nations Convention on Contracts for the International Sale of Goods of 11 April 1980 (CISG) is excluded.
The place of jurisdiction for all disputes arising from or in conjunction with the agreement shall be in accordance with the provisions of the Swiss Code of Civil Procedure.
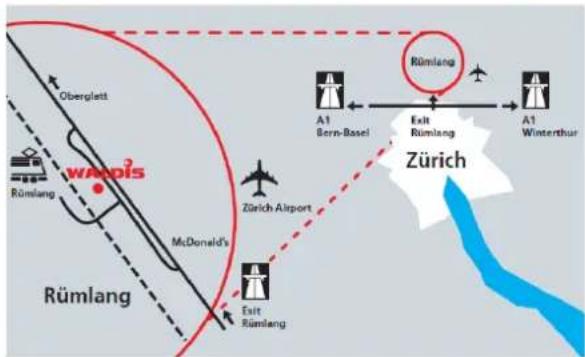
Head office: Rümlang Showroom
WALDIS Tresore AG
Hofwisenstrasse 20
8153 Rümlang
Tel. +41 43 211 12 00
info@tresore.ch
flowchart
graph TD
    A["Wappis"] -->|Oberglatt| B["Rümlang"]
    B --> C["Zürich Airport"]
    C --> D["Exit Rümlang"]
    D --> E["A1 Bern-Bassel"]
    E --> F["Rümlang"]
    F --> G["A1 Winterthur"]
    G --> H["Zürich"]
    style A fill:#f9f,stroke:#333
    style B fill:#ccf,stroke:#333
    style C fill:#cfc,stroke:#333
    style D fill:#fcc,stroke:#333
    style E fill:#cff,stroke:#333
    style F fill:#ffc,stroke:#333
    style G fill:#fcc,stroke:#333
    style H fill:#fff,stroke:#333
French-speaking Switzerland: Aubonne Showroom
WALDIS Tresore SA
WALDIS security products
• Steel-reinforced doors
- In-wall safes
• Security cabinets
- Furniture safes
- Hotel room safes
WALDIS services
- Consultation on site
- Expert reports
• Security concepts
- Maintenance, repairs
• Safe Contents Insurance
- Safe leasing
- Safe transport