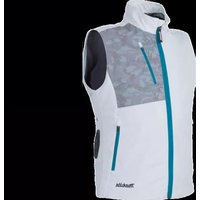
DFV210Z - Ventilated clothing MAKITA - Free user manual and instructions
Find the device manual for free DFV210Z MAKITA in PDF.


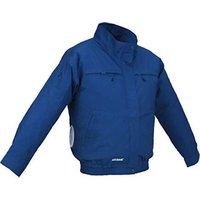
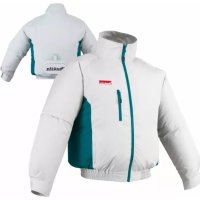
| Product Type | Cordless Fan Vest |
| Model | DFV210Z |
| Brand | Makita |
| Material (Outer) | Polyester 100% |
| Material (Pocket) | Polyester 100% |
| Rated Voltage | DC 10.8 V - 12 V max |
| Compatible Batteries | 10.8 V - 12 V max: BL1015, BL1016, BL1020B, BL1021B, BL1040B, BL1041B; 14.4 V: BL1415N, BL1430, BL1430B, BL1440, BL1450, BL1460B; 18 V: BL1815N, BL1820, BL1820B, BL1830, BL1830B, BL1840, BL1840B, BL1850, BL1850B, BL1860B |
| USB Power Supply Port | DC 5V, 2.1A, Type A (optional accessory) |
| Operating Time (High, BL1040B/BL1041B) | 5.0 hours |
| Operating Time (Medium, BL1040B/BL1041B) | 9.0 hours |
| Operating Time (Low, BL1040B/BL1041B) | 13.0 hours |
| Air Speed Settings | High, Medium, Low, Turbo |
| Turbo Mode Duration | 1 minute |
| Battery Protection System | Yes (auto cut-off when low capacity) |
| Fan Unit Attachment | Zip fastener, ring, strip with snap button |
| Battery Pocket | Yes, inside jacket with snap buttons |
| Mesh Pocket for Ice Pack | Yes, on back |
| Washability | Machine wash at below 30°C gentle cycle; detach fan unit and battery holder before washing |
| Safety Features | Child safety, anti-drop battery holder, overheat protection |
| Intended Use | Cooling body temperature |
| Included Accessories | Fan unit, battery holder, power cable, cable holder |
| Optional Accessories | Battery holder, filter set, Makita genuine battery and charger |
Frequently Asked Questions - DFV210Z MAKITA
User questions about DFV210Z MAKITA
0 question about this device. Answer the ones you know or ask your own.
Ask a new question about this device
Download the instructions for your Ventilated clothing in PDF format for free! Find your manual DFV210Z - MAKITA and take your electronic device back in hand. On this page are published all the documents necessary for the use of your device. DFV210Z by MAKITA.
USER MANUAL DFV210Z MAKITA
Cordless Fan Jacket / Cordless Fan Vest
natural_image
Line drawings of three different hooded jackets with visible buttons and side panels (no text or symbols)
Read before use.
WARNING
This appliance can be used by children aged from 8 years and above and persons with reduced physical, sensory or mental capabilities or lack of experience and knowledge if they have been given supervision or instruction concerning use of the appliance in a safe way and understand the hazards involved. Children shall not play with the appliance. Cleaning and user maintenance shall not be made by children without supervision.
SPECIFICATIONS
| Model: DFJ210 / | DFJ211 | DFJ310 /DFJ311 | DFJ410 /DFJ411 | DFJ212 /DFJ213 /DFJ214 /DFV210 | |
| Material Outer | Polyester 100% | Cotton 100% | Polyester(100%) +titanium pearlycoating | Polyester 100% | |
| Pocket Cotton 100% | Polyester 100% | ||||
| Shoulder pad - | Polyester 65% +Cotton 35% | - | |||
Specifications for the fan unit
| USB power supply port(optional accessory) | DC 5V, 2.1A, Type A | |
| Rated voltage DC 10.8 V - 12V max | DC 14.4 VDC 18 V | |
| Battery cartridge 10.8 V - 12V max | BL1015 / BL1016 / BL1020B / BL1021B / BL1040B / BL1041B | |
| 14.4 V BL1415N / BL1430 / BL1430B / BL1440 / BL1450 / BL1460B | ||
| 18 V BL1815N / BL1820 / BL1820B / BL1830 / BL1830B / BL1840 / BL1840B / BL1850 / BL1850B / BL1860B | ||
- Due to our continuing program of research and development, the specifications herein are subject to change without notice.
- Specifications and battery cartridge may differ from country to country.

WARNING: Only use the battery cartridges and chargers listed above. Use of any other battery cartridges I chargers may cause injury and/or fire.
Operating time
| Air speed | Battery | ||
| BL1040B BL1041B | BL1460B | BL1860B | |
| HIGH | 5.0 hours | 8.5 hours | 13.5 hours |
| MEDIUM 9.0 hours 16.0 hours 24.5 hours | |||
| LOW | 13.0 hours | 21.0 hours | 33.0 hours |
- The operating times in the above table are a rough guideline. They may differ from actual operating times.
- Operating times may differ depending on battery type, charging status, and usage condition.
Symbols
Some of the following symbols are used for the product. Be sure to understand their meaning before use.
| Read the instruction manual. | |
| Machine wash at below 30°C on the gentle cycle. | |
| Machine wash at below 40°C on the gentle cycle. | |
| Machine wash in domestic or commercial machines on the gentle cycle. | |
| Do not bleach. | |
| Line dry in the shade. | |
| Do not wring. | |
| Iron at low temperatures (not exceeding 110°C). | |
| Iron at medium temperatures (not exceeding 150°C). | |
| Do not iron. | |
| Do not dry clean. | |
| Do not tumble dry. | |
| Ni-MH Li-ion | Only for EU countriesDo not dispose of electric equipment or battery pack together with household waste material! In observance of the European Directives, on Waste Electric and Electronic Equipment and Batteries and Accumulators and Waste Batteries and Accumulators and their implementation in accordance with national laws, electric equipment and batteries and battery pack(s) that have reached the end of their life must be collected separately and returned to an environmentally compatible recycling facility. |
Intended use
The fan jacket is intended for cooling your body temperature.
SAFETY WARNINGS
WARNING: Read all safety warnings and all instructions. Failure to follow the warnings and instructions may result in electric shock, fire and/or serious injury.
Save all warnings and instructions for future reference.
- Never use the fan jacket when temperature reach more than 50°C (122°F). Also avoid use in high humidity. Doing so may cause burns.
- Do not wear the jacket over bare skin.
- Do not use the jacket while you are under the influence of drugs, alcohol or medication.
- Do not sleep while wearing the fan jacket. A steep decline of body temperature may harm your health.
- Children, handicapped persons, or anyone who is insensitive to temperature, for example, someone with poor blood circulation, should refrain from using the jacket.
- This appliance is not intended for medical use in hospitals.
- Do not use the jacket other than for its intended purpose.
- If you sense anything unusual, switch off the jacket and remove the battery holder immediately.
- If any abnormality is found, contact your local service center for repair.
- Do not stamp on, throw or otherwise abuse the fan jacket.
- Do not put your finger or a foreign object into the fan unit.
- Do not blow compressed air toward the fan. Do not put small sticks into the fan unit. Doing so may damage the fan and motor.
- Do not turn on the fan jacket unless you are wearing it.
- Do not use the fan jacket in places where a fire or spark could be generated. The fan unit may catch fire or spark and cause a fire or burns.
- Choose the appropriate fan speed in accordance with the usage environment for continuous use.
- Do not wear any clothing over the fan jacket.
- Keep the nameplate on the fan unit. If it becomes unreadable or goes missing, contact your local service center for repair.
- Before washing, detach the fan unit and battery holder, remove the battery cartridge. Wash the jacket part only.
- Do not leave the fan jacket in a place subject to high heat, such as a car sitting in the sun. Doing so may cause plastic parts to melt and become damaged.
- For long time storage, remove the battery holder and battery cartridge from the jacket, and remove the battery cartridge from the battery holder.
- When storing, keep the fan jacket, fan units, battery holder, and battery cartridge out of reach of children.
Electrical safety
- Do not expose the jacket to rain or wet conditions. Keep water away from electrical parts. Water entering the jacket may increase the risk of an electric shock.
- Do not handle the cord and battery with wet or greasy hands.
- Do not use the fan jacket when the cord or plug is damaged.
-
Do not abuse the cord. Do not use the cord for carrying, pulling or unplugging the jacket. Keep the cord away from heat, oil, and sharp edges.
-
Do not leave any cord disconnected while the battery power is supplied. Small children may put the live plug in their mouth and cause injury.
- Do not use the supplied cord with appliances other than the fan unit.
- Do not insert nails, wires, or other items. into the USB power supply port. Doing so may cause short circuit, which can cause smoke or a fire.
- Do not connect the power source to the USB port. The USB port is only intended for charging lower voltage devices. Always place the cover over the USB port when not charging a lower voltage device. Otherwise there is risk of fire.
- Recharge only with the charger specified by the manufacturer. A charger that is suitable for one type of battery pack may create a risk of fire when used with another battery pack.
- Only use with specifically designated batteries. Use of any other battery may create a risk of injury and fire.
- When battery pack is not in use, keep it away from other metal objects, like paper clips, coins, keys, nails, screws or other small metal objects, that can make a connection from one terminal to another. Shorting the battery terminals together may cause burns or a fire.
- Under abusive conditions, liquid may be ejected from the battery; avoid contact. If contact accidentally occurs, flush with water. If liquid contacts eyes, additionally seek medical help. Liquid ejected from the battery may cause irritation or burns.
- Do not use a battery pack or the fan unit that is damaged or modified. Damaged or modified batteries may exhibit unpredictable behaviour resulting in fire, explosion or risk of injury.
- Do not expose a battery pack or the fan unit to fire or excessive temperature. Exposure to fire or temperature above 130 °C may cause explosion.
- Follow all charging instructions and do not charge the battery pack or the fan unit outside the temperature range specified in the instructions. Charging improperly or at temperatures outside the specified range may damage the battery and increase the risk of fire.
Important safety instructions for battery cartridge
- Before using battery cartridge, read all instructions and cautionary markings on (1) battery charger, (2) battery, and (3) product using battery.
- Do not disassemble battery cartridge.
- If operating time has become excessively shorter, stop operating immediately. It may result in a risk of overheating, possible burns and even an explosion.
-
If electrolyte gets into your eyes, rinse them out with clear water and seek medical attention right away. It may result in loss of your eyesight.
-
Do not short the battery cartridge:
(1) Do not touch the terminals with any conductive material.
(2) Avoid storing battery cartridge in a container with other metal objects such as nails, coins, etc.
(3) Do not expose battery cartridge to water or rain.
A battery short can cause a large current flow, overheating, possible burns and even a breakdown.
-
Do not store the tool and battery cartridge in locations where the temperature may reach or exceed 50 °C (122 °F).
-
Do not incinerate the battery cartridge even if it is severely damaged or is completely worn out. The battery cartridge can explode in a fire.
-
Be careful not to drop or strike battery.
-
Do not use a damaged battery.
-
The contained lithium-ion batteries are subject to the Dangerous Goods Legislation requirements.
For commercial transports e.g. by third parties, forwarding agents, special requirement on packaging and labeling must be observed.
For preparation of the item being shipped, consulting an expert for hazardous material is required.
Please also observe possibly more detailed national regulations.
Tape or mask off open contacts and pack up the battery in such a manner that it cannot move around in the packaging.
-
Follow your local regulations relating to disposal of battery.
-
Use the batteries only with the products specified by Makita. Installing the batteries to non-compliant products may result in a fire, excessive heat, explosion, or leak of electrolyte.
SAVE THESE INSTRUCTIONS.
⚠️ CAUTION: Only use genuine Makita batteries. Use of non-genuine Makita batteries, or batteries that have been altered, may result in the battery bursting causing fires, personal injury and damage. It will also void the Makita warranty for the Makita tool and charger.
Tips for maintaining maximum battery life
- Charge the battery cartridge before completely discharged. Always stop tool operation and charge the battery cartridge when you notice less tool power.
- Never recharge a fully charged battery cartridge. Overcharging shortens the battery service life.
- Charge the battery cartridge with room temperature at 10 °C - 40 °C (50 °F - 104 °F). Let a hot battery cartridge cool down before charging it.
- Charge the battery cartridge if you do not use it for a long period (more than six months).
PARTS DESCRIPTION
Battery holder and fan unit

| 1 Battery holder(10.8 V - 12 V max)(optional accessory) | 2 Battery holder(14.4 V /18 V)(optional accessory) | 3 Fan unit 4 Power cable |
| 1 | Loop for name badge | 2 | Loop for arm badge | 3 | Sleeve holder | 4 | Battery pocket |
| 5 | Shoulder pad (DFJ410 / DFJ411 only) | 6 | Mesh pocket for ice pack 7 | Anti-slip | rubber (DFJ211, DFJ311 and DFJ411 only) | 8 | Hood (DFJ211, DFJ311 and DFJ411 only) |

| 1 Battery pocket 2 Hood | (DFJ212 only) | 3 Hook and loop fastener (DFJ212 only) | 4 Light reflector (DFJ214 only) |
INSTALLATION
Installing or removing the battery cartridge
⚠️CAUTION: Always switch off the device before installing or removing the battery cartridge.
⚠️CAUTION: Hold the battery holder and the battery cartridge firmly when installing or removing the battery cartridge. Failure to hold the battery holder and the battery cartridge firmly may cause them to slip out of your hands and result in damage to the battery holder and battery cartridge and/or a personal injury.

▶ 1. Red indicator 2. Button 3. Battery cartridge 4. Battery holder (optional accessory)
To install the battery cartridge, align the tongue on the battery cartridge with the groove in the housing and slip it into place. Insert the battery cartridge all the way until it locks in place with a small click. If you can see the red indicator on the upper side of the button, it is not locked completely.
To remove the battery cartridge, slide it from the battery holder while pressing the button on the front of the cartridge.
⚠️CAUTION: Always install the battery cartridge fully until the red indicator cannot be seen. Otherwise the battery cartridge may accidentally fall out of the battery holder, causing injury to you or someone around you.
⚠️CAUTION: Do not forcibly install the battery cartridge. If the battery cartridge does not slide in easily, it is not being inserted correctly.
Attaching the battery holder
You can hang the battery holder on your waist belt. To prevent the battery holder from dropping accidentally, attach a strap using the strap hole and secure it.

▶ 1. Strap hole
For 18V and 14.4V battery holders
The battery holder has an anti-drop function. When removing the battery holder from the belt, pull up the battery holder while pressing the unlock button.

▶ 1. Unlock button
Installing or removing the fan unit
- (For DFJ212 / DFJ213 / DFJ214 / DFV210 only) Open the zip fastener before installing or removing the fan unit.

natural_image
Diagram of a car interior showing a curved surface with a moving arrow and a device attached (no text or symbols)- Turn the ring counterclockwise while lifting the hook on it. Remove the ring when the mark on the ring aligns with the slot on the fan unit.

▶ 1. Fan unit 2. Ring 3. Hook 4. Slot 5. Mark
- Pass the head of the fan unit into the hole on the jacket. Set the ring onto the fan unit and turn it clockwise until the mark on the ring aligns with the mark further from the slot.
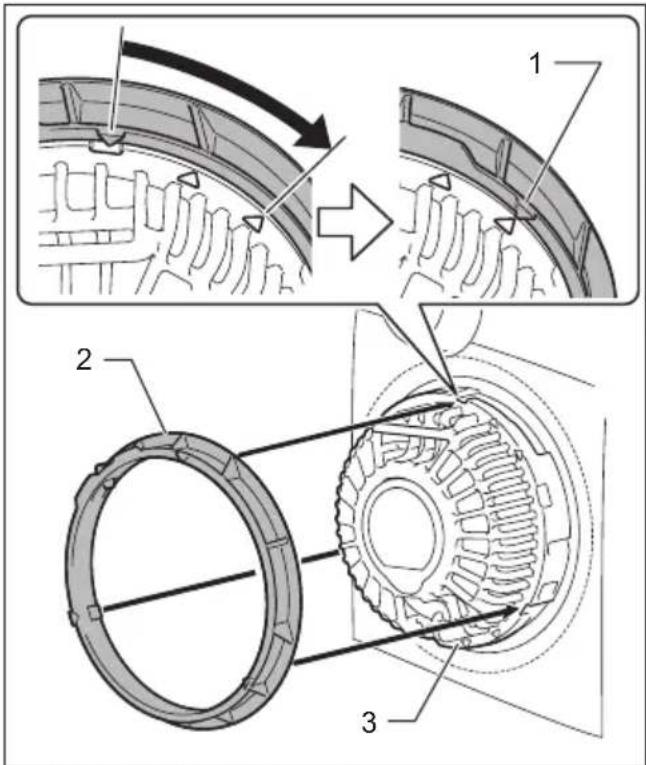
▶ 1. Mark 2. Ring 3. Fan unit
- Pass the strip through the loop on the fan unit and fasten the snap button.

natural_image
Technical diagram of a mechanical assembly with labeled component 1 (no text or symbols present)▶ 1. Strip
- Attach the other fan unit to the jacket in the same way.
- Connect the power cable to the fan units. Support the cable using the cable holder.
▶ 1. Power cable 2. Cable holder
▶ 1. Power cable 2. Hole 3. Cable holder
-
(For DFJ212 / DFJ213 / DFJ214 / DFV210 only) Close the zip fastener after installing or removing the fan unit.
-
Connect the other end of the power cable to the battery holder.

natural_image
Line drawing of a medical device with attached earbuds and tubing, no text or symbols present▶ 1. Battery holder
⚠CAUTION: Always use the strip and snap button to secure the fan unit to the jacket. If the fan unit falls, it may cause an injury, or damage to the fan unit.
Follow the installation procedure in reverse when removing it.
Attaching the filter set
Optional accessory
The filter set protects the fan unit from dust and powder. We recommend that you use the filter set in a dusty or powdery work place. Insert the filter attachment between the jacket and fan unit as shown in the figure.

▶ 1. Ring 2. Hole in the jacket 3. Filter attachment 4. Fan unit 5. Filter
When tightening the ring, stop it at the mark near the slot on the fan unit. After attaching the fan units, cover the filter attachments with filters.
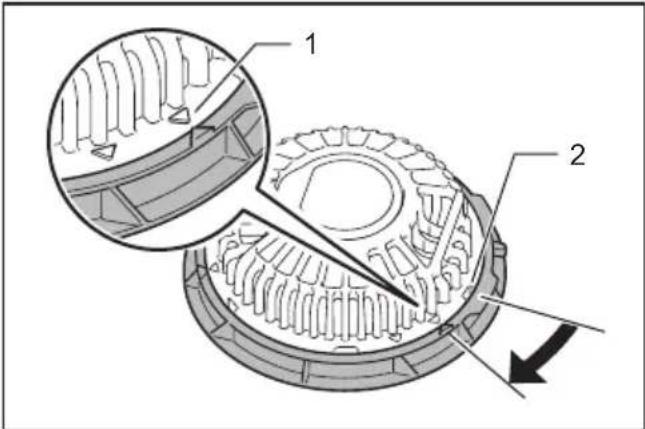
▶ 1. Mark 2. Slot
NOTICE: Make sure that the filter fully covers the filter attachment. For better protection against dust and powder, tuck the skirt of the filter between the jacket and filter attachment.
FUNCTIONAL DESCRIPTION
NOTICE: The fan jacket is effective when the humidity and temperature of intake air are lower than those of the body surface. The fan jacket may not be effective if the air temperature and/or humidity are higher than those inside the jacket.
Power button
To turn on the jacket, press and hold the power button on the battery holder (optional accessory). The jacket starts at high air speed. Each time you tap the power button, the air speed changes from high to medium, medium to low, and low to high. The air speed indicator shows the current air speed.
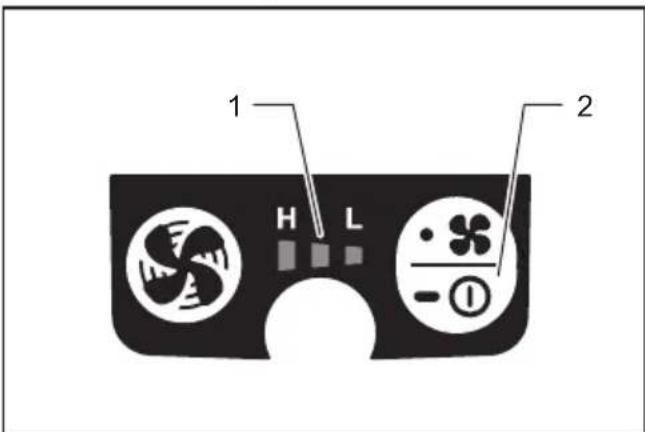
▶ 1. Air speed indicator 2. Power button
To turn off, press and hold the power button again.
Indicating the remaining battery capacity
Only for battery cartridges with the indicator

▶ 1. Indicator lamps 2. Check button
Press the check button on the battery cartridge to indicate the remaining battery capacity. The indicator lamps light up for a few seconds.
| Indicator lamps Remaining | capacity | ||
| Lighted Off | Blinking | ||
 | 75% to 100% | ||
 | 50% to 75% | ||
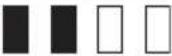 | 25% to 50% | ||
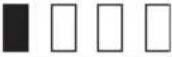 | 0% to 25% | ||
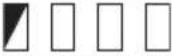 (For 14.4 V and 18 V batteries only) (For 14.4 V and 18 V batteries only) | Charge the battery. | ||
  (For 14.4 V and 18 V batteries only) (For 14.4 V and 18 V batteries only) | The battery may have malfunctioned. | ||
NOTE: Depending on the conditions of use and the ambient temperature, the indication may differ slightly from the actual capacity.
Battery protection system
The device is equipped with a battery protection system. This system automatically cuts off power to the motor to extend battery life.
If the remaining battery capacity is too low, the device will not operate. When you turn the device on, the motor will run again, but stops soon. In this situation, remove and recharge the battery cartridge.
Turbo button
By pressing turbo button on the battery holder, the jacket works in turbo mode for quick cooling. Turbo mode lasts for a minute and then air speed returns to normal.

▶ 1. Turbo button
Air flow
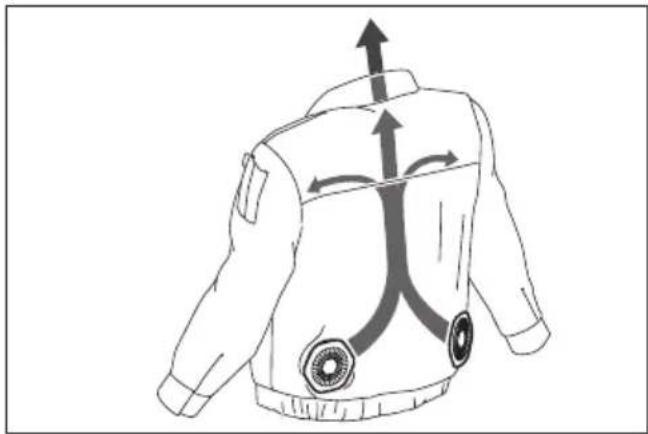
To maintain a stable air flow, close the button at the neck of the jacket. Fasten the button on the ribbon for better air flow in the back.

- Ribbon
Air flow inside the jacket is shown below.
natural_image
Line drawing of a jacket with arrows indicating direction and eye symbols (no text or labels)For a jacket with a hood, wear the hood over a helmet. The air from the fan goes through the helmet and cools your head.

natural_image
Illustration of a person wearing a full-face mask and head covering, with arrows indicating direction (no text or symbols)Battery pocket
A pocket is provided for storing the battery holder (with battery) inside the jacket. Connect the power cable to the battery holder, and then put it into the pocket and fasten the snap buttons.

natural_image
Technical line drawing of a mechanical device with attached cable and connector, shown in two views: one close-up and one enlarged (no text or symbols)Mesh pocket
Mesh pockets are provided on the back of the jacket for storing ice packs.

natural_image
Technical line drawing of a vehicle chassis with two front panels and cooling fans (no text or symbols)▶ 1. Mesh pocket
Connecting USB devices
⚠️ CAUTION: Connect only devices that are compatible with the USB power supply port. Not doing so may cause a malfunction of the battery holder.
NOTICE: Before connecting a USB device to the battery holder (with the battery), always back up the data on the USB device. Not doing so may cause a loss of your data.
The battery holder (with the battery) can work as an external power supply for USB devices.
Open the cover and connect a USB cable (not included) to the power supply port of the battery holder. Then connect the other end of the cable to the device and turn on the switch next to the USB port.
The battery holder (with the battery) supplies DC5V, 2.1A.

▶ 1. Cover 2. Switch
(For DFJ210 / DFJ211 / DFJ310 / DFJ311 / DFJ410 / DFJ411 only)
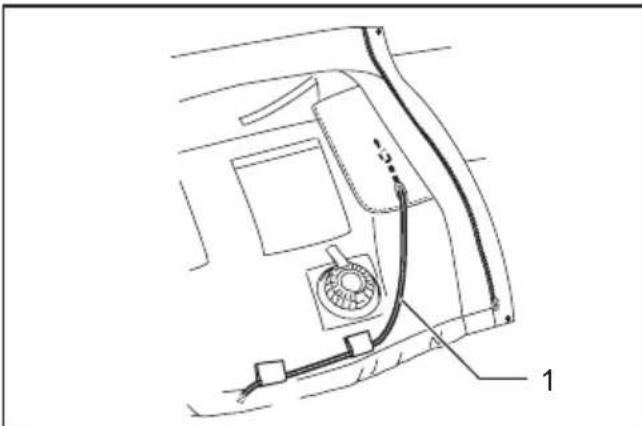
The USB cable can be placed inside the jacket for convenience using the hole in the pocket and the cable holder.
natural_image
Technical line drawing of a car interior showing fan, vent, and exhaust pipe (no text or symbols)- USB cable
NOTE: The battery holder may not supply power to some USB devices.
NOTE: When not using or after charging, remove the USB cable and close the cover.
NOTE: Battery power is consumed while the switch is turned on. Always turn off the switch when not in use.
MAINTENANCE
⚠️CAUTION: Always be sure that the jacket is switched off and the battery cartridge is removed before attempting to perform inspections or maintenance.
CAUTION: If the jacket does not switch on or any fault is found with a fully charged battery cartridge, clean the terminals of the battery holder and the battery cartridge. If the jacket still does not work properly, stop using the jacket and contact our authorized service center.
NOTICE: Never use gasoline, benzine, thinner, alcohol or the like. Discoloration, deformation or cracks may result.
To maintain product SAFETY and RELIABILITY, repairs, any other maintenance or adjustment should be performed by Makita Authorized or Factory Service Centers, always using Makita replacement parts.
- Use clean cloth to remove dirt, dust, oil, grease etc.
- Do not disassemble the fan unit when cleaning.
Cleaning the jacket
For all models
- Detach the fan unit(s) and battery holder from the jacket before washing.
- Follow the instructions on the tag.
- Cotton products may shrink when washed.
- Do not wash the jacket with other clothes. Doing so may cause color fading or color transfer.
- Use a laundry net when using a washing machine.
- Do not use the fabric softener.
- Use only neutral detergent.
• After washing, take out the jacket from washing machine at once. - Be sure to close the zip fastener before washing.
For DFJ214 only
- The performance of light reflector parts may be weakened by washing.
- Machine wash in gentle cycle (The number of times for washing is up to 5 times.)
- The number of times for washing is not the only the factor to decide the lifetime of the jacket.
- The life of the jacket changes by how to use, how to care and store state.
- If the light reflector parts or clothes have been deteriorated, replace to a new jacket.
OPTIONAL ACCESSORIES
CAUTION: These accessories or attachments are recommended for use with your Makita tool specified in this manual. The use of any other accessories or attachments might present a risk of injury to persons. Only use accessory or attachment for its stated purpose.
If you need any assistance for more details regarding these accessories, ask your local Makita Service Center.
- Battery holder
- Filter set
- Makita genuine battery and charger
NOTE: Some items in the list may be included in the tool package as standard accessories. They may differ from country to country.
Makita Europe N.V.
Jan-Baptist Vinkstraat 2, 3070 Kortenberg, Belgium
Makita Corporation
3-11-8, Sumiyoshi-cho, Anjo, Aichi 446-8502 Japan


- Cordless Fan Jacket / Cordless Fan Vest
- WARNING
- Symbols
- Intended use
- SAFETY WARNINGS
- Save all warnings and instructions for future reference.
- Electrical safety
- Important safety instructions for battery cartridge
- SAVE THESE INSTRUCTIONS.
- Tips for maintaining maximum battery life
- PARTS DESCRIPTION
- INSTALLATION
- Installing or removing the battery cartridge
- Attaching the battery holder
- For 18V and 14.4V battery holders
- Installing or removing the fan unit
- Attaching the filter set
- Optional accessory
- FUNCTIONAL DESCRIPTION
- Power button
- Indicating the remaining battery capacity
- Battery protection system
- Turbo button
- Air flow
- Battery pocket
- Mesh pocket
- Connecting USB devices
- MAINTENANCE
- Cleaning the jacket
- For all models
- For DFJ214 only
- OPTIONAL ACCESSORIES
Brand : MAKITA
Model : DFV210Z
Category : Ventilated clothing