
KS890EGT - Saw BLACK & DECKER - Free user manual and instructions
Find the device manual for free KS890EGT BLACK & DECKER in PDF.


| Product Type | Circular Saw |
| Brand | Black & Decker |
| Model | KS890EGT |
| Power Source | Corded Electric |
| Voltage | 120 V AC |
| Blade Diameter | 7-1/4 inches (184 mm) |
| Depth of Cut at 90° | 2-1/2 inches (64 mm) |
| Depth of Cut at 45° | 1-7/8 inches (48 mm) |
| Max Bevel Capacity | 50° |
| No-Load Speed | 5,000 RPM |
| Weight | 10.5 lbs (4.8 kg) |
| Cord Length | 6 ft (1.8 m) |
| Safety Features | Electric brake, lock-off switch, lower blade guard |
| Maintenance | Lubricate gears periodically, inspect carbon brushes |
| Included Accessories | Carbide-tipped blade, blade wrench, dust bag |
| Warranty | 2-year limited warranty |
| Product Dimensions | 12 x 10 x 8 inches |
| Certifications | UL listed |
Frequently Asked Questions - KS890EGT BLACK & DECKER
User questions about KS890EGT BLACK & DECKER
0 question about this device. Answer the ones you know or ask your own.
Ask a new question about this device
Download the instructions for your Saw in PDF format for free! Find your manual KS890EGT - BLACK & DECKER and take your electronic device back in hand. On this page are published all the documents necessary for the use of your device. KS890EGT by BLACK & DECKER.
USER MANUAL KS890EGT BLACK & DECKER
natural_image
Line drawing of two different types of household appliances, one with a saw and the other with a blade (no text or symbols)Congratulations!
On the purchase of your Black & Deckersaw.
To ensure the best results from your saw please read these safety and usage instructions carefully. If you have any questions or queries after reading this manual please do not hesitate to call your local service and information centre (the number is towards the back of this manual).
Contents
Page 4 Safety instructions
Double insulation
Page 5 Electrical safety
Mains plug replacement
Extension cables
Unwanted tools and the environment
The Black & Decker guarantee
Page 6 Accessories
Technical data
Features
Removal & refitting the blade
Page 7 Removing the blade
Fitting a blade
Operating your Scorpion Saw
Recommended Materials
Page8 Cleaning
EC declaration of conformity
Page 12 Black & Decker phone numbers and addresses
Scorpion Saw user manual
SAFETY INSTRUCTIONS
Warning! When using electric tools, the following basic safety precautions should always be taken to reduce the risk of fire, electric shock and personal injury. Read all these instructions before attempting to operate the product and save this booklet.
For safe operation:
- Keep the work area clean. Cluttered areas and benches invite injuries.
- Consider the work area environment. Do not expose the power tool to rain and do not use in damp or wet locations. Keep the work area well lit. Do not use the power tool where there is a risk to cause fire or explosion.
- Guard against electric shock. Avoid body contact, where possible, with earthed or grounded surfaces (e.g. pipes, radiators, ranges and refrigerators).
- Keep children away. Do not let visitors touch the tool or extension cord. All visitors should be kept away from the work area.
- Store idle tools. When not in use, tools should be stored in a dry, high or locked place, out of reach of children.
- Do not force the tool. It will do the job better and more safely at the rate for which it was intended.
- Use the right tool. Do not force small tools or attachments to do the job of a heavy duty tool. Do not use the tool for purposes not intended; for example, do not use a circular saw or Scorpion Saw to cut tree limbs or logs.
- Dress properly. Do not wear loose clothing or jewellery as they can be caught in moving parts. Rubber gloves and non-skid footwear are recommended when working outdoors. Wear protective hair covering to contain long hair.
- Use safety glasses. Use a face or dust mask as well, if the operation is dusty or if the tool is being used in enclosed spaces.
- Do not abuse the cord. Never carry the tool by its cord or yank it to disconnect it from the socket. Keep the cord away from heat, oil and sharp edges.
- Secure the work. Use clamps or a vice to hold the work. It is safer than using a hand and it frees both hands to operate the tool.
- Do not overreach. Keep proper footing and balance at all times.
-
Maintain the tool with care. Keep a cutting tool sharp and clean for better and safer performance. Follow the instructions for lubricating and changing accessories. Inspect the tools cord periodically and, if damaged, have repaired by an authorised service facility. Inspect the extension cord periodically and replace if damaged. Keep the handles dry, clean and free from oil and grease.
-
Disconnect the tool when not in use, before servicing and when changing accessories such as blades, bits and cutters.
- Avoid unintentional starting. Do not carry a plugged-in tool with a finger on the switch. Ensure the switch is off when plugging in.
- Use an outdoor extension cord. When a tool is used outdoors, only use an extension cord intended for outdoor use and so marked.
- Stay alert. Watch what you are doing, use common sense and do not operate the tool when tired.
- Check damaged parts. Before further use of the tool, a guard or other part that is damaged should be carefully checked to determine whether it will operate properly and perform its intended function. Check for alignment of moving parts, free running of moving parts, breakage of parts, mounting and any other conditions that may affect its operation. A guard or other part that is damaged should be properly repaired or replaced by an authorised service centre unless otherwise indicated in the product booklet. Have defective switches replaced by an authorised service centre. Do not use the tool if the switch does not turn it on and off.
- Warning! The use of any accessory or attachment, other than recommended in the product booklet, may present a risk of personal injury.
- Have the tool repaired by a qualified person. The electrical tool is in accordance with the relevant safety requirements. Repairs should only be carried out by qualified persons using original spare parts, otherwise, this may result in considerable danger to the user.
Save these instructions!
Additional safety instructions for Australia and New Zealand
- This appliance is not intended for use by young or infirm persons without supervision. Children must be supervised to ensure they do not play with the appliance.
- If the supply cord is damaged, it must be replaced by the manufacturer or an authorised Black & Decker Service Centre in order to avoid a hazard.
DOUBLE INSULATION

The tool is double insulated. This means that all the external metal parts are electrically insulated from the mains power supply. This is done by placing insulation barriers between the electrical and mechanical components making it unnecessary for the tool to be earthed.
Note: Double insulation does not take the place of normal safety precautions when operating the tool. The insulation system is for added protection against injury resulting from a possible electrical insulation failure within the tool.
ELECTRICAL SAFETY
Be sure the supply is the same as the voltage given on the rating plate. The tool is fitted with a two-core cable and plug.
MAINS PLUG REPLACEMENT (UK ONLY)
Should the mains plug need replacing and you are competent to do this, proceed as instructed below.
If you are in doubt, contact a Black & Decker service centre or a qualified electrician.
- Disconnect the plug from the power supply.
- Cut off the plug and dispose of safely. A plug with bared copper conductors is very dangerous if engaged in a live socket outlet.
- Only fit BS1363A approved plugs fitted with the correctly rated fuse. Note: Fuses do not give personal protection against electric shock.
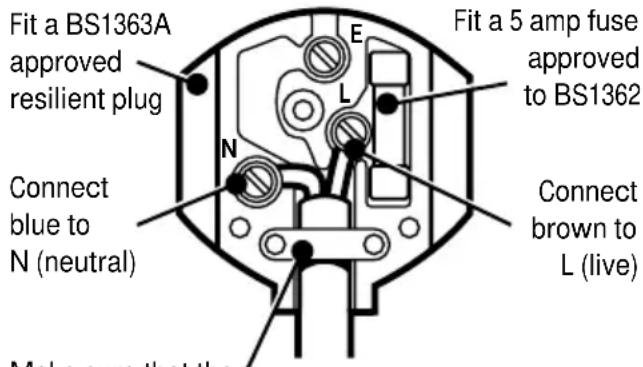
- The cable wire colours, or a letter, will be marked at the connection point of most good quality plugs. Attach the wires to their respective points in the plug (see diagram). Brown is L (live) and blue is N (neutral).
text_image
Fit a BS1363A approved resilient plug Connect blue to N (neutral) Make sure that the E L N Fit a 5 amp fuse approved to BS1362 Connect brown to L (live)Make sure that the outer sheath of the cable is held firmly by the clamp
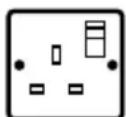
230 volts AC only Never use a light socket
- Before replacing the top cover of the plug ensure that the cable restraint is holding the outer sheath of the cable firmly and that the two leads are correctly fixed at the terminal screws. If the fuse cover is missing or damaged do not use the plug.
For replacement or detachable fuse covers, contact a Black & Decker service centre.
Warning! Never connect live or neutral wires to the earth pin marked E or 12
MAINS PLUG REPLACEMENT (AUSTRALIA AND NEW ZEALAND ONLY)
Should the mains plug or cordset of the product be damaged, it must only be replaced by an authorised Black & Decker service agent because special purpose tools are required.
EXTENSION CABLES
Up to 30m (100ft) of 3-core extension cable can be used without undue loss of power.
Note: An extension cable should not be used unless absolutely necessary. Use of an improper extension cable could result in a risk of fire and electric shock. If an extension cable must be used, make sure it is properly wired, contains the correct rated fuse as recommended in its literature and is in good electrical condition.
PROTECTING THE ENVIRONMENT

Black & Decker provides a facility for recycling Black & Decker products once they have reached the end of their working life.
This service is provided free of charge. To take advantage of this service please return your product to any authorised repair agent who will collect them on our behalf.
You can check the location of your nearest authorised repair agent by contacting your local Black & Decker office at the address indicated in this manual.
Alternatively, a list of authorised Black & Decker repair agents and full details of our after-sales service and contacts are available on the Internet at: www.2helpU.com.
GUARANTEE
Black & Decker is confident of the quality of its products and offers an outstanding guarantee. This guarantee statement is in addition to and in no way prejudices your statutory rights. The guarantee is valid within the territories of the Member States of the European Union and the European Free Trade Area.
ENGLISH
If a Black & Decker product becomes defective due to faulty materials, workmanship or lack of conformity, within 24 months from the date of purchase, Black & Decker guarantees to replace defective parts, repair products subjected to fair wear and tear or replace such products to ensure minimum inconvenience to the customer unless:
- The product has been used for trade, professional or hire purposes;
- The product has been subjected to misuse or neglect;
- The product has sustained damage through foreign objects, substances or accidents;
• Repairs have been attempted by persons other than authorised repair agents or Black & Decker service staff.
To claim on the guarantee, you will need to submit proof of purchase to the seller or an authorised repair agent. You can check the location of your nearest authorised repair agent by contacting your local Black & Decker office at the address indicated in this manual. Alternatively, a list of authorised Black & Decker repair agents and full details of our after-sales service and contacts are available on the Internet at: www.2helpU.com.
ACCESSORIES
The performance of any power tool is dependant upon the accessory used. Black & Decker accessories are engineered to high quality standards and are designed to enhance the performance of your tool. Buying a Black & Decker accessory will ensure that you get the very best from your Black & Decker product.
TECHNICAL DATA
The level of sound pressure of the tool is in accordance with EEC legislation. It is recommended that you take appropriate measures for the protection of your hearing if the sound level seems uncomfortable. This normally equates to a sound pressure in excess of 85dB (A).
KS890GT
Volts (V) 230
Watts 400
Current (A) 1.8
SPM (/min) 0-5500
Stroke (mm) 10
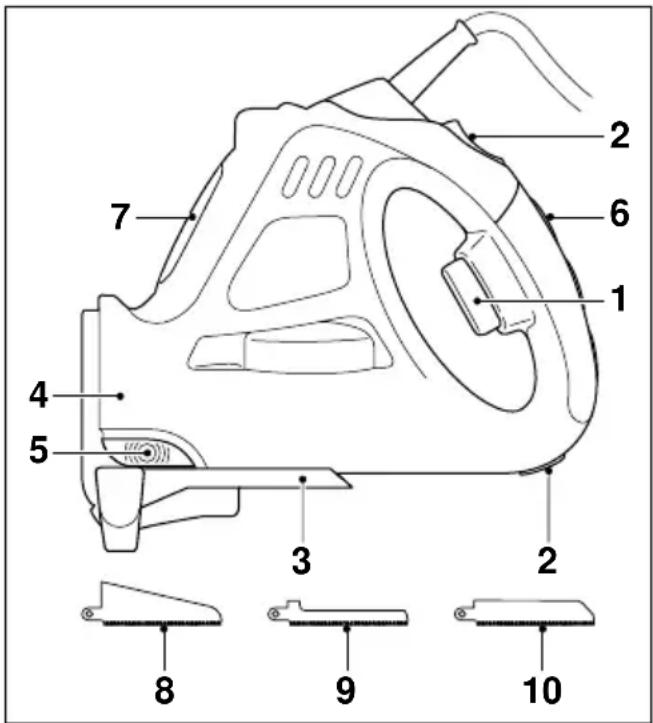
FEATURES
- Variable speed switch
- Lock-off button
- Shoe plate
- Dust blow
- Blade release
- Gel comfort grip
- Second hand position with gel comfort grip
- Large capacity blade
- Curve cutting blade
- Metal cutting blade
Your Scorpion Saw includes some or all of these features.
text_image
1 2 6 7 4 5 3 2 8 9 10Note: This user manual also covers catalogue numbers with a letter suffix. Refer to your carton for details of your product.
BEFORE USING YOUR SAW THINK!
Before you start cutting make sure that the area you are going to cut is clear of all obstacles particularly on the reverse side of the cut.
If you use the saw with one hand always ensure your free hand is away from the cutting area.
REMOVAL & REFITTING THE BLADE
Your Scorpion Saw has a new blade clamping mechanism. Before using the saw familiarize yourself with the removal of the blade and refitting the blade securely in the saw.
ENGLISH
Always ensure the unit is unplugged from the power supply when changing blades.
Always ensure the tooth protector is fitted when changing blades.
REMOVING THE BLADE
text_image
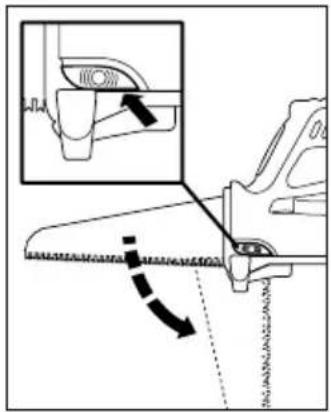
Diagram illustrating a sawing process with labeled components and directional arrows indicating movement or force.Ensure blade has cooled after use. Press and hold the rear of the blade release button fully, hold the back of the blade and rotate the blade through 90° as shown in the diagram. Slide the blade sideways off the retaining pin and remove from the saw.
FITTING A BLADE
natural_image
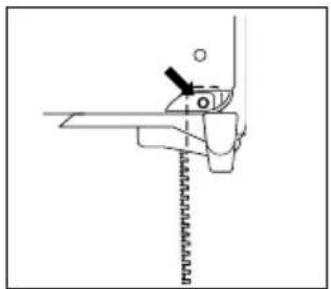
Technical line drawing of a mechanical assembly with a spring and pivot point (no text or symbols)Place the blade with the tooth protector fitted over the location pin. The blade teeth should be facing the handle. RotaíQ" the blade through 90° until it is fully located in the slot and the
location pin is in the locked position.
natural_image
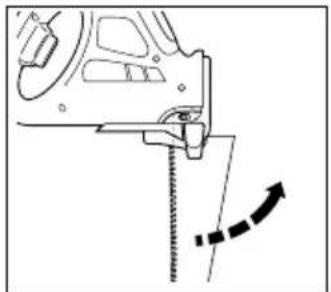
Technical line drawing of a mechanical component with an arrow indicating direction (no text or symbols)To ensure the blade is securely fitted try to remove without pressing the blade release button. Remove the tooth protector, your saw is now ready for use.
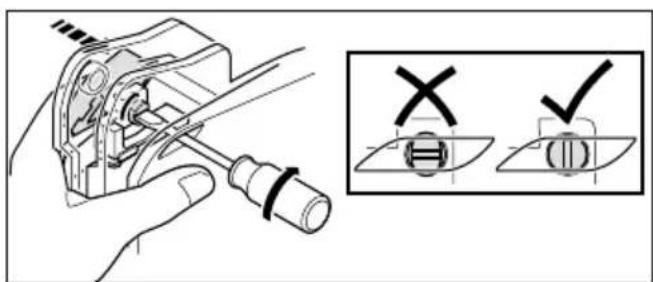
Note: If you are unable to fit the blade, check if the location pin is in the correct position as shown below. If it is not, keep the blade release button depressed and use a screwdriver to turn the location pin into the correct position.
text_image
Diagram showing a hand using a tool to adjust a component, with an inset showing two labeled parts marked 'X' and '✓'.Variable speed trigger switch
Your Scorpion Saw is equipped with a variable speed trigger switch that allows you greater control over start of cut, rate of cut and breakthrough of cut.
natural_image
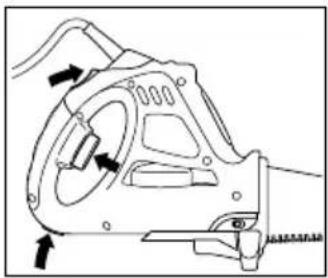
Technical line drawing of a manual saw cutting tool with arrows indicating motion (no text or symbols)To switch your Scorpion Saw on, push lock-off button (2) and squeeze the on/off variable speed trigger switch (1). To switch off, release the trigger, the unit will automatically lock-off.
Standard Mode
natural_image
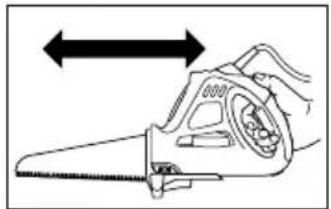
Illustration of a hand using a saw to cut a flat blade, with no text or symbols present.To obtain the best results from your Scorpion Saw, use the same backward and forward movement you would employ with a traditional hand saw.
This will enable a quicker cleaner cut.
Operating in Jigsaw Mode
natural_image
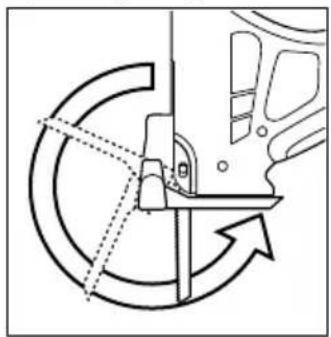
Pure mechanical diagram showing a gear and cam mechanism without any text or symbolsDisconnect unit from power supply. Remove blade, rotate shoe through 270° and secure in position. Fit curve cutting blade. Remove tooth protector and your Scorpion Saw is now ready for use.
Cutting Metal
Your Scorpion Saw can be used for cutting light gauge ferrous and non-ferrous metals such as copper, brass, aluminium, etc. See recommended materials.
It is advisable when cutting thin sheet to clamp a backing sheet of soft wood or plywood to the work as this will enable you to obtain a cleaner cut. Both metal and wood backing are sawn together. Do not force the cutting blade into the metal as this will reduce the life of the blade and possibly damage the motor. Cutting thin metal will take longer than cutting even a relatively thick piece of wood, so do not be tempted to speed up the operation by forcing the saw. Spread a thin film of oil along the proposed cutting line before cutting.
Only use the metal cutting blade for this purpose.
ENGLISH
RECOMMENDED MATERIALS
Recommended materials Capacity
Large capacity blade
Soft wood Up to 100mm x 100mm
Plastic soil pipe Up to 125mm ∅
Curve cutting blade
Worktop Up to 50mm
Metal cutting blade
Ferrous/non-ferrous metals Up to 3mm thick
CLEANING
Disconnect your Scorpion Saw from the power supply. Use only mild soap and a slightly damp cloth to clean your Scorpion Saw. Many household cleaners contain chemicals which could seriously damage the plastic and gel components. Also, do not use petrol, turpentine, lacquer or paint thinners or similar products. Never let any liquid get inside the tool and never immerse any part of your Scorpion Saw into liquid.
EC DECLARATION OF CONFORMITY
We declare that unit: KS890GT conforms to
98/37/EC, 89/336/EEC, EN55014,
73/23/EEC, EN50144, EN61000
A weighted sound pressure 83.3 dB(A)
A weighted sound power 96.3 dB(A)
Hand/arm weighted vibration 3.35 m/s ^4
text_image
K. HewittKevin Hewitt
Director of Consumer Engineering
Spennymoor, County Durham DL16 6JG,
United Kingdom
The Black & Decker policy is one of continuous improvement to our product and as such we reserve the right to change the product specification without prior notice.
  | KS890GT | TYP.1 | |
 | |||
| E13585 | www.2helpu.com | 06-06-03 | |
KS890GT
Australia
Black & Decker (Australia) Pty. Ltd. Tel. 03-8720 5100
20 Fletcher Road, Mooroolbark, Fax 03-9727 5940
Victoria, 3138
New Zealand
Black & Decker Tel. 09 579 7600
81 Hugo Johnston Drive Fax 09 579 8200
Penrose, Auckland, New Zealand
United Kingdom
Black & Decker Tel. 01753 511234
210 Bath Road Fax 01753 551155
Slough, Berkshire SL1 3YD Helpline 01753 574277