
BG180 - Sander BLACK & DECKER - Free user manual and instructions
Find the device manual for free BG180 BLACK & DECKER in PDF.


| Product Type | Bench Grinder / Sharpening Machine |
| Brand & Model | Black & Decker BG180 |
| Power Rating | 1/4 HP (180 W) |
| Wheel Diameter | 6 inches (152 mm) |
| Wheel Width | 5/8 inch (16 mm) |
| Arbor Size | 1/2 inch (13 mm) |
| Grain Options | Coarse (60) and Medium (36) discs |
| Voltage / Frequency | 230 V / 50 Hz |
| No-Load Speed | 2950 rpm (for 230V model) |
| Weight | 5.5 kg (12.1 lbs) |
| Noise Level (Sound Pressure) | Lp = 54.5 dB(A), Lw = 69.0 dB(A), K = 3 dB(A) |
| Intended Use | Sharpening hand tools and general grinding |
| Mounting | Must be securely bolted to a workbench using 1/4" (6 mm) bolts |
| Safety Features | Protection guard, spark arrestor, adjustable work rest (max gap 1/16") |
| Power Switch | Rocker switch (ON/OFF) on the front base |
| Wheel Change Procedure | Remove cover, lock rotor with screwdriver, undo hex nut, replace wheel, reinstall cover |
| Maintenance | Clean ventilation slots with soft brush; blow out wheel guards with compressed air; wipe with damp cloth |
| Accessories Compatibility | Only 6" wheels rated above 2950 rpm; use only supplied flanges |
| Environmental Protection | Do not dispose with household waste; recycle at local collection points |
Frequently Asked Questions - BG180 BLACK & DECKER
User questions about BG180 BLACK & DECKER
0 question about this device. Answer the ones you know or ask your own.
Ask a new question about this device
Download the instructions for your Sander in PDF format for free! Find your manual BG180 - BLACK & DECKER and take your electronic device back in hand. On this page are published all the documents necessary for the use of your device. BG180 by BLACK & DECKER.
USER MANUAL BG180 BLACK & DECKER
natural_image
Technical line drawing of a mechanical assembly with dual rollers and mounting base (no text or symbols)English (Original instructions) 4
natural_image
Technical line drawing of a mechanical component with mounting base and central bore (no text or symbols)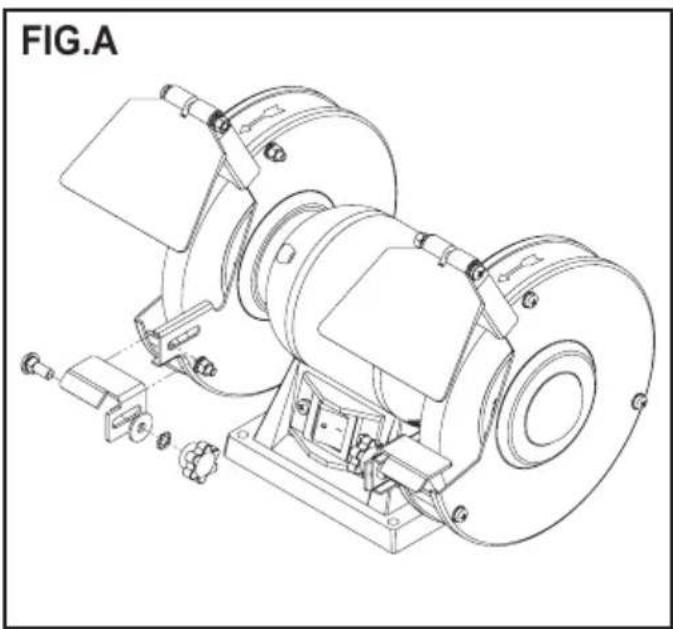
natural_image
Technical line drawing of a mechanical device labeled FIG.A, showing internal components and mounting brackets (no text or symbols on the diagram itself)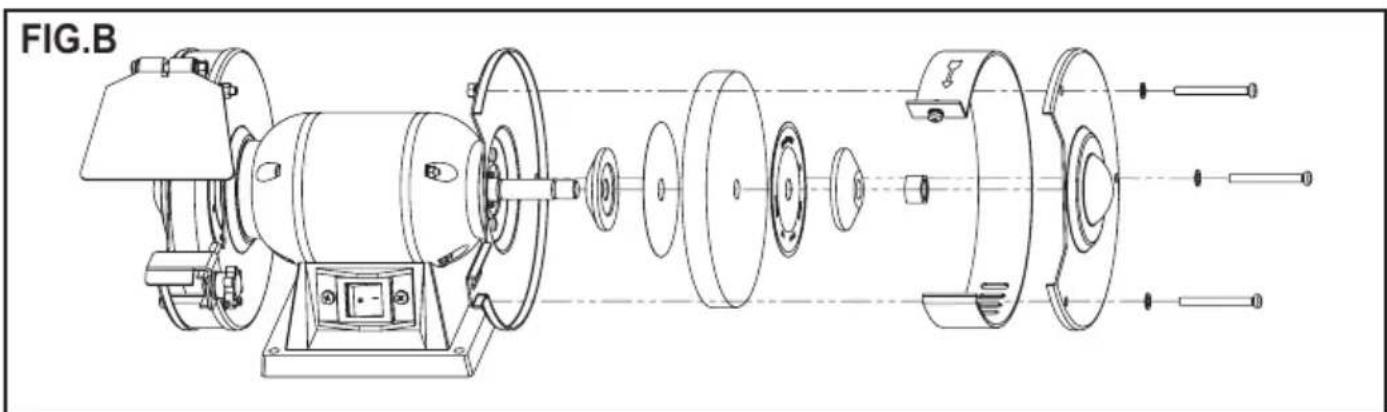
natural_image
Technical line drawing of an industrial machine assembly (FIG.B), showing internal components and shafts without any text or symbols.DO NOT RETURN THIS PRODUCT TO THE STORE, first contact your local Black & Decker office or nearest authorized service center.
INTENDED USE
This tool is intended as a stationary machine for sharpening of hand tools as well as for grinding.
GENERAL SAFETY RULES

Warning! Read and understand all instructions. Failure to follow all instructions listed below, may result in electric shock, fire and/or serious personal injury.
SAVE THESE INSTRUCTIONS
SAFETY INSTRUCTIONS

General power tool safety warnings. Warning! Read all safety warnings and all instructions. Failure to follow the warnings and instructions listed below may result in electric shock, fire and/or serious injury.
Save all warnings and instructions for future reference. The term “power tool” in all of the warnings listed below refers to your mains operated (corded) power tool or battery operated (cordless) power tool.
1. Work Area Safety
a. Keep work area clean and well lit. Cluttered and dark areas invite accidents.
b. Do not operate power tools in explosive atmospheres, such as in the presence of flammable liquids, gases or dust. Power tools create sparks which may ignite the dust or fumes.
c. Keep children and bystanders away while operating a power tool. Distractions can cause you to lose control.
2. Electrical Safety
a. Power tool plugs must match the outlet. Never modify the plug in any way. Do not use any adapter plugs with earthed (grounded) power tools. Unmodified plugs and matching outlets will reduce risk of electric shock.
b. Avoid body contact with earthed or grounded surfaces such as pipes, radiators, ranges and refrigerators. There is an increased risk of electric shock if your body is earthed or grounded.
c. Do not expose power tools to rain or wet conditions. Water entering a power tool will increase the risk of electric shock.
d. Do not abuse the cord. Never use the cord for carrying, pulling or unplugging the power tool. Keep cord away from heat, oil, sharp edges or moving parts. Damaged or entangled cords increase the risk of electric shock.
e. When operating a power tool outdoors, use an extension cord suitable for outdoor use. Use of a cord suitable for outdoor use reduces the risk of electric shock.
f. If operating a power tool in a damp location is unavoidable, use a residual current device (RCD) protected supply. Use of an RCD reduces the risk of electric shock.
Note: The term “Residual Curent Device (RCD)” can be replaced by “Ground Fault Circuit Interrupter (GFCI)” or by “Earth Leakage Circuit Breaker (ELCB)”.
3. Personal Safety
a. Stay alert, watch what you are doing and use common sense when operating a power tool. Do not use a power tool while you are tired or under the influence of drugs, alcohol or medication. A moment of inattention while operating power tools may result in serious personal injury.
b. Use personal protective equipment.
Always wear eye protection. Protective equipment such as dust mask, non-skid safety shoes, hard hat, or hearing protection used for appropriate conditions will reduce personal injuries.
c. Prevent unintentional starting. Ensure the switch is in the off-position before connecting to power source and/or battery pack, picking up or carrying the tool.
Carrying power tools with your finger on the switch or energising power tools that have the switch on invites accidents.
d. Remove any adjusting key or wrench before turning the power tool on. A wrench or a key left attached to a rotating part of the power tool may result in personal injury.
e. Do not overreach. Keep proper footing and balance at all times. This enables better control of the power tool in unexpected situations.
f. Dress properly. Do not wear loose clothing or jewellery. Keep your hair, clothing and gloves away from moving parts. Loose clothes, jewellery or long hair can be caught in moving parts.
g. If devices are provided for the connection of dust extraction and collection facilities, ensure these are connected and properly used. Use of these devices can reduce dust related hazards.
4. Power Tool Use and Care
a. Do not force the power tool. Use the correct power tool for your application.
The correct power tool will do the job better and safer at the rate for which it was designed.
b. Do not use the power tool if the switch does not turn it on and off. Any power tool that cannot be controlled with the switch is dangerous and must be repaired.
c. Disconnect the plug from the power source and/or the battery pack from the power tool before making any adjustments, changing accessories, or storing power tools. Such preventive safety measures reduce the risk of starting the power tool accidentally.
d. Store idle power tools out of the reach of children and do not allow persons unfamiliar with the power tool or these instructions to operate the power tool. Power tools are dangerous in the hands of untrained users.
e. Maintain power tools. Check for misalignment or binding of moving parts, breakage of parts and any other condition that may affect the power tools operation. If damaged, have the power tool repaired before use. Many accidents are caused by poorly maintained power tools.
f. Keep cutting tools sharp and clean. Properly maintained cutting tools with sharp cutting edges are less likely to bind and are easier to control.
5. Service
a. Have your power tool serviced by a qualified repair person using only identical replacement parts. This will ensure that the safety of the power tool is maintained.
6. Electrical safety

Warning! If the power cord is damaged, it must be replaced by the manufacturer, authorized Black & Decker Service Center or an equally qualified person in order to avoid damage or injury. If the power cord is replaced by an equally qualified person, but not authorized by Black & Decker, the warranty will not be valid.
7. Labels on tool
The label on your tool may include the following symbols:
 | Read In-structions Manual | Hz Hertz | ||
 | Use Eye Protection | W Watts Earthing | Terminal | |
 | Use Ear Protection | min minutes Safety | Alert Symbol | |
| VVolts Alternating | ~ Current | ../min Revolu-tions or Reciproca-tion per minute | ||
| AAmperes | --Direct Current | n_0 | No-Load Speed | |
Additional safety rules for bench grinders
Basic information on grinding wheels
- Put grinding wheel in individual package, and keep in a dry and well-ventilated place.
- Various shortcomings during installation and operation can lead to bursting of grinding wheels.
- Ordinary grinding wheels are generally not designed to withstand a greater lateral load.
- Tap off cutting debris from the grinding wheel always leads to damage of the grinding wheel.
- Grinding wheels which may have an imbalance burst easily.
- An unbalance of a grinding wheel can not be completely removed by withdrawing with a diamond dresser.
- Incorrectly stored grinding wheels can burst immediately after switching on, or individual small fragments fly away like a bullet.
• Always use proper guard with grinding wheel. A guard protects operator from broken wheel
ENGLISH
fragments.
• Accessories must be rated for at least the speed recommended on the tool warning label. Wheels and other accessories running over the rated speed can fly apart and cause injury.
- Before using, inspect recommended accessory for cracks or flaws. If such a crack or flaw is evident, discard the accessory. Do not use a grinding wheel that is cracked or flawed in any way.
- When starting the tool, let it run for one minute. Never start the tool with a person in line with the wheel. This includes the operator.
- Do not grind on the sides of grinding wheels unless they are specifically designed for that purpose.
- Do not overtighten wheel clamp nut. This may crack the grinding wheel.
- Clean the cavity around the grinding wheel periodically.

Warning! Some dust created by power sanding, sawing, grinding, drilling, and other construction activities contains chemicals known to cause cancer, birth defects or other reproductive harm. Some examples of these chemicals are:
- Lead from lead-based paints,
- Crystalline silica from bricks and cement and other masonry products, and
- Arsenic and chromium from chemically-treated lumber. (CCA)
Your risk from these exposures varies, depending on how often you do this type of work. To reduce your exposure to these chemicals: work in a well ventilated area, and work with approved safety equipment, such as those dust masks that are specially designed to filter out microscopic particles.
- Wear protective glasses;
- Do not use damaged or unshaped wheels;
- The adjustment of the spark arrestor shall be made frequently, so as to compensate the wear of the wheel, keeping the distance between the guard and the wheel as small as possible, but in any case not greater than 1/16" (2 mm);
- The adjustment of the work rest shall be done gradually so as to compensate the wear of the wheel, keeping the distance between the work rest and the wheel as small as possible, but in any case not greater than 1/16" (2 mm).
FEATURES (FIG. A)
- Protection guard
- Spark arrestor
- Grinding wheel
- Rest area for application
- On/Off switch
MOUNTING
Bench mounting
- The grinder should be unplugged.
- Position grinder on workbench. Check for the availability of power for the grinder. Mark location of holes for drilling.
- Drill appropriate sized holes.
- Insert 1/4" (6 mm) Hex head bolts through washers and the holes. You may want to use washers on the underside of the bench as well.
- Tighten the nuts. Do not overtighten. Allow the rubber feet to absorb the vibration when the grinder is running.
Installing tool rests
Turn off power and disconnect from power supply. Use the bolts, washers, spacers and lock nuts from the plastic bag to secure the brackets and tool rests in place.

Caution! Use the washers and screws supplied. Longer screws may interfere with the movement of the grinding wheel.
OPERATION
The machine is designed and manufactured exclusively for grinding metals using properly authorised grinding wheels. The grinding machine must be used exclusively for this purpose. Never use a bench grinder if it is not firmly fastened to a work bench or rigid frame. Before turning the grinder on, put on safety glasses. Turn on the grinder and allow it to reach full speed (120 V 3450 rpm), (127/220 V 3450 rpm) and (220 V 2950 rpm). Hold the workpiece firmly and against the tool rest. Hold very small pieces with pliers or other suitable clamps. Feed the work smoothly and evenly into the grinding wheel. Move the work slowly and avoid jamming the work against the wheel.
Release the pressure on work piece, grinding wheels will return running.
As the wheel tends to slow down you should occasionally release the pressure to let the wheel return to full speed. Grind only on the face of the grinding wheel and never on the side. (Some
wheels are designed for side grinding and will say so on their instruction sheets).
Stop and disconnect machine. Use two hands to lift up machine from two sides of bottom of bearing housing.

Caution! Prolonged grinding will cause most materials to become hot. Handle them with pliers.
SWITCH
The switch is located on the front of the grinder (Fig. A), on the base. To turn the tool on depress the side of the rocker switch on the right side, marked "ON". To turn off the grinder, depress the left side of the rocker switch, marked "OFF".
Changing accessories (Fig. B) Turn off the tool and disconnect from power supply. Use only wheels that measure 6" (152 mm) in diameter. This tool has 1/2" (13 mm) arbors on both sides.
Follow the steps below to remove and replace an accessory:
- Loosen and pull the tool rest out as far as possible. Do not remove it.
- Remove the three screws from the side of the wheel cover and remove the cover.
-
Insert a flat bladed screwdriver into the slot in the left end of the grinder's rotor shaft. Hold the screwdriver firmly to keep the shaft from turning as you loosen and remove the hex nut in the center of the grinding wheel or other accessory.
-
Remove the wheel washer and the wheel.
-
Inspect the wheel for cracks, chips or any other visible damage (other than normal wear) and discard if such damage is found. Inspect the blotters for damage. If the blotters are missing or severely damaged, replace them with pieces of thin cardboard or blotter paper cut in the same shape. Never use a grinding wheel without a blotter on each side of the wheel.
-
Install the new wheel or other accessory. Be sure that both wheel washers are in place (concave sides toward wheel). Use only flanges furnished with the grinder.
-
Hold as before and tighten the nut firmly but do not overtighten. Overtightening can crack a grinding wheel.
-
Replace the wheel cover and its screws.
-
Adjust the tool rest to at least 1/16" (2 mm) from the accessory and tighten securely.
MAINTENANCE
Your tool has been designed to operate over a long period of time with a minimum of maintenance. Continuous satisfactory operation depends upon proper tool care and regular cleaning.

Warning! Before performing any maintenance, switch off and unplug the tool.
- Regularly clean the ventilation slots in your tool using a soft brush or dry cloth.
• Regularly clean the motor housing using a damp cloth. Do not use any abrasive or solvent-based cleaner.
CLEANING
Blowing dust and grit out of the wheel guards using compressed air is a necessary regular maintenance procedure. Dust and grit containing metal particles often accumulate on interior surfaces and could create an electrical shock hazard if not frequently cleaned out. Always wear safety glasses.

Caution! Never use solvents or other harsh chemicals for cleaning the non-metallic parts of the tool. Use clean, dry rag only.
ACCESSORIES
The performance of your tool depends on the accessory used. Black & Decker and Piranha accessories are engineered to high quality standards and designed to enhance the performance of your tool. By using these accessories you will get the very best from your tool. Grinding wheels must fit within the confines of the guard and must be rated higher than the recommended speed as marked on the nameplate (120 V 3450 rpm), (127/220 V 3450 rpm) and (220V 2950rpm).

Caution! Strands of wire brushes may break and fly off while in use. Users and others in the area should wear adequate eye, face and body protection. Use only wire brushes that are rated at or greater than the RPM shown on the tool's nameplate. Do not use the spacer with grinding wheels.

Warning! To reduce the risk of injury, always use proper guards when grinding and wear eye protection.

Caution! The use of any non-recommended accessory may be hazardous.
PROTECTING THE ENVIRONMENT

Separate collection. This product must not be disposed of with normal household waste. Should you find one day that your Black & Decker product needs replacement, or if it is of no further use to you, do not dispose of it with household waste. Make this product available for separate collection.

Separate collection of used products and packaging allows materials to be recycled and used again. Re-use of recycled materials helps prevent environmental pollution and reduces the demand for raw materials. Local regulations may provide for separate collection of electrical products from the household, at municipal waste sites or by the retailer when you purchase a new product.
SERVICE INFORMATION
Black & Decker offers a full network of company-owned and authorized service locations. All Black & Decker Service Centers are staffed with trained personnel to provide customers with efficient and reliable power tool service. For more information about our authorized service centers and if you need technical advice, repair, or genuine factory replacement parts, contact the Black & Decker location nearest you, or visit us at www.BlackandDecker-la.com.
SPECIFICATIONS
| BG180 | |
| Power 1/4HP (180 W) | |
| Disc diameter 6" (152 mm) | |
| Grinding wheel width 5/8" (16 mm) | |
| Coarse grain Disc 60 | |
| Medium grain Disc 36 | |
| Voltage / Frequency | 230V / 50Hz |
| No-load speed | 2950/min |
| Weight 5.5 kg | |
| Noise Lp | 54.5 dB(A) |
| Lw | 69.0 dB(A) |
| K | 3 dB(A) |
EC declaration of conformity
MACHINERY DIRECTIVE

BG180
Black & Decker declares that these products described under "technical data" are in compliance with: 2006/42/EC, EN 61029-1, EN 61029-2-4.
These products also comply with Directive 2014/30/EU and 2011/65/EU. For more information, please contact Black & Decker at the following address or refer to the back of the manual.
The undersigned is responsible for compilation of the technical file and makes this declaration on behalf of Black & Decker.
R. Laverick Engineering Manager Black & Decker Europe, 210 Bath Road, Slough, Berkshire, SL1 3YD United Kingdom 08/07/2014
Guarantee
Black & Decker is confident of the quality of its products and offers an outstanding guarantee. This guarantee statement is in addition to and in no way prejudices your statutory rights. The guarantee is valid within the territories of the Member States of the European Union and the European Free Trade Area.
If a Black & Decker product becomes defective due to faulty materials, workmanship or lack of conformity, within 12 months from the date of purchase, Black & Decker guarantees to replace defective parts, repair products subjected to fair wear and tear or replace such products to make sure of the minimum inconvenience to the customer unless:
- The product has been used for trade, professional or hire purposes.
- The product has been subjected to misuse or neglect.
• The product has sustained damage through foreign objects, substances or accidents.
• Repairs have been attempted by persons other than authorised repair agents or Black & Decker service staff.
To claim on the guarantee, you will need to submit proof of purchase to the seller or an authorised repair agent. You can check the location of your nearest authorised repair agent by contacting your local Black & Decker office at the address indicated in this manual. Alternatively, a list of authorised Black & Decker repair agents and full details of our aftersales service and contacts are available on the Internet at: www.2helpU.com.
Please visit our website
www.blackanddecker.co.uk to register your new Black & Decker product and to be kept up to date on new products and special offers. Further information on the Black & Decker brand and our range of products is available at www.blackanddecker.co.uk.
KULLANIM AMACI
210 Bath Road, Slough,
Berkshire, SL1 3YD
Ingiltere
08/07/2014
Garanti

- INTENDED USE
- GENERAL SAFETY RULES
- SAVE THESE INSTRUCTIONS
- SAFETY INSTRUCTIONS
- Work Area Safety
- Electrical Safety
- Personal Safety
- Power Tool Use and Care
- Service
- Electrical safety
- Labels on tool
- Additional safety rules for bench grinders
- ENGLISH
- FEATURES (FIG. A)
- MOUNTING
- Bench mounting
- Installing tool rests
- OPERATION
- SWITCH
- MAINTENANCE
- CLEANING
- ACCESSORIES
- PROTECTING THE ENVIRONMENT
- SERVICE INFORMATION
- EC declaration of conformity
- Guarantee
- KULLANIM AMACI
- Garanti
Brand : BLACK & DECKER
Model : BG180
Category : Sander