
Avail 2 - Smartphone ZTE - Free user manual and instructions
Find the device manual for free Avail 2 ZTE in PDF.


User questions about Avail 2 ZTE
0 question about this device. Answer the ones you know or ask your own.
Ask a new question about this device
Download the instructions for your Smartphone in PDF format for free! Find your manual Avail 2 - ZTE and take your electronic device back in hand. On this page are published all the documents necessary for the use of your device. Avail 2 by ZTE.
USER MANUAL Avail 2 ZTE
Devices purchased for use on AT&T's system are designed for use exclusively on AT&T's system. You agree that you won't make any modifications to the Equipment or programming to enable the Equipment to operate on any other system. A voice plan is required on all voice-capable devices, unless specifically noted otherwise in the terms governing your agreement. Some devices or plans may require you to subscribe to a data plan.
Your phone is designed to make it easy for you to access a wide variety of content. For your protection, we want you to be aware that some applications that you enable may involve the location of your phone being shared. For applications available through AT&T, we offer privacy controls that let you decide how an application may use the location of your phone and other phones on your account. However, the AT&T privacy tools do not apply to applications available outside of AT&T. Please review the terms and conditions and the associated privacy policy for each location-based service to learn how location information will be used and protected. In addition, your AT&T phone may be used to access the Internet and to download, and/or purchase goods, applications, and services from AT&T or elsewhere from third parties. AT&T provides tools for you to control access to the Internet and certain Internet content. These controls may not be available for certain devices which bypass AT&T controls. AT&T may collect certain types of information from your device when you use AT&T services to provide customer support and to improve its services. For more information on AT&T's Privacy Policy, visit att.com/privacy.
microSD™ is a trademark of SanDisk. The Bluetooth® word mark and logos are registered trademarks owned by Bluetooth SIG, Inc.
Copyright © 2013 ZTE CORPORATION.
All rights reserved.
No part of this publication may be excerpted, reproduced, translated or utilized in any form or by any means, electronic or mechanical, including photocopying and microfilm, without the prior written permission of ZTE Corporation.
The manual is published by ZTE Corporation. We reserve the right to make modifications on print errors or update specifications without prior notice.
Version No.: V1.0
Edition Time: May 2013
Manual No.: 079584505309
Contents
Getting Started 1
Phone Setup....1
Switching Your Phone On/Off 3
Getting Around 4
Get to Know Your Phone....5
Key Functions 6
Phone Calls 12
How to Make Calls....12
How to Receive Calls....13
Adjusting Your Call Settings....15
Contacts....17
Importing and Exporting Contacts....17
Creating a Contact....19
Adding a Contact to Favorites....19
Searching for a Contact....19
Creating a New Group 19
Entering Text....20
Android™ Keyboard....20
TouchPal Keyboard 21
Choosing Touch Input Settings....24
Messaging 25
Message Box 25
Sending a Message....25
Changing Message Settings....26
Email 28
Creating an Email Account 28
Receiving Email....28
Composing and Sending an Email 28
Replying to or Forwarding an Email....29
Deleting an Email Account....29
Email Settings 29
Connecting to the Internet 30
Adding a New GPRS/EDGE/3G Connection 30
Turning on Wi-Fi ^® 30
Connecting to a Wi-Fi Network....31
Checking the Wi-Fi Network Status 31
Browsing the Internet 32
Opening a Web Page 32
Browsing Options 32
Opening Another Browser Window 33
Using Bookmarks....33
Changing Browser Settings 34
Using Google Chrome™ 34
Bluetooth ^® 35
Using Bluetooth 35
Entertainment 36
Taking Pictures With Your Camera....36
Adjusting Camera Settings 36
Sharing a Picture 37
Shooting Video with Your Camcorder 38
Adjusting Your Video Settings 38
Sharing a Video....39
Playing Your Videos....39
Opening Your Gallery 40
Adding Music to Your Phone.... 41
Playing Your Music....42
Making Memorable Memos....44
Applications....45
Alarm 45
Calculator 45
Facebook ^® 45
File Manager 46
Kingsoft Office 46
NotePad 46
Task Manager....46
Timer 47
Twitter ^® 47
Voice Dialer 47
Google™ Applications 48
Google Search and Google Now 48
Gmail ^™ 49
Google Play....50
Using Google Calendar....50
Using Google Talk™ 51
Google Local 52
Google Music ^™ 53
Google+53
Maps....53
Messenger....53
Navigation....53
News & Weather 53
Play Books....54
Play Magazines....54
Play Movies & TV 54
Voice Search 54
YouTube ^™ 54
Phone Settings 55
Setting Date and Time 55
Display Settings 55
Sound Settings 55
Language Settings....56
Mobile Network Services....56
Security Settings 56
Managing Your Device Memory....59
Factory Reset....59
Managing Applications....59
Managing Other Settings....60
For Your Safety....62
General Safety 62
FCC Regulations 63
RF Exposure Information (SAR) 64
Hearing Aid Compatibility (HAC) 65
CTIA 67
Distraction....68
Product Handling 68
Electrical Safety 72
Interference....72
Explosive Environments 74
Specifications....75
Warranty 76
Limited Warranty....77
How to Get Warranty Service....78
Other Warranty Programs....78
Getting Started
Phone Setup
Installing the SIM Card and Battery
Power off your phone before installing or replacing the battery or SIM card.
① Remove the back cover as shown.
② Insert the SIM card into the card slot with the cut corner oriented as shown.
③ Carefully insert the battery with the contacts located against the metal springs. Push down on the battery until it is fully seated.
④ Replace the back cover.
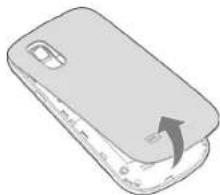
natural_image
Illustration of a smartphone showing the lid and base panel with an arrow indicating the fold (no text or symbols present)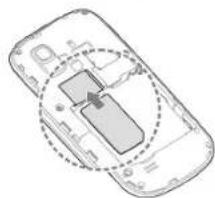
natural_image
Diagram of a smartphone showing internal components with no text or symbols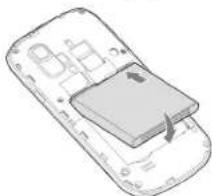
natural_image
Illustration of a smartphone with a partially open top panel showing internal components (no text or symbols)1Gettin
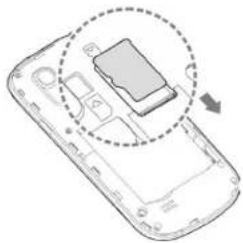
Inserting a microSD ^TM Card
① Insert a microSD card (not included) with the gold-colored contacts facing down.
② Replace the back cover.
Removing the Battery and SIM/microSD Card
① Power off your phone.
② Remove the back cover.
③ Lift the battery up and out.
④ Slide the SIM card out.
⑤ Slide the microSD card out.
Charging the Battery
Note: For best performance, charge the battery fully prior to using the phone for the first time.
① Insert the charger's connector into the charging port. Be sure to insert the connector in the correct orientation. Do not force the connector into the port.
② Plug the charger into a standard AC wall outlet.
③ When the battery is fully charged, unplug the charger and disconnect it from the phone.
natural_image
Diagram of a smartphone showing internal components and a highlighted card slot (no text or symbols)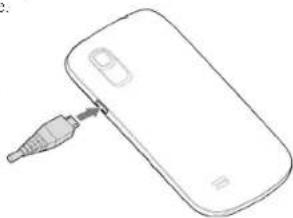
natural_image
Simple line drawing of a smartphone with an attached USB cable (no text or symbols)Switching Your Phone On/Off
Make sure the SIM card is in your phone and the battery is charged.
- Press and hold the Power Key to turn on your phone.
- To turn it off, press and hold the Power Key to open the options menu. Tap Power off > OK.
Setting Up Your Phone for the First Time
When you first power on your phone after you purchase it or reset it to factory settings (see Phone Settings - Factory Reset), you need to set up your phone settings before using it.
① Scroll the language list to highlight the language you need and then tap Start.
② If you have a Gmail account, tap Yes to sign in to Google. Tap No if you do not have an account.
③ To create a Google account, tap Get an account. You can also tap Not now to set up an account later.
④ Configure the Google location options and tap
⑤ Set up date and time and tap.
⑥ Input your name and tap
⑦ Read the Google services information and tap
® Tap Finish to complete setup.
Switching to Sleep Mode
To save battery power, Sleep Mode suspends your phone in a low-power-consumption state while the display is off. Your phone also goes into Sleep Mode by itself when the display is automatically turned off after a certain period of time,
which you can set by pressing □ > System settings > Display > Sleep from the home screen.
Press the Power Key to switch to Sleep Mode.
Waking Up Your Phone
① Press the Power Key to activate your screen display.
② Tap and hold to unlock the screen.
Note: If you have set an unlock pattern, PIN, or password for your phone (see Phone Settings - Security Settings) you'll need to draw the pattern or enter the PIN/password to unlock your screen.
Getting Around
Touch Control
Use the touch screen to control your phone. The controls on your touch screen change dynamically depending on the tasks you're performing.
① Tap the buttons, icons, or applications to select items or to open applications.
② Keep your finger on an item to see the available options.
⑨ Swipe the screen to scroll up, down, left, or right.
④ Drag and drop to move particular items across the screen.
⑤ Pinch with two fingers or double-tap the screen to zoom in/out on a web page or an image.
Note: You can view the phone screen in portrait or landscape orientation simply by holding it upright or turning it on its side.
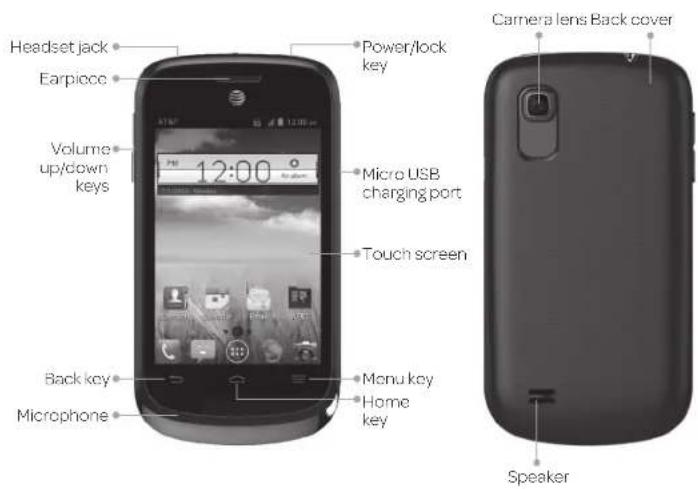
Get to Know Your Phone
text_image
Headset jack Earpiece Volume up/down keys 12:00 Power/lock key Micro USB charging port Touch screen Back key Microphone Monu key Home key Camera lens Back cover SpeakerGet to Know Your Phone (continued)
Key Functions
| Key Function | |
| Power Key Press and | hold to turn phone on/off, change sound setting to silent/vibration/sound, set to Airplane mode, or to restart the phone.Press to switch your phone to Sleep Mode.Press to wake up your phone. |
| Home Key Tap to return to the main home screen from any application or screen.Tap and hold to see recently used applications. | |
| Menu Key Tap to see the options for the current screen. | |
| Back Key Tap to go to the previous screen. | |
| Volume Keys Adjust the volume of the phone. | |
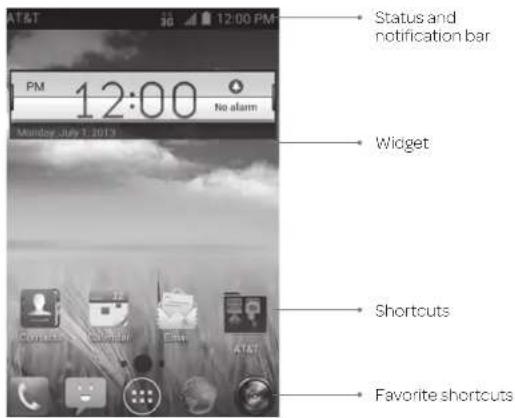
Home Screens
You can customize your home screens. Set your own wallpaper, add the widgets or application shortcuts you need, or remove them as you like.
text_image
AT&T 3G 12:00 PM PM 12:00 No alarm Monday July 1, 2013 Status and notification bar Widget Shortcuts Favorite shortcutsNavigating Your Home Screens
Your phone comes with 3 home screens, giving you more space to add more items. Simply swipe your finger to the left or right to see each home screen.
Choosing Your Wallpaper
① From the home screen, press > Wallpaper.
② TapHome or Lock screen.
③ Tap Gallery, Live Wallpapers or Wallpapers and choose the image or animation you want to use as the wallpaper. Some cropping may be needed for Gallery images.
④ Tap Done (for Gallery images) or Set wallpaper.
Note: Live wallpapers are not available for the lock screen.
Adding Items to Your Home Screen
①Tap
② Tap the Apps or Widgets tab to find the application or widget you desire.
③ Tap and hold the icon of the item you wish to add and then drag it to the home screen.
Removing Items from Your Home Screen
① Tap and hold the item you want to delete until Remove appears on the screen.
② Drag the item to Remove and release your finger when the item turns red.
Creating a Folder
① On a home screen, tap and hold an app icon and drag it to folder.
② You can add more apps to the folder by dragging icons to the folder.
③ Tap the folder to open it and access items in the folder.
④ To name the folder, open it and tap Unnamed Folder.
⑤ Enter a name and tap Done.
Deleting Items from A Folder
① Tap a folder to open it.
② Tap and hold an icon and drag it to Remove. Release the icon when it turns red.
8 Getting Started 9 Getting Started
Status and Notification icons
Your phone will tell you exactly what's going on by showing you simple icons. Here's what they mean.
Indicators and Icons
| Indicator | What it means Indicator |
| G | GPRS connected |
| E | EDGE connected |
| 3G | 3G connected |
| Flight mode | |
| Battery empty | |
| Battery low | |
| Battery partially drained | |
| Battery full | |
| Battery charging |
| What it means | |
| No signal | |
| Signal strength | |
| Mobile data in use | |
| Ringer off | |
| Vibrate mode | |
| Bluetooth on | |
| Connected to a Wi-Fi network | |
| Wi-Fi in use | |
| Wired headset connected | |
| Indicator | What it means Indicator |
| No SIM card. | No SIM card installed |
| New SMS | |
| New MMS | |
| New email | |
| New Gmail message | |
| New Google Talk instant message | |
| Problem with SMS/ MMS delivery | |
| Missed call | |
| Call in progress | |
| Song is playing | |
| GPS on |
| at it means | |
| Alarm set | |
| microSD card unmounted | |
| microSD card unexpectedly removed | |
| Preparing microSD card | |
| Upcoming event | |
| Call on hold | |
| New Wi-Fi network detected | |
| Downloading data | |
| Sending data | |
| Updates available | |
| USB debugging connected |
10 Getting Started 11 Getting Started
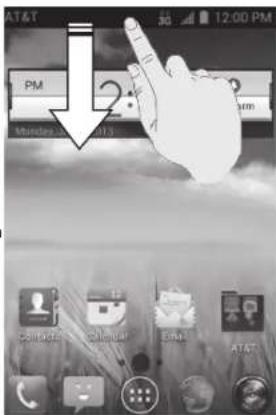
Using the Notifications Panel
The Notifications panel provides quick access to alerts including new messages, emails, and software updates.
- To open the Notifications panel, tap the top of the home screen and swipe down with your finger.
- Swipe right to clear individual notifications or tap X to clear all.
- Tap to access the full Settings menu.
• To close the Notifications panel, swipe up from the bottom of the screen or press
Reopen Recently Used Applications
① Press and hold from any screen. The phone will display applications you used recently.
② Tap the application you want to open.
text_image
AT&T PM 2:00 PM Monday 3:00 AM 12:00 PM Commerce Email AT&TPhone Calls
How to Make Calls
There are many ways to make a call with your phone, and they're all easy to do.
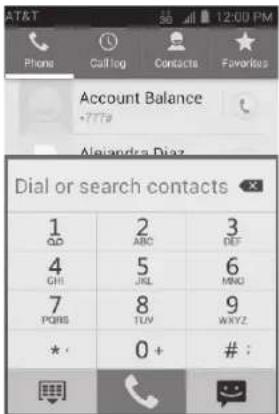
Calling from the Dialer
① From the home screen, tap
② Enter the phone number with the on-screen keypad. Tap ✗ to delete wrong digits.
③ Tap to place the call.
Tip: To make international calls, tap and hold 0 to enter the "+"
Calling from Your Contacts
① From the home screen, tap Contacts
② Swipe your finger to scroll the contacts list and tap next to the contact you want to call.
Tips:
• You can search for a contact by tapping and entering the contact name.
- You can also access your contacts by tapping > Contacts.
text_image
AT&T Phone Call log Contacts Favorites Account Balance •?? Alexandra Diaz Dial or search contacts 1 QQ 2 ABC 3 DEF 4 GHI 5 JKL 6 MNO 7 PORS 8 TUV 9 WAYZ * · 0 + # :Calling from Your Call History
① From the home screen, tap Call log.
@Tap next to the number you want to call.
Calling from a Text Message
If a text message contains a phone number that you want to call, you can make the call while viewing the text message.
① From the home screen, tap
② Tap the conversation and then the message that contains the phone number you need.
③ Tap the number.
④ TapCall.
How to Receive Calls
Answering a Call
Drag to the center of the screen to answer the call.
Rejecting a Call
Drag to the center of the screen to reject the call.
Drag 📄 to the center of the screen to send a text message to the caller. Choose the default message or send a custom one.
Muting a Call
During a call, you can mute your microphone so that the person you are speaking to cannot hear you, but you can still hear them.
Tap Mute to turn your microphone off. To turn your microphone back on, tap Mute again.
Putting a Call on Hold
During a call, you can put it on hold by tapping Hold.
Tip: If you accept an incoming call while you're on another call, the first call automatically goes on hold. Tap Swap to switch between the two callers.
Turning the Speakerphone On/Off
Tap Speaker during a call to turn the speakerphone on. Tap Speaker again to turn off the speakerphone.
Adding a Call
During a call, tap Add call and dial a number. When you call another number, the first call automatically goes on hold.
Swapping Calls
To switch between callers, tap Swap
Merging Calls
To merge two calls and create a conference call, tap Merge calls.
Note: The maximum number of callers on a call varies by carrier.
Ending a Call
Tap to finish a call.
Adjusting Your Call Settings
You can open the call settings menu by tapping > wings.
| Fixed dialing numbers | Restrict outgoing calls to a fixed set of numbers. To do this you must know your SIM's PIN2 code. Not all carriers support this functionality. |
| Quick responses Edit Quick response to rejected callers. | |
| Voicemail | Select a voicemail service provider (your carrier is the default), or edit the voicemail number if necessary. |
| TTY mode | Choose a TTY mode after connecting the TTY device to the phone's headset port.A TTY device can allow people who have hearing or speech disabilities to communicate by telephone. |
| Hearing aids | Turn on/off hearing aid compatibility. When you turn on the hearing aid compatibility and use a hearing aid with a Telecoil to answer the phone, it will help you hear more clearly during the phone call. |
| DTMF tones | Set the length of dual-tone multi-frequency (DTMF) signal tones: Normal or Long. |
| Speed dial Set contacts as speed dials for keys 2-9. | |
| Call barring settings Forbid certain types of calls. | |
| Call forwarding | Forward your incoming calls to a different number. You can choose when to forward: Always forward, Forward when busy, Forward when unanswered, or Forward when unreachable. |
| Additional settings | Caller ID: Choose whether people you call can see your number. |
| Call waiting: See new incoming calls while you're on another call. | |
Contacts
You can add contacts on your phone and synchronize them with the contacts in your Google account or other accounts that support contact syncing.
To see your contacts, tap Contacts on the home screen. From there, you can tap the tabs on the top to quickly switch to Phone, Call log, or Favorites.
Importing and Exporting Contacts
You can import or export contacts from/to your SIM card, phone storage, or microSD card. This is especially useful when you need to transfer contacts between different devices.
Importing Contacts from the SIM Card or Exporting to the Card
① From the Contacts screen, press import/export.
⑧ Choose to import or export contacts. If you have more than one account set up on your phone, you will need to select the account to which you'd like to import contacts. If not, your phone will automatically display the contacts.
③ Tap the contacts you want to import or export. Or, just tap☐ to select all contacts.
④ TapDone or Export.
Importing Contacts from a microSD Card or Exporting to the Card
① From the Contacts screen, press import/export.
② Choose to import or export contacts. If you have more than one account set up on your phone, you will need to select the account to which you'd like to import contacts.
- For import, you should have vCard files saved on the microSD card. If there's more than one vCard file, choose to import one, multiple, or all vCard files. Tap the vCard file and tap OK.
- For export, the phone will prompt you with the name of the vCard file. Tap OK to create the file on the microSD card.
Importing Contacts from the Phone Storage or Exporting to the Phone Storage
① From the Contacts screen, press import/export.
② Choose to import or export contacts. If you have more than one account set up on your phone, you will need to select the account to which you'd like to import contacts.
- For import, you should have vCard files saved in the phone storage. If there's more than one vCard file, choose to import one, multiple, or all vCard files. Tap the vCard file and tap OK.
- For export, the phone will prompt you with the name of the vCard file. Tap OK to create the file in the phone storage.
Creating a Contact
① From the Contacts screen, tap 20 add a new contact.
@ TapPhone contact to choose where to save the contact.
③ Enter the contact name, phone numbers, email addresses, postal addresses, and other information.
④TapDone to save the contact.
Adding a Contact to Favorites
① From the Contacts screen, tap the contact you want to add to Favorites.
② Tap ■ next to the contact's name.
Searching for a Contact
① Tap at the bottom of the Contacts screen.
② Enter the contact name you want to search for. Matching contacts will be listed.
Creating a New Group
① From the Contacts screen, tap
② Tap
③ Enter the group name and tap Done.
④ Tap and select the contacts you wish to be the group members.
⑤Tap √
To send messages to the group members, you can tap a group and then press > Send group message.
Entering Text
When you tap a field that needs text or numbers, a keyboard automatically appears on the screen. Open the Notifications panel and tap Choose input method to change input method.
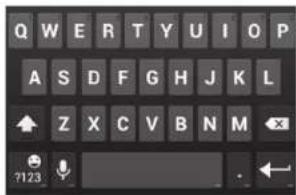
Android Keyboard
The Android keyboard provides a layout similar to a desktop computer keyboard. Turn the phone sideways and the keyboard will change from portrait to landscape.
To use the landscape keyboard, from the home screen, press > System settings > Accessibility > Auto-rotate screen.
Note: The landscape keyboard is not supported in all applications.
text_image
Q W E R T Y U I O P A S D F G H J K L Z X C V B N M ?123- Tap the alphabetic keys to enter letters. Tap and hold the keys to enter associated accented letters or numbers. For example, to enter E, tap and hold E and the available accented letters and number 3 appear. Then slide your finger to choose E.
- Tap to use uppercase or lowercase letters. This key also changes to indicate the current case you are using: 4 or lowercase, 5 uppercase, and 6 locked in uppercase. Tap and hold 7 block the keyboard in uppercase.
20 Entering Text
- Tap to delete any text you have entered.
- Tap to select numbers and symbols. You can then tap access more. Also, frequently used symbols are displayed on top of the keyboard. Swipe left or right to find the one you need and tap to enter.
- Tap and hold and then swipe to choose emoticons.
- Tap↓ to use Google's networked voice input.
- Tap and hold to change the input language or the Android keyboard settings.
TouchPal Keyboard
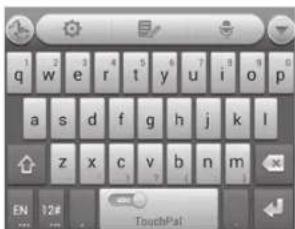
The TouchPal keyboard offers three layouts: Full QWERTY, 12-Key PhonePad, and CooTek T+.
To Switch the Keyboard Layout
① From the home screen, press > System settings > Language & input > next to TouchPal Keyboard > Keyboard layout.
② Check the box next to Swipe layout.
③ On the TouchPal keyboard screen, tap#, uncheck the Curve check box, and tap Close.
① Swipe left or right on the TouchPal keyboard to switch between the Full QWERTY, 12-Key PhonePad, or CooTek T+ keyboards.
Full QWERTY
- Tap the alphabetic keys to enter letters.
- Tap to use uppercase or lowercase letters. This key also changes to indicate the current case you are using: for lowercase, for uppercase, and when locked in uppercase.
- Slide right on 📄 to enable word prediction. Slide left on 📄 to disable word prediction.
- Tap to change the input language.
- Tap to enter digits, symbols, emoticons and other pre-defined texts. Tap to access more. Tap to lock or unlock text input. Tap to go back to entering letters.
- Tap to start a new line.
- Tap or tap and hold to delete text before the cursor.
- Tap to access the quick settings of TouchPal keyboard.
- Tap to change the TouchPal keyboard settings.
- Tap to open text editing options. You can select, cut, copy, paste, and delete text, or move the cursor.
- Tap to use voice input.
- Tap to hide the on-screen keyboard. Tap the Type message field again to show the keyboard.
text_image
q w e r t y u i o p a s d f g h j k l z x c v b n m EN 12# TouchPal22 Entering Text 23 Entering Text
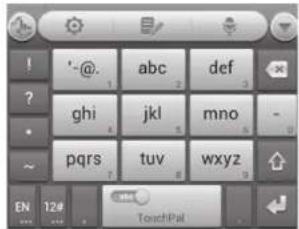
12-Key PhonePad
Tap a key repeatedly until the desired letter or symbol appears. If word prediction is enabled (☐), just tap the keys once and choose the right word.
text_image
! ' @ 1 abc 2 def 3 ? ghi jkl mno - pqrs tuv wxyz ~ EN 12# TouchPalCooTek T+
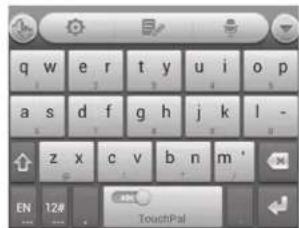
Tap to enter the left letter on the key; Double-tap to enter the desired letter/symbol on the key. If word prediction is enabled (☐), just tap the keys and choose the right word.
text_image
q w e r t y u i o p a s d f g h j k l - z x c v b n m' EN 12# TouchPalTo Enable and Use TouchPal Curve
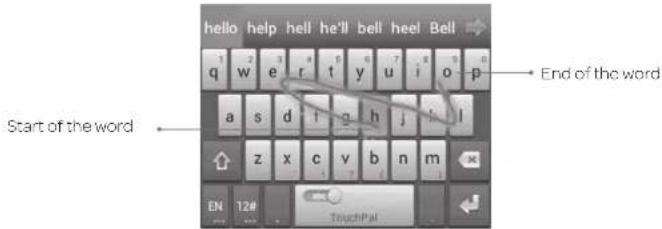
① On the TouchPal keyboard screen, tap check the box next to Curve, and tap Close.
② Move your finger from letter to letter on the keyboard to trace a word without lifting the finger until you reach the end of the word.
Note: TouchPal Curve is only available in the Full QWERTY layout.
text_image
hello help hell he'll bell heel Bell q w e r t y u i o p End of the word Start of the word z x c v b n m EN 12# TouchPalTips:
• To enter a single letter, simply tap it.
- Lift your finger at the end of the word. A space is added automatically when you begin to trace the next word.
Choosing Touch Input Settings
Choose the touch input settings by pressing □ > System settings > Language & input from the home screen.
In the Keyboard & Input Methods section, you can set the default input method and choose the settings for input methods.
24 Entering Text 25 Messaging
Messaging
Your SMS (text message) and MMS (multimedia message) are combined into one menu under
Message Box
Instead of an inbox and outbox, your phone organizes all messages you sent and received into one box, where messages exchanged with the same number are grouped into one message thread on the Messaging screen. You can tap a thread to see the conversation you have had with someone.
Message threads are sorted in chronological order with the latest one on top.
Sending a Message
① From the home screen, lap
②Tap
③ Enter the recipient's number or name in the To field. As you type, matching contacts will appear. Tap a suggested contact to add as a recipient or tap 📄 to access your contacts or call logs.
④ Tap the Type message field and enter your message.
- Press E to insert a smiley, contact, signature, or Quick Text.
- If you are sending an MMS, tap 📋 to attach a file to the message.
⑤ Tap Send to send your message.
Note: Add an attachment to a text message and it will be converted into an MMS automatically. Likewise, if you remove all attachments from an MMS, it will automatically become a text message.
Changing Message Settings
The phone's message settings are pre-configured for you to use immediately. To change them, press settings from the Messaging screen.
Storage settings:
- Delete old messages: Delete old messages as limits are reached.
- Text message limit: Set the maximum number of text messages allowed in a single thread.
- Multimedia message limit: Set the maximum number of multimedia messages allowed in a single thread.
Text (SMS) message settings:
- Manage SIM card messages: Manage the messages stored on your SIM card.
• Service Center: Enables you to view and edit the service center number.
Multimedia (MMS) message settings:
• Auto-retrieve: Automatically download multimedia messages.
- MMS creation mode: Choose to create an MMS message with or without restriction, or receive a warning when adding a restricted attachment to an MMS message.
Display settings:
- Dialog patterns: Select a dialog pattern.
Notification settings:
- Notifications: Show message notifications in the status bar.
- Select ringtone: Choose a ringtone for your incoming messages.
• Vibrate: Make your phone vibrate when a new message arrives.
Signature settings:
- Add signature: Add the signature to all outgoing messages.
- Edit signature: Edit your signature, which can be added automatically to outgoing messages.
WAP push switch settings:
- Enable WAP push receiving: Allow your phone to receive WAP push.
With the Email application, you can access your email from various providers, including Yahoo!® and Gmail.
Creating an Email Account
① From the home screen, tap
② Enter your email address and password.
③ Tap Next to let the phone retrieve the network parameters automatically.
Note: You can also enter these details manually by tapping Manual setup or when automatic setup fails.
④ Follow the on-screen instructions to finish the setup. Your phone will display your email inbox and start to download email messages.
Tip: To add more email accounts, open Email to get the Inbox screen and press > Settings > Add Account.
Receiving Email
When you are in an email account, tap to download recent emails.
You can adjust how often your account downloads new email by pressing > Settings > name of the account > Inbox check frequency. Tap an option to select it.
Composing and Sending an Email
After creating an email account, you can compose and send email messages.
① From your inbox, tap
② Tap the To field and enter the recipient's address or tap to select a contact or group.
When you enter the address, matching contacts on the phone will be displayed. Separate each recipient with a comma.
Tip: You can also press 📄 > Add Cc/Bcc to add more recipients.
③ Enter the subject and the content of your email.
④Press > Attach file to add files to the email.
⑤ TapSend to send the message.
Replying to or Forwarding an Email
① From your inbox, open the email you want to reply to or forward.
@Tap ← or 1 > Forward in the message header to reply to or forward the email. You can also tap > Reply all to reply to all recipients of the email.
③ Enter the contents/recipients of your email.
④ TapSend.
Deleting an Email Account
① From your inbox, press > Settings.
② Tap the account you want to delete and then tap Remove account.
③ Tap OK to confirm. All email messages in the account will be deleted.
Email Settings
General settings apply to all email accounts you add.
① From your inbox, press > Settings > General.
② Make the changes you want and press → when you're finished.
Connecting to the Internet
Your phone's impressive networking capabilities allow you to access the Internet or your corporate network with ease. You can use default connection settings to connect to the web via your mobile network (GPRS/EDGE/3G) or Wi-Fi. The GPRS/EDGE/3G connection can be enabled/disabled manually. From the home screen, press > System settings > Mobile networks and check or uncheck the Data enabled check box.
Adding a New GPRS/EDGE/3G Connection
To get connected via GPRS/EDGE/3G, you need a data plan with your service provider. If the GPRS/EDGE/3G settings are not pre-configured on your phone, please contact your provider to get the necessary information.
① From the home screen, press ≡ > System settings > Mobile networks > Access Point Names.
②Press ≡ > New APN.
③ Tap each item to enter the information you receive from your service provider.
④ TapSave to complete.
Tip: To set the APN to default settings, press > Reset to default.
Turning on Wi-Fi
Wi-Fi provides wireless Internet access over distances of up to 300 feet (90 meters).
From the home screen, press > System settings and then slide the Wi-Fi switch to the On position.
Connecting to a Wi-Fi Network
① From the home screen, press > System settings > Wi-Fi. The Wi-Fi network points, or "hotspots," that your phone has detected are displayed with their names and security settings.
② Tap a network to connect to it. If security features are implemented, you'll need to enter a password and then tap Connect.
③ To disconnect from a network, tap the network name and then tap Forget.
Checking the Wi-Fi Network Status
You can check the Wi-Fi network by looking at the 📂 in the status bar. Or, tap the network the phone is currently connected to on the Wi-Fi screen. You can then check the network status from the pop-up window.
Browsing the Internet
Your phone has two options for Internet access. Use the Browser or Google Chrome to view web pages and search for information.
From the home screen, tap
Opening a Web Page
- Tap the address bar, enter the website you want to browse, and tap Go.
- Tap beside the address bar or press bookmarks. Tap a bookmark to open it.
- Press > Bookmarks. Choose an item from the History tab or Saved Pages tab.
Browsing Options
While viewing most web pages, you can do the following.
- Scroll: Swipe the screen in any direction.
- Zoom out: Tap the screen or pinch two fingers together.
- Zoomin: Tap the screen or spread two fingers apart.
- Go back: Tap to return to the page you viewed previously.
- Go forward: Tap ▶
- Refresh the page: TapC
- Find text on the page: Press > Find on page and type the terms you want to search for.
- Send the page URL to friends: Press > Share page and select how you want to send the URL.
- Follow a link: Tap a link on the web page to open it.
- Save the page for offline reading: Press > Save for offline reading. To read saved pages, press > Bookmarks > Saved Pages.
Opening Another Browser Window
You can have multiple windows open in the browser. While in the browser, tap+ to open a new window. To view your open windows, tap+ ap o the window to close it.
Using Bookmarks
To bookmark a web page, open it and tap for , then tap Save to bookmarks. Give the bookmark a name and tap OK.
Editing a Bookmark
① From the home screen, tap
©Press ≡>Bookmarks.
③ Tap and hold the bookmark you want to edit until the shortcut menu pops up.
④ TapEdit bookmark.
⑤ Edit the name (Label) or location (Address), and then tap OK to save it.
Deleting a Bookmark
① From the home screen, tap
©Press >Bookmarks.
③ Tap and hold the bookmark you want to delete until the shortcut menu pops up.
④ Tap Delete bookmark > OK.
Changing Browser Settings
Press Settings from a browser window to change browser settings.
Using Google Chrome
Use Google Chrome to browse the Internet. Chrome on your Avail™ 2 can sync bookmarks, browsing history, and opened tabs from your Google account.
① From the home screen, tap > Chrome.
② Read the terms of service and touch Accept and Continue.
⑤ You can choose to sign in to Chrome to sync it with your open labs, bookmarks, and omnibox data from your computer. If you choose No thanks, you can sign in later via the Settings menu.
④ To enter a URL, touch the web address bar, enter an address and touch Go.
⑤ Scroll to navigate and touch links to open them. Use a pinching gesture to zoom out. Spread your fingers apart to zoom in. Press ■ to access additional settings.
To open a new browser tab, touch > New tab.
Syncing Chrome
From the home screen, tap 🎨 > Chrome > 📋 > Settings > Sign In To Chrome > Sign in.
Bluetooth
Bluetooth is a short-range wireless communication technology. Phones or other devices with Bluetooth capabilities can exchange information wirelessly within a distance of about 32 feet (10 meters). The Bluetooth devices must be paired before the communication is performed.
Using Bluetooth
③ Before you begin, place the Bluetooth device in pairing mode. From the home screen, press 📄 > System settings and slide the Bluetooth switch to the On position to turn on Bluetooth. When Bluetooth is on, the 📄 icon will appear in the status bar.
② Tap Bluetooth. Your phone will automatically search for Bluetooth devices and will show all visible devices in range.
③ Tap the device you want to pair with.
⑧ If necessary, confirm that the Bluetooth passkeys are the same between the two devices and tap Pair. Alternately, enter a Bluetooth passkey and tap Pair. Pairing is successfully completed when the other device accepts the connection or the same passkey is entered.
Notes:
- The Bluetooth passkey may be fixed for certain devices, such as headsets or hands-free car kits. You can try entering 0000 or 1234 (the most common passkeys), or refer to the documents for that device.
- To allow compatible Bluetooth devices to find your phone for pairing, tap Z992 on the Bluetooth settings screen. Your device will be visible for 2 minutes.
Entertainment
Taking Pictures with Your Camera
Your phone has a 2-megapixel camera.
① From the home screen, lap
② Zoom in or out by dragging the slider bar. To change color effects, tap and select an option.
③Tap or press either Volume key to take a picture. To view it, tap the picture thumbnail in the corner of the screen.
Adjusting Camera Settings
Before taking a photo, you can tap 📷 to open the following camera settings.
| Timing Set the lapet time for taking a photo. | |
| Image | Set exposure, contrast, saturation, or sharpness of the photo. |
| White balance | Select how the camera adjusts colors in different kinds of light to achieve the most natural looking colors for your shots, or allow the camera to adjust the white balance automatically. |
| Storage Choose the storage location for photos. | |
| ISO Set the ISO a Aeroo, ISO-100, ISO-200, or ISO-400. | |
| Geo-tagging | Choose to store location information with each photo you take. |
| Tones Turn shutter tones on or off. | |
| Composition line | Set the composition line to help you to aim the camera at the subject. |
| Picture size | Choose the size of the photo. |
| Picture quality | Adjust picture quality as super fine, fine, or normal. |
| Anti-band Set and band as auto, 50 Hz, or 60 Hz. | |
| Other Restore dodeal camera settings. |
Sharing a Picture
⑤ After taking a picture, tap the thumbnail in the corner of the screen and then tap
② Scroll through options to send via text messaging or email, Picasa ^™ , and more.
Shooting Video with Your Camcorder
① From the home screen, tap > Camcorder.
② Zoom in or out by dragging the slider bar. Tap to begin recording and to stop. Tap the video thumbnail in the corner of the screen to view the video you've just taken.
Tip: You can switch between camcorder and camera by tapping
Adjusting Your Video Settings
Before recording a video, you can tap to open the following camcorder settings.
| Video quality | Choose the video quality as VGA or MMS Video. |
| Storage Choose the storage location for videos. | |
| Time lapse | Set the lapse time for recording video. |
| White balance | Select how the camcorder adjusts colors in different kinds of light to achieve the most natural looking colors for your videos, or allow the camcorder to adjust the white balance automatically. |
| Geo-tagging | Choose to store location information with each video you take. |
| Other Restore | camcorder settings. |
Sharing a Video
① After recording a video, tap the thumbnail in the corner of the screen and then tap
② Scroll through options to send via text messaging or Gmail, Picasa, and more.
Playing Your Videos
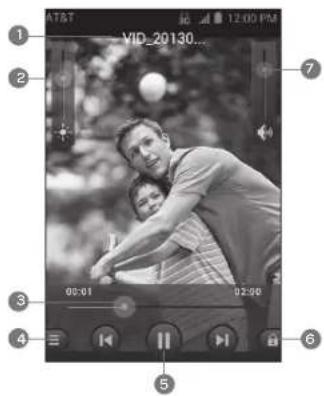
From the home screen, tap:Video Player. This will open your video library and show the video files saved in your memory card. Tap a video file to start playing
text_image
AT&T 12:00 PM YID 20130... 2 7 3 06:01 02:00 4 5 6| Number Function |
| 1 Video name. |
| 2 Drag the slider to adjust screen brightness. |
| 3 Drag the slider to jump to any part of the video. |
| 4 Tap to share or delete the video. |
| 5 Pause or resume playback. |
| 6 Tap to lock the screen. |
| 7 Drag the slider to adjust the volume. |
Opening Your Gallery
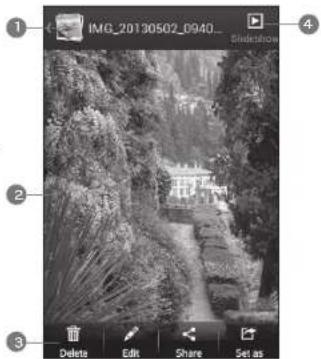
Gallery helps you view pictures and play videos. You can also do some basic editing of your pictures, set them as wallpaper or contact icons, or share with friends.
① From the home screen, tap > Gallery.
② Tap an album.
⑨ Tap a photo or video to view it.
text_image
IMG_20130502_0940 Shidshow ① ② ③ Delete Edit Share Set as| Number Function | |
| 1 | Tap to return to the album or thumbnails of all the pictures and videos in the album, which are displayed in a grid. |
| 2 | Swipe horizontally to see more; double tap a picture to view it in full screen. |
| 3 | Delete, edit, share, or set the picture as contact icon, wallpaper, or lock screen wallpaper. |
| 4 | Browse the album contents in a slideshow. |
Adding Music to Your Phone
You can add music to your phone's internal storage or to a removable microSD card (see Phone Setup - Inserting a microSD Card).
Note: Steps may vary depending on your operating system.
① Connect your phone to your computer with a USB cable.
②TapMedia device (MTP).
③ On your PC, choose to view files through Windows Explorer. If you have a Mac, visit http://www.android.com/filetransfer to download the necessary software.
④ Choose whether you want to add files to your phone's internal storage or to the microSD card, and then drag and drop the files you want to transfer.
⑤ When you're finished transferring files, open the notifications panel and tap Connected as a media device > Charge only. You may now safely disconnect your phone from the computer.
Playing Your Music
You can play the audio files stored in your phone's microSD card in Music.
① From the home screen, tap > Music to access the music player.
②SelectAlbums/Artists/Songs/Playlists/Folders/GenreList/Favorite to find the songs you want to play.
⑨ Tap an item from the list to start playing.
④ Adjust the volume with the Volume keys.
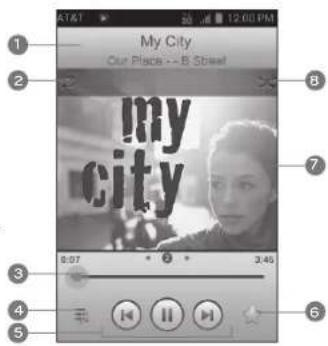
text_image
1 My City Our Place -- B Street 2 my city 3 9:07 3.45 4 5 6 7 8 12:00 PM| Number Function | |
| 1 Song and artist information. | |
| 2 | Tap to toggle repeat mode: repeat all songs, repeat current song, or repeat off. |
| 3 Drag the slider to jump to any part of the song. | |
| 4 Tap to open the current playlist. | |
| 5 Skip songs or pause and resume playback. | |
| 6 Add to Favorite playlist. | |
| 7 Album artwork. | |
| 8 | Tap to play the current playlist in shuffle mode, where tracks are played in random order. |
42 Entertainment
Creating Playlists
Playlists help you organize your music files.
① Tap ≡ next to the song in the music library.
② TapAdd to playlist.
③TapNew.
④ Type the playlist name and tap Save.
Managing Playlists
① Tap the Playlists tab in the music library to see your playlists.
② Tap ≡ next to a playlist.
③ Tap Rename Playlist or Delete Playlist.
Note: These options may not be available for certain automatically created playlists, such as Recently added.
Adding a Song to a Playlist
① Tap next to the song in the music library.
② TapAdd to playlist.
③ Tap a playlist.
Setting a Song as Ringtone
① Tap next to the song in the music library.
② Tap Use as phone ringtone.
Making Memorable Memos
Sound Recorder enables you to record your voice memos.
① From the home screen, lap > Sound Recorder.
② Tap ● to start recording.
④ Tap □ to stop recording or tap ✗ > OK to cancel recording.
Tip: You can find your recordings by tapping My records.
Play a Memo You Just Recorded
Tap
Play Any Saved Memo
① From the home screen, tap Sound Recorder.
② Tap My records.
③ Tap the title of a memo to play it.
Note: You can also tap next to the memo to share, rename, delete, tag, view file details, or set as a ringtone.
Applications
Alarm
① From the home screen, tap Alarm.
② Tap the default alarm to configure it or tap to create a new alarm.
③ Set up the alarm options, such as time, repeat, and alarm sound.
④ TapSave to save and exit.
⑤ Tap ◎ next to an alarm to turn on the alarm.
Calculator
From the home screen, tap #2 Calculator.
Tip: Tap ▶ or ▶ or swipe left or right to switch between different panels. You can also turn the phone to landscape to see all of the calculator buttons.
① From the home screen, tap Facebook.
② Log in and choose sync options.
Tip: You can change your Facebook sync settings by tapping ≡ > Settings > Sync Contacts.
- Tap to access your profile, news feed, messages, and more.
- Press > Settings to change your account settings.
- Tap Status, Photo, or Check In to update your status, upload a photo, or check in at a location.
File Manager
From the home screen, tap File Manager.
- Tap a folder to view its contents.
- Tap and hold a folder or file for options such as Delete, Share, Copy, and Move.
Kingsoft Office
Create, view, and edit Word documents, PowerPoint presentations, spreadsheets, and other types of files. From the home screen, tap Kingsoft Office.
Tip: Tap and scroll to the right to view options.
NotePad
From the home screen, tap 🎨NotePad to save and view your text notes.
① Tap □ to create a new note.
② Enter your text and tap to save it.
③ Tap a note to view it. You can also edit, delete, share, or export it.
Task Manager
From the home screen, tap 🎨 > Task Manager to view or stop applications.
- Tap a task in the Tasks tab to force stop or disable the app, uninstall the app, clear data and cache, or move the app between the internal storage and the memory card.
- Tap the Apps tab to manage all the apps on your phone.
- Tap the Resources tab to view the real-time system resources information.
Tip: If your phone is running slow, close applications you are not using by pressing and holding 📄 and swiping left or right on applications you wish to close.
Timer
From the home screen, tap 🎨 > Timer > Stopwatch or Countdown.
Note: You can set up to 20 laps with the stopwatch.
① From the home screen, tap 🎨 > Twitter and sign up for or sign in to your account.
② Tap 📋 to compose a tweet.
Voice Dialer
From the home screen, tap 🎨Voice Dialer and speak a command.
Google Applications
Signing in to your Google account lets you synchronize Gmail, Calendar, and Contacts between your phone and the web. If you don't have an account, you can easily create one.
① Tap a Google application that needs a Google account, such as Gmail or Google Talk.
② If you've got a Google account, tap Existing. Enter your user name and password and then tap ▶. (Or tap New if you don't have a Google account.)
③ Read the instructions and tap OK.
④ Set the backup and restore option and tap
Google Search and Google Now
Find whatever you're looking for with Google Search. Google Now tailors your search options over time, learning your preferences and making more accurate predictions for your needs. Google Now will also keep track of what you're doing and appear when you need it, like showing the next appointment on your calendar and what the traffic is like to get to it.
Performing a Search
From the home screen, tap Google. You can type in search terms, or say "Google" to begin a voice search.
You will see results for your search. To search images, places, and more, tap an option on the bar at the bottom of the screen. For additional web results, simply scroll down the screen.
Gmail
Gmail is a web-based email service that's configured when you sign in to your Google account. Depending on your synchronization settings, the Gmail on your phone can be automatically synchronized with your Gmail account on the web.
Creating and Sending an Email Through Gmail
① From the home screen, tap > Gmail.
② Tap
③ Enter an email address in the To field. If you're sending the email to several people, separate the email addresses with commas. You can add as many recipients as you want.
④ Enter the email subject, and then write your email. To add an attachment, press > Attach picture or Attach video.
⑤ Tap to send your email.
Adding Another Account
① From your Gmail inbox, press settings > Add account.
② Choose to add an existing account or create a new one and follow on-screen instructions to finish account setup.
Accessing Account Settings
① From your Gmail inbox, press settings.
② Tap an account name, or tap General settings to change settings for all accounts.
Google Play
Google Play gives you access to thousands of free and paid apps, games, books and magazines, music, and movies.
From the home screen, tap >
Navigating Google Play
From Play Store, you will have multiple ways to search for apps, games and more.
① Tap a category to browse popular apps, games, movies, books, and music organized by popularity or category.
②Tap to search the Play Store for a specific item, such as a game or app.
③ To install, tap the app and follow instructions. Once installed, you will see a notification in the Notifications panel. Open the app from this notification or by locating the app in the App tray
Note: A Google Wallet™ payment method is required to purchase apps.
Adding a PIN
Help prevent unauthorized app purchases by adding a PIN.
① While in Google Play, press > Settings > Set or change PIN.
② Enter a PIN and tap OK.
③ Enter your PIN again to confirm it and tap OK.
④ Tap Use PIN for purchases.
Using Google Calendar
From the home screen, tap > Calendar to use Google Calendar, Google's time management application. You can use the calendar to schedule appointments, including meetings and other events. Your appointments will be displayed on the screen as they are scheduled. You can also synchronize appointments to your Google account, which enables you to manage your schedule online on your PC.
50 Google Applications
Accessing Calendar Settings
① While in the calendar, press Esettings.
② Tap an account name, or tap General settings to change settings for all accounts.
Using Google Talk
Google Talk is Google's instant messaging program, which enables you to communicate with other people who also use it.
Opening Google Talk
From the home screen, tap 📄Talk.
Adding a New Friend
You can only add people who have a Google account.
⑤ Tap the account you wish to use.
②Tap
③ Enter your friend's address and tap Done
Note: If other people try to add you as a friend, you will receive a notification in the status bar and the invitation appears in your friends list. You can tap the invitation to Accept, Decline, or Block.
Changing Your Online Status
⑤ Tap your own entry at the top of your friends list.
② Tap your current status to change it.
③ Enter a status message or if you already have one, edit it. In addition to the standard status settings, you can also tap Change to a recently-used status to select a message that you've entered previously.
④Press → to return to your friends list.
Starting a Chat
① Tap a friend in your friends list. You can also tap to initiate a voice chat if the friend is online. The chat screen for that friend will open.
② Type in a message and tap.
Google Local
Google Local helps you find all kinds of businesses near you.
① From the home screen, press > System settings > Location services and then select the location options you want to use.
②Press >Local. Your phone will find your location and display it on the screen.
③ Tap a business category to view information for that type of business near you. You can also search for businesses by tapping and typing in keywords.
④ Tap a result you are interested in and check out the details and reviews about that place. You can also see the place on Google Maps™, find out how to get there, or call the business.
Google Music
You can access up to 20,000 songs from your music collection by storing them in the cloud. You can also purchase music through Google Play™ with this app.
From the home screen, tap > Play Music to access Google Music.
- Swipe left or right with your finger to access different areas of the app.
- You can view recently played songs, and you can also view music by playlist, artist, album, song, or genre.
Google+
Connect with friends and family via Google's social networking site. Set up circles to organize people into groups for sharing content. Create hangouts for group video chats, upload photos and videos, and much more.
Maps
Find local businesses, view maps, and get driving directions.
Messenger
With Google Messenger, you can bring groups of friends together into a simple group conversation with text, photos, and video chat.
Navigation
Get free, voice-guided turn-by-turn navigation and 360° views of your destination, whether you're driving, walking, or taking public transit. See estimated time to your destination based on live traffic information.
News & Weather
Get national and local news and weather updates based on your location.
Play Books
Browse and download millions of books, including recent bestsellers and thousands of free books.
Play Magazines
Discover hundreds of bestselling magazines, including new or back issues, from cooking to technology, travel, fashion, sports, photography, and so much more.
Play Movies & TV
Stream or download your favorite movies and television shows wherever you are.
Note: TV shows are currently available in the United States only.
Voice Search
Find what you're looking for by speaking your search terms into your phone.
YouTube
View videos and share your own with your friends, family, and the world.
Phone Settings
Setting Date and Time
① From the home screen, press ≡ > System settings > Date & time.
② Uncheck the Automatic date & time and Automatic time zone check boxes if you want to set the time, date, and time zone by yourself.
③ Set date, time, time zone, and date/time format.
Display Settings
You can adjust your phone's display settings. From the home screen, press System settings > Display.
- Brightness: Set the brightness of the display.
- Wallpaper: Select a background image for the home screen or lock screen.
- Sleep: Set the length of time of inactivity before the screen turns off.
- Font size: Set the font size of the text on the screen.
- Pulse notification light: Flash the LED light to notify you of missed calls, new messages, and other events.
Sound Settings
From the home screen, press 📄 > System settings > Sound to adjust volumes, toggle sound and mute, set up ringtone and notification sound, and select system sounds.
Tap Silent mode to turn off all sounds except media and alarm, or enable silent mode with vibration.
Language Settings
You can change the language of your phone system in two simple steps.
① From the home screen, press > System settings > Language & input > Language.
② Tap a language to select it.
Mobile Network Services
From the home screen, press □ > System settings > Mobile networks to enable or disable data service, allow data services when roaming, or set access point names for data access.
Note: Data roaming may incur significant roaming charges.
Security Settings
Protect your phone and SIM card from unauthorized use.
Protecting Your Phone with a Screen Unlock Pattern
Creating your screen unlock pattern
① From the home screen, press □ > System settings > Security > Screen lock > Pattern.
② Read the instructions, watch the example pattern, and tap Next.
③ With a finger, draw your own pattern and tap Continue.
④ Draw the pattern again and tap Confirm.
⑤PressthePower key to lock the screen.
Tip: Uncheck the Make pattern visible check box if you want to hide the pattern as you draw it on the screen.
Unlocking the Screen with Your Pattern
①PressthePower key to wake up the screen.
② Draw the pattern you set to unlock the screen.
If you make a mistake, your phone will ask you to try again.
Cannot Recall Your Screen Unlock Pattern?
You have up to five attempts to unlock your phone. If you still cannot recall the screen unlock pattern, tap Forgot pattern? and enter your Google account user name and password to reset the screen unlock pattern.
Note: You must sign in or create a Google account on your phone before using the preceding method to reset the pattern.
Protecting Your Phone with a PIN or Password
Creating a PIN or Password
⑤ From the home screen, press > System settings > Security > Screen lock.
② TapPIN or Password.
③ Enter a numeric PIN or any password you like, and tap Continue.
④ Enter it again and tap OK to confirm.
Unlocking the Screen with Your PIN or Password
©PressthePower key to wake up the phone.
② Enter the PIN or password you set.
③TapOK.
Cannot Recall Your PIN or Password?
You have up to five attempts to unlock your phone. If you still cannot recall the PIN or password, you will need to either contact your carrier for the PUK (PIN Unlock Key) code for the device or return it for service.
Disabling Screen Lock Settings
If you have created an unlock pattern, PIN or password, you can disable it.
① From the home screen, press > System settings > Security > Screen lock.
② Draw the screen unlock pattern or enter the PIN/password you have created.
④ TapNext > None.
Setting Up Credential Storage
This lets you select applications to access secure certificates and other credentials.
Enabling Secure Credentials
① From the home screen, press > System settings > Security.
② Tap Install from SD card to install certificates from your microSD card.
Deleting Secure Credentials
① From the home screen, press ≡ > System settings > Security.
② Tap Clear credentials to clear credentials.
Managing Your Device Memory
From the home screen, press 📄 > System settings > Storage. You can view the space information of the microSD card as well as the phone storage.
- Unmount/Mount SD card: You can unmount the microSD card to safely remove it, or mount the card.
- Erase SD card: Erase all data on the microSD card.
Factory Reset
Reset your phone to factory default settings. All your personal data from the phone's internal storage will be erased, including your Google account, system and app data and settings, and downloaded apps. You can also erase the data on the memory card during the process.
From the home screen, press 📄 > System settings > Backup & reset > Factory data reset > Reset phone > Erase everything.
WARNING! All your personal information and downloaded applications on your phone will be erased after resetting the phone.
Managing Applications
From the home screen, press 📄 > System settings > Apps to see apps installed on your phone and manage them.
Tap an app in the Downloaded, On SD Card, Running, or All tabs to see its information. You can stop the app, uninstall the app, clear data and cache, or move the app between the internal storage and the memory card.
Note: Not all applications can be moved or uninstalled.
From the home screen, press □ > System settings > Security and check the Unknown sources check box if you want to install applications from sources other than Google Play Store.
Note: Installing applications from unknown sources may compromise your phone and personal data.
Make sure that you select an application developed for your phone and processor type before installing it.
① Copy the application file to the microSD card and install the card on your phone.
② From the home screen, tap: > File Manager, and open the folder where the application file is.
③ Tap the file to start installation.
④ Read the installation instructions that come with the application and follow them to complete the setup.
Managing Other Settings
Search Settings
From the home screen, tap Google > > ngs.
You can set searchable items or clear shortcuts.
Voice Interaction
From the home screen, press > System settings > Language & input > Voice Search or Text-to-speech output to set text-to-speech and voice recognition options.
Accessibility
From the home screen, press system settings > Accessibility to configure options for accessibility-related applications.
TalkBack: Device provides spoken feedback, such as describing what you touch, select, and activate, to help blind and low-vision users.
60 Phone Settings
Power button ends call: When enabled, you can press the Power Key to end phone calls without turning the screen off.
Auto-rotate screen: Change the orientation of some on-screen content based on the position of the phone.
Speak passwords: Check this box to enable the speak passwords function.
Text-to-speech output: Change settings for text to speech and adjust the rate at which your phone speaks, to help blind and low-vision users.
Touch & hold delay: Select the time delay for the phone to distinguish finger touch and hold gestures.
Enhance web accessibility: Allow apps to install scripts from Google that make their web content more accessible for blind, low-vision, deaf, and hard of hearing users.
About Phone
From the home screen, press system settings > About phone to check system updates, phone status and battery use, or view legal information and software version.
For Your Safety
General Safety
 | Don't make or receive handheld calls while driving. And never text while driving. |  | use at gas stations. |
 | Keep your phone at least half an inch (15 mm) away from your ear or body while making calls. |  | Your phone may produce a bright or flashing light. |
 | Small parts may cause choking. |  | Don't dispose of your phone in a fire. |
 | Your phone can produce a loud sound. |  | Avoid contact with anything magnetic. |
 | Keep away from pacemakers and other electronic medical devices. |  | extreme temperatures. |
 | Switch off when asked to in hospitals and medical facilities. |  | Avoid contact with liquids. Keep your phone dry. |
 | Switch off when told to in aircrafts and airports. |  | take your phone apart. |
 | Switch off when near explosive materials or liquids. |  | Only use approved accessories. |
FCC Regulations
This mobile phone complies with part 15 of the FCC Rules. Operation is subject to the following two conditions: (1) This device may not cause harmful interference, and (2) this device must accept any interference received, including interference that may cause undesired operation.
This mobile phone has been tested and found to comply with the limits for a Class B digital device, pursuant to Part 15 of the FCC Rules. These limits are designed to provide reasonable protection against harmful interference in a residential installation. This equipment generates, uses and can radiate radio frequency energy and, if not installed and used in accordance with the instructions, may cause harmful interference to radio communications. However, there is no guarantee that interference will not occur in a particular installation if this equipment does cause harmful interference to radio or television reception, which can be determined by turning the equipment off and on, the user is encouraged to try to correct the interference by one or more of the following measures:
- Reorient or relocate the receiving antenna.
- Increase the separation between the equipment and receiver.
- Connect the equipment into an outlet on a circuit different from that to which the receiver is connected.
- Consult the dealer or an experienced radio/TV technician for help.
Caution: Changes or modifications not expressly approved by the party responsible for compliance could void the user's authority to operate the equipment.
RF Exposure Information (SAR)
This phone is designed and manufactured not to exceed the emission limits for exposure to radio frequency (RF) energy set by the Federal Communications Commission of the United States, Industry Canada of Canada.
During SAR testing, this device was set to transmit at its highest certified power level in all tested frequency bands, and placed in positions that simulate RF exposure in usage against the head with no separation, and near the body with the separation of 0.4 inches (10 mm). Although the SAR is determined at the highest certified power level, the actual SAR level of the device while operating can be well below the maximum value. This is because the phone is designed to operate at multiple power levels so as to use only the power required to reach the network. In general, the closer you are to a wireless base station antenna, the lower the power output.
The exposure standard for wireless devices employing a unit of measurement is known as the Specific Absorption Rate, or SAR. The SAR limit set by the FCC is 1.6W/kg, and 1.6W/kg by Industry Canada.
This device is complied with SAR for general population /uncontrolled exposure limits in ANSI/IEEE C95.1-1992 and Canada RSS 102, and had been tested in accordance with the measurement methods and procedures specified in OET Bulletin 65 Supplement C, and Canada RSS 102. This device has been tested, and meets the FCC, IC RF exposure guidelines when tested with the device directly contacted to the body.
The FCC has granted an Equipment Authorization for this model phone with all reported SAR levels evaluated as in compliance with the FCC RF exposure guidelines. SAR information on this model phone is on file with the FCC and can be found under the Display Grant section of www.fcc.gov/oet/ea/fccid after searching on FCC ID: Q78-Z992.
For this device, the highest reported SAR value for usage against the head is 1.25 W/kg, for usage near the body is 1.46 W/kg.
While there may be differences between the SAR levels of various phones and at various positions, they all meet the government requirements.
SAR compliance for body-worn operation is based on a separation distance of 0.4 inches (10 mm) between the unit and the human body. Carry this device at least 0.4 inches (10 mm) away from your body to ensure RF exposure level compliant or lower to the reported level. To support body-worn operation, choose the belt clips or holsters, which do not contain metallic components, to maintain a separation of 0.4 inches (10 mm) between this device and your body.
RF exposure compliance with any body-worn accessory, which contains metal, was not tested and certified, and use such body-worn accessory should be avoided.
Hearing Aid Compatibility (HAC) Regulations for Mobile Phones
In 2003, the FCC adopted rules to make digital wireless telephones compatible with hearing aids and cochlear implants. Although analog wireless phones do not usually cause interference with hearing aids or cochlear implants, digital wireless phones sometimes do because of electromagnetic energy emitted by the phone's antenna, backlight, or other components. Your phone is compliant with FCC HAC regulations (ANSI C63.19-2011). While some wireless phones are used near some hearing devices (hearing aids and cochlear implants), users may detect a buzzing, humming, or whining noise. Some hearing devices are more immune than others to this interference noise and phones also vary in the amount of interference they generate. The wireless telephone industry has developed a rating system for wireless phones to assist hearing device users in finding phones that may be compatible with their hearing devices. Not all phones have been rated. Phones that are rated have the rating on their box or a label located on the box. The ratings are not guarantees. Results will vary depending on the user's hearing device and hearing loss. If your hearing device happens to be vulnerable to interference, you may not be able to use a rated phone successfully. Trying out
the phone with your hearing device is the best way to evaluate it for your personal needs.
This phone has been tested and rated for use with hearing aids for some of the wireless technologies that it uses. However, there may be some newer wireless technologies used in this phone that have not been tested yet for use with hearing aids. It is important to try the different features of this phone thoroughly and in different locations, using your hearing aid or cochlear implant, to determine if you hear any interfering noise. Consult your service provider or the manufacturer of this phone for information on hearing aid compatibility. If you have questions about return or exchange policies, consult your service provider or phone retailer.
M-Ratings: Phones rated M3 or M4 meet FCC requirements and are likely to generate less interference to hearing devices than phones that are not labeled. M4 is the better/higher of the two ratings.
T-Ratings: Phones rated T3 or T4 meet FCC requirements and are likely to be more usable with a hearing device's telecoil ("T Switch" or "Telephone Switch") than unrated phones. T4 is the better/ higher of the two ratings. (Note that not all hearing devices have telecoils in them.)
Your phone meets the M4/T4 level rating.
Hearing devices may also be rated. Your hearing device manufacturer or hearing health professional may help you find this rating. For more information about FCC Hearing Aid Compatibility, please go to http://www.fcc.gov/cgb/dro.
CTIA
a) Do not disassemble or open crush, bend or deform, puncture or shred.
b) Do not modify or remanufacture, attempt to insert foreign objects into the battery, immerse or expose to water or other liquids, expose to fire, explosion or other hazard.
c) Only use the battery for the system for which it is specified.
d) Only use the battery with a charging system that has been qualified with the system per CTIA Certification Requirements for Battery System Compliance to IEEE 1725. Use of an unqualified battery or charger may present a risk of fire, explosion, leakage, or other hazard.
e) Do not short circuit a battery or allow metallic conductive objects to contact battery terminals.
f) Replace the battery only with another battery that has been qualified with the system per this standard, IEEE-Std-1725. Use of an unqualified battery may present a risk of fire, explosion, leakage or other hazard.
g) Promptly dispose of used batteries in accordance with local regulations.
h) Battery usage by children should be supervised.
i) Avoid dropping the phone or battery. If the phone or battery is dropped, especially on a hard surface, and the user suspects damage, take it to a service center for inspection.
j) Improper battery use may result in a fire, explosion or other hazard.
For those host devices that utilize a USB port as a charging source, the host device's user manual shall include a statement that the phone shall only be connected to CTIA certified adapters, products that bear the USB-IF logo or products that have completed the USB-IF compliance program.
Distraction
Driving
Full attention must be given to driving at all times in order to reduce the risk of an accident. Using a phone while driving (even with a hands-free kit) can cause distraction and lead to an accident. You must comply with local laws and regulations restricting the use of wireless devices while driving.
Operating Machinery
Full attention must be given to operating the machinery in order to reduce the risk of an accident.
Product Handling
General Statement on Handling and Use
You alone are responsible for how you use your phone and any consequences of its use.
You must always switch off your phone wherever the use of a phone is prohibited. Use of your phone is subject to safety measures designed to protect users and their environment.
• Always treat your phone and its accessories with care and keep it in a clean and dust-free place.
- Do not expose your phone or its accessories to open flames or lit tobacco products.
- Do not expose your phone or its accessories to liquid, moisture, or high humidity.
- Do not drop, throw, or try to bend your phone or its accessories.
- Do not use harsh chemicals, cleaning solvents, or aerosols to clean the device or its accessories.
68 For Your Safety 69 For Your Safety
- Do not paint your phone or its accessories.
- Do not attempt to disassemble your phone or its accessories. Only authorized personnel can do so.
- Do not expose your phone or its accessories to extreme temperatures, minimum 23°F and maximum 122°F (minimum - 5°C and maximum + 50°C).
- Please check local regulations for disposal of electronic products.
- Do not carry your phone in your back pocket as it could break when you sit down.
Small Children
Do not leave your phone and its accessories within the reach of small children or allow them to play with it. They could hurt themselves or others, or could accidentally damage the phone.
Your phone contains small parts with sharp edges that may cause an injury or may become detached and create a choking hazard.
Demagnetization
To avoid the risk of demagnetization, do not allow electronic devices or magnetic media close to your phone for a long time.
Electrostatic Discharge (ESD)
Do not touch the SIM card's metal connectors.
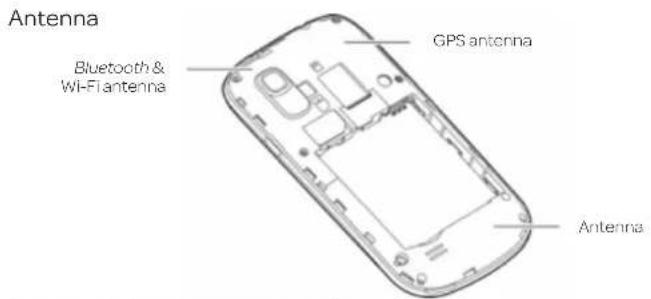
text_image
Antenna Bluetooth & Wi-Fi antenna GPS antenna AntennaDo not touch the antenna unnecessarily.
Normal Use Position
When placing or receiving a phone call, hold your phone to your ear, with the bottom toward your mouth.
Air Bags
Do not place a phone in the area over an air bag or in the air bag deployment area as an airbag inflates with great force and serious injury could result.
Store the phone safely before driving your vehicle.
Seizures/Blackouts
The phone can produce a bright or flashing light. A small percentage of people may be susceptible to blackouts or seizures (even if they have never had one before) when exposed to flashing lights or light patterns such as when playing games or watching video. If you have experienced seizures or blackouts or have a family history of such occurrences, please consult a physician.
Repetitive Strain Injuries
To minimize the risk of Repetitive Strain Injury (RSI) when texting or playing games with your phone:
• Do not grip the phone too tightly.
- Press the keys lightly.
- Use the special features that are designed to minimize the times of pressing buttons, such as Message Templates and Predictive Text.
• Take lots of breaks to stretch and relax.
Emergency Calls
This phone, like any wireless phone, operates using radio signals, which cannot guarantee connection in all conditions. Therefore, you must never rely solely on any wireless phone for emergency communications.
Loud Noise
This phone is capable of producing loud noises, which may damage your hearing. Turn down the volume before using headphones, Bluetooth stereo headsets or other audio devices.
Phone Heating
Your phone may become warm during charging and during normal use.
Electrical Safety
Accessories
Use only approved accessories.
Do not connect with incompatible products or accessories.
Take care not to touch or allow metal objects, such as coins or key rings, to contact or short-circuit in the battery terminals.
Connection to a Car
Seek professional advice when connecting a phone interface to the vehicle electrical system.
Faulty and Damaged Products
Do not attempt to disassemble the phone or its accessories.
Only qualified personnel can service or repair the phone or its accessories.
If your phone (or its accessories) has been submerged in water, punctured, or subjected to a severe fall, do not use it until you have taken it to be checked at an authorized service center.
Interference
General Statement on Interference
Care must be taken when using the phone in close proximity to personal medical devices, such as pacemakers and hearing aids.
Pacemakers
Pacemaker manufacturers recommend that a minimum separation of 6 inches (15 cm) be maintained between a mobile phone and a pacemaker
72 For Your Safety
to avoid potential interference with the pacemaker. To achieve this, use the phone on the opposite ear to your pacemaker and do not carry it in a breast pocket.
Hearing Aids
People with hearing aids or other cochlear implants may experience interfering noises when using wireless devices or when one is nearby.
The level of interference will depend on the type of hearing device and the distance from the interference source, increasing the separation between them may reduce the interference. You may also consult your hearing aid manufacturer to discuss alternatives.
Medical Devices
Please consult your doctor and the device manufacturer to determine if operation of your phone may interfere with the operation of your medical device.
Hospitals
Switch off your wireless device when requested to do so in hospitals, clinics, or health care facilities. These requests are designed to prevent possible interference with sensitive medical equipment.
Aircraft
Switch off your wireless device whenever you are instructed to do so by airport or airline staff.
Consult the airline staff about the use of wireless devices on board the aircraft. If your device offers a 'flight mode', this must be enabled prior to boarding an aircraft.
Interference in Cars
Please note that because of possible interference to electronic equipment, some vehicle manufacturers forbid the use of mobile phones in their vehicles unless a hands-free kit with an external antenna is included in the installation.
Explosive Environments
Gas Stations and Explosive Atmospheres
In locations with potentially explosive atmospheres, obey all posted signs to turn off wireless devices such as your phone or other radio equipment.
Areas with potentially explosive atmospheres include fueling areas, below decks on boats, fuel or chemical transfer or storage facilities, and areas where the air contains chemicals or particles, such as grain, dust, or metal powders.
Blasting Caps and Areas
Power off your mobile phone or wireless device when in a blasting area or in areas posted with power off "two-way radios" or "electronic devices" notices to avoid interfering with blasting operations.
Specifications
Handset specifications are shown in the following table.
| Handset standards GSM/WCDMA support | |
| Dimensions (HxWxD) 4.6"(H) x 2.4 | 4"(W) x 0.45"(D) |
| Weight 4.40 oz.(with battery) | |
| Display 3.5" 320 x 480 | |
| Camera 2.0 megapixels | |
| Video capture Up to 30 fps (VGA) | |
| Internal memory 524 MB | |
| Removable memory card 32 GB microSD card | |
| Battery 1,500 mAh, Lithium-Ion (L-Ion) | |
| Features Bluetooth, Wi-Fi Direct | TM, Google Maps,Kingsoft Office, Email, Browser, Play Store,YouTube, Facebook, Twitter, Messenger,Chrome, Gmail, Google, Google+, PlayBooks, Play Magazines, Play Movies & TV,Play Music, Talk, Voice Search |
| Supported file types AAC, MP3, M4 | A, 3GP, AMR, OGG, QCP, MID,3GA, MP4, M4V, WEBM |
| Continuous idle time | up to 380 hours |
| Continuous talk time | up to 5 hours |
| Charge time | 4 hours |
| WAP browser version | Webkit 534.30 |
Warranty
ZTE offers you a limited warranty that the enclosed subscriber unit and its enclosed accessories will be free from defects in material and workmanship for a period that expires one year from the date of sale of the Product to you, provided that you are the original end user purchaser of the Product and provided that your purchase was made from a supplier authorized by the Seller. Transfer or resale of a Product will automatically terminate warranty coverage with respect to that Product. This limited warranty is not transferable to any third party, including but not limited to any subsequent purchaser or owner of the Product. This limited warranty is applicable only to end users in the United States.
- This product or phone is warranted for 12 (twelve) months from date of purchase.
- For warranty service information, please call ZTE service number (877) 817-1759 (Toll Free). The manufacturer's website, http://www.zteusa.com, is also available for assistance.
- This warranty only applies if the product has been used in accordance with the manufacturer's instructions under normal use and with reasonable care.
- What this warranty does not cover:
a) Defects or damages resulting from the misuse of this product.
b) Defects or damages from abnormal use, abnormal conditions, improper storage, exposure to moisture, dampness or corrosive environments, unauthorized modifications, unauthorized repair, neglect, rough handling, abuse, accident, alteration, improper installation, incorrect voltage application, food or liquid spoilage, acts of God.
c) Normal wear and tear.
d) If the Product has been opened, modified or repaired by anyone other than a warranty service center or if it is repaired using unauthorized spare parts.
e) If the serial number or mobile accessory date code has been removed, erased, defaced, altered or are illegible in any way subject to sole judgment of ZTE.
LIMITED WARRANTY
TO THE EXTENT PERMITTED BY APPLICABLE LAW, THIS LIMITED WARRANTY IS YOUR SOLE AND EXCLUSIVE REMEDY AGAINST ZTE AND ZTE'S SOLE AND EXCLUSIVE LIABILITY IN RESPECT OF DEFECTS IN PRODUCT. HOWEVER, THIS LIMITED WARRANTY SHALL NOT EXCLUDE NOR LIMIT ANY OF YOUR LEGAL (STATUTORY) RIGHTS UNDER THE APPLICABLE NATIONAL LAWS.
TO THE EXTENT PERMITTED BY APPLICABLE LAW ZTE DOES NOT ASSUME ANY LIABILITY FOR LOSS OF OR DAMAGE TO OR CORRUPTION OF DATA, FOR ANY LOSS OF PROFIT, LOSS OF USE OF PRODUCTS OR FUNCTIONALITY, LOSS OF BUSINESS, LOSS OF REVENUES OR LOSS OF ANTICIPATED PROFIT, INCREASED COSTS OR EXPENSES OR FOR ANY INDIRECT, OR SPECIAL OR CONSEQUENTIAL LOSS OR DAMAGE. TO THE EXTENT PERMITTED BY APPLICABLE LAW, ZTE'S LIABILITY SHALL BE LIMITED TO THE PURCHASE VALUE OF THE PRODUCT. THE ABOVE LIMITATIONS SHALL NOT APPLY TO DEATH OR PERSONAL INJURY CAUSED BY DEFECT OF PRODUCT IN MATERIAL, DESIGN AND WORKMANSHIP.
How to Get Warranty Service
To obtain warranty service, please call (877) 817-1759. Please have the following information available when you send the phone in for repair:
• A valid Proof of Purchase
- Return address
• Daytime phone number or fax number
- Model #
- IMEI # (Look for the 15-digit IMEI # behind the battery of the device.)
• Complete description of the problem
• Transportation prepaid
Other Warranty Programs
You may have other warranty programs with your purchase, such as warranty exchange. If so, please refer to equipment package or the original point of sale.