Orange - Smartphone M3 Mobile - Free user manual and instructions
Find the device manual for free Orange M3 Mobile in PDF.


User questions about Orange M3 Mobile
0 question about this device. Answer the ones you know or ask your own.
Ask a new question about this device
Download the instructions for your Smartphone in PDF format for free! Find your manual Orange - M3 Mobile and take your electronic device back in hand. On this page are published all the documents necessary for the use of your device. Orange by M3 Mobile.
USER MANUAL Orange M3 Mobile
natural_image
Abstract graphic with orange diagonal lines and a white background, no text or symbols present.Using this manual
Thank you for purchasing this M3 ORANGEs. This device will provide you with high quality data capture and mobile communication at industrial level of ruggedness.
This user manual has been specially designed to guide you through the basic functions and features of M3 ORANGE series.
Read me first
- Please read all safety precautions and this manual carefully before using your device to ensure safe and proper use.
- This user manual is written based on current state of the device and the detail of this manual are subject to change without prior notice.
● The description on this manual is based on the default setting of the device. - Images and screenshots are taken using current version of software.
- This user manual assumes the device is fully optioned. For the available options with your device, please contact your local distributor or visit our homepage at http://www.m3mobile.net
- M3 Mobile is not liable for performance issues caused by third-party applications.
- M3 Mobile is not liable for performance issues or incompatibilities caused by user mistakes.
● M3 Mobile is not liable for copyright/patent infringement by the user. - M3 Mobile may request part of or entire application developed by third-party company to improve the overall product performance.
- Newer version of operating system (OS) than your current OS may have been released after your purchase. For the latest OS version information, please contact your local distributor.
● This user manual may contain technical and/or editing error.
Copyright
Copyright © 2012 M3 Mobile Co., Ltd.
This user manual is protected under international copyright laws.
Any part of this document cannot be copied, reproduces, modified or translated to other languages without prior written consent of M3 Mobile.
Trademarks
● M3 Mobile and the M3 logo are registered trademark of M3 Mobile Co., Ltd.
● M3 ORANGE is a registered trademark of M3 Mobile.
- Microsoft logo, Windows logo, MS Office, ActiveSync and Windows Mobile Device Center are registered trademarks of Microsoft Corporation.
- Bluetooth ^® is a registered trademark of the Bluetooth SIG, Inc.
- Summit and SCU are trademarks of Summit data communication.
Instructional icons
Before you start, familiarize yourself with the below icons to help with the manual.

Warning – situations that could cause injury to yourself or others.

Caution – situations that could cause damage to your device or other equipment.

Note – useful tips or additional information.
Safety precaution.
- Do not use PDA while driving.
√ It can expose to serious accident.
√ Using PDA while driving may defend against law.
- Do not touch charging plug with wet hand.
√ It may cause electric shock.
- Be aware of handling battery.
√ Do not apply big impact or drill into it.
√ Avoid damping the battery or submerge into water.
√ Avoid metallic contact with the battery.
- Do not expose PDA, battery or charger to excessive heat.
√ It may cause PDA's corruption or explosion.
√ If PDA has been left in a car, as temperature increases it may cause explosion.
- Do not use PDA in event of thunder and lightning.
√ Using PDA in lightning condition can cause electric shock.
- Avoid use of PDA in restricted area.
√ It can cause radio interference.
√ Avoid use of PDA within aircraft. It can interfere with the navigational system of the vessel.
√ Avoid use of PDA within hospital. It can interfere with the medical equipment.
● Turn off PDA where explosion risk area.
√ Please obey rules of explosion risk area.
√ It is safe to turn off PDA in patrol station.
- Be aware of using head set.
√ Continuous use of head set with high volume can damage hearing ability.
√ Using headset while walking or driving, it can decrease attentiveness and cause accident.
Revision History
Version 2.5 Release date: Sep, 2012
● Ear-Mic has been removed from package contents.
Version 2.4 Release date: July, 2012
● Service Center Address has been changed.
Version 2.3 Release date: April, 2012
● RFID Physical specification has been added.
Version 2.2 Release date: March, 2012
● New Pre-Caution note has been added.
Version 2.1 Release date: March, 2012
● Battery Removing method has been edited.
Version 2.0 Release date: January, 2012
- New form applied.
- Added new categories.
: Program development requirement.
: Brief application description.
Version 1.0 Release date: August, 2010
- Initial release
Contents
1.2.1 How to Use.... - 10 -
1.2.2 How to charge....- 11 -
1.3 Power on & off....- 14 -
2.6 Sync with PC 25 -
2.6.1 How to sync.... - 25 -
3. Application usage....- 27 -
3.1 Bluetooth....- 27 -
3.1.1 Bluetooth configuration - 27 -
3.1.2 Getting connected - 27 -
3.2 Camera - 29 -
3.2.1 Camera basics - 29 -
3.3 GPS....- 30 -
3.3.1 GPS basics - 30 -
3.4 Phone - 31 -
3.4.1 Phone basics.... - 31 -
3.5 RFID - 32 -
3.5.1 RFID basics.... - 32 -
3.6 Scanner - 33 -
3.6.1 Scanner basics.... - 33 -
3.6.2 Scanner use.... - 34 -
3.7 Wireless LAN - 35 -
3.7.1 WLAN configuration.... - 35 -
4. Advanced usage ...... - 37 -
4.1 Software development kit (SDK) ...... - 37 -
4.1.1 SDK Package - 37 -
4.1.2 OS Update - 38 -
4.1.3 Key customization.... - 38 -
5. Etc....- 41 -
5.1 Specification - 41 -
5.2 Services.... - 42 -
5.2.1 Contact details.... - 42 -
1. Getting Started
1.1 Product package
1.1.1 Device and Peripherals
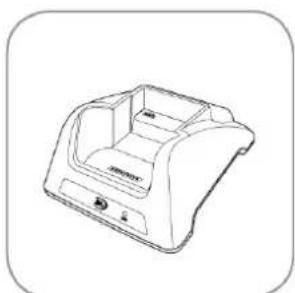
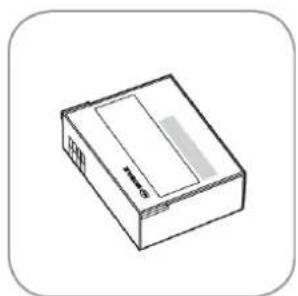
Check M3 ORANGE package contains below items:

natural_image
Line drawing of a mobile phone with control panel and keypad (no text or symbols)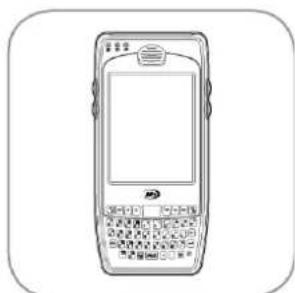
natural_image
Line drawing of a mobile phone with control panel and keypad (no text or symbols)Numeric or QWERTY) >
natural_image
Line drawing of a portable electronic device (no text or symbols)< Cradle>
natural_image
Simple line drawing of a rectangular box with a lid and front panel (no text or symbols)
natural_image
Line drawing of a knitted string with two connectors (no text or symbols)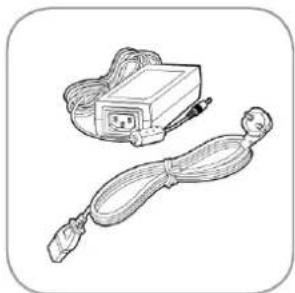
natural_image
Line drawing of a handheld electronic device with coiled cable and connector (no text or symbols)
natural_image
Simple line drawing of a pen or stylus (no text or symbols)
text_image
M3 ORANGE Quick ManualIf there is any missing part or damaged item, please contact your supplier immediately. (There will only be one PDA with in Package)

Use of controls or adjustments or performance of procedures other than those specified herein may result in hazardous radiation exposure.
1.2 Battery
1.2.1 How to Use
Inserting battery
- Open the battery cover by turning the battery lock clockwise.
- Insert the battery to the battery pack position.
- Replace the cover and turn the lock anti-clockwise to secure the cover.
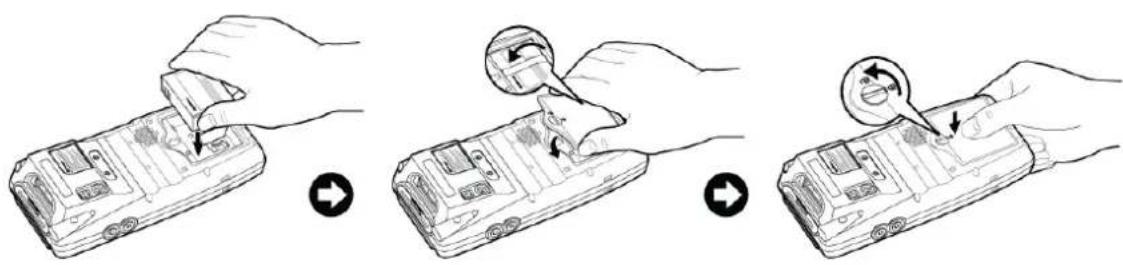
text_image
Illustration showing three-step battery shipment process with hand positioning and tool insertion steps
M3 ORANGE uses Li-Ion 3.7V, 3,300mAh smart battery.

- Using unauthorized battery may cause explosion or serious damage of the device.
- Risk of explosion if battery is replaced by an incorrect type. Dispose of used batteries according to the instructions.
- Check the battery is placed in the correct direction.
Removing battery
- Loosen the battery lock using the stylus.
- Then remove the battery from the battery position.
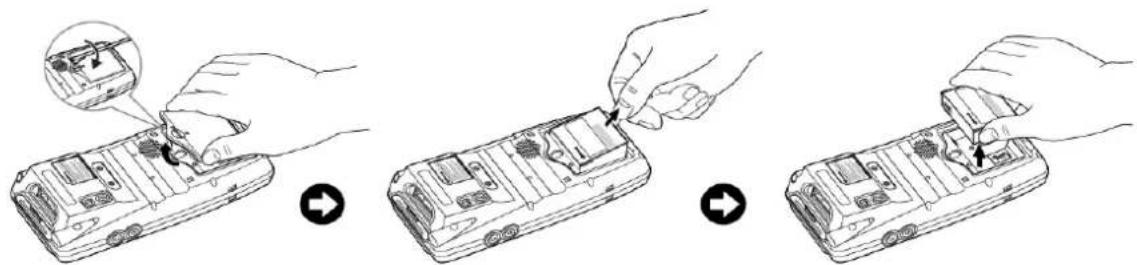
text_image
Diagram showing three-step battery installation procedure: adding a component, then adjusting internal compartments, and finally adding a plug.
Battery contact pin may bend or damaged not pull out properly.
Program error may be occurred when removing battery while any program is running. Please make sure the running program is closed before
The back-up battery would work when the battery has removed so the device goes to sleep mode.

M3 ORANGE can be used for maximum 11 hours with fully charged battery. It can be different depending on users' working environment.
1.2.2 How to charge
If the exclamation mark shows up next to the battery icon, please charge the battery otherwise the device will be turned off.
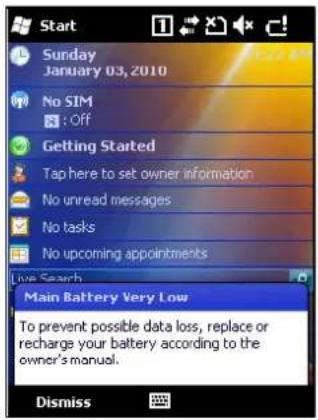
text_image
Start Sunday January 03, 2010 No SIM : Off Getting Started Tap here to set owner information No unread messages No tasks No upcoming appointments Live Search Main Battery Very Low To prevent possible data loss, replace or recharge your battery according to the owner's manual. DismissCharging the battery
- Plug in authentic AC adaptor plug to wall jack and DC jack to power connector of cradle.
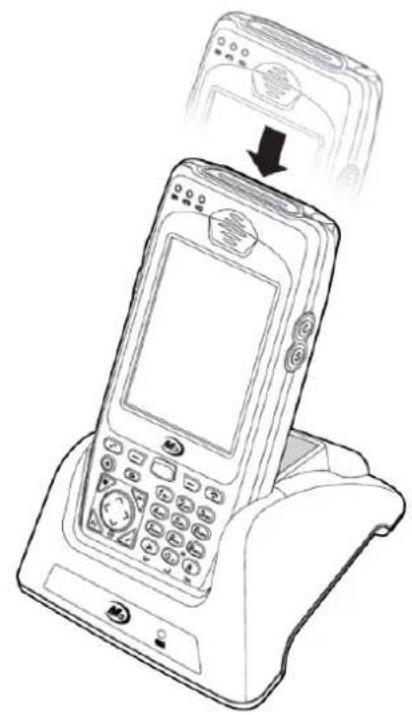
- Insert PDA to device slot to start charging the PDA. Make sure that the device is connected to the cradle correctly.

AC adaptor is rated at 100\~240V, 5A. Do not use the adapter outside the rated voltage.

Please use authentic cradle that M3 Mobile provides only, there might be a malfunction and/or failure of device.
natural_image
Line drawing of a mobile phone with a keypad and front panel, showing a device being placed into a base (no text or symbols)If PDA is in right position, charging LED will indicate red and it will start charging the battery. It will change to green when the battery is fully charged.
If the charging LED is not turned on, please re-insert the device to the cradle.
| LED Color | Description |
| Red | The battery is charging. |
| Green | The battery is fully charged. |

Do not exposure the battery to excessive temperature.
Acceptable user temperature range is -20^ ( -4^ )\~ 60^ ( 140^ )
It will take approximately 4 hours to fully charge from deplete state using the supplied charging cradle.
Charging spare battery
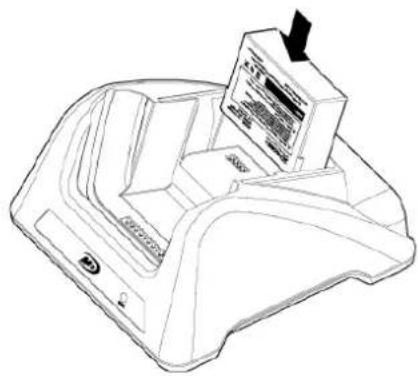
Position the spare battery to battery pack of the cradle as indicated in the following figure.
Charging LED on the cradle indicates the charging status.
natural_image
Line drawing of a computer monitor with an open screen and a download arrow (no text or symbols)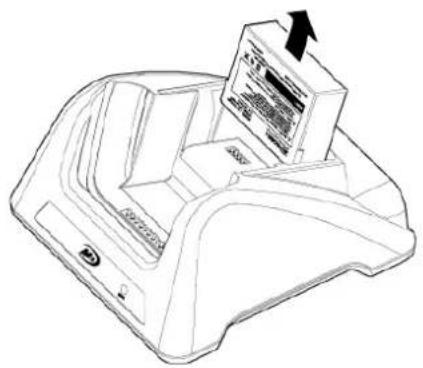
natural_image
Line drawing of a computer monitor with an open screen and an arrow indicating the next page (no text or symbols present)Remove the spare battery from the charging slot when charging is done.
Battery attached to the PDA will be charged first than the spare battery on the cradle, when two batteries are being charged at the same time.

- M3 Mobile recommends replacing the battery if the battery is being used for 2 years.
- Battery capacity decrease when charging and discharging is repeated.
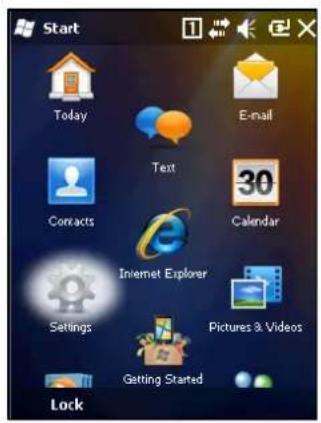
Battery information can be checked in Start→Settings→System→Power.
text_image
Start Today Text E-mail Contacts 30 Calendar Internet Explorer Settings Pictures & Videos Getting Started Lock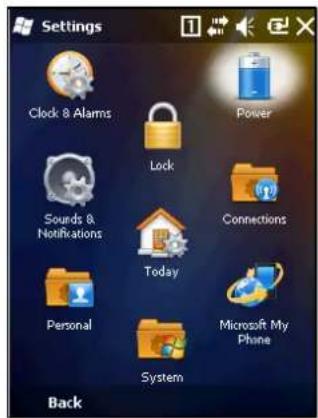
text_image
Settings Clock & Alarms Power Lock Sound & Notifications Connections Today Personal Microsoft My Phone System Back
text_image
Settings Power Main battery: LiIon Recharging state: Charging 0 100 Battery Advanced WakeupSmart battery used in M3 ORANGE enables user to check the charging status while charging.
1.3 Power on & off
1.3.1 Power on
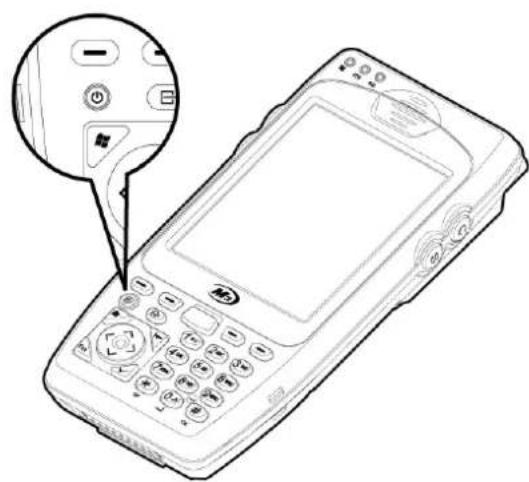
To turn on the device, attach fully charged main battery and press the power button briefly.

Empty or low level of the back-up battery may cause starting problem. If this happens press and hold the reset button for 5 seconds.
natural_image
Line drawing of a mobile phone with control panel and keypad (no text or symbols)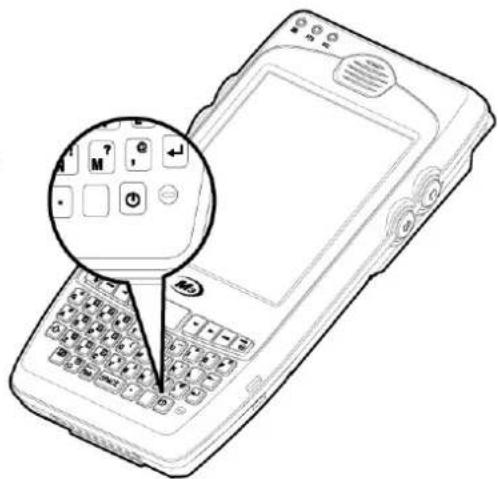
text_image
Line drawing of a mobile phone with a circular inset highlighting key keys and a cursor pointing to the keyboard.1.3.2 Power off
Press and hold the power button for more than 5 seconds to turn off the device.
1.3.3 Sleep mode
Device will automatically enter 'Sleep mode' to save battery if there is no constant usage.
By default, backlight is turned off after 30 seconds of null state and will enter sleep mode if the device is not used for 1 minute on battery power.
The time can be set from Start→Settings→System→Backlight for backlight off time and Start→Settings→Power for sleep mode.

In sleep mode, all modules except phone module are powered off which causes Wi-Fi to disconnect from the current AP. However, on resume, Wi-Fi is automatically re-connected to the AP normally within 10 seconds.
1.4 Memory card
1.4.1 Inserting memory card
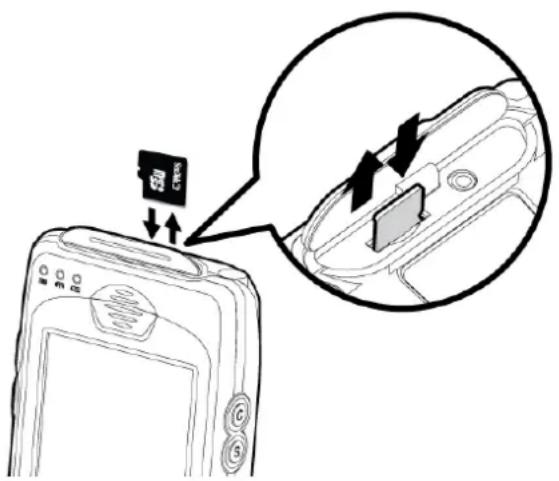
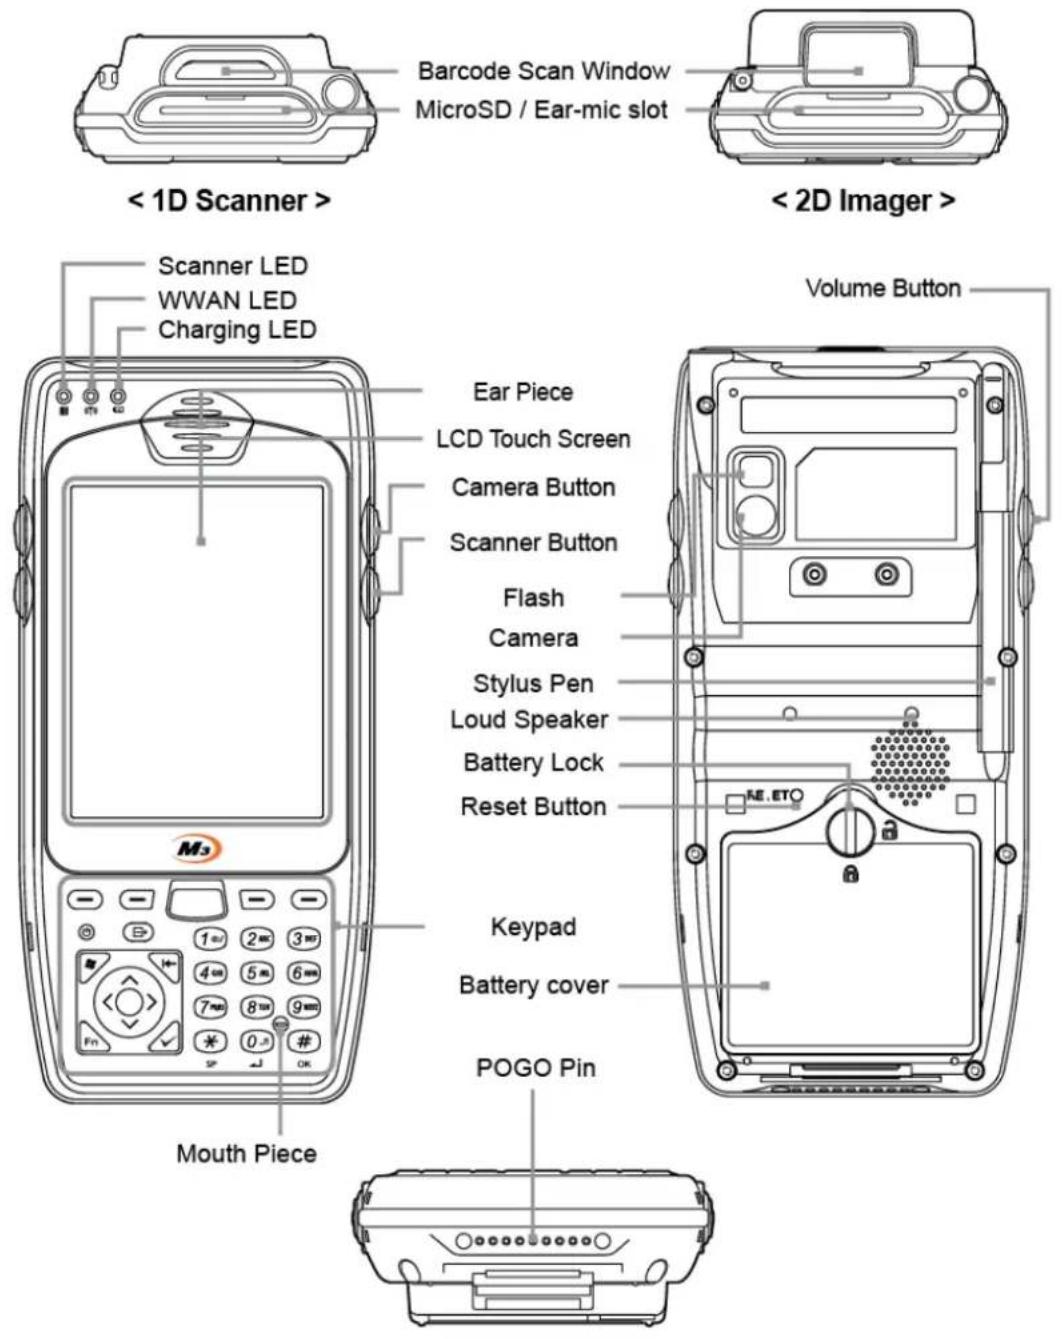
M3 ORANGE uses MicroSD external memory card. The external memory slot is located at the top side of the device as indicated in the following image:
text_image
Diagram showing a smartphone with a card and an inset close-up of the internal components, illustrating the process of inserting or removing a card into a device.To insert MicroSD, first open the top cover and slide in the external memory card in the right direction until you feel a click.

- M3 ORANGE with Windows Mobile 6.5 operating system supports up to 32GB of external memory.
- Only use 2GB or less for OS update.
1.4.2 Data check
Stored data can be checked in Start→File Explorer→Storage Card.
For OS update using MicroSD, please refer to section 4.2.1 OS update via SD card.
1.5 SIM card
1.5.1 Inserting SIM card
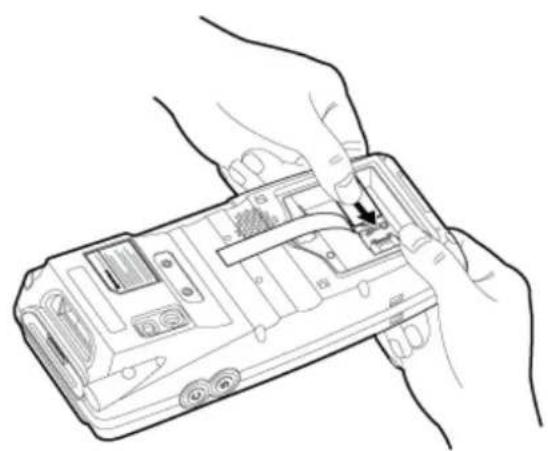
If the device is optioned with 3G network, SIM card slot is located under the battery socket.
The SIM must be authorized by the local network provider for voice or data communication over the wireless network.
To insert the SIM card, remove the battery and slide in the SIM card to the proper position.
natural_image
Line drawing of hands installing or adjusting a device component on a smartphone (no text or symbols visible)Please refer to section 3.5 Phone for more information on how to use the phone.
2. Basic usage
2.1 Features
Device layout
text_image
< 1D Scanner > < 2D Imager > Scanner LED WWAN LED Charging LED Mouth Piece Ear Piece LCD Touch Screen Camera Button Scanner Button Flash Camera Stylus Pen Loud Speaker Battery Lock Reset Button Keypad Battery cover POGO Pin Volume Button2.2 Keypad
2.2.1 Buttons
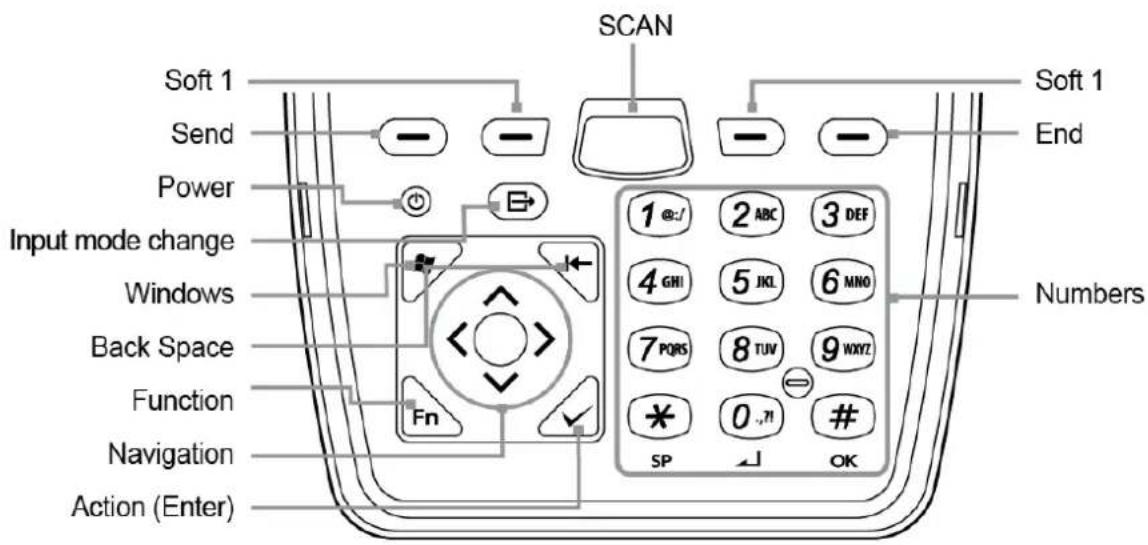
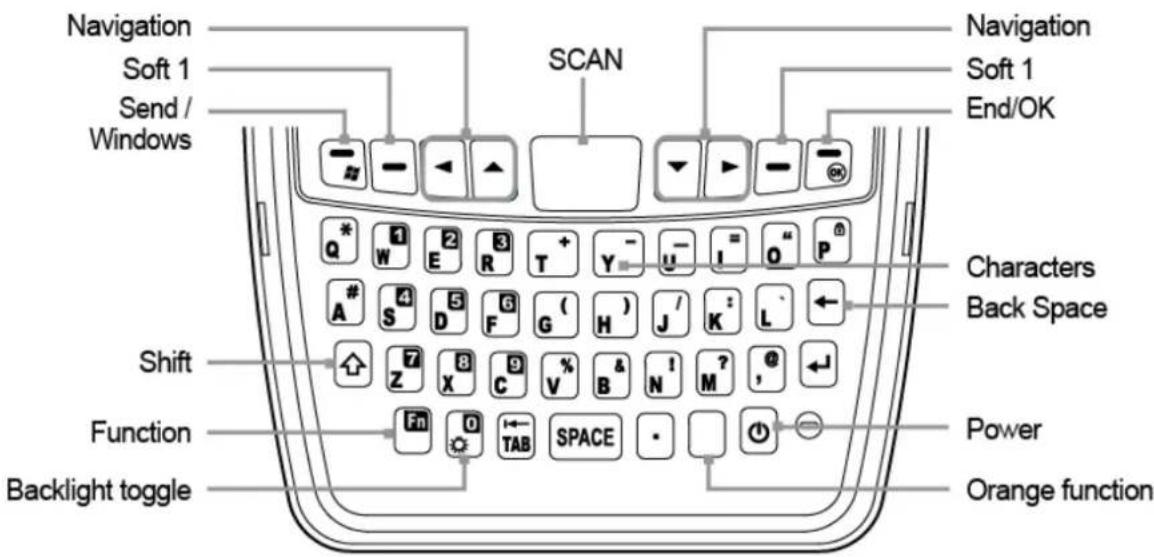
M3 ORANGE has two different keypad options: Alpha-Numeric and QWERTY.
Alpha-Numeric keypad layout
text_image
SCAN Soft 1 Send Power Input mode change Windows Back Space Function Navigation Action (Enter) 1 @:./ 2 ABC 3 DEF 4 GHI 5 JKL 6 MNO 7 PQRS 8 TUV 9 WXYZ * 0 .n # SP OK Soft 1 End Numbers| Button | Description |
| SCAN | Used to scan while scanner program is running. |
| Soft1 / Soft2 | Use specific command or menu. |
| Send / End | Used to make / end a call. |
| Power | Long press: Turns on/off the device.Short press: Enters Sleep/Wake up Mode. |
| Input mode change | Changes the input mode of the keypad. 1 (number) → (lowercase letter) → (uppercase letter) |
| Windows | Open ‘Start’ menu of windows. |
| Backspace | Deletes previous input data. |
| Function | Activate specific function. |
| Navigation | Move to up/right/down/left. |
| Action (Enter) | Performs chosen contents and/or function. |
| Number | Used to input numbers / characters or to execute functions. |
QWERTY keypad layout
text_image
Navigation Soft 1 Send / Windows SCAN Navigation Soft 1 End/OK Characters Back Space Shift Function Backlight toggle Power Orange function| Button | Description |
| SCAN | Used to scan while scanner program is running. |
| Navigation | Move to up/right/down/left. |
| Soft1 / Soft2 | Use specific command or menu. |
| Send / Windows | Used to make a call or to open ‘Start’ menu in orange mode. |
| End / OK | Used to end a call or to confirm changes in orange mode. |
| Characters | Used to input characters or to execute functions. |
| Back space | Deletes previous input data |
| Shift | Used to input uppercase letters. |
| Function | Activate specific function. |
| Power | Long press: Turns on / off the device.Short press: Enters Sleep / Wake up Mode. |
| Backlight toggle | Toggles the LCD backlight.Short press: Reduces the backlight level to 5% and/or turns on the backlightLong press: Turns off the backlight completely |
| Orange function | Enables orange mode.Orange ring: Orange mode is effective only once.Orange circle: Orange mode is effective until turned off. |
2.3 Screen
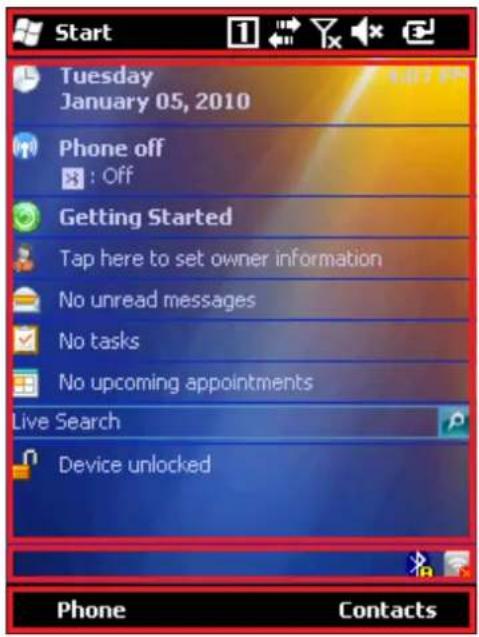
When you turn on the device, you will see a screen as the following image. The screen is divided into 4 sections.
text_image
Start Tuesday January 05, 2010 Phone off : Off Getting Started Tap here to set owner information No unread messages No tasks No upcoming appointments Live Search Device unlocked Phone Contacts→ Status bar
→ Today screen
→ Task bar
→ Menu bar
2.3.1 Status bar
Status bar indicates the status of the device and 'Start' menu.
| Icon | Name | Description |
 | Start menu | Expands the Start menu. |
 | Input mode | Number → Lowercase letter → Uppercase letter |
 | Function mode | Status of function mode.Only in Alpha-Numeric version. |
 | Orange mode | Status orange modeOnly in QWERTY version. |
 | Connectivity Display data connectivity (Sync) | |
 | Phone status Displays signal strength | |


Volume status
Indicates volume or vibration mode
Battery status
Charging or left power amount
2.3.2 Today screen
There are program icons which can be added and/or deleted in home screen.
| Icon | Name | Description |
 | Date / Time Show the current date and time | |
 | Wireless Information | Show the control panel for Bluetooth and phone function. |
 | Quick Guide | Show user manual that Microsoft supplies with OS. |
 | Owner information | Show and set owner's information. |
 | Messaging | Show the text messages, e-mail through outlook. |
 | Task Information Show the tasks assigned. | |
 | Calendar Show Calendar | |
 | Live search | Quick search bar |
 | Lock Screen Lock screen. | |
2.3.3 Task bar
Task bar is controlled by third-party applications.
| Icon | Name | Description | |
 |  | WLAN on / off | Used to turn on / off WLAN |


WLAN status Indicates WLAN status


Bluetooth
Indicated Bluetooth status.
If you run ScanEmul( ) or RfidEmul ( ), corresponding icon will appear on the task bar.
2.4 Data input
2.4.1 Stylus pen
Select and execute
Click on the target icon with stylus pen.
Selecting multiple items
Drag over the items with stylus pen.
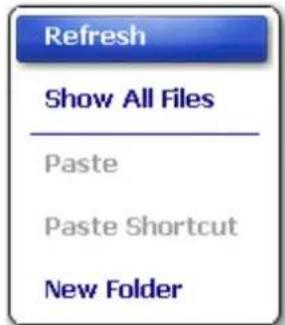
Menu popup
Long press on the LCD
text_image
Refresh Show All Files Paste Paste Shortcut New Folder2.4.2 Keyboard
Physical keys
Press the keypads on the device.
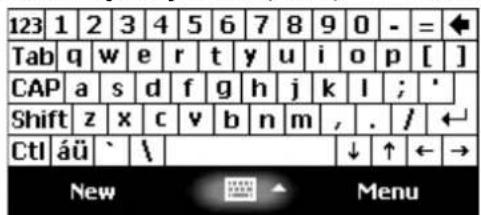
Soft input panel (SIP)
Click on keyboard icon at the menu bar ( ).
text_image
123 1 2 3 4 5 6 7 8 9 0 - = Tab q w e r t y u i o p [ ] CAP a s d f g h j k l ; ' Shift z x c v b n m , . / Ctl äü ` \ ↓ ↑ ← → New MenuTranscriber
Hand writing recognition.
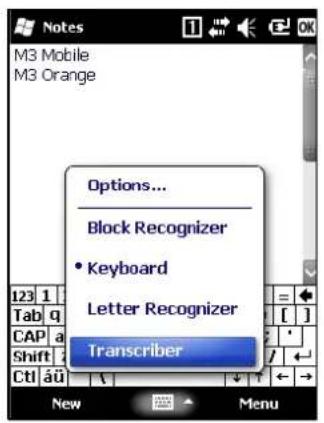
To enable transcriber, click on the up arrow when SIP is shown. When an SIP menu pops up select Transcriber. 'Transcriber Intro' window will be show up and click 'Don't show this', if this information is no longer needed.
text_image
Notes M3 Mobile M3 Orange Options... Block Recognizer • Keyboard Letter Recognizer Transcriber New Menu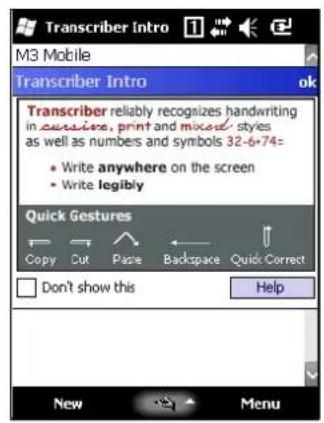
text_image
Transcriber Intro M3 Mobile Transcriber Intro ok Transcriber reliably recognizes handwriting in currency, print and mixed styles as well as numbers and symbols 32-6+74= • Write anywhere on the screen • Write legibly Quick Gestures Copy Cut Paste Backspace Quick Correct Don't show this Help New Menu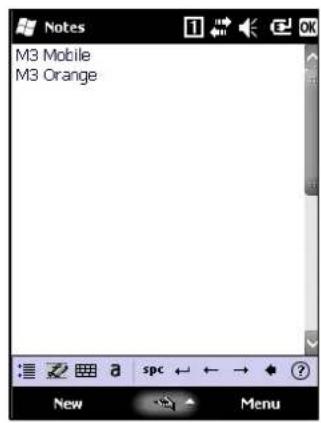
text_image
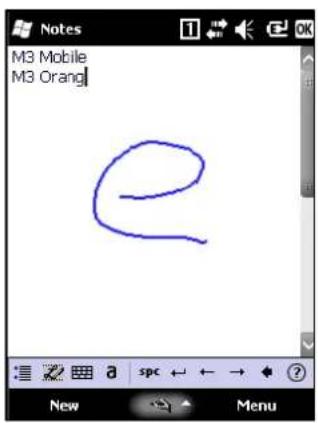
Notes M3 Mobile M3 OrangeInput data with stylus pen, checked data will be recognized within 2 seconds.
text_image
Notes M3 Mobile M3 Orang e New a spc ← ← → ★ Menu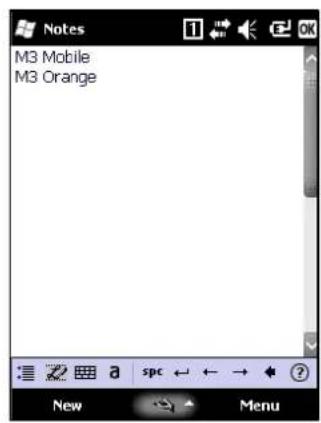
text_image
Notes M3 Mobile M3 Orange New spc ← ← → ? MenuTo turn off transcriber, simply select back to Keyboard from SIP menu.
2.5 Reset
2.5.1 Soft reset
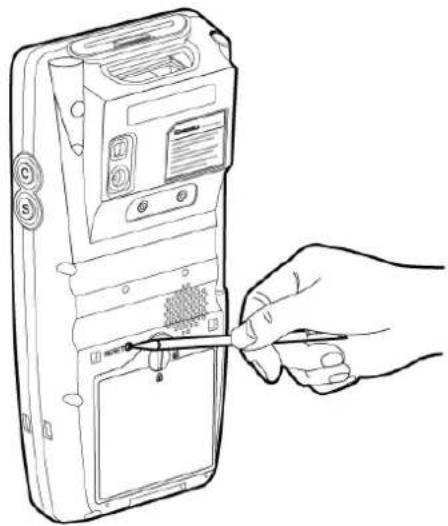
When an unexpected error occurs while using the device, SOFT RESET allows your device to restart, similar to rebooting a computer. It will adjust memory allocation - all records and entries are retained after soft reset but unsaved data or files will be lost.
- Press the RESET BUTTON briefly.
natural_image
Line drawing of a hand inserting a cable into a device (no text or symbols)2.5.2 Clean boot
When an unexpected error cannot be solved with SOFT RESET, perform CLEAN BOOT to restart the system. It will erase all data stored in the device except data stored in Flash Disk and return to its default settings.
Follow below steps to CLEAN BOOT. (or+)
● Turn off the device by pressing the power button more than 10 seconds.
- Press and hold Right direction button then press the power button.
- 'Clean Boot' will be displayed on screen and press '3' to precede clean boot.
● Device will be initialized after clean boot that is, clean boot deletes everything except data stored in Flash Disk.
2.6 Sync with PC
Sync is simplified form of Synchronization, which enables files transfer or back-up data between PC and the device.
To synchronize the device with PC, one of the following sync programs must be installed on the PC. Please download appropriate program depending on the operating system of the PC
Sync program download
Windows Mobile Device Center (Windows Vista or later): Download
ActiveSync (Windows XP): Download
2.6.1 How to sync
To sync, please follow the steps described below.
- Download and install WMDC (or ActiveSync) on PC.
- Connect client port of the cradle and PC using supplied USB cable.
- Supply AC power to the cradle.
- Turn on the device and place it on the cradle.
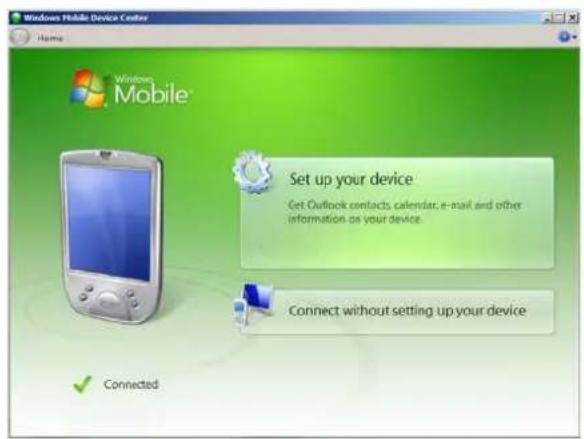
After step 4, your PC will automatically detect M3 ORANGE and install Pocket_PC driver. Once the driver installation is done successfully, you should be able to transfer files or back up files on the device.
text_image
Windows Mobile Device Center Home Windows Mobile Set up your device Get Outlook contacts, calendar, e-mail and other information on your device. Connect without setting up your device ConnectedWhen you see a window similar to this, it means your device is connected to the PC correctly.

If Cradle and PC is connected with USB cable before installing ActiveSync, PC may not recognize Equipment
For features of WMDC or ActiveSync, please visit Microsoft homepage for more details.
If ActiveSync does not work please check followings.
- Check USB cable is connected to cradle and PC properly.
- Check PDA and its LCD are turned on
- Check if [Allow USB connection with this desktop computer] is checked from ActiveSync program menu File Connecting Option

After checking all those above, try ActiveSync again or try Soft/Hard reset and ActiveSync.
3. Application usage
3.1 Bluetooth
3.1.1 Bluetooth configuration
Turning on
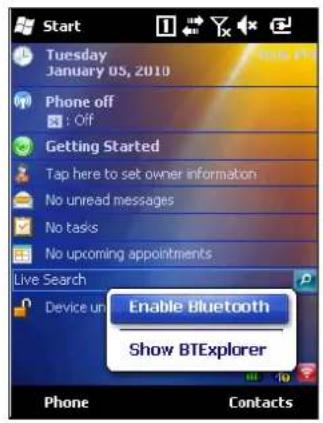
Click on Bluetooth icon on task bar ( ) and choose 'Enable Bluetooth' to turn on the Bluetooth module. Once the Bluetooth is on, the task bar icon will change to to indicate it is enabled.
text_image
Start Tuesday January 03, 2010 Phone off : Off Getting Started Tap here to set owner information No unread messages No tasks No upcoming appointments Live Search Device un Enable Bluetooth Show BTExplorer Phone ContactsTo turn it off, simply disable the Bluetooth after click on 📋 icon from task bar.

M3 ORANGE can use two different Bluetooth stacks:
- StoneStreetOne (default)
- Microsoft
Bluetooth stack can be changed from
Start→Settings→System→BT Select
The device must go through power cycle after stack change.
3.1.2 Getting connected
Set Bluetooth Connection
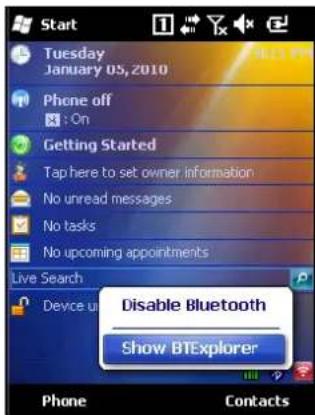
Bluetooth connections can be configured using BTExplorer. To launch BTExplorer, click on Bluetooth icon on task bar ( [icon] ) and choose 'Show BTExplorer'.
text_image
Start Tuesday January 05, 2010 Phone off : On Getting Started Tap here to set owner information No unread messages No tasks No upcoming appointments Live Search Device u Disable Bluetooth Show BTExplorer Phone Contacts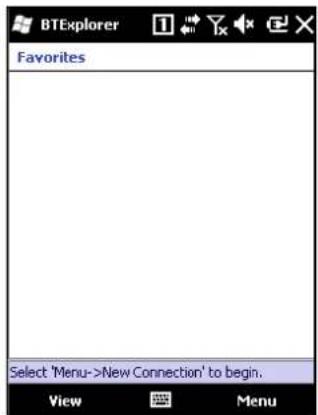
text_image
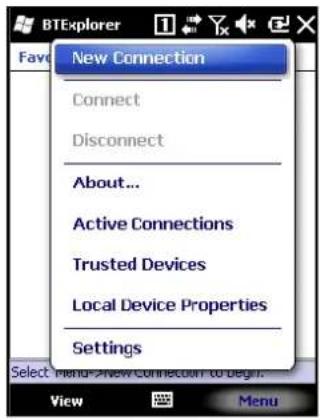
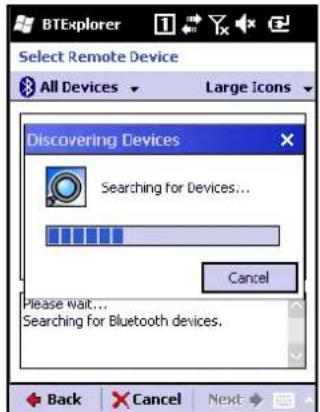
BTExplorer Favorites Select 'Menu->New Connection' to begin. View MenuTo make a new Bluetooth connection, follow steps below.
- Click Menu → New Connection to search for connectable devices.
text_image
New Connection Connect Disconnect About... Active Connections Trusted Devices Local Device Properties Settings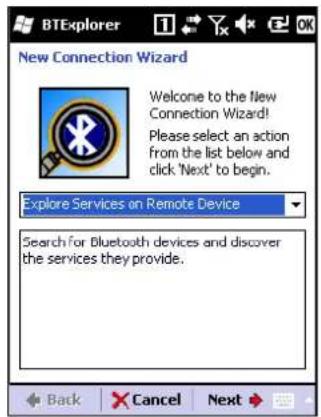
text_image
BTEExplorer New Connection Wizard Welcome to the New Connection Wizard! Please select an action from the list below and click 'Next' to begin. Explore Services on Remote Device Search for Bluetooth devices and discover the services they provide.- Choose the service willing to be connected and click 'Next' to go to next step.
text_image
Select Remote Device All Devices ▼ Large Icons Discovering Devices Searching for Devices... Cancel Please wait... Searching for Bluetooth devices. Back Cancel Next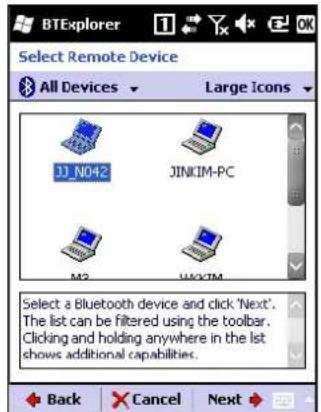
text_image
Select Remote Device All Devices ▼ Large Icons DJ_N042 JINKIM-PC M2 UWQTM Select a Bluetooth device and click 'Next'. The list can be filtered using the toolbar. Clicking and holding anywhere in the list shows additional capabilities. Back Cancel Next- Choose on device willing to be connected, and click 'Next' to proceed.
- When 'PIN Code Request' pops up, enter pin code which is identical with paired device, and follow the dialog to finish Bluetooth pairing.
3.2 Camera
3.2.1 Camera basics
M3 Mobile provides its own camera application for 3.0 MP AF camera with enhanced features.

Camera is an optional module
How to launch
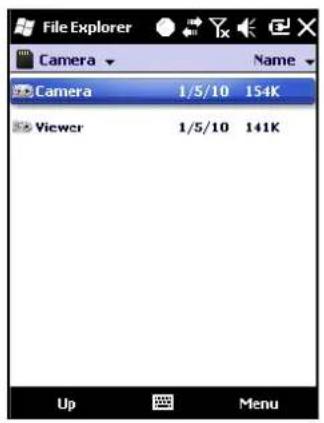
M3 camera application is located at \Flash Disk\Camera folder. To launch, click on Camera.exe in the folder.
text_image
File Explorer Camera Name Camera 1/5/10 154K Viewer 1/5/10 141K Up Menu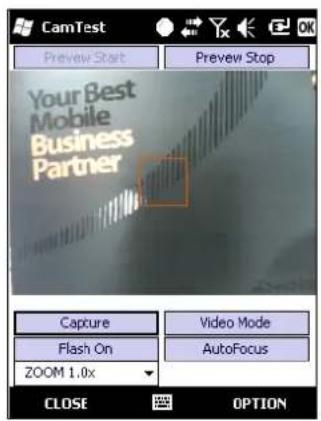
text_image
CamTest Preview Start Preview Stop Your Best Mobile Business Partner Capture Flash On ZOOM 1.0x Video Mode AutoFocus CLOSE OPTION
text_image
Your Best Mobile Business PartnerWhile the camera application is running, click on Capture button or press 'C' button (right-up side key) to capture the image. You should be able to check the result straight after the capture. Captured image is saved in the same folder (default path) as the camera application.
For detailed description of camera application, please refer to Application Manual. Application Manual Download

It may cause significant damage to your eyes if you directly look the flash attached at camera module.
3.3 GPS
M3 ORANGE provides Global Positioning System (GPS) and its test application.
3.3.1 GPS basics
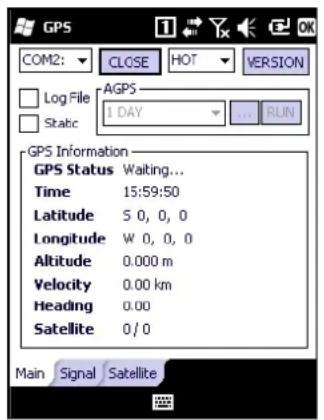
The GPS application is located at \Flash Disk\GPS folder. The application provides general positioning information, signal strength and satellite information as well as the GPS start options.
text_image
GPS COM2: CLOSE HOT VERSION Log File AGPS Static 1 DAY ... RUN GPS Information GPS Status Waiting... Time 15:59:50 Latitude S 0, 0, 0 Longitude W 0, 0, 0 Altitude 0.000 m Velocity 0.00 km Heading 0.00 Satellite 0 / 0 Main Signal Satellite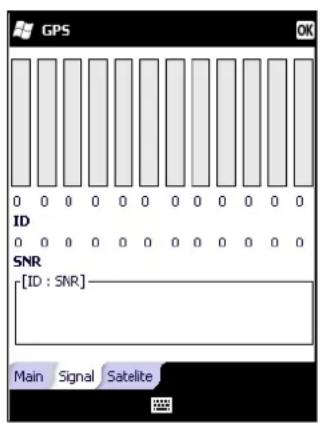
text_image
GPS 0 0 0 0 0 0 0 0 0 0 0 0 0 ID 0 0 0 0 0 0 0 0 0 0 0 0 SNR [ID : SNR] Main Signal Satellite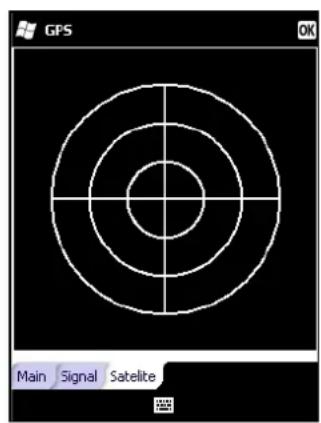
text_image
GPS Main Signal SatelliteHot Start: Start mode of the GPS receiver when current position, clock offset, approximate GPS time, and current ephemeris data are all available.
Warm Start: Start mode of the GPS receiver when current position, clock offset, and approximate GPS time are input by the user. Ephemeris data is not available.
Cold Start: A condition in which the GPS receiver can arrive at a navigation solution without initial position, time, and current Ephemeris.

- GPS is an optional module.
- Assisted GPS (AGPS) is only available with UBLOX GPS module. Please click on version to check your GPS module.
For detailed description of GPS application, please refer to Application Manual. Application Manual Download
3.4 Phone
M3 ORANGE provides 3G (HSDPA) network features.
3.4.1 Phone basics
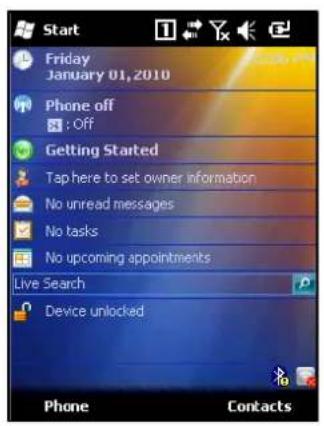
You can either go to Start→Phone or simply press 'Send' button on home screen to enter Phone menu.
text_image
Start Friday January 01, 2010 Phone off : Off Getting Started Tap here to set owner information No unread messages No tasks No upcoming appointments Live Search Device unlocked Phone Contacts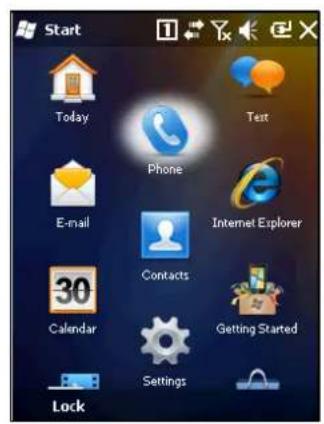
text_image
Start Today Text Phone E-mail Internet Explorer 30 Contacts Calendar Getting Started Settings Lock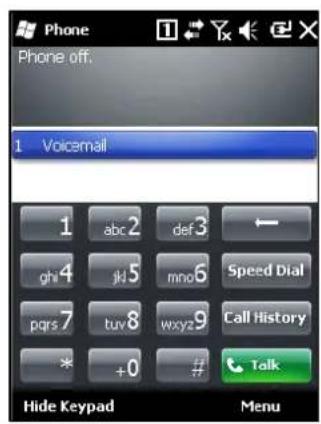
text_image
Phone off: Voicemail 1 abc 2 def 3 ghi 4 jk 5 mno 6 Speed Dial pqrs 7 tuv 8 wxyz 9 Call History * +0 # Talk Hide Keypad Menu- Press ( Hide Keypad) button to hide number pad.
- Press (Menu) button to enter menu.
- Press (✗) button to exit phone menu and return to today screen.

- Phone is an optional module.
- Make sure phone is on before you make a call or data transfer over the network
For GPRS setting, please refer to M3 FAQ document 'GPRS Settings' section. FAQ Download
3.5 RFID
M3 ORANGE provides high (HF) or ultra high frequency (UHF) RFID reader as an optional module. Please contact your local distributor for RFID options.
3.5.1 RFID basics
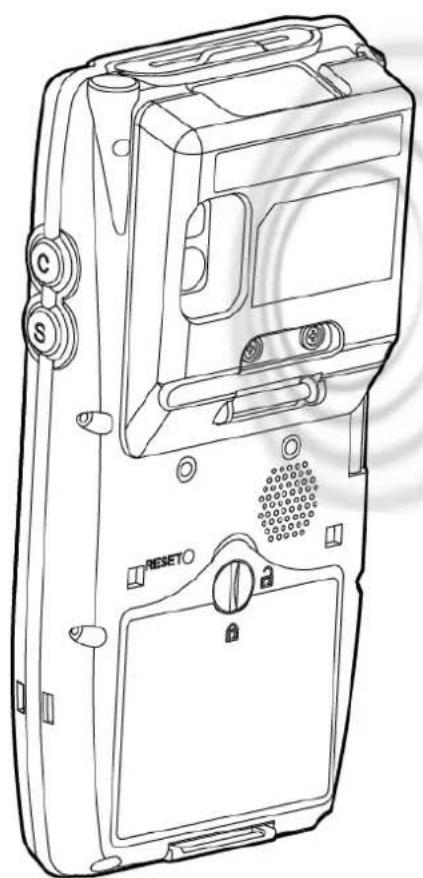
M3 Mobile provides two types of RFID program:
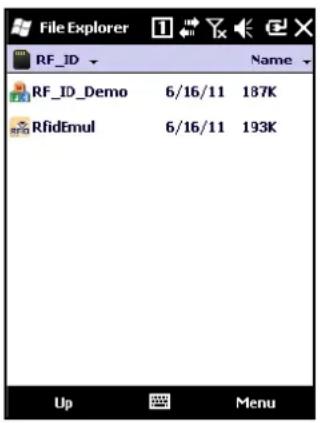
- RfidEmul Keyboard wedge application which sends tag data.
- RF_ID_Demo Used as RFID demonstration or quick tests.
When RfidEmul is running RFID icon (RFID) will appear on task bar.

While RfidEmul is running, RF_ID_Demo cannot be used and vice versa.
natural_image
Line drawing of a device casing with buttons and lock, no text or symbols present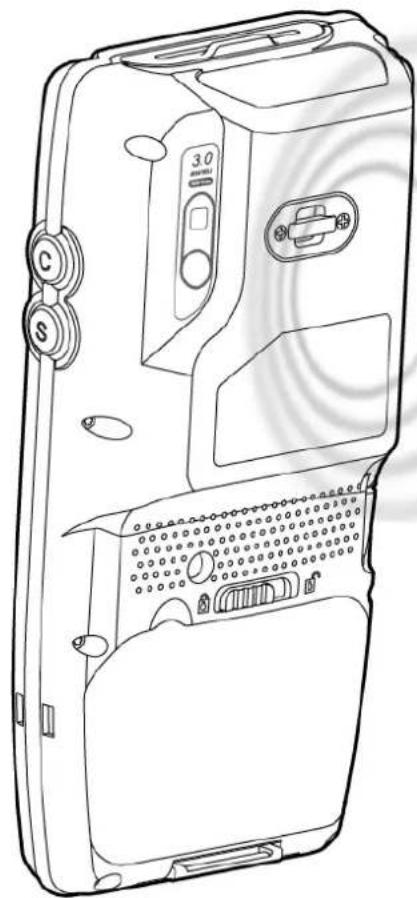
natural_image
Line drawing of a smartphone case with buttons and ventilation slots (no text or symbols)M3 RFID application is located at \Flash Disk\RFID folder. To launch, click on appropriate executable file in the folder.
text_image
File Explorer RF_ID Name RF_ID_Demo 6/16/11 187K RfidEmul 6/16/11 193K Up Menu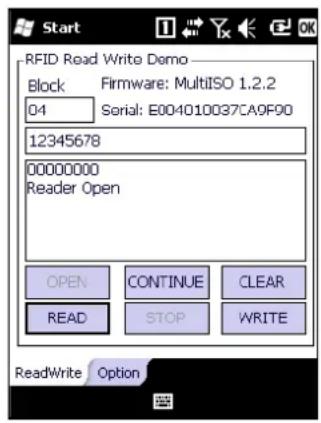
text_image
Start RFID Read Write Demo Block Firmware: MultiISO 1.2.2 04 Serial: E004010037CA0F90 12345678 00000000 Reader Open OPEN CONTINUE CLEAR READ SOP WRITE ReadWrite OptionFor detailed description of RFID application, please refer to Application Manual. Application Manual Download
3.6 Scanner
M3 ORANGE provides 1D or 2D scanner as an optional module. Please contact your local distributor for scanner options.
3.6.1 Scanner basics
M3 Mobile provides two types of scanner program:
- ScanEmul Keyboard wedge application which sends barcode data.
- ScanTest Used as scanner demonstration or quick tests.
When ScanEmul is running scanner icon (☐) will appear on task bar.

- While ScanEmul is running, ScanTest cannot be used and vice versa.
- Imager and Camera cannot run at the same time.
For detailed description of scanner application, please refer to Application Manual.
Application Manual Download
3.6.2 Scanner use
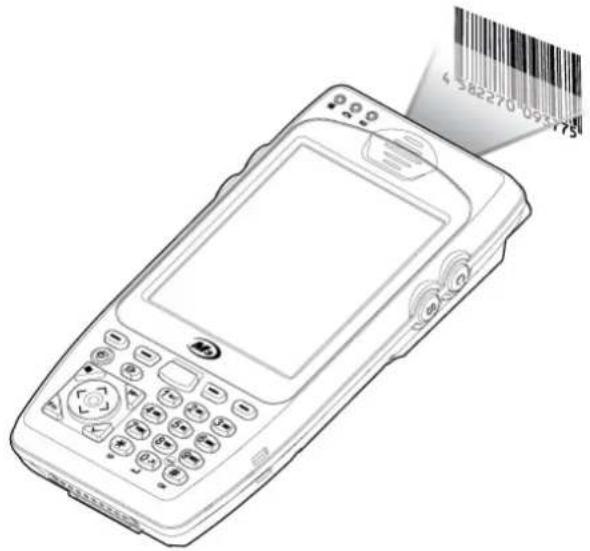
Press scanner button toward to barcode you want to read.
natural_image
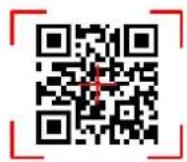
Line drawing of a mobile phone with a barcode tag attached (no text or symbols on the device itself)Make sure the laser beam covers whole barcode to read data properly.

text_image
Barcode image with a red horizontal line overlaying the bars0

X
0
<1D Scanner>
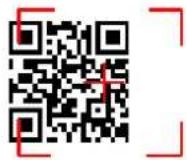
X
<2D Imager>

- Do not stare into beam.
- Use of control of adjustment or performance of procedures other than those specified herein may result in hazardous radiation exposure.
- LASER LIGHT - Do not stare into beam, CLASS 2 LASER PRODUCT 1.0mW, MAX OUTPUT:650nm
3.7 Wireless LAN
3.7.1 WLAN configuration
How to connect
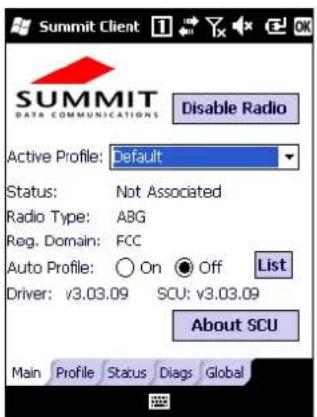
WLAN icon ( / ) on task bar indicates with WLAN is on or off respectively. If WLAN is off, click on the icon and Select 'WLAN Insert' to turn on WLAN module.
Then, WLAN status icon (L) will appear on the task bar. Click on the icon to launch Summit Client Utility (SCU).
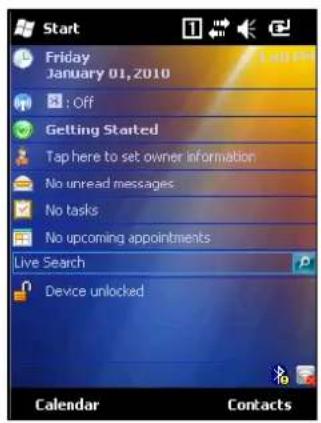
text_image
Start Friday January 01, 2010 : Off Getting Started Tap here to set owner information No unread messages No tasks No upcoming appointments Live Search Device unlocked Calendar Contacts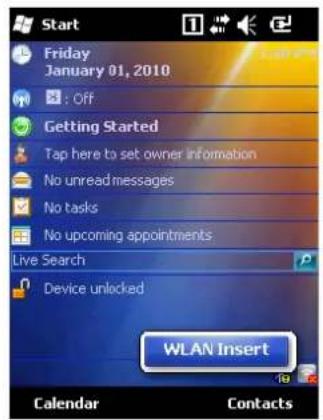
text_image
Start Friday January 01, 2010 : Off Getting Started Tap here to set owner information No unread messages No tasks No upcoming appointments Live Search Device unlocked WLAN Insert Calendar Contacts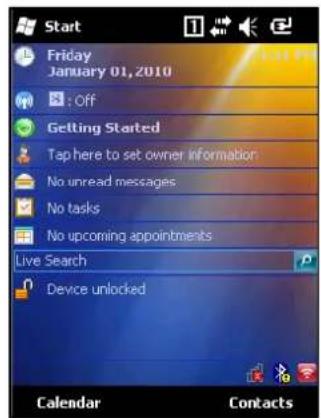
text_image
Start Friday January 01, 2010 : Off Getting Started Tap here to set owner information No unread messages No tasks No upcoming appointments Live Search Device unlocked Calendar ContactsTo connect to an AP, follow steps below.
i. Choose 'Scan' from 'Profile' tab of SCU.
text_image
Summit Client DISABLE RADIO SUMMIT DATA COMMUNICATIONS Active Profile: Default Status: Not Associated Radio Type: ABG Reg. Domain: FCC Auto Profile: On Off List Driver: v3.03.09 SCU: v3.03.09 About SCU Main Profile Status Diags Global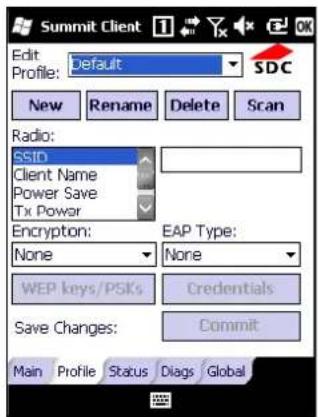
text_image
Summit Client Edit: Default Profile: New Rename Delete Scan Radio: SSID Client Name Power Save Tx Power Encryption: None EAP Type: None WEP keys/PSKs Credentials Save Changes: Commit Main Profile Status Diags Global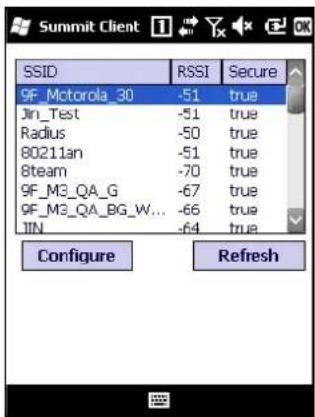
text_image
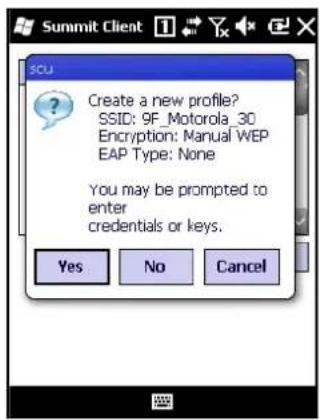
Summit Client SSID RSSI Secure 9F_Motorola_30 -51 true Jin_Test -51 true Radius -50 true 80211an -51 true 8team -70 true 9F_M3_QA_G -67 true 9F_M3_QA_BG_W... -66 true TIN -64 true Configure Refreshii. From the AP list, click on the target SSID and Configure to access. Enter secure codes if applicable.
text_image
Create a new profile? SSID: 9F_Motorola_30 Encryption: Manual WEP EAP Type: None You may be prompted to enter credentials or keys.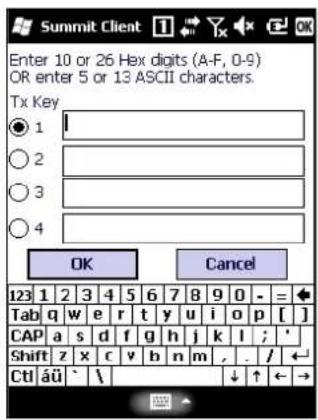
text_image
Enter 10 or 26 Hex digits (A-F, 0-9) OR enter 5 or 13 ASCII characters. Tx Key ○ 1 ○ 2 ○ 3 ○ 4 OK Cancel 123 1 2 3 4 5 6 7 8 9 0 - = ◆ Tab q w e r t y u i o p [ ] CAP a s d f g h j k l ; ; Shift z x c v h n m , . / ← Ctä äü ` \ ↓ ↑ ← →iii. Once a profile is created, click 'Commit' to save the profile and move to the main tab to change the active profile.
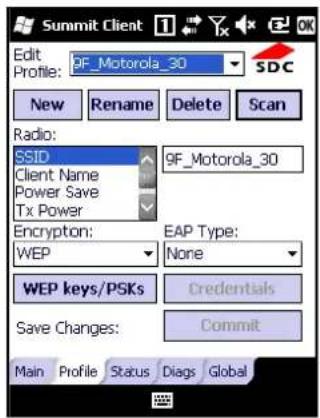
text_image
Summit Client Edit Profile: 9F_Motorola_30 SDC New Rename Delete Scan Radio: SSID Client Name Power Save Tx Power 9F_Motorola_30 Encryption: WEP EAP Type: None WEP keys/PSKs Credentials Save Changes: Commit Main Profile Status Diags Global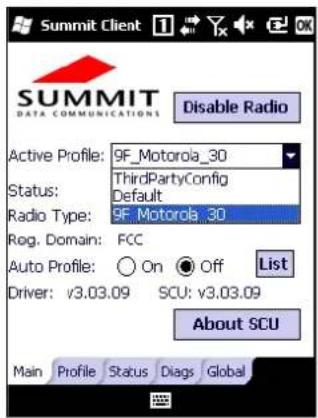
text_image
Summit Client SUMMIT DATA COMMUNICATIONS Disable Radio Active Profile: 9F_Motorola_30 Status: ThirdPartyConfig Default Radio Type: 9F_Motorola_30 Reg. Domain: FCC Auto Profile: ○ On ● Off List Driver: v3.03.09 SCU: v3.03.09 About SCU Main Profile Status Diags Global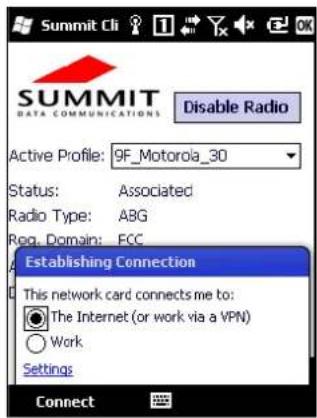
text_image
Summit Cli SUMMIT DATA COMMUNICATIONS Disable Radio Active Profile: 9F_Motorola_30 Status: Associated Radio Type: ABG Req. Domain: FCC Establishing Connection This network card connects me to: The Internet (or work via a VPN) Work Settings Connectiv. Check the connection status to ensure it is connected properly.

Entering sleep mode while the WLAN is connected will cause connection drop. However, upon wake up, it will automatically re-connect to the AP within 10 seconds.
4. Advanced usage
4.1 Software development kit (SDK)
M3 Mobile provides SDK to software developers to help them with their development.
Supported development tools
● Visual Studio 2005 (8.0) (.NET Framework 2.0) or higher
- Visual C++, Visual C#
● Visual Basic .NET (scanner only)
Development System Requirements
- Pentium – compatible 500MHz processor or better
● Microsoft Windows 98 / ME / 2000 / 2003 / XP - ActiveSync
Development Platform Requirements
- Windows Mobile Platform SDK must be installed on your computer to be able to develop software using this SDK.
4.1.1 SDK Package
M3 Mobile provides SDK as a package for each product. Please download appropriate SDK package from online support page (http://support.m3mobile.co.kr)
In the package the following are included:
i. SDK for each module
: Bluetooth, Camera, GPS, RFID, Scanner (1D/2D), WLAN
ii. Sample test program for each module.
iii. SDK Manual
: Introduction, Tutorial, Sample sources, References
4.1.2 OS Update
To improve the performance and quality of the product, M3 Mobile can release later version of OS than the one that are currently installed on your device.
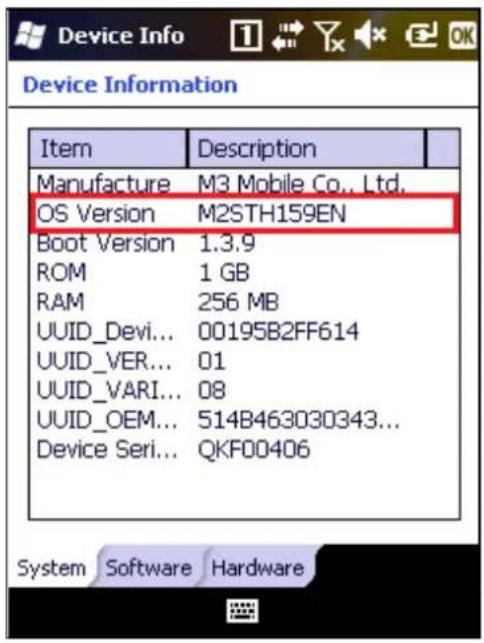
To check OS version of your device, please go to
Start → Settings → System → Device Info and check OS Version.
text_image
Device Information Item Description Manufacture M3 Mobile Co.. Ltd. OS Version M2STH159EN Boot Version 1.3.9 ROM 1 GB RAM 256 MB UUID_Devi... 00195B2FF614 UUID_VER... 01 UUID_VARI... 08 UUID_OEM... 514B463030343... Device Seri... QKF00406 System Software HardwareThe latest officially version of OS can be checked on M3 Mobile support webpage.
M3 ORANGE provides 2 ways of updating the OS:
i. Using MicroSD (2GB or less)
ii. Using cradle with USB connection
For detailed description of OS update method, please refer to M3 FAQ document 'OS' section. FAQ Download
4.1.3 Key customization
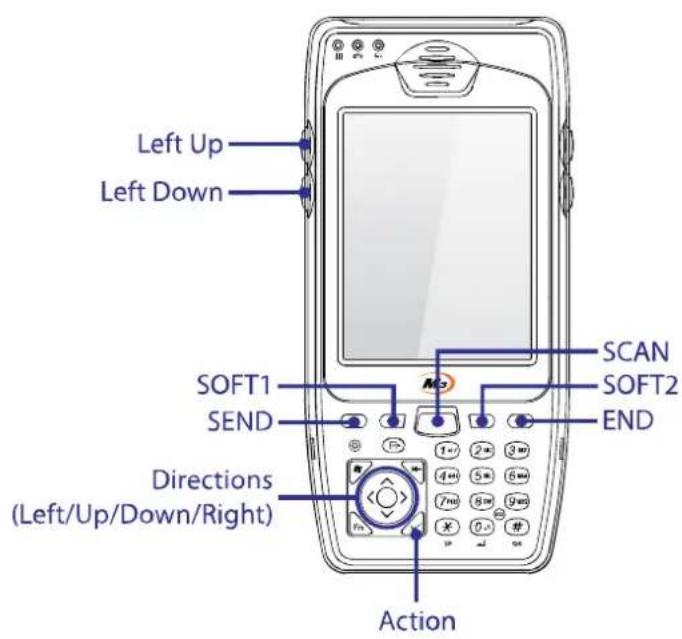
M3 ORANGE provides freedom to user with key customization.
text_image
Left Up Left Down SOFT1 SEND Directions (Left/Up/Down/Right) SCAN SOFT2 END Action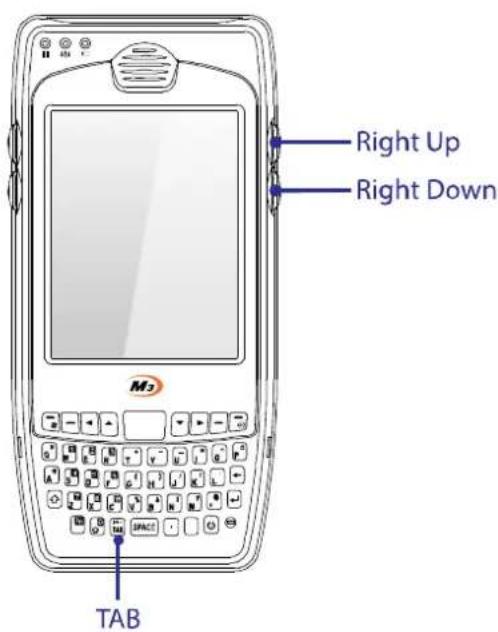
text_image
Right Up Right Down TABKey customization can be done in 3 ways:
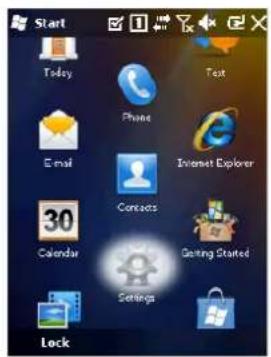
i. GUI method
[Start] → [Settings] → [Personal] → [Buttons] → [Side Key Setting]
text_image
Start Today Text Phone Email Internet Explorer 30 Calendar Contacts Getting Started Settings Lock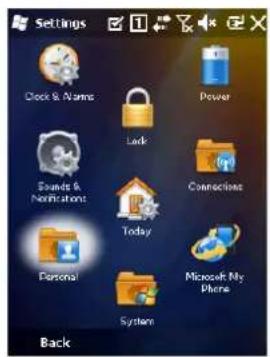
text_image
Settings Clock & Alarms Lock Power Sounds & Notifications Today Personal System Back Microsoft My Phone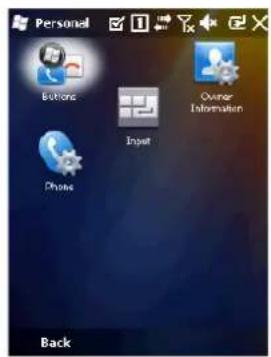
text_image
Personal Buttons Owner Information Input Phone Back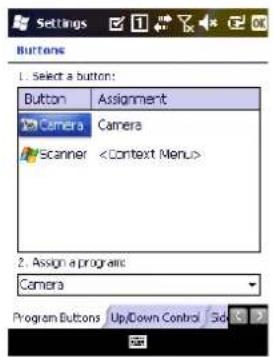
text_image
Settings Buttons 1. Select a button: Button Assignment Camera Camera Scanner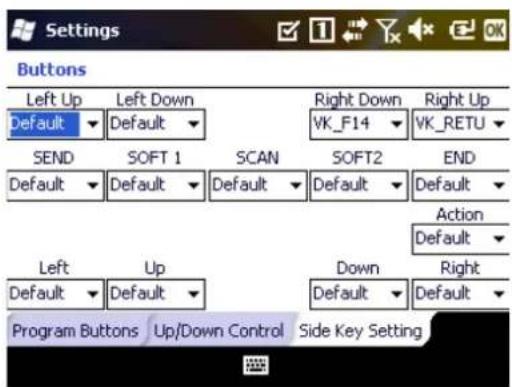
text_image
Settings Buttons Left Up Left Down Right Down Right Up Default Default VK_F14 VK_RETU SEND SOFT 1 SCAN SOFT2 END Default Default Default Default Default Action Default Left Up Down Right Default Default Default Default Program Buttons Up/Down Control Side Key Setting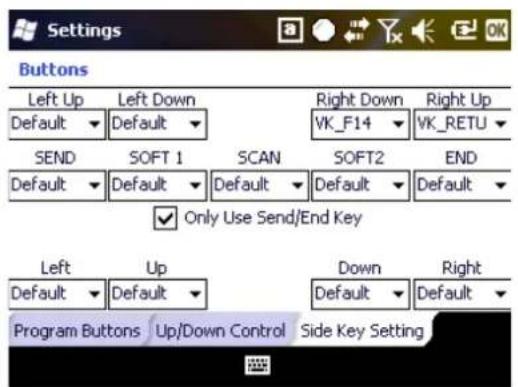
text_image
Settings Buttons Left Up Left Down Right Down Right Up Default Default VK_F14 VK_RETU SEND SOFT 1 SCAN SOFT2 END Default Default Default Default Default ✓ Only Use Send/End Key Left Up Down Right Default Default Default Default Program Buttons Up/Down Control Side Key Settingii. M3.ini, Visual INI
iii. Changing registry
In fact, with alpha-numeric version, all physical buttons except the power button are customizable with registry change method.
Please refer to M3 FAQ document 'Keypad' section for more details.
FAQ Download
5. Etc
5.1 Specification
Physical Characteristics
| Dimension(W x H x D)mm/inch | 78.6 x 166.2 x 24.9 mm78.6 x 165.5 x 40.2 (With HF)78.6 x 165.5 x 39.8 (With UHF) |
| 3.0 x 6.5 x 0.9 inch3.0 x 6.5 x 1.5 (With HF)3.0 x 6.5 x 1.56 (With UHF) | |
| Weight(including battery) | 332g / 11.7 oz362g / 12.7 oz (With HF)389g / 13.7 oz (With UHF) |
| Display | 3.5" QVGA TFT LCD, 240 x 320 pixels |
| Battery | Li-ion, 3.7 V, 3,300 mASmart battery |
Performance Characteristics
| Multi-processor | CPUMarvell Xscale PXA-320 806MHz |
| Radio ARM9 series | |
| OS | Windows Mobile 6.5 |
| Memory | RAM 256 MB |
| ROM 1 GB | |
| Card SlotMicro SD, up to 32 GB | |
| Interface | USB Host 1.1 / Client 1.1 |
User Environment
| Temperature | Operating-20~50 °C / -4~122 °F |
| Storing-30~70 °C / -22~158 °F | |
| Humidity | 93% non-condensing |
| Drop test | 1.5m / 5ft. |
| IP rating | IP65 |
Wireless radio options
| WWAN | 2G NetworkGSM(850/900/1800/1900 MHz) |
| 3G NetworkHSDPA (850/1900/2100 MHz) | |
| WLAN | IEEE 802.11 a/b/g |
| Security | WEP, WPA, WPA2, TKIP, AES, EAP-FAST, EAP-TLS, EAP-TTLS, PEAP-GTC, PEAP-TLS, PEAP-MSCHAPv2, LEAP, CCXv4 |
| Bluetooth | Class II, v2.0 |
| RFID | HF 13.56 MHz |
| UHF 868~956 MHz | |
| GPS | Sirf Star III |
| AGPS |
General options
| Scanner | 1D / 2D |
| Camera | 3.0 MP AF |
| RFID | HF (13.56 MHz) |
| UHF (868~956 MHz) | |
| Keypad | Alpha-Numeric (31 key)QWERTY (50 key) |
Certification





(M3 Orange White Only)

Windows Mobile
Bluetooth

SUMMIT

5.2 Services
If you experience any trouble while using our product, you can visit M3 Service center or send enquires to our online support web page
(http://support.m3mobile.co.kr), we will do our best to solve your trouble as soon as we can.
M3 FAQ document can help you with troubleshooting.
For any enquires about business program, please contact program provider for faster service.
5.2.1 Contact details
Headquarter
M3 Bldg., 735-45, Yeoksam-Dong, Gangnam-Gu, Seoul, 135-080, Korea
Tel: +82 2 574 0037 Fax: +82 2 558 1253
www.m3mobile.net, sales@m3mobile.co.kr
Service Center
9F M3 Bldg., 735-45, Yeoksam-Dong, Gangnam-Gu, Seoul, 135-080, Korea
Tel: +82 2 574 0037
Online Support Web page
http://support.m3mobile.co.kr