
Zaurus SL-5500 - Smartphone SHARP - Free user manual and instructions
Find the device manual for free Zaurus SL-5500 SHARP in PDF.


User questions about Zaurus SL-5500 SHARP
0 question about this device. Answer the ones you know or ask your own.
Ask a new question about this device
Download the instructions for your Smartphone in PDF format for free! Find your manual Zaurus SL-5500 - SHARP and take your electronic device back in hand. On this page are published all the documents necessary for the use of your device. Zaurus SL-5500 by SHARP.
USER MANUAL Zaurus SL-5500 SHARP
personal mobile tool
OPERATION MANUAL
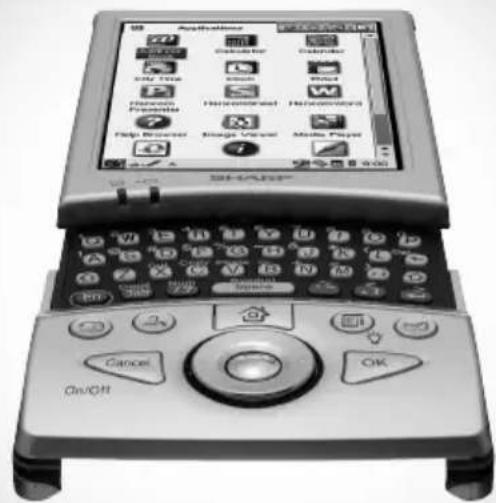
text_image
Applications Calculator Calculator Only Time Check Help Home/Video HimeraVessel HimeraVessel Flip Browser Image Vessel Make Paper OK ON/OFF SHARP Cancel OKTable of Contents
Introduction.... 1
About this manual....2
Address Book 3
Overview....3
Creating a new Address Book entry 6
Modifying an Address Book entry....7
Attaching a Note 7
Deleting an Address Book entry 8
Address Book Setup....8
Registering/Editing your personal information (My Personal Details) 9
Calendar 11
Overview....11
Adding Events 14
Modifying a Calendar event.... 18
Deleting Calendar event entries 18
Calendar Setup....20
Todo List.... 21
Overview....21
Creating a new Todo List entry....23
Modifying a Todo List entry .....24
Deleting Todo task entries.... 25
Other functions ......26
Text Editor 27
Overview....27
Creating a new Text Editor entry 29
Modifying a Text Editor entry....29
Deleting a Text Editor entry 29
Renaming the Text Editor file ....30


natural_image
Pure geometric lines and shapes without any text, numbers, or symbols
natural_image
Pure geometric diagram with intersecting lines and circles, no text or symbols present
text_image
00.Ca ii00.Cover.book Page ii Monday, January 21, 2002 5:47 PM
natural_image
Pure geometric diagram with intersecting lines and circles, no text or symbols presentMedia Player.... 31
Overview....31
Playing a file ....36
Playing a file in the Playlist ....37
Other functions 39
Image Viewer.... 41
Overview....41
Viewing images 43
Opera Browser 45
Overview......45
Browsing the Web page 47
EMail ....53
Overview....53
E-mail accounts 58
Creating an e-mail message....61
Sending an e-mail message 64
Receiving e-mail messages....65
Registering the e-mail address of the sender in the Address Book application ....66
Opening or arranging the attachment files .....67
Deleting e-mail messages 68
Searching for an e-mail message....70
Using a mailbox folder in the Inbox/Outbox folder...... 73
Other functions 75
Extras....77
City Time 77
Clock....79
Calculator 80
System Info....82
Voice Recorder (commercially available) 83
Help Browser 87


natural_image
Pure geometric lines and shapes without any text, numbers, or symbols
natural_image
Pure geometric diagram with intersecting lines and circles, no text or symbols presentGames....89
Asteroids....89
Go....89
Mindbreaker....89
Mine Hunt 90
Patience....90
Snake 90
Word Game 90
Settings.... 91
Adjusting the date and time (Date/Time) 91
Add/Remove Software....93
Backup/Restore 100
Beam Receive 102
Setting the Appearance ....106
Using the Application Key....107
Managing power (Light & Power) 108
Adjusting the touch panel (Recalibrate)....109
Security....109
Shutting down....112
Internet Settings 113
Internet Wizard 113
Network & Sync 127
Proxim Configuration 138
Wireless LAN Setting....138
Appendix 141


natural_image
Pure electrical circuit lines without any symbols
natural_image
Pure geometric diagram with intersecting lines and circular shapes (no text or symbols)
natural_image
Pure electrical circuit lines without any symbols00.Introduction.fm Page 1 Tuesday, January 22, 2002 7:33 PM
Introduction 1
Introduction
Congratulations and thank you for purchasing the SL-5500 Personal Mobile Tool.
We recommend that you first read the separate Start-up Guide (which mainly covers setup procedure, hardware operations, and common and basic software operations) before using the SL-5500 unit. Then read this Operation Manual (which mainly covers software operations).
Some of the accessories described in this manual may not be available at the time you purchase this product.
Copyright
It is the intent of Sharp that this product be used in full compliance with the copyright laws of the United States and that prior permission be obtained from copyright owners whenever necessary.


natural_image
Pure geometric lines and shapes without any text, numbers, or symbols
natural_image
Pure geometric diagram with intersecting lines and circular shapes, no text or symbols presentAbout this manual
The SL-5500 can be operated by either pressing keys on the keyboard or tapping an item (buttons, etc.) on the screen using the stylus.
- This operation manual mainly describes the stylus operation. Button or key operations are included, if they make it easier to carry out the function.
Keys
This manual represents keys with the following:
: HOME key
Cancel : Cancel key
OK : OK key
: Cursor key
- : Left cursor key
◎: Right cursor key
◎: Up cursor key
◎: Down cursor key
SELECT key
Screen Buttons and Menu Names
Screen buttons and menu names, such as "OK", "File", "Edit", etc., are indicated using quotation marks.


natural_image
Pure geometric lines and shapes without any text, numbers, or symbols
natural_image
Pure geometric diagram with intersecting lines and circular shapes, no text or symbols present
Address Book
The Address Book application allows you to manage contact information on friends, colleagues, etc. covering the items shown below.
You can also add notes to help you remember contacts more easily.
Overview
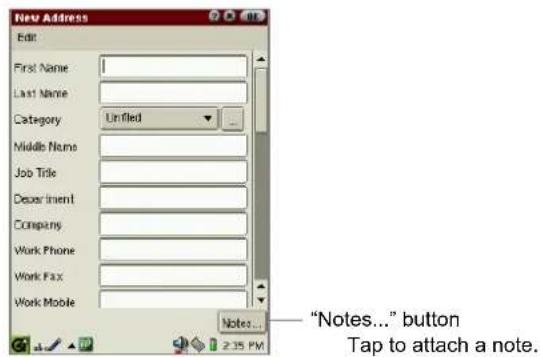
The Address Book application has three major screens: Edit Address screen, Index screen, and Detail screen.
New/Edit Address screen
- In the Applications folder of the Home screen, tap the "Address Book" application icon.
The Index screen appears.
- Tap
The New Address screen appears.
You can create a new Address Book entry.
text_image
New Address Edit First Name Last Name Category Unified Middle Name Job Title Department Company Work Phone Work Fax Work Mobile Notes... "Notes..." button Tap to attach a note. 2:35 PM

natural_image
Pure electrical circuit lines without any symbols
natural_image
Pure geometric diagram with intersecting lines and circular shapes, no text or symbols present| First Name First name | |
| Last Name Last name | |
| Category Category (Tap the drop-down list button.) | |
| Middle Name Middle name | |
| Job Title Title | |
| Department Department in the office | |
| Company Company name | |
| Work Phone Work Phone Number | |
| Work Fax Work Fax Number | |
| Work Mobile Business Mobile phone number | |
| Emails E-mail addresses | |
| Home Phone Home phone number | |
| Home Fax Home Fax Number | |
| Home Mobile | Personal Mobile phone number |
| Work Street Work Address | |
| Work City | Work City |
| Work State Work State | |
| Work Zip Work zip code | |
| Work Country | Country of the office |
| Work Pager Work pager-number | |
| Work Web Page | Company URL |
| Home Street | Street Address |
| Home City | Home City |
| Home State | Home State |
| Home Zip | Home Zip Code |
| Home Country | Home Country |
| Home Web Page | Home URL |
| Spouse | Spouse's name |
| Birthday | Birthday |
| Anniversary | Anniversary |
| Nickname | Nickname |
| Gender | Gender (Select from the drop-down list.) |
natural_image
Pure geometric lines and crosshair symbols without any text or labelsnatural_image
Pure geometric diagram with intersecting lines and circles, no text or symbols presentnatural_image
Pure geometric diagram with intersecting lines and circular shapes, no text or symbols presentNote:
- An Address Book entry can not be saved if only the Gender field is filled out. - You can enter multiple e-mail addresses in the Emails field by inserting a comma between them. Each e-mail address entered can be used as an e-mail address in the EMail application.Index Screen
A list of existing names and contact details is displayed. text_image
"Full Name" button Data area Address Book - All Data Category Options Full Name Contact Company Richard, Jim W 000/23-96 US Sky Longfield, Kat W 000/774-7 SKYBLU Jones, Pat Tin W 1-000-237 SHARP Cook, Koath H 000/666-86 Category name "Contact" button "Company" button H: Indicates Home Phone W: Indicates Work Phone 237 PM| Category name Indicates the category name of the entries listed. | |
| “Full Name” button Tap to sort the entries by full name. | |
| “Contact” button Tap to sort the entries by contact data. | |
| “Company” button Tap to sort the entries by company. | |
| Data area | Displays the contents of the entry.Full Name column displays the First Name, Last Name and Middle Name.Contact column displays the first entry listed under the First Name, Last Name, and Middle Name fields.(except for “Company” field)Tap this field to open the Detail screen of the entry. |
Note:
- If you have no entries in the First Name, Last Name or Middle Name field, the entry for the Company field will be displayed in the Full Name column instead. If there is no entry in the Company field, the first e-mail address in the Emails field will be displayed instead. - To find the desired entry in the Full Name column, Contact column, Company column, press the first few characters in the each column on the hardware keyboard. The focus moves to the matching column.Detail Screen
1. On the Index screen, tap an entry to see the full address details. Or move the focus to the entry by using Ⓓ and then press the SELECT key. text_image
Pat Tim Jones SHARP Email Addresses: jonesp@sales.sharp.com Home Phone: 000/555-3706 Work Phone: 1-800-237-4277 Category: BusinessCreating a new Address Book entry
You can add a new address using the New Address screen. 1. On the Index or Detail screen, tap The New Address screen for a new entry appears. 2. Enter the contact data in the fields. Pressing the tab key on the hardware keyboard moves the cursor to the next entry field. Pressing the shift-tab keys moves the cursor to the previous entry field.Note:
- Tap the "Notes..." button to attach a note. (See page 7.) - If you want to assign one or more category names, see the separate Start-up Guide for details. 3. Tap to save the new entry. The New Address screen returns to the Index screen. If you tap the new entry is canceled. natural_image
Pure geometric lines and crosshair symbols without any text or labelsnatural_image
Pure geometric diagram with intersecting lines and circular shapes (no text or symbols)Modifying an Address Book entry
1. On the Index screen, move the focus to the entry you want to modify. Or open the Detail screen. 2. Tap The Edit Address screen appears. 3. Tap each field and modify the entry. Note: Tap the "Notes..." button to attach a note. (See below.) 4. Tap to save the modification. The Edit Address screen turns to the Index screen. If you tap the modification is canceled.Attaching a Note
You can enter a note to go with the address. 1. On the New Address or Edit Address screen, tap the "Notes..." button. The Enter Note screen appears. text_image
Enter Note Edit:natural_image
Pure electrical circuit lines without any symbolsnatural_image
Pure geometric diagram with intersecting lines and circular shapes, no text or symbols presentDeleting an Address Book entry
1. On the Index screen, move the focus to the entry you want to delete. Or open the Detail screen. 2. Tap 📋 or tap the "Data" menu and then tap "Delete...". The confirmation message appears before the entry is deleted. If you want to delete all entries from the Address Book application, tap the "Data" menu and then tap "Delete all...". 3. Tap "Yes" to delete the entry. The entry will be deleted. If you tap "No", the deletion is canceled.Address Book Setup
The New Address or Edit Address screen always shows the First Name and Last Name fields at the top. You can change the order of the following fields except for the Category and Gender fields. 1. On the Index or Detail screen, tap the "Options" menu, then tap "Field Settings...". The Field Settings screen appears, and the fields following the Category field are listed in current order. text_image
Field Settings Select the field order: Middle Name Job Title Department Company Work Phone Work Fax Work Mobile Emails Home Phone Home Fax Home Mobile Work Street Work City Work State Work Zip Work Country Work Pagenatural_image
Pure geometric lines and crosshair symbols without any text or labelsnatural_image
Pure geometric diagram with intersecting lines and circles, no text or symbols presentnatural_image
Pure geometric diagram with concentric circles and crosshairs, no text or symbols presentRegistering/Editing your personal information (My Personal Details)
1. On the Index screen, tap the "Data" menu and then tap "My Personal Details...". My Personal Details screen appears. 2. Tap and then enter your information on Edit My Personal Details screen that appears. Note: On the Personal Detail screen, you cannot enter the category name. 3. Tap to save the setting. My Personal Details screen appears listing your information. 4. Tap the "Data" menu and then tap "My Personal Details...". The display returns to the Index screen. Note: Your personal information registered after FULL reset will be displayed on the My Personal Detail screen of step 1 above. (See the separate Start-up Guide, "Registering your personal information".)   natural_image
Pure geometric lines and shapes without any text, numbers, or symbolsnatural_image
Pure geometric diagram with intersecting lines and circular shapes, no text or symbols presentCalendar
The Calendar application is used to store events you are keeping track of and to set alarms. For this application to work properly, the built-in clock must be set to the correct time and date.Overview
You can view one day, one week or one month at a time. Tap the "View" menu, then select "Day", "Week" or "Month". There are also toolbar icons, (day), (week) and (month), for switching views. By selecting "Today" from the View menu, you can display the Day screen for today.Day screen
1. In the Applications folder of the Home screen, tap the "Calendar" application icon. text_image
Day icon Calendar Data View Options Oct 01.02 S M T W T F S Week icon Month icon Previous button 8:00 5:00 10:00 14:00 12:00p Lunch Date button Time indication 2:00p 3:00p 4:00p 5:00p 6:00p 7:00p Next button Start 3:00 AM End 12:00 PM Day of week buttons Event indication (Focused status)| Day icon Displays the Day screen. | |
| Week icon Displays the Week screen. | |
| Month icon Displays the Month screen. | |
| Previous button Moves to the previous date. | |
| Date button | Opens/closes the Calendar screen to select the date. |
natural_image
Pure geometric lines and crosshair symbols without any text or labelsnatural_image
Pure geometric diagram with intersecting lines and circular shapes, no text or symbols present12Calendar
| Day of week buttons Switches the day of the week. | |
| Next button Moves to the next date. | |
| Time indication | Displays the time.Tap or drag this field and tap to open the New Event screen with the Start and End time entered. |
| Event indication(Focused status) | Displays the registered events.○: Events with Alarm setting○: Repeating eventsPress or to move the focus.Then press the SELECT key or to open the Detail screen. |
Week screen
text_image
Week spinbox Year spinbox Time column Event indication Date indication Day of week buttons The currently focused initial is displayed in blue.| Year spinbox | Select the year.Tap to move to the next year, and tap to move to the previous year. |
| Week spinbox | Select the week.Tap to move to the next week, and tap to move to the previous week. |
| Date indication | Displays the start and end date of the selected week. |
| Time column Displays the time. | |
| Day of week buttons | Tap to open the Day screen of the selected day. |
natural_image
Pure geometric diagram with intersecting lines and circles, no text or symbols presentnatural_image
Pure geometric lines and crosshair symbols without any text or labelsnatural_image
Pure geometric diagram with intersecting lines and circular shapes, no text or symbols present| Event indication | Tap to display the detailed contents of the event.Green bar: All day eventRed bar: Event with an Alarm settingBlue bar: Event with Start and End time settingPress or to move the focus between days of the week. Then press or the SELECT key to open the Day screen. |
text_image
Month drop-down list button To January button Previous button Date cell Calendar Data View Options 0:1 2002 Sun Mon Tue Wed Thu Fri Sat 29 30 1 2 5 4 4 6 7 8 9 10 11 12 13 14 15 16 17 18 19 20 21 22 23 24 25 26 27 28 29 30 31 1 2 3 4 5 6 7 8 9 Year spinbox To December button Next button Focus frame 5:42 PM| To January button Moves to | January of the selected year. |
| Previous button Moves to the previous month. | |
| Month drop-down list button | Select the desired month. |
| Year spinbox | Select the year.Tapto move to the next year, and tapto move to the previous year. |
| Next button Moves to the next month. | |
| To December button Moves to December of the selected year. | |
| Date cell | Tap to open the Day screen of the date.Colored events mean:Red box: Event with an Alarm settingBlue box: Event with Start and End time setting: Repeating event: All day event |
| Focus frame | Pressto move the focus. Then pressOKor the SELECT key to open the Day screen. |
natural_image
Pure electrical circuit lines without any symbolsnatural_image
Pure geometric diagram with intersecting lines and circular shapes, no text or symbols presentDetail Screen
text_image
Date Options Tue Oct 01, 2002 4:00 PM - 6:00 PM Description: Sales meeting Location: Office Category : Untitled Repeat: Every week on TuesdayAdding Events
1. In any view mode screen of the Calendar application, tap  The New Event screen appears. text_image
Start/End date buttons Time zone drop-down list button Alarm checkbox Edit Description: None Location (Unknown) Category Unified Start Oct 01, 02 E:00 AM End Oct 01, 02 E:00 AM All day Time zone: New York Alarm 0 minutes Load Repeat No Repeat... Start/End time comboboxes All day checkbox City Time button Alarm sound on/off drop-down list button Repeat button Notes fieldnatural_image
Pure geometric lines and crosshair symbols without any text or labelsnatural_image
Pure geometric diagram with intersecting lines and shapes, no text or symbols presentTo set the Start and End date/time
1. On the New Event screen, tap the Start date or End date button. The Calendar screen appears. 2. Tap the desired date. 3. Tap the Start time or End time combobox. 4. Select the desired time, or change it by using the keyboard. You can mark an event as taking "All day" by tapping the All day checkbox.To set an alarm
1. On the New Event screen, check the Alarm checkbox. 2. Set the amount of time prior to the event when you would like the alarm to ring. 3. Tap the alarm sound on/off drop-down list button, and select "Silent" or "Loud". \- The alarm will ring and the Alarm screen will appear at the set time, even if the SL-5500 is off. (Tap "OK" to close the Alarm screen.) • The alarm will not ring with the following settings: • The alarm setting is "Silent". - The Mute checkbox is checked, or the Alarms checkbox is unchecked. (Tap the Sound volume icon on the taskbar.)To repeat an event
1. On the New Event screen, tap the Repeat button. The Repeating Event screen appears.   natural_image
Pure geometric lines and crosshair symbols without any text or labelsnatural_image
Pure geometric diagram with intersecting lines and circles, no text or symbols present16Calendar
2. Tap the appropriate repetition button for the event, i.e. "Day", "Week", "Month", or "Year". If you do not want to repeat the event, tap the "None" button. 3. Enter the necessary information. (See page 16 and 17 for details.) 4. Tap to save the repeat setting. The Repeating Event screen returns to the New Event screen. If you tap the repeat setting is canceled.Daily Events
Repeating Event screen (Day) Every spinbox End Date button text_image
Repeating Event None Day Week Month Year Every: 1 cay(s) End On: Nu End Date No End Date Every dayWeekly Events
Repeating Event screen (Week) Repeat On buttons text_image
Repeating Event None Day Week Month Year Every: 1 week(s) End On: No End Date No End Date Repeat On Sun Mon Tue Wed Thu Fri Sat Every week on Tuesdaynatural_image
Pure geometric lines and crosshair symbols without any text or labelsnatural_image
Pure geometric diagram with intersecting lines and circles, no text or symbols presentnatural_image
Pure geometric diagram with intersecting lines and circular shapes (no text or symbols)natural_image
Pure geometric diagram with concentric circles and crosshairs, no text or symbols presentMonthly Events
Repeating Event screen (Month) Repeat By buttons text_image
Repeating Event None Day Week Month Year Every: 1 month(s) End On: Na End Date No End Date Please! By Date The lot every monthAnnual Events
Repeating Event screen (Year) text_image
Repeating Event None Day Week Month Year Every: 1(year(s)) End On: No End Date No End Date Jan 1st every yearnatural_image
Pure electrical circuit lines without any symbolsnatural_image
Pure geometric diagram with intersecting lines and circular shapes, no text or symbols presentModifying a Calendar event
1. On the Day screen, tap and hold the entry you want to modify. The popup menu appears. 2. Select "Edit event". Or on the Detail screen, tap instead of performing steps 1 and 2. The Edit Event screen appears. text_image
Edit Event Edit Description: UNCA Location: (Unknown) Category: Personal Start: Oct 01, 02 ▼ 12:30 PM End: Oct 01, 02 ▼ 1:30 PM All day Time zone: New York Apm: 0 minutes Silent Repeat No Repeat...Deleting Calendar event entries
Deleting a Calendar event entry
1. On the Day screen, tap and hold the entry you want to delete. The pop-up menu appears. 2. Select "Delete". Or on the Detail screen, tap instead of performing steps 1 and 2. natural_image
Pure geometric lines and shapes without any text, numbers, or symbolsnatural_image
Pure geometric diagram with intersecting lines and circular shapes, no text or symbols presentDeleting the Daily, Weekly, or Monthly events
You can delete the daily, weekly, or monthly events (except for repeating events) at a time. 1. Open the view mode screen (Daily, Weekly, or Monthly) on which you want to delete events. 2. Tap the "Data" menu and then tap "Delete period...". 3. On the screen that appears, tap the drop-down list button and then tap the specified item as follows: For the daily events, tap "Events in selected day". For the weekly events, tap "Events in selected week". For the monthly events, tap "Events in selected month". 4. Tap "Yes". The confirmation message appears before the entry is deleted. 5. Tap "Yes" to delete the entry. The entry will be deleted. If you tap "No", the deletion is canceled.Deleting all Calendar event entries
1. In any view mode of the Calendar application, tap the "Data" menu and then tap "Delete all...". The confirmation message appears before the entry is deleted. 2. Tap "Yes" to delete all entries. All entries will be deleted. If you tap "No", the deletion is canceled.   natural_image
Pure geometric lines and shapes without any text, numbers, or symbolsnatural_image
Pure geometric diagram with intersecting lines and circles, no text or symbols presentCalendar Setup
You can change the starting time on the Day screen and Week screen, and the Alarm setting. 1. On the view mode screen (Daily, Weekly, or Monthly), tap the "Options" menu, then tap "Alarm and Start Time...". The Alarm and Start Time screen appears. text_image
Alarm and Start Time Start viewing events Start Time: 6:00 AM Start Time spinbox Alarm Preset checkbox Alarm Settings Alarm Preset 0 minutes Alarm Preset spinbox T:34 AMnatural_image
Pure geometric lines and crosshair symbols without any text or labelsnatural_image
Pure geometric diagram with intersecting lines and circular shapes (no text or symbols)Todo List
The Todo List application allows you to manage tasks you should not forget and reminds you to complete them before the due date. You can list them in the order of the checked status, the priority or description, and confirm them easily.Overview
On the Todo List Index screen, you can view a list of Todo entries.Index screen
1. In the Applications folder of the Home screen, tap the "Todo List" application icon. text_image
Teste - All Data Category Options Description button Prior Description Due Date 2 Buy present for Jimr 1/14/02 3 New products meet 1/16/02 4 Order tickets 1/22/02 Checked status button Completed checkbox Priority button Due Date button 7:39 AM| Checked status button Tap to sort the entries by checked status (completed or uncompleted). |
| Completed checkbox When unchecked, the task is not completed and when checked, the task is completed. |
| Priority button Tap to sort the entries by priority. |
| Description button Tap to sort the entries by description. |
| Due Date button Tap to sort the entries by due date. |
natural_image
Pure geometric lines and crosshair symbols without any text or labelsnatural_image
Pure geometric diagram with intersecting lines and circular shapes (no text or symbols)natural_image
Pure geometric diagram with intersecting lines and circles, no text or symbols presentDetail screen
1. On the Index screen, tap the desired entry. text_image
Desc - All Date. Options Description: (Done) Buy present for Jimmy Priority : 2 - High Due Date: Mon Jan 14, 2002 Category : UnfiledEdit screen
 Priority drop-down list button Completed checkbox Due date checkbox text_image
Edit Task Edit Priority: 2 - High Category: Unified Completed Due Mon Jan 14, 2002 Buy present for Jimmynatural_image
Pure geometric lines and symbols without any text, numbers, or labelsnatural_image
Pure geometric diagram with intersecting lines and circular shapes, no text or symbols present| Priority drop down list button | Tap to display the candidate of the properties and then tap your choice. |
| Category drop-down list button | Tap to display the candidate of the properties and then tap your choice.If you want other category name, tap the Edit Categories button. (For details, see the separate Start-up Guide.) |
| Edit Categories button Tap | Tap to display the Edit Categories screen where you can edit categories or assign multiple categories to an event. (See the separate Start-up Guide for more details.) |
| Completed checkbox Check if the task has been completed. | |
| Due date checkbox Check it off if the task is due to be completed on a specified date, and then tap the Due date button next to the checkbox. | |
| Due date button Tap this button to specify the due date if the Due date checkbox has checked. | |
Creating a new Todo List entry
1. On the Index or Detail screen, tap The New Task screen appears. 2. Tap the Priority drop-down list button and select the priority. 3. Tap the Category drop-down list button to set the task's category. You can also enter a desired category name. For details, see the separate Start-up Guide. 4. If the task has a due date, check the Due date checkbox. 5. Tap the Due Date button and then tap the due date from the pop-up Calendar screen. 6. Tap the text field and enter the task, etc. 7. Tap to save the new entry. The New Task screen turns to the Index screen. If you tap the new entry is canceled.  Modifying a Todo List entry
1. On the Index screen, tap and hold the Description field of the entry you want to modify. The pop-up menu appears. 2. Select "Edit task". Or move the focus to the entry you want to edit and tap instead of performing steps 1 and 2. The Edit Task screen appears. text_image
Completed checkbox Edit Priority: 3 - Normal Category: Unfiled Completed Date: Jan 01, 2002Deleting Todo task entries
Deleting a Todo task entry
1. On the Index screen, tap and hold the Description field of the entry you want to delete. The pop-up menu appears. 2. Select "Delete". The confirmation message appears before the entry is deleted. Or move the focus to the entry you want to delete and tap instead of performing steps 1 and 2. 3. Tap "Yes" to delete the entry. The entry will be deleted. If you tap "No", the deletion is canceled.Deleting all Todo task entries
1. On the Index or Detail screen, tap the "Data" menu and then tap "Delete all...". The confirmation message appears before the entry is deleted. 2. Tap "Yes" to delete all entries. All entries will be deleted.   natural_image
Pure geometric lines and shapes without any text, numbers, or symbolsnatural_image
Pure geometric diagram with intersecting lines and circles, no text or symbols presentOther functions
Checking a completed entry on the Index screen
When you have completed a Todo task, check the Completed checkbox on the Index screen. If you do not check the box, the Todo List entry is recognized as uncompleted. 1. On the Index screen, tap the Completed checkbox of the completed entry. To remove the check, tap the Completed checkbox again.Changing the priority on the Index screen
You can change the priority on the Index screen. 1. Tap the Priority field you want to change. The Priority drop-down list button appears. 2. Tap the Priority drop-down list button and select the priority.To view only the uncompleted entries
1. On the Index screen, tap the "Options" menu and then tap "View". 2. Tap "Hide completed tasks". Only uncompleted entries will be displayed. To toggle between completed and uncompleted tasks, tap the "Options" menu and then tap "View". Then tap "Show completed tasks" or "Hide completed tasks".   natural_image
Pure geometric lines and crosshair symbols without any text or labelsnatural_image
Pure geometric diagram with intersecting lines and circles, no text or symbols presentText Editor
The Text Editor application allows you to create a simple text file and open a file in a text format and edit it. The text files are displayed in the "Documents" folder of the Home screen.Overview
The Text Editor application has two main screens: Text Editor Index screen and Edit Text screen.Index screen
1. In the Applications folder of the Home screen, tap the "Text Editor" application icon. The Text Edit Index screen appears. The Text Editor Index screen displays a list of text files you can open. text_image
Text Editor File Options Meeting Not Forget Wordgame Xmas Present Listnatural_image
Pure geometric lines and shapes without any text, numbers, or symbolsnatural_image
Pure geometric diagram with intersecting lines and circles, no text or symbols presentEdit screen
1. Tap to create a new entry.
The New Text screen will be displayed. text_image
Edit menu File menu Edit area Net Faret - Text Editor File Edit View Not Forget --download the java application View menu| File menu | ||
| Save Saves | the current file. | |
| Edit menu | ||
| Undo Undoes | the last operation. | |
| Redo Cancels | the Undo operation to restore the status before the Undo operation is done. | |
| Cut Cuts selected text to the clipboard. | ||
| Copy Copies | selected text to the clipboard. | |
| Paste Pastes | text within clipboard to cursor position. | |
| View menu | ||
| Zoom in Makes | the display font size larger. | |
| Zoom out Makes | the display font size smaller. | |
| Bold Changes | the character type to bold. | |
| Italic Changes | the character type to italic. | |
| Wrap lines | The carriage return is inserted into the text according to the width of the screen. | |
Creating a new Text Editor entry
1. Tap to create a new entry. Or tap the "File" menu and then tap "New". The New Text screen will be displayed. 2. Enter text using one of the Input Methods. 3. Tap to save the new file. If you tap saving the file is canceled.Modifying a Text Editor entry
1. On the Text Editor Index screen, tap the file you want to edit. Or tap the text file icon you want to edit in the Documents folder of the Home screen. The Edit screen will be displayed 2. Edit the file. 3. Tap to save the modification. If you tap the modification is canceled. The display returns to the Text Editor Index screen.Deleting a Text Editor entry
1. On the Index screen, move the focus to the file you want to delete. 2. Tap the "File" menu and then tap "Delete...". The confirmation message appears before the file is deleted. 3. Tap "Yes" to delete the file. The file will be deleted. If you tap "No", the deletion is canceled.    natural_image
Pure geometric lines and shapes without any text, numbers, or symbolsnatural_image
Pure geometric diagram with intersecting lines and circles, no text or symbols presentRenaming the Text Editor file
1. On the Index screen, move the focus to the entry you want to rename. 2. Tap the "File" menu and then tap "Rename...". The Rename screen appears. text_image
Text Editor File Options Meeting Not Forget Merckname Rename Name: MercknameMedia Player
The Media Player application allows you to play MPEG1 video files and MP3 music files. You can also transfer files from a PC using PC link software.Note:
- Use a headphone connected to the stereo headphone jack of the unit to listen to the media sound. - Some files (such as MP3 music files of MPEG2.5 format) can not be played back with this application. - The Media Player application may close automatically if multiple applications are running simultaneously. - The media image may be distorted and the sound may be interrupted during playback if other programs are running simultaneously. - Do not insert or remove the memory card during playback. - For detailed information on how to attach and remove the memory card, see the separate Start-up Guide.Overview
The Media Player application has three folders on the Index screen: Video, Music, Playlist.   natural_image
Pure geometric lines and shapes without any text, numbers, or symbolsnatural_image
Pure geometric diagram with intersecting lines and circles, no text or symbols presentIndex screen
The Media Player application has three folders on the Index screen: Video, Music, Playlist. 1. In the Applications folder of the Home screen, tap the "Media Player" application icon. The Index screen appears. text_image
Video tab Music tab Add to playlist button Media Player File View Options Video Music Flanlist Title Media Size Streams CF 301KB Size button Media button Title button 8:26 AMtext_image
Play button Up button (for Playlist) Down button (for Playlist) Remove from playlist button Playlist tab File List area Media Player File View Options Video Music Playlist Title Media Size Stream CF 30 KB| Video folder Tap to display only the video files. | |
| Music folder Tap to display only the music files. | |
| Playlist folder Tap to display the files registered in the playlist. | |
| File List area Displays | the files (mpg, mpeg, mp3) which are registered in the Documents folder of the Home screen and on the memory cards inserted into the slots. |
| Play button Tap to start playback. | |
| “Add to playlist” button | Adds a file to a Playlist folder. |
| Up button Moves up the selected file in the playlist. | |
| Down button Moves down the selected file in the playlist. | |
| “Remove from playlist” button | Removes a file from a Playlist folder. |
natural_image
Pure geometric lines and crosshair symbols without any text or labelsnatural_image
Pure geometric diagram with intersecting lines and circles, no text or symbols present| Title button Tap to sort files by title. | |
| Media button Tap to sort files by storage media (CF, SD, RAM) | |
| Size button Tap to sort files by size. | |
| File menu | |
| Play Plays the file in the Video, Music, or Playlist folder. | |
| Info... Displays the file information. | |
| Add to playlist Adds a file to the Playlist folder. | |
| Up Moves up the selected file in the playlist. | |
| Down Moves down the selected file in the playlist. | |
| Remove from playlist Removes a file from the Playlist folder. | |
| View menu (used to play video files) | |
| Fullscreen Switches the screen mode, full screen, or normal screen. | |
| Scale Makes the image fit the screen. | |
| Options menu | |
| Repeat Repeats playback of the file in the Video, Music, or Playlist folder. | |
| Random Plays files in the Playlist folder at random. | |
| Help... Opens the on-line Help screen. | |
Note:
- To find the desired file, press the first few characters of the file name on the hardware keyboard. The focus moves to the matching file. - You can copy files stored on a memory card to the Documents folder by using the Copy function on the Documents Details screen (see the separate Startup Guide).Playback screens
The Playback screen varies depending on the type of file being played. 1. On the Index screen, tap the file you want to play and then tap for press OK or the SELECT key. • To close the playback screen, press on the SELECT key again. - To close the application, tap or press. Cancel For movie files text_image
Normal mode Media Player Walt S:25 AMnatural_image
A small elephant standing in front of a building with grass, labeled 'Fullscreen mode' at the top (no other text or symbols visible)| Press When pressed after 2 seconds after a file begins, the current file will be played again from the top. When pressed within 2 seconds, the previous file will start playback.When only one file or the first file in the list is being played in the once mode, stops the playback, and returns to the Index screen. |
| Press Moves to the next file.When only one file or the last file in the list is being played in the once mode, stops the playback, and returns to the Index screen. |
| Press Tap and hold to turn the volume up step by step. |
| Press Tap and hold to turn the volume down step by step. |
natural_image
Pure geometric lines and crosshair symbols without any text or labelsnatural_image
Pure geometric diagram with intersecting lines and circular shapes, no text or symbols presentFor music files
text_image
File information File name, artist name, sampling rate, etc. Playback control buttons Current playback time/ total playback time Media Player N - 45 Hz 120kHz joint stage SECRET PLAC 02:00 / 03:38 5:00 PM| (Play) Plays the current file from the top or resumes playback if paused. When tapped during playback, restarts playback from the top of the current file. | |
| (Stop) Stops playback. | |
| (Pause) Pauses playback. Tap again to resume the playback. | |
| (Open) Stops playback, and returns to the Index screen. | |
| (Repeat) Switches the playback mode (Repeat or Once). If you have selected the Repeat mode from the Options menu on the Index screen, this button will already have been pressed. | |
| (Previous) (Press ⏻) | When tapped (pressed) after 2 seconds after a file begins, the current file will be played again from the top. When tapped (pressed) within 2 seconds, the previous file will start playback. When only one file or the first file in the list is being played in the Once mode, stops the playback, and returns to the Index screen. |
| (Next) (Press ⏻) | Moves to the next file if the music file is being played. When only one file or the last file in the list is being played in the Once mode, stops the playback and returns to the Index screen. |
| (Volume Up) (Press ⏻) | Tap and hold to turn the volume up step by step. |
| (Volume Down) (Press ⏻) | Tap and hold to turn the volume down step by step. |
Playing a file
This section describes an example of playing files stored on a memory card. Before playing files, insert the memory card into the appropriate card slot of the SL-5500.To start playback
1. On the Index screen, tap the Video or Music tab. All files stored in the SL-5500 and memory card will be displayed according to the file type to be played. 2. Tap the desired file in the list. And then tap or press or the SELECT key. The selected file will be played. The playback screen varies according to the file type to be played.To stop playback
1. Press or the SELECT key, the playback will be stopped and the screen will return to the Index screen. Or while the music file is being played, tap □Setting the Repeat mode
1. On the Index screen, tap the "Options" menu and then tap "Repeat". The file will be played repeatedly. The files in the Playlist folder will be all played repeatedly. To cancel the Repeat mode, repeat step 1.   natural_image
Pure geometric lines and shapes without any text, numbers, or symbolsnatural_image
Pure geometric diagram with intersecting lines and circular shapes (no text or symbols)Playing a file in the Playlist
By registering the video or music files in the Playlist, you can play them in the registered order or in random sequence. This section describes an example of playing files stored on a memory card. Before playing files, insert the memory card into the appropriate card slot of the SL-5500.Adding files to the Playlist
1. On the Index screen, tap the Video or Music tab. All files stored in the SL-5500 and memory card will be displayed according to the file type to be played. 2. Tap the desired file in the list. 3. Tap the Add to playlist button (✗) Or tap the "File" menu and then tap "Add to playlist". The same file name of the selected file will be registered to the Playlist folder. Tapping the Playlist tab allows you to confirm it. 4. Repeat steps 1 to 3 above, if necessary, to register multiple files.Arranging the file order in the Playlist
Once you have registered files in the Playlist, you can change the file order ( playback order). 1. Tap the Playlist tab. 2. Tap the file you want to move. 3. Tap The selected file will move upwards or downwards.Deleting files from the Playlist
1. Tap the Playlist tab. 2. Tap the file you want to delete. 3. Tap the Remove from playlist button (✗) Or tap the "File" menu and then tap "Remove from playlist". The selected file will be deleted immediately.   natural_image
Pure geometric lines and shapes without any text, numbers, or symbolsnatural_image
Pure geometric diagram with intersecting lines and circles, no text or symbols presentTo playback files in the Playlist folder
1. Tap the Playlist tab. 2. Tap for press or the SELECT key. All files in the Playlist folder will be played once from the top of the list, and playback will stop automatically. Note: If the Repeat mode is selected in the Options menu, all files in the Playlist folder will be played repeatedly.To stop playback
1. Press on the SELECT key, the playback will be stopped and the screen will return to the Index screen. Or while the music file is being played, tap ☐To playback at random
1. Tap the Playlist tab. 2. Tap the "Options" menu and then tap "Random". All files in the Playlist folder will be played at random. To cancel the Random mode, repeat step 2.   natural_image
Pure geometric lines and crosshair symbols without any text or labelsnatural_image
Pure geometric diagram with intersecting lines and circles, no text or symbols presenttext_image
00.COther functions
Displaying the file information
1. Tap the "File" menu and then tap "Info...". The file information screen will be displayed. text_image
Media Player File Information Streams.mp3 Media type: audio/mpeg File size: 301 KB Last Modified: 09.01 Thu Jan 17, 2002 Play time: 00:15 Format: MPEG-1 Layer 3 Channel stereo Bit rate: 160 kbps Sampling rate: 32000 Hz Title: Streams Artist: Zouro Orchestranatural_image
Pure geometric lines and shapes without any text, numbers, or symbolsnatural_image
Pure geometric diagram with intersecting lines and circles, no text or symbols presentImage Viewer
The Image Viewer application allows you to see image files such as JPEG, GIF, BMP, PNG, XBM, and XPM. You can transfer files from a PC using PC link software.Note:
- Large image files will not be able to be viewed due to memory constraints. - Some files can not be viewed with this application. - For detailed information on how to attach and remove the expansion memory card, see the separate Start-up Guide.Overview
The Image Viewer opens with a list of images (Index screen).Index screen
1. In the Applications folder of the Home screen, tap the "Image Viewer" application icon. text_image
Options menu File menu File List area Image Viewer File Options Title Type Data My snap选股 10/10/01 Personal bnap 1/1/02 The shore-jpg 12/21/01natural_image
Pure geometric lines and shapes without any text, numbers, or symbolsnatural_image
Pure geometric diagram with intersecting lines and circular shapes (no text or symbols)42Image Viewer
| File menu | ||
| Open... Opens the image file. | ||
| Options menu | ||
| Slideshow Slideshows all entries. | ||
| Preferences... Opens a preference screen for slideshow setting. | ||
| Help... Opens the on-line Help screen. | ||
| Title button Tap to sort files by name. | ||
| Type button Tap to sort files by file type. | ||
| Date button Tap to sort files by date. | ||
| File List area Displays | the files that are registered in the Documents folder of the Home screen, and on the memory cards inserted into the slots. Tap a file to view the image file. | |
Note:
- To find to the desired file, press the first few characters of the file name on the hardware keyboard. The focus moves to the matching file. - You can copy files stored on a memory card to the Documents folder by using the Copy function on the Documents Details screen (see the separate Startup Guide).Image view screen
1. On the Index screen, tap the image file you want to view. The selected image appears on the screen. text_image
Options menu View menu Image Viewer - The shore View Options Rotate 180 icon Full screen icon Rotate 90 icon Image information| Full screen icon Displays | the image on the full screen with no Menu bar or taskbar on it. Tapping the display or pressing the SELECT key or returns to the Normal screen. | |
| Image Information Displays | plays the original image pixels, display image pixels, color information (and transparent colored file information, if available) | |
| View menu | ||
| Horizontal flip Flips | the image horizontally. | |
| Vertical flip Flips the | image vertically. | |
| Rotate 180 Rotates | the image by 180^ . | |
| Rotate 90 Rotates | the image by 90^ counterclockwise. | |
| Fullscreen Displays | the image on the full screen with no Menu bar or taskbar on it. Tapping the display or pressing the SELECT key or returns to the Normal screen. | |
| Options menu | ||
| Slideshow Slideshows | ws all entries. | |
| Preferences... | Opens a preferences screen for slideshow setting | |
| Help... | Opens the on-line Help screen. | |
Viewing images
Viewing a single image
1. On the Index screen, tap the image you want to view. The selected image will be displayed. - Press ⬙ to display the next screen, or press ⬙ to display the previous screen. - Tap on the image or press the SELECT key or OK to switch the screen mode between Full screen and Normal screen. 2. Tap or press to return to the Index screen.Slideshowing the file
1. Tap the "Options" menu and then tap "Slideshow". All files will be opened once from the top of the list in the Full screen mode. When the slideshow is finished, the display returns to the Index screen. natural_image
Pure geometric lines and crosshair symbols without any text or labelsnatural_image
Pure geometric diagram with intersecting lines and circles, no text or symbols present44Image Viewer
- If the Auto-play option is unchecked, the first file on top of the list will be opened. (For information on the Auto-play option and others, see below.) - If you press Ⓧ with the Auto-play option unchecked, the next file will be opened. If you press Ⓧthe previous file will be opened. - The View menu settings (Rotate, etc.) will not be effective for the Slideshow command. To stop the slideshow, press cThe display returns to the Index screen.To set up the slideshow preferences
1. Tap the "Options" menu and then tap "Preferences...". text_image
Preferences Auto-play checkbox Slideshow setting Auto-play Repeat Delay (sec) 5 10 20 30 40 60 Repeat checkbox Delay time slider 7:34 AM| Slideshow setting | |
| Auto-play checkbox | If checked, files will be automatically opened. |
| Repeat checkbox If checked, files will be automatically opened repeatedly. | |
| Delay time slider If the Auto-play option is checked, move the slider to adjust the delay time with which the next file will start. | |
natural_image
Pure geometric lines and crosshair symbols without any text or labelsnatural_image
Pure geometric diagram with intersecting lines and circles, no text or symbols presentnatural_image
Pure geometric diagram with intersecting lines and circles, no text or symbols presentOpera Browser
The Opera Browser application allows you to browse the Internet. To browse the Internet, you must set up the communication method (modem card, LAN card, etc.) and network preferences.Note:
- The Opera Browser application has no capability to save pages and embedded images. - Exiting the application clears the cache without saving it in a file. - Some Web pages (including font setting, etc.) can not be displayed or not displayed correctly in this application. - Some graphical images of larger size may not be displayed. - While browsing the Web pages, you can check incoming e-mail messages. Overview
Browsing screen
1. In the Applications folder of the Home screen, tap the "Opera Browser" application icon. text_image
Security Status icon Reload icon Forward icon Back icon Help icon Zoom icon Web page address icon Zaurus Bookmark list icon Preferences icon SHARP M O BILE SERVICES SHARP 12:17 AMnatural_image
Pure geometric lines and shapes without any text, numbers, or symbolsnatural_image
Pure geometric diagram with intersecting lines and circular shapes (no text or symbols)| Security Status icon | Displays security information.If the page you access uses the SSL protocol, etc., the Security Status icon changes to the locked state with a set security level. Tap the icon to display the security level description. |
| Back icon Returns to the previous page. Tap and hold to list recently displayed pages (tap again to close) and then tap any list item to display the page. | |
| Reload icon Displays the latest update of the page. When the page data is being downloaded, the Stop icon is displayed instead. | |
| Forward icon Re-displays the page displayed before you tapped the “Back” icon. Tap and hold to list recently displayed pages (tap again to close) and then tap any list item to display the page. | |
| Preferences icon Displays the screen to set up the homepage to be displayed at startup, together with security level. | |
| Bookmark list icon Displays the Bookmark list screen. Tap again to close. | |
| Web page address icon | Displays a Web page address screen for entering a URL, adding to bookmarks, or searching for a Web page. Tap again to close. |
| Zoom icon Displays a menu to specify the setting of the display (tap again to close). Choices: Tiny, Small, Medium, Large, Huge | |
| Help icon Displays a help screen. | |
natural_image
Pure geometric lines and crosshair symbols without any text or labelsnatural_image
Pure geometric diagram with intersecting lines and circles, no text or symbols presentnatural_image
Pure geometric diagram with intersecting lines and circles, no text or symbols presenttext_image
00.CBrowsing the Web page
Operations on the Web page including frames
If the Web page you opened includes a frame, use the "Use top" or "Use bottom" button. text_image
Opera Frame Index • The rest of character • The rest of Excerpt [HTML3.2] • The rest of sound • The rest of Cash Frame Use top button Use top Use bottom Use bottom button Frame • 1024 Characters Title • 2048 Characters Title • 2072 Characters Title • 4096 Characters Title • 4097 Characters Title • 5119 Characters TitleOpening the specified Web page
1. Tap the Web page address icon ( )
The Web page address screen will be displayed. Web page address field text_image
Opera - sharp global home page Web page address: http://sharp-world.com/index.html Add to bookmarks Go Search the web using: Google Search Global Hot 11:05 AMnatural_image
Pure geometric lines and shapes without any text, numbers, or symbolsnatural_image
Pure geometric diagram with intersecting lines and circular shapes, no text or symbols present48Opera Browser
2. Enter the desired Web page address beginning with "http://". 3. Tap "Go". The specified Web page will be displayed.Registering the Web page address in the bookmark list
1. Display the desired Web page. 2. Tap the Web page address icon ( ) The Web page address screen will be displayed. 3. Tap "Add to bookmarks". The Edit Bookmark screen will be displayed. text_image
Opera : sharp global home page Web page address: http://sharp-world.com/index.html Name: sharp global home page OK Cancel Global Homenatural_image
Pure geometric lines and shapes without any text, numbers, or symbolsnatural_image
Pure geometric diagram with intersecting lines and circular shapes, no text or symbols presenttext_image
00.CUsing the Search function
Search allows you to find the specific character strings using the search engine you select. 1. Tap the Web page address icon ( ) The Web page address screen will be displayed. text_image
Open: sharp global home page Web page address: http://esharp-world.com/index.html Add to bookmarks Go Search the web using: Google Search engine drop-down list button Search fieldUsing the bookmarks
1. Tap the Bookmark list icon ( The Bookmark list screen will be displayed.   natural_image
Pure electrical circuit lines without any symbolsnatural_image
Pure geometric diagram with intersecting lines and circular shapes, no text or symbols presenttext_image
Go radio button Del radio button Edit radio button sharp global home page Move radio button Bookmark list| Go radio button Displays the page selected in the bookmark list. |
| Del radio button Deletes the bookmark selected in the bookmark list. |
| Edit radio button Displays the Edit Bookmark screen. |
| Move radio button Allows you to change the order by dragging the item in the Bookmark list. |
| Bookmark list Lists all the addresses you have registered (bookmarked). |
Displaying the bookmarked page using bookmarks
1. On the Bookmark list screen, tap the "Go" radio button and tap the desired bookmark. The selected Web page will be displayed.Deleting the bookmark
1. On the Bookmark list screen, tap the "Del" radio button and then tap the desired bookmark. A confirmation message appears. 2. Tap "Yes" to delete the bookmark. If you tap "No", the deletion is canceled.Editing bookmarks
1. On the Bookmark list screen, tap the "Edit" radio button and then tap the desired bookmark you want to edit. natural_image
Pure geometric lines and crosshair symbols without any text or labelsnatural_image
Pure geometric diagram with intersecting lines and circular shapes, no text or symbols presenttext_image
Web page address field Page Name field sharp global home page Name: OK CancelChanging the bookmark order
1. On the Bookmark list screen, tap the "Move" radio button. 2. Drag the desired bookmark in the Bookmark list to change the order.Setting up the Opera Browser preferences
1. Tap the Preferences icon ( ) The Preferences screen will be displayed. text_image
Home page field Cookies checkbox Security checkbox Opera - bluetooth | upgrade Home page URL file:///home,Q1Pamtop/opera,start/Index.html Cookies Accept Security Enable SSL v2 Enable SSL v3 Enable TLS 1.0 Issue security warnings OK Cancel 12:56 AMnatural_image
Pure geometric lines and shapes without any text, numbers, or symbolsnatural_image
Pure geometric diagram with intersecting lines and circles, no text or symbols present| Home page field Enter the address of the homepage that will be displayed every time you launch the Opera Browser application. | |
| Cookies checkbox When checked, only the information you entered or selected on the Web page will be saved to disk. The cookie will be sent back the next time when the SL-5500 browses the same Web page. | |
| Security checkbox (Protects the page displayed with the SSL technology.) | |
| Enable SSL v2 Tap to enable the SSL v2 option. | |
| Enable SSL v3 Tap to enable the SSL v3 option. | |
| Enable TLS 1.0 Tap to enable the TLS 1.0 option. | |
| Issue security warnings Tap to display a warning message when you move between the safe and unsafe Web site | |
Overview
The EMail application allows you to send and receive e-mail messages. The EMail application features: • POP3/SMTP/IMAP4 protocols • Multiple e-mail accounts - Converts attachment files using the MIME format • The Mail light (LED) flashes for an e-mail receipt - Refers to the Address Book application to import e-mail addresses, and registers the e-mail addresses of the e-mail you received in the Address Book application. - Sorts the e-mail messages by queries you create - Groups e-mail messages by mailboxes you create  To send and receive e-mail messages, you must: \- Set up the communication method (modem card, LAN card) and network preferences \- Set up an e-mail account in the EMail applicationIndex screen
1. In the Applications folder of the Home screen, tap the "EMail" application icon. Caution: Be sure to check that enough memory storage space (the text size of the created message plus 10 Kbyte or more) is secured before exiting the EMail application because the EMail application needs to save the data being edited in the work area. Note: The EMail application may have a delayed launch depending on the saved quantity of data. natural_image
Pure geometric lines and shapes without any text, numbers, or symbolsnatural_image
Pure geometric diagram with intersecting lines and circular shapes, no text or symbols present| Folders folder Browses the Inbox, Outbox, and Sent folders in the tree format. |
| Inbox folder Displays the received e-mail messages.Unread messages will be displayed in blue. Messages that have been read will be displayed in black. Messages whose titles only have been downloaded will be displayed in red. (See page 65.) |
| Outbox folder Displays the e-mail messages you have created. The unsent e-mail messages are displayed in red. |
| Sent folder Displays the sent mail logs. (The original messages will be saved in the Outbox folder.) |
text_image
Mail menu Options menu Email Options Folders Inbox Outbox Cent Inbox Outbox Cent Inbox: 0 (0 new)text_image
Send mail icon Get all mail icon New mail icon Reply to mail icon Delete icon Sort by query button Mail Options Folders Inbox Outbox Cent Inbox Front Subject Date richard@char Meeting Tuesday richard@char... Report1 Tuesday Inbox: 2 (2 new)text_image
Edit mail icon Mail Options Folders Inbox Outbox Cent Outbox To Subject Date Richard@Sharp Meeting Tuesday Richard@Sharp Report Tuesday Outlook: 2 (2 unsent) 0:19text_image
Email Mail Options Folders Inbox Cutbox Sent To Subject Data richard@sher...Meeting... Tuesday richard@sher...Report... Tuesday Sent: 2 (0 unsent.) 051natural_image
Pure electrical circuit lines without any symbolsnatural_image
Pure geometric diagram with intersecting lines and circles, no text or symbols presentnatural_image
Pure geometric diagram with intersecting lines and circular shapes, no text or symbols present| Send mail icon Sends all unsent e-mail messages in the Outbox. | |
| Get all mail icon Receives all e-mail messages that are saved in the mail server. | |
| New mail icon Opens a screen to create a new e-mail message. | |
| Reply to mail icon Opens a reply mail screen for the sender only. | |
| Sort by query button | Tap to sort e-mail messages by query you create. (See page 71.) |
| Delete icon Delete the selected e-mail message. | |
| Mail menu | |
| Send all mail Sends | all unsent e-mail messages in the Outbox. |
| Get all mail Receives | all e-mail messages that are saved in the mail server. |
| Get mail in Receives | the e-mail messages in the selected account. |
| Cancel transfer Cancels | e-mail transfer. |
| New mail Opens a | screen to create a new e-mail message. |
| Edit mail Opens an | existing e-mail message to be edited. |
| Reply to mail Opens | a reply mail screen for the sender only. |
| Reply to all Opens | a reply mail screen for all senders and receivers. |
| Forward mail Opens | a screen to forward the received e-mail message. |
| Delete mail Deletes | the selected e-mail message. |
| Delete selected | Deletes the e-mail message displayed on the Examine screen, when checked. (See page 68.) |
| Options | |
| New account Opens | the New account screen. (See page 58.) |
| Edit account | Opens the Edit account screen displayed in the submenu. |
| Delete account | Deletes the selected account displayed in the submenu. |
| Font | Changes the display font size. |
| New query Opens | the New query screen. (See page 70.) |
| Edit query | Opens the Edit query screen. |
| Delete query | Deletes the selected query. |
| New mailbox Creates | a new mailbox. (See page 73.) |
| Rename mailbox | Renames the mailbox. |
| Delete mailbox | Deletes the mailbox. |
| Move to | Moves the e-mail messages to the folder displayed in the submenu. |
natural_image
Pure electrical circuit lines without any symbolsnatural_image
Pure electrical circuit lines without any symbolsExamine (Detail) screen
1. On the Index screen, tap an e-mail message. text_image
Select for delete checkbox View menu Mail menu Examine - Outbox Mail View select Previous icon Send mail icon Attachments icon Next icon E-mail message Subject: Business report Print: smith@ssy.sharpsec.com For scottoam@snarpsec.com Date: Tue Oct 1 2002 Attachments: New Product Images Reporting from the Electrical Show in Corn Francisco Focusing on Car Navigation Features are .ETC in-sar LAN using optical fiber MPEG Bluetooth IP v6 Attachments offer a clear outline of the various products! (Outbox)| Select for delete checkbox | Deletes the e-mail massage displayed on the Examine screen, when you select “Delete selected” from the Mail menu. | |
| Previous icon Displays the previous message. | ||
| Next icon Displays the next message. | ||
| Send mail icon (Outbox) | Sends the e-mail message displayed on the Examine screen. | |
| Reply to mail icon (Inbox) | Opens a reply mail screen for the sender only. | |
| Attachments icon Opens an attached list screen on which to open, save the attachment file, move it to the expansion memory card, etc. (see page 67.) | ||
| Mail menu | ||
| Get this mail (Inbox) | Receives an e-mail message if its e-mail header has been already received. | |
| Send this mail (Outbox/Sent) | Sends the e-mail message displayed on the Examine screen. | |
| New mail Opens a screen to create a new e-mail message. | ||
| Edit mail Opens an existing e-mail message to be edited. | ||
| Reply to mail Opens a reply mail screen for the sender only. | ||
| Reply to all Opens a reply mail screen for all senders and receivers. | ||
| Forward mail Opens a screen to forward the received e-mail message. | ||
| Add to address book | Adds the e-mail address of the sender to the Address Book application. | |
| Set status Changes the e-mail status between Sent and Unsent in the Outbox folder, or Unread in the Inbox folder. | ||
| Delete Deletes the e-mail message displayed on the Detail screen. | ||
| View menu | ||
| Previous Displays the previous message. | ||
| Next Displays the next message. | ||
| Attachments... | Opens an attached list screen on which to open, save the attachment file, move it to the expansion memory card, etc. (see page 67.) | |
| Text format Changes the view format between the text format and rich text format. | ||
New mail screen
1. On the Index screen, tap B 58EMail text_image
New mail Mail Edit To: Subject: Address Book icon Attachment icon Direction drop-down list button E-mail address field Subject field Message area| Direction drop-down list button | Tap to select the e-mail direction (TO, CC, BCC). |
| Address Book icon | When tapped, lists the e-mail addresses registered in the Address Book application. |
| Attachment icon | When tapped, lists the attachment files to be attached to the e-mail message. |
| Mail menu | |
| Send this mail Sends the e-mail message displayed. | |
| Refer Address Book Lists the e-mail addresses registered in the Address Book application. | |
| Adding Attachments Opens the screen to select the attachment files to be attached to the e-mail message. | |
E-mail accounts
The EMail application allows multiple e-mail accounts to be registered. Note: If you have already registered e-mail accounts in the Internet Wizard application, they apply to the e-mail accounts for the EMail application. To configure detailed settings, tap the "Options" menu on the Index screen and then tap the account from the "Edit account" submenu. Detailed procedures are described below.Setting an e-mail account
1. On the Index screen, tap the "Options" menu and then tap "New Account". The New Account screen will be displayed including two folders: Outgoing and Incoming. text_image
00.Ctext_image
New Account Edit Outgoing Incoming Account name Your name Email SMTP server SMTP port 25 Use signature| Account name Enter the account name. |
| Your name Enter your name as used in the “From” field of the e-mail message. |
| Email Enter your e-mail address. |
| SMTP server Enter the server name for sending e-mail messages. |
| SMTP port Enter the server port number for sending e-mail messages (default setting: 25). |
| Use signature checkbox Check to add a signature. On the screen that appears, enter the signature that is added to the end of the e-mail message. Tapto save the signature. |
natural_image
Pure geometric lines and shapes without any text, numbers, or symbolsnatural_image
Pure geometric diagram with intersecting lines and circular shapes, no text or symbols present3. Tap the "Incoming" tab to set the receiving options.
text_image
New Account Edit Outgoing Incoming Choose account type PDF Username Password Server Port 110 Server settings Synchronize Delete mail Skip large emails Skip large emails Synchronize checkbox Skip large emails checkbox Choose account type drop-down list button Delete mail checkbox| Choose account type drop-down list button | Tap to select the desired account type (POP, IMAP) |
| Username field Enter login name used to log in to an e-mail system. | |
| Password field Enter password used to log in to an e-mail system. | |
| Server field Enter name of the server used to receive e-mail messages | |
| Port field Enter server port number for receiving e-mail messages.(default setting: 110). | |
| Server settings | |
| Synchronize checkbox | Check if you want to synchronize e-mail information with the server. Then you can download only new messages that the server has received. |
| Delete mail checkbox | Check if you want to erase e-mail messages saved in the server after you have finished downloading messages. |
| Skip large emails checkbox | Check to specify an e-mail size limit.When checked, the Email threshold screen is displayed.Tap and hold the slider to specify the maximum size of incoming e-mail messages. (range: 10 Kbyte to 1000 Kbyte) Tap to save the setting.If you receive an e-mail message of a size larger than specified, only the message title (sender name, date and the size of the message) will be downloaded. |
4. When you have finished settings, tap to save them.
text_image
00.CEditing the e-mail account
1. On the Index screen, tap the "Options" menu and then tap the desired account from the "Edit account" submenu. 2. Edit in the same way as you do on the New Account screen.Deleting an e-mail account
1. On the Index screen, tap the "Options" menu and then tap the desired account from the "Delete account" submenu. The confirmation message will be displayed. 2. Tap "Yes" to delete the account. The selected account will be deleted.Creating an e-mail message
1. On the Index screen, tap ☐ Or tap the "Mail" menu and then tap "New mail". The New mail screen will be displayed. text_image
Direction drop-down list button E-mail address field Subject field Message area New mail Mail Edit To: Subject Address Book icon Attachment icon(E-mail account: From)
2. When registering multiple e-mail accounts, tap the Direction drop-down list button to select "From". 3. Tap the e-mail address field to select the desired account. (Recipient's address: To, CC, BCC) natural_image
Pure electrical circuit lines without any symbolsnatural_image
Pure geometric diagram with intersecting lines and circular shapes, no text or symbols present62EMail
4. Tap the Direction drop-down list button to select To, CC, or BCC. 5. Enter the e-mail address in the E-mail address field. - You can enter multiple e-mail addresses by inserting a comma between them. - E-mail messages are saved as drafts in the Inbox folder, unless otherwise specified. - Tap the Address Book icon ( ) on the New mail screen. The e-mail addresses stored in the Address Book application will be listed. text_image
New mail Mail Edit 10 subject Name Email Richard, Frank richard@sherp.co.jp Scott, Campbellscoticemi@shersec.com Tim, Brown brown@aoasales.com(File attachment)
7. If you want to attach one or more files, tap the Attachment icon (in the New mail screen. text_image
Adding attachments Type: All Documents Elephant All new Product Images The shore Attached New Product Image Attachment list Documents list Attach → Remove 0.56natural_image
Pure geometric lines and crosshair symbols without any text or labelsnatural_image
Pure geometric diagram with intersecting lines and circles, no text or symbols presentnatural_image
Pure geometric diagram with intersecting lines and circular shapes, no text or symbols presentChecking e-mail contents
1. Tap the e-mail message of which you want to view the contents. text_image
Examine - Onitex Mail View select Subject: Business report! From: smith@www.shorose.com Tox scottcam@snarpsec.com Data: Tue Dot 1 2002 Attachments: New Product Images Reporting from the Electrical Show in San Francisco Focusing on Car Navigation Features are .ETC In-car LAN using optical fiber Mpegel Bluetooth IF v6 Attachments offer a clear outline of the various products!natural_image
Pure geometric lines and crosshair symbols without any text or labelsnatural_image
Pure geometric diagram with intersecting lines and circles, no text or symbols presentSending an e-mail message
text_image
Send mail icon Mail Options Folders Inbox Outbox Sent Outbox To Subject Date sent/e-mail Business report Tuesday meeting report Tuesday Status button : unsent e-mail : draft e-mail Outbox: 2 (2 unsent) Displays the number of sent and unsent messagesSending all e-mail messages
1. In the Outbox folder, tap the "Mail" menu and then tap "Send all mail" Or tap the Send mail icon ( 2. All unsent e-mail messages will be sent. The sent e-mail messages are displayed in black, the sent mail logs are saved in the Sent folder and the original messages are saved in the Outbox folderSending a single e-mail message
1. Tap the desired e-mail message in the Outbox folder. The Examine screen appears. 2. Tap the "Mail" menu and then tap "Send this mail". Or tap the Send Mail icon ( ) on the Examine screen. 3. The e-mail message will be sent. The sent e-mail message is displayed in black, the sent mail log is saved in the Sent folder and the original message is saved in the Outbox folder.   natural_image
Pure geometric lines and crosshair symbols without any text or labelsnatural_image
Pure geometric diagram with intersecting lines and circular shapes (no text or symbols)Receiving e-mail messages
text_image
(purple): e-mail message unread ↓: e-mail title having no message downloaded Email Mail Options Folders Inbox Outbox Send Inbox From Subject Date richard@sher... Meeting Tuesday richard@sher... Report Tuesday Reply to mail icon Get mail icon Displays the number of received and unsent messages Inbox: 2 (1 new)Receiving e-mail messages from all e-mail accounts
1. On the Index screen, tap the "Mail" menu and then tap "Get all mail". Or tap the Get mail icon (in the Inbox folder. Note: If you receive an e-mail message of a size larger than specified, or the connection is terminated, only the message title (sender name, date, and the size of the message) will be downloaded. It is displayed in red with the down arrow on the Index screen of the Inbox folder. For information on maximum size settings, see page 60.Receiving e-mail messages from one e-mail account
1. On the Index screen, tap the "Mail" menu and then tap "Get mail in". 2. Tap the desired account.Opening an e-mail message
1. On the Index screen, tap the desired e-mail in the Inbox folder. The Examine screen of the received e-mail message will be displayed. natural_image
Pure geometric lines and shapes without any text, numbers, or symbolsnatural_image
Pure geometric diagram with intersecting lines and circular shapes (no text or symbols)Replying to an e-mail message
You can reply only to the sender(s). 1. Tap "Mail" menu and then tap "Reply to mail", or tap the Reply to mail icon (法)Replying to all
You can reply to all recipients and senders. 1. Tap the "Mail" menu and then tap "Reply to all".Forwarding an e-mail message
You can forward an e-mail message. 1. Tap the "Mail" menu and then tap "Forward mail".Registering the e-mail address of the sender in the Address Book application
You can register the e-mail address of the sender of the e-mail message you received in the Address Book application. 1. On the Index screen, tap the desired e-mail in the Inbox or Outbox folder. The Examine screen will be displayed. 2. Tap the "Mail" menu and then tap "Add to addressbook". The Add to addressbook screen will be displayed. text_image
Add to addressbook acottcam@snarpsec.com Re: Select email address. Features are .ETC In-car LAN using optical fiber MpygI Bluetooth IP v6 Attachments offer a clear outline of the various products!natural_image
Pure electrical circuit lines without any symbolsnatural_image
Pure electrical circuit lines without any symbolstext_image
09.FOpening or arranging the attachment files
You can not only open the received attachment file, but copy it to the Documents folder of the SL-5500, and move it to the expansion memory card. 1. Tap the received e-mail message including an attachment file in the Inbox folder, etc. The Examine screen will be displayed. 2. Tap the "View" menu and then tap "Attachments...". Or tap the Attachments icon (☐) The Attachments list screen will be displayed. text_image
Data menu Check the attachments which you want to be visible in the Documents too Attachment Type New Product Images.bmp image Attachment list| Open in (Application name) | Open the attachment file with a specified application. |
| Add to documents Copies the attachment file to the Documents folder of the SL-5500. | |
| Move to card [SD] Moves the attachment file to the SD memory card, while deleting the original attachment file. (The e-mail message will remain.) | |
natural_image
Pure electrical circuit lines without any symbolsnatural_image
Pure geometric diagram with intersecting lines and circular shapes, no text or symbols present| Move to card [CF] Moves the attachment file to the CF card, while deleting the original attachment file. (The e-mail message will remain.) |
| Delete Deletes the attachment file while leaving the original e-mail message. |
| Select all Select all attachment files in the Attachment list. |
| Deselect all Deselect the attachment files in the Attachment list. |
Deleting e-mail messages
Deleting an e-mail message
1. On the Index screen, move the focus to the e-mail message you want to delete. Or open the Examine screen of the e-mail message you want to delete. 2. Tap 📁. Or tap the "Mail" menu and then tap "Delete mail" ("Delete"). The confirmation message appears before the message is deleted. 3. Tap "Yes" to delete the message. Note: If you delete the sent e-mail messages from either the Outbox or Sent folder, the original e-mail messages and their log files will be deleted from both folders.Deleting the selected e-mail messages
You can delete e-mail messages that appear in the Inbox, Outbox or Sent folders.   natural_image
Pure geometric lines and shapes without any text, numbers, or symbolsnatural_image
Pure geometric diagram with intersecting lines and circular shapes, no text or symbols presenttext_image
09.Ftext_image
Examine - Inbox Mail View select Subject: Meeting From: smith@yyy.sharpsec.com To: brown@aseadbox.com DeIs: Tue Oct 1 2002 Please read my report I sent yesterday. The report is supposed to use on the meeting. Smith Select for delete checkboxtext_image
Email Mail Options Folders Inbox Outbox Sent Outbox To Subject Date brovng@acead...Meeting Tuesday richard@char... Meeting Tuesday richard@char... Report Tuesday Outbox: 3 (O unsent)natural_image
Pure geometric lines and crosshair symbols without any text or labelsnatural_image
Pure geometric diagram with intersecting lines and circular shapes (no text or symbols)Searching for an e-mail message
You can query the Inbox or Outbox folders to search for a specific e-mail message.Creating a new query
1. Tap the Folders tab to open the Folders folder. 2. Tap the desired folder (Inbox or Outbox). 3. Tap the "Options" menu and then tap "New query". The New query screen appears. text_image
Search option drop-down list buttons Mailbox, Status1, Status2, Attachment Search option fields From Recipient Subject Body Search option checkboxes and Date button after before Name field Edit query Outbox All mail Read/Unread Any attachment From scottcam@sharpcec.com Recipient Subject Project Body Sent after Ice On 12002 before Ice On 12002 Name Project| Search option drop-down list buttons | ||
| Mailbox Indicates | the Inbox and Outbox folders to be queried. | |
| Status 1 Specifies | an e-mail by status:Incomplete mail/complete mail for the Inbox folder, Mail not sent/Mail sent for the Outbox folder | |
| Status 2 Specifies | an e-mail by status:Read/Unread for the Inbox folder | |
| Attachment Specifies | an e-mail message by an attachment file:No attachment/Attachment | |
| Search option fields | ||
| From Enter a sender name. | ||
| Recipient Enter a recipient name. | ||
| Subject Enter an e-mail subject. | ||
| Body Enter a part of the e-mail message. | ||
natural_image
Pure geometric lines and crosshair symbols without any text or labelsnatural_image
Pure geometric diagram with intersecting lines and circles, no text or symbols present| Search option checkboxes and Date button | ||
| after Specifies an | e-mail by date. Tap to select the specified date after which the e-mail message has been received or sent. | |
| before Specifies an | e-mail by date. Tap to select the specified date before which the e-mail message has been received or sent. | |
| Name field Enter | the desired query name you can easily find. | |
To sort the e-mail message using query
1. Tap the desired folder tab: Inbox or Outbox. text_image
Sort by query button Email Mail Options Folders Inbox Outbox Sent Outbox To Subject Date rcharo@snap... Meeting Tuesday rcharo@snap Report Tuesday Outbox: 2 (2 uncent) 0.19natural_image
Pure geometric lines and crosshair symbols without any text or labelsnatural_image
Pure geometric diagram with intersecting lines and circular shapes (no text or symbols)To edit the query
1. In the Folders folder of the Index screen, tap the desired query you want to edit. 2. Tap the "Options" menu and then tap "Edit query". The Edit query screen appears.. text_image
Edit query Outbox All mail New/Printed Are attachment From scottcam@sharpsec.com Recipient Subject Project Body Serial after before Set Out 1,2002 Set Out 1,2002 Name ProjectTo delete a query
1. In the Folders folder of the Index screen, tap the desired query to be deleted. 2. Tap the "Options" menu and then tap "Delete query". The confirmation message appears before the query is deleted. 3. Tap "Yes" to delete the query. The selected query will be deleted. Note: Another way to delete the query is as follows: 1. In the Folders folder, tap and hold the desired query. 2. Select "Delete query" in the menu that pops up.   natural_image
Pure geometric lines and crosshair symbols without any text or labelsnatural_image
Pure geometric diagram with intersecting lines and circular shapes, no text or symbols presentUsing a mailbox folder in the Inbox/Outbox folder
Creating a new mailbox folder
This function allows you to create a new mailbox folder inside the Inbox or Outbox. 1. Tap the Folders tab to open the Folders folder. text_image
Email Mail Options Folders Inbox Outbox Sent Inbox Outbox Sent Inbox: 0 (0 new) 12:51 AMTo rename a mailbox folder
You can rename the mailbox folder created in the Inbox or Outbox. 1. Tap the Folders tab to open the Folders folder. 2. Tap the desired mailbox folder to be renamed. 3. Tap the "Options" menu and then tap "Rename mailbox". 4. Modify the folder name, as you wish.To delete a mailbox folder
You can delete the mailbox folder created in the Inbox or Outbox. 1. Tap the Folders tab to open the Folders folder. 2. Tap the desired mailbox folder to be deleted. 3. Tap the "Options" menu and then tap "Delete mailbox". A confirmation message appears before the mailbox is deleted. 4. Tap "Yes" to delete the mailbox folder. The selected mailbox folder including its e-mail messages will be deleted.Note:
- The default folders ("Inbox", "Outbox" and "Sent") cannot be renamed or deleted. - To rename or delete a mailbox folder, tap and hold the desired mailbox instead of performing steps 2 and 3, and select "Rename mailbox" or "Delete mailbox" from the pop-up menu. Moving an e-mail message to another folder
This function allows you to move e-mail messages saved in the Outbox, Inbox, or Sent folder to another folder in the same folder. 1. Open the desired folder (Inbox, Outbox, or Sent). 2. Move the focus to the e-mail message using Ⓤ 3. Tap the "Options" menu and then tap "Move to". 4. Tap the folder to which you want to move the e-mail message. The selected e-mail message will be moved to the folder. Note: Tap-and-holding the e-mail message in steps 2 and 3 will allow you to use a pop up menu. natural_image
Pure geometric lines and shapes without any text, numbers, or symbolsnatural_image
Pure geometric diagram with intersecting lines and shapes, no text or symbols presentOther functions
Changing the view pattern
You can view the e-mail message in Text or Rich text format on the Examine screen. 1. On the Examine screen, tap the "View" menu and then tap "Text format". The Text format will be unchecked and the Examine screen will be displayed in Rich text format. To return to the original mode, repeat step 1.Changing the e-mail status
You can change the e-mail status for received or sent messages. 1. On the Examine screen, tap the "Mail" menu. 2. Tap "Set status" and then tap "Sent" or "Unsent" for a sent e-mail message, or tap "Unread" for a received e-mail message.Switching the e-mail message to view
While displaying the Examine screen, you can switch e-mail messages. 1. Tap or on the Examine mail screen. Or tap the "View" menu and then tap "Previous" or "Next".    natural_image
Pure geometric lines and shapes without any text, numbers, or symbolsnatural_image
Pure geometric diagram with intersecting lines and circles, no text or symbols presentnatural_image
Pure geometric diagram with concentric circles and crosshairs, no text or symbols presentExtras
City Time
The City Time application shows you six world times you can choose at any time. 1. In the Applications folder of the Home screen, tap the "City Time" application icon. The City Time screen will be displayed. text_image
City Time Time Zone Map New York Thu Dec 26, 2:11 PM Night zone Daytime zone Magnification button ( City buttons New York Los Angeles Brisbane Oslo Tokyo Hong Kong Date indicators 2:11 PMTo change to other cities
1. Tap the City button that you want to change. The Select City screen appears listing the region's name in alphabetical order in the left list, and its main city names in the right list. text_image
City Time New York Thu Dec 26, 2:11 PM Select City Tuvaku Uganda Ukraine United Arab Emirates United States Milwaukee Minneapolis Monticello Nashville New Orleans New York Go to Zone Map 2:11 PMnatural_image
Pure geometric lines and shapes without any text, numbers, or symbolsnatural_image
Pure geometric diagram with intersecting lines and circular shapes (no text or symbols)78Extras
Note: To find the desired region's name, press the first character of the region's name on the hardware keyboard. The focus moves to the matching region's name. 2. Tap the desired region's name and then the city name. 3. Tap on the Select City screen. The selected city name appears on the button you have tapped in step 1, and the setting will be saved.To change to other cities using the zone map
1. Tap the City button that you want to change. The Select City screen appears. 2. Tap the "Go to Zone Map" button. 3. Tap and drag the stylus anywhere on the Time Zone Map or press to move the focus until the desired city name appears. If you want to magnify the map to find the city name precisely, tap the Magnification button ( Tap it again to return the original size. 4. When you find it, press the SELECT key or immediately while the pop-up window of the city name is displayed. The city name on the button will change to that selected on the Time Zone Map, and the setting will be saved.   natural_image
Pure geometric lines and shapes without any text, numbers, or symbolsnatural_image
Pure geometric diagram with intersecting lines and circles, no text or symbols presentClock
The Clock application shows the current time and date and can be used as a stopwatch. 1. In the Applications folder of the Home screen, tap the "Clock" application icon. The Clock screen appears. text_image
Clock 2:12 PM Thu Dec 26, 2002 Clock mode radio button Stopwatch mode radio button Stopwatch Start (Stop) button Reset buttonUsing a Stopwatch
1. Tap the Stopwatch mode radio button to switch to stopwatch mode. 2. Tap the "Start" button to start (or resume) the stopwatch, and tap the "Stop" button to stop it. While the stopwatch is running, it displays hour, minute, and second. When it stops, a hundredth of a second is also displayed. 3. Tap the "Reset" button to set the time back to zero. 4. Tap the Clock mode radio button to return to clock mode. Calculator
The Calculator application allows you to perform mathematical operations, including Euro conversions. It functions in exactly the same way as a standard calculator. Note: Be sure to tap "C·CE" before starting calculations. 1. In the Applications folder of the Home screen, tap the "Calculator" application icon. The Calculator screen appears. text_image
Conv./Calc button Switches the calculation mode between standard and conversion mode. This button toggles between Conv. and Calc every time the button is tapped. "C.CE" button Clears the number entered last, and tapping it twice clears the current calculation. "R.CM" button Displays the memory's content, and tapping it twice clears the memory. "+/−" button Changes a positive number to a negative number and vice versa. "C.E" button +/- % R.CM M- M+ ÷ 7 8 9 × 4 5 6 - 1 2 3 + 0 = 2 12 PM "M+" button Adds a number to the memory. "M-" button Subtracts a number from the memory.Note:
- Should you enter a wrong equation (+, -, x, etc.), be sure to enter the correct equation after the wrong equation. - Be sure to tap "C·CE" before performing the next calculation.Using the Euro conversion mode
In the Conversion mode, you can make conversions using the Euro currency symbol. natural_image
Pure geometric lines and crosshair symbols without any text or labelsnatural_image
Pure geometric diagram with intersecting lines and circles, no text or symbols presentnatural_image
Pure geometric diagram with intersecting lines and circles, no text or symbols presenttext_image
00.Ctext_image
Calculator C.CE Calc Rate % R CM ⊗ ⊗ ÷ 7 8 9 × 4 5 6 - 1 2 3 + 0 . = +When an error message appears
When the error indicator is displayed and the current calculation is suspended, tap the "C·CE" button to clear the error.    natural_image
Pure geometric lines and shapes without any text, numbers, or symbolsnatural_image
Pure geometric diagram with intersecting lines and circular shapes (no text or symbols)System Info
This application presents a set of tabbed folders each presenting a different aspect of the system's state. 1. In the Applications folder of the Home screen, tap the "System Info" application icon. The System Information screen appears.| “Memory” folder | Shows memory usage. |
| “Storage” folder | Shows storage usage.Shows main storage usage.If a memory card is inserted into the unit, the memory card information will be added on the screen. |
| “CPU” folder Shows the processor and its power while performing application tasks and system tasks. | |
| “Version” folder | Provides information on the system’s software. |
natural_image
Pure geometric lines and crosshair symbols without any text or labelsnatural_image
Pure geometric diagram with intersecting lines and circles, no text or symbols presentVoice Recorder (commercially available)
By attaching the commercially available microphone to the stereo headphone jack, you can record voice.Attaching the microphone
1. Attach the microphone to the stereo headphone jack, until it locks into place. natural_image
Line drawing of a device with a pipe fitting inserted into a slot (no text or symbols)Overview
Control screen
1. In the Applications folder of the Home screen, tap the "Voice Recorder" application icon. text_image
The Index screen appears. Record icon Options menu File menu Status indicator Recording/Playback time slider Title button Date button Stop icon Play icon Rewind icon Forward icon Trash icon Recording/Playback time indicator Media button Time buttonnatural_image
Pure geometric lines and crosshair symbols without any text or labelsnatural_image
Pure geometric diagram with intersecting lines and circular shapes, no text or symbols present| File menu | ||
| Record Starts recording. | ||
| Stop Stops recording or playback. | ||
| Play Plays back the selected file. | ||
| Rew Rewinds for a fifth seconds of the total playback time by tapping once. | ||
| FF Advances a fifth seconds of the total playback time by tapping once. | ||
| Rename Renames the selected file. Up to 100 character spaces are available. | ||
| Delete... Deletes the selected file. | ||
| Delete all... Deletes all files of this application. | ||
| Options menu | ||
| Preferences... Opens a screen to set up the Voice Recorder preferences. | ||
| Help... Opens the on-line Help screen. | ||
| Record icon Starts recording. | ||
| Stop icon Stops recording or playback. | ||
| Play icon | Plays back the selected file. | |
| Rewind icon | Rewinds for a fifth seconds of the total playback time by tapping once. | |
| Forward icon | Advances a fifth seconds of the total playback time by tapping once. | |
| Trash icon | Deletes the selected file. | |
| Status indicator | Indicates a recording or playback status. | |
| Recording/Playback time slider | Indicates a recording or playback time. | |
| Recording/Playback time indicator | Indicates recording time/recordable time or playback time/total playback time. | |
| Title button | Tap to sort entries by file name. | |
| Date button | Tap to sort entries by date. | |
| Time button | Tap to sort entries by recording time. | |
| Media button | Tap to sort entries by media. | |
| File List area | Lists the recorded files. | |
text_image
00.CRecording
1. Make sure that the microphone is attached. 2. In the Applications folder of the Home screen, tap the "Voice Recorder" application icon. The Voice Recorder Index screen appears. \- If you want to record images on a CF or SD/MMC memory card, select it from the Preferences screen (See page 86). 3. Tap the Record icon. 4. To stop recording, tap the Stop icon or press the SELECT key. text_image
Voice Recorder File Options 00:00 / 00:00 Title Date Time Media recording 12/26/02 01:13 RAM 2:15 PMNote:
• The recorded file will be saved in WAV format. - The default file will be named as follows: recording, recording 2, recording 3,... If you want to rename the file, use the File menu. The slash (/), period (.) and currency symbols can not be used. - During browsing of the Internet, transferring e-mail messages, or communicating with a PC, etc., recording is not possible. - If memory space is lacking during recording, recording stops automatically. Try again after deleting unnecessary files. - For the memory space less than the values listed below, recording will be canceled.| Main memory: | 512 kbyte |
| CF card: | 100 kbyte |
| SD memory card: (MMC) | 100 kbyte |
natural_image
Pure electrical circuit lines without any symbolsnatural_image
Pure geometric diagram with intersecting lines and circular shapes, no text or symbols presentPlaying
1. Attach the stereo headphone to the stereo headphone jack, until it locks into place. 2. On the Index screen, tap the desired record. 3. Tap the Play icon or press the SELECT key. • To stop playback, tap the Stop icon or press the SELECT key.Setting up the preferences
You can customize the saving or voice recording preferences. 1. On the Index screen, tap the "Options" menu and then tap "Preferences...". The Preferences screen appears. text_image
Preferences Save to Main Memory 3D Card CF Card Voice Recording Format 19,000Hz, 16bit, Mono (255kbps) Input Gain Min Max "Voice Recording format" drop-down list button Input Gain Adjustment slider| Save to Specify the destination. | If either the SD Card or CF Card is selected and the selected card is not in the slot, the destination will be automatically the internal memory. | |
| Voice Recording format | Specify the compression rate in voice recording mode. | |
| “Voice recording format” drop-down list button | Tap to select from the following:• 22,050 Hz, 16Bit, Mono (352kbps)• 16,000 Hz, 16Bit, Mono (256kbps)• 11,025 Hz, 16Bit, Mono (176kbps)• 8,000 Hz, 16Bit, Mono (128kbps)• 22,050 Hz, 8Bit, Mono (176kbps)• 16,000 Hz, 8Bit, Mono (128kbps)• 11,025 Hz, 8Bit, Mono (88kbps)• 8,000 Hz, 8Bit, Mono (64kbps) | |
| Input Gain Adjustment slider | Adjust the input gain. | |
natural_image
Pure geometric lines and symbols without any text, numbers, or labelsnatural_image
Pure geometric diagram with intersecting lines and circles, no text or symbols presentnatural_image
Pure geometric diagram with intersecting lines and circles, no text or symbols present? Help Browser
The Help Browser is a hypertext help system that works in a similar way to a Web browser. 1. In the Applications folder of the Home screen, tap the "Help Browser" icon. The top screen will be displayed. 2. Tap a blue word to jump to the page concerning the word. Note: With the following methods, you can open the context-sensitive help screen of the Help Browser. - Tap for application help screen. (not available for all applications) - Tap the "Options" menu and then tap "Help..." on the Index screen of applications. (not available for all applications) text_image
Bookmarks menu Qtopia Qtopia Help Applications Games Synchronizing with a PC Setup Home icon Forward icon Backward icon| Bookmarks menu | ||
| Add Bookmark Adds the page to the bookmarks. | ||
| Remove from Bookmarks Removes registered bookmarks. | ||
Registering bookmarks
By registering frequently-used pages, you can jump to the page easily. You can register up to 12 bookmarks in the Help Browser application. 1. Display the Help Browser page you want to register to the bookmarks. 2. Tap the "Bookmarks" menu, and then tap "Add Bookmark". The title of the page will be registered. Once you have registered it, the title of the bookmarked page will be displayed in the Bookmarks menu. natural_image
Pure geometric diagram with intersecting lines and circles, no text or symbols presentnatural_image
Pure geometric diagram with intersecting lines and shapes, no text or symbols presentnatural_image
Pure geometric diagram with intersecting lines and circles, no text or symbols presentRemoving bookmarks
1. Tap the "Bookmarks" menu and select the bookmarked page that you want to remove from the menu. The bookmarked page will be displayed. 2. Tap the "Bookmarks" menu, and then tap "Remove from Bookmarks". The bookmark of the page you are on will be removed from the bookmarks.   natural_image
Pure geometric lines and shapes without any text, numbers, or symbolsnatural_image
Pure geometric diagram with intersecting lines and circles, no text or symbols presenttext_image
00.CGames
You can launch the following games from the "Games" folder of the Home screen. To exit each game, tap or press . Cancel Asteroids
Destroy asteroids while avoiding collision. Press to launch a new ship. Press to move the ship. Press the SELECT key or the Space key on the keyboard to shoot. Press and hold to make the ship move faster. Press the Calendar key ( ) to start a new game. Go
Conquer more of the board than your opponent while avoiding capture. Tap the "Game" menu and then "New Game" to start. Tap an intersection on the board to place a stone. Tap the "Game" menu and then "Pass" to skip a turn. Tap the "Game" menu and then "Resign" to surrender. Tap the "Game" menu and then "Two player option" to play against an opponent. Mindbreaker
Guess the sequence of the colored pegs. Start at the bottom. Tap and drag colored pegs to the holes in the wood block. Tap a peg to remove it from the wood block. When all holes are filled, tap the right side of the wood block to view the results. Each black or white pin means a peg has the right color. A black pin also means a peg is in the right position. Tap to start a new game.    natural_image
Pure geometric lines and crosshair symbols without any text or labelsnatural_image
Pure geometric diagram with intersecting lines and circles, no text or symbols presentMine Hunt
Quickly mark all the squares that contain mines. Select a game level of "Beginner", "Advanced", or "Expert" from the "Game" menu. Tap and hold a square to mark (or unmark) it. Marked squares have a flag. Tap a square to clear it. Cleared squares show the number of mines in the surrounding squares. Tap the yellow smiley face to start a new game.Patience
Sort the cards in their suits from Ace to King. Select "Patience" or "Freecell" from the "Play" menu. Tap and drag cards to the desired location. Tap the "Settings" menu and then "Change Card Backs" to change the image on the back of the cards. Tap the "Settings" menu and then "Snap To Position" to make cards snap into position. Tap the "Settings" menu and then "Turn Three Cards" to toggle between turning one or three cards at a time (Patience only).Snake
Make the snake grow longer by eating the mice. Press the SELECT key or to start a new game. Use to guide the snake onto the mice. Do not hit the walls, edges or the snake's tail.Word Game
Use letters to form words and score points. Select player names from the comboboxes. Add a player to the list by typing the name in the combobox. Tap the "Start" button to begin a game. Tap and drag letters to the left to form words to place on the board. Tap the board and drag the stylus across the squares on the board where the word should go. Tap √ to end your turn. Tap ✉ to remove letters from the board. Tap to end the game.   natural_image
Pure geometric lines and crosshair symbols without any text or labelsnatural_image
Pure geometric diagram with intersecting lines and circles, no text or symbols presentSettings
Adjusting the date and time (Date/Time)
The date and time setting allows you to set the current time zone, date and time. For time-critical functions to work properly, the built-in clock application must be set to the current date and time. 1. Tap the "Date/Time" application icon in the Settings folder of the Home screen, or tap the time indicator at the bottom right of the taskbar. The Set System Time screen will be displayed. text_image
Hour and Minute spinboxes Set System Time Time Zone: New York Hour 12 Minute 5 AM Date Tue Jan 01, 2002 Time Zone drop-down list button City Time button Date button Time format drop-down list button Weeks start on Sunday Data format M/O/V Weeks start on drop-down list button Date format drop-down list buttonnatural_image
Pure geometric lines and shapes without any text, numbers, or symbolsnatural_image
Pure geometric diagram with intersecting lines and circular shapes, no text or symbols present92Settings
5. Tap the Date button and then tap your current date on the Calendar screen that appears. - Tap the up and down arrows of the year spinbox to set the current year. - Tap the month drop-down list button and select the current month. - Tap or to change the setting month by month. - Tap up to select the first month (January) or last month (December) in one go. 6. Tap the Weeks start on drop-down list button and then tap the starting day of the week of the calendar: Sunday or Monday. 7. Tap the Date Format drop-down list button and then tap the desired format. The selected format applies to the Date column displayed on the Index screen of the application, etc. M/D/Y (example, 12/26/02) D.M.Y (example, 26.12.02) Y-M-D (example, 02-12-26) D/M/Y (example, 26/12/02) 8. Tap to save the new date and time setting. Note: To move the cursor from steps 2 through 7, press the Tab key as required on the hardware keyboard.   natural_image
Pure geometric lines and crosshair symbols without any text or labelsnatural_image
Pure geometric diagram with intersecting lines and circles, no text or symbols presentAdd/Remove Software
You can install applications (Linux/Qt/Java) downloaded from the Internet or created by yourself to the SL-5500. These applications must be packaged in ipkg format (\*.ipk). You can also remove these applications and make space for other applications or data.Overview
On the Add/Remove Select screen, you can select whether to install applications or to uninstall them. You can also select the method of installation. 1. In the Settings folder of the Home screen, tap the "Add/Remove Software" application icon. The Add/Remove Select screen appears. text_image
Add Remove Software Install packages via networks Install packages Uninstall packages "Install packages via networks" button "Install packages" button "Uninstall packages" button| “Install packages via networks” button | Tap to install/uninstall applications via networks. |
| “Install packages” button | Tap to install applications from the expansion memory card or the Documents folder of the Home screen. |
| “Uninstall packages” button | Tap to uninstall applications. |
natural_image
Pure geometric lines and crosshair symbols without any text or labelsnatural_image
Pure geometric diagram with intersecting lines and circular shapes, no text or symbols presentInstalling Package files
1. Insert the expansion memory card including the application package files into the expansion card slot. 2. On the Add/Remove Select screen, tap the "Install packages" button. The Index screen for file installation appears displaying the list of application packages. text_image
Package button Icons : not installed : installed "Install" button Package Installer Package code -camera code -filename code -terminal Installnatural_image
Pure geometric lines and shapes without any text, numbers, or symbolsnatural_image
Pure geometric diagram with intersecting lines and circles, no text or symbols presenttext_image
00.Ctext_image
Settings 95Installing Package files via networks
Be sure to set up dial-up or LAN preferences before installing application package files via networks. (See page 113.)Index screen for installation via networks
1. On the Add/Remove Select screen, tap the "Install packages via networks" button. The Index screen for installation via networks appears. text_image
Package Manager Package Description Gas "Upgrade" button Server Setting icon Package Search icon Package Information icon Upgrade Progress bar| “Upgrade” button Updates the package information. | |
| Server Setting icon Displays the Package Servers screen where you can set up the servers/proxy servers and select a server. | |
| Package Search icon Displays the Search Packages screen where you can enter a keyword and search for it from the package list. | |
| Package Information icon Displays the Detail screen of the package information. |
natural_image
Pure geometric lines and shapes without any text, numbers, or symbolsnatural_image
Pure geometric diagram with intersecting lines and circles, no text or symbols presentServer setup
Configure the server from which you want to install package files. 1. On the Index screen for installation via networks, tap the Server Setting icon. The Package Servers screen appears. text_image
Package Server Servers list "New" button Proxy server for HTTP connection field Proxy server for FTP connection field New Remove Name: URL: Proxy Server name field URL of the server field Login name for the proxy server field Login password for the proxy server fieldInstalling package files via networks
The list of application package files from the network appears. text_image
Package Manager Package Description Size Java... Caffeine Mark 31k Java... Ice Blox 18k Java... Puzz 25k Java... Svarp 101k Java... Java applet demo (tic tax) 31k apo... Spreadsheet program 3948k apo... Line Game 22k apo... Game shoot the paracha 340k apo... QI sample 64k apo... WAV file player 23k apo... Game control falling blocks 60k apo... Test program 278k Sok... Solokban 278k Upgrade Icons : intended to be installed : not installed : installed : intended to be removed Description button Size buttonnatural_image
Pure geometric lines and shapes without any text, numbers, or symbolsnatural_image
Pure geometric diagram with intersecting lines and circles, no text or symbols presenttext_image
Package: ope-testplayer Installed-Size: 276k Filename: ./ope-testplayer_1.3.1-1_amu.plk Version: 1.3.1-1 Depends: cpe-base (1.3.1) Priority: optional Section: ope Maintener: Mr. SHARP Architecture: arm Description: Test program for 5L-5500 "Remove" button Makes this package ready to be removed. "Install" button "Ignore" button In order to return to the Index screen.Note:
- You can also make the application package file ready to be installed without opening the Package information screen by tapping the "not installed" icon ( ) you want to install. - If you want to install several package files, repeat steps 1 and 2. 3. Tap OK. The Select Install Storage screen appears. 4. Tap the radio button of the storage (RAM, CF or SD) you want to install the packages to. 5. On the Select Install Storage screen that appears, tap to execute the installation. The display turns to the Add/Remove Select screen. If you tap the installation is canceled. natural_image
Pure electrical circuit lines without any symbolsnatural_image
Pure geometric diagram with intersecting lines and circular shapes (no text or symbols)98Settings
6. Tap to close the Add/Remove Software application to restart the SL-5500. The unit will then be automatically restarted. The installed application package is listed in alphabetical order in the related folder of the Home screen and can be launched from there. Note: If an error message appears during installation, follow the instructions displayed on the screen.Searching for a package file
You can search for a desired application package file by keyword. 1. On the Index screen for installation via networks, tap the Package Search icon (☐). The Search Packages screen appears. text_image
Search Packages Find:natural_image
Pure electrical circuit lines without any symbolstext_image
Settings 99Uninstalling package files
If you uninstall a package file, all information about the application, such as data and settings, are also deleted. 1. On the Add/Remove Select screen, tap the "Uninstall packages" button. The Index screen for uninstallation appears. text_image
Package Uninstaller Package opt-terminal "Uninstall" button UninstallRemoving applications installed via networks
The Index screen for installation via networks allows you to remove applications. 1. On the Index screen, double-tap the package file you want to remove. Or move the focus to the package file you want to remove and then tap the Package Information icon. natural_image
Pure geometric lines and shapes without any text, numbers, or symbolsnatural_image
Pure geometric diagram with intersecting lines and circular shapes (no text or symbols)100Settings
2. On the Package Information screen, tap the "Remove" button. The Package Information screen turns to the Index screen. The package file is now ready to be removed and the icon on the Index screen turns to ✗ Note: On the Index screen, tap the "installed" icon ( ) you want to remove instead of performing steps 1 and 2 above. 3. Tap to execute the removal. The Index screen turns to the Add/Remove Select screen. 4. Tap to close the Add/Remove Software application to restart the SL-5500. The unit will then be automatically restarted. The application icon will disappear from the related folder of the Home screen. Backup/Restore
The Backup/Restore application allows you to make a backup file of the SL-5500's data on an expansion memory card, or to restore it back to the internal memory of the SL-5500. The expansion memory card needs 4 Mbyte - 32 Mbyte space (depending on the file size to be backed up) or more.Caution:
- Be sure to use the AC adapter, not the battery pack, to carry out the backup and restore process. The backup and restore process cannot be carried out if the battery is exhausted. - Be sure to save the current editing data and close all applications before carrying out the backup and restore process. - Do not press any key, tap the screen, or remove the expansion memory card during the backup and restore process. - The passcode entered for security will also be backed up and restored.Backup
1. With the SL-5500 turned on, insert the expansion memory card into the card slot. 2. In the Settings folder of the Home screen, tap the "Backup Restore" application icon. natural_image
Pure geometric diagram with intersecting lines and circles, no text or symbols presentnatural_image
Pure geometric diagram with intersecting lines and circles, no text or symbols presentnatural_image
Pure geometric diagram with intersecting lines and circular shapes, no text or symbols presenttext_image
00.Ctext_image
Backup/Restore Backup/Restore ● Backup ○ Restore Media ○ CF ○ SD 2002-12-26-14-25:00 Please make sure to exit all applications and to save data before executing Backup/Restore. Caution! Do not remove the storage card or attempt to operate the unit while it is processing. START 2.25 PMRestore
Caution: Restoring backup files will overwrite all files and passcode. 1. With the SL-5500 turned on, insert the expansion memory card that includes the backup files into the card slot. 2. In the Settings folder of the Home screen, tap the "Backup Restore" application icon. The Backup/Restore screen appears. 3. In the Backup/Restore options, tap the Restore radio button. 4. Tap the destination inserted in step 1 above in the Media option. 5. Tap the drop-down list button and then tap the import file. 6. Tap "Start". The confirmation message appears.    natural_image
Pure electrical circuit lines without any symbolsnatural_image
Pure geometric diagram with intersecting lines and circular shapes, no text or symbols present7. Tap "Yes" to start restore process.
When the restore process has been completed, the unit will automatically restarted and the display returns to the Home screen. Beam Receive
You can transfer a single entry created in the Address Book, Calendar, or Todo List applications or a document file using the IR port (IrDA) on the left side of the unit. This section describes how to transfer data between the same models. The SL-5500 can transfer data with other models. Note: Beaming items to models other than SL-5500 may cause loss of some items or character strings.Setting
When you transfer data by infrared beam, be sure to turn the IR port to face that of the other unit and to use both units within 8 inches (approximately 20 cm of each other). text_image
Not more than 8 inches (approximately 20 cm)Beam Receive screen
The Beam Receive screen allows you to set up preferences for IR communication. 1. In the Settings folder of the Home screen, tap the "Beam Receive" application icon.   natural_image
Pure geometric lines and shapes without any text, numbers, or symbolsnatural_image
Pure geometric diagram with intersecting lines and circular shapes, no text or symbols presenttext_image
00.Ctext_image
Beam Receive Beam receive mode ● Manual ○ Automatic Since this device regularly locks for sending device in "Automatic" mode, it consumes the battery. Manual" setting is recommended if you don't use beam transfer for a long time. Beam receive mode Manual radio button (recommended) Automatic radio button Manual beam receive Please press 'Start' button to receive data When it is done, press 'Stop' button Start Manual beam receive Start/Stop button| Beam receive mode | ||
| Manual radio button | When checked, the unit receives data in manual mode. In this mode, the Beam reception mode screen appears as the unit receives data. The unit enters receiving standby mode when you tap the “Start” button. | |
| Automatic radio button | When checked, the unit receives data in automatic mode. The unit starts receiving data any time the other unit sends data and the receiving unit detects a signal. | |
| Manual beam receive | ||
| Start/Stop button Tap | to start/stop the IR communication for manual beam receive. | |
Selecting the receiving mode
1. In the Settings folder of the Home screen, tap the "Beam Receive" application icon. The Beam Receive screen appears. 2. Tap the desired receiving mode (Manual, Automatic). 3. Tap to save the setting. The setting will be effective immediately.  natural_image
Pure geometric lines and shapes without any text, numbers, or symbolsnatural_image
Pure geometric diagram with intersecting lines and circles, no text or symbols presentTransferring data between the same models (SL-5500)
Receiving data in Manual mode
1. (in the receiving unit) In the Settings folder of the Home screen, tap the "Beam Receive" application icon. The Beam Receive screen appears. 2. Tap the Manual radio button and then tap "Start" to enter receiving standby mode. 3. Point the IR ports of both units at each other. 4. (in the sending unit) To send an application entry Open the Detail screen you want to send. Then, tap the "Data" menu and then tap "Send by beam...". The entry will be transferred. To send a document file Tap and hold the desired document file icon in the Documents folder, and then on the Details screen that appears, tap "Beam". The document file will be transferred. (in the sending unit) To cancel sending on the way, tap "Cancel". (in the receiving unit) After a while, the Beam Receive screen turns to the infrared receive screen.   natural_image
Pure geometric lines and shapes without any text, numbers, or symbolsnatural_image
Pure geometric diagram with intersecting lines and circles, no text or symbols presenttext_image
12.Stext_image
File information Information of the received entry Add button Receiving Infrared data Filename: contact.vof Type: text.jr-vCard Size: 268 You received a businesscard for: Kats Longfield Add to addressbook Cancel| File information Displays the file information (File name, type and size). | |
| Information of the received entry | Displays the simple description of the application entry received. |
| Add button Adds the received data to the application (or Documents folder) of the receiving unit. When the reception of the data is complete, the “Add” button becomes effective. | |
| Cancel button Tap to cancel registration of the received data. | |
Note:
- Be sure to tap the "Stop" button in step 6. Otherwise, the battery, if it is used, will be exhausted to be in Standby mode. - If the unit receives the data, which has the same category but belong to the different application, from the sending unit, the category of the received data will be changed to "Unfiled". natural_image
Pure geometric lines and crosshair symbols without any text or labelsnatural_image
Pure geometric diagram with intersecting lines and circular shapes, no text or symbols presentReceiving data in Automatic receive mode
The Automatic receive mode notifies you of the data, even if you are in another application. 1. Tap the Automatic radio button on the Beam Receive screen. 2. Perform step 3 to 5 above of "Receiving data in Manual mode" to start data transfer. Note: If the unit receives the data, which has the same category but belong to the different application, from the sending unit, the category of the received data will be changed to "Unfiled". Setting the Appearance
Appearance setting allows you to customize the desktop and window properties. 1. In the Settings folder of the Home screen, tap the "Appearance" application icon. A list of styles and a list of color schemes appear. text_image
Appearance Style Windows Light QPE Color Scheme: Blue Bright Desert Gray Green Purple Yellow 2:36 PMnatural_image
Pure electrical circuit lines without any symbolsnatural_image
Pure geometric diagram with intersecting lines and circular shapes, no text or symbols presentUsing the Application Key
The Application Key application allows you to assign the following four keys on the slide cover to any of the applications installed in the unit: Calendar key, Address Book key, Menu Popup key, EMail key.Overview
Set Application Key screen
1. In the Settings folder of the Home screen, tap the "Application Key" application icon. The Set Application Key screen appears. text_image
Set Application Key Calendar Address Book Menu Popup Emailnatural_image
Pure electrical circuit lines without any symbolsnatural_image
Pure geometric diagram with intersecting lines and circular shapes, no text or symbols presentManaging power (Light & Power)
Light & Power setting allows you to manage the frontlight and auto-power off feature. 1. In the Settings folder of the Home screen, tap the "Light & Power" application icon. text_image
Dim light after checkbox Light off after checkbox Brightness control slider Power saving Dim light after 30 seconds Light off after 20 seconds Suspend after 60 seconds Bright The brighter the screen light, the more batteries power is used Off 2.36 PM| Dim light after When checked, the frontlight will be dimmed if no operation is performed in the specified time. The frontlight will turn on again if you resume operation. |
| Light off after When checked, the frontlight will turn off if no operation is performed in the specified time.If the “Dim light after” option is also checked, the frontlight will turn off after the specified time after the frontlight is dimmed.The frontlight will turn on again if you resume operation. |
| Suspend after The power will turn off if no operation is performed in the specified time.If the two above options are also checked, the unit will suspend after the specified time after the frontlight turns off.This option cannot be turned off and does not function in the following cases:During slideshow of image files by the Image Viewer application.During playback of music files and viewing of video files by the Media Player applicationDuring file transfer by the Beam Receive applicationWhile the Stopwatch of the Clock application is runningWhen the AC adapter is connected to the unit. |
natural_image
Pure geometric lines and shapes without any text, numbers, or symbolsnatural_image
Pure geometric diagram with intersecting lines and circles, no text or symbols present| Brightness control slider | Move the slider to change the brightness of the frontlight. The actual brightness can be confirmed as you adjust the slider when the front light is turned on (which can be carried out by pressing the Front light key). |
Adjusting the touch panel (Recalibrate)
Calibration setting allows you to calibrate the screen. To ensure that your SL-5500 correctly matches the positions you tap on the screen with the screen's contents you may occasionally need to recalibrate. 1. In the Settings folder of the Home screen, tap the "Recalibrate" application icon. The screen will change and show a cross near the bottom left of the screen. 2. Press the stylus in the center of the cross, hold for a moment, then release. The cross will then move to another position. 3. Press, hold and release once again. 4. Repeat this process until recalibration automatically finishes. Security
The Security application allows you to set your own passcode to protect your unit from unauthorized use. Once you set the passcode and enable the setting, enter it every time you turn the unit on. Caution: Use this function with care. If you forget your passcode, you need to carry out the FULL reset. It will lose all data created and saved and add-on programs added to the unit. For detailed information on how to carry out FULL reset, refer to the separate Start-up Guide.    natural_image
Pure geometric lines and shapes without any text, numbers, or symbolsnatural_image
Pure geometric diagram with intersecting lines and circular shapes, no text or symbols presentOverview
1. In the Settings folder of the Home screen, tap the "Security" application icon. The Security Settings screen will be displayed. Note: If you have set the passcode in the initial settings after you have carried out a FULL reset or in this application, the passcode entry screen appears. text_image
Set passcode button Require pass code at power-on checkbox Set passcode Clear password Clear passcode button Pass code protection provides a minimal level of protection from caseal scope to the device.Setting the passcode
By default, the passcode is not registered. Use the on-screen-numeric keyboard to enter the passcode. 1. Tap the "Set passcode" button. 2. Enter your passcode. The passcode you enter will be replaced with “\*” for your security. 3. Tap "OK". To cancel setting, tap ✗ 4. Enter the same passcode again. 5. Tap "OK". You return to the Security Settings screen. 6. Tap on the Security Settings screen to save the passcode. text_image
00.Ctext_image
Settings 111Changing the passcode
1. Tap the "Change passcode" button. 2. Enter your passcode and then tap "OK". 3. Enter the new passcode and then tap "OK". You return to the Security Settings screen. 4. Tap on the Security Settings screen to save the passcode.Clearing the passcode
1. Tap the "Clear passcode" button and then tap OKTurning the Security setting on or off
1. Tap the "Require pass code at power-on" checkbox to turn Security setting on. 2. Tap on the Security Settings screen to save the passcode.Entering the passcode at startup
When the "Require pass code at power-on" checkbox is turned on, you need to enter the passcode at startup. 1. Enter the passcode at startup. The passcode you enter will be replaced with “\*” for your security. 2. Tap "OK". The Home screen will be displayed and then you can start operation. Note: If you enter the incorrect password, the screen will remain as the Passcode Entry screen and the Home screen will not be displayed.    natural_image
Pure geometric lines and shapes without any text, numbers, or symbolsnatural_image
Pure geometric diagram with intersecting lines and circular shapes, no text or symbols presentShutting down
The Shutdown application allows you to restart the Linux system and the Qtopia system. Restarting systems will erase data being edited.Overview
1. In the Settings folder of the Home screen, tap the "Shutdown" application icon. text_image
Shot down... Terminate Restart Qtopia Reboot button Terminate Qtopia button Reboot button These termination options are provided primarily for use while developing and testing the Qtopia system. In a normal environment, these concepts are unnecessary. Cancel| Restart Qtopia button Restarts the Qtopia system. |
| Reboot button Resets the SL-5500.The progress bar reaches 100% and then the Home screen will be displayed after approximately 20 seconds. |
| Terminate Qtopia button Terminates and then launches the Qtopia system automatically. |
| Cancel button Cancels the functions above. |
natural_image
Pure geometric lines and crosshair symbols without any text or labelsnatural_image
Pure geometric diagram with intersecting lines and circles, no text or symbols presentnatural_image
Pure geometric diagram with intersecting lines and circular shapes, no text or symbols presentInternet Settings
Internet Wizard
By following the on-screen instructions of the Internet Wizard application, you can set up dial-up and LAN preferences for both the EMail and Network & Sync applications. - Dial-up - PPP: for dial-up connection using a modem card (CF type) and ordinary telephone line; • LAN - TCP/IP: for local area network connection using a LAN card (CF type).Overview
1. In the Settings folder of the Home screen, tap the "Internet Wizard" application icon. The Internet Setting Wizard screen appears. text_image
Internet Setting Wizard When no connection has been set, select "New" button. Current Connection LAN Not Specified Dial-up Not Specified Select Connection drop-down list button Connection Information area LAN field Dial-up field New button Copy button Edit button Delete button Switch Connection button Cancel Switch Connection 12:25 AM| Current Connection | |
| LAN field Displays the current setting selected for LAN-TCP/IP.When no setting is registered, “Not Specified” is displayed instead. | |
| Dial-up field Displays the current setting selected for Dial-up - PPP.When no setting is registered, “Not Specified” is displayed instead. |
natural_image
Pure geometric lines and shapes without any text, numbers, or symbolsnatural_image
Pure geometric diagram with intersecting lines and circular shapes, no text or symbols present| Select Connection options | ||
| Select Connection drop-down list button | Lists all settings created for LAN/Dial-up. Tap to select the desired one. | |
| Connection Information area | Displays information concerning the current setting listed in the Select Connection drop-down list button above. This area lists the following. | |
| For the current LAN settings• Connection type (LAN)• Connection media (LAN Card, USB)• IP address (Obtain TCP/IP Information Automatically, Specify TCP/IP Information)• Proxy setting (No proxies, Auto configure proxies, Set proxies)• Mail settings (Set, None) For Dial-up settings• Connection type (Dial-up)• Modem type (Card Modem, Wireless Modem, IR)• Dial type (Tone, Pulse)• Telephone number of ISP• Proxy setting (No proxies, Auto configure proxies, Set proxies)• Mail settings (Set, None) | ||
| New button Opens a screen for creating a new connection. | ||
| Copy button Opens a screen for creating a new connection using a duplicate of the current setting in Select Connection. | ||
| Edit button Opens a screen for editing the current setting in the Select Connection. | ||
| Delete button Deletes the current setting in Select Connection. | ||
| Switch Connection button | If multiple connection settings are created, tap to set the current setting in Select Connection to the current connection. | |
natural_image
Pure geometric lines and shapes without any text, numbers, or symbolsnatural_image
Pure geometric diagram with intersecting lines and circles, no text or symbols presentnatural_image
Pure geometric diagram with intersecting lines and circles, no text or symbols presentCreating a new LAN setting
1. On the Internet Setting Wizard screen, tap "New". The New Connection screen appears. text_image
New Connection Select the connection type: LAN Dial-up(Telephone line) Connection type radio buttons Make mail setting checkbox Option Make mail setting Back button Next button Cancel -Back Next- 12:30 AM| Connection type radio buttons | Select the connection type. |
| Make mail setting checkbox | Check if you want to set up e-mail preferences. |
| Back button Moves to previous screen, if available. | |
| Next button Moves to the next screen (for dial-up or LAN) after saving settings made on the current screen. | |
natural_image
Pure geometric lines and shapes without any text, numbers, or symbolsnatural_image
Pure geometric diagram with intersecting lines and circles, no text or symbols present116Internet Settings
The first screen appears. text_image
New Connection (LAN) 1/3 Enter a name for the connection and IP address. Connection Name: LAN-TCF/IP Connect by: Network: Obtain IP address Automatically IP Address: Subnet Mask: Gateway: DNS... Cancel Back Next> "Obtain IP address Automatically" checkbox Connection Name field "Connect by" radio buttons "DNS..." button 12:33 AM| Connection Name field Enter the desired connection name to be displayed in the Select Connection drop-down list on the Internet Setting Wizard screen. | |
| Connect by radio buttons | Select the connection type (Card or USB). |
| Network | |
| “Obtain IP address Automatically” checkbox When checked, the IP address is automatically obtained from the Dynamic Host Configuration Protocol (DHCP) server. | |
| IP Address Enter the IP Address, if necessary.Dimmed if the “Obtain IP Address automatically” is selected. | |
| Subnet Mask Enter the subnet mask, if necessary.Dimmed if the “Obtain IP Address automatically” is selected. | |
| Gateway Enter the Gateway address, if necessary.Dimmed if the “Obtain IP Address automatically” is selected. | |
| “DNS...” button Opens the screen for setting DNS addresses (primary, secondary). Enter them, if necessary, and then tap to save them. | |
natural_image
Pure geometric lines and shapes without any text, numbers, or symbolsnatural_image
Pure geometric diagram with intersecting lines and circles, no text or symbols presenttext_image
00.Ctext_image
New Connection (LAN) 1/3 Enter a name for the connection and IP address. Connection Name: LAN-TCPIP DNS Primary DNS: Secondary DNS: Gateway: DNS... Cancel| No proxies Select when you do not set a proxy server. |
| Auto configure proxies Select when you want a proxy server to be automatically selected. |
| Set Proxies Select when you set it manually. |
text_image
New Connection (LAN) 2.3 Proxy No proxy Proxy drop-down list button Cancel < Back Next- 12:38 AMnatural_image
Pure electrical circuit lines without any symbolsnatural_image
Pure geometric diagram with intersecting lines and circular shapes, no text or symbols present118Internet Settings
Auto configure proxies Enter the URL for automatic proxy configuration in the Config field. text_image
New Connection (LAN) 2.3 Proxy Auto configure proxies Config: Canceltext_image
New Connections (LAN) 2.3 Proxy: Set Process Host: Port HTTP: 0000 FTP: 8060 No proxy for Cancel < Back Next> 12:39 AM| HTTP Proxy | |
| Host Enter the URL for | HTTP proxy server. |
| Port Enter the port number | ber for HTTP proxy server. Tap the up or down arrow to change the port number. |
| FTP Proxy | |
| Host Enter the URL for | FTP proxy server. |
| Port Enter the port number | for FTP proxy server. Tap the up or down arrow to change the port number. |
natural_image
Pure electrical circuit lines without any symbolsnatural_image
Pure geometric diagram with intersecting lines and circles, no text or symbols presentnatural_image
Pure geometric diagram with intersecting lines and circular shapes, no text or symbols presenttext_image
00.C8. Tap "Next".
The next screen for e-mail settings appears, if you have checked the "Make mail setting" checkbox on the New Connection screen (p. 115). If you have not, the confirmation screen appears (step 9). text_image
New Connection (LAN) 1.3 Enter mail setting. The mail settings are used in Email. Account Name: User Name: Save passwords Account Type: POP SMTP server: POP/DMAP: Mail address: Cancel| Account Name field Enter the account name, which will be displayed in the Accounts menu of the EMail application. | |
| User Name field Enter the login name used to log in to an e-mail server. | |
| Save password checkbox | Check if you want to save the password. If checked, you need no password to log in to an e-mail server. |
| Password field Enter the password.Dimmed if the “Save Password” checkbox is unchecked. | |
| Account Type drop-down list button | Select the receiving mail server type (POP or IMAP). |
| SMTP server field Enter the sending mail server. | |
| POP/IMAP server field Enter the receiving mail server name. | |
| Mail address field Enter the e-mail address. | |
natural_image
Pure geometric lines and crosshair symbols without any text or labelsnatural_image
Pure geometric diagram with intersecting lines and circles, no text or symbols present120Internet Settings
9. Tap "Next".
The confirmation screen appears. text_image
View Connection (LAN) Top the register button to accept the following the settings [Connection Type] LAN Mail Settings: Set LAN Settings ---- [Connection name] LAN-TCP/IP Connection by: Card Obtain IP address automatically Proxy Settings ---- Use Proxy Server/Info process Mail Settings ---- [Account Name] Mail Password] None [Account type] POP POP/IMAF Server! Cancel < Back Register 12:33 AM View area Register buttonCreating a new dial-up setting
1. On the Internet Setting Wizard screen, tap "New". The New Connection screen appears. 2. Tap the "Dial-up (Telephone line)" radio button for "Select the connection type". 3. If you do not want to set up e-mail preferences now, tap the Make mail setting checkbox to uncheck. 4. Tap "Next". Fill out the following screens according to your connection type. If necessary, tap "Back" on the following screens to modify settings on the previous screen.   natural_image
Pure geometric lines and shapes without any text, numbers, or symbolsnatural_image
Pure geometric diagram with intersecting lines and circular shapes (no text or symbols)text_image
New Connection (Dial-up) 1/4 Enter a name for the connection and a telephone number. Connection Name: Dial-up - PPP Telephone Number: Telephone Number: Dial using ● Tone ○ Pulse Select a Modem Type: ● Card ○ IR Advanced Setting Cancel| Connection Name field | Enter the desired connection name to be displayed in the Select Connection drop-down list on the Internet Setting Wizard screen. |
| Telephone Number field | Enter the telephone number. |
| Dial using radio buttons | Select the dial type (Tone or Pulse). |
| Modem type radio buttons | Select the modem type (Card or IR). |
| “Advanced Setting...” button | Opens the detailed screen for modem setting. |
natural_image
Pure geometric lines and crosshair symbols without any text or labelsnatural_image
Pure geometric diagram with intersecting lines and circular shapes (no text or symbols)122Internet Settings
5. If necessary, tap the "Advanced Setting..." button to enter more settings. The Advanced setting screen appears. text_image
New Connection (Oxal-up) 1/4 Enter a name for the connection and a telephone number. Connection Name Advanced setting AT-command ATDT Speed 115200 Hardware flow control Wait time 5 sec Advanced Setting... Cancel -Back Next- AT-command combobox Speed drop-down list button Hardware flow control checkbox Wait time slider| AT-commandcombobox | Enter if you add a special modem command to the telephone number. |
| Speed drop-down list button | Select the communication speed.Choices are:9600, 19200, 38400, 57600, and 115200.The default setting (115200) is recommended unless you need to change it. |
| Hardware flow control checkbox | Check to perform hardware flow control. (default: ON)Leave it checked unless you need to change it. |
| Wait time slider Change | the time-out for PPP connection by moving the slider, if necessary. |
text_image
New Connection (Dial-up) 2/4 Enter the connection ID and connection password. Connection ID: Save Password Auto-detect name servers "Auto-detect name servers" checkbox Connection ID field Password field Primary DNS field Secondary DNS field Cancel| Connection ID field Enter your account. | |
| Save Password checkbox | Check if you want to save the password. If checked, you need no password when dialing up. |
| Password field Enter the password.Dimmed if the “Save Password” checkbox is unchecked. | |
| “Auto-detect name servers” checkbox | Check if you want to set the DNS address assigned by the server. |
| Primary DNS field Enter the primary DNS address.Dimmed if the “Auto-detect name servers” is selected. | |
| Secondary DNS field Enter the secondary DNS address.Dimmed if the “Auto-detect name servers” is selected. | |
| No proxies Select when you do not set a proxy server. |
| Auto configure proxies Select when you want a proxy server to be automatically selected. |
| Set Proxies Select when you set it manually. |
No proxies
text_image
New Connection (Olat-up) 3/4 Prior: No process Cancel < Back Next> 12:53 AMnatural_image
Pure electrical circuit lines without any symbolsnatural_image
Pure geometric diagram with intersecting lines and circular shapes (no text or symbols)124Internet Settings
Auto configure proxies
Enter the URL for automatic proxy configuration in the Config field. text_image
New Connection (Olat-up) 3/4 Proxy: Auto configure proxies Config: Canceltext_image
New Connection (Olat-mp) 3.4 Proxy: Get Proxips Host: Port HTTP: 0000 FTP: 8080 No proxy for Cancel| HTTP Proxy | |
| Host Enter the URL for | HTTP proxy server. |
| Port Enter the port number | ber for HTTP proxy server. Tap the up or down arrow to change the port number. |
| FTP Proxy | |
| Host Enter the URL for | FTP proxy server. |
| Port Enter the port number | for FTP proxy server. Tap the up or down arrow to change the port number. |
10. Tap "Next".
The next screen appears telling you to set up the e-mail settings if you have checked the "Make mail setting" checkbox on the New Connection screen (p. 115). If you have not, the confirmation screen appears (step 12). text_image
New Connection (041-up) 4/4 Enter mail setting. The mail settings are used in Email. Account Name field User Name field Password field Save password Account Type POP SMTP server POP/IMAP Mail address Cancel -Deck Next> Account Name field User Name field Password field Account Type drop-down list button SMTP server field POP/IMAP server field Mail address field Save password checkbox| Account Name field Enter the account name, which will be displayed in the Accounts menu of the EMail application. | |
| User Name field Enter the login name used to log in to an e-mail server. | |
| Save password checkbox | Check if you want to save the password. If checked, you need no password to log in to an e-mail server. |
| Password field Enter the password.Dimmed if the “Save Password” checkbox is unchecked. | |
| Account Type drop-down list button | Select the receiving mail server type (POP or IMAP). |
| SMTP server field Enter the sending mail server. | |
| POP/IMAP server field Enter the receiving mail server name. | |
| Mail address field Enter the e-mail address. | |
natural_image
Pure geometric lines and shapes without any text, numbers, or symbolsnatural_image
Pure geometric diagram with intersecting lines and circular shapes, no text or symbols presentModifying settings
1. Open the Internet Setting Wizard screen. 2. Tap the Select Connection drop-down list button and then tap the desired setting. 3. Tap "Edit". 4. Modify the setting. For details on how to edit the setting, see section "Creating a new LAN (or dial-up) setting". 5. On the confirmation screen that appears, tap "Register" to save the modification.Deleting settings
1. Open the Internet Setting Wizard screen. 2. Tap the Select Connection drop-down list button and then tap the desired setting. 3. Tap "Delete". The confirmation message appears. 4. Tap "Yes". The selected setting will be deleted.Connecting or disconnecting
For LAN connection
1. When you have completed your settings, insert the LAN card into the CF card slot. Be sure to insert the card with the unit turned on, and remove it using the Eject Operation. (See the separate Start-up Guide.) 2. In the Settings folder of the Home screen, launch the Internet Wizard application. If multiple Network Services are available, tap the Select Connection drop-down list button and then tap the LAN setting. 3. Tap "Switch Connection" to establish the connection.   natural_image
Pure geometric lines and shapes without any text, numbers, or symbolsnatural_image
Pure geometric diagram with intersecting lines and circles, no text or symbols presentFor dial-up connection
1. When you have completed your settings, insert the modem card into the CF card slot. Be sure to insert the card with the unit turned on, and remove it using the Eject Operation. (See the separate Start-up Guide.) 2. Tap the Connection Status icon (icon on the taskbar. The pop-up list for network connection appears. text_image
Applications Address Books Calculator Calculator City Time Clock EMal I-Home Presenter Handwriting HomeWord Network Offline Disk-up-PPP Connect 2:45 AMNetwork & Sync
The Network & Sync application allows you to set up dial-up and LAN preferences, and IP address for USB or serial connection. The dial-up and LAN settings are effective for both the Network & Sync and Internet Wizard applications. - Dial-up - PPP: for dial-up connection using a modem card (CF type) and ordinary telephone line - IrDA - PPP: for dial-up connection using the IrDA port • LAN - TCP/IP: for local area network connection using the LAN card (CF type) - USB - TCP/IP: for local area network connection using the USB network128Internet Settings
1. In the Settings folder of the Home screen, tap the "Network & Sync" application icon. The Network screen will be displayed consisting of three folders: Current, Services, and Sync. Overview text_image
Network Current Services Sync This is the side of your running network services. Current folder Services folder Network Service list "Properties" button "Remove" button "Add..." button USB IP Address Serial IP Address Apply button Sync folder| Current folder Displays | the IP address of the current Network service for LAN connection for which you have established connection. If multiple Network services for LAN connection are registered, switching can be made in this folder. |
| Services folder | |
| Network service list Lists all settings. | |
| “Add...” button Adds a new destination. | |
| “Remove” button Deletes the selected destination. | |
natural_image
Pure geometric lines and shapes without any text, numbers, or symbolsnatural_image
Pure geometric diagram with intersecting lines and circular shapes (no text or symbols)| “Properties” button Displays the properties of the network service selected in the list. On the screen that appears, you can edit settings. | |
| Sync folder | |
| USB IP Address Enter the IP address to be used for USB connection. | |
| Serial IP Address Enter the IP address to be used for serial cable connection. | |
| Apply button Tap to save the setting above. |
Creating a new setting
1. Tap "Add..." in the Services folder. The Add Network Service screen will be displayed. text_image
Add Network Service These are the network services available to be added. Dial-up - PPP rCA - PPP LAN - TCF/IP USB - TCF/IP Network Service list Dial-up - PPP For dial-up connections through a modem and plan telephone line. Add button Cancel buttonSetting up PPP preferences
By setting up the PPP preferences, you can connect to a telephone line to access the Internet. Note: Specifying the IP address is not supported. 1. On the Add Network Service screen, tap "Dial-up - PPP" or "IrDA - PPP" in the Network Service list and then tap "Add". natural_image
Pure geometric lines and shapes without any text, numbers, or symbolsnatural_image
Pure geometric diagram with intersecting lines and circular shapes (no text or symbols)130Internet Settings
The Dial-up (or IrDA) screen will be displayed consisting of four folders: Account, Modem, Network, and Proxies. text_image
Name field Username field Password field Phone field Digi-up Account: Names: Digi-up - PPP Username: Password: Phone:| Name field Change the | name, if necessary. This name is displayed when you tap the Network Status icon on the taskbar. |
| Username field Enter the | username used to establish connection. |
| Password field Enter the | desired password used to establish connection |
| Phone field Enter the | telephone number used to access the Internet Service Provider. |
text_image
Dial-up Account Models Network Proces AT-dat: ATDT Speed: 115200 Flow control: Hardware flow control Wait time: 5 sec 3.56 PMnatural_image
Pure geometric lines and shapes without any text, numbers, or symbolsnatural_image
Pure geometric diagram with intersecting lines and circular shapes (no text or symbols)text_image
00.C4. Set the necessary items.
| AT-dial combobox Select your dial type: ATDT (tone) or ATDP (pulse). Or enter the arbitrary AT command, if necessary. | |
| Speed drop-down list button | Select the communication speed.The default setting (115200) is recommended, unless you need to change it. |
| Hardware flow control checkbox | Check to perform the hardware flow control. (default: ON)Leave it checked unless you need to change. |
| Wait time slider Change | the time-out for PPP connection by moving the slider, if necessary. |
5. Tap the "Network" tab.
The Dial-up screen for Network options will be displayed. text_image
Auto-detect name servers checkbox Account Models Network Processes Auto -defect name servers First DNS Second DNS First DNS field Second DNS field 5:21 AM6. Set the necessary items.
| Auto-detect name servers checkbox | Check if you want to set the DNS address assigned by the server. | |
| First DNS field | Enter the primary and secondary DNS by deselecting the Auto-detect name servers checkbox. | |
| Second DNS field | ||
natural_image
Pure electrical circuit lines without any symbolsnatural_image
Pure geometric diagram with intersecting lines and circular shapes, no text or symbols present132Internet Settings
7. Tap the "Proxies" tab.
The Dial-up screen for Proxies options will be displayed. text_image
Disk-up Account Mocern Network Proxies Proxy drop-down list No proxies 5:24 AM| No proxies Select when you do not set a proxy server. |
| Auto configure proxies Select when you want a proxy server to be automatically selected. |
| Set proxies Select when you set it manually. |
9. Select according to your choice.
Auto configure proxies Enter the URL for automatic proxy configuration in the Config combobox. text_image
Dias-up Account Vccm Network Proxes Auto configure process Config: 5:24 AMnatural_image
Pure geometric lines and crosshair symbols without any text or labelsnatural_image
Pure geometric diagram with intersecting lines and circles, no text or symbols presentnatural_image
Pure geometric diagram with intersecting lines and circles, no text or symbols presenttext_image
00.CSet proxies
text_image
Drip-up Account Modors Network Proxies Set proxies Host: Port HTTP: 9080 FTP: 9080 No proxies for: 5.25 AM| HTTP Proxy | |
| Host Enter the URL for HTTP proxy server. | |
| Port Enter the port number for HTTP proxy server. |
| FTP Proxy | |
| Host Enter the URL for FTP | proxy server. |
| Port Enter the port number | for FTP proxy server. |
| No proxies for Enter the URL for which the proxy server is not required. |
10. Tap OK.
The new setting will be added to the Services folder.Setting up network preferences
For LAN (or USB) preferences, consult your network administrator. 1. Tap "Add..." in the Services folder. 2. On the Add Network Service screen, tap "LAN - TCP/IP" or "USB - TCP/IP" and then tap "Add". natural_image
Pure geometric lines and shapes without any text, numbers, or symbolsnatural_image
Pure geometric diagram with intersecting lines and circular shapes (no text or symbols)134Internet Settings
The LAN (or USB) screen will be displayed consisting of four folders: Account, TCP/IP, DNS, and Proxies. text_image
Name field "Obtain TCP/IP Information Automatically" radio button "Specify TCP/IP Information" radio button LAN Account TCP/IP ON Process Name: LAN - TCP/IP Obtain TCP/IP Information Automatically Specify TCP/IP Information| Name field The default name of the network service will be displayed.Edit so you can easily distinguish when there are multiple settings. | |
| “Obtain TCP/IP Information Automatically” radio button | When checked, the IP address will be automatically obtained from the Dynamic Host Configuration Protocol (DHCP) server.The TCP-IP and DNS tabs are dimmed. |
| “Specify TCP/IP Information” radio button | When checked, specify the IP address in the TCP/IP, DNS folder, etc. |
natural_image
Pure geometric lines and shapes without any text, numbers, or symbolsnatural_image
Pure geometric diagram with intersecting lines and circular shapes (no text or symbols)text_image
00.Ctext_image
LAIN Account TCP/IP DNS Processes IP Address Subnet Mask: 255.255 255.0 Broadcast Gateway 11:00 AMtext_image
LAN Account TCPIP DNS Process First DNS Second DNS 11:00 AMnatural_image
Pure electrical circuit lines without any symbolsnatural_image
Pure geometric diagram with intersecting lines and circular shapes, no text or symbols present136Internet Settings
natural_image
Pure geometric diagram with intersecting lines and circles, no text or symbols presenttext_image
LAN Account TCPIP DNS Proxies No process 11:01 AM| No proxies Select when you do not set a proxy server. |
| Auto configure proxies Select when you want any proxy server to be automatically selected. |
| Set proxies Select when you set it manually. |