B810n - NAS Drobo - Free user manual and instructions
Find the device manual for free B810n Drobo in PDF.


User questions about B810n Drobo
0 question about this device. Answer the ones you know or ask your own.
Ask a new question about this device
Download the instructions for your NAS in PDF format for free! Find your manual B810n - Drobo and take your electronic device back in hand. On this page are published all the documents necessary for the use of your device. B810n by Drobo.
USER MANUAL B810n Drobo
natural_image
Black drobo device with green indicator lights and blue LED indicators (no readable text or symbols beyond branding)Table of Contents
1: Before You Begin 4
1.1 Product features at a glance .... 4
1.2 Checking box contents 5
1.3 Checking system requirements....5
1.4 Checking hardware requirements....6
1.4.1 Selecting drives 6
1.4.2 Recommended number and type of drives....7
1.4.3 Determining drive space requirements....8
1.4.4 Using power protection....9
2: Setting Up Drobo B810n 9
2.1 Inserting drives .... 10
2.1.1 How to insert the drives....10
2.2 Connecting Ethernet and power cables 11
2.2.1 How to connect Ethernet and power cables ....11
2.3 Powering on the Drobo 810n....12
2.4 Downloading and installing Drobo Dashboard....12
2.4.1 How to download Drobo Dashboard application....13
2.4.2 How to install Drobo Dashboard on Windows....13
2.4.3 How to install Drobo Dashboard on Mac....16
2.5 Initializing and updating your Drobo B810n to the latest firmware 21
2.6 Registering your Drobo B810n 23
2.7 Shares and Users 25
2.8 Using Drobo B810n with Time Machine or backup software....26
2.8.1 Overview....26
2.8.2 Creating a backup volume....26
2.9 Safely shutting down your Drobo B810n....28
2.9.1 When to shut down your Drobo B810n 29
2.9.2 Shutting down your Drobo B810n using Drobo Dashboard....29
3: What To Do Next 30
3.1 Using best practices for protecting data .... 31
3.2 Keeping your software up to date....31
3.2.1 Checking for software updates....31
3.3 Using online user guide 32
3.4 Using context-sensitive help.... 32
3.5 Using knowledge base....32
3.6 Registering your Drobo B810n 32
3.7 Getting technical support 33
3.8 Guide to meaning of indicator lights (LEDs) 33
3.8.1 Indicator light messages....34
1: Before You Begin
Before you begin to set up your Drobo B810n, it is recommended to check the operating system and hardware requirements.
This section covers the following topics:
• Product features at a glance
- Checking box contents
- Checking system requirements
- Checking hardware requirements
1.1 Product features at a glance
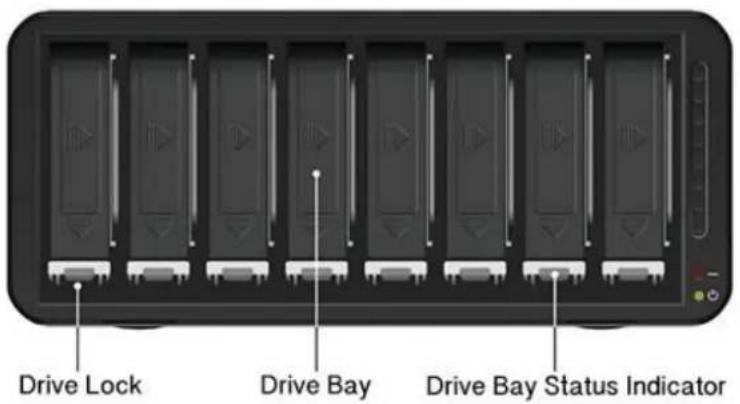
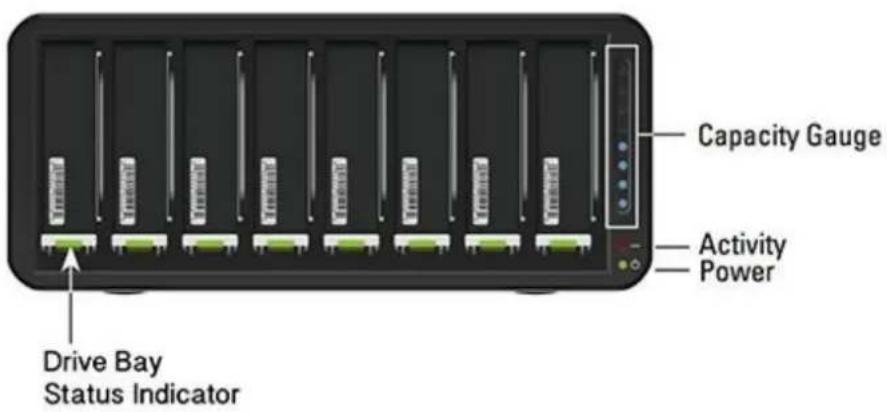
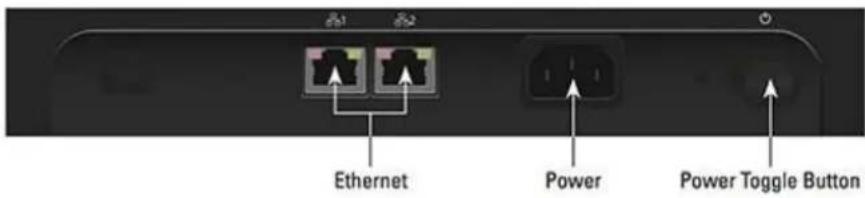
For a quick review of Drobo B810n hardware features, please review these images.
text_image
Drive Lock Drive Bay Drive Bay Status IndicatorFigure 1: Front of the Drobo B810n with bezel (faceplate) removed
text_image
Capacity Gauge Activity Power Drive Bay Status IndicatorFigure 2: Front of the Drobo B810n with bezel (faceplate) removed
text_image
Ethernet Power Power Toggle ButtonFigure 3: Rear panel of Drobo B810n
1.2 Checking box contents
Ensure that your product's box contains all the components listed below.
- Drobo B810n
- 2 x 6 ft (1.8 m) Ethernet cables
- 6 ft (1.8 m) Power Cord
- Quick Start Card
• International LED Labels for Front Panel (German, French, and Japanese)
Optional Accessories
Drobo 8-Bay Rack Mount Kit
1.3 Checking system requirements
This article provides the system requirements for using Drobo B810n.
| Drobo System Requirements and Specifications | |
| Operating systems | Operating systems supported for the Drobo B810n include:Apple® Macintosh® Mac OS X 10.8 or higherMicrosoft® Windows®10 32- and 64-bitMicrosoft® Windows® 8/8.1 32 and 64 bitMicrosoft® Windows® 7 32 and 64 bitMicrosoft® Windows® Server 2012 32 and 64 bitMicrosoft® Windows® Server 2008 R2 32 and 64 bitNote 1: For best performance and interoperability, ensure that you are running the latest service packs for the appropriate Windows operating systems.Note 2: For the most current list of supported operating systems, check the specifications for your products online at Drobo B810n Specifications. |
| Drobo software | Drobo Dashboard 2.7.0 or later. To download the latest Drobo Dashboard, see the Drobo B810n page on our website. |
| Connection (Gigabit Ethernet) | To connect to your router, network switch, or computer, Drobo B810n uses Gigabit Ethernet. |
| Drives | Drobo B810n requires at least two drives. It has eight 3.5-inch SATA drive bays. SSDs can be used in addition to the minimum 2 HDDs to accelerate the unit.For more information on selecting drives for Drobo B810n, see Selecting Drives. |
| Power protection (optional) | Though not required, we recommend using the following power protection with your Drobo B810n:An uninterruptible power supply (UPS), which protects against sudden losses in powerA power surge protector to protect against power surges |
| Electrical / operating environment | Power Supply: AC Input - 100-240VAC, 1.8/0.75 A, 50/60HzOperating Temperature: 10°C-35°C (50°-95°F)Non-operating (storage): 10°-60°C (14°-140°F)Operating Humidity: 5% - 80%Dimensions: 12.17" wide x 5.46" tall x 14.1" long (309mm wide x 138.9mm tall x 357.4mm long)Weight: 16 lbs 3 oz |
1.4 Checking hardware requirements
To use your Drobo B810n device, you will need at least two drives. If you plan to use Dual Disk Redundancy, which protects your data against two concurrent drive failures, you will need at least three drives.
This section covers the following topics:
- Selecting drives
• Determining drive space requirements
• Using power protection
1.4.1 Selecting drives
The Drobo B810n supports both standard 3.5" SATA III hard disk drives (HDDs) as well as SATA solid-state drives (SSDs) for added performance.
Warning:
When you insert drives into the Drobo B810n device, the pre-existing data on the drives will be erased.
You can choose HDDs from any manufacturer and with any capacity. For choosing SSDs, please visit our web page to view the compatible drive options.
1.4.2 Recommended number and type of drives
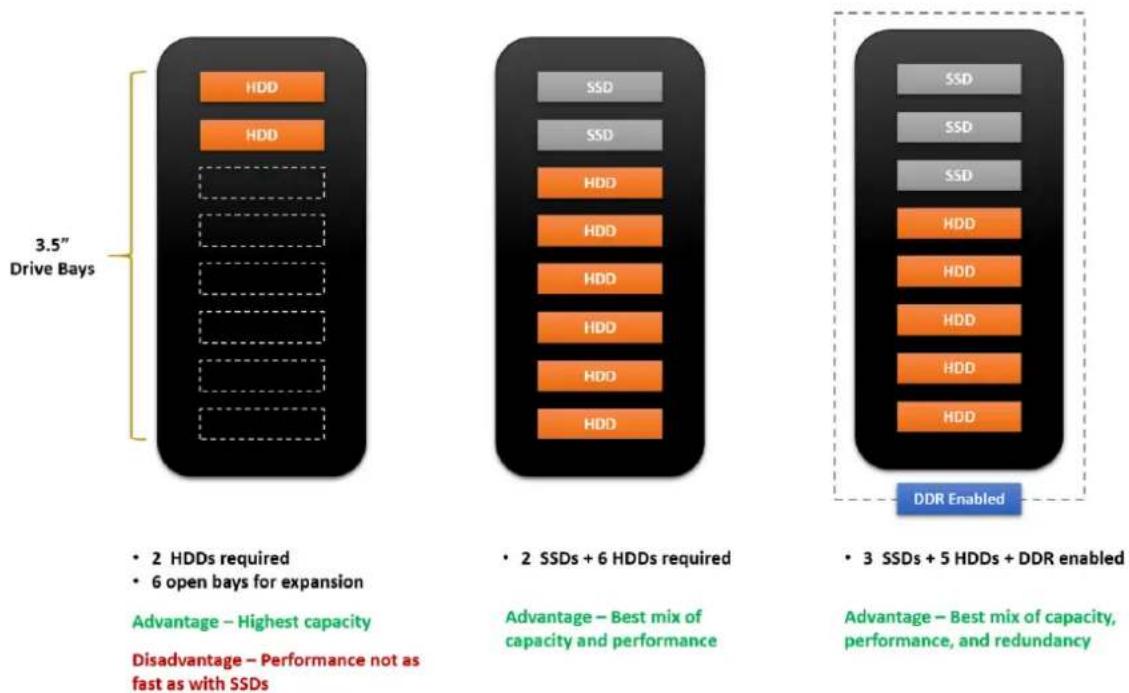
Here are the recommended number and type of drives you can use with your Drobo B810n device. Note that you need at least two drives in the drive bays to ensure your data is protected in the event of drive failure.
| Configuration | Benefit |
| All HDDs (2 to 8 slots) | Highest capacity |
| 6 HDDs + 2 SSDs | Best mix of capacity & performance |
| 5 HDDs + 3 SSDs + DDR enabled | Best mix of capacity, performance & redundancy |
For a performance comparison of these options, see the following illustration.
flowchart
graph TD
    A["3.5" Drive Bays"] --> B["• 2 HDDs required\n• 6 open bays for expansion"]
    B --> C["Advantage - Highest capacity"]
    B --> D["Disadvantage - Performance not as fast as with SSDs"]
    A --> E["• 2 SSDs + 6 HDDs required"]
    E --> F["Advantage - Best mix of capacity and performance"]
    A --> G["• 3 SSDs + 5 HDDs + DDR enabled"]
    G --> H["Advantage - Best mix of capacity, performance, and redundancy"]
    A --> I["DDR Enabled"]
1.4.2.1 Additional SSD benefits
Adding SSDs to your Drobo B810n provides multiple benefits. Along with accelerating the IOPS (Input/Output Operations Per Second) of the unit, SSDs also enable other advanced capabilities, such as Hot Data Cache (requires 1 SSD) and Data-Aware Tiering (requires 2 SSDs in Single Disk Redundancy mode, 3 SSDs in Dual Disk Redundancy mode). SSDs must be added in addition to the minimum 2 HDDs.
1.4.2.2 Drobo drive compatibility
This table describes Drobo B810n compatibility with specific types of HDDs and SSDs.
| Drive Type | Compatible | Incompatible |
| HDD | SATA I, II, and III | IDE |
| Any size | SCSI | |
| Any manufacturer | PATA | |
| Any performance classification. Choose based on your usage demands. | SAS | |
| SSD | To see which solid state drives are compatible with Drobo B810n, please see a list of qualified drives at What SSDs can I use with the Drobo B810n, Drobo 5D, Drobo Gen 3, Drobo 5N and Drobo Mini? | If an incompatible SSD is inserted into the Drobo, the drive light will blink red, indicating the need to replace that drive. |
1.4.3 Determining drive space requirements
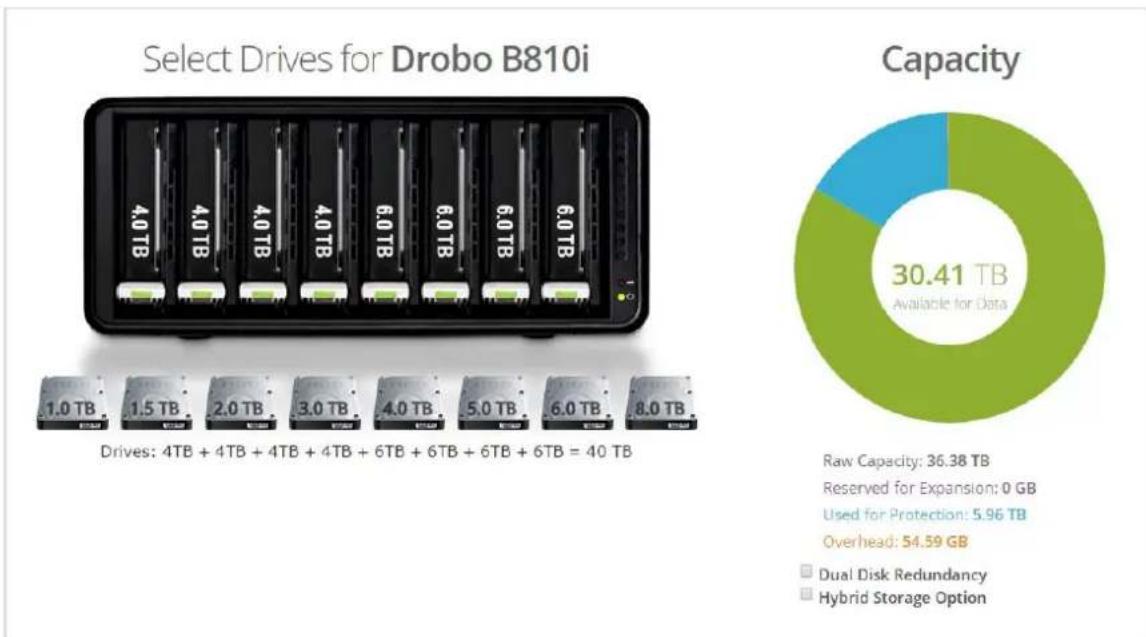
Your Drobo B810n automatically divides the total disk capacity of all its drives between data storage, data protection, and expansion. We offer a tool for previewing that space allocation.
1.4.3.1 Capacity calculator
The best way to determine how much usable and protected storage space is available for your data, based on the number and capacity of your drives, visit our Drobo Drive Capacity Calculator page.
pie
Select Drives for Drobo B810i | Category | Capacity (TB) | | :--- | :--- | | Raw Capacity | 36.38 | | Reserved for Expansion | 0 | | Used for Protection | 5.96 | | Overhead | 54.59 | | Dual Disk Redundancy | - | | Hybrid Storage Option | - |Figure 4: Drobo Drive Capacity Calculator
A shortcut to estimate the capacity available for your data is to omit the largest drive and then, add the capacity of the remaining drives. If you plan to use Dual Disk Redundancy, then omit the largest two drives.
Single disk (default) redundancy
| # Drives | Drive Capacity | Usable Protected Capacity * |
| 3 | 6TB+6TB+6TB- | = 12TB |
| 4 | 4TB+6TB+6TB+6TB- | = 14TB |
| 5 | 4TB+6TB+6TB+6TB+6TB- | = 22TB |
Dual disk redundancy
| # Drives | Drive Capacity | Usable Protected Capacity * |
| 3 | 6TB+6TB+6TB- | = 6TB |
| 4 | 4TB+4TB+6TB+6TB- | = 8TB |
| 5 | 4TB+6TB+6TB+6TB+6TB- | = 16TB |
Notes:
- Actual capacity is often less than what is shown in the examples above due to the different systems used for rating capacity. This has nothing to do with the Drobo B810n.
- Your Drobo B810n enables you to easily increase storage capacity at any time by simply inserting additional drives or replacing smaller drives with larger ones.
1.4.4 Using power protection
We recommend using the following power protection with your Drobo B810n:
- An uninterruptible power supply (UPS), which protects against sudden losses in power.
- A power surge protector to protect against power surges.
2: Setting Up Drobo B810n
Once you have unpacked your Drobo B810n device from its box and ensured that you meet all the operating system and hardware requirements, it is time to set up your device for use.
The Drobo B810n shipped out will not have the latest firmware. So, it is recommended to upgrade the firmware to the latest version before using the device.
You can perform the set up in just a few easy steps.
- Inserting the drives
- Connecting the data port of the Drobo to an Ethernet switch
- Powering on your Drobo B810n
- Downloading and installing Drobo Dashboard
- Registering your Drobo B810n
- Initializing your Drobo 810n and updating it with the latest firmware
- Shares and Users
Other topics mentioned in this section are:
- Using Drobo B810n with Time Machine or backup software
- Safely shutting down your Drobo B810n
2.1 Inserting drives
Insert the drives into your Drobo B810n. For more information on drive requirements, see Selecting drives.
Warning:
Any pre-existing data on the drives will be erased, as the drives will be formatted. If you wish to keep the data, copy it to another drive or medium before using with your Drobo B810n.
Note:
Once you insert the drives into your Drobo B810n, they function as a unit or "pack." To access the data on them, you will need the entire pack.
2.1.1 How to insert the drives
To insert the drives to your Drobo B810n device:
- Remove the magnetic front bezel (faceplate) from the front of your Drobo B810n by pulling it off.
- Hold the HDD with its connectors positioned at the device and toward the left (usually the labels will be on the top). Refer to the images below.
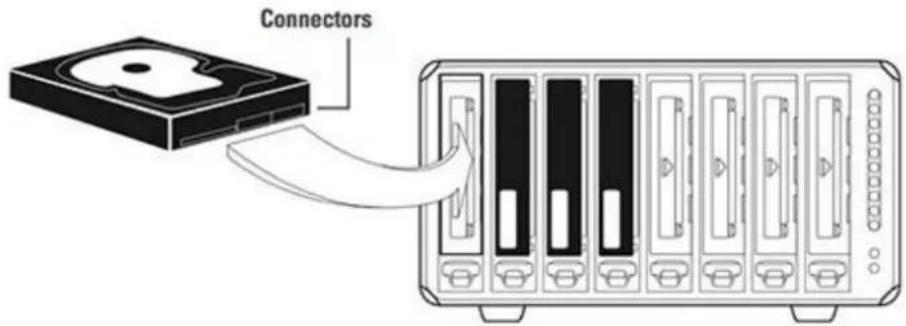
text_image
Connectors- With your other hand, use your thumb to depress and hold open one of the drive locks to a selected drive bay. Refer to the image below.
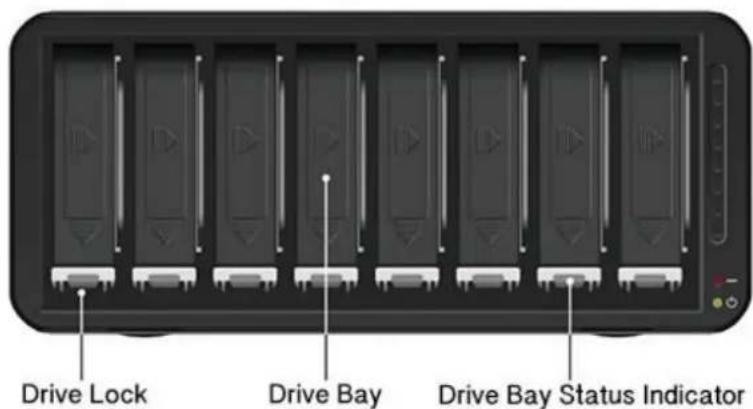
text_image
Drive Lock Drive Bay Drive Bay Status Indicator- Slide the drive into the drive bay, release the drive lock and push the drive into place until you feel it connect. The drive lock snaps behind the drive, securing it into place.
Note:
If you are inserting an SSD (Solid State Drive), ensure that it is compatible by visiting our web page on compatible drive options.
-
Insert additional drives in the same manner following Step 2 to Step 4.
-
When finished, replace the faceplate right side up so that when your Drobo B810n is turned on you will be able to see the indicator lights. For more information on Indicator lights, see Guide to meaning of indicator lights (LEDs).
2.2 Connecting Ethernet and power cables
After inserting the drives into your Drobo B810n, you are ready to connect the power and Ethernet cables to your Drobo B810n.
2.2.1 How to connect Ethernet and power cables
As you follow the steps below, refer to the following image.
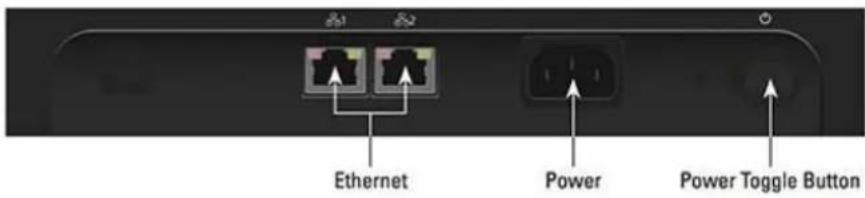
text_image
Ethernet Power Power Toggle Button-
Plug one end of the Ethernet cable into the back of your Drobo B810n.
-
Plug the other end of the Ethernet cable into your router, switch, or computer.
-
Connect the power supply to the power connection at the back of your Drobo B810n.
-
Connect the other end of the power supply to a power source.
Note:
We recommend plugging into an uninterruptible power supply (UPS) or surge protector. For more information, see Using power protection.
2.3 Powering on the Drobo 810n
The next step is to power on the Drobo device. For this, you have to attach the power cord and then, turn on the Drobo using the power switch located on the back. The Drobo will take several minutes to complete the power on cycle. When the power on cycle is complete the Drobo will flash blue and yellow lights.
Note:
If you need to assess that the process is moving smoothly, see Guide to meaning of indicator lights (LEDs).
2.4 Downloading and installing Drobo Dashboard
The Drobo Dashboard application will help you to set up and manage your Drobo B810n. After installing the Dashboard, you can configure the settings to automatically install version updates, which is highly recommended. You can install the Drobo software and firmware updates from Start Drobo B810n page.
This section covers the following topics:
• Downloading Drobo Dashboard
• Installing Drobo Dashboard on Windows
• Installing Drobo Dashboard on Mac
Note:
You need a full admin user account and Internet access on the computer on which you install the Drobo Dashboard
2.4.1 How to download Drobo Dashboard application
Go to the Start Drobo B810n page and click the appropriate Drobo Dashboard installation file based on the operating system (Windows/Mac) you are using. This downloads the Drobo Dashboard Installer.

text_image
Drobo Dashboard 2.8.3 for Mac Drobo Dashboard 2.8.3 for Windows Drobo Dashboard 2.8.3 Release NotesNow, let us see how to install the Drobo Dashboard.
2.4.2 How to install Drobo Dashboard on Windows
To install the Drobo Dashboard on a Windows machine:
Note:
If you are a first-time Drobo user, then simply install the latest version of the Drobo Dashboard.
If you are an existing Drobo user and have a Drobo Dashboard version earlier than 2.7.0 installed, then you must uninstall the Drobo Dashboard prior to installing the latest version. For more information, see What is the proper way to uninstall and re-install Drobo Dashboard on my Windows computer?
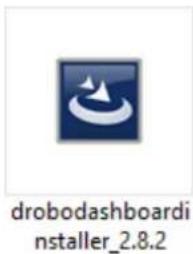
- After downloading the Drobo Dashboard installation file for Windows, double-click the Drobo Dashboard Installer to launch it.
text_image
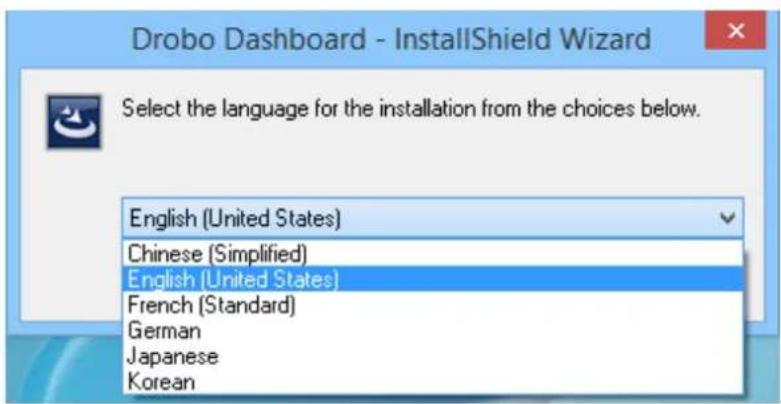
drobodashi installer_2.8.2- A pop up will appear asking you to choose the language for installation. Select the language of your choice and click OK.
text_image
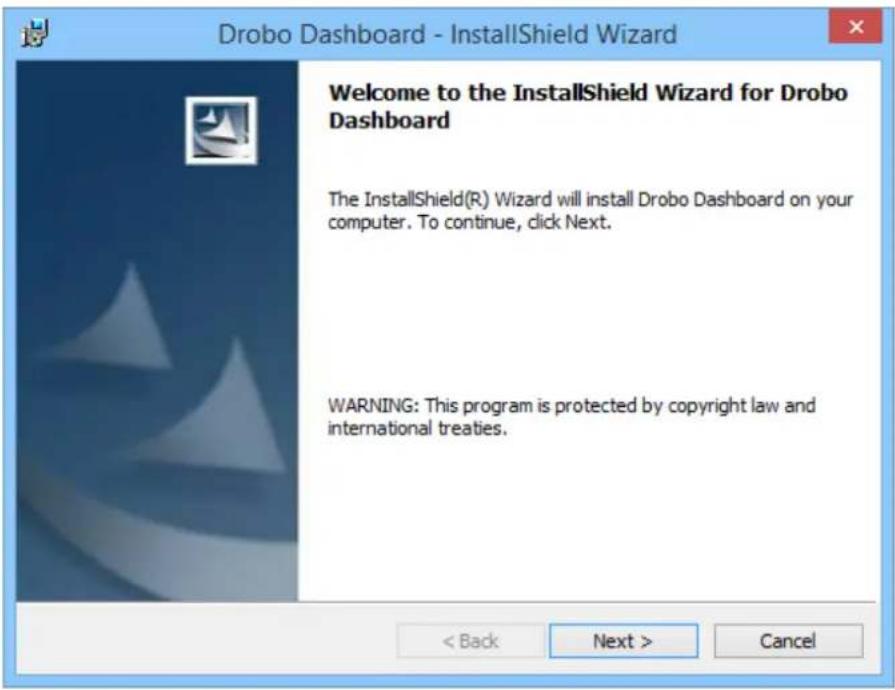
Drobo Dashboard - InstallShield Wizard Select the language for the installation from the choices below. English (United States) Chinese (Simplified) English (United States) French (Standard) German Japanese Korean- The Drobo Dashboard Installer (or Installation Wizard) will appear.
text_image
Drobo Dashboard - InstallShield Wizard Welcome to the InstallShield Wizard for Drobo Dashboard The InstallShield(R) Wizard will install Drobo Dashboard on your computer. To continue, click Next. WARNING: This program is protected by copyright law and international treaties. < Back Next > Cancel- Click the Next button to proceed.
- Follow the instructions of the Installation Wizard by clicking the Next button after each page.
- Once you reach the installation page, click the Install button.
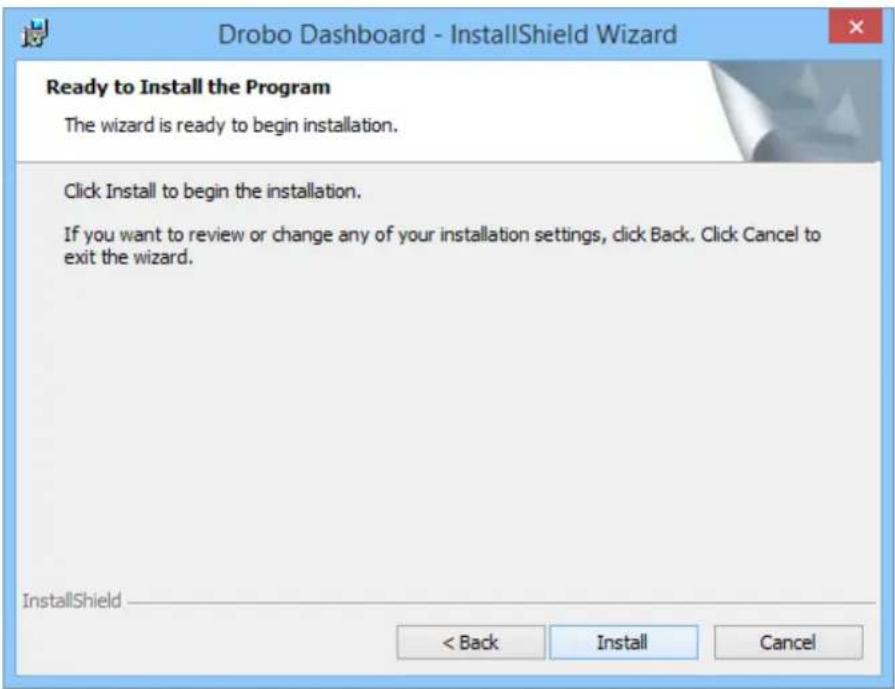
text_image
Drobo Dashboard - InstallShield Wizard Ready to Install the Program The wizard is ready to begin installation. Click Install to begin the installation. If you want to review or change any of your installation settings, click Back. Click Cancel to exit the wizard. InstallShield < Back Install Cancel-
In some Windows operating systems, the Windows Access Control dialog box appears, asking if you want to allow changes to your computer. Click the Allow or Yes button. This installs the Drobo Dashboard.
-
After the installation is complete, be sure the Launch Drobo Dashboard checkbox is selected and then, click the Finish button.
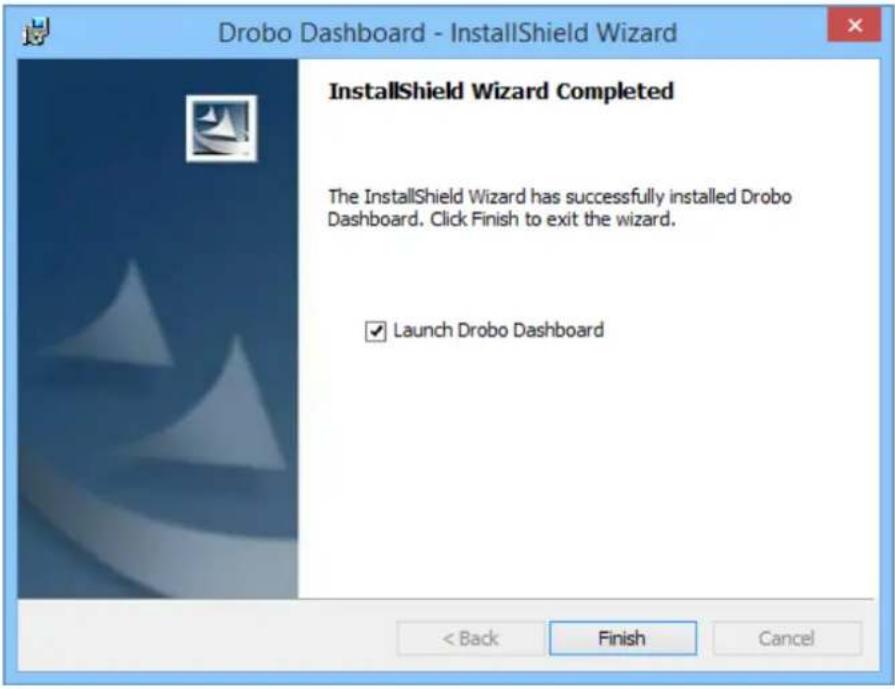
text_image
Drobo Dashboard - InstallShield Wizard InstallShield Wizard Completed The InstallShield Wizard has successfully installed Drobo Dashboard. Click Finish to exit the wizard. ✓ Launch Drobo Dashboard < Back Finish Cancel- The Drobo Dashboard application launches and you will be prompted to register your Drobo B810n. You can either register the Drobo B810n or skip the step and register it later. Select an option based on you preference. The serial number is printed on the compliance label at the bottom of the device.
Note:
We highly recommend to register your product in order to obtain support.
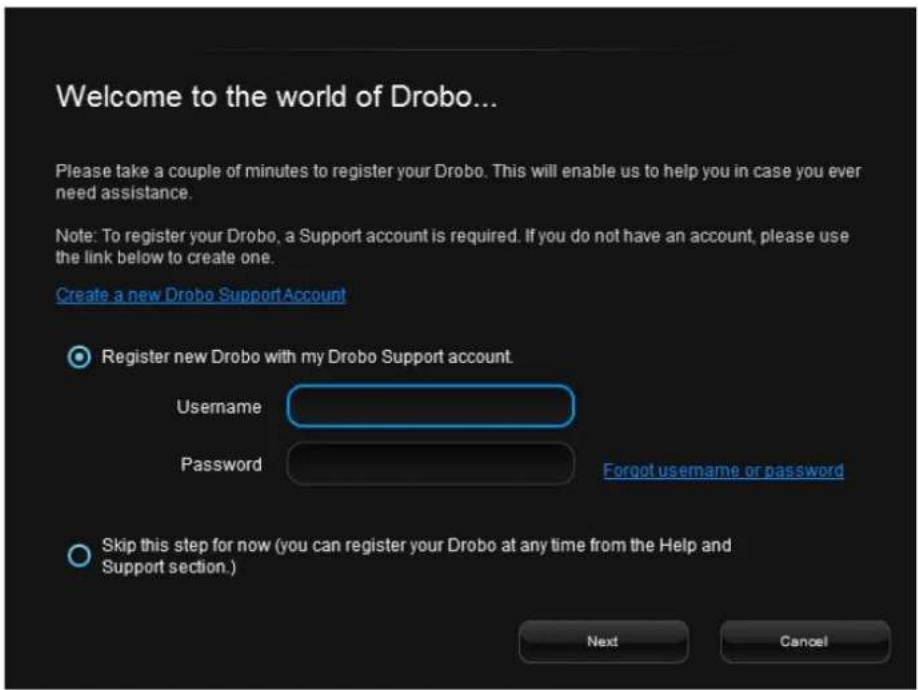
text_image
Welcome to the world of Drobo... Please take a couple of minutes to register your Drobo. This will enable us to help you in case you ever need assistance. Note: To register your Drobo, a Support account is required. If you do not have an account, please use the link below to create one. Create a new Drobo Support Account Register new Drobo with my Drobo Support account Username Password Forgot username or password Skip this step for now (you can register your Drobo at any time from the Help and Support section.) Next Cancel- Click the Next button to view the All Drobos page. After a few seconds, Drobo "discovers" all Drobo devices currently connected and displays them on this page.
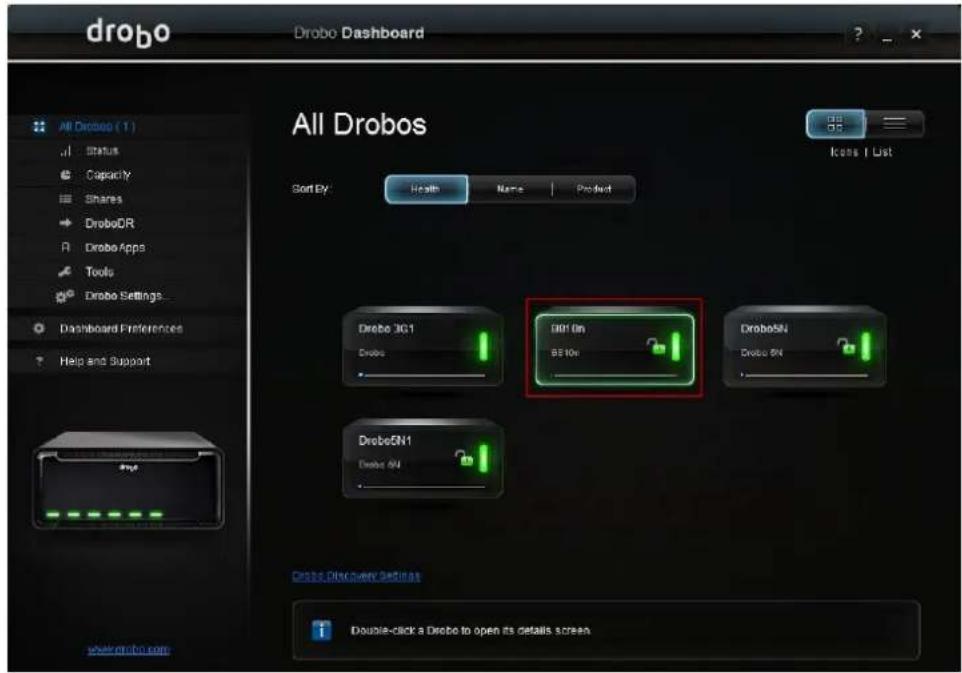
text_image
drobo Drobo Dashboard All Drobos Sort By: Health Name Product Icons | List Drobe 3G1 Drobe 001 On 8510x Drobe5N Drobe 6N Drobe5N1 Drobe 6N Cross Discovery Settings Double-click a Drobo to open its details screenNote:
After the Drobo Dashboard launches, you may be asked if Drobo can collect anonymous information on your usage. Click Yes or No, as desired.
-
If you have no Drobo device connected to the computer or powered on, a "No Drobos Detected" message displays until you do.
-
Your Drobo B810n will not work until you update the firmware. For information on updating the firmware to the latest version, see Updating your Drobo B810n to the latest firmware.
2.4.3 How to install Drobo Dashboard on Mac
To install the Drobo Dashboard on Mac:
Note:
If you are a first-time Drobo user, then simply install the latest version of the Drobo Dashboard. If you are an existing Drobo user and have a Drobo Dashboard version earlier than 2.7.0 installed, then you must uninstall the Drobo Dashboard prior to installing the latest version. For more information, see What is the proper way to uninstall and re-install Drobo Dashboard on my Mac?
- After downloading the Drobo Dashboard installation file for Mac, double-click the Drobo Dashboard Installer to launch it.
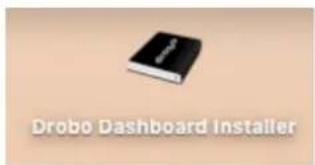
text_image
Drobo Dashboard Installer- A pop up will appear asking whether to open the Installer. Click Open.
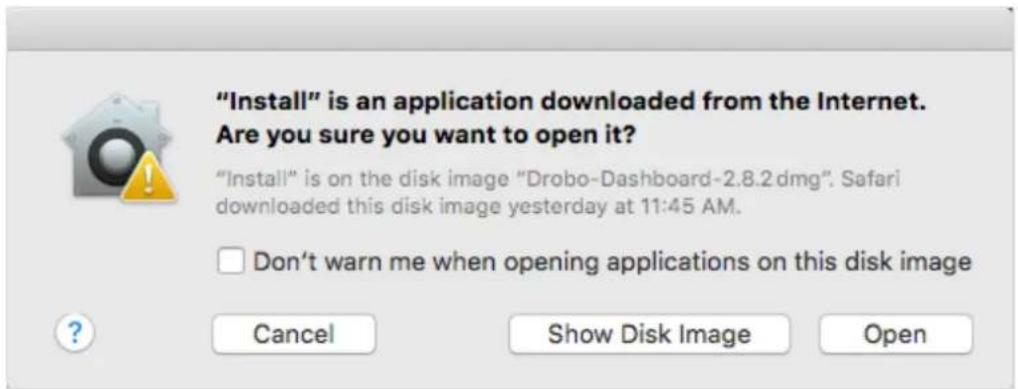
text_image
"Install" is an application downloaded from the Internet. Are you sure you want to open it? "Install" is on the disk image "Drobo-Dashboard-2.8.2 dmg". Safari downloaded this disk image yesterday at 11:45 AM. Don't warn me when opening applications on this disk image Cancel Show Disk Image Open- The Install Drobo Dashboard page will appear. Click Continue to proceed to the next screen.
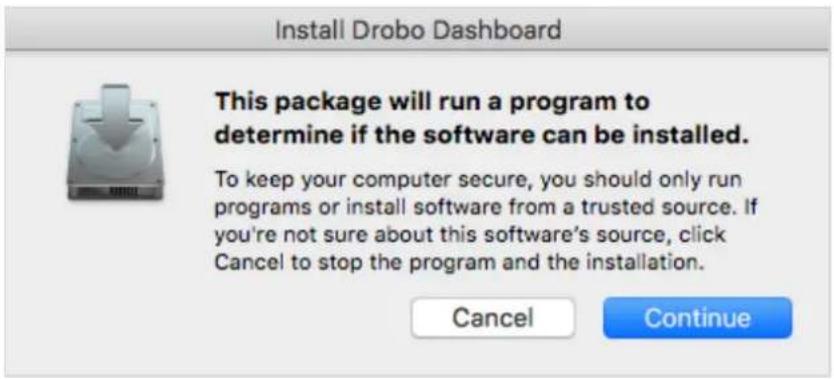
text_image
Install Drobo Dashboard This package will run a program to determine if the software can be installed. To keep your computer secure, you should only run programs or install software from a trusted source. If you're not sure about this software's source, click Cancel to stop the program and the installation. Cancel Continue- The Firewall Warning page appears. Click Continue.
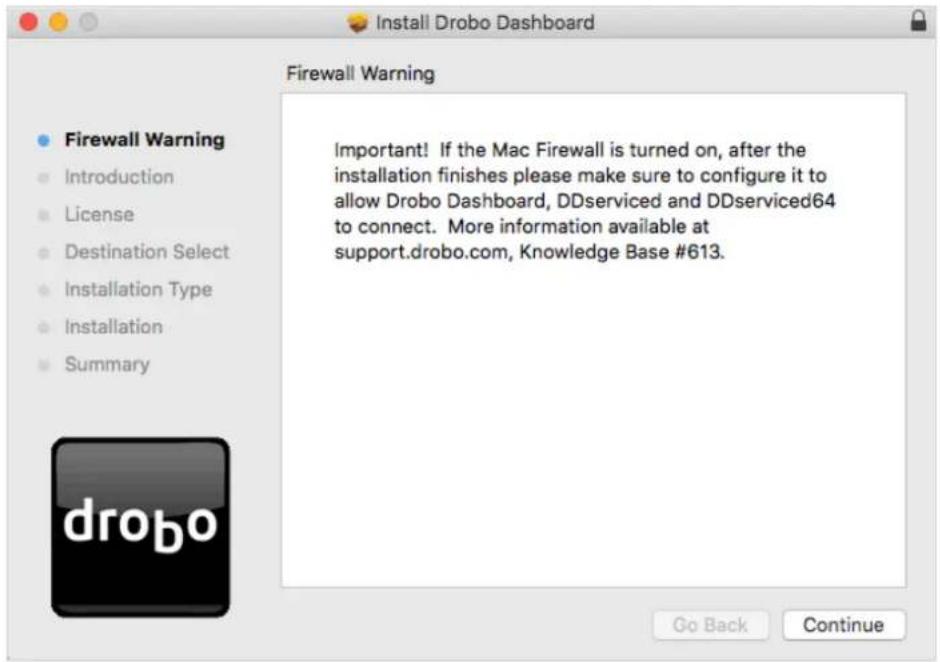
text_image
Firewall Warning Important! If the Mac Firewall is turned on, after the installation finishes please make sure to configure it to allow Drobo Dashboard, DDserviced and DDserviced64 to connect. More information available at support.drobo.com, Knowledge Base #613. Go Back Continue- Next, the Installation Wizard page appears. Click Continue to proceed.
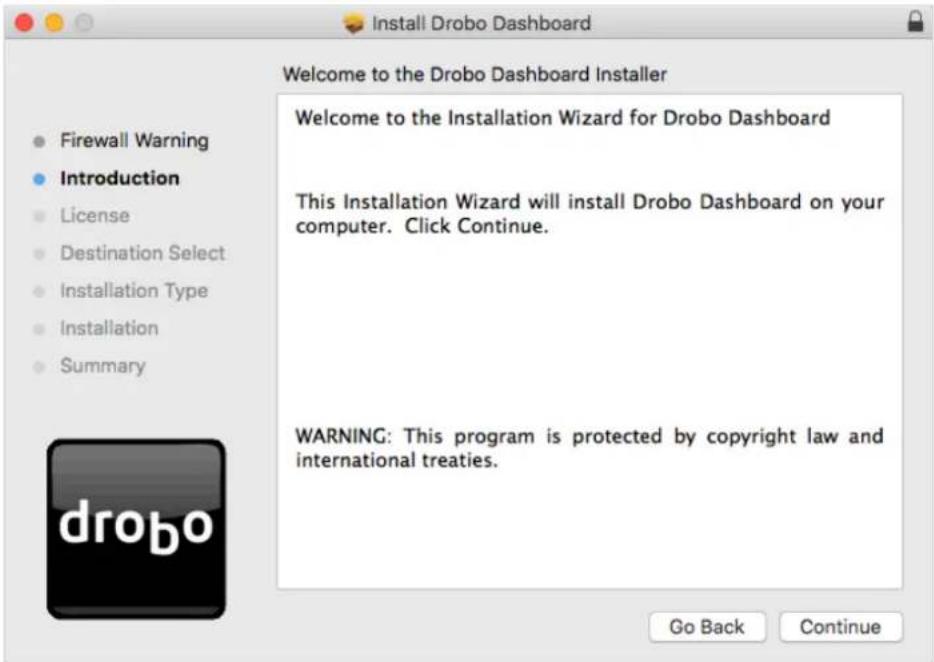
text_image
Install Drobo Dashboard Welcome to the Drobo Dashboard Installer Welcome to the Installation Wizard for Drobo Dashboard This Installation Wizard will install Drobo Dashboard on your computer. Click Continue. WARNING: This program is protected by copyright law and international treaties. Go Back Continue- The Software License Agreement page appears. From here, you can choose the language in which you want to proceed the installation process.
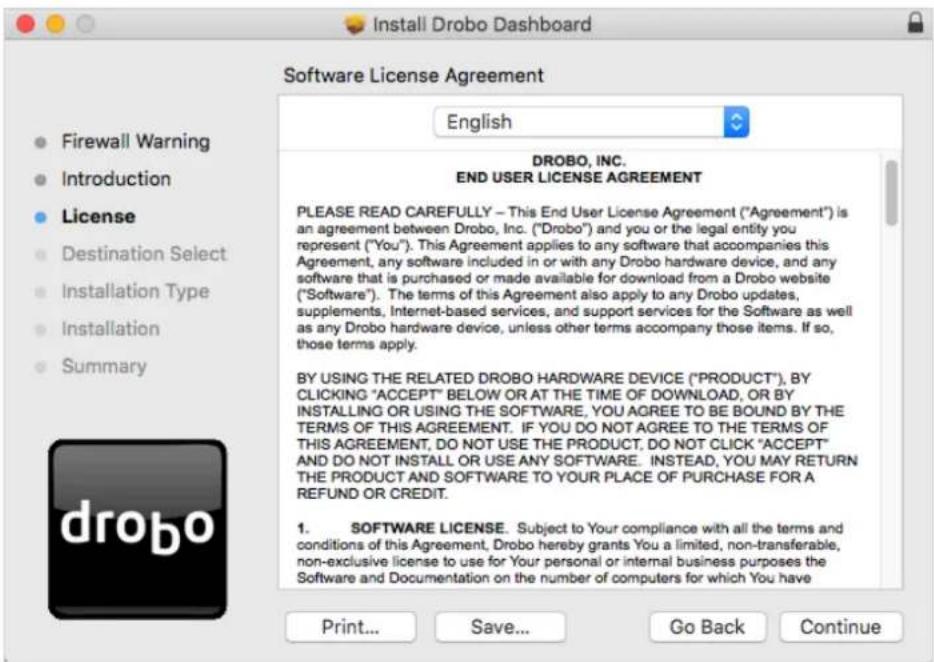
text_image
Install Drobo Dashboard Software License Agreement English DROBO, INC. END USER LICENSE AGREEMENT PLEASE READ CAREFULLY – This End User License Agreement ("Agreement") is an agreement between Drobo, Inc. ("Drobo") and you or the legal entity you represent ("You"). This Agreement applies to any software that accompanies this Agreement, any software included in or with any Drobo hardware device, and any software that is purchased or made available for download from a Drobo website ("Software"). The terms of this Agreement also apply to any Drobo updates, supplements, Internet-based services, and support services for the Software as well as any Drobo hardware device, unless other terms accompany those items. If so, those terms apply. BY USING THE RELATED DROBO HARDWARE DEVICE ("PRODUCT"), BY CLICKING "ACCEPT" BELOW OR AT THE TIME OF DOWNLOAD, OR BY INSTALLING OR USING THE SOFTWARE, YOU AGREE TO BE BOUND BY THE TERMS OF THIS AGREEMENT. IF YOU DO NOT AGREE TO THE TERMS OF THIS AGREEMENT, DO NOT USE THE PRODUCT, DO NOT CLICK "ACCEPT" AND DO NOT INSTALL OR USE ANY SOFTWARE. INSTEAD, YOU MAY RETURN THE PRODUCT AND SOFTWARE TO YOUR PLACE OF PURCHASE FOR A REFUND OR CREDIT. 1. SOFTWARE LICENSE. Subject to Your compliance with all the terms and conditions of this Agreement, Drobo hereby grants You a limited, non-transferable, non-exclusive license to use for Your personal or internal business purposes the Software and Documentation on the number of computers for which You have Print... Save... Go Back Continue- After choosing the desired language, Click Continue.
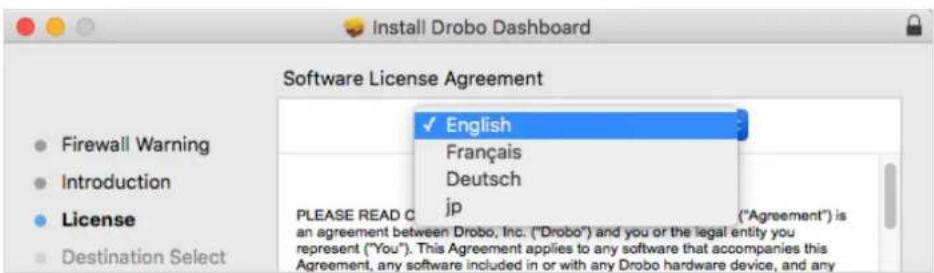
text_image
Install Drobo Dashboard Software License Agreement ✓ English Français Deutsch jp (Please READ C ("Agreement") is an agreement between Drobo, Inc. ("Drobo") and you or the legal entity you represent ("You"). This Agreement applies to any software that accompanies this Agreement, any software included in or with any Drobo hardware device, and any- A dialog box will appear asking you to Agree or Disagree the terms of the license agreement. Click Agree to proceed.
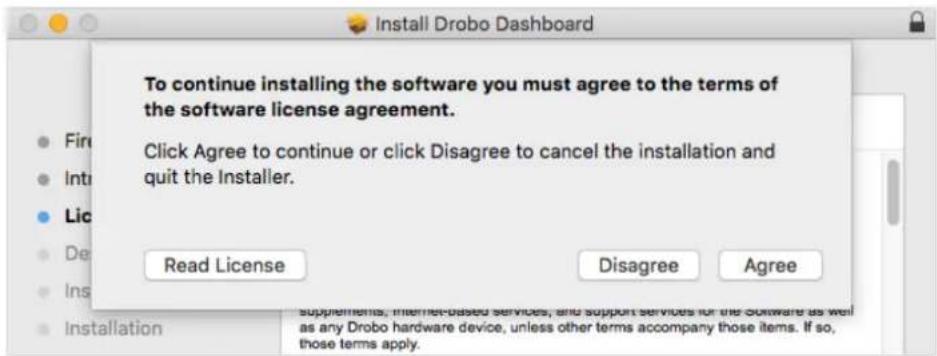
text_image
To continue installing the software you must agree to the terms of the software license agreement. Click Agree to continue or click Disagree to cancel the installation and quit the Installer. Read License Disagree Agree supplements, Internet-based services, and support services for the Software as well as any Drobo hardware device, unless other terms accompany those items. If so, those terms apply.- You will reach the Installation Type section. Click Install to proceed.
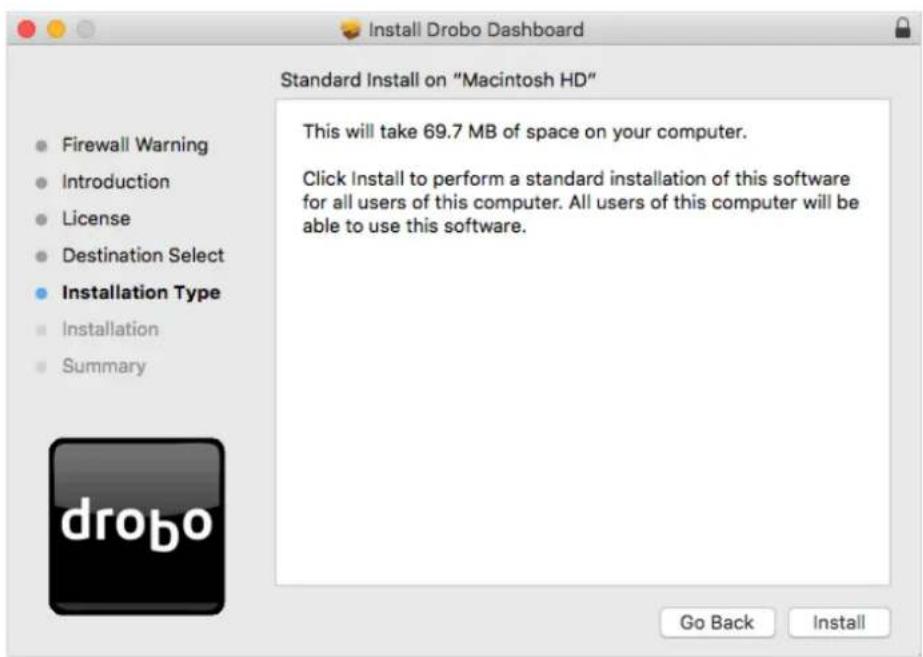
text_image
Install Drobo Dashboard Standard Install on "Macintosh HD" This will take 69.7 MB of space on your computer. Click Install to perform a standard installation of this software for all users of this computer. All users of this computer will be able to use this software. Firewall Warning Introduction License Destination Select Installation Type Installation Summary drobo Go Back Install- You will be prompted to enter the administrator password. Enter the password and click Install Software.
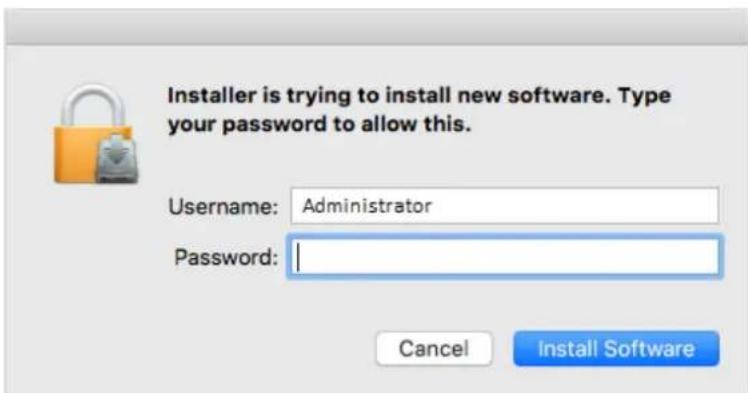
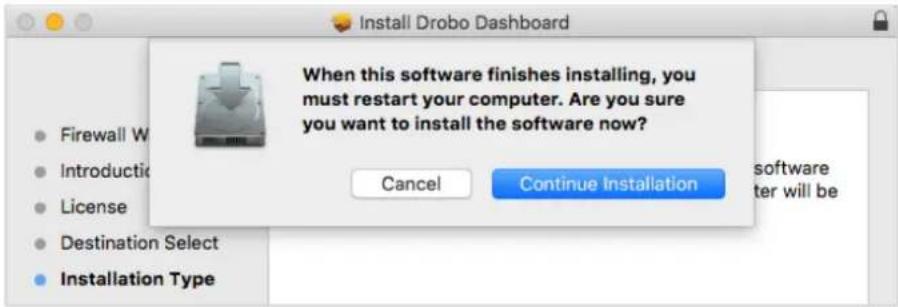
text_image
Installer is trying to install new software. Type your password to allow this. Username: Administrator Password: Cancel Install Software- Then, you will be prompted to restart your computer in order to complete the installation. Click Continue Installation to proceed.
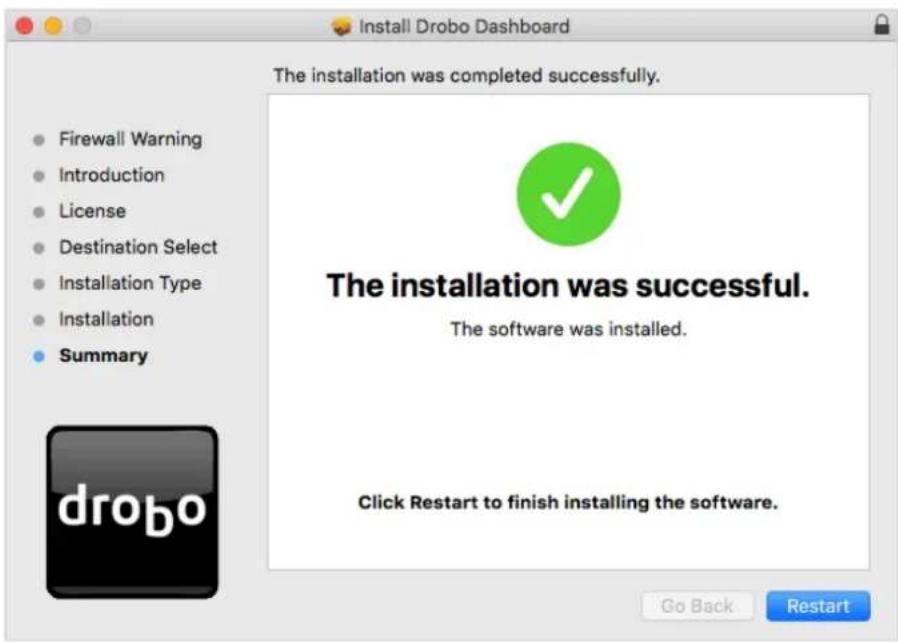
text_image
Install Drobo Dashboard When this software finishes installing, you must restart your computer. Are you sure you want to install the software now? Cancel Continue Installation Firewall W Introduction License Destination Select Installation Type- When the installation completes, you will see the following screen to restart the computer to finish the installation. Click Restart.
text_image
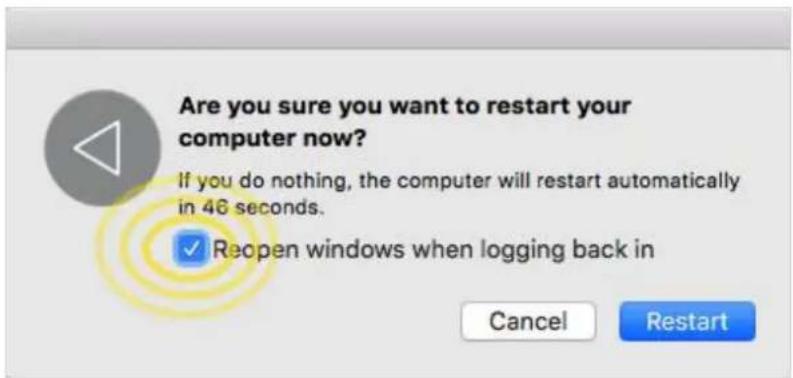
Install Drobo Dashboard The installation was completed successfully. Firewall Warning Introduction License Destination Select Installation Type Installation Summary the installation was successful. The software was installed. Click Restart to finish installing the software. Go Back Restart- The Drobo Dashboard installer will prompt you to restart your computer. When the window pops up asking if you are sure you want to restart your computer, be sure to select the check box next to Reopen windows when logging back in, so that you can continue you from the same point in the online setup.
text_image
Are you sure you want to restart your computer now? If you do nothing, the computer will restart automatically in 46 seconds. ✓ Reopen windows when logging back in Cancel Restart-
Once the computer restarts, launch the Drobo Dashboard application.
-
The application will prompt you to register your Drobo B810n. You can either register it or skip the step and register it later. Select an option based on you preference.
Note:
We highly recommend to register your product in order to obtain support.
- Click the Next button to view the All Drobos page. After a few seconds, Drobo "discovers" all Drobo devices currently connected and displays them on this page.
Note:
After the Drobo Dashboard launches, you may be asked if Drobo can collect anonymous information on your usage. Click Yes or No, as desired.
- If you have no Drobo device connected to the computer or powered on, a "No Drobos Detected" message displays until you do.
- Your Drobo B810n will not work until you upgrade the firmware. For information on updating the firmware to the latest version, see Updating your Drobo B810n to the latest firmware.
2.5 Initializing and updating your Drobo B810n to the latest firmware
When you first receive a new Drobo B810n device, you must use the Drobo Dashboard app to update it to the latest firmware release.
Important Note:
The Drobo B810n device will not be usable until you upgrade the firmware.
If you are a first-time Drobo user, then install the latest version of Drobo Dashboard. If you are an existing Drobo user and have a Drobo Dashboard version earlier than 2.7.0 installed, then you must follow the instructions to uninstall Drobo Dashboard prior to installing the latest version.
For information on uninstalling or re-installing Drobo Dashboard on your Windows computer, see What is the proper way to uninstall and re-install Drobo Dashboard on my Windows computer?
For information on uninstalling or re-installing robo Dashboard on your Mac computer, see What is the proper way to uninstall and re-install Drobo Dashboard on my Mac?
If you are a first time user, please follow these steps to update the firmware of your Drobo B810n to the latest one:
- Connect the data port of the Drobo to an Ethernet switch.
- Ensure that the Mac or PC you are using for this setup has a valid Internet/network connection.
- If using a Mac, ensure that the Firewall (System Preferences > Security and Privacy) is set to "allow incoming" for DD service (Drobo Dashboard).
- Verify that the Drobo is powered off.
- Insert the drives.
- Turn on the Drobo B810n.
Warning:
Powering on the Drobo will begin the disk format process. Please be aware that all data on the disks will be erased.
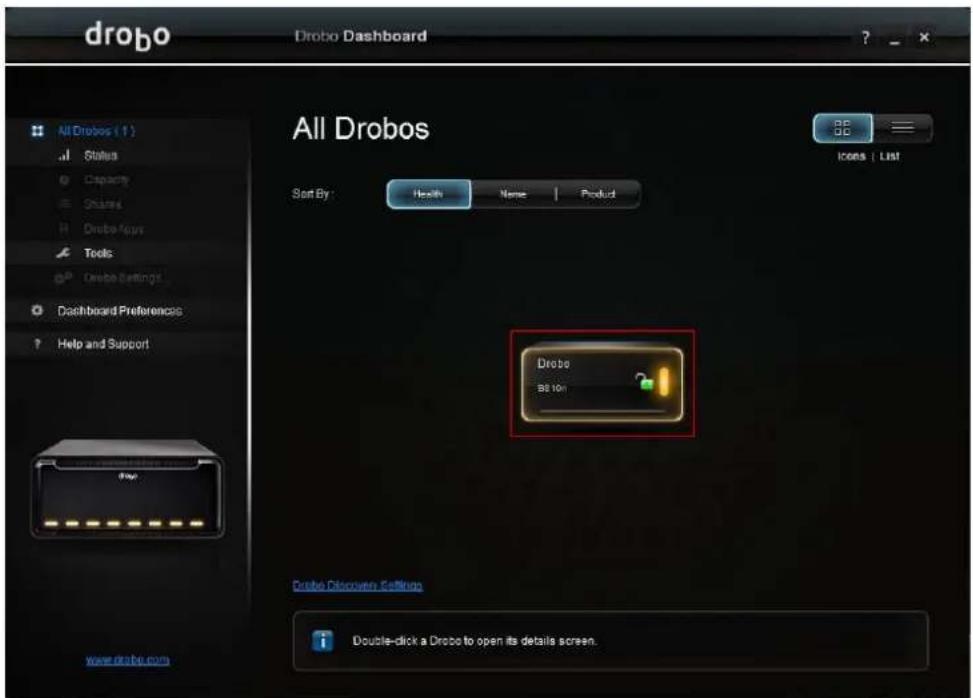
- Your Drobo B810n will appear with a yellow Drobo device icon on your main dashboard screen.
text_image
drobo Drobo Dashboard All Drobos Start By: Health Name Product 96 96 LIST Crobe 98 10m Crobe Discovery Settings Double-click a Drobo to open its details screen. www.drobe.com-
Click the Drobo device icon to begin initialization of your Drobo B810n. During this process your Drobo will download the latest firmware from the internet.
-
Go to the Status page in the Dashboard which will show that the Drobo is initializing. While initialization is taking place, all of the drive slot LEDs will be yellow, and the capacity LEDs will blink blue. When initialization is complete, Drobo will restart to finish the firmware upgrade process.
-
Your Drobo should begin updating to the latest firmware and automatically formatting the disk. Please allow Drobo up to 20 minutes for the total initialization process.
Note:
If the Drobo Dashboard does not detect your Drobo 810n and initialization does not begin, please disable any firewall and antivirus programs and ensure that your Drobo is connected directly to the Ethernet port on your computer and not via an Ethernet switch. In this scenario, be sure that your computer is set to get its IP address on that Ethernet port via DHCP.
If the Drobo Dashboard is still not detecting your Drobo 810n and the lights are remaining solid red, please call our support line for assistance or open a ticket on your support account. For more information, please see: How do I contact technical support?
- If the red drive lights are seen again (e.g. "Unknown Disk Set"), go to the Drobo Dashboard's Tools section and choose ERASE (reset), allowing the Drobo 810n to reboot.
Note:
If you need to assess that the process is moving smoothly, see Guide to meaning of indicator lights (LEDs).
- Alternatively, you can use the pinhole method to erase data from the disk. For more information, see How can I clear all my data off my Drobo storage device and start anew? This is for new setups only where the drives have no data.
Warning:
This procedure will erase all data from all drives and return your Drobo 810n to default settings.
2.6 Registering your Drobo B810n
If you did not register your Drobo B810n during setup, then you can register it from the Drobo Dashboard.
Note:
Make sure you are connected to the Internet before performing this action.
To register your Drobo B810n from the Drobo Dashboard:
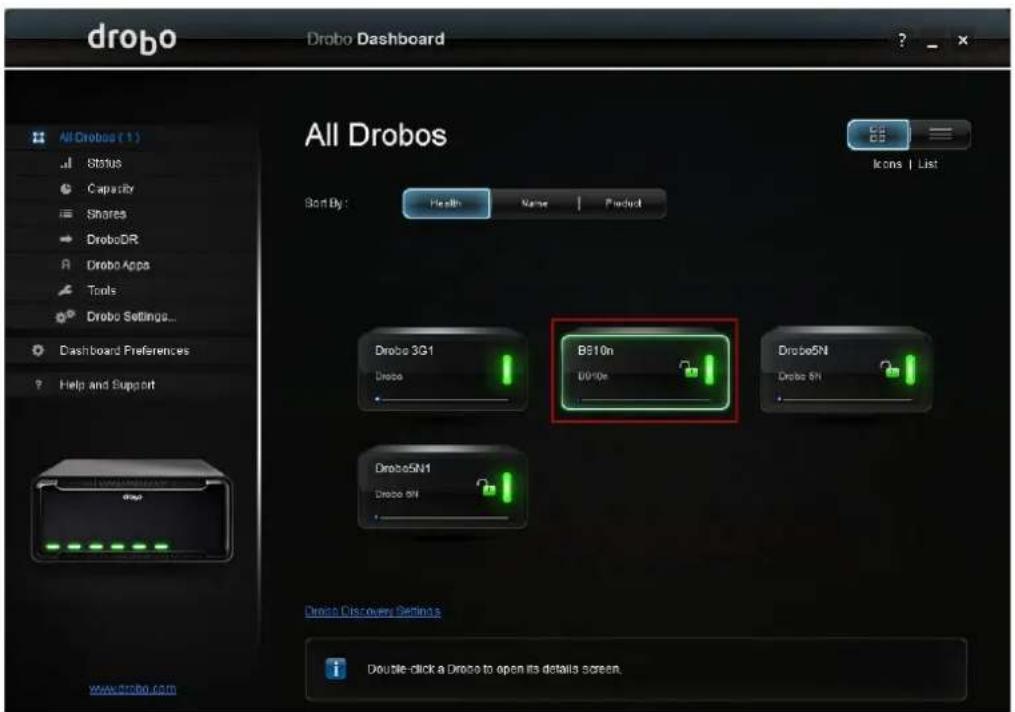
- From the All Drobos page, select Drobo B810n. Then, click the Help and Support option on the Navigation menu.
text_image
drobo Drobo Dashboard All Drobos Sort By: Health Name Product Icons | List Drobe 3G1 Drobe 8610h 00:00 Drobe5N Drobe 5N1 Drobe Discovery Settings Double-click a Drobo to open its details screen. www.drobe.com- The Help and Support page for Drobo B810n opens.

text_image
drobo Drobo Dashboard All Drobus (1) Status Capacity Shelves DroboUse Drobo Apps Tools Drobo Settings... Dashboard Preferences Help and Support Help and Support Drobo Registration Click on the link below to register your Drobo. Register my Drobo devices Check Drobo online resources! View Drobo User Guide Search Knowledge Base Contact Drobo Support Depending on the problem you want to resort, a Diagnostics file may be required by Drobo support. Please select the Drobo to get Diagnostic from: B810n Get Drazr Drobo Dashboard Version: 2.8.3 [63912] Use the Help and Support section to access Drobo documentation, contact Drobo support and create diagnostic files for advanced troubleshooting.- In the Drobo Registration area, click the Register my Drobo devices link. This opens the Registration page.
text_image
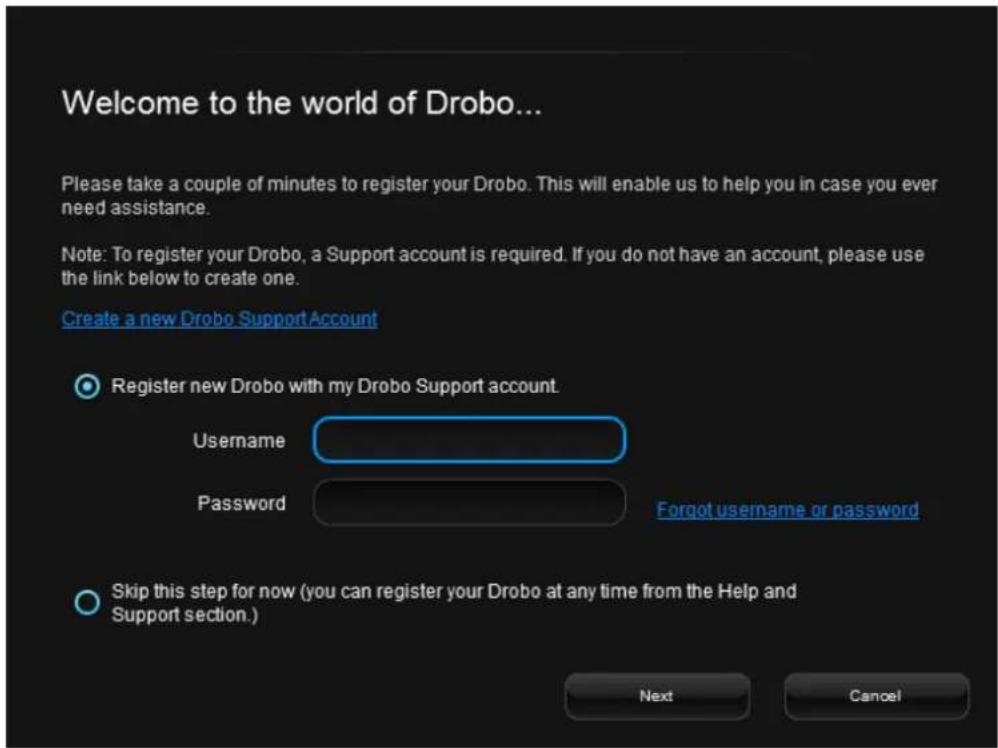
Welcome to the world of Drobo... Please take a couple of minutes to register your Drobo. This will enable us to help you in case you ever need assistance. Note: To register your Drobo, a Support account is required. If you do not have an account, please use the link below to create one. Create a new Drobo Support Account Register new Drobo with my Drobo Support account. Username Password Forgot username or password Skip this step for now (you can register your Drobo at any time from the Help and Support section.) Next Cancel- Do one of the following:
- If you do not have a Drobo account, click the Create a new Drobo account link. The Login page opens in your web browser. Then, click the Create an Account button to open the Signup page. Enter the required information and create your account, and then return to this step to log in to your account.
- If you already have a Drobo account, then select the Register new Drobo with my Drobo account option and enter your Drobo username and password. You can click the Forgot username or password link if needed. Continue with step 4.
- Click the Next button. The connected Drobo devices and their serial numbers will appear.
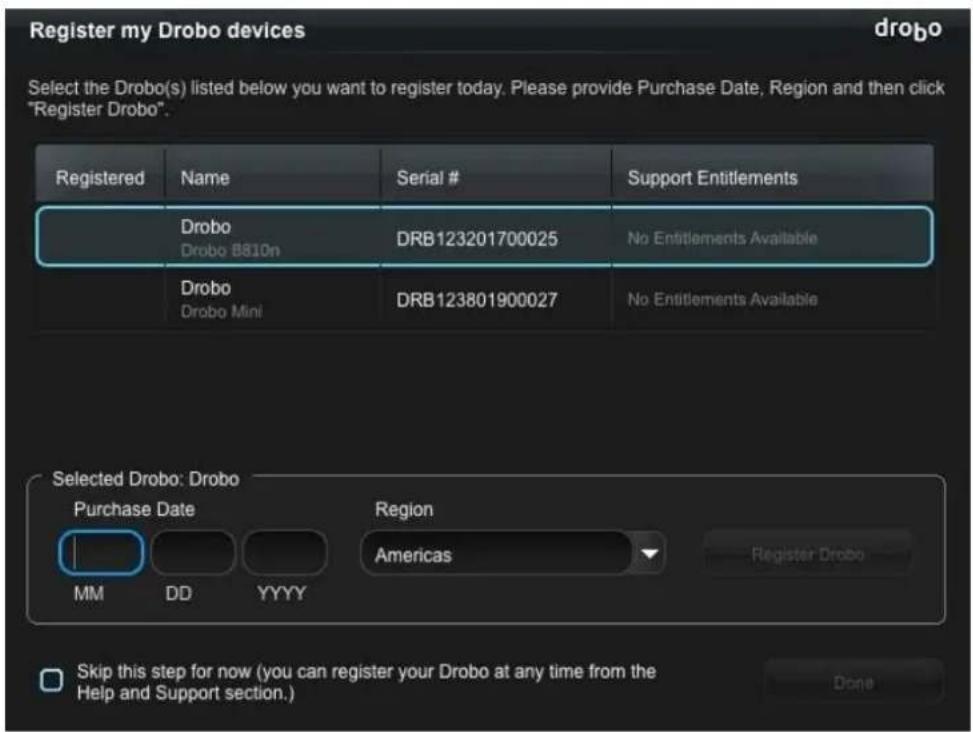
- Select Drobo B810n and enter its purchase date. Then, select the region from where you purchased it, as shown in the image below.
Tip:
You can click the Skip this step for now check box at any time.
text_image
Register my Drobo devices Select the Drobo(s) listed below you want to register today. Please provide Purchase Date, Region and then click "Register Drobo". Registered Name Serial # Support Entitlements Drobo Drobo 8810n DRB123201700025 No Entitlements Available Drobo Drobo Mini DRB123801900027 No Entitlements Available Selected Drobo: Drobo Purchase Date Region Americas MM DD YYYY Register Drobo Skip this step for now (you can register your Drobo at any time from the Help and Support section.) Done- Click the Register Drobo button. The next page shows with a check mark that your product has been registered.
Note:
You can choose to purchase a DroboCare license by clicking on that link.
- Repeat steps 5 and 6 to register additional Drobo devices.
- When finished, click the Done button. You will return to the Help and Support page.
2.7 Shares and Users
To view the Share settings:
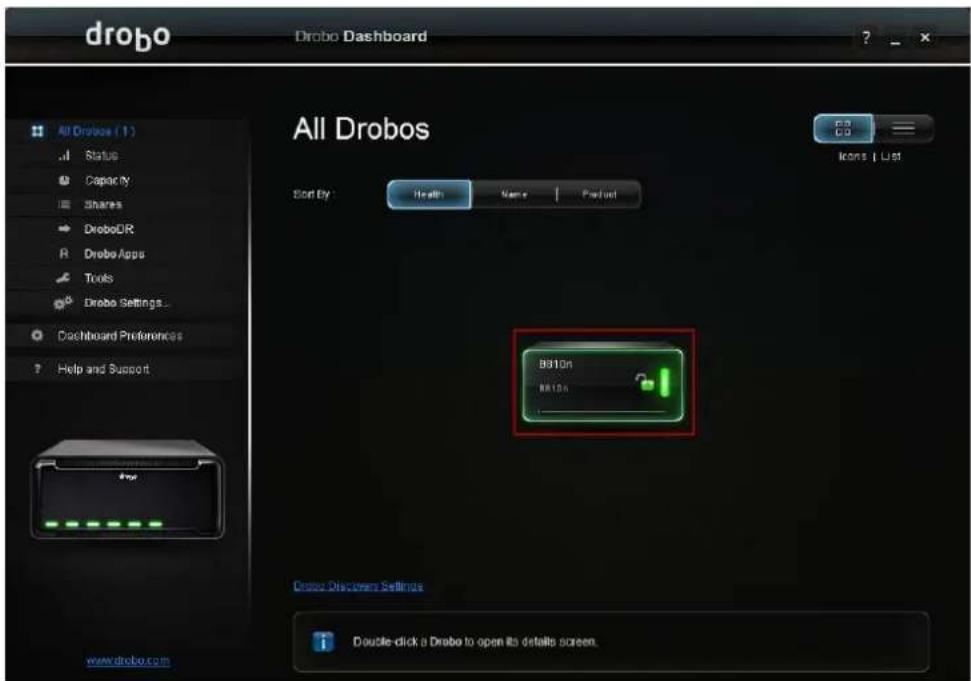
- Select the Drobo 810n by clicking on the green Drobo device icon.
text_image
drobo Drobo Dashboard All Drobos Start By: Health Name Product B810n NATn Options Discover Settings Double-click a Drobo to open its details screen. www.drobo.com-
Then, click the Shares option on the Navigation menu. This opens the Share Settings window.
-
You will see the Public share that is created automatically under the Select a share section and ready to use.
-
You can setup additional shares and users from the Share settings window.
Now, you can start using your Drobo B810n.
2.8 Using Drobo B810n with Time Machine or backup software
2.8.1 Overview
Drobo B810n introduces the ability to create a dedicated backup volume for use with OS X Time Machine, Windows Backup and Restore, or other backup software. The backup volume is compatible with encrypted backup options. This article will show you how to set it up.
2.8.2 Creating a backup volume
These steps will create a fixed-size backup volume that will appear as a new disk, separate from your main Drobo volume. Having this dedicated, fixed-size backup volume will prevent backup software from filling your main Drobo volume with daily backups.
Follow these steps:
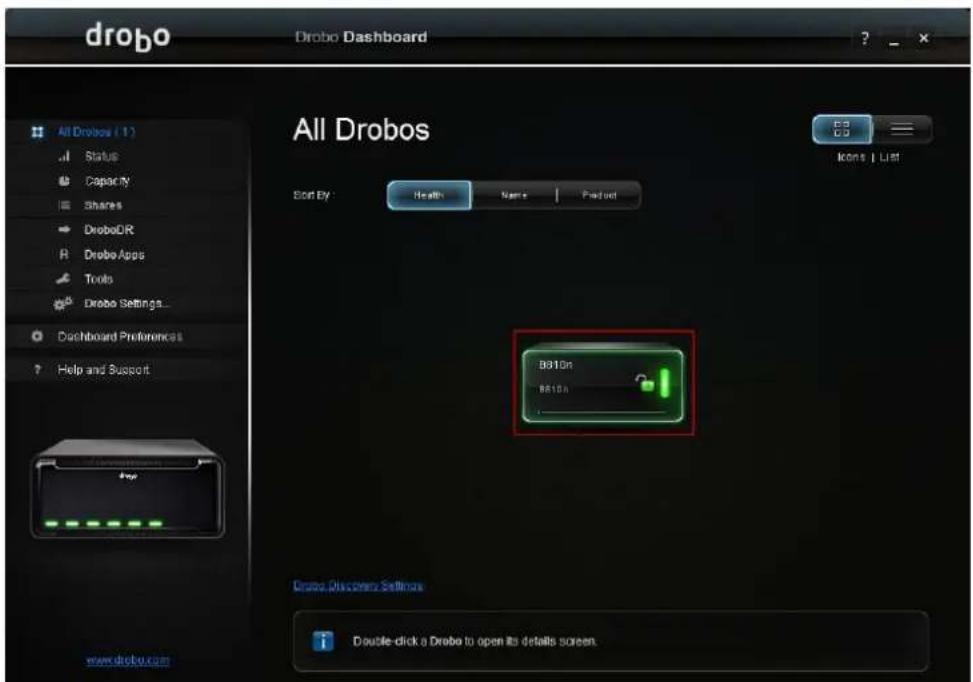
- Open the Drobo Dashboard, and wait for your Drobo B810n to appear under in the All Drobos page. Then, double-click the image of your Drobo B810n.
text_image
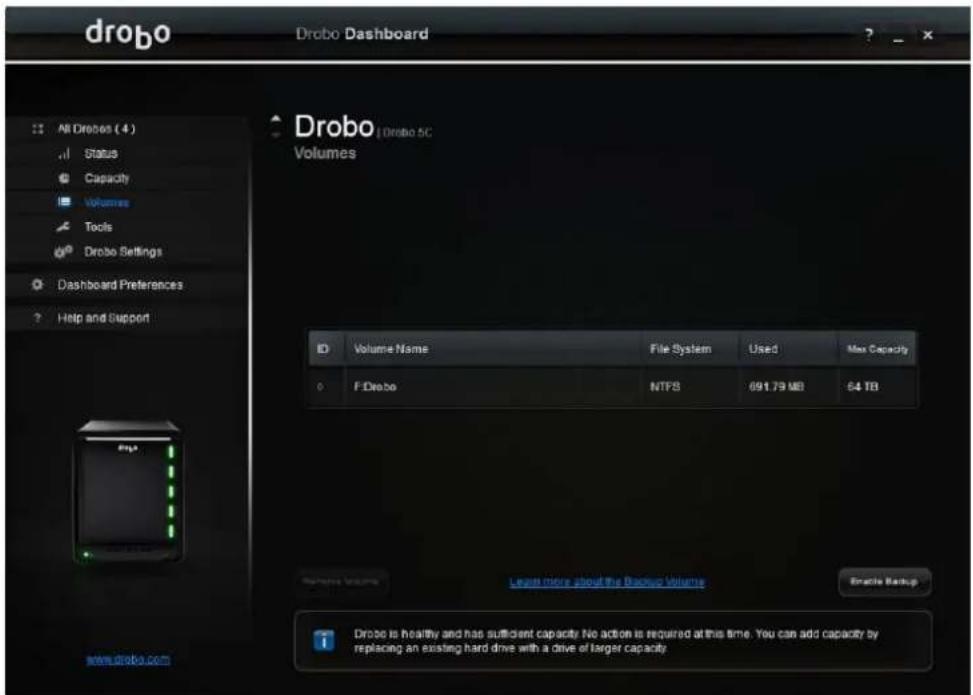
drobo Drobo Dashboard All Drobos All Drobos Start By: Health Name Part out 8010n 8010n 8010n Icons | List Double-click a Drobo to open its details screen. www.drobo.com- Then, click Volumes.
- Click the Enable Backup button.
text_image
drobo Drobo Dashboard All Drobo ( 4 ) Status Capacity Volumes Tools Drobo Settings Dashboard Preferences Help and Support Drobo / Drobo 5C Volumes ID Volume Name File System Used Max Capacity F.Drobo NTPS 691.79 MB 64 TB www.drobo.com Launch more about the Backup Volume Oracle Backup Drobe is healthy and has sufficient capacity. No action is required at this time. You can add capacity by replacing an existing hard drive with a drive of larger capacity- Enter a name for your backup volume and the desired size (GB).
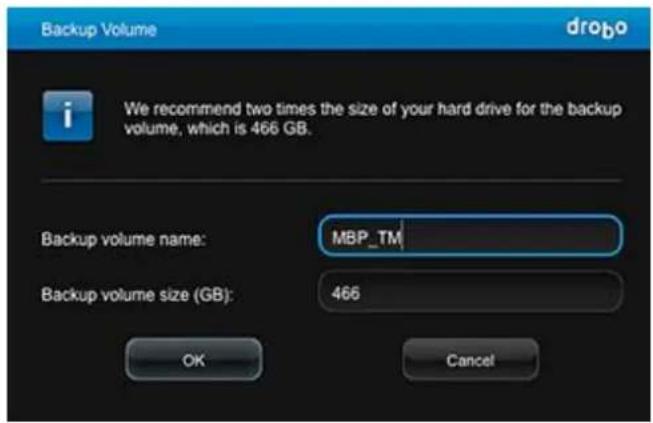
text_image
Backup Volume drobo We recommend two times the size of your hard drive for the backup volume, which is 466 GB. Backup volume name: MBP_TM Backup volume size (GB): 466 OK Cancel- Click the OK button.
- When you see the "Confirm Restart" dialog, take a moment to stop any activity on the Drobo B810n, because it must restart. When you are ready, click Yes to continue.
- Wait until you receive the message that "Volume management changes have been made successfully," then click the OK button.
- Now you will see the backup volume you created listed under Volumes. You may now close the Drobo Dashboard.
- To finish the process, open the settings for your third-party backup software, such as Time Machine, and select the backup volume that you created as the destination volume.
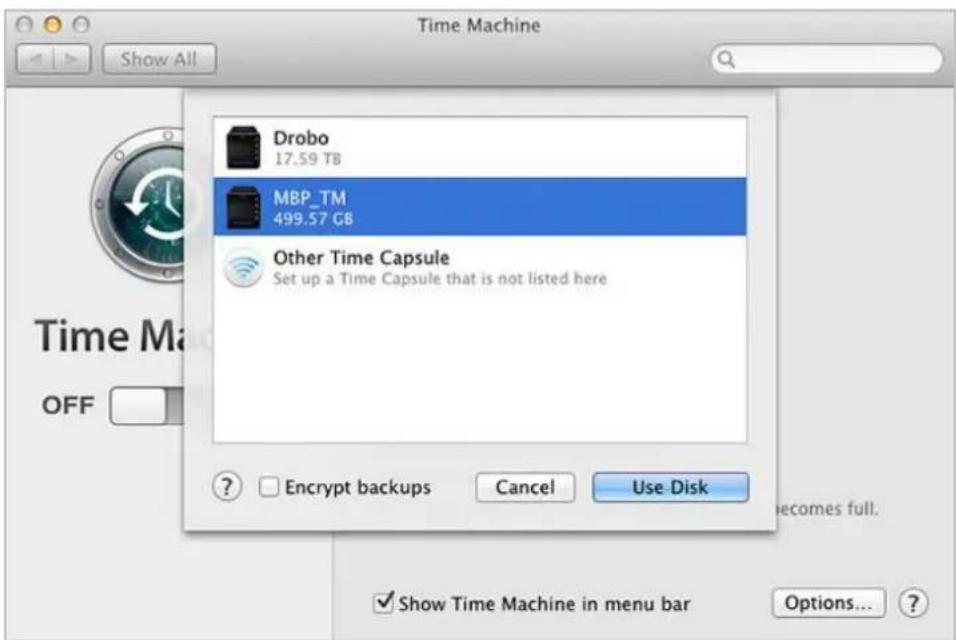
text_image
Time Machine Show All Drobo 17.59 TB MBP_TM 499.57 GB Other Time Capsule Set up a Time Capsule that is not listed here ? Encrypt backups Cancel Use Disk Time Ma OFF ✓ Show Time Machine in menu bar Options... ?2.9 Safely shutting down your Drobo B810n
If you plan to shut down your Drobo B810n for any reason, it is very important that you always do so safely. Improper Drobo device shutdowns may cause file corruption and/or data loss.
This section covers the following topics:
- When to shut down your Drobo B810n
• Shutting down your Drobo B810n using Drobo Dashboard
2.9.1 When to shut down your Drobo B810n
It is a good idea to shut down your Drobo B810n before any of the following situations:
- Your Drobo will not be used for an extended time.
• You need to disconnect a cable or power supply. - You want to move your Drobo to another location.
• You need to remove the entire disk pack. - You are going to apply operating system updates.
2.9.2 Shutting down your Drobo B810n using Drobo Dashboard
This is the recommended method for safely shutting down your Drobo B810n.
- Check that the activity light on your Drobo B810n is off, indicating that no data is actively being transferred to or from your Drobo B810n.
Note:
If data is actively being transferred, the activity light will be blinking green.
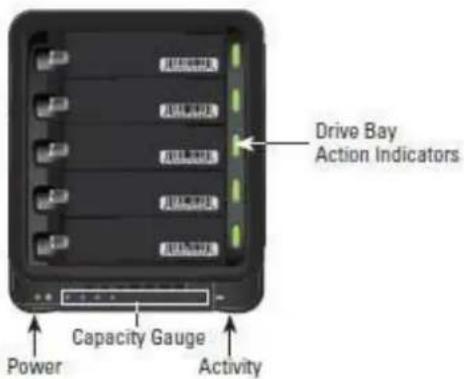
text_image
Drive Bay Action Indicators Capacity Gauge Power Activity- Also check to ensure the drive bay action indicator lights are not blinking alternately between yellow and green. This indicates that your Drobo B810n is busy working to protect your data. Wait until these lights are a solid green.
Important Note:
If one or more drive bay lights are red, you need to add capacity or replace the current drive. However, you can still safely shut down your Drobo B810n.
-
From the Drobo Dashboard, select the Drobo B810n that you would like to shut down from the All Drobos page.
-
Then, click the Tools option on the Navigation menu. The Tools page opens.
-
In the Drobo Operations area, select the Shutdown option.
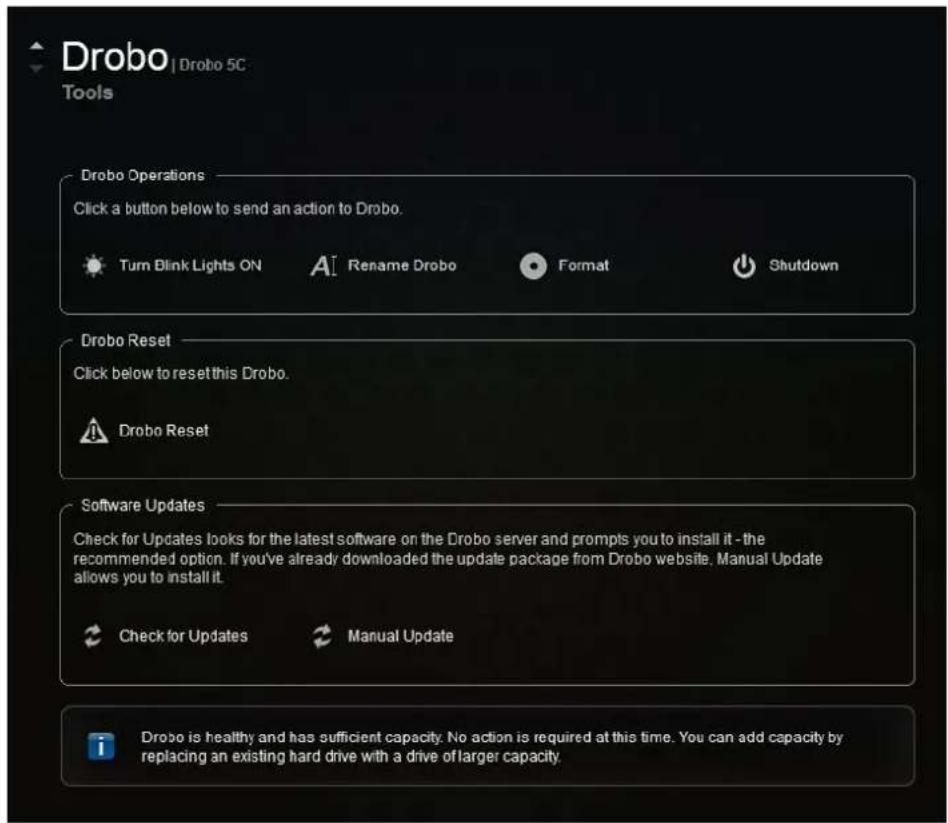
text_image
Drobo | Drobo 5C Tools Drobo Operations Click a button below to send an action to Drobo. Turn Blink Lights ON Rename Drobo Format Shutdown Drobo Reset Click below to reset this Drobo. Drobo Reset Software Updates Check for Updates looks for the latest software on the Drobo server and prompts you to install it - the recommended option. If you've already downloaded the update package from Drobo website. Manual Update allows you to install it. Check for Updates Manual Update Drobo is healthy and has sufficient capacity. No action is required at this time. You can add capacity by replacing an existing hard drive with a drive of larger capacity.-
A message box opens, asking you to confirm the shutdown.
-
Click the Yes button.
-
It can take up to two minutes for your Drobo B810n to power down. Afterwards, the power light turns off, indicating your Drobo B810n has shut down.
3: What To Do Next
Once you set up the Drobo B810n device and start to use it, we recommend you to read the following topics to understand the different ways to enhance the performance of the device.
• Using best practices for data protection
- Keeping Drobo Dashboard and Drobo B810n's firmware up to date
• Using Online User Guide
• Using Context-Sensitive Help
• Using the Knowledge Base
• Registering your Drobo B810n
• Getting Technical Support
3.1 Using best practices for protecting data
While Drobo protects B810n your data from a single drive failure and concurrent 2 drive failures (when used in Dual Disk Redundancy setting) our data can still be lost. Drive head crash, damage to the whole B810n device and disk pack, files corrupted before being saved to the Drobo B810n, unsafe shutdowns, and other traumatic events can result in data loss.
So to know more specific guidelines on how to best protect your data, please visit our Best Practices page. For additional information for professionals (Photographers, Videographers, etc.), please see Photographers, Here's A Bulletproof Backup Method Using Drobo.
Important Note:
To help protect your data, if you are unsure on how to proceed when using your Drobo B810n, it is very important that you review the Online User Guide for your product, review our Knowledge Base articles, or contact Drobo Support.
3.2 Keeping your software up to date
To ensure optimal performance for your Drobo B810n, we highly recommend you set your device to automatically check for software updates (you may have already done this during the initial setup). For more information, see Updating your Drobo B810n to the latest firmware. This feature keeps both the Drobo Dashboard and your device's firmware up to date.
You can also install updates from Start Drobo B810n page. If you would like to install a firmware update from the Drobo website, see Manually updating firmware from the website for more information.
3.2.1 Checking for software updates
The following steps ensure that the Drobo Dashboard and your Drobo B810n's firmware are up to date:
- In the Drobo Dashboard, select the appropriate Drobo B810n from the All Drobos page.
- Click the Tools option on the Navigation menu to open the Tools page.
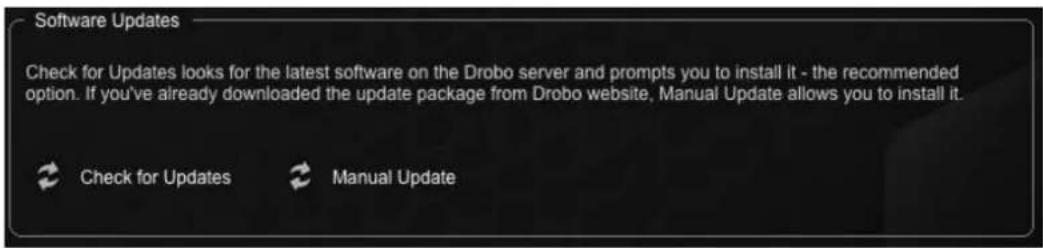
- In the Software Updates area of the Tools page, click the Check for Updates option.
Note:
If needed, ensure that you are logged in to this Drobo B810n.
text_image
Software Updates Check for Updates looks for the latest software on the Drobo server and prompts you to install it - the recommended option. If you've already downloaded the update package from Drobo website, Manual Update allows you to install it. Check for Updates Manual Update- If a software update is available, a dialog box opens, asking if you would like to install the update. Click the Yes button and follow the prompts to install the update.
3.3 Using online user guide
After you have set up your Drobo B810n, you are ready to use it to store and back up data. To learn how to manage and use your Drobo B810n, refer to the Online User Guide for your product available at the Drobo B810n page.
You can also access the user guide from the Drobo Dashboard by clicking the Help & Support option on the Navigation menu. This will lead to the Help and Support page. From here, click the View Drobo User Guide link to open the Online User Guide in a web browser.
3.4 Using context-sensitive help
On the top right corner of the Drobo Dashboard, you will find the Help button (?). Click this button to view the context-sensitive help. The Help window opens in your Internet browser providing information particular to the page from which you clicked for help.
3.5 Using knowledge base
Our searchable knowledge base provides answers to almost any questions related to your Drobo B810n related specific support needs.
To access our knowledge base follow the steps below.
-
From the Drobo Dashboard, click the Help and Support option on the Navigation menu. The Help and Support page opens.
-
In the Check Drobo online resources area, click the Search Knowledge Base link to open the Drobo Knowledge Base web page.
Note:
You can access our knowledge base from the Drobo Support page.
3.6 Registering your Drobo B810n
If you did not register your Drobo B810n during setup, you can do so from the Drobo Dashboard. For more information on registering your Drobo B810n, see Registering your Drobo B810n.
3.7 Getting technical support
To get technical support from Drobo, make sure you have registered your Drobo B810n at the Drobo Log In page. If not registered yet, go to Drobo Support page for details on how to contact support.
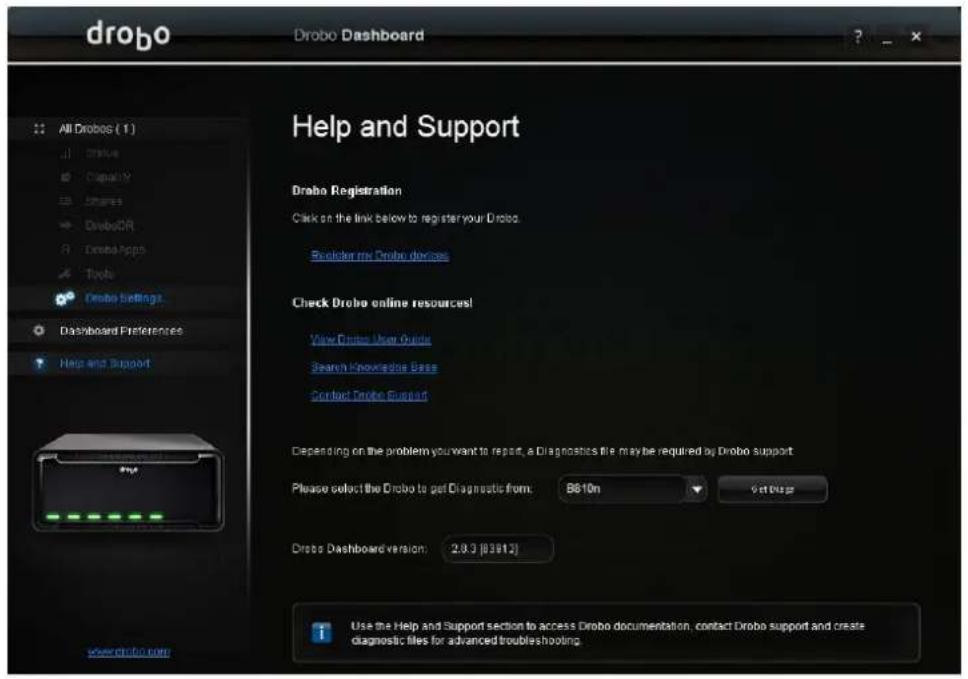
You can also use the Help and Support page in the Drobo Dashboard for registration. The Help and Support page opens and allows you to register your Drobo, access the online user guide and knowledge base, contact the Drobo support team and create a diagnostics file.
text_image
drobo Drobo Dashboard All Drobo ( 1 ) Drobo Capita Y Shares DroboCR Drobo Apps Tools Drobo Settings Dashboard Preferences Help and Support Help and Support Drobo Registration Click on the link below to register your Drobo Explorer my Drobo devices Check Drobo online resources! View Drobo User Guide Search Knowlungs Bass Contact Drobo Support Depending on the problem you want to report, a Diagnostics file may be required by Drobo support Please select the Drobo to get Diagnostic from: 8610n Set Bus Drobo Dashboard version: 2.8.3 [8391.2] Use the Help and Support section to access Drobo documentation, contact Drobo support and create diagnostic files for advanced troubleshootingYou can also obtain additional hardware and phone support by purchasing DroboCare™. To know more details on DroboCare™ and how to purchase it, visit the DroboCare page on our website. Also, see our DroboCare FAQ.
3.8 Guide to meaning of indicator lights (LEDs)
Your Drobo B810n provides a variety of status information via its indicator lights, as described in the table below.

text_image
Capacity Gauge Activity Power Drive Bay Status IndicatorFigure 5: Drobo B810n Indicator lights
3.8.1 Indicator light messages
| Light | Color | Meaning |
| Drive Bay Status Indicator | Green (solid) | Drive is healthy. No action required. |
| Yellow (solid) | Add a drive or replace the current drive with a larger drive soon. Your Drobo is running out of disk space. See Adding disk capacity. | |
| Yellow-Green (alternating) | Do not remove these drives or power down. Your Drobo is working to protect your data. | |
| Red (Solid) | Add a drive or replace the current drive with a larger drive immediately. Your Drobo is critically low on space. See Adding disk capacity. | |
| Red (blinking) | Replace this drive immediately. This drive has failed. See Adding disk capacity. | |
| Power | Green (solid) | The power is on and your Drobo is ready. |
| Yellow (solid) | Your Drobo is in the process of powering on. | |
| Red (solid) | Your Drobo has overheated. Safely power down your Drobo, disconnect the data cable and then the power cable. Let it cool down and then restart. | |
| Activity Capacity Gauge | Green (blinking) | Data is actively being transferred between your computer and your Drobo. |
| Blue (on/off) | Shows the percentage of your Drobo that is full in 10 percent increments. For example: if your Drobo is 30 percent full, three blue lights are on. |