Siros 800 S - Lighting Broncolor - Free user manual and instructions
Find the device manual for free Siros 800 S Broncolor in PDF.


User questions about Siros 800 S Broncolor
0 question about this device. Answer the ones you know or ask your own.
Ask a new question about this device
Download the instructions for your Lighting in PDF format for free! Find your manual Siros 800 S - Broncolor and take your electronic device back in hand. On this page are published all the documents necessary for the use of your device. Siros 800 S by Broncolor.
USER MANUAL Siros 800 S Broncolor
SA107.00 Portus in Contract US\$15
broncolor
THE LIGHT
Bran Elektronik A3
CH - 4123 Allschmit / Switzerland www.bron.ch

text_image
broncolor Siros Operating instructions | Bedienungsanleitung | Mode d'emploi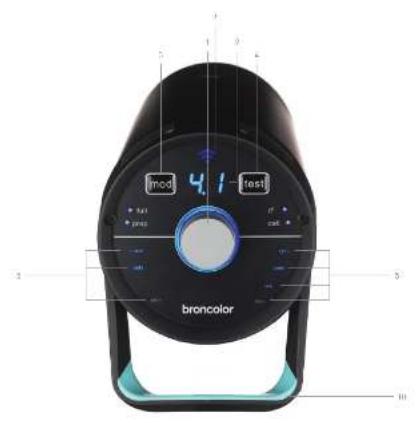
text_image
mod 4.1 test 3 broncolor 5 10Controls and displays
Rotary controller
2 Digital power distribution display
3 Modelling light on / off
5. Very well
4. Sun recact
7. Mini-USB
@ Mains switch
5 W=display
10 Hands
natural_image
Close-up of a black Siemens air purifier device with visible ports and ventilation slots (no text or symbols)natural_image
Woman in a pink dress posing on a spiral staircase against an industrial background (no text or symbols visible)
text_image
broncolor siros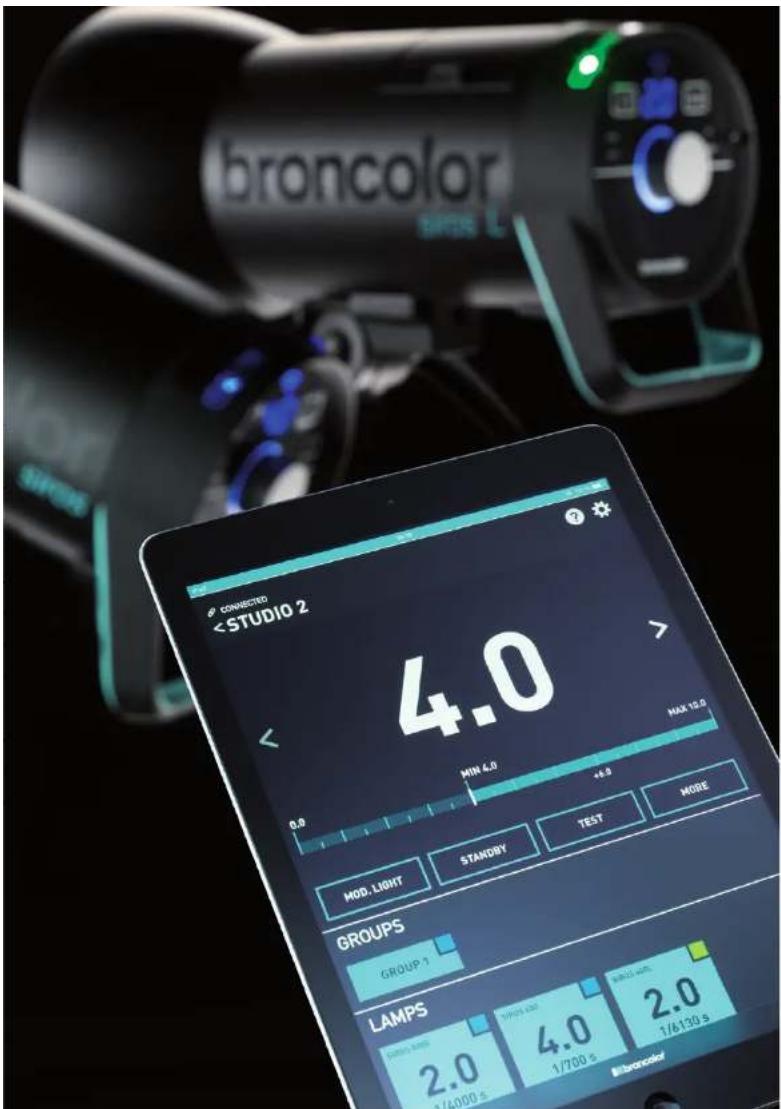
text_image
broncolor BPGS L CONNECTEDOPERATING INSTRUCTIONS | BRONCOLOR SIROS
Before use
Thank you for choosing broncolar Siros, which is a high-quality product in every respect. If used properly, it will give you many years of good service. Please read all the information contained in these operating instructions carefully. They contain important instructions for use, safety and maintenance of the appliance. Keep these operating instructions in a safe place and pass them on to further users if necessary. Observe the safety instructions. Contents Page| Important safety instructions | 6 |
| 1. Scope of supply 9 | |
| 2. First start-up 10 | |
| 3. Control elements 11 | |
| 4. Overview of main menu functions 12 | |
| 5. Menu navigation 12 | |
| 6. Controlling flash times 14 | |
| 7. Release 15 | |
| 8. Special functions 16 | |
| 9. Information and fault messages 17 | |
| 10. FAQs 18 | |
| 11. Accessories 20 | |
| 12. Maintenance/repairs | 21 |
| 13. Environmental protection information | 21 |
| 14. Guarantee | 21 |
| 15. Technical data | 22 |
IMPORTANT SAFETY INSTRUCTIONS
Before you use your flash equipment for the first time, please read all the information contained in these operating instructions carefully. The safety instructions they contain must be strictly followed! > Make sure you are thoroughly familiar with the operating instructions! > Remove all transport protection and packing materials! > Take special care of your equipment, particularly when there are children present! Never leave flash equipment unattended! > Like sunlight, flash light contains a certain amount of UV radiation! Using flash tubes or wearing glasses that provide UV protection considerably reduces the undesirable side effects on skin and eyes! Nevertheless, when taking pictures at close range, avoid exposing unprotected skin and eyes to flashes! Eye contact with the light source should also be avoided! The maximum daily exposure to UV radiation according to IEC 60335-2-27/DIN 5031-10 is 50J / m^2 . This value must not be exceeded. The distance between a lamp and a person or a lamp and an inflammable or heat-sensitive surface must be at least 1 m to prevent injury or damage from thermal radiation! > Always unplug appliance from electrical socket before cleaning, servicing and when not in use! Never jerk cable to pull the plug from the socket. Grasp plug and pull to disconnect! Allow at least 10 minutes for cooling before replacing a halogen lamp or the flash tube! > broncolor flash systems should only be used with original broncolor flash tubes, original broncolor bulbs and fuses, original broncolor accessories, and original broncolor spare parts. broncolor monolights and accessories comply with extremely high safety standards! However, if equipment from other manufacturers is used with broncolor monolights, the built-in safety measures may be rendered ineffective. Our guarantee is invalidated by the use of such unauthorised combinations and we accept no liability for damage arising from such use. To minimise the risk of fire, electric shock, or injury to persons, use exclusively accessories recommended by the manufacturer! > Check that the mains voltage corresponds to the information on the type plate! The flash equipment is designed for use in dry conditions and in an ambient temperature between -10^ and 45^ . Protect the flash equipment from moisture, condensation, from dripping and splash water, humidity, dirt, sand, metal chips and the effects of dust! > Protect flash equipment from electromagnetic fields, shock and vibration! > Protect flash equipment from heat and frost! If the monolight is exposed to sub-zero temperatures, a permanent loss of power output and serious technical damage may result! > Sudden temperature differences may result in condensation forming inside the unit. In such situations allow the equipment to stand for at least one hour in a well-ventilated place to acclimatise to the new temperature before start-up! > Do not operate the flash equipment in places where there is an explosion hazard! Monolights must never be used in water, on water or submerged in any other liquid! Attention: High voltage – danger of fatal injury! For safety reasons never operate the monolight without the safety glass in place! To protect eyes from UV radiation either a UV-coated safety glass or a UV-coated flash tube must be used. Before start-up the monolight must be mounted on a stand or suspended from a suitable mounting. When a lamp is suspended it must be secured to the stand adapter by tightening the retaining screw. For monoliths, use only sand-filled fuses of the type indicated on the safety plate to protect halogen lamps! Sand-filled fuses can be identified by their opaque body. If the wrong fuse is used, the modelling lamp may burst. > Filters or diffusers should not be fastened directly on to flash tubes, halogen modelling lamps, or safety glasses! > Do not operate appliance with a damaged earthed cable. Cables which are damaged or twisted must be replaced! > The unit must only be connected to an earthed socket, or an emergency power generator! > If an extension cable is necessary, a cable with a current rating at least equal to that of the appliance should be used. Cables rated for less amperage than the appliance may overheat. When using a cable reel, it must be completely unrolled before use to prevent overheating of the cable! > Make sure the cooling slots on the monolight are not covered or obstructed! > When laying, clearing away or rolling up cables, make sure they do not contact hot equipment or parts of lamps and that they do not cause a tripping hazard! > Flash tubes, modelling lights, halogen lamps and safety glasses operate at high temperatures. This applies also to the front face of monolights. Any accessories used on the front of a lamp also become very hot. Take great care when handling them! Touching hot components can cause injuries! When operating flash equipment, never touch glass or metal parts! After use allow the monolight to cool before packing it away! > Monolights that have fallen over or been damaged must be checked by a competent specialist before they are put back into service!IMPORTANT SAFETY INSTRUCTIONS
 > To avoid danger from electric shock never open amonight! There may still be dangerous voltages inside the unit. Units should only be opened, and all service and repair carried out by authorised broncolor service stations. Incorrect assembly can cause dangerous contact voltages, even on connected units. > When using Siros in conjunction with a stand, use a sandbag if the stand is extended more than 2 metres. Remove the protective cover before use! > Never put the unit in its case when it is hot! > Shipping instructions: > When transporting a monolight use the original broncolor packing. Before shipping flash tubes, halogen lamps and safety glasses, fit the transport protection elements (protective covers) supplied by us. If the transport protection elements are not all available, remove the flash tubes, halogen lamps and safety glasses from the lamps and pack and ship them separately!1. SCOPE OF SUPPLY
Siros 400 - 31.613.XX Siros 800 - 31.631.XX Siros 400 S - 31.623.XX Siros 800 S - 31.643.XX Check that all the following items have been delivered: Siros monolight Mains cable Operating instructions [8.4109.00]    > Kits Siros Basic Kit Siros Expert Kit Siros Pro Kit| 2 × Siros 400 or 800 | 2 × Siros 400 S or 800 S | 3 × Siros 800 S |
| 2 × umbrellas, 85 cm (33.974,00) | 1 × umbrella, 85 cm (33.974,00) | 1 × Softbox 60 x 60 (33.974,00) |
| 2 × Basic M Stand (33.106,00) | 1 × Softbox 60 x 60 (33.961,00) | 1 × Octobera 75 (33.969,00) |
| 1 × Flash Bag 2 (34.932,00) | 1 × Adapter ring (34.407,00) | 2 × Adapter ring (33.401,00) |
| 1 × Accessory bag (34.936,00) | 2 × Basic M Stand (33.105,00) | 2 × Standard reflector L40 (33.115,00) |
| 1 × Synchro cable (34.111,00) | 1 × Flash Bag 2 (34.937,00) | 3 × Basic M Stand (33.965,00) |
| 1 × Accessory bag (34.935,00) | 1 × Flash Bag 3 (34.937,00) | |
| 1 × Synchro cable (34.111,00) | 1 × Accessory bag (34.935,00) | |
| 1 × Synchro cable (34.111,00) |
2. FIRST START-UP
1. Remove protective cover 2. Plug in mains cable natural_image
Close-up of a hand adjusting a black camera lens on a tripod stand (no text or symbols visible)natural_image
Close-up of a hand pressing down on a black cylindrical device with a circular top (no visible text or symbols)natural_image
Hand interacting with a black cylindrical device with a blue-lit button (no visible text or symbols)3. CONTROL ELEMENTS
Element Function| Rotary controller (1) Switches the unit on and off [stand-by model].Pressing on the rotary controller for 3 s switches the unit to stand-by. | ||
| In menu: menu navigation and confirmation of menu items. There is an explanation of menu navigation in Chapter 5. | ||
| in operation: changes the flash energy. Turning anti-clockwise reduces the flash energy, turning clockwise increases it. Turning slowly changes it in 1 / 10 f-stop steps, turning fast ("twisting") in 1 / 1 f-stop steps. | ||
| 6.7 | Infodisplay (2) Shows the flash energy selected, or the menu selection options. | |
| mod | ModModelling-lighton / off (3) | Switches the modelling light on or off. A longer press changes the operating mode from "full" to "prop" or vice versa. |
| test | Test (4) | Starts test: the "Ready" display around the rotary controller changes to blue as soon as the charge / discharge operation has been completed. |
| speed | Speed [5] | For fast charging and flash times. See explanation in Chapter 6. |
| WiFi | WiFi [6] | Indicates whether WiFi is switched on or off. |
| st/ch | Studio/Channel [8] | For switching the current studio channel [RFS 2] |
| lamp | Lamp [9] | For selecting the lamp channel [RFS 2] |
| seq | Sequence [10] | To select the number of flashes. |
| beep | Beep [11] | Shows if the acoustic "Ready" warning is switched on or off. |
| sync | Sync [12] | Permits the selection of different methods of release (photocell, radio, photocell and / or radio). |
| Sync socket / Mini USB [13 / 14] | For release via the sync cable, or software update via Mini USB. | |
| On / Off [15] | Switches the unit on or off. |
4. OVERVIEW OF MAIN MENU FUNCTIONS
1) To enter the main menu, press the rotary controller [1]. 21 Turn the rotary controller clockwise or anti-clockwise to reach the required menu item. 3) To confirm your selection, press the rotary controller (1) again. The selected menu item starts to blink. Display Selection options Description| Speed on | off | See chapter 6 - Controlling flash times |
| WiFi on | off | See chapter 8.2 - WiFi settings |
| sync | ||
| st / ch 1 - 99 Sets the studio address / channel from 1 - 99 | ||
| lamp 1 - 40 Setting the lamp address / zone from 1 - 40 | ||
| seq | off | Selects a certain number of flash releases from 2 - 50 |
| 2 - 50 | ||
| beep | on | Switches acoustic "Ready" signal on or off |
| off | ||
| sync rf | ce | Selection of different methods of release (radio "rf", photocell "ce", photocell and radio "all" or only sync cable "--"] |
| all | ||
| -- | ||
5. MENU NAVIGATION
Overview of menu functions| Siros 400/800 | Siros 400/800 WiFi/ RFS 2 | Siros 400 S/800 S WiFi/ RFS 2 | |
| speed | • | ||
| WiFi | • | • | |
| st/ch | • | • | |
| lamp | • | • | |
| seq • | • | • | |
| beep | • | • | • |
| sync | • | • | • |
Please note: if a menu item cannot be selected, the unit does not support this function!
Example: Set a sequence of 15 flashes per release 1) Press the rotary controller (1) to enter the main menu. The menu item last selected will be displayed. The main display changes from showing the output power to the selected menu item. 21 Turn the rotary controller [1] until you reach the menu item "seq" 3) Press the rotary controller [1], to confirm this function. The "seq" display begins to blink. 4) Turn the rotary controller (1) until "15" appears in the main display. 5) Confirm this selection by pressing the rotary controller (1). After this confirmation, the unit switches to its normal state. If the selection is not confirmed within 5 s, the unit switches to its normal state without changing its setting. 1) 2) 3)    4) 5]  6. CONTROLLING FLASH TIMES
With Siros, you can control the flash time in two different ways:6.1 Controlling flash time using the "speed" setting in the main menu
In the main menu you can set the flash time of the monolight to "speed". This setting calculates the fastest possible flash time for the chosen energy level. This also may cause the flash colour to shift slightly towards the blue region. 1) Press the rotary controller (1) to enter the main menu. 2) Turn the rotary controller (1) until you reach the menu item "speed". 3) Confirm this selection by pressing the rotary controller (1). 4) Use the rotary controller (1) to select the option "on" or "off". 5) Confirm this with the rotary controller [1]. 1) 2) 3)    4|5|  7. RELEASE
7.1 RFS 2 module (radio frequency system)
For RFS 2 flash control, the channel (studio address) must correspond to the transmitter's channel. The studio address is set in the menu at position "st". The lamp channel is defined in the menu under "lamp". See chapter 8.3 for more information about changing the colours of the cognition lights. With the radio transceiver, you can define and set the individual lamps as you wish. To learn how to do this, please see the operating instructions for the transceiver. The transceiver is not included with individual heads as standard.7.2 Photocell (cell)
The photocell can be switched on and off using the menu function "sync" [11]. When it is active, the blue LED beside the "cell" label is illuminated. After the first flash of a sequence, the active photocell is deactivated, and the blue LED beside the "sync" key [11] blinks. Pressing the "test" key switches it on again.7.3 Sync socket (12)
The sync cables, 5 m (16.4 ft) (Art. No. 34.111.00) and 10 m (32.8 ft) (34.112.00), can be fitted to the socket for cable release (12).7.4 "test" key (4)
Using this key, the monolight can be triggered manually. The flash can be triggered as soon as 70% of the set energy level is reached. The visual "Ready" indicator, on the other hand, only illuminates when 100% is attained.8. SPECIAL FUNCTIONS
8.1 Reset (to factory settings)
Press the "test" key (4) for 4 s. This resets all functions to the works settings. Resetting is acknowledged with a double beep.8.2 bronControl App and WiFi settings
For control of your Siros monolight, you can download the "bronControl" app. To find the app, search for "bronControl" in Apple's App Store, or in Google's Play Store. If your unit is equipped with WiFi, you have access to all settings using this app.8.2.1 Operating modes
8.2.1.1 Operation in "Private" mode (factory setting)
If the WiFi mode is activated on more than one monolight, these units link up automatically to form a private network. A smartphone or tablet must then be connected to this network in order to control it. Activate the WiFi function on your smartphone or tablet device. Your device will automatically search for available WiFi networks. Connect your device to the desired Bron-Studio network. You will be prompted to enter the password: bronControl. Start the bronControl app. Add the correspondent new studio and connect the app with this studio. Further tips concerning the operation of the app can be found in the help menu "?" of the app.8.2.1.2 Operation in "enterprise" mode
If there is an existing WiFi network (router), the unit can be integrated into this using a smartphone or tablet. To achieve this, in the "bronControl" app, under Settings, go to "Network Setting" and enter your router's settings in "Infrastructure Mode". Make sure the unit is set to the correct studio address. Siros saves the last type of connection and tries to connect to the last network the next time it starts. 8.2.2 Menu settings| on / off / sync [on / -- / sy] | |
| on | WiFi module is activated. The unit tries to connect to a network. |
| -- | WiFi module is deactivated. |
| sy | When "sy" is selected, the unit reverts to a "Private" mode.This means that the unit loses its network setting and connects to the private network. |
| Symbol | Description |
| Off | WiFi is not activated or there is no WiFi module installed |
| Blinking | WiFi is activated, but not connected to a network |
| Permanently on blue | WiFi is activated and connected to a Siros network (Private) |
| Permanently on violet | WiFi is activated and connected to an existing network (Enterprise) |
8.3 Cognition lights
When the various lamp channels are selected (zones), the cognition light on the top surface of the unit changes colour. The purpose of this is to differentiate between individual units when they are controlled by the "bronControl" app. The light on the unit changes colour when the app is activated on a smartphone or tablet or when the rotary controller on the unit is pressed; it changes back to blue on leaving the menu. The lamp channel colours are as follows: Lamp channel 1 blue Lamp channel 2 green Lamp channel 3 violet Lamp channel 4 yellow Lamp channel 5 turquoise From lamp channel 6, the colours repeat in the same order [starting with blue].9. INFORMATION AND FAULT MESSAGES\*
9.1 Acoustic signals| Beep sound | end of charging or discharging |
| Double beep | energy demand above or below energy control setting via RFS 2.1 / 2.2 transmitter |
| Error 1(f1) | No flash after triggering→ Is the ignition wire correctly connected?Is the flash tube correctly installed?Otherwise replace flash tube |
| Error 2(f2) | Afterglow→ Switch the unit off and then on again. If this fault occurs repeatedly,the flash tube is defective |
| Error 3(f3) | Electronics defective→ Unit must be sent to Service for repair |
| Error 4(f4) | Overvoltage in flash capacitors→ Unit must be sent to Service for repair |
| Error 5(f5) | Thermal alarm, capacitors overheated→ A cooling phase of approximately 20 minutes starts. Do not switchthe unit off! |
10. FAQ5
10.1 Changing flash tubes
1) Disconnect the mains cable from the unit. 2) Remove the safety glass by pulling it out of its retaining clips. 3) Press the contact spring downwards and pull the flash tube out carefully. 1) 2) 3) 10.2 Changing the fuse
1) Disconnect the mains cable from the unit. (explanation in Chapter 10.1) Open the fuse compartment beneath the unit. 2) Prise the blown fuse carefully out with a pointed object. 3) Insert the replacement fuse and close the fuse compartment again. 1|2|3| 10.3 Changing light shapers
1) Turn the light shaper in either direction to its stop. 2) Pull the release backwards and, at the same time, turn the light shaper until it is free of the bayonet fitting. 3) Remove the light shaper carefully to the front. Take care not to damage the safety glass. 1) 2) 3) 10.4 Mounting an umbrella
Insert the umbrella in the opening provided beneath the unit. 11. ACCESSORIES
Siros is compatible with the entire range of broncolor light shapers. The articles listed here are specially recommended accessories:| 33.115.00 Standard reflector L40 | |
| 34.260.00 Halogen modelling light, 300 W for Siros | |
| 34.360.00 Flash tube, 400 / 800 J for Siros | |
| 34.369.00 Safety glass for Siros | |
| 35.105.00 Basic M Stand | |
| 36.531.00 Flash Bag 1 | |
| 36.532.00 Flash Bag 2 | |
| 36.533.00 Flash Bag 3 | |
| 33.194.00 Honeycomb grid set for L40 | |
| 33.570.00 Umbrella 105 cm silver / black | |
| 33.571.00 Umbrella 105 cm white / black | |
| 33.572.00 Umbrella 105 cm transparent | |
| 33.573.00 Umbrella 85 cm white / black | |
| 33.574.00 Umbrella 85 cm silver / black | |
| 33.117.00 Umbrella reflector for Siros incl. protective cover | |
| 33.118.00 Protective cover for Siros | |
| 33.119.00 Barn door with 4 wings for L40 | |
| 33.318.00 Colour filters for barn door for L40 | |
| 33.319.00 Colour correcting and diffusion filters for barn door for L40 | |
| 33.576.00 Focus 110 umbrella silver / black ∅ 110 cm [43.3"] | |
| 36.133.00 | RFS 2.1 transmitter |
| 36.160.00 | RFS 2.2 C transmitter (Canon) |
| 36.161.00 | RFS 2.2 N transmitter (Nikon) |
| 36.162.00 | RFS 2.2 S transmitter (Sonyl) |
12. MAINTENANCE AND REPAIRS
Your broncolor monolight is a precision instrument and will give many years trouble-free operation if treated with the appropriate care. However should a fault occur please do not try to open the unit and repair it yourself. Even when the unit is switched off there may still be dangerous voltages inside it. Therefore, for maintenance and repairs always send the unit to your broncolor service point.13. ENVIRONMENTAL PROTECTION INFORMATION
At the end of its useful life, this product may not be disposed of as normal household waste but should be taken to a collection point for the recycling of electrical and electronic appliances. The materials are recyclable according to their markings. By re-use, recycling or other form of using old appliances you are making an important contribution to the protection of our environment. Please ask your local authorities or our sales partner for the appropriate disposal point.14. GUARANTEE
All broncolor power packs, lamps, monolights and accessories are built to a high quality standard. We offer a two-year factory guarantee from the date of purchase (for the first owner) on the above broncolor products. Excluded from this guarantee are flash tubes, halogen lamps, safety glasses, cables, batteries and textiles. Faults resulting from non-observance of safety instructions, incorrect handling, use of accessories from another manufacturer, unauthorised intervention or modification are excluded from the factory guarantee. We assume no liability for damage resulting from non-observance of safety instructions, incorrect handling, use of accessories from another manufacturer or unauthorised intervention or modification. In the event of technical problems, please contact the nearest authorised broncolor service station immediately. Article numbers, product descriptions and the scope of supply can vary from one country to another. For more detailed information please contact your broncolor sales partner. Errors and misprints excepted.15. TECHNICAL DATA
| Siros 400 WiFi / RFS 2 | 31.613.XX Siros 800 WiFi / RFS 2 | 31.631.XX | ||
| Flash energy | 400 J/WS 800 J/WS | |
| Aperture at 2 m (6 1⁄2 ft), 100/50 With reflector L40 | 22 5 / 10 32 8 / 10 | |
| With reflector P70 | 32 5 / 10 45 6 / 10 | |
| Flash duration t 0.1 (t 0.5) Min. energy | 1 / 400 s [1 / 1000 s] 1 / 200 s [1 / 500 s] | |
| Max. energy | 1 / 1000 s [1 / 2200 s] 1 / 500 s [1 / 1100 s] | |
| Charging time (100 % of selected energy) 230 V / 50 Hz | 0.1 - 0.95 s 0.2 - 1.9 s | |
| 120 V / 60 Hz | 0.1 - 0.95 s 0.14 - 1.9 s | |
| 100 V / 50 Hz | 0.1 - 1.45 s 0.18 - 3.1 s | |
| Setting range for flash energy | Over 7 f-stops, in stops of 1 / 10 or full f-stops | |
| 6.5 - 400 J/WS | 13 - 800 J/WS | |
| Colour temperature Max. energy / P70 | 5750 K | 5750 K |
| Connection data | Adapts automatically to 100-120 V / 50-60 Hz mains voltage: 5.5 A, 200-240 V / 50-60 Hz: 3.5 AOperation independent of mains possible with external battery converter | |
| Modelling light | Halogen max. 300 W / 120 V, adjustable: off, full or proportional to flash energy | |
| Flash triggering | Manual release button, photocell, sync cable, with a built-in broncolorRFS 2 receiver | |
| Remote control | With bronControl app for mobile devices [only devices with a built-in WiFi module]RFS 2.1 / 2.2 transmitter [only with built-in RFS 2 receiver] | |
| "Ready" indicator | Visual and acoustic (can be switched off) | |
| Additional functions | Sequences (flash series) up to 50 flashesIntegral umbrella mounting and integral umbrella reflectorSpeed mode for fastest flash timesUSB connection for software updatesThermal monitoring of power electronicsInternal discharge for output reduction | |
| Cooling | Fan, temperature controlled | |
| Standards | EN 60065 / EN 61000-4-2EN 55015EN 301489-1 / EN 301489-3ISO10330 | |
| Dimensions | 32×13×18cm [12.6×5.1×7.1"] | |
| Weight | 3.2 kg [7.1 lbs) | 3.6 kg [7.9 lbs] |
| Siros 400 S WiFi / RFS 2 | 31.623.XX Siros 800 S WiFi / RFS 2 | 31.643.XX | |
| Flash energy | 400 J/WS 800 J/WS |
| Aperture at 2 m (6 1⁄2 ft), 10050 With reflector L40 | 22 5 / 10 32 8 / 10 |
| With reflector P70 | |
| Flash duration t 0.1 (t 0.5) Min. energy | 32 5 / 10 45 6 / 10 |
| 1 / 6500 s (1 / 13000 s) 1 / 4000 s (1 / 8000 s) | |
| Max. energy | |
| Charging time (100 % of selected energy) 230 V / 50 Hz | 1 / 1000 s (1 / 2200 s) 1 / 500 s (1 / 1100 s) |
| 0.02 - 0.95 s 0.07 - 1.9 s | |
| 120 V / 60 Hz | |
| 0.02 - 0.95 s 0.04 - 1.9 s | |
| 100 V / 50 Hz | |
| Setting range for flash energy | Over 9 f-stops, in stops of 1 / 10 or full f-stops |
| 2 - 400 J/WS 4 - 800 J/WS | |
| Colour temperature Max. energy / P70 | ECTC technology (Enhanced Colour temperature Control) for constant colour temperature |
| Connection data | Adapts automatically to 100 - 120 V / 50 - 60 Hz mains voltage: 5.5 A, 200 - 240 V / 50 - 60 Hz: 3.5 AOperation independent of mains possible with external battery converter |
| Modelling light | Halogen max. 300 W / 120 V, adjustable: off, full or proportional to flash energy |
| Flash triggering | Manual release button, photocell, sync cable, with a built-in broncolorRFS 2 receiver |
| Remote control | With bronControl app for mobile devices [only devices with a built-in WiFi module]RFS 2.1 / 2.2 transmitter [only with built-in RFS 2 receiver] |
| "Ready" indicator | Visual and acoustic (can be switched off) |
| Additional functions | Sequences (flash series) up to 50 flashesIntegral umbrella mounting and integral umbrella reflectorSpeed mode for fastest flash timesUSB connection for software updatesThermal monitoring of power electronicsInternal discharge for output reduction |
| Cooling | Fan, temperature controlled |
| Standards | EN 60065 / EN 61000-4-2EN 55015EN 301489-1 / EN 301489-3ISO 10330 |
| Dimensions | 32×13×18cm (12.6×5.1×7.1") |
| Weight | 3.2 kg (7.1 lbs) |