
Nuvi 2200 - Gps GARMIN - Free user manual and instructions
Find the device manual for free Nuvi 2200 GARMIN in PDF.


User questions about Nuvi 2200 GARMIN
0 question about this device. Answer the ones you know or ask your own.
Ask a new question about this device
Download the instructions for your Gps in PDF format for free! Find your manual Nuvi 2200 - GARMIN and take your electronic device back in hand. On this page are published all the documents necessary for the use of your device. Nuvi 2200 by GARMIN.
USER MANUAL Nuvi 2200 GARMIN
text_image
11:32: Where To? View Map Stop Detour Volume Tools GARMINfor use with these nüvi models:
2200, 2240, 2250
Getting Started
! WARNING
See the Important Safety and Product Information guide in the product box for product warnings and other important information.
When using your device for the first time, complete the following tasks.
- Mount the device (page 2).
- Connect the device to vehicle power (page 3).
- Register the device (page 5).
- Check for updates.
- Software updates (page 5).
- Free map update (page 5).
- Download the full owner's manual (page 5).
Mounting Your Device
NOTICE
Before mounting the device, see the Important Safety and Product Information guide for information about laws pertaining to windshield mounting.
- Remove the clear plastic from the suction cup.
- Clean and dry your windshield and the suction cup with a lint-free cloth.
- Press the suction cup to the windshield.
-
While pressing, flip the lever back toward the windshield.
-
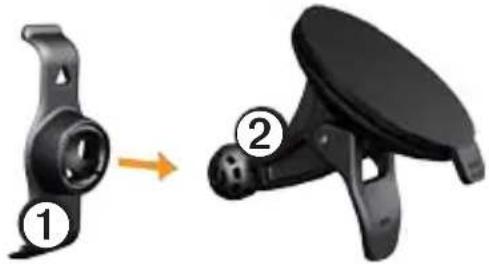
Snap the mount ① onto the suction cup arm ②.
natural_image
Two black mechanical components with numbered labels, one showing a circular component and the other a circular base (no text or symbols present)-
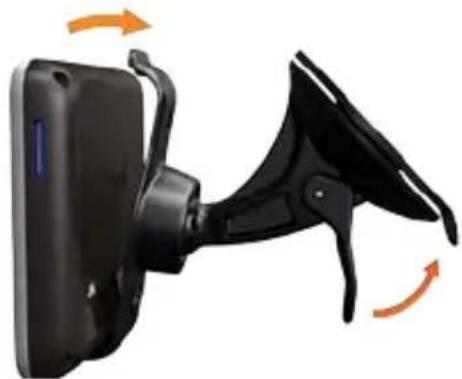
Fit the bottom of your device into the mount.
-
Tilt your device back until it snaps into place.
natural_image
Close-up of a black rectangular device mounted on a wall, with orange arrows indicating rotation or change (no text or symbols visible)Connecting the Device to Vehicle Power
! WARNING
This product contains a lithium-ion battery. To prevent the possibility of personal injury or product damage caused by battery exposure to extreme heat, remove the device from the vehicle when exiting or store it out of direct sunlight.
Charge your device before using it on battery power.
- Plug the vehicle power cable into the mini-USB connector ① on the back of the device.

natural_image
Close-up of a black electronic device with a blue indicator light and a numbered label (1) on the side, no visible text or symbols.- Plug the other end of the vehicle power cable into a power outlet in your vehicle.
- If you are using a traffic receiver in Europe, connect the external antenna to the traffic receiver and secure it to the windshield using the suction cups.
After the device has been connected to vehicle power, the following should occur.
- The device turns on.
- The device acquires satellite signals. When at least one of the bars is green, your device has acquired satellite signals.
NOTE: The device may need a clear view of the sky to acquire satellite signals. - The device charges as you drive. in the status bar indicates the status of the internal battery.
About myDashboard
You can use myDashboard to register your device, check for software and map updates, access manuals, contact product support, and more.
For more information, go to www.garmin.com/dashboard.
Setting Up myDashboard
- Connect the USB cable to the USB connector on the device.
- Connect the USB cable to the USB port on your computer.
- Double-click to open the myDashboard Web page.
NOTE: If does not open, or you are using Windows 7 or a Mac® computer, go to www.garmin.com/agent. - Follow the on-screen instructions.
Registering the Device
- From myDashboard, click Register Now.
- Follow on-screen instructions.
- Keep the original sales receipt, or a photocopy, in a safe place.
Updating the Software
- Open myDashboard (page 4).
- Register the device (page 5).
- Under Software Updates, click Update Now.
- Follow the on-screen instructions.
nüMaps Guarantee™
Your device is eligible for one free map update within 60 days of acquiring satellites while driving with your nüvi. You are not eligible for the free map update if you register by phone or wait longer than 60 days after the first time you acquire satellites while driving with your nüvi. For more information, go to
www.garmin.com/numaps.
Updating Maps
- Open myDashboard (page 4).
- Register the device (page 5).
- Under Map Updates, click Update Now.
- Follow the on-screen instructions.
Downloading the Owner's Manual
The owner's manual for your device is available on the Garmin Web site.
- Open myDashboard (page 4).
- Register the device (page 5).
- Click Manuals.
A list of the product manuals in several languages appears.
-
Click Download next to the manual for your device.
-
Click to save the file to your computer.
Device Overview
text_image
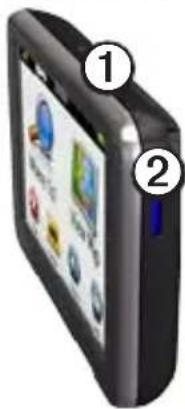
Image of a black electronic device with labeled parts, showing app icons and labels ① and ②.| 1 | Power key |
| 2 | microSDTM card slot |
Using the Power Key
Press and quickly release the Power key to view additional options.
- Touch and drag the scroll bar to adjust screen brightness.
- Touch Power Off to turn off your device.
- Press and hold the Power key to reset the device.
- Press and quickly release the Power key to exit the menu.
About Points of Interest
The detailed maps loaded in your device contain points of interest, such as restaurants, hotels, and auto services.
Finding a Point of Interest by Category
- From the Main menu, touch Where To? > Points of Interest.
- Select a category.
- If necessary, select a subcategory.
- Select a destination.
- Touch Go!.
Touch Save to save the location to a Favorites folder on the device. Use Favorites to save the location of your workplace, home, and other common destinations.
-
If necessary, select an option.
-
Touch Drive to calculate a route you will navigate by driving.
- Touch Walk to calculate a route you will navigate by walking.
- Touch Public Transit to calculate a route that combines public transit and walking.
NOTE: You must have cityXplorer™ maps loaded to navigate using public transit.
Go to www.garmin.com to purchase cityXplorer maps.
Main Menu
text_image
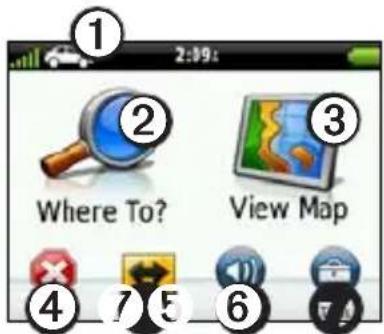
1 2:09: Where To? View Map 3 4 5 6- Touch ① to select a transportation mode.
- Touch ② to find a destination.
- Touch ③ to view the map.
- Touch ④ to stop a route.
- Touch ⑤ to detour a route.
- Touch ⑥ to adjust the volume.
- Touch ⑦ to open the menu of tools and settings.
Your Route on the Map
NOTICE
The speed limit icon feature is for information only and does not replace the driver's responsibility to abide by all posted speed limit signs and to use safe driving judgment at all times. Garmin will not be responsible for any traffic fines or citations that you may receive for failing to follow all applicable traffic laws and signs.
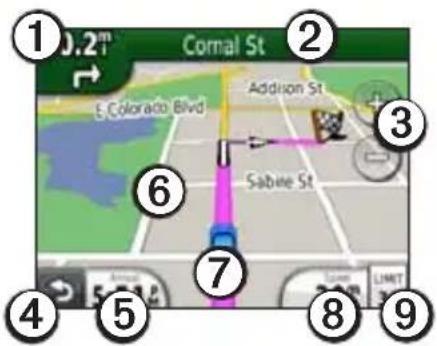
text_image
10.2m Cornal St E Colorado Blvd Addison St Sabine St 6 7 8 9 4 5 LIMITYour route is marked with a magenta line on the map. If you depart from the original route, your device recalculates the route. A speed limit
icon could appear as you travel on major roadways.
- Touch ① to view the next turn.
- Touch ② to view the turn list.
- Touch ③ to zoom in and out.
- Touch ④ to return to the Main menu.
Touch and hold to return to the Main menu.
- Touch ⑤ to change the data field.
- Touch and drag ⑥ to view a different area of the map.
- Touch ⑦ to view the Where Am I? page.
- Touch ⑧ to view the trip computer.
- Touch ⑨ to change the speed limit if the speed limit icon shown on the map is incorrect.
Using myTrends
As you drive with the device on, myTrends™ gathers information that allows the device to predict when you are traveling to a common destination, like your workplace or home. When myTrends is activated, the destination and estimated time of travel will appear in the navigation bar on the map.
myTrends only works for locations that are saved as Favorites (page 6).
When myTrends information appears in the navigation bar, touch the navigation bar to view route information.
About the Transportation Modes
| Automobile mode | |
| Pedestrian mode |
Routes are calculated differently based on your transportation mode.
For example, in Automobile mode, estimated time of arrival is calculated using the speed limit of the roads on the route. Pedestrian mode calculates time of arrival based on walking speed.
Changing Your Transportation Mode
- From the Main menu, touch the transportation mode icon.
- Select a mode.
- Touch Save.
About Traffic
NOTICE
Garmin is not responsible for the accuracy or timeliness of FM Traffic information.
Some models can receive FM Traffic Message Channel (TMC) traffic content. The FM TMC traffic receiver, which is integrated in the vehicle power cable, is included in some packages. The FM TMC traffic subscription is automatically enabled.
For information about traffic receivers and coverage areas, go to www.garmin.com/traffic.
Receiving Traffic Information
The vehicle power cable and the device must be in data range of an FM station transmitting traffic information.
- Connect the traffic receiver to an external power source.
- Connect the traffic receiver to the device.
NOTE: Heated (metallized) windshields could degrade the performance of the traffic receiver.
Traffic on Your Route
When calculating your route, the device examines the current traffic and automatically optimizes the route for the shortest time. If a severe traffic delay occurs on your route while you are navigating, the device automatically recalculates the route.
You might still be routed through traffic if no better alternative routes exist.
Manually Avoiding Traffic on Your Route
- From the map, touch .
- Touch Traffic On Route.
- If necessary, touch the arrows to view other traffic delays on your route.
- Touch >Avoid.
Power Cables
Charge the device using one of these cables.
- Vehicle power cable
• USB cable (optional accessory)
• AC adapter (optional accessory)
Getting More Information
You can find more information about this product on the Garmin Web site.
Go to www.garmin.com /ontheroad.
Contacting Garmin Product Support
Contact Garmin Product Support if you have any questions about this product:
- In the USA, go to www.garmin .com/support, or call Garmin USA at (800) 800.1020.
• In the UK, call Garmin (Europe) Ltd. at 0808 2380000. - In Europe, go to www.garmin.com/support and click Contact Support for in-country support information, or contact Garmin (Europe) Ltd. by phone at +44 (0) 870.8501241.
Garmin ^® , the Garmin logo, and nüvi ^® are trademarks of Garmin Ltd. or its subsidiaries, registered in the USA and other countries. cityXplorer ^™ , nüMaps Guarantee ^™ , and myTrends ^™ are trademarks of Garmin Ltd. or its subsidiaries. These trademarks may not be used without the express permission of Garmin. The Bluetooth ^® word mark and logos are owned by the Bluetooth SIG, Inc., and any use of such name by Garmin is under license. Mac ^® is a trademark of Apple Computer, Inc., registered in the U.S. and other countries.
For the latest free software updates (excluding map data) throughout the life of your Garmin products, visit the Garmin Web site at www.garmin.com.

text_image
GARMIN®© 2010 Garmin Ltd. or its subsidiaries

Garmin International, Inc.
1200 East 151 ^st Street, Olathe, Kansas 66062, USA
Garmin (Europe) Ltd.
Liberty House, Houndown Business Park, Southampton, Hampshire, SO40 9LR UK
Garmin Corporation
No. 68, Jangshu 2 ^nd Road, Sijhih, Taipei County, Taiwan
www.garmin.com
September 2010 Part Number 190-01250-01 Rev. B Printed in Taiwan