A10 - Smartphone Garmin-Asus - Free user manual and instructions
Find the device manual for free A10 Garmin-Asus in PDF.


User questions about A10 Garmin-Asus
0 question about this device. Answer the ones you know or ask your own.
Ask a new question about this device
Download the instructions for your Smartphone in PDF format for free! Find your manual A10 - Garmin-Asus and take your electronic device back in hand. On this page are published all the documents necessary for the use of your device. A10 by Garmin-Asus.
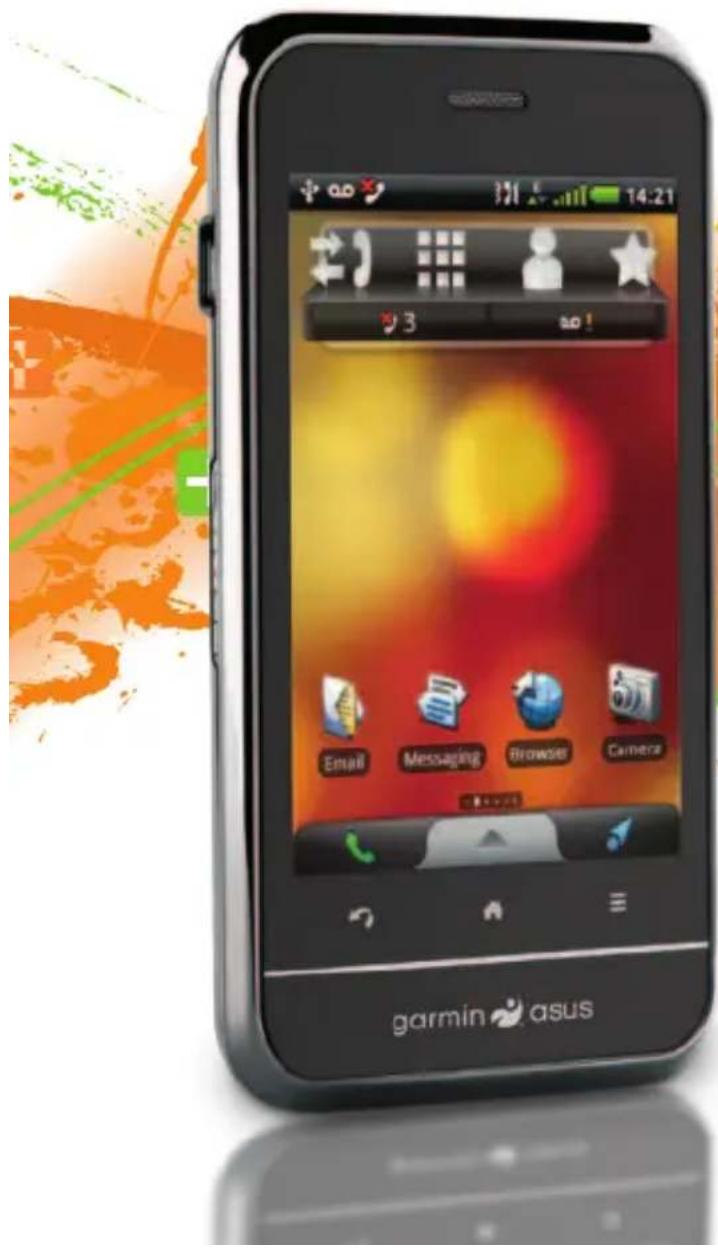
USER MANUAL A10 Garmin-Asus
Garmin-Asus A10 owner's manual
text_image
garmin asus 14:21 3 ao!
natural_image
Illustration of Android and iOS robot icons on a stylized orange gradient background (no text or symbols)© 2010 Garmin Ltd. or its subsidiaries and ASUSTeK Computer Inc.
All rights reserved. Except as expressly provided herein, no part of this manual may be reproduced, copied, transmitted, disseminated, downloaded or stored in any storage medium, for any purpose without the express prior written consent of Garmin and ASUS. Garmin and ASUS hereby grant permission to download a single copy of this manual onto a hard drive or other electronic storage medium to be viewed, and to print one copy of this manual or of any revision hereto, provided that such electronic or printed copy of this manual must contain the complete text of this copyright notice and provided further that any unauthorised commercial distribution of this manual or any revision hereto is strictly prohibited.
Information in this document is subject to change without notice. Garmin and ASUS reserve the right to change or improve their products and to make changes in the content without obligation to notify any person or organisation of such changes or improvements. Go to www.garminasus.com for current updates and supplemental information concerning the use and operation of this and other Garmin-Asus products.
ASUS is a trademark of ASUSTeK Computer Incorporated. The combined Garmin-Asus logo is a trademark of Garmin Ltd. and ASUSTeK Computer Incorporated. Garmin® is a trademark of Garmin Ltd. or its subsidiaries, registered in the USA and other countries. cityXplorer™, Ciao!™, Garmin-Asus™ and nüMaps Guarantee™ are trademarks of Garmin Ltd. or its subsidiaries. These trademarks may not be used without the express permission of Garmin. The Bluetooth® word mark and logos are owned by the Bluetooth SIG, Inc. and any use of such marks by Garmin or ASUS is under licence. Wi-Fi is a registered mark of the Wi-Fi Alliance. Adobe is a registered trademark of Adobe Systems Incorporated. Mac is a trademark of Apple Inc., registered in the U.S. and other countries. Microsoft, Exchange ActiveSync, Excel, Outlook and PowerPoint are either registered trademarks or trademarks of Microsoft Corporation in the United States and/or other countries. Google, Panoramio and Android are trademarks of Google Inc. MPEG Layer-3 audio coding technology is licensed from Fraunhofer® IIS and Thomson®.
Other trademarks and trade names are those of their respective owners.
Based on traffic data provided with the permission of one or more third parties.
Introduction
The Garmin-Asus™ A10 is a multi-media mobile phone with integrated navigation and services.
Getting support
- Go to www.garminasus.com /support.
- Select your region.
Updating the software
- Go to www.garminasus.com /support.
- Select your region.
- Under the A10, click Software Updates.
- Follow the on-screen instructions.
Buying additional maps
- Go to www.garminasus.com /support.
- Select your region.
- Under the A10, click Map Updates.
- Follow the on-screen instructions.
Getting help
- From the application tray, touch Help.
- Touch a topic.
Table of Contents
Table of Contents
Introduction ......i
Getting support ......i
Updating the software......i
Buying additional maps ......i
Getting help ....i
Getting started 1
Device features....1
Setting up the device 2
Registering your product ....4
Mounting your device 4
Completing the setup....5
Getting to know your device ......6
Using the Home screen ......6
About the keys 7
Using the application tray .....8
Viewing notifications 8
Setting the default ringtone......9
Customising the Home screen .....9
Downloading applications from the Market ....11
Changing the volume......12
Rotating the device 12
Using the touchscreen .....13
Using the on-screen keyboard......13
About the automatic screen lock ....15
About the headset 15
Status and notification icons .....16
Using the phone ....18
Dialling a number....18
Calling a found location .....18
Using in-call options .....18
Ending a call 19
Answering a call 19
Silencing an incoming call ......19
Sending an incoming call to voice mail 19
Activating call waiting .....20
Using call waiting 20
Setting up voice mail ....20
Calling voice mail....20
Using call history ......21
Placing a conference call....22
Forwarding calls ......23
Barring calls 23
Table of Contents
| Turning on Aeroplane mode | 24 |
| Multi-tasking | 24 |
| Managing your contacts | 25 |
| Adding a contact | 25 |
| Adding a number in call history to contacts | 25 |
| Calling a contact | 25 |
| Searching for a contact | 25 |
| Using the contact shortcut menu | 26 |
| Editing and deleting contacts | 26 |
| Starting a route to a contact | 28 |
| Managing your SIM contacts | 28 |
| Searching for locations | 30 |
| About GPS signals | 30 |
| Finding a point of interest | 30 |
| Working with found locations | 31 |
| Changing the search area | 32 |
| Saving and editing locations | 32 |
| Sharing locations | 34 |
| Finding Destinations by Speaking | 34 |
| Finding your parking spot | 35 |
| Finding your current location | 35 |
| Setting your home location | 36 |
| Finding an address | 36 |
| Finding local businesses | 37 |
| Finding recently found locations | 37 |
| Finding forthcoming events | 38 |
| Finding PanoramioTM photos | 38 |
| Finding fuel prices | 39 |
| Finding towns | 39 |
| Using the telephone directory | 39 |
| Entering coordinates | 40 |
| Finding junctions | 41 |
| About Extras | 41 |
| Following your route | 42 |
| About the map | 42 |
| Using the map | 42 |
| About usage modes | 43 |
| Navigating in Driving mode | 44 |
| About Traffic | 46 |
| Navigating in Walking mode | 48 |
| Taking a detour | 50 |
| Stopping the route | 50 |
| Working with routes | 51 |
| Viewing your trip log | 52 |
Table of Contents
Sending and
receiving messages ....53
Sending a text message ....53
About multimedia messages .....53
Reading messages .....54
Setting up SMS cell broadcast .....56
Using email 57
Using Ciao!™ 61
Registering your device and joining Ciao! 61
Changing your display name .....62
Inviting a friend 62
Accepting or declining an invitation 62
Sending a location update ......62
Automatically sending location updates ....62
Updating your status....63
Viewing friends 63
Adding a friend to contacts ......63
Sending a message to a friend .....63
Starting a route to a friend's location 63
Removing an invitation ......64
Removing a friend 64
Hiding and revealing your location 64
Viewing Ciao! networks .....64
Disabling Ciao! 64
Browsing the web 65
Using the browser....65
Viewing multiple browser windows 67
Saving a web page to Favourites 67
Viewing your history 67
Sharing a URL 68
Opening a web site in a new window 68
Deleting a web site from a list......68
Setting your browser home page 68
Downloading files ......69
Playing music ....70
Music player file types .....70
Playing a song 71
Table of Contents
Changing the music player view .....71
About playlists ....71
Searching the music player .....73
Saving a song as a ringtone ......73
Streaming online music .....73
Taking and viewing pictures and videos 74
Taking a picture 74
Taking a picture with GPS information ....74
Recording a video....75
Changing the camera and video settings ....75
Viewing pictures 76
Viewing a video 76
Viewing a slideshow 76
Sharing pictures and videos .....76
Setting your wallpaper 77
Editing pictures and videos......77
Adding a picture to a contact .....77
Starting a route to a photograph or video 78
Changing the Gallery settings .....78
Organising your life 80
Using the calendar 80
Viewing a document 81
Checking the weather forecast .....83
Using the clock 83
Using the converter 85
Checking flight status 87
Finding cinema times....88
Connecting with other devices 89
Synchronising your device with your computer 89
Synchronising your device with an Exchange server ....90
Synchronising with a Google™ account 90
Using Bluetooth technology .....91
Transferring files 92
About Wi-Fi 93
Customising your device .....95
Wireless Manager....95
Audio settings 96
Table of Contents
Display settings 96
Phone settings 98
Home screen 99
Navigation settings 99
Email account settings......101
Contacts settings 102
Calendar settings....102
Messaging settings ......103
Managing applications ......105
Accounts and Sync settings ......106
Security and location settings .....106
Changing the text language......108
Keyboard settings ......108
Date and time settings .....108
Units settings 109
Privacy settings ......109
Clearing all user data....110
Changing the storage settings ..... 110
Viewing software information ...... 110
Appendix 111
About satellite signals 111
About connected services ...... 111
Battery information 112
Mounting on your dashboard ..... 113
Removing the device, cradle and mount 113
Resetting the device .....114
Caring for your device 114
Specifications 115
Troubleshooting 117
Index 119
Getting started

WARNING
See the Important safety and product information document in the product box for product warnings and other important information.
NOTICE
It is strongly recommended that you sign up for a data plan to use this phone.
Download the latest owner's manual at www.garminasus.com/support.
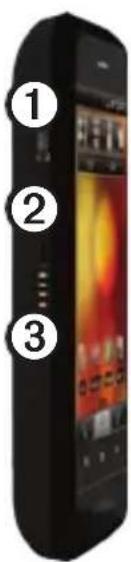
Device features
text_image
Diagram of a mobile phone with numbered labels pointing to screen interfaces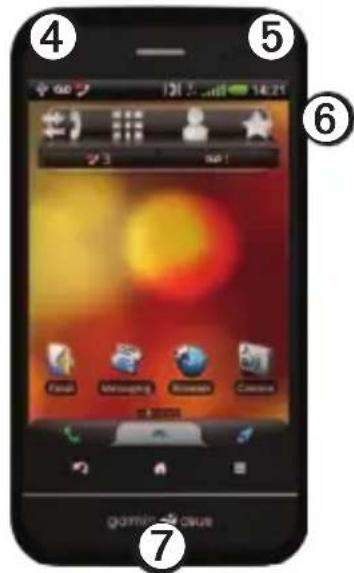
text_image
4 5 6 7 gdmle-ef-cause| 1 | Micro-USB connector |
| 2 | Camera lens (on back) |
| 3 | Navigation cradle connector |
| 4 | Power key |
| 5 | Audio out connector |
| 6 | Volume keys |
| 7 | Battery cover notch |
Getting started
Setting up the device
- Remove the battery cover.
- Install the SIM card.
- Install the microSD card (optional) (page 3).
- Install the battery (page 3).
- Replace the battery cover (page 3).
- Charge the battery (page 3).
- Register the device and check eligibility for a free map update (page 4).
Removing the battery cover
- Place your thumb in the centre of the battery cover ①.

natural_image
Two views of a black electronic device showing internal components and an orange arrow indicating direction (no text or symbols)- Locate the battery cover notch ② on the bottom of the device.
2 Garmin-Asus A10 Owner's Manual
- Insert your fingernail in the notch.
- Prise the cover up.
- Remove the cover from the device.
Installing the SIM card
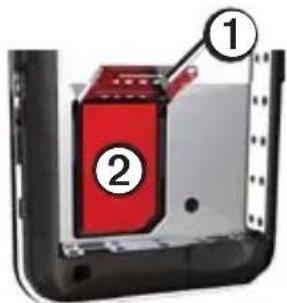
- Slide the SIM card holder ① towards the top edge of the device and lift up as directed on the holder.
text_image
Diagram of a device component with labeled parts, showing red box and numbered parts 1 and 2.- Place the SIM card ② in the device with the gold contacts facing down and the notched corner near the bottom of the device.
- Close the card holder.
- Slide the card holder towards the bottom of the device to lock it.
Installing the microSD card
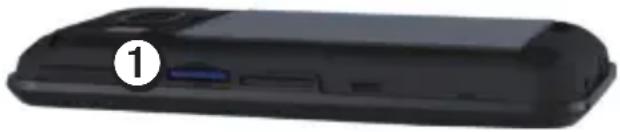
Insert the microSD card in the microSD slot ① with the gold contacts facing down.
natural_image
Black rectangular electronic device with a labeled component (1) and no visible text or symbols on the body.Installing the battery
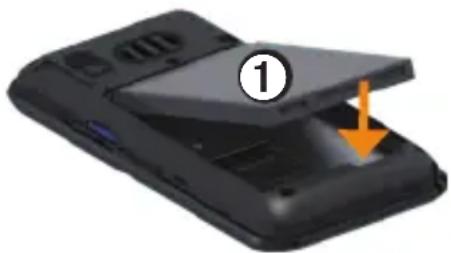
- Locate the battery ① that came in the product box.
- Locate the metal contacts on the end of the battery and in the battery compartment.
- Insert the battery with the Garmin-Asus logo facing up and the metal contacts on the battery aligned with the contacts in the battery compartment.
natural_image
Black mobile phone with open lid and orange arrow indicating a component (no text or symbols visible)Replacing the battery cover
- Properly align the battery cover on the back of the device.
- Press the battery cover down until it snaps into place.
Charging the battery
NOTICE
Your device will not charge if the temperature has exceeded 140^ F ( 60^ C). If the device is mounted on the windscreen, remove it from the mount and place it somewhere out of direct sunlight to allow the battery to charge.
Charge the battery for at least four hours before using the device for the first time.
If you completely discharge the battery, recharge it for at least 20 minutes before turning on your device.
- Insert the plug into the AC power adapter, if necessary.
Getting started
- Plug the USB cable into the AC adapter.
- Connect the micro-USB end of the USB cable to the connector on the bottom of the device.
- Plug the AC adapter into a power outlet.
Alternative charging methods
• (Preferred) Use the vehicle power cable connected to the cradle, with the device in the cradle.
- Use the vehicle power cable connected to the device (not the cradle).
- Use the USB cable connected to your device and a computer.
- Use the battery charger accessory. For more information about accessories, go to www.garminasus.com.
Registering your product
- Go to www.garminasus.com /support.
- Select your region, if necessary.
- Under the A10, click Product Registration.
- Follow the on-screen instructions.
After registering, click Maps to see if you are eligible for one or more map updates.
Mounting your device
! WARNING
This product contains a lithium-ion battery. To prevent the possibility of personal injury or product damage caused by battery exposure to extreme heat, remove the device from the vehicle when exiting or store it out of direct sunlight.
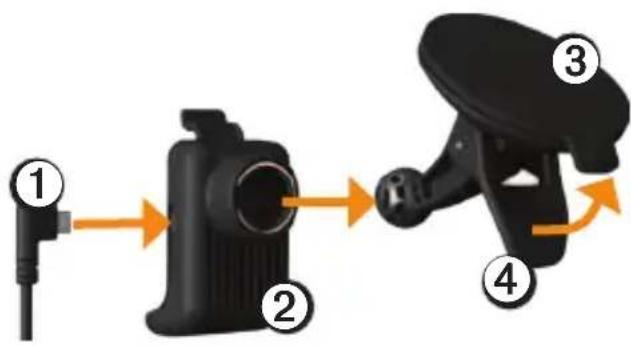
- Plug the vehicle power cable ① into the power connector on the side of the cradle ②
flowchart
graph LR
    A["①"] --> B["②"]
    B --> C["③"]
    C --> D["④"]
- Remove the clear plastic from the suction cup ③.
- Clean and dry your windscreen and the suction cup with a lint-free cloth.
- Place the suction cup on the windscreen.
- Flip the lever ④ back towards the windscreen.
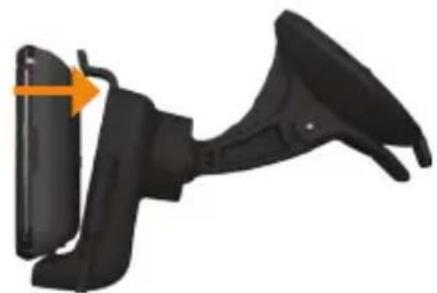
- Snap the cradle onto the suction cup arm.
-
Fit the gold contacts on the left side of the device into the cradle.
-
Tilt the device back until it snaps into the cradle.
natural_image
Close-up of a black handheld device with a handle and orange arrow indicating rotation (no text or symbols)- Plug the other end of the vehicle power cable into a power outlet in your vehicle.
TIP: To learn how to remove the device from the mount, see page 113.
Completing the setup
Complete the following optional tasks to finish setting up your device:
- Set up voice mail (page 20).
- Set up an email account (page 57).
• Synchronise the device (page 90).
Getting to know your device
Getting to know your device
Using the Home screen
The Home screen is designed with several panes which can be customised.

text_image
Screenshot of a mobile app interface with numbered UI elements including Email, Messaging, Browser, and Camera.- Drag ① towards the bottom of the screen to view notifications. The status bar displays notification icons, status icons and the current time.
- Drag your finger across the screen ② to view the other Home screen panes.
- Touch any icon ③ on the Home screen to open the application.
- Touch ④ to open the phone application.
- Drag ⑤ towards the top of the screen to open the application tray (page 8).
- Touch ⑥ to view the Where To? pane.
Switching Home screen panes
Use any of the following options to switch to another pane:
• To switch to the next pane, slide your finger across the screen from right to left.
• To switch to the previous pane, slide your finger across the screen from left to right.
• To quickly switch to the Where To? pane, touch
- To quickly switch to a specific pane, touch and touch a pane.
About the Where To? pane
The Where To? pane provides quick access to the navigation features of your device, such as the map, points of interest and location search.
The Where To? pane is the far left pane on the Home screen.
About the keys
| Key Use | |
 | Touch to return to the Home screen. |
| From the Home screen, touch to quickly switch panes. | |
| Touch and hold to open a menu of recently used applications. | |
 | Touch to go back to the previous screen or to exit the current application. |
 | Touch to view a menu of options for the current screen or application. |
| Volume up and down | Press to increase or decrease the audio level. |
Getting to know your device
Using the application tray
The application tray contains shortcuts for the applications on the device.
NOTE: The application tray is available on all Home screen panes except for the Where To? pane.
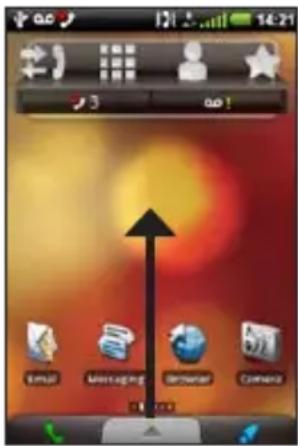
- From the Home screen, touch and drag the application tray towards the top of the screen.
text_image
Screenshot of a mobile app interface showing status bar, navigation tabs, and icons like Email, Messaging, Browser, and Camera.-
Touch and drag to scroll through all of the shortcuts.
-
Touch a shortcut icon to start an application.
Viewing notifications
When a notification icon appears in the status bar, open the notification window to view more information.
- Touch and drag the status bar towards the bottom of the screen.
The notification window expands to fill the screen. - Touch an item to view more details or to go to the application.
Hiding the notification window
Touch and drag the bottom of the notification window to the top of the screen.
Setting the notification tone
You can select a tone that sounds when you receive a notification.
- From the Home screen, touch 📋 Settings > Audio and Display > Notifications.
- Touch a tone.
- Touch Save.
Setting the default ringtone
- From the Home screen, touch ☒ Settings > Audio and Display > Ringtones.
- Touch a ringtone.
- Touch Save.
Customising the Home screen
You can customise the Home screen to suit your needs.
NOTE: You cannot customise the Where To? pane.
Changing the Home screen wallpaper
- From the Home screen, touch ➕ Wallpaper.
- Select an option.
- Select an image to use as the wallpaper (background).
- Touch Save or Set Wallpaper.
About the Home screen items
You can add additional panes to the Home screen. You can add widgets, shortcuts and folders to a pane.
Widgets are small applications that are attached to a pane. Shortcuts provide quick access to applications or other items on your phone. You can use folders to organise shortcuts or other items on the Home screen.
Getting to know your device
Adding items to a pane
- From the Home screen, switch to the pane where you want to add items.
- Touch and hold an empty area of the pane.
- Touch the type of item to add.
- Enter additional information, if necessary.
Removing items from a pane
- From the Home screen, switch to the pane from which you want to remove items.
- Touch and hold the item to remove.
- Drag the item to
Adding panes
You can add additional panes to the Home screen.
- From the Home screen, touch
- Touch


Deleting panes
NOTE: The panes initially included on your device cannot be deleted.
- From the Home screen, touch
- Touch on the pane to delete.

Adding Home screen folders
You can use folders to organise content on the Home screen.
- From the Home screen, switch to the pane where you want to add a folder.
- Touch and hold an empty area of the pane.
- Touch Folders.
- Touch the type of folder that you want to add.
- Enter a folder name and touch OK, if necessary.
You can drag a shortcut onto the folder to add the shortcut to the folder.
Renaming a Home screen folder
Before you can rename a folder, you must add a folder to the Home screen.
- From the Home screen, touch the folder.
- Touch and hold the folder name at the top of the folder window.
- Enter the name and touch OK.
Arranging items on the Home screen
You can move widgets, shortcuts and folders to arrange them on the Home screen.
- Touch and hold the item you want to move until the device vibrates.
- Drag the item to a new location.
- To move an item to an adjacent pane, drag the item to the edge of the screen and hold it until the adjacent pane appears.
- To move a shortcut into a folder, drag the shortcut onto the folder.
Downloading applications from the Market
You can purchase and download additional applications from the Market.
- From the application tray, touch Market.
- Follow the on-screen instructions to set up your Google account, if necessary.
- Read the terms of service and touch Accept.
For more information about using the Market application, touch ➕ Help.
Getting to know your device
Changing the volume
You can change the volume for certain features, such as the ringer, music player, navigation prompts and messaging notifications.
- Open the application for which you want to change the volume.
- Press the Volume Up or Volume Down key.
TIP: You can also access the volume settings from the application tray. Touch Settings > Audio and Display > Volume Levels.
-
Select an option:
-
Continue pressing the Volume Up or Volume Down key to adjust the volume.
- Touch to quickly turn on the ringer, when available.
-
Touch to set the ringer to vibrate, when available.
-
Touch 📄 to set the ringer to ring and vibrate, when available.
- Touch is silence the ringer, when available.
Rotating the device
NOTE: Some applications can only be viewed in one orientation. For example, the camera is only available in landscape mode.
Rotate the handset to alternate between vertical (portrait) mode and horizontal (landscape) mode.
TIP: To change the rotation settings, from the Home screen, touch
Settings > Audio and Display > Orientation.
Using the touchscreen
NOTE: The touchscreen requires direct contact with your skin. The device does not respond if you touch the touchscreen with your fingernail or with a glove.
- Touch and drag your finger to slowly scroll the screen.
- Scroll the screen both vertically and horizontally, when available.
- Touch, drag and quickly remove your finger (flick the screen) to quickly scroll the screen.
- Touch the screen to stop scrolling.
- Touch two points near the centre of the page and drag your fingers apart to zoom in, when available.
- Touch two points near opposite edges of the page and drag your fingers towards the centre of the page to zoom out, when available.
Using the on-screen keyboard
A keyboard appears when you need to enter text.
- Touch a key to enter text.
- Touch to backspace.
- Touch to shift.
- Touch and hold to turn on caps lock.
- Touch to close the keyboard.
- Touch to display numbers and symbols.
- Touch tABC isplay an alphabetic keyboard.
- Touch to change the keyboard if more than one keyboard is enabled (page 108).
- Touch the text or numbers on the screen to insert a cursor.
Getting to know your device
Using text completion
The device includes a text-completion feature that recognises words you are typing.
NOTE: To adjust the text-completion settings, see page 108.
- Begin typing a word.
A row of suggested auto-text words appears above the keyboard. The closest match is highlighted. - Continue typing.
The text-completion words may change or disappear. - Touch a text-completion word to accept it.
NOTE: The highlighted word is inserted automatically when you enter a space or a punctuation mark.
Selecting an input method
The device includes multiple input methods, such as text editing and language-specific keyboards.
Before you can select an input method, you must enable additional input methods using the keyboard settings (page 108).
- Touch and hold a text field.
- Touch Input Method.
- Select an option.
About the automatic screen lock
The device automatically locks if you do not use it for a specified amount of time.
If the device is in the mount with external power, the screen will not automatically lock.
Manually locking the device
Press the Power key.
Unlocking the device
To adjust the unlock settings, see page 107.
- Quickly press the Power key, if necessary.
- Tap and drag to the right.
About the headset
You can use the wired headset (included in some packages) or a Bluetooth wireless headset to listen to audio and talk on the phone.
To connect a Bluetooth headset, see page 91. For information on using a Bluetooth headset, see the instructions that came with the headset.
Connecting the headset
Connect the 3.5-mm headset connector to the audio-out connector on the device.
Using the headset
- Press the button on the headset to answer a call.
- Speak into the adapter on the headset which contains the microphone.
- Use the Volume knob to adjust the audio volume.
Status and notification icons
| Icon Description | |
| 11:40 | Current time. The time is supplied by your network provider based on the location of the device or on the selected time zone. |
| Battery life. | |
| External power is connected and the battery is charging. | |
| Mobile signal strength. The more coloured bars that appear, the stronger the signal. A red bar indicates there is no mobile signal. | |
| Aeroplane mode. | |
| Wi-Fi® connectivity. This icon appears in place of the network connectivity icon when the device is using Wi-Fi. | |
| Bluetooth wireless technology is enabled, but no wireless device is connected. | |
| The A10 is connected to a device using Bluetooth® wireless technology. | |
| Teletypewriter (TTY) mode is activated (page 98). | |
| Hearing aid mode (HAC) is activated (page 98). | |
| 3G | Network connectivity. This icon appears when the device is connected for Internet access. The connection types are as follows: G – GPRS, E – Edge, 3G – 3G, H – HSDPA 3.5G. |
| GPS satellite strength. The more coloured bars that appear, the stronger the satellite signal. A red "X" indicates no satellite signals. | |
| Vibrate mode. | |
Getting to know your device
| Icon | Description |
 | Silent mode. |
 | Speakerphone. |
 | In a phone call. |
| [1DXA] | Calls are being forwarded. |
| [207W] | Text or MMS message received. |
| [428Z] | Email message received. |
| [182Y] | Appointment reminder. |
| [1X2X] | New voice mail message. |
| [WY0A] | Parking spot has been saved. |
 | You are currently navigating a route in Driving mode. |
| [X2SA] | You are currently navigating a route in Walking mode. |
| [WHDB] | An alarm is enabled. |
| [WWCZ] | Connected to the computer using the USB cable. |
 | Synchronising data with your computer, email account or Exchange ActiveSync account. |
| [DSST] | There is an error synchronising data. |
Using the phone
Using the phone
Dialling a number
- From the Home screen, touch
- Dial the number.
- Touch Call.
Calling a found location
You can call a location that you have found in the Where To? menu, if the location has a phone number associated with it.

- From the Home screen, touch
- Find a location (page 30).
- Touch Call.
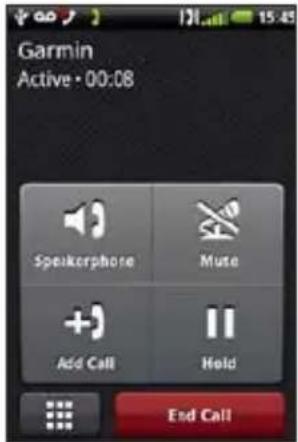
Using in-call options
text_image
Garmin Active • 00:08 Speakerphone Mute Add Call Hold End CallWhile you are on a call, use the following options:
- Touch Speakerphone to activate the speakerphone.
- Touch Audio to select the audio output when a wireless hands-free device is connected (page 91).
- Touch Mute to mute the audio input.
- Touch Add Call to place a new call.
The first call is placed on hold:
- Touch Switch to change between the current call and the call on hold, if you are on call waiting.
-
Touch Merge to create a conference call.
-
Touch Hold to place the current call on hold.
- Touch to display a numeric keypad for automated systems that require numeric entries.
Ending a call
Touch End Call.
Answering a call
- If the screen is locked, drag the right.

- If the screen is unlocked, touch Answer.
Silencing an incoming call
When you receive a call, press the Volume Up or Volume Down key.
Sending an incoming call to voice mail
There are a few ways to send an incoming call to voice mail.
- Press the Power key.
- If the screen is locked, drag the left.
- If the screen is unlocked, touch Ignore.

Using the phone
Activating call waiting
From the Home screen, touch ⚠️ Settings > Phone > Call Waiting > On > Save.
Using call waiting
If call waiting is activated, use these call waiting options when you receive an incoming call.
- Touch Answer + Hold to answer the new call and place the original call on hold:
- Touch Merge to create a conference call with the original call and the new call. - Touch Switch to switch between the original call and the new call.
- Touch Answer + End to answer the new call and end the original call.
- Touch Ignore to send the new call to your voice mail.
Setting up voice mail
- From the Home screen, touch ▶ Settings > Phone > Voice Mail Number.
- Verify that your voice mail number is correct.
- Touch .
- Touch and hold 1.
- Follow the voice prompts.
Calling voice mail
When you have new voice mail, appears in the status bar.
- Touch and drag the status bar towards the bottom of the screen.
- Touch New Voice Mail.
TIP: You can also touch Call > 1 to call your voice mail.
Using call history
- From the Home screen, touch


Calls are organised into three categories:
| Icon Description | |
| Dialled call | |
| Received call | |
| Missed call | |
- Touch a call.
- Select an option.
Calling a number using call history


- From the Home screen, touch
- Touch next to the number or contact.
Deleting a call from the call history
- From the Home screen, touch
- Touch a call.
- Touch Delete from Call History > OK.
Adding a number in call history to contacts
- From the Home screen, touch
- Touch a call.
- Touch ☑ Add to Contacts > Create new contact.
- Touch a phone type.
- Touch Name, enter a name and touch Next.
- If necessary, enter more contact information.
- Touch Save.
Using the phone
Viewing related calls
Related calls are calls made to or received from the same number which is displayed as one item in the call history.
- From the Home screen, touch 📋.
- Touch a call.
- Touch ➕ View Related Calls.
A list of related calls appears showing the length of each call or a status message.
Using reverse lookup
This service is not available in all areas. This service may be available as a paid subscription. A data connection is required for this feature. Your regular data usage charges apply.
A reverse lookup allows you to search for the address of a phone number that called you.
- From the Home screen, touch >
- Touch a call.
- Touch ➞ Reverse Lookup.
Deleting all calls from the call history
From the Home screen, touch > Clear Call Log.
Placing a conference call
You can host a conference call with two other callers.
TIP: If you receive a call while you are already on another call, you can start a conference call by touching Merge.
- Place a call to the first phone number.
- Touch Add Call.
- Place a call to the second phone number.
-
Touch Merge.
-
Touch to view the other members of the conference call (optional).
Speaking privately during a conference call
You can speak privately with another member of the conference call.
- During the conference call, touch

- Touch next to the contact with whom you would like to speak. The other members of the conference call can continue to speak to each other.
Touch Merge to end the private conversation.
Forwarding calls
- From the Home screen, touch ☐ > Settings > Phone > Call Forwarding.
- Select a forwarding option.
- Enter a number to forward calls to.
Barring calls
Before you can bar incoming calls and outgoing calls, you must obtain the call-barring password from your service provider.
-
From the Home screen, touch ▶ Settings > Phone > Call Barring.
-
Touch a call type.
- Select an option.
- Touch Save.
- Enter the call-barring password.
- Touch OK.
Using the phone
Turning on Aeroplane mode
Aeroplane mode turns off the phone and data connections for situations such as an aeroplane flight.
From the Home screen, touch >Settings > Wireless Manager > Aeroplane Mode.
When Aeroplane mode is on, the telephone, network and Bluetooth features are deactivated. You cannot send or receive calls, email messages or SMS/MMS messages.
Multi-tasking
Use the keys to help you multi-task.
Placing a call while navigating
- If you are driving, pull over and stop.
-
Touch ▶ and place the call.
-
Touch > View Map to return to the map.
- Carry on your conversation using the speakerphone.
Answering a call while on the Internet
- While browsing the Internet, touch Answer when the phone rings.
- Touch 📋 to return to the browser.
- Carry on your conversation using the speakerphone.
Placing a call while on the Internet
- While browsing the Internet, touch > and place the call.
- Touch to return to the browser.
- Carry on your conversation using the speakerphone.
Ending a call while multi-tasking
To hang up, touch 📋 End Call.
Managing your contacts
Adding a contact
- From the application tray, touch
Contacts >
- Enter the contact information.
- Touch Save.
Adding a number in call history to contacts
- From the Home screen, touch

1
- Touch a call.
- Touch ▷ Add to Contacts >
Create new contact.
- Touch a phone type.
-
Touch Name, enter a name and touch Next.
-
If necessary, enter more contact information.
- Touch Save.
Calling a contact
- From the Home screen, touch


TIP: You can also open Contacts using the application tray.
- Touch a contact.
- Touch Call.
- If the contact has more than one phone number, touch the phone number to call.
Searching for a contact
- From the application tray, touch
Contacts > - Enter part of the contact name.
- Touch the contact.
Managing your contacts
Using the contact shortcut menu
-
From the application tray, touch Contacts.
-
Touch the contact image.
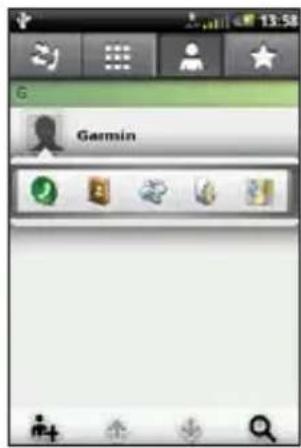
text_image
G GarminA shortcut menu opens, which provides quick access to commonly used items relating to contacts.
- Touch an icon.
Editing and deleting contacts
Editing a contact
-
From the application tray, touch Contacts.
-
Touch a contact.
-
Touch ≧ Edit.
-
Edit the contact:
- Touch an item to edit the information.
- Touch to delete the information.
- Touch Save.
Adding a picture for a contact
-
From the application tray, touch Contacts.
-
Touch a contact.
-
Touch ▷ Edit.
-
Touch the picture of the contact.
-
Select an option: Take a Photo or Select Photo from Gallery.
- Take or choose a picture.
- Touch and drag the square to crop the picture and touch Save.
- Touch Save.
Assigning a location to a contact
- From the application tray, touch Contacts.
- Touch a contact.
- Touch ☑ Edit > Add Address >
-
Select the location:
-
Touch the location on the map.
-
Touch and search for the location.
-
Touch Select this Location > Save.
Setting a ringtone for a contact
- From the application tray, touch Contacts.
- Touch a contact.
- Touch More Info > ☑ Contact Options > Ringtone.
- Touch a ringtone.
- Touch Save.
Sending all calls from a contact to voice mail
- From the application tray, touch Contacts.
- Touch a contact.
- Touch More Info > ☑ Contact Options.
- Select the Incoming Calls tick box.
Managing your contacts
Deleting a contact
- From the application tray, touch Contacts.
- Touch a contact.
- Touch ☐ Delete > OK.
Starting a route to a contact
Before you can start a route to a contact, you should assign a location for the contact (page 27).
- From the application tray, touch Contacts.
- Touch a contact.
- Touch Go!.
Managing your SIM contacts
Importing contacts from your SIM card
-
From the application tray, touch Contacts.
-
Touch ≧ SIM Phone Book > Import Contacts from SIM.
-
Touch a method to import contacts:
-
Touch Import All Contacts.
-
Select the tick box for the contact.
-
Touch Import.
Exporting contacts to your SIM card
-
From the application tray, touch Contacts.
-
Touch SIM Phone Book > Export Contacts to SIM.
-
Touch a method to export contacts:
- Touch Export All Contacts.
- Select the tick box for the contact.
- Touch Export.
Creating a new SIM contact
- From the application tray, touch Contacts.
- Touch SIM Phone Book > View SIM Contacts > Create New SIM Contact.
- Touch Name, enter the name and touch Done.
- Touch Primary Number, enter the phone number and touch Done.
- Touch Done.
Call or send a message to a SIM contact
- From the application tray, touch Contacts.
-
Touch SIM Phone Book > View SIM Contacts.
-
Touch a contact.
- Touch Call or Send Message.
Editing contacts on your SIM card
- From the application tray, touch Contacts.
- Touch SIM Phone Book > View SIM Contacts.
- Touch a contact.
- Touch ≧ Edit.
- Edit the information as needed.
- Touch Done.
Deleting contacts on your SIM card
- From the application tray, touch Contacts.
- Touch ▶ SIM Phone Book > View SIM Contacts.
- Touch a contact.
- Touch ☐ Delete > OK.
Searching for locations
Searching for locations
The Where To? menu provides several different categories you can use to search for locations and destinations.
About GPS signals
Before you can navigate or use location-based applications, your device must acquire satellite signals.
When you start an application that requires GPS signals, the device begins acquiring satellite signals. Acquiring satellite signals can take a few minutes.
TIP: If you are having difficulty acquiring satellite signals, go outdoors to an open area, away from tall buildings and trees.
For more information on GPS satellite signals, see page 111 and page 117.
Finding a point of interest
The detailed maps loaded in your device contain points of interest, such as restaurants, hotels and vehicle services.
Finding a point of interest by category
- From the Home screen, touch view the Where To? pane.
- Touch Browse Places.
- Touch a category.
- Touch a subcategory, if necessary. A list of items near your current location appears.
- Touch a location.

Finding by spelling the name
- From the Home screen, touch view the Where To? pane.
- Touch the text entry field.
- Enter part or all of the location name and touch 🔒

- Touch a location.
Working with found locations
After you find a location, the location appears on the map. An information balloon displays the name of the location.
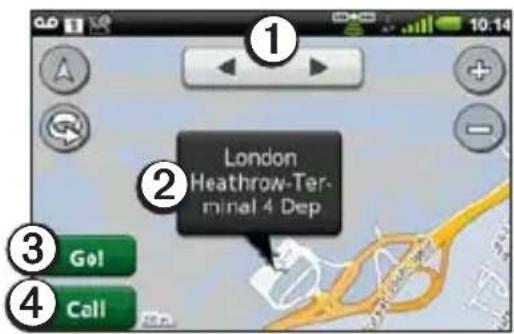
text_image
London Heathrow-Ter- minal 4 Dep Go! Call- Touch ① to view the other locations on the map.
- Touch ② to view additional details, such as the address and phone number, if known.
- Touch ③ to create a route to the location.
- Touch ④ to dial the phone number of the location, if available.
Starting a route to a location
-
Find a location (page 30).
-
Touch Go!.
-
Touch a navigation mode, if necessary.
Calling a location
-
Find a location (page 30).
-
Touch Call.
Finding a nearby location
-
Find a location (page 30).
-
Touch ➞ Search Near.
-
Select an option.
Adding a location to contacts
-
Find a location (page 30).
-
Touch the information balloon.
-
Touch ➞ Add to Contacts.
-
Select an option.
Searching for locations
Changing the search area
By default, your device finds locations near your current location.
- From the Home screen, touch view the Where To? pane.

-
Touch Browse Places > ☐ Change Location.
-
Select the location:
-
Touch the location on the map.
-
Touch and search for the location.
-
Touch Select this Location.
Saving and editing locations
Saving a found location
- Find a location (page 30).
- Touch the information balloon.
- Touch Save.
Saving your current location
- From the Home screen, touch view the Where To? pane.
- Touch View Map.
- Touch the vehicle icon.
- Touch Save.
- Enter a name and touch Done, if necessary.

Finding saved locations
To save a location, see page 32.
- From the Home screen, touch view the Where To? pane.
- Touch Browse Places > Saved Locations.
- Touch the left or right arrow to search different categories, if necessary.
- Touch an item.

Editing saved locations
- From the Home screen, touch view the Where To? pane.
- Touch Browse Places > Saved Locations.
- Touch and hold a location.
- Touch Edit.
- Touch an item to edit it.
- Touch Save.

Deleting a saved location
- From the Home screen, touch view the Where To? pane.
- Touch Browse Places > Saved Locations.
- Touch and hold a location.
- Touch Delete > Confirm.

Creating categories
When you save a location, it is automatically assigned to a category. You can create your own categories to help organise your saved locations.
- From the Home screen, touch view the Where To? pane.
- Touch Browse Places > Saved Locations.
- Touch and hold a location.
- Touch Edit > Categories > Enter New Category.
- Enter a name for the category and touch OK.
- Touch Done > Save.

Searching for locations
Assigning saved locations to categories
- From the Home screen, touch view the Where To? pane.
- Touch Browse Places > Saved Locations.
- Touch and hold a location.
- Touch Edit > Categories.
- Touch the categories to assign to this location.
- Touch Done > Save.

Sharing locations
Sharing a found location
- Find a location (page 30).
- Touch the information balloon.
- Touch Share and select an option to send the location.
-
Touch To, add a recipient and touch Done.
-
Touch Message, enter a message and touch Done.
- Touch Send.
Sharing your current location
- From the application tray screen, touch Where Am I?.
- Touch Share.
- Select an option to send the location.
- Touch To, add a recipient and touch Done.
- Touch Message, enter a message and touch Done.
- Touch Send.
Finding destinations by speaking
You can find points of interest by saying their names.
This service is not available in all areas and languages.
- From the Home screen, touch view the Where To? pane.
- Touch Voice Search.
- When “Speak Now” is displayed, say a location name.
- Touch the correct location, if necessary.
Finding your parking spot
About the parking spot feature
When the My Parking Spot feature is enabled, the location of your parking spot is saved automatically if you are receiving satellite signals when you remove the device from the cradle.
When your parking spot is saved, P appears in the status bar.
Starting a route to your parking spot
- Touch and drag the status bar towards the bottom of the screen.
TIP: You can also access your parking spot from Browse Places > Saved Locations.
- Touch Saved Parking Spot > Go!.
Finding your current location
Use the Where Am I? page to view information about your current location. This is a helpful feature if you need to tell emergency personnel your location.
-
From the application tray, touch Where Am I?.
-
Touch the information balloon to open the Where Am I? page to view your location coordinates and nearby items, such as petrol stations.
TIP: You can also open the Where Am I? page by touching the vehicle icon on the map.
Searching for locations
Setting your home location
You can save a home location and quickly generate a route to it.
- From the Home screen, touch view the Where To? pane.
- Touch Browse Places > Home.
- Select an option.

Starting a route to your home
Before you can create a route to your home location, you must set your home location.
- From the Home screen, touch view the Where To? pane.
- Touch Browse Places > Home > Go!.

Finding an address
NOTE: Depending on the version of the built-in map data on your device, the button names and order of steps could be different from the following steps.
- From the Home screen, touch view the Where To? pane.
- Touch Browse Places > Address. TIP: To change the search area, touch Change County/Country and touch a county or country.
- Touch Enter House Number, enter the house number and touch Next.
- Enter all or part of the street name or number and touch Done.
- Select the street, if necessary.
- Enter and select the correct town, if necessary.
- Select the correct address, if necessary.

Finding local businesses
Local search enables you to search for local businesses. In addition to searching by spelling the name of a location, you can also spell the names of categories, like "salon" or "coffee".
This service is not available in all areas. A data connection is required for this feature. Your regular data usage charges apply.
- From the Home screen, touch to view the Where To? pane.
- Touch Browse Places > Local Search.
- Enter your search term and touch
- Touch an item.
Finding recently found locations
Your device stores the last 50 locations you have found.
- From the Home screen, touch view the Where To? pane.
- Touch Browse Places > Recently Found.
- Touch a location.
Clearing the recently found list
-
From the Home screen, touch to view the Where To? pane.
-
Touch Browse Places > Recently Found.
-
Touch ≧ Clear > OK.
The list of recently found locations is cleared. These locations are not deleted from the map data.
Searching for locations
Finding forthcoming events
Search for forthcoming events, such as art shows and sporting events.
This service is not available in all areas. This service may be available as a paid subscription. A data connection is required for this feature. Your regular data usage charges apply.

- From the Home screen, touch view the Where To? pane.
- Touch Browse Places > Forthcoming Events.
- Touch a category.
- Touch the arrows or the date to select a different date, if necessary.
- Touch an event to view more information.
- Select an option:
- If the event begins within two hours, touch Go! to navigate to the event.
- If the event begins in more than two hours, touch Remind Me! to add the event as an appointment on your calendar.
Finding Panoramio™ photos
Panoramio photographs contain information about the location where the photograph was taken. You can use this information to navigate to locations and landmarks shown in Panoramio photographs.
This service is not available in all areas. A data connection is required for this feature.
- From the Home screen, touch view the Where To? pane.

- Touch Browse Places > Panoramio.
A list of photographs from nearby locations appears.
- Touch a photograph.
Finding fuel prices
This service is not available in all areas. This service may be available as a paid subscription. A data connection is required for this feature. Your regular data usage charges apply.
- From the Home screen, touch view the Where To? pane.

- Touch Browse Places > Fuel Prices.
A list of fuel prices near your current location appears.
Changing the fuel type

- From the Home screen, touch view the Where To? pane.
- Touch Browse Places > Fuel Prices.
- Touch and select a fuel type.
Finding towns
- From the Home screen, touch view the Where To? pane.
- Touch Browse Places > Towns.
- Enter the name and touch Done. TIP: To view a list of nearby towns, touch ➕ Nearby Towns.
- Touch a town.
Using the telephone directory
This service is not available in all areas. This service may be available as a paid subscription. A data connection is required for this feature. Your regular data usage charges apply.
Finding by name
- From the Home screen, touch view the Where To? pane.
- Touch Browse Places > Telephone Directory > By Name.
Searching for locations
- Enter all or part of the last name and touch Next.
- Enter all or part of the first name (optional) and touch Done.
- Touch Search.
- Enter the post code, if necessary.
Finding by phone number
This service may not be available for all phone numbers.
- From the Home screen, touch view the Where To? pane.
- Touch Browse Places > Telephone Directory > By Phone Number.
- Enter the area code and phone number.
- Touch Search.

Entering coordinates
If you know the geographic coordinates of your destination, you can use your device to navigate there. This can be especially helpful when geocaching.
- From the Home screen, touch view the Where To? pane.
- Touch Browse Places > Coordinates.
- Touch a cardinal direction button to change the direction.
- Touch a field to enter the latitude and longitude data.
- Touch View Map.

Changing the map coordinate format
- From the Home screen, touch view the Where To? pane.
- Touch Browse Places > Coordinates > Coordinate Format.

- Touch a format.
Finding junctions
- From the Home screen, touch view the Where To? pane.
- Touch Browse Places >Junctions.
- If necessary, touch Change County/Country to change the county or country.
- Touch Enter Street 1.
- Enter all or part of the street name.
- Touch the correct street.
- Repeat for the second street.
- Touch the correct junction, if necessary.
About Extras
You can download additional content, such as custom POIs, from www.garminasus.com.
Custom POIs are customised points on the map. They can contain alerts that let you know if you are near a designated point or if you are travelling faster than a specified speed.
You can create or download custom POI lists and install them on your device using POI Loader software available at www.garminasus.com. See the POI Loader Help file for more information.
Finding Extras
- From the Home screen, touch view the Where To? pane.
- Touch Browse Places > Extras.
- Touch a category.

Following your route
Following your route
Before you can navigate with your device, you must acquire satellites (page 30).
About the map
NOTICE
The speed limit icon feature is for information only and does not replace the driver's responsibility to abide by all posted speed limit signs and to use safe driving judgement at all times. Garmin will not be responsible for any traffic fines or citations that you may receive for failing to follow all applicable traffic laws and signs.
From the Home screen, touch View Map to display your current location. The vehicle icon displays your position on the map. A speed limit icon may appear as you travel on major roadways.
Using the map
- From the Home screen, touch view the Where To? pane.

-
Touch View Map.
-
Touch anywhere on the map.
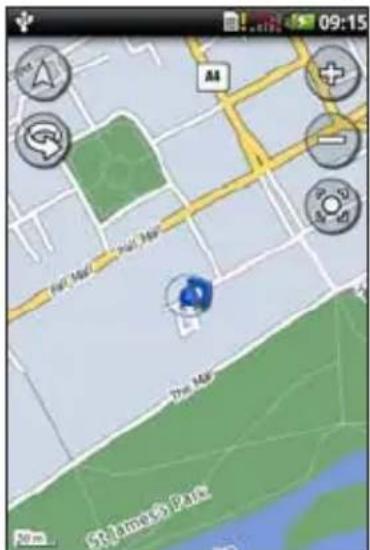
text_image
09:15 A4 + - - - - - - - - - - - - - - - - - - - - - - - - - - - - - - - - - - - - - - - - - - - - - - - - - - - - - - - - - - - - - - - - - - - - - - - - - - - - - - - - - - - - - - - - - - - - - - - - - - - - -50 m 50 (1000x) 24.0- Touch and drag to view different parts of the map.
- Touch and to zoom in and out.
° As you zoom out, the map changes to a digital elevation map showing the contours of the area.
° Zoom far out to view a globe. Touch and drag to spin the globe.
- Touch to rotate the map.
- Touch to view the map in two dimensions.
- Touch to view the map in three dimensions.
- Touch to centre the map on your location.
- Touch anywhere on the map. An arrow points to the location.
- Touch for more options.
NOTE: You can only see detailed map information for areas for which you have maps loaded on your device.
About usage modes
You can navigate to a destination in Driving mode or in Walking mode. The navigation tools vary slightly based on your usage mode.
In Driving mode, your device calculates routes for cars. These routes obey traffic rules, such as for one-way streets. Your device uses typical car speeds when estimating your arrival time.
In Walking mode, your device calculates routes for walking. These routes avoid motorways in favour of smaller streets. Your device uses typical walking speeds when estimating your arrival time. If you have cityXplorer™ maps installed, your device may include public transport systems in walking routes.
Following your route
Navigating in Driving mode
Starting a route in Driving mode
- From the Home screen, touch view the Where To? pane.

-
Find a location (page 30).
-
Touch Go! > Driving.
NOTE: When the device is in the mount, Driving is automatically selected.
The device creates a route to the location and opens the map.
Using the map to navigate in Driving mode
Your route is marked with a magenta line.
As you travel, your device guides you to your destination with voice prompts, arrows on the map and directions at the top of the map.
If you deviate from the original route, your device recalculates the route and provides new directions.
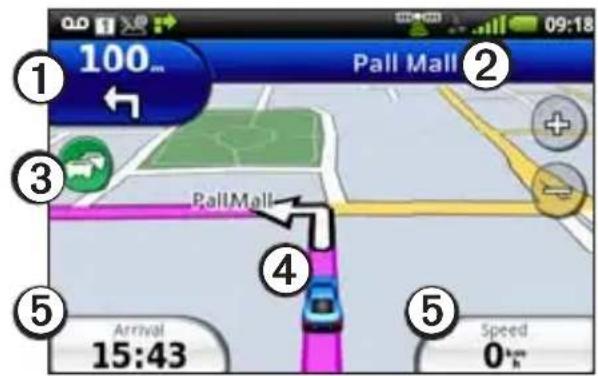
text_image
100 Pall Mall PallMall Arrival 15:43 Speed 0 km- Touch ① to view the next turn.
- Touch ② to view the route details.
- Touch ③ to view the Traffic menu, when available. Traffic services require an additional subscription and data plan charges.
- Touch ④ to open the Where Am I? page.
- Touch ⑤ to view the trip computer.
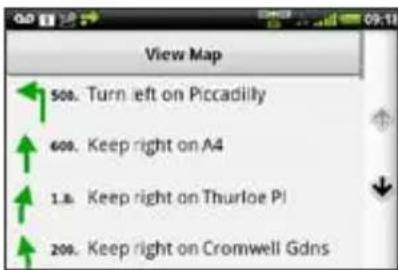
Viewing the route details
When you are navigating in Driving mode, you can view all of the turns for your entire route and the distance between turns.
- While navigating to a destination, touch the text bar on the top of the map.
text_image
View Map 500. Turn left on Piccadilly 600. Keep right on A4 1.8. Keep right on Thurloe Pi 200. Keep right on Cromwell Gdns- Touch a turn on the list to view details for the turn.
Viewing the entire route on the map
-
From the map, touch the text bar on the top of the screen.
-
Touch View Map.
The map appears with your route marked with a magenta line.
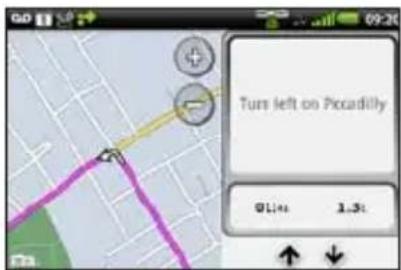
Viewing the next turn
When you are navigating in Driving mode, you can view the turn on the map and the distance and time left before you reach the turn.
- While navigating to a destination, touch the turn indicator on the map.
text_image
Turn left on Pocadilly 01:44 1.3:- Touch the arrows to see more turns in the route.
Viewing the trip computer in Driving mode
The trip computer displays a compass, your current speed and other helpful statistics about your trip.
While you are navigating in Driving mode, from the map, touch Speed.
Following your route

text_image
00:07 0m Speed 0m 24s Time on 00:07 0mResetting the trip computer in Driving mode
Reset the trip computer before beginning a trip.
- While you are navigating in Driving mode, from the map, touch Speed >
- Touch an item to reset.
Avoiding road features
- From the Home screen, touch ☐ > Settings > Navigation > Avoidances.
- Select the tick boxes to mark the road features to avoid.
About Traffic
This service is not available in all areas. This service may be available as a paid subscription. A data connection is required for this feature. Your regular data usage charges apply.
NOTE: Garmin and ASUS are not responsible for the accuracy of the traffic information.
Turning on Traffic
Before you can receive traffic information, you must turn on background data.
- From the Home screen, touch ⚠️ Settings >Navigation.
- Select the Background Data tick box.
About the Traffic icon
The traffic icon on the map changes colour to indicate the severity of traffic conditions.
| Icon Definition | |
| Grey Traffic information is not available. | |
| Green Traffic is flowing freely. | |
| Yellow Traffic is moving, but there is a delay. There is moderate traffic congestion. | |
| Red Traffic is not moving or is moving very slowly. There is a severe delay. | |
Traffic on your route
When calculating your route, the device examines the current traffic and automatically optimises the route for the shortest time.
If a severe traffic delay occurs on your route while you are navigating, the device automatically recalculates the route. You might still be routed through traffic if no better alternative routes exist.
If a non-severe traffic delay occurs on your route, the traffic icon displays how much time the delay has added to your route. This time is already included in your estimated arrival time.
Avoiding traffic automatically
You can enable the device to automatically avoid traffic.
- From the Home screen, touch
Settings > Navigation > Avoidances.
- Select the Traffic tick box.
Manually avoiding traffic on your route
-
While you are navigating in Driving mode, from the map, touch the Traffic icon.
-
Touch Traffic On Route.
Following your route
- Touch the arrows to select a traffic delay, if necessary.
- Touch ☑ Avoid to avoid the selected traffic delay.
You might still be routed through traffic if no better alternative routes exist.
Viewing the Traffic map
The Traffic map displays colour-coded traffic flow and delays on nearby roads.
To return to the normal map, touch the Traffic icon and then touch Show Normal Map.
- On the map, touch the Traffic icon.
- Touch Show Traffic Map.
Viewing traffic delays
- On the Map page, touch the Traffic icon.
-
Touch Traffic Search to view a list of traffic delays.
-
Touch an item to view the delay on a map and details about the delay.
- If there is more than one delay, touch the arrows to view the additional delays.
Navigating in Walking mode
Starting a route in Walking mode
- From the Home screen, touch view the Where To? pane.
- Find a location (page 30).
- Touch Go! > Walking. NOTE: The device must be out of the mount to be able to select Walking.
The device creates a route to the location and opens the map.
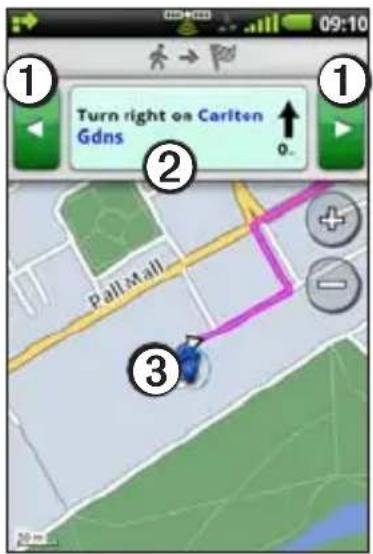
Using the map to navigate in Walking mode
Your route is marked with a magenta line.
text_image
Turn right on Carlton Gdns 0.- Touch ① to view the next turn or previous turn.
- Touch ② to view the Itinerary page.
- Touch ③ to view the Where Am I? page.
Viewing the Itinerary page
While navigating a route in Walking mode, touch ➕ View Itinerary.
Using the compass to navigate
- From the Map page, touch Trip Computer.
As you travel, the compass rotates to indicate your direction of travel.
- Move in a circle until the arrow points at the bug indicator.
The bug indicator is the inverted triangle at the top of the compass, which indicates your current direction.
- Continue travelling in this direction towards your destination.
Following your route
Calibrating the compass

- From the Home screen, touch view the Where To? pane.
- Touch View Map > ☐ Trip Computer > ☐ Calibrate Compass.
- Follow the on-screen instructions.
Resetting the trip computer in Walking mode
Reset the trip computer before beginning a trip.
-
From the Home screen, touch View Map > Trip Computer > .
-
Touch an item to reset.
Taking a detour
While navigating a route, you can use detours to avoid obstacles ahead of you, such as construction areas.
-
While navigating a route, touch
-
Touch and drag the status bar towards the bottom of the screen. The notification window opens.
- Select an option:
- Touch Detour when in Driving mode.
- Touch Recalculate when in Walking mode.
If the route you are currently taking is the only reasonable option, the device might not calculate a detour.
Stopping the route
- While navigating a route, touch
- Touch and drag the status bar towards the bottom of the screen. The notification window opens.

- Touch Stop.
Working with routes
Adding points to the active route
- While navigating a route, touch
- From the Home screen, touch view the Where To? pane.
- Find a location (page 30).
- Touch the intermediate destination.
- Touch Go! > Insert Via Point.


Planning a new route
- From the application tray, touch Routes > Create New Route.
- Touch the text field and enter a route name.
- Touch Add Location.
- Select the location:
- Touch the location on the map.
- Touch and search for the location.
- Touch Select this Location.
- Repeat steps 3–5 as necessary.
- Touch Save.
Editing a route
- From the application tray, touch Routes.
- Touch a route.
- Touch Edit.
- Edit the route:
- Touch Add Location to add more locations.
- Touch and drag or to move the location down or up in the route.
- Touch to delete a location.
Following your route
Optimising and reversing a saved route
- From the application tray, touch Routes.
- Touch a route.
- Touch Edit >
- Touch Optimise Route or Reverse Route.
- Touch Save.
Deleting a saved route
- From the application tray, touch Routes.
- Touch a route.
- Touch Edit > Delete Route > OK.
Starting to navigate a saved route
- From the application tray, touch Routes.
- Touch a route.
- Touch Go!.
Viewing your trip log
You can record the path you travel (called a trip log) and display it as a dotted line on the map.
-
From the Home screen, touch Settings >Navigation.
-
Select the Trip Log tick box for the Car and/or Pedestrian settings.
The trip log appears on the map.
Clearing the trip log
From the Home screen, touch 📋 Settings > Navigation > 📋 Clear Trip Log.
Sending and receiving messages
Your regular messaging fees apply when sending and receiving messages.
Sending a text message
You can send Short Message Service (SMS) text messages.
- From the application tray, touch Messaging > New Text Message.
- Enter a phone number or a contact name and touch a recipient.
- Enter the text message.
- Touch for additional options.
- Touch Send.
About multimedia messages
A multimedia (MMS) message is similar to a text message, but it includes an attachment, such as a photo, video, contact or calendar event.
Sending an MMS
- From the application tray, touch Messaging > New Text Message.
- Enter a phone number or a contact name and touch a recipient.
- Enter the text message.
- Touch ≧ Attach.
- Touch a media type.
- Touch the file to attach.
- Touch Send.
Sending and receiving messages
Sending a location message

CAUTION
Use caution when sharing your location information with others.
Location messages allow you to send your current location information to other people.
- From the application tray, touch Messaging > New Text Message.
- Enter a phone number or a contact name and touch a recipient.
- Enter the text message.
- Touch
- Select the location:
- Touch the location on the map.
- Touch and search for the location.
- Touch Select this Location.
- Touch Send.
Reading messages
A number on the Messaging icon displays the number of unread messages in your inbox.
- From the Home screen, touch Messaging. The inbox opens containing SMS and MMS messages received from other devices.
Unread messages are displayed in bold.
- Touch a message to read it. TIP: Touch and hold a message to view more options.
- Touch ■ for more options.
Replying to a message
- From the Home screen, touch Messaging.
- Touch a message.
- Touch the data entry field.
- Enter a message.
- Touch Send.
Forwarding a message
- From the Home screen, touch Messaging.
- Touch a message.
- Touch and hold a message in the thread.
- Touch Forward.
- Enter a phone number or a contact name and touch a recipient.
- Touch Message to edit the message, if necessary.
- Touch Send.
Deleting a message
- From the Home screen, touch Messaging.
- Touch a message.
- Touch and hold a message in the thread.
- Touch Delete Message.
Deleting a thread
- From the Home screen, touch Messaging.
- Touch a message.
- Touch ☐ Delete Thread.
Sending and receiving messages
Setting up SMS cell broadcast
If SMS cell broadcast is supported by your service provider and region, you can receive text messages that are broadcast to multiple subscribers in the area.
- From the Home screen, touch
Settings > Messaging. - Select the Cell Broadcast Service tick box.
- Touch Select Language, select the language you want to receive messages in and touch Save.
- Touch Manage Channels.
- Select the Receive Channel List tick box.
- Select the channels you want to receive.
TIP: You can also add a channel that does not appear in the list.

Adding a new channel
- From the Home screen, touch
Settings > Messaging > Manage Channels. - Touch
- Touch the Channel Number field and enter the channel number.
- Touch the Description field and enter a description for the channel.
- Touch the Note field and enter a note about the channel.
- Touch Save.


About cell broadcast messages
When you receive a cell broadcast message, it is displayed in the notification bar (page 8).
Using email
Adding an email account
Contact your email account provider for your email configuration information.
NOTE: To add a Google email account, see page 90. Access Google mail using the Google mail application.
- From the application tray, touch Email > Other (POP3/IMAP4).
- Enter the email address and the email password.
- Touch Save.
- If necessary, enter account configuration information from your service provider.
- Touch Next > Save.
Adding an Exchange ActiveSync email account
Contact your network administrator to obtain the necessary information for your network.
For more information about Exchange ActiveSync, see page 90.
- From the application tray, touch Email > Exchange ActiveSync.
- Enter your email address and your email password.
- Touch Next.
- If necessary, enter or correct the information.
- Touch Next.
The device verifies the account settings.
Sending and receiving messages
Sending an email message
- From the application tray, touch Email > Compose.
- Touch the fields on the screen to enter recipients, to enter a subject and to add attachments.
- Touch Message.
- Enter the text message.
- Touch for more options (optional).
- Touch Send.
Viewing an email message
- From the application tray, touch Email.
- Touch to check for new email messages, if necessary.
- Touch an email message.
- Select an option:
- Touch to view the location information, if available.
- Touch 📋 to open the attachment, if available.
Deleting email messages
- From the application tray, touch
Email > - Touch the messages to delete.
- Touch Delete.
Searching for an email message
NOTE: This only searches the sender name and headers of the messages, not the message text.
- From the application tray, touch Email.
TIP: To search a different folder, touch ➕ View Folders and touch a folder, if necessary. - Touch ☐ Search Current Folder.
- Enter the search text and touch Done.
Changing email folders
- From the application tray, touch Email.
- Touch ➕ View Folders.
- Touch a folder.
Setting an email signature
You can set an email signature for each email account you have added.
- From the application tray, touch Email > Manage Accounts.
- Touch an account.
- Verify the Use Signature tick box is selected.
- Touch Signature.
- Enter a signature and touch Save.
Changing the Email account password
- From the Home screen, touch ☒ Settings > Email.
- Select an account.
- Touch Account Info > Password.
- Enter the new passwords.
- Touch Save.
Adding another email account
- From the application tray, touch Email > Manage Accounts > Add New Account.
- Select the account type and follow the applicable instructions on page 57.
Changing email accounts
- From the application tray, touch Email.
- Touch and .
Sending and receiving messages
Setting the default email account
- From the Home screen, touch ☑ Settings > Email > ☑ Set Default Account.
- Touch an account.
- Touch Done.
Editing your Exchange ActiveSync account
- From the application tray, touch Email > Manage Accounts > Exchange ActiveSync > Account Info.
- Edit the fields as necessary.
- Touch
-
Select an option:
-
Touch Yes to verify your account.
- Touch No to save the changes without verifying.
Using Ciao!™
Ciao! periodically sends your location to our partner networks and downloads the most recent location of your friends. This application only submits your location when you tell it to, unless you enable automatic updates.
This service is not available in all areas. A data connection is required for this feature. Your regular data usage charges apply.

CAUTION
Use caution when sharing your location information with others.
Registering your device and joining Ciao!
- From the application tray, touch Ciao!.
-
Read and accept the on-screen messages.
-
Follow the steps to register your device.
After registering, you will receive an SMS message for verification. - Open the SMS message received from myGarmin.
- Touch the link to complete the verification process.
- Touch OK.
The Ciao! registration page opens. - Select the tick box to verify that you are of legal age to use Ciao!
- Touch Next.
- Enter a display name and touch Done.
- Touch a type of location update: Manual or Automatic.
- Touch the link to read the terms of service for the displayed network or networks.
- Touch Accept.
Using Ciao!TM
Your location is updated and becomes available to your friends.
Changing your display name
- From the application tray, touch Ciao! > My Details > ☑ Change Name.
- Enter a new name.
- Touch Done.
Inviting a friend
- From the application tray, touch Ciao! > Invite.
- Select an option to find a friend.
- Touch Done.
Your invited friend must accept the invitation before you can receive location updates from that friend.
Accepting or declining an invitation
- From the application tray, touch Ciao!.
- Touch the friend that sent you the invitation.
- Touch Accept or Decline.
Sending a location update
From the application tray, touch Ciao! > My Details > Send Update.
Automatically sending location updates
CAUTION
Use caution when sharing your location information with others.
By default, your location is only sent when you manually send it.
- From the application tray, touch Ciao! > My Details.
- Touch ☑ Change Location Updates > Automatic > Done.
Updating your status
- From the application tray, touch Ciao! > My Details > Change Status.
- Enter a new status message.
- Touch Done.
Viewing friends
Your list of friends displays the status of, the distance to and the direction to your friends.
- From the application tray, touch Ciao!.
- Touch a friend. The location for the friend appears on a map.
Viewing all friends on the map
From the application tray, touch Ciao! > View Map.
Adding a friend to contacts
- From the application tray, touch Ciao!.
- Touch a friend.
- Touch ☐ Add to Contacts.
Sending a message to a friend
- From the application tray, touch Ciao!.
- Touch a friend.
- Touch Message.
Starting a route to a friend's location
- From the application tray, touch Ciao!.
Using Ciao!™
- Touch a friend.
- Touch Go!.
Removing an invitation
- From the application tray, touch Ciao!.
- Touch an invited friend.
- Touch Uninvite.
Removing a friend
- From the application tray, touch Ciao!.
- Touch a friend.
- Touch the information balloon.
- Touch □ > Remove Friend > Yes.
Hiding and revealing your location
- From the application tray, touch Ciao! > ≧ Hide > Hide.
Your current location is hidden from your friends.
- To stop hiding, touch Ciao! > □> Stop Hiding > Stop Hiding.
Viewing Ciao! networks
- From the application tray, touch Ciao!.
- Touch ➕ Privacy > ➕ Networks.
Disabling Ciao!
- From the application tray, touch Ciao!.
- Touch ☑ Privacy > ☑ Disable Ciao! > OK.
All the Ciao! information stored on your device is removed. You no longer send any position updates.
To enable Ciao!, you must join Ciao! again.
Browsing the web
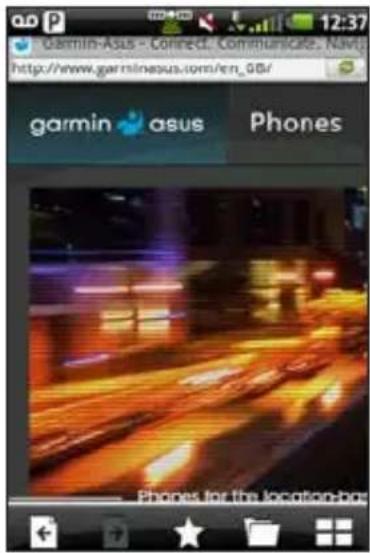
- From the application tray, touch Browser.
- Touch the URL bar.
- Enter a search term or a URL and touch Go.
text_image
Garmin-Asus - Connect Communications Navig http://www.garminasus.com/en_98/ garmin asus Phones Phones for the location-boxUsing the browser
- Touch to refresh the current web page.
- Touch to stop loading the web page.
- Touch and drag the screen to scroll the web page.
- Touch two points near the centre of the page and drag your fingers apart to zoom in.
- Touch two points near opposite edges of the page and drag your fingers towards the centre of the page to zoom out.
- Touch links, text entry boxes and other interactive items to activate them.
- Touch and hold interactive items to view a menu of additional options.
Browsing the web
- Touch to return to the previous web page in your history.
- Touch to go to the next web page in your history.
- Touch to add this web page to your Favourites, if it is not already added.
- Touch remove this web page from your Favourites, if it is already added.
- Touch to view a list of recently viewed web sites ( ), favourite web sites ( ) and most viewed web sites ( ).
- Touch to view other active browser windows.
- Touch ☐ use the following options:
- Touch Go To URL to enter a URL.
- Touch Refresh to refresh the web page.
- Touch Share to send the URL in a text message or an email.
- Touch Find on Page to find text in the current web page.
- Touch Select Text to copy text from the current web page to the system clipboard. Touch and drag across the text to copy. When you lift your finger, the selected text is copied to the clipboard.
- Touch View Downloads to view your download history.
Viewing multiple browser windows
You can view another web page without closing the current page by launching another browser window.
- From the application tray, touch Browser > ☐New Page.
-
Select an option:
-
Touch a web site.
-
Touch the URL bar to enter a web address, which opens the new web page.
-
Touch
- Touch an active browser window.
Saving a web page to Favourites
- Open the web page to save.
- Touch ★
When you view one of your favourite web pages, appears gold.
Removing a web site from Favourites
- Open the web page to remove.
- Touch ★
Opening a favourite web page
- From the application tray, touch Browser > □. ★
- Touch a web page to view in the browser.
Viewing your history
- From the application tray, touch Browser > ▶.
- Touch a web page to view in the browser.
Clearing your web page history
From the Home screen, touch >Settings > Browser > Clear History > Yes.
Browsing the web
Sharing a URL
- From the application tray, touch
Browser > - Touch a category.
- Touch and hold a web page.
- Touch Share.
- Select an option to send the URL.
Opening a web site in a new window
- From the application tray, touch
Browser > - Touch a category.
- Touch and hold a web page.
- Touch Open in New Window.
Deleting a web site from a list
- From the application tray, touch
Browser > . - Touch a category.
- Touch ✗
- Touch next to the web site to remove the site from the list.
- Touch again to delete.
- Touch Done.
Setting your browser home page
- From the Home screen, touch
Settings > Browser > Set Home Page. - Enter a URL.
- Touch OK.
Downloading files
- From the application tray, touch Browser.
- Open a web page that contains a download link.
- Touch the download link.
The download history page appears and a progress bar indicates the status of the download.
TIP: Touch and hold the progress bar to cancel or pause the download.
-
Touch and select an option, if necessary:
-
Touch Clear All to clear the download history. This option does not remove downloaded files from the device.
-
Touch Pause All to pause all in-progress downloads.
-
Touch Resume All to resume all paused downloads.
-
Touch Cancel All to cancel all in-progress downloads. This option does not remove downloads that have already been completed.
-
When the progress bar is full, touch the file name to view the downloaded file.
Viewing downloads
-
From the application tray, touch Browser > ☐ View Downloads.
-
Touch the file.
Playing music
Playing music
Music player file types
The music player supports the following file types:
• MP3
- MPEG4
• WMA
- AAC/AAC+/eAAC+
- WAV
• MIDI
- OGG
All supported music files on your device are displayed in the music player.
Music player information
Supply of this product does not convey a licence nor imply any right to distribute content created with this product in revenue-generating broadcast systems (terrestrial, satellite, cable and/or other distribution channels), streaming applications (via Internet, intranets and/or other networks), other content distribution systems (pay-audio or audio-on-demand applications and the like) or on physical media (compact discs, digital versatile discs, semiconductor chips, hard drives, memory cards and the like). An independent licence for such use is required. For details, please visit http://mp3licensing.com.
Playing a song
You must transfer music files to your device before playing songs or creating playlists (page 92).
- From the application tray, touch Music.
-
Select an option:
-
Touch All Songs.
- Touch a category and a subcategory, if necessary.
All the songs in the selected category are added to the current playlist.
- Touch a song.
The music player plays the selected song and the following songs.
Changing the music player view
While playing a song, touch the following icons to change the music player view:
- Touch 📂️ new the current playlist.
- Touch to view the current track, cover art and a progress slider.
- Touch ☑Browse Music Library to browse the music library without stopping the music.
About playlists
A playlist is a list of songs that can be saved. The current playlist appears on the playlist screen of the music player. You can also create and save playlists for future playback.
Playing music
Creating a playlist
- From the application tray, touch Music > Playlists > +
- Enter a new name and touch Save.
- Touch the new playlist.
- Touch +
- Touch a category and subcategories, if necessary.
- Select the tick box next to each song to add to the playlist.
- Touch Add to Playlist.
- Repeat steps 4–7 to add additional songs.
- Touch Done > Save.
- Touch and drag the song to a new position in the list to change the order of the playlist (optional).
- Touch Save.
Playing a playlist
- From the application tray, touch Music > Playlists.
- Touch a playlist.
- Touch a song to begin playing the playlist.
Editing a playlist
- From the application tray, touch Music > Playlists.
- Touch a playlist.
- Touch ▶ Edit Playlist.
- Select an option to edit the playlist:
- Touch 🧑 add songs to the playlist.
- Touch to remove a song from the playlist.
- Touch and hold and drag the song to a new position in the playlist.
- Touch Save.
Searching the music player
- From the application tray, touch Music.
- Touch
- Enter all or part of the song title, album or artist.
- Touch Done.
Saving a song as a ringtone
- From the music player playlist view, touch and hold the song.
- Touch Add to ringtone list.
Streaming online music
You can stream supported music files without saving them on the device.
- From the application tray, touch Browser.
- Select an option:
- Enter a URL.
- Navigate to a page with a link to a supported music file.
- Touch the music file link.
The music player launches and plays the song. The URL for the song appears. - If possible, touch ☑ Save to save the song.
Taking and viewing pictures and videos
Taking and viewing pictures and videos
NOTE: If it is not already removed, remove the plastic film from the camera lens before using the camera.
Taking a picture
- From the Home screen, touch Camera.
- Use the screen as a viewfinder and point the camera lens at the subject to photograph.
- Touch and hold and hold the camera still.
A flashing grey box appears on the screen. The device focuses on the object inside of the box. When the camera is in focus, the box turns green and stops flashing.
- Release to take the picture.
When you hear the camera click, the photo has been taken and is displayed for review for three seconds.
-
Select an option:
-
Touch ⓘ for more options, such as to set the image as the wallpaper or as a contact icon.
- Touch to share the image.
- Touch to erase the image.
- Touch to take a new picture.
TIP: To take a picture quickly, touch and release.
Taking a picture with GPS information
If you are receiving GPS signals, the device can assign a GPS location to the photo.
- From the Home screen, touch Camera.
- Touch
TIP: Before taking pictures with GPS information, you may need to wait a few moments for the device to acquire satellite signals.
- Use the screen as a viewfinder and point the camera lens at the subject to photograph.
- Touch and hold and hold the camera still.
- Release to take the picture. When you hear the camera click, the photo has been saved.
Recording a video
- From the Home screen, touch Camera.
- Touch 📁 to select video.
- Use the screen as a viewfinder and point the camera lens at the subject to be recorded.
- Touch to begin recording.
- Touch to stop recording.
Taking and viewing pictures and videos The video is saved automatically.
TIP: Touch to find and view the video.
Changing the camera and video settings
- From the application tray, touch Camera > ≧ Camera Settings.
-
Select an option:
-
Touch Colour Effect to select a colour effect to apply to photos you take.
- Touch Lighting Adjustment to select a lighting condition or select Automatic.
- Touch Picture Resolution to select the resolution at which to capture photos. Higher settings use more storage memory to provide better quality photos.
- Touch Shutter Sound to turn the shutter sound on or off.
Taking and viewing pictures and videos
- Touch Auto Review to turn the review page on or off. The review page displays the photo briefly after you take it.
- Touch Video Quality to select the resolution at which to record video.
NOTE: Video Quality can only be adjusted when MP4 is selected as the Video Format.
- Touch Video Format to select the video format to use when saving videos.
NOTE: Only 3GPP videos can be sent as a multimedia message.
Viewing pictures
- From the application tray, touch Gallery.
- Touch a picture.
- Touch the arrows to view additional photos.
Viewing a video
- From the application tray, touch Gallery.
- Touch a video. Videos are indicated by
- Touch ▶
- Touch the screen to view the playback controls.
Viewing a slideshow
- From the application tray, touch Gallery.
- Touch ➕ View Slideshow.
Sharing pictures and videos
- From the application tray, touch Gallery.
- Touch the picture or video.
- Touch
- Select an option to share the image.
Setting your wallpaper
You can select and prepare a photo to serve as wallpaper.
- From the application tray, touch Gallery.
- Touch a picture.
- Touch ☐ Set As > Wallpaper.
- Touch and drag the edges of the rectangle to crop the photo.
- Touch Save.
Editing pictures and videos
- From the application tray, touch Gallery.
- Touch a picture or a video.
- Touch
- Select an option:
- Touch Rotate to turn the photo left or right.
Taking and viewing pictures and videos
- Touch Crop, touch and drag the edges of the rectangle to crop the photo and touch Save.
A new file with the cropped photo is created. - Touch More Info > ☐ > Rename Picture or Rename Video to rename files.
Adding a picture to a contact
- From the application tray, touch Gallery.
- Touch a picture.
- Touch ☐ Set As > Contact Photo.
- Touch a contact.
- Touch and drag the edges of the square to crop the photo.
- Touch Save.
Taking and viewing pictures and videos
Starting a route to a photograph or video
You can route to photographs that have GPS location information (page 74).
- From the application tray, touch Gallery.
- Touch a picture.
- Touch Go!.
Changing the Gallery settings
-
From the application tray, touch Gallery > ≧ Gallery Settings.
-
Select an option:
-
Touch Grouping to select the criteria by which to group your pictures.
-
Touch Display Size to select the size of the picture previews.
-
Touch Sort Order to select the order in which to sort your pictures.
- Touch Slideshow Interval to select the amount of time that each picture should be displayed in the slideshow.
- Touch Slideshow Transition to select the transition effect to use when changing pictures in the slideshow.
- Select the Repeat Slideshow tick box to play the slideshow multiple times.
- Select the Shuffle Slides tick box to display the slides in random order.
Taking and viewing pictures and videos
MPEG-4 EULA
This product is licensed under the MPEG-4 Visual Patent Portfolio Licence for the personal and non-commercial use of a consumer for (i) encoding video in compliance with the MPEG-4 visual standard ("MPEG-4 Video") and/or (ii) decoding MPEG-4 video that was encoded by a consumer engaged in a personal and non-commercial activity and/or was obtained from a video provider licensed by MPEG LA to provide MPEG-4 video. No licence is granted or shall be implied for any other use. Additional information including that relating to promotional, internal and commercial uses and licensing may be obtained from MPEG LA, LLC. See www.MPEGLA.com.
AVC EULA
This product is licensed under the AVC Patent Portfolio Licence for the personal and non-commercial use of a consumer to (i) encode video in compliance with the AVC standard ("AVC Video") and/or (ii) decode AVC video that was encoded by a consumer engaged in a personal and non-commercial activity and/or was obtained from a video provider licensed to provide AVC video. No licence is granted or shall be implied for any other use. Additional information may be obtained from MPEG LA, LLC. See www.MPEGLA.com.
Organising your life
Organising your life
You can synchronise your phone with your computer, Google account and Exchange account to keep your inbox, contacts and calendar up to date in all locations (page 90).
Using the calendar
Viewing an appointment
-
From the application tray, touch Calendar.
-
Select an option, if necessary:
-
Touch to view the current day. The number in the circle is the current day of the month.
- Touch to view an agenda of forthcoming appointments.
- Touch to-view appointments for today.
- Touch to select a date on the monthly calendar.
- Touch or to change the day or the month.
- Touch an appointment to view details.
Creating an appointment
- From the application tray, touch Calendar.
- Touch .+
- Touch Subject, enter a subject and touch Done.
- Touch Location and select an option to enter a location:
- Enter the full address or location name and touch Done.
- Touch Add Location, touch the location on the map and touch Select this Location > Done.
- Touch Add Location, touch , find the location and touch Select this Location > Done.
-
Select the duration of the appointment:
-
Select start and end times.
-
Select the All Day tick box to create an all-day appointment.
-
Touch Reminder, select a reminder time and touch Save, if necessary.
- Touch Repeat, select how often the appointment recurs and touch Save, if necessary.
- Touch Calendar to select a calendar, if you have more than one calendar on the device.
- Touch Note to make notes about the meeting (optional).
- Touch Invites to invite people to the appointment, if necessary. You can invite people to the meeting if you are using a Google or Exchange ActiveSync account.
- Touch Save.
Starting a route to an appointment
If the appointment has location information, you can start a route to the location.
- From the application tray, touch Calendar.
- Touch the appointment.
- Touch Go!.
Viewing a document
You can view the following document types using the document viewer: Microsoft® Word, Excel®, PowerPoint®, Adobe® PDF, HTML and plaintext files. For more information on transferring files, see page 92.
1. From the application tray, touch Document Viewer.
Organising your life
TIP: To display files of a certain type, touch ☐ Show By File Type and touch a file type.
- Touch the document.
NOTE: You can also open a document attached to an email or linked on a web page.
-
Perform any of the following actions:
-
Touch or to move backwards or forwards one page.
- Touch Page and enter a page number.
- Touch two points near the centre of the page and drag your fingers apart to zoom in.
-
Touch two points near opposite edges of the page and drag your fingers towards the centre of the page to zoom out.
-
Touch ☐ > Search to search the document.
- Touch ☐Rotate to rotate the document 90° clockwise.
- Touch Share to send the document.
Searching a document
- Open the document in the Document Viewer (page 81).
- Touch ≧ Search.
- Enter a search term.
- Touch 🔒
- Touch or to find the next occurrence or the previous occurrence of the search term.
- Touch to close the search bar.
Checking the weather forecast
This service is not available in all areas. A data connection is required for this feature. Your regular data usage charges apply.
TIP: To change the units of measurement, see page 109.
- From the application tray, touch Weather.
The current local weather conditions and a six-day forecast are displayed.
- Touch a day to view a detailed forecast for that day.
Viewing the forecast in other towns
- From the application tray, touch Weather > ☑ Edit Favourite Towns > Add Town.
- Enter the town name.
- Touch Done.
- Touch the town.
- Touch Done.
- Touch or to view the forecast in your favourite towns.
Using the clock
For information on manually changing the time or the time zone, see page 108.
Adding towns to the time list
- From the application tray, touch Clock > ▶ . +
- Enter all or part of a town name.
- Touch Done.
- Touch the town.
Organising your life
Setting an alarm
- From the application tray, touch Clock > Add New Alarm.
- Touch Alarm Message, enter a message for the alarm and touch OK.
- Touch Start, select an alarm time and touch Done.
- If necessary, touch Repeat, select how often the alarm should repeat and touch OK.
- Select the Enabled tick box.
- Touch Ringer, touch a ringer and touch Done (optional).
- Touch Save.
Managing alarms
- Select or clear the tick box next to an alarm to enable or disable the alarm.
- To delete an alarm, touch an alarm and touch ➞ Delete Alarm.
- When the alarm sounds, touch Snooze to hear the alarm again in 10 minutes or touch Dismiss.
Using the stop watch
- From the application tray, touch Clock >
- Touch Start to start the timer.
- Touch Lap to record the lap time and the split time (optional).
- Touch Stop to stop the timer.
- Touch the Lap and Split times to view details (optional).
- Touch Reset to reset the timer (optional).
Viewing the world map
- From the application tray, touch
Clock >
The globe displays areas of daylight and night across the world.
- Perform any of the following actions:
- Touch and drag the globe to change the speed or the direction of rotation.
- Touch the globe to stop the rotation.
- When the globe is stopped, touch again to view a flat map view.
- Touch the map to switch back to the globe view.
Using the converter
Converting units
- From the application tray, touch Converter.
- Touch the button next to Convert.
- Touch the type of items to be converted.
- Touch Done.
- Touch a unit of measurement.
- Touch the unit type.
- Touch Done.
- Touch a number.
- Enter the number of units to be converted.
- Touch Done.
TIP: To clear the number of units, touch ≧ Clear.
Organising your life
Converting currency
- From the application tray, touch Converter.
- Touch the button next to Convert.
- Touch Currency > Done.
- Touch a currency button.
TIP: Touch and drag the tab to quickly scroll through the currencies. - Touch a currency.
- Touch Done.
- Touch the amount below the currency to convert.
- Enter the amount.
- Touch Done.
Updating the currency rates
A data connection is required for this feature.
- From the application tray, touch Converter.
- Touch the button next to Convert.
- Touch Currency > Done > Update.
Setting conversion rates manually
- From the application tray, touch Converter.
- Touch the button next to Convert.
- Touch Currency > Done.
- Touch a currency button.
-
Touch the currency for which you want to set the conversion rate and touch Done.
-
Repeat step 5 to set the other currency, if necessary.
- Touch ▷ Custom.
- Touch a conversion tab to change how the currencies are converted.
- Touch a conversion rate.
- Enter a new conversion rate and touch Done.
Checking flight status
A data connection is required for this feature. Your regular data usage charges apply.
- From the application tray, touch Flight Status.
- Perform a search:
- Touch Current Location to search for flights in airports near your current location.
- Touch Another Town to search for flights in airports near the town you select.
A list of airports appears. Major airports are listed first and all other airports are sorted by distance.
- Touch an airport.
TIP: Touch to view the airport on the map. - Select an option.
- Touch a flight.
Organising your life
Finding cinema times
This service is not available in all areas. A data connection is required for this feature. Your regular data usage charges apply.
Finding a film by the title
- From the application tray, touch Cinema Times > Films.
- Touch the arrows or the date to select a different date, if necessary.
- Touch a film.
- Touch Cinemas.
- Touch a cinema.
- Select an option.
Finding a film by cinema
-
From the application tray, touch Cinema Times > Cinemas.
-
Touch a cinema.
-
Touch the arrows or the date to select a different date, if necessary.
- Touch a film.
- Select an option.
Starting a route to a cinema
After you select a film and cinema, you can create a route to the cinema.
Touch Go!.
Setting an appointment for a film
After you select a film and cinema, you can set an appointment for the film time.
- Touch ≧ Remind Me.
- Touch a cinema time.
Connecting with other devices
Synchronising your device with your computer
Synchronise your device with your computer to transfer your contacts and calendar events to your device.
Downloading and installing Garmin-Asus PC Sync
NOTE: Garmin-Asus PC Sync software is not compatible with Mac® computers.
- Go to www.garminasus.com /pcsync.
- Follow the on-screen instructions to download and install Garmin-Asus PC Sync software.
Synchronising with your computer
- Verify that you have downloaded and installed Garmin-Asus PC Sync software on your computer.
- Connect the micro-USB cable to the connector on the bottom of the device (not the cradle).
- Connect the cable to your computer. The USB connected page opens on the device.
NOTE: If the USB connected page does not open, open the Notification bar and touch USB Connected.
4. Touch Sync.
Your Microsoft Outlook ^® contacts, calendar events and tasks are synchronised with your device contact list and calendar.
Connecting with other devices
Synchronising your device with an Exchange server
Synchronise your contacts, calendar and email with an Exchange ActiveSync account. You must have a data connection to use this feature. Contact your network administrator to obtain the necessary information for your network.
See page 57 for more information about setting up an Exchange ActiveSync account.
You can select the types of data (email, contacts and calendar) to synchronise, and how the device synchronises data (page 106).
Synchronising with a Google™ account
You can synchronise your Google account data with the calendar, contacts and Google Mobile wireless services.
-
From the Home screen, touch □> Settings > Accounts and Sync > Add New Account > Next.
-
Select an option:
-
Touch Sign In to sign in to an existing Google account. Enter your username and password and touch Sign In.
-
Touch Create to create a new Google account. Follow the on-screen instructions.
-
Select the types of data you want to synchronise.
Data in your Google account synchronises automatically with the applications on your device. Use the Google Mail application to access the email from your Google account.
Connecting with other devices
Removing a Google account
From the Home screen, touch
Settings > Accounts and Sync > Google > Remove Account.
Using Bluetooth technology
Use Bluetooth wireless technology to connect with other devices wirelessly.
Turning on Bluetooth
- From the Home screen, touch > Settings > Wireless Manager > Bluetooth.
- Select the Bluetooth tick box.
Pairing with a device
You can wirelessly connect to a device with Bluetooth technology.
- Place the device to pair with in discoverable/pairing mode.
- From the Home screen, touch ☒ Settings > Wireless Manager > Bluetooth.
Garmin-Asus A10 Owner's Manual 91
- Select the Bluetooth tick box.
- Select the Discoverable tick box.
- Touch Scan for Devices.
NOTE: You might have to wait a moment for the names of the devices to appear.
- Select the device to pair with in the list.
- Enter the passkey of the device.
- Touch OK.
Connecting to a paired device
Before you can connect to another device, you must pair it with your device.
- From the Home screen, touch > Settings > Wireless Manager > Bluetooth.
- Touch a paired device.
- Touch Connect.
Garmin-Asus A10 Owner's Manual 91
Connecting with other devices
Changing your device name
You can change the name that identifies your device on other Bluetooth devices.
- From the Home screen, touch ☒ Settings > Wireless Manager > Bluetooth.
- Touch Device name.
- Enter a name.
- Touch Save.
Disconnecting a device
- From the Home screen, touch ☒ Settings > Wireless Manager > Bluetooth.
- Touch the device.
- Touch Disconnect.
The device is disconnected, but it remains paired with your device.
Removing a paired device
- From the Home screen, touch ▶ Settings > Wireless Manager > Bluetooth.
-
Select an option:
-
Touch a device and touch Unpair.
- Touch ▶ Clear Device List to remove all paired devices.
Removing all paired devices
From the Home screen, touch 📋 Settings > Wireless Manager > Bluetooth > 📋 Clear Device List > Yes.
Transferring files
You can transfer files, such as MP3s and JPEGs, to your device.
- Insert the microSD card (page 3).
-
Connect the micro-USB cable to the connector on the bottom of the device (not the cradle).
-
Connect the cable to your computer. The USB connected page opens.
- Touch File Transfer.
NOTE: If the USB connected page does not open, open the Notification bar and touch USB Connected.
Two additional drives (volumes) appear in the list of drives on your computer. One is the internal memory of the device. The other is the memory card.
- Copy and paste the files to be transferred into the appropriate folders in the new drives.
About File transfer mode
NOTICE
If you are not sure about the purpose of a file, do not delete the file. Your device memory contains important system files that should not be deleted. Be especially cautious of files located in folders entitled "Garmin".
File transfer mode is also referred to as USB mass storage mode. Use File transfer mode to add files to the device. The computer does not need Garmin-Asus PC Sync installed to use File transfer mode.
About picture and video file types
Your device supports the following file types:
• Picture: JPEG, PNG, BMP, GIF
• Video: 3GP, WMV, MP4
About Wi-Fi
Connect to the Internet using a Wi-Fi connection. You must be in a Wi-Fi coverage area (Wi-Fi hotspot) to use Wi-Fi.
Connecting to a Wi-Fi network
- From the Home screen, touch > Settings > Wireless Manager > Wi-Fi.
Connecting with other devices
- Select the Wi-Fi tick box. The device searches for Wi-Fi networks.
- If necessary, touch Scan for Wi-Fi Networks.
- Touch a network.
- Enter the network encryption key, if necessary.
- Touch Connect.
- If necessary, enter your username and password.
Adding a network
You can add non-broadcasting networks or other networks that your device does not automatically detect.
- From the Home screen, touch Settings > Wireless Manager > Wi-Fi.
- Select the Wi-Fi tick box.
-
Touch next to Add Wi-Fi Network.
-
Touch the field below Network SSID.
- Enter the network SSID and touch Done.
- Touch the field below Security.
- Touch a security type.
- Enter a password and touch Done.
- Touch Save.
Removing a remembered network
After you have connected to a Wi-Fi network, the device remembers the network for future use. Remembered networks appear in the network list even when they are out of range.
- From the Home screen, touch Settings > Wireless Manager > Wi-Fi.
- Touch the network.
- Touch Forget.
Customising your device
Wireless Manager
From the Home screen, touch ⚠️ Settings > Wireless Manager.
• Aeroplane mode — see page 24.
• Wi-Fi — see page 93.
- Data — see below.
NOTE: Data charges apply when the data connection is On.
- Bluetooth — see page 91.
- VPN — allows you to configure and connect to a Virtual Private Network (VPN). Contact your network administrator for the necessary information.
Data connection settings
NOTICE
There may be additional charges from your service provider to use the data connection while roaming.
From the Home screen, touch 📋 Settings > Wireless Manager > Data.
- Data Connection — turns on the data connection.
NOTE: Data charges apply when the data connection is On. - Data Roaming — turns on the data connection when roaming.
NOTE: There may be additional charges from your service provider to use the data connection while roaming. - Internet Sharing — shares the data connection with the computer when connected with a USB cable.
Customising your device
• Network Preference — allows you to select your preferred type of network.
- Access Point Names — displays connected data service access points.
Audio settings
From the Home screen, touch > Settings > Audio and Display.
• Volume Levels — allows you to adjust the volume levels of each output.
- Ringtones — allows you to select a ringtone for phone calls.
- Notifications — sets the ringtone for notifications, such as text messages.
- Ring Style — sets the ring style to Ring Only, Vibrate Only, Ring + Vibrate or Silent.
- Audible Touch Tones — plays a tone when you dial.
- Audible Selection — plays a tone when you touch the screen.
- Haptic Feedback — sets the device to vibrate when you press certain soft keys.
- SD Card Notifications — sets the device to vibrate when you eject or remove the memory card.
Display settings
From the Home screen, touch ⚠️ Settings > Audio and Display.
- Brightness — changes the brightness of the screen. Decreasing the brightness can save battery power. Auto Brightness sets the brightness based on the ambient lighting.
- Colour Mode — sets a light background (Daytime), a dark background (Night-time) or automatically switches between the two based on the sunrise time and sunset time for your current location (Auto).
- Screen Timeout — sets how the screen automatically shuts off if the device is inactive for the selected length of time.
- Orientation — allows the phone to rotate the screen display as you rotate the device.
- Animation — enables animations when you open or close windows.
- Screenshot — allows you to take a picture of the device screen.
Adjusting the screen timeout length
- From the Home screen, touch ☒ Settings > Audio and Display > Screen Timeout.
- Select a time.
- Touch Save.
Taking a screenshot
- From the Home screen, touch 📋 Settings > Audio and Display > Screenshot.
- Touch and hold ☐ to take a picture of a screen.
Screenshots are saved in the "Screenshot" folder on the device.
Customising your device
Phone settings
From the Home screen, touch ⚠ Settings > Phone.
- Call Waiting — see page 20.
- Call Forwarding — see page 23.
- Call Barring — see page 23.
- Caller ID — sets a preference for sending caller ID information when you make phone calls.
• Voice Mail Number — sets the number to access voice mail, usually the same as your phone number.
- TTY — enables TTY (teletypewriter) mode. This requires the use of a TTY adapter (part number 010-11459-03), available from www.garminasus.com/a10/tty_adapter.
- Hearing Aid Mode — optimises the phone speaker for use with hearing aids.
- Fixed Dialling Numbers — enables you to set up your device so that it can only dial certain phone numbers.
• Network Operators — searches for local networks.
Enabling and adding Fixed Dialling Numbers
Before you can change the Fixed Dialling Numbers (FDN) settings, you must acquire the FDN PIN for your SIM card from your service provider.
- From the Home screen, touch ☒ Settings > Phone > Fixed Dialling Numbers > Enable FDN.
- Enter the FDN PIN and touch Save.
-
Touch Manage FDN List > Add contact.
-
Enter a name and number and touch Save.
- Enter the FDN PIN to add the contact to the FDN phone number list.
NOTE: You must enter the FDN PIN to disable FDN.
Home screen
- Home Screen Style — changes the Home screen to the Classic Home or the Breeze Home, which uses panes.
• Change Wallpaper — see page 9.
Navigation settings
• Voice — sets the language used for all voice prompts and messages.
- Traffic Service — enables the Traffic service.
- Safe Mode — prevents you from entering data when your vehicle is
in motion.
- Background Data — enables Garmin Connected Services to access data in the background.
Changing the navigation voice
- From the Home screen, touch > Settings > Navigation > Voice.
- Select a language.
- Touch OK.
Turning off the Traffic service
- From the Home screen, touch > Settings > Navigation.
- Touch the Traffic Service tick box to clear it and turn off the Traffic service.
Car and Pedestrian navigation settings
You can adjust the navigation settings for Car (Driving) and Pedestrian (Walking) usage modes.
Customising your device
From the Home screen, touch Settings > Navigation.
- Route Preference — sets the preference for calculating routes.
- Map Detail — sets the level of detail on the map. More detail may result in slower map drawing.
-
Map View — sets the perspective of the Map page.
-
Track Up displays the map in two dimensions (2-D) with your direction of travel at the top.
° North Up displays the map in 2-D with north at the top.
° 3-D displays the map in three dimensions with Track Up orientation (default).
- Avoidances — types of roads and manoeuvres the device should attempt to avoid when creating routes, available for Car (Driving) mode only.
- Notification Type — sets the method with which you are notified of manoeuvres in the route, available for Pedestrian (Walking) mode only.
- Vehicle or Avatar — changes the icon to represent your position on the map.
• Auto Dim Brightness — automatically dims the backlight while navigating. - Trip Log — displays the path of your travels on the map.
Changing public transportation navigation settings
Public transportation settings are available when cityXplorer maps are loaded.
-
From the Home screen, touch Settings > Navigation > Public Transportation.
-
Select the types of public transportation you would like to take.
Disabling proximity points
If you have loaded proximity points, such as safety cameras and custom POIs, you can disable them without removing them from the device.
- From the Home screen, touch ➕ Settings > Navigation > Proximity Points.
- Clear the tick box for the type of proximity points you want to disable.
Downloading safety cameras
CAUTION
Garmin and ASUS are not responsible for the accuracy of, or the consequences of using, a custom point of interest (POI) or a safety camera database.
This service may be available as a paid subscription. This service is not available in all areas. A data connection is required for this feature.
- From the Home screen, touch □> Settings > Navigation > Download Safety Cameras.
- Select a region or regions.
- Touch Download.
Viewing map information
From the Home screen, touch ➕ Settings > Navigation > ➕ Map Info.
A list of installed maps appears.
NOTE: Select or clear the tick box next to a map to enable or disable the map.
Email account settings
From the Home screen, touch ⚠️ Settings > Email and touch an account.
Customising your device
- Account Info — contains information about this account, such as the password (page 59).
- Email Check Interval — sets the frequency for checking for new email.
- Email Sync Back Days — sets the length of time to synchronise email.
- Calendar Sync Back Days — sets the length of time to synchronise the calendar.
- Email Notifications — sets how you are notified when you receive an email.
- Select Ringtone
• Vibrate - Use Signature
• Signature — see page 59.
Contacts settings
From the Home screen, touch ⚠ Settings > Contacts.
- Sort Contacts By — sorts contacts by first or last name.
- Hide Contacts with No Phone — hides contacts that do not have a phone number.
Calendar settings
From the Home screen, touch ⚠ Settings > Calendar.
- Set Default Reminder Time — sets the number of minutes before an appointment when the device should notify you of the appointment.
- Reminder Style — sets how the device notifies you of a forthcoming appointment.
-
Set Reminder Ringtone — sets the ringtone that notifies you of a forthcoming appointment.
-
Set Snooze Time — sets the amount of time to snooze when you touch Snooze on a calendar notification.
- Vibrate — sets whether the device vibrates to notify you of a forthcoming appointment.
Messaging settings
From the Home screen, touch ⚠️ Settings > Messaging.
- Delivery Reports — requests a delivery report for each SMS and MMS message you send.
- Manage SIM card messages — allows you to copy or delete SMS messages stored on your SIM card.
- SMSC — allows you to change the short message service centre (SMSC) number, if necessary.
-
Read Reports — requests a read report for each MMS message you send.
-
Auto-retrieve — retrieves MMS messages automatically when you are not roaming.
- Roaming Auto-retrieve — retrieves MMS messages automatically when you are roaming.
- Creation Mode — limits the size and type of MMS message attachments for compatibility with all service providers.
- Notifications — displays a notification in the status bar when you receive a message.
- Select Ringtone — sets a ringtone to play when you receive a message.
- Vibrate — sets how the device vibrates when you receive a message.
• Cell Broadcast Service — see page 56.
Customising your device
Browser settings
General browser settings
From the Home screen, touch ⚠️ Settings > Browser.
- Set Home Page — sets the browser home page (page 68).
- Block Pop-ups — blocks pop-up windows while browsing.
- Auto-fit Web Pages — resizes web pages to fit the screen.
- Load Images — allows you to view images on web pages.
- Set Text Size — sets the size of text that the browser uses to display web pages.
- Enable JavaScript — allows JavaScript.
- Map URL Handling — adjusts how map URLs are opened:
- Enable Support — allows map URLs to be opened in Garmin
maps.
- Set as Default — opens map URLs in Garmin maps by default.
Browser privacy settings
From the Home screen, touch ⚠️ Settings > Browser.
- Accept Cookies
- Remember Form Data
- Clear Cache
- Clear History
- Clear Cookies
- Clear Form Data
Browser security settings
From the Home screen, touch ⚠️ Settings > Browser.
- Remember Passwords — saves usernames and passwords for web sites.
• Show Warnings — displays a
warning when the browser detects a problem with the security of a web site.
- Clear Passwords — clears saved password information.
Quick search settings
From the Home screen, touch ⚠️ Settings > Quick Search.
- Searchable Items — sets what is searched when using the Search widget.
- Clear Search Shortcuts — clears the shortcuts to recently selected search results.
- Google Search Settings — changes the search settings for Google Mobile Services.
Managing applications
NOTICE
Cleared data cannot be restored.
- From the Home screen, touch
Settings > Application Management > Manage Applications.
A list of applications appears, showing the amount of memory used for each application.
- Touch ☐ to sort or filter the list (optional).
- Touch an application to view details, including storage size, cache size, defaults and permissions.
-
Select one or more options:
-
Touch Uninstall to remove the application from your device, if available.
- Touch Clear data to clear stored data associated with the application.
- Touch Clear cache to clear cached data for the application.
Customising your device
- Touch Clear defaults to clear application defaults.
- Touch Force Stop to close the application.
Allowing the installation of applications
You can allow the installation of applications from outside the Android ^™ Market.
-
From the Home screen, touch
Settings > Application Management > Manage Applications.
-
Select the Unknown Sources tick box.
Accounts and Sync settings
From the Home screen, touch > Settings > Accounts and Sync.
- Background Data — allows applications, such as email, to send
and receive data at any time.
- Auto-sync — allows applications, such as email, to synchronise with the server automatically.
- Select an account to change the Sync settings.
For information about email account settings, see pages 101–102.
Security and location settings
From the Home screen, touch ⚠️ Settings > Security and Location.
- My Parking Spot — saves your parking spot when you remove the device from the mount while power is applied to it.
- Use Wireless Networks — determines your location using Wi-Fi and mobile networks.
- Use GPS Satellites — determines your location using GPS satellites.
Using a pattern to unlock the screen
When the screen unlock pattern is turned on, you must enter a pattern to unlock the device. You can still use the device to contact emergency services without using the screen unlock pattern.
- From the Home screen, touch
Settings > Security and Location > Set Unlock Pattern.
- Follow the on-screen instructions to create an unlock pattern.
If you forget your pattern, contact Product Support. Your device can be unlocked, but all personal information is erased in the process. See page 110 for more information.
Locking the SIM card
Use these settings to require a PIN to enable all non-emergency features of the device. You can still use the device to contact emergency services without a PIN. You can remove the SIM card to use the non-telephone features of the device.
- From the Home screen, touch ☐ > Settings > Security and Location > Set up SIM Card Lock > Use SIM Card Lock.
- Enter a PIN and touch OK. If you forget your SIM PIN, contact your service provider to obtain a Personal Unblocking Key (PUK).
Viewing passwords as you type them
- From the Home screen, touch ☒ Settings > Security and Location.
- Select the Visible Passwords tick box.
Customising your device
Setting a credential storage password
You can store security credentials, such as passwords and certificates, for quick access.
- From the Home screen, touch
Settings > Security and Location > Set Password.
- Enter a password and touch OK. Use Secure Credentials is automatically selected.
Changing the text language
NOTE: Changing the text language does not change the language of map data, such as street names or user-entered data.
-
From the Home screen, touch ☐ > Settings > Language and Keyboard > Language.
-
Touch a language for all on-screen text.
Keyboard settings
From the Home screen, touch ⚠️ Settings > Language and Keyboard.
• Text Completion — displays suggested words as you enter text.
• Auto Capitalisation — automatically capitalises the first word in a field.
- Enable Keyboards — enables keyboards for different languages.
Date and time settings
From the Home screen, touch ⚠ Settings > Date and Time.
• Automatic — uses the network settings for the date and time. If you clear the Automatic tick box, you can set the following items:
- Set Date — allows you to set the date manually.
- Set Time — allows you to set the time manually.
-
Set Time Zone — allows you to select a time zone manually.
-
Date Format — sets the date format.
- Time Format — sets the time format to 12-Hour, 24-Hour or UTC.
Units settings
From the Home screen, touch ⚠ Settings > Units.
- Distance — units of measurement for distance.
• Temperature — units of measurement for temperature. - Coordinates — units of measurement for the Coordinates format.
Privacy settings
From the Home screen, touch > Settings > Privacy.
NOTE: Sharing your location information and feedback requires the use of your data plan and any associated charges will apply.
- Share with Google — allows Google applications to use location information.
- Connected Services Feedback — allows Garmin to collect your speed, direction and location information and share it with strategic partners and service providers to enhance the quality of the content the device receives.
Customising your device
Clearing all user data
NOTICE
This process restores all settings to factory defaults and removes all user data.
Any items that you have saved on your device, such as Saved Locations, photos and contacts, are erased.
Any applications you have purchased and downloaded are removed. You should be able to download and install the applications again.
Map data is not erased.
Cleared data cannot be restored.
From the Home screen, touch >Settings >Privacy >Master Clear.
Changing the storage settings
- From the Home screen, touch ▶ Settings > Storage.
- Scroll to view the total space and the available space for each storage type.
- Touch Default Storage.
- Select Internal Storage or SD Card.
- Touch Save.
Viewing software information
- From the Home screen, touch ▷ Settings > About Phone.
- Touch an item.
Appendix
About satellite signals
The GPS status icon appears in the upper right corner of the status bar to indicate the GPS signal strength. When at least one of the lines is green, your device has acquired satellite signals.
The more green lines are stronger the GPS signal. If the device is not receiving GPS signals, appears.
For troubleshooting information about acquiring satellites, see page 117.
Viewing detailed GPS signal information
- From the application tray, touch Where Am I?.
- Touch the information balloon.
- Touch ≧ Satellite Info.
About connected services
Use connected services to search for location-relevant information such as traffic, weather data and flight status.
These services are not available in all areas. A data connection is required for these services. Your regular data usage charges apply.
Additional services may be available with a subscription. For more information, go to www.garminasus.com.
Appendix
Battery information
The 100m in the status bar indicates the status of the internal battery. To increase the accuracy of the battery gauge, fully discharge the battery and then fully charge it. Do not unplug the device until it is totally charged.
Maximising the battery life
- From the Home screen, touch Settings > Audio and Displ Brightness to turn down the backlight.
- From the Home screen, touch Settings > Display > Screen Timeout to reduce the timeout length.
- Do not leave your device in direct sunlight.
- Avoid prolonged exposure to excessive heat.


Replacing the battery
CAUTION
Do not use a sharp object to remove the battery. A sharp object may puncture the battery, which may present a risk of fire, chemical burn, electrolyte leak and/or injury.
Only use the correct battery type. Using an incorrect battery may present a risk of explosion.
NOTICE
To avoid losing your customised settings, replace the battery within five minutes of removing it from your device.
Contact your local waste disposal department for information on properly disposing of the battery and device.
Appendix
If you need to replace the battery in the device, use an SBP-23 lithium-ion battery. For more information on purchasing a replacement battery, go to www.garminasus.com.
Mounting on your dashboard
NOTICE
The permanent mounting adhesive is extremely difficult to remove after it is installed.
A mounting disk is included in some device packages. Use the mounting disk to mount your device on the dashboard and comply with certain national regulations.
- Clean and dry the dashboard where you are placing the disk.
-
Remove the backing from the adhesive on the bottom of the disk.
-
Place the disk on the dashboard.
- Remove the clear plastic cover from the top of the disk.
- Place the suction cup mount on top of the disk.
- Flip the lever down (towards the disk).
Removing the device, cradle and mount
Removing the device from the cradle
- Press up on the tab on the top of the cradle.
- Tilt the device forwards.
Removing the cradle from the mount
- Turn the cradle to the right or left.
- Apply pressure until the socket on the cradle releases the ball on the mount.
Appendix
Removing the suction cup mount from the windscreen
- Flip the lever on the suction cup mount towards you.
- Pull the tab on the suction cup towards you.
Resetting the device

CAUTION
Do not use a sharp object to remove the battery. A sharp object may puncture the battery which may present a risk of fire, chemical burn, electrolyte leak and/or injury.
If the device stops functioning, you may need to reset the device.
- Turn off the device and then turn it back on.
- If necessary, remove and replace the battery (page 112).
The device should restart and operate normally.
Caring for your device
- Avoid dropping your device and operating it in high shock and high vibration environments.
- Do not expose the device to water. Contact with water can cause this device to malfunction.
- Do not store the device where prolonged exposure to extreme temperatures can occur because it can cause permanent damage.
- Never use a hard or sharp object to operate the touchscreen as this may result in damage.
- To help avoid theft, remove the device and mount from sight when not in use.
- Remove the residue on the windscreen left by the suction cup.
Specifications
Physical size (W × H × D):
2.28 × 4.33 × 0.54 in.
(58 × 110 × 13.8 mm)
Weight: 4.61 oz (130.6 g)
Display: 3.2 in. diagonal, 320 × 480
pixels; HVGA display with white backlight and touchscreen
Case: IP51 (Not waterproof)
Operating temperature range:
from 5^ F to 104^ F
(from -15°C to 40°C)
Storing temperature range:
from -4^ F to 158^ F
(from -20°C to 70°C)
Battery charging temperature range:
from 32°F to 140°F
(from 0°C to 60°C)
Power connector: Micro-USB for power and computer
Battery type: User-replaceable
1500 mAh lithium-ion battery
Battery life: 9–11 hours talk time,
530–660 hours standby time,
depending on usage and settings
Charge time: Approximately 3 hours
Power input: AC input using micro-
USB connector and AC charger, or DC input using vehicle power cable
Usage: 3 W max.
GPS receiver: High sensitivity
Acquisition times*:
Warm: < 1 sec
Cold: < 38 sec
Factory reset: < 45 sec
*Average acquisition times for a stationary receiver with a clear view of the sky.
Appendix
Frequency band: 3G Bands I and VIII; 2G (GSM) 850/900/1800/1900
Other connectivity: Bluetooth 2.0+EDR; 802.11 b/g (Wi-Fi); micro-USB 2.0
Platform: Android™ platform
Camera: 5.0 MP camera
Audio out: 3.5 mm
Computer interface: Plug-and-play USB mass storage
Data storage: Internal memory and optional removable microSD card. Data stored indefinitely.
Troubleshooting
| Issue/Question Solution | |
| The device is not acquiring satellite signals. | From the Home screen, touch > Settings > Security and Location. Select the Use GPS Satellites tick box. |
| Ensure that the GPS has enough time to initialise. When the GPS is turned on for the first time, it may take a few minutes to initialise. | |
| The device will not turn on. | Charge the battery (page 3 and page 4). |
| Replace the battery (page 112). | |
| The device will not charge. | Replace the fuse in the vehicle power cable. |
| As a safety precaution in high temperature environments, the device will suspend charging and use battery power.If the device is mounted in a vehicle, remove the device from the mount and place it out of direct sunlight. | |
| I cannot place a phone call. | The call function may have been suspended because of low battery power. In low battery situations, you might be prompted to turn off the call functions. You can still navigate in these situations. |
| From the Home screen, touch > Settings > Wireless Manager.Clear the Aeroplane mode tick box. | |
| Do not delete necessary files. | In mass storage mode, do not delete or format the original directories, such as Garmin and Documents. Do not delete files for which you do not know the purpose. |
Appendix
| How can I improve the phone signal? | Step outside your vehicle. |
| Use a hands-free headset. | |
| Move the device outside to an open area. | |
| Walk to a window to improve indoor reception. | |
| Avoid windows with reflective metal film. | |
| Move to a higher elevation. | |
| Move the device away from electronic equipment. |
Index
Index
Symbols
2-D map view 100
2G 96
3-D map view 100
3G 96
3GP 93
12-hour time format 109
A
additional maps i
address
contact address 27
finding 36
alarm, setting 84
answering a call 19
applications
downloading 11
managing 105
appointment
adding 80
routing to 81
saving local event
as 38,88
setting cinema time as 88
settings 102
audio
connector 1
notifications 9
ringtone 9
volume 7
audio out 116
avoiding
road closures 50
road features 46, 100
traffic 47
B
backlight brightness 96
battery
charging 3
information 112
removing 112
Bluetooth technology 91–92
BMP 93
brightness 96
browsing the map 42
browsing the web 65–69, 104
cookies 104
history 104
home page 68
security 104
settings 104–105
bus 101
C
calendar 80–81
settings 102
caller ID 98
calls 18, 21, 22, 25
barring 23
ending 19
forwarding 23,98
history 21
options 18
waiting 20,98
camera 74
caring for the device 114
cell broadcast 56
Index
Ciao! 61–64
accepting invite 62
hiding location 64
inviting 62
joining 61
registering 61
removing a friend 64
status 63
viewing friends 63
cinema times 88
clock 83–85, 108
setting 108
compass 49
calibrating 50
computer
connecting to 89
synchronising with 89
conference call 22, 23
connected Services 111
cinema times 88
currency converter
update 86
flight status 87
forthcoming events 38
fuel prices 39
local business
search 37
safety cameras 101
subscription 111
telephone directory 39
traffic 46
weather 83
contacts 25–29
adding 25
assigning location 27
deleting 26
editing 26–28
managing SIM 28–29
navigating to 28
ringtone 27
saving 21
setting picture for 26, 74, 77
shortcut menu 26
converting
currency 86
units 85
cookies, clearing 104
coordinates 40
D
data connection
settings 95, 95–97
share 95
deleting
call history 22
recently found
locations 37
detour 50
device hardware 1
keys 7
mounting 4
digital elevation map 43
display settings 96
document
searching 82
transferring 92
viewing 81–82
downloading files 69
driving route 43, 44–46, 50
settings 99–101,
100-101, 101
E
email 57–60, 58
signature 59
emergency assistance 35
emergency mode 107
Exchange ActiveSync server
sync with 90
F
file
downloading 69
media gallery 93
music 70
transferring 92
fixed dialling 98
flight mode (data off) 24
flight status 87
folders 9
forwarding a message 55
fuel prices 39
G
gallery 93–94
geocaching 40
geographic coordinates 40
globe view 43
go home 36
search settings 105
sync with account 90
H
headset 15, 116
hearing aid 98
Help file i
history 104
hold, phone call 19
home location 36
home screen 6–7, 9–11
customising 9–11
folders 10–11
|
ignoring a call 19
Internet
connection icon 16
Internet sharing 95
J
JPEG 93
K
keyboard 13, 108
keys on the device 7
L
language
keyboard 108–110
text 108-110
limited dialling 98
lithium-ion battery 112
local events 38
local search 37
location information 31
changing update
method 63
location messages 54
locking the screen 15
automatically 97
locking the SIM card 107
M
making a phone call 18
Index
map 42–52
additional i
browse 42
contours 43
detail 100
moving 42
settings 99–100
zoom 42
MapSource i
maximum speed,
resetting 46, 50
media gallery 93–94
messages (SMS/MMS)
forward 55
new 53
read 54
micro-USB 1
MMS 53
money exchange rates 86
mounting 4–5
removing from
mount 113
MP3 70
MP4 93
mute 12, 18
N
navigation
cradle 5
settings 99–100
voice 99
network type 96
0
odometer 46, 50
on-screen keyboard 13
P
pane, home screen 6–7, 9–11
Panoramio photos 38
parking spot 35
phone 18–24
turn off (aeroplane) 24
picture
file types 93
take 74
view 76
playing music 70
PNG 93
power key 1
public transportation 99, 100, 101
R
receiving a call 19
recently found locations 37
registering 61
removing the mount 113
resetting 114
device 114
maximum speed 46, 50
odometer 46, 50
trip computer 46, 50
restrict dialling 98
reverse lookup 22
ringtone
for a contact 27
for appointments 102
for calls 9, 96
for email 102
for messages 103
for notifications 96
ring style 12
save song as 73
Index
rotating screen 12
routing
add points to 51
add stops 51
all turns in 45
details 45
editing 51, 52
home 36
navigate saved route 52
next turn 45
plan 51–52
route summary 45
starting driving route 44
starting walking route 48
stop 50, 51
to a Ciao friend's location 63
to a contact 28
to a film 88
to a forthcoming event 38, 88
to a found location 31
to a friend's location 63
to a location 31
to an appointment 81
to a photograph location 78
to your home 36
to your parking spot 35
view on map 45
S
safe mode 99
safety cameras 101, 101–110
saved locations 32
saving location to Favourites 32
saving your current location 32
screen
brightness 96
lock 15
orient 12
rotate 12
screenshot 97
timeout 97
use the touchscreen 13
searching for locations 30
address 36
changing the search area 32
Favourites 32
item on the map 42
navigate to a contact 28
points of interest 30
recently found 37
spell name 30
security settings 106–107, 108–109
sending
email 58
found location 34
SMS 53
text 53
your location 54
setting picture as
contact icon 26,77
wallpaper 77
Index
settings 95–110
sharing
documents 82
feedback 109
found location 34
Internet connection 95
picture 74
pictures and videos 76
URL 66, 68
your location 34
shortcuts 9
contacts 26
signature 59
silencing the ringer 19
silent ring style 12
SIM card
copy contacts 28
slideshow 76
SMS 53–60
cell broadcast 56
software
update i
view information 110
speakerphone 18
specifications 115
spelling the location 30
status bar 16
stop watch 84
storage 110
storing the device 114
streaming music 73
synchronising 89
with a Google account 90–91
with computer 89
with Exchange Server 90
T
telephone directory 39–40
teletypewriter 98
text completion 14, 108
text message 53–60
theft, ways to avoid 114
time format 109
traffic 46–52
avoid 47–52
icon 47
train 101
transfer files 92–93
trip computer 46, 50
trip log 52
clearing 52
TTY 98
U
underground transport 101
units of measurement 109
updating
maps i software i
USB cable 4
user data, deleting 110
using the map 42
V
vibrate ring style 12
for alarm 84
for appointments 103
for email messages 102
for messages 103
for phone call 96
Index
video
file types 93
recording 75, 75–79
voice mail 19,20
volume 12
volume keys 1
VPN 95
W
walking routes 101
settings 99
wallpaper 9, 74, 77
weather 83
Where Am I? 35
Where To? pane 7
Wi-Fi 93-94
WMV 93
Z
zoom 13,42,43,65,82
For the latest free software updates (excluding map data) throughout the life of your device, go to www.garminasus.com.

text_image
garmin asus™CE0700①
For model 0100088110
© 2010 Garmin Ltd. or its subsidiaries and ASUSTeK Computer Inc. November 2010 Part Number 190-01278-18 Rev. B Printed in China