
1220 - Smartphone NOKIA - Free user manual and instructions
Find the device manual for free 1220 NOKIA in PDF.


User questions about 1220 NOKIA
0 question about this device. Answer the ones you know or ask your own.
Ask a new question about this device
Download the instructions for your Smartphone in PDF format for free! Find your manual 1220 - NOKIA and take your electronic device back in hand. On this page are published all the documents necessary for the use of your device. 1220 by NOKIA.
USER MANUAL 1220 NOKIA
text_image
NOKIA CONNECTING PEOPLE ser GuideUser Guide

natural_image
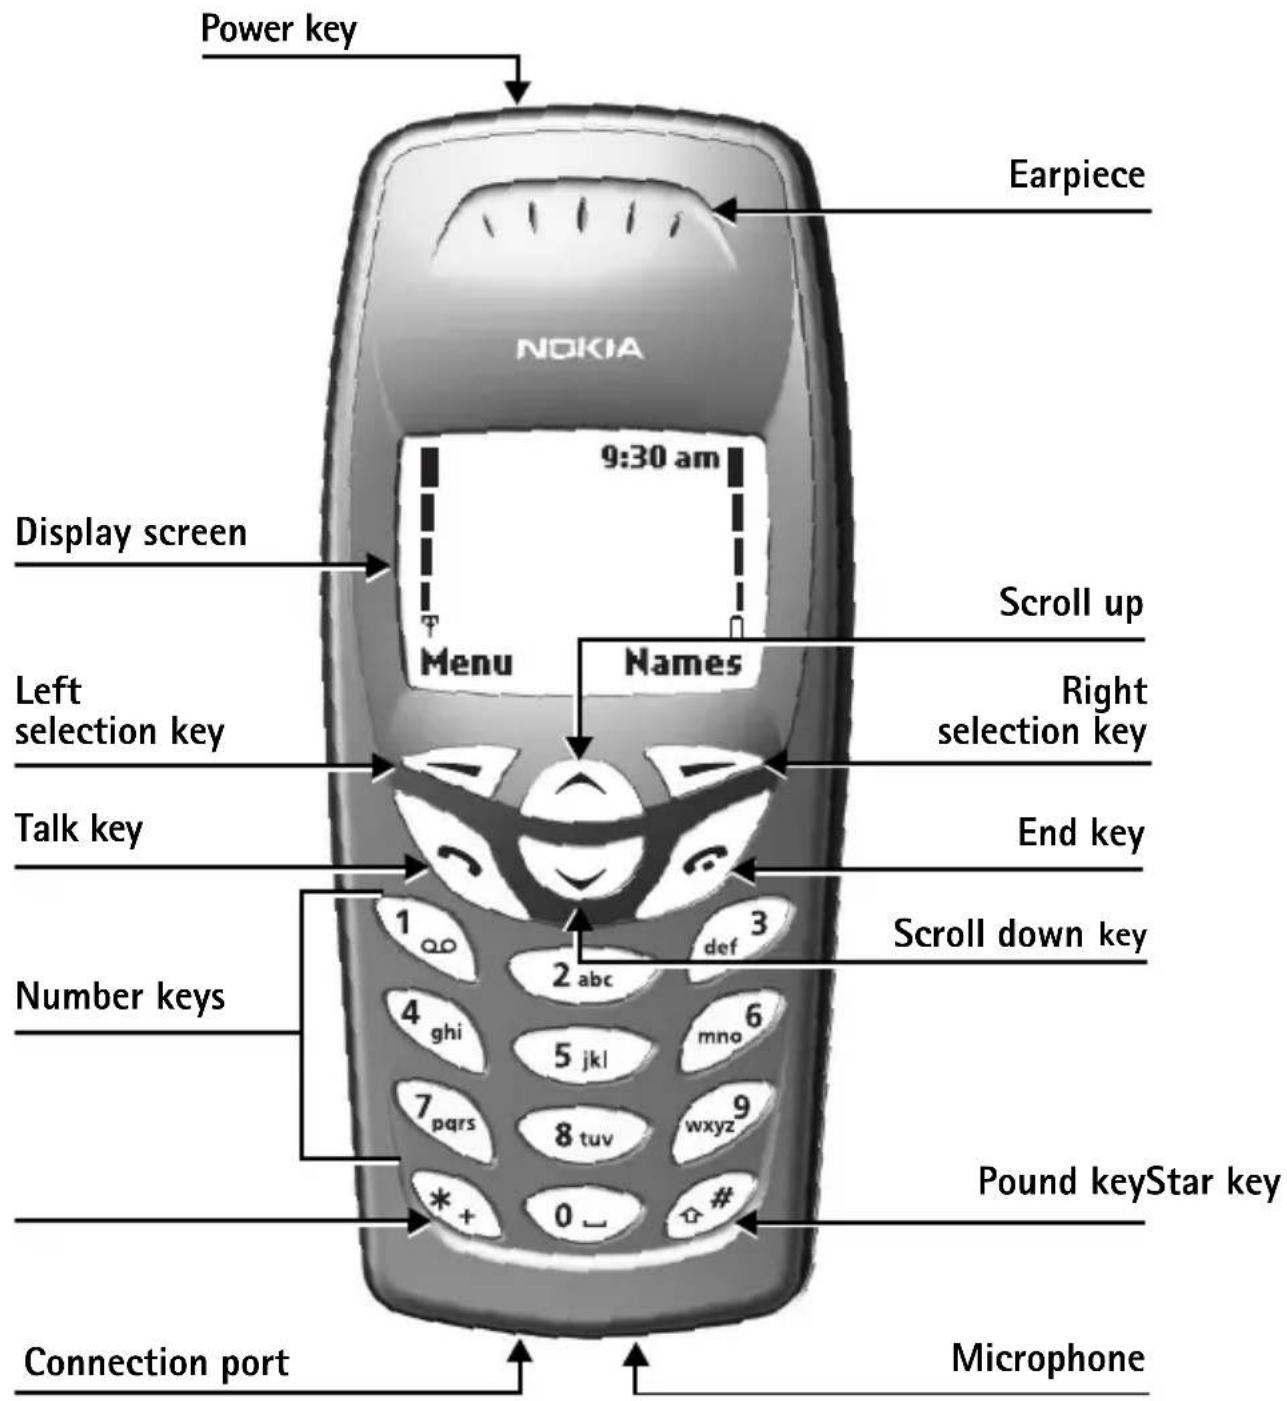
Illustration of a human forearm with five fingers extended (no text or symbols)Nokia 1220, Nokia 1221, and Nokia 1260 phones at a glance
text_image
Power key NOKIA Earpiece 9:30 am Display screen Menu Names Scroll up Left selection key Text Right selection key Talk key End key Number keys 1 abc def 3 2 abc 3 Scroll down key 4 ghi mno 6 5 jkl wxyz 9 7 pqrs 8 tuv Pound keyStar key * + 0 _ # Connection port Microphone- QUICK GUIDE
Action Description
Make a call Enter a phone number, and press the Talk key.
Answer a call Press the Talk key, or select Answer.
Answer call during call Press the Talk key.
End a call Press the End key.
Decline a call Press the End key to send the call to voice mail.
Mute a call Select Mute during a call.
Redial Press the Talk key twice.
Adjust call volume Press the Volume keys during a call.
Use in-call menu Select Options during a call.
Save name and number Enter a number, select Save , enter a name, and select OK.
Use 1-touch dialing Press and hold a key (2–8). You must assign a key to a number in the phone book.
Look up a name Select Names > Find.
Check voice mail Press and hold the 1 key (contact your service provider for details).
Write text messages Select Menu > Messages > Write Message. Write the message.
Send text messages In the message entry screen, select Options > Send. Enter the number and select Send. Message service is dependent on the service provider.
Read new message If Message received appears on the display, select Read, and highlight the message; then select Read again.
Reply to a message While viewing a message, select Options > Reply. Write a reply, and select Options > Send.
Press Press a key briefly and release it.
Press and hold Press a key, hold it for two to three seconds, and release it.

LEGAL INFORMATION
PART NO. 0903039 ISSUE NO. 1
Copyright © 2004 Nokia. All rights reserved.
Nokia, Nokia Connecting People, Nokia 1220, Nokia 1221, Nokia 1260, Space Impact and Snake II, and the Nokia Original Enhancements logos are trademarks or registered trademarks of Nokia Corporation. Other company and product names mentioned herein may be trademarks or trade names of their respective owners. Printed in Mexico 09/2004
T9 text input software Copyright ©1999-2004. Tegic Communications, Inc. All rights reserved.

Includes RSA BSAFE cryptographic or security protocol software from RSA Security.
The information contained in this user guide was written for the Nokia 1220, Nokia 1221, and Nokia 1260 products. Nokia operates a policy of ongoing development. Nokia reserves the right to make changes to any of the products described in this document without prior notice.
UNDER NO CIRCUMSTANCES SHALL NOKIA BE RESPONSIBLE FOR ANY LOSS OF DATA OR INCOME OR ANY SPECIAL, INCIDENTAL, AND CONSEQUENTIAL OR INDIRECT DAMAGES HOWSOEVER CAUSED. THE CONTENTS OF THIS DOCUMENT ARE PROVIDED "AS IS." EXCEPT AS REQUIRED BY APPLICABLE LAW, NO WARRANTIES OF ANY KIND, EITHER EXPRESS OR IMPLIED, INCLUDING, BUT NOT LIMITED TO, THE IMPLIED WARRANTIES OF MERCHANTABILITY AND FITNESS FOR A PARTICULAR PURPOSE, ARE MADE IN RELATION TO THE ACCURACY AND RELIABILITY OR CONTENTS OF THIS DOCUMENT. NOKIA RESERVES THE RIGHT TO REVISE THIS DOCUMENT OR WITHDRAW IT AT ANY TIME WITHOUT PRIOR NOTICE.
EXPORT CONTROLS
This device contains commodities, technology, or software exported from the United States in accordance with the Export Administration regulations. Diversion contrary to U.S. or Canadian law is prohibited.
FCC/INDUSTRY CANADA NOTICE
Your device may cause TV or radio interference (for example, when using a telephone in close proximity to receiving equipment). The FCC or Industry Canada can require you to stop using your telephone if such interference cannot be eliminated. If you require assistance, contact your local service facility. This device complies with part 15 of the FCC rules. Operation is subject to the condition that this device does not cause harmful interference.
Manufactured or sold under one or more of the following US patents:
| 5001372 | 5371481 | 5553125 | 5805084 | 5893060 | 6006114 | 6119002 | 6229996 |
| 5045973 | 5390223 | 5594797 | 5819165 | 5903839 | 6026161 | 6119003 | 6269331 |
| 5101175 | 5400949 | 5604921 | 5822366 | 5907823 | 6035194 | 6128509 | 6282373 |
| 5124672 | 5416435 | 5606548 | 5835858 | 5914796 | 6043760 | 6144243 | 6285888 |
| 5212834 | 5430740 | 5613235 | 5839101 | 5920826 | 6049796 | 6151485 | 6286122 |
| 5230091 | 5442521 | 5625274 | 5842141 | 5924026 | 6055439 | 6151507 | 6292668 |
| 5233634 | 5446364 | 5677620 | 5844884 | 5924038 | 6060193 | 6154457 | 6308084 |
| 5241284 | 5471655 | 5692032 | 5845219 | 5953665 | 6084962 | 6163609 | 6310609 |
| 5241583 | 5479476 | 5697074 | 5857151 | 5956625 | 6094587 | 6164547 | 6311054 |
| 5266782 | 5487084 | 5734683 | 5870683 | 5987406 | 6097961 | 6185295 | 6314166 |
| 5317283 | 5493255 | 5760568 | 5887262 | 5987639 | 6097964 | 6188909 | 6324412 |
| 5335362 | 5551067 | 5794142 | 5892475 | 5999523 | 6115617 | 6219560 |
Pending:
29158527 29158526
29158528 29158485
29158529 29158524
Contents
Quick guide ....ii
1 For your safety.... 1
About your device 2
Network services 2
2 About your phone .... 3
Register your phone 3
Updates....3
Terms 3
Icons....3
Start screen 4
Scroll bar 4
Antenna 4
Remove and install the battery 5
Charge the battery....6
Important battery information....7
Prolong battery life 7
Headset....7
Get help 8
3 Basic operations....9
Switch your phone ON or OFF 9
Make and answer calls 9
Lock the keypad....10
Select silent profile 10
In-phone help 10
Menus....11
4 Text entry 12
Standard mode....12
Predictive text input....13
Punctuation and special characters....14
5 Phone book 15
Phone book options....15
Save names, numbers, and e-mail addresses 15
Recall names and numbers....15
Make a call....16
Edit a name or number....16
Erase names and numbers 16
Customize your phone book view. 16
Check memory status 16
6 Call log 17
Check missed, received, or dialed calls 17
Clear call lists....17
Call timers 18
7 Messages....19
Voice mail....19
Text, e-mail, and picture messages ..... 19
Text messages 21
Picture messages....22
E-mail messages 23
8 Personalization. 24
Profiles 24
Accessory settings....25
Display language 26
Clock....26
Welcome note 27
Restore factory settings 27
9 Advanced calling features 28
In-call options....28
Voice privacy 29
Call forwarding 29
Call waiting 30
Send own caller ID....31
Select a phone number....31
Automatic redial 32
1-touch dialing 32
Touch tone strings....32
Link phone book entries 34
System selection 34
10 Security 35
Security code 35
Call restriction....35
11 Special features .... 37
Alarm clock 37
Business cards 37
Calculator....38
Ringing tones....39
12 Prepaid services ....40
Activate and deactivate 40
Save your access numbers 40
Check your balance 40
Add money to your account 41
Call customer service 41
Expiration date....41
13 Minute Manager 42
Call information....42
Account information....43
Customer care 43
14 Games 44
Play a game 44
Game settings 44
15 Hardware and accessories....45
Charging times....45
Standby and talk times 45
Accessories....46
16 Reference Information 47
Battery information....47
Enhancements 48
Enhancements, Batteries, and Chargers 48
Care and maintenance 48
Additional safety information....49
Technical information 54
Appendix A Message from the CTIA 59
Appendix B Message from the FDA ....63
Index 69
NOTES
1 For your safety
Read these simple guidelines. Not following them may be dangerous or illegal. Read the complete user guide for further information.

SWITCH ON SAFELY
Do not switch the phone on when wireless phone use is prohibited or when it may cause interference or danger.

ROAD SAFETY COMES FIRST
Obey all local laws. Always keep your hands free to operate the vehicle while driving. Your first consideration while driving should be road safety.

INTERFERENCE
All wireless phones may be susceptible to interference, which could affect performance.

SWITCH OFF IN HOSPITALS
Follow any restrictions. Switch the phone off near medical equipment.

SWITCH OFF IN AIRCRAFT
Follow any restrictions. Wireless devices can cause interference in aircraft.

SWITCH OFF WHEN REFUELING
Don't use the phone at a refueling point. Don't use near fuel or chemicals.

SWITCH OFF NEAR BLASTING
Follow any restrictions. Don't use the phone where blasting is in progress.

USE SENSIBLY
Use only in the normal position as explained in the product documentation. Don't touch the antenna unnecessarily.

QUALIFIED SERVICE
Only qualified personnel may install or repair this product.

ENHANCEMENTS AND BATTERIES
Use only approved enhancements and batteries. Do not connect incompatible products.

WATER-RESISTANCE
Your phone is not water-resistant. Keep it dry.

BACK-UP COPIES
Remember to make back-up copies or keep a written record of all important information stored in your phone.

CONNECTING TO OTHER DEVICES
When connecting to any other device, read its user guide for detailed safety instructions. Do not connect incompatible products.
EMERGENCY CALLS
Ensure the phone is switched on and in service. Press End as many times as needed to clear the display and return to the main screen. Enter the emergency number, then press Send. Give your location. Do not end the call until given permission to do so.
• ABOUT YOUR DEVICE
The wireless device described in this guide is approved for use on the TDMA and AMPS networks. Contact your service provider for more information about networks.
When using the features in this device, obey all laws and respect privacy and legitimate rights of others.

Warning: To use any features in this device, other than the alarm clock, the phone must be switched on. Do not switch the device on when wireless phone use may cause interference or danger.
• NETWORK SERVICES
To use the phone you must have service from a wireless service provider. Many of the features in this device depend on features in the wireless network to function. These Network Services may not be available on all networks or you may have to make specific arrangements with your service provider before you can utilize Network Services. Your service provider may need to give you additional instructions for their use and explain what charges will apply. Some networks may have limitations that affect how you can use Network Services. For instance, some networks may not support all language-dependent characters and services.
Your service provider may have requested that certain features be disabled or not activated in your device. If so, they will not appear on your device menu. Contact your service provider for more information.
2 About your phone
- REGISTER YOUR PHONE
Make sure to register your phone at www.warranty.nokiausa.com or 1-888-NOKIA-2U (1-888-665-4228) so that we can serve your needs better if you should need to call the center or have your phone repaired.
- UPDATES
From time to time, Nokia may update this user guide to reflect changes or corrections. The latest version may be available at the Nokia site on the internet at www.nokia.com/us.
An interactive user guide that provides step-by-step instructions for any of your phone features is available at www.nokiahowto.com
- TERMS
This guide uses certain terms for the parts of the phone and the steps that you are asked to perform.
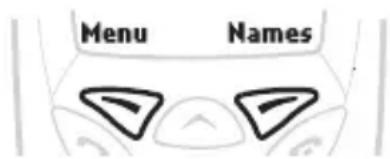
- Selection keys allow you to select various phone options.
- Select means to press the Left selection key or the Right selection key. In the illustration, press the Left selection key to select Menu, or press the Right selection key to select Names.
- Scroll keys, located just below the screen, are used to move up and down in the menus and phone book.
- Highlighted options on the screen are enclosed in a dark bar. The selection keys are used to act on the highlighted option.
text_image
Menu Names- ICONS
Icon What it means

Active call in progress

Silent has been selected as the current profile.

The phone keypad is locked to prevent any accidental key presses.

One (or more) new voice messages waiting

One or more new text messages waiting. (If blinking, the text message memory is full.)
Icon What it means

Digital service is available.

Standard text input mode for entering alpha characters. Press # to switch between uppercase and lowercase input.

Predictive text mode for quickly entering text messages. Press # to switch between uppercase and lowercase input.

Numerical mode. This icon appears when you press and hold # while entering text. You can now enter only numbers (not alpha characters). Press and hold # again to return to text entry mode.

Special character mode. This appears when you press * while entering text. Once the characters appear, you can select a special character by selecting Insert.

Alarm clock is set.
- START SCREEN
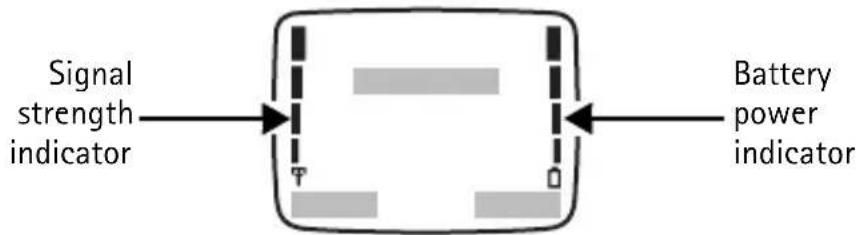
When you switch on your phone, a welcome appears; then you see the start screen. The start screen indicates that the phone is in the standby mode.
text_image
Signal strength indicator Battery power indicator- SCROLL BAR
When you select Menu, a vertical scroll bar appears on the right side of the screen. This scroll bar has a tab which moves up or down as you use the scroll keys to move through the menus.

text_image
Profiles Select Exit 3 Scroll bar- ANTENNA
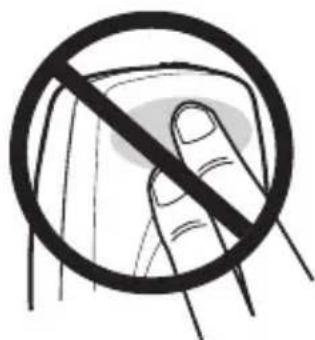
Your phone has an internal antenna. Hold the phone as you would any other telephone with the antenna pointed up and over your shoulder.

Note: As with any other radio transmitting device, do not touch the antenna unnecessarily when the device is switched on. Contact with the antenna affects call quality and may cause the phone to operate at a higher power level than otherwise needed. Avoiding contact with the antenna area when operating the phone optimizes the antenna performance and the battery life.
text_image
Prohibition sign with hand holding a circle, crossed out by diagonal lines- REMOVE AND INSTALL THE BATTERY
This phone can be powered by a 900-mAh NiMH battery (BMC-3) or a 950-mAh Li-Ion battery (BLC-2). This section tells you how to remove and install the battery. You will need to remove the battery when replacing it, or to view the phone label (located under the battery).
Remove the battery
If you purchase a new battery or need to access information on the phone label, you may need to remove the battery. Make sure the phone is turned off for 10 seconds.

Note: Dispose of batteries according to applicable local regulations (for example, recycling). Do not dispose as household waste.
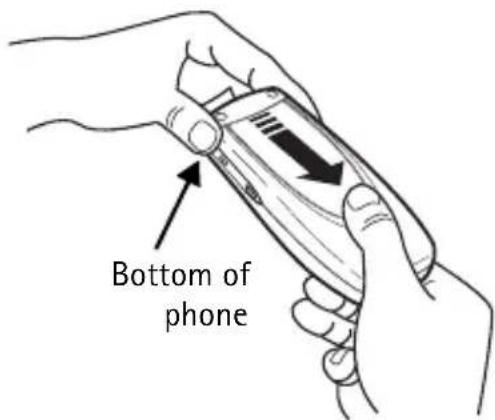
1 Hold the phone with the back facing you. At the bottom corners of the phone, press the battery cover with your thumb and forefinger.
2 Place the thumb of your other hand in the groove, approximately 1 inch from the top of the phone. Apply pressure with the thumb and slide the back cover toward you to release it; then remove it.
text_image
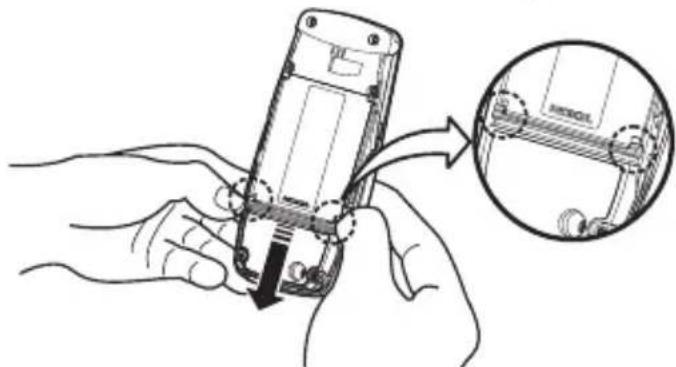
Bottom of phone3 Look for the battery latch that runs along the end of the battery nearest the top of the phone.
4 Place your thumbs on the corners of the latch and press away from the battery.
5 Once the battery is released from the latch, it will lift slightly so that it can be removed from the phone.
natural_image
Illustration of a hand holding a mobile phone with a magnified inset showing the internal structure (no text or symbols)
Warning: Use only your hands to remove the battery. Do not use any objects that may damage the phone or the battery.
Install the battery
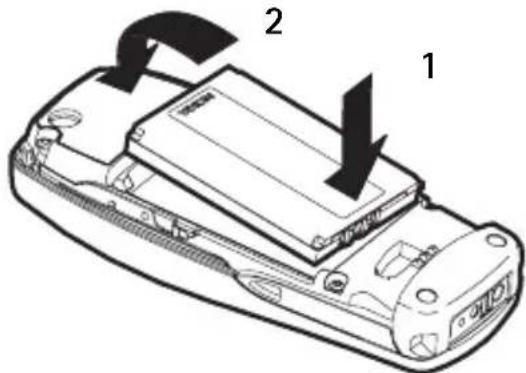
1 Place the battery in the compartment with the label side facing up and the golden contact area of the battery aligned with the contact prongs inside the phone.
2 Press down on the battery until it snaps into place.
3 Align the cover over the back of the phone, placing the end of the cover approximately 1/4 inch past the end of the phone. Lower the back cover onto the phone.
4 Press down slightly and slide the cover until it locks into place.
- CHARGE THE BATTERY
Before you begin, you need to prepare your phone by charging the battery.
1 Plug the charger into a standard wall outlet; then connect the lead from the charger to the bottom of the phone.
The battery power indicator (or battery bar) appears on the screen and starts scrolling. If the phone is on, Charging appears also.
When the battery bar stops scrolling, the battery charge is complete. Battery full appears also, if the phone is on.
2 Disconnect the charger from the phone.
text_image
Diagram of a mobile phone casing with labeled parts 1 and 2, showing internal components and directional arrows.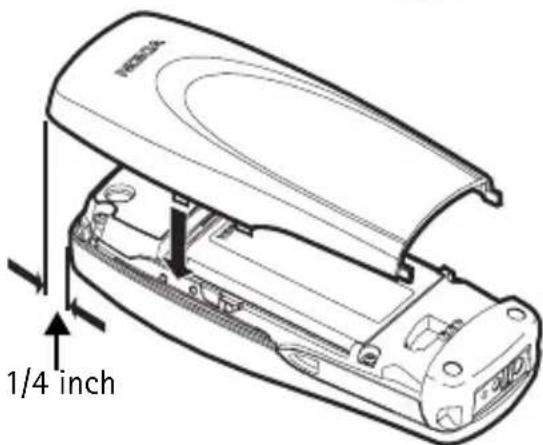
text_image
1/4 inch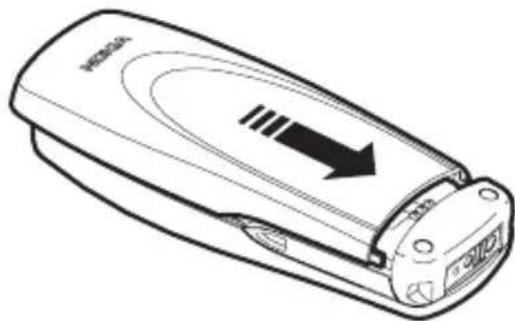
natural_image
Line drawing of a mobile phone casing with an arrow indicating direction (no text or symbols)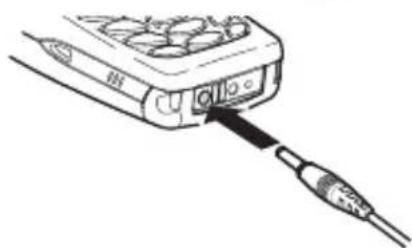
natural_image
Diagram of a USB cable inserted into an electronic device (no text or symbols visible)• IMPORTANT BATTERY INFORMATION
Use the following guidelines to obtain the best performance from your battery:
- With your phone turned off, charge your new battery for three hours before its first use. Use the battery until it is fully discharged. Repeat this procedure twice for a total of three charging cycles.
- Battery operation time may be less than the estimated times during the first charges. This condition is normal.
- If the battery is fully discharged, the scrolling bars may not appear immediately when charging.
- After the first charge, you can make and receive calls during the charging cycle, but the calls interrupt the charge. When the phone call ends, the charge will resume.
- The bars on the screen stop scrolling and remain constant when the phone is charged. If you leave the phone connected to the charger, the battery receives an additional charge.

Note: The battery will accept a "trickle charge" for an additional two hours. See "Reference Information" on page 47 for more information on batteries.
- Charging time depends on the charger and battery used. See "Hardware and accessories" on page 45 for charging, talk, and standby times.
• PROLONG BATTERY LIFE
For good operation times with NiMH batteries, discharge the battery from time to time by leaving your phone switched on until it turns itself off. Ignore any messages to recharge your battery and let the battery completely discharge.

Note: Do not attempt to discharge the battery by any other means.
- HEADSET
Your phone is compatible with the HDC-5, HDE-2 and HDB-5 headsets.
To connect the headset:
1 Plug the headset jack into the bottom of your phone.
2 Put the earbud into one ear.
With the headset connected, you can make and answer calls as usual.
The microphone for the headset hangs at the side of your head. Although the microphone may seem far from your mouth, you can speak at a normal volume.

Note: You can set your phone to answer automatically when the headset is connected. See "Automatic answer" on page 26.
- GET HELP
Find phone information
We recommend that you have the following information available before contacting the Nokia Customer Care Center or the service provider:
- Your billing address ZIP code
- The phone or accessory in question
- Your phone model number—located on the phone type label
• ESN (electronic serial number)—located on the phone type label
The type label is located under the battery inside the back cover. Do not remove or deface the label.
Contact Nokia
| Nokia Customer Care Center, USA Customer Care Centre, Canada | |
| Nokia Mobile Phones7725 Woodland Center Blvd. Suite #150Tampa, Florida 33614Tel: 1-888-NOKIA-2U(1-888-665-4228)Fax: 1-813-249-9619For TTY users: 1-800-24-NOKIA(1-800-246-6542) | Nokia Products Ltd.601 Westney Road SouthAjax, OntarioL1S 4N7Tel: 1-888-22-NOKIA(1-888-226-6542)Fax: 1-905-427-1070Web site:www.nokia.ca |
Contact your service provider
You may want to save your service provider's customer support telephone number into your phone. This will let you easily contact your provider if you have questions or issues with your phone service.
Accessibility solutions
Nokia is committed to making mobile phones easy to use for all individuals, including those with disabilities. For more information, visit the web site at www.nokiaaccessibility.com.
3 Basic operations
• SWITCH YOUR PHONE ON OR OFF

Warning: Do not switch on the phone when wireless phone use is prohibited or when it may cause interference or danger.
Switch on your phone
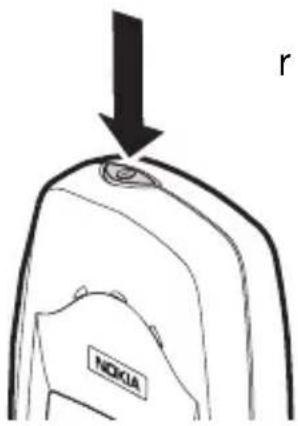
Press and hold the Power key for 2 seconds.
Switch off your phone
Press and hold the Power key.
• MAKE AND ANSWER CALLS
text_image
r NOKLAThere are several ways to make and answer calls on your phone. You will discover other tips throughout this guide when reading about phone features.
Make a call
1 Enter the phone number, including area code if needed.
2 Press the Talk key.
End a call
Press the End key to end the call or cancel the call attempt.
Answer a call
When your phone rings, press the Talk key. You can press any key to answer a call except the Power key or the End key.

Note: If Keyguard is active, the keypad will unlock when you have an incoming call.
Silence an incoming call
Press the End key or select Silent to mute the ringing of an incoming call.
Redial the last dialed number
Press the Talk key two times.
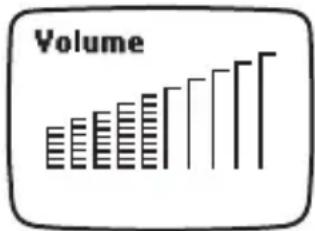
Adjust the earpiece volume
You can adjust the earpiece volume while in a call by pressing the scroll keys located just below the screen.
- Press the Scroll up key to increase the volume.
- Press the Scroll down key to decrease the volume.
text_image
Volume- LOCK THE KEYPAD
Keyguard locks your keypad to prevent accidental key presses.
• To lock the keys, select Menu and press *.
• To unlock the keys, select Unlock and press *.
- To answer a call when Keyguard is active, select Answer or press the Talk key. If you are connected to a headset or loopset, press and hold the End key to end the call.
• After you end the call, Keyguard automatically becomes active again.
- If you need the phone lights while Keyguard is on, press the Power key to quickly switch the lights on for 15 seconds.
- Connecting your phone to a car kit automatically disables Keyguard.
When the Keyguard is on, calls still may be possible to the official emergency number programmed into your phone. Enter the emergency number and press the Talk key.
- SELECT SILENT PROFILE
If you do not want the phone to disturb others, select the profile to silence the ringing tone and all other tones.
1 At the start screen, quickly press and release the Power key.
2 Scroll to Silent and select Select.
- IN-PHONE HELP
Many menu items have brief help text. To view the help text, scroll to the menu item and wait for about 15 seconds. Select More or press the Scroll down key to continue reading the text. Select Back to exit, or wait a few seconds to return to the current menu.
- MENUS
A menu is a list of choices you can make to change settings on your phone or use various phone features. Each menu can contain several levels of submenus. You can use menus and submenus two ways: by scrolling or by using a shortcut.
Scroll method
1 At the start screen, select Menu, and scroll through the menus using the Scroll up and Scroll down keys.
2 Use the scroll and selection keys to navigate the submenus; press the End key to return to the start screen.
For example, when you see "From the menus, select Call log > Clear call lists > Missed", the scrolling method is as follows:
At the start screen press the Left selection key (under the word Menu), scroll to Call log and press the Left selection key (under the word Select), scroll to Clear call lists and press the Left selection key (under the word Select), scroll to Missed and press the Left selection key (under the word Select).
Shortcuts
Menus and options are numbered so that you can quickly find your way to an option. The numbers appear in the top right corner of the screen and show your location in the menu.
1 Select Menu.
2 Within 3 seconds, enter the first number of the menu function you want to access. Repeat until you have entered all the numbers.
For example, to clear the missed calls list, select Menu 2-4-2.
Menu tips
- To quickly access the last option in a menu list, scroll upward.
• To return to the previous menu level, select Back. - To exit a menu and return to the start screen, press the End key. If you leave a menu this way, you cancel any changes you made.
- Some menus may not appear. Ask your service provider for details.
4 Text entry
You can use two methods for entering text and numbers.
- Standard mode is the only way to enter names into contacts and to rename caller groups.
• Predictive text input is a quick and easy method for writing messages.
Press # to switch predictive text on or off and to use text entry in various modes. Press and hold # to switch between text and numeric entry. As you press #, the following icons (not the descriptions) appear in the upper left of the display:
Icon Indicates...

ABC
Uppercase text. Predictive text is Off.

abc
Lowercase text. Predictive text is Off.

Abc
Sentence case text. Predictive text is Off.

Abc
Sentence case text. Predictive text is On.

abc
Lowercase text. Predictive text is On.
- STANDARD MODE
Enter text (Abc)
- Press a key once to insert the first letter on the key, twice for the second letter, etc. If you pause briefly, the last letter in the display is accepted and the phone awaits the next entry.
- Select Clear to backspace the cursor and delete a character.
- Select and hold Clear to backspace continuously and delete characters.
- Press the 0 key to enter a space and accept a completed word.
- Press the 1 key to enter a period (.).
- Press the 1 key repeatedly to cycle through special characters. Pause to insert the displayed character.
- Press * to display all special characters. See "Punctuation and special characters" on page 14.
Switch to and from numeric entry (123)
To switch between 123 mode and Abc mode, press and hold # at any message entry screen until the icon in the upper left corner of the display switches from Abc to 123 (or vice versa).
- PREDICTIVE TEXT INPUT
Predictive text input allows you to enter text quickly using your keypad and the built-in phone dictionary.
Activate predictive text
1 At any text entry screen, select Options > Predictive text.
2 Select the language of your choice.
Enter text
- For each letter of the word that you want to spell, press the corresponding key on your keypad only once, even if the letter you want is not the first letter on the key. The phone "guesses" the word you are trying to spell.
- If a displayed word is not correct, press * to see other matches. To move forward through a list of matches, keep pressing *.
- Press the 0 key to accept the word, enter a space, and begin writing the next word.
- If ? appears after a word, select Spell to add the word to the dictionary. See "Add new words to the dictionary" on page 13.
- Press the 1 key to insert a period into your message.
- Press and hold * to display special characters. See "Punctuation and special characters" on page 14.
Add new words to the dictionary
If you encounter a word that predictive text does not recognize, a question mark (?) follows the word and Spell appears in the lower left of the display.
Select Spell, enter your new word using the keypad, and select Save. The word is added to the dictionary and to the message that you are writing.
Keep these factors in mind when adding words:
- New words that you accept by selecting Save, the 0 key, or deleting the space between two words are saved to the dictionary.
- Depending on the language and the length of the words, you may be able to add hundreds of words to the dictionary.
- When the dictionary is full, the most recent addition replaces the first.
Predictive text example
To write Nokia with predictive text on and with the English dictionary selected, press each of the following keys once:
the 6 key
the 6 key
the 5 key
the 4 key
the 2 key
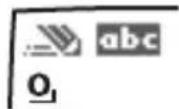
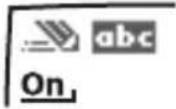
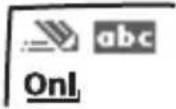
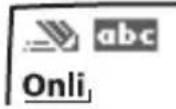
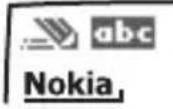
The illustration above simulates your display each time a key is pressed.
• PUNCTUATION AND SPECIAL CHARACTERS
While at any text entry screen, press * to display special characters (press and hold * if predictive text is on).
Navigate special characters using the 2, 4, 6, and 8 keys much as you would a joystick. Once a character is highlighted, press the 5 key to insert the character into your message.
To enter a symbol while adding a name to the phone book, press *.
To add a special character for creating a number string in the number box, press *. See "Touch tone strings" on page 32.
5 Phone book
The phone book can store up to 200 entries. An entry can consist of a number only or a name and a number. An entry can also include an e-mail address.
• PHONE BOOK OPTIONS
At the start screen, select Names; then select one of the following options:
Find—Search for a specific entry.
Add new—Add a new entry.
Erase all—Erase names and numbers one by one or all at once.
Options—Go to options for memory status and scrolling view.
1-touch dialing—Assign up to eight keys for speed dialing (see "1-touch dialing" on page 32).
- SAVE NAMES, NUMBERS, AND E-MAIL ADDRESSES
For information on entering text, see "Text entry" on page 12.
Quickly save a name and number
1 At the start screen, enter the phone number and select Save.
2 Enter a name and select OK.
Save an entry using the phone book menu
1 At the start screen, select Names > Add new.
2 Enter a name and select OK.
3 Enter a number and select OK.
Save an e-mail address to an existing entry
1 Find the name to which you want to add an e-mail address.
2 If you are not in the Name+number phone book view, select Details.
3 Select Options > E-mail address.
4 Enter the e-mail address and select OK.
- RECALL NAMES AND NUMBERS
1 At the start screen, select Names > Find and enter one or two letters of the name you want to recall.
2 Select Find; then scroll to the appropriate entry.
You can use these alternate methods for recalling a number.
- At the start screen, select Names, enter the first letter of the name, and scroll to the name.
- At the start screen, press the scroll keys to enter your list of names and scroll to the name you want to dial.
- At the start screen, press the Talk key to access a list of your last ten dialed calls; then scroll to the one you want to dial.
- MAKE A CALL
When a phone book entry is highlighted, press the Talk key to dial the number.
• EDIT A NAME OR NUMBER
1 Recall the name or number you wish to edit.
2 If you are not in the Name+number phone book view, select Details.
3 Select Options > Edit.
4 Edit the name or number and select OK.
• ERASE NAMES AND NUMBERS
Erasing stored names and numbers removes them from your phone. Once you erase an item, you can restore it only by reentering it.
Individual entries
1 Recall the phone book entry you want to erase.
2 If you are not in the Name+number phone book view, select Details.
3 Select Options > Erase > OK.
Entire contents
1 At the start screen, select Names > Erase all > OK.
2 Enter your security code and select OK.
- CUSTOMIZE YOUR PHONE BOOK VIEW
You can change the way you view names and numbers in the phone book.
1 At the start screen, select Names > Options > Phone book view.
2 Select one of the following options:
Name list—Display three names at a time.
Name+number—Display one name and its corresponding number.
Name only—Display individual names only. To view the corresponding phone number, select Details and scroll up or down.

Note: If you select the Name+number phone book view, you will not need to select Details when working with phone book options.
- CHECK MEMORY STATUS
You can check how much of your phone book memory is free and how much has been used.
At the start screen, select Names > Options > Memory status.
6 Call log
The call log registers information about calls you make and receive. The phone stores the numbers of the last ten calls that you missed, the last ten calls that you received, and the last ten calls that you dialed. For call log to work properly:
- You must be in a digital network, your service provider must support caller ID, and it must be enabled.
- Your calls cannot be blocked.
- Your phone must be on and within the service area, or in a compatible network if roaming.
- CHECK MISSED, RECEIVED, OR DIALED CALLS
1 From the menus select Call log; then select either Missed calls, Received calls, or Dialed calls.
2 Scroll through the list of numbers and highlight your selection.
3 Select Options; then select one of the following options:
Call time—Show the time when the call was connected.
Send message—Send a text message to the person who called you or whom you called.
Edit number—Edit the number and save it with a name to your phone book.
Save—Enter a name for the number and save both to your phone book.
Erase—Delete the number from the call list.
View number—View the number. This option appears if the call was made from a name entry in the phone book.
Call—Dial the number from the call log.
When the number of a missed, received, or dialed call is highlighted, you can call the number by pressing the Talk key.
- CLEAR CALL LISTS

Warning: You cannot undo this operation.
1 From the menus, select Call log > Clear call lists.
2 Select either All, Missed, Received, or Dialed.
- CALL TIMERS
Your phone tracks the amount of time you spend on each call.

Note: The actual time invoiced for calls by your service provider may vary, depending upon network features, rounding off for billing, and so forth.

Note: Some timers may be reset during service or software upgrades.
View call durations
1 From the menus, select Call log > Call timers.
2 Select one of the following options:
Duration of last call—Show the call duration of the last call.
Duration of all calls—Show the call duration of all calls that have been made and received since you reset the timers.
Clear timers—Clear all call timers for the currently selected phone number. (Your phone includes separate timers for each number used.) This action cannot be undone.
Clear call timers
1 From the menus, select Call log > Call timers > Clear timers.
2 Enter your security code and select OK.
Turn on a current call timer
You can set your phone to show the running elapsed time while a call is active.
1 From the menus, select Settings > Call settings > Current call timer > On.
From this point on, the timer is active during each call you make or receive. The time appears on the phone screen.
2 After a call ends, press any key on the phone keypad to clear the current call time from the screen.
7 M e s s a g e s
Your phone can send and receive voice mail, text and picture messages, and e-mail.
Not all messaging features are available in all wireless networks. Contact your service provider for availability and subscription information, for your mailbox phone number, and for instructions for using the voice mail system greetings, passwords, and prompts.

Note: Only devices that offer compatible multimedia message or e-mail features can receive and display multimedia messages. Multimedia message objects may contain viruses or otherwise be harmful to your device or PC. Do not open any attachment if you are not sure of the trustworthiness of the sender.
- VOICE MAIL
Save the voice mailbox number
1 From the menus, select Messages > Voice messages > Voice mailbox number.
2 Enter your voice mailbox phone number and select OK.
Your voice mailbox number can be up to 32 digits long and is used until you change it. Therefore, if your phone number changes, the voice mail number will probably change also. For further information, contact your service provider.
Check for messages
When you receive a voice message, your phone beeps and New voice message appears on your phone screen, along with the 100n
If you receive more than one voice mail message, your phone may show the number of messages that you have received. The service provider determines the type of indication you will receive. To listen to a voice message immediately, select Listen and follow the automated instructions. To store the message for later listening, select Exit.
To listen to stored voice messages, press and hold the 1 key; then follow the prompts.
• TEXT, E-MAIL, AND PICTURE MESSAGES
If you subscribe to a message service, you can send and receive messages to compatible phones that also have a message service. Text and picture messages and e-mail must be supported by the network and by both the sending and receiving phones.
The maximum length of a sent or received message is 160 characters. Your phone has space for several messages, depending on the length of each message. The maximum length of a message also may depend on the capabilities of the network from which the message originated.
Folders
Your phone has folders for managing text messages. Text message folders are located under the Messages menu.
Inbox—The inbox stores received messages. Messages remain in the inbox until you delete them or save them in the archive folder. You can forward or reply to messages in the inbox.
Outbox—The outbox stores messages you have written, sent, edited, and forwarded. Messages in the outbox are not saved messages. As you send new messages, old messages are automatically removed from the outbox. If you want to save a message you have sent, read the message while it is in the outbox and use the Options menu to save it to the archive folder.
Archive—The archive folder stores messages you have saved. You can save messages to the archive folder from the inbox and the outbox. You can reply to or forward saved messages.
Erase messages from folders
1 From the menus, select Messages > Erase all.
2 Select either All read, Inbox, Archive, or Outbox.
3 Enter your security code, and select OK.
Message options
There are several options available when working with text, picture and e-mail messages. The order and availability of options may vary depending on the messaging function and your service provider.
Send—Attempt to send the text message to the recipient.
Settings—Set Urgent, Read receipt, Reply req., and Callback no. options for the message.
Save—Save the message in the archive folder.
Clear text—Clear the text in the message editor.
Exit editor—Return to the Write message menu.
Predictive text—Turn predictive text on and off.
Insert word—If predictive text is activated, you can manually spell a word and insert it into your message.
Insert number—Insert numbers into the message.
Insert symbol—Access the list of special characters.
Matches—List alternative word choices while using predictive text.
Details—When viewing a picture message, view the sender's number.
Preview—Preview your picture message before sending.
Edit text—Add text to a picture message.
Erase—Erase a picture message.
Forward—Forward a picture message.
Use number—Use the number associated with a picture message.
Edit recipient—Edit the e-mail address.
Edit subject—Edit the subject of an e-mail message.
- TEXT MESSAGES
Write and send a text message
1 From the menus, select Messages > Write message.
2 Enter a message of up to 160 characters.
A counter in the upper right corner of the screen shows the number of characters remaining.
3 Select Options > Send.
4 Enter or recall the recipient's phone number; then select Send.
When sending messages, your device may display the words Message Sent. This is an indication that the message has been sent by your device to the message center number programmed into your device. This is not an indication that the message has been received at the intended destination. For more details about messaging services, check with your service provider.
Receive a text message
When you receive a text message, the phone beeps and displays Message received and the

indicator in the upper left corner of the screen.
To view the message immediately, select Read. To move the message to the inbox, select Exit.
Read messages in the inbox
1 From the menus, select Messages > Inbox.
2 If you have more than one new message, scroll to the message you want to view.
Messages in the inbox are listed in the order they are received, with the most recent message listed first. Unread messages are indicated by 📄
Forward or reply to a text message
1 While reading the message, select Options; then select either Forward or Reply.
2 Select either As message or As e-mail.
When forwarding or replying as e-mail, see "Send an e-mail message" on page 23.
When forwarding or replying as message, see "Write and send a text message" on page 21.
Save a message to the archive folder
While reading the message, select Options > Save.
Erase a message
While reading the message, select Options > Erase > OK.
When phone memory is full
When the phone message memory is full, one or more messages of the lowest priority are automatically deleted. When you receive an emergency message, messages may be deleted from any of your message folders.
If you have more messages waiting at the network, 📁s on the start screen. You can erase old messages to create space for new messages.
• PICTURE MESSAGES
Your phone offers five picture messages that you can use to send pictures and text to your friends and family. You can also save a new picture by replacing an existing picture.
Each picture message is made up of several text messages.

Note: This function can be used only if it is supported by your network operator or service provider. Only compatible phones that offer picture message features can receive and display picture messages.
Send a picture message
1 From the menus, select Messages > Picture Messages.
2 Scroll to the picture you want to send, and select Show.
3 To choose a different picture, select Back and scroll to another picture.
4 Select Options > Edit text, and enter a text message to send with the picture.
5 To preview the picture message, select Options > Preview.
6 After viewing the picture message, select Back.
7 To send the picture message, select Options > Send.
8 Enter or recall the recipient's phone number; then select Send.
Receive a picture message
1 When your phone displays Picture message received, select Show and the message appears.
2 If the picture has a text message with it, scroll up or down to see the entire message.
Save a picture message
1 Select Show to view the message; then select Save.
2 Scroll to the picture you want to erase; then select Replace.
• E-MAIL MESSAGES
Messages sent to you by e-mail arrive as regular text messages. You can use all the options described earlier to save, reply to, or forward a message. Contact your service provider to get the e-mail address and gateway number for your phone, and for more information on using e-mail.
When you write an e-mail message, the total message, including the address and subject line, can be up to 160 characters. There is a running total of remaining characters in the top right corner of the screen.

Note: Predictive text is not available when entering an e-mail address or subject line.
Send an e-mail message
1 From the menus, select Messages > Write e-mail.
2 Enter the recipient's e-mail address, or select Find to retrieve the e-mail address from your phone book; then select OK.
3 Enter a subject for your e-mail message, if desired, and select OK.
4 Enter the text of your e-mail and select Options > Send.
Receive an e-mail message
When you receive an e-mail message, the phone makes a sound and displays Message received and the 📋 indicator in the upper left corner of the screen.
To read the message, select Read.
Edit an existing e-mail message
You can edit an e-mail message by replying to the message or forwarding it.
You can edit messages from any folder.
Forward or reply to an e-mail message
1 While reading the message, select Options; then select either Forward or Reply.
2 Select either As message or As e-mail.
When forwarding or replying as e-mail, see "Send an e-mail message" on page 23. When forwarding or replying as message, see "Write and send a text message" on page 21.
8 Personalization
- PROFILES
Profiles let you set your phone sound settings to match your environment. Pick the profile that suits your current environment: Normal, Silent, Meeting, Outdoor, or Pager. You can customize any of the profiles.
Select a profile
1 At the start screen, quickly press and release the Power key.
2 Scroll to the profile you want to use and select Select.
Customize a profile
1 From the menus, select Profiles.
2 Scroll to the profile you want to customize and select Options > Customize.
3 Select the option you want to customize.
RINGING OPTIONS
You can choose the type of ring your phone uses to notify you of an incoming call. This setting does not affect any incoming text message alert tones.
From the customization options, select Ringing options; then select one of the following:
Ring—The phone rings normally.
Ascending—Ringing volume gets louder if the phone is not answered.
Ring once—The phone rings once to indicate an incoming call.
Beep once—The phone beeps once to indicate an incoming call.
Silent—The phone makes no sound.
RINGING TONE
The ringing tone is the sound your phone makes when you receive a call. You can set the ringing tone to a specific sound or tune to personalize how the phone rings.
From the customization options, select Ringing tone; then scroll through the available tones and select the one that you want to use.
If you have already chosen a ringing option of either Silent or Beep once, the ringing tones are already turned off.
RINGING VOLUME
You can set the default ringing volume for incoming voice calls and message alert tones.
From the customization options, select Ringing volume; then scroll through the volume levels and select the one that you want to use.
MESSAGE ALERT TONE
You can set your phone to use a certain tone to indicate an incoming text message.
1 From the customization options, select Message alert tone; then scroll through the available tones.
The phone plays samples of each choice as you scroll to it.
2 When you find the tone you want, select Select.
KEYPAD TONES
You can set the volume of the tone you hear when you press your phone keys. In the Silent profile, the keypad tones are turned off.
From the customization options, select Keypad tones; then scroll through the available levels and select the one that you want to use.
WARNING TONES
Warning tones include the sounds your phone makes during error conditions, during confirmations, when the battery is low, and when you need to recharge the battery.
1 From the customization options, select Warning tones.
2 Select either On or Off.
Rename a profile
1 From the customization options, select Profile name.
2 Enter the new name and select OK.
You cannot rename the Normal profile.
- ACCESSORY SETTINGS
You can use your phone with these Nokia accessories:
- Headset (HDC-5, HDE-2, HDB-5)
- Handsfree Car kit (CARK-125 and PPH-1)
- Loopset (LPS-3)
• TTY/TDD Adapter (HDA-9)

Note: You can select a default profile that will be associated with each accessory. However, the Accessory settings menu will not appear until after an accessory has been connected to the phone at least once.
Loopset
1 Attach the loopset to the phone.
2 From the menus, select Settings > Accessory settings > Loopset > Use loopset > Yes.
Automatic answer
This feature lets the phone answer incoming calls after just one ring when an accessory is connected.
1 From the menus, select Settings > Accessory settings.
2 Select either Headset, Handsfree, or Loopset.
3 Select Automatic answer > On.
Lights (car kit only)
When your phone is connected to a car kit, you have a choice of having the phone lights on continuously or only when the phone is in use.
1 From the menus, select Settings > Accessory settings > Handsfree > Lights.
2 Select On (phone lights on continuously), or Automatic (phone lights on only when in use); then select OK.
Default profile
When you use the headset, car kit, or loopset, you can select a default profile.
1 From the menus, select Settings > Accessory settings.
2 Select either Headset, Handsfree, or Loopset.
3 Select Default profile; then select the profile you want.

Note: The Active profile uses the current profile setting you have selected for your phone.
• DISPLAY LANGUAGE
You can choose the phone display language.
1 From the menus, select Settings > Phone settings > Language.
2 Select the language you want.
- CLOCK
Your phone contains a real-time clock. You can either set the clock manually, or have the clock set automatically using the time information provided by the network. Once the time is set, you can display the clock on the start screen.
For added convenience, the clock is connected to an alarm clock. See "Alarm clock" on page 37 for additional information.
Time format
1 From the menus, select Settings > Time settings > Clock > Time format.
2 Select either 24-hour or am/pm.
Set the clock
1 From the menus, select Settings > Time settings > Clock > Set the time.
2 Enter the time in hh:mm format, and select OK.
3 If the current time format is am/pm, select am or pm.
Automatic update of time
You can set your phone to update the time from the network when you turn the phone on. If the clock in your phone is 30 seconds or more off the network time, the phone will automatically update to reflect the network time.

Note: Automatic update of time is a network dependent feature. Contact your service provider for details and availability.
1 From the menus, select Settings > Time settings > Auto update of time.
2 Select one of the following options:
On—Update the time automatically.
Confirm first—Request confirmation before updating the time. You can accept or decline the update.
Off—Do not automatically update the time.
Display or hide the clock
1 From the menus, select Settings > Time settings > Clock.
2 Select either Hide clock or Show clock (toggles—only one choice appears, depending on the current setting).
- WELCOME NOTE
You can add a welcome note that your phone displays briefly when you turn it on.
1 From the menus, select Settings > Phone settings > Welcome note.
2 Enter a note and select Options > Save.
To erase the welcome note, select Settings > Phone settings > Welcome note > Options > Erase.
- RESTORE FACTORY SETTINGS
If you have made changes to your phone profiles (settings), you can restore them to their original or factory settings. The memory, timers, language selection, and security code are not reset. However, profile and accessory settings are reset.
1 From the menus, select Settings > Phone settings > Restore factory settings.
2 At the prompt, enter your five-digit security code and select OK.
9 Advanced calling features
Not all features described in this chapter are available in all wireless networks. Contact your service provider for availability of network services.
- IN-CALL OPTIONS
Your phone allows you to use a number of features during a call; however, you may not be able to use all options at all times. Also, the order of in-call options may vary.
During a call, select Options to see the in-call menu choices:
Lock keys—Lock the phone keypad during a call.
Mute—Mute the phone microphone. This option can affect the microphones of accessories connected to the phone.
End all calls—End all active calls.
Touch tones—Send touch tones.
New call—Make another call while you have a call in progress.
Menu—Access the menus. (Select Exit to exit the menus. Do not press the End key or you will end your call.)
Names—Access the phone book.
Make a new call
To make a new call while already in a call, dial the number and press the Talk key.
End all calls
Press the End key.
Save a name and/or number
You can save a name and number during a call.
1 Enter the number you want to save.
2 Select Options > Names > Add new.
3 Add the name and number to the phone book as you normally would.
Conference calling
While in a call, you can call another number to add a third party to the call.

Note: Conference calling is a network dependent feature. Contact your service provider for availability and details.
CONFERENCE A CALL
1 While in a call, dial the number you want to add and press the Talk key.
2 When the third party answers, press the Talk key to connect all three parties.
DISCONNECT THIRD PARTY
While all three parties are connected, press the Talk key to disconnect the third caller while keeping the second party's call active.
DISCONNECT SECOND PARTY
To disconnect with the second party and remain connected to the third party, have the second party terminate the call on his/her end.
RECALL A NUMBER FROM THE PHONE BOOK DURING A CALL
1 To access the phone book, select Options > Names.
2 Select the number in the phone book.
3 Select OK to call the number.
END A CONFERENCE CALL
To end all calls, press the End key.
- VOICE PRIVACY
The voice privacy feature encrypts the voice channel so that people cannot eavesdrop on your phone conversations.

Note: Voice privacy is a network dependent feature. Contact your service provider for more information.
1 From the menus, select Settings > Network services > Voice privacy.
2 Select On to activate, or Off to deactivate.
During a call, voice privacy becomes active and notifies you with a beep.
A notification message also appears on the screen.
If you turn this feature on and voice privacy becomes inactive, your phone beeps and displays the message Voice privacy not active.

Note: Use caution when sending confidential information if voice privacy is not active.
- CALL FORWARDING
With call forwarding, you can forward incoming calls to another phone number. Before you can use call forwarding, you must first store the feature codes. Once call forwarding has been activated, Call forwarding appears as a menu option.

Note: Call forwarding is a network dependent feature. Some networks require that call forwarding be activated manually. Contact your service provider for availability and full details.
Feature codes
Your network requires separate codes for activating and cancelling the various types of call forwarding. You must contact your service provider to obtain the necessary feature codes for these network services.
Once you store these feature codes in your phone, they are sent automatically to the network when you select one of the call forwarding options.
Your phone can store the following types of feature codes:
Forward all calls—Forward all incoming calls to the number you specify.
Forward if busy—Forward incoming calls when you are in a call.
Forward if not answered—Forward incoming calls when you are unable to answer.
Forward if out of reach—Forward incoming calls when the phone is out of the network or switched off.
Cancel all call forwarding—Cancel all active call forwarding options.
Store the feature code
1 From the menus, select Settings > Network services > Network feature setting.
2 Enter the feature code and select OK > Call forwarding.
3 Select the call forwarding option you want; then select Activate.
Activate or cancel
1 From the menus, select Settings > Network services > Call forwarding; then select the desired call forwarding option.
2 Select Activate to activate call forwarding, or Cancel to cancel call forwarding.
3 If you are activating call forwarding, enter the number to which you want your calls forwarded, or select Find to recall a number from the phone book; then select OK.
- CALL WAITING
During a call, call waiting beeps to let you know that someone else is calling you. Depending on your caller ID setup, the phone might also display the number of the incoming call. Once call waiting has been activated, Call waiting appears as a menu option.

Note: Call waiting is a network dependent feature. In some networks the call waiting code must be activated manually. Contact your service provider for availability and full details.
Store the feature code
1 From the menus, select Settings > Network services > Network feature setting.
2 Enter the feature code issued by your service provider and select OK.
3 Select Call waiting > Activate.
Activate call waiting
From the menus, select Settings > Network services > Call waiting > Activate.
Manage calls
Call waiting works with both local and long distance calls.
• To answer an incoming call, press the Talk key.
• To switch from one call to another, press the Talk key.
• To end both calls, press the End key.
- SEND OWN CALLER ID
This feature allows you to block caller ID when you call someone (your number will not be displayed on their caller ID). This feature works on a call-by-call basis. You must enable this feature each time you want to block the sending of your own number to the recipient's caller ID.

Note: This feature is available only when supported by the wireless network and may not function if you are roaming.
Store the feature code
Before you can use the Send own caller ID call feature, you must store the feature code for activating this feature. Once the code is stored in your phone, it is sent automatically to the network when you select this option from your phone menu.
1 From the menus, select Settings > Network services > Network feature setting.
2 Enter the feature code issued by your service provider and select OK.
3 Select Send own caller ID > Yes.
Place a call without sending your number
1 From the menus, select Settings > Network services > Send own caller ID > No.
2 Enter the desired phone number, or select Find to recall a phone number from the phone book; then select OK.
The phone automatically inserts the feature code into the dialing string and dials the phone number. The phone you are calling will not display your phone number through caller ID.
- SELECT A PHONE NUMBER
Your service provider programs your phone number and system information into your phone memory when your phone is first activated. Your phone can hold up to three numbers. This means that your phone can be activated in three different service areas. Each service area would assign a different phone number or account to your phone.
You must select a phone number for your home system. Only one phone number can be active at a time. If you travel outside your home system, you can choose another number. One phone number is usually enough if your service provider has service or roaming agreements for each area in which you wish to use your phone. Contact your service provider for details.
You need at least one active number to make calls. You cannot change from one phone number to another during a call.

Note: Phone number selection is a network dependent feature. Some networks may not support more than one number. Contact your service provider for availability and full details.
1 From the menus, select Settings > Network services > Own number selection.
2 Select the phone number you want to use.
• AUTOMATIC REDIAL
When the wireless network is busy or unavailable, Automatic redial instructs your phone to retry the call. However, this feature does not automatically retry a number when the number you are calling is busy.
From the menus, select Settings > Call settings > Automatic redial > On.
If the network is busy, your phone makes three additional call attempts. If you want to stop the automatic redial process before the last attempt, press the End key or select Quit.
• 1-TOUCH DIALING
You can assign a name from your phone book to a 1-touch dial location, using keys 2–9. The phone number assigned to that key is dialed automatically when you press and hold the key.
Assign a key to 1-touch dialing
1 At the start screen, select Names > 1-touch dialing.
2 Scroll to a number that has the message (empty) and select Assign.
3 Select the name and number to which you want to assign this key.
4 To call a number using 1-touch dialing, press and hold the appropriate key for a few seconds.
Change 1-touch dialing numbers
1 At the start screen, select Names > 1-touch dialing.
2 Scroll to the key you want to change and select Options > Change.
3 Scroll through the phone book and select the new number.
Erase 1-touch dialing numbers
1 At the start screen, select Names > 1-touch dialing.
2 Scroll to the key you want to erase and select Options > Erase > OK.
- TOUCH TONE STRINGS
Your phone allows you to create special sets of numbers known as touch tone strings which will dial a series of digits after a "wait" or a "pause." For example, you can program your phone to send your account number while you are banking by phone.
You must be in the mode to enter these characters. Enter the numbers as usual.
When you want to insert the special characters, press the Star key repeatedly to switch among *, +, p, w characters.

Note: Use caution when sending confidential information if voice privacy is not active.
p Creates a pause when a number is dialed. The numbers you enter after this special character are automatically sent as touch tones after a 2.5-second pause.
w Creates a wait when a number is dialed. Your phone waits for you to press the Left selection key before it sends the number as touch tones.
* Sends command strings to the network. Contact your service provider for details.
+ Links a 1-touch dialing number to a number in the phone book.
Set manual touch tones
1 From the menus, select Settings > Phone settings > Touch tones > Manual touch tones.
2 Select one of the following options:
Continuous—Sound the tone for as long as you press and hold a key.
Fixed—Set the tone to a fixed length, regardless of how long you press a key.
Off—Turn off the tones. No tones are sent.
Set touch tone length
You can also set the length of each touch tone.
1 From the menus, select Settings > Phone settings > Touch tones > Touch tone length.
2 Select either Short (0.1 second) or Long (0.5 second).
Store touch tone strings
You can store touch tone strings the same way that you store names and numbers in your phone book. You can store an entire sequence of digits and send it as touch tones for frequently used strings of numbers.
1 Enter the phone number that you want associated with a touch tone.
2 Enter the touch tone character where needed (p, w, or *).
3 Enter the touch tone string.
4 Store the number as you normally would.
Send a touch tone string
1 From the menus, select Settings > Phone settings > Touch tones > Manual touch tones.
2 Select either Continuous or Fixed (not Off).
3 During the call, select Options > Touch tones.
4 Enter the touch tone string or recall the string from the phone book, and select OK.
If you send touch tones while in the analog mode, be careful not to send confidential information.
- LINK PHONE BOOK ENTRIES
This feature allows you to store a phone number in one phone book location and link it to another phone book entry.
For example, you can link the phone number of an automated service, such as automated banking service, with a touch tone string entry in your phone book, such as account and PIN numbers. Then the phone automatically recalls and sends the touch tone string when you call the service.
1 Store the touch tone string in the phone book.
2 Assign the phone book entry with the touch tones to a 1-touch dialing location.
See "1-touch dialing" on page 32.
3 Edit the automated service phone number by adding +n to the end of the phone number (where n is the 1-touch dialing location).
Example: 214-555-1234+3
4 Select OK to save your changes.
5 Dial the automated service number from your phone book.
Your phone automatically sends the touch tones when the call connects.

Note: You may need to enter a pause (p) or a wait (w) before the + in order to account for delays in the automated system answering your call (example: 214-555-1234p+3).
- SYSTEM SELECTION
Your phone can operate in residential, private, and public systems (such as your home system). You can choose how your phone selects a network to use. Your phone may not show the options described here. For information, contact your service provider.
From the menus, select System; then select one of the following options:
Automatic—The phone automatically searches for available networks and chooses the appropriate one. Every time you turn on your phone, it resets to Automatic.
Manual—The phone searches for networks. If an available network is found, the word Available appears on the screen followed by the name of the network. To choose the network listed, select OK.
New search—The phone begins a new search for both private and residential systems. When it finds the best system available, the phone shows the system name.
If the phone does not find another system, Perform an extended search? appears. Select OK to continue searching.
10 Security
- SECURITY CODE
The security code prevents unauthorized users from changing certain important feature settings on your phone. The phone prompts you to enter the security code when required. The default code is 12345. Nokia recommends that you change the default code immediately.

Note: If you enter an incorrect security code five times in a row, the phone will not accept the correct code for 5 minutes.
Use this procedure to change the security code.
1 From the menus, select Settings > Security settings > Change security code.
2 At the Security code prompt, enter the default security code (12345) or your current security code and select OK.
3 At the Enter new security code prompt, enter your new five-digit security code and select OK.
4 At the Verify new security code prompt, enter your new security code again and select OK.
Keep your security code secret and stored in a safe place away from your phone. If you have changed your security code and do not remember the new code, contact your service provider.
- CALL RESTRICTION
You can create up to 10 restrictions to restrict incoming and outgoing calls.
When calls are restricted, calls still may be possible to the official emergency number programmed into your phone.
Add a number to the call restriction list
1 From the menus, select Settings > Security settings > Call restrictions.
2 Enter your security code and select OK.
3 Select Restrict outgoing calls > Add restriction.
4 Enter the number you want to restrict and select OK.
For example: If you want to restrict all long distance calls that begin with 1, enter 1. If you want to restrict all calls that begin with 972, enter 972.
5 Enter a name for the restriction and select OK.
If you select OK without entering a name, the number will be used.
Restrict outgoing calls
1 From the menus, select Settings > Security settings > Call restrictions.
2 Enter your security code and select OK.
3 Select Restrict outgoing calls; then select one of the following options:
Select—Select a call restriction from the outgoing calls list.
Add restriction—Add a new restriction.
Edit—Edit an existing call restriction.
Erase—Erase an existing call restriction.
4 To deactivate a call restriction, select Select, highlight the restriction, and select Unmark.
5 To activate a call restriction, select Select, highlight the restriction, and select Mark.
6 Select Back.
7 At the Save changes? prompt, select Yes.
Restrict all incoming calls
1 From the menus, select Settings > Security settings > Call restrictions.
2 Enter your security code and select OK.
3 Select Restrict incoming calls.
4 If incoming calls are not currently restricted, select Mark to restrict all incoming calls. OR
If incoming calls are currently restricted, select Unmark to deactivate restriction of all incoming calls.
5 Select Back.
6 At the Save changes? prompt, select Yes.
11 Special features
- ALARM CLOCK
The alarm clock feature is based on the internal clock of the phone and sounds an alert at a time you specify. The alarm clock works even when the phone is off.
Set the alarm clock
1 From the menus, select Settings > Time settings > Alarm clock.
2 Enter the alarm time in hh:mm format; then select OK.
3 If the time setting is in am/pm format, select either am or pm.
Respond to the alarm
At the time of the alarm, the phone sounds an alert tone. Select Stop or press the End key to stop the alarm and return to the start screen.
Snooze
There are several ways you can enable the snooze feature:
- Select Snooze.
- Press any key except the End key.
- Allow the alarm to sound for one minute.
Once snooze is enabled, the alarm will sound again in 10 minutes. If you select Stop or press the End key while snoozing, the alarm is turned off.
Alarm when phone is off
If the alarm time is reached while the phone is off, the phone switches itself on and starts sounding the alarm tone. If you select Stop, the phone asks whether you want to activate the phone for calls. Select No to switch off the phone or Yes to make and receive calls. Do not select Yes when wireless phone use is prohibited or when it may cause interference or danger.
Turn off the alarm clock
From the menus, select Settings > Time settings > Alarm clock > Off.
- BUSINESS CARDS
Your phone can send or receive electronic business cards consisting of a name, phone number and e-mail address. You can save received business cards in your phone book.

Note: Business card transmission is a network dependent feature. Contact your service provider for more information.
Send a business card
1 Find the name in the phone book.
2 Select Options > Send bus. card.
3 Enter or recall the phone number to which you want to send the business card, and select Send.
View a received business card
1 When your phone displays Business card received, select Options > Show.
2 Scroll through the available information.
Save a viewed business card
1 After viewing the business card, select Back > Save.
2 At the Name prompt, edit the name if desired; then select OK.
3 At the Number prompt, edit the number if desired; then select OK.
4 At the E-mail prompt, edit the e-mail address if desired; then select OK.
Delete a viewed business card
After viewing the business card, select Back > Discard > OK.
- CALCULATOR
Depending on the model, your phone may include a calculator.
The calculator adds, subtracts, multiplies, divides, and converts currencies.

Note: This calculator has limited accuracy and is designed for simple calculations.
1 From the menus, select Calculator.
2 Enter the first number in the calculation. To enter a decimal point, press # . Select Clear to delete any mistakes.
3 Select Options; then select either Add, Subtract, Multiply, or Divide. OR
Press * repeatedly to cycle through the add, subtract, multiply, and divide functions.
4 Enter the second number in the calculation and select Options > Equals.
5 Repeat steps 3–4 as many times as necessary.
Convert currency
You can use the calculator function to set an exchange rate and then calculate prices based on that exchange rate.
SET THE EXCHANGE RATE

Note: When you change base currency, you must enter the new rates because all previously set exchange rates are reset to zero.
1 From the menus, select Calculator > Options > Exchange rate.
2 Select one of the following options:
Foreign units converted to home units—Enter the number of foreign units to a domestic unit.
Home units converted to foreign units—Enter the number of domestic units to a foreign unit.
3 Enter the appropriate exchange rate (press # to enter a decimal point) and select OK.
CONVERT A CURRENCY AMOUNT
1 From the menus, select Calculator.
2 Enter the amount which you wish to convert.
3 Select Options; then select one of the following options:
To home—Convert foreign units of currency to home units.
To foreign—Convert home units of currency to foreign units.
• RINGING TONES
You can download up to 10 ringing tones to replace the personal entries in your list of ringing tones. This is a network dependent feature.
When your phone receives a downloaded ringing tone, Ringing tone received appears.
Listen to received ringing tones
1 When your phone shows Ringing tone received, select Options > Playback > OK to play the ringing tone.
2 To stop playing the ringing tone, press any key or select Quit.
Save a received ringing tone
1 After listening to the ringing tone, select Quit > Save tone > Select.
2 Choose which ringing tone you want to replace—either an empty Personal location, if any are remaining, or a previously downloaded tone.
3 If you are replacing a previously downloaded tone, at the Replace tone? prompt, select OK to replace the tone or Back to return to the previous menu.
Discard a received ringing tone
After listening to the ringing tone, select Quit > Discard tone > OK.
12 Prepaid services
Depending on your service provider, you may have either prepaid service or Minute Manager. Check with your service provider to determine which of these services, if any, applies to you. If you have Minute Manager, disregard this chapter and see "Minute Manager" on page 42 for more information.
With prepaid service, you buy wireless network services in advance. Your phone works the same way it did before, with some additional features. You can check your prepaid balance, add money to your account, and call customer service.
Prepaid service may not be available from your wireless service provider. Contact your service provider for details.
• ACTIVATE AND DEACTIVATE
After you sign up with your service provider for prepaid service, you can access the Prepaid menu in your phone. This menu appears on your screen only if you have activated the service.
To activate prepaid services, at the start screen, enter *#7766#.
To deactivate prepaid services, at the start screen, enter *#77633#.
- SAVE YOUR ACCESS NUMBERS
For convenience, you can save the prepaid service access numbers in your phone. Contact your service provider for the access numbers.
1 From the menus, select Prepaid > Save access phone numbers > Replenish phone number.
2 Enter the replenish number from your service provider; then select OK.
3 Select Balance phone number.
4 Enter the balance number from your service provider; then select OK.
5 Select Customer service phone number.
6 Enter the customer service number from your service provider; then select OK.
- CHECK YOUR BALANCE

Note: When no more charging units or currency units are left, calls may only be possible to the emergency number programmed into your phone (for example, 911 or other official emergency number).
1 From the menus, select Prepaid > Check account balance.
2 If you have not already saved the balance number under Save access phone numbers, enter the balance number and select OK.
The phone calls the balance number.
3 Follow the prompts from the operator.
- ADD MONEY TO YOUR ACCOUNT
1 From the menus, select Prepaid > Add money to account.
2 If you have not already saved the replenish number under Save access phone numbers, enter the replenish number and select OK.
The phone calls the replenish number.
3 Follow the prompts from the operator.
- CALL CUSTOMER SERVICE
1 From the menus, select Prepaid > Call customer service.
2 If you have not already saved the customer service number under Save access phone numbers, enter the customer service number and select OK.
The phone calls the customer service number.
3 Follow the prompts from the operator.
- EXPIRATION DATE
You can store and edit the expiration date of your prepaid credit each time you add money to your account. You enter and change this date manually.
Enter an expiration date
1 From the menus, select Prepaid > Expiration date.
2 Enter your expiration date and select OK.
View the expiration date
From the menus, select Prepaid > Expiration date.
13 Minute Manager
Depending on your service provider, you may have either prepaid service or Minute Manager. Check with your service provider to determine which of these services, if any, applies to you. If you have prepaid service, disregard this chapter and see "Prepaid services" on page 40 for more information.
With Minute Manager service, you cap monthly spending of cellular service. This section describes how you can use your Minute Manager menu to manage your cellular account. Contact your service provider for more information on Minute Manager service.

Note: The actual invoice for calls and services from your service provider may vary, depending upon network features, rounding-off for billing, taxes, and so forth.
- CALL INFORMATION
My charges
You can view the current charges for all calls made this billing cycle, or you can view the charge for the last call you made. This information is approximate. The actual charges and minutes will be listed on your monthly bill.
1 From the menus, select Minute Mgr. > My calls > My charges.
2 Select either Current or My last call.

Note: If you exceed your Minute Manager limit, calls may only be possible to the emergency number programmed into your phone (for example, 911 or other official emergency number). You can also call 611 and the customer service number for your Minute Manager account.
My minutes
You can check the minutes you have used in the current billing cycle, as well as the number of anytime minutes remaining in your plan package. This information is for regular plan minutes. It does not include information on long distance calls or SMS messages.
1 From the menus, select Minute Mgr. > My calls > My minutes.
2 Select either Minutes used or Package mins.
My data
You can check the total number of SMS messages you have sent and received. This number includes any free messages provided by your plan.
1 From the menus, select Minute Mgr. > My calls > My data.
2 Select either Messages sent or Msgs received.
- ACCOUNT INFORMATION
You can check information on your current bill, spending limit, and rate plan.
My bill
Bill information is updated by your service provider and reflects the current amount owed.
To view your current bill, select Minute Mgr. > My account > My bill.
My bill date
The bill date is the date when the next bill cycle starts.
To view your bill date, select Minute Mgr. > My account > My bill date.
My limit
The spending limit of your account is set by your service provider during account activation and is independent of any balance information.
To view your spending limit, select Minute Mgr. > My account > My limit.
My rate plan
To view information about your current rate plan, select Minute Mgr. > My account > My rate plan.
My number
To view your mobile number, select Minute Mgr. > My account > My number.
- CUSTOMER CARE
You can call the customer care number for your Minute Manager account. This is the same number you will call to make a payment. The customer care number may be preprogrammed in your phone. If not, contact your service provider for the number.
Use this procedure to make a payment.
1 From the menus, select Minute Mgr. > Customer care > Make payment.
The customer care number appears on the screen.
2 Select Call to dial the number.
14 Games
- PLAY A GAME
1 From the menus, select Games.
2 Select the desired game; then select one of the following options:
Continue—Continue a game that was stopped.
New Game—Start a new game.
Level (Snake II and Pairs II only)—Choose the game difficulty level.
Mazes (Snake II only)—Choose among different maze designs.
Top score—Display the top score.
Instructions—Learn how to play the game.
Time trial (Pairs II only)—To advance to the next level, you must pair up all tiles before the dynamite fuse runs out.
Puzzle (Pairs II only)—Reveal pictures to find pairs with as few tries as possible.
Visit Nokia games services on the Internet for more hints and tips at www.nokia.com/us.
- GAME SETTINGS
You can turn game sounds and lights on or off.
1 From the menus, select Games > Settings.
2 Select either Game sounds or Game lights.
3 Select either On or Off.
When you are not using a charger, disconnect it from the power source.
When the battery is running out of power and your phone only has a few minutes of talk time remaining, a warning tone sounds and the Battery low message appears briefly. When no more talk time is left, a warning tone is sounded and the phone switches itself off.
15 Hardware and accessories
- CHARGING TIMES
The charging times listed below are approximate.
| Battery option | ACP-7U Charger | ACP-8U Charger | ACP-12U Charger |
| BMC-3 NiMH Battery900 mAh | up to4 h | up to2 h | up to1 h 40 min |
• STANDBY AND TALK TIMES
Battery talk and standby times are estimates only and depend on signal strength, network conditions, features used, battery age and condition (including the effect of charging habits), temperatures to which the battery is exposed, use in digital mode, and many other factors. Please note that the amount of time a phone is used for calls will affect its standby time. Likewise, the amount of time that the phone is turned on and in standby mode will affect its talk time.
| Battery option Talk time Standby Time | ||||
| Digital Analog Digital Analog | ||||
| BMC-3 NiMH | up to 5 h | up to 2 h | up to 15 d | up to 2 d |
| Battery 900 mAh | ||||
| BLC-2 Li-Ion | up to 5 h | up to 2 h | up to 16 d | up to 2 d |
| Battery 950 mAh | ||||
- ACCESSORIES
Power Audio
- 900-mAh NiMH Battery (BMC-3) • Headset (HDC-5)
- 950-mAh Li-Ion Battery (BLC-2) • Headset (HDE-2)
• Standard Travel Charger (ACP-7U)
• Rapid Travel Charger (ACP-8U)
• Rapid Travel Charger (ACP-12U) - Rapid Cigarette Lighter Charger (LCH-9) Car
- Spare Battery Charger (DDC-1) Compatible with: Standard Travel Charger (ACP-7U) Rapid Travel Charger (ACP-8U)
- Boom Headset (HDB-5)
- Loopset (LPS-3)
• TTY/TDD Adapter (HDA-9) - Mobile Holder (MBC-6) Compatible with: Rapid Cigarette Lighter Charger (LCH-9) Express Car Kit (PPH-1)
• Express Car Kit (CARK-125)
- Express Car Kit (PPH-1)
16 Reference Information
• BATTERY INFORMATION
Charging and discharging
Your device is powered by a rechargeable battery. The full performance of a new battery is achieved only after two or three complete charge and discharge cycles. The battery can be charged and discharged hundreds of times but it will eventually wear out. When the talk and standby times are noticeably shorter than normal, buy a new battery. Use only Nokia approved batteries, and recharge your battery only with Nokia approved chargers designated for this device.
Unplug the charger from the electrical plug and the device when not in use. Do not leave the battery connected to a charger. Overcharging may shorten its lifetime. If left unused, a fully charged battery will lose its charge over time. Temperature extremes can affect the ability of your battery to charge.
To prolong the battery life of NiMh batteries, discharge the battery from time to time by leaving your device switched on until it turns itself off. Do not attempt to discharge the battery by any other means.
Use the battery only for its intended purpose. Never use any charger or battery that is damaged.
Do not short-circuit the battery. Accidental short-circuiting can occur when a metallic object such as a coin, clip, or pen causes direct connection of the positive (+) and negative (−) terminals of the battery. (These look like metal strips on the battery.) This might happen, for example, when you carry a spare battery in your pocket or purse. Short-circuiting the terminals may damage the battery or the connecting object.
Leaving the battery in hot or cold places, such as in a closed car in summer or winter conditions, will reduce the capacity and lifetime of the battery. Always try to keep the battery between 59^ F and 77^ F ( 15^ C and 25^ C). A device with a hot or cold battery may not work temporarily, even when the battery is fully charged. Battery performance is particularly limited in temperatures well below freezing.
Do not dispose of batteries in a fire! Dispose of batteries according to local regulations. Please recycle when possible. Do not dispose as household waste.
- ENHANCEMENTS
A few practical rules about accessories and enhancements:
- Keep all accessories and enhancements out of the reach of small children.
- When you disconnect the power cord of any accessory or enhancement, grasp and pull the plug, not the cord.
- Check regularly that enhancements installed in a vehicle are mounted and are operating properly.
• Installation of any complex car enhancements must be made by qualified personnel only.
• ENHANCEMENTS, BATTERIES, AND CHARGERS
Check the model number of any charger before use with this device. This device is intended for use when supplied with power from ACP-7U, ACP-8U, ACP-12U, and LCH-9 chargers.

Use only batteries, chargers, and enhancements approved by Nokia for use with this particular model. The use of any other types may invalidate any approval or warranty, and may be dangerous.
For availability of approved enhancements, please check with your dealer. When you disconnect the power cord of any enhancement, grasp and pull the plug, not the cord.
Your device and its enhancements may contain small parts. Keep them out of reach of small children.
• CARE AND MAINTENANCE
Your device is a product of superior design and craftsmanship and should be treated with care. The suggestions below will help you protect your warranty coverage and enjoy your device for many years.
- Keep the device dry. Precipitation, humidity, and all types of liquids or moisture can contain minerals that will corrode electronic circuits. If your device does get wet, remove the battery and allow the device to dry completely before replacing it.
- Do not use or store the device in dusty, dirty areas. Its moving parts and electronic components can be damaged.
- Do not store the device in hot areas. High temperatures can shorten the life of electronic devices, damage batteries, and warp or melt certain plastics.
- Do not store the device in cold areas. When the device returns to its normal temperature, moisture can form inside the device and damage electronic circuit boards.
- Do not attempt to open the device other than as instructed in this guide.
- Do not drop, knock, or shake the device. Rough handling can break internal circuit boards and fine mechanics.
-
Do not use harsh chemicals, cleaning solvents, or strong detergents to clean the device.
-
Do not paint the device. Paint can clog the moving parts and prevent proper operation.
- Use only the supplied or an approved replacement antenna. Unauthorized antennas, modifications, or attachments could damage the device and may violate regulations governing radio devices.
All of the above suggestions apply equally to your device, battery, charger, or any enhancement. If any device is not working properly, take it to the nearest authorized service facility for service.
• ADDITIONAL SAFETY INFORMATION
Operating environment
Remember to follow any special regulations in force in any area and always switch off your device when its use is prohibited or when it may cause interference or danger. Use the device only in its normal operating positions. To maintain compliance with radio frequency exposure guidelines only use accessories approved by Nokia for use with this device. When the device is on and being worn on the body, always use an approved carrying case.
Medical devices
Operation of any radio transmitting equipment, including wireless phones, may interfere with the functionality of inadequately protected medical devices. Consult a physician or the manufacturer of the medical device to determine if they are adequately shielded from external RF energy or if you have any questions. Switch off your phone in health care facilities when any regulations posted in these areas instruct you to do so. Hospitals or health care facilities may be using equipment that could be sensitive to external RF energy.
PACEMAKERS
Pacemaker manufacturers recommend that a minimum separation of 6 in (15.3 cm) be maintained between a wireless phone and a pacemaker to avoid potential interference with the pacemaker. These recommendations are consistent with the independent research by and recommendations of Wireless Technology Research. To minimize the potential for interference, persons with pacemakers should
- Always keep the device more than 6 in (15.3 cm) from their pacemaker when the device is switched on
- Not carry the device in a breast pocket
- Hold the device to the ear opposite the pacemaker
If you have any reason to suspect that interference is taking place, switch off your device immediately.
HEARING AID
Some digital wireless devices may interfere with some hearing aids. If interference occurs, consult your service provider.
Vehicles
RF signals may affect improperly installed or inadequately shielded electronic systems in motor vehicles such as electronic fuel injection systems, electronic antiskid (antilock) braking systems, electronic speed control systems, air bag systems. For more information, check with the manufacturer or its representative of your vehicle or any equipment that has been added.
Only qualified personnel should service the device, or install the device in a vehicle. Faulty installation or service may be dangerous and may invalidate any warranty that may apply to the device. Check regularly that all wireless device equipment in your vehicle is mounted and operating properly. Do not store or carry flammable liquids, gases, or explosive materials in the same compartment as the device, its parts, or enhancements. For vehicles equipped with an air bag, remember that an air bags inflate with great force. Do not place objects, including installed or portable wireless equipment in the area over the air bag or in the air bag deployment area. If in-vehicle wireless equipment is improperly installed and the air bag inflates, serious injury could result.
Potentially explosive environments
Switch off your device when in any area with a potentially explosive atmosphere and obey all signs and instructions. Potentially explosive atmospheres include areas where you would normally be advised to turn off your vehicle engine. Sparks in such areas could cause an explosion or fire resulting in bodily injury or even death. Switch off the device at refuelling points such as near gas pumps at service stations. Observe restrictions on the use of radio equipment in fuel depots, storage, and distribution areas, chemical plants or where blasting operations are in progress. Areas with a potentially explosive atmosphere are often but not always clearly marked. They include below deck on boats, chemical transfer or storage facilities, vehicles using liquefied petroleum gas (such as propane or butane), and areas where the air contains chemicals or particles such as grain, dust or metal powders.
FCC regulations prohibit using your wireless device while in the air. The use of wireless telephones in an aircraft may be dangerous to the operation of the aircraft, disrupt the wireless telephone network, and may be illegal.
Failure to observe these instructions may lead to suspension or denial of telephone services to the offender, legal action, or both.
EMERGENCY CALLS

Important: Wireless phones, including this phone, operate using radio signals, wireless networks, landline networks, and user-programmed functions. Because of this, connections in all conditions cannot be guaranteed. You should never rely solely on any wireless phone for essential communications like medical emergencies.
To make an emergency call:
1 If the phone is not on, switch it on. Check for adequate signal strength.
2 Press the End key as many times as needed to clear the display and ready the phone for calls.
3 Key in the official emergency number for your present location. Emergency numbers vary by location.
4 Press the Talk key.
If certain features are in use, you may first need to turn those features off before you can make an emergency call. Consult this guide or your service provider. When making an emergency call, give all the necessary information as accurately as possible. Your wireless phone may be the only means of communication at the scene of an accident. Do not end the call until given permission to do so.
CERTIFICATION INFORMATION (SAR)
NOKIA PHONE MODELS MEET THE GOVERNMENT'S REQUIREMENTS FOR EXPOSURE TO RADIO WAVES.
Your wireless phone is a radio transmitter and receiver. It is designed and manufactured not to exceed the emission limits for exposure to radio frequency (RF) energy set by the Federal Communications Commission of the U.S. Government. These limits are part of comprehensive guidelines and establish permitted levels of RF energy for the general population. The guidelines are based on standards that were developed by independent scientific organizations through periodic and thorough evaluation of scientific studies. The standards include a substantial safety margin designed to assure the safety of all persons, regardless of age and health.
The exposure standard for wireless mobile phones employs a unit of measurement known as the Specific Absorption Rate, or SAR. The SAR limit set by the FCC is 1.6W/kg.* Tests for SAR are conducted using standard operating positions accepted by the FCC with the phone transmitting at its highest certified power level in all tested frequency bands. Although the SAR is determined at the highest certified power level, the actual SAR level of the phone while operating can be well below the maximum value. This is because the phone is designed to operate at multiple power levels so as to use only the power required to reach the network. In general, the closer you are to a wireless base station antenna, the lower the power output.
Before a phone model is available for sale to the public, it must be tested and certified to the FCC that it does not exceed the limit established by the government-adopted requirement for safe exposure. The tests are performed in positions and locations (for example, at the ear and worn on the body) as required by the FCC for each model. The highest SAR values as reported to the FCC are as follows:
| When tested for use at the ear | When worn on the body, as described in this user guide | |
| Nokia 1220 phone 1.19 W/kg 1.06 W/kg | ||
| Nokia 1221 phone 1.19 W.kg 1.06 W/kg | ||
| Nokia 1260 phone 1.23 W/kg 1.02 W/kg |
(Body-worn measurements differ among phone models, depending upon available accessories and FCC requirements). While there may be differences between the SAR levels of various phones and at various positions, they all meet the government requirement.
The FCC has granted an Equipment Authorization for these phone models with all reported SAR levels evaluated as in compliance with the FCC RF exposure guidelines. SAR information on these model phones is on file with the FCC and can be found under the Display Grant section of http://www.fcc.gov/oet/fccid after searching on FCC ID LJPNKC-1X for the Nokia 1220 and Nokia 1221 phones or LJPNKW-1X for the Nokia 1260 phone.
For body-worn operation, these Nokia phone models have been tested and meet the FCC RF exposure guidelines for use with an accessory that contains no metal and that positions the handset a minimum of 7/8-inch (2.2 cm) from the body. Use of other accessories may not ensure compliance with the FCC RF exposure guidelines.
*In the United States and Canada, the SAR limit for mobile phones used by the public is 1.6 watts/kilogram (W/kg) averaged over one gram of tissue. The standard incorporates a substantial margin of safety to give additional protection for the public and to account for any variations in measurements. SAR values may vary depending on national reporting requirements and the network band. For SAR information in other regions please look under product information at www.nokia.com.
• TECHNICAL INFORMATION
| Feature Specification | |
| Weight 5.3 oz with BMC-3 900-mAh NiMH battery | |
| Size 105 cc | |
| Frequency Range | Lowband (for Nokia 1220, Nokia 1221, and Nokia 1260 phones):824.04–848.97 MHz (TX)869.04–893.97 MHz (RX)Highband (for Nokia 1260 phone only):1850.04–1909.92 MHz (TX)1930.08–1989.96 MHz (RX) |
| Transmitter Output Power Up to 600 mW | |
| Battery Voltage 3.6 V nominal | |
| Operating Temperature | -4°F to + 104°F(-20°C to + 40°C) |
| Number of channels 832 low band (for Nokia 1220, Nokia 1221, and Nokia 1260 phones)1997 highband (for Nokia 1260 phone only) | |
| Phone numbers Up to 3 | |
| Phone book Locations Up to 200 | |
- Nokia ONE-YEAR LIMITED WARRANTY
Nokia Inc. ("Nokia") warrants that this cellular phone ("Product") is free from defects in material and workmanship that result in Product failure during normal usage, according to the following terms and conditions:
1 The limited warranty for the Product extends for ONE (1) year beginning on the date of the purchase of the Product. This one year period is extended by each whole day that the Product is out of your possession for repair under this warranty.
2 The limited warranty extends only to the original purchaser ("Consumer") of the Product and is not assignable or transferable to any subsequent purchaser/end-user.
3 The limited warranty extends only to Consumers who purchase the Product in the United States of America.
4 During the limited warranty period, Nokia will repair, or replace, at Nokia's sole option, any defective parts, or any parts that will not properly operate for their intended use with new or refurbished replacement items if such repair or replacement is needed because of product malfunction or failure during normal usage. No charge will be made to the Consumer for any such parts. Nokia will also pay for the labor charges incurred by Nokia in repairing or replacing the defective parts. The limited warranty does not cover defects in appearance, cosmetic, decorative or structural items, including framing, and any non-operative parts. Nokia's limit of liability under the limited warranty shall be the actual cash value of the Product at the time the Consumer returns the Product for repair, determined by the price paid by the Consumer for the Product less a reasonable amount for usage. Nokia shall not be liable for any other losses or damages. These remedies are the Consumer's exclusive remedies for breach of warranty.
5 Upon request from Nokia, the Consumer must prove the date of the original purchase of the Product by a dated bill of sale or dated itemized receipt.
6 The Consumer shall bear the cost of shipping the Product to Nokia in Melbourne, Florida. Nokia shall bear the cost of shipping the Product back to the Consumer after the completion of service under this limited warranty.
7 The Consumer shall have no coverage or benefits under this limited warranty if any of the following conditions are applicable:
a) The Product has been subjected to abnormal use, abnormal conditions, improper storage, exposure to moisture or dampness, unauthorized modifications, unauthorized connections, unauthorized repair, misuse, neglect, abuse, accident, alteration, improper installation, or other acts which are not the fault of Nokia, including damage caused by shipping.
b) The Product has been damaged from external causes such as collision with an object, or from fire, flooding, sand, dirt, windstorm, lightning, earthquake or damage from exposure to weather conditions, an Act of God, or battery leakage, theft, blown fuse, or improper use of any electrical source, damage caused by computer or internet viruses, bugs, worms, Trojan Horses, cancelbots or damage caused by the connection to other products not recommended for interconnection by Nokia.
c) Nokia was not advised in writing by the Consumer of the alleged defect or malfunction of the Product within fourteen (14) days after the expiration of the applicable limited warranty period.
d) The Product serial number plate or the enhancement data code has been removed, defaced or altered.
e) The defect or damage was caused by the defective function of the cellular system or by inadequate signal reception by the external antenna, or viruses or other software problems introduced into the Product.
8 Nokia does not warrant uninterrupted or error-free operation of the Product. If a problem develops during the limited warranty period, the Consumer shall take the following step-by-step procedure:
a) The Consumer shall return the Product to the place of purchase for repair or replacement processing.
b) If "a" is not convenient because of distance (more than 50 miles) or for other good cause, the Consumer shall ship the Product prepaid and insured to: Nokia Inc., Attn: Repair Department 795 West Nasa Blvd. Melbourne, FL 32901
c) The Consumer shall include a return address, daytime phone number and/or fax number, complete description of the problem, proof of purchase and service agreement (if applicable). Expenses related to removing the Product from an installation are not covered under this limited warranty.
d) The Consumer will be billed for any parts or labor charges not covered by this limited warranty. The Consumer will be responsible for any expenses related to reinstallation of the Product.
e) Nokia will repair the Product under the limited warranty within 30 days after receipt of the Product. If Nokia cannot perform repairs covered under this limited warranty within 30 days, or after a reasonable number of attempts to repair the same defect, Nokia at its option, will provide a replacement Product or refund the purchase price of the Product less a reasonable amount for usage. In some states the Consumer may have the right to a loaner if the repair of the Product takes more than ten (10) days. Please contact the Customer Service Center at Nokia at the telephone number listed at the end of this warranty if you need a loaner and the repair of the Product has taken or is estimated to take more than ten (10) days.
f) If the Product is returned during the limited warranty period, but the problem with the Product is not covered under the terms and conditions of this limited warranty, the Consumer will be notified and given an estimate of the charges the Consumer must pay to have the Product repaired, with all shipping charges billed to the Consumer. If the estimate is refused, the Product will be returned freight collect. If the Product is returned after the expiration of the limited warranty period, Nokia's normal service policies shall apply and the Consumer will be responsible for all shipping charges.
9 You (the Consumer) understand that the product may consist of refurbished equipment that contains used components, some of which have been reprocessed. The used components comply with Product performance and reliability specifications.
10 ANY IMPLIED WARRANTY OF MERCHANTABILITY, OR FITNESS FOR A PARTICULAR PURPOSE OR USE, SHALL BE LIMITED TO THE DURATION OF THE FOREGOING LIMITED WRITTEN WARRANTY. OTHERWISE, THE FOREGOING LIMITED WARRANTY IS THE CONSUMER'S SOLE AND EXCLUSIVE REMEDY AND IS IN LIEU OF ALL OTHER WARRANTIES, EXPRESS OR IMPLIED. NOKIA SHALL NOT BE LIABLE FOR SPECIAL, INCIDENTAL, PUNITIVE OR CONSEQUENTIAL DAMAGES, INCLUDING BUT NOT LIMITED TO LOSS OF ANTICIPATED BENEFITS OR PROFITS, LOSS OF SAVINGS OR REVENUE, LOSS OF DATA, PUNITIVE DAMAGES, LOSS OF USE OF THE PRODUCT OR ANY ASSOCIATED EQUIPMENT, COST OF CAPITAL, COST OF ANY SUBSTITUTE EQUIPMENT OR FACILITIES, DOWNTIME, THE CLAIMS OF ANY THIRD PARTIES, INCLUDING CUSTOMERS, AND INJURY TO PROPERTY, RESULTING FROM THE PURCHASE OR USE OF THE PRODUCT OR ARISING FROM BREACH OF THE WARRANTY, BREACH OF CONTRACT, NEGLIGENCE, STRICT TORT, OR ANY OTHER LEGAL OR EQUITABLE THEORY, EVEN IF NOKIA KNEW OF THE LIKELIHOOD OF SUCH DAMAGES. NOKIA SHALL NOT BE LIABLE FOR DELAY IN RENDERING SERVICE UNDER THE LIMITED WARRANTY, OR LOSS OF USE DURING THE PERIOD THAT THE PRODUCT IS BEING REPAIRED.
11 Some states do not allow limitation of how long an implied warranty lasts, so the one year warranty limitation may not apply to you (the Consumer). Some states do not allow the exclusion or limitation of incidental and consequential damages, so certain of the above limitations or exclusions may not apply to you (the Consumer). This limited warranty gives the Consumer specific legal rights and the Consumer may also have other rights which vary from state to state.
12 Nokia neither assumes nor authorizes any authorized service center or any other person or entity to assume for it any other obligation or liability beyond that which is expressly provided for in this limited warranty including the provider or seller of any extended warranty or service agreement.
13 This is the entire warranty between Nokia and the Consumer, and supersedes all prior and contemporaneous agreements or understandings, oral or written, relating to the Product, and no representation, promise or condition not contained herein shall modify these terms.
14 This limited warranty allocates the risk of failure of the Product between the Consumer and Nokia. The allocation is recognized by the Consumer and is reflected in the purchase price.
15 Any action or lawsuit for breach of warranty must be commenced within eighteen (18) months following purchase of the Product.
16 Questions concerning this limited warranty may be directed to: Nokia Inc.
Attn: Customer Service
7725 Woodland Center Blvd., Ste. 150
Tampa, FL 33614
Telephone: 1-888-NOKIA-2U (1-888-665-4228)
Facsimile: (813) 249-9619
TTY/TDD Users Only: 1-800-24-NOKIA (1-800-246-6542)
17 The limited warranty period for Nokia supplied attachments and accessories is specifically defined within their own warranty cards and packaging.
Appendix A Message from the CTIA
(Cellular Telecommunications and Internet Association) to all users of mobile phones.
© 2001 Cellular Telecommunications & Internet Association. All Rights Reserved.1250 Connecticut Avenue, NW Suite 800, Washington, DC 20036. Phone: (202) 785-0081
Safety is the most important call you will ever make.
A Guide to Safe and Responsible Wireless Phone Use
Tens of millions of people in the U.S. today take advantage of the unique combination of convenience, safety and value delivered by the wireless telephone. Quite simply, the wireless phone gives people the powerful ability to communicate by voice--almost anywhere, anytime--with the boss, with a client, with the kids, with emergency personnel or even with the police. Each year, Americans make billions of calls from their wireless phones, and the numbers are rapidly growing.
But an important responsibility accompanies those benefits, one that every wireless phone user must uphold. When driving a car, driving is your first responsibility. A wireless phone can be an invaluable tool, but good judgment must be exercised at all times while driving a motor vehicle--whether on the phone or not.
The basic lessons are ones we all learned as teenagers. Driving requires alertness, caution and courtesy. It requires a heavy dose of basic common sense---keep your head up, keep your eyes on the road, check your mirrors frequently and watch out for other drivers. It requires obeying all traffic signs and signals and staying within the speed limit. It means using seatbelts and requiring other passengers to do the same.
But with wireless phone use, driving safely means a little more. This brochure is a call to wireless phone users everywhere to make safety their first priority when behind the wheel of a car. Wireless telecommunications is keeping us in touch, simplifying our lives, protecting us in emergencies and providing opportunities to help others in need.
When it comes to the use of wireless phones, safety is your most important call.
Wireless Phone "Safety Tips"
Below are safety tips to follow while driving and using a wireless phone which should be easy to remember.
1 Get to know your wireless phone and its features such as speed dial and redial. Carefully read your instruction manual and learn to take advantage of valuable features most phones offer, including automatic redial and memory. Also, work to memorize the phone keypad so you can use the speed dial function without taking your attention off the road.
2 When available, use a hands free device. A number of hands free wireless phone accessories are readily available today. Whether you choose an installed mounted device for your wireless phone or a speaker phone accessory, take advantage of these devices if available to you.
3 Position your wireless phone within easy reach. Make sure you place your wireless phone within easy reach and where you can grab it without removing your eyes from the road. If you get an incoming call at an inconvenient time, if possible, let your voice mail answer it for you.
4 Suspend conversations during hazardous driving conditions or situations. Let the person you are speaking with know you are driving; if necessary, suspend the call in heavy traffic or hazardous weather conditions. Rain, sleet, snow and ice can be hazardous, but so is heavy traffic. As a driver, your first responsibility is to pay attention to the road.
5 Do not take notes or look up phone numbers while driving. If you are reading an address book or business card, or writing a "to do" list while driving a car, you are not watching where you are going. It's common sense. Don't get caught in a dangerous situation because you are reading or writing and not paying attention to the road or nearby vehicles.
6 Dial sensibly and assess the traffic; if possible, place calls when you are not moving or before pulling into traffic. Try to plan your calls before you begin your trip or attempt to coincide your calls with times you may be stopped at a stop sign, red light or otherwise stationary. But if you need to dial while driving, follow this simple tip--dial only a few numbers, check the road and your mirrors, then continue.
7 Do not engage in stressful or emotional conversations that may be distracting. Stressful or emotional conversations and driving do not mix--they are distracting and even dangerous when you are behind the wheel of a car. Make people you are talking with aware you are driving and if necessary, suspend conversations which have the potential to divert your attention from the road.
8 Use your wireless phone to call for help. Your wireless phone is one of the greatest tools you can own to protect yourself and your family in dangerous situations--with your phone at your side, help is only three numbers away. Dial 9-1-1 or other local emergency number in the case of fire, traffic accident, road hazard or medical emergency. Remember, it is a free call on your wireless phone!
9 Use your wireless phone to help others in emergencies. Your wireless phone provides you a perfect opportunity to be a "Good Samaritan" in your community. If you see an auto accident, crime in progress or other serious emergency where lives are in danger, call 9-1-1 or other local emergency number, as you would want others to do for you.
10 Call roadside assistance or a special wireless non-emergency assistance number when necessary. Certain situations you encounter while driving may require attention, but are not urgent enough to merit a call for emergency services. But you still can use your wireless phone to lend a hand. If you see a broken-down vehicle posing no serious hazard, a broken traffic signal, a minor traffic accident where no one appears injured or a vehicle you know to be stolen, call roadside assistance or other special non-emergency wireless number.
Careless, distracted individuals and people driving irresponsibly represent a hazard to everyone on the road. Since 1984, the Cellular Telecommunications Industry Association and the wireless industry have conducted educational outreach to inform wireless phone users of their responsibilities as safe drivers and good citizens. As we approach a new century, more and more of us will take advantage of the benefits of wireless telephones. And, as we take to the roads, we all have a responsibility to drive safely.
The wireless industry reminds you to use your phone safely when driving.
For more information, please call 1-888-901-SAFE.
For updates: http://www.wow-com.com/consumer/issues/driving/articles.cfm?ID=85
© 2001 Cellular Telecommunications & Internet Association. All Rights Reserved.1250
Connecticut Avenue, NW Suite 800, Washington, DC 20036. Phone: (202) 785-0081
NOTES
Appendix B Message from the FDA
(U.S. Food and Drug Administration) to all users of mobile phones.
July 18, 2001......For updates: http://www.fda.gov/cdrh/phones
Consumer Update on Wireless Phones
U.S. Food and Drug Administration
1. Do wireless phones pose a health hazard?
The available scientific evidence does not show that any health problems are associated with using wireless phones. There is no proof, however, that wireless phones are absolutely safe. Wireless phones emit low levels of radiofrequency energy (RF) in the microwave range while being used. They also emit very low levels of RF when in the stand-by mode. Whereas high levels of RF can produce health effects (by heating tissue), exposure to low level RF that does not produce heating effects causes no known adverse health effects. Many studies of low level RF exposures have not found any biological effects. Some studies have suggested that some biological effects may occur, but such findings have not been confirmed by additional research. In some cases, other researchers have had difficulty in reproducing those studies, or in determining the reasons for inconsistent results.
2. What is FDA's role concerning the safety of wireless phones?
Under the law, FDA does not review the safety of radiation-emitting consumer products such as wireless phones before they can be sold, as it does with new drugs or medical devices.
However, the agency has authority to take action if wireless phones are shown to emit radiofrequency energy (RF) at a level that is hazardous to the user. In such a case, FDA could require the manufacturers of wireless phones to notify users of the health hazard and to repair, replace or recall the phones so that the hazard no longer exists.
Although the existing scientific data do not justify FDA regulatory actions, FDA has urged the wireless phone industry to take a number of steps, including the following:
- Support needed research into possible biological effects of RF of the type emitted by wireless phones;
- Design wireless phones in a way that minimizes any RF exposure to the user that is not necessary for device function; and
- Cooperate in providing users of wireless phones with the best possible information on possible effects of wireless phone use on human health.
FDA belongs to an interagency working group of the federal agencies that have responsibility for different aspects of RF safety to ensure coordinated efforts at the federal level. The following agencies belong to this working group:
• National Institute for Occupational Safety and Health
• Environmental Protection Agency
• Federal Communications Commission
• Occupational Safety and Health Administration
• National Telecommunications and Information Administration
The National Institutes of Health participates in some interagency working group activities, as well.
FDA shares regulatory responsibilities for wireless phones with the Federal Communications Commission (FCC). All phones that are sold in the United States must comply with FCC safety guidelines that limit RF exposure. FCC relies on FDA and other health agencies for safety questions about wireless phones. FCC also regulates the base stations that the wireless phone networks rely upon. While these base stations operate at higher power than do the wireless phones themselves, the RF exposures that people get from these base stations are typically thousands of times lower than those they can get from wireless phones. Base stations are thus not the subject of the safety questions discussed in this document.
3. What kinds of phones are the subject of this update?
The term wireless phone refers here to hand-held wireless phones with built-in antennas, often called cell mobile or PCS phones. These types of wireless phones can expose the user to measurable radiofrequency energy (RF) because of the short distance between the phone and the user's head. These RF exposures are limited by Federal Communications Commission safety guidelines that were developed with the advice of FDA and other federal health and safety agencies. When the phone is located at greater distances from the user, the exposure to RF is drastically lower because a person's RF exposure decreases rapidly with increasing distance from the source. The so-called cordless phones; which have a base unit connected to the telephone wiring in a house, typically operate at far lower power levels, and thus produce RF exposures far below the FCC safety limits.
4. What are the results of the research done already?
The research done thus far has produced conflicting results, and many studies have suffered from flaws in their research methods. Animal experiments investigating the effects of radiofrequency energy (RF) exposures characteristic of wireless phones have yielded conflicting results that often cannot be repeated in other laboratories. A few animal studies, however, have suggested that low levels of RF could accelerate the development of cancer in laboratory animals. However, many of the studies that showed increased tumor development used animals that had been genetically engineered or treated with cancer-causing chemicals so as to be pre-disposed to develop cancer in the absence of RF exposure. Other studies exposed the animals to RF for up to 22 hours per day. These conditions are not similar to the conditions under which people use wireless phones, so we don't know with certainty what the results of such studies mean for human health.
Three large epidemiology studies have been published since December 2000. Between them, the studies investigated any possible association between the use of wireless phones and primary brain cancer, glioma, meningioma, or acoustic neuroma, tumors of the brain or salivary gland, leukemia, or other cancers. None of the studies demonstrated the existence of any harmful health effects from wireless phone RF exposures. However, none of the studies can answer questions about long-term exposures, since the average period of phone use in these studies was around three years.
5. What research is needed to decide whether RF exposure from wireless phones poses a health risk?
A combination of laboratory studies and epidemiological studies of people actually using wireless phones would provide some of the data that are needed. Lifetime animal exposure studies could be completed in a few years. However, very large numbers of animals would be needed to provide reliable proof of a cancer promoting effect if one exists. Epidemiological studies can provide data that is directly applicable to human populations, but 10 or more years follow-up may be needed to provide answers about some health effects, such as cancer. This is because the interval between the time of exposure to a cancer-causing agent and the time tumors develop - if they do - may be many, many years. The interpretation of epidemiological studies is hampered by difficulties in measuring actual RF exposure during day-to-day use of wireless phones. Many factors affect this measurement, such as the angle at which the phone is held, or which model of phone is used.
6.What is FDA doing to find out more about the possible health effects of wireless phone RF?
FDA is working with the U.S. National Toxicology Program and with groups of investigators around the world to ensure that high priority animal studies are conducted to address important questions about the effects of exposure to radiofrequency energy (RF).
FDA has been a leading participant in the World Health Organization International Electromagnetic Fields (EMF) Project since its inception in 1996. An influential result of this work has been the development of a detailed agenda of research needs that has driven the establishment of new research programs around the world. The Project has also helped develop a series of public information documents on EMF issues.
FDA and the Cellular Telecommunications & Internet Association (CTIA) have a formal Cooperative Research and Development Agreement (CRADA) to do research on wireless phone safety. FDA provides the scientific oversight, obtaining input from experts in government, industry, and academic organizations. CTIA-funded research is conducted through contracts to independent investigators. The initial research will include both laboratory studies and studies of wireless phone users. The CRADA will also include a broad assessment of additional research needs in the context of the latest research developments around the world.
7. How can I find out how much radiofrequency energy exposure I can get by using my wireless phone?
All phones sold in the United States must comply with Federal Communications Commission (FCC) guidelines that limit radiofrequency energy (RF) exposures. FCC established these guidelines in consultation with FDA and the other federal health and safety agencies. The FCC limit for RF exposure from wireless telephones is set at a Specific Absorption Rate (SAR) of 1.6 watts per kilogram (1.6 W/kg). The FCC limit is consistent with the safety standards developed by the Institute of Electrical and Electronic Engineering (IEEE) and the National Council on Radiation Protection and Measurement. The exposure limit takes into consideration the body's ability to remove heat from the tissues that absorb energy from the wireless phone and is set well below levels known to have effects.
Manufacturers of wireless phones must report the RF exposure level for each model of phone to the FCC. The FCC website (http://www.fcc.gov/oet/rfsafety) gives directions for locating the FCC identification number on your phone so you can find your phone's RF exposure level in the online listing.
8. What has FDA done to measure the radiofrequency energy coming from wireless phones?
The Institute of Electrical and Electronic Engineers (IEEE) is developing a technical standard for measuring the radiofrequency energy (RF) exposure from wireless phones and other wireless handsets with the participation and leadership of FDA scientists and engineers. The standard, Recommended Practice for Determining the Spatial-Peak Specific Absorption Rate (SAR) in the Human Body Due to Wireless Communications Devices: Experimental Techniques, sets forth the first consistent test methodology for measuring the rate at which RF is deposited in the heads of wireless phone users. The test method uses a tissue-simulating model of the human head. Standardized SAR test methodology is expected to greatly improve the consistency of measurements made at different laboratories on the same phone. SAR is the measurement of the amount of energy absorbed in tissue, either by the whole body or a small part of the body. It is measured in watts/kg (or milliwatts/g) of matter. This measurement is used to determine whether a wireless phone complies with safety guidelines.
9. What steps can I take to reduce my exposure to radiofrequency energy from my wireless phone?
If there is a risk from these products--and at this point we do not know that there is--it is probably very small. But if you are concerned about avoiding even potential risks, you can take a few simple steps to minimize your exposure to radiofrequency energy (RF). Since time is a key factor in how much exposure a person receives, reducing the amount of time spent using a wireless phone will reduce RF exposure.
If you must conduct extended conversations by wireless phone every day, you could place more distance between your body and the source of the RF, since the exposure level drops off dramatically with distance. For example, you could use a headset and carry the wireless phone away from your body or use a wireless phone connected to a remote antenna.
Again, the scientific data do not demonstrate that wireless phones are harmful. But if you are concerned about the RF exposure from these products, you can use measures like those described above to reduce your RF exposure from wireless phone use.
10. What about children using wireless phones?
The scientific evidence does not show a danger to users of wireless phones, including children and teenagers. If you want to take steps to lower exposure to radiofrequency energy (RF), the measures described above would apply to children and teenagers using wireless phones. Reducing the time of wireless phone use and increasing the distance between the user and the RF source will reduce RF exposure. Some groups sponsored by other national governments have advised that children be discouraged from using wireless phones at all. For example, the government in the United Kingdom distributed leaflets containing such a recommendation in December 2000. They noted that no evidence exists that using a wireless phone causes brain tumors or other ill effects. Their recommendation to limit wireless phone use by children was strictly precautionary; it was not based on scientific evidence that any health hazard exists.
11. What about wireless phone interference with medical equipment?
Radiofrequency energy (RF) from wireless phones can interact with some electronic devices. For this reason, FDA helped develop a detailed test method to measure electromagnetic interference (EMI) of implanted cardiac pacemakers and defibrillators from wireless telephones. This test method is now part of a standard sponsored by the Association for the Advancement of Medical instrumentation (AAMI). The final draft, a joint effort by FDA, medical device manufacturers, and many other groups, was completed in late 2000. This standard will allow manufacturers to ensure that cardiac pacemakers and defibrillators are safe from wireless phone EMI. FDA has tested hearing aids for interference from handheld wireless phones and helped develop a voluntary standard sponsored by the Institute of Electrical and Electronic Engineers (IEEE). This standard specifies test methods and performance requirements for hearing aids and wireless phones so that no interference occurs when a person uses a compatible phone and a accompanied hearing aid at the same time. This standard was approved by the IEEE in 2000.
FDA continues to monitor the use of wireless phones for possible interactions with other medical devices. Should harmful interference be found to occur, FDA will conduct testing to assess the interference and work to resolve the problem.
12. Where can I find additional information?
For additional information, please refer to the following resources:
• FDA web page on wireless phones
http://www.fda.gov/cdrh/phones/index.html
- Federal Communications Commission (FCC) RF Safety Program http://www.fcc.gov/oet/rfsafety
- International Commission on Non-Ionizing Radiation Protection http://www.icnirp.de
• World Health Organization (WHO) International EMF Project http://www.who.int/emf
• National Radiological Protection Board (UK)
http://www.nrpb.org.uk/
July 18, 2001 For updates: http://www.fda.gov/cdrh/phones
Index
Numerics
1-touch dialing 32
A
accessories
reference information 46
settings 25
account
balance 40
information 43
active call options 28
alarm clock 37
antenna 4
archive 20
automatic redial 32
automatic time update 27
B
back cover 5, 6
battery
charge 6
charging time 45
important information 7
initial charging 7
install 6
prolong life 7
remove 5
standby time 45
talk time 45
business cards 37
C
calculator 38
call
answer 9
automatic redial 32
conference 28
duration 18
end 9
forwarding 29
information 42
log 17
make 9
redial last 9
restriction 35
silence 9
speed dialing 32
timers 18
touch tones 32
waiting 30
car kit 26
change
1-touch dialing numbers 32
earpiece volume 10
message alert tone 25
phone book view 16
profile name 25
ringing tone 24
ringing volume 24
security code 35
time format 26
charge the battery 6
charger
connecting 6
clear call lists 17
clock 26
alarm 37
automatic update 27
set the time 26
show/hide 27
time format 26
conference calls 28
connect headset 7
cover 5, 6
currency conversion 38
customer care 8
D
definition of terms 54
delete. See erase
dictionary 13
display language 26
download
ringing tones 39
user guide 3
E
edit
e-mail message 23
name or number 16
e-mail messages 23
emergency calls
with keypad locked 10
enter
e-mail addresses 15
names and numbers 15
text 12
erase
call lists 17
messages from folders 20
phone book entries 16
text messages 21
expiration date 41
F
folders 19
G
games 44
glossary 54
H
headset 7
help text 10
|
icons 3
illustrated view
antenna 4
battery removal 5
connect the charger 6
headset connection 7
power key 9
inbox 19
in-call options 28
in-phone help 10
install battery 6
K
Keyguard 10
L
label 8
language setting 26
lithium ion battery 5, 46
lock/unlock the keypad 10
loopset 25
M
memory
phone book 16
text message 22
menus 11
messages
alert tone 25
check voice mail 19
e-mail 23
picture 22
read 21
text 21-22
text entry 12
write and send 21
Minute Manager 42-43
missed calls 17
N
network
search 34
Nokia
accessories 46
customer care center 8
0
one-touch dialing 32
outbox 20
P
personalization 24
phone book 15–16
picture messages 22
power 9
predictive text 13–14
prepaid services 40–41
balance 40
expiration date 41
replenish 41
profiles
accessory settings 25
customize 24
selecting 24
punctuation 14
R
received calls 17
redial
automatic 32
last dialed number 9
remove battery 5
ringing tones
change 24
download 39
options 24
receive 39
save 39
volume 24
S
save
e-mail addresses 15
names and numbers 15
prepaid access numbers 40
ringing tones 39
voice mailbox number 19
scroll keys 3
security code 35
send
business card 38
e-mail message 23
picture message 22
text message 21
touch tone string 33
silent mode 10
special characters 14
standby time 45
start screen 4
strings, touch tone 33
T
talk time 45
text
messages 21-22
predictive 13–14
time 26-27
timers, call 18
touch tones 32
turn phone on/off 9
U
unlock the keypad 10
user guide
interactive 3
updates 3
V
view
call duration 18
clock on start screen 27
dialed calls 17
missed calls 17
picture messages 22
received calls 17
received messages 21
voice mail 19
volume
earpiece 10
keypad tones 25
ringing 24
W
warning tones 25
web sites
accessibility information 8
register your phone 3
user guides 3
write and send a message 21