PrinTao 8 - Uncategorized LaserSoft Imaging - Free user manual and instructions
Find the device manual for free PrinTao 8 LaserSoft Imaging in PDF.


User questions about PrinTao 8 LaserSoft Imaging
0 question about this device. Answer the ones you know or ask your own.
Ask a new question about this device
Download the instructions for your Uncategorized in PDF format for free! Find your manual PrinTao 8 - LaserSoft Imaging and take your electronic device back in hand. On this page are published all the documents necessary for the use of your device. PrinTao 8 by LaserSoft Imaging.
USER MANUAL PrinTao 8 LaserSoft Imaging
Effortless Professional Printing
User Guide

natural_image
Close-up of a black and silver mechanical component with a circular logo featuring 'LSI' and 'LaserSoft Imaging' in the corner (no readable text or symbols on the main subject)Table of Contents
The guide includes the following sections:
• Installation & First Program Start
- Creating a new Document
- Main Window
• Mediathek
- Tool Palettes
- Template
• Page overview
• Image properties
- Cell properties
- Print
• Central working area
- Editing an image cell
- Editing an image
- Cropping an image
- Rotating and flipping an image
• Cutting options for roll paper
• Horizontal Toolbar
- Preferences
natural_image
Close-up of a black and gray mechanical component with a circular logo featuring 'LSI' and 'LaserSoft Imaging' in the corner (no readable text or symbols on the main subject)Manual for Printing with PrinTao 8
Installation & First Program Start
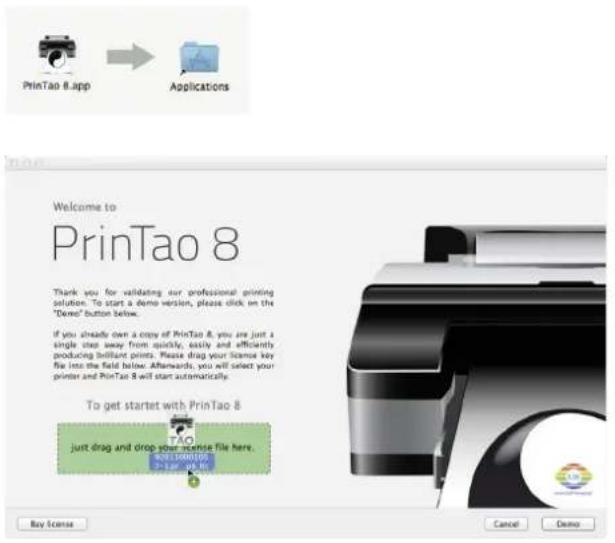
After downloading PrinTao 8, the disk image is opened with a double click. Using the mouse, the program icon can be drawn to the application folder alias. This action moves it to the application folder. Starting PrinTao 8 for the first time, the user license agreement will show up. Having agreed, PrinTao 8 can be unlocked for the appropriate printer models using a purchased license file. This file will downloaded and installed automatically directly with the purchase. In addition, the license file will be sent per email for later usage. For manual installation, the license file having a .printao8_lic file extension is registered with a double click or by simply dragging it with the mouse onto the provided box in the welcome screen. Alternatively, it can be dropped right onto the program icon in the taskbar. PrinTao 8 now installs the license file and enables to setup the appropriate printer models.
Install additional Licenses
Licenses for additional printer classes can be purchased and installed directly from within PrinTao 8. Therefore, the PrinTao 8 top menu features an entry Buy new license... . Clicking it opens a new window to select and purchase a new license. After purchasing, PrinTao 8 automatically installs the new license and unlocks the additional printer models. For later use, the license file is also sent via email.
Install Printers
PrinTao 8 detects all printers, which are switched on and connected with the local network. It shows just those, which are included with installed licenses. By clicking on the green Install printer (1) button, PrinTao 8 downloads and installs actual printer drivers for the selected printer model and corresponding paper profiles from the printer manufacturer from the web. It is not necessary to enter the IP address manually, any further setup is done by PrinTao.
text_image
PrinTao 8.app Applications Welcome to PrinTao 8 Thank you for validating our professional printing solution. To start a demo version, please click on the "Demo" button below. If you already own a copy of PrinTao 8, you are just a single step away from quickly, easily and efficiently producing brilliant prints. Please drag your license key file into the field below. Afterwards, you will select your printer and PrinTao 8 will start automatically. To get started with PrinTao 8 TAO just drag and drop your license file here. Buy Scene Cancel Demo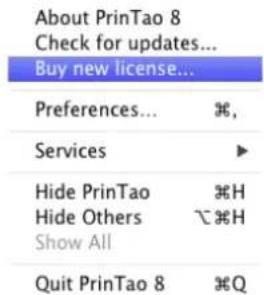
text_image
About PrinTao 8 Check for updates... Buy new license... Preferences... %, Services ▶ Hide PrinTao %H Hide Others ⌘%H Show All Quit PrinTao 8 %Q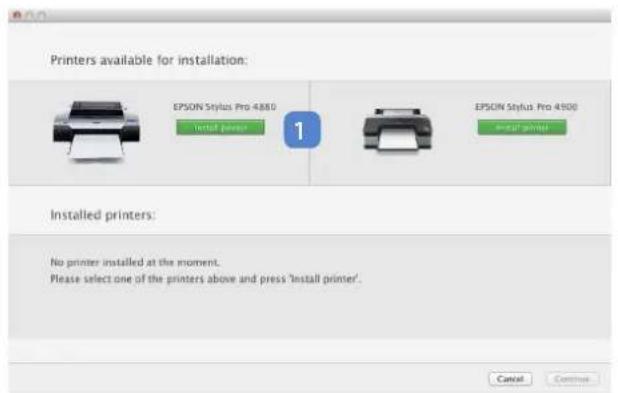
text_image
Printers available for installation: EPSON Stylus Pro 4580 Install power 1 EPSON Stylus Pro 4500 install power Installed printers: No printer installed at the moment. Please select one of the printers above and press 'Install printer'. Cancel ContinueCreating a new Document
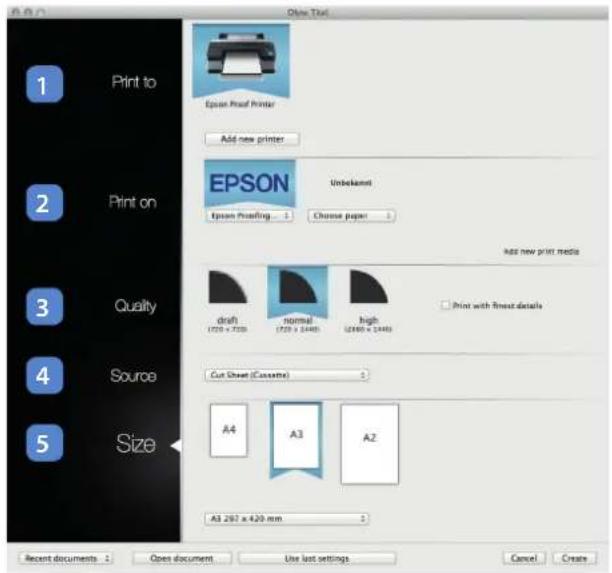
A new document has to be created before the actual work with PrinTao 8 can start. Therefore, a clearly structured dialog is guiding the user through the process of selecting printer (1), paper type (2), print quality (3), and paper source (4) as well as the print media size (5). For convenience, PrinTao 8 shows only the actually available options: For example, just those quality options can be selected, which are supported by the printer. Likewise, PrinTao 8 offers only those paper types and sizes, which are available for the respective printer. The list of available paper types will be updated automatically.
PrinTao 8 remembers the settings used for creating the former document. These settings can be restored for the new document by clicking on Use last settings. If desired, changes to the restored settings can be made at this point, before clicking on the Create button, which opens the new document window with its central working area.
text_image
Print to Epson Print Printer Add new printer Print on EPSON Unbekamati Epson Printing... Choose paper Add new print media Quality draft normal high (720 x 720) (720 x 3440) (2500 x 3440) Print with Front details Source Cut Sheet (Cassette) Size A4 A3 A2 A3 267 x 420 mm Recent documents Open document Use last settings Cancel CreateMain Window
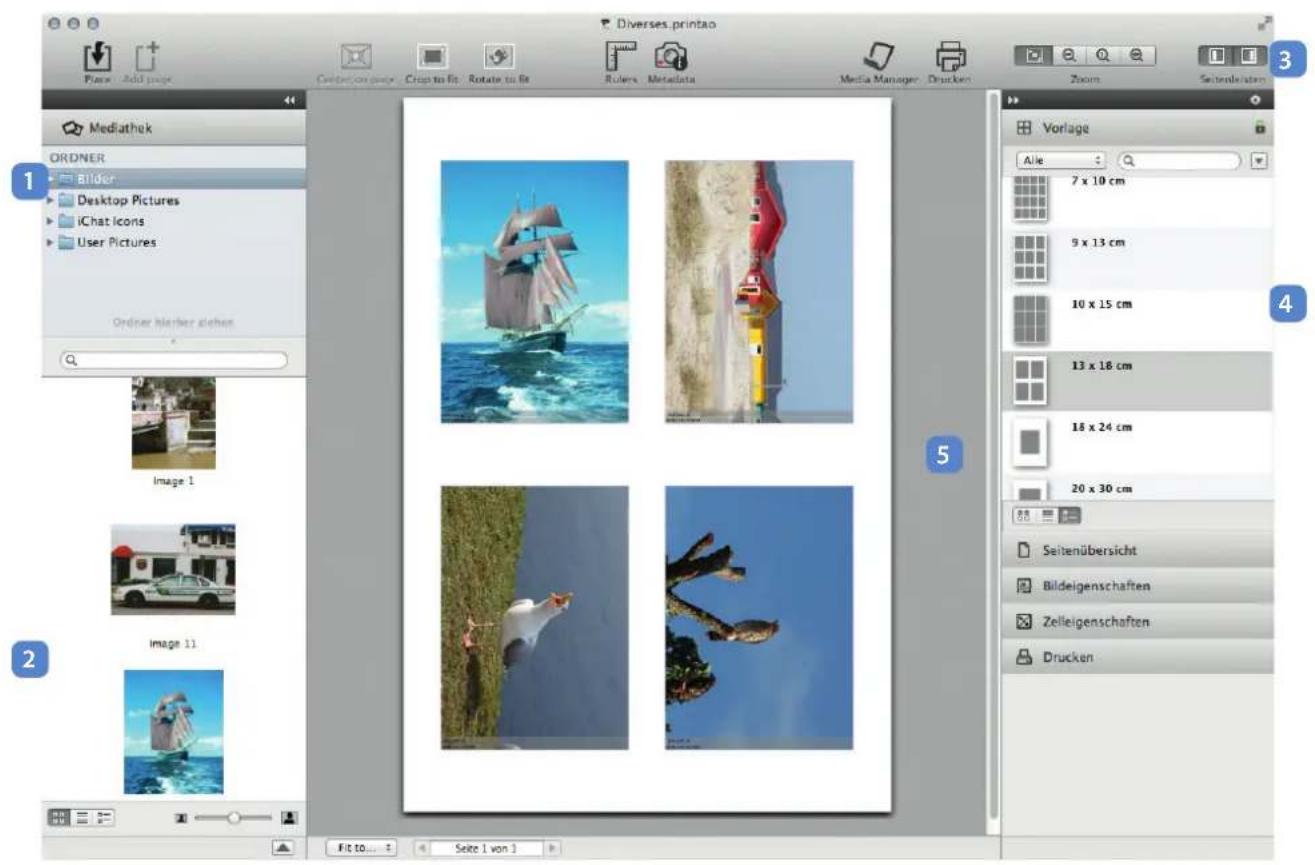
The main window of PrinTao 8 is basically sectioned into five areas: The Mediathek (1), which optionally displays Metadata (2) for the image selected at the workspace or Mediathek. Furthermore a horizontal toolbar (3) above, some tool palettes (4) and the central working area (5). Within these areas the entire process from selecting images, defining page layout to the final print order will take place. It is not necessary to switch back and forth between different program windows.
Images can be drawn from the Mediathek or the Finder to the central working area using the mouse. Alternatively, a file browser for importing images will open when clicking the Place button in the top horizontal toolbar. If an image is dropped besides the print media, PrinTao 8 will insert it at the end of the document. If it is dropped between two image cells, it is inserted there and all following image cell move one position back. An image can be overwritten by dropping another image exactly above an image cell. PrinTao 8 adds further page to the document if needed. If a template is used, which already contains image cells, images can be directly drawn to any of these cells.
Mediathek
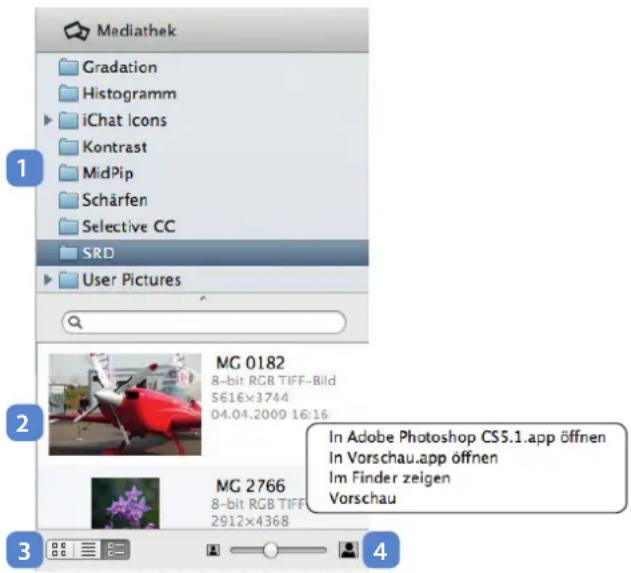
The easiest way to select images for printing is to use the Mediathek dialog located in the left sidebar. Folders containing images can be drawn to the folders area (1) using the mouse. Orders drawn here, will stay available permanently. In this easy way, the Mediathek can be arranged to personal requirements. Right-clicking on a folder opens a context menu, which allows to remove this folder, to open it in the Finder, or to reload it. Alternatively, images can be drawn directly from the Finder to the PrinTao 8 window.
The content of A selected folder is shown in the lower part of the Mediathek as a preview (2). This preview can be displayed as thumbnails, list of file names or thumbnails including details. A switch changes the kind of preview display (3) and a slider adjusts the size (4) of the thumbnails. Additionally, the text field works as a filter for quick searching for an image name inside the selected folder.
text_image
Mediathek Gradation Histogramm iChat Icons Kontrast MidPip Schärfen Selective CC SRD User Pictures MG 0182 8-bit RGB TIFF-Bild 5616×3744 04.04.2009 16:16 MG 2766 8-bit RGB TIFF 2912×4368 In Adobe Photoshop CS5.1.app öffnen In Vorschau.app öffnen Im Finder zeigen VorschauImages can be directly drawn with the mouse from the preview window to PrinTao's central working area. They will be inserted to the document according to the selected template. Performing a double click on an image inside the Mediathek, opens it with the default software for this file type. Right-Clicking opens a context menu offering further options and hitting the space bar key opens the selected image with the OS X QuickLook preview.
Tool Palettes
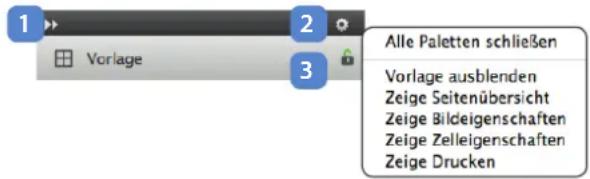
A sidebar with tool palettes is located at the central working area's right side. Clicking on a tool's title bar opens or closes this tool's palette. By default, the sidebar is preset to have only a single palette open at once. This way, the sidebar will remain tidy and tedious scrolling is unnecessary. By clicking on the padlock, a palette will remain open (3) permanently. If the padlock is locked, auto-closing the palette is prevented. The gear wheel button (2) at the very top right of the right sidebar opens a context menu to open and close individual tool palettes. The complete sidebar can be hidden (1) for a larger central working are by clicking the double arrow button.
Template
This tool palette contains a number of pre-defined templates for layouting the print medium. It includes templates for arranging the images on the medium in grid patterns, templates for photographers, who want to provide their customers with packages of images in different standard sizes, as well as templates for free placement of images and custom templates. Using a drop-down menu (1) the templates displayed in this dialog can be reduced to one of these groups.
A click on the arrow button at the top right displays additional options (2) for an automatic image placement. If the option Crop to fit is checked, PrinTao 8 increases or decreases the image until the image cell is completely filled – overlapping parts of the image are cut off. A check at Rotate to fit ensures that images are rotated at placement, if they would better fit into the cell after rotation.
The template preview (3) shows all available pre-defined, free and custom templates. Templates which are not applicable (4), because they do not fit within the selected paper size, are crossed out and not selectable. A switch (5) changes the type of template preview display between icons, list and list of icons with description.
The template can also be changed, if the document already contains images. PrinTao 8 arranges all images according to the new template and adds new pages to the document if necessary. Doing this, an intelligent algorithm ensures to arrange all images on the print media as efficient as possible and thus ensures a minimal paper usage. Large savings can be achieved particularly when using a pack template.
Page overview
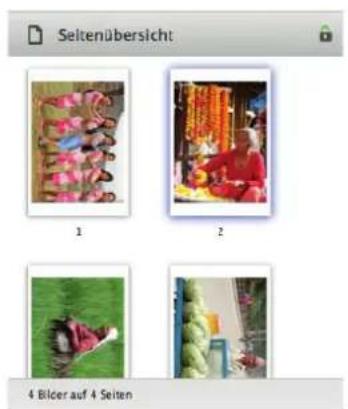
The Page overview palette is useful for navigating through larger documents and for quickly gaining an overview of all included images. Selecting a page in the overview palette, opens this page in the general working area. The status bar below the Page overview window shows the number of pages and number of images included with this document.
If using a Free template, the status bar does also contain buttons for adding new pages and for removing existing ones. For templates with fixed image cells, these buttons are obsolete.
Image properties
This palette dialog allows to view and modify basic properties of the image – not the image cell. These properties are image position (1), resolution (2), angle of rotation (3), image size (4) and horizontal or vertical flipping (5). The values displayed will change immediately, if the selected image is moved or scaled. Numerical values can also be directly entered into the text fields.
The background colors of the slider control indicate whether the resolution is set optimally. Regularly, the best print results can be achieved between 200 dpi and 400 dpi (green area). At lower resolutions (red area, image is too large), individual pixels may become visible and higher resolutions (yellow area, image is too small) can lead to artifacts due to scaling.
Cell properties
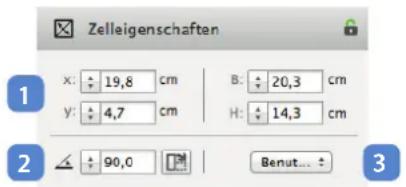
Similar to the image properties, this palette dialog enables to view and modify the properties of an image cell – not of the image itself. In addition to cell coordinates and cell size (1), also the angle of cell rotation (2) can be adjusted. This angle is based on the orientation of the original image. The button next to the cell angle parameter rotates a selected cell at 90° clockwise around the center point of the cell. The drop-down menu offers some standard cell sizes (3) to select.
The Print palette combines all settings relevant for the actual print. The options regarding printer (1) and paper (2) are set as these options have been set when creating the document (see above at "Creating a new Document"). All settings can be reviewed here and adjusted again if necessary. The Finest Details option improves the print impression of very fine, straight lines.
The drop-down menu for the rendering intent (3) offers a set of four rendering intents, which have been defined by the International Color Consortium (ICC): perceptually oriented, absolute colorimetric, relative colorimetric and saturation preserving. Different color spaces of input and output devices afford a color space conversion of the print data to the printer's color space. Depending on the image content and the purpose – the rendering intent – to be followed with the print, a different conversion algorithm will be used.
text_image
Zelleigenschaften x: 19,8 cm B: 20,3 cm y: 4,7 cm H: 14,3 cm 2 90,0 Benut...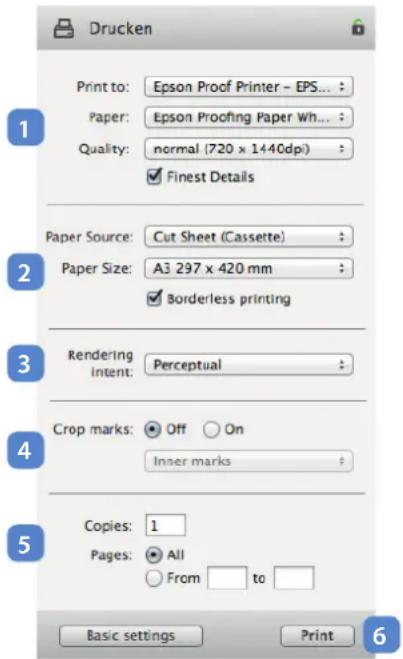
text_image
Drucken Print to: Epson Proof Printer - EPS... Paper: Epson Proofing Paper Wh... Quality: normal (720 x 1440dpi) ; Finest Details Paper Source: Cut Sheet (Cassette) Paper Size: A3 297 x 420 mm Borderless printing Rendering Intent: Perceptual Crop marks: Off On Inner marks Copies: 1 Pages: All From to Basic settings PrintThe perceptual rendering intent, also referred to as photographic rendering intent, compresses a larger source color space into the printer's color space. Relative color differences are preserved with this compression, resulting in an image impression, which is appealing to the human eye. This rendering intent is well suited for photographic printing.
For printing charts or images with a very limited color palette, the saturation preserving rendering intent is particularly suitable. Colors are rich and bright, but color fidelity is not necessarily given.
A relative colorimetric rendering intent is correcting the output data to the effect that all colors of the source material, which can be represented by the combination of printer and paper, will be colorimetrically correct. Colors, which are outside the paper's color space, will be moved to its border (clipping, burning). This will be no problem for offset color proofs printed on an inkjet printer, because the inkjet printer's color space is much larger, so there will be nothing lost. Due to the fact that the offset paper's white tone will not be simulated, the same offset paper should be used for the proof, a paper with a very similar white tone at least. On many proof systems, the relative colorimetric rendering intent is the default preset. It is perfect for photographic printing, when the color space of the output data lies completely within the color space of the printer and paper. In this case the output data can be reproduced completely and the print is colorimetrically correct.
The absolute colorimetric rendering intent is also often used for digital proofs. If the paper, used for the proof print, is brighter than the paper, which will be used for the later offset print, this rendering intent simulates the offset paper's white tone. Thus, the offset paper is not necessarily required for proof printing.
Additional options set in the Print palette are crop marks (4), which can be added to the images, and a restriction of the pages to print (5) to a certain range.
A click on the print button (6) finally starts the actual printing.
Central working area
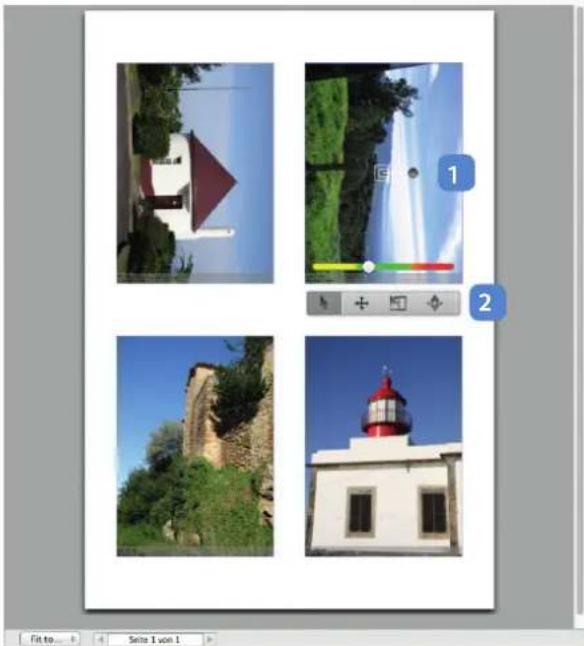
The central working area shows the print media, on which the images are placed and prepared for printing. By selecting an image with a mouse click, a context sensitive toolbar (2) appears. From left to right, it is containing the following controls: Edit cell, edit image, crop image, rotate image by 90°, mirror image and set cell size. The lever in the middle of the cell is used to rotate (1) the cell or the image respectively. Using a Free layout template, image cells can be manually arranged, resized and rotated by the user. The Grid and Pack templates, in contrast, have fixed image cells.
Editing an image cell
The Edit cell mode (1) is used to resize, rotate and move the complete image cell on the print media. Image quality effects of any resizing will be immediately indicated by the background color of the slider control. An image cell is resized, while maintaining its image's proportions, by moving its corner handles or its slider control. An image cell is moved on the print media by dragging it with the mouse. Any change in position and size can be tracked in the Cell properties palette. The text fields can be used to enter exact numerical values.
Editing an image
In edit image mode (2), the controls are very similar to the controls in edit cell mode (1). The image cell is fixed in position and the editing affects the image inside this cell. In this case, moving the control slider resizes the image inside the cell, while the cell size itself remains the same. Again, the slider's background color indicates the print quality regarding image resolution.
Cropping an image
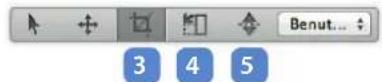
In crop image mode (3), the image is not resized when resizing the cell, like it is in edit cell mode (1). Thus, resizing the cell in crop image mode is used to crop the image, while not changing the print quality. Like in edit image mode (2), the image can be rotated and moved inside the cell using the mouse in order to find the right image detail.
natural_image
Four-panel image collage showing a building with a red arrow, water spray, a lighthouse, and a stone cliff under a clear sky (no text or symbols)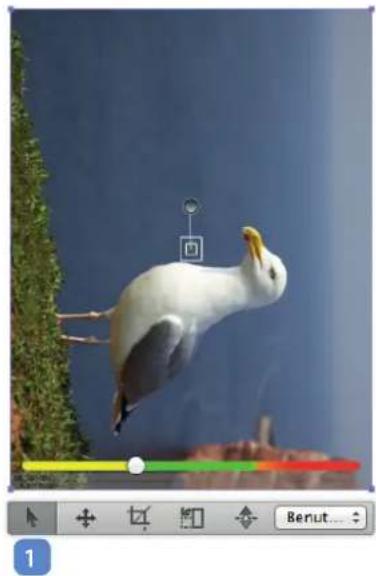
natural_image
Seagull in flight against a blue sky with green foliage (no text or symbols visible)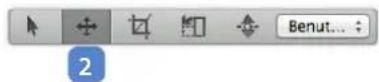
Rotating and flipping an image
In edit cell mode (1), the rotate tool (4) rotates the cell by 90° clockwise. In edit image mode(2) and in crop image mode(3), it rotates the image inside the cell. Holding down the [shift] key, results in a rotation by 90° counterclockwise. The mirror tool (5) flips the image horizontally. Holding down the [shift] key, results in a vertically flipping.
Cutting options for roll paper
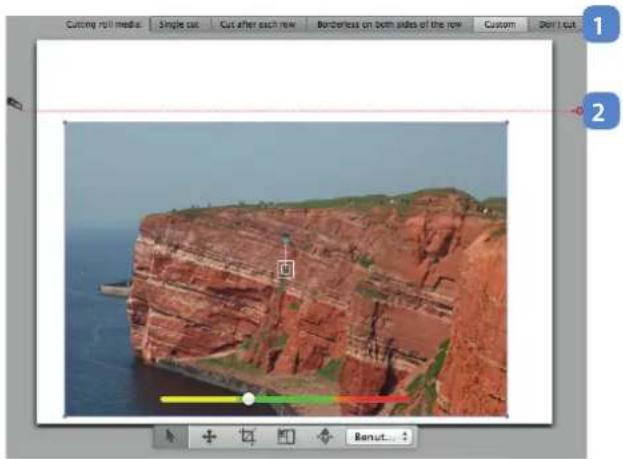
If the selected Paper Source is Roll, PrinTao 8 displays an additional toolbar containing cutting options (1) right above the central working area. This toolbar is used to define, if and where the printer will cut the roll paper. The option Single Cut adds a single cut mark at the end of the document, while Cut after each row sets cut marks just below every row of image cells. The option Borderless on both sides of the row in addition adds a cut mark right above each row, resulting in a print of image cell rows without top and bottom borders. User defined cut marks are set using the Custom option. Using this option, a single cut mark is per default placed below the first row. It can be moved up or down, by moving the cutter icon on the left or the cut line itself. A click on the red circle icon on the right, adds a new cut mark (2). Cut marks can also be added by right-clicking at the desired location. Right-clicking on an existing cut mark will delete it. The option Don't cut, will set no cut marks at all.
natural_image
Scenic view of a red rock formation on the Cape of England, overlooking the sea (no text or symbols visible)Horizontal toolbar

text_image
Place Add page Center on page Crop to fit Rotate to fit 12 Rulers Metadata Media Manager Drucken Zoom SeitenkristenImportant functionalities, which are also found at other places, are gathered together in the horizontal toolbar, for making them quickly available. The following three features are of special interest:
The Metadata (1) option allows to include image file names and/or creation dates with the print. If one of these options is checked, this information will be added to the lower left corner of each image cell.
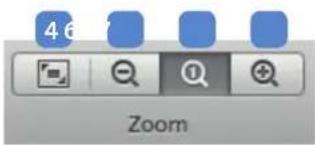
Using the Zoom (3) buttons, the display size of the central working area can be adjusted. The "Fit to window" (4) options sets the zoom to a level, the whole print media fits completely into the central working area window. Zooming in and out step by step is done using the magnifying glass buttons showing plus (7) and minus (5) symbols, while the magnifying glass button in the middle (6), sets the zoom to 100%.
The Media Manager (2) manages the profiles for all installed or available papers. Reducing the Installed papers to the set of papers, which are actually used, could lead to a clearer arrangement for the Paper drop-down menu in the Print palette. Checked papers in the Installed papers tab are removed by clicking the Uninstall button. Additional papers available for the selected printer can be easily added in the Available papers tab. Checked papers are added by clicking the Install button. The Custom papers tab manages user specified papers. For adding a custom paper, initially, a Basic paper with similar properties should be selected. User defined ICC profiles and the Advanced settings are the next steps to Save a custom paper, which takes the specific combination of printer and paper into account. This selection of installed and custom papers is adjusted for each available printer separately. The printer is selected in the left column.
Preferences
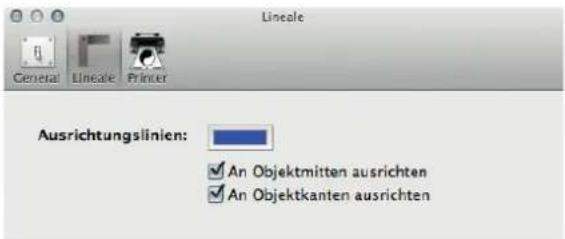
The General tab defines, wether PrinTao 8 uses Inch or Centimeter as measuring unit. An alignment help can be activated in the Rulers tab. If the options Snap to object center and Snap to object edges are checked, an image cell will automatically snap into place, when moved near to a center axis or edge of another cell. The color of the alignment guides can be individually set. The Printer tab allows to add or remove printer (see chapter "Install Printers").
text_image
46 Zoom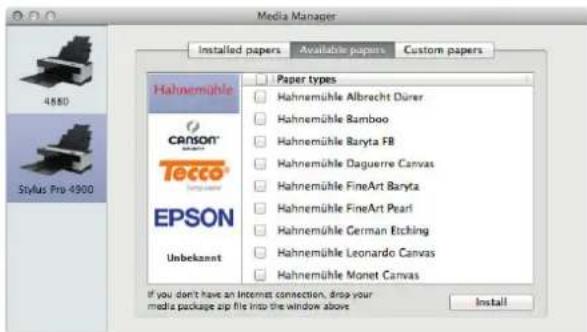
text_image
Media Manager Installed papers Available papers Custom papers Hahnemühle Canson Tecco EPSON Unbekannt Paper types Hahnemühle Albrecht Dürer Hahnemühle Bamboo Hahnemühle Baryta FB Hahnemühle Daguerre Canvas Hahnemühle FineArt Baryta Hahnemühle FineArt Pearl Hahnemühle German Etching Hahnemühle Leonardo Canvas Hahnemühle Monet Canvas If you don't have an Internet connection, drop your media package zip file into the window above Install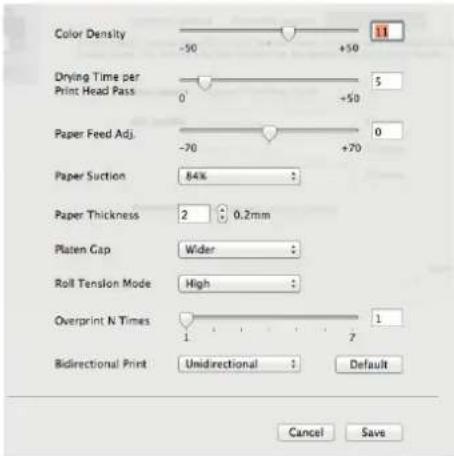
text_image
Color Density -50 +50 Drying Time per Print Head Pass 0 +50 Paper Feed Adj. -70 +70 Paper Suction 84% Paper Thickness 2 0.2mm Platen Gap Wider Roll Tension Mode High Overprint N Times 1 7 Bidirectional Print Unidirectional Default Cancel Save