
IKBP 2720-22 - Fridge LIEBHERR - Free user manual and instructions
Find the device manual for free IKBP 2720-22 LIEBHERR in PDF.


| Product Type | Integrated fridge-freezer with BioFresh |
| Brand | Liebherr |
| Model | IKBP 2720-22 |
| Climate Classes | SN (10°C to 32°C), N (16°C to 32°C), ST (16°C to 38°C), T (16°C to 43°C) |
| Temperature Control | Electronic, adjustable from 3°C to 9°C for fridge compartment |
| BioFresh Temperature | Adjustable from b1 (lowest, may go below 0°C) to b9 (highest), default b5 |
| SuperCool Function | Yes, for rapid cooling of large quantities |
| Child Lock | Yes, prevents inadvertent switching off |
| Door Alarm | Audible warning if door open >60 seconds, can be muted |
| Interior Light | LED, automatically switches off after 15 minutes if door open |
| Shelves | Adjustable glass shelves with pull-out stops, sectioned shelf available |
| Door Racks | Adjustable, includes bottle holder and can rack |
| Egg Tray | Removable and rotatable, two parts for marking dates |
| BioFresh Compartment | DrySafe (low humidity) and Fruit & Vegetable safe (adjustable humidity) |
| Freezer Compartment | Yes, with ice cube tray, manual defrost |
| Defrosting | Automatic for fridge, manual for freezer |
| Cleaning | Most parts dishwasher safe; clean with lukewarm water and mild detergent |
| Power Supply | 220-240 V, 50/60 Hz |
| Safety Features | Child lock, door alarm, refrigerant circuit safety, compliance with EU directives |
| Energy Saving | Keep ventilation clear, avoid warm food placement, arrange food properly |
Frequently Asked Questions - IKBP 2720-22 LIEBHERR
User questions about IKBP 2720-22 LIEBHERR
0 question about this device. Answer the ones you know or ask your own.
Ask a new question about this device
Download the instructions for your Fridge in PDF format for free! Find your manual IKBP 2720-22 - LIEBHERR and take your electronic device back in hand. On this page are published all the documents necessary for the use of your device. IKBP 2720-22 by LIEBHERR.
USER MANUAL IKBP 2720-22 LIEBHERR
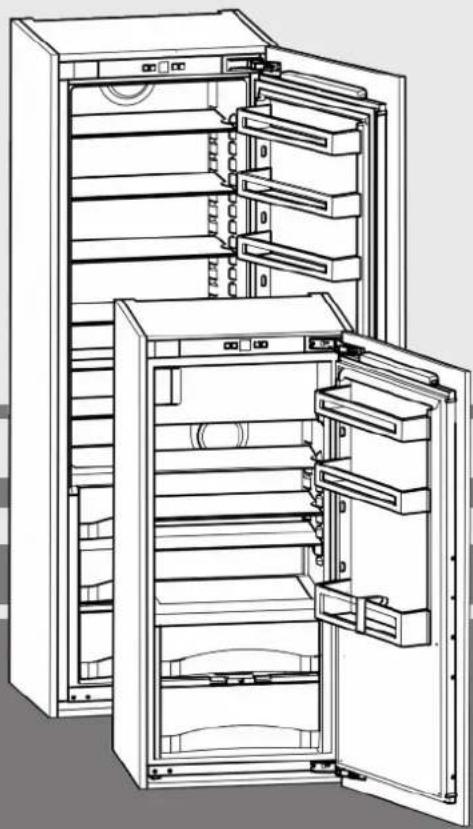
integrated fridge with BioFresh
EN
natural_image
Line drawing of an open refrigerator with doors open, showing internal compartments and ventilation slots (no text or labels)20200622
7086514 - 01
(S)IKB
LIEBHERR
Contents
1 Appliance at a glance.... 2
1.1 Description of appliance and equipment.... 2
1.2 Appliance range of use.... 2
1.3 Conformity.... 3
1.4 Product data.... 3
1.5 EPREL database.... 3
1.6 Saving energy.... 3
2 General safety information.... 3
3 Controls and displays.... 4
3.1 Operating and control elements.... 4
3.2 Temperature display.... 4
4 Putting into operation.... 4
4.1 Switching on the appliance.... 4
5 Control.... 5
5.1 Child proofing.... 5
5.2 Door alarm....5
5.3 Refrigerator compartment.... 5
5.4 BioFresh compartment....6
5.5 Freezer compartment*....8
6 Maintenance....9
6.1 Defrosting....9
6.2 Cleaning the appliance....9
6.3 Customer service.... 10
7 Malfunctions.... 10
8 Decommissioning.... 11
8.1 Switching off the appliance.... 11
8.2 Taking the appliance out of service.... 11
9 Disposing of the appliance.... 11
The manufacturer works constantly on the further development of all the types and models. Therefore please understand that we have to reserve the right to make design, equipment and technical modifications.
To get to know all the benefits of your new appliance, please read the information contained in these instructions carefully.
The instructions apply to several models. Differences may occur. Text relating only to specific appliances is marked with an asterisk (*).
Instructions for action are marked with a ▶the results of action are marked with a ▷
1 Appliance at a glance
1.1 Description of appliance and equipment
text_image
Diagram of a refrigerator with numbered compartments and food items, including refrigerants, bottles, and food containers.Fig. 1
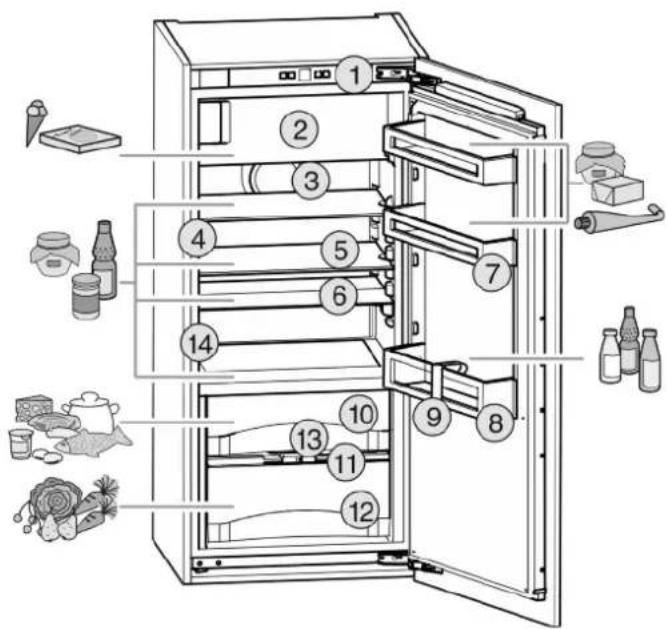
(1) Operating and control elements
(2) Freezer compartment*
(3) Fan
(4) LED interior light
(5) Shelf
(6) Shelf, sectioned*
(7) Can rack
(8) Bottle rack
(9) Bottle holder
(10) DrySafe
(11) Fruit & Vegetable safe cover
(12) Fruit & Vegetable safe
(13) Drain hole
(14) Type plate
Note
▶ Place food inside the appliance as shown in the diagram. This allows the appliance to save energy during operation.
▶ Shelves, drawers and baskets are arranged for optimum energy efficiency on delivery.
1.2 Appliance range of use
Intended use
The appliance is only suitable for cooling food products in a domestic or household-like environment. This includes, for example, use:
The appliance is not suitable for freezing food;*
- in staff kitchens, bed and breakfast establishments,
- by guests in country houses, hotels, motels and other accommodation,
- for catering and similar services in the wholesale trade.
All other types of use are not permitted.
Foreseeable misuse
The following applications are expressly forbidden:
- Storing and refrigerating medicines, blood plasma, laboratory preparations or similar substances and products based on the Medical Device Directive 2007/47/EC
- Use in areas at risk of explosions
Misusing the appliance may lead to damage to the goods stored or they may spoil.
Climate classifications
Depending on the climate classification the appliance is designed to operate in restricted ambient temperatures. The climate classification applying to your appliance is printed on the rating plate.
Note
▶ Keep to the specified ambient temperatures in order to guarantee that the appliance works properly.
| Climate classification | for ambient temperatures of |
| SN 10 °C to 32 °C | |
| N 16 °C to 32 °C | |
| ST 16 °C to 38 °C | |
| T 16 °C to 43 °C |
1.3 Conformity
The refrigerant circuit has been tested for leaks. In installed condition, this appliance complies with the applicable safety stipulations and with directives 2014/35/EU, 2014/30/EU, 2009/125/EG, 2011/65/EU and 2010/30/EU.
The BioFresh compartment meets the requirements of a cold storage compartment as set out in DIN EN 62552:2020.
1.4 Product data
Product data is included with the appliance, as per Directive (EU) 2017/1369. The complete product data sheet is available on the Liebherr website under Downloads.
1.5 EPREL database
Details about energy labelling and ecodesign requirements will be available on the European product database (EPREL) from 1st March 2021. You can access the product database at the following link: https://eprel.ec.europa.eu/ You will be asked to enter the model ID. You can find the model ID on the name-plate.
1.6 Saving energy
- Pay attention to good ventilation. Do not cover ventilation holes or grids.
- Always keep the fan air slits clear.
- Do not install the appliance in direct sunlight, next to an oven, radiator or similar.
- Energy consumption is dependent on the installation conditions, e.g. ambient temperature (see 1.2 Appliance range of use). If the ambient temperature deviates from the standard temperature of 25^ , the energy consumption may differ.
-
Open the appliance for as short a time as possible.
-
The lower the temperature is set the higher the energy consumption.
- Arrange the food in an organised way (see 1 Appliance at a glance).
- Keep all food properly packed and covered. This prevents frost from forming.
- Only take food out for as long as necessary so that it doesn't warm up too much.
- Inserting warm food: allow to cool down to room temperature first.*
- Thaw frozen food in the refrigerator.*
- If there is a thick layer of frost in the appliance: defrost the appliance.*
2 General safety information
Danger for the user:
- This device can be used by children and people with impaired physical, sensory or mental abilities or with a lack of experience and knowledge provided that they are supervised or have received instruction in the safe use of this device, and about the resulting hazards. Children must not play with this appliance. Cleaning and user maintenance work must not be carried out by children without adult supervision. Children aged between 3 and 8 are allowed to load and unload the appliance. Children below the age of 3 must be kept away from the appliance unless they are under continuous adult supervision.
- When disconnecting the appliance from the supply, always take hold of the plug. Do not pull the cable.
- In the event of a fault pull out the mains plug or deactivate the fuse.
- Do not damage the mains power cable. Do not operate the appliance with a defective mains power cable.
- Repairs, interventions on the appliance and the replacement of mains connection line may only be carried out by After-Sales Service or other suitably trained specialist personnel.
- Only install, connect and dispose of the appliance according to the instructions.
- Only use the appliance when it is installed.
- Please keep these instructions in a safe place and pass them on to any subsequent owners.
Fire hazard:
- The coolant used (information on the model plate) is eco-friendly but also flammable. Any leaking coolant may ignite.
- Do not damage the refrigerant circuit pipes.
-
Do not handle ignition sources inside the appliance.
-
Do not use electrical appliances inside the appliance (e.g. steam cleaners, heaters, ice cream makers, etc.).
-
If the refrigerant leaks: remove any naked flames or ignition sources from the vicinity of the leakage point. Properly air the room. Inform customer services.
-
Do not store explosives or sprays using combustible propellants such as butane, propane, pentane, etc. in the appliance. To identify these spray cans, look for the list of contents printed on the can, or a flame symbol. Gases possibly escaping may ignite due to electrical components.
- Please be sure to store alcoholic drinks or other packaging containing alcohol in tightly closed containers. Any alcohol that leaks out may be ignited by electrical components.
Danger of tipping and falling:
- Do not misuse the plinth, drawers, doors etc. as a step or for support. This applies particularly to children.
Danger of food poisoning:
- Do not consume food which has been stored too long.
Danger of frostbite, numbness and pain:
- Avoid prolonged skin contact with cold surfaces or refrigerated/frozen goods or take protective measures, e.g wear use gloves.
Danger of injury and damage:
- Hot steam can lead to injury. Do not use electrical heating or steam cleaning equipment, open flames or defrosting sprays to defrost.
- Do not use sharp implements to remove the ice.
Danger of crushing:
- Do not hold the hinge when opening and closing the door. Fingers may get caught.
Symbols on the appliance:

The symbol can be located on the compressor. It refers to the oil in the compressor and indicates the following danger: Swallowing or inhaling can be fatal. This is only relevant for recycling. There is no danger in normal operation.
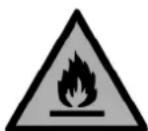
This symbol is found on the compressor and indicates the danger of flammable materials. Do not remove the sticker.
A sticker to this effect may be applied to the rear of the appliance. It refers to the foam-padded panels in the door and/or the housing. This is only relevant for recycling. Do not remove the sticker.
Please observe the specific information in the other sections:
 | DANGER | identifies a situation involving direct danger which, if not obviated, may result in death or severe bodily injury. |
 | WARNING | identifies a dangerous situation which, if not obviated, may result in death or severe bodily injury. |
 | CAUTION | identifies a dangerous situation which, if not obviated, may result in minor or medium bodily injury. |
| NOTICE | identifies a dangerous situation which, if not obviated, may result in damage to property. | |
| Note | It contains useful instructions and tips. |
3 Controls and displays
3.1 Operating and control elements

text_image
7 5 MENU 5 °C DEMO On/Off SuperCool Up/Down Alarm ① ④ ② ⑧ ③ ⑥Fig. 2
(1) On/Off button
(2) Temperature display
(3) Setting button
(4) SuperCool button
(5) SuperCool symbol
(6) Alarm button
(7) Menu symbol
(8) Child lock symbol
3.2 Temperature display
During normal operation, the display shows:
- the average cooling temperature
The following displays indicate a fault. Possible causes and solutions: (see 7 Malfunctions).
- F0 to F9
4 Putting into operation
4.1 Switching on the appliance
▶ Open the door.
▶ Press the On/Off button Fig. 2 (1).
The temperature display lights up. The interior light goes on when the door is opened. The appliance is switched on.
▷ If "DEMO" is displayed, demo mode is activated. Please contact the after sales service.
5 Control
5.1 Child proofing
The child-proofing function enables you to make sure that the appliance is not inadvertently switched off by playing children.

5.1.1 Setting the child lock
To activate the setting mode:
▶ Press the SuperCool button Fig. 2 (4) for about 5 seconds.
The Menu symbol is shown on the display, Fig. 2 (7).
▷ c flashes on the display.
To switch on the function:
▶ Confirm briefly with the SuperCool button Fig. 2 (4).
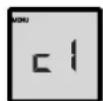
▷ cl appears on the display.
▶ Confirm briefly with the SuperCool button Fig. 2 (4).
▷ The child lock symbol, Fig. 2 (8), lights up on the display.
▷ c flashes on the display.
▷ The child lock function is switched on.
If the function is to be switched off:
▶ Confirm briefly with the SuperCool button Fig. 2 (4).
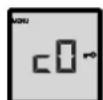
▷ c0 appears on the display.
▶ Confirm briefly with the SuperCool button Fig. 2 (4).
▷ c flashes in the display.
The child lock function is switched off.
To end the setting mode:
▶ Briefly press the On/Off button Fig. 2 (1).
The temperature display shows the temperature again.
5.2 Door alarm
For the fridge and BioFresh compartments
An audible warning sounds if the door is open for longer than 60 seconds.
The audible warning stops automatically when the door is closed.
5.2.1 Muting the door alarm
The audible alarm can be muted when the door is open. The sound switch-off function is active as long as the door is left open.
▶ Press alarm button Fig. 2 (6).
▷ The door alarm is silenced.
5.3 Refrigerator compartment
The natural circulation of air in the refrigerator compartment results in zones differing in temperature. It is coldest directly above the plate separating off the BioFresh zone and at the rear wall. It is warmest at the top front of the compartment and in the door.
5.3.1 Refrigerating food
Note
The energy consumption increases and the cooling performance decreases if the ventilation is inadequate.
▶ Always keep the air slits of the fan free.
▶ Place butter and preserves in the top area and in the door. (see 1 Appliance at a glance)
▶ Use reusable plastic, metal, aluminium, glass containers and foil wrap to store food.
▶ Always store raw meat and fish in clean, sealed containers on the bottom shelf of the refrigerator, to prevent them coming into contact with or dripping onto other foods.
▶ Foods that easily absorb or give off smell or taste, as well as liquids, should be stored in sealed containers or covered.
▶ Use the front area of the base shelf only to temporarily set down refrigerated foods, for example while rearranging or sorting the contents. Remember not to leave refrigerated foods here as they could shift to the back or tip over when you close the door.
▶ Do not pack foods too closely together, as the air needs to circulate.
5.3.2 Setting the temperature
The temperature depends on the following factors:
- the frequency of opening the door
- how long the door is open for
- the room temperature of the installation location
- the type, temperature and quantity of the food
Recommended temperature setting: 5 °C
An average temperature of approx. -18 °C is then established in the freezer compartment.*
The temperature can be adjusted continually. Once the setting 3 °C is reached, the cycle is begun again at 9 °C.
▶ Call up temperature function: press the setting button Fig. 2 (3).
The previously-set value will flash in the temperature display.
▶ Change the temperature in 1 °C steps: Press the setting button Fig. 2 (3) until the required temperature is indicated in the temperature display.
▶ Change temperature continually: hold down setting button.
During adjustment the value flashes on the display.
The new setting is adopted approx. 5 seconds after the last time the button was pressed and the set temperature is again displayed. The temperature in the interior gradually adjusts to the new value.
5.3.3 SuperCool
SuperCool is for maximum cooling. This option is for very low temperatures:
- In the fridge compartment
- In the freezer compartment*

Use SuperCool to quickly cool large amounts of food.
To freeze food, activate SuperCool when you place the goods in the appliance.*
When SuperCool is activated, the fan* may run. The appliance operates with maximum cooling performance, which means that the noise of the refrigeration unit may be temporarily louder.
The SuperCool function uses slightly more energy.
Switching onSuperCool
▶ Briefly press SuperCool button Fig. 2 (4).
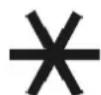
Control
The SuperCool Fig. 2 (5) symbol lights up in the display.
The cooling temperature drops to the lowest setting.
The freezing temperature drops to the lowest setting.*
▷ SuperCool is on.
▷ SuperCool turns off automatically. The appliance continues in energy-saving Normal mode.
To prematurely deactivate SuperCool
▶ Briefly press SuperCool button Fig. 2 (4).
The SuperCool symbol Fig. 2 (5) goes out in the display.
▷ SuperCool is deactivated.
5.3.4 Shelves
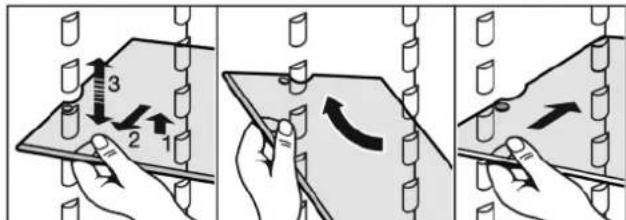
Moving or removing shelves
The shelves are prevented from being pulled out accidentally by pull out stops.
text_image
Diagram illustrating three steps of a mechanical or electrical procedure involving a component with arrows and numbered parts, likely for assembly or maintenance.Fig. 3
▶ Lift the shelf and pull forward a little.
▶ Adjust the height of the shelf. To do this move the slots along the supports.
▶ Only a short shelf may be inserted in front of the fan. *
▶ In order to remove the shelf fully, place it at a slant and pull out towards the front.
▶ Re-insert shelves at the required height. The stops must face downwards and lie behind the front shelves.
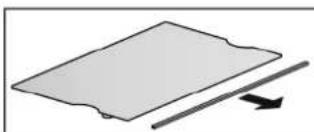
Dismantling shelves
▶ The shelves can be dismantled for cleaning.
natural_image
Simple diagram showing a rectangular object with a diagonal line and an arrow indicating direction (no text or symbols)5.3.5 Using the sectioned shelf\*
▶ Slide the sectioned shelf under, as shown in the illustration.
text_image
Technical diagram showing two labeled components (1 and 2) with directional arrows indicating movement or force on a mechanical assembly.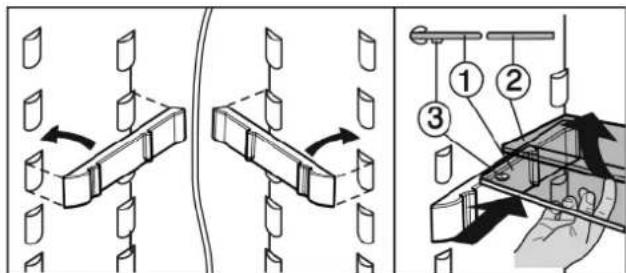
text_image
Technical diagram illustrating three-step assembly or installation process with labeled components and directional arrowsFig. 4
The glass plate (1) with pull-out stops must be at the front so that the stops (3) face downwards.
When dealing with appliances with a freezer compartment, do not attach trayslides and sectioned shelves in front of the fan.*
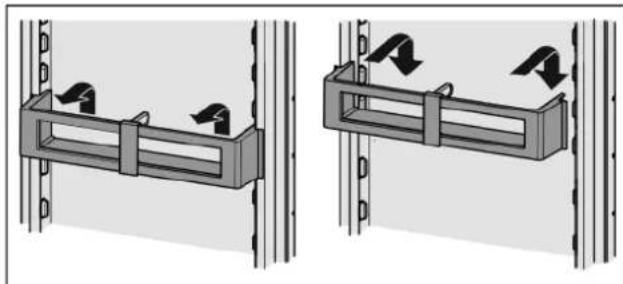
5.3.6 Door racks
Moving the storage rack
natural_image
Two mechanical assembly diagrams showing a bracket with arrows indicating motion, mounted on vertical supports (no text or symbols present)Fig. 5
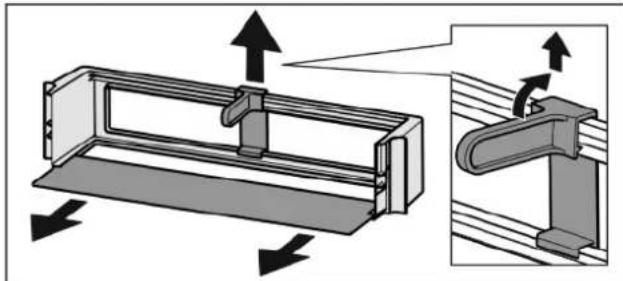
Dismantling door racks
natural_image
Technical diagram of a mechanical assembly with directional arrows indicating motion (no text or symbols)Fig. 6
▶ The door racks can be dismantled for cleaning.
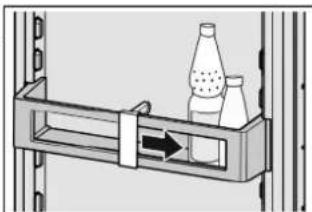
5.3.7 Using the bottle holder
▶ To avoid the bottles tipping over, push the bottle holder along.
natural_image
Diagram of a mechanical device with two bottles and a directional arrow, no text or symbols present5.3.8 Egg tray
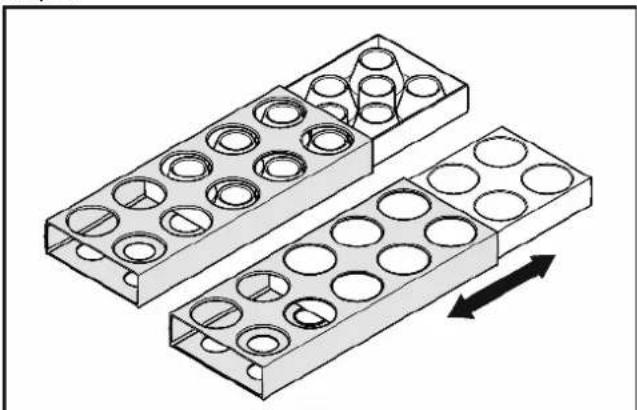
You can take out and rotate the egg tray. You can use the two parts of the egg tray to mark different use-by dates, for example.
natural_image
Diagram of two rectangular plastic crates with circular holes, showing internal structure and directional arrows (no text or symbols)▶ Use the top part to store e.g. chicken eggs.
▶ Use the bottom part to store quails' eggs.
5.4 BioFresh compartment
In the BioFresh section, certain fresh foods can be kept fresh for longer compared to conventional cooling methods.
For food with an indicated best before date, the date specified on the packaging always applies.
If the temperature falls below 0^ C, foodstuffs can freeze.
5.4.1 DrySafe
The DrySafe is suitable for storing dry or wrapped food (e.g. dairy products, meat, fish, sausages). A relatively dry storage climate is established here.
5.4.2 Fruit & Vegetable safe
The humidity in the Fruit & Vegetable safe depends on the moisture content of the items being stored and the number of times the door is opened. You can set the humidity yourself.
On the high moisture setting, the Fruit & Vegetable safe is suitable for storing loose salad, vegetables and fruit with a high moisture content. A well-stocked drawer is stored in absolute freshness.
5.4.3 Setting the moisture level in the Fruit & Vegetable safe
text_image
floor meshFig. 7
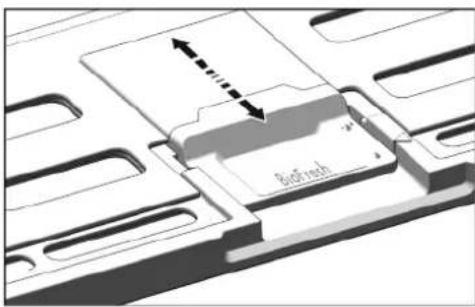
You can choose any moisture setting for the Fruit & Vegetable safe.

Low humidity: Slide the slide bar backwards.
The openings in the cover are partially or fully open. The moisture levels drop in the Fruit & Vegetable safe.
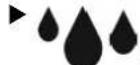
High humidity: Slide the slide bar forwards.
The openings in the cover are partially or fully closed. The moisture levels rise in the Fruit & Vegetable safe.
5.4.4 Storing food
Note
Do not put the following in the BioFresh section: cold-sensitive vegetables including cucumbers, aubergines, tomatoes, courgettes and any cold-sensitive tropical fruits.
▶ To prevent food spoilage due to transfer of germs: Store unwrapped animal and vegetable products separate from one another in the drawers. This also applies to different sorts of meat.
If food has to be stored together due to lack of space:
▶ wrap the food.
▶ Storing high-moisture content foods: shake off the moisture beforehand.
If there is too much moisture in the compartment:
▶ select the low moisture setting.
-or-
▶ Remove any excess moisture with a cloth.
5.4.5 Storage times
| Guidelines for storage periods at low humidity 0 °C | |||
| Butter up to 90 days | |||
| Hard cheese up to 110 days | |||
| Milk up to 12 days | |||
| Guidelines for storage periods at low humidity 0 °C | |||
| Cold meats | up to 9 | days | |
| Poultry | up to 6 | days | |
| Pork | up to 7 | days | |
| Beef | up to 7 | days | |
| Game | up to 7 | days | |
Note
▶ Please note that protein-rich food deteriorates faster, i.e. shellfish and crustaceans deteriorate faster than fish, fish faster than meat.
| Guidelines for storage periods at high humidity 0 °C | |||
| Vegetables, salads | |||
| Artichokes | up to 14 days | ||
| Celery | up to 28 days | ||
| Cauliflower | up to 21 days | ||
| Broccoli | up to 13 days | ||
| Chicory | up to 27 days | ||
| Leaf lettuce | up to 19 days | ||
| Peas | up to 14 days | ||
| Kale | up to 14 days | ||
| Carrots | up to 80 days | ||
| Garlic | up to 160 days | ||
| Cabbage | up to 55 days | ||
| Round lettuce | up to 13 days | ||
| Herbs up to 13 days | |||
| Leeks up to 29 days | |||
| Mushrooms | up to 7 days | ||
| Radishes | up to 10 days | ||
| Sprouts | up to 20 days | ||
| Asparagus | up to 18 days | ||
| Spinach | up to 13 days | ||
| Savoy cabbage | up to 20 days | ||
| Fruit | |||
| Apricots | up to 13 days | ||
| Apples | up to 80 days | ||
| Pears | up to 55 days | ||
| Blackberries | up to 3 days | ||
| Dates | up to 180 days | ||
| Strawberries | up to 7 days | ||
| Figs | up to 7 days | ||
| Blueberries | up to 9 days | ||
| Raspberries | up to 3 days | ||
| Red currants up to 7 days | |||
| Cherries, sweet | up to 14 days | ||
| Kiwis | up to 80 days | ||
| Peaches | up to 13 days | ||
| Plums up to 20 days | |||
| Cranberries up to 60 days | |||
| Rhubarb up to 13 days | |||
| Gooseberries up to 13 days | |||
| Grapes up to 29 days | |||
5.4.6 Adjusting the temperature in the BioFresh compartment
Recommended refrigerator setting: 5 °C. The BioFresh temperature is controlled automatically and is between 0 °C and 3 °C.
You can set a slightly higher or lower temperature. The temperature can be set from bl (lowest temperature) to b9 (highest temperature). The default is b5. With levels bl to b4 the temperature may drop below 0 °C so that the food can freeze.
The value can be changed continually. Once setting b9 is reached, the cycle is started at b1 again.
▶ To activate the setting mode: press the SuperCool button Fig. 2 (4) for about 5 s.
The menu symbol Fig. 2 (7) shines. The temperature display indicates c.
▶ Press setting button Fig. 2 (3) until b flashes on the display.
▶ To confirm: briefly press the SuperCool button Fig. 2 (4).
▶ Press the setting button Fig. 2 (3) until the required value is indicated on the display.
▶ To confirm: press SuperCool button Fig. 2 (4).
▷ b flashes on the display.
▶ To deactivate the setting mode: press the On/Off button Fig. 2 (1).
The refrigerator compartment temperature is again indicated on the temperature display.
The temperature in the BioFresh compartment gradually adjusts to the new value.
5.4.7 Drawers
text_image
Technical diagram illustrating a mechanical assembly process with labeled components and directional arrowsFig. 8
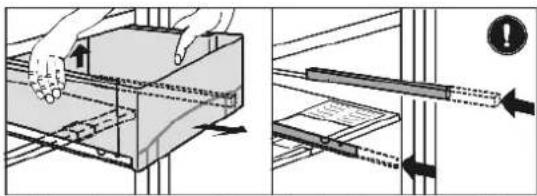
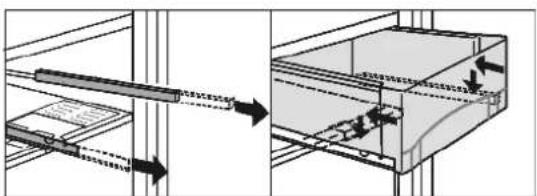
▶ Pull out the drawer, lift it at the back and draw it forwards for removal.
▶ Replace the racks.
text_image
Technical diagram showing mechanical assembly with directional arrows and component labelsFig. 9
▶ Pull out the rails.
▶ Attach the drawer to the rails and push it in until it engages audibly at the back.
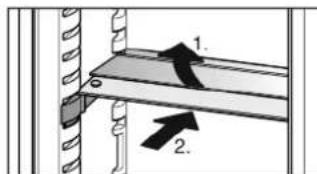
5.4.8 Fruit & Vegetable safe cover
text_image
Diagram of a computer drive showing labeled components, including numbered parts 1 and 2.Fig. 10
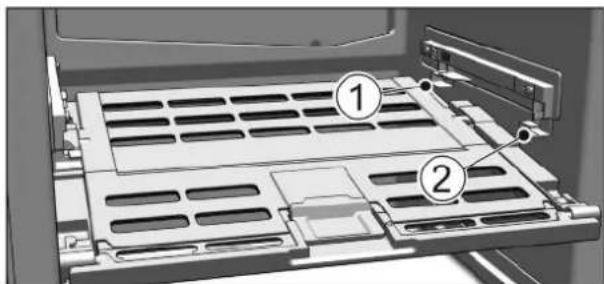
Removing the Fruit & Vegetable safe cover: After pulling out the drawers, carefully pull the cover towards you and down.
▶ Replacing the Fruit & Vegetable safe cover: Guide the ridges on the cover into the rear brackets Fig. 10 (1) and click it into the front bracket Fig. 10 (2).
5.5 Freezer compartment\*
You can store frozen food for several months, make ice cubes and freeze fresh food in the freezer compartment at a temperature of -18 °C and lower.
The air temperature in the compartment, measured by thermometer or other instruments, may fluctuate.
5.5.1 Freezing food
The rating plate indicates the maximum quantity of fresh food you can freeze within 24 hours (see 1 Appliance at a glance) under "Freezing capacity ... kg/24h".

CAUTION
Risk of injury due to broken glass!
Bottles and cans containing drinks may burst when being frozen. This applies particularly to sparkling drinks.
▶ Do not freeze bottles and cans containing drinks!
▶ Switch on SuperCool when you load the product (see 5.3.3 SuperCool).
So that the food is rapidly frozen through to the core, do not exceed the following quantities per pack
- Fruit, vegetables up to 1 kg
- Meat up to 2.5 kg
Pack the food in portions in freezer bags, reusable plastic, metal or aluminium containers
5.5.2 Storage times
| Guide times for storing various types of food in the freezer compartment: | |
| Ice cream | 2 to 6 months |
| Sausage, ham | 2 to 6 months |
| Bread, bakery products | 2 to 6 months |
| Game, pork | 6 to 10 months |
| Fish, fatty | 2 to 6 months |
| Fish, lean | 6 to 12 months |
| Cheese | 2 to 6 months |
| Poultry, beef | 6 to 12 months |
| Vegetables, fruit | 6 to 12 months |
Storage times given are guide times.
5.5.3 Thawing food
- in the refrigerator compartment
- in a microwave oven
- in a conventional or fan oven
- at room temperature
▶ Remove only as much food as is required. Use thawed food as quickly as possible.
▶ Food once thawed should be re-frozen only in exceptional cases.
5.5.4 Ice cube tray\*
text_image
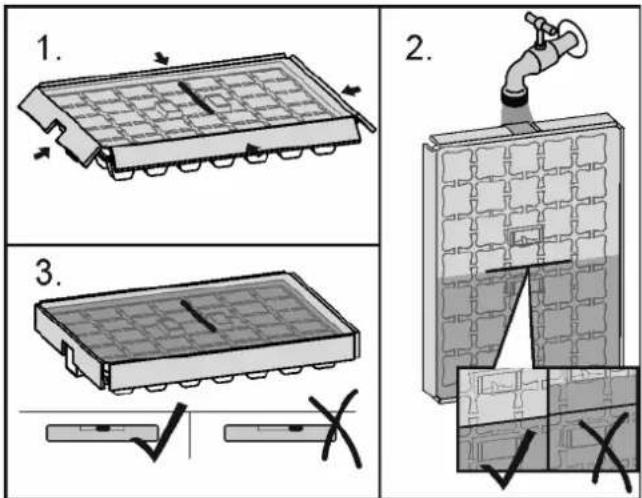
1. 2. 3.Fig. 11 When the water is frozen:
▶ Hold ice cube tray under hot water for a short time.
▶ Remove the lid.
▶ Gently turn the ends of the ice cube tray in opposite directions and release the cubes.
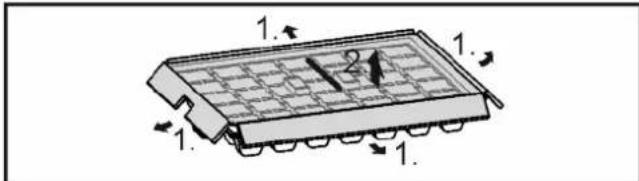
Dismantling the ice cube tray
text_image
1. 2 1.Fig. 12 You can take the ice cube tray apart for cleaning.
6 Maintenance
6.1 Defrosting
6.1.1 Defrosting refrigerator compartment
The refrigerator compartment is defrosted automatically. The water evaporates. Drops of water on the rear wall are functionally conditioned and perfectly normal.
▶ Clean the drain hole at regular intervals to allow the defrost water to drain (see 6.2 Cleaning the appliance).
6.1.2 Defrosting freezer compartment\*
A layer of frost and ice forms in the freezer compartment after the appliance has been in use for a lengthy period of time. This is quite normal. The layer of frost and ice forms more quickly if the door is opened frequently or if the food is warm when placed inside. However, a thick layer of ice will increase the appliance's energy consumption. You should therefore defrost the appliance regularly.

WARNING
Danger of injury and damage
▶ Do not use any mechanical aids or other means not recommended by the manufacturer in order to accelerate the defrosting process.
▶ Do not use electrical heating or steam cleaning equipment, open flames or defrosting sprays to defrost.
▶ Do not use sharp implements to remove the ice.
▶ Do not damage the pipework in the refrigerant circuit.
▶ Switch off the appliance.
▷ The temperature display goes out.
▷ If the temperature display does not go out, the child-proofing function (see 5.1 Child proofing) is active.
▶ Pull out the plug.
▶ Wrap the frozen food in newspaper or blankets and store in a cool place.
▶ Leave the compartment and appliance door open during defrosting.
▶ Remove detached pieces of ice.
▶ Pay attention that the defrost water does not run into the kitchen unit.
▶ If necessary, pick up defrost water several times, using a sponge or cloth.
▶ Clean the compartment (see 6.2 Cleaning the appliance).
6.2 Cleaning the appliance
Clean the appliance regularly.

WARNING
Risk of injury and damage as a result of hot steam!
Hot steam can lead to burns and can damage the surfaces.
▶ Do not use any steam cleaners!
NOTICE
Incorrect cleaning damages the appliance!
▶ Do not use cleaning agents in concentrated form.
▶ Do not use any scouring or abrasive sponges or steel wool.
▶ Do not use any sharp or abrasive cleaning agents, nor any that contain sand, chloride or acid.
▶ Do not use chemical solvents.
▶ Do not damage or remove the type plate on the inside of the appliance. It is important for the customer service.
▶ Do not pull off, bend or damage cables or other components.
▶ Do not allow any cleaning water to enter the drain channel, ventilation grille or electrical parts.
▶ Please use soft cleaning cloths and a universal pH-neutral cleaning agent.
▶ Please use cleaning and care products suitable for contact with foodstuffs in the appliance interior.
▶ Empty appliance.
▶ Pull out the power plug.

▶ Clean plastic outer and inner surfaces with lukewarm water and a little washing-up liquid.
natural_image
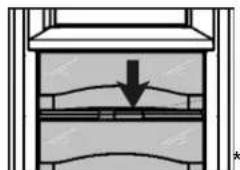
Cross-sectional diagram of a mechanical or structural component with a downward arrow indicating force or direction (no text or symbols)▶ Clean drain hole: Remove deposits with a narrow instrument, e.g. a cotton bud.
natural_image
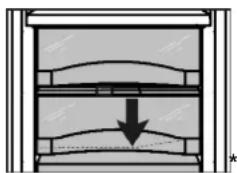
Cross-sectional diagram of a mechanical or structural component with a downward arrow indicating force or movement (no text or symbols present)▶ Most of the parts can be dismantled for cleaning: see the relevant chapter.
▶ Clean drawers by hand with lukewarm water and a little washing up liquid.
▶ Clean the Fruit & Vegetable safe cover by hand using lukewarm water and a small amount of detergent.
▶ All the other fittings can be put in the dishwasher.
▶ Only use a damp cloth to clean the telescopic rails. The grease in the runners is for lubrication purposes and must not be removed.
After cleaning:
▶ Wipe dry the appliance and items of equipment.
▶ Connect the appliance and switch it on again. When the temperature is sufficiently cold:
▶ Put the food back inside.
6.3 Customer service
First check whether you can correct the fault yourself by reference to the list (see 7 Malfunctions). If this is not the case, please contact the customer service whose address is given in the enclosed customer service list.

WARNING
Risk of injury if repair work is not carried out professionally!
▶ Have any repairs and action - not expressly specified - on the appliance and mains cable carried out by service personnel only. (see 6 Maintenance)
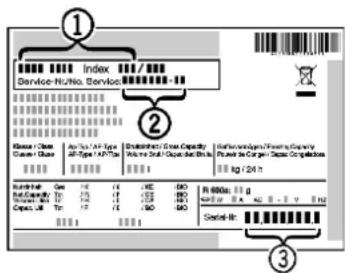
▶ Read the appliance designation Fig. 13 (1), service No. Fig. 13 (2) and serial No. Fig. 13 (3) off the type plate located inside the appliance on the left-hand side.
text_image
① Index Service-Haula. Service ② Name: C#m C#m/Chase An Type: A/F Type A/F Type: A/F Type Distance: C#m Capacity Type: n-1 Chap. Type: n-1 Chap. Distance: C#m Capacity Type: n-1 Chap. Type: n-1 Chap. Distance: C#m Capacity Type: n-1 Chap. Type: n-1 Chap. Distance: C#m Capacity Type: n-1 Chap. Type: n-1 Chap. Distance: C#m Capacity Type: n-1 Chap. Type: n-1 Chap. Distance: C#m Capacity Range: 24 m R 6000x g R 6000x g R 6000x g R 6000x g R 6000x g R 6000x g R 6000x g R 6000x g R 6000x g R 6000x g R 6000x g R 6000x gFig. 13
▶ Notify the customer service, specifying the fault, appliance designation Fig. 13 (1), service No. Fig. 13 (2) and serial No. Fig. 13 (3).
▷ This will help us to provide you with a faster and more accurate service.
▶ Keep the appliance closed until the customer service arrives.
▷ The food will stay cool longer.
▶ Pull out the mains plug (not by pulling the connecting cable) or switch off the fuse.
7 Malfunctions
Your appliance is designed and manufactured for a long life span and reliable operation. If a malfunction nonetheless occurs during operation, check whether it is due to a handling error. In this case you will have to be charged for the costs incurred, even during the warranty period. You may be able to rectify the following faults yourself:
Appliance does not work.
→ The appliance is not switched on.
▶ Switch on the appliance.
→ The power plug is not properly inserted in the wall socket.
▶ Check power plug.
→ The fuse of the wall socket is not in order.
▶ Check fuse.
The compressor runs for a long time.
→ The compressor switches to a low speed when little cold is needed. Although the running time is increased as a result, energy is saved.
This is normal in energy-saving models.
→ SuperCool is activated.
The compressor runs for longer in order to rapidly cool the food. This is normal.
A LED on the bottom rear of the appliance (at the compressor) flashes repeatedly every 5 seconds\*.
→ There is a fault.
▶ Please contact the after-sales service (see 6 Maintenance).
Excessive noise.
→ Due to the various speed steps, speed-regulated* compressors can generate different running noises.
▶ The sound is normal.
A bubbling and gurgling noise.
→ This noise comes from the refrigerant flowing in the refrigeration circuit.
The sound is normal.
A quiet clicking noise.
→ The noise is produced whenever the refrigeration unit (motor) automatically switches on or off.
The sound is normal.
A hum. It is briefly a little louder when the refrigeration unit (the motor) switches on.
→ The refrigeration increases automatically when the SuperCool function is activated, fresh food has just been placed in the appliance or the door has been left open for a while.
▶ The sound is normal.
→ The ambient temperature is too high.
▶ Solution: (see 1.2 Appliance range of use)
A low hum.
→ The sound is produced by air flow noise of the fan.
The sound is normal.
Vibration noises
→ The appliance is not standing firmly on the floor. As a result objects and adjacent units start to vibrate when the refrigerator is running.
▶ Check the installation and realign the appliance.
▶ Keep bottles and jars apart.
The temperature display indicates: F0 to F9
→ There is a fault.
▶ Please contact the after-sales service (see 6 Maintenance).
DEMO shines in the temperature display.
→ The demo mode is activated.
▶ Please contact the after-sales service (see 6 Maintenance).
The outer surfaces of the appliance are warm\*.
→ The heat of the refrigeration circuit is used to prevent condensate from forming.
This is normal.
The temperature is not cold enough.
→ The door of the appliance is not properly closed.
▶ Close the door of the appliance.
→ Insufficient ventilation.
▶ Keep ventilation grille clear, and clean it.
→ The ambient temperature is too high.
▶ Solution: (see 1.2 Appliance range of use).
→ The appliance was opened too frequently or for too long.
▶ Wait to see whether the appliance reaches the required temperature by itself. If not, please contact the after sales service (see 6 Maintenance).
→ The temperature is incorrectly set.
▶ Set the temperature to a colder setting and check after 24 hours.
→ The appliance is too close to a source of heat (stove, heater etc).
▶ Change the position of the appliance or the source of heat.
→ The appliance was not inserted properly into the recess.
▶ Check whether the appliance was inserted correctly and the door closes properly.
The internal light does not come on.
→ The appliance is not switched on.
▶ Switch the appliance on.
→ The door was open for longer than 15 minutes.
The internal light switches itself off automatically after about 15 minutes if the door is open.
→ The LED illumination is faulty or the cover is damaged:

WARNING
Risk of injury due to electric shock!
There are live electrical parts under the cover.
▶ Only ever have the inside LED light replaced or repaired by customer service or trained personnel.

WARNING
Risk of injury from LED bulb!
The light intensity of the LED light corresponds to hazard group RG 2.
If the cover is defective:
▶ Do not look directly into the light from close range. It cause injury to the eyes.
With an ambient temperature below 18 °C the device is slightly warmed in places on the inner surface of the fridge compartment's right side wall.\*
→ This is a necessary part of the function.
This is normal.
The door gasket is defective or should be replaced for other reasons.
→ In some units, the seal around the door can be replaced. You will not need any special tools to do this.
▶ Please contact the after-sales service (see 6 Maintenance).
The unit has iced up or condensation has formed.
→ The door seal may have also slipped out of its groove.
▶ Check to ensure that the door seal is seated properly in the groove.
8 Decommissioning
8.1 Switching off the appliance
▶ Press On/Off button Fig. 2 (1) for approx. 2 seconds.
▷ A long beep is emitted. The temperature display is dark. The appliance is switched off.
▷ If the appliance cannot be switched off, the child lock function is active (see 5.1 Child proofing).
8.2 Taking the appliance out of service
▶ Empty the appliance.
▶ Switch off the appliance (see 8 Decommissioning).
▶ Remove mains connector.
▶ Clean the appliance (see 6.2 Cleaning the appliance).
▶ Leave the door open to prevent odour.

9 Disposing of the appliance
The appliance contains some reusable materials and should be disposed of properly - not simply with unsorted household refuse. Appliances which are no longer needed must be disposed of in a professional and appropriate way, in accordance with the current local regulations and laws.
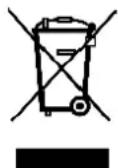
When disposing of the appliance, ensure that the refrigeration circuit is not damaged to prevent uncontrolled escape of the refrigerant it contains (data on type plate) and oil.
▶ Disable the appliance.
▶ Pull out the plug.
▶ Cut through the connecting cable.

