SF6101VN - Oven SMEG - Free user manual and instructions
Find the device manual for free SF6101VN SMEG in PDF.


User questions about SF6101VN SMEG
0 question about this device. Answer the ones you know or ask your own.
Ask a new question about this device
Download the instructions for your Oven in PDF format for free! Find your manual SF6101VN - SMEG and take your electronic device back in hand. On this page are published all the documents necessary for the use of your device. SF6101VN by SMEG.
USER MANUAL SF6101VN SMEG
1.1 General safety instructions 52
1.2 Appliance purpose 55
1.3 Manufacturer liability 55
1.4 This user manual 55
1.5 Identification plate 55
1.6 Disposal 55
1.7 How to read the user manual 56
2 Description 57
2.1 General Description 57
2.2 Control panel 59
2.3 Other parts 60
2.4 Available accessories 61
3 Use 63
3.1 Instructions 63
3.2 First use 63
3.3 Using the accessories 64
3.4 Using the oven 65
3.5 Cooking advice 73
3.6 Special functions 75
3.7 Secondary menu 78
4 Cleaning and maintenance 81
4.1 Instructions 81
4.2 Cleaning the appliance 81
4.3 Removing the door 81
4.4 Cleaning the door glazing 82
4.5 Vapor Clean (on some models only) 86
4.6 Pyrolytic (on some models only) 89
4.7 Extraordinary maintenance 91
5 Installation
5.1 Electrical connection 93
5.2 Cable replacement 93
5.3 Positioning 94
TRANSLATION OF THE ORIGINAL INSTRUCTIONS
We advise you to read this manual carefully, which contains all the instructions for maintaining the appliance's aesthetic and functional qualities.
For further information on the product: www.smeg.com
1 Instructions
1.1 General safety instructions
Risk of personal injury
- During use the appliance and its accessible parts become very hot. Never touch the heating elements during use.
- Protect your hands by wearing oven gloves when moving food inside the oven.
- Never try to put out a fire or flames with water: Turn off the appliance and smother the flames with a fire blanket or other appropriate cover.
- This appliance may be used by children aged at least 8 and by people of reduced physical, sensory or mental capacity, or lacking in experience in the use of electrical appliances, provided that they are supervised or instructed by adults who are responsible for their safety.
• Children must not play with the appliance. -
Keep children under the age of eight at a safe distance unless they are constantly supervised.
-
Keep children under the age of 8 away from the appliance when it is in use.
- Cleaning and maintenance must not be carried out by unsupervised children.
- The cooking process must always be monitored. A short cooking process must be continuously monitored.
- Never leave the appliance unattended during cooking operations where fats or oils could be released, as these could then heat up and catch fire. Be very careful.
- Do not insert pointed metal objects (cutlery or utensils) into the slots in the appliance.
- Do not pour water directly onto very hot trays.
- Keep the oven door closed during cooking.
- If you need to move food or at the end of cooking, open the door 5 cm for a few seconds, let the steam come out, then open it fully.
Instructions
- Do not use or store flammable materials near the appliance.
- Do not use aerosols in the vicinity of this appliance whilst it is in use.
- Switch off the appliance immediately after use.
Risk of damaging the appliance
- Do not use abrasive or corrosive detergents (e.g. scouring powders, stain removers and metallic sponges) on glass parts. Use wooden or plastic utensils.
- Do not use cleaning products containing chlorine, ammonia or bleach on parts made of steel or that have metallic surface finishes (e.g. anodizing, nickel- or chromium-plating).
- Do not use rough or abrasive materials or sharp metal scrapers.
- Racks and trays should be inserted as far as they will go into the side guides. The mechanical safety locks that prevent them from being removed must face downwards and towards the back of the oven cavity.
- Do not seat on the appliance.
- Do not use steam jets to clean the appliance.
- Do not spray any spray products near the appliance.
- Do not obstruct ventilation openings and heat dispersal slots.
- Never leave objects on the cooking surface.
- Do not use the appliance to heat rooms for any reason.
- Do not use plastic cookware or containers when cooking food.
- Do not put sealed tins or containers in the oven.
- Remove all trays and racks which are not required during cooking.
- Do not cover the bottom of the oven cavity with aluminium or tin foil sheets.
- Do not place pans or trays directly on the bottom of the oven cavity.
-
If you wish to use greaseproof paper, place it so that it will not interfere with the hot air circulation inside the oven.
-
Do not use the open door to rest pans or trays on the internal glass pane.
- Never use the oven door to lever the appliance into place when fitting.
- Avoid exerting too much pressure on the oven door when open.
- Do not use the handle to lift or move the appliance.
Installation and maintenance
- This appliance must not be installed in a boat or caravan.
- The appliance must not be installed on a pedestal.
- Position the appliance into the cabinet cut-out with the help of a second person.
- To avoid potential overheating, the appliance must not be installed behind a decorative door or a panel.
- Have qualified personnel carry out installation and assistance interventions according to the standards in force.
-
Have the electrical connection performed by authorised technical personnel.
-
The appliance must be connected to earth in compliance with electrical system safety standards.
- Use cables withstanding a temperature of at least 90 °C.
- The tightening torque of the screws of the terminal supply wires must be 1.5 - 2 Nm.
- If the power supply cable is damaged, contact technical support immediately and they will replace it.
• Always use any necessary/required personal protective equipment (PPE) before performing any work on the appliance (installation, maintenance, positioning or movement). - Before performing any work on the appliance, switch off the power supply.
- Do not modify this appliance.
- Do not try to repair the appliance yourself or without the intervention of a qualified technician.
- Do not pull the cable to remove the plug.
For this appliance
- Ensure that the appliance is switched off before replacing the bulb.
- Do not rest any weight or sit on the open door of the appliance.
• Take care that no objects are stuck in the doors.
1.2 Appliance purpose
- This appliance is intended for cooking food in the home environment. Every other use is considered improper.
- The appliance is not designed to operate with external timers or with remote-control systems.
1.3 Manufacturer liability
The manufacturer declines all liability for damage to persons or property caused by:
- Use of the appliance other than that specified;
- Failure to comply with the instructions in the user manual;
- Tampering with any part of the appliance;
• The use of non-original spare parts.
1.4 This user manual
This user manual is an integral part of the appliance and must therefore be kept in its entirety and within the user's reach for the whole working life of the appliance.
Read this user manual carefully before using the appliance.
1.5 Identification plate
The identification plate bears the technical data, serial number and brand name of the appliance. Do not remove the identification plate for any reason.
1.6 Disposal
This appliance must be disposed of separately from other waste (Directives 2002/95/EC, 2002/ 96/EC, 2003/108/EC). The appliance does not contain substances in quantities sufficient to be considered hazardous to health and the environment, in accordance with current European directives.
To dispose of the appliance:
- Cut the power supply cable and remove it along with the plug.

Power voltage Danger of electrocution
- Disconnect the mains power supply.
- Unplug the appliance.

Instructions
- Deliver the appliance to the appropriate recycling centre for electrical and electronic equipment waste, or return it to the retailer when purchasing an equivalent product, on a one for one basis.
Our appliances are packaged in non-polluting and recyclable materials.
- Deliver the packing materials to the appropriate recycling centre.

Plastic packaging Danger of suffocation
- Do not leave the packaging or any part of it unattended.
- Do not let children play with the plastic bags.
1.7 How to read the user manual
This user manual uses the following reading conventions:
Instructions

General information on this user manual, on safety and final disposal.
Description

Description of the appliance and its accessories.
Use

Information on the use of the appliance and its accessories, cooking advice.
Cleaning and maintenance

Information for proper cleaning and maintenance of the appliance.
Installation

Information for the qualified technician: Installation, operation and inspection.

Safety instructions

Information

Advice
- Sequence of instructions for use.
- Standalone instruction.
2 Description
2.1 General Description
text_image
1 2 3 4 5 6 7 8 9 10 11 12 13 14 15 16 17 18 19 20 21 22 23 24 25 26 27 28 29 30 31 32 33 34 35 36 37 38 39 40 41 42 43 44 45 46 47 48 49 50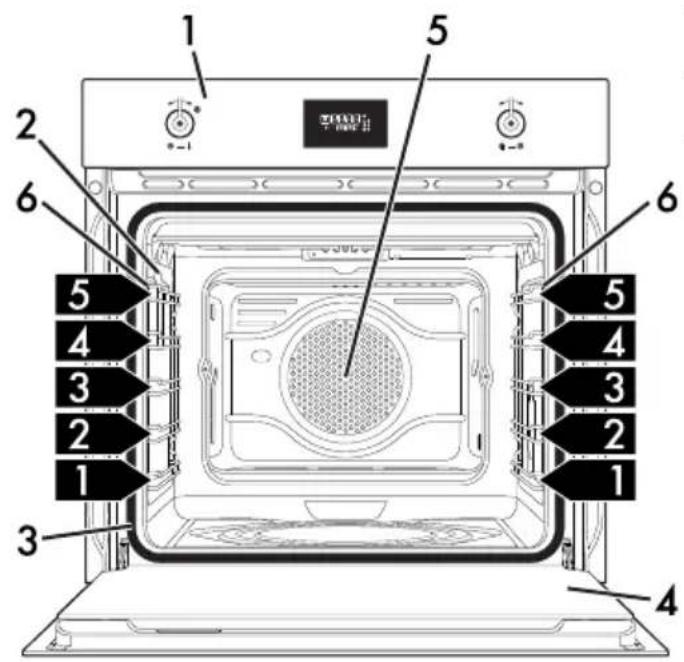
text_image
1 2 3 4 5 6 7 8 9 10 11 12 13 14 15 16 17 18 19 20 21 22 23 24 25 26 27 28 29 30 31 32 33 34 35 36 37 38 39 40 41 42 43 44 45 46 47 48 49 50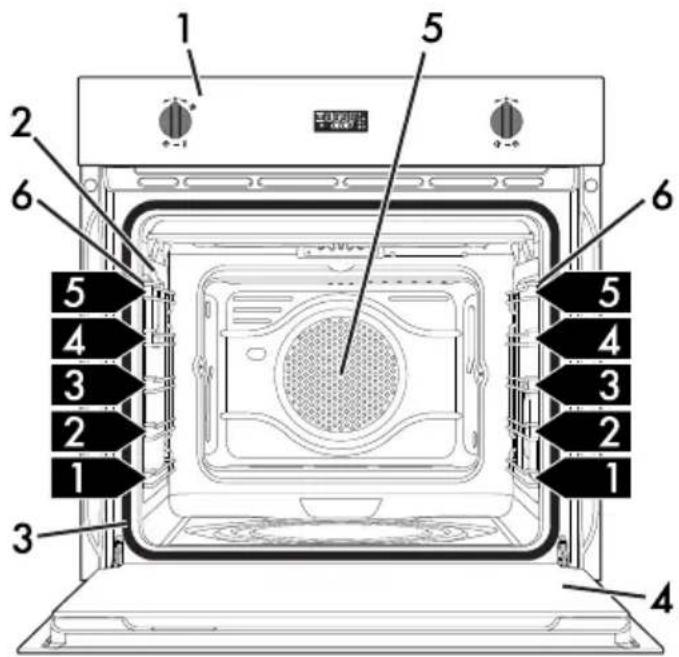
text_image
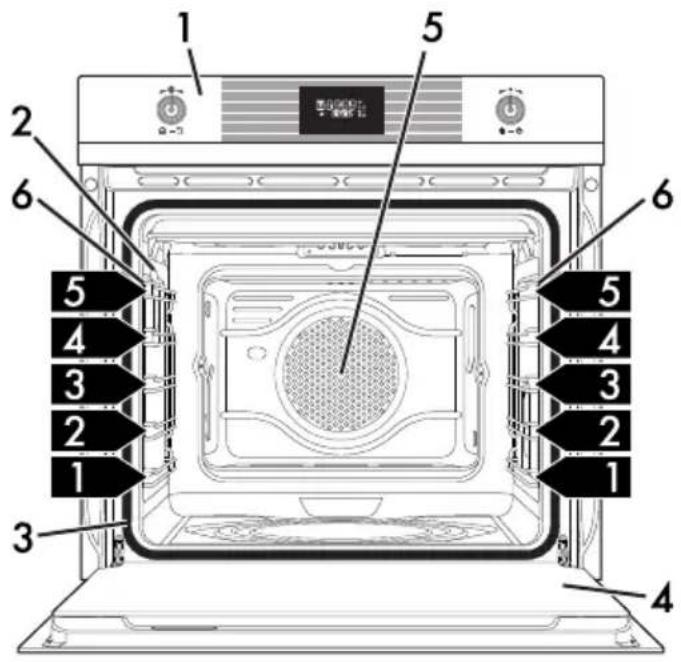
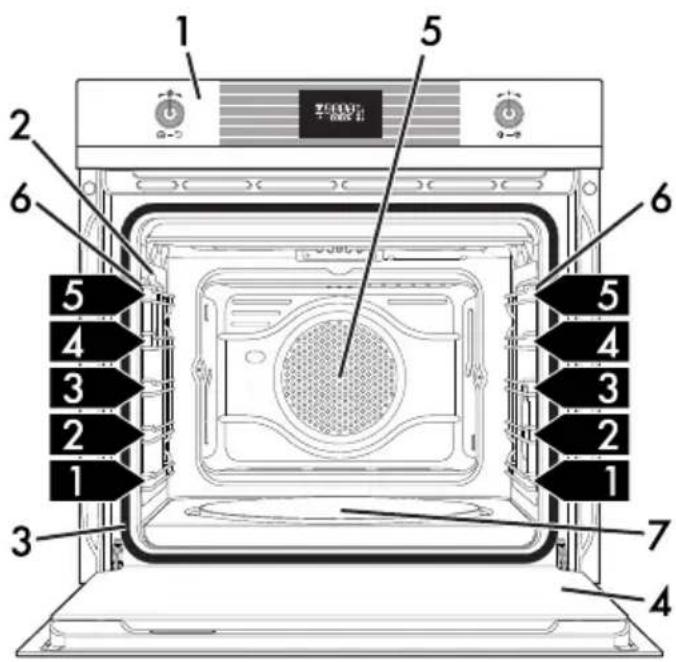
1 2 3 4 5 6 7 8 9 10 11 12 13 14 15 16 17 18 19 20 21 22 23 24 25 26 27 28 29 30 31 32 33 34 35 36 37 38 39 40 41 42 43 44 45 46 47 48 49 50Multifunction/Pyrolytic models
1 Control panel
2 Oven light
3 Seal
4 Door
5 Fan
6 Rack/tray support frames
1,2,3... Frame shelf
text_image
1 2 3 4 5 6 7 8 9 10 11 12 13 14 15 16 17 18 19 20 21 22 23 24 25 26 27 28 29 30 31 32 33 34 35 36 37 38 39 40 41 42 43 44 45 46 47 48 49 50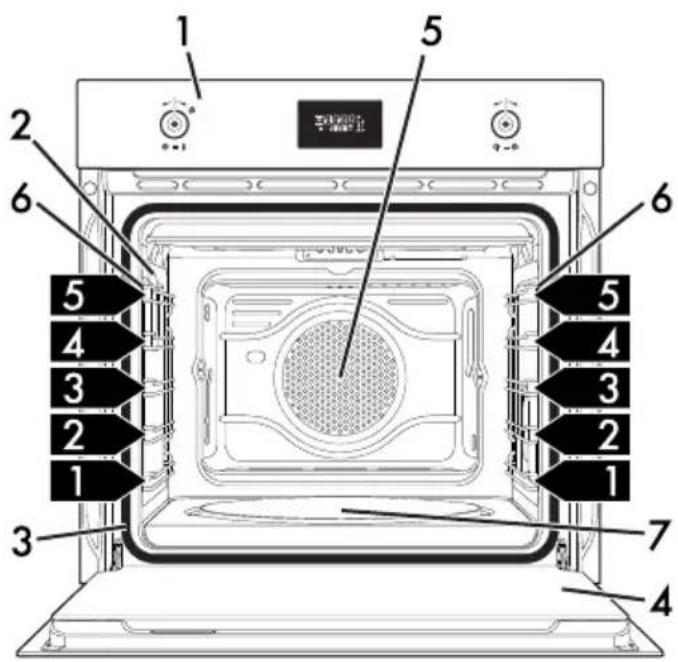
text_image
Technical diagram of an oven with numbered components and labeled parts in Chinese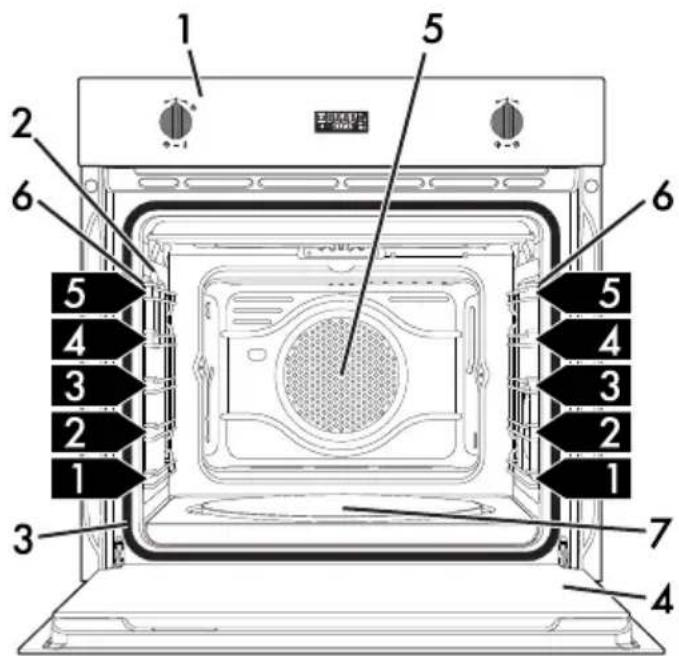
text_image
Technical diagram of an oven with numbered components and labeled parts for assembly or maintenance reference.Models with pizza stone
1 Control panel
2 Oven light
3 Seal
4 Door
5 Fan
6 Rack/tray support frames
7 Pizza stone
1,2,3
Frame shelf
2.2 Control panel
text_image
1 2 3 8888° 8888° 1 2 3 8888° 8888° 1 2 3Z
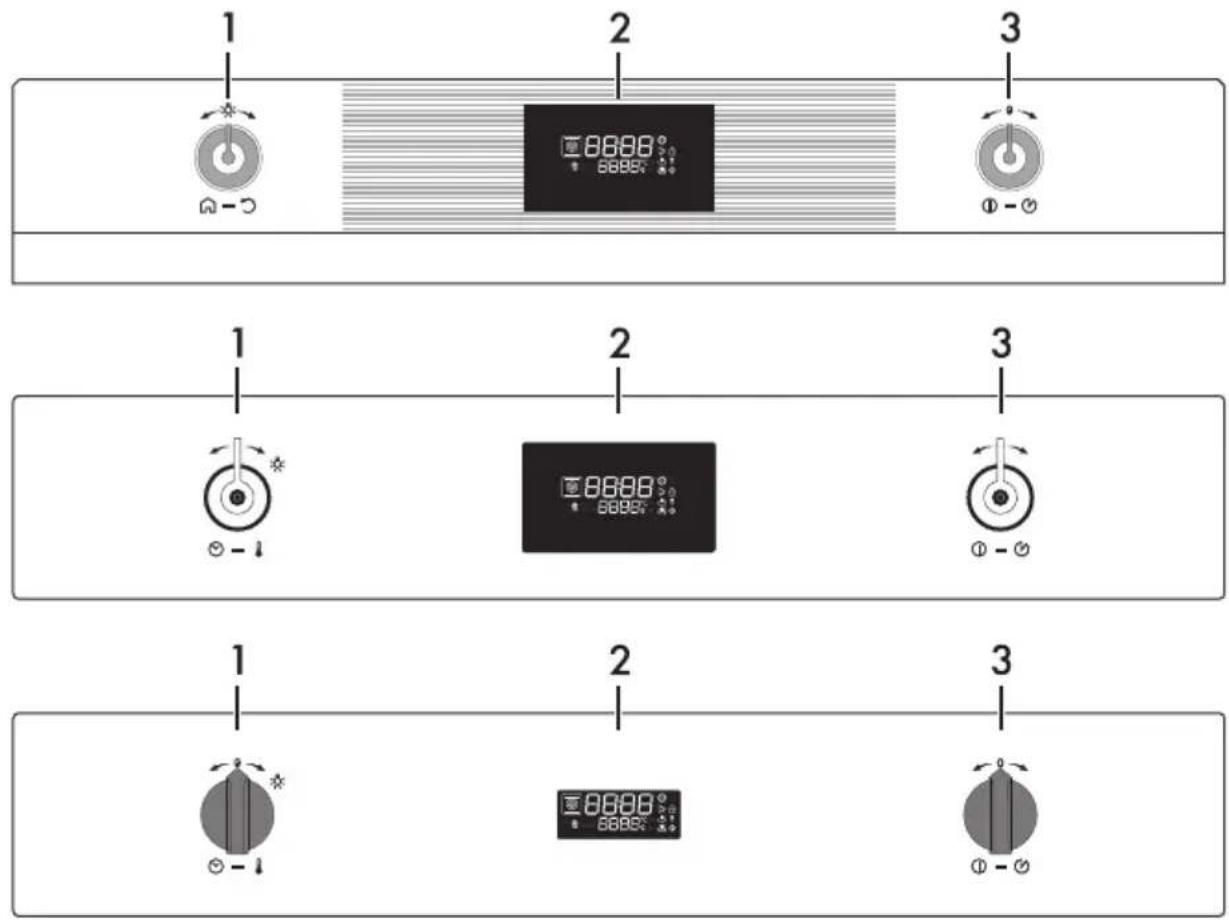
1 Programming knob
This knob can be used to select:
• The cooking temperature
• The duration of a function
• Programmed cooking procedures
- The current time
- The turning on or off of the light inside the appliance.
2 Display
Displays the current time, the selected cooking temperature, power and function and any time set.
3 Function knob
This knob can be used to:
- Turn the appliance on and off
- Select a function
• Temporarily start or stop a function.

Press and hold the function knob down for around 3 seconds to immediately terminate any cooking operation.
2.3 Other parts
Interior lighting
The appliance's interior lighting comes on:
- When the door is opened (on some models only).
- When any function is selected, apart
from



functions (where present)
- When no function is selected, turn the programming knob briefly to the right to activate or deactivate internal lighting.

In order to save energy, the light turns off after a minute at the start of cooking (this function can be deactivated via the secondary menu).

When the door is open, it is not possible to turn off the interior lighting (on some models only).
Shelves
The appliance features shelves to position trays and racks at different heights. The insertion heights are indicated from the bottom upwards (see 2.1 General Description).
Cooling fan and
natural_image
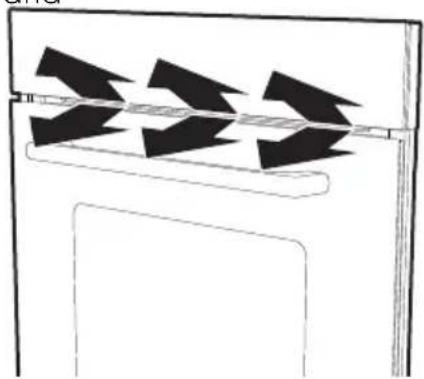
Diagram of a door with three black arrows indicating directional flow or force, no text or symbols presentThe fan cools the appliance and comes into operation during cooking.
The fan causes a steady outflow of air from above the door which may continue for a brief period of time even after the appliance has been turned off.
2.4 Available accessories

Some models are not provided with all accessories.
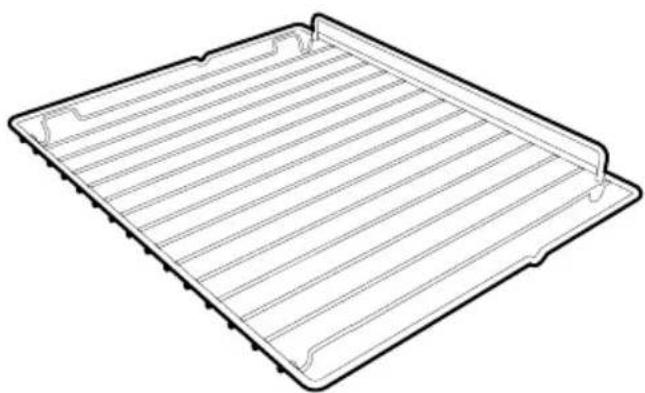
Rack
natural_image
Line drawing of a rectangular metal tray with horizontal slats and mounting holes (no text or symbols)Useful for supporting containers with food during cooking.
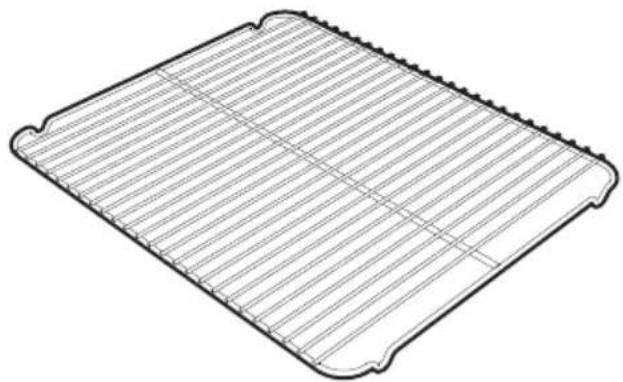
Tray rack (on some models only)
natural_image
Technical line drawing of a rectangular grid-patterned object with no text or symbolsTo be placed over the top of the oven tray; for cooking foods which may drip.
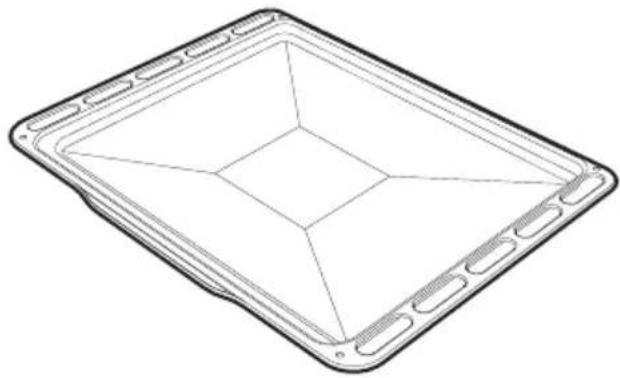
Oven tray (on some models only)
natural_image
Line drawing of a rectangular tray with internal geometric patterns (no text or symbols)
Useful for collecting fat from foods placed on the rack above and for cooking sweets, biscuits, etc.
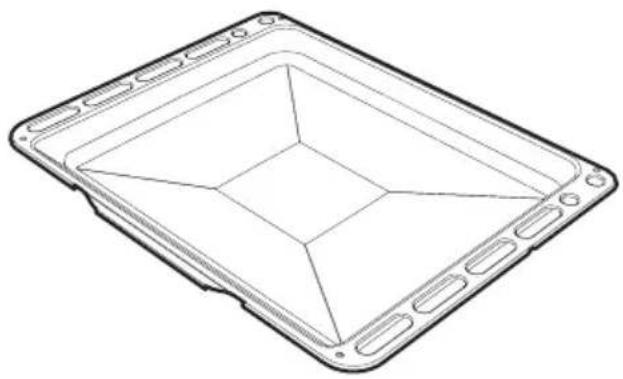
Deep tray
natural_image
Line drawing of a square electronic component with internal grid structure (no text or symbols)Useful for collecting fat from foods placed on the rack above and for cooking pies, pizzas and baked desserts.
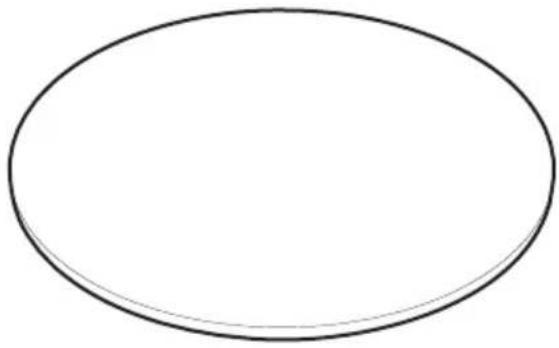
Pizza stone (on some models only)
natural_image
Simple oval shape with no text, numbers, or symbolsSpecially designed for cooking pizza and similar dishes.
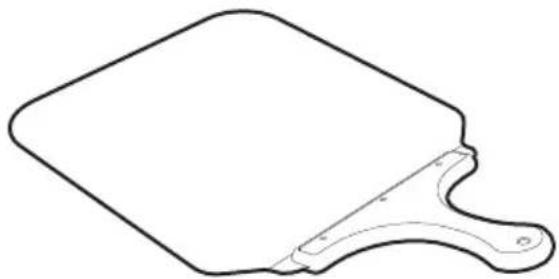
Pizza spatula (on some models only)
natural_image
Simple line drawing of a flat plate with a handle, no text or symbols presentFor easily placing the pizza on the pizza stone.
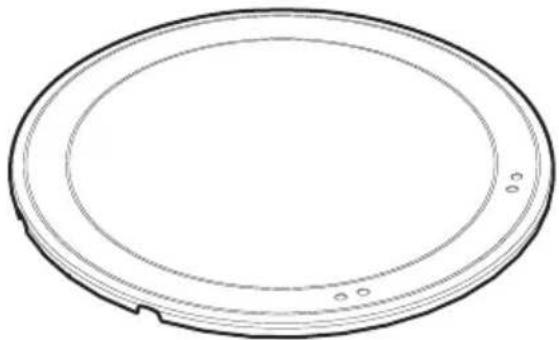
Pizza stone cover (on some models only)
natural_image
Simple line drawing of a circular mechanical component with concentric rings and a small notch at the bottom (no text or symbols)To be placed in the housing on the base of the oven in place of the pizza stone when this is not being used.
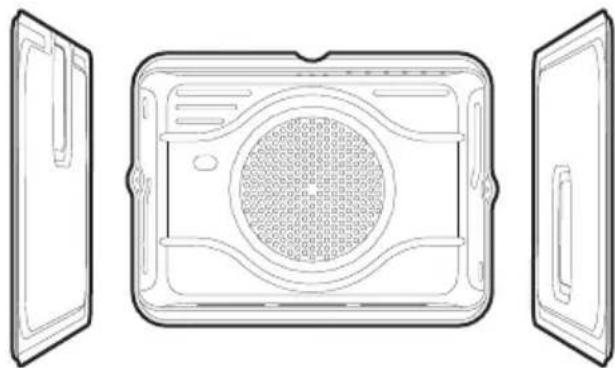
Self-cleaning panels (on some models only)
natural_image
Line drawing of a microwave oven with open doors and internal grid pattern (no text or symbols)Useful for absorbing small grease residues.

The appliance accessories intended to come into contact with food are made of materials that comply with the provisions of current legislation.

Original supplied and optional accessories can be requested to Authorised Assistance Centres. Use only original accessories supplied by the manufacturer.
3 Use
3.1 Instructions

High temperature inside the oven during use Danger of burns
- Keep the oven door closed during cooking.
- Protect your hands by wearing oven gloves when moving food inside the oven.
- Do not touch the heating elements inside the oven.
- Do not pour water directly onto very hot trays.
- Do not allow children to approach the appliance when it is in operation.

Improper use Risk of damage to surfaces
- Do not cover the bottom of the oven cavity with aluminium or tin foil sheets.
- If you wish to use greaseproof paper, place it so that it will not interfere with the hot air circulation inside the oven.
- Do not place pans or trays directly on the bottom of the oven cavity.
- Do not pour water directly onto very hot trays.

High temperature inside the oven during use Danger of fire or explosion
- Do not spray any spray products near the appliance.
- Do not use or leave flammable materials near the appliance.
- Do not use plastic cookware or containers when cooking food.
- Do not put sealed tins or containers in the oven.
- Do not leave the appliance unattended during cooking operations where fats or oils could be released.
- Remove all trays and racks which are not required during cooking.
3.2 First use
- Remove any protective film from the outside or inside of the appliance, including accessories.
- Remove any labels (apart from the technical data plate) from the accessories and from the oven cavity.
- Remove and wash all the appliance accessories (see 4 Cleaning and maintenance).
- Heat the empty oven at the maximum temperature to burn off any residues left by the manufacturing process.
3.3 Using the accessories
Racks and trays
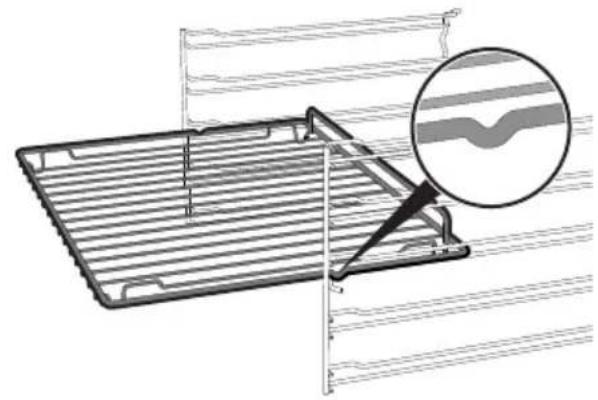
Racks and trays have to be inserted into the side guides until they come to a complete stop.
- The mechanical safety locks that prevent the rack from being taken out accidentally must face downwards and towards the back of the oven cavity.
natural_image
Technical diagram of a mechanical assembly with a magnified inset showing a wavy line feature (no text or symbols present)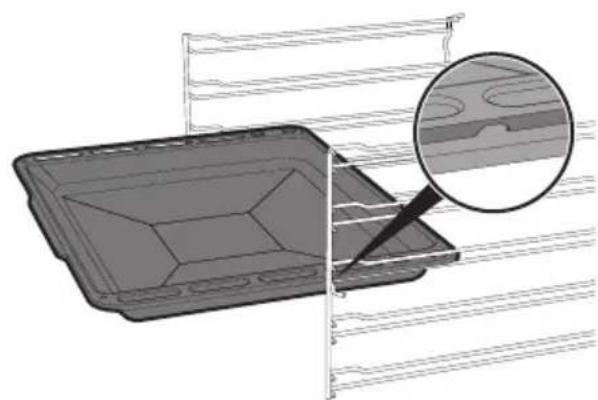
natural_image
3D diagram of a rectangular container with internal compartments and a magnified inset showing internal structure (no text or symbols)
Gently insert racks and trays into the oven until they come to a stop.

Clean the trays before using them for the first time to remove any residues left by the manufacturing process.
Tray rack (on some models only)
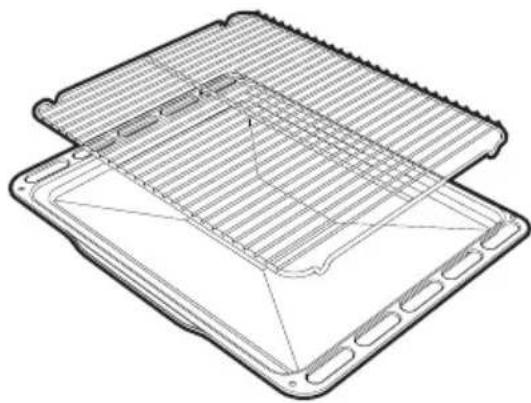
The tray rack has to be inserted into the tray. In this way fat can be collected separately from the food which is being cooked.
natural_image
Technical line drawing of a mechanical component with grid pattern and internal structure (no text or symbols)Cover and pizza stone (on some models only)

Improper use Danger of burns and damage to surfaces
- The stone stays hot for many minutes after cooking has ended. Ensure it is handled with due caution.
- Do not use the pizza stone other than as described, for example do not use it on gas or glass ceramic hobs or in ovens which are not designed for this purpose.
- If you like oil on your pizza, it is best to add it after removal from the oven since oil stains on the pizza stone are unsightly and may reduce its efficiency.
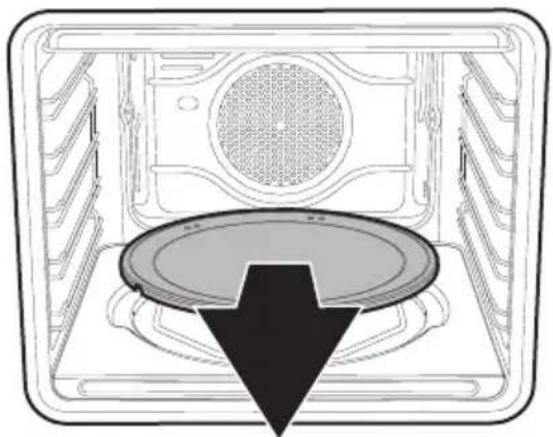
- If the pizza stone is not in use, remove it from the oven and cover the bottom of the oven with the cover provided.
With the appliance cold, remove the cover from the bottom and insert the pizza stone.
Make sure that the stone is inserted correctly in the recess provided.
For cooking, use the special pizza
function
natural_image
Diagram of a microwave oven interior showing ventilation duct and fan structure (no text or symbols)Pizza spatula (on some models only)
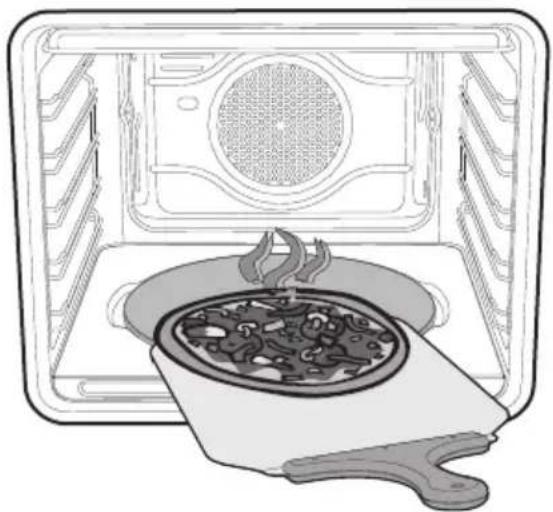
Always grip the pizza spatula by the handle when moving food to avoid the risk of burns. You are advised to dust the steel surface lightly with flour to make it easier to slide fresh products on and off, as they could stick to the steel due to their moisture content.
natural_image
Illustration of a microwave oven with a cooking pan inside, showing food and steam rising (no text or symbols)3.4 Using the oven
Switching on the oven
- Press the function knob to turn on the display.
- Turn the function knob to the right or left to select the required function.
- Press the programming knob.
- Turn the programming knob to set the temperature.
- Press the programming knob or wait 3 seconds.
- Press the function knob to start cooking.

Press and hold the function knob down for around 3 seconds to immediately terminate any cooking operation.
Preheating stage
Cooking itself is preceded by a preheating stage, which allows the appliance to heat to the cooking temperature more quickly.
The light flashes to indicate that this stage is in progress.
When the preheating stage is over, the indicator light will remain lit steadily and a buzzer will sound to indicate that the food can be placed inside the oven.

Cooking can be interrupted at any time by pressing and holding the function knob down for at least 3 seconds.
List of cooking functions

Eco
This function is particularly suitable for cooking on a single shelf with low energy consumption.
Ideal for cooking meat, fish and vegetables. It is not recommended for leavened foods.
To obtain maximum energy savings and reduce cooking times, it is recommended to place food in the oven without preheating.

When using the ECO function, avoid opening the door during cooking.

Cooking (and preheating) times are longer with the ECO function.

Static (on some models only)
As the heat comes from above and below at the same time, this system is particularly suitable for certain types of food. Traditional cooking, also known as static cooking, is suitable for cooking just one dish at a time. Perfect for all types of roasts, bread and cakes, and in any case, particularly suitable for fatty meats such as goose and duck.
Grill
The heat coming from the grill element gives perfect grilling results above all for thin and medium thickness meat and, in combination with the rotisserie (where fitted), gives the food an even browning at the end of cooking. Perfect for sausages, spare ribs and bacon. This function enables large quantities of food, particularly meat, to be grilled evenly.
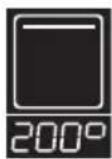
Small grill (on some models only)
Using only the heat released from the central element, this function allows you to grill small portions of meat and fish for making kebabs, toasted sandwiches and any types of grilled vegetable side dishes.

Lower element (on some models only)
The heat coming just from the bottom allows you to complete the cooking of foods that require a higher bottom temperature, without affecting their browning. Perfect for cakes, pies, tarts and pizzas.

Fan assisted (on some models only)
The operation of the fan, combined with traditional cooking, ensures consistent cooking even with complex recipes. Perfect for biscuits and cakes, even when simultaneously cooked on several levels. (For multiple-level cooking, we recommend using the 2^nd and 4^th shelves).
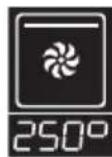
Fan with grill
The air produced by the fan softens the strong heatwave generated by the grill, grilling perfectly even very thick foods. Perfect for large cuts of meat (e.g. shin of pork).
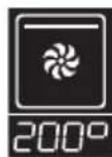
Fan-assisted small grill (on some models only)
Through the combined action of the fan and the heat of the central element only, this function is perfect for rapid cooking and cooking au gratin of small quantities of food (particularly meats), by bringing together the dietary advantages of the grill and the even cooking of the fan.

Fan + lower element (on some models only)
The combination of the fan with just the lower heating element allows cooking to be completed more rapidly. This system is recommended for sterilising or for finishing off the cooking of foods which are already well-cooked on the surface, but not inside, which therefore need a little more heat. Perfect for any type of food.


Turbo (on some models only)
The combination of fan assisted cooking and traditional cooking allows different foods to be cooked on several levels extremely quickly and efficiently, without odours and flavours mingling. Perfect for large volumes that call for intense cooking. (For multiple-level cooking, we recommend using the 1 ^st and 4 ^th shelves.)

Circulaire (on some models only)
The combination of the fan and the circulaire heating element (incorporated in the rear of the oven) allows you to cook different foods on several levels, as long as they need the same temperatures and same type of cooking. Hot air circulation ensures instant and even distribution of heat. It will be possible, for instance, to cook fish, vegetables and biscuits simultaneously (on different levels) without odours and flavours mingling.

Pizza (on some models only)
The operation of the fan, combined with the grill and the lower heating element, ensures uniform cooking even with complex recipes. Perfect not just for pizzas, but also for biscuits and cakes.
Display
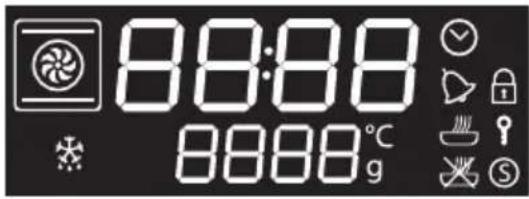
text_image
88:88 8888°C 9
Clock indicator light

Minute minder timer indicator light

Programmed cooking indicator light

Timed cooking indicator light

Door lock indicator light (pyrolytic models only)

Child lock indicator light

Showroom indicator light
Operating modes
Stand-by: When no function is selected, the display shows the current time.
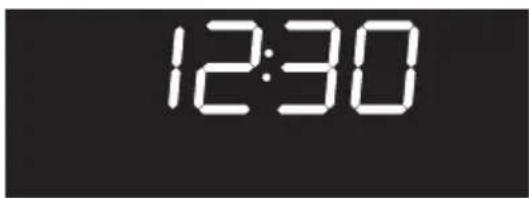
text_image
12:30ON: When a function is activated, the display shows the parameters set such as temperature, duration and temperature reached.
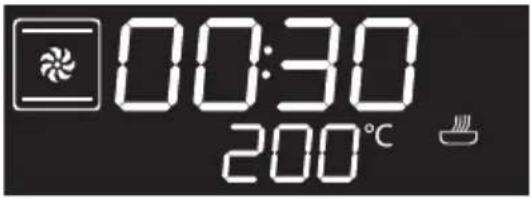
text_image
00:30 200°C
Each time the programming knob is pressed during a function, the parameters will be cycled through in the following order.

Temperature

Minute minder timer duration

Programmed cooking duration

Timed cooking duration

Current time display
In all states it is possible to modify the value by turning the programming knob to the left or right. Keep the knob turned to produce a faster increase or decrease.
Setting the time
On the first use, or after a power failure, the message will flash on the
appliance's display. To be able to start any cooking function, the current time must be set.
- Turn the programming knob to set the displayed hour (keep the knob turned to produce a faster increase or decrease).
- Press the programming knob.
- Turn the programming knob to set the minutes (keep the knob turned to produce a faster increase or decrease).
- Press the programming knob to complete the setting.

It may become necessary to change the current time, for example for daylight saving time. From the stand-by position, keep the programming knob turned to the right or left until the hours flash. It is not possible to change the time if the oven is ON.
Minute minder

This function only activates the buzzer, without stopping cooking.

The minute minder can be activated both during cooking and when the appliance is in standby.
- Press the programming knob once (twice if cooking is already in progress). The
display shows 0000 and the indicator light flashes.
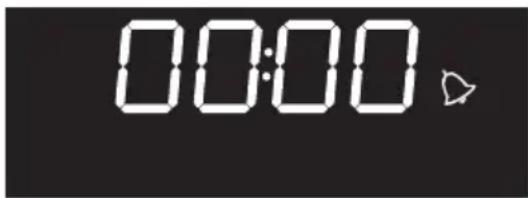
text_image
00:00- Turn the programming knob to set the duration (from 1 minute to 4 hours). After
a few seconds, the indicator light stops flashing and the countdown s

- Wait for the buzzer to indicate that the
time has finished. The indicator light flashes.

- Turn the programming knob to select another minute minder. Or else press the programming knob to stop the buzzer.
Timed cooking
Timed cooking is the function which allows a cooking operation to be started and then ended after a specific length of time set by the user.

Activation of timed cooking cancels any minute minder timer which may previously have been set.
- After selecting a cooking function and temperature, press the programming knob three times. The display shows
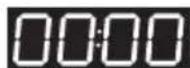
and the indicator light

flashes.
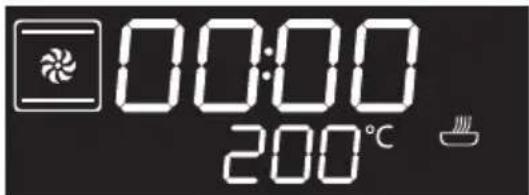
text_image
00:00 200°C- Turn the programming knob to set the cooking time (from 00:01 to 13:00). Keep the knob turned to produce a faster increase or decrease.
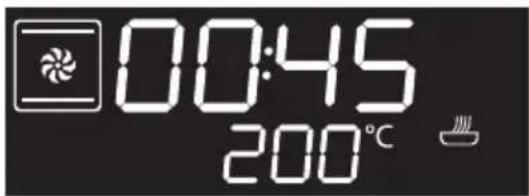
text_image
00:45 200°C-
A few seconds after the required duration is set, the indicator light stops flashing. Press the function knob to start timed cooking.
-
At the end of cooking, STOP flashes on the display and a buzzer will sound that can be deactivated by opening the door or pressing/rotating one of the two knobs.
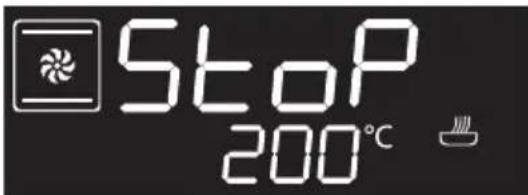
text_image
Stop 200°C
To select a further timed cooking, turn the programming knob right or left again.

To extend the cooking time manually, press the programming knob again. The appliance will resume its normal operation with the previously selected cooking settings.

When cooking has finished, it is possible to select a new function by rotating the function knob.

Press and hold the function knob down to switch off the appliance.
Programmed cooking

Programmed cooking is the function which allows a cooking operation to be stopped automatically at an established time depending on the time set by the user, after which the oven will switch off automatically.
- After selecting a cooking function and temperature, press the programming knob three times. The display shows
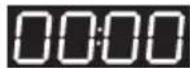
and the indicator light

flashes.
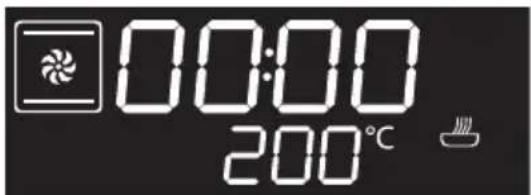
text_image
00:00 200°C- Turn the knob to set the cooking time (from 00:01 to 13:00). Keep the knob turned for a fast increase or decrease.
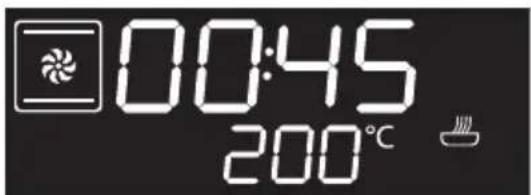
text_image
00:45 200°C-
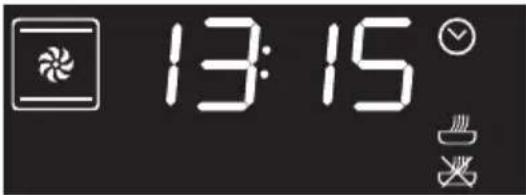
Press the programming knob a fourth time. The indicator light shes. Turn the knob to set the cooking end time.
-
After a few seconds the indicator lights

and stop flashing. The iance waits for the set start time.
text_image
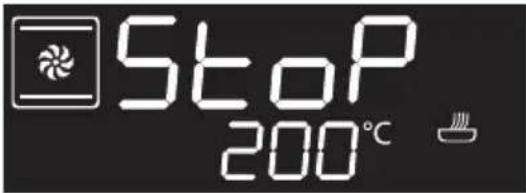
13:15- At the end of the cooking, STOP flashes on the display and a buzzer will sound that can be deactivated by opening the door or pressing/rotating one of the two knobs.
text_image
Stop 200°C
To extend the cooking time manually, press the programming knob again. The appliance will resume its normal operation with the previously selected cooking settings.

Press and hold the function knob down to switch off the appliance.

For safety reasons, it is not possible to set the end of cooking time by itself without setting the cooking duration.
3.5 Cooking advice
General advice
- Use a fan assisted function to achieve consistent cooking at several levels.
- It is not possible to shorten cooking times by increasing the temperature (the food could be overcooked on the outside and undercooked on the inside).
Advice for cooking meat
- Cooking times vary according to the thickness and quality of the food and to consumer taste.
- Use a meat thermometer when roasting meat, or simply press on the roast with a spoon. If it is hard, it is ready; If not, it needs another few minutes cooking.
Advice for cooking with the Grill and the Fan with grill
- Meat can be grilled even when it is put into the cold oven or into the preheated oven if you wish to change the effect of the cooking.
- With the Fan with grill function, we recommend that you preheat the oven before grilling.
• We recommend placing the food at the centre of the rack. - With the Grill function, we recommend that you set the temperature to the maximum value to optimise cooking.
Advice for cooking desserts/pastries and biscuits
- Use dark metal moulds: They help to absorb the heat better.
-
The temperature and the cooking time depend on the quality and consistency of the dough.
-
To check whether the dessert is cooked right through: At the end of the cooking time, put a toothpick into the highest point of the dessert. If the dough does not stick to the toothpick, the dessert is cooked.
- If the dessert collapses when it comes out of the oven, on the next occasion reduce the set temperature by about 10^ C, selecting a longer cooking time if necessary.
Advice for defrosting and proving
- Place frozen foods without their packaging in a lidless container on the first shelf of the oven.
- Avoid overlapping the food.
- To defrost meat, use the rack placed on the second level and a tray on the first level. In this way, the liquid from the defrosting food drains away from the food.
- The most delicate parts can be covered with aluminium foil.
- For successful proving, a container of water should be placed in the bottom of the oven.
To save energy
- Stop cooking a few minutes before the time normally used. Cooking will continue for the remaining minutes with the heat which has accumulated inside the oven.
- Reduce any opening of the door to a minimum to avoid heat dispersal.
- Keep the inside of the appliance clean at all times.
- (Where fitted) When it is not being used, remove the pizza stone and put the cover back in its slot.
Cooking information table
| Food | Weight (Kg) | Function Shelf | Temperature (°C) | Time (minutes) | |
| Lasagne | 3 - 4 Static 1 220 - 230 45 - 50 | ||||
| Pasta bake | 3 - 4 Static 1 220 - 230 45 - 50 | ||||
| Roasted veal | 2 Turbo/Fan assisted 2 180 - 190 90 - 100 | ||||
| Pork loin | 2 Turbo/Fan assisted 2 180 - 190 70 - 80 | ||||
| Sausages | 1.5 Fan with grill 4 280 15 | ||||
| Roast beef | 1 Turbo/Fan assisted 2 200 40 - 45 | ||||
| Roast rabbit | 1.5 Circulaire/Fan assisted 2 180 - 190 70 - 80 | ||||
| Turkey breast | 3 Turbo/Fan assisted 2 180 - 190 | 110 - 120 | |||
| Roast pork neck | 2 - 3 Turbo/Fan assisted 2 180 - 190 | 170 - 180 | |||
| Roast chicken | 1.2 | Turbo/Fan assisted 2 180 - 190 65 - 70 | |||
| 1^st surface | 2^nd surface | ||||
| Pork chops | 1.5 Fan with grill 4 280 | 15 5 | |||
| Spare ribs | 1.5 Fan with grill 4 280 | 10 | 10 | ||
| Bacon | 0.7 | Grill | 5 280 7 | 8 | |
| Pork fillet | 1.5 Fan with grill 4 280 | 10 5 | |||
| Beef fillet | 1 | Grill | 5 280 | 10 7 | |
| Salmon trout | 1.2 | Turbo/Fan assisted 2 | 150 - 160 35 - 40 | ||
| Monkfish | 1.5 | Turbo/Fan assisted 2 | 160 60 - 65 | ||
| Turbot | 1.5 | Turbo/Fan assisted 2 | 160 45 - 50 | ||
| Pizza | 1 Turbo/Fan assisted 2 280 | 8 - 9 | |||
| Bread | 1 | Circulaire/Fan assisted | 2 190 - 200 25 - 30 | ||
| Focaccia | 1 Turbo/Fan assisted 2 180 - 190 20 - 25 | ||||
| Bundt cake | 1 | Circulaire/Fan assisted | 2 160 55 - 60 | ||
| Tart | 1 | Circulaire/Fan assisted | 2 160 35 - 40 | ||
| Ricotta cake | 1 | Circulaire/Fan assisted | 2 160 - 170 55 - 60 | ||
| Jam tarts | 1 Turbo/Fan assisted 2 160 20 - 25 | ||||
| Paradise cake | 1.2 Circulaire/Fan assisted 2 160 55 - 60 | ||||
| Profiteroles | 1.2 | Turbo/Fan assisted 2 | 180 80 - 90 | ||
| Sponge cake | 1 | Circulaire/Fan assisted | 2 150 - 160 55 - 60 | ||
| Rice pudding | 1 Turbo/Fan assisted 2 160 55 - 60 | ||||
| Brioches | 0.6 Circulaire/Fan assisted 2 160 30 - 35 | ||||
The times indicated in the table do not include preheating times and are provided only as a guide.
3.6 Special functions
Defrost by time

This function allows you to defrost food on the basis of a selectable time.
- Place the food inside the oven.
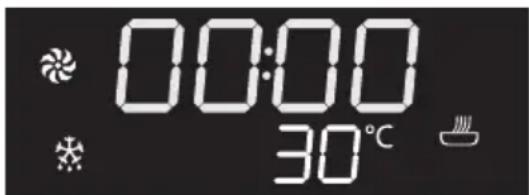
- Press and turn the function knob to select the defrost by time function marked by
the indicator light and the indicator
flashing.

text_image
00:00 30°C- Turn the programming knob to adjust the duration (from 1 minute to 13 hours).
- Press the programming knob to confirm the values entered.
- Press the function knob to start defrosting.
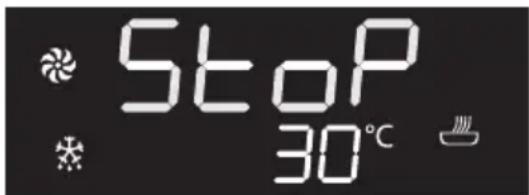
- At the end of the defrosting function, STOP flashes on the display and a buzzer will sound that can be deactivated by opening the door or pressing/rotating one of the two knobs.
text_image
Stop 30°CDefrost by weight

This function defrosts foods on the basis of the type and weight of the frozen product.
- Place the food inside the oven.
- Press and turn the function knob to select the defrost by weight function, marked by
the indicator light and . - Press the function knob to confirm.
- Turn the function knob to select the type of food to defrost.
- Press and turn the programming knob to select the weight (in grams) of the food to defrost.
- Press the function knob to confirm the parameters and start defrosting.
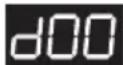
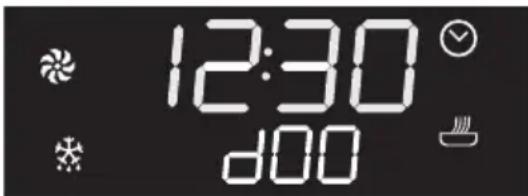
text_image
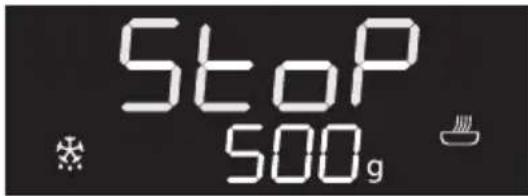
12:30 d00- At the end of the defrosting function, STOP flashes on the display and a buzzer will sound that can be deactivated by opening the door or pressing/rotating one of the two knobs.
text_image
Stop 500gPre-set parameters:
| dE Type | Weight (g) | Time (minutes) | |
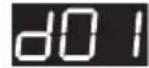 | Meat 500 105 | ||
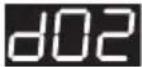 | Fish 400 40 | ||
 | Fruit 300 45 | ||
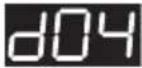 | Bread 300 20 | ||
Proving

For successful proving, a container of water should be placed in the bottom of the oven.
- Press and turn the function knob to select the proving function.
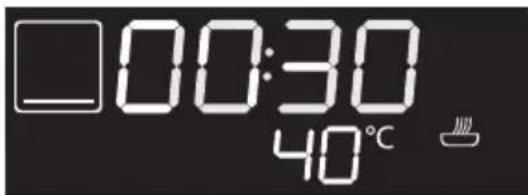
text_image
00:30 40°C-
Press the function knob to start the proving function.
-
While the function is in progress, it is possible to set a minute minder (see "Minute minder"), a proving duration

(see "Timed cooking") or delayed
proving e "Programmed cooking"). Press the programming knob to make the desired changes.

Unless otherwise set, the proving will have a maximum duration of 13 hours.

The light inside the oven will remain off during the proving function.
- When the proving function finishes a buzzer will sound; to stop the buzzer, press the function knob.

When using the proving function the temperature cannot be altered.
Sabbath (on some models only)

This function results in the appliance operating in a particular way:
• Cooking can proceed indefinitely, it is not possible to set any cooking duration.
- No preheating will be performed.
- The cooking temperature which can be selected varies between 60-100 °C.
- Oven light disabled, any operation such as opening the door (where present) or manual activation with the knob will not activate the light.
- The internal fan remains turned off.
- Knob illumination and audible prompts remain disabled.

After activating the Sabbath function the settings cannot be altered.
Any action on the knobs will produce no effect; only the function knob remains active to allow you to return to the main menu.
- Press and turn the function knob to select the Sabbath function.

text_image
□5A66Z
- Press and turn the programming knob to select the required temperature (from 60^ C to 100^ C).
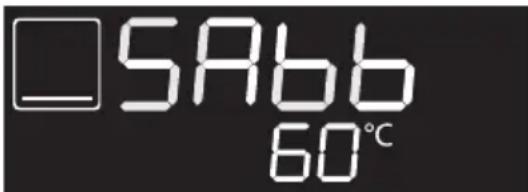
text_image
□5A66 60°C- Press the programming knob to confirm the parameters entered.
- Press the function knob to start the Sabbath function.
- To exit this function, press and hold the function knob down for at least 5 seconds.
3.7 Secondary menu
The appliance also has a drop-down secondary menu allowing the user to:
- Activate or deactivate the Child lock.
- Activate or deactivate Showroom mode (which disables all the heating elements so that only the control panel works).
- Activate or deactivate Eco-Logic mode.
- Activate or deactivate Eco-light mode.
With the appliance in Stand-by status
- Turn the programming knob to the right to activate the oven light.
- Press and hold the programming knob down for at least 5 seconds.
- Turn the programming knob right or left to change the setting status (ON/OFF).
- Press the programming knob to move to the next mode.
Child Lock mode: This mode allows the appliance to lock the controls automatically after one minute of normal operation without any intervention from the user.
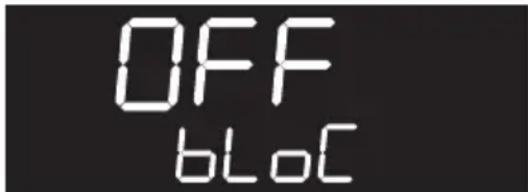
text_image
OFF bLOC
text_image
on blocDuring normal operation it is indicated by the indicator light coming on.
To temporarily release the lock during cooking, hold the programming knob down for 5 seconds. One minute after the last setting the lock will become active again.

Touching or varying the position of the temperature and function knobs, the display will show
bloC for two seconds.

It is still possible to turn the appliance off instantaneously by pressing and holding the function knob down for 3 seconds when in child lock mode.
Showroom mode (for exhibitors only):
This mode allows the appliance to deactivate all heating elements, while keeping the control panel active.

To use the appliance normally, set this mode to OFF.

If the mode is active, the indicator light lights up on the display.
Eco-logic mode: This mode allows the appliance to limit the power used.
Suitable for simultaneous use with further home appliances.
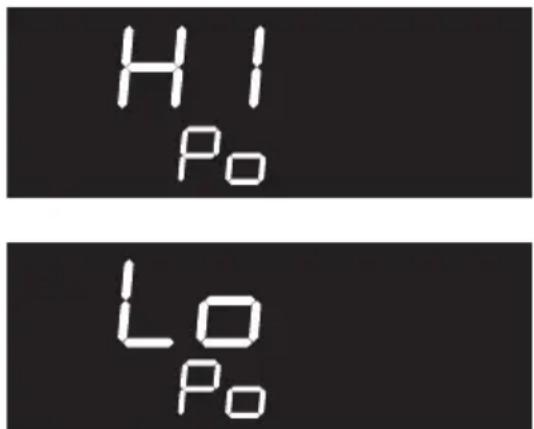
HI: normal power.
LO: low power.

Activating eco-logic mode means that preheating and cooking times may be extended.
Keep warm
This mode allows the appliance to keep cooked food warm (at low temperatures) after cooking finishes with a cooking cycle for which a duration has been set (if this is not manually interrupted), without altering the taste and smell obtained during cooking.
OFF
Ho Id
on
Ho Id
To use the appliance normally, set this mode to OFF
Eco-light mode
For greater energy savings, the light is automatically deactivated one minute from the start of cooking.
on
LIGH
OFF
LIGH
To stop the appliance from automatically deactivating the light after one minute, set this mode to OFF.

The manual on/off control is always available with both settings by turning the programming knob to the right.
Cleaning and maintenance
4 Cleaning and maintenance
4.1 Instructions

Improper use Risk of damage to surfaces
- Do not use steam jets to clean the appliance.
- Do not use cleaning products containing chlorine, ammonia or bleach on parts made of steel or that have metallic surface finishes (e.g. anodizing, nickel- or chromium-plating).
- Do not use abrasive or corrosive detergents (e.g. scouring powders, stain removers and metallic sponges) on glass parts.
- Do not use rough or abrasive materials or sharp metal scrapers.
4.2 Cleaning the appliance

We recommend the use of cleaning products distributed by the manufacturer.
Recommendations for cleaning the oven cavity
In order to keep your oven in the best possible condition, clean it regularly after letting it cool down.
Avoid letting food residue dry inside the oven cavity, as this could damage the enamel.
Take out all removable parts before cleaning.
For easier cleaning, we recommend removing:
- The door
• The rack/tray support frames
• the seal (excluding pyrolytic models).

In the event you are using specific cleaning products, we recommend running the oven at maximum temperature for 15-20 minutes in order to eliminate any residue.
4.3 Removing the door
For easier cleaning it is recommended to remove the door and place it on a tea towel.
To remove the door proceed as follows:
- Open the door completely and insert two pins into the holes on the hinges indicated in the figure.
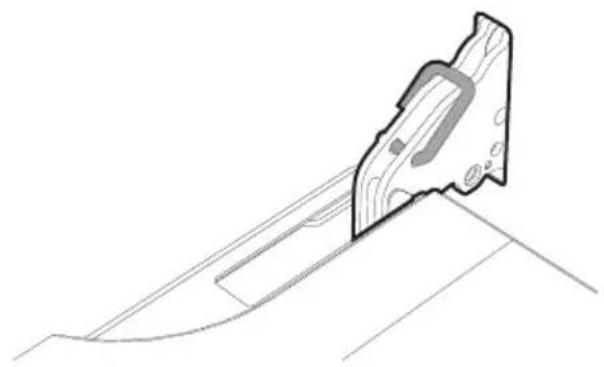
natural_image
Technical line drawing of a mechanical component or bracket assembly (no text or symbols)Cleaning and maintenance
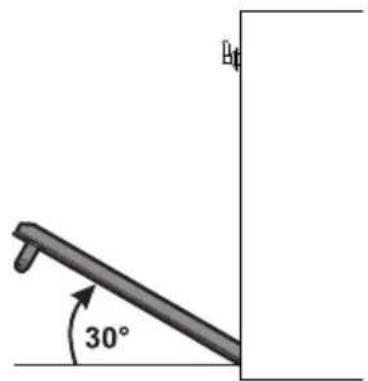
- Grasp the door on both sides with both hands, lift it forming an angle of around 30^ and remove it.
text_image
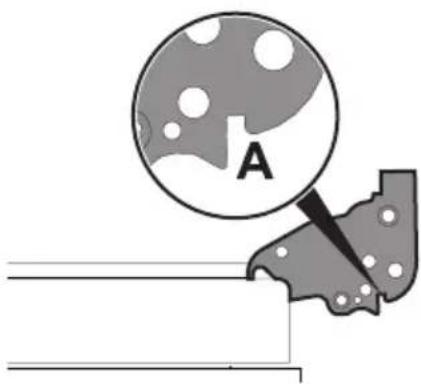
30°- To reassemble the door, put the hinges in the relevant slots in the oven, making sure that grooved sections A are resting completely in the slots. Lower the door and once it is in place remove the pins from the holes in the hinges.
natural_image
Diagram showing a magnified view of a circular object labeled 'A' with a shaded region and dotted pattern, partially overlaid on a stepped surface (no text or symbols)4.4 Cleaning the door glazing
The glass in the door should always be kept thoroughly clean. Use absorbent kitchen roll. In case of stubborn dirt, wash with a damp sponge and an ordinary detergent.
Removing the internal glass panes
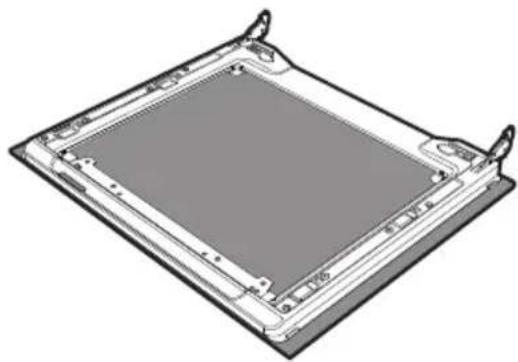
For easier cleaning the internal glass panes of the door can be removed.
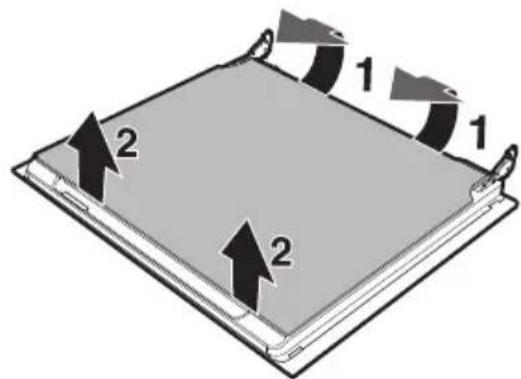
- Remove the internal glass pane by pulling the rear part gently upwards, following the movement indicated by the arrows (1).
- Then, pull the front part upwards (2). This way, the 4 pins attached to the glass detach from their housings in the oven door.
text_image
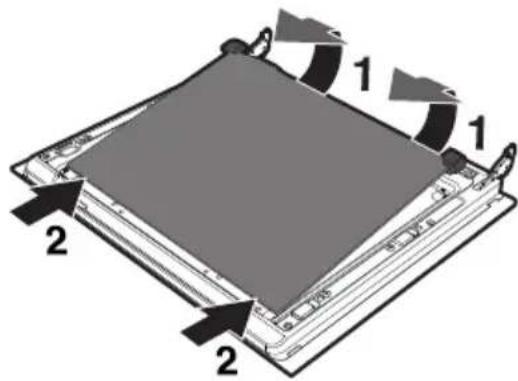
1 1 2 2- Some models have an intermediate glass pane. Remove the intermediate glass pane by lifting it upwards.
text_image
1 1 2 2Cleaning and maintenance
- Clean the external glass pane and the panes removed previously. Use absorbent kitchen roll. In case of stubborn dirt, wash with a damp sponge and neutral detergent.
natural_image
Technical line drawing of a rectangular electronic component with mounting brackets (no text or symbols)-
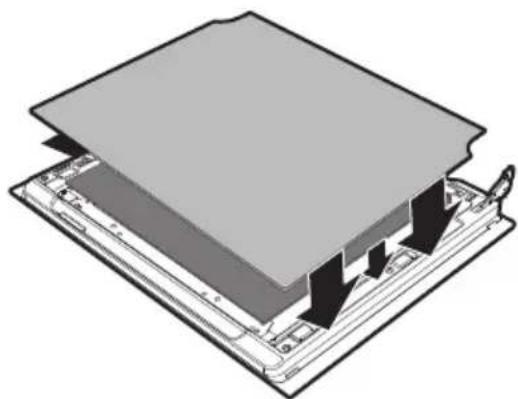
Refit the panes in the reverse order in which they were removed.
-
Reposition the internal glass pane. Take care to centre and insert the 4 pins into their housings in the oven door by applying slight pressure.
natural_image
3D diagram of a computer monitor with an open lid and internal components (no text or symbols)Removing rack/tray support frames
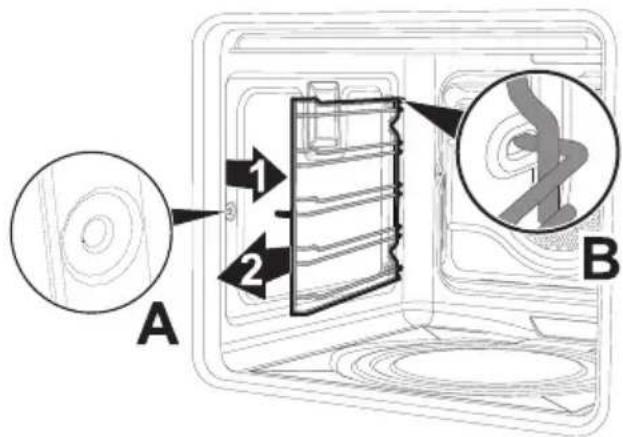
Removing the rack/tray support frames enables the sides to be cleaned more easily. This operation should be performed each time the automatic cleaning cycle is used (on some models only).
To remove the rack/tray support frames:
-
Pull the frame towards the inside of the oven cavity to unhook it from groove A.
-
Then slide it out of the seats at the back B.
-
When cleaning is complete, repeat the above procedures to put the rack/tray support frames back in.
text_image
A 1 2 BCleaning and maintenance
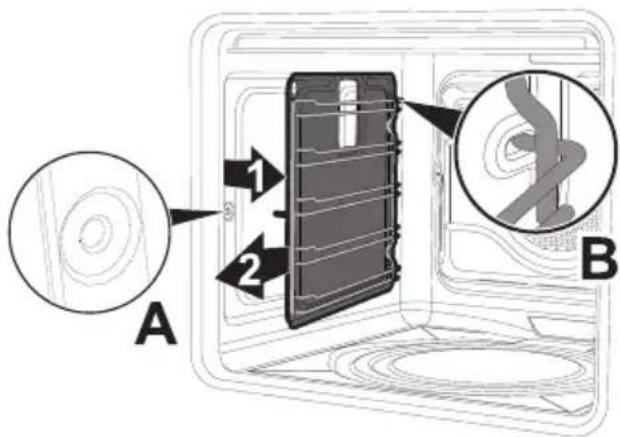
Removing self-cleaning panels and rack/tray support frames (fitted only to some models)
Removing the self-cleaning panels and the rack/tray support frames enables the sides to be cleaned more easily.
To remove the rack/tray support frames:
- Pull the frame towards the inside of the oven cavity to unhook it from groove A.
- Then slide it out of the seats at the back B.
- When cleaning is complete, repeat the above procedures to put the rack/tray support frames back in.
text_image
A 1 2 BRegeneration of self-cleaning panels (catalysis cycle) (on some models only)
The regeneration cycle of the self-cleaning panels is a cleaning method through heating suitable for removing small grease residues, not sugar-based ones.
- Clean the base and the upper guard first (where fitted) with a microfibre cloth soaked in water and neutral washing up liquid. Rinse thoroughly.
- Set a regeneration cycle by selecting a fan assisted function at the maximum temperature for one hour.
- If the panels are particularly dirty after the regeneration cycle, remove them and wash them with neutral washing up liquid. Rinse and dry them.
- Put the panels back in the oven and set a fan assisted function at a temperature of 180^ C for one hour, in order to ensure that they are thoroughly dry.

We recommend carrying out the self-cleaning panel regeneration cycle every 15 days.
Cleaning and maintenance
On pizza models only:
Remove in sequence the pizza stone cover (1) and the base (2) on which it is placed. The base has to be lifted a few millimetres, then pulled outwards.
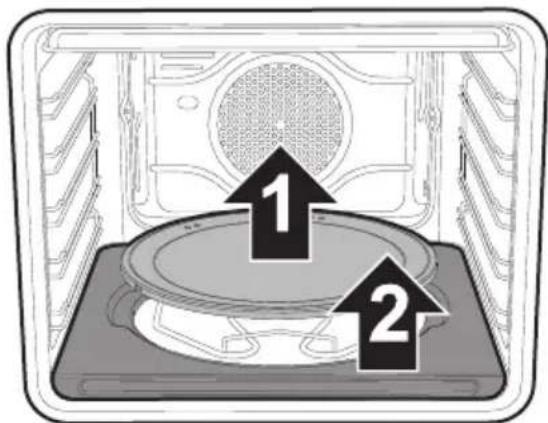
text_image
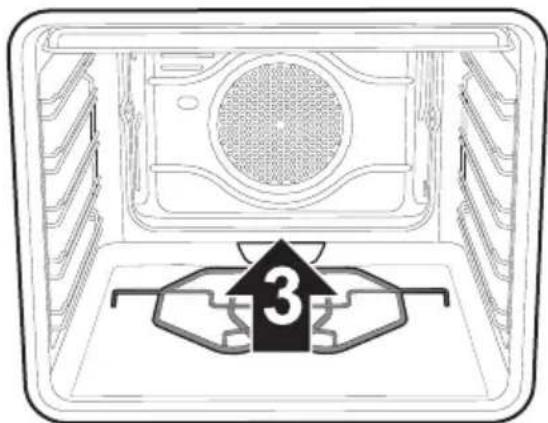
Diagram of a microwave oven with labeled parts, showing two numbered arrows pointing to the lid.Lift the end of the bottom heating element (3) a few centimetres and clean the oven base.
natural_image
Diagram of a microwave oven interior with a numbered arrow and label '3' (no text or symbols beyond the number)Put the pizza stone base back in place, pushing it in until it hits the back of the oven, and push it down so that the heating element plate is embedded into the base itself.
Cleaning the roof of the oven (on some models only - excluding pyrolytic models)

High temperature inside the oven during use Danger of burns
- The following operations must be performed only with the oven switched off and completely cool.
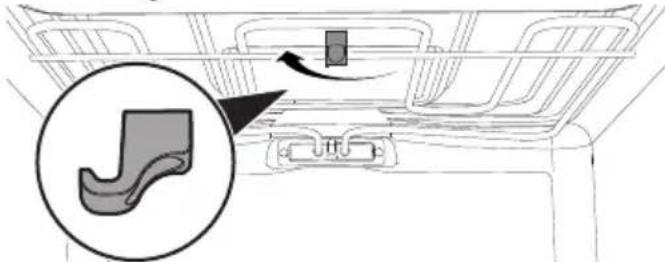
The appliance is equipped with a tilting grill element that allows for easy cleaning of the roof of the oven cavity.
- Free the upper heating element by gently lifting it and rotating its retaining latch by 90 degrees.
natural_image
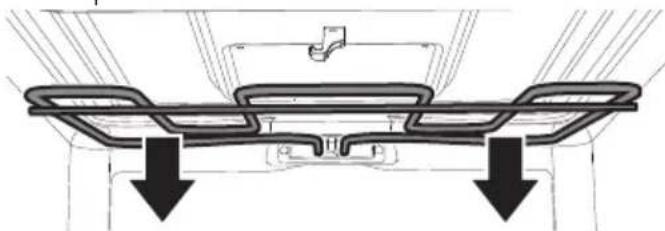
Diagram of a car backrest with a highlighted component and directional arrow (no text or symbols)- Gently lower the heating element until it stops.
natural_image
Diagram of a vehicle rearview structure with two downward arrows indicating bottom levels (no text or symbols present)
Improper use Risk of damage to the appliance
- Do not excessively flex the element during cleaning.
- When you have finished cleaning, place the heating element back in position and turn the retaining latch to lock it in place.
Cleaning and maintenance
4.5 Vapor Clean (on some models only)

Vapor Clean is an assisted cleaning procedure which facilitates the removal of dirt. Thanks to this process, it is possible to clean the inside of the oven very easily. The dirt residues are softened by the heat and water vapour for easier removal afterwards.

Improper use Risk of damage to surfaces
- Remove any food residues or large spills from previous cooking operations from the inside of the oven.
- Carry out assisted oven cleaning operations only when the oven is cold.
Preliminary operations
Before starting the Vapor Clean cycle:
- For Multifunction models: Completely remove all accessories from inside the oven.
- Remove the self-cleaning panels (see "Removing self-cleaning panels and rack/tray support frames (fitted only to some models)").
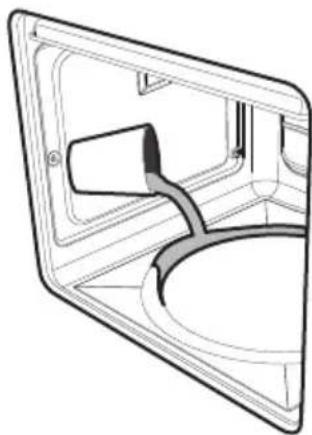
- Pour approx. 40 cc of water onto the floor of the oven. Make sure it does not overflow out of the cavity.
natural_image
Line drawing of a kitchen sink with a bucket and handle (no text or symbols)- For models with pizza stone: Remove all accessories from the inside of the oven, except the rack/tray support frames.

The cover should be placed in the housing on the base of the oven in place of the pizza stone.
- Place a tray on the first shelf.
- Pour approximately 40 cc of water into the tray. Make sure it does not overflow out of the tray.

natural_image
Diagram of a container with liquid being poured into a tank (no text or symbols)Cleaning and maintenance
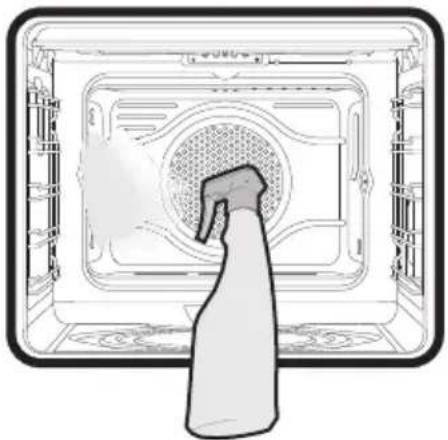
- For Multifunction models and models with pizza stone: Spray a water and washing up liquid solution inside the oven using a spray nozzle. Direct the spray against the side walls, upwards, downwards and towards the deflector.
natural_image
Illustration of a kitchen appliance with a spray gun inserted, showing internal components and no text or symbols.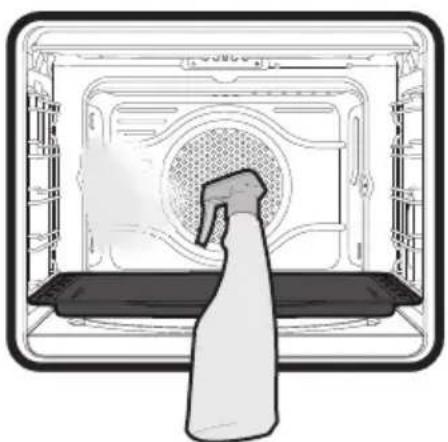
natural_image
Illustration of a kitchen oven with a spray gun inside, showing interior airflow and ventilation (no text or symbols)
We recommend spraying approx. 20 times at the most.
- Close the door.
- During the assisted cleaning cycle, wash the self-cleaning panels (where fitted), which were previously removed, separately in warm water and a small amount of detergent.
Vapor Clean cycle setting
If the internal temperature is greater than that required for the Vapor clean function, the cycle will be stopped immediately,
Stop will appear on the display and a buzzer will sound. Let the appliance cool down before activating Vapor Clean.
- Press and turn the function knob to select the Vapor Clean function.
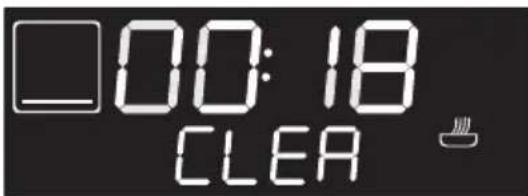
text_image
00:18 CLEAR- The duration of the Vapor Clean cycle will appear on the display.

The duration and temperature parameters cannot be changed by the user.
- Press the function knob to start the Vapor Clean function.
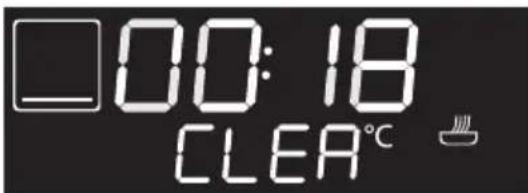
text_image
00:18 CLEA°C- At the end of the Vapor Clean function, STOP flashes on the display and a buzzer will sound that can be deactivated by opening the door or pressing/rotating one of the two knobs.
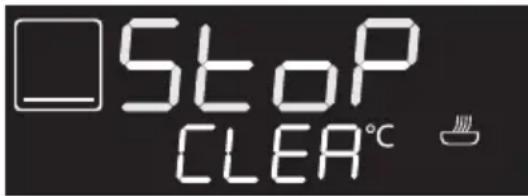
text_image
Stop CLEAR°CSetting timed Vapor Clean
It is possible to program the Vapor Clean start time, like any cooking function.
- After selecting the Vapor Clean function, press the programming knob. The display will show the current time and the temperature, and the light will come on.
- Turn the programming knob to set the time you wish Vapor Clean to finish.
- Press the programming knob to confirm the values entered. The 📋, 📊, and
indicator lights turn on steadily and the appliance then waits for the set start time to begin the Vapor Clean cycle.
End of Vapor Clean
- Open the door and wipe away the less stubborn dirt with a microfibre cloth.
- Use a non-scratch sponge with brass filaments on hard to remove deposits.
- In case of grease residues use specific oven cleaning products.
- Remove the residual water inside the oven.
-
Where fitted, reposition the self-cleaning panels and the rack/tray support frames.
For greater hygiene and to avoid foods taking on unpleasant odours: -
We recommend drying the inside of the oven with a fan assisted function at 160^ for around 10 minutes.
- Where the self-cleaning panels are fitted, we recommend drying the inside of the oven with a simultaneous catalysis cycle "Regeneration of self-cleaning panels (catalysis cycle) (on some models only)".

We recommend wearing rubber gloves for these operations.

We recommend removing the door in order to make the manual cleaning of the parts that are difficult to reach easier.
Cleaning and maintenance
4.6 Pyrolytic (on some models only)

Pyrolytic cleaning is an automatic high-temperature cleaning procedure which causes dirt to dissolve. Thanks to this process, it is possible to clean the inside of the oven very easily.

Improper use Risk of damage to surfaces
- Remove any food residues or large spills from previous cooking operations from the inside of the oven.
- Switch off the burners or electric hot plates of the hob installed above the oven.
Preliminary operations
Before starting the pyrolytic cycle:
- Clean the internal glass pane following the usual cleaning instructions.
- For very stubborn encrustations spray an oven cleaning product onto the glass (read the warnings on the product); leave for 60 minutes, then rinse and dry the glass using kitchen roll or a microfibre cloth.
- Completely remove all accessories from inside the oven.
- Remove the rack/tray support frames.
- Close the door.
Pyrolytic function setting
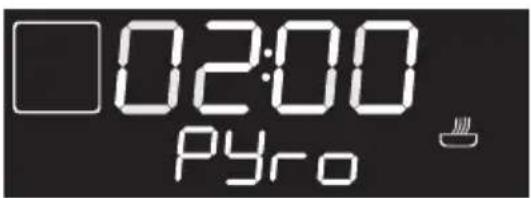
- Press and turn the function knob to select the Eco Pyrolytic or Pyrolytic function.
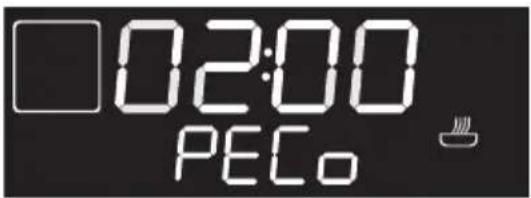
text_image
02:00 PECo
text_image
02:00 Pyro- The duration of the Pyrolytic cycle will appear on the display.
- Press and turn the programming knob to set the Pyrolytic cycle duration from a minimum of 2 hours to a maximum of 3 hours (except for the PECO whose duration is 2 hours).
- Press the programming knob to confirm the values entered.
- Press the function knob to start the Pyrolytic cycle.

Recommended pyrolytic cycle duration:
• Light dirt: 2 hours.
• Medium dirt: 2 ½ hours.
• Heavy dirt: 3 hours.
Pyrolytic cycle
- Two minutes after the Pyrolytic cycle starts, the indicator light comes on to indicate that the door is locked by a device that prevents the door from being opened.

It is not possible to select any function once the door lock device has been activated.
- At the end of the Pyrolytic function, STOP flashes on the display and a buzzer will sound that can be deactivated by opening the door or pressing/rotating one of the two knobs.

text_image
Stop- The door remains locked until the temperature inside the oven returns to a safe level. Wait for the oven to cool down (the indicator light turn off) and collect the residue deposited inside the oven with a damp microfibre cloth.

During the first Pyrolytic cycle, unpleasant odours may occur due to the normal evaporation of oily manufacturing substances. This is an absolutely normal phenomenon which disappears after the first pyrolytic cycle.

During the pyrolytic cycle the fans produce a more intense level of noise due to a greater rotation speed. This is an absolutely normal operation, intended to provide more effective heat dispersal. At the end of the pyrolytic cycle, the fans will continue to operate for long enough to avoid overheating the walls of adjacent units and the front of the oven.

If the pyrolytic cycle gives unsatisfactory results at minimum duration, it is recommended to set a longer time for subsequent cleaning cycles.
Cleaning and maintenance
Setting of a programmed Pyrolytic cycle
It is possible to program the pyrolytic cycle start time like all other cooking functions.
-
After selecting the Pyrolytic function and setting the duration (except for Eco Pyrolytic), press the programming knob. The display will show the current time and the temperature, and the indicator light will come on.
-
Turn the programming knob to set the time you wish the Pyrolytic cycle to finish.
-
Press the programming knob to confirm the values entered. The 📋, 📋d
indicator lights turn on steadily and the appliance then waits for the set start time to begin the Pyrolytic cycle.

It is not possible to select any function once the door lock device has been activated. It remains possible, however, to switch off the appliance using the specific controls.
4.7 Extraordinary maintenance
Removing and installing the door seal (not on pyrolytic models)
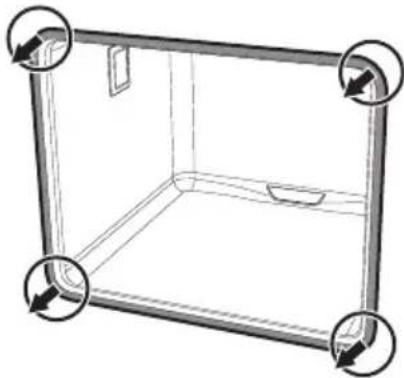
To remove the seal:
- Unhook the clips in the 4 corners then pull the seal outwards.
natural_image
Simple line drawing of a rectangular frame with four corner handles and directional arrows indicating rotation (no text or symbols)To refit the seal:
- Hook the clips in the 4 corners onto the seal.
Seal maintenance tips
The seal should be soft and elastic.
- To keep the seal clean, use a non-abrasive sponge and wash with lukewarm water.
Cleaning and maintenance
Replacing the internal light bulb

Live parts Danger of electrocution
- Unplug the appliance.
- Completely remove all accessories from inside the oven.
- Remove the rack/tray support frames.
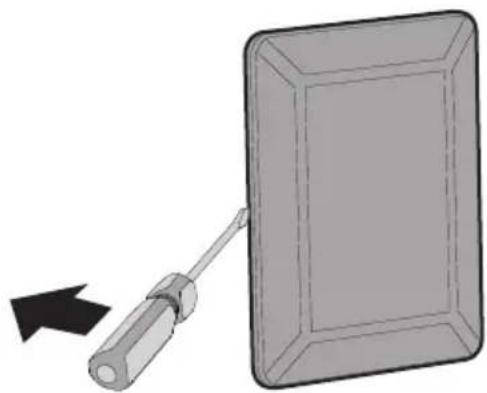
- Remove the bulb cover using a tool (e.g. a screwdriver).
Pay attention not to scratch the oven cavity enamel.
natural_image
Illustration of a screwdriver inserted into a rectangular plate with a black arrow indicating direction (no text or symbols)- Slide out and remove the light bulb.
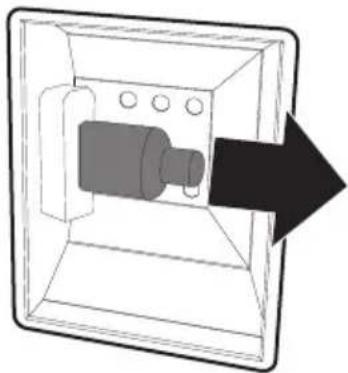
natural_image
Diagram of a mechanical component inside a transparent housing, with an arrow pointing to it (no text or symbols present)
Do not touch the halogen light bulb directly with your fingers, but wrap it in insulating material.
- Replace the light bulb with one of the same type (40W).
- Refit the cover. Ensure the moulded part of the glass (A) is facing the door.
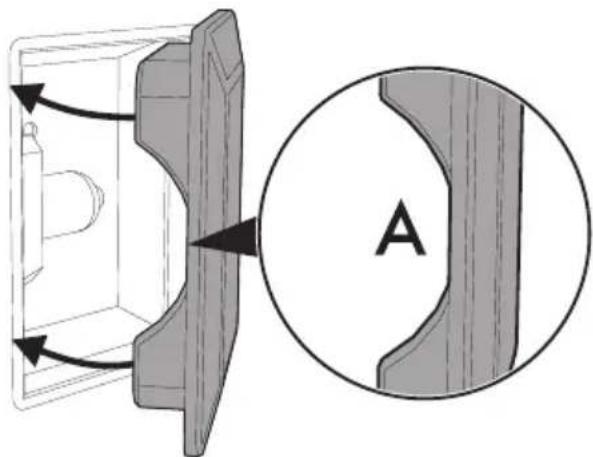
natural_image
Diagram showing a mechanical component with directional arrows and a magnified view labeled A (no text or symbols present)- Press the cover completely down so that it attaches perfectly to the bulb support.
5 Installation
5.1 Electrical connection

Power voltage Danger of electrocution
- Have the electrical connection performed by authorised technical personnel.
- The appliance must be connected to earth in compliance with electrical system safety standards.
- Disconnect the mains power supply.
General information
Check the grid characteristics against the data indicated on the plate.
The identification plate bearing the technical data, serial number and brand name is visibly positioned on the appliance.
Do not remove this plate for any reason. The appliance operates at 220-240 V\~.
Use a three-core cable (3 × 1.5 mm ^2 internal conductors).
Make the earth connection using a wire that is 20 mm longer than the other wires.
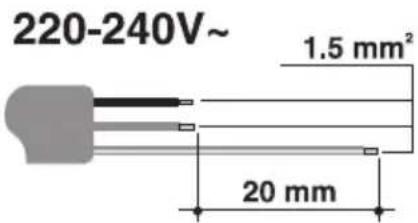
text_image
220-240V~ 1.5 mm² 20 mmFixed connection
Fit the power line with an omnipolar circuit breaker in compliance with installation regulations.
The circuit breaker should be located near the appliance and in an easily reachable position.
Connection with plug and socket
Make sure that the plug and socket are of the same type.
Avoid using adapters and shunts as these could cause overheating and a risk of burns.
5.2 Cable replacement

Power voltage Danger of electrocution
- Disconnect the mains power supply.
- Unscrew the rear casing screws and remove the casing to access the terminal board.
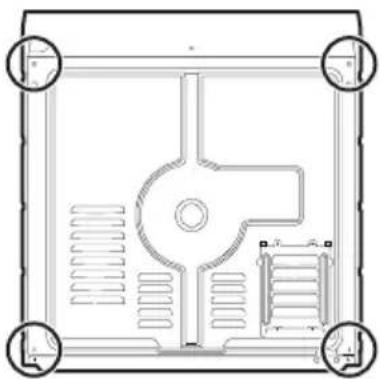
natural_image
Top-down architectural or mechanical diagram showing a central vertical structure with internal components and four corner circular markers (no text or symbols)- Replace the cable.
- Make sure that the cables (for the oven or any hob) follow the best route in order to avoid any contact with the appliance.
5.3 Positioning

Heavy appliance Crushing hazard
- Position the appliance into the cabinet cut-out with the help of a second person.

Pressure on the open door Risk of damage to the appliance
- Never use the oven door to lever the appliance into place when fitting.
- Avoid exerting too much pressure on the oven door when open.

Heat production during appliance operation Risk of fire
- Check that the carcase material is heat resistant.
- Check that the carcase has the required openings.
- Do not install the appliance in a recess which can be closed with a door, or in a cupboard.
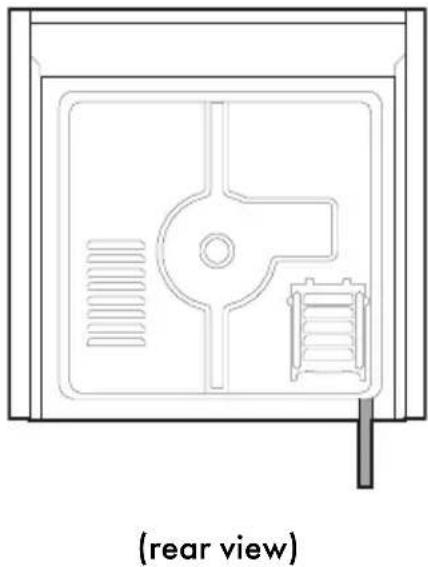
Position of the power cable
natural_image
Top-down architectural diagram of a front view of a rectangular room with internal fixtures and a side-mounted shelf (no text or symbols)Front panel seal
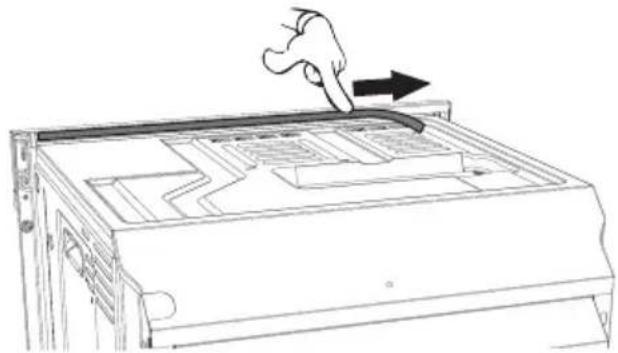
Glue the supplied seal to the rear part of the front panel to avoid water or other liquids from leaking in.
natural_image
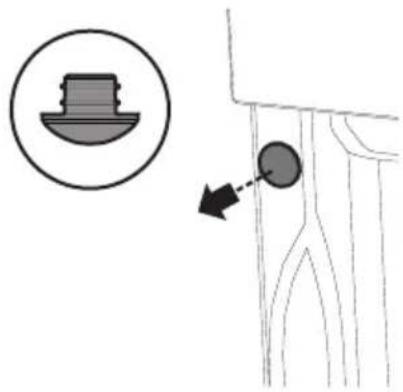
Line drawing of a hand pressing down on a computer tower panel with an arrow indicating motion (no text or symbols)Fastening bushings
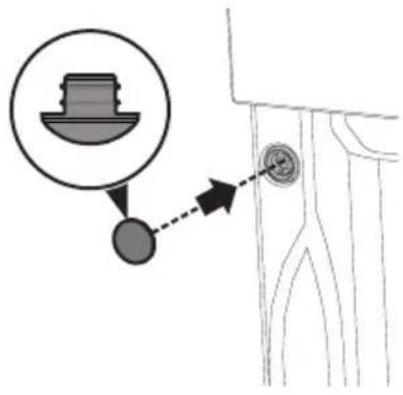
- Remove the bushing covers inserted on the front of the appliance.
natural_image
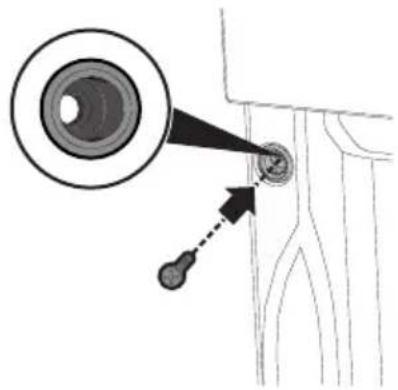
Diagram showing a small boat icon and a directional arrow pointing to a circular object on a vertical structure (no text or symbols)- Mount the appliance into the recess.
- Secure the appliance to the carcase using the screws.
natural_image
Diagram showing a magnified circular object interacting with a small circular object, with an arrow pointing to it (no text or symbols present)- Cover the bushings with the previously removed covers.
text_image
Diagram showing a mechanical component with a magnified inset and a dashed arrow pointing to a circular feature on the right side.Appliance overall dimensions (mm)
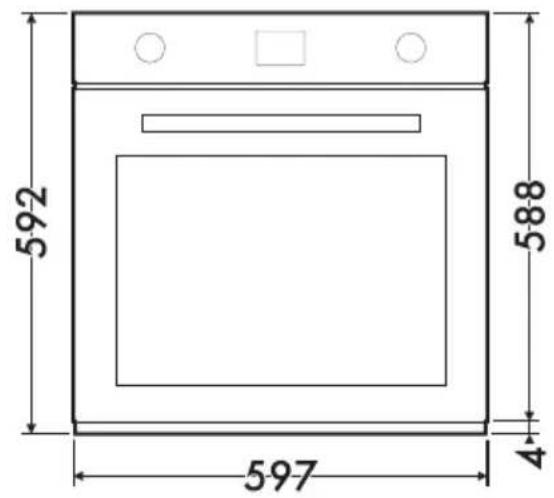
text_image
592 588 597 4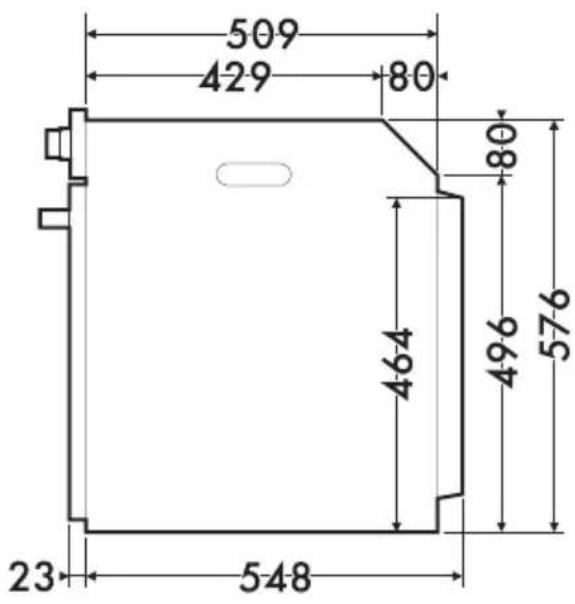
text_image
509 429 80 80 464 496 576 23 548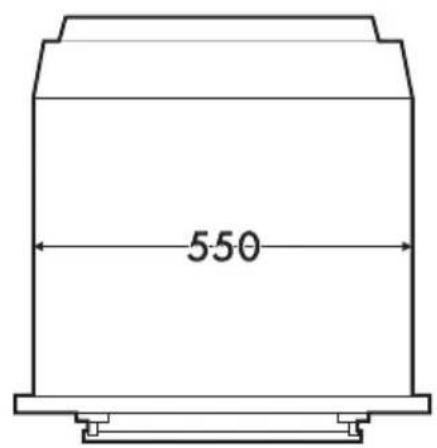
text_image
550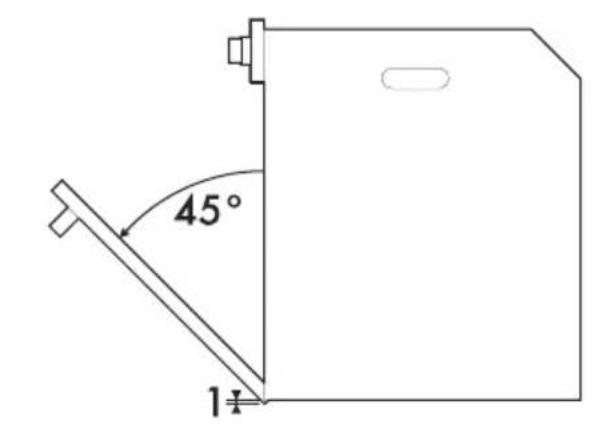
text_image
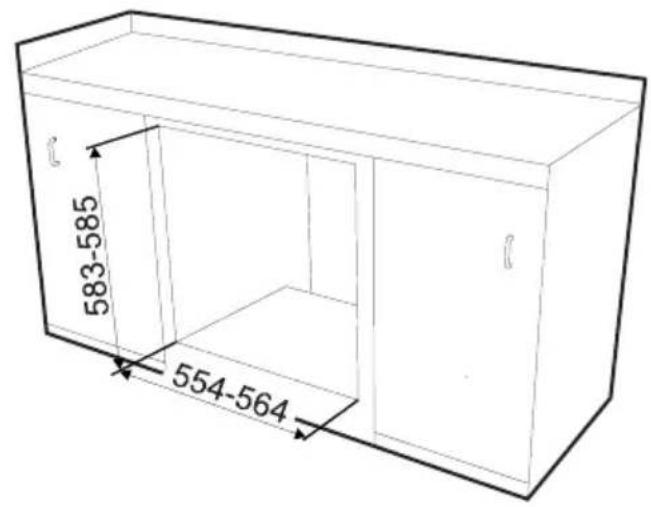
45° 1°Mounting under worktops (mm)
text_image
583-585 554-564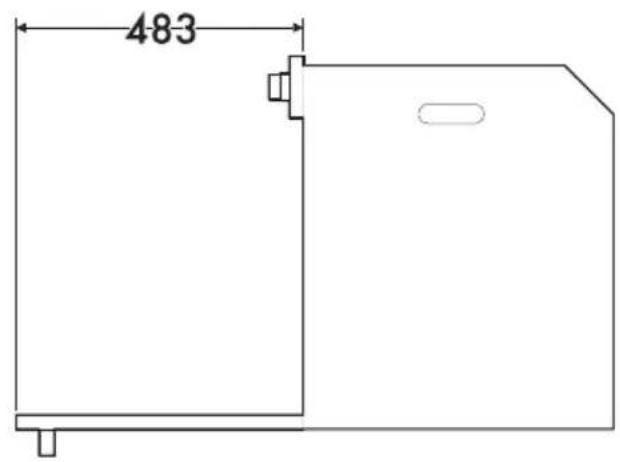
text_image
483
text_image
min 583 - max 585 2 min 11 max 13 5 60 490-500
Make sure that the carcase rear/bottom section has an opening of approx. 60 mm.
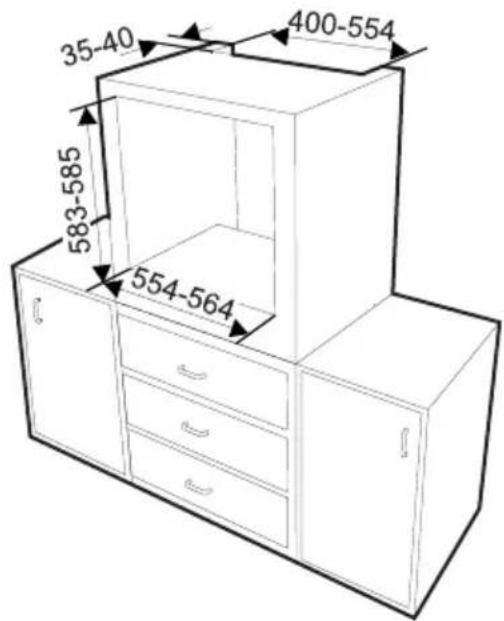
Mounting into a column (mm)
text_image
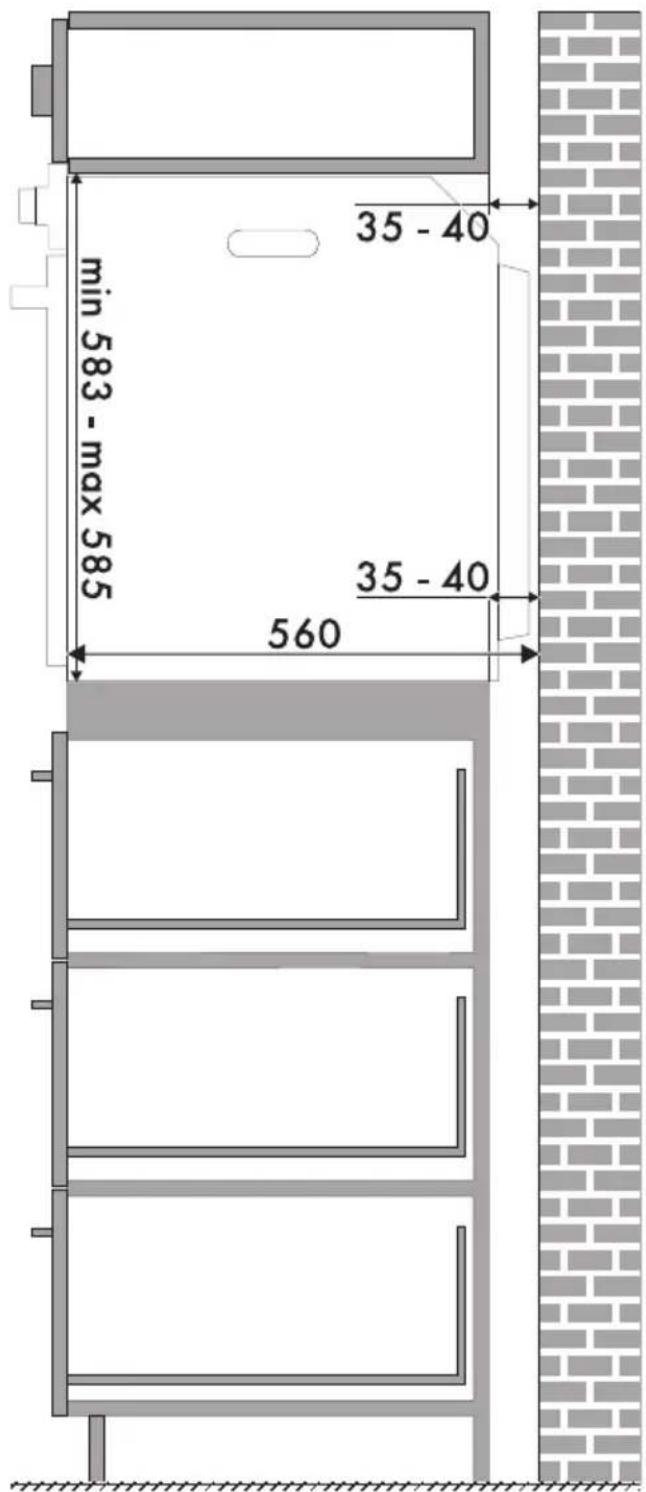
35-40 400-554 583-585 554-564
Make sure that the carcase top/rear section has an opening approx. 35-40 mm deep.