
F2X - Lighting Chimera - Free user manual and instructions
Find the device manual for free F2X Chimera in PDF.


| Product Type | Large Studio Lightbank (Softbox) |
| Available Sizes | 5' x 10' (1.5m x 3m), 10' x 20' (3m x 6m), 10' x 30' (3m x 9m) |
| Frame Material | High-strength thin wall aircraft aluminum tubing with machined interlocking flanges |
| Cover Material | Fabric with diffuser and inner baffle |
| Assembly | Tool-free, color-coded poles for quick assembly (2 people, 2-3 hours for 10' x 20') |
| Light Output | Produces beautiful long continuous highlights; extremely even coverage for large subjects |
| Light Mounts | Adjustable light mounts with swivel tubes for aiming |
| Bracing System | Velcro™ cross brace brackets for stability (10x20 and 10x30 only) |
| Rigging Options | Light stands, rope and pulley, or FOBA motorized systems |
| Maintenance | Lubricate threads occasionally with Dry Slide Teflon Powder; clean cover gently |
| Safety | Ensure proper grounding, total light amperage appropriate for circuit breaker; have electrician check requirements |
| Manufacturer | Chimera Lighting, 1812 Valtec Lane, Boulder, Colorado 80301 USA |
| Warranty | Not specified; contact manufacturer |
Frequently Asked Questions - F2X Chimera
User questions about F2X Chimera
0 question about this device. Answer the ones you know or ask your own.
Ask a new question about this device
Download the instructions for your Lighting in PDF format for free! Find your manual F2X - Chimera and take your electronic device back in hand. On this page are published all the documents necessary for the use of your device. F2X by Chimera.
USER MANUAL F2X Chimera
natural_image
Orange sports car displayed under a black CHIMERA studio lighting fixture (no text or symbols on the car or background)Xtremely Beautiful Light
The F2x produces those beautiful long continuous highlights that make you stand apart. Two people can assemble a 10 x 20 F2x in two to three hours -- WITHOUT TOOLS! Now, that's a huge savings in time and money.
F2x
New
From...

CHIMERA
FRAME:
● high-strength, thin wall aircraft aluminum tubing.
machined interlocking end flanges mate for Xtreme strength.
Frame sections are color coded for quick assembly.
• NO TOOL assembly.
• perfect for both location and studio installs.
initially available in 5'x10', 10'x20', and 10'x30'. (1.5m x 3m, 3m x 6m, 3m x 9m)
LIGHT:
- beautiful long continuous highlights.
- Xtremely even coverage for large subjects.
● adjustable light mounts.
• See our web site for more details.
1812 Valtec Lane, Boulder, Colorado 80301 USA www.chimeralighting.com
Outline - F2X Assembly Instructions
Basic Information
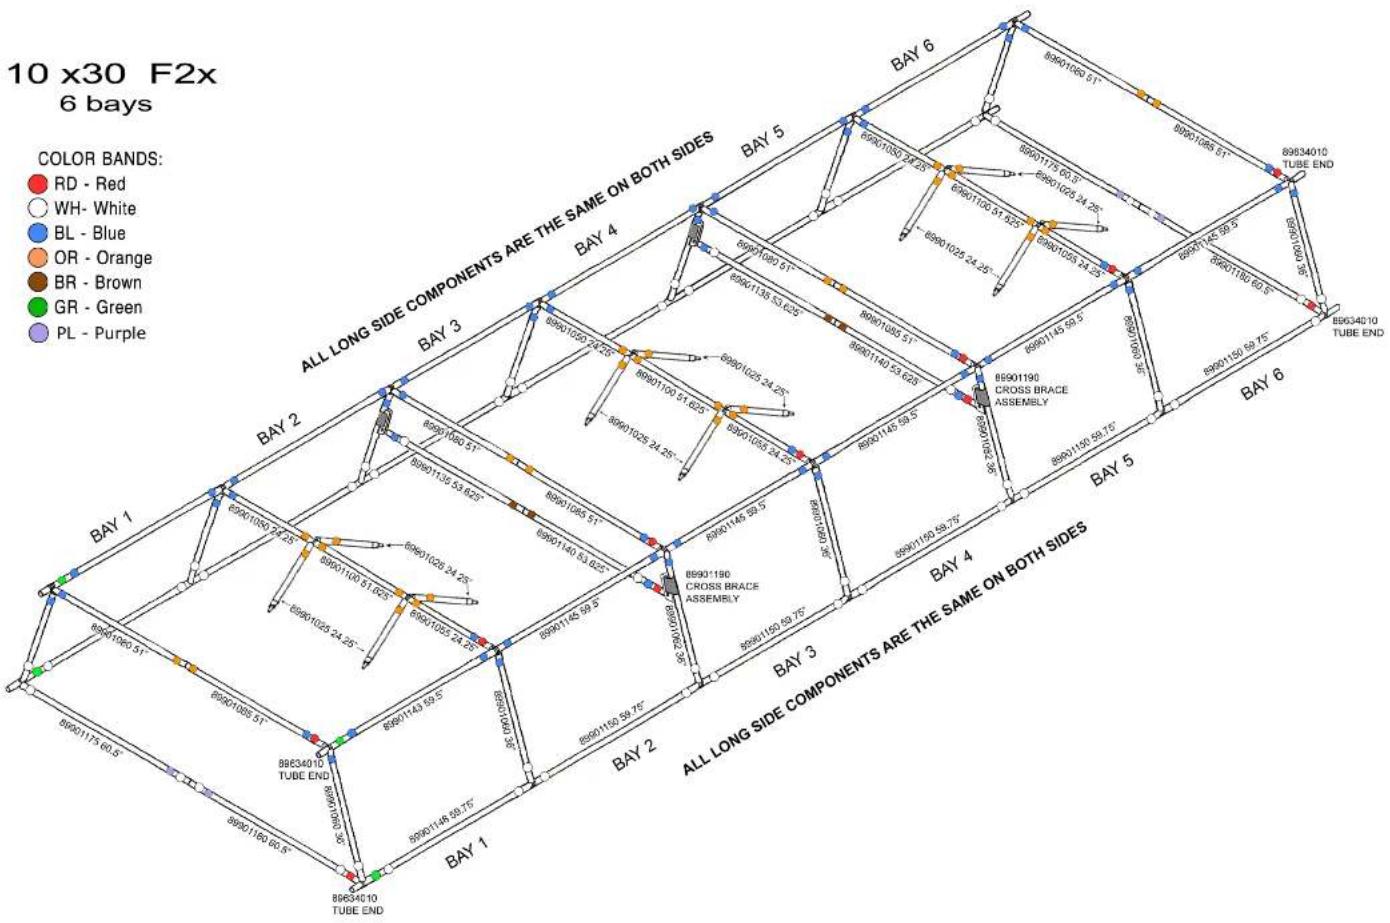
■ Layout the parts, grouping by color codes. Poles are bundled in specific groups for your convenience.
■ Align tubes carefully as to not cross thread. Laying on the floor or a flat surface is helpful. Do not force if you encounter undue resistance.
■ Start the first bay on one side, and then complete the opposite side, working a bay at a time, adding top perimeter tubes as you go - bay by bay.
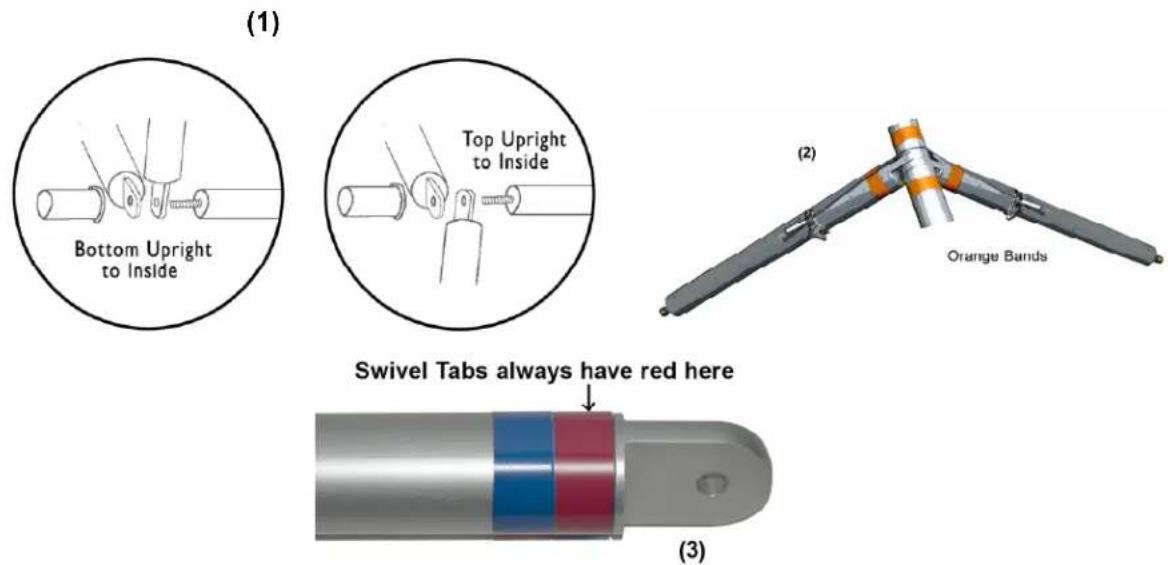
■ Position all the cross tubes tabs on the same side of the uprights, either all to left of all to right throughout, except as noted for the ends (1). Slide all tabbed parts over the threads carefully.
It is recommended to pre-assemble all cross tubes, including the light support assemblies (adjusting and locking the light tube angles (2) for efficiency.
■ Refer to the drawings for further instructions.
It is recommended to lubricate the threads occasionally with Dry Slide Teflon Powder for easier assembly.
■ Swivel tube Tabs. Each cross tube, when assembled, should have a stationary tab on one end and a swivel tab on the other end. This allows the tabs to be properly aligned during frame assembly. Tube components that have the swivel tabs are identified by a stripe of red tape on the tab end (3).
Start
Position all the bottom perimeter tubes first.
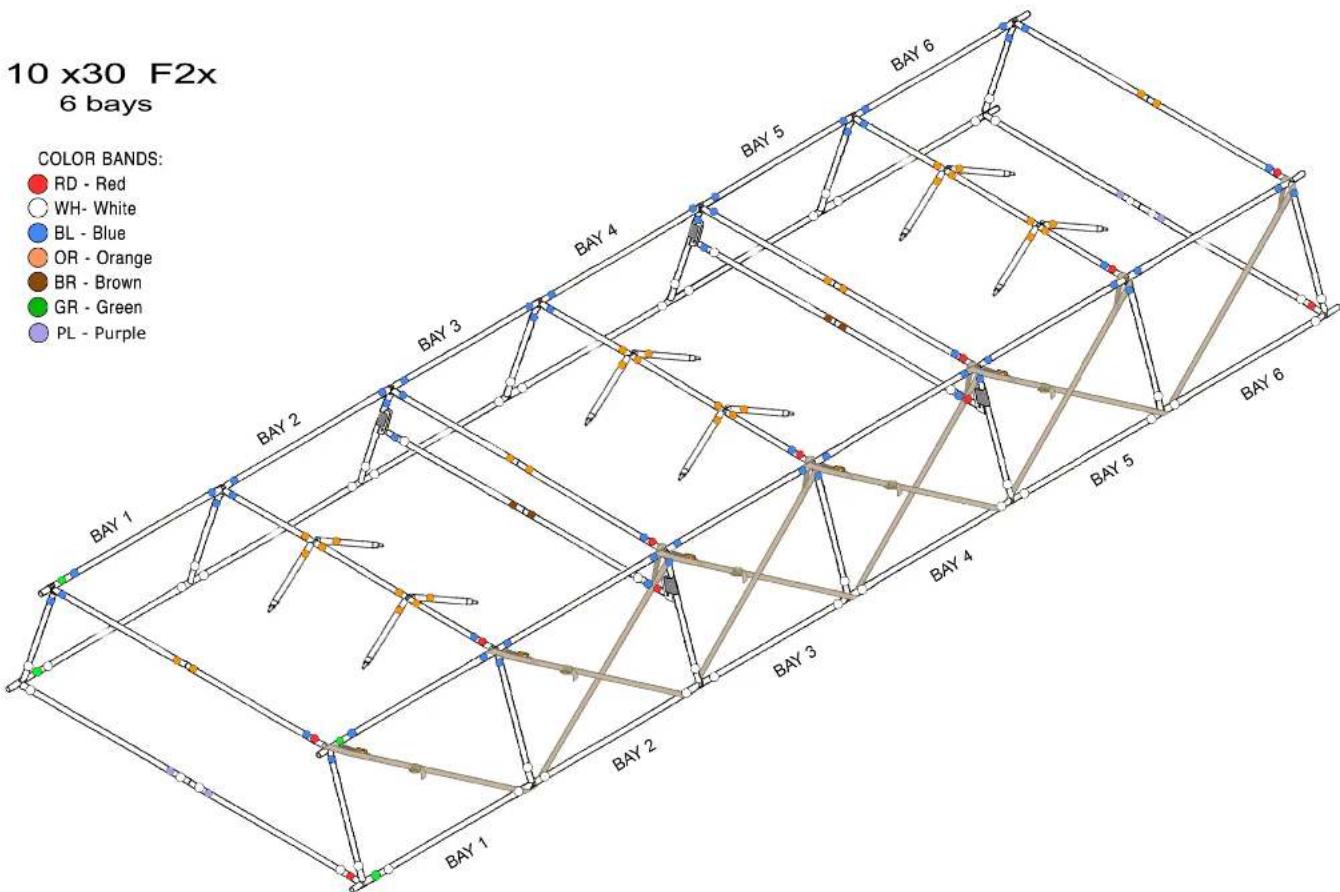
Cross Brace Assembly (10x20' and 10x30' only)
Layout a corner with a bottom long side tube, an assembled bottom end cross tube, one upright and an end cap.
As you assemble, the threaded studs will all be pointing in the same direction.
Repeat this for the opposite side.
Next, assemble the bottom tubes of the next bay, with the upright tubes between the bays.
Now go back and finish the top tube sections of the first bay.
Continue this procedure throughout the remaining bays.
Bracing Tubes
The upright tubes that support the bracing cross tubes have Velcro ^TM strips on the top end. When laying these out, position the uprights so when lifted into position, the Velcro ^TM is on the inside.
To assemble the bracing cross tubes:
- attach a Velcro ^TM tube cross brace bracket on an upright on one side
- insert bracing cross tube into its receptacle.
- put opposite receiver onto the cross tube.
- position the Velcro ^TM receiver unit on opposite side upright tube and slide this upward to produce tight fit. Securely wrap with the Velcro ^TM wraps.
Finishing Frame
When the frame is completely assembled, check squareness - nudge as needed to help straighten. This can be done by eye.
Now position the entire frame up on supports - off ground - on short stands, apple boxes, etc.
Attach web strap supports as per drawing details.
- strap clips are positioned to inside (so they don't rub against cover).
- adjust until taut - not overly tight.
Attach all lights and wiring with cables over top edge and hang down the sides.
Test lights before proceeding. It is suggested that you have an electrician check your electricity requirements. Check grounding carefully and make sure that the total light amperage is appropriate for the circuit breaker ratings.
Attach the inner baffle - clip to frame as per the drawing detail. First attach to diagonal corners and then the opposite diagonals and pull the fabric taut.
Lightbank Cover
CAUTION: take extreme care in next step to not get front diffuser dirty by dragging on the floor or ground. You can put clean material down over a dirty surface - tape it securely so it doesn't move. Raise your F2X frame off the ground at this stage, but not too high, approximately 2 feet, either on short light stands or apple boxes, etc.
Spread the cover and attach the four corner straps. Then lift and attach the end panels. Cover panels go inside top tube, over, and out and then Velcro's to itself.
Start to lift and attach side panels to every other bay. Finish by going around up to three times to tighten and smooth out the entire cover.
Top cover is spread over the top of the unit and attaches first to ends and again is stretched to flatten and smooth out material.
Rigging
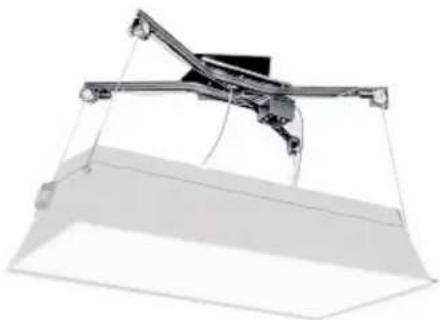
The last step is to rig your F2 Lightbank. Your options are:
- on light stands
- rope and pulley
- FOBA motorized systems – www.foba.com/eng/decken/decken.htm
natural_image
3D rendering of a mechanical device suspended from a conical base (no text or symbols visible)Also see the assembly video in our video library: www.chimeralighting.com.

CHIMERA®
PERFECT LIGHTING
other
| Color Band | Node IDs | Color Description | |------------|----------|-------------------| | RD - Red | BAY 1 | Red | | WH - White | BAY 1 | White | | BL - Blue | BAY 2 | Blue | | OR - Orange| BAY 2 | Orange | | BR - Brown | BAY 3 | Brown | | GR - Green | BAY 3 | Green | | PL - Purple| BAY 4 | Purple |
Brand : Chimera
Model : F2X
Category : Lighting