Inspiroy WH1409 V2 - Graphic tablet Huion - Free user manual and instructions
Find the device manual for free Inspiroy WH1409 V2 Huion in PDF.


User questions about Inspiroy WH1409 V2 Huion
0 question about this device. Answer the ones you know or ask your own.
Ask a new question about this device
Download the instructions for your Graphic tablet in PDF format for free! Find your manual Inspiroy WH1409 V2 - Huion and take your electronic device back in hand. On this page are published all the documents necessary for the use of your device. Inspiroy WH1409 V2 by Huion.
USER MANUAL Inspiroy WH1409 V2 Huion
natural_image
Black digital drawing tablet with a stylus resting on it against a solid blue background (no text or symbols visible)WH1409 V2
Wireless Pen Tablet
Precautions
- Please read this manual carefully before using, and keep it well for future reference.
- Before cleaning the tablet please unplug the power cord and wipe with a soft damp cloth, do not use any kind of detergents.
- Don't expose this product to water or other liquids. Take care to never spill liquids onto the tablet and pen. Exposing this product to water or other liquids may cause product malfunction or electrical shock.
- Do not place the tablet on where is unstable or a height for children reaching easily in order to avoid danger. Prevent children from swallowing the pen nib or side switch. The pen nib, side switch, or other movable parts may accidentally be pulled out if children are biting on them.
- Power off your tablet in locations where/when electronic devices is not allowed. Because the tablet may cause other electronic devices to malfunction in some locations where/when the use of electronic devices is not allowed, such as within an airplane, be sure to turn off the tablet.
- To protect your tablet and save power, please switch off the power when it is not in use.
- Do not disassemble the tablet and pen. Do not disassemble or otherwise modify the tablet or pen. Such action may cause heat generation, ignition, electronic shock, or other damage, including human injury. Disassembling the product will void your warranty.
- While getting the components replaced, you are supposed to guarantee that the repairman is using the substitute components specified by the manufacturer. Unauthorized component replacement might cause fire, electric shocks or other dangers.
- Do not insert foreign material into the USB port or any other opening of this product. If a metal object or foreign material is inserted into a port or other opening of this product it may cause the product to malfunction or burn out, or cause electronic shock.
- The nib of the digital pen can't be pressed when it is placing, otherwise the pen can't enter the power-saving state, which is easy to cause lithium battery over-discharge damage.
Contents
1. Product Overview....3
1.1 Tablet Introduction....3
1.2 Product and Accessories....3
1.3 Tablet Connection....5
1.4 Driver Installation....6
1.5 Pen Nib Replacement....6
2. Product Basic Operation....7
2.1 Using The Pen....7
2.2 Using the Tablet....9
3. Function Setting....10
3.1 Device Connection Prompt....10
3.2 Working Area Setting....10
3.3 Press Keys Function Setting....12
3.4 Pen Buttons Function Setting....12
3.5 Pressure Sensitivity Setting....13
3.6 Pen Pressure Testing....13
3.7 Enable the Windows Ink feature....14
3.8 Data Export and Import....14
4. Specifications....15
5. Trouble Shooting....15
5.1 Possible Breakdowns Related to TABLET....15
5.2 Possible Breakdowns Related to SYSTEM....15
6. CE and FCC Notice....17
1. Product Overview
1.1 Tablet Introduction
Thanks for choosing HUION ^® WH1409 V2 wireless graphics tablet. This is a new generation of professional battery-free drawing tablet, which can greatly improve your work efficiency of painting and creation, and full of fun. You can freely painting and writing, depicting different lines and colors, just as the pen writes on the paper, which brings you a real shock experience.
To give you a better understanding and using of your tablet, please read this user manual carefully. The user manual only shows the information under Windows, unless otherwise specified, this information applies to both Windows and Macintosh systems.
1.2 Product and Accessories
1.2.1 Graphics Tablet
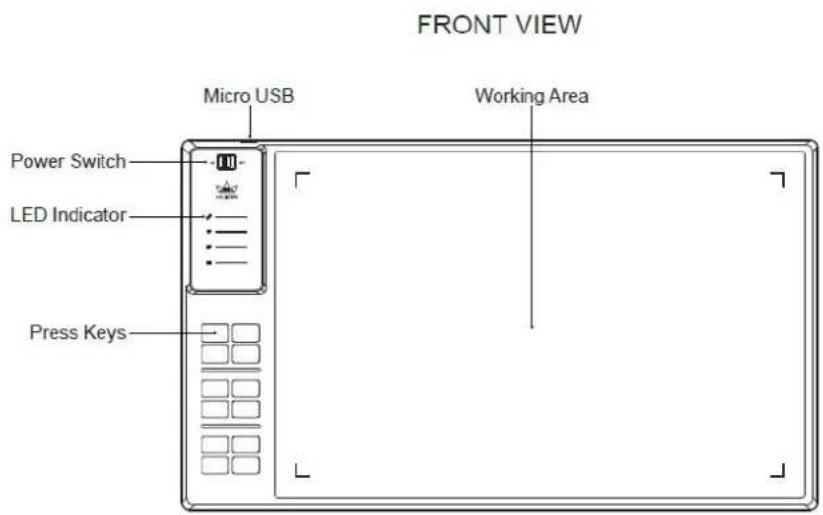
text_image
FRONT VIEW Micro USB Working Area Power Switch LED Indicator Press Keys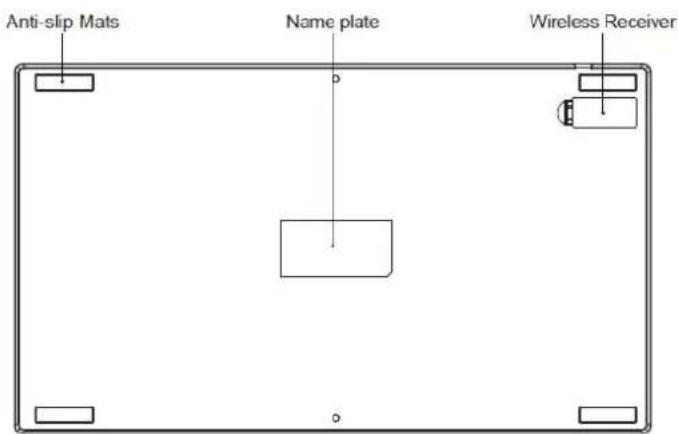
text_image
Anti-slip Mats Name plate Wireless ReceiverREAR VIEW
1.2.3 Wireless Receiver
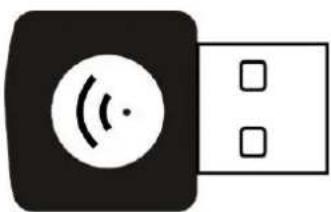
natural_image
Icon of a USB flash drive with signal symbol and two ports (no text or labels)When using wireless mode, please insert the receiver into your computer and unplug the USB cable in the same time.
1.2.4 Other Accessories
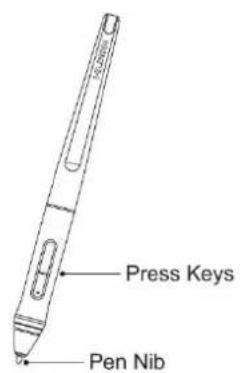
text_image
Press Keys Pen Nib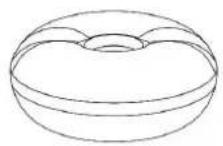
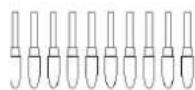
Digital Pen Pen Holder Replacement Nibs
text_image
Quick Start Guide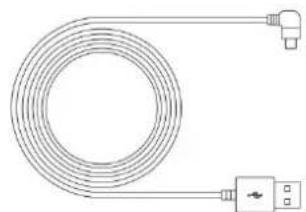
natural_image
Pure diagram of a coiled cable with two connectors, no text or symbols present
Quick Start Guide Micro USB Cable Pen Nib Clip
1.3 Tablet Connection
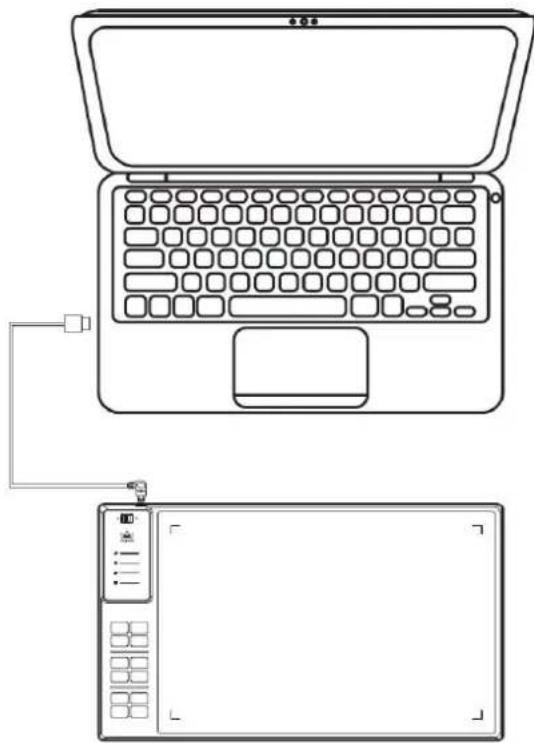
1.3.1 Wired Mode Connection
- Connect the tablet to your computer with USB cable.
natural_image
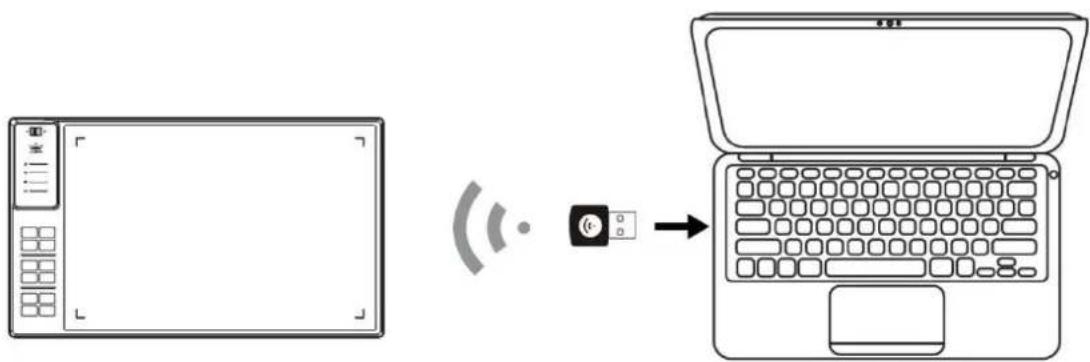
Line drawing of a laptop and its external screen device (no text or symbols)1.3.2 Wireless Mode Connection
- Insert the wireless receiver to your computer.
- Toggle the power switch to the left to power on the tablet.
- When not using for 15mins, the tablet will enter sleep mode. In this case you need to toggle the switch right- then left to wake the tablet up.
text_image
Diagram showing a laptop connected to a wireless signal and an icon to its screen, illustrating the connection process.1.4 Driver Installation
1.4.1 OS Support
Windows 7 or later, macOS 10.12 or later
1.4.2 Install Driver
Please download the driver from our website: www.huion.com/download
After finishing installation, you can find the driver icon in the system tray area, which means the driver was installed successfully; when you connect the tablet to computer, the icon will change to color, which means the driver has already recognized the tablet and you can start using it now.
Notice:
- Before installing, you need to uninstall other driver of similar products, including the old driver of this product.
- Before installing, please close all graphics software and anti-virus software to avoid unnecessary mistake.
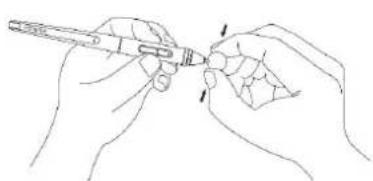
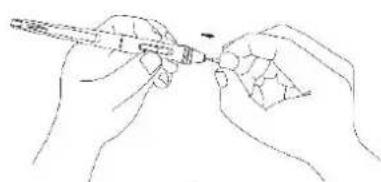
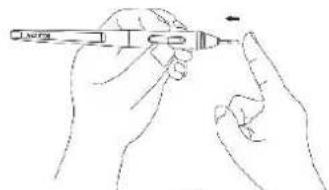
1.5 Pen Nib Replacement
The nib will be wear out after using for a long time, then you need to replace a new nib.
natural_image
Line drawing of two hands holding a tool, no text or symbols present①
natural_image
Line drawing of two hands holding a pen, no text or symbols present②
natural_image
Line drawing of two hands holding a pen, no text or symbols present③
2. Product Basic Operation
2.1 Using The Pen
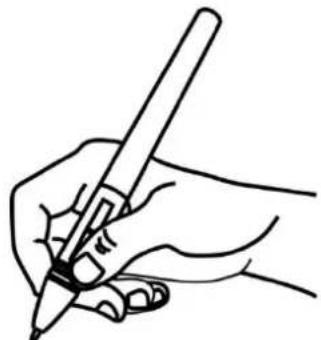
2.1.1 Hold the pen
Hold the pen as you hold a normal pen or pencil. Adjust your grip so that you can toggle the side switch easily with your thumb or forefinger. Be careful not to accidentally press the switch while drawing or positioning with the pen.
natural_image
Line drawing of a hand holding a pen, writing on paper (no text or symbols present)Notice: When not in use, place the pen in the pen case or on the desk. Do not place the pen on the surface of screen, which may interfere with the use of other screen cursor positioning equipment, may also cause your computer can not enter the sleep mode.
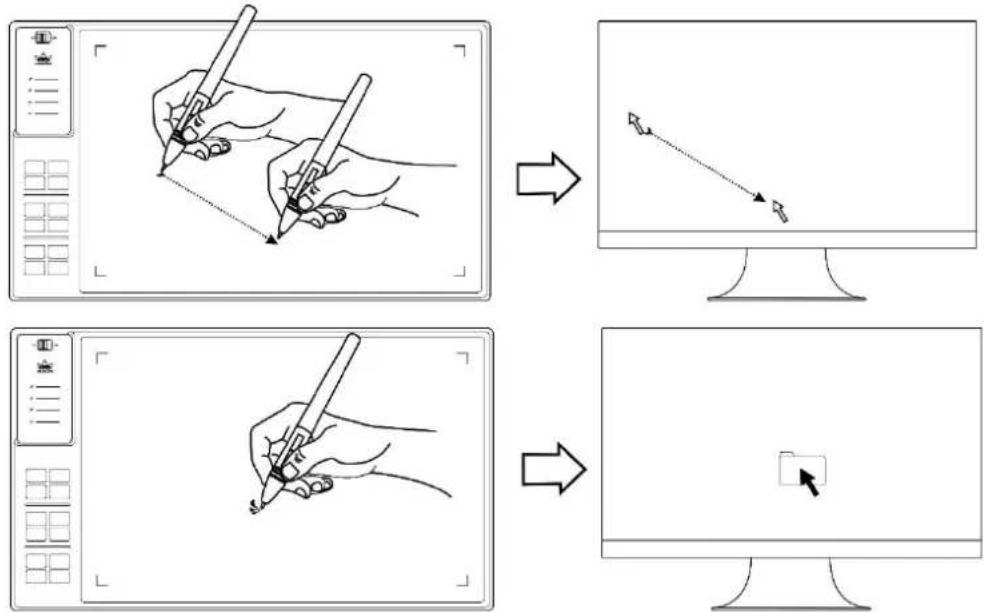
2.1.2 Position the cursor
Move the pen slightly above the active area without touching the screen surface, the cursor will move to the new position accordingly.
Press the pen tip on the screen to make a selection. Tap the screen once with the pen tip, or touch it to the screen with enough pressure to register a click.
flowchart
graph TD
    A["Start: Hand-drawn sketch of pen"] --> B["Step 1: Drawing arrow on screen"]
    B --> C["Step 2: Drawing arrow on monitor with icon"]
    C --> D["End: Screen with cursor icon"]
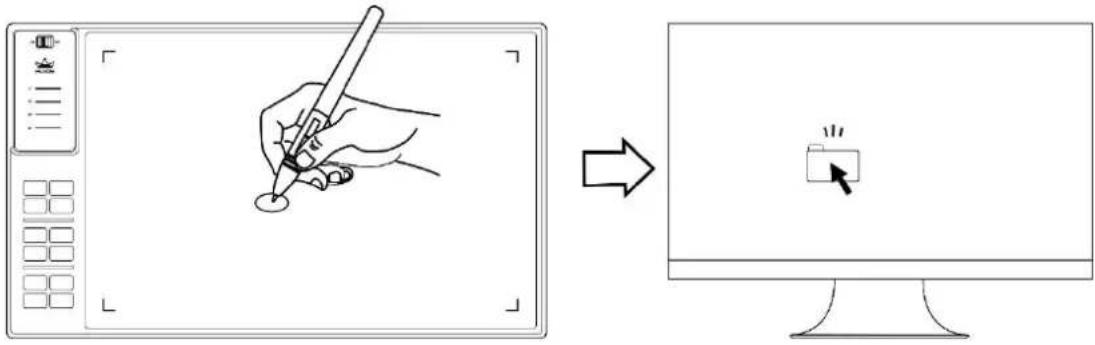
2.1.3 Click
Use the pen tip to tap once on the screen to register a click. Tap to highlight or select an item on the screen and double-click to open it.
text_image
Diagram showing a hand-drawn sketch of a drawing tablet being edited to process a computer screen with a cursor icon.2.1.4 Move
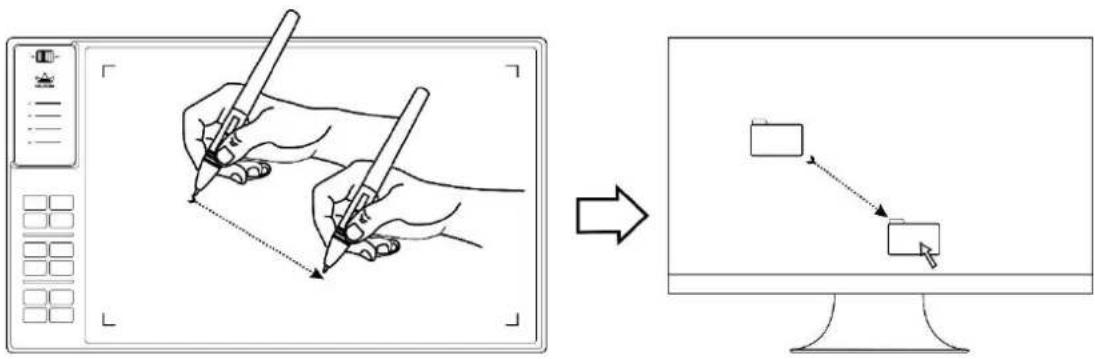
Select the object, then slide the pen tip across the screen to move it.
flowchart
graph LR
    A["Before Drawing: Square with arrow"] --> B["After Drawing: Rectangle with arrow"]
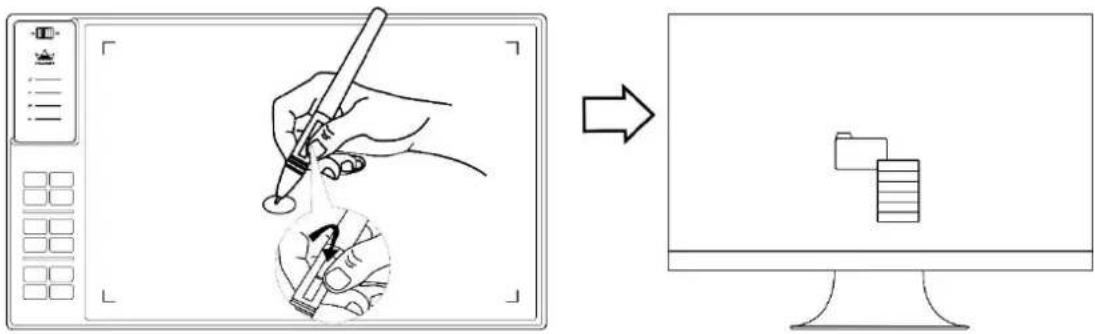
2.1.5 Use the side buttons
The buttons of the pen can be set to two different customizable functions.
You can use the buttons whenever the pen tip is within 10mm of the tablet active area.
You do not have to touch the pen tip to the tablet in order to use the switch.
text_image
Diagram illustrating the process of inserting a device into a computer, showing hand-drawn sketch and file icon.2.2 Using the Tablet
2.2.1 Power Switch
-
The power switch was placed on the top left side of the tablet, when you use the tablet on wireless mode, you need to turn on the power switch before using.
-
When not use the tablet for 15 minutes or toggle the switch off, it will enter sleep mode.
-
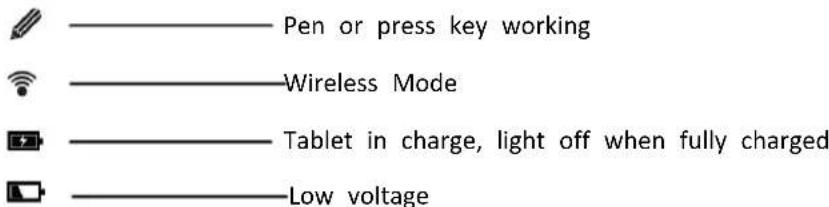
LED indicator:
text_image
Pen or press key working Wireless Mode Tablet in charge, light off when fully charged Low voltage2.2.2 Press Keys
There are 12 press keys on the left side of the tablet, which you can set the function on the driver interface according to your own habits, which will help to improve your work efficiency.
2.2.3 Charging the Tablet
-
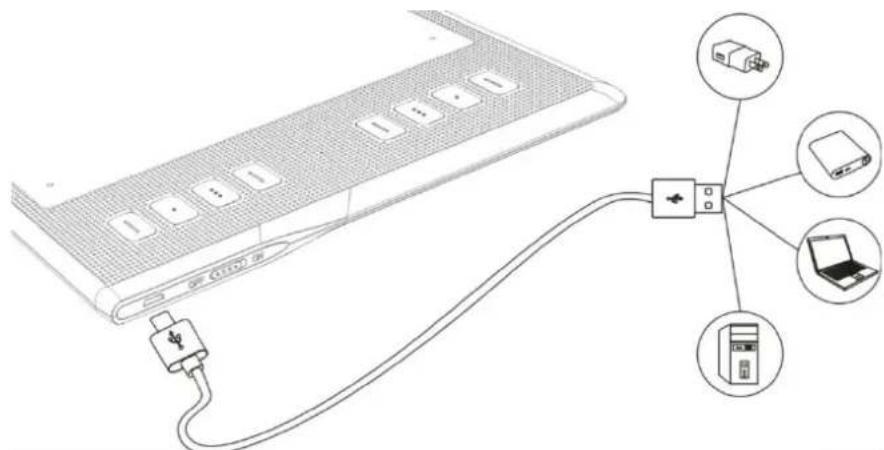
Before using the tablet for the first time in wireless mode, you should fully charge the tablet battery. Do this by connecting the USB cable between tablet and a primary USB port on your computer, or to a powered USB port.
-
The USB cable is used for charging the battery, and also for operating the tablet as a wired USB tablet. The battery will charge whenever the USB cable is connected and the battery is not fully charged.
-
It will take about 7 hours to fully charge an empty battery. The actual charge time depends on current battery level and tablet use while charging. The battery status indicator shows RED when charging, and will be OFF when fully charged.
-
Whenever the tablet is connected to computer with USB cable, the wireless mode will be disabled.
text_image
Diagram showing connection between a computer via USB cable, with labeled components including USB port, USB switch, laptop, and devices.3. Function Setting
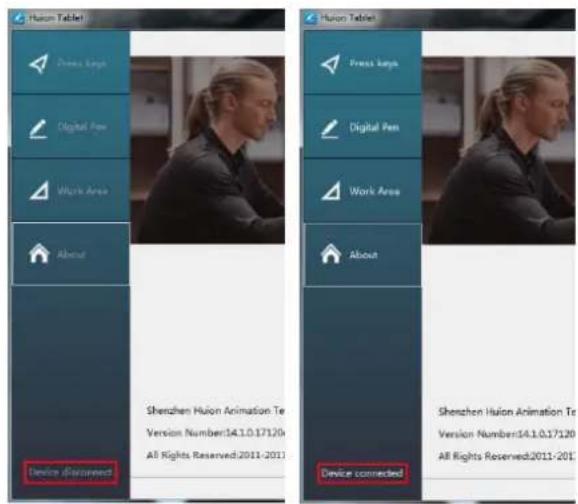
3.1 Device Connection Prompt
- Device disconnected: The computer does not recognize the tablet.
- Device connected: The computer has recognized the tablet.
text_image
Huron Tablet Press Keys Digital Pens Work Area About Device disconnect Shenzhen Hulon Animation Te Version Number:14.1.0.17120 All Rights Reserved:2011-2011 Shenzhen Hulon Animation Te Version Number:14.1.0.17120 All Rights Reserved:2011-2011 Device connected3.2 Working Area Setting
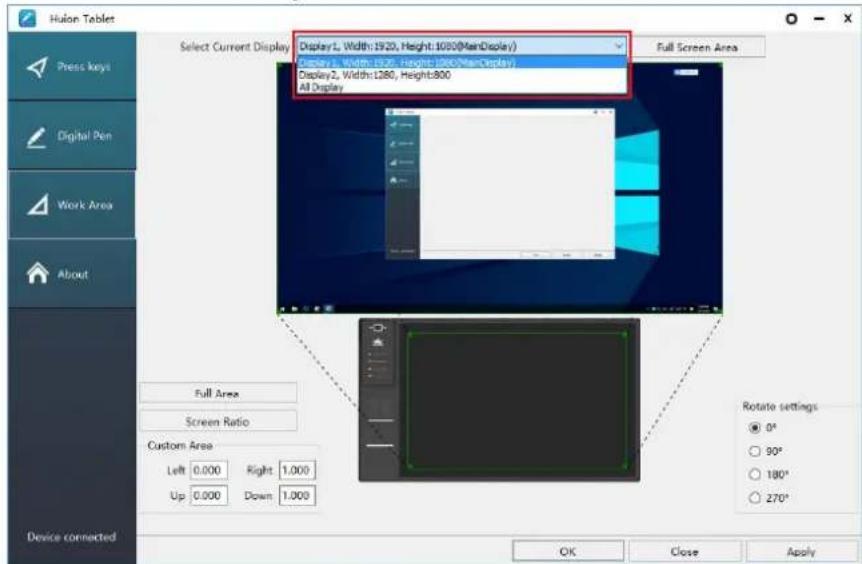
3.2.1 Using Multiple Monitors
Select the Working Area tab to define the relationship between pen movement on the tablet and cursor movement on the monitor screen.
By default the entire active area of tablet maps to the entire monitor. If more than one monitor is in use and you are in extended mode, you need to choose the related monitor on the driver interface which you are going to map to.
If your monitors are in mirror mode (All monitors display the same content), the tablet maps to the entire space on each monitor and the screen cursor is displayed on each monitor simultaneously.
text_image
Hulon Tablet Select Current Display Display L Width: 1920, Height: 1030 (MainDisplay) Display 1, Width: 1260, Height: 1000 (MainDisplay) Display 2, Width: 1280, Height: 800 All Display Full Screen Area Full Area Screen Ratio Custom Area Left 0.000 Right 1.000 Up 0.000 Down 1.000 Device connected Rotate settings ● 0° ○ 90° ○ 180° ○ 270° OK Close Apply3.2.2 Working Area Setting
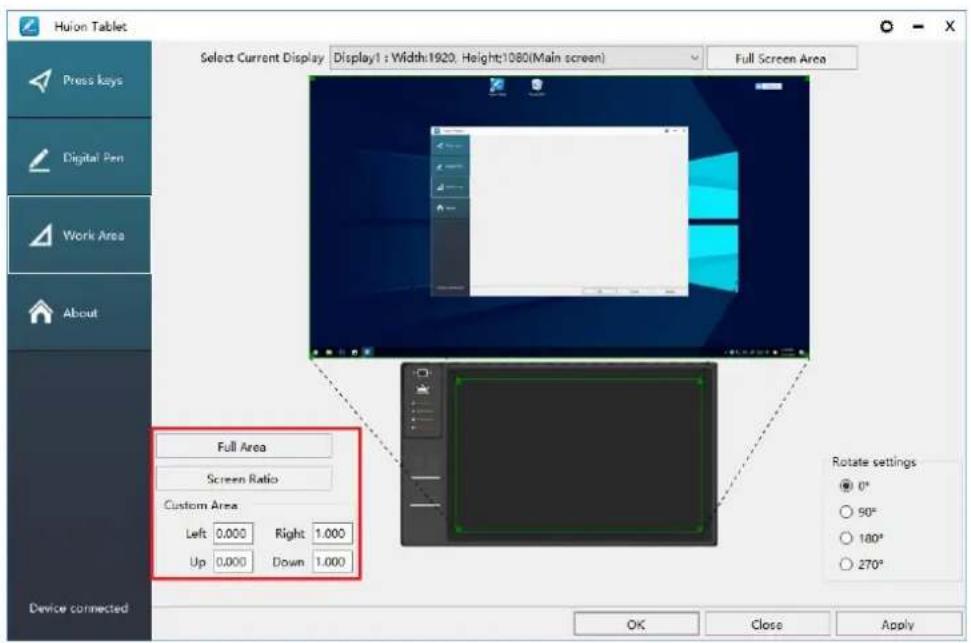
Define the tablet area that will be mapped to the screen area.
- Full Area: the entire active area of the tablet. This is the default setting.
- Customized Area: 1.> Enter coordinate values. or2>. Drag the corners of the foreground graphic to select the screen area.
text_image
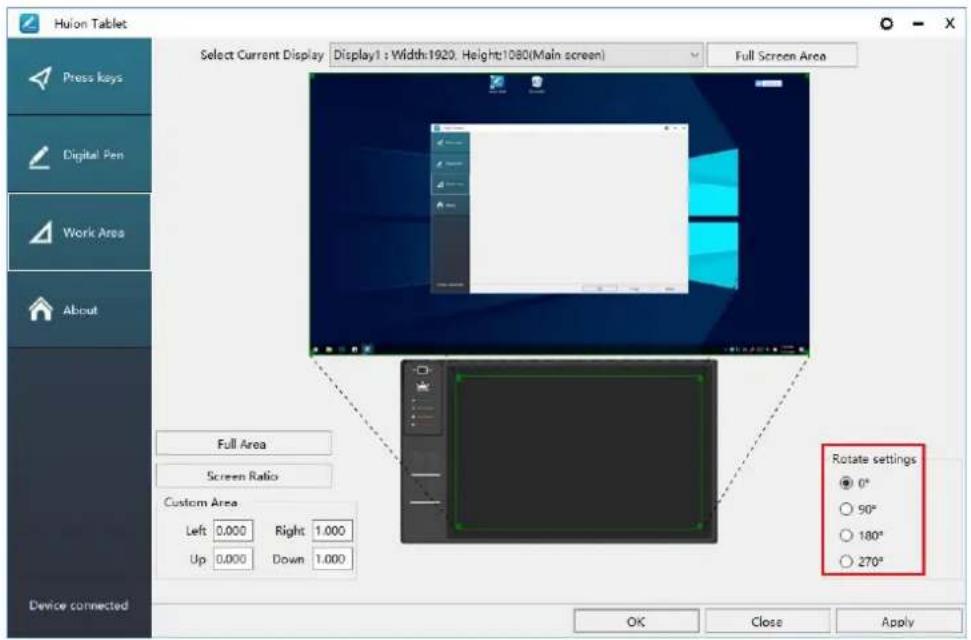
Huion Tablet Select Current Display: Display1 : Width:1920, Height:1080(Main screen) Full Screen Area Press keys Digital Pen Work Area About Full Area Screen Ratio Custom Area Left 0.000 Right 1.000 Up 0.000 Down 1.000 Device connected Rotate settings ● 0° ○ 50° ○ 180° ○ 270° OK Close Apply3.2.3 Rotate Working Area
By changing the direction of the tablet to adapt to the left and right hand operation. You can rotate the tablet by 0^, 90^, 180^ or 270^ .
text_image
Huion Tablet Select Current Display Display1: Width:1920, Height:1080(Main screen) Full Screen Area Press keys Digital Pen Work Area About Full Area Screen Ratio Custom Area Left 0.000 Right 1.000 Up 0.000 Down 1.000 Rotate settings ● 0° ○ 50° ○ 180° ○ 270° Device connected OK Close Apply3.3 Press Keys Function Setting
Default Setting: Place the cursor on the press key or click the press key to find the default values.
Customized Setting: Select the function to be achieved on the pop-up dialog box, then click APPLY or OK to take effect.
Enable/Disable Press Keys: Check/Uncheck" Enable Press Keys"
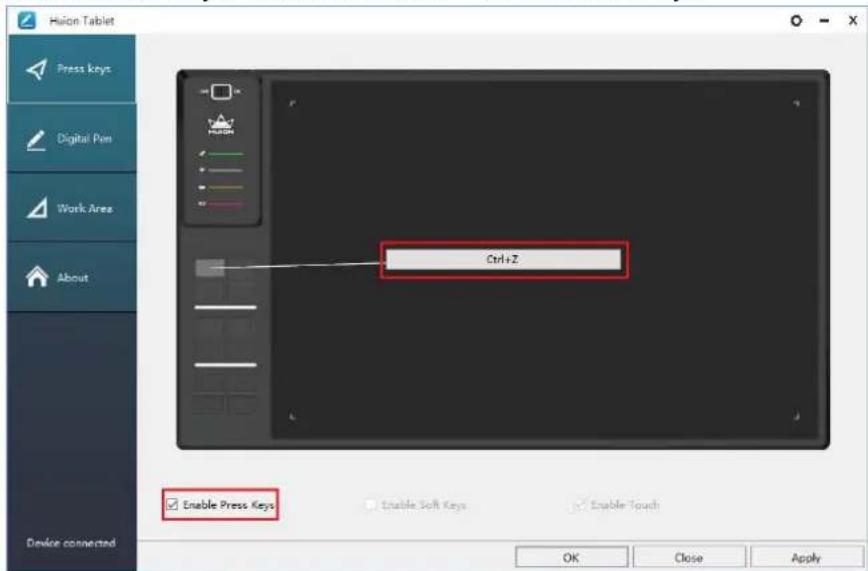
text_image
Huion Tablet Press keys Digital Pen Work Area About Ctrl+Z Enable Press Keys Enable Soft Keys Enable Touch Device connected OK Close Apply3.4 Pen Buttons Function Setting
Select the function to be achieved on the pop-up dialog box, then click APPLY or OK to take effect.
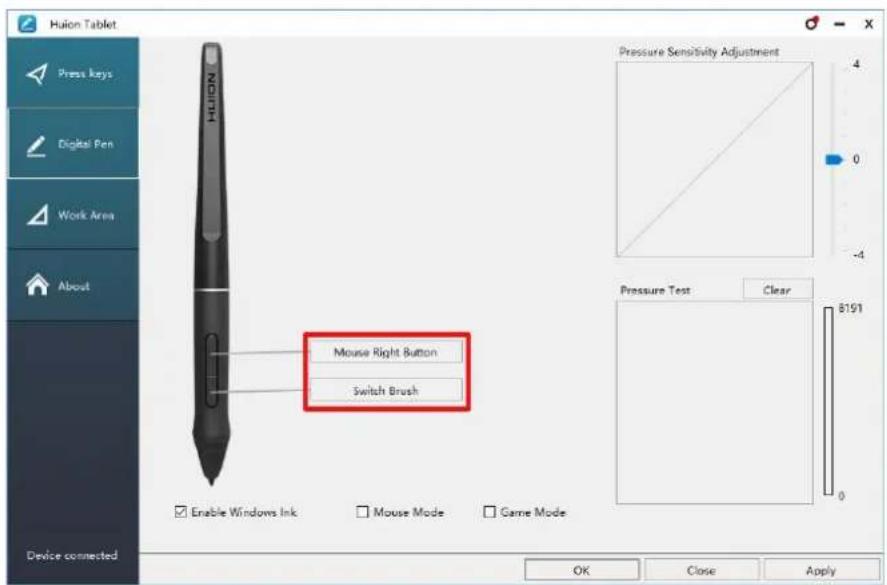
text_image
Huilon Tablet Press keys Digital Pen Work Area About Device connected Mouse Right Button Switch Brush Enable Windows Ink Mouse Mode Game Mode Pressure Sensitivity Adjustment Pressure Test Clear 8191 OK Close Apply3.5 Pressure Sensitivity Setting
The pressure sensitivity will be changed by dragging the slider up and down, the smaller the value, the more pressure sensitive.
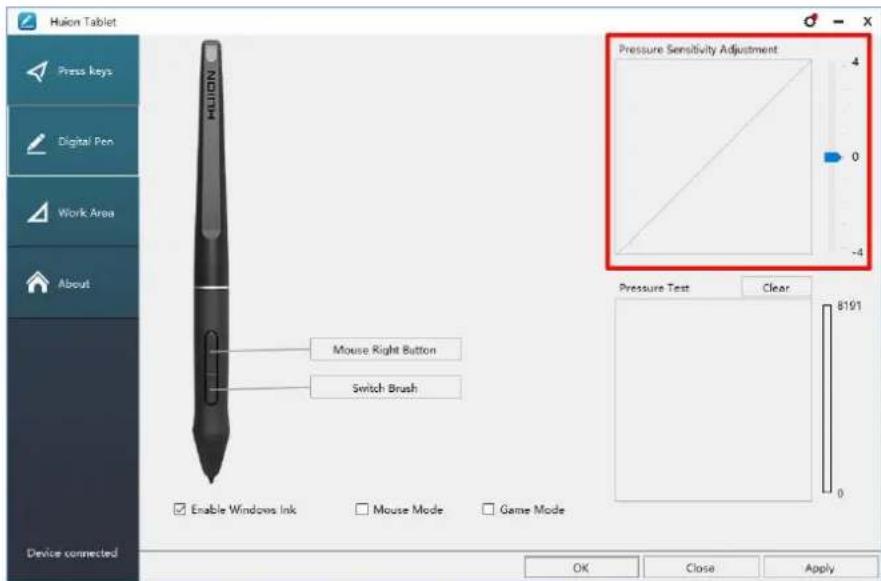
text_image
Huilon Tablet Press keys Digital Pen Work Area About Device connected Mouse Right Button Switch Brush Enable Windows Ink Mouse Mode Game Mode Pressure Sensitivity Adjustment 4 0 -4 Pressure Test Clear 8191 0 OK Close Apply3.6 Pen Pressure Testing
Click "start pressure test", you can gradually apply pressure to the stylus on the screen to test the pressure level. Click "Clear" button to clear all the ink.
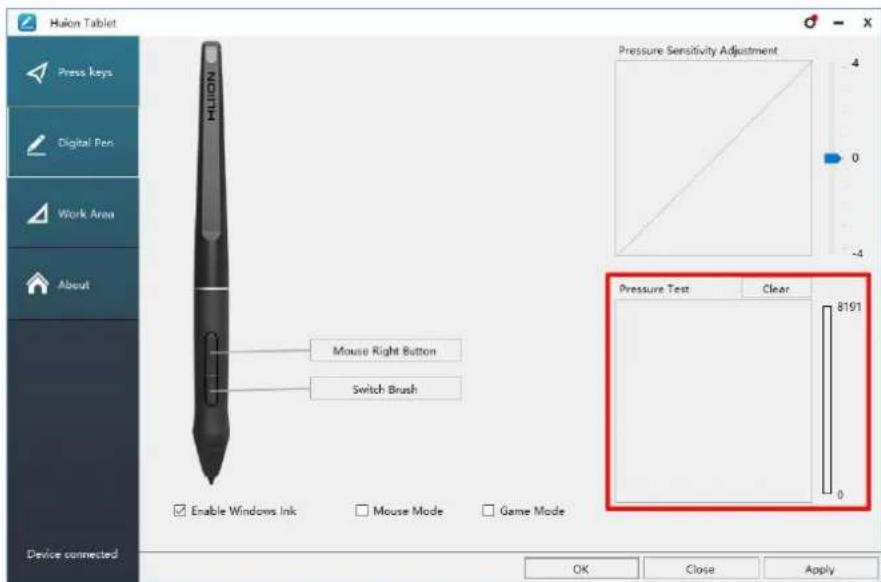
text_image
Huilon Tablet Press keys Digital Pen Work Area About Device connected Mouse Right Button Switch Brush Enable Windows Ink Mouse Mode Game Mode Pressure Sensitivity Adjustment Pressure Test Clear 8191 0 4 0 -4 OK Close Apply3.7 Enable the Windows Ink feature
Microsoft Windows provides extensive support for pen input. Pen features are supported in such as Microsoft Office、Windows Journal、Adobe Photoshop CC、SketchBook 6 and so on.

text_image
Huilon Tablet Press keys Digital Pen Work Area About Device connected Mouse Right Button Switch Brush Enable Windows Ink Mouse Mode Game Mode Pressure Sensitivity Adjustment 4 0 -4 Pressure Test Clear 8191 OK Close Apply3.8 Data Export and Import
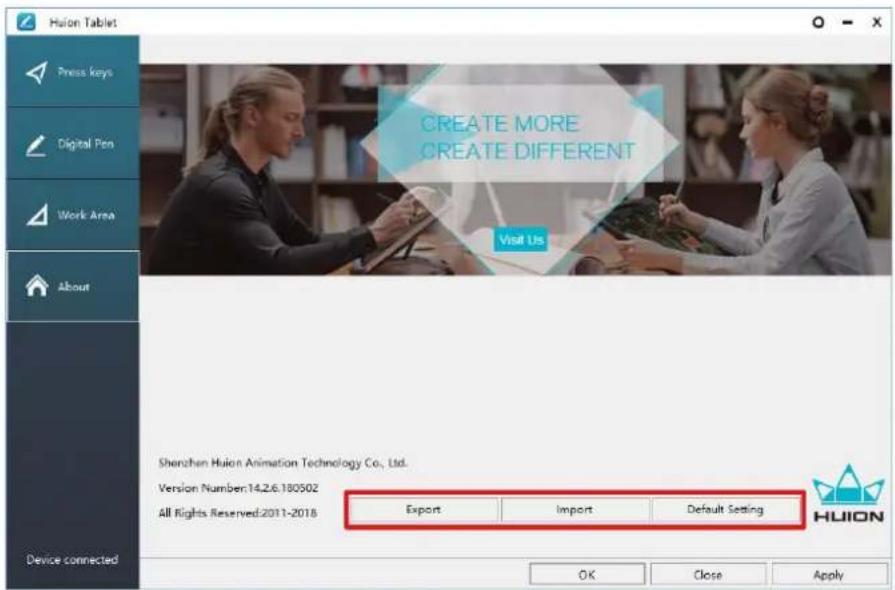
The driver supports exporting and importing your custom configuration data of the product, which is convenient for you to use different software and avoid the trouble of repeated settings.
text_image
Huion Tablet Press keys Digital Pen Work Area About CREATE MORE CREATE DIFFERENT Visit Us Shenzhen Huion Animation Technology Co., Ltd. Version Number:14.2.6.180502 All Rights Reserved:2011-2018 Export Import Default Setting Device connected OK Close Apply- Specifications
| Pen Tablet | |
| Model | WH1409 V2 |
| Touch Technology | Battery-free Electromagnetic Resonance |
| Working Area | 350 x 218mm(13.8 x 8.6inch) |
| Dimension | 456 x 266 x 16mm |
| Net Weight | 1.1kg |
| Touch Resolution | 5080LPI |
| Report Rate | 266PPS |
| Pen Sensing Height | 10mm |
| Interface | Micro USB |
| Press Keys | 12 Customized Press Keys |
| Wireless | USB 2.4G |
| Wireless Distance | Approx. 10-20m(Depending on the actual use of the environment) |
| Battery Capacity | 2000mAh |
| Life Time | Approx. 25 hrs |
| OS Support | Windows 7 or later,macOS 10.12 or later |
| Stylus Pen | |
| Model | PW500 |
| Pressure | 8192 Levels |
| Accuracy | ±0.3 mm |
5. Trouble Shooting
5.1 Possible Breakdowns Related to TABLET
| Abnormal Phenomena | Possible Solutions |
| There is no pressure in the graphics software but the cursor moves | You may have installed other tablet drivers or opened the drawing software when installing the driver. Please uninstall all drivers and close the drawing software, then reinstall the Huion driver. It's better to restart your computer after finishing the installation.' |
| While using the tablet, the battery indicator flashes red | The battery voltage is low, please recharge the tablet in time. |
| The pen does not work | 1. Make sure you are using the pen that originally came with your tablet.2. Make sure you installed the driver correctly. |
| Press Keys does not work | 1. Make sure the Press Keys function were enabled in the driver.2. Make sure you have correctly defined the Press Key |
| The cursor is not stable or the drawing line is not straight when using wireless mode | 1. Make sure there is no other 2.4G device surround, because it may affect the tablet function.2. Make sure there is no barrier between the tablet a receiver. |
| The computer can't enter sleep mode | When you are not using the tablet, please do not put the pen on the tablet surface, which will keep the computer awake. |
| The side button of the pen doesn't work | When pressing the side button, please make sure that the nib didn't touch the glass surface and the distance between the nib and surface is within 10mm. |
5.2 Possible Breakdowns Related to SYSTEM
| Abnormal Phenomena | Possible Solutions |
| The computer can’t recognize the tablet or the wireless receiver | Make sure the USB port is functional, if not, please change to another USB port. |
| The tablet charging progress seems to stop whenever the computer enters sleep mode | It might because the system stops powering the USB port. Then you can adjust your system power or energy saver settings so that the computer can’t enter sleep mode while the tablet is charging. |
6. CE and FCC Notice
This device was tested for typical body-worn operations. To comply with RF exposure requirements, a minimum separation distance of 0mm must be maintained between the user's body and the handset, including the antenna.
Third-party belt-clips, holsters, and similar accessories used by this device should not contain any metallic components. Body-worn accessories that do not meet these requirements may not comply with RF exposure requirements and should be avoided. Use only the supplied or an approved antenna.
This device in compliance with the essential requirements and other relevant provisions of Directive 2014/53/EU. All essential radio test suites have been carried out.
- CAUTION: RISK OF EXPLOSION IF BATTERY IS REPLACED BY AN INCORRECT TYPE. DISPOSE OF USED BATTERIES ACCORDING TO THE INSTRUCTIONS:
- The product shall only be connected to a USB interface of version USB 2.0
- The device complies with RF specifications when the device used at 0mm form your body
This device complies with part 15 of the FCC Rules. Operation is subject to the condition that this device does not cause harmful interference Changes or modifications not expressly approved by the party responsible for compliance could void the user's authority to operate the equipment.
NOTE: This equipment has been tested and found to comply with the limits for a Class B digital device, pursuant to Part 15 of the FCC Rules. These limits are designed to provide reasonable protection against harmful interference in are sidential installation. This equipment generates, uses and can radiate radio frequency energy and, if not installed and used in accordance with the instructions, may cause harmful interference to radio communications. However, there is no guarantee that interference will not occur in a particular installation.
If this equipment does cause harmful interference to radio or television reception, which can be determined by turning the equipment off and on, the user is encouraged to try to correct the interference by one or more of the following measures:
-- Reorient or relocate the receiving antenna.
-- Increase the separation between the equipment and receiver.
-- Connect the equipment into an outlet on a circuit different from that to which the receiver is connected.
-- Consult the dealer or an experienced radio/TV technician for help.
Specific Absorption Rate (SAR) information:
This device meets the government's requirements for exposure to radio waves. The guidelines are based on standards that were developed by independent scientific organizations through periodic and thorough evaluation of scientific studies. The standards include a substantial safety margin designed to assure the safety of all persons regardless of age or health.
FCC RF Exposure Information and Statement The SAR limit of USA (FCC) is 1.6 W/kg averaged over one gram of tissue. Device types: G10T (FCC ID: 2AFEJ-H16WT) has also been tested against this SAR limit. The highest SAR value reported under this standard during product certification for use at the ear is 1.188W/kg and when properly worn on the body is 1.342W/kg. This device was tested for typical body-worn operations with the back of the handset kept 0mm from the body. To maintain compliance with FCC RF exposure requirements, use accessories that maintain a 0mm separation distance between the user's body and the back of the handset. The use of belt clips, holsters and similar accessories should not contain metallic components in its assembly. The use of accessories that do not satisfy these requirements may not comply with FCC RF exposure requirements, and should be avoided.
Body-worn Operation
This device was tested for typical body-worn operations. To comply with RF exposure requirements, a minimum separation distance of 0cm must be maintained between the user's body and the handset, including the antenna. Third-party belt-clips, holsters, and similar accessories used by this device should not contain any metallic components. Body-worn accessories that do not meet these requirements may not comply with RF exposure requirements and should be avoided. Use only the supplied or an approved antenna.