Saturn 2 - Processor FabFilter - Free user manual and instructions
Find the device manual for free Saturn 2 FabFilter in PDF.


User questions about Saturn 2 FabFilter
0 question about this device. Answer the ones you know or ask your own.
Ask a new question about this device
Download the instructions for your Processor in PDF format for free! Find your manual Saturn 2 - FabFilter and take your electronic device back in hand. On this page are published all the documents necessary for the use of your device. Saturn 2 by FabFilter.
USER MANUAL Saturn 2 FabFilter
text_image
10101 0110 11001 fabfilter software instrumentsFabFilter Saturn 2
User Manual
text_image
FabFilter Saturn 2 labfilter Saturn2 labfilter labfilter software instruments A/8 Copy Voyager 2 Help Warm Tape MIX FEEDBACK—FREQ DYNAMICS DRIVE TONE LEVEL Space XLFO 1 Fast EG Transients Mod Wheel MIDI Learn Linear Phase High Quality 5 100% 0.0 dB 0.0 dBTable of Contents
Introduction
About FabFilter Saturn 2 3
Quick start 5
Using FabFilter Saturn 2
Overview 6
Knobs 8
Interactive multi-band display 9
Band controls 11
Modulation 13
Drag-and-drop modulation slots 15
Modulation visualization 17
XLFO 18
Envelope generator 20
Envelope follower 22
MIDI source 23
XY controller 24
Full Screen mode and resizing 25
Input/output controls 27
MIDI learn 29
Undo, redo, A/B switch 31
Presets
Loading presets 32
Saving presets 33
Section presets 34
How presets are stored....35
Purchasing FabFilter Saturn 2
Purchasing FabFilter Saturn 2 36
Entering your license key 37
Support
Support 38
Manual installation 39
VST plug-in versions 40
External side chaining 41
License agreement 43
Acknowledgements 45
About FabFilter 46
About FabFilter Saturn 2
The distortion effect has played a huge role in music history. By driving and distorting a guitar amplifier, rock-and-roll was born in the 1960s! Since that day, distortion has been used in many forms, and not only to get that crunchy electric guitar sound. Today, distortion is used to color sounds in various ways while mixing, by driving vacuum tubes, saturating tape and even by reducing bit rate.
FabFilter Saturn 2 offers many flavors of distortion and sound mangling, combined with multi-band audio processing and virtually endless modulation possibilities. From subtle, clean and warm tube or tape saturation to the wildest multi-band guitar amp effects: FabFilter Saturn 2 delivers!
text_image
FabFilter Saturn 2 fabfilter Saturn2 software instruments A/B Copy Voyager 2 Help Warm Tape MIX FEEDBACK — FREQ DYNAMICS DRIVE TONE LEVEL Space XLFO 1 Fast EG Translents Mod Wheel MIDI Learn Linear Phase High Quality 100% 0.0 dB 0.0 dBNew in Saturn 2
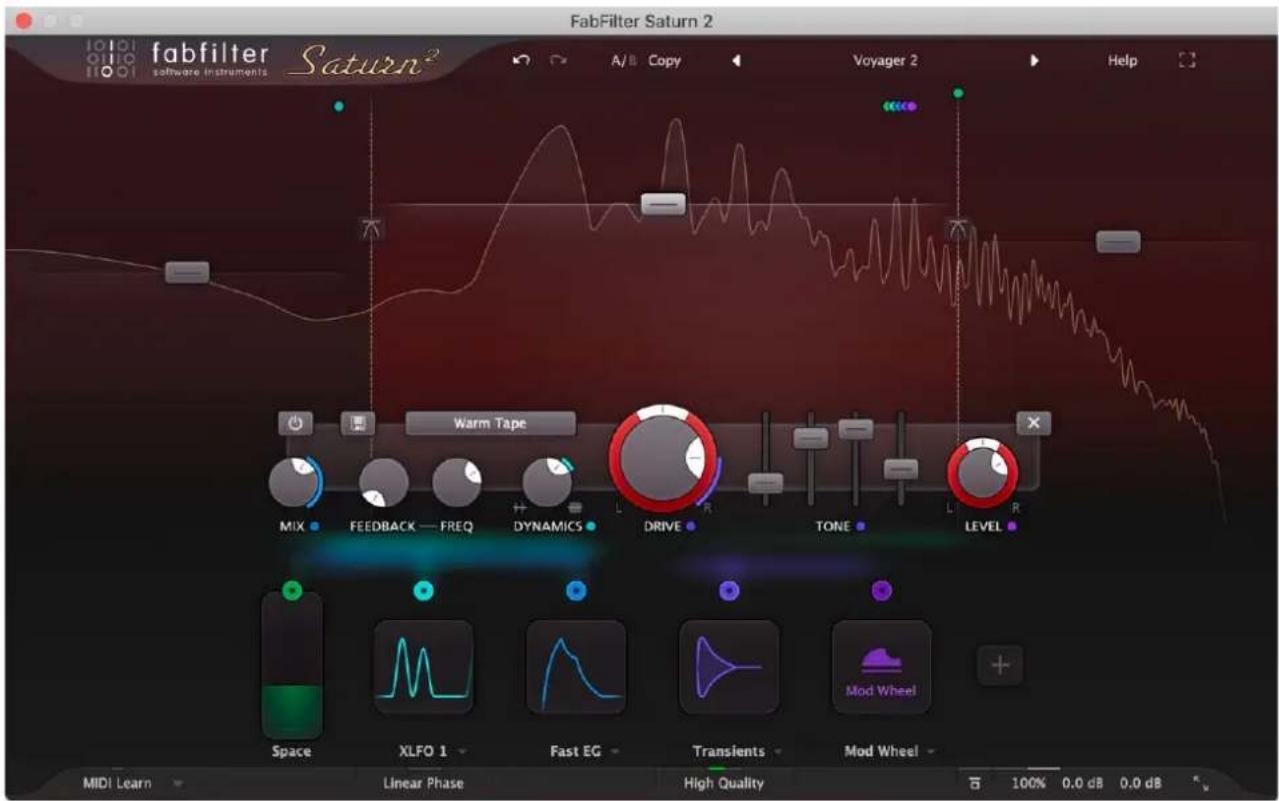
The first thing you will notice when you open Saturn 2 is the brand-new look. We have put a lot of effort into redesigning the interface, making it much more pleasant and efficient to work with. All the goodness of Saturn version 1 is still there of course, but we've added a lot more:
- Linear phase mode (for crossover filtering and the High Quality mode), making Saturn's multi-band processing much more suitable for mastering purposes.
- Adjustable slope for crossovers, offering 6, 12, 24 and 48 dB/oct options.
- Added a 'Superb' HQ mode in addition to the existing HQ mode, which reduces aliasing to an absolute minimum.
- Fully redesigned and modernized interface, including a new design of modulation sources and slots.
- Modulation visualization for modulation sources and targets.
- Introducing four new Amplifier distortion styles, modeled after famous American and British amps.
- Introducing three new Transformer distortion styles, from subtle to warm.
- Introducing new Foldback and Breakdown FX styles.
- Added new subtle versions of Tube, Tape and Saturation distortion styes, more suitable for mastering purposes.
- Envelope generators now have a curve slope setting for their attack, decay and release curves, opening up a much wider range of possible shapes, from very snappy and aggressive to gentle and smooth.
- Envelope generators and envelope followers can now also trigger on band inputs.
- Added Transient mode for envelope followers, which turns them into transient detectors.
- Introducing Slider mode and a range setting for XY controllers. In Slider mode, the XY controller only works in vertical direction, taking up much less space. The range setting toggles between bipolar (-1 to 1) and unipolar (0 to 1) behavior.
- Increased the number of XY controllers/sliders to 6.
- Modulation sources can now be renamed to make their use easier to understand.
- The XLFO Balance and Frequency Offset parameters are now modulation targets.
- XLFO MIDI triggering now offers a new Legato mode.
- The EG Threshold parameters are now modulation targets. In addition, the incoming signal level is displayed in a meter around the Threshold knob, and it's now possible to audition the external side chain input.
- The EGs now have an Range setting, toggling between Normal (a range between 0 and 1) and Neutral Sustain (a range around the Sustain level, where EG outputs 0 when it's in the sustain stage).
- Introducing full resizing and Full Screen mode.
Other key features
Of course, all the features that make Saturn unique are still there: multi-band distortion processing (up to 6 bands), a large variety of different distortion styles, from subtle saturation to heavy guitar amps and bit crushing, per-band drive, mix, feedback, dynamics, tone and level control, plus tons of modulation options with XLFOs, Envelope Followers, Envelope Generators, MIDI Sources and XY Controllers.
FabFilter Saturn 2 is available in VST, VST3, AU (Audio Units), AAX Native and AudioSuite formats.
| Windows requirements | macOS requirements |
| 32-bit: Windows 10, 8, 7, Vista or XP | OS X 10.8 or higher (64-bit only) |
| 64-bit: Windows 10, 8, 7 or Vista (x64) | AU or VST 2/3 host or Pro Tools |
| VST 2/3 host or Pro Tools | Intel processor |
Next: Quick start
See Also
Using FabFilter Saturn 2
Quick start
The installer will copy the FabFilter Saturn 2 plug-in into the common VST, VST 3, AU (macOS only) and Pro Tools plug-in folders on your computer. On macOS, the global plug-in folders in /Library/Audio/Plug-Ins are used.
In most cases, your host will then recognize the plugin automatically. However, if the instructions below do not work, see Manual installation instead.
- Pro Tools
Choose an empty insert slot on one of your audio tracks, instrument tracks or buses and select FabFilter Saturn 2 from the pop-up menu in the Harmonic section.
- Studio One
Click the '+' button next to the Inserts tab of an audio track, instrument track or bus and select 'FabFilter Saturn 2' from the drop-down menu.
- Logic Pro
Choose an empty insert slot on one of your audio tracks, instrument tracks or buses and select FabFilter Saturn 2 from the pop-up menu. You will find FabFilter Saturn 2 in the Audio Units > FabFilter section (named FF Saturn 2).
- Ableton Live
In Session view, select the track you would like to place FabFilter Saturn 2 on, for example by clicking the track name. At the left top of Ableton Live's interface, click on the Plug-in Device Browser icon (third icon from the top). From the plug-ins list, double-click FabFilter/FabFilter Saturn 2, or drag it onto the track.
- Cubase
Choose an empty insert slot, for example in the Mixer, and select FabFilter Saturn 2 from the menu that appears. To use the MIDI features in Saturn 2, create a new MIDI track and set its output to the Saturn 2 instance you have just created. (The VST 3 version of Saturn 2 can be found in the Distortion section.)
Use the Presets button at the top of the plug-in interface to try different settings from the many factory presets that are bundled with FabFilter Saturn 2. Have fun!
Next: FabFilter Saturn 2 overview
See Also
VST plug-in versions
Loading presets
Overview
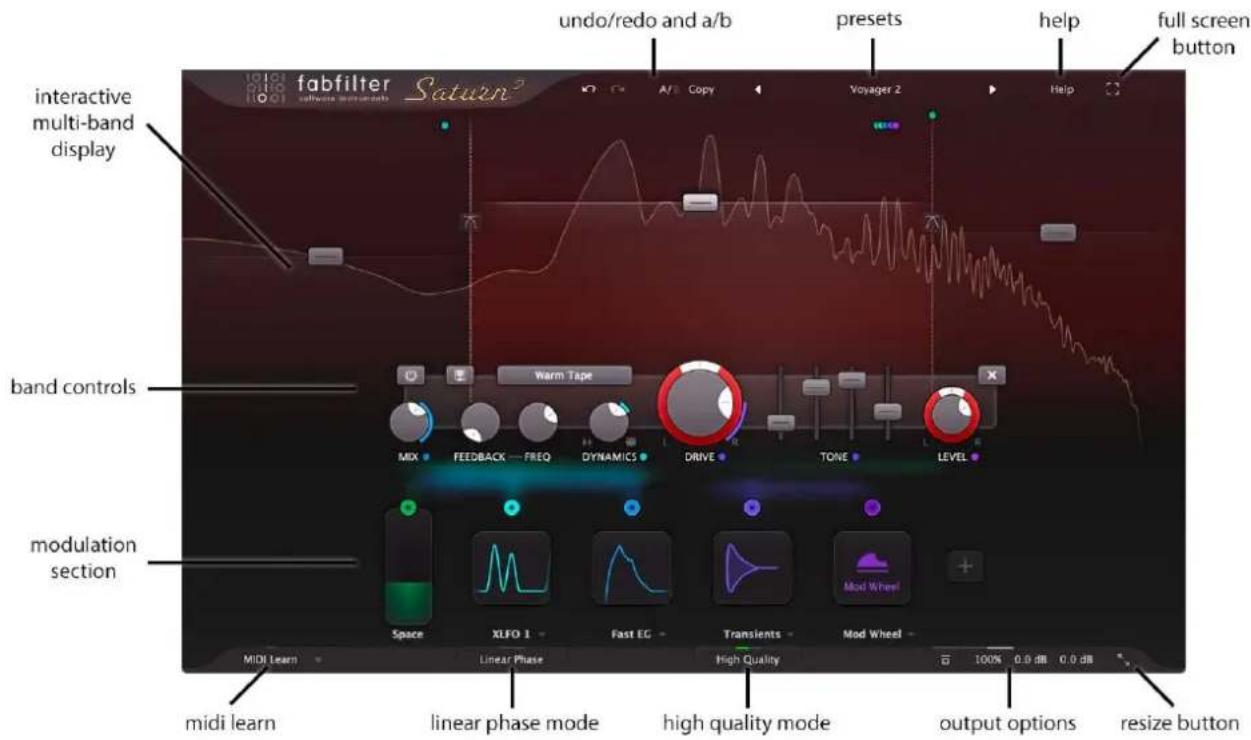
FabFilter Saturn 2's interface is divided into multiple sections:
text_image
undo/redo and a/b presets help full screen button fabfilter Saturn interactive multi-band display band controls modulation section midi learn linear phase mode high quality mode output options resize button- Interactive multi-band display
The interactive display lets you directly create and select frequency bands. At the same time, it's a real-time frequency analyzer, visualizing the outgoing signal and making it easy to decide where to set the band crossover frequencies.
- Band controls
The band controls control the settings of the selected bands in the display. For each band, you can separately adjust the distortion type, drive, feedback settings, dynamics, tone, level and mix settings.
• Modulation section
The modulation section at the bottom shows all modulation sources, visualizing the signal flow and making it easy to set up modulation and create new sources. FabFilter Saturn 2 offers XLFO, Envelope generator (EG), Envelope follower (EF), MIDI and XY controller or slider sources. See Modulation to get started.
- Linear Phase
When Linear Phase mode is enabled, both multi-band crossover filtering and internal oversampling (High Quality mode) is done using linear phase filtering. See Input/output options.
- High Quality
The High Quality button controls the oversampling of the internal distortion algorithms, offering Good and Superb modes. See Input/output options.
• Output options
On the far right of the bottom bar, you can bypass the entire plug-in and the output button gives access to the Unrestricted Feedback, Channel Mode and input/output/mix controls. See Input/output options.
- Resize and Full Screen mode
Using the Resize button at the right of the bottom bar, you can choose a desired interface size. In addition, using the Full Screen button at the right top corner, you can enter Full Screen mode, in which Saturn 2 fills the whole screen. See Full Screen mode and resizing.
- MIDI learn
MIDI Learn lets you easily associate any MIDI controller with any plug-in parameter. See MIDI Learn.
• Presets, undo, A/B, help
With the preset buttons, you can easily browse through the factory presets or save your own settings so you can re-use them in other songs. The Undo, Redo, A/B and Copy buttons at the top of the plug-in interface enable you to undo your changes and switch between different states of the plug-in. Finally, the Help menu provides access to help and version information. See Loading presets and Undo, redo, A/B switch.
Next: Knobs
See Also
Quick start
Knobs
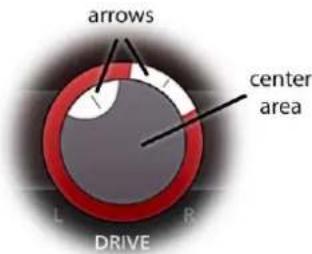
It is easy to control FabFilter Saturn 2's parameters with the large round knobs. They will light up when you move the mouse cursor around to indicate that you can adjust them. The moment you move the mouse cursor over a knob, a parameter value display will pop up, which shows the name and the current value of the parameter.
text_image
arrows center area L R DRIVEAll knobs support four ways of control:
1. Vertical mode
Click on the center area of a knob and drag up or down to rotate it. The knob reacts to the speed with which you are dragging, so if you move the mouse slowly, you make precise adjustments.
2. Rotate mode
Grab the arrow of the knob and drag it around. By moving the mouse cursor further away from the knob while dragging it, you can make precise adjustments.
3. Mouse wheel mode
Perhaps the easiest way to make adjustments is by using the mouse wheel when you hover over a knob. This mode works for all the knobs and possible panning rings. (On Windows, you might need to click in the plug-in interface first to make sure it is the active window.)
4. Text entry mode
Double-click a knob to enter an exact value using the keyboard.
Tips
- To reset a knob to its default position, hold down the Ctrl key (Windows) or Command key (macOS) and click the knob once. Note: In Pro Tools, Saturn 2 uses the default Pro Tools keyboard shortcut for reset: Alt+click.
- To fine-tune a value when using vertical drag mode or the mouse wheel, hold down the Shift key while dragging or moving the mouse wheel. Note: In Pro Tools, Saturn 2 uses the default Pro Tools keyboard shortcut for fine tune: Ctrl+drag on Windows or Command+drag on macOS.
- There are several handy shortcuts in text entry mode. With frequency values, you can type e.g. '1k' to set the value to 1000 Hz, and also 'A4' for 440 Hz, or even strings like 'C#3+13'. With dB values, you can type e.g. '2x' to get +6 dB (the value that corresponds to two times louder). With all values, you can also type a percentage (e.g. '50%' will put a knob exactly in the middle position).
- Sometimes, knobs in our plug-in interfaces are linked: these be adjusted simultaneously by holding down the Alt key (Shift key in Pro Tools) while dragging on one of them. For example, an output level and input level setting of a plug-in could be adjusted simultaneously (in the opposite direction) this way.
Next: Interactive multi-band display
See Also
Overview
Interactive multi-band display
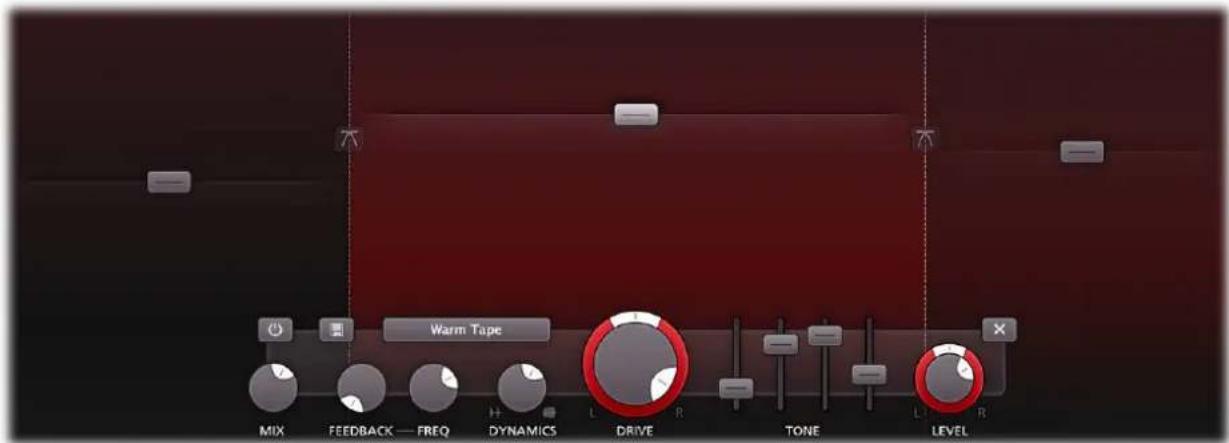
FabFilter Saturn 2's top section consists of a large interactive multi-band display, which makes it very easy to create and select frequency bands and adjust their level and drive settings. At the same time, it's also a real-time frequency analyzer.
text_image
Warm Tape MIX FEEDBACK — FREQ DYNAMICS DRIVE TONE LEVEL- To add a new frequency band, simply click on the small '+' button that appears at the top of the display when you move the mouse here. By clicking this button, the current frequency band splits with a crossover frequency at the current mouse position. The new band will copy its settings from the band that has just been split.
- Simply click anywhere in a band to select it.
- Click and drag on the display background to select adjacent bands by dragging a rectangle around them.
If only one band is active, it will be selected by default and the band controls control the settings of this single band. Once you have multiple frequency bands available, the display highlights the level buttons of the selected bands and the band controls are linked to these bands. In the screen shot above, the middle band is selected. In addition, the band controls will slide underneath the selected band.
- Click and drag a selected level button vertically to adjust the level setting of all selected bands. If you have multiple bands selected, the level of all selected bands will be adjusted with the same relative change. Alternatively, simply use the mouse wheel while hovering anywhere above one of the selected band. You can also double-click the level button to type the level value directly.
- Ctrl-click (Windows) or Cmd-click (macOS) to reset the band level.
- Hold the Alt key to adjust the drive setting of the selected bands instead, while applying one of the above changes via dragging, mouse wheel or click.
- Hold the Shift key (Ctrl in Pro Tools) to fine-tune band levels or drive while applying changes via dragging or using the mouse wheel.
- To change a crossover frequency, click and drag the vertical crossover split. Alternatively, click and drag a level button horizontally to change the crossover frequencies at both edges of the band. Double-click a crossover split to type a frequency value directly.
- Via the crossover slope button in the middle of a crossover split, you can choose the steepness of crossover filtering, ranging from a gentle 6 dB/oct to a very steep 48 dB/oct.
Tip: About everything in the display can be modulated, even the cross-over splits. Simply drag and drop a modulation source to it!
Solo and mute
text_image
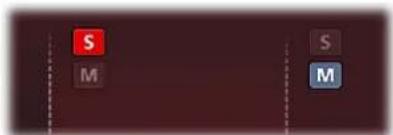
S M S MIf you hover the mouse over the top of the display and there is more than one band, small solo and mute buttons in the left-top corner of each band will appear. The solo button lets you listen to a single band, while the mute button does the opposite and mutes the band, letting you hear all other bands. Of course, you can solo or mute multiple bands at the same time, just like with tracks in your DAW.
- Hold down the solo or mute button to solo or mute a band only temporarily, as long as the mouse button is pressed.
- To solo or mute a band exclusively, Ctrl-click (Windows) or Cmd-click (Mac) the solo or mute button. Solo and mute changes can be automated and are saved with the other parameters, so you can also use them for creative effects.
Next: Band controls
See Also
Overview
Band controls
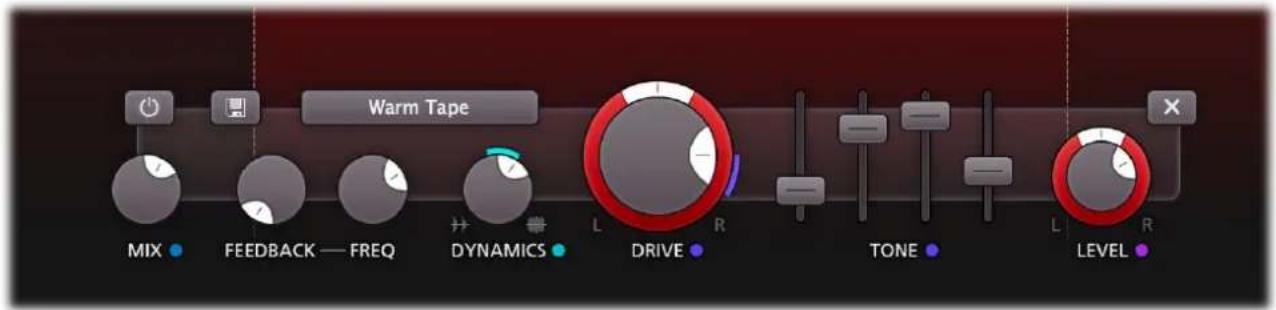
FabFilter Saturn 2 contains one set of controls to adjust the currently selected bands in the display. When only one band is used, it will be selected by default and the controls are linked to this single band. Once you have multiple frequency bands available, the band controls are linked to all selected bands.
text_image
Warm Tape MIX • FEEDBACK — FREQ DYNAMICS L DRIVE R TONE L LEVELFrom left to right, the following parameters are available:
- The Enabled button lets you easily bypass the selected frequency bands. When bypassed, the dry input signal of the band is passed to the output straight away. Note that you can also solo and mute bands with the solo/mute buttons in the display.
- The Band Presets button lets you quickly save or restore the parameters for the selected bands. See Section presets.
- The Mix sets the combination of unprocessed (dry) signal and the processed/distorted signal for the band.
- The Feedback Amount knob sets the level of feedback for the band, which feeds the processed audio back into the input of the band. The Feedback Frequency knob sets the ringing frequency of the feedback loop. You can simply compare this to the distance of a microphone which picks up the signal of an amplifier that outputs its own signal: the closer the mic gets to the speaker, the higher the ringing frequency.
- The Dynamics knob can be used to either gate or compress the band signal. Turning the knob to the right will add heavily pumping compression, while turning the knob to the left will introduce great all-purpose gating/expansion.
-
The Style button selects the type of distortion applied to the signal. You can choose between:
-
Tube emulations: from subtle and clean, high mastering-grade tubes to juicy or even broken tube sound.
- Tape emulations: subtle, clean, warm or extreme tape saturation.
- Amplifier emulations: from American and British classics to modern smooth, crunchy or screaming amplifiers.
- Transformer emulations: from subtle and controlled to colorful and lush-sounding transformer emulations.
- Smudge: this creative distortion algorithm smudges and stretches the audio in weird and unexpected ways. The Drive knob sets the amount of smudging/stretching.
- Breakdown: a combination of down pitching and aggressive distortion. Great in combination with the Drive Pan knob!
- Foldback: an aggressive and very digital sounding form of clipping.
- Rectify: a crunchy combination of rectified sound, DC offset removal and soft clipping.
-
Destroy: a destructive combination of bit-crushing, sample rate reduction and clipping.
-
The Drive knob is obviously one of the most important parameters, setting how much the clipping stage is driven with input signal. While increasing the drive, the output level will be adjusted automatically, to ensure that the overall sound level doesn't get out of control. With the pan ring, you can change the balance of the drive amount between the stereo channels (see also Mid/Side processing).
- The Tone controls adjust the bass, mid, treble and presence of the processed band signal, allowing you to tweak the harmonics generated by the distortion algorithm.
- The Level knob sets the output level of the selected bands between minus infinity and +36 dB. With the pan ring, you can change the relative levels of the left and right audio channels (or mid/side when Mid/Side processing is active).
- The Remove button deletes the currently selected bands.
Tips
- If there is more than one band, you can also easily adjust the level or drive settings of any band via the interactive multi-band display.
- All continuous band parameters can be modulated, of course!
- When adjusting band settings with a continuous range (for example Drive, Level, Dynamics) for multiple selected bands at once, the relative differences between the bands will be preserved. When adjusting discrete parameters (HQ, Distortion Style), the parameter for all bands will be set to the same new value. If you double-click a knob to enter a value, this value will be applied to all bands directly as well.
Next: Modulation
See Also
Overview
Interactive multiband display
Modulation
When you open the plug-in with its default settings, the interface looks simple and clean. But the real fun with FabFilter Saturn 2 starts with the incredible modulation options. Almost any parameter can be modulated. These are called modulation targets. They can be modulated by any of the following available modulation sources:
- The XLFO can generate almost any waveform you can imagine and can be synchronized to the host tempo.
- The Envelope generator is of the usual ADSR kind and triggered by audio or MIDI.
- The Envelope follower will follow the loudness or transients of the audio signal it triggers on.
- The MIDI source transforms any incoming MIDI data into a modulation signal.
- Finally, the XY controller or slider lets you modulate targets using horizontal and/and vertical mouse movements.
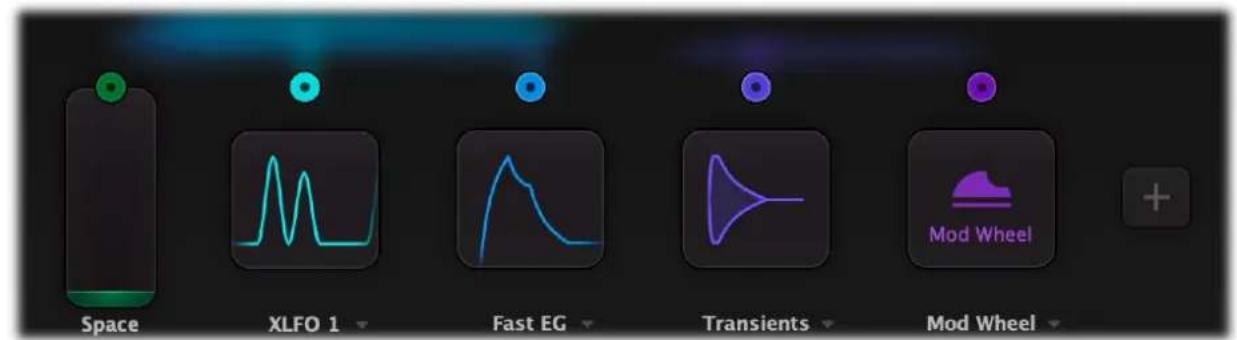
To add a modulation source, just click the '+' button in the modulation section at the bottom of the interface and choose one of the available options. Now, a source component button becomes visible, showing a graphical representation of the source's current settings.
To delete a source, move the mouse over the source component button and click the remove icon × in the right-top corner.
A modulation source drag button is located at the top of the source (two for XY controllers). Drag-and-drop this button to any modulation target in the interface to make a new modulation connection. The modulation signal always flows via a modulation slot that allows you to vary the extent of modulation. Click the source drag button once to pop up the modulation slot panel, containing all slots that are affected (either directly or indirectly) by this source.
Every source has its own associated color scheme, which is also used for modulation visualization and modulation indicators in the interface, making it easy to see which types of sources are modulating a target.
text_image
Space XLFO 1 Fast EG Transients Mod WheelClick a source component button once to expand the full source interface. Click and drag a button to directly adjust the main parameters for the source, as shown in the value displays when you hover above the button. For example, with an XLFO you can directly change the frequency.
You can customize any source's name by double-clicking the label below the source. Source names are stored in presets, A/B and undo states and will be saved with your session.
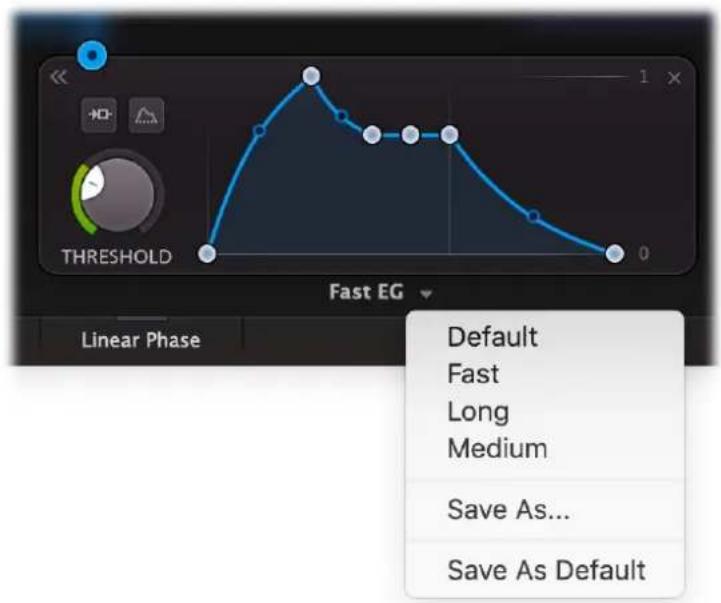
Right next to the source name label, the preset button ▼ provides access to the source's section presets. You can customize the default settings for a newly added source by overwriting the predefined Default section preset using the Save As Default item in the preset menu.
text_image
THRESHOLD Linear Phase Fast EG Default Fast Long Medium Save As... Save As DefaultTip
- If a modulation source drag button shows a filled dot inside, this means the source is actually in use at the moment.
Next: Drag-and-drop modulation slots
See Also
Overview
Modulation visualization
Drag-and-drop modulation slots
One of the best features in FabFilter Saturn 2 is the way you set up modulation connections with drag-and-drop. There is no need to search through long drop-down menus containing dozens of sources and targets or to find your way in cluttered and obscure matrix views. This simple method of making modulation connections makes sound design fun, easy and, above all: fast. So how does it work?
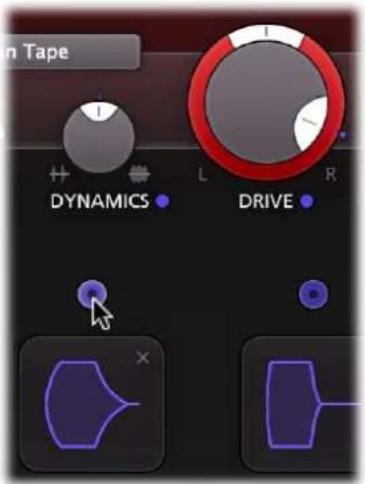
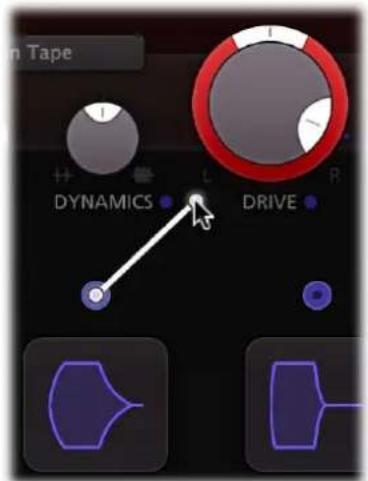
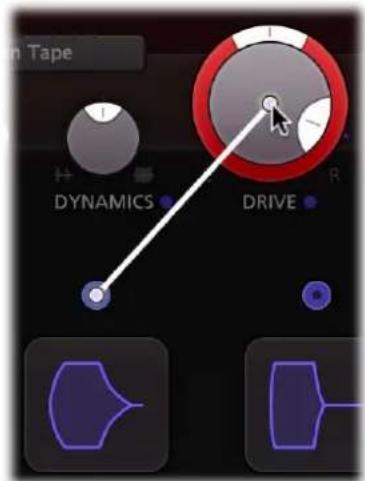
Grab a source... ... drag it to a target... ... and drop it.
text_image
In Tape DYNAMICS L DRIVE RFirst, grab the source drag button that you would like to use as a modulation signal, for example XLFO 1. The moment you click on the source drag button, the interface dims and all modulation targets are highlighted.
text_image
in Tape DYNAMICS L DRIVE RThe moment you start dragging, you will see a line from the source drag button to the icon that you are dragging. If you hover the mouse over the bands in the display or source selection buttons they will automatically be activated. The line will snap to any available modulation target.
text_image
In Tape DYNAMICS DRIVENow drop the icon on the highlighted target of the parameter that you would like to modulate, for example the Drive knob of Band 2. That's all there is to it!
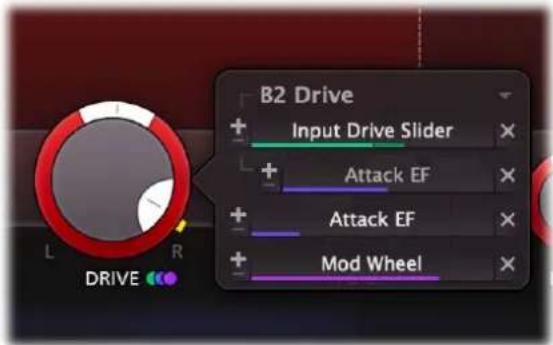
After you have connected a modulation source to a target, the modulation slot panel will popup near the target control. It contains all slots that affect the modulation target. Slots that modulate other slot levels, are shown indented and connected to the slot they are modulating.
text_image
B2 Drive + Input Drive Slider + Attack EF + Attack EF + Mod WheelWhen a control is modulated, a small modulation indicator dot appears near the control. The color matches the source that modules the control. If multiple types of sources modulation a control, the modulation indicator consists of multiple colored dots.
You can view the slots for a specific source or target, simply by clicking any of the modulation source drag buttons or clicking any target control or modulation indicator in the interface. In the modulation slot panel that pops up, slots can be adjusted in the following way:
- Use the level slider to adjust the amount of modulation. Like with knobs, hold down Shift for fine-tuning; hold down Alt to adjust all slot levels for the same source; Ctrl-click (Windows) or Command-click (macOS) to reset the level to the default value. (In Pro Tools, the default Pro Tools shortcuts are used instead.)
-
To the left of the Level slider, you can invert the modulation signal with the +/- button.
-
When you hover over the slider on the left an on/off button appears. Use this to temporarily disable the slot.
- On the right, a drop-down menu is accessible that lets you change the slot's source or target.
- To delete the slot, click the Remove button × to the right of the Level slider.
- To delete/bypass/invert all slots, use the drop down menu at the right top of the slot panel.
Tips
- When a modulation indicator appears in a band in the interactive multi-band display or in an envelope generator, this means one or more parameters of that band or EG are modulated. When you click the indicator, the modulation slot panel that pops up shows all slots that modulate the band or envelope generator.
- To hide the modulation slot panel, simply click on a background area in the display or interface.
Next: Modulation visualization
See Also
Modulation
Modulation visualization
New in Saturn 2 are the advanced modulation visualization features which greatly help you to understand the effect of the modulation that is going on. In the plug-in interface, modulation is visualized in three different ways: the effect of applied modulation to controls is shown by real-time target level indicators, the global amount and direction of modulation generated by sources is visualized in the source flow area, and finally, current connections by different types of sources are made clear by the modulation indicators next to target controls.
Target level indicators
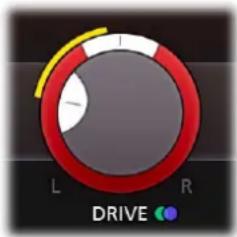
All modulation that is applied to a control in the interface is shown in real-time via target level indicators around knobs, sliders and other controls. The level indicator originates from the current knob/slider position, and shows the range of modulation: it visualizes how the knob is dynamically changing due to the current modulation signal.
The color of the target level visualization matches the type of source that modulates it. Note that if a target is modulated by multiple types of sources, a generic yellow color is used instead.
text_image
L R DRIVEThe source flow area
In the area right above the modulation sources, the signal being produced by the sources is visualized in real-time by a diffuse flow, directed towards the targets it is currently modulating.
This visualization gives you a global idea of the current activity and effect of sources. It is not intended to show all connections exactly, as this would highly clutter the interface and would probably be more confusing than helpful.

text_image
EQ DYNAMICS DRIVE TONE LEVEL X YModulation indicators
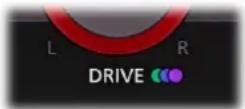
When a control is modulated, a small modulation indicator dot appears near the control. The color matches the source that modules the control. If multiple types of sources modulation a control, the modulation indicator consists of multiple colored dots.
When a modulation indicator appears in a band in the interactive multi-band display or in an envelope generator, this means one or more parameters of that band or EG are modulated. When you click the indicator, the modulation slot panel that pops up shows all slots that modulate a target of the band or envelope generator.
Tips
- Click on a modulation indicator next to a target control or on a control itself, to pop up the modulation slot panel, showing all associated modulation slots. Click the control again, or click on the interface background, to hide the modulation slot panel.
- Are you seeing yellow colored target level visualization? This means that the target is modulated by multiple types of sources at the same time.
Next: XLFO
See Also
Overview
XLFO
The XLFO is like a classic LFO (Low Frequency Oscillator) on steroids: it can do so much more! It can be a regular LFO, but it can also turn into a 16-step sequencer with an individual glide setting for every step. The display shows the waveform that is used by the XLFO. Steps can be freely added or deleted to shape the funkiest of waveforms.
To add an XLFO as a modulation source, click the + button in the modulation section and click New XLFO.

natural_image
Digital audio waveform display showing a teal sine wave pattern on a dark background (no text or symbols)Initially the XLFO is shown as a source component button in the interface, showing a graphical representation of the current settings. For more information on working with source component buttons, see Modulation.
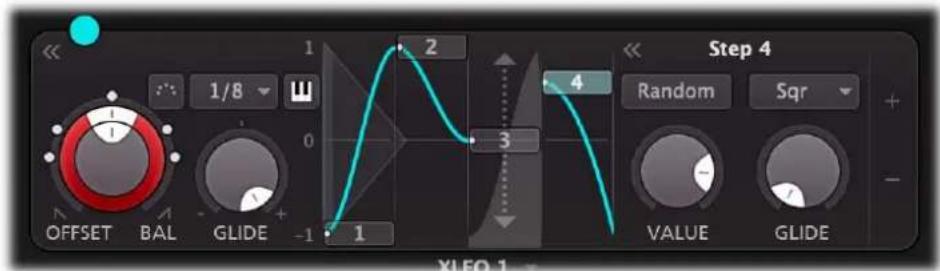
Click the source component button once to expand the full XLFO interface:
text_image
1/8 OFFSET BAL GLIDE -1 0 1 2 3 4 Step 4 Random Sqr + VALUE GLIDE XLEO 1At the left, you will find the global parameters that affect the entire waveform:
- Frequency
The frequency knob sets the time it takes for one cycle of the waveform to complete. This knob is a modulation target, so you could let one XLFO modulate the frequency of another XLFO. The XLFO can be synchronized to the tempo of the plug-in host or set to run free. With the options at the top-right corner of the frequency button you can choose the different settings:
- Free running mode will allow values from 0.02 to 500 Hz, so the minimum cycle length is 0.002 seconds.
- When using any of the synchronized cycle lengths (16 to 1/64, measured in bars) the frequency knob changes into the Offset knob. It now acts like a cycle length multiplier and therefore is capable of changing the cycle length relative to the host tempo, from half to two times the host tempo. Click the dots around the knob to jump to certain predefined offsets for dotted and triplet synchronization. Note that the Offset knob is also a modulation target.
Balance
The outer ring of the frequency knob adjusts the time balance of the first and last halves of the step sequence. For example, when turned to the left, the first half of the wave form is generated more quickly than the last half. The balance ring is also a modulation target so you can modulate the balance for creative effects.
- MIDI sync
The XLFO can be restarted at any point using MIDI if one of the MIDI sync options is enabled at the top-right corner of the frequency knob. In the Retrigger mode, any note-on MIDI message (e.g. pressing a key) will restart the cycle of the waveform (to the point set by the Phase offset slider). If set to Legato mode, the XLFO will only be triggered by the first note-on MIDI message, and won't retrigger on successive notes while notes are still being held down.
- Snap
This function makes it possible to use the XLFO as an arpeggiator. When you enable Snap, a small piano keyboard appears, the range of the XLFO turns into 2 octaves, and steps "snap" to notes on the piano keyboard. Now when you modulate a frequency parameter, turn the slot level to maximum, and the total amount of modulation will exactly correspond to 2 octaves.
- Glide
The global Glide knob acts like an overall glide offset. The amount of glide determines the point within a step at which the XLFO starts to interpolate to the value of the next step. The global Glide value is added to the glide value for individual steps to arrive at the final glide value for each step. The final glide value is limited between 0 (no interpolation) and 1 (full interpolation). Because the global Glide value can range from -1 to 1 it can completely overrule the individual step glide values at the extreme settings. It is also a modulation target which allows for very cool effects.
- Phase offset
In the step editor you can see a triangular shape. The vertical line of the shape indicates the beginning of each cycle. You can move this triangular shape, and thus change the beginning of a XLFO cycle. This phase offset is a modulation target, so when the XLFO frequency is set to 0, you can use another modulator to cycle through the different steps. Tip: Like with knobs, you can Ctrl/Command-click on the phase offset slider to reset it.
To delete an XLFO, move the mouse over it and click the remove button × in the top right corner. Below the source, next to the source name, the Presets button ▼ provides access to the XLFO section presets. By default, the XLFO starts with two steps that make a sine wave. You can customize this by overwriting the predefined Default section preset using the Save As Default command from the preset menu.
Editing Steps
You can shape the waveform of the XLFO in almost any way you want by editing the individual steps.
- Drag a step up or down to change the value for the step.
- Click a step to select it.
- Hold down Ctrl (Command on Mac) and click a step to select multiple steps. Hold down Shift and click a step to select a consecutive range of steps.
- Click next to a step to deselect all steps.
- Click the + button at the end of all steps to add a new step. The new step is added to the right of the selected step, or at the end of all steps.
- Click the - button at the end of all steps to remove the selected steps. If no steps are selected, the last step is removed.
If one or more steps are selected, the XLFO expands to show the step interface where the parameters for the selected steps can be edited:
- Random
The Random button enables random values for this step. If enabled, the XLFO will use a new random value for the step each time it encounters it. The display also changes to show that the value is chosen at random (see step 3 in the screen shot above).
- Value
The Value knob adjusts the value of step. This is the same as dragging the step up and down, except that with multiple selected steps, the value of all steps is set to the same value. In contrast, when you drag multiple selected steps, the relative distance is kept the same.
- Curve
The Curve button selects the curve that is used to interpolate to the next step when the final glide value is higher than 0: Linear, Sqr, Sqrt and Sine.
- Glide
The Glide knob sets the per-step glide value. This is combined with the global glide value to determine at which point the XLFO starts to interpolate towards the next step.
To start exploring the many sound-shaping possibilities, start with an XLFO that modulates a Drive knob or Crossover Frequency to make the sound change over time. You'll be amazed by the many possibilities. Have a look at the presets to see the XLFO in many different setups to get an idea of what it can do for you and start creating your own sequences!
Next: Envelope generator
See Also
Modulation
Drag-and-drop modulation slots
Envelope generator
The envelope generator (EG) generates a traditional ADSR envelope. The envelope defines how the level changes with time and is controlled by the Attack, Decay, Sustain and Release parameters. Its function is to modulate a parameter over time, based on MIDI input or the amplitude of an audio signal (e.g. plug-in input or external side chain signal) that triggers it.
To add an envelope generator as a modulation source, click the + button in the modulation section and click New Envelope Generator.
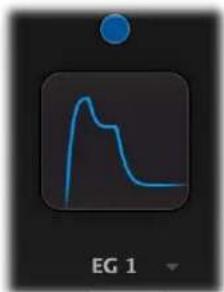
natural_image
Blue line graph icon on dark background, labeled 'EG 1' at bottom left (no other text or symbols)Initially the EG is shown as a source component button in the interface, showing a graphical representation of the current settings. For more information on working with source component buttons, see Modulation.
Click the source component button once to expand the full EG interface:
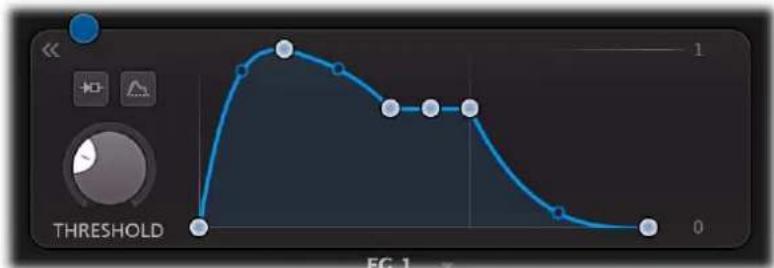
text_image
THRESHOLD 1 0 FIG 1The expanded interface contains a large graphical envelope controller with triggering controls on the left.
- The trigger input button opens a menu to select which signal is used for triggering the EG: the main input signal, the signal from the external side-chain input, MIDI note on events, or one of the band inputs. See also External side chaining.
- An audition button becomes visible when triggering on the external side-chain or a band input. Click and hold it to temporarily listen to the signal this EG is triggering on.
- The threshold knob sets the level of the incoming signal that the EG will trigger on. You should adjust the threshold depending on the type and amplitude of the incoming signal. The circular level meter around the threshold knob gives a good indication of what threshold level to use. Note: the threshold knob is hidden when MIDI input triggering is used.
- The range button selects whether the EG produces a signal in the default range between 0 and 1, or with a range such that the EG outputs 0 while in its sustain phase. In the latter case, the EG will attack from a negative value to a positive value, and finally release to a negative value. This "centers" the output value around 0, which can be useful for modulation.
In the envelope controller you can click and drag the dots to customize the envelope shape. The following parameters are available:
- Delay The time it takes for the attack to start after the key is pressed (or triggered when the input signal exceeds the threshold).
- Attack The Attack portion of the envelope is the time taken for the amplitude to reach maximum value. Slow attack is commonly part of sounds called pads. But for percussive sounds the attack time should be as short as possible.
- Decay After the sound has reached its maximum level, it starts to decay until it reaches a level known as the Sustain level at a rate set by the Decay time setting.
- Sustain This is the level reached after the decay time. The EG will hold this level as long as a key is pressed (or as long as the trigger input level is above the threshold). Note that this parameter specifies a
volume level rather than a time period.
- Hold
Once the key is released (or the input level drops below the threshold), the value will remain at the sustain level for a time set by the hold parameter.
- Release
After the hold time the sound resumes its decay, this time at a new rate determined by the Release setting.
- Attack, Decay and Release Slope
The attack, decay, and release curves each have a slope dot in the middle that you can drag up and down to vary the curve shape between linear, logarithmic and exponential behavior. This lets you customize each of these curves to change its feel and snappiness and makes the EG much more versatile.
Tips
- When adjusting the EG control points, you can hold down the Shift key to fine-tune a setting, just like with regular knobs.
- To let a sustain pedal control the EG, you can hook it up to the Hold setting. The recommended way to do this is via a MIDI source.
Next: Envelope follower
See Also
Modulation
Drag-and-drop modulation slots
Envelope follower
The envelope follower modulation source outputs an envelope or transient signal based on the plug-in input, side-chain or band input audio level. Unlike the envelope generator, which produces its own envelope, the EF tracks the envelope of the trigger signal and smoothes it out to produce a modulation signal.
To add an envelope follower as a modulation source, click the + button in the modulation section and click New Envelope Follower.
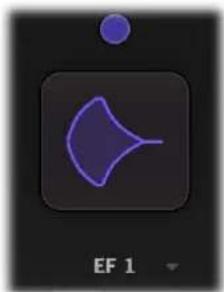
natural_image
Abstract purple shape on dark background with a blue circular element at top (no text or symbols)Initially the EF is shown as a source component button in the interface, showing a graphical representation of the current settings. For more information on working with source component buttons, see Modulation.
Click the source component button once to expand the full EF interface:
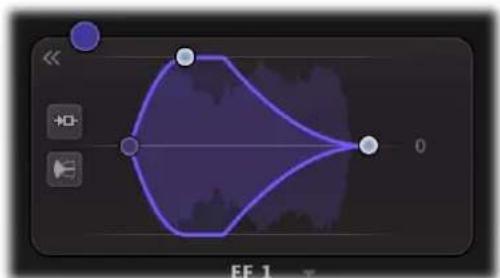
natural_image
Digital audio editing interface showing a smooth purple waveform with control buttons and a numeric input field (no readable text or symbols)In the graphical envelope controller you can click and drag the dots to customize the attack and release times of the EF, which controls how the signal is smoothed.
The trigger input button opens a menu to select which signal is used for triggering the EF: the main input signal, the signal from the external side-chain input, or one of the band inputs. See also External side chaining.
An audition button becomes visible when triggering on the external side-chain or a band input. Click and hold it to temporarily listen to the signal this EF is triggering on.
The mode button toggles between the default Envelope setting and a Transient mode, where the envelope follower will work as a transient detector, only producing output for short-term bursts of energy in the signal (e.g. drum hits).
Next: MIDI source
See Also
Modulation
Drag-and-drop modulation slots
MIDI source
The MIDI source is a powerful modulation source if you want more control over FabFilter Saturn 2 using a MIDI keyboard or MIDI controller. Note that you first need to route data from a MIDI track to Saturn 2 in your host.
To add a MIDI source as a modulation source, click the + button in the modulation section and click New MIDI Source.
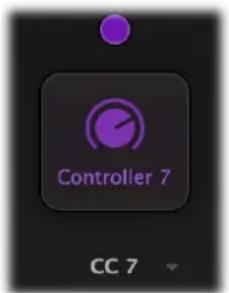
text_image
Controller 7 CC 7Initially the MIDI source is shown as a source component button in the interface, showing a graphical representation of the current settings. For more information on working with source component buttons, see Modulation.
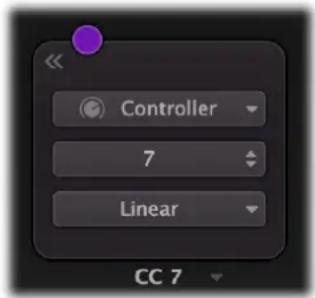
Click the source component button once to expand the full interface:
text_image
Controller 7 Linear CC 7The expanded MIDI source interface contains the following controls:
- MIDI Input
Normally the MIDI source lets you use MIDI input such as velocity, pitch bend and modulation wheel to influence any parameter that can be modulated.
- Controller number
... but when you set the input selection to Controller, it lets you use any MIDI controller as a modulation source.
• Response curve
The response curve can be adjusted to get the desired control over the MIDI source output. For example, when used with velocity as MIDI source the linear, exponential, logarithmic, square, square root or sine curves make great dynamic differences.
Using a MIDI source is different from MIDI Learn because there is no direct control of a knob via MIDI but it uses a modulation slot instead. This way you can add modulation to an already modulated destination. Or you can use the full rotation of a knob while actually modulating a smaller range. This can be a good way to control say, a band level or EG attack for which you sometimes want to make small changes with great precision.
Tips
- To let a sustain pedal control an envelope generator, use a MIDI source. Set the input to Controller, and the controller number to 64. Now, drag the source drag button for the MIDI source to the hold control point of the envelope generator, and set the slot level to maximum. Of course, you can also set up more sophisticated behavior of the sustain pedal, for example by modulation the release setting instead of hold: the possibilities are endless.
- The VST3 version of FabFilter Saturn 2 doesn't support per-note aftertouch modulation.
Next: XY controller
See Also
Modulation
Drag-and-drop modulation slots
MIDI learn
XY controller
The XY controller makes for more tweaking fun. It's a classic, and we didn't dare to leave it out! It can control two parameters with one mouse movement. When browsing presets don't forget to listen to the sound mangling possibilities provided by these controllers. The XY controller can also be set to a one-dimensional Slider mode.
To add an XY controller or slider as a modulation source, click the + button in the modulation section and click New XY Controller or New Slider.
The new XY controller or slider is now added to the modulation sources in the interface. Note that every source has its own associated color scheme, which is also used for modulation visualization and indicators in the interface.
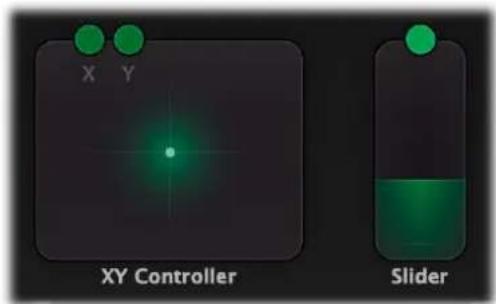
text_image
XY Controller SliderYou can customize any source's name by double-clicking the label below its interface. Source names are stored in presets, A/B and Undo states and will be saved with your session. This is particularly useful for XY controllers and sliders, to indicate their purpose in a preset.
In bi-directional mode, the XY controller has two "outputs", so it also has two source drag buttons labeled X and Y. When using it as a slider, only the Y source drag button is available.
The remove button × at the right top deletes the source, including its associated modulation slots.
At the bottom right of the XY Controller, a drop-down menu gives access to the following options:
- The mode switches between the traditional XY mode (two dimensions) or simpler Slider mode (offering only one dimension).
- The range of the XY controller can be set to bipolar (-1 to 1) domain, or to unipolar (0 to 1) behavior.
In slider mode, the current position value of the slider is displayed when you move the mouse over the slider. Double-click the slider to type a new value directly.
Tips
- To reset the XY Controller to its default position, hold down the Ctrl key (Windows) or Command key (macOS) and click once.
- When you want to adjust only one parameter on one axis, holding Shift will make it easier to do so while keeping the other parameter constant.
- With MIDI learn, you can set up a hardware MIDI controller to control the XY controller. So if your MIDI controller has XY-functionality you can directly control FabFilter Saturn 2 with it.
Next: Full Screen mode and resizing
See Also Support
Full Screen mode and resizing
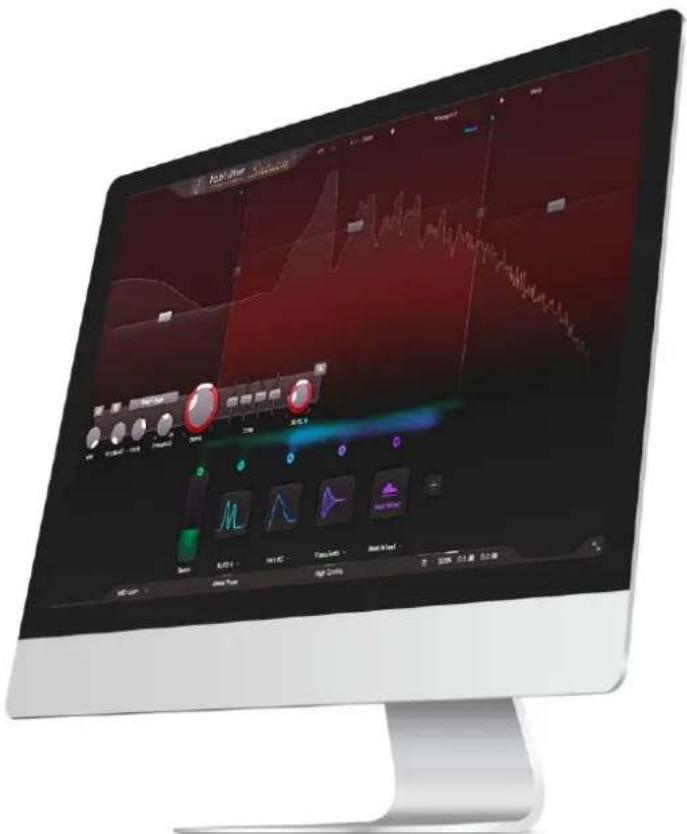
With just the click of a button, the Saturn 2 interface will fill up the whole computer screen so you can make ultra-precise adjustments and get the best view on the spectrum analyzer. To exit Full Screen mode, just press Escape or click the Full Screen button again.
text_image
Computer monitor displaying a digital audio workstation interface with waveform graphs and control buttonsResizing
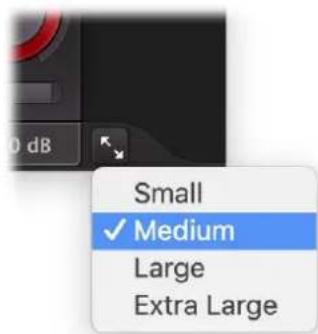
In addition to Full Screen mode, you can also customize the normal interface size using the Resize button at the right of the bottom bar. You can choose between Small, Medium (the default size), Large or Extra Large. Once you have selected a size, it will automatically become the default size for new plug-in instances.
text_image
Small ✓ Medium Large Extra LargeTips
- When using the VST3 plug-in, you can resize the plug-in interface by just dragging the window edges to any size you like. Of course you can always go back to one of the predefined sizes with the resize button.
- The Large and Extra Large interface options will be greyed out in the Resize button menu if the current display is too small to support them.
Input and output controls
Next to the MIDI learn button, the bottom bar contains various input/output options and settings.

text_image
MIDI Learn Linear Phase High QualityWhen Linear Phase is enabled, both multi-band crossover filtering and internal oversampling (High Quality mode) is done using linear phase filters. As this avoids phase distortion/smudging, it makes Saturn 2 much more suitable for mastering purposes. Note that other types of filtering that are taking place (e.g. Tone EQ, pre/post EQ stages for the different distortion types, amp and cabinet modelling) do not switch to linear phase processing, as this would highly affect the actual character of the different styles.
The High Quality button controls the oversampling of the internal distortion algorithms. Distortion processing introduces digital aliasing effects, especially when applying a lot of drive. Enabling High Quality mode will drastically reduce aliasing artifacts by oversampling the internal saturation section, at the cost of using more CPU power.
Using Good mode (8 times oversampling) will be more than sufficient to suppress possible aliasing in most cases. In Superb mode (32 times oversampling), aliasing will be reduced to an absolute minimum, but the CPU load may increase quite drastically, depending on the number of bands and the chosen distortion styles.
The Global Bypass button lets you bypass the entire plug-in. While most hosts already provide the ability to bypass plug-ins, our internal global bypass feature is guaranteed to work correctly with Linear Phase and High Quality modes (compensating for the latency of the plug-in) and also applies soft bypassing to avoid clicks. While the plug-in is bypassed, the frequency analyzer stops and a red line at the top of the bypass button appears.
text_image
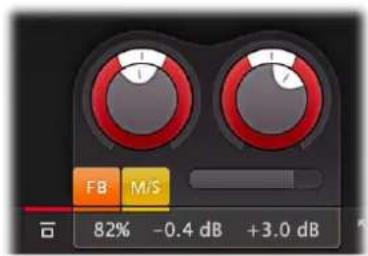
FB M/S 82% -0.4 dB +3.0 dBAs soon as you hover the mouse over the output button, right next to the bypass button, a panel with various options and large input/output/pan knobs will pop up, giving you access to the following settings:
• Unrestricted Feedback
When Unrestricted Feedback (FB) is enabled, the plug-in can self-oscillate endlessly due to feedback, even if there's no more input or playback in your DAW has stopped. By default, Unrestricted Feedback is disabled which means that the feedback amount for each band is automatically reduced when the plug-in input becomes silent.
- Channel Mode
The Channel Mode button selects how the stereo channels in Saturn are used: in normal Stereo mode (L/R) or in Mid/Side mode (M/S). Mid/Side mode lets you create a wide variety of stereo effects that are otherwise not possible. You can learn more about mid/side processing in this tutorial: www.fabfilter.com/video/#mid-side-demystified
- Input level/pan
The input reading in the output button shows the current input gain and lets you adjust it from -36 dB to +36 dB. To change the gain, you simply drag the input reading in the output button in the bottom bar up and down. For precise adjustments, or to change the panning, hover over the output button or click it once to access the input gain/pan knobs. The input gain and pan knobs are also modulation targets.
• Output level/pan
The output reading shows the current output gain, also adjustable from -36 dB to +36 dB. It works the same as the input reading and knobs and is also a modulation target. Note that you can overdrive the filters by increasing the input gain and reducing the output gain at the same time.
• Mix
You can use the mix slider to mix some of the original (dry, unprocessed) input signal back into the output signal, reducing the amount of filtered (wet) signal. Like the input and output parameters, this is also a modulation target.
Next: MIDI learn
See Also
Overview
Modulation
MIDI Learn
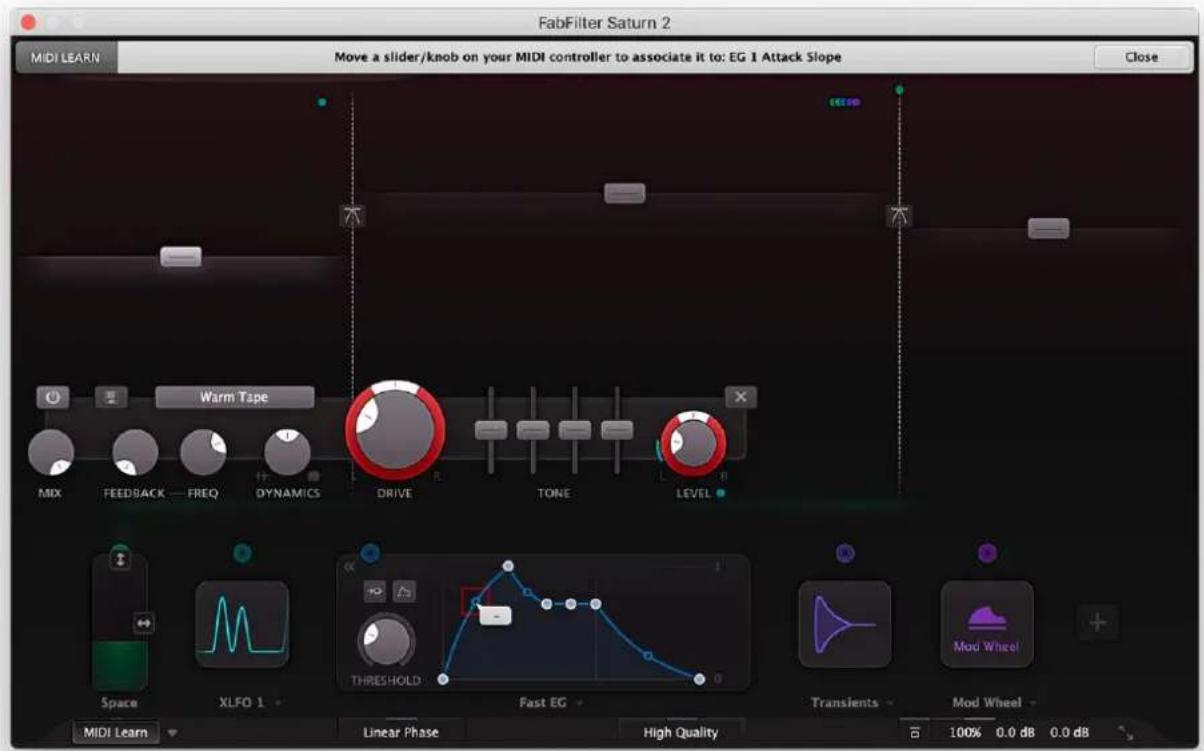
Controlling FabFilter Saturn 2's parameters directly with MIDI is very easy using the MIDI Learn feature. With MIDI Learn, you can associate any MIDI controller with any parameter.
text_image
FabFilter Saturn 2 Move a slider/knob on your MIDI controller to associate it to: EG 1 Attack Slope Close MIDI LEARN MIX FEEDBACK — FREQ DYNAMICS DRIVE TONE LEVEL Warm Tape Space XLFO 1 THRESHOLD Fast EG Transients Mod Wheel MIDI Learn Linear Phase High Quality 5 100% 0.0 dB 0.0 dBClick the MIDI Learn button in the bottom bar to enter MIDI Learn mode. The interface dims and the parameters that can be controlled are highlighted. Each parameter has a small text balloon that displays the associated controller number. Now do the following to associate a controller number with a parameter:
- Touch the control of the desired parameter in the interface that you wish to control. Ared square will mark the chosen parameter.
- Adjust the slider or knob on your MIDI keyboard or MIDI controller that you want to associate with that parameter.
That's it! The parameter will now be controlled with the MIDI controller. You can now go back to step 1 to associate a different parameter. Note that there is no warning when you associate a different knob with a controller number that is already used. It will just be replaced.
To exit MIDI Learn mode, click the MIDI Learn button again, or click Close at the top of the interface.
Click the small menu drop-down button next to the MIDI Learn button to access the MIDI Learn menu:
- Enable MIDI
This globally turns MIDI control of parameters on or off: useful in hosts that automatically send all MIDI events on a track to all effect plug-ins associated with that track as well.
- Clear
This submenu shows all parameter associations and lets you delete individual associations or clear all associations in one step.
- Revert
Reverts to the last saved MIDI mapping (or the state when the plug-in was started).
- Save
Saves the current MIDI mapping so Revert will go back to this state. The current mapping is automatically saved when closing the plug-in.
Routing MIDI to effect plug-ins
For MIDI Learn to work properly, the plug-in need to actually receive MIDI of course. Depending on your host, it can be quite difficult to route MIDI data to effect plug-ins. Here's how to do it in the most important hosts:
• Pro Tools
Create a new MIDI track. From the MIDI input drop down menu, choose your MIDI device (if not already selected) and from the MIDI output drop down menu, choose FabFilter Saturn 2 -> channel 1
for the instance you would like to control.
- Logic Pro
Instead of adding FabFilter Saturn 2 to one of the insert slots, create a new Instrument Track, and click on the Instrument slot. Then choose AU MIDI-controlled Effects > FabFilter > FF Saturn 2. Now, the plug-in receives MIDI. To get audio into the plug-in, click the 'Side Chain' drop down menu in Logic's plug-in header and choose the actual input track. Next, you can mute that original track, so you only hear the audio through the plug-in. The only downside is that plug-ins with an external side-chain cannot use it anymore.
- Ableton Live
First of all, create a new MIDI track. From the 'MIDI from' drop down menu, choose your MIDI device (if not already selected). Then, in the 'MIDI to' drop down menu, choose the Audio track that has FabFilter Saturn 2 on it. Note: only the first plug-in on any track can receive MIDI.
- Cubase
Simply create a new MIDI track and set its output to the Saturn 2 instance you would like to control via MIDI.
Next: Undo, redo, A/B switch
See Also
Overview
Undo, redo, A/B switch
The Undo and Redo buttons at the top of the FabFilter Saturn 2 interface enable you to easily undo changes you made to the plug-in. With the A/B feature, you can quickly switch between two different states of the plug-in.
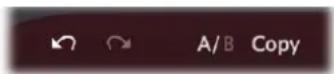
- The Undo button at the left will undo the last change. Every change to the plug-in (such as dragging a knob or selecting a new preset) creates a new state in the undo history. The Undo button steps back through the history to restore the previous states of the plug-in.
- The Redo button cancels the last undo command. It steps forward through the history until you are back at the most recent plug-in state.
- The A/B button switches from A to B and back. Before switching, the current state of the plug-in is saved, so if you click this button twice, you are back at the first state. The button highlights the currently selected state (A or B). In the example above, the A state is active.
- The Copy button copies the active state to the inactive state. This marks the current state of the plug-in and allows you to go back to it easily with the A/B button. After clicking Copy, the button disables itself to show that both states are equal, so there is nothing to copy anymore.
Notes
- If the plug-in parameters are changed without using the plug-in interface, for example with MIDI or automation, no new undo states are recorded.
- The Undo and Redo buttons will disable themselves if there is nothing to undo or redo.
Next: Loading presets
See Also
Overview
Loading presets
Plenty of presets are provided with FabFilter Saturn 2, giving a good idea of what you can do. You can either use the presets as they are, or tweak them further to create your own unique sounds.
- To load a preset, click the preset button. The presets menu will appear with all available presets. Click a menu item to load that preset. The currently selected preset is highlighted with check marks.
- To explore the presets one by one, click on the little arrow buttons to the left and right of the main preset button. This will load the previous or next preset in the menu.
The preset button shows the name of the current preset. If you have changed the preset by adjusting one or more parameters, the name is dimmed to indicate that this is not the original preset anymore.
Tips
- The Default Setting preset is loaded automatically when FabFilter Saturn 2 is started. To change the default settings, simply overwrite this preset by clicking Options > Save As Default in the presets menu.
- To open a preset outside the presets folder, click Options > Open Other Preset. This might be useful if someone sends you a preset by email, for example.
- If somehow the factory presets are lost or not installed properly, click Options >Restore Factory Presets in the preset menu to restore them.
MIDI Program Change and Bank Select
Loading a presets can also be done via MIDI, using Bank Select and Program Change messages. Click Options > Enable MIDI Program Changes in the preset menu to enable or disable this feature. When enabled, the corresponding bank/program numbers are shown in front of the preset name (for example: (0/65) My Preset). This means that you can load that preset by first sending a Bank Select message to select bank 0 and then sending a Program Change message to select program 65.
Important: All the presets in your preset folder are numbered automatically, starting with bank 0 and program 0. This way, you are able to access any of the presets via MIDI. However, this also means that when you add new presets to the menu, bank/program numbers of other presets might change. Be aware of this when recording program changes in a session! We recommend to create a dedicated folder in your presets folder for your program changes, and name it with two leading underscores (e.g. "__Programs") to ensure it's the first folder in your preset collection and the presets in this folder start with bank 0 and program 0.
Next: Saving presets
See Also
Overview
Acknowledgements
Saving presets
You can easily extend the included presets with new settings to build your own library of presets for FabFilter Saturn 2 that you can reuse in various projects. This is also a good way to copy settings across multiple instances of FabFilter Saturn 2 in a session.
To save the current setting as a preset, click the preset button, and then click Save As. A standard Save dialog will appear. Type a name for the new preset and click Save to finish.
In the Save dialog, you can also rename and delete existing presets and create a new folder to store presets in. New folders will show up as new categories in the preset menu. (On macOS, this should be done with the Finder.)
See How presets are stored to determine the preset folder location and learn more about factory presets.
Next: Section presets
See Also
Loading presets
Overview
Section presets
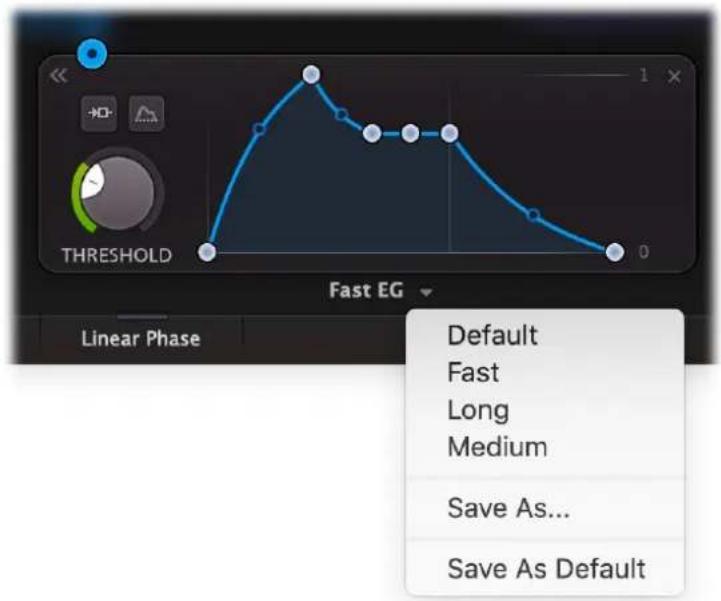
To make designing sounds for FabFilter Saturn 2 easier, you can save section presets for different sections of the plug-in. In this way you can, for example, easily re-use certain settings.
text_image
THRESHOLD Linear Phase Fast EG Default Fast Long Medium Save As... Save As DefaultTo load and save section presets, click the Presets menu button right next to the modulation source name, centered at the bottom of the source interface. This will display a presets menu for that section. FabFilter Saturn 2 comes with a selection of ready-made section presets, but we encourage you to save your own presets to build a custom library of sound building blocks.
Supported sections are:
- Band controls
XLFO
• Envelope generator
• Envelope follower - MIDI source
When you add a new modulation source, it loads its Default section preset. You can customize the initial settings just by overwriting that preset using the Save dialog.
Section presets are stored in the Application Data folder (Windows) or Application Support folder (macOS) for the current user. For example, the full path to the section presets on Windows 10 is C:\Users\
Next: How presets are stored
See Also
Loading presets
Overview
How presets are stored
Presets for FabFilter Saturn 2 are stored in separate files with the .ffp extension (for FabFilter Preset). All presets reside in subfolders in the main preset folder. The subfolders will show up as separate categories in the preset menu. You can also further divide the subfolders into categories.
You can manage the preset files just like other files on your computer. The easiest way to do this is in the Save dialog that appears if you are saving a preset. The preset menu will automatically reload itself with the changes when the dialog is closed.
Furthermore it is very easy to share your newly created presets with other users since FabFilter presets use the same file format on both Windows and macOS.
The default location of the main preset folder is My Documents\FabFilter\Saturn 2 for Windows, and \~/Library/Audio/Presets/FabFilter/FabFilter Saturn 2 for macOS. To change this location, first copy all presets to the desired new location, and then click Options > Change Preset Folder in the preset menu and select the new folder.
Restoring factory presets
If you have accidentally lost the factory presets, you can easily restore them by clicking Options >Restore Factory Presets in the preset menu. This will install all factory presets again.
Next: Purchasing FabFilter Saturn 2
See Also
Saving presets
Overview
Purchasing FabFilter Saturn 2
Once you have downloaded and installed the evaluation copy of FabFilter Saturn 2, you may evaluate it during 30 days. Every time you start the plug-in, you will see the following dialog:
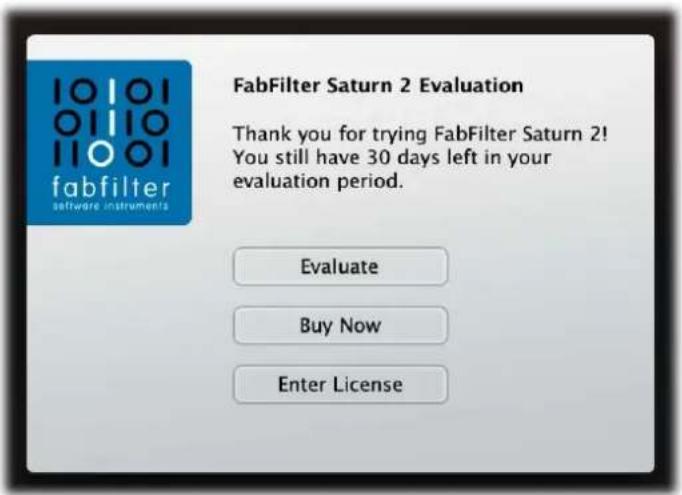
text_image
FabFilter Saturn 2 Evaluation Thank you for trying FabFilter Saturn 2! You still have 30 days left in your evaluation period. Evaluate Buy Now Enter LicenseWhile there are still days left, you can click Evaluate to start working with the plugin. If you want to keep using FabFilter Saturn 2 after the evaluation period, you must buy a copy in the online FabFilter Shop by clicking the Buy Now button in the evaluation dialog.
- Go to the FabFilter Shop and purchase FabFilter Saturn 2 now
We accept a wide range of payment methods, like credit cards, PayPal, wire transfer and iDeal. The FabFilter Shop uses secure connections and encryption: therefore your personal information is completely safe.
Within a few minutes after you have purchased your copy, you will receive an email containing your personal license key. You use this license key to turn the evaluation copy into a fully registered version without the evaluation dialog and the 30-day trial restriction. In addition, we will automatically create a FabFilter account for you (if you don't have one already). Here, you can access all your license keys at any time.
Note: If the evaluation period has expired but you didn't have the chance to properly evaluate the plugin, you can request a new evaluation period by contacting us at info@fabfilter.com.
Next: Entering your license key
See Also
Support
License agreement
Entering your license key
After you have purchased FabFilter Saturn 2 in the online FabFilter Shop ☐, you will immediately receive an e-mail containing your personal license key. This license key will turn the evaluation version into a fully registered plug-in.
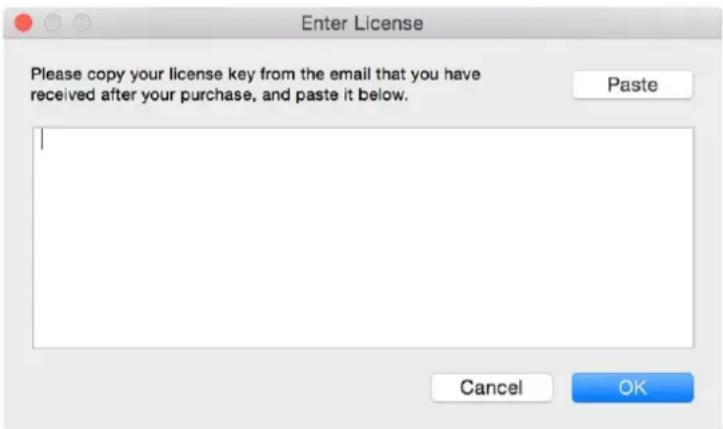
- Start FabFilter Saturn 2 and click Enter License in the evaluation dialog, or click Enter License on the Help menu if the plug-in is already running.
- Copy the license information from the email you have received and paste it into the text field. Make sure that you are copying the entire license key including the Product and Licensee lines! If you are not sure what text to copy, just copy and paste the whole e-mail.
text_image
Enter License Please copy your license key from the email that you have received after your purchase, and paste it below. Paste Cancel OKAfter you have entered your license information, you will need to restart the plug-in host, so make sure you save your settings if needed. From now on, you will be able to use FabFilter Saturn 2 for an unlimited period of time with full support via email.
Tips
- After your purchase, you can always retrieve your license key again by logging into your personal FabFilter account. Here you can also keep track of all your orders and take advantage of great discounts when buying other FabFilter plug-ins.
- To deauthorize your license key and remove it from the computer, click Deauthorize on the Help menu. If you temporarily needed to install your license on another computer, or if you have transferred your license to someone else, this is the way to deinstall your personal license key safely.
Next: Support
See Also
Purchasing FabFilter Saturn 2
Support
License agreement
Support
If you need help with problems or questions, and the help file does not provide an answer, please visit the support pages on our web site.
- Go to FabFilter Support
From here, you have direct access to the customer support forum, very useful tutorial videos for all FabFilter plug-ins, online and PDF versions of all our help files, and a section with extra downloads (such as presets, controller templates, older plug-in versions).
For sales-related questions and technical support, you can also contact FabFilter directly at info@fabfilter.com.
Reporting a bug
If you have encountered a bug in FabFilter Saturn 2, first of all make sure that you are using the latest version of the plug-in, which you can find at www.fabfilter.com/download ☑ You can easily check the version of FabFilter Saturn 2 that you are using by clicking Help > About in the plug-in interface. If the bug is still present in the latest version, please send us an e-mail at info@fabfilter.com and include as much technical information as possible: operation system and version, host software and version, steps to reproduce the bug, etc. Thanks in advance!
Next: Manual installation
See Also
Overview
About FabFilter
Manual installation
When installing FabFilter Saturn 2, the installation program will try to copy the plug-in into the appropriate plug-ins folders, and in most cases your host will recognize FabFilter Saturn 2 automatically. Otherwise, please follow these instructions:
Windows
On Windows, most hosts have their own VST plug-ins folder. So if you are using Windows and your host does not recognize FabFilter Saturn 2, you need to locate the proper plug-ins folder for your host first (it is usually shown in the Preferences or similar dialog). Then, copy the file FabFilter Saturn 2.dll from C:\Program Files\FabFilter\Saturn 2 (or C:\Program Files (x86)\FabFilter\Saturn 2 if you are using a 32-bit host on 64-bit Windows) to the plug-ins folder that you have found and restart the host so it can reload all its plug-ins. For the AAX version of Saturn 2, copy the FabFilter Saturn 2.aaxplugin folder to the common Pro Tools AAX plug-in folder on your computer.
You can simply uninstall plug-ins or bundles via the Control Panel.
macOS
On macOS, plug-ins are installed in the standard plug-in folders in the system Library folder. These are the only possible correct locations:
• Audio Units: /Library/Audio/Plug-Ins/Components
• VST/VST3: /Library/Audio/Plug-Ins/VST and /Library/Audio/Plug-Ins/VST3
• AAX: /Library/Application Support/Avid/Audio/Plug-Ins
Note: AU and VST/VST3 plug-ins may also be placed in the user's Library folders under /Users/
To uninstall the plug-ins from your Mac, you can just delete the specific FabFilter plug-in files at the above locations. Finally, if you really want to delete all data written by our plug-ins, you can remove the following folders/files from the user Library folder as well:
- /Users/
/Library/Audio/Presets/FabFilter/FabFilter Saturn 2 - /Users/
/Library/Application Support/FabFilter/Saturn 2 - /Users/
/Library/Preferences/com.fabfilter.Saturn.2.plist
Note: Since OS X 10.7 (Lion), the system and user Library folders are marked as hidden by default. To make them visible again in Finder, open Terminal (found in /Applications/Utilities) and enter the following commands:
chflags nohidden /Library chflags nohidden \~/Library
If you still have problems, contact FabFilter Support ↗.
Next: VST plug-in versions
See Also
Quick start
Support
VST plug-in versions
FabFilter Saturn 2 is available in both VST 2 and VST 3 formats. They can be installed and used both at the same time. The VST 3 format offers easy side-chaining, free interface resizing, and is more CPU-friendly in some cases, but it can only be used by hosts that support it, for example recent versions of Cubase, Studio One or FL Studio. The VST 2 format is compatible with a larger variety of hosts.
Both the VST 2 and VST 3 versions of the plug-in automatically adapt themselves to the channel layout of the track they are inserted on (mono/stereo).
Next: External side chaining
See Also
Quick start
Manual installation
External side chaining
FabFilter Saturn 2 offers the possibility of feeding an external signal to its side chain, so that you can make it trigger on a different signal than the audio it is actually processing. Feeding a signal to a plugin's side-chain inputs works slightly different in various hosts. This topic describes the procedure for some of the most popular hosts around: Cubase, Logic Pro, Ableton Live and Pro Tools.
To explain how it works, we use a scenario with two tracks. The first one contains the audio that we want to process with Saturn 2, which we'll call the main track from now. The second track contains the audio that we want to route to Saturn 2's external side-chain input and use as trigger signal. We'll call this track the side chain track.
After setting up everything according to the instructions below for your host, you can check whether everything is routed correctly: play the audio and enable FabFilter Saturn 2's Audition button to listen to the side-chain signal. Afterwards, disable the Audition mode again. Any envelope generators or envelope followers that are set to trigger on the external side chain, will now respond to the side chain signal.
Pro Tools
- Open Pro Tools and start a new empty session.
- Create two audio tracks that we'll use as main track and side chain track. Add audio files to both track.
- Open the Mix window to display the tracks with their Insert slots and Sends slots.
- In the first 'Sends' slot of the side chain track, choose 'Bus 1'. The track view for Bus 1 will open: set its level slider to 0.0 dB so the bus actually produces audio!
- In the first 'Inserts' slot of the main track, choose Harmonic > FabFilter Saturn 2.
- Open FabFilter Saturn 2's interface and set up an envelope generator or envelope follower, triggered by the external side chain signal.
- Now, in the 'Key Input' menu of the plug-in interface (just above the FabFilter logo), choose bus > Bus 1 instead of the default 'no key input'. Now, the audio from the side chain track is routed to Saturn 2's external side chain input via Bus 1.
Studio One
- Open Studio One and choose 'Create a new song'.
- Add two audio tracks (via Track > Add Tracks...) that we'll use as main track and side chain track.
- Add audio files on both the main track and the side chain track. You can simply drag audio files from a Finder/Explorer window onto a track.
- Access the mix window via "Mix" in Studio One's bottom right corner.
- Insert FabFilter Saturn 2 on your main track via the '+' button next to the Insert tab.
- Open FabFilter Saturn 2's interface and set up an envelope generator or envelope follower, triggered by the external side chain signal.
- On the side chain track, select Sends > Sidechains > FabFilter Saturn 2.
Ableton Live
- Open Ableton Live and start with an empty arrangement. We'll use Track 1 as the side chain track and Track 2 as the main track.
- From the folder menu's on at the left top of Ableton Live's interface, drag different audio clips to the first empty slots of Track 1 and Track 2.
- From the VST (or Audio Units) plug-in menu, also at the left top of Ableton Live's interface, drag FabFilter Saturn 2 onto Track 2, the main track.
- Open FabFilter Saturn 2's interface and set up an envelope generator or envelope follower, triggered by the external side chain signal.
- In Track 1 (the side chain track) in the 'Audio To' menu select 'Track 2' instead of the default 'Master'. Now, an extra menu appears right below: choose 'FF Saturn 2 3/4' instead of the default 'Track In' to route the track's signal to FabFilter Saturn 2's external side chain inputs.
- Note: In the scenario above, you won't hear Track 1 (the side-chain signal) anymore, since its audio is only routed to Saturn 2's side-chain inputs. To avoid this, use one additional track (e.g. Track 3), choose 'Track 1' from its 'Audio From' dropdown menu, and in the 'Audio To' menu select 'Track 2' instead of the default 'Master'. Now, from the extra menu below choose 'FF Saturn 2 3/4'. Of course, you can now leave Track 1's 'Audio To' setting to the original 'Master' so you will still hear the signal.
Logic Pro
- Open Logic Pro and create a new empty project via File > New...
- Add two audio tracks (via Track > New...) that we'll use as main track and side chain track.
- Add audio files on both the main track and the side chain track. You can simply drag audio files from a Finder/Explorer window onto a track.
- Select the main track and add Saturn 2 in the first Insert effect slot.
- Open FabFilter Saturn 2's interface and set up an envelope generator or envelope follower, triggered by the external side chain signal.
- In the right top corner of the plug-in interface header, in the 'Side Chain' menu, choose the side chain track. Now, the signal from the side chain track is sent to FabFilter Saturn 2's external side-chain input.
Cubase
- Open Cubase and create a new empty project.
- Add two audio tracks that we'll use as main track and side chain track.
- Add audio files on both the main track and the side chain track. You can simply drag audio files from a Finder/Explorer window onto a track.
- Open the Mixer. In the main track, click on an empty insert slot and select the VST 3 version of FabFilter Saturn 2 in the Distortion menu (note the VST 3 icon which looks like //).
- Open FabFilter Saturn 2's interface and set up an envelope generator or envelope follower, triggered by the external side chain signal.
- In the plug-in header, click on the Activate Side-Chain button (right of the R/W buttons) to enable the external side chain in Cubase.
- At the top of the Mixer, set the output for the side chain track to the side-chain input of FabFilter Saturn 2.
Next: License agreement
See Also
Input/output options
FabFilter Software License Agreement
This license agreement concerns and describes your rights and the conditions upon which you may use the FabFilter software you selected. We advise you to read this entire agreement. By accepting this agreement or by using FabFilter software, you agree to all of these terms. If you do not accept and comply with these terms, you may not use the FabFilter software or its features.
Applicability
This license agreement applies to all the FabFilter software, plug-ins and programs you may use during the Evaluation period, and/or thereafter subject to an acquired license key to certain FabFilter software of any version, including any and all upgrades, supplements or services, unless other terms come with such versions, upgrades or supplements.
Licenses
The software will be licensed to the Customer, not sold. With the FabFilter license key, you will be granted after full payment the right in perpetuity (meaning that the license agreement shall not automatically expire) to install, run and use the software concerned under certain conditions. These conditions vary subject to the license you acquired. FabFilter distinguishes the following licenses:
- A Personal License is a named license to the software concerned, granting access to the software on an unlimited number of Devices, as long the license is used by the designated person who acquired the FabFilter license key. Usage of the Personal license by someone else but the designated licensee is an infringement of the rights of FabFilter. The Customer should at all times protect its license key from theft and/or abuse.
- A Site License is a non-personal license to the FabFilter software concerned, acquired on the name of an institution or entity, who is the licensee. A Site License will grant access to the FabFilter software on a certain maximum number of designated Devices, as specified in the license key itself (e.g. "20 seats"). If the Site License is used on computers/servers for any form of automated processing, the licensee may not make any plug-in controls/parameters of the FabFilter software available to the end users of the FabFilter software, i.e. only "black box" processing is allowed.
These FabFilter licenses, whether a Personal or Site License, will give you access to certain FabFilter software of the specified major version. The license will include all future minor updates to the software (e.g. version 2.19 to version 2.20), which typically include bug fixes or small new features. The license will exclude any future new major versions of the products (e.g. version 1.x to version 2.x). To allow yourself access to such new major version of the software, a new FabFilter license to such major version must be acquired.
All FabFilter licenses, both Personal or Site License, give the Customer or end user the right to install and use the FabFilter software to the extent it has been developed and under the conditions herein. Any rights not explicitly granted to you, the Customer, remain with FabFilter, including but not limited to the right to alter, reverse engineer, reverse compile, take apart, or disassemble the FabFilter software or any of the files in the distribution.
A Bundle License is Personal or Site License for multiple FabFilter software products, which gives the Customer or end user the right to install and use the specific software products that the bundle (e.g. Total Bundle) contains at the moment of purchasing the Bundle License. Any software products or new major software versions added to the bundle after that date cannot be claimed as part of the prior acquired Bundle License. A Bundle License (if not Educational or NFR) can only be transferred as a whole, using a License Transfer.
An Upgrade License is a Personal or Site License for a new major version of FabFilter software. You may only use an Upgrade License if you have a license for the previous major version of the same FabFilter software.
Educational (EDU) and NFR licenses
A Personal or Site License can be marked as EDU (Educational) or NFR (Not For Resale), meaning the following:
- A Personal or Site License marked as Educational License is equal to the respective Personal or Site License, with the only exception that the Educational License may not be transferred to a third party.
- A Personal or Site License marked as NFR ("Not For Resale"), is typically intended for journalists that wish to review the FabFilter software. A License marked as NFR is equal to the respective Personal or Site License, with the only exception that the NFR License may not be transferred to a third party.
Duration and Evaluation
As specified in the specific terms per license, all licenses will be granted for perpetuity (meaning that the license agreement shall not automatically expire), as long as all conditions herein are respected.
The Evaluation period is a period of thirty (30) days commencing on the first day of using the software concerned and automatically expiring 30 days thereafter. After the Evaluation period has expired and no FabFilter license key has been acquired, the software will stop working and should be removed from your computer.
In addition to any and all such possibilities that FabFilter may have in accordance with the law, FabFilter may terminate without prior notice or warning in case of abuse of the FabFilter software as well as in case of (personal) bankruptcy.
Support
FabFilter shall give its reasonable commercial efforts to service any major version of any FabFilter software including email support. FabFilter is entitled to terminate support for any major version of any FabFilter software at any time at its sole discretion.
License Transfer
A Personal or Site License (not Educational or NFR) may be transferred to a third party. You will have to buy a License Transfer to activate the "transfer"-option in your FabFilter account ☑ After this option has been activated you will be able to transfer your license to any third party.
Third Party Software
VST is a trademark of Steinberg Media Technologies GmbH. RTAS and AAX are trademarks of Avid Technology, inc. Audio Units is a trademark of Apple Computer, inc.
Applicable Law
This license agreement is governed by Dutch law. The courts of Amsterdam are authorized courts to rule on any dispute that may arise from this license agreement.
Disclaimer
TO THE MAXIMUM EXTENT PERMITTED BY LAW, FABFILTER, FREDERIK SLIJKERMAN AND FLORIS KLINKERT, AUTHORS OF THIS FABFILTER PRODUCT, SPECIFICALLY DISCLAIM ALL WARRANTIES, EXPRESSED OR IMPLIED, INCLUDING BUT NOT LIMITED TO IMPLIED WARRANTIES OF NON-INFRINGEMENT, MERCHANTABILITY AND FITNESS FOR A PARTICULAR PURPOSE. FABFILTER, FREDERIK SLIJKERMAN AND FLORIS KLINKERT, DO NOT WARRANT THAT THE SOFTWARE WILL MEET YOUR REQUIREMENTS OR THAT THE SOFTWARE WILL OPERATE ERROR-FREE OR UNINTERRUPTED. TO THE MAXIMUM EXTENT PERMITTED BY LAW, FABFILTER, FREDERIK SLIJKERMAN AND FLORIS KLINKERT, SHALL NOT BE LIABLE FOR ANY DAMAGE A FABFILTER PRODUCT MAY CAUSE OR DAMAGES THAT MAY ARISE OUT OF THE USE OF A FABFILTER PRODUCT OR INABILITY TO USE A FABFILTER PRODUCT, INCLUDING BUT NOT LIMITED TO SPECIAL, INCIDENTAL, CONSEQUENTIAL OR OTHER DAMAGES. IN NO EVENT FABFILTER, FREDERIK SLIJKERMAN OR FLORIS KLINKERT WILL BE LIABLE FOR AN AMOUNT IN EXCESS OF TWO HUNDRED FIFTY EUROS (€ 250,00).
Next: Acknowledgements
See Also
Purchase FabFilter Saturn 2 Support
Acknowledgements
We would like to thank all beta testers for their relentless testing, helping us to make this plug-in as awesome (and bug-free) as possible.
FabFilter Saturn 2 comes with a library of presets. Almost all of these were created by external sound designers:
- bManic (BM)
• Stephan Müsch (SM) - Ouroboros (O)
• Dax Liniere (Dax)
• Maarten de Boer (MdB)
Visit the FabFilter sound designers page ☐ to read more about each sound designer.
Next: About FabFilter
See Also
Purchase FabFilter Saturn 2
Support
About FabFilter
Beautiful sound. Fantastic workflow. These are the foundations of FabFilter. We create powerful audio plug-ins with superb sound quality and innovative interfaces.
A unique perspective
At FabFilter, we make the best possible tools for music production and audio processing. To achieve this, we continually rethink and challenge industry standards: we've never been afraid of reinventing the wheel. Considering every little detail, we tune our algorithms and interfaces until they sound perfect, look amazing and feel great to work with.
It's the sound that counts
Above everything else, you need superb sound quality. That's why we put a lot of effort into developing unique audio processing algorithms, ranging from our famous resonating filters to transparent high-end EQ and dynamics processing.
Innovative interfaces, great design
Every FabFilter plug-in has an easy-to-use, well-designed interface aimed at providing unsurpassed workflow. Our plug-ins focus on the task you're performing at that specific moment: they expose the features you need, when you need them. And because of our special attention to design, you'll be delighted every time you open a FabFilter plug-in.
Don't take our word for it
We always set the highest standard for sound quality, usability and design to make truly great products that raise the bar on what audio software can do. That's why we're very happy with the praise we've received from users and press alike:
"In the decade since the release of its first plug-in, One, FabFilter has made an indelible mark on the music production landscape." — Computer Music magazine
"While many other software developers are busy trying to model hardware, FabFilter is leaving them in the dust by being visionaries and reaching into the future. FabFilter stuff is just on another level." — Jeff Sanders
"FabFilter has an enviable reputation for making easy-to-use, powerful tools." — Music Tech magazine
FabFilter was founded in 2002 by Frederik Slijkerman and Floris Klinkert, and is based in Amsterdam, The Netherlands.
See Also
Support
FabFilter web site