
PowerSlave - Remote control Impact - Free user manual and instructions
Find the device manual for free PowerSlave Impact in PDF.


| Product Type | Wireless Remote Trigger System (Transmitter/Receiver) |
| Brand | Impact |
| Model | PowerSlave (PSL-C, PSL-N, PSL-R) |
| Frequency | 2.4 GHz |
| Number of Channels | 16 |
| Operating Range | Up to 150 ft (50 m) |
| Sync Speed | Up to 1/200 s |
| Transmitter Dimensions | 2.7 x 1.8 x 1.2 in (6.8 x 4.5 x 3 cm) |
| Receiver Dimensions | 3.1 x 1.4 x 1.4 in (7.8 x 3.5 x 3.6 cm) |
| Transmitter Weight | 1.7 oz (48 g) |
| Receiver Weight | 2.1 oz (59 g) |
| Transmitter Power Supply | 1 x 23A 12V alkaline battery |
| Receiver Power Supply | 2 x AAA batteries |
| Key Features | 16 user-selectable channels, flash wake-up function, 2.4 GHz radio signal, wireless triggering up to 150 ft, sync speed up to 1/200 s, universal receiver |
| Maintenance & Cleaning | Clean with a soft, dry cloth. Do not use water or solvents. |
| Safety Precautions | No user-serviceable parts inside. Do not operate near flammable gases. Keep away from water. Remove batteries when not in use for extended periods. |
| Spare Parts & Repairability | No user-serviceable parts; contact Impact customer service for warranty or repair. |
| General Information | Brand: Impact, Model: PowerSlave, Made in China, FCC compliant, One-year limited warranty. |
Frequently Asked Questions - PowerSlave Impact
User questions about PowerSlave Impact
0 question about this device. Answer the ones you know or ask your own.
Ask a new question about this device
Download the instructions for your Remote control in PDF format for free! Find your manual PowerSlave - Impact and take your electronic device back in hand. On this page are published all the documents necessary for the use of your device. PowerSlave by Impact.
USER MANUAL PowerSlave Impact
natural_image
Two black power slave flashboxes with visible buttons and ports, displayed against a yellow background (no text or symbols on the devices themselves)PSL-C / PSL-N / PSL-R
PowerSlave Transmitter / Receiver
INSTRUCTIONS
Table of Contents
Introduction....3
Key Features ....4
Precautions 5
Overview....6
Contents Include 8
Compatible Devices 10
Battery Installation....11
LED Indicator Lights 12
Channel Selection 12
Connecting the Transmitter to the Camera....13
Mounting the Receiver on a Light Stand 14
Mounting the Receiver to a Studio Flash....15
Mounting the receiver to the Impact Quickbox 16
Wirelessly Triggering Your Hot-Shoe Flash....18
Wirelessly Triggering Your Studio Flash 18
Wake-Up Feature....19
Using as a Camera Trigger 20
Specifications 22
Troubleshooting....23
Introduction
Thank you for choosing Impact.
Congratulations on the purchase of your Impact PowerSlave Transmitter for Canon / Nikon with Wake-Up feature. This 2.4 GHz wireless system opens up a new world of options for beginners and advanced users alike who wish to trigger their devices from a distance. This product is especially useful for those who want to trigger their flash inside an Impact Quikbox or other softboxes using a radio signal, eliminating the need for line-of-sight wireless connections. It's also a great solution for photographers interested in controlling the camera shutter from a wired or wireless trigger.
The Impact PowerSlave's built-in wake-up function frees the user to remotely wake a device from a sleep mode to a ready-to-be-triggered state without having to walk back to the device. The 16 user-selectable channels help avoid interference from others. The Impact PowerSlave allows flash sync speeds of up to 1/200 of a second on compatible cameras, enabling you to take advantage of sync speeds that match the rating of your camera.
The Impact PowerSlave transmitter wake-up function is available in separate dedicated models for Canon or Nikon cameras. To make full use of the device, use only the dedicated hot-shoe flashes that are compatible with your camera brand.
Key Features
- Sixteen user-selectable channels: Multiple channels allow you to change your transmitter/receiver settings to avoid interference from other wireless remotes.
- Flash wake up: Allows the user to wake a flash device after it has entered sleep mode by half pressing the shutter release button.
- Universal receiver: The PowerSlave receiver is universally compatible with both Canon and Nikon versions of the transmitter companion device and can be used with either the dedicated Canon or Nikon transmitter.
- Multiple triggering options: Can be used to trigger a hot-shoe flash, studio flash, or camera shutter release.
- 2.4 GHz radio signal: Using a radio signal allows you to trigger a studio flash with less interference.
- Wireless triggering: Cable-free wireless triggering allows you to trigger a device from up to 150-feet (50 meters) away.
- Flash sync speed up to 1/200s: Take advantage of sync speeds that match the rating of your camera up to 1/200 of a second (compatible cameras only).
Precautions
- Please read and follow these instructions and keep this manual in a safe place.
- There are no user-serviceable parts inside the devices. Do not attempt to disassemble or perform any unauthorized modification.
- Do not operate the Impact PowerSlave units in the presence of flammable gas or vapors.
- Do not handle with wet hands or immerse in or expose to water or rain. Failure to observe this precaution could result in fire or electric shock.
- Keep out of reach of children. This device contains small parts which may pose a choking hazard.
- Observe caution when handling batteries. Batteries may leak or explode if improperly handled. Use only the batteries listed in this manual. Make certain to align the battery with the correct polarity.
- Batteries are prone to leakage when fully discharged. To avoid damage to the product, be sure to remove the batteries when leaving the product unattended for prolonged periods or when no charge remains.
- Handle the units with care.
- Do not use or leave the devices in conditions of extreme heat, severe cold, or high humidity.
- Turn off the power on your camera and flash units before inserting or removing the remote cord.
- Dispose of used batteries, packaging, and old devices in accordance to appropriate local environmental regulations.
- Clean the unit with a soft, dry cloth.
- Use only parts provided by the manufacturer.
- Make sure the item is intact and that there are no missing parts.
- All images are for illustrative purposes only.
Overview
PowerSlave Transmitter
- Indicator/Confirmation Light
- Test Button/Shutter Release
- Hot Shoe
-
On/Off Switch
-
Channel Selector Switches
- Battery Compartment
- Hot-Shoe Mount
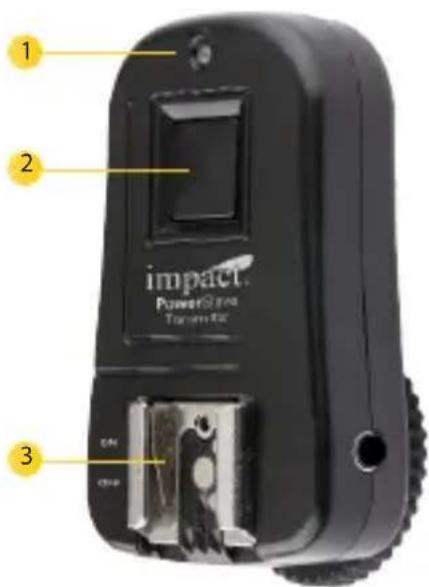
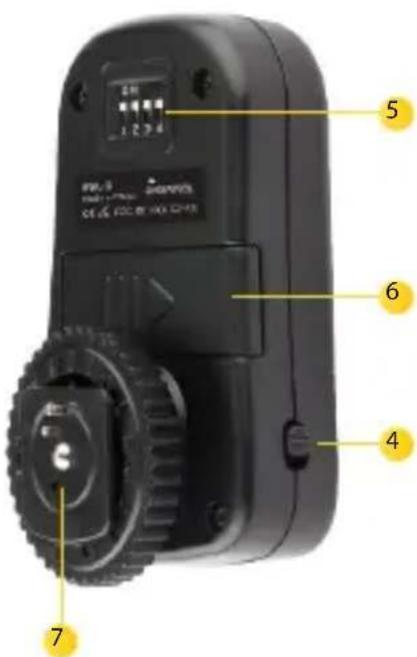
Overview (Continued)
PowerSlave Receiver
- Indicator/Confirmation Light
- On/Off Switch
- Channel Selector Switches
-
Hot Shoe
-
Cold Shoe
- Battery Compartment
- 1/4"-20 Light-stand Mount
- 2.5 mm Output Port
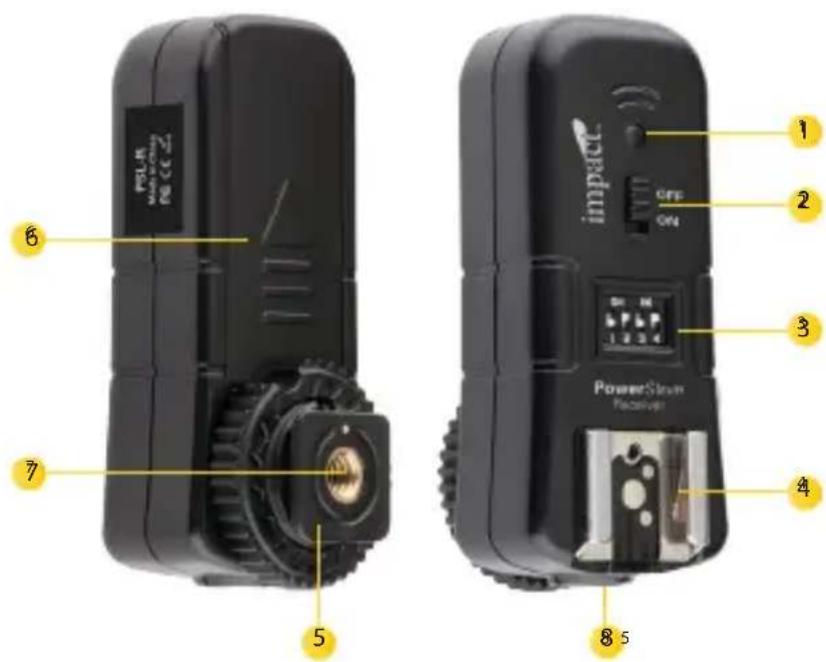
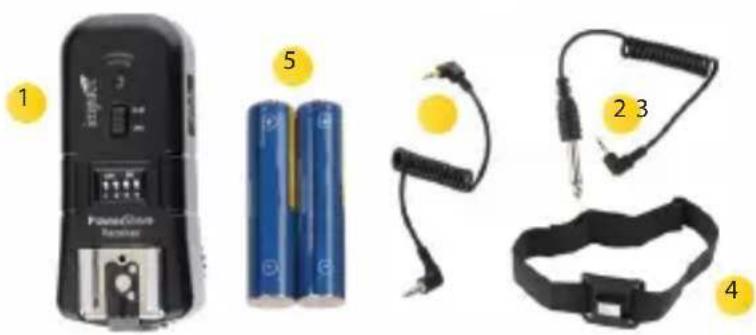
Contents Include
PSL-C / PSL-N
- Dedicated transmitter specific for Canon or Nikon hot-shoe mount
- Receiver with 1/4"-20 light stand socket and universal shoe mount
- 2.5 mm to PC sync cable
-
2.5 mm to 1/4" monoplug sync cable
-
2.5 mm to 3.5 mm sync cable
- Elastic light stand cold-shoe mount
- 1 × 23A 12-volt alkaline battery
- 2 × AAA batteries
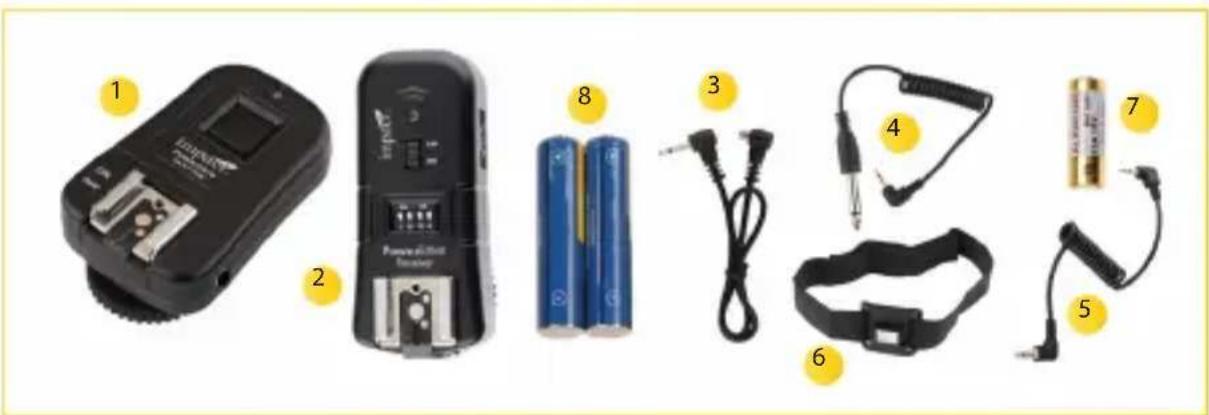
Contents Include (Continued)
PSL-R
- Receiver with 1/4"-20 stand socket
- 2.5 mm to 1/4" monoplug sync cable
-
2.5 mm to 3.5 mm sync cable
-
Elastic light stand cold-shoe mount
- 2 × AAA batteries
natural_image
Product photo showing a power cord controller, two blue batteries, a black cable with straps, and a strap (no text or symbols visible)Compatible Devices
We recommend that you use a fully manual-controlled flash with this device. Since the PowerSlave does not transmit TTL settings, the power output must be set manually.
The PowerSlave is compatible with most cameras, flash units, and studio lights. However, for flash wake-up functionality, the camera, flash, and PowerSlave transmitter must be compatible.
To take advantage of the flash wake-up feature using a Canon camera, the flash must be Canon compatible and the PowerSlave model for Canon must be used. Likewise, the PowerSlave for Nikon model must be employed in order to take advantage of the flash wake-up feature using a Nikon camera.
Note:
- If the flash does not have a wake-up function, the sleep mode may have the option to be disabled. Refer to your flash's manual for instructions.
- The Sony/Minolta, Pentax, Sony Multi-shoe cameras and flashes are not compatible with the PowerSlave system.
Battery Installation
Before You Begin
The Impact PowerSlave system transmitter requires one 23A 12-volt alkaline battery (included). The receiver requires two AAA batteries (included).
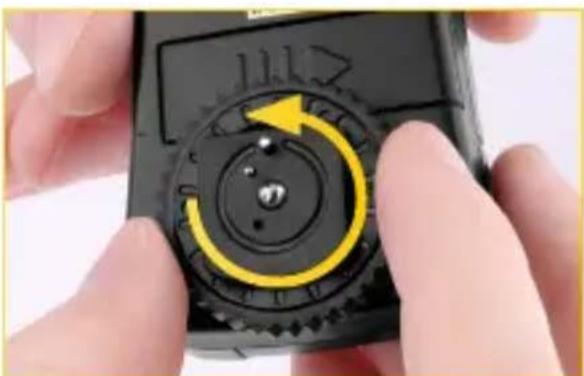
To install the batteries:
- Turn all devices off.
- Loosen the shoe locking wheel, and remove the battery compartment door from the back of the unit.
- In each unit, insert the required batteries in the battery compartment. Be sure they are installed using the correct polarity as indicated inside the compartment.
- Replace the battery compartment doors.
To turn on the transmitter or receiver, move the On/Off switch to the On position. Do the opposite to turn off the device.
natural_image
Close-up of hands holding a black handheld device with a yellow circular dial and arrow indicator (no visible text or symbols)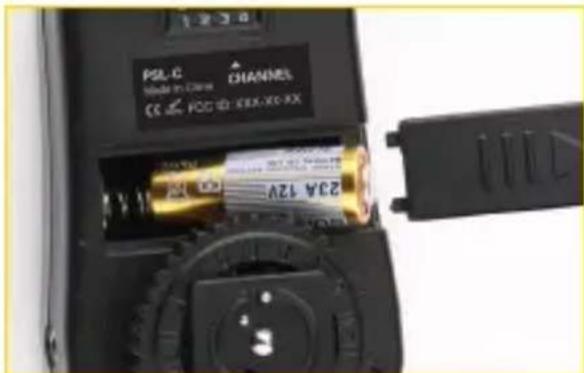
natural_image
Close-up of a black electronic device showing a cylindrical battery with a gold internal component, attached to a black plastic housing (no visible text or symbols on the device itself)LED Indicator Lights
The PowerSlave transmitter and receiver each contain an LED indicator light. The lights display their device status slightly differently.
Transmitter:
• Power on: one green flash
• Auto-focus: green while trigger button half-pressed
- Trigger: red while trigger button fully pressed
Receiver:
• Power on: one red flash
- Auto-focus: green while transmitter trigger button half pressed
- Trigger: red while transmitter trigger button fully pressed
Channel Selection
The PowerSlave transmitter and receiver provide the user with 16 selectable channels. Make sure that both the transmitter and the receiver are set to the same channel. Select a channel by configuring the four switches as shown in the chart below.
Note: Channel 1 sends a "trigger all" signal to all available receivers, regardless of what channel they are set to.

Connecting the Transmitter to the Camera
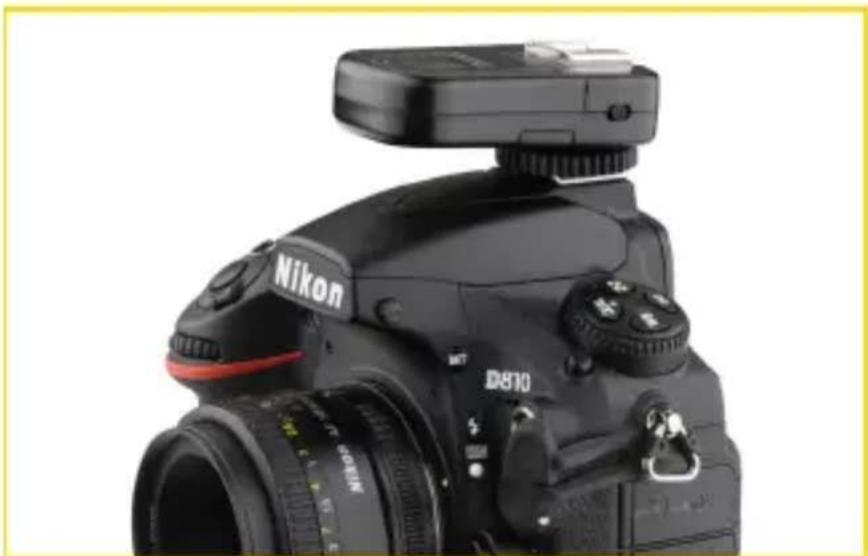
Connecting to a Hot Shoe
- Turn off all devices.
- Slide the transmitter's hot-shoe foot into your camera's hot shoe.
- Turn the locking wheel to secure the transmitter to the camera.
natural_image
Close-up of a black Nikon DSLR camera with attached top and lens (no visible text or symbols on body)Mounting the Receiver on a Light Stand
The receiver has a 1/4"-20 threaded socket for secure mounting to compatible light stands.
- Turn the device over a compatible threaded light stand stud until tight.
NOTE: An umbrella bracket with an adjustable flash shoe is available separately.
Connecting the Receiver to a Flash
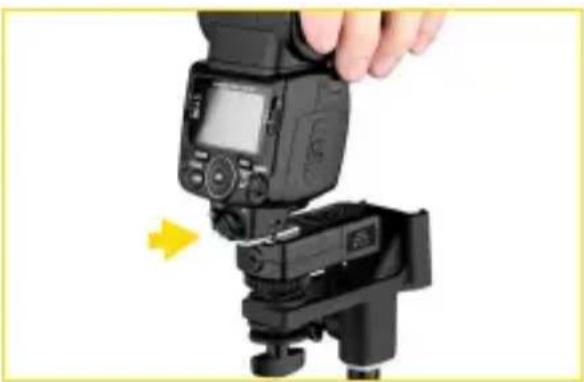
To a Hot-Shoe Flash
- Slide the flash's hot-shoe foot into the receiver's hot shoe.
- Tighten the locking ring to secure the devices.
- Attach the flash/receiver assembly to a light stand or tripod using the receiver's 1/4"-20 threaded socket.
natural_image
Hand holding a DSLR camera with a yellow arrow indicating motion (no text or symbols visible)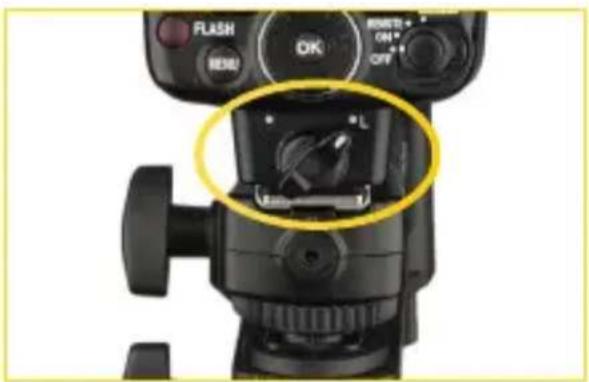
Mounting the Receiver to a Studio Flash
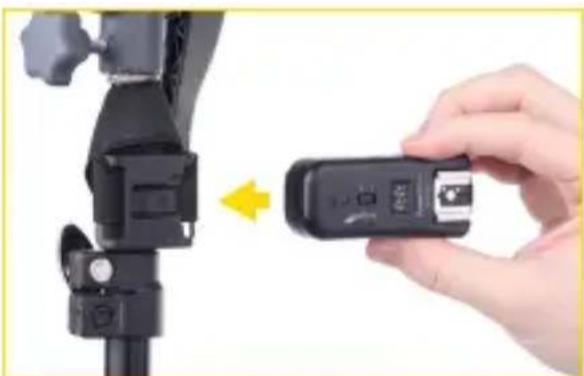
To a Studio Flash
- Use the adjustable elastic light stand cold-shoe mount to secure the receiver to a studio flash or stand. The receiver fits into its cold-shoe mount.
- Using the included 2.5 mm to 1/4" monoplug sync cable, or the 2.5 mm to 3.5 mm sync cable, connect the receiver to the studio flash.
Make sure that both the transmitter and the receiver are set to the same channel.
natural_image
Hand holding a black handheld device next to a black tripod-mounted camera rig, with a yellow arrow indicating the motion direction (no text or symbols visible)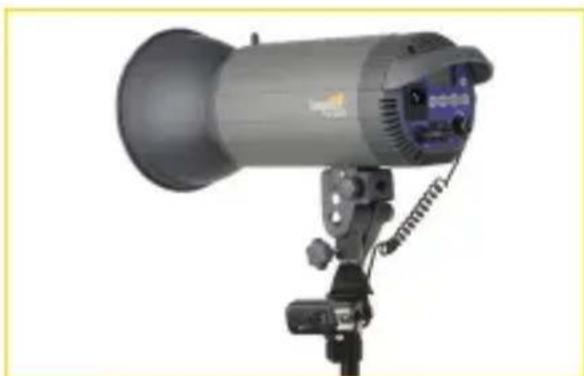
natural_image
Exterior view of a gray optical instrument with adjustable lens and tripod base (no visible text or symbols)Mounting the receiver to the Impact Quickbox
The following instructions are for mounting the PowerSlave receiver to the Quickbox. For more information about Impact's Quickbox and the Speed Ring Flash Bracket, refer to the user manuals included with those products.
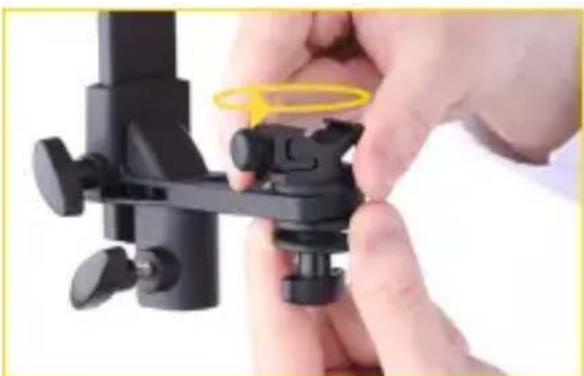
Preparing the Speed Ring Flash Bracket
- Slightly loosen the bottom thumb screw.
- Hold the thumbscrew and the three washers in place while unscrewing and removing the cold shoe from the bracket.
- Align the threaded socket of the receiver with the top of the exposed screw and screw in the receiver until secure. Tighten the locking wheel until it is secure.
natural_image
Close-up of hands assembling a black mechanical clamp or clip device with a yellow ring on the handle (no text or symbols visible)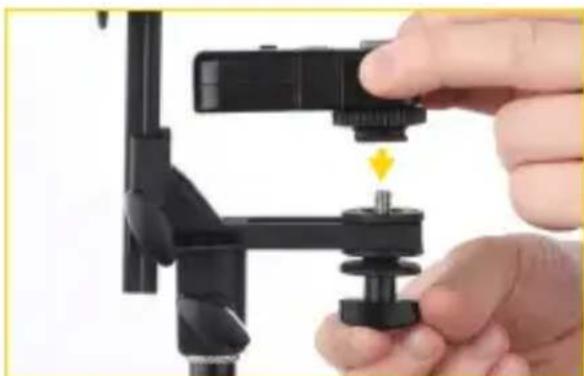
natural_image
Close-up of a hand adjusting a black mechanical clamp or fixture with a yellow arrow indicating the adjustment point (no text or symbols visible)Mounting the receiver to the Impact Quickbox (Continued)
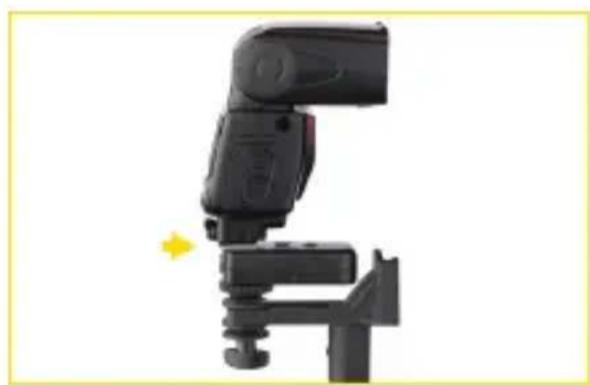
Note: Depending on the height of the receiver and/or flash head, the three disc-shaped washers located under the cold shoe are removable to create an optimal fit for the receiver and flash assembly.
-
Fasten the flash head directly onto the cold shoe of the receiver.
-
Adjust the height of the bracket by loosening the side adjustment thumb screw and moving the bracket so that the flash is centered in the opening.
natural_image
Close-up of a black camera lens assembly with a yellow arrow indicating motion direction (no text or symbols visible)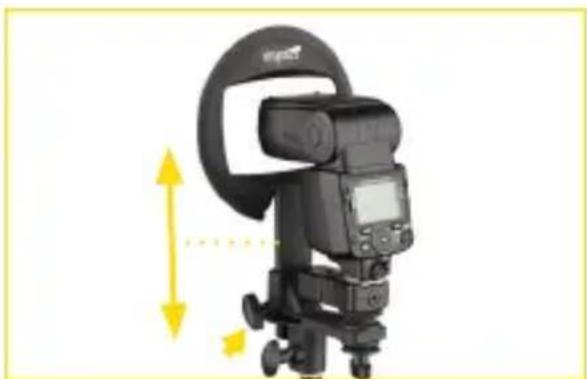
natural_image
Black camera setup with a circular head cover and yellow directional arrows indicating motion (no text or symbols)Wirelessly Triggering Your Hot-Shoe Flash
- With the device turned off, connect the transmitter to the camera (see setup instructions in "Connecting the Transmitter to the Camera" on pg. 13).
- With the hot-shoe flash turned off, connect the flash to the receiver. Tighten the flash's locking lever to secure the devices.
- Mount the connected receiver and flash to a light stand or secure it into the desired position.
- Synchronize the channels on the transmitter and receiving devicest.
- Switch on the receiver and flash devices.
- Press the on-camera shutter release button or the test button on the transmitter to fire the flash.
Wirelessly Triggering Your Studio Flash
-
With both devices turned off, connect and secure the transmitter to your camera (see setup instructions in "Connecting the Transmitter to the Camera" on pg. 13).
-
With the studio flash turned off, connect the receiver to the studio flash (see setup instructions in "Mounting the Receiver to a Studio Flash" on pg. 15) using the included cable.
Wake-Up Feature
- Synchronize the channels on the transmitter and receiver. See channel selection instructions on page 12.
- Turn on the camera, transmitter, receiver, and studio flash.
- Press the shutter release button on the camera or the test button on the transmitter to trigger the flash.
NOTE: A household male to 1/4" female adapter is available separately.
Wake-Up Feature
Some devices will enter sleep mode after a period of inactivity. If the flash has a wake-up function, the Impact PowerSlave system has an easy-to-use function that wakes up the flash after it has entered sleep mode.
To wake up a device, half-press the camera's shutter release button.
TIP: If the flash does not have a wake-up function, the sleep mode may have the option to be disabled. Refer to your flash's manual for instructions.
Using as a Camera Trigger
Triggering Your Camera
Connecting the receiver to the camera
- Turn off all devices.
- Slide the receiver's cold-shoe foot into the camera's hot shoe.
- Tighten the locking ring to secure the devices.
- Connect the devices with the appropriate shutter release cable (not included). Insert the 2.5 mm sync cable into the receiver's output, and the other end into the camera's shutter release port.
- Synchronize the channels on the transmitter and receiver.
- Turn on the transmitter, receiver, and camera.
- Set the camera to single-shot mode.
- Half-press the Test/Shutter Release button on the transmitter to auto-focus the camera. The camera and lens must be set to auto-focus for this function to work.
- Press the Test/Shutter Release button on the transmitter to trigger the camera's shutter.
NOTE: See insert for compatible Shutter Release Cables.
Using as a Camera Trigger (Continued)
Wireless Bulb Mode (Long Exposure):
- Turn off all devices.
- Connect the receiver to the camera using the appropriate shutter release cable.
- Synchronize the channels on the transmitter and receiver.
- Turn on the transmitter, receiver, and camera.
- Set the camera to Bulb mode.
- Half-press the Test/Shutter Release button on the transmitter to auto-focus the camera. The camera and lens must be set to auto-focus for this function to work.
- Press and hold the Test/Shutter Release button on the transmitter to trigger the camera's shutter. The shutter will stay open as long as you hold the button down. Release the button to close the shutter.
Specifications
Specifications
Frequency 2.4 GHz
Number of channels 16
Receiver connections 2.5 mm output sync port
Operating range Up to 150' (50 m)
Sync Speed Up to 1/200s
Transmitter dimensions 2.7" x 1.8" x 1.2" (6.8 x 4.5 x 3 cm)
Receiver dimensions 3.1" x 1.4" x 1.4" (7.8 x 3.5 x 3.6 cm)
Transmitter Weight 1.7 oz. (48 g)
Receiver Weight 2.1 oz. (59 g)
Transmitter power 1 x 23A 12v alkaline battery
Receiver power 2 x AAA batteries
Troubleshooting
- Make sure that all devices are set to the same channel.
- If your first choice of channel doesn't work due to interference, try different channels until you find one that works.
- Make sure that all cables are installed correctly.
- Make sure that the power source for each device is properly installed and carrying a sufficient charge. Weak batteries can reduce the distance over which a transmission works.
- Make sure the devices are connected using the correct cable and make sure the cable is connected to the correct input/output port.
- Make sure that the communication confirmation light appears when sending or receiving a signal.
- Verify that flash and camera equipment are operating properly.
- Make sure the devices are within the maximum operating range.
- Verify that your camera and flash are compatible with this device. Please reference the Device Compatibility section of this manual (pg. 10) for more information.
FCC DISCLAIMER:
This device complies with Part 15 of the FCC rules. Operation is subject to the following two conditions: (1) this device may not cause harmful interference, and (2) this device must accept any interference received, including interference that may cause undesired operation.
CE FC
Made in China
One-Year Limited Warranty
This IMPACT product is warranted to the original purchaser to be free from defects in materials and workmanship under normal consumer use for a period of one (1) year from the original purchase date or thirty (30) days after replacement, whichever occurs later. The warranty provider's responsibility with respect to this limited warranty shall be limited solely to repair or replacement, at the provider's discretion, of any product that fails during normal use of this product in its intended manner and in its intended environment. Inoperability of the product or part(s) shall be determined by the warranty provider. If the product has been discontinued, the warranty provider reserves the right to replace it with a model of equivalent quality and function.
This warranty does not cover damage or defect caused by misuse, neglect, accident, alteration, abuse, improper installation or maintenance. EXCEPT AS PROVIDED HEREIN, THE WARRANTY PROVIDER MAKES NEITHER ANY EXPRESS WARRANTIES NOR ANY IMPLIED WARRANTIES, INCLUDING BUT NOT LIMITED TO ANY IMPLIED WARRANTY OF MERCHANTABILITY OR FITNESS FOR A PARTICULAR PURPOSE. This warranty provides you with specific legal rights, and you may also have additional rights that vary from state to state.
To obtain warranty coverage, contact the Impact Customer Service Department to obtain a return merchandise authorization ("RMA") number, and return the defective product to impact along with the RMA number and proof of purchase. Shipment of the defective product is at the purchaser's own risk and expense.
For more information or to arrange service, visit www.impactstudiolighting.com or call Customer Service at 212-594-2353.

IMPACT™
A Gradus Group Brand
Product warranty provided by the Gradus Group.
www.gradusgroup.com
IMPACT is a registered trademark of the Gradus Group.
© 2016 Gradus Group LLC. All Rights Reserved.

- Table of Contents
- Introduction
- Key Features
- Precautions
- Overview
- PowerSlave Transmitter
- Overview (Continued)
- PowerSlave Receiver
- Contents Include
- PSL-C / PSL-N
- Contents Include (Continued)
- PSL-R
- Compatible Devices
- Note:
- Battery Installation
- Before You Begin
- LED Indicator Lights
- Transmitter:
- Receiver:
- Channel Selection
- Connecting the Transmitter to the Camera
- Connecting to a Hot Shoe
- Mounting the Receiver on a Light Stand
- Mounting the Receiver to a Studio Flash
- To a Studio Flash
- Mounting the receiver to the Impact Quickbox
- Mounting the receiver to the Impact Quickbox (Continued)
- Wirelessly Triggering Your Hot-Shoe Flash
- Wake-Up Feature
- Using as a Camera Trigger
- Triggering Your Camera
- Using as a Camera Trigger (Continued)
- Wireless Bulb Mode (Long Exposure):
- Specifications
- Troubleshooting
- FCC DISCLAIMER:
- One-Year Limited Warranty
Brand : Impact
Model : PowerSlave
Category : Remote control