Air R - Télécommande à distance NISSIN - Free user manual and instructions
Find the device manual for free Air R NISSIN in PDF.


User questions about Air R NISSIN
0 question about this device. Answer the ones you know or ask your own.
Ask a new question about this device
Download the instructions for your Télécommande à distance in PDF format for free! Find your manual Air R - NISSIN and take your electronic device back in hand. On this page are published all the documents necessary for the use of your device. Air R by NISSIN.
USER MANUAL Air R NISSIN
Receiver for wireless flash shooting Canon/ Nikon/ Sony
INSTRUCTION MANUAL

text_image
Nissin AUTO 8 100% AC Ch ABC GrThank you for purchasing a Nissin product
Before using this receiver unit, read this instruction manual and the instruction manuals of your camera and NAS (Nissin Air System) Flash to familiarize yourself with the operations.
The Nissin Air R is a receiver to adapt your normal flashes units to NAS system for wireless flash shooting.
There are 3 types of Air R; Air R for Canon, Air R for Nikon, Air R for Sony. Air R was tested and is guaranteed to work with Nissin flashes and manufacturers flashes.
However, Air R has to work with the same type of Air 1 commander e.g. Air R for Canon has to work with Air 1 for Canon.
Compatible flashes
Please refer Nissin's compatibility chart shown at its home page for details and recent updates: http://www.nissin-japan.com or http://www.nissindigital.com
SAFETY INSTRUCTIONS
These safety instructions refer to important information on how to use this product safely and properly. Please read the following instructions before using the product.

CAUTIONS
This sign refers to conditions which may cause damage or defect.
- Do not touch the inside parts from the opening when the unit was dropped or broken.
- Place the batteries correctly in position. Placing the batteries in wrong polarity may cause leakage, exothermic heat or explosion.
- Do not leave or store the receiver unit in the temperature over 40^ / 104^ , such as in the automobile.
● The receiver unit is not water resistance. Keep the unit away from rain, snow and humidity. - Do not use benzene, thinner or other alcoholic agents to clean the unit.
- Do not use this receiver unit with flashes which are not recommended in the compatibility list at official website, otherwise it may damage the flash's circuitry.
- Remove the batteries when not in use for a longer period of time.
- Do not have a heavy impact to the receiver unit, nor throw it onto a hard surface floor.
Nissin Air R is designed for Nissin Air System (NAS)
● (1) 2.4GHz radio receiving operation. No radio signal is generated from NAS Air R.
● Use with NAS receiver & Nissin digital flashes & Original flashes.
● The Nissin commander attached to the camera is called master unit.
● The flash unit attached to the Air R is called slave unit.
- Once connecting to NAS Commander, all functions will be controlled through NAS Commander.
● Transmission distance, approx. 30m (98.4 ft.)
● Metal/ Wire/ Wall/ another 2.4 GHz radio may reduce the NAS transmission distance
Built in stand
Just flip the built in stand foot out and the Air R can be place on any flat surface without mounting a tripod.
External sync socket
Air R can trigger some flash units that have the external syn socket. A standard sync-cable available in the market is usable.
Manually select channel
In some cases, the radio environment may be too noisy and user may find it difficult to select the channel automatically. In such a case, manually selecting the channel will help to find a usable channel. Just set the channel number on the channel dial the same as the channel number setting on the NAS commander, then both Air R & the NAS commander will work on the same channel.
Low GN mode/ High GN mode (default)
For GN 25-49 choose Low GN mode front indicator = Green color For GN 50-60 choose High GN mode front indicator = Red color
Simple operation
Set "Ch" dial to "Auto". Set "Gr" dial to desired group Set TTL mode on the flash unit. Plug the Flash unit into the Air R.
The combination is ready as a 2.4GHz radio wireless flash unit for NAS system.
Names of the Components
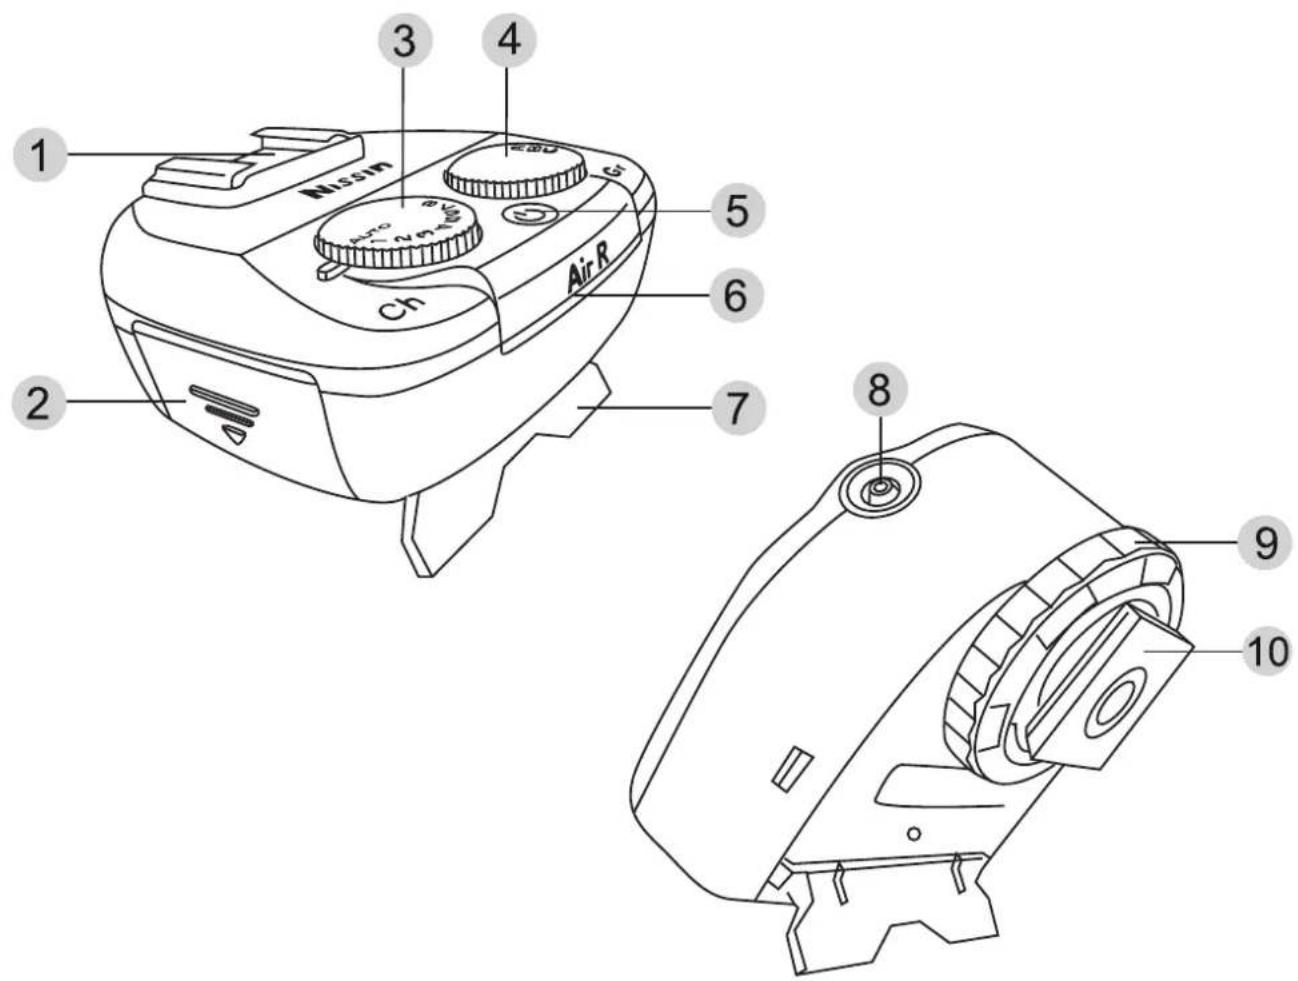
text_image
1 2 3 4 5 6 7 Air R 8 9 101 Hotshoe mount
2 Battery compartment door
3 Channel selection dial
4 Group selection dial
5 On/ Off switch
6 Front indicator
7 Built in stand
8 X-terminal socket
9 Lock ring
10 Cold shoe/ 1/4" Tripod lug
Basic Operation
Before starting wireless flash shooting.
Inserting batteries
Usable batteries - Alkaline batteries, Lithium batteries or NiMH batteries.
-
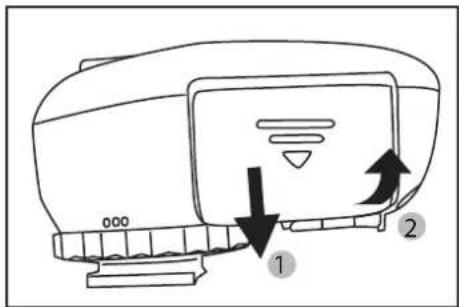
Open the battery compartment door and insert 2 x size AAA batteries as shown by the picture.
-
Make sure the + and - battery contacts are correctly inserted at the battery compartment.
-
Close the battery compartment door and slide it back in place.
text_image
Diagram of a device with labeled parts and directional arrows indicating movement or flow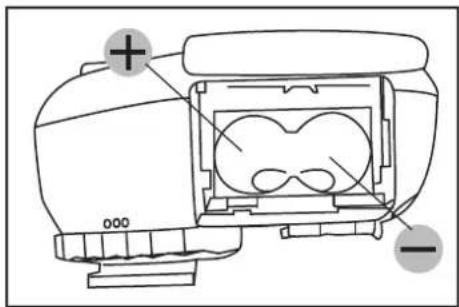
text_image
Technical diagram of a device with labeled components and directional indicators (+ and -)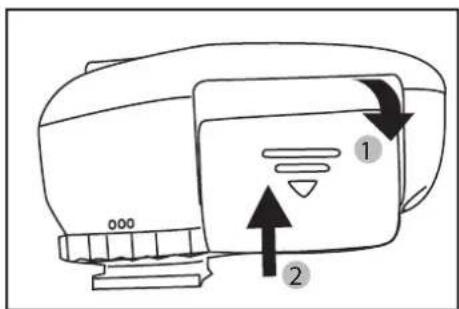
text_image
Diagram of a printer with labeled parts and directional arrows indicating motion or movementNOTE
It is recommended to use 2 batteries of the same brand and type, and replace them all at the same time.
Wrong insertion of each battery would not make electric contact.
Mounting flash unit to the Air R
Mounting a flash unit to the Air R is just like mounting a flash unit on a camera.
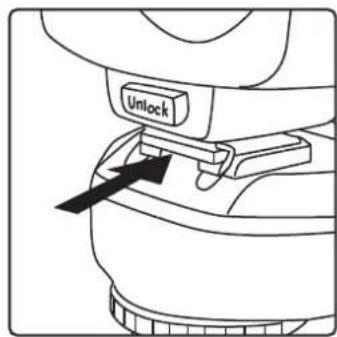
Unlock button type as shown in the picture :
- Slide the mounting foot of flash into the hotshoe of the Air R.
- Make sure that the mounting foot will lock (with a "click") when it has been inserted completely.
Lock ring button type:
- Twist the lock ring anti-clockwise to loosen it.
- Slide the mounting foot of flash into the hotshoe of Air R.
- Twist the lock ring clockwise to tighten it.
text_image
UnlockRemoving flash from the Air R
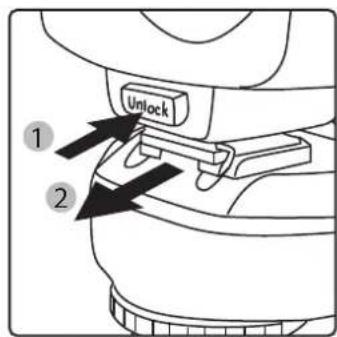
Unlock button type as shown in the picture :
- Press the unlock button and slide the mounting foot of flash off the hotshoe of the Air R.
Lock ring button type:
- Loosen the lock ring and slide the mounting foot flash off the hotshoe of Air R.
text_image
1 2 UnlockBasic Operation
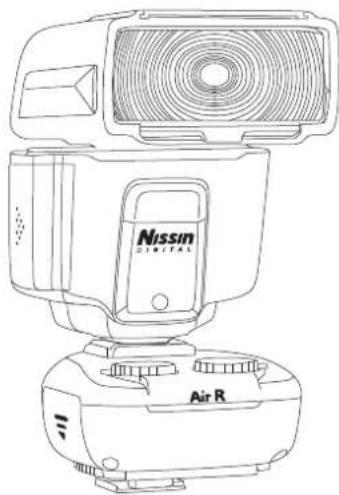
- Switch on both Air R and attached flash unit.
- Set the flash unit to TTL mode and EV compensation to zero.
- All control will be done at NAS commander.
natural_image
Line drawing of a Nissin digital camera with air return button (no text or symbols on body)For Canon camera model EOS 1DX, 7DM2 and 5Ds Only
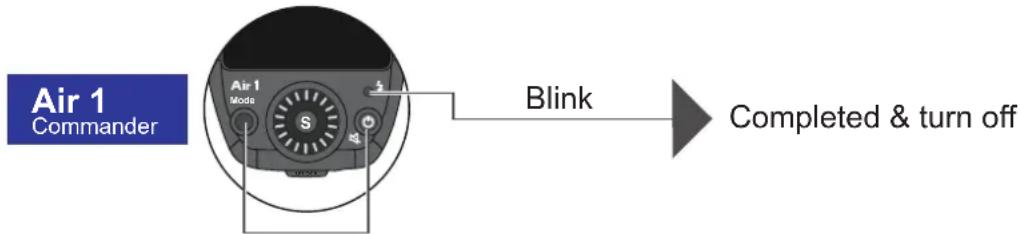
For using with Canon camera model EOS 1DX, 7DM2 and 5Ds. Before Binding setting, please follow the technical setting below on Commander Air 1.
Step 1: Commander Air 1 is OFF
Step 2: Hold "Mode" and on/off switch for two seconds until Pilot button Blinking (orange/ white)
Step 3: Hold on/off switch for 5 seconds to turn off the Commander unit
Step 4: Binding setting
(please follow the binding instruction on page 9)
text_image
Air 1 Commander Air 1 Mode S Blink Completed & turn offHold 2 sec
* Repeat step 1 to 3 for Canceling the technical setting
For Nikon Only
Since Nikon type flash units has some variation between models, the therefore Receiver Air R needs to recognize which Nikon type flash unit is plugged on it. By doing this recognition 1) Just install your Nikon type flash unit on your Receiver Air R. 2) Power them on until ready. 3) Make sure that the group selected on the Air R is not turned off at thr commander Air 1. Press the pilot button on the Commander Air 1 to cause your grouped a flash unit to emit flash. 4) The recognition is complete.
***The recognition process is important otherwise the TTL exposure may not be corrected***
For Sony Only
For using with Sony cameras.
Before using the Commander Air 1, please install Air 1 on camera and change the Flash mode to "WL" in camera menu.
For Sony Only - HSS High-Speed Synchronization
● Air 1 supports shutter speeds up to 1/8,000 second.
● High-speed Synchronization: In M/ TTL mode.
● High-speed Synchronization is controlled by Air 1.
● To enable/ disable on Air 1:
ON: Press and hold Pilot button for 3 seconds.
Pilot button starts blinking twice.
OFF: Press and hold Pilot button for 3 seconds to cancel the setting.
● High-speed mode uses higher flash energy. To protect the flash from overheat, the recycling time will be extended to a minimum of 7 seconds.
Wireless Setting
To perform wireless shooting, set the commander Air 1 (master unit) and flash/Air R (slave unit) with the following procedure.

Binding before use
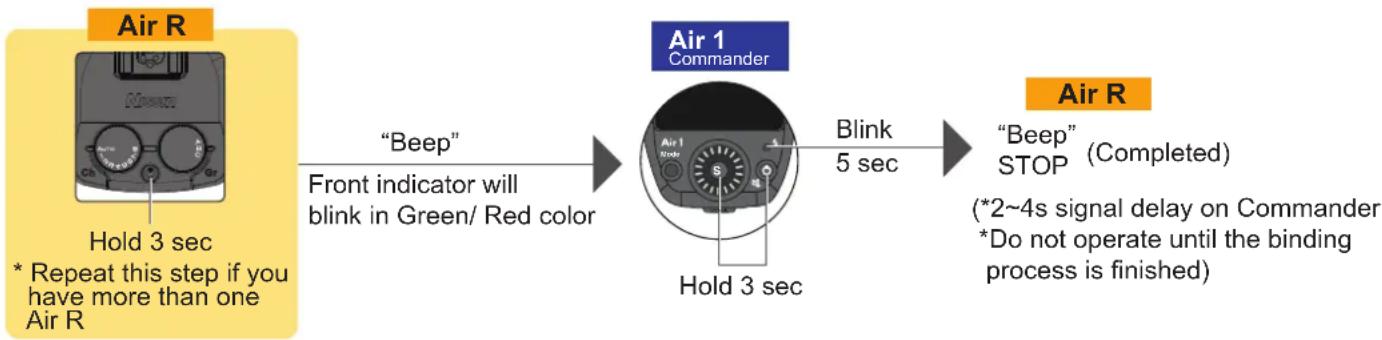
Step 1: All the units are powered OFF
Step 2: Binding setting
Nissin Air R
- Press power switch for 3 seconds.
- "Beep" sound ON & the front indicator will begin blinking in Green/ Red color.
* Repeat this step if you have more than one Air R

Nissin commander Air 1
- Hold s and On/Off switch for 3 seconds
- Pilot button Blinking for about 5 seconds

Nissin Air R
"Beep" sound STOP ---- Binding setting completed
*2\~4s signal delay on commander
*Do not operate until the binding process is finished
flowchart
graph LR
    A["Air R"] --> B["Hold 3 sec\n* Repeat this step if you have more than one Air R"]
    B --> C["Beep"]
    C --> D["Front indicator will blink in Green/ Red color"]
    D --> E["Air 1 Commander"]
    E --> F["Blink 5 sec"]
    F --> G["Air R"]
    G --> H[""Beep" STOP (Completed)\n(*2~4s signal delay on Commander\n*Do not operate until the binding process is finished)"]
NOTE
- The binding setting is memorized and remains unchanged when power on/off.
- For a test-flash, press the pilot button on the NAS commander.
- The Nissin commander attached to the camera is called the master unit, and a flash that is wirelessly controlled is called slave unit.
- When Air R connected to NAS Commander, all functions will be controlled through NAS Commander.
Step 3: Channel setting
To avoid interference with wireless multiple flash system using radio transmission that are used by other photographers, or with other devices that use radio waves (wireless), you can change the transmission channel.
Nissin Air R channel select in auto mode.
Set the Channel "Ch" dial to 'Auto'.
Nissin Air R channel select manually.
Set the "Ch" dial to the channel number that is same as the channel number setting in NAS commander.

Nissin commander Air 1
- Hold ⓢ button for 3 seconds
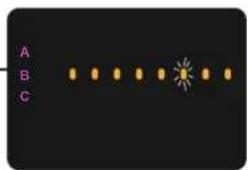
- Display screen automatically changes to
- Rotate the dial to select 1 in 8 Channels
- Press \$ 1 time to confirm
- "Beep" sound in Air R
- Channel setting completed
text_image
A B C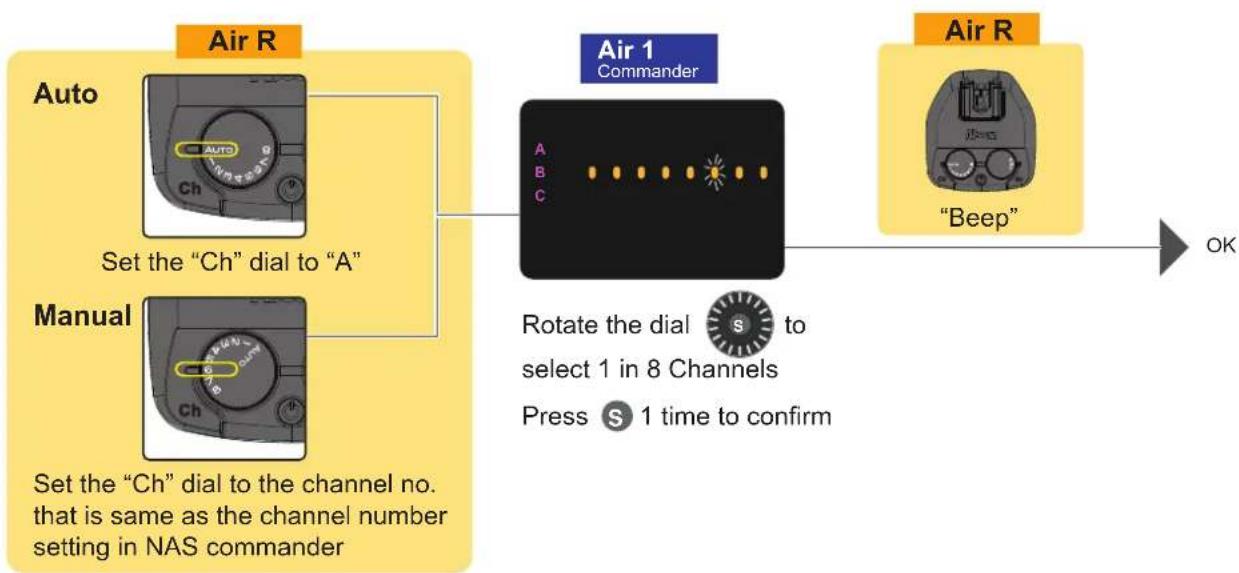
flowchart
graph LR
    A["Auto"] --> B["Set the "Ch" dial to "A""]
    C["Manual"] --> D["Set the "Ch" dial to the channel no. that is same as the channel number setting in NAS commander"]
    E["Air 1 Commander"] --> F["Rotate the dial to select 1 in 8 Channels Press S 1 time to confirm"]
    G["Air R"] --> H["Beep"]
    style A fill:#f9f,stroke:#333
    style C fill:#f9f,stroke:#333
    style E fill:#ccf,stroke:#333
    style G fill:#ccf,stroke:#333
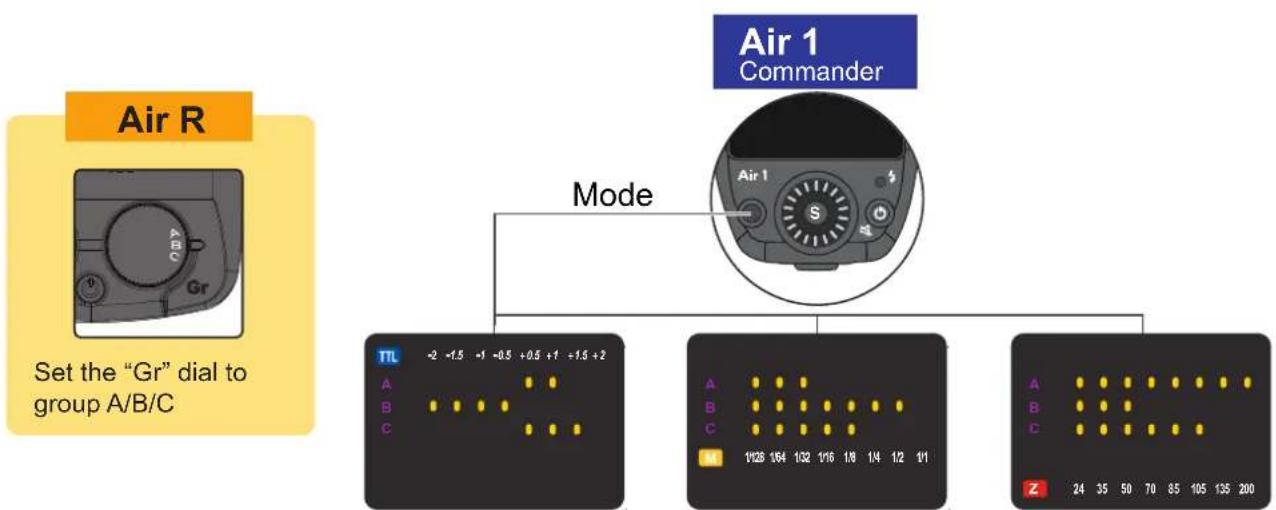
Step 4: Desire group setting
flowchart
graph TD
    A["Air R"] --> B["Set the "Gr" dial to group A/B/C"]
    C["Air 1 Commander"] --> D["Mode"]
    D --> E["TL: -2, -1.5, -1, -0.5, +0.5, +1, +1.5, +2"]
    D --> F["A: A"]
    D --> G["B: B"]
    D --> H["C: C"]
    D --> I["A: A"]
    D --> J["B: B"]
    D --> K["C: C"]
    D --> L["Z: 24, 35, 50, 70, 85, 105, 135, 200"]
TTL Manual Zoom
- Press Mode to select the Flash mode
TTL/M/Z - Press Ⓐ to select the group A / B / C / ABC
- To turn off the group by pressing ⏻ when the group is blinking
- Rotate the dial ⚫ to adjust the EV compensation (TTL)/Power output (Manual)/ Zoom position (Zoom)
Change Guide no. mode
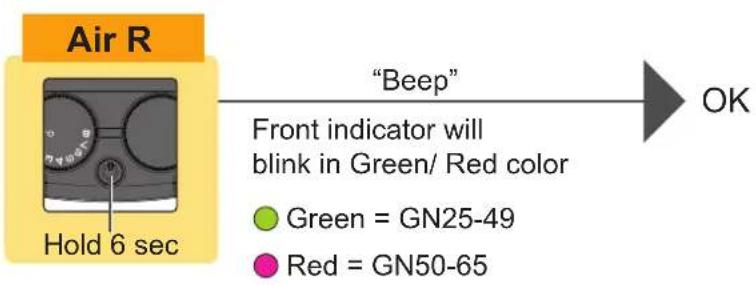
flowchart
graph LR
    A["Air R"] --> B["Beep"]
    B --> C["OK"]
    D["Hold 6 sec"] --> E["Front indicator will blink in Green/ Red color"]
    F["Green = GN25-49"] --> G
    H["Red = GN50-65"] --> I
Control the Flash "Beep" sound On/Off
Nissin commander Air 1
- Press On/Off switch
- Color change on Pilot button
Orange - sound On
White - sound Off
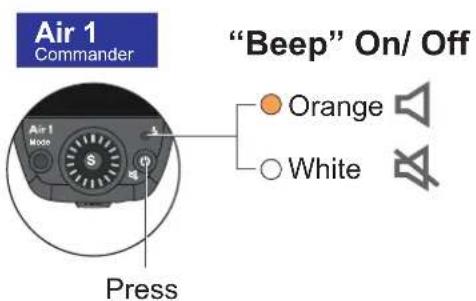
text_image
Air 1 Commander "Beep" On/ Off Orange White PressTransmission distance, approx. 30m (98.4 ft.)
When the flash is set to the Wireless mode, the power level will be controlled by the master unit. The remote works on all channels and with group A/B/C.
Set slave flash at any place and direct the flash head as you desire. The optical system may not work in bright conditions but the radio should.
Use build in stand which can be placed either on a flat surface, or Air R also can be mounted on the tripod by the screw.
Autoflash shooting using One slave unit
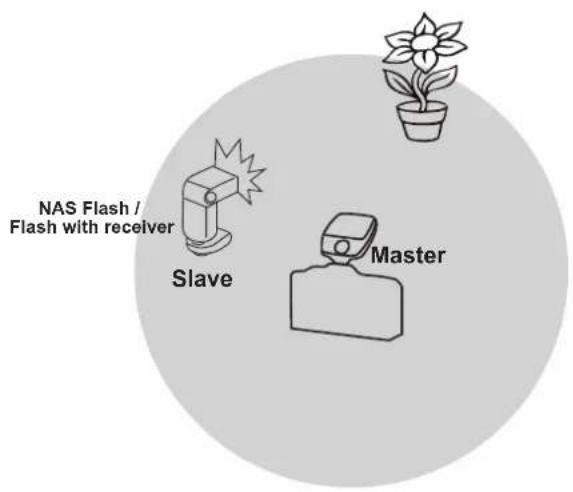
text_image
NAS Flash / Flash with receiver Slave MasterAutoflash shooting using Two slave groups
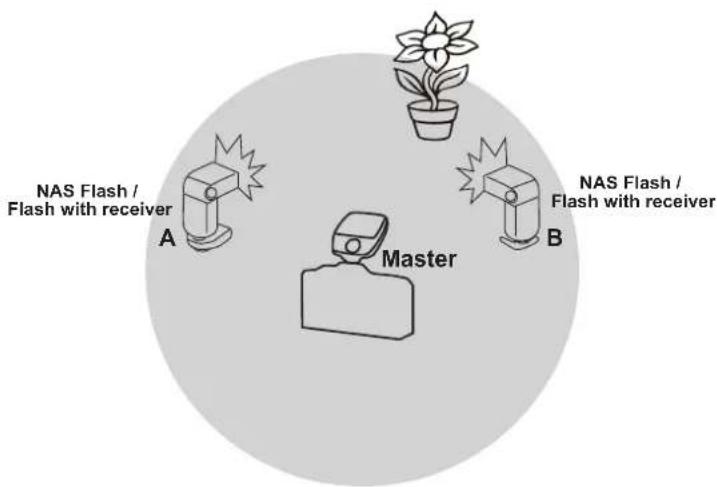
text_image
NAS Flash / Flash with receiver A Master B NAS Flash / Flash with receiverAutoflash shooting using Three slave groups
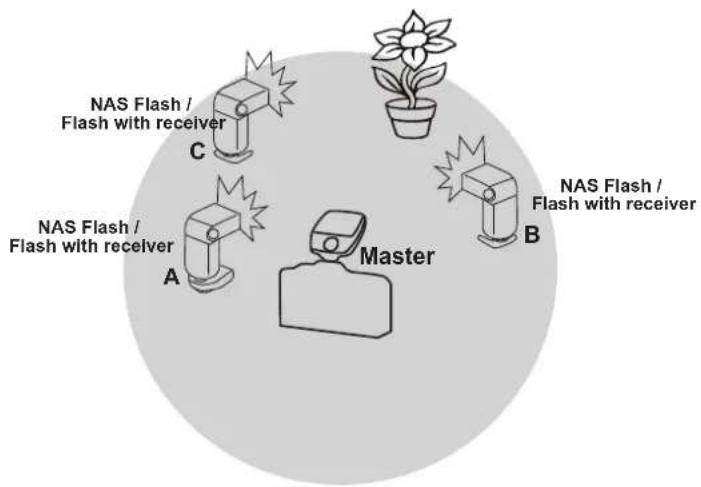
text_image
NAS Flash / Flash with receiver C NAS Flash / Flash with receiver A Master B NAS Flash / Flash with receiverSpecifications
| Type | For Nissin digital flashes & Original flashes |
| Wireless system | Radio category |
| Radio specifications | 2.4GHz ISM band (Obtaining technical standards conformity certification) |
| Channel | 8 channels, auto select or manual select |
| Flash Groups | A, B, C (3 Groups) |
| Power Source | 2 x AAA batteries |
| Guide no. mode | Low GN mode/ High GN mode (default) |
| Mode (set at NAS commander) | TTL, Manual and Manual zoom |
| EV compensation on flash | [TTL] -2.0~ +2.0, 1/2EV step [manual]1~1/128 (8 steps)Each group can be adjusted independently or synchronized |
| Manual output | 8 steps of Manual output1/128 - 1/64 - 1/32 - 1/16 - 1/8 - 1/4 - 1/2 - 1/1(Full) power |
| Manual zoom | Manual adjustment(24/ 35/ 50/ 70/ 85/ 105/ 135/ 200 mm) |
| Continuous shooting speed | 10 shots/sec |
| Number of flashes (Approx.) | 5,000 flashes |
| Transmission distant | Max. 30m (Depending on the environment) |
| High speed synchronization | 1/8,000sec (controlled by NAS commander.) |
| Mounting | Built in stand, Cold shoe, 1/4” Tripod Lug |
| External syn socket | Standard PC sync cable |
| Mode | TTL, M , M zoom, no setting is needed, all set at NAS commander |
| Synchronization modes | No setting is need, controlled by NAS commander. |
| Mounting | Built in stand, Cold Shoe/ 1/4” Tripod Lug |
| Dimensions | 65(L) x 60 (W) x 50 (H)mm/2.6(L) x 2.4(W) x 2 (H)inch |
| Weight | 55g / 1.9oz (without batteries) |
Warranty
In case of the following reason of the defect, it may void the warranty. Please refer the respective warranty condition for details which depends on the country of purchase.
- The product is not used in accordance with the instruction of the owner's manual.
- The product is repaired or modified by the one who is not an authorized repair service.
- When the product is used with the cameras not applicable, lens, adaptors or such accessories produced by the third party.
- Fault or defect caused by fire, earthquake, flood, public pollution and such natural accident.
- In case that the product is stored in dust, moisture, extremely high temperature or such poor condition.
- Scratch, blemish, crush or worn out by a violent use or treatment.
- Guarantee card without name of place purchased or date of purchase stamped, or no guarantee card.
Nissin
Nissin Japan Ltd., Tokyo
http://www.nissin-japan.com
Nissin Marketing Ltd., Hong Kong
http://www.nissindigital.com