
Modern 15 Pro - Laptop MSI - Free user manual and instructions
Find the device manual for free Modern 15 Pro MSI in PDF.


User questions about Modern 15 Pro MSI
0 question about this device. Answer the ones you know or ask your own.
Ask a new question about this device
Download the instructions for your Laptop in PDF format for free! Find your manual Modern 15 Pro - MSI and take your electronic device back in hand. On this page are published all the documents necessary for the use of your device. Modern 15 Pro by MSI.
USER MANUAL Modern 15 Pro MSI
Copyright and Trademarks Notice....1-5
Revision History 1-5
FCC-B Radio Frequency Interference Statement 1-6
FCC Conditions 1-6
CE Conformity 1-6
Battery Regulations 1-7
WEEE Statement 1-7
Chemical Substances Information 1-7
RoHS Statement 1-8
Japan JIS C 0950 Material Declaration....1-8
India RoHS 1-8
Turkey EEE regulation 1-8
Ukraine restriction of hazardous substances 1-8
Vietnam RoHS....1-8
Upgrade and Warranty 1-9
Acquisition of Replaceable Parts 1-9
Safety Instructions....1-10
MSI Highlights 1-13
Introductions....2-1
Unpacking 2-2
Product Overview....2-3
Top-open View 2-3
Front Side View 2-5
Right Side View....2-6
Left Side View 2-7
Rear Side View....2-9
Bottom Side View 2-10
How to Use the Keyboard 2-11
Power Key/ Enter Sleep Mode 2-11
Windows Key....2-11
Quick Use FN keys....2-12
Use Quick Fn Launch Keys....2-12
Screen Capture 2-14
Use Multiple Monitors....2-14
Application: True Color (optional)....2-14
Specifications 2-15
How to Get Started ....3-1
Begin to Use the Notebook 3-2
How to Use the Notebook Comfortably....3-3
How to Manage Power Supply 3-4
AC/DC Adapter....3-4
Battery 3-4
How to Set Up a Power Plan in Windows 10 ....3-6
Choose or Customize a Power Plan 3-6
Create Your Own Power Plan 3-9
How to Set Up Windows Hello Fingerprint Login 3-11
How to Use the Touchpad 3-16
About HDD and SSD 3-17
About M.2 SSD Slot 3-17
How to Connect the Internet....3-18
Wireless LAN....3-18
Wired LAN 3-20
How to Set Up Bluetooth Connection....3-25
Activating Bluetooth Connection 3-25
How to Connect External Devices....3-28
Video: How to Use RAID Function 3-29
How to Select Boot Mode in BIOS 3-30
Video: How to Restore Windows 10 Operating System on MSI Notebooks ......3-31
Copyright and Trademarks Notice
Copyright © Micro-Star Int'l Co., Ltd. All rights reserved. The MSI logo used is a registered trademark of Micro-Star Int'l Co., Ltd. All other marks and names mentioned may be trademarks of their respective owners. No warranty as to accuracy or completeness is expressed or implied. MSI reserves the right to make changes to this document without prior notice.
Revision History
▶ Version: 2.0
Date: 10, 2020
FCC-B Radio Frequency Interference Statement
This equipment has been tested and found to comply with the limits for a Class B digital device, pursuant to part 15 of the FCC rules. These limits are designed to provide reasonable protection against harmful interference in a residential installation. This equipment generates, uses and radiates radio frequency energy, and, if not installed and used in accordance with the instructions, may cause harmful interference to radio communications. However, there is no guarantee that interference will not occur in a particular installation. If this equipment does cause harmful interference to radio or television reception, which can be determined by turning the equipment off and on, the user is encouraged to try to correct the interference by one or more of the following measures:
▶ Reorient or relocate the receiving antenna.
▶ Increase the separation between the equipment and receiver.
- Connect the equipment into an outlet on a circuit different from that to which the receiver is connected.
NOTE
The changes or modifications not expressly approved by the party responsible for compliance could void the user's authority to operate the equipment.
- Shield interface cables and AC power cord, if any, must be used in order to comply with the emission limits.
FCC Conditions
This device complies with part 15 of the FCC Rules. Operation is subject to the following two conditions:
This device may not cause harmful interference.
This device must accept any interference received, including interference that may cause undesired operation.
CE Conformity

This device is in compliance with the essential safety requirements and other relevant provisions set out in the European Directive.
Battery Regulations

European Union: Batteries, battery packs, and accumulators should not be disposed of as unsorted household waste. Please use the public collection system to return, recycle, or treat them in compliance with the local regulations.

廢電池請回收
Taiwan: For better environmental protection, waste batteries should be collected separately for recycling or special disposal.
California, USA: The button cell battery may contain perchlorate material and requires special handling when recycled or disposed of in California.
For further information please visit: http://www.dtsc.ca.gov/hazardouswaste/perchlorate/
Safety Guideline for Using Lithium Battery
Danger of explosion if battery is incorrectly replaced. Replace only with the same or equivalent type recommended by the equipment manufacturer. Discard used batteries according to manufacturer's instructions.
WEEE Statement

European Union: Under the European Union ("EU") Directive on Waste Electrical and Electronic Equipment, Directive 2002/96/EC, which takes effect on August 13, 2005, products of "electrical and electronic equipment" cannot be discarded as municipal waste anymore and manufacturers of covered electronic equipment will be obligated to take back such products at the end of their useful life.
Chemical Substances Information
In compliance with chemical substances regulations, such as the EU REACH Regulation (Regulation EC No. 1907/2006 of the European Parliament and the Council), MSI provides the information of chemical substances in products at:
http://www.msi.com/html/popup/csr/evmtprtt_pcm.html
RoHS Statement
Japan JIS C 0950 Material Declaration
A Japanese regulatory requirement, defined by specification JIS C 0950, mandates that manufacturers provide material declarations for certain categories of electronic products offered for sale after July 1, 2006.
http://www.msi.com/html/ popup/csr/cemm_jp.html
http://tw.msi.com/html/popup/csr_tw/cemm_jp.html
India RoHS
This product complies with the "India E-waste (Management and Handling) Rule 2011" and prohibits use of lead, mercury, hexavalent chromium, polybrominated biphenyls or polybrominated diphenyl ethers in concentrations exceeding 0.1 weight % and 0.01 weight % for cadmium, except for the exemptions set in Schedule 2 of the Rule.
Turkey EEE regulation
Conforms to the EEE Regulations of the Republic Of Turkey.
Ukraine restriction of hazardous substances
The equipment complies with requirements of the Technical Regulation, approved by the Resolution of Cabinet of Ministry of Ukraine as of December 3, 2008 № 1057, in terms of restrictions for the use of certain dangerous substances in electrical and electronic equipment.
Vietnam RoHS
As from December 1, 2012, all products manufactured by MSI comply with Circular 30/2011/TT-BCT temporarily regulating the permitted limits for a number of hazardous substances in electronic and electric products.
Upgrade and Warranty
Please note that certain components, such as memory modules, HDD, SSD, ODD, and Bluetooth/WiFi combo card, etc., preinstalled in the product may be upgradable or replaceable by user's request depending on the models users purchased.
For any further information on the product users purchased, please contact the local dealer. Do not attempt to upgrade or replace any component of the product if users do not understand the component location or how to assembly/disassembly, since it may cause the product to be damaged. It is recommended that you contact the authorized dealer or service center for product service information.
Acquisition of Replaceable Parts
Please be noticed that the acquisition of replaceable parts (or compatible ones) of the product users purchased in certain countries or territories may be fulfilled by the manufacturer within 5 years at most since the product has been discontinued, depending on the official regulations declared at the time. Please contact the manufacturer via http://www.msi.com/support/ for the detailed information about the acquisition of spare parts.
Safety Instructions

Read the safety instructions carefully and thoroughly. All cautions and warnings on the equipment or user's manual should be noted.

- Replacement of a battery with an incorrect type that can defeat a safeguard.
- Disposal of a battery into fire or a hot oven, or mechanically crushing or cutting of a battery, that can result in an explosion. Leaving a battery in an extremely high temperature surrounding environment that can result in an explosion or the leakage of flammable liquid or gas.
- A battery subjected to extremely low air pressure that may result in an explosion or the leakage of flammable liquid or gas.

- Plug the power cord into an AC outlet that is easily accessible at all times.
- Disconnect power from the notebook by unplugging the power cord from the AC outlet.
- If a power cord with 3-prong plug came with the package, always plug the power cord into a grounded (earthed) AC outlet. Do not remove the grounding pin of the power cord, since it is an important safety feature.
- Always use the AC/DC adapter and power cord approved by MSI, or a compatible one purchased from MSI.
- Place the power cord in a way that people are unlikely to step on it. Do not place anything on top of the power cord.

- Always place the notebook on a stable, flat, hard surface before setting it up.
- Do not lay the notebook on an unstable surface while using it, such as your lap, bed, pillow, or sofa, etc...
- Do not cover the ventilators of the notebook to prevent the notebook from overheating.

WARNING: Do not ingest battery. If the coin / button cell battery is swallowed, it can cause severe internal burns and can lead to death. Keep new and used batteries away from children.

Keep the notebook away from humidity and high temperature.

Always keep the strong magnetic or electrical objects away from the notebook.

- Do not leave the notebook in an unconditioned environment with a storage temperature above 60^ (140°F) or below 0^ (32°F), which may damage the notebook. - This notebook should be operated under maximum ambient temperature of 35^ (95°F).

- Never pour liquid into the opening that could damage the equipment or cause an electrical shock. - Never use any chemical substance to wipe the surface of this equipment, such as keyboard, touchpad, and notebook case.

If any of the following situations arises, get the equipment checked by a service personnel:
• The power cord or plug is damaged.
• Liquid has penetrated into the equipment.
• The equipment has been exposed to moisture.
- The equipment has not worked well or you can not get it work according to User's Manual.
• The equipment was dropped and damaged.
• The equipment has obvious signs of breakage.

Green Product Features
- Reduced energy consumption during use and stand-by
- Limited use of substances harmful to the environment and health
• Easily dismantled and recycled - Reduced use of natural resources by encouraging recycling
• Extended product lifetime through easy upgrades - Reduced solid waste production through take-back policy
Environmental Policy
- The product has been designed to enable proper reuse of parts and recycling and should not be thrown away at its end of life.
- Users should contact the local authorized point of collection for recycling and disposing of their end-of-life products.
- Visit the MSI website and locate a nearby distributor for further recycling information.
- Users may also reach us at gpcontdev@msi.com for information regarding proper disposal, take-back, recycling, and disassembly of MSI products.
MSI Highlights
Explore more exclusive features of MSI notebooks for all series, please visit: http://www.msi.com and https://www.youtube.com/user/MSI

How to use SteelSeries Engine 3 on MSI notebooks
MSI collaborates with SteelSeries to develop an exclusive SteelSeries Engine 3 in gaming notebooks. SteelSeries Engine 3 is the Apps to combine frequently used functions for gamers in multiple devices management.
Sound by Dynaudio on MSI Gaming Notebooks
MSI partners with Dynaudio, the Danish sound specialists, in its gaming notebooks to present you an authentic fidelity audio performance.

Color Your Life with True Color
MSI has partnered with Portrait Displays, Inc. in developing more accurate, high precision panel quality. MSI True Color Technology guarantees that each panel in a MSI notebook comes with the finest precision in color.

Tutorial: How to use Nahimic
Discover how to use Nahimic and its three features: Nahimic Audio Effects, Microphone Effects and HD Audio recorder.
Introductions
Congratulations on becoming an user of this notebook, the finely designed notebook. You will have a delightful and professional experience in using this exquisite notebook. We are proud to tell users that this notebook is thoroughly tested and certified by our reputation for unsurpassed dependability and customer satisfaction.
Unpacking
First, unpack the shipping carton and check all items carefully. If any item contained is damaged or missing, please contact your local dealer immediately. Also, keep the box and packing materials in case you need to ship the unit in the future. The package should contain the following items:
▶ Notebook
▶ Quick Start Guide
▶ AC/DC adapter and AC power cord
▶ Optional carry bag
Product Overview
This section provides the description of basic aspects of the notebook. It will help you to know more about the appearance of this notebook before using it. Please be aware that the figures shown here are for reference only.
Top-open View
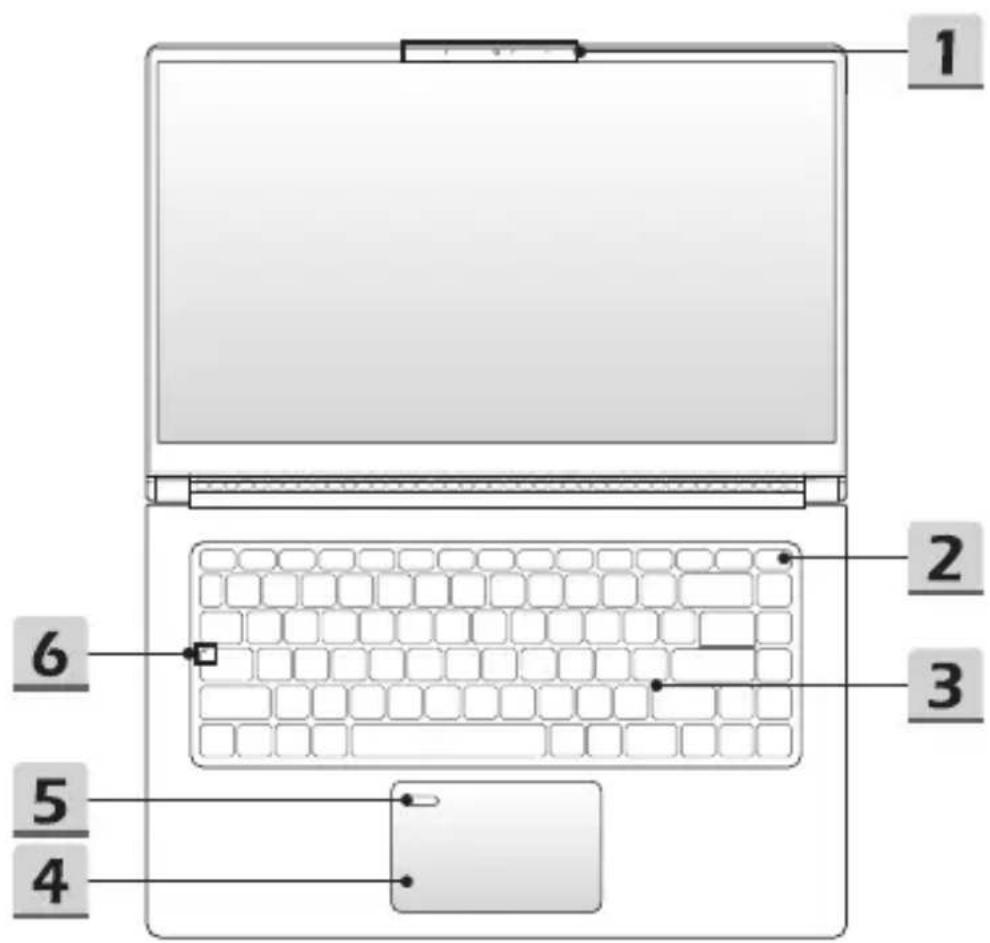
The figure of top-open view and description shown below will lead you to browse the main operating area of your notebook.
text_image
1 2 3 6 5 41. Webcam/ Webcam LED/ Internal Microphone
- This built-in webcam can be used for picture taking, video recording or conferencing, and so on.
- Webcam LED indicator, next to the webcam, blinks when webcam function is activated; LED goes out when this function is turned off.
• The built-in microphone shares the same function with an external one.
2. Power Key on keyboard/ Power LED/ GPU Mode LED

Power Key on keyboard
- Press this key to turn the notebook power ON.
- While the notebook is turned on, press this key to force the computer into sleep state. Press again to wake up the system from sleep state.
- Long press this key to force a shutdown, if needed.
Power LED/ GPU Mode LED
- Glowing white when the notebook power is turned on, and the UMA GPU mode is selected.
- Glowing amber when the optionally supported discrete GPU mode is selected.
• LED flashes when the notebook goes to the sleep state.
• LED goes off when the notebook is turned off.
3. Keyboard
The built-in keyboard provides all the functions of a notebook keyboard. Refer to How to Use the Keyboard for details.
4. Touchpad
This is the pointing device of the notebook.
5. Fingerprint Sensor (optional)
Use the fingerprint sensor to set up user's fingerprints on the notebook, and use it to unlock the notebook. Refer to "How to Set Up Windows Hello Fingerprint Login" in chapter 3 for details.
6. Status LED

Caps Lock
Glows when the Caps Lock function is activated.
Front Side View

natural_image
Simple line drawing of a horizontal rectangular object with rounded ends and a central horizontal bar (no text or symbols)Right Side View
text_image
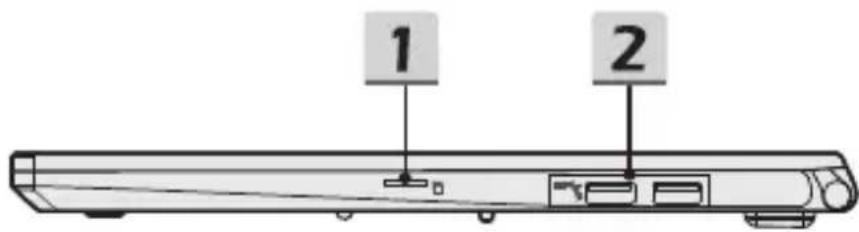
1 21. Card Reader
The built-in card reader supports various types of memory cards. Check the Specifications for details.
2. USB 3.2 Gen 2 Port
USB 3.2 Gen 2, the SuperSpeed USB 10Gbps, delivers the higher interface speeds for connecting various devices, such as storage devices, hard drives, or video cameras, and offers more advantages over high-speed data transferring.
Left Side View
text_image
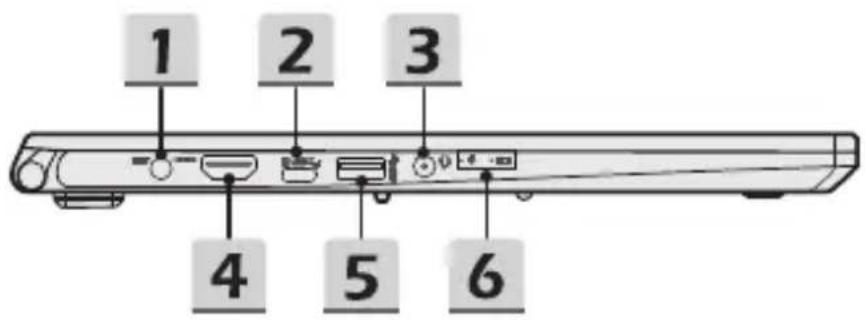
1 2 3 4 5 61. Power Connector
This connector is to connect the AC/DC adapter and supply power for the notebook.
2. USB 3.2 Gen 1 Port (Type C)
USB 3.2 Gen 1, the SuperSpeed USB, delivers the higher interface speeds for connecting various devices, such as storage devices, hard drives, or video cameras, and offers more advantages over high-speed data transferring.
The slim and sleek USB Type C connector features reversible plug orientation and cable direction and supports 5V/3A portable charging power when AC power is connected. However, the maximum portable charging power limitation may up to 5V/1.5A while battery DC power is connected.
3. Combo Audio Port

• A port for headsets with attached microphones
- The Combo Audio Port supports 4-Pole 3.5mm headphone jack.
4. HDMI Connector

HDMI (High-Definition Multimedia Interface) technology is the industry-leading interface and de-facto standard connecting high-definition (HD) and ultra high-definition (UHD) equipment.
5. USB 3.2 Gen 1 Port
USB 3.2 Gen 1, the SuperSpeed USB, delivers the higher interface speeds for connecting various devices, such as storage devices, hard drives, or video cameras, and offers more advantages over high-speed data transferring.
6. Status LED

Power
• LED glows when the notebook power is turned on.
• LED flashes when the notebook goes to the sleep state.
• LED goes off when the notebook is turned off.

Battery
• LED glows when the battery is being charged.
- LED turns glowing amber while the battery is in low capacity status.
- Continuously blinking if the battery fails. If the problem persists, please contact your local authorized retailer or service center.
- Battery LED goes out when it is fully charged or when the AC/DC adapter is disconnected.
Rear Side View

natural_image
Pure diagram of a rectangular object with rounded corners and small protrusions, no text or symbols present.Bottom Side View
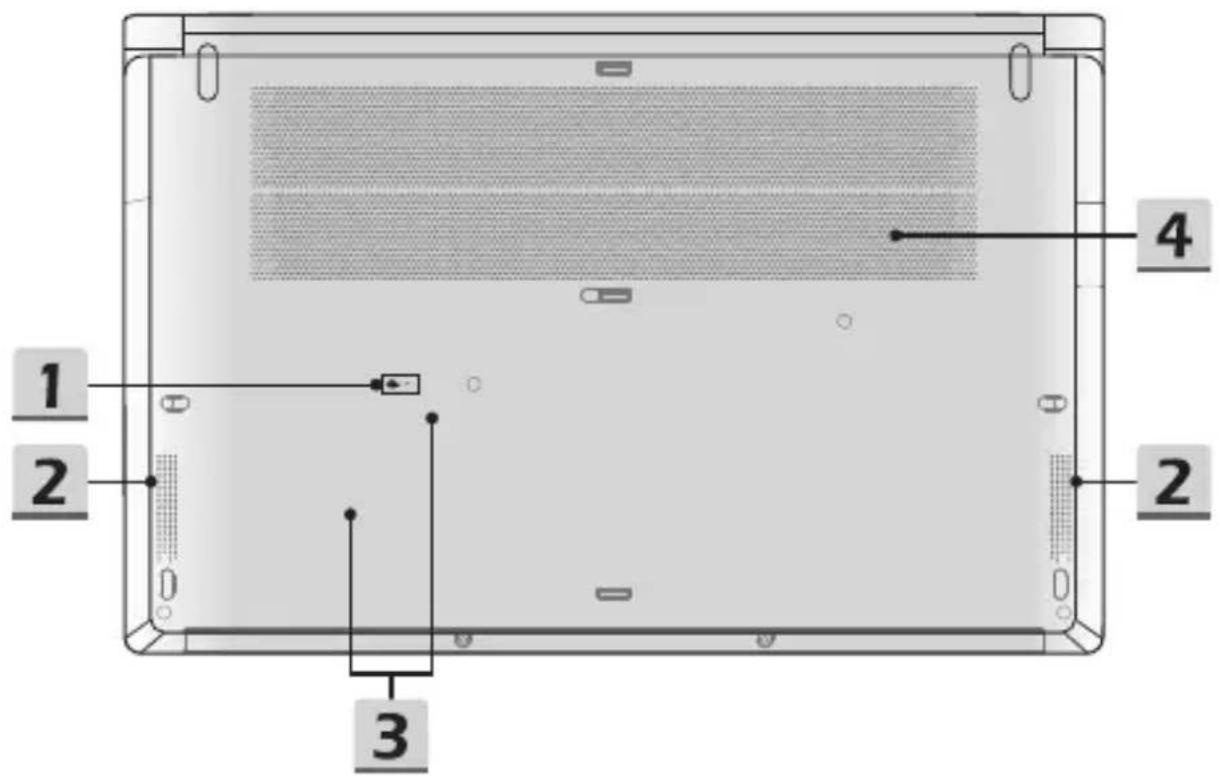
text_image
1 2 3 4 21. Battery Reset Hole
Whenever the system firmware (EC) is upgraded or the system hangs, please 1) power off the notebook; 2) remove the AC power; 3) use a straightened paperclip and insert it to this hole for 10 secs; 4) connect the AC power; 5) power on the notebook.
2. Stereo Speakers
This notebook may be equipped with built-in stereo speakers which deliver the high quality sound, and supports the HD audio technology.
3. SSD Slot
This notebook is equipped with a SSD M.2 slot that supports the SSD device with PCIe or SATA interface. Contact the authorized dealer or service center for product service.
4. Ventilator
The ventilator is designed to cool the system. DO NOT block the ventilator for air circulation.
How to Use the Keyboard
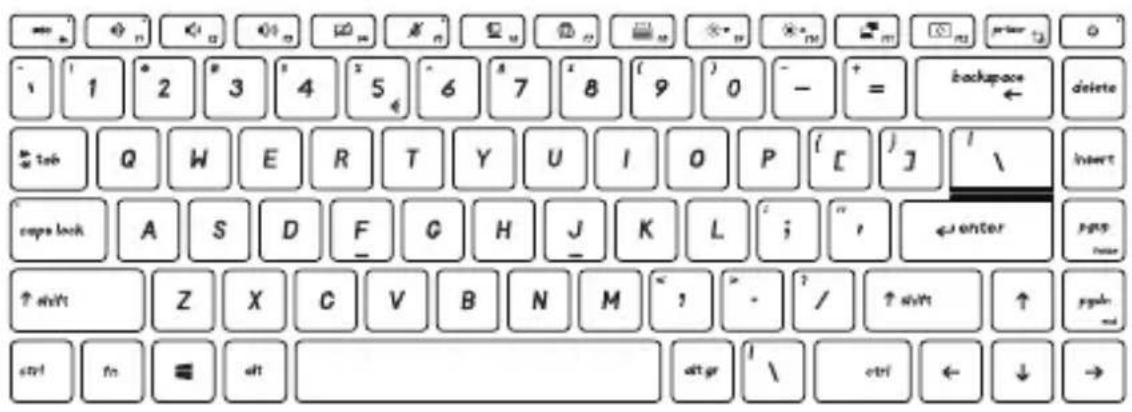
This notebook provides a full functioned keyboard. To ensure that the keyboard will be functioning properly, it is a must to install the necessary applications before using the keyboard function keys.
Use the FN keys on the keyboard to activate the specific applications or tools. With the help of these keys, users will be able to work more efficiently.
text_image
Cropped image of a standard keyboard layout showing lettered keys with some highlighted in black.Power Key/ Enter Sleep Mode
- Press this key to turn the notebook power ON.
- While the notebook is turned on, press this key to force the notebook into sleep state (depending on the system configuration) Press again to wake up the system from sleep state.
- Long press this key to turn off the notebook by force, if needed.
Windows Key

You can find the Windows Logo key on the keyboard which is used to perform Windows-specific functions, such as opening the Start menu and launching the shortcut menu.
Quick Use FN keys
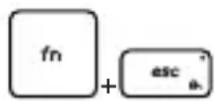
- This notebook is equipped a set of quick FN function keys. Each function key, F1 to F12, is available to use with an easy single press by default.
- Users are allowed to disable the default FN function keys by pressing FN and ESC keys.
- The FN Lock LED indicator, located on the ESC keycap, glows when the default FN function keys are disabled.
- Press again to restore the default FN functions, and the FN Lock LED indicator goes out.
Use Quick Fn Launch Keys
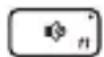
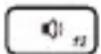
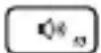
Speaker Settings
• f1: Mute the built-in speakers.
- f2: Decrease the built-in speaker's volume.
- f3: Increase the built-in speaker's volume.
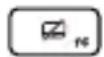
Touchpad
Press to enable or disable the touchpad function.
Microphone
- Press to enable or disable the microphone function.
• Microphone is turned off under default settings.
Webcam
- Press to turn ON/ OFF the Webcam function on.
- Webcam is turned off under default settings.
 | MSI CenterThis notebook may be pre-installing with a versatile utility, MSI Center, providing users an astonished and efficient solution in multitasking.Press repeatedly to switch between High Performance/ Balanced/ Silent/ Super Battery scenarios according to your preference.Refer to the Notebook Software Application Manual for further details. |
 | Keyboard Backlight LED SettingsPress repeatedly to select a backlight LED level according to your preference. |
  | LCD Settingsf9: Decrease the LCD brightness.f10: Increase the LCD brightness. |
 | Switch DisplaySwitch the display output mode between the LCD, external monitor and both. |
 | Screen RotationRotate the screen upside down for 180 degrees. Press again to rotate the screen back to its default position. |
Screen Capture
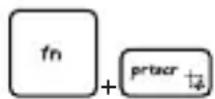
It is a must to use both keys to take a screen capture to the clipboard, and then it can be pasted into an editing program.
Use Multiple Monitors

If users connect an additional monitor to the notebook, the system will automatically detect the external monitor connected. Users will be allowed to customize the display settings.
- Connect the monitor to the notebook.
- Press and hold the Windows key, and then press [P] key to bring up [Project].
- Select how you want your display to project on the second screen from the selections of PC screen only, Duplicate, Extend, and Second screen only.
Application: True Color (optional)
This notebook may be pre-installed with the True Color application. With this application, users can select various color settings for the best viewing experience.

True Color
- Press and hold the FN key, and then press the Z key to launch the True Color application.

True Color Selections
- Press and hold the FN key, and then press the A key to change different view modes.
Specifications
The specifications listed here is reference only, and may change without notice. The actual products sold are different from areas.
Visit MSI official website at www.msi.com, or contact the local retailers to learn the correct specifications of the product user purchased.
| Physical Characteristic | |
| Dimension 356.8 (W) x 233.75 (D) x 15.9 (H) mm | |
| Weight 1.6 kg | |
| CPU | |
| Package BGA | |
| Mobile Processor The latest Intel | ^^TM Processor Family |
| Memory | |
| Technology DDR4, 2400/2666 | |
| Memory 2 x SO-DIMM slots | |
| Maximum Up to 64GB | |
| Power | |
| AC/DC Adapter (option 1) | 1 x 90W, 19VInput: 100-240V~, 50/60HzOutput: 19V ---, 4.74A |
| AC/DC Adapter (option 2) | 1 x 65W, 19VInput: 100-240V~, 50/60HzOutput: 19V ---, 3.42A |
| Battery 3-cell | |
| RTC Battery Yes | |
Storage
| SSD 2 x M.2 slot, supports PCIe or SATA SSD device |
I/O Port
| 2 x USB 3.2 Gen 2 | |
| USB | 1 x USB 3.2 Gen 1 |
| 1 x USB 3.2 Gen 1 Type C |
Audio 1 x Mic-in/ Headphone-out combo
Video 1 x HDMI
Card Reader 1 x optionally supports SD3.0/ SD/ MMC
Communication Port
Bluetooth Supported
Wireless LAN Supported
Display
| LCD Type 15.6" FHD/ UHD LED panel |
Video
| Graphics | NVIDIA® GeForce® discrete graphics with NVIDIA® OptimusTM supportedIntel HD UMA graphics |
VRAM GDDR5, based on GPU structure
Webcam
Resolution HD
Audio
Internal Speakers 2 x stereo speakers
Security
| Trusted Platform Module (optional) | TPM 2.0 is a hardware-based encryption device that collaborates with software measures to form a more advanced and secure data protection.TPM functionalities can be de/activated in BIOS settings where appropriate.With professional versions of Windows, BitLocker is the default console available for TPM communications serving data encryption purposes. |
How to Get Started
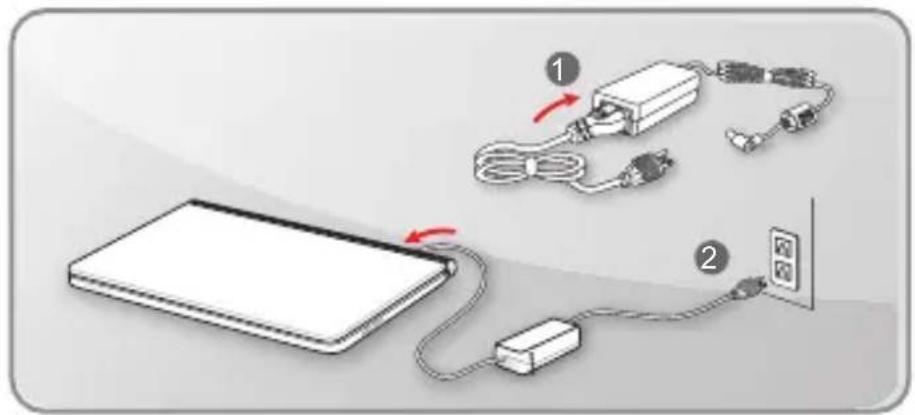
Begin to Use the Notebook
For a new user of this notebook, we would like to suggest you follow the illustrations below to begin to use the notebook.
text_image
Diagram showing a device connected to a power adapter via cable and plug, with numbered instructions indicating connection steps.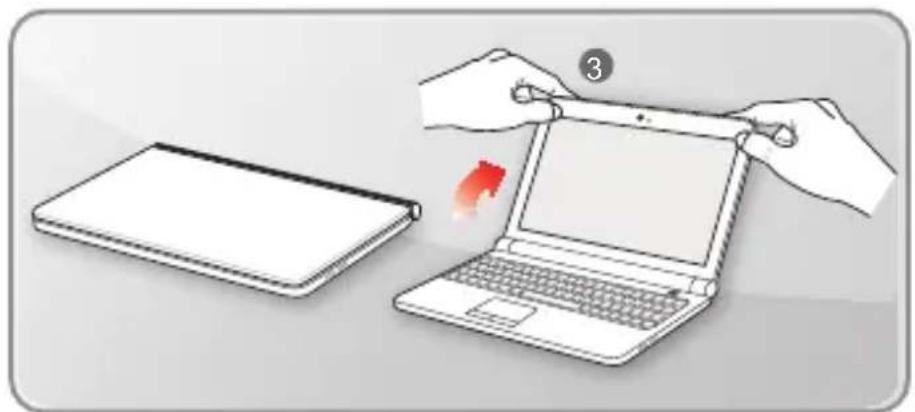
natural_image
Illustration of hands installing a laptop on a tablet device, showing the screen and keyboard (no text or symbols)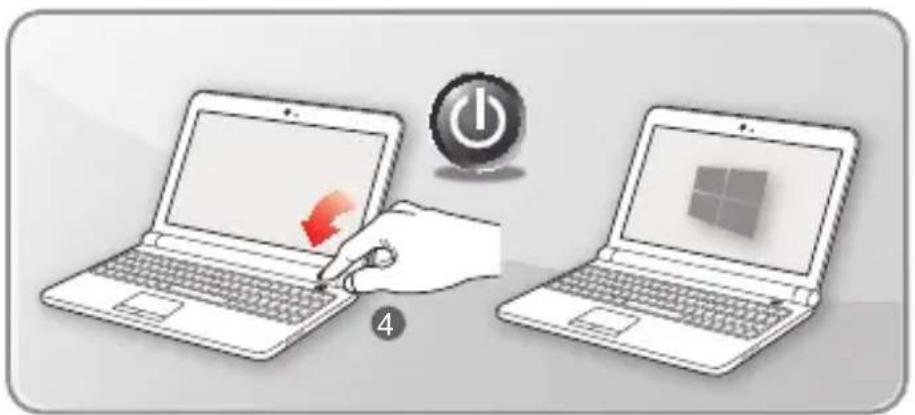
text_image
Illustration showing a hand interacting with two laptops, one displaying a red arrow and the other displaying a Windows logo.How to Use the Notebook Comfortably
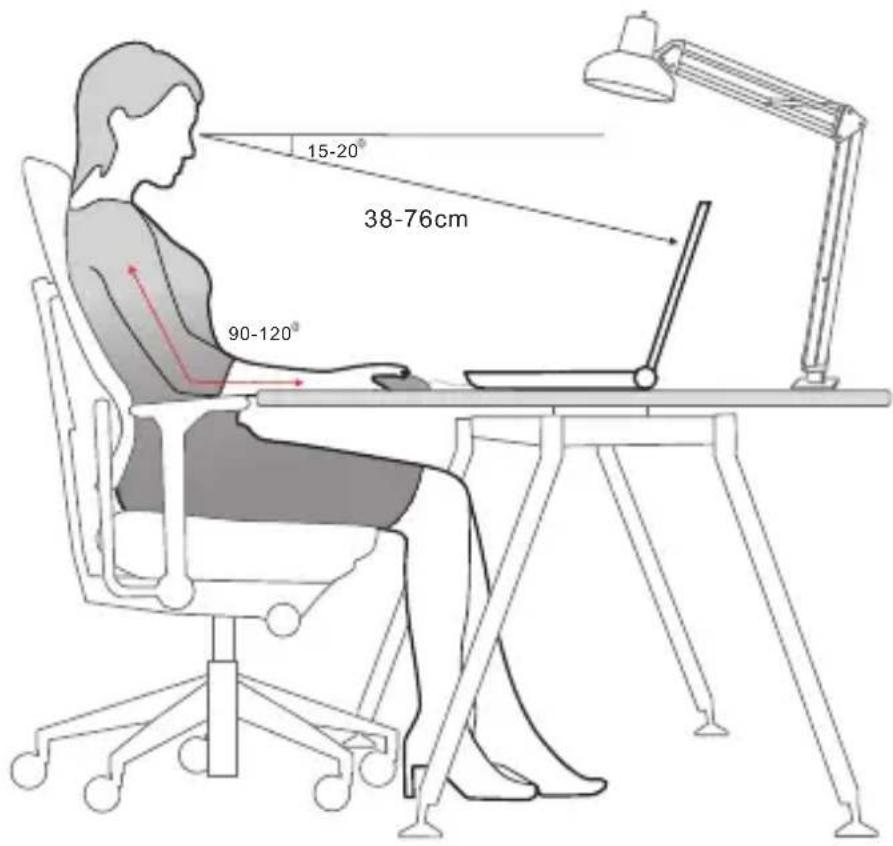
If you are a beginner to the notebook, please read the following instructions to assure your own safety, and make yourself comfortable during the operations.
▶ Good illumination is essential in the work area.
- Choose a chair and desk with good ergonomics and adjust their heights according to your posture.
- Adjust the backrest to support your lower back comfortably when you are sitting upright.
- Place your feet flat on the floor with your knees bent to a 90 degrees.
- Adjust the angle/position of the LCD panel to have an optimal view.
▶ Stretch and relax your body regularly. Always take a break after working for a period of time.
text_image
15-20° 38-76cm 90-120°How to Manage Power Supply
This section provides users basic safety precautions to take when using an AC/DC adapter and battery power properly.
AC/DC Adapter
Ensure that your notebook is connected to an AC power source via the AC adapter before turning it on for the first time. If the notebook automatically shuts down due to low battery power, it is likely to cause system failure. Below are some Dos and Don'ts of an AC/DC adapter.
▶ Dos
• Use the adapter that shipped with your notebook only.
• Always be aware of heat coming from the in use AC/DC adapter.
• Unplug the AC power cord before disassembly the notebook.
▶ Don'ts
• Cover an in-use adapter since it can generate heat.
- Have the AC power cord plugged after powering off the system when the notebook is going to be left unused for a longer time.
Battery
When you get a new notebook or a new notebook battery, it is important to know how to charge and care for your battery in order to get the most out it for as long as you can.
Be aware of that the battery may not be replaced by users.
▶ Safety guidelines
- This notebook is equipped with a non-removable battery, follow the local regulations while discarding the notebook.
- Always keep the notebook and its battery away from excessive moisture and extreme temperatures.
• Always unplug the AC power cord before installing any module to the notebook.
▶ Battery type
- This notebook may be equipped with a high-capacity Li-ion or Li-polymer battery pack depending on the model you have.
• The rechargeable battery pack is an internal power source of the notebook.
▶ Battery charging behavior
To optimize battery life and avoid a sudden power loss, read the tips below:
- Suspend system operation if the system will be idle for a while or shorten the suspend timer's time period.
- Turn off the system if you won't be using it for a period of time.
- Disable unnecessary settings or remove idle peripherals.
- Connect an AC/DC adapter to the system whenever possible.
▶ How to charge the battery properly
Please pay attention to the following tips before recharging the battery:
- If a charged battery pack is not available, save your work and close all running programs and shut down the system.
• Plug in an AC/DC adapter. - You can use the system, suspend system operation or shut down and turn off the system without interrupting the charging process.
- The Li-ion or Li-polymer battery has no memory effect. It is unnecessary to discharge the battery before recharging. However, to optimize the life of battery, we suggest that consuming the battery power completely once a month is necessary.
• The actual charging time will be determined by the applications in use.
How to Set Up a Power Plan in Windows 10
A power plan is a collection of hardware and system settings that manages how your computer uses and conserves power. Power plans can save energy, maximize system performance, or balance energy conservation with performance. The default power plans — Balanced and Power saver — meet most people's needs. But you can modify settings for existing plans or create your own plan.
Choose or Customize a Power Plan
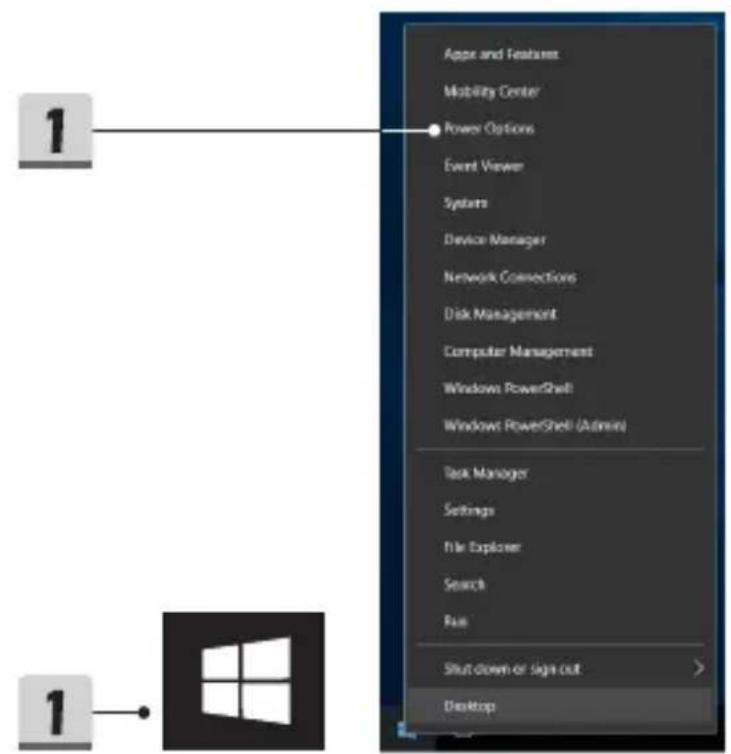
- Find [Windows] icon in the lower-left corner of the screen. Right click it to unfold the selection menu. Select [Power Options] within the menu.
- Select [Additional power settings] under [Related settings].
- The Power Plan of [Balanced] is selected as an example here. Click on the [Change plan settings] to the right of the power plan to customize a power plan.
- Choose the sleep and display settings you want your computer to use. Click on [Change advanced power settings] to make changes to the selected power plan settings to meet your needs.
- To restore the selected Power Plan back to its default settings, click on [Restore plan defaults] and then click [Yes] to confirm.
- Click [OK] to finish.
text_image
App and Features Mobility Center Power Options Event Viewer Systems Device Manager Network Connections Disk Management Computer Management Windows PowerShell Windows PowerShell (Admin) Task Manager Settings File Explorer Search Run Shut down or Sign out Desktop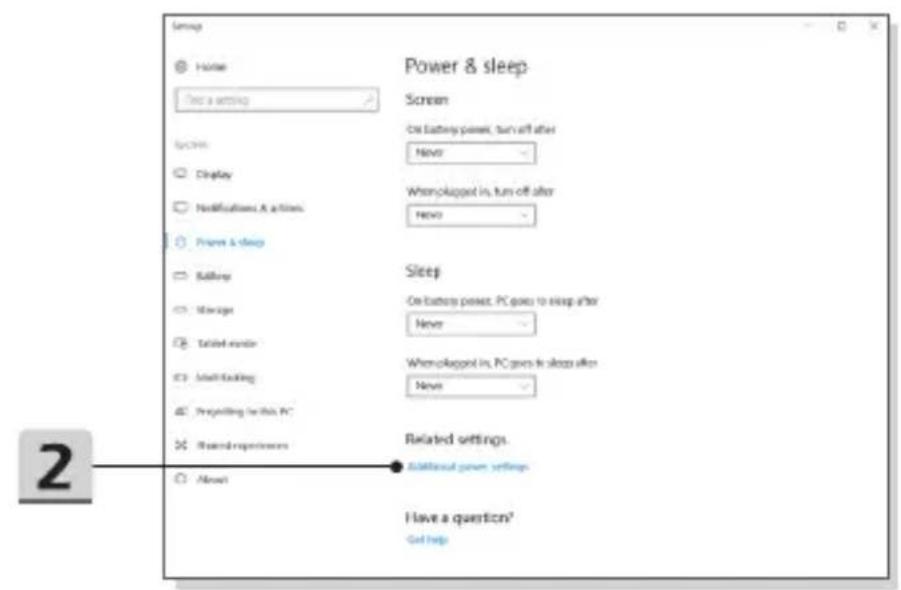
text_image
Setup Home On a setting System Display Notifications & actions Power & sleep Battery Storage Tablet mode Small reading Preparing in this PC Shared experiments None Power & sleep Screen On battery panel, turn off after Never When together is, turn off after Never Sleep On battery panel, PC goes to sleep after Never When together is, PC goes to sleep after Never Related settings. Additional power settings Have a question? Get help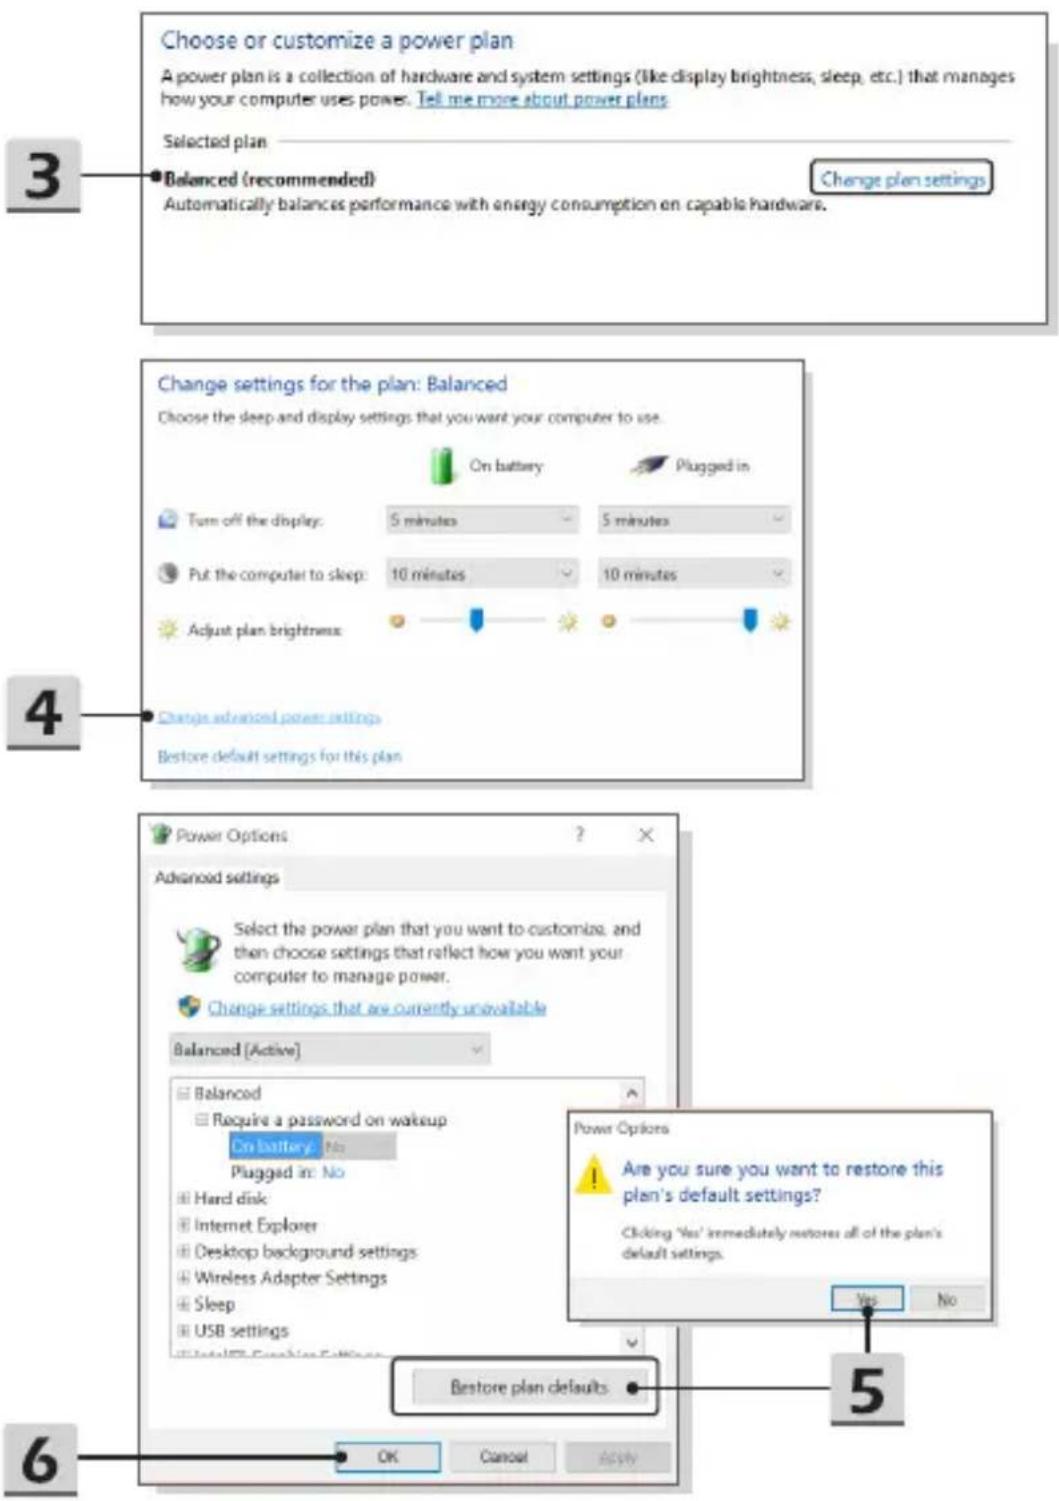
text_image
Choose or customize a power plan A power plan is a collection of hardware and system settings (like display brightness, sleep, etc.) that manages how your computer uses power. Tell me more about power plans Selected plan 3 Balanced (recommended) Change plan settings Automatically balances performance with energy consumption on capable hardware. Change settings for the plan: Balanced Choose the sleep and display settings that you want your computer to use. On battery Plugged in Turn off the display: 5 minutes 5 minutes Put the computer to sleep: 10 minutes 10 minutes Adjust plan brightness 4 Change advanced power settings Restore default settings for this plan Power Options Advanced settings Select the power plan that you want to customize, and then choose settings that reflect how you want your computer to manage power. Change settings that are currently unavailable Balanced [Active] Balanced Require a password on wakeup On battery No Plugged in: No Hard disk Internet Explorer Desktop background settings Wireless Adapter Settings Sleep USB settings Bestore plan defaults 5 6 OK Cancel ApplyCreate Your Own Power Plan
You can create your own power plan and customize it as your requirement. However, it will be recommended to use ECO Mode power saving function to optimize the battery life while using this notebook.
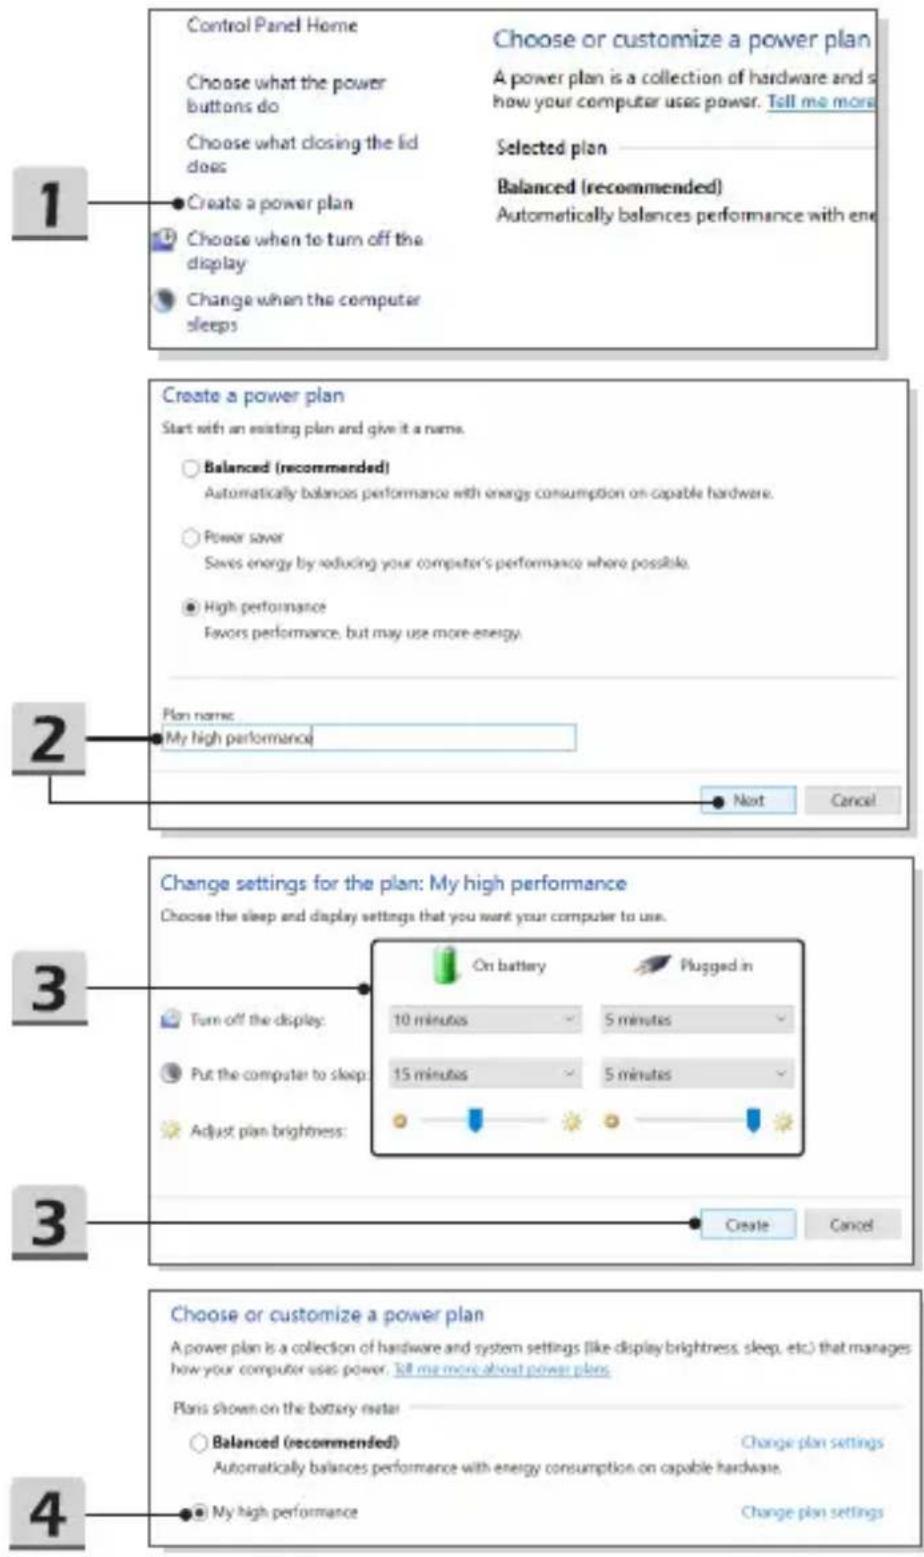
- Select Power Options in the menu. Click [Create a power plan] in the left pane.
- Select an existing plan that meet your needs most, and give the plan a name. Click [Next] to continue.
- Change the settings for the new power plan. Click [Create] to make the customized power plan taking effect.
- Now you have a new power plan that is automatically set as active.
text_image
1 Control Panel Home Choose or customize a power plan Choose what the power buttons do A power plan is a collection of hardware and s how your computer uses power. Tell me more Choose what closing the lid does Selected plan Balanced (recommended) Automatically balances performance with ene 1 Choose a power plan Choose when to turn off the display Change when the computer sleeps 2 Create a power plan Start with an existing plan and give it a name. Balanced (recommended) Automatically balances performance with energy consumption on capable hardware. Power saver Saves energy by reducing your computer's performance where possible. High performance Favors performance, but may use more energy 3 Plan name: My high performance 4 Change settings for the plan: My high performance Choose the sleep and display settings that you want your computer to use. On battery Plugged in Turn off the display: 10 minutes 5 minutes Put the computer to sleep: 15 minutes 5 minutes Adjust plan brightness: 3 Create Cancel 3 Choose or customize a power plan A power plan is a collection of hardware and system settings like display brightness, sleep, etc.) that manages how your computer uses power. Tell me more about power plans. Paris shown on the battery meter Balanced (recommended) Change plan settings Automatically balances performance with energy consumption on capable hardware. My high performance Change plan settingsHow to Set Up Windows Hello Fingerprint Login
Windows Hello is a more secure, personal way to get instant access to your Windows 10 devices using fingerprint or facial recognition. The feature requires fingerprint reader or a infrared camera that supports it. Once you're set up, you'll be able to sign in with a quick swipe or glance.
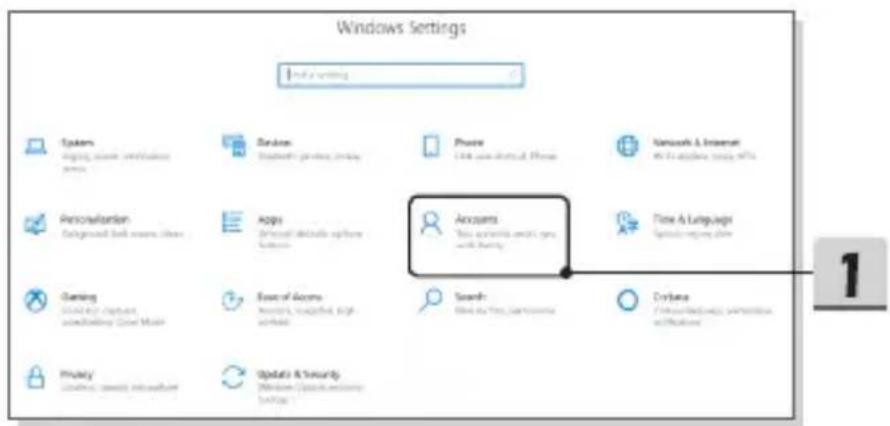
Follow below instructions to login with a touch. You need to set up a password and PIN code before you're allowed to use Windows.
text_image
Windows Settings Install a new Systems Options, options, websites, apps Database Organic products, services, tools Apps External details, open Accessories Accounts This is currently available for and also available to Software Search Data as free, regardless of Services Drillards Information security, regardless of all or more Personnelers Background book covers, files Gaming Cloud file capture adjusting Cloud Music Ease of Access Access, organelled, high Services Update & Security Microsoft's access, security on Web▶ Create a Password
- Open up Settings and locate [Accounts].
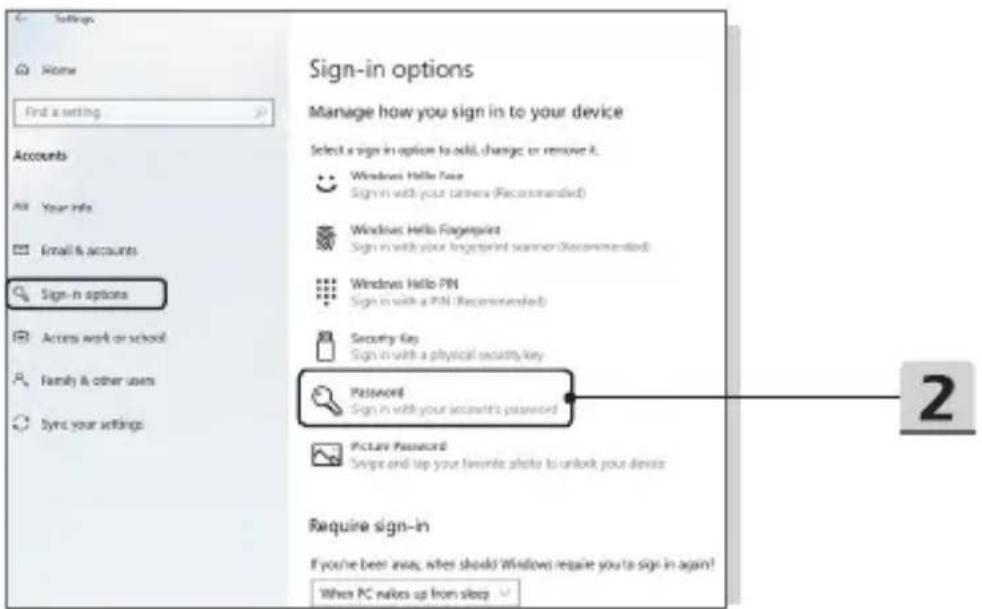
- In Sign-in options, click Password.
- Follow on-screen instruction to create a new password.
- Enter again to verify your account password, click [OK] to close.
text_image
Settings Home Find a setting Accounts All Your info. Email & accounts Sign-in options Access work or school Family & other users Sync your settings Sign-in options Manage how you sign in to your device Select a sign in option to add, change, or remove it. Windows Hello Face Sign in with your camera (Recommended) Windows Hello Fingerprint Sign in with your fingerprint scanner (Recommended) Windows Hello PN Sign in with a PN (Recommended) Security Key Sign in with a physical security key Password Sign in with your account's password Picture Password Snap and tap your favorite photo to unlock your device Require sign-in If you're beer away, when should Windows require you to sign in again! When PC takes up from sleep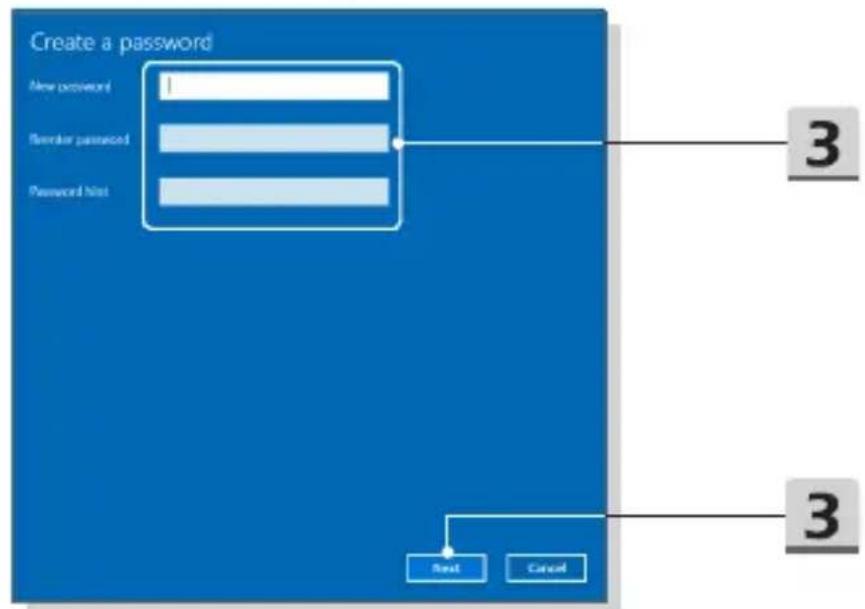
text_image
Create a password New password Reminder password Password list 3 3 Next Cancel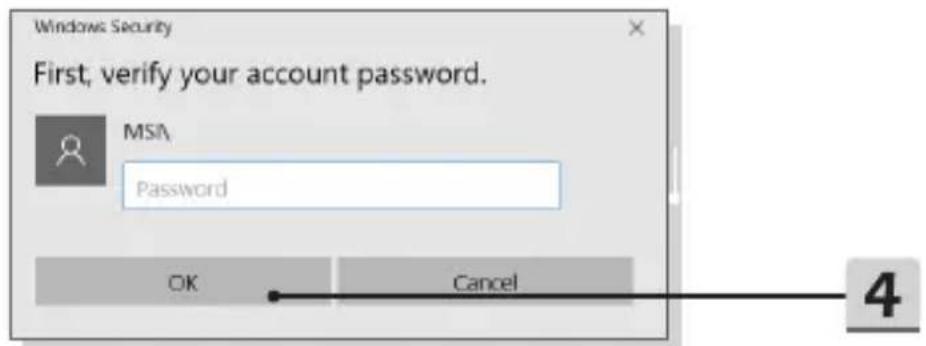
text_image
Windows Security First, verify your account password. MSA Password OK Cancel 4▶ Set up a PIN
- Click Windows Hello PIN.
-
Click [Add] to continue.
-
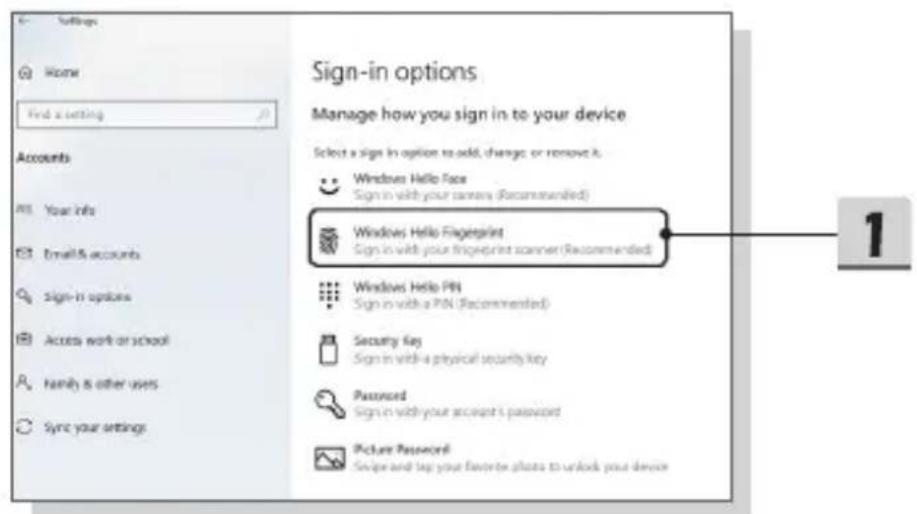
You may be asked to verify in your account with the password. Set up a PIN and then re-enter to confirm, click [OK] to close.

text_image
Settings Home Find a setting Accounts Your info Email & accounts Sign-in options Access work or school Family & other users Sync your settings Sign-in options Manage how you sign in to your device Select a sign in option to add change or remove it. Windows Hello Face Sign in with your accounts (Recommended) Windows Hello Fingerprint Sign in with your fingerprint signed (Recommended) Windows Hello Print Sign in with a PIN (Recommended) Security Key Sign in with a physical security key Password Sign in with your account's password Picture Password Snap and tap your favorite photo to unlock your device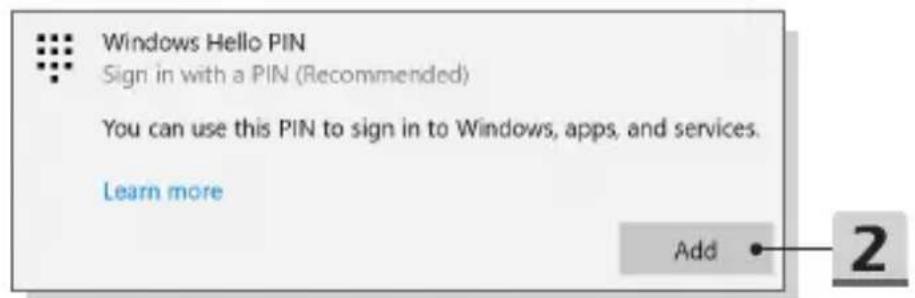
text_image
Windows Hello PIN Sign in with a PIN (Recommended) You can use this PIN to sign in to Windows, apps, and services. Learn more Add 2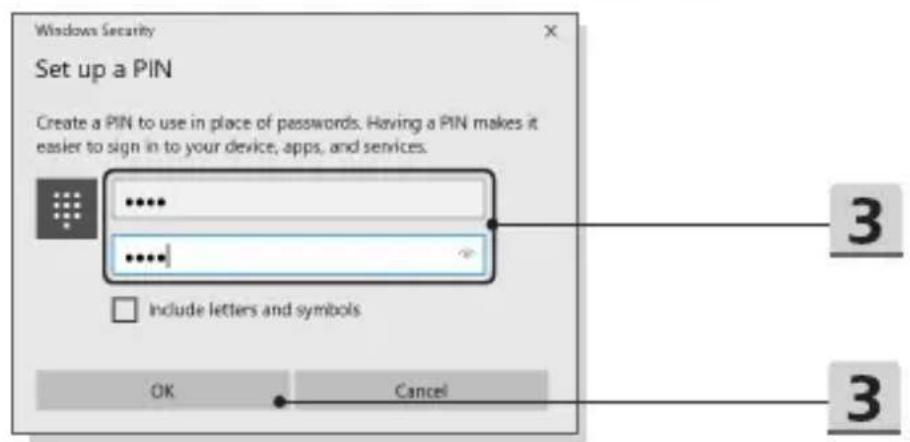
text_image
Windows Security Set up a PIN Create a PIN to use in place of passwords. Having a PIN makes it easier to sign in to your device, apps, and services. ..... ..... Include letters and symbols OK Cancel 3 3▶ Set up a Fingerprint
- Click Windows Hello Fingerprint.
- Click [Set up].
- On the Windows Hello setup wizard, click [Get started] button.
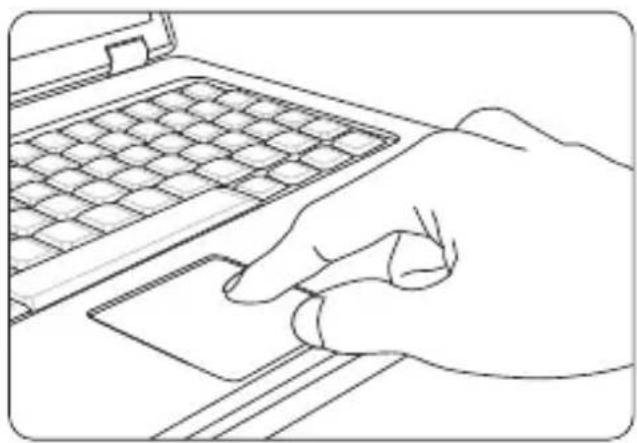
- Place your preferred finger on the upper-left corner of the touchpad. You will be asked swipe the same finger for a few times to setup Windows Hello.
- Click [Add Another] if you want to repeat the process with another finger, or close the program.
text_image
Settings Home Find a setting Accounts My Info Email & accounts Sign-in options Access work or school Family & other users Sync your settings Sign-in options Manage how you sign in to your device Select a sign in option to add, change, or remove it. Windows Hello Face Sign in with your accounts (Recommended) Windows Hello Fingerprint Sign in with your fingerprint scanner (Recommended) Windows Hello PIN Sign in with a PIN (Recommended) Security Key Sign in with a physical security key Password Sign in with your account's password Picture Password! Skip and tap your favorite photo to unlock your device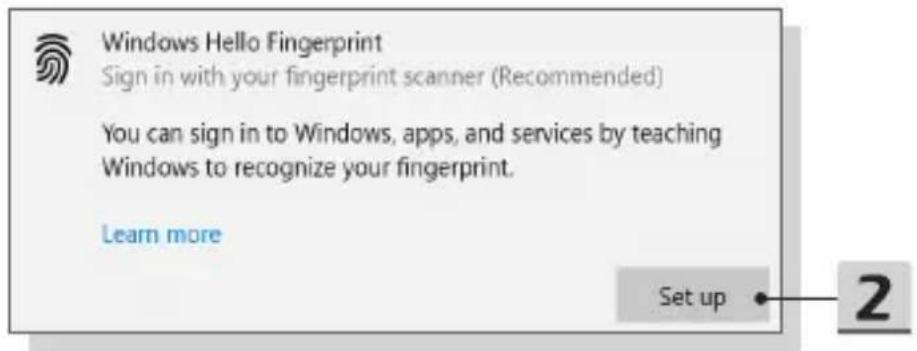
text_image
Windows Hello Fingerprint Sign in with your fingerprint scanner (Recommended) You can sign in to Windows, apps, and services by teaching Windows to recognize your fingerprint. Learn more Set up 2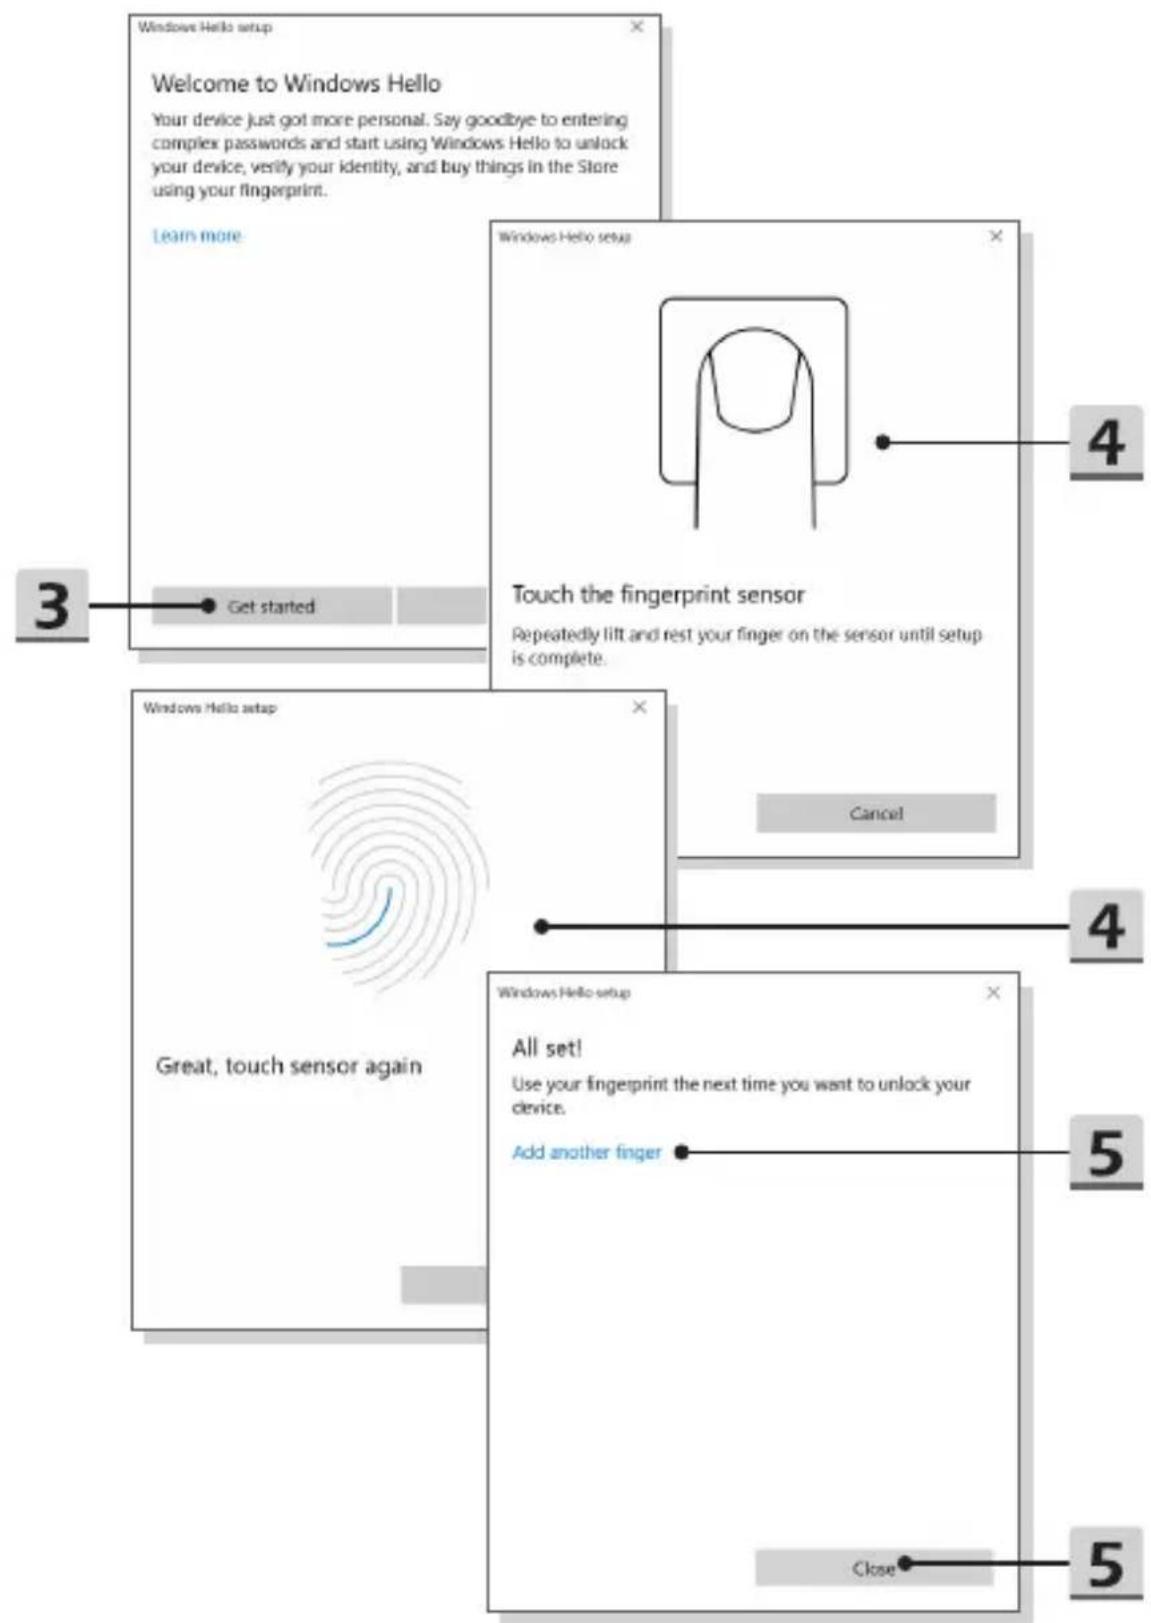
text_image
Windows Hello setup Welcome to Windows Hello Your device just got more personal. Say goodbye to entering complex passwords and start using Windows Hello to unlock your device, verify your identity, and buy things in the Store using your fingerprint. Learn more 3 Get started 4 Windows Hello setup Touch the fingerprint sensor Repeatedly lift and rest your finger on the sensor until setup is complete. 5 Windows Hello setup All set! Use your fingerprint the next time you want to unlock your device. Add another finger Close 4 5How to Use the Touchpad
The touchpad integrated in your notebook is a pointing device that is compatible with standard mouse, allowing you to control the notebook by pointing the location of the cursor on the screen.
natural_image
Line drawing of a hand typing on a laptop keyboard (no text or symbols)Configure the Touchpad
You can customize the pointing device to meet your personal needs. For example, if you are a left-handed user, you may want to swap the functions of the two buttons. In addition, you can change the size, shape, moving speed and other advanced features of the cursor on the screen.
To configure the touchpad, you can use the standard Microsoft or IBM PS/2 driver in your Windows operating system. The Mouse Properties in Control Panel allows you to change the configuration.
▶ Position and Move
Place your finger on the touchpad (usually using the forefinger), and the rectangular pad will act as a miniature duplicate of your display. When you move your fingertip across the pad, the cursor on the screen will move simultaneously to the same direction. When your finger reaches the edge of the pad, lift your finger and place it on a proper location of the touchpad to continue the movement.
▶ Point and Click
When you have moved and placed the cursor over an icon, a menu item or a command that you want to execute, simply tap slightly on the touchpad or press the left button to select. This procedure, called as point and click is the basics of operating your notebook. Unlike the traditional pointing device such as the mouse, the whole touchpad can act as a left button, so that your each tap on the touchpad is equivalent to pressing the left button. Tapping twice more rapidly on the touchpad is to execute a double-click.
Drag and Drop
You can move files or objects in your notebook by using drag-and-drop. To do so, place the cursor on the desired item and slightly tap twice on the touchpad, and then keep your fingertip in contact with the touchpad on the second tap. Now, you can drag the selected item to the desired location by moving your finger on the touchpad, and then lift your finger from the touchpad to drop the item into place. Alternately, you can press and hold the left button when you select an item, and then move your finger to the desired location; finally, release the left button to finish the drag-and-drop operation.
About HDD and SSD
This notebook may be equipped with hard disk drive (HDD) or solid state drive (SSD) depending on the models users purchased.
The hard disk drive and solid state drive are the data storage devices used for storing and retrieving digital information. Most SSDs use NAND-based flash memory, and have higher data transfer rates, lower power consumption, and faster read/write speed than HDDs.
Do not attempt to remove or install the HDD and SSD when the notebook is powered on. Please consult an authorized retailer or service center for the replacement of the HDDs and SSDs.
About M.2 SSD Slot
The notebook may be equipped with M.2 SSD slots for M.2 SSD cards, which are compatible with SATA or PCIe interfaces, providing diverse features and usages to users. Consult an authorized retailer or service center for correct specifications and installations.
How to Connect the Internet
Wireless LAN
Wireless LAN is a wireless broadband connection that allows you to connect to the Internet without using any cables. Follow the instructions below to set up a Wireless LAN connection.
▶ Wireless LAN Connection
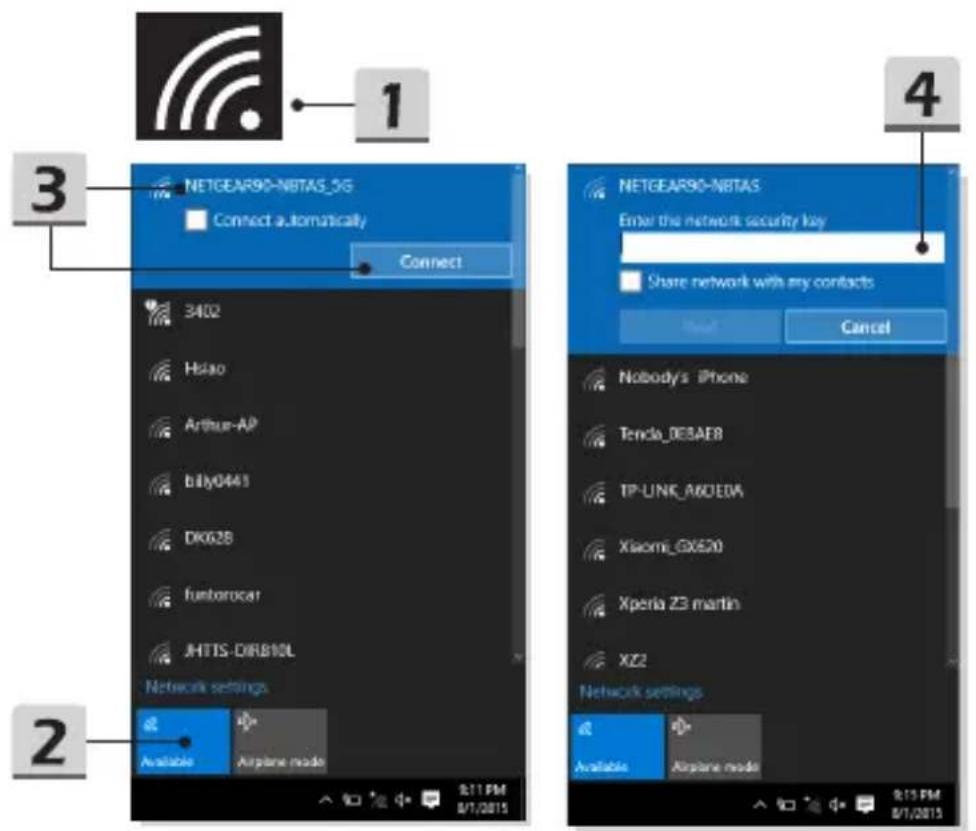
- Go to the desktop. Find the icon in the lower-right corner of the task bar and click on it to unfold the settings menu.
- There are [Wi-Fi] and [Airplane mode] two options in the Network settings, select [Wi-Fi] here.
- Choose one Wireless LAN connection from the network list to connect to the Internet. Click [Connect] to continue.
- A security key may be required for connecting the selected network. Then click [Next].
text_image
1 3 NETGEAR90-NBTAS_5G Connect automatically Connect 3402 Hsiao Arthur-AP bIly0441 DK028 funtorocar JHTTS-DIRB10L Network settings Available Airplane mode 2 4 NETGEAR90-NBTAS Enter the network security key Share network with my contacts Next Cancel Nobody's iPhone Tendo_DEBAE8 TP-UNK_A60EDA Xiaomi_GX620 Xperia Z3 martin XZ2 Network settings Available Airplane mode R:15 PM 8/1/2015▶ Check the Wireless LAN status
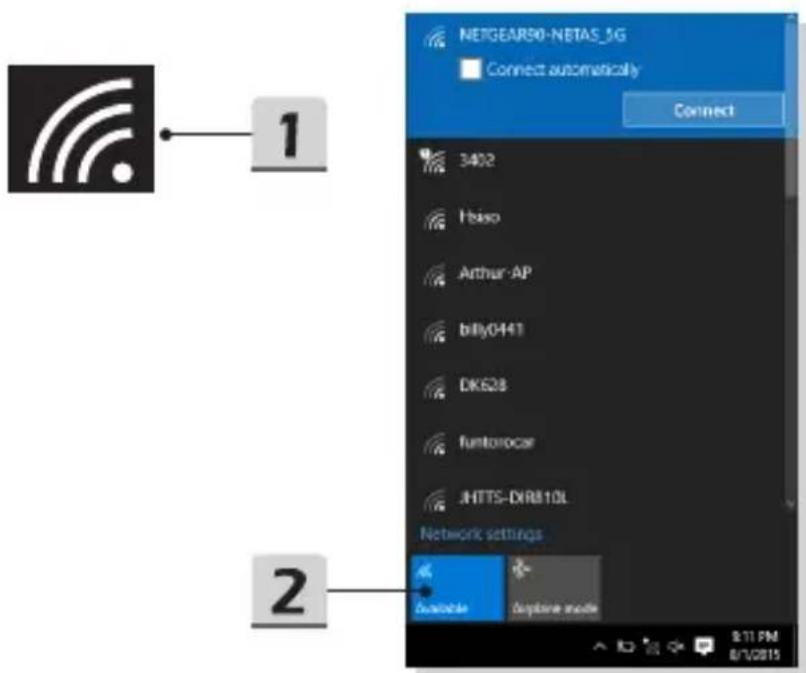
When Airplane mode is enabled, Wireless LAN connection will be turned off. Before setting up a Wireless LAN connection, make sure that Airplane mode is turned off.
- Go to the desktop. Find the icon in the lower-right corner of the task bar and click on it to unfold the settings menu.
- Check if Wireless LAN mode is available in the Network settings.
text_image
NETGEAR50-NETAS_5G Connect automatically Connect 3402 Hisco Arthur-AP billy0441 DK628 Funtorocar JHTTS-DXR810L Network settings Avacate Avapine mode 9:11 PM 8/1/2015Wired LAN
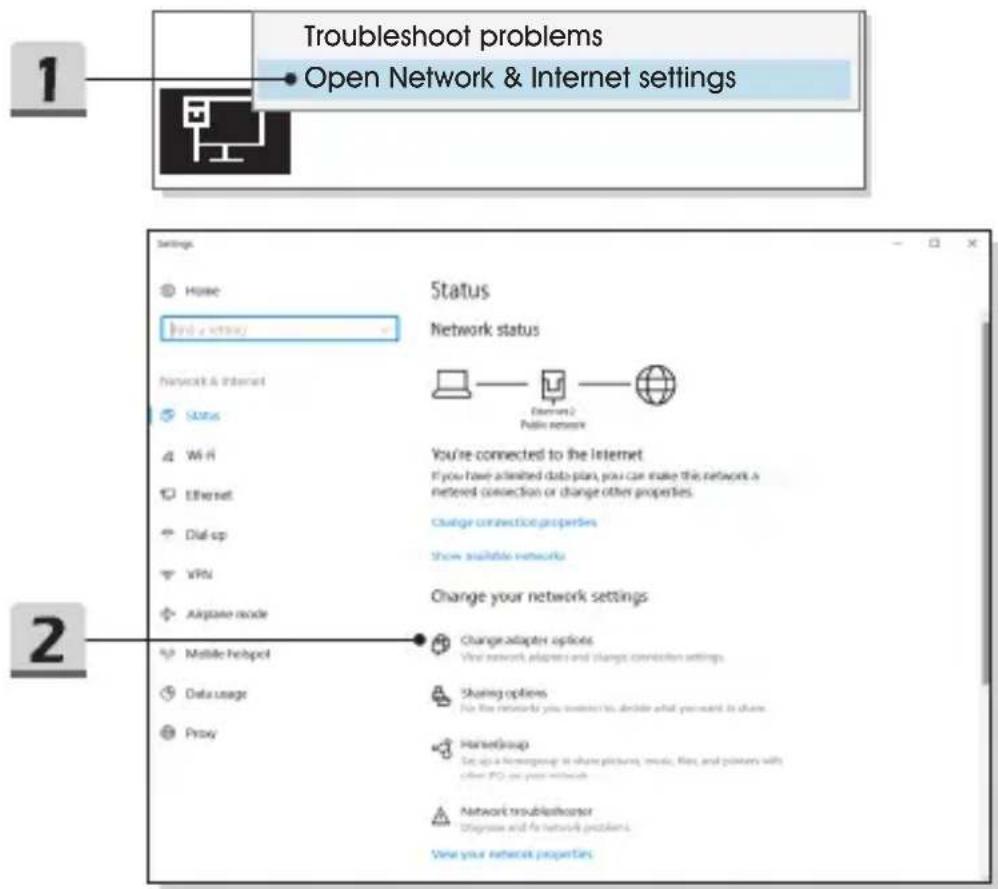
Using cables and network adapters to connect to the Internet. Before setting up the connection of Dynamic IP/PPPoE or Broadband (PPPoE) or Static IP, contact your Internet Service Provider (ISP) or network administrator for assistance of setting up Internet connection.
▶ Dynamic IP/PPPoE Connection
- Go to the desktop. Find the icon in the lower-right corner of the task bar, and then right click on it to select [Open Network & Internet settings].
- Choose [Change adapter options].
- Right click on [Ethernet] to select [Properties] from the drop-down menu.
- In the Ethernet Properties window, select [Networking] tab and check [Internet Protocol Version 4 (TCP/IPv4)]. Then click [Properties] to continue.
- Select [General] tab, click [Obtain an IP address automatically] and [Obtain DNS server address automatically]. Then click [OK].
text_image
Troubleshoot problems Open Network & Internet settings 1 Settings Home Find a remote Network & Internet Status Wi-Fi Ethernet Dial-up VRN Airplane mode Mobile helipot Data usage Proxy Status Network status Electron2 Pain network You're connected to the Internet If you have admitted data plan, you can make this network a netted connection or change other properties. Change connection properties Show available networks Change your network settings Change adapter options View network, adapters and changes connection settings. Sharing options For the network you want to decide what you want it share. Hansetgroup Set up a homegroup in share pictures, music, files, and printers with other PDFs on your network. Network troubleshooter Diagnosis and for network problems. View your network properties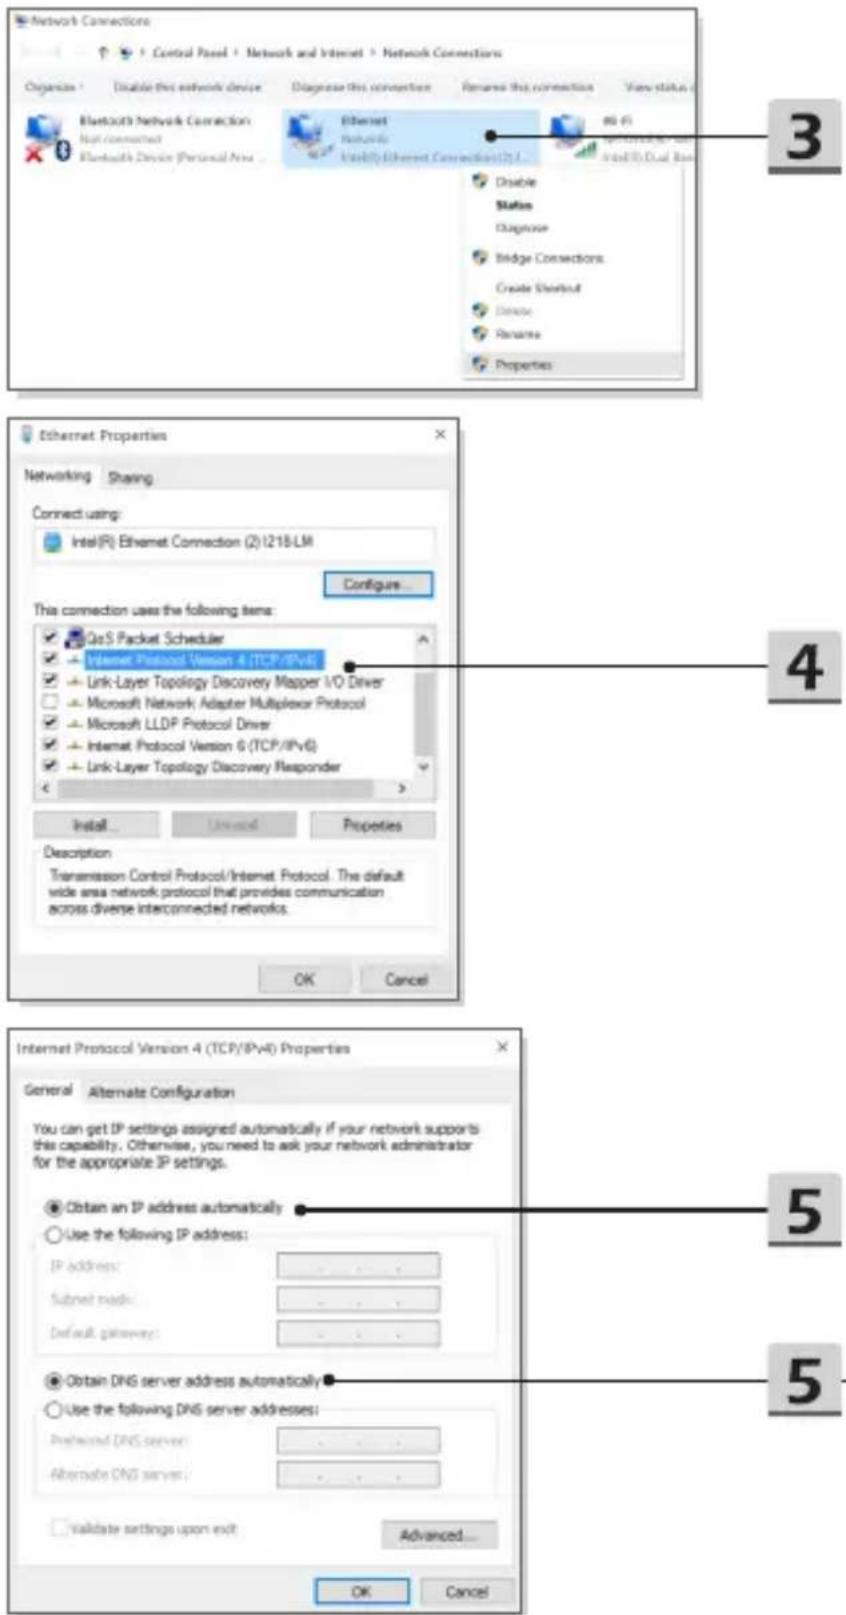
text_image
Network Connections Control Panel + Network and Internet + Network Connections Organics Disable this network device Diagnose this connection Remains this connection View status Bluetooth Network Connection Not connected Bluetooth Device (Personal Area) Ethernet Ethernet Enable Ethernet Connection(2.1) 80 Fi Disable Status Diagnose Bridge Connections Create Shortleaf Delete Rename Properties Ethernet Properties Networking Sharing Connect using: Intel(R) Ethernet Connection (2) I218-LM Configure... This connection uses the following items: QoS Packet Scheduler Viewer Protocol Version 4 (TCP/IPv6) Link-Layer Topology Discovery Mapper I/O Driver Microsoft Network Adapter Multiplexor Protocol Microsoft LLDP Protocol Driver Internet Protocol Version 6 (TCP/IPv6) Link-Layer Topology Discovery Responder Install... Linked... Properties Description Transmission Control Protocol/Internet Protocol. The default wide area network protocol that provides communication across diverse interconnected networks. OK Cancel Internet Protocol Version 4 (TCP/IPv6) Properties General Alternate Configuration You can get IP settings assigned automatically if your network supports this capability. Otherwise, you need to ask your network administrator for the appropriate IP settings. Obtain an IP address automatically Use the following IP address: IP address: Subnet mode: Default gateway: Obtain DNS server address automatically Use the following DNS server addresses: Preferred DNS server: Alternate DNS server: Validate settings upon exit Advanced... OK CancelBroadband (PPPoE) Connection
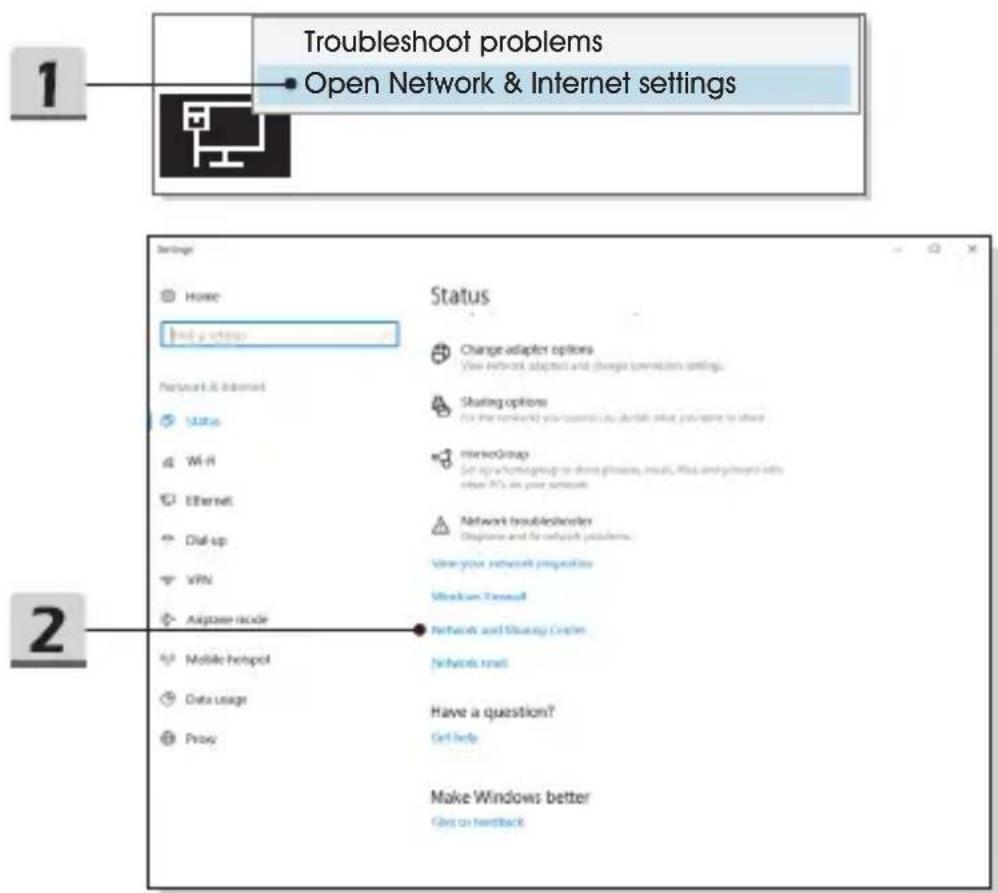
- Go to the desktop. Find the icon in the lower-right corner of the task bar, right click on it to select [Open Network & Internet settings].
- Select [Network and Sharing Center] and then select [Set up a new connection or network] under [Change your networking settings].
- Select [Connect to the Internet], and then click [Next].
- Click [Broadband (PPPoE)].
- Fills User name, Password, and Connection name fields. Then click [Connect].
text_image
Troubleshoot problems Open Network & Internet settings 1 Settings Home Help a server Network & Internet Status Wi-Fi Ethernet Dial-up VPN Adaptive mode Mobile Hotspot Data usage Proxy Status Change adapter options View network, adaptout and change transmission settings. Sharing options (2. For the network) your control Lix, which what you want to switch mseroGroup Set up a homegroup or these phones, emails, files and privacy links other PCs in your networks. Network troubledenter Disencies and for network problems. View your network protocols Streakwn Terminal Network and Streaking Console Network next Have a question? Get help Make Windows better Gives on feedback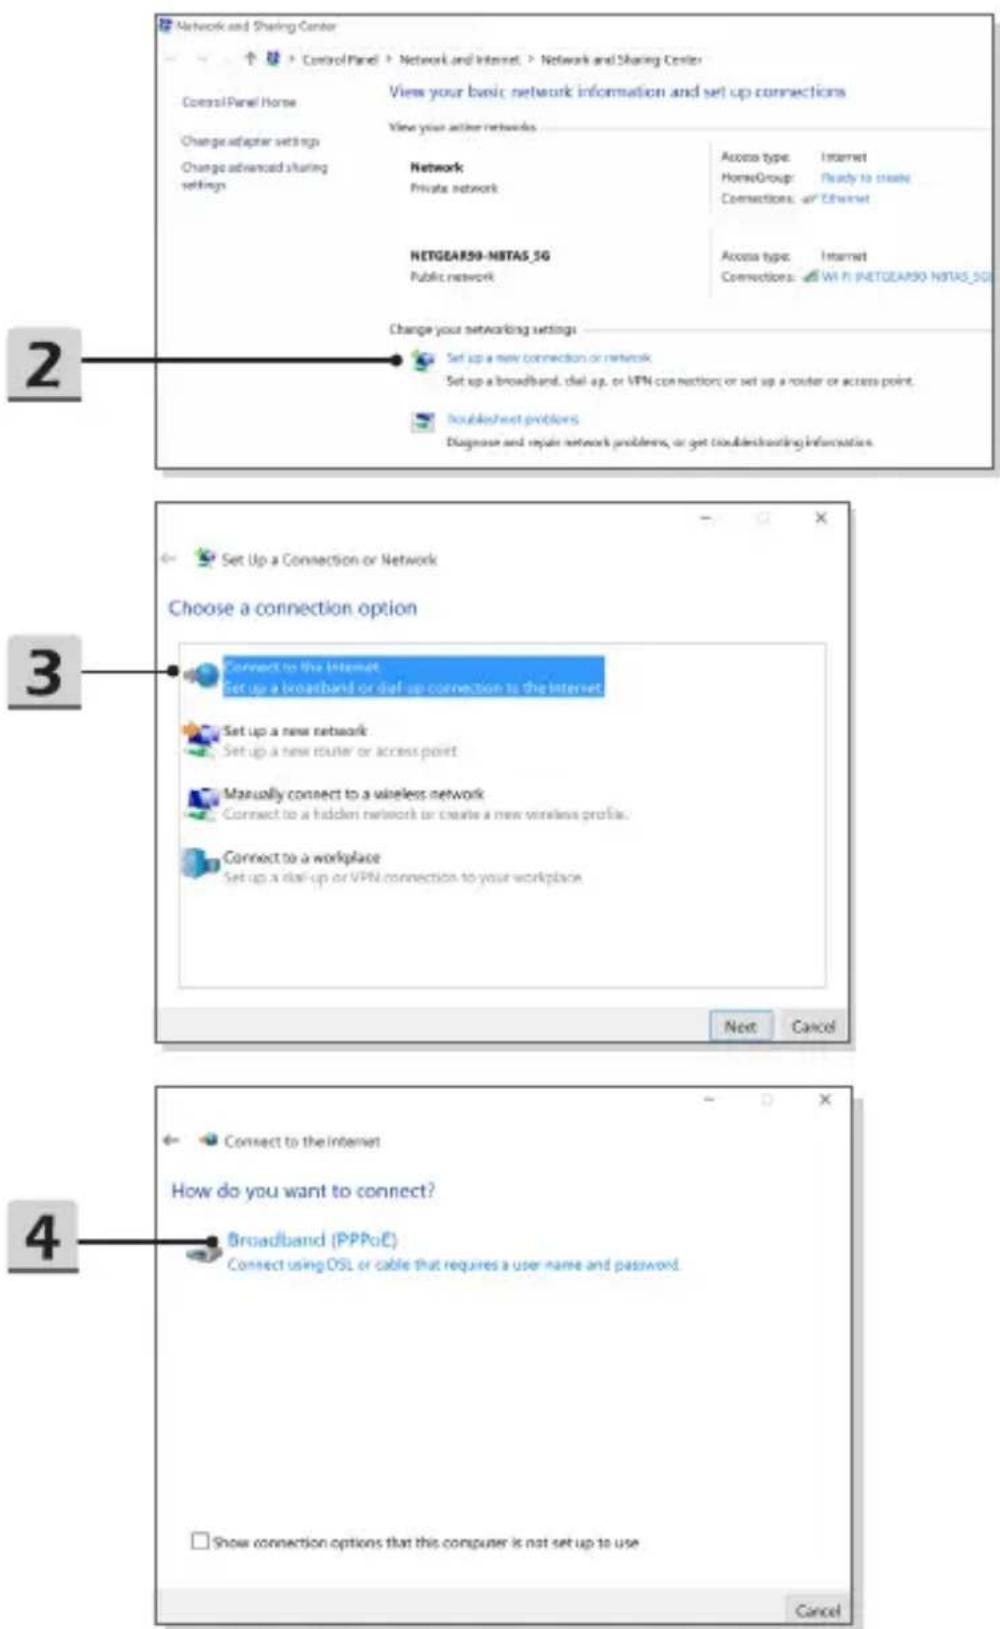
text_image
Network and Sharing Center Control Panel > Network and Internet > Network and Sharing Center View your basic network information and set up connections Control Panel Horse Change adapter settings Change advanced sharing settings View your active networks Network Private network Access type: Internet HomeGroup: Ready to create Connections: or Ethernet NETGEAR59-NBTAS_5G Public network Access type: Internet Connections: Wi-Fi (NETGEAR59-NBTAS_5G) Change your networking settings Set up a new connection or network Set up a broadband, dial up, or VPN connection; or set up a router or access point. Doubleheet problems Diagnose and repair network problems, or get trouble/shr Economics Set Up a Connection or Network Choose a connection option Connect to the Internet Set up a broadband or dial-up connection to the Internet Set up a new network Set up a new router or access point Manually connect to a wireless network Connect to a hidden network or create a new wireless profile. Connect to a workplace Set up a dial-up or VPN connection to your workplace Next Cancel 4 Connect to the Internet How do you want to connect? Broadband (PPPoE) Connect using DSL or cable that requires a user name and password. Show connection options that this computer is not set up to use Cancel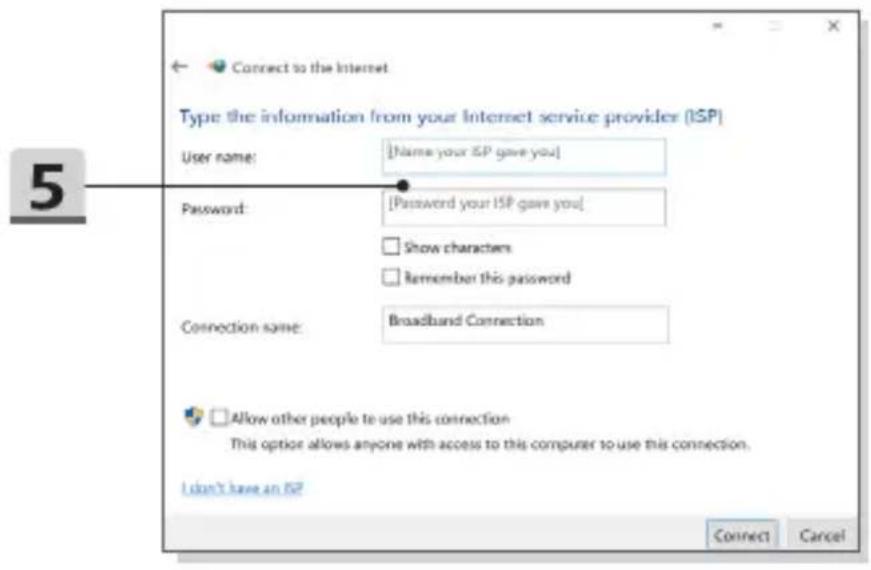
text_image
Connect to the Internet Type the information from your Internet service provider (ISP) User name: [Name your ISP gave you] Password: [Password your ISP gave you] Show characters Remember this password Connection name: Broadband Connection Allow other people to use this connection This option allows anyone with access to this computer to use this connection. I don't have an ISP Connect Cancel▶ Static IP Connection
- Follow the previous steps 1 to 4 in Dynamic IP/PPPoE Connection.
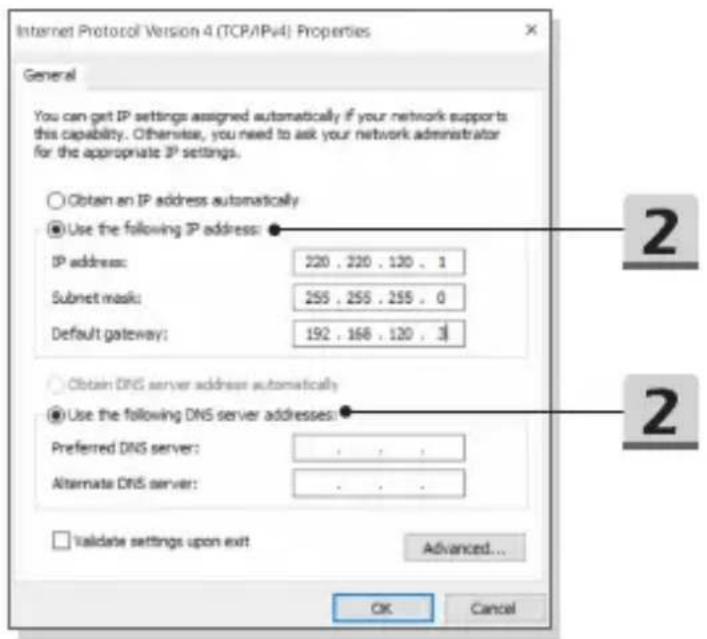
- Select [General] tab and click [Use the following IP address] and [Use the following DNS server addresses]. You will be asked to fill the IP address, Subnet mask, and Default gateway, and then click [OK].
text_image
Internet Protocol Version 4 (TCP/IPv4) Properties General You can get IP settings assigned automatically if your network supports this capability. Otherwise, you need to ask your network administrator for the appropriate IP settings. Obtain an IP address automatically Use the following IP address: IP address: 220 . 220 . 130 . 1 Submit mask: 255 . 255 . 255 . 0 Default gateway: 192 . 168 . 120 . 1 Obtain DNS server address automatically Use the following DNS server addresses: Preferred DNS server: . Alternate DNS server: . Validate settings upon exit Advanced... OK CancelHow to Set Up Bluetooth Connection
Bluetooth pairing is a process in which two Bluetooth devices communicate with each other through an established connection.
Activating Bluetooth Connection
▶ Checking the Bluetooth status
When Airplane mode is enabled, Bluetooth connection will be turned off. Before setting up a Bluetooth connection, make sure that Airplane mode is turned off.
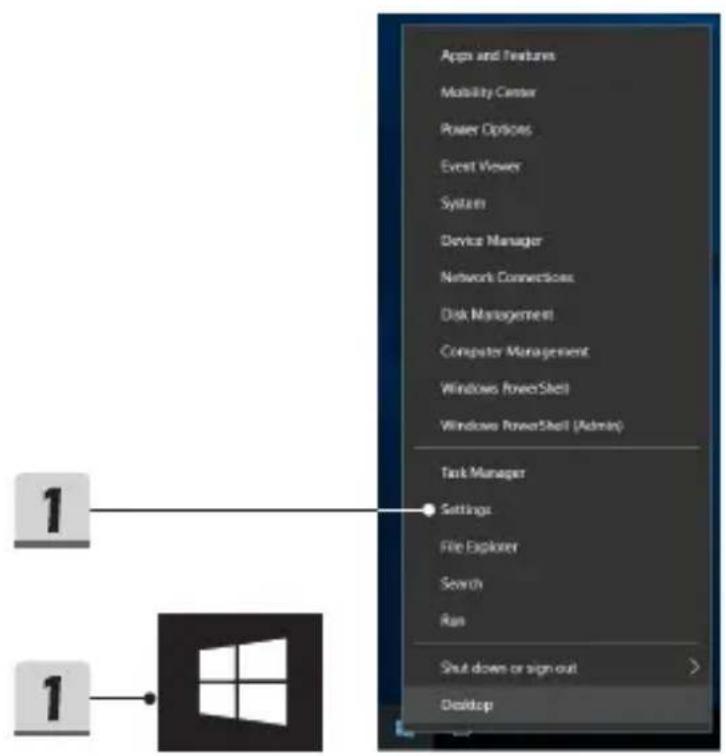
- Go to the desktop. Find the right click on it.
icon in the lower-left corner of the screen and - Select [Settings] to bring out [Windows Settings] menu, and then select [Devices] to enter the next Settings menu.
- Select [Bluetooth & other devices].
- Switch [On] the Bluetooth connection if it is set to [Off].
text_image
Apps and Features Mobility Center Power Options Event Viewer System Device Manager Network Connections Disk Management Computer Management Windows PowerShell Windows PowerShell (Admin) Task Manager Settings File Explorer Search Run Shut down or sign out Desktop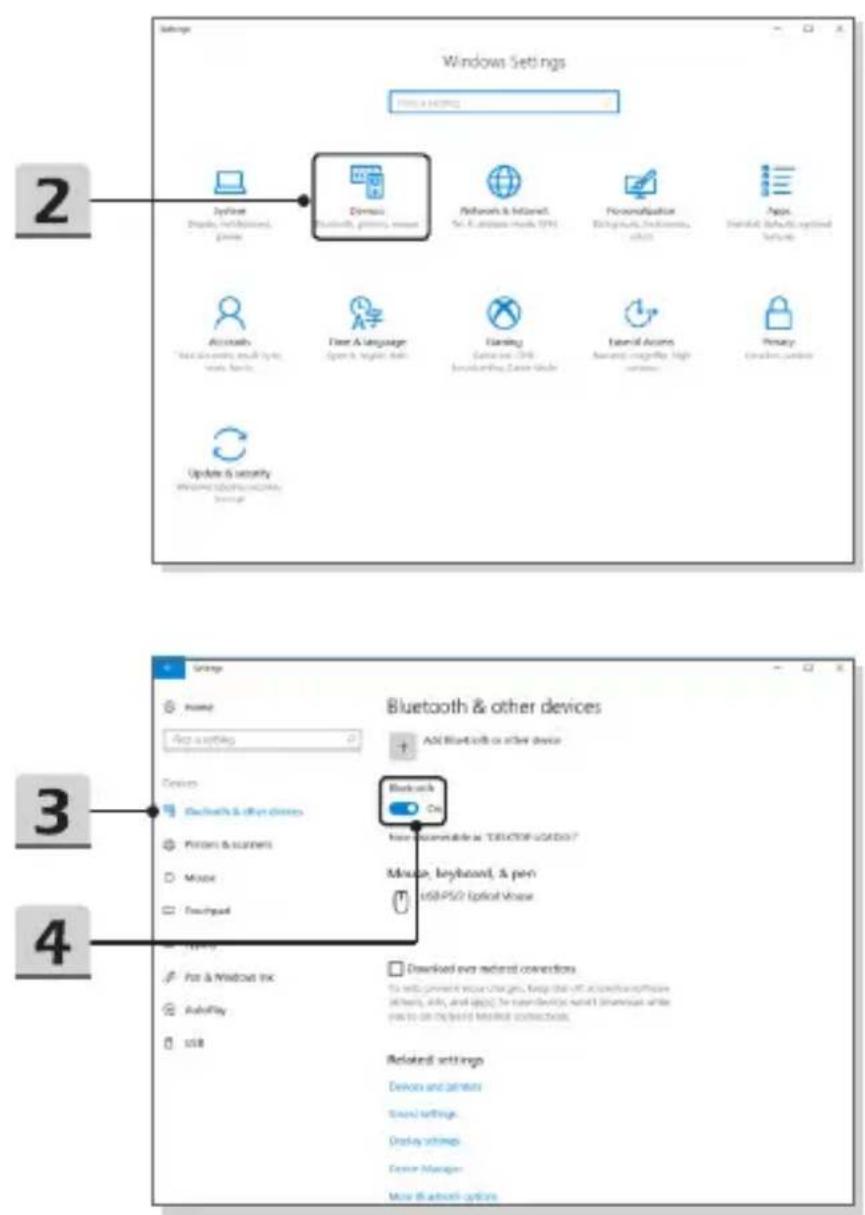
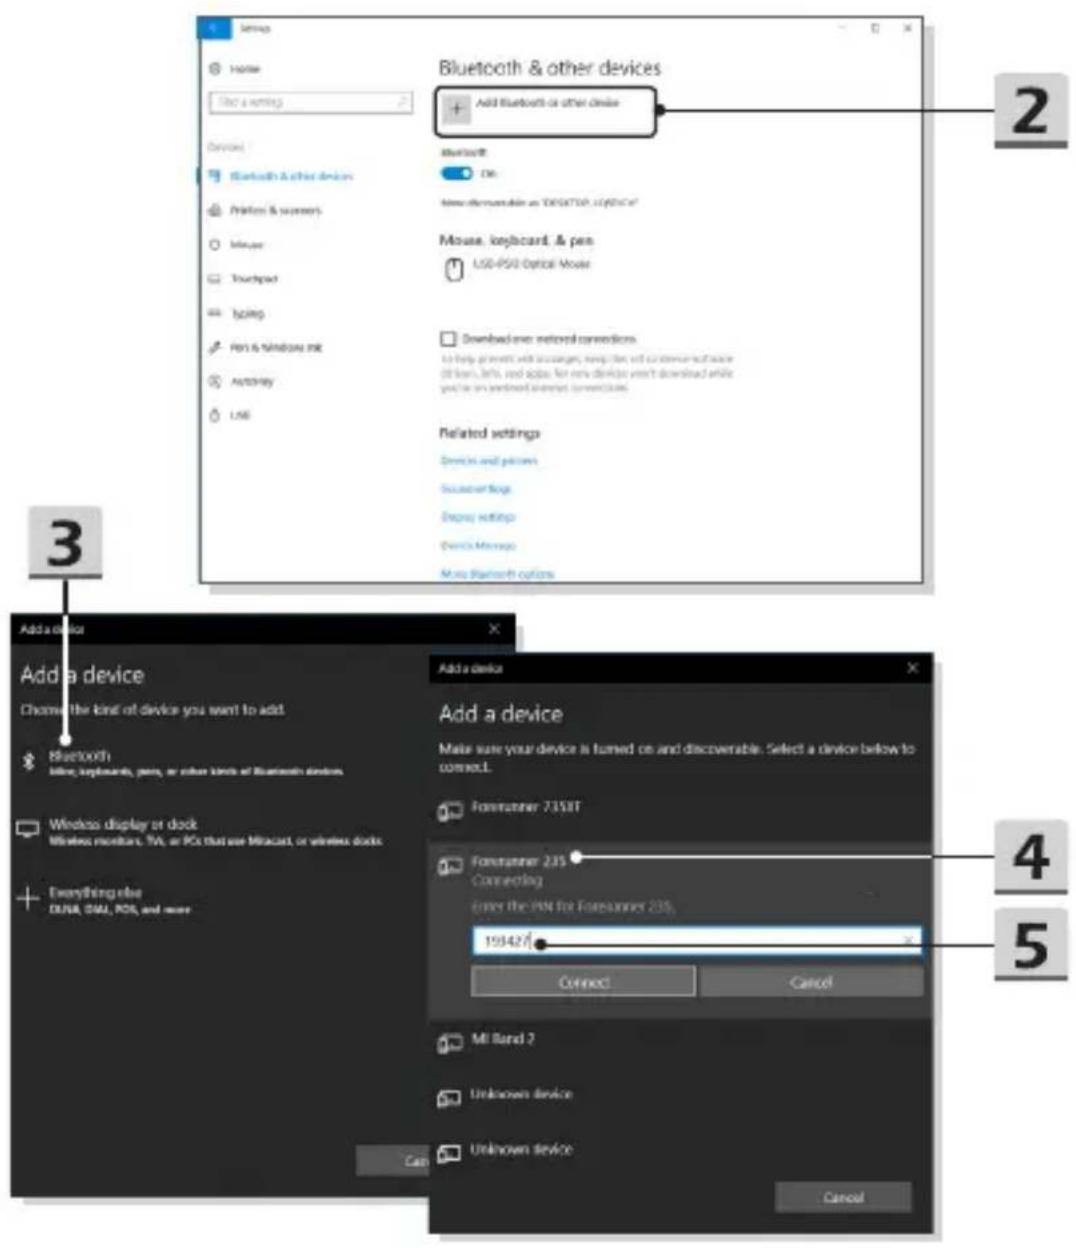
▶ Pairing the Bluetooth devices
- Go to [Start/ Settings/ Devices], and then find [Bluetooth & other devices].
- Click on [Add Bluetooth or other device].
- Click on [Bluetooth].
- Select a device to start pairing.
- Give the passcode as instructed by the device waiting to be connected, and then click on [Connect] to continue.
text_image
Bluetooth & other devices Add Bluetooth or other devices Bluetooth On: New determinable as "E650TOP 1.01934" Mouse, keyboard, & pen USB/PSG Optical Mouse Download own network connections To help access with uscargers, megatlon, etc. to ensure soft access all items, hot, and appa. For new devices won't download while you are on network connected connections. Related settings Devices and patterns Schematic flags Display settings Device Messages Make Bluetooth options Add a device Add a device Choose the kind of device you want to add. Bluetooth inline, keyboards, pins, or other kinds of Bluetooth devices Windows display or dock Windows monitors, TVs, or PCs that use Miracard, or wireless docks Everything else DUNA, DISA, PCS, and more Add a device Make sure your device is turned on and discoverable. Select a device below to connect. Fornstream 7358T Fornstream 235 Connecting Enter the PIN for Fornstream 235, 193427# Connect Cancel MI Band 2 Unknown device Unknown device CancelHow to Connect External Devices
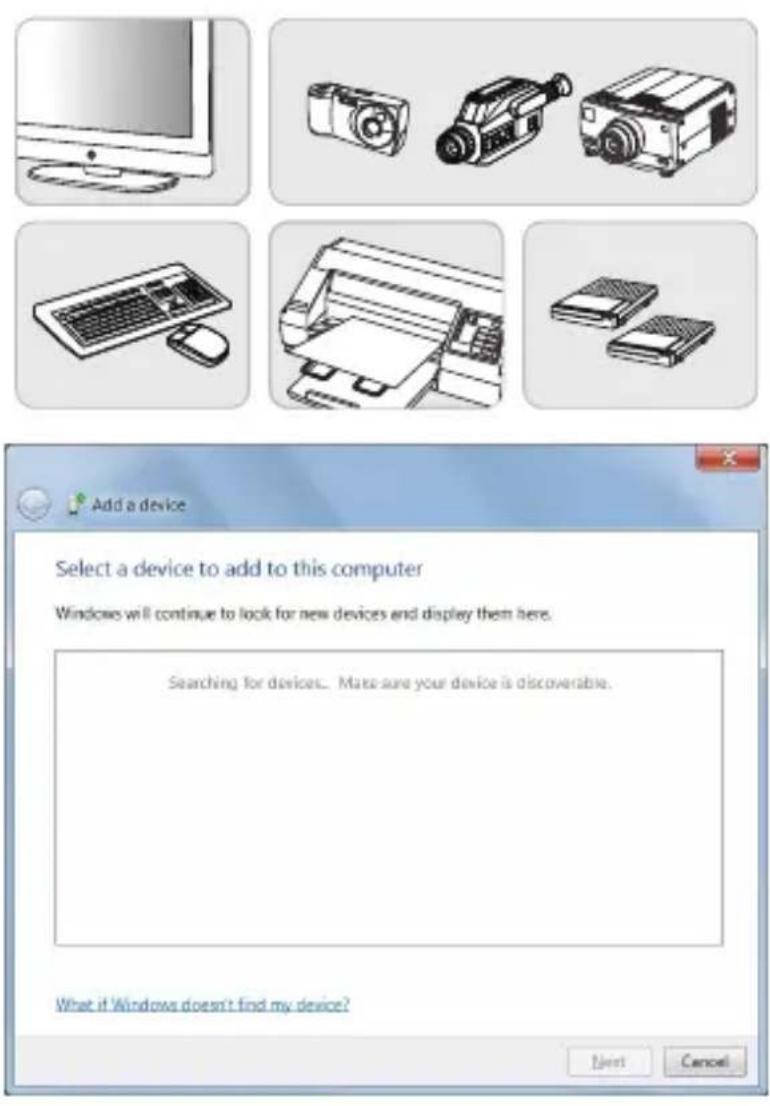
This notebook may be equipped with various connecting I/O (input/output) ports, such as USB, HDMI, DisplayPort, and mini DisplayPort. Users will be able to connect diverse peripheral devices to the notebook.
To connect these devices, refer to the instruction manuals of each device first, and then connect the device to the notebook. This notebook is capable to auto detect the connected devices, and if there is no detection of the devices, please manually enable the devices by going to [Start Menu/ Control Panel/ Hardware and Sound/ Add a device] to add the new devices.
Video: How to Use RAID Function
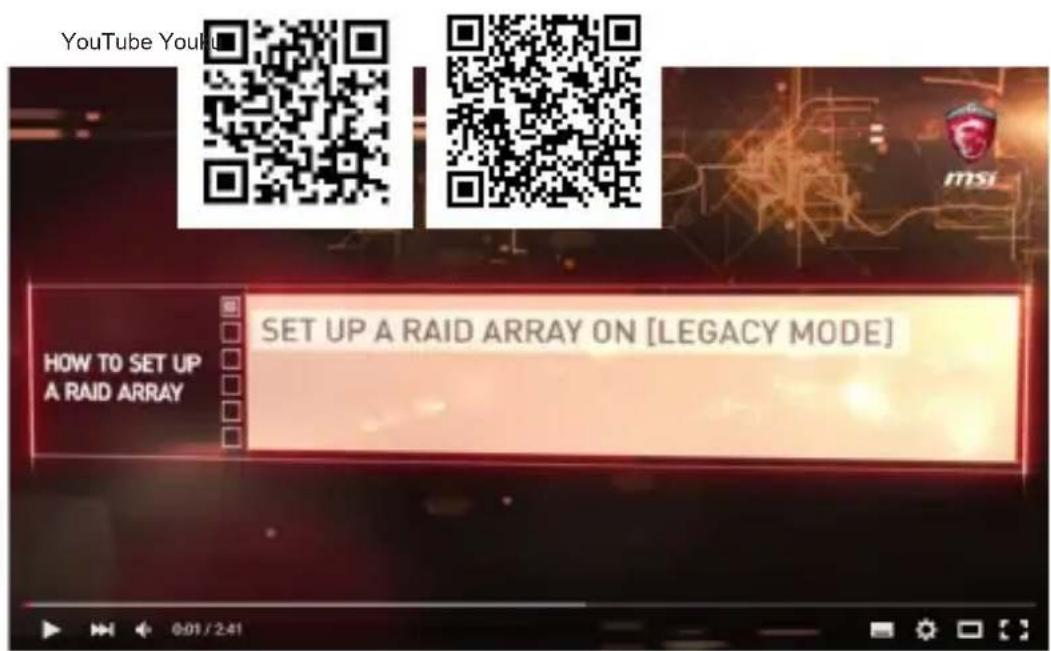
This notebook may support RAID function of different levels. RAID allows users to store data on multiple hard disk drives or solid state drives. Contact the local dealer for further and correct information and be noted that the supported RAID functions may vary depending on the models users purchased.
Watch the instruction video at: https://youtu.be/u2C35-ctFbw
text_image
YouTube YouTube HOW TO SET UP A RAID ARRAY SET UP A RAID ARRAY ON [LEGACY MODE]How to Select Boot Mode in BIOS
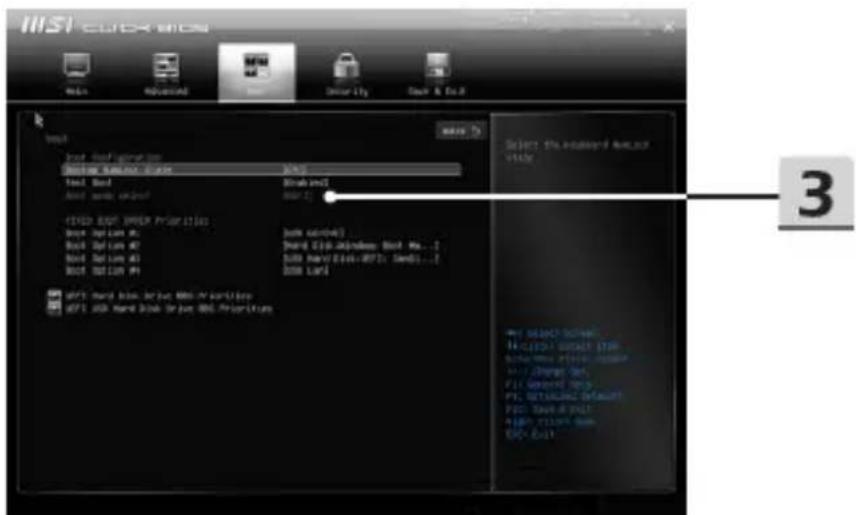
- Power on the system. As soon as the first logo screen appears, press the DEL key immediately and enter the BIOS menu.
- Move the cursor to [Boot] tab, and select [Boot mode select] in Boot Configuration.
- For operating system supports UEFI-based BIOS (Windows 10), it is suggested to select [UEFI].
- Refer to MSI FAQ for further information about installing Windows operating system on the notebook at https://www.msi.com/faq/notebook-1971
text_image
HISI CLOX EXON WIN Advanced Win Drive Flo Back & Do A Browse Load Configuration Dissay: 0.0000000000000000000000000000000000000000000000000000000000000000000000000000000000000000 Build Build Bed Build name: 24197 ADD: 8567 DIPER PIRAGE 11343 Build Name: 24197 Build Date: 24197 Build Name: 24197 ADD: 8567 DIPER PIRAGE 11343 Build Name: 24197 ADD: 8567 DIPER PIRAGE 11343 ADD: 8567 DIPER PIRAGE 11343 ADD: 8567 DIPER PIRAGE 11343 ADD: 8567 DIPER PIRAGE 11343 ADD: 8567 DIPER PIRAGE 11343 ADD: 8567 DIPER PIRAGE 11344 ADD: 8567 DIPER PIRAGE 11344 ADD: 8567 DIPER PIRAGE 11344 ADD: 8567 DIPER PIRAGE 11344 ADD: 8567 DIPER PIRAGE 11344 ADD: 8567 DIPER PIRAGE 11345 ADD: 8567 DIPER PIRAGE 11345 ADD: 8567 DIPER PIRAGE 11345 ADD: 8567 DIPER PIRAGE 11346 ADD: 8567 DIPER PIRAGE 11346 ADD: 8567 DIPER PIRAGE 11347 ADD: 8567 DIPER PIRAGE 11347 ADD: 8567 DIPER PIRAGE 11348 ADD: 8567 DIPER PIRAGE 11349 ADD: 8567 DIPER PIRAGE 11350 ADD: 8567 DIPER PIRAGE 11351 ADD: 8567 DIPER PIRAGE 11352 ADD: 8567 DIPER PIRAGE 11353 ADD: 8567 DIPER PIRAGE 11354 ADD: 8567 DIPER PIRAGE 11355 ADD: 8567 DIPER PIRAGE 11356 ADD: 8567 DIPER PIRAGE 11357 ADD: 8567 DIPER PIRAGE 11358 ADD: 8567 DIPER PIRAGE 11359 ADD: 8567 DIPER PIRAGE 11360 ADD: 8567 DIPER PIRAGE 11361 ADD: 8567 DIPER PIRAGE 11362 ADD: 8567 DIPER PIRAGE 11363 ADD: 8567 DIPER PIRAGE 11364 ADD: 8567 DIPER PIRAGE 11365 ADD: 8567 DIPER PIRAGE 11366 ADD: 8567 DIPER PIRAGE 11367 ADD: 8567 DIPER PIRAGE 11368 ADD: 8567 DIPER PIRAGE 11369 ADD: 8567 DIPER PIRAGE 11370 ADD: 8567 DIPER PIRAGE 11371 ADD: 8567 DIPER PIRAGE 11372 ADD: 8567 DIPER PIRAGE 11373 ADD: 8567 DIPER PIRAGE 11374 ADD: 8567 DIPER PIRAGE 11375 ADD: 8567 DIPER PIRAGE 11376 ADD: 8567 DIPER PIRAGE 11377 ADD: 8567 DIPER PIRAGE 11378 ADD: 8567 DIPER PIRAGE 11379 ADD: 8567 DIPER PIRAGE 11380 ADD: 8567 DIPER PIRAGE 11381 ADD: 8567 DIPER PIRAGE 11382 ADD: 8567 DIPER PIRAGE 11383 ADD: 8567 DIPER PIRAGE 11384 ADD: 8567 DIPER PIRAGE 11385 ADD: 8567 DIPER PIRAGE 11386 ADD: 8567 DIPER PIRAGE 11387 ADD: 8567 DIPER PIRAGE 11388 ADD: 8567 DIPER PIRAGE 11389 ADD: 8567 DIPER PIRAGE 11390 ADD: 8567 DIPER PIRAGE 11391 ADD: 8567 DIPER PIRAGE 11392 ADD: 8567 DIPER PIRAGE 11393 ADD: 8567 DIPER PIRAGE 11394 ADD: 8567 DIPER PIRAGE 11395 ADD: 8567 DIPER PIRAGE 11396 ADD: 8567 DIPER PIRAGE 11397 ADD: 8567 DIPER PIRAGE 11398 ADD: 8567 DIPER PIRAGE 11399 ADD: 8567 DIPER PIRAGE 12022 ADD: Add to the following: Add to the following: Add to the following: Add to the following: Add to the following: Add to the following: Add to the following: Add to the following: Add to the following: Add to the following: Add to the following: Add to the following: Add to the following: Add to the following: Add to the following: Add to the following: Add to the following: Add to the following: Add to the following: Add to the following: Add to the following: All data is available in this case. All data is available in this case. All data is available in this case. All data is available in this case. All data is available in this case. All data is available in this case. All data is available in this case. All data is available in this case. All data is available in this case. All data is available in this case. All data is available in this case. All data is available in this case. All data is available in this case. All data is not available in this case. All data is not available in this case. All data is not available in this case. All data is not available in this case. All data is not available in this case. All data is not available in this case. All data is not available in this case. All data is not available in this case. All data is not available in this case. All data is not available in this case. All data is not available in this case. All data is not applicable to the following: All data is available in this case. All data is available in this case. All data is available in this case. All data is available in this case. All data is available in this case. All data is available in this case. All data is available in this case. All data is available in this case. All data is available in this case. All data is available in this case. All data is available in this case. All data is available in this case. Select the following: Add to the following: Add to the following: Add to the following: Add to the following: Add to the following: Add to the following: Add to the following: Add to the following: Add to the following: Add to the following: Add to the following: Add to the following: Add to the following: Add to the following: Add to the following: Add to the following: Add to the following: Add to the following: Add to the following: Add, add, add, add, add, add, add, add, add, add, add, add, add, add, add, add, add, add, add, add, add, add, add, add, add, add, add, add, add, add, add, add, add, add, add, add, add, add, add, add, add, add, add, add, add, add, add, add, add, add, add, +Video: How to Restore Windows 10 Operating System on MSI Notebooks
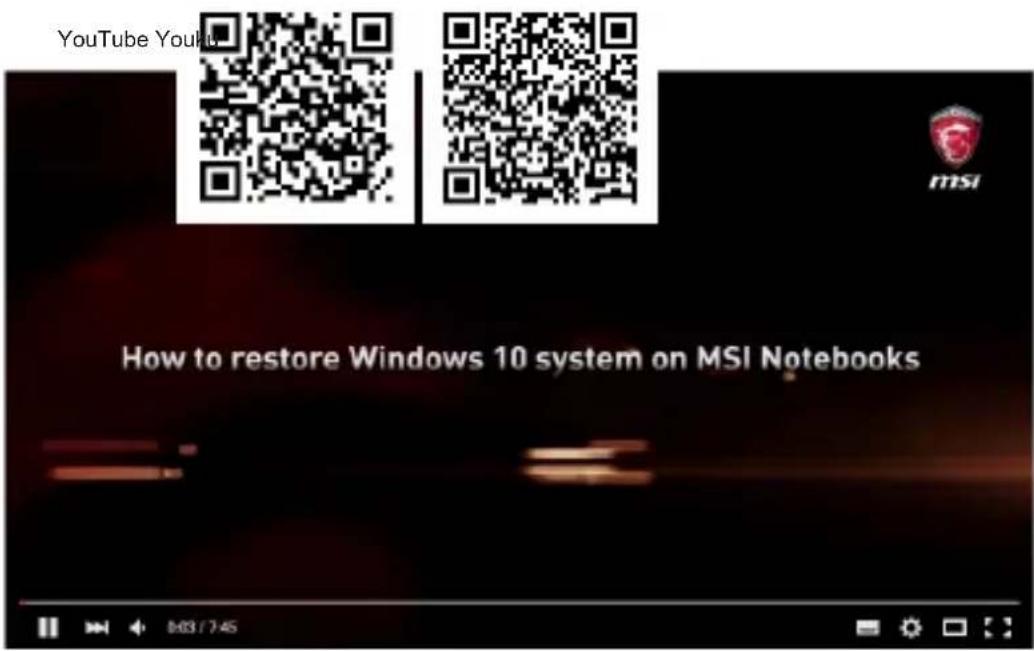
Watch the instruction video at: https://www.youtube.com/watch?v=hSrK6xAQooU, to restore the Windows 10 operating system by using [F3 Recovery] and [Windows 10 Settings] when it is needed.
text_image
YouTube Youku msi How to restore Windows 10 system on MSI Notebooksmsi®

MSI.COM

MSI GLOBAL YOUTUBE
MSI
INSTAGRAM