
C612n - Printer OKI - Free user manual and instructions
Find the device manual for free C612n OKI in PDF.


| Product Type | Color LED Printer |
| Model | C612n / ES6412 |
| Dimensions (W x D x H) | 435 x 547 x 340 mm (without duplex unit) |
| Weight | Approx. 26 kg (without duplex unit) |
| Power Supply | 220-240 VAC, 50/60 Hz ±2% |
| Power Consumption (Operating) | 1300W max; 600W average (at 25°C) |
| Power Consumption (Standby) | 100W average (at 25°C) |
| Power Consumption (Power Save) | Less than 15W |
| Power Consumption (Sleep) | Less than 1.2W |
| Power Consumption (Off) | Less than 0.5W |
| Print Resolution | 600 x 600 dpi, 1200 x 600 dpi, ProQ2400 |
| Print Technology | Single Pass Color Digital LED |
| Emulations | PostScript 3, PCL 5c, PCL 6, Epson FX |
| Standard Paper Input Capacity | 300 sheets (tray 1) + 100 sheets (MP tray) |
| Maximum Paper Input Capacity | Up to 880 sheets (with optional trays) |
| Output Tray Capacity (Face Down) | 250 sheets (80 g/m²) |
| Output Tray Capacity (Face Up) | 100 sheets (80 g/m²) |
| Supported Paper Weights | 64-220 g/m² (trays), 64-250 g/m² (MP tray) |
| Duplex Printing | Optional (standard on dn models) |
| Connectivity | 10/100/1000Base-T Ethernet, USB 2.0, optional Wireless LAN |
| Memory (Standard) | 256 MB |
| Memory (Maximum) | 768 MB (with optional 256 or 512 MB DIMM) |
| Operating Temperature Range | 10 to 32 °C |
| Operating Humidity Range | 20 to 80% RH (non-condensing) |
| Noise Level (Operating) | 68 dB(A) sound pressure level |
Frequently Asked Questions - C612n OKI
User questions about C612n OKI
0 question about this device. Answer the ones you know or ask your own.
Ask a new question about this device
Download the instructions for your Printer in PDF format for free! Find your manual C612n - OKI and take your electronic device back in hand. On this page are published all the documents necessary for the use of your device. C612n by OKI.
USER MANUAL C612n OKI
text_image
OKI OKI CB1Q User's GuideUser's Guide
natural_image
Two white HP printers side by side, no visible text or labels on the devices themselves.PREFACE
Every effort has been made to ensure that the information in this document is complete, accurate, and up-to-date. The manufacturer assumes no responsibility for the results of errors beyond its control. The manufacturer also cannot guarantee that changes in software and equipment made by other manufacturers and referred to in this guide will not affect the applicability of the information in it. Mention of software products manufactured by other companies does not necessarily constitute endorsement by the manufacturer.
While all reasonable efforts have been made to make this document as accurate and helpful as possible, we make no warranty of any kind, expressed or implied, as to the accuracy or completeness of the information contained herein.
The most up-to-date drivers and manuals are available from:
http://www.oki.com/printing/
© 2016 Oki Data Corporation.
OKI is a registered trademark of Oki Electric Industry Co., Ltd.
Energy Star is a trademark of the United States Environmental Protection Agency.
Microsoft, Windows, Windows Server and Windows Vista are registered trademarks of Microsoft Corporation.
Apple, Macintosh, Rosetta, Mac and Mac OS are registered trademarks of Apple Inc.
Other product names and brand names are registered trademarks or trademarks of their proprietors.

As an Energy Star Program Participant, the manufacturer has determined that this product meets the Energy Star guidelines for energy efficiency.

This product complies with the requirements of the Council Directives 2014/30/EU(EMC), 2014/35/EU(LVD), 1999/5/EC (R&TTE), 2009/125/EC (ErP) and 2011/65/EU (RoHS), as amended where applicable, on the approximation of the laws of the member states relating to Electromagnetic Compatibility, Low Voltage, Radio & Telecommunications Terminal Equipment, Energy related Products and Restriction on the use of certain Hazardous Substances in electrical and electronic equipment.
The following cables were used to evaluate this product to achieve EMC directive 2014/30/EU compliance and configurations other than this may affect that compliance.
| CABLE TYPE LENGTH(METRE) | CORE SHIELD | |
| Power 1.8 | × | |
| USB 5.0 | × | |
| LAN 15.0 | × | |
The following notations may be used in this manual.
• C612/ES6412 -> C612
• C712/ES7412 -> C712
EMERGENCY FIRST AID
Take care with toner powder:
If swallowed, give small amounts of cold water and seek medical attention. DO NOT attempt to induce vomiting.

If inhaled, move the person to an open area for fresh air. Seek medical attention.
If it gets into the eyes, flush with large amounts of water for at least 15 minutes keeping eyelids open. Seek medical attention.
Spillages should be treated with cold water and soap to help reduce risk of staining skin or clothing.
MANUFACTURER
Oki Data Corporation,
4-11-22 Shibaura, Minato-ku,
Tokyo 108-8551,
Japan
IMPORTER TO THE EU/AUTHORISED REPRESENTATIVE
Oki Europe Limited
Blays House
Wick Road
Egham
Surrey, TW20 0HJ
United Kingdom
For all sales, support and general enquiries contact your local distributor.
ENVIRONMENTAL INFORMATION

text_image
www.oki.com/printing/ OKICONTENTS
Preface 2
Emergency first aid ....3
Manufacturer....3
Importer to the EU/authorised representative....3
Environmental information ....3
Contents 4
Notes, cautions and warnings ....6
About this guide ....7
Documentation suite 7
On-line usage 8
Printing pages. 8
Introduction 9
Printer overview 10
Front view 10
Rear view 12
Changing the display language .....13
Getting started 13
Turning On the Power 13
Turning Off the Power 14
Power saving mode .....14
Paper recommendations....15
Cassette trays. 16
Multi purpose tray 16
Output tray (face down). 16
Rear output tray (face up) .....16
Duplex unit. 17
Loading paper....18
Cassette trays. 18
Multi purpose tray . . . . . . . . . . . . . . . . . . . . . . . . . . . . . . . . . . . . . . . . . . . . . . . . . . . . . . . . . . . . . . . . . 21
Operation 22
Menu functions .....23
Operator panel: 23
How to change the settings - user . . . . . . . . . . . . . . . . . . . . . . . . . . . . . . . . . . . . . . . . . . . . . . . . . . . . . . . 24
How to change the settings - administrator .....24
Boot menu 25
Maintenance 26
Replacing consumable items 26
Toner cartridge replacement . . . . . . . . . . . . . . . . . . . . . . . . . . . . . . . . . . . . . . . . . . . . . . . . . . . . . . . . . 26
Image drum replacement .....29
Replacing the transfer belt unit . . . . . . . . . . . . . . . . . . . . . . . . . . . . . . . . . . . . . . . . . . . . . . . . . . . . . . . . . . . 32
Fuser replacement. . . . . . . . . . . . . . . . . . . . . . . . . . . . . . . . . . . . . . . . . . . . . . . . . . . . . . . . . . . . 34
Cleaning. 36
...the unit casing ....36
...the LED head 36
...the paper feed rollers . . . . . . . . . . . . . . . . . . . . . . . . . . . . . . . . . . . . . . . . . . . . . . . . . . . . . . . . . 37
Installing upgrades....38
Duplex unit. 38
Memory upgrade 39
SD card 42
Wireless LAN module 44
Additional paper tray(s) 46
Setting the driver device options .....47
Windows 47
Mac OS X 47
Storage cabinet. 47
Troubleshooting 48
Major printer components and paper path 48
Paper sensor error codes .....49
Clearing paper jams 50
Specifications ....56
Index ....57
Oki contact details....58
NOTE
A note provides additional information to supplement the main text.
CAUTION!
A caution provides additional information which, if ignored, may result in equipment malfunction or damage.
WARNING!
A warning provides additional information which, if ignored, may result in a risk of personal injury.
For the protection of your product, and in order to ensure that you benefit from its full functionality, this model has been designed to operate only with genuine original toner cartridges. Any other toner cartridge may not operate at all, even if it is described as "compatible", and if it does work, your product's performance and print quality may be degraded.
Use of non-genuine products may invalidate your warranty.
Specifications subject to change without notice. All trademarks acknowledged.
NOTE
Images used in this manual may include optional features that your product does not have installed.
DOCUMENTATION SUITE
This guide is part of a suite of online and printed documentation provided to help you become familiar with your product and to make the best use of its many powerful features. The documentation is summarised below for reference and is found on the manuals DVD unless indicated otherwise:
Installation Safety booklet: provides information for safe use of your product.
This is a paper document that is packaged with the product and should be read before setting up your machine.
Set-up guide: describes how to unpack, connect and turn on your product.
This is a paper document that is packaged with the product.
User's Guide: helps you become familiar with your product and make the best use of its many features. Also included are guidelines for troubleshooting and maintenance to ensure that it performs at its best. Additionally, information is provided for adding optional accessories as your printing needs evolve.
Network Guide: helps you become familiar with the functionality of the built in network interface card.
Printing Guide: helps you become familiar with the many features of the driver software supplied with your product.
These are paper documents that are packaged with the consumables and optional accessories.
On-line Help: on-line information accessible from the printer driver and utility software.
Depending on your OS, model or version, the description on this document may be different.
ON-LINE USAGE
This guide is intended to be read on screen using Adobe Reader. Use the navigation and viewing tools provided in Adobe Reader.
There are many cross-references within this book, each highlighted as blue text. When you click on a cross-reference the display will instantly jump to the part of the manual containing the referenced material.
By using the button in Adobe Reader, you can navigate directly back to where you were before.
You can access specific information in two ways:
In the list of bookmarks down the left hand side of your screen, click on the topic of interest to jump to the required topic. (If the bookmarks are not available, use the "Contents" on page 4.)
In the list of bookmarks, click on Index to jump to the Index. (If the bookmarks are not available, use the "Contents" on page 4.) Find the term of interest in the alphabetically arranged index and click on the associated page number to jump to the page containing the term.
PRINTING PAGES
The whole manual, individual pages, or sections may be printed. The procedure is:
-
From the toolbar, select File > Print (or press the Ctrl + P keys).
-
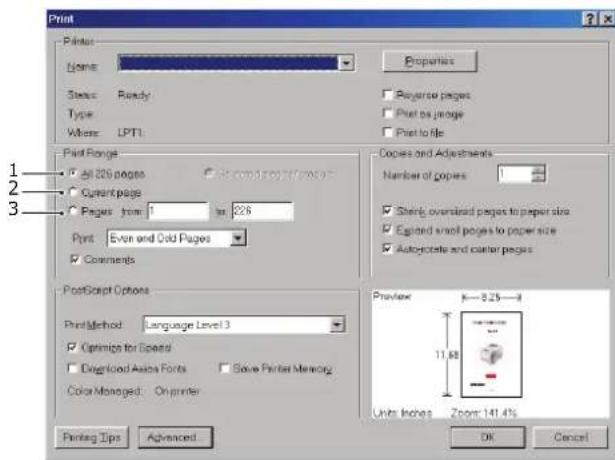
Choose which pages you wish to print:
(a) All pages, (1), for the entire manual.
(b) Current page, (2), for the page at which you are looking.
text_image
Print Printer: Name: Properties Status: Ready Reverse pages Type: Print as page Wise: LPT1 Print Range: All 226 pages Second page Current page Pages from 1 to 226 Print: Even and Odd Pages Comments Copies and Adjustments: Number of copies Sheryl overstrated pages to paper size Expired small pages to paper size Autoactivate and corner pages PostScript Options Print Method: Language Level 3 Optimize for Speed Download Audio Fonts Save Printer Memory Color Managed: On printer Preview: K=8.25- Units Inches Zoom: 141.4% Printing Tips Advanced OK Cancel(c) Pages from and to, (3), for the range of pages you specify by entering their page numbers.
(d) Click OK.
INTRODUCTION
Congratulations on choosing this colour printer. Your new printer is designed with advanced features to give you clear, vibrant colour prints and crisp black and white pages at high speed on a range of print media for the office.
Your printer includes these features:
ProQ2400, multi-level technology produces subtler tones and smoother gradations of colour to lend photographic quality to your documents.
600 x 600, 1200 x 600 dpi (dots per inch) and ProQ2400 print resolution for high quality image production showing the finest detail.
Internet Protocol version 6 (IPv6).
Single Pass colour Digital LED technology for high speed processing of your printed pages.
PostScript 3, PCL 5C, PCL 6 and Epson FX emulations for industry standard operation and wide compatibility with most computer software.
10Base-T, 100Base-TX and 1000Base-T network connection lets you share this valuable resource among users on your office network.
Photo Enhance mode to improve printouts of photographic images (Windows PCL driver only).
Additionally, the following optional features are also available:
Automatic two-sided (duplex) printing for economical use of paper and compact printing of larger documents (standard on dn models).
Additional paper tray for loading a further 530 sheets to minimise operator intervention, or different paper stocks for letterhead stationery, alternative paper sizes or other print media.
Additional memory allows printing of more complex pages. For example, high resolution banner printing.
SD card for storage of overlays, macros and downloadable fonts, and automatic collation of multiple copies of multipage documents and the download of ICC Profiles.Storage Cabinet.
Wireless LAN.
PRINTER OVERVIEW
FRONT VIEW
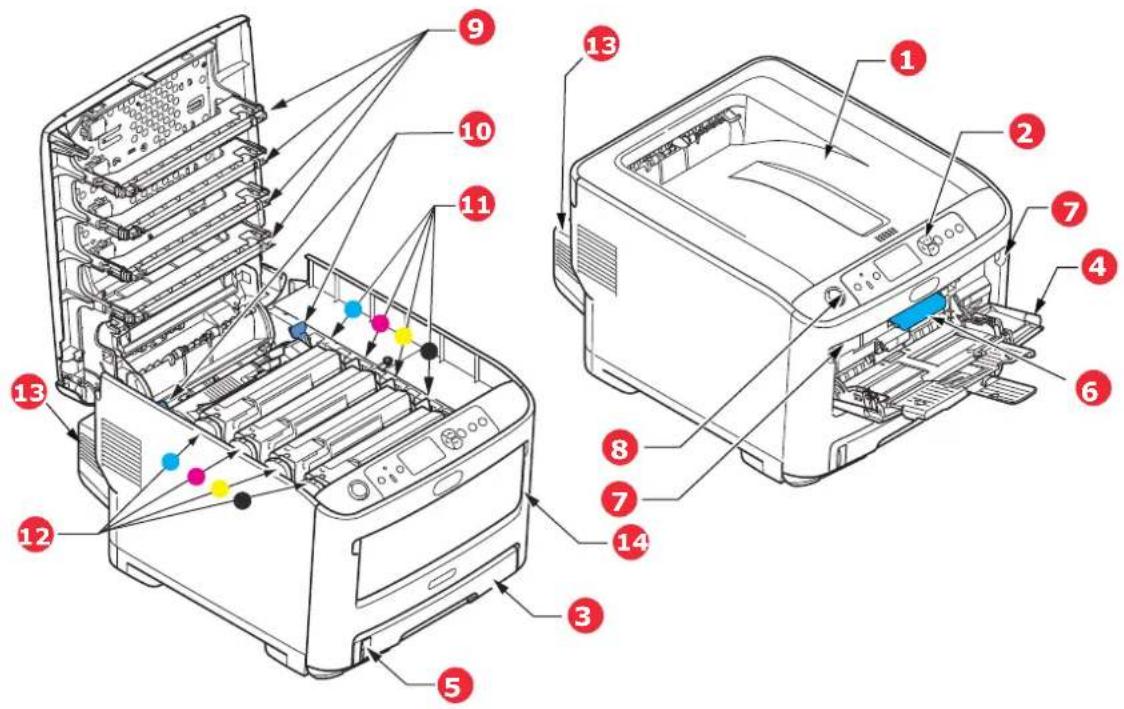
C612/ES6412
text_image
Technical diagram of a printer internal structure with numbered components for identification- Output tray (face down).
Standard printed copy delivery point. Holds up to 250 sheets at 80g/m².
- Operator panel.
Menu driven operator controls and LCD panel ^a .
- Paper tray.
Standard paper tray. Holds up to 300 sheets of 80g/m² paper.
- Multi purpose tray.
Used for feeding heavier paper stocks, envelopes and other special media. Also for manual feeding of single sheets when required.
-
Paper level indicator.
-
Front cover release lever.
-
Multi-purpose tray release recess.
-
Output tray release button.
-
LED heads.
-
Fuser release levers.
-
Toner cartridges (C,M,Y,K).
-
ID units (C,M,Y,K).
-
Duplex unit (when fitted).
-
Power switch.
a. The display language can be changed to show different languages. (see "Changing the display language" on page 13).
text_image
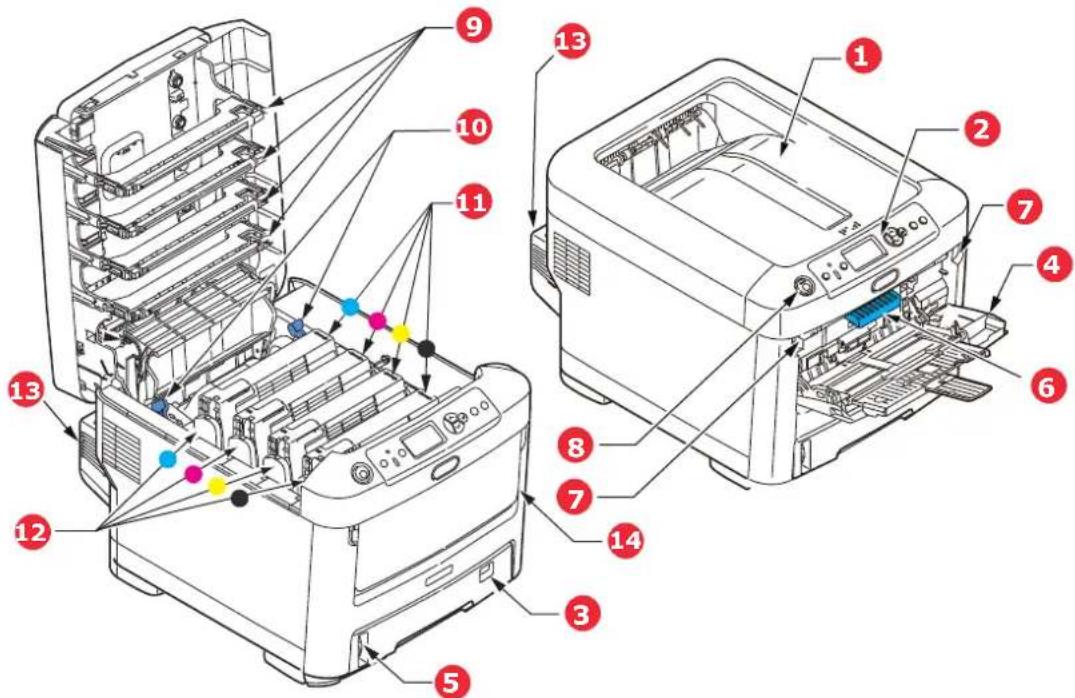
Technical diagram of a printer internal structure with numbered components for identification- Output tray (face down).
Standard printed copy delivery point. Holds up to 350 sheets at 80g/m².
- Operator panel.
Menu driven operator controls and LCD panel ^4 .
- Paper tray.
Standard paper tray. Holds up to 530 sheets of 80g/m² paper.
- Multi purpose tray.
Used for feeding heavier paper stocks, envelopes and other special media. Also for manual feeding of single sheets when required.
-
Paper level indicator.
-
Front cover release lever.
-
Multi-purpose tray release recess.
-
Output tray release button.
-
LED heads.
-
Fuser release levers.
-
Toner cartridges (C,M,Y,K).
-
ID units (C,M,Y,K).
-
Duplex unit (when fitted).
-
Power switch.
a. The display language can be changed to show different languages. (see "Changing the display language" on page 13).
REAR VIEW
This view shows the connection panel, the rear output stacker and the location of the optional duplex (two-sided printing) unit.
C612/ES6412
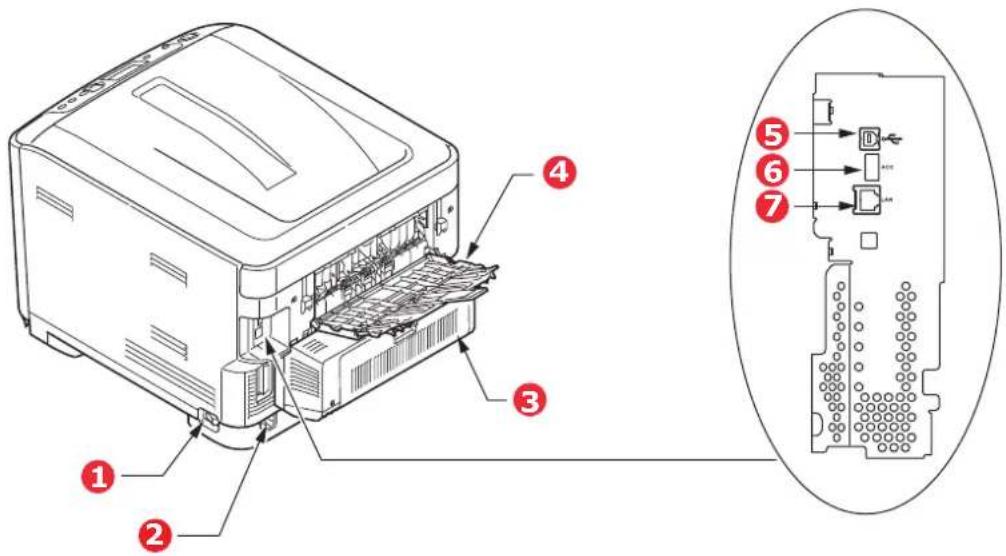
text_image
Technical diagram of a device with numbered components and labeled parts, including internal structure and external wiring.-
Main power switch.
-
USB interface.
-
AC power socket.
-
ACC interface (host USB).
-
Duplex unit (when fitted).
-
Network interface. ^4
-
Rear output tray (face up stacker).
a. The Network Interface may have a protective "plug" which must be removed before connection can be made.
C712/ES7412
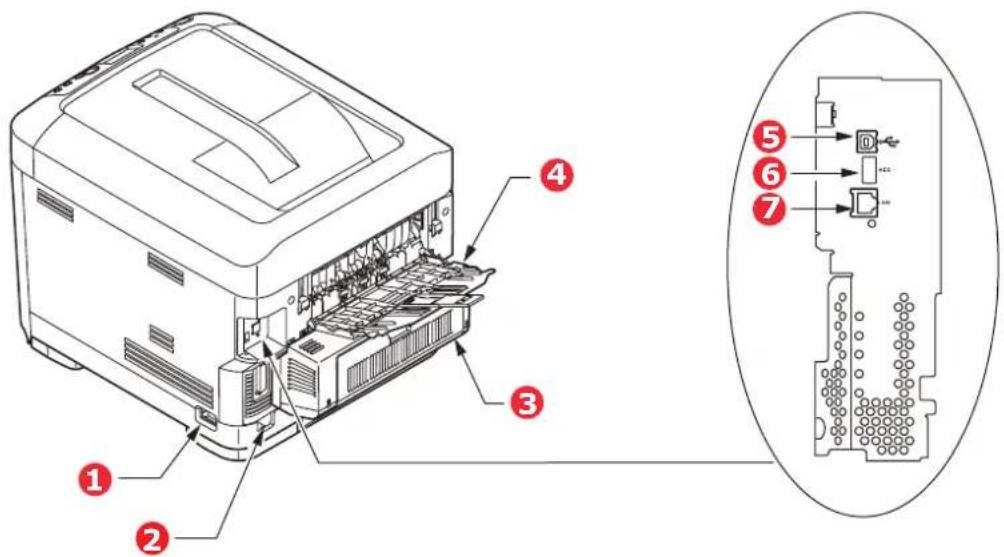
text_image
Technical diagram of a printer with numbered parts and internal wiring, showing internal structure and connector layout.-
Main power switch.
-
USB interface.
-
AC power socket.
-
ACC interface (host USB).
-
Duplex unit (when fitted).
-
Network interface. ^a
-
Rear output tray (face up stacker).
a. The Network Interface may have a protective "plug" which must be removed before connection can be made.
When the rear paper stacker is folded down paper exits the printer through the rear of the printer and is stacked here face up. This is mainly used for heavy print media. When used in conjunction with the multi purpose feed tray, the paper path through the printer is essentially straight. This avoids bending the paper around curves in the paper path and enables feeding of up to 250g/m^2 media.
CHANGING THE DISPLAY LANGUAGE
This can be set in the menu (Admin Setup > Others Setup > Language Setup > Select Language) from the operator panel.
GETTING STARTED
- Plug the AC cord (1) into the AC power socket of your printer.
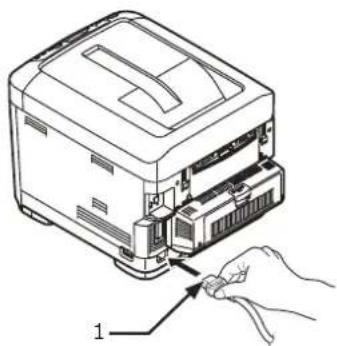
text_image
Diagram of a printer with labeled parts and directional arrow indicating process flow-
Plug the AC cord into the electric socket.
-
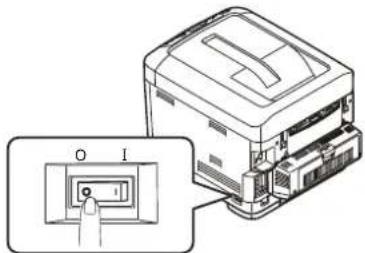
Turn on the main power switch.
-
Hold down the power switch (2) for about 1 second to turn on the power.
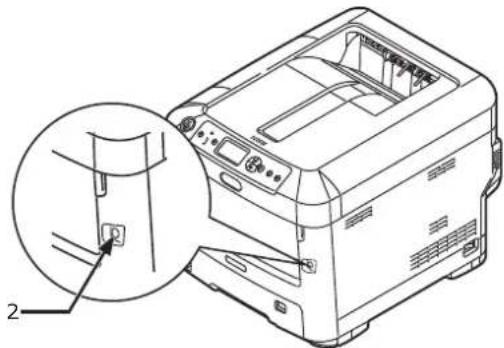
natural_image
Line drawing of a printer with a close-up inset showing a cable attachment detail (no text or symbols)The Power switch LED indicator lights up when the printer turns on.
The message "Ready To Print" is displayed in the operator panel once printer is ready.
- Hold down the power switch (2) for about a second.
The message "Shutting down. Please wait. Printer will turn off automatically" appears in the operator panel, and the power switch indicator blinks every 1 second. Then the printer turns off automatically and the power switch indicator goes out.
NOTE
It may take about 5 minutes to turn off the power. Wait until it turns off.
Holding down the power switch for more than 5 seconds turns off printer forcibly. Only perform this procedure when a problem occurs.
- Turn the main power switch off.
POWER SAVING MODE
If you do not use the machine for a while, it will enter the power saving mode to control the power consumption of the device. To cancel or initiate power saving mode, press the Power Save / Wake Up button on the control panel.
PAPER RECOMMENDATIONS
Your printer will handle a variety of print media, including a range of paper weights and sizes, labels and envelopes. This section provides general advice on choice of media, and explains how to use each type.
The best performance will be obtained when using standard 75\~90g/m ^2 paper designed for use in copiers and laser printers. Suitable types are:
M-Real Data Copy Everyday 80g/m²
Color Copy by Mondi 90g/m²
Use of heavily embossed or very rough textured paper is not recommended.
Pre-printed stationery
CAUTION!
Pre-printed stationery can be used, but the ink must not offset when exposed to the high fuser temperatures used in the printing process.
Continued use of pre-printed stationery may cause the paper feed performance to degrade over time and paper jams may occur. Clean the paper feed rollers as described on page 37.
Envelopes
CAUTION!
Envelopes should be free from twist, curl or other deformations. They should also be of the rectangular flap type, with glue that remains intact when subjected to hot roll pressure fusing used in this type of printer. Window envelopes are not suitable.
Labels
CAUTION!
Labels should also be of the type recommended for use in copiers and laser printers, in which the base carrier page is entirely covered by labels. Other types of label stock may damage the printer due to the labels peeling off during the printing process.
Recommended type is Avery White Label types 7162, 7664, 7666 (A4), or 5161 (Letter).
CASSETTE TRAYS
SIZE DIMENSIONS WEIGHT (G/M²)
| A6 ^a | 105 x 148mm Light 64 - 74g/m ^2 | |
| A5 148 x 210mm | Medium Light 75 - 90g/m ^2 | |
| B5 182 x 257mm | Medium 91 - 105g/m ^2 | |
| Executive 184.2 x 266.7mm | Heavy 106 - 120g/m ^2 | |
| A4 210 x 297mm | Ultra heavy1 121 - 188g/m ^2 | |
| Letter 215.9 x 279.4mm | Ultra heavy2 189 - 220g/m ^2 | |
| Legal 13in. 216 x 330mm | Ultra heavy3 221 - 250g/m ^2 | |
| Legal 13.5in. | 216 x 343mm | |
| Legal 14in. 216 x 356mm | Tray 1/2/3: 64 - 220g/m ^2 | |
| MP Tray: 64 - 250g/m ^2 | ||
a. C712: A6 printing from the MP Tray only.
If you have identical paper stock loaded in another tray (2nd or 3rd tray if you have one, or multi purpose tray) you can set the printer to automatically switch to the other tray when the current tray runs out of paper. When printing from Windows applications, this function is enabled in the driver settings. When printing from other systems, this function is enabled in the Print Menu. (See "Menu functions" on page 23.)
MULTI PURPOSE TRAY
The multi purpose tray can handle the same sizes as the cassette trays but in weights up to 250g/m^2 . For very heavy paper stock use the face up (rear) paper stacker. This ensures that the paper path through the printer is almost straight.
The multi purpose tray can feed paper widths from 76mm to 215.9mm and lengths from 127.0mm to 1320mm (banner printing).
For paper lengths exceeding 356mm (Legal 14in.) use paper stock between 90g/m ^2 and 128g/m ^2 and the face up (rear) paper stacker.
Use the multi purpose tray for printing on envelopes. Up to 10 envelopes can be loaded at one time, subject to a maximum stacking depth of 10mm.
OUTPUT TRAY (FACE DOWN)
C612: The output tray on the top of the printer can hold up to 250 sheets of 80g/m² standard paper, and can handle paper stocks up to 188g/m².
C712: The output tray on the top of the printer can hold up to 350 sheets of 80g/m² standard paper, and can handle paper stocks up to 188g/m².
Pages printed in reading order (page 1 first) will be sorted in reading order (last page on top, facing down).
REAR OUTPUT TRAY (FACE UP)
The rear output tray at the rear of the printer should be opened and the tray extension pulled out when required for use. In this condition paper will exit via this path, regardless of driver settings.
The rear output tray can hold up to 100 sheets of 80g/m^2 standard paper, and can handle stocks up to 250g/m^2 .
Always use this stacker and the multi purpose feeder for paper stocks heavier than 188g/m^2 .
DUPLEX UNIT
This option provides automatic two-sided printing on the same range of paper sizes as tray 2 (i.e. all cassette sizes except A6), using paper stocks from 64 - 220g/m ^2 .
NOTE:
The duplex unit comes as standard with dn models.
LOADING PAPER
NOTE
For illustrative purposes, the C712 printer has been shown. If you have a C612
printer, the principle is the same with any exceptions noted.
CASSETTE TRAYS
- Remove the paper tray from the printer.
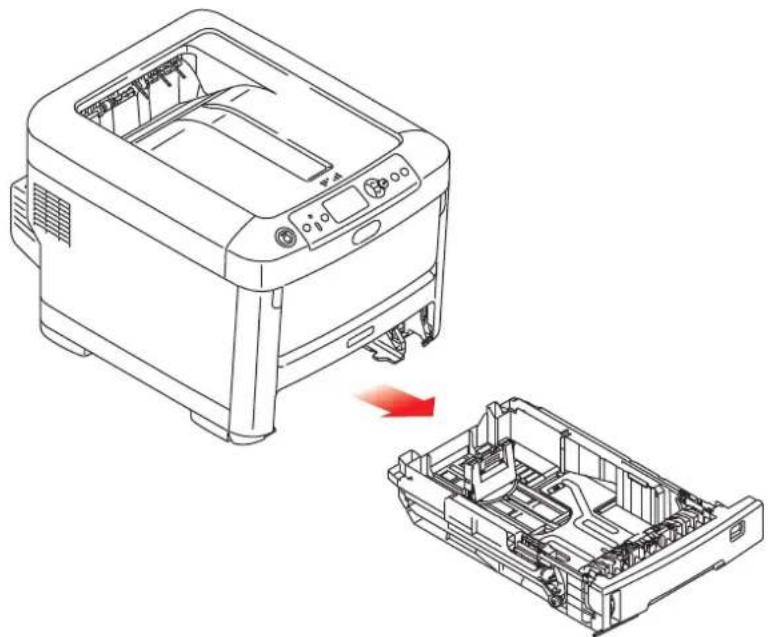
natural_image
Line drawing of a toaster with a red arrow indicating the process, showing internal components before and after disassembly (no text or symbols present)- Fan the paper to be loaded at the edges (1) and in the middle (2) to ensure that all sheets are properly separated, then tap the edges of the stack on a flat surface to make it flush again (3).
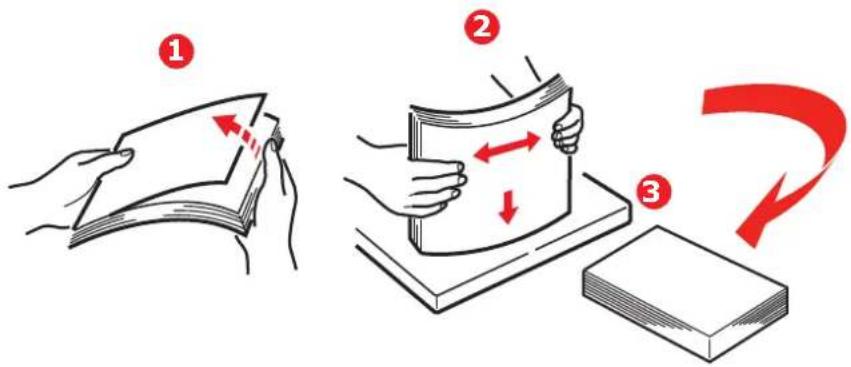
text_image
Illustration showing three-step folding process: folding paper, folding paper with red arrows indicating movement, and folding paper with red curved arrow indicating rotation.- Load paper (letter headed paper face down and top edge towards the front of the printer), as shown.
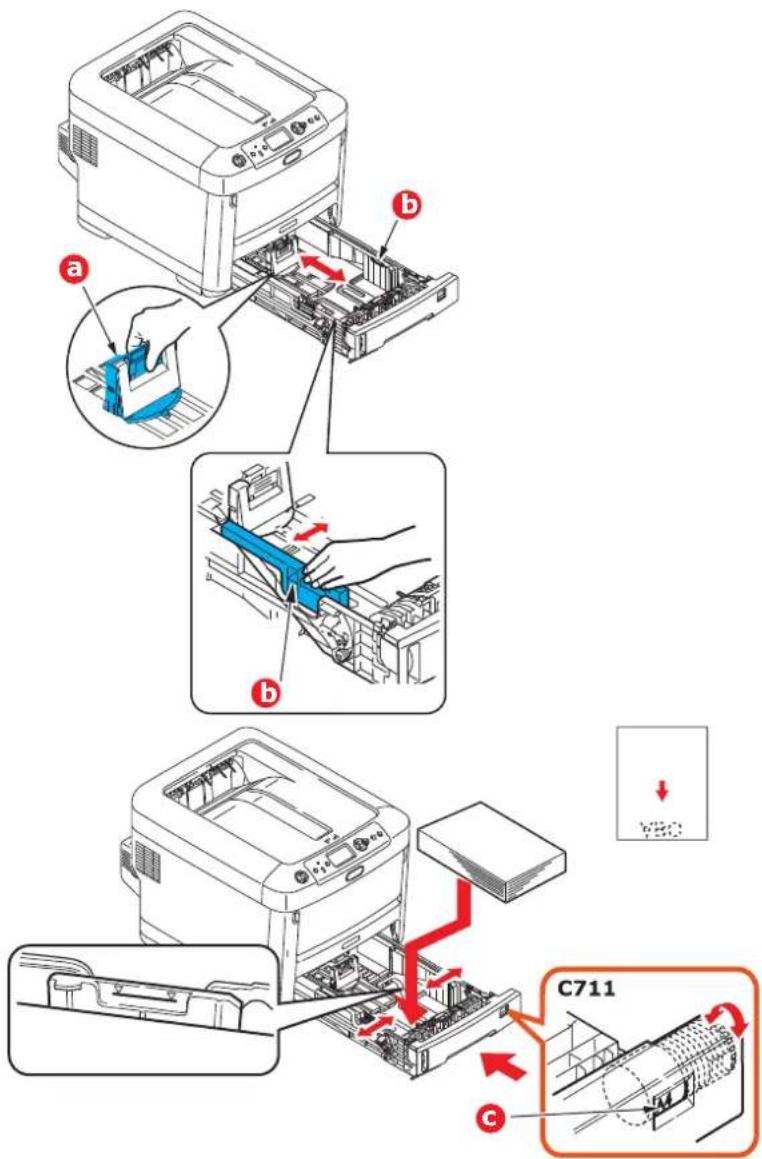
text_image
a b b C711 cAdjust the rear stopper (a) and paper guides (b) to the size of paper being used.
CAUTION!
C712 ONLY: IMPORTANT: Set paper size dial (c) to the size of paper being used (A4 in the above example).
To prevent paper jams:
Do not leave space between the paper and the guides and rear stopper.
Do not overfill the paper tray. Capacity depends on the type of paper stock.
Do not load damaged paper.
Do not load paper of different sizes or types at the same time.
Close the paper tray gently.Do not pull the paper tray out during printing (except as described below for the 2nd tray).
NOTE
If you have two trays and you are printing from the 1st (upper) tray, you can pull out the 2nd (lower) tray during printing to reload it. However, if you are printing from the 2nd (lower) tray, do not pull out the 1st (upper) tray. This will cause a paper jam.
For face down printing, make sure the rear output tray (a) is closed (the paper exits from the top of the printer). Stacking capacity is approximately 250 sheets for the C612 and 350 sheets for the C712, depending on paper weight.
For face up printing, make sure the rear output tray (a) is open and the paper support (b) is extended. Paper is stacked in reverse order and tray capacity is approximately 100 sheets, depending on paper weight.
Always use the rear output tray for heavy paper (card stock, etc.).
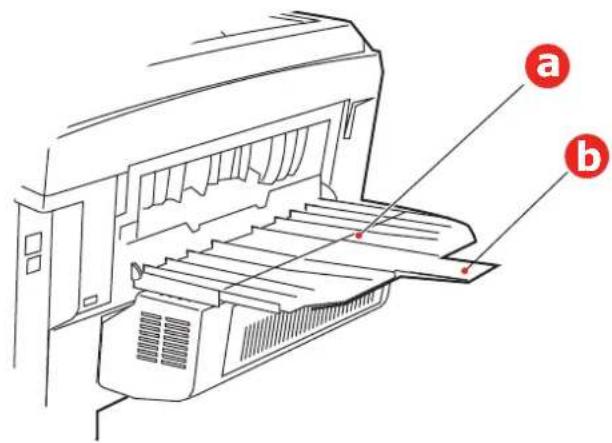
text_image
Technical diagram of a printer with labeled parts (a) and (b), showing internal structure and component layout.CAUTION!
Do not open or close the rear paper exit while printing as it may result in a paper jam.
MULTI PURPOSE TRAY
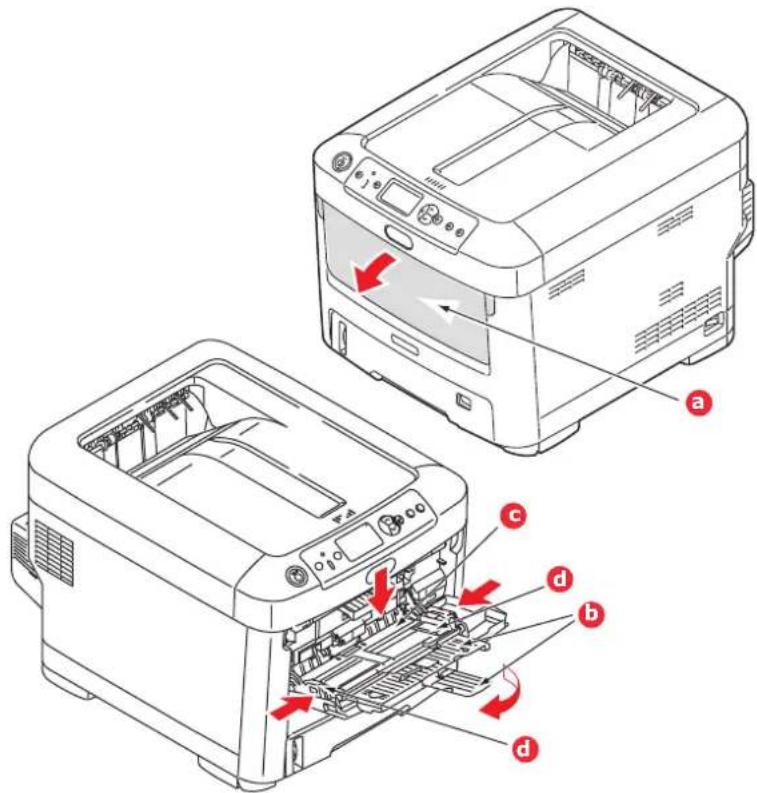
- Open the multi purpose tray (a).
- Fold out the paper supports (b).
text_image
Technical diagram of a printer with labeled parts and directional arrows indicating process flow- Press gently down on the paper platform (c) to ensure it is latched down.
- Load the paper and adjust the paper guides (d) to the size of paper being used.
For single-sided printing on headed paper load the paper into the multi purpose tray with pre-printed side up and top edge into the printer.
For two-sided (duplex) printing on headed paper load the paper with pre-printed side down and top edge away from the printer. (Optional duplex unit must be installed for this function.)
Envelopes should be loaded face up with top edge to the left and short edge into the printer. Do not select duplex printing on envelopes.
Do not exceed the paper capacity of about 100 sheets or 10 envelopes. Maximum stacking depth is 10mm.
-
Press the tray latch button inwards to release the paper platform, so that the paper is lifted and gripped in place.
-
Set the correct paper size for the multi purpose tray in the Media Menu (see "Menu functions" on page 23).
OPERATION
For full details of how to use the machine and any optional accessories to print jobs efficiently and effectively, please refer to the Printing Guide and the Barcode Guide.
For full details of how to access and use the printer security features, please refer to the Security Guide.
MENU FUNCTIONS
This section lists the menus accessed via the controls on the printer's operator panel and displayed in the LCD window.
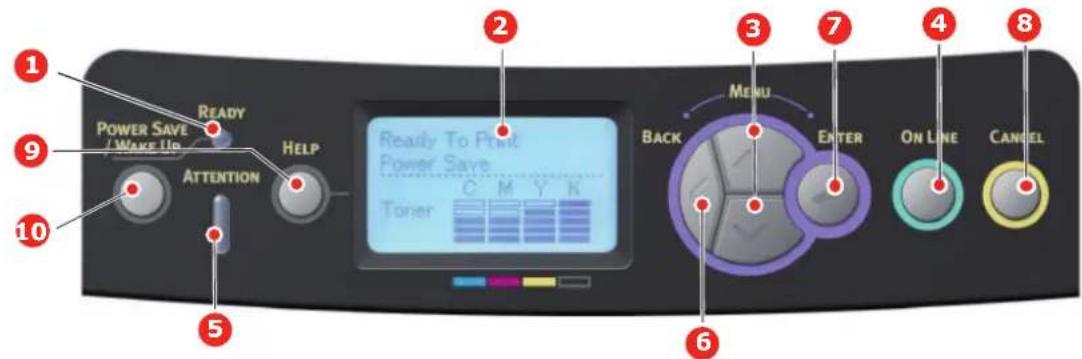
OPERATOR PANEL:
text_image
1 2 3 4 5 6 7 8 9 READY POWER SAVE /WAKE UP HELP ATTENTION Toner C M Y K MENU BACK ENTER ON LINE CANCEL| 1. Ready LED ON: | Ready to receive data.BLINKING: Processing data.OFF: Offline. | 2. Display Displays the printer status and any error messages. |
| 3. Menu Scroll Buttons | Enters the Menu mode. In Menu mode, forwards or reverses the menu item displayed.Press for 2 secs. or longer to jump from top to bottom. | 4. On Line Button Switches between ONLINE and OFFLINE.Exits the menu and goes ONLINE when pressed in the Menu mode.Scrolls the HELP screen.Forces printing on the paper currently loaded when pressed with "WRONG PAPER" or "WRONG PAPER SIZE" displayed. |
| 5. Attention LED ON: | A warning occurs.Printing may be possible (e.g low toner).BLINKING: An error occurs.Printing not possible (e.g. toner empty).OFF: Normal condition. | 6. Back Button Returns to the previous higher level menu item.Pressing this button for more than 4 seconds initiates the printer shutdown procedure, select Yes to continue or No to abort. |
| 7. Enter Button | In the ONLINE or OFFLINEmode: enters the Menu mode.In the Menu mode:determines the setting selected. | 8. Cancel Button Deletes the data being printed or received when pressed for two seconds or longer.Deletes the data when pressed for two seconds or longer with WRONG PAPER SIZE, RUN OUT OF PAPER, TRAY 1 IS OPEN, or TRAY 1 IS NOT FOUND is displayed.Exits the menu and goes ONLINE when pressed in the Menu mode. |
| 9. Help Button Provides advice when an error such as incorrect paper size occurs. | 10. Power Save/Wake Up ButtonPressing this button switches the machine into sleep or wake-up mode. Refer to "Power saving mode" on page 14. | |
HOW TO CHANGE THE SETTINGS - USER
It should be noted that many of these settings can be, and often are, overridden by settings in the printer drivers. However, several of the driver settings can be left at "Printer Setting", which will then default to the settings entered in these printer menus.
Where applicable, factory default settings are shown in bold type in the following tables.
In the normal operating condition, known as "standby," the printer's LCD window will show Ready to Print. In this condition, to enter the menu system, press the up and down Menu buttons on the operator panel to move up and down through the list of menus until the menu you wish to view is displayed. Then proceed as follows:
- Press Enter to enter the menu.
- Use the up and down MENU buttons on the control panel to scroll through the menus. When the item you want to change is displayed, press Enter to view the sub-menus for that item.
- Use the up and down MENU buttons to move up and down through the sub-menu items. When the item you want to change is displayed press Enter to display the setting.
-
Use the up and down MENU buttons to move up and down through the available settings for the sub-menu item. When the item you want to change is displayed press Enter to display the setting. An asterisk (*) will appear next to the setting, indicating that this setting is currently in effect.
-
Do one of the following:
Press Back again to move up to the list of menus;
or...
Press On Line or Cancel to exit from the menu system and return to standby.
HOW TO CHANGE THE SETTINGS - ADMINISTRATOR
You can set whether to ENABLE or DISABLE each category in the user menu.
Disabled categories are not displayed in the User's menu. Only a system administrator can change these settings.
- Turn OFF the printer. Turn ON the printer while pressing the Enter button. When Boot Menu appears, take your finger off the button.
- Press the Enter button.
- At the Enter Password prompt, enter the admin password:
(a) Using the up and down MENU buttons, scroll to the required letter/digit.
(b) Press the Enter button to input and move to the next letter/digit.
(c) Repeat steps (a) and (b) until all letters/digits are entered.
Enter your 4 to 9 digit password.
(The default password is 999999).
- Press the Enter button.
- Press the up or down MENU button until the "category" you want to change is displayed.
- Press the Enter button.
- Press the up or down MENU button until the "item" you want to change is displayed.
- Press the Enter button.
- Using the up or down MENU button, identify the parameter as required.
- Press the Enter button. An asterisk (*) will appear next to the setting, indicating that this setting is currently in effect.
- Press the On Line button to switch to online. The machine will automatically re-boot.
BOOT MENU
This menu should only be changed by the System Administrators. In order to gain access to this menu, follow the instructions in "How to change the settings - administrator" on page 24.
This menu is in ENGLISH only (default settings in bold type).
Network Factory Defaults
| ITEM SETTINGS EXPLANATION | ||
| Network Factory Defaults | Execute Specifies whether to initialize the network menu. | |
Wireless Module
| ITEM SETTINGS EXPLANATION | ||
| Wireless Module Enable | Disable | Enables the wireless LAN board.With "Enable", this setting will still remain enabled even after the wireless LAN board is removed.Since the factory default is "Disable" even for devices provided with wireless LAN as standard, please change this setting to "Enable" to use wireless LAN. |
NOTE
For illustrative purposes, the C712 printer has been shown. If you have a C612
printer, the principle is the same.
REPLACING CONSUMABLE ITEMS
Only use genuine original consumables to ensure the best quality and performance from your hardware. Non original products may adversely affect your printer's performance and invalidate your warranty.
TONER CARTRIDGE REPLACEMENT
NOTE
When the LCD display indicates Toner Low, or if print appears faded, first open the output tray and try tapping the cartridge a few times to evenly distribute the toner powder. This will enable you to obtain the best "yield" from your toner cartridge.
CAUTION!
To avoid toner wastage and possible toner sensor errors, do not change the toner cartridge(s) until "Install Toner" is displayed.
The toner used in this printer is a very fine dry powder. It is contained in four cartridges: one each for cyan, magenta, yellow and black.
Have a sheet of paper handy so that you have somewhere to place the used cartridge while you install the new one.
Dispose of the old cartridge responsibly, inside the pack that the new one came in. Follow any regulations, recommendations, etc., which may be in force concerning waste recycling.
If you do spill any toner powder, lightly brush it off. If this is not enough, use a cool, damp cloth to remove any residue.
Do not use hot water, and never use solvents of any kind. They will make stains permanent.
WARNING!
If you inhale any toner or get it in your eyes, drink a little water or bathe your eyes liberally in cold water. Seek medical attention immediately.
- Press the cover release and open the printer's output tray fully.
WARNING
If the printer has been powered on, the fuser will be hot. This area is clearly labelled. Do not touch.
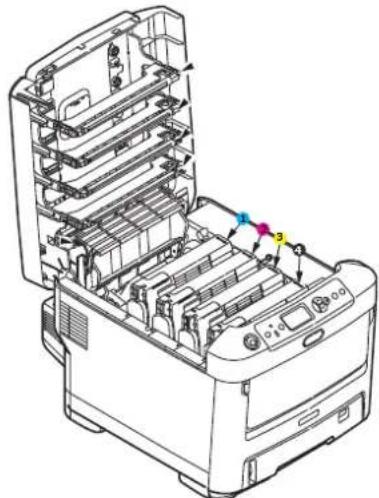
- Note the positions of the four cartridges.
natural_image
Technical line drawing of a printer internal structure with color-coded indicators (no text or symbols)-
Cyan cartridge 2. Magenta cartridge
-
Yellow cartridge 4. Black cartridge
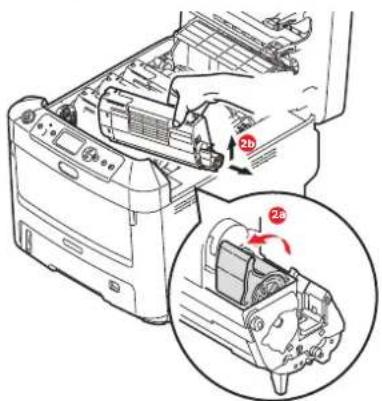
(a) Pull the coloured toner release lever on the cartridge to be replaced fully towards the front of the printer.
text_image
Diagram showing printer internal components with labeled parts and a magnified view highlighting the component '2b'(b) Lift the right-hand end of the cartridge and then draw the cartridge to the right to release the left-hand end as shown, and withdraw the toner cartridge out of the printer.
-
Put the cartridge down gently onto a piece of paper to prevent toner from marking your furniture.
-
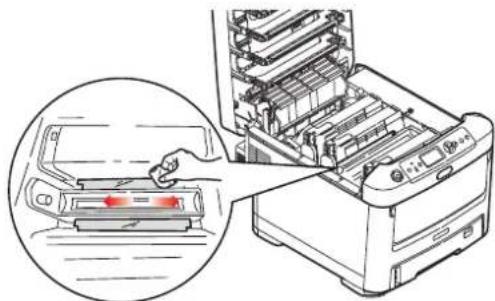
Clean the top of the ID unit with a clean, lint free cloth.
natural_image
Illustration of a printer with a hand inserting a red indicator light into the engine compartment (no text or symbols present)-
Remove the new cartridge from its box but leave its wrapping material in place for the moment.
-
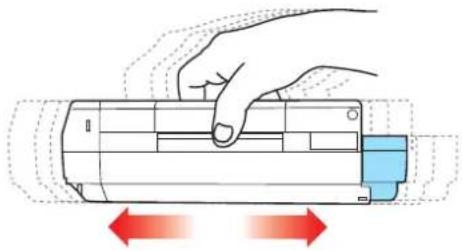
Gently shake the new cartridge from end to end several times to loosen and distribute the toner evenly inside the cartridge.
natural_image
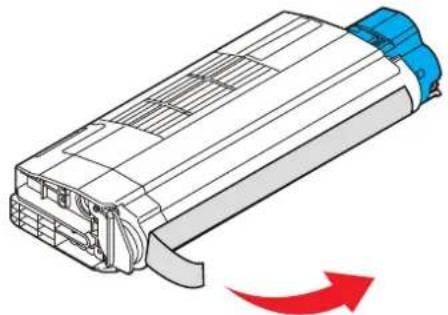
Illustration of a hand pressing down on a cylindrical device with red directional arrows indicating motion (no text or symbols)- Remove the wrapping material and peel off the adhesive tape from the underside of the cartridge.
natural_image
Diagram of a battery pack with blue insulation and red arrow indicating rotation (no text or symbols)-
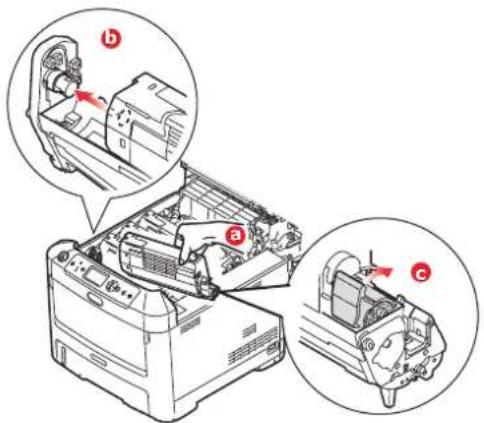
Holding the cartridge by its top centre with the coloured lever to the right, lower it into the printer over the image drum unit from which the old cartridge was removed.
-
Insert the left end of the cartridge into the top of the image drum unit first, pushing it against the spring on the drum unit, then lower the right end of the cartridge down onto the image drum unit.
text_image
Technical diagram of a printer with labeled parts (a, b, c) showing internal components and assembly steps-
Pressing gently down on the cartridge to ensure that it is firmly seated, push the coloured lever towards the rear of the printer. This will lock the cartridge into place and release toner into the image drum unit.
-
Gently wipe the LED head surface with a clean, lint free cloth.
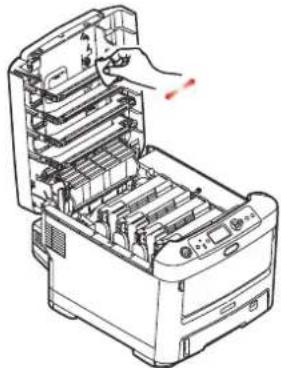
natural_image
Line drawing of a printer's internal structure with a hand inserting a component (no text or symbols visible)- Finally, close the output tray and press down firmly at both sides so that the cover latches closed.
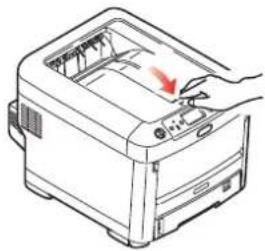
natural_image
Illustration of a printer with a hand pressing down on the cover (no text or symbols visible)IMAGE DRUM REPLACEMENT
CAUTION!

Static sensitive devices, handle with care.
The printer contains four image drums: cyan, magenta, yellow and black.
- Press the cover release and open the printer's output tray fully.
WARNING!
If the printer has been powered on, the fuser will be hot. This area is clearly labelled. Do not touch.
- Note the positions of the four toner cartridges (a) and image drums (b). It is essential that they go back in the same order.
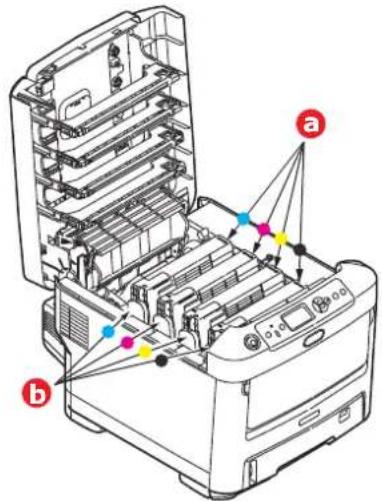
text_image
Diagram of a printer's internal structure with labeled parts (a) and (b), showing color-coded components and connection points.- Holding it by its top centre, lift the image drum, complete with its toner cartridge, up and out of the printer.
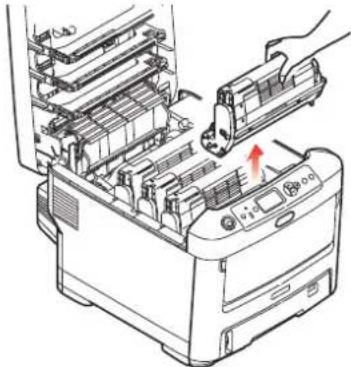
natural_image
Diagram of a printer's internal structure showing internal components and a hand inserting a component (no text or symbols visible)- Put the assembly down gently onto a piece of paper to prevent toner from marking your furniture and to avoid damaging the green drum surface.
CAUTION!
The green image drum surface at the base of the ID unit is very delicate and light sensitive. Do not touch it and do not expose it to normal room light for more than 5 minutes. If the drum unit needs to be out of the printer for longer than this, please wrap the cartridge inside a black plastic bag to keep it away from light. Never expose the drum to direct sunlight or very bright room lighting.
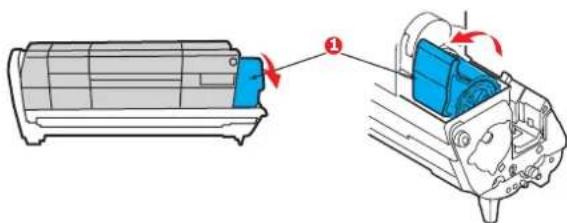
- With the coloured toner release lever (1) to the right, pull the lever towards you. This will release the bond between the toner cartridge and the image drum unit.
text_image
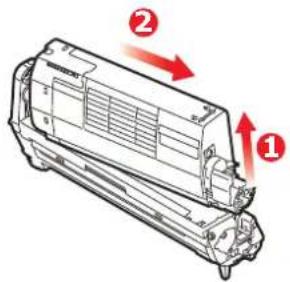
Diagram showing airflow or ventilation process of an air conditioner unit with labeled component 1- Lift the right-hand end of the toner cartridge (1) and then draw the cartridge to the right to release the left-hand end as shown (2), and withdraw the toner cartridge out of the image drum cartridge. Place the cartridge on a piece of paper to avoid marking your furniture.
text_image
Technical diagram of a mechanical device with numbered annotations indicating directional flow or movement.- Take the new image drum cartridge out of its packaging and place it on the piece of paper where the old cartridge was placed. Keep it the same way round as the old unit. Pack the old cartridge inside the packaging material for disposal.
NOTE:
Follow instructions that come with the new image drum for additional information such as the removal of packaging material, etc.
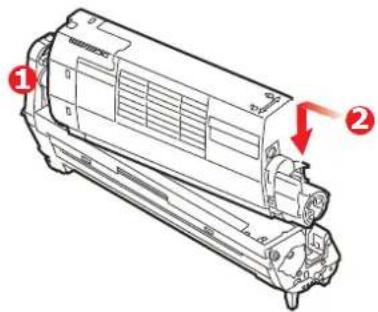
- Place the toner cartridge onto the new image drum cartridge as shown. Push the left end in first, and then lower the right end in. (It is not necessary to fit a new toner cartridge at this time unless the remaining toner level is very low.)
text_image
Technical diagram of a mechanical component with numbered callouts and red arrows indicating features- Push the coloured release lever away from you to lock the toner cartridge onto the new image drum unit and release toner into it.

natural_image
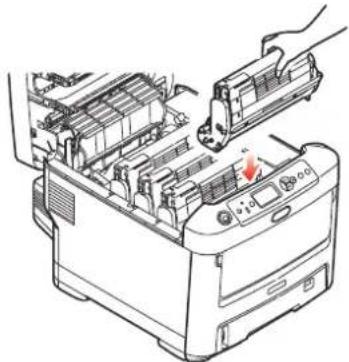
Technical line drawing of a mechanical component with a blue component and red arrow indicating direction (no text or symbols)- Holding the complete assembly by its top centre, lower it into place in the printer, locating the pegs at each end into their slots in the sides of the printer cavity.
natural_image
Illustration of a printer's internal structure with a hand inserting a component (no text or symbols visible)- Finally, close the output tray and press down firmly at both sides so that the cover latches closed.
NOTE:
If you need to return or transport your printer for any reason, please make sure you remove the image drum unit beforehand and place in the bag provided. This is to avoid toner spillage.
REPLACING THE TRANSFER BELT UNIT
The belt unit is located under the four image drums.
Switch off the printer and allow the fuser to cool for about 10 minutes before opening the cover.
- Press the cover release and open the printer's output tray fully.
WARNING!
If the printer has been powered on, the fuser will be hot. This area is clearly labelled. Do not touch.
- Note the positions of the four toner cartridges (a) and image drums (b). It is essential that they go back in the same order.
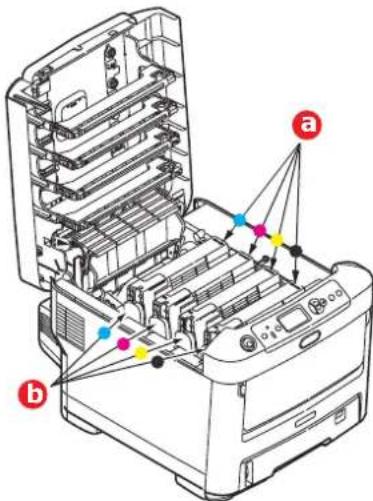
text_image
Technical diagram of a printer internal structure with labeled components and connection points- Lift each of the image drum units out of the printer and place them in a safe place away from direct sources of heat and light.
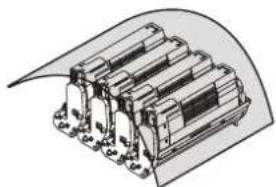
natural_image
Technical illustration of a multi-layered electrical component with mounting flanges (no text or symbols)CAUTION!
The green image drum surface at the base of each cartridge is very delicate and light sensitive. Do not touch it and do not expose it to normal room light for more than 5 minutes. If the drum unit needs to be out of the printer for longer than this, please wrap the cartridge inside a black plastic bag to keep it away from light. Never expose the drum to direct sunlight or very bright room lighting.
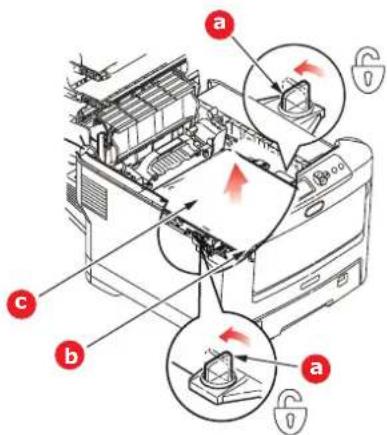
- Locate the two fasteners (a) at each side of the belt and the lifting bar (b) at the front end.
text_image
Diagram of a printer's internal structure with labeled parts (a, b, c) and directional arrows indicating process flow or movement.-
Turn the two fasteners 90^ to the left. This will release the belt from the printer chassis.
-
Pull the lifting bar (b) upwards so that the belt tilts up towards the front, and withdraw the belt unit (c) from the printer.
-
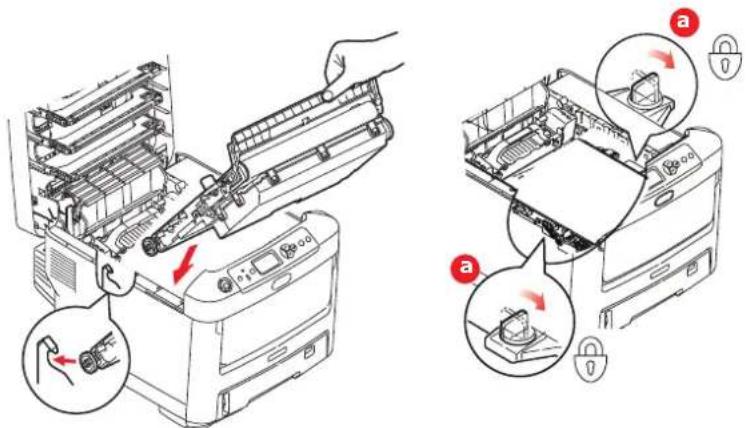
Lower the new belt unit into place, with the lifting bar at the front and the drive gear towards the rear of the printer. Locate the drive gear into the gear inside the printer by the rear left corner of the unit, and lower the belt unit flat inside the printer.
text_image
Diagram illustrating printer operation steps with labeled parts and directional arrows indicating process flow-
Turn the two fasteners (a) 90^ to the right until they lock. This will secure the belt unit in place.
-
Replace the four image drums, complete with their toner cartridges, into the printer in the same sequence as they came out: cyan (nearest the rear), magenta, yellow and black (nearest the front).
-
Finally, close the output tray and press down firmly at both sides so that the cover latches closed.
FUSER REPLACEMENT
The fuser is located inside the printer just behind the four image drum units.
WARNING
If the printer has recently been powered on, some fuser components will be very hot. Handle the fuser with extreme care, holding it only by its handle, which will only be mildly warm to the touch. A warning label clearly indicates the area. If in doubt, switch the printer off and wait at least 10 minutes for the fuser to cool before opening the printer cover.
-
Press the cover release and open the printer's output tray fully.
-
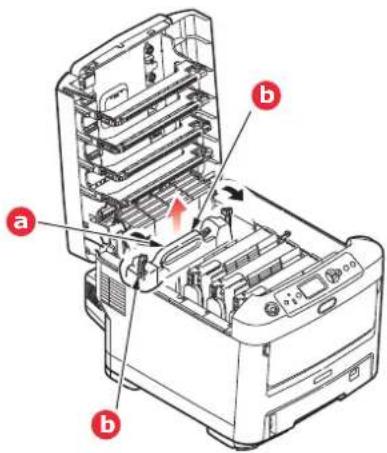
Identify the fuser handle (a) on the top of the fuser unit.
text_image
Diagram of a printer's internal structure with labeled parts (a, b) and directional arrows indicating movement or assembly.-
Pull the two fuser retaining levers (b) towards the front of the printer so that they are fully upright.
-
Holding the fuser by its handle (a), lift the fuser straight up and out of the printer. If the fuser is still warm, place it on a flat surface which will not be damaged by heat.
-
Remove the new fuser from its packaging and remove the transit material.
-
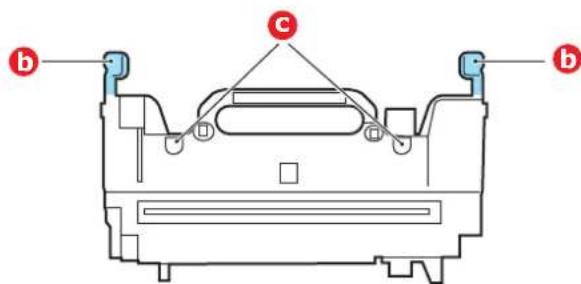
Holding the new fuser by its handle, make sure that it is the correct way round. The retaining levers (b) should be fully upright, and the two locating lugs (c) should be towards you.
text_image
b c b-
Lower the fuser into the printer, locating the two lugs (c) into their slots in the metal partition which separates the fuser area from the image drums.
-
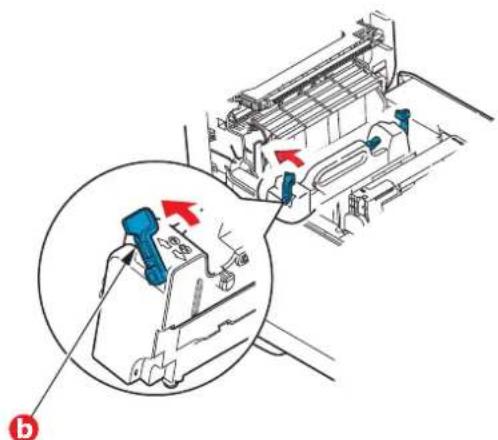
Push the two retaining levers (b) towards the rear of the printer to lock the fuser in place.
natural_image
Technical diagram showing a mechanical assembly with a magnified inset highlighting a component being inserted (no text or symbols present)- Finally, close the output tray and press down firmly at both sides so that the cover latches closed.
CLEANING
CAUTION!
Use a clean, moist, lint-free cloth for cleaning. Do not use benzine, thinners or alcohol as a cleaning agent.
...THE UNIT CASING
-
Switch the printer off.
-
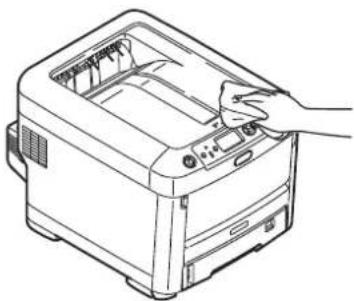
Wipe the unit surface with a soft cloth moistened sparingly with water or neutral detergent.
natural_image
Line drawing of a hand operating a computer tower with control panel (no text or symbols)- Use a soft dry cloth to dry the unit surface.
...THE LED HEAD
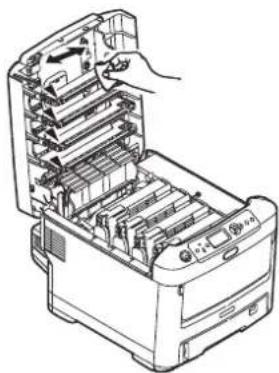
Clean the LED heads when printing does not come out clearly, has white lines or when text is blurred.
There is no need to switch off the printer to clean the lens.
-
Press the cover release and open the printer's output tray fully.
-
Gently wipe the LED head surface with a clean, lint free cloth.
natural_image
Technical line drawing of a printer internal structure showing internal components and a hand inserting a component (no text or symbols present)CAUTION!
Do not use methyl alcohol or other solvents on the LED head as damage to the lens surface will occur.
- Close the output tray and press down firmly at both sides so that the cover latches closed.
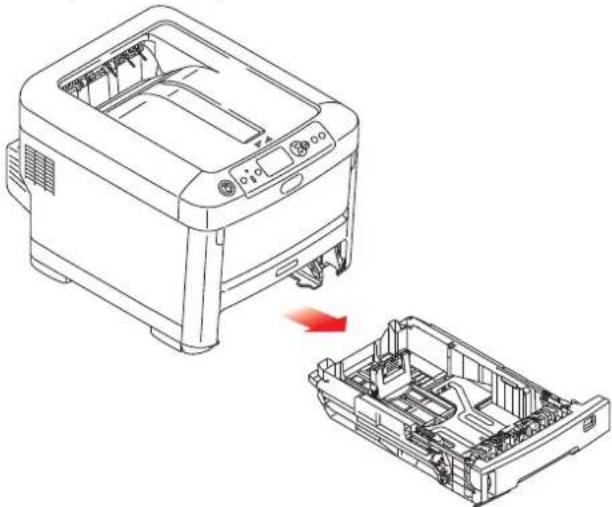
Clean the paper feed rollers if paper jams frequently occur.
CAUTION!
Use a clean, moist, lint-free cloth for cleaning. Do not use benzine, thinners or alcohol as a cleaning agent.
- Remove items like a wrist watch or bracelet.
- Switch the printer off.
- Remove the paper tray from the printer.
natural_image
Line drawing of a printer with internal components and a red arrow indicating a disassembly or disassembly process (no text or symbols present)- Gaining access through the gap left by paper tray, wipe the paper feed rollers with a clean, lint-free cloth moistened with water.
- Wipe the feed roller on the paper tray.
- Replace the paper tray.
NOTE
For illustrative purposes, the C712 printer has been shown. If you have a C612
printer, the principle is the same.
This section explains how to install optional equipment into your printer. This includes:
duplex (two-sided printing) unit
additional RAM memory
SD card
Wireless LAN module
additional paper tray(s)
cabinet
DUPLEX UNIT
The duplex unit adds the function of two-sided printing, using less paper and making large documents easier to handle. It also enables booklet printing, which uses even less paper and makes large documents even easier to handle.
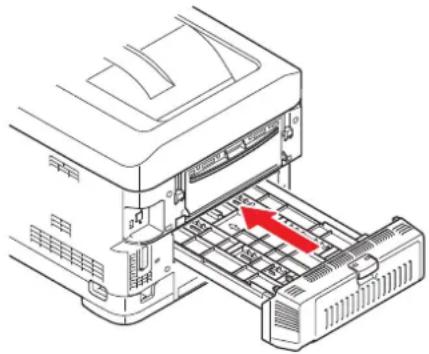
The duplex unit slides straight into the rear of the printer and requires no tools to install.
- Unpack the new unit and remove any transit material from it.
-
Switch the printer off. It is not necessary to disconnect the AC power cable.
-
Ensure that the unit is the right way up, as shown, and push it into the slot behind the rear panel. The panel will swing inwards as you push the unit into it. Push the unit all the way in until it stops and latches home.
natural_image
Technical line drawing of a printer with an open slot and red arrow indicating a component (no text or symbols present)-
Switch the printer on and wait for it to warm up (about 1 minute).
-
Print a menu map as follows:
(a) Press the Enter button.
(b) Press the Menu down button, then the Enter button to select the Print Information menu.
(c) Select Configuration with the Enter button.
(d) Press the Enter button once more to execute the Configuration menu.
(e) When the Configuration map is printed, press Online to exit the menu system.
-
Examine the first page of the menu map.
-
Near the top of the page, between the two horizontal lines, you will see the current printer configuration. This list should indicate that the duplex unit is now installed.
All that remains is to adjust the printer driver to make full use of the new features ("Setting the driver device options" on page 47).
MEMORY UPGRADE
The basic printer model comes equipped with 256MB of main memory. This can be upgraded with an additional memory board of 256MB or 512MB, giving a maximum total memory capacity of 768MB.
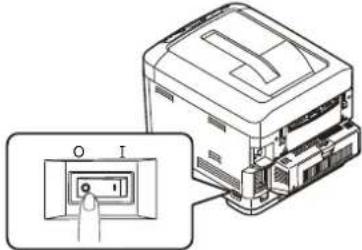
- Switch the printer off and disconnect the AC power cable.
text_image
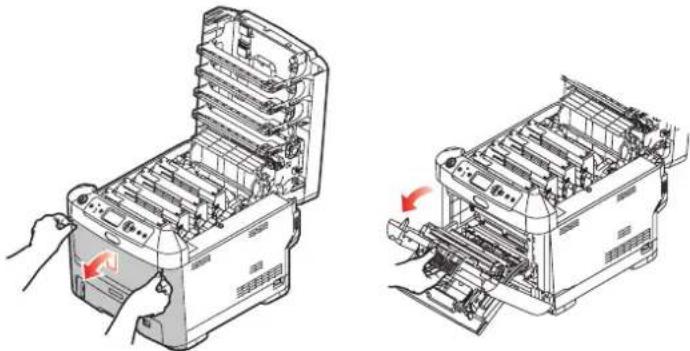
Diagram showing a printer with labeled ports O and I, including a magnified inset highlighting the port's position.- Press the cover release and open the printer's output tray fully.
WARNING!
If the printer has been powered on recently, the fuser will be hot. This area is clearly labelled. Do not touch.
- Pull down the MP Tray using the depressions. Lift the front cover release lever and lower the front cover.
natural_image
Technical line drawing of a printer's internal structure showing two views of the printer's internal components (no text or symbols present)-
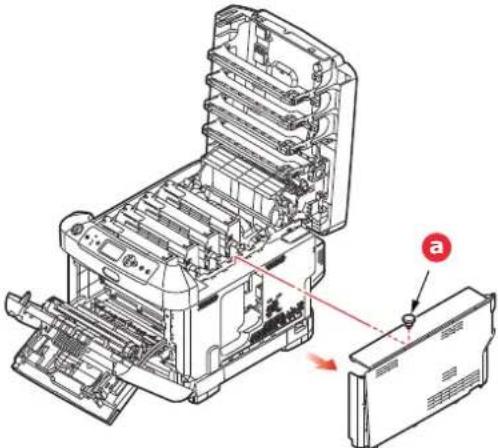
Loosen the screw (a) securing the right-hand side cover.
-
Lift the edge of the side cover slightly and pull the cover away from the printer at the top. Lift the cover slightly to detach it from the printer. Place it safely to one side.
natural_image
Technical line drawing of an open industrial machine with a close-up view of its internal components (no text or symbols)-
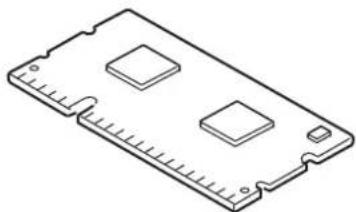
Carefully remove the new memory board from its wrapping. Try to handle the board only by its short edges, avoiding contact with any metal parts as far as possible. In particular, avoid touching the edge connector.
-
Notice that the memory board has a small cutout in the edge connector, which is closer to one end than the other.
natural_image
Isometric line drawing of a rectangular electronic component with three square holes and a central slot (no text or symbols)-
Identify the RAM expansion slot in the printer.
-
If the RAM expansion slot already contains a memory upgrade board, that board will have to be removed before you can install the new one. To remove it, proceed as follows, otherwise skip to step 10.
(a) Release retaining clips and pull the board out of the slot.
(b) Place the removed memory board in the antistatic bag which originally contained the new memory board.
-
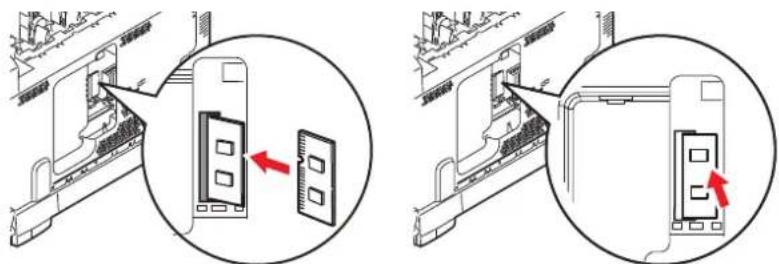
Hold the new memory board by its short edges, so that the edge connector faces in towards the RAM expansion slot, and the small cutout is closer to the rear of the printer.
-
Gently push the board into the RAM expansion slot until it latches in and will not go any further.
text_image
Diagram showing two views of a device with labeled components and directional arrows indicating assembly or connection.-
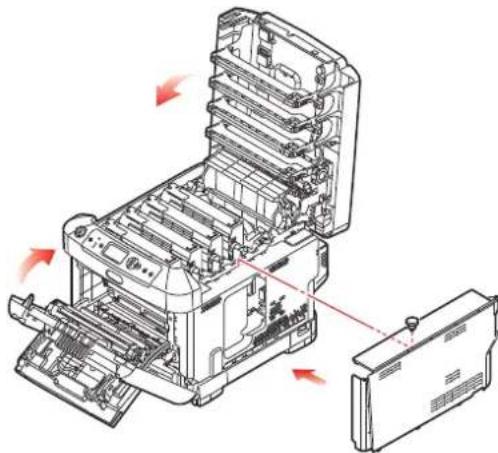
Locate the retaining clips at the bottom of the side cover into their rectangular holes near the bottom of the printer.
-
Close the top of the side cover up to the printer and refit the securing screw loosened in step 4.
natural_image
Technical line drawing of a printer internal structure with red arrows indicating motion or assembly (no text or symbols present)-
Close the front cover, and close the output tray, pressing down firmly at each side to latch it closed.
-
Reconnect the AC power cable and switch the printer on.
-
When the printer is ready, print a menu map as follows:
(a) Press the Enter button.
(b) Press the Menu down button then the Enter button to select the Print Information menu.
(c) Select Configuration with the Enter button.
(d) Press the Enter button once more to execute the Configuration menu.
(e) When the Configuration map is printed, press On Line to exit the menu system.
- Examine the first page of the menu map.
Near the top of the page, between the two horizontal lines, you will see the current printer configuration. This list contains the figure for total memory size.
This should indicate the total memory now installed.
SD CARD
The optional SD card enables collating of printed pages and can be used to store overlays and macros, fonts, and secure or proof documents waiting to be printed.
- Switch the printer off and disconnect the AC power cable.
text_image
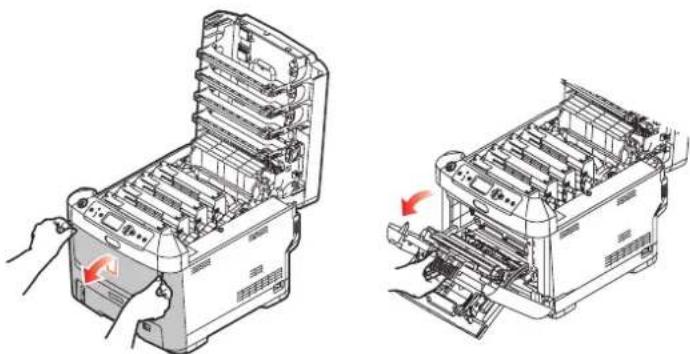
Technical diagram showing a printer with labeled ports O and I, including a magnified inset view of the port's internal structure.- Press the cover release and open the printer's output tray fully.
WARNING!
If the printer has been powered on recently, the fuser will be hot. This area is clearly labelled. Do not touch.
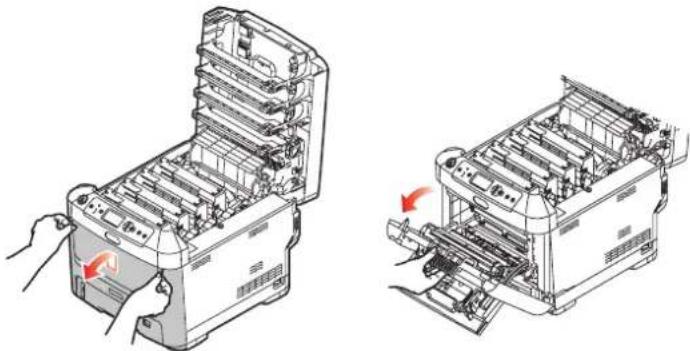
- Pull down the MP Tray using the depressions. Lift the front cover release lever and lower the front cover.
natural_image
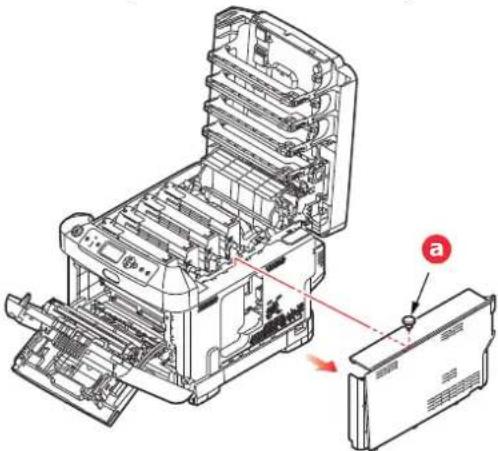
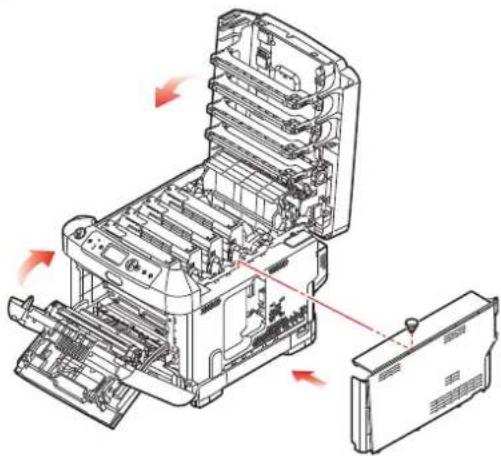
Technical line drawing of two industrial machines with internal components and directional arrows indicating assembly (no text or symbols)- Loosen the screw (a) securing the right-hand side cover. Lift the edge of the side cover slightly and pull the cover away from the printer at the top. Lift the cover slightly to detach it from the printer. Place it safely to one side.
natural_image
Technical line drawing of a printer internal structure with a close-up view of the base panel (no text or symbols present)- Notice that the SD card has one chamfered corner.
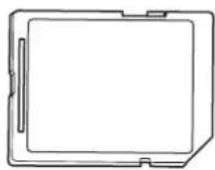
- Gently push the SD card into the slot as shown.
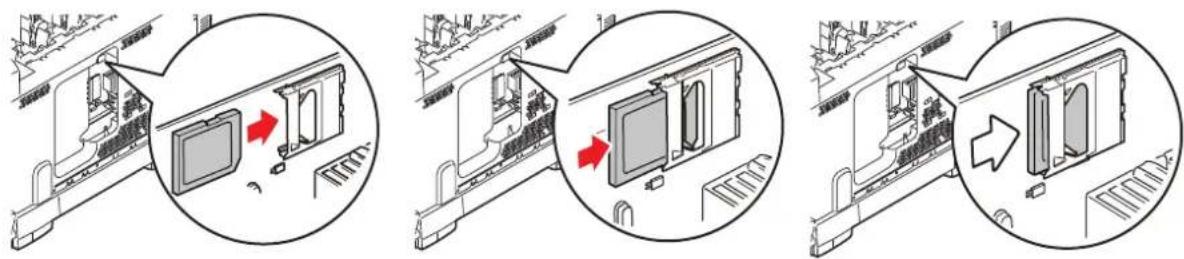
natural_image
Three-step diagram showing a device interior with labeled components and directional arrows (no text or symbols present)-
Locate the retaining clips at the bottom of the side cover into their rectangular holes near the bottom of the printer.
-
Close the top of the side cover up to the printer and refit the securing screw loosened in step 4.
natural_image
Technical line drawing of an open industrial machine with internal components and red directional arrows indicating motion (no text or symbols)-
Close the front cover and the output tray, pressing down firmly at each side to latch it closed.
-
Reconnect the AC power cable and switch the printer on.
-
When the printer is ready, print a menu map as follows:
(a) Press the Enter button.
(b) Press the Menu down button then the Enter button to select the Print Information menu.
(c) Select Configuration with the Enter button.
(d) Press the Enter button once more to execute the Configuration menu.
(e) When the Configuration map is printed, press On Line to exit the menu system.
- Examine the first page of the menu map. This should now indicate that the SD card is installed.
WIRELESS LAN MODULE
The optional wireless LAN module to the machine allows you to use the wireless LAN function.
- Turn the machine off, and then unplug the power cord.
NOTE
Wait for at least 1 minute after unplugging the power cord, and then proceed to the next step.
- Press the cover release and open the printer's output tray fully.
WARNING!
If the printer has been powered on recently, the fuser will be hot. This area is clearly labelled. Do not touch.
- Pull down the MP Tray using the depressions. Lift the front cover release lever and lower the front cover.
natural_image
Technical line drawing of two views of a mechanical device with internal components and directional arrows indicating assembly (no text or symbols present)- Loosen the screw (a) securing the right-hand side cover. Lift the edge of the side cover slightly and pull the cover away from the printer at the top. Lift the cover slightly to detach it from the printer. Place it safely to one side.
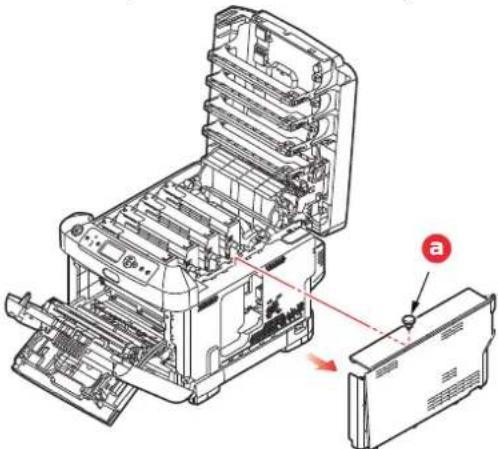
natural_image
Technical line drawing of a printer internal structure with a close-up view of the base panel (no text or symbols present)- Connect the connector of the connection cable at the rear of right side to the wireless LAN module, and then install the module to the machine.
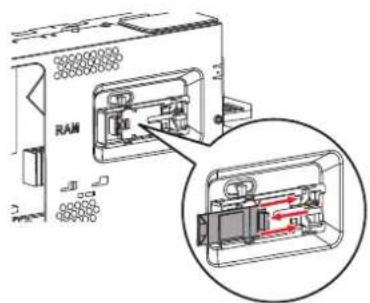
text_image
RAM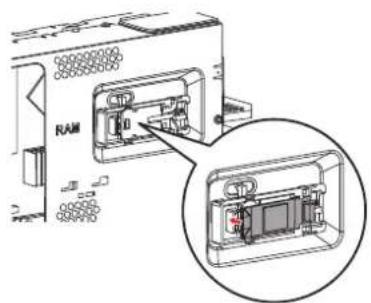
text_image
RAM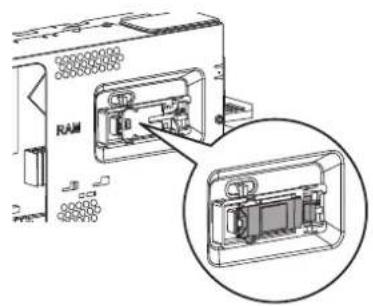
text_image
RAM-
Locate the retaining clips at the bottom of the side cover into their rectangular holes near the bottom of the printer.
-
Close the top of the side cover up to the printer and refit the securing screw loosened in step 4.

natural_image
Technical line drawing of a mechanical device with internal components and directional arrows indicating motion (no text or symbols)-
Close the front cover and the output tray, pressing down firmly at each side to latch it closed.
-
Turn the machine on.
-
Press Enable for Wireless Module displayed in Boot Menu.
ADDITIONAL PAPER TRAY(S)
- Switch the printer off and disconnect the AC power cable.
- Place additional paper tray(s) on desired location.
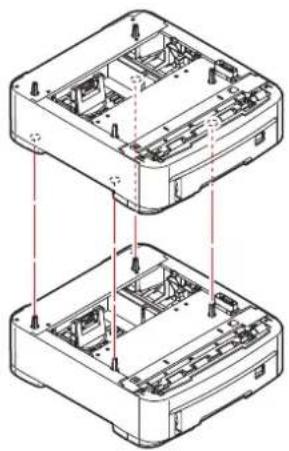
natural_image
Technical line drawing of two stacked electronic devices with internal components and mounting points (no text or symbols)- Observing safety rules for lifting and, using locating guides, place printer on top of the additional paper tray(s).
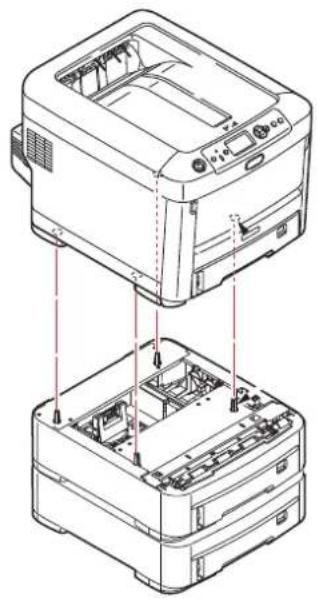
natural_image
Technical line drawing of a printer with internal components and mounting base (no text or symbols)- Re-connect the AC power cable and switch the printer ON.
All that remains is to adjust the printer driver to make full use of the new features ("Setting the driver device options" on page 47).
SETTING THE DRIVER DEVICE OPTIONS
Once your new upgrade has been installed, you may need to update the printer driver so that the additional features are available to your applications.
Accessories such as additional paper trays will only be usable if the printer driver on your computer knows they are there.
In some cases the hardware configuration of your machine is automatically detected when the driver is installed. However, it is advisable to at least check whether all of the available hardware features are listed in the driver.
This procedure is essential if you subsequently add extra hardware features to your machine after the drivers have been installed and set up.
Remember that if your machine is shared between users on different computers, the driver must be adjusted on each user's machine.
WINDOWS
- Access the driver's Properties window.
(a) Open Devices and Printers via the Start Menu or from the Windows Control Panel.
(b) Right-click the icon for this machine, and choose Printer Properties from the pop-up menu.
- Select the Device Options tab.
In the PostScript driver the tab may be called Device Settings.
- Set the options for any devices you have just installed.
- Click OK to close the window and save your changes.
MAC OS X
- Select System Preference from the Apple menu. Open the Printers & Scanners.
- Ensure your machine is selected.
- Click Options & Supplies.
- Click Options.
- Select all hardware options appropriate to your machine and click OK.
STORAGE CABINET
Instructions for installing the Storage Cabinet are supplied with the cabinet.
TROUBLESHOOTING
Provided that you follow the recommendations in this guide on the use of print media, and you keep the media in good condition prior to use, your printer should give years of reliable service. However, paper jams occasionally do occur, and this section explains how to clear them quickly and simply.
Jams can occur due to paper misfeeding from a paper tray or at any point on the paper path through the printer. When a jam occurs, the printer immediately stops, and the Attention LED on the control panel informs you of the event. If printing multiple pages (or copies), do not assume that, having cleared an obvious sheet, others will not also be stopped somewhere along the path. These must also be removed in order to clear the jam fully and restore normal operation.
MAJOR PRINTER COMPONENTS AND PAPER PATH
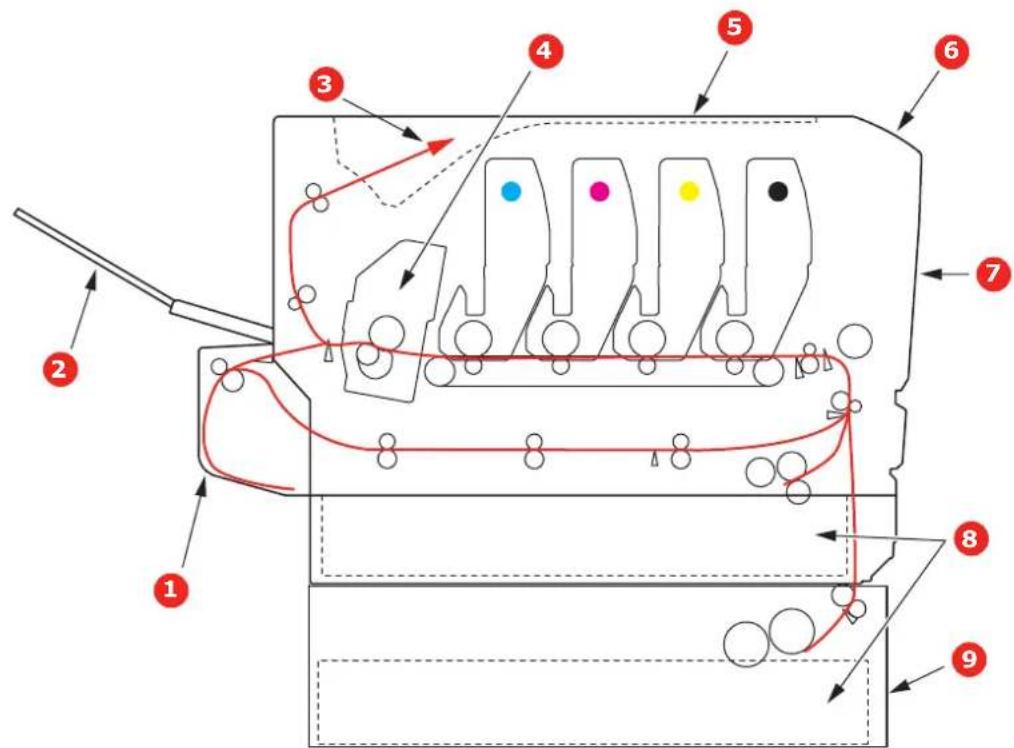
text_image
Technical diagram of a mechanical or electrical component with numbered parts and directional arrows indicating flow or movement.- Duplex unit (if fitted). 6. Operator panel.
- Rear output tray. 7. Front cover.
- Paper exit. 8. Paper tray.
- Fuser unit. 9. Additional paper tray (if fitted).
- Output tray.
PAPER SENSOR ERROR CODES
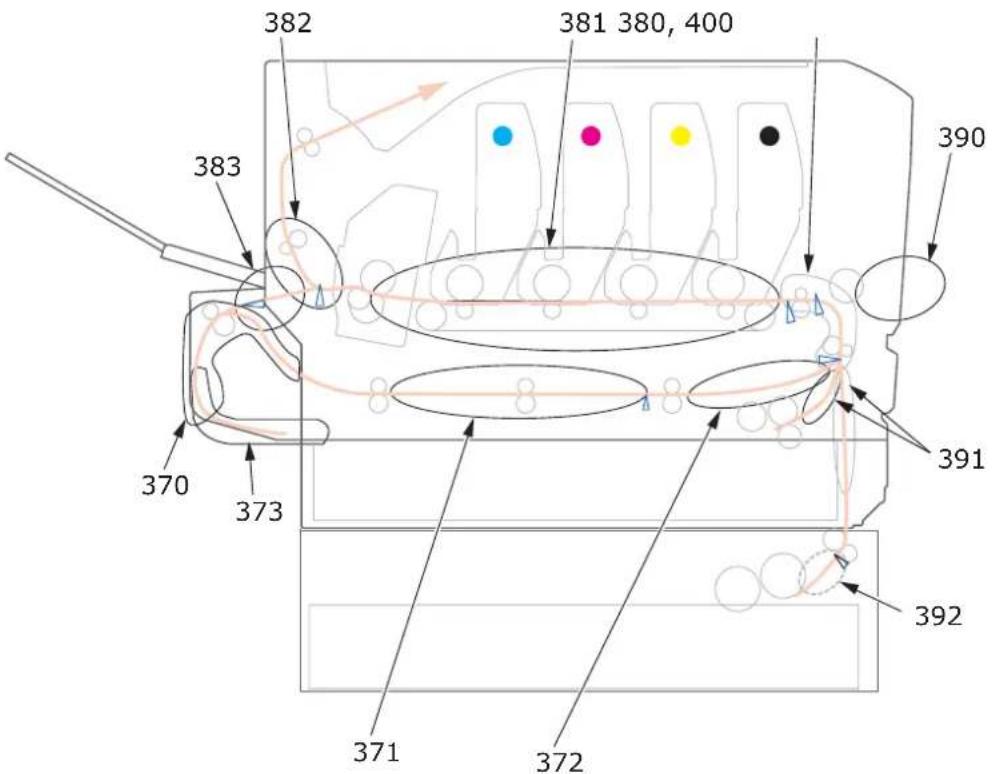
text_image
382 381 380, 400 383 370 373 390 391 392 371 372| CODE # LOCATION CODE # LOCATION | |||
| 370 | Duplex unit ^a | 382 Paper exit | |
| 371 | Duplex unit ^a | 383 | Duplex unit ^a |
| 372 | Duplex unit ^a | 390 MP Tray | |
| 373 | Duplex unit ^a | 391 Paper Tray | |
| 380 Paper feed 392 | 2^nd Paper tray ^a | ||
| 381 Paper path 400 Paper size | |||
a. If fitted.
CLEARING PAPER JAMS
NOTE
For illustrative purposes, the C712 printer has been shown. If you have a C612 printer, the principle is the same.
-
If a sheet is well advanced out of the top of the printer, simply grip it and pull gently to draw it fully out. If it does not remove easily, do not use excessive force. It can be removed from the rear later.
-
Press the cover release and open the printer's output tray fully.
WARNING!
If the printer has been powered on, the fuser will be hot. This area is clearly labelled. Do not touch.
- Note the positions of the four toner cartridges (a) and image drums (b). It is essential that they go back in the same order.
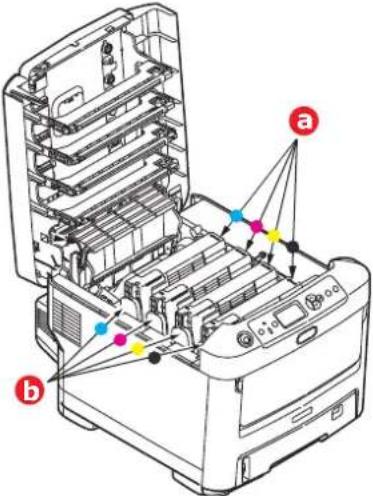
text_image
Technical diagram of a printer internal structure with labeled components and colored connection pointsIt will be necessary to remove the four image drums to gain access to the paper path.
- Holding it by its top centre, lift the image drum, complete with its toner cartridge, up and out of the printer.
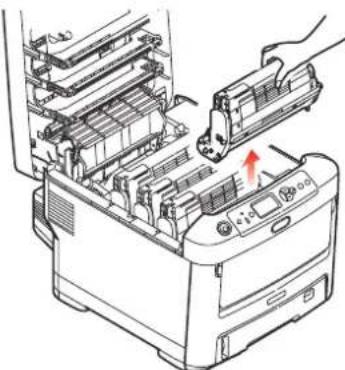
natural_image
Illustration of a printer's internal structure with a hand inserting a component (no text or symbols visible)- Put the assembly down gently onto a piece of paper to prevent toner from marking your furniture and to avoid damaging the green drum surface, and cover.
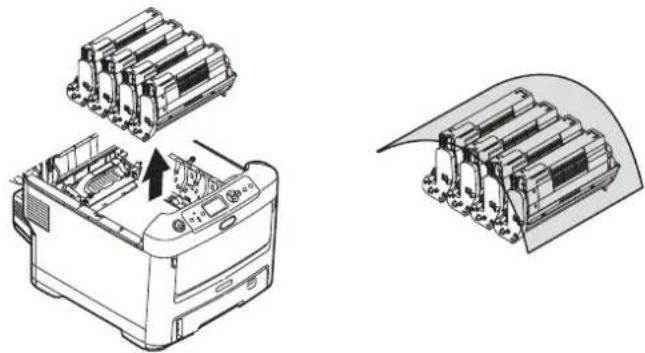
natural_image
Technical line drawing of a printer with internal components and a separate view showing the same device (no text or symbols present)CAUTION!
The green image drum surface at the base of the Image Drum is very delicate and light sensitive. Do not touch it and do not expose it to normal room light for more than 5 minutes. If the drum unit needs to be out of the printer for longer than this, please wrap the cartridge inside a black plastic bag to keep it away from light. Never expose the drum to direct sunlight or very bright room lighting.
-
Repeat this removal procedure for each of the remaining image drum units.
-
Look into the printer to check whether any sheets of paper are visible on any part of the belt unit.
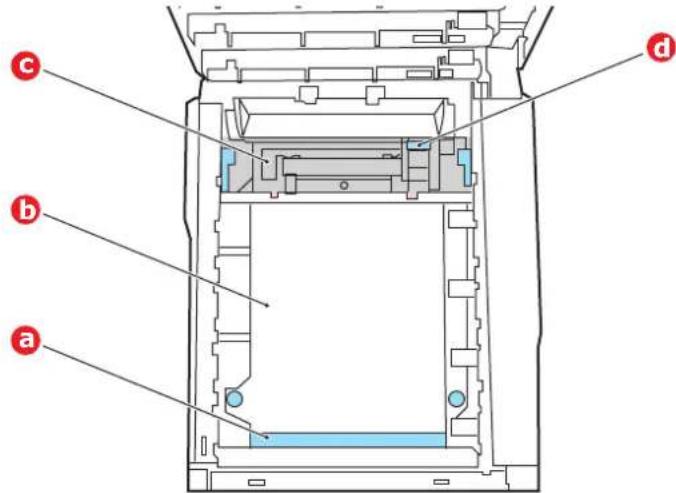
text_image
a b c dCAUTION!
Do not use any sharp or abrasive objects to separate sheets from the belt. This may damage the belt surface.
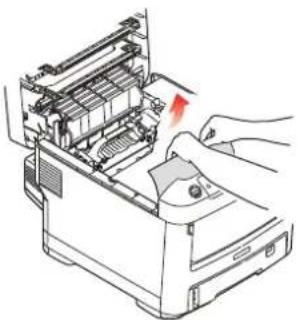
(a) To remove a sheet with its leading edge at the front of the belt (a), carefully lift the sheet from the belt and pull it forwards into the internal drum cavity and withdraw the sheet.
natural_image
Illustration of hands operating a computer with a red arrow indicating a component (no text or symbols present)(b) To remove a sheet from the central area of the belt (b), carefully separate the sheet from the belt surface and withdraw the sheet.
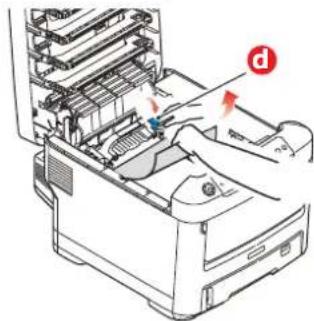
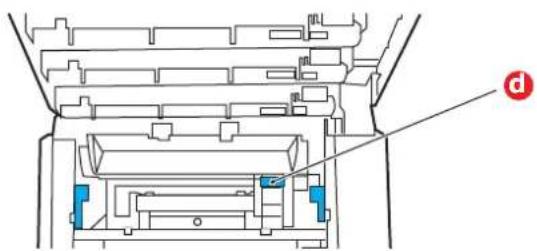
(c) To remove a sheet just entering the fuser (c), separate the trailing edge of the sheet from the belt, push the fuser pressure release lever (d) towards the front and down to release the fuser's grip on the sheet, and withdraw the sheet through the drum cavity area. Then allow the pressure release lever to rise again.
natural_image
Diagram of a printer's internal structure showing internal components and a hand operating the part (no text or symbols present)NOTE
If the sheet is well advanced into the fuser (only a short length is still visible), do not attempt to pull it back.
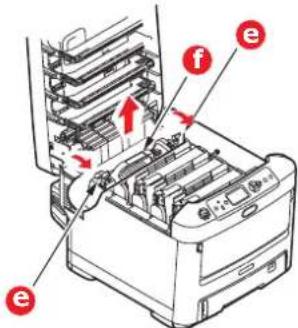
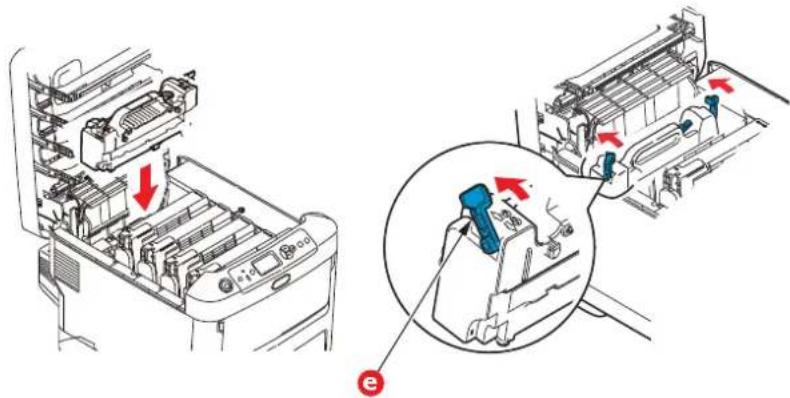
(d) To remove a sheet in the fuser, push the two retaining levers (e) towards the rear of the printer to release the fuser. Withdraw the fuser unit using the handle (f).
text_image
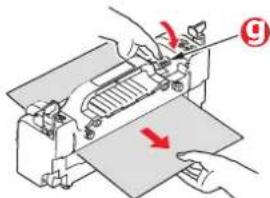
Diagram of a printer with labeled parts (e, f) and directional arrows indicating process flow or movement.(e) Press release lever (g) and pull the trapped paper from the fuser.
text_image
Diagram showing hands operating a sewing machine with a red arrow indicating direction, labeled with number 9.(f) Replace fuser unit into the machine and move locking levers (e) toward the rear of the machine.
natural_image
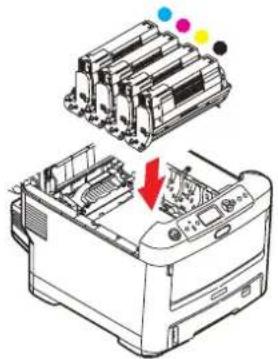
Diagram showing internal components of a car air conditioner unit with red arrows indicating flow direction (no text or labels present)- Starting with the cyan image drum unit nearest the fuser, replace the four image drums into the drum cavity, making sure to locate them in the correct order.
natural_image
Diagram of a printer with internal components and a red arrow indicating a process (no text or symbols present)Holding the complete assembly by its top centre, lower it into place in the printer, locating the pegs at each end into their slots in the sides of the printer cavity.

natural_image
Illustration of a printer's internal structure with a hand inserting a component (no text or symbols visible)-
Lower the output tray but do not press down to latch it closed yet. This will protect the drums from excessive exposure to room lighting while you check the remaining areas for jammed sheets.
-
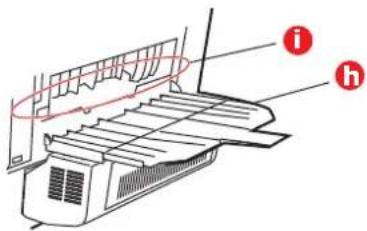
Open the rear output tray (h) and check for a sheet of paper in the rear path area (i).
text_image
Diagram of an air conditioner unit with labeled parts i and h, showing internal structure and ventilation system.Pull out any sheets found in this area.
If the sheet is low down in this area and difficult to remove, it is probably still gripped by the fuser. In this case raise the output tray, reach around and press down on the fuser pressure release lever (d).
text_image
Technical diagram of a mechanical assembly with labeled component 'd'-
If you are not using the rear output tray, close it once any paper has been removed from this area.
-
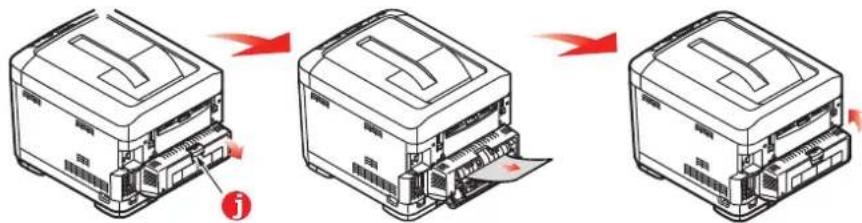
If a duplex unit is fitted, lift lever (j) and lower the duplex unit cover and pull out any sheets found in this area. Close the duplex unit cover
text_image
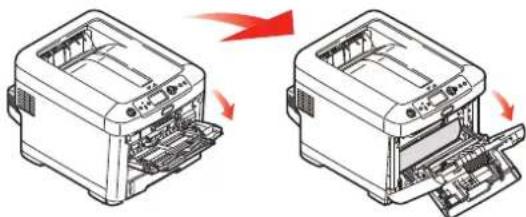
Diagram showing three-step printer operation with red arrows indicating process flow, labeled with number 'j'- Pull down the MP Tray using the depressions. Lift the front cover release lever and lower the front cover.
natural_image
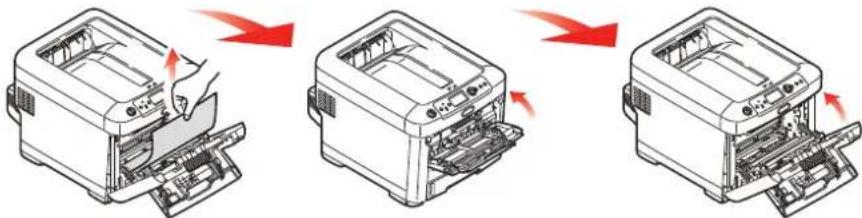
Diagram showing two views of a printer's internal structure before and after disassembly, with no text or symbols present.- Check inside the cover for sheets in this area and remove any that you find, then close the cover.
natural_image
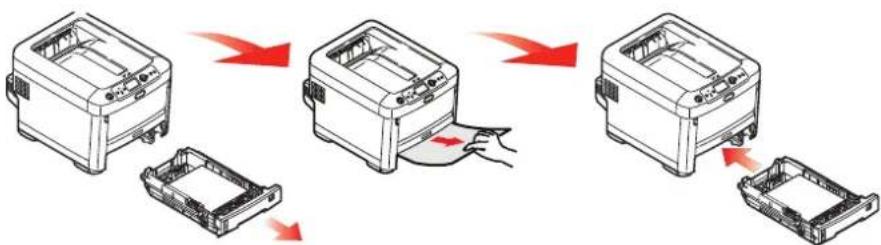
Three-step illustration of a printer's internal structure showing disassembly and assembly (no text or symbols)- Pull out the paper tray and ensure that all paper is stacked properly, is undamaged, and that the paper guides are properly positioned against the edges of the paper stack. When satisfied, replace the tray.
flowchart
graph TD
    A["Printer"] --> B["Printer"]
    B --> C["Printer"]
    C --> D["Printer"]
    D --> E["Final Box"]
    style A fill:#f9f,stroke:#333
    style B fill:#f9f,stroke:#333
    style C fill:#f9f,stroke:#333
    style D fill:#f9f,stroke:#333
    style E fill:#f9f,stroke:#333
- Finally, close the output tray and press down firmly so that the cover latches closed. When the jam has been cleared, if Jam Recovery is set to ON in the System Adjust Menu, the printer will attempt to reprint any pages lost due to paper jams.
When the error message "Caution, unknown Consumable detected" is displayed, you can use any consumables in your product, but you must accept the risks of using non-genuine consumables. If the use of non-genuine consumables causes damage to the product or results in your product not functioning to its full specification, then such damage or effect on the product is not covered by warranty. To accept these risks and to restore function;
-
Turn off your product.
-
Press and hold the CANCEL button and turn your product on.
-
After start up, release the CANCEL button.
NOTE
This operation will be recorded for future reference.
SPECIFICATIONS
C612/ES6412 - N31193B
C712/ES7412 - N31194B
| ITEM SPECIFICATION | |
| Dimensions | C612/ES6412: 435 x 547 x 340mm (W x D x H) without duplex unitC712/ES7412: 435 x 547 x 389mm (W x D x H) without duplex unit |
| Weight C612/ES6412: | 26Kg approx. (without duplex unit)C712/ES7412: 27.6Kg approx. (without duplex unit) |
| Power supply 220 to 240VAC @ 50/60 Hz ± 2% | |
| Power consumption Operating: 1300 max.; 600W av. (25°C)Standby: 100W av. (25°C)Power save mode: less than 15WSleep mode: less than 1.2WOff mode: less than 0.5W | |
| Operating environment | Operating 10 to 32 °C/20 to 80% RH(optimum 25 °C wet, 2 °C dry)Off: 0 to 43 °C/10 to 90% RH(optimum 26.8 °C wet, 2 °C dry) |
| Print environment 30 to | 73% RH @ 10 °C; 30 to 54% RH @ 32 °C10 to 32 °C @ 30% RH; 10 to 27 °C @ 80% RHColour 17 to 27 °C @ 50 to 0% RH |
| Noise(Sound pressure level) | Operating: 68dB(A)Standby: 37dB(A) |
INDEX
B
Belt
how to replace.... 32
C
Cleaning
the LED head 36
the paper feed rollers ..... 37
the unit casing.... 36
D
Duplex
how to install.... 38
paper size and weight
limits 17
E
Envelopes
loading 21
F
Fuser
how to replace.... 34
I
Image drum
how to replace.... 29
M
Maintenance menu.... 25
Major printer components
and paper path 48
Menu functions.... 23
Menus
factory default settings ..... 24
how to use 23
Multi purpose tray
how to use 21
paper metrics 16
0
Operator Panel.... 23
P
Paper
jam clearing 48
jam, error codes 49
loading cassette trays ..... 18
loading letterhead 19
recommended types..... 15
supported sheet sizes..... 16
Printer overview.... 10
S
SD Card
how to install 42
T
Toner
how to replace.... 26
U
Upgrades
additional paper tray(s).... 46
duplex.... 38
memory 39
SD card.... 42
storage cabinet...... 47
OKI CONTACT DETAILS
Oki Systems (UK) Ltd
Blays House
Wick Road
Egham
Surrey
TW20 0HJ
Tel: +44 (0) 1784 274300
Fax: +44 (0) 1784 274301
http://www.oki.co.uk
Oki Systems Ireland Limited
The Square Industrial Complex
Tallaght
Dublin 24
Tel: +353 (0) 1 4049590
Fax: +353 (0)1 4049591
http://www.oki.ie
Oki Systems Ireland Limited - Northern Ireland
19 Ferndale Avenue
Glengormley
BT36 5AL
Northern Ireland
Tel: +44 (0) 7767 271447
Fax: +44 (0) 1 404 9520
http://www.oki.ie
Technical Support for all Ireland:
Tel: +353 1 4049570
Fax: +353 1 4049555
E-mail: tech.support@oki.ie
OKI Systems (Czech and Slo- vak), s.r.o.
Futurama Business Park -
Sokolovská 651/136A
186 00 Praha 8
Czech Republic
Tel: +420 224 890158
Fax:+420 22 232 6621
Website: www.oki.cz, www.oki.sk
Albania, Bosnia, Bulgaria, Croatia,
Cyprus, Estonia, Greece, Israel,
Latvia, Lithuania, Macedonia,
Romania, Serbia, Slovenia
CEE Export Group: OKI Systems (Poland) Ltd
ul. Domaniewska 42
02-672 Warsaw
Poland
Tel: +48 (0) 22 448 65 00
Fax: +48 (0) 22 448 65 0
E-mail: tech@oki.com.pl
Platinum Business Park II, 3rd Floor
ul. Domaniewska 42
02-672 Warsaw
Poland
Tel: +48 22 448 65 00
Fax: +48 22 448 65 01
Website: www.oki.com.pl
E-mail: oki@oki.com.pl
Hotline: 0800 120066
E-mail: tech@oki.com.pl
OKI Systems Rus, LLC (Russia)
Sector B, 3rd Floor, Svyatogor-4
Business Center10/4, Letnikovskaya
str.115114, Moscow
Tel: +7 495 276 5060
Fax: +7 495 258 6070
e-mail: info@oki.ru
Website: www.oki.ru
Technical support:
Tel: +7 495 564 8421
e-mail: tech@oki.ru
Raisy Opkinoy Street,8
Building B, 2 ^nd Floor,
Kiev 02002
Ukraine
Tel: +380 44 537 5288
e-mail: event@oki.ua
Website: www.oki.ua
Oki Systems (Belgium)
Medialaan 24
1800 Vilvoorde
Helpdesk: 02-2574620
Fax: 02 2531848
Website: www.oki.be
OKI Systems (Danmark) a·s
Herstedøstervej 27
2620 Albertslund
Danmark
Oki Systems (Norway) AS
Tevlingveien 23
N-1081 Oslo
Tel: +47 (0) 63 89 36 00
Telefax: +47 (0) 63 89 36 01
Website: www.oki.no
Var vänlig kontakta din
Oki Systems (Sweden) AB
Borgafjordsgatan 7
Box 1198
164 26 Kista
Tel. +46 (0) 8 634 37 00
e-mail: info@oki.se
Website: www.oki.se
2000 Bishops Gate Blvd.
http://WWW.OKIPRINTINGSOLUTIONS.COM
http://my.okidata.com
Oki Data Americas Inc.(Canada • Canadá)
4140B Sladeview Crescent Unit 7 & 8
Mississauga, Ontario
Canada L5L 6A1
Tél: 1-905-608-5000
Téléc: 1-905-608-5040
http://WWW.OKIPRINTINGSOLUTIONS.COM
Oki Data Americas Inc.(América Latina (OTRO))
2000 Bishops Gate Blvd.
HTTP://www.okiprintingsolutions.com
Argentina/Chile/Paraguay/Perú/Uruguay
Oki Data Americas, Inc.
Sucursal Argentina
Ugarte 3610 Piso 4°(1605) Olivos
Buenos Aires, Argentina
TEL: +54 11 5288 7500
Fax: +54 11 5288 7599
Colombia/Ecuador/Venezuela/Centroamérica y Caribe
Oki Data Americas, Inc.
Sucursal Colombia
1168/81-82 Lumpini Tower,
27th Floor Rama IV Road
Tungmahamek, Sathorn
Bangkok 10120
Tel: (662) 679 9235
Fax: (662) 679 9243/245
http://www.okisysthai.com
Oki Data(Australia) Pty Ltd.
Level1 67 Epping Road, Macquarie Park
NSW 2113, Australia
Tel: +61 2 8071 0000
(Support Tel: 1800 807 472)
Fax: +61 2 8071 0010
http://www.oki.com.au
OKI Data New Zealand
8 Antares Place Rosedale,
Auckland, 0632 New Zealand
Tel: (64) 9 477 0500
Fax: (64) 9 477 0549
http://www.oki.co.nz/
Oki Data(S) P Ltd. Malaysia Rep Office
Suite 21.03, 21st Floor Menara IGB, Mid Valley City,
Lingkaran Syed Pura 59200,
Kuala Lumpur, Malaysia
Tel: (60) 3 2287 1177
Fax: (60) 3 2287 1166
Oki Data Corporation
4-11-22 Shibaura, Minato-ku, Tokyo
108-8551, Japan