
SL150II - Lighting GODOX - Free user manual and instructions
Find the device manual for free SL150II GODOX in PDF.


User questions about SL150II GODOX
0 question about this device. Answer the ones you know or ask your own.
Ask a new question about this device
Download the instructions for your Lighting in PDF format for free! Find your manual SL150II - GODOX and take your electronic device back in hand. On this page are published all the documents necessary for the use of your device. SL150II by GODOX.
USER MANUAL SL150II GODOX
GODOX Photo Equipment Co., Ltd.
| Add: Building 2, Yaochuan Industrial Zone, Tangwei Community, Fuhai Street, Bao'an District,
Shenzhen 518103, China Tel: +86-755-29609320(8062) Fax: +88-755-25723423
^1 E-mail: godox@godox.com
godox.com
Made in China


RoHS


SL系列摄影灯
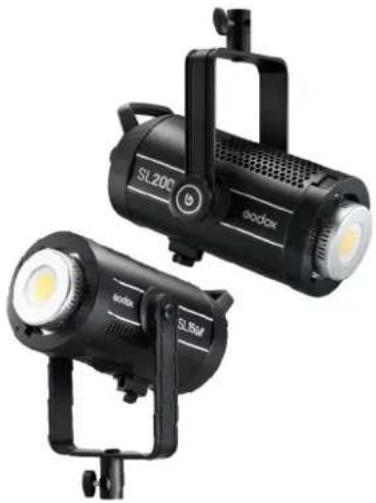
SL Series LED Video Light
SL200II SL150II
natural_image
Two black SL200 and SL55M streetlights with visible headlights and mounting brackets (no text or symbols on the lights themselves)使用手册
Instruction Manual
前言 部件名称
感谢您购买神牛产品!
natural_image
Collection of photography lighting equipment including a box, umbrella, lamp, and cone (no text or symbols)接通电源
Thank you for purchasing this Godox Product!
With 8 special effects modes, strong power, soft illumination and abundant functions, SL
Series LED Video Light SL150II/SL200II can achieve creative shooting easily.
Main Features:
- With 8 FX special effects mode to simulate various of shooting scene.
- Silent mode: fanless, without noises and interference.
• Strong power mode: the power can be up to the maximum value
• Built-in Godox 2.4G wireless X system & wirelessly adjust parameters. - With stable light source and 0% to 100% precise light adjustment.
• With 16 groups and 32 channels wireless control. - With U-type bracket to adjust different angles easily.
- Bowens-mount enables to install various of accessories.
- Clear LCD display.
• Excellent heat dissipation.
Warning
▲ Always keep this product dry. Do not use in rain or in damp conditions.
Do not disassemble. Should repairs become necessary, this product must be sent to an authorized maintenance center.
▲ Keep out of reach of children.
As this product do not have waterproof function, please take measures of waterproof in rainy or damp environment.
Do not use the product in the presence of flammable gases, chemicals and other similar materials.
As this product has built-in lithium battery, do not disassemble, impact, squeeze or put it into fire. If serious bulge occurs, please do not use. Do not use or store the product if the ambient temperature reads over 40°C.
Please charge the product with specialized charger and correctly operate it within the defined voltage and working temperate according to the instruction manual.
Body
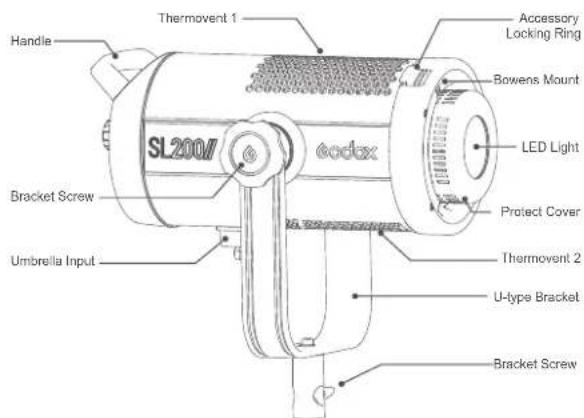
text_image
Handle Thermovent 1 SL2007 Bracket Screw Umbrella Input Accessory Locking Ring Bowens Mount LED Light Protect Cover Thermovent 2 U-type Bracket Bracket Screw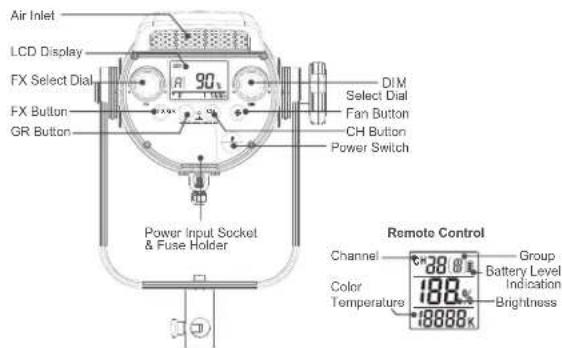
text_image
Air Inlet LCD Display FX Select Dial FX Button GR Button Power Input Socket & Fuse Holder DIM Select Dial Fan Button CH Button Power Switch Remote Control Channel 280k Color 188k Temperature 18888k Battery Level Indication BrightnessLCD Panel
LCD Panel
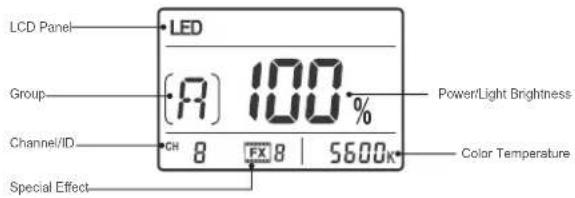
text_image
LCD Panel LED Group (P) 100% Channel/ID CH 8 FX 8 5600K Special Effect Power/Light Brightness Color TemperatureIncluded Items
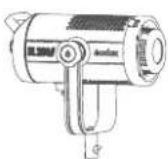
LED video light *1

Reflector for Bowens mount LED light *1

Lamp cover *1 Power cord *1

Separately Sold Accessories
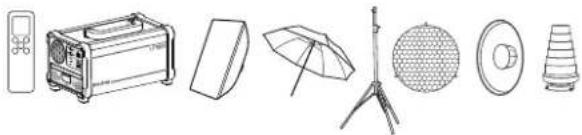
The product can be used in combination with the following accessories sold separately, so as to achieve best photography effects: RC-A6 remote control, Power Inverter, Softbox, Photographic Umbrella, Light Stand, Barndoor, Snoot, etc.
natural_image
Line drawings of various photography equipment including a box, lens, umbrella, and cone (no text or symbols)Power Connection
Use the power cord to connect the LED light to an AC power source and turn on the power switch.
Operation
Setting
Mode Selection
1.1 LED silent mode: in this mode, the fan and special effects are turned off. There is no noises and interference in this mode.
1.2 LED special effects modes: Short press the FX button to enter or exit the special effects. When entering the FX modes, FX icon will be displayed on the LCD panel. Then, turn the FX select dial to choose one mode from the 8 special effects modes to achieve creative shooting.
| Display | Fx1 | Fx2 | Fx3 | FX4 | FX5 | FX6 | FX7 | Fx8 |
| Scene | Flash1 | Flash2 | Flash3 | Storm1 | Storm2 | Storm3 | TV | Broken bulb |
1.3 LED strong power mode: turn on the fan to enter LED strong power mode and the power will up to the maximum value in this mode.
Light Brightness Adjustment
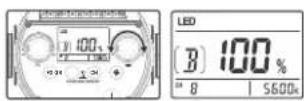
In LED mode, the light brightness of LED light can be adjusted by turning the DMX select dial from 0% to 100%. And the light brightness will be clearly displayed on the LCD Panel.
Group GR, Channel CH and ID Setting
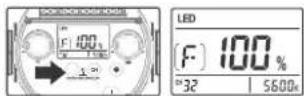
GR Setting: Short press GR button to choose group from A, B, C, D, E, F and 0 to 9.
CH Setting: Short press CH button to choose channel from 1 to 32.
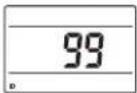
ID Setting: Long press GR and CH button to enter ID setting interface. Then, turn the DIM select dial to choose ID from OF and 01 to 99.
Wireless Control
With 2.4G wireless system, SL Series SL150II/SL200II have receive and control function. Up to multiple groups of LED lights can be controlled. 32 channels and 100 wireless IDs are available with strong anti-interference capability. Please set the channels, groups and IDs of LED light to the same as those of RC-A6 remote control before usage.
Adjusting Channel/Group with the Remote Control
- Press the CH/GR button and the group icon blinks.
Press the"-""+ "button to choose a group (A to F, 0 to 9).
- Press the CH/GR button twice and the channel icon blinks.
Press the "-" + "button to choose a channel (1 to 32).
Adjusting ID with the Remote Control
- Double click the CH/GR button and press the *-""+"button to choose ID from OFF or 0 to 99.
Adjusting Light Brightness with the Remote Control
- Press the"-**+"button to adjust the light brightness.
Adjusting Color Temperature with the Remote Control (The color temperature value of this LED light cannot be adjusted) - Press the SET button of the remote control and the color temperature icon blinks. Press the "-" + "button
to adjust the color temperature.
Remote control reset: press down "-" and "+" button simultaneously to reset.
Note: The wireless signal can be received only when the controller of LED light is powered on.
Remote control is available separately.
Setting color temperature range
The factory setting of remote control's color temperature range is 2500-10000K. In order to use remote control conveniently, color temperature range settings are added: when the remote control is off, hold down the SET button and turn it on to enter color temperature adjusting interface. Press CH/GR button to switch the lowest and highest color temperature value and press "-" or "+" button to change the value. Press the SET button to confirm it.
Technical Data
| LED Video Light | SL150II | SL200II |
| Power Supply | AC100V-240V (50/60Hz) | |
| Max Power | 150W | 200W |
| Color Temperature | 5600±200K | |
| 100% Light Brightness(LUX,1M) | ≈58000 | ≈74000 |
| CRI ≈ | 96 | |
| TLCI ≈ | 97 | |
| Light Brightness Range | 10%-100% | |
| Operation Temperature | -10°C ~ 40°C | |
| Channel | 32 | |
| Group | 16(A, B, C, D, E, F, 0-9) | |
| Dimension (not included a standard reflector) | 34x20x16cm | 36.7x20x16cm |
| Net Weight | 2.95Kg | 3.33Kg |
FCC Statement
This device complies with part 15 of the FCC Rules. Operation is subject to the following two conditions: (1) This device may not cause harmful interference, and (2) this device must accept any interference received, including interference that may cause undesired operation.
Note: This equipment has been tested and found to comply with the limits for a Class B digital device, pursuant to part 15 of the FCC Rules. These limits are designed to provide reasonable protection against harmful interference in a residential installation. This equipment generates uses and can radiate radio frequency energy and, if not installed and used in accordance with the instructions, may cause harmful interference to radio communications. However, there is no guarantee that interference will not occur in a particular installation. If this equipment does cause harmful interference to radio or television reception, which can be determined by turning the equipment off and on, the user is encouraged to try to correct the interference by one or more of the following measures:
- Reorient or relocate the receiving antenna.
- Increase the separation between the equipment and receiver.
- Connect the equipment into an outlet on a circuit different from that to which the receiver is connected.
- Consult the dealer or an experienced radio/TV technician for help.
产品保修
Dear customers, as this warranty card is an important certificate to apply for our maintenance service, please fill in the following form in coordination with the seller and safe-keep it. Thank you!
| Product Information | Model | Product Code Number |
| Customer Information | Name | Contact Number |
| Address | ||
| Seller Information | Name | |
| Contact Number | ||
| Address | ||
| Date of Sale | ||
| Note: | ||
Note: This form shall be sealed by the seller.
Applicable Products
The document applies to the products listed on the Product Maintenance Information (see below for further information). Other products or accessories (e.g. promotional items, giveaways and additional accessories attached, etc.) are not included in this warranty scope.
Warranty Period
The warranty period of products and accessories is implemented according to the relevant Product Maintenance Information. The warranty period is calculated from the day(purchase date) when the product is bought for the first time, And the purchase date is considered as the date registered on the warranty card when buying the product.
How to Get the Maintenance Service
If maintenance service is needed, you can directly contact the product distributor or authorized service institutions. You can also contact the Godox after-sale service call and we will offer you service. When applying for maintenance service, you should provide valid warranty card. If you cannot provide valid warranty card, we may offer you maintenance service once confirmed that the product or accessory is involved in the maintenance scope, but that shall not be considered as our obligation.
Inapplicable Cases
The guarantee and service offered by this document are not applicable in the following cases: ①. The product or accessory has expired its warranty period; ②. Breakage or damage caused by inappropriate usage, maintenance or preservation, such as improper packing, improper usage, improper plugging in/out external equipment, falling off or squeezing by external force, contacting or exposing to the improper temperature, solvent, acid, base, flooding and damp environments, etc; ③. Breakage or damage caused by non-authorized institution or staff in the process of installation, maintenance, alternation, addition and detachment; ④. The original identifying information of product or accessory is modified, alternated, or removed; ⑤. No valid warranty card; ⑥. Breakage or damage caused by using illegally authorized, nonstandard or non-public released software; ⑦. Breakage or damage caused by force majeure or accident; ⑧. Breakage or damage that could not be attributed to the product itself. Once met these situations above, you should seek solutions from the related responsible parties and Godox assumes no responsibility. The damage caused by parts, accessories and software that beyond the warranty period or scope is not included in our maintenance scope. The normal discoloration, abrasion and consumption are not the breakage within the maintenance scope.
Maintenance and Service Support Information
The warranty period and service types of products are implemented according to the following Product Maintenance Information:
| Product Type | Name | Maintenance Period(month) | Warranty Service Type |
| Parts | Circuit Board | 12 | Customer sends the product to designated site |
| Battery | 3 | Customer sends the product to designated site | |
| Electrical parts e.g.battery charger, power cord, sync cable, etc. | 12 | Customer sends the product to designated site | |
| Other Items | Flash tube, modeling lamp, lamp body, lamp cover, lockingdevice, package, etc. | No | Without warranty |
Godox After-sale Service Call 0755-29609320-8062