Prime Film XAs - To scan Pacific Image - Free user manual and instructions
Find the device manual for free Prime Film XAs Pacific Image in PDF.


User questions about Prime Film XAs Pacific Image
0 question about this device. Answer the ones you know or ask your own.
Ask a new question about this device
Download the instructions for your To scan in PDF format for free! Find your manual Prime Film XAs - Pacific Image and take your electronic device back in hand. On this page are published all the documents necessary for the use of your device. Prime Film XAs by Pacific Image.
USER MANUAL Prime Film XAs Pacific Image
CyberView X5 MF User's Manual
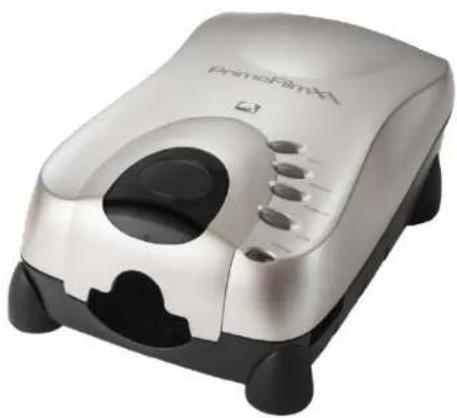
natural_image
Exterior view of a white and black HPV HPV HPV device (no visible text or symbols)FEDERAL COMMUNICATIONS COMMISSION (FCC) STATEMENT
This Equipment has been tested and found to comply with the limits for a class B
digital device, pursuant to Part 15 of the FCC rules. These limits are designed to provide reasonable protection against harmful interference in a residential installation. This equipment generates uses and can radiate radio frequency energy and, if not installed and used
in accordance with the instructions, may cause harmful interference to radio communications. However, there is no guarantee that interference w
ill not occur in a particular installation. If this equipment does cause harmful interference to radio or television reception, which can be determined
by turning the equipment off and on, the user is encouraged to try to correct the interference by one or more of the following measures:
• Re-orient or relocate the receiving antenna.
- Increase the separation between the equipment and receiver.
- Connect the equipment into an outlet on a circuit different from which the receiver is connected to.
- Consult the dealer or an experienced radio/TV technician for help.
Warning :
Use only shielded signal cables to connect I/O devices to this equipment.
You are cautioned that changes or modifications not expressly approved by the party responsible for compliance could void your authority to operate the equipment.
TABLE OF CONTENTS
Getting Started 4
Quick Installation Guide (QIG) 6
Installing Software and Driver 6
Installing Hardware 8
Inserting 35mm Slides 8
Inserting 35mm Film strips 9
Additional Features 10
One Button Scan (PC ONLY Feature) 10
How to Scan Film and Slides 11
STEP 1 - Acquire Driver
STEP 2- Select Film Type
STEP 3 - Optional Prescan
STEP 4 - Set Scan Settings 13
STEP 5 - Set Scan Preferences 16
STEP 6 - Scan 17
STEP 7 - Exit 16 17
User Interface 22
I Main Window Area 18
II Preview Window Area 18
III Active Frame Setting Area 27
IV Thumbnail Panel Area 28
Technical Support 30
GETTING STARTED
Check the package content before getting started.
For Quick Installation please refer to Quick Installation Guide. (Ref. Pg. 11)
Important! Save the original box, receipt and packing material for future shipping needs.
Package Contents
- Film Scanner.
• Power Adapter
Warning! Using any other power adapter may severely damage the scanner and will void the product warranty.
- USB 2.0 Cable.
• SilverFast SE Scanning software CD
GENERAL GUIDANCE:
- Only use the supplied USB-Cable. Connect the computer to the scanner directly using the USB 2.0 cable.
- Do not use a Hub or extension cable, or USB cables over 6ft long
Only use the USB ports on the rear of desktop computers.
- If there are any other devices (multifunction device, printers, scanners, web-cam) connected to the computer through USB disconnect them, this does not apply to Wi-Fi connected devices
• A minimum of 1 GB RAM (Windows/Mac) is required.
| Operating Ambient Temperature Range50° to 104°F (10° to 40°C) |
| Note: Do not turn on the scanner unless it is within this range. If the scanner has been stored or transported outside of this range, allow it to return to within this range before turning it on. |
| Operating Ambient Humidity Range 15% to 76% relative humidity(non-condensing) |
| Note: If the scanner is stored or to be transported in cold temperature and then brought into a warm / humid environment condensation may occur. |
QUICK INSTALLATION GUIDE
INSTALLING SOFTWARE AND DRIVER
Installing Scanner Driver
NOTE: Make sure the scanner is NOT connected to the computer during the Cyber-View X 5.0 driver installation.
a. Download the CyberView X scanning software from the website Download Drivers Click Here
b. PC – Open the download location Double click the "CyberView" icon to open the zipped file
c. Click on the CyberView X_Windows installer to begin the installation, follow the onscreen prompts
MAC – Download the driver from the above link, then click on the CyberViewX_Mac file in the downloads folder this will create a CyberView removable drive icon on the desktop, Open your Applications folder next open the CyberView drive and drag the CyberView icon into the Applications folder to install it.
Please Note: When installing your new scanner onto a Windows system that already has another USB Scanning device CONNECTED
EXAMPLE: Flatbed scanner or All-in-one Scan/Copier/Printer device, it may be necessary to power off or if there is no on/off switch disconnect the other scanner from the USB port for the Film scanner to work properly,
Installing Hardware a. Connect the slide scanner to a power source.
-
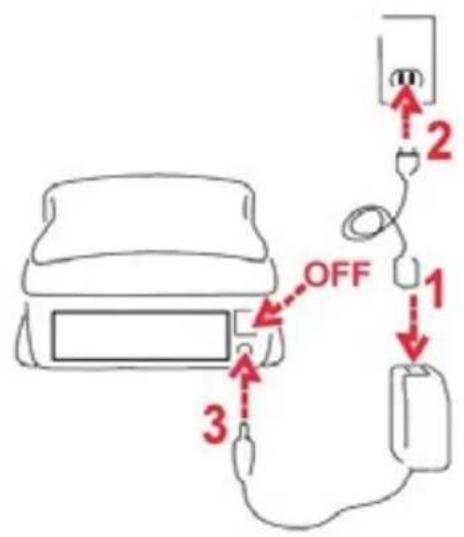
Locate the power switch on the lower left t side back of the scanner. Make sure the scanner is TURNED OFF.
-
Plug the AC adapter into an AC power source FIRST before plugging it into the scanner.
-
Attach the USB cable to the computer using the standard USB adapter end. Attach the U shaped USB adapter end of the cable to back panel of the scanner.
text_image
OFF 1 2 3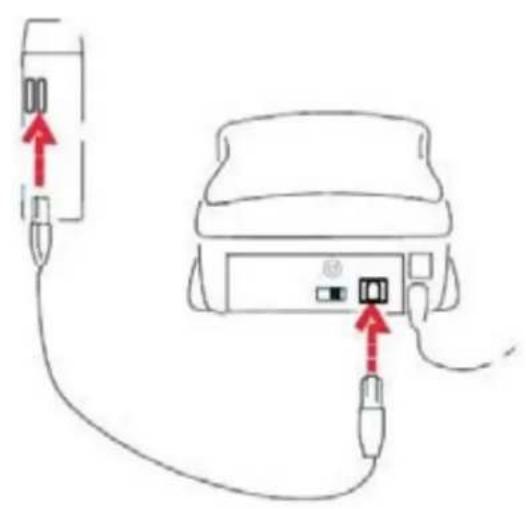
text_image
Diagram showing cable connection between a device with two connectors and red arrows indicating direction of connectionAttention Before Scanning...Make sure there is no filmstrip inside scanner before you insert the slide and there is no slide inside scanner before you insert the filmstrip.
Please note the slide and filmstrip cannot be put into the scanner at the same time.
Mounted Slides
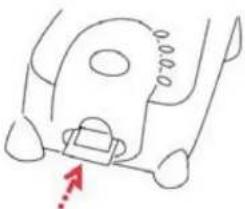
- Insert the slide into the slot on the front of the unit, with the dull (emulsion)side facing up This will result in backwards scans, however to achieve the best quality this is how they need to be placed
natural_image
Line drawing of a mechanical component with a red arrow indicating direction (no text or symbols)- Set Scan settings and preferences See Page
Note: Some slide mounts are thin and will require you to apply gentle pressure to the edge of the mount after insertion for it to register in the scanner, you will know it is detected by the Preview bar in the user interface, the icons will illuminate in color

text_image
Positive 135 FilmNo Slide detected (tool bar greyed out)

text_image
Positive 135 FilmSlide is detected
Inserting Filmstrips
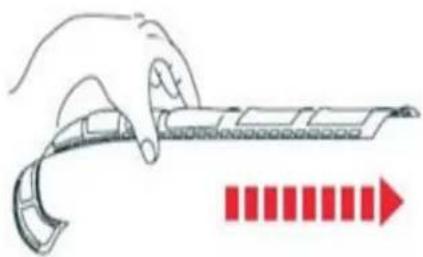
- Insert the filmstrip with emulsion side up from the left film entrance.
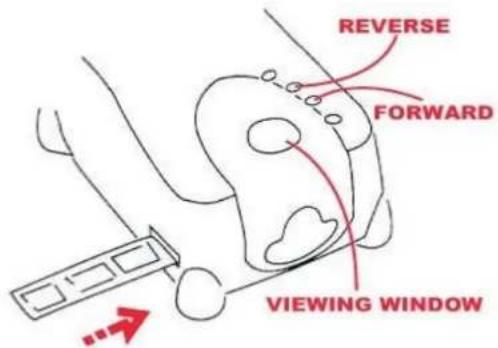
- Scanner will auto load and position the first frame in the center of the viewing window, if the first frame is not at the correct position, please move it by clicking "FORWARD" or "REVERSE" button and you can also move it via the fine tuning function in CyberView interface. See Page 24
- See Scanning options on page
You can load the film easily by holding around the 3rd frame of the filmstrip
natural_image
Illustration of a hand holding a flexible film strip with a red arrow indicating direction (no text or symbols)Additional features
Buttons on the scanner
Eject - Ejects the Film strip
Reverse - Reverses the strip one frame
Forward - Advances the film one frame
Scan - See One Button Scanning below
text_image
REVERSE FORWARD VIEWING WINDOWOne Button Scan (PC ONLY)
-
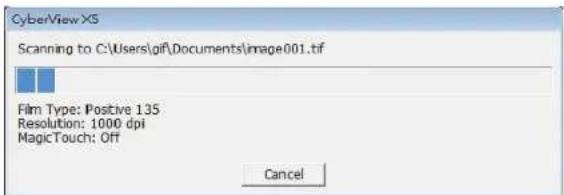
FIRST you must Open the CyberView software (see page 11 to acquire the CyberView driver program)
-
Configure Scan Settings (see Page)
-
Select the Scan to directory, file format (TIF or JPG, once configured, Press the scanner button) to begin scanning.
NOTE: If you do not open CyberView FIRST, the scan button will not function.
text_image
CyberView X5 Scanning to C:\Users\gif\Documents\image001.tif Film Type: Positive 135 Resolution: 1000 dpi MagicTouch: Off CancelHOW TO SCAN
STEP 1 – Turn on the scanner Wait for the flashing light to come on steady indicating the hardware is ready to use.
Acquire Driver
(For PC User) Open CyberView from Start – All Programs – CyberView or desktop icon (For MAC User)

Open Macintosh Hard drive – Applications – CyberView X.app or from the Apple menu Go – Applications – CyberView X.app
STEP 2 – Select Film Type
Select the film type to be scanned – Positive, Negative or B&W (Black and White).
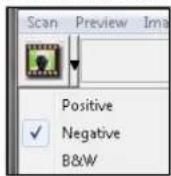
STEP 3 – Optional Prescan (To be used if you wish to pre-edit the images before final scan
Select the "Prescan Current Frame" to Prescan the slide currently loaded into the scanner or "Prescan All.." to Prescan an entire negative strip
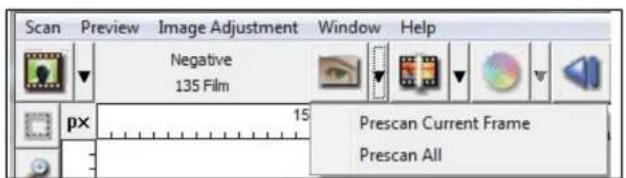
text_image
Scan Preview Image Adjustment Window Help Negative 135 Film Prescan Current Frame Prescan AllHOW TO SCAN...cont.
STEP 4 – Set Scan Parameters
Notice: Higher scanning resolutions result in greater scanning time and hard disk space requirements.
a. Resolution
The default scanning resolution is 1000dpi, additional resolution options are listed below.
b. Color Depth
Choose between 8 and 16bit. A higher color depth setting will result in a larger range of colors in the final scanned image.
The Film Scanner color depth is 48 bit true color. The scanning software has the capability of selecting 8 bit color mode or 16 bit color mode when scanning, This will produce 24 or 48 bit color images, 8 bits or 16 bits per Red, Green and Blue color channels.
Example:
8 bit mode = 8 Red, 8 Green, and 8 Blue for a total of 24 bit color
16 bit mode = 16 Red, 16 Green, and 16 Blue for a total of 48 bit color"
Scan Mode – Fast, Normal mode produces a scan in JPEG format with "loss-less" TIFF image.
| Scanning Resolution | Color Depth (by RGB channel) | Color Mode | File Size TIFF (no compression) |
| 300dpi | 8 bit | 24-bit | ~350Kb |
| 600dpi | 8 bit | 24-bit | ~1MB |
| 1800dpi | 8 bit | 24-bit | ~12MB |
| 3600dpi | 8 bit | 24-bit | ~52MB |
| 7200dpi | 8 bit | 48-bit | ~208MB |
Set Scan Preferences
Select Scan - Preference - Film Type - Scan Setting or click the Settings icon on the main user interface
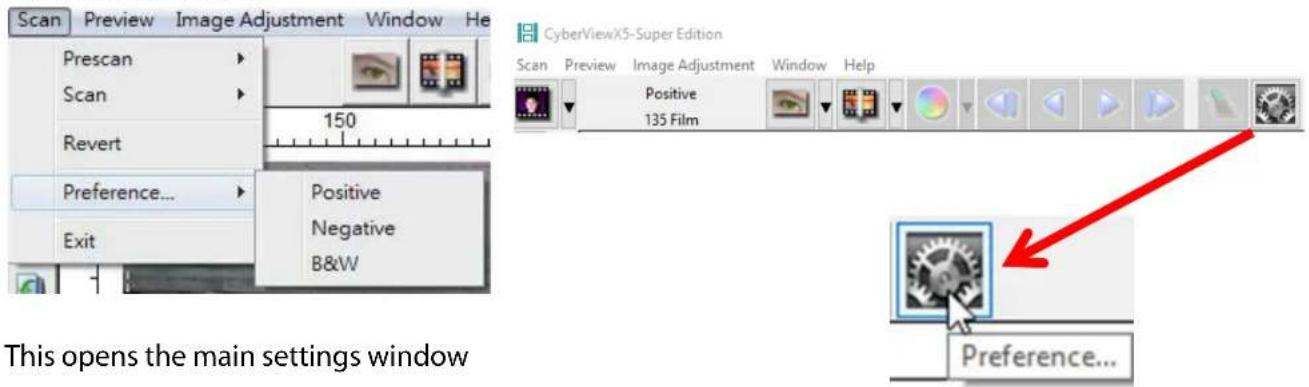
text_image
Scan Preview Image Adjustment Window He Prescan Scan Revert Preference... Exit Positive Negative B&W This opens the main settings window CyberViewX5-Super Edition Scan Preview Image Adjustment Window Help Positive 135 Film Preference...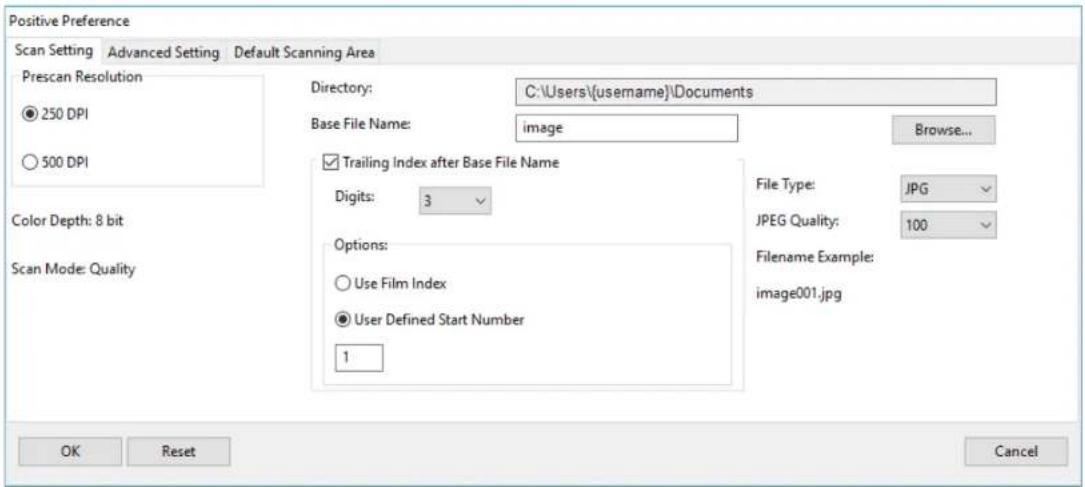
text_image
Positive Preference Scan Setting Advanced Setting Default Scanning Area Prescan Resolution ● 250 DPI ○ 500 DPI Color Depth: 8 bit Scan Mode: Quality Directory: C:\Users\{username\Documents Base File Name: image Browse... ✓ Trailing Index after Base File Name Digits: 3 ✓ Options: ○ Use Film Index ● User Defined Start Number 1 File Type: JPG ✓ JPEG Quality: 100 ✓ Filename Example: image001.jpg OK Reset CancelScan Setting

text_image
Positive Preference Scan Setting Advanced Setting Default Scanning Area Prescan Resolution 250 DPI 500 DPI Color Depth: 8 bit Scan Mode Quality Directories C:\Users\values\Documents\ Base File Name: image Texting Index after Base File Name Digits: 3 Options Use Film Index User Defined Start Number 1 File Type: JPG JPEG Quality: 100 Filename Example: image601.jpg OK Reset CancelPrescan Resolution: use this when prescanning only, the 500 dpi setting produces a larger prescan view when in full screen mode
2 Directory: Select where the files are saved to, Documents is the default setting, to change select Browse and choose a different location
3 Base File Name: This is the file name applied to every image which will then have a number after it, image is the default
4 Trailing Index after Base File Name: Tis is the number length, digits 3 default file name example image001, you can select 1-6 digits for the number length
5 Color Depth: These can be configured in the Active Frame settings window 8 bit is 8 bits per RGB channel = 24 bit color mode, 16 bit is 16 bits per color channel = 48 bit color mode Scan Mode: Normal for standard photographic images, Quality for high definition images such as x-rays, Quality mode results in a slower scan speed
6 Options: Use Film Index; the software automatically numbers the files User Defined Start Number: Allows for more custom numbering of the files
7 File Type: TIF; Full uncompressed image, JPG; uses JPG compression to reduce the file output size JPG only supports 8 bit image output
8 OK: Saves the settings applied and closes this window
9 Reset: Resets the software to ALL Factory Defaults
10 Cancel: Closes this window and no settings will be saved
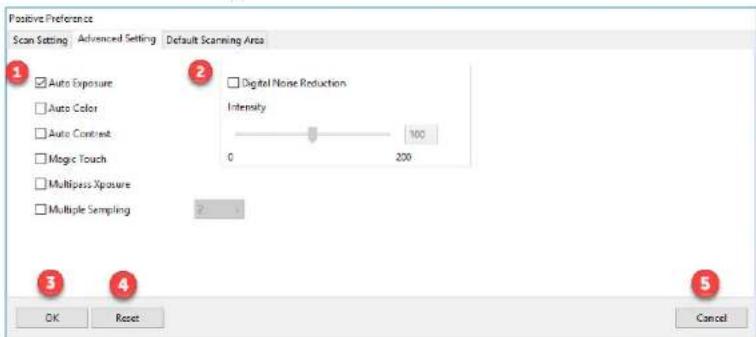
Advanced settings
text_image
Positive Preference Scan Setting Advanced Setting Default Scanning Area 1 Auto Exposure Auto Color Auto Contrast Magic Touch Multipass Xposure Multiple Sampling 2 Digital Noise Reduction Intensity 100 0 200 3 4 OK Reset Cancel
Auto Exposure: Automatically adjusts the image exposure, on by default
Auto Color: Corrects image colors when activated
Auto Contrast: Adjusts image contrast when enabled
Magic Touch: Removes dust and scratches when enabled
Multipass Xposure: Performs a triple scan to obtain the best possible image, This process captures the three individual scans, first a normal pass then two more scans to highlight the shadow details to expose the darker areas more fully, The software then intuitively calculates the final scan, which now contains the data from all three scans.
Multi Sampling: Configure the settings to scan a single image (multiple times) 2x, 4x for the highest quality output. Please note this greatly increases scan time. With Multi-Sampling image noise is a thing of the past.

Digital Noise Reduction: This reduces digital film grain on higher speed films, do not use on 100 aa or slower as it will cause image degradation

OK: Saves settings and returns to main interface

Reset: Restores factory defaults on ALL Settings

Cancel: Closes settings and returns to main interface without saving changes
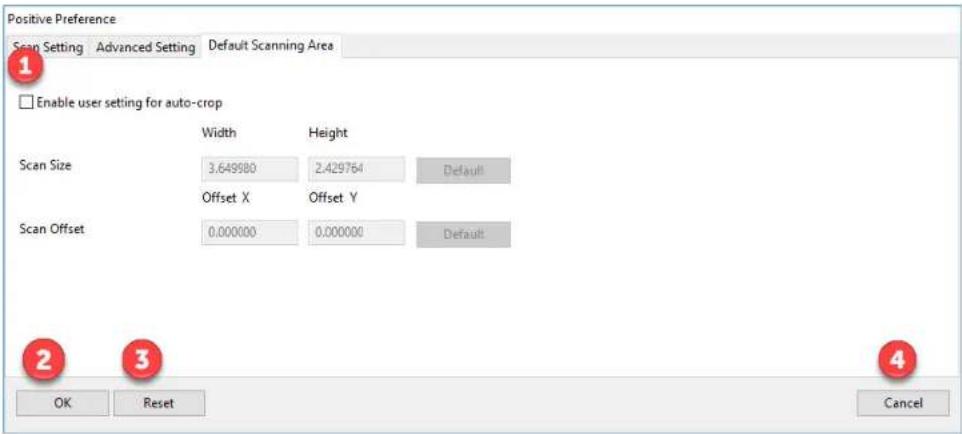
Default Scan Area
text_image
Positive Preference Scan Setting Advanced Setting Default Scanning Area Enable user setting for auto-crop Width Height Scan Size 3.649980 2.429764 Default Offset X Offset Y Scan Offset 0.000000 0.000000 Default OK Reset Cancel
Enable user setting for auto-crop: This allows you to configure a smaller than standard 35mm scan area so it applies the same to every scan, this can be useful when scanning 110 slides, it cannot be set outside the 36.5 x 24.5 maximum scanning area, so there is no ability to capture the film sprocket area outside these dimensions

OK: Returns you back to the main software interface and saves your settings

Reset: Restores ALL settings back to factory defaults

Cancel: Returns you back to the main software interface without saving your settings
Scan
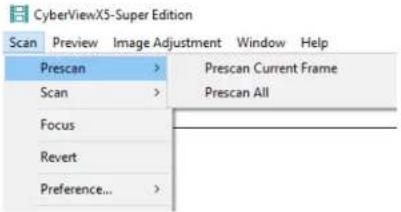
Prescan – Prescan Current or Prescan ALL (strip 3 -40 frames)
text_image
CyberViewX5-Super Edition Scan Preview Image Adjustment Window Help Prescan > Prescan Current Frame Scan > Prescan All Focus Revert Preference... >Prescanned images appear here, NOTE: Scanned images DO NOT appear in the CyberView window
text_image
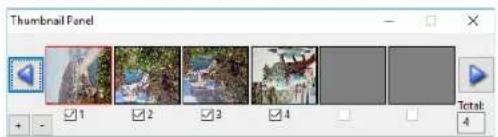
Thumbnail Panel 1 2 3 4 Total: 4Scan - Scan-
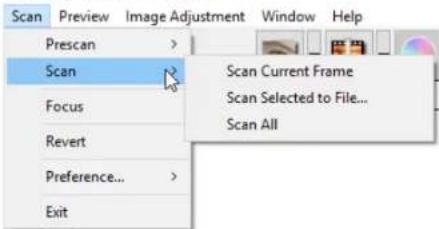
Scan Current Frame: Scan current image in the viewing window
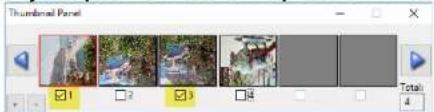
Scan selected: images chosen from strip
(if you performed an optional Prescan) Example 1 & 3 selected
text_image
Thumbnail Panel 1 2 3 4 Total 4Scan ALL: scan all frames in the strip 3-40 frames
CyberViewX5-Super Edition
text_image
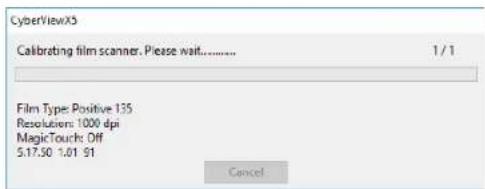
Scan Preview Image Adjustment Window Help Prescan > Scan Focus Revert Preference... Exit Scan Current Frame Scan Selected to File... Scan AllCalibrating
text_image
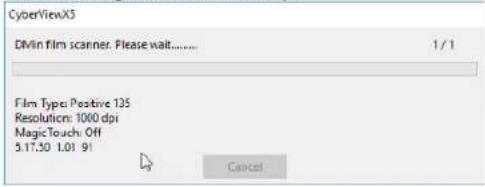
CyberView/X5 Calibrating film scanner. Please wait...... 1 / 1 Film Type: Positive 135 Resolution: 1000 dpi MagicTouch: Off 5.17.50 -1.01 91 CancelMeasuring the films density
text_image
CyberViewX5 DMin film scanner. Please wait...... 1 / 1 Film Type: Positive 135 Resolution: 1000 dpi MagicTouch: Off 5.17.50 1.01 9! CancelScanning
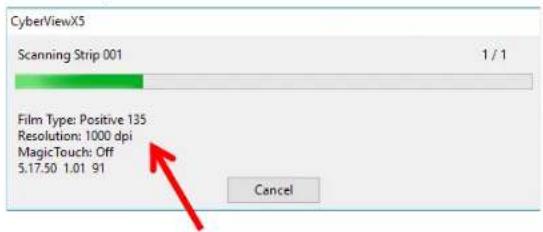
text_image
CyberViewX5 Scanning Strip 001 1 / 1 Film Type: Positive 135 Resolution: 1000 dpi MagicTouch: Off 5.17.50 1.01 91 CancelScanning stats:
Film Type selected
Scan dpi
Scratch removal
Software / Firmware / Hardware version
USER INTERFACE
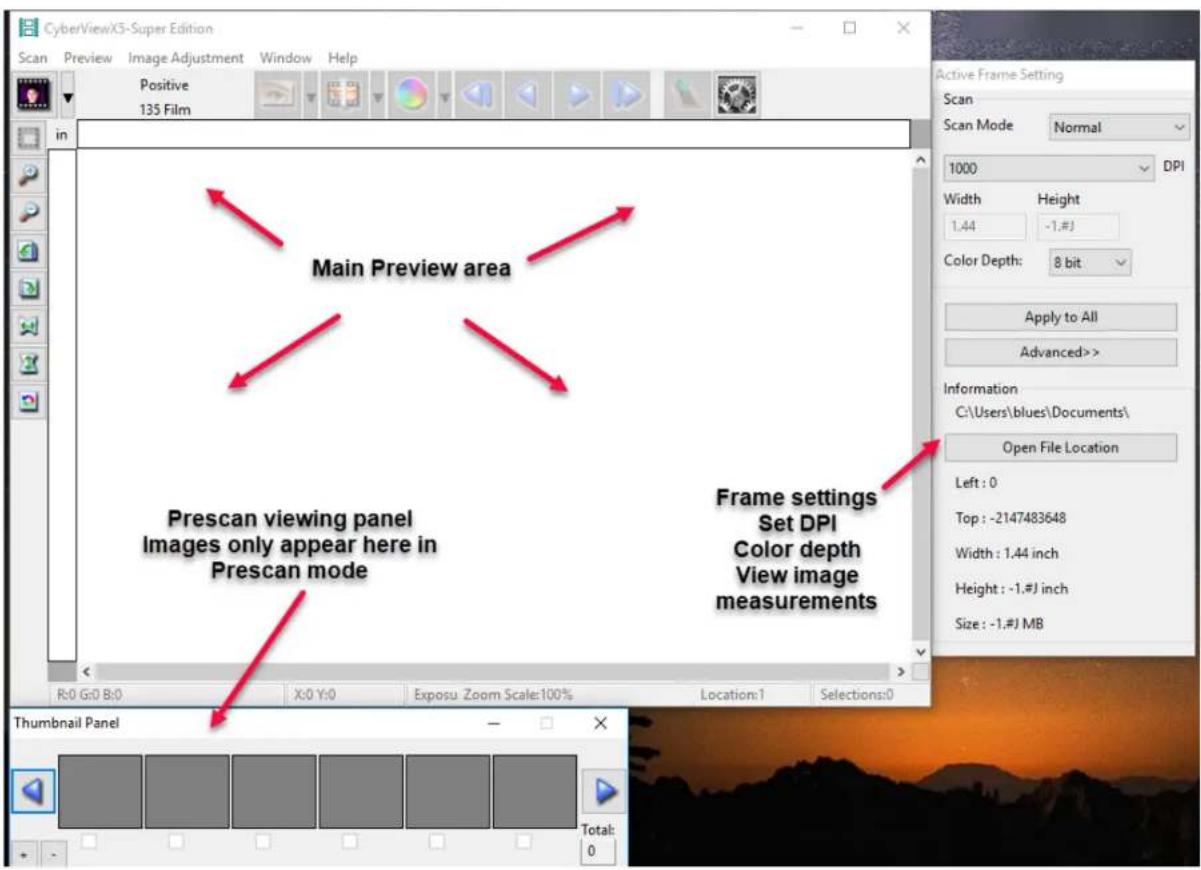
text_image
Main Preview area Prescan viewing panel Images only appear here in Prescan mode Frame settings Set DPI Color depth View image measurements R:0 G:0 B:0 X:0 Y:0 Exposu Zoom Scale:100% Location:1 Selections:0 Thumbnail Panel Total: 0 Active Frame Setting Scan Scan Mode Normal 1000 DPI Width Height 1.44 -1.#J Color Depth: 8 bit Apply to All Advanced>> Information C:\Users\blues\Documents\ Open File Location Left : 0 Top : -2147483648 Width : 1.44 inch Height : -1.#J inch Size : -1.#J MBThere are four major parts of the CyberView X 5 user interface:
I. Main Window Area [Fixed Windows]
II. Preview Window Area [Fixed Window]
III. Active Frame Setting Area [Floating Window]
I. Main Window Area [Fixed Windows]
Menu Commands - Scan
Prescan - Prescan Current Frame: Pre-scan the existing slide.
Scan - Scan Current Frame - Scan Selected to File - Scan All
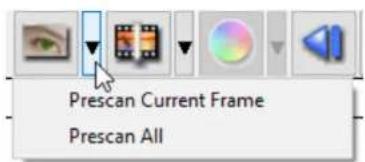
text_image
Prescan Current Frame Prescan All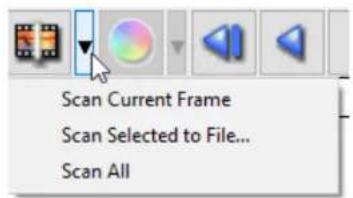
text_image
Scan Current Frame Scan Selected to File... Scan AllZoom, Rotate & Flip features.
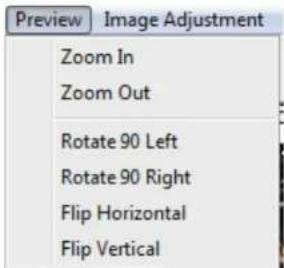
text_image
Preview Image Adjustment Zoom In Zoom Out Rotate 90 Left Rotate 90 Right Flip Horizontal Flip VerticalPreference - See Scan Setting (See Page 13)
Exit
Closes the CyberView X5 user interface.
Menu Commands - Image Adjustment
a. Image Adjustment
- Variations: Generates different views of image with options to make changes to highlights, mid-tones, etc.
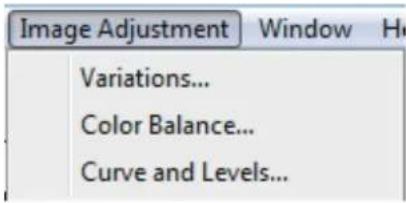
text_image
Image Adjustment Window Hi Variations... Color Balance... Curve and Levels...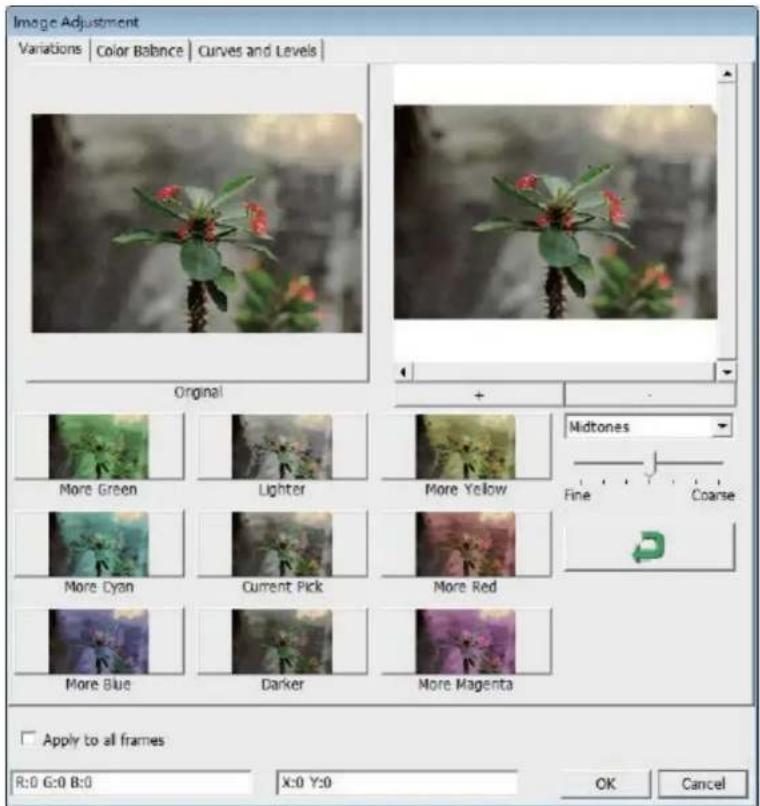
text_image
Image Adjustment Variations | Color Balance | Curves and Levels | Original More Green Lighter More Yellow Midtones Fine Coarse More Cyan Current Pick More Red More Blue Darker More Magenta Apply to all frames R:0 G:0 B:0 X:0 Y:0 OK Cancel2. Color Balance
To adjust the brightness, contrast, saturation, and color (CMY or RGB) of the image. Comparisons between before and after adjusted images are shown for reference
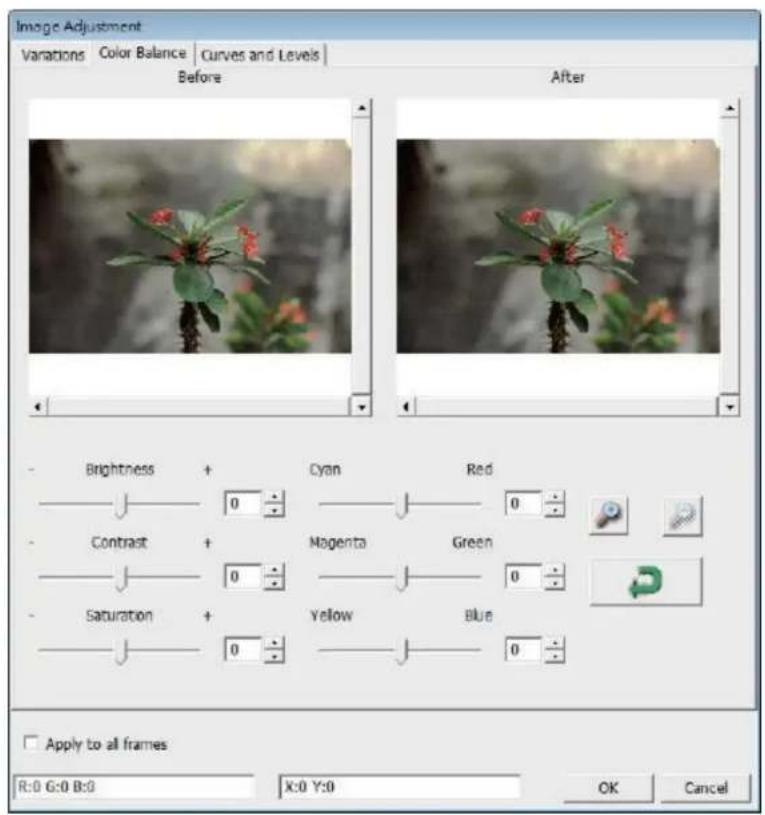
text_image
Image Adjustment Variations Color Balance Curves and Levels Before After Brightness + Cyan Red Contrast + Magenta Green Saturation + Yellow Blue Apply to all frames R:0 G:0 B:0 X:0 Y:0 OK CancelExample: If a previewed image appears too dark, use the "Brightness" slider in the "Color Balance" window to adjust the image by selecting the slider in the center and moving it to the right. The image's "After" view becomes lighter. Select "OK" to accept the changes which will be sent to the scanning hardware. This can also be used to adjust each of the functions in "Color Balance" by contrast, saturation and specific color ranges of cyan, magenta and yellow.
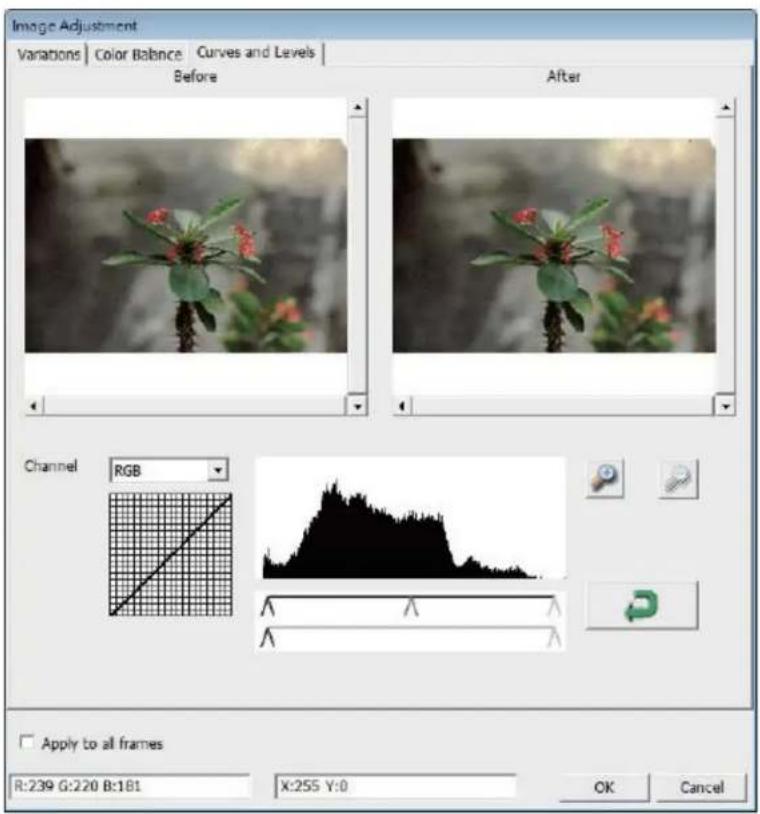
3. Curves and Levels
Adjust image settings by moving Curve and Levels settings. Comparison between before and after adjustment is displayed for reference.
text_image
Image Adjustment Variations | Color Balance | Curves and Levels | Before After Channel RGB Apply to all frames R:239 G:220 B:181 X:255 Y:0 OK CancelExample: When the previewed image appears to be too dark, adjustments with the Input slider in the Curves and Levels window can be made to correct the image. Selecting the Gray slider in the center and moving it to the left will result in changes in the "After" view resulting in a lighter image. Once the adjusted image is acceptable select "OK" to send changes to the scanning hardware. The same method can also be used to adjust each color channel independently, using the channel drop down menu "RGB = All colors" R = Red, G = Green, and B = Blue.
Menu Commands - Windows
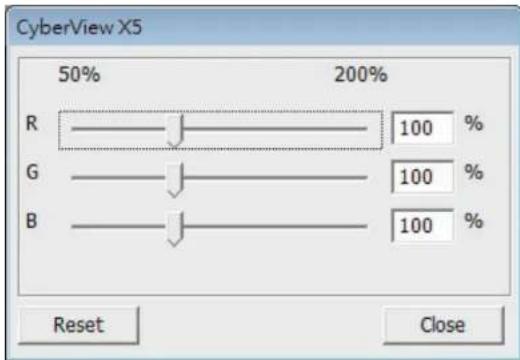
- Exposure Setting: To adjust the exposure time (R, G, B) press "Reset" to restore to the default setting. CyberView X5
text_image
CyberView X5 50% 200% R 100 % G 100 % B 100 % Reset CloseMenu Commands - Help
- Update: Firmware: Upgrade the firmware version, select the path where the file of firmware has been saved. (These files may be downloaded from our website)
- About: Displays system information (including operation system, CPU), product information (including product name, model name, hardware version, firmware version, software version, device information including interface and optical resolution).
Function Bar Diagram
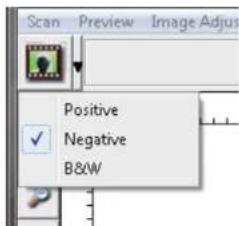
Please select your film type and brand from the toolbar: Negative Positive (also known as Slide) Black and White
text_image
Scan Preview Image Adjus Positive Negative B&WII. Preview Window Area [Fixed Windows]
![Pacific Image Prime Film XAs - Preview Window Area [Fixed Windows] - 1](/content/2026/05/812867/images/b7922c44917484e6dabe60cf2874821a0336b58a5abcdb44289620c88f7ad21e.jpg)
Prescan: Pre-scans the current film, or press drop down for more options.
![Pacific Image Prime Film XAs - Preview Window Area [Fixed Windows] - 2](/content/2026/05/812867/images/0b42603b678efff3bf02c728bf59b07b785ee64c56f2940191a5a17df126af1d.jpg)
Scan: Scan film, begins the scan process or press drop down button for more options
![Pacific Image Prime Film XAs - Preview Window Area [Fixed Windows] - 3](/content/2026/05/812867/images/2ebed1d5f5fd4c8ea3c1835ced3af47ecf5d7ca489f7eee4019c9eb645a880ce.jpg)
Image Adjustment: Accesses the image adjustment area after a Prescan has been performed. Press drop down button for more options.
![Pacific Image Prime Film XAs - Preview Window Area [Fixed Windows] - 4](/content/2026/05/812867/images/2edf3c0777d74b30614f02daa03b5a1893dda0c6391bebcd22eaf42d956dc423.jpg)
Left Return arrow: Ejects the film to the left
![Pacific Image Prime Film XAs - Preview Window Area [Fixed Windows] - 5](/content/2026/05/812867/images/2f689c0dfa21d4f87f80092c0faa183d5204967e0b91f3ee87f89f6466776302.jpg)
Left arrow: Reverses the film one frame to the left
![Pacific Image Prime Film XAs - Preview Window Area [Fixed Windows] - 6](/content/2026/05/812867/images/fa560ca5a84cbe730dc1f0b8d01b337d16170247d789de610f5b1f34cfbcab5c.jpg)
Right arrow: Advances the film one frame to the right
![Pacific Image Prime Film XAs - Preview Window Area [Fixed Windows] - 7](/content/2026/05/812867/images/b756f407fd07782d1967dcc7d1521bf8fa3b026ca9c44bbb624bbdb7a18c6540.jpg)
Right return arrow: Ejects the film to the right
![Pacific Image Prime Film XAs - Preview Window Area [Fixed Windows] - 8](/content/2026/05/812867/images/1227891a8116c19529d5230523eae27c89325ac8326954ea1d3f50f1054407de.jpg)
Go To:... You can select which frame to move to in the strip
![Pacific Image Prime Film XAs - Preview Window Area [Fixed Windows] - 9](/content/2026/05/812867/images/66396479d8218963e7031a5dcaa1cab0256cfd6b1a04bd028aa2de74ade2b8e4.jpg)
Preference : Accesses the scan settings area
CyberView X Left Tool bar diagram
These tools become available when an image is prescanned first

natural_image
Row of nine software icons including zoom, refresh, and navigation symbols (no text or labels)Crop Tool: Select scan area: more than one selection can be made at a time.
Zoom In: To magnify the image where the cursor is currently located. The image will be magnified with every click until the maximum multiple (1000%) is reached.
Zoom Out: To reduce the size of the viewed image click the Zoom Out cursor to the desired area, the image will reduce by half with every click until the lowest multiple (25%) is reached.
Rotate 90 Left: To rotate the image counter clockwise 90 degrees.
Rotate 90 Right: To rotate the image clockwise 90 degrees.
Flip Horizontal: To Flip the image 180 degrees horizontally.
Flip Vertical: To Flip the image 180 degrees vertically.
Revert: Discard all modifications and restores the image back to the original state in preview windows.
II. Preview Window Area [Fixed Windows] (Continued...)
Image Alignment Tool
![Pacific Image Prime Film XAs - Preview Window Area [Fixed Windows] (Continued...) - 1](/content/2026/05/812867/images/398c5c2f86eea1caa6b10e5ae45f8ee8e517b3df88e3b682b568d672f4dab2f3.jpg)
text_image
Scan Preview Image Adjustment Window Help Negative 135 Film 150 300 450Frame adjustment tool (TA BS) if your film is miss aligned after insertion you can use these TA BS on the ruler to adjust alignment by dragging the TA B to align with the edge of the film frame
![Pacific Image Prime Film XAs - Preview Window Area [Fixed Windows] (Continued...) - 2](/content/2026/05/812867/images/a123f0163da3b52c7eee397ddd5efd8047d41ee9c88d18817d68f7dcead81711.jpg)
You can select the ruler measurement unit "in"-"cm"-"px" by clicking the upper left corner.
Status Line
In the lower left hand corner, the color level (RGB: red, green, blue) and coordinates of the location [ex: I] are displayed. The zoom scale, the current frame location and how many areas selected to scan (if you see Selections 2 or higher indicates: Multiple scan areas on one slide [ex: II]).

text_image
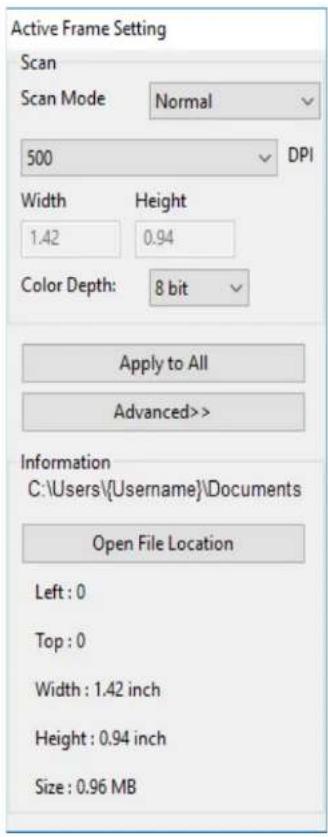
I. R/5 G/5 B:5 $1.291 Y:60 II. Exposure R:100% $Zoom Scale: 100% Location 0 Selections 1III. Scan Setting Area [Floating Windows] Normal mode: [ex: I] to input the basic parameter to scan (including scan resolution, film size, color depth).
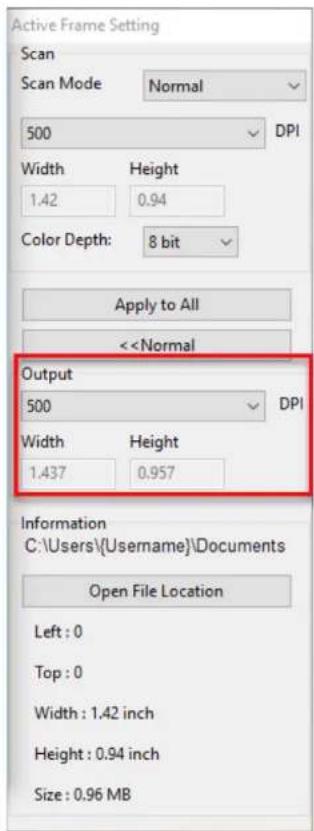
Advanced mode: [ex: II] Allows you to input the parameter of scan output, scan resolution
Apply to All : Applies settings made in this window only to all frames
text_image
Active Frame Setting Scan Scan Mode Normal 500 DPI Width Height 1.42 0.94 Color Depth: 8 bit Apply to All Advanced>> Information C:\Users\Username\Documents Open File Location Left : 0 Top : 0 Width : 1.42 inch Height : 0.94 inch Size : 0.96 MB