200DL - Camera Ikelite - Free user manual and instructions
Find the device manual for free 200DL Ikelite in PDF.


| Product Type | Underwater Camera Housing |
| Brand | Ikelite |
| Model | 200DL (Product # 71476) |
| Compatible Cameras | Sony a1, a7S III |
| Depth Rating | 200 feet (61 meters) |
| Construction Material | Corrosion-resistant plastic with hard anodized aluminum base plate |
| Lens Port Compatibility | DL lens port system (sold separately) |
| Controls | Shutter, zoom/focus, front/rear dials, AEL, AF-ON, C1-C4, menu, joystick, playback, ISO, DISP, power, mode, movie, exposure compensation, C2 |
| Accessory Port | M16 threaded accessory port |
| Top Accessory Mount | 1/4-20 threaded mount for GoPro, focus light, etc. |
| Bulkhead Connection | For sync cord or TTL converter (waterproof bulkhead cap included) |
| Vacuum Valve | For leak check (pump sold separately) |
| Lid Snaps | 6 lid snaps with locks |
| Base with Quick Release Handle | Hard anodized aluminum base with 1/4-20 tripod mount and additional mounting locations (handle included) |
| Trigger Extensions | Optional for right-hand handle (sold separately) |
| Included Accessories | Camera mount for a1 (#95419) and a7S III (#95415 installed), main O-ring #0132.59, port O-ring #0132.45, zoom gear retainer #0072.42, port hole cover #0200.92, bulkhead cap #9104.7, base with left-hand handle, tool for retainer, hex key, silicone lubricant |
| Maintenance | Rinse with fresh water after use, lubricate controls with Ikelite lubricant, service annually |
| Warranty | 2 years limited warranty against manufacturing defects |
| Country of Manufacture | USA (Indianapolis) |
Frequently Asked Questions - 200DL Ikelite
User questions about 200DL Ikelite
0 question about this device. Answer the ones you know or ask your own.
Ask a new question about this device
Download the instructions for your Camera in PDF format for free! Find your manual 200DL - Ikelite and take your electronic device back in hand. On this page are published all the documents necessary for the use of your device. 200DL by Ikelite.
USER MANUAL 200DL Ikelite
200DL Underwater Housing for Sony Alpha a1, a7S III
Product # 71476
Product Registration
Please register your product within 15 days of purchase. Our product registration database is the quickest way for us to contact you in the event of a product update.
To register, send a photo of the above registration label to us via ikelite@ikelite.com along with your name, address, and phone number.
Introduction
Thank you for your purchase of Ikelite products.
Our primary focus is to provide quality, professional grade products for use in and under water. Our products are designed, manufactured, and distributed from our sole facility in Indianapolis, USA where we started in 1962.
We are available if you have any questions or want photo advice. Send us an email 24 hours a day to ikelite@ikelite.com. We strive to reply within 1 business day.
An electronic version of this instruction manual is available for download via the product page on our website:
https://www.ikelite.com
In the Box
- Housing
• Camera Mount for Sony a1 # 95419
• Camera Mount for Sony a7S III # 95415 (installed)
• Main O-ring # 0132.59 (installed)
• Port O-ring # 0132.45 (installed) - Zoom Gear Retainer # 0072.42 (installed)
• Port Hole Cover # 0200.92 (installed)
• Waterproof Bulkhead Cap # 9104.7 (installed) - Base with Left-Hand Quick Release Handle (installed)
- Hardware Set for Base with Handle # 9523.23 (installed)
• Tool for Zoom Gear Retainer # 0945.06
• .050" Hex Key # 0945.11
• Silicone Lubricant 1cc tube
Important Notices
»This housing requires a compatible DL lens port for waterproof operation (sold separately). The housing is not waterproof without a DL lens port attached.
»A bulkhead cap or sync cord must be attached to the housing bulkhead for waterproof operation. Never submerge the housing in water without either a sync cord or bulkhead cap attached.
» Do not pull the shutter trigger without a camera installed. You may accidentally detach or damage the control spring.
»Never leave a housing in a rinse tank, even if it is the only system in the tank. Accidental damage may occur when the user walks away from a housing while it is in the rinse tank.
»Do not use alcohol, cleaning agents, spray lubricants, Rain-X, or other solvents on the housing or lens port. Use of an incompatible chemical compound can damage the plastic and o-rings, and may result in leaking.
»If you will be using the system in strong surf it is recommended to draw a vacuum on the housing using the optional vacuum pump (sold separately).
Contents
Product Registration 1
Introduction 2
In the Box 2
Important Notices 3
Getting to Know Your Housing .6.
Base with Quick Release Handle...9....
Accessory Port..9....
Top Accessory Mount...10....
Vacuum Valve .10
Trigger Extensions...10
Setting Up Your Camera 11....
Pre-Installation Checklist .11
Camera Settings...11
Exposure Settings....1
Back Button Focus....12
Power Save....12
Setting Up Your Housing 13
Removing the Port Hole Cover....13
Installing a Zoom or Focus Gear....14....
Opening the Housing....15
Installing the Camera....16
Attaching the Hotshoe....17
Closing the Housing....17
Turning the Camera On/Off....18
Attaching a Lens Port 19
Installing the Lens and Port 20
Setting Up An External Strobe 22
About Sync Cords....27
Attaching a Sync Cord or TTL Converter....23
Getting in the Water.24
Final Check 24
Entering the Water...25......
Shooting Underwater...25
Learning about Underwater Photography .26
Maintaining Your Housing 26
Post-Dive..26
Lens Port 27
Storage 27
Servicing Recommendations...28
Lubricating Controls. 28
Lubricating Push Buttons 29
Lubricating Control Shafts 29
Troubleshooting....31
Spare Parts....33
Limited Warranty....34
Service and Repairs....34
Contact Us 35
Getting to Know Your Housing
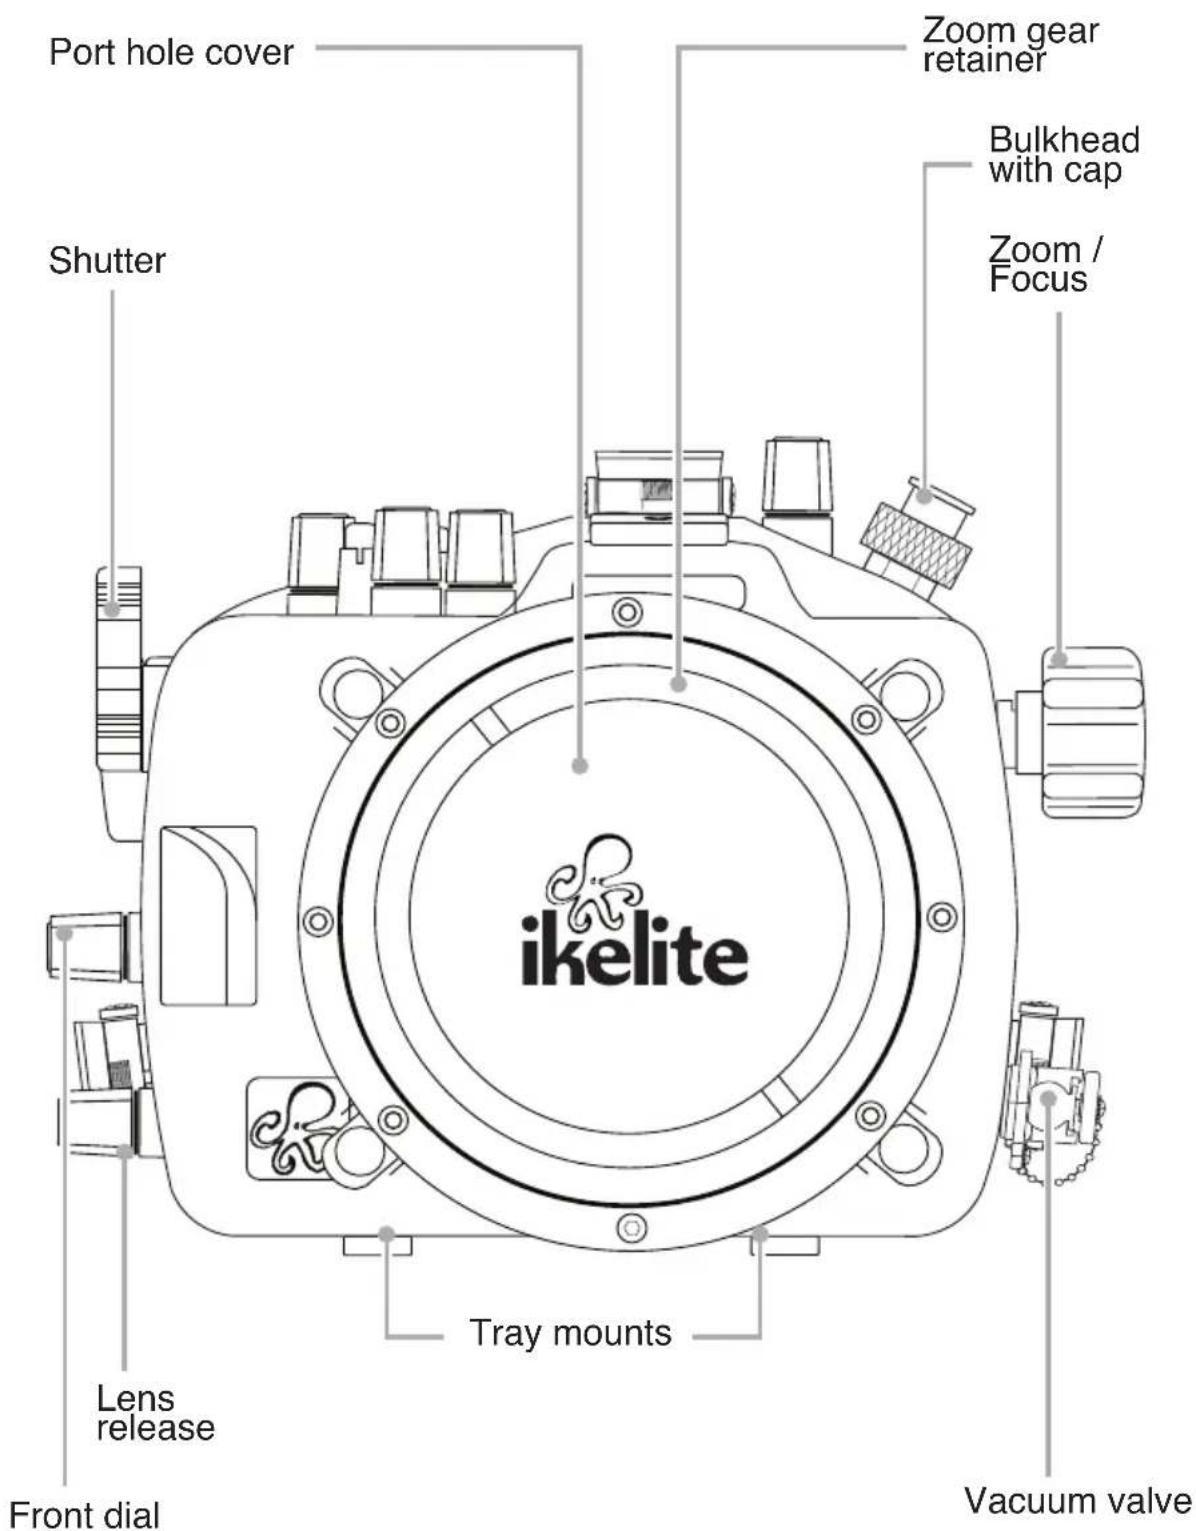
text_image
Port hole cover Shutter Lens release Front dial Tray mounts Zoom gear retainer Bulkhead with cap Zoom / Focus Vacuum valve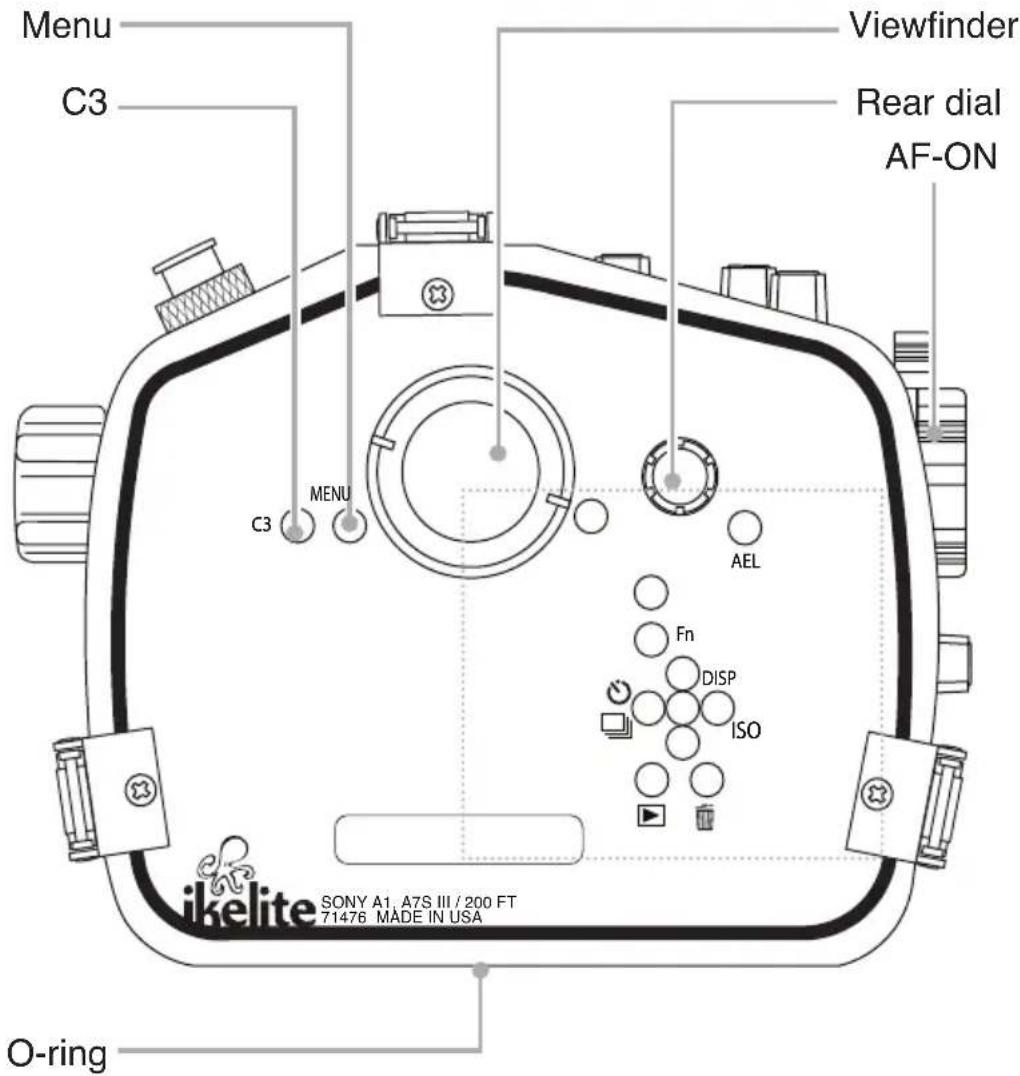
text_image
Menu C3 Viewfinder Rear dial AF-ON C3 MENU AEL Fn DISP ISO ikelite SONY A1, A7S III / 200 FT 71476 MADE IN USA O-ring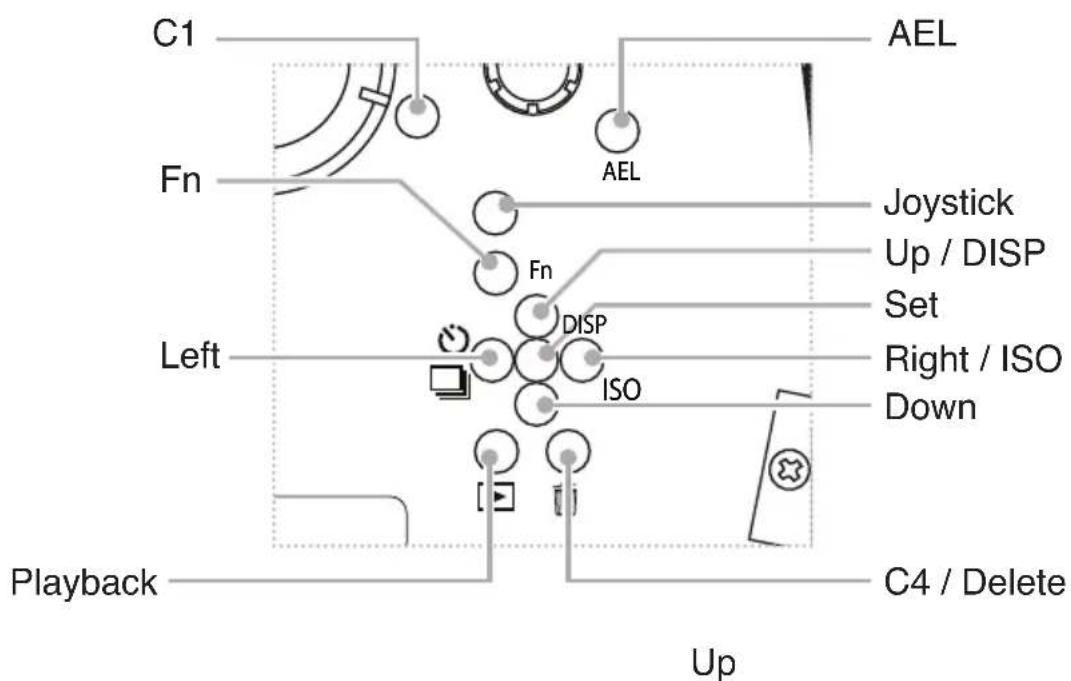
text_image
C1 Fn Left Playback AEL AEL Joystick Up / DISP Set Right / ISO Down DISP ISO C4 / Delete Up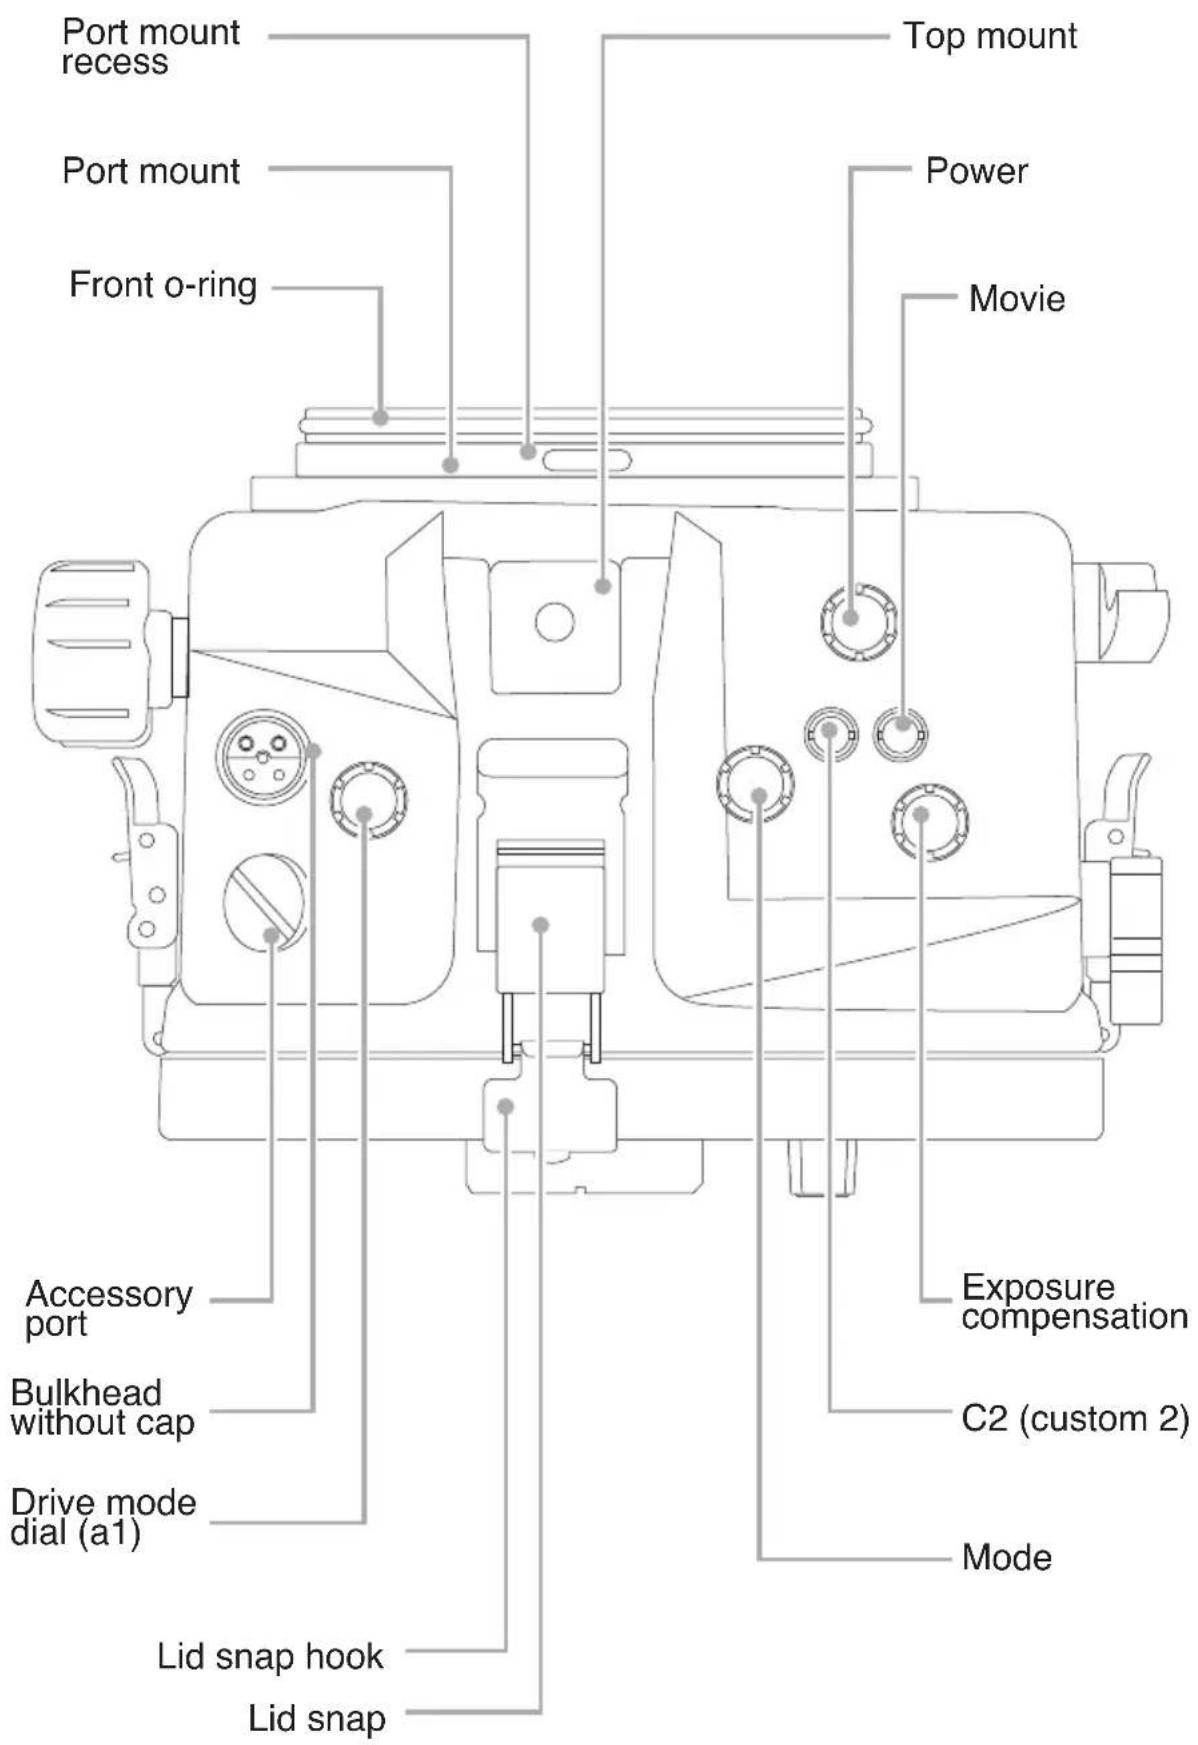
text_image
Port mount recess Port mount Front o-ring Accessory port Bulkhead without cap Drive mode dial (a1) Lid snap hook Lid snap Top mount Power Movie Exposure compensation C2 (custom 2) ModeBase with Quick Release Handle
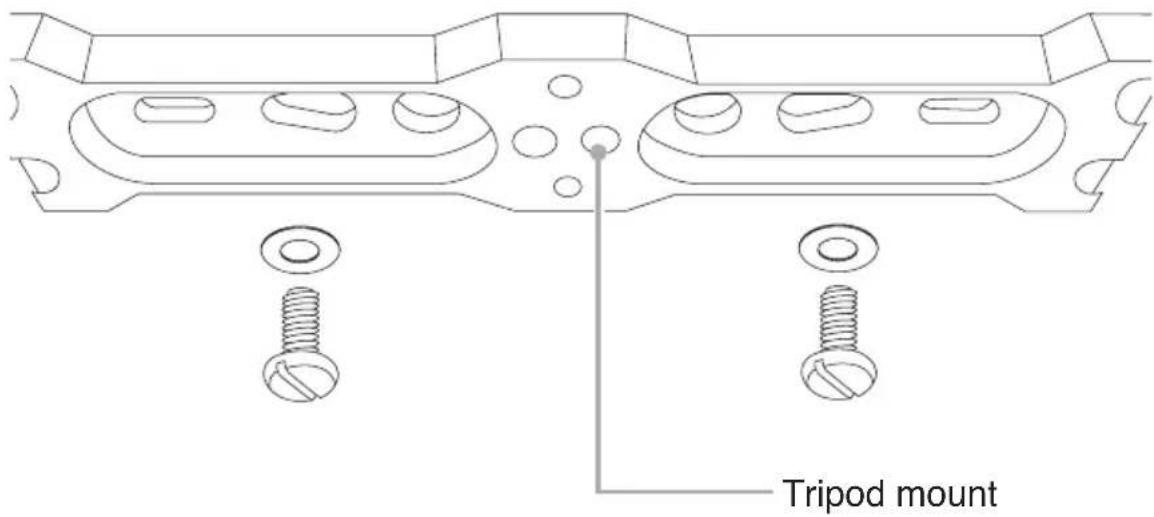
The hard anodized aluminum base plate attaches to your housing with the two 1/4" nylon washers and 1/4-20 x 3/8" screws.
text_image
Tripod mountIt is recommended to remove your base with quick release handle and thoroughly rinse the tray, housing, and hardware periodically.
A central 1/4-20 threaded hole allows attachment of the base plate to a standard tripod.
The base features additional mounting locations for attachment to a variety of Ikelite housings (hardware not included).
Accessory Port
This housing features one spare accessory port which may be used for the attachment of optional accessories. This port accepts fittings designed for an M16 threaded hole. Visit ikelite.com for an updated list of compatible products.
»Do not remove or loosen the accessory port plug unless you are installing a compatible accessory.
Top Accessory Mount
The housing features a 1/4-20 threaded top mount. Ball and flex type mounts are available for the attachment of a GoPro camera, focus light, or other lightweight accessories.
Vacuum Valve
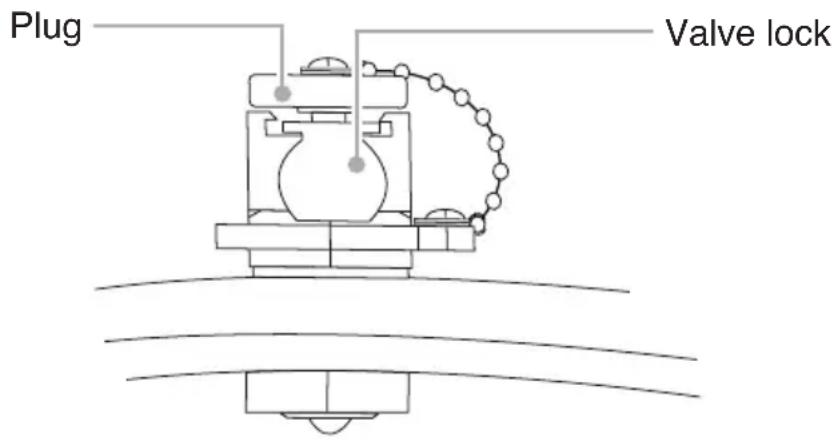
Your housing features a valve to check for leaks before entering the water. Use of the vacuum valve requires a pump, sold separately.
text_image
Plug Valve lock»DO NOT remove vacuum valve plug unless you are plugging in a vacuum pump.
»DO NOT submerge the housing without the plug installed. The housing will not be waterproof without the plug installed.
Trigger Extensions
The shutter and AF/MF/AEL levers may be extended to be closer to your hands when using the optional Right-Hand Quick Release Handle # 4077.02. This requires the Trigger Extension # 4077.95 (one per control).
Trigger extensions and right-hand quick release handle are sold separately.
Setting Up Your Camera
Pre-Installation Checklist
- Insert a fully charged camera battery.
- Insert a properly formatted memory card.
- Remove lens cap and any attached lanyard or neck strap.
Camera Settings
- Set Eye-Start AF to "Off."
- Set FINDER/MONITOR to "Monitor."
- Set Touch Operation to "Off."
- Set Release button to use dial to “Yes”. This allows adjustments that are normally made by holding a button and rotating a command dial to be made instead by rotating the command dial after the button is released. Refer to your camera’s instruction manual for more information.
- Set Flash mode to "Fill flash" when using an external strobe. "Rear-curtain sync" may be used with compatible TTL converters.
- Set Red Eye Reduction to "Off" when using an external strobe.
- Set AF Illuminator to "Off" when using an external strobe.
- Set Silent Shooting Mode to "Off" when using an external strobe.
Exposure Settings
Refer to the Cheat Sheets in the Photo School section of our website for recommendations on exposure settings for a wide variety of shooting situations:
https://www.ikelite.com/blogs/cheat-sheets
Back Button Focus
Back button focus takes some adjustment to get used to but can be very valuable in a variety of shooting scenarios.
Use the camera's custom settings menu to set Pre-AF to "Off." Set AF w/Shutter to "Off." In the custom key settings, set AEL button to "AF-ON," which initiates autofocus. Set AF/MF button to "AF/MF Cntrl Toggle."
The AEL button is conveniently accessed by a thumb lever on the side of the housing. Instead of half-pressing the shutter to obtain focus and lock focus, press AEL.
For super macro photography, you can use this technique instead of a manual focus gear. Press AEL to lock focus at the minimum focusing distance of your lens. Then move slightly in or out until the subject is in focus.
Other focus functions like Focus Mode and Focus Area may be assigned to the custom buttons on the camera for easy access.
Power Save
The camera's power save function allows you to extend battery life significantly and yet always be ready for the next shot.
Instead of turning the camera off and on to conserve energy, the camera will automatically sleep when not active. To wake the camera, simply press the shutter button to instantly return to full power.
Use the camera's setup menu to set Pwr Save Start Time to 1-5 minutes depending on your average period of time between active shooting intervals.
Remote Control and Cntrl w/Smartphone settings must be turned off for this to work. You also have to make sure that you're not in one of the camera's menus, or it will prevent the camera from going to sleep.
Setting Up Your Housing
Removing the Port Hole Cover
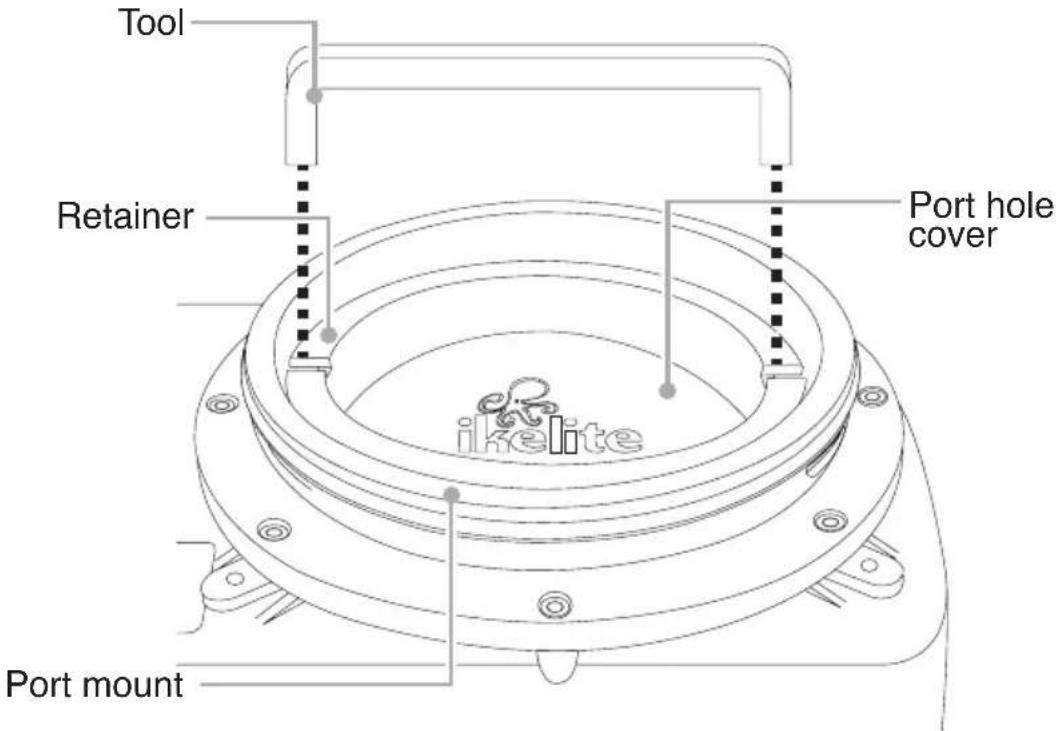
- Align the zoom gear retainer tool with the notches in the zoom gear retainer.
text_image
Tool Retainer Port hole cover ikelite Port mount-
Rotate the removal tool counter-clockwise until the retainer is free from the lens port mount.
-
Remove the port hole cover from the housing.
Installing a Zoom or Focus Gear
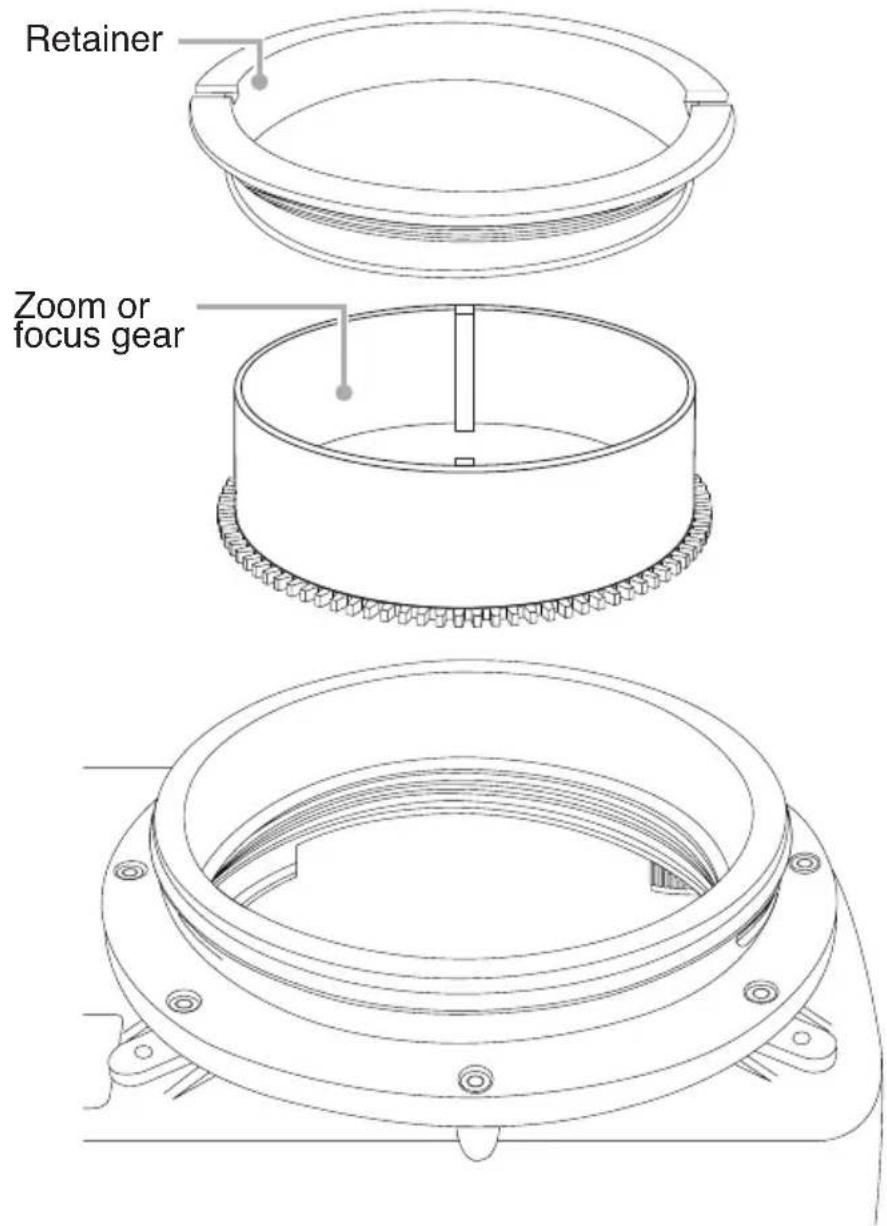
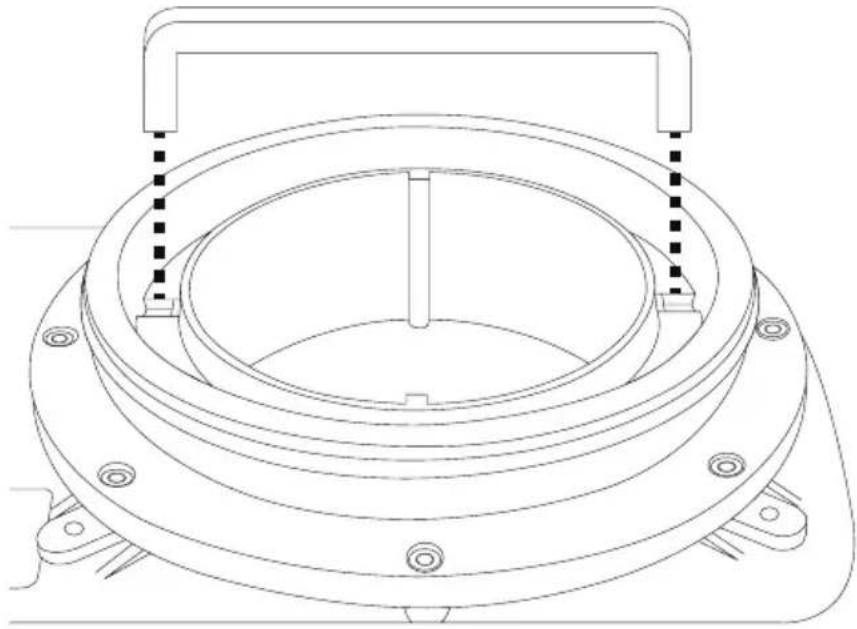
- Place the zoom or focus gear (sold separately) into the lens port mount opening with the gear teeth toward the inside of the housing.
text_image
Retainer Zoom or focus gear-
Place the gear retainer into the opening around the gear.
-
Tighten the retainer by turning clockwise with the tool until snug. Do not overtighten.
natural_image
Technical line drawing of a mechanical component with mounting flanges and central shaft (no text or symbols)Opening the Housing
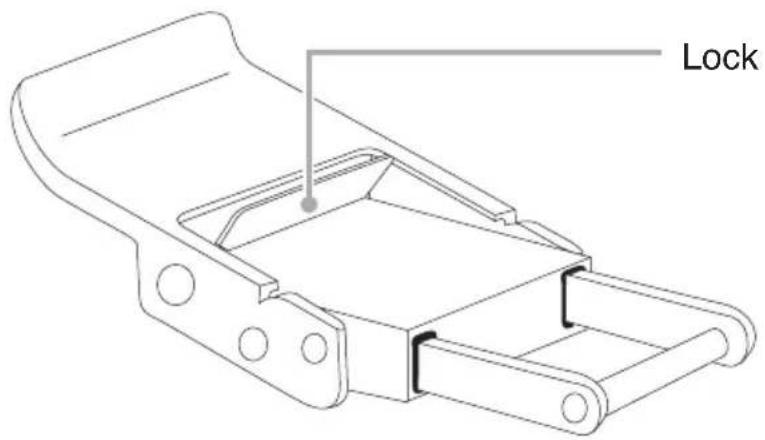
- Push the lid snap lock forward and lift the curved end away from the housing.
text_image
Lock-
Lid snaps are designed to provide enough force to compress the o-ring for a proper seal. Keep firm pressure against the lid snap while lifting it away.
-
Repeat with remaining lid snaps.
-
Remove the housing back.
Installing the Camera
- Remove any lanyard or neck strap which may be attached to the camera.
- Check to see whether the camera's lens will fit through the port opening of the housing. If not, the lens will need to be removed from the camera body and re-attached after the camera body is installed in the housing.
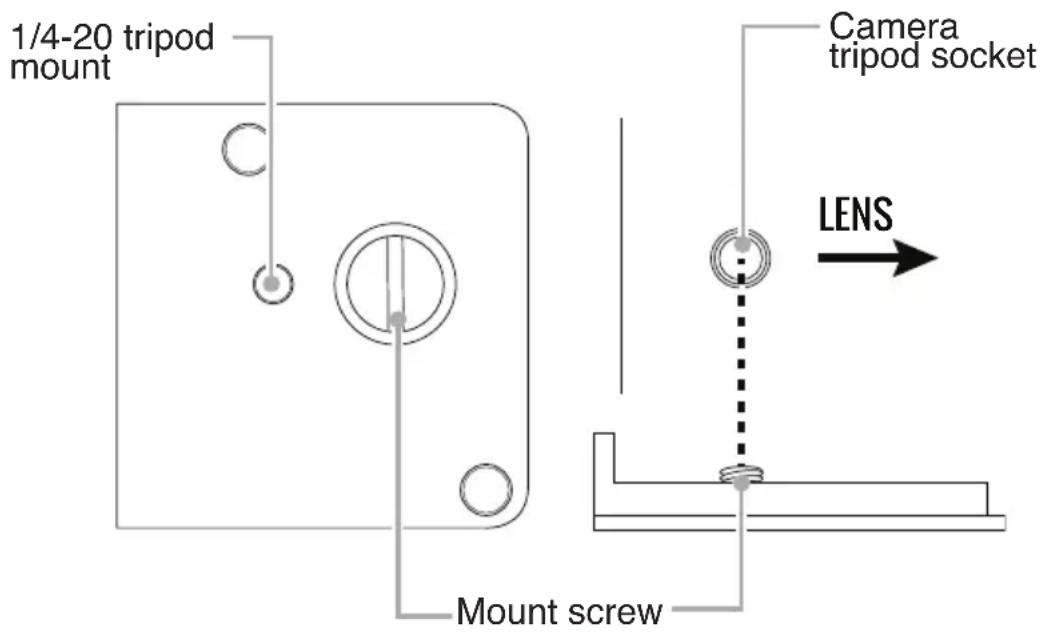
- Remove the camera mount from the housing. If using the Sony a1, use Camera Mount # 95419 (packaged separately). If using the Sony a7S III, use Camera Mount # 95415. Store the additional camera mount in a clean, dry place.
- Line the mount screw up with the camera's tripod socket. Use a flat screwdriver to tighten the mount plate to the camera.
text_image
1/4-20 tripod mount Camera tripod socket LENS Mount screw- Pull out on the housing control knobs to move the controls out of the way.
-
Insert the mount plate into the slot on the inside bottom of the housing. Push the camera all of the way forward until it stops.
-
Push housing control knobs in and check orientation with the camera.
»The camera may be attached to a tripod using the 1/4-20 threaded mounting hole on the bottom of the mount plate.
Attaching the Hotshoe
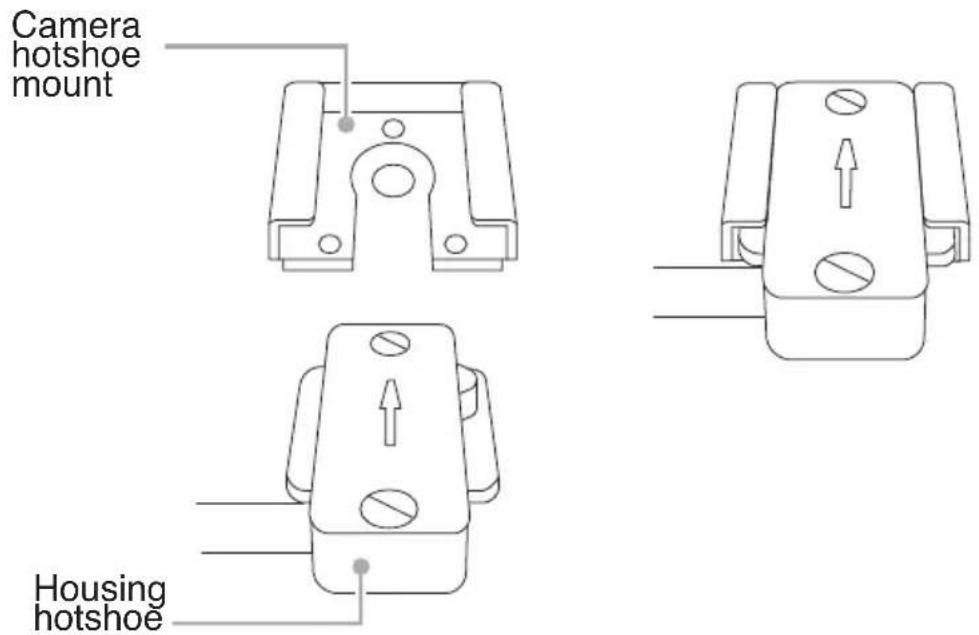
- Orient the hotshoe with the arrow on top pointing towards the front of the camera.
text_image
Camera hotshoe mount Housing hotshoe- Slide the housing hotshoe into camera's hotshoe mount until it stops.
»The hotshoe must be all the way forward in the camera mount for proper flash operation.
Closing the Housing
-
Make sure the o-ring is clean and in its proper location on the back of the housing. The rear housing o-ring does not require lubricant to make a seal.
-
Place the back onto the housing front.
-
Make sure no controls or wires are interfering with the o-ring or the back of the housing.
- Place each lid snap into the corresponding hook on the housing back.
- Push the lid snaps towards the housing until they are flat against the housing and the lock has engaged. Close opposing lid snaps at the same time.
- Check the o-ring seal. The o-ring should form a uniform, solid line visible through the back of the housing.
- Check control functions.
- Attach a lens to the camera body. If using a zoom gear with clamp, refer to the zoom gear instructions for information on interfacing the clamp with the zoom gear.
Turning the Camera On/Off
-
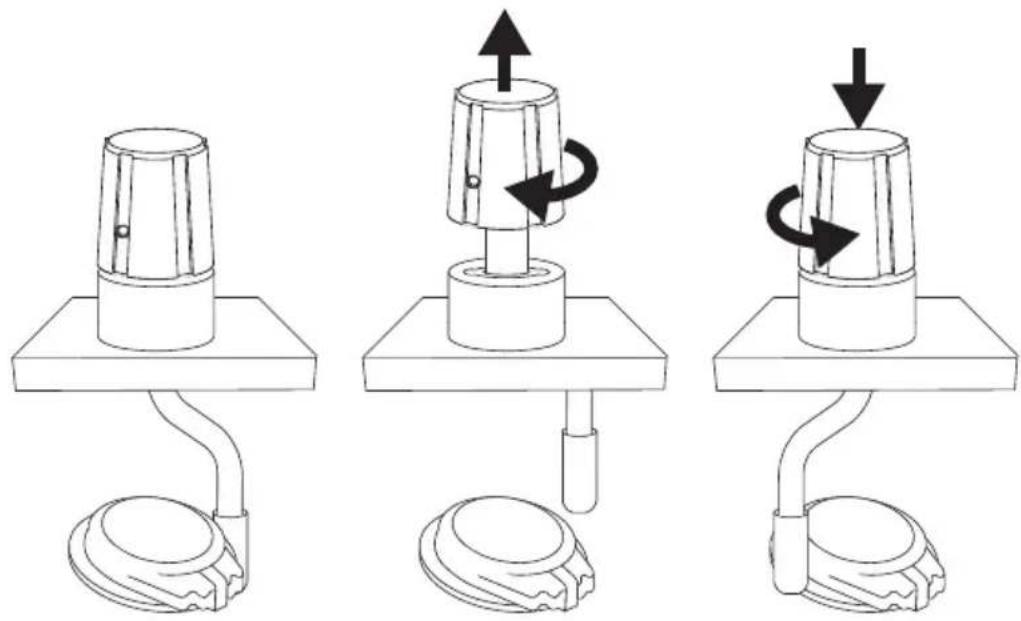
The housing on/off lever acts like your finger pressing against the side of the camera's control. Rotate the knob to operate the control. The control will only operate in one direction depending on which side of the camera's control the lever is sitting on.
-
To reverse directions, lift and rotate the knob to move the lever to the other side of the control.
natural_image
Three technical diagrams showing mechanical components with arrows indicating rotation or movement (no text or symbols)»If the control knob stops and the desired effect hasn't occurred, repeat step 2 to reverse directions.
Attaching a Lens Port
Refer to the appropriate lens port chart to find compatible lens ports for a wide variety of popular wide angle, zoom, and macro lenses.
Choose a dome port for wide angle and zoom lenses. Larger diameter domes are better for split shots (half-in, half-out of the water) and provide sharper images.
Choose a flat port for macro lenses. Flat ports magnify the subject underwater. Flat ports are not recommended for wide angle or zoom lenses due to their limited field of view and risk of vignetting (dark shadows around the edges of the image).
»This housing requires a compatible DL lens port for waterproof operation (sold separately). The housing is not waterproof without a DL lens port attached.
Installing the Lens and Port
- Attach the lens to the camera. If using a zoom/focus gear set that requires a clamp, make sure the clamp slots are aligned with the gear tabs. Test the function before attaching the port.
- Check that the port sealing surface is clean and free of debris.
-
Apply a very thin, even layer of lubricant to the exposed portion of the front o-ring and to the lens port sealing surface. Avoid dry spots or uneven build-up of lubricant.
-
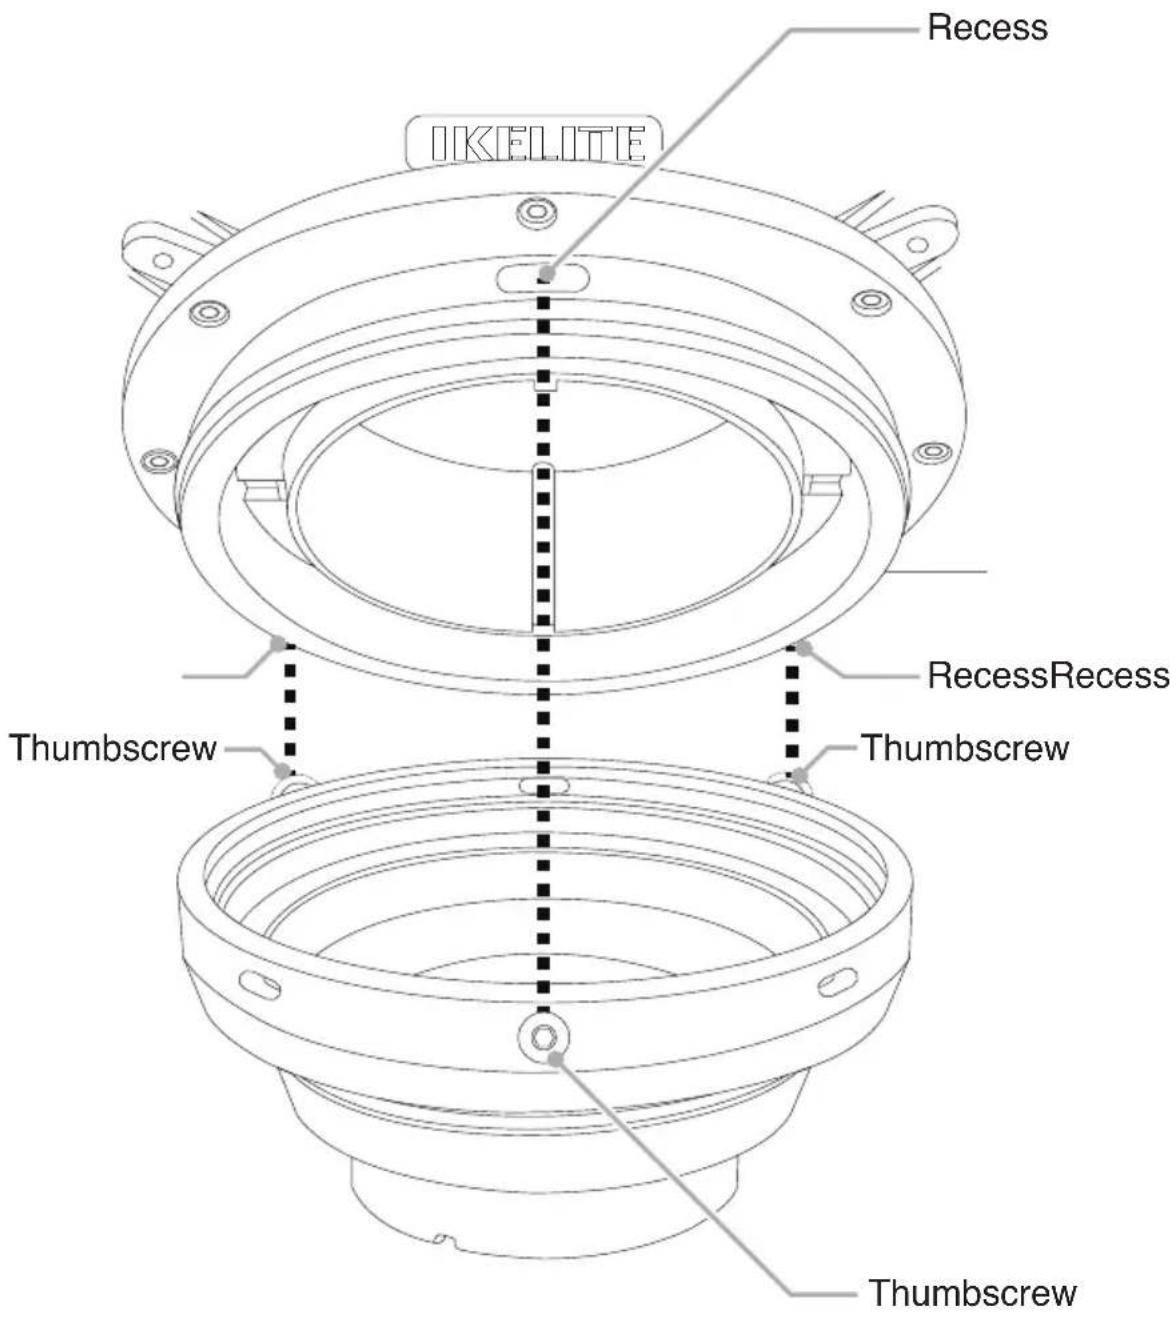
Align the port thumbscrews with the recesses in the housing's port mount.
text_image
IKELITE Recess RecessRecess Thumbscrew Thumbscrew Thumbscrew-
Press the port firmly towards the housing until the base of the port is flush with the housing's port mount. If there is resistance, remove the port and re-check that the thumbscrews are loosened and the o-ring is properly lubricated.
-
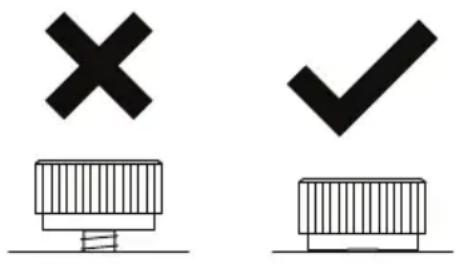
Tighten all three thumbscrews while holding the port firmly towards the housing. The thumbscrews should thread in completely until the head touches the port or extension body. If the screws are difficult to turn and/or they bottom out before their heads are flush, it is an indication that the port is not properly aligned.
text_image
Diagram showing two symbols: a cross above a rectangular block and a checkmark above a rectangular block, likely indicating selection or confirmation.»Proper alignment is critical to waterproof operation. Check that your lens port is oriented correctly and fully seated before entering the water.
»Zoom/focus gear parts and installation vary depending on the lens you are using. Refer to the instructions included with the zoom or focus gear for detailed installation information.
Setting Up An External Strobe
We recommend attaching an external strobe for the optimal color and clarity in a wide variety of photographic situations, including daylight photography.
This housing provides a direct electrical connection to the camera's external flash hotshoe via a manual flash hotshoe. An external strobe may be triggered via electrical sync cord.
About Sync Cords
Connecting a strobe via electrical sync cord provides faster strobe recycle times as compared to a fiber optic connection, and prolongs camera battery life.
»To connect two strobes to the camera, you must use a dual sync cord.
»A second slave strobe may be triggered optically off of a primary strobe connected by sync cord.
Attaching a Sync Cord or TTL Converter
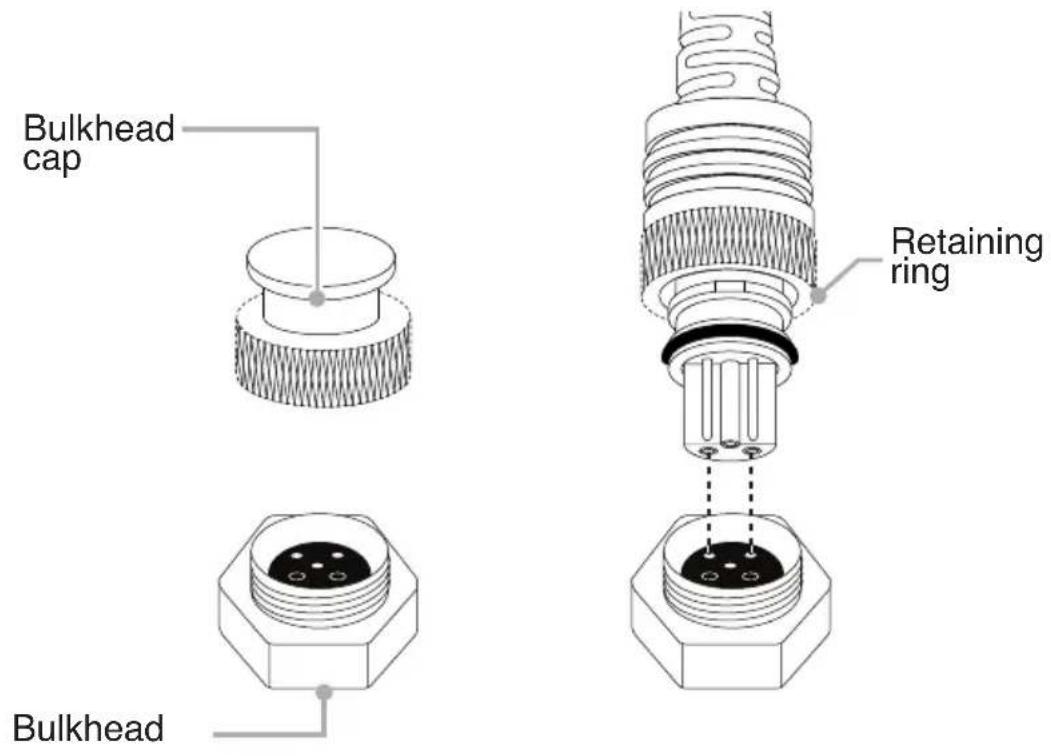
- Remove connector protectors and bulkhead caps from each connection.
- Apply a very thin, even layer of lubricant on all threads, sealing surfaces, and the exposed portion of the plug o-ring. Do not allow lubricant to get into the pins and receptacles of the plug or bulkheads.
text_image
Bulkhead cap Retaining ring Bulkhead- Align plug and insert into the housing bulkhead. Each male pin mates with a female receptacle. Failing to line up the contacts properly before tightening may result in damage to the converter plug and/or housing bulkhead.
-
Hand-tighten the retaining ring.
-
Attach the other end of the sync cord to the bulkhead on your strobe.
- Turn on the strobe(s).
- Turn on the camera. Take a test photo to ensure that your strobe(s) are functioning properly.
»A bulkhead cap or sync cord must be attached to the housing for waterproof operation. Never submerge the housing without either a sync cord or waterproof bulkhead cap attached.
Getting in the Water
Final Check
- Re-check the rear o-ring seal. The seal should form an even, solid line visible through the back of the housing.
- Turn on the camera and check all control functions.
- Make sure that the camera can obtain focus and take a photo. If using a +4 diopter, your camera will only be able to obtain focus on subjects at a distance of approximately 12" (0.3m) on the surface.
- Check camera battery level and available storage space on your memory card.
- We strongly recommend drawing a vacuum on the housing to check for leaks using the optional vacuum pump (sold separately).
- Submerge the housing in a fresh water tank dedicated to underwater photography equipment. Visually confirm that there are no signs of water intrusion. One sign of water intrusion is a steady stream of bubbles coming from one of the housing's seals.
Entering the Water
- Before entering the water, turn the camera on and operate each of the housing controls to get a feel for using the camera in the housing.
- We recommend entering the water without your housing to ensure you are comfortable and your life-saving equipment is in working order. Once you are stable, have someone pass your camera housing to you.
- Submerge the housing at the surface of the water and visually confirm that there are no signs of water intrusion. Look for water droplets or fogging inside of the housing, or a steady stream of bubbles coming from one of the housing seals.
- Use your hand to gently flush away any small bubbles that may be on the face of the lens port. Bubbles will produce soft focus spots in your photo or video.
» If water appears to be entering the housing, point the lens port downward and return the housing to the surface immediately. Please observe all necessary safety precautions. NEVER ascend faster than accepted safety limits.
Shooting Underwater
- Get as close as possible to your subject. For the best results, only photograph subjects that are less than 6' (1.8m) away.
- Be careful not to stir up sand or silt.
• Photograph subjects straight on or at a slight upward angle. - If you err in exposure, it is better to have the image slightly underexposed rather than overexposed. An overexposed image is missing color information which cannot be adjusted in a photo processing program. A slightly underexposed image has color information that can be adjusted.
»It is important to respect all living creatures underwater, including people, marine life, and coral. Get as close as you can to your subjects when taking a photograph, but never touch or disturb the marine life.
Learning about Underwater Photography
Visit the Photo School section of ikelite.com for a wide range of information on shooting underwater including:
• Product Tutorials and Videos
- Cheat Sheets with exposure setting recommendations for a wide variety of situations
- Advanced Techniques with in-depth articles on different shooting techniques
• Frequently Asked Questions
• Photo Galleries showing examples of real results underwater
• Feature Articles and more!
Maintaining Your Housing
Post-Dive
- Rinse the housing in fresh water. Rotate the housing controls and press each button several times while submerged in fresh water to flush out any salt or debris to ensure smooth operation on future dives.
- NEVER leave your housing in a fresh water rinse tank, even if it is the only system in the tank. Collisions with another person's gear can cause scratches or damage to your equipment. Accidental damage occurs most often in the rinse tank.
-
Rinse off any residual residue from the rinse tank with clean, running fresh water.
-
Stow the housing in a shaded place where it is protected from impact and overheating. If no shade is available, cover the housing with a light colored towel or cloth.
- Check the memory card capacity and battery life of your camera and strobe(s). Recharge as necessary.
- Always re-check o-ring seals after opening the housing or removing the lens port.
- Detach the cord plug or bulkhead cap and lubricate the threads, o-ring(s) and sealing surface(s) every 2-3 days during continuous use.
Lens Port
Treat the surface of the lens port like a camera lens. After use, rinse and gently dry the outside lens port to avoid water spotting. Use only a microfiber lens cleaning cloth to avoid scratches. To clean, use a mild soap solution.
»Do not rinse the inside of the lens port.
»Do not use alcohol, cleaning agents, spray lubricants, Rain-X, or other solvents on the housing or lens port. Use of an incompatible chemical compound can damage the plastic and o-rings, and may result in leaking.
Storage
- Clean the housing and controls thoroughly prior to storage.
- Remove the rear and front o-rings. Place in a small re-sealable plastic bag inside of the housing.
- Leave the lid snaps open to release pressure on the lid snap springs.
-
Disassemble and thoroughly rinse the base with quick release handle(s) and hardware prior to storage.
-
Store the housing in a cool, dry place away from direct sunlight and chemicals.
- Before using the housing, check the tightness of the set screw in each control knob. Check each control gland to make sure they are snug. There is a slight chance that either could vibrate loose during travel.
»Do not leave the camera and housing in direct sunlight for prolonged periods. Heat may damage the camera.
»Do not transport with the camera inside of the housing.
»Do not store the housing in a humid environment. Prolonged exposure to high humidity may damage electronic components.
Servicing Recommendations
It is recommended that the housing be sent to Ikelite or an authorized service center annually for routine service and maintenance. Service may be required more or less frequently depending on care and use.
Lubricating Controls
The housing's controls may need to be lubricated if they become difficult to use or if the o-rings have dried out during longer periods of storage.
»Use only Ikelite lubricant. Other types of lubricant may cause swelling of o-rings or cracking of plastic components.
»Lubricant is not a sealant; it is used to reduce friction. Excessive lubricant can collect sand, hair or debris which may interfere with proper sealing.
»Never use spray lubricants as the propellant ingredient can cause the plastic housing to crack or o-rings to swell.
Lubricating Push Buttons
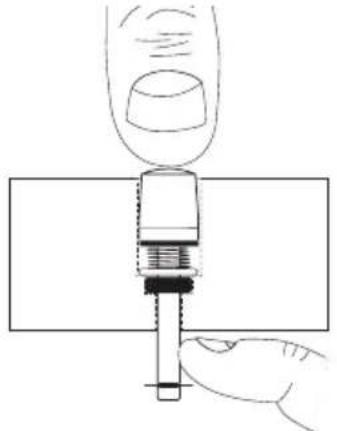
- Press and hold the push button all the way in.
- Place a small amount of lubricant at the base of the push button shaft inside the housing.
natural_image
Hand inserting a plug into a socket, no text or symbols visible-
Press and release the push button several times to work the lubricant into the o-ring.
-
If a push button control becomes difficult to push or if it sticks when depressed, soak the housing in warm, soapy fresh water. After a few minutes, operate the push button. If this does not correct the problem, return the housing to Ikelite for maintenance.
»To prevent build-up of salt, sand, or debris, the push buttons should be flushed with fresh, clean water after every use. Depress each push button while the housing is submerged in fresh water.
»If it is necessary to remove a housing push button, NEVER re-use the e-clip. Push button o-ring kits include replacement e-clips.
»Push buttons look similar but vary in length. Remove and reinstall one push button at a time.
Lubricating Control Shafts
-
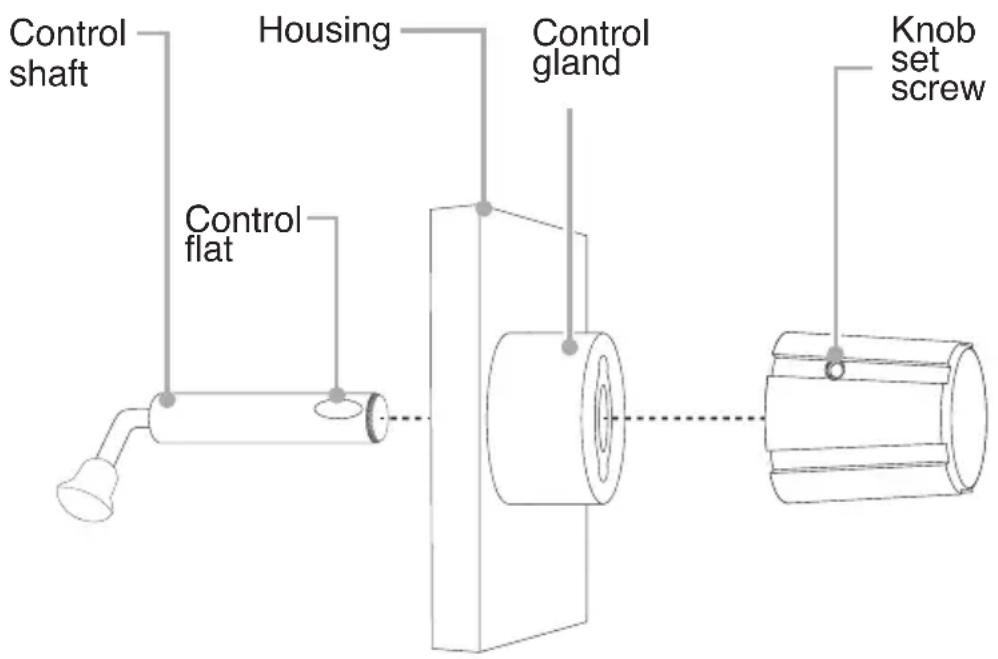
Loosen the knob set screw using a hex key.
-
Remove the control shaft from the inside of the housing.
- Clean and lightly lubricate the shaft, including the large outer end of the shaft.
- If there is a spring associated with the control, make sure it is in its proper position.
text_image
Control shaft Housing Control flat Control gland Knob set screw- Re-install the shaft from the inside of the housing. Rotate the shaft gently for smooth installation into the gland. Push the control shaft all of the way through until the flat of the shaft is visible on the outside of the housing.
- Align the knob set screw with the control flat.
- Tighten the set screw firmly against the flat of the control shaft using a hex key.
- Check that the set screw is oriented properly by holding the control shaft in place on the inside of the housing while attempting to rotate the control knob on the outside of the housing. If there is rotation, loosen the set screw and realign with control flat; retighten and recheck.
»We do not recommend removing the control gland from the housing.
» Always take the housing underwater to depth without a camera after removing and re-installing controls.
»Remove and re-install one control at a time.
» DO NOT pull the shutter trigger without a camera installed. You may accidentally detach or damage the control spring.
Troubleshooting
Water enters the housing
- Check and reinstall the rear and front o-rings.
- Replace the o-rings if there are any signs of cracks or tears.
• Take the housing underwater to depth without a camera installed to ensure that the leaking has been corrected.
Photos are over-exposed (too light)
- Adjust aperture (smaller), shutter speed (faster), or ISO (lower) setting.
- Move light(s) farther away from your subject.
- Adjust exposure compensation in the camera.
- Adjust lighting power.
Photos are under-exposed (too dark)
- Adjust aperture (larger), shutter speed (slower), or ISO (higher) setting.
- Move light(s) closer to your subject and make sure they are pointed in the right direction.
- Adjust exposure compensation in the camera.
- Adjust lighting power.
Strobe(s) will not fire
- Turn on strobe.
- Check the strobe(s) battery life.
- Restore the camera to factory default settings. There are some camera settings that will prevent an external flash from firing.
- Check camera settings recommended for use with an external strobe in the beginning of this manual.
- Check that the sync cord is properly attached.
- Check that the hotshoe connectors are plugged in properly.
- Check that the housing's hotshoe is pushed all of the way forward on the camera.
Button(s) are sticking
- Soak the housing in lukewarm fresh water. Depress each button several times while the housing is submerged. Rinse the housing with running fresh water.
- Lubricate the controls.
Button(s) or control(s) not operating
- Tighten the camera mounting plate with a screwdriver.
- Ensure that nothing is preventing the camera from going all of the way into the housing.
- Check that the camera mounting plate is pushed all of the way forward.
Camera is not functioning normally underwater
- Check each housing control while underwater to ensure that they are disengaged. An inadvertently engaged control may limit functioning of the camera.
- If using a dome port, the lens must be able to focus to 12" (0.3m). If the minimum focus of the lens is greater than 12" (0.3m), add a +4 diopter to the front of the lens.
- Check that no controls are being accidentally pressed.
- Check that the shutter is not half depressed. If the shutter spring has been damaged by activation without a camera installed, it may not return properly. Adjust or replace the shutter spring.
Backscatter or "snow" in images
- Reposition strobe(s) or light(s) to light up the subject only and not the water in-between the camera and subject.
- Avoid using strobes in extremely low-visibility conditions.
Spare Parts
Rear o-ring # 0132.59
Front o-ring # 0132.45
Camera Mount for Sony a1 # 95419
Camera Mount for Sony a7S III # 95415
DL port thumbscrews (set of 3) # 9249.7
Port hole cover # 0200.92
Zoom gear retainer # 75900
Trigger lever extension # 4077.95
Hardware set for base with handle # 9523.23
Waterproof bulkhead cap # 9104.7
Silicone lubricant # 5020
Push button o-ring kit # 6201.03
Tool for zoom gear retainer # 0945.06
.050" hex key # 0945.11
Limited Warranty
This Ikelite product is warranted against any manufacturing defects for a period of two (2) years from the original date of purchase. Defective products should be returned to Ikelite postage paid. Ikelite will, at its sole discretion, repair or replace such products, and will return to customer postage paid. All other claims of any nature are not covered. Except as mentioned above, no other warranty expressed or implied applies to this Ikelite product.
Service and Repairs
Ikelite is most interested in performing any service to ensure that all products perform as intended.
No prior authorization is required. You may return directly to us or through your dealer. Please include a brief description of the problem, any relevant email correspondence, and/or description of the service request. Always include name, shipping address, email address, and phone number inside of the package. Send postage paid to:
Ikelite Underwater Systems
Attention: Service Department
50 W 33rd St
Indianapolis, IN 46208 USA
+1 (317) 923-4523
service@ikelite.com
For detailed instructions on returning your product for service including important information on international customs documentation, please refer to our website at:
https://www.ikelite.com/pages/service-repairs
Contact Us
If you have any questions about your product or need advice on getting the images you want, please get in touch with us and we'll do everything we can to help you capture your unique perspective.
Ikelite Underwater Systems
50 W 33rd St
Indianapolis, IN 46208 USA
+1 (317) 923-4523
ikelite@ikelite.com