Access UHD651-L - Monitor Christie - Free user manual and instructions
Find the device manual for free Access UHD651-L Christie in PDF.


User questions about Access UHD651-L Christie
0 question about this device. Answer the ones you know or ask your own.
Ask a new question about this device
Download the instructions for your Monitor in PDF format for free! Find your manual Access UHD651-L - Christie and take your electronic device back in hand. On this page are published all the documents necessary for the use of your device. Access UHD651-L by Christie.
USER MANUAL Access UHD651-L Christie
text_image
Installation and Setup Guide 020-102404-08Installation and Setup Guide
020-102404-08
Access Series LCD Panels
UHD551-L, UHD651-L, UHD751-P, UHD861-P, and
UHD861-LT
CHKISTIE®
NOTICES
COPYRIGHT AND TRADEMARKS
Copyright © 2019 Christie Digital Systems USA Inc. All rights reserved.
All brand names and product names are trademarks, registered trademarks or trade names of their respective holders.
GENERAL
Every effort has been made to ensure accuracy, however in some cases changes in the products or availability could occur which may not be reflected in this document. Christie reserves the right to make changes to specifications at any time without notice. Performance specifications are typical, but may vary depending on conditions beyond Christie's control such as maintenance of the product in proper working conditions. Performance specifications are based on information available at the time of printing. Christie makes no warranty of any kind with regard to this material, including, but not limited to, implied warranties of fitness for a particular purpose. Christie will not be liable for errors contained herein or for incidental or consequential damages in connection with the performance or use of this material. Manufacturing facilities in Canada and China are ISO 9001 certified. Manufacturing facilities in Canada are also ISO 14001 certified.
WARRANTY
Products are warranted under Christie's standard limited warranty, the complete details of which are available by contacting your Christie dealer or Christie. In addition to the other limitations that may be specified in Christie's standard limited warranty and, to the extent relevant or applicable to your product, the warranty does not cover:
a. Problems or damage occurring during shipment, in either direction.
b. Problems or damage caused by combination of a product with non-Christie equipment, such as distribution systems, cameras, DVD players, etc., or use of a product with any non-Christie interface device.
c. Problems or damage caused by misuse, improper power source, accident, fire, flood, lightning, earthquake, or other natural disaster.
d. Problems or damage caused by improper installation/alignment, or by equipment modification, if by other than Christie service personnel or a Christie authorized repair service provider.
e. Use of third party product enclosures for environmental protection during outside use must be approved by Christie.
f. Problems or damage caused by use of a product on a motion platform or other movable device where such product has not been designed, modified or approved by Christie for such use.
g. Except where the product is designed for outdoor use, problems or damage caused by use of the product outdoors unless such product is protected from precipitation or other adverse weather or environmental conditions and the ambient temperature is within the recommended ambient temperature set forth in the specifications for such product.
h. Image retention on LCD flat panels.
i. Defects caused by normal wear and tear or otherwise due to normal aging of a product.
The warranty does not apply to any product where the serial number has been removed or obliterated. The warranty also does not apply to any product sold by a reseller to an end user outside of the country where the reseller is located unless (i) Christie has an office in the country where the end user is located or (ii) the required international warranty fee has been paid.
The warranty does not obligate Christie to provide any on site warranty service at the product site location.
PREVENTATIVE MAINTENANCE
Preventative maintenance is an important part of the continued and proper operation of your product. Failure to perform maintenance as required, and in accordance with the maintenance schedule specified by Christie, will void the warranty.
REGULATORY
The product has been tested and found to comply with the limits for a Class A digital device, pursuant to Part 15 of the FCC Rules. These limits are designed to provide reasonable protection against harmful interference when the product is operated in a commercial environment. The product generates, uses, and can radiate radio frequency energy and, if not installed and used in accordance with the instruction manual, may cause harmful interference to radio communications. Operation of the product in a residential area is likely to cause harmful interference in which case the user will be required to correct the interference at the user's own expense. Changes or modifications not expressly approved by the party responsible for compliance could void the user's authority to operate the equipment
CAN ICES-3 (A) / NMB-3 (A)
The product is designed and manufactured with high-quality materials and components that can be recycled and reused. This symbol 📄 means that electrical and electronic equipment, at their end-of-life, should be disposed of separately from regular waste. Please dispose of the product appropriately and according to local regulations. In the European Union, there are separate collection systems for used electrical and electronic products. Please help us to conserve the environment we live in!
Content
Package handling. 5
Unpacking the panel. 5
Handling and mounting guidelines 6
Cleaning the panel. 6
Important safeguards. 7
General safety warnings....7
AC power precautions. 7
Product labels. 8
Avoiding image retention. 8
Parts list. 9
Product documentation. 9
Related documentation....9
Installing a display panel....1 1
Display panel control joystick. 1 1
Display components. 12
Touch compatibility.... 14
Remote control....14
Installing the Wi-Fi dongle (UHD861-P and UHD861-LT only). 16
Installing the IR extender cable. 17
Installing an OPS module. 17
Mounting a display panel. 17
Installing a display panel on an indented wall. 18
Configuring the display panel after installation. 18
Connecting sources to the panel. 19
Displaying content on multiple display panels. 19
Controlling CEC-enabled devices....19
Selecting the audio destination. 20
Connecting to a wired network. 20
Connecting to a wireless network. 21
Enabling Wake on LAN. 21
Remotely waking the display panel from standby. 2 2
Connecting to the display panel over Bluetooth. 2 2
Rotating the on-screen display. 22
Copying settings from one display panel to another. 23
Changing the startup logo. 23
Upgrading the firmware from USB. 23
Disabling the remote control. 24
Using the Crestron RoomView Control tool. 24
Playing content on the display panels. 25
Playing media over the network. 25
Playing media from USB. 26
Playing USB media automatically. 26
Displaying an image when no signal is detected. 27
Display panel menu contents. 28
Troubleshooting....34
Understanding the LED status indicators. 34
Wireless network not available. 34
Connection is slow. 35
Disruption during playback or slow reactions. 35
Internet connection not available. 35
Audio video sharing not working. 35
Invalid domain. 36
Remote control does not work. 36
Image has artifacts or judder. 36
Access Series display panels Specifications. 37
Physical specifications....37
Power specifications....37
Environmental specifications....38
Wireless LAN transmitter specifications. 38
Regulatory. 39
Modification statement. 39
Safety. 39
RF exposure. 39
Electro-magnetic compatibility.... 40
Environmental. 40
Package handling
Learn how to remove the display panel from the packaging and how to handle the display panel.
Unpacking the panel
Learn how to remove the panel from the packaging.
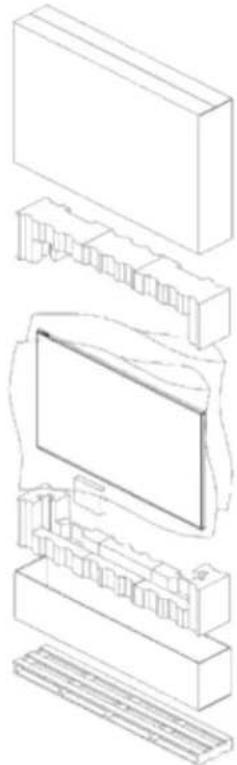
Each LCD panel is packed inside a box carton. To protect the panel during transportation, additional packing material has been placed within the carton.
natural_image
Exploded view diagram of a computer monitor showing internal components (no text or labels)- Before unpacking, prepare a stable, level, and clean surface near a wall outlet.
- Set the box in an upright position and pull out the white carton locks.
- Lift up the top cover carton.
- Remove the ESD bag before removing the display from the bottom tray carton.
- Remove any additional packaging, such as protective stickers, from the display panel.
Handling and mounting guidelines
Follow these best practices when handling and mounting panels.

Notice. If not avoided, the following could result in property damage.
- When moving the panel, always use the handles. Do not carry the panel by the frame.
- Do not twist, bend, or tilt the panel.
- Do not apply excessive force to the sides of the bezel when mounting the panel or pushing into its locked position.
• Always handle the display panel from the sides or handles.
Follow the following guidelines before removing the panel from the packaging.
• Always use the handles to pick up and carry the panel.
- For panels 65" or smaller, use two people to handle and mount the panel. For panels larger than 65", use four people to handle and mount the panel.
- Leave the panel in the box until the mount is on the wall and you are ready to install the panel.
- To avoid putting undue stress on the panel when mounted, make sure the mount is square, flat, and level.
- Do not rest panels on top of a lower panel.
- When inserting the panel into the wall, pay close attention to adjacent panels.
- Make sure there is a minimum of 0.5 mm between mounted panels to allow for thermal expansion.
Cleaning the panel
Learn how to clean the display panel.
After disconnecting the power cable, wipe contaminated parts and each part of the product screen lightly with a dry and soft cloth.
Do not use a liquid, spray cleaners, or any abrasive cleaners to clean the LCD panel.
Washing with various cleaning agents, brighteners, abrasives, waxes, benzene, alcohol, solvent, surface active agent, may damage the surface of the product.
Important safeguards
To prevent personal injury and to protect the device from damage, read and follow these safety precautions.
General safety warnings
Observe these important safety rules to avoid personal injury or damage to the product.

Warning! If not avoided, the following could result in death or serious injury.
- FIRE AND SHOCK HAZARD! Use only the attachments, accessories, tools, and replacement parts specified by Christie.
• Always provide proper ventilation for the product to prevent overheating. - FIRE HAZARD! Do not install near any devices that produce heat such as amplifiers, radiators, heat registers, or stoves.

Caution! If not avoided, the following could result in minor or moderate injury.
• This product is intended for indoor use only.
- Do not operate the product at an altitude exceeding 2000 m.
- Do not operate the product in tropical climate regions.
- Only clean the components with Christie approved products.
- Do not place objects containing liquids on the product.
- Do not spray cleaners or pour liquids directly onto the surface of the product.
- Do not remove the protective housing.
AC power precautions
Learn the safety precautions related to AC power.

Warning! If not avoided, the following could result in death or serious injury.
- SHOCK HAZARD! Disconnect the product from AC before installing, moving, servicing, cleaning, removing components, or opening any enclosure.
- FIRE AND SHOCK HAZARD! Do not attempt operation unless the power cord, power socket, and power plug meet the appropriate local rating standards.
- Never compromise the ground or earth connection of the product.
- SHOCK HAZARD! The AC power cord must be inserted into an outlet with grounding.
- The appliance coupler and main power supply plug must be easily accessible for disconnecting the product from the power source.
- FIRE OR SHOCK HAZARD! Do not overload power outlets and extension cords.
- SHOCK HAZARD! Only use the AC power cord provided with the product or recommended by Christie.
- FIRE HAZARD! Do not use a power cord, harness, or cable that appears damaged.
- TRIP OR FIRE HAZARD! Position all cables where they cannot contact hot surfaces, be pulled, be tripped over, or damaged by persons walking on or objects rolling over the cables.
Product labels
Learn about the labels that may be used on the product. Labels on your product may be yellow or black and white.
General hazards
Hazard warnings also apply to accessories once they are installed in a Christie product that is connected to power.
Fire and Shock Hazard
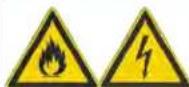
To prevent fire or shock hazards, do not expose this product to rain or moisture.
Do not alter the power plug, overload the power outlet, or use it with extension cords.
Do not remove the product enclosure.
Only Christie qualified technicians are authorized to service the product.
Electrical Hazard

Risk of electric shock.
Do not remove the product enclosure.
Only Christie qualified technicians are authorized to service the product.
Additional labels
Complies with IDA
Standards
DB107167
Indicates compliance with the Dealer's Class License and Dealer's Individual License requirements.
Avoiding image retention
Image retention can occur when static content appears on the display panel in as little as a few hours. Image retention is not covered under warranty. To prolong the life of your display panel, follow these recommendations.
- Operate the display panel within its rated ambient environment. Christie recommends an operating temperature of 0 to 40 degrees Celsius (32 to 104 degrees Fahrenheit), with a maximum relative humidity of 90% .
- Avoid static content. Christie recommends displaying moving images whenever possible, and using a screen saver with a moving image.
- Turn off the display panel when it is not in use, or use the Scheduling feature to automatically turn off the display panel at preset times of the day.
- Turn on the Pixel shift setting.
- When designing content for the display panels, consider the following:
- Regularly change the color of the text and background of the content
- Move text or images around the display
- Use colors of similar brightness levels
- Avoid using text color and background color with contrasting brightness, for example black and white.
- Gray may contribute to image retention
Parts list
Your display panel is shipped with the following items. If any items are missing or damaged, contact your dealer.
- Remote control and batteries
- IR extender cable
• Product Safety Guide and USB flash drive
• Wi-Fi dongle (UHD861-P only)
Related information
Installing the IR extender cable (on page 17)
Installing the Wi-Fi dongle (UHD861-P and UHD861-LT only) (on page 16)
Product documentation
For installation, setup, and user information, see the product documentation available on the Christie website. Read all instructions before using or servicing this product.
- Access the documentation from the Christie website:
- Go to this URL: http://bit.ly/2iUdjFs.
- Scan the QR code using a QR code reader app on a smartphone or tablet.
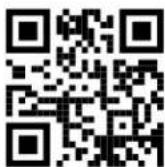
- On the product page, select the model and switch to the Downloads tab .
Related documentation
Additional information on the LCD panels is available in the following documents.
- Access Series LCD Panels Product Safety Guide (P/N: 020-102422-XX)
• Installing the Touch Overlay (P/N: 020-102431-XX)
- Access Series LCD Panels External Controls (P/N: 020-102554-XX)
• UHD551-L Service Guide (P/N: 020-102683-XX)
• UHD651-L Service Guide (P/N: 020-102685-XX)
• UHD751-P Service Guide (P/N: 020-102686-XX)
• UHD861-P Service Guide (P/N: 020-102744-XX)
Installing a display panel
Learn how to install a display panel and connect sources.
Use this display panel for dynamic presentations, educational collaboration, and engaging retail applications.
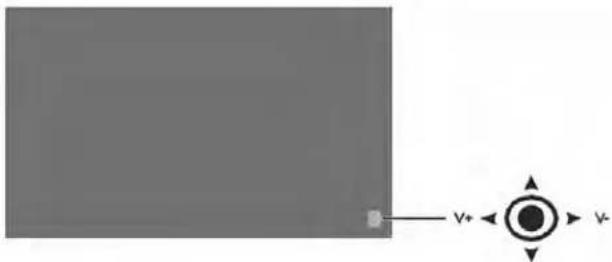
Display panel control joystick
Learn about the control joystick on the rear of the display panel.
The on-screen display menu cannot be displayed with the control joystick.
natural_image
Simple diagram with a gray rectangle and a central circular symbol with arrows pointing to it, no text or labels present.- To turn on the display panel, press the center of the control joystick.
- To turn off the display panel and put it into standby mode, press and hold the center of the control joystick for a few seconds.
- To change the source, press the center of the control joystick.
- To scroll through the available sources, move the joystick up and down.
- To change the volume, press the control joystick left and right.
To increase the volume, move the joystick right. To decrease the volume, move the joystick left.
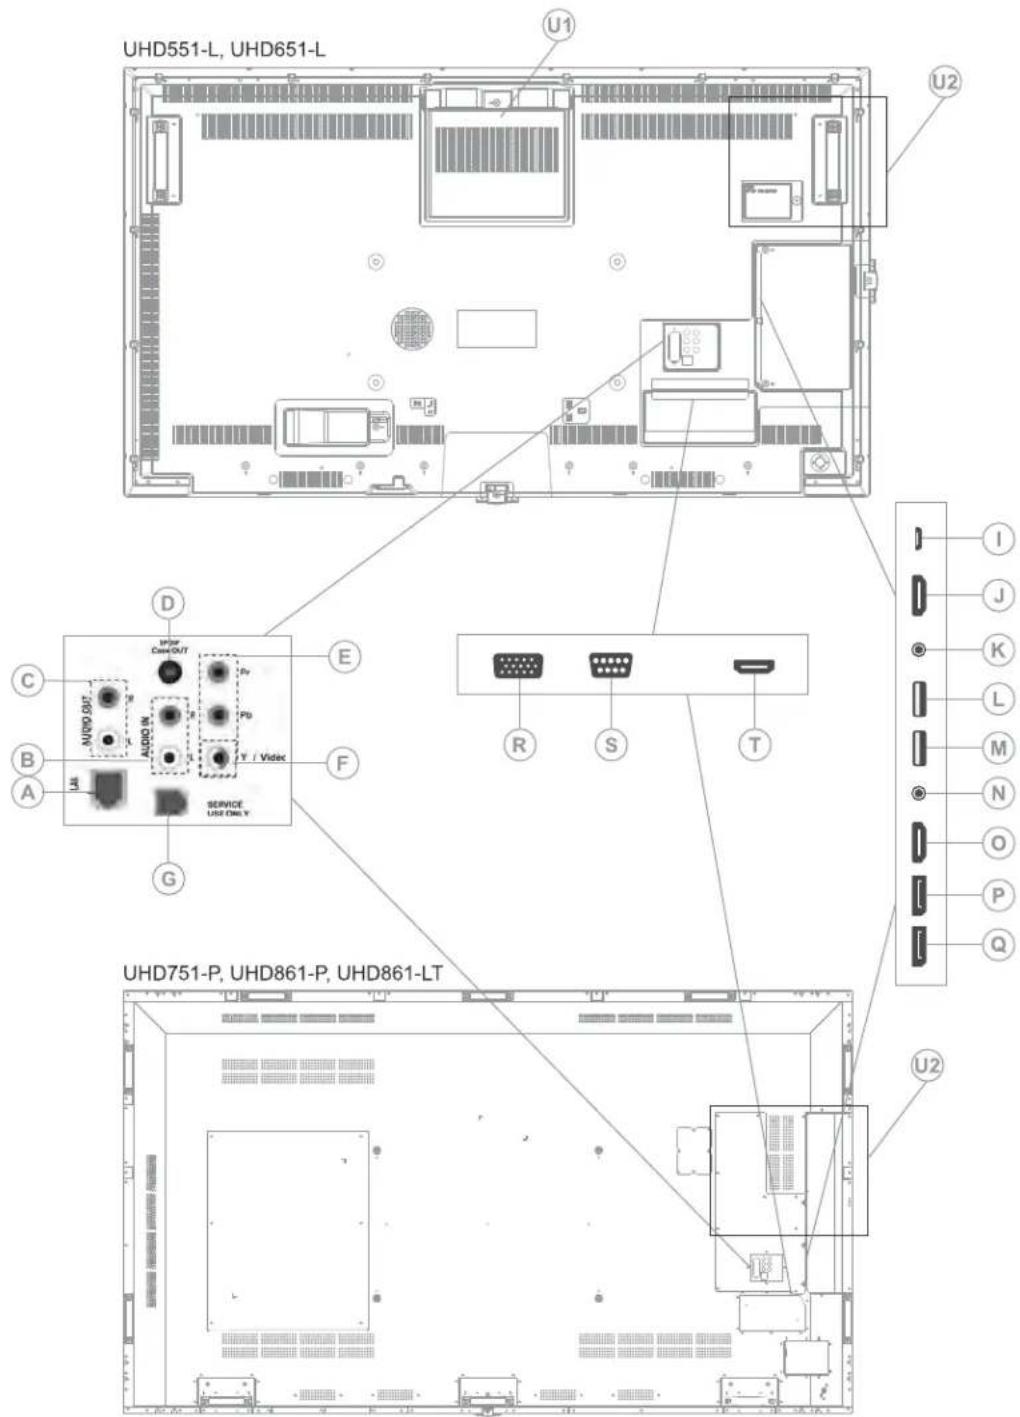
Display components
Learn about the various parts of the display panel.
text_image
UHD551-L, UHD651-L U1 U2 D E F G C B A MND OUT AUDIO IN AVOC IN Pv Po Y / Videc SERVICE USB ONLY R S T I J K L M N O P Q UHD751-P, UHD861-P, UHD861-LT U2| A Ethernet/LAN port (RJ45) M USB 2.0 | ||
| B Audio in N Headphone | ||
| C Audio out O HDMI 1 | ||
| D SPDIF Coaxial out P DisplayPort Out | ||
| E YPbPr Q DisplayPort In | ||
| F Video in R VGA | ||
| G RJ12 (Service use only) S RS232 | ||
| I Micro USB T HDMI 2 | ||
| J HDMI OutOnly the content received from the HDMI1 input port (N) can be outputted from this port. The HDMI output port functions when a source device is connected to the HDMI input. | U OPS slot | locationsU1—UHD551-LU2—UHD651-L, UHD751-P, UHD861-P, and UHD861-LT |
| K IR input | ||
| L USB 3.0 |
Touch compatibility
The touch panel and overlays support the following behavior:
• Up to 10 simultaneous touch points, over 90% of the panel area
- Responds to finger, gloved hand, pointer (Object sizes of 5mm or more)
- Touch accuracy of +/-2mm, over 90% of the panel area
• Response time <10ms
• Can be used with Windows 7, Windows 8, Windows 10, and Mac operating systems
To add touch functionality to the UHD551-L, UHD651-L, and UHD751-P, install the appropriate TA551, TA651, or TA751 touch overlay kit. The UHD861-LT model has touch functionality integrated into the display panel.
To maximize the touch functionality on the LCD display panel, Christie recommends installing interactive software such as Quizdom OKTOPUS or Microsoft Whiteboard on the connected computer.
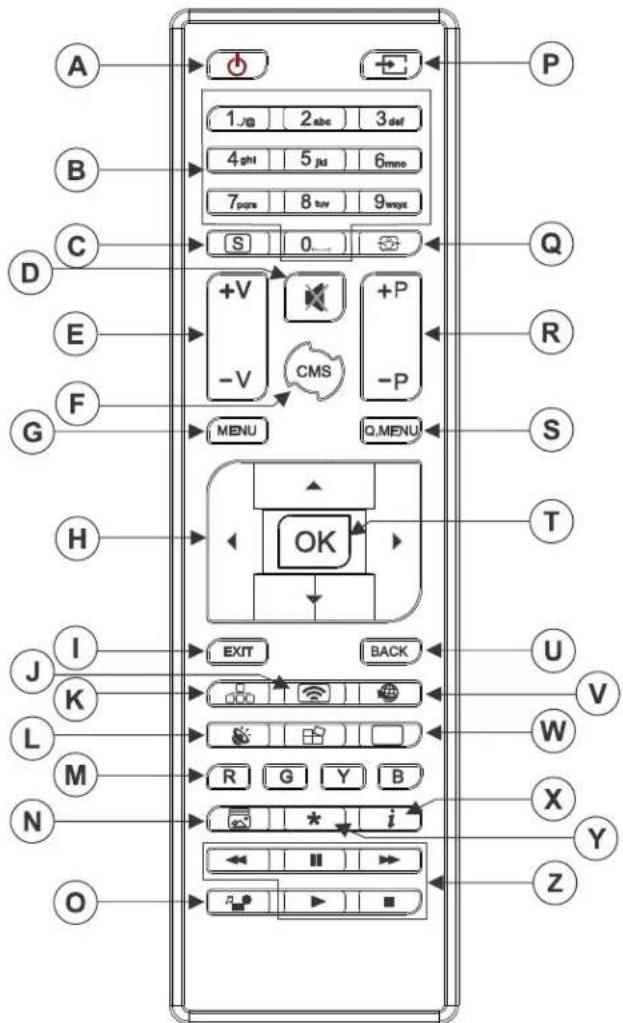
Remote control
Learn the functions of the remote control.
Before you insert batteries in the remote control, consider the following:
• Ensure that the battery polarities are correct.
• Do not mix an old battery with a new one or mix different types of batteries together.
• Do not expose batteries to excessive heat such as sunlight or fire.
If you will not use the remote control for a long time, consider removing the batteries to avoid damage from battery leakage.
text_image
A B C D E F G H I J K L M N O 1_0 2 abc 3 def 4 ght 5 jd 6 mno 7 pms 8 tuv 9 wgs S 0_ +V -V CMS +P -MENU Q.MENU OK EXIT BACK R G Y B i X Y Z P Q R S T U V W X Y Z| A Standby— Switches the display panel on and off. N Picture Mode—Cycles between picture modes. | |||
| B Numeric buttons O Media browser—Opens the media browsing screen. | |||
| C | Signage—Displays the Signage Settings menu. | P | Source—Shows all available content sources. |
| D | Mute—Silences the volume of the display panel. | Q | Screen—Changes the aspect ratio of the screen. |
| E Volume—Increases or decreases the volume. R Not supported | |||
| F Not supported S Quick Menu—Displays a list of menus for quick access. | |||
| G Menu—Displays the main menu. T OK—Confirms user selections. | |||
| H Directional buttons—Navigates through sub-menus and settings. | U Back—Returns to previous screen. | ||
| I Exit—Exits the displayed menu, or returns to the previous screen. | V Not supported | ||
| J Wireless Display—Opens the wireless display connection screen. | W Picture—Displays the Picture Settings menu. | ||
| K Network—Displays the Network/Internet Settings menu. | X Info—Displays information about on-screen content. | ||
| L Sound—Displays the Sound Settings menu. Y Not supported | |||
| M Colored Buttons—For colored button functions, follow the on-screen instructions. | Z Play buttons—Rewind, play, fast forward, stop, or pause media. | ||
Related information
Installing the IR extender cable (on page 17)
Installing the Wi-Fi dongle (UHD861-P and UHD861-LT only)
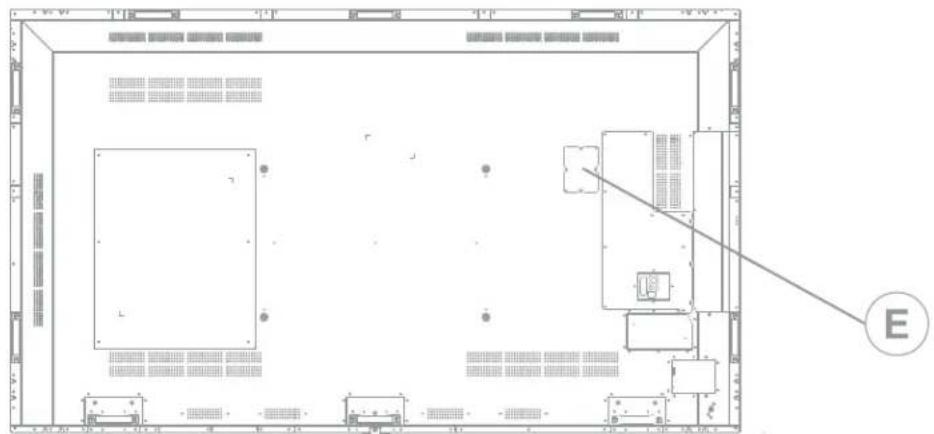
Install the Wi-Fi dongle into the port on the UHD861-P.
Wireless functionality is not available on the UHD861-LT display panel.

For the UHD551-L, UHD651-L, and UHD751-P display panels the Wi-Fi device is already installed.
- On the rear of the panel, using a Phillips screwdriver, remove the port cover over the internal USB compartment (E).
text_image
Technical diagram of a rectangular room layout with labeled components and an arrow pointing to component E- Plug the Wi-Fi dongle into the USB port.
Do not reinstall the port cover as it may interfere with Wi-Fi transmission.
- If you experience Wi-Fi connection issues, connect the Wi-Fi dongle to the display panel with a USB cable, and move the Wi-Fi dongle away from the metal back-plate of the display panel. The Wi-Fi dongle can be plugged into any of the USB ports on the display panel.
Installing the IR extender cable
For remote control commands to be received by the display panel, the display panel must have the IR extender cable installed.
- On the rear of the panel, plug the IR extender cable into the display panel.
- Position the IR receiver so it is visible from the front of the display panel.
Installing an OPS module
To provide a network distributed processor for managing content on the display panel, install an OPS module.

The Access Series display panels only support OPS modules with a power draw of 40 watts or less.
- Ensure the display panel is powered off.
- On the rear of the display panel, remove the screw securing the OPS slot cover and remove the cover.
- Insert the OPS module into the slot, ensuring the module is fully seated.
- Replace and secure the OPS slot cover.
- Complete any OPS module configuration as identified in the documentation provided by the OPS manufacturer.
Mounting a display panel
Use only the approved wall-mount kit designed for your display panel.

Caution! If not avoided, the following could result in minor or moderate injury.
- TIP HAZARD! Center align the product on the stand or mount.

Ensure the IR extender cable is installed before mounting the panel. For UHD861-P display panels, install the Wi-Fi dongle before mounting the panel.

Wireless functionality is not available on the UHD861-LT display panel.
If you decide to wall-mount a display panel, ensure that the wall-mount bracket is installed according to the instructions that are included with it. The wall must be capable of supporting three times the weight of the display panel, or be reinforced.
To ensure the mounting brackets clear any protrusions on the rear of the panel, Christie recommends using spacers with a minimum height of 6.35 mm (.25 in).
Mounting brackets may block access to the connector ports. To ensure the preferred mount allows access to the connectors, refer to the display panel line drawings on www.christiedigital.com for measurements.
When mounting the UHD751-P and UHD861-P in portrait mode, ensure the ports and OPS slot are on the bottom edge of the display panel. It may be necessary to move the Christie name plate to the bottom edge of the display panel. Use a #1 Phillips screwdriver to remove the screws from the
nameplate, and to remove the extra screws from the secondary nameplate location on the bottom of the panel.
At the location where the space between tiles is the tightest, use the spacer tool to ensure there is a minimum of 0.5mm, or the thickness of a credit card, between adjacent LCD display panels.
Related information
Installing the IR extender cable (on page 17)
Installing the Wi-Fi dongle (UHD861-P and UHD861-LT only) (on page 16)
Installing a display panel on an indented wall
When installing the display panel on an indented wall, ensure there is sufficient space around the display panel and the wall for ventilation.
The ambient temperature must be between 0-35°C (32-95°F). Do not expose the product to direct sunlight.
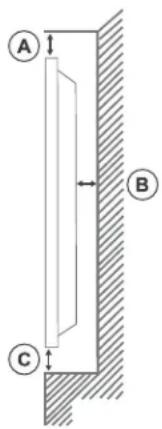
text_image
A B C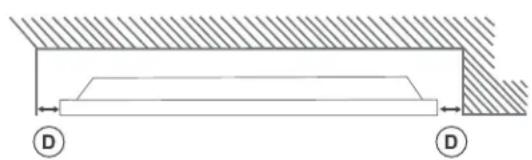
natural_image
Technical diagram of a rectangular structure with two circular components labeled D, showing internal dimensions (no text or symbols beyond labels)| A Minimum | 70 mm |
| B Minimum | 50 mm |
| C Minimum | 50 mm |
| D Minimum | 50 mm |
Configuring the display panel after installation
After turning the display panel on for the first time, complete the initial configuration.
- Power on the display panel.
- Using the display panel remote, select the display language and press OK.
- Select the country and press OK
- Configure the Signage settings, such as the OSD orientation and display panel ID. Model name, Serial number, and Software version cannot be modified.
- Press OK.
-
Configure the display panel to connect to a wired or wireless network.
-
Press OK.
-
To repeat this process and reset the display panel settings to the factory defaults, select Signage Settings > First time installation and press OK. Accept the confirmation message.
-
To exit the menu, on the remote press Menu again.
Connecting sources to the panel
Select the port the source computer is connected to.
- Connect a cable from the source computer to the display panel.
- On the display panel remote, press Menu.
- Select System > Settings > Sources.
- Select the source input and press OK.
- To exit the menu, on the remote, press Menu again.
Displaying content on multiple display panels
Configure the display panels to show content on multiple devices.
The maximum number of display panels that can be connected by using daisy-chaining may differ depending on the capacity of the source device. The image displayed on all display panels is defined by the source device. For example, to stream four different FHD images, the source device should be capable of supporting this operation.
- Connect a cable between the DisplayPort or HDMI output port on one display panel and the DisplayPort or HDMI input port on another display panel.
- Set the input source on the display panels to the appropriate input.
- If using the DisplayPort, on the display panel remote, press Menu.
-
Select System > Settings > More > DP Stream Setting and select a method of connecting the display panels.
-
MST—Select MST (Multi-Stream Transport) when using an MST hub between the source computer and multiple display panels, extending a single image across multiple display panels. This is the default.
-
SST—Select SST (Single-Stream Transport) when the same image is displayed on all connected display panels. The maximum number of the display panels that can display HDCP encrypted content is seven. For content that is not HDCP encrypted, if the signal is stable and there is no cable loss, there is no limitation to the number of display panels.
-
To exit the menu, on the remote press Menu again.
Controlling CEC-enabled devices
Control CEC-enabled devices connected through the HDMI ports using the display panel remote.
- On the remote, press Menu.
- Select System > Settings > More > CEC.
- Select Enable.
-
On the remote control, press Source.
-
In the Sources list, select the HDMI input of the connected CEC device.
When a new CEC source device is connected, the connected HDMI port name is replaced with the name of the CEC source device in the Source menu.
- To exit the menu, on the remote, press Menu again.
Selecting the audio destination
Configure whether the audio is played through an amplifier or through the display panel.
Compatible audio devices must support System Audio Control.
- On the display panel remote, press Menu.
- Enable the CEC option (on page 19).
- Select System > Settings > More > Speakers.
- Select the destination for the audio.
- Display—All audio is played through the display panel speakers.
- Amplifier—All audio is played through the connected sound system, the display panel speakers are muted, and the volume is controlled using the remote for the display panel.
The display panel also supports also ARC (Audio Return Channel) feature. This is an audio link meant to replace other cables between the display panel and the audio system.
When ARC is active, the audio of the display panel is not muted automatically. To hear audio from connected audio devices only, the volume of the display panel must be turned down manually.
- To exit the menu, on the remote, press Menu again.
Connecting to a wired network
For wired connections, connect the display panel to the modem or router with an Ethernet cable.
- On the display panel remote, press Menu.
- Select System > Settings > Network/Internet Settings > Network Type.
- Select the Wired device network connection.
- If necessary, configure the network connection.
a) Select Advanced Settings and press OK.
b) Change the IP address setting to Manual and type the IP address for the display panel.
c) To save the settings, press OK.
d) Repeat steps 4b and 4c for the DNS settings.
- To exit the menu, on the remote, press Menu again.
Connecting to a wireless network
Content stored on a mobile device connected to the wireless network can be accessed and displayed on the display panel through the Media Browser.

Wireless functionality is not available on the UHD861-LT display panel.
The display panel supports 802.11 a,b,g and n type modems. Christie recommends using the IEEE 802.11n communication protocol.
The display panel cannot connect to networks with a hidden wireless network name (SSID). If the modem shares the same SSID as another modem in the area, change the SSID of the modem. Use a wired connection if you experience problems with a wireless connection.
- (UHD861-P only) Plug the Wi-Fi dongle into a USB port on the rear of the display panel.
- On the display panel remote, press Menu.
- Select System Settings > Network/Internet Settings > Network Type.
- Select the Wireless device network connection.
The display scans for wireless networks automatically.
- Select the network from the list.
- If required, using the directional buttons on the remote, enter the network password and press OK.
Alternatively, if the router has a WPS (Wi-Fi Protected Setup) button, select Press WPS on your Wi-Fi router and press OK, and press the WPS button on the router.
When the IP address is displayed on the screen, the connection with the network has been established.
- If necessary, configure the network connection.
a) Select Advanced Settings and press OK.
b) Change the IP address setting to Manual and type the IP address for the display panel.
c) To save the settings, press OK.
d) Repeat steps 7b and 7c for the DNS settings.
- To exit the menu, on the remote press Menu again.
Enabling Wake on LAN
Configure the display panel to accept Wake on LAN commands.
- Disable Quick Standby.
a) On the remote, press Menu.
b) Navigate to Signage Settings > Power up settings > Quick Standby
c) Ensure Quick Standby is disabled.
- Enable Wake on LAN.
a) Using a terminal program, access the display panel.
b) Run the following command: SWOL 1
c) To verify Wake on LAN is enabled, run the following command: GWOL
Remotely waking the display panel from standby
To remotely wake the display panel from standby, configure and use Wake on LAN software.
- Download the Wake On LAN (WOL) software. Free Wake On LAN software packages are available for downloading from the internet. The steps below are for the Aquilia WOL software.
- To open WakeOnLAN, select the downloaded file and click New Host.
- Select the Wake Up page.
a) Enter the MAC address, which is the same as the display panel.
b) Enter the broadcast IP address.
The domain is the same as the computer.
For example, the IP address of the computer is 10.0.21.105, the subnet mask is 255.255.0.0, and the broadcast IP address is set to 10.0.255.255.
- Enter any IP address in the FQDN/IP.
Leave all other fields at their default values.
- Select the newly added host, right-click, and select Wake Up.
Connecting to the display panel over Bluetooth
Connect Bluetooth devices such as a mobile devices or laptops to the display panel.

Bluetooth is not available on the UHD861-LT display panel.
- On the Bluetooth-enabled device, turn on pairing mode.
- To connect audio devices, select System > Sound > Audio Link.
- To initiate device discovery, on the remote, press the green button.
- From the list of available devices, select the device to connect to and press OK.
If the message Device connected is displayed, the connection was successfully. If the connection fails, try again. - To exit the menu, on the remote, press Menu again.
Rotating the on-screen display
Change the orientation of the on-screen display.

The UHD551-L, UHD651-L, and UHD861-LT display panels do not support rotating the content to a portrait orientation.
- On the display panel remote, press Menu.
- Select Signage Settings > Controls > OSD Orientation and select the appropriate orientation.
- To exit the menu, on the remote, press Menu again.
Copying settings from one display panel to another
For installations with multiple display panels, copy the settings from one display panel and import them onto the other display panels.
The settings copied include database files, all preference data, and the signage and link option settings.
The Copy from USB and Copy to USB menu options are only available when a USB device is connected to the display panel.
- Copy the settings to an external USB storage device.
a) Connect the USB storage device to the display panel.
b) On the display panel remote, press Menu.
c) Select Signage Settings > USB > Clone to USB.
The settings are saved to a folder named Cloned
- Copy the settings from the external USB storage device to the display panel.
a) Connect the USB storage device to the display panel.
b) On the display panel remote, press Menu.
c) Select Signage Settings > USB > Clone from USB.
d) Navigate to the folder created in 1C and click OK.
- To exit the menu, on the remote, press Menu again.
Changing the startup logo
Update the logo displayed when the display panel starts.
- On a USB storage device, create a folder named spi.
- Copy a .jpeg file into the spi folder.
- Rename the .jpeg file to boot_logo.bin.
- Connect the USB storage device to the display panel.
- If the Media Browser is displayed, to close it press Exit on the remote.
- On the display panel remote, press Menu.
- Select Signage Settings > USB > USB operations and on the remote press Enter. The boot logo is updated.
- Restart the display panel.
Upgrading the firmware from USB
Install the new firmware to upgrade the display panels.
- Download the latest software from www.christiedigital.com and unzip the file.
-
Navigate to core_update/access_
_mb120.bin. -
Copy the access_
_mb120.bin file to the root of a USB storage device. - On the USB storage device, rename the file to upgrade_mb120.bin.
- Connect the USB storage device to the display panel.
- If the Media Browser is displayed, to close it press Exit on the remote.
- On the display panel remote, press Menu > 1505.
- In the confirmation dialog, select Yes.
During the upgrade process the display panel restarts. After the display panel restarts, while the upgrade finishes nothing is displayed on the panel and a red LED blinks in the top right corner. The process may take a few minutes to complete.
Disabling the remote control
Turn off the ability to control the display panel using the remote control.
The remote control functions in Stand-By mode independently from this setting.
- On the display panel remote, press Menu.
- Select Signage Settings > Controls > RCU Inhibit and select On.
If this option is set as On only the Volume Up/Down, Numeric Buttons, and the Standby button on the remote are functional.
- To enable the remote, press MENU > 1973 on the remote control keypad.
- Select Signage Settings > Controls > RCU Inhibit and select Off.
Using the Crestron RoomView Control tool
Crestron RoomView provides a central monitoring station for 250+ control systems on a single Ethernet network (more are possible, the number depends on the combination of IP ID and IP address).
Crestron RoomView monitors each projector, including projector's online status, system power, light source life, network setting and hardware faults, plus any custom attribute as defined by the Administrator. The Administrator can add, delete, or edit room information, contact information and events, which are logged automatically by the software for all users.

Crestron RoomView functions are set according to the models and specifications of the product.
For further information, visit http://www.crestron.com and http://www.crestron.com/getroomview.
Playing content on the display panels
Learn how to play images, video, and audio on the display panels.
Playing media over the network
Play content available on the same network as the display panel.
For higher playback quality, Christie recommends using a wired connection when connecting the display panel to other devices.

Third party software such as Nero MediaHome may be required to share content over the network.
- Configure the display panel to connect to a wired or wireless network.
- On the display panel remote, press Media Browser.
- Select the media type and press OK.
- Select the media server or network to connect to and press OK.
To refresh the device list, on the remote, press the green button. - If the selected media type is video, navigate to the location of the video files and select the file to play.
- To play other media types, go back to main Media Browser menu and select the media type and the network again.
To switch to next media type quickly without changing the network, press the blue button.

-
Play the selected content.
-
To play all files in the list as a loop, in their original order, start playback with the Play button and activate 📄.
- To play the same file continuously, start playback with the OK button and activate 📄.
- To shuffle all files in the list once, start playback with the Play button and activate ✗.
-
To shuffle all files in the list indefinitely, start playback with the Play button and activate and
-
To exit the menu, on the remote, press Menu again.
Related information
Connecting to a wired network (on page 20)
Connecting to a wireless network (on page 21)
Playing media from USB
Play photos, music, and movie files stored on a USB device by connecting it to the display panel.
USB memory sticks and 2.5" and 3.5" inch external hard drives with external power supplies can provide content to the display panel through the USB inputs of the display panel. Certain types of USB hard drives, flash drives, and USB devices such as MP3 players may not be compatible with the display panel. The display panel supports FAT32 and NTFS disk formatting.
The following media types are supported: mpg, mpeg, mp4, mkv, and avi.
If both an internal USB device and external device are inserted, the media player uses the external device only.
USB hubs can be used with the USB inputs of the display panel. External power supplied USB hubs are recommended. When connecting a USB hard drive, use the USB inputs of the display panel directly.
Back up the files on your storage devices before connecting them to the display panel.
Before removing the USB device, ensure files are not being read or played from the device. Failure to do so may cause physical damage to the USB player and the USB device itself.
- Back up the files on the storage devices before connecting them to the display panel.
-
Connect a USB hard drive or flash drive to one of the USB inputs located on the side of the display panel.
-
On the display panel remote, press Media Browser.

-
Select the media type and press OK.
-
Navigate to the media to show on the display panel.
The Media Browser menu can only display 1000 image files stored on the connected USB device.
-
Play the selected content.
-
To play all files in the list as a loop, in their original order, start playback with the Play button and activate 📄.
• To play the same file continuously, start playback with the OK button and activate 📄. - To shuffle all files in the list once, start playback with the Play button and activate ✗.
-
To shuffle all files in the list indefinitely, start playback with the Play button and activate and
-
To exit the menu, on the remote, press Menu again.
Playing USB media automatically
Automatically start playing the media content on a USB device.
The content types available through the Media Browser are played in a predetermined order: photo, video, and then audio. If there are photo files in the root directory of the USB device, the Media Browser plays the photos in alphabetical order by file name. If there are no photo files, the USB device is checked for video content, and then audio.
If Signage settings > Controls > No signal is set to Failover, the Media Browser Autoplay setting is ignored and any media on the connected USB device is played.
- On the display panel remote, press Media Browser.

-
Select Settings.
-
Enable the AutoPlay option.
- To exit the menu, on the remote, press Menu.
Displaying an image when no signal is detected
Set the behavior of the display panel when no signal is detected from the selected input source.
- In the display panel menu, select Signage Settings > No Signal.
- To set the display panel to check the connected USB devices for available files to play, select Failover.
If no playable files are available or there is no USB device connected to the display panel, the No Signal image is displayed and the display panel turns off after five minutes.
If the No Signal image is not available, the message "No Signal OSD" is displayed on the screen, and the display panel turns off after five minutes.
Display panel menu contents
Learn the structure of the display panel menu tree.
System > Picture menu
| Mode Changes the picture mode to suit the site preference or requirements. Picture mode can be set to one of these options: Text, Game, Sports, Signage, and Natural.The Contrast, Brightness, Sharpness, and Color can be adjusted for each mode. | |
| Energy Saving To reduce energy consumption by regulating the backlight level selectMinimum, Medium, Maximum, or Auto.Controls the Backlight level. The backlight function is inactive if the Energy Saving is set to an option other than Custom. To set the backlight to a fixed value, select Custom and use the left or right buttons on the remote to adjust the backlight level.To disable Energy Saving mode, select Off.To turn the screen off immediately select Auto and press the right button on the remote, or select Custom and press the left button. In the confirmation message select Proceed and press OK. If no buttons are pressed, the screen turns off in 15 seconds. Press any button on the remote or on the display panel to turn the screen on.The available options may differ depending on the selected mode. | |
| Advanced Settings | |
| Dynamic Contrast Changes the dynamic contrast ratio to the desired value. | |
| Noise Reduction Reduces the amount of noise in a picture if the signal is weak. | |
| Colour Temp Sets the desired color temperature value. Cool, Normal, and Warm options are available. | |
| Picture Zoom Sets the desired image size format. | |
| Film Mode Adjusts the display for films with fast motion scenes. | |
| Skin Tone Adjusts the skin tone. | |
| RGB Gain Adjusts the strength of the red, green, and blue colors. RGB Gain can also be used for fine adjustments of white balance in the picture. | |
| HDMI Full Range Enhances the blackness in the picture. | |
| PC Position Appears only when the input source is set to VGA/PC. | |
| Auto position Automatically optimizes the display. | |
| H Position Shifts the image horizontally to the right or left of the screen. | |
| V Position Shifts the image vertically towards the top or bottom of the screen. | |
| Dot Clock Corrects the interference that appears as vertical banding in dot intensive presentations like spreadsheets, paragraphs, or text in smaller fonts. | |
| Phase Clears hazy or noisy pictures, by trial and error. | |
| Reset Resets the picture settings to factory default settings (except Game mode). | |
| While in VGA (PC) mode, some items in Picture menu are unavailable. Instead, VGA mode settings are added to the Picture Settings. | |
System > Sound menu
| Volume Adjusts the volume level. | |
| Equalizer Selects the equalizer mode. Custom settings can be made only when in User mode. | |
| Balance Adjusts whether the sound comes from the left or right speaker. | |
| Headphone Sets headphone volume.To prevent damage to your hearing, before using headphones, ensure that the headphone volume is set to a low level. This is only available if the Headphone/Lineout option is set to Headphone. | |
| Audio Link Discovers and wirelessly connects sound devices to the display panel. (Not available on UHD861-LT) | |
| AVL (Automatic Volume Limiting) Sets the sound to a fixed output level for all sources. | |
| Headphone/Lineout Sets the type of external audio.Lineout—An external amplifier is connected to the display panel using the headphone jack.Headphone—Headphones are connected to the display panel. | |
| Dynamic Bass Enables or disables dynamic bass. | |
| Surround Sound | Enables or disables surround sound. |
| Digital Out | Sets the digital out audio type to PCM or Compressed. |
System > Settings menu
| Language | Sets the OSD menu language. The available languages are:Albanian, Arabic, Belarusian, Bulgarian, Croatian, Czech, Danish, Dutch, English, Estonian, Finnish, Flemish, French, Gaelic, German, Greek, Hebrew, Hungarian, Italian, Kazakh, Latvian, Lithuanian, Macedonian, Mongolian, Norwegian, Persian, Polish, Portuguese, Romanian, Russian, Serbian, Slovak, Slovenian, Spanish, Swedish, Thai, Turkish, Ukrainian | |
| Date/Time | Sets the date and time. | |
| Sources | Enables or disables selected source options. | |
| For 4K images, if the connected device is HDMI 2.0 compatible set the source to Enhanced. If the connected device is HDMI 1.4 compatible, set the source to Regular. Regular and Enhanced change the color settings for the selected HDMI source.To disable an HDMI source, select Disabled. | ||
| Network/Internet Settings Displays network/internet settings. | ||
| More Displays other setting options of the display panel. | ||
| Menu Timeout Changes the timeout duration for menu screens. | ||
| Standby Led Enables or disables the functionality of the standby LED. If disabled, the LED will not function. | ||
| Software Version Displays the current software version. | ||
| Application Version Displays the current software version. | ||
| Auto Display OFF Sets the desired time for the display panel to automatically go into standby mode when not being operated. | ||
| Audio Video Sharing Shares files stored on a smartphone or tablet. Sharing software must be installed on the connected device. | ||
| Video Wall Settings Opens the Video Wall Settings menu screen to set the Row Count, Column Count, Cell, and Offset options. | ||
| CEC Enables and disables the CEC functionality completely. | ||
| CEC Auto Power On Allows connected HDMI-CEC compatible devices to turn on the display panel and switch to its input source automatically. | ||
| Speakers Sets whether audio is heard through the display panel speakers or a connected compatible audio device set. | ||
Signage Settings menu
| Device Info | ||
| Set ID Sets the device ID with a value between 0-99. | ||
| Software version | Displays the firmware version currently installed on the display panel. | |
| Serial number | Displays the serial number of the unit. | |
| Model name | Displays the model name of the unit. | |
| Save model information | Copies the model information data of the unit to a connected USB device. | |
| Display Life Time | Displays the amount of time the panel has been active since the panel was first turned on, including any time the panel was in stand-by. | |
| Controls | ||
| OSD Orientation | Sets the orientation of the display panel on-screen display. | |
| Pixel shift | Enables or disables pixel shifting, which may help to avoid image retention that can occur when displaying fixed patterns or still images for a long periods of time. If enabled, the picture and OSD (On-Screen Display) is shifted at specified time intervals. | |
| No Signal Sets the behavior preference of the display panel, when no signal is detected from the currently set input source. Failover and Input Search options are available.If no playable files are available or there is no USB device connected to the display panel, the No Signal image is displayed and the display panel turns off after 30 seconds.If the No Signal image is not available, the message "No Signal OSD" is displayed on the screen, and the display panel turns off after 30 seconds.If Input Search is selected the display panel searches all available input sources consecutively to find a signal. For each source, to select the priority number use the left and right arrows. If no signal is detected from other available sources, "No Signal OSD" is displayed and the display panel turns off after a period of 30 seconds.If Failover is selected, the Media Browser Autoplay setting is ignored and any media on the connected USB device is played. | |
| No signal delay Sets a delay between the No Signal state is detected and when the No Signal preference is applied. | |
| No signal Power off When enabled, if no signal is received from the selected source, the display panel turns itself off after a period of 30 seconds. This feature only works if all of the following circumstances occur:No Signal option is set as Failover.A USB device is not connected to the display panel, or a USB device is connected, but no playable files are installed in the USB device. | |
| Panel Lock Prohibits the use of the control joystick on the display panel. | |
| RCU Inhibit Inhibits the use of theremote. The remote control functions in Stand-By mode independently from this setting.If this option is set as ON only the Volume Up/Down, Numeric Buttons, and the Standby button on the remote are functional.To access the menu and enable the remote, press MENU > 1973 on the remote. Signage Settings menu will appear. Enter the Controls menu and set this option as Off. | |
| UART 0 Sets the protocol for UART 0 to either ASCII or HEX. The default value isASCII. The display panel does not need to be restarted after changing the protocol.If debug logs are enabled, ASCII must be selected. If the HEX protocol is selected while debug is enabled, revert the protocol to ASCII and reboot the display panel.To change the baud rate, select ASCII and select 38400 or 115200.The HEX protocol works with the baud rate value 19200 for UART0. | |
| UART 1 Sets the protocol for UART 1 to either ASCII or HEX. The default value isHEX. The display panel does not need to be restarted after changing the protocol.The HEX protocol works with the baud rate value 9600 for UART1. | |
| Embedded Touch Enables or disables the touch overlay. (UHD861-LT only) | |
| Power up settings | |
| Power Up Mode Configures the power up mode preference to Last state, Always on, or Standby. | ||
| Quick Standby When this feature is enabled, when the display panel enters standby the screen goes black, but all other functionality remains active. If the panel is turned off using RS232 and LAN commands, it can be turned on again with RS232 and LAN commands.With the feature disabled, when the display panel enters standby the display panel is turned off and enters a low power state. To turn the panel back on, use the Wake on RS232 command with baud rate 38400 or press the power button on the remote control. This is the energy-saving mode. | ||
| Power on Delay Sets a delay value at power on, from 0 to 2000 ms in steps of 100 ms.The display panel turns on after the set delay time is expired. | ||
| Auto Launch Configures the auto launch preference as CMS (Start URL), Open Browser (Open Browser initial page), or Disabled. | ||
| Boot Up Picture mode Configures the picture mode preference at power on. If set as Off, the last set picture mode is used at power on. | ||
| HDMI1 Wake Up When enabled, if an HDMI input source (HDMI 5V signal) is detected the display panel wakes up, and when the signal is inactive the display panel shuts down. | ||
| HDMI2 Wake Up | If a schedule is set or an OPS unit is connected to the display panel, this option is inactive and can not be enabled. | |
| USB | ||
| Clone to USB Copies the database files from the unit to a connected USB device. | ||
| Clone from USB Copies the database files from a connected USB device to the unit. | ||
| USB Information Displays the Current Total space and Free space information of the connected USB device, and formats the connected USB device. | ||
| USB Operations Highlight and press OK to perform USB operations. | ||
| USB Option Disables the USB ports on the display panel, or select the 5V option to provide 5 volts power over USB. When set to 5V, browsing the USB content through the Media Browser is disabled. | ||
| OPS SettingsThis menu is not available if an OPS is not connected to the display panel. | ||
| OPS Information Displays read-only information about the OPS unit, if supported. | ||
| OPS Status Displays whether the OPS module is on or off. Allows the change of status via soft PSON signal (0.5s). | ||
| Boot Signal Enables or disables sending a PSON signal when a non-standard OPS erroneously reports it is ON during bootup. | ||
| Power down Turns the OPS off via hard PSON signal (5s). | ||
| Scheduler Settings | Sets the unit to turn on or off automatically at defined time with the defined input source setting.If the Source option is set as Last State, the input source will not be changed at power-up. | |
| If the Source option is set as USB, the media files in the connected USB device are played back automatically. | ||
| Link Options Displays the current Start URL and Settings URL links, and the configuration for the Open browser initial page and NTP server link preferences. | ||
| Volume Settings Displays the volume preferences. | ||
| Reset to Default Values Returns the display panel to default settings. | ||
| First time installation Resets all settings to factory defaults, and begins the First Time Installation configuration. | ||
Troubleshooting
Learn about common issues and their solutions.
Understanding the LED status indicators
Identify the LED state flashing pattern and meaning.
| LED Status Status of the monitor | |
| Power LED not lit Power on | |
| Power LED lit Power off (Standby mode) | |
| Power LED flashing (slow) Scheduler active | |
| Power LED flashing (fast) Power up/down and software update |
Wireless network not available
The wireless network does not appear in the list of available networks.
Resolution

Wireless functionality is not available on the UHD861-LT display panel.
- Ensure the display panel wireless connection is allowed through the network firewall.
• Try searching for wireless networks again. - If the wireless network does not function properly, use the wired network.
- If the display panel does not function using the wired connection, check the modem and router.
- If the router does not have a problem, check the internet connection of your modem.
Related information
Connecting to a wired network (on page 20)
Connection is slow
The network connection to the display panel is slow.
Resolution
To get information on the internet service area, connection speed, signal quality, and other settings, refer to the wireless modem documentation.
Disruption during playback or slow reactions
While content is playing on the display panel, the video is disrupted or slow to play.
Resolution
- Ensure the display panels are at least three meters away from microwave ovens, mobile telephones, Bluetooth-enabled devices, or any other Wi-Fi compatible devices.
- Change the active channel on the WLAN router.
Internet connection not available
The display panel cannot connect to the internet.
Resolution
- Ensure the display panel wireless connection is allowed through the network firewall.
- The MAC address of the display panel is authenticated each time when connecting to the internet. If the MAC address of the computer or modem is permanently registered, it is possible that the display panel might not connect to the internet. Because the display panel has its own MAC address, the internet service provider cannot validate the MAC address of the display panel. For this reason, the display panel cannot connect to the internet.
Contact the internet service provider and request information on how to connect a different device, such as the display panel, to the internet.
Audio video sharing not working
Audio and video cannot be shared to the display panel.
Resolution
- Ensure the display panel wireless connection is allowed through the network firewall.
- The MAC address of the display panel is authenticated each time when connecting to the internet. If the MAC address of the computer or modem is permanently registered, it is possible that the display panel might not connect to the internet. Because the display panel has its own MAC address, the internet service provider cannot validate the MAC address of the display panel. For this reason, the display panel cannot connect to the internet.
Contact the internet service provider and request information on how to connect a different device, such as the display panel, to the internet.
Invalid domain
An invalid domain error is displayed when trying to share media.
Resolution
Prior to sharing any files in the media server program on the computer, ensure that an authorized username and password is used for logging in, and that the domain is active. If the domain is invalid, this might cause problems while browsing files in Audio Video Sharing mode.
Remote control does not work
Using the remote control has no impact on the display panel.
Resolution
For remote control commands to be received by the display panel, the IR extender cable must be installed.
In certain conditions, direct light may impact the ability for the IR receiver to identify commands from the remote control.
Image has artifacts or judder
On the UHD861-P display panel, on certain resolutions the image may contain artifacts or judder.
Resolution
To resolve the issue, do one of the following.
- Navigate to System > Picture Menu and set the mode to either Sports or Game.
- Navigate to System > Picture Menu > Advanced Settings and turn off Movie Sense.
These settings may introduce judder into the image.
Access Series display panels Specifications
Learn about the product specifications. Due to continuing research, specifications are subject to change without notice.
Physical specifications
Learn the physical specifications for the tiles and the power supply.
| UHD551-L UHD651-L UHD751-P UHD861-P UHD861-LT | |||||
| Dimensions (W x H x D) | 1238 mm x 712 mm x 104 mm(48.74 in x 28.02 in x 4.09 in) | 1459 mm x 841 mm x 96 mm(57.44 in x 33.11 in x 3.78 in) | 1684mm x 967mm x 93mm(66.3 in x 38.07 in x 3.66 in) | 1975mm x 1146mm x 103mm(77.76 in x 45.12 in x 4.05 in) | 1975mm x 1146mm x 103mm(77.76 in x 45.12 in x 4.05 in) |
| Weight 17.5 kg (38.58 lb) | 22.5 kg (49.6 lb) | 36.5 kg (80.47 lb) | 65.5 kg (144.4 lb) | 92 kg (202 lb) | |
| Resolution 3840 x | 2160 (16:9) UHD | ||||
| VESA wall mount measurements | |||||
| Hole pattern size | 400 mm x 200 mm | 400 mm x 400 mm | 600 mm x 400 mm | 600 mm x 400 mm | 600 mm x 400 mm |
| Screw thread size | M6 M8 | ||||
| Screw length 9.5 | mm minimum, 16.5 mm maximum | ||||
Power specifications
Learn the power requirements for the display panels.
| UHD551-L UHD651-L UHD751-P UHD861-P UHD861-LT | |||||
| Input rating 110-240V AC50-60Hz 1300mA | 110-240V AC50-60Hz 1400mA | 110-240V AC50-60Hz 2500mA | 110-240V AC50-60Hz 3200mA | 110-240V AC50-60Hz 3600mA | |
Environmental specifications
Learn the environmental specifications for the display panels.
Non-operating environment
| UHD551-L UHD651-L UHD751-P UHD861-P UHD861-LT | |
| Temperature -20 °C - 60 °C (-4 °F - 140 °F) | |
| Humidity 20 – 90% RH (No condensation) | |
Operating environment
| UHD551-L UHD651-L UHD751-P UHD861-P UHD861-LT | |
| Temperature 0 °C | - 40 °C (32 °F - 104 °F) |
| Humidity 10 – 90% RH (No condensation) | |
Wireless LAN transmitter specifications
Learn the wireless LAN transmitter specifications for the display panels.
| Frequency ranges Maximum output power | |
| 2400 - 2483,5 MHz (CH1-CH13) < 100 mW | |
| 5150 - 5250 MHz (CH36 - CH48) < 200 mW | |
| 5250 - 5350 MHz (CH52 - CH64) < 200 mW | |
| 5470 - 5725 MHz (CH100 - CH140) < 200 mW |
Country restrictions
This device is intended for home and office use in all EU countries (and other countries following the relevant EU directive) without any limitation, except for the countries mentioned below.
| Country Restriction | |
| Bulgaria General authorization required for outdoor use and public service. | |
| France Indoor use only for 2454-2483.5 MHz. | |
| Italy If used outside of own premises, general authorization is required. | |
| Greece Indoor use only for 5470-5725 MHz band. | |
| Luxembourg General authorization required for network and service supply (not for spectrum). | |
| Norway | Radio transmission is prohibited for geographical area within a radius of 20km from the center of Ny-Ålesund. |
| Russian Federation | Indoor use only. |
The requirements for any country may change at any time. It is recommended that users check with local authorities for the current status of their national regulations for both 2.4 GHz and 5GHz wireless LANs.
Regulatory
This product conforms to the latest regulations and standards related to product safety, environmental, and electromagnetic compatibility (EMC) requirements.
Modification statement
Christie Digital Systems has not approved any changes or modifications to this device by the user. Any changes or modifications could void the user's authority to operate the equipment.
- ANSI/UL 60950-1 – Information Technology Equipment – Safety – Part 1: General Requirements
• CAN/CSA C22.2 No. 60950-1
• EN 60950-1 - IEC 60950-1 IEC/EN 60950-1 – Information Technology Equipment – Safety – Part 1: General Requirements
RF exposure
This equipment complies with FCC/ISED radiation exposure limits set forth for an uncontrolled environment and meets the FCC radio frequency (RF) Exposure Guidelines and RSS-102 of the ISED radio frequency (RF) Exposure rules. This equipment has very low levels of RF energy that is deemed to comply without maximum permissive exposure evaluation (MPE).
This device complies with Part 15 of the FCC Rules and Innovation, Science and Economic Development Canada license-exempt RSS standard(s). Operation is subject to the following two conditions: (1) this device may not cause interference, and (2) this device must accept any interference, including interference that may cause undesired operation of the device.
Electro-magnetic compatibility
Emissions
• CISPR 32/EN 55032
- FCC CFR47, Part 15, Subpart B, Class A – Unintentional Radiators
• ICES-003 (A), ISSUE 5, Class A
- IEC 61000-3-2/EN61000-3-2: Limits for Harmonic Current Emissions
Immunity
• IEC 61000-3-3/EN61000-3-3
- IEC/EN61000
• IEC 61000-4-2/EN61000-4-2
• IEC 61000-4-3/EN61000-4-3
• IEC 61000-4-4/EN61000-4-4
• IEC 61000-4-5/EN61000-4-5
• IEC 61000-4-6/EN61000-4-6
• IEC 61000-4-11/EN61000-4-11
Environmental
- China Ministry of Information Industry (along with 7 other Government Agencies) Order No.32 (01/2016) on the control of pollution caused by electronic information products, hazardous substances concentration limits (GB/T 26572 - 2011), and the applicable product marking requirement (SJ/T 11364 - 2014).
- EU Directive (2011/65/EU) on the restriction of the uses of certain hazardous substances (RoHS) in electrical and electronic equipment and the applicable official amendment(s).
- EU Directive (2012/19/EU) on waste and electrical and electronic equipment (WEEE) and the applicable official amendment(s).
- Regulation (EC) No. 1907/2006 on the registration, evaluation, authorization and restriction of chemicals (REACH) and the applicable official amendment(s).
Corporate offices
| Christie Digital Systems USA, Inc. |
| ph: 714 236 8610 |
| Christie Digital Systems Canada Inc. |
| ph: 519 744 8005 |
Worldwide offices
| Africaph: +27 (0)11 510 0094 | Columbiaph: +57 (318) 447 3179 | Korea (Seoul)ph: +82 2 702 1601 | United Kingdomph: +44 (0) 118 977 8000 |
| Australiaph: +61 (0) 7 3624 4888 | Franceph: +33 (0) 1 41 21 44 04 | Mexicoph: +52 55 4744 1790 | United States (Arizona)ph: 602 943 5700 |
| Brazilph: +55 (11) 2548 4753 | Germanyph: +49 (0) 221 99512 0 | Singaporeph: +65 6877 8737 | Independent salesconsultant offi ces |
| China (Beijing)ph: +86 10 6561 0240 | Indiaph: +91 (080) 6708 9999 | Spainph: +34 91 633 9990 | Italyph: +39 (0) 2 9902 1161 |
| China (Shanghai)ph: +86 21 6030 0500 | Japan (Tokyo)ph: 81 3 3599 7481 | Middle Eastph: +971 (0) 503 6800 | Russiaph: +36 (0) 1 47 48 100 |