Aurora Pro Explorer - Sports camera SiOnyx - Free user manual and instructions
Find the device manual for free Aurora Pro Explorer SiOnyx in PDF.


User questions about Aurora Pro Explorer SiOnyx
0 question about this device. Answer the ones you know or ask your own.
Ask a new question about this device
Download the instructions for your Sports camera in PDF format for free! Find your manual Aurora Pro Explorer - SiOnyx and take your electronic device back in hand. On this page are published all the documents necessary for the use of your device. Aurora Pro Explorer by SiOnyx.
USER MANUAL Aurora Pro Explorer SiOnyx
natural_image
Abstract flame-like logo design with stylized curves and flame-like shapes (no text or symbols)SiOnyx
AURORA FAMILY OF CAMERAS
SPORT/BLACK/CLASSIC/PRO
User Manual

natural_image
Abstract flame-like logo design with stylized curves and circular elements (no text or symbols)SiOnyx
SiOnyx, LLC
100 Cummings Center, Suite 303B
Beverly, MA 01915
U.S.A.
(978) 922-0684
support@sionyx.com
Follow us on Facebook
@SiOnyxNightVision


SiOnyx, LLC
AURORA
4.2/3.6DC ≈ 0.72/0.84A

T D180006007
MADE IN INDONESIA
Pat.:sionyx.com/patents
Contains FCC ID:2AO17-CDV18A
Contains IC:23556-CDV18A


Table of Contents
Chapter 1. Getting Started ...... 6
1.1 Unpacking the Box 6
1.2 Charging the Battery 6
1.2.1 Removing the Battery 9
1.2.2 Viewing the Battery Charge....10
1.3 Viewing the Camera Modes and Settings....10
1.3.1 Button Overview....11
1.3.2 Settings Dial....11
1.3.3 Viewfinder 12
1.3.4 Scene Ring....12
1.3.5 Focusing Ring....13
1.4 Inserting the Micro SD Card....13
1.5 Setting the Date and Time....15
1.6 Downloading the SiOnyx Aurora App to Connect to Your Camera......18
1.7 Attaching the Neck Strap....23
Chapter 2. Photos and Videos.... 25
2.1 Taking a Photo and Shooting a Video 25
2.1.1 Taking a Photo 25
2.1.2 Shooting a Video....26
2.1.3 Adjusting the Focus 27
2.1.4 Zooming In and Out 28
2.1.5 Setting Exposure Compensation 28
2.1.6 Using the Scene Ring 29
2.2 Viewing and Deleting Photos and Videos....29
2.2.1 Viewing and Zooming In on Photos and Videos 30
2.2.2 Viewing Thumbnails of Photos and Videos 30
2.2.3 Playing Videos....32
2.2.4 Deleting Photos and Videos....32
2.2.5 Deleting Multiple Photos and Videos....34
2.3 Shooting Photos: Settings 35
2.3.1 Shutter Speed 35
2.3.2 Burst....38
2.3.3 HDR....40
2.3.4 SelfTimer 42
2.3.5 Panorama....44
2.3.6 Time Lapse 45
2.4 Shooting Photos and Videos: Advanced Settings....48
2.4.1 Brightness....48
2.4.2 Overlay....50
2.4.3 EVF Time Out 58
2.4.4 Night Glow....60
2.4.5 Quick Review....62
2.4.6 Invert Image 63
2.5 Shooting Videos: Settings....64
2.5.1 EIS....64
2.5.2 Setting the Frame Rate 66
2.5.3 Resolution 68
2.5.4 HDR....70
Chapter 3. Loop Mode....72
3.1 Trigger Type 72
3.2 Trigger Mode....74
Chapter 4. WIFI/Settings Mode....76
4.1 About....76
4.1.1 Factory Reset....77
4.2 Auto Power OFF....78
4.3 Compass....79
4.4 Date and Time 80
4.4.1 GPS Set 80
4.4.2 Format....83
4.5 SD Card 85
4.6 Chimes....87
4.7 Audio 88
4.8 GPS....89
4.8.1 Turning GPS On 89
4.8.2 Changing the GPS Format 90
4.8.3 GeoTag Image 93
4.9 WIFI 94
Chapter 5. Reference Information....95
5.1 Battery....95
5.1.1 Operating Temperature Range 95
5.1.2 Tips on Reducing Battery Usage 95
5.1.3 Battery Storage and Handling....95
5.1.4 Battery Disposal 95
5.2 Camera Specifications....96
5.3 SiOnyx Customer Care....97
Chapter 6. Troubleshooting....98
Chapter 7. Warranty 99
Chapter 1. Getting Started
Congratulations on purchasing your new SiOnyx Aurora Night Vision camera! Let's get started!
1.2 Charging the Battery
The first thing you need to do after unpacking the camera is to charge the battery. You charge the battery via the USB port.

Click here to view a related video
To charge the battery:
- Make sure the camera is in OFF mode.
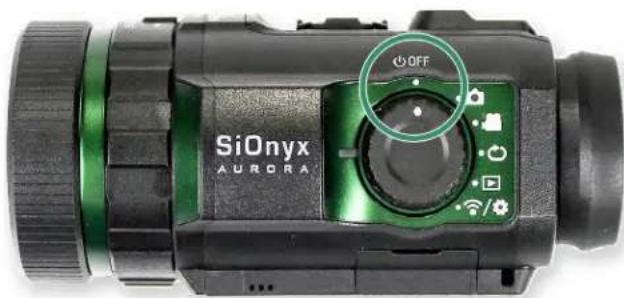
text_image
SiOnyx AURORA OFFChapter 1. Getting Started
- Remove the Viewfinder by pulling down on the Viewfinder Release button.
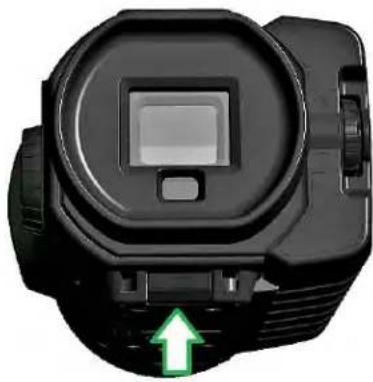
natural_image
Close-up of a black circular device with a square display and green arrow indicator (no text or symbols)- Pull the Viewfinder straight out.
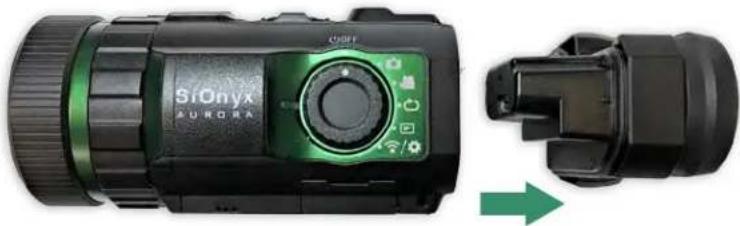
natural_image
Close-up of a SiOnyx Aurora digital camera with green control panel and white adjustment knob (no text or symbols on device body)- Slide the battery into the battery slot.
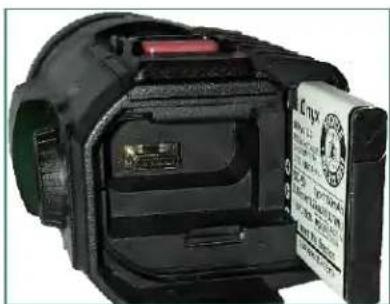
natural_image
Close-up of a black camera module with visible lens and internal components (no text or symbols)Chapter 1. Getting Started
- Insert the Micro USB cable into the camera USB port.
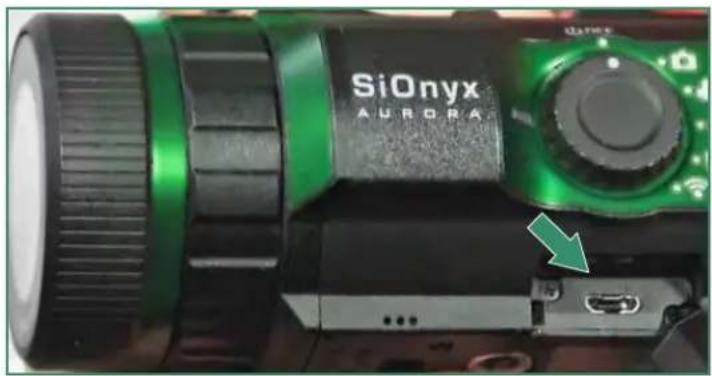
natural_image
Close-up of a green SiOnyx Aurora camera lens with attached connector (no text or symbols on body)- Connect the camera to a powered-on computer or plug it into a wall charger using the supplied Micro USB cable.
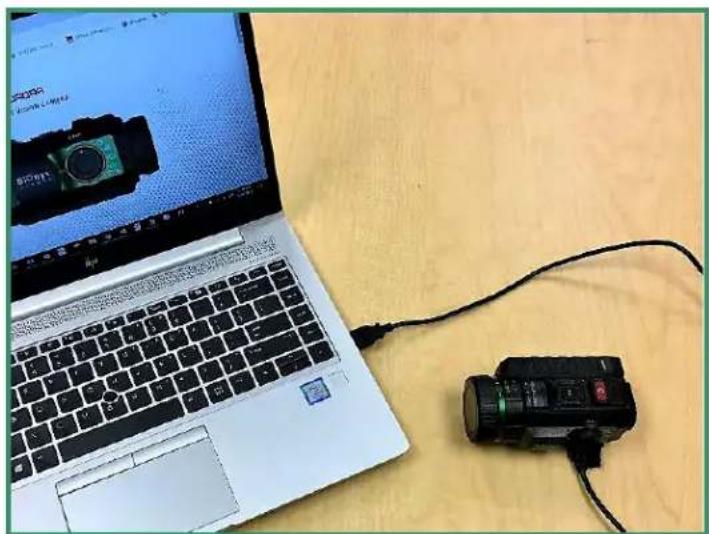
natural_image
Laptop with a camera on a wooden desk next to a DSLR camera and cable (no visible text or symbols)A green light appears and blinks slowly during the charging process. When the battery is fully charged, the light will turn off.
Note: It will take about 2-3 hours to charge the battery to 100% and it will last \~2 hours of shooting video.
Chapter 1. Getting Started
1.2.1 Removing the Battery
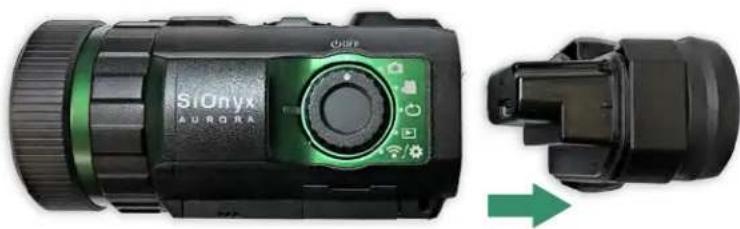
- Open the Viewfinder by pulling down on the Viewfinder Release button.
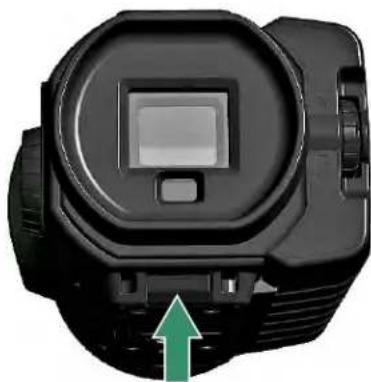
natural_image
Close-up of a black mechanical device with a green upward arrow indicating a component or feature (no visible text or symbols)- Pull the Viewfinder straight out.
natural_image
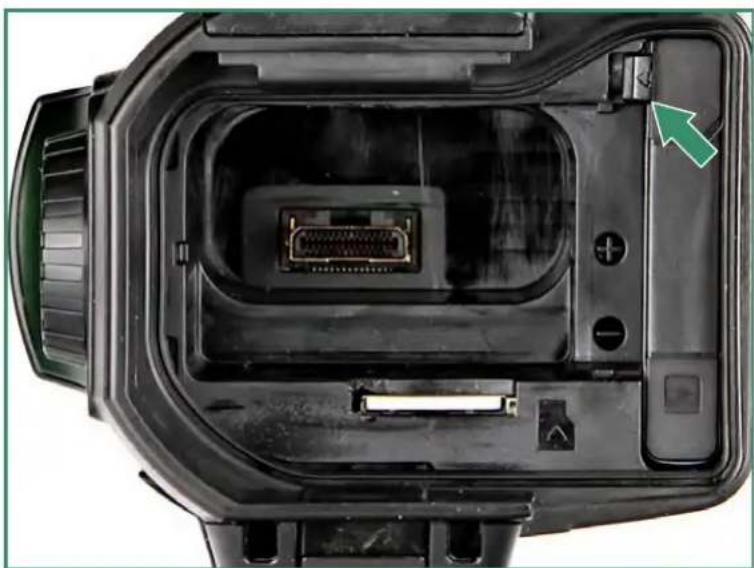
Close-up of a SiOnyx Aurora camera with green control panel and white adjustment arrow (no text or symbols on device body)- Press the tab on the left side of the battery and slide the battery out.
natural_image
Interior view of a black electronic device showing internal components including a central connector and labeled pins (no text or symbols visible)- Slide the Viewfinder back into its slot.
Chapter 1. Getting Started
1.2.2 Viewing the Battery Charge
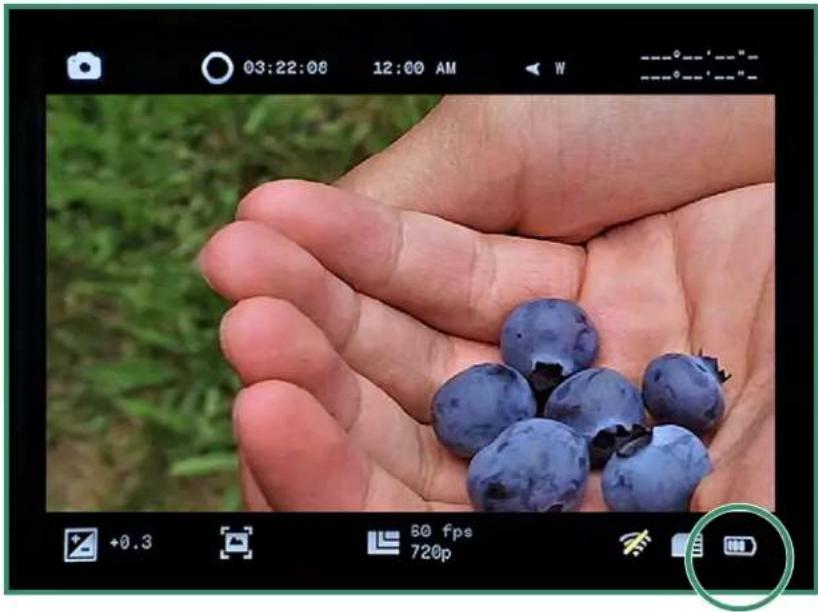
To view the remaining battery charge, rotate the Settings Dial to Photo, Video, Loop or WiFi/Settings.

natural_image
Close-up of a SiOnyx Aurora digital camera with green lens and control buttons (no readable text beyond branding)The battery gauge icon is on the bottom right of the screen.
natural_image
Close-up of a hand holding blueberries with visible cracks, set against green grass background (no text or symbols)1.3 Viewing the Camera Modes and Settings
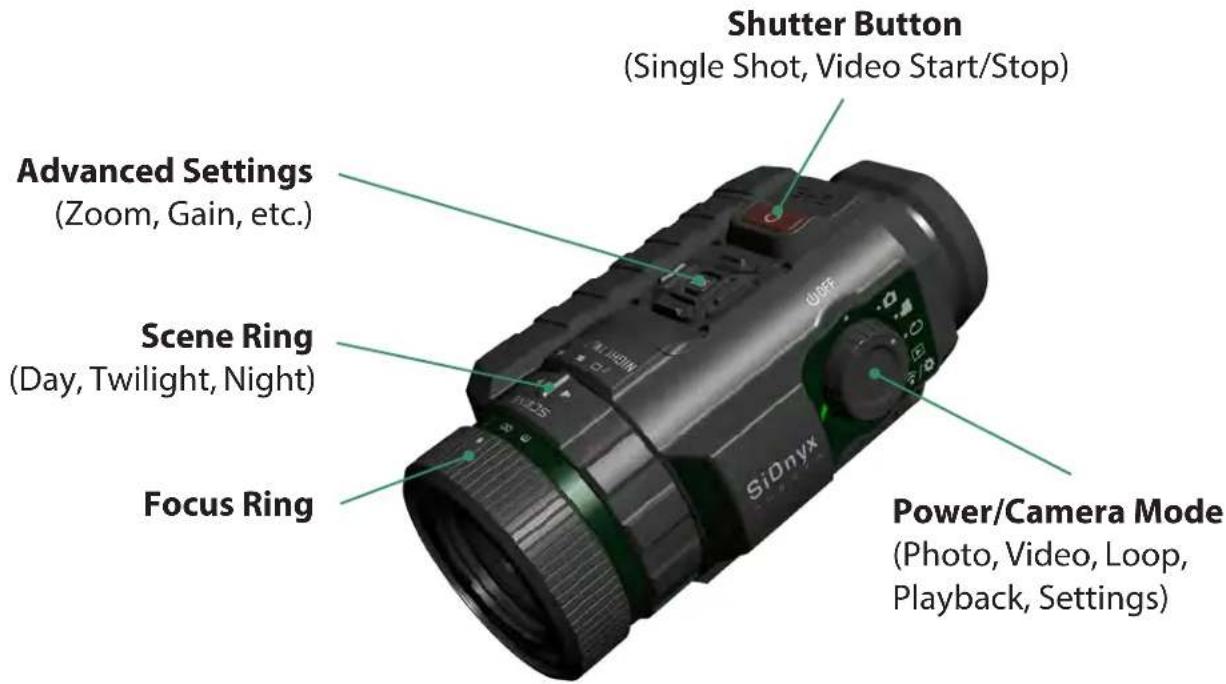
Here's an overview of the camera buttons.

Click here to view a related video
1.3.1 Button Overview
text_image
Shutter Button (Single Shot, Video Start/Stop) Advanced Settings (Zoom, Gain, etc.) Scene Ring (Day, Twilight, Night) Focus Ring Power/Camera Mode (Photo, Video, Loop, Playback, Settings)1.3.2 Settings Dial
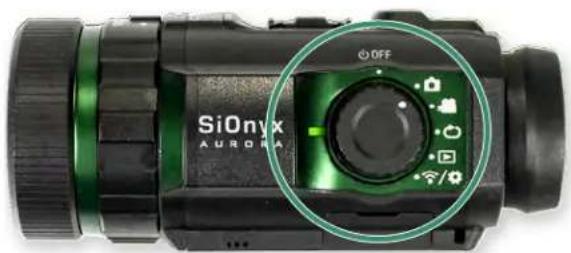
The Settings Dial turns the camera on and off as well as to set the camera mode.
natural_image
Close-up of a SiOnyx Aurora digital camera with green lens and control buttons (no readable text beyond brand name)Power Off
• Photo
Video
- Loop
- Playback
- WiFi/Settings


Chapter 1. Getting Started
1.3.3 Viewfinder
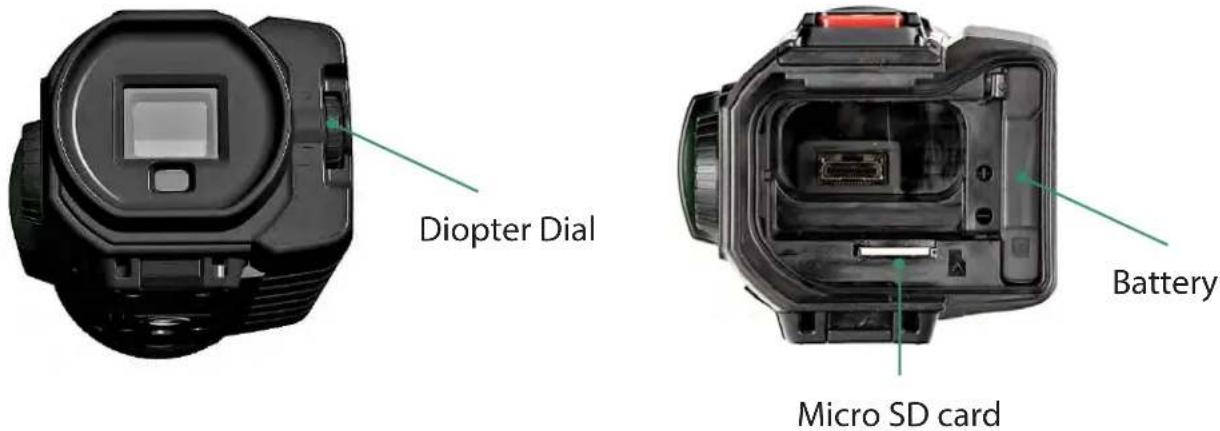
The Electronic Viewfinder (EVF) contains a menu and control system for the camera. On the right side of the EVF is the Diopter Dial, which will allow you to focus without prescription glasses. The EVF will need to be removed to access the battery and Micro SD card.
1.3.4 Scene Ring
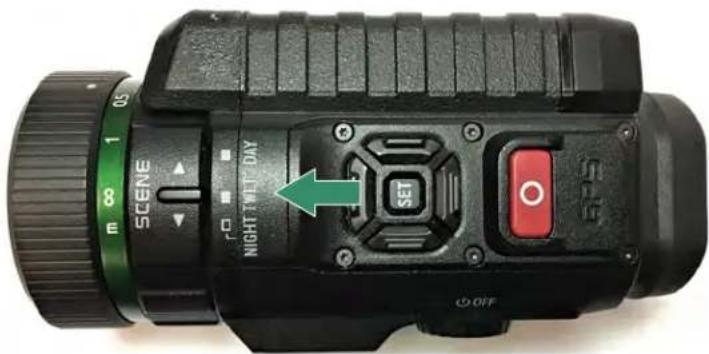
Use the Scene Ring to adjust the lens to the time of day.
text_image
SCENE 8 1 05 NO NIGHT TWENT DAY SET GPS OFFChapter 1. Getting Started
1.3.5 Focusing Ring
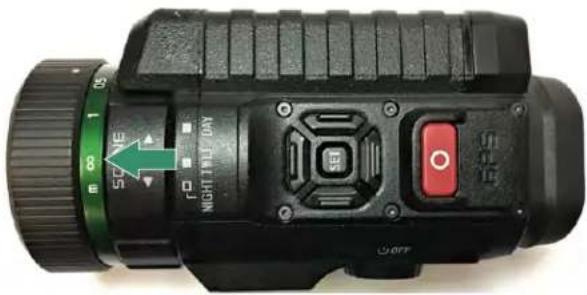
Use the Focusing Ring to adjust the focus visually or by the distance settings on the dial.
natural_image
Close-up of a black night light bulb device with green control knob and red button (no readable text or symbols)1.4 Inserting the Micro SD Card
The Micro SD card holds all your videos and photos.
Note: The camera does not come with a Micro SD card. You need to purchase a Micro SD/Micro SDHC Class 10 or UHS-1 with a capacity of up to 32GB. (PRO has a 256GB limit)
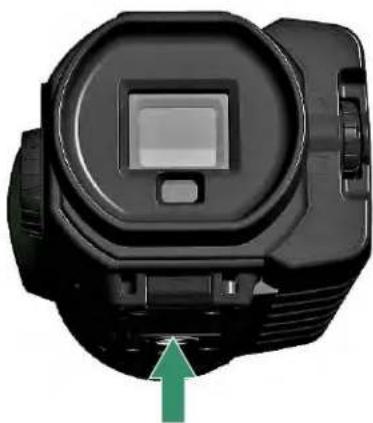
- To insert the Micro SD card, remove the Viewfinder by pulling down on the Viewfinder Release button.
- Pull the Viewfinder straight out.
- Insert the SD card into its slot and push it until it locks. To remove it, push it again and it will release.
- Slide the Viewfinder back into its slot.
natural_image
Close-up of a black mechanical device with a green arrow pointing to a small component (no visible text or symbols)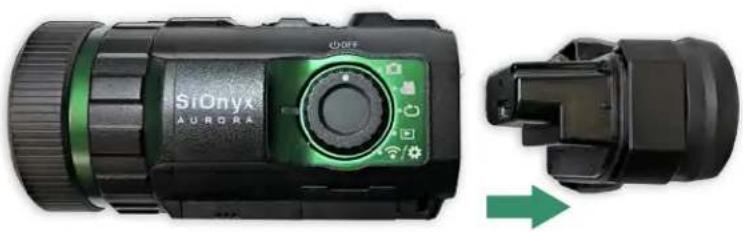
natural_image
Close-up of a SiOnyx Aurora digital camera with green control panel and white adjustment arrow (no text or symbols on device body)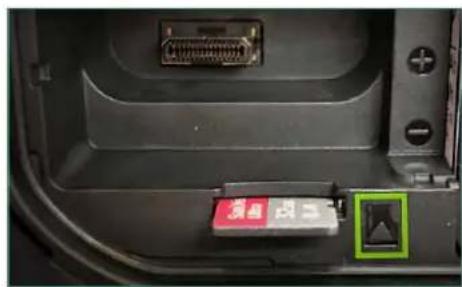
natural_image
Close-up of a car rear panel showing an electronic device with a connector and a green square icon (no visible text or symbols)Note: Don't force the SD card into the slot or the data may be damaged.
Aurora User Manual 13
Chapter 1. Getting Started
text_image
WiFi/Setting SiOnyx AURORA
1.5 Setting the Date and Time
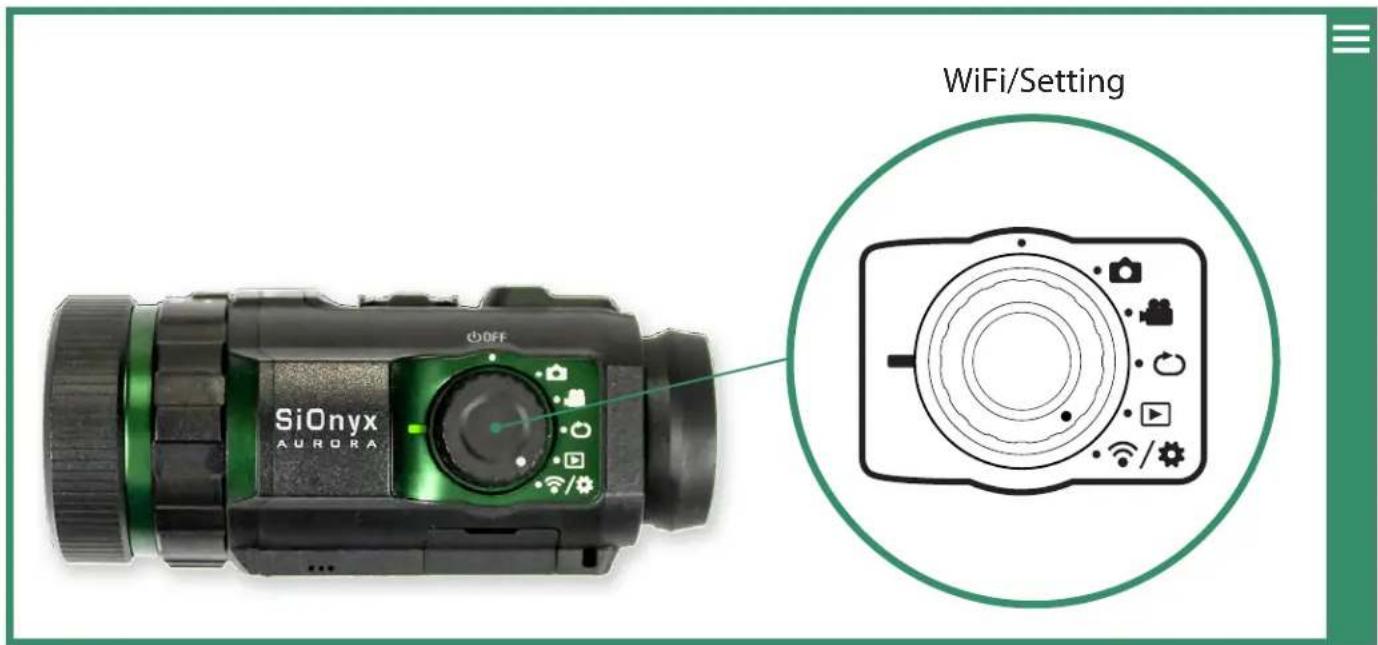
- To set the date and time, rotate the Settings Dial to the WiFi/Settings menu .
/

Click here to view a related video
- Press SET to access the WiFi/Settings menu.
- This warning will appear until the date and time are set.
Chapter 1. Getting Started
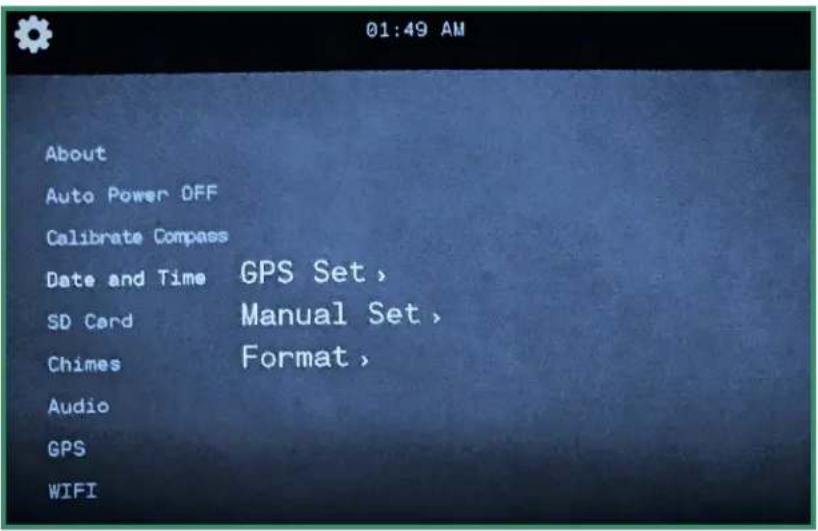
- Toggle down to Date and Time and toggle right to the Date and Time options.
text_image
01:49 AM About Auto Power OFF Calibrate Compass Date and Time GPS Set , SD Card Manual Set , Chimes Format , Audio GPS WIFI- You can either set the time by GPS (Aurora 'classic' and Pro only) (see "Section 4.4.1 GPS Set" on page 80) or manually. You can also change the format of the date and time (see "Section 4.4.2 Format" on page 83). To set the date and time manually, toggle down to Manual Set.
When your SiOnyx Aurora is powered on for the first time, you will be prompted to set the date and time. This prompt will persist until the date and time has been set.
- Rotate the Settings Dial to the WiFi & Settings position.
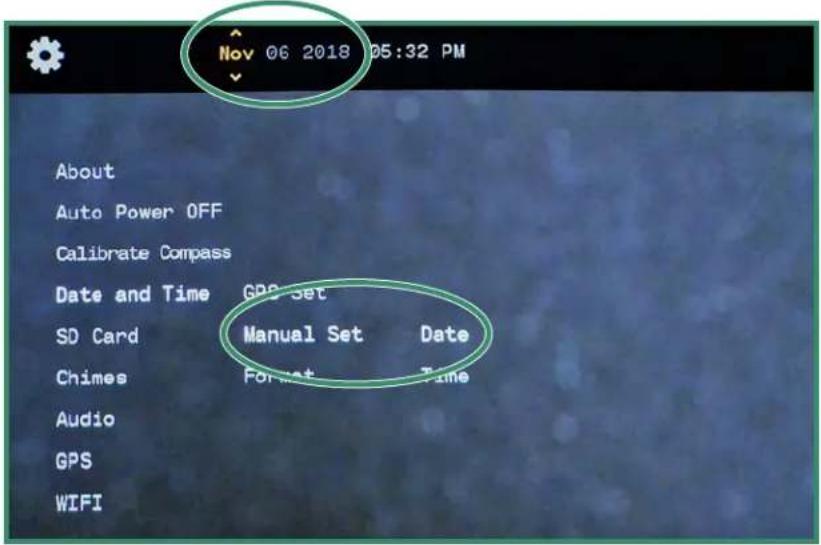
- Toggle down to Date and Time and then right to Manual Set.
- Toggle right to Date and press SET. The date at the top of the menu is now in change mode.
text_image
Nov 06 2018 05:32 PM About Auto Power OFF Calibrate Compass Date and Time GPS Set SD Card Manual Set Date Chimes Format Time Audio GPS WIFIChapter 1. Getting Started
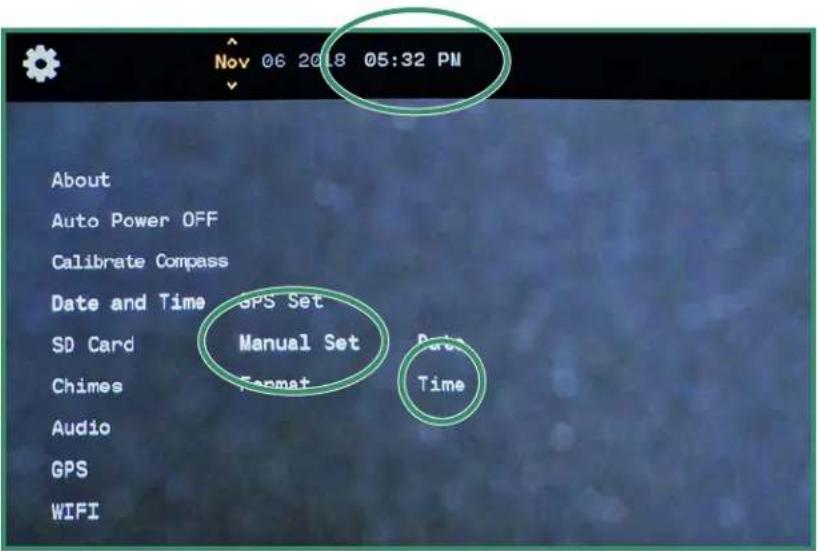
- Toggle up and down to change the Date and press SET. Repeat these steps to set the Time.
text_image
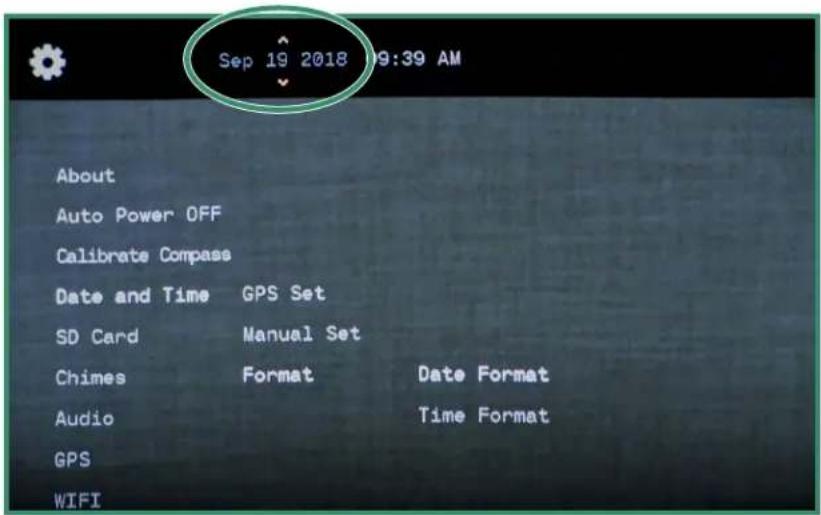
Nov 06 2018 05:32 PM About Auto Power OFF Calibrate Compass Date and Time GPS Set SD Card Manual Set Chimes Format Date Audio Time GPS WIFI- To set the Date Format, toggle right to Date Format and press SET.
text_image
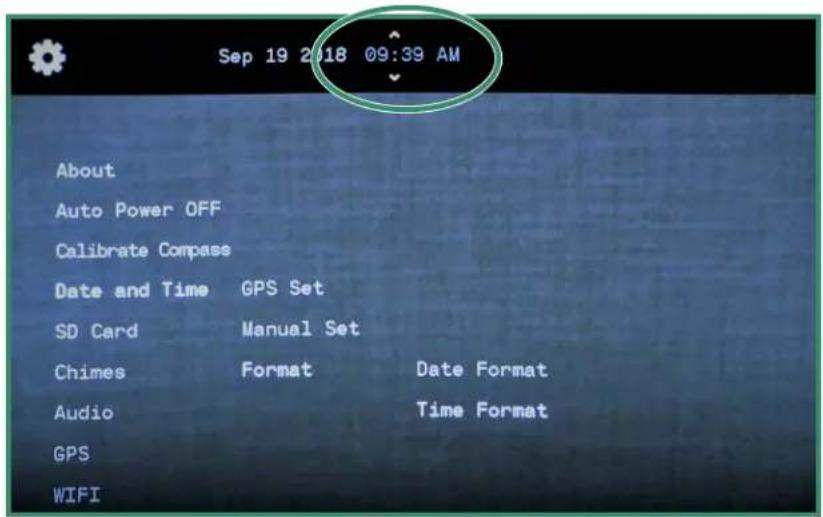
Sep 19 2018 09:39 AM About Auto Power OFF Calibrate Compass Date and Time GPS Set SD Card Manual Set Chimes Format Date Format Audio Time Format GPS WIFI- Select the Date Format at the top of the screen. Select an option and press SET. See "Section 4.4.2 Format" on page 83 for more details.
Chapter 1. Getting Started
- Toggle down to Time Format and press SET and select the option you want at the top of the screen and press SET.
text_image
Sep 19 2018 09:39 AM About Auto Power OFF Calibrate Compass Date and Time GPS Set SD Card Manual Set Chimes Format Date Format Audio Time Format GPS WIFI- Toggle left twice to exit to the main menu and toggle left twice to return to the main WIFI/Settings menu.
1.6 Downloading the SiOnyx Aurora App to Connect to Your Camera
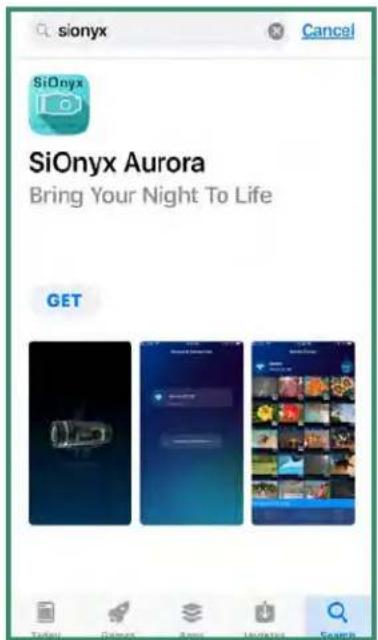
The SiOnyx Aurora app works as your camera's Viewfinder with all your camera controls. The app is available at the App Store and Google Play.
- Download the SiOnyx Aurora App from the App Store or Google Play.
text_image
sionyx Cancel SiOnyx SiOnyx Aurora Bring Your Night To Life GET Taylor Grazea Apple Initiate SearchChapter 1. Getting Started
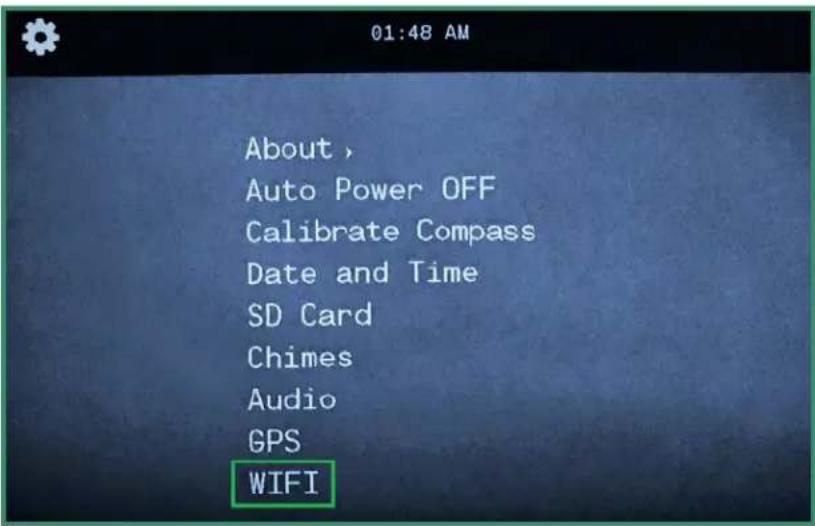
- To connect your smartphone or tablet to the camera, rotate the Settings Dial to the WiFi/Settings Mode to access the menu.
text_image
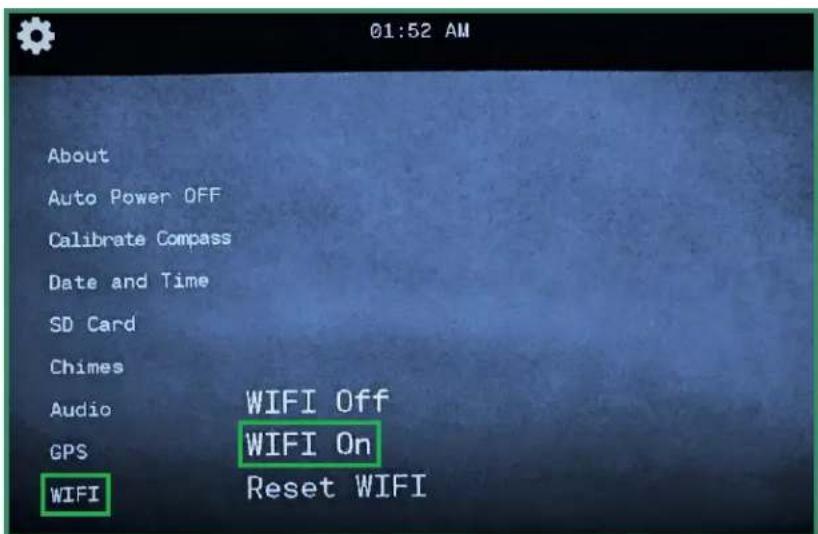
01:48 AM About > Auto Power OFF Calibrate Compass Date and Time SD Card Chimes Audio GPS WIFI- Toggle down to WIFI and toggle right to WIFI On and press SET.
text_image
01:52 AM About Auto Power OFF Calibrate Compass Date and Time SD Card Chimes Audio WIFI Off GPS WIFI On WIFI Reset WIFIChapter 1. Getting Started
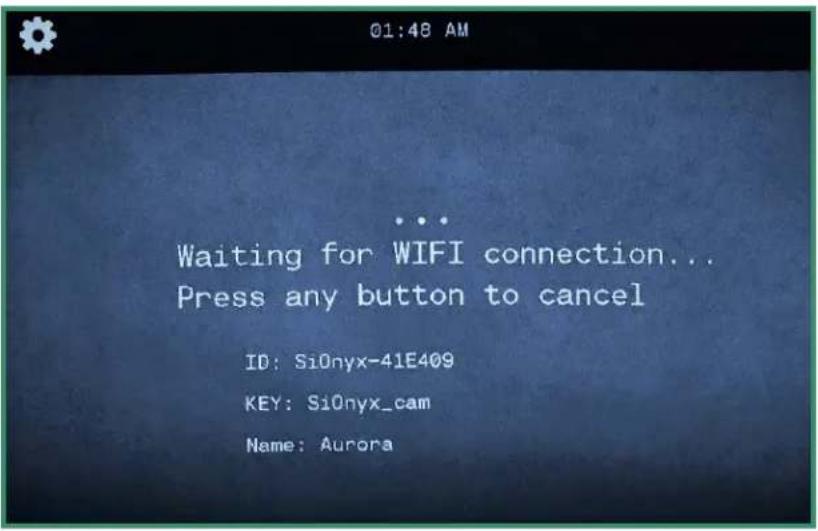
- The screen will display "Waiting for WIFI connection..."
text_image
01:48 AM ... Waiting for WIFI connection... Press any button to cancel ID: SiOnyx-41E409 KEY: SiOnyx_cam Name: Aurora- Go to the WiFi setting on your smartphone or tablet and select the SiOnyx camera WiFi connection.
Note: If you're using an iPhone or iPad, turn off Bluetooth in iOS Settings before connecting to Aurora. Do not use the Control Center.
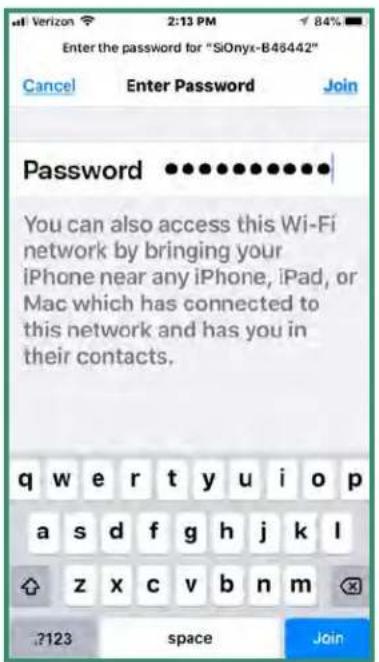
- Enter the Wi-Fi password, "SiOnyx_cam".
text_image
Enter the password for "SiOnyx-B46442" Cancel Enter Password Join Password You can also access this Wi-Fi network by bringing your iPhone near any iPhone, iPad, or Mac which has connected to this network and has you in their contacts. q w e r t y u i o p a s d f g h j k l z x c v b n m ?123 space JoinChapter 1. Getting Started
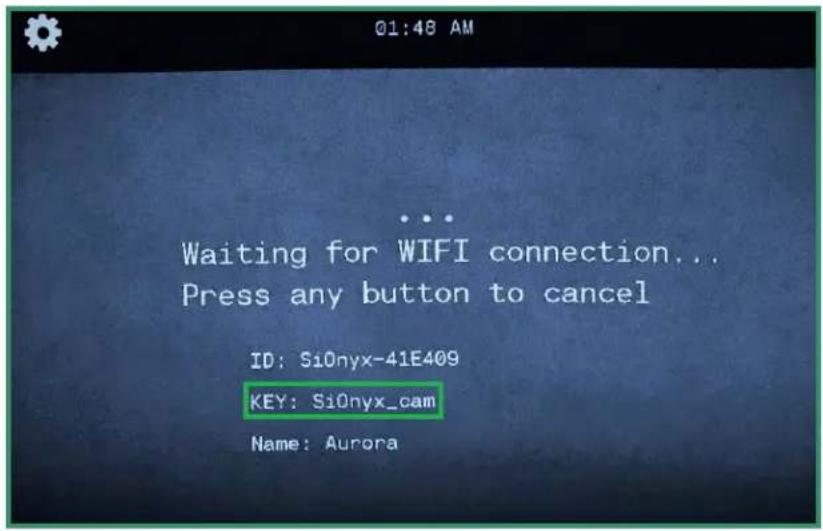
The password displays as the KEY in the Viewfinder.
text_image
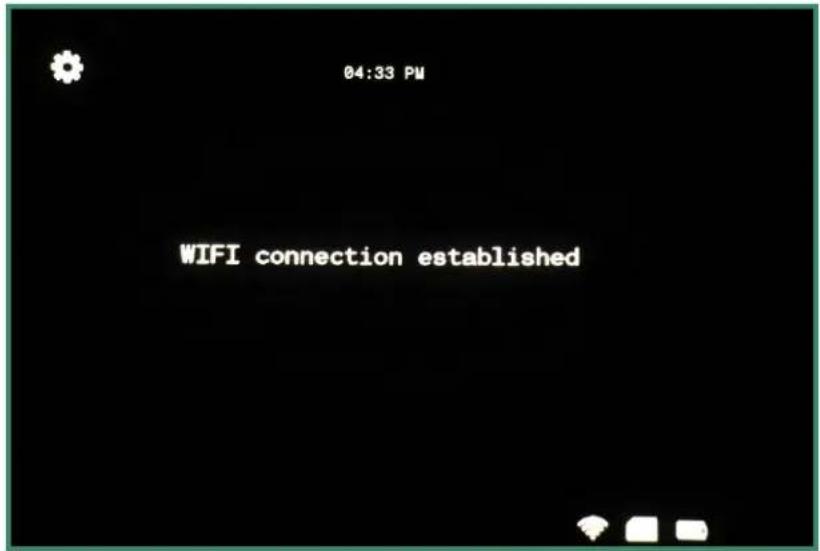
Q1:48 AM Waiting for WIFI connection... Press any button to cancel ID: SiOnyx-41E409 KEY: SiOnyx_cam Name: AuroraOnce the WiFi connection is established, the Viewfinder displays "WIFI connection established."
text_image
04:33 PM WIFI connection establishedNote: The camera will continue to display this message until you disconnect from WiFi.
Chapter 1. Getting Started
- Open the SiOnyx Aurora app and tap the camera name.
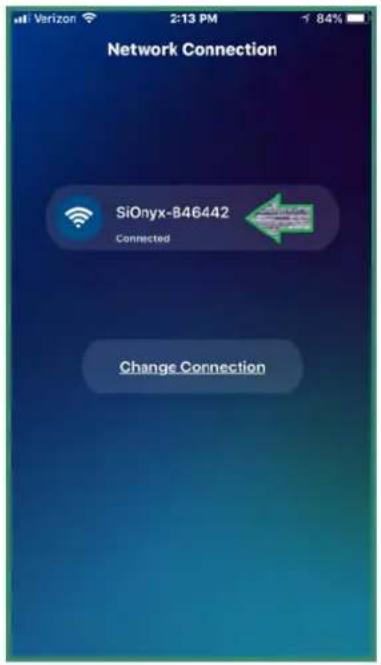
text_image
Network Connection SiOnyx-846442 Connected Change ConnectionNow you're on the home screen of the app, which is called the Media Center.
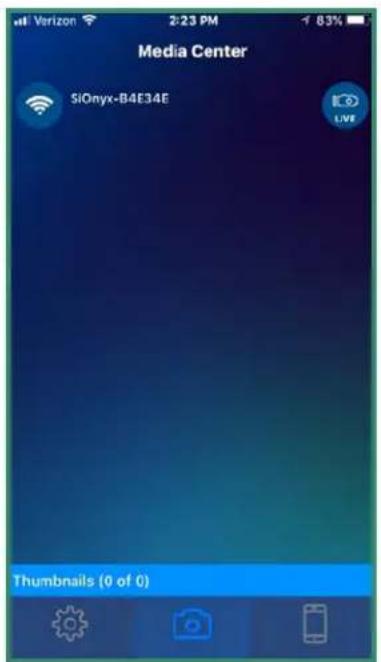
text_image
Media Center SiOnyx-B4E34E Thumbnails (0 of 0)Note: For more information about how to use the SiOnyx Aurora Mobile App, click here for the complete Mobile App guide.
Chapter 2. Photos and Videos
text_image
Shutter button WiFi/Setting SiOnyx AURORA2.1 Taking a Photo and Shooting a Video
2.1.1 Taking a Photo

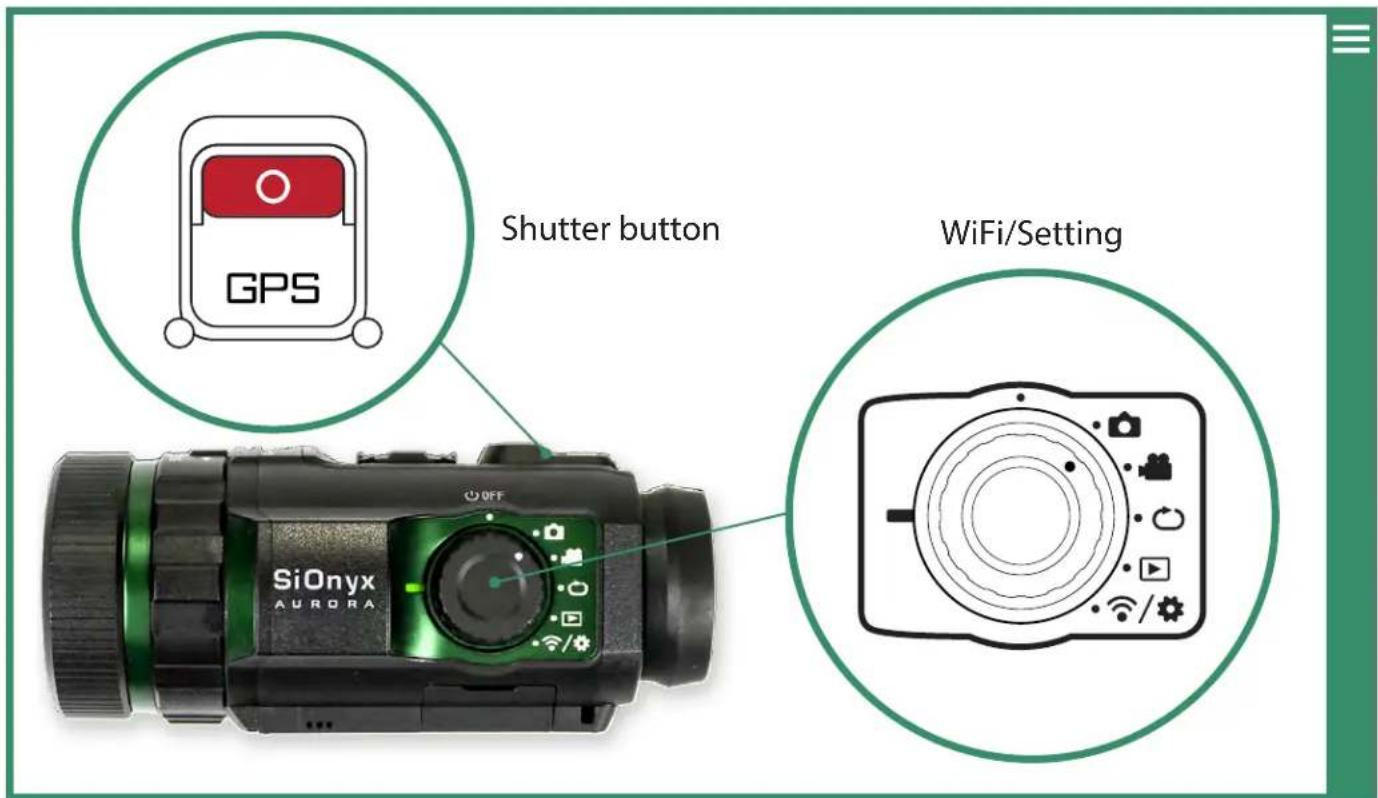
- To take a photo, rotate the Settings Dial to Photo Mode
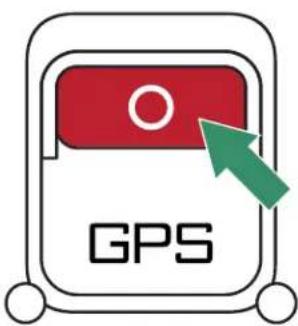
- Press the Shutter button to take a photo.
2.1.2 Shooting a Video

- To shoot a video, rotate the Settings Dial to Video Mode
- Press the Shutter button to start and stop the video.
text_image
GPSChapter 2. Photos and Videos
text_image
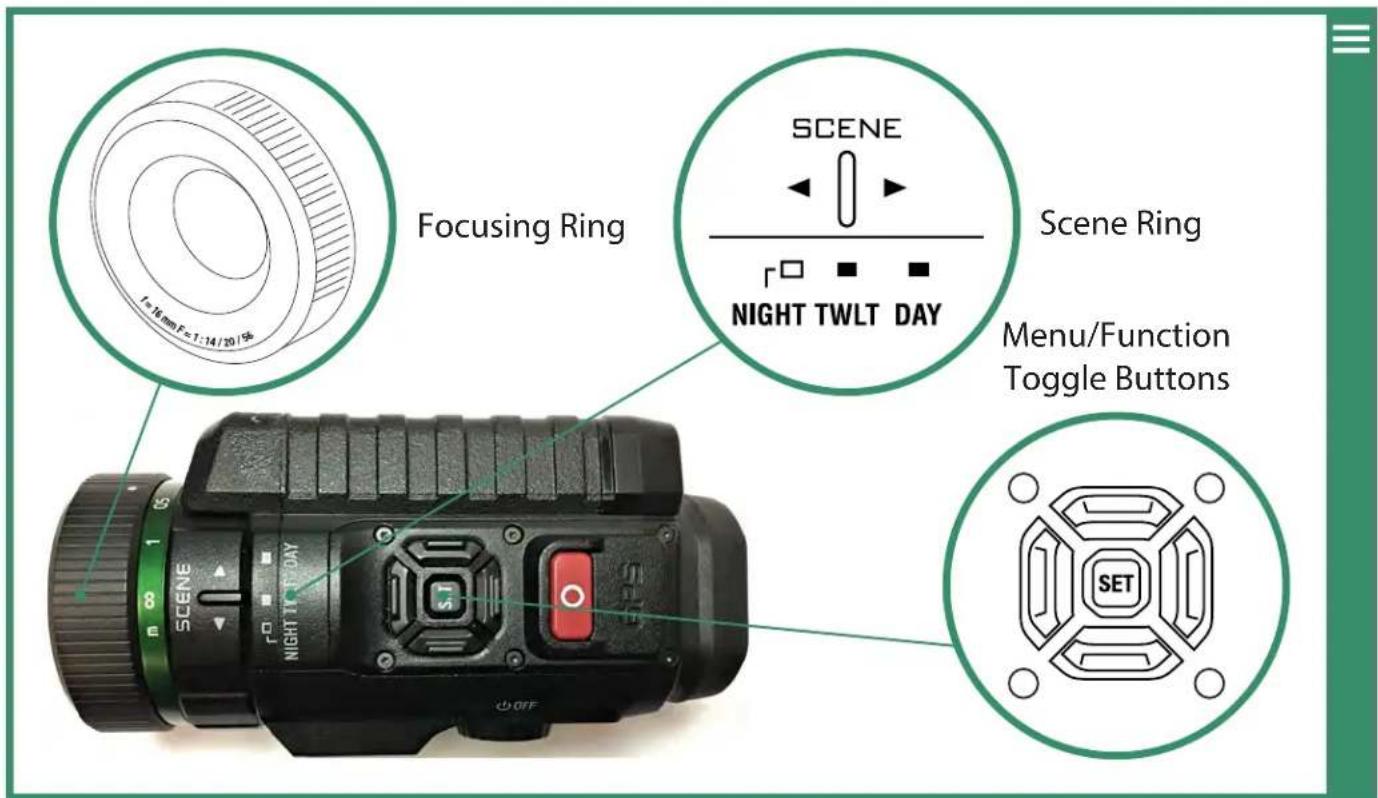
Focusing Ring SCENE NIGHT TWLT DAY Scene Ring Menu/Function Toggle Buttons SET2.1.3 Adjusting the Focus
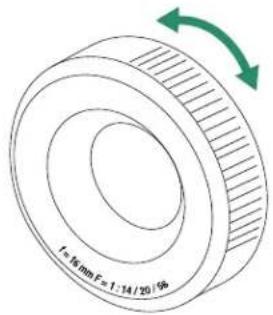
To bring an image into focus, turn the Focusing Ring left and right.
text_image
F = 16 mm F = 1.14 / 20 / 50Note: To assist in focusing, estimate the distance where the action in your scene will occur and set that distance in meters on the focus scale. You can also turn on Focus Peak under the Overlay menu. See "Chapter 2.4.2.1 Focus Peak" on page 50 for more information about Focus Peak. Refer to "Section 1.3.3 Viewfinder" on page 12 to adjust the Viewfinder. (Aurora 'classic' and Pro only)
Chapter 2. Photos and Videos
2.1.4 Zooming In and Out
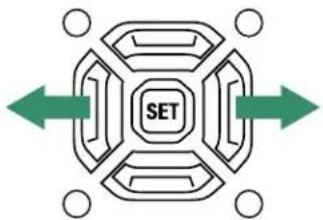
To zoom in and out, toggle left and right. Three right toggle clicks gives you 1:1 imaging.
flowchart
graph TD
    A["SET"] --> B["Node 1"]
    A --> C["Node 2"]
    A --> D["Node 3"]
    A --> E["Node 4"]
    A --> F["Node 5"]
    A --> G["Node 6"]
    A --> H["Node 7"]
    A --> I["Node 8"]
    A --> J["Node 9"]
    A --> K["Node 10"]
2.1.5 Setting Exposure Compensation or Gain
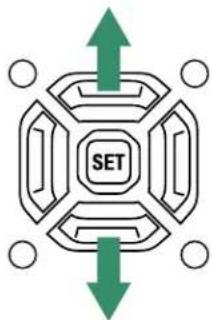
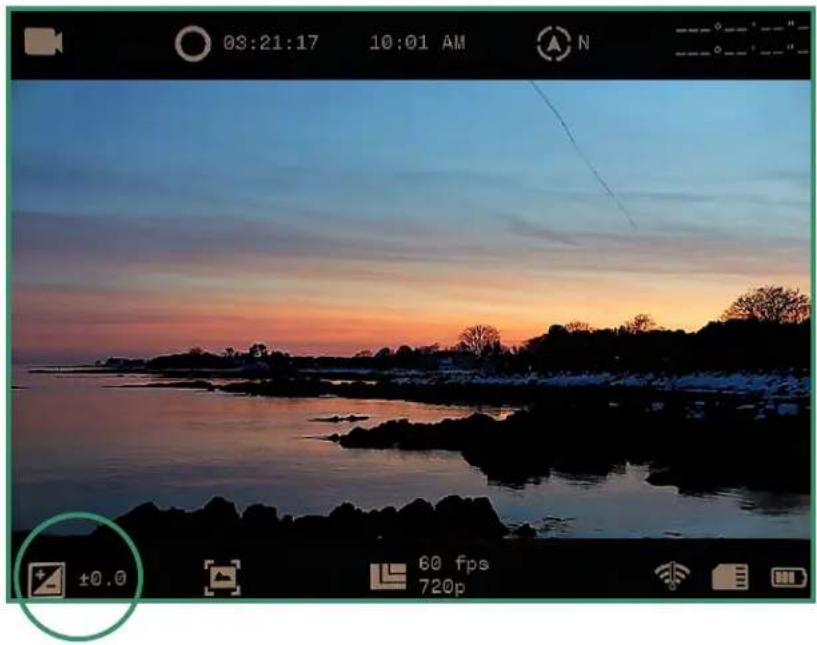
Exposure Compensation or Gain adjusts the brightness and darkness of the scene. Toggle up and down to adjust the Exposure Compensation.
flowchart
graph TD
    A["SET"] --> B["Arrow Up"]
    A --> C["Arrow Down"]
    A --> D["Arrow Left"]
    A --> E["Arrow Right"]
Note: Exposure Compensation is the same as Gain. This will increase and decrease Gain.
Chapter 2. Photos and Videos
The Exposure Compensation/Gain setting is located on the bottom left of the Viewfinder screen.
natural_image
Sunset over a calm coastal landscape with silhouetted trees and distant buildings (no text or symbols visible)2.1.6 Using the Scene Ring
The camera has settings for Night, Twilight and Day:
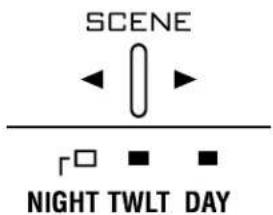
• Night – full night vision (f/1.4)
Twilight – approximately one hour before sunrise and one hour after daylight (f/2.0)
• Day – sun or clouds (f/5.6)
2.2 Viewing and Deleting Photos and Videos
You can use the Playback Mode features to view and delete photos and videos.

Click here to view a related video
Chapter 2. Photos and Videos

2.2.1 Viewing and Zooming In on Photos and Videos
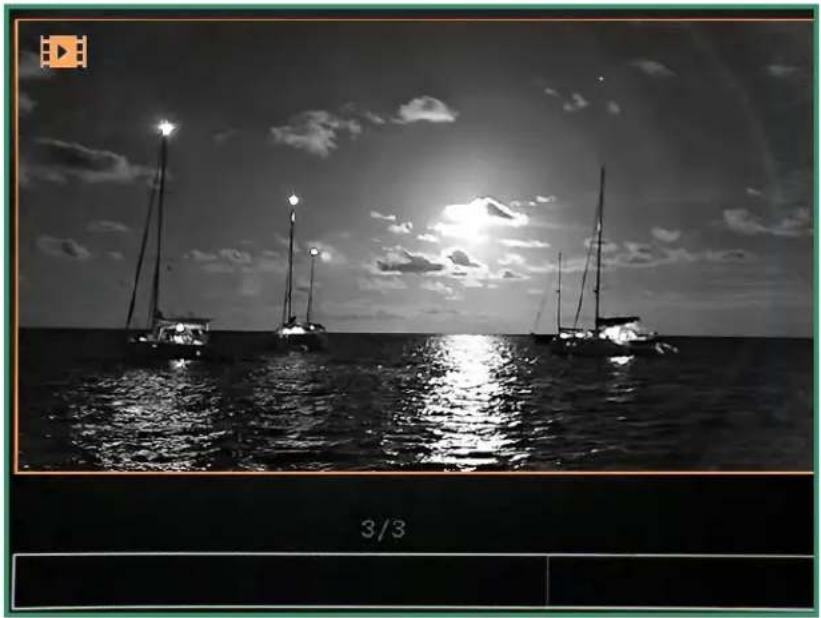
You can view and zoom in on photos and videos in the Playback Mode.
- Rotate the Settings Dial to Playback Mode .
- You'll see the latest photo or video you shot.
natural_image
Black-and-white photo of sailboats on the sea at night with a full moon and cloudy sky, no visible text or symbols- Toggle left and right to view your photos or videos.
- You can zoom in temporarily by long pressing SET.
Note: Double-click SET to get a permanent zoom. You can then long press the right toggle button to further zoom in, or the left toggle button to zoom out. When zoomed in, quick presses of the various toggle buttons pan around the image. To return to normal view, long press the left toggle until is restored to normal size, and double-click SET.
2.2.2 Viewing Thumbnails of Photos and Videos
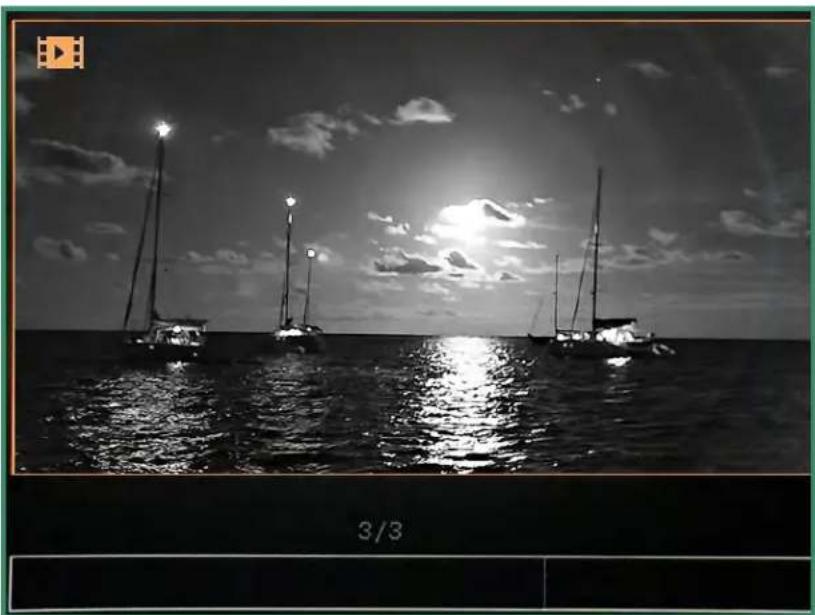
You can view four or nine thumbnails of photos and videos in the Playback Mode.
- Rotate the Settings Dial to Playback Mode .
Aurora User Manual 30
Chapter 2. Photos and Videos
- You'll see the last photo or video you shot.
natural_image
Black-and-white photo of sailboats on the sea at night with a bright sky and scattered clouds (no text or symbols visible)- Toggle up twice quickly to view four thumbnails.
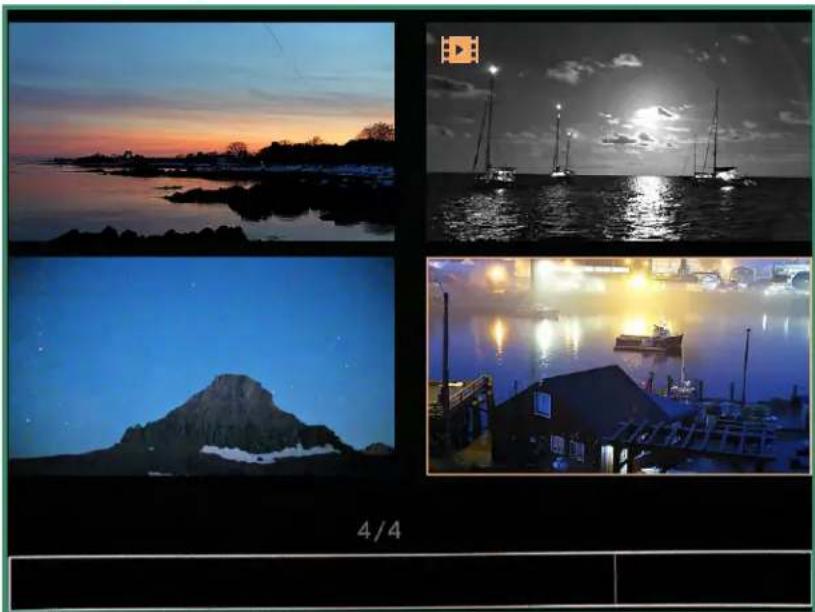
natural_image
Four-panel collage showing coastal scenes at dusk, a sailboat on water, a snowy mountain silhouette, and a waterfront scene with boats and buildings (no visible text or symbols)Chapter 2. Photos and Videos
- Toggle up twice quickly again to view nine thumbnails.
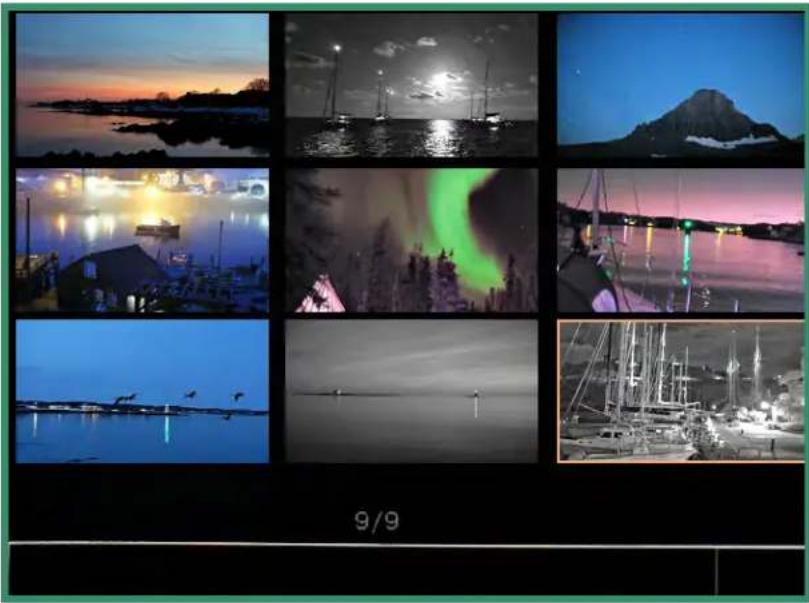
natural_image
Grid of nine black-and-white photos showing coastal scenes at dusk, including lakes, boats, and a snowy mountain silhouette (no text or symbols)- Toggle left and right to highlight the photo or video.
- To exit out of thumbnail mode, toggle up twice quickly.
2.2.3 Playing Videos
View videos in the Playback Mode

- Rotate the Settings Dial to Playback Mode.
- Toggle to the video that you want to play and long press SET until the video starts playing.
2.2.4 Deleting Photos and Videos
Delete photos and videos in the Playback Mode

- Rotate the Settings Dial to Playback Mode.
Chapter 2. Photos and Videos
- Toggle to the photo or video that you want to delete and press SET. A green checkmark will appear in the bottom right-hand corner.
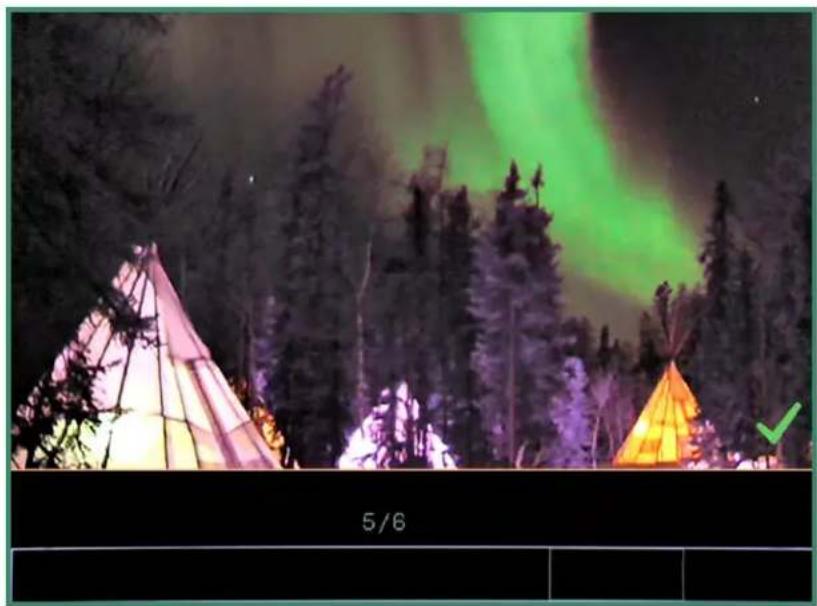
natural_image
Nighttime forest scene with illuminated tents and green/orange lighting (no text or symbols visible)- Long press SET until a trash can image appears.
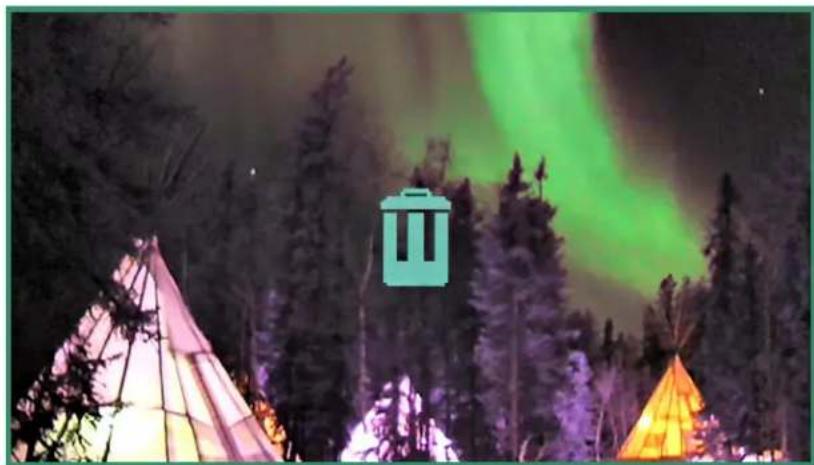
natural_image
Nighttime forest scene with illuminated tents and green laser beams, no visible text or symbolsIf you decide not to delete the photo or video, toggle left and the image will return to the one that has the green check-mark. Press SET to remove the checkmark.
- To delete the photo or video, long press SET until the trash can starts to flash, then release the SET button. The image or video is now deleted.
Chapter 2. Photos and Videos
2.2.5 Deleting Multiple Photos and Videos
You can delete multiple photos and videos at the same time.
- Rotate the Settings Dial to Playback Mode .
- View the thumbnails of your photos or videos, following the instructions in "Section 2.2 Viewing and Deleting Photos and Videos" on page 29.
- Toggle to the photos or videos that you want to delete.
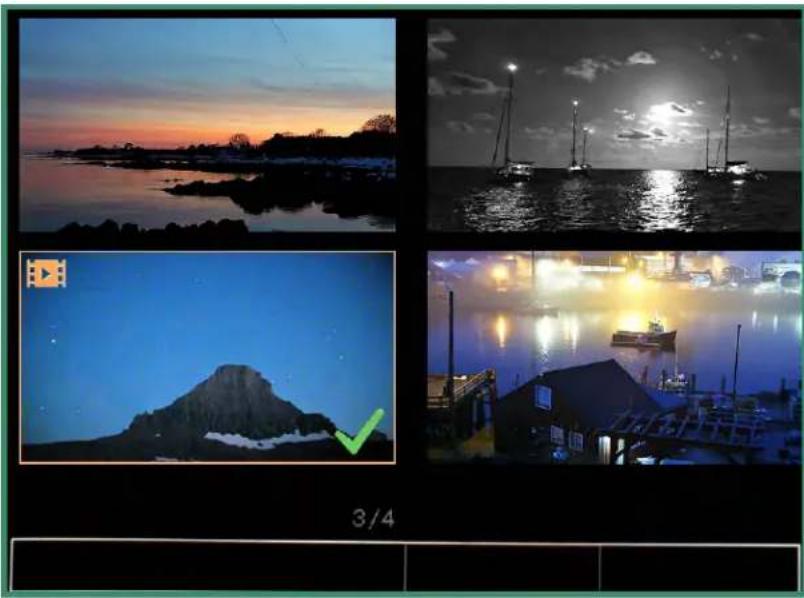
- Select the image and press SET. You'll see a green checkmark in the bottom right-hand corner. Do this for each image that you want to delete.

natural_image
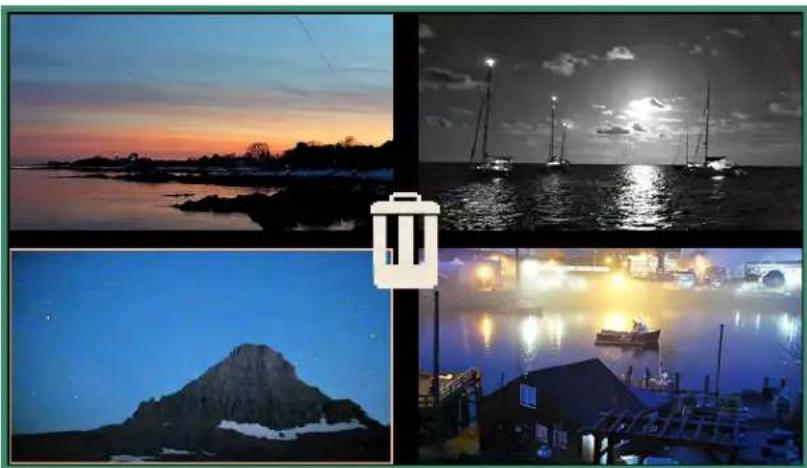
Four-panel collage showing a coastal sunset over water, a night sky with sailboats on the water, a night sky with a rocky island, and a waterfront scene with boats and buildings (no text or symbols)- Long press SET until a trash can appears.
natural_image
Four-panel collage showing a sunset over water, a sailboat on the water at night, a night sky with a rocky island, and a waterfront scene with boats and buildings (no text or symbols)Chapter 2. Photos and Videos
If you decide you don't want to delete the photo(s) or video(s), toggle left and the green checkmark appears. Press SET to remove the checkmark(s).
- To continue with deletion long press SET until the trash can starts to flash. The photo(s) or video(s) are now deleted.
2.3 Shooting Photos: Settings

2.3.1 Shutter Speed
Shutter speed is the length of time the shutter is open when you take a photo. Faster shutter speed lets in less light and reduces subject motion.
There are two shutter settings: Auto and Manual. Your camera is set to Auto by default. You can adjust the shutter speed.
-
Turn the camera on by rotating the Settings Dial to Photo Mode.
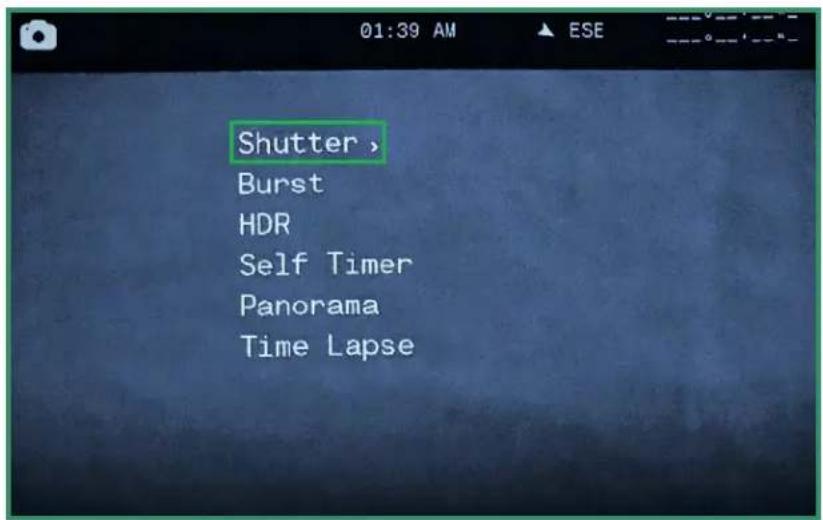
-
Press SET to access the Camera menu.
text_image
Shutter > Burst HDR Self Timer Panorama Time LapseChapter 2. Photos and Videos
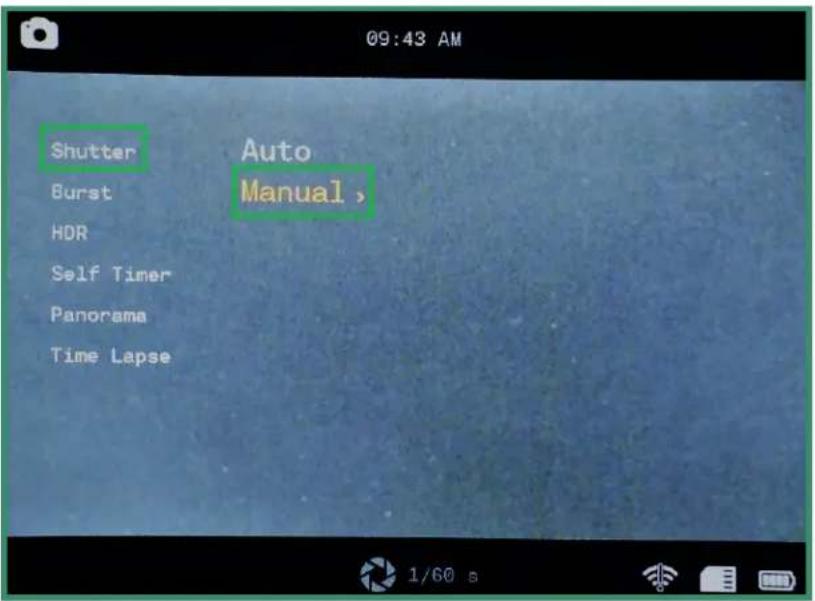
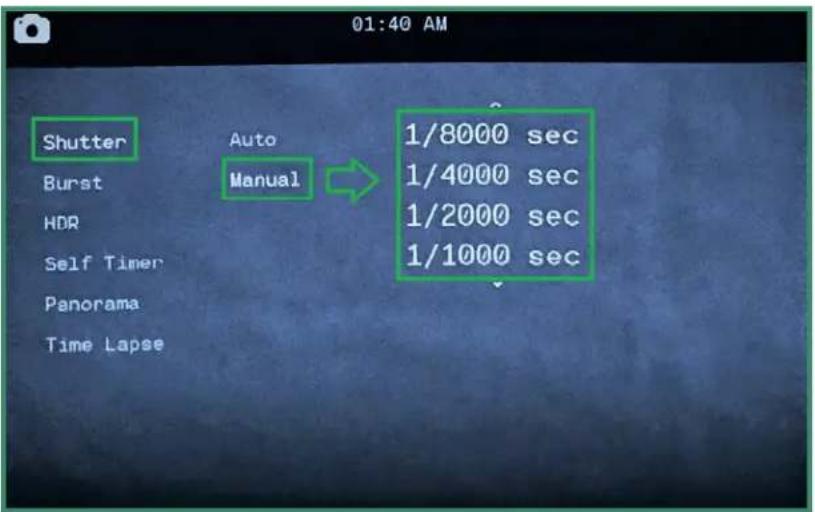
- Toggle right on Shutter to Auto or Manual.
text_image
Shutter Burst HDR Self Timer Panorama Time Lapse Auto Manual > 09:43 AM 1/60 s- To set the shutter settings manually, toggle down to Manual and right to the shutter speeds.
text_image
01:40 AM Shutter Burst HDR Self Timer Panorama Time Lapse Auto Manual 1/8000 sec 1/4000 sec 1/2000 sec 1/1000 sec- Toggle up and down to scroll through the shutter speed settings.
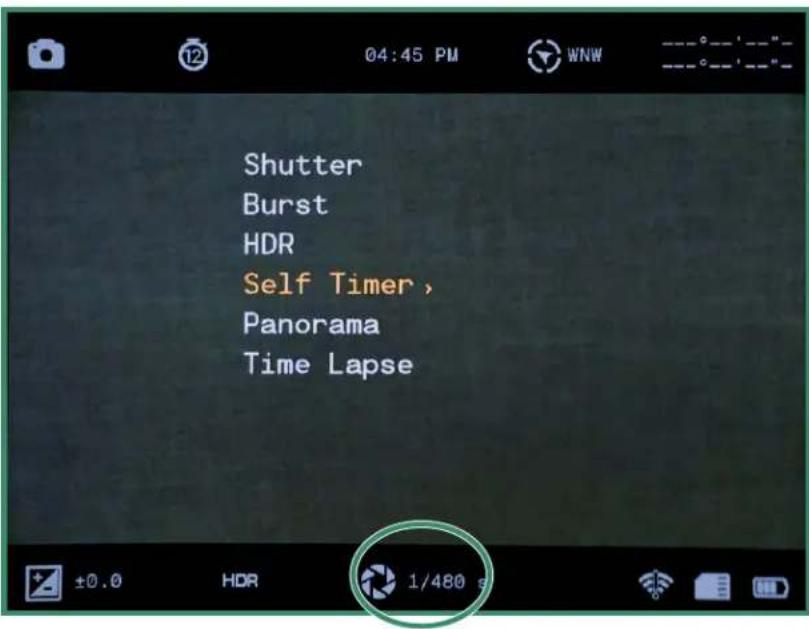
- Press SET to select the shutter speed that best suits your scene. You can set the shutter speed from 1/8000 of a second to 1.5 seconds.
Chapter 2. Photos and Videos
- Toggle left and press SET to exit the Shutter speed. The shutter speed is now visible at the bottom of the screen.
text_image
Shutter Burst HDR Self Timer > Panorama Time LapseNote: All features remain selected when the camera is turned off and then on again.
Chapter 2. Photos and Videos
2.3.2 Burst
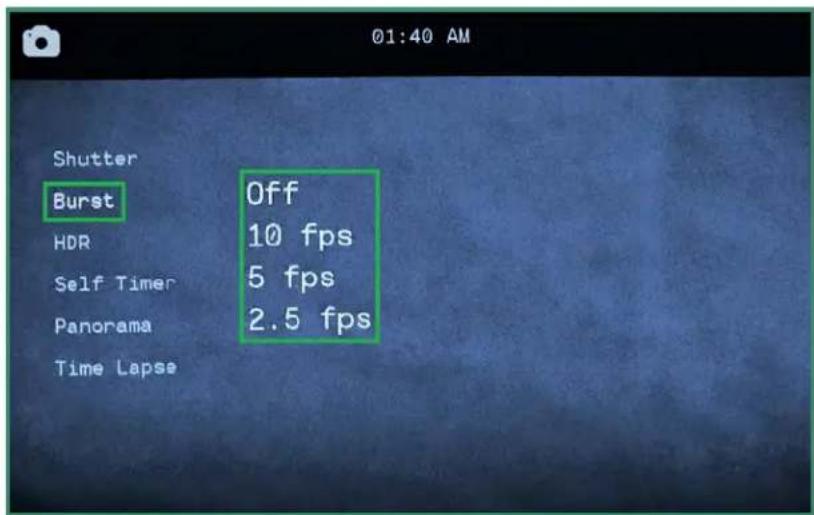
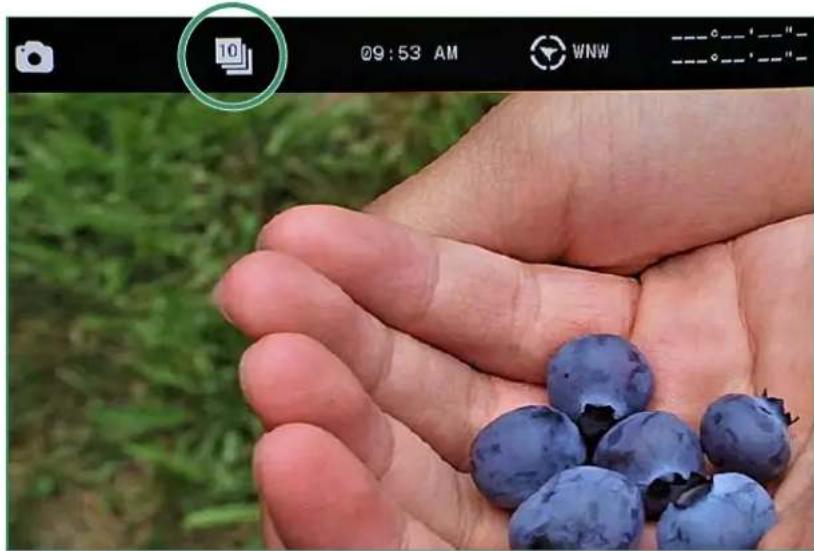
The Burst mode enables you to take unique consecutive photos at a rate of 10 frames per second (fps), 5 fps or 2.5 fps. The Burst mode is helpful when you're capturing action shots.
-
Turn the camera on by rotating the Settings Dial to Photo Mode.
-
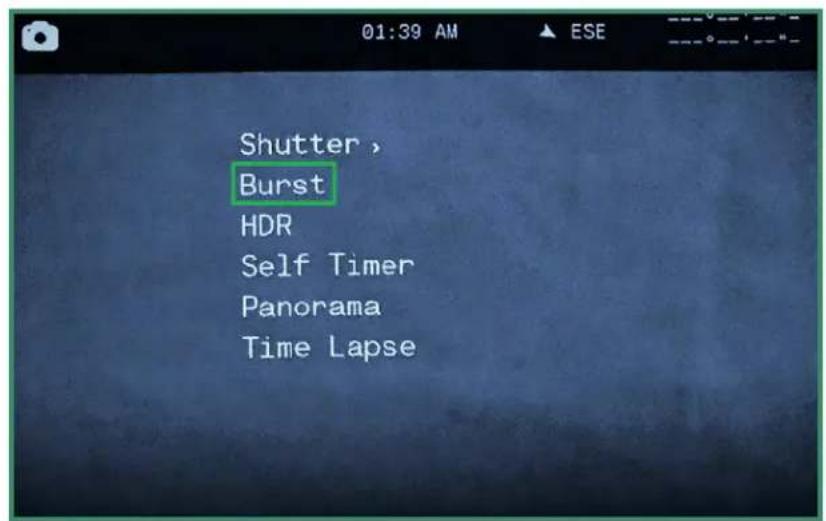
Press SET to access the menu.
text_image
Shutter > Burst HDR Self Timer Panorama Time Lapse- Toggle down to Burst and then right to the options.
text_image
01:40 AM Shutter Burst Off HDR 10 fps Self Timer 5 fps Panorama 2.5 fps Time Lapse- Select the option the best suits your scene and press SET.
Chapter 2. Photos and Videos
- Press SET to exit out of the menu and you'll see the Burst setting icon.
natural_image
Close-up of a hand holding blueberries with a green grass background (no text or symbols on the main subject)- To take a photo, press the Shutter button. With Chimes on (recommended), you can hear clicks for every photo the camera takes. Continue to press the Shutter button until the clicks stop.
Note: All features remain selected when the camera is turned off and then on again.
Chapter 2. Photos and Videos
2.3.3 HDR
HDR stands for High Dynamic Range. This is a technique that's used in photography and imaging to reproduce a greater dynamic of luminosity than is possible with standard digital photographic or imaging techniques. It allows you to capture more detail from bright and dark areas.
- Turn the camera on by rotating the Settings Dial to Photo Mode.
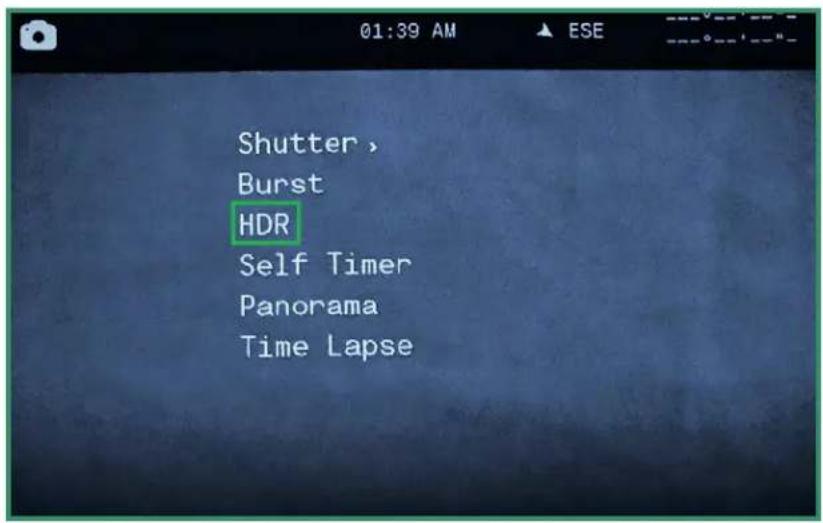
- Press SET to access the menu.
text_image
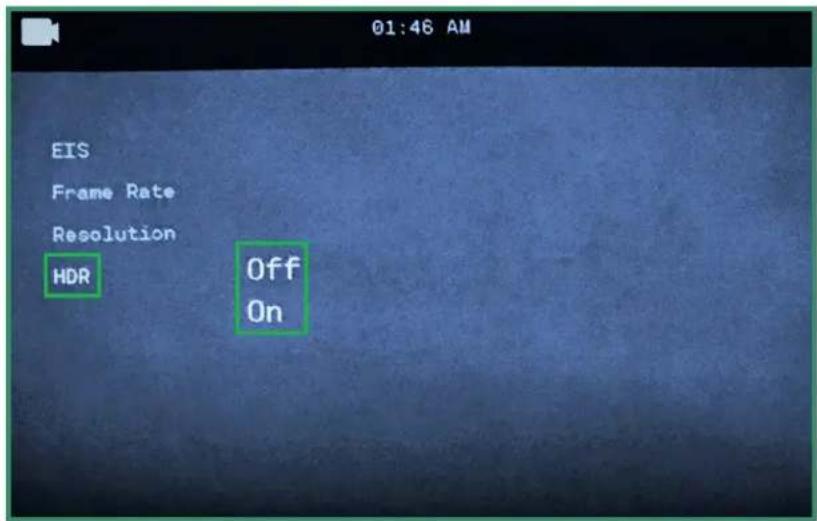
Shutter, Burst HDR Self Timer Panorama Time Lapse- Toggle down to HDR and right to On or Off and press SET.
text_image
01:46 AM EIS Frame Rate Resolution HDR Off On- Press SET to exit the menu.
Chapter 2. Photos and Videos
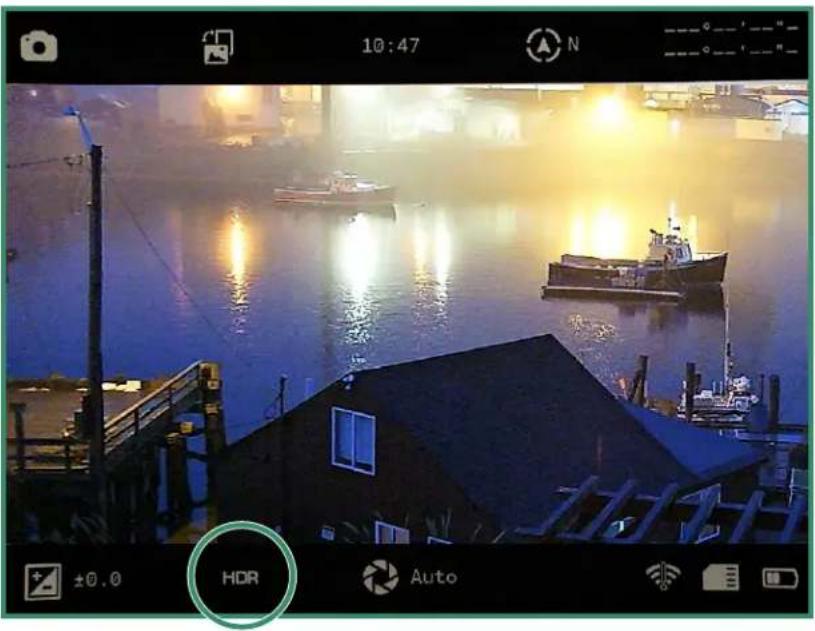
- The HDR icon will be visible in the Viewfinder.
natural_image
Nighttime cityscape with boats on water and a house, no visible text or symbolsNote: All features remain selected when the camera is turned off and then on again.
Chapter 2. Photos and Videos
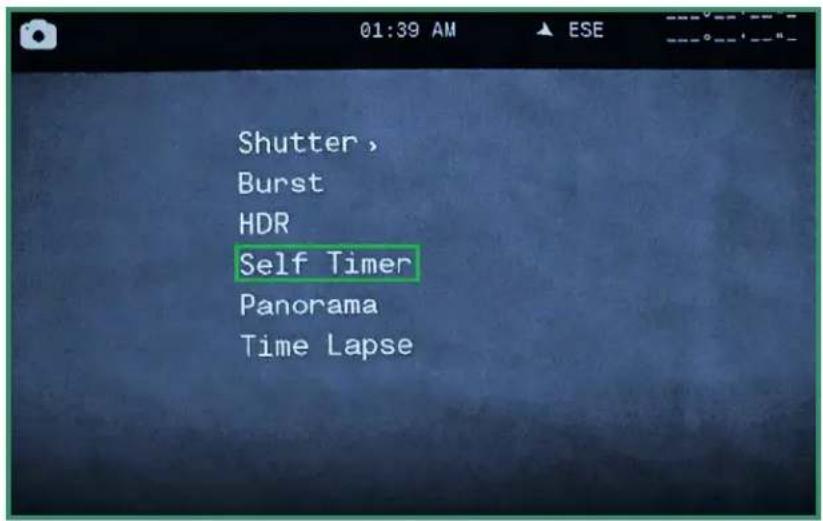
2.3.4 Self Timer
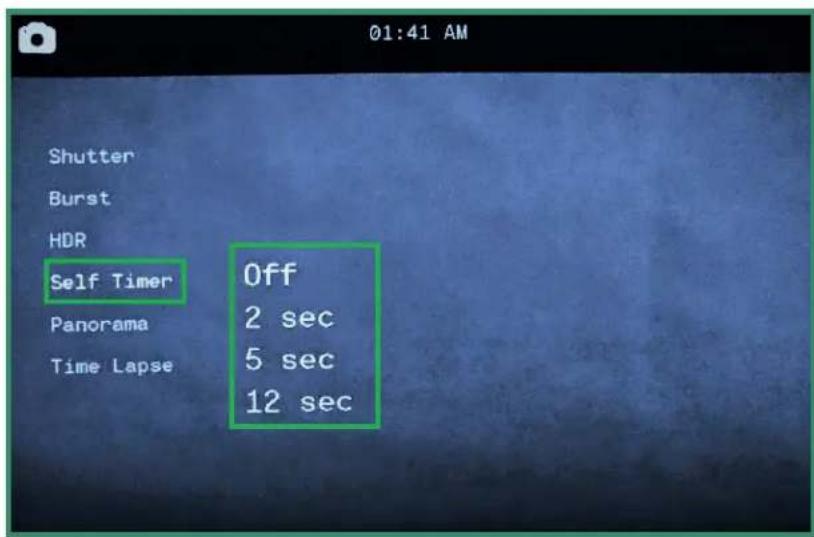
The Self Timer allows you to delay the timing of the shutter release so that you can be included in the photo. You can set the Self Timer for 2, 5, or 12 seconds.
- Turn the camera on by rotating the Settings Dial to Photo Mode.
- Press SET to access the menu.
text_image
Shutter, Burst HDR Self Timer Panorama Time Lapse- Toggle down to Self Timer and right to the options.
text_image
01:41 AM Shutter Burst HDR Self Timer Panorama Time Lapse Off 2 sec 5 sec 12 sec- Toggle down to the amount of delay you require and press SET.
Chapter 2. Photos and Videos
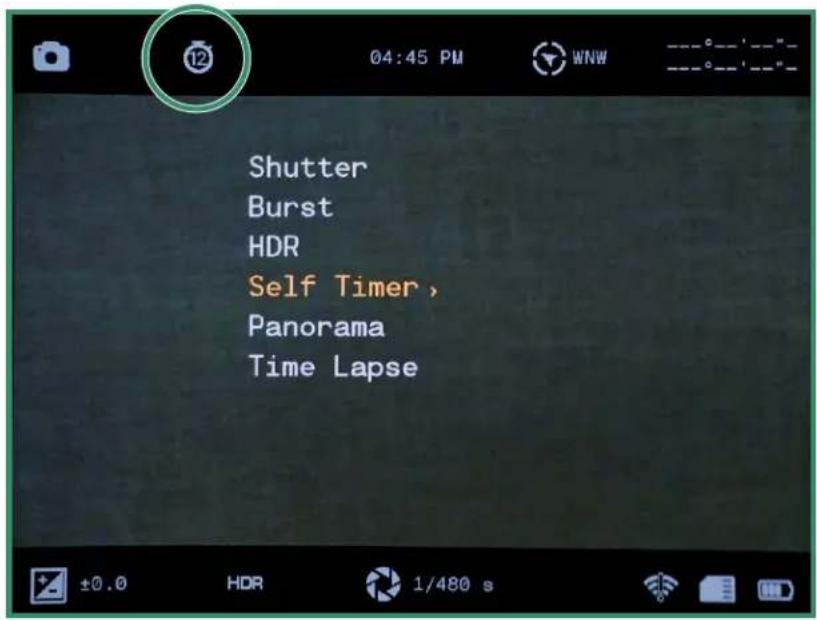
- Press SET to exit out of the menu. You can see the Self Timer setting in the Viewfinder.
text_image
Shutter Burst HDR Self Timer , Panorama Time LapseWhen you press the Shutter button chimes will sound to count down the delay, followed by a click when the picture is taken.
Note: All features remain selected when the camera is turned off and then on again.
Chapter 2. Photos and Videos
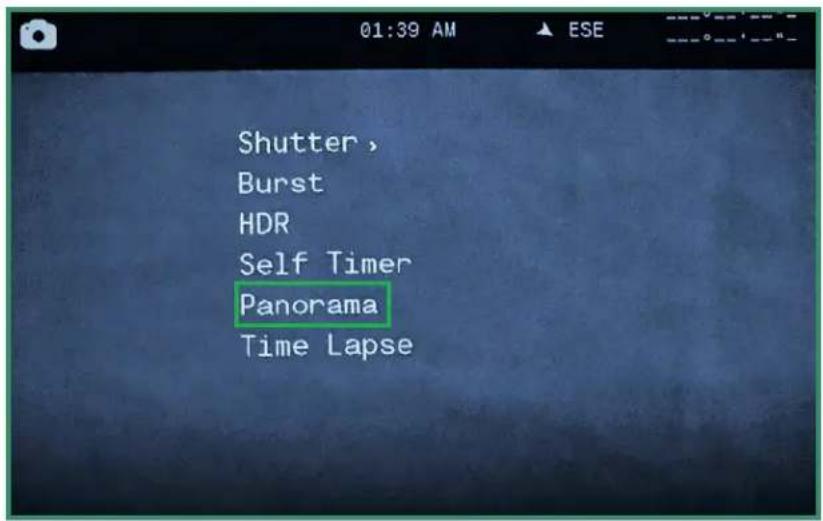
2.3.5 Panorama
You can take a Panorama photo by panning the camera from left to right for a landscape photo or up and down for a portrait photo. The camera will produce a 180-degree photo.
- Turn the camera on by rotating the Settings Dial to Photo Mode.
- Press SET to access the menu.
text_image
Shutter, Burst HDR Self Timer Panorama Time Lapse- Toggle down to Panorama and right to Portrait or Landscape.
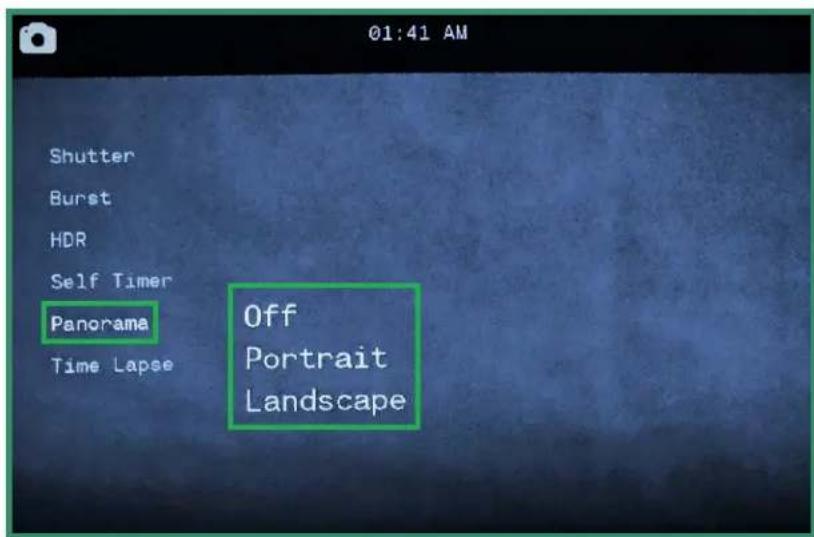
text_image
Shutter Burst HDR Self Timer Panorama Time Lapse Off Portrait LandscapeChapter 2. Photos and Videos
- Press SET to exit out of the menu. The Panorama setting will be visible in the Viewfinder.
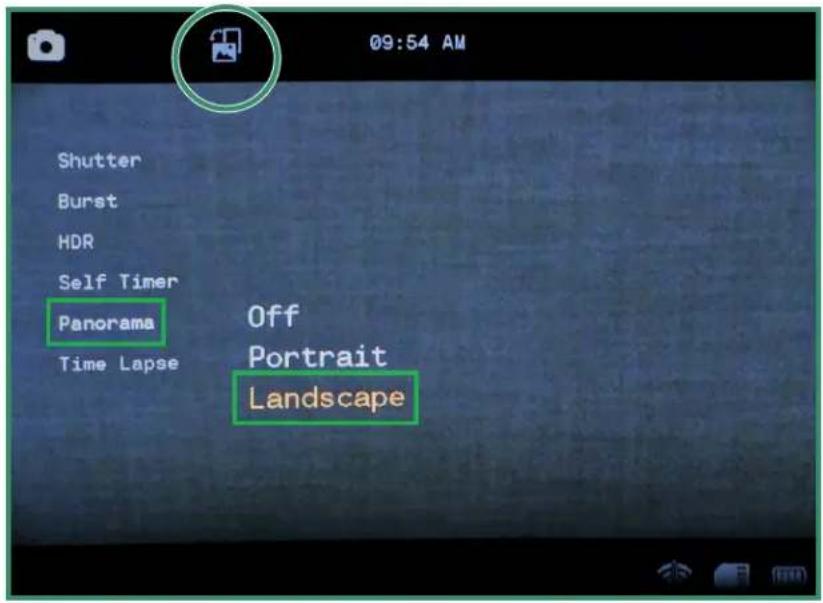
text_image
Shutter Burst HDR Self Timer Panorama Time Lapse Off Portrait Landscape- To take a panorama photo, press the Shutter button. You'll see a gray bar either on the left side of the screen (Landscape) or on the bottom of the screen (Portrait). Move the camera either up and down (Portrait) or left and right (Landscape). As you move the camera, you'll see the gray bar progress across the bottom of the screen.
Your Panorama must be between 90 degrees and 180 degrees. If it is less, or if you move the camera too quickly, you'll see an error message: "Swing Range Error." If you don't want to go the full 180 degrees, press the Shutter button to stop taking the photo.

natural_image
Street scene with vehicles and a person walking, no visible text or signage2.3.6 Time Lapse
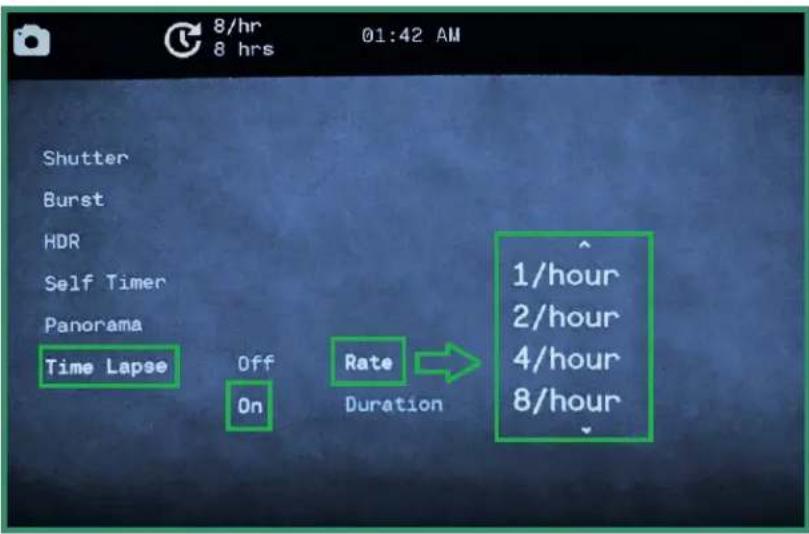
The Time Lapse feature which allows you to set the camera to take a certain number of photos per hour for a selectable number of hours. Once the time lapse is complete, the camera will create a video.
The camera will take photos at the rate of one per hour up to as many as 60 per hour.
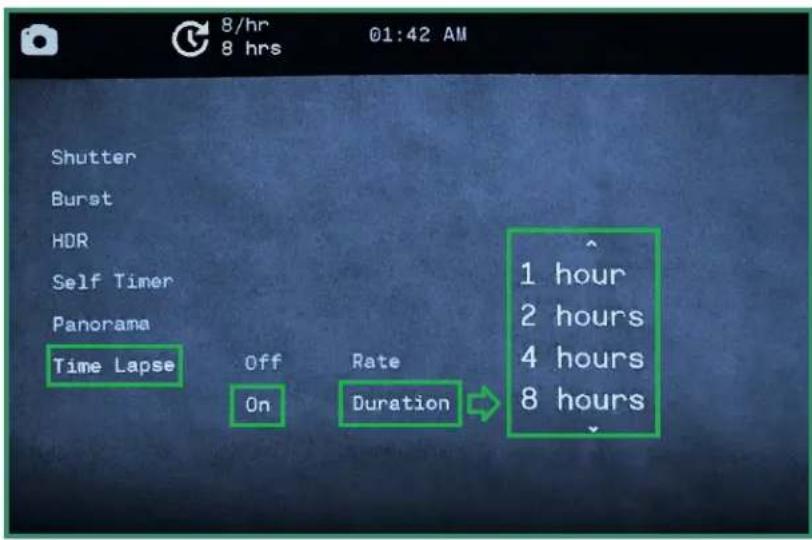
You can also have the camera take photos over a set time period using the Time Lapse duration feature. This means the camera can take photos for one hour up to 24 hours.
- Turn the camera on by rotating the Settings Dial to Photo Mode.

Chapter 2. Photos and Videos
- Press SET to access the menu and toggle down to Time Lapse.
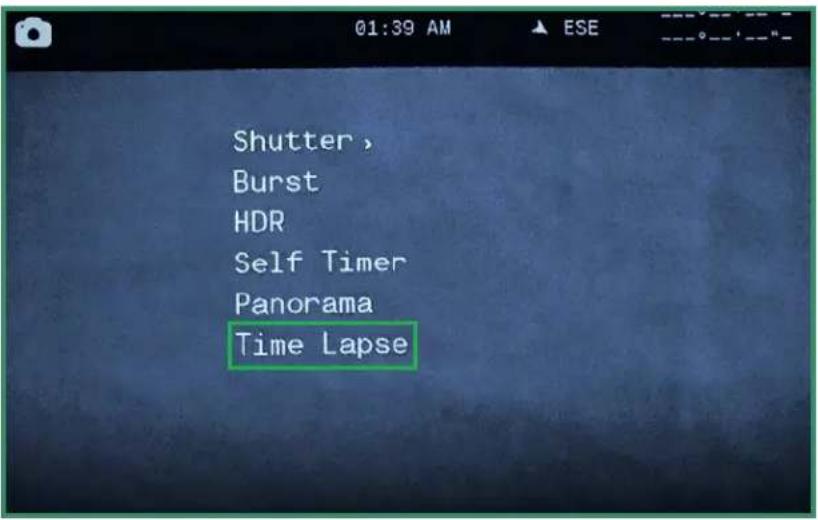
text_image
Shutter, Burst HDR Self Timer Panorama Time Lapse- Toggle right to On and right again to set the Rate.
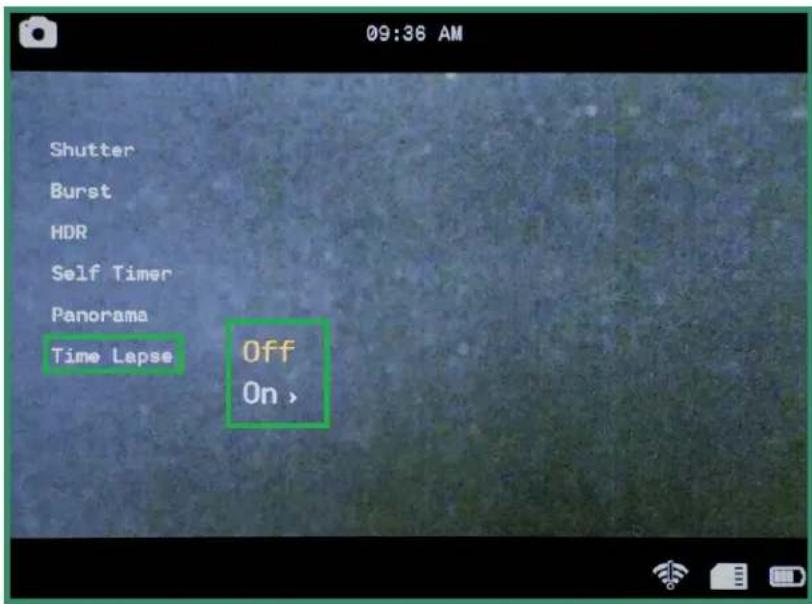
text_image
Shutter Burst HDR Self Timer Panorama Time Lapse Off On >Chapter 2. Photos and Videos
- Choose a Rate by pressing SET.
text_image
Shutter Burst HDR Self Timer Panorama Time Lapse Off Rate 1/hour On Duration 2/hour 4/hour 8/hour- Toggle down to Duration and right to select the number of hours.
text_image
8/hr 8 hrs 01:42 AM Shutter Burst HDR Self Timer Panorama Time Lapse Off On Rate Duration 1 hour 2 hours 4 hours 8 hours- Toggle left twice and press SET to exit.
Chapter 2. Photos and Videos
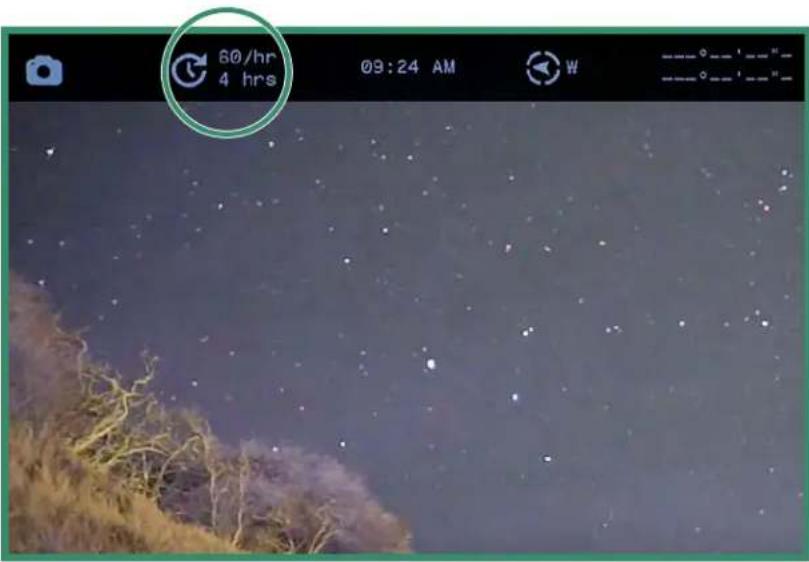
- The Time Lapse settings will be visible at the top of the screen.
text_image
60/hr 4 hrs 09:24 AM W --------o__'__''_ --------o__'__''_- To start a Time Lapse session, place the camera in the location that best suits your scene and press the Shutter button. The camera will start shooting the photos based on your settings.
Note: All features remain selected when the camera is turned off and then on again.
2.4 Shooting Photos and Videos: Advanced Settings
The camera has some additional settings that should help you with your shooting needs.
Note: These settings are available in the Photo, Video, and Loop Modes. The Quick Review feature is only available in the Photo Mode. See "Section 2.4.5 Quick Review" on page 62.



2.4.1 Brightness
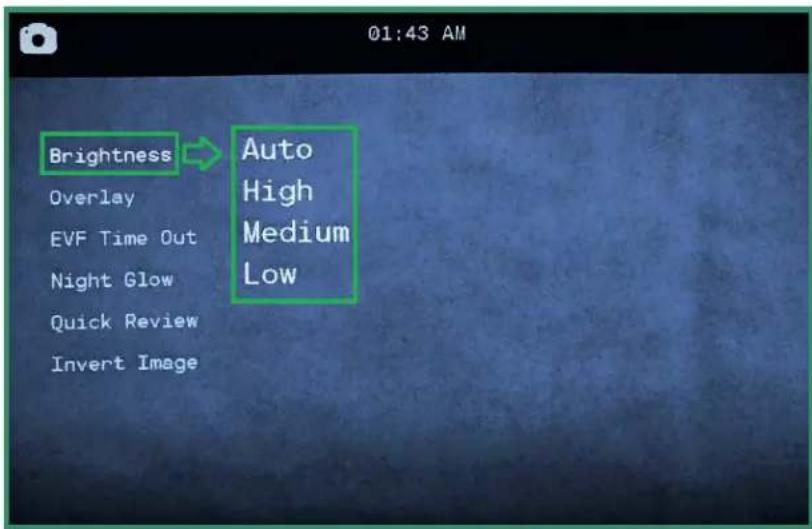
You can adjust the brightness of the Viewfinder using the Brightness feature. The default is Auto and you can change it to high, medium, or low. The brightness level in the Viewfinder will change with each scene mode: Night, Twilight, or Day.
Aurora User Manual 48
Chapter 2. Photos and Videos
- Rotate the Settings Dial to Photo, Video, or Loop Mode.


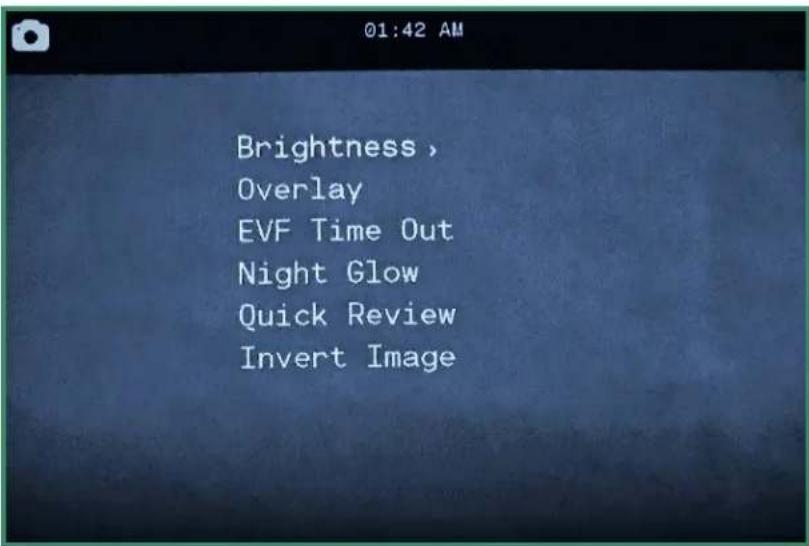
- Long press the SET button to access the menu.
text_image
Brightness , Overlay EVF Time Out Night Glow Quick Review Invert Image- Toggle right on Brightness and select the option best suited to your eye and situation and press SET.
text_image
01:43 AM Brightness → Auto High Medium Low Overlay EVF Time Out Night Glow Quick Review Invert Image- Press SET again to exit out of the menu.
Chapter 2. Photos and Videos
2.4.2 Overlay (Aurora 'classic' and Pro only)
The Overlay menu has special features to help you take more accurate and level photos and videos.
2.4.2.1 Focus Peak
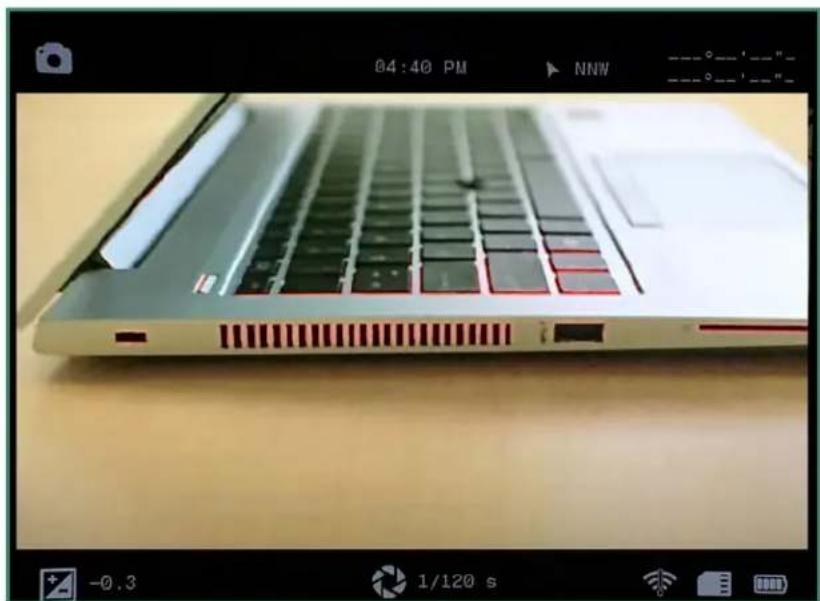
Focus Peak is a focusing aid that places a red highlight on in-focus edges.

Click here to view a related video
- Turn the camera on by rotating the Settings Dial to Photo, Video, or Loop Mode.
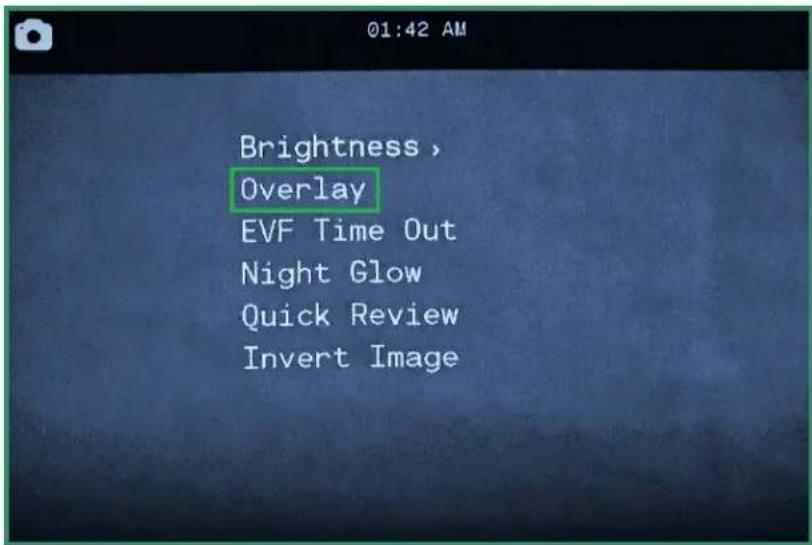
- Long press the SET button to access the menu.
text_image
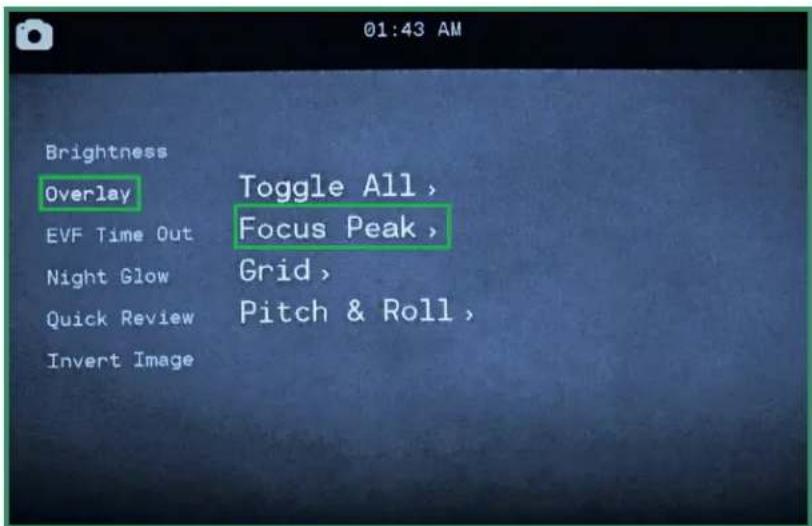
01:42 AM Brightness , Overlay EVF Time Out Night Glow Quick Review Invert Image- Toggle down to Overlay and then toggle right and down to Focus Peak. (Aurora 'classic' and Pro only)
text_image
01:43 AM Brightness Overlay Toggle All , EVF Time Out Focus Peak , Night Glow Grid , Quick Review Pitch & Roll , Invert ImageChapter 2. Photos and Videos
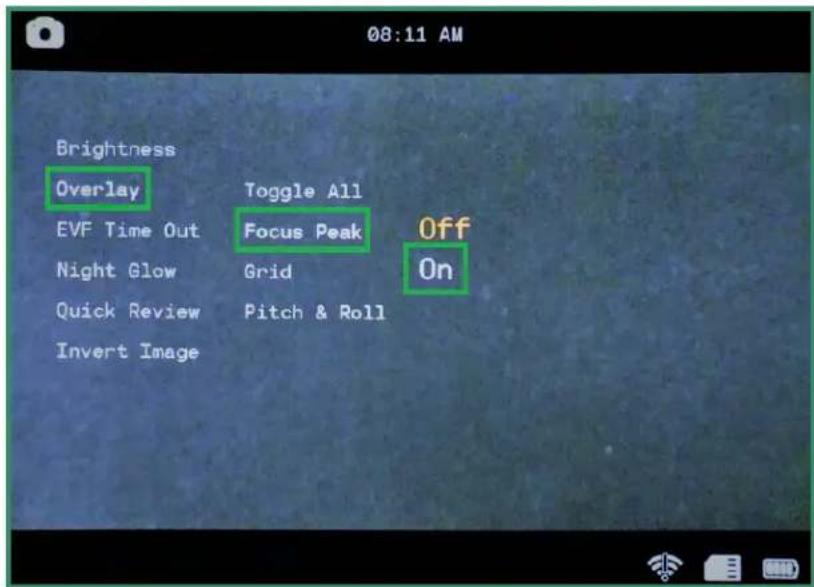
- Toggle right on Focus Peak. Select Off or On and press SET.
text_image
08:11 AM Brightness Overlay EVF Time Out Night Glow Quick Review Invert Image Toggle All Focus Peak Grid Pitch & Roll Off On- Toggle left and press SET to exit the menu. Now when you look through the Viewfinder, you'll see a red edge where your subject is in focus.
natural_image
Close-up of a laptop keyboard with red LED indicators and a small USB port, captured in a photo editing interface (no readable text or symbols on the keyboard itself)Chapter 2. Photos and Videos
2.4.2.2 Grid (Aurora 'classic' and Pro only)
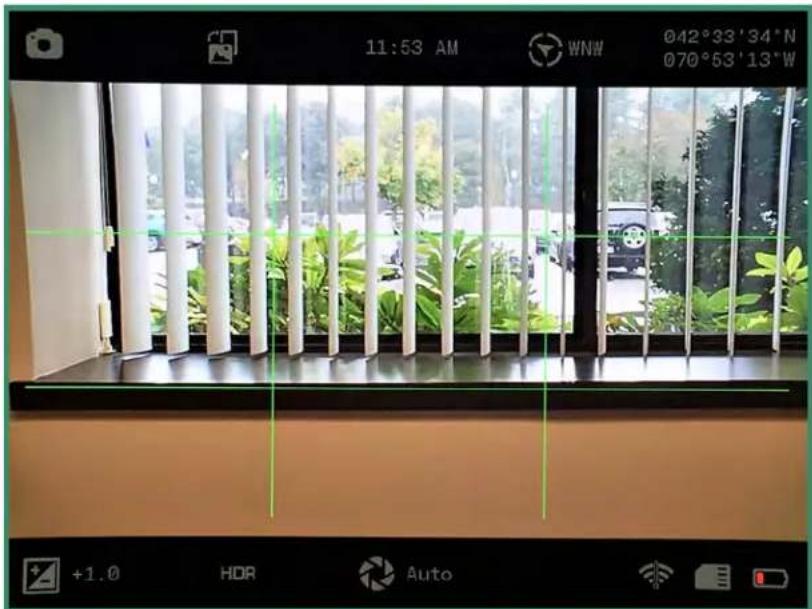
The Grid feature divides the Viewfinder into nine sections using a four line grid. The Grid can help you align the subjects in your photo or video and aids in image composition.
- Turn the camera on by rotating the Settings Dial to Photo, Video, or Loop Mode.
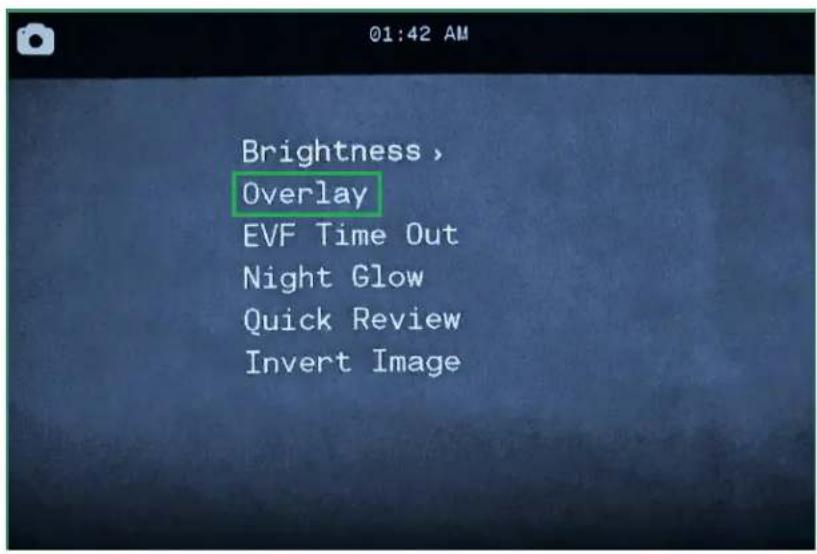
- Long press the SET button to access the menu.
text_image
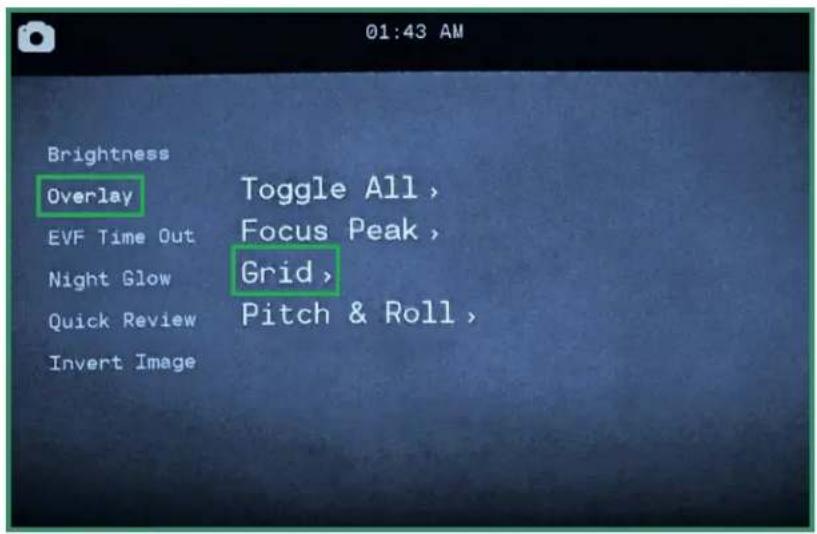
Brightness , Overlay EVF Time Out Night Glow Quick Review Invert Image- Toggle down to Overlay and then toggle right and down to Grid.
text_image
01:43 AM Brightness Overlay Toggle All , EVF Time Out Focus Peak , Night Glow Grid , Quick Review Pitch & Roll , Invert ImageChapter 2. Photos and Videos
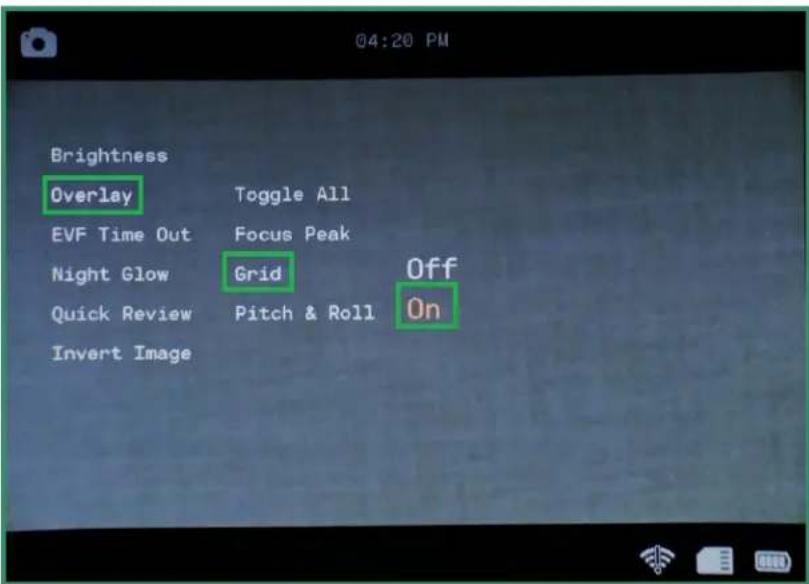
- Toggle right again and select On and press SET.
text_image
04:20 PM Brightness Overlay Toggle All EVF Time Out Focus Peak Night Glow Grid Off Quick Review Pitch & Roll On Invert Image- Toggle left and press SET to exit. The Grid will now be visible in the Viewfinder.
text_image
11:53 AM WNW 042°33'34"N 070°53'13"W +1.0 HDR AutoChapter 2. Photos and Videos
2.4.2.3 Pitch & Roll (Aurora 'classic' and Pro only)
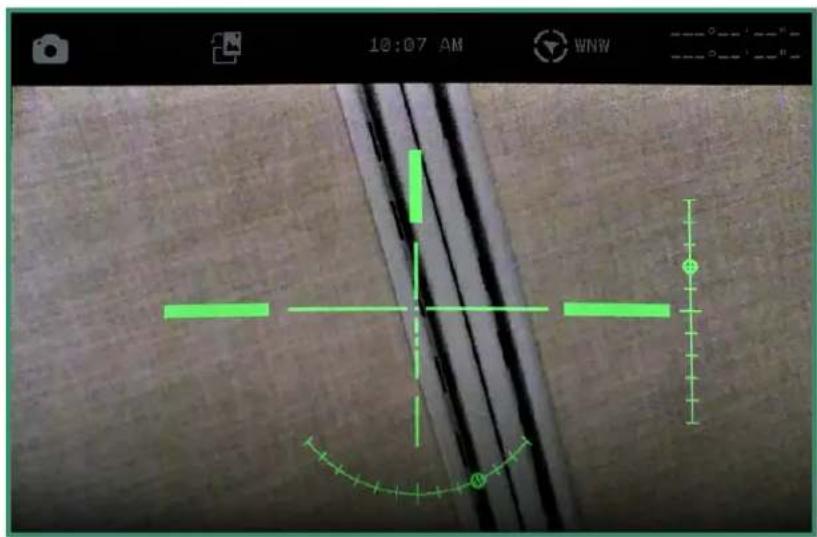
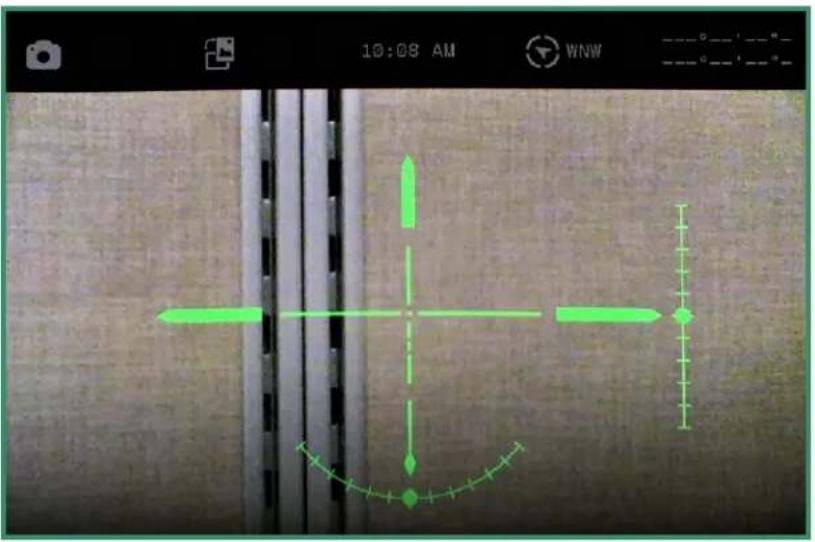
The Pitch & Roll feature will help keep your camera level, both front to back and side to side.

Click here to view a related video
- Turn the camera on by rotating the Settings Dial to Photo, Video, or Loop Mode.
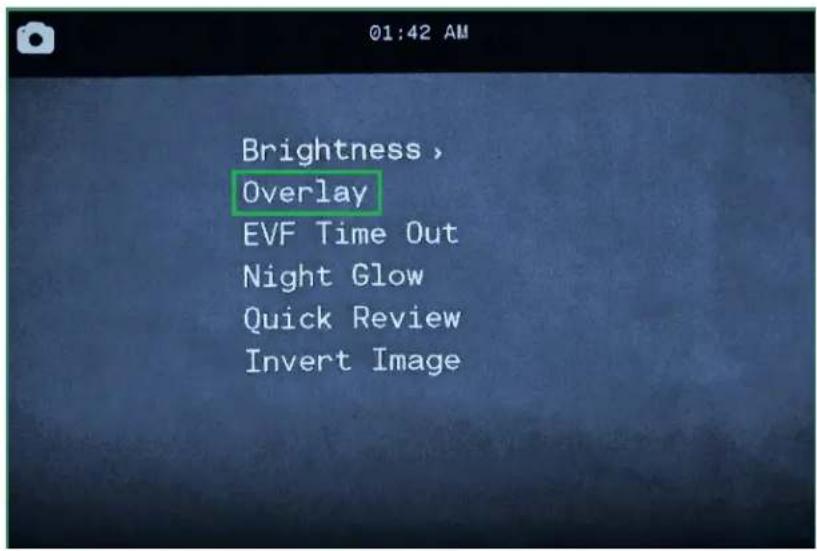
- Long press the SET button to access the menu.


text_image
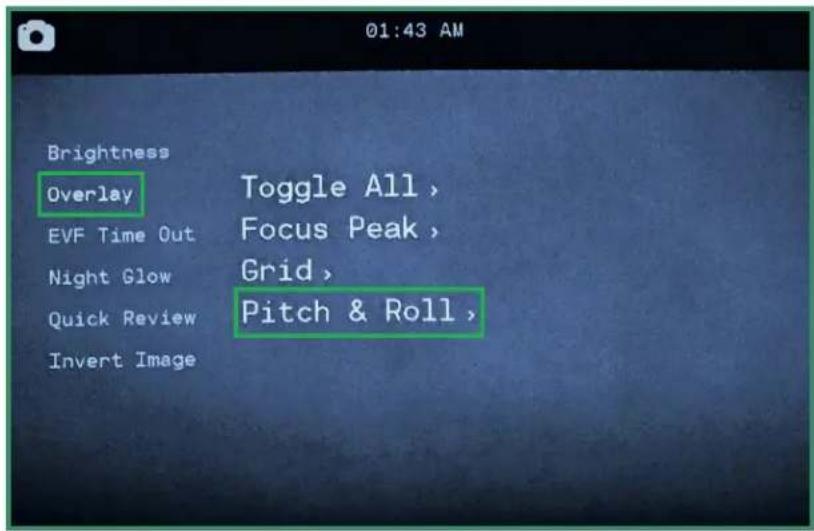
Brightness , Overlay EVF Time Out Night Glow Quick Review Invert Image- Toggle down to Overlay and then right and down to Pitch & Roll.
text_image
01:43 AM Brightness Overlay Toggle All , EVF Time Out Focus Peak , Night Glow Grid , Quick Review Pitch & Roll , Invert ImageChapter 2. Photos and Videos
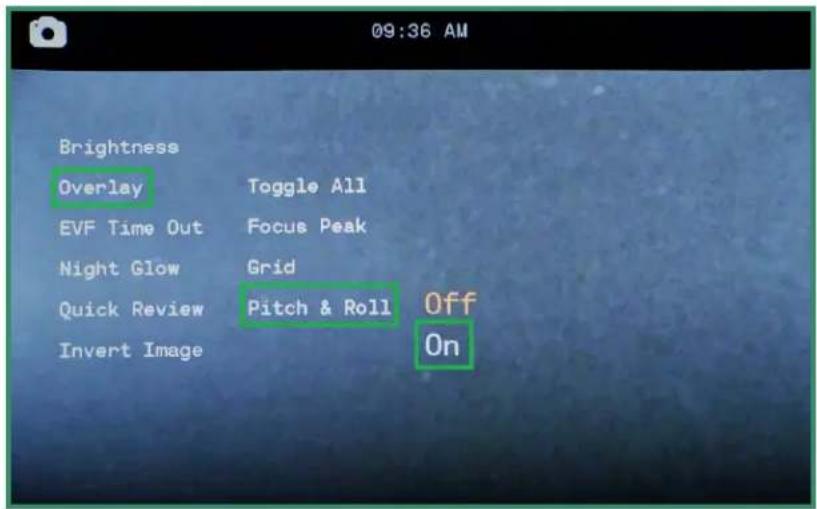
- Toggle right to On and press SET.
text_image
09:36 AM Brightness Overlay Toggle All EVF Time Out Focus Peak Night Glow Grid Quick Review Pitch & Roll Off Invert Image On- Toggle left and press SET to exit. The Pitch & Roll feature will now be visible in the Viewfinder.
Chapter 2. Photos and Videos
- To level the camera, move until a pointer appears at the end of the vertical and horizontal bars.
text_image
10:08 AM WNW ----°---'-- ----°---'--'Note: All features remain selected when the camera is turned off and then on again.
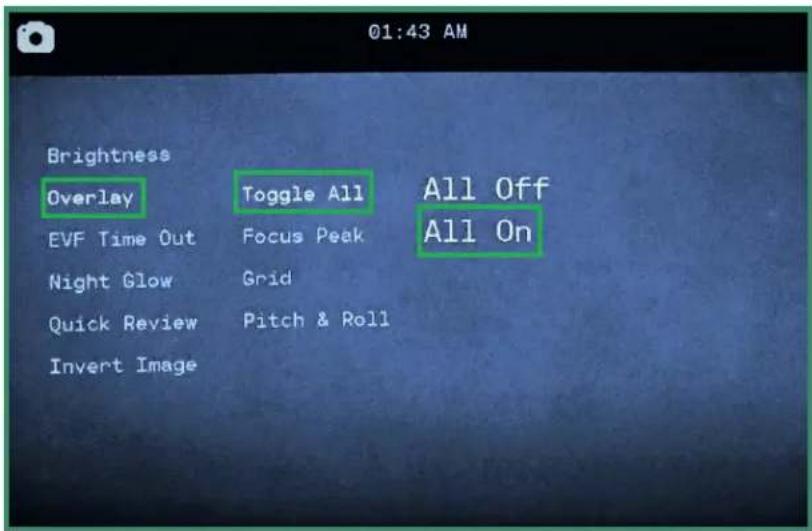
2.4.2.4 Toggle All (Aurora 'classic' and Pro only)
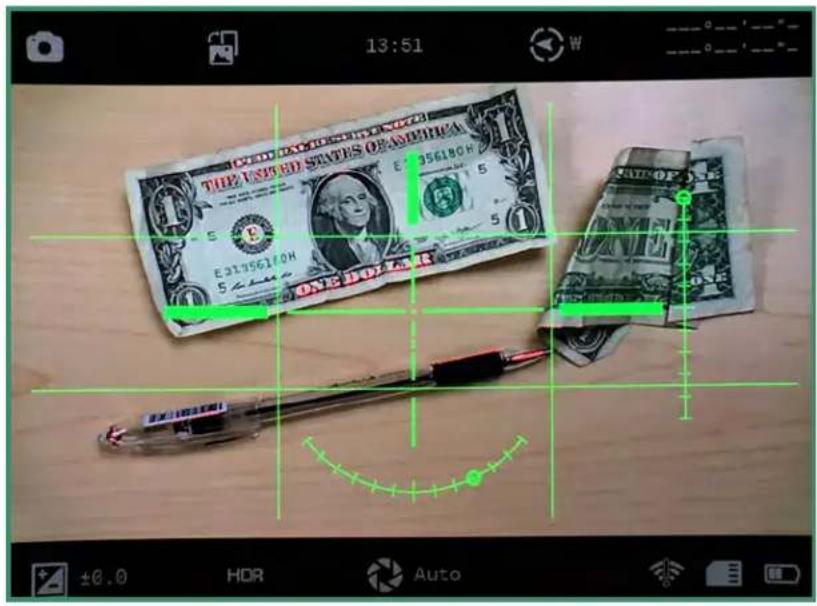
The Toggle All option turns all three of the Overlay features on and off: Focus Peak (See "Section 2.4.2.1 Focus Peak" on page 50), Grid (See "Section 2.4.2.2 Grid" on page 52) and Pitch & Roll (See "Section 2.4.2.3 Pitch & Roll" on page 54).
- To turn the Toggle All option on, rotate the Settings Dial to Photo, Video, or Loop Mode.
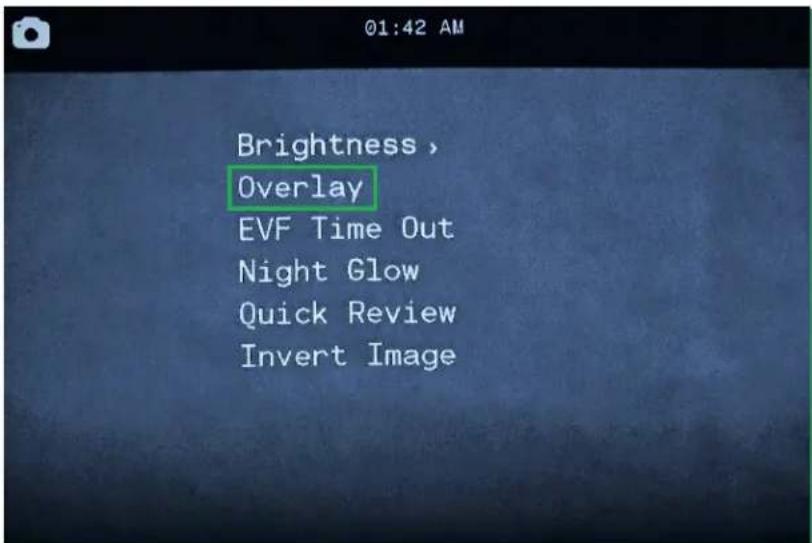
- Long press the SET button to access the menu.

text_image
Brightness , Overlay EVF Time Out Night Glow Quick Review Invert ImageAurora User Manual 56
Chapter 2. Photos and Videos
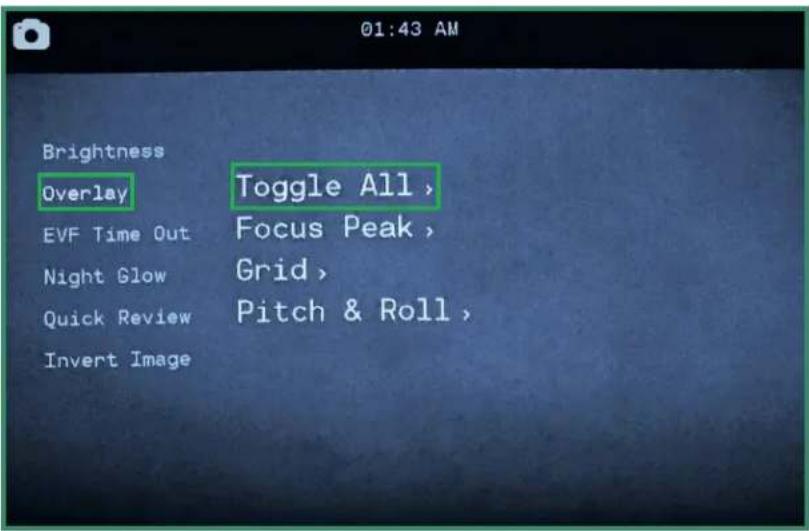
- Toggle down to Overlay and then right to select the Toggle All option.
text_image
01:43 AM Brightness Overlay EVF Time Out Night Glow Quick Review Invert Image Toggle All , Focus Peak , Grid , Pitch & Roll ,- Select All Off or All On and press SET.
text_image
01:43 AM Brightness Overlay Toggle All All Off EVF Time Out Focus Peak All On Night Glow Grid Quick Review Pitch & Roll Invert ImageChapter 2. Photos and Videos
- Toggle left and press SET to exit. All the Overlay selections will be visible in the Viewfinder.
text_image
13:51 THE UNITED STATES OF AMERICA E 356180H E31356180H ONE JOLLER ±0.0 HDR AutoNote: All features remain selected when the camera is turned off and then on again.
2.4.3 EVF Time Out
You can set the Electronic Viewfinder (EVF) to turn off at certain time intervals. The camera will stay on, but the EVF will turn off after a time that you set. Setting the EVF Time Out option reduces your battery usage.
The Electronic Viewfinder contains a proximity sensor (Aurora 'classic' and Pro only) that automatically turns the Viewfinder on or off to save battery life. When the proximity sensor is blocked (e.g., by your eye) it will turn the Viewfinder on.
- Turn the camera on by rotating the Settings Dial to Photo, Video, or Loop Mode.
Chapter 2. Photos and Videos
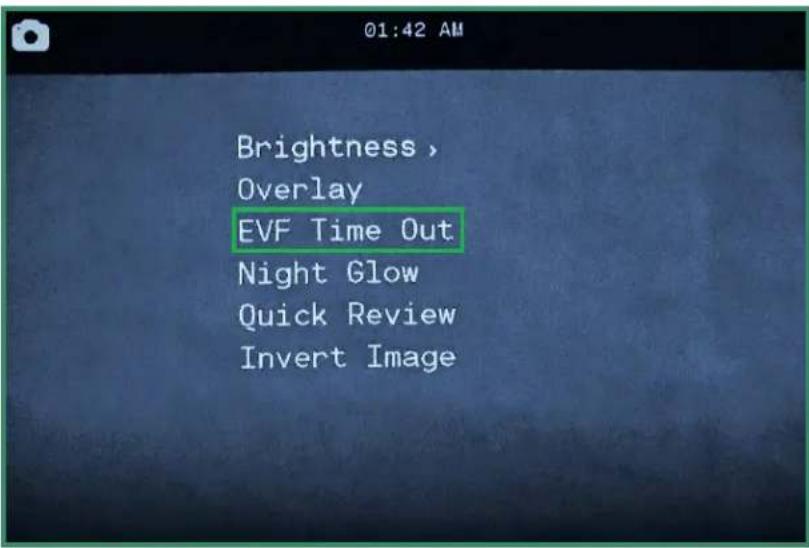
- Long press the SET button to access the menu.
text_image
Brightness , Overlay EVF Time Out Night Glow Quick Review Invert Image- Toggle down to EVF Time Out and toggle right to the Time Out options.

text_image
01:44 AM Brightness Overlay EVF Time Out Night Glow Quick Review Invert Image Auto 1 min 2 min 5 min Never- Toggle down to the option you want and press SET twice to select the Time Out and then exit.
Note: The EVF setting does not appear in the Viewfinder.
Chapter 2. Photos and Videos
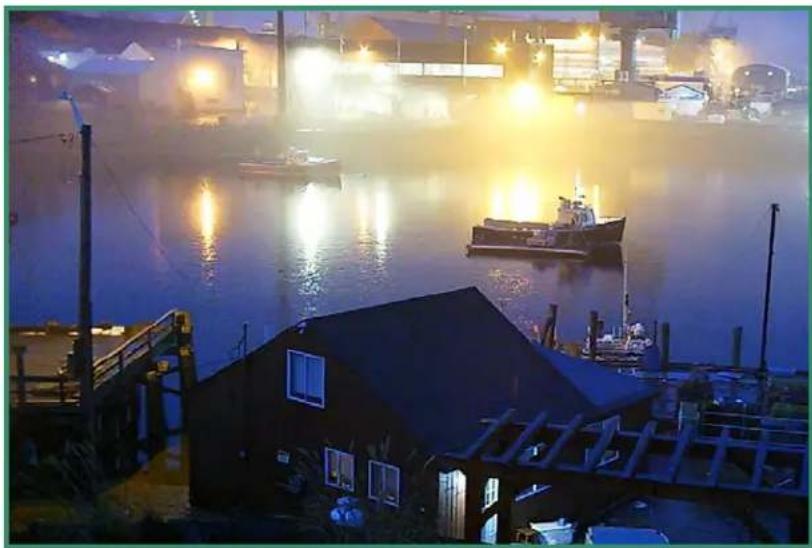
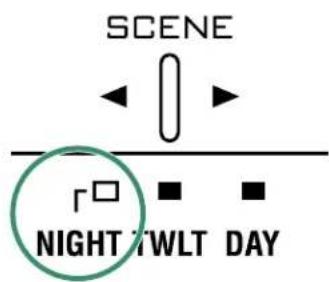
2.4.4 Night Glow
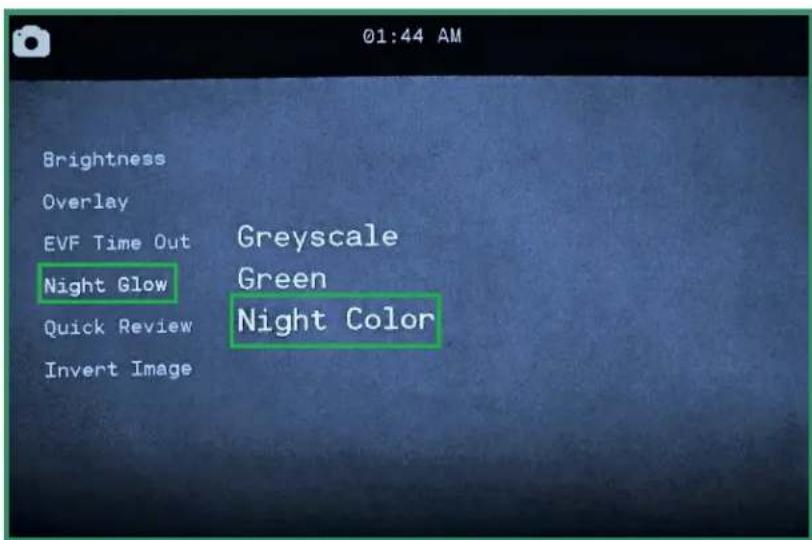
There are three settings in the Night Glow menu that you can use with Night Scene:
- Greyscale – this setting adjusts the Viewfinder to shades of grey and it enables you to take photos or videos when there is no artificial light and barely any natural light. This can be helpful in hunting scenarios.
- Green – since the human eye is more sensitive to green light, the Green setting removes the distraction that can occur with colors.
- Night Color – this setting adjusts the Viewfinder to color during night scenarios. This setting is beneficial when sensing colors is important, such as when docking a boat at night.
Experiment with each of these settings in Night Scene to see which one works best for your scenario.

Click here to view a related video
natural_image
Nighttime scene of a waterfront scene with boats and illuminated structures, no visible text or symbols- To change the Night Glow settings, first turn the Scene Ring to Night.
text_image
SCENE r□ ■ ■ NIGHT TWLT DAY- Turn the camera on by rotating the Settings Dial to Photo, Video, or Loop Mode .
Chapter 2. Photos and Videos
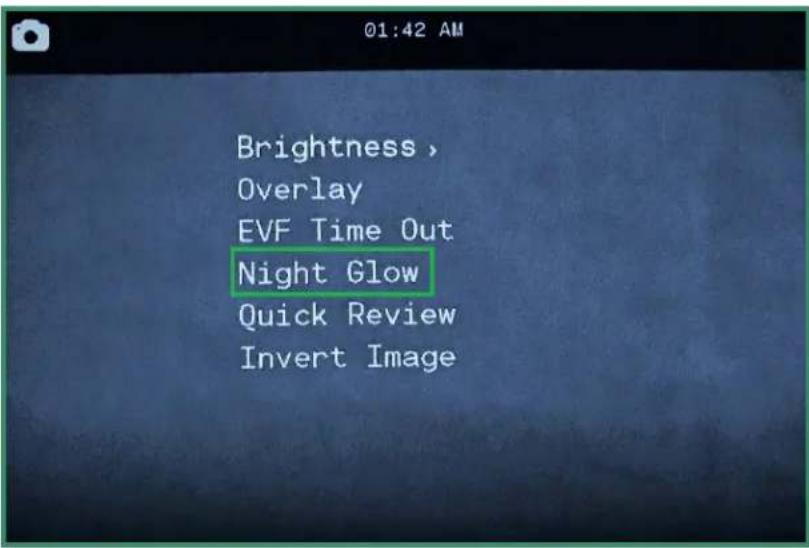
- Long press the SET button to access the menu.
text_image
Brightness , Overlay EVF Time Out Night Glow Quick Review Invert Image- Toggle down to Night Glow and right to the options.
text_image
01:44 AM Brightness Overlay EVF Time Out Greyscale Night Glow Green Quick Review Night Color Invert Image- Select the option that best suits your scene and press SET and SET again to exit.
Note: The Night Glow setting doesn't appear in the Viewfinder.
Chapter 2. Photos and Videos
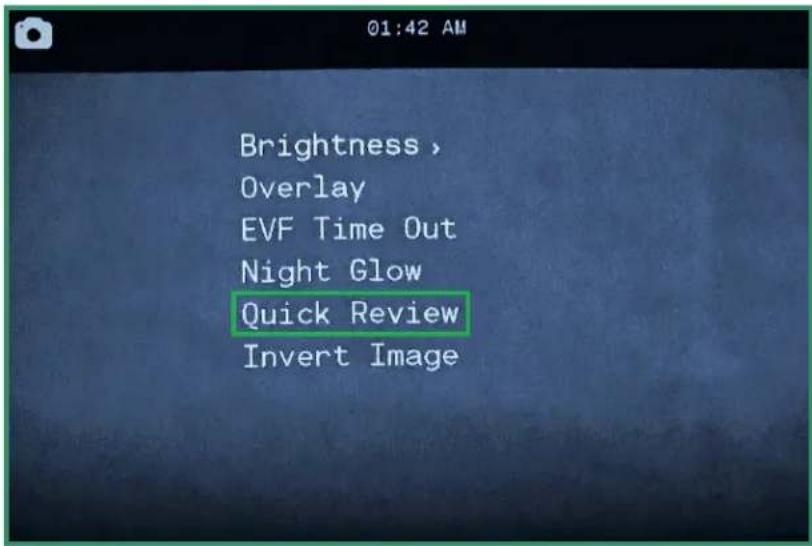
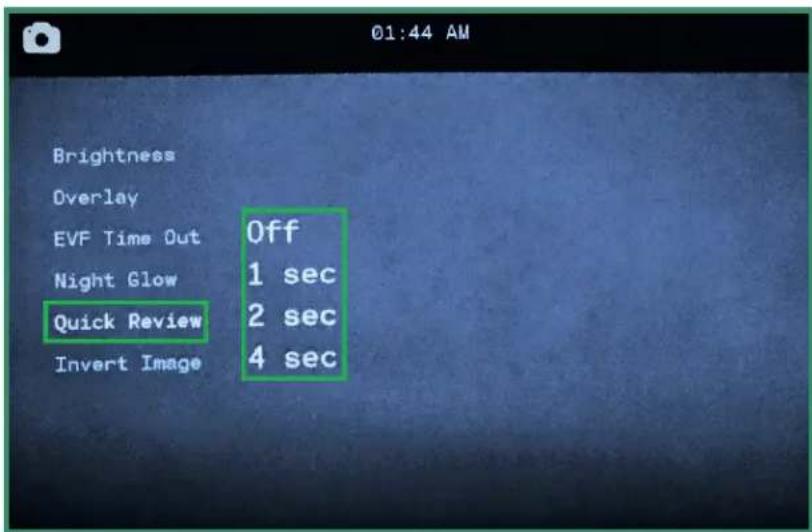
2.4.5 Quick Review
The Quick Review feature enables you to review a photo immediately after you take it for either 1, 2, or 4 seconds.
Note: This feature only works in Photo Mode.
- Turn the camera on by rotating the Settings Dial to Photo Mode.
- Long press the SET button to access the menu.
text_image
01:42 AM Brightness , Overlay EVF Time Out Night Glow Quick Review Invert Image- Toggle down to Quick Review and right to the options.
- Toggle down to the option you want and press SET and SET again to exit.
text_image
01:44 AM Brightness Overlay EVF Time Out 0ff Night Glow 1 sec Quick Review 2 sec Invert Image 4 secChapter 2. Photos and Videos
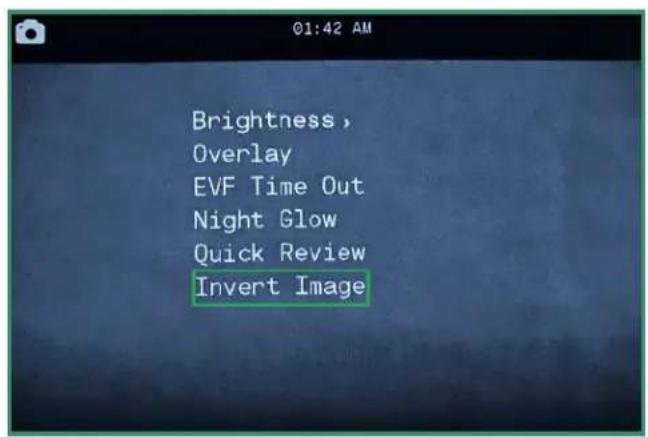
2.4.6 Invert Menu
The Invert Menu feature allows you to read the menus when the camera is upside down.
- Turn the camera on by rotating the Settings Dial to Photo, Video, or Loop Mode
- Long press the SET button to access the menu.
- Toggle down to Invert Image and toggle right to turn the option on. Press SET and SET again to exit.
- The menu will now be inverted.
text_image
Brightness, Overlay EVF Time Out Night Glow Quick Review Invert Image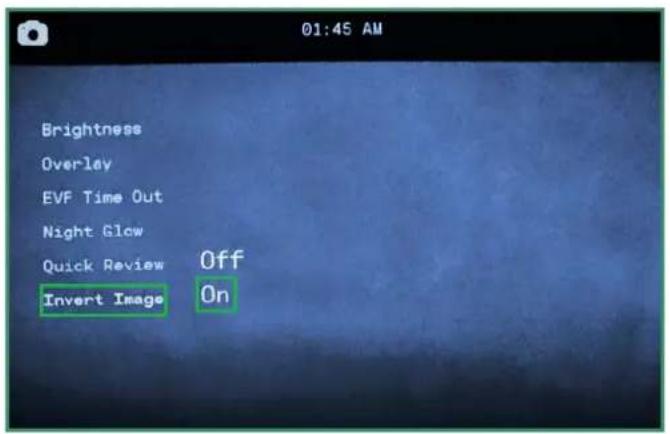
text_image
01:45 AM Brightness Overlay EVF Time Out Night Glow Quick Review Off Invert Image On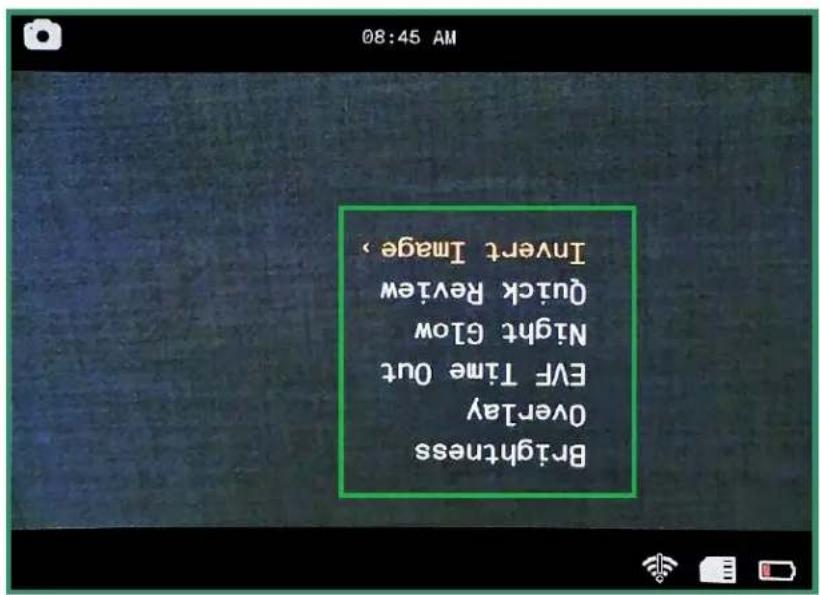
text_image
08:45 AM Brighness Overly EV Time Out Night Blow Quick Review Invert Image,Note: All features remain selected when the camera is turned off and then on again.
2.5 Shooting Videos: Settings
2.5.1 EIS
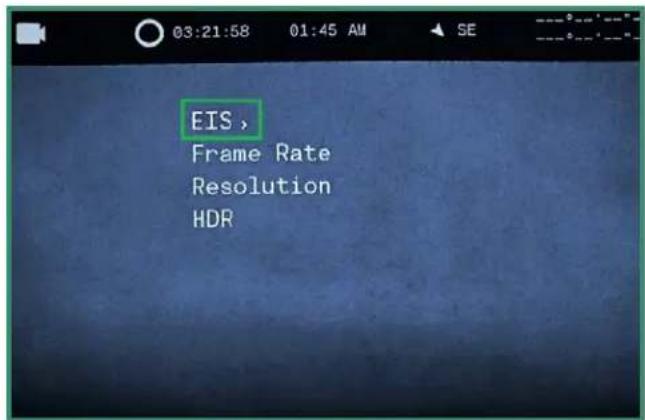
Electronic Image Stabilization (EIS) uses electronic processing to stabilize video. If the EIS setting is turned on, it will minimize blurring and compensate for shaking of the camera.
- Turn the camera on by rotating the Settings Dial to Video or Loop Mode.
- Press SET to access the menu.
- Toggle right on EIS to turn the option Off or On. Press SET to select and SET again to exit.
- The EIS setting can be seen when you look through the Viewfinder.
text_image
EIS, Frame Rate Resolution HDR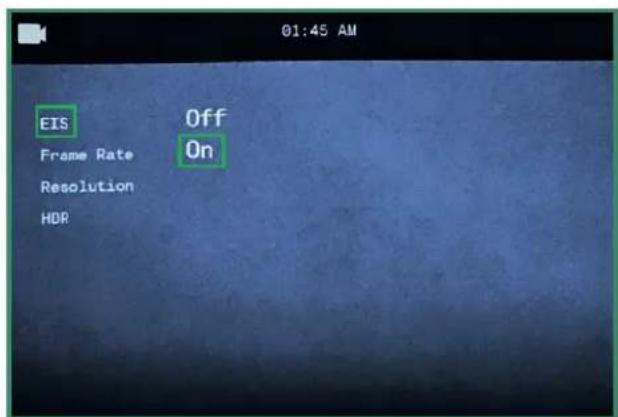
text_image
EIS Frame Rate Resolution HDR Off On 01:45 AM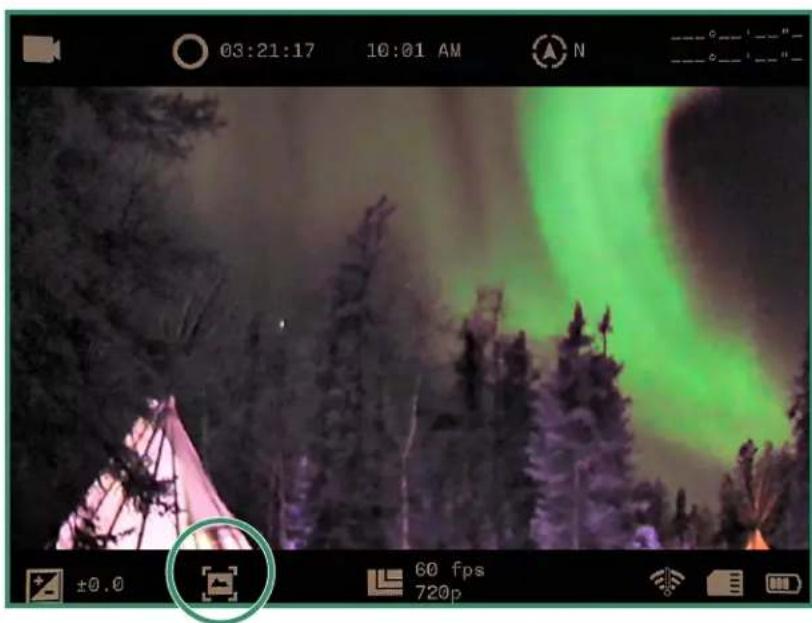
natural_image
Nighttime forest scene with green and purple lighting, no visible text or symbolsChapter 2. Photos and Videos
2.5.2 Setting the Frame Rate
The frame rate is the speed at which the camera records video.
- Turn the camera on by rotating the Settings Dial to Video or Loop Mode
- Press SET to access the menu.
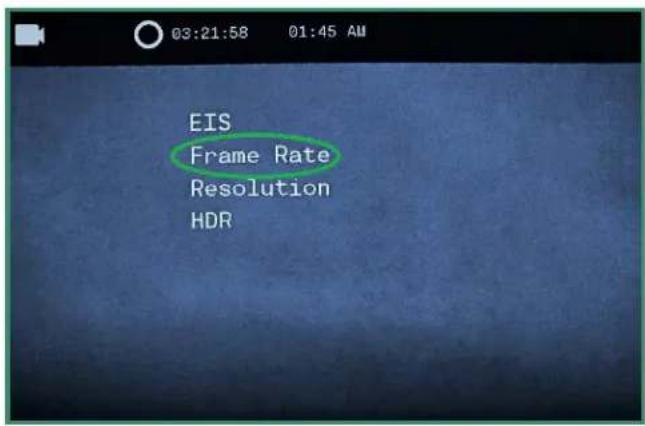
- Toggle to Frame Rate and right to the FPS options.
- Choose a rate that best suits your scene. Press SET, and SET again to exit.


text_image
EIS Frame Rate Resolution HDR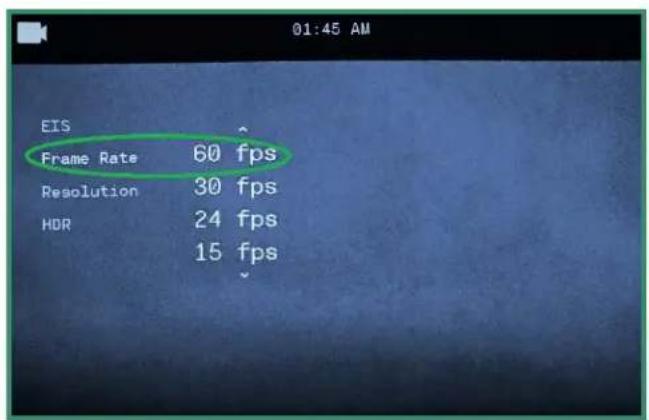
text_image
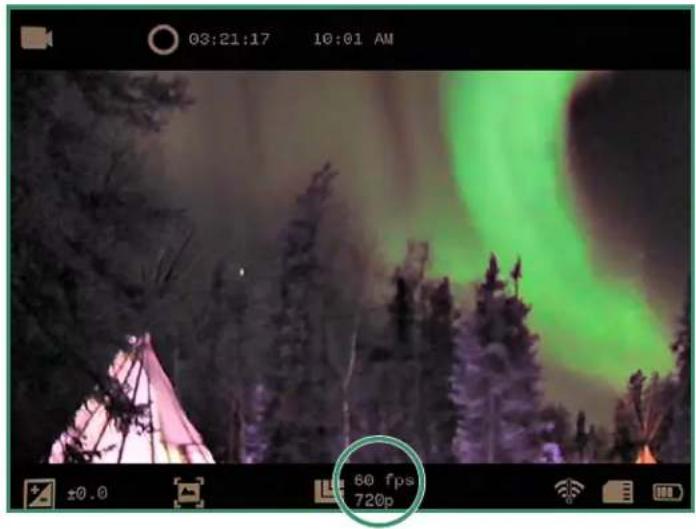
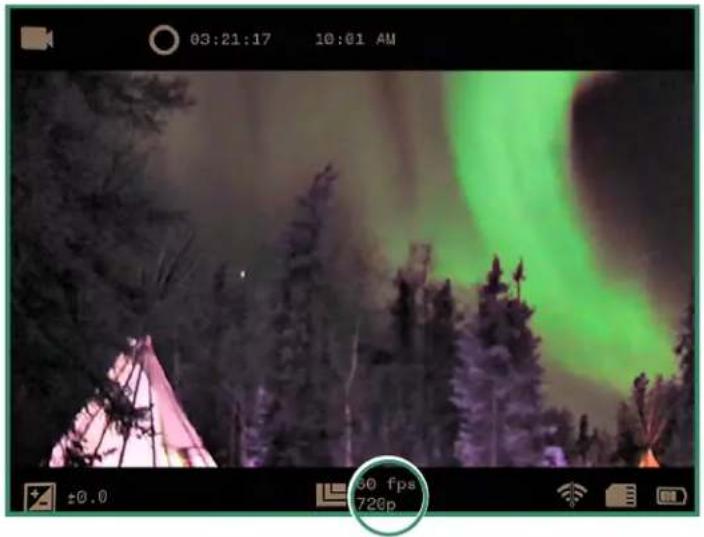
01:45 AM EIS Frame Rate 60 fps Resolution 30 fps HDR 24 fps 15 fpsNote: 60 fps will generally produce a smooth looking video. You can set the frame rate from 60 fps to Slo Mo. The Frame Rate will be displayed at the bottom of the Viewfinder. For best results when using the Day setting on the Scene Ring, select 60 fps. With the Twilight or Night setting, select 30 fps or slower.
text_image
03:21:17 10:01 AM 60 fps 720pChapter 2. Photos and Videos
2.5.3 Resolution
The camera has two video resolutions: 720p and 360p.

- Turn the camera on by rotating the Settings Dial to Video or Loop Mode
- Press SET to access the menu.
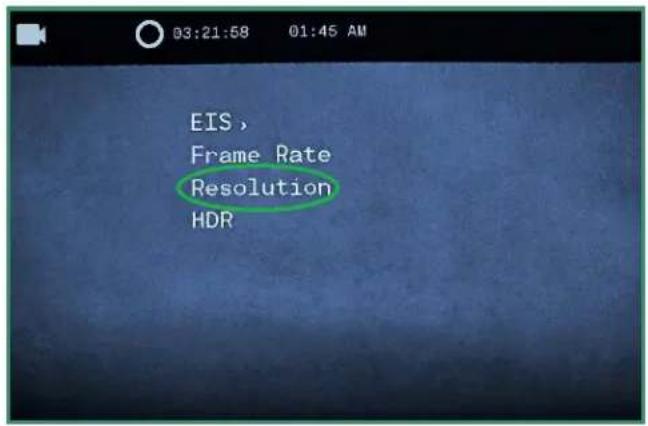
- Toggle to Resolution and right to chose 720p or 360p. Press SET and SET again to exit.
text_image
EIS, Frame Rate Resolution HDR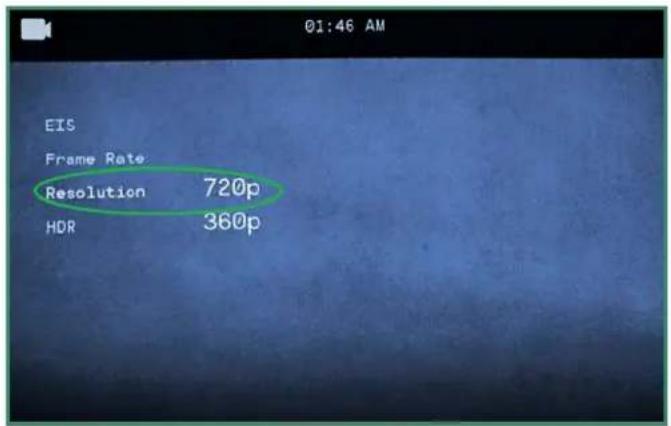
text_image
01:46 AM EIS Frame Rate Resolution 720p HDR 360p- The Resolution will be visible at the bottom of the Viewfinder.
natural_image
Nighttime forest scene with green and purple lighting, no visible text or symbolsNote: All features remain selected when the camera is turned off and then on again.
Chapter 2. Photos and Videos
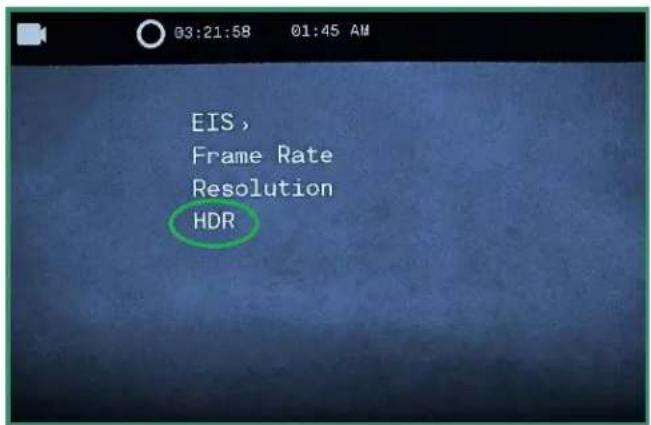
2.5.4 HDR
HDR stands for High Dynamic Range. This is a technique that's used in photography and imaging to reproduce a greater dynamic of luminosity than is possible with standard digital photographic or imaging techniques. It allows you to capture more detail from bright and dark areas.
- Turn the camera on by rotating the Settings Dial to Video or Loop Mode
- Press SET to access the menu.
- Toggle to HDR and right to select On or Off. Press SET to select and SET again to exit.
text_image
EIS, Frame Rate Resolution HDR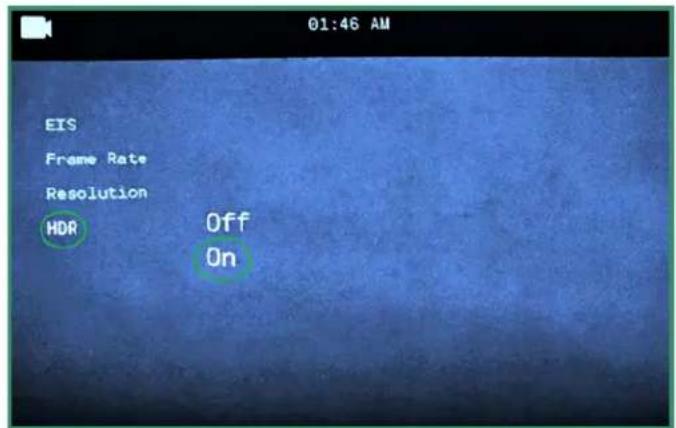
text_image
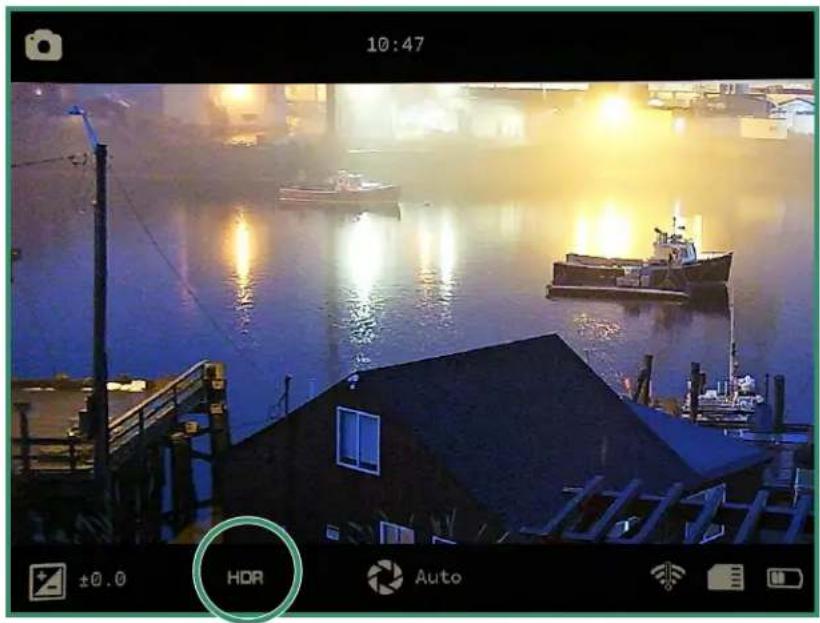
01:46 AM EIS Frame Rate Resolution HDR Off On- The HDR icon will be visible at the bottom of the Viewfinder.
natural_image
Nighttime cityscape with boats on a river, illuminated by warm lights and no visible text or symbolsChapter 3. Loop Mode
Loop Mode enables you to capture video that's activated by a trigger. A trigger can either be the shutter button or a shock (Aurora 'classic' and Pro only) to the camera such as the recoil from a gun.

Click here to view a related video
The Loop Mode has some of the same options as the Video mode: "EIS", "Setting the Frame Rate", "Resolution" and "HDR".
3.1 Trigger Type
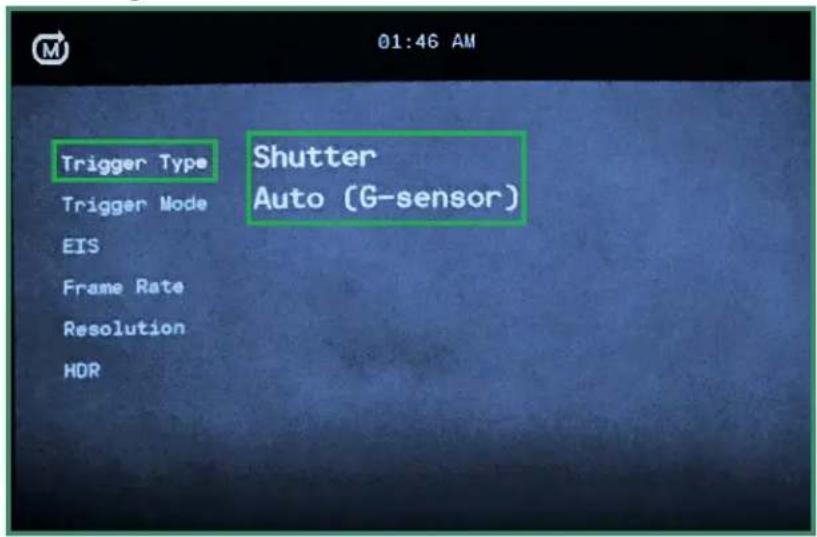
You can set the Trigger to be activated by the Shutter button or a sensor.
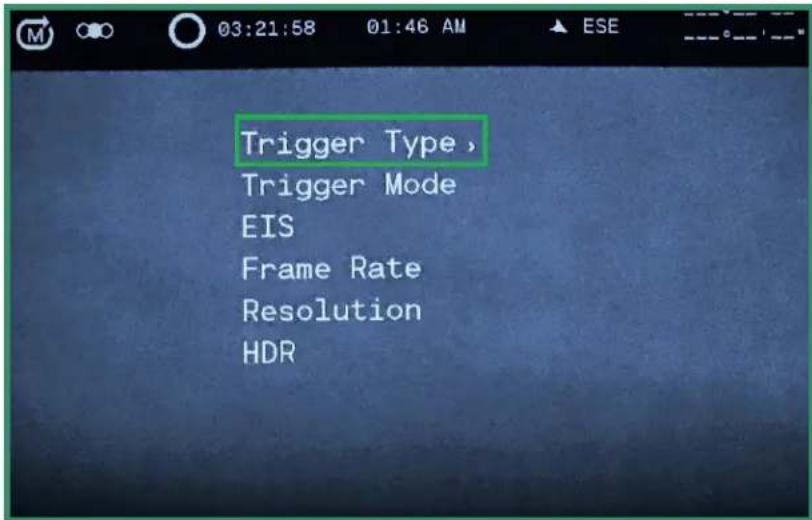
- To set the Trigger Type, rotate the Settings Dial to Loop Mode

text_image
Trigger Type, Trigger Mode EIS Frame Rate Resolution HDR- Press SET to access the Loop menu.
Chapter 3. Loop Mode
- Toggle right on Trigger Mode to select Shutter or Auto (Aurora 'classic' and Pro only). Press SET to select and SET again to exit.
text_image
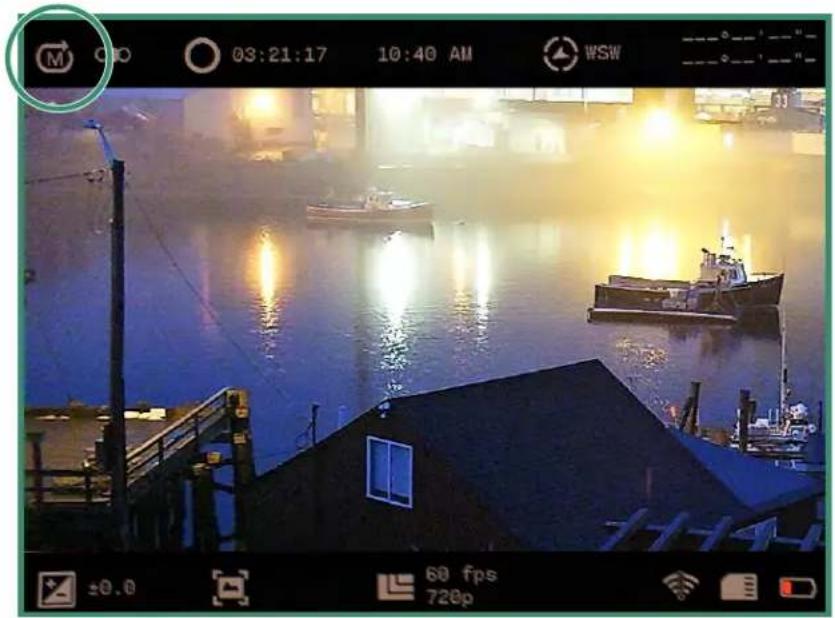
01:46 AM Trigger Type Shutter Auto (G-sensor) Trigger Mode EIS Frame Rate Resolution HDR- The Trigger settings will be visible in the Viewfinder.
natural_image
Nighttime coastal scene with boats on water and a building, no visible text or symbolsNote: All features remain selected when the camera is turned off and then on again.
Chapter 3. Loop Mode
3.2 Trigger Mode
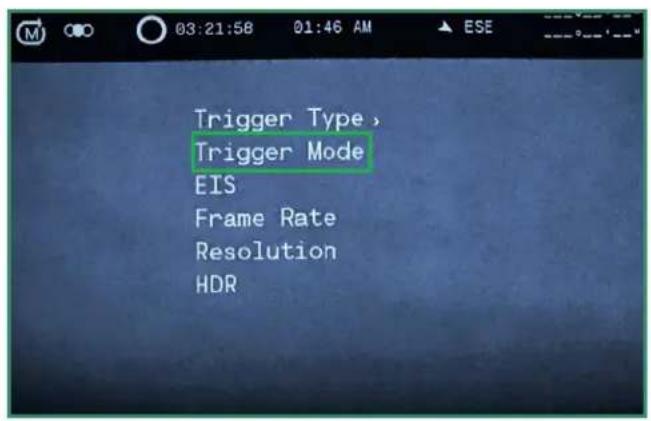
You can set the Trigger Mode to three different timing options:
• Before – records 30 seconds before the trigger
- Middle – records 15 seconds before and 15 seconds after the trigger
• After – records 30 seconds after the trigger
- To set the Trigger Mode, rotate the Settings Dial to Loop Mode

- Press SET to access the menu.
- Toggle right on Trigger Mode and press SET to select Mode and SET again to exit.
- The Trigger Mode will be visible in upper left of the Viewfinder.
text_image
Trigger Type Trigger Mode EIS Frame Rate Resolution HDR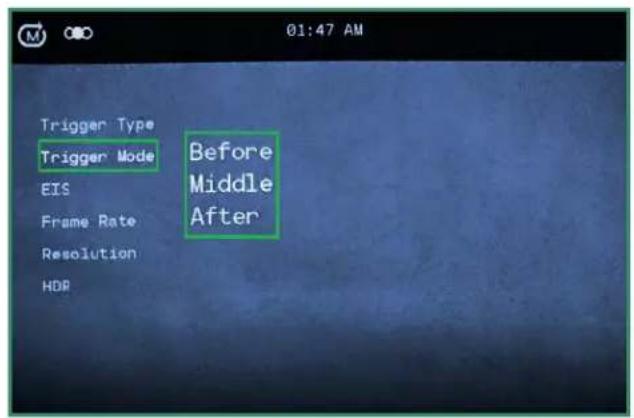
text_image
Trigger Type Trigger Mode EIS Frame Rate Resolution HDR Before Middle After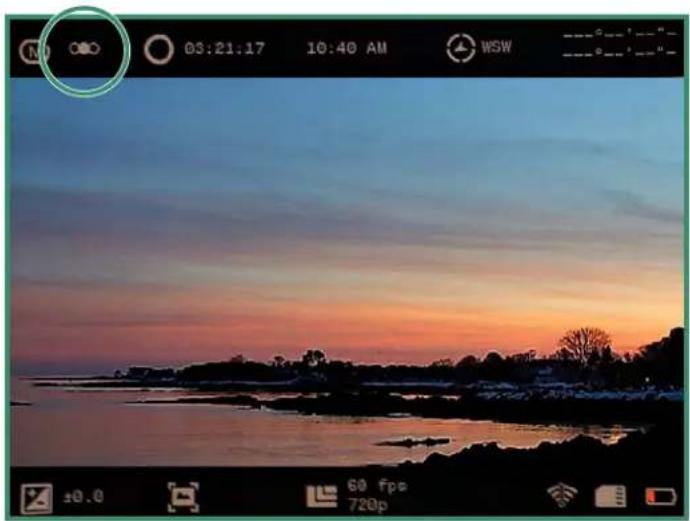
natural_image
Sunset over coastal waters with silhouetted trees and distant buildings (no text or symbols visible)4.1 About
The About option displays information about your camera.
.1. Turn the cam
- The WiFi/Settings menu appears.
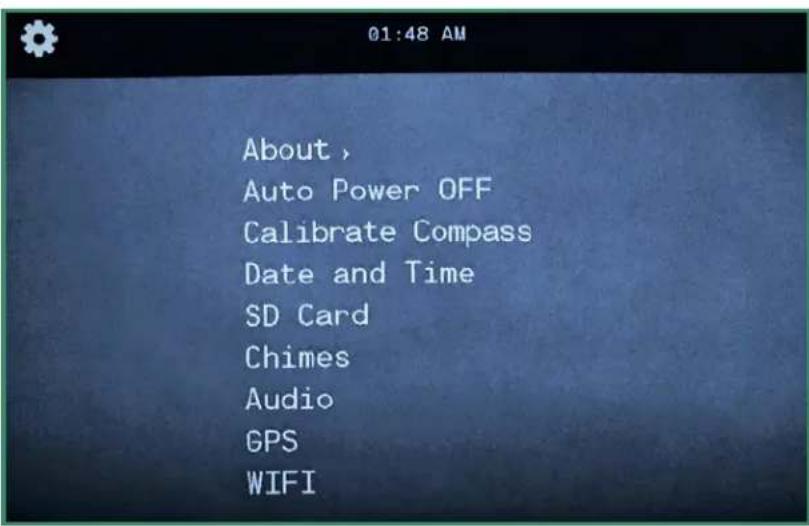
text_image
01:48 AM About > Auto Power OFF Calibrate Compass Date and Time SD Card Chimes Audio GPS WIFINote: To exit out of the WiFi/Settings menu, simply rotate the Settings Dial to another Mode.
- Toggle right on About to access the menu.
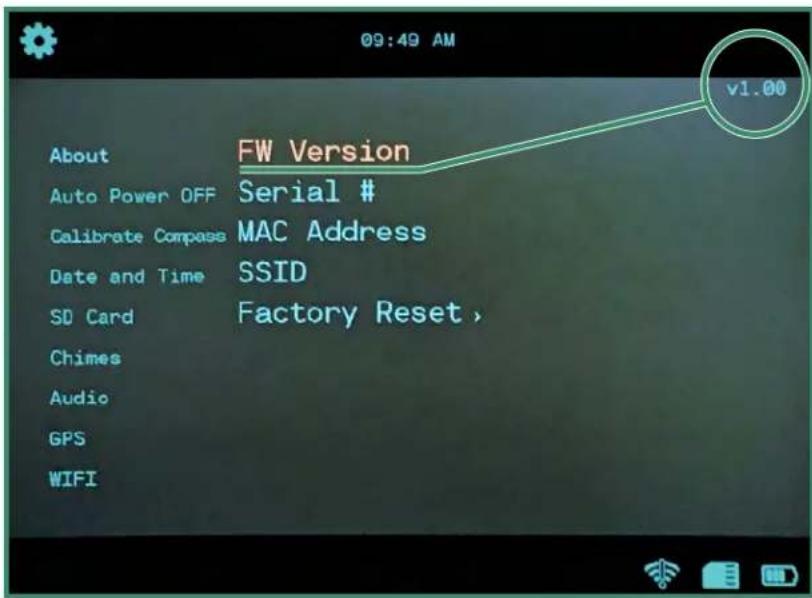
text_image
09:49 AM About FW Version Auto Power OFF Serial # Calibrate Compass MAC Address Date and Time SSID SD Card Factory Reset , Chimes Audio GPS WIFI v1.00Chapter 4. WIFI/Settings Mode
4.1.1 Factory Reset
Factory Reset returns the camera to its default settings.
- Turn the camera on by rotating the Settings Dial to WiFi/Settings Mode to access the menu.
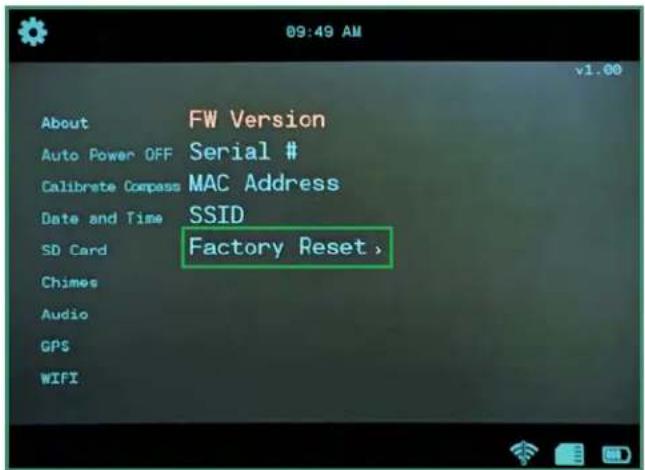
- Toggle right on About and down to Factory Reset. Select 'Yes' to reset your camera.
- When the Factory Reset is complete, you'll return to the previous menu. Press SET to exit the menu. Turn your camera off and back on again to complete the Factory Reset.
text_image
09:49 AM About FW Version Auto Power OFF Serial # Calibrate Compass MAC Address Date and Time SSID SD Card Factory Reset , Chimes Audio GPS WIFI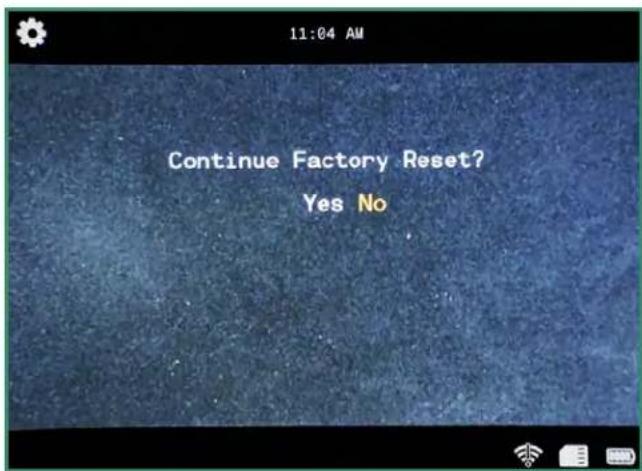
text_image
11:04 AM Continue Factory Reset? Yes No4.2 Auto Power OFF
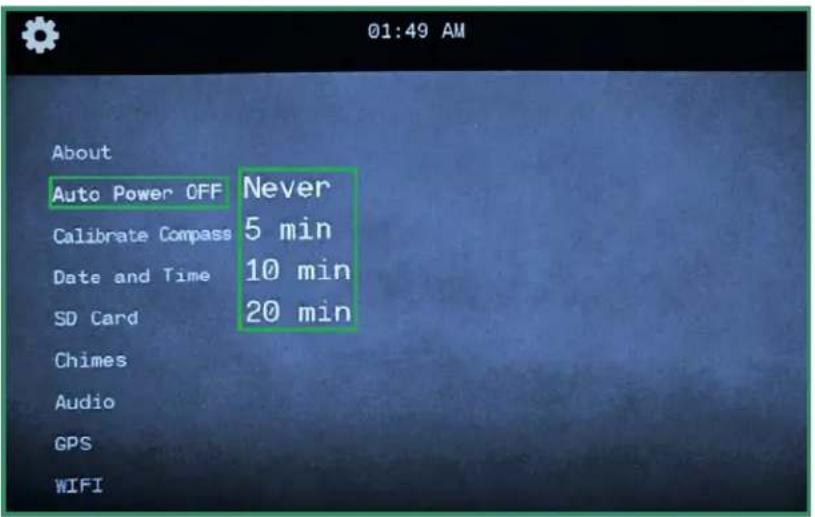
The Auto Power OFF option turns the camera off automatically at time frames of Never, 5 minutes, 10 minutes, or 20 minutes. The default setting is Never.
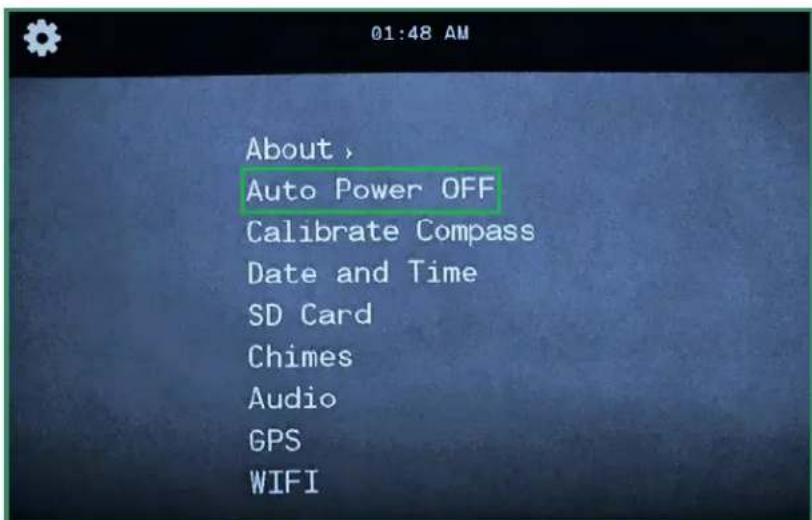
- Turn the camera on by rotating the Settings Dial to WiFi/Settings Mode to access the menu.
text_image
01:48 AM About > Auto Power OFF Calibrate Compass Date and Time SD Card Chimes Audio GPS WIFIChapter 4. WIFI/Settings Mode
- Toggle down to Auto Power OFF and right to the Power Off options.
text_image
01:49 AM About Auto Power OFF Never 5 min Calibrate Compass 10 min Date and Time 20 min SD Card Chimes Audio GPS WIFI- Toggle down to the option that best suits your camera use and press SET.
- Turn the Settings Dial to another Mode to exit the menu.
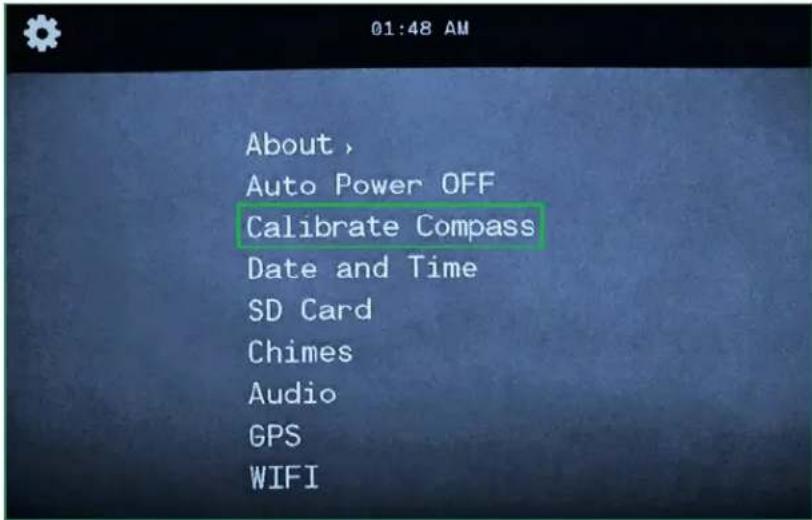
4.3 Compass (Aurora 'classic' and Pro only)
The camera has an electronic compass that is calibrated at the factory. If you feel that your compass is directionally off you can recalibrate it manually.

Click here to view a related video
- Turn the camera on by rotating the Settings Dial to WiFi/Settings Mode to access the menu.
/
text_image
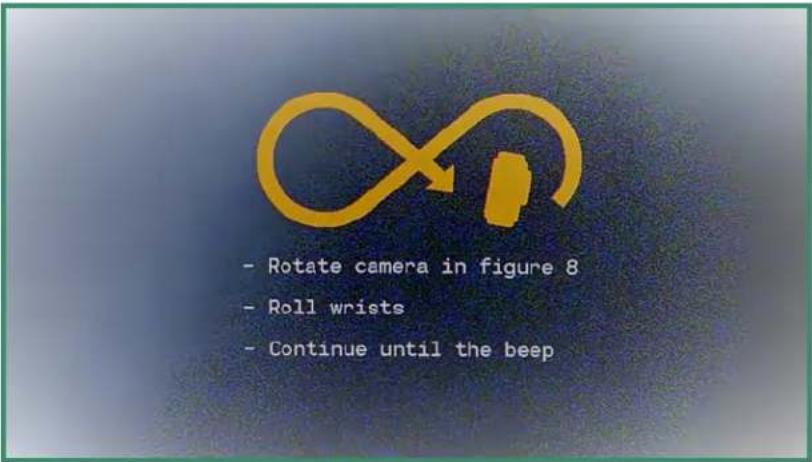
01:48 AM About > Auto Power OFF Calibrate Compass Date and Time SD Card Chimes Audio GPS WIFI- Toggle down to Calibrate Compass and right to access the animated instructions.
text_image
- Rotate camera in figure 8 - Roll wrists - Continue until the beep- If you've calibrated correctly, you will see this message: "Compass Calibration Successful."
If the compass fails to calibrate, you'll hear a boing sound and see a message that says: "Retry compass calibration."
4.4 Date and Time
To set the date and time, see "Section 1.5 Setting the Date and Time" on page 15. You can also set the date and time and change the format under GPS Set.
4.4.1 GPS Set (Aurora 'classic' and Pro only)
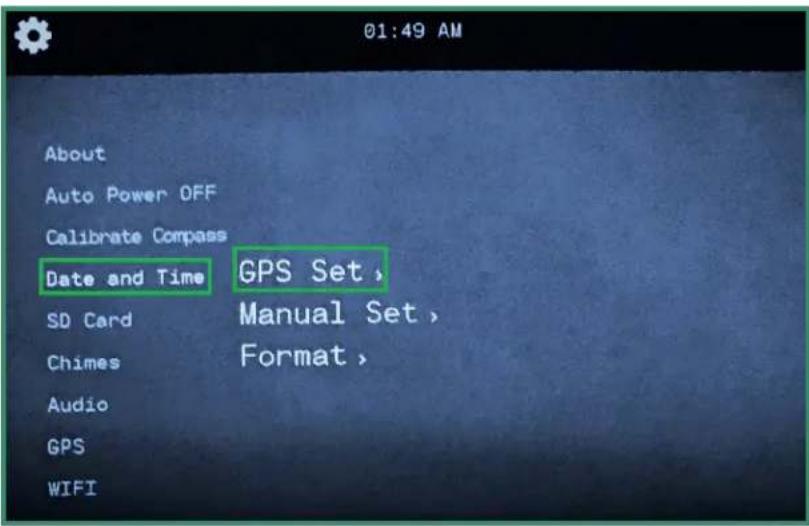
You can have the GPS set the time.
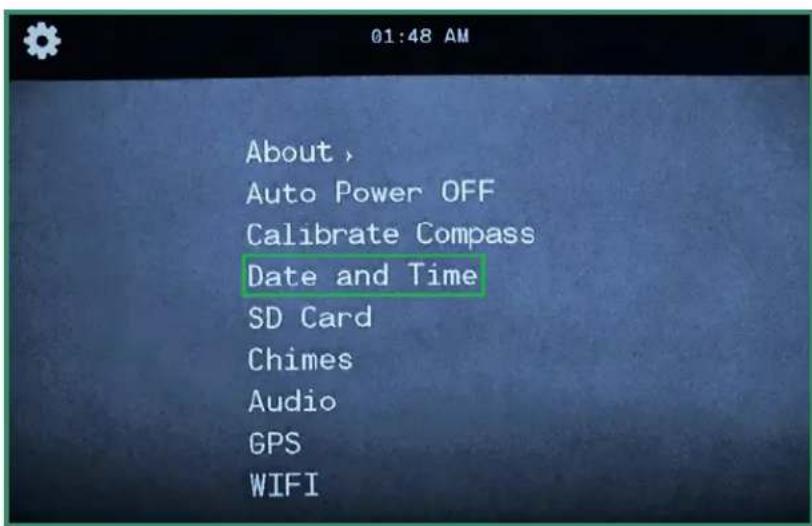
- Turn the camera on by rotating the Settings Dial to WiFi/Settings Mode to access the menu.
/
text_image
01:48 AM About > Auto Power OFF Calibrate Compass Date and Time SD Card Chimes Audio GPS WIFIChapter 4. WIFI/Settings Mode
- Toggle down to Date and Time and right to GPS Set and right again to options.
text_image
01:49 AM About Auto Power OFF Calibrate Compass Date and Time GPS Set , SD Card Manual Set , Chimes Format , Audio GPS WIFI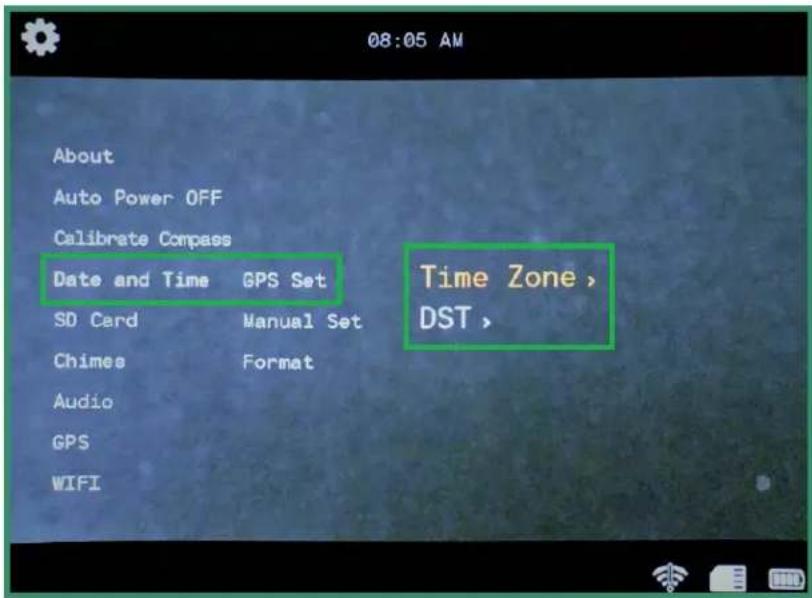
text_image
08:05 AM About Auto Power OFF Calibrate Compass Date and Time GPS Set SD Card Manual Set Chimes Format Audio GPS WIFI Time Zone , DST >Chapter 4. WIFI/Settings Mode
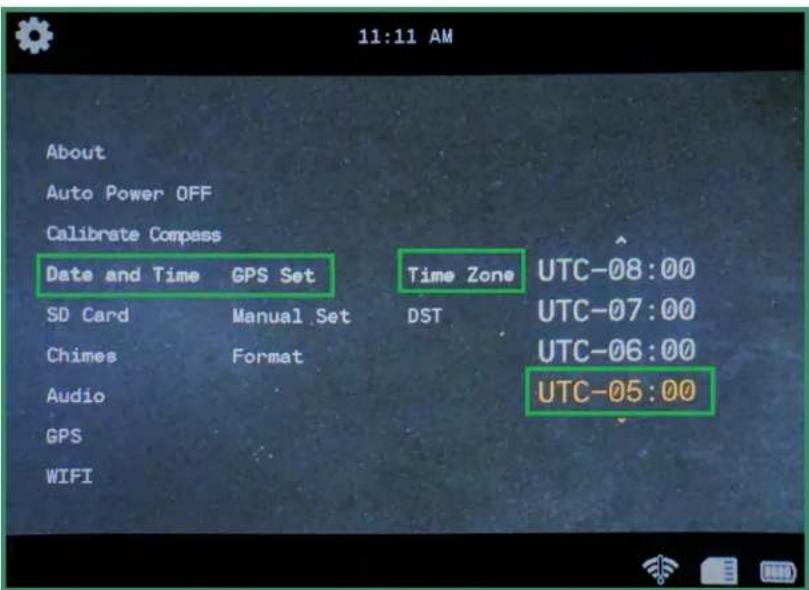
- Toggle right on Time Zone and press SET to select your Time Zone. (The United States Eastern Time Zone is 'UTC-5:00'.)
text_image
11:11 AM About Auto Power OFF Calibrate Compass Date and Time GPS Set Time Zone UTC-08:00 SD Card Manual Set DST UTC-07:00 Chimes Format UTC-06:00 Audio GPS WIFI UTC-05:00- Toggle left twice to exit the menu.
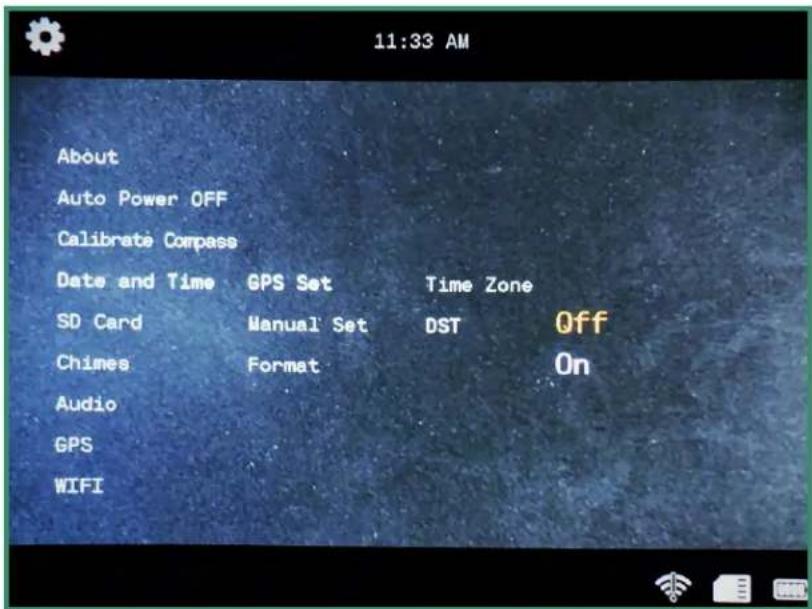
- If you want to set the Daylight Savings Time to on, toggle down to DST and right to On and press SET.
text_image
11:33 AM About Auto Power OFF Calibrate Compass Date and Time GPS Set Time Zone SD Card Manual Set DST Off Chimes Format On Audio GPS WIFI- Toggle left twice to exit the sub-menus.
4.4.2 Format
You can change the format of the date and time.
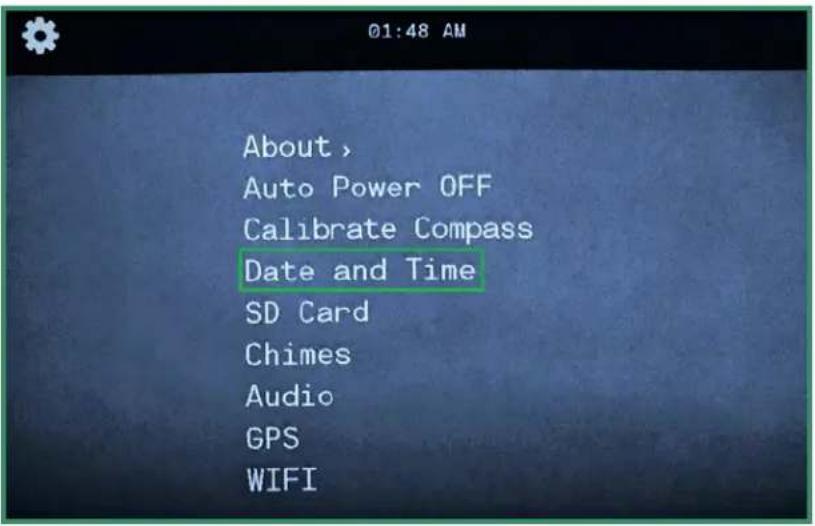
- Turn the camera on by rotating the Settings Dial to WiFi/Settings Mode to access the menu.

text_image
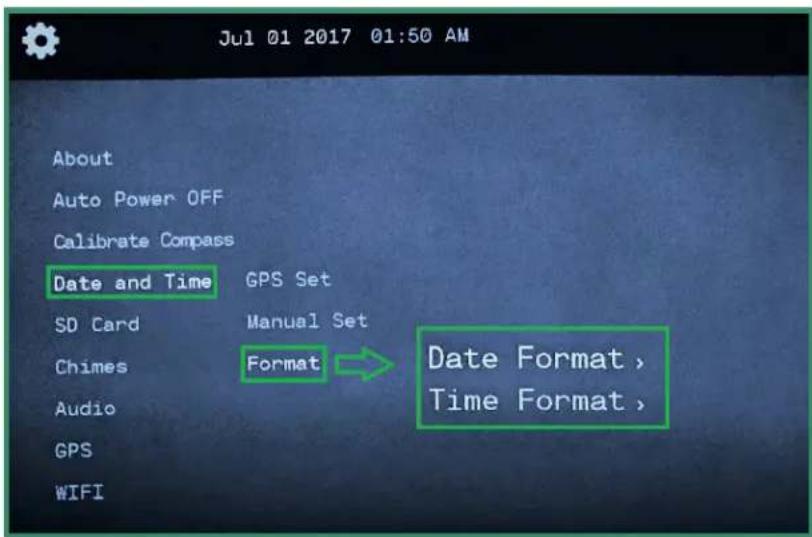
About > Auto Power OFF Calibrate Compass Date and Time SD Card Chimes Audio GPS WIFI- Toggle down to Date and Time and toggle right to Format.
text_image
Jul 01 2017 01:50 AM About Auto Power OFF Calibrate Compass Date and Time GPS Set SD Card Manual Set Chimes Format → Date Format , Audio GPS WIFIChapter 4. WIFI/Settings Mode
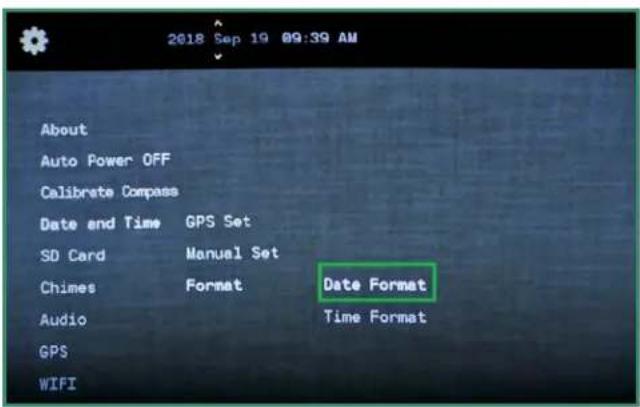
- Toggle right again to Date Format and press SET.
- The selectable options are at the top of the screen. The default Date Format is month-date-year. To change the format, toggle up and down and the format will change.
text_image
2018 Sep 19 09:39 AM About Auto Power OFF Calibrate Compass Date and Time GPS Set SD Card Manual Set Chimes Format Date Format Audio Time Format GPS WIFI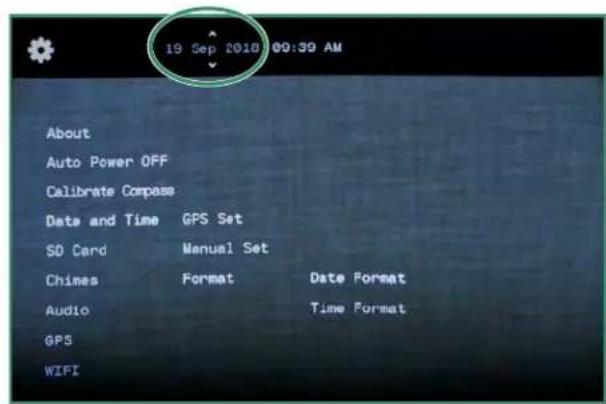
text_image
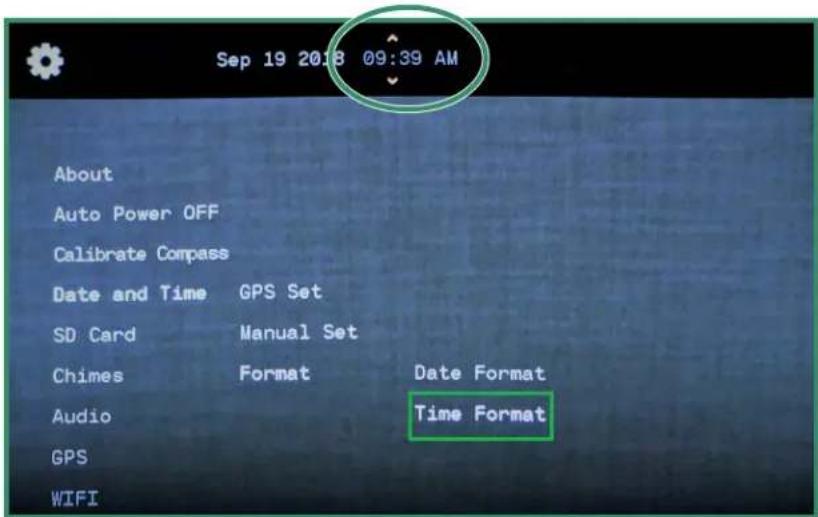
19 Sep 2018 00:30 AM About Auto Power OFF Calibrate Compass Date and Time GPS Set SD Card Manual Set Chimes Format Date Format Audio Time Format GPS WIFI- Toggle down to Time Format and toggle right. The selectable options are at the top of the screen. The default Time Format is 12 hour. To change to 24 hour, toggle up and press SET.
text_image
Sep 19 2018 09:39 AM About Auto Power OFF Calibrate Compass Date and Time GPS Set SD Card Manual Set Chimes Format Date Format Audio Time Format GPS WIFI- Select the option you want and press SET.
4.5 SD Card
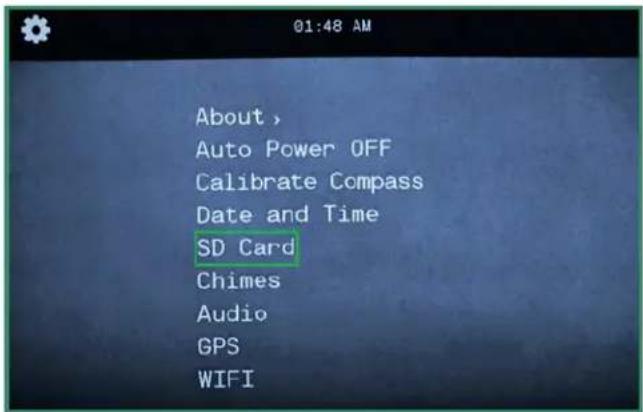
If your SD card becomes corrupt, you can format it through the camera.
- Turn the camera on by rotating the Settings Dial to WiFi/Settings Mode to access the menu.
- Toggle down to SD Card and right twice to Format.
- Toggle to Yes and press SET.
text_image
About , Auto Power OFF Calibrate Compass Date and Time SD Card Chimes Audio GPS WIFI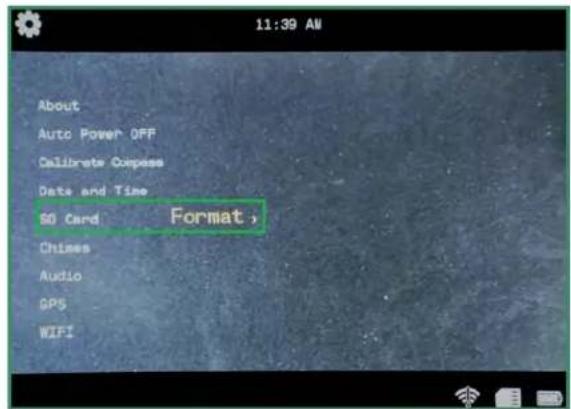
text_image
11:39 AM About Auto Power OFF Calibrate Express Data and Time SO Card Format, Chines Audio GPS WIFI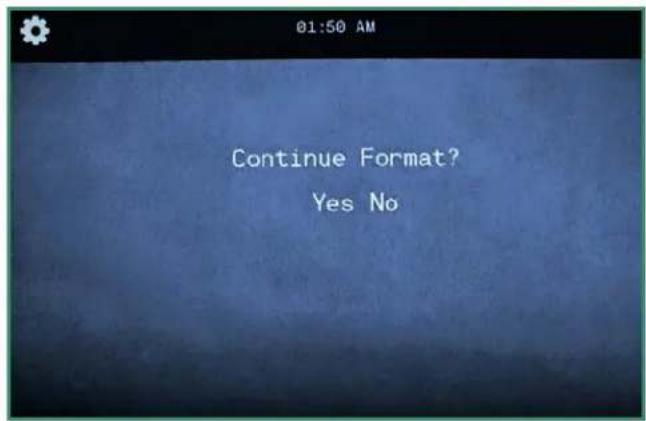
text_image
01:50 AM Continue Format? Yes NoNote: If you don't want to format the SD Card, select No and press SET and toggle left to the main menu.
CAUTION
Formatting your SD card will erase all of the card data!
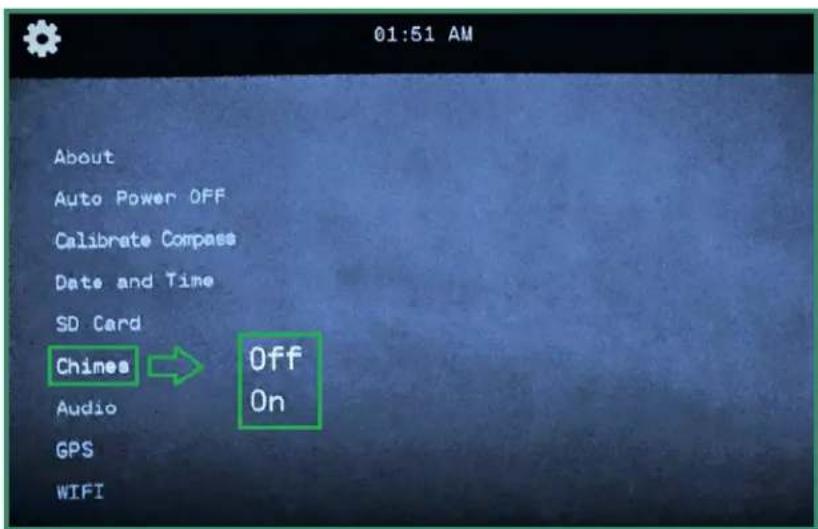
4.6 Chimes
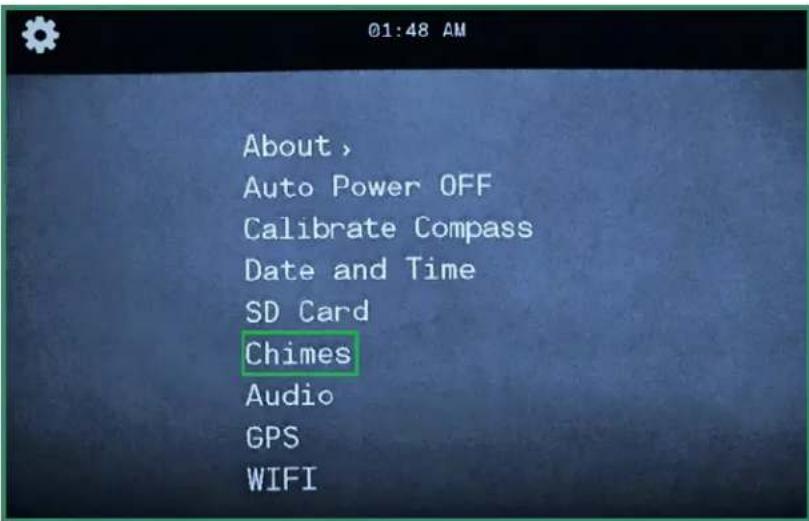
The camera plays chimes for different functions and when you turn the camera on and off.
- Turn the camera on by rotating the Settings Dial to WiFi/Settings Mode to access the menu.
/
text_image
About > Auto Power OFF Calibrate Compass Date and Time SD Card Chimes Audio GPS WIFI- Toggle down to Chimes and right to turn Chimes Off or On.
text_image
01:51 AM About Auto Power OFF Calibrate Compass Date and Time SD Card Chimes → Off Audio On GPS WIFI- Choose Off or On and press SET.
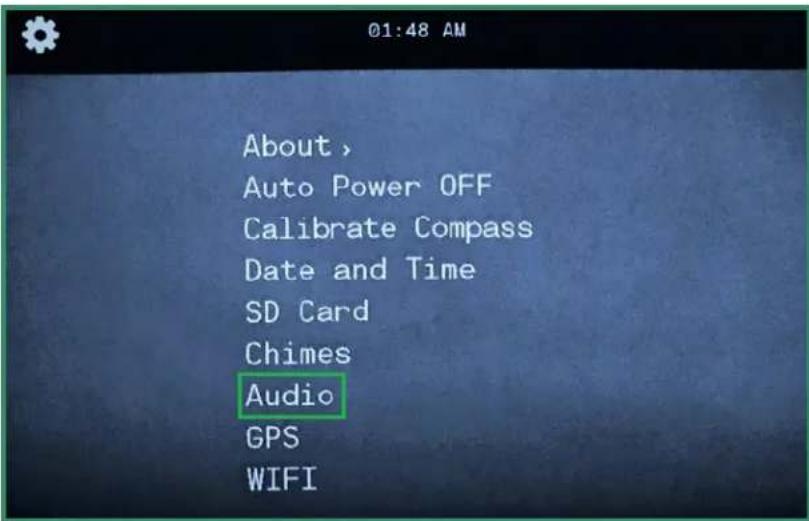
4.7 Audio
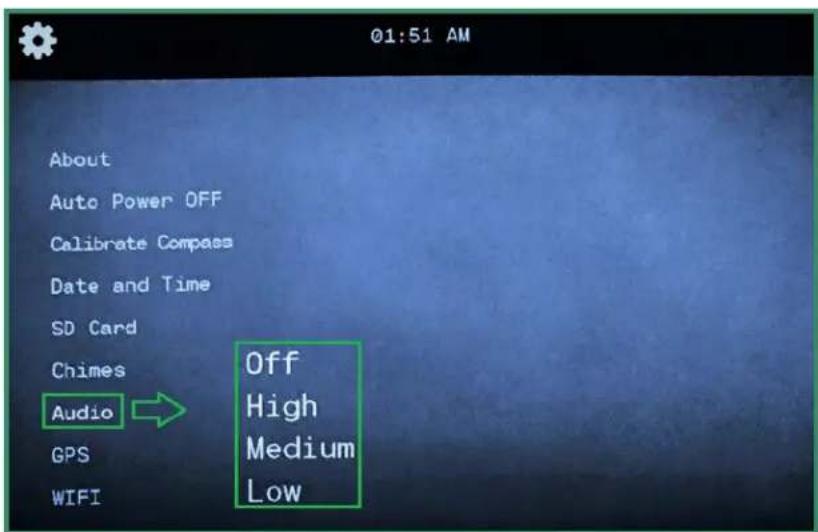
The playback audio in a video can be set to Off, High, Medium or Low.
- Turn the camera on by rotating the Settings Dial to WiFi/Settings Mode to access the menu
text_image
About > Auto Power OFF Calibrate Compass Date and Time SD Card Chimes Audio GPS WIFI- Toggle down to Audio and right to the volume options.
text_image
01:51 AM About Auto Power OFF Calibrate Compass Date and Time SD Card Chimes Audio Off High Medium Low GPS WIFI- Select the volume option you prefer and press SET.
4.8 GPS (Aurora 'classic' and Pro only)
The camera GPS displays your exact longitude and latitude. GPS coordinates are visible in the Viewfinder when in Photo, Video, or Loop Mode.

Click here to view a related video
4.8.1 Turning GPS On
Note: GPS only works when you're outside and requires 1-2 minutes for the camera to receive an initial location.
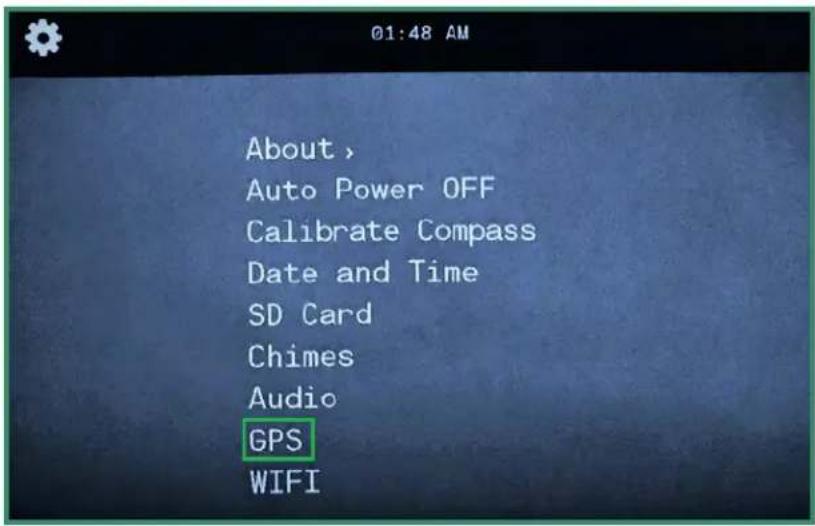
- Turn the camera on by rotating the Settings Dial to WiFi/Settings Mode to access the menu.

text_image
About > Auto Power OFF Calibrate Compass Date and Time SD Card Chimes Audio GPS WIFIChapter 4. WIFI/Settings Mode
- Toggle down to GPS and right to the GPS menu.
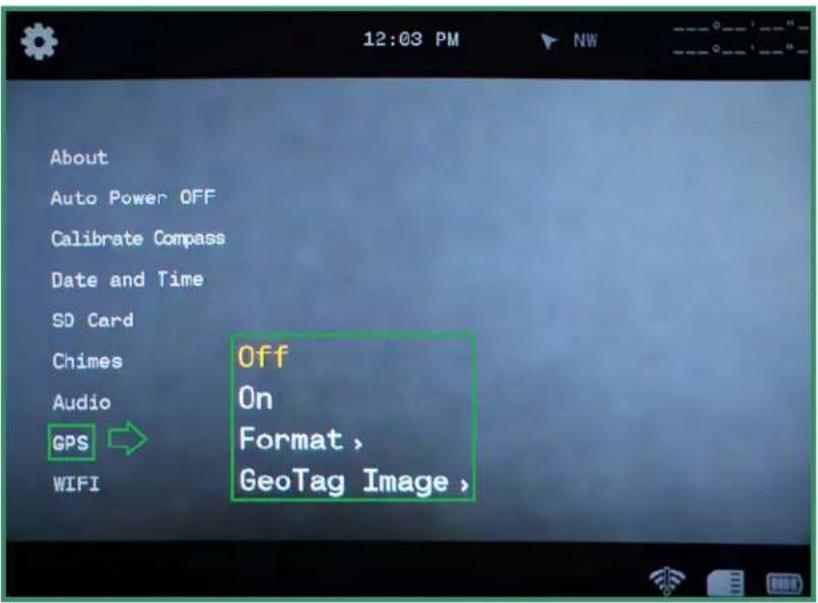
text_image
About Auto Power OFF Calibrate Compass Date and Time SD Card Chimes Audio GPS WIFI Off On Format > GeoTag Image >- Toggle down to On and press SET.
- Turn the camera to either the Photo, Video, or Loop Mode and go outside to receive a signal.
- GPS coordinates are in the upper right corner of the menu.
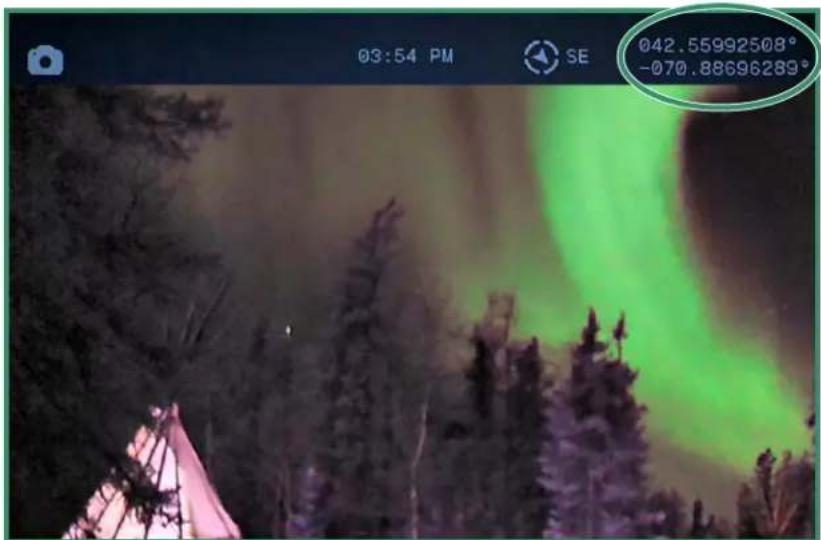
text_image
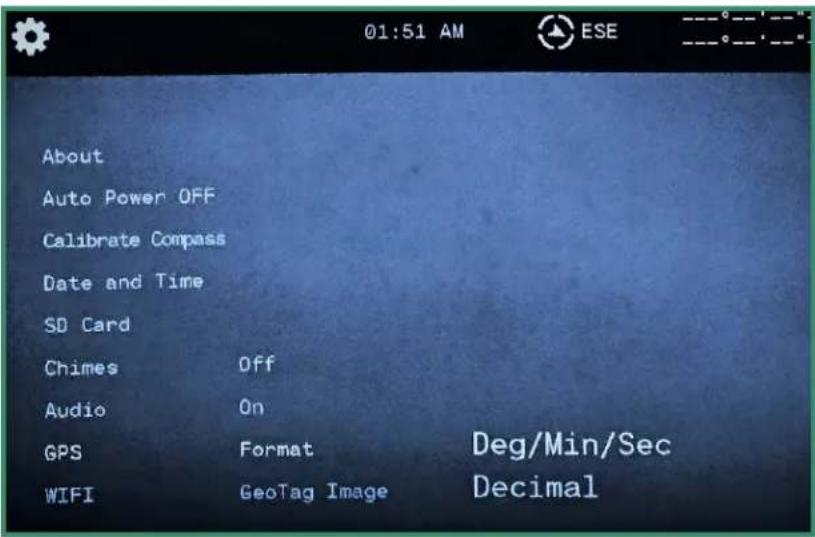
03:54 PM SE 042.55992508° -070.88696289°4.8.2 Changing the GPS Format
You can change the GPS format from degrees/minutes/seconds to decimals.
Chapter 4. WIFI/Settings Mode
- Turn the camera on by rotating the Settings Dial to WiFi/Settings Mode to access the menu.

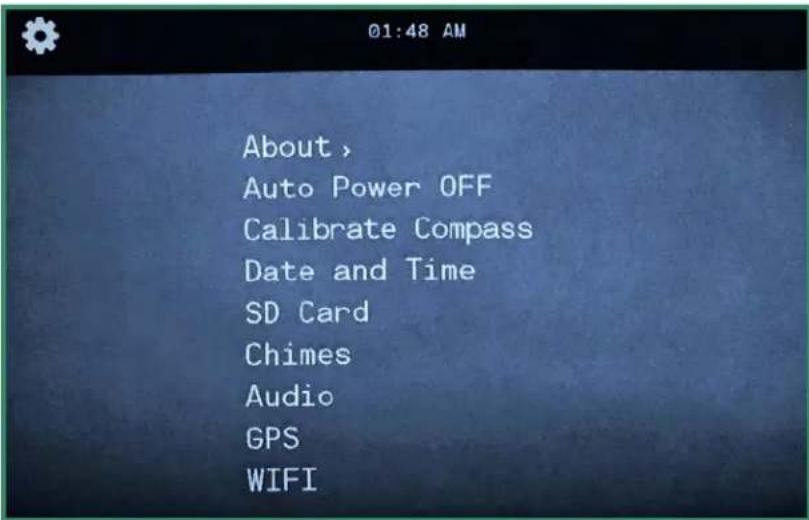
text_image
About > Auto Power OFF Calibrate Compass Date and Time SD Card Chimes Audio GPS WIFI- Toggle down to GPS and right to the menu.
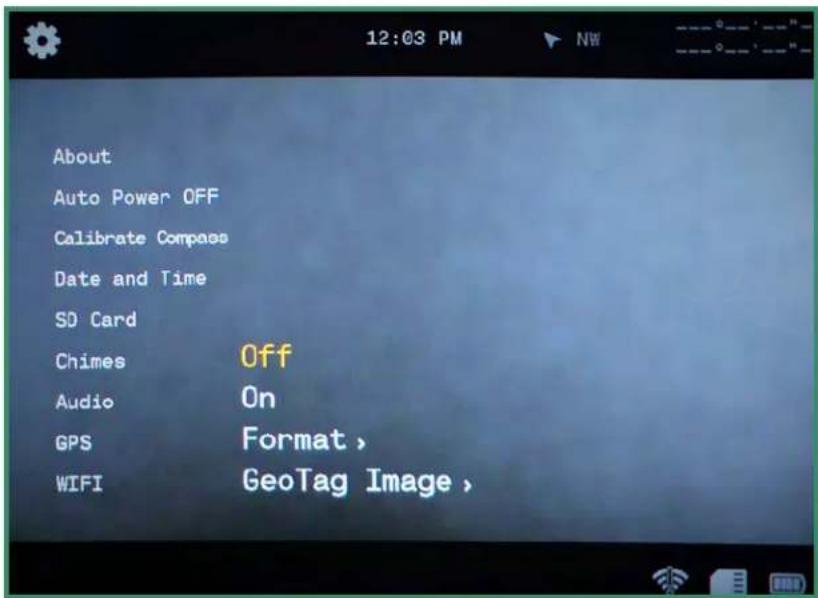
text_image
About Auto Power OFF Calibrate Compass Date and Time SD Card Chimes Off Audio On GPS Format > WIFI GeoTag Image >Chapter 4. WIFI/Settings Mode
- Toggle down to Format and right to the Format options.
text_image
About Auto Power OFF Calibrate Compass Date and Time SD Card Chimes Off Audio On GPS Format Deg/Min/Sec WIFI GeoTag Image Decimal- Select an option and press SET.
- Toggle left to exit the GPS menu.
Note: GPS consumes power and should be turned off to extend battery life when not in use.
- Turn the camera to either the Photo, Video, or Loop Mode and go outside to receive a signal. The GPS coordinates are in the upper right side of the Viewfinder.

text_image
03:54 PM SE 042.55992508° -070.88696289°4.8.3 GeoTag Image (Aurora 'classic' and Pro only)
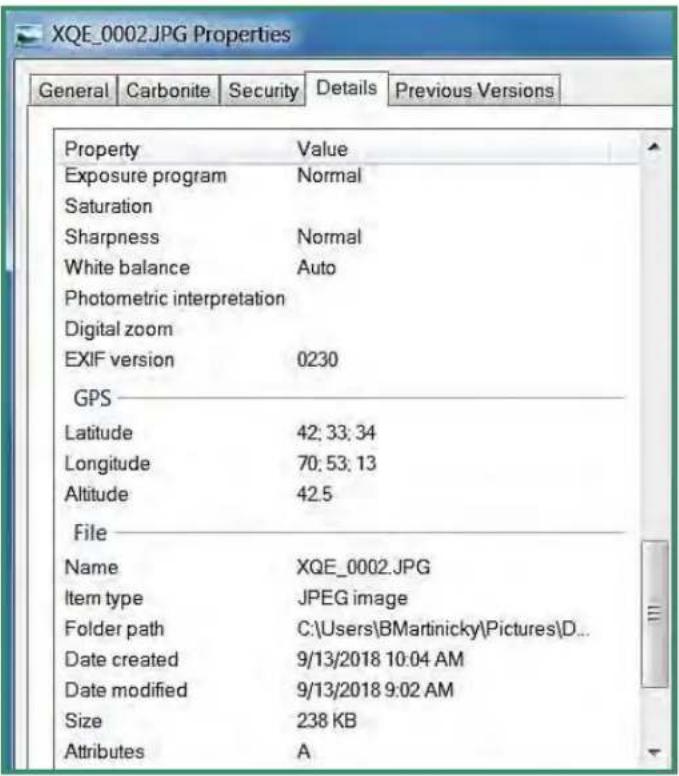
The GeoTag Image writes GPS metadata to both photos and videos. For photos, the metadata can be viewed with third party EXIF viewers and some versions of Windows® by right-clicking on the photo, selecting properties and then details. For videos, it's stored as custom metadata for each frame.
text_image
XQE_0002.JPG Properties General Carbonite Security Details Previous Versions Property Value Exposure program Normal Saturation Sharpness Normal White balance Auto Photometric interpretation Digital zoom EXIF version 0230 GPS Latitude 42; 33; 34 Longitude 70; 53; 13 Altitude 42.5 File Name XQE_0002.JPG Item type JPEG image Folder path C:\Users\BMartinicky\Pictures\D... Date created 9/13/2018 10:04 AM Date modified 9/13/2018 9:02 AM Size 238 KB Attributes A- Turn the camera on by rotating the Settings Dial to WiFi/Settings Mode to access the menu.
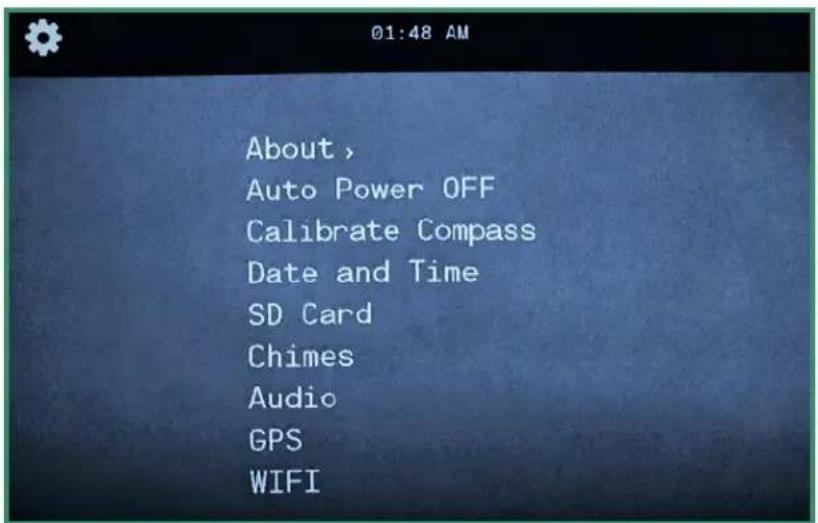
/
text_image
About > Auto Power OFF Calibrate Compass Date and Time SD Card Chimes Audio GPS WIFIChapter 4. WIFI/Settings Mode
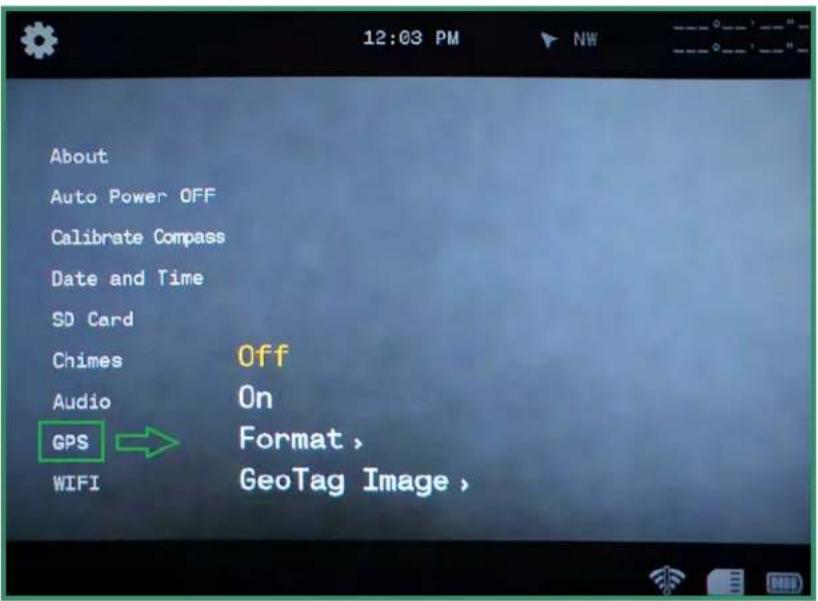
- Toggle down to GPS and right to the GPS menu.
text_image
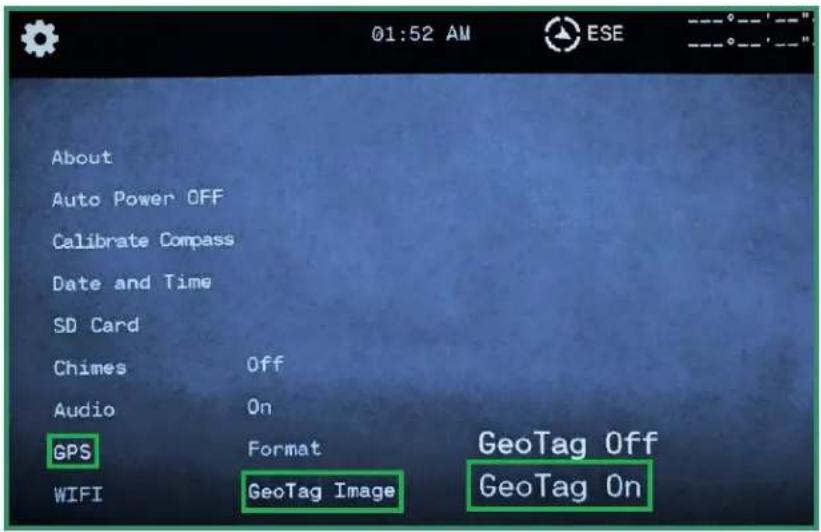
About Auto Power OFF Calibrate Compass Date and Time SD Card Chimes Off Audio On GPS Format , WIFI GeoTag Image >- Toggle down to GeoTag Image and right to the Off or On option. Press SET to select.
text_image
01:52 AM About Auto Power OFF Calibrate Compass Date and Time SD Card Chimes Off Audio On GPS Format GeoTag Off WIFI GeoTag Image GeoTag On- Toggle left to exit the GPS menu.
4.9 WIFI
To learn more about WiFi, see "Section 1.6 Downloading the SiOnyx Aurora App to Connect to Your Camera" on page 18.
5.1 Battery
5.1.1 Operating Temperature Range
The operating temperature range of the Aurora camera is 14 ^ - 104 ^ (-10 ^ - 40 ^ ) at 90% relative humidity.
5.1.2 Tips on Reducing Battery Usage
To save your battery's power, follow these tips:
- Turn the camera off whenever you're not using it.
- Turn off WiFi, GPS, EIS, audio and chimes.
-
Reduce the brightness of the Viewfinder.
-
Enable the Auto Power Off feature. See "Section 4.2 Auto Power OFF" on page 78.
5.1.3 Battery Storage and Handling
Here are some tips for storing and handling the battery.
Avoid exposing your camera to very cold or very hot temperatures. Low or high temperature conditions may shorten the battery life.
Keep the battery away from heat and fire. Do not dry the camera or battery with an external heat source such as a microwave oven or hair dryer.
Do not store your battery with metal objects, such as coins, keys or necklaces. If the battery terminals come in contact with metal objects, this may cause a fire.
Do not make any alterations to the camera. Do not use unauthorized chargers. Doing so may compromise safety, regulatory compliance, performance, and may void the warranty.
WARNING
Do not drop, disassemble, open, crush, bend, deform, puncture, shred, microwave, incinerate or paint the camera or battery. Do not insert foreign objects into the battery opening on the camera. If the battery doesn't fit, please check the battery's orientation and do not force it into the battery opening.
Do not use the camera or the battery if it has been damaged – for example, if cracked, punctured or harmed by water. Stop using the battery if there are noticeable abnormalities such as abnormal smell, heat, deformities or discoloration. Disassembling or puncturing the battery can cause an explosion or fire.
5.1.4 Battery Disposal
Many localities have laws in place requiring battery recycling.
To safely dispose of lithium-ion batteries, protect terminals from exposure to other metal.
Lithium-ion batteries contain recyclable materials and are accepted for recycling by the rechargeable battery recycling coloration's (RBRC) battery recycling program. Visit call2recyle at call2recycle.org or call 1-800-BATTERY in North America to find a convenient recycling location.
Never dispose of a battery in a fire because it may explode.
WARNING
Only use manufacturer-recommended replacement batteries for your camera.
Keep the battery away from infants and children under 5 years old. Make sure to supervise children and instruct them on the proper use and care of the battery.
5.2 Camera Specifications
| Sensor | Ultra Low-Light CMOS |
| Night Vision | Moonless starlight capable |
| Display | Color or monochrome |
| Lens | 16mm; f/1.4 (Night), f/2.0 (Twilight), f/5.6 (Day) selectable |
| Video | 360p/720p • .MOV |
| FPS | 7.5, 15, 24, 30, 60 |
| Photo | .9 MP images |
| Shutter Speeds | 1.5 sec, 1 sec, 1/.2 sec, 1/4 sec, 1/7.5 sec, 1/15 sec, 1/30 sec, 1/60 sec, 1/120 sec, 1/240 sec, 1/480 sec, 1/1000 sec, 1/2000 sec, 1/4000 sec, 1/8000 sec |
| IMU | GPS, Accelerometer, Compass (Aurora 'classic' and Pro only) |
| Connectivity | WiFi, USB 2.0 |
| Storage | Micro SD 4-32 GB (not included) |
| Viewfinder | Micro OLED display |
| Water-Resistant | Water-Resistant IP67 |
| Lithium-ion Battery | Rechargeable 2h continuous |
| Apps | iOS, Android |
Water Resistant
Aurora is splash, water, and dust resistant and is tested under controlled laboratory conditions with a rating of IP67 under IEC standard 60529. Aurora is water resistant to 3 feet for 30 minutes.
If your Aurora is wet or has recently been in water, be sure to dry it off thoroughly before removing the Viewfinder to prevent any water from entering the body of the camera.
5.3 SiOnyx Customer Care
To reach SiOnyx Customer Care, contact us at the following:
https://support.sionyx.com/support/home
Support@sionyx.com
Chapter 6. Troubleshooting
If an error occurs when using the camera, a message will display in the Viewfinder. A corresponding red light will also flash on the side of the camera.
| Error Issue How to Fix | ||
| Camera Overheating | If the temperature of the camera reaches 104 °F (40 °C) it will shut down automatically. | Camera will work when temperature reaches operating range. |
| Low Battery The battery is not sufficiently charged to run the camera. | Charge the battery. | |
| No SD Card Inserted | SD card is not inserted Remove message by pressing the SET button. Install an SD Card. | |
| Unformatted SD Card | SD Card is unformatted. Format SD Card. | |
| SD Card Error When SD card is not recognized. If SD Card is above 32 GB card will not work. Install 32 GB SD card. (PRO = 256GB) | ||
| SD Card is full | When there is no space left on SD Card. | Replace with new SD Card or delete images from current SD Card. |
| Please set date and time | Out-of-box or after firmware update. Remove message by pressing the SET button. Set date and time. | |
| WIFI connection lost | When the WiFi connection is lost. Shows message until WiFi is reestablished or Mode on Settings Dial is changed. | |
| WIFI connection not found | When the WiFi connection is not found. Shows message until WiFi is established or Mode on Settings Dial is changed. | |
| Swing range error | When Panorama mode is on and swing direction is wrong or movement is too fast. | Message will disappear automatically. Repeat Panorama process. |
| No Satellites | When the GPS cannot find a satellite signal for 5 minutes after being set to On. | Camera needs to be outdoors with a clear view of the sky. |
| No Photo | In Playback mode when there is no image to display. | In Playback mode there are no photos to display on SD Card. Turn Settings Dial to another Mode. |
7.1 SiOnyx Aurora Return / Exchange Limited Warranty Policy
7.1.1 What's Covered by This Limited Warranty
SiOnyx, LLC ("SiOnyx" or "we") warrants to the original end-user purchaser ("you") the SiOnyx-branded product and accessories contained in the original packaging ("SiOnyx Product"), including battery, neck strap, protective bag, and USB cable, against defects in materials and workmanship when used normally in accordance with SiOnyx's published guidelines for a period of ONE (1) YEAR from the date of original retail purchase by the end-user purchaser ("Warranty Period"). SiOnyx's published guidelines include, but are not limited to, information contained in technical specifications, user manuals, and service communications.
This limited warranty is only valid and enforceable in the country where the SiOnyx Product was purchased, provided that said country is on the list of specified countries in which we sell the Aurora camera.
If the SiOnyx Product fails within the Warranty Period we will, within a commercially reasonable time, free of charge, either repair or replace it as described below.
7.1.2 What's Not Covered by This Limited Warranty
What's Not Covered by This Limited Warranty
This limited warranty does not apply to any non-SiOnyx branded hardware products or any software, even if packaged or sold with SiOnyx hardware. Manufacturers, suppliers, or publishers, other than SiOnyx, may provide their own warranties to you – please contact them for further information. Software distributed by SiOnyx with or without the SiOnyx brand (including, but not limited to, system software) is not covered by this limited warranty. Please refer to the licensing agreement accompanying the software for details of your rights with respect to its use. SiOnyx does not warrant that the operation of the SiOnyx Product will be uninterrupted or error-free. SiOnyx is not responsible for damage arising from failure to follow instructions relating to the SiOnyx Product's use.
This limited warranty does not apply: (a) to consumable parts, such as batteries or protective coatings that are designed to diminish over time, unless failure has occurred due to a defect in materials or workmanship; (b) to cosmetic damage, including but not limited to scratches (including to lenses), dents, and broken plastic on ports; (c) to damage caused by use with another product; (d) to damage caused by accident, abuse, misuse, tampering, liquid (beyond IP67 certification), grit, impact, fire, lack of proper care or maintenance, earthquake, or other external cause; (e) to damage caused by operating the SiOnyx Product outside SiOnyx's published guidelines; (f) to damage caused by use of unauthorized parts or by service (including upgrades and expansions) performed by anyone who is not a representative of SiOnyx or a SiOnyx Authorized Service Provider ("SASP"); (g) to a SiOnyx Product that has been modified to alter functionality or capability without the written permission of SiOnyx; (h) to defects caused by normal wear and tear or otherwise due to the normal aging of the SiOnyx Product; or (i) if any serial number has been removed or defaced from the SiOnyx Product.
7.1.3 What Are Your Remedies Under this Limited Warranty?
All warranty claims will require an RMA number. To discuss a warranty claim and acquire an RMA number, please call SiOnyx Aurora Customer Care at (833) SiOnyx 1 (833-746-6991). You will be required to furnish a sales receipt/proof of purchase indicating date of purchase, amount paid and place of purchase.
If a claim is received within the Warranty Period and the SiOnyx Product is found to have failed based on a phone evaluation by SiOnyx Aurora Customer Care we will, at our option:
• repair the camera or accessory, or
- exchange the camera or accessory with a product that is new, or which has been manufactured from new or serviceable used parts and is at least functionally equivalent to the original product, or
- exchange the camera or accessory with a product that is a new and upgraded model which has at least equivalent or upgraded function to the original product.
As far as applicable laws permit, the Warranty Period will not be extended or renewed or otherwise affected due to subsequent exchange, resale, repair, or replacement of the camera or accessory. However, part(s) repaired or replaced during the Warranty Period will be warranted for the remainder of the original Warranty Period or for ninety (90) days from the date of repair or replacement, whichever is longer.
7.1.4 Warranty Limitations Subject to Consumer Law
To the extent permitted by law, this limited warranty and the remedies set forth are exclusive and in lieu of all other warranties, remedies, and conditions, whether oral, written, statutory, express, or implied and represent our entire liability for any breach of this limited warranty. Except as provided in this limited warranty and to the maximum extent permitted by law, we are not responsible for any consequential, incidental, special or punitive damages or losses, whether direct or indirect, resulting from the use of this product, or arising out of any breach of this limited warranty. SiOnyx disclaims all statutory and implied warranties, including without limitation, warranties of merchantability and fitness for a particular purpose and warranties against hidden or latent defects, to the extent permitted by law. In so far as such warranties cannot be disclaimed, SiOnyx limits the duration and remedies of such warranties to the duration of this express limited warranty and, at SiOnyx's option, the repair or replacement services described above. Some states (countries or provinces) do not allow limitations on how long an implied warranty (or condition) may last, or the exclusion or limitation of incidental or consequential damages, so the limitations described above may not apply to you.
This Warranty gives you specific legal rights, and you may have other rights that vary from state to state (or by country or province). Other than as permitted by law, SiOnyx does not exclude, limit, or suspend other rights you may have, including those that may arise from the nonconformity of a sales contract. For a full understanding of your rights you should consult the laws of your country, province, or state.
7.1.5 Returning Products
You may return merchandise for a refund of the product price, or exchange, if the return is made within 14 days of receipt of the item. Refunds will exclude any return shipping charges and a 15% restocking fee. You are responsible for all shipping charges for return shipping, except for out of box failures deemed failures by SiOnyx Aurora Customer Care.
All returns will require an RMA number. To discuss a return and acquire an RMA number, please call SiOnyx Aurora Customer Care at (833) SiOnyx 1 (833-746-6991).
All orders must be inspected by customers within 30 days of the date of purchase. After this time, SiOnyx will not be responsible for items damaged in shipping, lost, or any other issues not related to technical support.
Returned or exchanged products must be in brand-new, mint condition. Items must be in the original, undamaged manufacturer product packaging with all parts and paperwork, including instruction booklets and packing inserts. Please do not place stickers or shipping labels on the original manufacturer's product package.
We will not accept C.O.D. shipments or products without an RMA number. Products shipped to our facility without an RMA number will be disposed of. There will be no question or other recourse regarding this process.
Please allow up to 10 (ten) business days (from the time we receive the return) for your exchange or return to be processed.
Return address will be provided to you by SiOnyx Aurora Customer Care when you call for an RMA number.
Questions? Please contact SiOnyx Aurora Customer Care at (833) SiOnyx 1 (833-746-6991).