Fusion R400 - Disk array Sonnet - Free user manual and instructions
Find the device manual for free Fusion R400 Sonnet in PDF.


User questions about Fusion R400 Sonnet
0 question about this device. Answer the ones you know or ask your own.
Ask a new question about this device
Download the instructions for your Disk array in PDF format for free! Find your manual Fusion R400 - Sonnet and take your electronic device back in hand. On this page are published all the documents necessary for the use of your device. Fusion R400 by Sonnet.
USER MANUAL Fusion R400 Sonnet
FUSION™ R400 RAID USB 3.0
1U Rackmount 4-Drive Hardware RAID 5 SATA Storage System with USB 3.0 Interface
User's Guide
Contents
1 Fusion R400 RAID USB 3.0 Features 1
2 Drive Installation and Enclosure Setup 2
Install Drives
Connect the Fusion R400 RAID USB 3.0 to Computer and Power Outlet
3 Drive Mode Descriptions 3
RAID 0: Striping, No Redundancy
RAID 10: Striping, Mirror Spans Two Drives
Span: Concatenation, Volume Spans Four Drives
RAID 5: Striping, Parity Distributed Among Drives
JBOD: Just a Bunch of Disks
4 Drive Mode Configuration Instructions 5
General Information
Select Drive Mode
5 Drive Formatting Instructions 6
OS X Users' Instructions
Windows 8/7/Vista and Server 2012/2008 Users' Instructions
Linux Users' Information
6 Status LED Indications 7
System Powered, No Data Reads or Writes
Drive Activity
Drive Not Recognized
RAID 5 or RAID 10 Rebuild
Bad Drive Detected
7 Specifications, Warnings, and Additional Information 8
Specifications
Safety Precautions
Warnings
FCC Compliance
Contacting Customer Service
Visit Our Website
This page left intentionally blank
1 - Fusion R400 RAID USB 3.0 Features

text_image
① ② ④③ Power Build Fusion R400 RAID USB 3.0 S©NN®5 ⑤ ⑤ ⑤ ⑤1 - Power Indicator LED
This blue LED lights when the Fusion R400 RAID USB 3.0 is powered.
2 - Rebuild Indicator LED
This orange LED lights when the Fusion R400 RAID USB 3.0 is rebuilding the data on a RAID 5 or 10 RAID set.
3 - Mode Change Confirmation; Drive 1 Presence, Activity, and Fault Indicator LED
This LED lights red when the Drive Mode Change Switch is pressed. It also indicates Drive 1's ready state (solid green), read and write activity (flashes green), and fault status (OFF). Note that the LED will remain off if the drive in drive bay 1 is not recognized.
4 - Presence, Activity, and Fault Indicator LEDs for Drives 2-4
These LEDs indicate the ready state (solid green), read and write activity (flashes green), and fault status (OFF) for drives 2–4. Note that an LED will remain off if the corresponding drive is not recognized (or if no drive is installed).
5 - Drive Tray
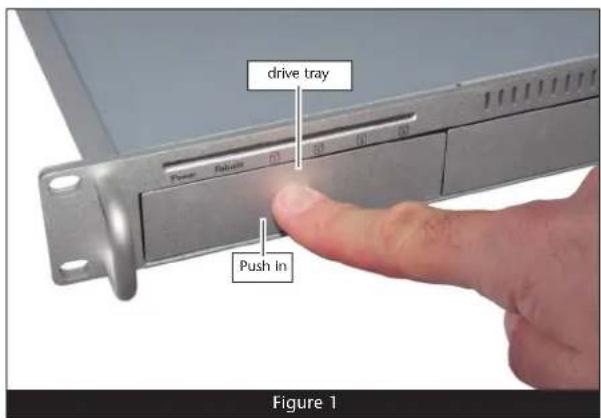
To remove a drive tray, press its handle in until it pops out, then pull out the entire tray. To insert a drive tray, insert it into the drive bay until it stops, and then push its handle in until it latches closed.

text_image
Back panel diagram of a computer drive with labeled ports and components6 - Power Switch
7 - Power Cord Socket
8 - Drive Mode Change Switch
Press and hold this switch for three or more seconds to activate the selected drive mode.

NING: Once you press and hold the Mode Change
Switch for more than three seconds while the R400 RAID USB 3.0 is powered, any files stored on the system are lost and cannot be recovered!
9 - Drive Mode Setting Switch
Select the drive mode setting using this switch.
10 - USB 3.0 Interface Port
This port is compatible with the included Sonnet USB 3.0 cable and other USB 3.0 cables. It is also compatible with USB 2.0 cables. However, when a USB 2.0 cable is used, the R400 RAID USB 3.0's performance will be reduced by as much as 85 percent.
2 - Drive Installation and Enclosure Setup
Install Drives
- Remove the Fusion R400 RAID USB 3.0 from its packaging, and then place it on a flat, level surface.
- If you intend to use the Fusion enclosure in a rack and need to be able to slide the enclosure in and out of the rack, install the Sonnet rack slide set (or equivalent), sold separately:
• FUS-RSS-P for 17-21.5" deep racks
• FUS-RSS-S for 23–26.5" deep racks
• FUS-RSS for 27–30.5" deep racks
• FUS-RSS-L for 29–32.5" deep racks
- Push in a drive tray's handle until it pops out (Figure 1). Pull the handle toward you to slide out and remove the drive tray.

NING: When handling computer products, take care to prevent components from being damaged by static electricity; working in carpeted areas. Handle hard drives only by their and avoid touching connector traces and component pins.
- Remove a SATA drive from its packaging and set it in on a flat, level surface with the label side down. Open the supplied tube of threadlocker and apply a single drop inside each of the four screw holes on the bottom of the drive (Figure 2).
- Turn the tray upside down and lay it on top of the drive, with the back of the tray facing toward the drive's connectors (Figure 3).
- Using four of the supplied screws, secure the drive tray to the drive; tighten each screw to secure the tray snugly to the drive; do not overtighten the screws (Figure 3).

NING: When securing the trays to the hard drives, you must verify the screw heads are flush with the tray. Otherwise, v may catch on the enclosure and prevent you from removing it.
- Carefully slide the drive module (label side up) back into the enclosure until it stops, and then push the handle in until it clicks to secure the drive module inside the enclosure (Figure 4).
- Repeat steps 3 - 7 for the remaining drives, and then install the Fusion R400 RAID USB 3.0 into the rack or set it on the surface which it will reside.
Connect the Fusion R400 RAID USB 3.0 to Computer and Power Outlet
- Using the supplied USB 3.0 cable, connect the Fusion R400 RAID USB 3.0 to a USB 3.0 port on your computer.

Support Note: The Fusion R400 RAID USB 3.0 requires a USB
3.0 cable and a USB 3.0 port on your computer to achieve full performance. Connecting the Fusion storage system to your computer using a USB 2.0 cable, or connecting it to a USB 2.0 port will result in reduced performance.
2. Connect the supplied power cable between the Fusion R400 RAID USB 3.0 and a grounded wall outlet or power strip; verify the cable is plugged in securely.
text_image
drive tray Push in Figure 1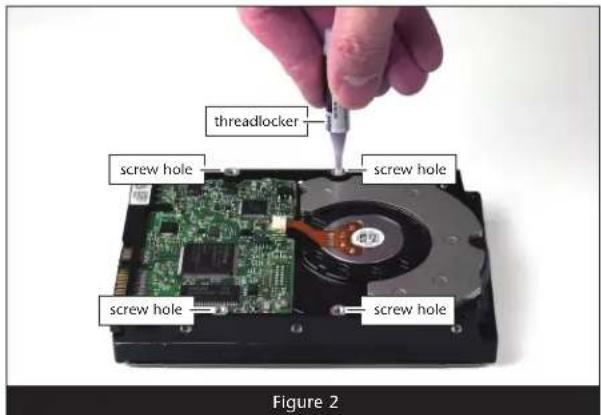
text_image
threadlocker screw hole screw hole screw hole screw hole Figure 2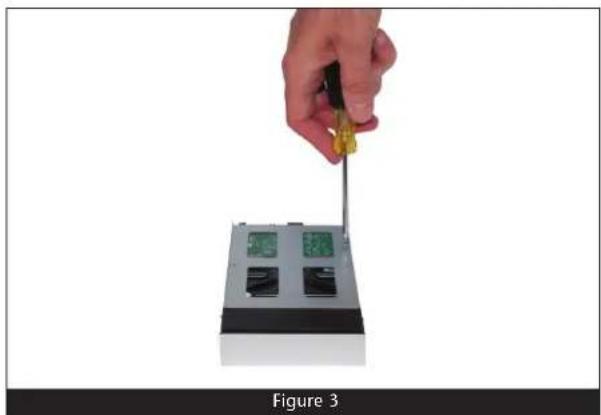
natural_image
Hand holding a tool interacting with a device labeled Figure 3 (no visible text or symbols on the device itself)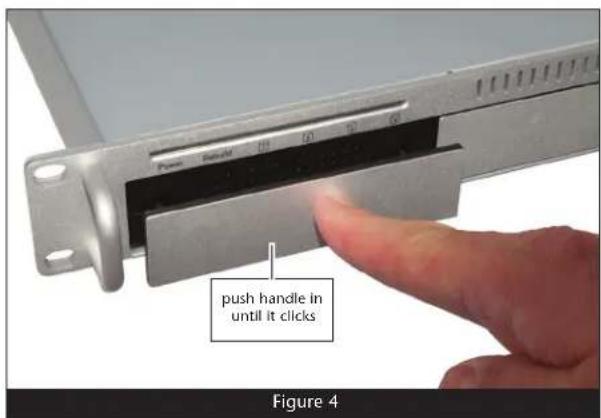
text_image
push handle in until it clicks Figure 43 - Drive Mode Descriptions
The following two pages describe the various drive modes supported by the R400 RAID USB 3.0. To configure the Fusion R400 RAID USB 3.0's drives, refer to Select Drive Mode on page 5.

Support Note: In all modes except JBOD, Sonnet strongly recommends you use four identical drives
in the Fusion R400 RAID USB 3.0. Due to varying operating characteristics, the use of different drives may lead to issues ranging from reduced total capacity, to louder operation, to RAID failures.
RAID 0: Striping, No Redundancy
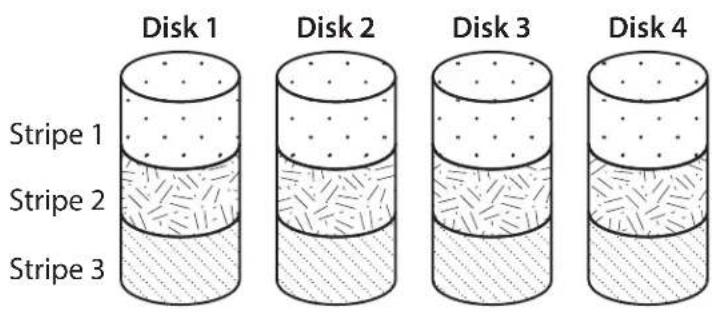
RAID 0 (striping) is based on the concept that increased performance can be achieved by simultaneously accessing data across multiple drives, increasing data transfer rates while reducing average access time by overlapping drive seeks. Drives are accessed alternately, as if stacked one on top of the other. Although RAID 0 is typically used by applications requiring high performance for non-critical data, when used in the R400 RAID USB 3.0 it's only advantage next to RAID 5 is increased formatted capacity. RAID 0 provides no data protection; If one drive fails, all data within that stripe set is lost. See Figure 5.
When configured as a RAID 0 volume, the volume size is equal to the full capacity of the drives.

ING: RAID 5 and 10 configuration improves data accessibility and reliability during normal ions. However, you still need a good backup strategy g-term protection of your data.
RAID 10: Striping, Mirror Spans Two Drives
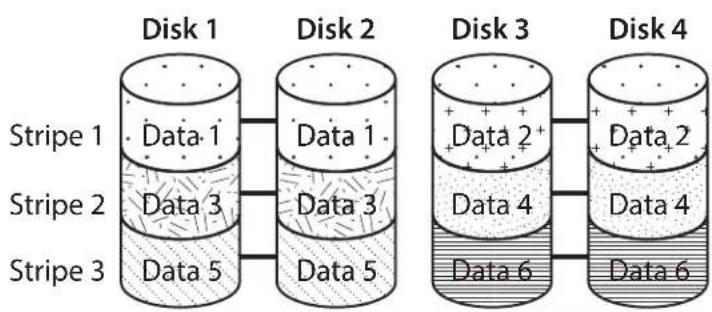
RAID 10 increases data transfer rates while ensuring security by writing the exact same data simultaneously to two or more different drives. Any one of the four drives can fail, and the volume will continue to function. RAID 10 is used in applications requiring higher performance and redundancy, combining the attributes of RAID Levels 1 and 0. See Figure 6.
RAID 10 offer 50% of the total capacity of the four drives.
Span: Concatenation, Volume Spans Four Drives
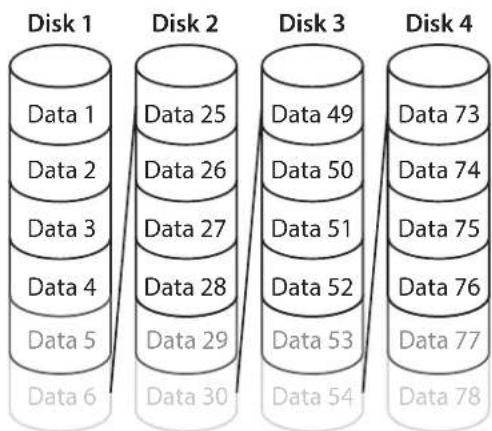
Span mode creates a single, large volume that spans all four drives, writing files to the capacity of the first drive, then the second drive, and so on. See Figure 7. Span mode provides no data protection.
When configured as a spanned volume, the total volume size depends on the drive with the smallest capacity.
RAID 0: Striping, No Redundancy
text_image
Disk 1 Disk 2 Disk 3 Disk 4 Stripe 1 Stripe 2 Stripe 3Figure S
RAID 10:
Striping, Mirror Spans Two Drives
text_image
Disk 1 Disk 2 Stripe 1 Data 1 Data 1 Stripe 2 Data 3 Data 3 Stripe 3 Data 5 Disk 3 Disk 4 Data 2 Data 4 Data 6 Disk 6Figure 6
Span (Concatenation, Big)
bar_stacked
| Disk | Data 1 | Data 2 | Data 3 | Data 4 | Data 5 | Data 6 | Data 29 | Data 30 | Data 49 | Data 50 | Data 51 | Data 52 | Data 53 | Data 54 | Data 73 | Data 74 | Data 75 | Data 76 | Data 77 | Data 78 | |---|---|---|---|---|---|---|---|---|---|---|---|---|---|---|---|---|---|---|---|---| | Disk 1 | 25 | 26 | 27 | 28 | 29 | 30 | - | - | - | - | - | - | - | - | - | - | - | - | - | - | | Disk 2 | - | - | - | - | - | - | - | - | - | - | - | - | - | - | - | - | - | - | - | - | | Disk 3 | 49 | 50 | 51 | 52 | 53 | 54 | - | - | - | - | - | - | - | - | - | - | - | - | - | - | | Disk 4 | 73 | 74 | 75 | 76 | 77 | 78 | - | - | - | - | - | - | - | - | - | - | - | - | - | - |Figure 7
3 - Drive Mode Descriptions
RAID 5: Striping, Parity Distributed Among Drives
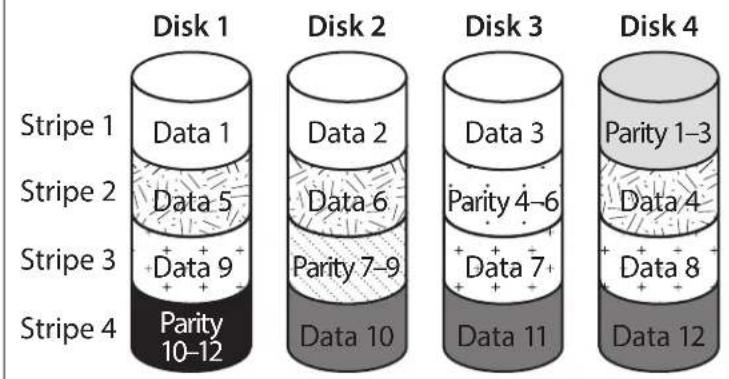
RAID 5 configuration increases reliability while using fewer drives than RAID 10 mirroring by using parity redundancy: parity is distributed across multiple drives. Any one of the four drives can fail, and the volume will continue to function. See Figure 8. When the failed drive is replaced, the parity data on the three other drives is used to rebuild the RAID volume with data spread across all four drives.
In the R400 RAID USB 3.0, RAID 5 configuration offers 75% of the four drives' total capacity. For example, if your system has four 4TB drives, the total unformatted capacity is 16TB. After configuring the drives in RAID 5 mode, approximately 12TB is available for storage, with the other 4TB set aside for parity.
JBOD: Just a Bunch of Disks
JBOD mode enables all four drives to be available individually at the same time for normal storage operations. See Figure 9. JBOD provides no data protection.
JBOD offers the full capacity of each of the drives.
RAID 5:
Striping, Parity Distributed Among Drives
bar_stacked
| Disk | Stripe | Data 1 | Data 2 | Data 3 | Parity 4-6 | Data 7 | Parity 1-3 | Data 4 | Data 8 | |------|--------|--------|--------|--------|------------|--------|------------|--------|--------| | 1 | Stripe 1 | Data 1 | Data 2 | Data 3 | Data 4-6 | Data 7 | Data 10 | Data 11 | Data 12 | | 2 | Stripe 2 | Data 5 | Data 6 | Data 3 | Data 4-6 | Data 7 | Data 10 | Data 11 | Data 12 | | 3 | Stripe 3 | Data 9 | Parity 7-9 | Data 3 | Data 4-6 | Data 7 | Data 10 | Data 11 | Data 12 | | 4 | Stripe 4 | Parity 10-12 | Parity 10-12 | Data 3 | Data 4-6 | Data 7 | Data 10 | Data 11 | Data 12 |Figure 8
JBOD (Just a Bunch of Disks)

text_image
Disk 1 Data 1 Data 2 Data 3 Data 4 Disk 2 Data 5 Data 6 Data 7 Data 8 Disk 3 Data 9 Data 10 Data 11 Data 12 Disk 4 Data 13 Data 14 Data 15 Data 16Figure 9
4 - Drive Mode Configuration Instructions
General Information
Drives installed into the Fusion R400 RAID USB 3.0 must be configured first by the enclosure itself (drive mode), and then by your computer's operating system. Select the drive mode following the directions below.
Select Drive Mode
- With drives installed, power up the Fusion R400 RAID USB 3.0 enclosure.
-
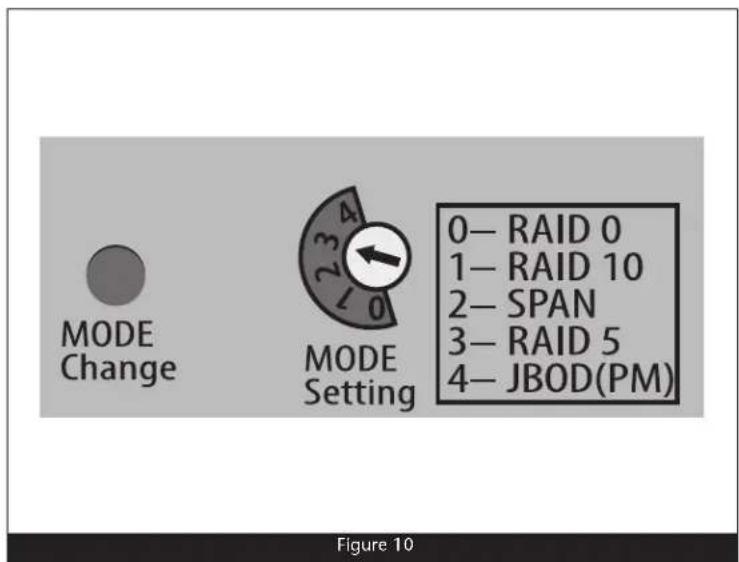
Using a small screwdriver, turn the MODE Setting switch on the back of the enclosure to the position that matches the mode you wish to use (Figure 10).
-
Press and hold the MODE Change switch for more than three seconds (Figure 11); the Drive 1 LED will light red, while the LEDs for Drives 2 – 4 will light green until you release the button (Figure 11). Once you release the button, all four drive LEDs will flash green as the mode change takes place.

NING: Reconfiguring the drives in your Fusion R400 RAID USB 3.0 enclosure requires you to that them. Reformating the drives will erase any on them! If there is any data on them, back it up a configuring the drives.
- Turn on your computer; you may now format the drives using your computer's operating system drive formatting application; go to the next page.
text_image
MODE Change MODE Setting 0— RAID 0 1— RAID 10 2— SPAN 3— RAID 5 4— JBOD(PM) Figure 10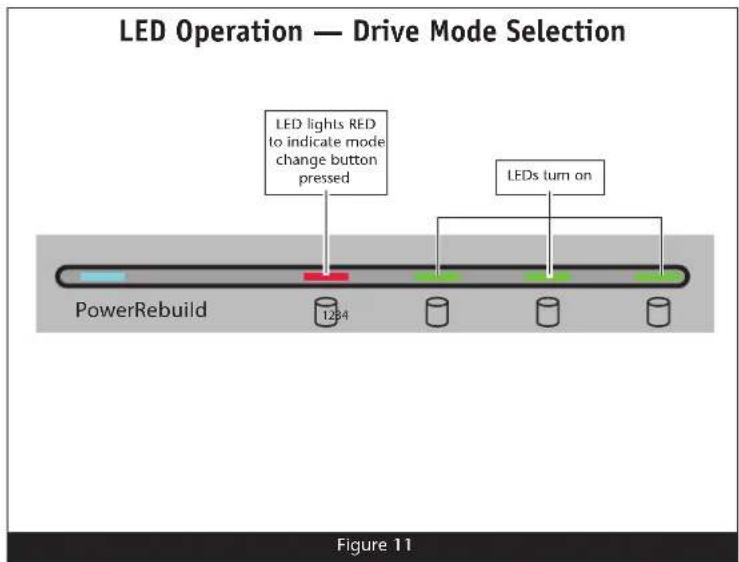
text_image
LED Operation — Drive Mode Selection LED lights RED to indicate mode change button pressed LEDs turn on PowerRebuild 1284 Figure 115 - Drive Formatting Instructions
OS X® Users' Instructions
- After the Fusion R400 RAID USB 3.0 finishes configuring the drives, a Disk Insertion window will appear stating that there is an unreadable volume; click Initialize, and then Disk Utility will open. Note that if you configured the drives as JBOD, multiple Disk Insertion windows will open; clicking Initialize on the first window will cause Disk Utility to launch.
- In the Disk Utility window, RAID 0-, RAID 10-, Span-, and RAID 5-configured drives will appear as a single volume; JBOD-configured drives will each appear as a single volume. Select the volume, and then click the Erase tab at the top of the window.
- Select a drive format and name for the volume, and then click the Erase button; a window will appear asking you to approve your choice.
- Click Erase; the R400 RAID USB 3.0 volume will appear on your computer's desktop.
- Repeat steps 2 – 4 as necessary if the drives were JBOD-configured. Otherwise, close Disk Utility; the R400 RAID USB 3.0 is ready for use.
Windows® 8/7/Vista and Server 2012/2008 Users' Instructions
- Click the Start button, and then right-click Manage; the Computer Management window opens.
- In the Computer Management window, click Storage on the left, and then double-click Disk Management.
- When the Initialize Disk window appears, select the RAID volume you created. Select the MBR partition style if you need to access your RAID storage from a computer running Windows XP Professional or 32-bit Windows Server 2003; otherwise, select GPT. Click OK.
- In the Disk Management window, the Fusion R400 RAID USB 3.0's drives will appear (listed as "unallocated") as a single volume (unless they were configured as JBOD). Right-click where the word "unallocated" appears, and then select New Simple Volume.
- When the Welcome to the New Simple Volume Wizard window appears, click next to start the process.
- Follow the remaining steps to complete the process.
Note: If you do not select the quick format option, this process will take much longer to complete.
- When the Assign Drive Letter or Path window appears, select Assign the following drive letter, choose a letter, and then click Next.
- When the Format Partition window appears, enter a new name for the volume table if you'd like. Select Perform a quick format, and then click Next.
- When the next window appears, click Finish.
- Repeat steps 4 - 9 as necessary if the drives were JBOD-configured.
- Depending on how you configured the drives, the volume may already be available to the system. Once the volume has been formatted and finishes building, the R400 RAID USB 3.0 is ready for use.
Linux Users' Information
For Linux drive formatting information, please contact your Linux/Unix vendor.
6 – Status LED Indications
System Powered, No Data Reads or Writes
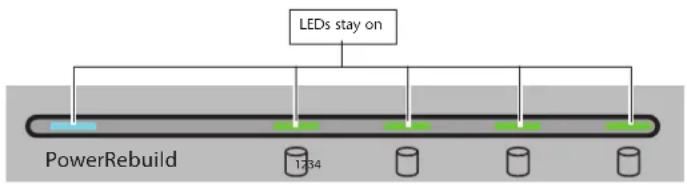
When the Fusion R400 RAID USB 3.0 is powered on, and no data is being written or read, the Power and Drive LEDs turn on (Figure 12).
System Powered, No Data Reads or Writes
flowchart
graph TD
    A["LEDs stay on"] --> B["PowerRebuild"]
    B --> C["1.334 Unit"]
    C --> D["Cylinder 1"]
    C --> E["Cylinder 2"]
    C --> F["Cylinder 3"]
Figure 12
Drive Activity
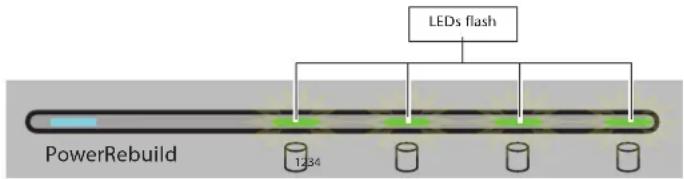
When data is being read from or written to a drive, its corresponding LED will flash during read and write activity (Figure 13).
Drive Activity (Data Reads and Writes)
flowchart
graph TD
    A["LEDs flash"] --> B["PowerRebuild"]
    B --> C["1:34"]
    B --> D[" "]
    B --> E[" "]
    B --> F[" "]
Figure 13
Drive Not Recognized
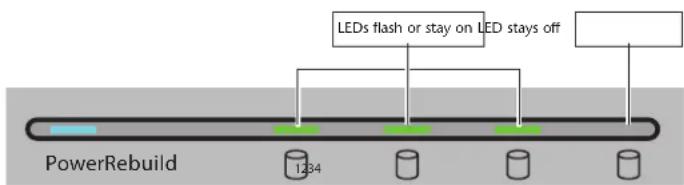
When one or more drive LEDs is off while the others remain lit, the corresponding drive(s) is not recognized (Figure 14). There are a few possible causes for a drive to not be recognized, including: the corresponding drive module is not plugged securely into the enclosure or the drive itself has failed. There is a small chance that the enclosure is defective.
Drive Not Recognized
flowchart
graph TD
    A["LEDs flash or stay on LED stays off"] --> B["1234"]
    B --> C["Water Tank"]
    D["PowerRebuild"] --> E["Water Tank"]
Figure 14
RAID 5 or RAID 10 Rebuild
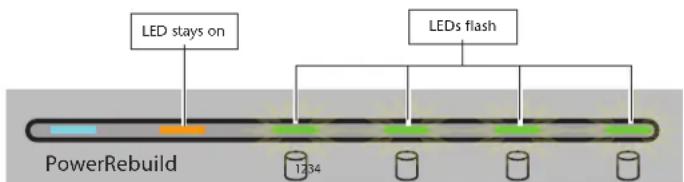
After inserting a drive into the R400 RAID USB 3.0 enclosure to replace a failed drive from a RAID 5 or RAID 10 group (or putting in a new drive to be cloned to), the Rebuild LED lights up orange, and the Drive LEDs flash with activity until the RAID has been rebuilt or the clone copy completed (Figure 15). Once the rebuild is complete, the Rebuild LED turns off. Please note that a RAID 5 or RAID 10 rebuild operation may take several hours to complete.
RAID 5 or RAID 10 Rebuild
text_image
LED stays on LEDs flash PowerRebuild 1234Figure 15
7 – Specifications, Warnings, and Additional Information
Specifications
| Compatibility Compatible with Mac, Windows, and Linux computers with an eSATA interface | |
| External Connector One USB | 3.0 |
| Data Transfer Speed Up to 250 | MB/s, depending on interface used and drive configuration |
| OS Support Platform independent | |
| Supported Drive Configurations | Hardware-based RAID 0, 5, and 10; span, and JBOD |
| Power Supply Universal 220W | 100–240V AC, 50–60Hz |
| Operating Temperature 32 to | 104° F (0° C to +40° C) |
| Dimensions (WxDxH) 17.0 x | 16.25 x 1.75 in.(43.2 x 41.3 x 4.4 cm) |
| Weight 14.85 lbs (6,74 kg) | |
| RoHS Compliant Yes | |
| Package Contents • Rackmount | disk enclosureFour 3.5" drive traysOne USB 3.0 cablePower cordUser's guideTube of threadlockerDrive mounting screws |
SAFETY PRECAUTIONS
Please read this section carefully before proceeding. These precautions explain the correct and safe use of this device, thereby helping to prevent injury to you or others, and also help you to minimize the risk of damaging the device.
Warnings
Always follow the basic warnings listed here to avoid the risk of serious injury or death from electrical shock, short-circuiting, fire, and other hazards. These warnings include, but are not limited to:
- With the exception of the user-swappable parts, do not attempt to disassemble or modify the enclosure. If this device appears to be malfunctioning, contact your reseller or local distributor.
- Do not drop the enclosure; dropping or mishandling of the enclosure or adapter card may result in a malfunction leaving the product inoperable.
-
Do not expose the device to rain, use it near water or containers that contain liquids which might spill into any openings, or in damp or wet conditions.
-
If unusual smells, sounds, or smoke come from the device, or if liquids enter it, switch it off immediately and unplug it from the electrical outlet.
- Follow the instructions in this manual carefully; contact your reseller or local distributor for additional advice not covered in this User's Guide.
FCC Compliance
Fusion R400 RAID USB 3.0 complies with Part 15 of the FCC Rules. Operation is subject to the following two conditions: This device may not cause harmful interference, AND this device must accept any interference received, including interference that may cause undesired operation.
Contacting Customer Service
The Sonnet Web site located at www.sonnettech.com has the most current support information and technical updates. Before you call Customer Service, please check our Web site for the latest updates and online support files, and check this User's Guide for helpful information.
When you call Customer Service, have the following information available so the customer service staff can better assist you:
- Product name
• Product serial number - Date and place of purchase
- Hard drive model(s)
- Computer model
- Operating system
- Software/firmware versions
USA Customers
If further assistance is needed, please contact Sonnet Customer Service at:
Tel: 1-949-472-2772
(Monday–Friday, 7 a.m.–4 p.m. Pacific Time)
E-mail: support@sonnettech.com
For Customers Outside the USA
For support on this product, contact your reseller or local distributor.
Visit Our Web Site
For the most current product information and online support files, visit the Sonnet Web site at www.sonnettech.com/support/. Register your product online at http://registration.sonnettech.com to be informed of future upgrades and product releases.